

Page 1
60g
66 X 35 X 12 mm
DC 12~ 24V
50M (M AX.)
2400 ~2483 .5MHz
4.4 (2 0dB BW)
16QA M,QPSK,BP SK
+14d Bm@16 QAM EVM 5 %,
+18d Bm@QP SK EVM 8%
-72d Bm@QA M, -85d Bm@QP SK
O O O O
-10 C~+5 0 C/ 14 F~122 F
15%~ 85%RH
60克
66 X 35 X 12 mm
DC 12V @250m A; DC24 V@150 mA
DC 12~ 24V
50M (M AX.)
2400 ~2483 .5MHz
4.4 (2 0dB BW)
16QA M,QPSK,BP SK
+14d Bm@16 QAM EVM 5 %,
+18d Bm@QP SK EVM 8%
-72d Bm@QA M, -85d Bm@QP SK
1Vp- p±0.2
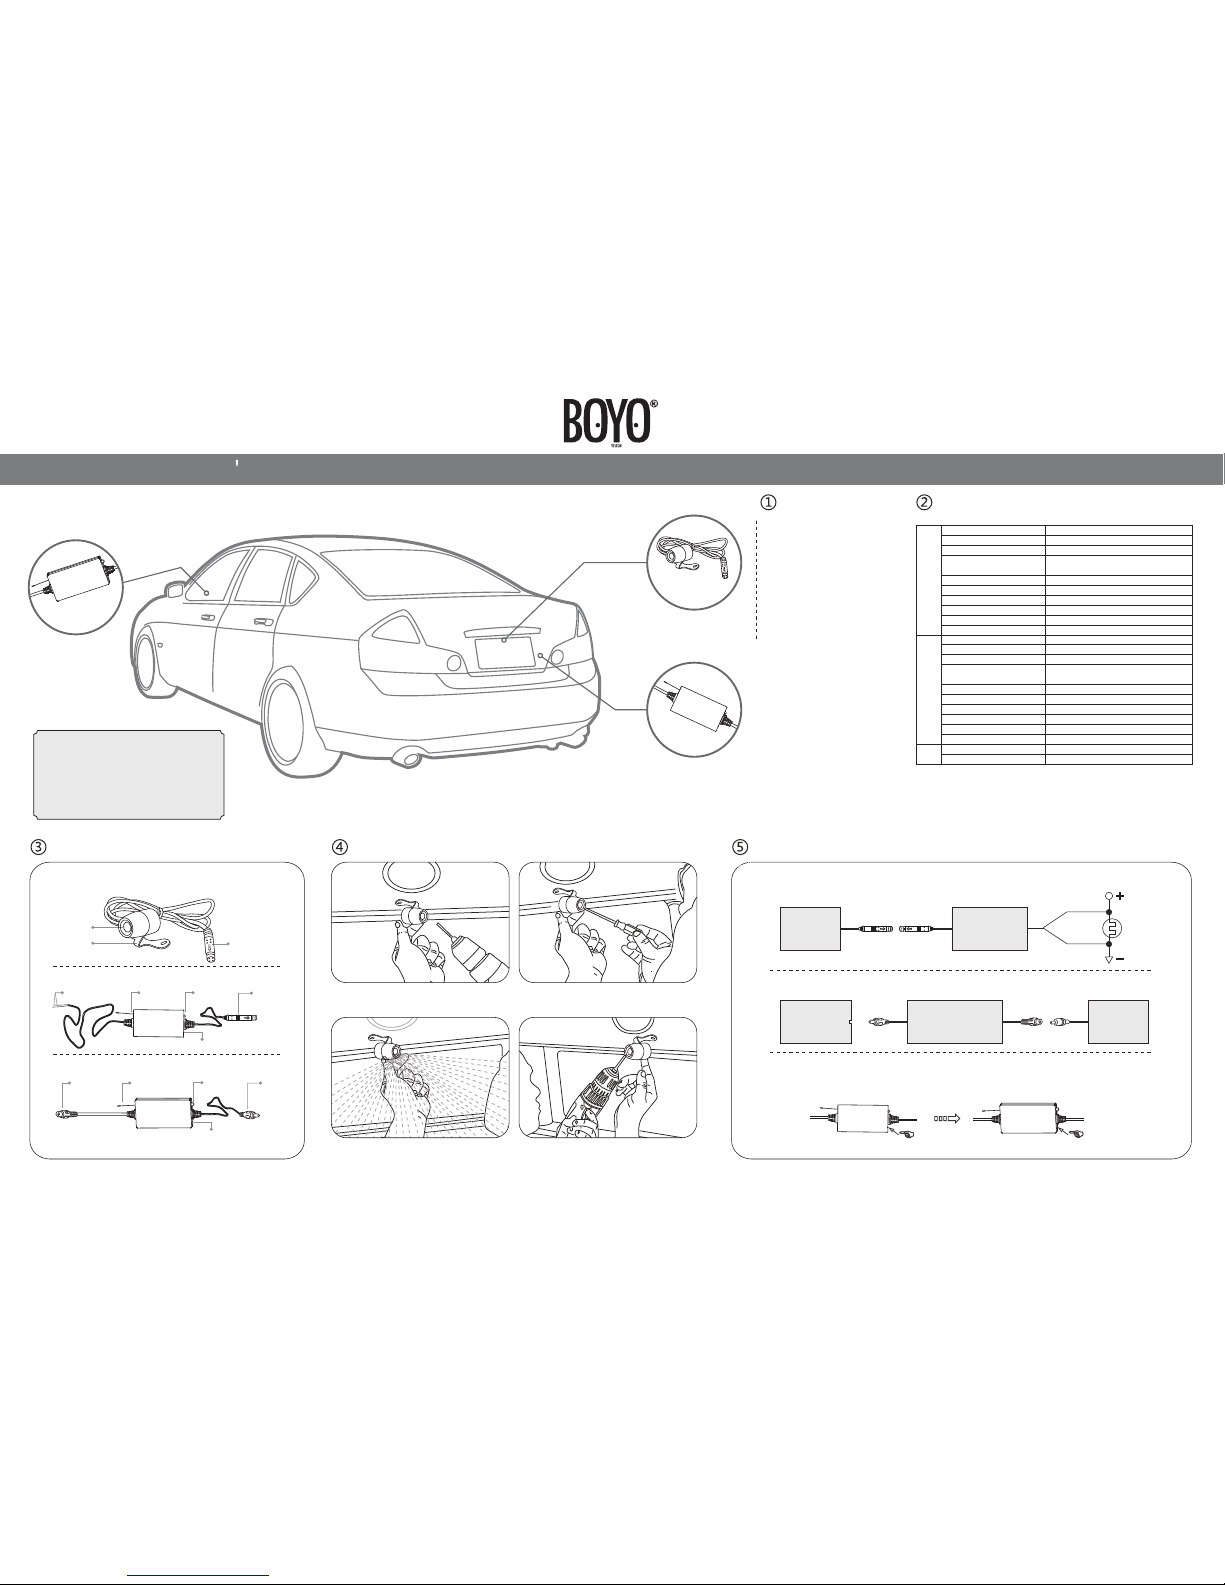
Model: VT X300D
Wire less tr ansmi tter bo x: X 1
Wire less re ceive r: X 1
Wate rproof c ase: X1
Cig arette L ighte r Adapt er: X1
Powe r Suppl y Cable : X1
(pre -asse mbled
on th e TX box)
Warr anty Ca rd x 1
Regi strat ion Car d x 1
Use r's Man ual x 1
Wir el ess R ece ive r
Wir el ess boxTra nsm itt er
Wir ed c ame ra( Opt ion al)
Wireless Transmitter
Wire d camer a
Wire less Re ceive r
Display or Monitor
Bla ck line
Red l ine
Power input
(Connected with a
cigarette lighter)
Indicator
Antenna
Connect the vehicle
power supply
Bracket
Camera Lens
Tra nsmi tter
Rec eiver
USER S MANUAL VT X300 D Digital Wireles s Trans mitt er + Receiver box
Cam era
(op tiona l)
Tra nsmi tterRec eiver
Unobstructed Effective Range
Unobstructed Effective Range
Power Supply
Weight
Receiving Sensitivity
Weight
Dimensions (W X D X H)
Receiving Sensitivity
Power Supply
Video output
Dimensions (W X D X H)
Operation Humidity
Operation Temperature
Transmission Power
Transmission Power
Modulation/Demodulation Mode
Modulation/Demodulation Mode
Consumption Current
Transmission Frequency
Transmission Frequency
Data Bandwidth
Data Bandwidth
Packing List:
Specifications:
Product Structure: Installation Wired Camera:
Video Output
Video Input
Pairing
Video Output
Indicator
Antenna
Pairing
1.Choose a location close to the rear clearance
lights, so you can easily splice the power and
ground connections.
2. Use a screwdriver to the first screw is screwed
into the screw hole of the drilled.
3. Move the camera orientation to adjust
the display effect.
4. After adjustment, second screw drill, mount and
tighten the screws, the camera is installed.
Wiring diagram and the pairing setting:
Wir ed c ame ra+Wirele ss :Tra nsm itt er
Rea r
lam p
Wireless receiver:
Cigarette lighter
power supply
Video input
Pairing : To pair the T X Box and R X Box suc cessf ully, p lease f ollow t he inst ructi ons bel ow acco rding ly:
1. Pre ss and Ho ld the P airin g Butto n on the TX B ox for 3s ec. The i ndica tor lig ht will s tart fla shing .
2. Within 30sec of flashing time, Press and Hold the Pairing Button on the RX Box for 3sec until the indicator light flashes.
3. Once both TX Box and RX Box are successfully paired, the indicator lights on TX Box and RX Box will stop flashing.
Wirele ss Receiv er
Wirele ss Transm itter
Note:
1. Th e syste m requir es 12VD C Power.
2. Rec ommen d Profe ssion al inst allati on
from a n afte rmarke t custo mizer s hop.
3. Avo id high t emper ature a nd high
pres sure lo catio n when wi ring.
Not e: Alig n the ant enna ve rtica lly for o ptimu m perfo rmanc e
Pai ring Bu tton
Pai ring Bu tton
Page 2
 Loading...