

Page 1
VTW73M
◆
VTW73M
7.3 Inch Car Rear View Mirror Monitor with Built-In Miracast
Page 2

Welcome to use our 7.3 inch car rear view mirror monitor with built-in miracast
●We reserve the final explanation right on this User's Manual.
●Specifications are subjected to change without notice. Sorry for any
inconvenience caused!
●Please make a copy of important data. We assume no responsibility for the data
loss.
●This manual has been carefully revised. Please contact our service center when
any type mistake is found.
●Please read the operating instruction carefully and use the accessories only
provided by the original factory to avoid any unexpected damage. No warranty
will be executed if you are not following the instruction or connecting with the
incompatible accessories. We assume no responsibility for any loss and damage
caused hereby.
●Any discrepancy between the pictures and real products hereinafter, the real
one prevails.
User's Manual
Chapter One: Product Introduction . . . . . . . . . . . . . . . . . . . . . . . . . . . . . . . . . . 1
1.1 Package. . . . . . . . . . . . . . . . . . . . . . . . . . . . . . . . . . . . . . . . . . . . . . . . 1
1.2 Features . . . . . . . . . . . . . . . . . . . . . . . . . . . . . . . . . . . . . . . . . . . . . . . 1
1.3 Specifications . . . . . . . . . . . . . . . . . . . . . . . . . . . . . . . . . . . . . . . . . . . 1
1.4 Front buttons operation. . . . . . . . . . . . . . . . . . . . . . . . . . . . . . . . . . . 2
Chapter Two: Installation and Wiring . . . . . . . . . . . . . . . . . . . . . . . . . . . . . . . . 5
2.1 How to install . . . . . . . . . . . . . . . . . . . . . . . . . . . . . . . . . . . . . . . . . . . 5
2.2 Special bracket . . . . . . . . . . . . . . . . . . . . . . . . . . . . . . . . . . . . . . . . . . 6
2.3 How to wire . . . . . . . . . . . . . . . . . . . . . . . . . . . . . . . . . . . . . . . . . . . . 7
Chapter Three: Adjustable Guide Line . . . . . . . . . . . . . . . . . . . . . . . . . . . . . . . . 9
3.1 About guide line . . . . . . . . . . . . . . . . . . . . . . . . . . . . . . . . . . . . . . . . . 9
3.2 What is the regular guide line . . . . . . . . . . . . . . . . . . . . . . . . . . . . . . 9
3.3 How to adjust the guide line . . . . . . . . . . . . . . . . . . . . . . . . . . . . . . 10
Chapter F : . . . . . . . . . . . . . . . . . . . . . . . . . . . . . . . . . . . . . . .our 11 Menu Setting
4.1 Remote control. . . . . . . . . . . . . . . . . . . . . . . . . . . . . . . . . . . . . . . . . 12
4.2 Menu setting guidance . . . . . . . . . . . . . . . . . . . . . . . . . . . . . . . . . . . 12
Chapter Five: Built-In Miracast. . . . . . . . . . . . . . . . . . . . . . . . . . . . . . . . . . . . . 14
5.1 How to connect. . . . . . . . . . . . . . . . . . . . . . . . . . . . . . . . . . . . . . . . . 14
5.2 Channel switching. . . . . . . . . . . . . . . . . . . . . . . . . . . . . . . . . . . . . . . 17
Chapter Six: Firmware Update . . . . . . . . . . . . . . . . . . . . . . . . . . . . . . . . . . . . . 21
Table of Contents
Page 3
Chapter One: Product Introduction
1.3 Specifications
The packing box contains the following accessories. Please confirm:
7.3 inch car rear view mirror monitor with mirror link
Wire harness
User's manual
Wire cover
Remote control
Please check your package box for the items listed above. Please contact the
distributor or the agent as soon as possible if there is any damage.
1.1 Package
●
●
●
●
●
7.3 inch wide LCD display screen
2-way video inputs
Back-up camera display
Automatic brightness adjustment
4.0 mm glass and 21 mm car factory OEM bracket
Adjustable guide line
Mode switch between wide screen and dual screen LCD display separately
1.2 Features
●
●
●
●
φ
●
●
Screen size: 7.3 inch
Display screen: TFT-LCD
Aspect resolution: 1280(H)*390(V)
Working voltage: 12V
Working temperature: -20℃~+65℃
Signal system: PAL/Auto/NSTC
●
●
●
●
●
●
●
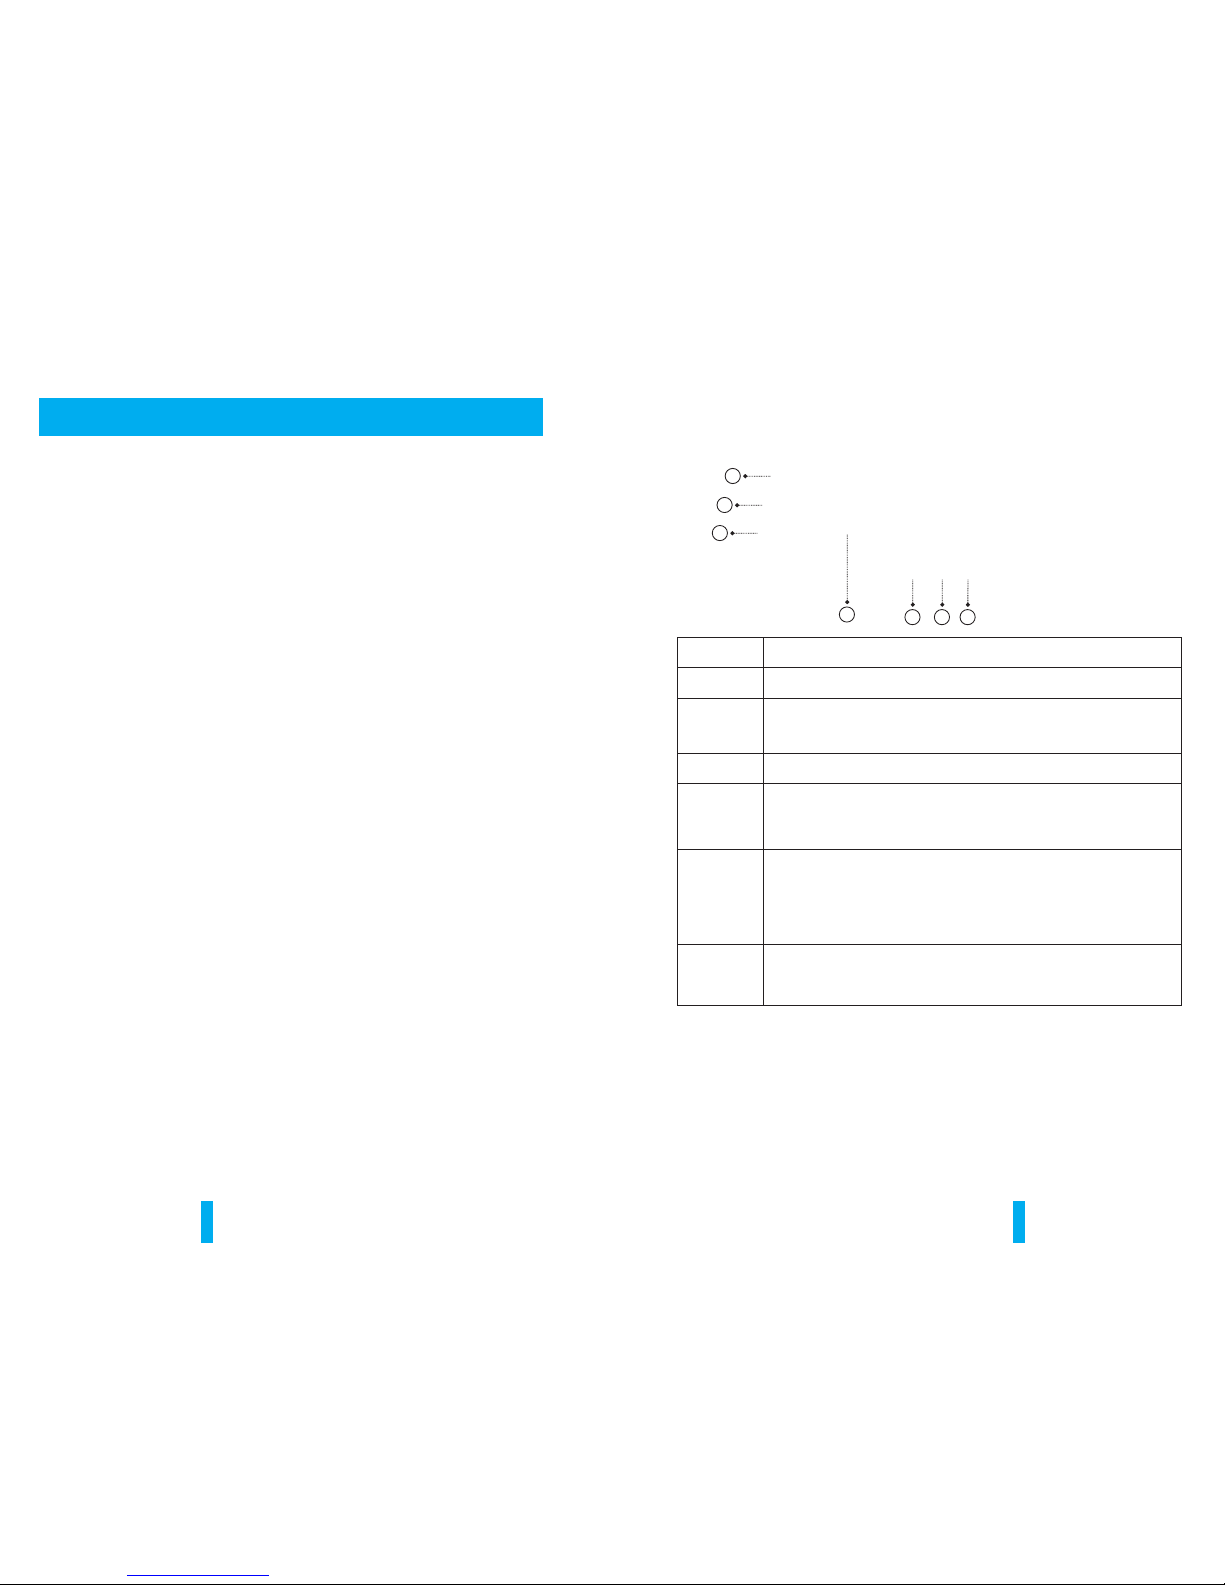
1.4 Front buttons operation
7.3 inch ultra high brightness display screen
1
Turn on/off the display screen ( reversing mode: short press to
adjust the screen brightness)
Indicator
1
2
3
4
5
6
7
2 3 4
7
6
5
Front light sensor
1 2
Press”M” button to switch back and forth bet ween Android mode and iOS mode
built-in miracast mode switch
Press”CH” button to switch back and forth among 7 display modes: miracast,
Video+miracast, miracast+video, camera+miracast, miracast+camera, video full
display, camera full display.
Switch display mode
Pressing this button shortly can a djust the color mode of the image. Four modes
are available-- -standard, bright, beau tiful, and soft.
Color mode adjustment
Page 4
3 4
8
9
10
11
12
14
15
16
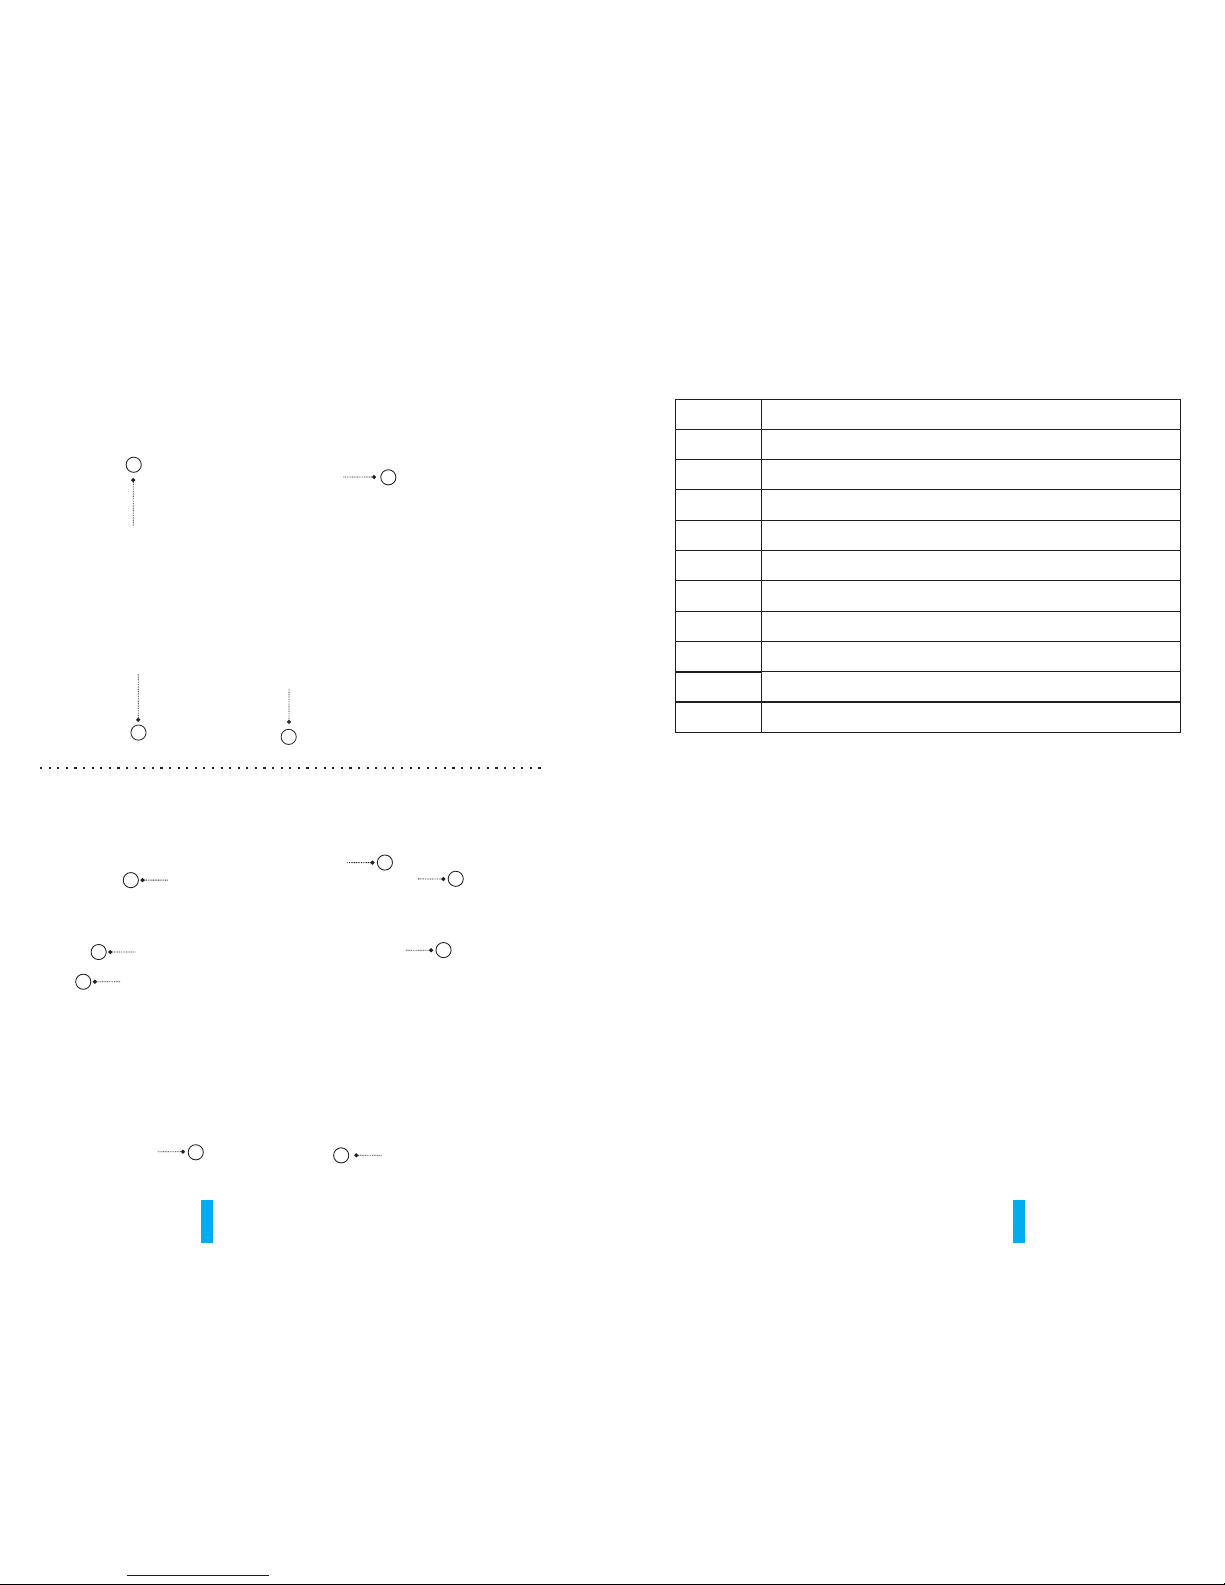
Speaker
Special bracket
8
9
10
11
12
13
14
15
16
17
Red to ACC+
Black to GND
Back car signal
Video input
Camera
Connector
Connector cover
17
8
18
Cable cover
13
18
Trigger line 1
Page 5
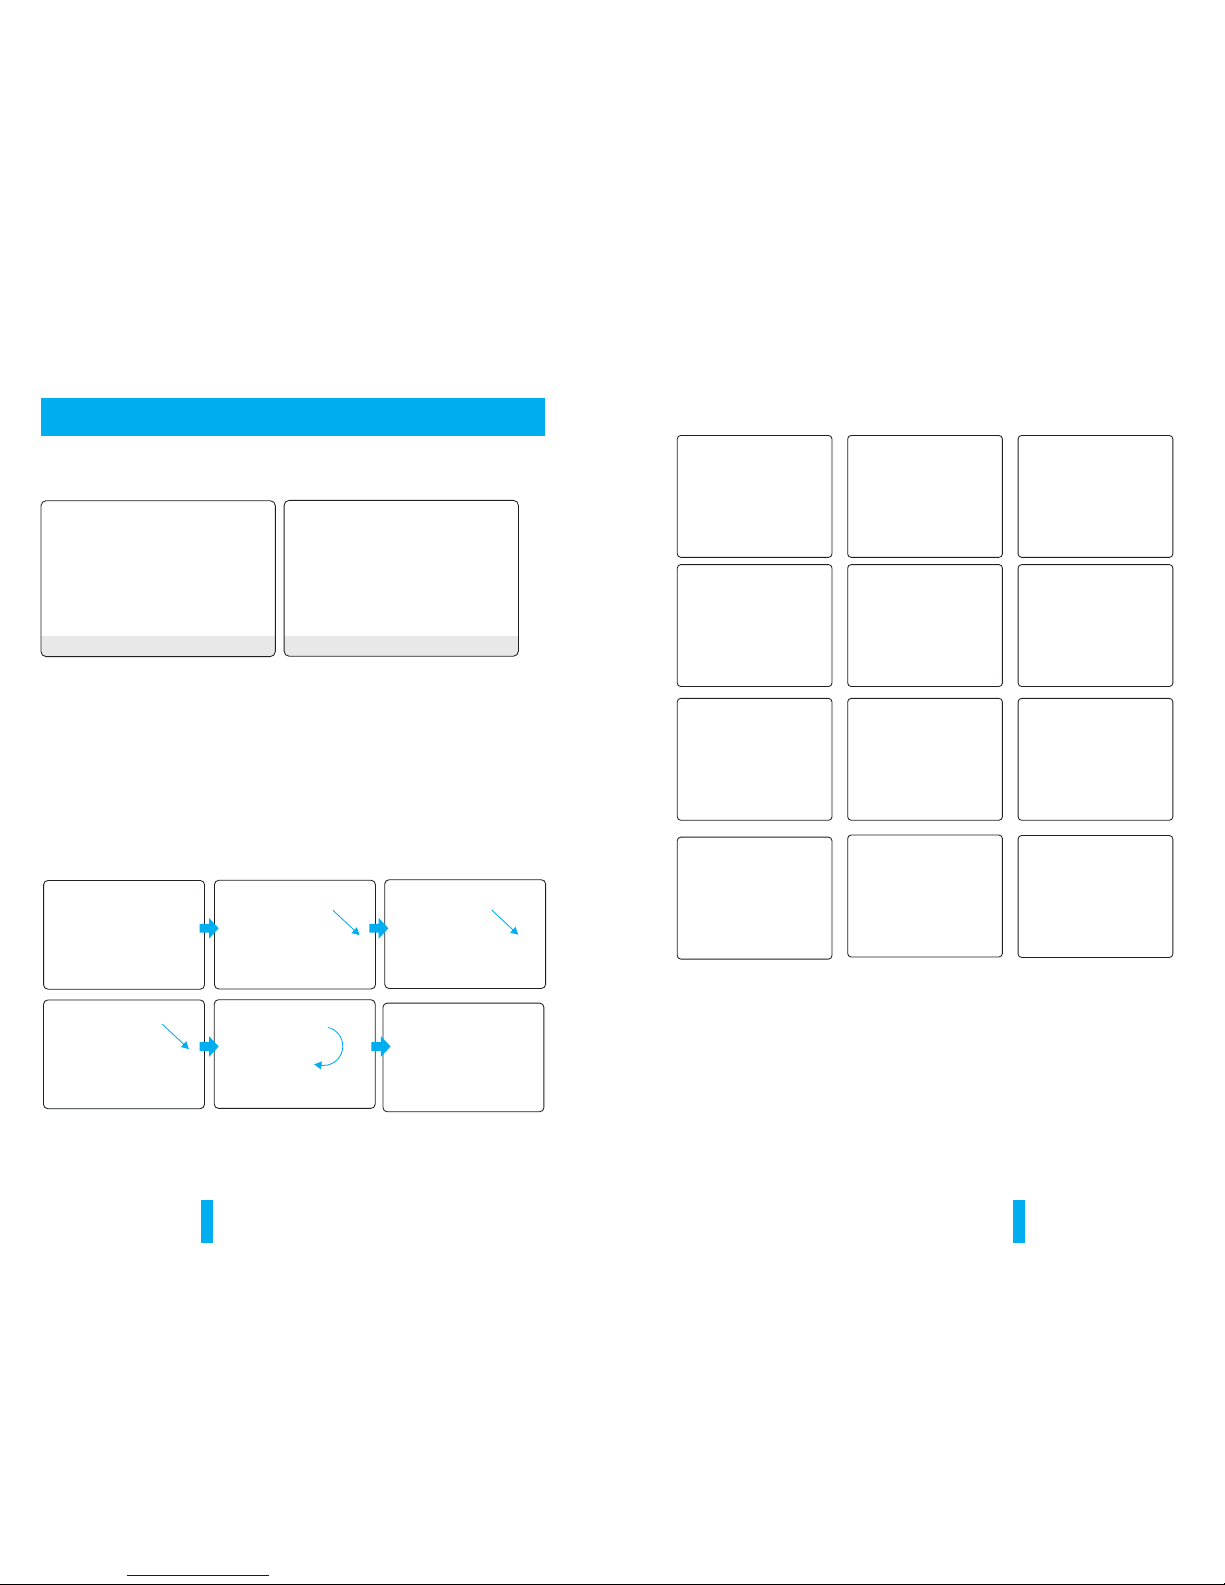
2.1 How to install
Remove the original rear view mirror and remain
the metal based on the windscreen
Original car rear view mirror
Install rear view mirror along
this direction.
Install rear view mirror along
this direction.
Install rear view mirror along
this direction.
contrarotate the fixed
rear view mirror
1
Many kinds of brackets are available. Please find the one that suits your vehicle.
Please contact us if you could not find the bracket of your car here.
2.2 Special bracket
5 6
Chapter Two: Installation and Wiring
Different cars have different brackets. It depends on your vehicle maker and
manufacturer.
There are many methods to remove the original rear view mirror. However, please
don’t force the mirror off the bracket.
The manufacturer will not be responsible for any damage caused to your car by
wrong installation of the mirror.
Remove the original mirror
Install mirro r monitor on the base
Page 6
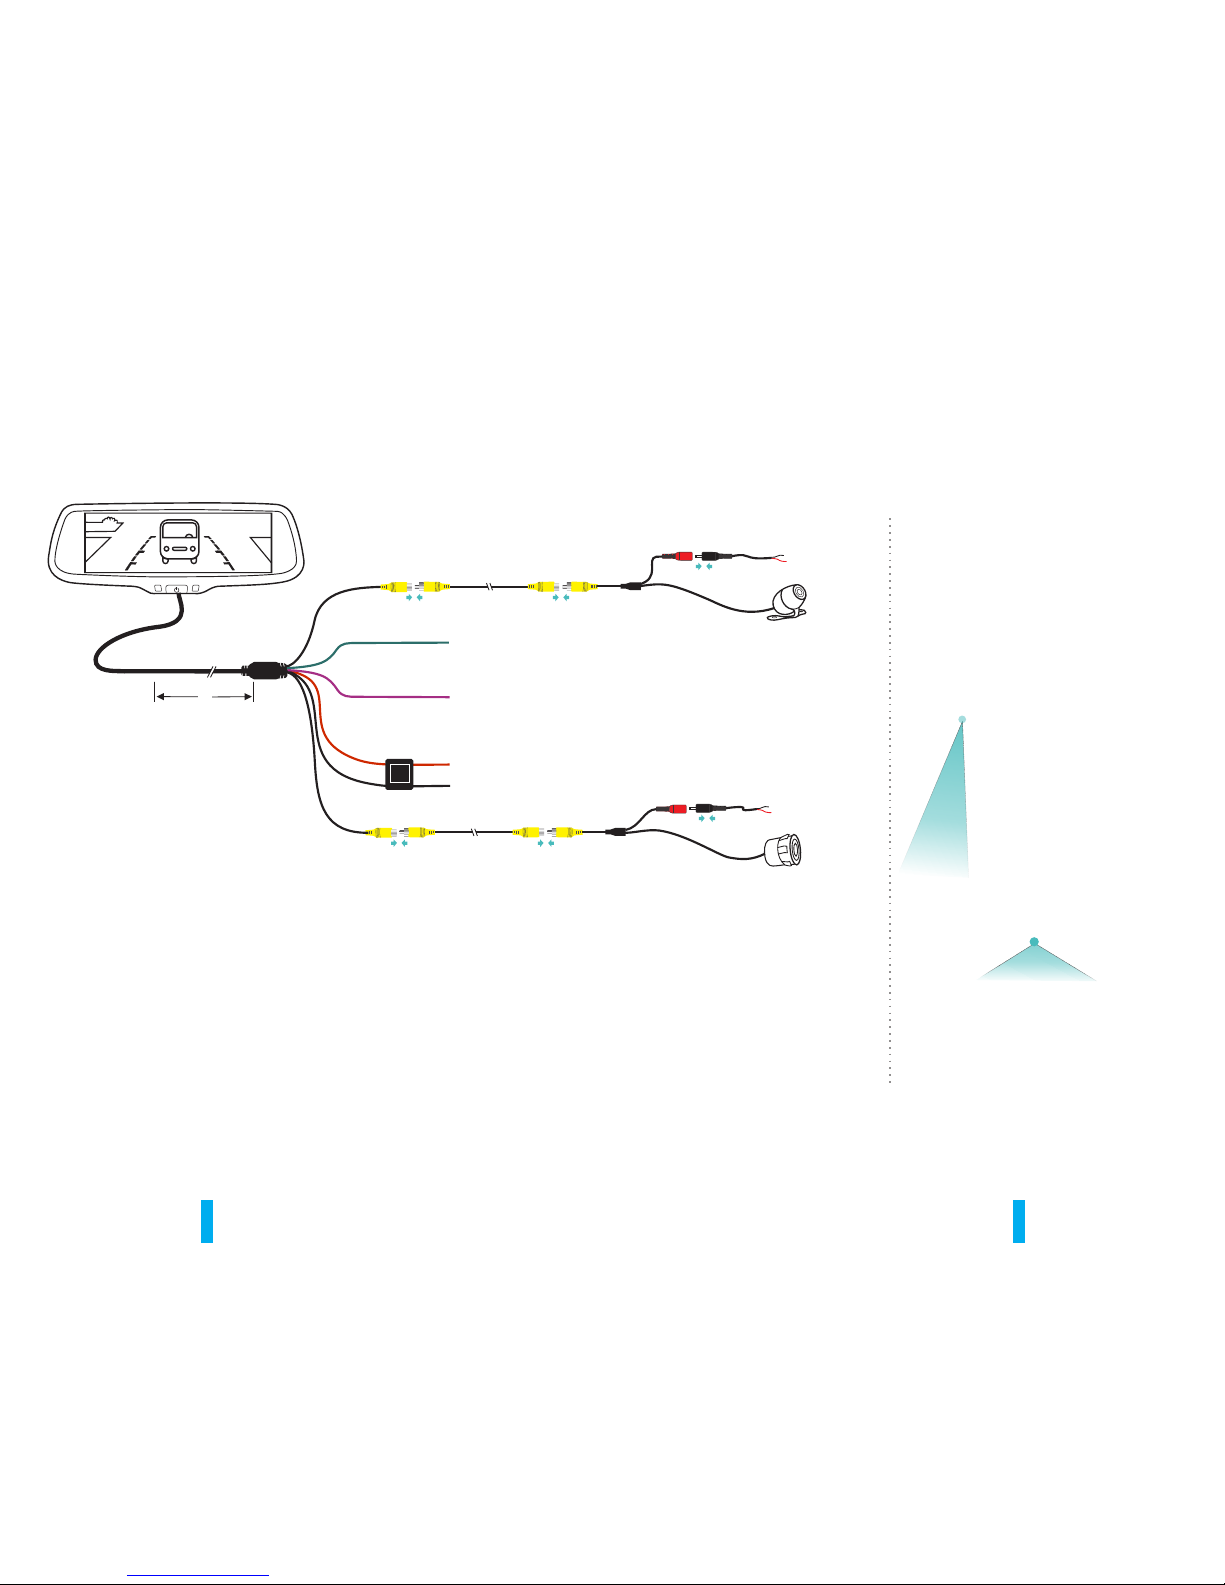
2.3 How to wire
3M
7 8
power harness
PUSE
BOX
Black to GND
Red to A CC +12V
Black to GND
Red to ACC +12V
Black to GND
Red to ACC +12V
Bac k up vide o
Lef t video
The advisable installation
position for camera
Back up video
The reversing signal is input to rear view mirror by connecting the green line.
Therefore, reversing video can be displayed automatically on the wide 7.3 inch
LCD monitor.
Lef
t v
ide
o
gre en
Bac k car sin gal
Trig ger lin e 1
pur ple
Page 7
UP
Clockwise
Dow n
Right
lef t
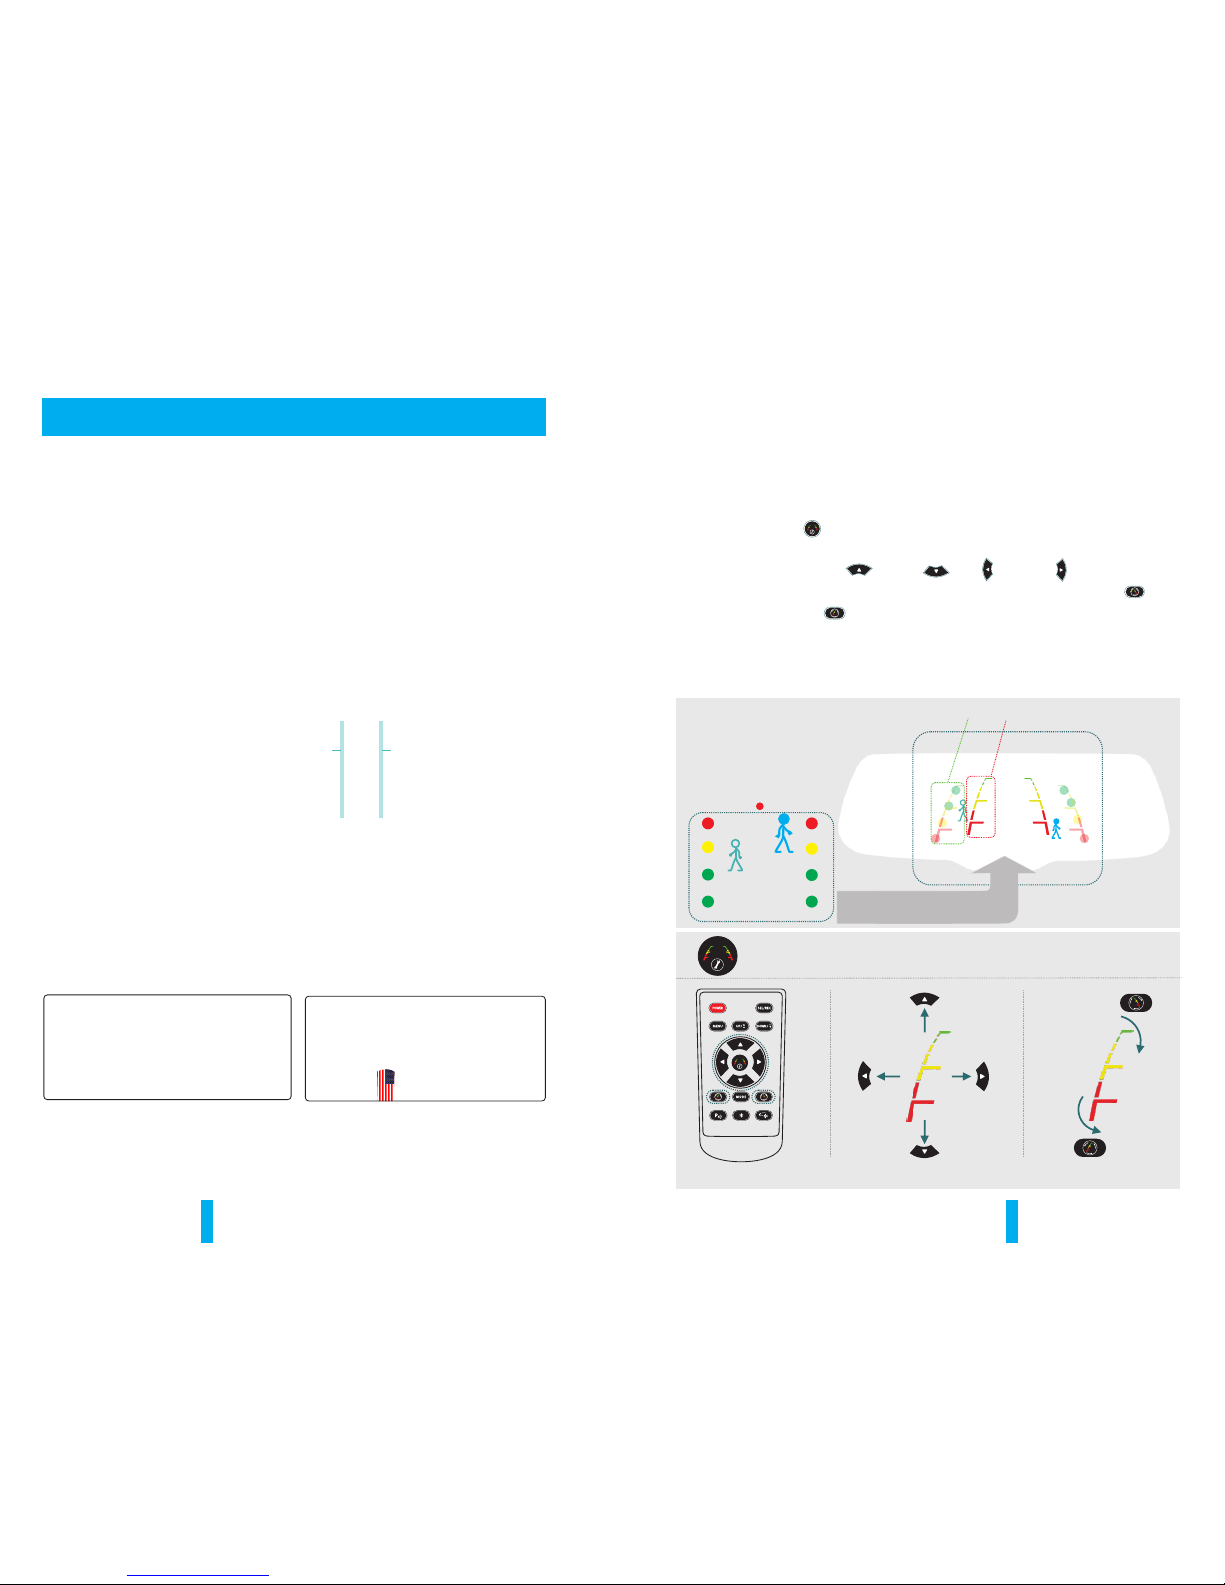
Move the guide line Rotate the guide line
anti-clockwise
Press the button to choose L or R adjustable guide line.
Remote control
RL
Wrongposition
Right position
9 10
According to the site of standard reference line, we can put reference objects such
as desks in the back side of the car. Compared with the marked reference objects,
we can adjust the sites and angles of two guide lines are displayed on the monitor.
You will get the accurate and safety guide lines once it coincide with the reference
objects.
Press setting button to enter “guide line adjustment” mode. The system is
defaulted to adjust left guide line firstly. Press the button again to switch to adjust
the right guide line. The up , down left and right buttons are to
adjust the corresponding location of guide lines. The clockwise rotation and
contra rotating buttons are to adjust the angles of guide lines. It is easy to
operate and calibrate. After finishing calibration, switch the reverse gear to save
the information.
Caution: keep the remote control 0.5m-1.0m away from rear view mirror when you use the remote
to adjust the parking lines.
3.3 How to adjust the guide line
Displayonthemonitor
There are three lines---red, yellow, and green, to help drivers estimate the
distance from obstacles. Those three lines are displayed on the monitor when
the car is reversing. The green line is 10 feet away from the back of the car, and
the yellow line is 6.5 feet away. The distant red line is 3.3 feet away from the
back of the car, while the closed red line is 1.3 feet away. Please note that there
is 0.65 feet distance from the car for reference lines shown below.
3.1 About guide line
Regular guide lines are fixed although installation sites of camera and car size are
different. The fixed guide line is not accurate enough for drivers. There is huge
difference between the regular, fixed guide lines, and real guide lines of the car.
It may cause accidents when camera is mounted on the left or right side on the
back side of the car.
3.2 What the regular guide line is
Chapter Three: Adjustable Guide Line
7.8 in ch
7.8 in ch
Page 8
11 12
Chapter Four: Menu Setting
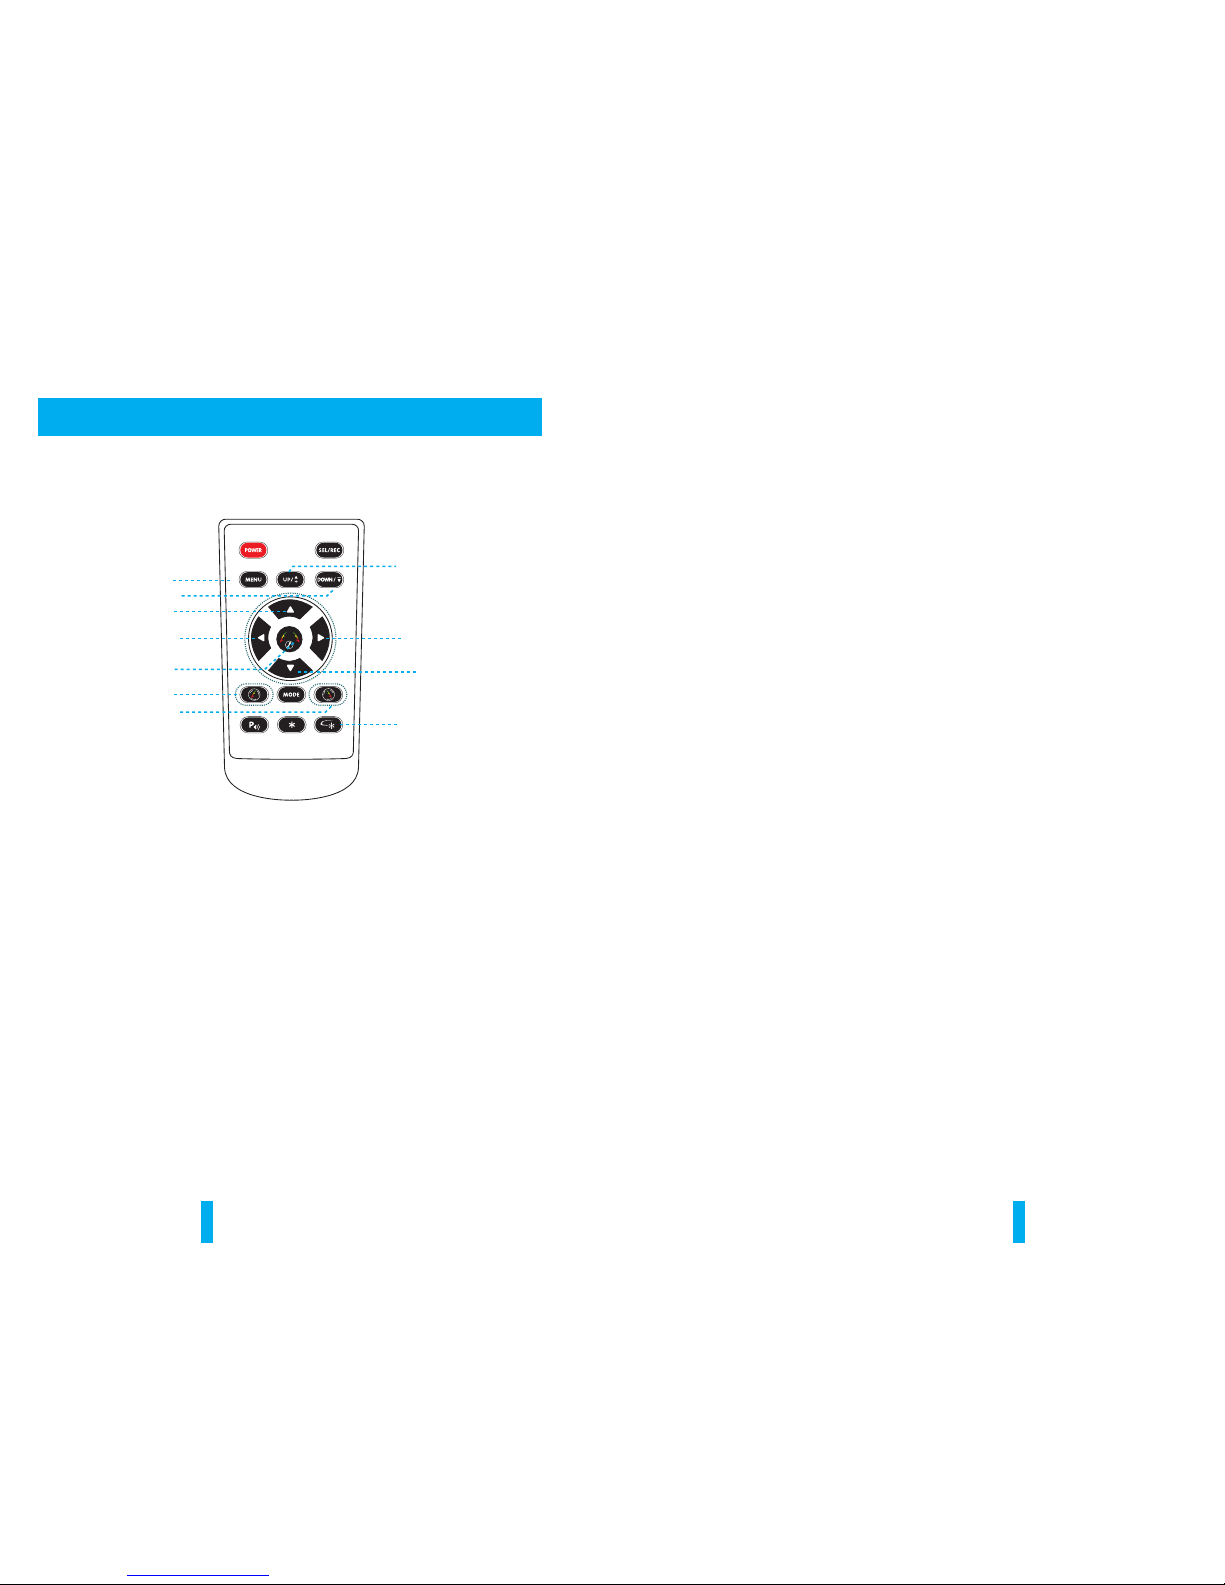
Enter pic ture menu
Guide line cl ockwise
Menu pa rameter de creases
Menu paramete r in creases
Guid e line up
Guid e line left
Enter guide lin e
adju stment
Guide line ant i-clockwise
Guid e line right
Guid e line down
Pres s t o r eset all
menu a nd paramete rs
4.1 Remote control
The menu o nly c an be s et by r emo te co ntr ol, a nd ki ndl y check its d efi nit ion a s bel ow.
4.2 Menu setting guidance
Short press “MENU”to enter “PICTURE”, then you can switch betwee n
“BRIGHTNE SS”, “COLOR”, “CON TRA ST”, “SCALE”, “STAR T LOGO”, “PRESET”,
or ente r ou t. When it switches to “ PRESET ”, re-press shortly the MENU , an d
you woul d close the menu. UP and DOWN are to change the fig ure of e ach
set tin g.
4.2.1 BRIGH TNE SS ADJUSTMENT
The d efaulted se tting is 50, ranging from 0 to 100, and on ly CVBS s ignal c an work.
4.2.2 CO LOR ADJUSTME NT
The d efaulted se tting is 50, ranging from 0 to 100, and on ly CVBS s ignal c an work.
4.2.3 CO NTR AST A DJUSTMENT
The d efaulted se tting is 50, ranging from 0 to 100, and on ly CVBS s ignal c an work.
4.2.4 SCALE A DJU STMENT
Turn o n/off the a dju stab le gu idelines.
Page 9

4.2.6 PRESE T ADJUSTMENT
4.2.5 START LOGO ADJUSTM ENT
It is default ed as OFF, and ON is to pre-s et the menu, then it swit ches to OFF
aut omatica lly.
It is d efaulted as “ ON”, you can se t it to “O FF” m anu ally.
13
Chapter Five: Built-In Miracast
This is a spe cia l device to project your mobi le pho ne to rear vi ew mir ror
monito r thro ugh Wi -Fi co nne cti on, and the po pul ar standards like DLNA ,
Miracast and Air Play. The driver can set the navigat ion path on the phon e
before entering the car. The navigat ion audio and vi deo can be dis played
simultane ous ly on t he rear view mir ror as lon g as th e Wi-Fi is conne cte d to
the rea r view mirror. Whi le driving you can als o set navigation path by a
passenger usin g a mobile phone, the ima ge is dis played simultane ous ly on
the rear v iew mirror.
5.1 How to connect
1: Make sure and roid phone has w ireless proj ect ion fun cti on ( part of the
phone can not support wire les s projection, or part of the phone wire les s
display needs to root an d co uld use aft er changing th e system fi le) .
2: Cli ck the “M” button o n the TP b utton, swi tch wir ele ss mode to Android
mode; open the Wi -Fi o n you r phone, then sea rch equipment in t he ph one 's
wirele ss pro jection f unc tio n, con nec t t he device accordi ng to the wirel ess
dev ice n ame s that are di spl ayed on the s cre en. Please see the st eps as
below,
“M” button
14
4.2.7 VO LUME ADJU STMENT
The d efaulted se tting is 80, ranging from 0 to 100, and on ly CVBS s ignal c an work.
5.1.1 How to connect with And roi d ph one (Android v ers ion has more
functi ons on how to u se wirel ess projection. P lea se se e you r phone
instru cti ons for reference. )
Please note: Make sure to tur n of the bl uet ooth when you use mi racast
function an d con nec t your phone!
Page 10

WIF I name
tap h ere
tap h ere
15 16
After finishing the connection, the n the phone screen is projecte d to the
rea r view mi rror, you can press “CH” on T P button to ch oos e "d oub le mobile
dual mode" or " sin gle -sc reen mode".
“M” button
1: Click t he “M ” but ton on TP button , swi tch the wirele ss mo de to i OS mo de.
5.1.2 How to co nne ct with iPhone
2: Usi ng iPh one search Wi -Fi (W i-Fi name is dis played on the sc reen and
shown as below), then enter the defa ult passwo rd: 12345678. After
finishing WIFI connection, br ing up the s hor tcu t menu, cl ick on the AirPlay
function, s ele ct th e dev ice n ame , and o pen t he mirroring.
tap h ere
Tap her e
Turn i t on
Tap her e
Page 11

17 18
5.2 Channel switching
5.2.1 Full CA MER A scr een d isp lay
5.2.2 Full VI DEO 1 screen display
After finishing the connection, the n the phone screen is projecte d to the
rea r view mi rro r, you c an press “CH ” on TP bu tton to choose “double mo bil e
dual mode”or “s ing le- screen mode”.
Pre ss the “C H” bu tton on the sc reen to sw itc h dis pla y amo ng CAMERA,
VIDEO1 , MOBI LE, VI DEO1+MOBILE, MOBILE+VIDEO1, CAMERA+MO BIL E,
and MOBILE+CAM ERA .
5.2.3 Full MO BIL E scr een d isp lay
Page 12

5.2.4 VIDEO 1 and M OBI LE display sim ult ane ous ly
5.2.5 CAMER A and M OBI LE di spl ay simultane ous ly
19 20
Please n ote :
1. Bo th Rever sing mo de and no n-reve rsing m ode have s even sta tes: bu ilt-i n miraca st, vid eo+bu ilt-i n miraca st,
bui lt-in m iracas t+vid eo, camera+b uilt- in mira cast, bu ilt-i n mirac ast+ca mera, f ull vid eo scree n, and fu ll came ra
scr een.
2. Power on each ti me, the s creen au tomat icall y keep the l ast stat us befor e the shu t down. T here are t otal ei ght
stat es or sty les-- -seven a re list ed as abo ve, an d off- scree n state.
3. Th ere are th ree mod es of ope ration c an trig ger vid eo;
1) Th e first gr ade is +1 2V BACKU P LIGHT: You c an adju st the se ven sta tes whe n there is sig nal of tr igger ing
reve rsing t hroug h touchi ng CH but ton. Th e final s tate wil l be store d after p owerin g off, and t he fina l state
wil l be show n autom atical ly when t here is t rigge r BACKUP L IGHT ne xt time ;
2) Th e secon d grade is + 12V VID EO CONT ROL-- V ideo ch annel t rigge red line , which c onnec ts the tu rning l ight
or br ake lig ht in a gen eral way. Mi rror wi ll swi tch auto matic ally to f ull sc reen mod e of VIDE O when th e trigg er
sig nal app ears; w hile it w ill sw itch aut omati cally to previ ous sta te whe n the tr igger s ignal d isapp ears aft er 3
sec onds, i n VIDEO t rigg er state : the onl y brightnes s button o f TP butt ons can wo rk, whi le butt on of M and C H
don 't work .
4. Wh en the ca mera and m obile s how at th e same ti me, gui de line c an't be d isplay ed.
Page 13
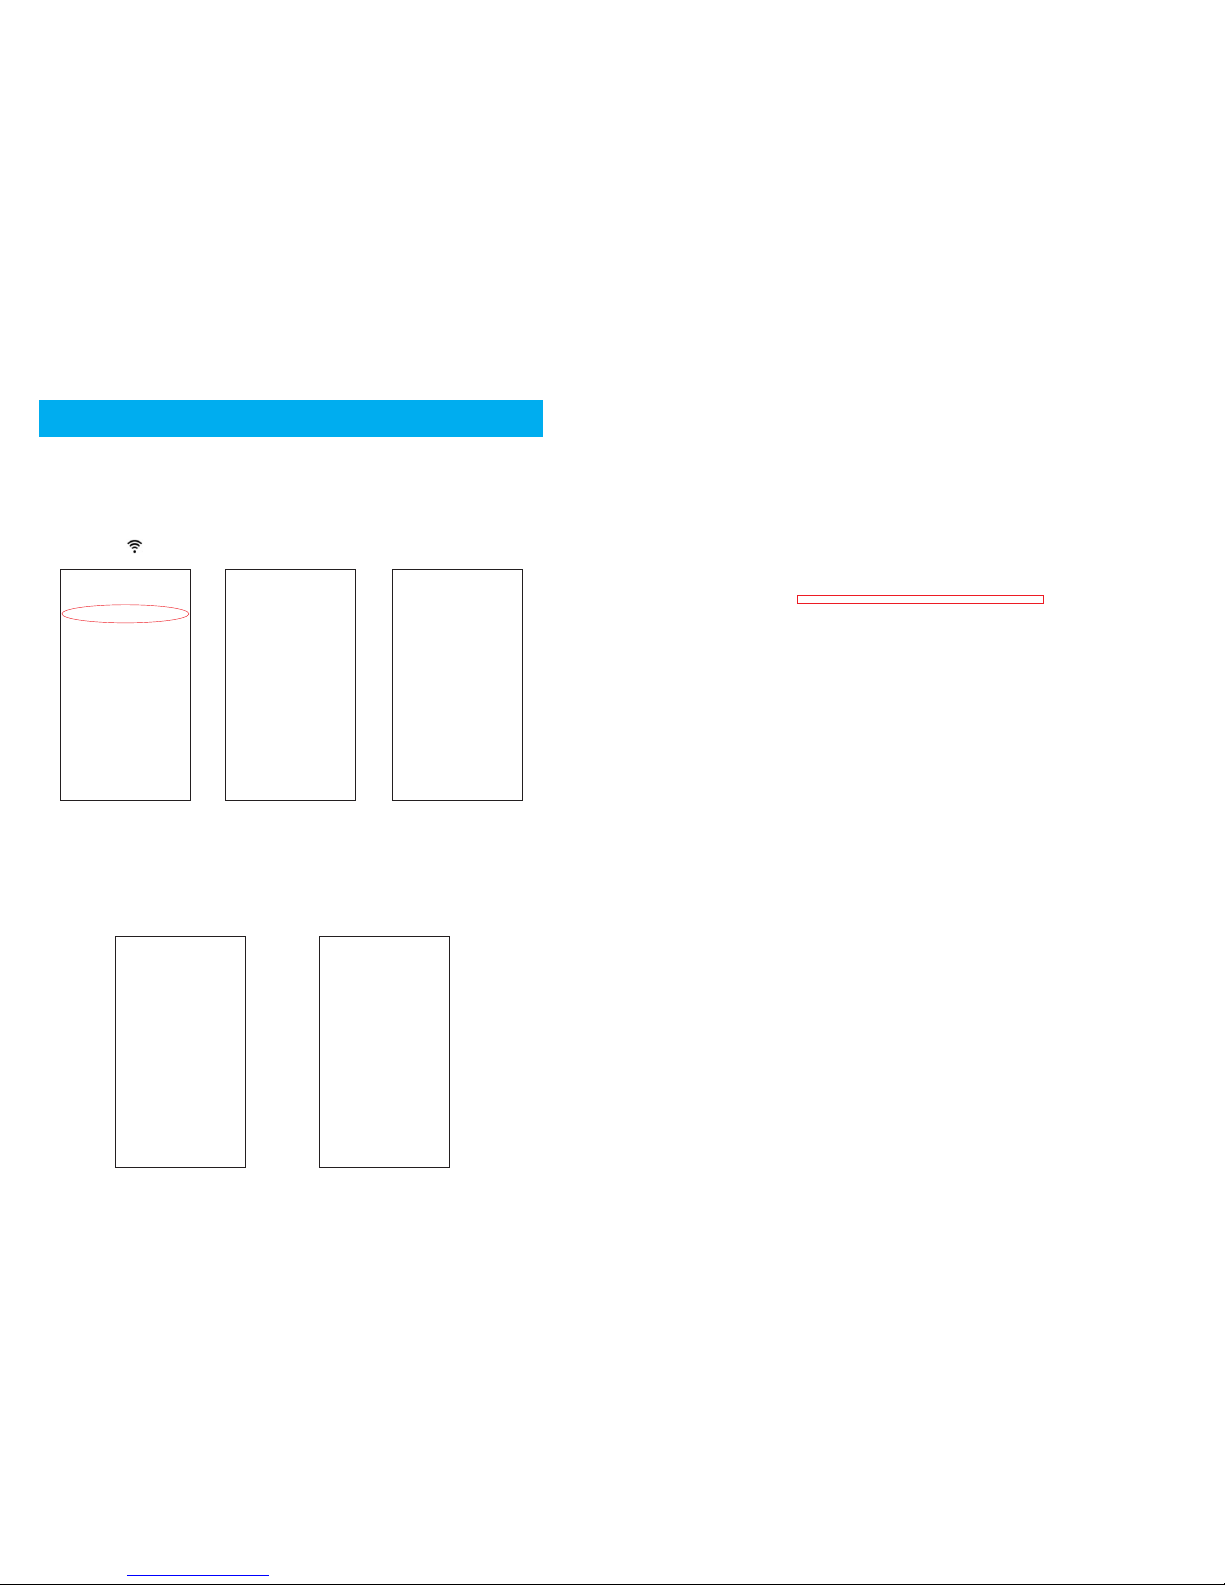
Chapter Six: Firmware Update
1. cl ick the “ M” button on TP b utton , swit ch the wire less mode t o iOS mode.
3. Tap “Scan ” and fo llow th e inst ructi ons to co nnect to Wi -Fi AP whic h allow s to acc ess
Int ernet through WA N. Plea se note t hat wh en the co nnect ion bet ween dong le and AP
is es tabl ished , the con necti on betw een dongl e and mobil e phone /lapt op/tabl e may be
dis conne cted. The r easo n is that t he conn ection ch annel b etwee n dongle an d mobil e
pho ne is dif fere nt fro m the chann el betw een do ngle an d AP. I n this case , mobile ph one
/la ptop/ tabl et shou ld be con nected to d ongle by us ing soft AP a gain.
4. Do ngle is a ble to ac cess Inte rnet t hroug h AP. AP's SSID an d dongl e's IP ad dress
tha t are di spatc hed from AP ( “Dev ice IP1 ”) will b e shown o n the scr een. The
mob ile pho ne/la ptop/ tabl et that i s connect ed to do ngle al lows to acces s the
Int ernet bec ause o f AP brid ge func tion of d ongle .
The n long pr ess “M” but ton to u pgrade with in 30 sec onds.
21 22
“If new iO S releases, VTW73M may r equ ire new firmwa re update for Miraca st
function. Availability of New fir mware update m ay take awhi le af ter Apple's
rel eas ed ne w iOS.”
2. 1) u sing mo bile/ lapto p/ta ble sea rch Wi- Fi (Wi-Fi n ame is di splayed on the sc reen) ,
the n enter t he def ault p asswo rd: 123 4567 8.
2) Up on the co nnectio n betwe en mobile /lapt op/tabl e and dongl e is comp lete d, open
web browser on the mobile phone/laptop/tablet.
3) Tap the ico n to make the we b brow ser jump to a nothe r page.
WIF I name
5. Af ter upg rade i s compl eted , restar t the mir ror.
BOYO products are consistently at the forefront of technology and innovation. Looking for cameras and driver safety? Visit our website.
 Loading...