

Page 1
VTR113
Vehicle Camera Recorder
USER’S GUIDE
Caution: Always practice safe driving. Do not operate the VTR113
while driving.
Page 2
Initial setup
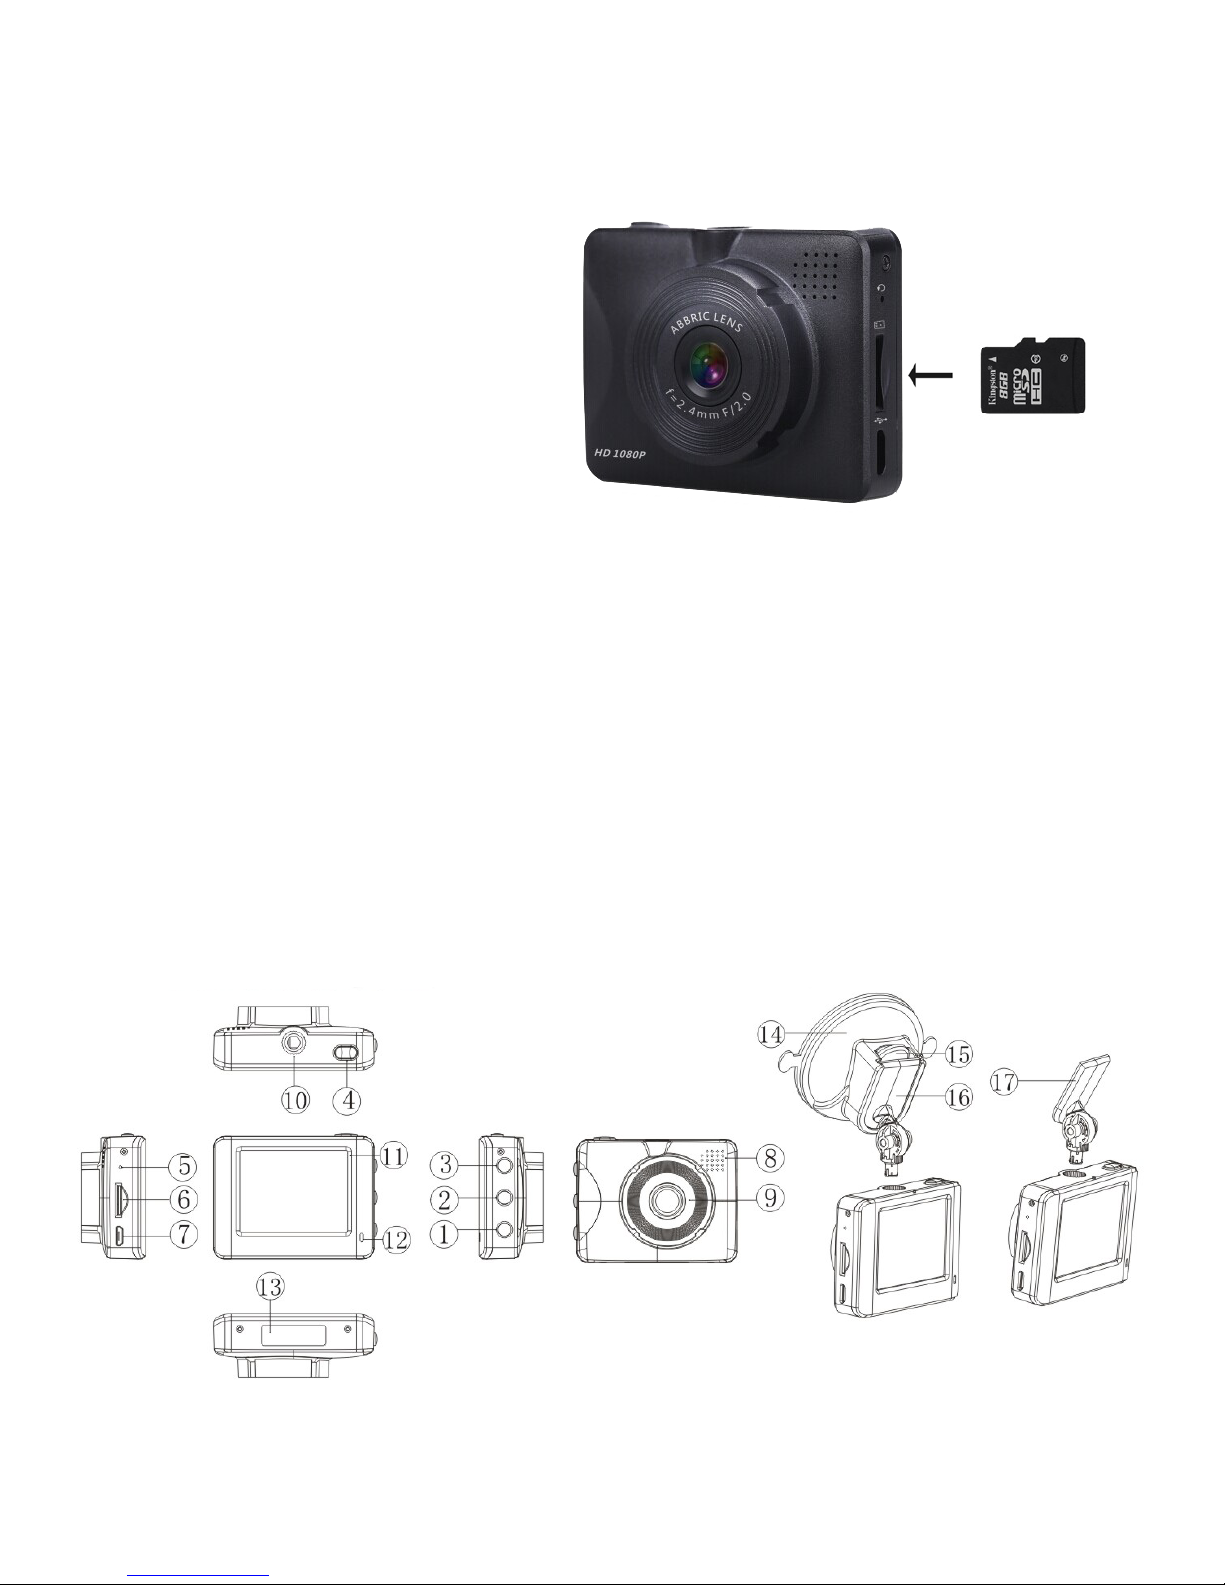
Please insert the MicroSD card into the VTR113 vehicle camera recorder card slot.
It is recommended to format the card before the inial use. (To format MicroSD
card, go to setup, Format and choose yes for format MicroSD card)
Package Contents:
1. 1080p VTR113 x1
2. Car charger (DC12V) x1
3. OBDII connector x1
4. Power cable x1
5. USB cable x1
6. Windshield mount x1
7. Joint connecter between VTR113 and windshield mount x1
8. Double side tape x1
9. Micro SD Card 8GB x1
10. Micro SD adapter x1
11. SD Card case x1
12. Manual
Control Indicators and Connections
1
Page 3

Description
Buttons During Live
Mode
During Camera
Mode
During Preview
Mode
During Play
Mode
During Menu
Mode
1. [POWER] ON / O
(Hold the button
approximately
4 sec to turn on
or o)
Press once to
switch to camera
mode
Press once from
camera mode to
Play back mode
N/A Switch between
Setup menu and
Video menu
2. [DOWN] Turn Audio record ON / OFF
N/A Previous le N/A Down button
3.[UP] Turn LCD screen
ON / OFF
N/A Next le Stop play mode
(Go back to
search mode)
Up button
4. [ENTER] Turn Recording
ON / OFF
Press once to
take a photo
Press to play
video.
Press and hold
2 sec to Delete/
Protect
Play and pause
video
Main Menu /
Enter Button
(Press and hold
3 sec to go to
the menu screen
or to exit the
menu screen)
*DVR cannot
enter menu
screen while it’s
on recording
mode.
5 Reset button
6 MicroSD Card Slot
7 USB port for power/ Data transmission
8 Speaker
9 Lens (2.4mm)
10 Mount holder
11 2.0 inch LCD Screen
12 Indicator LEDs(Blue = Recording, Red = Charging)
13 Serial number
14 Windshield mount bracket
15 Windshield mount lever
16 Windshield mount and Dash-cam rotatable joint
17 Permanent mount solution with double sided tape included in the package
2
Page 4

How to mount
There are two ways to mount vehicle camera recorder.
1. You can use windshield suction cup to mount on to the windshield. If
you preferred to use windshield suction mount, please locate the right
place for you and use the lever to lock the position on to the windshield.
When the suction cup has been mounted on the windshield, please
slide the #17 base-clip on to the suction cup mount and adjust VTR113
for the desired position.
2. If you prefer to permanently mount it using double sided tape, please
peel o one side of the tape and attach it to the #17 base-clip. Then peel
o the other side of the tape and mount it to a safe location area on the
windshield
Powering Method
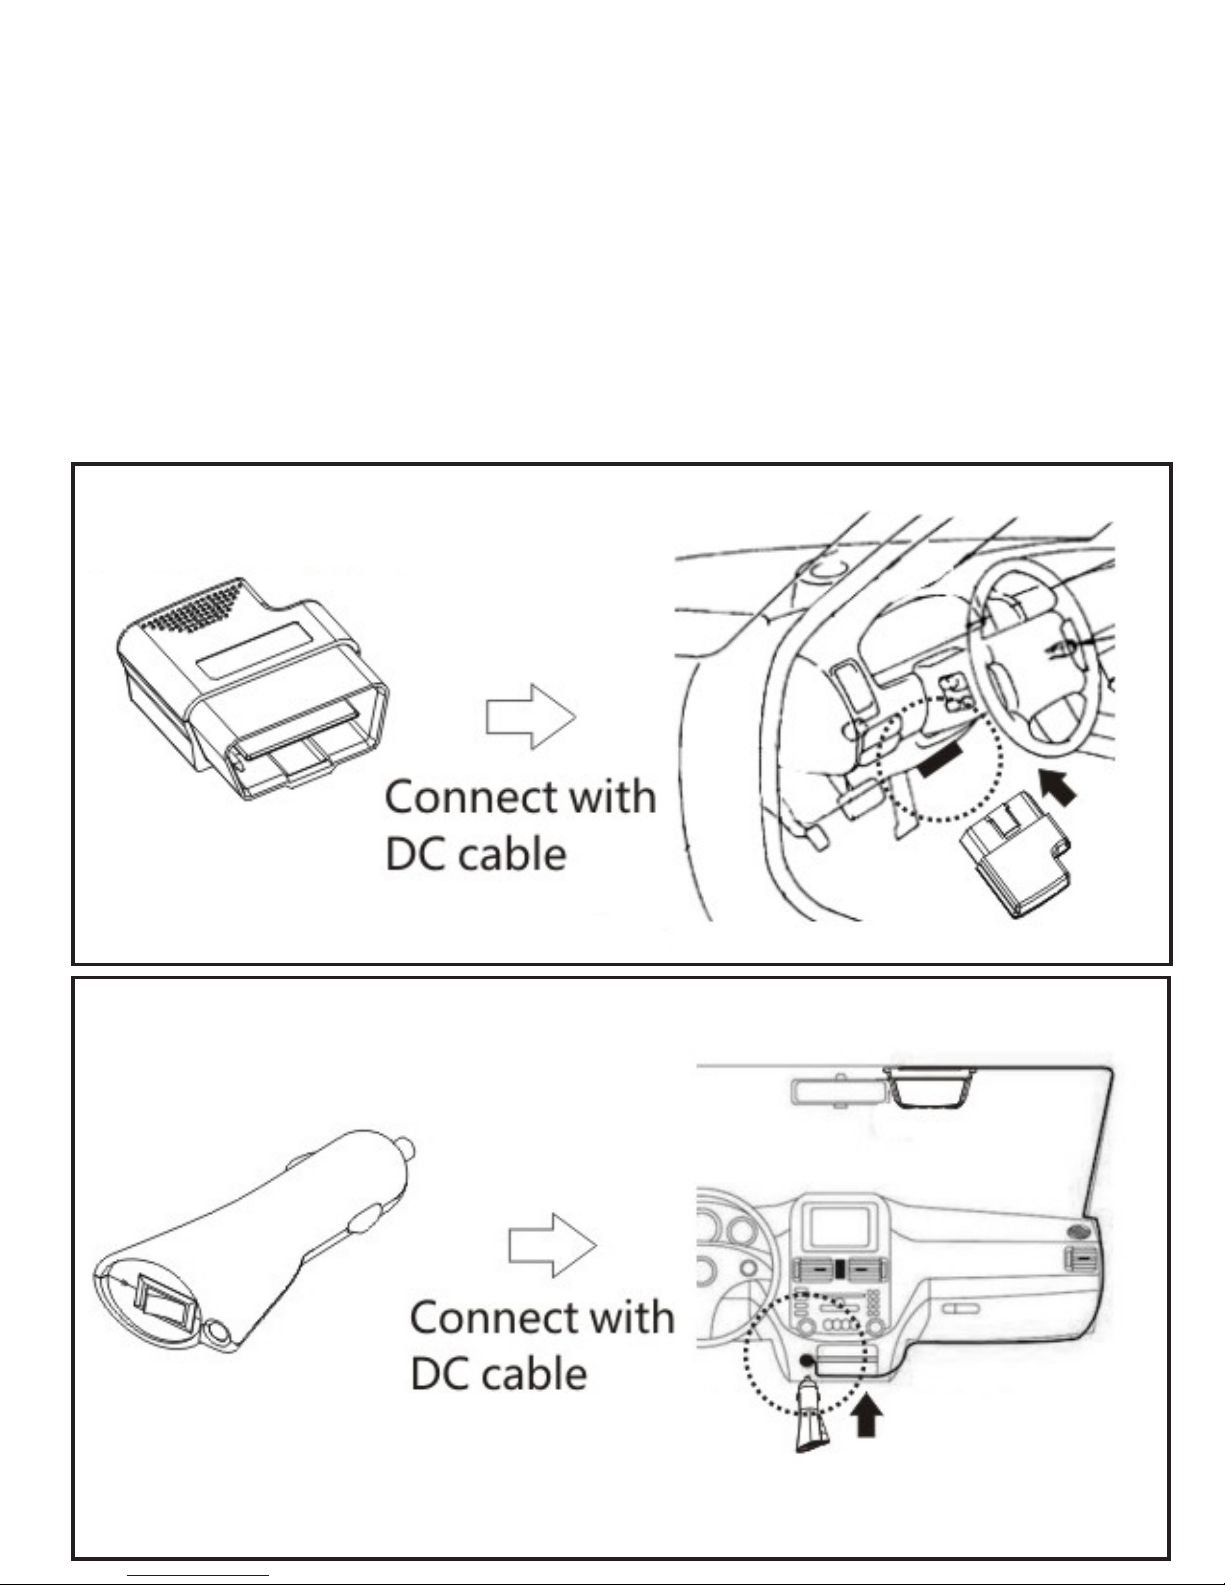
There are two ways to power the VTR113. You can power the DVR using
the cigarette plug or the OBDII connector if the vehicle is equipped.
1. Power using OBDII connector
A. The OBD II port is typically located inside the vehicle above
the brake pedal, under the steering wheel. Please see vehicle
user’s manual if you cannot locate OBD II port)
A. Insert OBDII connector on to the OBD II port of the vehicle and
connect power wire between power adapter and VTR113.
2. Power using car charger
B. Insert the cigarette car charger plug into the cigarette lighter
socket in the vehicle.
C. Connect the power cable to the car charger and power port to
VTR113 USB port.
D. The VTR113 will power up and start recording automatically
when the car starts.
3
Page 5
Device Operation
1. VTR113 will automatically start when car engine starts.
2. VTR113 may have sleep mode when the vehicle is on parking mode. But,
when you have accident while in sleep mode, you will still have 1 minute
of recording even VTR113 is on sleep mode. And also, you can always edit
parking monitor mode and Parking Record Time setup from Video menu.
3. When you are experiencing low voltage to the VTR113, it will be shut
down automatically.
4
Page 6
DVR Mode Types
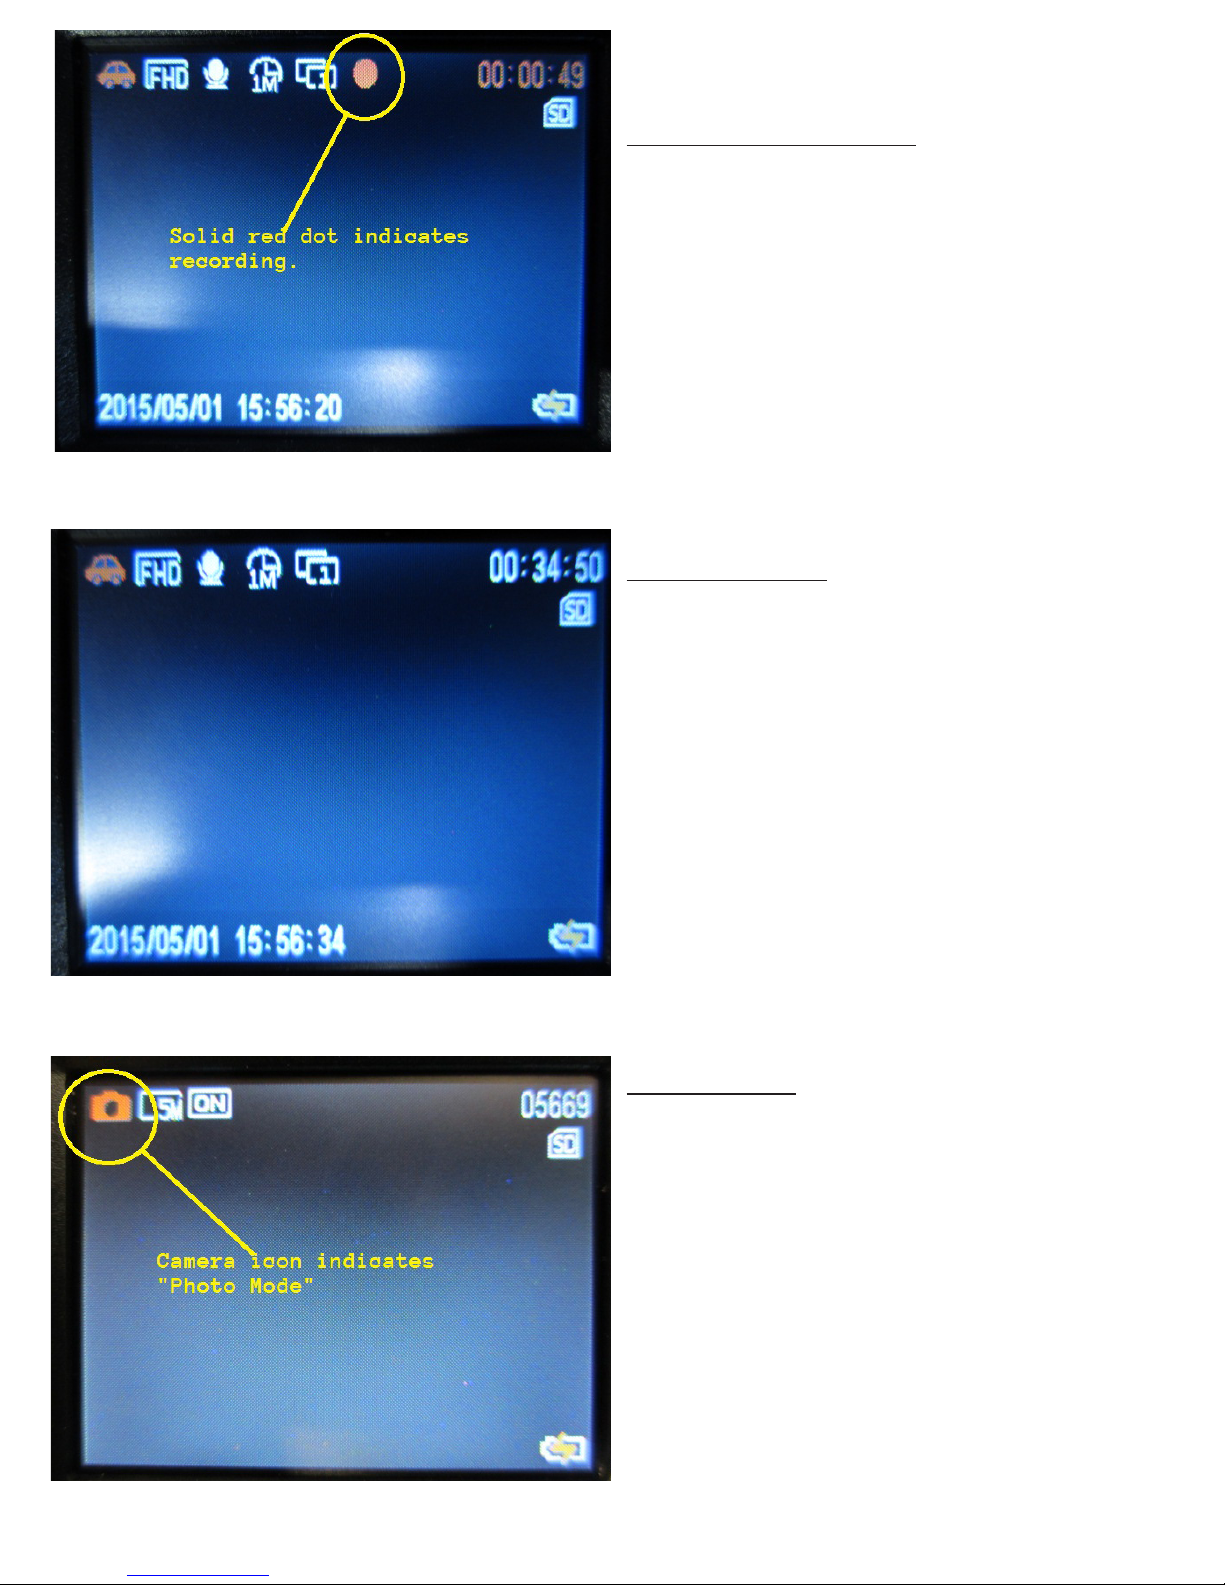
Live Recording Mode
When the vehicle is turned on, the
VTR113 will automatically turn on and
start to record.
Solid red dot will blink indicating that
the unit is recording. The red timer on
the top right corner shows the recording duration.
To stop recording, press the [ENTER].
Standby Mode
Standby is when the unit is powered on
and out of recording mode.
Photo Mode
To get to the photo mode the unit
must be out of recording mode (Standy
Mode), Press [ENTER] to turn on/o
the recording mode. When the unit is
in standby mode, press the [POWER]
button to enter Photo Mode. There is a
“Camera Icon” on the upper left corner
of the screen when it’s on Photo Mode.
You can cycle through the modes by
pressing [POWER] button.
Page 7
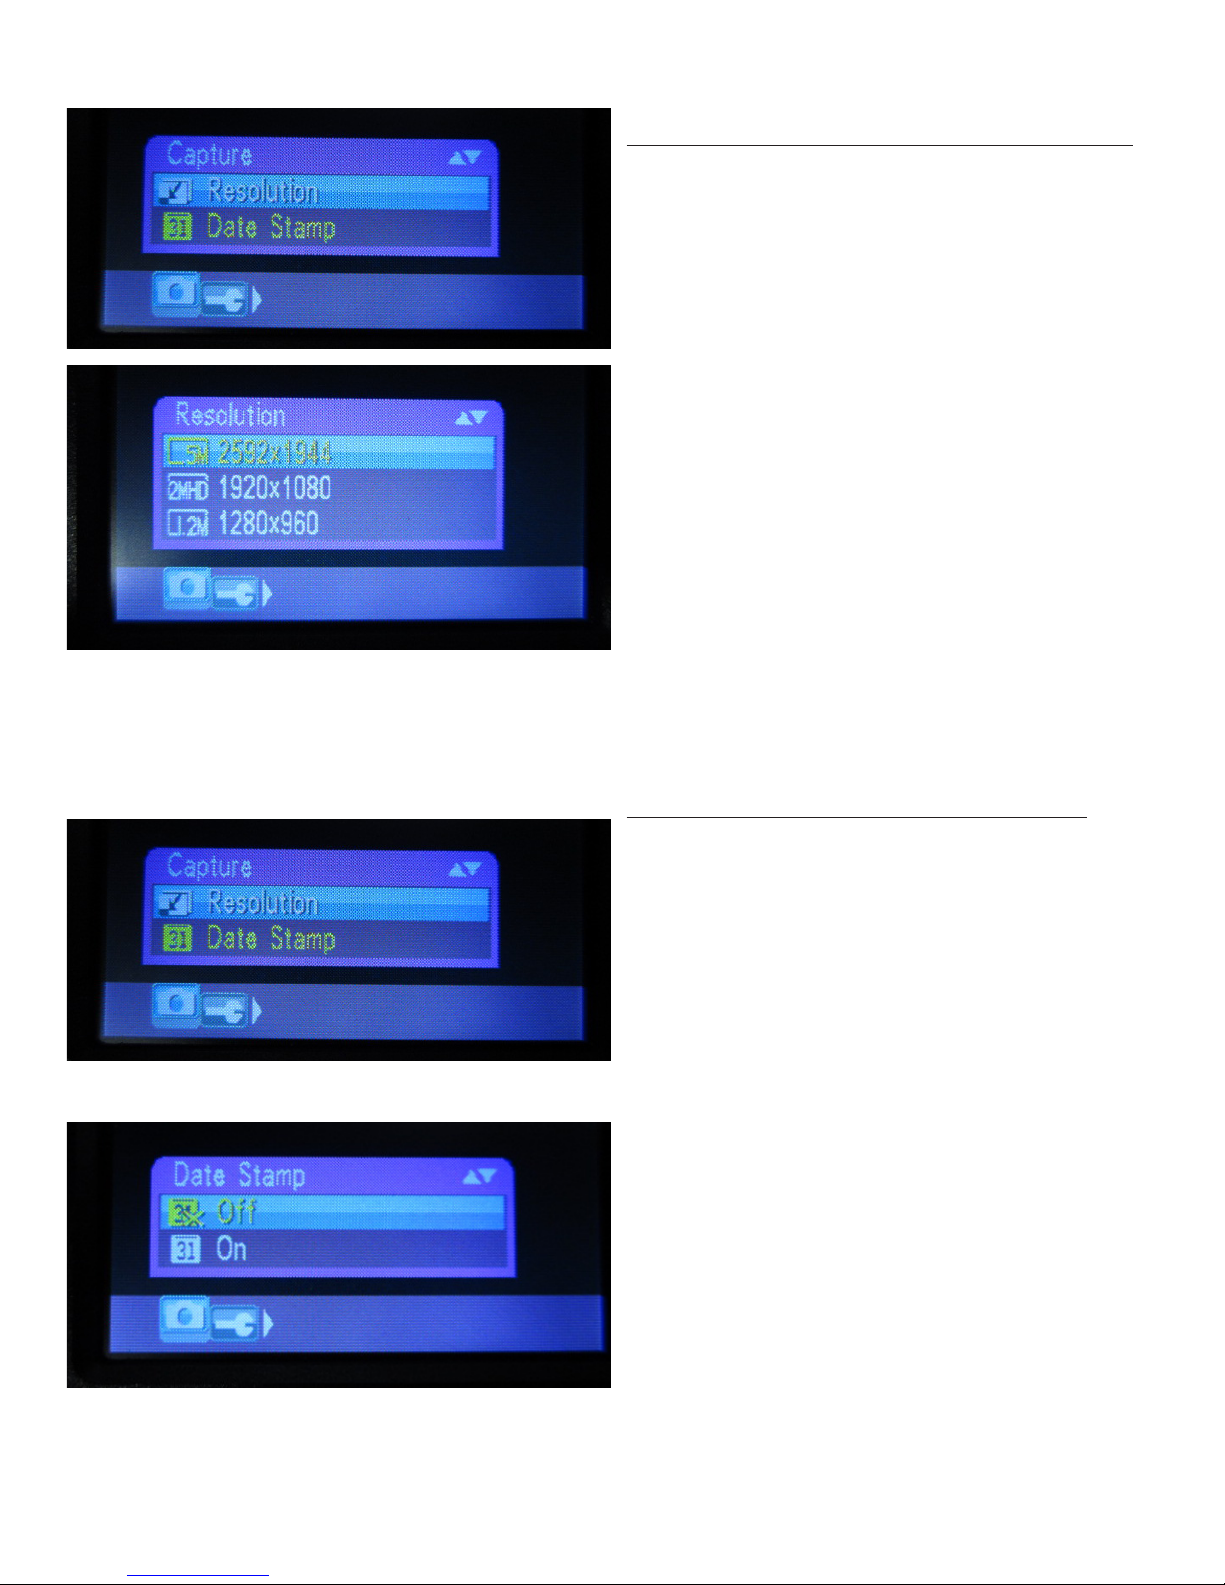
Photo Mode
Resolution Setting for Photo Mode
During Photo Mode, press and hold
down [ENTER] button for 3 seconds.
Highlight Resolution and press [ENTER]
button
Use the [UP] and [Down] arrow buttons
to navigate to the desired setting.
Then press [ENTER]. To exit the menu
screen, hold down [ENTER] button for
3 seconds.
Date Stamp on or o for photos
During Photo Mode, press and hold
down [ENTER] button for 3 seconds.
Highlight to Date Stamp and press
[ENTER] button
Choose either on or o for date stamp
for your photos. Press [ENTER] button
to select. To exit the menu screen,
press and hold [ENTER] button for 3
seconds.
6
Page 8
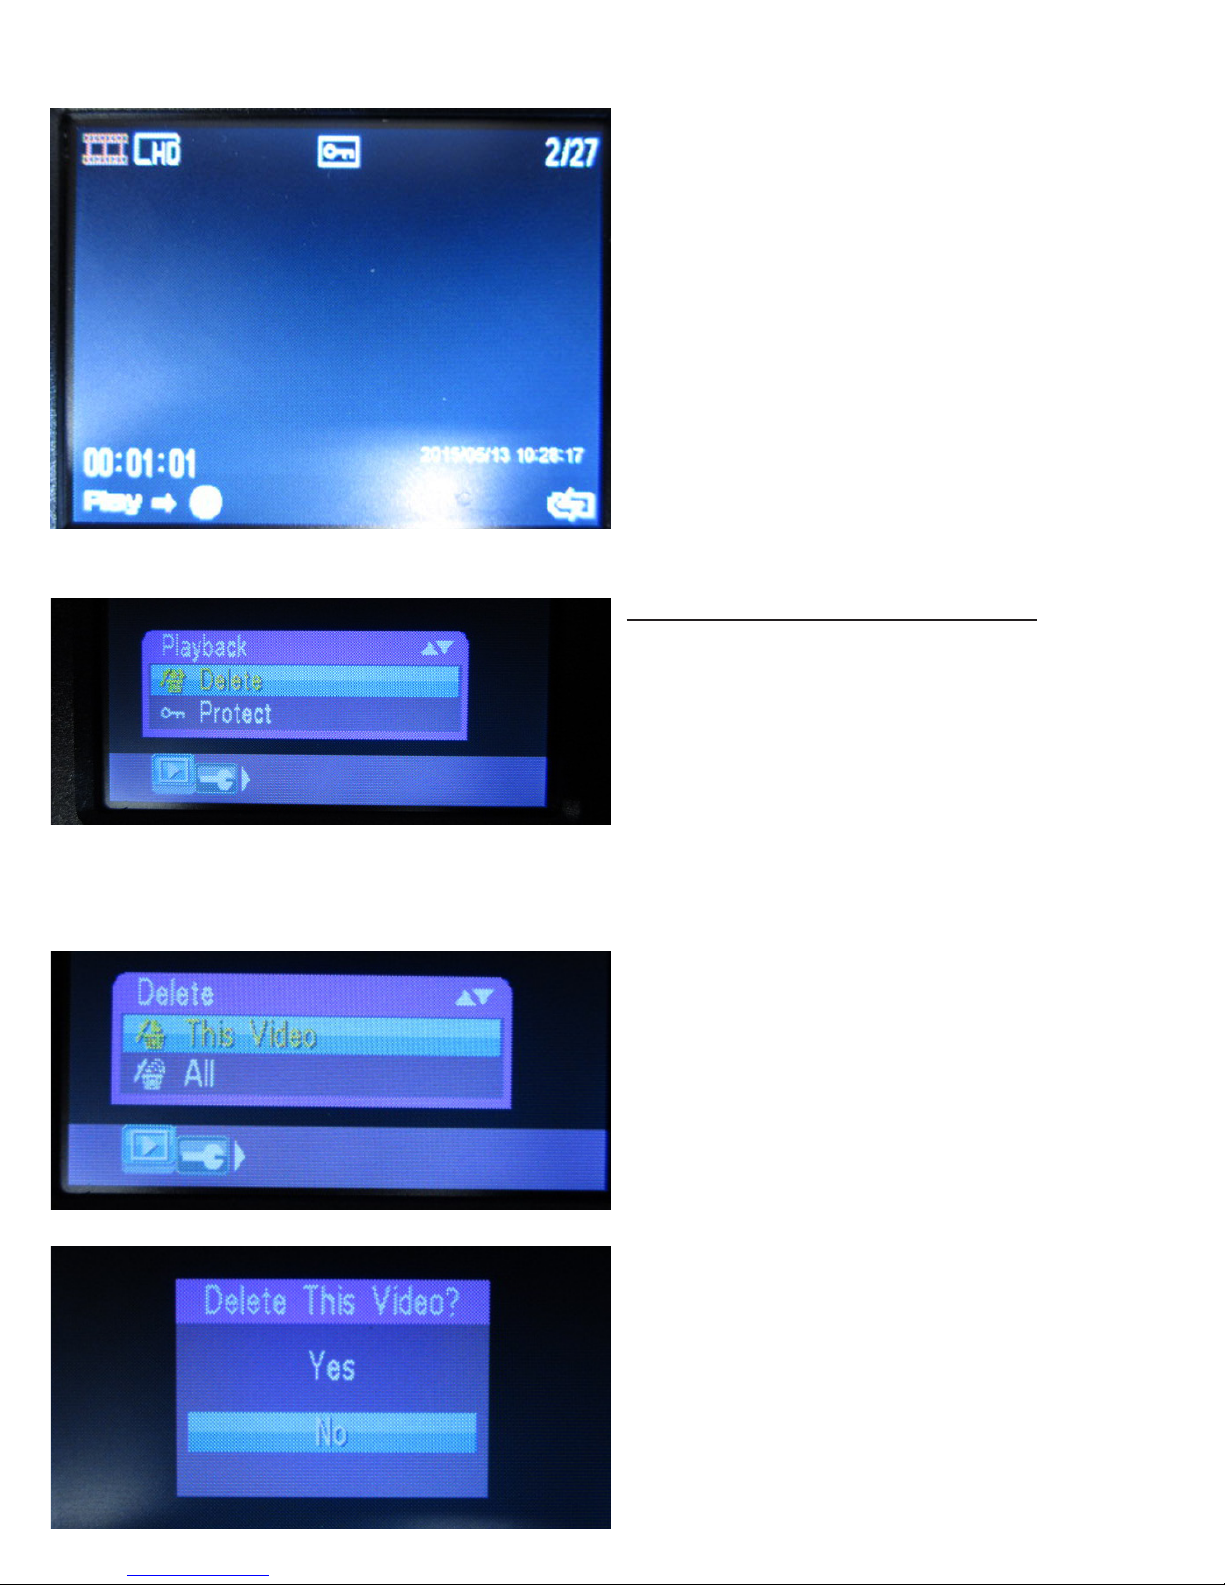
Playback/Delete/Protect Mode
From Stanby mode, press power button
twice to cycle to Playback Mode.
Please press up or down buttons to
browse through the video and photo
les. To play the video le, press [ENTER] to start and stop playing the video.
Delete video and photo les
Note: This method will not delete locked
les. It will only delete unlocked les.
To delete a single video or photo
le, browse to the le in the playback
mode, then hold down [ENTER] for 3
seconds. Choose Delete and press
[ENTER].
Choose “This Video” and press [ENTER]
button to delete single le. Choose
“ALL” to delete all unprotected les. To
delete protected les, the les must
be unlocked rst. To unlock les, see
*Locking and unlocking les.
Highlight “YES” and then [ENTER] button to delete the single video or photo.
7
Page 9
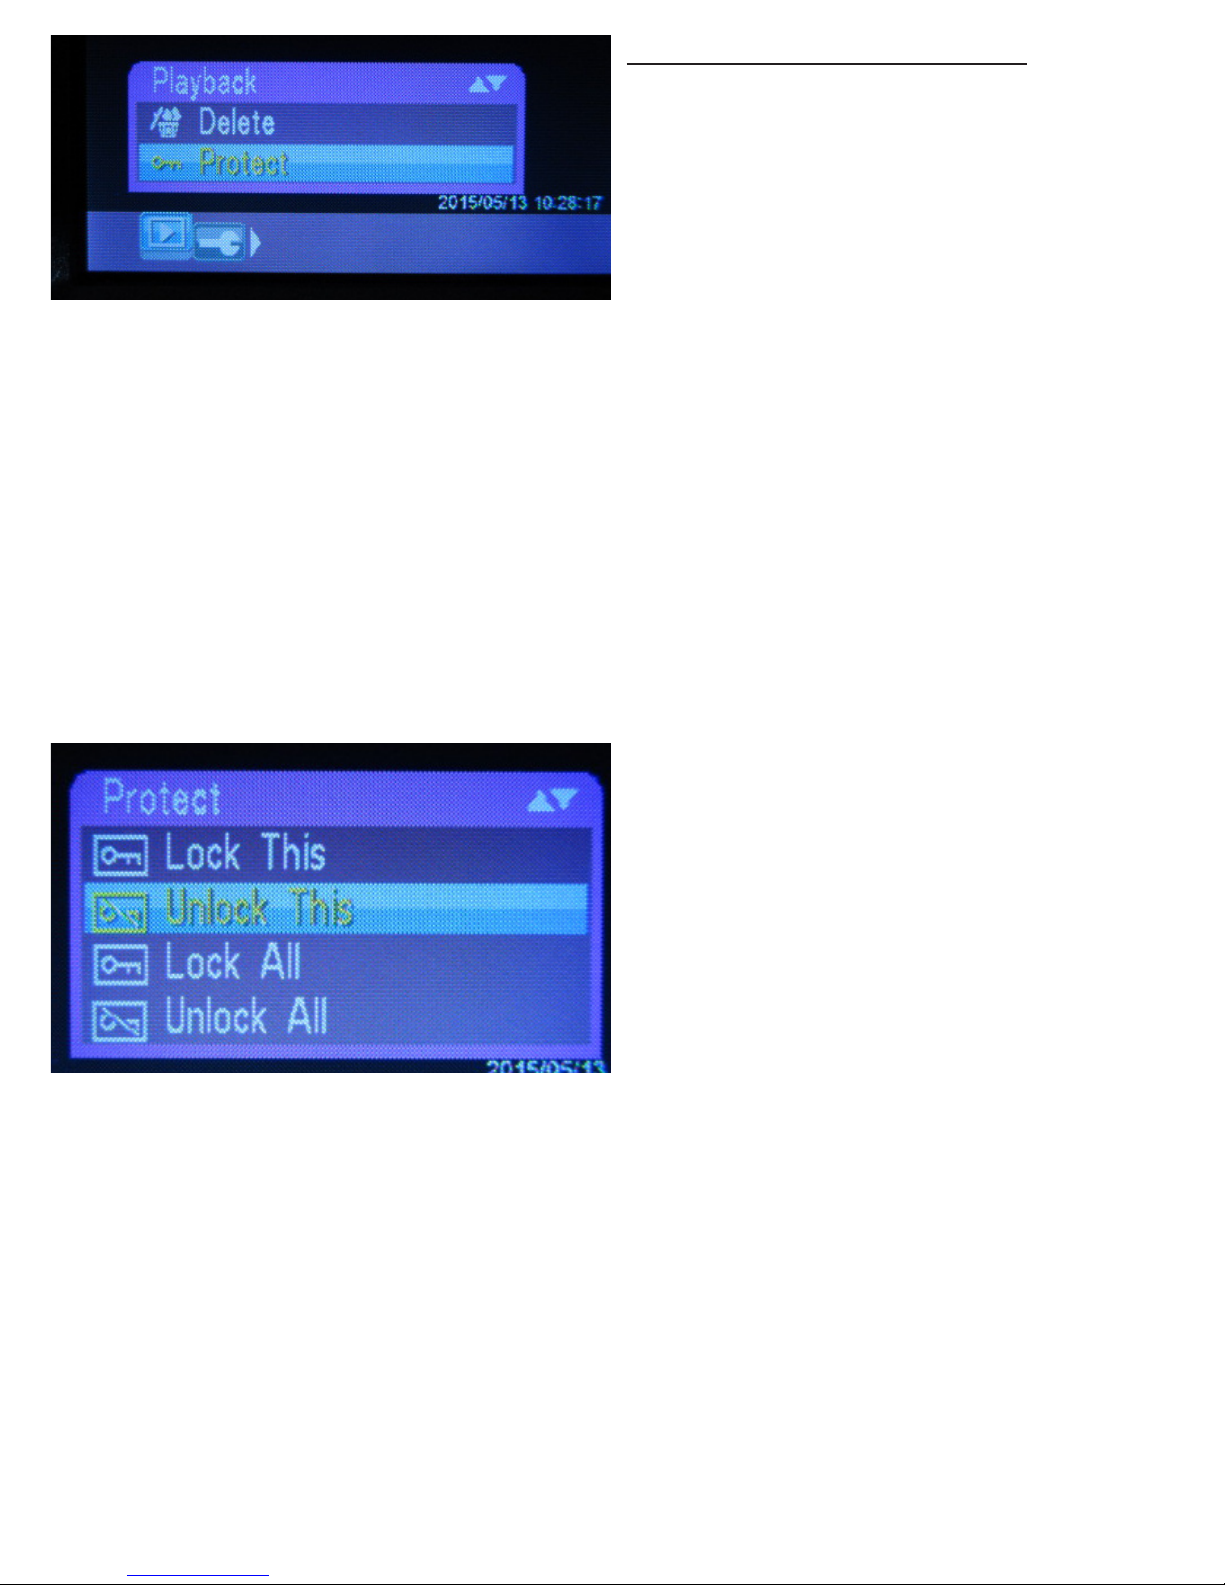
Locking and unlocking les
Note: Locking means the same as
protecting. The locked les will not be
overwritten or deleted automatically.
Locked les can only be deleted manually or by reformatting the storage card.
Reformatting will wipe the entire storage
card clean.
To get to the “Protect” settings, browse
to the desired le in the Playback Mode.
Press and hold down [MENU] button for
3 seconds.
Select “Protect” and press [ENTER] button.
“Lock This” will lock a single le.
“Unlock This” will unlock single le.
“Lock All” will lock all the les in the
storage entirely.
“Unlock All” will unlock all the les in
the storage entirely.
Select using the up and down buttons,
then press [ENTER]. Then exit the menu
screen by pressing and holding [ENTER]
button for 3 seconds.
8
Page 10
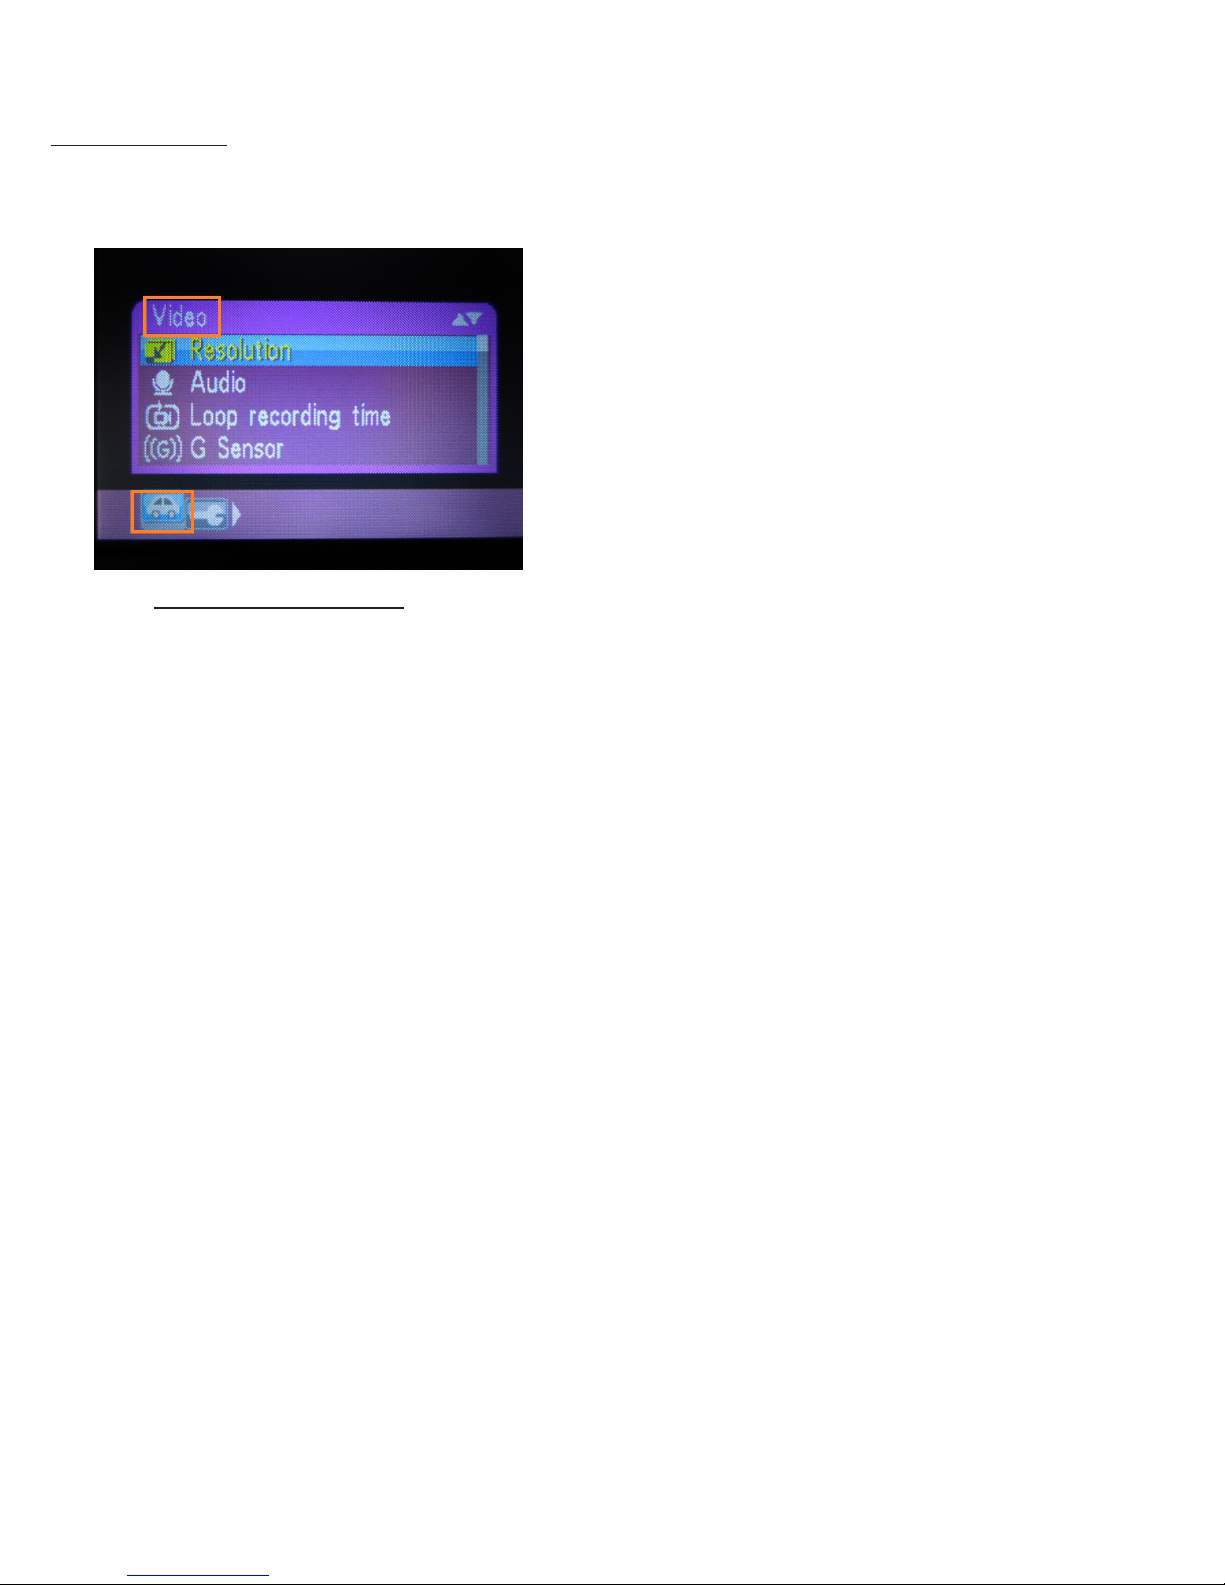
Video Menu and Setup Menu
Video Menu
To get to the menu settings, press and hold down the [ENTER] button for 3 seconds while in Standby Mode.
Video setup menu
1. Resolution: Choose the resolution setting for the recording video.
A. FHD: 1920x1080
B. HD: 1280x720
C. VGA: 640x480
2. Audio: Microphone audio recording. Turning it o will disable the audio
recording.
A. O
B. On
3. Loop recording time: VTR113 records and saves video les in segments.
Once the card is full, it will overwrite old les and continue to record.
A. 2 min (Saves video les in 2 minute segments and loop over
when the card is full)
B. 5 min (Saves video les in 2 minute segments and loop over
when the card is full)
C. 10 min (Saves video les in 2 minute segments and loop over
when the card is full)
D. O ( Saves video les in 2 minute segments and will stop
recording when the card is full)
4. G Sensor: This feature works only while the unit is in recording mode.
During the recording mode, if it senses impact, it will save and lock the
le. To delete locked/protected les, see *“Playback/Delete/Protect Mode”.
*Note: G-Sensor mode doesn’t apply while in Standby Mode.
A. Low (Low sensitivity) *Triggered by heavy impact.
9
Page 11

B. Medium (Medium sensitivity)
C. High (High Sensitivity) *Triggered by light impact.
D. O (Disable)
5. Parking Setting: This feature only applies with the use of OBDII connector.
Parking setting mode alllows recording while the car is turned o. When
it senses impact, the VTR113 will turn on automatically and start to record
thereafter.
A. O (Disable impact sensing)
B. Low (Low sensitivity) *Triggered by heavy impact.
C. Medium (Medium sensitivity)
D. High (High sensitivity) *Triggered by light impact.
6. Parking Monitor Mode: This feature only applies with the use of the OBDII
connector with “Parking Setting” to Low, Med, or High. When recording
during parking setting mode, choose the record setting for FPS (frames
per second).
A. 30 fps (records in better quality videos; results in large le size)
B. 1 fps (records in lesser quality videos; best for saving memory
capacity)
7. Parking Record Time: This feature only applies with the use of the OBDII
connector with “Parking Setting” to Low, Med, or High. When the VTR113
senses impact and starts to record, it will record for the below duration,
then turns o automatically. If it triggered by another impact thereafter, it
will restart the process.
A. 1 min
B. 2 min
C. On (When triggered by impact, it will record continously. It will
stop recording when the battery is below 12VDC.
8. Standby Delay: This feature only applies with the use of the OBDII
connector. Standby Delay feature lets the user record for additional
length of time after turning o the vehicle. The car must be turned o
while the unit was in recording mode for this feature to take eect.
A. O (Disable)
B. 3 min (Records for 3 minutes after the car is turnd o)
C. 5 min (Records for 5 minutes after the car is turned o)
9. Date Stamp: This feature can show the time and date of the recording
embedded in the video.
A. O (Disable)
B. On (Enable)
10
Page 12
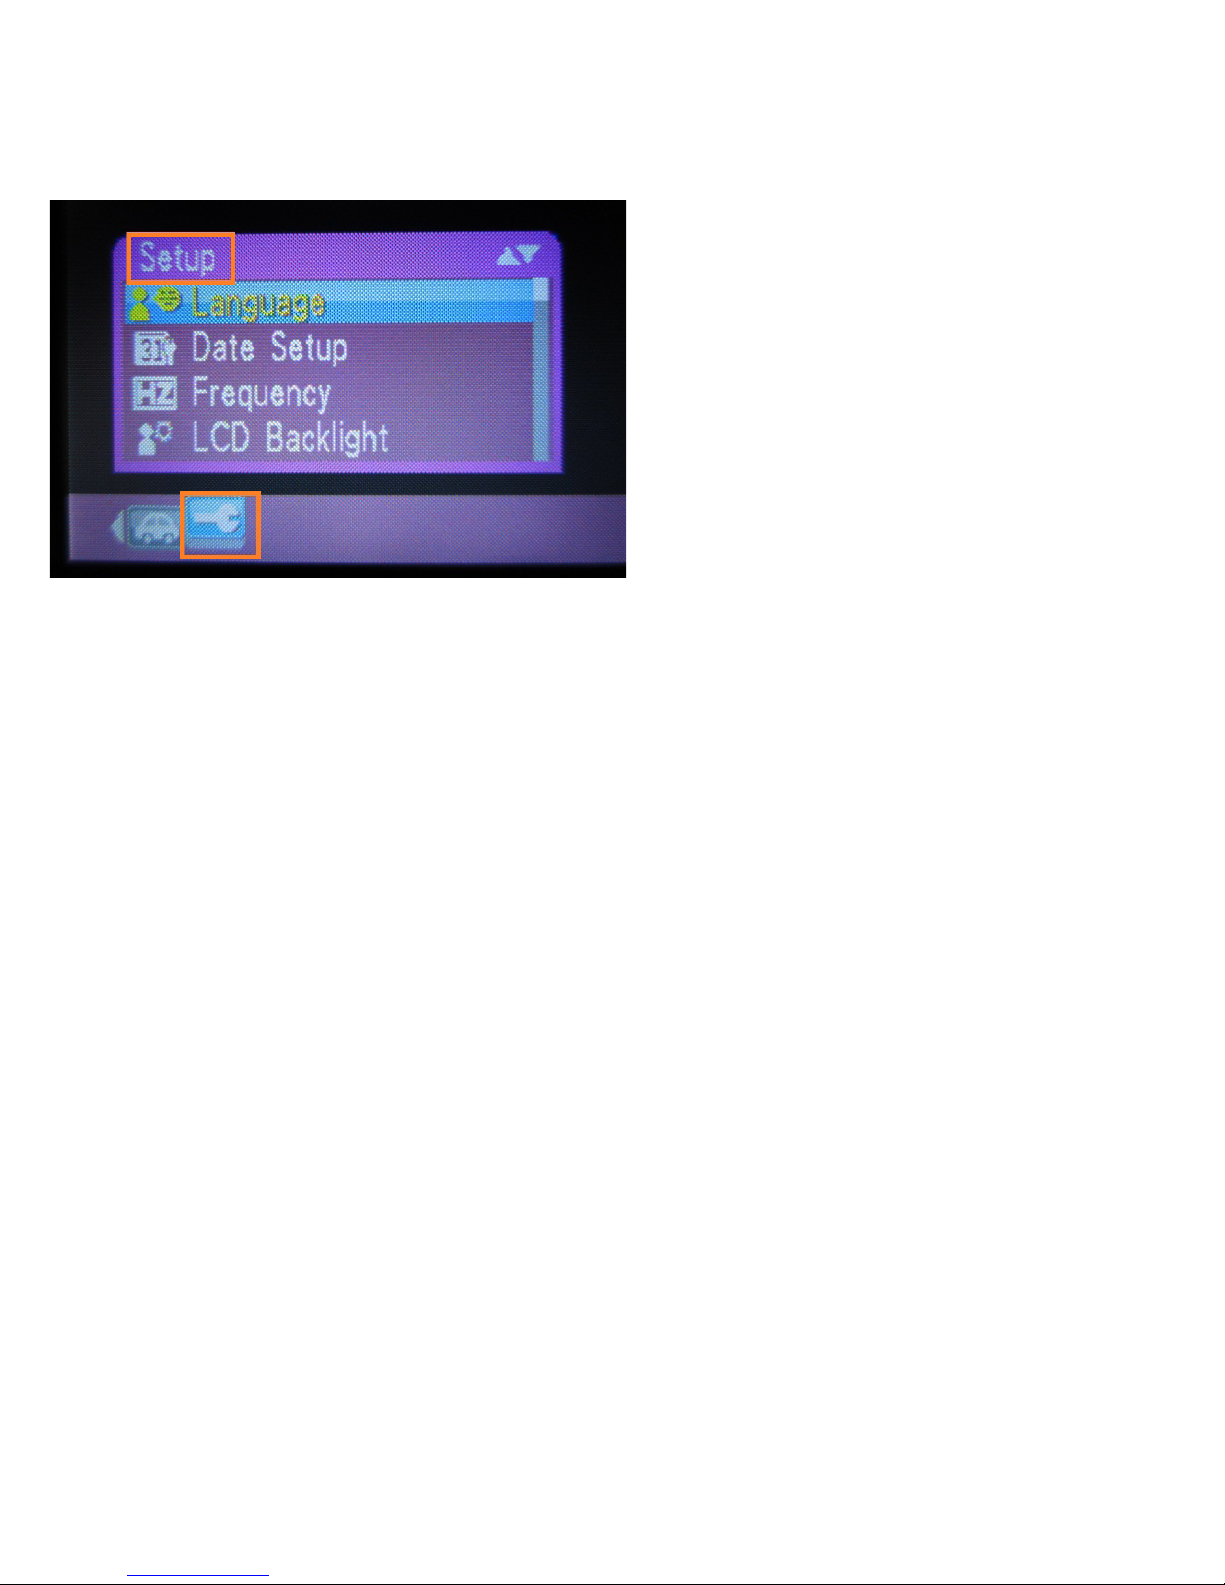
Setup Menu
To get to the Setup settings, press and hold down the [ENTER] button for 3 seconds while in Standby Mode, then press [POWER] button to switch between Video
Settings and Setup Menu.
1. Language: Change the language of the OSD
A. English
B. Deutsch
C. French
D. Spanish
E. Italian
F. Turkish
G. Russian
H. Portuguese
I. Nederland
J. Chinese Traditional
K. Chinese Simplied
L. Japanese
2. Date Setup: Time setting is only available in military time. Use the [UP]
and [DOWN] buttons to adjust each eld. Cycle through the eld by
pressing [POWER] button.
A. Date and time setup
3. Frequency: Refresh rate frequency of the built-in LCD monitor.
A. 60 Hz
B. 50 Hz
4. LCD Backlight: This feature turns o the display automatically after the set
time.
11
Page 13

A. 10 sec
B. 30 sec
C. 60 sec
D. On (Always on)
5. Sound Eect: Button sound eect
A. O
B. On
6. Format: Formatting will delete entire data in the storage card including
protected les.
A. Yes (Format the card. Cannot retrieve or undo)
B. No (Cancel)
7. Default Setting: Restores back to factory default settings.
A. Yes (Restore back to factory default)
B. No (Cancel)
8. Firmware Version: Displays current rmware version for the device
Technical Specications
1. Product feature : Smart Parking Monitoring
3. Two ways for power
4. G-Sensor: Yes (Auto-Induction)
5. LCD Screen: 2.0 inch TFT
6. Lesn: HD wide angle
7. Multi-language OSD support
8. Video Format: AVI
9. Recording Resolution: FHD 1920x1080, HD 1280x720, VGA 640x380
10. Uninterrupted cycle recording, no breaks in between les
11. Restore to factory default support
12. Power Supply: OBD II and car charger
13. Photo Format: JPEG
14. Photo Resolution: 5M 2592x1944, 2M 1920x1080, 1.2M 1280x960
15. Memory Card: TF (2G ~ 32G, Class 6 and above)
16. Audio: Built-in mic
17. LCD Back light sleep timer: 10s, 30s, 60s, On
18. Format: Support (formatting will delete all les including protected les)
19. USB: Support (USB2.0)
20. Power Port: DC12V 1A
12
Page 14

Vision Tech America, Inc.
www.visiontechamerica.com
For technical support, call 888-941-3060
Email: [email protected]
 Loading...