

Page 1
CAR BLACK BOX
Model- VTR102
User Manual
Read carefully before using the device
Page 2
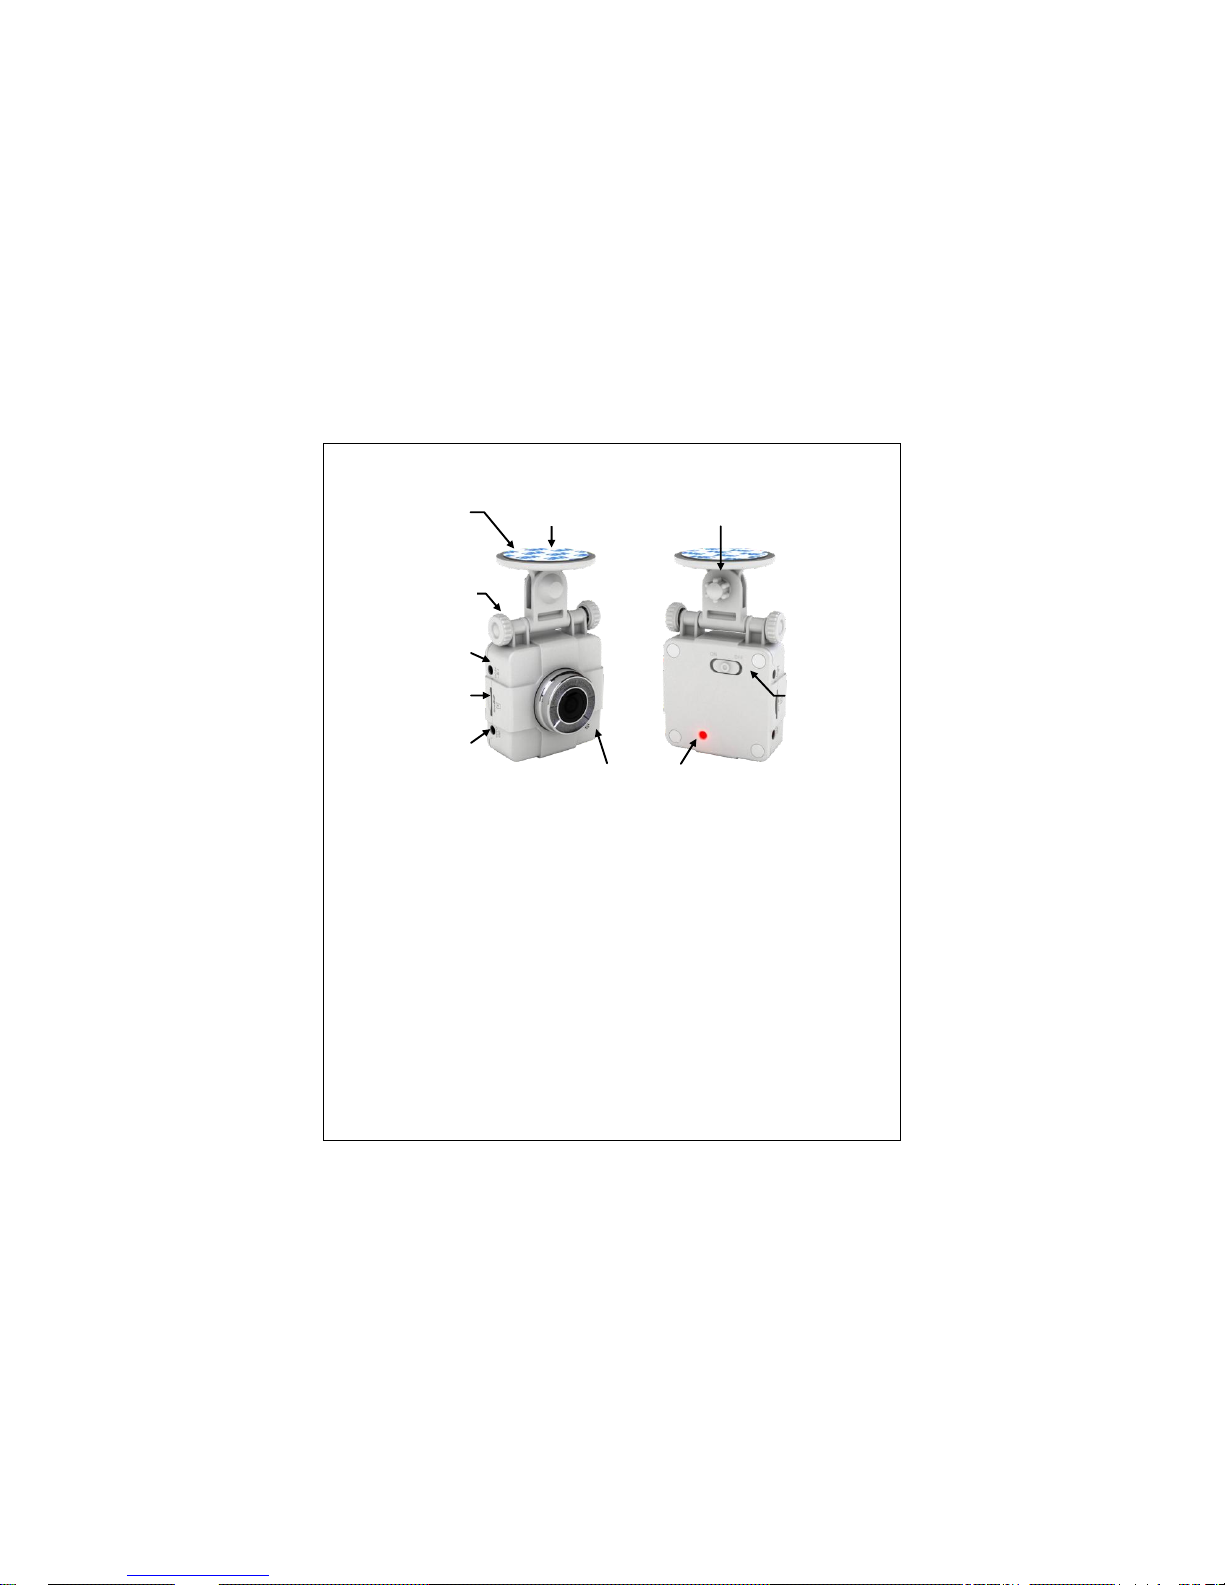
1. Name of each part
2. Features
2.0M pixels CMOS digital sensor
Recording resolution 720x480 D1 level
G-sensor built-in
Video recording : mpeg4
Audio recording : aac (built-in MIC)
Recording storage : microSD
Two different recording method at once
* Normal recording: saving a video clip every 2 minutes (30MB/file)
If microSD card is full, firstly saved files are automatically deleted in
order to keep saving the newly recorded files. (max. 4hours/ 4GB)
* Event recording: saving a video file 20 seconds independently in case of impact,
accident, sharp brake, sudden turning, etc (5MB/file, max. 200 files)
. These files do not be deleted although SD card is full.
Angle of view 120° (Diagonal)
Built-in RTC (Real Time Clock)
Video-out port for external display
Input power : DC 12V-24V (Cigar jack)
Dimension : 52(H) x 87(L) x 22(D) mm / 49g
Country of Origin : Korea
Direction
control stand
(up/down,
right/left)
Knob
(up/down,
right/left)
Power input
port
microSD card
slot
Metal plate
attached here
Direction control knob
(right/left)
Power
switch
Microphone
Recording
status LED
Video
output port
Page 3
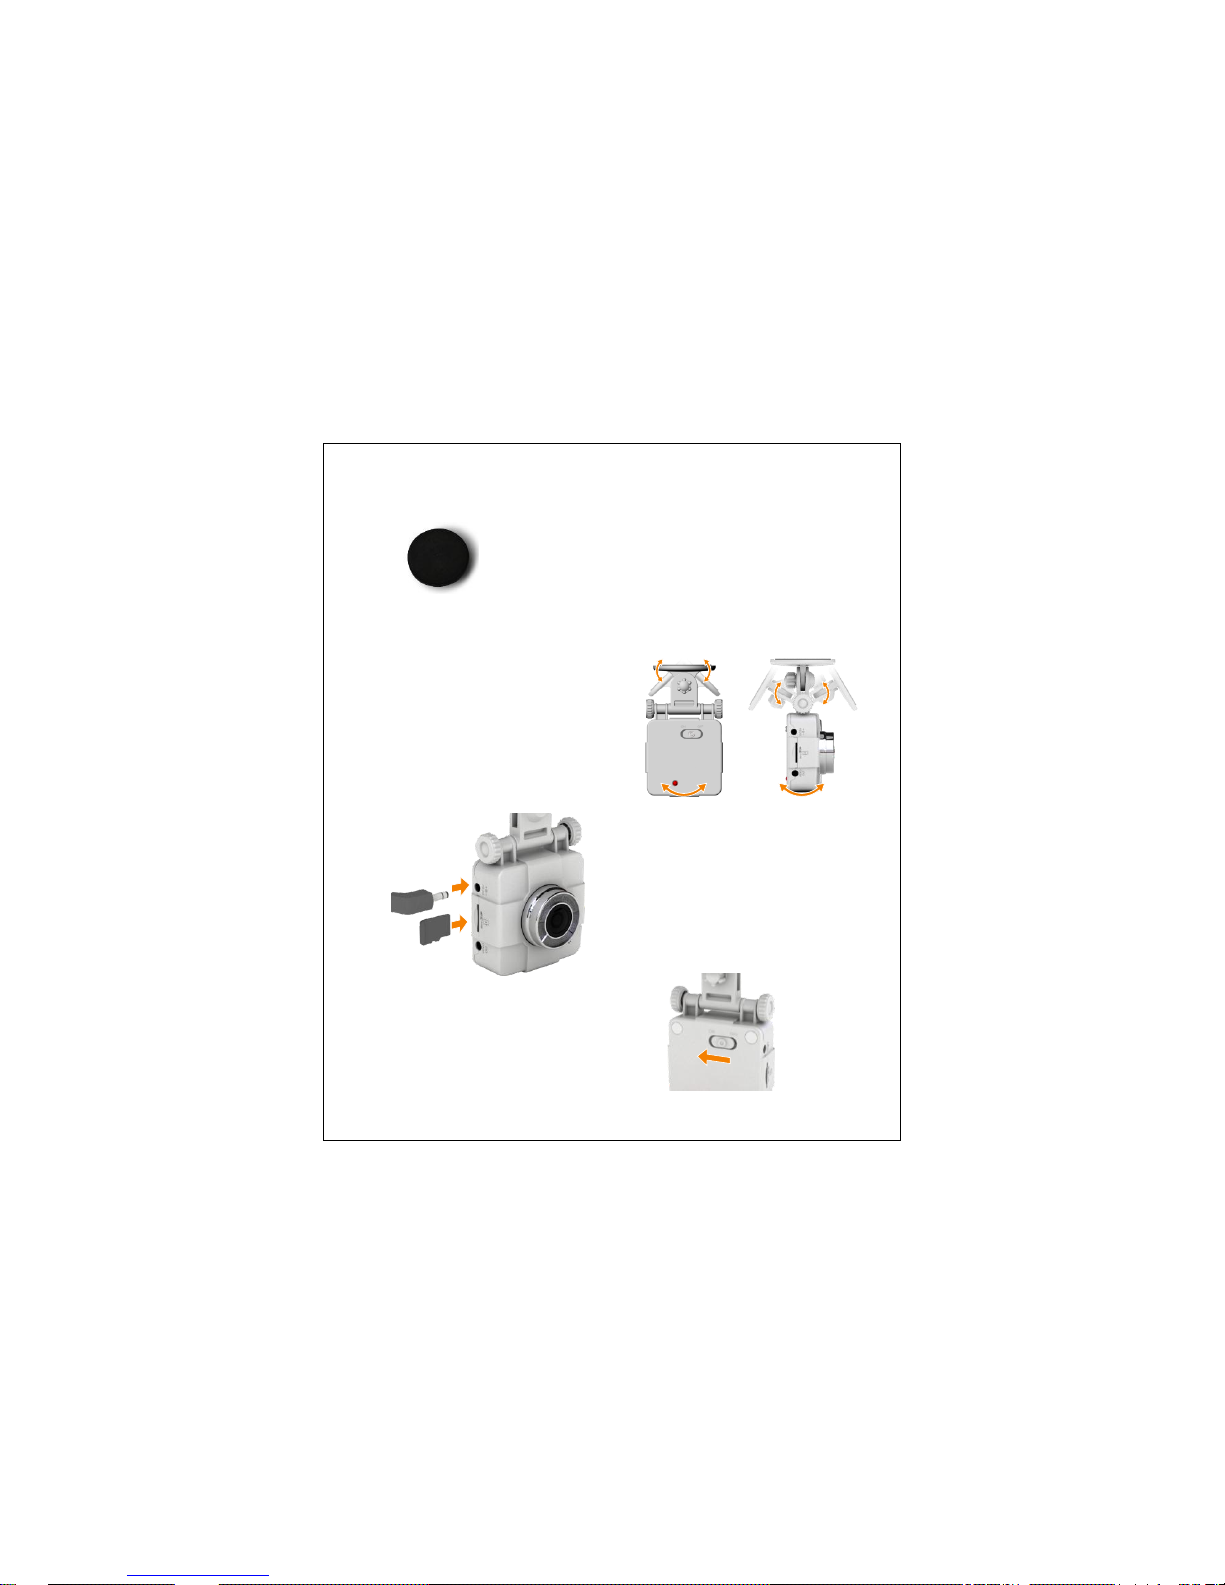
3. Installation
1) Take off the adhesive tape from the magnetic holder.
Attach the magnetic holder on the windshield of the car.
Also attach the metal plate on the device.
Note - Magnetic holder is optional and may not
come with it, depending on countries. If it does not
come in the package, take off the adhesive tape
from the device and attach it on the windshield of
the car directly
2) Using the knob, check the direction
where you want to record, fasten
the knob
3) After inserting microSD card into slot,
connect the supplied cigar jack to the port.
Attached the device on the magnetic
holder.
* Caution
Be sure to use the supplied cigar
jack, otherwise, the device
may be damaged and does not work.
4) Power "ON".
Recording begins automatically if the car starts.
Page 4
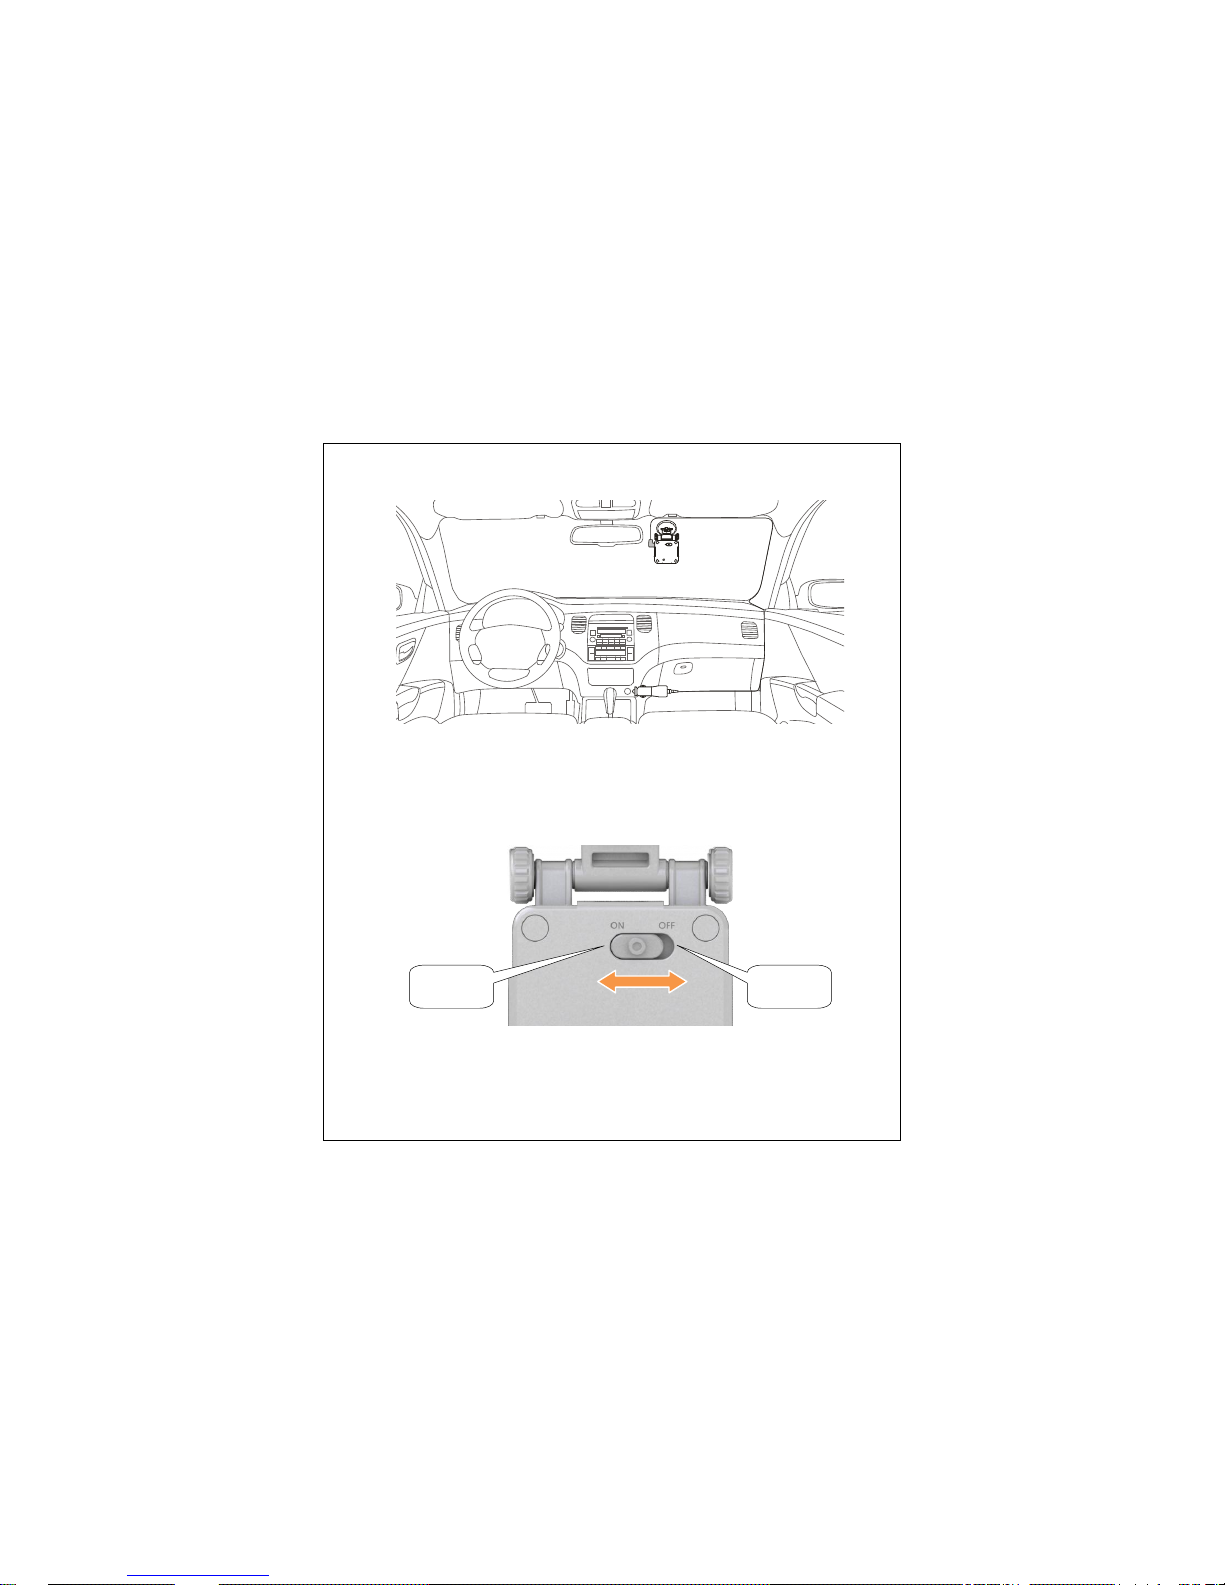
5) Basic installation
4. How to work
- VTR102 is connected to cigar jack. Recording begins automatically if the car starts.
- In case of the power OFF, VTR102 not works even the car starts.
- If SD card is full, firstly saved files are automatically deleted in order so it keeps saving the
newly recorded files. (max. 4hours / 4GB)
- In case of turning the power switch off or the power off the car, VTR102 saves a last
recording file. And the operation stops by the cut of inner power.
Power
“ON”
Power
“OFF”
Page 5
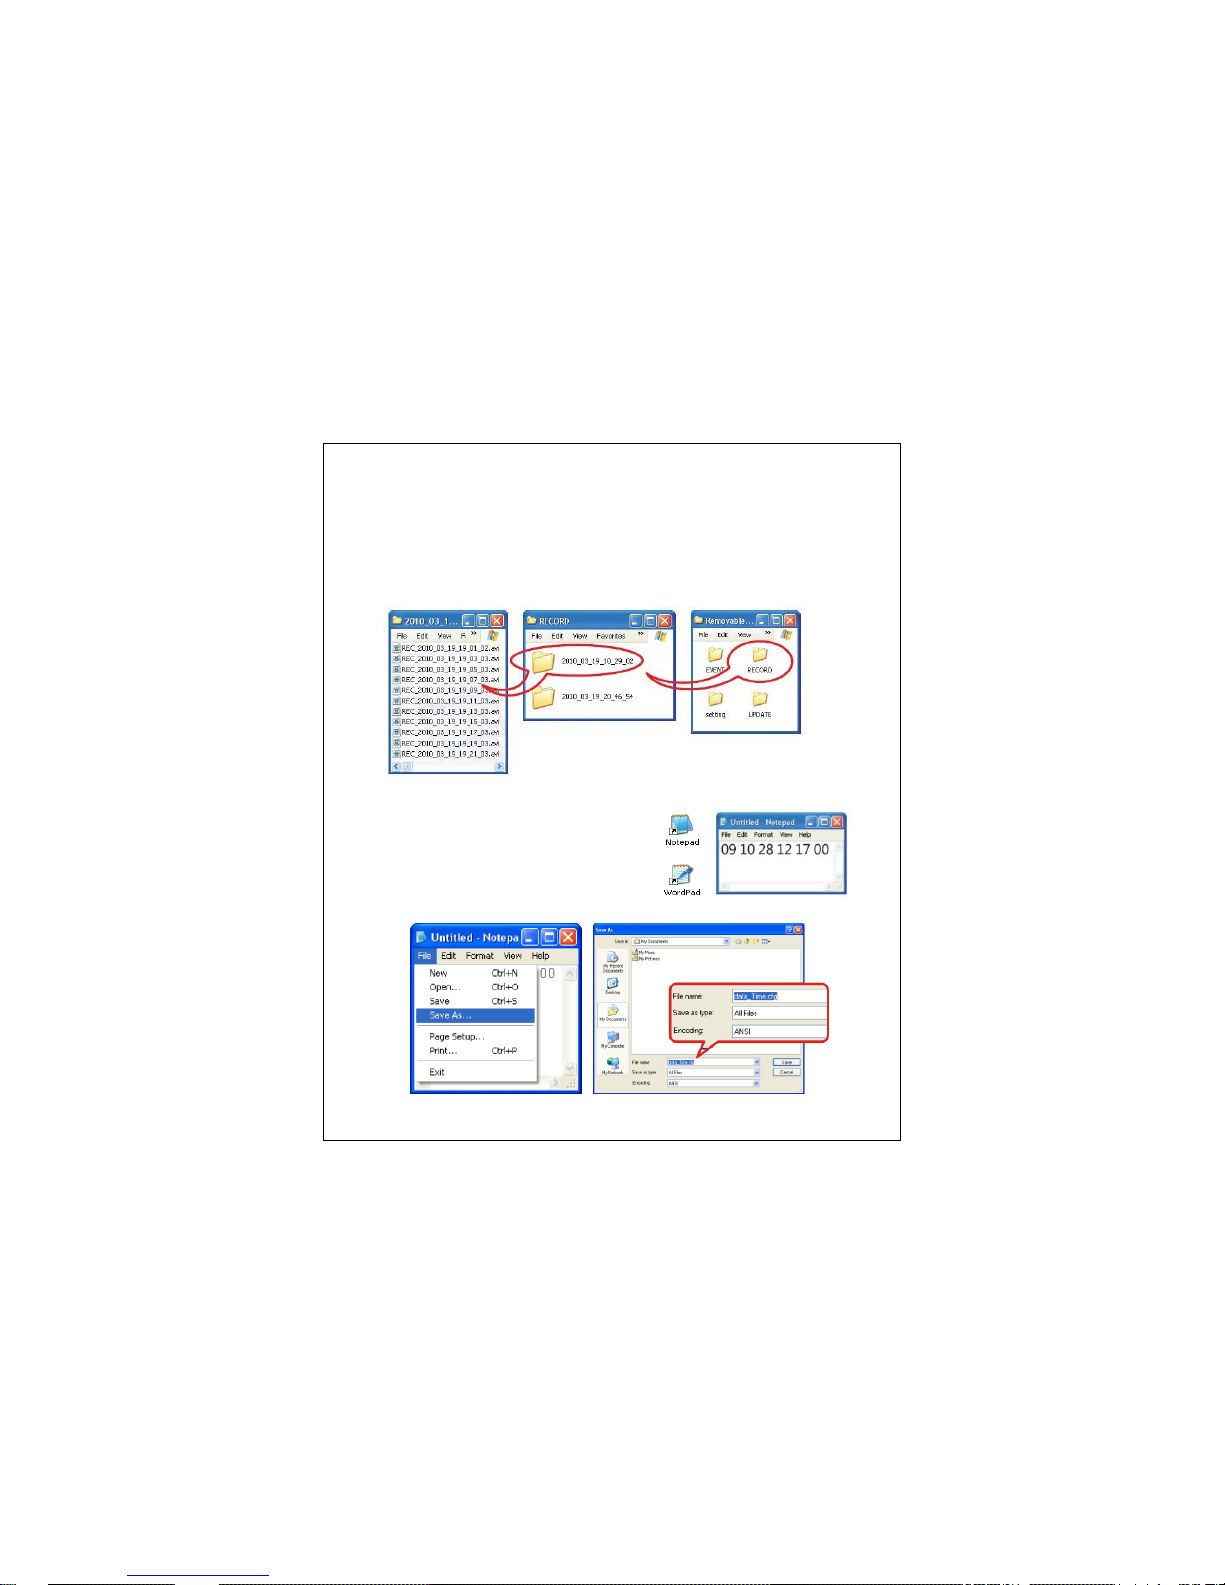
5. Normal recording, Event recording folder
1) Normal and Event recording folder is made on the top folder of SD card.
2) Normal recording folder : Saving the recorded file in general.
- Folder is created with recording start date in "Normal Recording" folder. If the SD card has
no longer the free space, firstly saved files are automatically deleted in order so it keeps
saving the newly recorded files
- File name : REC_2010_03_12_10_40_14.avi (Max 2,000 files)
3) Event recording folder : Saving the recorded file by outside shock.
- File name : EVT_2010_03_12_10_40_14.avi ( Max 200 files)
6. Time setting
1) Built-in RTC(Real Time Clock) function.
- To set the RTC time, run the text editor (e.g
MS Word).
- Input the setting time as right picture.
e.g) "09 10 18 12 17 00" stands for "2009,
October, 18th, date, hour 12, minute 17,
second 00".
2) Save the time setting file under the name of [data_Time.cfg].
Page 6
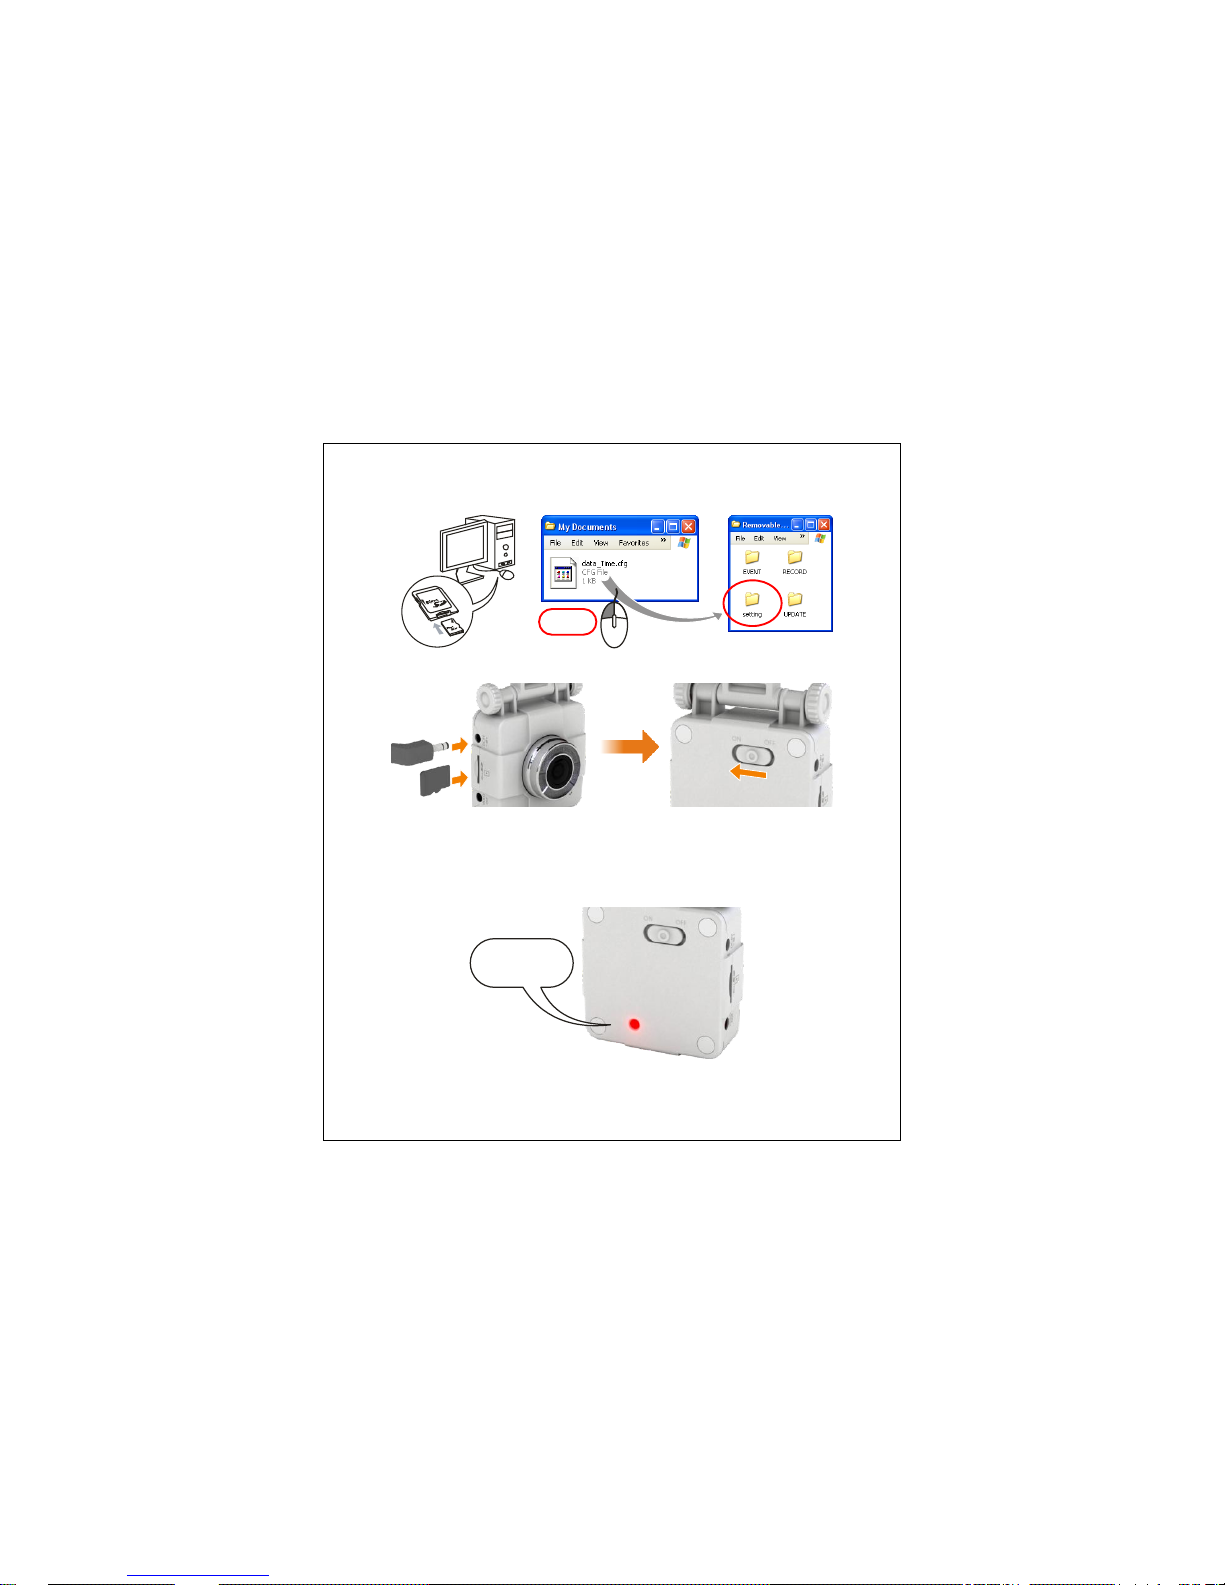
3) After insertion of micro SD card to PC, copy and paste [data_Time.cfg] file into [setting]
folder of micro SD card.
4)After inserting of microSD card to VTR102, turn on the power switch. And Time is
automatically set in the time of [data_Time.cfg]. And the file is automatically deleted.
7.LED operation
- LED displays the recording status.
- In normal recording , LED keeps red light.
- In case of no-recording or abnormal status, LED keeps blinking. (e.g : microSD card is not
inserted, power is unstable etc)
- Event recording by outside-shock keeps red light after 2 or 3 times blinking.
Copy
Recording
status LCD
(RED)
Page 7
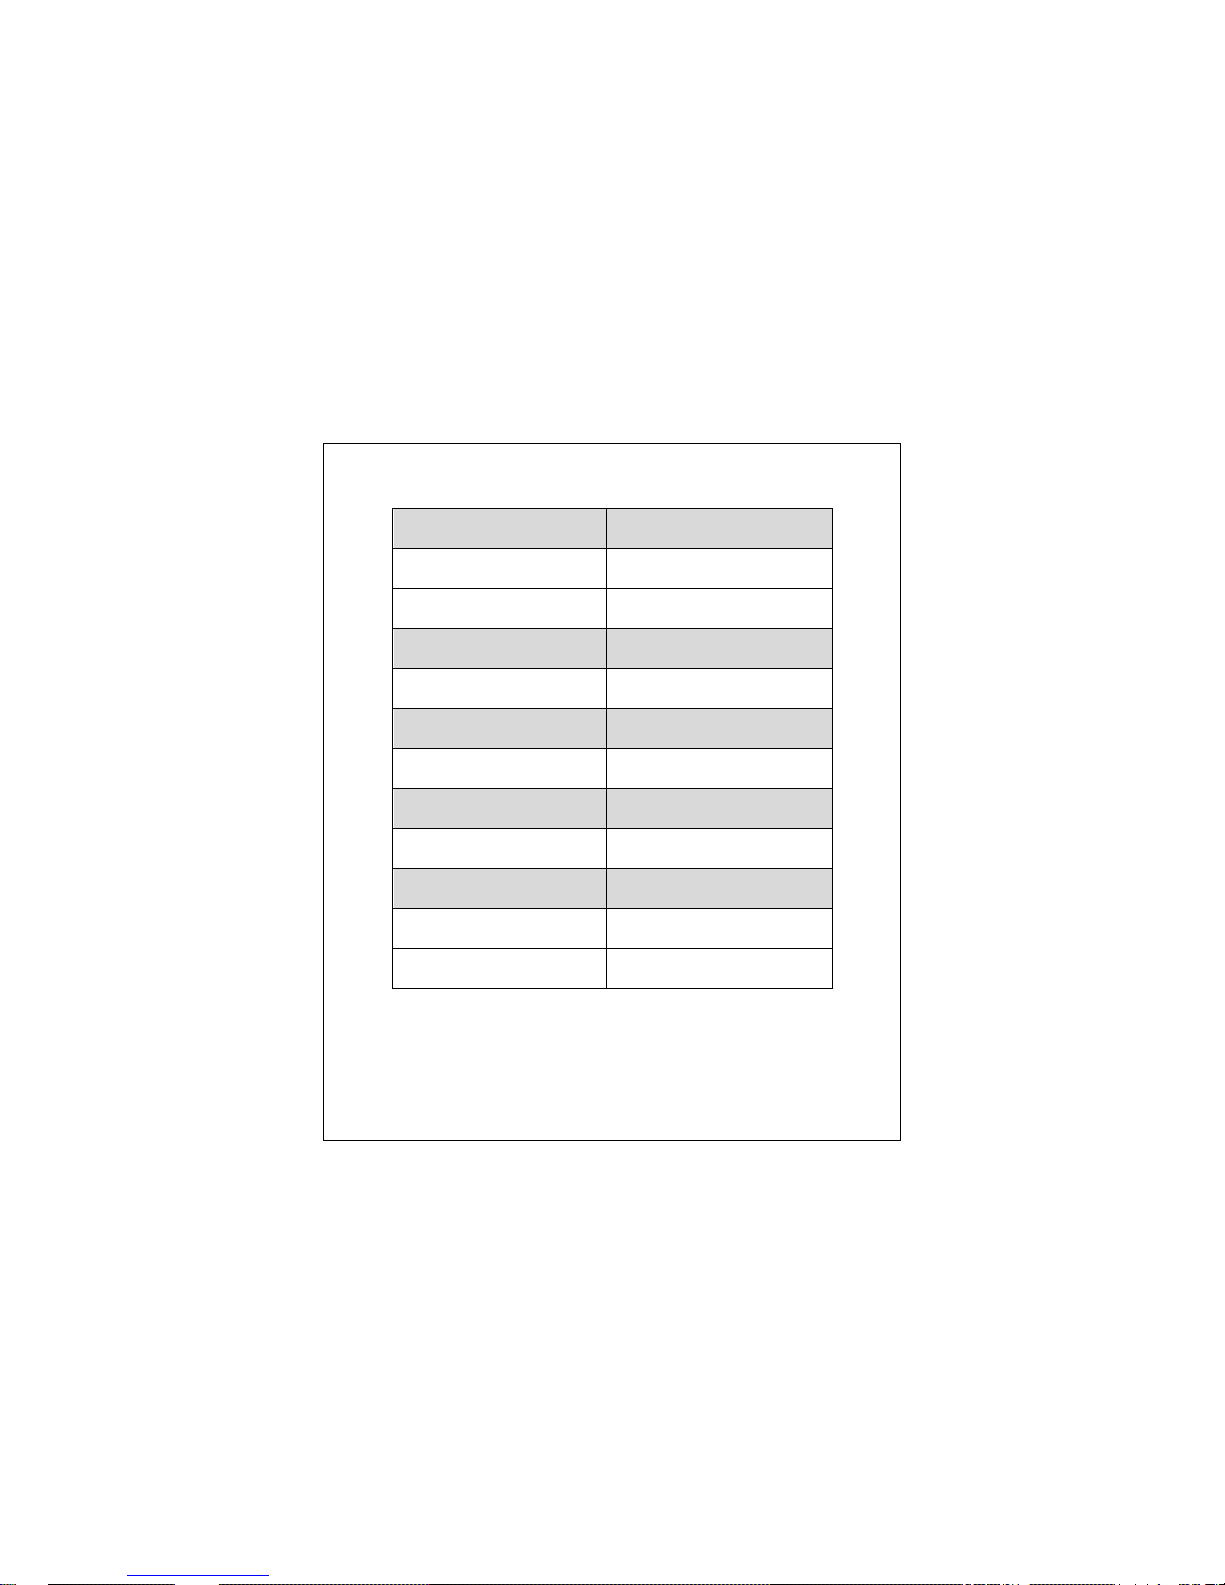
LED status Meaning
Blinking every 0.5 sec
Power ON during 5~6secs( booting )
SD card not inserted
SD card defected
Continuous lighting Normal recording
After lighting, continuous blinking
by 0.5sec
Ab-normal recording( Not recorded )
After lighting, blinking 2 times
every 0.5sec
Starting event recording
Blinking approx. 10 secs every
0.25sec
In upgrade
8. OSD
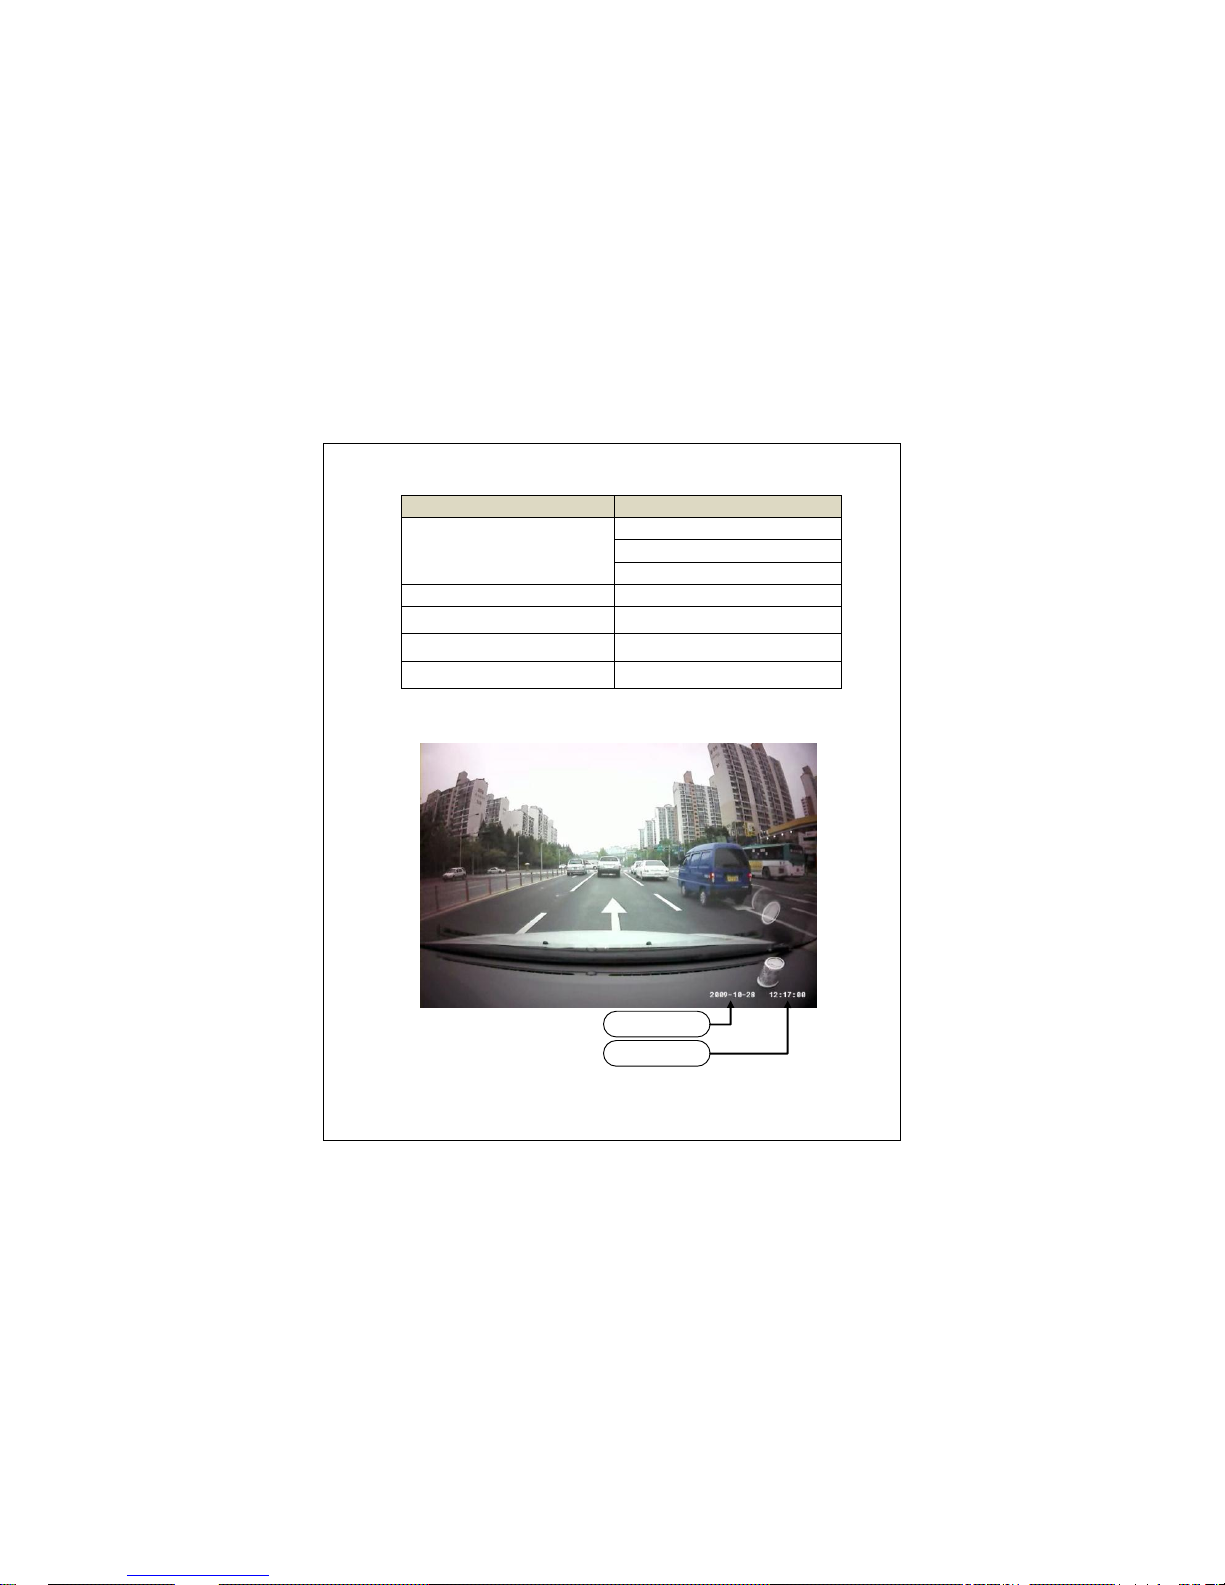
- VTR102 is saving the OSD information simultaneously with video data.
- The information of OSD is date and time.
Recording date
Recording time
Page 8
9. Specifications
Power DC 12V
Power Consumption 170mA
Working Temperature Range -20℃ ~ 60℃
Video Element 2.0M Pixels, ⅓” CMOS
Compression Format D1(720 x 480), MPEG4
Audio Format AAC (Advanced Audio Codec)
Recording Storage microSD card (4GB)
External Output Video Output
G-sensor 3 axis(X, Y, Z) sensor
Dimension 52(W) x 87(H) x 22(D) mm
Weight 49g
Page 9
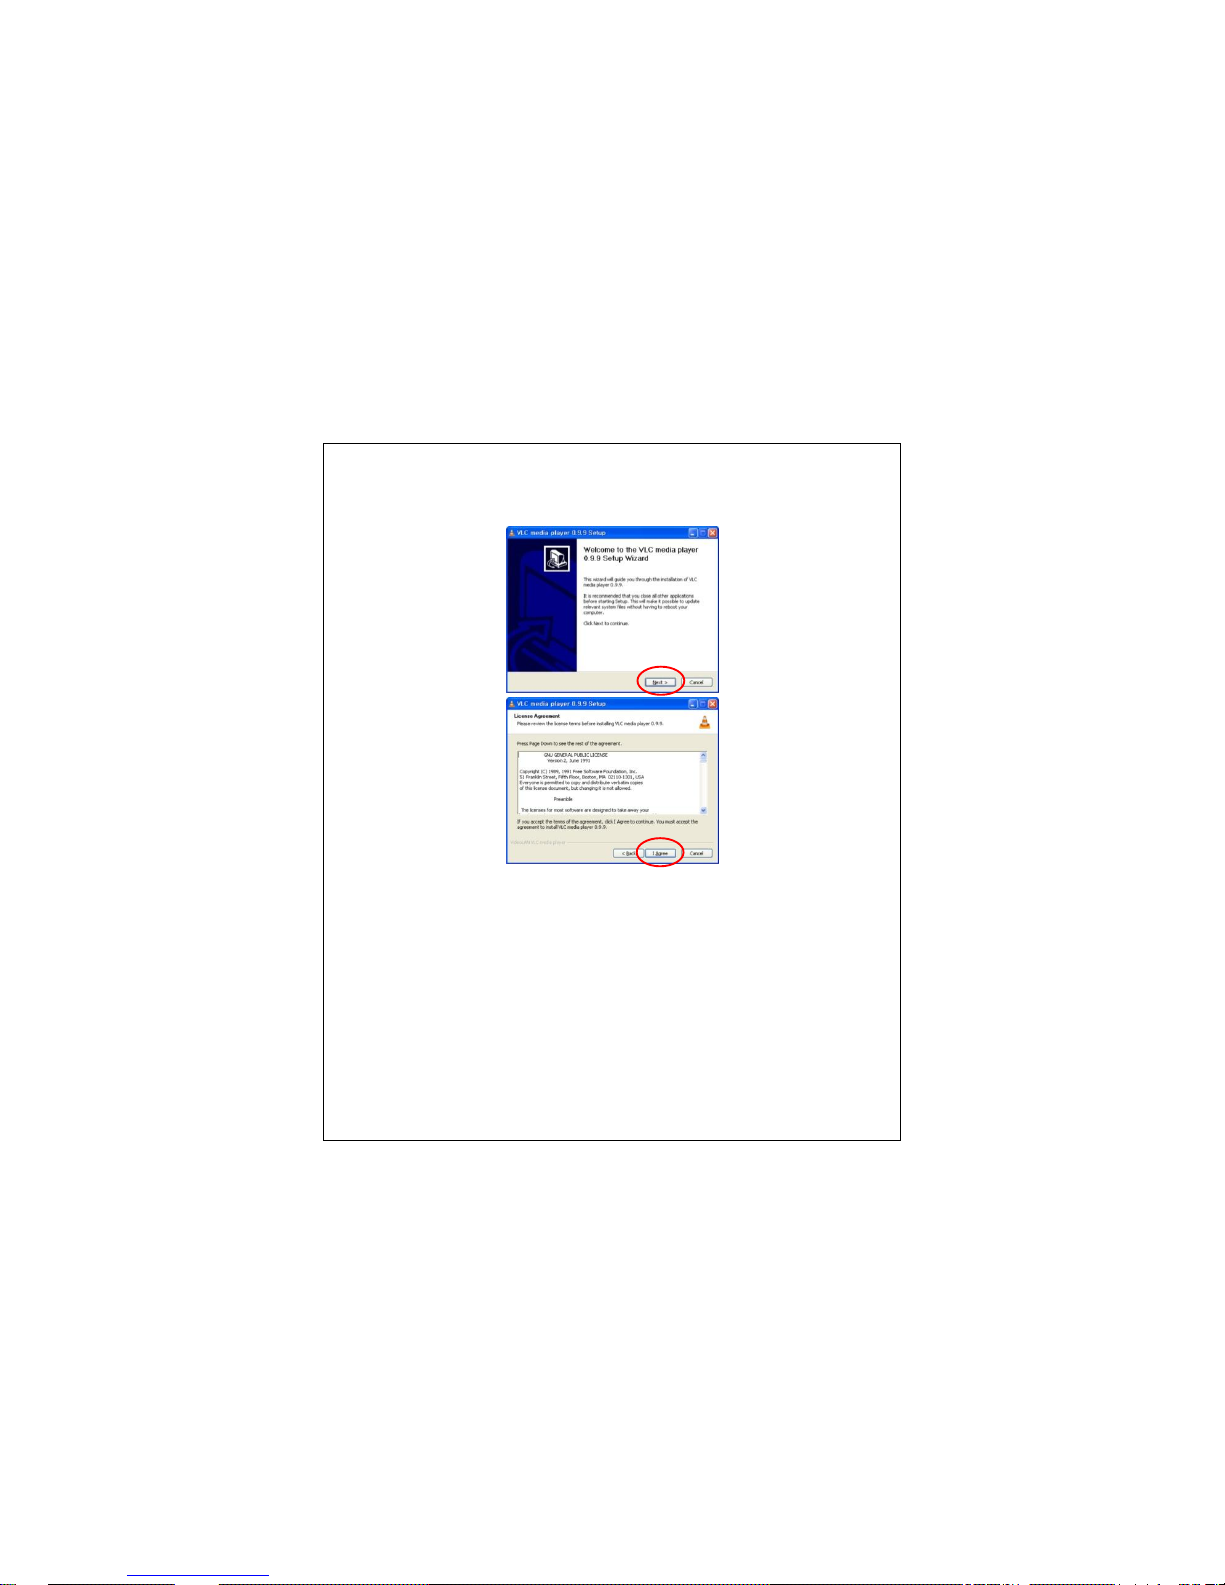
1. Installation of VLC media player
1) Insert CD into your computer and double click VLC media player.
2) Click [Next>], click [I Agree].
Page 10
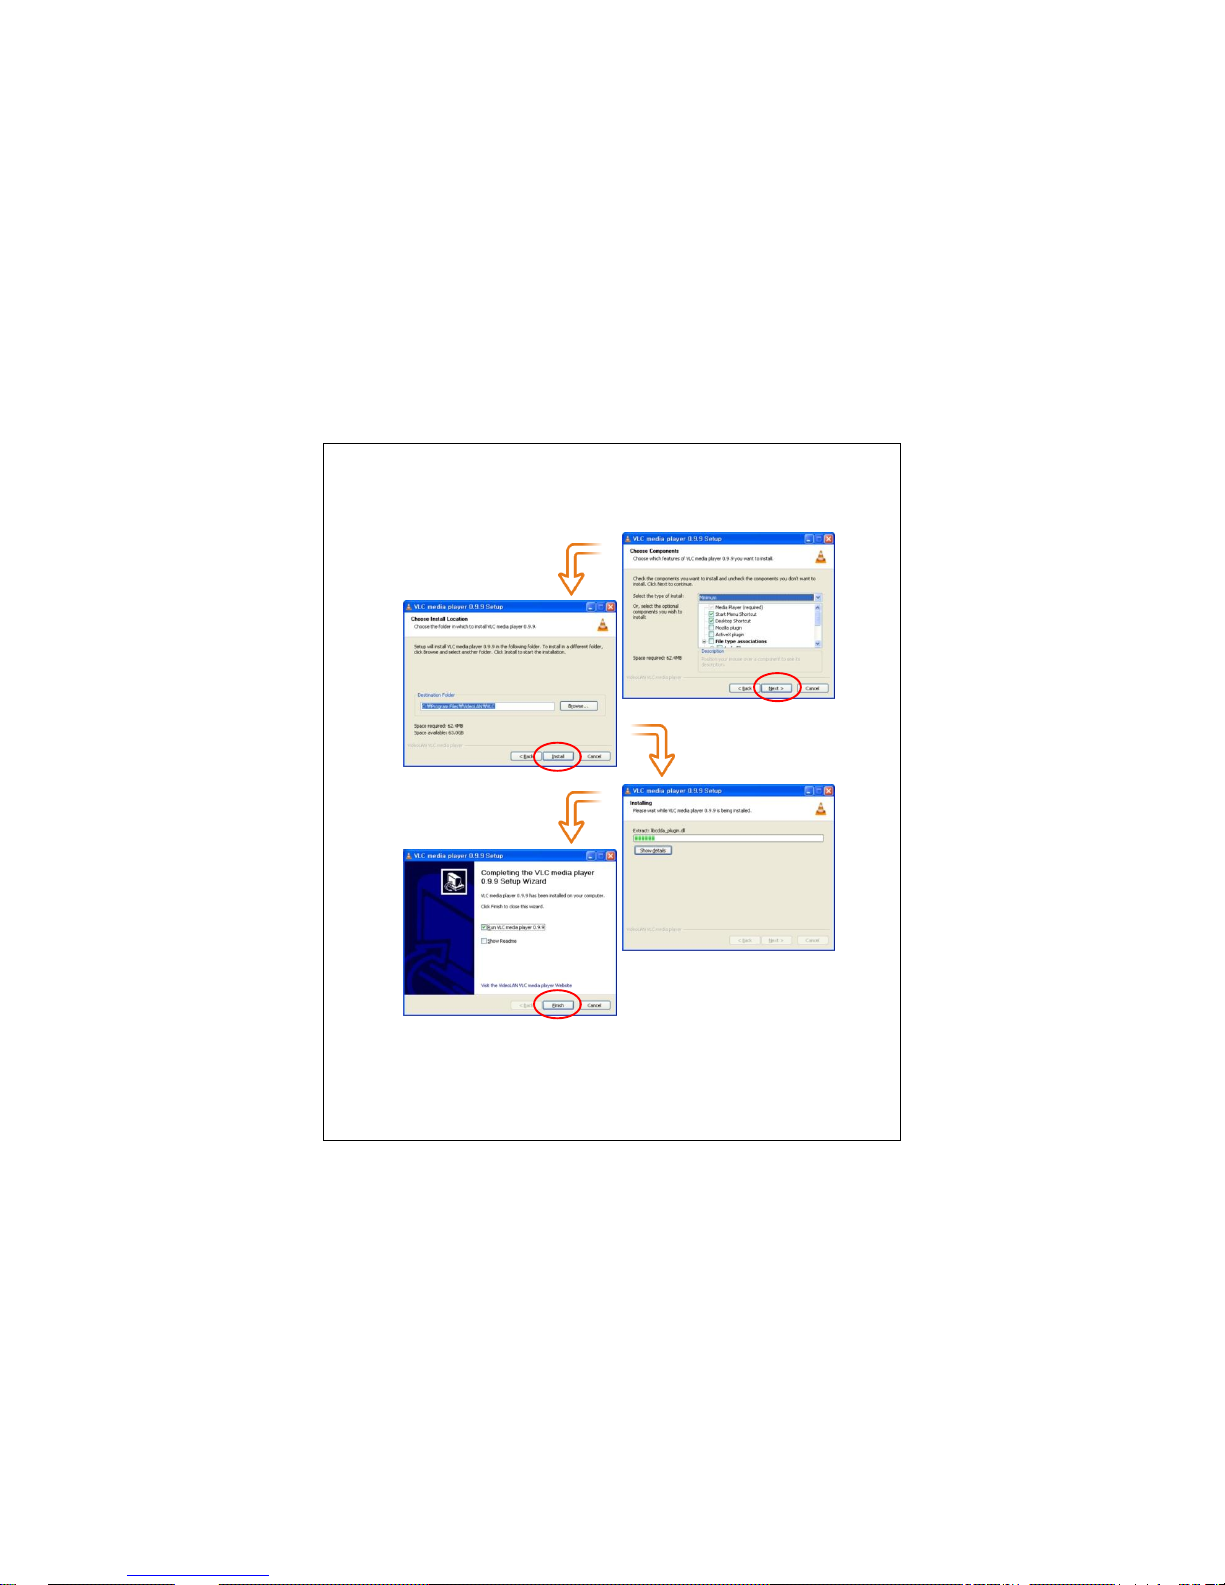
3) “ Choose “Minimum" at the [Select type of the install]. (User can change the install type.)
Click [Next>]. After selecting the folder to install, click the [Install], and then click the [Finish],
installation is completed.
Page 11
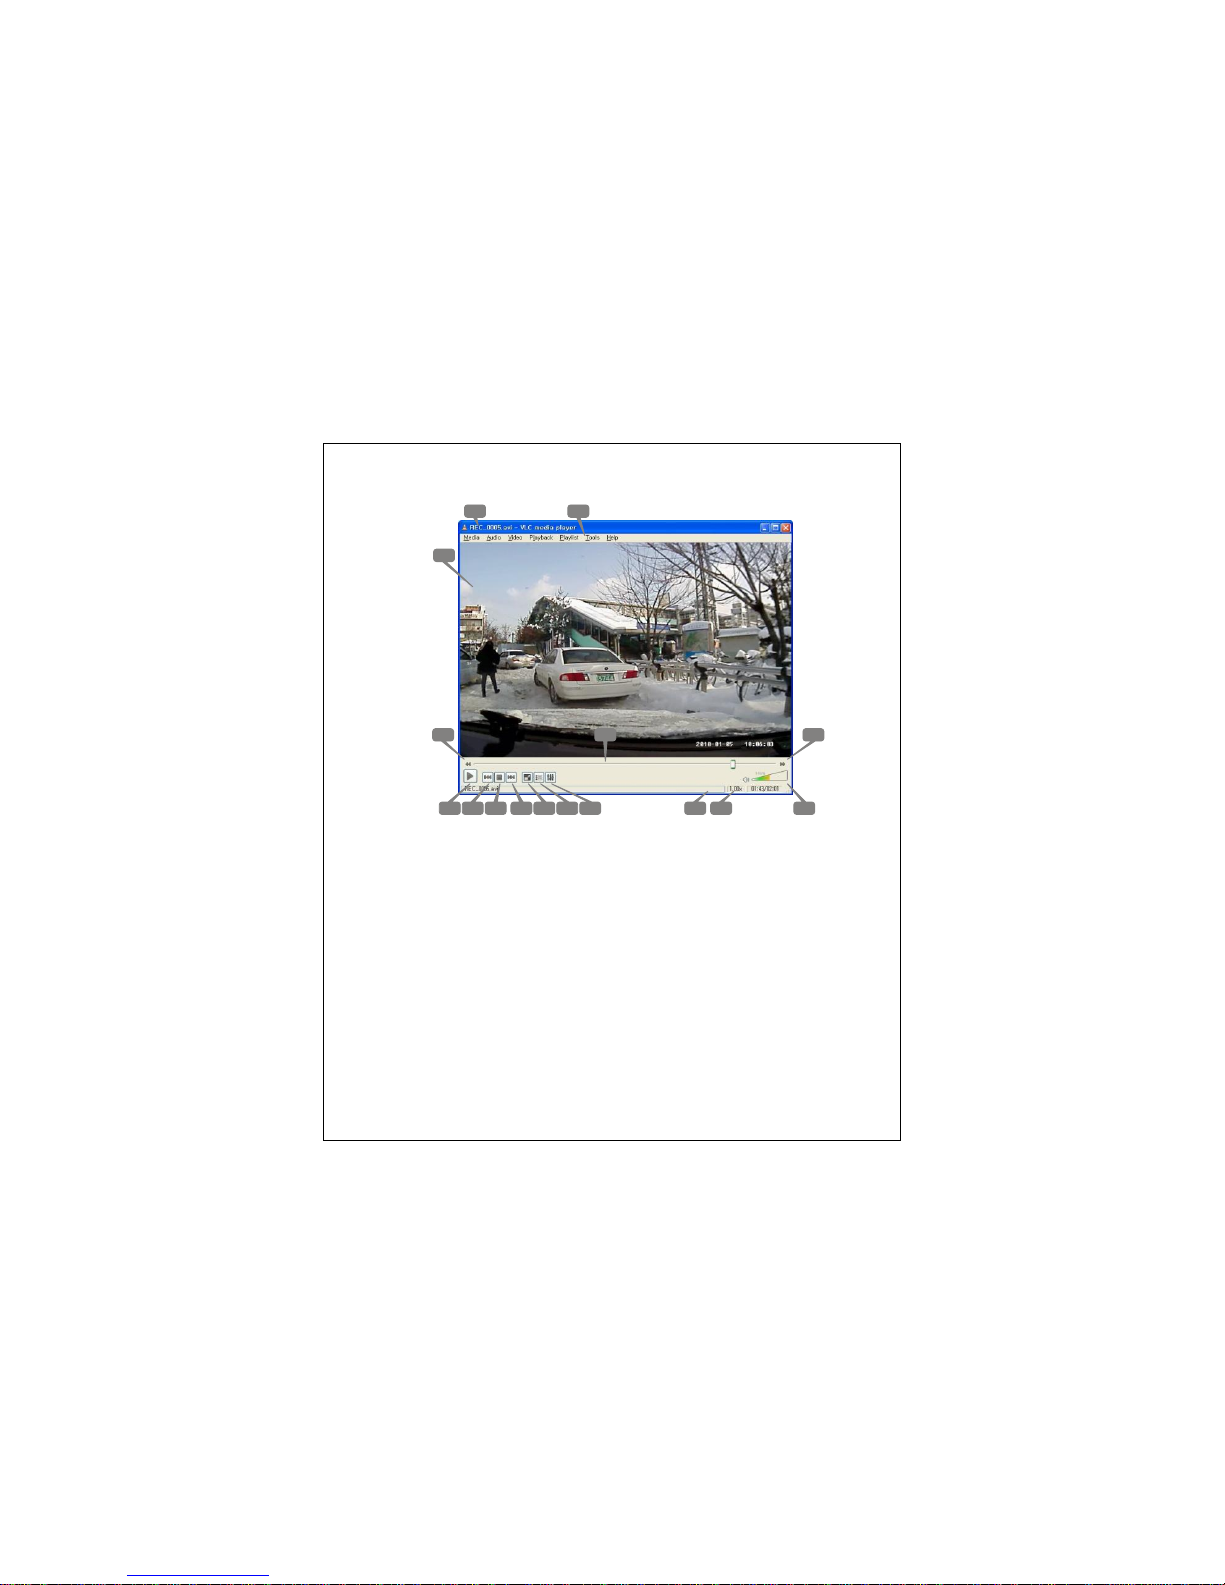
2. How to use a basic VLC media player
[ 1 ]: Recorded file name/title indicate line
[ 2 ]: Basic Menu collection
[ 3 ]: Playback pictures
[ 4 ]: Playback button (slow)
[ 5 ]: Playback status bar
[ 6 ]: Playback button (fast)
[ 7 ]: Button Play/Pause
[ 8 ]: Previous playback button
[ 9 ]: Pause button
[10]: Next file playback button
[11]: Normal screen /Full screen button
[12]: Playback list button
[13]: Control & Effect button
[14]: Slow/Fast playback status indicating line
[15]: Playback time indicating line
[16]: Volume control Bar
1 2
3
4 5 6
7 8 9 10 11 12 13 14 1615
Page 12
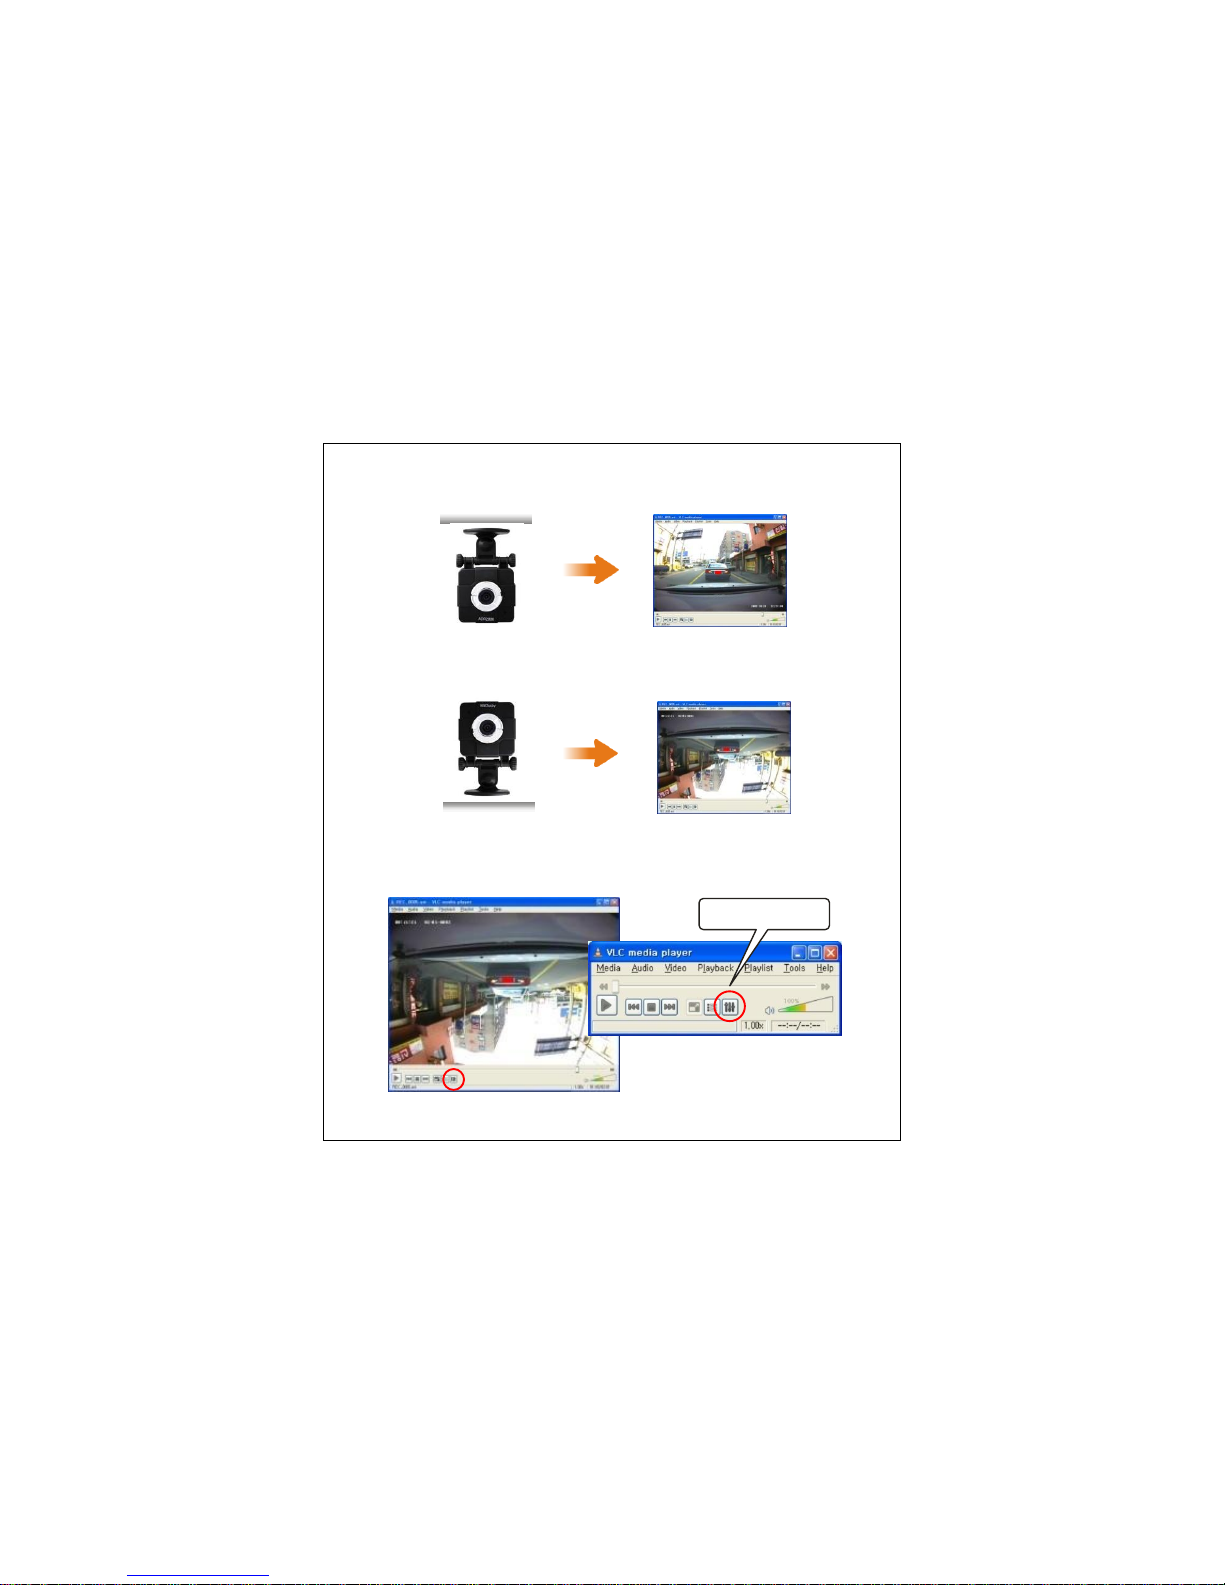
3. Notice in playback of VLC media player
1) Install the VTR102 as the following picture.
2) Install the VTR102 as the following picture, the recorded video file plays upside down.
In case of the recorded file is upside down, you can rotate it, according to the following setup.
1. Click the [control & effect button].
Correct stall
Control & effect button
Correct view
Upside down install
Upside down view
Page 13
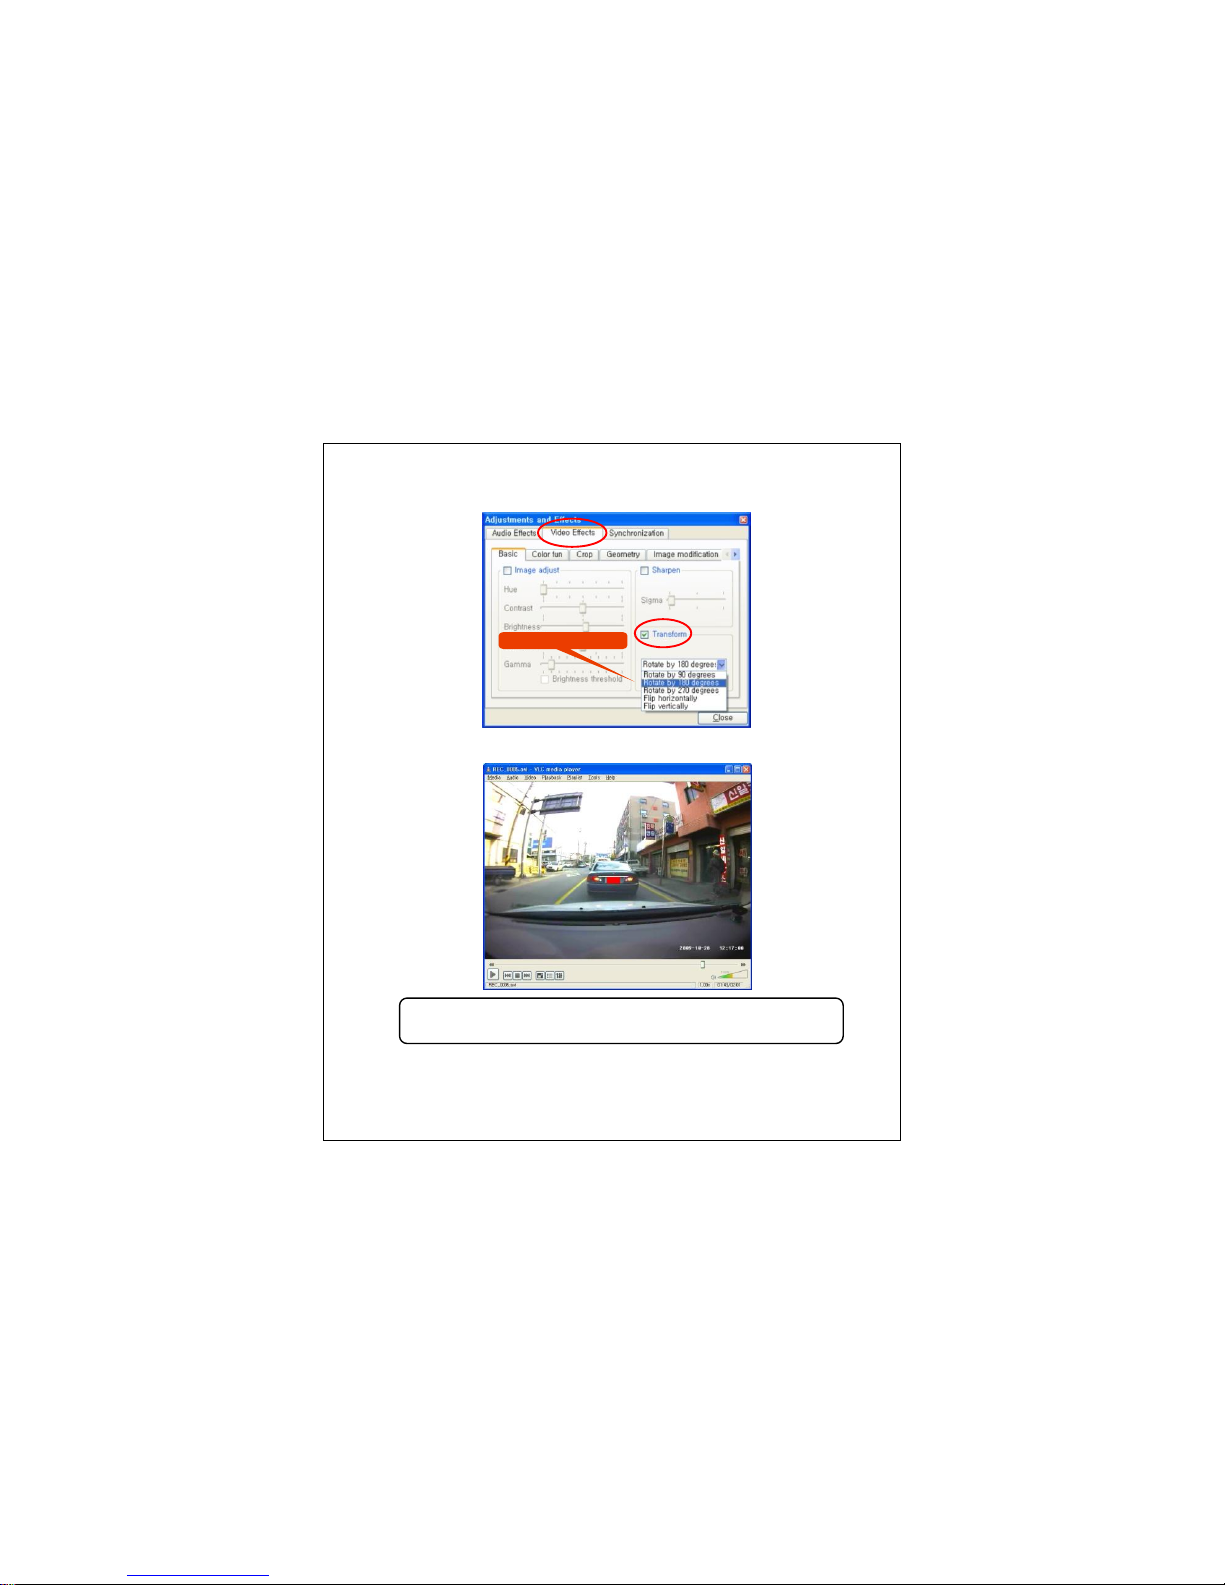
2. Select [Video Effects] on the menu bar. Check “Transform” and choose “Rotate by
180 degrees”
3. Click the “Close” and exit from [adjustment & effects]. You can see right view..
“Rotate by 180 degrees”
VLC media player : www.videolan.org
BOYO SENSORS
BACK UP SENSOR SYSTEMS
 Loading...