

Boxlight Corporation Premier 50HD User Manual
This manual may not be copied in any media or form without the written consent of the manufacturer.
© All rights reserved.


Table of Contents
Chapter 1
Introduction
Package Contents . . . . . . . . . . . . . . . . . . . . . . . . . . . . . . . . . . . . . . . . . . . . . . .2
Features . . . . . . . . . . . . . . . . . . . . . . . . . . . . . . . . . . . . . . . . . . . . . . . . . . . . . . .2
Components . . . . . . . . . . . . . . . . . . . . . . . . . . . . . . . . . . . . . . . . . . . . . . . . . . . .3
Front View. . . . . . . . . . . . . . . . . . . . . . . . . . . . . . . . . . . . . . . . . . . . . . . . . . . .3
Top View . . . . . . . . . . . . . . . . . . . . . . . . . . . . . . . . . . . . . . . . . . . . . . . . . . . . .4
Rear View . . . . . . . . . . . . . . . . . . . . . . . . . . . . . . . . . . . . . . . . . . . . . . . . . . . .5
Remote Control . . . . . . . . . . . . . . . . . . . . . . . . . . . . . . . . . . . . . . . . . . . . . . . .6
Chapter 2
Connections
Preface
Before Setting Up . . . . . . . . . . . . . . . . . . . . . . . . . . . . . . . . . . . . . . . . . . . . . . .7
Connections . . . . . . . . . . . . . . . . . . . . . . . . . . . . . . . . . . . . . . . . . . . . . . . . . . . .7
Power . . . . . . . . . . . . . . . . . . . . . . . . . . . . . . . . . . . . . . . . . . . . . . . . . . . . . . . .7
Device Connections. . . . . . . . . . . . . . . . . . . . . . . . . . . . . . . . . . . . . . . . . . . . .8
Wired Remote Control. . . . . . . . . . . . . . . . . . . . . . . . . . . . . . . . . . . . . . . . . .11
+12VDC Outlet . . . . . . . . . . . . . . . . . . . . . . . . . . . . . . . . . . . . . . . . . . . . . . .11
Turning On/Off . . . . . . . . . . . . . . . . . . . . . . . . . . . . . . . . . . . . . . . . . . . . . . .12
Turning Off . . . . . . . . . . . . . . . . . . . . . . . . . . . . . . . . . . . . . . . . . . . . . . . . . .13
Chapter 3
Operation
Operating the Control Panel and Remote Control . . . . . . . . . . . . . . . . . . .14
Zoom and Focus . . . . . . . . . . . . . . . . . . . . . . . . . . . . . . . . . . . . . . . . . . . . . .14
Power . . . . . . . . . . . . . . . . . . . . . . . . . . . . . . . . . . . . . . . . . . . . . . . . . . . . . . .14
Input. . . . . . . . . . . . . . . . . . . . . . . . . . . . . . . . . . . . . . . . . . . . . . . . . . . . . . . .15
Menu . . . . . . . . . . . . . . . . . . . . . . . . . . . . . . . . . . . . . . . . . . . . . . . . . . . . . . .15
Color Temperature. . . . . . . . . . . . . . . . . . . . . . . . . . . . . . . . . . . . . . . . . . . . .15
Navigation Buttons . . . . . . . . . . . . . . . . . . . . . . . . . . . . . . . . . . . . . . . . . . . .16
The Remote Control . . . . . . . . . . . . . . . . . . . . . . . . . . . . . . . . . . . . . . . . . . .16
Setting Up the Projector . . . . . . . . . . . . . . . . . . . . . . . . . . . . . . . . . . . . . . . .17
i

Preface
Chapter 4
OSD Menus
About the OSD Menus . . . . . . . . . . . . . . . . . . . . . . . . . . . . . . . . . . . . . . . . . 18
Main Menu . . . . . . . . . . . . . . . . . . . . . . . . . . . . . . . . . . . . . . . . . . . . . . . . . . 18
Input Signals . . . . . . . . . . . . . . . . . . . . . . . . . . . . . . . . . . . . . . . . . . . . . . . . 19
Picture (Video Only) . . . . . . . . . . . . . . . . . . . . . . . . . . . . . . . . . . . . . . . . . . 19
Advanced . . . . . . . . . . . . . . . . . . . . . . . . . . . . . . . . . . . . . . . . . . . . . . . . . . . 22
Video System . . . . . . . . . . . . . . . . . . . . . . . . . . . . . . . . . . . . . . . . . . . . . . . . 23
FLI De-interlacing . . . . . . . . . . . . . . . . . . . . . . . . . . . . . . . . . . . . . . . . . . . . 23
RS232 Baud Rate . . . . . . . . . . . . . . . . . . . . . . . . . . . . . . . . . . . . . . . . . . . . . 23
Geometry . . . . . . . . . . . . . . . . . . . . . . . . . . . . . . . . . . . . . . . . . . . . . . . . . . . 26
Aspect Ratio. . . . . . . . . . . . . . . . . . . . . . . . . . . . . . . . . . . . . . . . . . . . . . . . . 27
Language . . . . . . . . . . . . . . . . . . . . . . . . . . . . . . . . . . . . . . . . . . . . . . . . . . . 28
Factory Default . . . . . . . . . . . . . . . . . . . . . . . . . . . . . . . . . . . . . . . . . . . . . . 28
Appendix A
Specifications
Product Specifications . . . . . . . . . . . . . . . . . . . . . . . . . . . . . . . . . . . . . . . . . 29
Appendix B
Maintenance
Maintenance . . . . . . . . . . . . . . . . . . . . . . . . . . . . . . . . . . . . . . . . . . . . . . . . . 30
Lamp Maintenance. . . . . . . . . . . . . . . . . . . . . . . . . . . . . . . . . . . . . . . . . . . . 30
Cleaning the Air Filters . . . . . . . . . . . . . . . . . . . . . . . . . . . . . . . . . . . . . . . . 33
Troubleshooting . . . . . . . . . . . . . . . . . . . . . . . . . . . . . . . . . . . . . . . . . . . . . . 34
Appendix C
The Gamma Manager Utility
About the Gamma Manager Utility . . . . . . . . . . . . . . . . . . . . . . . . . . . . . . 35
Required Hardware and Software . . . . . . . . . . . . . . . . . . . . . . . . . . . . . . . . 35
Connecting the Projector to the PC . . . . . . . . . . . . . . . . . . . . . . . . . . . . . . 36
Connecting the Projector to a PC. . . . . . . . . . . . . . . . . . . . . . . . . . . . . . . . . 36
Installing the Software . . . . . . . . . . . . . . . . . . . . . . . . . . . . . . . . . . . . . . . . . 37
Uninstalling the Software. . . . . . . . . . . . . . . . . . . . . . . . . . . . . . . . . . . . . . . 39
Using the Gamma Manager Utility . . . . . . . . . . . . . . . . . . . . . . . . . . . . . . . 40
Appendix D
Throw Ratio
About the Throw Ratio . . . . . . . . . . . . . . . . . . . . . . . . . . . . . . . . . . . . . . . . . 47
ii

Desktop Installation. . . . . . . . . . . . . . . . . . . . . . . . . . . . . . . . . . . . . . . . . . . .47
Ceiling Mount Installation. . . . . . . . . . . . . . . . . . . . . . . . . . . . . . . . . . . . . . .50
Appendix E
RS-232 communication
RS-232C communication. . . . . . . . . . . . . . . . . . . . . . . . . . . . . . . . . . . . . . . .53
Communications setting . . . . . . . . . . . . . . . . . . . . . . . . . . . . . . . . . . . . . . . .53
Computer (Windows) - HyPer Terminal . . . . . . . . . . . . . . . . . . . . . . . . . . . .53
Command Or Read command . . . . . . . . . . . . . . . . . . . . . . . . . . . . . . . . . . . .53
Computer (Windows) - RS232ControlAP.exe . . . . . . . . . . . . . . . . . . . . . . .54
Command data chart . . . . . . . . . . . . . . . . . . . . . . . . . . . . . . . . . . . . . . . . . . .55
Preface
iii

About this manual
This manual is designed for use with the PREMIERE 50HD DLP Projector. Information in this document has been carefully checked for accuracy; however, no guarantee is given to the correctness of the contents. The information in this document is
subject to change without notice.
Copyright
© Copyright 2003
This document contains proprietary information protected by copyright. All rights are
reserved. No part of this manual may be reproduced by any mechanical, electronic
or other means, in any form, without prior written permission of the manufacturer.
Trademarks
All trademarks and registered trademarks are the property of their respective owners.
FCC COMPLIANCE
This device complies with Part 15 of the FCC Rules. Operation is subject to the following two conditions:
(1) This device may not cause harmful interference.
(2) This device must accept any interference received, including interference that
may cause undesired operation.
Preface
Federal Communications Commission (FCC) Statement
This equipment has been tested and found to comply with the limits for a Class B
digital device, pursuant to part 15 of the FCC Rules. These limits are designed to
provide reasonable protection against harmful interference in a residential installation. This equipment generates, uses and can radiate radio frequency energy and, if
not installed and used in accordance with the instructions, may cause harmful interference to radio communications. However, there is no guarantee that interference
will not occur in a particular installation. If this equipment does cause harmful interference to radio or television reception, which can be determined by turning the
equipment off and on, the user is encouraged to try to correct the interference by one
or more of the following measures:
• Reorient or relocate the receiving antenna.
• Increase the separation between the equipment and the receiver.
• Connect the equipment to an outlet on a circuit different from that to which the
receiver is connected.
• Consult the dealer or an experienced radio/TV technician for help.
Preface
NOTICES
Warning! To meet FCC requirements, a shielded power cord is
required in order to prevent interference. It is essential that only the
supplied power cord be used. Use only shielded cables to connect
I/O devices to this equipment. You are cautioned that changes or
modifications not approved by the party responsible for compliance
could void your authority to operate the equipment.
Warning! The projector cooling fan continues to run for approximately two minutes after the projector is turned off using the Power
button on the control panel or remote control. Never turn off the
projector using the power switch on the projector while the lamp is
lit. This can damage the lamp or power supply.
Warning! High brightness light source. Do not stare into the beam
of light, or view directly. Do not allow children to stare directly into
the beam of light.
Warning! To reduce the risk of fire or electric shock, do not expose
this product to rain or moisture.
Caution!
For minimal servicing and to maintain high image quality, we recommend that you use the projector in an environment that is smoke
and dust free. When used in areas where there is a lot of smoke or
dust, the filter and lens should be cleaned often to lengthen the service life of the projector.
Warning! The ventilation slots, lamp, and objects next to them may
get extremely hot during operation. Do not touch these areas until
they have sufficiently cooled down.
Warning! When replacing the lamp, turn off the power switch and
disconnect the input power. Allow the lamp to cool at least 15 minutes prior to opening the lamp door.

Warning! Be careful when removing the lamp. In the event of a lamp
rupture there may be small fragments of glass in the lamp housing
and the projector. Clean out the fragments as much as possible taking care not to touch the fragments. Alternately, you can contact
Technical Support to have the projector serviced.
Preface

Precautions
When using the projector, refer to the following instructions :
Any electrical equipment is hazardous if handled improperly. Ensure that you follow
the preceding safety instructions to avoid harm to yourself and damage to the unit.
• Read and follow all instructions and warnings provided.
• Save these instructions for future use.
• When servicing or replacement parts are required, ensure work is done by a
qualified technician.
• Do not use this unit near water or in a rainy/moist environment, or near heat
sources such as radiators, stoves, or space heaters.
• Use supplied cables only.
• Never insert any objects through ventilation holes.
• The projector power cable is equipped with a three-prong plug for grounding.
Do not alter the plug and defeat this safety feature. If your outlet does not
accommodate a three-prong grounding type plug, contact an electrician to
replace it.
• Only mount the projector on a tabletop or ceiling as recommended by the
manufacturer.
• Do not place the projector on an unstable cart or stand.
• Allow at least 0.3 foot (10 cm) space between the ventilation slots and the
nearest object or wall.
• When the ventilation slots are obstructed, the projector lamp automatically
turns off as a safety precaution. When this happens, the over temperature
alarm LED will light. Remove the obstruction and push the power button again
to return the projector to normal operating condition.
Note: The projector has an over temperature warning LED on the control
panel. If the projector overheats because of a dirty filter or other problem,
the LED will flash, and the projector lamp will turn off, after which a 2minute cooling off period occurs. If, after correcting the over temperature
condition and restarting the projector, the projector still doesn't function
properly, contact technical support to arrange for service.
Chapter 1
Introduction
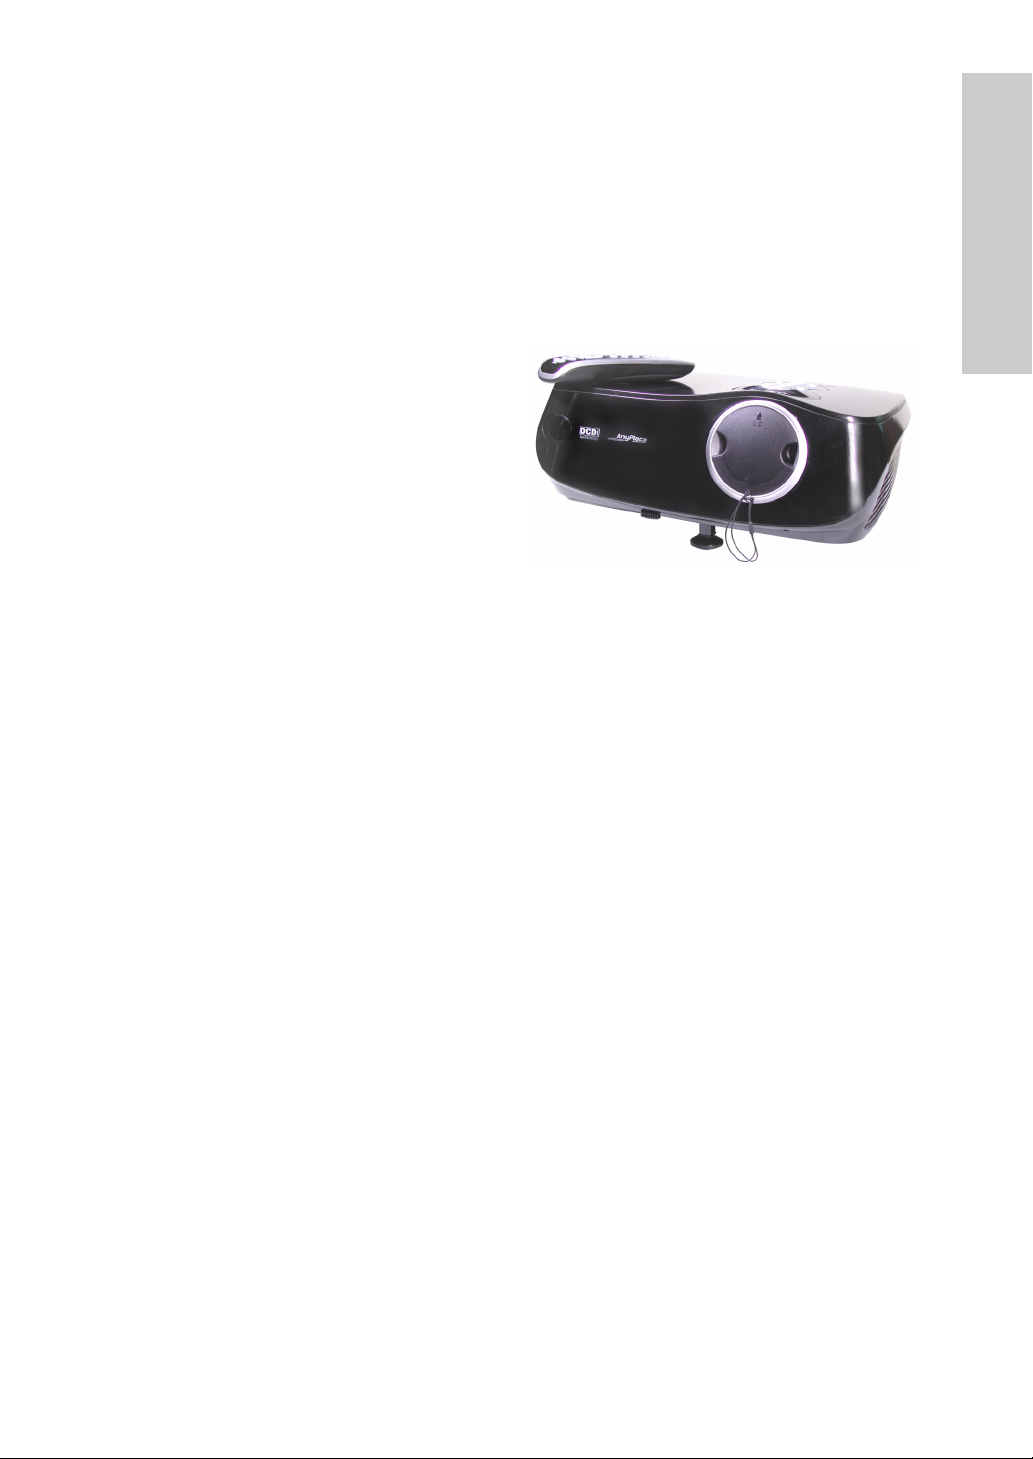
Congratulations on selecting the Premiere 50HD DLP Projector.
The Premiere 50HD DLP is the first
mainstream projector to offer Silicon
Optix AnyPlace™ technology, which
provides flexibility in projector placement while displaying a high-definition
image.
The projector is equipped with a full
set of I/O connectors, enabling you to
attach a wide variety of input devices
including Composite Video, S-Video,
Digital Video Interface (DVI), Computer VGA, and Component Video.
The control panel and remote control enable you to easily set up functions such as
input source, aspect, gamma correction, and color temperature. The keystone feature provides maximum flexibility in projector placement while still providing a flat
image.
The menu driven OSD (On-Screen Display) provides a suite of functions that enable
you to set such items such as the source input device, gamma, brightness, contrast,
clock, and phase. The RS-232 port enables easy upgrades to ensure that the projector firmware is always up-to-date.
The Silicon Optix image processor is incorporated in the design with its unique AnyPlace™ technology, which adjusts for the vertical and horizontal projection angles to
the screen, allowing users to place the projector anywhere in the room and still display a perfect image. This eliminates the need for room remodelling, and enables the
projector to naturally blend into a room. In addition to AnyPlace placement flexibility,
the Premiere 50HD DLP projector delivers superior keystone and scaling image
quality.
The Premiere 50HD DLP Projector is supported by a standard two-year limited warranty.
INTRODUCTION

Chapter 1 – Introduction
Package Contents
INTRODUCTION
Features
Open the package and ensure that you have the following items:
•Power Cord
• Remote control and two AAA alkaline batteries
• Warranty Card
•Cables
– Remote wired cable
– RCA cable for composite video
– VGA cable
• User's manual
• Quick Guide
• CD installation kit
If anything is missing or appears damaged, contact your dealer immediately. Do not
discard the packing materials in the event you need to ship the unit for service.
The Premiere 50HD DLP Projector comes with the following advanced features:
• 1280 x 720 native resolution
• Super high contrast ratio (1700 & above), providing enhanced image depth
• Brightness control allows for excellent film viewing in different ambient lighting
conditions
• TI DLP™ Technology Premiere 50HD DMD providing superior image quality
• 5X speed color wheel with 6 color segments provides outstanding color reproduction
• Native 16:9 aspect ratio
• Faroudja video de-interlacing chip incorporates enhanced 3:2 pull down and
DCDi, providing you with crystal clear, high-resolution picture performance
• Anyplace™ scaling technology provides the ability to perform simultaneous
horizontal and vertical keystone (Diagonal-keystone-correction™). This technology enables the projector to be positioned almost anywhere in a room
• Wide-angle optical system design and Anyplace™ technology perform all
scaling functions, real-time geometry processing, and distortion correction
• Professional quality video conversion eliminates the image distortion that
occurs when standard television content (4:3 aspect ratio) is displayed on a
16:9 HDTV front projection display system
• User friendly backlit remote control and control panel
2
Chapter 1 – Introduction
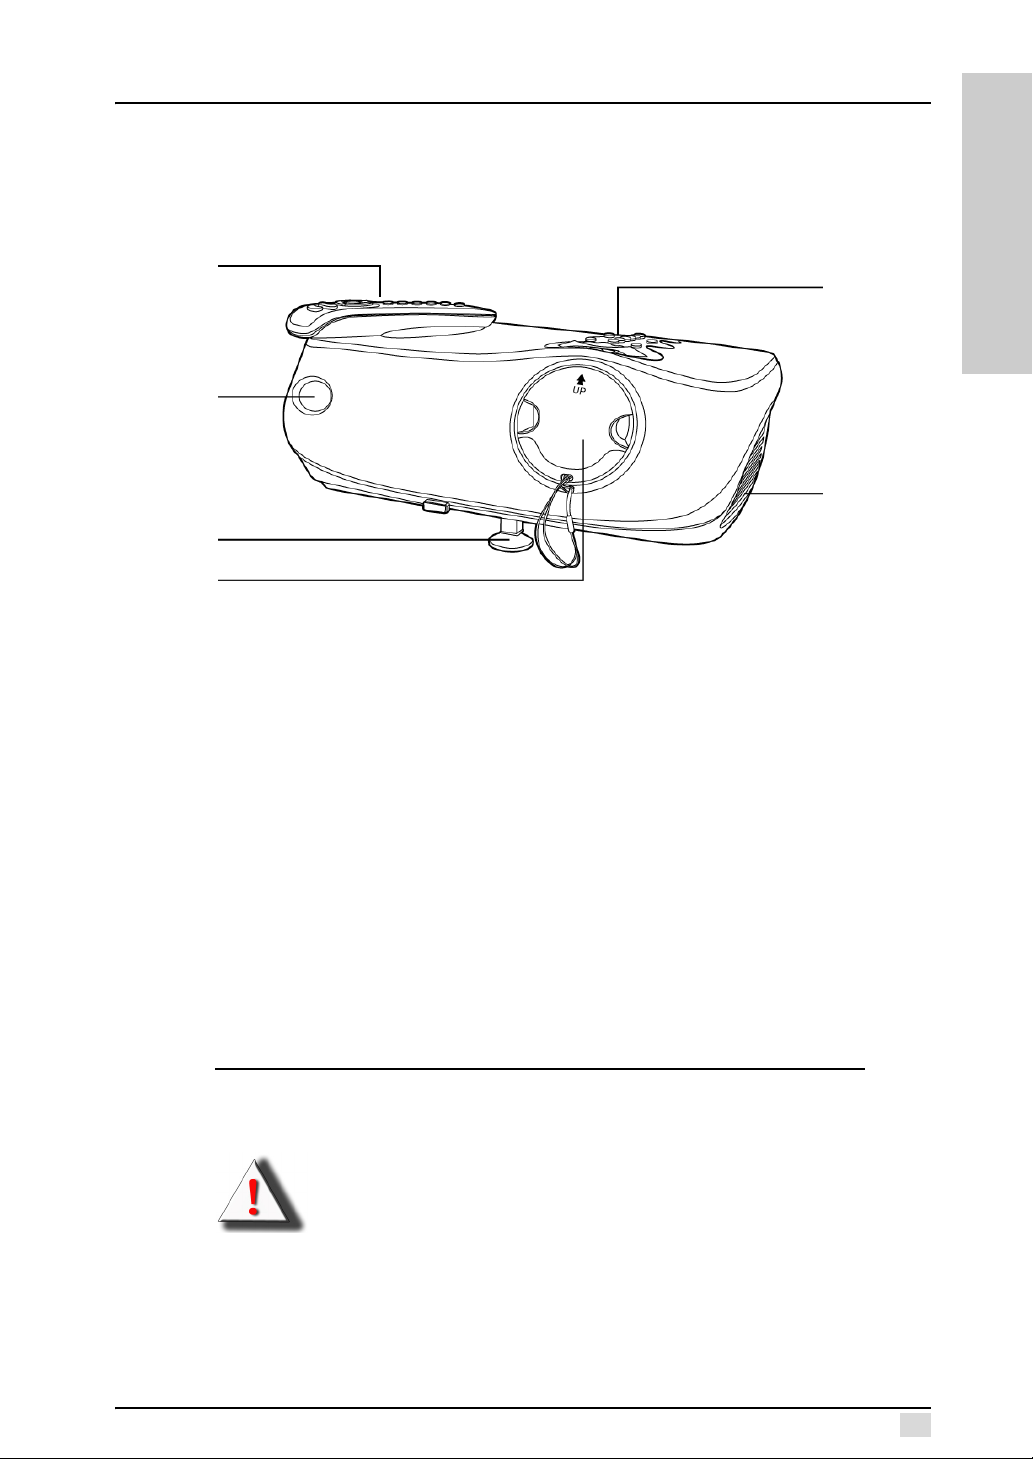
Components
Front View
Remote
Control
Remote
Control
Sensor
Adjustment
Peg
Lens Cap
INTRODUCTION
Control
Panel
Ventilation
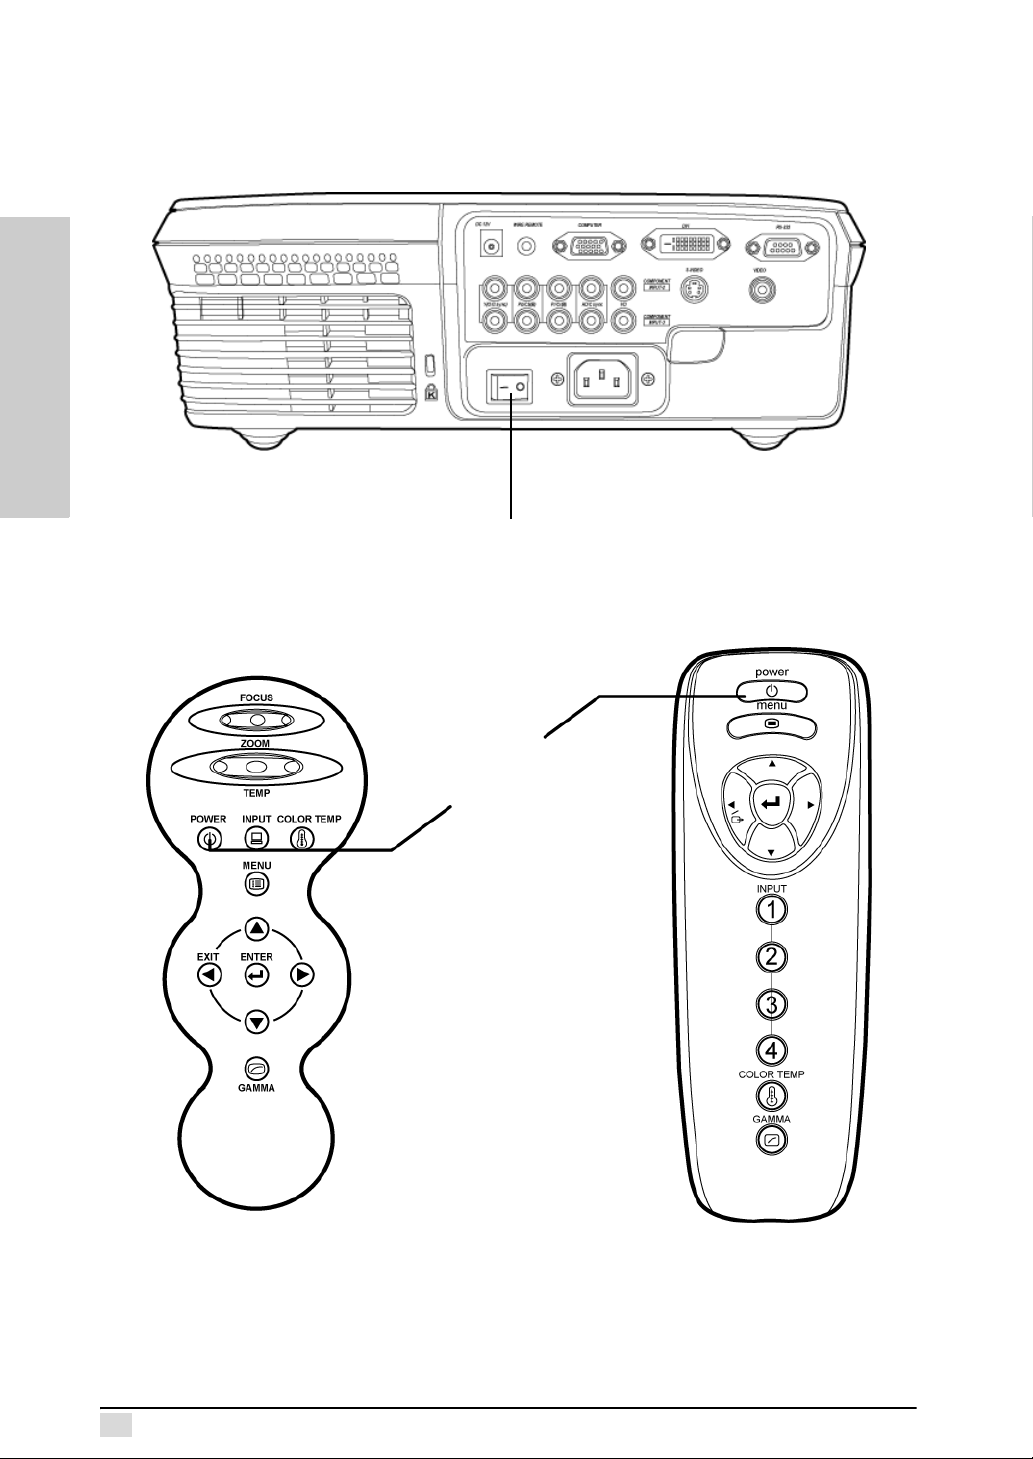
Remote Control: Enables you to control the projector. There are infrared sensors on
the front and rear of the projector allowing you to control the color temperature, input
device, gamma correction, OSD menu items, and turn the projector on and off. You
can also connect the remote control to the Wire Remote Control jack on the back
panel. See "Wired Remote Control" on page 11.
Control Panel: The control panel enables you to adjust the focus and zoom of the
projector lens, set the input device, gamma, and color temperature, access the OSD
menus, and turn the projector on and off.
Remote Control Sensor: Point the remote control at this sensor to operate the projector with the remote control. There is another sensor at the rear of the projector.
Lens Cap: The lens cap protects the projector lens when the projector is not in use.
Ventilation: The projector has a strong fan to keep the lamp from becoming too hot.
Adjustment Peg: The adjusment peg enables you to adjust the image height.
Note: Ensure that the ventilation slots have enough space around them
for proper air flow.
Warning!
Because the projector lamp becomes extremely hot, air coming
from the ventilation slots can be uncomfortably hot.
3
Chapter 1 – Introduction
Top View
Focus
Zoom
Power on/ Standby
Input
Menu
Over Temperature Alarm LED
Color Temperature
INTRODUCTION
OSD Menu Controls
Gamma Correction
Focus: Turn this dial to focus the projected image on the screen.
Zoom: Turn this dial to adjust the size of the projected image on the screen.
Over Temperature Alarm LED: This LED flashes when the projector lamp becomes
too hot.
Warning! When this LED flashes, the lamp will shut off and the cooling fans will continue to run for approximately two minutes. Check
the air intakes and filter to make sure they are not clogged or
blocked. Refer to "Cleaning The Air Filters" on page 34 for further
information about cleaning the Air Filters. Refer to "Turning Off" on
page 13 for proper power down procedures.
Power on/ Standby: Press this button to put the projector into or bring it out of
standby mode.
4
Note: The Power button does not turn all power off. The power switch at
the rear of the projector turns it off. See "Turning Off" on page 13 for
proper power down procedures.
Input: Press this button to select the input source (for example S-Video or DVI).
Color Temperature: Enables you to set the image color temperature. You can set it
to Native, 5500, 6500, or 9300 K, or User Mode for fine adjustment.
Menu: Press this button to enter the OSD menus.
Menu Controls: These buttons enable you to navigate the menus. The up and down
arrows scroll up and down through the menus, while the left and right arrows scroll
left and right. Press the Enter button to enter a value, setting, or to go into a sub-
menu. Press the left button to exit the OSD menus or submenus.
Gamma: Enables you to set the gamma correction. Default setting is gamma 2.2.
Gamma curves for all input sources can be set using the gamma user mode. Users
can use the Gamma Manager utility to adjust or create gamma curves as desired.
The Gamma Manager can be found on the bundled CD installation kit or downloaded
from our Web site. Refer to appendix C for more information about this utility.
Chapter 1 – Introduction
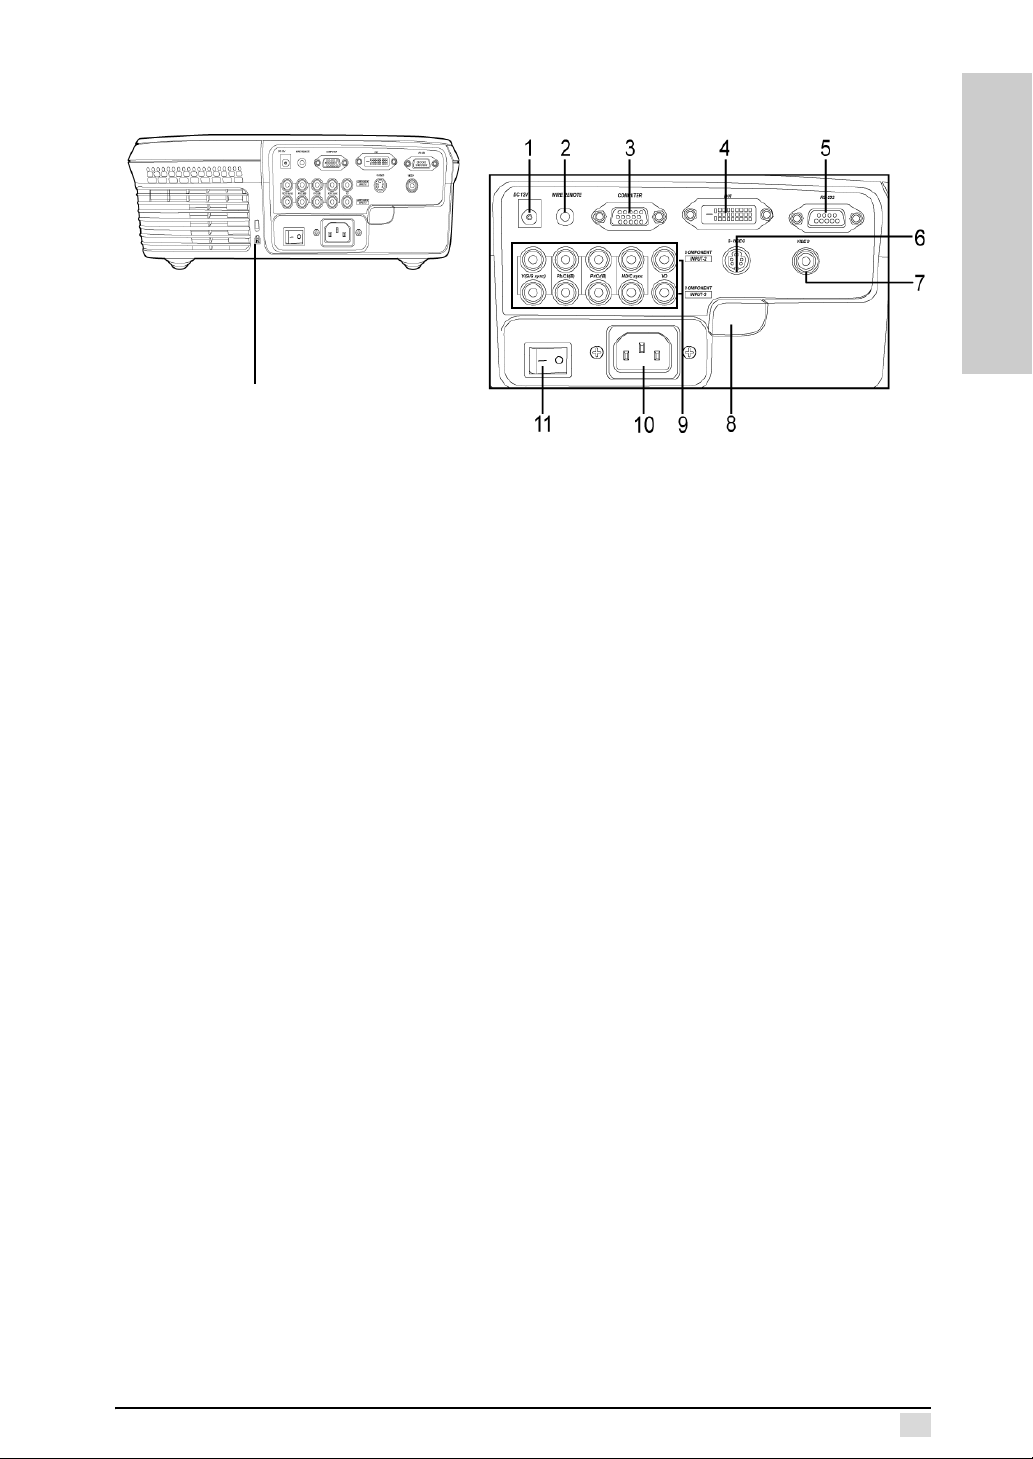
Rear View
Ventilation Back panel I/O and
controls
Kensington
lock aperture
Back panel I/O and controls
Ventilation: This fan provides ventilation to the lamp. Ensure that you do not
obstruct this opening.
Kensington Lock: Connect a Kensington MicroSaver Security System to this aperture. Refer to the information that came with the system for instructions on how to
use it to secure the projector from theft.
Back Panel I/O: The back panel I/O provides input and control connections. The following describes each control or I/O port.
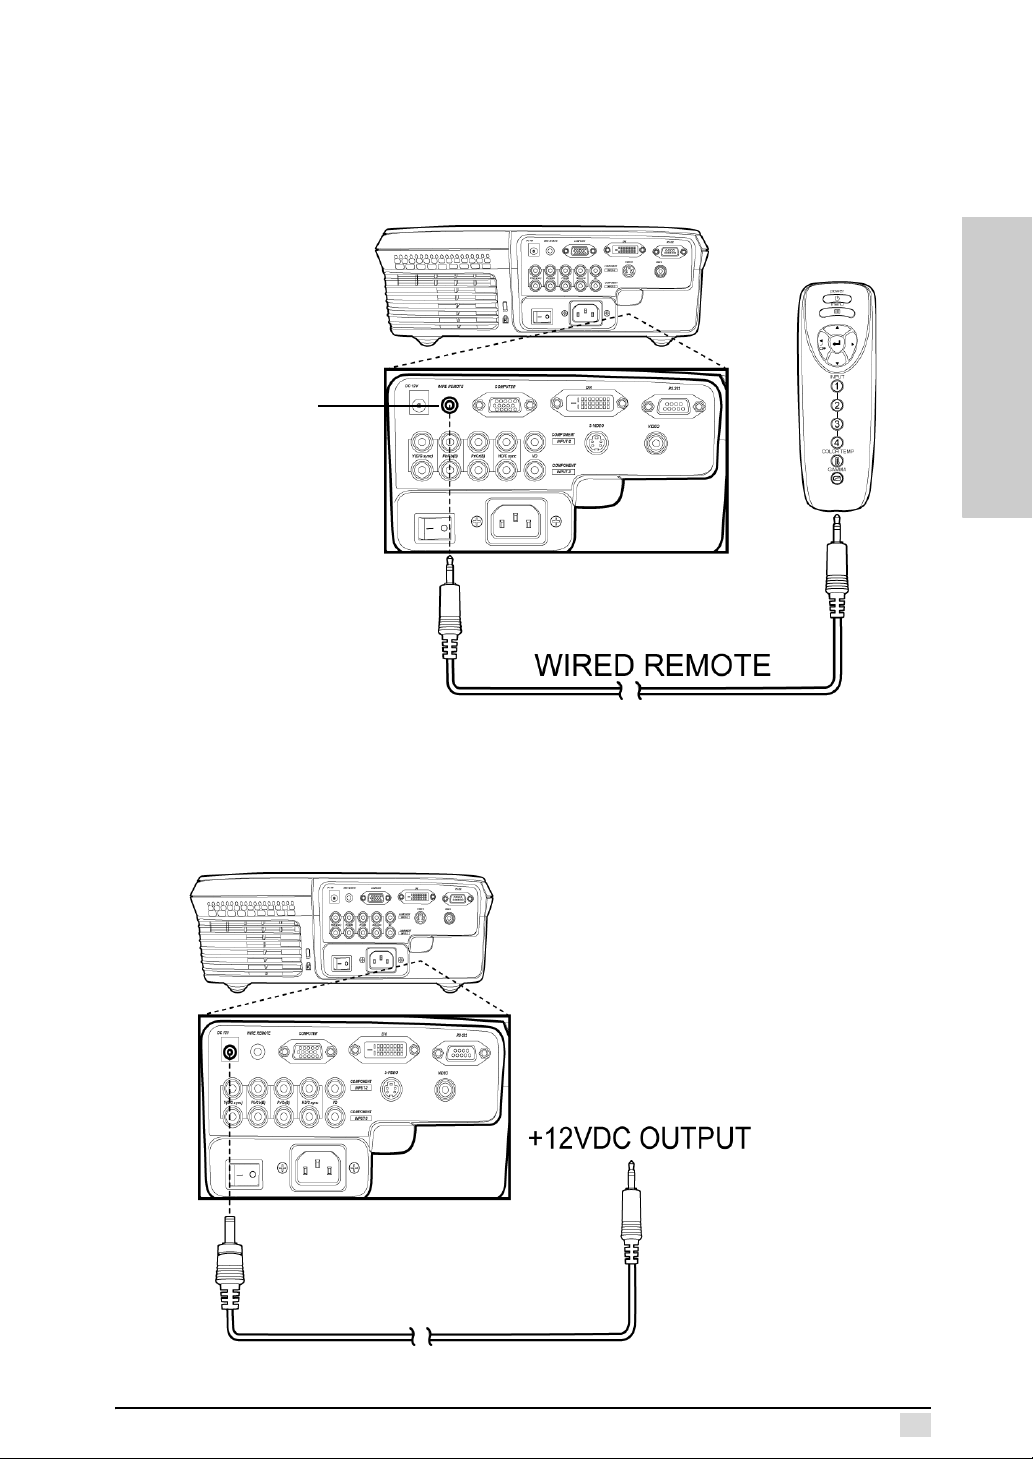
1. +12VDC Outlet: Power outlet for an external device such as an automatic
screen. This output is energized when the projector is turned on. Before using
this feature, ensure that the polarity of the external device matches the projector and the current rating is less than 200 mA to avoid damage to the projector.
2. Wired Remote: Connecting the remote control directly to the projector allows the remote control to work over greater distances and without interference from external sources such as fluorescent lighting.
3. Computer/Input 1: Connect a computer’s VGA output to this RGB 15-pin Dsub port to project the computer display.
4. DVI-D/Input 1: Connect a Digital Video Interface device to this port.
5. RS-232: Connect a serial cable to this 9-pin D-sub port and your computer to perform firmware upgrades or to control the projector using RS232 commands (See Appendix E).
6. S-Video /Input 4: Connect an S-Video source to this 4-pin mini-DIN port.
7. Composite Video / Input 4: Connect a standard RCA video cable to this port.
8. Rear Remote Infrared Sensor: Point the remote control at this sensor to control the projector.
9. Component / Input - 2&3: Attach component device cables to these RCA ports. Component Video will provide the best image quality.
10.AC Power Socket: Connect the power cable to this socket.
11. Power Switch: Turns the power to the projector on and off. Note that you
must press the Power button on the top control panel to put the projector in
operating mode. Do not set this switch to off if the projector lamp is on. Always
place the projector into standby mode prior to setting this switch to off.
INTRODUCTION
5

Chapter 1 – Introduction
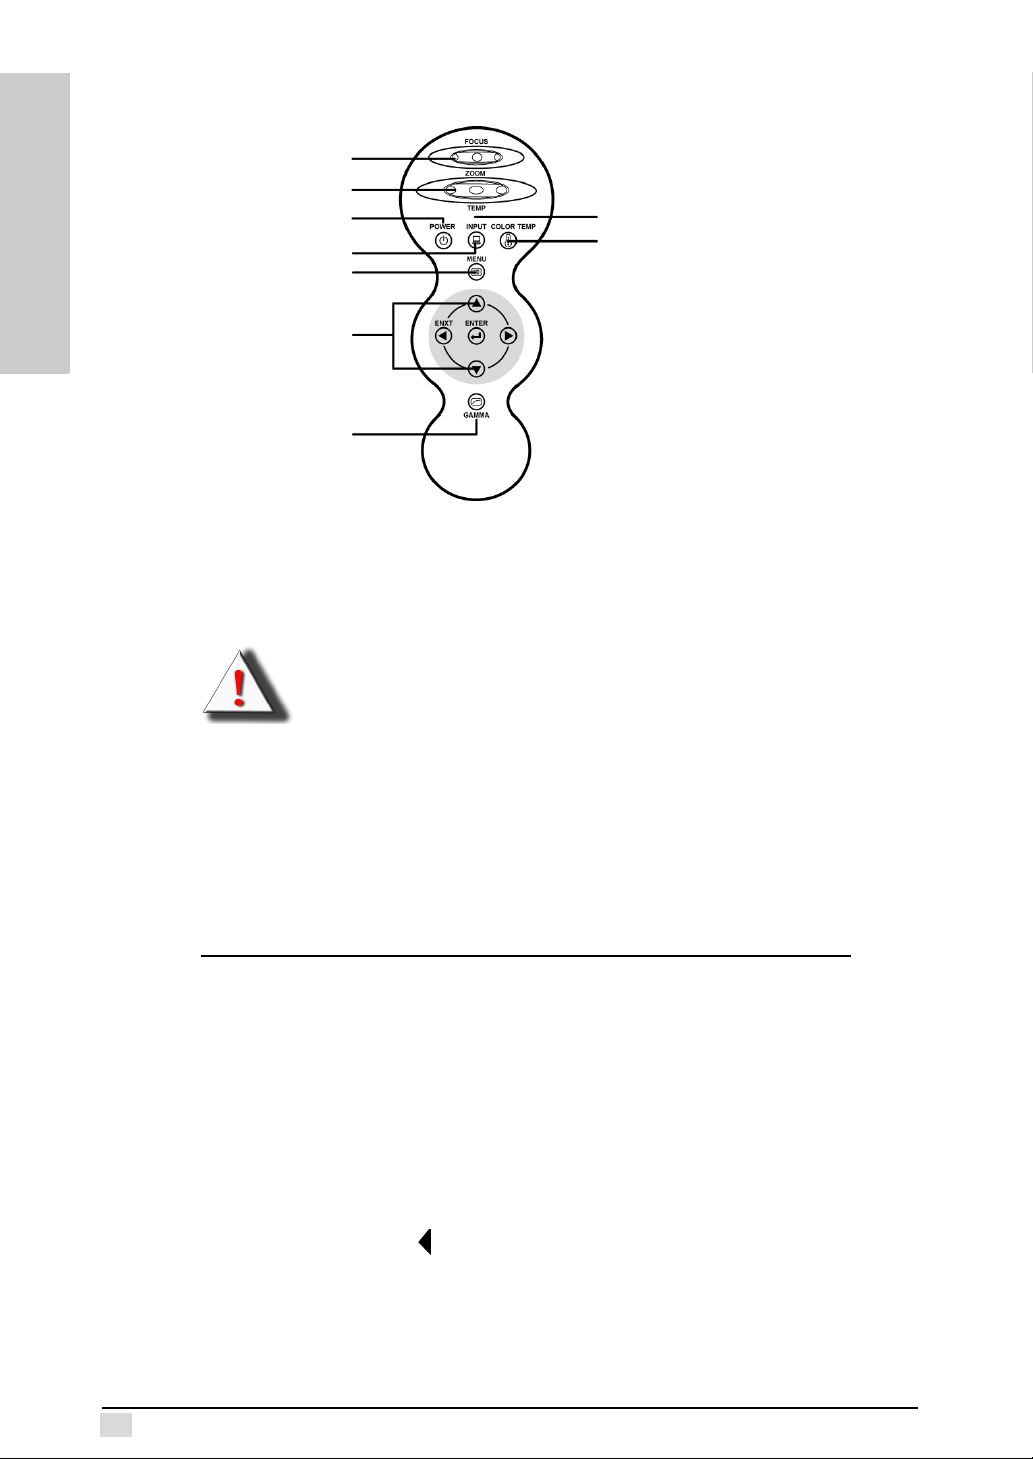
Remote Control
Power on/ Standby
Menu
INTRODUCTION
OSD
Exit
Power: Press this button to put the projector into or bring it out of standby mode.
Note: The Power button does not turn all power off. The power switch at
the rear of the projector turns it off. See "Turning Off" on page 13 for
more information.
Menu
Controls
Input 1 (Computer/DVI)
Input 2 (Component 1)
Input 3 (Component 2)
Input 4 (S/
Color Temperature
Gamma Correction
Composite -Video)
6
Menu: Press this button to enter the OSD menus.
Menu Controls: These buttons enable you to navigate the menus. The up and down
arrows scroll up and down through menus, while the left and right arrows scroll left
and right. Press the Enter button to enter a value or setting.
Color Temperature: Enables you to set the image color temperature. You can set it
to Native, 5500, 6500, 9300 K or User Mode.
Input: Press this button to select the type of input signal connected to the projector
– Input 1 – computer or DVI
– Input 2&3 – component 1&2
– Input 4 – S-Video/composite Video
Gamma: Enables you to set the gamma correction. Default setting is gamma 2.2.
There is gamma user mode for users to define their own gamma curve for all input
sources. Users can use the Gamma Manager utility to adjust or create gamma
curves as desired. The Gamma Manager can be found on the bundled CD installation kit or downloaded from our Web site. Refer to appendix C for more information
about this utility.
This concludes this chapter. The next chapter explains how to connect the projector
to power and different types of input devices.
Before Setting Up
The Premiere 50HD DLP Projector is extremely flexible when considering installation
locations. The keystone feature enables you to place the projector at an angle to the
screen and digitally corrects the distortion of the skewed image. You can configure
the image for rear, mirror, or ceiling mounted projection.
When positioning the projector, follow these tips and precautions:
• Place the projector on a stable surface. When mounting the projector on the
ceiling, ensure that it is securely fastened to the ceiling mount.
• Ensure that the projector has enough space around it to provide proper ventilation.
• Place the projector so that the power cable and device cables are out of the
way of foot traffic.
• Ensure that the infrared ports are unobstructed to ensure that you have maximum range with the remote control.
Chapter 2
Connections
CONNECTIONS
Connections
This section covers connecting devices to the I/O sockets and ports on the rear
panel. See “Rear View” on page 5 for the location of the ports.
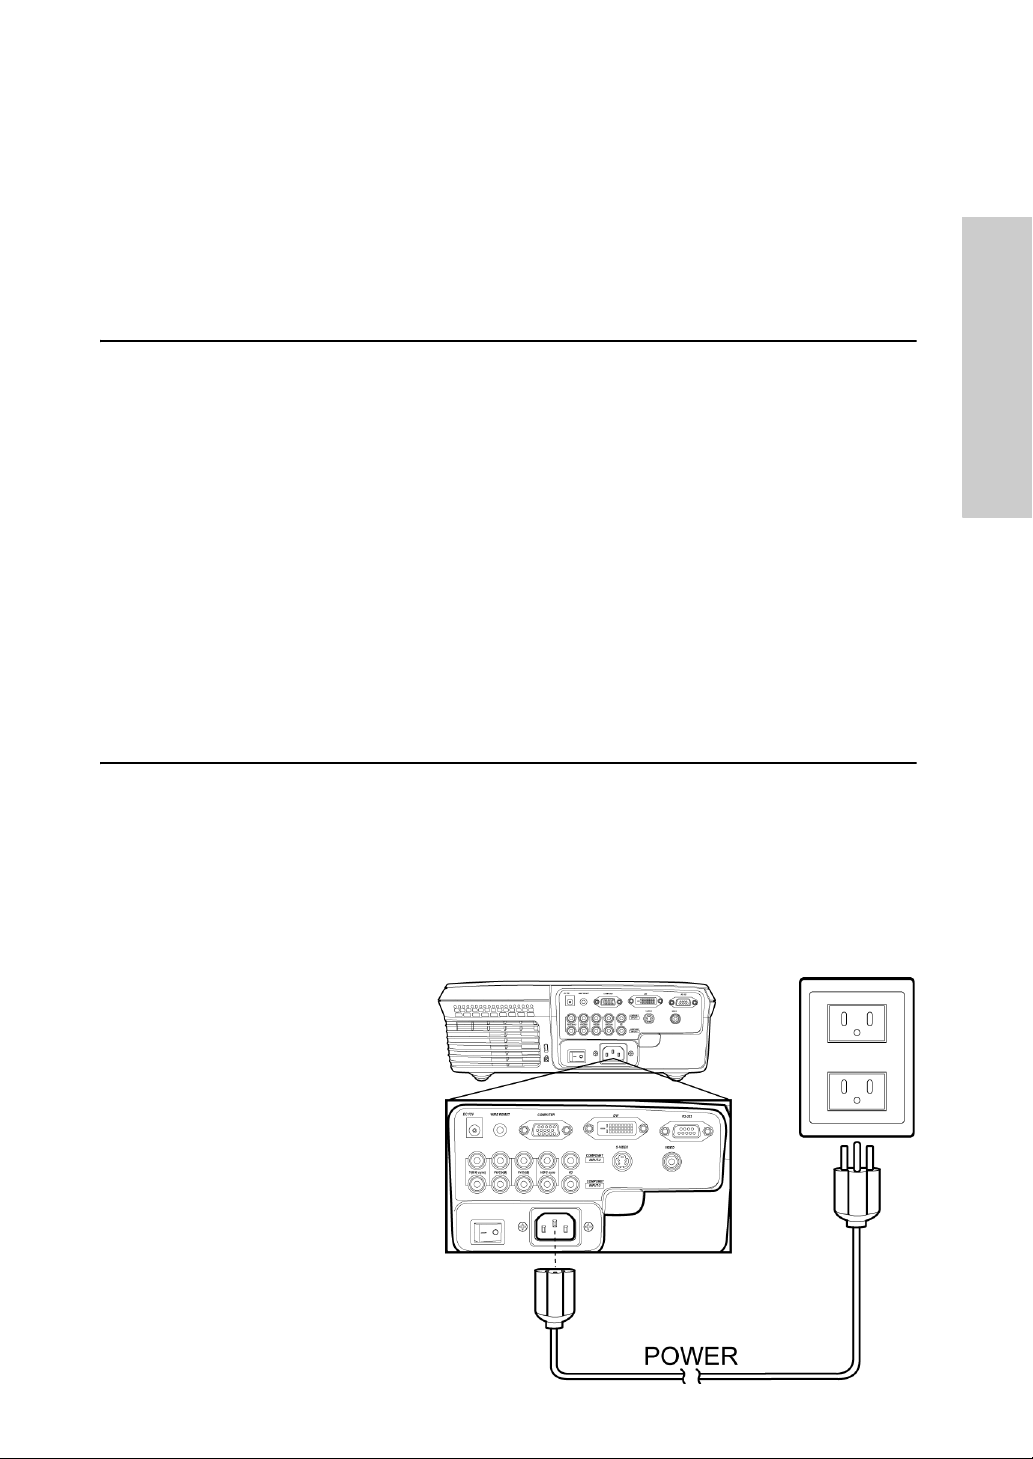
Power
The projector’s power supply is a universal input (100-240VAC)
Connecting Power
Connect the power cable to
the AC socket on the rear
panel.
AC socket
Chapter 2 – Connections
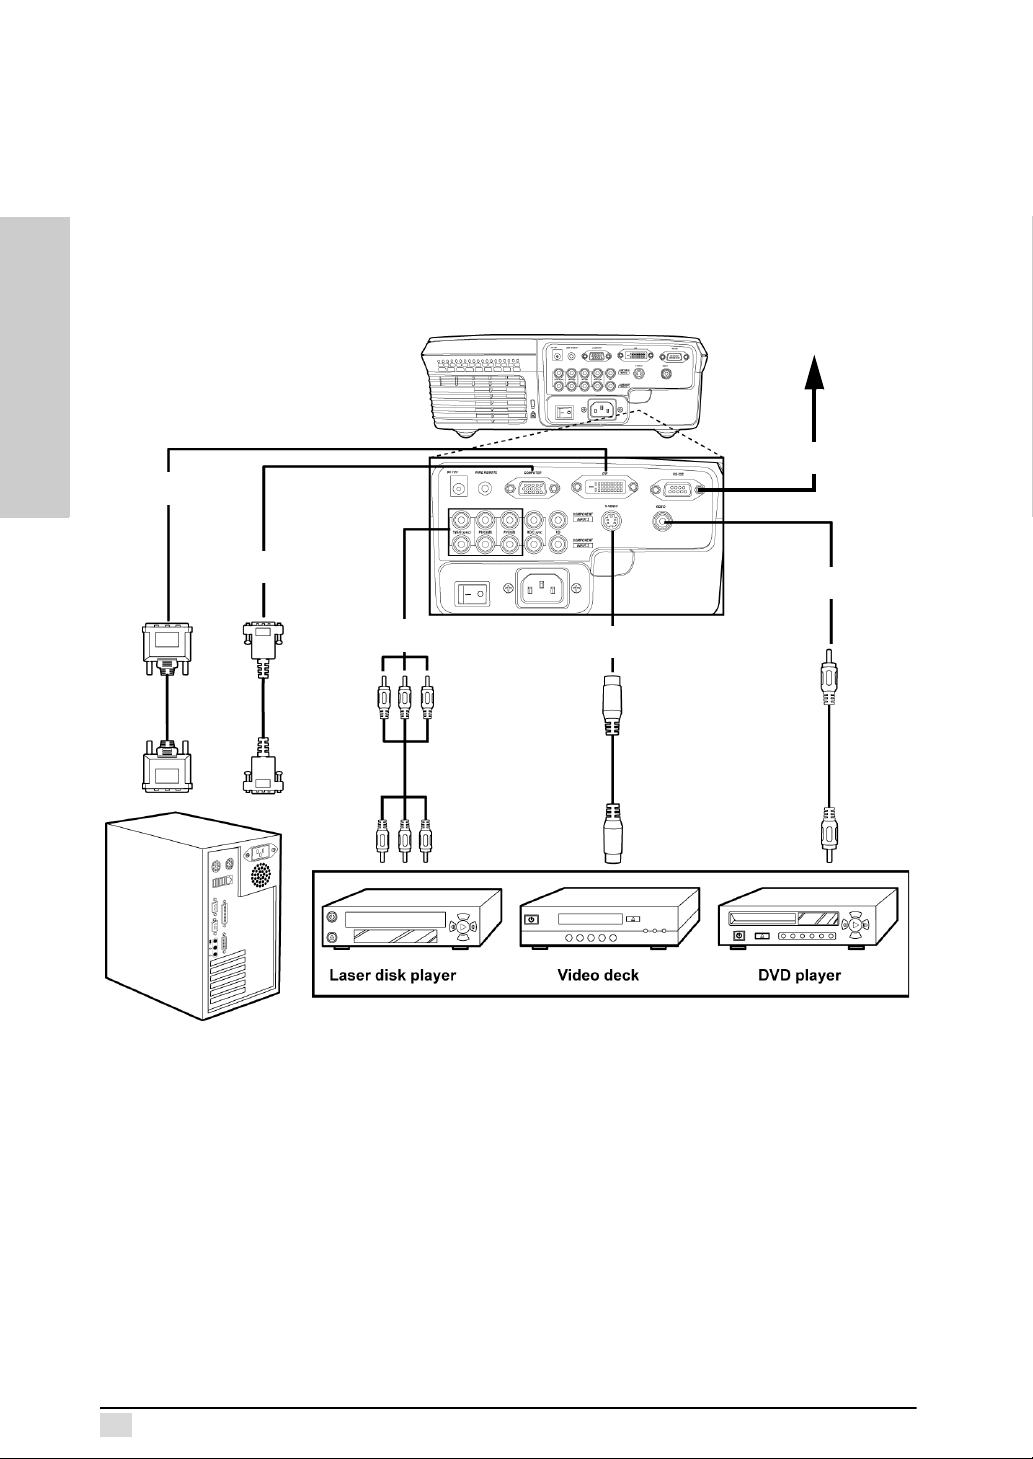
Device Connections
The following section describes device connections. The projector supports connections to a wide variety of multimedia output devices. Refer to the illustration on the
next page for device connection locations.
Computer Graphics Compatibility
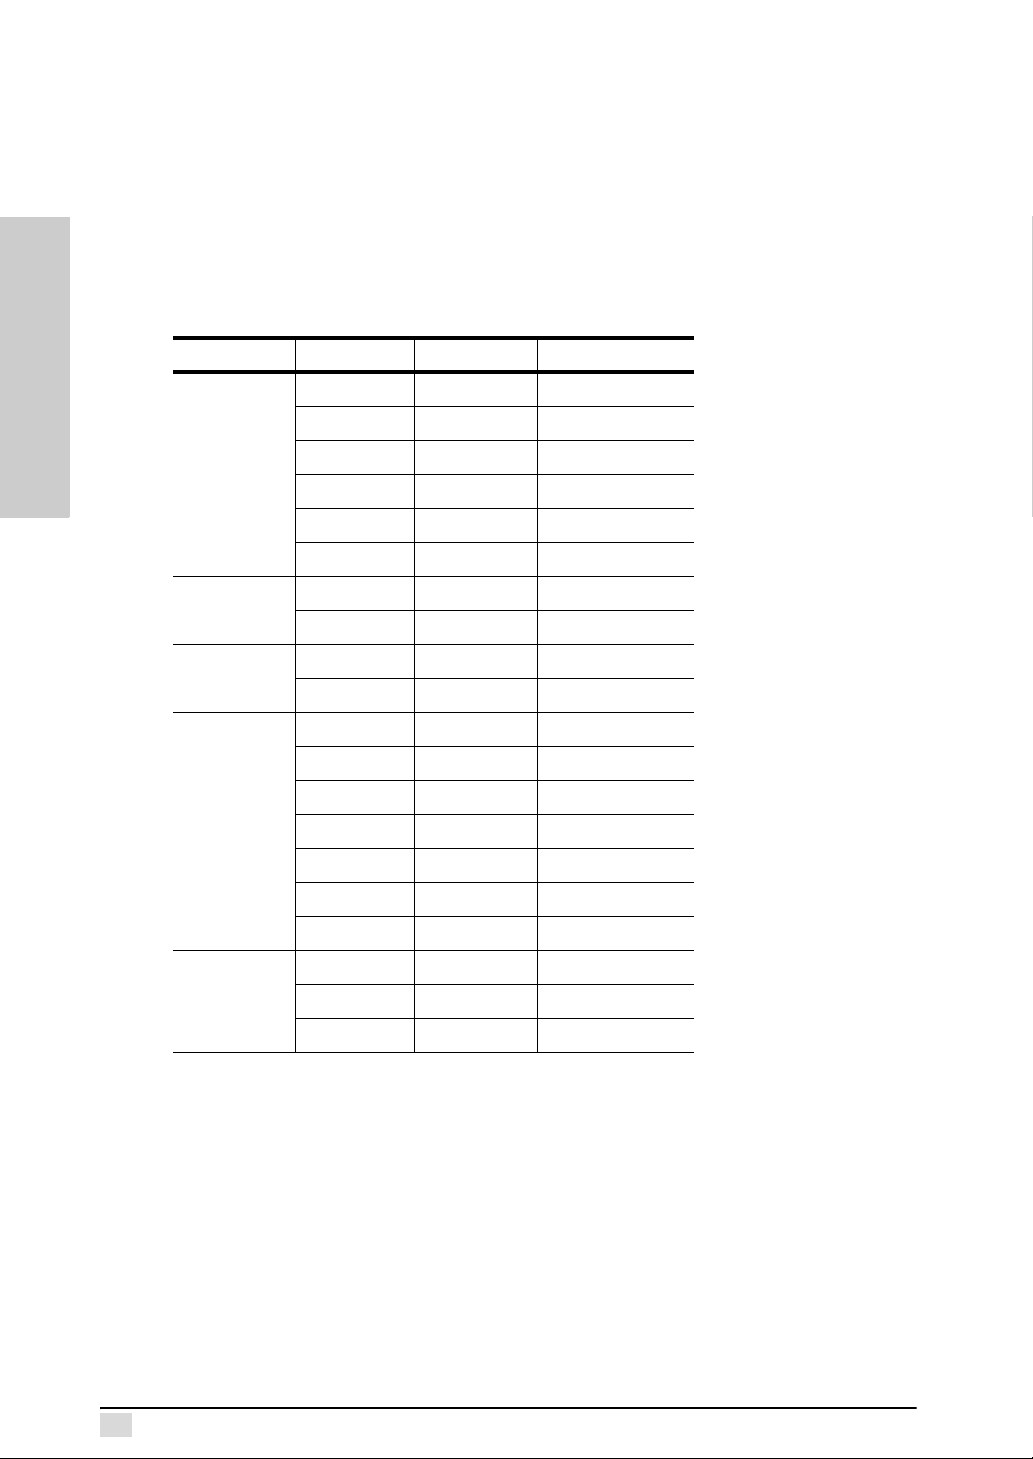
The following table lists the supported input signals and corresponding resolutions.
Keystone Input Resolution V. FREQ (Hz)
CONNECTIONS
Standard
NTSC 720 x 480 —
PAL 720 x 580 —
VGA 640 x 480 60/72/75/85
SVGA 800 x 600 56/60/72/75/85
XGA 1024 x 768 60/70/75/85
SXGA 1280 x 1024 60
Letterbox
Virtual Wide
Anamorphic
Pixel to Pixel
NTSC 720 x 480 —
PAL 720 x 580 —
NTSC 720 x 480 —
PAL 720 x 580 —
NTSC 720 x 480 —
PAL 720 x 580 —
VGA 640 x 480 60/72/75/85
SVGA 800 x 600 56/60/72/75/85
XGA 1024 x 768 60/70/75/85
720P 1280 x 720 —
1080i 1920 x 1080 —
VGA 640 x 480 60/72/75/85
SVGA 800 x 600 56/60/72/75/85
XGA 1024 x 768 60/70/75/85
8

Chapter 2 – Connections
Computer/Input 1
The computer port enables you to connect your computer to the projector using a
standard 15-pin D-sub VGA cable.
DVI input/Input 1
The projector supports connection to a DVI (Digital Visual Interface), which enables
you to connect any device with DVI-D (Digital Only) output.
RS-232
The standard RS-232 port enables you to connect the projector to a PC and upgrade
the projector firmware through a PC or control the projector using RS232 commands. See Appendix E for more information about RS232 controls.
Note: The firmware upgrade is located on the CD that came bundled with
the projector. Contact your dealer for information on future upgrades.
Component/ Input 2 & 3
The projector supports two component video devices (Input 2&3). Component video
is typically transmitted in either YPbPr/YCbCr or RGB (Red/Green/Blue) formats.
Component video connections provide the best picture quality and are preferable to
S-Video and Composite Video connections.
Note: The PbPc/YCbCr color model is used for encoding video. Pb/Cb is
the luminosity of the black and white signal. Pb/Cb and Pr/Cr are color
difference signals. Pb/Cb is blue minus Y (B-Y), and Pr/Cr is red minus Y
(R-Y). The Premiere 50HD DLP Projector provides three standard RCA
phono plugs (x 2) to support YPbPc/YCbCr component video output.
CONNECTIONS
S-Video/Input 4
Connect a DVD, VCR, or DTV decoder source device with the S-Video cable to this
socket. S-video separates pictures into chrominance and luminance signals providing a high quality image that is preferable to a composite video connection.
Composite Video/Input 4
Connect a DVD, VCR, or DTV decoder source device to this socket.
9
Chapter 2 – Connections
To computer
serial port.
CONNECTIONS
DVI
Computer
Component
RS-232
Composite
Video
S-Video
10
Chapter 2 – Connections
Wired Remote Control
The wired remote control jack enables you to connect the remote control to the projector using the included cable. When using the wire remote control feature, you do
not have to be in the line of sight of the IR sensors to operate the projector. Also, the
remote control is powered by the projector which saves battery power.
Connect the
remote control
to this jack using
the included
remote control
cable.
CONNECTIONS
+12VDC Outlet
The +12VDC Outlet jack enables you to trigger an external device when the projector power is turned on. The maximum output current is 200mA. Please use an adaptor plug with "+" polarity 2.5 mm inside diameter and "-" polarity 5.5 mm outside
diameter and cable length as needed.
11
Chapter 2 – Connections
Turning On/Off
Follow these instructions to turn on projector.
1. Press the power switch on the rear panel to supply power to the projector.
CONNECTIONS
2. Press the Power button on the control panel or remote control.
Press this switch to supply power to the projector.
Press the
power button.
The fan starts running and the projector warms up. After the projector warms
up, (approximately 30 sec.) the image appears on the screen.
12
 Loading...