

Page 1
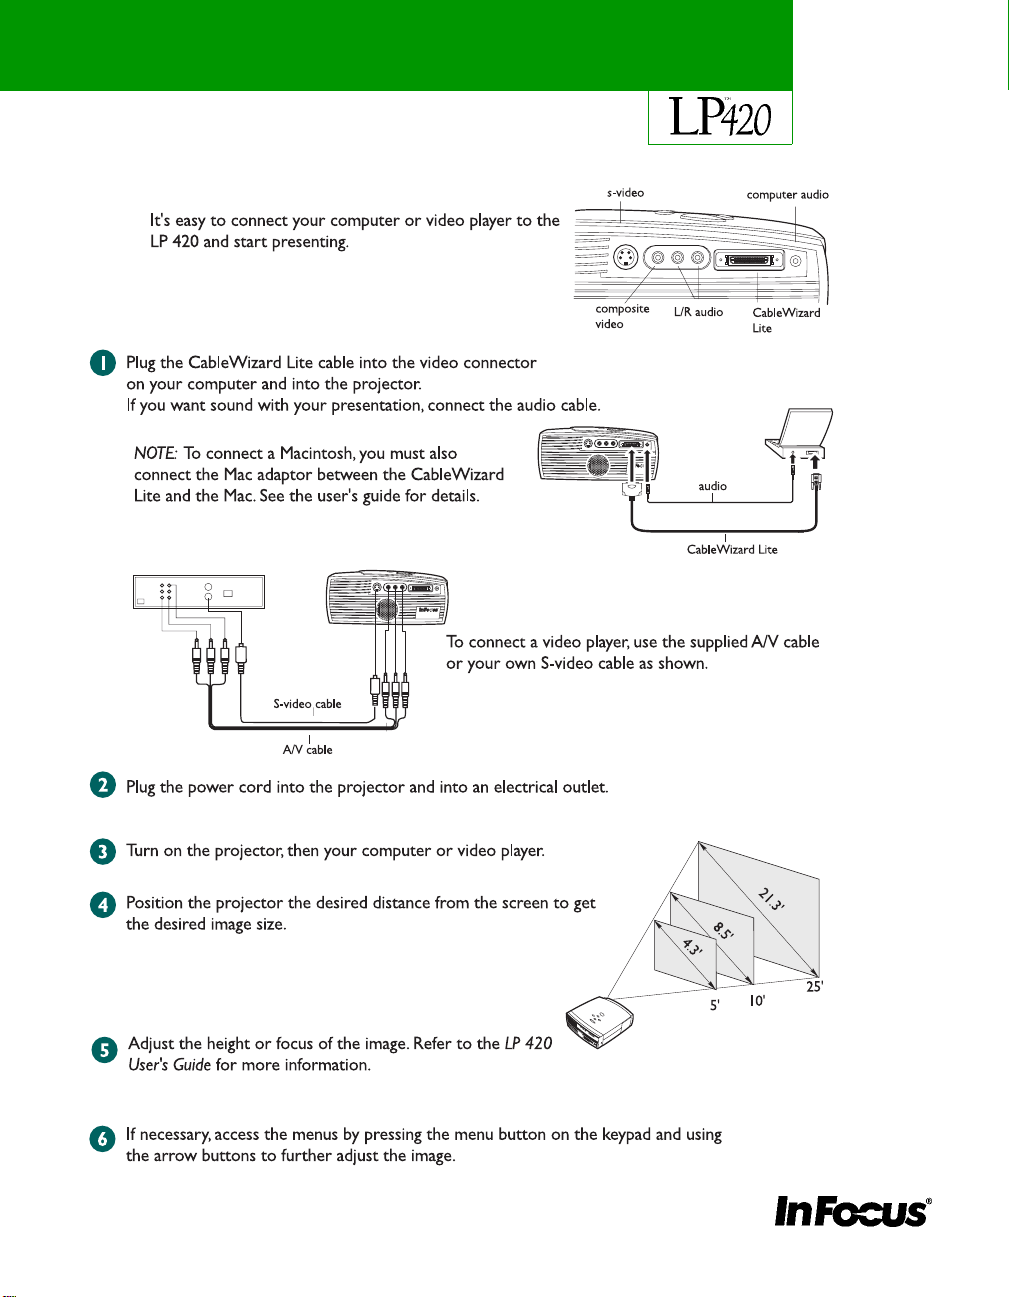
Q
UICK START
009-0314-00 (English)
ъххмшхтфсшххъ
Page 2
Q
UICK START
SAFETY SUMMARY
: Please
read these instructions before
using your projector. Failure to
comply could result in fire,
electrical shock, personal injury or
equipment damage.
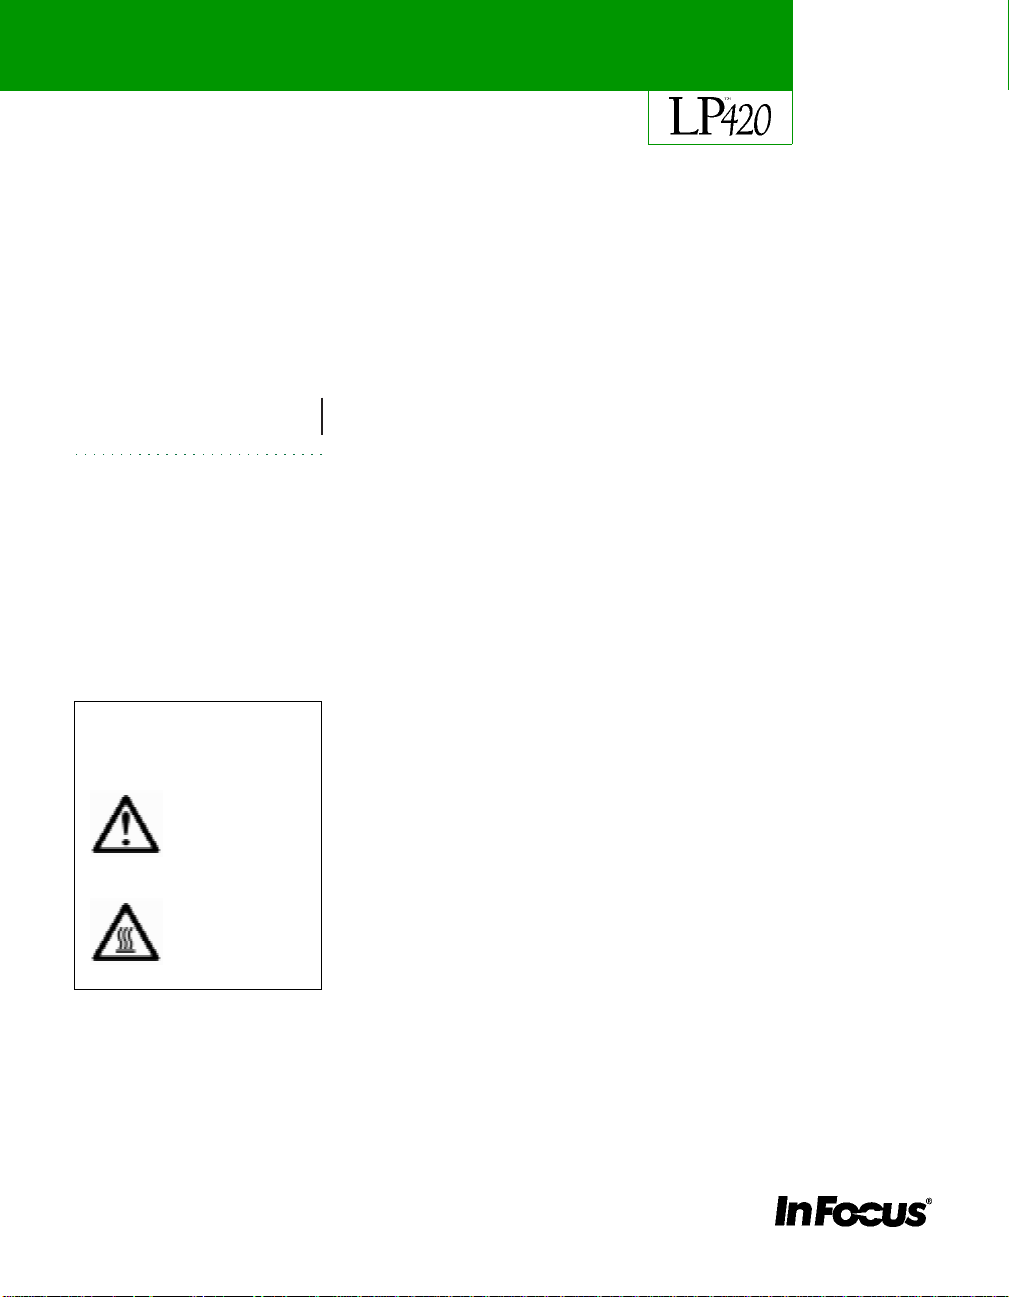
Definition of Safety Icons
on Product Labels
Refer to the User’s
Guide for more
information.
Don’t Look Into The Lens!
Be extremely care ful not to look di rect ly into the l ens when the pr ojector is on . The
bright light can h arm your eyes. B e esp ecially careful to k e e p ch ildren from looking into the lens.
Don’t Di sassemble
Do not open the projector’s case! Doing so exposes you to an electric shock hazard. Except for the pr oject ion lamp, ther e ar e no user - servic eable parts . All servi ce
must be performed by an In Focus Authorized Service Provider.
Avoid Hot Surfaces
The inside of the projector lamp housing can be very hot. Allow the projector to
cool for at least 30 minutes before opening the lamp door to replace the lamp. Use
extreme care. Avoid touching the hot surfaces inside.
Use Only The 420 Power Cord
Always use the power cord that came with the projector. Although other cords
might look the same, they have not been safety-tested with the 420. Never use the
power cord if it’s damaged or frayed. When you disconnect the projector, always
remove the power cord from the electri cal outl et fir s t, then from the projector.
Don’t Defeat The Purpose Of The Grounding Plug
The projector is grounded through the grounding conductor on the power cord.
To avoid electric shock, plug the power cord into a properly wired receptacle.
Avoid Liquid Spills
Don’t set drinks on top of the projecto r. Spilled liquids can flow inside causing
damage.
Don’t Block Ventilation
Openings in the case provide ventilation to protect the projector from overheating. Keep loose papers and other objects away from the grills. Don’t place the projector on top of or close to a comput e r or o the r h e at -p roducin g eq uipment.
Avoid hot surfa ces.
Customer Service
If you need assistance, call In Focus Customer Service directly at
1-800-799-9911. Call between 5 a.m. and 5 p.m. PST, Monday through Friday.
Or, send us an e-mail at [email protected]
In Europe, call In Focus in The Netherlands at (31) 23-5540310.
In Singapore, call (65) 740-6435.
Page 3

TABLE OF CONTENTS
Safety Summary iii
Introduction 1
Image Resolution 1
Compatibility 1
Unpacking the Projector 1
Usage Guidelines 3
If You Need Assistance 4
Warranty 4
Setting up the Projector 5
Connecting an IBM-Compatible Computer 7
Connecting a Macintosh Computer 8
Connecting a Video Player 9
Powering up the Projector and Adjusting the Image 11
Turning Off the Projector 12
Using the Projector 13
Basic Image Adjustment 13
Adjusting the Projector 13
Using the Keypad Buttons 15
Using the On-Screen Menus 16
Display Menu Functions 17
Audio Menu Functions 19
Image Menu Functions 20
Controls Menu Functions 22
Maintenance & Troubleshooting 25
Cleaning the Lens 25
Replacing the Projection Lamp 25
Using the Kensington Lock 28
Troubleshooting 29
i
Page 4

Table o f C o ntents
Appendix 33
Specifications 33
Accessories 35
Portable and Laptop Activation Chart 37
Using Video Mirroring with a PowerBook Computer 42
Projected Image Size 43
Index 45
ii
Page 5

SAFETY SUMMARY
Please read these instructions carefully before using your LP 420.
Failure to comply with them could result in fire, electrical shock,
personal injury or damage to equipment.
These graphics are used throughout this manual to draw your
attention to important information about the projectors.
NOTE: Additional useful details or tips.
CAUTION: Steps to take to avoid damage to your equipment.
WARNING: Steps to take to avoid personal injury.
These graphics are used on the projector’s labels.
Attention
- Refer to this User’s Guide for important
safety information.
CAUTION-Hot Surfaces
- Avoid touching hot surfaces.
Do not touch until the projector has cooled.
Do Not Look Into The Lens!
Be extremely careful not to look into the projection lens when the projector is turned on. The b right light may harm your eyes. Be especia lly ca reful to keep children from looking into the lens.
Power Source
Use only a three-wire grounding type power source. The power source
should not exceed 275 volts rms between the supply conductors or
between either conductor and the ground.
Power Cord
Use only the power cord that was shipped with the projector. Although
other power cords might be similar in appearance, they have not been
safety-tested with the projector. Do not use a power cord if it has become
damaged or frayed. Contact your In Focus dealer or call In Focus if you
need to replace your power cord.
iii
Page 6

Safety Summary
Grounding
The projector is grounded through the grounding conductor on the
power cord. To avoid electric shock, plug the power cord into a properly
wired receptacle. Do not defeat the purpose of the grounding-type plug.
Lamp
To avoid overheating and unacceptable image quality, replace the projection lamp with a lamp of the specified type. Refer to page 33 for lamp
specifications and to page 25 for instructions on replacing the lamp.
Lamp Compartment
To avoid burns, do not open the lamp module door until the projector is
turned off and the lamp has cooled for at least 30 minutes. Follow the
instructions in this manual for lamp replacement carefully.
Hot Surfaces
Allow the projector to cool at least 30 minutes before replacing a lamp.
When you open the lamp housing, be very careful not to touch the hot
surfaces inside.
NO TE: If you open the projector
case, you will void the warranty.
iv
Ventilation and Overheating
Openings in the projector case provide ventilation to protect it from
overheating. Keep loose papers and other objects well away from the
grills. Do not place the project or on top of or close to a computer or othe r
heat-producing eq uipment.
Liquid Spills
Do not set drinks on top of the projector. Spilled liquids can flow inside
and cause damage.
Do Not Disassemble
All service must be performed by an authorized In Focus service center.
The only user-serviceable part in the projector is the projection lamp,
which you can replace by opening the lamp cover on the side of the projector (see page 25). Do not open any other part of the projector. If your
projector needs repair, call your local Authorized Service Provider or In
Focus Technical Support as described on page 4. Before you call, refer to
“Troubleshooting” starting on page 29 to see if you can resolve the problem yourself.
Page 7

INTRODUCTION
The In Focus LP 420™ is specifically designed for the mobile presenter. It packs SVGA graphics with 16.7 million colors into a
small, 6.8 pound package. It generates crisp, clear images usin g
Digital Light Processing™ (DLP) technolo gy. The LP 420 is easy
to connect, easy to use, and easy to maintain.
Image Resolution
The SVGA resolution of the 420’s projected image is 800x600.
Screen resolutions between 800x600 and 1024x7 68 are compressed to 800x600. The 420 cannot compress screen resolutions
above 1024x768. If your computer’s screen resolution is higher
than 1024x768, reset it to a lower resolution before you connect
the 420
.
Compatibility
The projector is compatible with a wide variety of computers and
video devices, including:
•
IBM-compatible computers, including laptops, up to 1024x768
resolution.
NO TE: The 420 automatically
expands 640x480 images to
800x600. You can display these
images at 640x480 by turning off
the Auto Resize feature. See “Auto
Resize” on page 20 for more information.
•
Apple Macintosh and PowerBook computers up to 1024x768
resolution.
•
Most standard VCRs, camcorders and laser disc players.
Unpacking the Projector
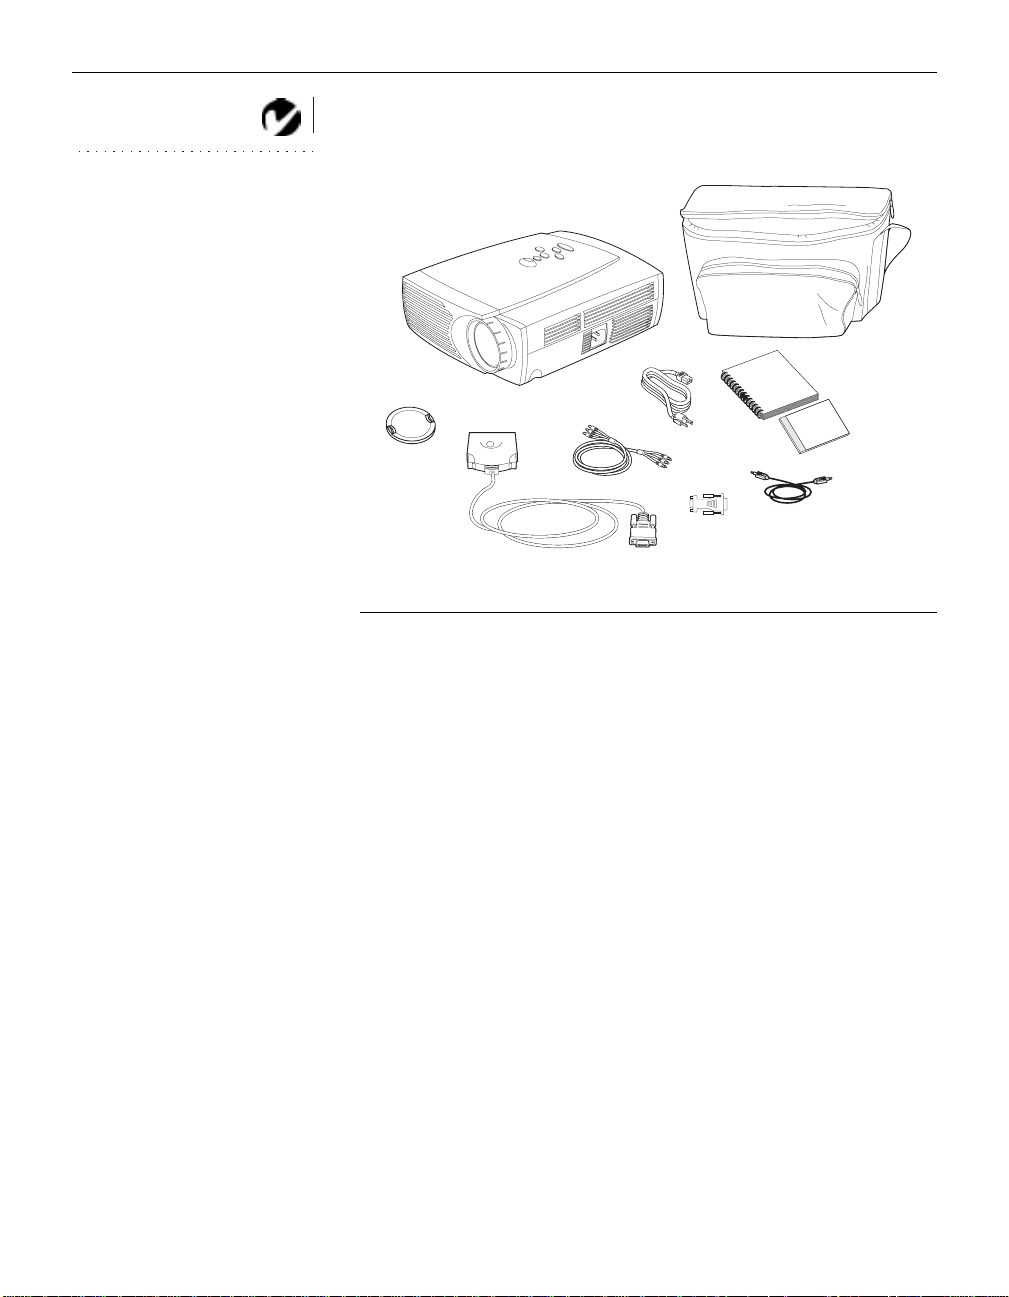
The projector comes with the items shown in Figure 1. Check to
make sure all are included.
diately if anything is missing
Contact yo ur In F o cus deal er imme-
.
If you are experienced in setting up presentation systems, use the
LP 420 Quick Start
card that was included in the shipping box. For
complete details on connecting and operating the projector, refer
to this User’s Guide. User’s Guides are also available for download from our website at www.infocus.com.
NOTE: The 420 ships standard
with computer and audio cables. If
you want mouse control of your
computer, you must order the
optional CableWizard and remote.
1
Page 8
Introduction
NO TE: The contents of your
shipping box may vary depending
on the projector configuration
you’ve ordered.
2
1
3
5
4
9
6
7
F
IGURE 1
8
Shipping box contents
1. LP 420 projector 5. RCA audio/video (A/V) cable
2. Soft carry case 6. Audio cable
3. LP 420 User’s Guide and
7. Macintosh adaptor
Online User Guide CD
4. power cord 8. CableWizard Lite cable
9. Lens cap
2
Page 9
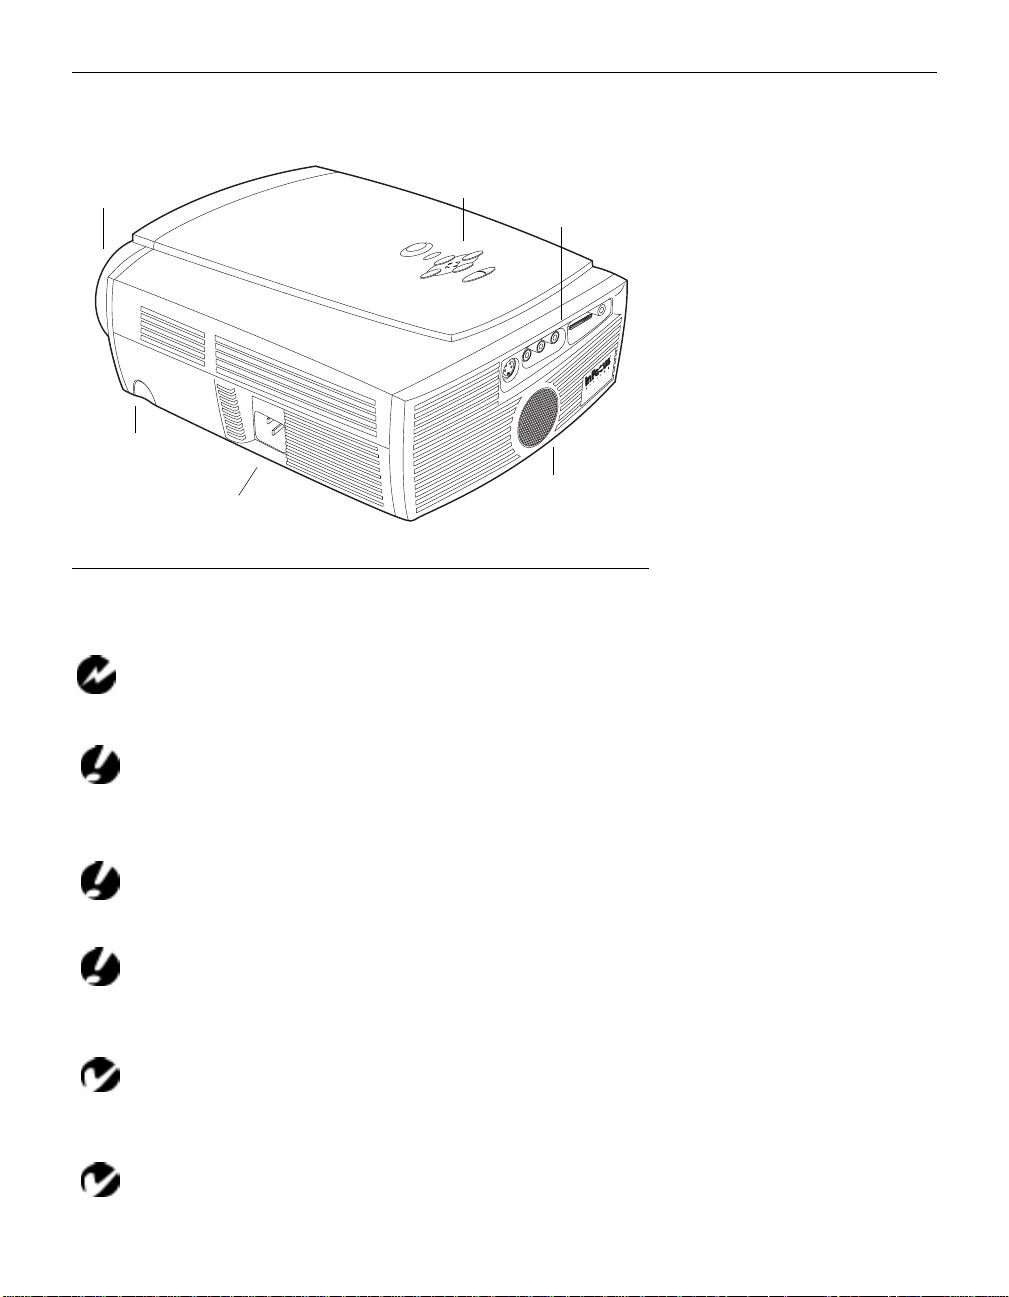
focus ring
elevator button
power
cord
connector
keypad
connector panel
speaker
Side view of projector
Usage Guidel ines
Do not look directly into the projection lens when the projector is
turned on. The bright light may harm your eyes.
FIGURE 2
o not block the grills on the projec tor. Restricting the air flow can
D
cause it to overheat and turn off. If this happens, you must wait a minute
before attempting to turn it back on.
Handle the pr oject or as you wo uld any pr od uct wi th glass com po-
nents. Be especially careful not to drop it.
Avoid leaving the projector in direct sunlight or extreme cold for
extended periods of time. If this happens, allow it to reach room temperature before use.
This projector is not intended for use in mainframe computer
rooms as defined in the Standard for the Protection of Electronic Computer/Data Processing Equ ipment, ANSI/NFPA 75.
Transport the projector in a vendor-approved hard or soft case.
Part numbers for these cases are listed on page 35.
3
Page 10

Introduction
If You Need Assistance
The first place to look for help is in this manual. Be sure to check
the guidelines in “Troubleshooting” on page 29.
If this manual doesn’t answer your question, call your In Focus
dealer. You can also call In Focus Customer Service directly at
1-800-799-9911
through Friday. In Europe, call In Focus in The Netherlands at
(31) 23-5540310
e-mail at
. Call between 5 a.m. and 5 p.m. PST, Monday
. In Singapore, call
(65) 740-6435
. Or, send us an
Our World Wide Web address is
http://www.infocus.com.
Warranty
This product is backed by a limited one-year warranty. The
details of the warranty are printed at the back of this manual.
Longer term warranties can be purchased from your In Focus
dealer. Refer to page 36 for part numbers.
4
Page 11
SETTING UP THE PROJECTOR
Place the projector on a flat surface.
1
•
The projector must be within 10 feet (3 m) of your power
source and within 6 feet (1.8 m) of your computer.
•
If you want to project from behind a translucent screen, set
up the projector behind your screen. See “Rear Projection”
on page 23 to reverse the image.
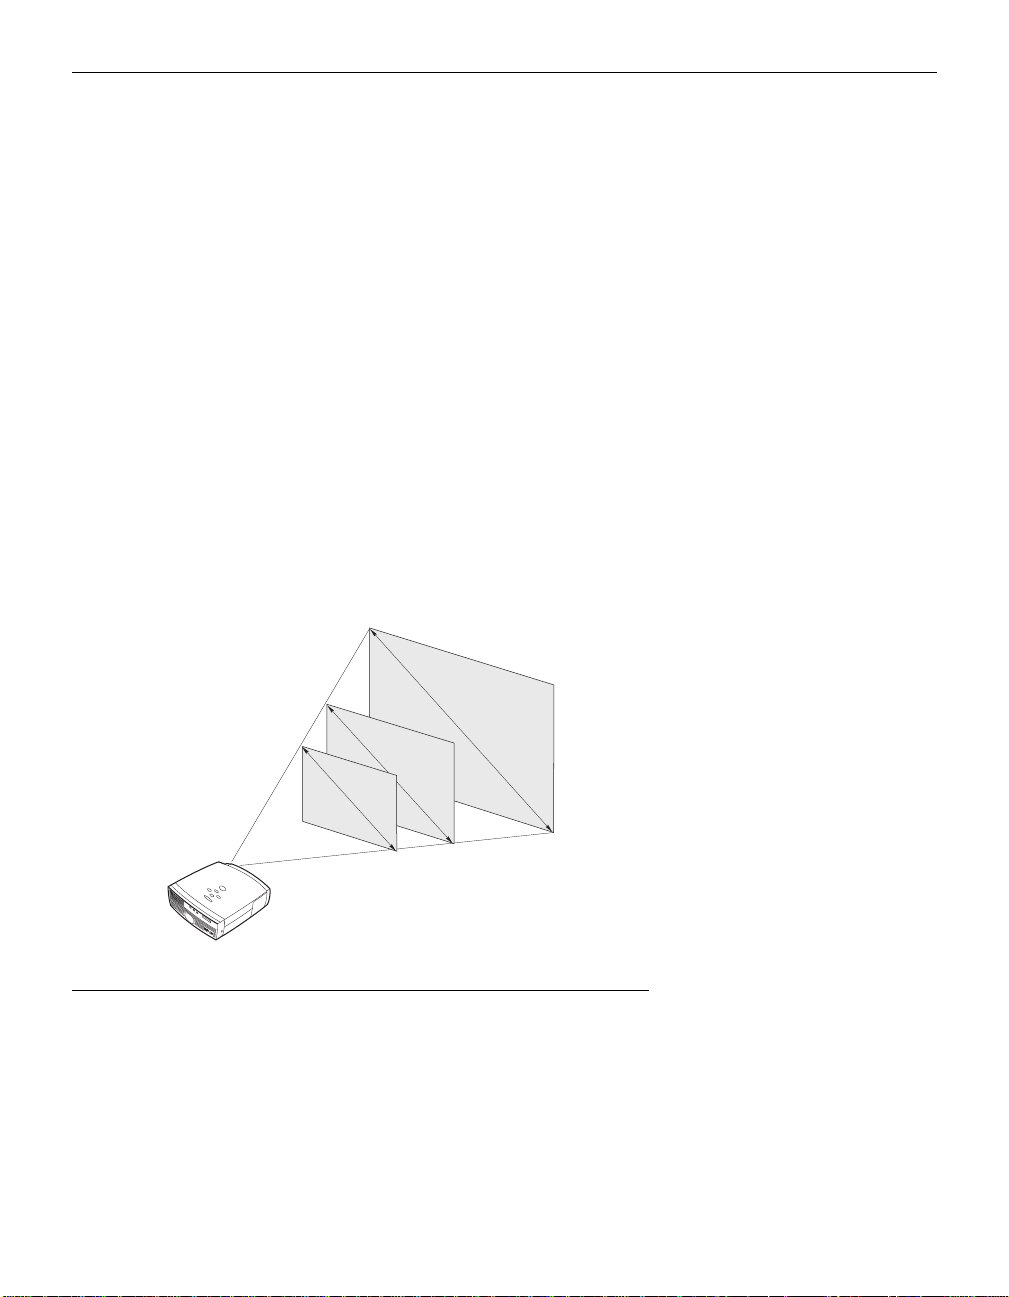
Position the projector the desired distance from the screen.
2
•
The distance from the lens of the projector to the screen
determines the size of the projected image. Figure 3 shows
three projected image sizes. For more information about
image size, see “Projected Image Size” on page 43.
Make sure the projector and your computer are turned off.
3
2
1
.
3
f
t
.
8
.
5
4
f
.
t
3
.
f
t
.
5 ft.
10 ft.
25 ft.
FIGURE 3
Projected image size
5
Page 12
Setting up the Projector
NO TE: Before you continue,
make sure the projector and your
equipment are turned off. If you’re
connecting a computer, make sure
the distance between it and the
projector is 6 feet or less.
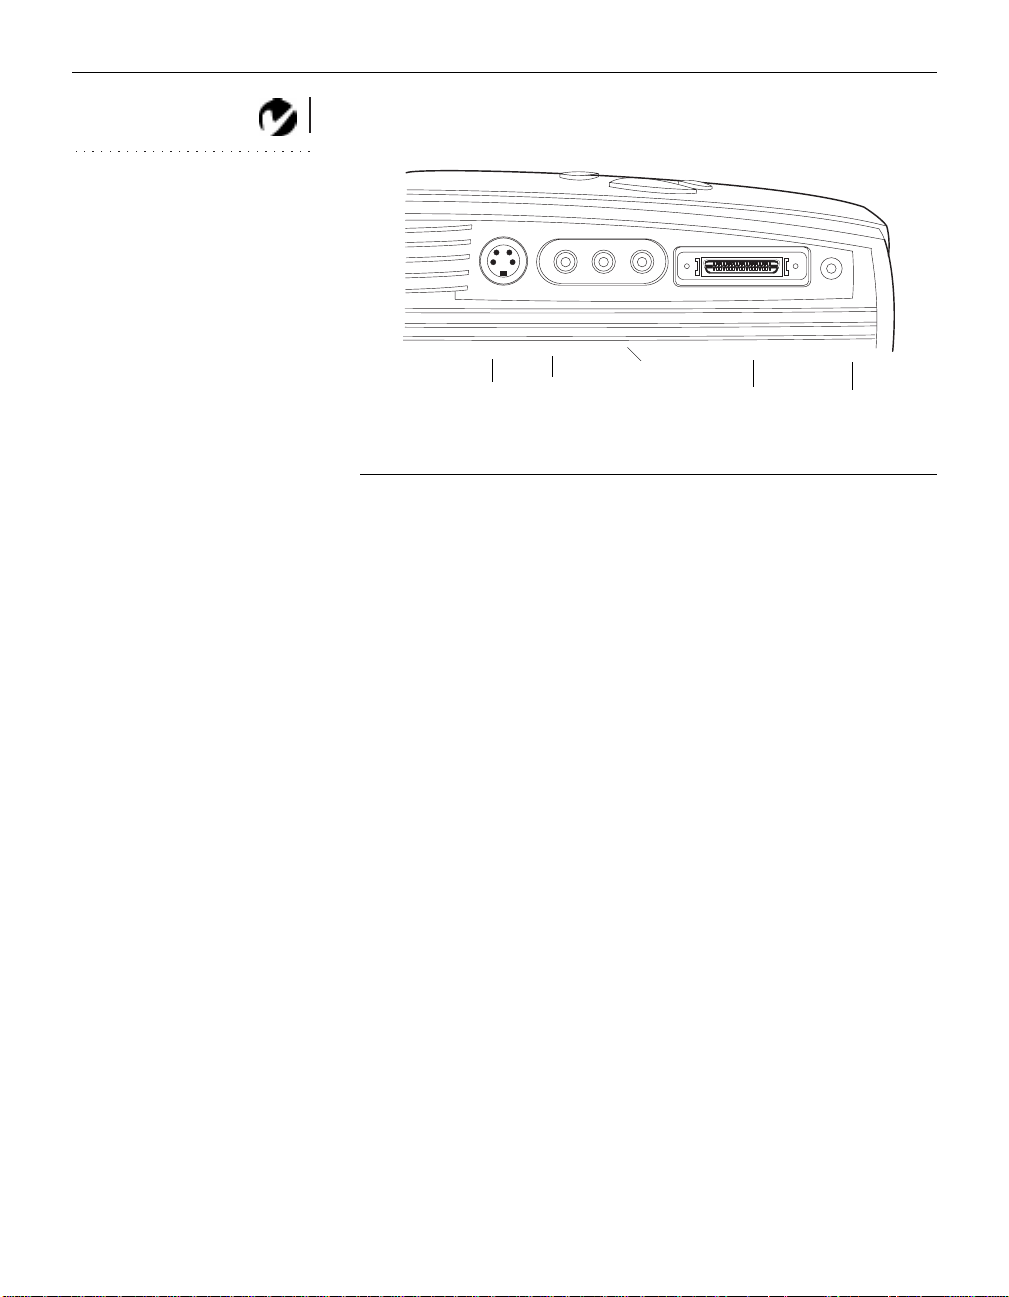
L/R audio in
(for video source)
F
IGURE 4
s-video
composite
video
Connector panel
CableWizard
Lite
computer
audio in
6
Page 13
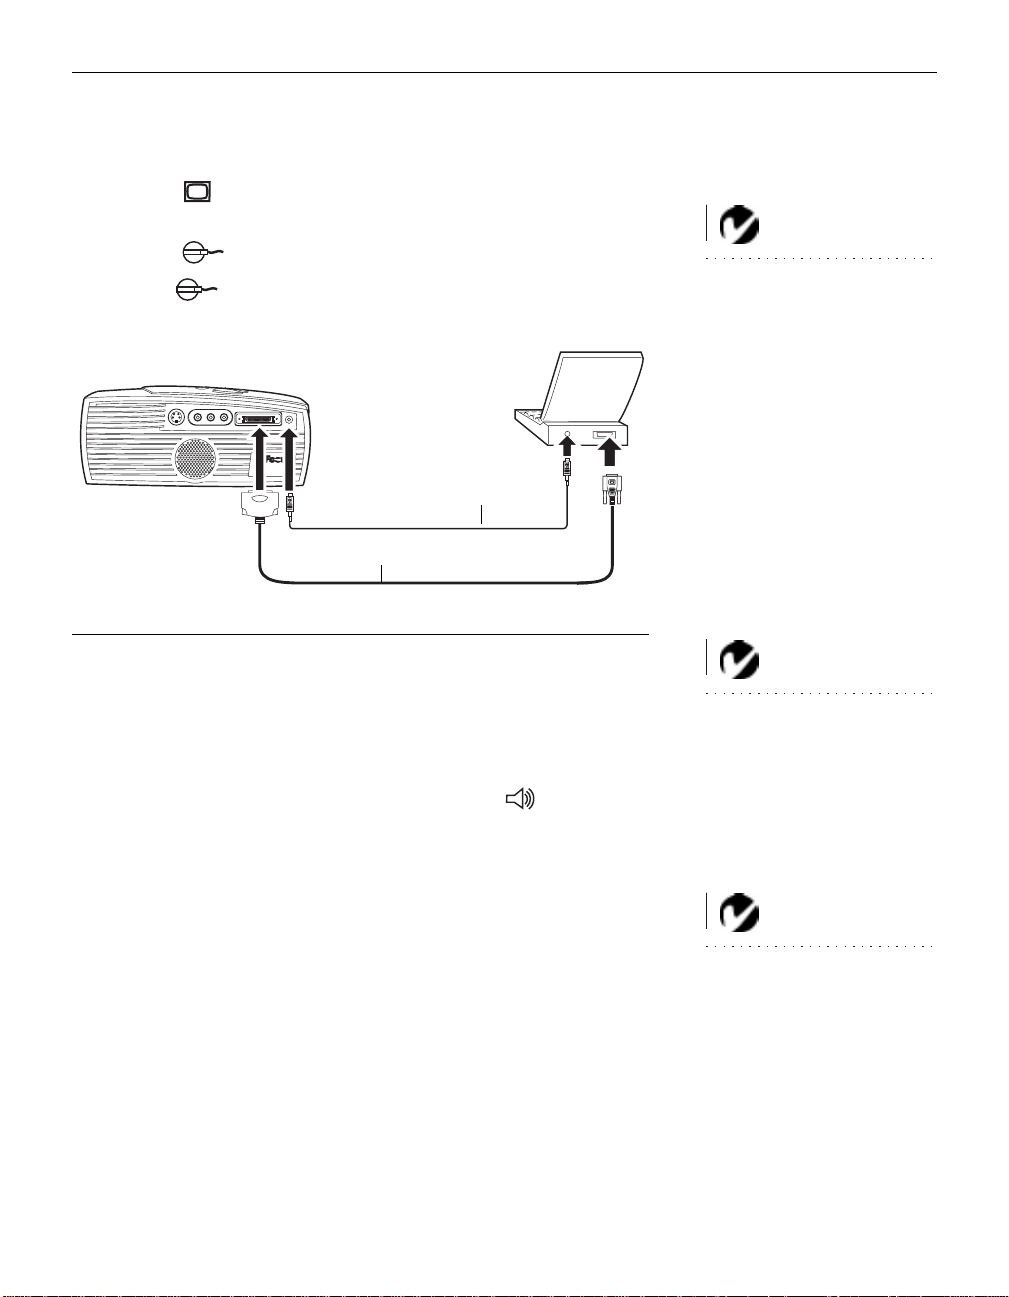
Connecting an IBM-Compatible Computer
Plug the end of the CableW izard Lite computer cable into
1
the video connector on your computer.
Plug the end of the CableWizard Lite computer cable
2
into the connector on the projector.
audio cable
CableWizard Lite cable
FIGURE 5
Connecting the computer cable to an IBM-compatible computer
Do you want to play your computer’s audio on the projector?
Plug either end of the audio cable into the audio connector on
1
your computer.
Plug the other end of the audio cable into the connector
2
on the projector.
NO TE: Many laptop computers
do not automatically turn on their
external video port when a secondary display device such as a
projector is connected. Refer to
your computer manual for the
command that activates the external video port. Activation commands for some laptop computers
are listed in the Appendix of this
manual on page 37.
NO TE: If you are connecting a
desktop computer and want to
view your presentation on your
monitor, purchase the optional
CableWizard.
NO TE: If you w ant mouse control,
purchase the optional CableWizard and remote.
7
Page 14
Setting up the Projector
e
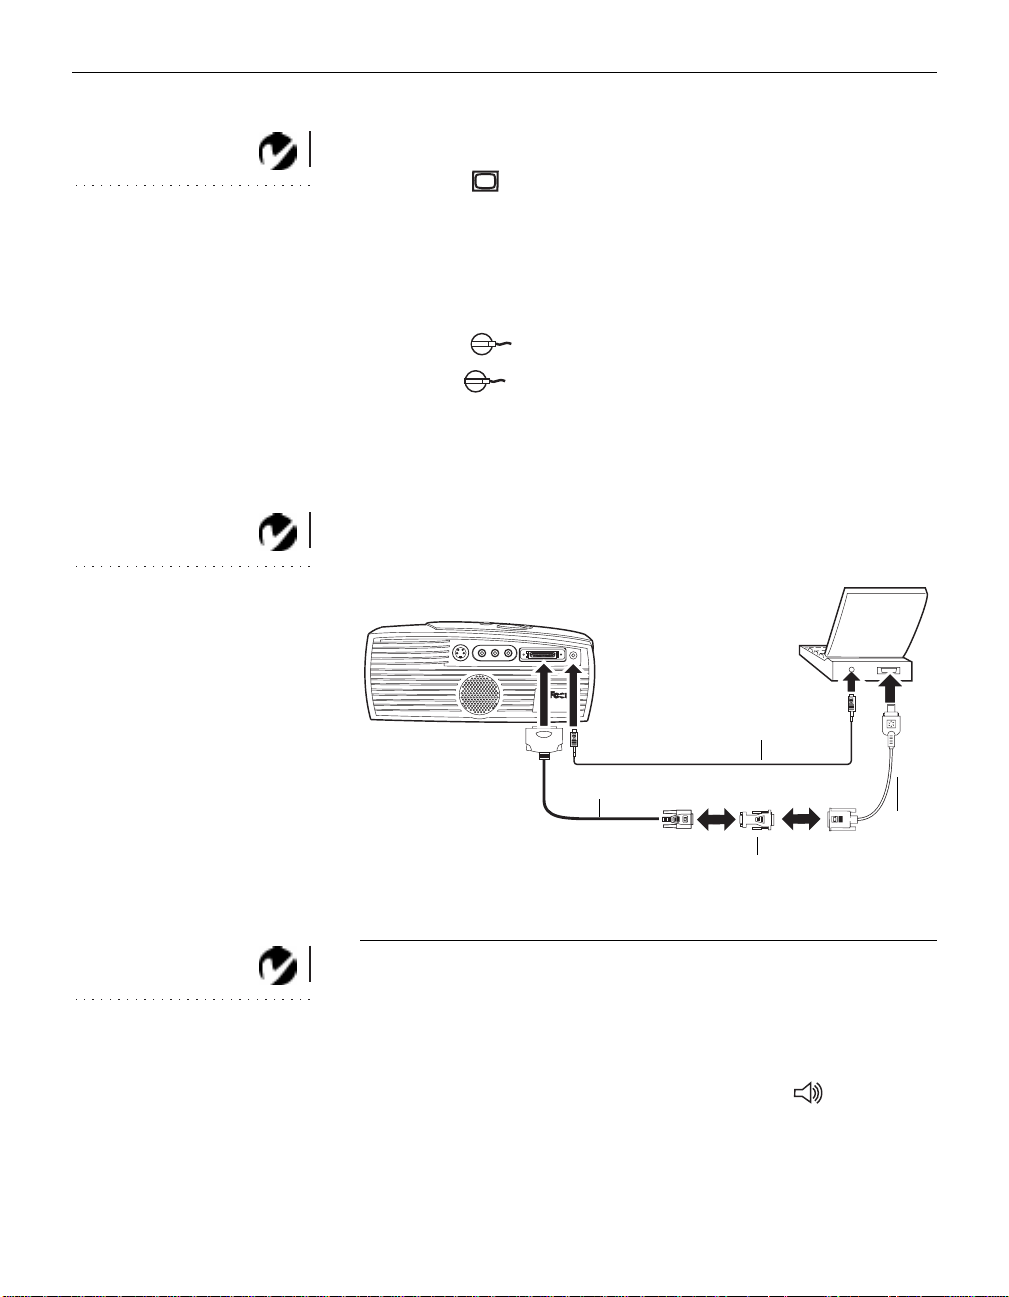
Connecting a Macintosh Computer
Plug the end of the CableW izar d Lite computer cable into
1
NOTE: Some PowerBooks require
the Apple-supplied video-out cable
or monitor adapter for external
video. Connect it between the
PowerBook and the CableWizard
Lite computer cable/Mac adaptor
as shown in Figure 6.
the In Focus-supplied Mac adaptor.
Plug the CableWizard Lite/Mac adaptor into the video con-
2
nector on your computer (or the Apple video-out cable or
monitor adapter, if needed).
Plug the end of the CableWizard Lite computer cable
3
into the connector on the projector.
If you want the projector display to be the same as the Power-
4
Book’s screen display, turn on video mirroring (called
SimulScan in newer PowerBooks). See “Using Video Mirroring with a PowerBook Computer” on page 42 for additional
information.
NOTE: If you are connecting a
desktop computer and want to
view your presentation on your
monitor, purchase the optional
CableWizard.
audio cable
NO TE: If you w ant mouse control,
purchase the optional
CableWizard and remote.
8
CableWizard Lite cable
PowerBook
Mac adaptor
FIGURE 6
Connecting the CableWizard Lite computer cable to a Macintosh
Do you want to play your computer’s audio on the projector?
Plug either end of the audio cable into the audio connector on
1
video-out cabl
or monitor
adaptor
your computer.
Plug the other end of the audio cable into the connector
2
on the projector.
Page 15
Connecting a Video Player
If your video player uses a round, one-pr on g composite video
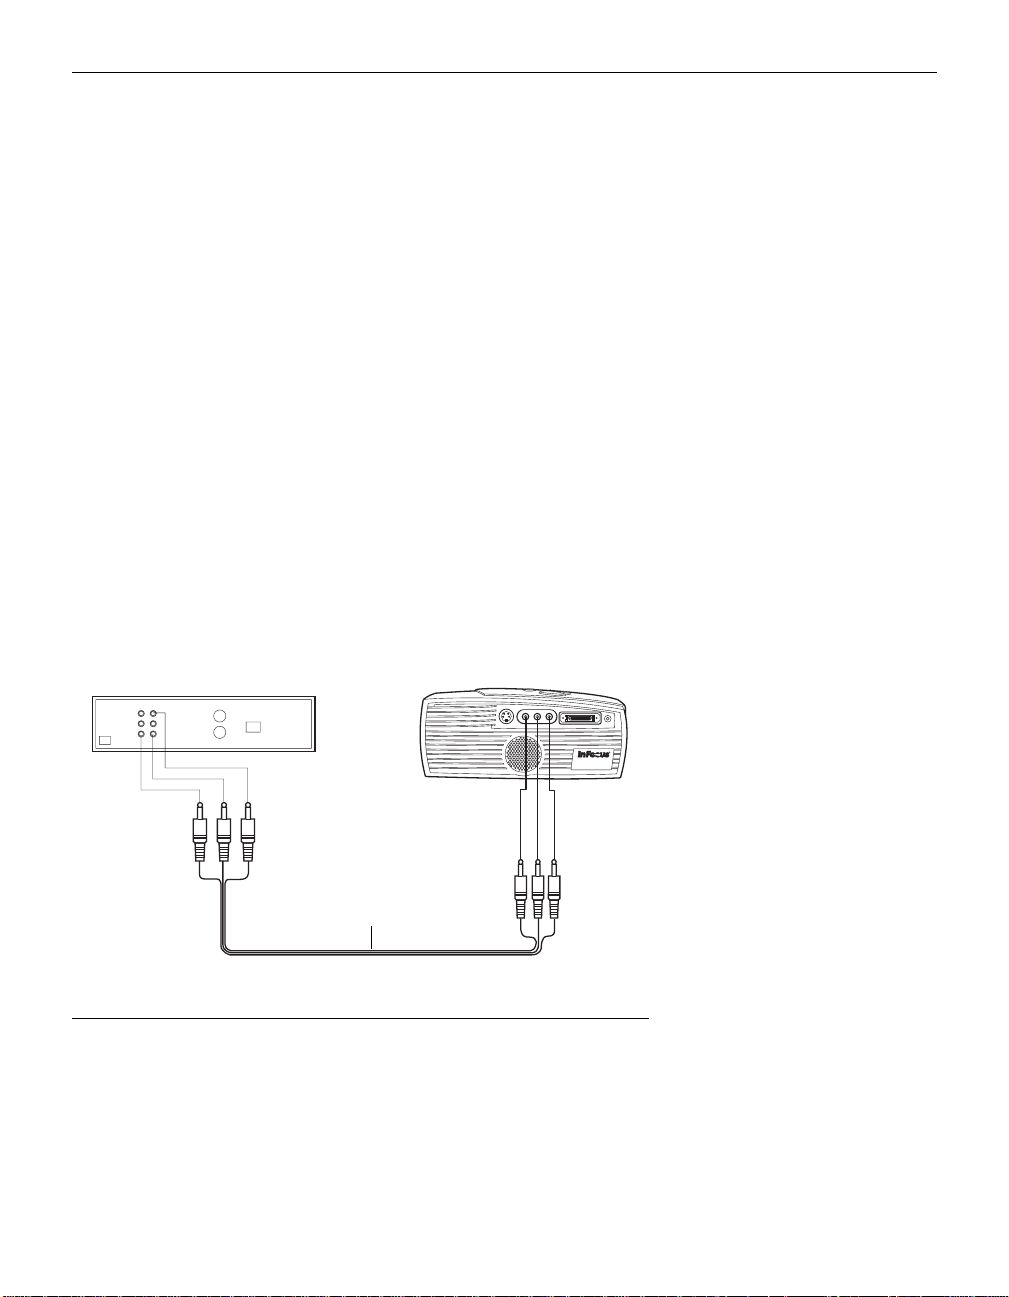
1
connector, you’ll need only the A/V cable that shipped with
the projector.
•
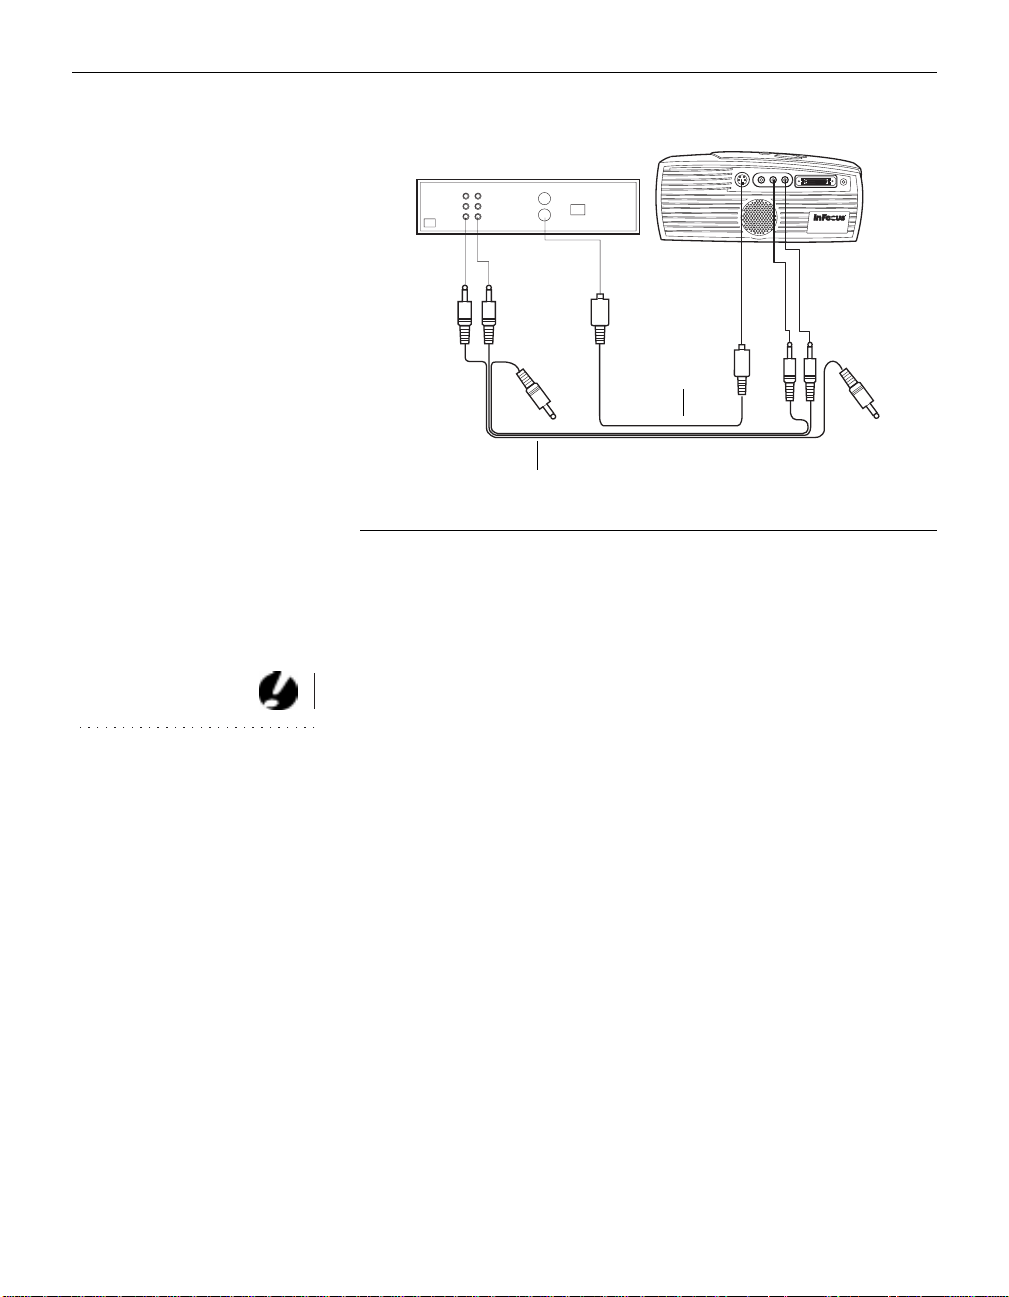
If your video player uses a round, four-prong S-video connector, you’ll need an S-video cable in addition to the A/V
cable. The S-video cable is sold separately. (See “Accessories” on page 35.)
Plug the A/V cable’s yellow connector into the “video-out”
2
port on your video player (Figure 7). This port may be labeled
“To Monitor.”
•
If you’re using an S-video cable, connect it to the “s-video
out” connector on the video player (Figure 8).
Plug the other yellow connector int o the composite connector
3
on the back of the projector.
•
If you’re using S-video, plug the other end of the cable into
the “s-video” connector on the projector (Figure 8).
audio/video cable
FIGURE 7
Connecting the projector to a video player using the standard A/V cable (with composite
video connector)
9
Page 16
Setting up the Projector
S-video cable
A/V cable
IGURE 8
F
Connecting the projector to a video player using an S-video cable and the audio connectors on the standard A/V cable
Plug the A/V cable’s white connector into the left “audio out”
4
port on your video player. Plug the cable’s red connector into
the right “audio out” port on the video player (Figure 7 and
Figure 8).
CAUTION: Your video player
may also have a “Video Out” port
for a coaxial cable connection.
DO NOT use this to connect to the
projector.
10
•
If you’re using an S-video cable, the yellow connectors on
the A/V cable remain unused (Figure 8).
Plug the A/V cable’s other white and red connectors to the
5
left and right “audio in” ports on the projector.
The projector is compatible with these major broadcast video
standards: NTSC, NTSC 4.43, PAL, PAL-M, PAL-N, and SECAM.
It automatically adjusts to optimize its performance for the
incoming video. The input signals for SECAM, PAL-M, and
PAL-N video are similar to other video signals and cannot be
automatically detected, therefore they must be chosen manually.
See “Video Standard” on page 22 for details.
Page 17

Powering up the Projector and Adjusting the Image
Remove the lens cap.
1
Plug the power cord into the side of the projector, then plug it
2
into your electrical outlet. A surge-protected power strip is
recommended if power surges are common in your area.
Turn on the projector.
3
•
The In Focus startup screen displays and the Power LED on
top of the projector lights.
If you connected a video player, turn it on.
4
•
The video image should display on the projection screen. If
a computer source is active, press the
button on the
source
keypad (page 15) to display your video im age. You can
select a default source to determine which source the projector examines first during power-up for active video; see
“Default Source” on page 23.
•
Use the
Turn on your computer.
5
•
The computer image should display on the projection
volume
screen. (If a video sour ce is active, press the
buttons to adjust the volume.
source
button to
display your computer’s imag e.)
NO TE: Alw ays use the po w er cor d
that shipped with the projector.
•
If necessary, make adjustments to the image from the projector’s on-screen menus. To open the menus, press the
button on the keypad, then select the Display or
menu
Image menu. For more information about the menus, see
page 16.
NOTE: With some computers,
the order in which you power up
the equipment is very import ant.
Most computers should be turned
on last, after all other peripherals
have been turned on. Refer to your
computer’s documentation to
determine the correct order.
11
Page 18

Setting up the Projector
Turning Off the Projector
If you want to turn off the projector for a short period of time,
press the
standby
button on the keypad. This blanks the screen for
fifteen minutes, but keeps the projector running. After 15 minutes, the lamp goes out (the projector keeps running). To exit
standby mode, press the
standby
button again. (It takes several
seconds for the projection lamp to reach full power and project
the image again.)
To completely power off the projector, press the “O” side of the
power switch on the side of the projector. If you want to turn the
projector back on immediately, you must allow about a minute
for the lamp to cool. The lamp won’t light if it’s too hot.
CAUTION: When you
disconnect the projector after you
have switched it off, always
remove the power cord from the
electrical outlet first, then remove
it from the projector.
12
Page 19
USING THE PROJECTOR
This section describes how to use and make adjustments to the
projector. It also provides a reference to the keypad buttons and
the options available from the on-screen menus.
Basic Image Adjustment
Make sure you have powered up your equipment in the right
1
order (page 11).
If the image doesn’t display completely, adjust the height of
2
the projector (page 14) or center the image by adjusting its
horizontal or vertical position (page 21). Be sure the projector
is at a 90 degree angle to the screen.
If the image is out of focus, rotate the focus lens (page 13).
3
If the image appears to shimmer or if it has blurry vertical
4
bars after you have adjusted the focus, turn Auto Image
(page 20) off and then back on to reset the automatic sync and
tracking. If that doesn’t clear up the image, turn Auto Image
off adjust the sync (page 21) and/o r the tracking (page 21)
manually.
NO TE: In Focus has created a
software program called In Focus
Presents that automatically optimizes your computer’s display
when used with any In Focus projector. This free program is
included with every projector and
available for download from our
website at www.infocus.com.
If the colors don’t look right, adjust the brightness (page 17).
5
Adjusting the Projecto r
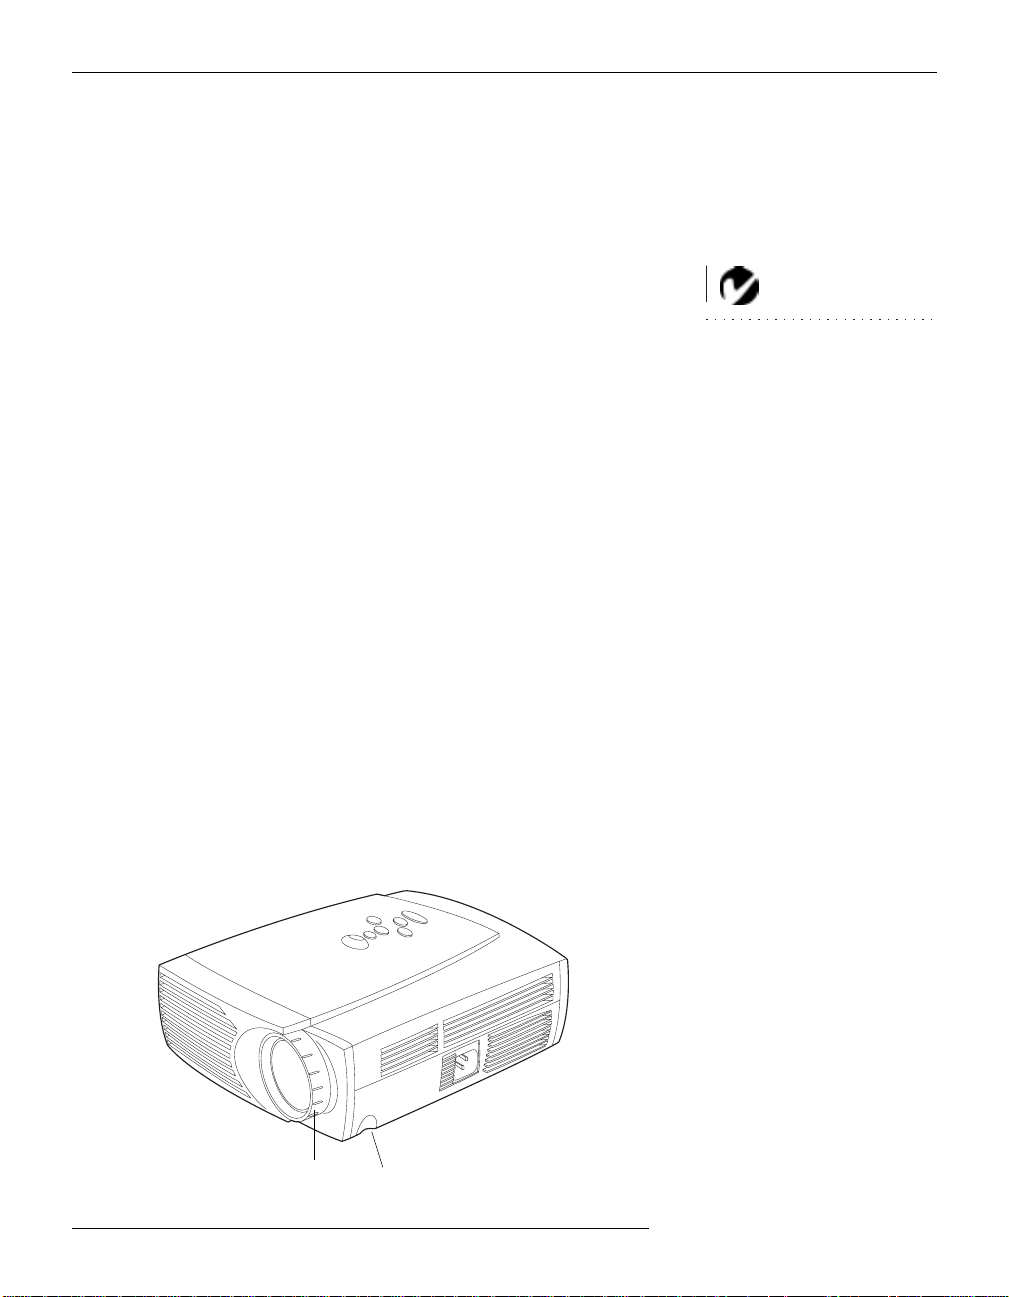
T o focus the image, rotate the focus ring (Figure 9) until the image
is clear.
focus ring
elevator button
FIGURE 9
Focus ring and elevator button
13
Page 20
Using the Projector
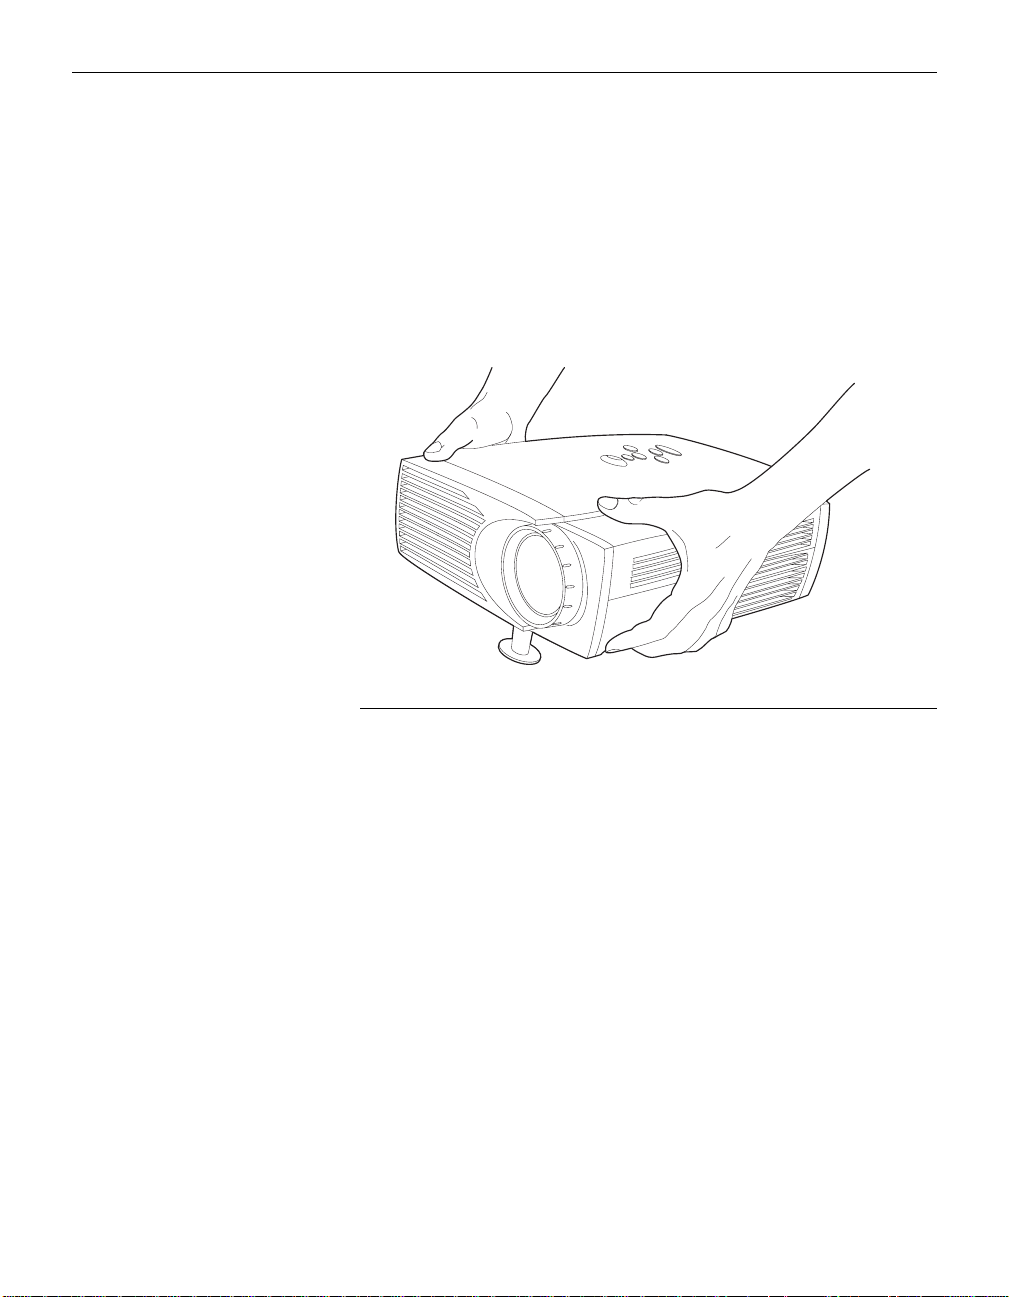
The projector is equipped with a self-locking, quick-release elevator foot and button (Figure 10).
To raise the projector:
Press and hold the elevator button (Figure 9).
1
Raise the projector to the height you want, then release the
2
button to lock the elevator foot into position.
14
FIGURE 10
Adjusting the height of the projector
To lower the projector:
Press the elevator button.
1
Lower the projector.
2
Page 21
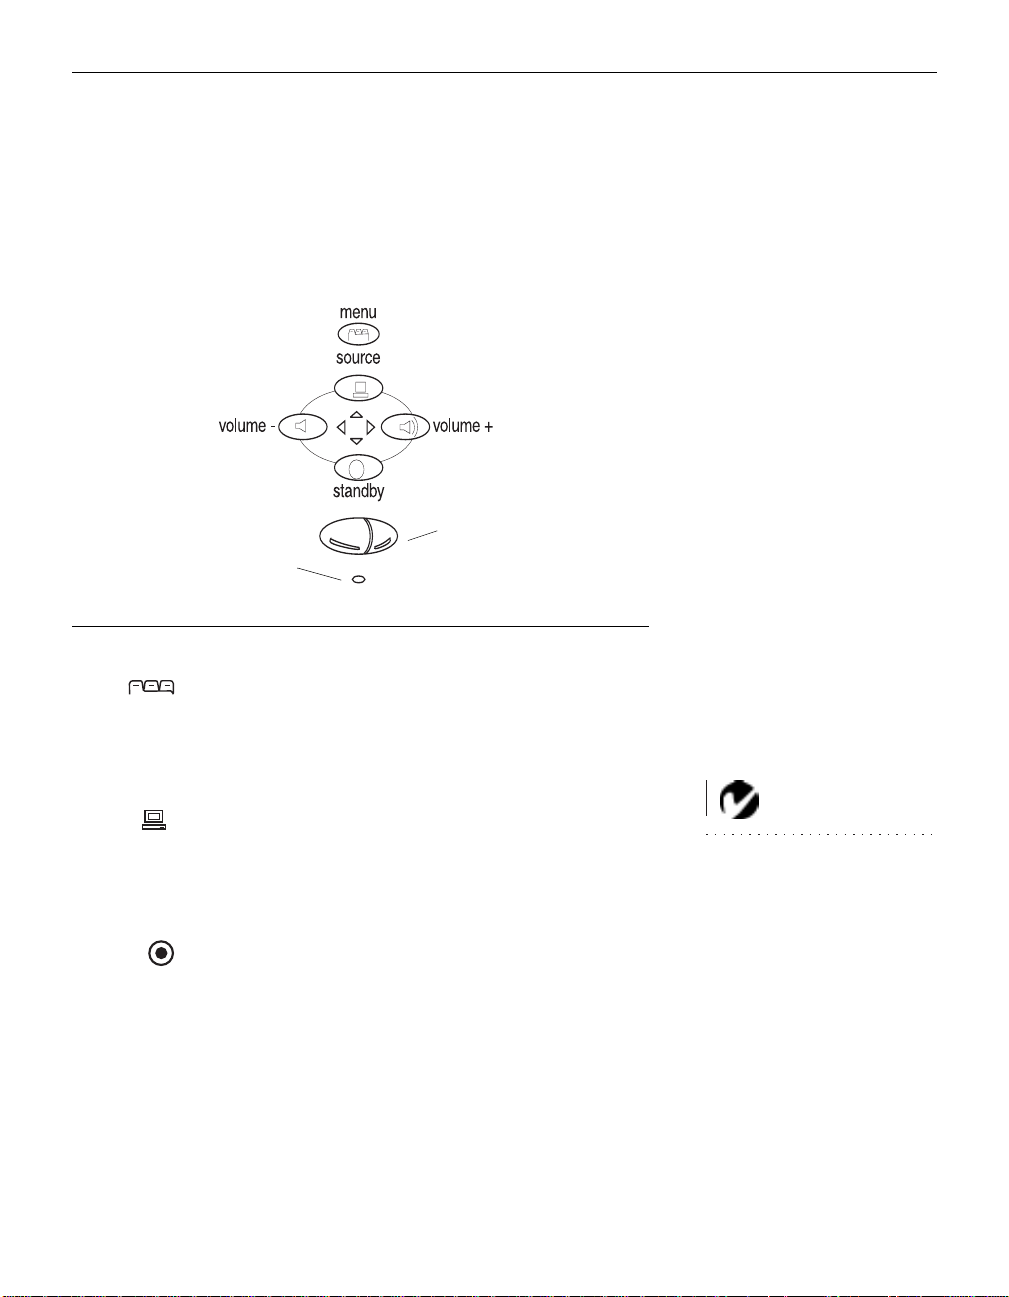
Using the Keypad Buttons
The keypad is lit orange when the projector is on and lit green
while the menus are displayed. While the menus are displayed,
the volume, source, and standby buttons act as naviga tion buttons. See “Using the On-Screen Menus” on page 16 for details.
left/right mouse buttons
power LED
FIGURE 11
Keypad
Menu
Press
green). Press
to open the on-screen menus (the keypad lights
menu
again to close the menus. When you close the
menu
menus, the projector saves any changes you made. For more
information about the on-screen menus, see page 16.
Source
When you have more than one source (computer or LiteShow Pro
and video) connected to the projector, select between them by
pressing the button.
Standby
When you press
standby
, the display and audio turn off and a
blank screen is displayed for 15 minutes.
•
If you press
standby
again within 15 minutes, the projector
returns to normal operations immediately.
•
If you press
standby
again after 15 minutes, there is about a
30 second delay before the lamp turns back on.
•
If you don’t press
standby
again, the lamp turns off after 15
minutes.
NO TE: LiteShow Pr o is an
optional presentation player. Contact your In Focus dealer for more
information.
15
Page 22
Using the Projector
Volume
•
To increase the volume, press
•
To decrease the volume, press
Volume adjustments are saved for each source you have connected.
Using the On-Screen Menus
The projector
has four on-screen menus that allow you to ma ke
image adjustments and change a variety of settings. Most of these
adjustments aren’t available directly from the keypad.
To open the on-screen menus, press the
button on the key-
menu
pad. This changes the volume, source, and standby buttons on
the keypad to menu navigation buttons (and illuminates the keypad green). Press the corresponding buttons to move the cursor
up, down, left, or right. To select a menu, use these buttons to
move the cursor to the tab for the menu you want, then click
either mouse button. To change a menu setting, move the cursor
to the setting you want to change using the navigation buttons,
then use one of the two mouse buttons to make changes. Press
again when you want to close the menus. All changes are
menu
saved when you close the menus.
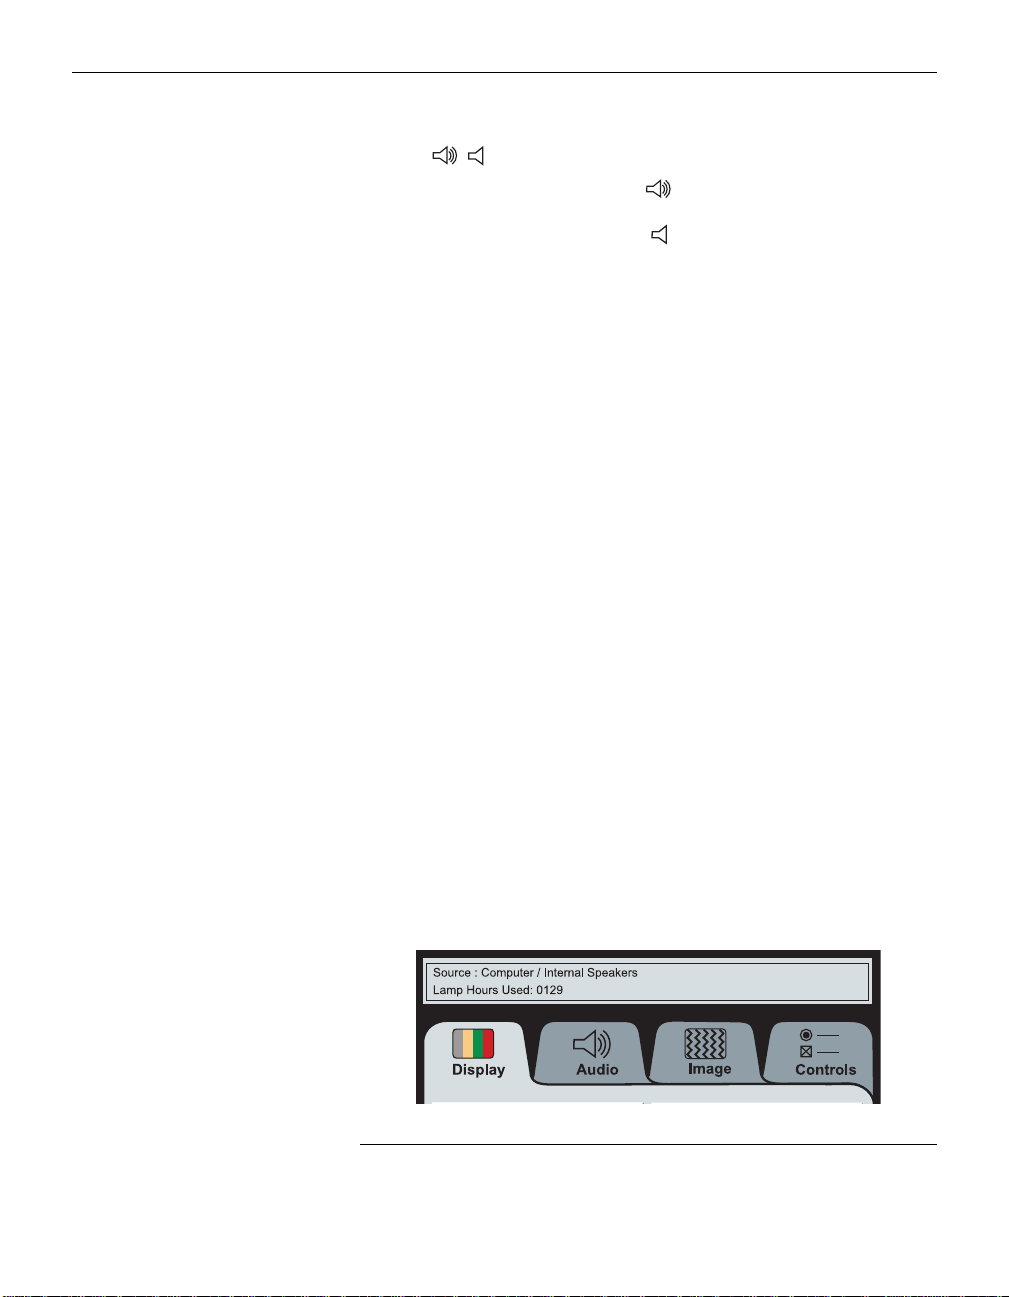
The status bar at the top of the menu display indicates the source
that is currently active (Computer or Video) and any peripherals
that are connected. It also contains a lamp hour counter that
starts at zero hours and counts each hour the lamp is in use.
Change the bulb whe n t he brig h tnes s is no lon ge r acce pt abl e. See
“Replacing the Projection Lamp” on page 25 for details.
16
FIGURE 12
On-screen menu status bar
Page 23
Display Menu Functions
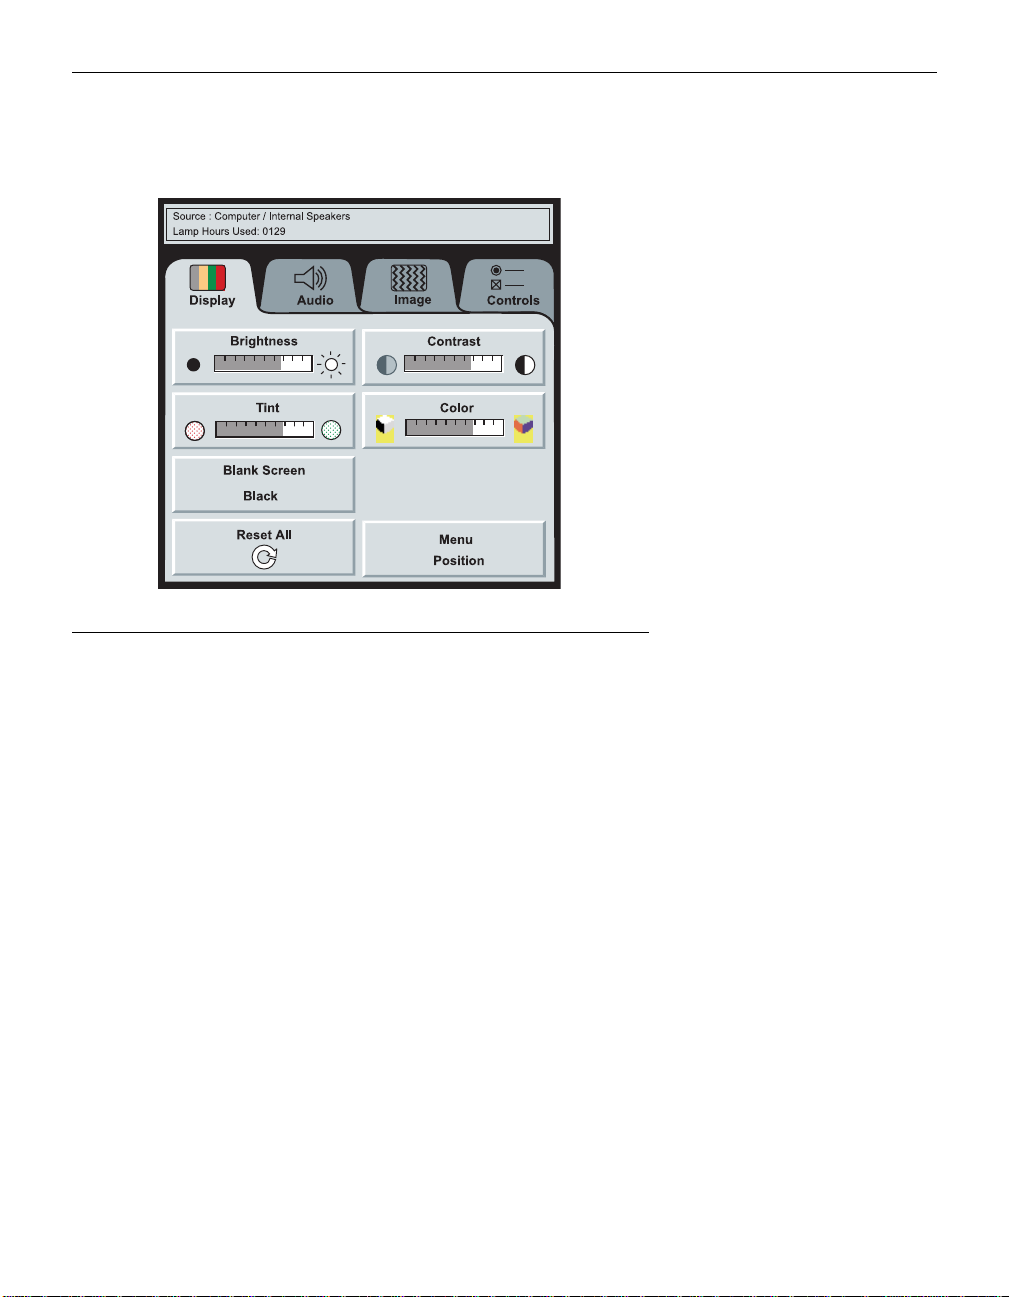
FIGURE 13
Display menu
Brightness
Adjusting the brightness changes the intensity of the image.
•
Press the left mouse button to darken the image.
•
Press the right mouse button to lighten the image.
Contrast
The contrast controls the degree of differ ence between the lightest
and darkest parts of the picture. Adjusting the contrast changes
the amount of black and white in the image.
•
Press the left mouse button to decrease the contrast.
•
Press the right mouse button to increase the contrast, making
the blacks appear blacker and the whites appear whiter.
Tint
The
setting adjusts the red-green color balance in computer
Tint
and NTSC video images.
17
Page 24

Using the Projector
•
Press the left mouse button to increase the amount of green in
the image.
•
Press the right mouse button to increase the amount of red in
the image.
Color
The
setting adjusts a video image from black and white to
Color
fully saturated color.
•
Press the left mouse button to decrease the amount of color in
the image.
•
Press the right mouse button to increase the amount of color in
the image.
Blank Screen
Blank Screen determines what color (blue or black) is displayed
when there is no active source. Click the button to toggle between
the two options.
Reset All
Click either mouse button to reset all the options (except Language and Video Standard) in all the menus to their original settings.
18
Menu Position
This lets you move the menu to various locations on the screen,
allowing you to view different parts of the image while making
adjustments. The default position is the center of the screen. Click
Menu Position to move the menu to the upper-left corner; click it
again to move it to upper-right, then lower right, then lower left,
then center again.
Page 25
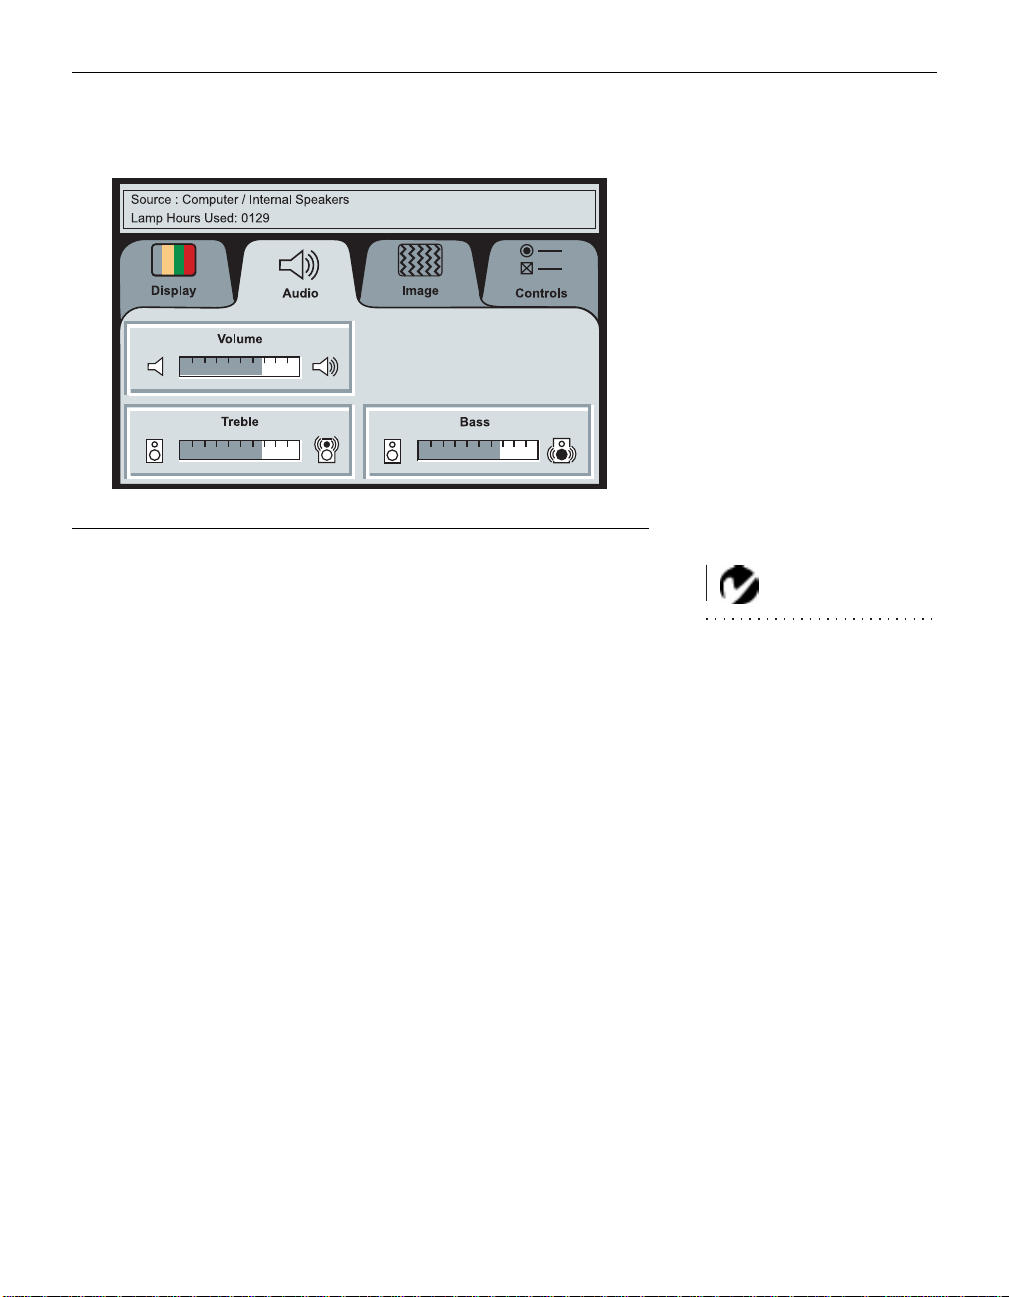
Audio Menu Functions
Volume
•
Press the left mouse button to decrease the volume.
•
Press the right mouse button to increase the volume.
Volume adjustments you make are saved for each source.
Treble
The
setting controls the higher frequencies of your audio
Treble
source.
FIGURE 14
Audio menu
NO TE: Changing the volume
from the menu is the same as
changing it using the keypad.
•
Press the left mouse button to decrease the treble.
•
Press the right mouse button to increase the treble.
Bass
The
setting controls the lower frequencies of your audio
Bass
source.
•
Press the left mouse button to decrease the bass.
•
Press the right mouse button to increase the bass.
19
Page 26
Using the Projector
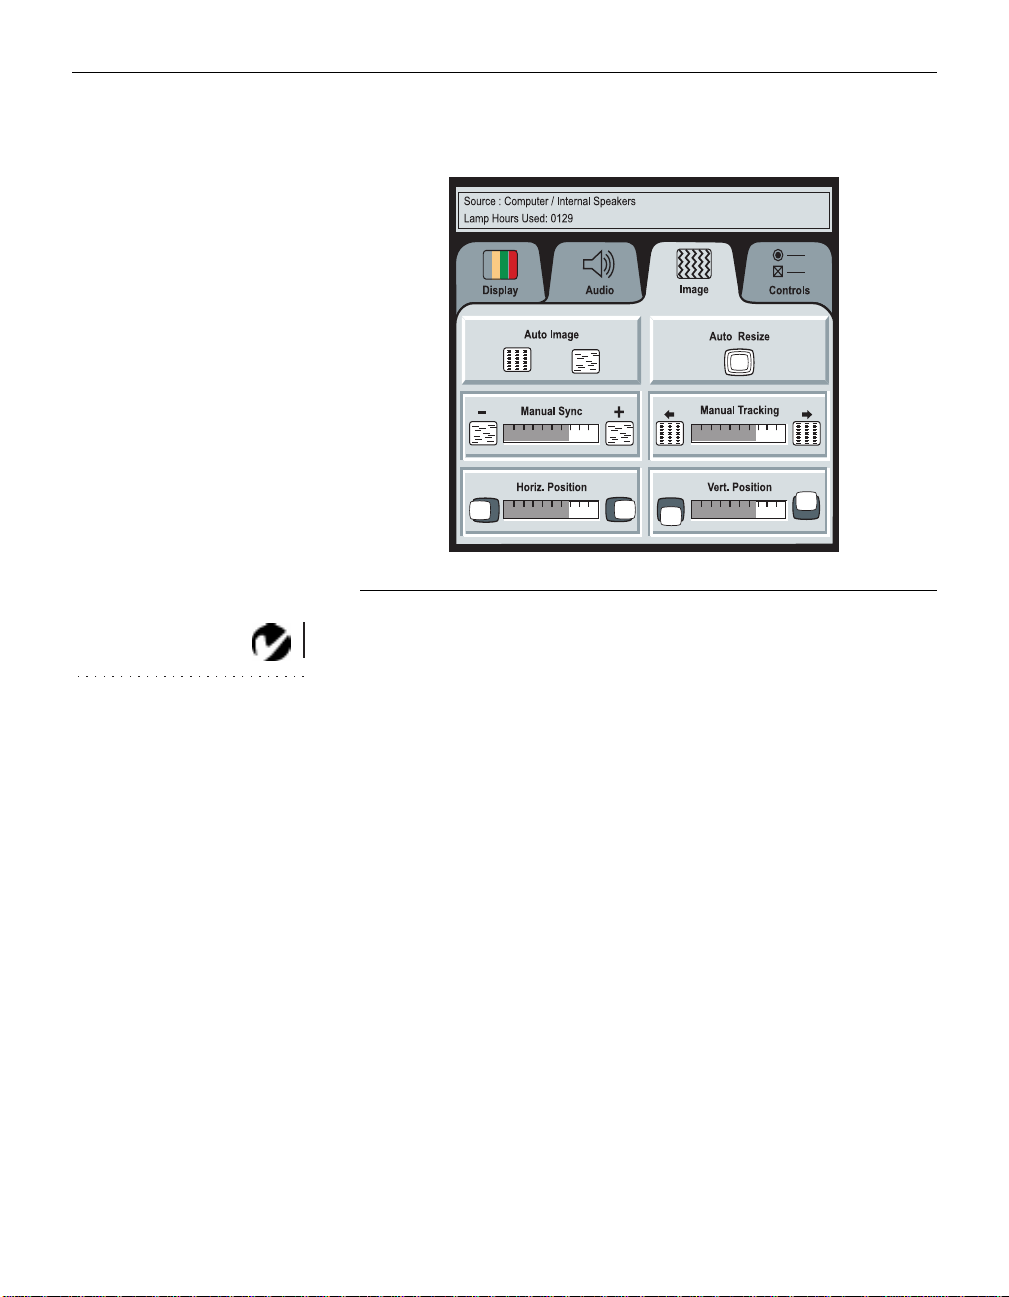
Image Menu F unctions
FIGURE 15
Image menu
NOTE: Some screen savers
interfere with the operation of
Auto Image. If you’re experiencing
problems, try turning your screen
saver off, then turning Auto Image
off and back on.
Auto Image
The projector automatically adjusts tracking, signal synchronization and vertical and horizontal position for most computers. If
you want to adjust these features manually, you must turn off
Auto Image
first by clicking it. Remember, to generate the best
quality image, set your compu ter to output 800 x 600 resolution.
Auto Resize
The
Auto Resize
images.
Auto Resize
setting is available only for computer-generated
automatically resizes the image by scaling it
up or down.
When
Auto Resize
image to the screen. If you turn
is on, the projector makes the best fit of the
Auto Resize
off (by cl icki ng it ), the
image may be either cropped or too small for the screen.
20
Page 27

Manual Sync
The projector adjusts signal synchronization aut omatically for
most computers. But if the projected computer image looks fuzzy
or streaked, try turning
Auto Image
off then back on again. If the
image is still unacceptable, try adjusting the signal synchronization manually:
Click the
1
Press the left or right mouse buttons repeatedly until the
2
Auto Image
button to turn Auto Image off.
image is sharp and free of streaks.
Manual Tracking
The tracking function adjusts the projector to match the video
signal from your computer. The projector usually adjusts the
tracking automatically when you connect your computer. However, if the display shows evenly spaced, fuzzy, vertical lines or if
the projected image is too wide or too narrow for the screen, try
turning
Auto Image
off then back on again. If the image is still
unacceptable, try adjusting the tracking manually as described
below.
Click the
1
Press the left or right mouse buttons repeatedly until the
2
Auto Image
button to turn Auto Image off.
fuzzy vertical bars are gone.
Horiz. Position
Follow these steps to manually adjust the horizontal position.
Click the
1
Press the left mouse button to move the image right; press the
2
Auto Image
button to turn Auto Image off.
right mouse button to move the imag e le ft.
NOTE: The Manual Sync,
Manual Tracking, Horiz. Position and Vert. Position buttons
are available only for computer
sources. The projector sets these
options automatically for a video
source.
Positioning adjustments are saved when you power off the projector.
Vert. Position
Follow these steps to manually adj ust the vertical position.
Click the
1
Press the left mouse button to move the image down; press
2
Auto Image
button to turn Auto Image off.
the right mouse button to move the image up.
Positioning adjustments are saved when you power off the projector.
21
Page 28
Using the Projector
Controls Menu Functions
NOTE: If you already know the
video standard used in your
geographical area, it’s often best to
manually select it.
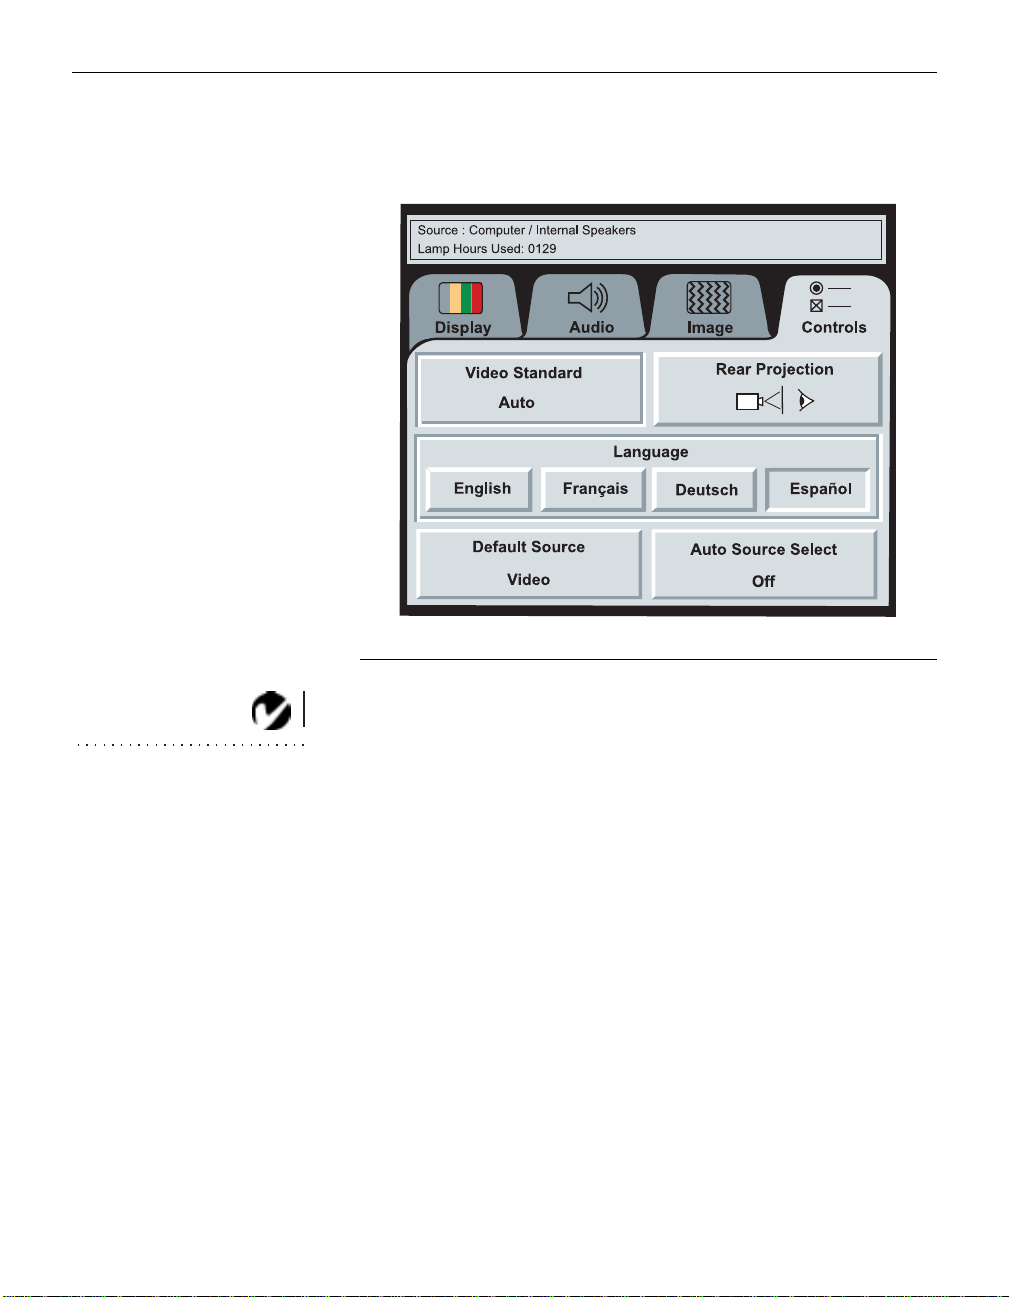
FIGURE 16
Controls menu
Video Standard
When
is on, the projector attempts to pick the video stan-
Auto
dard (NTSC, NTSC 4.43, PAL, PAL-M, PAL-N, or SECAM) automatically based on the input signal it receives. (The video
standard options may vary depending on your region of the
world.) The input signals for SECAM, PAL-M, and PAL-N video
cannot be automatically detected, therefore they must be chosen
manually. If the projector is unable to detect the standard, the colors might not look right or the image might appear “torn.” If this
happens, manually select a video standard by clicking the button
and cycling through the standards.
Language
You can display the on-screen menus in English, French, German,
and Spanish. The default is English.
•
Click the button for the language you want. The menus redraw
immediately.
22
Page 29

Rear Projection
When you select
Rear Proje c tion
, the projector r everses the image
so you can project from behind a translucent screen.
Default Source
Default Source toggles between Computer and Video. This determines which source the projector checks first during power-up
for active video. Click the button to toggle between the options.
Auto Source Select
This setting toggles between On and Off. When this feature is Off,
the projector defaults to the source selected in Default Source. To
display another source, you must manually select one by pressing the
computer
or
button on the keypad. When this fea-
video
ture is On, the projector automatically finds the active source,
checking the default source first. Click the button to toggle
between the options.
23
Page 30

MAINTENANCE & TROUBLESHOOTING
This section describes how to:
•
clean the lens
•
replace the projection lamp
•
use the Kensington lock feature
•
troubleshoot the projector
Cleaning the Lens
Follow these steps to clean the projection lens:
Apply a non-abrasive camera lens cleaner to a soft, dry cloth.
1
•
Avoid using an excessive amount of cleaner.
•
Abrasive cleaners, solvents or other harsh chemicals might
scratch the lens.
Lightly wipe the cleaning cloth over the lens.
2
If you don’t intend to use the projector immediately, replace
3
the lens cap.
Replacing the Projection Lamp
The lamp hour counter on the status bar at the top of the menus
counts the number of hours the lamp has been in use. The LP 420
uses a metal halide bulb. These types of bulbs deteriorate over
time. Replace the lamp when the brightness is no longer acceptable. You can order new lamp modules from your In Focus
dealer. See “Accessories” on page 35 for information.
Follow these steps to replace the projection lamp:
Turn off the projector and unplug the power cord.
1
Wai t 30 minutes to allow it to cool thoroughly.
2
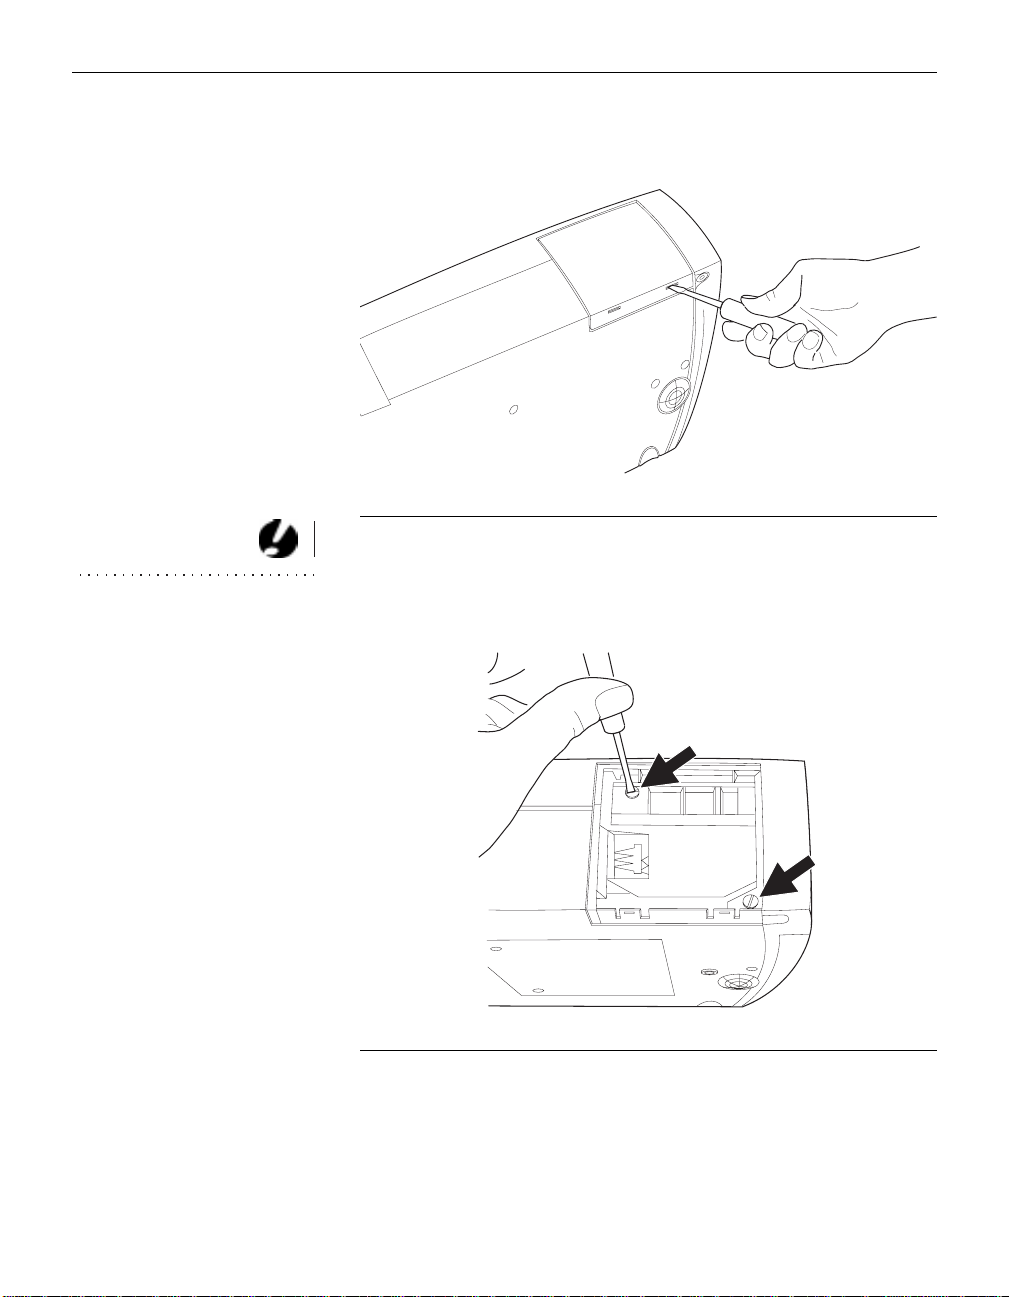
Place the projector on its side, then insert a small screwdriver
3
or other flat object into the tabs on the lamp module door (Figure 17).
WARNING: To avoid burns,
allow the projector to cool for at
least 30 minutes before you open
the lamp module door. Never
extract the lamp module while the
lamp is operating.
25
Page 31
Maintenance & Troubleshooting
Pull the lamp door up and remove it.
4
FIGURE 17
Removing the lamp door
Loosen the two non-removable screws on the outside of the
5
CAUTION: Never operate the
projector with the lamp door open
or removed. This disrupts the air
flow and causes the projector to
overheat.
module.
26
FIGURE 18
Loosening the screws on the lamp module
Page 32
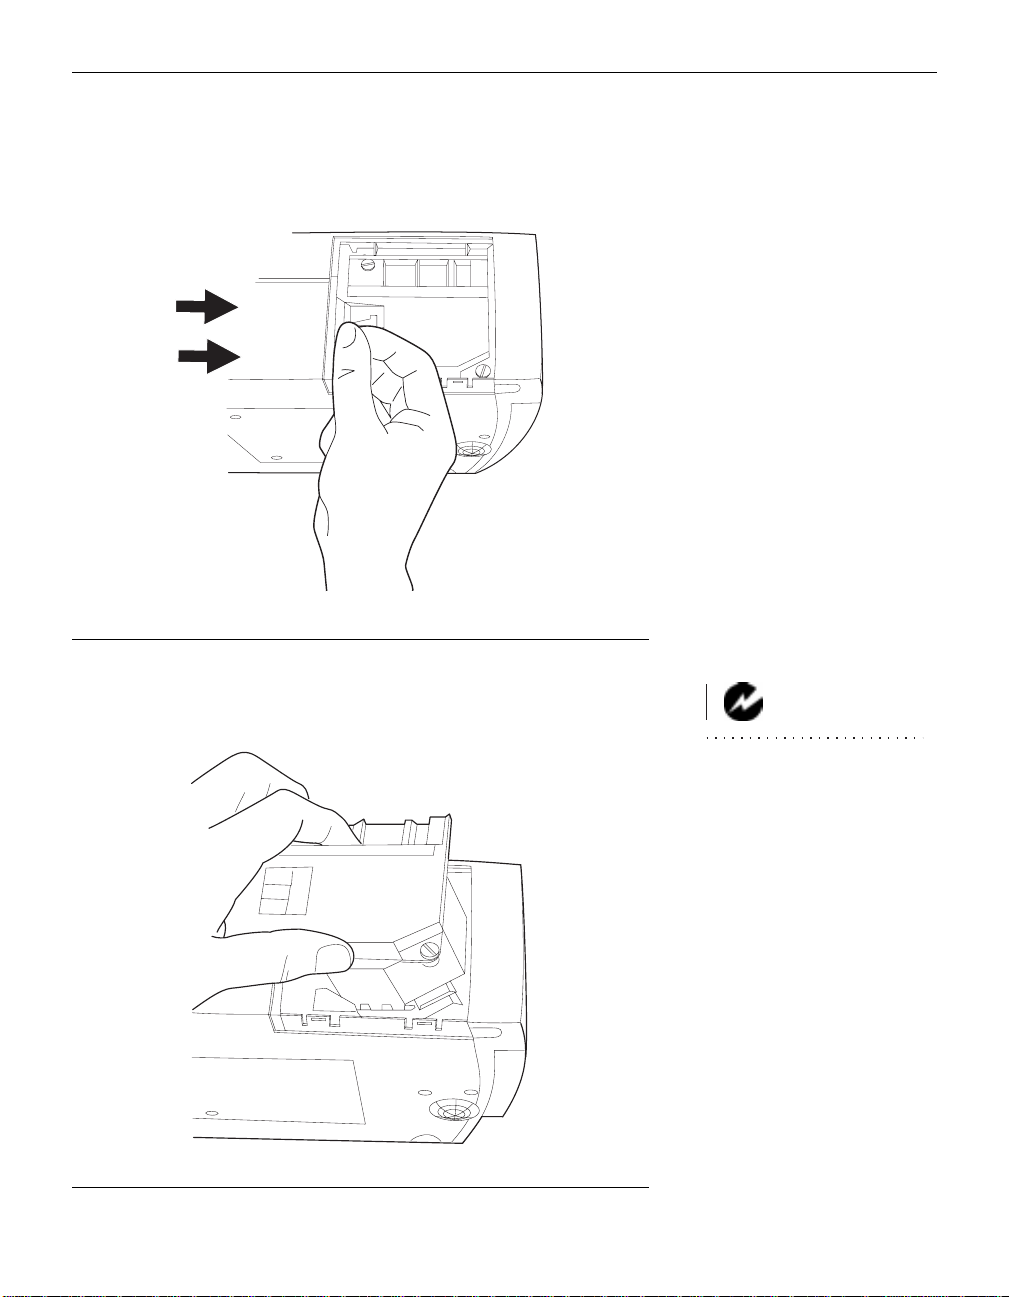
Slide the lamp connector to the right to disconnect it from the
6
projector (Figure 19).
FIGURE 19
Sliding the lamp connector
Remove the module (Figure 20).
7
F
IGURE 20
Removing the lamp module
WARNING: Do not drop the
lamp module or touch the glass
bulb! The glass may shatter and
cause injury.
27
Page 33
Maintenance & Troubleshooting
Align the new lamp module in the correct direction.
8
Gently push the module in as far as it goes.
9
Tighten the screws on the outside of the module.
10
Slide the lamp connector to the left to re-attach it.
11
Insert the tabs at the top of the lamp door into the projector
12
and press the lamp door into place.
Plug in the power cord and turn the projector back on.
13
To reset the lamp hour counter in the Status bar, press and
14
hold the left mouse button, then press the menu button (while
still holding down the mouse button) for 5 seconds. Verify
that the counter was reset by pressing the menu button and
viewing the counter.
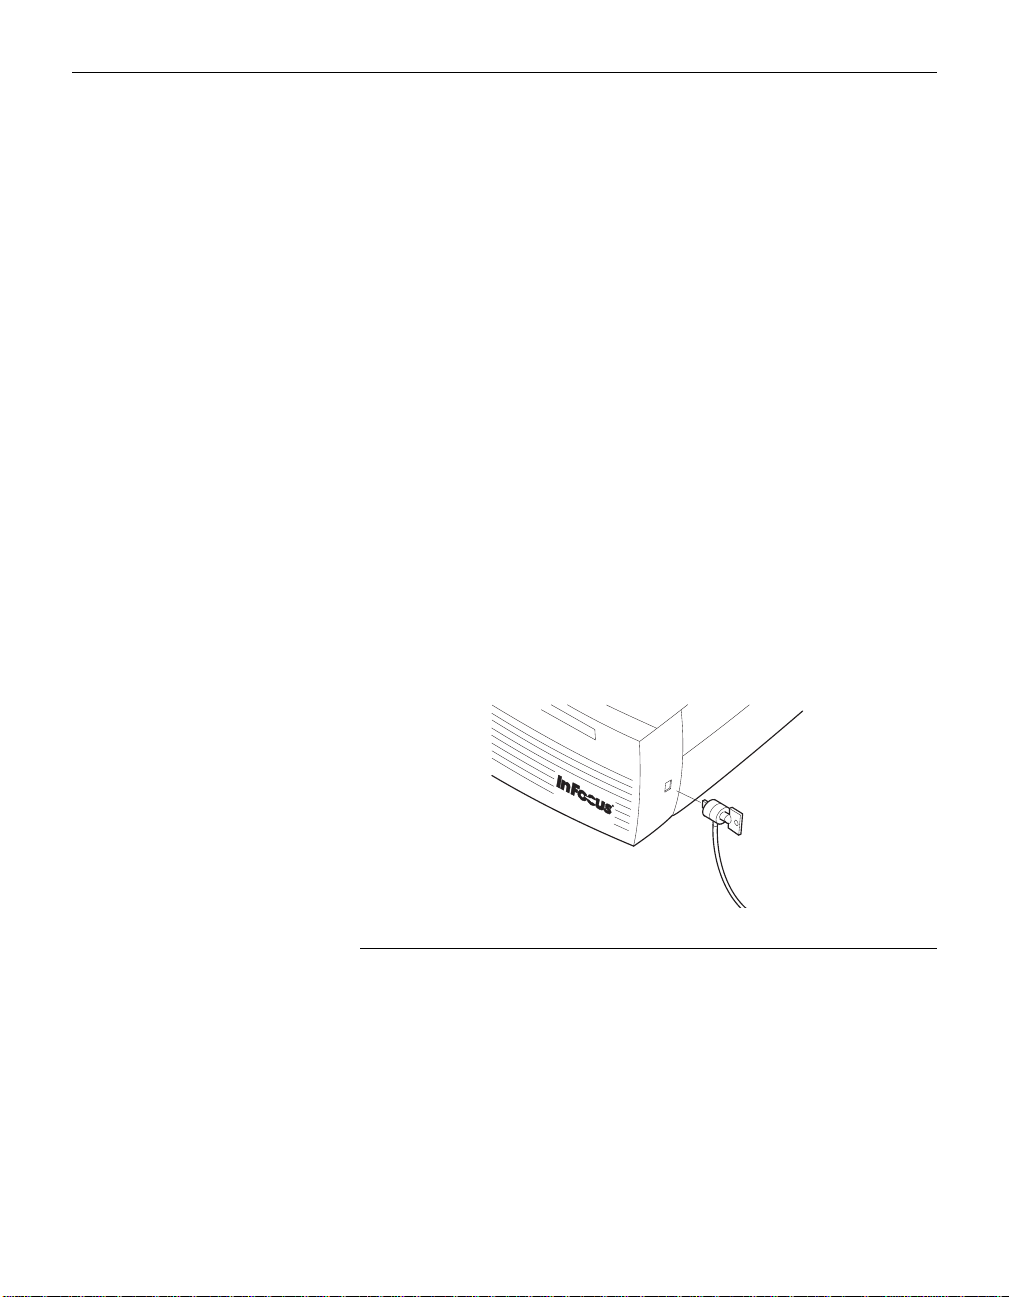
Using the Kensington Lock
The projector has a Kensington Security Standard connector for
use with a Kensington MicroSaver Security System (Figure 21).
Refer to the information that came with the Kensington System
for instructions on how to use it to secure the projector.
28
FIGURE 21
Installing the Kensington lock
Page 34

Troubleshooting
Problem: Nothing on projection screen
•
Make sure that the power cord is properly conn ected to a func-
tional AC electrical outlet. Make sure that the power cord is
also properly connected to the projector.
•
If the projector is plugged into a power strip, make sure the
power strip is turned on.
•
Make sure you have removed the lens cap on the projection
lens at the front of the projector.
•
Make sure the projector is switched on.
•
Check the projector’s lamp to ensure that it is securely con-
nected in the lamp module. See “Replacing the Projection
Lamp” on page 25.
•
Make sure that the cables do not have any bent pins.
Problem: Color or text not being projected
•
You m ight need to adjust the brightness up or down until the
text is visible. Refer to “Brightness” on page 17 for more information.
Problem: The screen resolution is not right
•
Make sure the computer’s video card is set for a resolution of
no greater than 1024x768. A resolution of 800x600 yields the
highest quality image.
Problem: Image isn’t centered o n the screen
•
Reposition the image. Refer to “Horiz. Position” on page 21
and “Vert. Position” on page 21.
•
Be sure the projector is at a 90 degree angle to the screen.
Problem: Only the start-up screen displays
•
Verify that the cables are connected correctly. See page 7
through page 9 for connection procedures.
•
Verify that the proper input source is connected. See “Source”
on page 15.
29
Page 35

Maintenance & Troubleshooting
•
You might need to turn everything off and power up the
equipment again in the proper order. Refer to your computer’s documentation to determine the correct order.
•
Make sure your laptop’s external video port is turned on. See
the “Portable and Laptop Activation Chart” on page 37 or
your computer’s manual for details.
•
Make sure your computer’s video board is installed and con-
figured correctly.
If you’re using Windows 3.x:
In the Windows Program Manager, double-click the Win-
1
dows Setup icon in the Main program group.
Verify that the Display setting is 1024x768 or less.
2
If you’re using Windows 95:
Open “My Computer” icon, the Control Panel folder and
1
then the Display icon.
Click the Settings tab.
2
Verify that the Desktop area is set to 1024x768 or less.
3
Also check the following:
•
Does your computer have a compatible video board? The pro-
jector isn’t CGA or EGA compatible.
•
Is your computer’s video port activated? This is especially
true for laptop computers. See “Portable and Laptop Activation Chart” on page 37.
Problem: Image is too wide or narrow for screen
•
You might need to manually adjust the tracking to reduce or
enlarge the projected image. Refer to “Manual Tracking” on
page 21.
•
Adjust the resolution of your video card if it’s greater than
1024x768 pixels.
30
Page 36

Problem: Image is out of focus
•
Turn the projection lens to focus the image.
•
Make sure the projection screen is at least 5 feet (1.5 m) from
the projector.
•
Check the projection lens to see if it needs cleaning.
Problem: Image and menus are reversed left to right
•
Rear projection mode is probably turned on. Turn Rear Projec-
tion off in the Controls menu. The image should immediately
return to forward projection. See “Rear Projection” on
page 23.
Problem: the projector displays vertical lines, “bleeding” or
spots
•
Adjust the brightness. See “Brightness” on page 17.
•
Check the projection lens to see if it needs cleaning.
Problem: no sound
•
Adjust volume.
•
Verify audio/input connections.
•
Adjust audio source.
Problem: Image is “noi sy” or streaked
Try these steps in this order.
Deactivate the screen saver on your computer.
1
2
Turn
Auto Image
off and then back on again. See “Auto
Image” on page 20.
Adjust the synchronization and trac king manually to find an
3
optimal setting. See “Manual Sync” on page 21 and “Manual
Tracking” on page 21.
•
The problem could be with your computer’s video card. If
possible, connect a different computer.
31
Page 37

Maintenance & Troubleshooting
Problem: Pro jected colors don’ t match the com puter or vid eo
player’s colors
•
Adjust the brightness, tint and/o r contrast from the Display
menu. Just as there are differences in the displays of different
monitors, there are often differences between the computer
image and the projected image. See “Brightness” on page 17,
“Tint” on page 17 and “Contrast” on page 17.
Problem: Lamp seems to be getting dimmer
•
The lamp begins to lose brightness when it has been in use for
a long time. Replace the lamp as described in “Replacing the
Projection Lamp” on page 25.
Problem: Lamp shuts off
•
A minor power surge may cause the lamp to shut off. Turn the
projector off, wait at least a minute, then turn it back on.
Before calling your dealer or In Focus Technical Support for assistance, please have the following information available:
32
•
the projector’s serial number (located on the bottom label)
•
the resolution of your computer.
Call In Focus Technical Support at
1-800-799-9911
between 5 a.m.
and 5 p.m. PST, Monday through Friday.
Page 38

APPENDIX
Specifications
The LP 420 must be operated and stored within the temperature
and humidity ranges specified.
Tem p e r at u re
Operating
Non-operating
Humidity
Operating and non-oper. 5% to 95% relative humidity, non-condensing
Dimensions
4.0 x 9.3 x 11.8 inches (10.3 x 23.8 x 30.3 cm)
Weight
6.8 lbs. (3.1 kg) unpacked
Altitude
Operating 0 to 10,000 feet (3,048 meters)
Non-operating 0 to 40,000 feet (12,192 meters)
50 to 104° F (10 to 40° C)
-4 to 158
° F (-20 to 70° C)
Optics
Focus Range 5.0 - 16 feet (1.5-5 m)
Lamp
Type 270-watt metal halide
Input Power Requirements
100/120V, 6.0/6.0A, 50/60 Hz
230V, 3.0A, 50 Hz
33
Page 39

Appendix
Video Audio Input
Input Impedance 5K ohm DC coupled
Maximum Input Voltage (L
+ RIN)
IN
< 4.5 V for THD ≤ 0.3%
PEAK
LIN or RIN < 2.0 Vrms for THD ≤ 0.3%
Sensitivity 100 mV at 1 KHz for 88 dB SPL at 1 meter
Connector Type RCA jack
Computer Audio Input
Input Impedance 10K ohm nominal, AC coupled
Maximum Input Voltage (LIN + RIN)
< 4.5 V for THD ≤ 0.3%
PEAK
LIN or RIN < 2.0 Vrms for THD ≤ 0.3%
Sensitivity 100 mV at 1 KHz for 88 dB SPL at 1 meter
Connector Type 3.5 mm (1/8 inch) stereo phone jack
34
Page 40

Accessories
Standard Accessories
(ship with the projector) Part Number
LP 420 Quick Start card 009-0314-xx
LP 420 User’s Guide 010-0140-xx
Soft Case 110-0190-xx
Shipping Box 110-0186- xx
CableWizard Lite computer cable 6.5 ft (2 m) SP-CW2LITE
Macintosh adaptor 515-0045-xx
Audio Cable 6 ft (1.8 m) 210-0118-xx
Projection Lamp Module SP-LAMP-LP4
Lens Cap 505-0235-xx
Audio/Video Cable 210-0053-xx
Online User’s Guide CD-ROM 010-0116-xx
Power Cords (one ships with projector, type depends on country)
North American Power Cord 210-0023-xx
Australian Power Cord 210-0027-xx
UK Power Cord 210-0028-xx
European Power Cord 210-0029-xx
Danish Power Cord 210-0030-xx
Swiss Power Cord 210-0031-xx
NO TE: Use only In Focusapproved accessories. Other products have not been tested with the
projector .
35
Page 41

Appendix
Optional Accessories
Personal Plus Accessory Pack, includes: SP-PP-LP4
Deluxe Soft Case (CA-C132)
CableWizard 2 (SP-CW2)
2-button remote (HW -EXREM)
Deluxe Soft Case CA-C132
ATA Travel Case CA-C134
Executive Leather Case CA-C133
CableWizard 2 SP-CW2
CableWizard Extension Cable, non-ple-
SP-CW2EXT
num rated, 60.7 ft (18.5 m)
CableWizard Extension Cable, plenum-
SP-CW2EXTP
rated, 60.7 ft (18.5m)
2-button remote HW-EXREM
Full-Feature Smart Remote Control HW-SM ART
LiteShow Pro Presentation Player HW-LSPRO
LiteShow Pro Soft Case CA-C131
32 MB Memory Upgrade HW-MEM-LSP
Kensington MicroSaver Security System SP- KENLOC
Tripod Mount SP-TRIP-LP4
Portable Projector Stand SP-STND
S-Video Cable 515-0027-xx
nd
Year Advantage Service Plan
2
AS-LP4xx-12
(1 year extension)
rd
3
Year Advantage Service Plan
AS-LP4xx-24
(2 year extension)
36
Page 42

Portable and Laptop Activation Chart
Many laptop computers do not automatically turn on their external video port when a secondary display device such as a projector is connected. Activation commands for some laptop
computers are listed in the following table. (If your computer is
not listed or the given command does not work, refer to the computer’s documentation for the appropriate command.) On some
laptops, the activation function key is labeled with an icon, for
example or the text CRT/LCD.
K ey command to
Computer
Acer Ctrl-Alt-Esc (for setup) Ctrl-Alt-Esc (for setup)
AST* ** FN-D or Ctrl-D FN-D or Ctrl-D
AMS FN-F2 FN-F2
AMT setup screen setup screen
AT&T FN-F3
Advanced Logic
Research
Altima Shift-Ctrl-Alt-C Shift-Ctrl-Alt-L
Ambra** FN-F12 FN-F12
Amrel* ** setup menu setup menu
Apple see Mac Portable and Mac PowerBook
Aspen automatic automatic
activate port
Ctrl-FN-D Ctrl-FN-D
FN-F5 FN-F5
type from A:/IVGA/CRT type from A:/IVGA/CRT
FN-F12 FN-F12
FN-F6
Ctrl-Alt-V Ctrl-Alt-V
setup VGA/
Conf.Simulscan
FN-F5 FN-F5
F2/Choose Option/F5 F2/Choose Option/F5
Shift-Ctrl-D Shift-Ctrl-D
K ey command to
de-activate port
FN-F3
FN-F6
setup VGA/
Conf.Simulscan
NO TE: Often, pressing the key
commands once activates the
external video port, pressing it
again activates both the external
and internal ports, and pressing it
a third time activates the internal
port. Refer to your computer’s documentation for details on your specific model.
37
Page 43

Appendix
K ey command to
Computer
Austin Ctrl-Alt-comma Ctrl-Alt-comma
Award FN-F6 FN-F6
BCC* automatic reboot computer
Bondwell LCD or CR T options after
Chaplet** setup screen setup screen
Chembook FN-F6 FN-F6
Commax Ctrl-Alt-#6 Ctrl-Alt-#5
Compaq* ** Ctrl-Alt-< Ctrl-Alt->
Compuadd* ** automatic automatic
Data General Ctrl-Alt-Command Ctrl-Alt-Command
Data General
Walkabout
Datavue Ctrl-Shift-M Ctrl-Shift-M
DEC** FN-F5 FN-F5
Dell** Ctrl-Alt-< Ctrl-Alt->
Digital* automatic reboot
Dolch dip switch to CRT dip switch to LCD
Epson dip switch to CRT dip switch to LCD
activate port
bootup
FN-F6 FN-F6
FN-F4 FN-F4
FN-F4 FN-F4
automatic automatic
mode/? (for setup option) mode/? (for setup option)
Alt-F for screen setup
option
2 CRT/X at DOS prompt reboot
FN-F4 FN-F4
Ctrl-Alt-F10 Ctrl-Alt-F10
FN-F8 (CRT/LCD) FN-F8
FN-D FN-D
FN-F12 FN-F12
FN-F2 FN-F2
K ey command to
de-activate port
reboot for LCD or CRT
options to appear
Alt-F for screen setup
option
38
Page 44

K ey command to
Computer
Everex* setup screen option setup screen option
For-A Ctrl-Alt-Shift-C Ctrl-Shift-Alt-L
Fujitsu FN-F10
Gateway FN-F3
Grid* ** FN-F2, choose auto or
Hitachi FN-F7 FN-F7
Honeywell FN-F10 FN-F10
Hyundai setup screen option setup screen option
IBM 970* automatic warm reboot
IBM ThinkPad** reboot, enter setup menu FN-F2
Infotel FN-F12 FN-F12
Kaypro boot up, monitor plugged inunplug monitor
activate port
FN-F1/FN-F1 again simultaneous
simultaneous
Ctrl-Alt-Tab Ctrl-Alt-Tab
FN-F7, select choice from
setup menu
FN-F1, select choice
FN-F5, select choice
PS/2 SC select choice
(CRT, LCD, etc.)
K ey command to
de-activate port
FN-F3
FN-F1
FN-F2
Kris Tech FN-F8 FN-F8
Leading Edge FN-T FN-T
Mac Portable
100
Mac PowerBook
140, 145, 150,
170
160, 165, 180,
520, 540, 5300
210, 230, 250,
270, 280, 2300
no video port: not compatible
no video port: requires a 3rd-part y interface
Contro l Pa ne l f old er, Pow erBook Display folder;
Activate Video Mirroring
requires Apple Docking Station or Mini Dock
warm reboot
39
Page 45

Appendix
K ey command to
Computer
Magitronic FN-F4 FN-F4
Mastersport FN-F2 FN-F1
Micro Express* automatic warm reboot
Micron FN-F2 FN-F2
Microslate* automatic warm reboot
Mitsubishi SW2 On-Off-Off- Off SW2 Off-On-On-On
NCR setup screen option setup screen option
NEC* ** setup screen option setup screen option
Olivetti* automatic automatic
Packard Bell* ** FN-F0 FN-F0
Panasonic FN-F2 FN-F2
Prostar Ctrl-Alt-S at bootup Ctrl-Alt-S at bootup
Samsung* setup screen option setup screen option
Sanyo setup screen option setup screen option
Sharp dip switch to CRT dip switch to LCD
Sun SPARC-
Dataview
Tandy** Ctrl-Alt-Insert Ctrl-Alt-Insert
Tangent FN-F5 FN-F5
Texas Instru-
ments*
Top-Link* ** setup screen option setup screen option
Toshiba* ** Ctrl-Alt-End Ctrl-Alt-Home
activate port
CRT at the DOS prompt LCD at the DOS prompt
FN-F3 FN-F3
FN-O/* FN-O/*
Ctrl-Alt-< Ctrl-Alt->
Ctrl-Shift-M Ctrl-Shift-M
setup screen option setup screen option
setup screen option setup screen option
FN-F6 FN-F6
FN-End FN-Home
FN-F5 FN-F5
setup screen option setup screen option
K ey command to
de-activate port
40
Page 46

K ey command to
Computer
Twinhead* FN-F7 FN-F7
WinBook Ctrl-Alt-F10 Ctrl-Alt-F10
Wyse software driven software driven
Zenith** FN-F10 FN-F10
Zeos** Ctrl-Shift-D
* These manufacturers have models that automatically send video
to the external CRT port when some type of display device is
attached.
** These manufacturers offer more than one key command depend-
ing on the computer model.
activate port
FN-F5 FN-F5
Automatic Automatic
FN-F2 FN-F2
FN-F1 FN-F1
FN-F1
K ey command to
de-activate port
Ctrl-Shift-D
FN-F1
41
Page 47

Appendix
Using Video Mirroring with a PowerBook Computer
When you turn video mirroring (called SimulScan in newer PowerBooks-see below) on, the projector displays the same information that appears on your PowerBook’s built-in screen. When
video mirroring is off, the projector acts like a separate display.
To turn on video mirroring for the first time:
Open the Monitors control panel; click on Monitor 2.
1
Set the number of colors you want.
2
Open the Control Strip; click on the monitor icon.
3
Select “Turn Video Mirroring On.”
4
Now you can turn video mirroring on and off from the Control
Strip without having to open the Monitors control panel again.
When using video mirroring and high color graphics such as
slide shows, the projected image occasionally might turn black
and white. If this happens, perform the following steps:
Turn off video mirroring.
1
Open the Monitors control panel.
2
Move the white menu bar to Monitor 2 to set the projector as
3
the primary monitor.
Restart the PowerBook.
4
Using SimulScan
Some newer PowerBooks display images on an external monitor
or projector differently than previous ones. When using
SimulScan, the projector displays the same information that
appears on your PowerBook
To select Sim ulScan:
Open the Control Panel, then double-click Monitors and
1
Sound.
In the Resolution list, choose the SimulScan mode, then click
2
OK.
If this changes your display settings, a dialog box appears.
3
Click OK to confirm the change.
42
Page 48
Projected Image Size
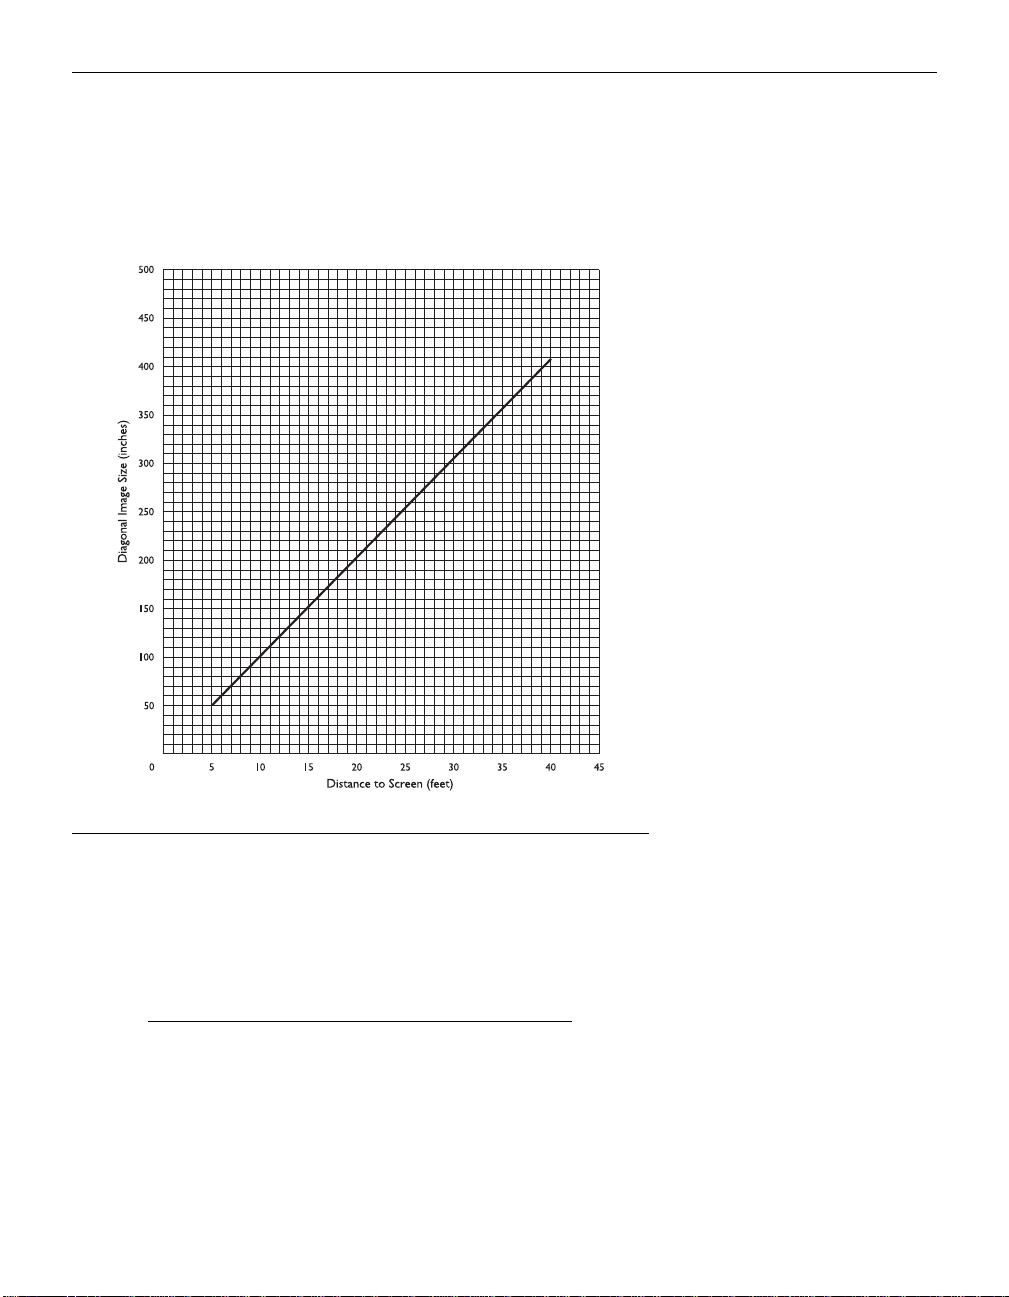
Use the chart and table to help you determine projected image
sizes.
Table 1:
Image Size, W idt h and Height
Distance to
Screen (feet)
5 51.0 40.8 30.6
10 102.0 81.6 61.2
15 153.0 122.4 91.8
20 204.0 163.2 122.4
25 255.3 204.0 153.0
30 306.0 244.8 183.6
35 357.0 285.6 214.2
40 408.0 326.4 244.8
Diagonal
(inches)
Width
(inches)
FIGURE 22
Projected image size
Height
(inches)
43
Page 49
Product Note
Product:
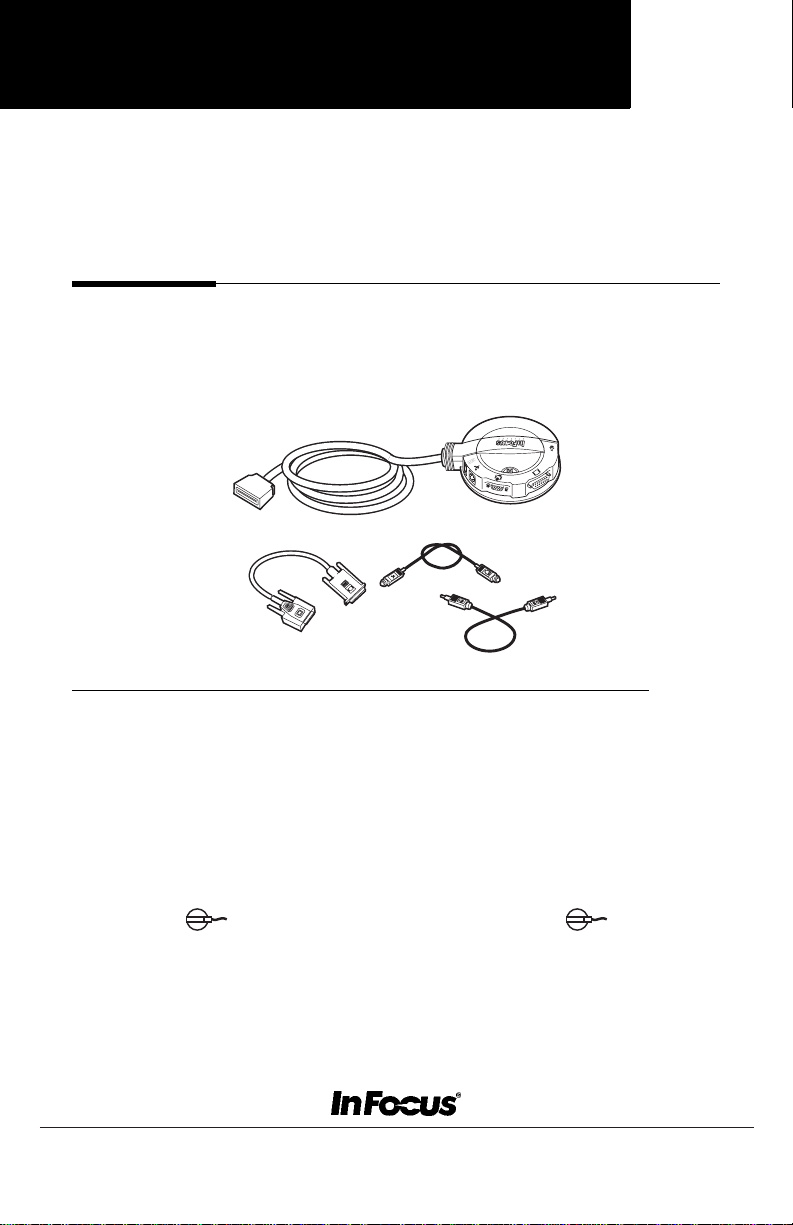
The CableWizard2 allows you to connect your computer to your In Focus projector . It pr o vides computer, monitor, audio and mouse connectors. It also provid es a
serial connector for IBM-compatible computers.
CableWizard
computer cable
1
F
IGURE
CableWizard2 and cables
CableWizard2 (SP-CW2)
mouse cable
audio cable
Connecting the CableWizard2™ to the Projector
The CableWizard2 simplifies the connection process by providing a central hub for all the connections between the projector and your computer.
Be sure to turn off the computer, monitor, and projector whenever you
connect or disconnect cables. The connectors on the CableWizard2 are
labeled with icons.
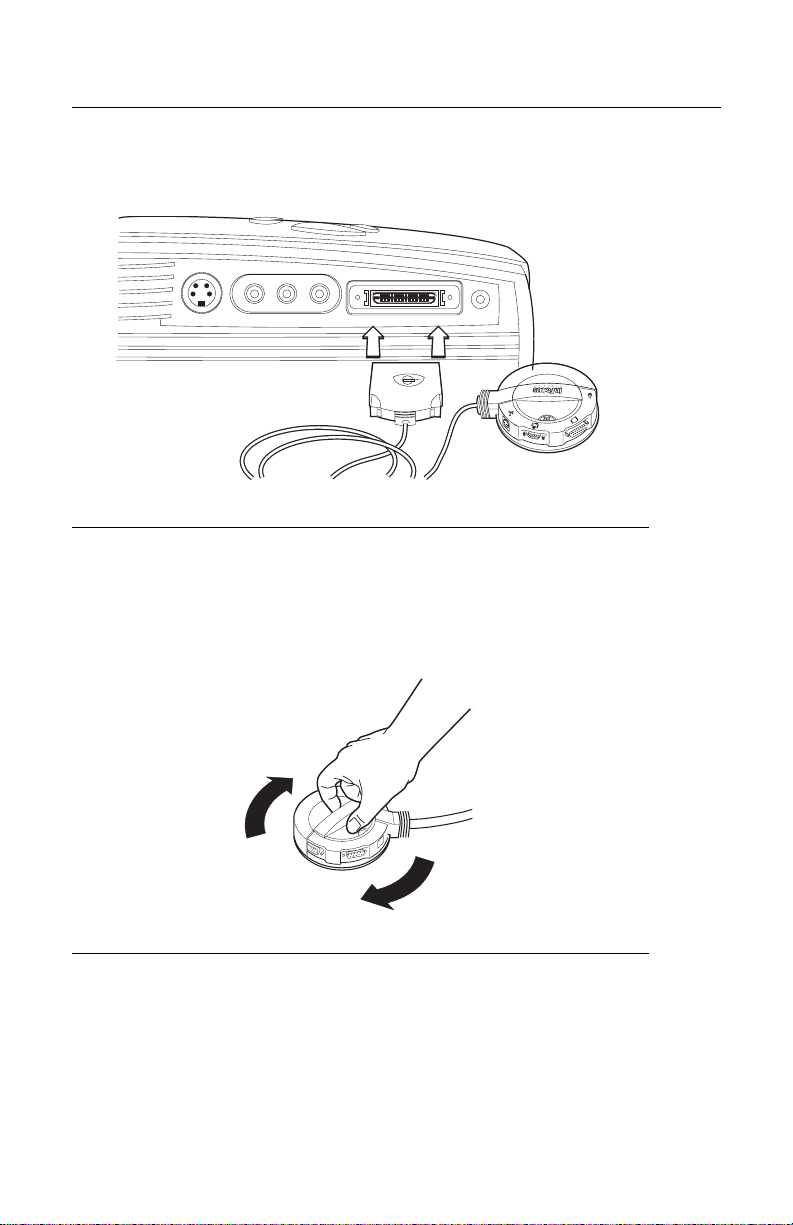
Connect the end of the CableWizard2 cable to the connector
on the projector’s connector panel.
009-0319-00 (English)
27700B Parkway Avenue • Wilsonville, Oregon 97070-9215 • 800-294-6400 • 503-685-8888 • Fax: 503-685-8887
Europe: Hoofddorp, The Netherlands (31) 23-5540300, Fax: (31)23-5624388 • Asia: Singapore (65) 334-9005, Fax: (65) 536-3891
http://www.infocus.com
Page 50
Product Note
F
2
IGURE
Connecting the CableWizard2 to the projector
Selecting Connectors on the CableWizard2
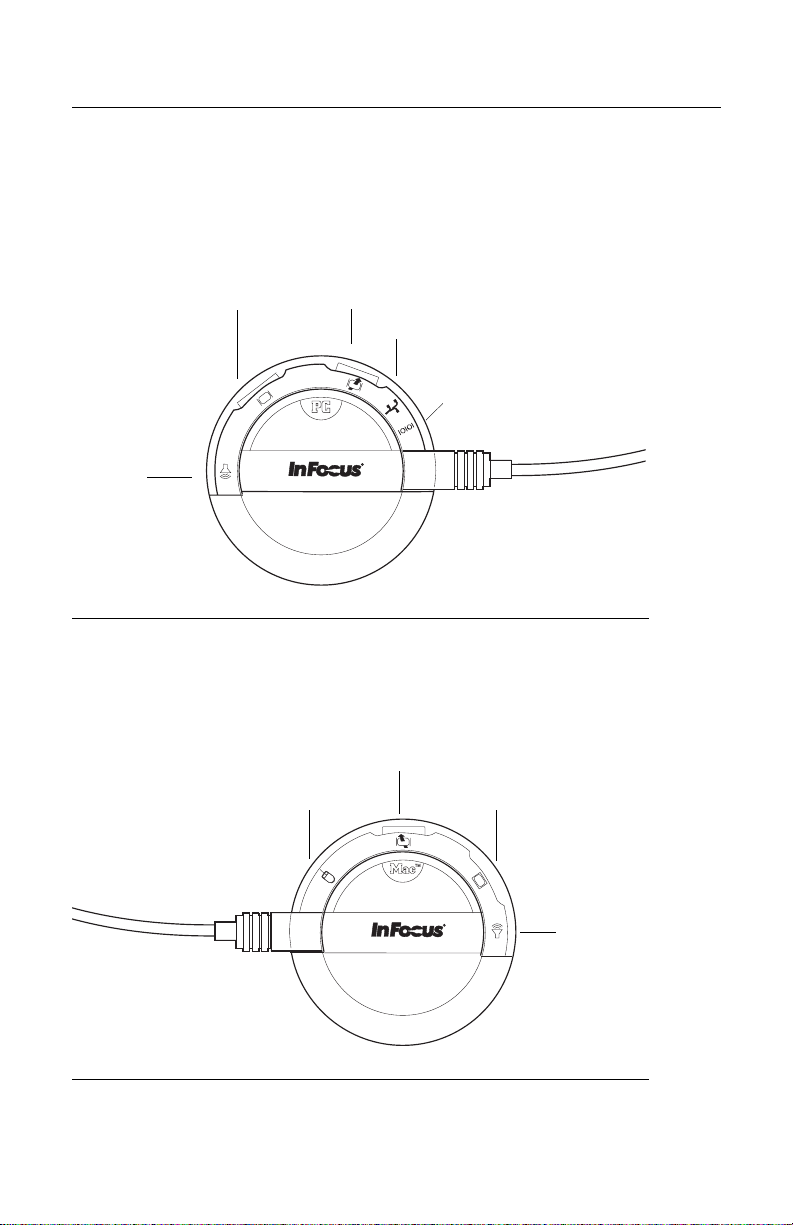
Turn the selector on the top of the CableWizard2 to reveal the correct
connectors for your computer.
F
3
IGURE
Selecting connectors on the CableWizard2
Page 51
Product Note
•
If you’re connecting an
IBM-compatib le deskto p or la ptop co mputer
the selector until the window displays “PC.”
computer
audio
F
4
IGURE
Selecting the IBM-compatible connectors on the CableWizard2
•
If you’re connecting a
puter
, turn the selector until the window displays “Mac™.”
monitor
mouse
serial
Macintosh desktop or an Appl e PowerBook com-
monitor
mouse
computer
, turn
F
5
IGURE
Selecting the Macintosh connectors on the CableWizard2
audio
Page 52

Product Note
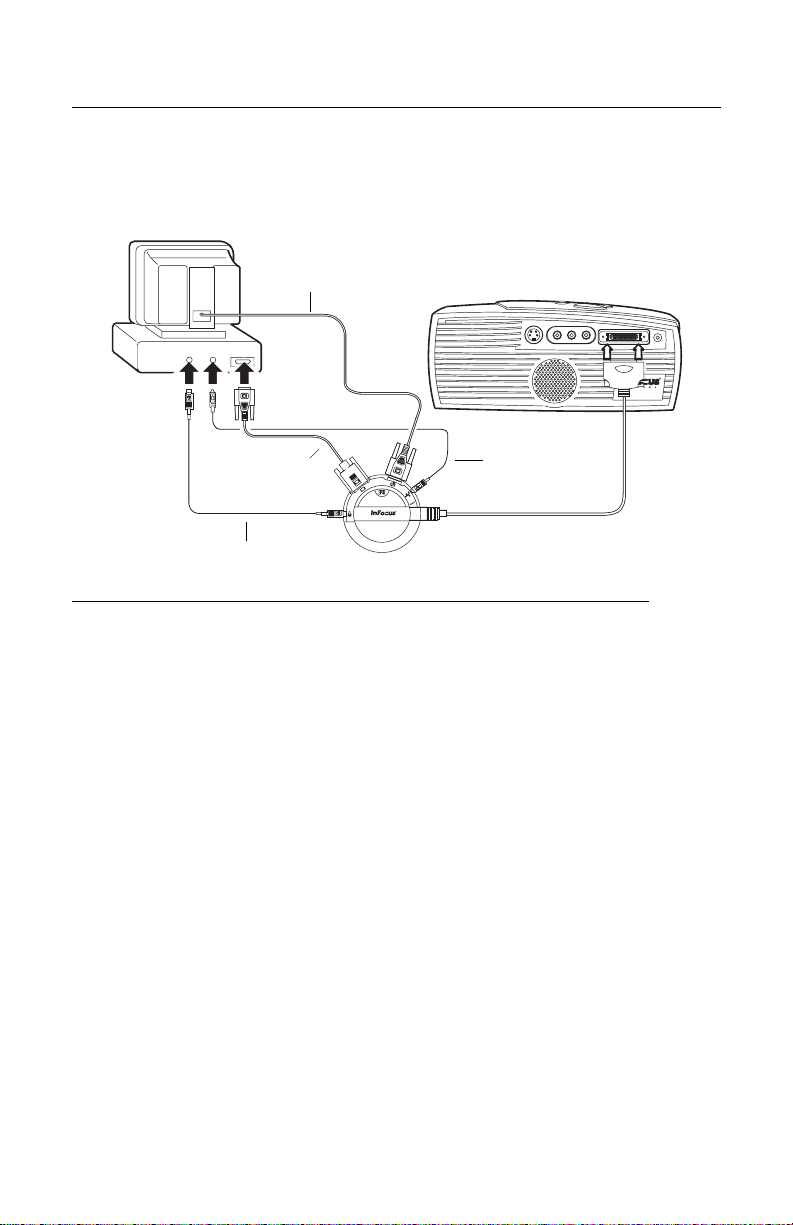
Connecting an IBM-Compatible Computer
1
(Desktop models only) Locate the cable that connects your monitor to
your computer. Unplug it from the computer.
2
Plug the end of the CableWizard2 computer cable into the monitor connector on your computer.
3
Plug the end of the computer cable into the connector on the
CableWizard2.
(Desktop models only) Do you want to display the image on your computer’s
monitor as well as on the projection screen?
1
Plug your monitor’s cable into the connector on the
CableWizard2.
Do you want to play your computer’s audio on the projector?
1
Unplug the audio cable, if present, from your computer.
2
Plug either end of the CableWizard2 audio cable into the audio connector on your computer.
3
Plug the other end of the audio cable into the connector on the
CableWizard2.
Do you want to control your computer’s mouse from the projector’s remote
or keypad?
1
Unplug the mouse cable, if present, from your computer.
2
Plug the end of the CableWizard2 mouse cable into the mouse connector on your computer.
3
Plug the end of the CableWizard2 mouse cable into the connector on the CableWizard2.
Page 53
Product Note
monitor cable
computer cable
audio cable
F
6
IGURE
Connecting the CableWizard2 cables to an IBM-compatible computer
mouse cable
Now you’re ready to power up the projector and your computer . See your
projector’s user’s guide for details.
Page 54

Product Note
Connecting a Macintosh Computer
1
(Desktop models only) Locate the cable that connects the monitor to
your computer. Unplug it from the computer.
2
Plug the end of the CableWizard2 computer cable into the monitor connector on your computer.
3
Plug the end of the CableWizard2 computer cable into the
connector on the CableWizard2.
NOTE: Some PowerBooks require the Apple-supplied video-out
cable or Macintosh adaptor for external video. Connect it
between the PowerBook and the CableWizard2 computer cable.
(Desktop models only) Do you want to display the image on your computer’s
monitor as well as on the projection screen?
1
Plug the monitor’s cable into the connector on the CableWizard2.
Do you want to play your computer’s audio on the projector?
1
Unplug the audio cable, if present, from your computer.
2
Plug either end of the CableWizard2 audio cable into the audio connector on your Macintosh.
3
Plug the other end of the audio cable into the connector on the
CableWizard2.
Do you want t o contr ol th e comput er’s mouse from the pr ojector ’s remote or
keypad?
1
Unplug the mouse from your Macintosh or locate an unused ADB
connector.
2
Plug the end of the CableWizard2 mouse cable into the mouse
connector or the (ADB) connector on your Macintosh.
Page 55
Product Note
3
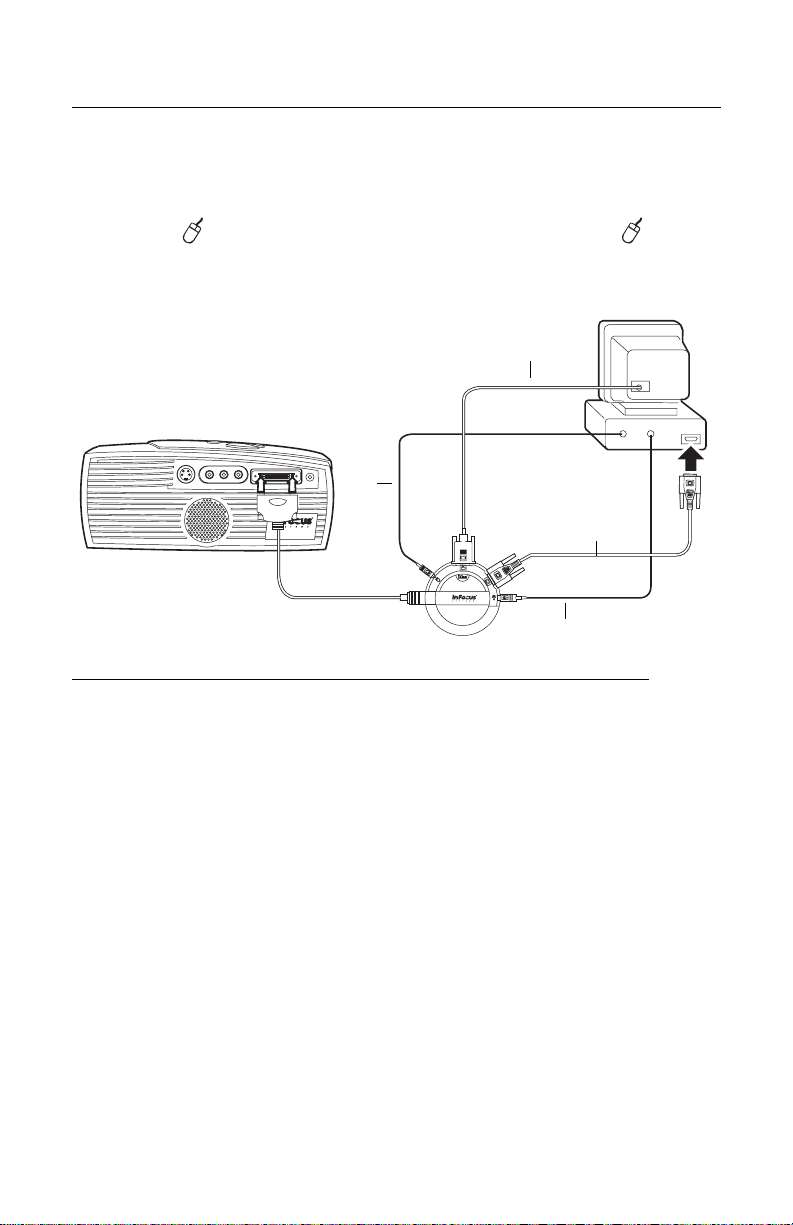
Plug the end of the CableWi zard2 mouse cable into the connector on the CableWizard2.
monitor cable
mouse
cable
computer cable
audio cable
F
7
IGURE
Connecting the CableWizard2 cables to a Macintosh computer
Now you’re ready to power up the pr ojector and the Macintosh. See your
projector’s user’s guide for details.
 Loading...