

Page 1
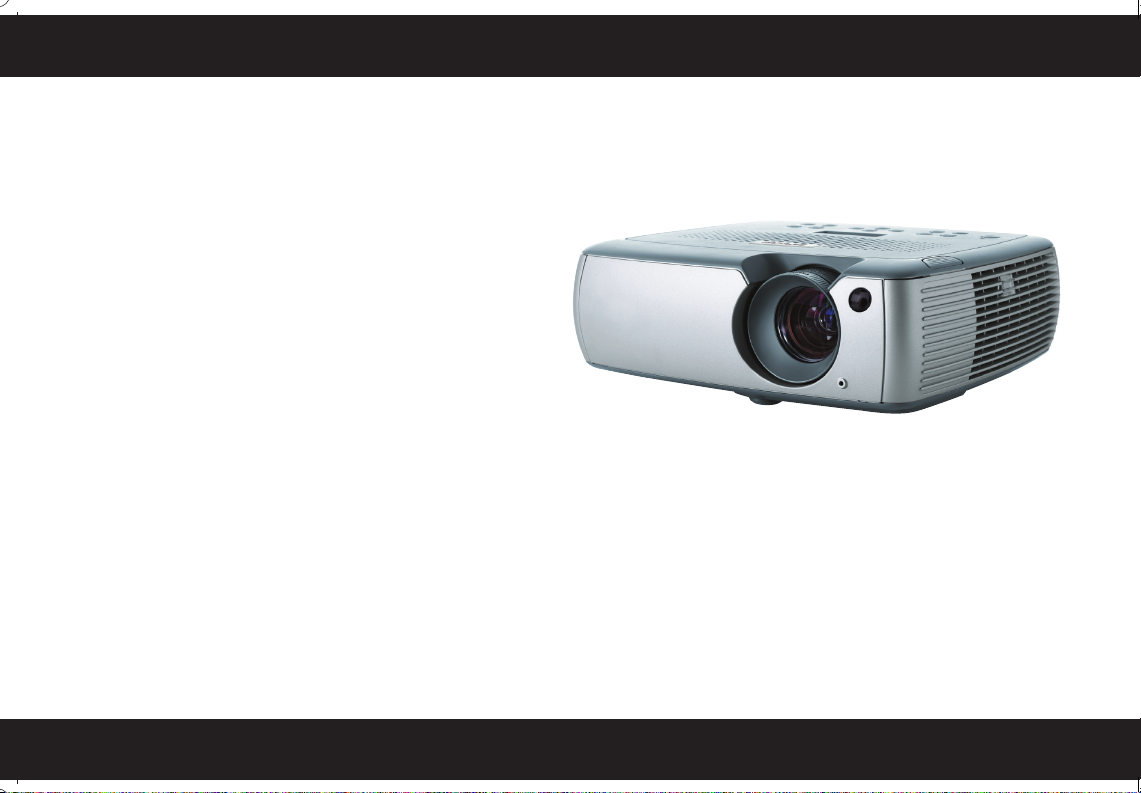
Meeting Room Projector
User’s Guide
Page 2

Trademarks
Apple, Macintosh, and PowerBook are trademarks or registered trademarks of Apple Computer, Inc. IBM is a trademark or registered trademark of International Business
Machines, Inc. Microsoft, PowerPoint, and Windows are trademarks or registered trademarks of Microsoft Corporation. Adobe and Acrobat are trademarks or registered trademarks of Adobe Systems Incorporated.
FCC Warning
This equipment has been tested and found to comply with the limits for a Class A digital device, pursuant to part 15 of the FCC Rules. These limits are designed to provide reasonable protection against harmful interference when the equipment is operated in a commercial environment. This equipment generates, uses, and can radiate radio frequency
energy and, if not installed and used in accordance with the instruction manual, may cause harmful interference to radio communications. Operation of this equipment in a residential area is likely to cause harmful interference in which case the user will be required to correct the interference at his own expense.
EN 55022 Warning
This is a Class A product. In a domestic environment it may cause radio interference, in which case the user may be required to take adequate measures. The typical use is in a
conference room, meeting room or auditorium.
Canada
This Class A digital apparatus complies with Canadian ICES-003.
Cet appareil numérique de la classe A est conforme à la norme NMB-003 du Canada.
Agency Approvals
UL, CUL, TUV, GOST
Other specific Country Approvals may apply, please see product certification label.
This user’s guide applies to models GEN200 and GEN201.
Page 3

Table of Contents
Introduction 4
Connecting a computer 6
Required computer connections 6
Displaying a computer image 8
First-time projector use with Windows 98 9
Adjusting the image 11
Connecting a video device 12
Displaying a video image 13
Shutting down the projector 15
Troubleshooting your setup 15
Using the keypad buttons 23
Using the remote control 24
Using the audio 25
Optimizing computer images 26
Presentation features 26
Optimizing video images 27
Customizing the projector 27
If you are experienced in setting up presentation systems, use the included
Quick Set Up card. For complete details on connecting and operating the
projector, refer to this User’s Guide.
Using the menus 28
Picture menu 29
Settings menu 32
Maintenance 36
Cleaning the lens 36
Replacing the projection lamp 37
Cleaning the dust filter 39
Using the security lock 39
Appendix 40
Accessories 40
Red LED behavior and projector errors 40
Projected image size 41
2
Page 4
Important Operating Considerations for Safety
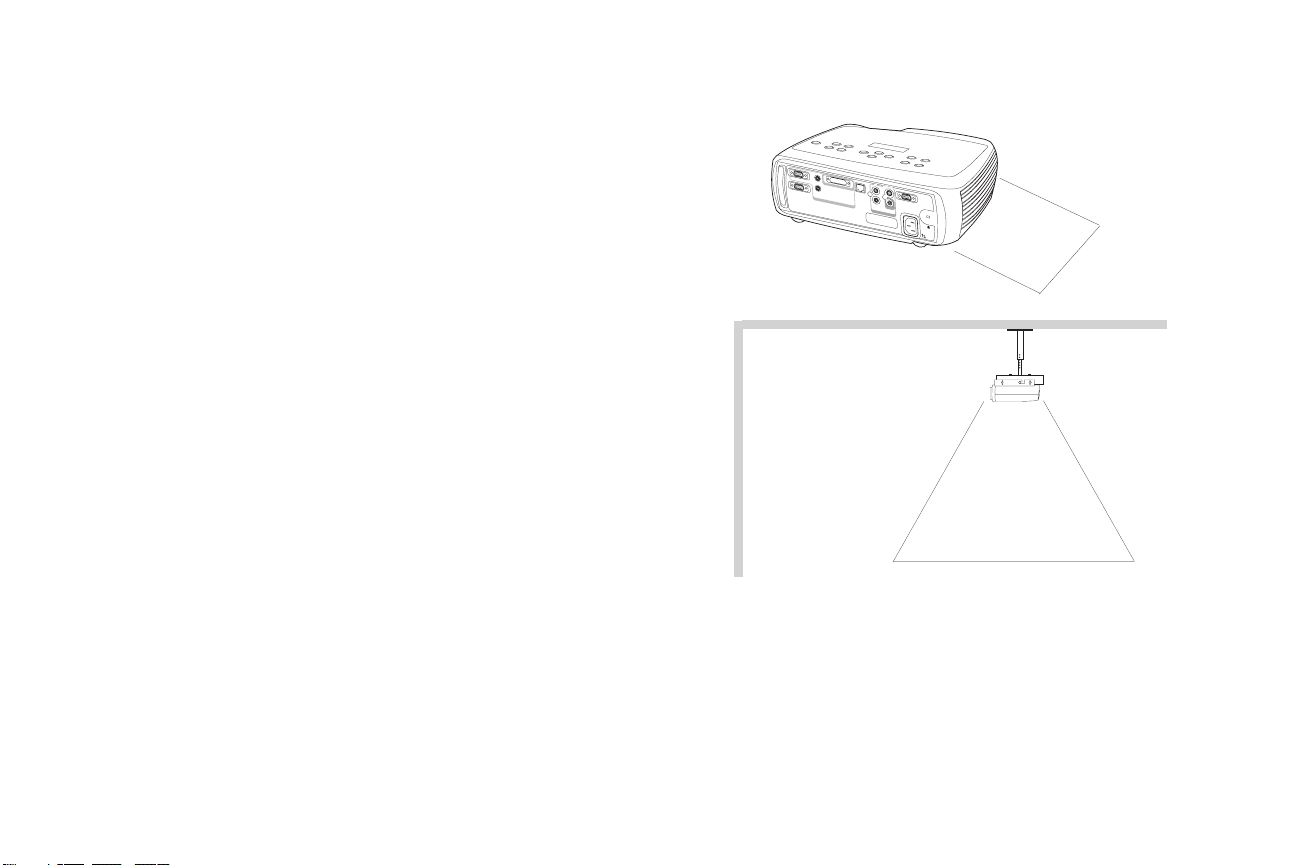
• Place the projector in a horizontal position no greater than 15 degrees
off axis.
• Locate the projector in a well-ventilated area without any obstructions
to intake or exhaust vents. Do not place the projector on a tablecloth or
other soft covering that may block the vents.
• Locate the projector at least 4' (1.2 m) away from any heating or cooling
vents.
• Use only approved ceiling mounts.
• Use only the power cord provided. A surge-protected power strip is
recommended.
• Refer to this manual for proper startup and shutdown procedures.
• In the unlikely event of the lamp rupturing, discard any edible items
placed in the surrounding area and thoroughly clean the area along all
sides of the projector. Wash hands after cleaning the area and handling
the ruptured lamp. This product has a lamp which contains a very
small amount of mercury. Dispose of it as required by local, state or federal ordinances and regulations. For more information see
www.eiae.org
.
Follow these instructions to help ensure image quality and lamp life over
the life of the projector. Failure to follow these instructions may affect the
warranty.
Do not place objects or people in the 2 foot (.6m) area along the side of the projector.
For ceiling mount applications, this area should be 5 feet (1.5m).
c
o
m
p
u
te
r
2
audioout
m
o
n
audioin
ito
r
o
u
t
R
c
o
m
p
u
te
S
r
-v
1
id
e
o
1
n
e
tw
o
r
k
c
o
m
p
u
te
r
in
s
e
ria
l
c
o
n
t
ro
l
L
a
u
d
io
v
in
id
e
o
2
v
id
e
o
in
2 ft (.6m)
5 ft (1.5m)
3
Page 5
Introduction
Your new digital projector provides computer and video inputs and has
XGA 1024x768 resolution. The projector is easy to connect, easy to use, easy
to maintain. An Interactive Display on the top of the projector gives you
constant feedback on the status of the projector.
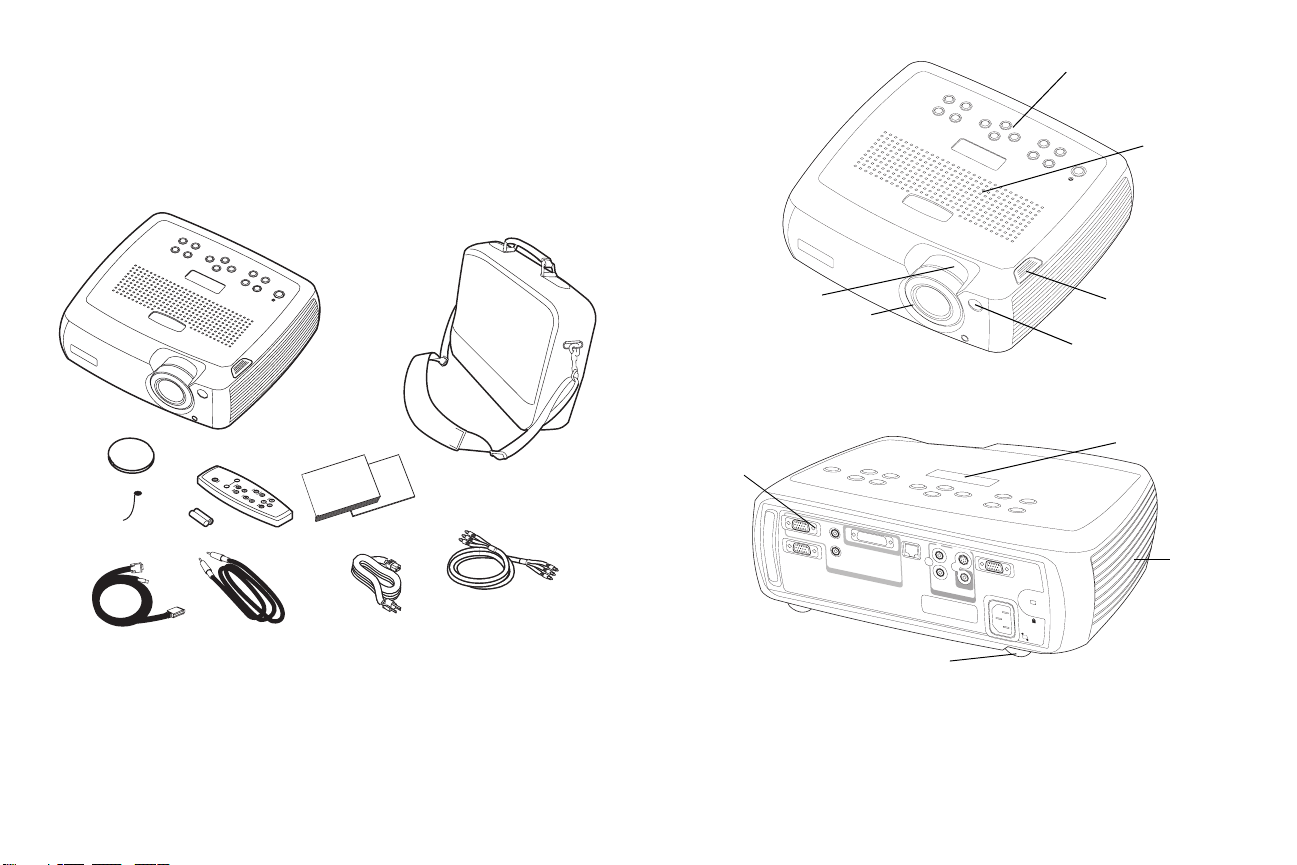
Included items
Projector components and features
keypad
speakers
carry case
projector
remote
lens cap
documentation
lens cap tether*
audio/video cable
computer
cable
audio cable
power
cable
*The lens cap tether ships in the Documentation Pack. Attach it to the lens cap and
the projector if desired.
4
connectors
zoom
c
o
m
m
o
n
ito
elevator foot release
focus
remote
control
receiver (IR)
Interactive display
p
u
te
r
2
a
u
d
i
o
o
u
t
c
o
m
p
u
te
a
u
d
i
r
o
i
o
n
u
t
c
o
m
p
u
te
r
in
R
r
1
S
-v
id
e
o
n
e
1
tw
o
rk
s
e
ria
l
c
o
n
tro
L
a
u
d
io
in
v
id
l
v
id
e
o
2
e
o
in
heat vent
leveling
foot
Page 6
Connector Panel
The Standard version provides one computer and two video connectors:
• one M1-D/A (HD, DVI, and computer)
• one S-video
•one composite RCA
It also has an RS-232 serial connector for serial control.
Connector panel of Standard version
external
monitor
speaker
(audio out)
monitor out
audioout
audioin
M1-D/A
computer
computer 1
computer in
audio
audio in
R
L
s-video
video in
RS232 serial control
S-video 1
serial control
video 2
The Enhanced version has an additional VESA computer input (HD, HD
component, and computer) and an RJ-45 connector for networked control .
computer
audio
Connector panel of Enhanced version
external
speaker
(audio out)
VESA computer
computer 2
monitor out
audioout
audioin
M1-D/A
computer
computer 1
computer in
monitor
computer
audio
5
RJ-45
network
audio
audio in
composite
video
s-video
S-video 1
R
L
video in
composite
video
lock
power
connector
RS232 serial control
serial control
video 2
lock
power
connector
Page 7
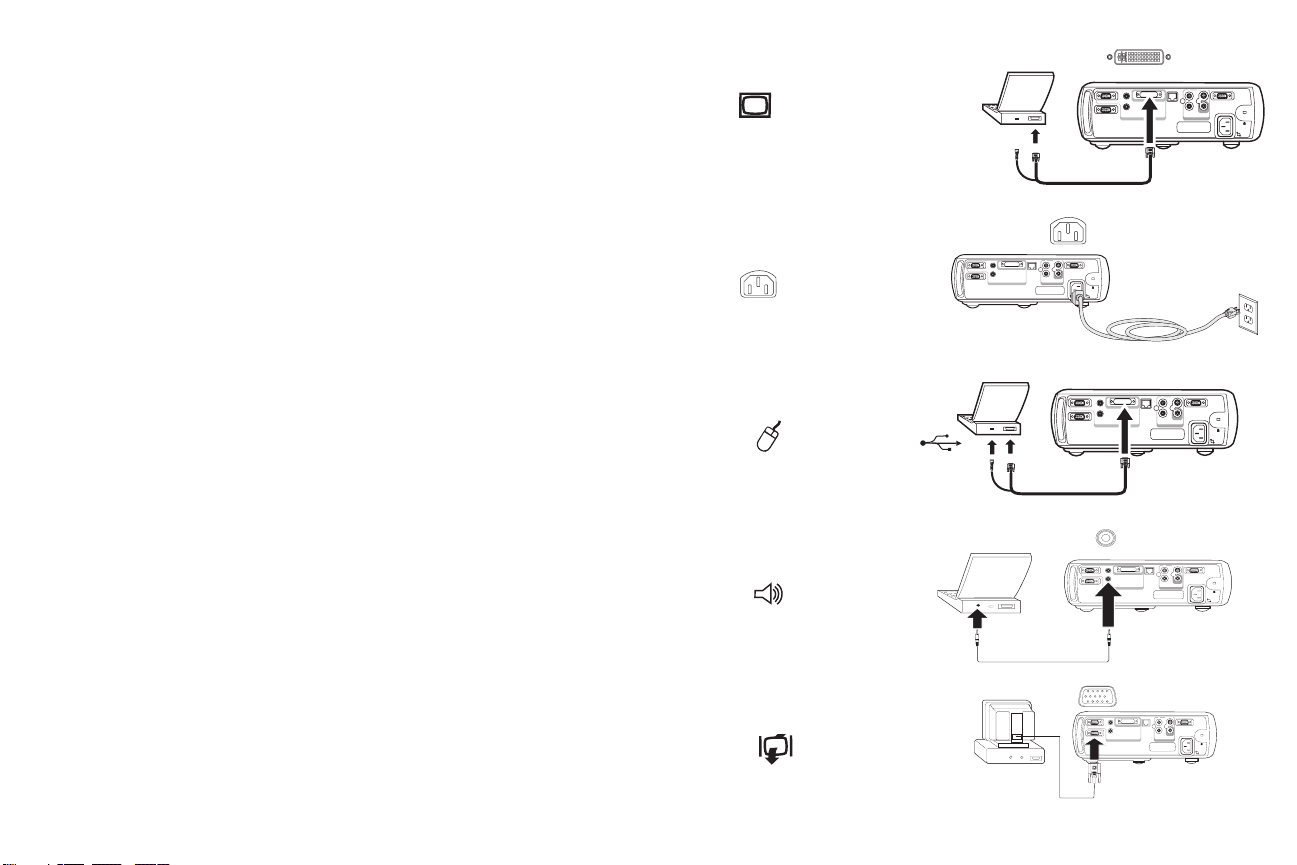
Connecting a computer
Required computer connections
Connect the black end of the computer cable to the to the Computer 1 connector on the projector. Connect the blue end to the video port on your computer. If you are using a desktop computer, you first need to disconnect the
monitor cable from the computer’s video port.
connect computer cable
computer2
audioin
monitorout
computerin
serialcontrol
network
L
video2
audioin
videoin
S-video1
R
computer1
audioout
Connect the black power cable to the connector on the back of the projector
and to your electrical outlet.
The Power LED on the projector’s keypad turns solid green.
NOTE: Always use the power cable that shipped with the projector.
Optional computer connections
To advance slides in a PowerPoint™ presentation using the remote, plug the
USB connector on the computer cable into the USB mouse connector on
your computer. USB drivers must be installed to use the USB feature. For
more information, see page 10.
To have sound with your presentation, connect the audio cable to your computer and to the computer Audio In connector on the projector.
If you are using a desktop computer and want to see the image on your
computer screen as well as on the projection screen, plug the monitor cable
to the black Monitor Out connector on the projector.
connect power cable
connect computer cable
connect audio cable
connect monitor cable
computer2
audioin
monitorout
computerin
serialcontrol
network
L
video2
audioin
videoin
S-video1
R
computer1
audioout
computer2
audioin
monitorout
computerin
computer1
audioout
computer2
audioin
monitorout
computerin
computer1
audioout
computer2
audioin
monitorout
computerin
serialcontrol
network
L
video2
audioin
videoin
S-video1
R
serialcontrol
network
L
video2
audioin
videoin
S-video1
R
serialcontrol
network
L
video2
audioin
videoin
S-video1
R
computer1
audioout
6
Page 8
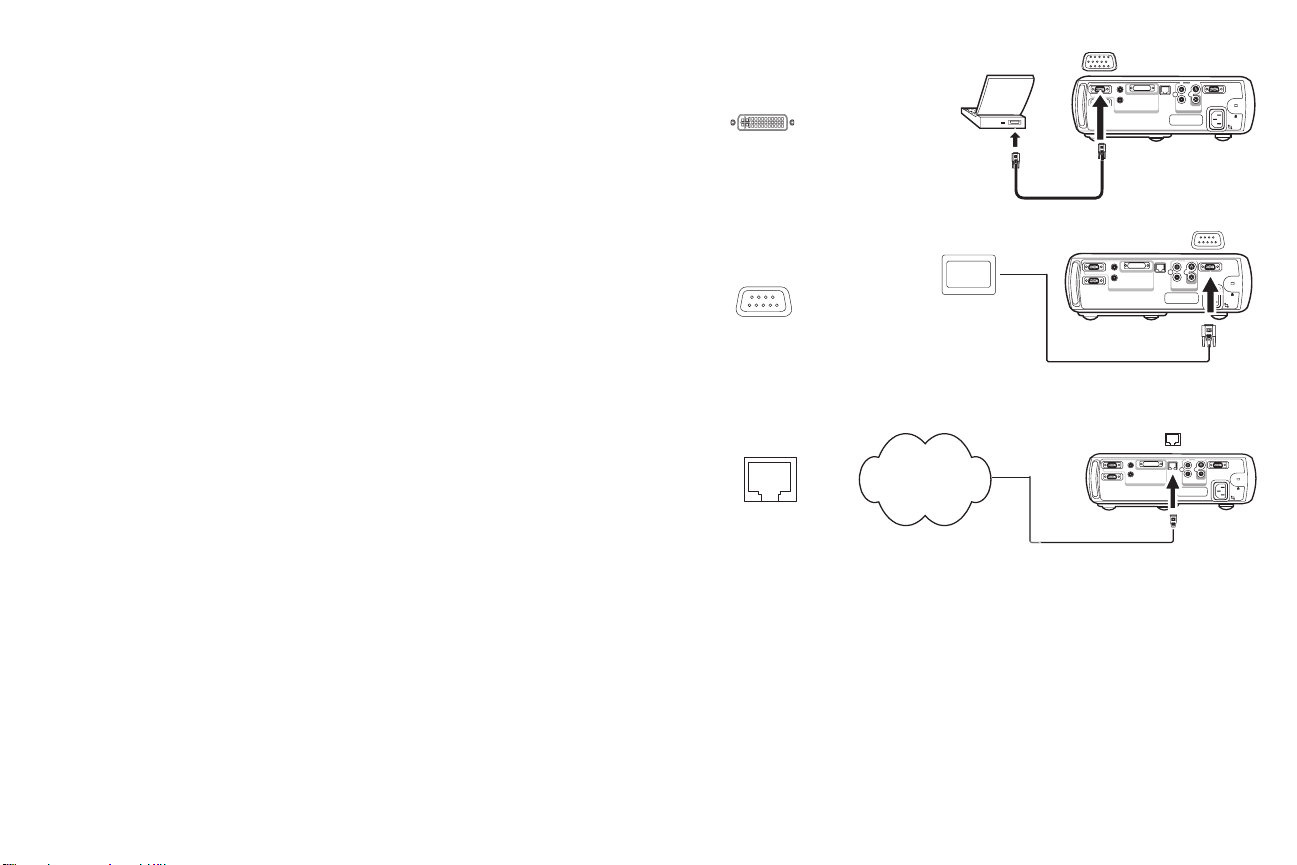
If you prefer connecting your Enhanced version projector to your computer
with an optional VESA cable, connect one end of the cable to the VESA port
on your computer, and connect the other end of the cable to the blue Com-
puter 2 connector on the projector.
connect VESA cable
computer2
audioin
monitorout
computerin
serialcontrol
network
L
video2
audioin
videoin
S-video1
R
computer1
audioout
You can control the projector from an LCD control panel or computer by
connecting an RS-232 cable to the projector’s Serial connector.
The Enhanced version projector can be managed by networking software
through its Network connector.
connect RS-232 cable
connect network cable
Network
computer2
audioin
monitorout
computerin
audioout
computer2
audioin
monitorout
computerin
serialcontrol
network
L
video2
audioin
videoin
S-video1
R
computer1
serialcontrol
network
L
video2
audioin
videoin
S-video1
R
computer1
audioout
7
Page 9
Displaying a computer image
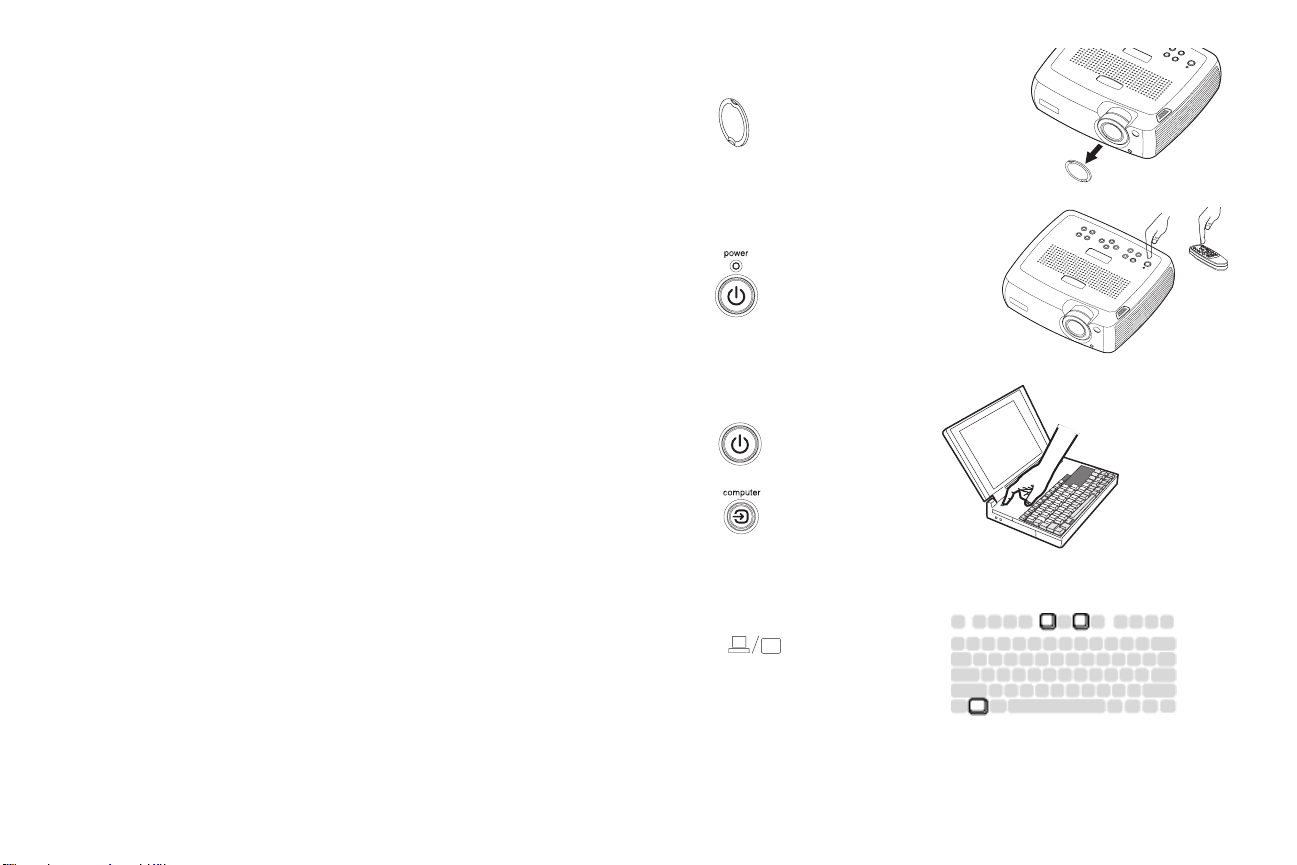
Remove the lens cap.
remove lens cap
Press the Power button on the top of the projector or the remote.
The LED flashes green and the fans start to run. When the lamp comes on,
the startup screen is displayed and the LED is steady green. It can take a
minute for the image to achieve full brightness. The Interactive Display on
the projector indicates the startup status.
? No startup screen? Get help on page 16.
Turn on your computer.
The computer’s image should appear on the projection screen. If it doesn’t,
press the Computer button on the projector’s keypad.
Make sure your laptop’s external video port is active.
Many laptops do not automatically turn on their external video port when a
projector is connected. Usually a key combination like FN + F5 is used to
turn the external display on and off. Refer to your computer’s documentation to learn your computer’s key combination.
? No computer image? Try pressing the Auto Image
button on the keypad. Get help on page 16.
press Power button
turn on computer
activate laptop’s external port
8
Page 10
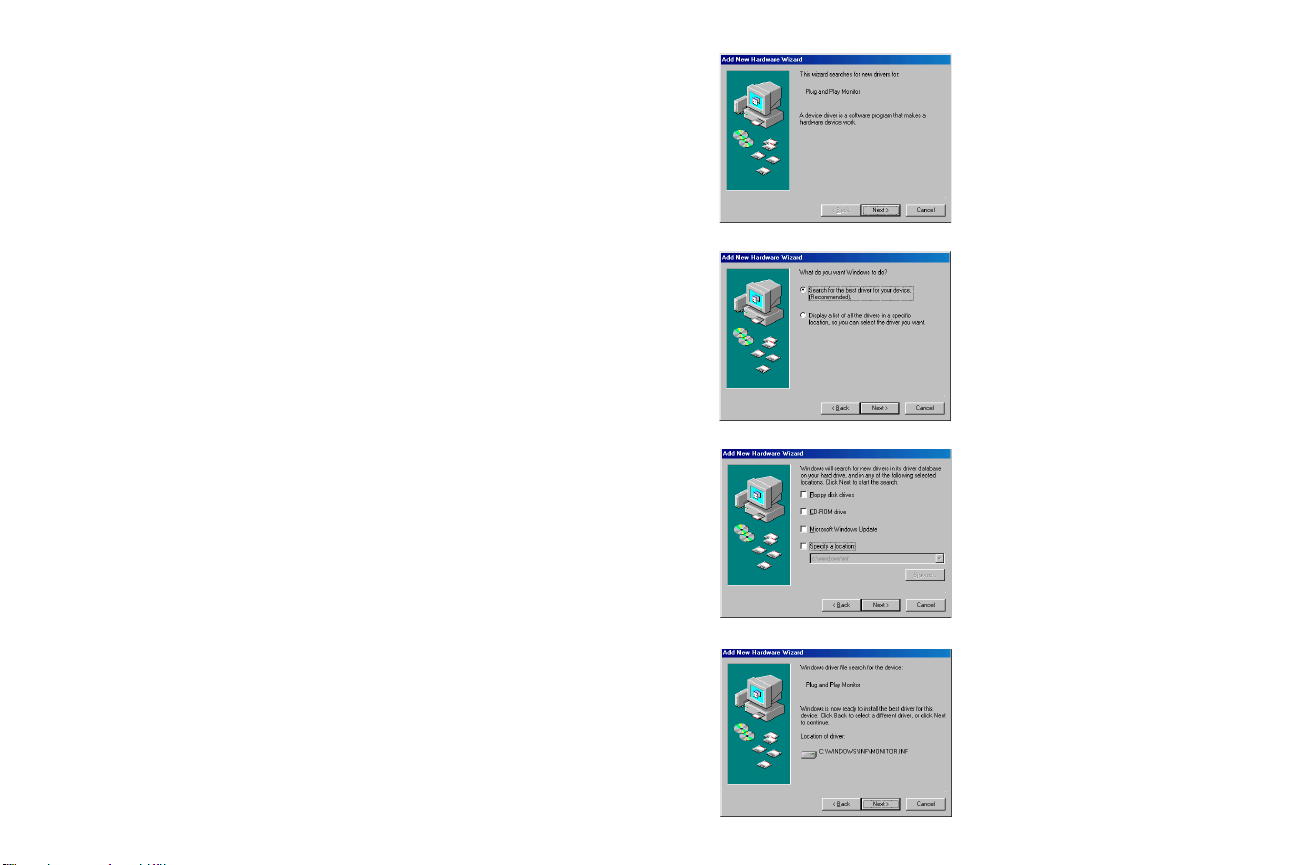
First-time projector use with Windows 98
The first time you connect a computer running Windows 98 to the projector,
the computer recognizes the projector as “new hardware” and the Add
New Hardware Wizard appears. Follow these instructions to use the Wizard to load the correct driver (which was installed with your Windows
operating system).
If you are running Windows 2000, Windows ME, or Window XP, skip these
steps and go to “Adjusting the image” on page 11.
a
a Click Next to begin searching for the driver.
b Make sure “Search for the best driver” is selected, then click Next.
c Uncheck any checked boxes, then click Next. Windows automatically
locates the driver. If this driver has been removed, reload the driver using
your Windows operating system CD.
d When Windows finds the driver, you are ready to install it. Click Next.
b
c
d
9
Page 11

Skip this page if you did not connect the USB portion of the M1 computer cable
For Windows 98:
• If you connected the USB cable, the Add New Hardware Wizard
appears again. Drivers must be installed to use the USB functionality.
• The Wizard launches two times.
The first time it detects a USB Human Interface Device (for the keyboard).
The second time it detects a USB Human Interface Device (for the
mouse).
For Windows 2000, Windows ME, and Windows XP:
• The USB drivers are automatically installed.
10
Page 12
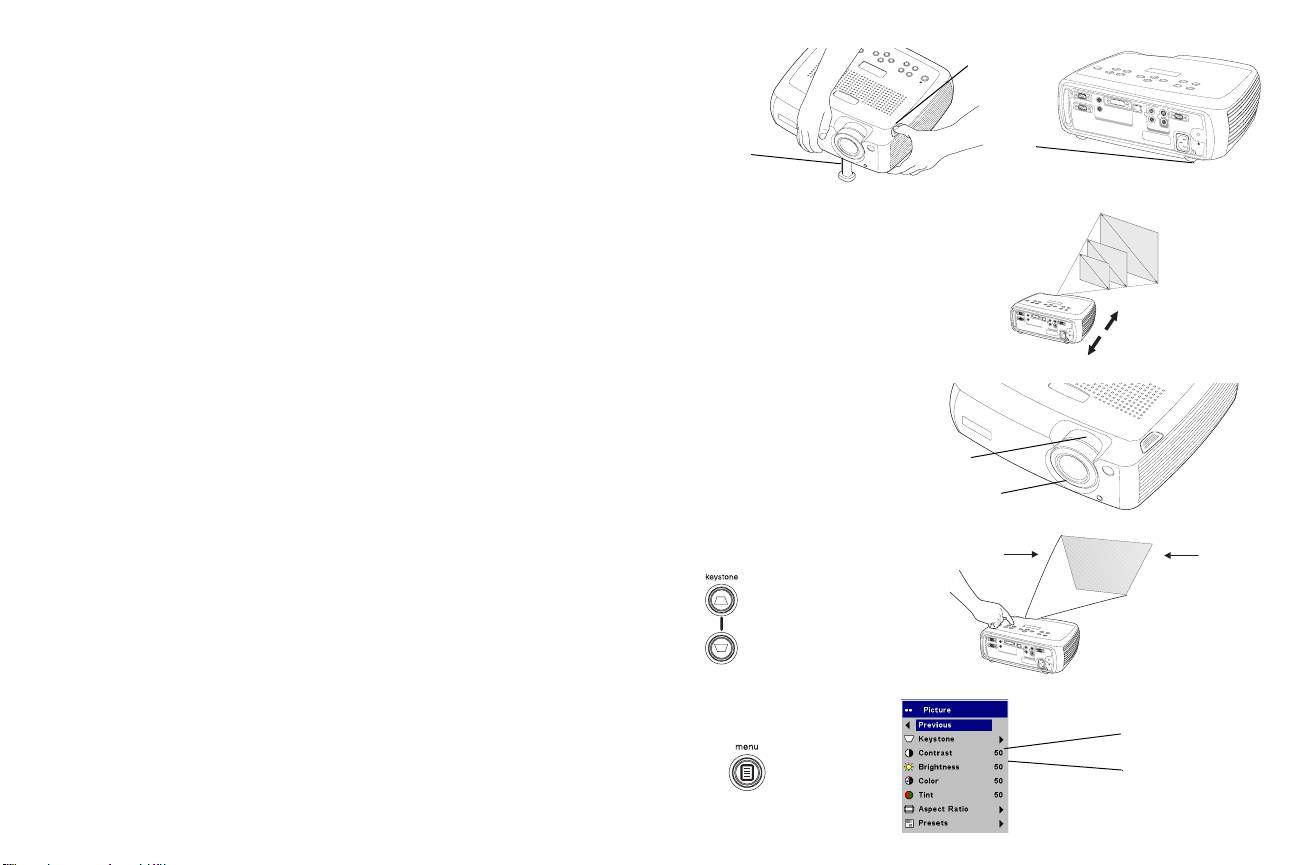
Adjusting the image
Adjust the height of the projector, if necessary, by pressing the release button to extend the elevator foot.
Rotate the leveling foot (located at the bottom back right corner), if necessary.
Position the projector the desired distance from the screen at a 90 degree
angle to the screen.
See page 41 for a table listing screen sizes and distances.
adjust height
elevator
foot
adjust distance
release button
rotate
leveling
foot
c
o
m
p
u
t
e
r
2
m
o
n
i
t
o
r
o
u
t
c
o
m
p
u
te
r
2
a
u
d
i
o
o
u
t
R
c
o
m
p
u
te
S
r
-v
1
id
e
o
m
o
n
a
ito
u
d
i
r
o
i
o
n
u
t
a
u
d
i
o
o
u
t
R
c
o
m
p
u
t
e
S
r
v
1
i
d
e
o
1
a
u
d
i
o
i
n
n
e
t
w
o
r
k
c
o
m
p
s
u
e
t
e
r
i
r
a
i
l
n
c
o
n
t
r
o
l
L
a
u
d
i
o
v
i
n
i
d
e
o
2
v
i
d
e
o
i
n
1
n
e
tw
o
rk
c
o
m
p
u
te
r
se
ria
in
l
c
o
n
tro
l
L
a
u
d
io
v
in
id
e
o
2
v
id
e
o
in
Adjust the zoom or focus rings by rotating them until the desired image size
and focus are produced.
If the image is not square, adjust the vertical digital keystone by using the
buttons on the keypad.
Press the upper Keyst one button to reduce the upper part of the image, and
press the lower Keys tone button to reduce the lower part. You can also
adjust the horizontal keystone of the Enhanced version projector via the
menus, or set the projector to automatically adjust the vertical keystone. See
page 29.
Adjust the Contrast or Brightness in the Picture menu.
See page 28 for help with the menus.
adjust zoom and focus
adjust keystone
adjust Contrast or Brightness
11
zoom
focus
c
o
m
p
u
t
e
r
2
a
u
d
i
o
o
u
t
R
c
o
m
p
u
t
e
S
r
v
1
i
d
e
o
1
m
o
n
a
i
u
t
o
d
i
r
o
i
o
n
n
u
e
t
t
w
o
r
k
c
o
m
p
s
u
e
t
e
r
i
r
a
i
l
n
c
o
n
t
r
o
l
L
a
u
d
i
o
v
i
n
i
d
e
o
2
v
i
d
e
o
i
n
contrast
brightness
Page 13
Connecting a video device
Standard video connections
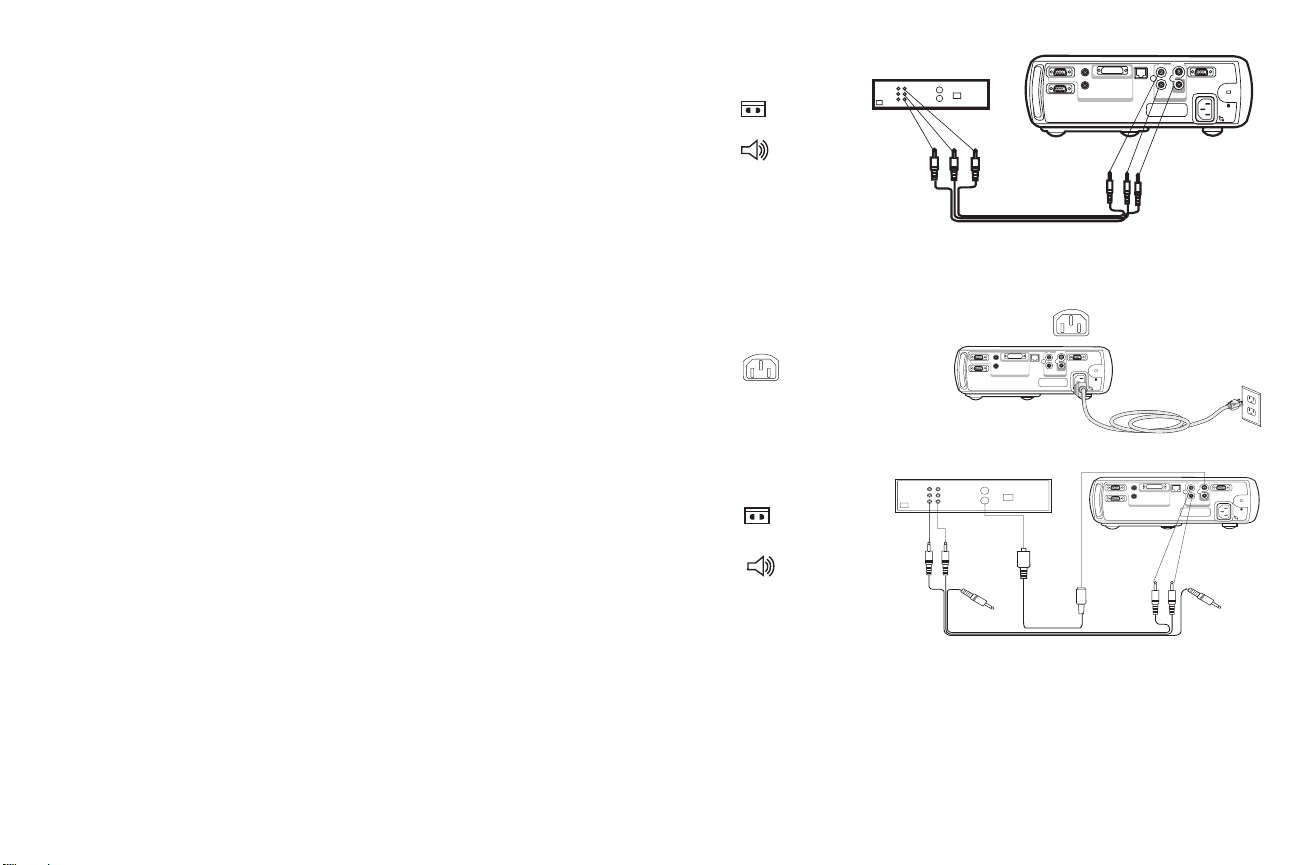
Plug the audio/video (A/V) cable’s yellow connector into the video-out
connector on the video device. Plug the other yellow connector into the yellow Video 2 connector on the projector.
Plug a white connector into the left audio out connector on the video device
and plug a red connector into the right audio out connector on the video
device. Plug the remaining white connector into the left audio in connector
on the projector, and plug the red connector into the right audio in connector on the projector.
connect A/V cable
computer2
audioin
monitorout
computerin
serialcontrol
network
L
video2
audioin
videoin
S-video1
R
computer1
audioout
Connect the black power cable to the connector on the back of the projector
and to your electrical outlet.
NOTE: Always use the power cable that shipped with the projector.
Optional video connections
If the video device uses a round, four-prong S-video connector, plug an
S-video cable (sold separately) into the S-video connector on the video
device and into the S-Video 1 connector on the projector. Use the A/V
cable’s audio connectors as described directly above (the yellow connectors
on the A/V cable are not used).
To connect a progressive scan EdTV or HD source, use the Component to
M1 adapter (sold separately).
connect power cable
connect S-video and video cables
12
computer2
audioin
monitorout
computerin
serialcontrol
network
L
video2
audioin
videoin
S-video1
R
computer1
audioout
computer2
audioin
monitorout
computerin
serialcontrol
network
L
video2
audioin
videoin
S-video1
R
computer1
audioout
Page 14

Displaying a video image
Remove the lens cap.
remove lens cap
Press the Power button on the top of the projector or the remote.
The LED flashes green and the fans start to run. When the lamp comes on,
the startup screen is displayed and the LED is steady green. It can take a
minute for the image to achieve full brightness. The Interactive Display on
the projector indicates the startup status.
? No startup screen? Get help on page 15.
Plug in and turn on the video device.
The video device’s image should appear on the projection screen. If it
doesn’t, press the Video button on the keypad.
Adjust the height of the projector by pressing the release button to extend
the elevator foot. Rotate the leveling foot, if necessary.
Position the projector the desired distance from the screen at a 90 degree
angle to the screen. See page 41 for a table listing screen sizes and distances
to the screen.
press Power button
turn on video device
adjust height
elevator
foot
adjust distance
release button
rotate
leveling
foot
c
o
m
p
u
te
r
2
a
u
d
i
o
o
u
t
R
c
o
m
p
u
te
S
r
-v
1
id
e
o
m
o
n
a
i
u
to
d
i
r
o
i
o
n
u
t
1
n
e
tw
o
rk
co
m
p
u
te
s
e
r
in
ria
l
c
o
n
tro
l
L
a
u
d
io
v
in
id
e
o
2
v
id
e
o
in
13
c
o
m
p
u
t
e
r
2
a
u
d
i
o
o
u
t
R
c
o
m
p
u
t
e
S
r
v
1
i
d
e
o
1
m
o
n
a
i
u
t
o
d
i
r
o
i
o
n
n
u
e
t
t
w
o
r
k
c
o
m
p
s
u
e
t
e
r
i
r
a
i
l
n
c
o
n
t
r
o
l
L
a
u
d
i
o
v
i
n
i
d
e
o
2
v
i
d
e
o
i
n
Page 15

Adjust the zoom or focus rings by rotating them until the desired image size
and focus are produced.
If the image is not square, adjust the vertical keystone using the buttons on
the keypad.
Press the upper Keyst one button to reduce the upper part of the image, and
press the lower Keys ton e button to reduce the lower part. You can also
adjust the horizontal keystone on the projector via the menus, or set the projector to automatically adjust the vertical keystone. See page 29.
adjust zoom and focus
adjust keystone
zoom
focus
c
o
m
p
u
t
e
r
2
a
u
d
i
o
o
u
t
R
c
o
m
p
u
t
e
S
r
v
1
i
d
e
o
1
m
o
n
a
i
u
t
o
d
i
r
o
i
o
n
n
u
e
t
t
w
o
r
k
c
o
m
p
s
u
e
t
e
r
i
r
a
i
l
n
c
o
n
t
r
o
l
L
a
u
d
i
o
v
i
n
i
d
e
o
2
v
i
d
e
o
i
n
Adjust the volume on the keypad or remote.
Adjust the Contrast, Brightness, Color, or Tint in the Picture menu.
See page 28 for help with the menus.
adjust volume
adjust Picture menu
14
c
o
m
p
u
t
e
r
2
audio
out
m
o
n
audioin
i
t
o
r
o
u
t
R
c
o
m
p
u
t
e
S
r
v
1
i
d
e
o
1
n
e
t
w
o
r
k
c
o
m
p
u
t
e
r
i
n
s
e
r
i
a
l
c
o
n
t
r
o
l
L
a
u
d
i
o
v
i
n
i
d
e
o
2
v
i
d
e
o
i
n
Page 16

Shutting down the projector
Troubleshooting your setup
The projector automatically blanks the screen after no active source is
detected for 30 minutes. This blank screen helps preserve the life of the projector. The image returns when an active source is detected or a remote or
keypad button is pressed. The Interactive Display on the projector indicates
the shutdown status.
Screen Save
You can make the blank screen appear after five minutes by turning on
Screen Save in the Settings>System menu. See page 32. There are six time
options for the Screen Save feature. They range from five minutes to 30 minutes with five minute intervals.
Power Sav e
The projector also has a Power Save feature that automatically turns the
lamp off after no signals are detected for 5 minutes. After 3 additional minutes with no signal, the projector powers down. If an active signal is
received before the projector powers down, the image is displayed. You
must press the Power button to display an image after 30 minutes have
passed. When Power Save is enabled, Screen Save is disabled. See page 32.
Turning off the projector
To turn off the projector, press the Powe r button and verify that you want to
turn the projector off by pressing the Powe r button again within 3 seconds.
You can cancel the shutdown by not pressing the Power button a second
time. The lamp turns off and the LED blinks green for 1 minute while the
fans continue to run to cool the lamp. When the lamp has cooled, the LED
lights green and the fans stop. Unplug the power cable to completely power
off the projector.
If your image appears correctly on the screen, skip to the next section
(page 24). If it does not, troubleshoot the setup. The Interactive Display and
LED on top of the projector indicate the state of the projector and can help
you troubleshoot.
Table 1: LED behavior and meaning
LED color/behavior Meaning
solid green The projector is plugged in, or the projec-
blinking green The power button has been pressed and
blinking red
see page 40 for more information
solid red An unidentifiable error.
tor has been powered on and the software has initialized. The projector has
been turned off and the fans have stopped.
the software is initializing, or the projector is powering down and the fans are
running to cool the lamp.
A fan or lamp failure has occurred. Make
sure the vents aren’t blocked (see
page 21). Turn off the projector and wait
one minute, then turn the projector on
again. If the Replace Lamp message
appears, replace the lamp and reset the
lamp timer.
The following tables show common problems. In some cases, more than one
possible solution is provided. Try the solutions in the order they are presented. When the problem is solved, you can skip the additional solutions.
15
Page 17

Source Troubleshooting
Problem Solution Result
No startup screen
c
o
m
p
u
te
r
2
a
u
d
io
o
u
t
R
c
o
m
p
u
te
S
r
-v
1
id
e
o
m
o
n
a
ito
u
d
io
r
in
o
u
t
1
n
e
tw
o
r
k
c
o
m
p
u
te
r
in
L
a
u
d
io
v
in
id
e
o
2
v
id
eo
in
Only startup screen appears
A
Plug power cable in, press Power button.
Remove lens cap.
c
o
m
p
u
t
e
r
2
a
u
d
i
o
o
u
t
m
o
n
a
ito
u
d
i
r
o
i
o
n
u
t
s
e
ria
l
c
o
n
tro
l
R
c
o
m
p
u
te
S
r
v
1
id
e
o
1
n
e
t
w
o
r
k
c
o
m
p
u
te
r
in
s
e
r
ia
l
c
o
n
tr
o
l
L
a
u
d
io
v
in
id
e
o
2
v
id
e
o
in
Correct image
c
o
m
p
u
te
r
2
m
o
n
ito
r
o
u
t
a
u
d
io
o
u
t
R
c
o
m
p
u
te
S
r
-v
1
id
e
o
a
u
d
io
in
1
n
e
tw
o
rk
c
o
m
p
u
te
r
s
e
in
ria
l
c
o
n
tro
l
L
a
u
d
io
v
in
id
e
o
2
v
id
e
o
in
Computer image projected
Press the Computer button
Activate laptop’s external port
A
A
or restart
c
o
m
p
u
t
e
r
2
a
u
d
i
o
o
u
t
R
c
o
m
p
u
t
e
S
r
v
1
i
d
e
o
m
o
n
a
i
u
t
o
d
i
r
o
i
o
n
u
t
1
n
e
t
w
o
r
k
c
o
m
p
u
t
e
r
i
s
e
r
i
a
n
l
c
o
n
t
r
o
l
L
a
u
d
i
o
v
i
n
i
d
e
o
2
v
i
d
e
o
i
n
laptop
c
o
m
p
u
t
e
r
2
a
u
d
i
o
o
u
t
R
c
o
m
p
u
t
S
e
r
v
1
i
d
e
o
m
o
n
a
i
u
t
o
r
o
u
t
1
d
io
i
n
n
e
t
w
o
r
k
c
o
m
p
s
u
e
t
e
r
i
r
a
i
l
n
c
o
n
t
r
o
l
L
a
u
d
i
o
v
i
n
i
d
e
o
2
v
i
d
e
o
i
n
16
Page 18

No computer image, just the words “Signal out of
range”
Adjust computer refresh rate in Control
Panel>Display>Settings>Advanced>
Adapter (location varies by operating
system)
Computer image projected
Signal out of
A
c
o
m
p
u
t
e
r
2
a
u
d
i
o
o
u
t
c
o
m
p
u
t
e
r
1
m
o
n
a
i
u
t
o
d
i
r
o
i
o
n
n
u
e
t
c
o
m
p
u
t
e
r
i
n
range
R
S
v
i
d
e
o
1
t
w
o
r
k
s
e
r
i
a
l
c
o
n
t
r
o
l
L
a
u
d
i
o
v
i
n
i
d
e
o
2
v
i
d
e
o
i
n
The video embedded in my PowerPoint
presentation does not play on the screen
A
A
B
c
o
m
p
u
t
e
r
2
a
u
d
i
o
o
u
t
R
c
o
m
p
u
t
S
e
r
v
1
i
d
e
o
m
o
n
i
t
o
r
1
a
u
d
i
o
i
o
n
n
u
e
t
t
w
o
r
k
c
o
m
p
s
u
e
t
e
r
i
r
a
i
l
n
c
o
n
t
r
o
l
L
a
u
d
i
o
v
i
n
i
d
e
o
2
v
i
d
e
o
i
n
You may also need to set a different
resolution on your computer, as shown
in the following problem, “Image fuzzy
or cropped”
Turn off the internal LCD display on your
laptop
A
c
o
m
p
u
t
e
r
2
a
u
d
i
o
o
u
t
R
c
o
m
p
u
t
S
e
r
v
1
i
d
e
o
m
o
n
i
t
o
r
o
Embedded video plays correctly
c
o
m
p
u
t
m
o
n
i
t
o
r
1
a
u
d
i
o
i
n
n
u
e
t
t
w
o
r
k
c
o
m
p
s
u
e
t
e
r
i
r
a
i
l
n
c
o
n
t
r
o
l
L
a
u
d
i
o
v
i
n
i
d
e
o
2
v
i
d
e
o
i
n
e
r
2
a
u
d
i
o
o
u
t
R
c
o
m
p
u
t
S
e
r
v
1
i
d
e
o
1
a
u
d
i
o
i
o
n
n
u
e
t
t
w
o
r
k
c
o
m
p
s
u
e
t
e
r
i
r
a
i
l
n
c
o
n
t
r
o
l
L
a
u
d
i
o
v
i
n
i
d
e
o
2
v
i
d
e
o
i
n
A
A
B
17
Page 19

Image fuzzy or cropped
A
A
A
Set your computer’s display resolution to
the native resolution of the projector
(Start>Settings>Control
Panel>Display>Settings tab, select
1024x768)
For a laptop,
disable laptop
monitor
or turn-on dualdisplay mode
Image clear and not cropped
A
Remote control not advancing PowerPoint slides
X
Connect USB cable (page 6) then load USB
drivers, if needed (page 9).
computer2
audioin
monitorout
computerin
serialcontrol
network
L
video2
audioin
videoin
S-video1
R
computer1
audioout
18
Remote advances slides
See page 24 for information on the remote
Page 20

Projector troubleshooting
Problem Solution Result
Image not square Adjust keystone on keypad or Picture menu
c
o
m
p
u
t
e
r
2
a
u
d
i
o
o
u
t
R
c
o
m
p
u
t
e
S
r
v
1
i
d
e
o
1
m
o
n
a
i
u
t
o
d
i
r
o
i
o
n
n
u
e
t
t
w
o
r
k
c
o
m
p
s
u
e
t
e
r
i
r
a
i
l
n
c
o
n
t
r
o
l
L
a
u
d
i
o
v
i
n
i
d
e
o
2
v
i
d
e
o
i
n
Image not sharp
Adjust the focus lens or Sharpness in the
Picture>Advanced menu
ABAB
Image does not fit 16:9 screen
Change aspect ratio to 16:9 in
Picture>Aspect ratio menu
Square image
Correct image
AB
Correct image
19
Page 21

Image upside down
Turn off Ceiling in Settings>System menu
Correct image
A
Image reversed left to right
B
A
Projected colors don’t match source
COLOR
Turn off Rear in Settings>System menu
Adjust color, tint, color temperature,
brightness, contrast in the menus
AB
Correct image
AB
Correct image
COLOR
20
Page 22

Lamp won’t turn on, LED blinking red (page 15)
blinks
red
c
o
m
p
u
te
r
2
a
u
d
io
o
u
t
R
c
o
m
p
u
te
S
r
-v
1
id
e
o
m
o
n
a
ito
u
d
io
r
in
o
u
t
1
n
e
tw
o
rk
c
o
m
p
u
te
r
s
e
in
ria
l
c
o
n
tro
l
L
a
u
d
io
v
in
id
e
o
2
v
id
e
o
in
Make sure vents aren’t blocked; allow
projector to cool for one minute
c
o
m
p
u
te
r
2
audio
out
m
o
n
audio
ito
r
in
o
u
t
R
c
o
m
p
u
te
S
r
-v
1
id
e
o
1
n
e
tw
o
rk
c
o
m
p
u
te
r
in
s
e
ria
l
c
o
n
tro
l
L
a
u
d
io
v
in
id
e
o
2
v
id
e
o
in
Unplug projector; wait one minute; plug in
projector and turn it on: lamp lights
c
o
m
p
u
te
r
2
a
u
d
io
o
u
t
R
c
o
m
p
u
te
S
r
-v
1
id
e
o
m
o
n
a
ito
u
d
io
r
in
o
u
t
1
n
e
tw
o
rk
c
o
m
p
u
te
r
s
e
in
ria
l
c
o
n
tro
l
L
a
u
d
io
v
in
id
e
o
2
v
id
e
o
in
Lamp won’t turn on, LED blinking red (page 15)
blinks
red
co
m
p
u
te
r
2
au
d
io
o
u
t
R
c
o
m
p
u
te
S
r
-v
1
id
e
o
m
o
n
a
ito
u
dio
r
in
o
u
t
1
n
e
tw
o
rk
c
o
m
p
u
te
r
s
e
r
in
ia
l
c
o
n
tro
l
L
a
u
d
io
vid
in
e
o
2
v
id
e
o
in
Lamp must be replaced (page 37)
21
Lamp turns on
c
o
m
p
u
te
r
2
m
o
n
ito
r
o
u
t
au
d
io
ou
t
R
c
o
m
p
u
te
S
r
-v
1
id
e
o
a
u
d
io
in
1
n
e
tw
o
rk
c
o
m
p
u
te
r
s
e
r
in
ia
l
c
o
n
tr
o
l
L
a
u
d
io
v
in
id
e
o
2
v
id
e
o
in
Page 23

Image not centered on screen
c
o
m
p
u
t
e
r
2
a
u
d
i
o
o
u
t
R
c
o
m
p
u
t
e
S
r
v
1
id
e
o
m
o
n
a
ito
u
d
i
r
o
in
o
u
t
1
n
e
t
w
o
r
k
c
o
m
p
u
te
s
e
r
r
in
ia
l
c
o
n
t
r
o
l
L
a
u
d
io
v
in
i
d
e
o
2
v
id
e
o
in
Still having problems?
Contact your local dealer for support.
Move projector, adjust zoom, adjust height
zoom
co
m
p
u
te
r
2
a
u
d
i
o
o
u
t
R
c
o
m
p
u
te
S
r
v
1
id
e
o
1
m
o
n
a
ito
u
d
i
r
o
i
o
n
n
u
e
t
tw
o
r
k
c
o
m
p
s
u
e
te
ria
r
in
l
c
o
n
tro
l
L
a
u
d
io
v
in
id
e
o
2
v
id
e
o
in
Adjust horizontal or vertical position in
Picture>Advanced menu
Correct image
c
o
m
p
u
t
e
r
2
a
m
o
n
i
t
o
r
o
u
t
u
d
i
o
o
u
t
R
c
o
m
p
u
t
e
S
r
v
1
i
d
e
o
a
u
d
i
o
i
n
c
o
m
1
n
e
t
w
o
r
k
p
u
t
e
r
i
n
s
e
r
i
a
l
c
o
n
t
r
o
l
L
a
u
d
i
o
v
i
n
i
d
e
o
2
v
i
d
e
o
i
n
22
Page 24

Using the keypad buttons
Most buttons are described in detail in other sections, but here is an overview of their functions:
power–turns the projector on (page 8) and off (page 13).
menu–opens the on-screen menus (page 28).
select–confirms choices made in the menus (page 28).
up/down arrows–navigates to and adjusts settings in the menus (page 28).
auto image–resets the projector to the source.
presets–cycles through the available preset settings (page 30).
keystone–vertical keystone adjusts the squareness of the image (page 11).
You can also adjust the horizontal keystone of the Enhanced version projector via the menus. See page 29.
volume–adjusts sound (page 25).
video and computer–changes the active source.
menu navigation buttons
23
Page 25

Using the remote control
The remote uses two (2) provided AA batteries. They are easily installed by
sliding the cover off the remote’s back, aligning the + and - ends of the batteries, sliding them into place, and then replacing the cover.
To operate, point the remote at the projection screen or at the projector (not
at the computer). The range of optimum operation is about 30 feet (9.14m).
Previous and Next buttons allow you to navigate through your PowerPoint
presentation while in Slide Show mode. Connect the USB connector on the
computer cable to your computer to use these buttons. When you do this for
the first time, the Add New Hardware wizard may appear. See page 9 for
details on loading the correct USB drivers.
Press the remote’s Menu button to open the projector’s menu system. Use
the arrow buttons to navigate, and the Select button to select features and
adjust values in the menus. See page 28 for more info on the menus.
previous button
navigation
buttons
next button
The remote also has a Power button to turn the projector on and off (see
page 15 for shutdown info), Vol u me and Mute buttons to control the sound,
and Video and Computer buttons to switch between sources.
Two presentation-specific features are also provided. Use the Blank button
to display a blank screen instead of the current slide (you can choose which
color is displayed, see page 33); use the Effect button to invoke a user-definable action, such as freeze or zoom (see page 34 to learn to program this button).
Troubleshooting the remote
• Make sure the batteries are installed in the proper orientation and are
not dead. The LED at the top of the remote lights when any button is
pressed when the battery power is adequate.
• Make sure you’re pointing the remote at the projector, not the computer, and are within the remote range of 30 feet (9.14m).
• If you are trying to advance PowerPoint slides, make sure the USB
cable is connected. If using a USB cable, make sure the correct drivers
are installed.
24
Page 26

Using the audio
To play sound from the projector, connect your source to the Audio In connector on the projector.
To adjust the volume, use the buttons on the keypad or remote.
To adjust the balance or turn off the projector’s chime, use the Audio menu
(see page 32).
To mute the sound, press the Mute button.
Troubleshooting audio
If there is no sound, check the following:
• Make sure the audio cable is connected.
• Make sure mute isn’t active.
• Make sure the volume is turned up enough. Press the Vol um e button
on the keypad or remote.
• Adjust the audio source.
• If playing a video, make sure the playback has not been paused.
Connecting external speakers
The projector can be attached to external speakers that have their own
power source by plugging a speaker cable into the projector’s Audio Out
connector.
connect audio cable
adjust volume
external speakers
computer2
audioin
monitorout
computerin
c
o
m
p
u
t
e
r
2
audioout
m
o
n
audioin
i
t
o
r
o
u
t
monitorout
R
c
o
m
p
u
t
e
S
r
v
1
i
d
e
o
1
n
e
t
w
o
r
k
c
o
m
p
u
t
e
r
i
n
audioout
computer2
audioin
computerin
s
e
r
i
a
l
c
o
n
L
a
u
d
i
o
v
i
n
i
d
e
o
2
v
i
d
e
o
i
n
computer1
network
serialcontrol
network
L
video2
audioin
videoin
t
r
o
l
S-video1
R
serialcontrol
L
video2
audioin
videoin
S-video1
R
computer1
audioout
25
speaker
cable
Page 27

Optimizing computer images
Presentation features
After your computer is connected properly and the computer’s image is on
the screen, you can optimize the image using the onscreen menus. For general information on using the menus, see page 28.
• Adjust the Keystone, Contrast, or Brightness in the Picture menu.
• Change the Aspect Ratio. See page 29 for details.
• Adjust the Color Temperature in the Advanced menu.
• Adjust the Phase, Tracking, or Horizontal or Vertical position in the
Advanced menu.
• Once you have optimized the image for a particular source, you can
save the settings using Presets. This allows you to quickly recall these
settings later. See page 30.
• Adjust the Room Lighting. Select Dark if you are in a dark room, Light
if in a bright room (page 30).
Several features are provided to make giving presentation easier. The following is an overview, details are found in the menu section on page 28.
•The remote’s Effect button allows you to assign various features to the
key. The default effect is Freeze. You can select from Blank, Mute,
Aspect Ratio, Source, Auto Image, Freeze, Zoom, About, PiP, and Mask.
See page 34 for details.
• The Freeze effect allows you to freeze the displayed image. This is useful if you want to make changes on your computer without your audience seeing them.
•The Blank button on the remote allows you to display a blank screen
instead of the active source. See page 33.
• The PiP effect lets you show a video source in a smaller window on top
of the computer image. See page 34.
• The Startup Logo menu option lets you change the default startup
screen to a black, white, or blue screen. See page 33.
• Two menu options, Power Save and Screen Save, are provided to automatically shut down the projector after several minutes of inactivity or
display a blank screen. This helps preserve lamp life. See page 32.
26
Page 28

Optimizing video images
Customizing the projector
After the video device is connected properly and the image is on the screen,
you can optimize the image using the onscreen menus. For general information on using the menus, see page 28.
• Adjust the Keystone, Contrast, Brightness, Color, or Tint in the Picture
menu. See page 29.
• Change the Aspect ratio. Aspect ratio is the ratio of the image width to
image height. TV screens are usually 1.33:1, also known as 4:3. HDTV
and most DVDs are 1.78:1, or 16:9. Choose the option that best fits your
input source. See page 29.
• Select a Sharpness setting. See page 31.
• Adjust the Color Temperature. Select a listed value, or select User and
individually adjust the intensity of the red, green, and blue color. See
page 31.
• Adjust the Room Lighting. Select Dark if you are in a dark room, Light
if in a bright room (page 30).
You can customize the projector for your specific setup and needs. See
page 32 to page 36 for details on these features.
• For rear projection, turn Rear mode on in the Settings>System menu.
• For ceiling mounted projection, turn Ceiling mode on in the Set-
tings>System menu.
• Turn on Automatic Vertical Keystone adjustments.
• Specify which source the projector checks first for active video during
power-up.
• Specify the function of the Effect Key on the remote.
• Turn the projector’s display messages on and off.
• Turn on power saving features.
• Specify blank screen colors and startup logos.
• Specify the menu language.
• Control your projector using RS232 commands. See page 7.
27
Page 29

Using the menus
To open the menus, press the Menu button on the keypad or remote. (The
menus automatically close after 60 seconds if no buttons are pressed.) The
Main menu appears. Use the arrow buttons to move up and down to highlight the desired submenu, then press the Select button.
To change a menu setting, highlight it, press Select, then use the up and
down arrow buttons to adjust the value, select an option using radio buttons, or turn the feature on or off using check boxes. Press Select to confirm
your changes. Use the arrows to navigate to another setting. When your
adjustments are complete, navigate to Exit, then press Select to go to the
previous menu; press the Menu button at any time to close the menus.
Dot
Main menu
Menu
button
Keypad navigation
buttons
Dots appear before the menu name. The number of dots indicate the menu’s
level, ranging from one (the Main menu) to four (the most nested menus).
The menus are grouped by usage:
• The Picture menu provides image adjustments.
• The Settings menu provides set-up type adjustments that are not
changed often.
• The About menu provides a read-only display of information about the
projector and source.
Certain menu items may be grayed out until a particular source is connected. For example, Sharpness is only available for video sources and will
be hidden when a computer source is active. Other menu items may be
grayed out when they are not available. For example, Brightness is grayed
out until an image is active.
28
Picture
menu
Dots
Settings
menu
About menu
Page 30

Picture menu
To adjust the following six settings, highlight the setting, press Select, use
the up and down arrows to adjust the values, then press select to confirm
the changes.
Ver t ic a l Ke y st o n e: adjusts the image vertically and makes a squarer image.
You can also adjust vertical keystone from the keypad. If you want the projector to automatically adjust the vertical keystone, check the Auto Vert
check box.
Horizontal Keystone: adjusts the image horizontally and makes a squarer
image. This option is only available on the Enhanced version projector.
Contrast: controls the degree of difference between the lightest and darkest
parts of the picture and changes the amount of black and white in the
image.
Brightness: changes the intensity of the image.
Color: (video and component sources only) adjusts a video image from
black and white to fully saturated color.
Tint: (NTSC video sources only) adjusts the red-green color balance in the
image.
Vertical Keystone
increasing keystone
decreasing keystone
Horizontal Keystone
Aspect Ratio: Aspect ratio is the ratio of the image width to image height.
TV screens are usually 1.33:1, also known as 4:3. HDTV and most DVDs are
1.78:1, or 16:9. The default is 4:3, which displays the input resized up or
down to fill the display area.
Aspect Ratio
29
Page 31

Presets: The provided Presets optimize the projector for displaying com-
puter presentations, photographs, and film images. You can use the preset
as a starting point, then further customize the settings for each source. If
you do change the settings, the Preset menu item selected changes to None
to indicate your customization. The settings you customize are saved in the
preset for each source. To restore the factory default settings, choose Factory Reset in the Settings>Service menu.
There are also three user-definable presets. To set a preset for the current
source, adjust the image, then choose Save User 1, 2, or 3. You can recall
these settings in the future by selecting the appropriate user presets.
Room Lighting: This features optimizes the projector for your room’s lighting conditions. Select Dark if you are in a dark room, Light if in a bright
room. Choosing Light maximizes the light output from the projector.
Presets
30
Room Lighting
Page 32

Advanced settings
Sharpness: (video sources only) changes the clarity of the edges of a video
image. Select a sharpness setting.
Color Space: This option applies to computer sources. It allows you to
select a color space that has been specifically tuned for the video input.
When Auto is selected, the projector automatically determines the standard.
To choose a different setting, turn off Auto, then choose RGB for computer
sources, choose either SMPTE240, REC709 or REC601 for component
sources.
Color Temperature: changes the intensity of the colors. Select a listed
value, or select User and individually adjust the intensity of the red, green,
and blue colors.
Sharpness
Color Space
The following 4 options are for computer and component sources only.
Phase: adjusts the horizontal phase of a computer source.
Tr a c k i ng : adjusts the vertical scan of a computer source.
Horizontal/Vertical Position: adjusts the position of a computer source.
Color Temperature
31
Page 33

Settings menu
Audio: allows adjustments to the volume and balance, and turns the projec-
tor’s startup Chime on and off.
Sources: allows you to assign a particular input to a specific source key
when using the optional Integrator remote. Also allows selection of a
default Startup Source and enables or disables Autosource.
Sources>Startup Source: this determines which source the projector
checks first for active video during power-up.
Sources>Autosource: When Autosource is not checked, the projector
defaults to the source selected in Startup Source. If no source is found, a
blank screen displays. When Autosource is checked, Startup Source determines which source the projector defaults to at power-up. If no signal is
present, the projector checks the sources in order until a source is found or
until power down.
System>Rear: reverses the image so you can project from behind a translucent screen.
Ceiling: turns the image upside down for ceiling-mounted projection.
Auto Ceiling: automatically senses when the projector is inverted and turns
the image upside down. This is On by default.
Auto Power: When Auto Power is checked, the projector automatically
goes into the startup state after the projector is powered on. This allows control of ceiling mounted projectors with a wall power switch.
Display Messages: displays status messages (such as “Searching” or
“Mute”) in the lower-left corner of the screen.
Power Sav e : automatically turns the lamp off after no signals are detected
for 5 minutes. After 3 additional minutes with no signal, the projector powers down. If an active signal is received before the projector powers down,
the image will be displayed.
Screen Save: automatically blanks the screen with a black color after no signals are detected for a preset number of minutes. The image returns when
an active source is detected or a remote or keypad button is pressed. Screen
Save is disabled when Power Save is enabled.
Audio
Sources
System menu
Startup
Source
Screen Save
32
Page 34

Startup Logo: allows you to display a blank Black, White, or Blue screen
instead of the default screen at startup and when no source is detected. It
also allows you to capture and display a custom startup screen.
To capture a custom logo, display the image you want to capture on your
computer, highlight Capture New, then press Select twice. While the capture is underway, the LED on the keypad turns orange. When ready, the
projector confirms the capture and the LED changes to green.
The next time you start the projector, the custom logo you captured displays.
Blank Screen: determines what color is displayed when you press the
Blank button on the remote.
Startup Logo
Blank Screen
33
Page 35

Effect Key: allows you to assign a different function to the Effect button on
the remote to quickly and easily use the effect. Only one effect can be
enabled at a time. Highlight an effect and press Select to choose a different
one. The default effect is Freeze.
Blank: shows an empty screen.
Mute: turns off all sound.
Aspect Ratio: sets the ratio of the image width to image height.
Source: cycles through the available sources.
Auto Image: causes computer sources to be reacquired.
Freeze: pauses the projected image.
Zoom: lets you magnify a part of the screen. This feature only works if
you purchase an optional remote control with mouse buttons and cursor control. To use the Zoom effect, press Effect, then press the left
mouse button to zoom the image, press the right mouse decrease the
magnification. You can use the cursor control to pan the image, displaying different parts of it (only if the image is magnified). To return to the
original size and cancel Zoom, press the Effect button a second time.
About: displays the About menu.
PiP: (Picture in Picture) allows you to overlay a smaller window show-
ing the video source on top of the larger computer source window. You
must have both a computer and video source connected to use PIP. You
can’t show a computer image in the smaller PiP window, only a video
image. You can select a small, medium, or large window. You can also
move the PiP window on the screen using the PiP Position X and Y
options in the menu. Press the up and down arrows to change the position.
Mask: allows you to cover part of the image with a black curtain. Press
the up and down arrows to raise or lower the curtain on the image.
Effect Key
Picture in Picture
34
Page 36

Network: The Enhanced version projector has an RJ45 Ethernet connector
that supports network connections and TCP/IP protocols. This will allow
for the control and management of the projector over a corporate network.
The following fields are accessible when DHCP is not checked and available
for manual entry of data.
IP Address: Identifies the projector on the network.
Subnet mask: Separates the network address part of the IP address.
Default gateway: The IP address of the local router.
DHCP: Select this to automatically obtain an IP address, Subnet mask,
and Default gateway.
Network Info: Provides information on the network configuration.
Network
Network
Info
The Network Info menu is informational and cannot be edited. It displays
the current IP Address, Subnet Mask, Default Gateway, and the projector’s
MAC Address.
Language: allows you to select a language for the onscreen display of
menus and messages.
Service: to use these features, highlight them and press Select.
Factory Reset: restores all settings (except Lamp Hours and Network set-
tings) to their default after displaying a confirmation dialog box.
Reset Lamp: resets the lamp hours counter in the About menu to zero. Do
this only after changing the lamp. It displays a confirmation dialog box.
Service Info: provides information about the projector ’s software version
and the active source.
Service Code: only used by authorized service personnel.
Language
Service menu
35
Page 37

Maintenance
Cleaning the lens
1 Apply a non-abrasive camera lens cleaner to a soft, dry cloth.
Avoid using an excessive amount of cleaner, and don’t apply the
cleaner directly to the lens. Abrasive cleaners, solvents or other harsh
chemicals might scratch the lens.
2 Lightly wipe the cleaning cloth over the lens in a circular motion. If you
don’t intend to use the projector immediately, replace the lens cap.
clean the lens
with a soft dry cloth
and non-abrasive
cleaner
36
Page 38

Replacing the projection lamp
The lamp hour timer in the About menu counts the number of hours the
lamp has been in use. Fifty hours before the specified end of the lamp’s life,
the message “Replace lamp” briefly appears on the screen at each startup
and in the Interactive Display. After 50 additional hours, the lamp will no
longer light. You can order new lamp modules from your dealer.
About menu
1 Turn off the projector and unplug the power cable.
2 Wait 60 minutes to allow the projector to cool thoroughly.
3 Turn the projector upside down and remove the lamp door by loosening
the captive screw and then prying the lamp door out.
4 Remove the two screws on the lamp module.
WARNINGS:
• To avoid burns, allow the projector to cool for at least 60 minutes before
you replace the lamp.
• Unplug the power cord before replacing the lamp.
• Do not drop the lamp module. The glass may shatter and cause injury.
• Do not touch the glass lamp screen. Fingerprints can obscure projection
sharpness.
computer2
audioin
monitorout
computerin
serialcontrol
network
L
video2
audioin
videoin
S-video1
R
computer1
audioout
loosen the screw on lamp door
remove the screws on lamp module
turn off and unplug
the projector
wait 60 minutes
pry the lamp door off
37
Page 39

• Be extremely careful when removing the lamp housing. In the unlikely
event that the lamp ruptures, small glass fragments may be generated.
The lamp module is designed to contain most of these fragments, but
use caution when removing it. Before replacing the lamp, clean the
lamp compartment and dispose of cleaning materials. Wash hands after
lamp replacement. his product has a lamp which contains a very small
amount of mercury. Dispose of it as required by local, state or federal
ordinances and regulations. For more information see www.eiae.org.
5 Carefully remove the lamp module by grasping and lifting the metal
bail wire. Dispose of the lamp in an environmentally proper manner.
6 Install the new lamp module, making sure that it is properly seated.
7 Replace the two screws.
8 Replace the lamp door and tighten the screw.
9 Plug in the power cable then press the Pow er button to turn the projec-
tor back on.
10 Reset the lamp hour timer.
Resetting the lamp timer
If the lamp timer has reached the maximum number of hours for the projector lamp, the LED on the projector’s keypad will show a lamp error (see
“LED behavior and meaning” on page 15). To reset the lamp timer, press the
decrease volume button on the remote and then the increase volume button
within 3 seconds. At that point the LED will turn green and you can power
on the projector. You can also navigate to the Settings>Service menu and
select Lamp Reset to reset the lamp timer.
remove module using bail wire
reset lamp time in Service menu
38
Page 40

Cleaning the dust filters
The dust filters catch dust and other particles in the air. If the filters become
clogged, the projector does not cool properly and may malfunction. In dirty
or dusty environments, they should be cleaned after every 100 hours of use.
Failure to do so may result in premature lamp failure.
There are two filters, one mesh filter attached to the dust filter door and one
metal grid filter adjacent to the lamp door.
1 Turn off the projector and unplug the power cable.
computer2
audioin
monitorout
computerin
serialcontrol
network
L
video2
audioin
videoin
turn off and unplug
the projector
S-video1
R
computer1
audioout
wait 60 minutes
2 Wait 60 minutes to allow the projector to cool thoroughly.
WARNING: To avoid burns, allow the projector to cool for at least 60
minutes before you clean or replace the dust filter.
3 Turn the projector upside down and remove the lamp door. See page 37.
4 Remove the dust filter door.
5 Clean the filter using a vacuum set on low power.
6 Replace the dust filter door and the lamp door.
7 Vacuum the non-removable metal grid filter adjacent to the lamp door.
Using the security lock
The projector has a security lock for use with a cable lock system. Refer to
the information that came with the lock for instructions on how to use it.
39
metal grid filter
remove filter door
computer1
audioout
computer2
audioin
monitorout
computerin
vacuum filter
S-video1
R
network
serialcontrol
L
video2
audioin
videoin
security lock
Page 41

Appendix
Accessories
Red LED behavior and projector errors
If the projector is not functioning properly and the red LED is blinking, consult Ta b l e 2 to determine a possible cause. There are two second pauses
between the blinking cycles.
Standard Accessories
(ship with the projector)
Shipping Box (with packaging)
Carry Case
Computer Cable 6 ft (1.8 m)
Audio/Video Cable 6 ft (1.8 m)
Audio Cable 6 ft (1.8 m)
Power Cable*
Navigator Remote
Projection Lamp Module (included
in projector)
Lens Cap
Lens Cap Tether
Quick Setup card
User’s Guide
Safety Card
Color-coded Cable Ties, 3 set
SCART Adapter*
*country-dependent
NOTE: Use only approved accessories.
Table 2:
Red LED Behavior Explanation
One (1) blink The lamp won't strike after five (5)
attempts. Check the lamp and lamp door
installations for loose connections.
Two (2) blinks The lamp counter hours have exceeded
lamp life hours. Replace the lamp and
reset the lamp hours counter.
Three (3) blinks The projector has shut down the lamp.
Replace the lamp.
Four (4) blinks The fan has failed.
Five (5) blinks The projector is overheating. Check for a
blocked air vent.
40
 Loading...