

Page 1

Table of Contents
1. Introduction···················································································· 2
2. Features··························································································· 2
3. Operation Notice ·········································································· 3
4. Projector Components ······························································ 4
4.1 Control Panel 4
5. Accessories···················································································· 7
5.1 Remote Control 8
5.2 Remote Control Functions 9
6. Operation guide·········································································· 11
6.1 Connecting component 11
6.2 Connecting the projector to a computer 12
6.3 Connecting the projector to a Video Source 12
6.4 Turning on the projector 13
6.5 Basic Image Adjustment 13
6.6 Turning off the projector 13
6.7 Adjusting the projected image height 14
6.8 Adjusting the image focus and zoom 15
7. OSD menu····················································································· 16
7.1 Image (Computer mode) 16
7.2 Image (Video mode) 17
7.3 Display (Computer mode) 18
7.4 Display (Video mode) 20
7.5 Audio 22
7.6 Management 23
7.7 Language 24
8. Maintenance and service························································25
8.1 Replacing the lamp module 25
8.2 Cleaning the projector lens 26
9. Appendix························································································27
9.1 Common problems and solutions 27
9.2 Distance ratio of screen and projector 29
9.3 Specifications 30
1
Page 2

1. Introduction
Please read this manual carefully before using, to find out:
◆ How to use the projector safely
◆ How to use the remote control
◆ How to set up and connect the projector
◆ How to start and turn off the projector
◆ How to use the On-screen display (OSD) menus
◆ How to replace the lamp module
◆ How to troubleshoot common problems
2. Features
◆ TI 0.7”/ 0.6” DLP
◆ Full-function remote including remote mouse control.
◆ High quality manual zoom lens.
◆ Weighs only 7.5 pounds with a beautifully designed case.
◆ Expandable module design, compact and lightweight.
◆ High brightness/high contrast. Clear images.
◆ Adjustable screen aspect ratio (4:3 / 16:9).
◆ NTSC, PAL, P- Scan (480P), & HDTV (1080i / 720P) compatible.
◆ Multilingual OSD (on screen display) Menus.
TM
DMD Chip.
2
Page 3

3. Operation Notice:
Please read and follow the following safety instructions carefully. Improper
operation may result in fire, electrical shock, personal injury, or projector damage.
Warning: Do not cover the lens while the lamp is lit.
Warning: To prevent eye injury, do not look directly into the projector lens.
Warning: Make sure that you provide adequate ventilation for the
projector. Do not block the ventilation holes in the case
Warning:
Warning:
Warning:
Warning:
Warning:
Warning:
Warning:
To prevent electrical shock, never open the projector case.
Before using, please make sure that the power cord is connected
to an AC receptacle with a protective safety ground terminal.
Before replacing the lamp, turn the projector off and unplug the
power cord. To avoid burns, wait 1 hr before opening the lamp
door. Refer to page 24 for lamp replacement instructions.
Always use the power cord provided, and a receptacle with a
protective safety ground terminal.
Do not place any drinks on top of your projector. Spilled liquids
may damage the projector.
Do not place the projector on a hot surface, moisture or in direct
sunlight.
Handle carefully during transportation. Avoid dropping the
projector.
3
Page 4
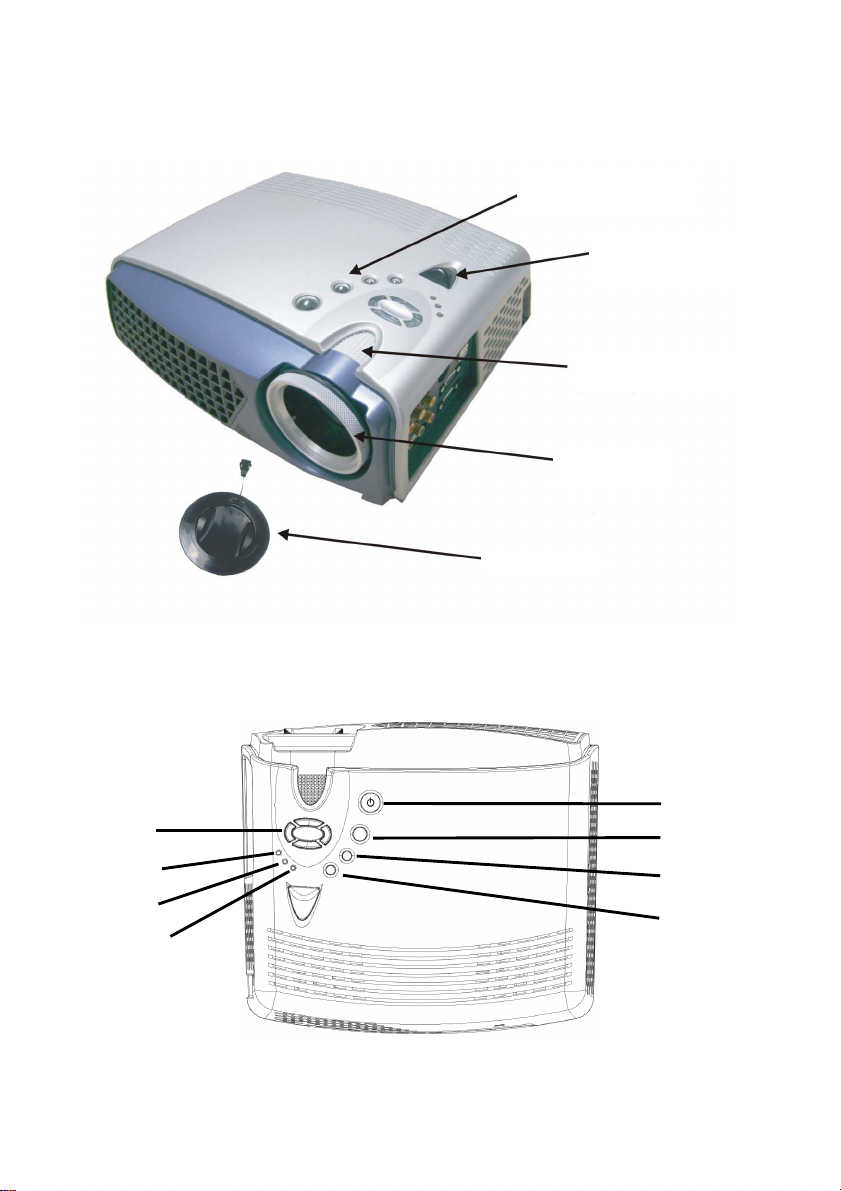
4. Projector Components
↑↓
A
p
4.1 Control Panel:
Control panel
Infrared remote
sensor
Zoom ring
Focus ring
Lens Ca
←→
LAMP LED
TEMP LED
POWER LED
4
POWER
MENU
SOURCE
UTO/ENTER
Page 5

Power LED (Indicator light)
•When power is applied to the projector, the Power LED blinks. Press the
Power button to turn the projector on. When the projector is on, the Power
LED is lit constantly.
Temp LED (Indicator light)
•When there is a fan malfunction, a fan error message is displayed on the
screen, the Temp LED lights and the projector shuts down.
•When the projector internal temperature is too high, a temperature error
message is displayed, the Temp LED blinks and the projector shuts down.
Lamp LED (Indicator light)
•Lamp LED will turn on automatically when lamp is on. Lamp LED will turn
off automatically when the lamp is off.
Power
•Turns the projector power off and on.
•Refer to “Starting and turning off the projector” on Page 13.
(On/Standby)
Menu (OSD menu)
•Press to display or hide the OSD menu.
•The OSD menu closes automatically after 20 sec of inactivity.
Source (Signal source)
•Steps through the input sources in the following order: Analog RGB, Analog
Y Pb Pr, Digital RGB, Composite Video, S-Video and Component Video.
Auto/Enter (confirm/Sync)
•When using the OSD menu, this button is used to select menu functions.
•When the OSD menu is not displayed, this button activates the Sync function.
5
Page 6

↑↓(Up and down button)
•When using the OSD menu, these buttons are used to move between menu
options.
•When the OSD menu is not displayed, these buttons select the video input
source.
← →(Left and right button)
•These buttons are used to adjust values in the OSD menus.
6
Page 7
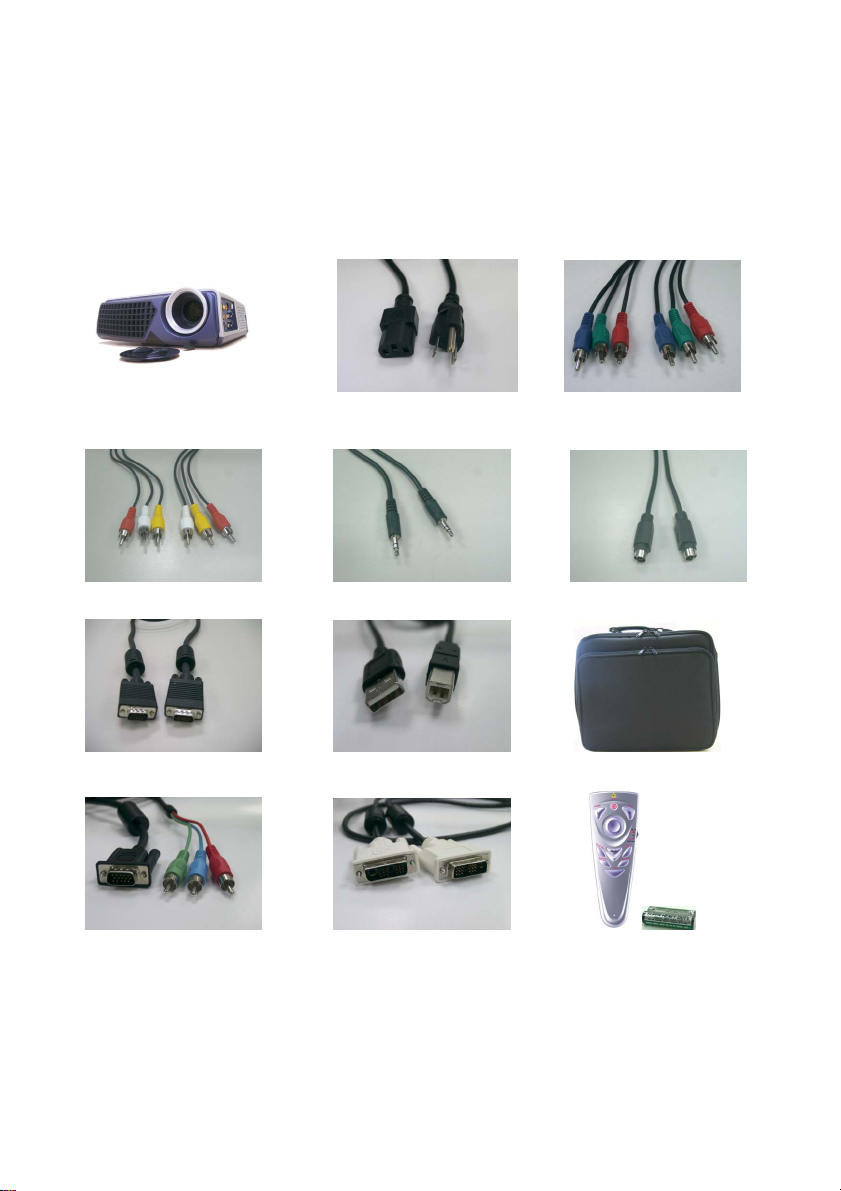
5. Accessories
When unpacking the projector, make sure you have all of the accessories shown
below. If any of the accessories are missing or damaged, contact your dealer or
Boxlight Technical Support.
Projector lens cap power cord Component Video
cable
Composite Video cable PC Audio in/out cable S-Video cable
VGA cable USB cable Carry bag
VGA-RCA cable DVI cable remote control & 2 AAA batteries
7
Page 8
5.1 Remote Control
The infrared remote control sensor is located on the top of the projector. For best
results, the distance between the sensor and remote control should not exceed 10
meters.
Inserting batteries into the remote control:
1) Remove the battery compartment cover.
2) Insert two AAA batteries into the battery compartment. Ensure the batteries are
aligned correctly.
3) Replace the battery compartment cover.
*Using the remote control
8
Page 9
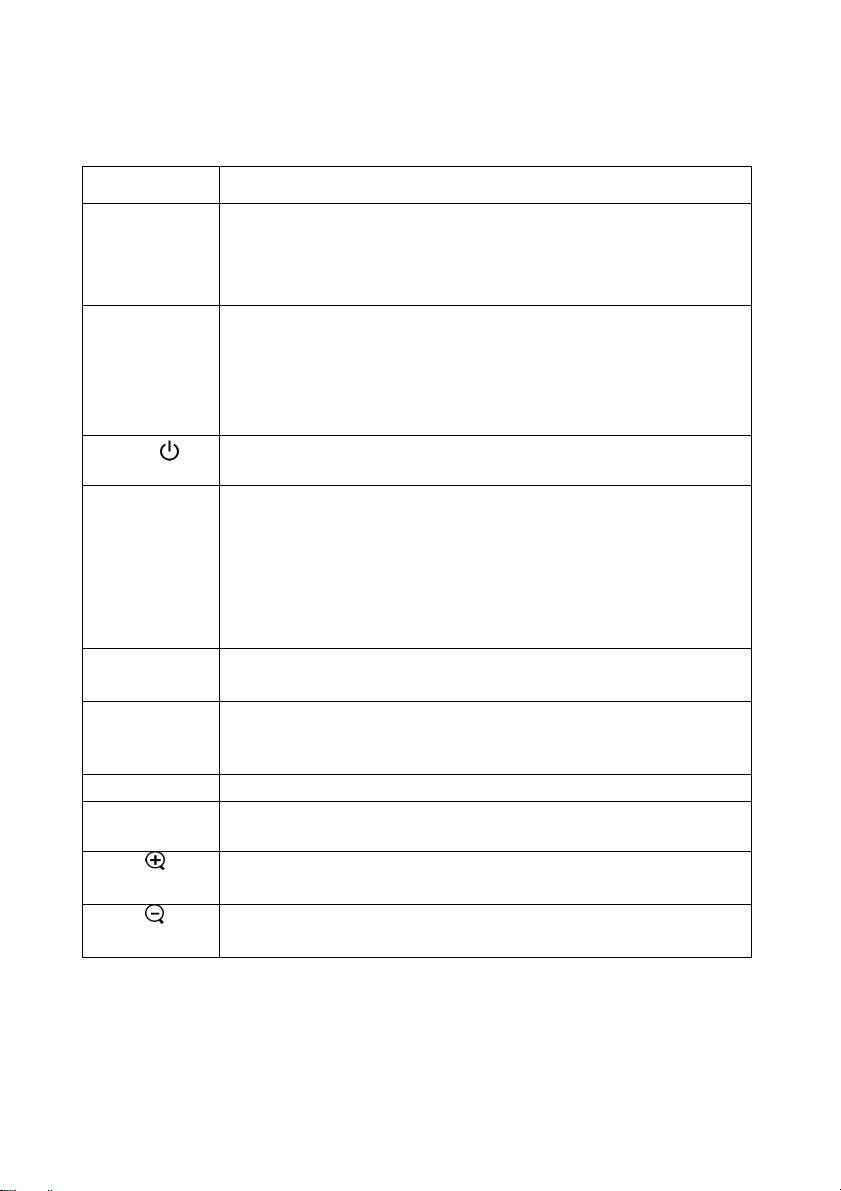
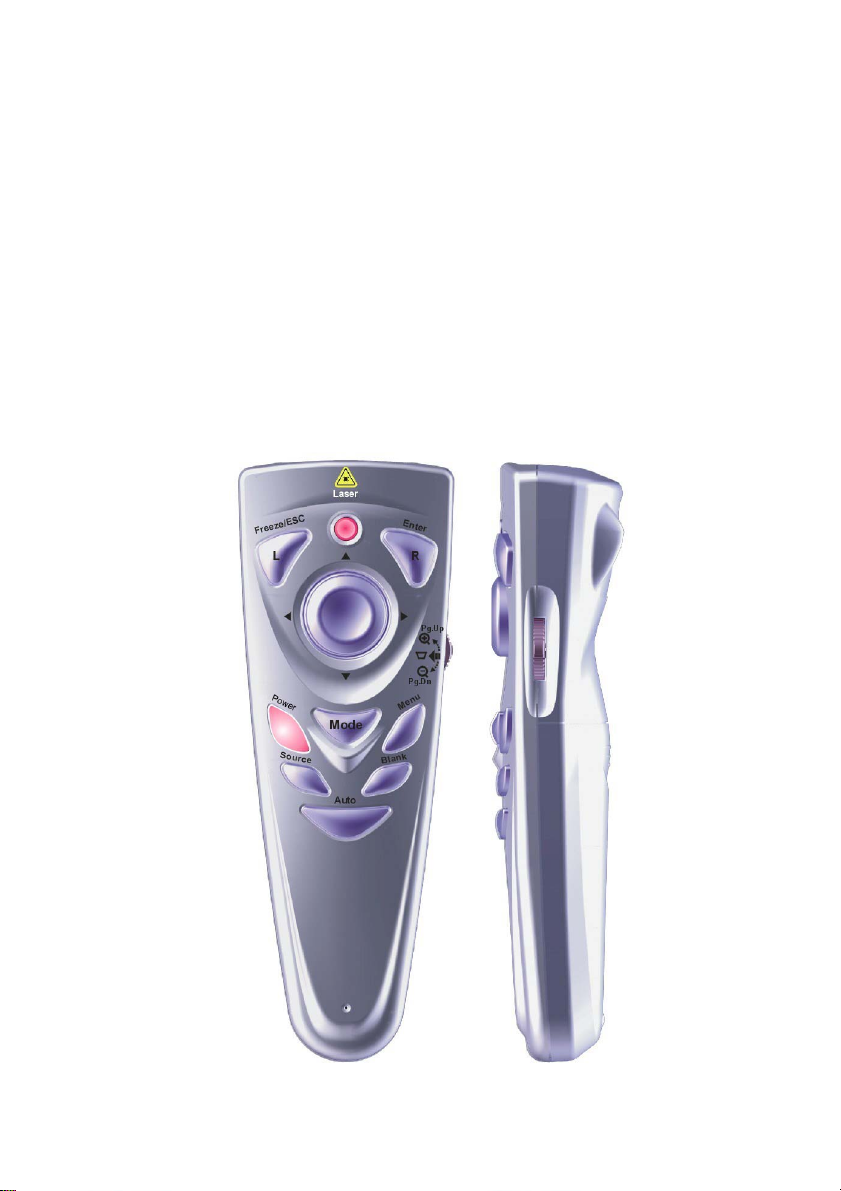
5.2 Remote Control Functions:
Function key Function description
Freeze/Esc/L
Enter/R
Power
Mode
Menu
Source
Blank
Auto
Pg.Up
Pg.Dn
•OSD inactive: freezes the image. Press again to exit freeze
mode.
•OSD active: exits the selected function.
•Mouse mode: Use as the left mouse button.
•When using the OSD menu, this button is used to select menu
functions.
•When the OSD menu is not displayed, this button activates the
Sync function.
•Mouse mode: Use as the right mouse button.
•Turns the projector on and off. Refer to “Turning on and turning
off the projector” on page 13.
• Toggles the remote between mouse and normal modes.
When the Mode LED is green, the remote control is in
mouse mode and will control the computer mouse functions.
• If no buttons are pressed for 15 sec, the remote control will
return to normal mode automatically.
" You must have a USB cable connected between your
computer and the projector to use this option.
••Displays or hides the OSD menu.
•The OSD menu closes automatically after 20 sec of inactivity.
•Steps through the input sources in the following order: Analog
RGB, Analog Y Pb Pr, Digital RGB, Composite Video,
S-Video and Component Video.
•Displays a blank, blue screen.
•Automatically adjusts the picture position and frequency
settings to match the current input.
•Enlarge the current image (zoom in)*.
•Mouse mode: Sends a Page Up command to the computer.
•Reduce the current image (zoom out)*.
•Mouse active: Sends a Page Down command to the computer.
9
Page 10

↑↓← → •Normal mode: The same as the Up, Down, Left, Right control
*Press “Auto” to return these settings to their previous values.
•Activates keystone adjustment mode.Press the right and left
buttons to adjust the shape of the image*.
• Press Å button to correct a display that is wider at the
bottom than the top.
• Press Æ button to correct a display that is wider at the top
than the bottom.
" Using the keystone adjustments can cause distortion to text
or fine image details.
buttons on the panel*.
•Mouse mode: Move the mouse cursor Up, Down, Left, or Right.
10
Page 11

6. Operation guide
6.1 Connecting components
You can connect the projector to a computer, DVD player, VCR, or other video
source. To connect the projector to a DVD player or VCR, go to “Connecting to a
Video Source” on page 12.
1. VGA In/Out port
2. USB In port
3. S-Video In port
4. Composite Video port
5. PC Audio In/Out In port
6. DVI-D In port
11
Page 12

6.2 Connecting the projector to a computer
1) Plug the VGA cable into the VGA port at the left side of projector then plug
the other end of VGA cable into the computer.
Note: If you are connecting to a notebook, you may need to make adjustments to
the notebook’s display settings first. Please refer to the user’s guide that
came with your notebook.
2) If you want to use the remote control as a mouse, plug the USB cable into the
USB port at the left side of projector, then plug the other end into the computer.
3) If your presentation contains audio, plug the PC Audio in/out cable into the
Audio In port at the left side of projector, then plug the other end into the
computer.
4) Turn on the projector first, then the computer.
6.3 Connecting the projector to a Video Source
If you are using a composite video source, refer to the following:
1) Plug the yellow, red, and white RCA connectors separately into the
appropriately colored port at the left side of projector.
2) Plug the yellow, red, and white connectors on the other end into the
corresponding ports on the Video Source.
If you are using an S-video source, refer to the following:
1) Plug the S-Video cable connector into the S-Video port at the left side of
projector then plug the other end into the Video Source.
2) Plug the red and white connectors from the composite video cable into the
corresponding ports at the left side of projector, then plug the other end into the
corresponding ports on the Video Source.
Note: When you are using the S-Video cable along with the A/V cable, do not plug in
the A/V cable’s yellow connector
.
12
Page 13

After you have connected all of the components to the projector, you are ready to
begin using the projector.
6.4 Turning on the projector:
1) Remove the lens cap.
2) Ensure the cable connectors are connected properly.
3) Plug in the power cord, set the main switch (located above the power cord
socket) to “1”. The Power LED blinks steadily and slowly.
4) Press the “Power” button on the remote control or control panel to turn on the
projector, the Power LED lights steady blue and the Lamp LED lights steady
green.
5) A 30 second countdown will be displayed, after the countdown the projector will
automatically detect and display the input source. Press the "Power" button
one time to bypass the 30 second warm up period.
6) If the screen displays “No signal”, ensure the proper source is selected and the
cables are properly connected.
7) To ensure the best possible image performance, press “AUTO/ENTER” after the
source is displayed.
Note: If you try to turn on the projector when the internal temperature is too high,
the Lamp LED will blink rapidly and the projector will automatically enter
cool down mode for 8 seconds. During the cool down sequence, the
projector will not light the lamp or respond to remote control or control
panel inputs.
6.5 Basic image adjustment
1) Power up your equipment in the right order and point the projector at the screen.
2) Rotate the zoom ring to adjust the image size.
3) Rotate the focus ring to adjust the image focus.
4) Use the tilt foot to adjust the image height.
5) Use the control panel or remote control to adjust the horizontal and vertical
position of the image or to adjust the keystone correction.
6) Use the OSD menu to adjust the brightness, contrast and color of the image.
13
Page 14

6.6 Turning off the projector
Adj
Adj
1) Press Power and the “Press Power again to turn off the lamp!” message
appears.
2) Press “Power” again to turn off the projector (the message will disappear
automatically after 5 sec if the power button is not pressed again).
3) The lamp turns off and the Power LED indicator blinks rapidly. The fans
continue to run for 60 seconds to cool down the projection lamp. During this
cool down sequence the projector will not respond to any user input.
4) When the fans stop and the Power LED starts flashing slowly, you can either
turn the projector back on or set the power switch to “o” and disconnect the
power cord.
Note: To extend the lamp life-span, please do not unplug the power cord
immediately after the lamp is turned off. Please allow at least 120 sec for
the fan to stop, and then you can unplug the power cord.
6.7 Adjusting the projected image height.
ustor-foot release button
ustor-foot
To adjust the angle of the projector
To raise the projector
1. Press and hold the Adjustor-foot release button.
2. Raise the projector to the height you want, then release the button to lock the
foot into position.
14
Page 15

To lower the projector
g
1. Press and hold the Adjustor-foot release button.
2. Lower the projector to the height you want, then release the button to lock the
foot into position.
6.8 Adjusting the image focus and zoom
Zoom Wheel
Focus rin
Adjust the zoom ring to enlarge or reduce the image size. Rotate counterclockwise
to enlarge the image. Rotate clockwise to reduce the image. To adjust the focus,
rotate the focus ring to obtain the best focus. The focus distance of this projector is
1.4~12 meter(3.9~39ft).
15
Page 16

7. OSD Menu
p
Press “Menu” to open the menu. Press up or down to choose the OSD options or
press Esc to exit. To enter a submenu, press “Auto/Enter” or the right mouse button.
Under the submenu, press “Menu” or Esc on the remote control to return to the
main Menu screen or double click to exit the OSD menu.
7.1 Image (Computer mode)
Submenu
Description Operation method
options
Brightness
(**)
Contrast
Keystone
Zoom
Adjusts the overall brightness of
the image
Adjusts the contrast of the
image.
Corrects an image that is wider
at the top or at the bottom.
Enlarges or reduces a portion of
the image.
•PressÅto reduce the brightness of the image.
•PressÆ to increase the brightness of the image.
(*)
•PressÅto reduce the contrast of the image.
•PressÆ to increase the contrast of the image.
(*)
•PressÅ to correct an image that is wider at the
bottom.
•PressÆ to correct an image that is wider at the
top.
(*)
•PressÅ to reduce the zoom.
•PressÆ to enlarge the zoom.
(*)
¾ Please press Auto/Enter button to enter zoom
mode.
Inthis mode, pressÅÆ to move the image,
ress Pg Up and Pg Dn on the remote control to
adjust the image size.
* Press “Auto” button to return to previous setting value.
**If the source is switched to HDTV/DVD 480P, “Brightness” becomes “Tint” which
adjusts the balance between red and blue in the image.
16
Page 17

7.2 Image (Video mode)
User Menu – Normal
User Menu –Advanced
Note: Advanced and Normal functions are set up in Management/User Menu (p.23).
Submenu
options
Brightness
Contrast
Hue
Saturation
Sharpness
* Press “Auto” to return the setting to the previous value.
Adjusts the overall brightness of
the image
Adjusts the contrast of the image.
Adjusts the balance between
red and green in the image.
Changes the image from black
and white to color.
Adjusts the sharpness of the
image.
Description Operation method
•PressÅto reduce the brightness of the image.
•PressÆ to increase the brightness of the image.
(*)
•PressÅto reduce the contrast of the image.
•PressÆ to increase the contrast of the image.
(*)
•PressÅ to increase the amount of green.
•PressÆ to increase the amount of red.
(*)
•PressÅ to reduce the color saturation.
•PressÆ to increase the color saturation level.
(*)
•PressÅto make the image softer.
•PressÆto make the image sharper.
(*)
17
Page 18

7.3 Display (Computer mode)
User Menu – Normal
User Menu – Advanced
Submenu options Description Operation method
Frequency
Phase
V position
18
Minimizes vertical bars or
stripes visible on the screen
background.
Removes horizontal
distortion and clears or
sharpens characters.
Adjusts the display image
position up and down.
•PressÅ Æ to adjust (*).
•Press Å Æ to adjust(*).
•PressÅ to move the image down.
•PressÆ to move the image up.
(*)
Page 19

H position
Proportion
User Color
Red Gain
Green Gain
Blue Gain
Color temperature
* Press “Auto” to return to previous setting.
Adjusts the image position
left and right.
Switches between 4:3 and
16:9 screen ratio.
Activates individual red,
green, or blue color
correction controls.
Adjusts the red color level.
Adjusts the green color
level.
Adjusts the blue color level.
Adjusts the red or blue tint
of the image.
•PressÅ to move the image to the
left.
•PressÆ to move the image to the
right.
(*)
•Press Å Æ to choose.
•Choose Yes, and the user red,
user green, and user blue
adjustments are displayed.
•Choose No the user adjustments
are hidden.
•PressÅ to reduce the red color
level.
•PressÆ to increase the red color
level.
(*)
•PressÅ to reduce the green color
level.
•PressÆ to increase the green
color level.
(*)
•PressÅ to reduce the blue color
level.
•PressÆ to increase the blue color
level.
(*)
•PressÅ to reduce the color
temperature, and make the
image appear warmer (more
red).
•PressÆ to increase the color
temperature, and make the
image appear cooler (more
blue).
(*)
19
Page 20

7.4 Display (Video mode)
User Menu – Normal
User Menu –Advanced
Submenu options Description Operation method
Keystone
Proportion
User Color
Corrects an image that is
wider at the top or at the
bottom.
Switches between 4:3 and
16:9 screen ratios.
Activates individual red,
green, or blue color
correction controls.
•PressÅ to correct an image that
is wider at the bottom than the
top.
•PressÆ to correct an image that
is wider at the top than the
bottom.
(*)
•Press Å Æ to change.
•Choose Yes, and the user red,
user green, and user blue
adjustments are displayed.
•Choose No, the user adjustments
are hidden.
20
Page 21

Red Gain
Green Gain
Blue Gain
Color temperature
* Press “Auto” to return to previous setting.
Adjusts the red color level.
Adjusts the green color
level.
Adjusts the blue color
level.
Adjusts the red or blue tint
of the image.
•PressÅ to reduce the red color
level.
•PressÆ to increase the red color
level.
(*)
•PressÅ to reduce the green color
level.
•PressÆ to increase the green
color level.
(*)
•PressÅ to reduce the blue color
level.
•PressÆ to increase the blue color
level.
(*)
•PressÅ to reduce the color
temperature, and make the
image appear warmer (more
red).
•PressÆ to increase the color
temperature, and make the
image appear cooler (more
blue).
(*)
21
Page 22

7.5 Audio
Submenu options Description or operation method
Volume
Balance
Treble
Bass
Mute
* Press “Auto” button to return to previous setting.
•PressÅ to decrease the volume.
•PressÆ to increase the volume.
(*)
•PressÅ to decrease the volume of the left speaker.
•PressÆ to increase the volume of the right speaker.
(*)
•PressÅ to decrease the treble
•PressÆ to increase the treble.
(*)
•PressÅ to weaken the bass.
•PressÆ to enhance the bass.
(*)
•Choose “Yes” to mute.
22
Page 23

7.6 Management
Submenu
options
OSD location
Adjusts the position of the OSD
within the image.
Projection
User Menu
There are two types of functions ,
Advanced and Normal, for users to
choose.
Description Operation method
(Projector in front of the screen)
Default
(Projector behind the screen)
Flips the display image so it
can be viewed correctly when
the projector is set up for rear
screen projection.
(Projector ceiling-mounted)
Flips the display image so it
can be viewed correctly when
the projector is
ceiling-mounted.
•PressÅ Æ to select (*).
•PressÅ Æ to select (*).
•PressÅ Æ to select (*).
23
Page 24

Lamp Reset
Resets the lamp timer.
• Press right, and the “Press
Auto/Enter button, reset
the lamp timer” message
will be displayed, press
“Auto/Enter” to reset the
timer. Press “Menu” or
“Esc” on the remote
control to exit without
resetting the timer.
Auto Adjust
Automatically adjusts the display
settings to the ideal settings for the
display source.
•Select Yes, and the
brightness and contrast
value will be adjusted
automatically each time you
press “Auto” button.
•Select No, the brightness and
contrast value is fixed and
unchanged.
Reset All
Returns all settings to the factory
•Press right button.
defaults.
Source type
Switches between available video
•PressÅ Æ button to choose.
input sources.
* Press “Auto” to return to previous setting.
7.7 Language
Changes the language of the OSD menu. Choose between English, German, French,
Italian, Spanish, Portuguese, Japanese, Traditional, Chinese, and Simple Chinese.
24
Page 25

8. Maintenance and service
p
Change the lamp module immediately when the lamp life reaches 1500 hrs to
maintain the best projection image.
8.1 Replacing the lamp module
When the lamp is within 30 hours of maximum lamp life, the projector will display
the “Lamp has reached its end of life! Lamp replacement is suggested!” warning.
When this message appears, change the lamp.
To replace the lamp module:
1. Turn off the projector and wait for the fan to stop.
2. Turn off the main power switch, and disconnect the power cord and all cables.
3. Let the projector lamp cool down completely (approximately 30 minutes).
4. Use a screwdriver to loosen the screws of lamp door and lamp module.
5. Take out the lamp module.
6. Gently insert the new lamp module into the lamp bay, replace the lamp module
retaining screws.
7. Replace the lamp door, and tighten the door screw.
8. Reset the lamp timer using the Lamp Reset function in the Management menu.
Use a screwdriver to loosen the lamp door,
and press down the lock to remove the door.
25
Remove the three lamp module
retaining screws, unsnap the
lamp removal handle to change
module.
the lam
Page 26

8.2 Cleaning the projector lens
Follow this procedure to clean the projector lens:
1. Use a small amount of cleaner on a clean soft cloth. Do not use abrasive cleaners,
solvents, or other chemicals, they may cause damage to the projector lens.
2. After cleaning and while the projector is not being used, place the lens cap on
the lens to protect the lens.
26
Page 27

9. Appendix
9.1 Common problems and solutions
When you encounter problems while using the projector, refer to the following
troubleshooting tips:
If you are unable to correct the problem, contact your dealer or Boxlight Technical
Support.
█ No image on the screen
ÖMake sure that all components are connected correctly.
ÖMake sure the power cord is not damaged.
ÖMake sure the main switch of the projector is turned on.
ÖEnsure the lamp is securely installed.
ÖMake sure the lens cap is removed.
█ The screen resolution is not right
Ö Make sure the computer resolution is not set higher than 1280 X 1024.
█ Display image is instable or flashing
ÖPress the “Auto” button on the remote control or the Auto/Enter button on the
projector.
ÖAdjust the “Phase” setting in the “Display” menu.
ÖChange the color setting of on your computer.
█ Image has vertical flashing stripes or bars.
ÖPress the “Auto” button on the remote control or the Auto/Enter button on the
projector.
Ö Adjust the “Frequency” setting in the “Display” menu.
ÖCheck the display mode of your display .
█ The image is blurry
ÖAdjust the focus ring on the projector.
ÖMake sure the projection screen is 1.4 ~12 meters (3.9 ~ 39 ft) from the
projector.
27
Page 28

█ Projected colors don’t match the computer or video player’s colors
ÖThis is a normal phenomenon; adjust the brightness, color or contrast value in
the menu.
█ When the projector is connected to a DVD player, and the film aspect ratio is
16:9, the display image is distorted.
ÖAdjust the image proportion of projector into 4:3.
█ Image is reversed
ÖOpen the Menu, and then choose “Projection setting” option to adjust the
projection method.
█ Lamp is burned or cracking sound happens.
ÖWhen the lamp has reached its end of life, it may burn out and shatter. Contact
your dealer or Boxlight to buy a replacement lamp module.
28
Page 29

9.2 The distance proportion between screen and projector
(Based on Zoom Ratio 1.18:1, for reference only)
Projection distance 1.45M 2M 4M 6M 12M
Minimum diagonal screen
size
Maximum diagonal screen
size
30” 40” 80” 120” 240”
35” 47” 94” 141” 283”
29
Page 30

9.3 Specifications
Resolution
Lamp
Dimensions
Wei ght
Projection distance
Ratio of projection
Zoom ratio
Uniformity
Screen proportion
Contrast ratio
H. Frequency
V. Scan rate
Video compatibility
HDTV compatibility
Power supply
Power consumption
IO port
XGA(1024*768), SXGA(1280*1024) compressed
250W User Replaceable VIP Lamp
330 x 276 x 104 mm
7.5 lbs
1.4m〜12m (3.9 ~ 39 ft)
1.34:1〜 1.6:1 (Distance: Diagonal)
1.2:1 (Manual Zoom/Focus)
80%
4:3 / 16:9 screen selectable
1800:1
31.5 〜 80 kHz
56 〜 85 Hz
NTSC / PAL /SECAM
480p/720p/1080i
90 to 240 VAC, 50 to 60 Hz
350W
DVI, USB Mouse, RGB In(D-Sub 15 pin), RGB
Out(D-Sub 15 pin), Component Video, S-Video Mini
DIN 4 pin, Audio: RCA Jack, 3.5mm Mini Jack,
Composite Video(RCA Jack), PC Audio In, PC Audio
Out, 2 watt speaker
* These specifications are subject to change without notice.
This device complies with Part 15 of the FCC Rules. Operation is subject to the
following two conditions: (1) the device may not cause harmful interference, and
(2) this device must accept any interference received, including interference that
may cause undesired operation.
30
Page 31

LIMITED WARRANTY
Boxlight (“Boxlight”) warrants that each Boxlight CD-726c (“the Product”) sold hereunder will
conform to and function in accordance with the written specifications of Boxlight. Said limited warranty
shall apply only to the first person or entity that purchases the Product for personal or business use and
not for the purpose of distribution or resale. Said warranty shall continue for a period of two (2) years
from the date of such purchase. The standard limited warranty excludes the lamps in projectors after
120 days or 500 hours (whichever comes first) and the accessories after one year. Boxlight does not
warrant that the Product will meet the specific requirements of the first person or entity that purchases
the Product for personal or business use. Boxlight’s liability for the breach of the foregoing limited
warranty is limited to the repair or replacement of the Product or refund of the purchase price of the
Product, at Boxlight’s sole option. Replacement Product may be re-furbished in “like-new” condition, at
Boxlight’s sole discretion. To exercise the Purchaser’s rights under the foregoing warranty, the Product
must be returned at the Purchaser’s sole cost and expense, to Boxlight or to any authorized Boxlight
service center, and the Product must be accompanied by a written letter explaining the problem and
which includes (i) proof of date of purchase; (ii) the dealer’s name; and (iii) the model and serial
number of the Product. When sending your unit in for repair, please ship your unit in its original
packing material or a Boxlight approved ATA Shipping Case, or have a professional packaging
company pack the unit. Please insure your shipment for its full value. A return authorization number,
issued by the Boxlight Customer Service department, must also be clearly displayed on the
outside of the shipping carton containing the Product.
WARRANTY LIMITATION AND EXCLUSION
Boxlight shall have no further obligation under the foregoing limited warranty if the Product has been
damaged due to abuse, misuse, neglect, accident, unusual physical or electrical stress (unusual physical
and electrical stress includes unusually long operation, exposure to smoke and other airborne
contaminants), unauthorized modifications, tampering, alterations, or service other than by Boxlight or
its authorized agents, causes other than from ordinary use or failure to properly use the Product in the
application for which said Product is intended.
31
Page 32

DISCLAIMER OF UNSTATED WARRANTIES
THE WARRANTY PRINTED ABOVE IS THE ONLY WARRANTY APPLICABLE TO THIS
PURCHASE. ALL OTHER WARRANTIES, EXPRESS OR IMPLIED, INCLUDING, BUT NOT
LIMITED TO, THE IMPLIED WARRANTIES OF MERCHANTABILITY AND FITNESS FOR A
PARTICULAR PURPOSE ARE DISCLAIMED. THERE ARE NO WARRANTIES THAT EXTEND
BEYOND THE FACE HEREOF AND THE FOREGOING WARRANTY SHALL NOT BE
EXTENDED, ALTERED OR VARIED EXCEPT BY WRITTEN INSTRUMENT SIGNED BY
BOXLIGHT. SOME STATES DO NOT ALLOW LIMITATIONS ON HOW LONG AN IMPLIED
WARRANTY MAY LAST, SO SUCH LIMITATIONS MAY NOT APPLY TO YOU.
LIMITATION OF LIABILITY
IT IS UNDERSTOOD AND AGREED THAT BOXLIGHT’S LIABILITY WHETHER IN
CONTRACT, IN TORT, UNDER ANY WARRANTY, IN NEGLIGENCE OR OTHERWISE SHALL
NOT EXCEED THE RETURN OF THE AMOUNT OF THE PURCHASE PRICE PAID BY
PURCHASER AND UNDER NO CIRCUMSTANCES SHALL BOXLIGHT BE LIABLE
FOR SPECIAL, INDIRECT, INCIDENTAL OR CONSEQUENTIAL DAMAGES OR LOST PROFITS,
LOST REVENUES OR LOST SAVINGS. THE PRICE STATED FOR THE PRODUCT IS A
CONSIDERATION IN LIMITING BOXLIGHT’S LIABILITY. NO ACTION, REGARDLESS OF
FORM, ARISING OUT OF THE AGREEMENT TO PURCHASE THE PRODUCT MAY BE
BROUGHT BY PURCHASER MORE THAN ONE YEAR AFTER THE CAUSE OF ACTION HAS
ACCRUED. SOME STATES DO NOT ALLOW THE EXCLUSION OR LIMITATION OF
INCIDENTAL OR CONSEQUENTIAL DAMAGES SO THE ABOVE LIMITATION OR
EXCLUSION MAY NOT APPLY TO YOU. THIS LIMITED WARRANTY GIVES YOU SPECIFIC
LEGAL RIGHTS, AND YOU MAY ALSO HAVE OTHER RIGHTS THAT VARY FROM STATE TO
STATE.
Boxlight Corporation
19332 Powder Hill Place
Poulsbo, WA 98370-7407 USA
USA and Canada 800.762.5757
International +1.360.779.7901
www.boxlight.com
32
 Loading...