

Page 1
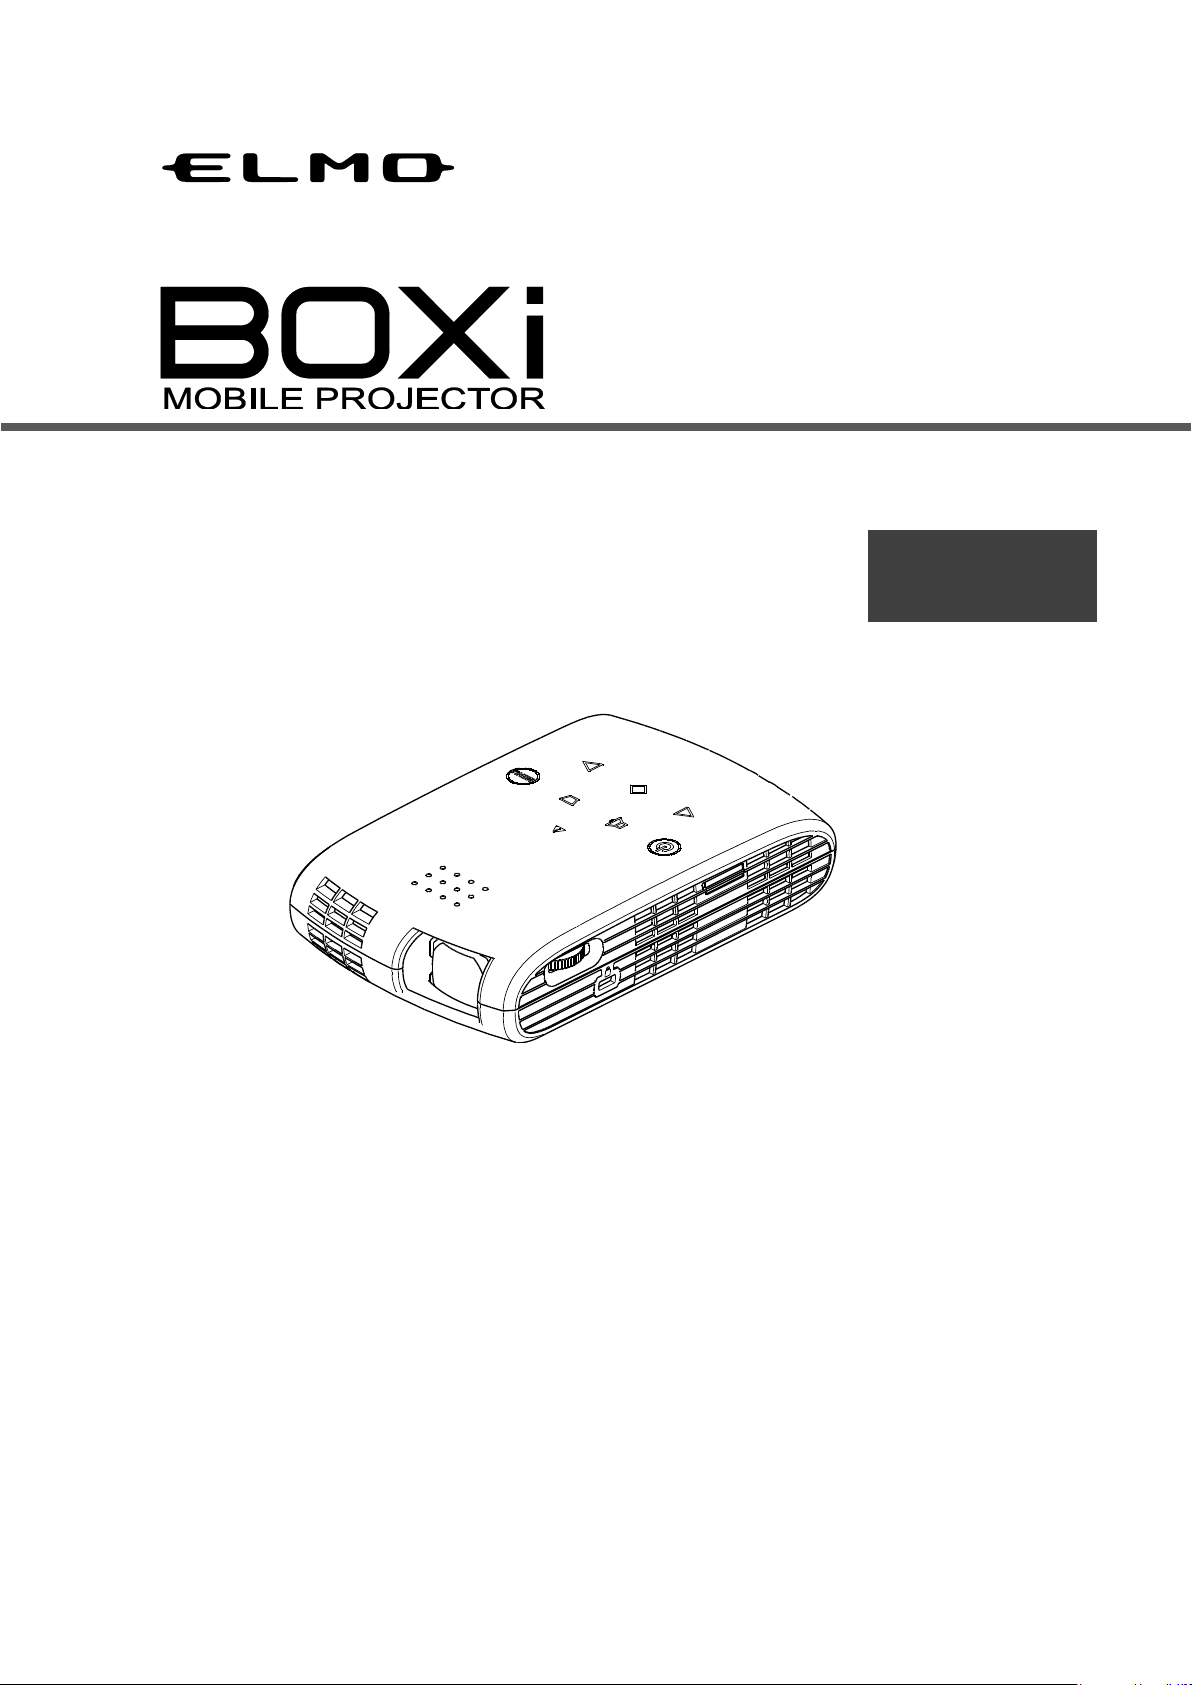
T-200
English
Instruction Manual
■ Read the separate “IMPORTANT SAFEGUARD” carefully before using the projector.
■ Keep this guide in a safe place for future reference.
©2013 Copyright ELMO Co., Ltd. All rights reserved.
Page 2

IMPORTANT SAFEGUARDS
■ Read Instructions
All the safety and operating instructions should be read before the appliance is operated.
■ Retain Instructions
The safety and operating instructions should be retained for future reference.
■ Heed Warnings
All warnings on the product and in the operating instructions should be adhered to.
■ Follow Instructions
All operating and use instructions should be followed.
■ Cleaning
Unplug this product from the power source before cleaning. Do not use liquid cleaners or
aerosol cleaners. Use a damp cloth for cleaning.
■ Attachments
Do not use attachments not recommended by the product manufacturer as they may
cause hazards.
■ Water and Moisture
Do not use this product near water - for example, near a bath tub, wash bowl, kitchen sink,
or laundry tub, in a wet basement, or near a swimming pool, and the like.
■ Placement
Do not place this product on an unstable cart, stand, tripod, bracket, or table. The product
may fall, causing serious injury to a child or adult, and serious damage to the product. Use
only with a cart, stand, tripod, bracket, or table recommended by the manufacturer, or sold
with the product.
Any mounting of the product should follow the manufacturer’s instructions, and should use
a mounting accessory recommended by the manufacturer.
■ Ventilation
Slots and openings in the cabinet are provided for ventilation and to ensure reliable
operation of the product and to protect it from overheating, and these openings must not
be blocked or covered.
The openings should never be blocked by placing the product on a bed, sofa, rug, or other
similar surface. This product should not be placed in a built-in installation such as a
bookcase or rack unless proper ventilation is provided or the manufacturer’s instructions
have been adhered to.
2
Page 3
■ Power Sources
This product should be operated only from the type of power source indicated on the
marking label. If you are not sure of the type of power supply to your home consult your
appliance dealer or local power company. For products intended to operate from battery
power, or other sources, refer to the operating instructions.
■ Grounding or Polarization
This product may be equipped with either a polarized 2-wire AC line plug (a plug having
one blade wider than the other) or a 3-wire grounding type plug, a plug having a third
(grounding) pin.
If the 2-wire polarized plug fails to fit in the outlet socket, try reversing the plug”. If the plug
still fails to fit, contact your electrician to replace your obsolete outlet. For safety reasons
do not force the polarized plug into the outlet socket. The 3-wire grounding type plug will fit
into a grounding type power outlet socket. This is a safety feature. If you are unable to
insert the plug into the outlet socket, contact your electrician to replace your obsolete
outlet socket. For safety reasons do not force the grounding type plug into the outlet
socket.
■ Power-Cord Protection
Power-supply cords should be routed so that they are not walked on or pinched by items
placed upon or against them. Pay particular attention to cords and plugs, convenience
receptacles, and the point where they exit from the product.
■ Lightning
For added protection for this product during a lightning storm, or when it is left unattended
and unused for long periods of time, unplug it from the wall outlet and disconnect the
antenna or cable system. This will prevent damage to the product due to lightning and
power-line surges.
■ Overloading
Do not overload wall outlets, extension cords, or integral convenience receptacles as this
can result in a risk of fire or electric shock.
■ A product and cart combination should be moved with care.
Quick stops, excessive force, and uneven surfaces may cause the
product and cart combination to overturn.
■ Object and Liquid Entry
Never push objects of any kind into this product through openings as they may touch
dangerous voltage points or short-out parts that could result in a fire or electric shock.
Never spill liquid of any kind on the product.
■ Servicing
Do not attempt to service this product yourself as opening or removing covers may expose
you to dangerous voltage or other hazards. Refer all servicing to qualified service
personnel.
3
Page 4

■ Damage Requiring Service
Unplug this product from the wall outlet and refer servicing to qualified service personnel
under the following conditions:
• When the power-supply cord or plug is damaged.
• If liquid has been spilled, or objects have fallen into the product.
• If the product has been exposed to rain or water.
• If the product does not operate normally by following the operating instructions. Adjust
only those controls that are covered by the operating instructions as improper
adjustment of other controls may result in damage and may require extensive work by
a qualified technician to restore the product to its normal operation.
• If the product has been dropped or damaged in any way.
• When the product exhibits a distinct change in performance - this indicates a need for
service.
■ Replacement Parts
When replacement parts are required, be sure the service technician has used
replacement parts specified by the manufacturer or have the same characteristics as the
original part. Unauthorized substitutions may result in fire, electric shock or other hazards.
■ Safety Check
Upon completion of any service or repairs to this product, ask the service technician to
perform safety checks to determine that the product is in proper operating condition.
■ Heat
The product should be situated away from heat sources such as radiators, heat registers,
stoves, or other products (including amplifiers) that produce heat.
4
Page 5
CAUTION:
TO REDUCE THE RISK OF
ELECTRIC SHOCK, DO NOT
REMOVE COVER (OR BACK).
NO USER-SERVICEABLE
PARTS INSIDE.
REFER SERVICING TO
QUALIFIED SERVICE
PERSONNEL.
CAUTION
RISK OF
ELECTRIC SHOCK
DO NOT OPEN
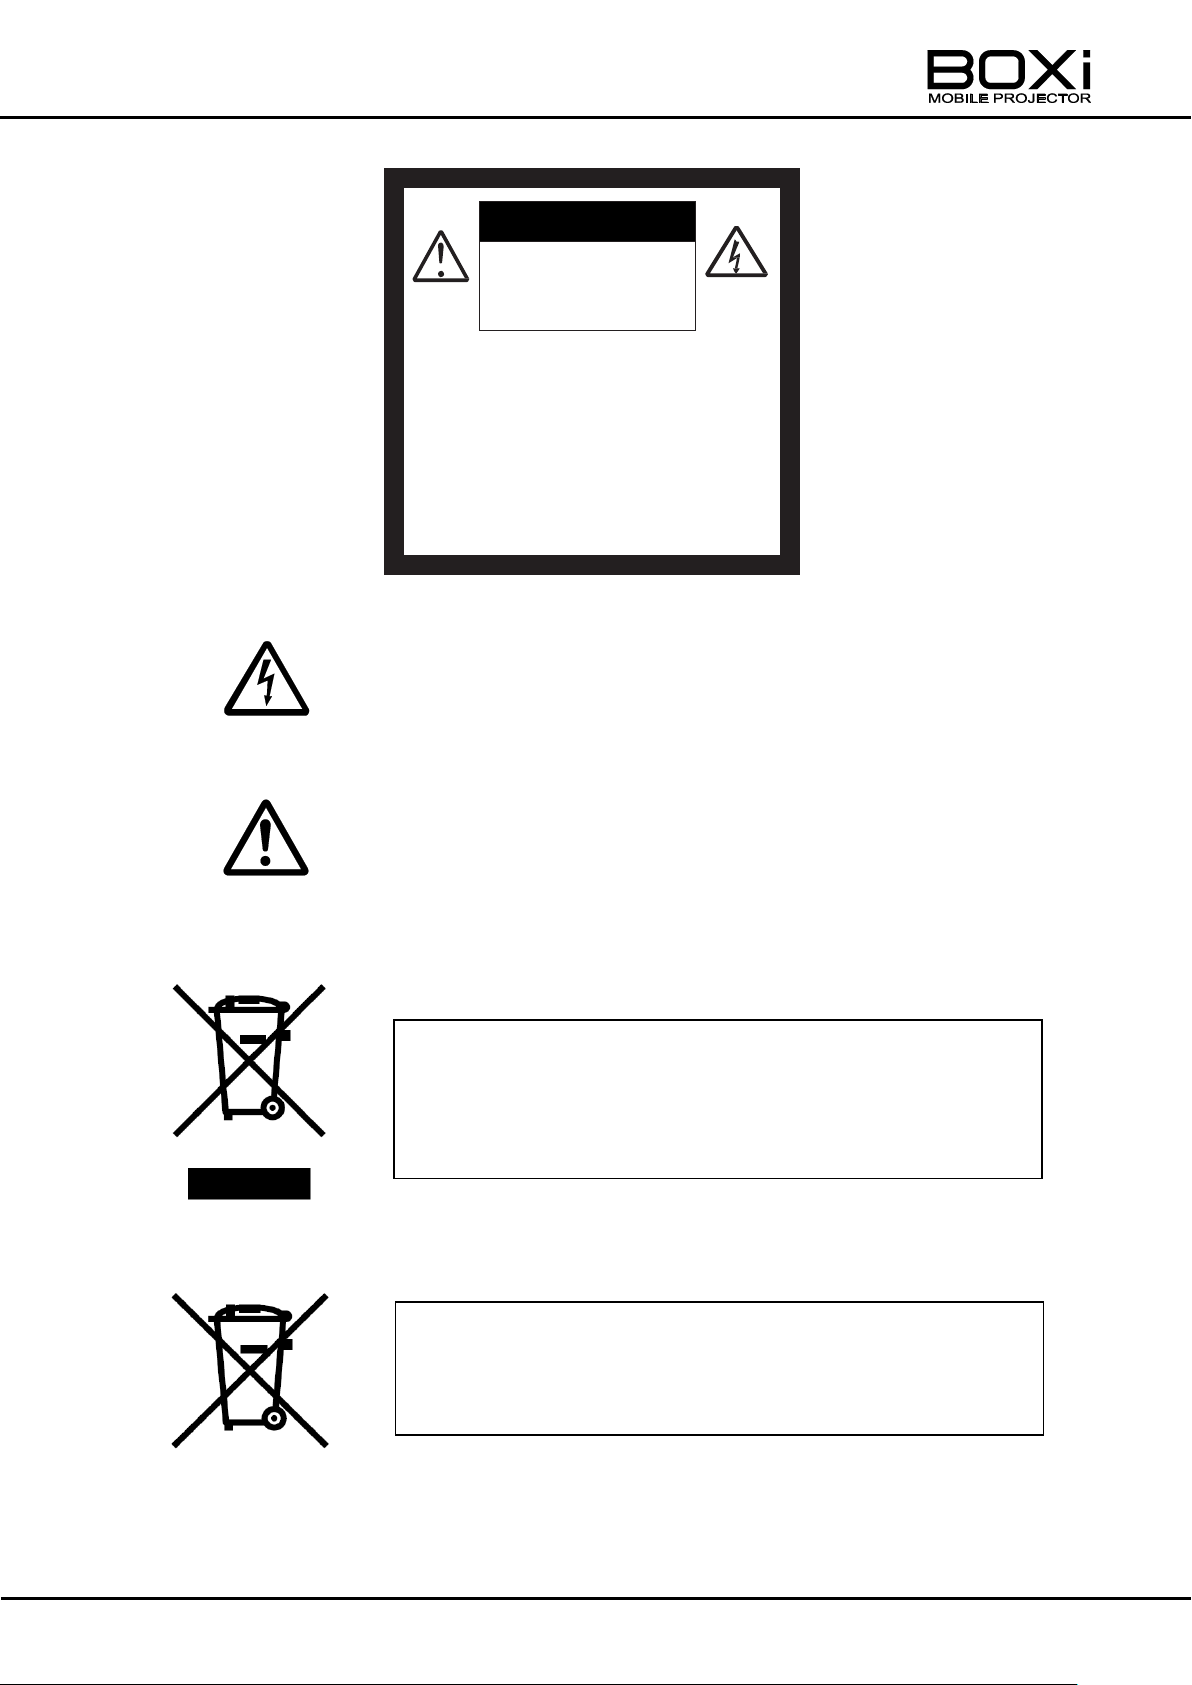
The lightning flash with arrowhead symbol, within an equilateral
triangle, is intended to alert the user to the presence of uninsulated
“dangerous voltage” within the product’s enclosure that may be of
sufficient magnitude to constitute a risk of electric shock to persons.
The exclamation mark within an equilateral triangle is intended to
alert the user to the presence of important operating and
maintenance (servicing) instructions in the literature accompanying
the product.
SA 1966
SA 1965
This symbol [crossed-out wheeled bin WEEE Annex IV] indicates
separate collection of waste electrical and electronic equipment in the
EU countries.
Please do not throw the equipment into the domestic refuse.
Please use the return and collection systems available in your country
for the disposal of this product.
This symbol [crossed-out wheeled bin Directive 2006/66/EC Annex II]
indicates separate collection of waste batteries in the EU countries.
Please do not throw the batteries into the domestic refuse. Please use
the return and collection systems available in your country for the
disposal of the waste batteries.
5
Page 6

BEFORE YOU USE
■ To use this product, please be sure to use the supplied power cord and AC adapter.
■ The supplied power cord and AC adapter are designed for exclusive use with this product. Do not
use them with other equipment.
■ Be sure to use the power cord applicable to your local power specifications. If the product was sold
in Japan, use the AC adapter sold with the product with 100VAC and 50 or 60 Hz.
■ Do not knot or coil the power cord or AC adapter cord or wrap them around the AC adapter. Doing
so may damage the cords, causing fire or electric shock.
■ Carry this product by holding the lower part of the main unit in both hands. Do not apply excessive
vibration or shock to the product. Doing so may damage parts causing malfunction.
■ Do not apply vibration or shock during projection. Do not use this product in a car or ship where
vibration or shock is applied to the product. Vibration or shock may damage parts causing
malfunction.
■ Do not use this product near high-voltage power lines or power source. The product may receive
harmful interference.
■ Do not use this product in locations subject to humidity, dust, smoke, oil smoke or steam. Dirt may
attach to the optical parts, such as the lens, causing reduced image quality.
■ Do not use this product in locations exposed to extreme temperature or locations where the
temperature changes too quickly.
Use this product under the following environmental conditions:
Temperature:5℃~ 35℃ Humidity: less than 85%(No condensation)
■ When the product is suddenly brought into a warm place from a cold place or when the room
temperature is quickly raised, condensation may occur to the surface of the lens causing reduced
image quality. Wait until the condensation is completely gone and the image becomes clear.
■ Do not touch the lens. It may leave fingerprint marks which can result in a blurred image.
■ Important notes when connecting an HDMI cable.
• Use a HIGH SPEED HDMI cable with the HDMI logo.
HDMI cables that are not compliant with HDMI standards should not be used.
・Do not apply excessive force to the HDMI terminal while the cable is connected as it could
damage the HDMI terminal, leading to a malfunction.
■ Follow the guidelines below to prevent the product from dropping or overturning.
• Use the product on a stable base, desk, or table. Do not place the product on an unstable base or
sloping location.
• Secure and tidy all cables to prevent accidentally pulling the projector off any surface.
6
Page 7

■ Luminescent spot and black spot
There may be some pixels that do not operate properly due to the use of an image pick-up device
made-up of many pixels. Though luminescent or black spots may be found on the screen, it is a
phenomenon peculiar to the image pick-up device and is not a malfunction.
■ There may be some flickering on the screen when shooting a pattern image with gradual changes
in brightness. It is a phenomenon peculiar to the image pick-up device and is not a malfunction.
This product is not designed to display such kind of images.
■ There may be some image distortion for a moment when the output resolution of the connected
device is changed while the image is projected. This is because the product automatically adjusts
the projection settings according to the input signal. It is not a malfunction.
■ Lifetime of the parts
Avoid using the projector in severe conditions such as high temperature, dusty or smoky
environments as well as long-continuous use in excess of eight hours.
Doing so may shorten the life of critical components such as the optical engine and cooling fan
which may lead to degraded image quality. Please note, warranty repair may not apply if the unit is
deemed to be subjected to such abuse. Regarding paid component replacement, please contact
the distributor the product was purchased from or our service office.
7
Page 8

CONTENTS
IMPORTANT SAFEGUARDS .................................................................................... 2
BEFORE YOU USE ............................................................................................... 6
CONTENTS ................................................................................................................ 8
1 GETTING STARTED ............................................................................................. 11
CHECKING THE PACKAGE CONTENTS ............................................................. 11
PART NAMES AND FUNCTIONS ......................................................................... 12
Projector ............................................................................................................ 12
LED BACKLIGHT INDICATION ........................................................................ 14
Side panel ......................................................................................................... 15
Remote control .................................................................................................. 16
Operating range for the remote control.............................................................. 19
INSTALLING THE PROJECTOR .......................................................................... 20
Throw distance and screen size ........................................................................ 20
Raising the projected image .............................................................................. 21
Using a tripod for a camera ............................................................................... 22
CONNECTING TO THE DEVICES ....................................................................... 23
Connecting the power (AC adapter and power cord) ........................................ 23
Connecting to HDMI terminal ............................................................................ 24
Output audio through the AUDIO terminal ......................................................... 25
Supplying the power from USB port .................................................................. 26
2 BASIC OPERATION ............................................................................................. 27
TURNING THE POWER ON/OFF......................................................................... 27
Powering on ...................................................................................................... 27
Powering off ...................................................................................................... 28
ADJUSTING THE FOCUS .................................................................................... 29
CORRECTING THE KEYSTONE DISTORTION .................................................. 30
Correcting the keystone distortion manually with the remote control ................. 30
SELECTING THE DISPLAY MODE (remote control) ............................................ 31
CONTROLLING THE VOLUME (remote control) .................................................. 32
Turning up the volume ....................................................................................... 32
Turning down the volume .................................................................................. 32
Controlling the volume with control panel ................................ .......................... 33
TURNING OFF THE SOUND ............................................................................... 34
HIDING THE IMAGE ............................................................................................. 35
ADJUSTING THE BRIGHTNESS (remote control) ............................................... 36
ADJUSTING THE CONTRAST (remote control) ................................................... 37
SETTING THE ECO MODE (remote control) ........................................................ 38
8
Page 9

3 MENU OPERATION .............................................................................................. 39
DISPLAYING THE MENU AND BASIC OPERATION ........................................... 39
Displaying the main menu ................................................................................. 39
Operating the menus ......................................................................................... 39
MAIN MENU ......................................................................................................... 41
CORRECTING TH KEYSTONE DISTORTION ..................................................... 43
SELECTING THE DISPLAY MODE ...................................................................... 44
Setting up User mode ........................................................................................ 46
ADJUSTING THE BRIGHTNESS ......................................................................... 49
ADJUSTING THE CONTRAST ............................................................................. 50
CONTROLLING THE VOLUME ............................................................................ 51
Volume setting ................................................................................................... 51
Turning off the sound (MUTE) ........................................................................... 51
SETTING THE LANGUAGE ................................................................................. 52
DETAIL SETTINGS ............................................................................................... 53
Displaying the detail settings ............................................................................. 53
Checking various information ............................................................................ 55
Setting the ECO mode....................................................................................... 55
Selecting the aspect ratio ................................ .................................................. 56
Setting the auto power off .................................................................................. 57
Selecting the projection mode ........................................................................... 58
Selecting the installation mode .......................................................................... 59
Setting the CEC mode ....................................................................................... 60
Selecting the Backlight Brightness mode .......................................................... 61
Returning to the factory settings ........................................................................ 62
4 MAINTENANCE .................................................................................................... 63
CLEANING THE LENS, THE CABINET AND THE REMOTE CONTROL ............. 63
Cleaning the lens ............................................................................................... 63
Cleaning the cabinet and the remote control ..................................................... 63
CLEANING THE INSIDE OF THE PROJECTOR .................................................. 64
5 TROUBLESHOOTING .......................................................................................... 65
INDICATOR ICONS .............................................................................................. 65
TEMPERATURE & WARNING INDICATOR DISPLAY.......................................... 67
COMMON PROBLEMS AND CHECK ITEMS ....................................................... 68
6 SPECIFICATIONS ................................................................................................. 70
SPECIFICATIONS ................................................................................................ 70
Remote control .................................................................................................. 71
Supplied accessories......................................................................................... 71
LIST OF COMPATIBLE SIGNALS ........................................................................ 72
TRADEMARKS ..................................................................................................... 74
9
Page 10

7 WARRANTY AND AFTER SALES SERVICE ....................................................... 75
10
Page 11
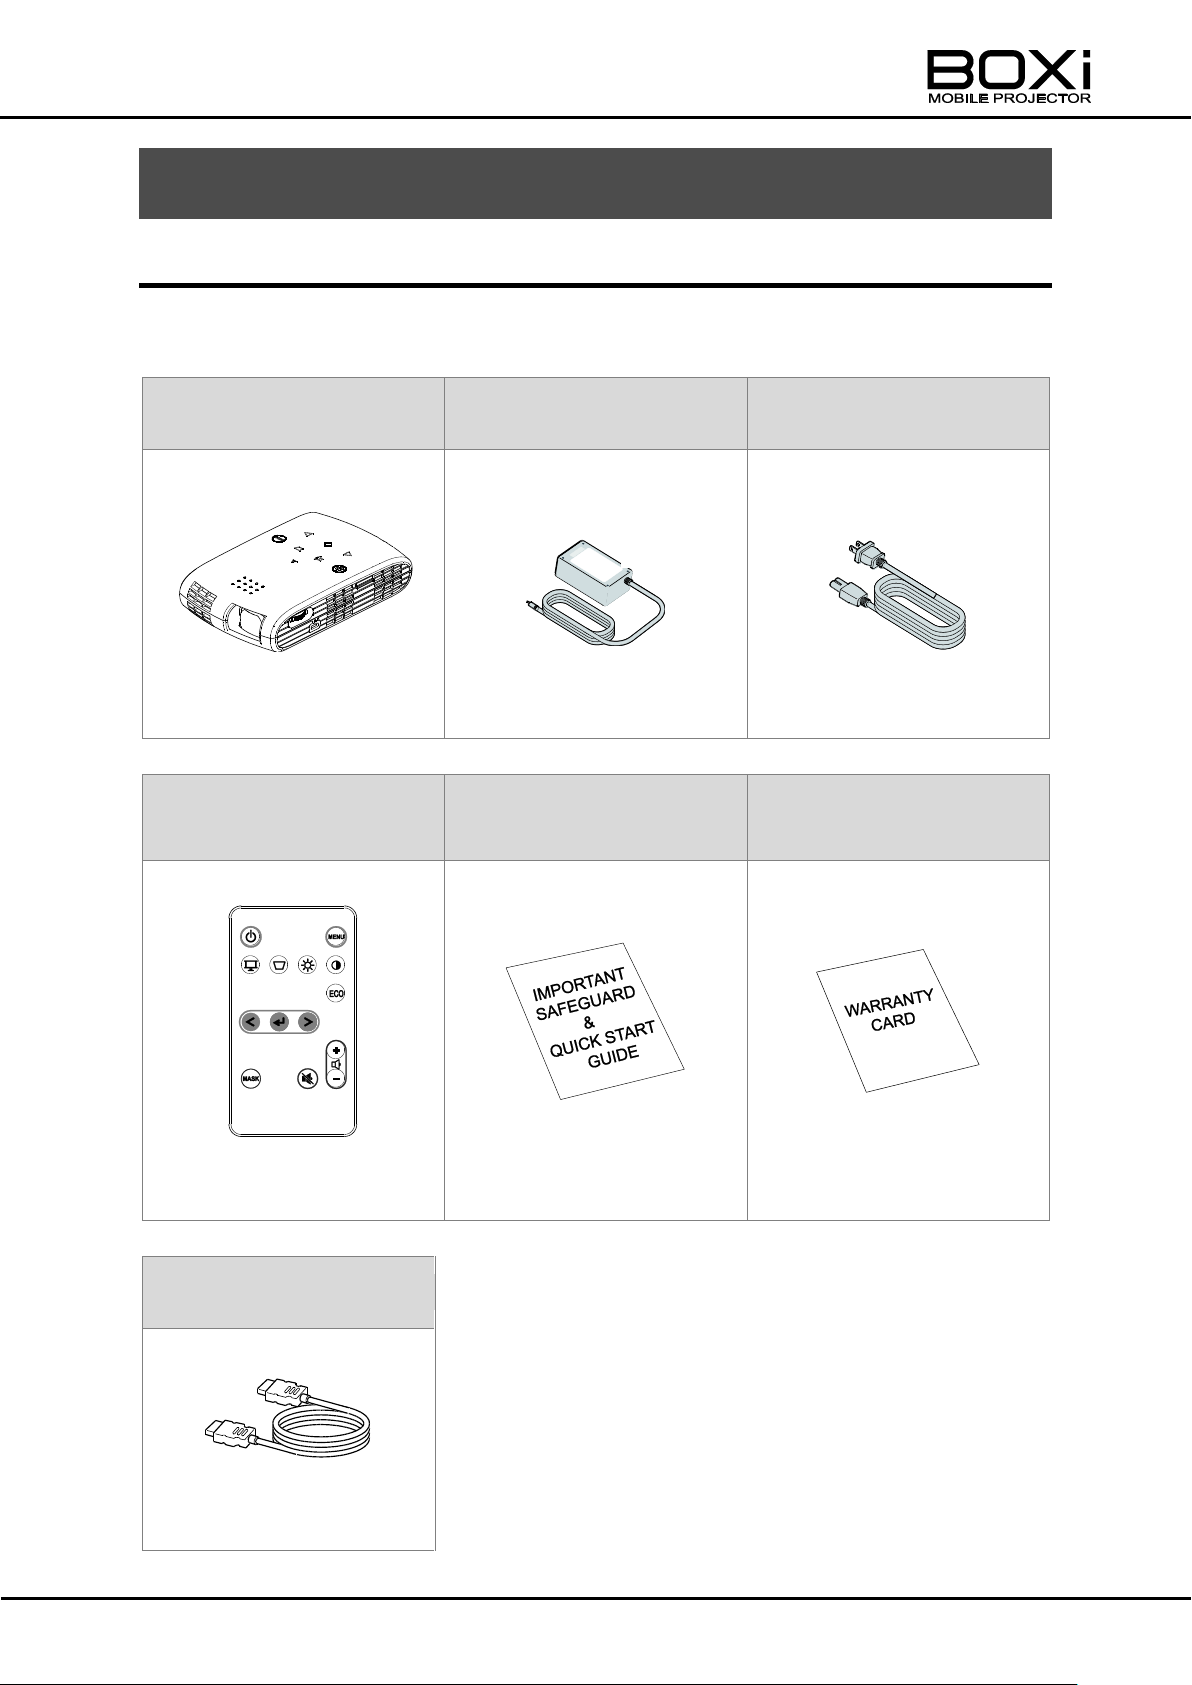
Projector
AC adapter
Power cord
Remote control
IMPORTANT SAFEGUARD
QUICK START GUIDE
WARRANTY CARD
*Battery included
HDMI cable
1 GETTING STARTED
CHECKING THE PACKAGE CONTENTS
The items below are included with this product. If any item is missing, contact the
dealer from whom you purchased this product.
11
Page 12
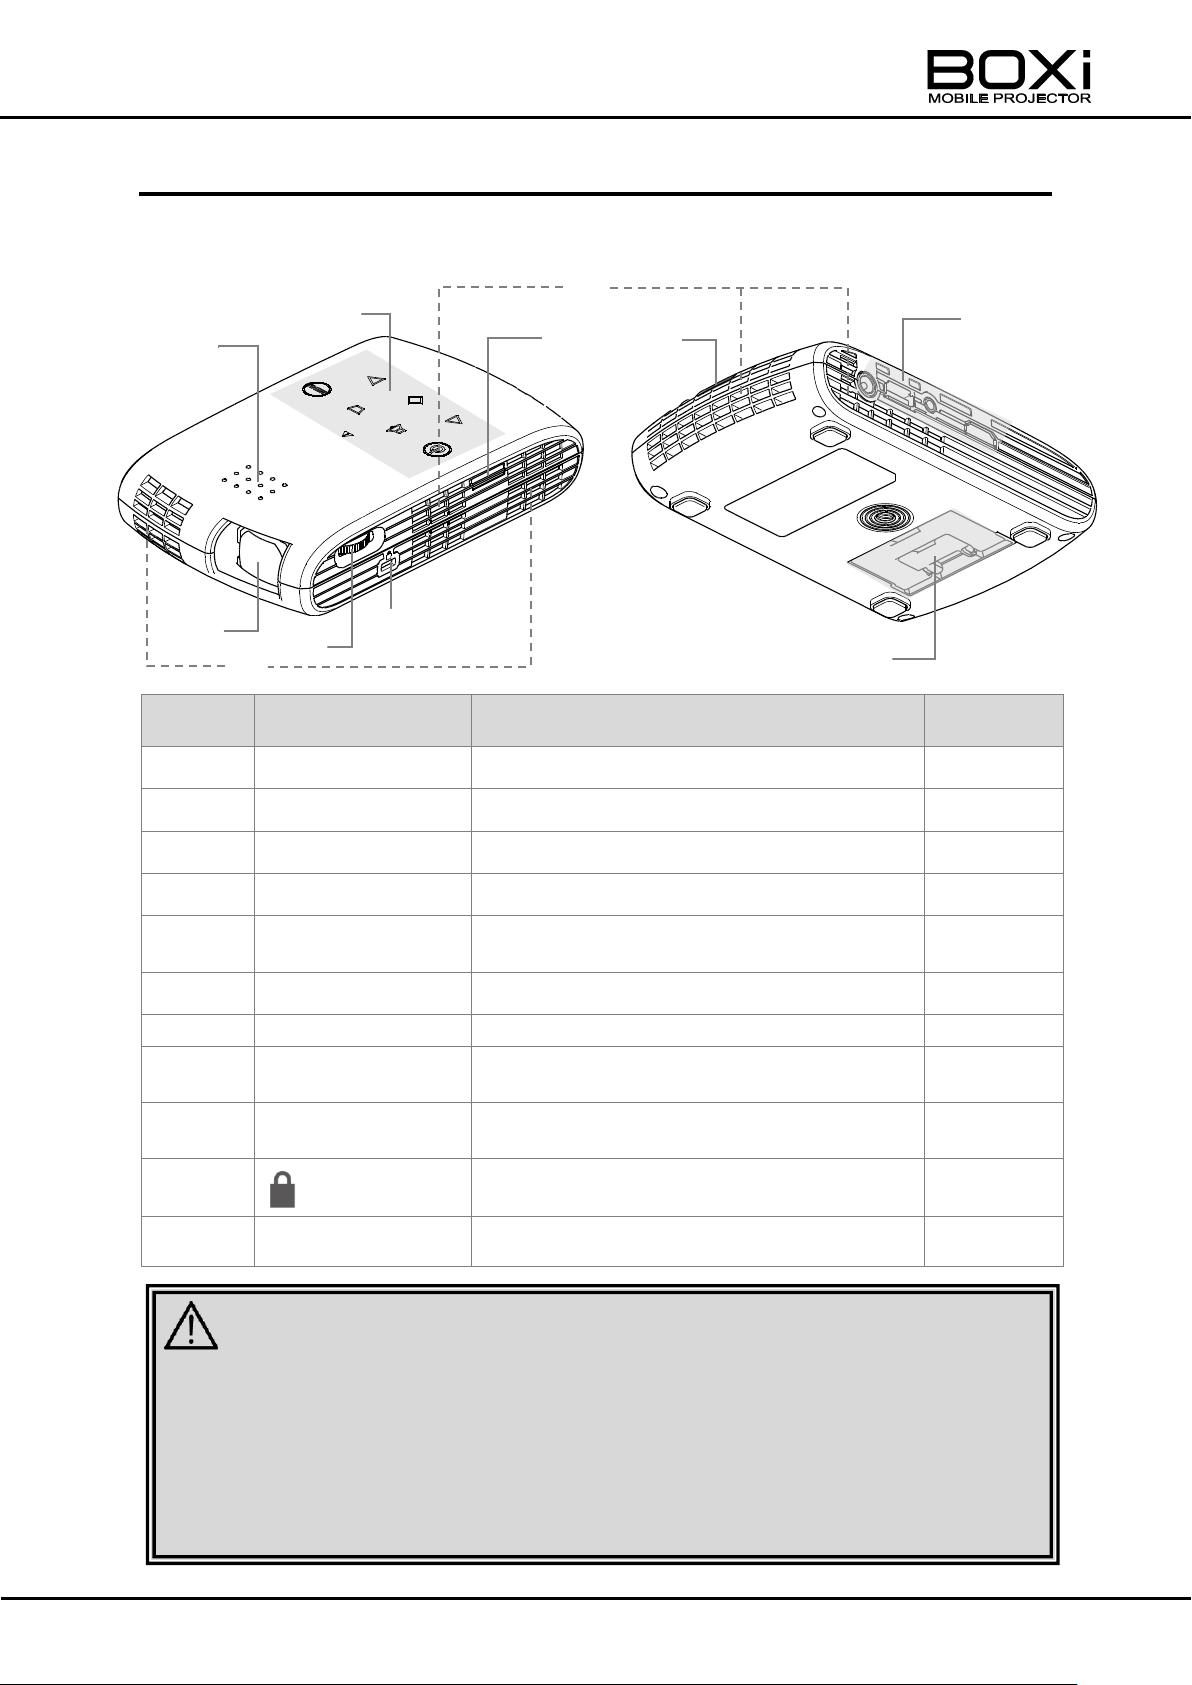
Number
Name
Function
Related
Page
①
Lens
Project an image.
→P.20
②
Focus dial
To focus the projected image.
→P.29
③
Speaker
Built-in speaker.
-
④
Control panel
To control the projector.
→P.13
⑤
Remote sensor
To receive IR signal from the remote
control.
→P.19
⑥
Side panel
Terminal panel to connect other devices.
→P.15
⑦
Tilt stand
Adjust the projection angle.
→P.21
⑧
Intake vent
Air ventilator inlet to cool down the inside
of the projector.
-
⑨
Exhaust vent
Air ventilator outlet to exhaust the air
inside of the projector.
-
⑩
Anti-theft security slot.
To connect a security cable.
-
⑪
MAINTENANCE
This port is for maintenance only.
-
■ Do not look into the lens during the projection. The strong light emitted from the lens
may cause damage to your eyes. Pay attention especially when you use the
projector in an environment where there are children.
■ Do not touch around the exhaust vent during or immediately after the projection. The
area around the exhaust vent may become very hot and could result in burn.
■ Hot air may be emitted from the exhaust vent. Do not place any objects, which are
easily affected by heat, in front of the exhaust vent.
CAUTION
①
② ③ ④
⑤
⑥
⑩
⑪
⑧
⑨
⑦
PART NAMES AND FUNCTIONS
Projector
TOP/FRONT BOTTOM /BACK
12
Page 13
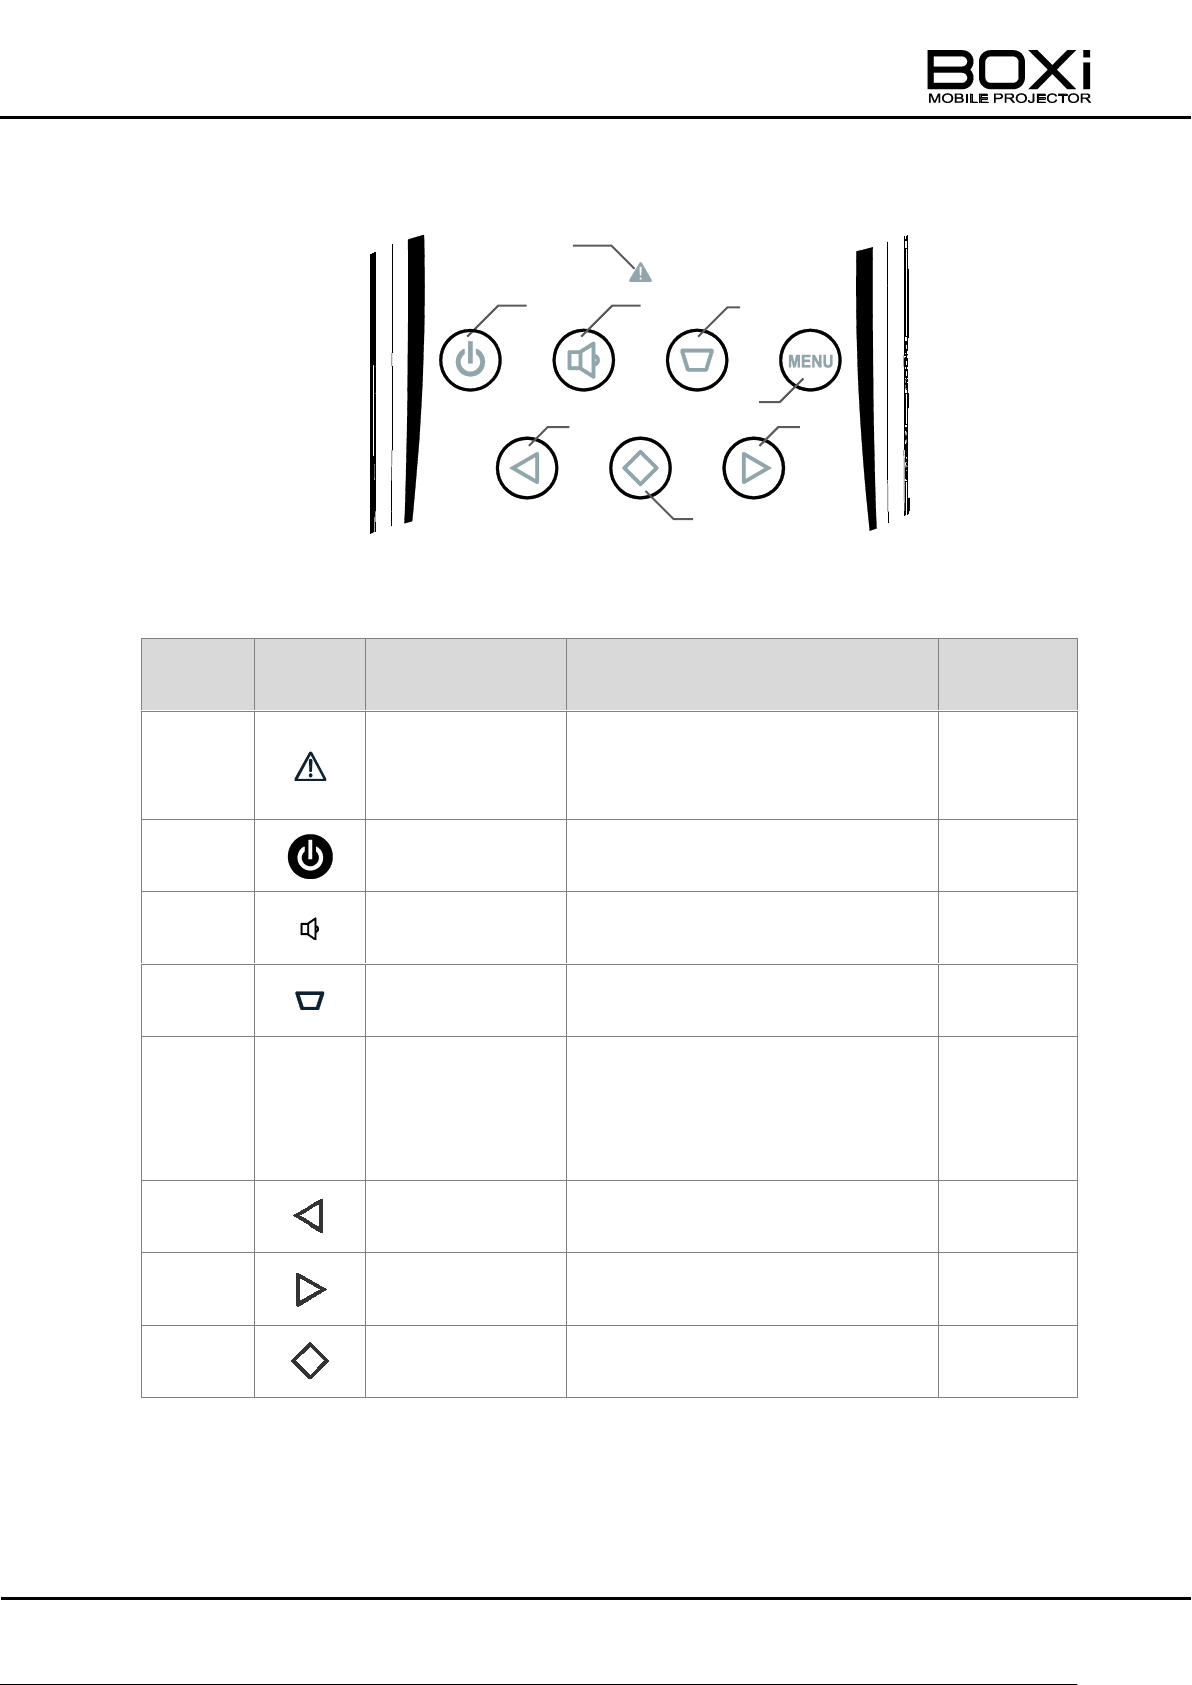
Number
Mark
Name
Function
Related
Page
①
Warning
indicator
The red LED flashes when there
is something wrong with the
projector.
→P.14,67
②
Power button
To turn the projector on/off.
→P.27,28
③
Volume button
The “Volume control” screen
appears.
→P.33
④
DOWN button
The “Keystone correction”
screen appears.
→P.30
⑤
MENU
Menu button
To display/hide the menu.
To return to the previous menu
without executing the selected
item while operating the menu.
→P.39
⑥
LEFT button
To move the selected item to the
left.
-
⑦
RIGHT button
To move the selected item to the
right.
-
⑧
Enter button
To execute the selected item.
-
② ① ③
④
⑤
⑥
⑦
⑧
Control panel
* Touch switch
13
Page 14
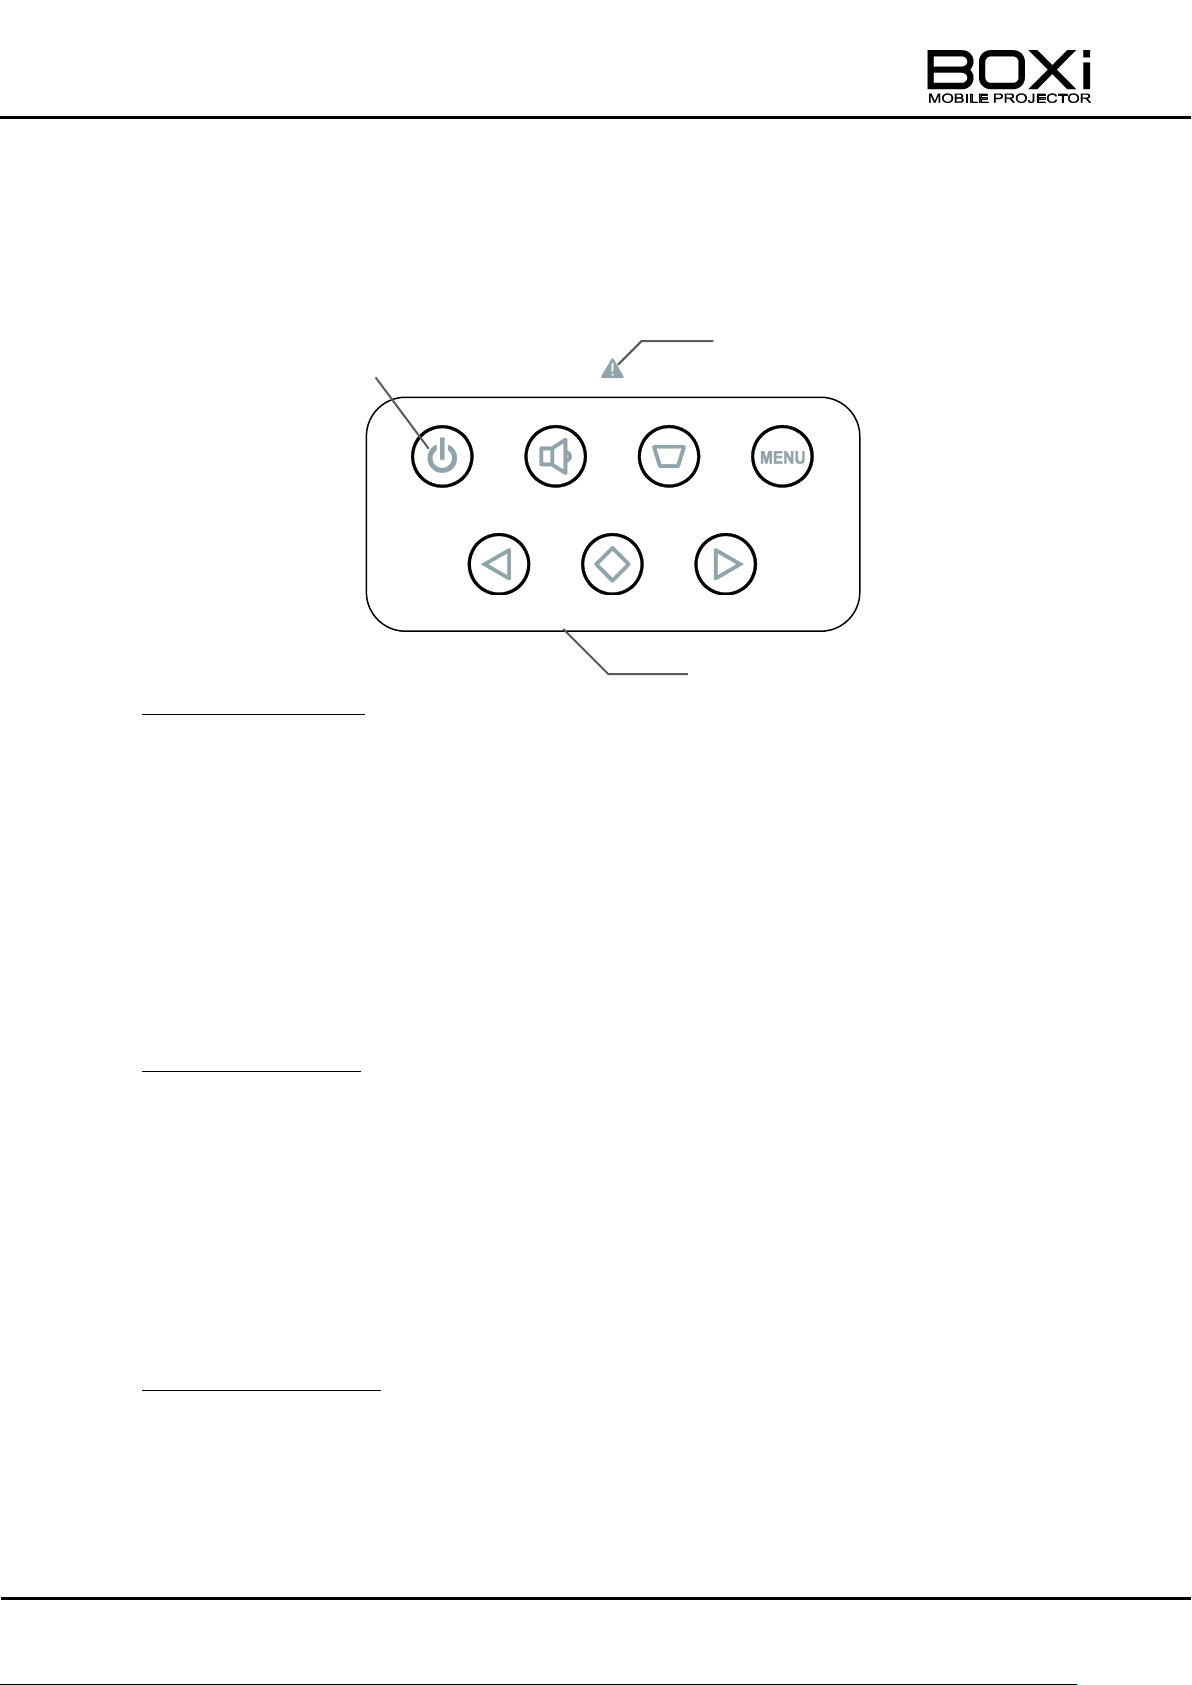
Warning indicator(red)
LED Backlight(Blue)
7pcs
Power indicator:
This LED also turns red.
LED BACKLIGHT INDICATION
There is an LED indicator behind each button on the control panel (7pcs in total) and
the warning indicator. These LEDs will light up according to the status of the projector.
LED Backlight(Blue)
There is a blue LED indicator behind each button on the control panel (7pcs in total).
These LEDs will light up when the power is on.
The brightness of the LED has three levels which can be set from the menu. You can
also set the LED to always ON.
Unless it is set to OFF from the menu, the LED will light up at the brightest level while
the menu is displayed.
The power button LED also works as a start indicator.
The LED will flash at its brightest level at 2 seconds intervals (light on for 1 second
and light off for 1 second) until the start-up is complete and the power is on.
LED Backlight(Red)
There is a red LED indicator behind the power button on the control panel, which will
light up dimly when the power is off.
The LED will flash at 0.5 seconds intervals (light on for 0.25 seconds and light off for
0.25 seconds) when the projector is in "abnormal temperature (warning)" status and
flash in 2 seconds intervals (light on for 1 second and light off for 1 second) when the
projector is in "abnormal temperature (stop)" status.
When the temperature of the projector becomes too high, while the power is off, the
red LED will light dimly and will flash.
Warning indicator(red)
The LED will flash at 0.5 seconds intervals (light on for 0.25 seconds and light off for
0.25 seconds) when there is something wrong with the fan and flash at 2 seconds
intervals (light on for 1 second and light off for 1 second) when the brightness level of
the LED decreases.
14
Page 15
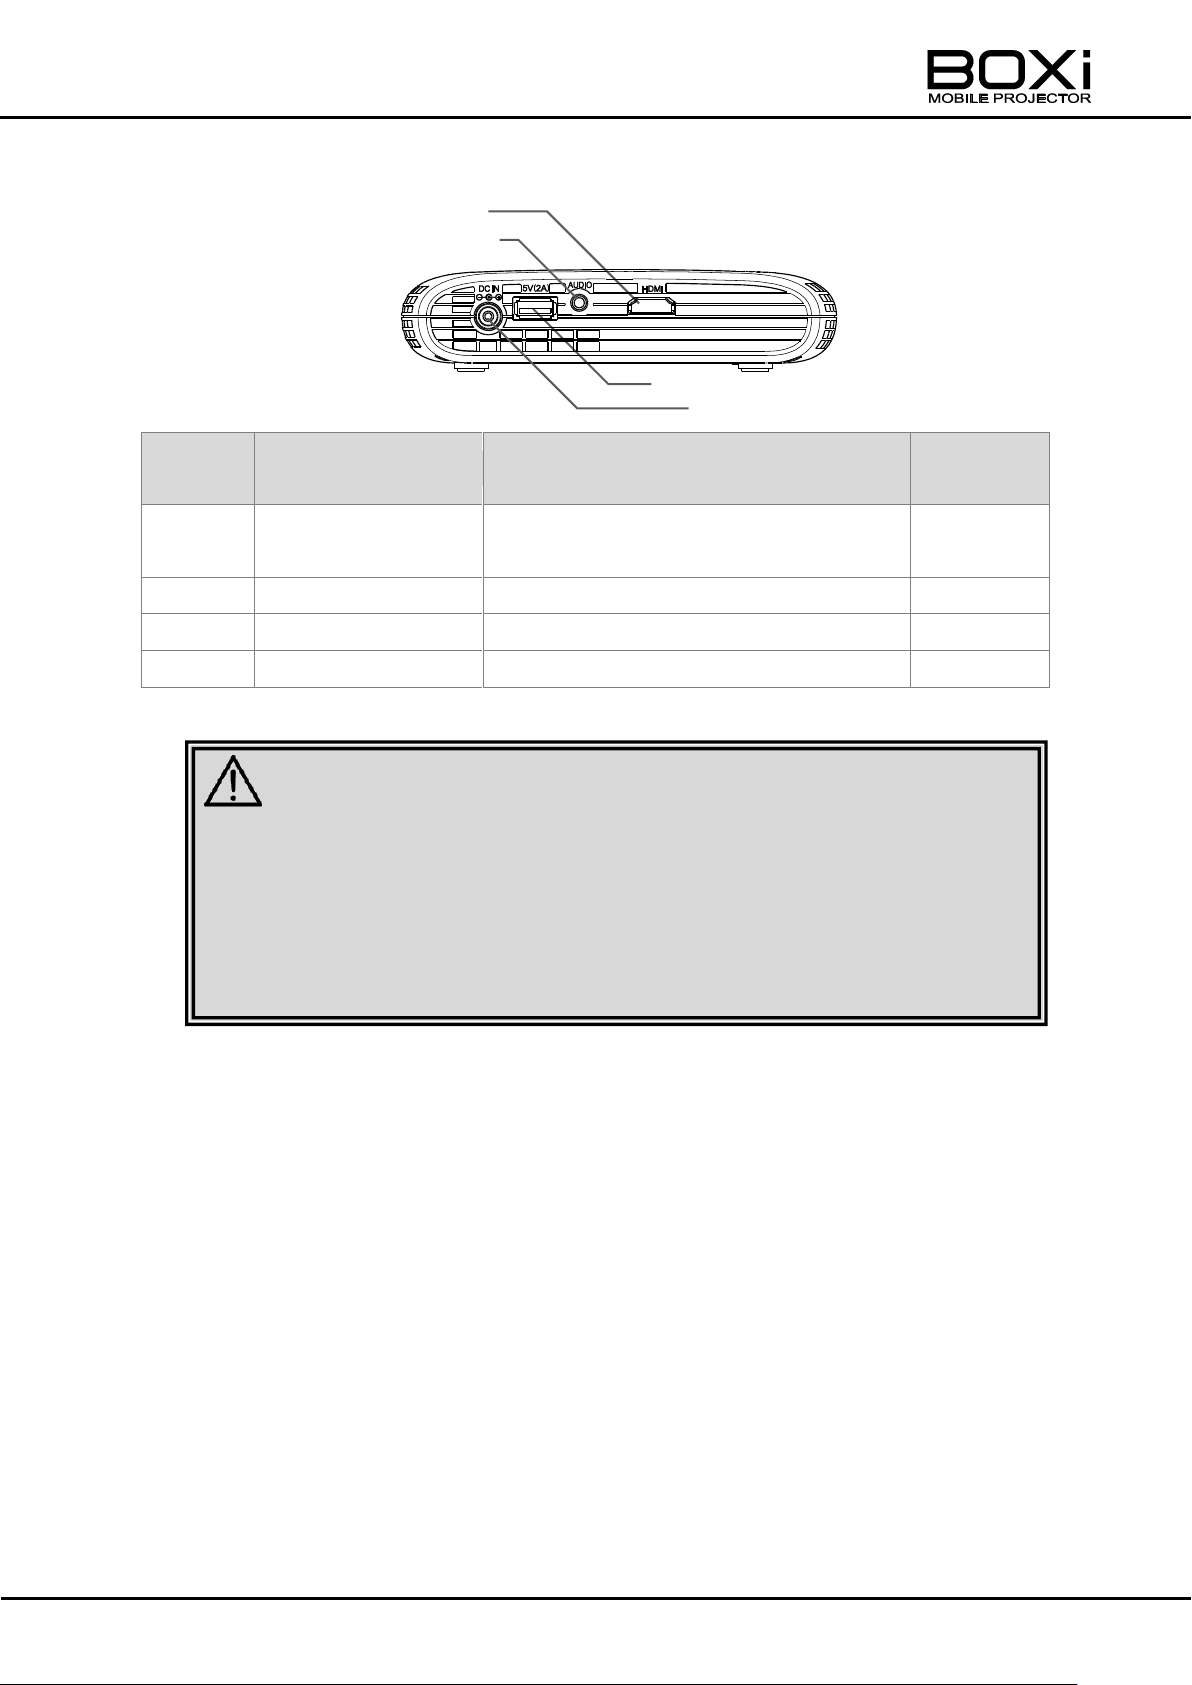
Number
Name
Function
Related
Page
①
HDMI
HDMI input terminal.
To connect an HDMI output device.
→P.24
②
AUDIO
Head Phone output Terminal.
→P.25
③
USB
To supply 5V power up to 2A.
→P.26
④
DC IN
To connect the supplied AC adapter.
→P.23
■ Use the HIGH SPEED HDMI cable with HDMI logo.
HDMI cable that is not compliant with HDMI standard may not be used.
■ Do not apply excessive force to the HDMI terminal while an HDMI
output device is connected. It could damage the HDMI terminal, leading
to a malfunction.
CAUTION
①
③ ② ④
Side panel
15
Page 16
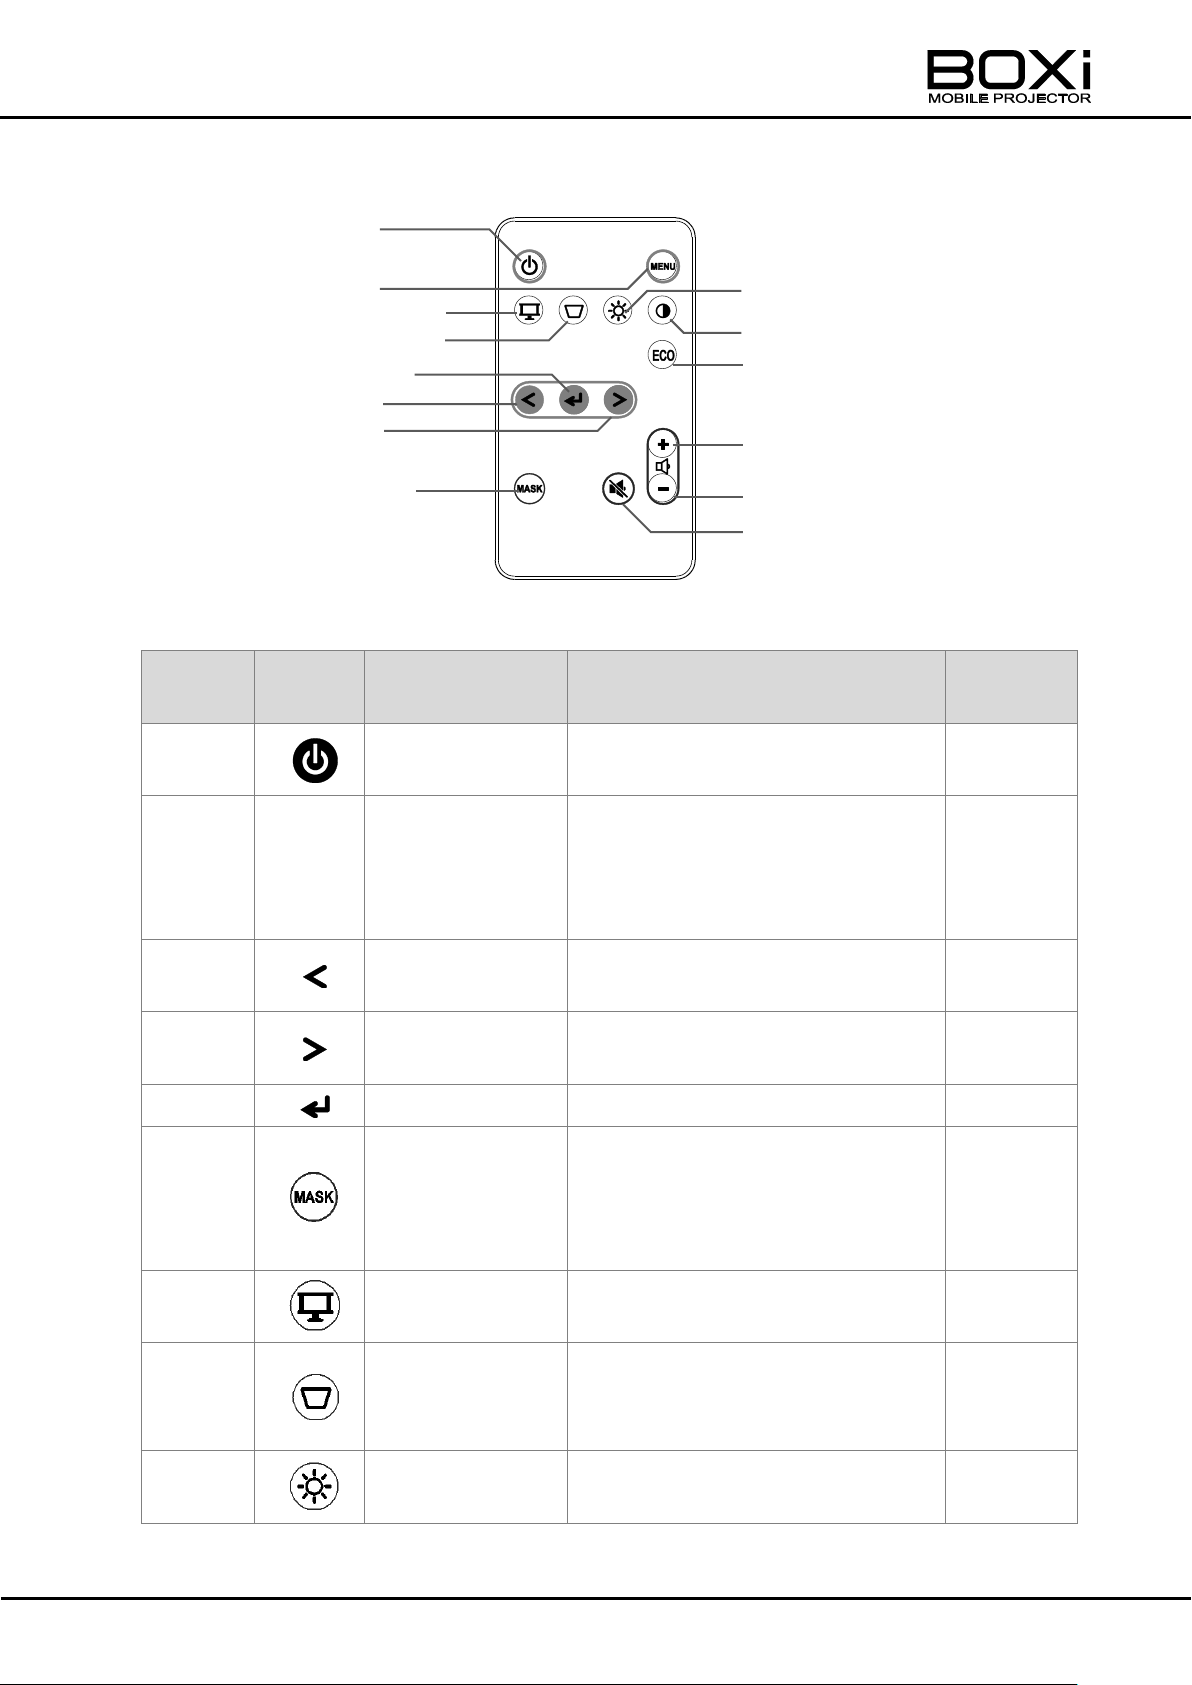
Number
Mark
Name
Function
Related
Page
①
Power button
To turn the projector on/off.
→P.27,28
②
MENU
Menu button
To display/hide the menu.
To return to the previous menu
without executing the selected
item while operating the menu.
→P.39
③
LEFT button
To move the selected item to the
left.
-
④
RIGHT button
To move the selected item to the
right.
⑤
ENTER button
To execute the selected item.
-
⑥
Blank screen
button
To toggle between the projected
image and a blank screen. You
can temporarily hide the
projected image.
→P.35
⑦
Display mode
button
To set the display mode.
→P.31
⑧
Keystone
button
To correct the vertical keystone
distortion in increments of one
degree.
→P.30
⑨
Brightness
button
To adjust the brightness of the
projector.
→P.36
⑦ ⑧ ⑥ ⑪ ⑫
⑬
⑨
③
④
⑤
⑭
① ② ⑩
Remote control
16
Page 17
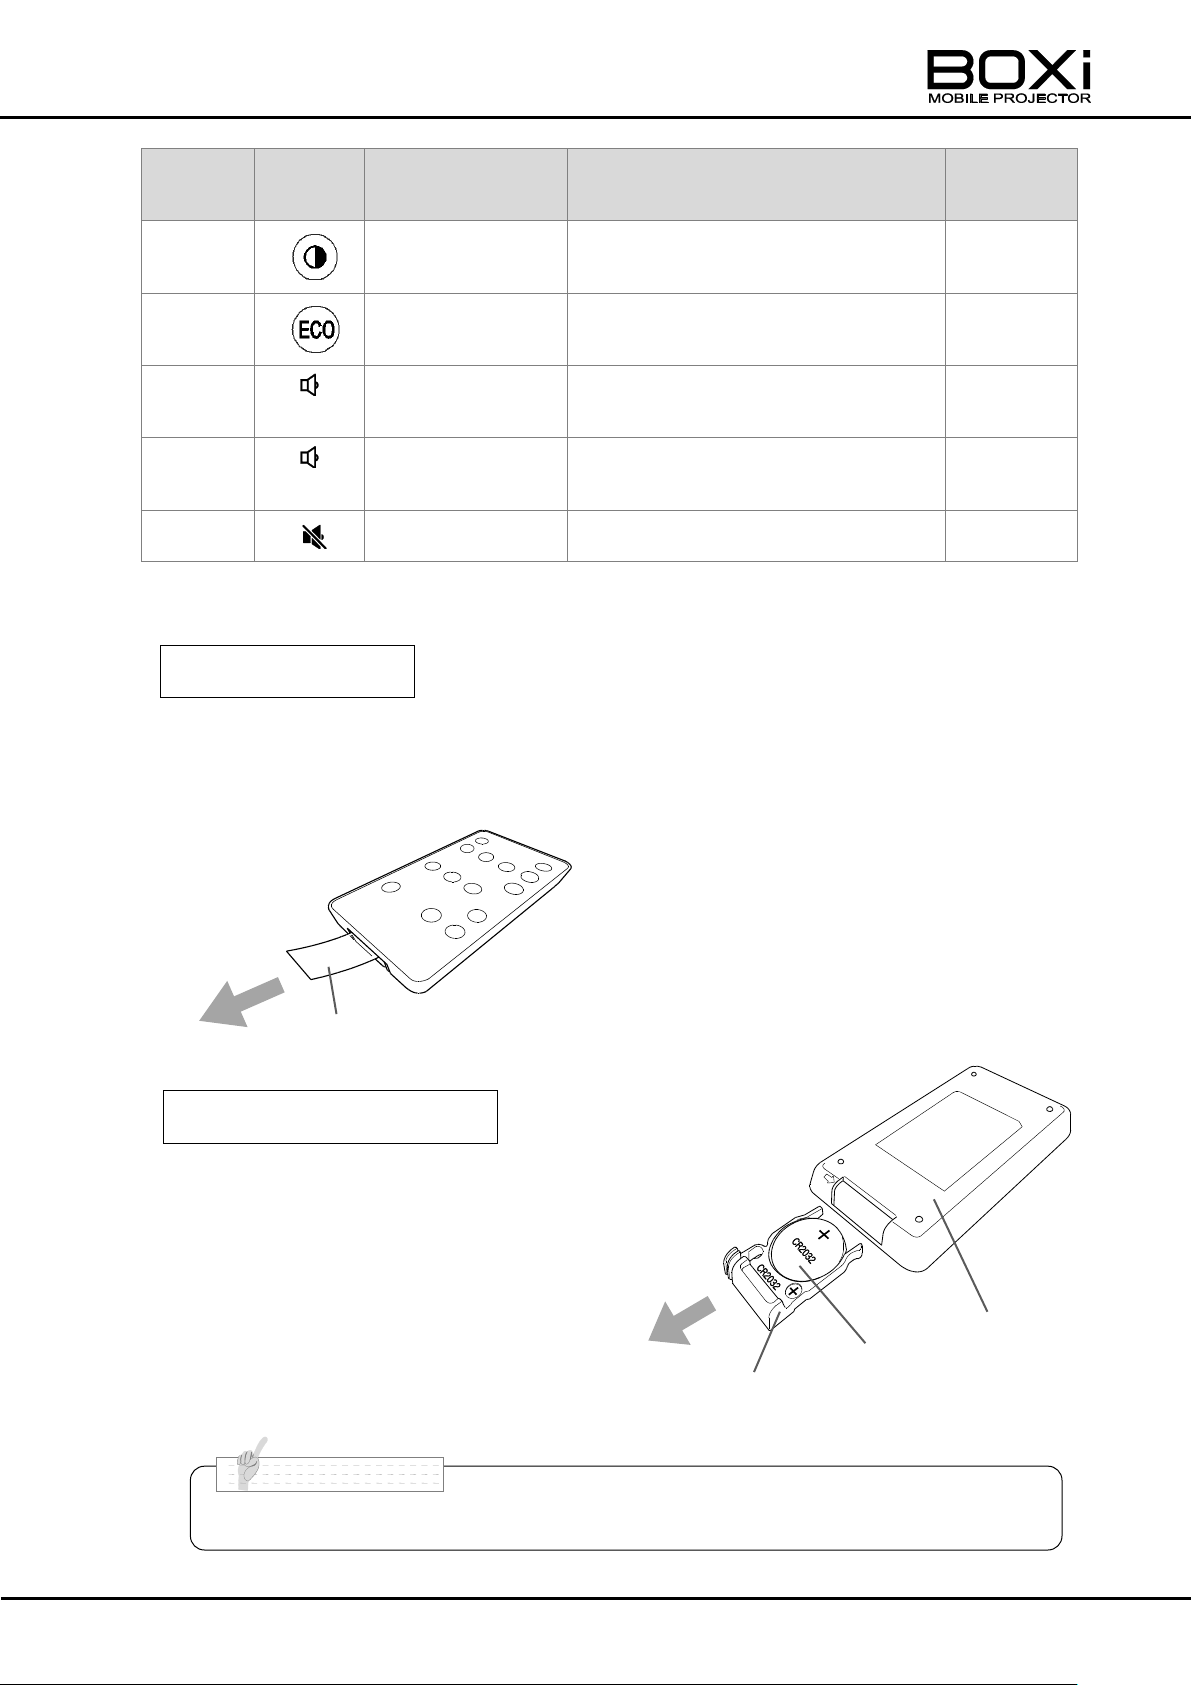
Number
Mark
Name
Function
Related
Page
⑩
Contrast
Button
To adjust the contrast of the
projector.
→P.37
⑪
ECO button
To set the ECO mode.
→P.38
⑫
+
Volume+button
To increase the volume of the
built-in speaker.
→P.32
⑬
-
Volume-button
To decrease the volume of the
built-in speaker.
→P.32
⑭
MUTE button
To temporarily mute the sound.
→P.34
■ Use the button battery type CR2032 for the remote control.
When purchased
How to change the battery
N o t e
Insulation sheet
Remote control
(Back)
Battery case
Button battery
Preparing the remote control
1. A battery is pre-installed in the remote control at the time of shipment (with
insulation sheet).
Remove the insulation sheet before using the remote control for the first time.
1. Pull out the battery case.
2. Take out the old button
battery and put the new
button battery in the battery case
with the "+" side facing up.
3. Insert the battery case to the remote
control.
17
Page 18
■ Improper use of the battery may lead to electrolyte leakage or bursting
and may cause fire, injury or corrosion to the remote control. Observe
the following precautions for safety use of the product.
・ Do not use any battery other than specified.
・ If the battery leaks, wipe off the leaked electrolyte with a cloth and
install a new battery. If the leaked electrolyte contacts your skin,
immediately wash it away with running water.
・ When the time to replace the battery comes, immediately remove the
battery.
・ Remove the battery from the remote control when you do not use the
remote control for a long period of time.
・ Do not heat the battery or throw into fire.
・ Do not reverse the positive (+) and negative (-) terminals.
・ When disposing the battery, follow the recycling or disposal
regulations in your community.
■ Keep the battery removed from the remote control out of reach of
children.
The battery could choke children if swallowed.
CAUTION
18
Page 19
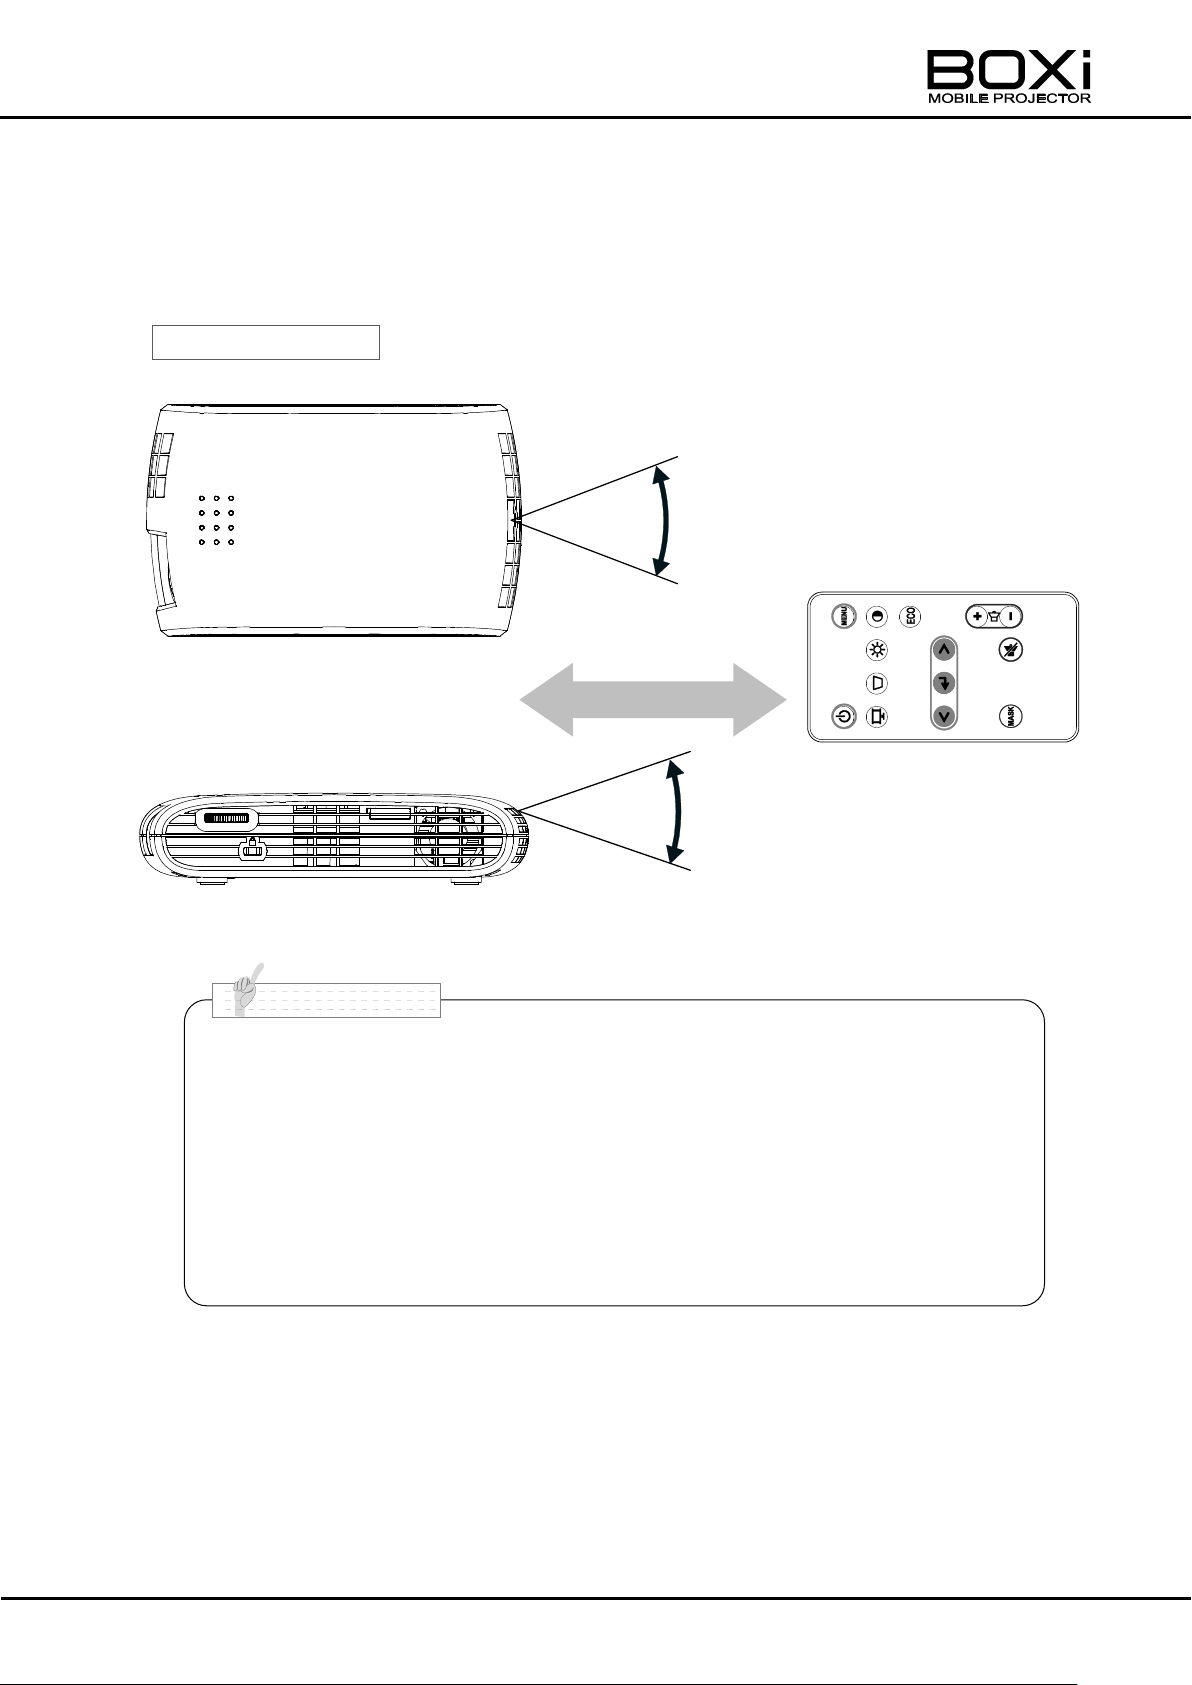
Operating
6m
42°
38°
■ Do not place any objects between the remote control and the IR receiver.
The remote control transmits IR signals and the projector will not respond
if there are objects between the remote control and the IR receiver.
■ The remote control may not work correctly if strong light (such as direct
sun light) or light from an extremely close range (such as from an inverter
fluorescent lamp) shines on the IR receiver of the projector. Keep such
light sources away from the projector.
N o t e
Operating range for the remote control
Aim the IR transmitter of the remote control at the IR receiver on the back of the
projector to control the projector.
Use the remote control within its operating range as described below.
19
Page 20
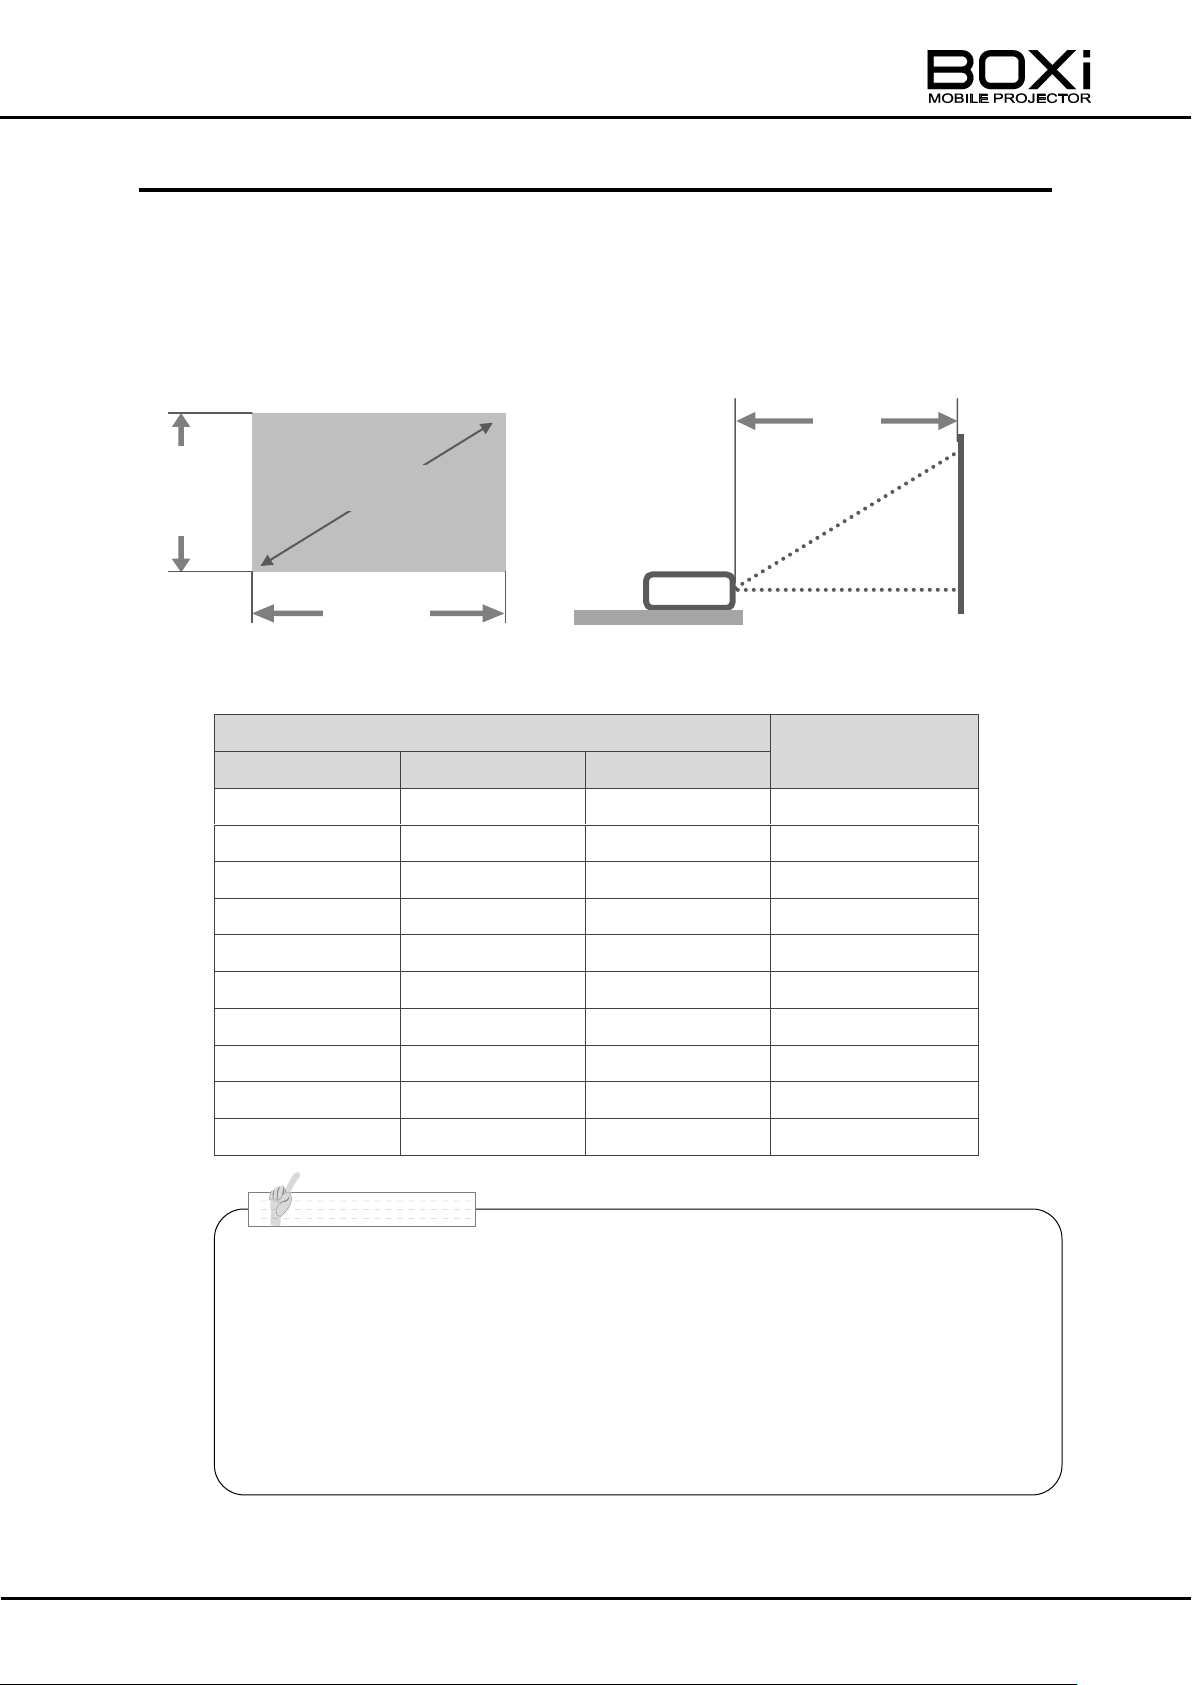
Screen size
Projection distance
Inch
Width (cm)
Height (cm)
L(cm)
25
53.8
33.7
48
30
64.6
40.4
58
35
75.4
48.0
68
40
86.1
53.8
78
45
96.9
60.6
88
50
107.7
67.3
98
55
118.5
74.0
108
60
129.2
80.8
118
65
140.0
87.5
128
68
146.5
91.5
133
スクリーンサイズ(型)
幅
高
さ
Screen size (inch)
Height
Width
■ The values in the fable are design values and may vary. Use them as
an indication only.
■ The aspect ratio of the projected image in full screen is 16: 10. When
the aspect ratio of the input signal is different from 16: 10 (such as
16: 9 or 4: 3), top and bottom or left and right of the image will not be
displayed and the screen size becomes smaller than those specified
in the above table.
N o t e
L
INSTALLING THE PROJECTOR
Throw distance and screen size
Decide on the position to place the projector.
The distance between the projector and the screen should be between 48cm (screen
size: 25 inch) and 133 cm (screen size: 68 inch).
20
Page 21
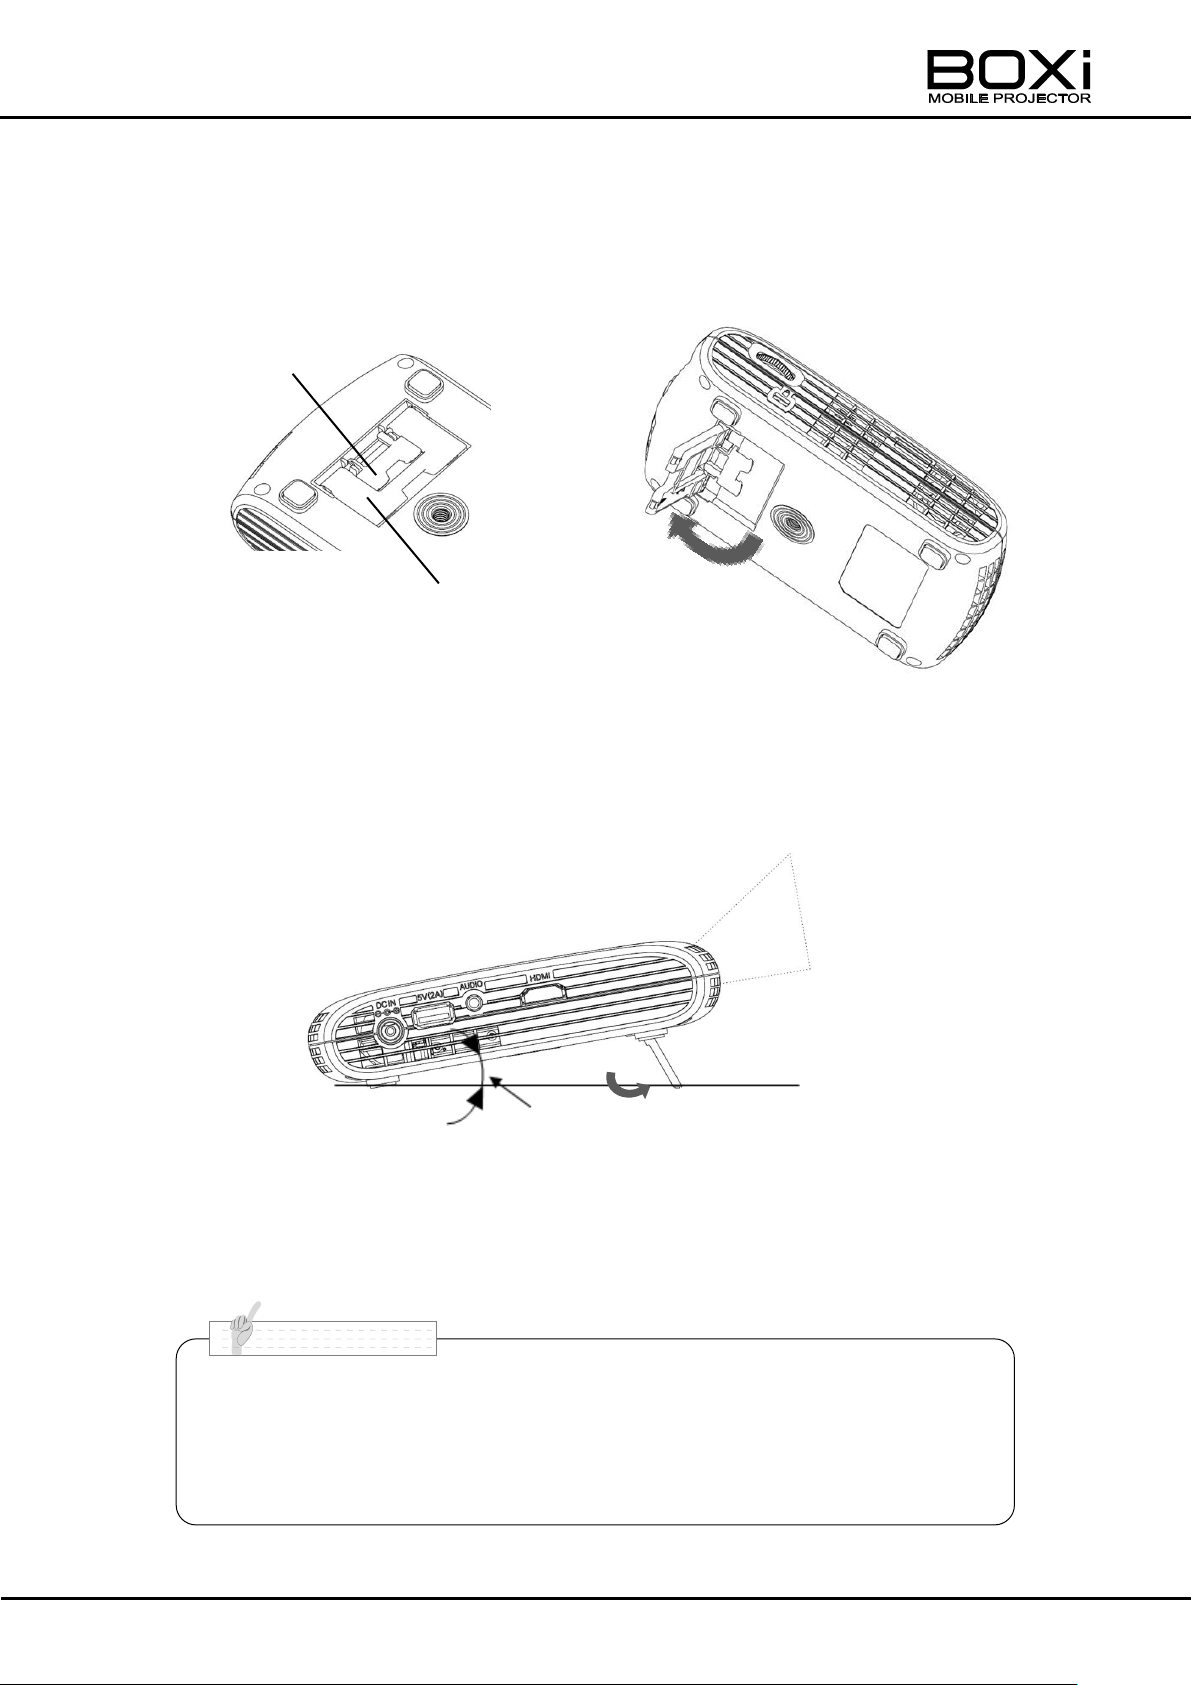
■ Keystone distortion can occur when using the tilt stand.
Adjust keystone settings to correct keystone distortion.
Refer to “CORRECTING THE KEYSTONE DISTORTION”
(Page30,43) for details.
傾斜角度
Inclination angle
N o t e
Tilt stand(10°)
Tilt stand(5°)
Raising the projected image
Projected image can be raised up when using the built-in tilt stand underneath the
projector.
Bottom of the projector
1. Use the tilt stand
Setting up the tilt stand allows you to raise the projected image.
The two position tilt stand allows you to set up the projectionangle to
either 5°or 10°.
The greater the angle, the higher the image is projected.
2. Reset the position of the projected image.
The projector will project horizontally when the tilt stand is folded to the first
position.
21
Page 22
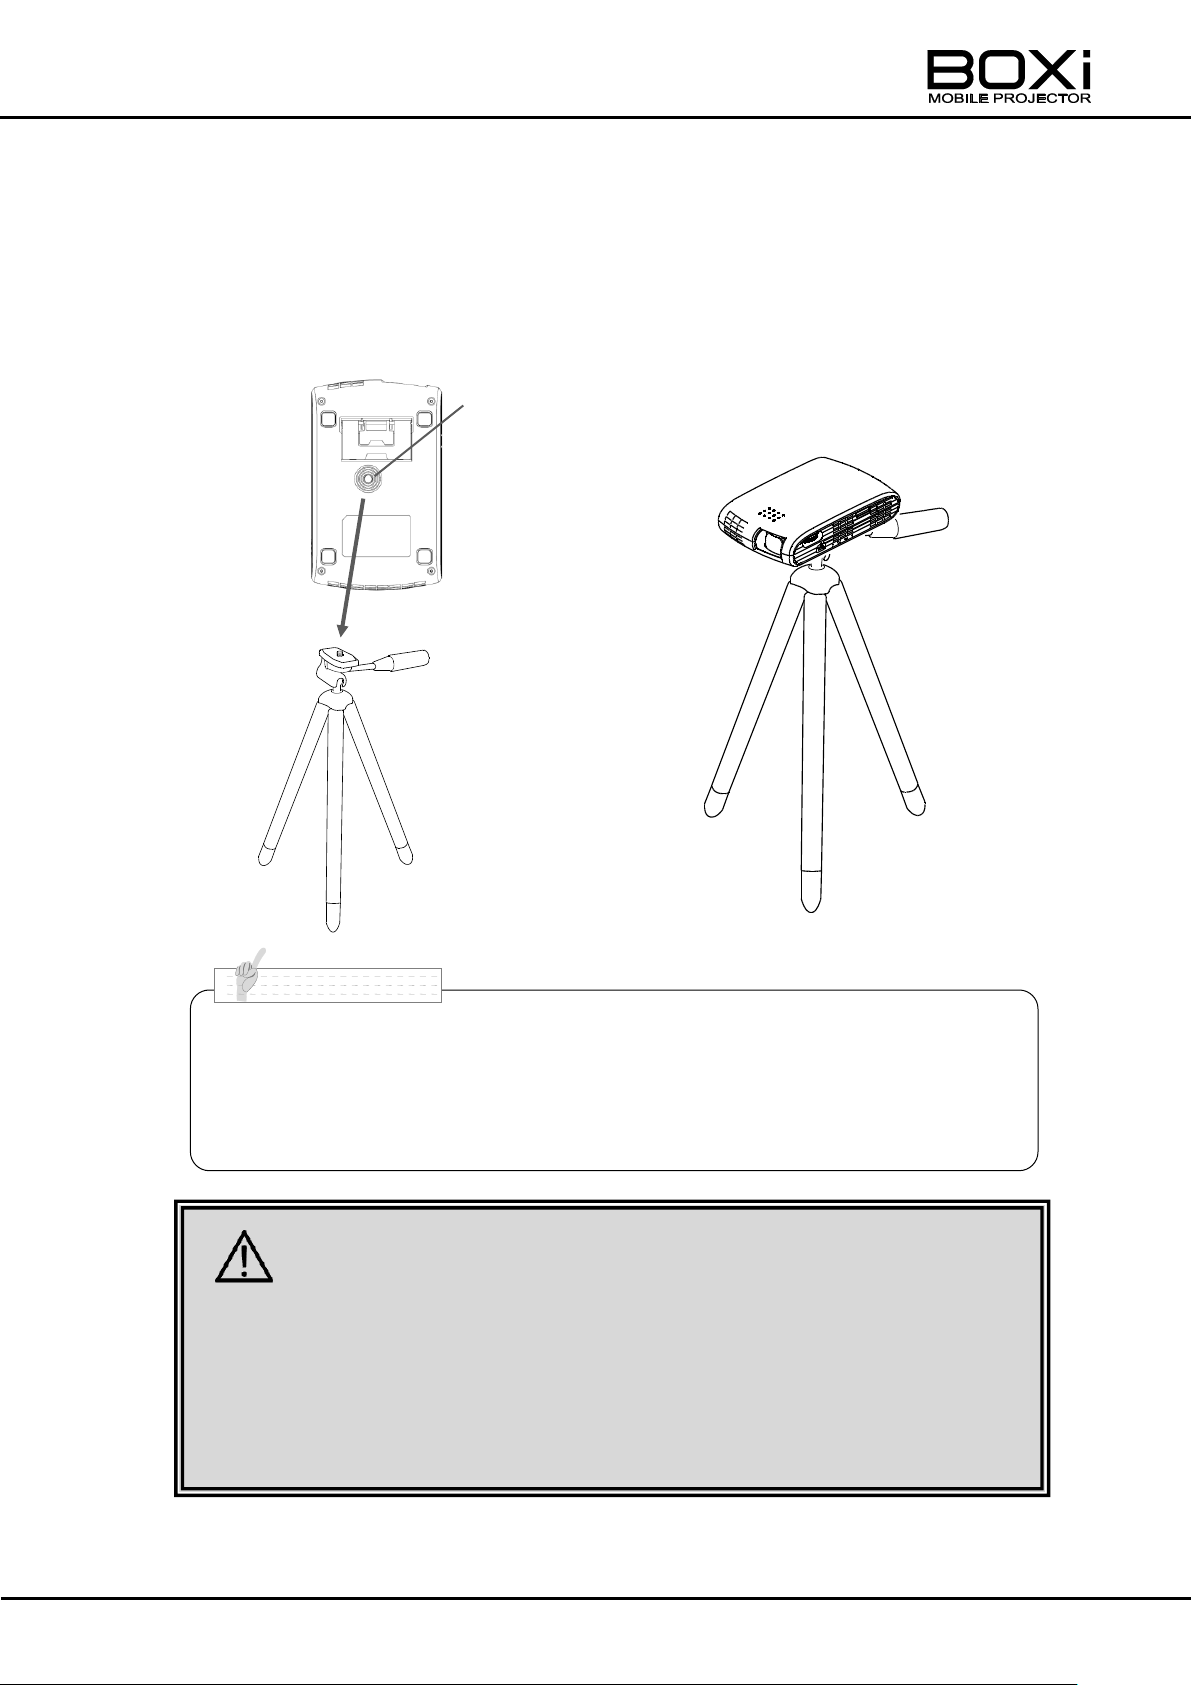
●Bottom of the projector
●When mounted on a tripod
Tripod
receptacle
■ Refer to the instruction manual of the tripod for instructions on the use of
the tripod. Place the tripod in stable condition. Otherwise, it may tip over,
causing injury.
■ When connecting the cables (such as the power cord, HDMI cable), make
sure that nobody can trip over the cables. Otherwise, the projector may fall
or tip over, causing injury.
■ Use a tripod that can support 500g or more.
■ Fully spread the legs of the tripod. In case of using a tripod with an
elevating column, do not extend the column when mounting the
projector.
N o t e
CAUTION
Using a tripod for a camera
The projector is equipped with a tripod receptacle on the bottom of the projector. You
can mount the projector on a tripod for a camera.
22
Page 23
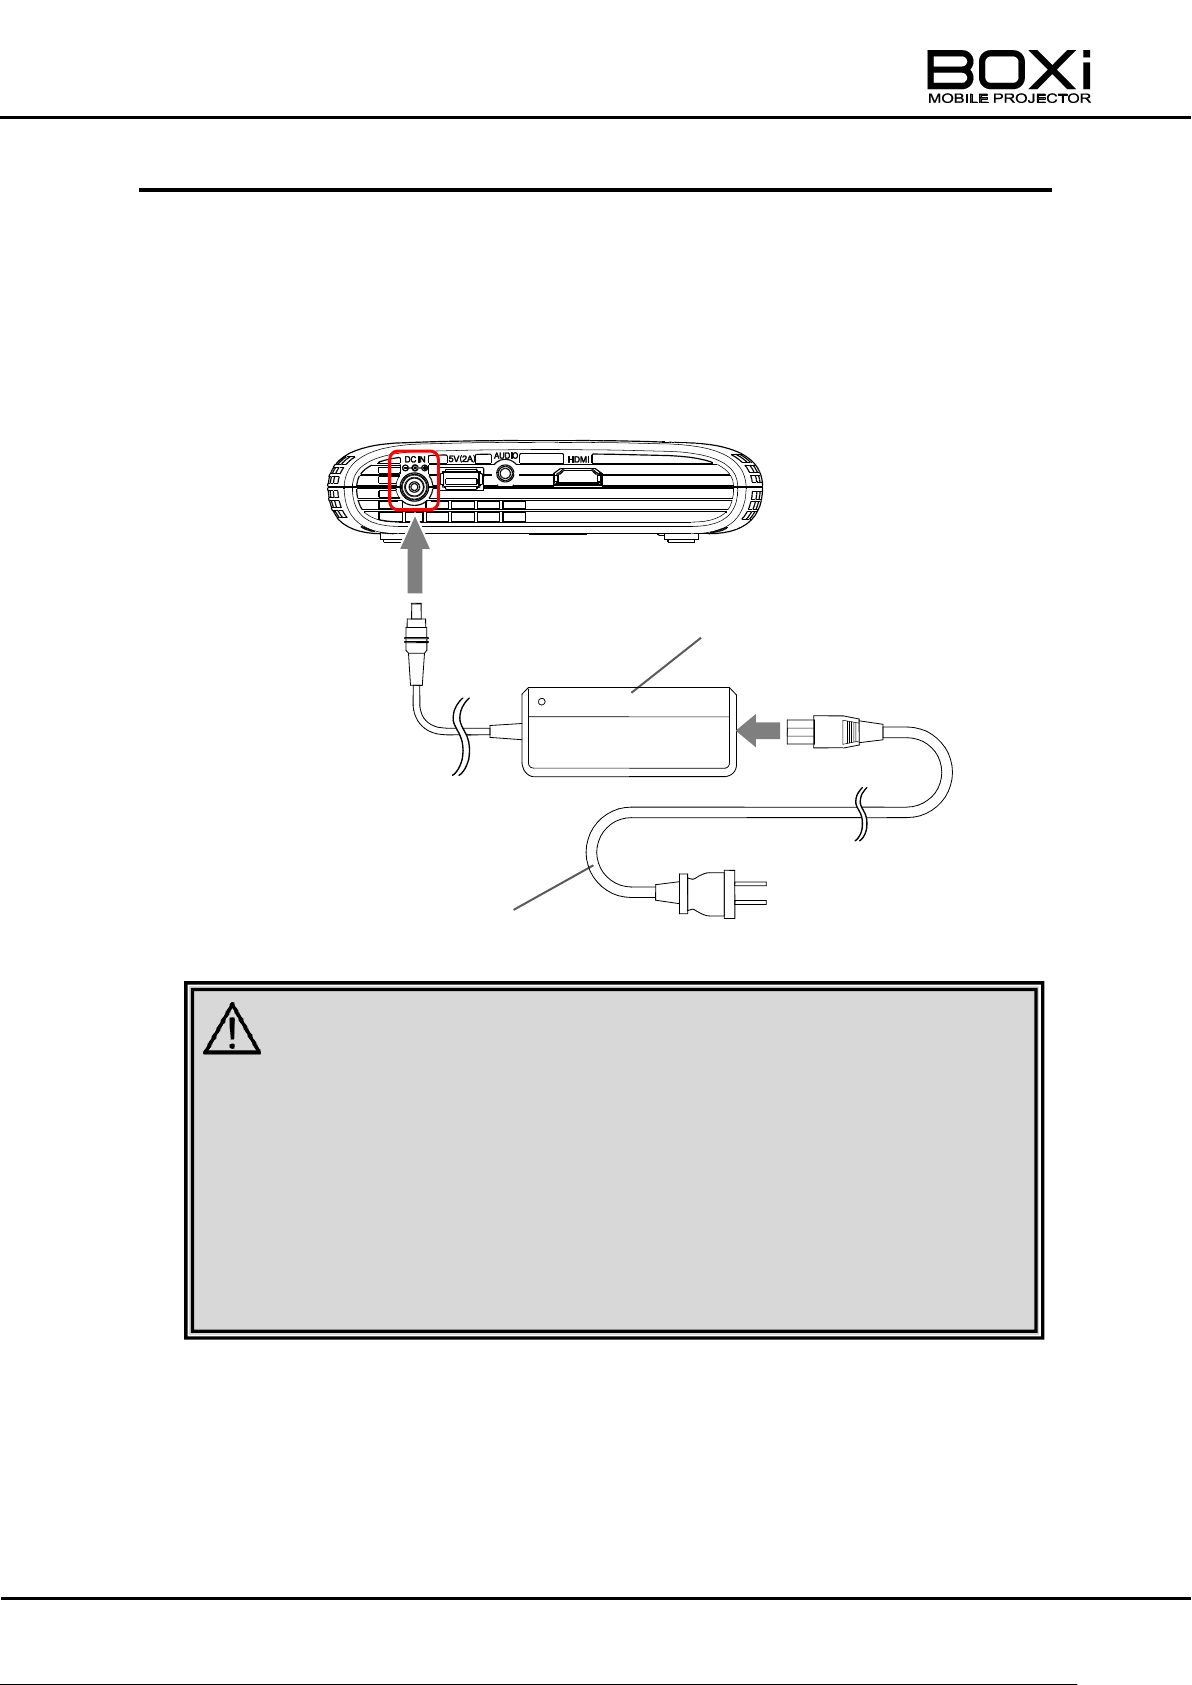
Power cord
(Supplied)
AC adapter (Supplied)
Terminal Panel
■ The supplied AC adapter and power cord are for use with the projector
only. Do not use with other devices.
■ Do not place the projector on carpet, cushions or bedding and do not
cover the projector with a cloth or tablecloth. Doing so will increase the
temperature of the projector and may cause fire or malfunction.
■ The supplied AC adapter may become hot during normal operation.
This is normal. Do not continue to touch the adapter for a long period.
CAUTION
CONNECTING TO THE DEVICES
Connecting the power (AC adapter and power cord)
Connect the supplied AC adapter and the power cord, and then firmly connect to the
DC IN of the projector.
Then insert the other plug of the power cord securely into the wall outlet.
23
Page 24
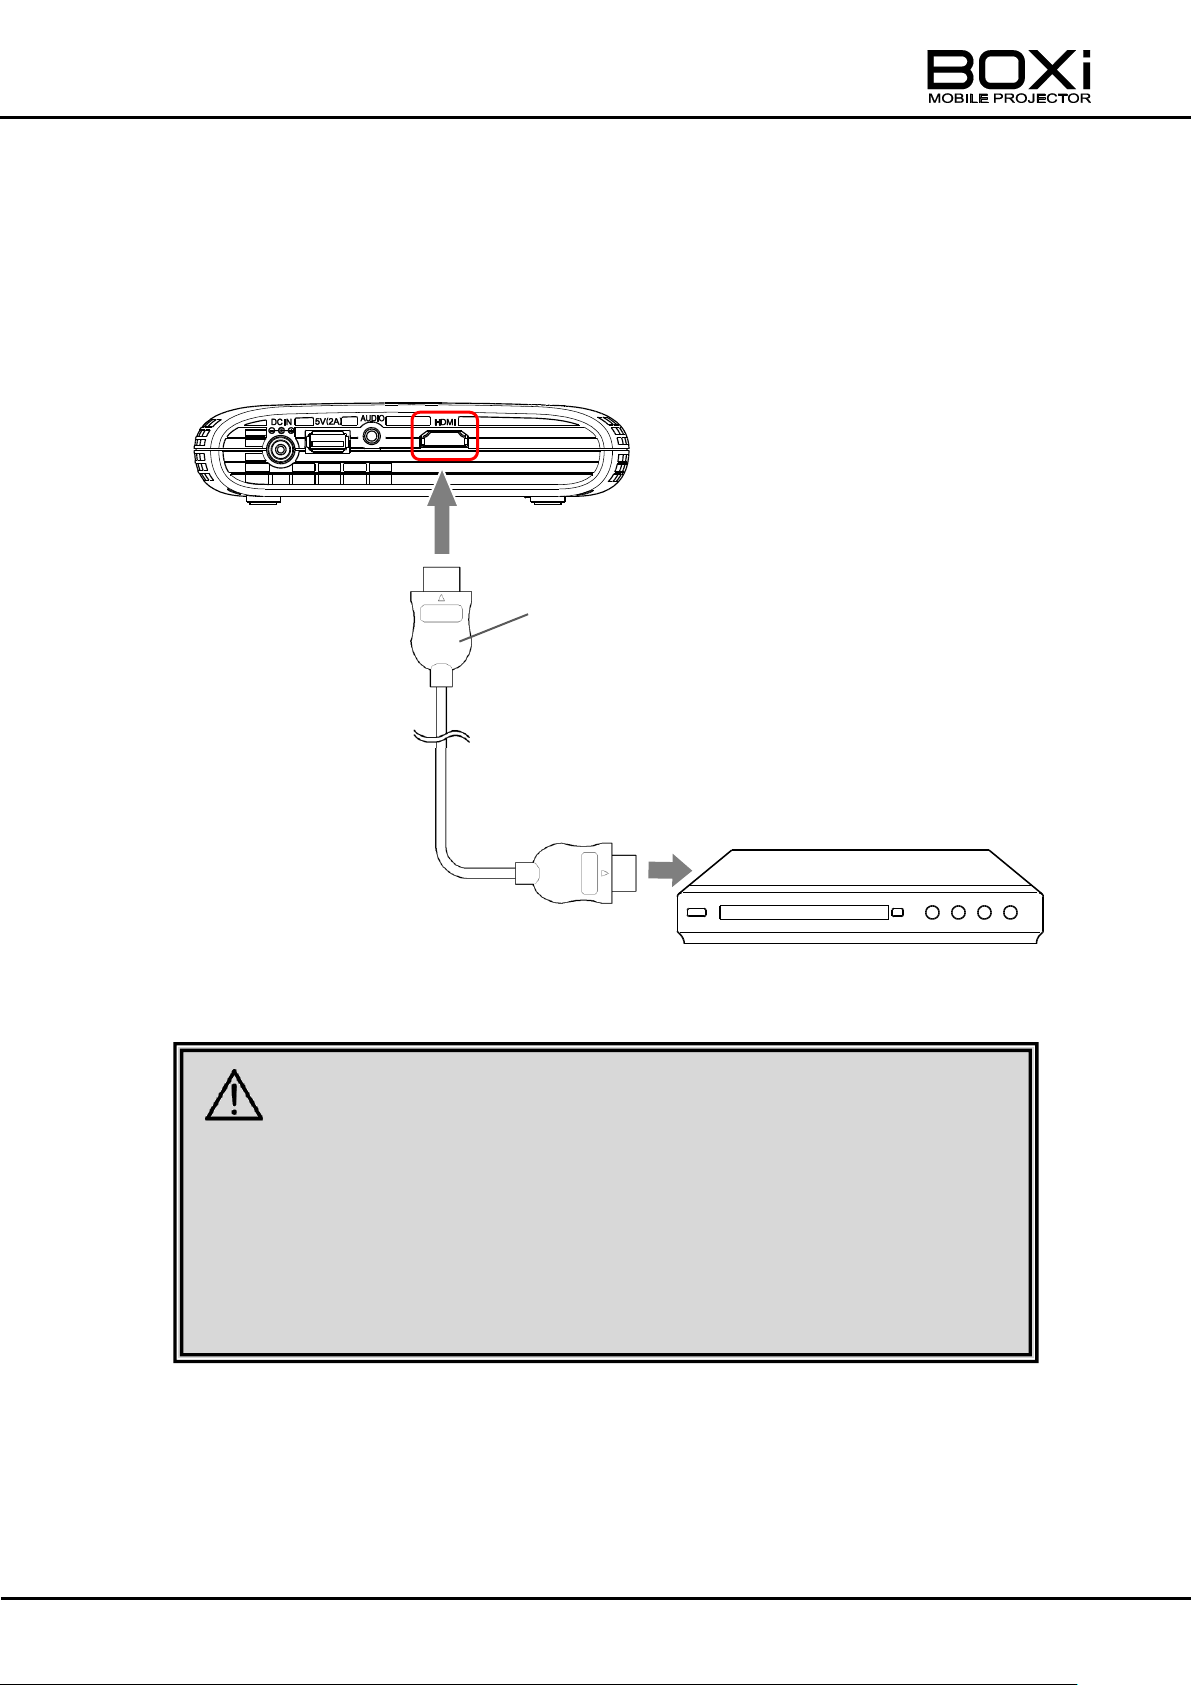
■ Use the HIGH SPEED HDMI cable with HDMI logo.
HDMI cable that is not compliant with HDMI standard may not be used.
■ This projector complies with HDMI standard. However, we do not
guarantee the operation with all the output devices.
■ Do not apply excessive force to the HDMI terminal while an HDMI output
device is connected. It could damage the HDMI terminal, leading to a
malfunction.
HDMI cable
(Supplied)
Device
(such as a DVD-player)
Terminal Panel
CAUTION
Connecting to HDMI terminal
1. Connect the projector to a device such as a DVD-player using HDMI
cable.
Connect the HDMI output terminal of your device such as a DVD-player and
computer to the HDMI terminal of the projector using an HDMI cable (Supplied)
as shown in the below picture. Firmly insert the cable into the connector.
24
Page 25
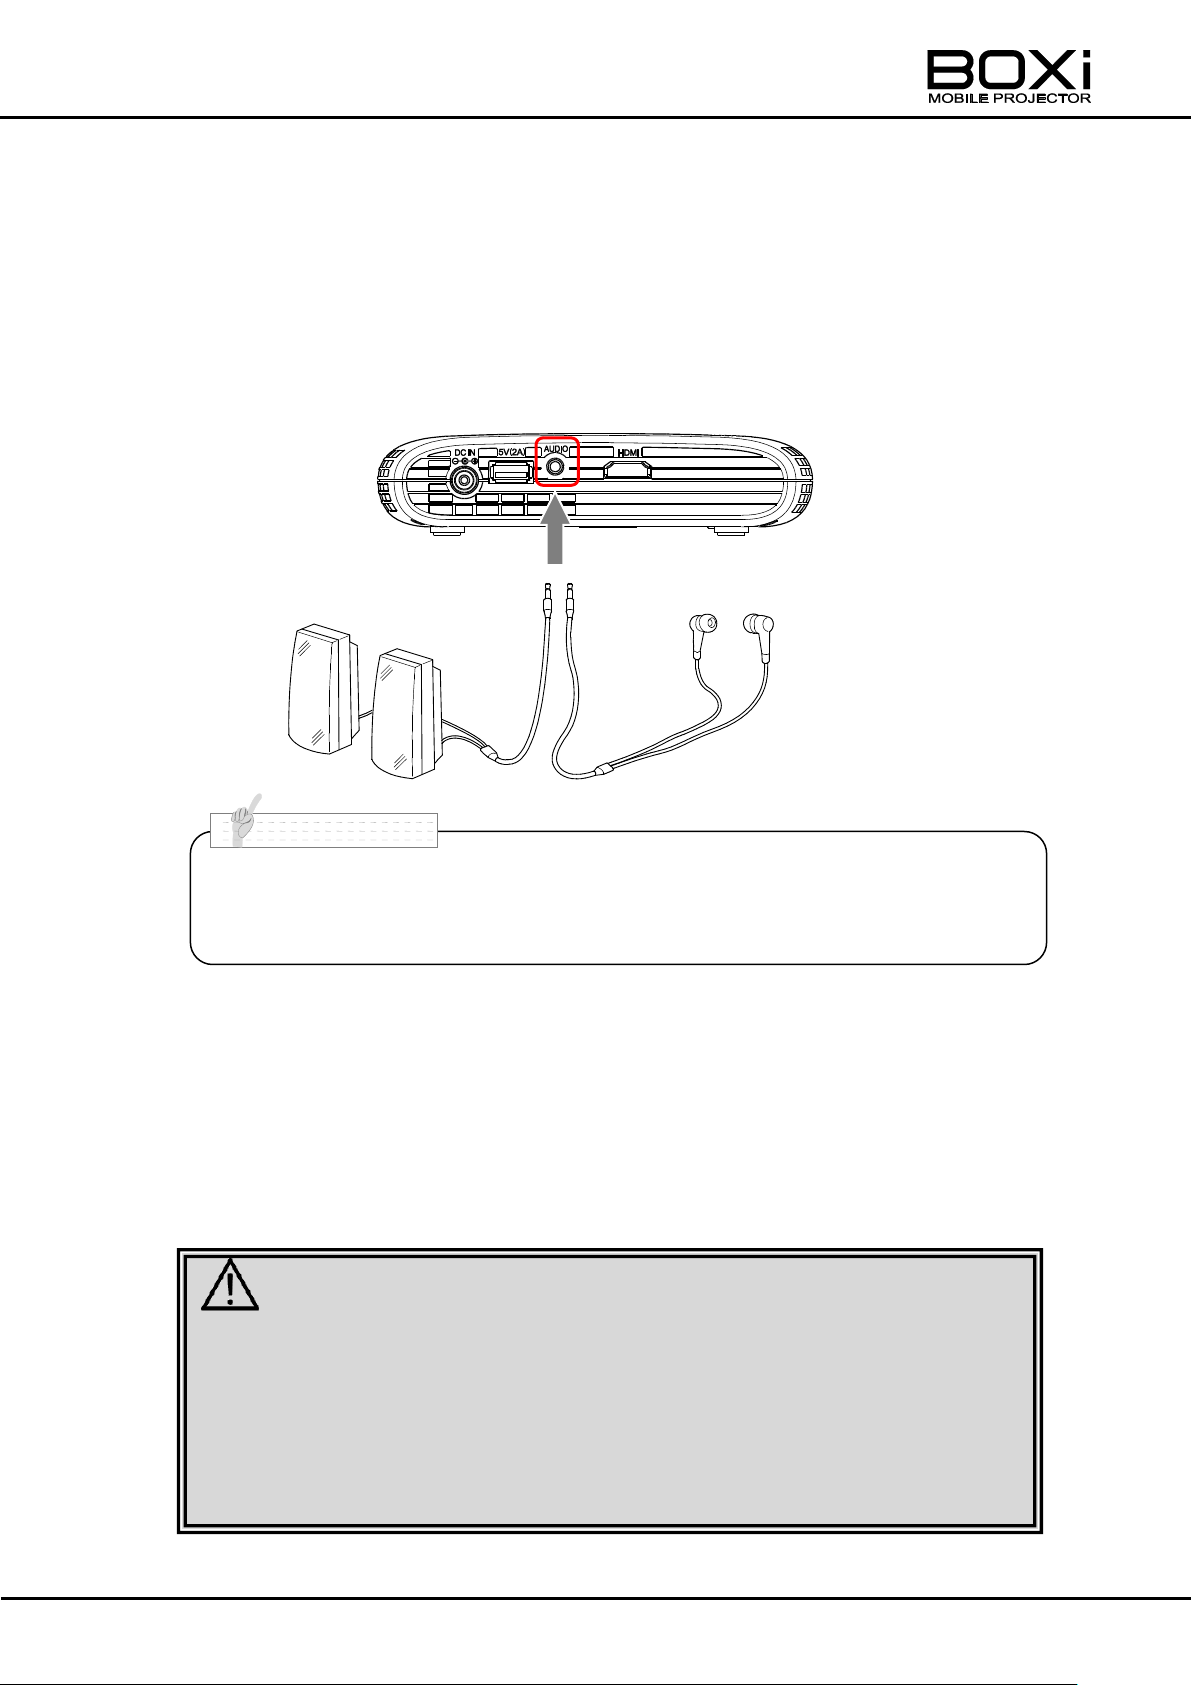
■ Please be careful of volume level when using headphones. Continuous
usage of the headphone at very high volume may cause hearing loss. In
order to protect hearing, please do not turn up the volume level too high.
Please increase volume gradually as sudden increases may harm
hearing.
■ Please do not add extra force to the projector when inserting headphones
as this may cause damage.
■ Please read this instructional manual before connecting headphones or
an external speaker before connecting to the projector.
■ Please lower the audio volume of the external speaker before turning on.
Headphone
(Sold separately)
External Speakers
(Sold separately)
N o t e
CAUTION
Terminal Panel
Output audio through the AUDIO terminal
1. Connect headphones or an external speaker to the projector
Plug in headphones(sold separately) or an external speaker(sold separately) to
the AUDIO output port of the projector.
Built-in speaker output will be stopped and audio will be output through
headphones or an external speaker.
2. Adjust audio volume of the headphone
Audio volume of headphone can be adjusted by volume settings shown after
pressing MENU button on the front panel or the remote control while the
headphone is inserted to the AUDIO output terminal of the projector.
Refer to “CONTROLLING THE VOLUME” (Page51) for details.
The volume of the headphone can be adjusted by pressing the volume buttons
on the remote control.
Refer to “CONTROLLING THE VOLUME (remote control)” (Page32) for details.
25
Page 26
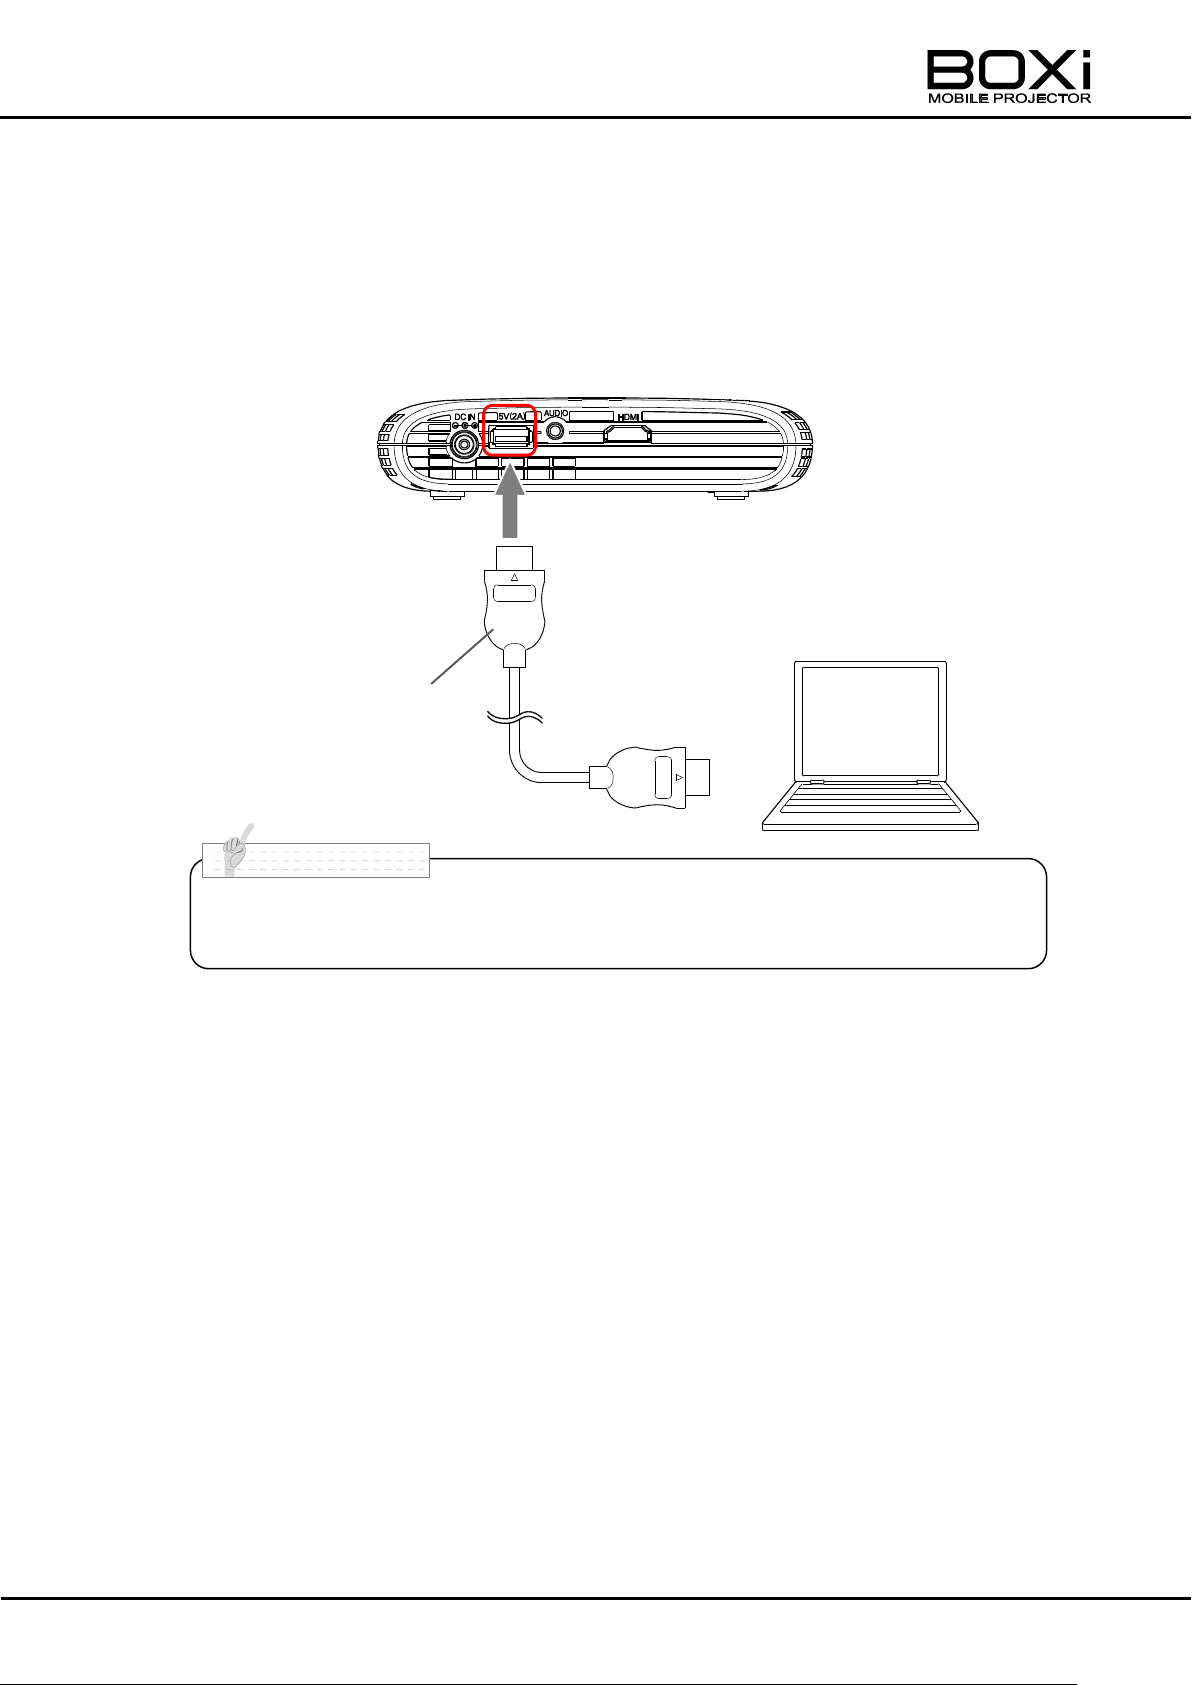
PC(Other USB apparatuses)
USB Cable
(Sold separately)
■ The USB power supply is activated when the AC adapter is connected to the
projector even if the power is on or off.
N o t e
Terminal Panel
Supplying the power from USB port
1. connect other USB apparatuses to this plane
connect other USB apparatuses to this plane
The USB port can supply 5V power up to 2A. This USB port is for power supply
only and has no communication function.
26
Page 27
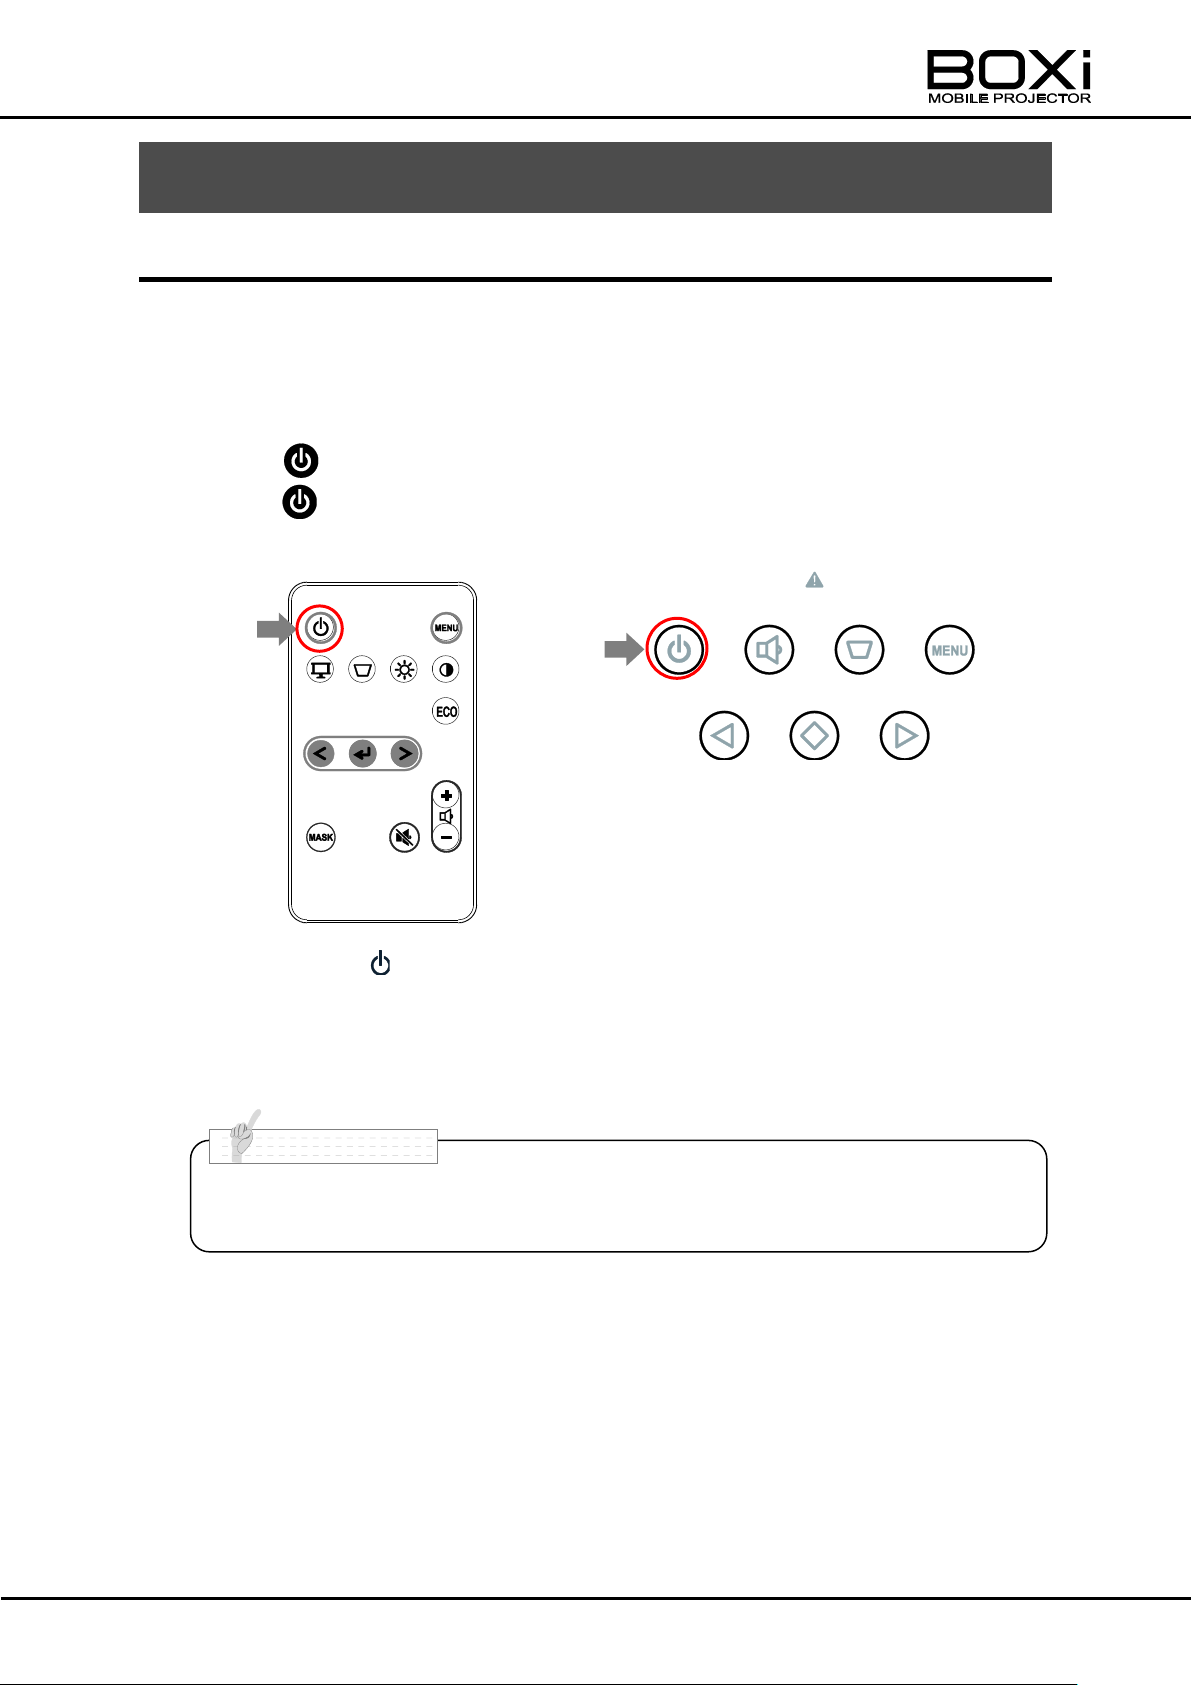
Control panel
Remote control
■ It will take some time before you can operate the projector after the power
is on.
N o t e
2 BASIC OPERATION
TURNING THE POWER ON/OFF
Powering on
1. Make sure that the power and all necessary cables are connected
properly.
2. Touch button on the control panel.
(Press button on the remote control.)
Power indicator will turn green
The “Input source standby” screen will be displayed.
27
Page 28
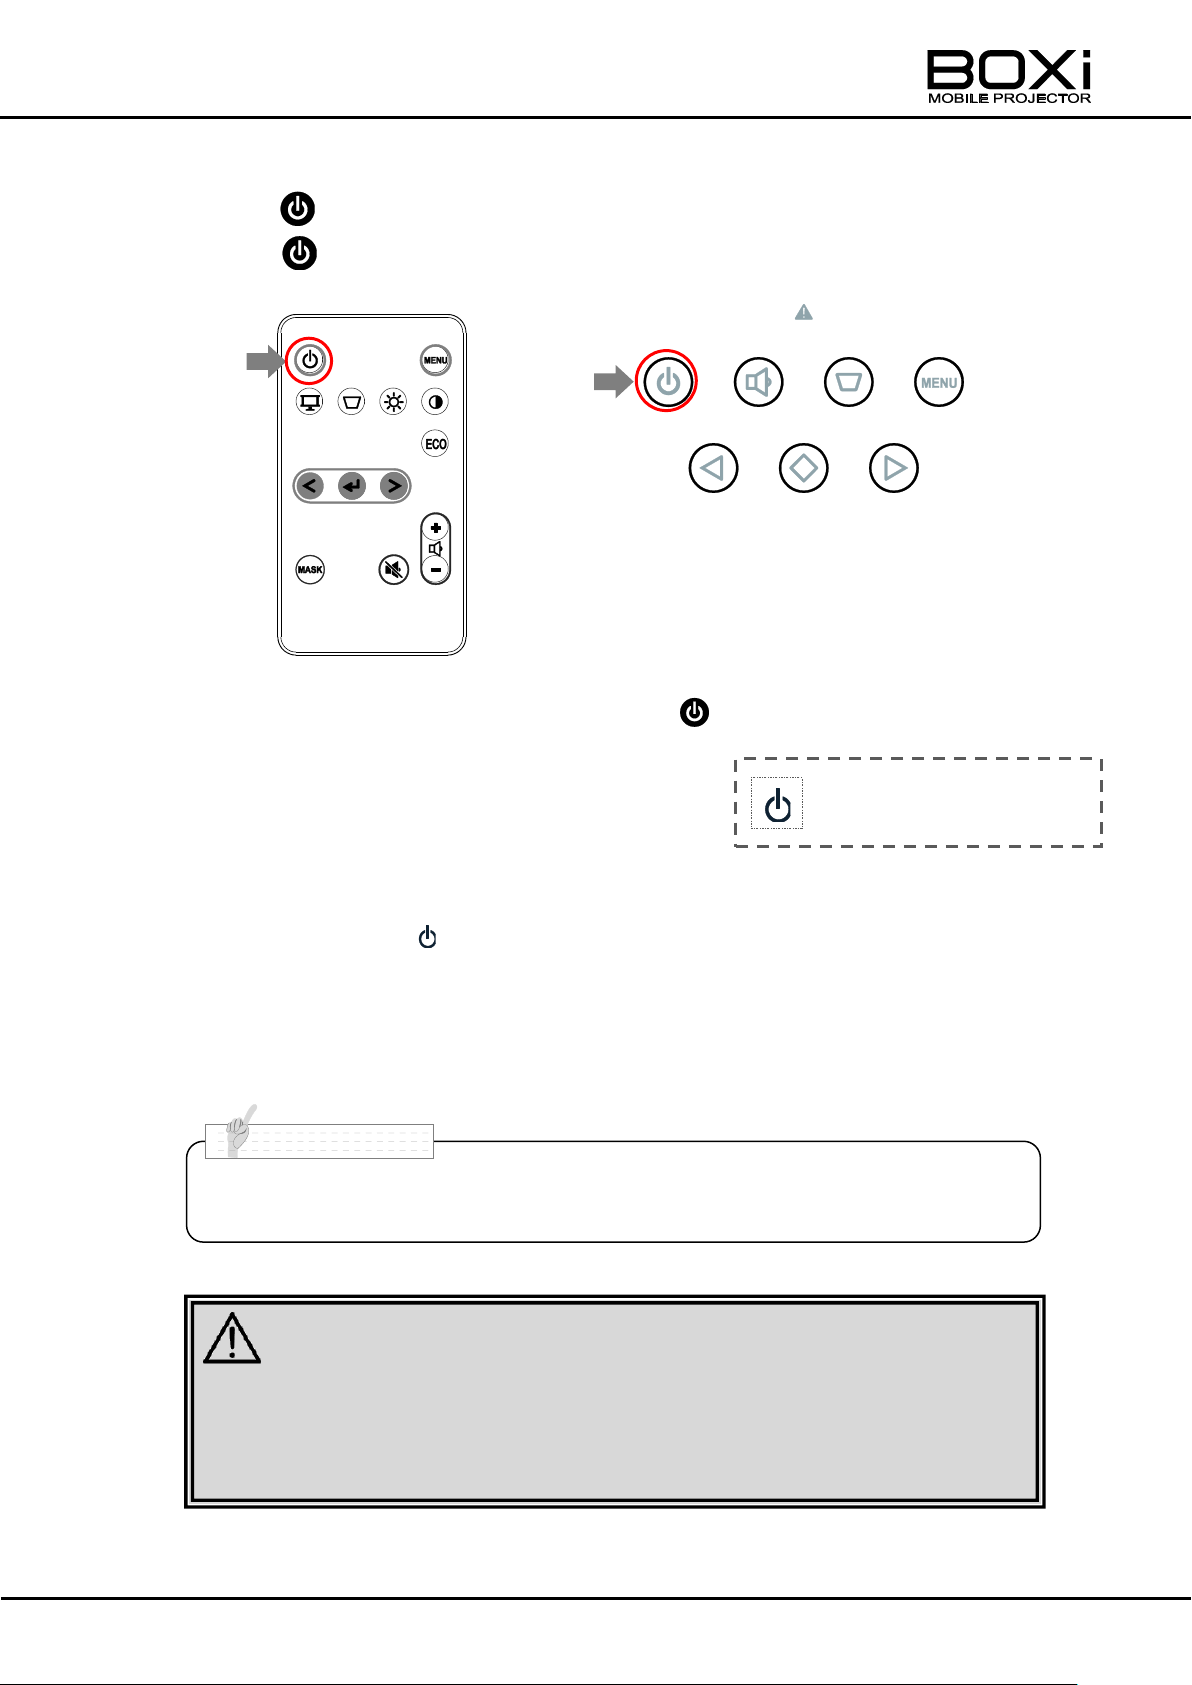
■ The “Power off confirmation” message will disappear after 5 seconds of
no operation.
Press Power button again to
turn off the projector.
When the warning indicator is lit or flashing, it indicates that a malfunction
has occurred to the projector.
Refer to “Warning indicator ” (Page67) for details.
CAUTION
N o t e
Control panel
Remote control
Powering off
1. Touch button on the control panel.
(Press button on the remote control.)
2. A message will be displayed. Press the button again.
Press the Power button on the control panel of
the projector or on the remote control while the
message in the right figure is displayed to turn off
the power.
The Power indicator will turn off.
The cooling fan will operate for a while. Disconnect the power cord after the fan
stops.
28
Page 29
■ The focus adjustment can be performed when the throw distance is
between 48cm and 133cm.
■ Refer to “Throw distance and screen size” (Page20) for details on the
screen size.
■ Sometimes, you may notice fine streaks on projected images. This is
due to interference with the screen surface. Replace the screen or
displace the focus a little.
CAUTION
■ Do not look into the lens during the projection. The strong light emitted
from the lens may cause damage to your eyes. Pay attention especially
when you use the projector in an environment where there are children.
■ Do not touch the lens. If the lens becomes dirty from fingerprints or
anything else, the projected images may become blurry. In such cases,
wipe the lens with commercial lens-cleaning paper. Make sure to turn
off the projector, disconnect the power cord and then allow the cabinet
to cool before cleaning the lens.
■ When the projector is moved from a cold place to a warm place or when
the room temperature is suddenly increased, condensation on the lens
may occur, resulting in blurred image. In such cases, let the projector
warm up to room temperature before using it.
N o t e
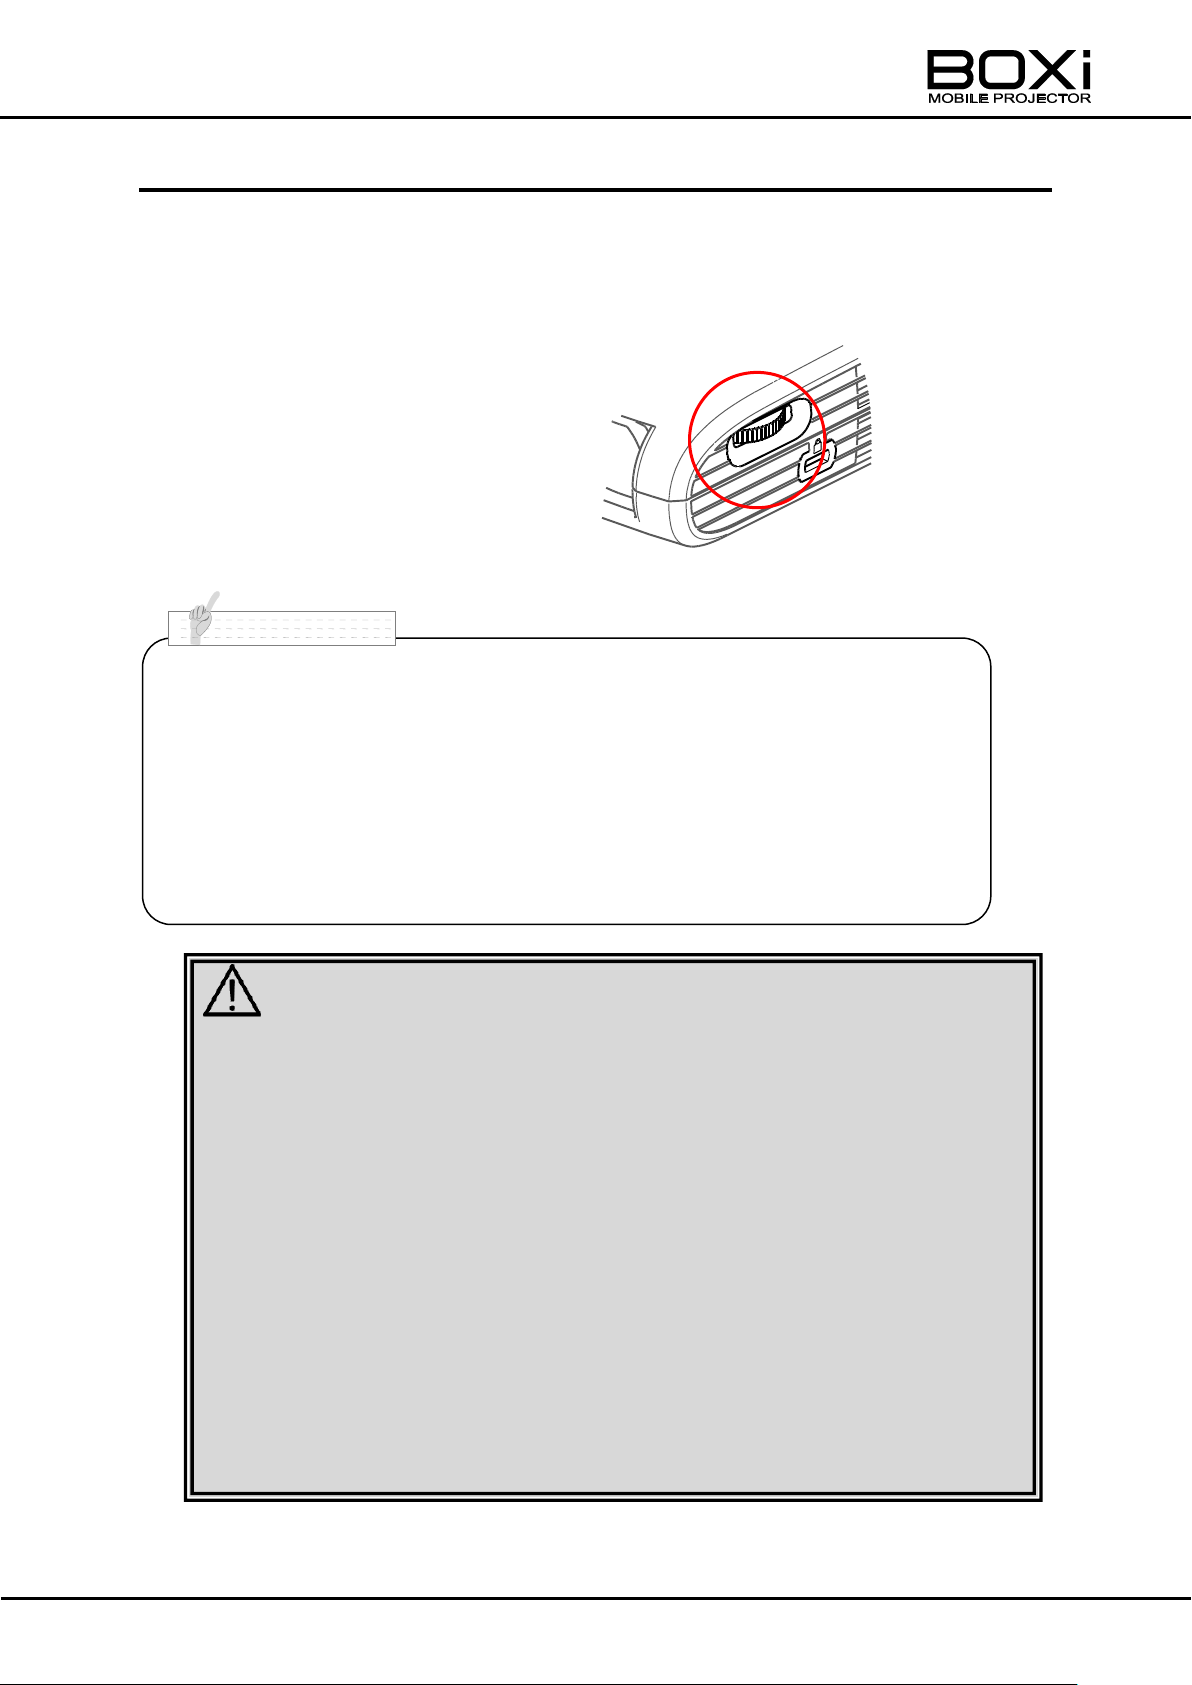
ADJUSTING THE FOCUS
Turn the focus ring to adjust the focus.
29
Page 30
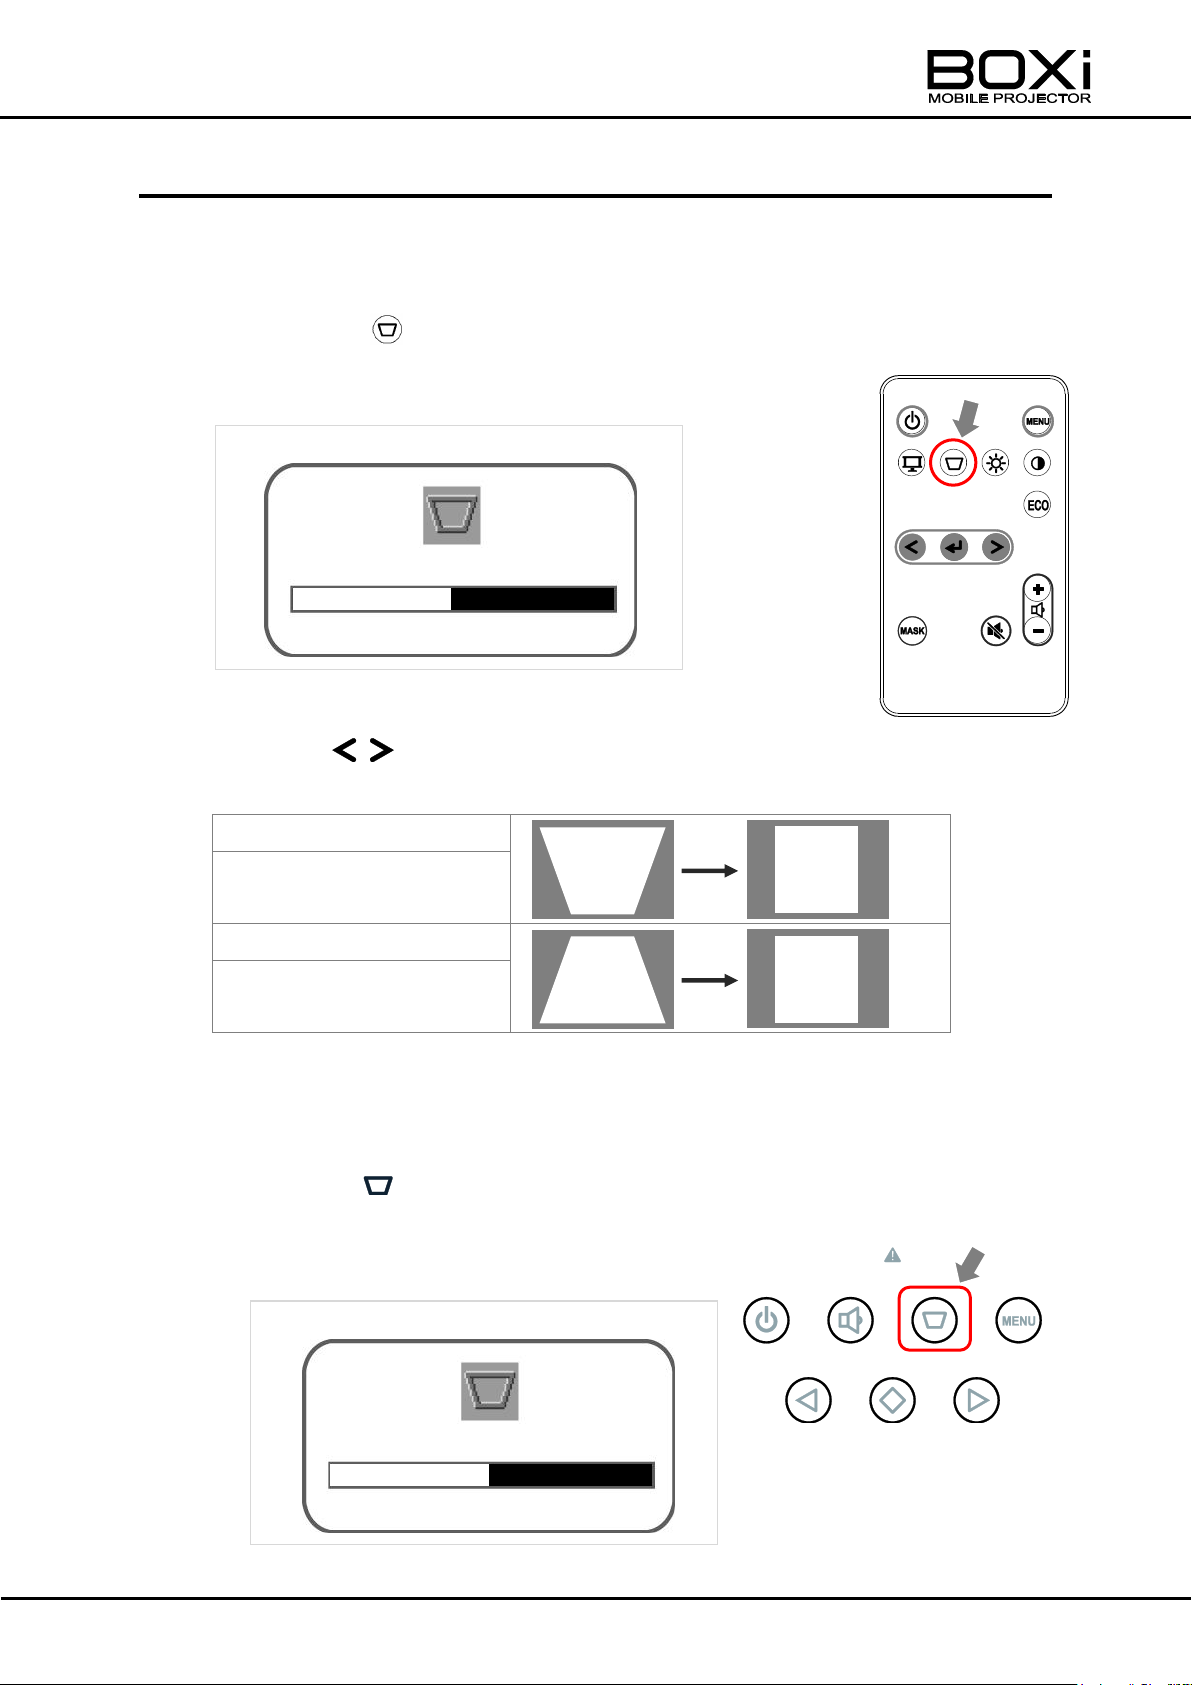
Press the “>” button.
(Press when the projection
angle is increased.)
Press the “<” button.
(Press when the projection
angle is decreased.)
Control panel
Remote control
Keystone correction window
Keystone correction window
CORRECTING THE KEYSTONE DISTORTION
Correcting the keystone distortion manually with the
remote control
1. Press the the button.
The following “Keystone correction” window will be displayed.
2. Press the “ ” buttons.
Correcting the keystone distortion manually with control panel
1. Press the “ ”button on the control panel.
The following “Keystone correction” window
will be displayed.
30
Page 31
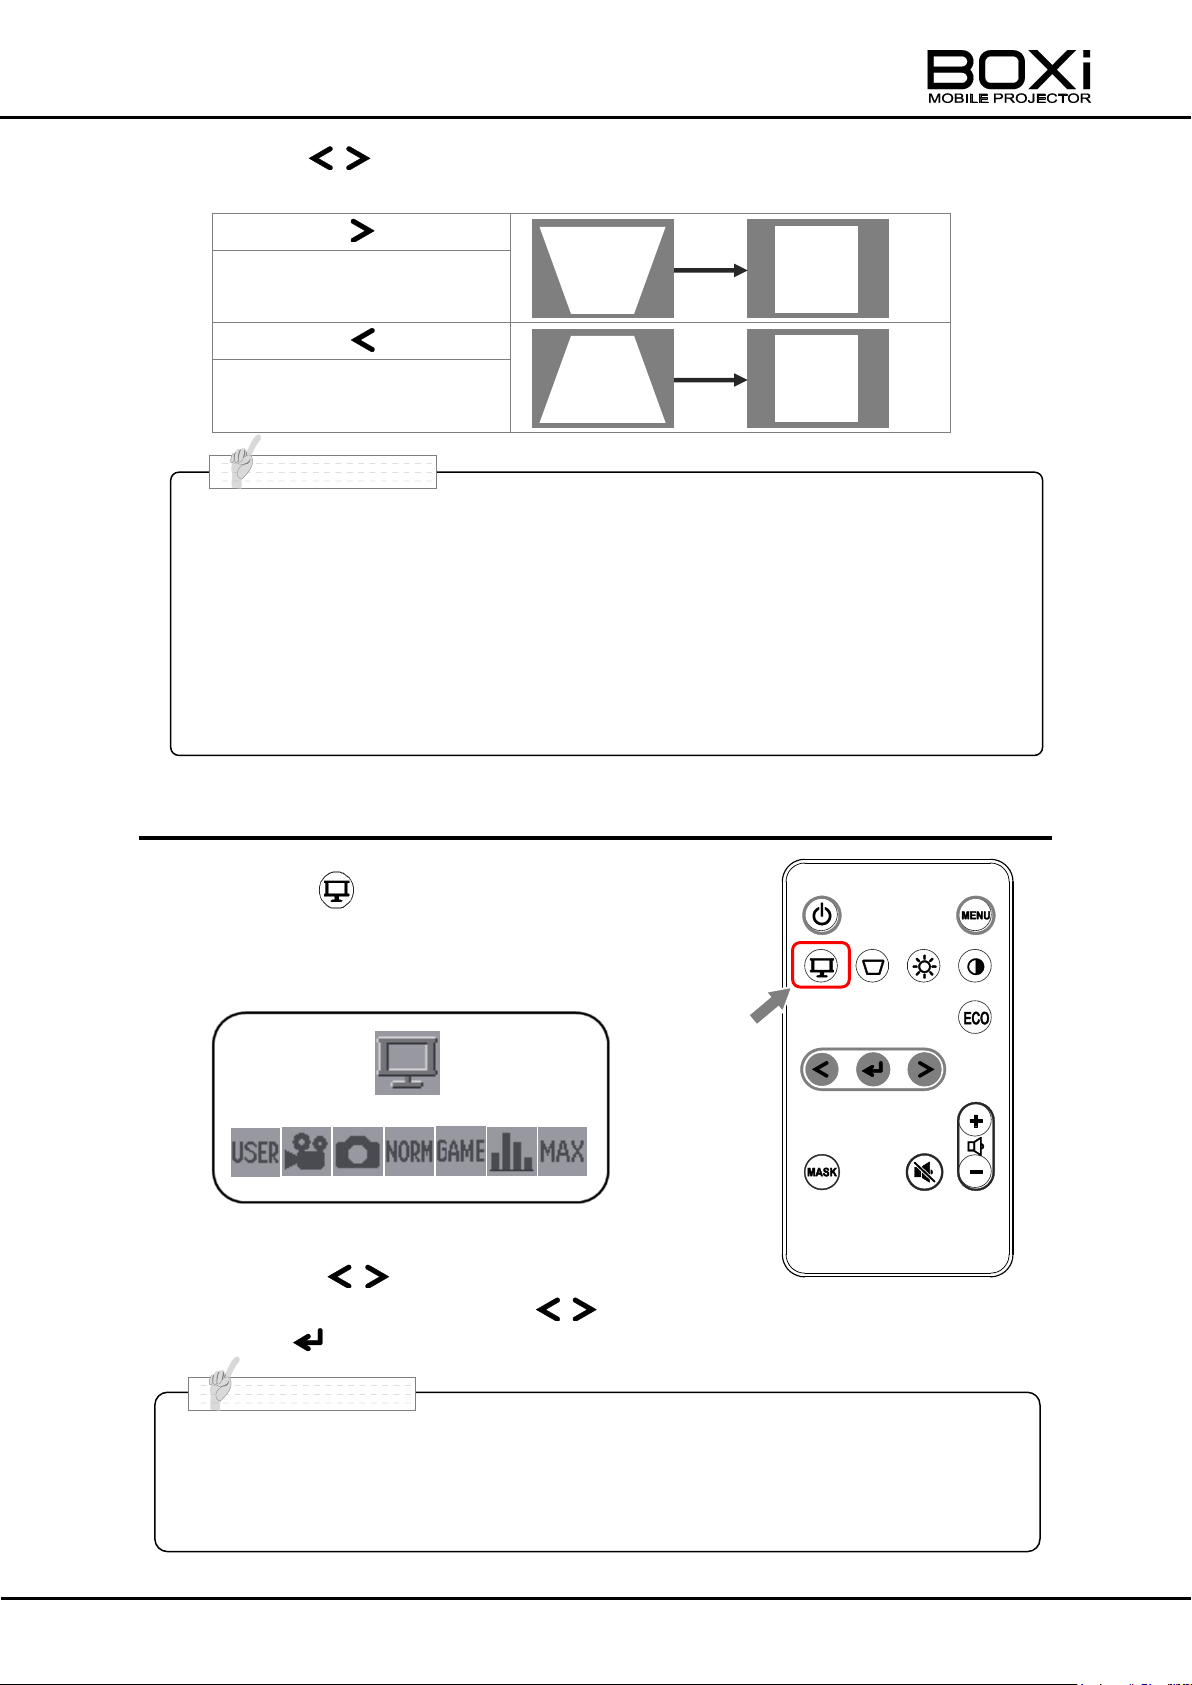
Display mode select menu
■ The “Keystone correction” window will be automatically closed after 3
seconds of no operation.
■ The keystone correction can cause an image to be slightly degraded
because the correction is made electronically.
■ The keystone distortion can be corrected to ±40°of the angle of tilt.
■ The keystone correction can also be performed from the menu.
Refer to “CORRECTING THE KEYSTONE DISTORTION” (Page3043) for
details.
■ The “Display mode select” menu will be automatically closed after 3 seconds
of no operation.
■ Selecting the display mode can also be performed from the menu.
Refer to “SELECTING THE DISPLAY MODE” (Page44) for details.
Press the “ ” button.
(Press when the projection
angle is increased.)
Press the “ ” button.
(Press when the projection
angle is decreased.)
N o t e
N o t e
2. Press the “ ” buttons on the control panel to correct the keystone
distortion.
SELECTING THE DISPLAY MODE (remote control)
1. Press the button on the remote control.
“Display mode select” menu will be displayed.
2. Press the “ ” buttons of remote control.
Select the display mode with the buttons on the remote control.
Press the button to execute the selection.
31
Page 32
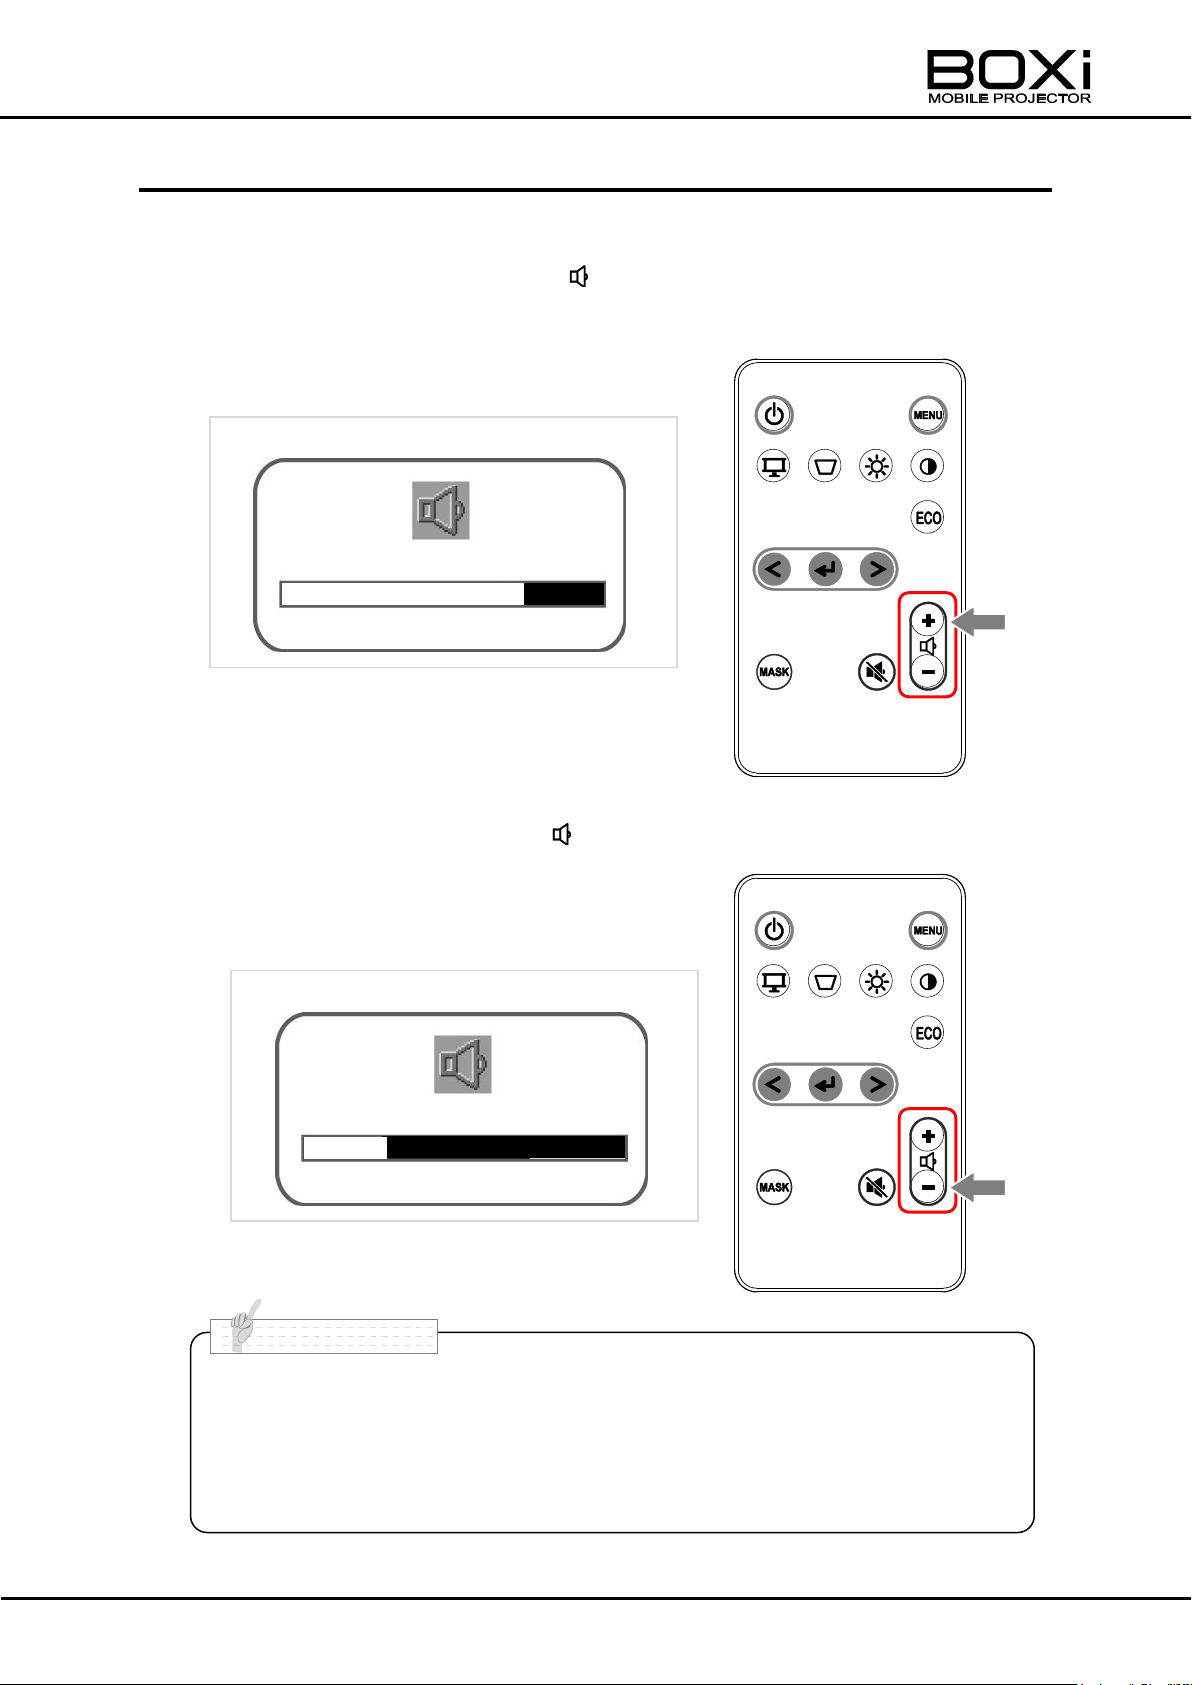
■ The “Volume control” window will be automatically closed after 3
seconds of no operation.
■ The volume control can also be performed from the menu.
Refer to “CONTROLLING THE VOLUME” (Page51) for details.
N o t e
Volume control window
Volume control window
CONTROLLING THE VOLUME (remote control)
Turning up the volume
1. Press the “+” button near the mark on the remote control.
The following “Volume control” window will be displayed and the volume will be
turned up.
Turning down the volume
1. Press the “-” button near the mark on the remote control.
The following “Volume control” window will be
displayed and the volume will be turned down.
32
Page 33
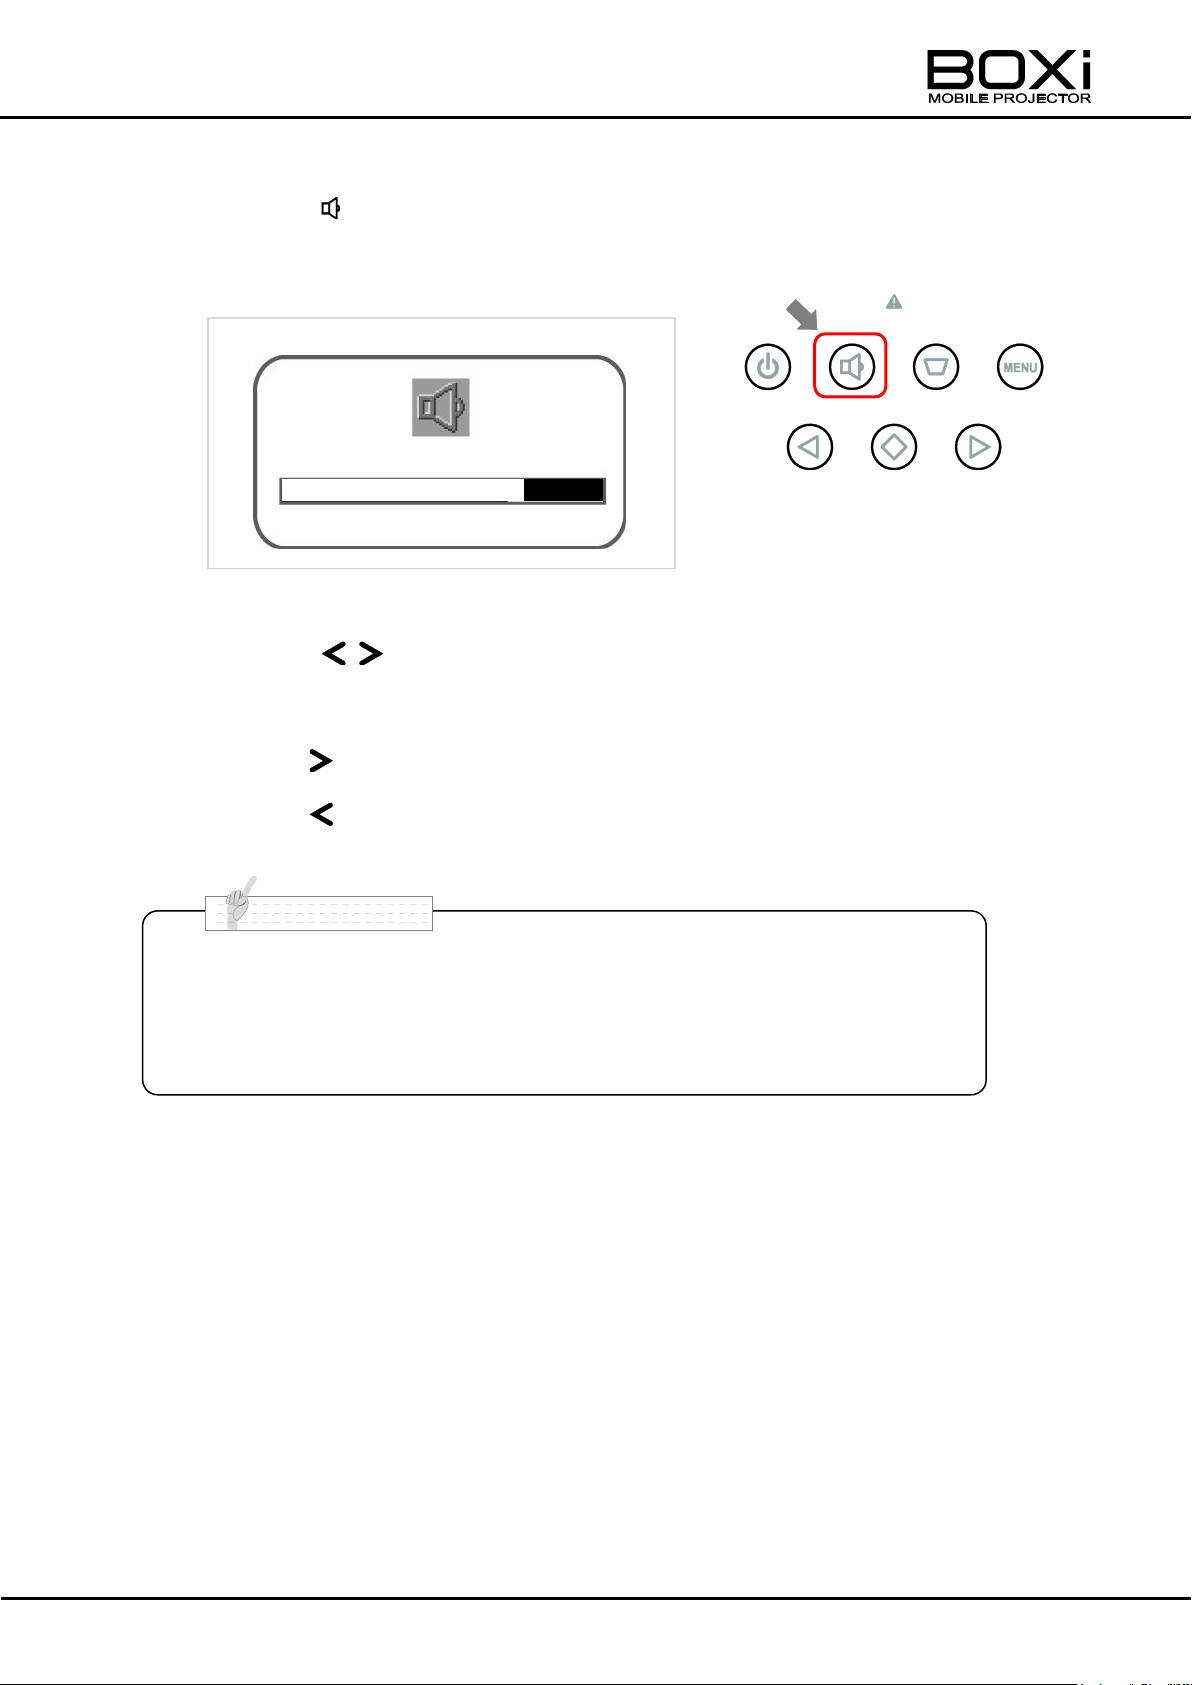
■ The “Volume control” window will be automatically closed after 3
seconds of no operation.
■ The volume control can also be performed from the menu.
Refer to “CONTROLLING THE VOLUME” (Page51) for details.
Control panel
N o t e
Volume control window
Controlling the volume with control panel
1. Press the “ ”button on the control panel.
The following “Volume control” window
will be displayed.
2. Press the “ ” buttons on the control panel to controlling the
volume.
Press the buttons : Turning up the volume
Press the buttons : Turning down the volume.
33
Page 34
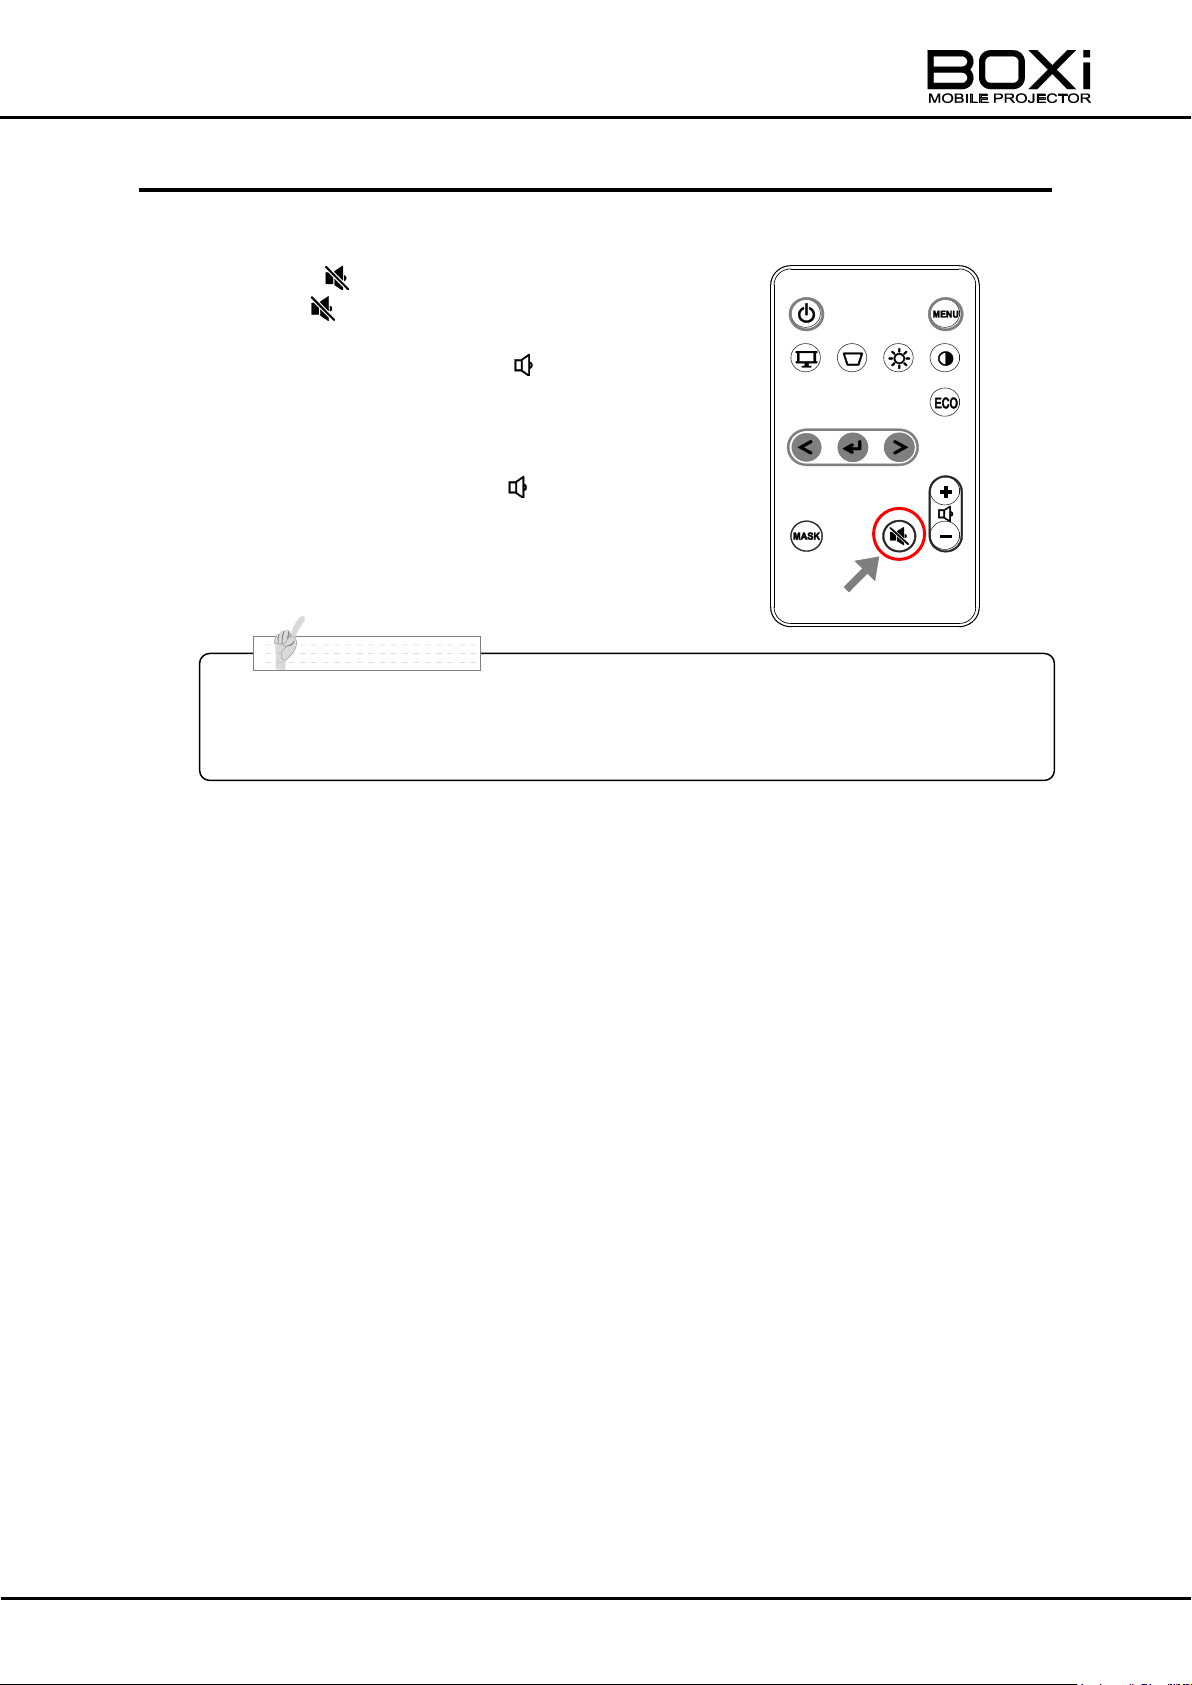
When an external speaker is connected to the projector, the internal
speaker will also become mute.
N o t e
TURNING OFF THE SOUND
You can temporarily mute the sound from the built-in speaker.
1. Press the button to mute the sound.
Press the button again to cancel the mute.
When the “+” button near the mark on the
remote control is pressed while in mute,
the mute will be released and the volume
will be increased by 1 level.
When the “-” button near the mark on the
remote control is pressed while in mute,
the mute will be released and the volume
will be decreased by 1 level.
34
Page 35
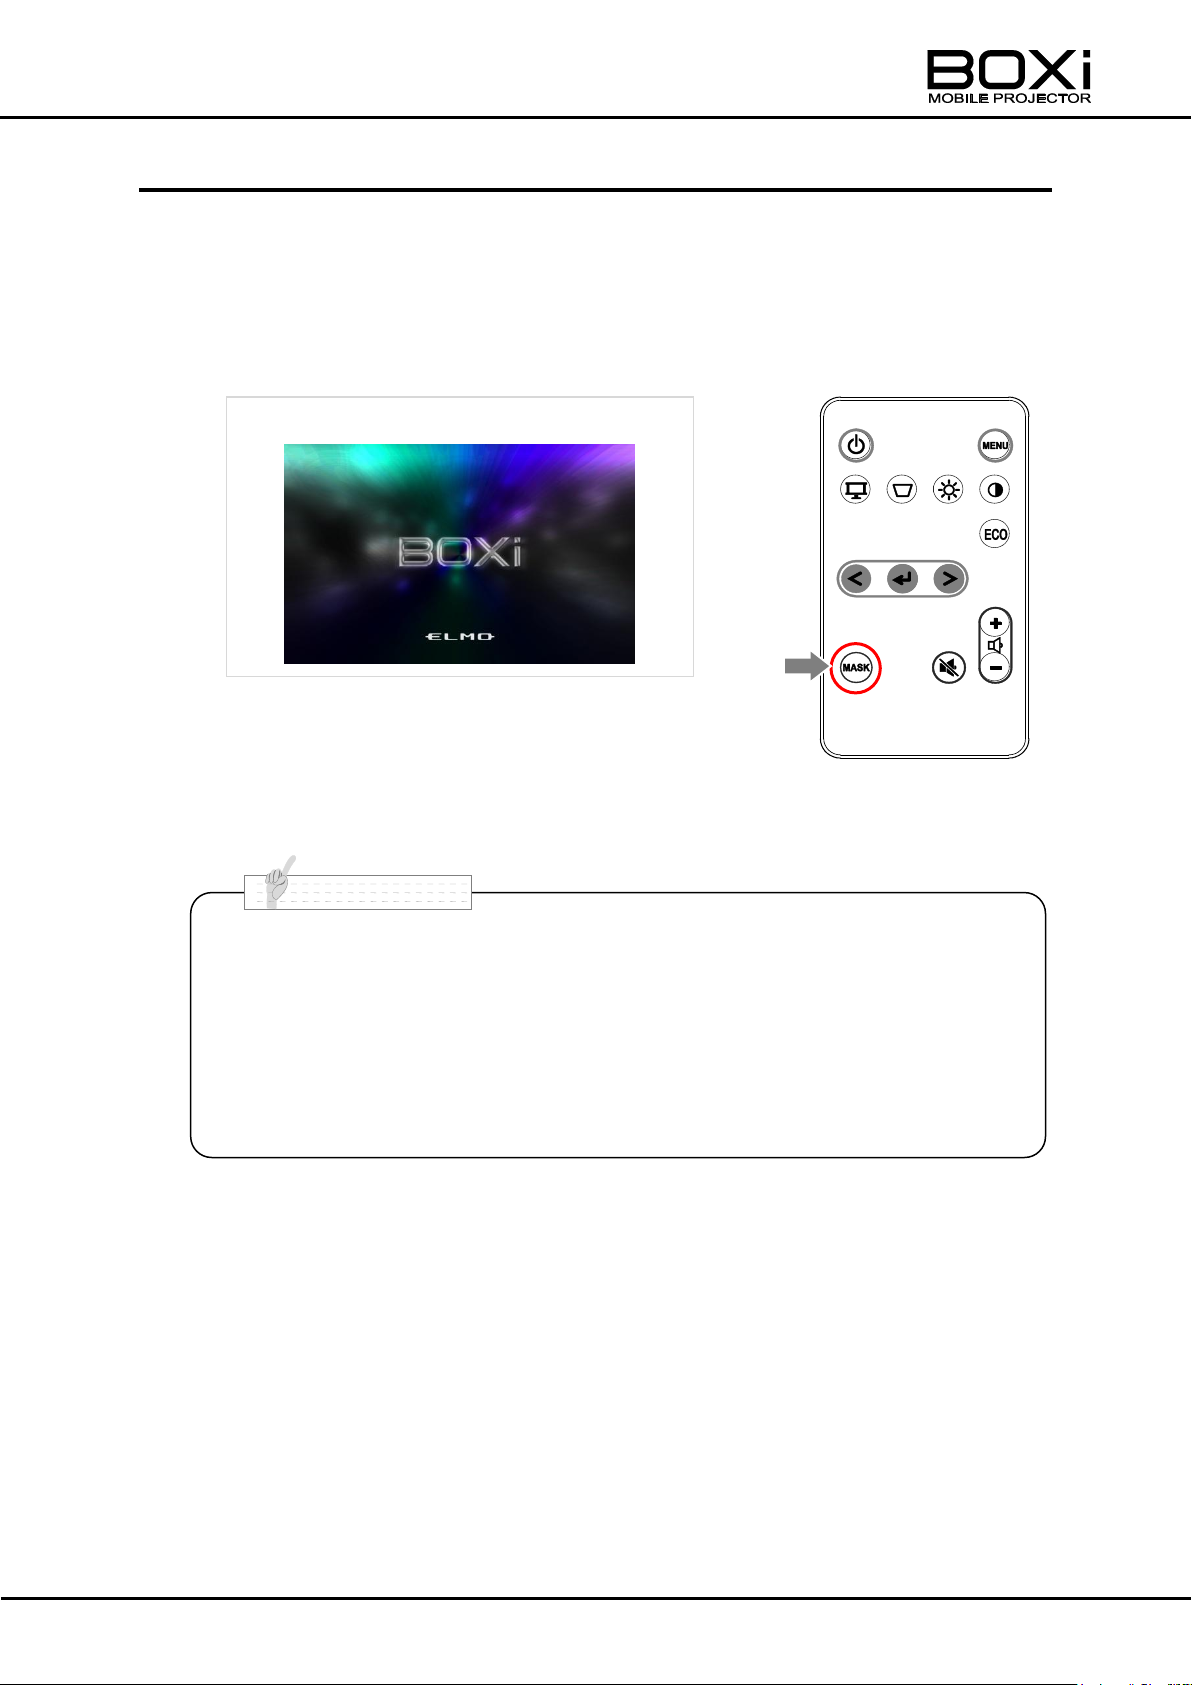
Blank screen
■ You can also exit the blank screen by pressing any button on the control
panel or on the remote control, except the MASK button on the remote
control.
■ The sound will not be muted when the blank screen is displayed.
■ While in “Black Screen” mode no signal will be recognized. To initialize
the projector “Black Screen” mode must be turned off by pressing the
button.
N o t e
HIDING THE IMAGE
You can temporarily hide the projected image with the “Blank screen” function.
1. Press the MASK button on the remote control.
The blank screen will be displayed to hide the projected image.
Press the MASK button again to return to the input signal screen.
35
Page 36
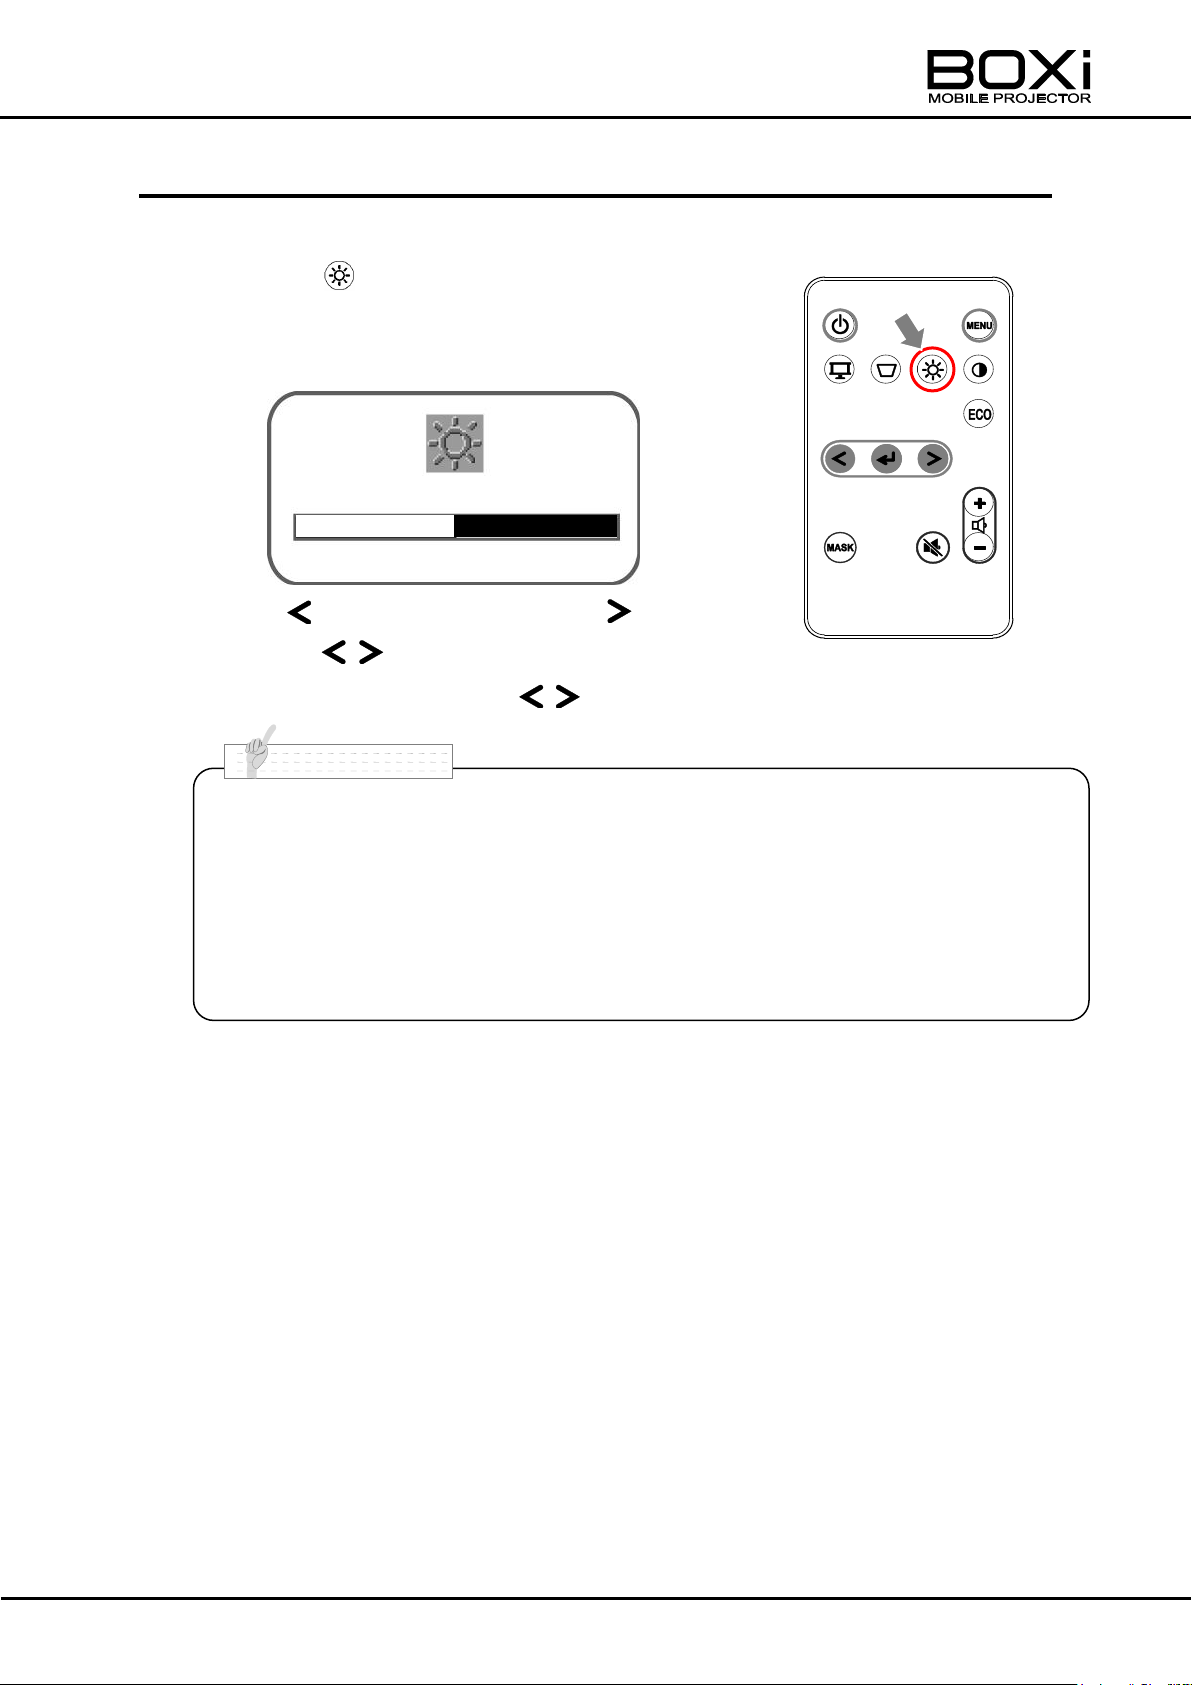
Brightness adjustment window
Darken
Lighten
■ The “Brightness adjustment” window will be automatically closed after 3
seconds of no operation.
■ The brightness adjustment cannot be done from the “Input source standby”
screen.
■ The brightness adjustment can also be performed from the menu.
Refer to “ADJUSTING THE BRIGHTNESS” Page49 for details.
N o t e
ADJUSTING THE BRIGHTNESS (remote control)
Adjust the brightness on the remote control.
1. Press the button on the remote control.
The “Brightness adjustment” window will be displayed.
2. Press the “ ” buttons of remote control.
Adjust the brightness with the buttons.
36
Page 37
■ The “Contrast adjustment” window will be automatically closed after 3
seconds of no operation.
■ The contrast adjustment cannot be done from the “Input source standby”
screen.
■ The contrast adjustment can also be performed from the menu.
Refer to “ADJUSTING THE CONTRAST” Page50 for details.
N o t e
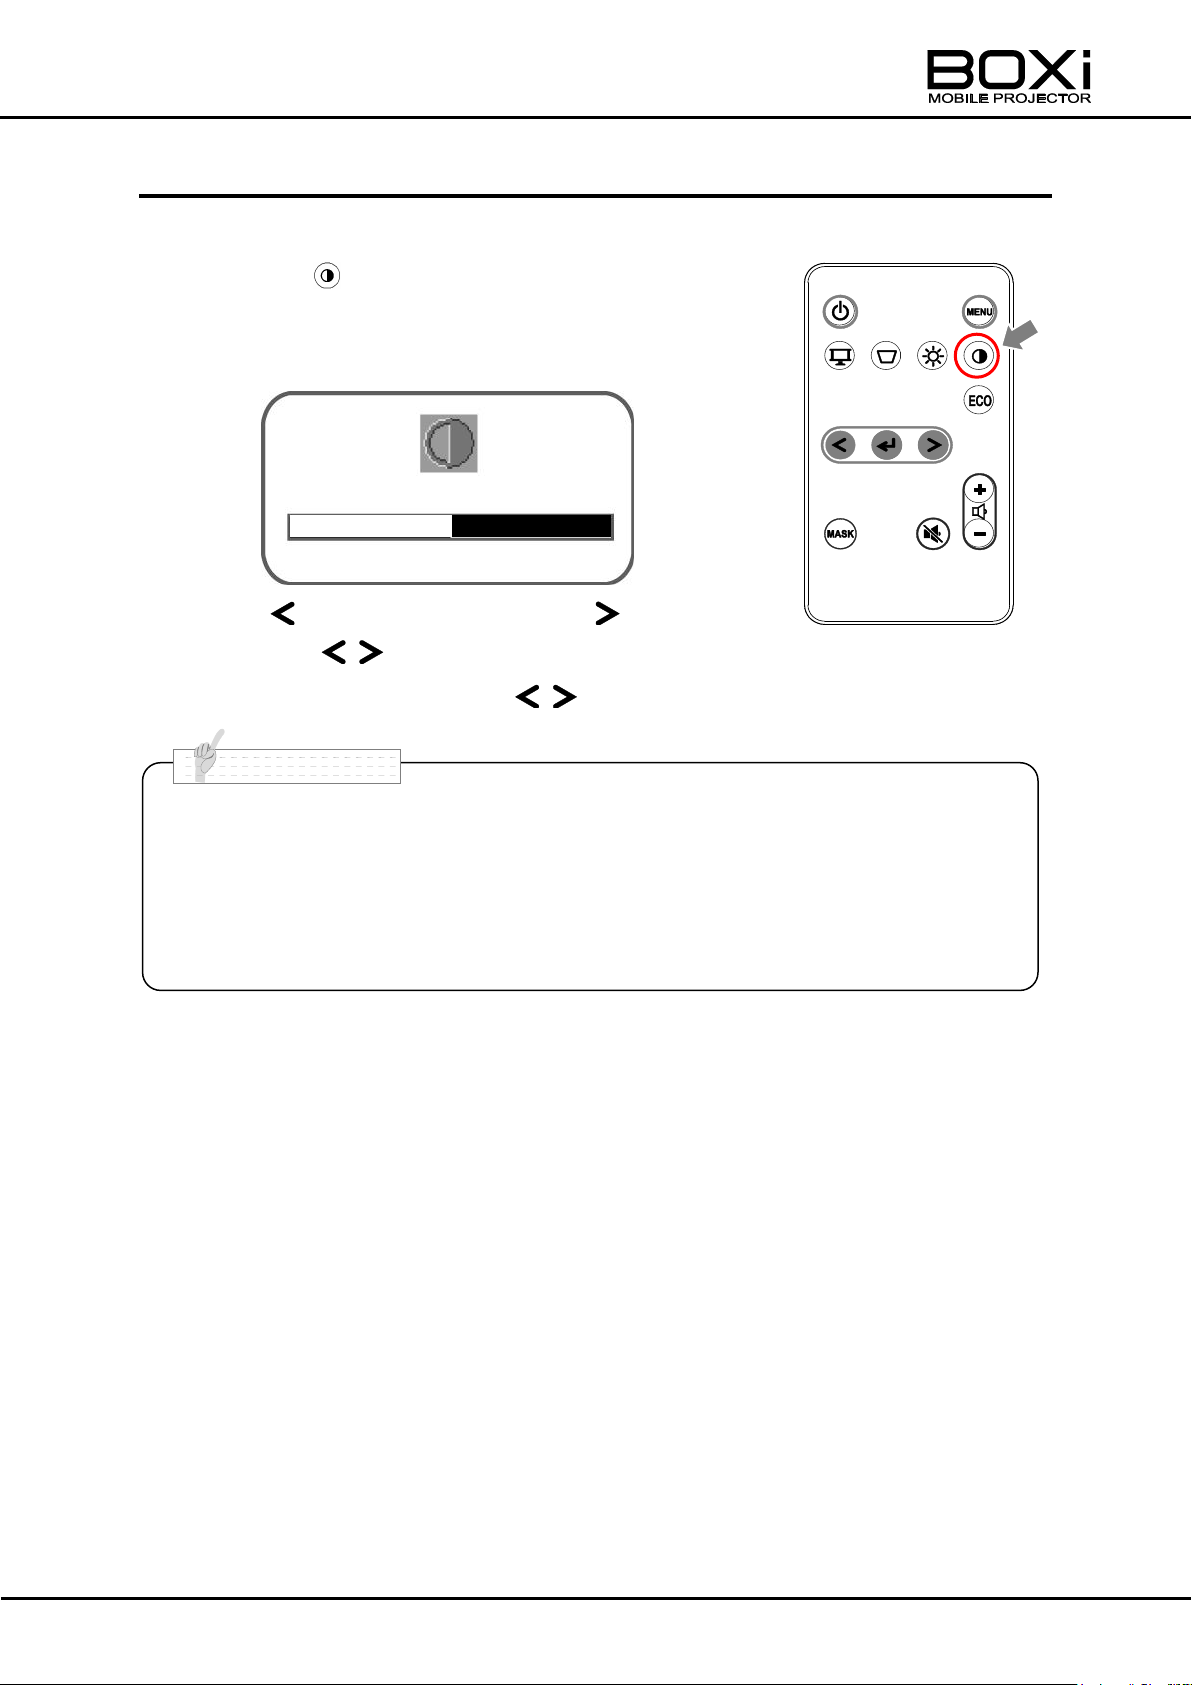
Weaken
Sharpen
Contrast adjustment window
ADJUSTING THE CONTRAST (remote control)
Adjust the contrast on the remote control.
1. Press the button on the remote control.
The “Contrast adjustment” window will be displayed.
2. Press the “ ” buttons of remote control.
Adjust the contrast with the “ ” buttons.
37
Page 38
Setting
Description
ON
To activate the ECO mode.
OFF
To cancel the ECO mode.
N o t e
■ The “ECO mode setting” menu will be automatically closed after 3
seconds of no operation.
■ Setting the ECO mode can also be performed from the menu.
Refer to “SETTING THE ECO MODE” (Page55) for details
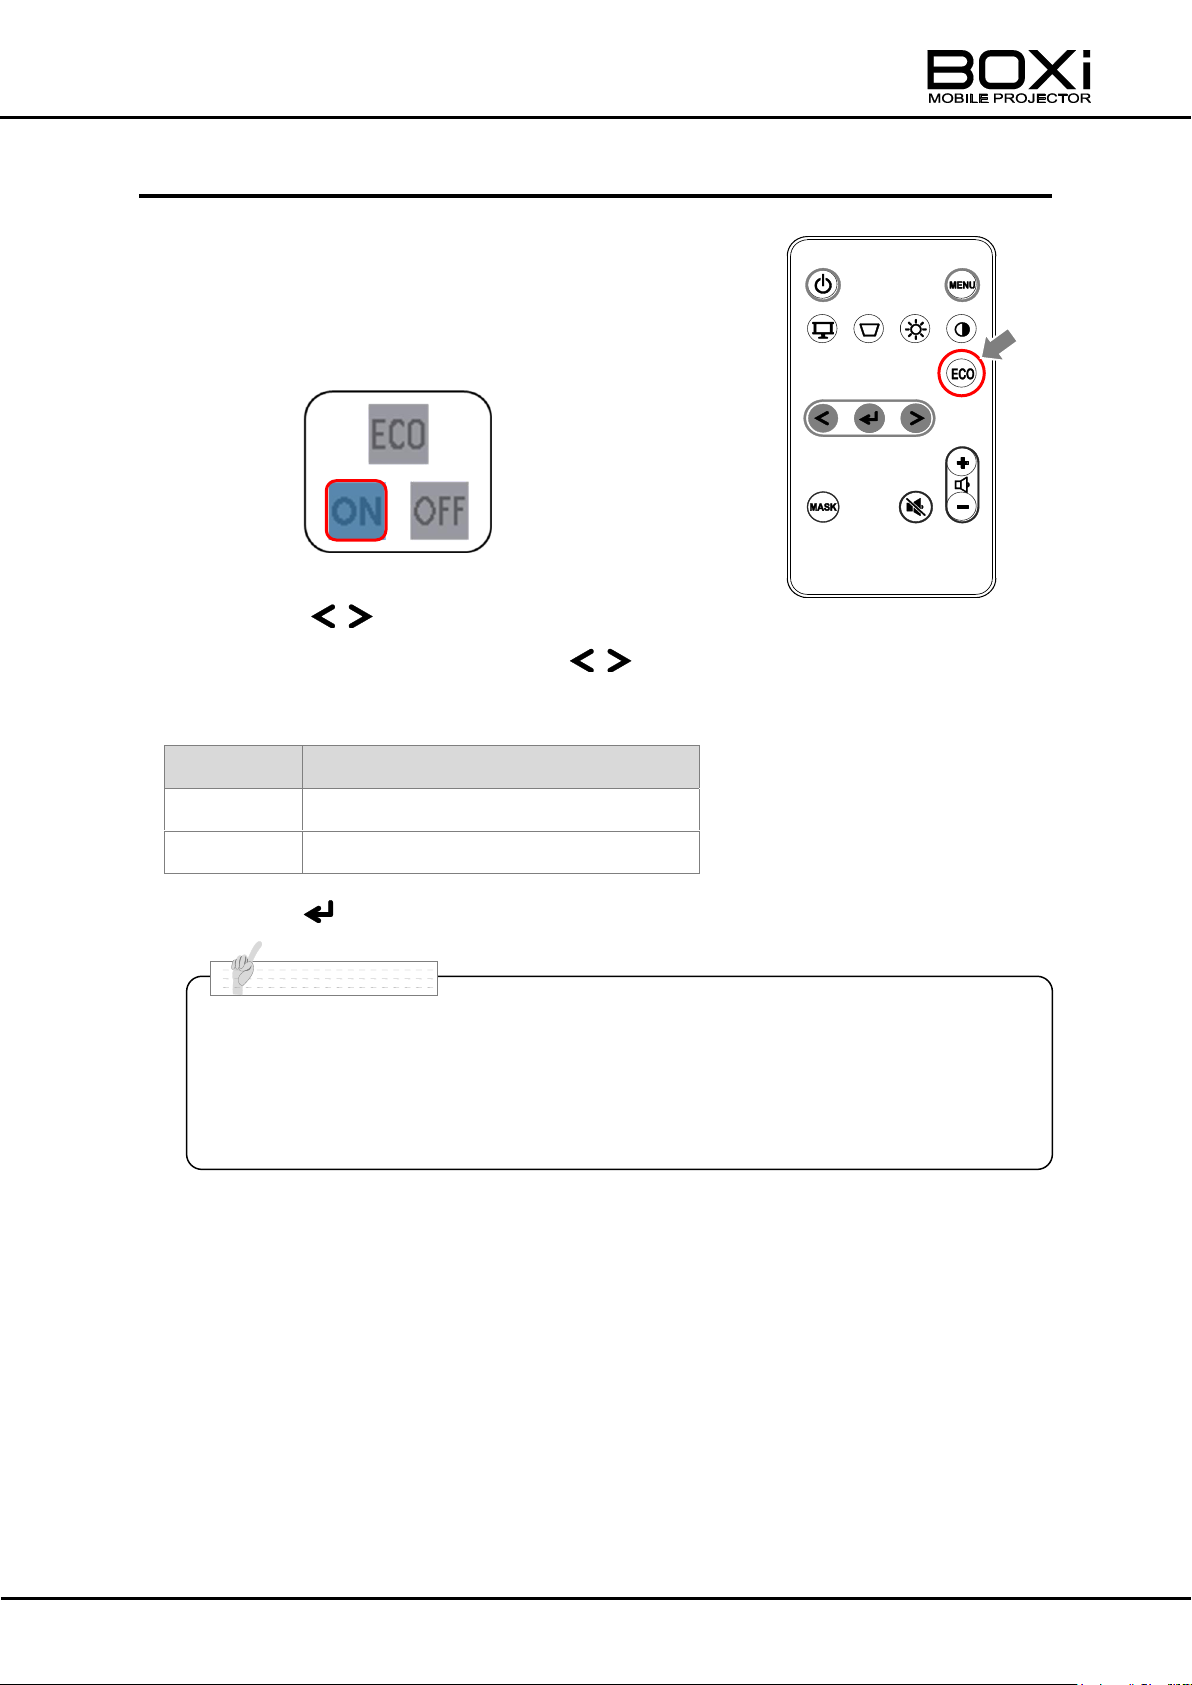
ECO mode setting menu
SETTING THE ECO MODE (remote control)
Setting the ECO mode on the remote control.
1. Press the ECO button on the remote control.
The “ECO mode setting” menu will be displayed.
2. Press the “ ” buttons of remote control.
Select “ON” or “OFF” with the
buttons on the remote control.
Press the button to execute the selection.
38
Page 39
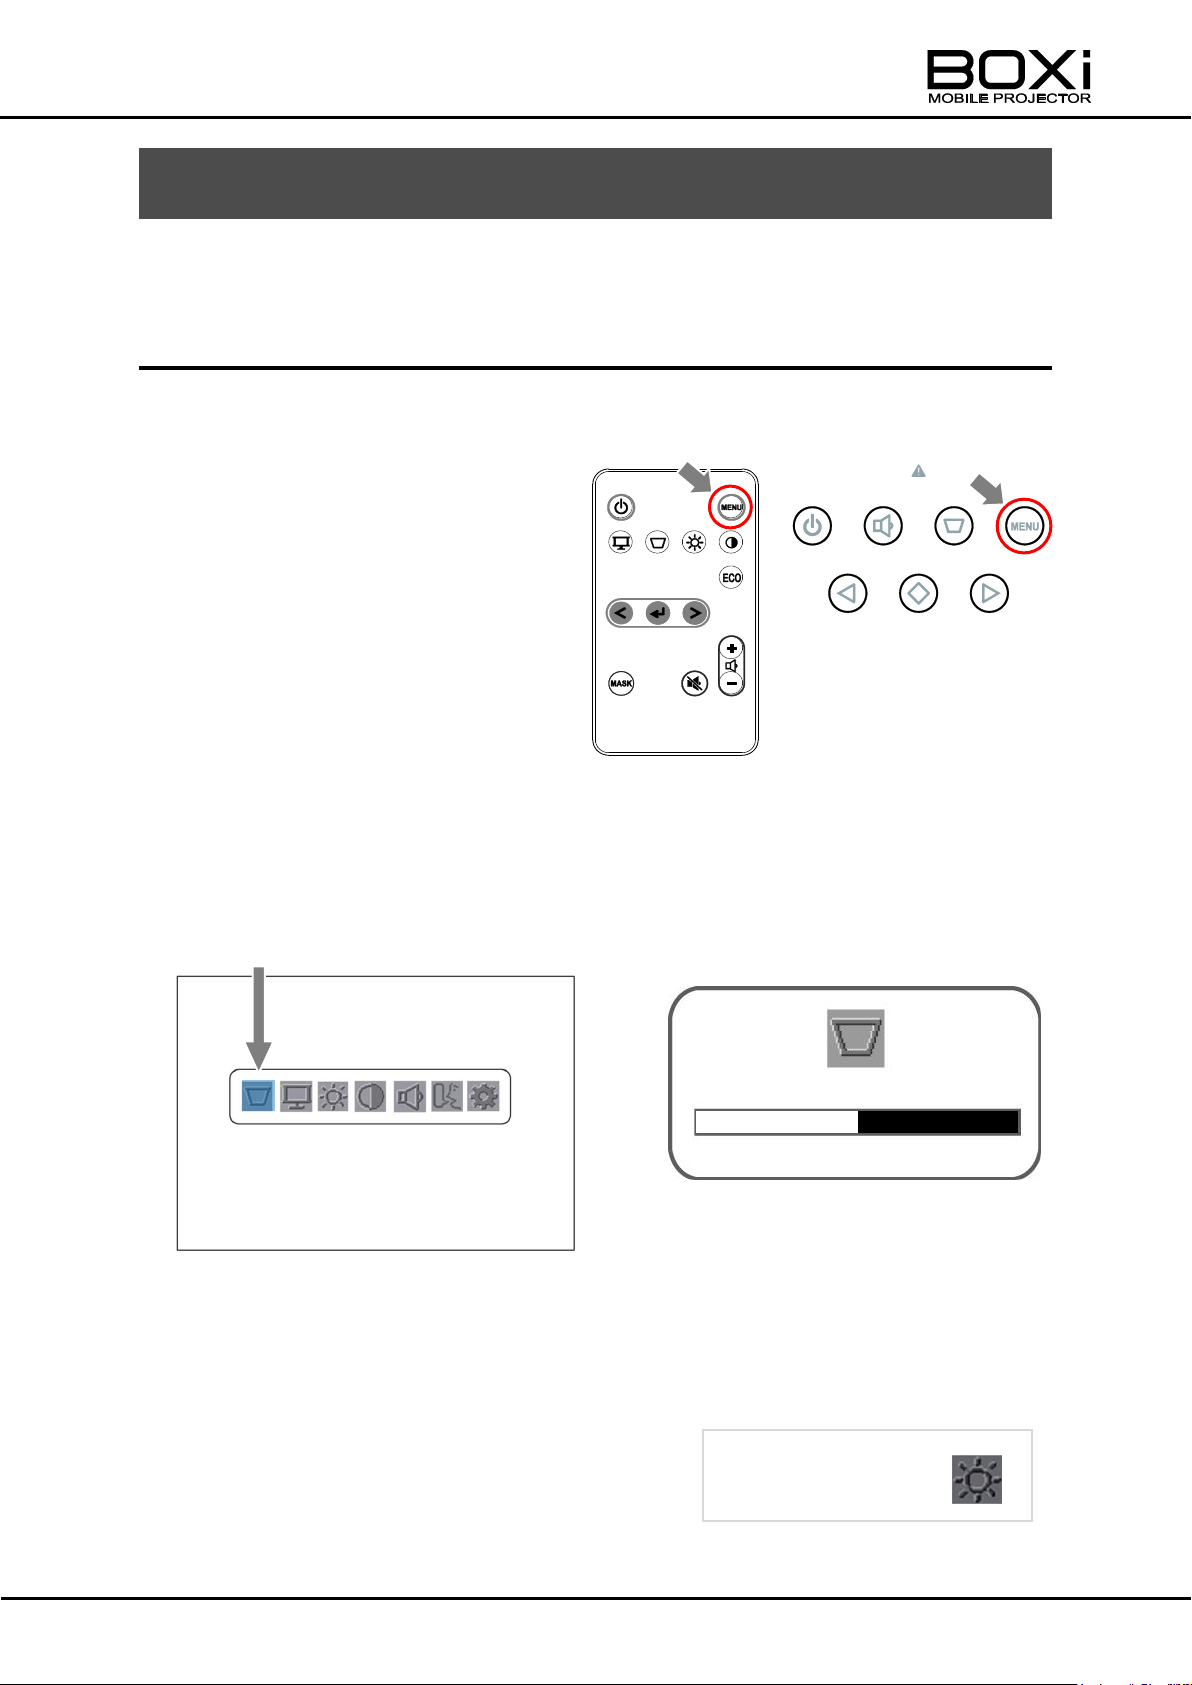
Main menu Sub menu
The selected item will be marked in blue.
The non selectable
items will be marked in
dark grey. →
Remote control
Control panel
3 MENU OPERATION
Various configurations and adjustments to the projected image can be done from the
menu.
DISPLAYING THE MENU AND BASIC OPERATION
Displaying the main menu
1. Press the MENU button.
Press the MENU button on the
remote control or on the control
panel.
The menu will be closed if the MENU button is pressed again.
The menu will also be closed automatically after 30 seconds of no operation.
Operating the menus
The selected item in the main menu will be marked in blue.
If you open the selected item, a sub menu will be displayed and you can configure
the details.
The items that cannot be selected will be marked in dark grey.
39
Page 40
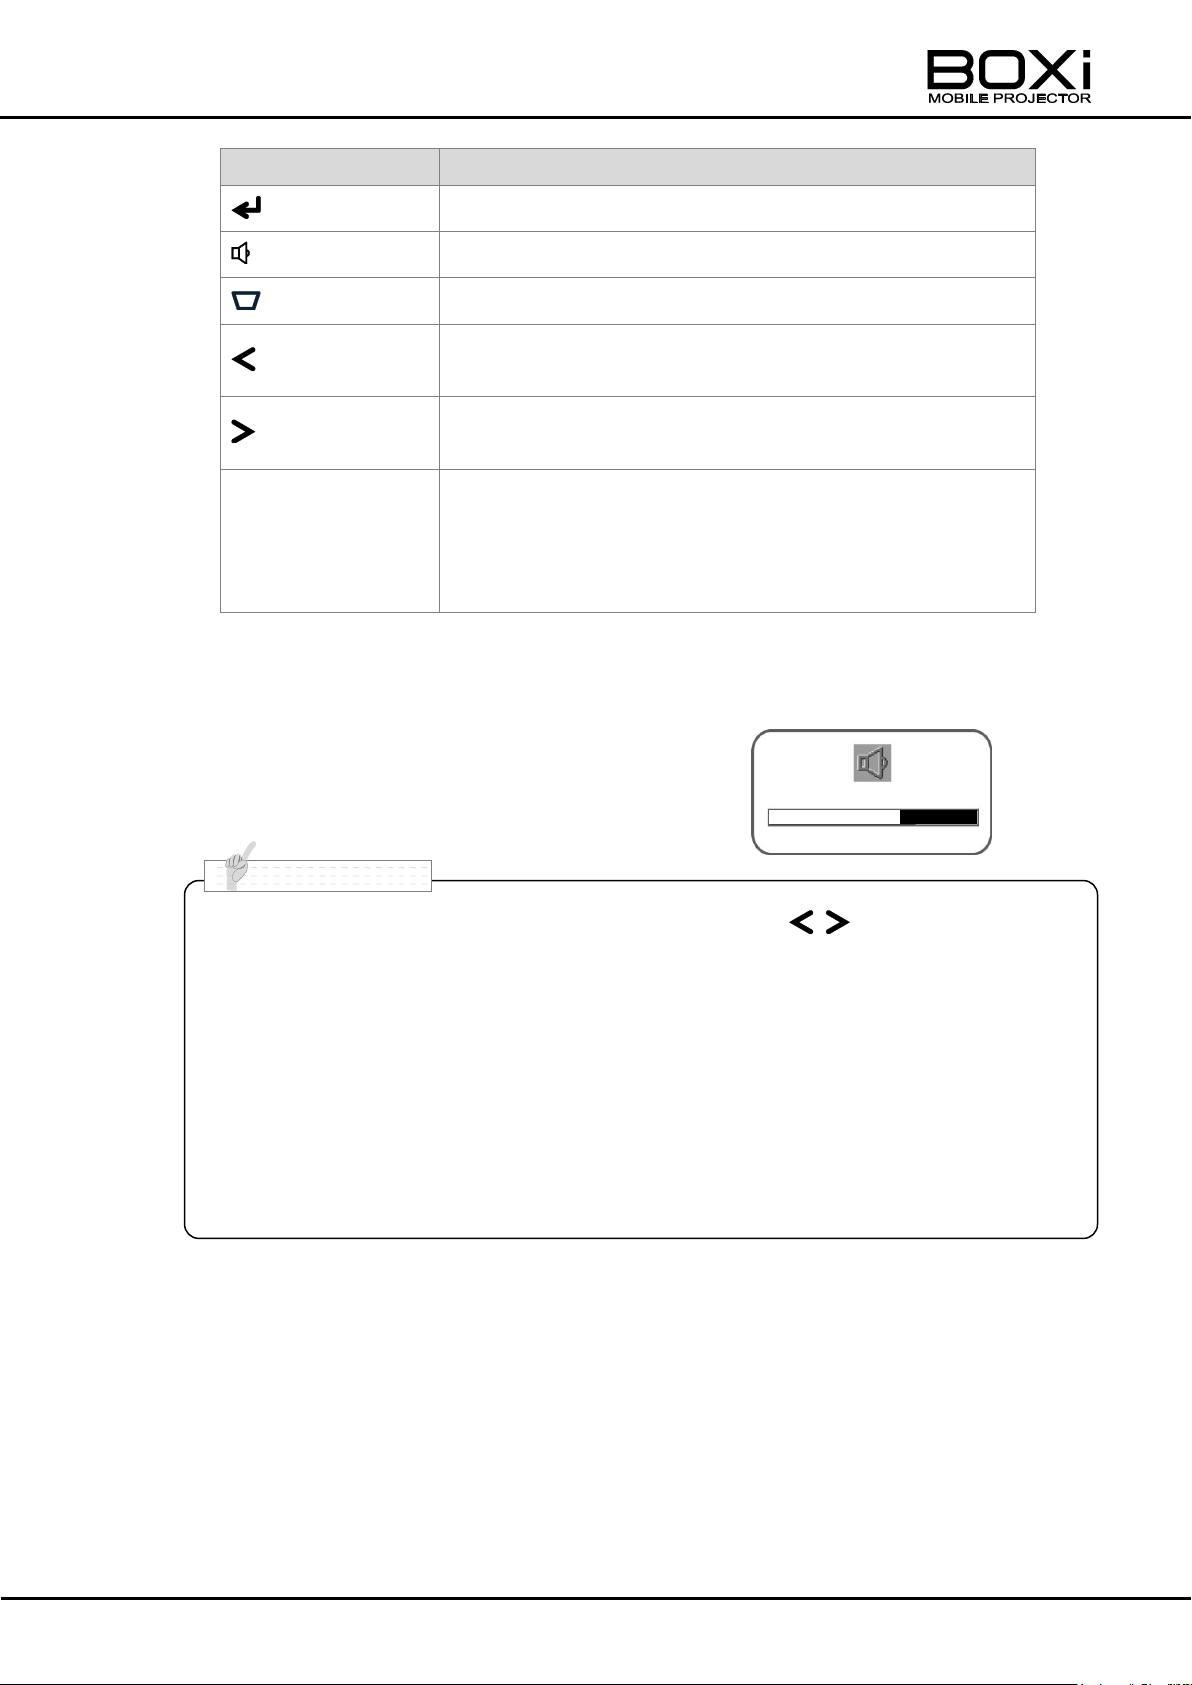
Button
Function
button
Configure the setting of the selected icon.
button
The “Volume control” screen appears.
button
The “Keystone correction” screen appears.
button
Move the selected item left.
Adjust the setting value of the adjustment bar*.
button
Move the selected item right.
Adjust the setting value of the adjustment bar.
MENU button
Return to the previous menu without changing the
settings.
When the main menu is displayed, the main menu will
be closed.
■ The value set with of the adjustment bar using the buttons cannot
be returned to the previous value before setting by pressing the MENU
button.
■ The menu will be automatically closed after 30 seconds of no operation.
Press the MENU button again to display the menu.
■ The setting screen for Keystone/Volume button on this product and the
setting screen for display mode/keystone/brightness/contrast/eco/volume
button of the remote control will be automatically closed after 3 seconds of
no operation.
*Adjustment bar: To be used to adjust the setting values.
(For example: Volume adjustment bar)
40
Page 41
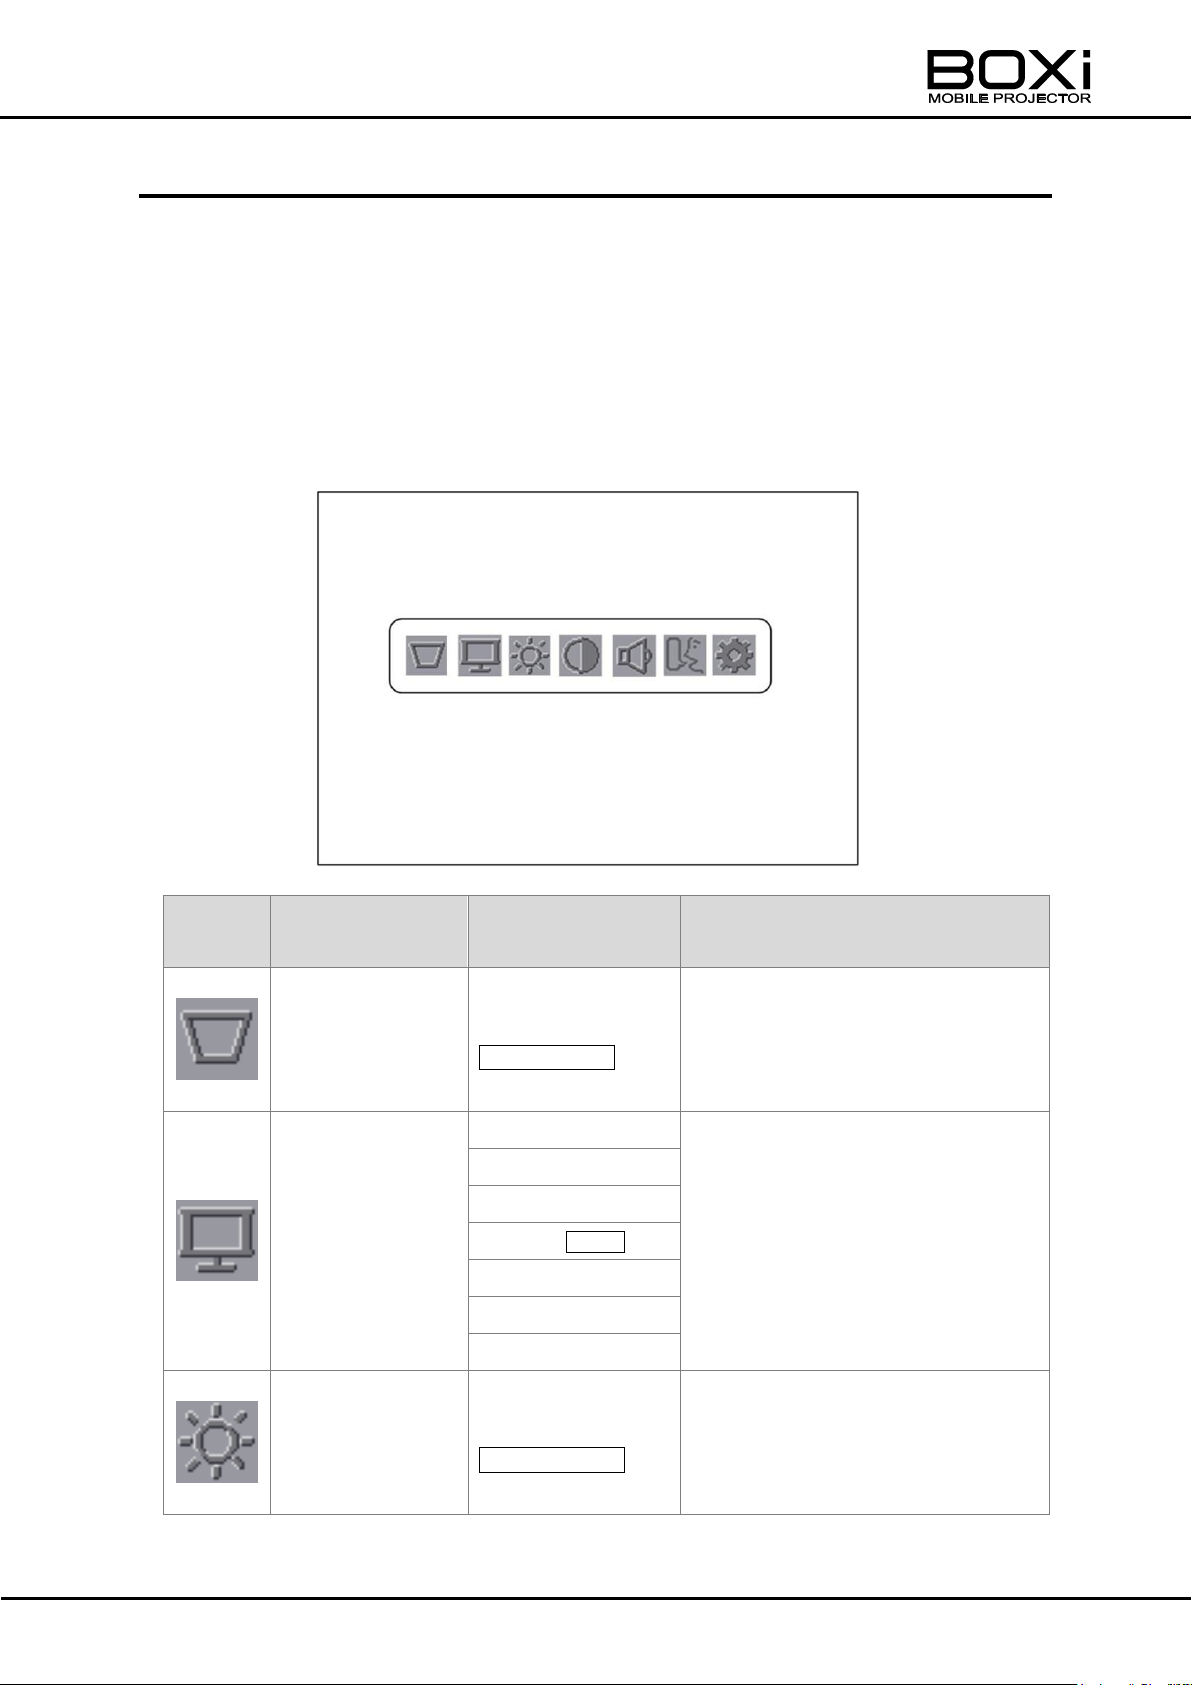
Icon
Name
Options/
Adjustable range
Description
Keystone
adjustment
→P.43
- 40 ~ + 40
Default setting:0
Correct the vertical keystone
distortion.
The correction can be made in
increments of one degree.
Display mode
selection
→P.44
User
Set an appropriate image mode
according to the scene.
Cinema
Photo
Normal Default
Game
Presentation
Bright (Max)
Brightness
adjustment
→P.49
1 ~ 100
Default setting:50
Adjust the brightness of the
image.
The adjustment can be made in
increments of one unit.
MAIN MENU
The following items can be configured from the main menu:
Keystone adjustment/ Display mode selection/ Brightness adjustment/ Contrast
adjustment/ Volume adjustment/ Language/ Detail settings
If you select the item, a sub menu will be displayed.
Refer to “Displaying the main menu” (Page39) for details on displaying the main
menu.
41
Page 42
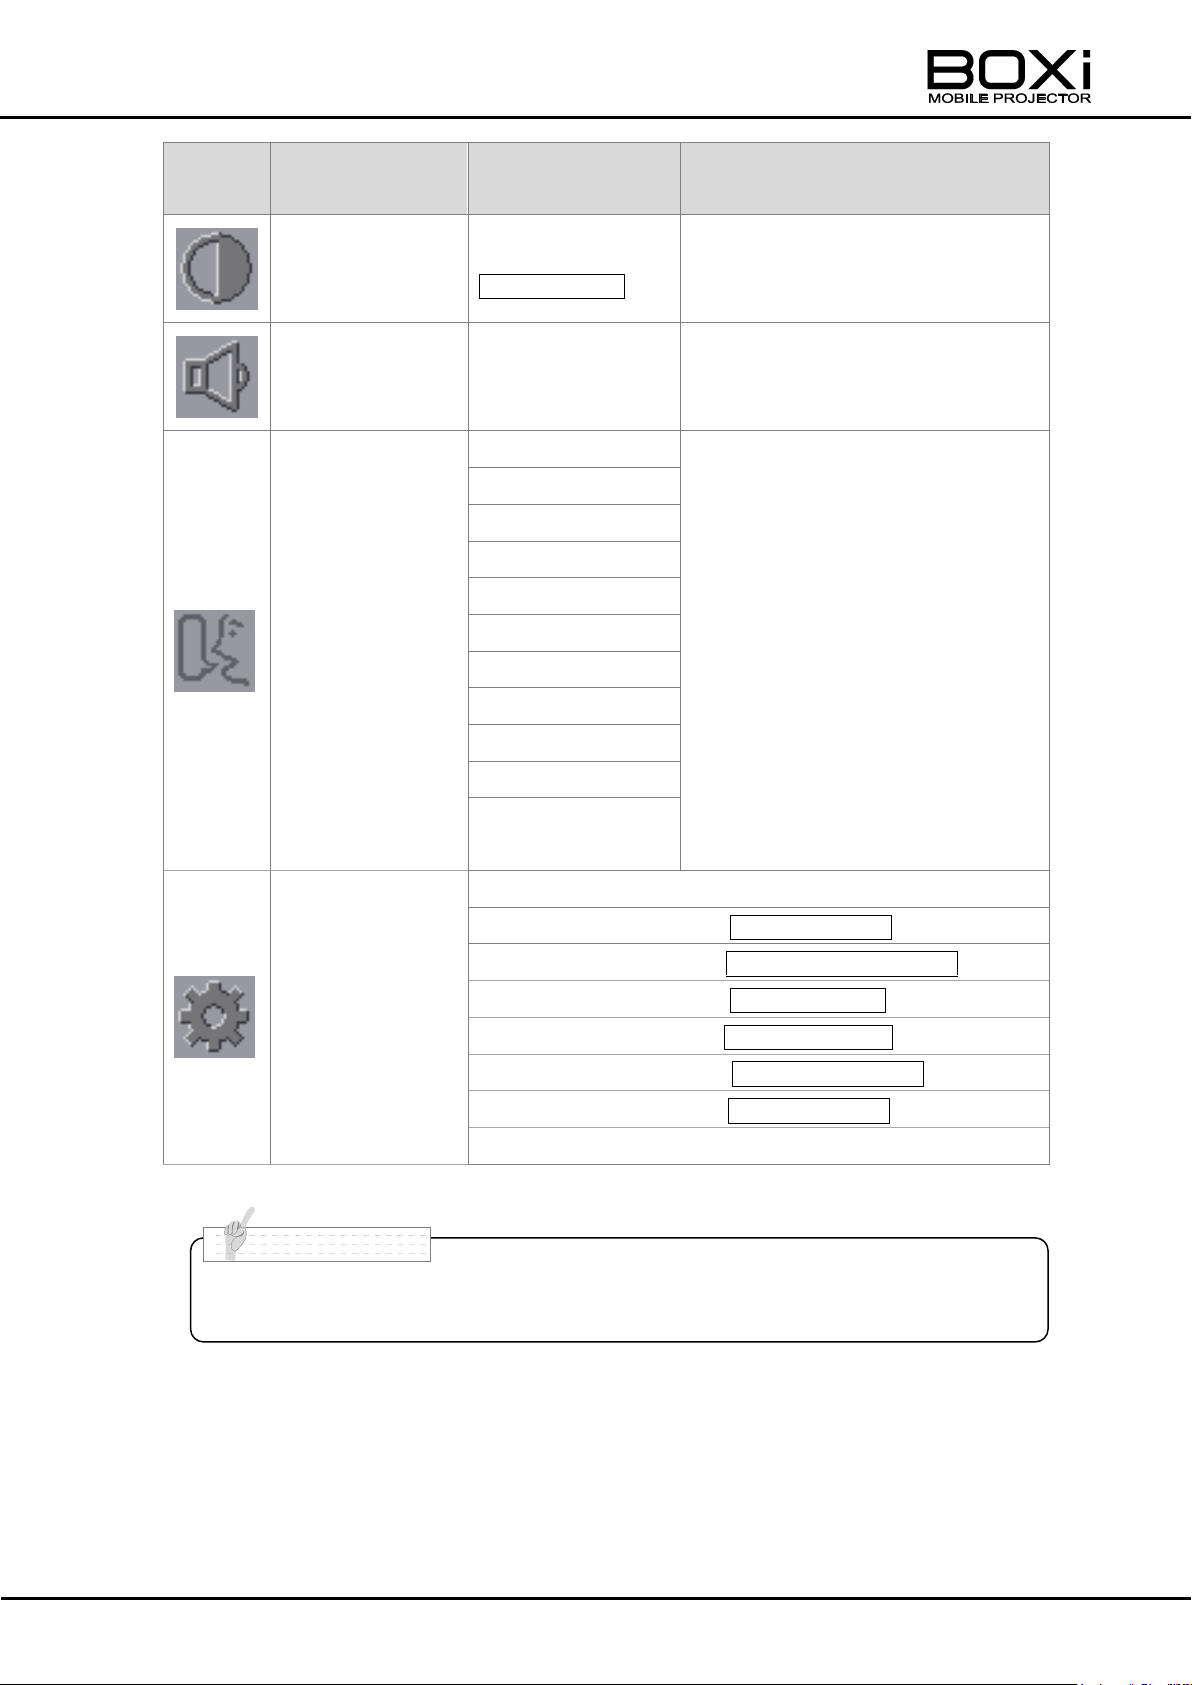
Icon
Name
Options/
Adjustable range
Description
Contrast
adjustment
→P.50
1 ~ 100
Default setting:50
Adjust the contrast of the image.
The adjustment can be made in
increments of one unit.
Volume
adjustment
→P.51
1 ~ 10
Default setting:7
Adjust the volume of the image.
The adjustment can be made in
increments of one unit.
Language
→P.52
English
Set the language for the menus
and messages.
French
German
Spanish
Italian
Swedish
Dutch
Portuguese
Russian
Japanese
Simplified
Chinese
Detail settings
→P.53
The following items can be configured:
ECO mode Default setting:OFF
Aspect ratio Default setting:AUTO(Fixed)
Auto power off Default setting:180
Projection mode Default setting:Front
Installation mode Default setting:Desktop
CEC mode Default setting:OFF
Factory settings
■ The main menu will be automatically closed after 30 seconds of no
operation or when the MENU button is pressed again.
N o t e
42
Page 43
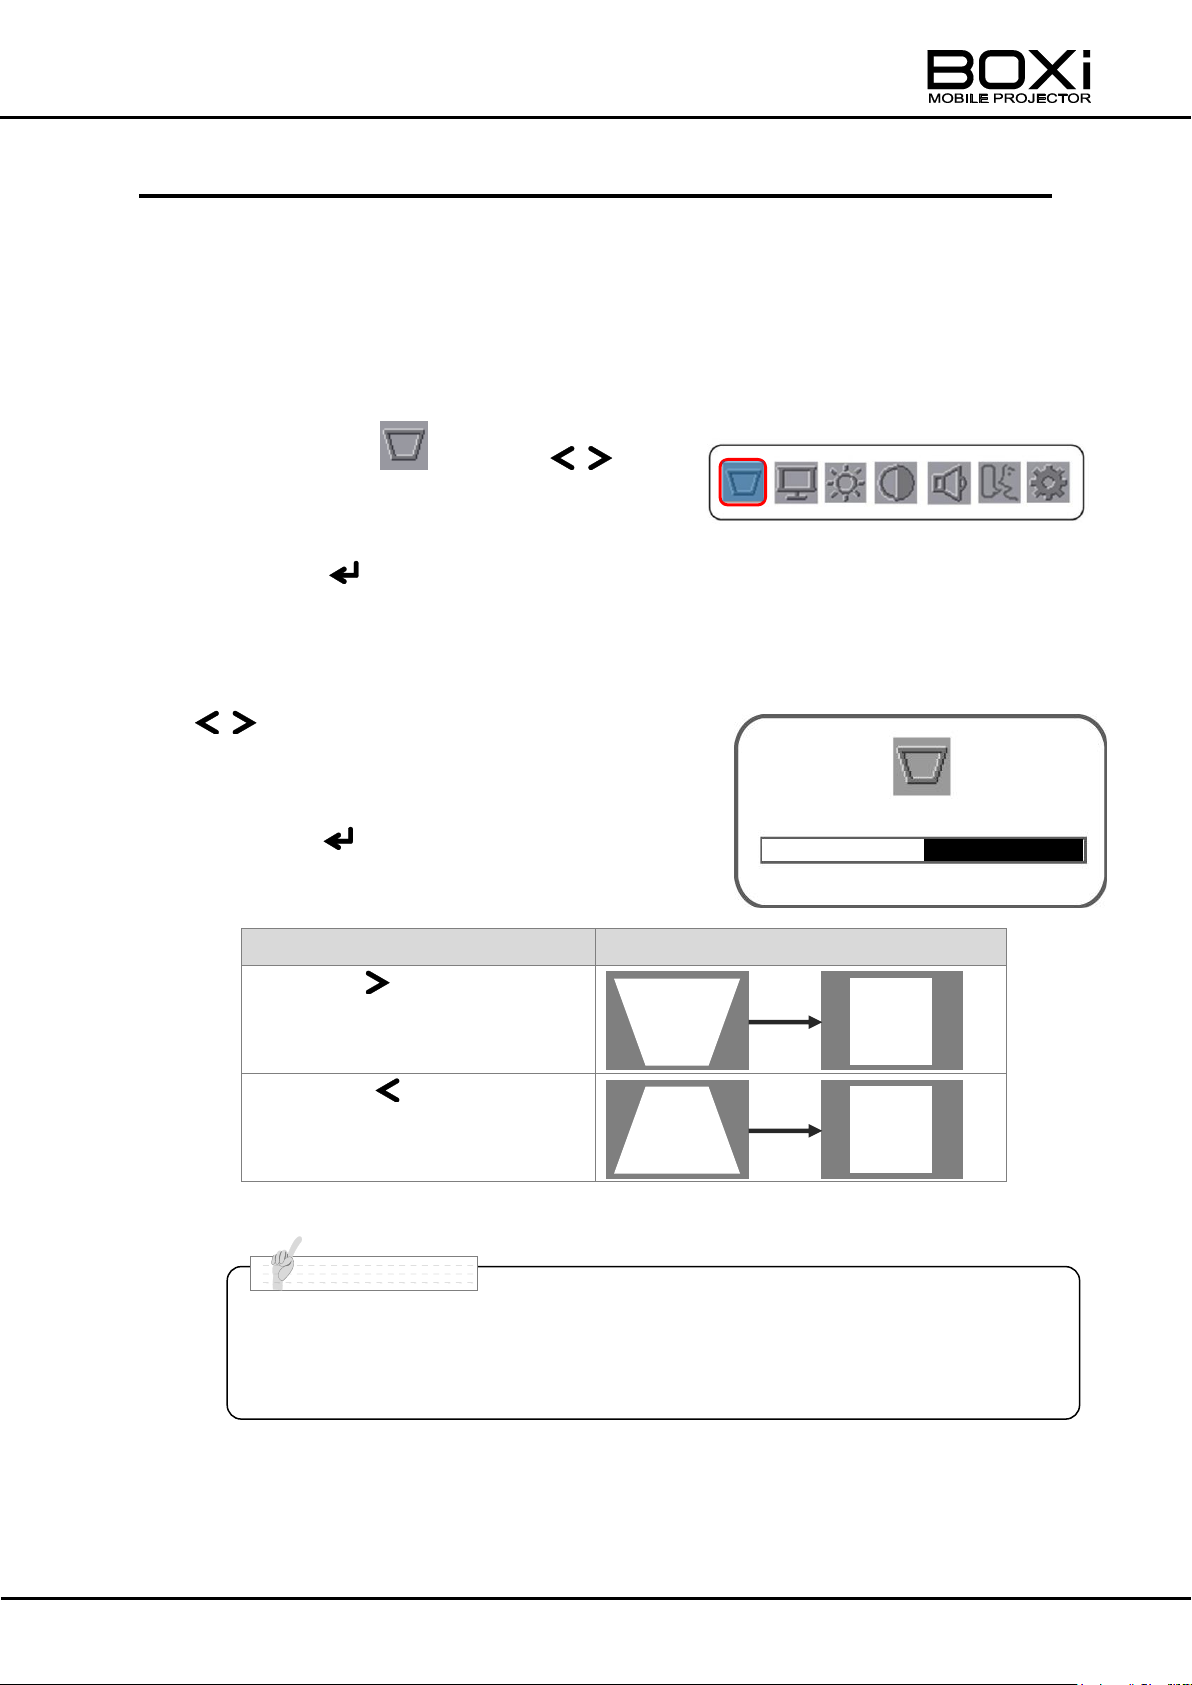
Remote control or control panel
Press the button.
(Press when the projection angle
is increased.)
Press the button.
(Press when the projection angle
is decreased.)
■ The keystone correction can cause an image to be slightly degraded
because the correction is made electronically.
■ The keystone distortion can be corrected to ±40°of the angle of tilt.
N o t e
Main menu
Keystone correction window
CORRECTING TH KEYSTONE DISTORTION
1. Display the “Main” menu.
Refer to “Displaying the main menu” (Page39).
Press the MENU button on the remote control or on the control panel.
The main menu will be displayed.
2. Select the icon with the
buttons on the remote control or on the
control panel.
Press the button to execute the selection.
The “Keystone correction” window will be displayed.
3. Correct the keystone distortion with the
buttons on the remote control or on
the control panel.
Press the button to execute the correction
and return to the main menu.
43
Page 44
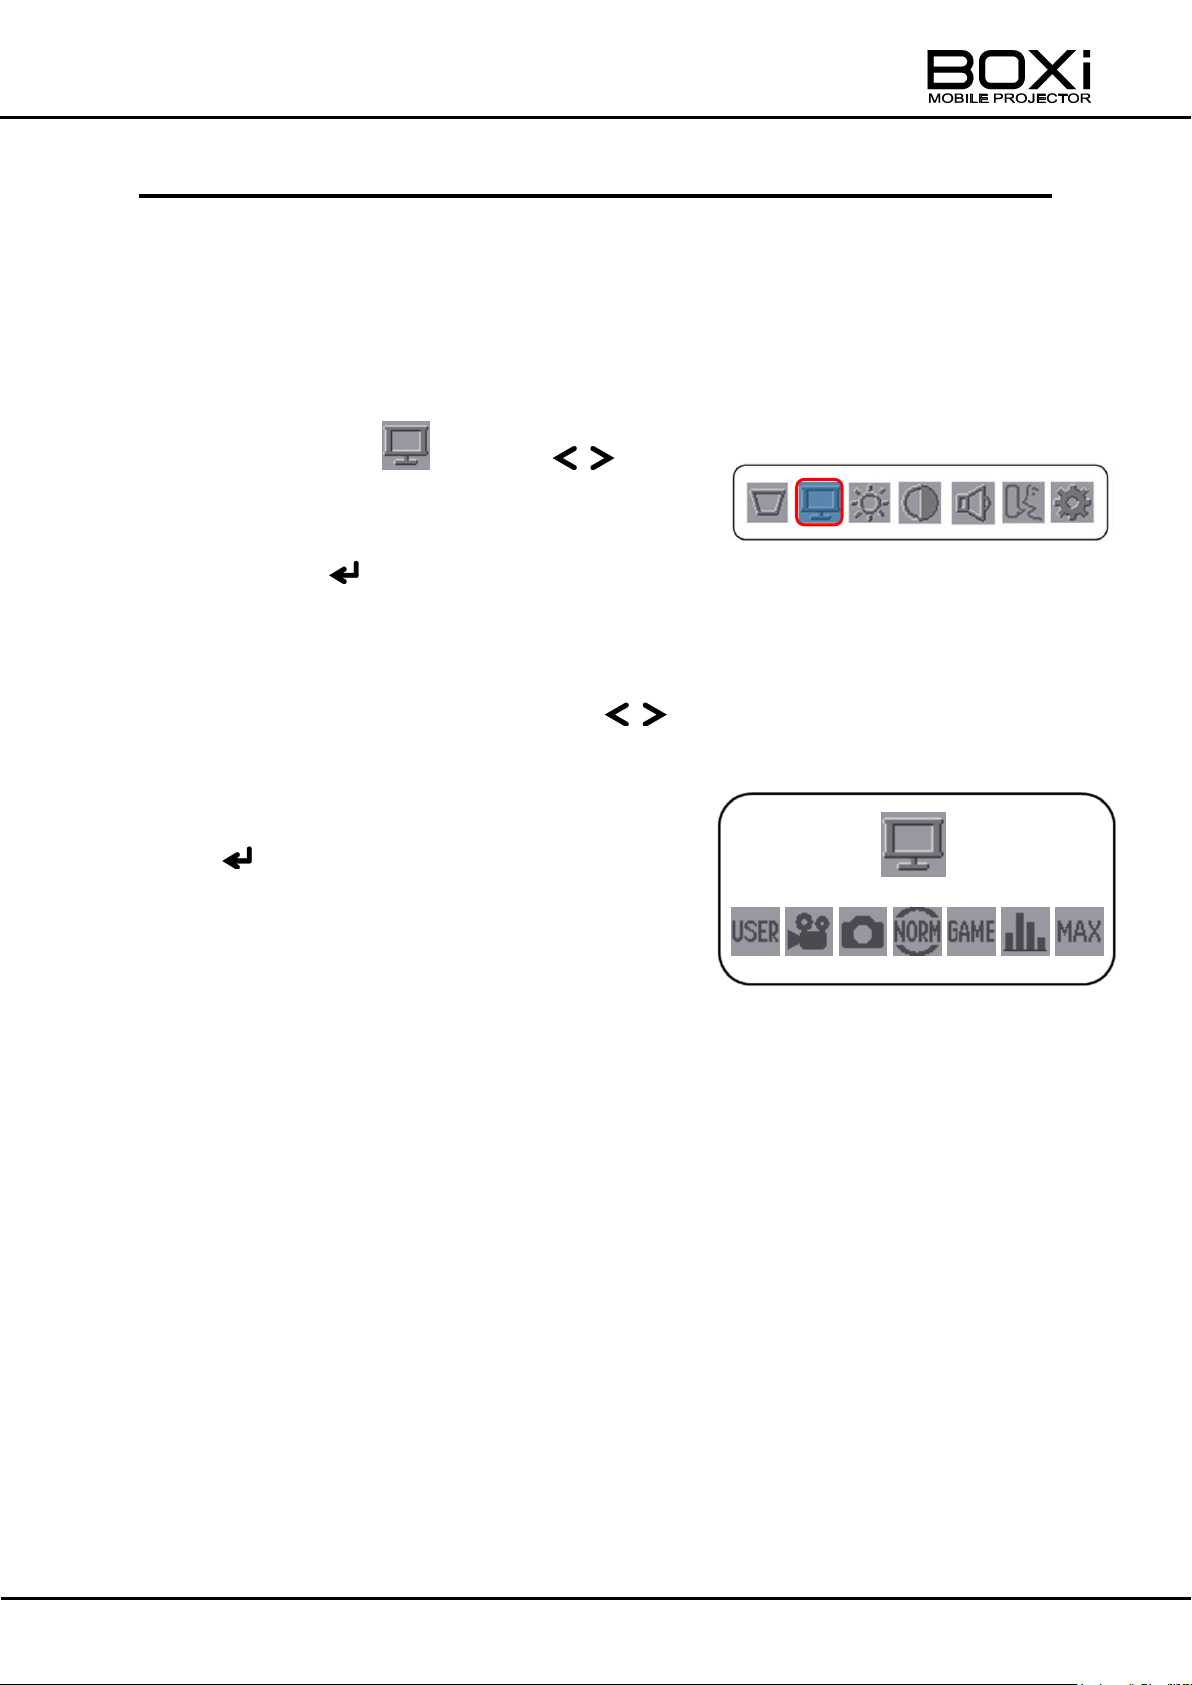
Main menu
Display mode select menu
SELECTING THE DISPLAY MODE
1. Display the “Main” menu.
Refer to “Displaying the main menu” (Page39).
Press the MENU button on the remote control or on the control panel.
The main menu will be displayed.
2. Select the icon with the
buttons on the remote control or on the
control panel.
Press the button to execute the selection.
The “Display mode select” menu will be displayed.
3. Select the display mode with the
buttons on the remote control or on the
control panel.
Selected screen mode is shown by pressing
button.
Press MENU button to return to the main
menu. Turn off the main menu by pressing
the MENU button again.
To set up user mode, please refer to "Setting up User Mode."(Page46)
Press the MENU button to cancel the selection.
44
Page 45
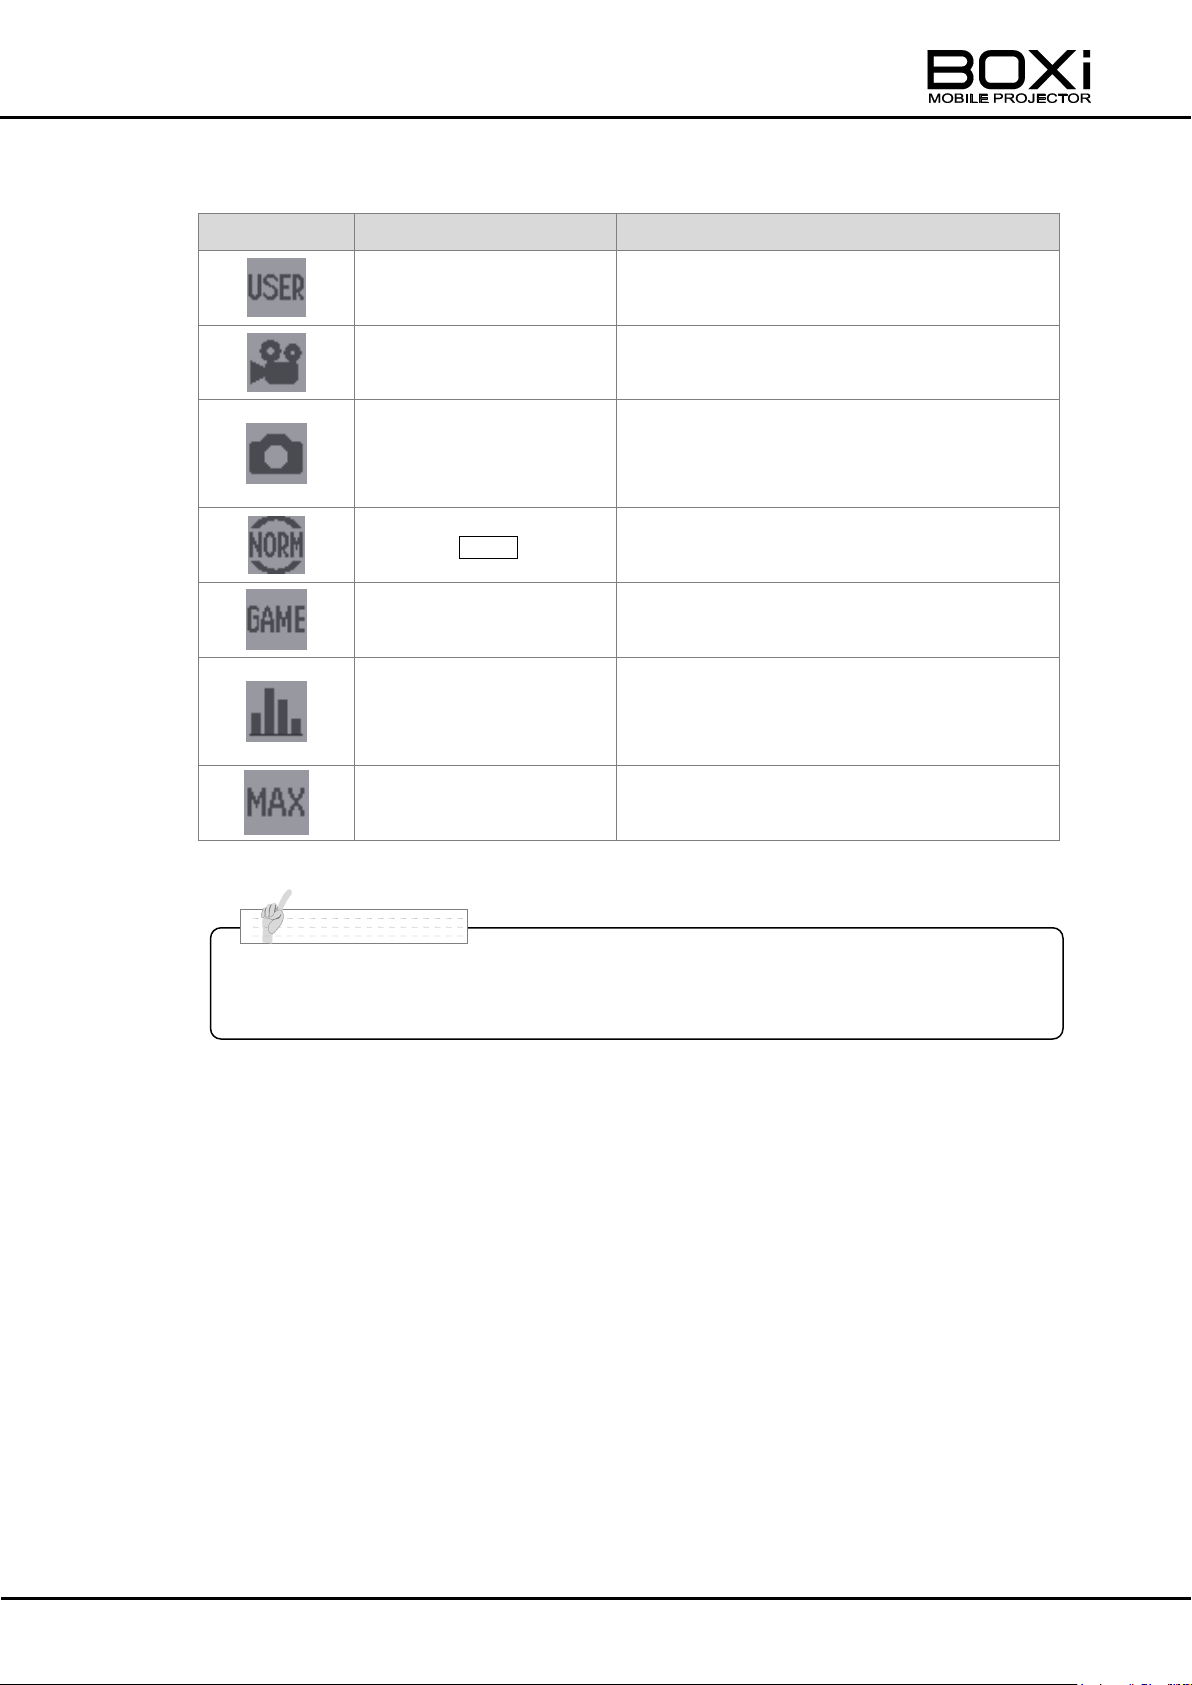
Icon
Mode
Description
User
A Mode that can be adjusted to users’
preferences. "(Page46)
Cinema
A mode suitable for films.
Photo
A mode suited for showing still images,
such as photos, for exact color
reproduction.
Normal Default
A normal mode for standard shades of
color and brightness.
Game
A mode suited for images of games or
animations.
Presentation
An Advanced chromogenic mode for
vivid projection of documents such as
charts in computers or catalogs.
Bright (Max)
A mode for brighter projection.
■ Color in the presentation mode may differ from original. Please use the
photo mode for true color reproduction.
N o t e
The following display mode can be selected:
45
Page 46
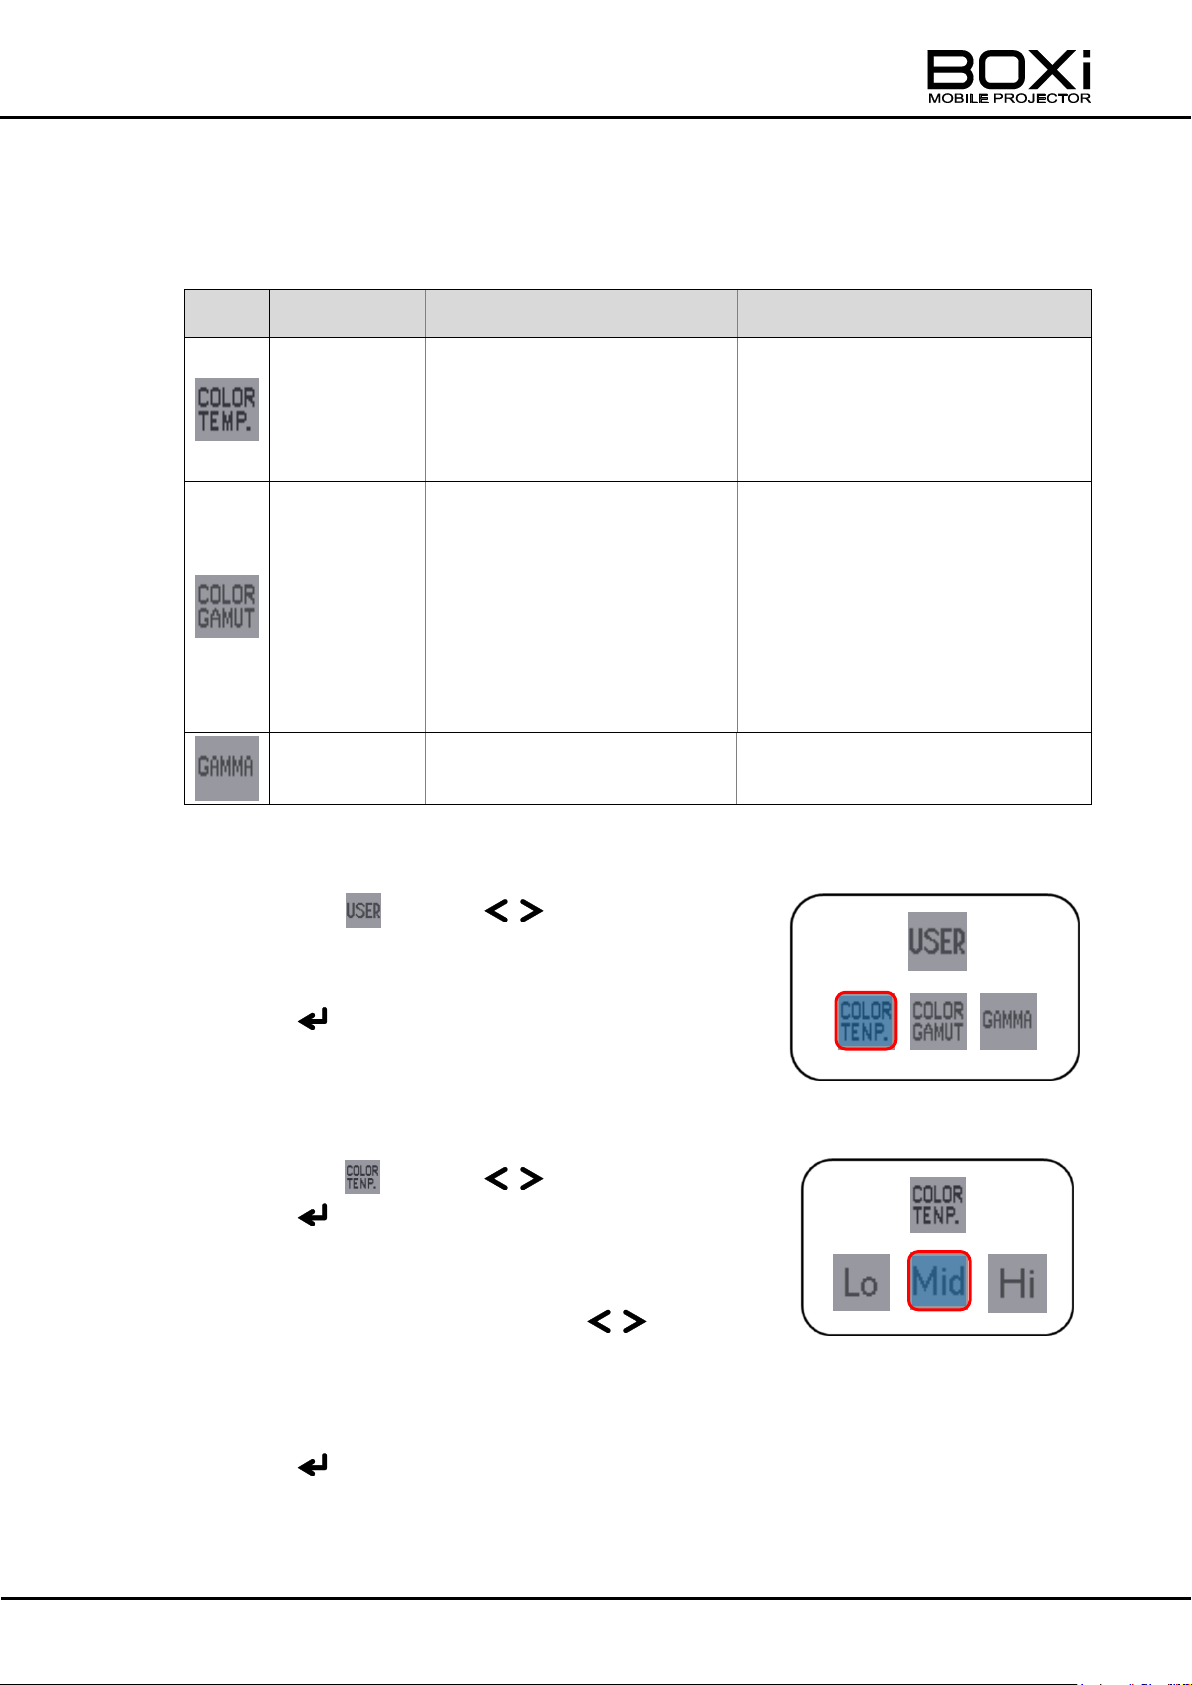
Icon
Name
Options/ Adjustable range
Description
Color
temperature
Lo: 5,000K,
Mid:6,000K
Hi: 9,300K
Lower color temperature
projects warm color. Higher
color temperature projects cold
color.
Color gamut
Std : sRGB
Standard color gamut for
Windows environment.
Wide : AdobeRGB
Color gamut with wider G
coverage that can express
vibrant green color.
Color gamut allows you to set
up recognizable color coverage
for sRGB or AdobeRGB.
Gamma
Gamma
γ
=1.9, γ=2.2, γ=2.4
Gray scale brightness. Lower
value projects a brighter image.
User setting menu
Color temperature setting menu
Setting up User mode
User mode allows the color balance to be adjusted by setting color temperature,
color gamut and gamma of the image.
1. Select the User mode
Select the icon with the buttons
buttons on the remote control or on the
control panel.
Press the button to execute the selection.
The “User setting” menu will be displayed.
2. Set the Color temperature
Select the icon with the buttons.
Press the button to execute the selection.
The “Color temperature setting” menu will
be displayed.
Select the color temperature with the
buttons.
Lo:5,000K, Mid:6,500K, Hi:9,300K
Press the button to execute the correction.
Press the MENU button to return to the User setting menu.
46
Page 47
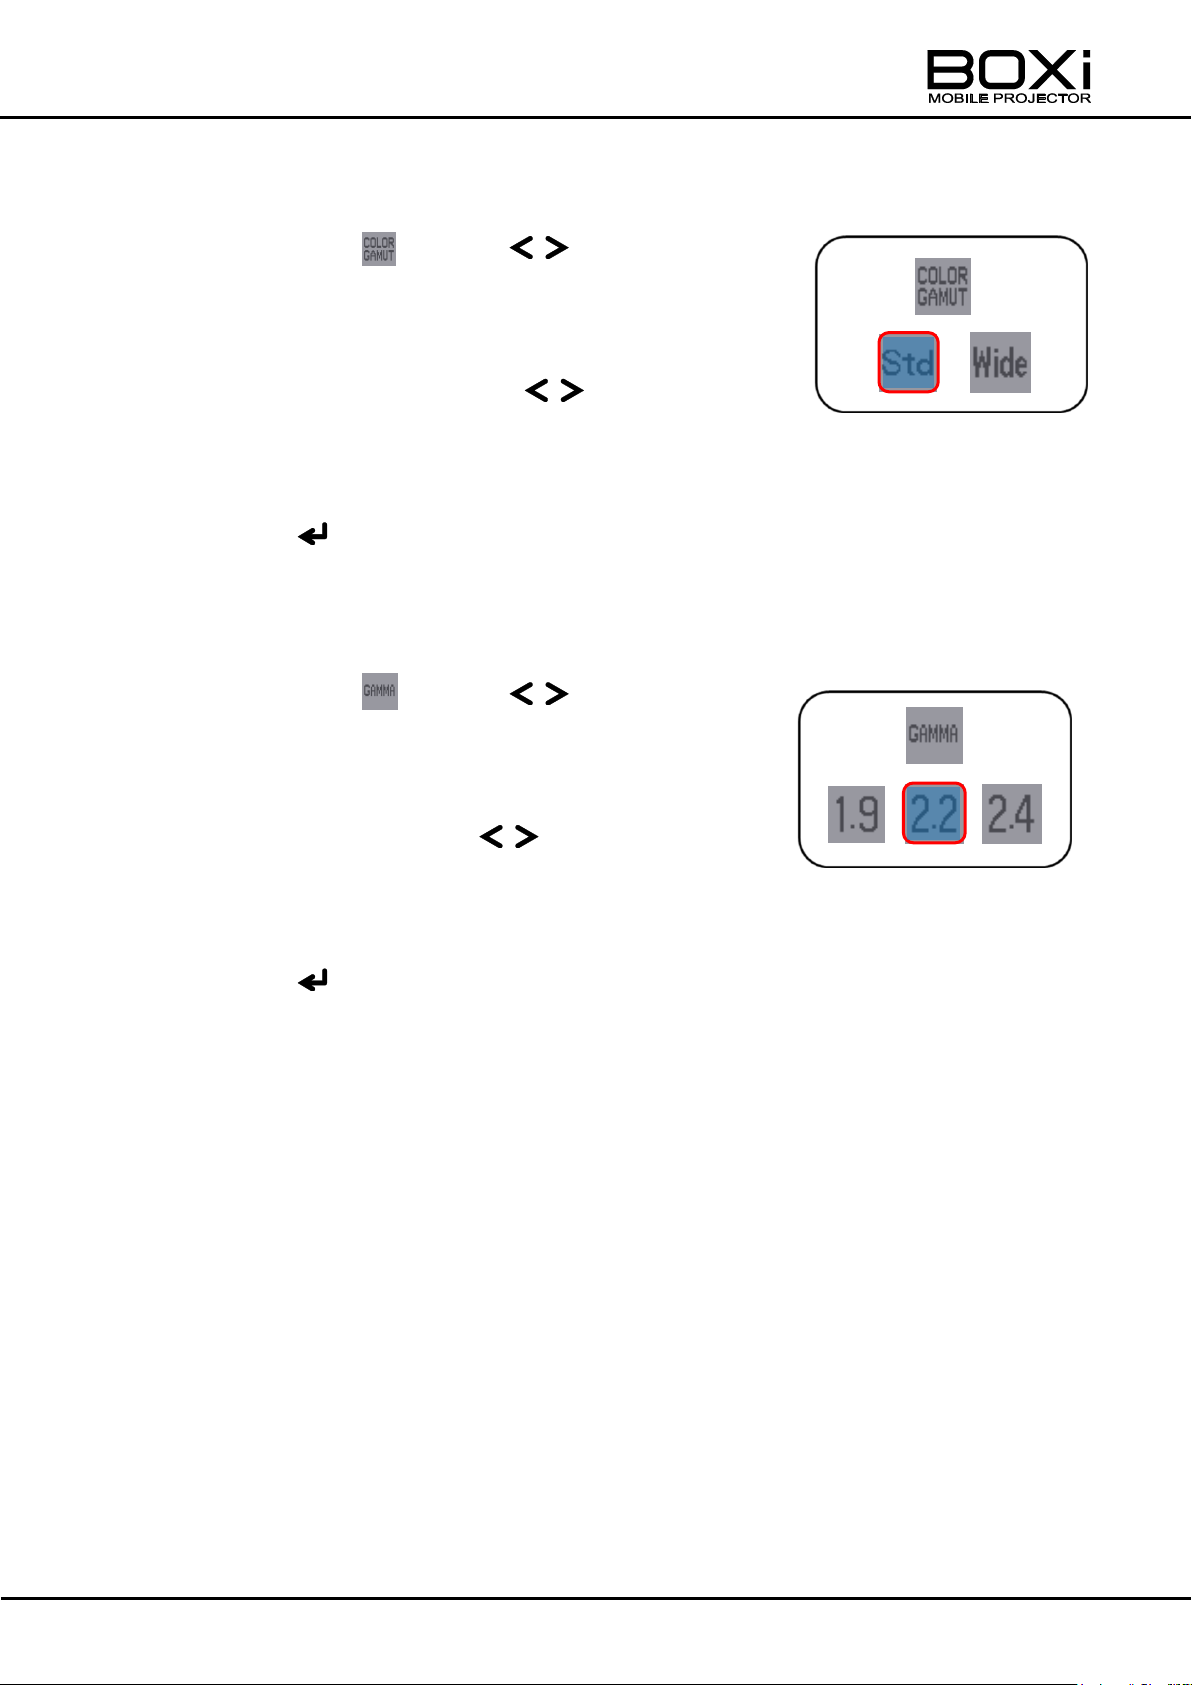
Color gamut Setting menu
Gamma Setting menu
3. Set the Color gamut
Select the icon with the buttons
on the remote control or on the control panel.
The “Color gamut Setting” menu will be displayed.
Select the color gamut with the buttons.
Std:sRGB, Wide:Adobe RGB equivalent
Press the button to execute the correction.
Press the MENU button to return to the User setting menu.
4. Set the Gamma
Select the icon with the buttons
on the remote control or on the control panel.
The “Gamma Setting” menu will be displayed.
Select the gamma with the buttons.
Gamma: γ=1.9, γ=2.2, γ=2.4
Press the button to execute the correction.
Press the MENU button to return to the User setting menu.
47
Page 48
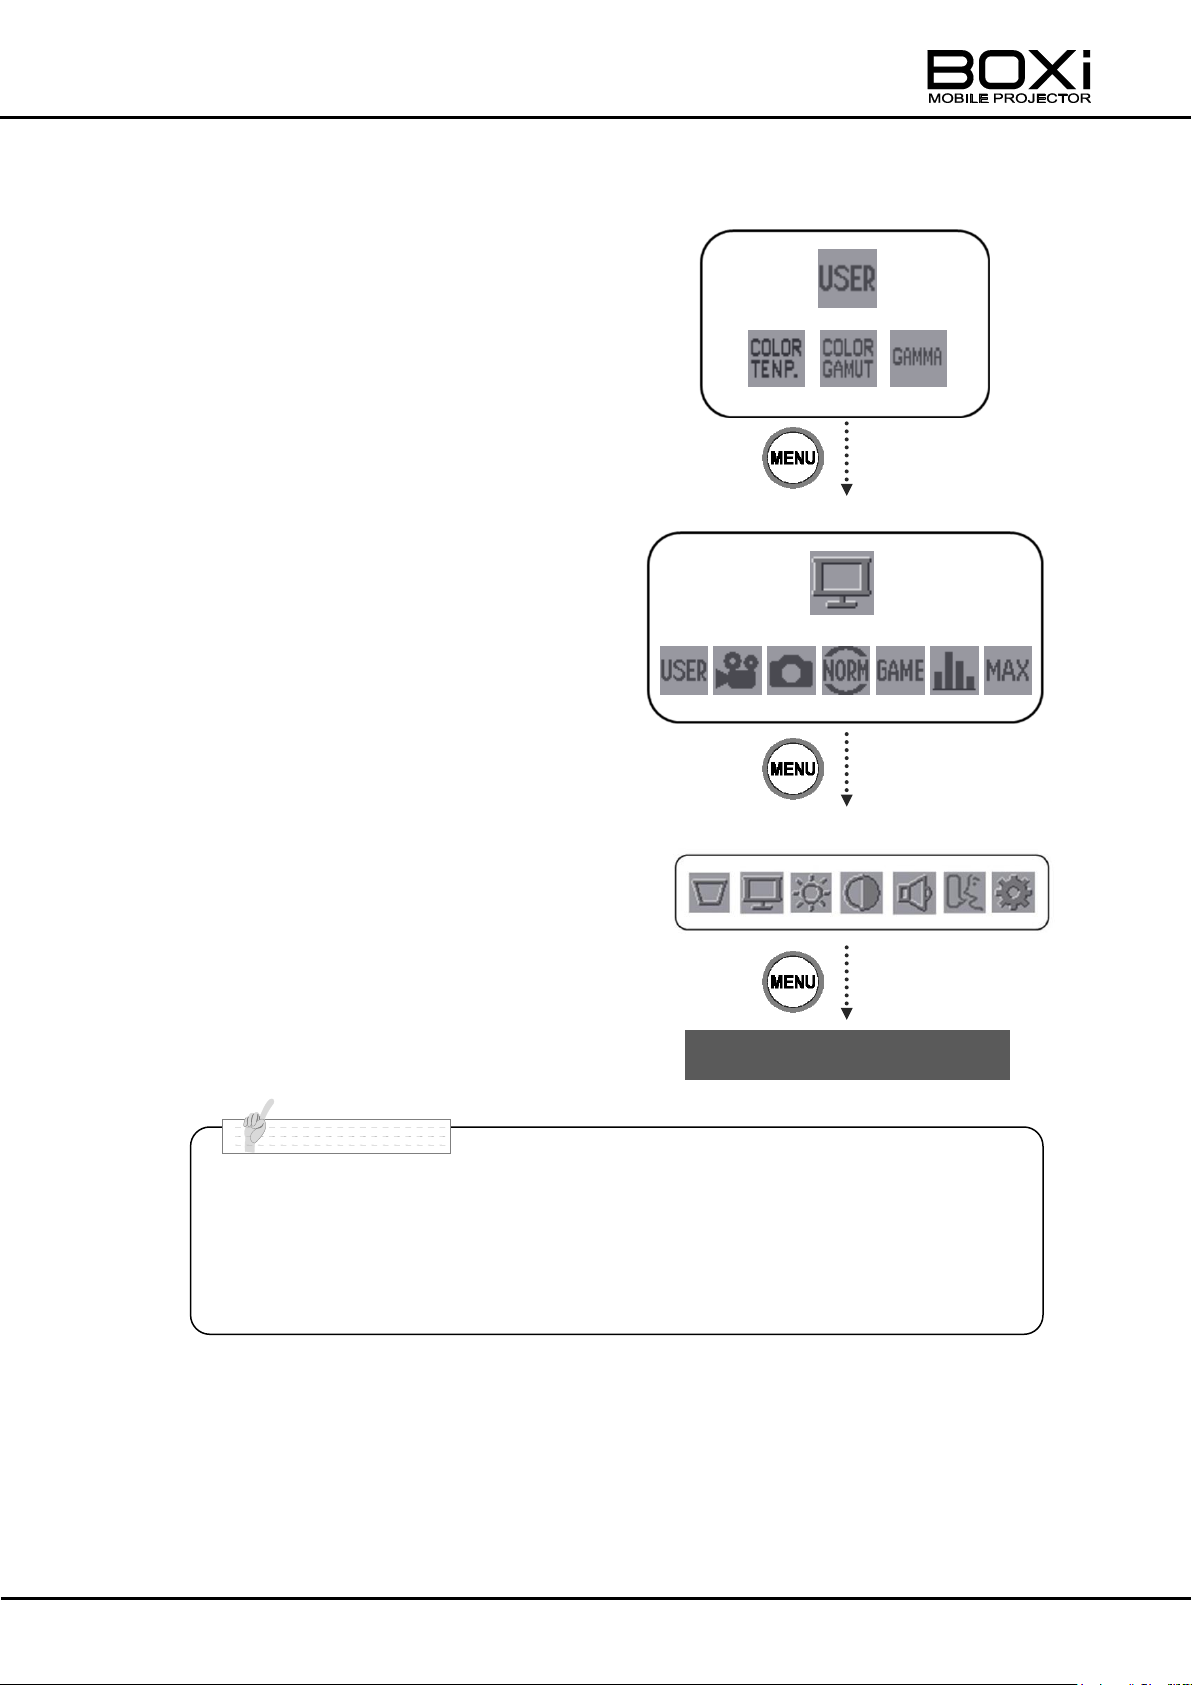
■ Display mode is in effect when showing input images. Image input is
necessary to change settings. Settings cannot be changed without
image input.
■ The menu will be automatically closed after 30 seconds of no
operation. Press the MENU button again to display the menu.
N o t e
User Settings menu
Close the menu
Main menu
Display mode menu
5. Close the menu
After setting up the user set up menu,
press the MENU button in the control panel
or remote control to go back to the display
mode menu.
Press the MENU button in the display
mode menu to return to the main menu.
Press the MENU button again to close
the main menu.
48
Page 49
■ The brightness adjustment cannot be done from the “Input source
standby” screen.
N o t e
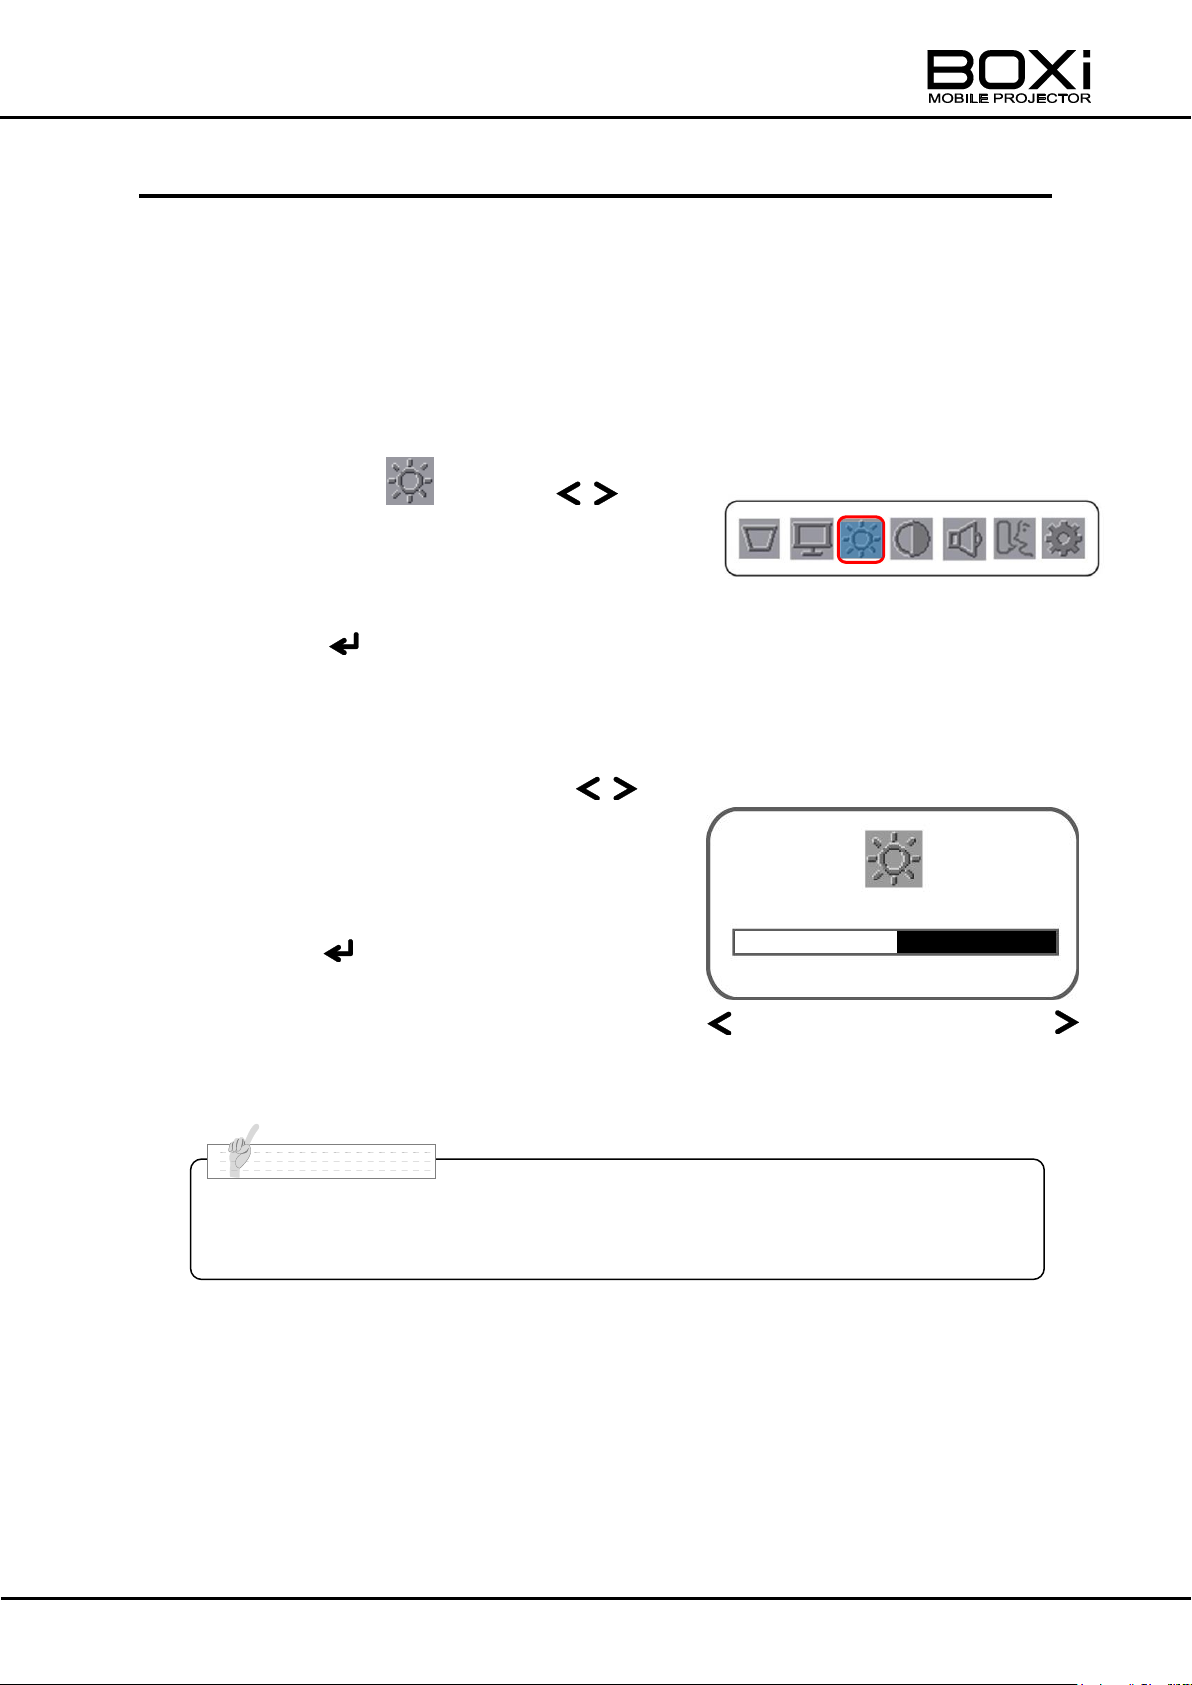
Main menu
Darken
Lighten
Brightness adjustment window
ADJUSTING THE BRIGHTNESS
1. Display the “Main” menu.
Refer to “Displaying the main menu” (Page39).
Press the MENU button on the remote control or on the control panel.
The main menu will be displayed.
2. Select the icon with the
buttons on the remote control or on the
control panel.
Press the button to execute the selection.
The “Brightness adjustment” window will be displayed.
3. Adjust the brightness with the
buttons on the remote control or on the
control panel.
Press the button to execute the
adjustment and return to the main menu.
49
Page 50
■ The contrast adjustment cannot be done from the “Input source standby”
screen.
N o t e
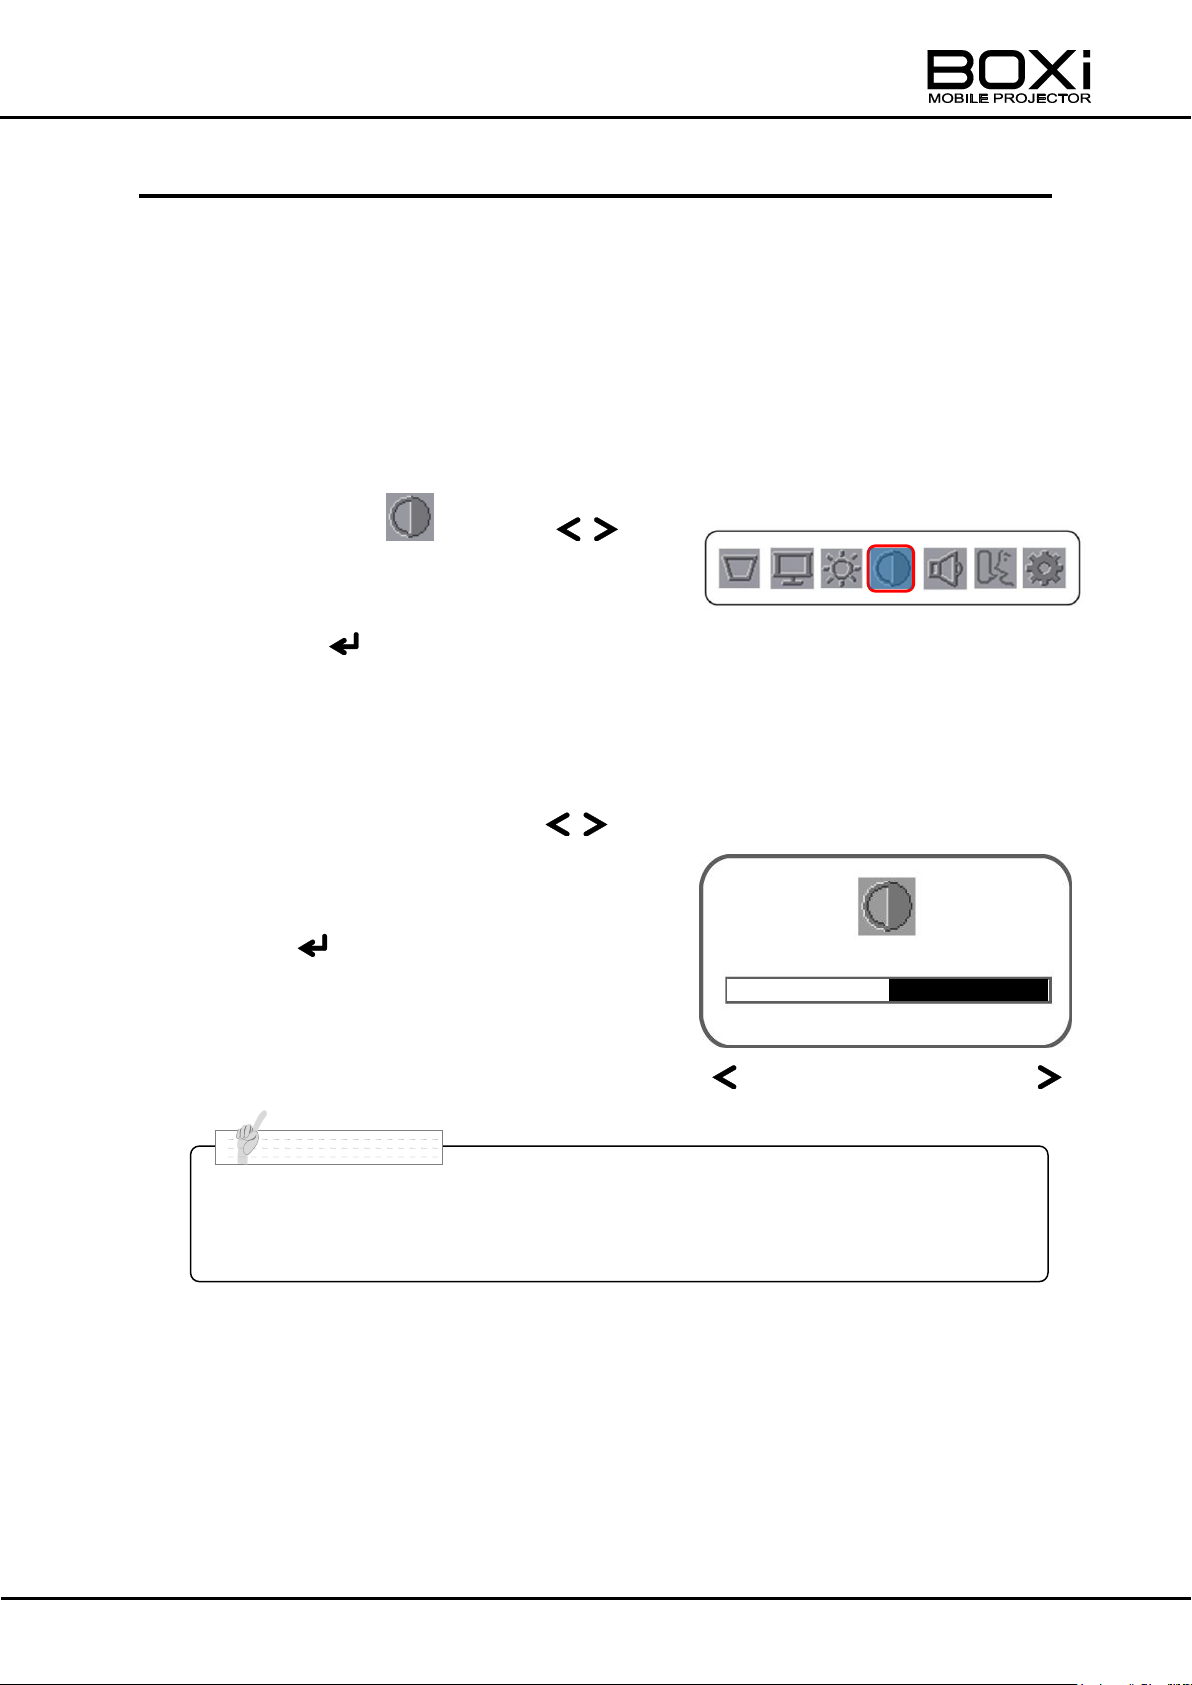
Main menu
Weaken
Sharpen
Contrast adjustment window
ADJUSTING THE CONTRAST
1. Display the “Main” menu.
Refer to “Displaying the main menu” (Page39).
Press the MENU button on the remote control or on the control panel.
The main menu will be displayed.
2. Select the icon with the
buttons on the remote control or on the
control panel.
Press the button to execute the selection.
The “Contrast adjustment” window will be displayed.
3. Adjust the contrast with the
buttons on the remote control or on the
control panel.
Press the button to execute the
adjustment and return to the main menu.
50
Page 51
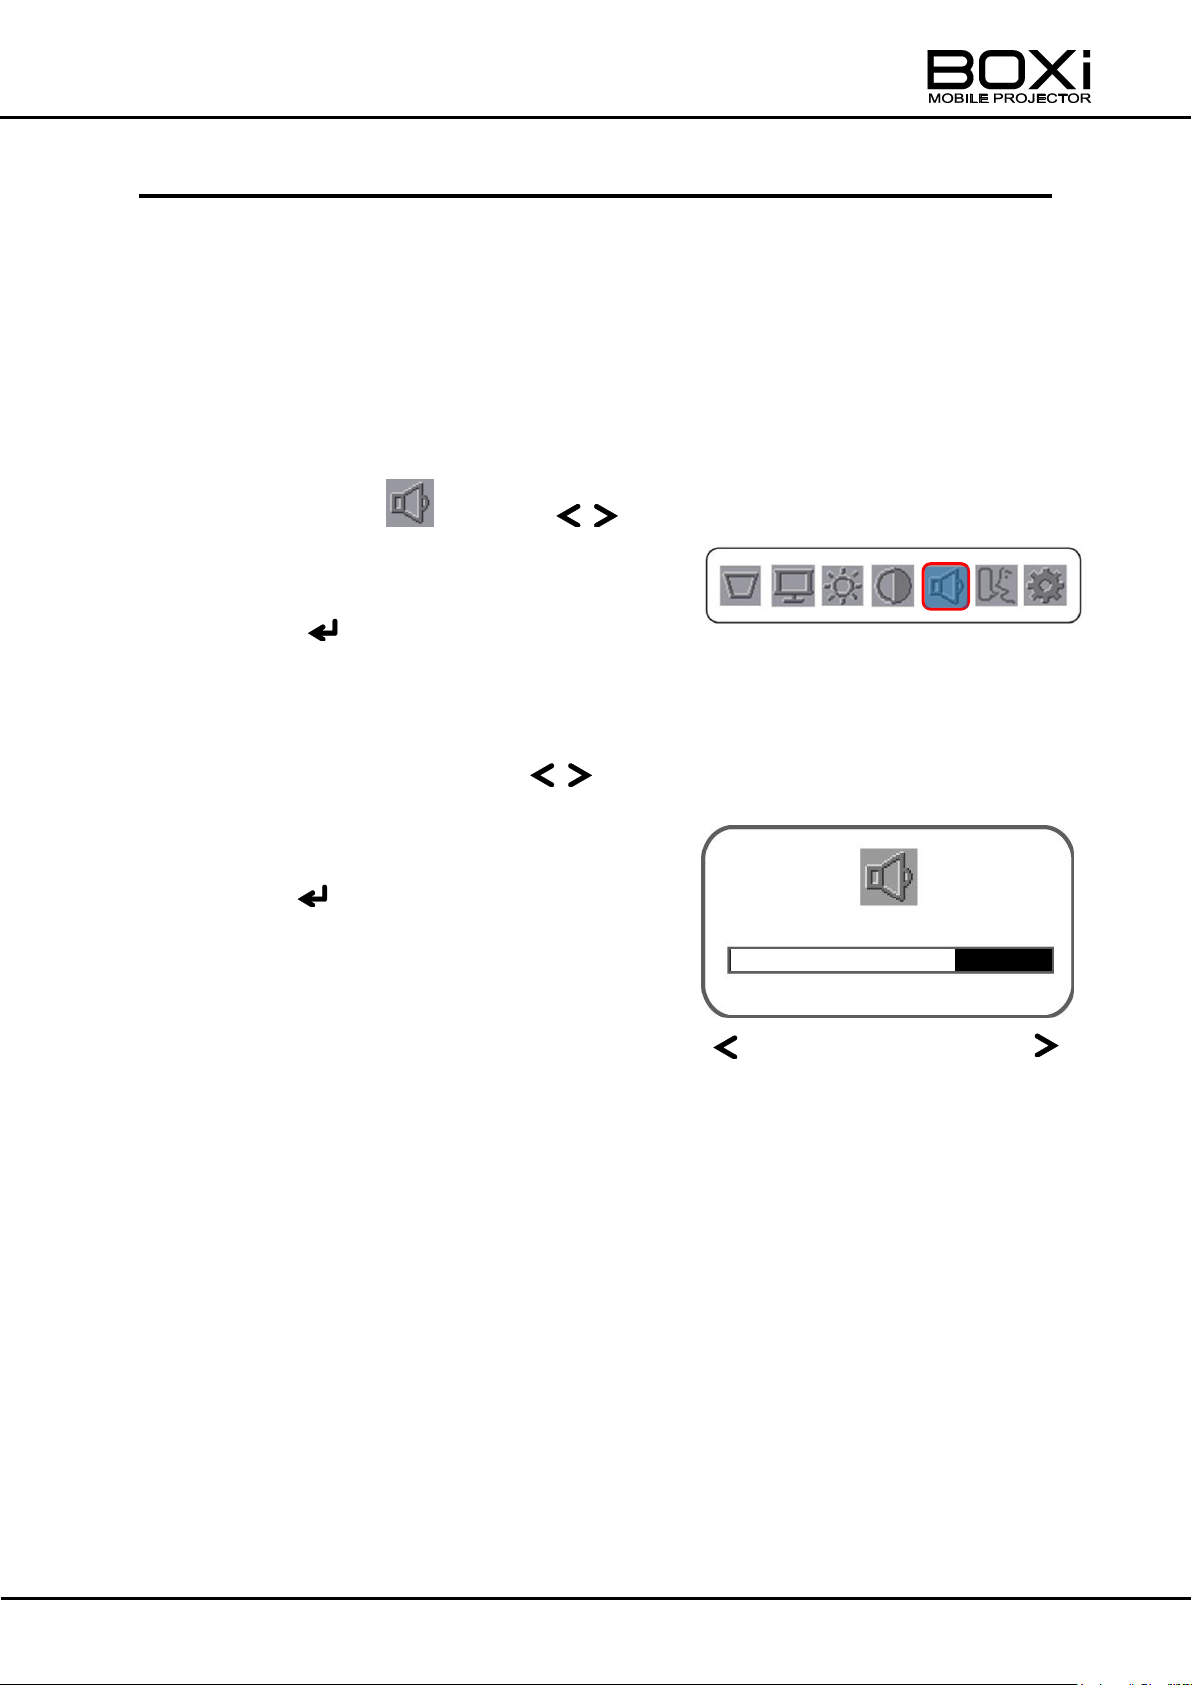
Main menu
Volume setting window
Down
Up
CONTROLLING THE VOLUME
Volume setting
1. Display the “Main” menu.
Refer to “Displaying the main menu” (Page39).
Press the MENU button on the remote control or on the control panel.
The main menu will be displayed.
2. Select the icon with the
buttons on the remote control or on the
control panel.
Press the button to execute the selection.
The “Volume setting” window will be displayed.
3. Adjust the volume with the
buttons on the remote control or on the
control panel.
Press the button to execute the
adjustment and return to the main menu.
Turning off the sound (MUTE)
You can temporarily mute the sound with the MUTE button on the remote control.
Refer to “Turning off the sound” (Page34)
51
Page 52
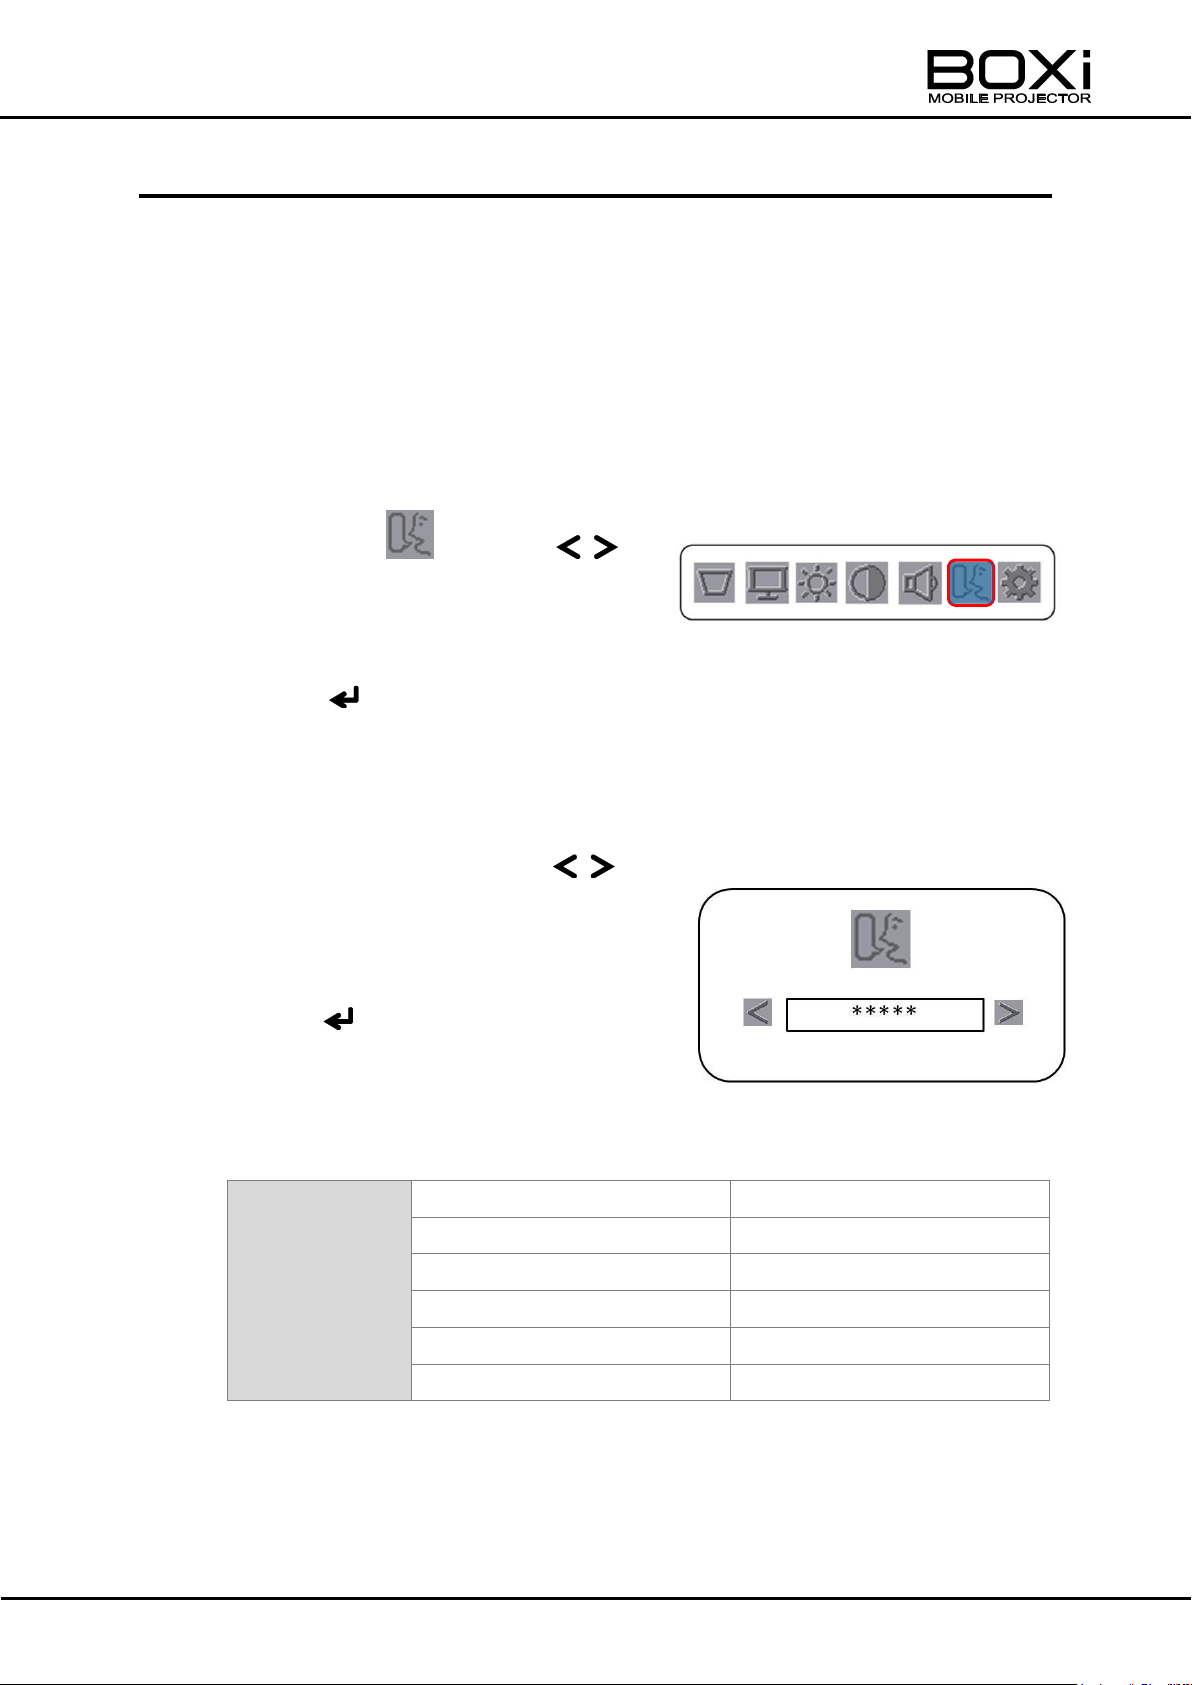
Language
English
French
German
Spanish
Italian
Swedish
Dutch
Portuguese
Russian
Japanese
Simplified Chinese
Language menu
Main menu
SETTING THE LANGUAGE
Set the language to be used for the menus.
1. Display the “Main” menu.
Refer to “Displaying the main menu” (Page39).
Press the MENU button on the remote control or on the control panel.
The main menu will be displayed.
2. Select the icon with the
buttons on the remote control or on
the control panel.
Press the button to execute the selection.
The “Language” menu will be displayed.
3. Select the language with the
buttons on the remote control or on the
control panel.
Press the button to execute the
selection and return to the main menu.
The following language can be selected.
52
Page 53
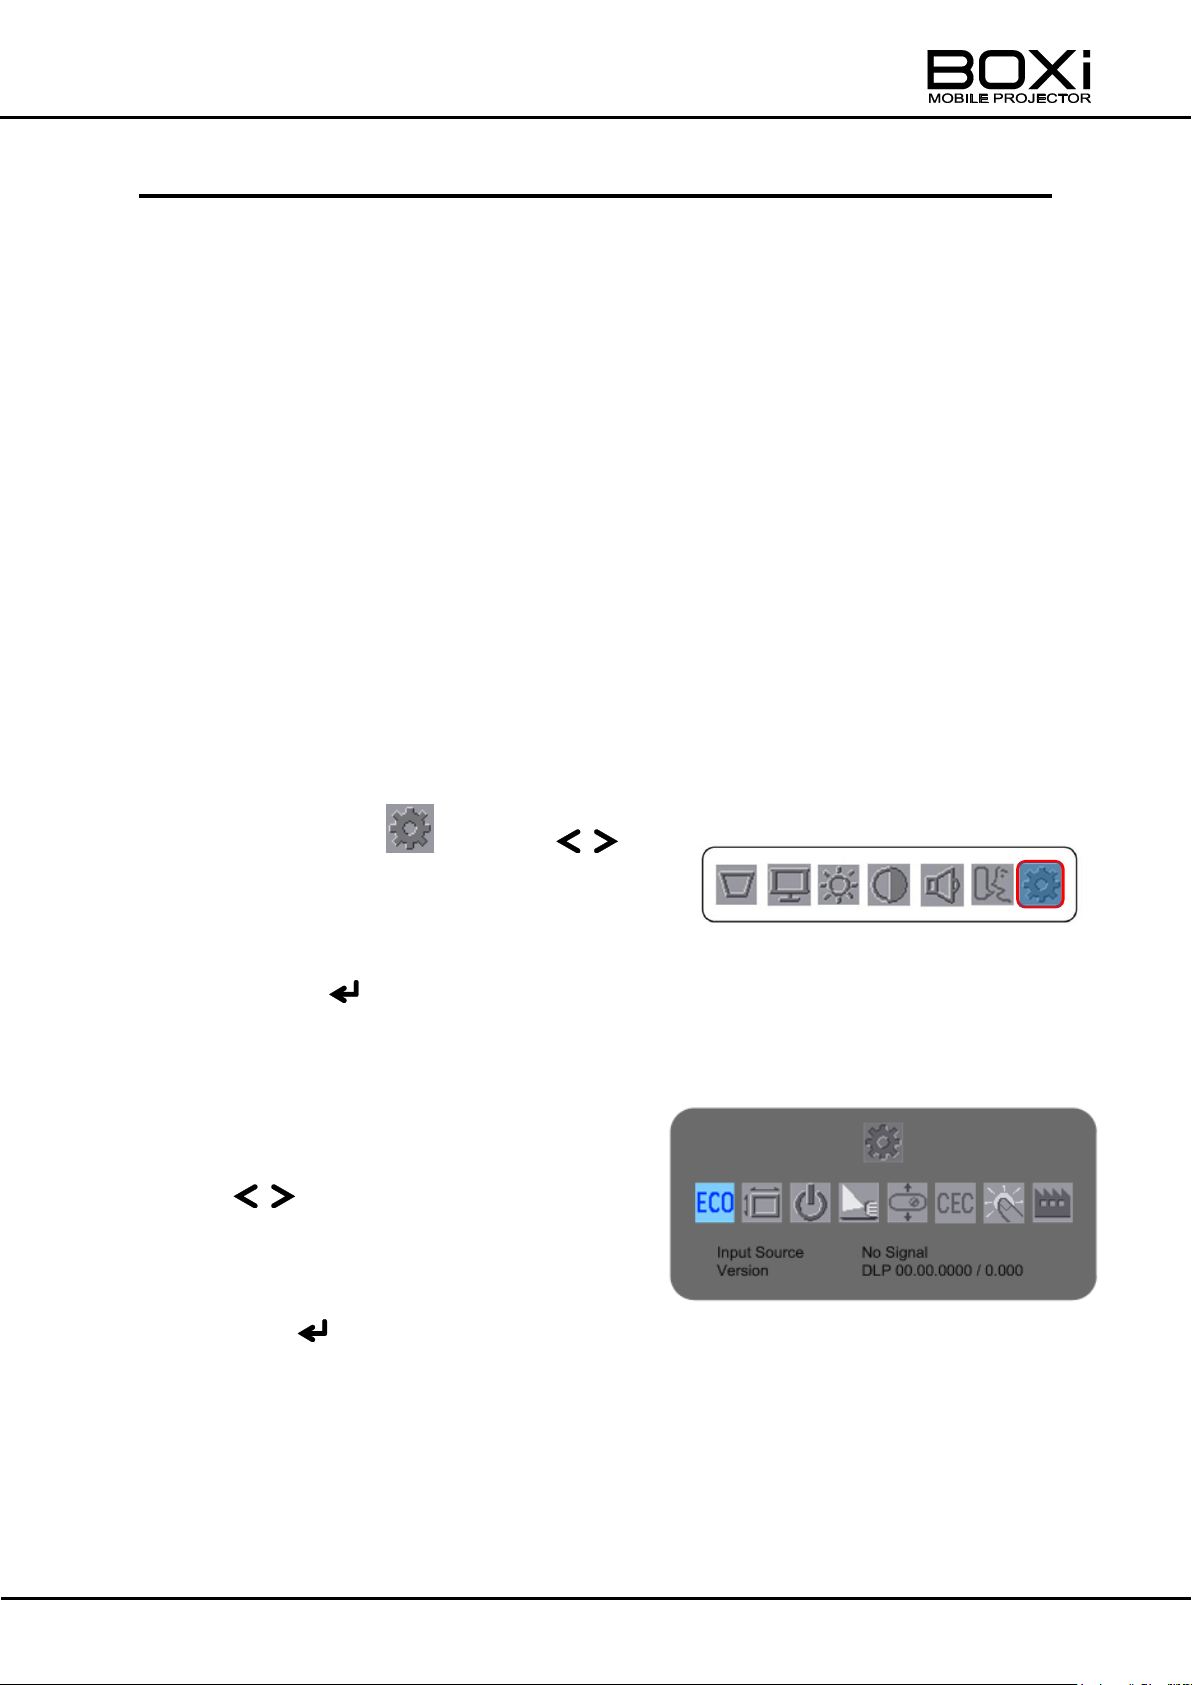
Main menu
Detail settings menu
DETAIL SETTINGS
The following items can be configured:
ECO mode/ Aspect ratio setting / Auto power off/ Projection mode/ Installation mode/
CEC mode/Factory settings
Various information can be obtained from this screen.
Refer to “Checking various information” (Page55).
Displaying the detail settings
1. Display the “Main” menu.
Refer to “Displaying the main menu” (Page39).
Press the MENU button on the remote control or on the control panel.
The main menu will be displayed.
2. Select the icon with the
buttons on the remote control or on the
control panel.
Press the button to execute the selection.
The “Detail settings” menu will be displayed.
3. Select the item to be configured with
the buttons on the remote
control or on the control panel.
Press the button to display the setting menu of the selected item.
Press the MENU button to return to the main menu.
53
Page 54
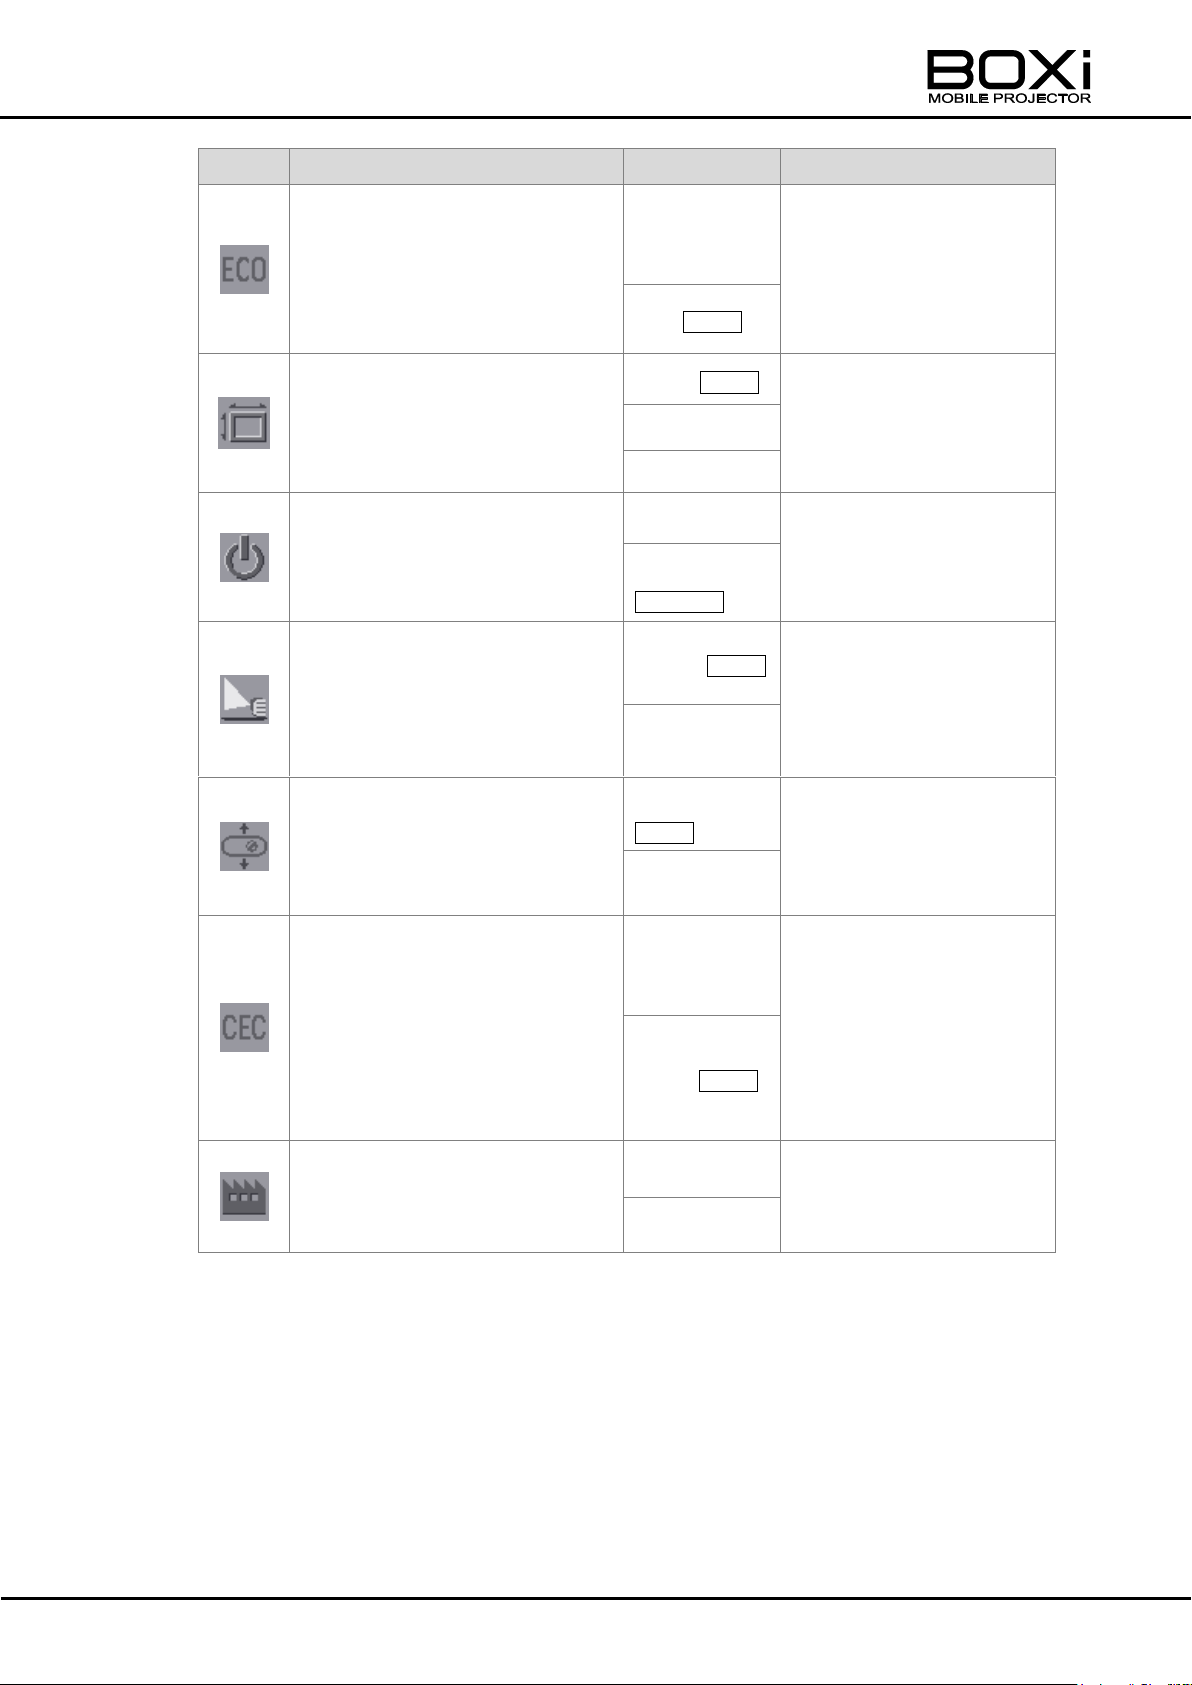
Icon
Name
Options
Description
ECO mode setting
→P.55
On
Set the ECO mode.
When the projector is in
the ECO mode, the
LED brightness and fan
noise will decrease.
Off Default
Aspect ratio setting
→P.56
Auto Default
Set the horizontal to
vertical ratio of the input
signal.
4:3
16:9
Auto power off setting
→P.57
Off
Automatically turn off
the projector after a
certain period of no
operation.
1 ~ 180
Default180
Projection mode setting
→P.58
Front Default
Set whether to project
images from the front of
the screen or from the
rear of the screen.
Rear
Installation mode setting
→P.59
Desktop
Default
Set how to install the
projector.
Ceiling
CEC mode setting
→P.60
ON
Set the CEC mode.
Setting up CEC mode
allows you to operate
the projector in
conjunction with a CEC
compatible HDMI
device.
OFF Default
Factory settings
→P.62
Yes
Return all settings to
factory default.
No
54
Page 55
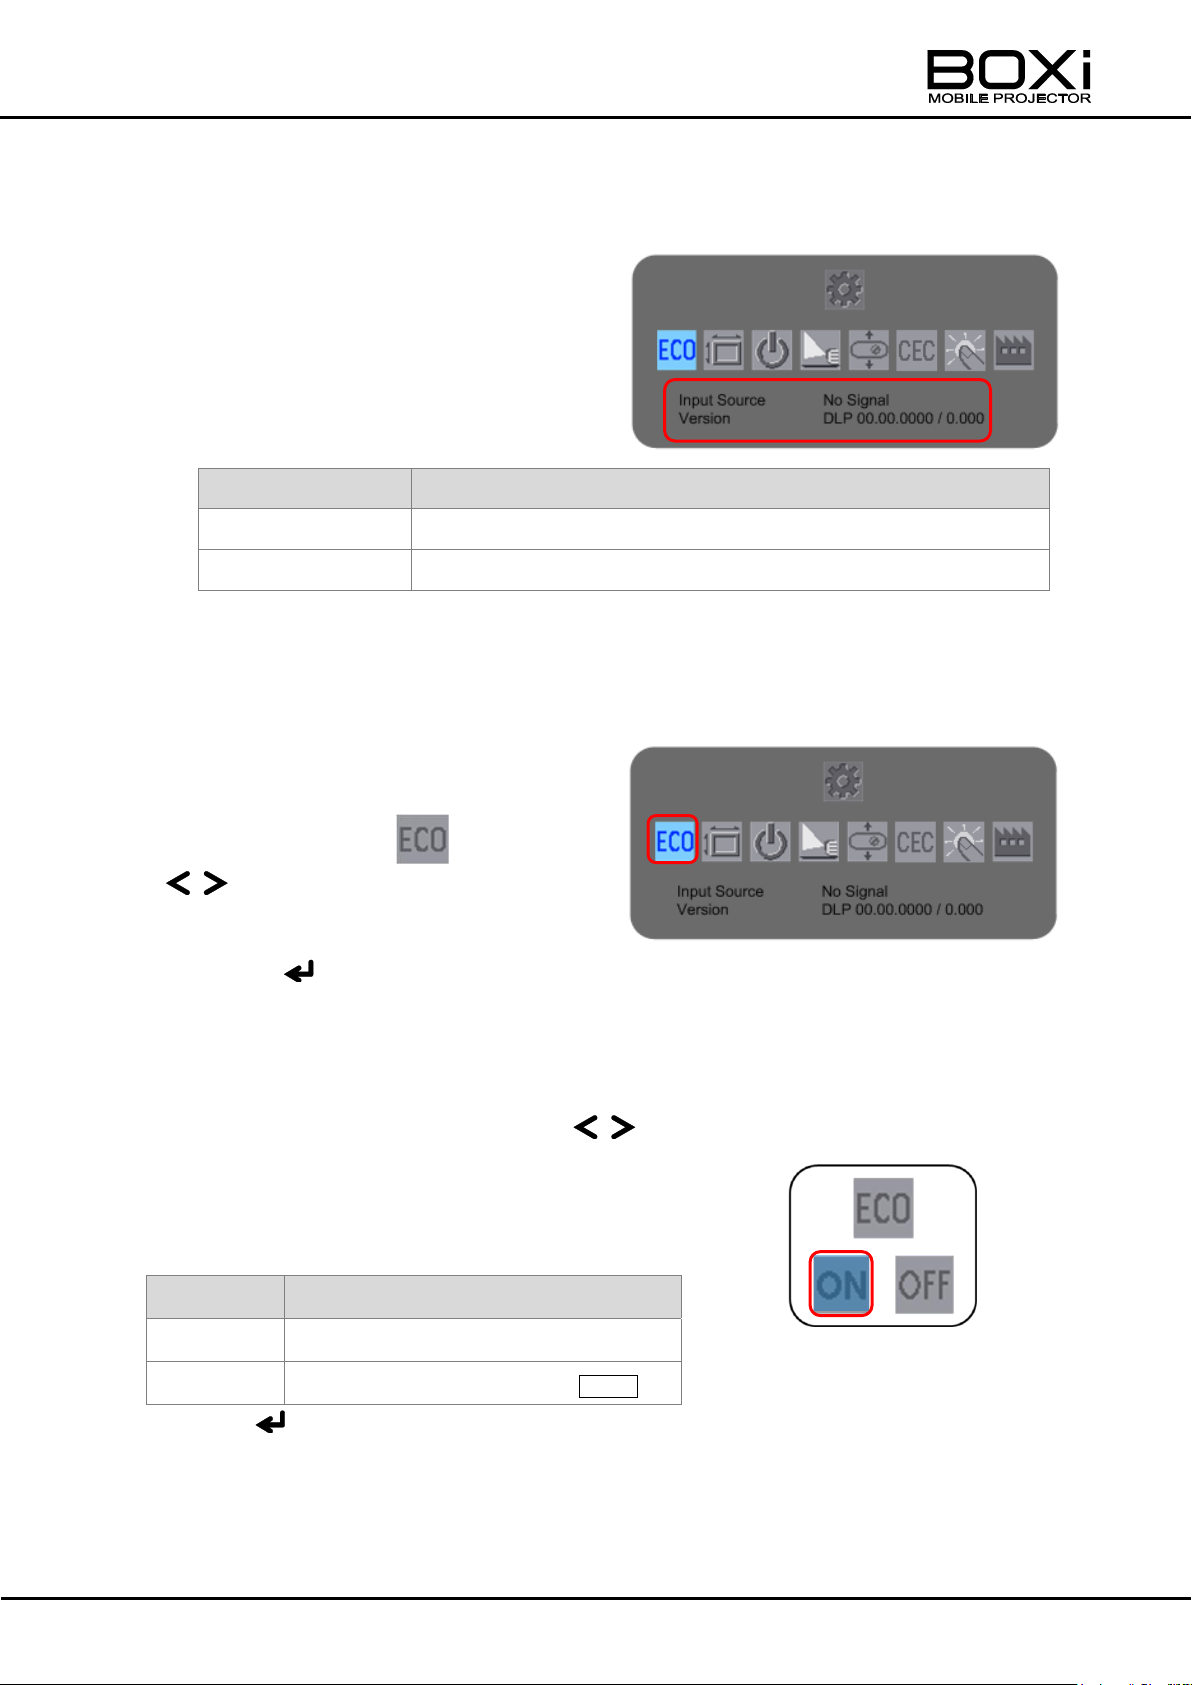
ECO mode setting menu
Information
Description
Input Source
The current input source will be displayed.
Version
The firmware version of the projector will be displayed.
Setting
Description
ON
To activate the ECO mode.
OFF
To cancel the ECO mode. Default
Detail settings menu
Detail settings menu
Checking various information
1. Display the “Detail settings” menu.
The following information can be viewed.
Setting the ECO mode
1. Display the “Detail settings” menu.
2. Select the icon with the
buttons on the remote control
or on the control panel.
Press the button to execute the selection.
The “ECO mode setting” menu will be displayed.
3. Select “ON” or “OFF” with the
buttons on the remote control or on
the control panel.
Press the button to execute the selection and return to the “Detail settings” menu.
55
Page 56
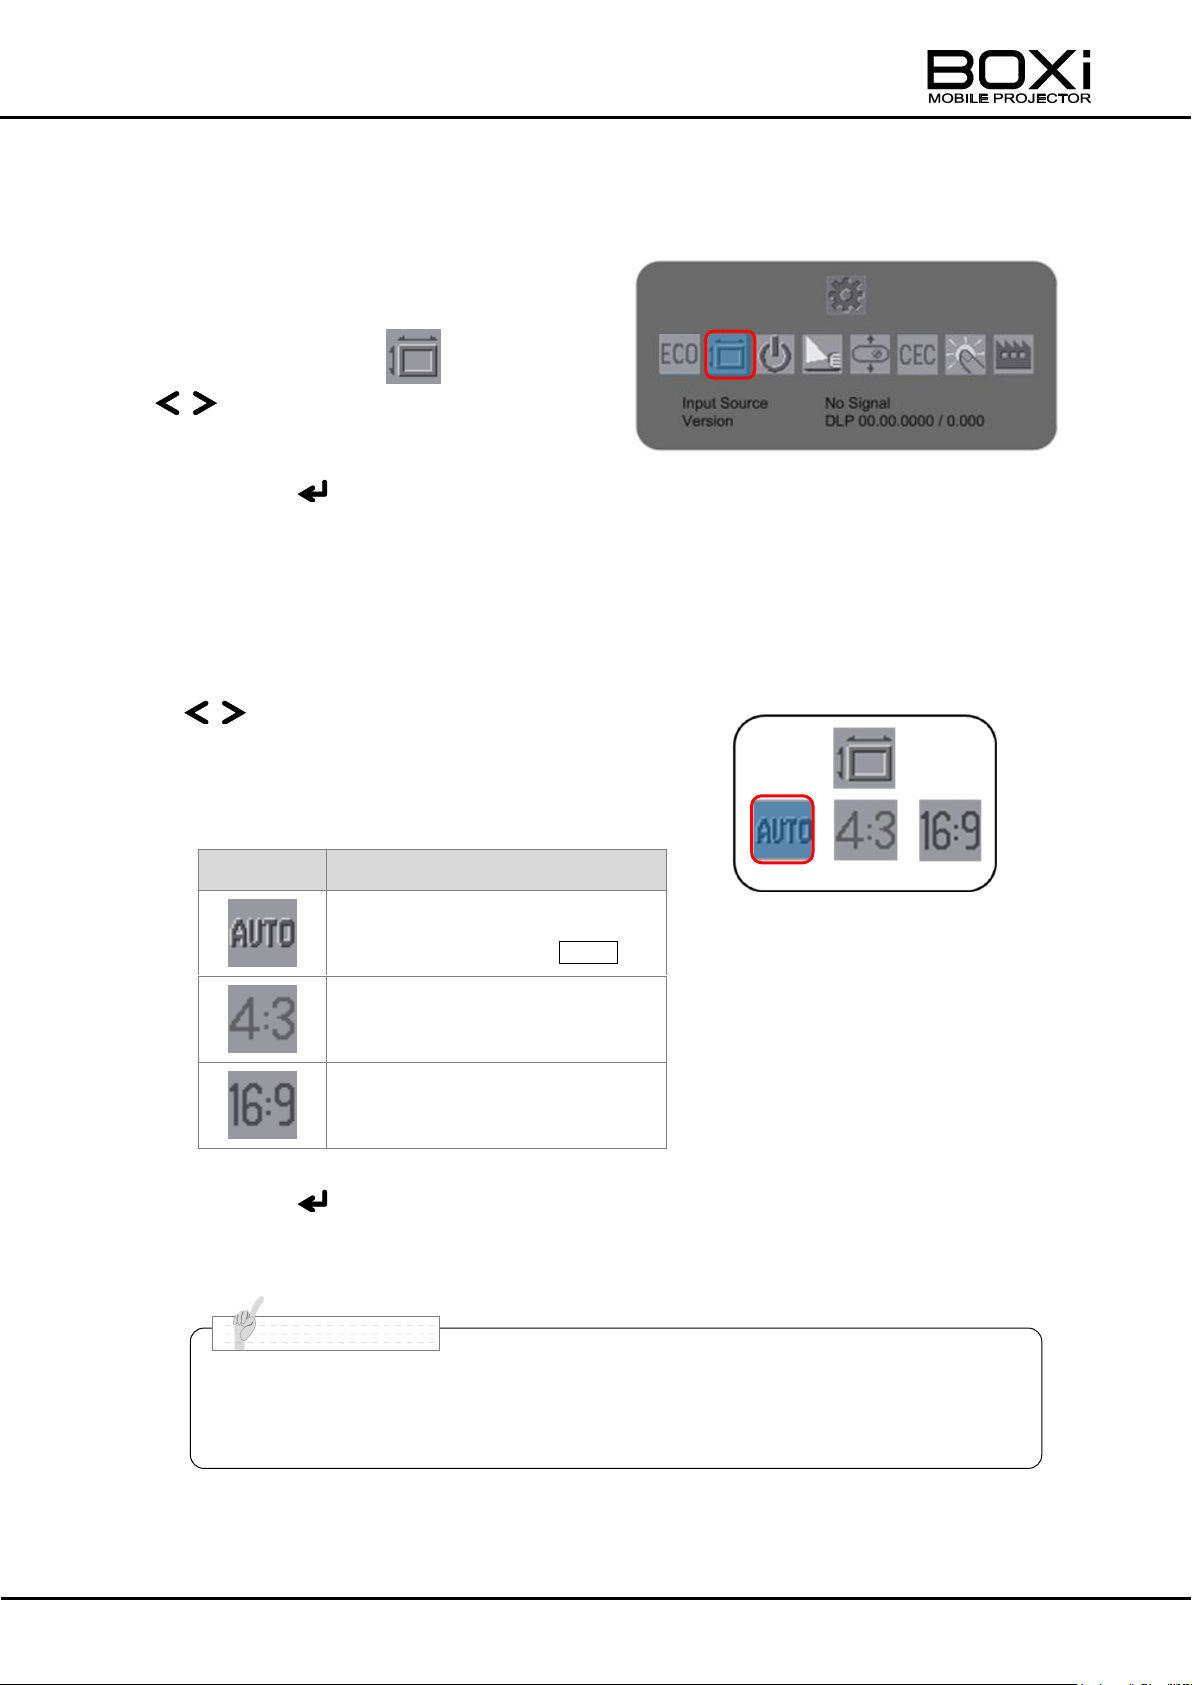
Icon
Description
Display the input signal in its
original aspect ratio. Default
Display the input signal in 4:3
aspect ratio.
Display the input signal in
16:9 aspect ratio
■ The aspect ratio setting will not be saved. It will be reset to “AUTO” when
the projector is restarted.
N o t e
Aspect ratio setting menu
Detail settings menu
Selecting the aspect ratio
1. Display the “Detail settings” menu.
2. Select the icon with the
buttons on the remote control
or on the control panel.
Press the button to execute the selection.
The “Aspect ratio setting” menu will be displayed.
3. Select the aspect ratio with the
buttons on the remote control
or on the control panel.
The following aspect ratio can be selected.
Press the button to execute the selection and return to the “Detail settings”
menu.
56
Page 57
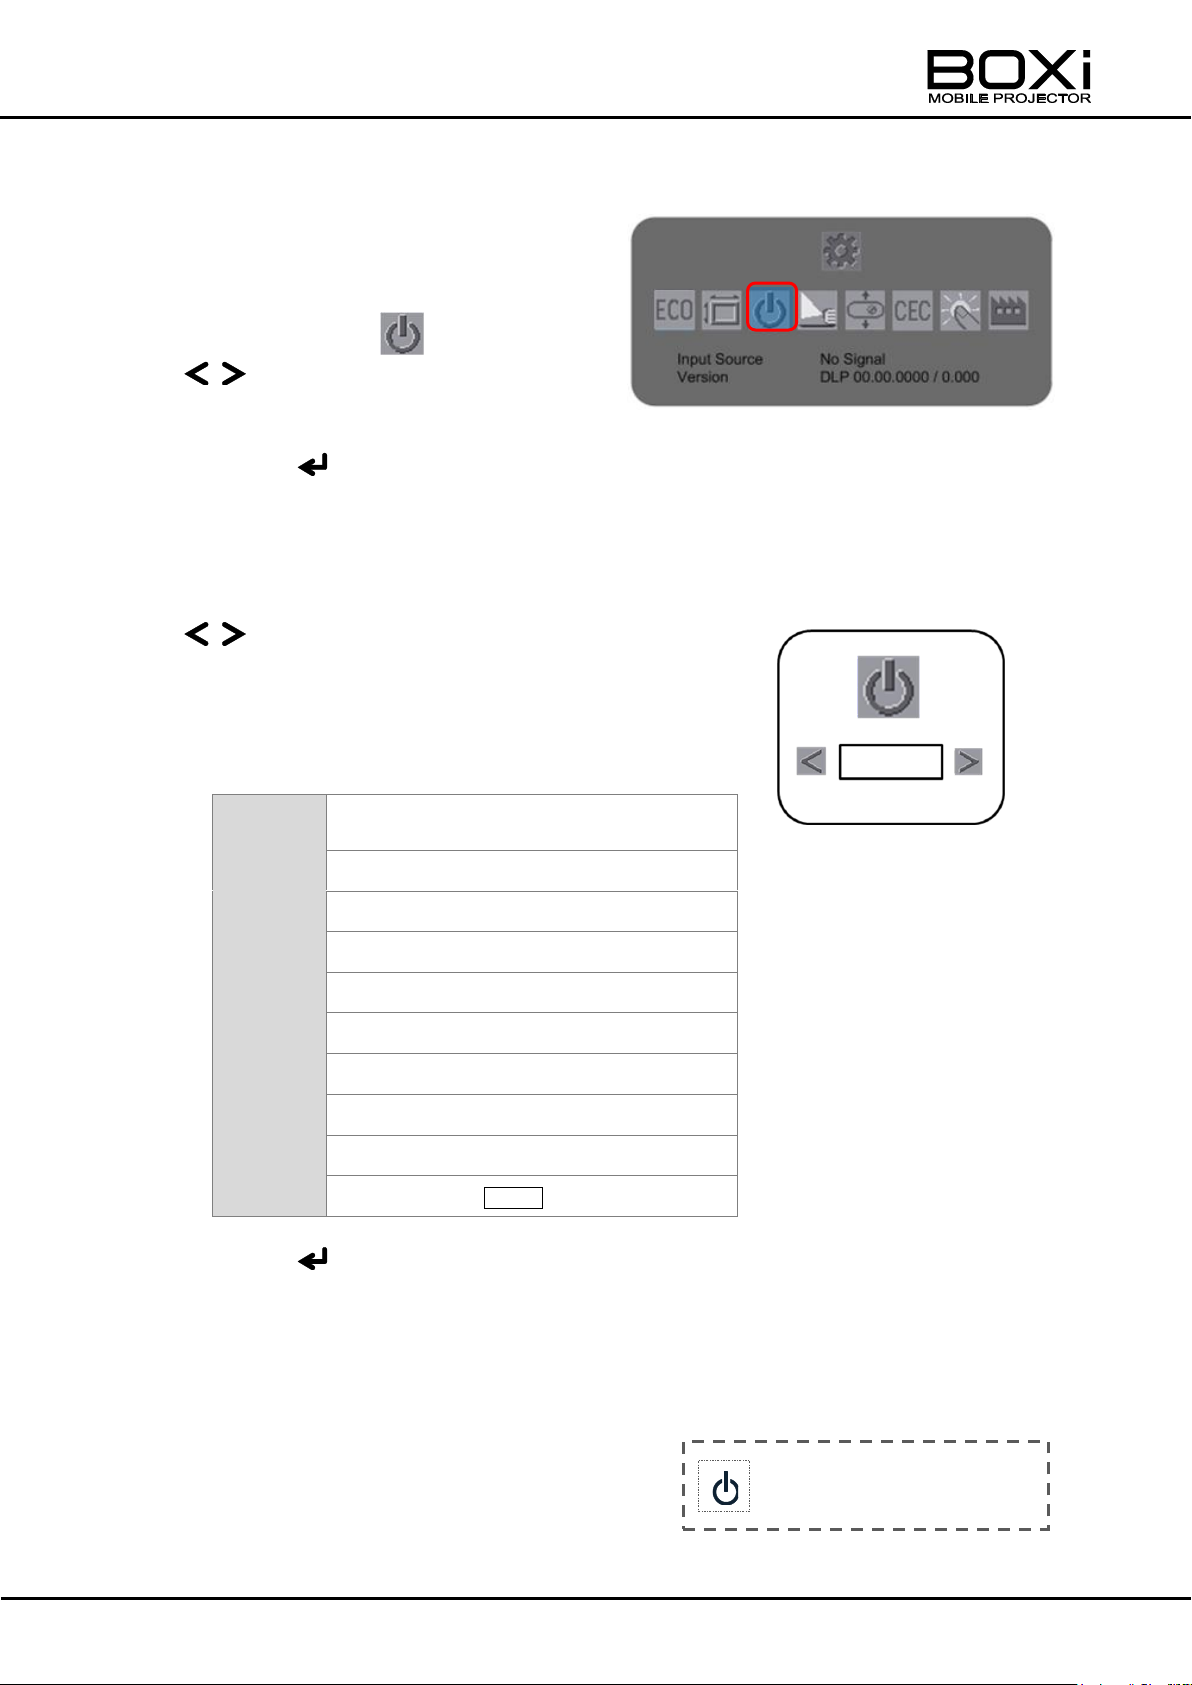
Auto
power
off time
Off
(Disable the auto power off function)
1 minute
3 minutes
5 minutes
10 minutes
20 minutes
30 minutes
60 minutes
120 minutes
180 minutes Default
The projector will be turned
off after 30 seconds.
Auto power off setting menu
Detail settings menu
Setting the auto power off
1. Display the “Detail settings” menu.
2. Select the icon with the
buttons on the remote
control or on the control panel.
Press the button to execute the selection.
The “Auto power off setting” menu will be displayed.
3. Select the auto power off time with the
buttons on the remote control or
on the control panel.
The following auto power off time can be selected.
Press the button to execute the selection and return to the “Detail settings”
menu.
When the auto power off function is enabled, the projector will be turned off
automatically after no operation is performed, either from the control panel or
from the remote control, for a preset amount of time.
The message as shown in the right picture
will be displayed 30 seconds before the
projector is turned off automatically.
57
Page 58
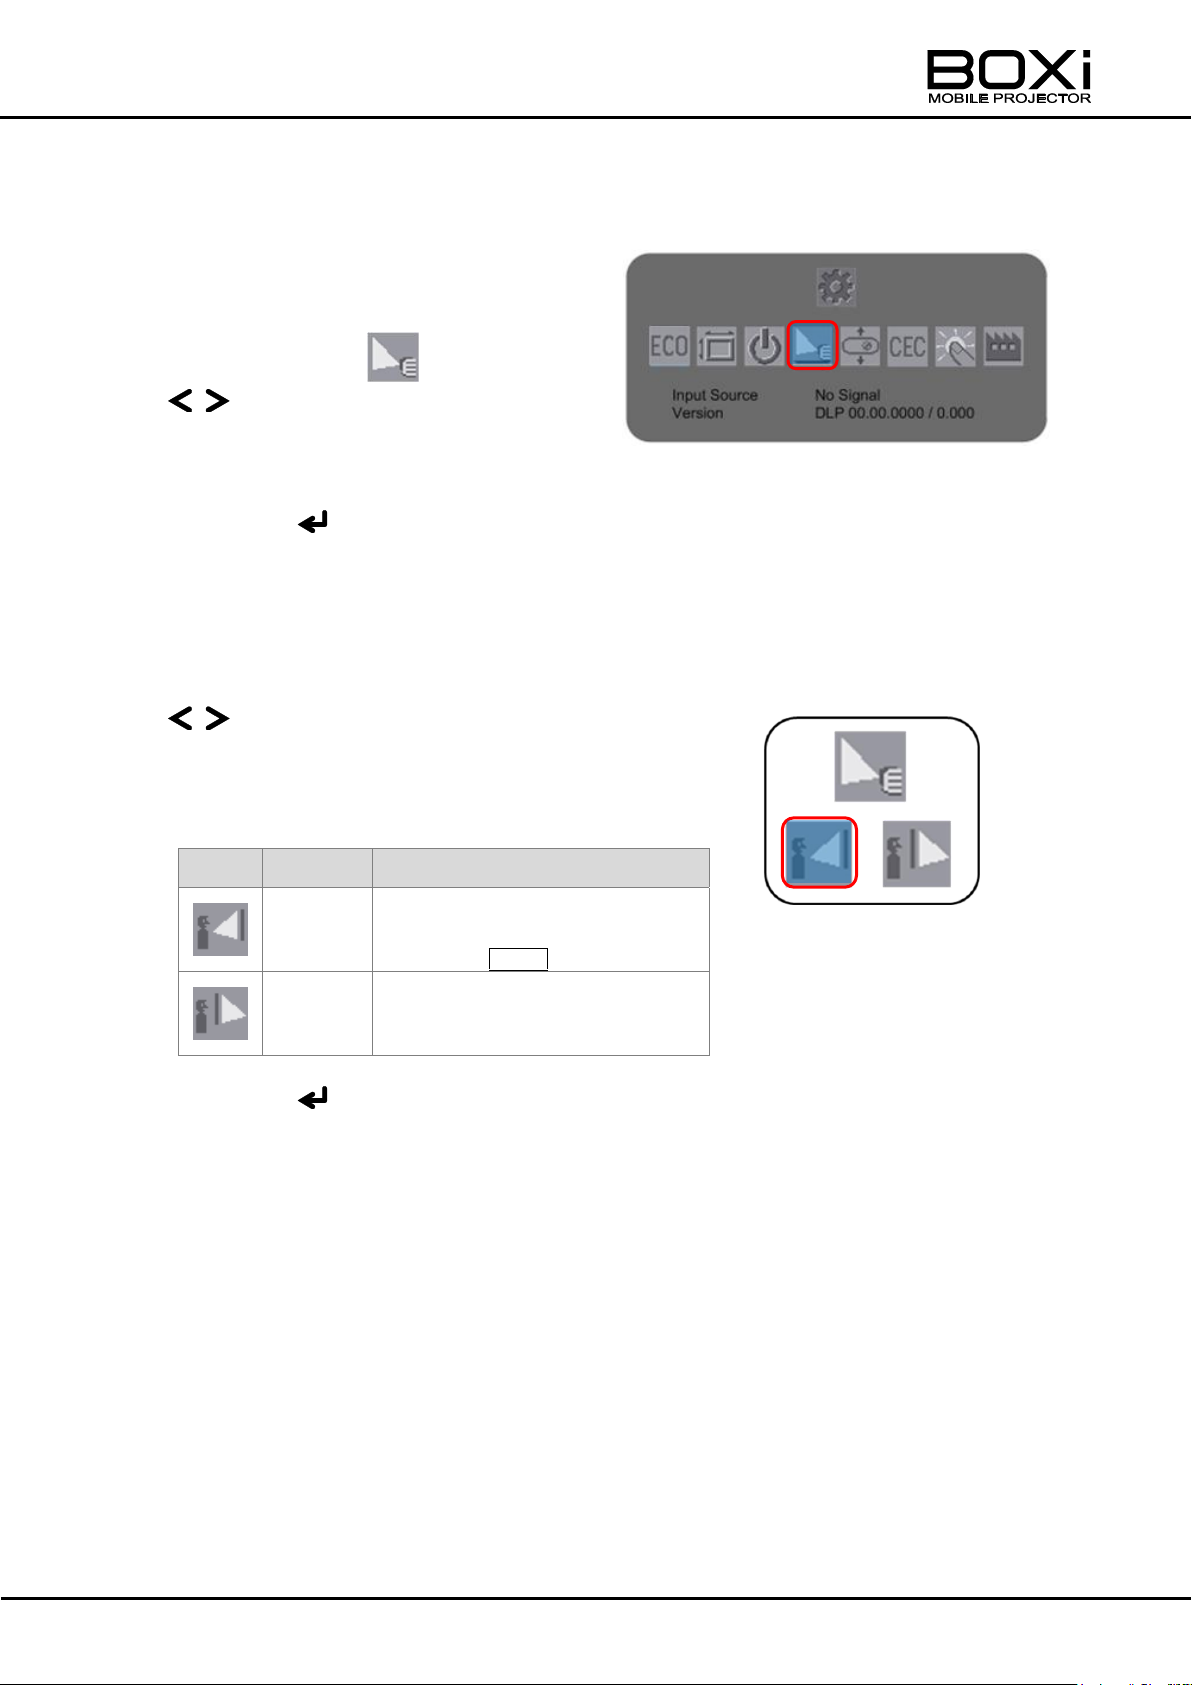
Projection mode setting menu
Icon
Mode
Description
Front
To be used when the
projector is placed in front of
a screen. Default
Rear
To be used when the
projector is placed behind a
screen.
Detail settings menu
Selecting the projection mode
1. Display the “Detail settings” menu.
2. Select the icon with the
buttons on the remote
control or on the control panel.
Press the button to execute the selection.
The “Projection mode setting” menu will be displayed.
3. Select “Front” or “Rear” with the
buttons on the remote control or
on the control panel.
Press the button to execute the selection and return
to the “Detail settings” menu.
58
Page 59
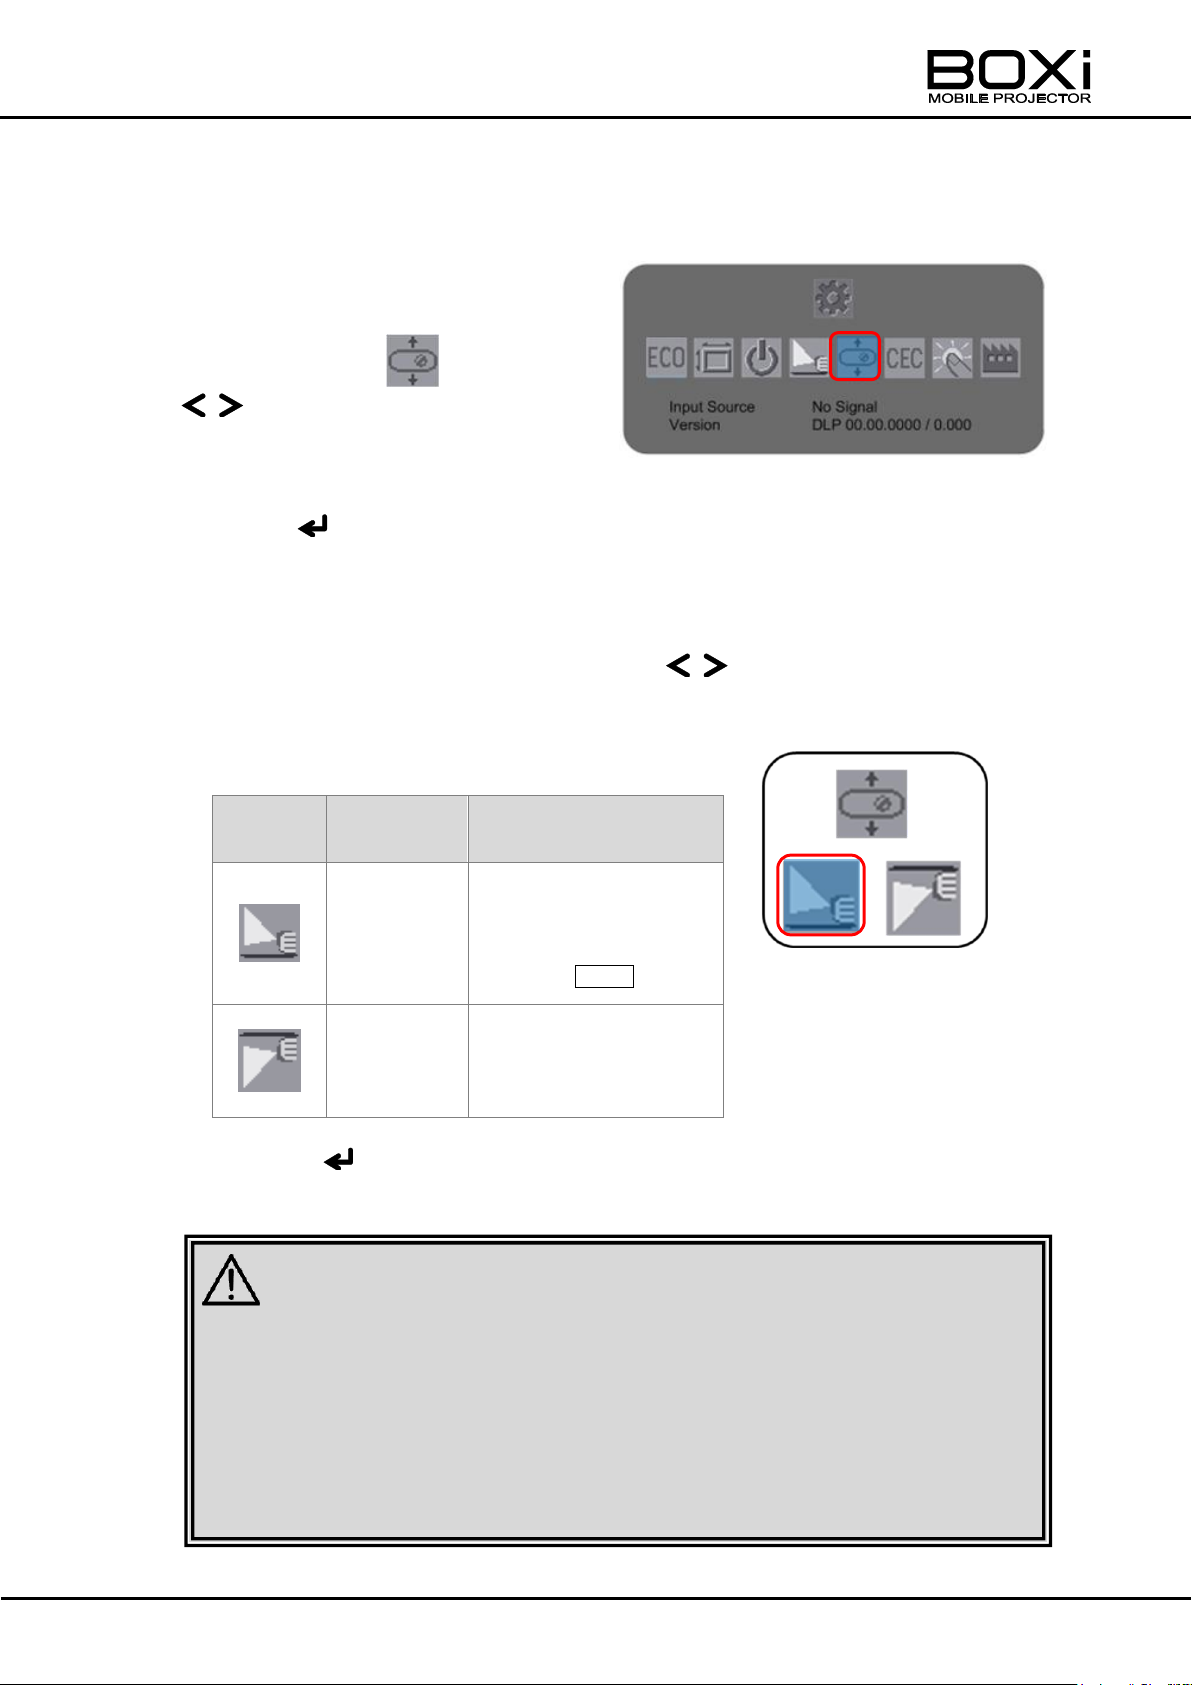
Icon
Mode
Description
Desktop
To be used when the
projector is installed
in the desktop mount
position. Default
Ceiling
To be used when the
projector is installed
to the ceiling.
■ Do not place the projector on an unstable cart, stand, or table. Doing so
may cause the projector to fall down or tip over.
■ Installation work (such as ceiling suspension) should only be carried out
by a qualified technician. If installation is not carried out correctly, the
projector may fall, causing injury or accident. Contact a qualified
technician or your dealer for installation.
CAUTION
Installation mode setting menu
Detail settings menu
Selecting the installation mode
1. Display the “Detail settings” menu.
2. Select the icon with the
buttons on the remote
control or on the control panel.
Press the button to execute the selection.
The “Installation mode setting” menu will be displayed.
3. Select “Desktop” or “Ceiling” with the buttons on the remote
control or on the control panel.
Press the button to execute the selection and return to the “Detail settings”
menu.
59
Page 60
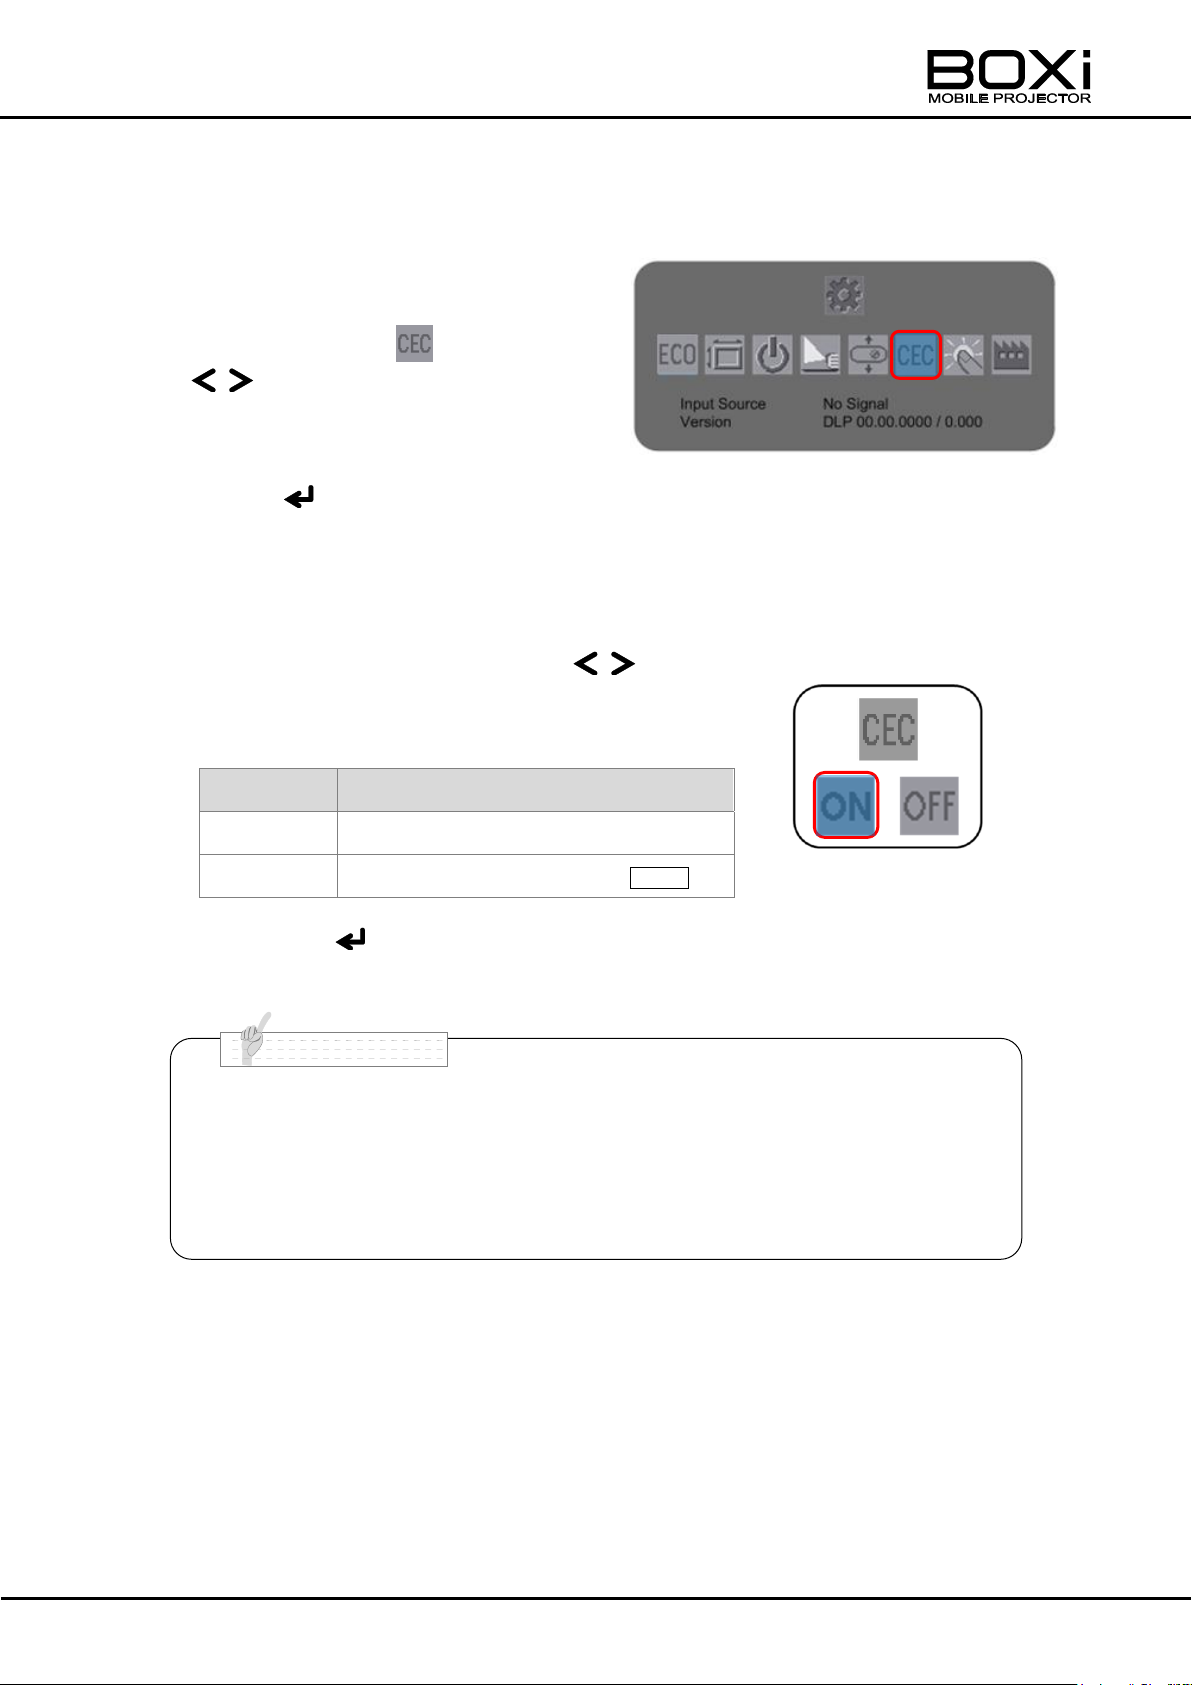
Setting
Description
ON
To activate the CEC mode.
OFF
To cancel the CEC mode. Default
■ Setting up CEC mode allows you to operate the projector in conjunction
with a connected CEC compatible HDMI device.
Turn on the CEC mode and start the CEC compatible HDMI device this
will power on the projector.
Powering off the projector will turn off the power off the HDMI device as
well.
N o t e
CEC mode setting menu
Detail settings menu
Setting the CEC mode
1. Display the “Detail settings” menu.
2. Select the icon with the
buttons on the remote
control or on the control panel.
Press the button to execute the selection.
The “CEC mode setting” menu will be displayed.
3. Select “ON” or “OFF” with the
buttons on the remote control or on
the control panel.
Press the button to execute the selection and return to the “Detail
settings” menu.
60
Page 61
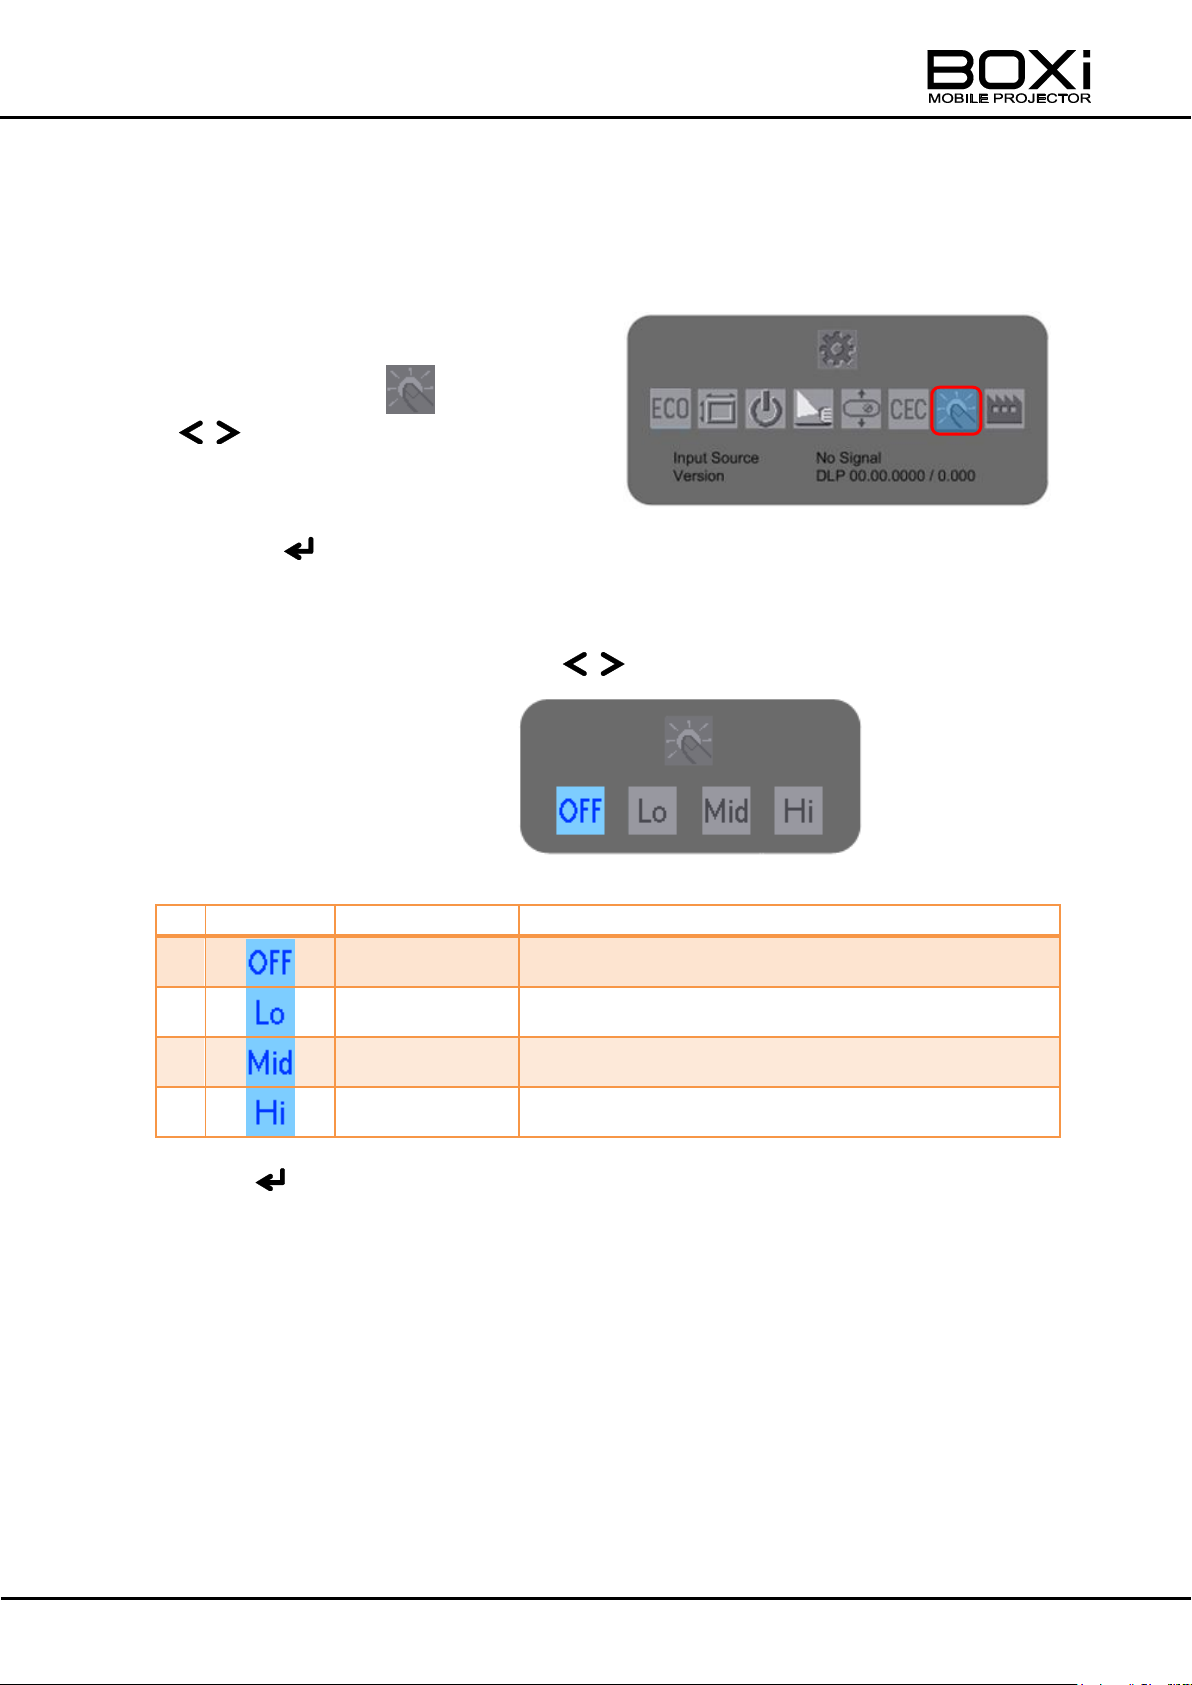
Setting
Item
Description
1 OFF
Always turn the LED off.
2 Lo
Turn the LED to its lowest brightness level.
3 Mid
Turn the LED to its medium brightness level.
4 Hi
Turn the LED to its highest brightness level.
Detail settings menu
Selecting the Backlight Brightness mode
1. Display the “Detail settings” menu.
2. Select the icon with the
buttons on the remote
control or on the control panel.
Press the button to execute the selection.
The “Backlight Brightness mode setting” menu will be displayed
3. Select “ON” or “OFF” with the buttons on the remote control
or on the control panel.
Press the button to execute the selection and return to the “Detail settings” menu.
61
Page 62
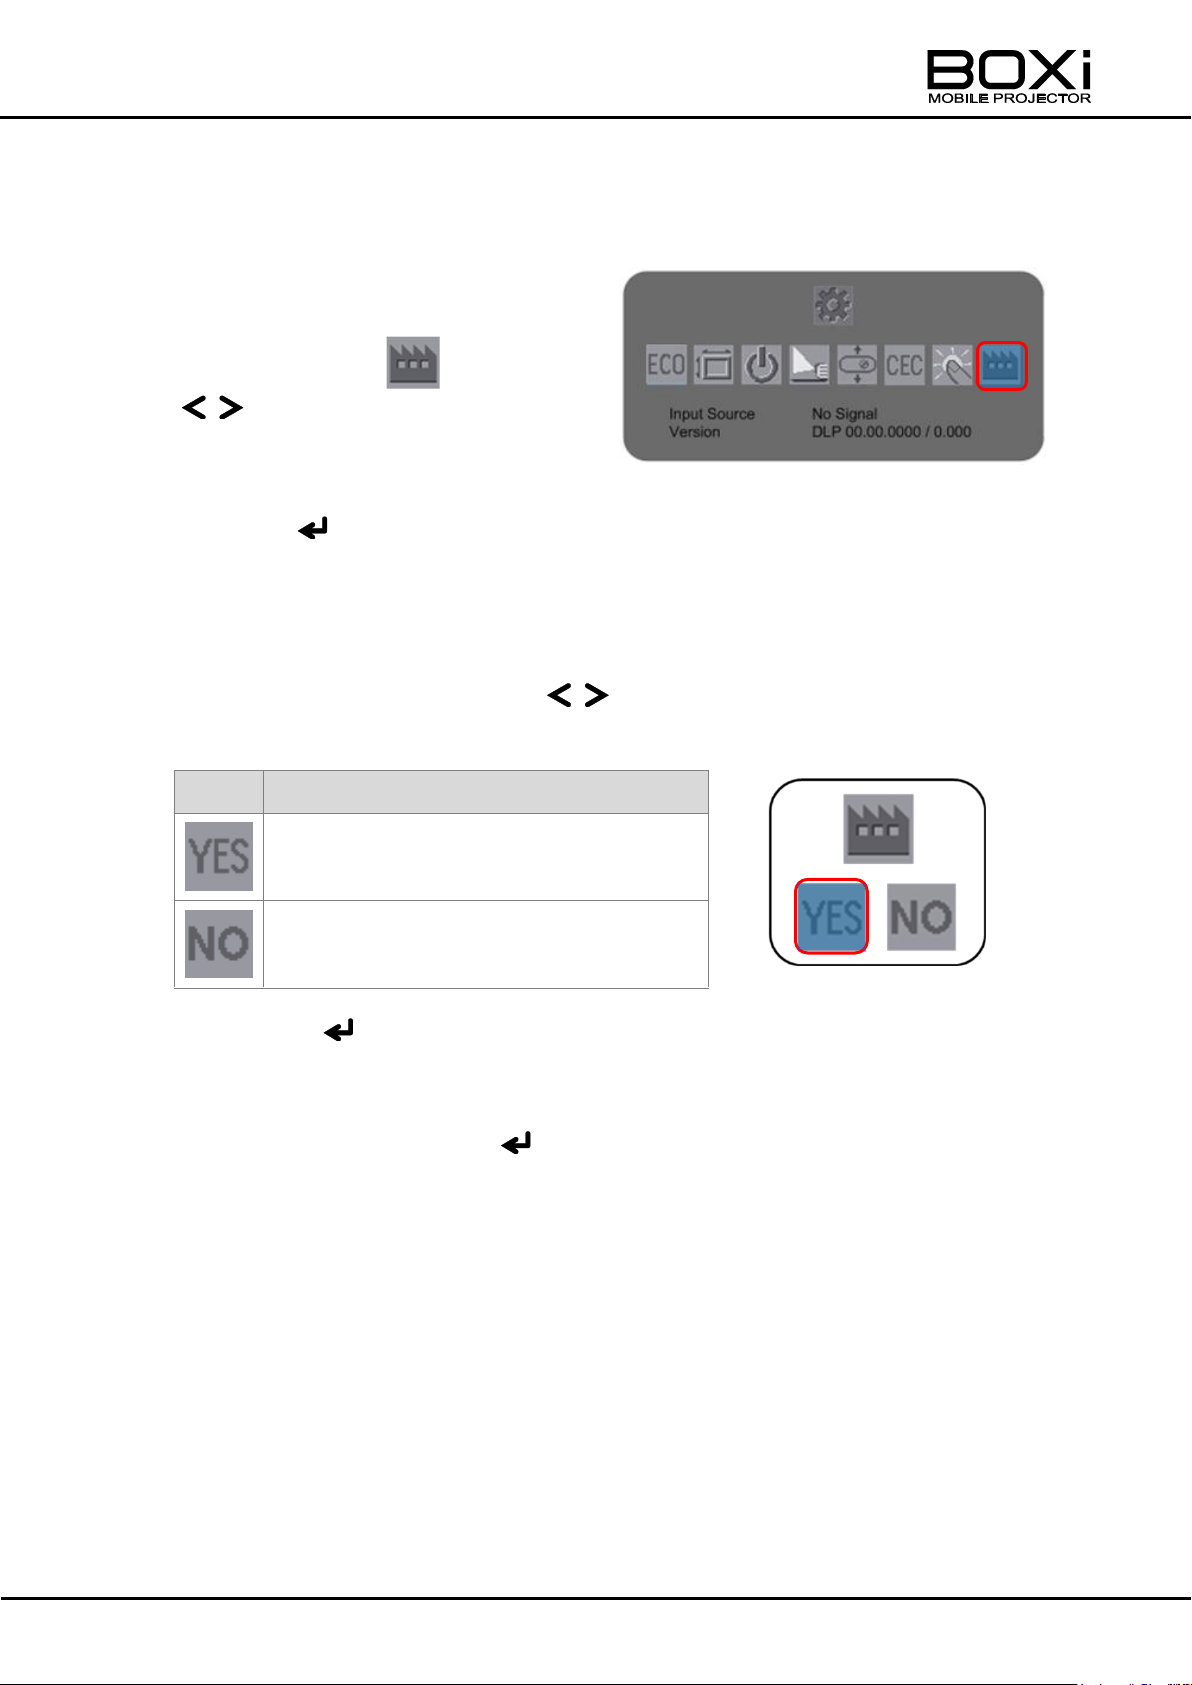
Icon
Description
Return to the factory settings.
Do not return to the factory settings.
Factory settings menu
Detail settings menu
Returning to the factory settings
1. Display the “Detail settings” menu.
2. Select the icon with the
buttons on the remote
control or on the control panel.
Press the button to execute the selection.
The “Factory settings” menu will be displayed.
3. Select “Yes” or “No” with the buttons on the remote control or
on the control panel.
Press the button to execute the selection.
Select "YES" to return to factory default settings.
When configuration is completed, the screen returns to start menu.
Select "NO" and press the button returns to the "Detail settings" menu.
Refer to “MAIN MENU” (Page41) for the default values for each setting item.
62
Page 63
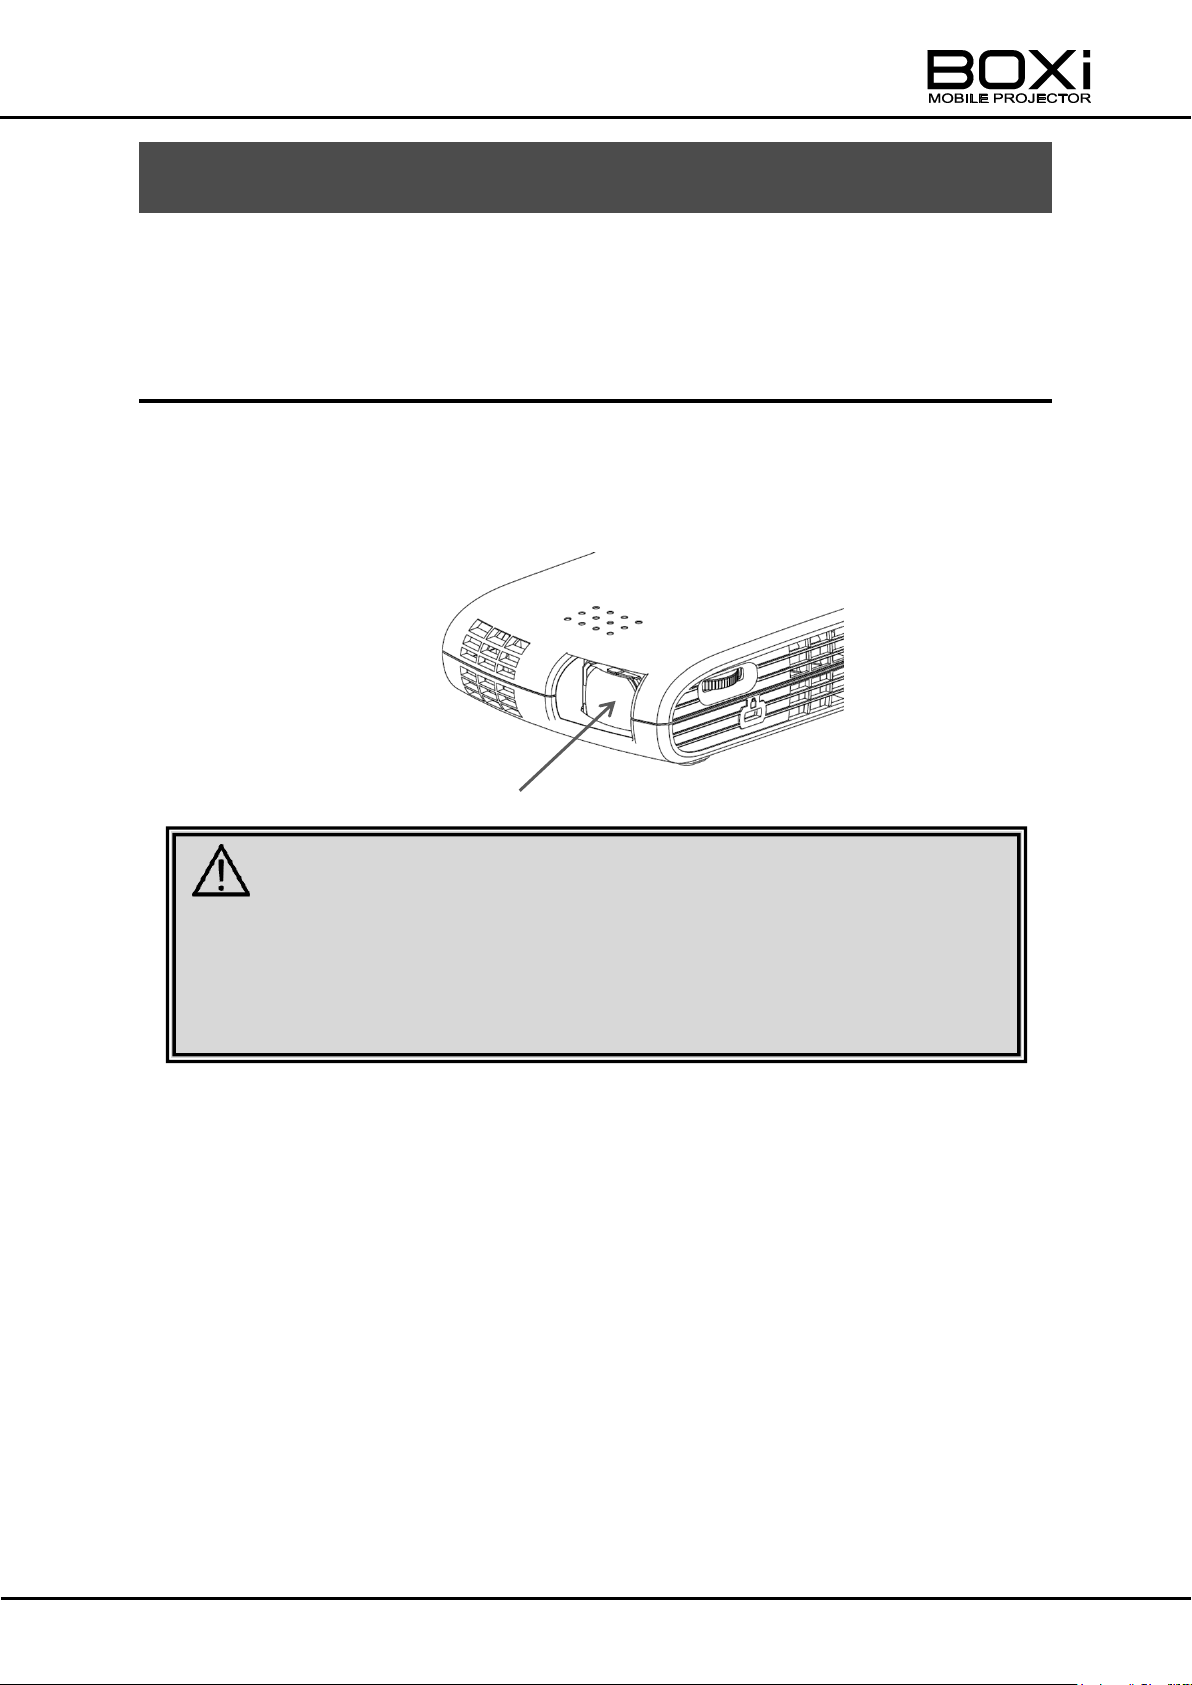
■ Do not look into the lens during the projection. The strong light emitted
from the lens may cause damage to your eyes.
■ The lens surface is easily damaged. Do not rub the lens with a hard
material or hit it.
Lens
CAUTION
4 MAINTENANCE
This section describes the simple maintenance procedures you should follow to clean
the lens, the cabinet and the remote control.
CLEANING THE LENS, THE CABINET AND THE
REMOTE CONTROL
Cleaning the lens
1. Before starting the cleaning, turn off the projector, disconnect the power cord and
then allow the cabinet to cool.
2. Wipe the lens with commercial lens-cleaning paper.
Cleaning the cabinet and the remote control
<Cleaning the cabinet>
1. Before starting the cleaning, turn off the projector, disconnect the power cord and
then allow the cabinet to cool.
2. Gently wipe the cabinet with a soft cloth like gauze. If the cabinet is particularly
dirty, soak the soft cloth in water with a small amount of neutral detergent in it,
squeeze the cloth very well, and then wipe the cabinet. After cleaning, gently
wipe the cabinet with a dry cloth.
<Cleaning the remote control>
Wipe the dirt off the remote control with a dry soft cloth.
63
Page 64
■ Do not use solvents such as alcohol, benzene or thinner as they may
mar the finish of the case, causing electric shock.
■ Do not apply volatile materials such as insecticide on the cabinet. Do not
leave a rubber, sticky tape or vinyl product in prolonged contact with it.
Otherwise, the surface finish will be deteriorated or the coating may be
stripped off.
■ The surface of the cabinet is easily scratched. Do not rub the cabinet
with a hard material or hit it.
■ Do not clean the inside of the projector by yourself. There are
high-voltage components inside and you could injure yourself or
damage the projector.
CAUTION
CAUTION
CLEANING THE INSIDE OF THE PROJECTOR
Continued use with dust inside may result in fire, electric shock, malfunction or
deteriorated image. For the safe use of the projector, have it cleaned and inspected
by your dealer at least once a year. Ask you dealer for the maintenance fee.
64
Page 65
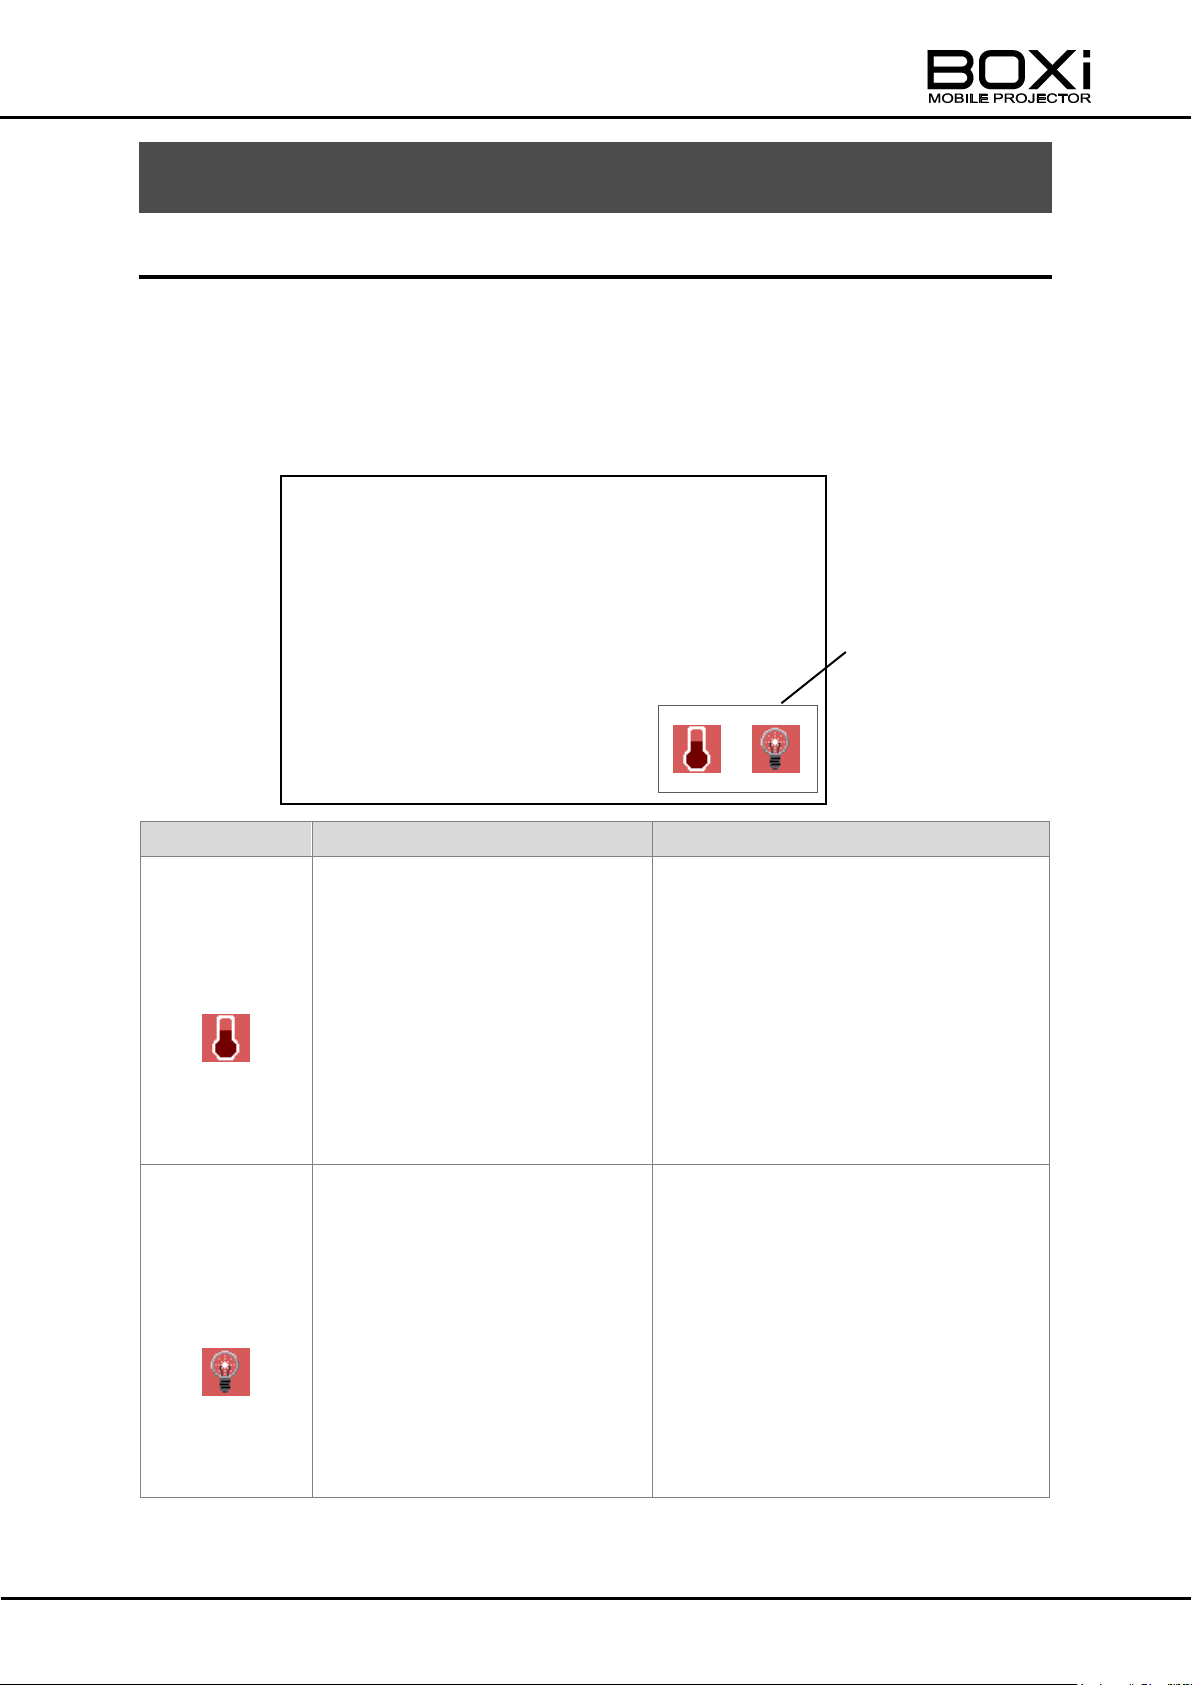
Icon
Description
Solution
Temperature
warning
The internal temperature has
been increased.
This icon will be displayed for
10 seconds every 5 minutes.
Turn off the projector immediately
and allow the projector to cool
down for at least 30 minutes.
Make sure of the following and turn
on the projector:
- The ventilator is not blocked by
objects or in any way obstructed.
- The ventilator is not covered with
dust.
- The peripheral temperature is not
exceeding 35℃.
LED
brightness
degradation
The brightness of the LED is
decreased.
It is the time to replace the
LED lamp. If you continue to
use the projector without
replacing the lamp, the
brightness will decrease
continuously.
This icon will be displayed
once after the projector is
turned on.
Contact your dealer for repair.
Warning icons
5 TROUBLESHOOTING
INDICATOR ICONS
During use of the projector, the following icons may appear at the bottom right of the
screen to warn you or indicate errors. When the icon appears, follow the instructions
described in the table below.
If the same icon still appears after following the above instructions, contact your
dealer.
Example of the warning indication
65
Page 66
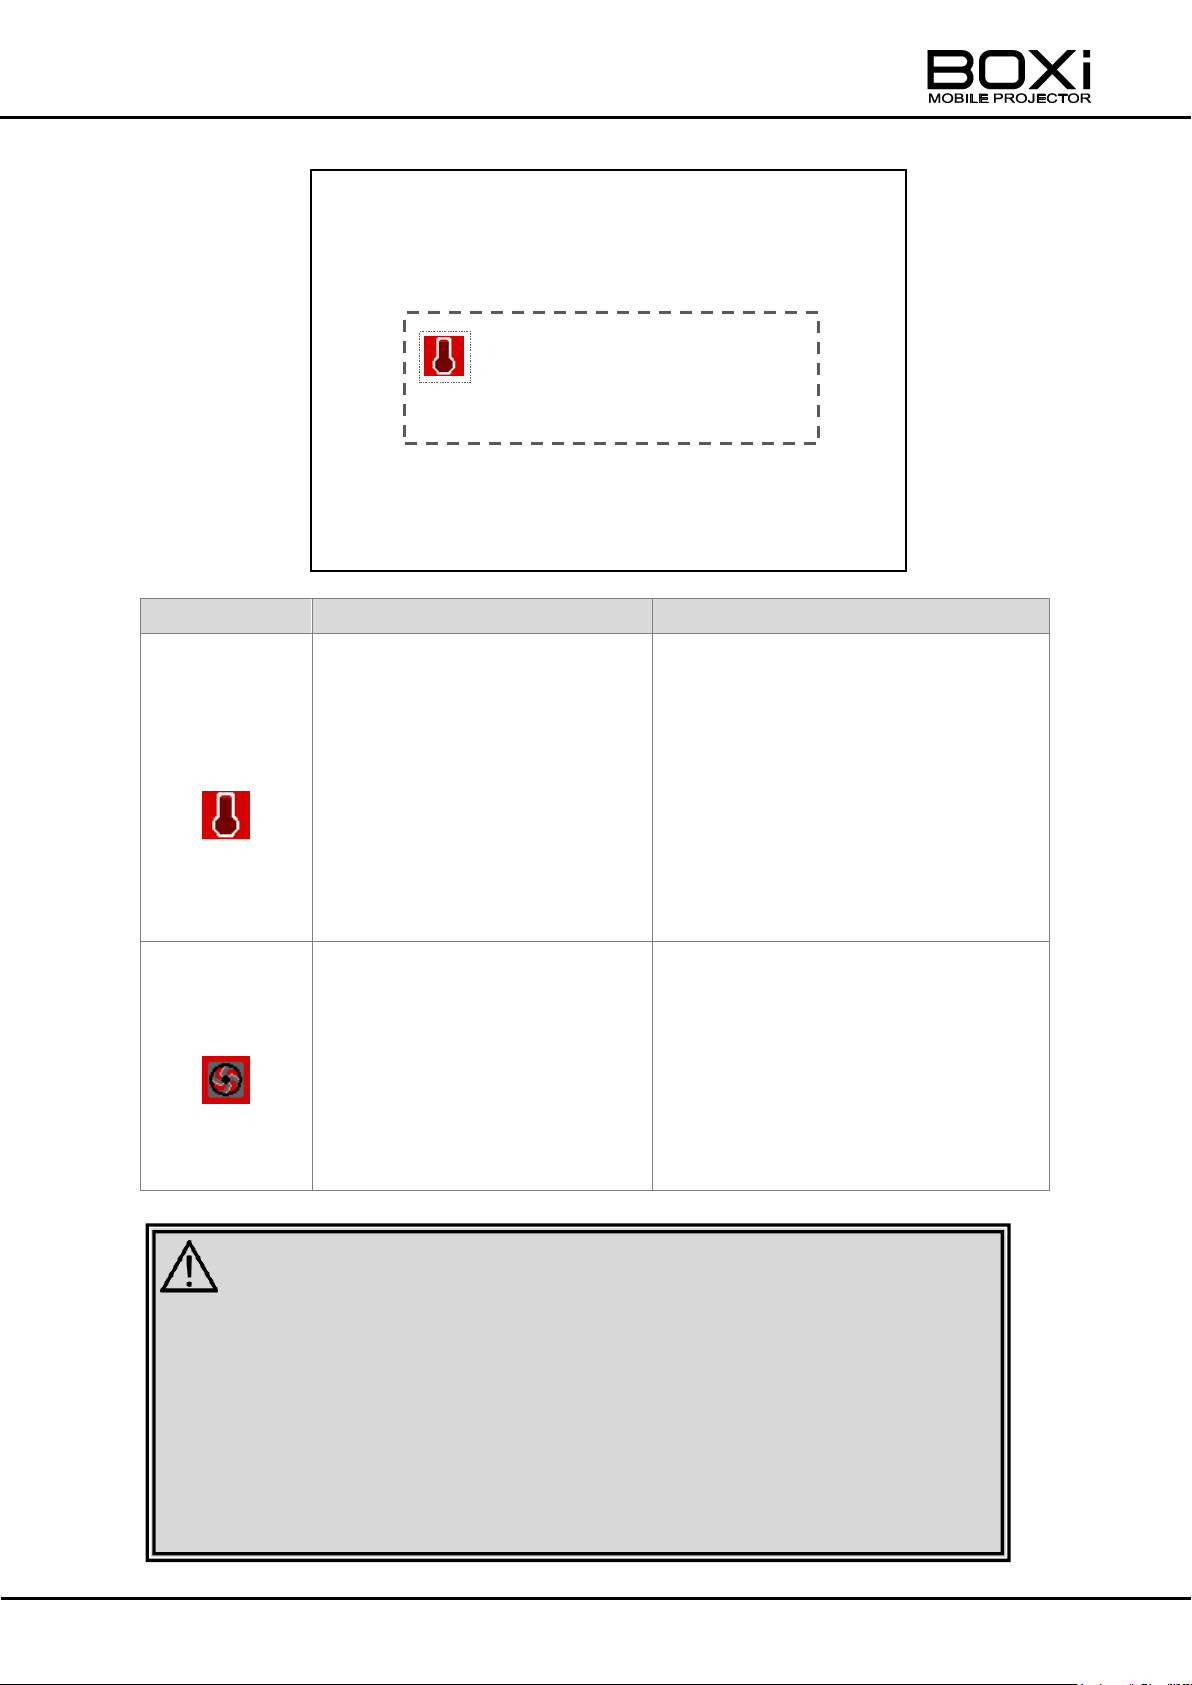
Icon
Description
Solution
Temperature
error
The internal temperature has
been increased.
The projector will be turned off
in 5 seconds.
Turn off the projector immediately
and allow the projector to cool
down for at least 30 minutes.
Make sure of the following and turn
on the projector:
- The ventilator is not blocked by
objects or in any way obstructed.
- The ventilator is not covered with
dust.
- The peripheral temperature is not
exceeding 35℃.
FAN error
There is a problem with the
internal fan.
The projector will be turned off
in 5 seconds.
Turn off the projector immediately
and allow the projector to cool
down for at least 30 minutes.
Make sure of the following and turn
on the projector:
- No foreign objects are inserted
between the rotating fan blades.
- There are no magnetic objects
near the projector.
An error occurred.
The projector will be turned off in 5
seconds.
■ Using the projector in places where the temperature is high or where
there is a lot of dust or smoke, or using it continuously for long hours for
business purposes may deteriorate the performance or the quality of the
projector after less than 1 year of use depending on the life of the
components.
■ In such cases, contact your dealer for chargeable repair.
CAUTION
Example of the error indication
66
Page 67
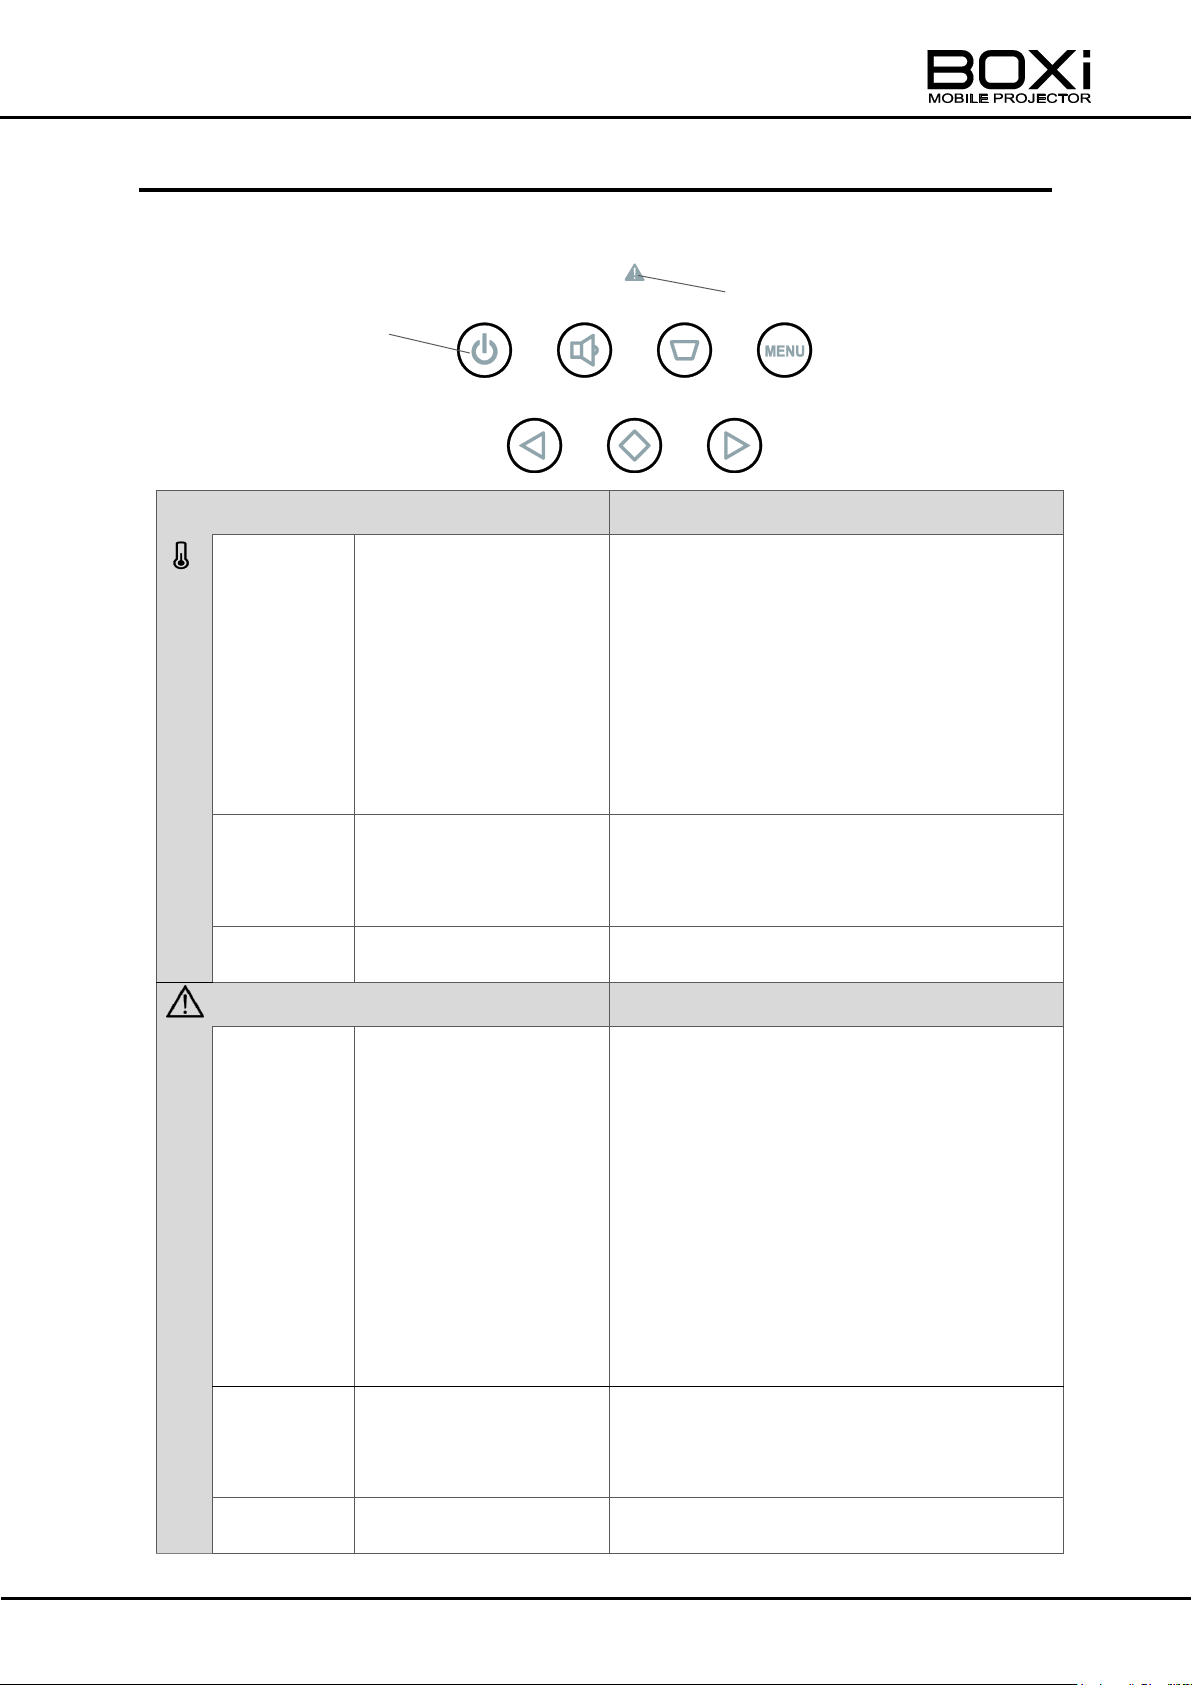
Temperature indicator (Red)
Solution
On
An abnormal
temperature inside
the projector is
detected.
Turn off the projector immediately and
allow the projector to cool down for at
least 30 minutes.
Make sure of the following and turn on
the projector:
- The ventilator is not blocked by objects
or in any way obstructed.
- The ventilator is not covered with dust.
- The peripheral temperature is not
exceeding 35℃.
Flashing
*Flashing
every 0.25
seconds.
Either an abnormal
rise of temperature
inside the projector is
detected.
The internal temperature is in a rise.
Follow the instructions described in
“INDICATOR ICONS” (Page65).
Off
The projector is in
normal condition.
‐
Warning indicator (Red)
Solution
Flashing
*Flashing
every 0.25
seconds.
There is something
wrong with the
internal fan.
Turn off the projector immediately and
allow the projector to cool down for at
least 30 minutes.
Make sure of the following and turn on
the projector:
- No foreign objects are inserted
between the rotating fan blades.
- There are no magnetic objects near the
projector.
Flashing
*Flashing
every
second.
Either an abnormal
the brightness of the
LED is decreased.
The state to which the light volume of
LED fell.
Follow the instructions described in
“INDICATOR ICONS” (Page65).
Off
The projector is in
normal condition.
‐
Warning indicator
Power indicator
TEMPERATURE & WARNING INDICATOR DISPLAY
The warning indicators indicate the status of the internal temperature and the internal
fan, by flashing or by lighting.
< Upper part of the Control panel>
67
Page 68
Problem
Check item
Related Page
No power.
➡
Is the power cord connected to the outlet
correctly?
→P.23
➡ Is there electricity to the outlet?
→P.23
➡ Is the AC adapter connected correctly?
→P.23
➡ Is the power cord damaged?
→P.23
➡ Is the temperature of the projector too high?
→P.65,67
➡ If the temperature of the projector is too high,
the projector does not turn on for protection.
→P.65,67
Power turns off
automatically.
➡
Is the warning icon displayed before the
projector is turned off?
→P.65
➡ Is the indicator flashing?
→P.67
➡ Is the auto power off function enabled?
(Default setting:180 minutes)
→P.57
No image.
➡
Is the projector in the blank screen mode?
→P.35
➡ Is the cable connected to the input terminal
correctly?
→P.24
➡ Is the video signal output from the connected
video source?
➡ Is the contrast setting set to minimum?
→P.37,50
➡ Is the input signal supported by the
projector?
→P.72
Image is dark.
➡
Is the brightness adjusted correctly?
→P.36,49
➡ Is the projector in the ECO mode?
→P.38,55
➡ Is the LED lamp approaching to the end of its
life time?
→P.65,67
Image is
distorted.
➡
Is the projector installed correctly?
→P.20
➡ If there is keystone distortion, perform the
keystone correction.
→P.30,43
COMMON PROBLEMS AND CHECK ITEMS
The following problems may not be caused by malfunction of the projector. Check the
items in the table below before requesting a repair service.
If the problem still persists, contact your dealer.
68
Page 69
Problem
Check item
Related Page
Image is blurred.
➡
Is the lens correctly adjusted?
→P.29
➡ Is the projector placed correctly to the
screen?
→P.20
➡ Is the lens dirty?
→P.63
➡ Is there condensation on the lens?
→P.63
➡ Is the distance between the projector and the
screen within the adjustable range of the
focus?
→P.29
Image is unstable.
➡
Is the video cable connected correctly?
→P.24
➡ Is the video cable damaged?
→P.24
Bright dots or
black dots in the
image.
➡
This is a common problem peculiar to the
display device. This is not a malfunction.
Vertical stripes in
the image.
➡
This is due to the interference with the
screen. This is not a malfunction.
Color is uneven.
➡
This is due to the diffraction of light which is
peculiar to the projector. This is not a
malfunction.
No sound.
➡
Is the volume set to mute?
→P.34
➡ Is the volume adjusted to low?
→P.32
➡ Is the sound output from the connected
video source?
Remote control
cannot be
operated.
➡
Is there enough remaining battery for the
remote control?
→P.17
➡
Is the polarity of the battery set correctly?
→P.17
➡ Is there any obstacle between the IR
transmitter of the remote control and the IR
receiver of the projector?
→P.19
➡ Is the remote control used within its
operating range?
→P.19
➡ Is the IR transmitter aimed at the IR
receiver?
→P.19
➡ Is the remote control receiving influence from
the fluorescent light?
→P.19
Indicator flashes.
➡
Refer to the list of indicators.
→P.67
69
Page 70
MODEL
T-200
Display technology
Single-chip DLP
Display device
Size
0.45 type
Resolution
1,280×800 (WXGA)
Aspect ratio
16:10
Lens
Focus
adjustment
Manual
Focal length
f = 9.05mm
F number
F 2.04
Lamp
3 LED (R,G,B)
Screen size (projection distance)
25 ~ 68 inches ( 0.48 ~ 1.33 m )
Projection method (can be
selected from the menu)
Front/ Rear/ Desktop/ Ceiling
Brightness
150 lm
Contrast ratio (full white/ full black)
1,000:1 (JIS X 6911)
(10,000:1 According to our company's
measurement standard.)*
Color reproduction
Full color 16,770,000 colors
Audio output
1W monaural speaker
Audio output terminal
Head Phone output Terminal (min16Ω)
In/out terminals
HDMI
HDMI Type A×1 (HDCP compliant)
Operation
environment
Temperature
5℃ ~ 35 ℃
Humidity
85% (max.)
Storage
temperature
-20℃~+60℃
Storage humidity
90% (max.) (no condensation)
Input voltage
DC12V~19V
Power
(Supplied)
AC adapter
Input:AC90~264V、50~60Hz
Output:DC12V
Power
consumption
36W(DC12V, 3.0A)
(ECO MODE OFF / Bright(MAX) / with USB power supply 2A)
25W(DC12V, 2.1A)
(ECO MODE OFF / Bright(MAX) / without USB power supply 2A)
USB power
supply(DC)
Output Voltage 5V ± 5%
Output Current 2A(Max.)
External dimensions
95 mm (W) x 153 mm (D) x 36 mm (H* including the
rubber foot)
Weight
300g
6 SPECIFICATIONS
SPECIFICATIONS
* The contrast ratio between the maximum white luminance and the minimum black
luminance for the projection system.
70
Page 71
Power
DC 3V (Button battery: CR2032)
Operating range
6m
External dimensions
50 mm x 90 mm x 10 mm
Weight
28.5g(including battery)
Remote control *with a battery inserted
・・・・・・・・・・・・・・・・・
1pce
Power cord
・・・・・・・・・・・・・・・・・
1pce
AC adapter
・・・・・・・・・・・・・・・・・
1pce
HDMI Cable
・・・・・・・・・・・・・・・・・・
1pce
Important safeguard& Quick start guide
・・・・・・・・・・・・・・・・・
1pce
Warranty card
・・・・・・・・・・・・・・・・・
1pce
Remote control
Supplied accessories
71
Page 72
Signal mode
Resolution
(H x V)
Horizontal
frequency
(kHz)
Vertical
frequency
(Hz)
640 × 350
640
×
350
31.5
70.1
TEXT (70Hz)
720
×
400
37.9
70.0
TEXT (85Hz)
720
×
400
37.9
85.0
VGA (60Hz)
640
×
480
31.5
59.9
640 × 480 (67Hz)
640
×
480
35.0
66.7
VGA (72Hz)
640
×
480
37.9
72.8
VGA (75Hz)
640
×
480
37.5
75.0
VGA (85Hz)
640
×
480
43.3
85.0
SVGA (56Hz)
800
×
600
35.2
56.3
SVGA (60Hz)
800
×
600
37.9
60.3
SVGA (72Hz)
800
×
600
48.1
72.2
SVGA (75Hz)
800
×
600
46.9
75.0
SVGA (85Hz)
800
×
600
53.7
85.1
832 × 624 (75Hz)
832
×
624
49.7
74.5
XGA (60Hz)
1024
×
768
48.4
60.0
XGA (70Hz)
1024
×
768
56.5
70.1
XGA (75Hz)
1024
×
768
60.0
75.0
XGA (85Hz)
1024
×
768
68.7
85.0
1152 × 864 (75Hz)
1152
×
864
67.5
75.0
1152 × 870 (75Hz)
1152
×
870
68.7
75.1
W-XGA(60Hz)
1280
×
768
47.7
60.0
1280×800 (60Hz)
1280
×
800
49.7
60.0
1280×800 (75Hz)
1280
×
800
62.8
74.9
1280×800 (85Hz)
1280
×
800
71.6
84.8
1280×960 (60Hz)
1280
×
960
60.0
60.0
1280×960 (85Hz)
1280
×
960
85.9
85.0
SXGA (60Hz)
1280
×
1024
64.0
60.0
SXGA (75Hz)
1280
×
1024
80.0
75.0
LIST OF COMPATIBLE SIGNALS
The following system modes are available with the projector.
The projector will detect the input signal and select the appropriate system mode
automatically.
Computer signal input format (for HDMI)
72
Page 73
Signal mode
Resolution
(H x V)
Horizontal
frequency
(kHz)
Vertical
frequency
(Hz)
1360×768(60Hz)
1360
×
768
47.7
60.0
SXGA+ (60Hz)
1400
×
1050
65.3
60.0
WXGA+(60Hz)
1440
×
900
55.9
59.9
WXGA+(75Hz)
1440
×
900
70.6
75.0
WSXGA+(60Hz)
1680
×
1050
65.3
60.0
Signal mode
Resolution
(H x V)
Horizontal
frequency
(kHz)
Vertical
frequency
(Hz)
480i
720
×
480
15.73
59.94
480i
720
×
480
15.75
60.00
480p
720
×
480
31.47
59.94
480p
720
×
480
31.50
60.00
576i
720
×
575
15.63
50.00
576p
720
×
575
31.26
50.00
720p
1280
×
720
37.50
50.00
720p
1280
×
720
44.95
59.94
720p
1280
×
720
45.00
60.00
1080i
1920
×
1080
28.13
50.00
1080i
1920
×
1080
33.71
59.94
1080i
1920
×
1080
33.75
60.00
1080p
1920
×
1080
26.97
23.98
1080p
1920
×
1080
27.00
24.00
1080p
1920
×
1080
56.25
50.00
1080p
1920
×
1080
67.43
59.94
1080p
1920
×
1080
67.50
60.00
1080p
1920
×
1080
67.5
60.0
■ An image with higher resolution will be compressed and displayed
■ When the image is compressed, the thickness of the characters or lines
may not be uniform or the color may be blurred.
■ Depending on the computer used, some adjustments may be needed.
Refer to “DETAIL SETTINGS” (Page53) for details.
N o t e
Video signal input format (for HDMI)
73
Page 74
TRADEMARKS
is a registered trademark of ELMO Co., Ltd.
DLP(Digital Light Processing) is a trademark of Texas Instruments.
VGA, XGA, and SXGA are trademarks or registered trademarks of International Business
Machines Corp.
iPhone and iPad are trademarks or registered trademarks of Apple Inc. in the U.S. and
other countries.
iOS is a trademark or registered trademark of Cisco Systems Inc. in the U.S. and other
countries.
HDMI, logo and High-Definition Multimedia interface are trademarks or
registered trademarks of HDMI Licensing LLC.
Microsoft, Windows, Word, Excel and PowerPoint are trademarks or registered
trademarks of Microsoft Corporation in the U.S. and other countries.
Adobe PDF is a trademark or registered trademark of Adobe Systems Incorporated in the
U.S. and other countries.
All other company/ product names described in this manual are trademarks or registered
trademarks of their respective companies.
74
Page 75

7 WARRANTY AND AFTER SALES
SERVICE
[LIMITED WARRANTY AND REPAIR]
■ WARRANTY PERIOD
We offer you a 1 year limited warranty on our product, from the date of the original purchase
(“Warranty Period”).
Keep the warranty card included in the product package in a safe place.
Faults reported outside of the Warranty Period are subject to a chargeable repair.
■ WARRANTY COVERAGE
This warranty shall apply only when the projector is used under the conditions and in the
manner intended by ELMO as specified in the instruction manual during the Warranty Period.
■ EXCLUSIONS AND LIMITATIONS
This warranty does not cover the following:
(1) Failure or damage caused by misuse, improper application, wrong operation other than
specified in the instruction manual;
(2) Failure or damage resulting from repair, modification or cleaning by disassembling by
someone other than authorized service center;
(3) Failure or damage caused by mud, sand, water, dropping or impact;
(4) Failure or damage caused by fire, salt, gas, earthquake, wind, flood, environmental
pollution, lightning, electrical surges or other natural disasters;
(5) Failure or damage that occurs in shipment or during transportation after the purchase or
the failure or damage caused by dropping or improper storage after the purchase;
(6) When the warranty card is lost; and
(7) If the information such as the name of the shop and the date of purchase is altered.
■ REPAIR CONDITIONS
(1) The warranty repair is available only for products manufactured by ELMO.
(2) We do not provide on-site repair service. Faulty units have to be brought to our customer
service or to be sent to our customer service at customer’s expenses.
(3) Contact our customer service (described below) when you need repair service.
75
Page 76

■ [OTHER CUSTOMER SERVICE]
■ Customer service
You can inquire the following inquiries about the projector to our customer service;
(1) About repair service
(2) About instruction of use, sale or other issues
76
Page 77
6-14, Meizen-cho, Mizuho-ku
Nagoya, 467-8567, Japan
ELMO USA CORP.
ELMO Europe SAS
Headquarters
Headquarters
1478 Old Country Road
Immeuble Elysées La Défense,
Plainview, NY 11803, U.S.A.
7C, Place du Dôme,
Tel. (516) 501-1400 Fax.(516) 501-0429
92056 Paris La Défense, France
E-mail: [email protected]
Tel. 33 (0) 1 73 02 67 06
Web: http://www.elmousa.com
Fax. 33 (0) 1 73 02 67 10
E-mail: [email protected]
Web: http://www.elmoeurope.com
West Coast Branch
German Branch
5676 Corporate Avenue
Hansaallee 201, Haus 1
Cypress, CA 90630, U.S.A.
40549 Düsseldorf Germany
Tel. (714) 828-8457 Fax. (714) 823-8429
Tel. 49 (0) 211 544756 40
Fax. 49 (0) 211 544756 60
OVERSEAS SUBSIDISRY COMPANIES
6X1SPJEC1(en) R0-Xfx
77
 Loading...