

Page 1

Contents
Safety summary
iii
Introduction
Unpacking the projector 2
Compatibility 4
Cables and adapters 5
Usage guidelines 5
If you need assistance 6
Setting up the LitePro 580
Getting started 7
Positioning the projector 8
Connections to the projector 8
Connecting a computer 9
Connecting video equipment 14
Connecting the remote control by cable 17
Powering up and adjusting the LitePro 580 18
Turning off the LitePro 20
Using the LitePro 580
Basic functions 21
Display mode controls 23
Menu mode controls 24
Using the menus 25
Reference to menu functions 26
21
1
7
Using LP Utilities
Connecting your computer 33
Installing the LP Utilities softwa re 34
LP-Link Utility 35
LP Remote Programmer Utility 43
LitePro 580 User’s Guide i
33
Page 2

Maintenance
Cleaning the lens 47
Cleaning the remote control 48
Cleaning the fan intake filter 49
Replacing the projection lamp 50
Replacing batteries in the remote control 52
Replacing the fuse 53
47
Troubleshooting
Before you call for assistance 55
Common problems and solutions 56
Monitor lights 59
Appendix
Compatibility and cabling 61
About broadcast video 61
About computer video 62
Specifications 63
Pin assignments 64
Order information 66
Laptop display activation chart 67
Index
55
61
71
ii LitePro 580 User’s Guide
Page 3

Safety summary
Please read these instructions before using your LitePro. Failure to
comply with these instructions could result in fire, electrical shock,
personal injury or damage to equipment.
These graphics are used throughout this manual to draw your
attention to important information about the LitePro:
Do not look into the lens!
Be very careful not to look into the projection lens when the projector
is turned on. The bright light may harm your eyes. Be especially
careful to keep children from looking into the lens.
Additional useful details or tips
Steps to avoid damage to your equipment
Steps to avoid personal injury
Power source
Use only a three-wire grounding type power source. The power
source should not exceed 250 volts rms between the supply
conductors or between either conductor and the ground.
Power cord
Use only the power cord that was shipped with the LitePro. Although
other power cords might be similar in appearance, they have not
been safety-tested with the LitePro. Do not use a power cord if it has
become damaged or frayed. Contact your In Focus dealer or call In
Focus if you need to replace your LitePro power cord.
LitePro 580 User’s Guide iii
Page 4

Safety summary
Grounding
The LitePro is grounded through the grounding conductor on the
power cord. To avoid electric shock, plug the power cord into a
properly wired receptacle. Do not defeat the purpose of the
ground ing-type plu g .
Fuse
For protection against the risk of fire, use only a fuse of the specified
type. Refer to page 63 for more information about fuse specifications
and to page 53 for instructions on replacing the fuse.
Lamp
To avoid overheating and unacceptable image quality, replace the
projection lamp with a lamp o f the specified type. Refer to page 63 for
lamp specifications and to page 50 for instructions on replacing the
lamp.
Hot surfaces
Allow the LitePro to cool at least 20 minutes before replacing a lamp.
When you open the lamp housing, be very careful not to touch the
hot surfaces inside.
Ventilation and overheating
Openings in the LitePro case provide ventilation to protect it from
overheating. Keep loose papers and other objects well away from the
bottom, top and side grills. Do not place the LitePro on top of or close
to a computer or other heat-producing equipment.
Liquid spills
Do not set drinks on top of the LitePro. Spilled liquids can flow inside
and damage the LitePro.
Do not disassemble
All service must be performed by an authorized In Focus service
center. The only user-serviceable part in the LitePro is the projection
lamp, which you can replace by opening the lamp cover on the
bottom of the projector. Do not open any other part of the LitePro.
iv LitePro 580 User’s Guide
Page 5

Introduction
The In Focus Systems LitePro 580 is a multimedia projector designed
for portability, durability, and ease of use. It displays the brightest
and clearest images generated by your computer and video equipment.
The LitePro 580 connects to most IBM-compatible and Macintosh
computers. It also connects to VCRs, laser disc players, and camcorders using any of the worldwide video standards, including NTSC,
PAL, and SECAM. Both computer and video sources have separate
audio channels for better sound quality direct from the projector or
from external speakers. The versatility of the LitePro 580 allows you
to enhance your presentations by switching back and forth between
computer-generated graphics and full-motion video with sound.
LitePro 580 User’s Guide 1
Page 6
Introduction
9
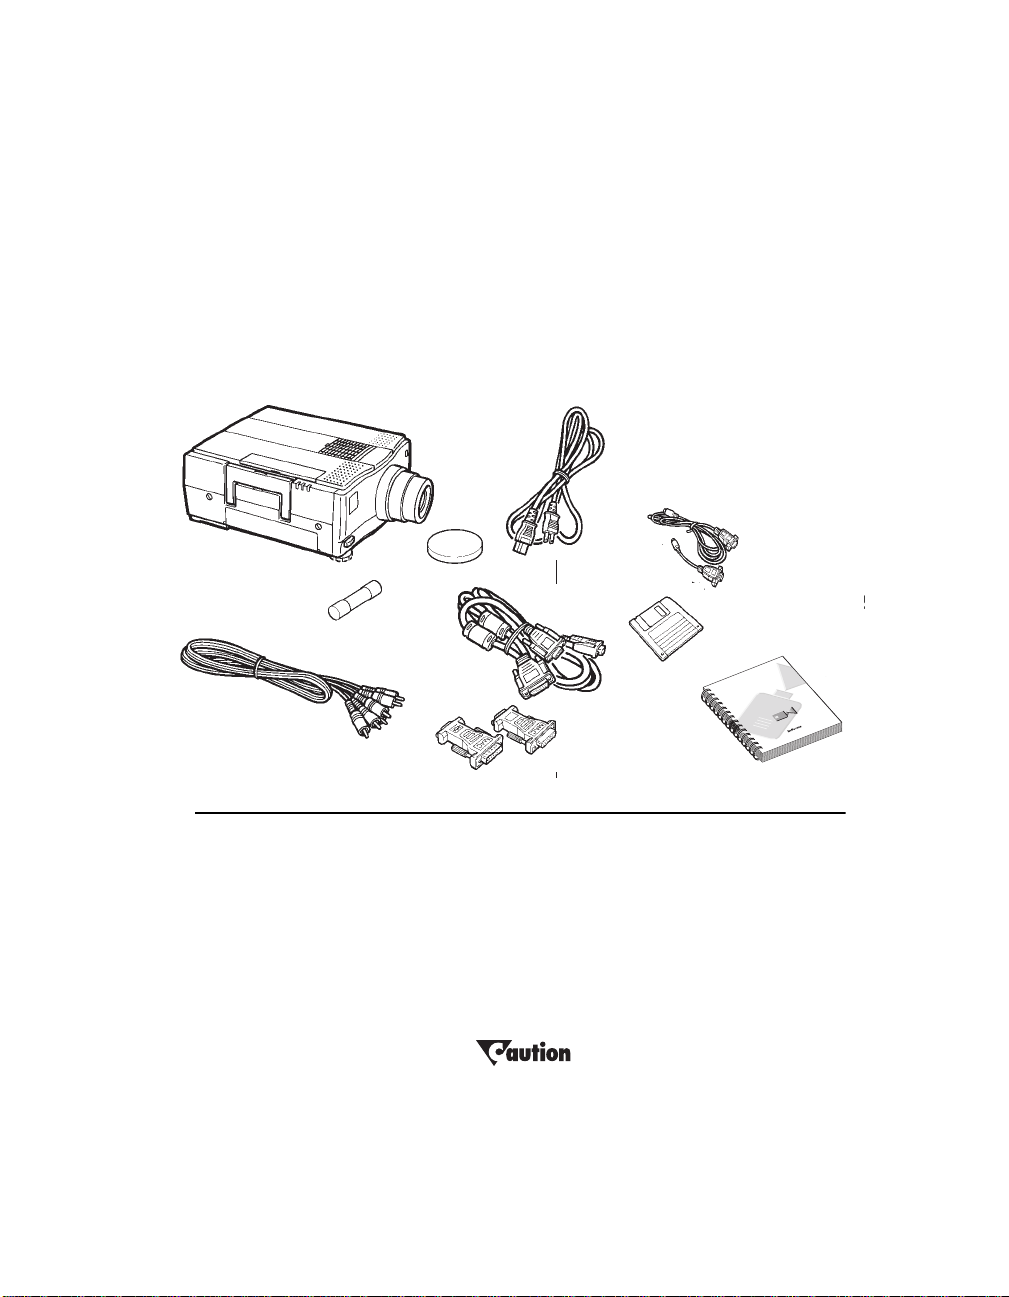
Unpacking the projector
The projector comes with the pa rts shown below. Check to make sure
all are included. If any parts ar e missing, cont act your dealer imm ediately.
If you are experienced in setting up presentation systems, use the
Quick Start
connecting and operating the projector, refer to the appropriate chapters in this manual.
.
card at the front of this manual. For complete details on
1
8
3
2
4
5
10a
10b
9
11
10c
c
7
6
s
Shipping Box Contents
1. LitePro 580 LCD projector 8. Remote control
2. Lens cover 9. Batteries for the remote control
3. Power cord 10. LitePro Utilities kit
4. Fuse (6.3A. 250V. T.) a. LitePro Utilities serial cable
5. VGA (Y-shaped) cable b. Mac adapter for serial cable
6. Mac adapters for VGA cable c. LitePro Utilities disks
7. Audio/video cable 11. LitePro 580 User’s Guide
It is recommended that you do not reuse the LitePro’s
shipping carton to transport or ship the LitePro.
2 LitePro 580 User’s Guide
Page 7
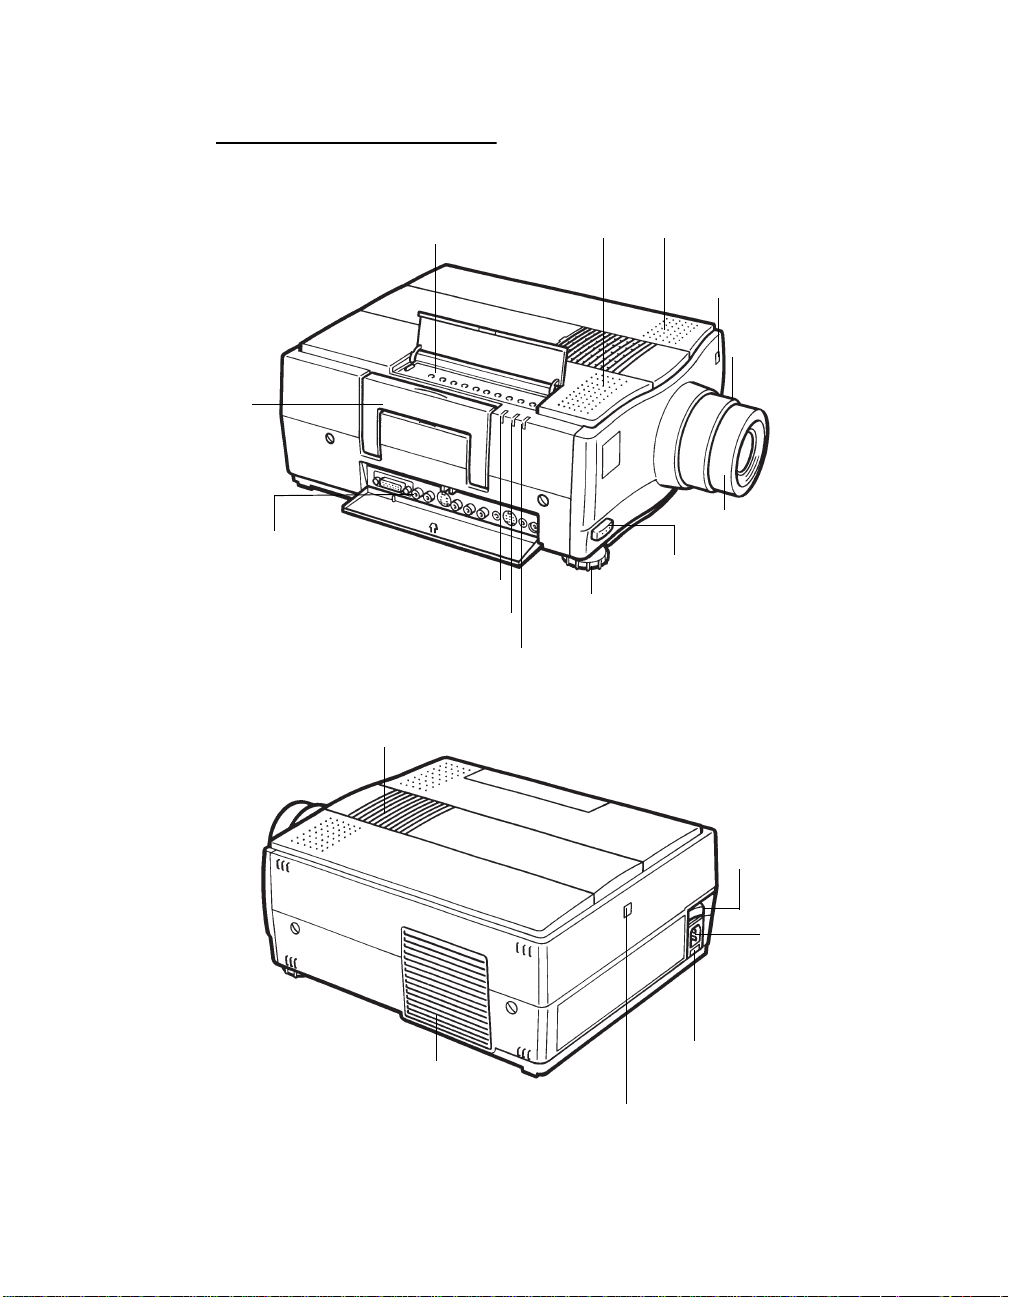
LitePro 580—Front and rear view
Introduction
handle
connector ports
projector control panel
temperature monitor
lamp monitor
operation monitor
fan intake grill
speakers
remote control
receiver
lens zoom ring
lens focus ring
elevator foot button
elevator foot
power switch
power cord
connector
fuse holder
fan exhaust grill
remote control receiver
LitePro 580 User’s Guide 3
Page 8
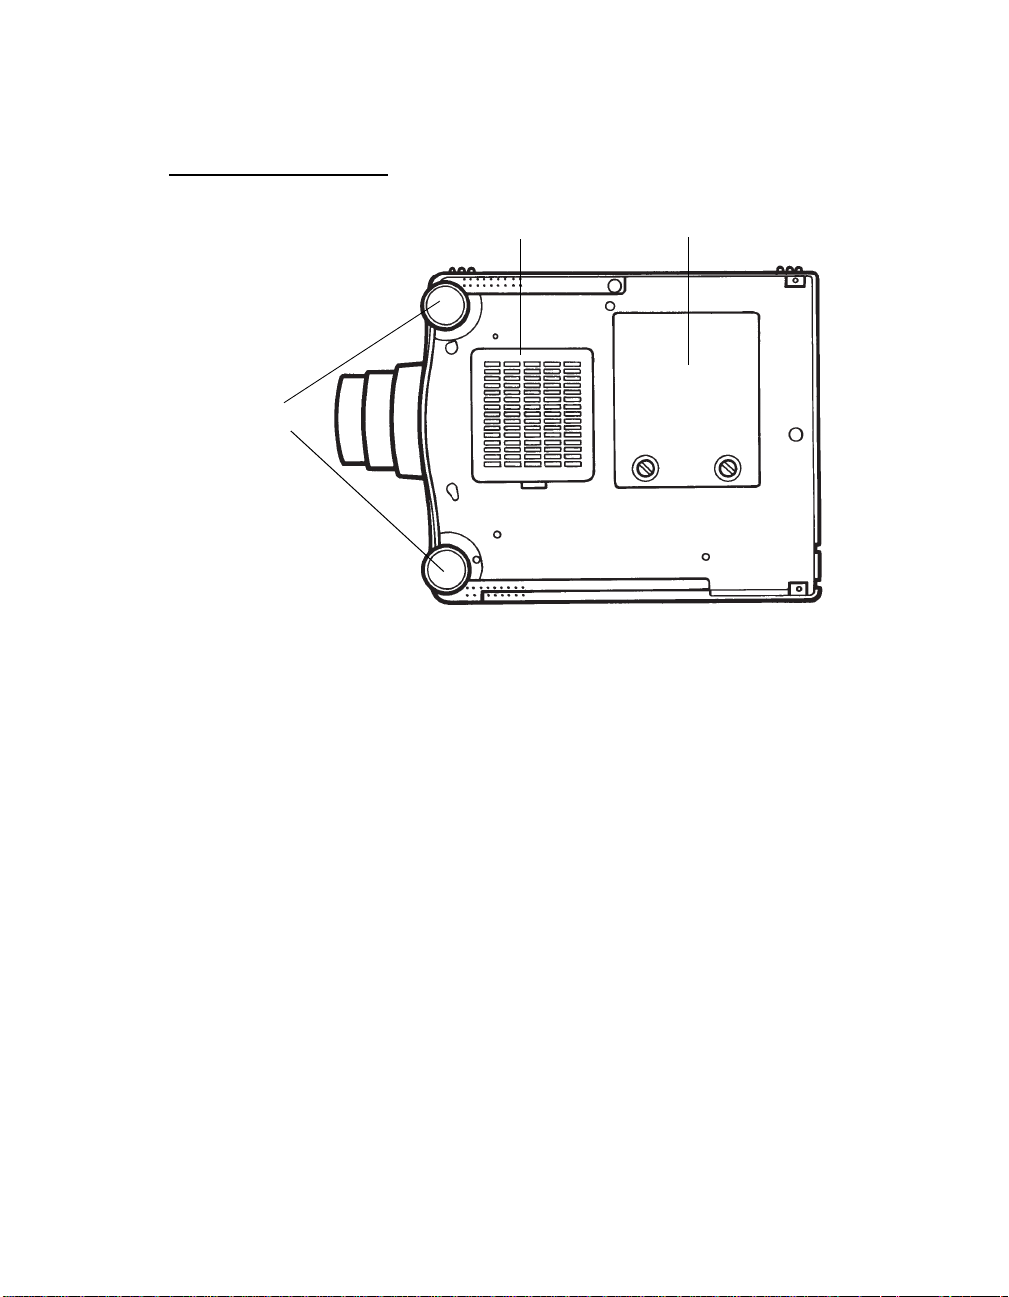
Introduction
LitePro 580—Bottom view
elevator feet
Compatibility
The LitePro 580 is compatible with a wide variety of computers and
video devices, including:
• IBM-compatible desktop and laptop systems
• Macintosh systems (including LC, Performa, Quadra,
PowerBook, and Power Mac units)
fan intake grill
lamp cover
• Various VCRs, camcorders, laser disc and CD players
4 LitePro 580 User’s Guide
Page 9

Cables and adapters
The LitePro 580 comes with these cables and adapters:
• VGA cable, a Y-shaped cable that connects the LitePro to your
computer and its monitor . Its ends ar e labeled “LCD,” “Monitor,”
and “VGA.”
• Two Macintosh adapters for the VGA cable.
• Audio/video cable to connect the LitePro to your video
equipment.
• LP Utilities serial cable to connect the LitePro to your computer.
• Macintosh adapter for the LP Utilities serial cable.
• Power cord.
Usage guidelines
• The LitePro can become very warm during use. Make sure there
is no flammable material such as paper or cloth under, on, or near
the projector. Use extreme care when handling the projector. We
recommend that you let the projector cool before lifting it.
Introduction
• Do not block the ventilating grill on the left side of the projector.
Restricting the air flow can cause it to overheat and shut down
automatically.
• Do not place objects on or insert metallic objects in the projector.
• Avoid leaving the LitePro in direct sunlight or extreme cold for
extended periods of time. If this happens, allow it to reach room
temperature before use.
• Do not expose the LitePro to moisture or dust.
• Handle the LitePro as you would any product with glass
components. Do not drop it.
• Transport the LitePro in the original shipping carton or vendor-
approved hard or soft case.
LitePro 580 User’s Guide 5
Page 10

Introduction
If you need assistance
The first place to look for help is in this manual. Check the
chapter on “Troubleshooting” beginning on page 55.
If this manual does not answer your question, call your In Focus
dealer. You can also call In Focus Technical Support directly at
1-800-294-6400
through Friday. In Europe, call In Focus in The Netherlands at
31 (0) 2503-23200
Your LitePro is backed by a limited one-year warranty. For
details, see the last page of this manual.
. Call between 6 a.m. and 5 p.m. PST, Monday
.
6 LitePro 580 User’s Guide
Page 11

Setting up the LitePro 580
This chapter describes how to position the LitePro for optimum
viewing, how to connect computers and video equipment to the
LitePro, and how to power up the projector.
Getting started
Choose a location where you can dim the lighting.
1.
• To use the LitePro in a well-lit room, use a special high gain
screen, which you can obtain from your In Focus dealer.
Place the LitePro on a flat surface.
2.
Orient the LitePro so that its lens is at a right angle to the projec-
3.
tion screen.
• If you want to use the LitePro’s Rear Project feature, set it up
behind a translucent screen. See “Rear Proj” on page 28.
Remove the lens cover.
4.
Plug the power cord into the LitePro, then plug it into your elec-
5.
trical outlet.
Always use the power cord that was shipped with your
LitePro. The LitePro accepts power from 110-120 VAC and 220240 VA C, 50 or 60 Hz, three-wire type grounded sources. When
you disconnect the LitePro, always remove the power cord
from the electri c al outlet first, then from the LitePro.
It is recommended that you connect a power strip
between the LitePro and your electrical outlet to
LitePro 580 User’s Guide 7
protect against a power surge.
Page 12
Setting up the LitePro 580
Positioning the projector
The distance from the LitePro 580 to the screen determ ines the size o f
the projected image. Use of the LitePro’s X1.4 zoom lens also affects
screen size. The table below indicates the size of the screen image
when using the maximum or minimum zoom at various distances.
Approximate size of image determined by distance of the projector to the screen
Distance to screen
in ft. (m) 4(1.2) 8 (2.5) 12 (4) 19 (6) 27 (8) 40 (12)
Diagonal image size
in ft. (m) with
maximum zoom
Diagonal image size
in ft. (m) with
minimum z oom
2.5 (1) 5 (1.5) 8 (2.5) 12 (3.5) 17 (5) 25 (7)
2 (.5) 3 ( 1) 6 (2) 8 (2.5) 12(3.5) 18 (5.5)
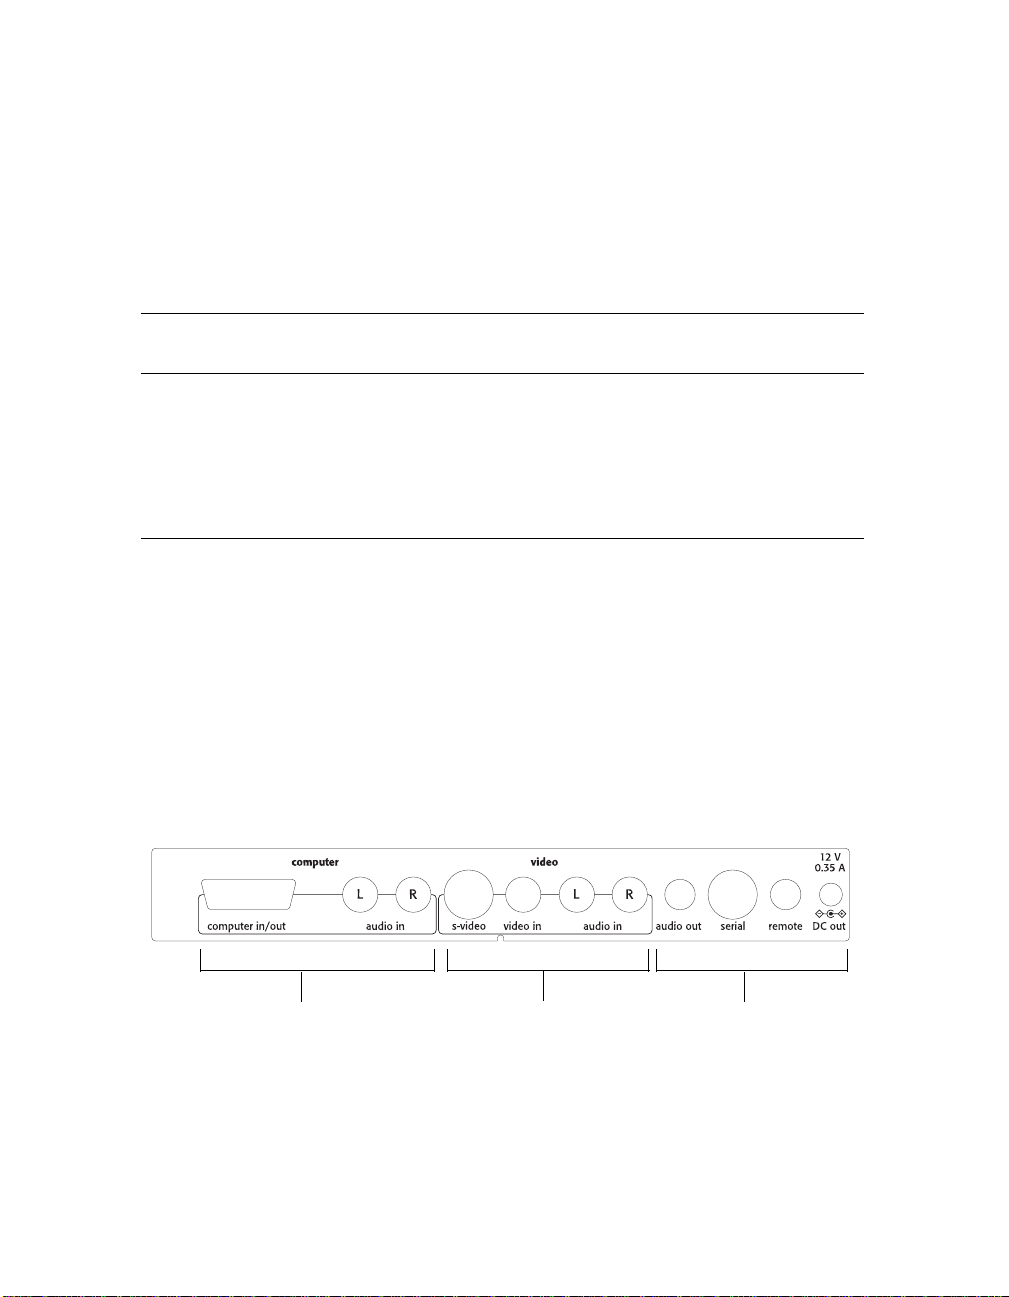
Connections to the projector
The connection ports of the LitePro 580 ar e located on the right side of
the projector , just below the handle. Push lightly on the panel labeled
“Push” to reveal them. Cables from your computer or video source as
well as cables to speakers, control devices, and low voltage powered
equipment connect to the projector here.
Computer Video equipment
Speaker, control device,
power output portsinput ports input ports
8 LitePro 580 User’s Guide
Page 13

Connecting a computer
Different computers require different connections. Connections to a
Macintosh differ slightly from those to an IBM-compatible computer.
Connections to a desktop unit differ from those to a laptop.
The LitePro 580 works with IBM, IBM-compatible, and Macintosh
computers that have a video RGB output port.
To connect your computer, you need the Y-shaped VGA cable. If you
have a Macintosh, you also need the Macintosh adapters. We
recommend that you turn off your computer, monitor and projector
whenever you connect or disconnect cables.
Setting up the LitePro 580
LitePro 580 User’s Guide 9
Page 14
Setting up the LitePro 580
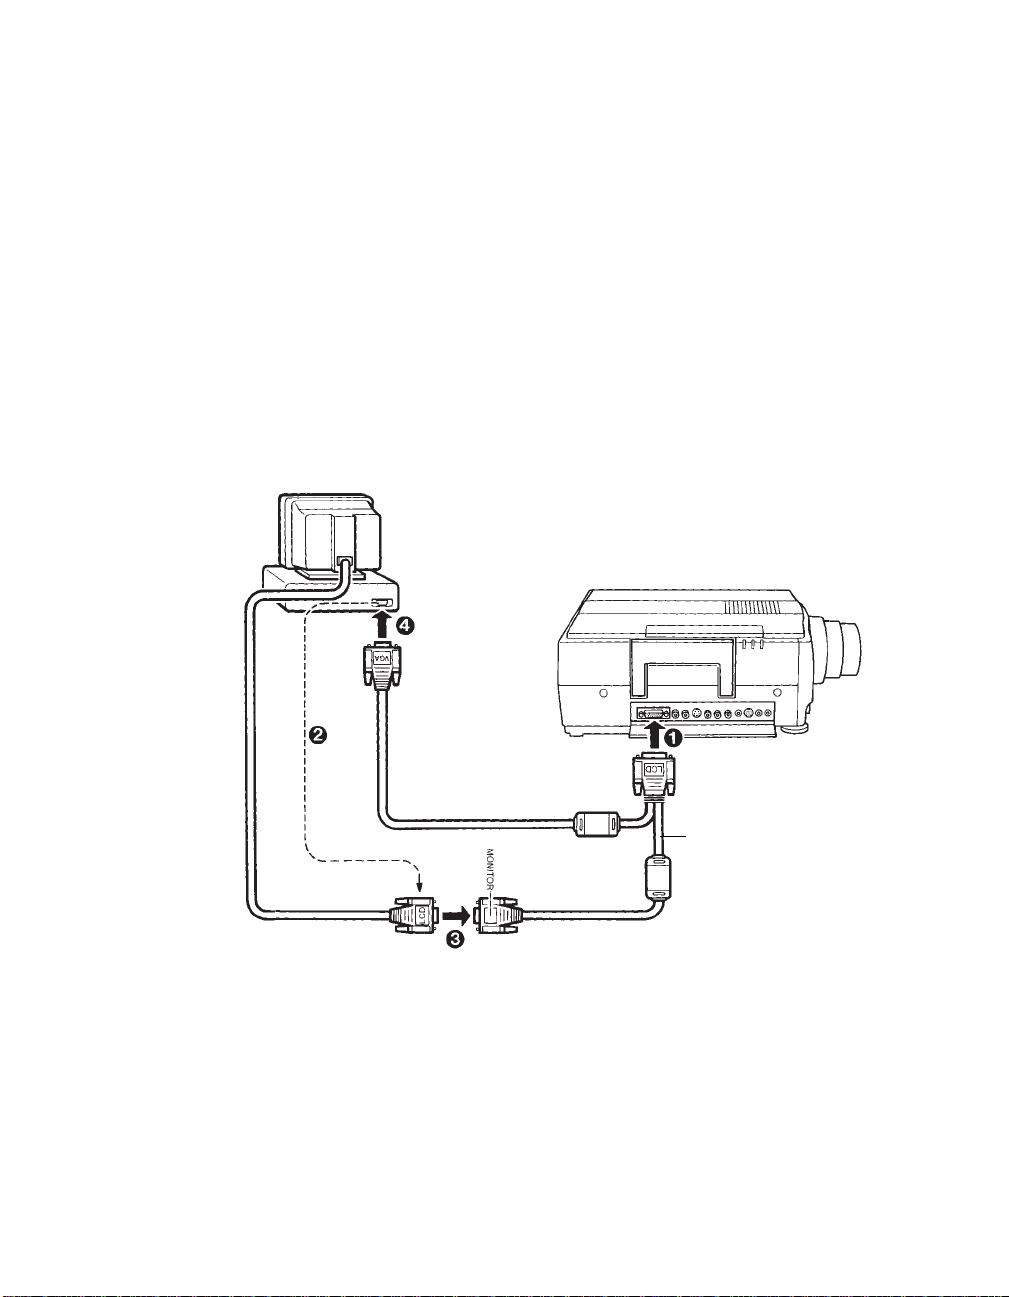
Connecting an IBM-compatible desktop computer
1. Plug the LCD connector on the VGA cable into the projector’s
2. Unplug the monitor cable from the computer’s graphic port.
3. Plug the monitor cable that you just removed into the MONITOR
4. Plug the VGA connector on the VGA cable into the computer’s
5. Tighten the thumb screws on all the connectors to ensure proper
6. Turn on the projector, monitor, and computer.
Computer port.
connector on the VGA cable.
graphics port.
grounding.
VGA Cable
10 LitePro 580 User’s Guide
Page 15
Setting up the LitePro 580
Connecting a Macintosh desktop computer
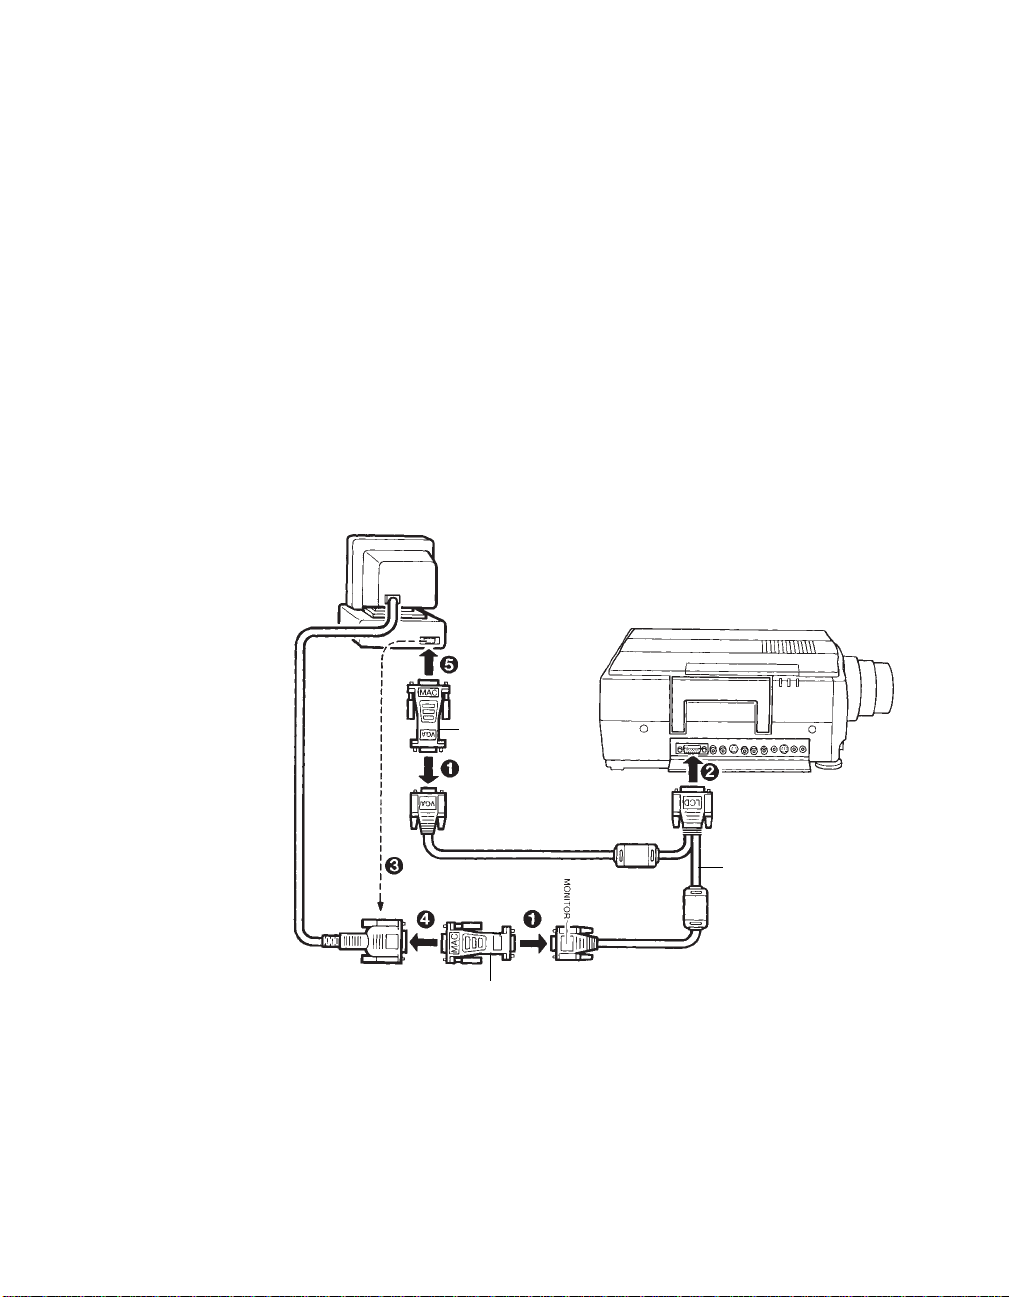
1. Attach one Mac adapter to the VGA connector and one Mac
adapter to the MONITOR connector of the VGA cable.
2. Plug the LCD connector on the VGA cable into the projector’s
Computer port.
3. Unplug the monitor cable from the computer’s monitor port.
4. Plug the monitor cable that you just removed into the MONITO R
connector (with the Mac adapter) on the VGA cable.
5. Plug the VGA connector (with the Mac adapter) on the VGA
cable into the computer’s graphics port.
6. Tighten the thumb screws on all the connectors to ensure proper
grounding.
7. Turn on the projector, monitor, and computer.
Mac Adapter
VGA Cable
Mac Adapter
LitePro 580 User’s Guide 11
Page 16
Setting up the LitePro 580
Connecting an IBM-compatible laptop computer
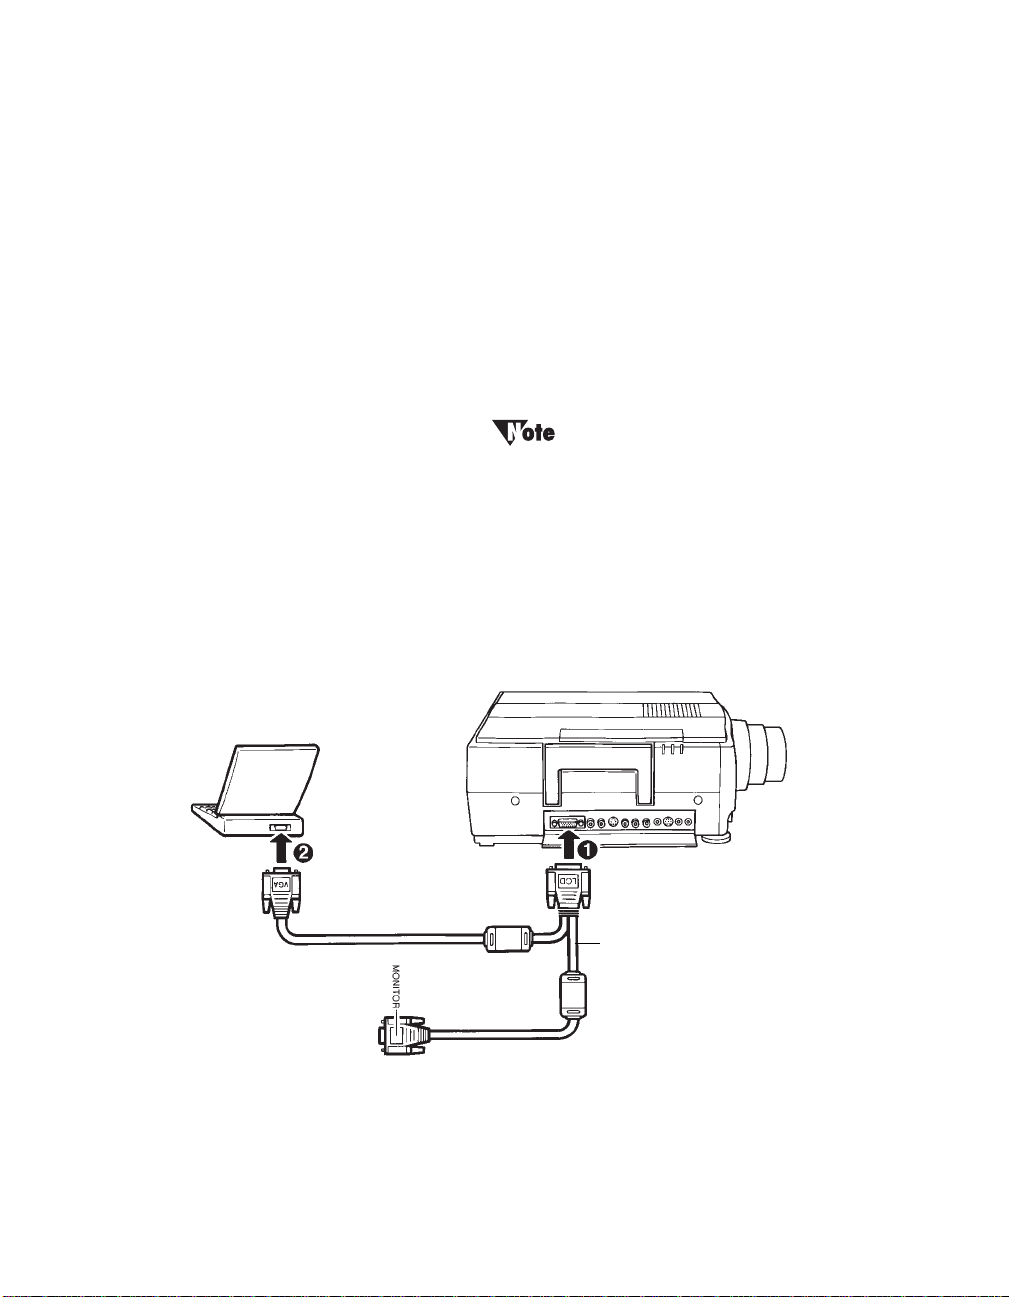
1. Plug the LCD connector on the VGA cable into the projector’s
2. Plug the VGA connector on the VGA cable into the laptop’s
3. Tighten the thumb screws on the connectors to ensure proper
4. Turn on the projector and the laptop.
5. If necessary, activate the external display port. (Refer to the
Computer port.
graphics port.
grounding.
appendix of this manual for a list of activation commands.)
Many laptop computers do not automatically turn on
their external video port when a secondary display
device such as the LitePro is connected. Refer to your
computer manual for the command that activates
the external video port. Activation commands for
some laptop computers are listed in the Appendix on
page 67.
VGA Cable
12 LitePro 580 User’s Guide
Page 17
Setting up the LitePro 580
Connecting a Macintosh PowerBook
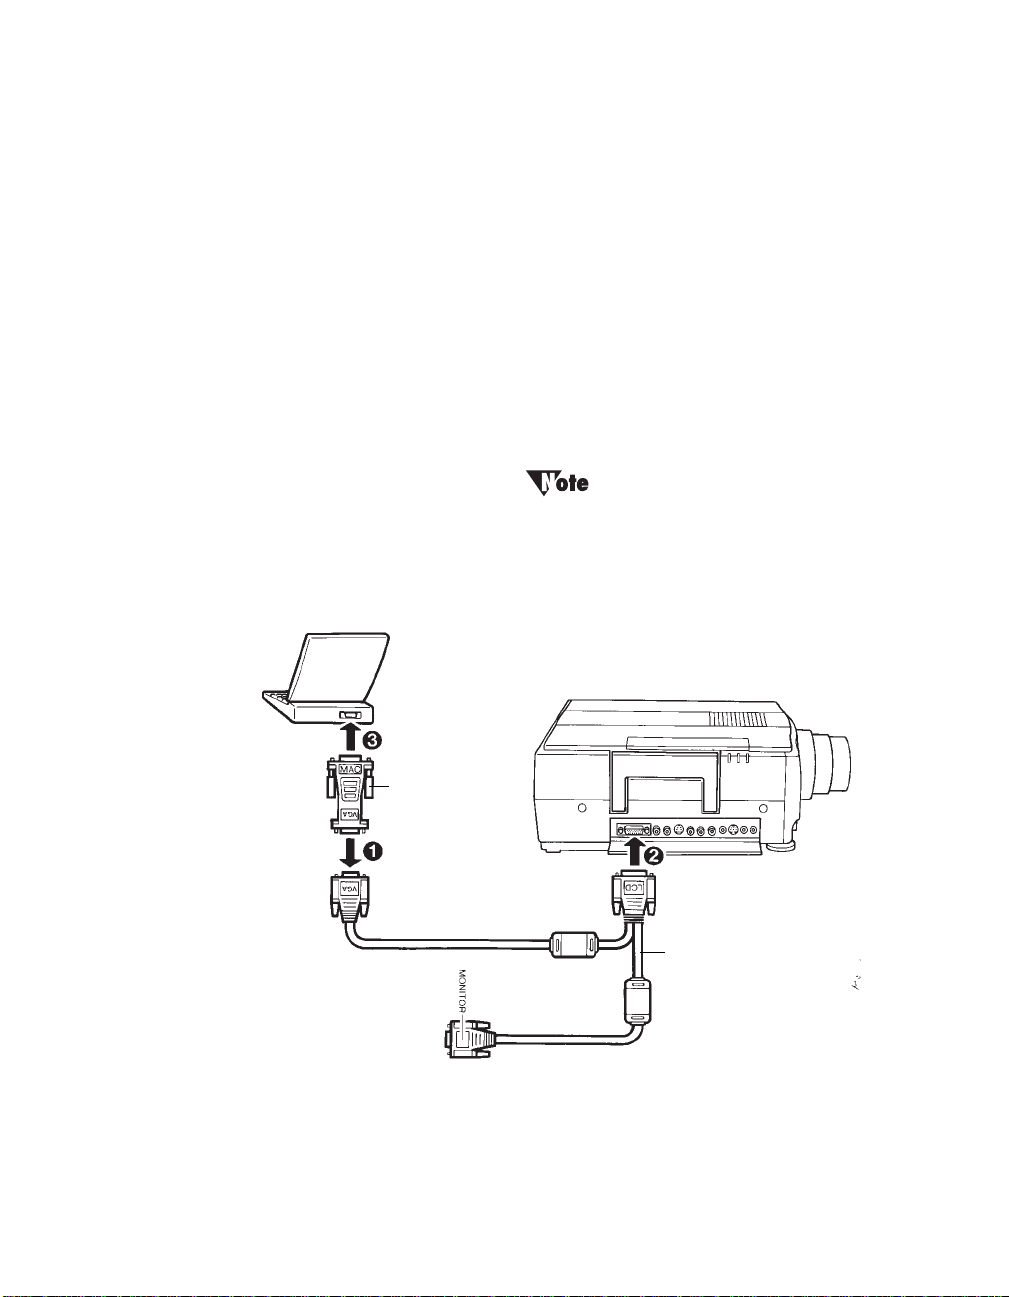
1. Attach one Mac adapter to the VGA connector of the VGA cable.
2. Plug the LCD connector on the VGA cable into the projector’s
Computer port.
3. Plug the VGA connector (with the Mac adapter) on the VGA
cable into the PowerBook’s video port.
4. Tighten the thumb screws on all connectors.
5. Turn on the projector.
6. Turn on the PowerBook.
7. Enable video mirroring by opening the PowerBook Display Con-
trol panel and selecting “Mirroring.”
PowerBooks require the video-out cable, provided
with each PowerBook, for external video. Use it to
connect the PowerBook to the Mac adapter on the
VGA cable.
Mac Adapter
VGA Cable
LitePro 580 User’s Guide 13
Page 18

Setting up the LitePro 580
Connecting video equipment
When connecting your VCR, camcorder, laser disc player, or other
video source, use the A/V cable included with the projector and the
LitePro 580’s ports marked “Video.”
The projector also accommodates higher quality S-Video signals. A
round, four-pin connector S-Video cable is not included with the
projector but is usually supplied with your video equipment. If both
video inputs are connected, the S-video input has priority. Use SVideo connections when your video equipment is within a few feet of
the projector. With the S-Video connection, the greater the distance
between the video source and the projector, the more the signal will
degrade.
The projector automatically detects the broadcast signal of the video
input and accommodates the major broadcast systems: NTSC , PAL
and SECAM. The projector also allows you to lock the projector to a
specific broadcast system signal. (See “Video Mode” on page 27.)
However, if the video signal does not match the locked broadcasting
system, the projector won’t reproduce the video image properly.
Connect your video equipment’s audio output to the “Audio In”
ports of either the Video source or the Computer source. If two audio
inputs are connected at the same time, you can use the Audio menu
to lock the projector to either of the two inputs. (See “Audio Source”
on page 29.)
14 LitePro 580 User’s Guide
Page 19
Setting up the LitePro 580
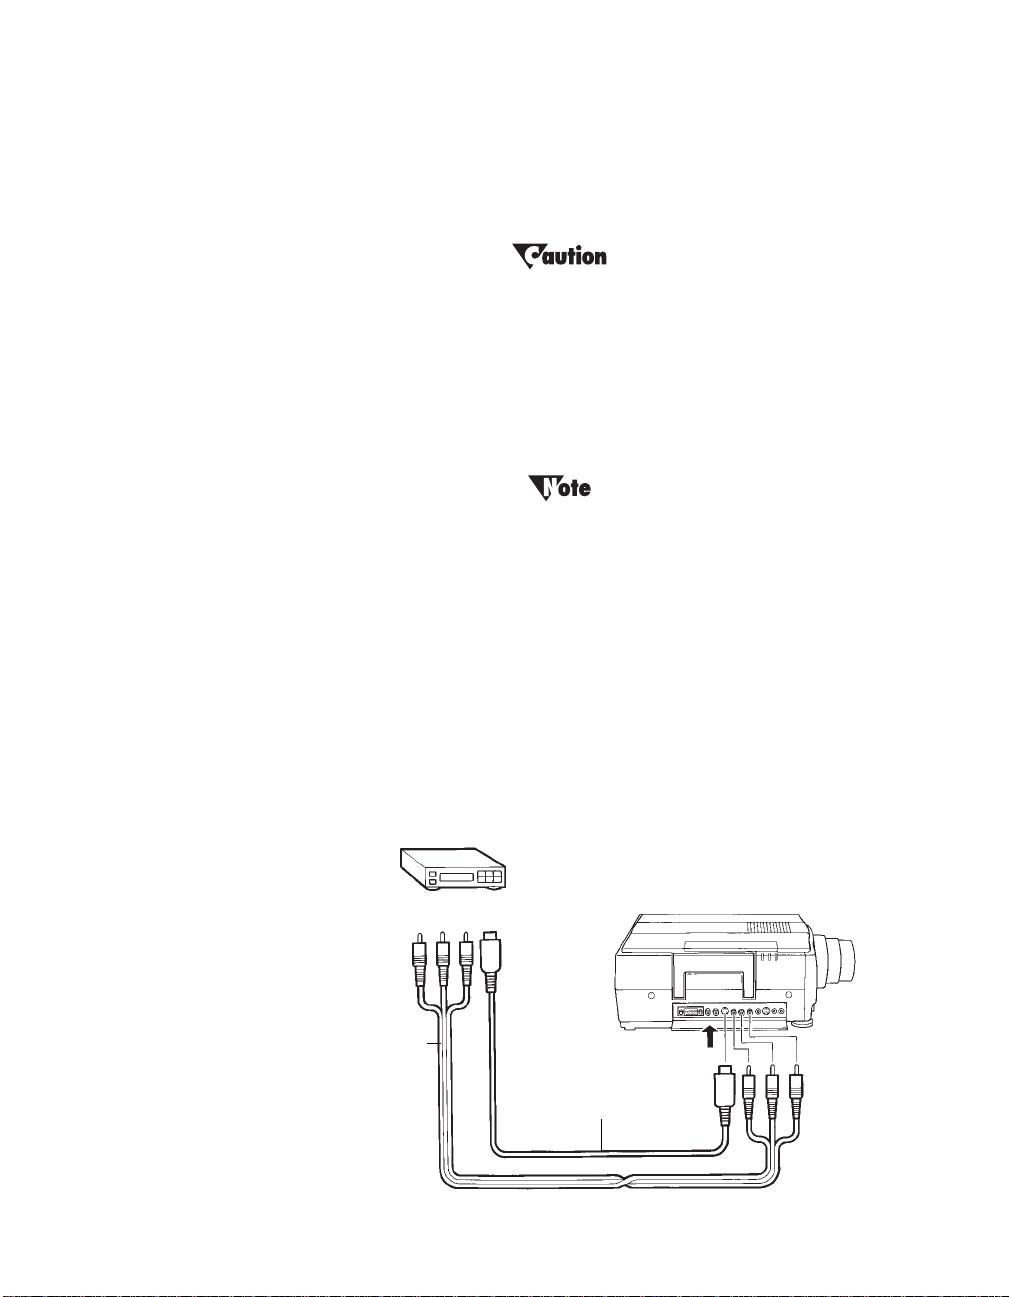
Connecting audio/video equipment
1. Plug the yellow connector of the audio/video cable into the
“Video Out” or “To Monitor” port on your video equipment. To
use the S-Video connection, plug the S-Video cable into the
“S-Video Out” port.
Your video source may also have a “Video Out” port
for a coaxial cable connection. Do not use this to
connect to the LitePro 580.
2. Plug the white connector of the audio/video cable into the
“Audio Out/L” port and the red connector into the “Audio
Out/R” port on the video equipment.
To connect a monaural signal, use only the “Audio
In/L” and “Audio Out/L” ports and the white
connector on the A/V cable.
3. Plug the other yellow connector of the audio/video cable into the
“Video In” port on the projector. If you are using S-Video, plug
the other end of the S-Video cable into the projector’s “S-Video”
port and unplug the yellow connector of the A/V cable.
4. Plug the other white connector of the audio/video cable into the
“Audio In/L” port and the other red connector into the “Audio
In/R” port on the projector.
.
A/V Cable
Yellow=Video
White=Left Audio
Red=Right Audio
LitePro 580 User’s Guide 15
Optional S-Video Cable
Page 20
Setting up the LitePro 580
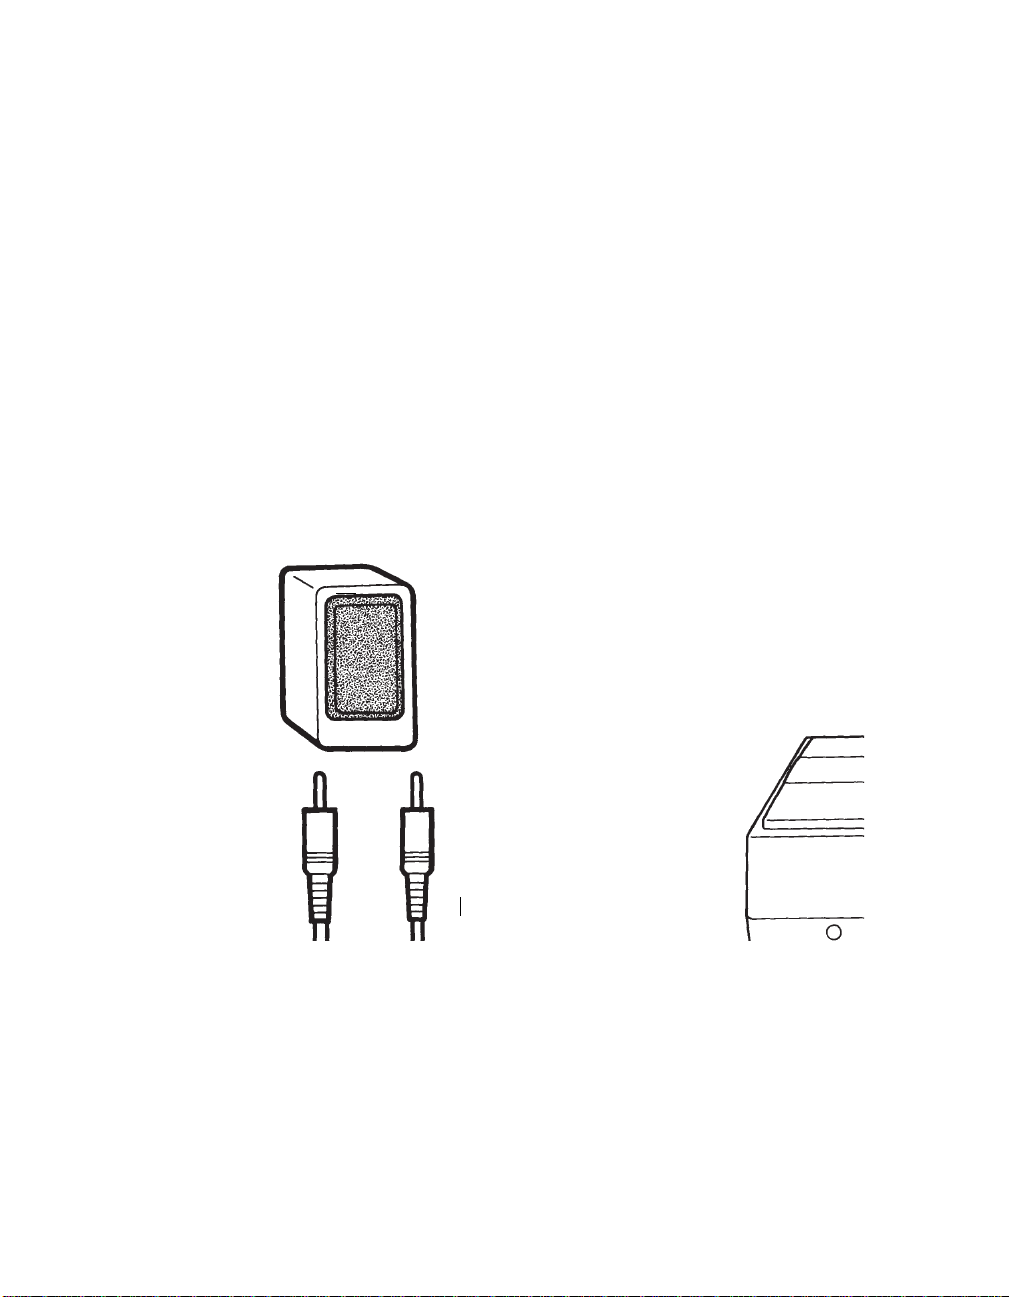
Connecting an external sound system
You can use an external public address system or an external selfamplified speaker system for presentations in large halls or lecture
rooms.
To connect the LitePro 580 to an external sound system, use an audio
cable (3.5mm stereo mini plug), an optional accessory available from
your In Focus dealer.
1. Plug one end of the audio cable into the “Audio Out” port on the
2. Plug the other end of the cable into the corresponding “Audio In”
3. Use the “Fade” feature on the Audio menu to adjust the audio
projector.
jack on the external speaker(s).
output. (See “Fade” on page 29.)
Amplified
speaker
Optional Audio Cable
16 LitePro 580 User’s Guide
Page 21
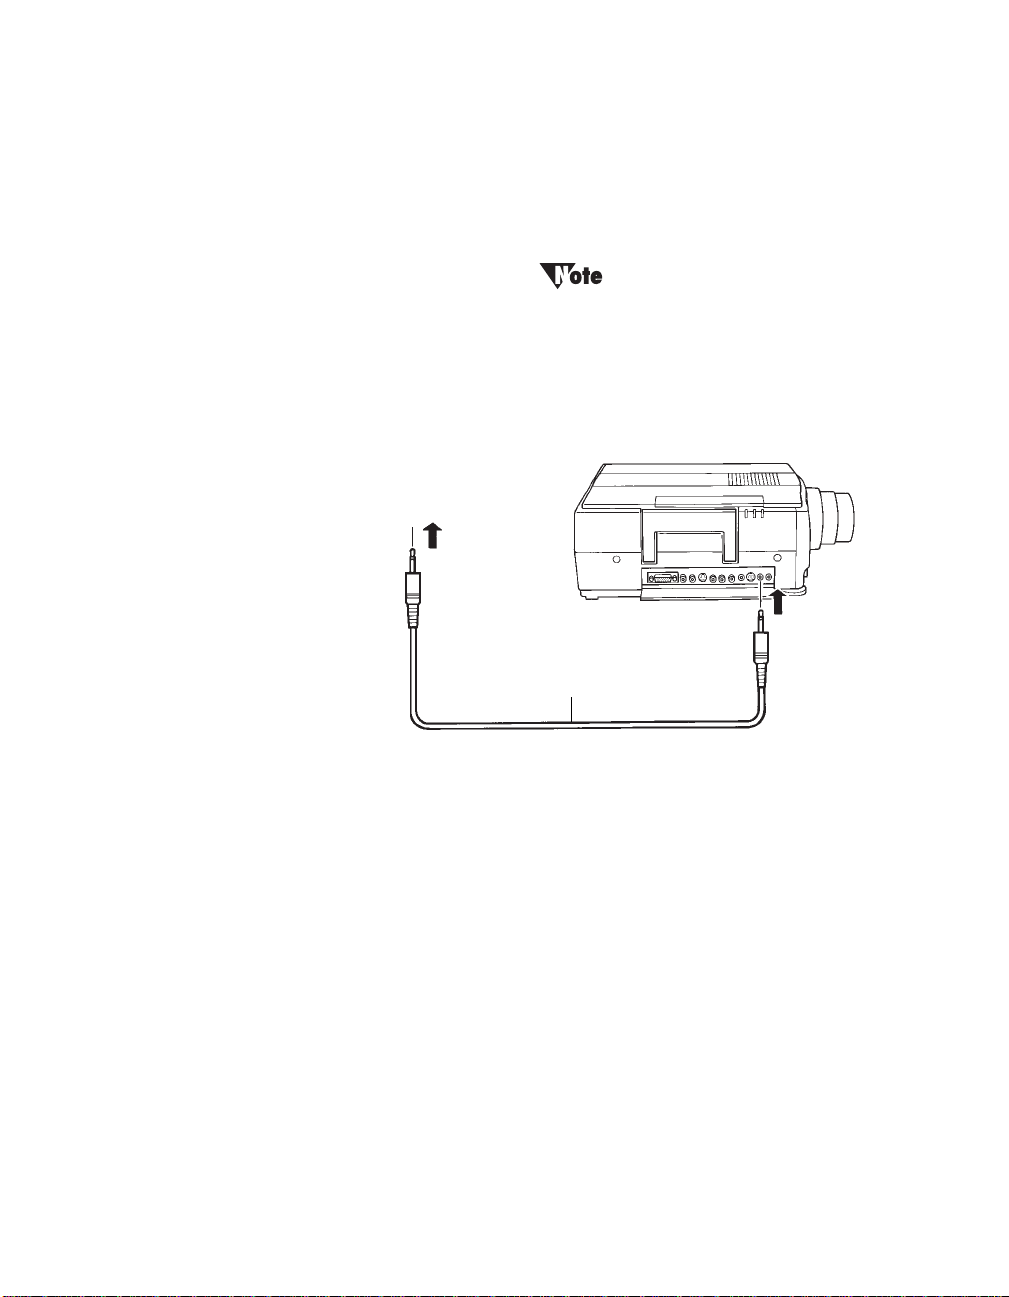
Connecting the remote control by cable
If the projector cannot receive the remote’s signal, as may be the case
if you are using rear projection, you can connect the remote directly
to the LitePro with a cable. The remote cable is an optional accessory
available from your In Focus dealer.
Make sure the remote control cable is securely
attached. If the cabl e is loose, the remote control
may not work properly.
Setting up the LitePro 580
Optional Remote Control Cable
LitePro 580 User’s Guide 17
Page 22
Setting up the LitePro 580
Powering up and adjusting the LitePro 580
1.
2.
Turn the power switch on.
• Allow ten seconds for the image to appear and 25 seconds for
full illumination.
• The lamp monitor begins flashing green. Once the projector
has warmed up, the lamp monitor stops flashing and lights
steadily in green.
• If a computer or video player is attached, the video signal is
projected. (If you are using a laptop computer, refer to the
Appendix for laptop monitor re-activation commands.)
Be very careful not to look directly into the lens
when the projector is turned on. The bright light may
harm your eyes. Be especially careful to keep
children from looking into the lens.
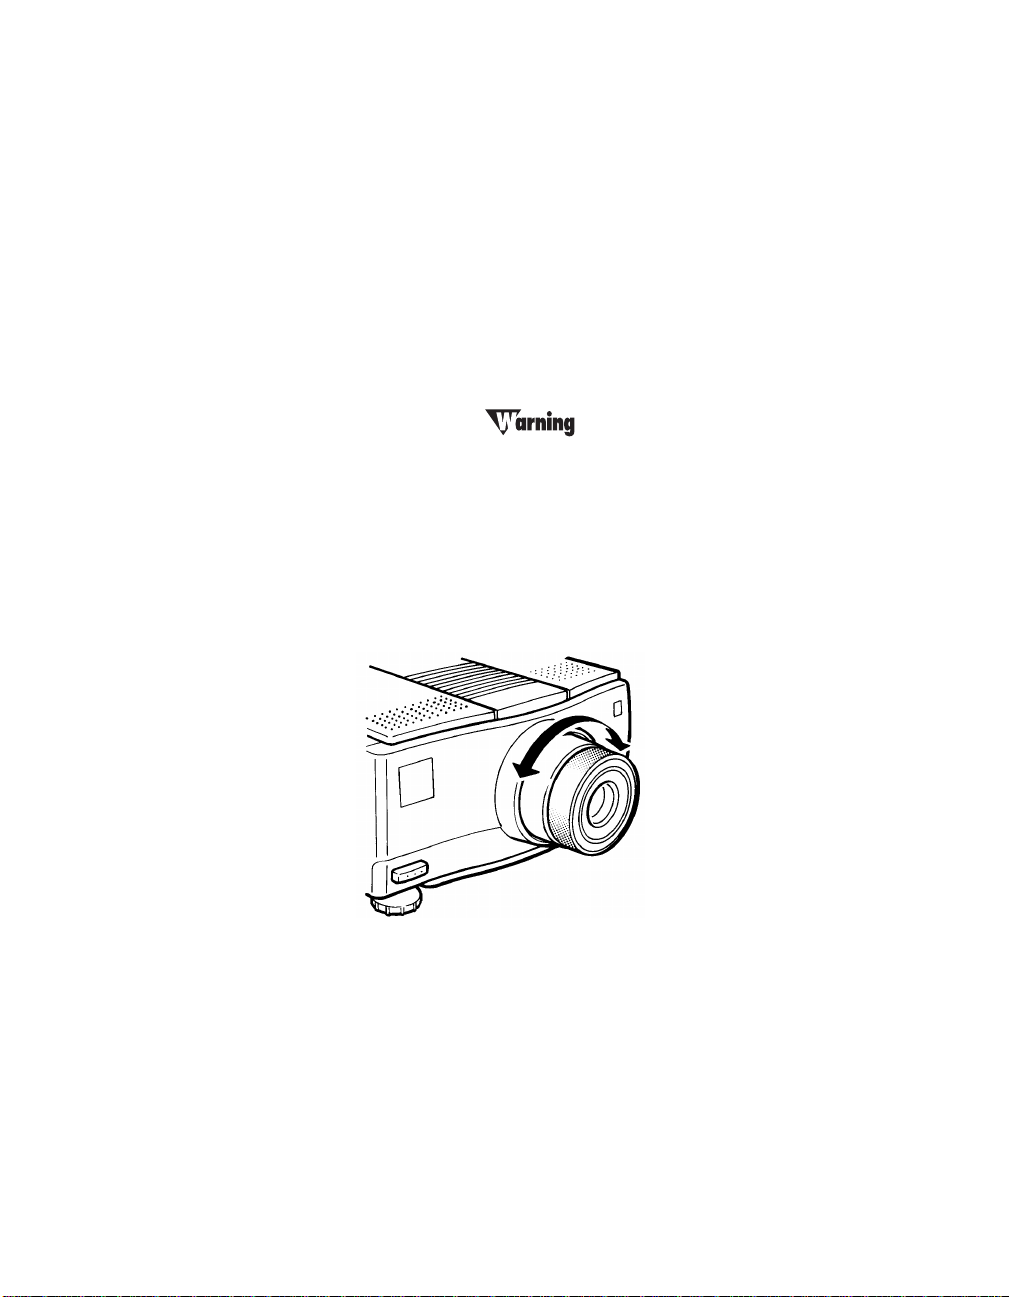
Focus the image.
• Turn the focus ring on the projector until the image is sharp.
Adjust the projected image size.
3.
• First alter the distance from the projector to the screen, then
adjust the image size by turning the X1.4 zoom lens ring until
you have the desired image size.
18 LitePro 580 User’s Guide
Page 23

Setting up the LitePro 580
4. Adjust the height of the projected image.
• Raise the front of the projector to the desired angle.
• Press the elevator foot butto ns until each foot touches the
tabletop.
• Release the elevator foot buttons.
• Fine tune the height by manually turning each foot. Turn
clockwise to lower the foot, counterclockwise to raise it, as
shown in the illustration on the next page.
LitePro 580 User’s Guide 19
Page 24

Setting up the LitePro 580
5. Adjust sync or brightness to fine tune the image.
6. Adjust the volume with the volume control on the projector or
Turning off the LitePro
If you want to turn off the projector for a short period of time, press
the Standby button on the projector or the remote control. This turns
off the lamp but keeps the projector running.
the remote control if you have audio input.
To completely power off the projector, turn the power switch off. If
you want to turn the projector back on immediately, you must allow
from 10 to 60 seconds for the lamp to cool. The lamp will not light if it
is too hot.
Each time you power off the projector, its settings are retained in
memory. These settings are then available to you the next time you
turn on the projector.
Be very careful not to look directly into the lens
when the projector is turned on. The bright light may
harm your eyes. Be especially careful to keep
children from looking into the lens.
20 LitePro 580 User’s Guide
Page 25

Using the LitePro 580
This section explains how to operate the projector. It provides a
reference to the projector and remote control buttons and the menu
commands.
Basic functions
The projector has two modes of operation:
mode
. In display mode, while images are projected, you can control
image sync to stop flickering, image brightness, image freezing,
volume, muting, and the source of the video signal. In menu mode
you display menus where you can adjust the projector’s set tings.
Both display and menu mode controls are accessible from either the
control panel on the projector or the remote control.
Projector control panel
The control panel is on the top right side. Flip the cover up to gain
access to the controls.
Menu Mode Controls
display mode
Display Mode Controls
and
menu
LitePro 580 User’s Guide 21
Page 26

Using the LitePro 580
Remote control
To use the remote control, point it at the front or rear of the LitePro or
at the projection screen. The range for optimum operation is within
30 degrees of the receiver at a distance of about 35 feet (10 meters).
If you can’t aim the remote control at the projector so that its signal is
received—for example, when using rear projection—yo u can connect
the remote directly to the pr ojector with a cable. This optional ca ble is
available from your In Focus dealer.
In menu mode, the trackball, the Adjust buttons, and the Menu Select
button become active. For more information see “Menu mode
controls” on page 24.
22 LitePro 580 User’s Guide
Page 27

Display mode controls
When your computer or video equipment is projecting an image,
your projector is in display mode. The buttons on the pro jector or the
remote control provide basic control of how the image is displayed. A
summary of these controls follows:
Lite Pro 580 basic display mode functions
Using the LitePro 580
Button on
projector
Standby Standby Turns projector lamp on and off.
Sync + - Sync + - Adjusts flickering or blurred image.
Bright + - Bright + - Adjusts the brightness of the image.
Freeze Freeze Freezes the image. To cancel, press any
Video Video Selects video equipme nt as the source of
Mute Mute Shuts off the audio. To cancel, press the
Volume + - Volume + - Adjusts the volume.
Button on
remote Function
Synchronizes the projector to the
computer input signal.
button.
the signal to be proj ected. By default, th e
projector is set to computer input.
Pressing the button again returns to
computer input.
Mute button again or adjust Volume.
Light Illuminates buttons on th e remote for 10
seconds. Press any button while the
buttons are lit to extend the time for 10
seconds.
Custom Carries out a function you have assi gned
with the Custom Key menu. (See
“Custom menu functions” on page 31.)
LitePro 580 User’s Guide 23
Page 28

Using the LitePro 580
Menu mode controls
The LitePro 580’s on-scr een menus allow you to adjust th e pr ojector’s
input, output, and operational settings. These include settings for:
• controlling computer input and output (Computer menu)
• controlling video input and output (Video menu)
• controlling how the image is displayed (Disp lay menu)
• controlling audio input and output (Audio menu)
• controlling general operation options (Options menu)
• assigning a function to the remote’s Custom button (Custom
menu)
Buttons on the projector or the remote control provide control of
menu settings. A summary of these controls follows:
Lite Pro 580 menu mode functions
Button on
projector
Menu Menu Brings up on-screen menu to adjust
Menu
Select < >
Function
Select < >
Function
Adjust - +
Button on
remote Function
settings. To return t o display mo de, press
the button again.
Menu Select Selects the menu whose settings you
want to change.
Trackball Selects the item on the menu you want
to change.
Adjust
L (-) R (+)
Makes changes to the settings.
24 LitePro 580 User’s Guide
Page 29

Using the menus
To make adjustments to the projector’s settings, place the projector in
menu mode, select the desired menu and menu item, and then
change the setting.
To place the projector in menu mode, press “Menu” on the
1.
projector or the remote control.
• The Computer menu appears at the bottom of the screen.
If video equipment is attached to the projector, the Video
menu appears. (You can choose to have the menu appear at
the top of the screen. See “Menu” on page 28.)
Press “Menu Select” on the remote control or the projector to
2.
move to the desired menu.
Using the LitePro 580
0
➡
➡
Use the trackball on the remote or “Function Select” on the pro-
3.
jector to choose an item on the menu that you want to adjust.
➡
Press “Adjust” or “Function Adjust” to change the setting. Press
4.
“+” or “-” to adjust the settings.
Press “Menu” to remove the menu from the screen and return to
5.
display mode.
LitePro 580 User’s Guide 25
Page 30

Using the LitePro 580
Reference to menu functions
Menu item Function
Source Indicates input is from a computer or video equipment.
Brightness Adjusts image brightness; increases or decreases the
Contrast Adjusts image contrast; increases or decreases the
Sync Adjusts picture synchronization to get rid of fuzzy
Tracking Adjusts picture tracking to get rid of fuzzy vertical lines.
Red Adjusts the intensity of red.
Green Adjusts the intensity of green.
Blue Adjusts the intensity of blue.
Text Compresses image display of DOS text screens wider than
Mac LC Adjusts tracking and removes fuzzy vertical bars when
Reset Deletes cha nges and resets all items on this menu to
Computer menu functions
brightness of white.
difference in brightness between black and white.
horizontal lines.
the projector’s image area. Select only if using DOS.
using any Macintosh
. This option appears and replaces
“Text” when a Macintosh is connected. Select only if
connected to a Macintosh.
default settings. When selected, a dialog box appears
asking you to confirm this action.
This menu is available only when the source of input is a computer.
0
26 LitePro 580 User’s Guide
Page 31

Using the LitePro 580
Video menu functions
Menu item Function
Source Indicates input is from a computer or video equipment.
Brightness Adjusts image brightness; increases or decreases the
brightness of white.
Contrast Adjusts image contrast; increases or decreases the
difference in brightness between black and white.
Sharpness Sharpens the image.
Color Adjusts image color saturation or density.
Video Mode Switches video broadcast format. Choose “Auto” for
automatic switching or lock the unit into NTSC, PAL, or
SECAM format.
Tint Adjusts the balance between red and green.
Reset Deletes cha nges and resets all items on this menu to
default settings. When selected, a dialog box appears
asking you to confirm this action.
This menu is available only when the source of input is video equipment.
✓
LitePro 580 User’s Guide 27
Page 32

Using the LitePro 580
Menu item Function
Source Indicates input is from a computer or video equipment.
Horiz Adjusts the horizontal display position of the image.
Vert Adjusts the vertical display position of the image.
Menu Indicates where menu will be displayed on screen.
Blank to Sets the color of the display when the screen is blank.
Rear Proj Flips the image horizontally (left to right) for use in rear
Upside down Flips the image vertically (top to bottom).
Invert Reverses the colors of the projected image. U sed mainly
Reset Deletes changes and resets all items on this menu to
Display menu functions
Select bottom or top display.
Choose “Blue,” “White,” or “Black.”
projection.
for black and white displays.
default settings. When selected, a dialog box appears
asking you to confirm this action.
✓
✓
28 LitePro 580 User’s Guide
Page 33

Using the LitePro 580
Audio menu functions
Menu item Function
Source Indicates input is from a computer or video equipment.
Volume Adjusts sound volume.
Balance Adjusts sound balance between the left and right speaker.
Audio
Source
Activates the audio input from the computer source (C),
the video source (V), or from either active source (C or V).
Bass Adjusts low tones.
Treble Adjusts high tones.
Loudness Turns bass boost on and off.
Fade Adjusts the audio level between the internal speaker and
the external sound source. If using external speakers, set
to “E.”
Reset Deletes cha nges and resets all items on this menu to
default settings. When selected, a dialog box appears
asking you to confirm this action.
✓
LitePro 580 User’s Guide 29
Page 34

Using the LitePro 580
Menu item Function
Source Indicates whether input is from a computer or video
Prompt Displays temporarily at the top of the screen the source
Backgnd Chooses the background pattern th at is displayed when
Serial Enables LP Utilities. (See “Using LP Utilities” starting on
Power Save Adjusts the number of minutes projector must be idle
Dly on Places projector in standby mode when powered on.
Language Switches the language used in the menus. Select
Reset ALL Deletes all changes and resets all items on all menus to
Options menu functions
equipment.
of the input.
or
the projector and lamp are running and no input signal
is being received. Select “Test Pattern,” “Black”
background, or “Blue” background.
page 35.)
before the lamp turns off to save power. If set to 0, this
function is disabled.
English, German, French, Spanish, Italian, or Japanese.
default settings. When selected, a dialog box appears
asking you to confirm this action.
✓
✓
30 LitePro 580 User’s Guide
0
Page 35

Using the LitePro 580
Custom menu functions
Menu item Function
Source Indicates input is from a computer or video equipment.
Pattern Enables the remote ’s Custom button to blank the screen
to a test pattern.
Serial Enables the remote’s Custom button to activate LP
Utilities. (See “Using LP Utilities” starting on page 35.)
Blank Enables the remo te’s Custom butto n to b lank the scre en
to blue, white, or black. The result depends on the
setting of the “Blank To” option on the Display menu.
Prompt Ena bles the remote’s Custom button to display on
screen the source of the projected im age.
Reset Deletes changes and resets all items on this menu to
default settings. When selected, a dialog box appears
asking you to confirm this action.
✓
LitePro 580 User’s Guide 31
Page 36

Using LP Utilities
The LitePro 580 projector provides even greater ease of use with LP
Utilities, which include two software programs: LP-Link and LP
Remote Programmer.
LP-Link allows you to operate the projector directly from the
computer.
LP Remote Programmer allows you to use the trackball and five
programmable buttons on the remote control to operate the
presentation software and control projector functions. To use these
utilities you must connect your computer to the projector with the LP
serial cable and run the LP Utility software.
Connecting your computer
To conn ect the projector and your computer, use the LitePro Utilities
serial cable (and adapter if needed) provided with the projector.
Turn off your computer, monitor, and LitePro projector.
1.
Plug the round, 8-pin connector of the LP serial cable into the LP
2.
Serial port on the projector.
Plug the other end of the LP serial cable into the serial po rt on the
3.
computer. For a Macintosh, attach the Mac adapter to the serial
cable and plug it in the modem or printer port.
If your IBM-compatible has only a 25-pin serial port,
you will need a 25-pin serial adapter. This adapter is
available at most computer supply stores.
LitePro 580 User’s Guide 33
Page 37

Using LP Utilities
IBM-Compatible PC
LP Utilities
Serial Cable
Macintosh
Mac Adapter
4. Turn on the projector, monitor, and computer.
Installing the LP Utilities software
To install the LitePro Utilities software, insert the LP Utilities diskette
into your computer.
For IBM-compatible computers, running Microsoft Windows
• Select Run from the Program Manager’s File menu.
• Enter A:\SETUP (if you inserted the diskette in drive A:) to start
the installation process.
(VGA cable must
be connected as
shown on pp. 12-15.)
:
For Macintosh computers:
• Double-click the diskette icon to open it.
• Double-click the LP Utilities icon to start the installation process.
34 LitePro 580 User’s Guide
Page 38

LP-Link Utility
The LP-Link utility allows you to control your projector from your
computer. Having this control on the computer monitor avoids
displaying menus and making adjustments on the projection screen
during a presentation.
Launch the LP-Link program and a window opens displaying two
areas:
• a control panel on the right, marked “Control,” to control basic
functions, and
• individual control panels on the left, marked “Adjustment,” to
adjust settings.
Using LP Util ities
LitePro 580 User’s Guide 35
Page 39

Using LP Utilities
Using the control icons
The LP-Link function controls are the same as those on the projector
and the remote. Select a button to change its setting. Select and hold
down the mouse button to increase or decrease values. A list of the
controls follows:
LP-Link control icons
Icon Command Function
Standby Turns projector lamp on and off.
(If the LitePro is in standby mode,
this is the only icon that is
displayed.)
Sync (-) Adjusts a flickering or blurred
image. Synchronizes the projector
to the computer or video input
signals.
Sync (+) Adjusts a flickering or blurred
image. Synchronizes the projector
to the computer or video input
signals.
Bright (-) Decreases the brightness of the
image.
Bright (+) Increases the brightness of the
image.
Volume - Decreases the volume.
Volume (+) Increases the volume.
Custom Carries out a function you have
assigned with the Custom Key
menu.
Source Selects either a computer or a
video device as the source of the
signal to be projected.
Freeze Freezes the image. To cancel, click
the icon again.
Mute Shuts off the audio. To cancel,
click the icon again.
36 LitePro 580 User’s Guide
Page 40

Using the adjustment control panels
LP-Link’s adjustment control panel al lows you to adjust the
projector’s input, output, and operational settings.
Adjusting the Computer settings
1. Double-click the Computer control panel icon.
• The Computer settings dialog box appears.
Using LP Util ities
Adjusts image
brightness
Adjusts image
contrast
Adjusts the
intensity of red
Adjusts the
intensity of green
Adjusts the
intensity of blue
Synchronizes the
projector and the
computer to stop
flickering or clear
blurred images
Compresses
image width
Adjusts image
tracking
Indicates source
of input
Resets changes to default settings
Closes dialog box
2. Make the desired changes.
• Click any active arrow to increase or decrease a value.
• Click the Text check box to select it. Click it again to deselect it.
• Click “Reset” to reset the value to their original settings.
3. Close the dialog box.
• Click “OK” to save any changes and close the dialog box.
You cannot access this dialog when video is being
LitePro 580 User’s Guide 37
displayed.
Page 41

Using LP Utilities
Adjusting the Video settings
1. Double-click the Video control panel icon.
• T he Video settings dialog box appears.
Adjusts image
brightness
Adjusts image
contrast
Adjusts the sharpness
of the image
Adjusts the color
density of the image
Adjusts the tint
2. Make the desired changes.
Selects video
broadcast format .
Indicates source
of input
Resets changes to default settings Closes dialog box
• Click any active arrow to increase or decrease a value.
• Click an option button under Mode to select one of four
options.
• Click “Reset” to reset the value to their original settings.
3. Close the dialog box.
• Click “OK” to save any changes and close the dialog box.
You cannot access this dialog when computer input
38 LitePro 580 User’s Guide
is being displayed.
Page 42

Adjusting the Audio settings
1. Double-click the Audio control panel icon.
• The Audio settings dialog box appears.
Using LP Util ities
Adjusts the volume
Adjusts bass
Adjusts treble
Adjusts the balance
between the left
and right speakers
Adjusts the audio
level between the
internal and external speakers
Turns bass boost
on and off
Activates audio
input from the
computer, the
video, or from
whichever source
is active
Indicates source
of input
Resets changes to default settings Closes dialog box
2. Make the desired changes.
• Click any arrow to increase or decrease a value.
• Click the Loudness check box to select it. Click it again to
deselect it.
• Click an option button under Audio Source to select one of
three options.
• Click “Reset” to reset the value to their original settings.
3. Close the dialog box.
• Click “OK” to save any changes and close the dialog box.
LitePro 580 User’s Guide 39
Page 43

Using LP Utilities
Adjusting the Display settings
1. Double-click the Display control panel icon.
• The Display settings dialog box appears.
Sets the color of
the display
when the screen
is blank
Flips image horizontally for
rear projection
Flips image vertically so it appears
upside down
Inverts the colors
displayed
Adjusts the vertical display of the
image
Adjusts the horizontal display of
the image
Indicates source
of input
Resets changes to default settings
Closes dialog box
2. Make the desired changes.
• Click an option button under Blank To to select one of three
options.
• Click any arrow to increase or decrease a value.
• Click a check box to select it. Click it again to deselect it.
• Click “Reset” to reset the value to their original settings.
3. Close the dialog box.
• Click “OK” to save any changes and close the dialog box.
40 LitePro 580 User’s Guide
Page 44

Adjusting the Options settings
1. Double-click the Options control panel icon.
• The Options settings dialog box appears.
Using LP Util ities
Allows you to
select desired
background
pattern when
no input signal is being
received
Adjusts the
number of
minutes the
projector
must be idle
before the
lamp turns off
Activates onscreen display of
input source
Enables the
LP Remote
Programmer
Places projector
in standby when
powered on
Indicates source
of input
Resets all changes. Click “OK”
in the confirmation dialog to
reset all default settings.
Closes dialog box
2. Make the desired changes.
• Click an option button under Background to select one of
three options.
• Click any active arrow to increase or decrease a value.
• Click a check box to select it. Click it again to deselect it.
• Click “Reset” to reset the value to their original settings.
3. Close the dialog box.
• Click “OK” to save any changes and close the dialog box.
LitePro 580 User’s Guide 41
Page 45

Using LP Utilities
Displays the background pattern.
Adjusting the Custom settings
1. Double-c l i c k the Custom cont rol panel icon.
• The Custom Key settings dialog box appears.
Enables LP Remote
Programmer
Blanks the screen
to selected pattern
Displays input
source on screen
2. Assign a function to the Custom key on the remote.
3. Close the dialog box.
PATTERN
SERIAL
BLANK
PROMPT
Resets changes to default settings. Closes dialog box
• Click an option button to select one of four options.
• Click “Reset” to reset the values to their original settings.
• Click “OK” to save any changes and close the dialog box.
42 LitePro 580 User’s Guide
Page 46

LP Remote Programmer Utility
LP Remote Programmer allows you to use the remote’s trackball as
you do your computer’s mouse, control presentation software as an
electronic clicker, and customize buttons to carry out commands. It
also provides button templates for popular presentation software
applications.
Programmable buttons
Five of the buttons on the remote control unit are programmable. You
can assign a sequence of up to 32 keystrokes to each of these buttons.
For example, instead of typing CTRL + TAB to advance to the next
screen, you can assign this sequence to one of the buttons. Then,
pressing the button has the same effect as typing CTRL + TAB.
LP Remote Programmer dialog box
All buttons except the five programmable ones are displayed in gray
to indicate that they are unavailable. The text box next to each
programmable button shows the keystrokes currently assigned to it.
Using LP Util ities
Enter keystrokes here
Saves
changes
Deletes
changes
LitePro 580 User’s Guide 43
Assigned
keystrokes
are displayed
here
Page 47

Using LP Utilities
Macros and templates
A sequence of keystrokes assigned to a button is called a macro. A set
of macros is stored in a file called a template. You can create as many
templates as you like: one for each presentation softw are application,
for example.
The first time you launch LP Remote Programmer, it opens the
default template. In the illustration on the previous page, a template
named REMOTDEF.TPT is opened.
Programming a button
There are two ways to assign a macro to a button: you can record it or
type it. Recording keystrokes is usually preferable. However, if the
macro includes control keys (CTRL, ALT, SHIFT, etc.), you should
type the characters and codes in the text box.
To record a macro:
1. Click the button you want to program. (You can also press Enter
on an IBM-compatible computer or Select on a Macintosh to
select a button to program.)
• The text box at the top of the window displays the keystrokes
that are already assigned to the button.
2. Click the Record button to start recording. (Y ou can also press the
Scroll Lock key on an IBM-compatible computer to start recording.)
3. Ty pe the keystrokes you want to assign to the button, up to 32
keystrokes.
• If you are using an IBM-compatible computer and the
keystroke sequence includes the Scroll Lock key, click th e
Record button to stop recording, type [SC] (including the
brackets), then click Record to start recording again.
4. Click “OK” to stop recording.
5. Repeat steps 1-4 for the other buttons.
6. Save the template by choosing “Save” from the File menu.
44 LitePro 580 User’s Guide
Page 48

Using LP Util ities
To type a macro:
1. Click the button you want to program. (You can also press Enter
on an IBM-compatible computer or Select on a Macintosh to
select a button to program.)
• The text box at the top of the window displays the keystrokes
that are already assigned to the button.
2. Enter the keystrokes you want to assign to the button, up to 32
keystrokes. For alphanumeric (character) keys, simply type the
key. If you want to include non-character keys in your macro, follow the guidelines below for either IBM-compatible computers or
Macintosh computers.
To include non-character keys on IBM-compatible computers:
• Type the code enclosed in brackets. Click the Key Help button
to display a list of the non-character key codes.
• If two control keys are to be pressed at the same time, put
brackets around the entire combination. For example, if
Control and Alt are to be pressed at the same time, type
[[CTRL][ALT]].
• To assign mouse clicks to a button: select the button to be
programmed, select “Mouse Button” from the Special menu,
then choose the desired mouse click. You can also type the
code for the mouse click in the text box next to the button. The
codes are listed here:
Mouse button Code
Left Button Click [MLBC]
Left Button Double-Click [MLBDC]
Left Button Down [MLBD]
Left Button Up [MLBU]
Left Button Drag On/Off [MLBDG]
Right Button Click [MRBC]
Right Button Double-Click [MRBDC]
Right Button Down [MRBD]
Right Button Up [MRBU]
Right Button Drag On/Off [MRBDG]
LitePro 580 User’s Guide 45
Page 49

Using LP Utilities
To include non-character keys on Apple Macintosh computers:
• Use the recording method as described on the previous page;
simply press the keys you want to include. Open “Mouse/
Special Buttons” in the Special menu to insert non-character
keys.
• If two non-character keys are to be pressed at the same time,
use the “Link” special key to connect the keys. For example, if
the X key and the Control key are to be pressed at the same
time, open “Mouse/Special Buttons” in the Special menu,
insert the Control key code, insert the Link key code, then
press X.
• To assign mouse clicks to a button: select the button to be
programmed, select “Mouse/Special Buttons” from the
Special menu, then choose the desired mouse click.
3. Repeat steps 1 and 2 for the other buttons.
4. Save the template by choosing “Save” from the File menu.
Activating and verifying the template
Once you have programmed the buttons in a new template—or if you
open another template—you must activate the template so that the
remote buttons carry out the assigned macros. To do this, click the
Activate button or choose “Activate” from the Special menu. A dialog
box appears indicating that the template was activated.
To verify the keystroke sequence programmed to a button, click the
Button Te st button or choose “Button Test” from the Special menu. A
text box appears. Press a programmed button. LP Remote
Programmer displays the keystrokes assigned to the button.
To increase or decrease trackball speed on the
remote control, choose the desired speed from
“Mouse Speeds” in the Special menu.
46 LitePro 580 User’s Guide
Page 50

Maintenance
This section describes how to:
• clean the lens
• clean the air filter
• replace the projection lamp
• replace the batteries in the remote control
• replace the fuse
Do not open the LitePro case!
Except for the projection lamp, there are no user-
serviceable parts inside. Opening the case may
cause electric shock! If you are having problems with
your LitePro, refer to the “Troubleshooting” section
of this manual. Call In Focus Technical Support if
necessary. If your Lit ePro needs repair , they will refer
you to an In Focus Authorized Service Provider.
Cleaning the lens
Follow these steps to clean the projection lens.
Apply a non-abrasive glass cleaner to a soft, dry cleaning cloth.
1.
• Be careful not to use excessive amounts of cleaner.
• Abrasive cleaners, solvents or other harsh chemicals may
scratch the lens.
Lightly wipe the cleaning cloth over the lens.
2.
If you will not be using the LitePro immediately, replace the lens
3.
cover.
LitePro 580 User’s Guide 47
Page 51

Maintenance
Cleaning the remote control
Avoid getting dirt, dust or hand lotion on the remote’s trackball. If
the trackball gets dirty, it will not work properly. Foll ow these steps
to clean the trackball and the remote contro l.
Turn off the projector.
1.
Using 2 pointed objects, such as pens, remove the trackball cover.
2.
Put the pointed ends into the two holes in the trackball cover.
Turn the cover counter-clockwise about one-half turn until it
3.
comes off.
Remove the trackball.
4.
Wipe the trackball gently with a soft, dry cloth. If necessary,
5.
dampen the cloth with a mild detergent. Do not use alcohol solvents on the trackball.
If necessary, use a cotton swab to clean the inside of the trackball
6.
mechanism. Be very careful not to press hard on the rubber
roller; if it gets out of alignment, the trackball will not work properly.
Replace the trackball.
7.
Replace the trackball cover. Turn it clockwise to lock it in place.
8.
48 LitePro 580 User’s Guide
Page 52

Cleaning the fan intake filter
The fan intake filters on the bottom and top of the projector catch
dust and particles in the air. If a filter becomes clogged, the projector
will not cool properly and may malfunction. To pre vent this, clean the
filters after every 100 hours of use.
To clean the filter:
Turn off the power and unplug the power cable.
1.
Remove the filter.
2.
• Carefully place a screwdriver against the indented part of the
filter and lift.
Clean the filter.
3.
Maintenance
• Use a vacuum cleaner set on low power to remove the dust
and dirt.
Replace the filter.
4.
• First , insert the side with tabs, and then press the other end in
place.
• If the filter cannot be cleaned or is damaged, contact your In
Focus dealer for a replacement.
LitePro 580 User’s Guide 49
Page 53

Maintenance
Replacing the projection lamp
If the lamp fails to come on and the lamp monitor on the projector
lights in red, you must replace the bulb. Be sure to replace it with
another metal halide lamp.
You can order replacement lamps from In Focus. Refer to “Order
information” on page 66 for information.
Follow these steps to replace the lamp module.
Turn off the projector and unplug the power cord. Allow the
1.
projector to cool thoroughly.
Allow the LitePro to cool for at least 20 minutes
before you open the lamp cover! The inside of the
LitePro can become very hot. Use extreme care.
Remove the lamp cover on the bottom of the projector.
2.
• Loosen the two screws with a screwdriver or a coin.
• Pull the lamp cover up to remove it.
Pull out the lamp.
3.
• L oosen the two screws holding the lamp in place.
• Pull up on the handle to remove the lamp.
50 LitePro 580 User’s Guide
Page 54

Do not drop the lamp module or touch the glass
bulb! The glass can shatter and cause injury.
Fit the new lamp in place.
4.
• Align the lamp in the correct direction.
• Lightly press on it until it touches bottom.
• Tighten the two screws.
Maintenance
Replace the lamp cover.
5.
• Reposition the cover in place.
• Repl ace th e s c rews and ti ghten them.
Never operate the LitePro with the lamp cover open
or removed. This disrupts the airflow and causes the
LitePro to overheat.
LitePro 580 User’s Guide 51
Page 55

Maintenance
Replacing batteries in the remote control
The life of the remote batteries depends on how often and how long
you use the remote. Symptoms of low battery charge include erratic
responses when using the remote and a reduced range where the
remote works.
Follow these steps to replace the batteries.
Slide the battery cover off the end of the remote.
1.
Remove the old batteries.
2.
Install two new AAA alkaline batteries. Make sure each is
3.
installed in the correction orientation.
Slide the battery cover back on the remote.
4.
52 LitePro 580 User’s Guide
Page 56

Replacing the fuse
A power surge or spike can blow the power supply fuse and cause
the LitePro to stop working. If this happens, you’ll need to r eplace the
fuse.
Use only the specified power supply fuse. Using a
different fuse may cause serious damage to the
The correct fuse for your LitePro is a 6.3A. 250V. T. 5x20 mm fuse.
Follow these steps to replace the fuse.
Make sure that the condition that caused the fuse to blow no
1.
longer exists.
Turn off and unplug the projector.
2.
Remove the fuse holder, located just below the power cord con-
3.
nector, from the projector.
• Pull out the fuse holder with a screwdriver as shown.
Maintenance
LitePro.
LitePro 580 User’s Guide 53
Page 57

Maintenance
4. Remove the blown fuse from the fuse holder.
5. Push the new fuse into the clips of the holder until it is securely
seated.
6. Place the fuse holder back in position.
54 LitePro 580 User’s Guide
Page 58

Troubleshooting
Opening the case may cause electric shock!
Except for the projection lamp, there are no user-
serviceable parts inside. If you are having problems
with your LitePro, read through this section. Call In
Focus Technical Support if necessary. They will refer
you to an In Focus Authorized Service Provider if
Before you call for assistance
Before calling your dealer for assistance, follow these steps in this
order to make sure everything is properly connected.
Make sure you have connected the LitePro to your equipment as
1.
described in section “Setting up the LitePro 580” beginning on
page 7.
Check cable connections. Verify that all computer, video, and
2.
power cables are properly connected.
Do not open the LitePro case!
your projector needs repair.
Verify that all power is switched on.
3.
If the LitePro still does not display an image, reboot the com-
4.
puter.
If the image is still bad, unplug the LitePro from the computer
5.
and check the computer monitor’s display. The problem may be
with your graphics controller rather than with the LitePro. (When
you reconnect the LitePro, remember to turn the computer and
monitor off before you power up the LitePro. Power the equipment back up in this order: LitePro, monitor, computer.)
If the problem still exists, read through the problems and
6.
solutions in this chapter.
LitePro 580 User’s Guide 55
Page 59

Troubleshooting
Common problems and solutions
Problem: Projector doesn’t turn on
• Make sure power cord is plugged in firmly.
• Make sure projector is plugged in a live AC outlet or power
strip.
• Check to see that the projector is not too hot to operate and
that the temperature monitor light is not orange.
• If the projector lamp was replaced, make sure the new one is
fitted correctly and the lamp door is properly fastened.
• Check the fuse to see if it has blown.
Problem: Nothing on screen
• Make sure you have removed the lens cover.
• Verify that computer or video cables are connected to the
correct ports on the projector and the computer or video
equipment.
• Press the Standby button. This toggles the lamp on and off.
• Make sure no cable connector has a bent pin.
• Make sure the lamp is not too hot to operate. It will not light if
it is.
Problem: Picture is blurred or only part of image is in focus
• Focus the lens.
• Make sure the projector is not too close or too far from the
screen.
• Make sure the projector is at a right angle to the screen.
•Adjust Sync.
• Adjust Brightness.
• Adjust T racking.
Problem: Image is not centered on the screen
• Adjust the Horizontal and Vertical settings on the Display
menu.
56 LitePro 580 User’s Guide
Page 60

Troubleshooting
Problem: Poor color
• Adjust Brightness.
•Adjust Color.
•Adjust Tint.
• Adjust Red, Green, and Blue.
• Use a shorter cable between video source and the projector.
• Verify that the pr o j ector is set to receive the appropriate video
broadcast format.
Problem: Only the test pattern is displayed
• Verify all cable connections. Check to see that the cable is
connected to the graphics/monitor port on the computer.
• Check that your computer graphics system is set up correctly.
If you have a CGA or EGA board, you cannot use the cable
that was shipped with the LitePro (it’s a VGA cable). Call In
Focus to order a CGA/EGA cable.
• Make sure your computer’s graphics board or external video
board is turned on.
Problem: No image on the computer screen
• Make sure the monitor is turned on.
• Verify that the VGA cable is connected correctly.
Problem: No sound
• Verify audio input/output connections.
• Adjust Audio Source.
•Adjust Volume.
• Press the Mute button.
• Adjust Fade to balance the internal and any external speaker.
Problem: Image is too wide or narrow for screen
• Adjust Tracking to reduce or enlarge the projected image.
LitePro 580 User’s Guide 57
Page 61

Troubleshooting
Problem: Fuzzy vertical bars in image
• A djust Tr acking.
• If your computer is a Macintosh, select the “Mac LC” box in
the LitePro’s Computer menu (see page 26).
• Make sure your cables are connected correctly and adjust
signal synchronization f rom the remote.
Problem: Image and menus are reversed left to right
• Rear projection is turned on. Select “Rear Proj” on the Display
menu to turn it off.
Problem: LitePro displays vertical lines, “bleeding” or spots
• Adjust Brightness.
Problem: Image is “noisy” or streaked with horizontal lines
• Adjust Sync.
Problem: Dim image
• Adjust Brightness.
• Adjust Contrast.
• Replace lamp if it has been used for over 500 hours.
Problem: Remote control doesn’t work
• Check the batteries. They may need to be replaced or they
may be loaded incorrectly.
• Make sure nothing is blocking the remote control receiver on
the projector.
• Make sure you are not too far from the projector when using
the remote. It has a limited range.
58 LitePro 580 User’s Guide
Page 62

Monitor lights
The projector has three lights that monitor its operations:
Operation monitor—indicates the projector is on, is in Standby
1.
mode, or is receiving signals from the remote control.
Lamp monitor—indicates if lamp is warming up, lit, or cooling
2.
down.
Temperature monitor—indicates if projector is overheating.
3.
Temperature monitor
Color Explanation
Flashing orange Internal temperature of projector is
Orange Internal temperature of the projector is
Troubleshooting
OperationLampTemperature
high. Cooling fan turns at higher
speed. (Solution: Make sure nothing is
obstructing the fan intake grill. Turn
off lamp by pressing “Standby” and
allow lamp to cool.)
too high. Lamp turns off automatically
(Solution: Make sure the fan intake grill
is not obstructed or dirty. Allow
projector to cool before turning on
lamp by pressing “Standby.”
LitePro 580 User’s Guide 59
Page 63

Troubleshooting
Lamp monitor
Color Explanation
Flashing green Lamp warming up.
Green Lamp operating.
Flashing orange Lamp coo ling down.
Flashing red Lamp is not working. (Solution: Press
Standby button or change lamp.)
Operation monitor
Color Explanation
Orange Projector in Standby.
Green Projector and lamp operating.
Flashing green Signal from remote control being received.
Flashing red Problem with the projector. (Solution:
Turn power switch off and then on.)
60 LitePro 580 User’s Guide
Page 64

Appendix
Compatibility and cabling
The LitePro 580 provides an image resolution of 640 by 480 pixels
with up to 16 million colors. It is compatible with various computer
graphics and video format s.
Source Format Resolution Cable
IBM compatible VGA, VESA, NEC,
Apple/Macintosh
(includes Apple II,
Mac II, LC, Performa,
Quadra, PowerBook
and Power
Macintosh)
Video
(Composite)
Video
(S-Video)
JEGA, MDA*,
CGA, Hercules*,
ATT*
Standard
graphics, 8- and
24-bit color
monitor
NTSC
PAL, SECAM
NTSC
PAL, SECAM
640x480
640x200
640x400
640x350
720x350**
720x400**
800x600**
640x480
640x400
640x480
768x576**
640x480
768x576**
VGA cable supplied
with projector
VGA cable with Mac
adapters supplied with
projector
A/V cable supplied
with projector
S-Video cable
*
Monochrome only; requires special cable.
**
The LitePro 580 displays only 640x480 images; images of higher resolution will be
compressed or cropped.
About broadcast video
Most broadcast video signals in the world are one of three standards:
• NTSC (National Television Standards Committee)—a 60 Hz 525line resolution standard used in North America, parts of South
America, and Japan.
• PAL (Phase Alternating Line)—a 50 Hz 768x576 resolution
standard used in Europe, Australia, China, and some South
American and African countries.
LitePro 580 User’s Guide 61
Page 65

Appendix
• SECAM (Sequentiel Couleur à Mémoire)—a 50 Hz 768x576
resolution standard similar to PAL used in France, Eastern
Europe, and some African and Middle Eastern countries. PAL
and SECAM differ in the way color information is encoded on the
broadcast signal.
Video produced by VCRs, laser disc players, and camcorders is sent
and received in one of two formats:
• Composite video—carries sync, luminance (the black and white
part of the video signal), and color information on one signal
with a single pin and ground connection, and
• S-Video—separates color information from the luminance and
sync signal with a four-pin and ground connection. Because of
the color separation, S-Video produces a higher quality display
with better colors and less noise. It is not recommended for use
over distant connections as the signal tends to degrade the longer
the it must travel.
About computer video
Computer video generates five separate signals for IBM compatible
computers: red, green, blue, H-sync and V-sync. It provides four
separate signals for Macintosh computers: red, green, blue, and
composite sync. These types of signal are called RGB for red, green,
and blue.
62 LitePro 580 User’s Guide
Page 66

Specifications
The LitePro must be operated or stored within the limits of these
specifications.
Projection Lamp
Type 150W 65V metal halide short-arc
Life Average 600 hours to 50% of initial brightness
Fuse
Type 6.3A. 250V.T. 5x20mm
Power Requirements
100-120 VAC 3.5A, 50/60 Hz
220-240 VAC 1.3A, 50/60 Hz
Remote Control
Battery Three (3) AAA alkaline cells
Range Approximately 35 feet (10 m.) when aimed at the
Appendix
projector or reflected off a white wall or projection
screen within 30° of the projection axis
Optical
Aspect ratio 4 (H) X 3(V)
Brightness average 200 lumens
(measured by ANSI 9 point method)
Uniformity 1.3:1 maximum
(measured by 12 point method)
Projection range 3.9 to 40.4 feet
(1.2 to 12.3 m)
Zoom ratio 1:1.4
Image size 21 in. to 300 in. (.5 m to 7 m)
T emperature
Operating 5° to 40° C
Non-operating -20° to 60° C
LitePro 580 User’s Guide 63
Page 67

Appendix
Altitude
Operating 0 to 10,000 feet (3000 meters)
Non-operating 20,000 feet (6000 meters)
Humidity
Operating 20 to 80% RH, non-condensing
Non-operating 10 to 90% RH, non-condensing
Dimensions
LitePro 580 11.22 [W] x 5.51(5.87) [H] x 13.54(16.26) [D] inches
28.5 [W] x 14(14.9) [H] x 34.4(41.3) [D] cm
Weight
Unpacked 16.98 lbs. (7.7 kg)
Pin assignments
VGA Cable
The Y-shaped VGA cable that shipped with your LitePro has three
connectors, they are labeled “Monitor,” “VGA,” and “LCD.” The pin
assignments for these connectors are listed here.
“LCD” Connector
The end of the VGA cable that plugs into the LitePro is a male 26-pin
D-style connector. The table below lists its pin assignments.
Input Pin Signal Description Output Pin
1 Vertical sync 10
2 Horizontal sync 11
8 Blue analog 14
6 Intensity digital 12
7 Green digital 13
9 Red analog 15
16 Blue digital 3
17 Red digital 4
18 Green analog input with composite sync 5
64 LitePro 580 User’s Guide
Page 68

Appendix
Input Pin Signal Description Output Pin
20 GND
21 GND
22 GND
23 Digital/analog video cable ID
24 GND
25 VGA/no video cable ID pin
26 Monochrome digital (Hercules) 19
Monitor” and “VGA” Connectors
The pin assignments are the same for the “Monitor” and “VGA”
connectors. The “Monitor” connector is a female video RGB, 15-pin
micro-D-style connector. The “VGA” connector is a male video RGB,
15-pin micro-D-style connector. The table below lists the pin
assignments for both connectors.
Pin Signal Description
1 Red analog input
2 Green analog input with composite sync
3 Blue analog input
4GND
5GND
6Red GND
7 Green GND
8Blue GND
9NC
10 Sync GND
11 GND
12 NC
13 Horizontal sync/composite sync input
14 Vertical sync input
15 NC
LitePro 580 User’s Guide 65
Page 69

Appendix
Order information
The following In Focus products, used with the LitePro 580, can be
ordered from your In Focus dealer.
Standard Accessories (ship with LitePro)
LitePro 580 User’s Guide 010-0097-xx
Lens cover 340-0182-xx
VGA cable 210-0014-xx
Mac adapter for VGA cable 516-0003-xx
A/V cable 210-0053-xx
Projection lamp 232-0059-xx
Fan intake filter 321-0044-xx
Fan intake cover 321-0042-xx
Projector connection ports cover 340-0180-xx
Projector control panel cover 340-0181-xx
LP Utilities kit 599-0076-xx
Fuse, 6.3A. 250 V.T. 5x20mm 749-0018-xx
Power Cords (one ships with LitePro)
North American Power Cord 210-0023-xx
Australian Power Cord 210-0027-xx
UK Power Cord 210-0028-xx
European Power Cord 210-0029-xx
Danish Power Cord 210-0030-xx
Swiss Power Cord 210-0031-xx
Part Number
Optional Accessories
Travel case 591-0162-xx
Remote control cable 210-0070-xx
CGA/EGA cable 210-0032-xx
60” polarized screen 591-0149-xx
66 LitePro 580 User’s Guide
Page 70

Laptop display activation chart
The LitePro connects to a laptop computer through the computer’s
external monitor port. Most laptop computers do not automatically
activate this port when a device such as the LitePro is connected. The
following chart lists the commands that activate the external monitor
port for a variety of computers. If your computer is not listed here,
refer to your computer’s documentation.
Appendix
Computer
Acer Ctrl-Alt-Esc (for setup)< Ctrl-Alt-Esc (for setup)
AST FN-D or Ctrl-D FN-D or Ctrl-D
Austin Ctrl-Alt-,, Ctrl-Alt-,
Altima* Shift-Ctrl-Alt-C Shift-Ctrl-Alt-L
Amrel* ** setup menu setup menu
BCC automatic - no activation
Bondwell LCD or CRT option LCD or CRT option
Chaplet** setup screen setup screen
Commax Ctrl-Alt-#6 Ctrl-Alt-#5
Compaq** Ctrl-Alt-< Ctrl-Alt->
Data General Ctrl-Alt-Command Ctrl-Alt-Command
Data General
Walkabout
Datavue Ctrl-Shift-M Ctrl-Shift- M
Dell* Ctrl-Alt-< Ctrl-Alt->
Digital a utomatic reboot
Dolch dip switch to CRT dip switch to LCD
Epson dip switch to CRT dip switch to LCD
Key command to
activate port
Ctrl-FN-D Ctrl-FN-D
FN-F5 FN-F5
type from A:/IVGA/CRT type from A:/IVGA/CRT
setup VGA/Conf.Simulscan setup VGA/Conf.Simulscan
Shift-Ctrl-D Shift-Ctrl-D
command needed
FN-F4 FN-F4
2 CRT/X at DOS prompt reboot
Ctrl-Alt-F10 Ctrl-Alt-F10
FN-F2 FN-F2
Key command to
de-activate port
reboot computer
LitePro 580 User’s Guide 67
Page 71

Appendix
Computer
Key command to
activate port
Key command to
de-activate port
Everex** setup screen option setup screen option
For-A Ctrl-Alt-Shift-C Ctrl-Shift-Alt-L
Gateway 2000 FN-F1 FN-F1
Grid* ** FN-F2, choose auto or
FN-F2
simultaneous
Ctrl-Alt-Tab Ctrl-Alt-Tab
Hyundai setup screen option setup screen option
IBM 970 automatic warm reboot
IBM ThinkPad setup screen option setup screen option
Kris Tech** FN-F8 FN-F8
Mac Portable no video port: not compatible
Mac PowerBook
140, 145, 170 no video port: requires a 3rd-party interface
160, 165, 180, 250 automatic: use Set
warm reboot
Mirroring option
230 requires Apple Docking Station
Mastersport FN-F2 FN-F1
Micro Express automatic warm reboot
Microslave automatic warm reboot
Mitsubishi SW2 On-Off-Off-Off SW2 Off-On-On-On
NCR setup screen option setup screen option
NEC* setup screen option setup screen option
CRT at the DOS prompt LCD at the DOS prompt
Packard Bell* FN-F2 FN-F2
Ctrl-Alt-< Ctrl-Alt->
Panasonic FN-F2 FN-F2
Samsung setup screen option setup screen option
Sanyo setup screen option setup screen option
Sharp dip switch to CRT dip switch to LCD
SPARC-Dataview Ctrl-Shift-M Ctrl-Shift-M
Tandy* ** Ctrl-Alt-Insert Ctrl-Alt-Insert
setup screen option setup screen option
Texas Instruments setup screen option setup screen option
Top-Link* ** setup screen option setup screen option
FN-F6 FN-F6
68 LitePro 580 User’s Guide
Page 72

Appendix
Computer
Key command to
activate port
Key command to
de-activate port
Toshiba* ** Ctrl-Alt-End Ctrl-Alt-Home
FN-End FN-Home
4500 FN-F5 FN-F5
setup screen option setup screen option
Wyse software driver software driver
Zenith FN-F10 FN-F10
* These manufacturers have other models that automatically send video to th e
external CRT port when some type of display device is attached.
** These manufacturers offer more than one key command depending on the
computer model.
LitePro 580 User’s Guide 69
 Loading...