


INSTRUCTIONS FOR USE
Pro-Ject Pre Box DS2 Digital

© Pro
-Ject Audio Systems · Pro-Ject Pre Box DS2 digital · Revision 2017.03.31
2
Dear music lover,
thank you for purchasing this Pro-Ject Audio Systems preamplifier.
In order to achieve maximum performance and reliability you should study these instructions for use carefully.
Warning of a hazard for the user, the unit or possible misuse
Important notice
Safety instructions
AC outlet voltages vary from country to country. Before connecting to the mains, make sure that the
voltage in your area meets the voltage requirements printed on the power supply.
The power supply is used to disconnect the unit from the mains. Make sure that the power supply is easily
accessible at all times.
Never handle the device or the power supply while your hands are wet or damp.
Avoid letting liquids enter the device or the power supply. Never place any item containing liquid,
such as a flower vase on or near the device. Never spill any liquid on the device or the power supply.
Never place any naked flame sources, such as lighted candles on or near the device. The product shall not
be used in damp or wet locations, next to a bathtub, sink, swimming pool or any other similar conditions.
Connectors
Make all connections whilst the preamplifier is
disconnected from the power supply
.
Take care to connect the left and right channels correctly. The right channel is usually marked red,
the left channel black or white.
Never use any other power supply than the one supplied with the unit except of Pro-Ject Power Boxes
which can replace original power supplies.
Analogue out
The unit offers following analogue RCA output sockets:
Fix Out -
fixed output level
Var Out -
variable output level controlled by the Volume knob on the front panel. Gain of the output can be
increased by 6dB using the DIP switch
Var Gain
Sub Out –
subwoofer connection
Headphone
- socket on front panel

© Pro-Ject Audio Systems · Pro-Ject Pre Box DS2 Digital · Revision 2017.
03.31
3
Inputs
In1 USB:
is dedicated to connection to a Computer. Connect the USB-input of the unit (unit must be
switched on) to a free USB-socket on your computer and turn it on/make sure it is powered on.
Driver installation (Windows® operating systems only)
* For Windows
®
operating systems a USB driver (supplied on CD) has to be installed.
Insert the included CD into the drive of you PC and follow the instructions.
Complete the installation by restarting the computer.
After installing the driver, some settings have to be checked/done.
For example - Windows 7® and newer operating system:
Control Panel Hardware and Sound Sound Playback:
select
Speaker/Project Pre Box DS2 USB 2.0 Audio Out
Properties Supported formats:
make sure nothing is assigned
Level Sound: setting must be
100
Enhancements:
disable all enhancements
Advanced Default Format: set to
studio quality 24/192
Please note: Connection should be made to an USB-socket of your computer directly. Connecting to
USB-hubs or switches can cause problems.
In 2 to In 4:
Pre Box DS2 digital offers 3 digital S/PDIF inputs:
In 2
and
In 3
are optical inputs,
In 4
is coaxial
input.
In 5:
Bluetooth connection
Make sure the antenna is attached to its connector
BT In 5
on the back panel prior using Bluetooth.
The LED for Input 5 BT works as a status indicator:
Slow blinking
: no active Bluetooth connection
Fast Blinking
: waiting for pairing confirmation
Steady light
: Bluetooth device is connected
Connection of a new device is only possible when LED is blinking slow.
Pairing with Android devices
Open
Settings
and tap on
Bluetooth.
Turn on Bluetooth and tap on
Scan.
Searched devices will show up.
Tap on
Pre Box DS2 Digital
and confirm presented pairing code on your Android device. Then press
Subsonic
button on
Pre Box DS2 digital
(alternatively button 8 on remote control) when the blue LED of input
5 starts blinking fast. When paired, your Android device will show "Connected to media Audio". Now you
can play music from your Android device over Bluetooth to
Pre Box DS2 Digital
.
Bluetooth pairing with Apple devices
Tap on
Settings,
tap on
Bluetooth
, turn on Bluetooth. Your device will automatically start searching for
available devices. Tap on
Pre Box DS2 Digital
and confirm by pressing
Subsonic
button on
Pre Box DS2
digital
(alternatively button 8 on remote control) when the blue LED of input 5 is blinking fast.
Line In 6:
Analogue input. This input is dedicated to source with analog output signal, e.g.: tape deck, FM
tuner.
Phono In 7
: Connect the tonearm signal lead to the
Phono In 7
input of the amplifier. The MM/MC switch on
the front panel allows to adapt to connected cartridge type. The earthing wire may be connected to the screw
terminal if you encounter hum problems when using the turntable.

© Pro
-Ject Audio Systems · Pro-Ject Pre Box DS2 digital · Revision 2017.03.31
4
Mains power connection and methods to switch the unit on and off
Connect the low voltage plug from the power supply to the
Power 18V
socket of the preamplifier
before
connecting the power supply to the mains. The unit can be switched on and off by using 2 different methods
which are equal in priorities.
We recommend to set the volume control to minimum, prior to switching on.
1. Using front pushbutton to switch on or into standby
The pushbutton on the front panel of the unit alternately turns the power on or returns it to standby mode. The
blue LED on the front panel shows that the unit is powered on. If a trigger signal is present the unit can’t be
switched off by the pushbutton.
2. Remote power on - triggers
The unit can be switched on via other Box Design components when a 12V trigger voltage is present at the
2.5mm socket marked
Trigger Input.
Special power-on cables (polarity ) in diverse lengths are
available as accessories. The remote power-on signal can be relayed to further units via the
Trigger Output
socket. When the 12V trigger signal is switched off, the unit will also switch off.
Trigger cables may only be plugged into the sockets when the unit is disconnected from t
he power
supply and from the mains. Failure to do so may result in damage of the unit.
Remote control
POWER turns the unit on or back into standby
MUTE
activates and deactivates mute. If mute is engaged, the blue LED
above the ON/OFF switch flashes.
CH+/CH-
select the inputs in turn
1-7
access to a specific input directly
8
confirms Bluetooth pairing
© Pro-Ject Audio Systems · Pro-Ject Pre Box DS2 Digital · Revision 2017.
03.31
5
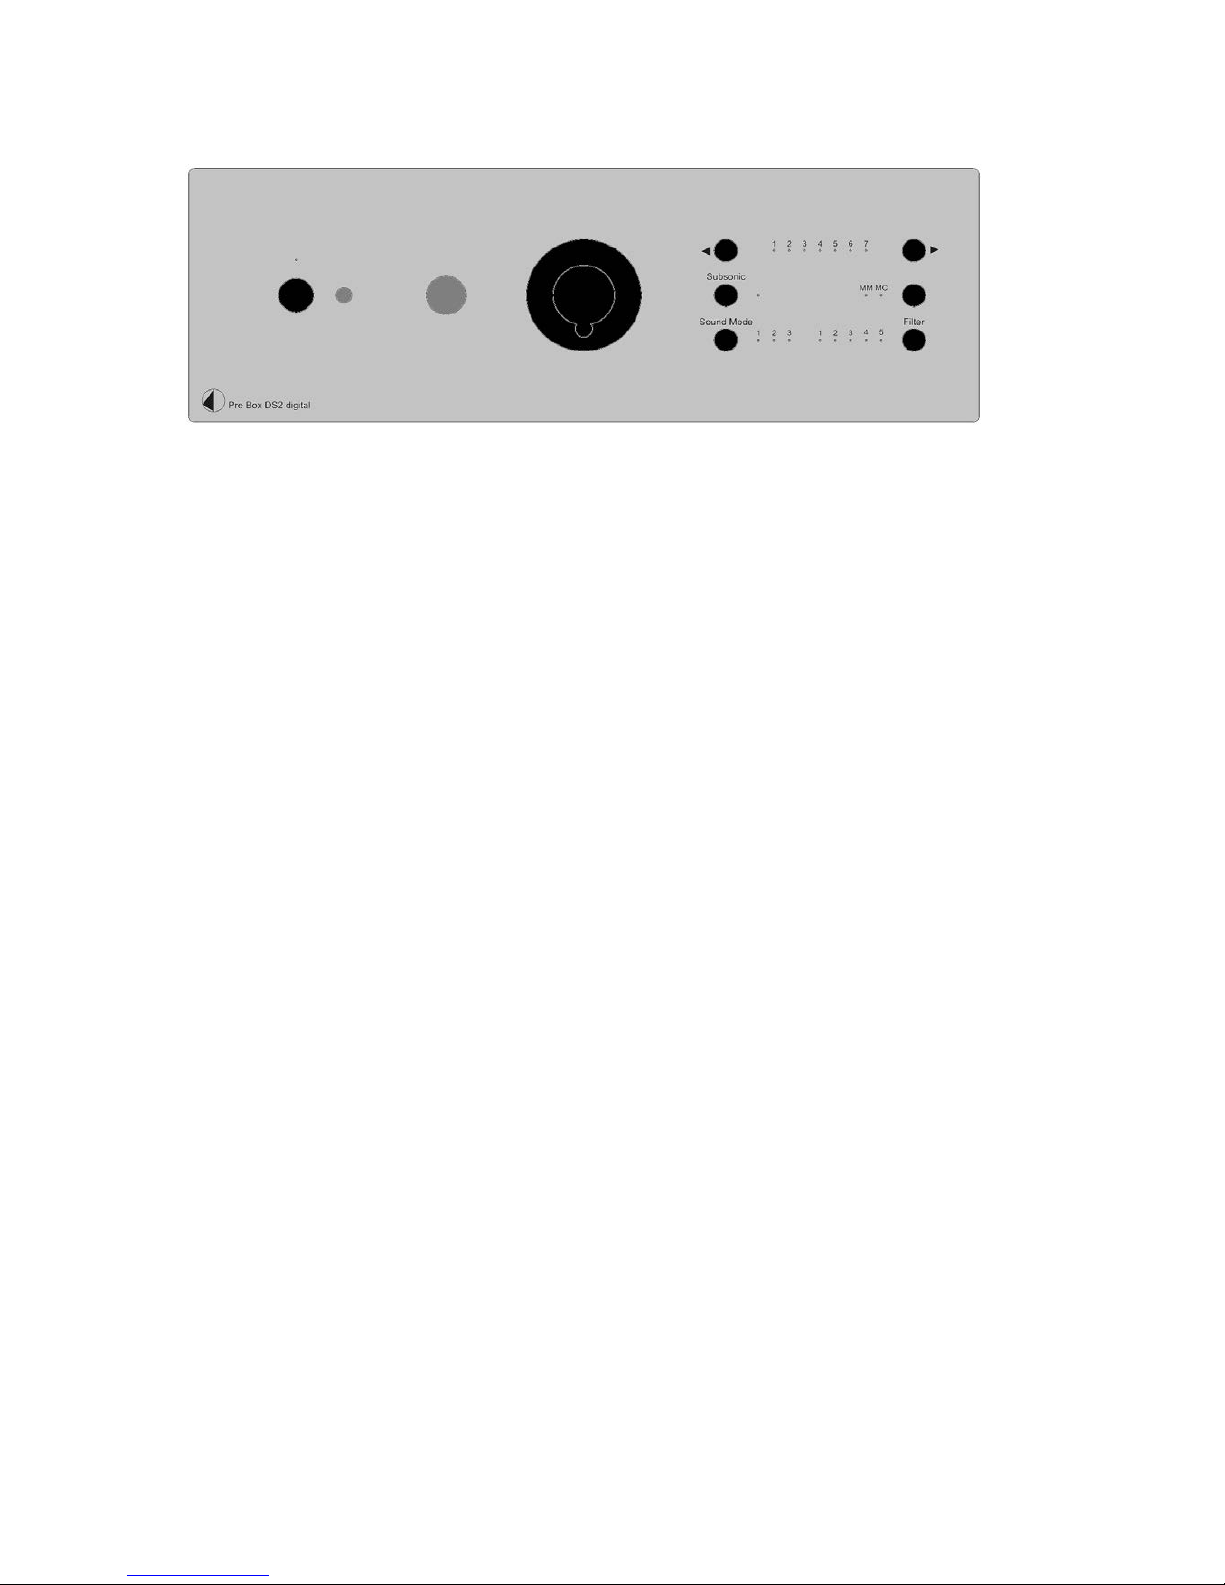
Front panel
Headphone connection
Connect the headphones to the socket on the front panel (Jack 6,3mm). The rear outputs are not
disconnected when headphones are in use.
Volume
Adjust the volume to the desired level, using the large knob in the middle of the front panel.
Input selector
After the unit is powered on, operating the buttons marked with ◄► select the inputs. The selected input
will be shown by the corresponding LED.
Subsonic
The button activates or deactivates subsonic filter. Blue LED is on when subsonic filter is active.
MM MC
The button selects between MM and MC cartridge.

© Pro
-Ject Audio Systems · Pro-Ject Pre Box DS2 digital · Revision 2017.03.31
6
Sound Mode
Mode 1:
Upsampling: this mode upsamples all incoming signals to highest possible output rate:
Sound Mode 1
input
input PCM
sampling rate [kHz]
output PCM
sampling rate [kHz]
available
filters
USB
44
705
1,2
48
768
1,2
88
705
1,2
96
768
1,2
176
705
1,2,3,4
192
768
1,2,3,4
352
705
1,2,3,4
384
768
1,2,3,4
705
705
1,2,3,4
768
768
1,2,3,4
S/PDIF
44
768
1,2
48
705
1,2
88
768
1,2
96
705
1,2
176
768
1,2,3,4
192
705
1,2,3,4
input DSD output DSD
USB
DSD
64
256
1,2,3,4
128
256
1,2,3,4
256
256
1,2,3,4
Mode 2:
Conversion to DSD: all incoming signals are converted to DSD format
Sound Mode 2
Input
input PCM
sampling rate [kHz]
output DSD
available
filters
USB
44-48
128
1,2
88-96
256
1,2
176-768 256 1,2,3,4
S/PDIF
44, 48, 88
128
1,2
176
128
1,2,3,4
96
256
1,2
192
256
1,2,3,4
USB DSD
Same as with Sound Mode 1

© Pro-Ject Audio Systems · Pro-Ject Pre Box DS2 Digital · Revision 2017.
03.31
7
Mode 3:
USB Upsampling bypass:
USB Input sampling rate remains the same as USB output sampling rate.
Sound Mode 3
USB input
sample rate [kHz]
available filters
44-96
1,2,3,4
176-768
1,2,3,4,5
DSD input format remains the same as DSD output format.
S/PDIF input rates are upsampled to PCM352kHz / PCM384kHz
Sound Mode 3
input
input PCM
sampling rate [kHz]
output PCM
sampling rate [kHz]
available
filters
S/PDIF
44
384
1,2
48
352
1,2
88
384
1,2
96
352
1,2
176
384
1,2,3,4
192 352 1,2,3,4
Filters
Filter button toggles between 5 filters. Availability of filters depends on input format and frequency shown in
previous article:
Filter
Sound type
Filter name
Remarks
Sound source
positioning
Edge
1
Natural tone
Super slow roll-off
No echo, natural
sound
Close
Ultra
sharp
2
Acoustic tone
Short delay roll-off
Minimal echo,
original sound
Sharp
3
Traditional tone
Slow roll-off
Minimal echo,
original sound
Middle
4
Acoustic sound
Short delay sharp roll-off
Post echo, bass
sound
Sharp
5
Traditional sound
Sharp roll-off
Pre and post
echo, powerful
sound
Far
Slow

© Pro
-Ject Audio Systems · Pro-Ject Pre Box DS2 digital · Revision 2017.03.31
8
DSD playback
Up to now DSD playback on a computer using a Windows® operating system is only reliably possible with
the PC software player Foobar2000.
Nevertheless, this player has to be prepared, out of the box it is not capable to play DSD. Please read the
following instructions how to prepare the player.
You will need to download the following software and drivers from the internet:
The software player Foobar2000 http://www.foobar2000.org/download
The Foobar2000 for ASIO playback http://www.foobar2000.org/components/view/foo_out_asio
The Foobar2000 for SACD playback http://sourceforge.net/projects/sacddecoder/files/foo_input_sacd/.
Unzip the enclosed files and store into a folder of your choice.
The actual Windows® USB driver comes with the unit on CD. Store all files from the CD on your computer
into a folder of your choice.
Please install the USB driver first. To do that, in the folder, where you stored the files to, start the installation
by double clicking on
Setup.exe
. Follow the instructions of the installation program.
Please install Foobar2000 now by double clicking on the downloaded file. Please start Foobar2000 after that.
Now you have to integrate the downloaded components into Foobar2000. Please do the following: In the
upper menu bar, click on
File
and then on
Preferences
.

© Pro-Ject Audio Systems · Pro-Ject Pre Box DS2 Digital · Revision 2017.
03.31
9
In the window that now opens, please click on
Components
.
Now click on
Install...
(lower right) und search for
foo_out_asio.fb2k-component
in the opened explorer window.
Click on it and after that on
Apply
to activate the Component. Foobar2000 asks now, if you agree to start,
restart the program to activate the changes. Confirm with
Yes
. Foobar2000 restarts.
Now exit Foobar2000 and double click on the program
ASIOProxyInstall-0.6.5.exe
in the folder, where you
unzipped the Component
foo_input_sacd
to. Follow the instructions of the installation program.
Now please start Foobar2000 again and open the
Preferences
Box by clicking on
File/Preferences
.
Click on
Install
and go the folder where you unzipped
foo_input_sacd
to.
Click on
foo_input_sacd.fb2k-component
and confirm with
Apply
.
Foobar2000 asks once again, if you agree to start restart the program to activate the changes.
Confirm with
Yes
. Foobar2000 restarts.
Now you have installed all necessary components. Before you can start to playback DSD files however, you
have to carry out some settings. For that please open the
Preferences
Box by clicking on
File/Preferences
again.

© Pro
-Ject Audio Systems · Pro-Ject Pre Box DS2 digital · Revision 2017.03.31
10
Click on the small triangle to the left of
Playback
now and after that on
Output
.
In the dropdown menu below
Device
, choose the driver
Asio: foo_dsd_asio
.

© Pro-Ject Audio Systems · Pro-Ject Pre Box DS2 Digital · Revision 2017.
03.31
11
Click
Playback
and the small triangle on the left side of
Output
and then on
ASIO
. Below
ASIO Drivers
please double click on
foo_dsd_asio
.
In the window that follows, please choose
Project Box Asio Driver
and in the dropdown menu
ASIO Driver
.
In the same window, please choose
DoP Marker 0x05/0xFA
in the dropdown menu
DSD Playback Method
.
Close the window with a click on the small
X
in the upper right corner.

© Pro
-Ject Audio Systems · Pro-Ject Pre Box DS2 digital · Revision 2017.03.31
12
Select
Tools
, click the small triangle to the left and then
SACD
. Choose
DSD
in the dropdown menu
ASIO
Driver mode
.
Now you have completed all necessary settings. Close the
Preferences
window with a click on OK. Now you
can playback DSD files with the extensions
DSF
and
DFF
. You can open the files in Foobar2000 either with
your mouse via drag and drop or with the
File
menu in the upper menu bar.
Please be aware that downloads from the Internet are made entirely at your own risk. Under no
circumstances can we carry responsibility or provide support for software products sourced from the
internet or for any damage or problems arising from the use thereof. All downloads should be
checked with an up-to-date anti-virus programme.
Replacing batteries
Proceed as follows:
• Unlock and slide open the battery case cover
• Replace the battery.
Make sure the battery is the right way round!
• Close the battery case cover
Battery type: 1 x CR2032 / 3V or 1 x CR2025 / 3V
Do not dispose the batteries as ordinary domestic refuse. Please dispose your exhausted batteries at
the appropriate collection sites - usually located at supermarkets and drugstores.

© Pro-Ject Audio Systems · Pro-Ject Pre Box DS2 Digital · Revision 2017.
03.31
13
Technical specifications Pro-Ject Pre Box DS2 digital
2 analogue inputs 1x Line In (RCA), 1x Phono Line In (RCA)
Phono input specifications MM: 47kohms/50pF; MC: 10ohms
5 digital inputs 1x coax (S/PDIF), 2x optical (TOSlink®), USB B, Bluetooth(aptX)
D/A-converter AK4490 32-bit PCM 768kHz / DSD256
Sampling rate converter AK4137EQ upsampling to 768kHz
Sampling rates 32/44,1/48/88,2/96/176,2/192/352,8/384/768 kHz
DSD support DSD64, DSD128 and DSD256
Filter settings 5 different selectable on front
Frequency response 20Hz - 20kHz (+0/-1dB)
Analogue outputs 6.3mm Headphone (front), 1x Subwoofer(RCA), 1x Fixed (RCA), 1x
Variable Out (RCA)
Output voltage 2,2 Veff (switchable +6dB gain gives 4,4 Veff )
Minimal recommended headphone impedance 8ohms
Headphone output power 100mW/8ohms
THD 0,00085%
Crosstalk -117dB (10kHz@0dB)
Signal to noise ratio 113dB (20 - 20.000 kHz)
Power consumption <1 watt standby, 600mA max
Outboard Power supply 18V/1000mA DC (included)
Dimensions W x H x D (D with sockets): 206 x 71 x 200 (220) aluminium
240 x 72 x 199 (220) wood
Weight (without power supply): 1.570g aluminium, 2.000g wood
Service
Should you encounter a problem which you are not able to alleviate or identify, please contact your dealer for
further advice. Only if the problem cannot be resolved there, the unit should be sent to the responsible
distributor in your country.
Warranty
The manufacturer accepts no responsibility for damage caused by not adhering to these instructions
for use. Modification or changes to any part of the product by unauthorized persons release the
manufacturer from any liability over and above the lawful rights of the customer.
Copyright, trademarks
Pro-Ject Audio Systems is a registered Trademark of
H. Lichtenegger.
This guide was produced by: Pro-Ject Audio Systems
Copyright
©
2017. All rights reserved.
The information was correct at the time of going to
press. The manufacturer reserves the right to make
changes to the technical specification without prior
notice as deemed necessary to uphold the ongoing
process of technical development.
Windows®, Windows XP®, Windows Vista®, Windows 7®, Windows 8®, Windows 10® are trademarks of the
Microsoft group of companies. Mac
®
and Mac OS® are trademarks of Apple Inc., registered in the U.S. and
other countries. TOSlink
®
is a registered trademark of Toshiba corporation. Dolby® is a registered
trademarks of Dolby Laboratories. DTS
™
is a registered trademark of DTS, Inc. DSD and the DSD logo are
trademarks of Sony Corporation.
 Loading...