

Page 1
Bowles Corporation
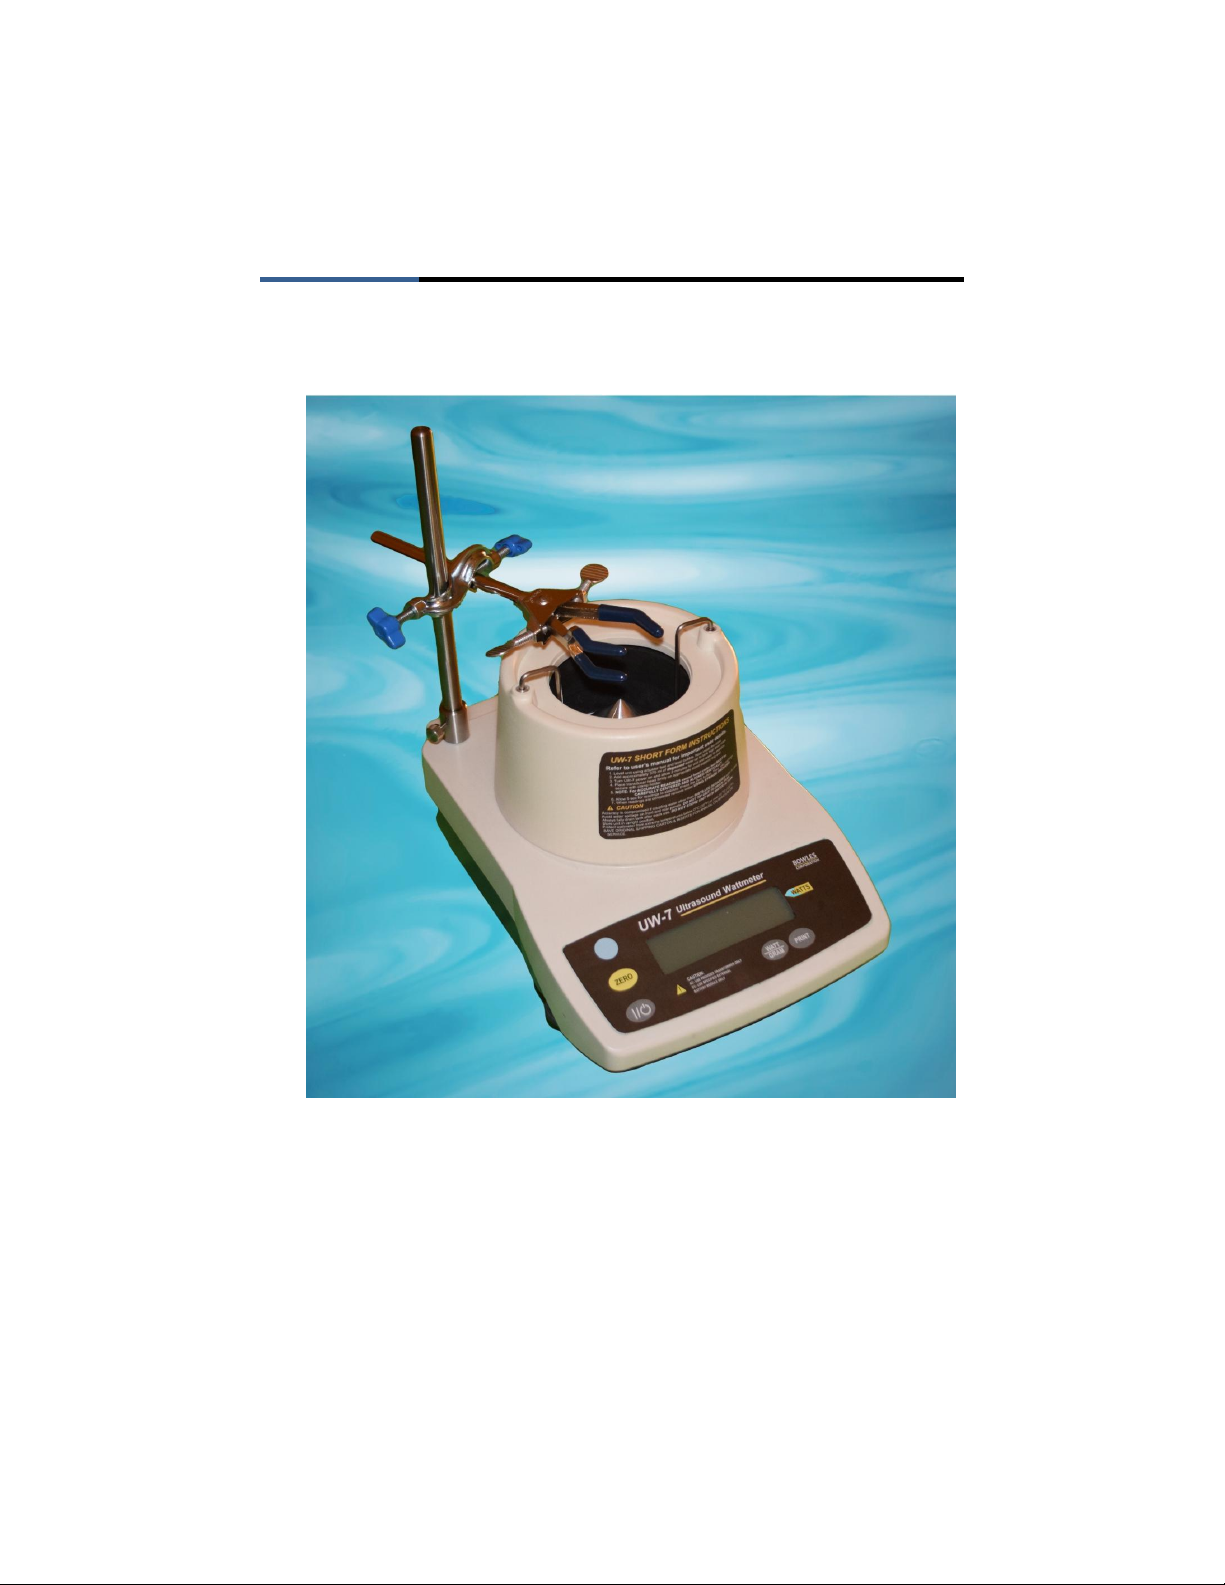
UW-7 Ultrasound Wattmeter
User Manual
Rev – 04/27/18
Page 2

Bowles Corporation UW 7
Manual P/N 3009
Bowles Corporation
445 Long Point Road, N. Ferrisburgh, VT 05473
www.BowlesCorp.com 802-425-3447
Page 3

Bowles Corporation UW 7
Contents
WARRANTY .................................................................................................................... 1
NOTICES ....................................................................................................................... 2
SAFETY CONSIDERATIONS .............................................................................................. 4
HAZARD WARNINGS ....................................................................................................... 5
PRECAUTIONS ................................................................................................................ 5
ELECTROMAGNETIC INTERFERENCE AND SUSCEPTIBILITY .................................................. 6
EC DIRECTIVE 73/23/EEC LOW VOLTAGE (USER SAFETY) ............................................... 7
CHAPTER 1: GENERAL INFORMATION ............................................................................... 9
SUMMARY OF FEATURES............................................................................................... 10
ULTRASOUND AND ITS APPLICATIONS ............................................................................ 11
PATIENT TREATMENT WITH THERAPEUTIC ULTRASOUND .................................................. 12
CHAPTER 2: DESCRIPTION ................................................................................................... 13
UW-7 SPECIFICATIONS ................................................................................................. 14
OVERALL UNIT LAYOUT ................................................................................................ 15
FRONT PANEL DESCRIPTION ......................................................................................... 16
BACK PANEL DESCRIPTION ........................................................................................... 17
BOTTOM PANEL DESCRIPTION ....................................................................................... 18
STANDARD ACCESSORIES ............................................................................................. 18
OPTIONAL ACCESSORIES .............................................................................................. 20
CHAPTER 3: INSTALLATION & THE OPERATING ENVIRONMENT ............................ 21
UNPACKING AND INSPECTION ........................................................................................ 22
OPERATION ................................................................................................................. 25
UW-7 SYSTEMS CHECK ............................................................................................... 27
BEGINNING ULTRASOUND POWER MEASUREMENTS ........................................................ 29
USING THE UNIVERSAL TRANSDUCER CLAMP ASSEMBLY AND CENTERING RINGS .............. 31
ULTRASOUND UNIT TESTING ......................................................................................... 33
USING THE RS232 PORT .............................................................................................. 34
CHAPTER 4: SAFETY, MAINTENANCE, STORAGE & SHIPPING ................................... 35
RECOMMENDED PROCEDURES AND PRECAUTIONS.......................................................... 36
CALIBRATION WEIGHT CHECK PROCEDURES .................................................................. 36
MAINTENANCE ............................................................................................................. 37
SERVICE ...................................................................................................................... 37
RETURNING THE UW-7 FOR RECALIBRATION .................................................................. 38
USING BATTERY POWER MODULE ................................................................................. 38
STORAGE .................................................................................................................... 39
REPACKAGING AND SHIPPING ........................................................................................ 39
APPENDIX A: TROUBLESHOOTING GUIDE ....................................................................... 43
RETURN MATERIALS AUTHORIZATION FORM ............................................................... 47
Bowles Corporation
445 Long Point Road, N. Ferrisburgh, VT 05473
www.BowlesCorp.com 802-425-3447
Page 4

Bowles Corporation UW 7
Bowles Corporation
445 Long Point Road, N. Ferrisburgh, VT 05473
www.BowlesCorp.com 802-425-3447
Page 5

1
Warranty
Bowles Corporation (Bowles) warrants the UW-7 against defects in materials and
workmanship for one year from the date of original purchase. The standard warranty is
extended for a second year if the instrument is returned to Bowles for its recommended
yearly recalibration. Recalibration is not covered under the warranty.
During the warranty period, we will repair or, at our option, replace at no charge a
product that proves to be defective, provided you return the product in its custom
shipping box and with shipping prepaid to Bowles Corporation.
Only serialized products are covered under this warranty.
The warranty may become void if:
You elect to have the unit serviced or “calibrated” by someone other than
Bowles.
The tamper-resistant Quality Seal and/or the serial number tag is removed
or broken without proper factory authorization.
the product has been damaged by accident or misuse or as the result of:
Service or modification by other than Bowles.
Shipping the product without adherence to the procedures found on page 39
of this manual.
Shipping the product in packaging other than the original custom shipping
box and foam set.
Bowles reserves the right to discontinue the UW-7 at any time, and change its
specifications, price, or design without notice and without incurring any obligation.
Bowles does not guarantee availability of service and service parts after the manufacture
of the unit is discontinued, but will do its utmost to service the product for five years
following discontinuation.
The purchaser assumes all liability for any damages or bodily injury, which may result
from the use or misuse of the unit by the purchaser, his employees, agents, or customers.
In no event shall Bowles Corporation be liable for consequential
damages.
Bowles Corporation UW 7
Page 6

Bowles Corporation UW 7
2
Notices
Copyright
Copyright © 2018 by Bowles Corporation. All rights reserved. No part of this
publication may be reproduced or transmitted in any form other than for the purchaser’s
personal use without written permission from Bowles Corporation.
Certification
This instrument was thoroughly tested and inspected. Calibration measurements are
traceable to the National Institute of Standards and Technology (NIST). Devices for
which there are no NIST calibration standards are measured against in-house
performance standards using accepted test procedures.
Trademarks
Bowles and UW-7 are trademarks of Bowles Corporation. Any other trademark names
used in this manual are only for editorial purposes and the benefit of the respective
trademark owner with no intention of improperly using that trademark.
Refunds and Credits
Only products returned within 90 days from the date of original purchase are eligible for
refund/credit. A restocking charge will be applied to any returns (see below).
In order to receive a refund/credit of a product’s purchase price, the product must not have
been damaged by the customer or by the carrier chosen by the customer to return the goods,
and the product must be returned complete (meaning with all manuals, cables, accessories,
etc.) and in “as new” and resalable condition, and must be returned properly packed in the
original shipping container.
Products not returned within 90 days of purchase, or products, which are not in “as new”, and
resalable condition, are not eligible for credit return and will be returned to the customer. The
Return Procedure (see below) must be followed to assure prompt refund/credit.
Page 7

Bowles Corporation UW 7
3
Restocking Charges
Products returned within 30 days of original purchase are subject to a minimum
restocking fee of 10 %. Products returned in excess of 30 days after purchase, but prior
to 90 days, are subject to a minimum restocking fee of 15 %. Additional charges for
damaged and/or missing parts, including the custom box set, and accessories will be applied to
all returns.
Return Procedure
A Return Material Authorization (RMA) number must be obtained from Bowles
Corporation customer service at 802-425-3447, before a product is returned for any
reason, including yearly calibration. The RMA form found on page 47 must be filled out
and included with the product. The RMA number should be clearly marked on the
outside of the package.
All items being returned (including all warranty-claim shipments) must be sent freightprepaid to our factory location. When you return an instrument to Bowles, we
recommend using United Parcel Service, Federal Express, or Air Parcel Post. We also
recommend that you insure your shipment for its actual replacement cost. Bowles
Corporation will not be responsible for lost shipments or instruments that are received in
damaged condition due to improper packaging or handling. We recommend that you use
the original carton and packaging material for shipment. If they are not available, contact
Bowles for replacement packing. See the repackaging and shipping instructions on
page 39 for the proper procedure to avoid damage to the unit in transit.
Returns should be shipped to this address:
Bowles Corporation
445 Long Point Road
N. Ferrisburgh, VT 05473
T: 802-425-3447
Email: [email protected]
Page 8
Bowles Corporation UW 7
4
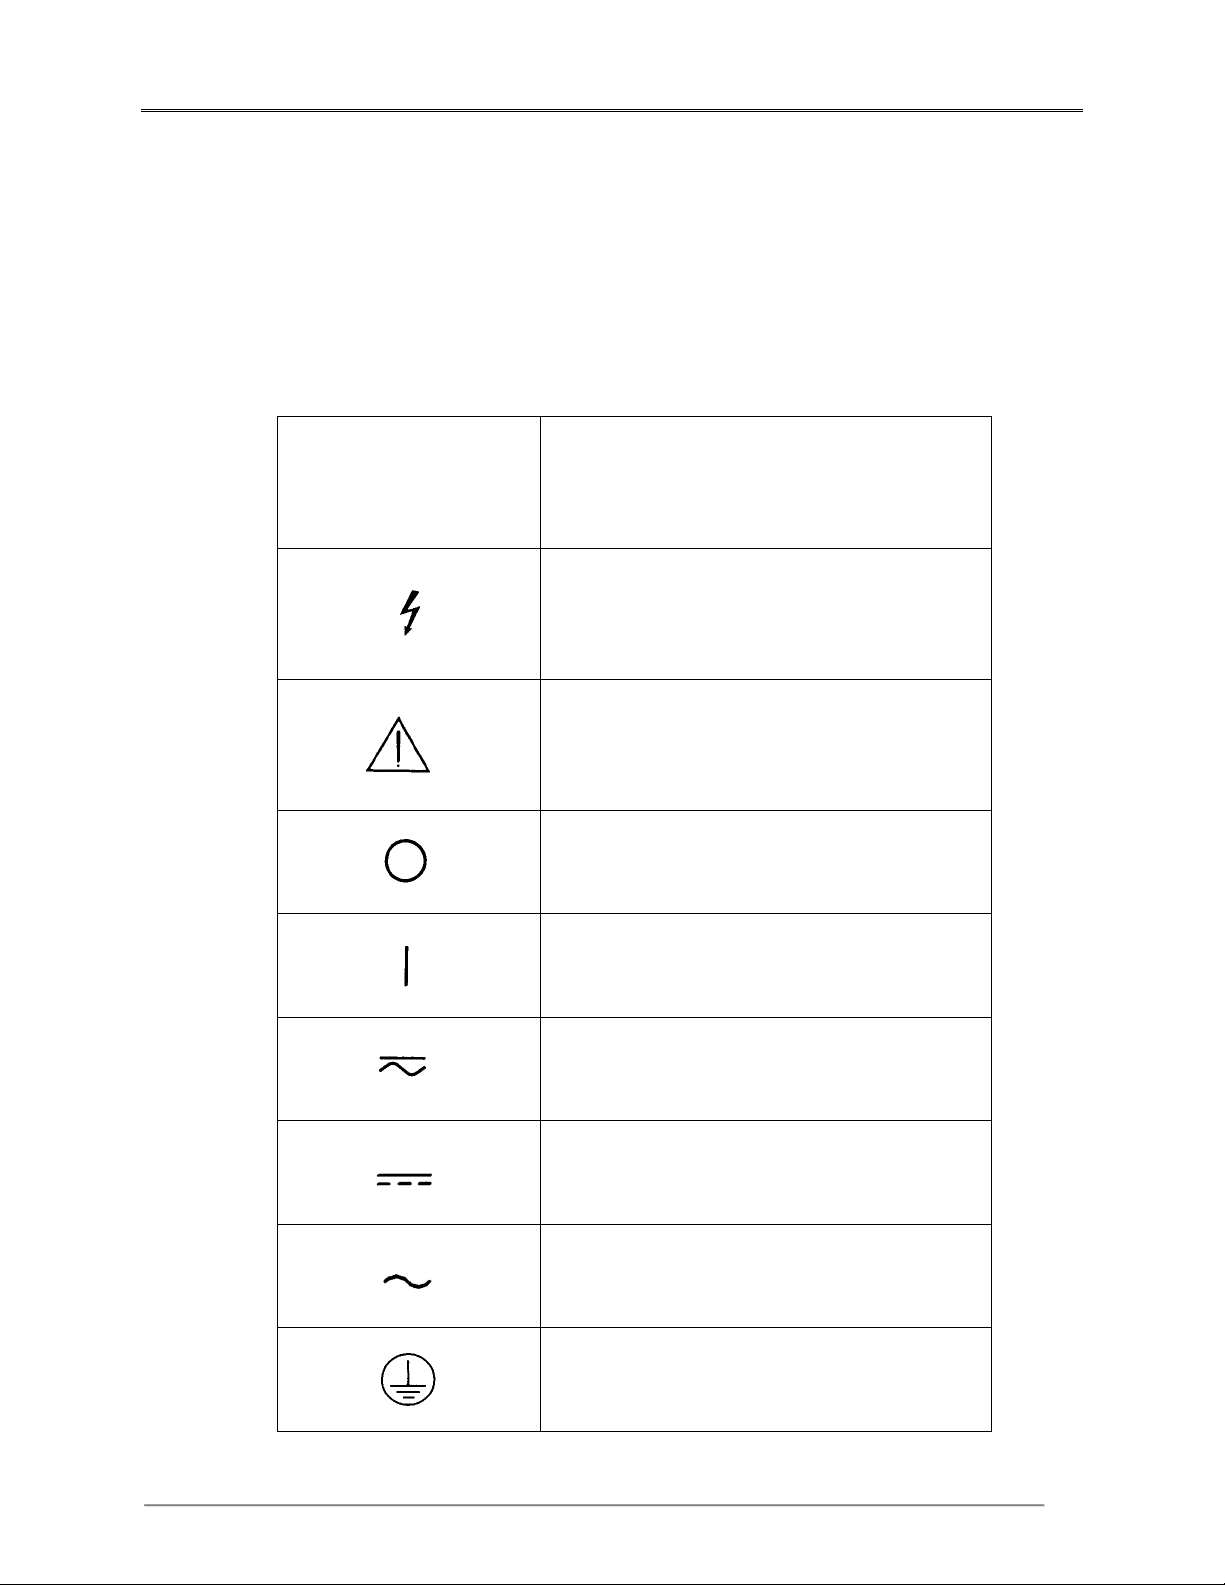
Symbol
Description
Caution: Risk of electric
shock
Caution: Refer to
documentation
Power Off (Mains)
Power On (Mains)
DC/AC
DC
AC
Earth (Ground)
Safety Considerations
Use of this instrument is restricted to qualified personnel who recognize shock hazards
and are familiar with safety precautions used when operating electrical equipment. Read
the manual carefully before operating the UW-7.
The following warning symbols may be found on the UW-7:
Page 9

Bowles Corporation UW 7
5
Hazard Warnings
Warning! Power Rating. The UW-7’s main power input must be connected to
an external power transformer that provides voltage and current within the specified
rating for the system.
Use of an incompatible power transformer may produce electrical shock and
fire hazards. See Specifications and Optional Accessories in Chapter 2.
Warning! Internal Voltage. Always turn off the power switch and unplug the
power cord before cleaning the UW-7’s outer surface.
Warning! Liquids. Avoid spilling liquids on the digital scale; fluid seepage into
internal components creates a potential shock hazard. Do not operate the
instrument if internal components are exposed to fluid. Use a soft cloth to wipe
off any spilled water.
* Warning! Unauthorized user modifications or application beyond the
published specifications may result in electrical shock hazards or improper
operation. Bowles Corporation will not be responsible for any injuries
sustained due to unauthorized equipment modifications.
* Warning! Changes or modifications to this unit not expressly approved by the
manufacturer could void the user's authority to operate the equipment.
Precautions
The following precautions are provided to help you avoid damaging the system or
creating inaccurate readings:
Caution: Service. Authorized service personnel should service the UW-7. Only
qualified technical personnel should perform troubleshooting and service procedures on
internal components.
Caution: Environmental Conditions. Do not expose the system to temperature
extremes during operation. Storage ambient temperatures should remain between 10 -
35C (50-95° F). System operation should be at approximately 21 c (70 F) performance
may be adversely affected if temperatures fluctuate above or below this range. Allow 45
minutes for unit to reach room temperature.
Caution: Use of cell phones in close proximity to the unit may cause readings to
vary slightly.
Caution: Do Not Immerse. Clean only with a mild detergent, and wipe down with
a gentle cloth.
Page 10

Bowles Corporation UW 7
6
Electromagnetic Interference and Susceptibility
USA FCC CLASS A
Warning: Changes or modifications to this unit not expressly approved by the
manufacturer could void the user's authority to operate the equipment. This equipment
has been tested and found to comply with the limits for a Class A digital device, pursuant
to Part 15 of the FCC Rules. These limits are designed to provide reasonable protection
against harmful interference when the equipment is operated in a commercial
environment. Like all similar equipment, this equipment generates, uses, and can radiate
radio frequency energy and, if not installed and used in accordance with the instruction
manual, may cause harmful interference to radio communications. Operation of this
equipment in a residential area is likely to cause interference, in which case the user will
be required to correct the interference at his/her own expense.
Canadian Department of Communications Class A
This digital apparatus does not exceed Class A limits for radio emissions from digital
apparatus set out in the Radio Interference Regulations of the Canadian Department of
Communications.
Emissions - CLASS A
The system has been type tested by an independent, accredited testing laboratory and
found to meet the requirements of EN 61326-1:1998 for Radiated Emissions and Line
Conducted emissions. Verification of compliance was conducted to the limits and
methods of the following:
CISPR 16-1:1993 and CISPR 16-2:1996
Immunity
The system has been type tested by an independent, accredited testing laboratory and
found to meet the latest harmonized European emissions and immunity standard
requirements of EN 61326 for commercial measurement equipment. Verification of
compliance was conducted to the limits and methods of the following:
EN 61326-1 IAW EN 61000-4-2 Electrostatic Discharge
EN 61326-1 IAW EN 61000-4-3 Annex D Radiated & Conducted EM
EN 61326-1 IAW EN 61000-4-4 Electrical Fast Transient/Burst
EN 61326-1 IAW EN 61000-4-5 Surge Immunity
EN 61326-1 IAW EN 61000-4-6 Conducted Disturbances
EN 61326-1 IAW EN 61000-4-11 Voltage Interrupts
Page 11

Bowles Corporation UW 7
7
EC Directive 73/23/EEC Low Voltage (User Safety)
The system has been type tested by an independent testing laboratory and found to meet
the requirements of EC Directive 73/23/EEC for Low Voltage. Verification of
compliance was conducted to the limits and methods of the following:
EN 61010-1
“Safety Requirements for Electrical Equipment for Measurement, Control and Laboratory
Use, Part 1: General requirements” (including amendments 1 & 2).
Page 12

Bowles Corporation UW 7
8
Page 13
Bowles Corporation UW 7
9
1
Chapter 1: General Information
Inside This Chapter
Summary of Features
Ultrasound and its Applications
Patient Treatment with Therapeutic Ultrasound
Page 14

Bowles Corporation UW 7
10
Summary of Features
The UW-7 digital Ultrasound Wattmeter provides an accurate means of verifying and
calibrating the output of therapeutic ultrasound devices. The instrument measures
output through a strain gauge bridge transducer. The UW-7:
Has a resolution of 0.01 Watt and a repeatability of -3%
of readings .02 watts from 0 - 30 W
Maintains electrical accuracy of .01 grams throughout
range;
Features a large, backlit, easy to read display that enables
the user to quickly and accurately make power
measurements;
1.5 sec electrical readout response time for fast
measurements. Ultrasound readings will take 4-5 seconds.
Can accommodate a variety of transducer shapes and sizes
without interfering with the measurement;
The UW 7 is provided with a 140-ml piston syringe for
draining the tank. Under no circumstances should the water
be poured out of the tank by tipping the unit on its side.
Always use the syringe for convenient and controlled
drainage of the tank. Once the tank is emptied use a soft
cloth towel or sponge to wipe tank fully dehydrated.
NEVER use paper towels for this purpose since this will
leave small fibers that will degrade the accuracy of the
readings.
Measures total-pulsed or continuous-average power.
Has a selectable readout in grams or watts.
Unit is line-powered by a 120 VAC or 240 VAC
transformer for normal testing. For portable operation an
optional Li Ion battery module is available.
Has a USB or RS232 interface cable option
Includes a field functional check weight.
Is housed in a sturdy case.
Is ruggedly built for portable use to meet the needs of
service groups and biomedical engineers.
Comes with a soft carrying case as a standard accessory for
ease of transporting and storage.
Page 15

Bowles Corporation UW 7
11
Ultrasound and Its Applications
Human perception of sound waves is limited to frequencies of fewer than 20,000
vibrations per second. Higher frequency vibrations — between 0.7 and 3.3 MHz —
are used for ultrasound therapy. (Most ultrasound equipment produces an output of
between 1 and 3.3 MHz.)
An ultrasound unit produces electrical oscillations at a specified frequency that cause
the transducer in the ultrasound applicator to generate sound waves. The resulting
ultrasonic radiation is transmitted from the ultrasound applicator, or treatment head,
through a coupling medium, to the patient’s tissue.
Therapeutic Use of Ultrasound
The therapeutic use of ultrasonic energy is accepted worldwide, and most modern
hospitals and clinics have ultrasound devices in their physical therapy
departments.
Ultrasound therapy is primarily used in the treatment of sports-related injuries.
Another common use is the treatment of circulatory disorders and rheumatic
diseases of the musculoskeletal system and peripheral nerves. Ultrasound has
been found to be extremely effective in treating body areas with a great deal of
scar tissue.
Physiological Effects of Ultrasound Therapy
It is well documented that ultrasound therapy heals because of thermal,
mechanical, and chemical effects. *
Thermal effects include deep tissue heating at depths to 5 cm or more. The thermal effects of ultrasound differ from diathermy (the use of electrical impulses to
produce generalized vasodilation) in that the ultrasound beam heats only a small
tissue area that approximates the cross-section of the beam. This heating effect is
concentrated in muscles, ligaments, nerves, bones, and where the ultrasound beam
crosses from one type of tissue to another.
The mechanical effects are best described as micro massage, a deep stirring action
within the tissue. The benefit of this action is an increased circulation to the
damaged tissue. In addition, ultrasound is capable of separating collagen fibers
from one another and of changing the tensile strength of tendons, thereby
increasing their extensibility.
* Physical Agents for Physical Therapists, Second Edition, James E. Griffin and Terence Karselis, Charles C. Thomas
Publishing Co., 1992.
Page 16

Bowles Corporation UW 7
12
The physiological benefits from ultrasound therapy are numerous. Ultrasound
therapy affects the peripheral nerves by chemically changing the conduction
velocity (this has been shown clinically in situ). Ultrasound alters the diffusion of
Na+ and K+ (sodium and potassium) across red blood cell membranes.
Ultrasound can also remove some salt deposits from irritated tissues.
Patient Treatment with Therapeutic Ultrasound
The clinician working with ultrasound can ensure successful ultrasound treatment by
assessing:
the physical condition of the patient,
the absorption coefficient of the tissue(s),
the energy output of the ultrasound unit (continuous and pulsed),
the massivity and location of the affected tissue, and
the spread pattern of the beam.
The most essential assurance that the clinician can have is the verification that the
ultrasound unit is producing the ultrasound energy for which it was designed. The
Bowles UW-7 digital power meter enables the clinician to accurately measure this
output energy.
Page 17
Bowles Corporation UW 7
13
2
Chapter 2: Description
Inside This Chapter
Specifications
Overall Unit Layout
Front Panel Description
Back Panel Description
Standard Accessories
Optional Accessories
Page 18

Bowles Corporation UW 7
14
UW-7 Specifications
Measurement range 0.01 - 30 Watts
Input Power Level 0 - 30 W
Input Frequency 0.5 - 10 MHz
Resolution 0.01 W
Accuracy, electrical +/- .15 W (+/-.01 grams)
throughout range
Repeatability 3% of reading .2 watts
Zero Shift Auto Zero button
Acceptable Transducer Size up to 6.7 cm (2.65") diameter
Operating Temperature 10° - 30° C (50° - 86° F)
AC Power Requirements Use the transformer provided.
Battery power 14 – 18 VDC Use only the LI battery power module.
Battery Life Maximum of 36 hours
Note: Unit will not auto shut down on battery power.
Height 6 ½” (11.5” with Clamp Post)
Enclosure ABS ® with internal die cast metal sensor support base
Page 19
Bowles Corporation UW 7
15
Leveling
Bubble
Overflow Drain
Notch
Transducer Cone
Front Panel
Acoustic Sensor
Tank
Cone Hanger Mounts
Rear Water
Splash Guard
Clamp
Support Post
Cone Hanger
Overall Unit Layout
Figure 2-1: UW 6 General Layout
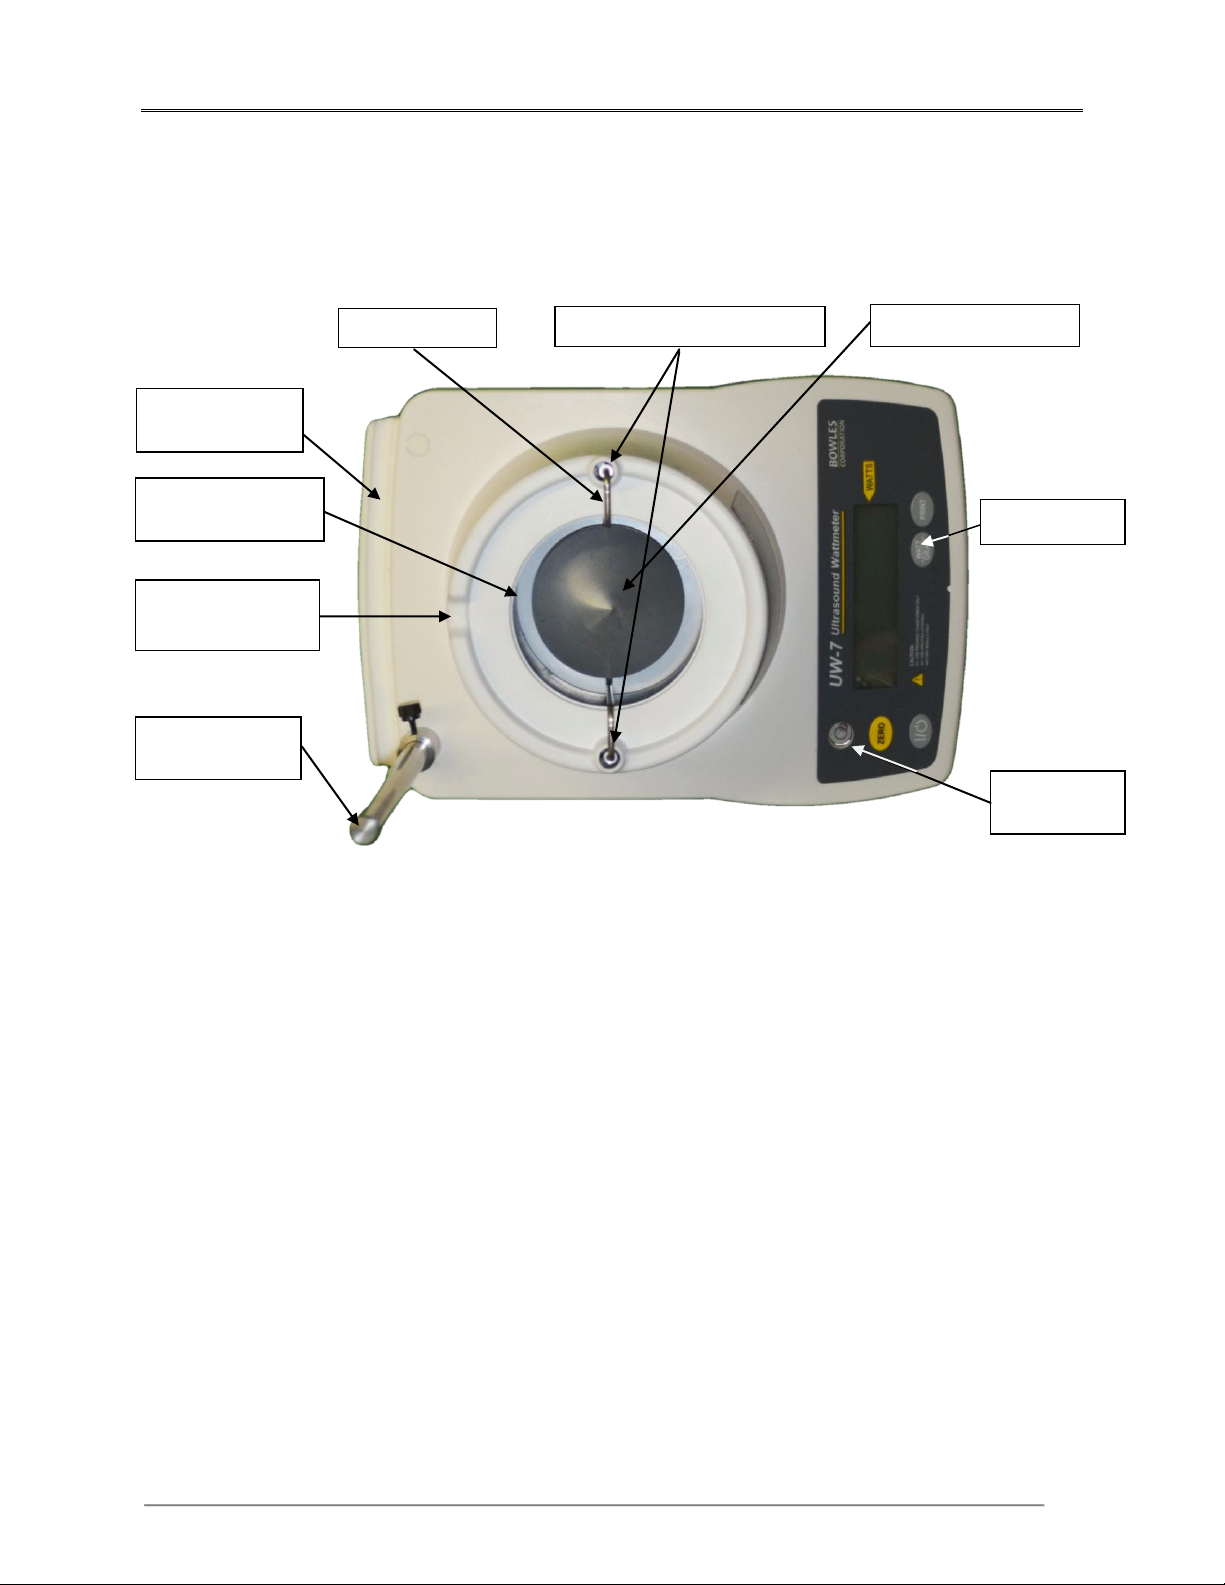
The top of the UW-7 Ultrasound wattmeter is shown in Figure 2-1. It includes
the following components.
Front Panel: Includes LCD readout and keyboard.
Rear Panel: Includes Battery compartment, RS-232 Connector and
Power Transformer Jack.
Sound Tank: To be filled with 420 ml 10 ml of degassed and
distilled water for each use.
Transducer Cone: The cone is removable for safe transporting.
Leveling Bubble: Used to help level the unit before turning it on.
Cone Hanger: Suspends the cone in the sound tank from the load cell
mounts during readings.
Cone Hanger Mounts: Connect the cone hanger and cone with the
unit’s load cell during readings.
Universal Transducer Clamp Support Post: A removable, vertically
mounted bar to which the transducer clamp may be attached.
Page 20
Bowles Corporation UW 7
16
Front Panel Description
Figure 2-2: UW-7 Front Panel Layout
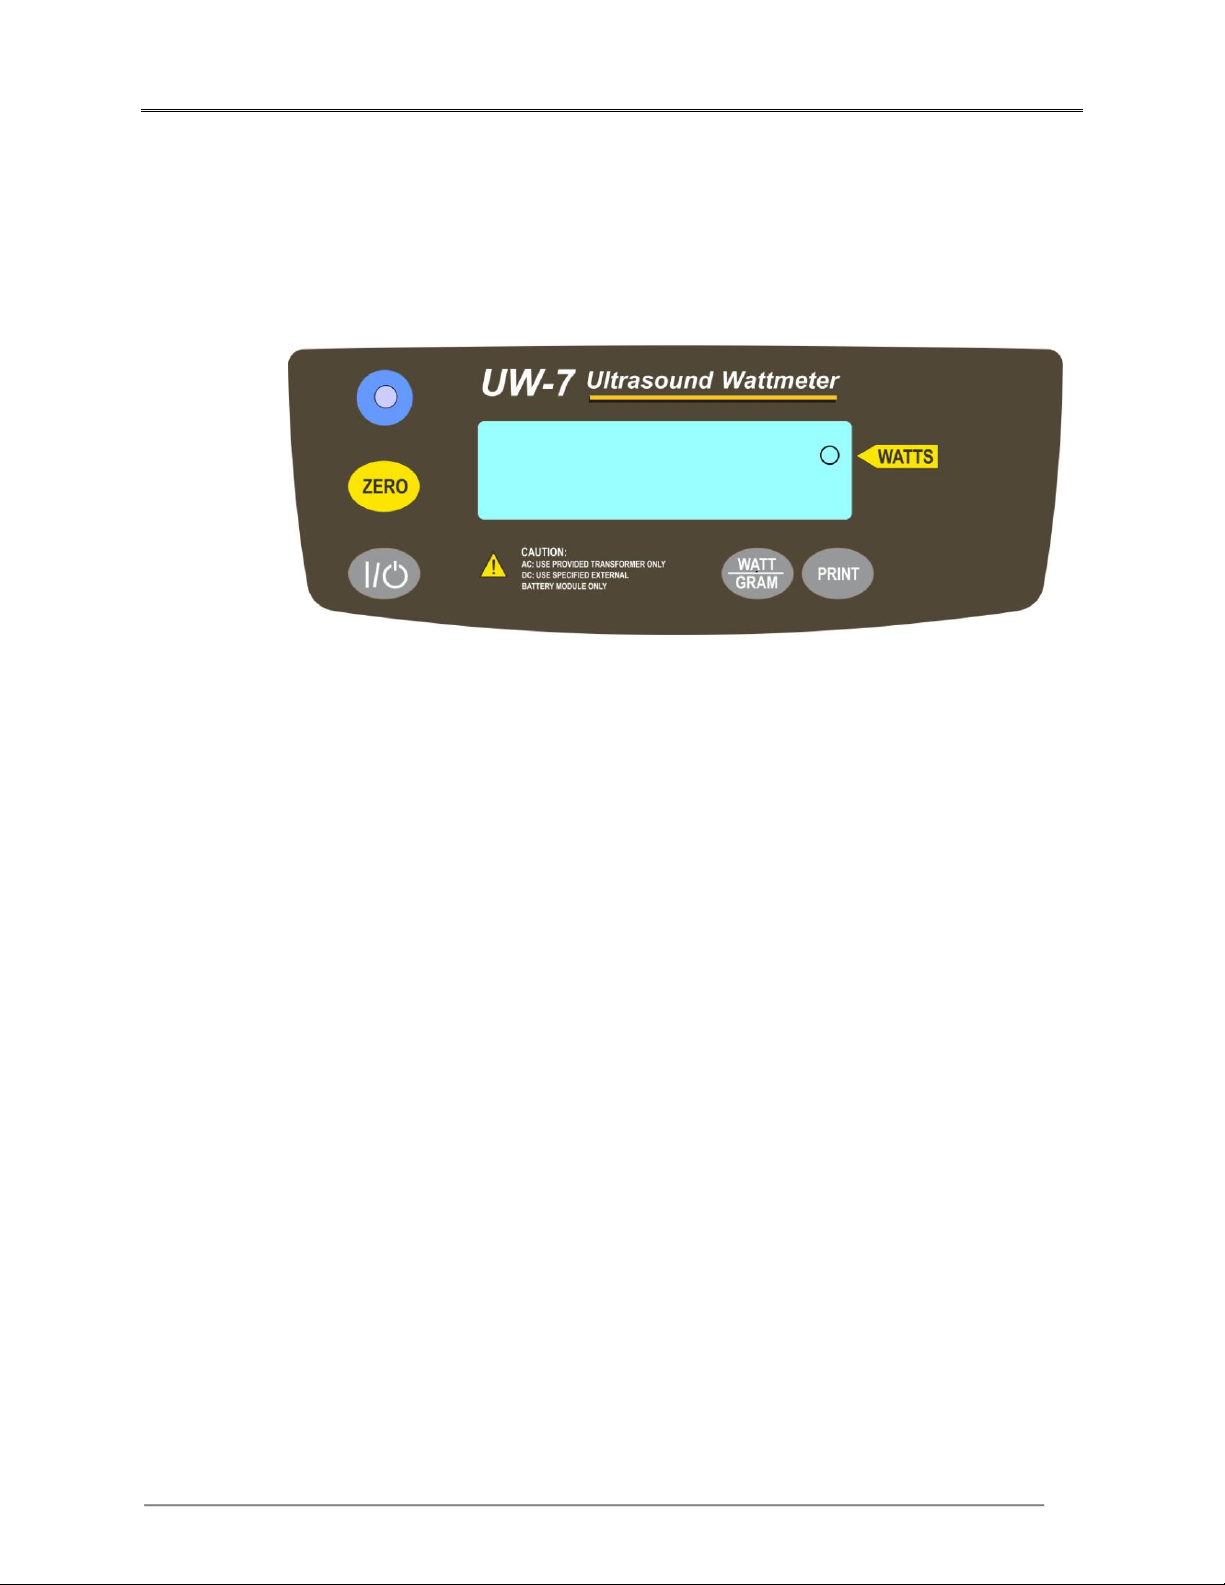
The front panel of the UW-7 ultrasound wattmeter is shown in Figure 2-2. It
includes the following components:
LCD Display: Indicates the meter reading in watts or grams.
Power On/Off Switch: Turns the unit on and off.
Auto Zero Button: Adjusts the LCD display to 0.00 watts or 0.00
grams depending on the mode selected.
WATT/GRAM button: Switches the mode from watts to grams and
back.
Print Button: Sends the text on screen to the RS-232 or USB port for
printing or recording.
Leveling Bubble: For leveling unit.
Page 21
Bowles Corporation UW 7
17
Transformer Jack
15 Vdc only!
Clamp Support
Post
RS-232 Port
Drip Shield
Back Panel Description
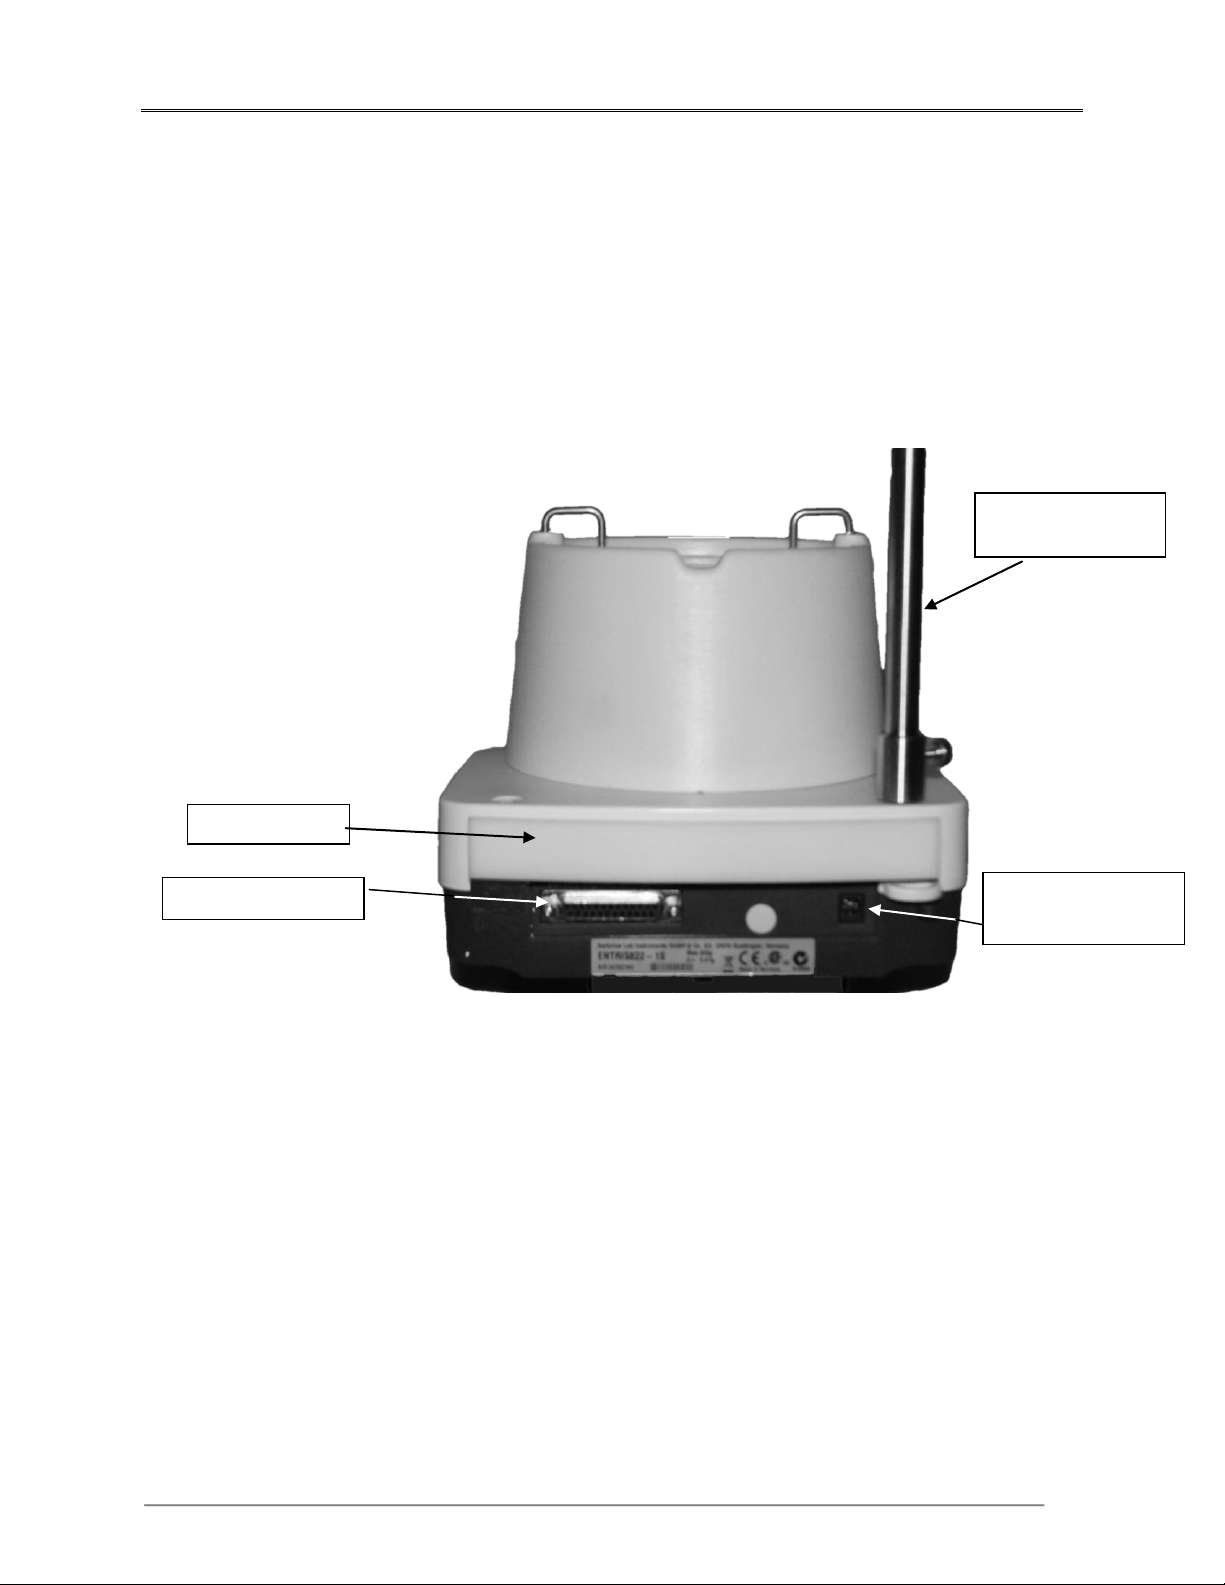
The back panel of the UW-7 is shown in Figure 2-3. It includes the following
components:
Wall Transformer Jack: When using the wall-mounted transformer,
simply plug into a receptacle.
Figure 2-3: UW 6
Back Panel
Layout
RS-232 Port: To connect to a computer or a printer. Only use the
special RS-232 cable to USB cable supplied by Bowles Corporation.
Drip Shield: A drip shield is also provided to minimize the risk of
water spillage from getting into the electrical connections. However,
care should be exercised to minimize the amount of water spilling
down the rear panel.
Page 22
Bowles Corporation UW 7
18
Leveling Jacks
Non-
Adjustable
Bottom Panel Description
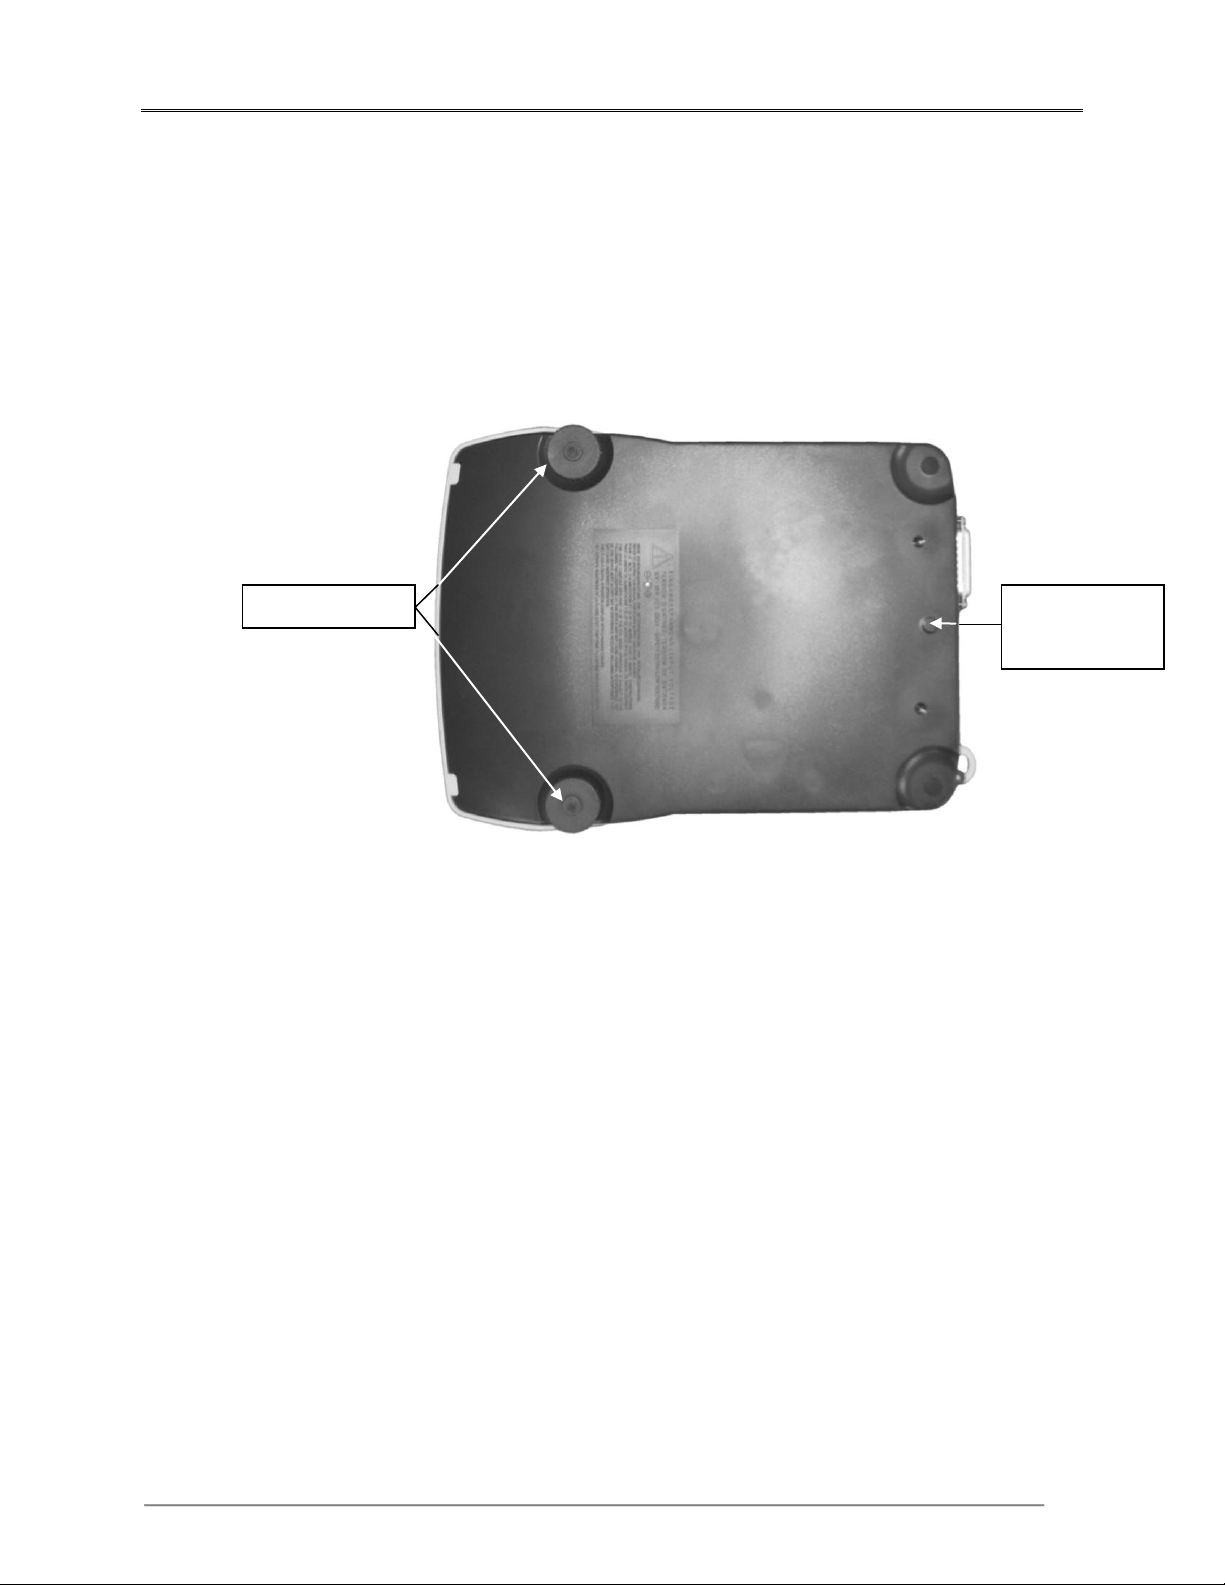
The bottom panel of the UW-7 is shown in Figure 2-4. It includes the following
components:
Leveling Jacks: There are three support legs located on the bottom
panel, two of which are threaded to be able to act as leveling jacks for
the height adjustment to level the unit.
Standard Accessories
Transducer Clamp: The clamp frees the operator from holding the
transducer head in the transducer well during testing.
Centering Rings: Rings used to help ensure that transducers are
centered and aimed at the cone properly. This is important for
accurate readings.
Power Transformer: An AC wall mounted transformer is provided
for extended testing.
Calibration Check Weight: A 100 gram OMIL class M1 weight is
included. This to be used to ensure the unit is operating properly and
is in allowable calibration range.
Calibration Weight Adapter Pedestal: This ring provides a platform
for the 100 gram check weight when checking the unit's calibration
and performance.
Figure 2-4: UW-7 Bottom Panel Layout
Carrying Bag: A soft bag used for safely transporting and storing the
unit.
Page 23

Bowles Corporation UW 7
19
Shipping Container: This corrugated box contains specifically
designed foam inserts to ensure safe shipment of the UW-7 Wattmeter.
Please save both the box and the foam inserts for future shipment
of the unit for service or calibration.
Note: The Carrying Bag is an integral piece of the shipping container. Ship
with the carrying case in its original packing. See Chapter 4- Repackaging
and Shipping.
Page 24
Bowles Corporation UW 7
20
Description
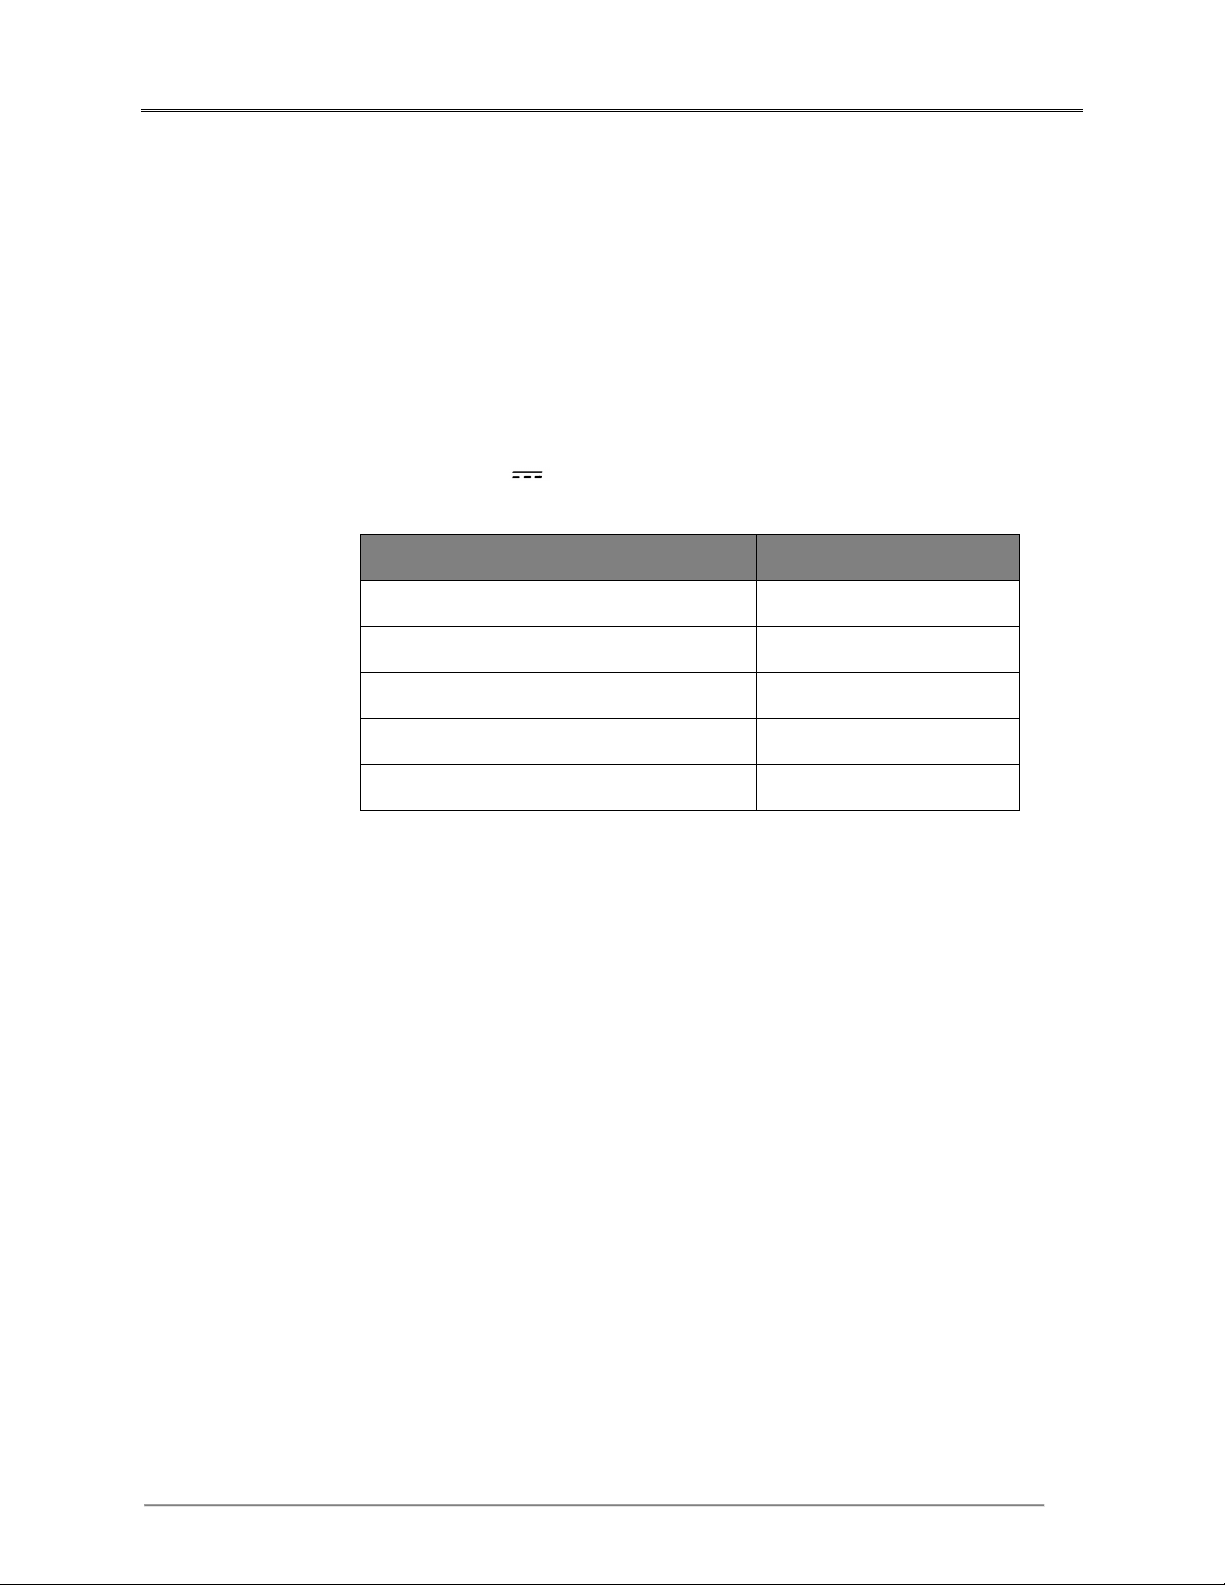
Part Number
120V~/60 Hz USA 2-Pin UL/CSA
UW 7-AC1
220 V~/50 Hz Euro 2-Pin CE
UW 7-AC2
220 V~/50 Hz UK 3-Pin CE
UW 7-AC3
100 V~/60 Hz Japan 2-Pin
UW 7-AC4
220 V~/50 Hz AUS/NX 2-Pin T-Mark
UW 7-AC5
Optional Accessories
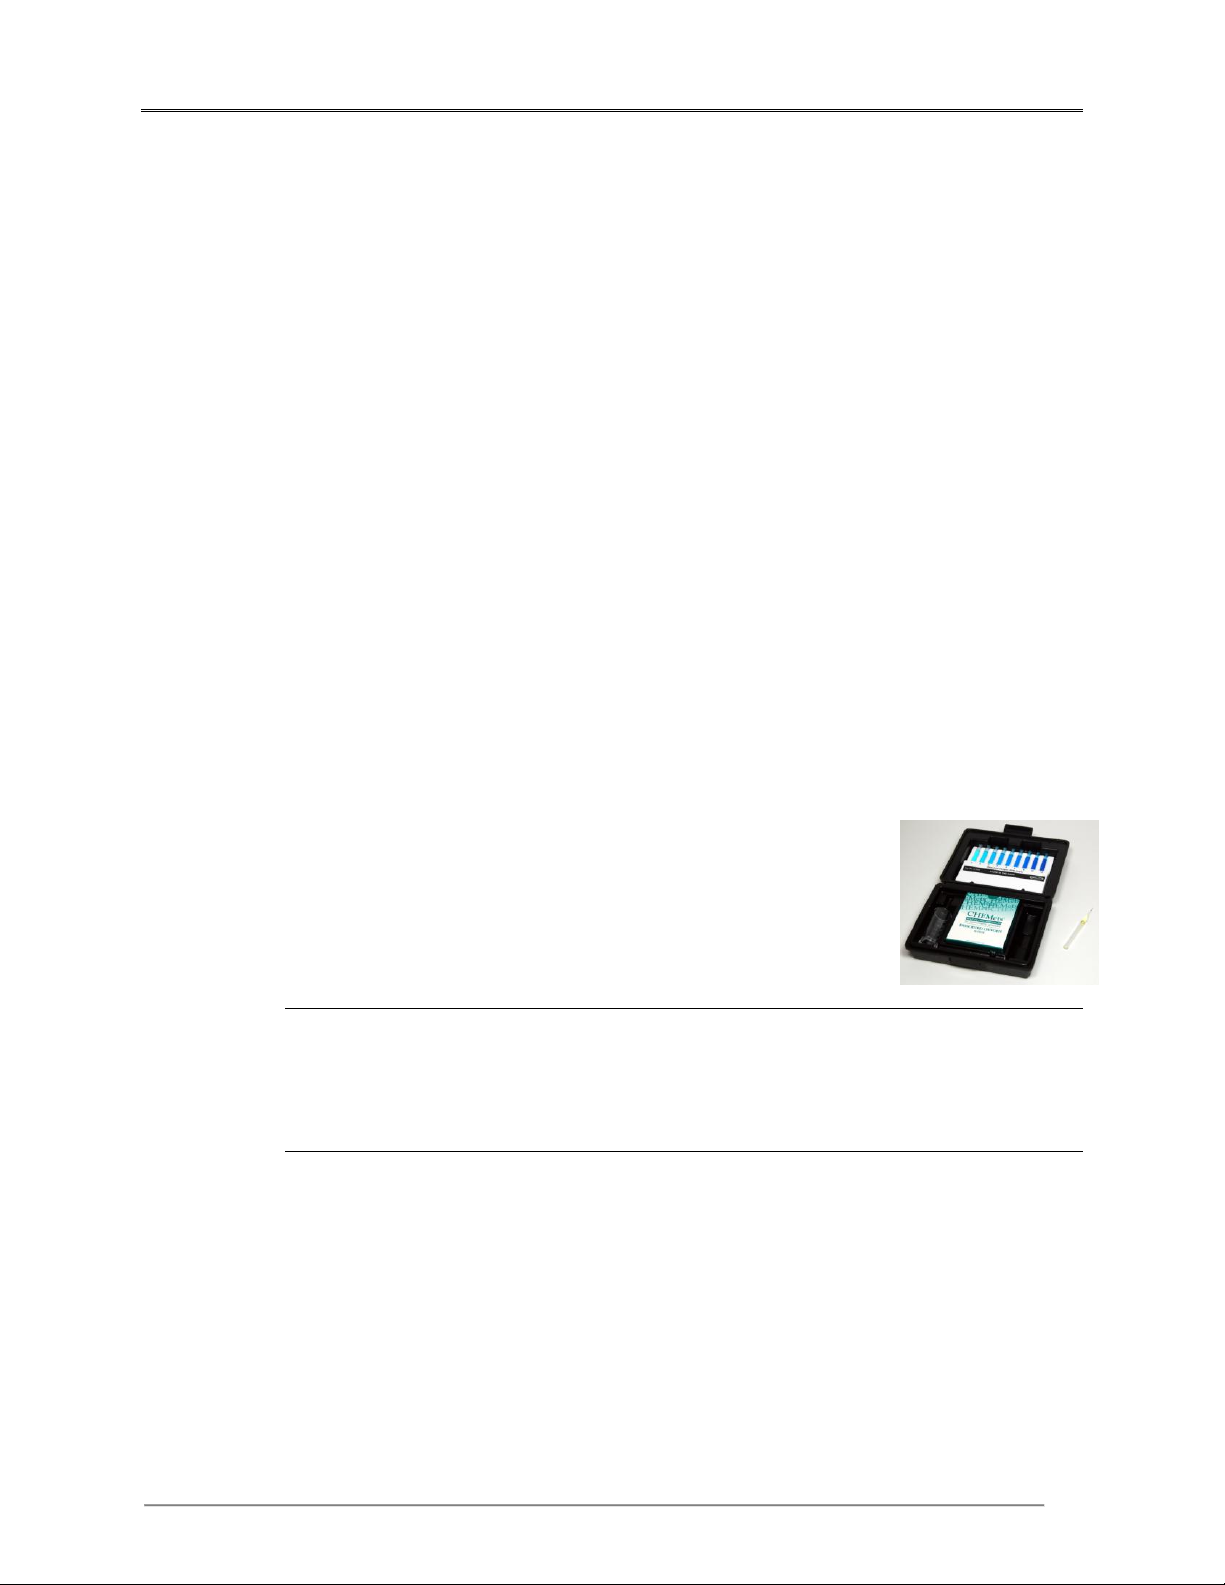
Dissolved Oxygen Test Kit: Tests the dissolved oxygen content of the
degassed water. Dissolved oxygen test kits are available at Chemetrics
(800-350-3072) Kit- P/N K-7512; Refills- P/N R-7512.
RS-232 to USB Cable: Used for connecting the unit to a computer or a
serial printer. Call Bowles for ordering information: 802-425-3447.
AC Transformer Unit:
Output: 15V DC 300 mA
Input:
15 Vdc Lithium Ion battery pack: Optional – for portable operation
when AC power is not available.
Page 25
Bowles Corporation UW 7
21
3
Chapter 3: Installation & the Operating Environment
Inside This Chapter
Unpacking and Inspection
Operation
UW-7 Systems Check
Beginning Ultrasound Power Measurements
Using the Universal Transducer Clamp Assembly and
Centering Rings
Ultrasound Unit Testing
Using the RS232 Port
Page 26
Bowles Corporation UW 7
22
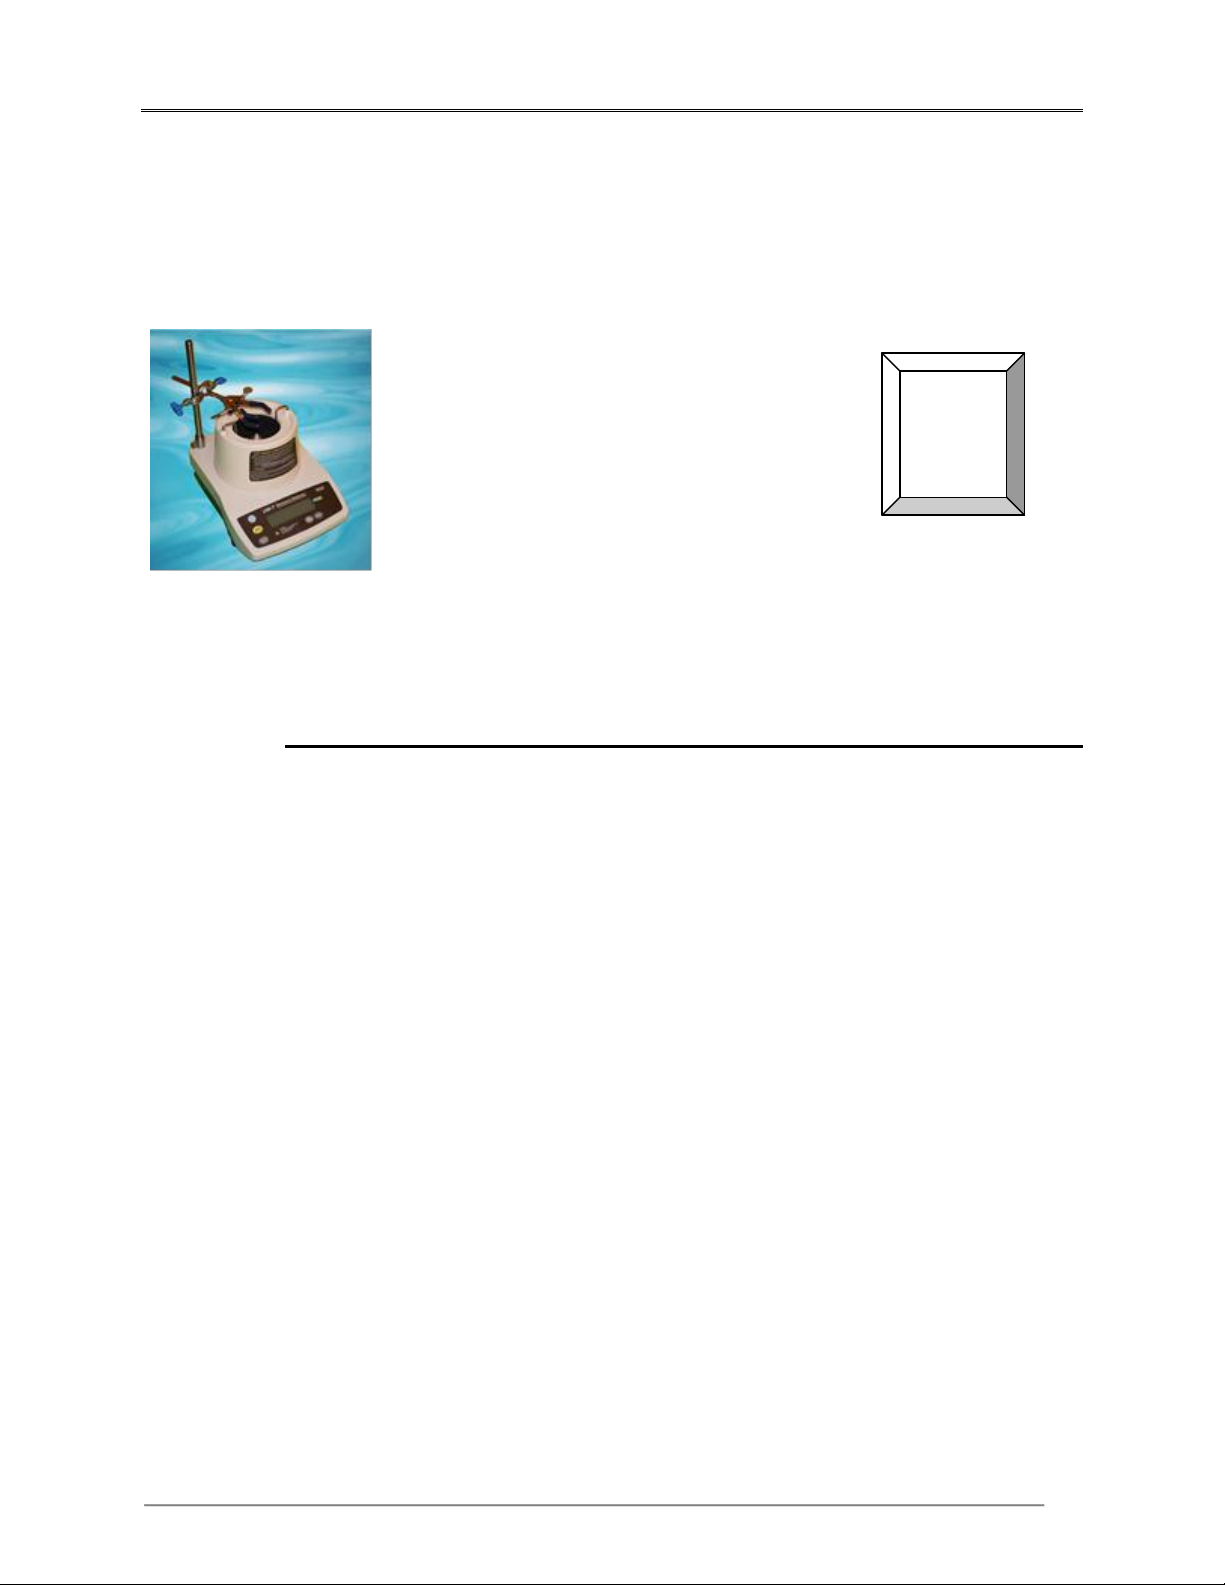
Unpacking and Inspection
When you receive the UW-7, inspect the shipping carton for damage. If the shipping
carton is damaged, unpack the instrument and note any dents and scratches on the
UW-7. Immediately notify Bowles if the UW-7 was damaged in shipping. Bowles
will arrange repair or replacement of your instrument without waiting for settlement of
the claim against the carrier. Retain the damaged shipping carton and packing
material for the carrier’s inspection.
Be sure to save the box and packing materials. They will be needed when you return
the UW-7 to Bowles for recalibration or future service. (Refer to Chapter 4 for
shipping instructions.)
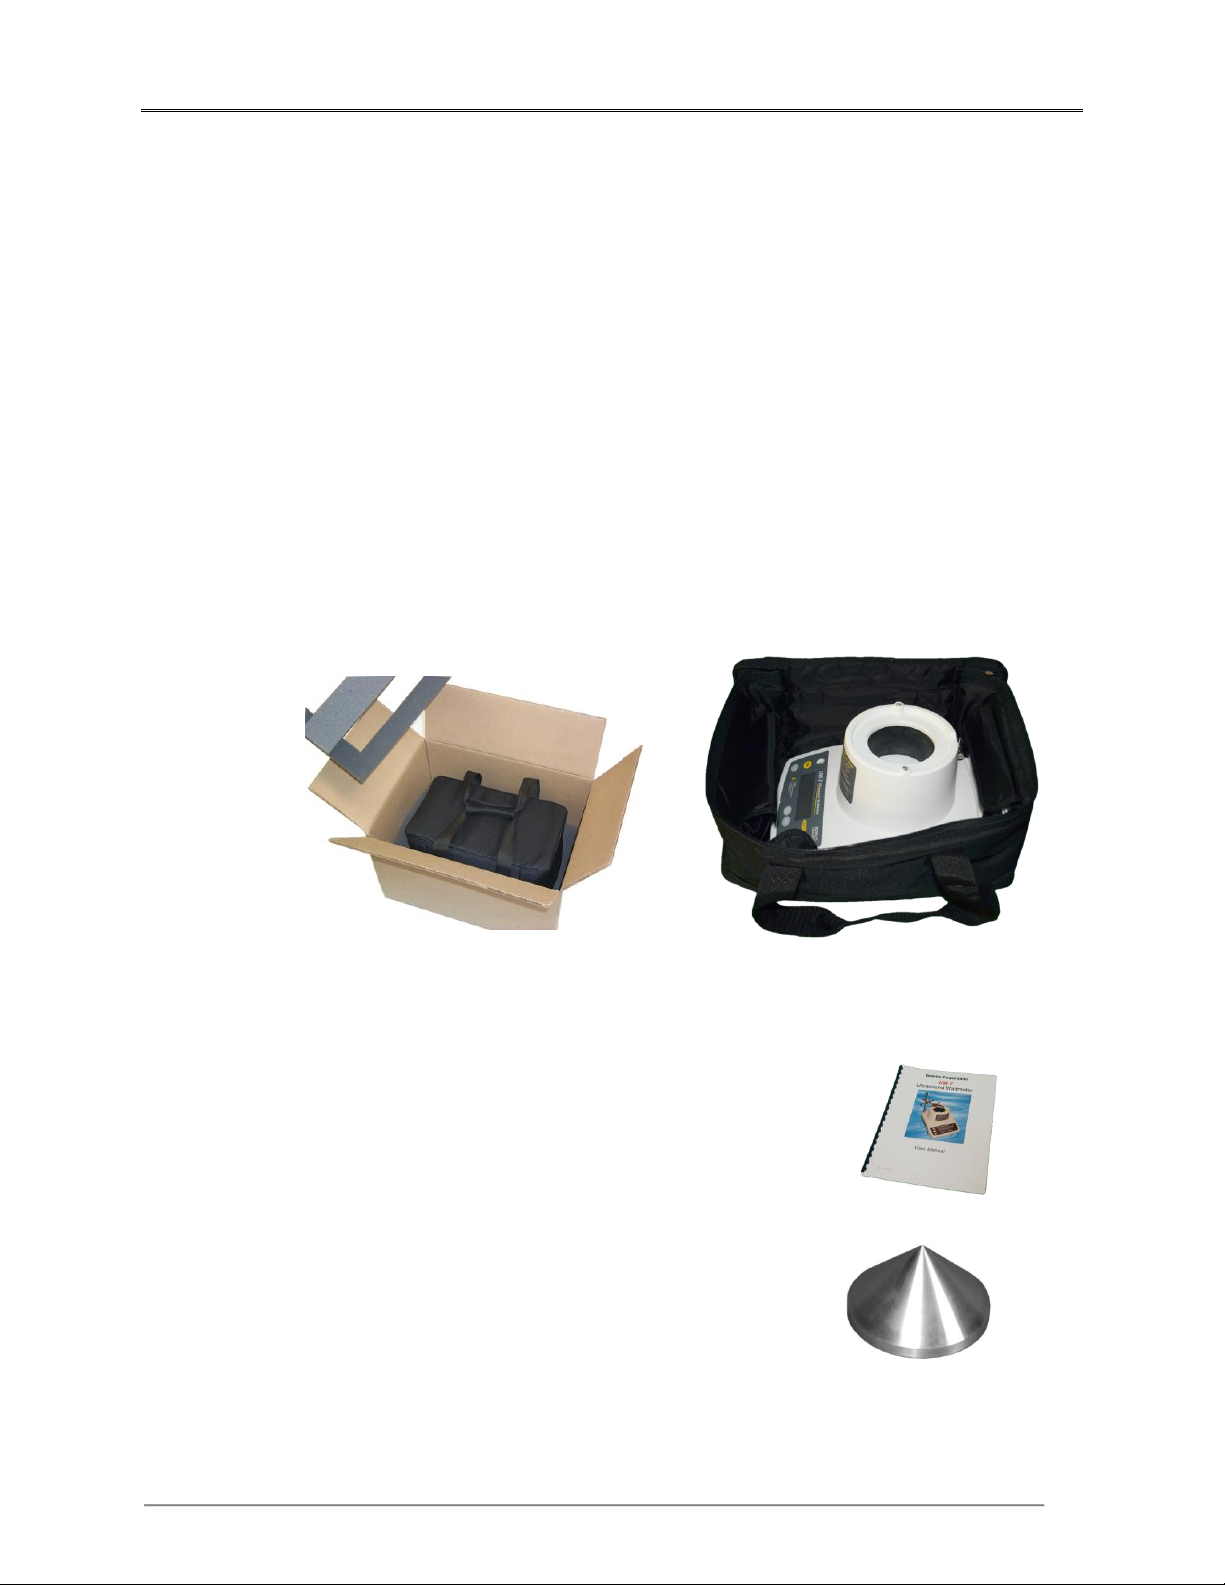
If there is no shipping damage, continue removing the carrying case, with the UW-7 in
it, from the shipping case. Then check the carrying case for the following accessories
that are shipped with every UW-7:
UW-7 Operator’s Manual
Transducer Cone
Page 27
Bowles Corporation UW 7
23
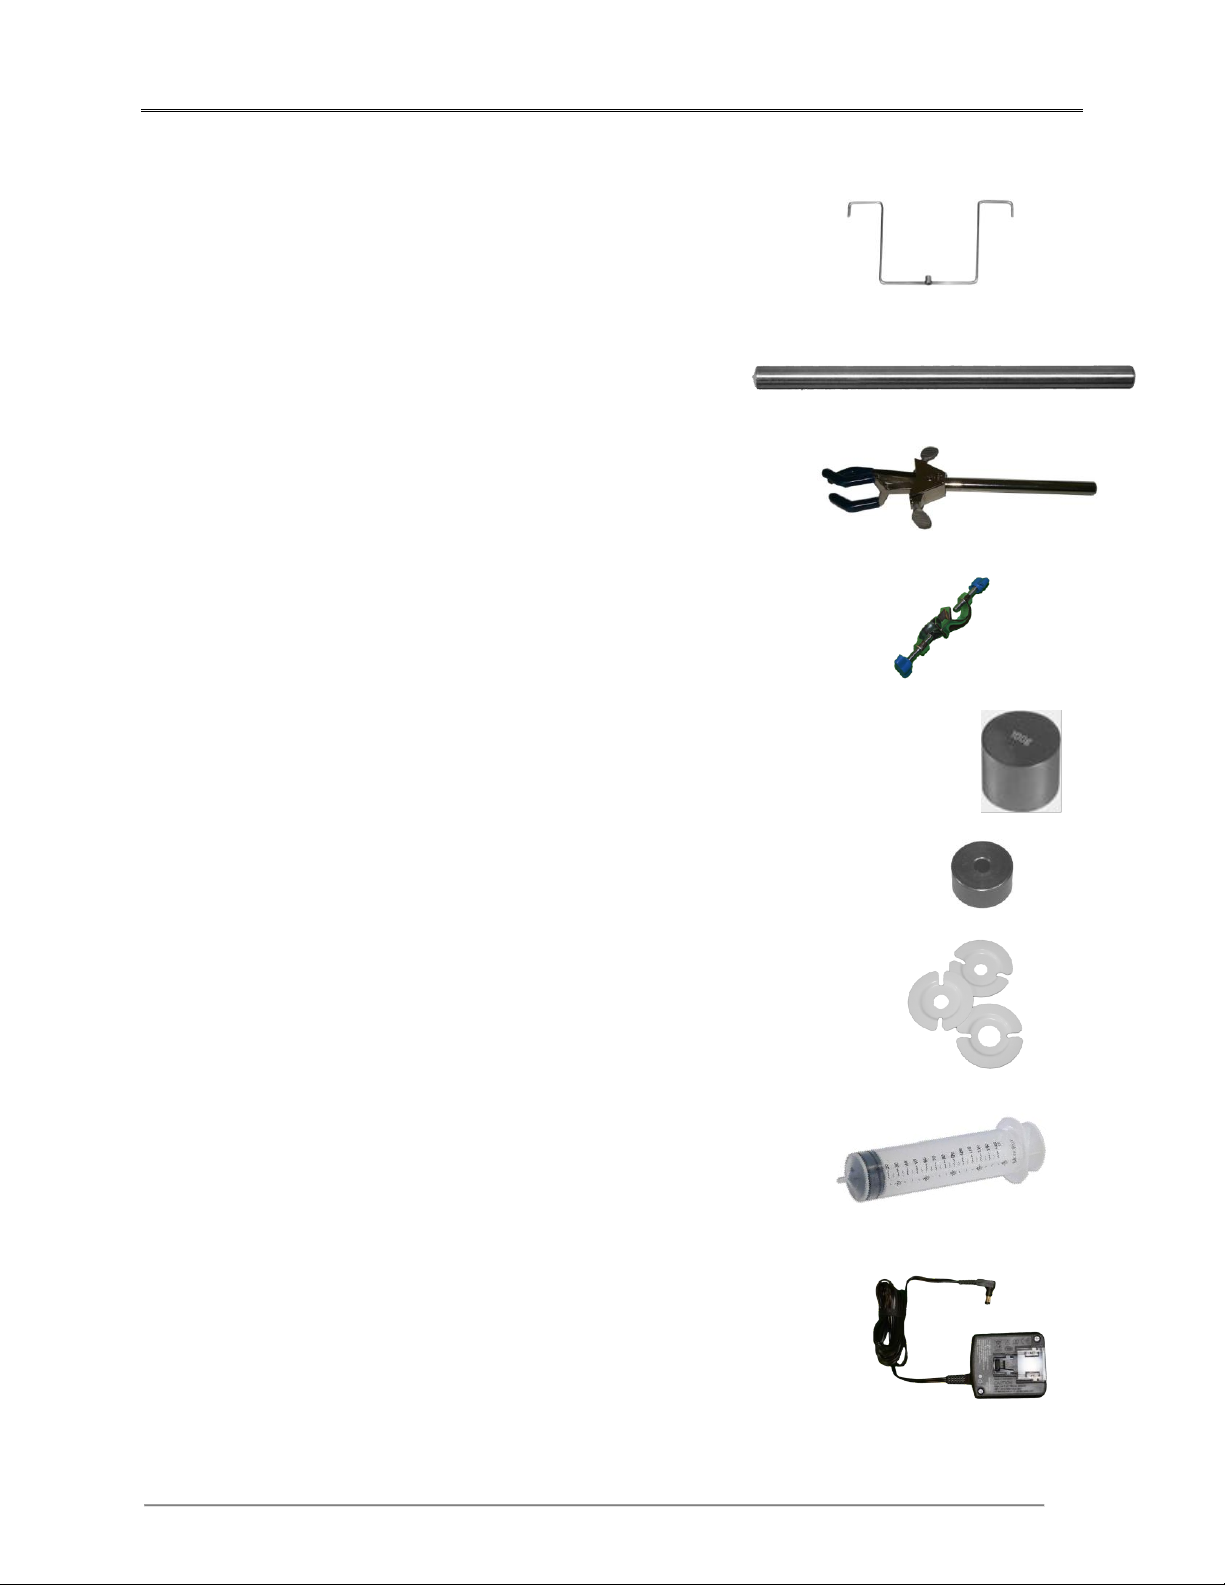
Cone Hanger
Clamp Support Post
Clamp
Clamp Tie Hook
100 Gram Cal Check Weight
Calibration Weight Adapter Pedestal
Centering Rings (3)
Syringe
Universal Power Transformer
Page 28
Bowles Corporation UW 7
24
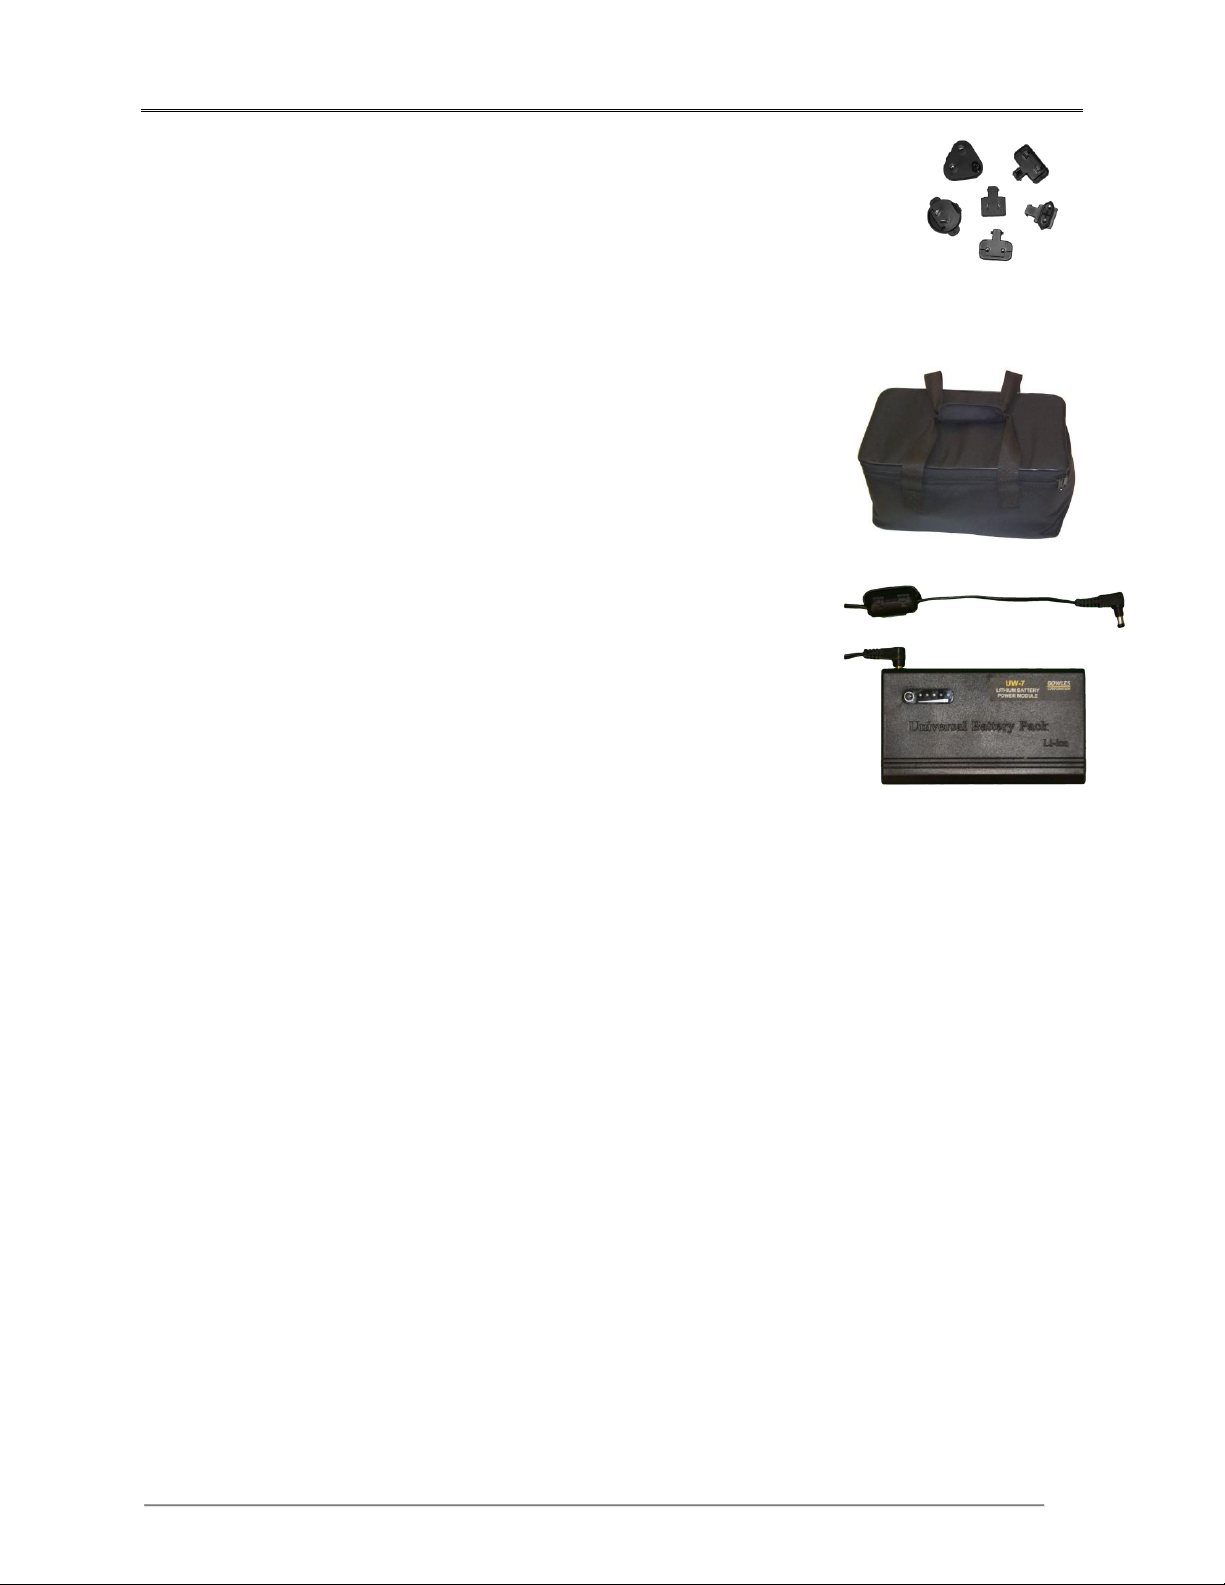
Country specific AC Plug Adapter (1)
You will receive the one adapter
specified for your country.
Carrying Case
15 Vdc Lithium ion battery pack.
(OPTIONAL)
Page 29

Bowles Corporation UW 7
25
Operation
When operated according to the instructions given in this chapter, the UW-7 digital
Ultrasound Wattmeter will quickly and accurately measure the energy output of
ultrasound devices.
Operating Environment
The UW-7 must be allowed to adjust to room temperature before the unit can be
operated. The relative humidity in the room should not exceed 90%.
Refer to Chapter 4 for additional information on safety, storage and shipping
requirements for the UW-7.
Precautions
When using the UW-7 to test ultrasound devices, follow the safety precautions
outlined by the ultrasound manufacturer.
Do not use any coupling medium other than degassed and distilled water.
Use of improper media can lead to reading variations of up to 10%.
Do not spill water on the front or rear panel.
Do not apply more than 30 W of input power to the UW-7.
Do not operate the UW-7 for more than 1 hour during testing. Change water
after 45 minutes of use.
Remove and dry the cone when the test is complete.
Drain the unit completely after each test session.
Page 30
Bowles Corporation UW 7
26
Preparing the Distilled and Degassed Water
Distilled and degassed water must be used as the coupling medium to obtain stable
and accurate readings with the UW-7. The water must also be allowed to reach
room temperature before pouring into tank in order for unit to stabilize quickly.
Use the following procedure to obtain the best coupling medium:
1. Use a Distiller to distill tap water or purchase distilled water.
2. Boil the distilled water for 30 minutes in a clean tempered glass or stainless
steel flask. This will force the oxygen and nitrogen from the water. Bottle the
water immediately.
3. Select some small glass bottles with good seals for storing the water. Glass
canning jars work well.
4. Siphon the boiling degassed water into the bottles and fill each bottle to the
brim. Leave no air space in the bottle.
5. Cap the bottles immediately.
6. Allow the water to cool in the bottles. As the water cools, it will contract and
a vacuum will be formed if the bottles have been properly sealed. Allow the
water to cool to room temperature.
7. Label and date each bottle. The degassed water should remain good for a long
time if the seal is not broken.
8. Test each bottle for oxygen content before it is to be used.
The oxygen content should be less than 2 ppm. Dissolved
oxygen test kits are available at Chemetrics (800-350-
3072) Kit- P/N K-7512; Refills- P/N R-7512.
Note: When the bottle is opened and exposed to air, it can be used during the
following 45 minutes. Exposure to air makes this water lose its excellent
coupling property; therefore, the bottles should not be opened until tests with the
UW-7 are ready to begin. Be sure to allow water to come to room temperature
before use.
Page 31
Bowles Corporation UW 7
27
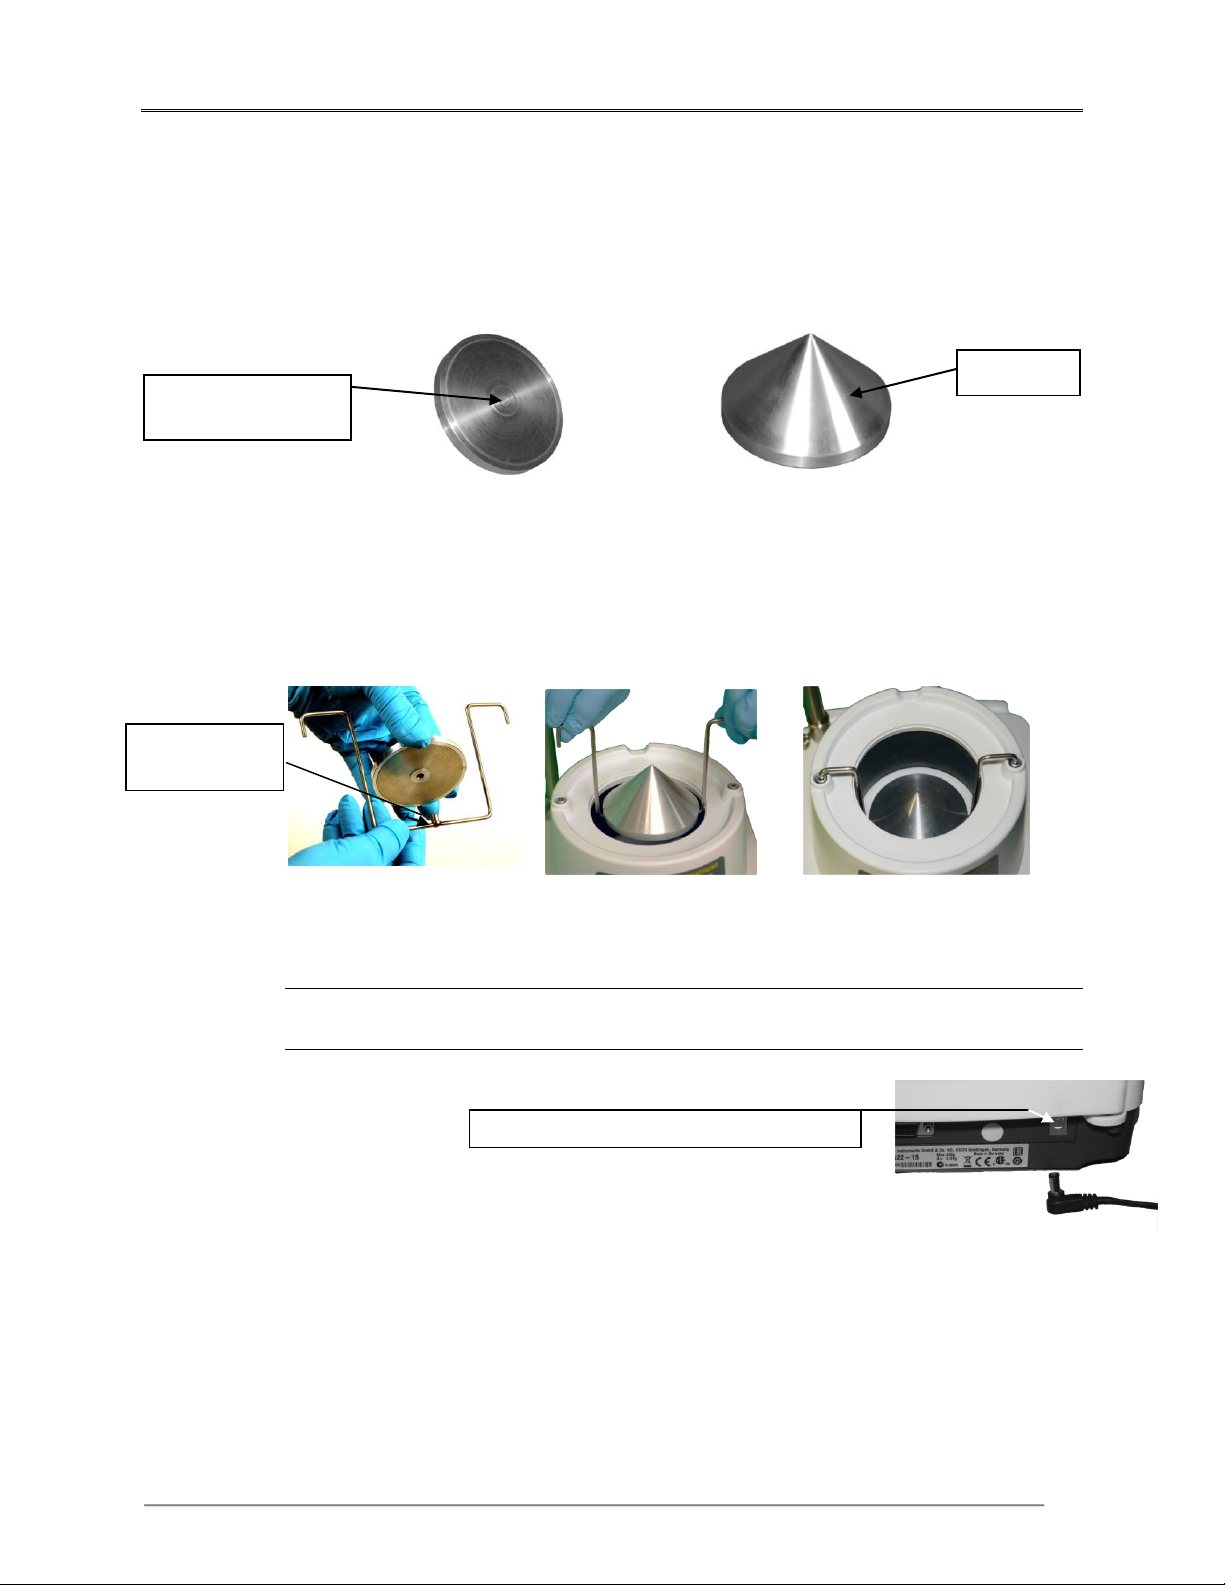
Cone
Mounting Pin
Cone Top
Transformer Unit Power Jack
Cone Mounting
Hole
UW-7 Systems Check
1. Level the unit using the two adjustable feet in the front of the base of the unit. The
unit is level when the bubble is centered. Inspect the transducer cone for dents and
clean if needed. Do not use a dented cone. Incorrect readings may result.
Inspect the cone hanger to verify that the hanger is not bent or distorted. Check by
laying the hanger flat on a table. Make minor adjustments as needed to ensure that
the hanger lays flat. Carefully install the cone on the transducer mount pins on the
cone hanger as shown below. Insert the ends of the cone hanger into the
protruding cone hanger mount post holes, making sure they are properly seated.
2.
3. If a transformer is to be used, plug it into the jack located at the lower left rear of
the unit. Then plug the transformer into a wall socket.
Note: There are transformers available for all plug and voltage configurations,
which can be ordered separately.
4. Allow sufficient time for the UW-7 to fully adjust to room
temperature. If the unit is not at room temperature, the transducer will be slowly
warming or cooling and will cause the readings to shift.
5. Obtain a bottle of the distilled and degassed water prepared following the
procedures discussed earlier in this chapter. Be sure that the water is at room
temperature before continuing with set up.
6. Open the bottle of degassed water. When the vacuum seal is broken you should be
able to hear it. If you do not hear or feel the seal being broken, discard the water.
Page 32
Bowles Corporation UW 7
28
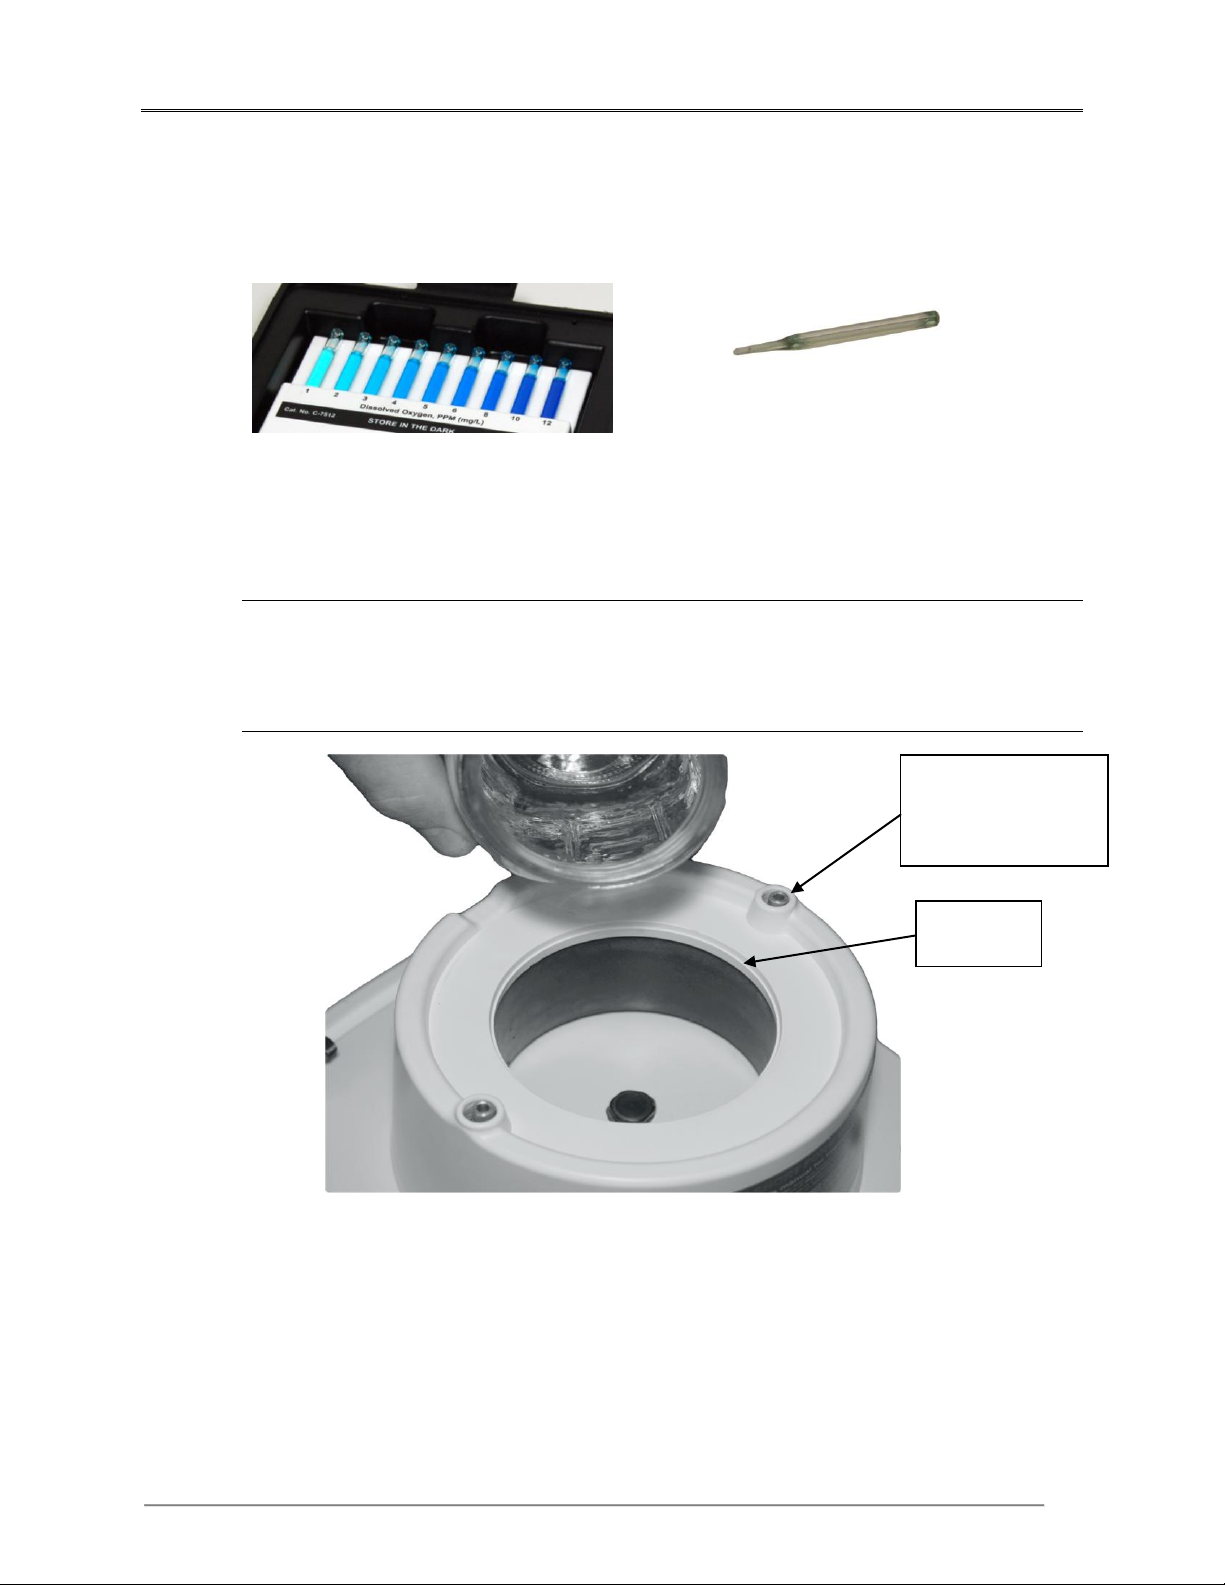
Water Fill
Level
DO NOT SPILL
WATER DOWN
THESE
OPENINGS!
7. Use a Dissolved Oxygen Test kit to ensure that the oxygen content of the water is
less than 2 ppm.
8. Fill the tank with 600 ml 50 ml of fresh distilled and degassed water. Do not
spill water on the panel of the UW-7. Fill until the water reaches slightly above
the bottom lip of the well, as shown below.
Immediately replace the cap on the coupling water bottle.
Water Fill Note: Be sure the water has been allowed to completely come to room
temperature. If the temperature of the unit, room, and water are not stabilized it will
be difficult for the unit to achieve a stable zero setting.
9. Insure that there are no air bubbles on or under the transducer cone or stuck to the
rubber sound absorber surrounding the cone in the tank. Air bubbles may induce
some reading errors due to buoyancy changes of the transducer cone,
erratically bouncing some of the sound beam in the wrong direction or away
from the sound absorber.
Page 33
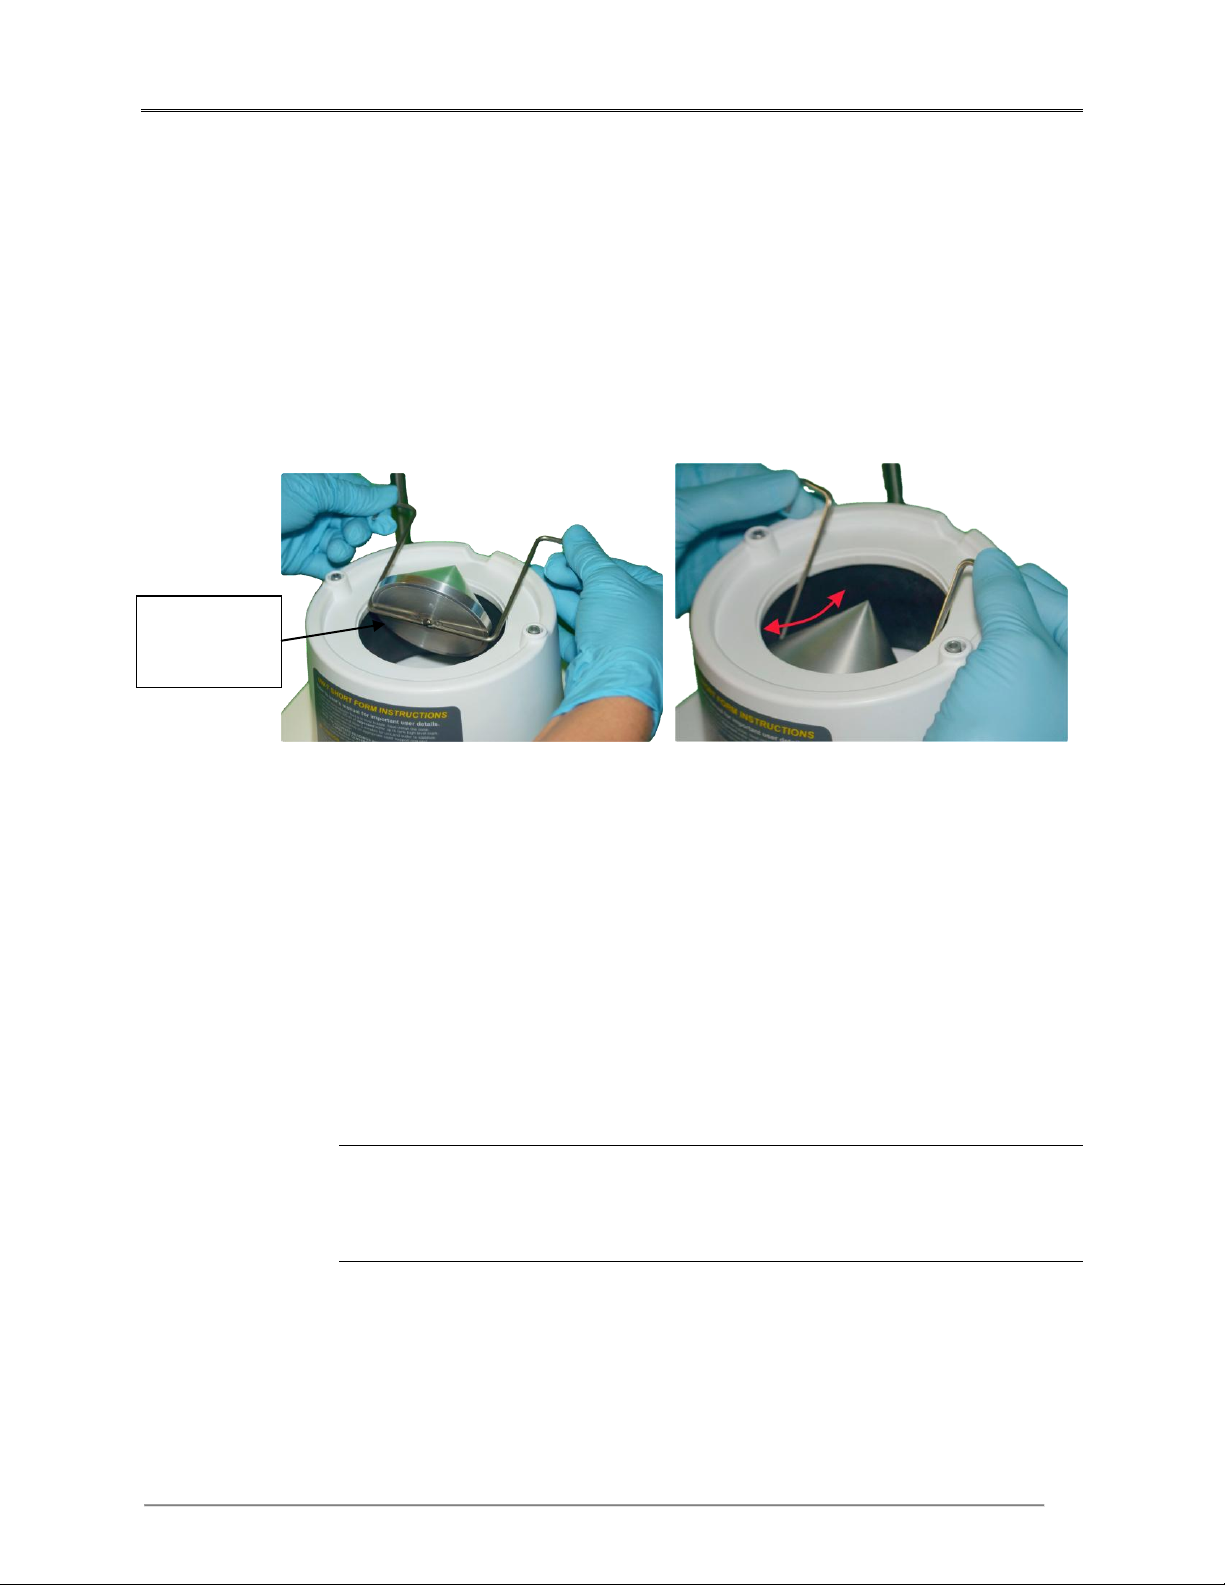
Bowles Corporation UW 7
29
Potential
for trapping
Air Bubbles
The easiest way to ensure that there are no bubbles under the cone is to lift the cone
hanger out of the post mount and tip it to the side. As a final measure, gently swish
the cone side to side before re-seating it on the post mount. This will allow any
trapped air to escape and also allow for a visible verification.
9. Turn the unit on and allow 5 minutes for the electronics to warm up and become
stable.
Beginning Ultrasound Power Measurements
Measurements
1. Place the transducer in the coupling medium partially submerged so that the head is
facing directly downward. Use the centering ring and clamp as needed so that the
transducer is exactly centered and vertical (see section on universal clamp and
centering rings below). If the transducer is off center, or not aligned vertically, the
reading may be low and out of tolerance. The transducer head should be
completely coupled with the distilled and degassed water and there should be no
bubbles beneath the radiating head of the transducer.
Note: The coupling water in the transducer well must be changed every 45
minutes or when the readings become unstable. A bottle of opened distilled
and degassed water will only be usable for approximately 45 minutes to 1
hour.
2. Turn on the UW-7 using the ON switch on the front panel. Ensure that the unit is in
the Watts mode (displayed units will read 0 in the right hand side). Allow five
minutes for the unit to warm up and stabilize before starting the readings.
Page 34
Bowles Corporation UW 7
30
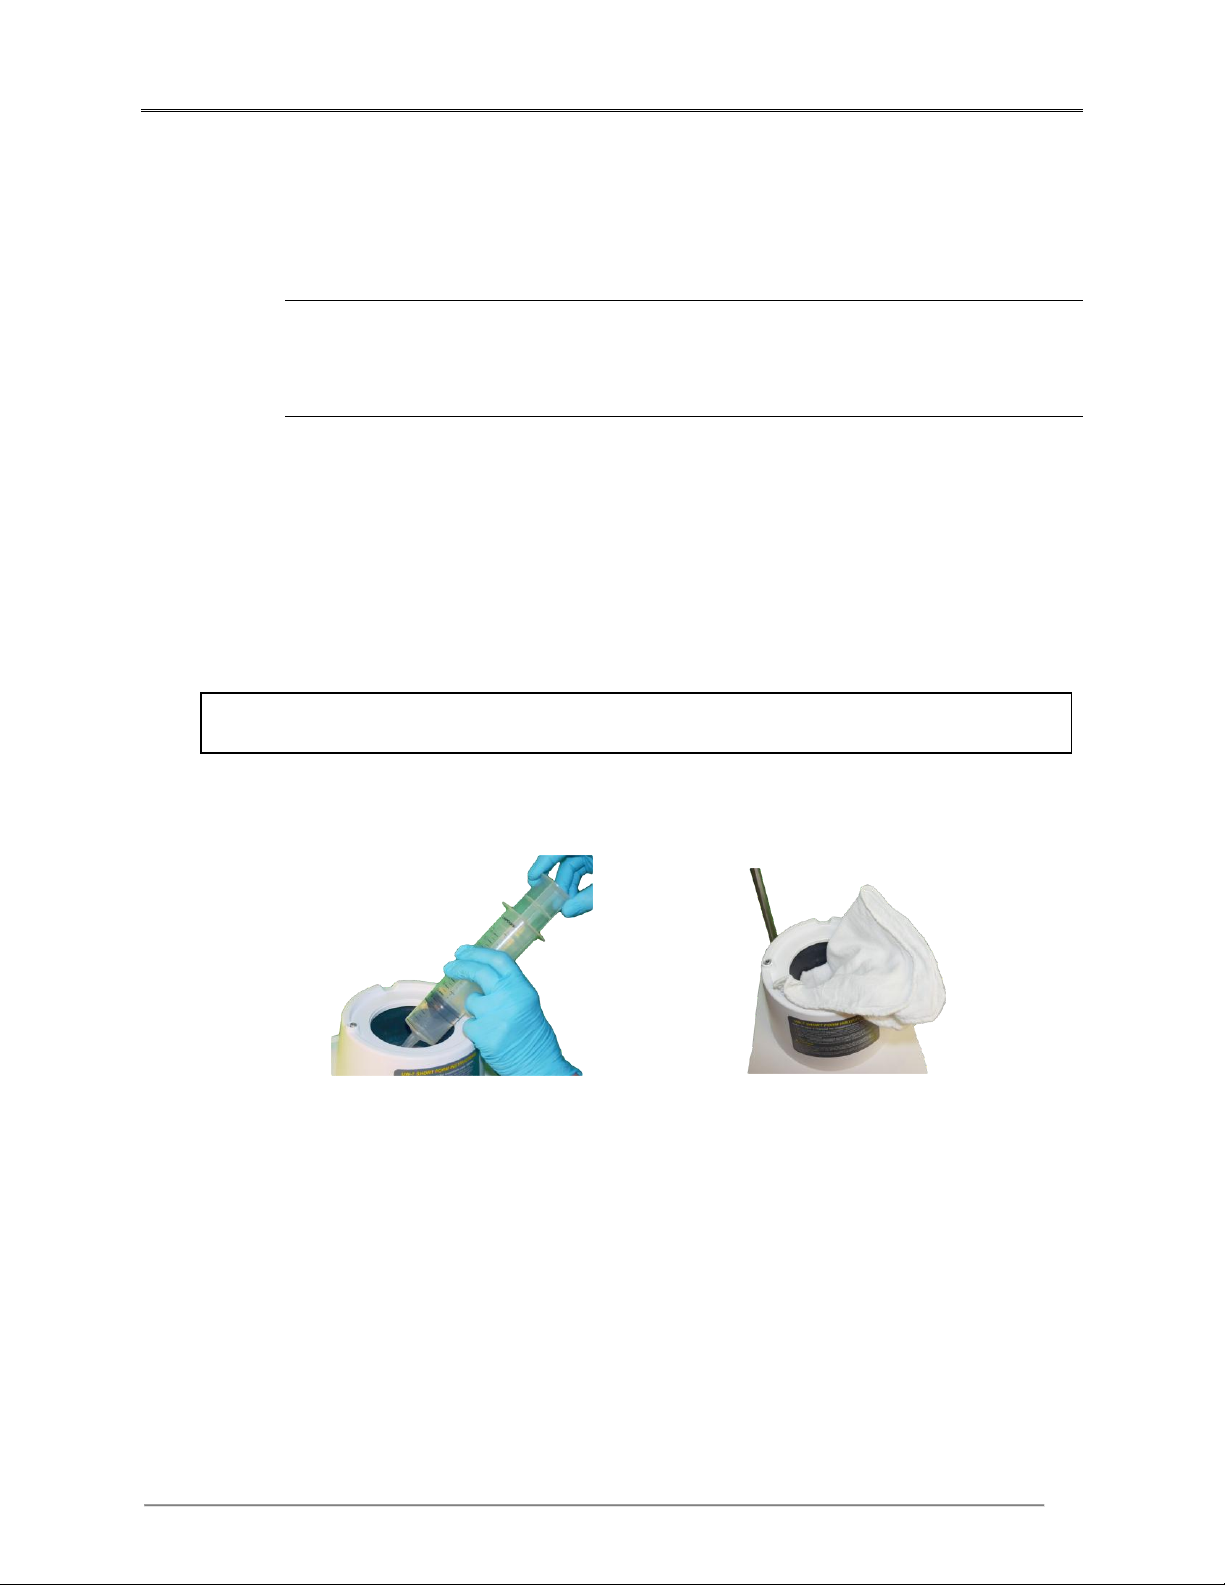
DO NOT USE PAPER TOWELS! Paper fibers left behind will affect the sound signal in
the future
3. Once the unit is warmed up, set the digital reading to 00.0 by pressing the AUTO
ZERO button. This may take several tries until the unit settles down. Avoid any
vibration or movement of the test head, since the unit is VERY sensitive.
Note: Certain cell phone frequencies may affect the stability of the reading. If
the reading is fluctuating erratically, turn off or remove all cell phones from the
test area and try again. If the unit still cannot be zeroed, refer to Troubleshooting
in Appendix A.
4. Turn on the ultrasound unit following the manufacturer’s instructions. Adjust it to
the desired level. Never exceed 30 watts.
5. Read the actual output power in WATTS on the LCD of the UW-7.
6. After all of the readings are completed, shut off the ultrasound unit.
7. Completely remove the water from the transducer test well when the measurements
are complete. Use the syringe provided and a dry cloth. It is important to fully
drain and dry the tank when testing is complete. This will prevent bacterial
growth and other potential water related damage.
Dispose
8. Dispose of any water left in the opened bottle of degassed and distilled water. The
water will absorb oxygen over time, rendering it ineffective as a coupling medium.
Page 35
Bowles Corporation UW 7
31
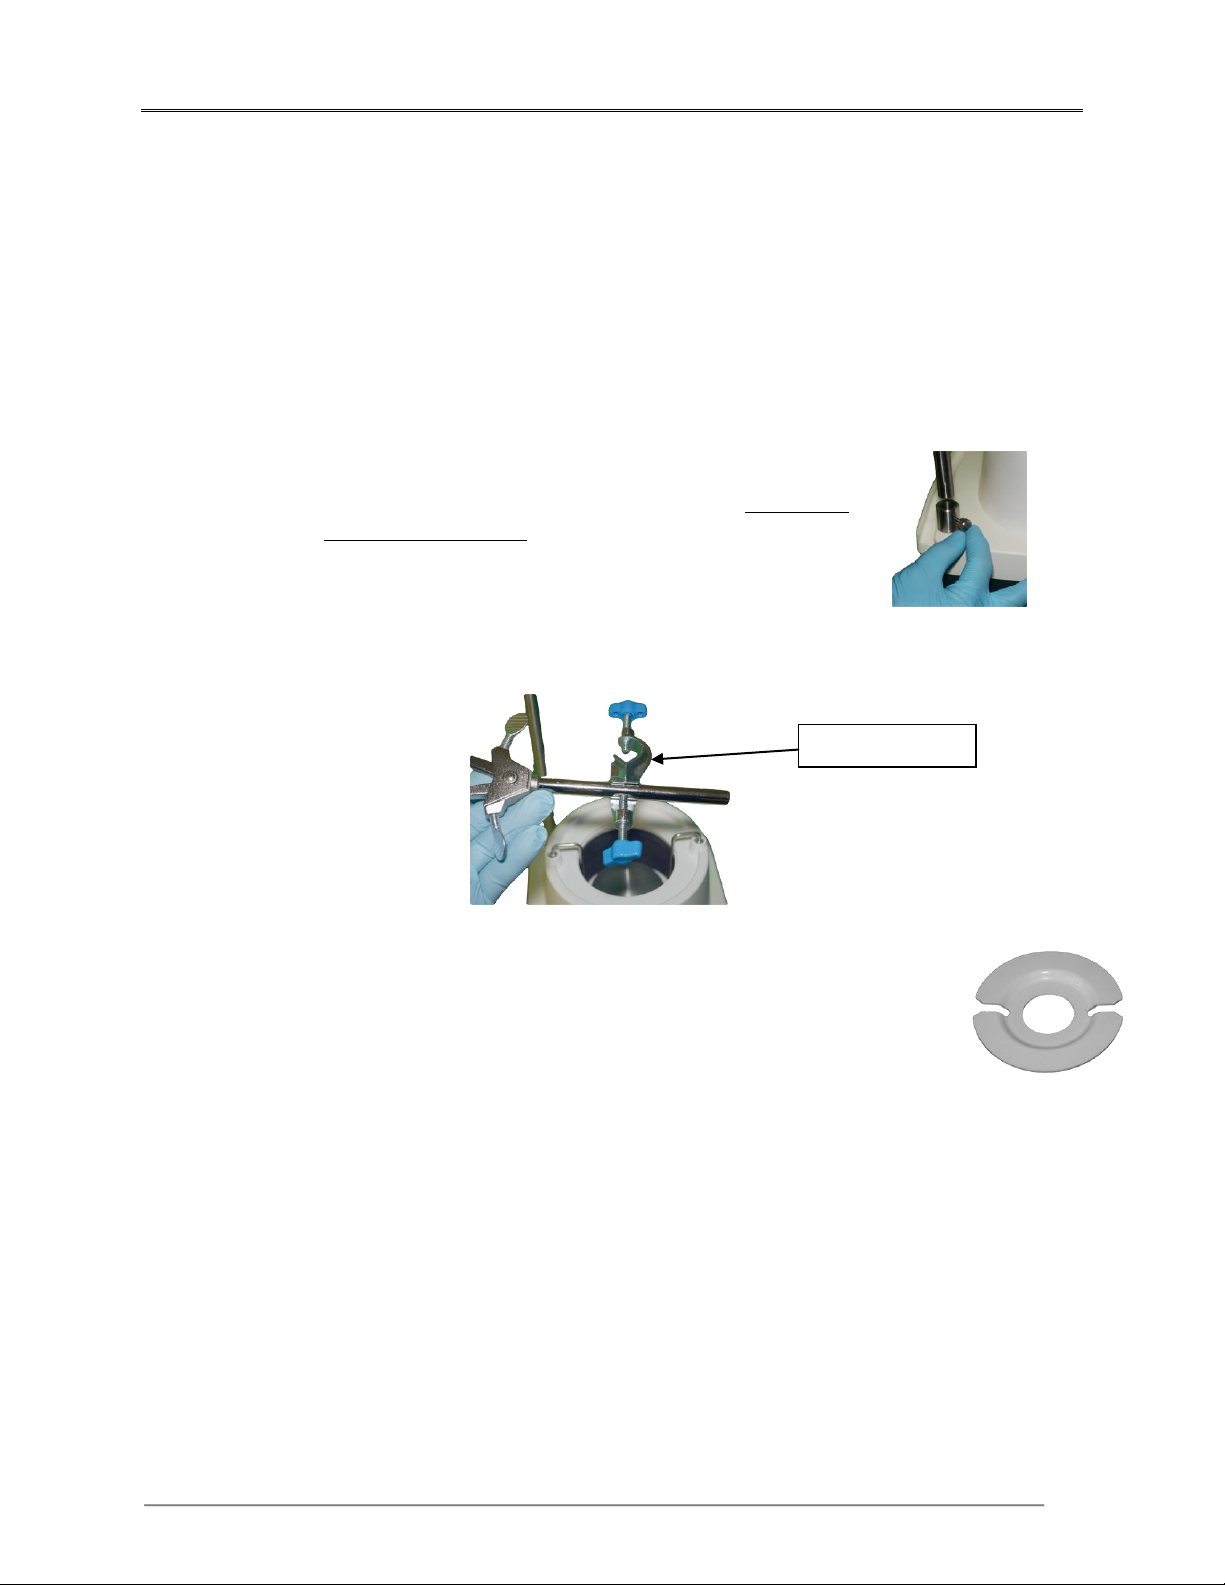
Clamp Hook
Using the Universal Transducer Clamp Assembly and Centering
Rings
The universal transducer clamp assembly frees the operator from holding the transducer
treatment (radiating) head in the coupling water and prevents transducer movement, ensuring
more accurate and stable readings. The centering rings help to properly center and aim the
transducer head in the tank.
1. Insert the support post in the mounting collar located at the
rear of the unit. Securely tighten by hand. Do not use
pliers to tighten post.
2. Center the transducer clamp assembly over the transducer well, as shown,
using the clamp hook to tighten it into place.
3. Place a centering ring, with the hole sized to fit the transducer,
on top of the well. The centering ring helps assure that the
sound head is properly centered and aimed vertically toward the
transducer cone. NOTE: It is very important to carefully center
and aim the transducer straight onto the cone to obtain accurate
readings.
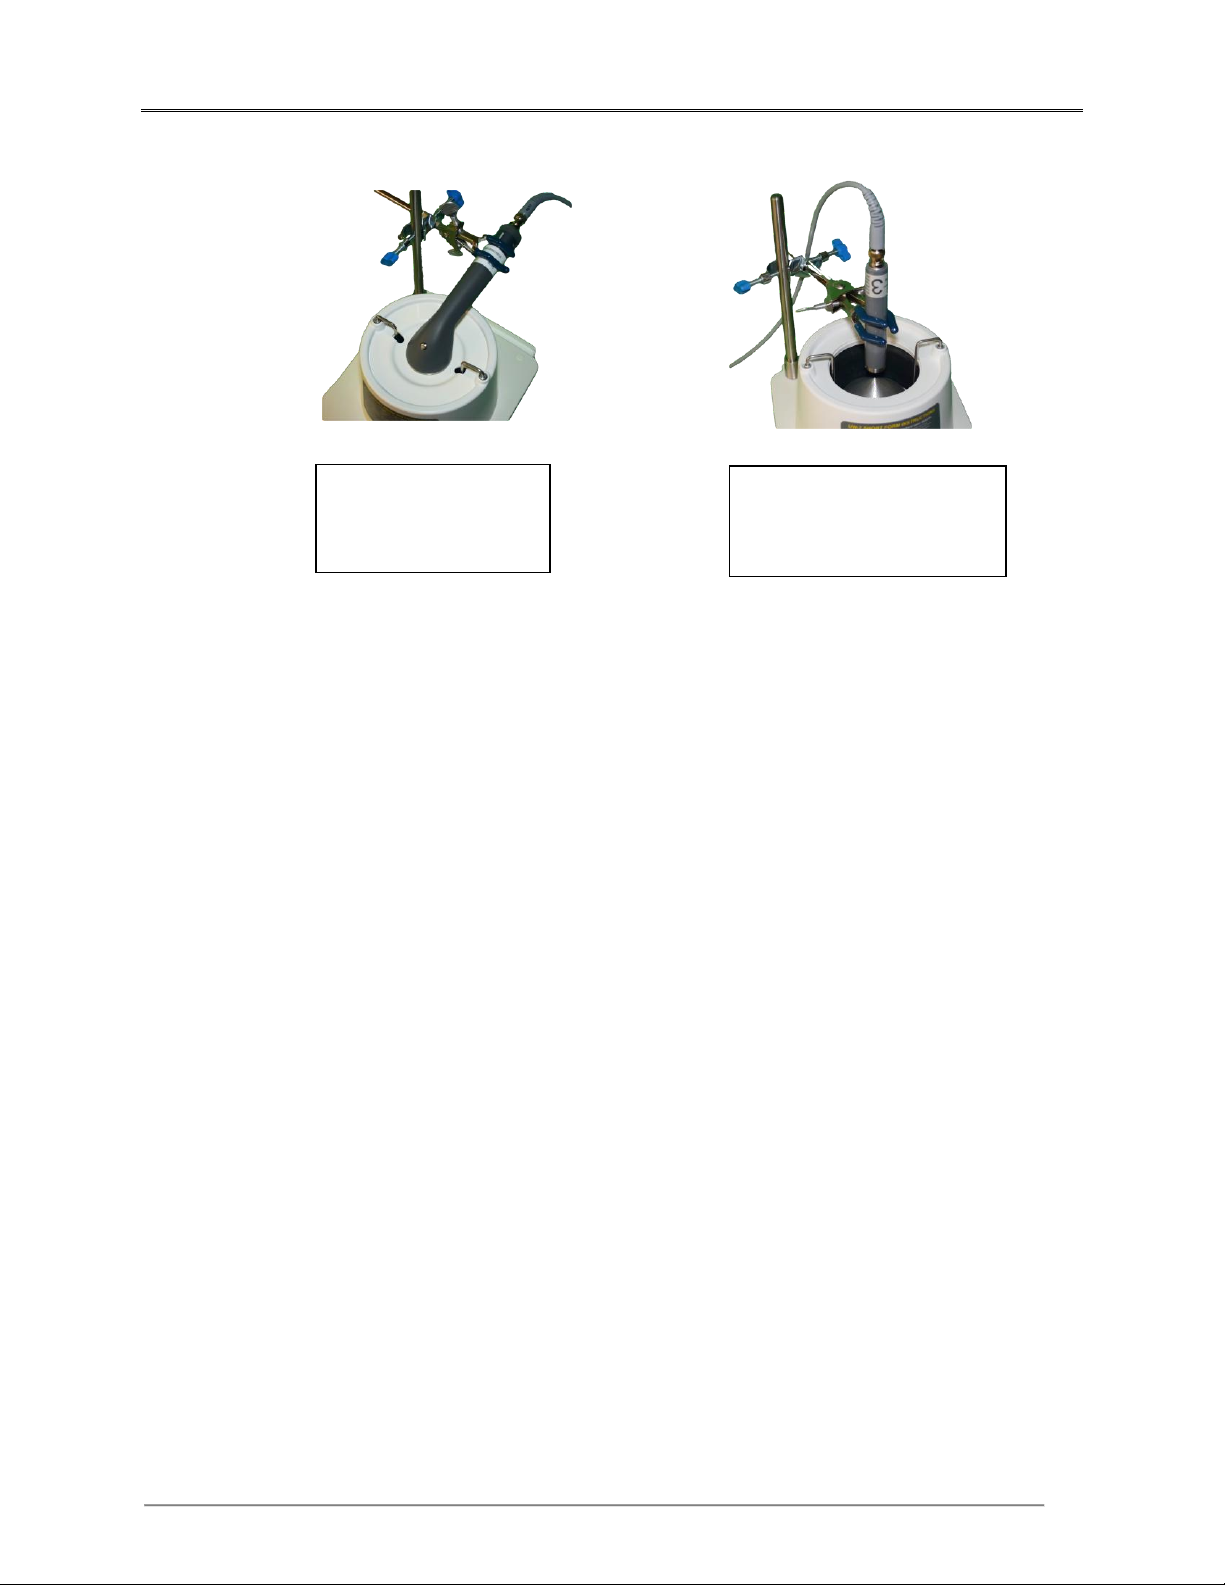
4. Loosen the side screw of the clamp assembly so that clamp rotation is easy,
and roughly center the clamp opening over the transducer well for vertical
transducers without handles (as shown in A), or position it such that it aligns
with the transducer handle (as shown in Figure B below).
Page 36
Bowles Corporation UW 7
32
Figure A
Clamp orientation
transducer with
handle
Figure B
Clamp orientation
transducer without
handle or Centering ring
5. Open the clamp by turning the clamp thumbscrews counterclockwise to fit the
desired transducer head or handle.
6. Tighten the clamp screw to effectively grab the transducer head or handle.
Make sure that the transducer radiating head remains completely submerged
in the coupling water.
7. Re-center the transducer head directly over the middle of the transducer well
using the centering ring to assure alignment for accurate readings. Make sure
the transducer surface is entirely in the coupling medium. The transducer
head should be completely coupled with the distilled and degassed water and
there should be no bubbles beneath the radiating head of the transducer. Any
bubbles beneath the transducer head will create a low reading.
Caution
Never ship the power meter with the transducer clamp
assembly mounted on the unit, or the cone and hanger still
mounted in the unit. Damage to the unit will result and the
warranty will be void.
Page 37
Bowles Corporation UW 7
33
Frequency
MHz
Target Power
Settings (Watts)
Record Actual
Power Setting
(Watts)
UW 6 Reading
(Watts)
Allowable
Variation from
Actual Power
Settings (Watts)
3
4.0 +/- 0.5 watts
+/- 0.3
1
10.0 +/- 0.5 watts
+/- 0.5
3
8.70 +/- 0.5 watts
+/- 0.4
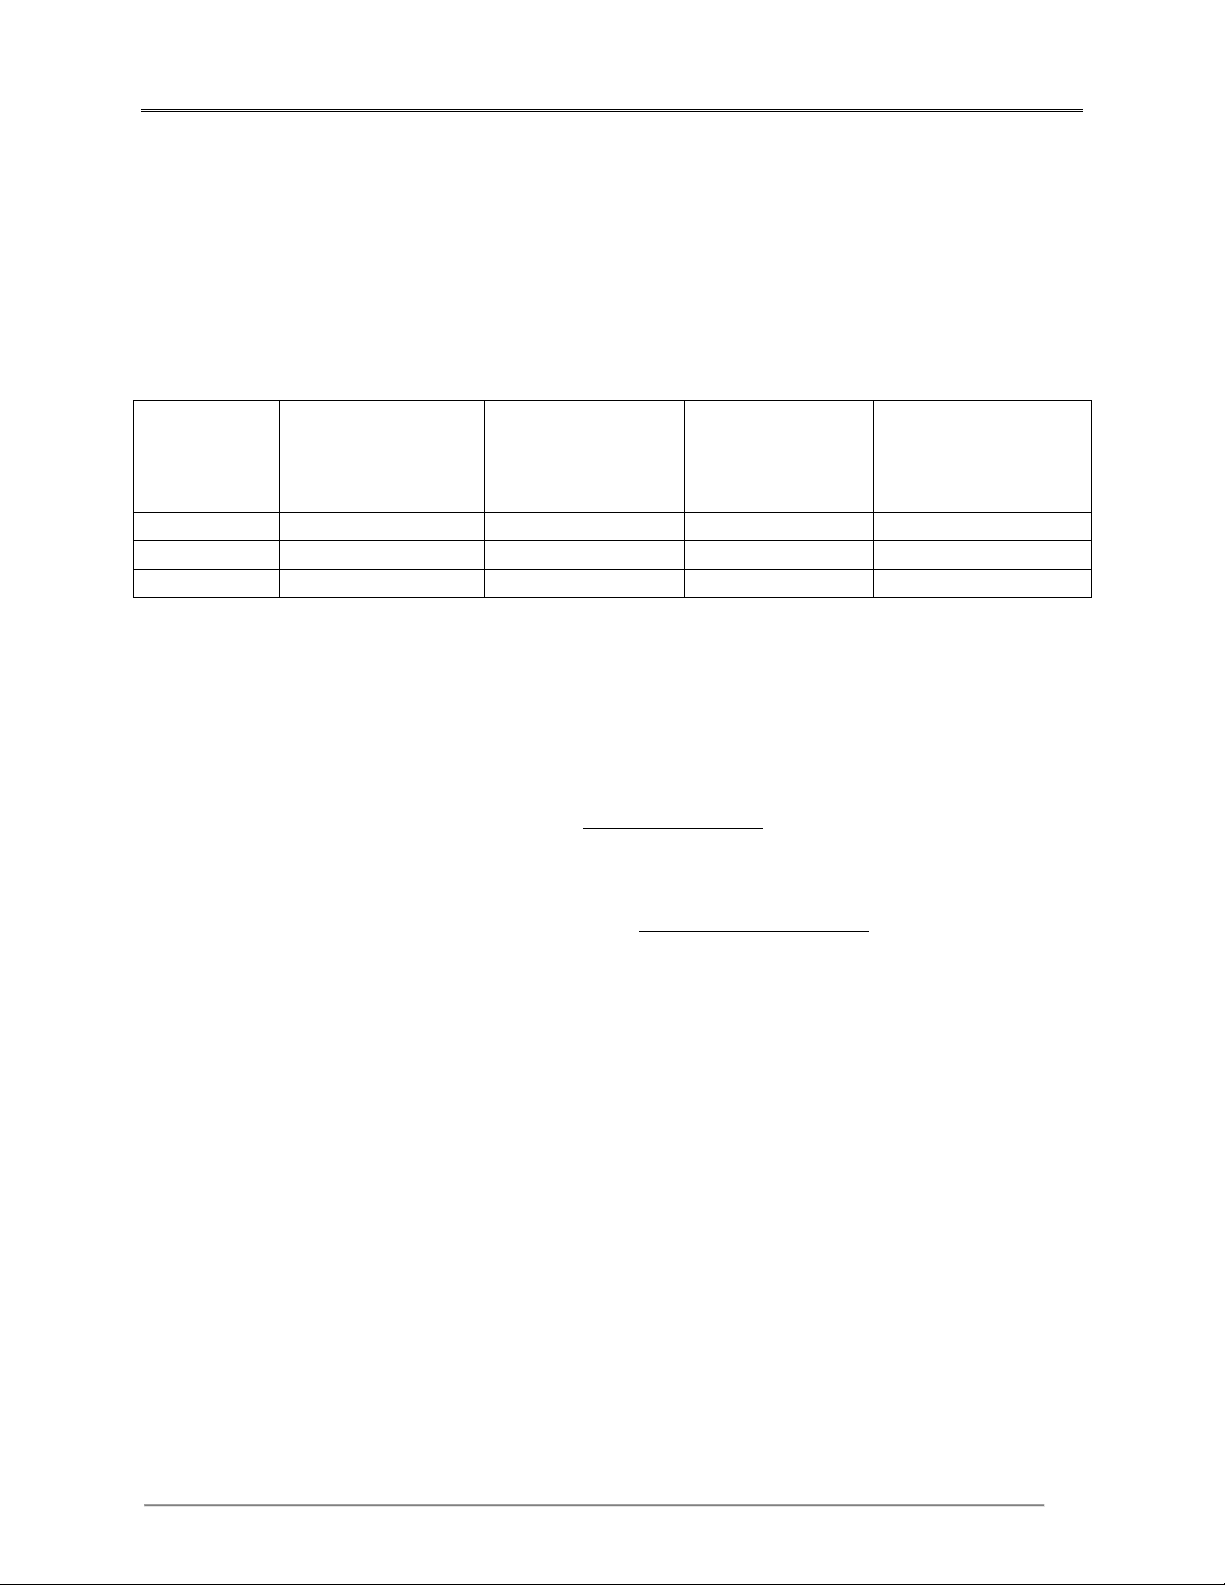
Ultrasound Unit Testing
Use a performance record label or sheet during testing that will allow you to record
both the ultrasound unit’s settings and the corresponding outputs as measured by the
UW-7. Here is an example:
Testing Using Discrete Values (Method I)
1. Follow the procedures in this section on operating the UW-7. Review the
Precautions found on page 5.
2. Set the Ultrasound Unit on discrete values such as 5, 10, 15 or 20.
3. Record these values under Ultrasound Setting on the performance label or
sheet.
4. Measure the output on the UW-7.
5. Record the UW-7 reading under Actual Output in Watts on the performance
label or sheet.
Testing Using Exact Meter Settings (Method II)
When this method is used, an exact meter setting is obtained for each power desired.
This enables the physical therapist to select exactly the ultrasound output that the
patient requires.
1. Follow the procedures in this section on UW-7 operation. Review the
Precautions found on page 5.
2. Adjust the ultrasound unit to read a desired value on the UW-7.
3. Record the Ultrasound Setting and the actual UW-7 reading on the label.
Page 38
Bowles Corporation UW 7
34
Using the RS232 Port
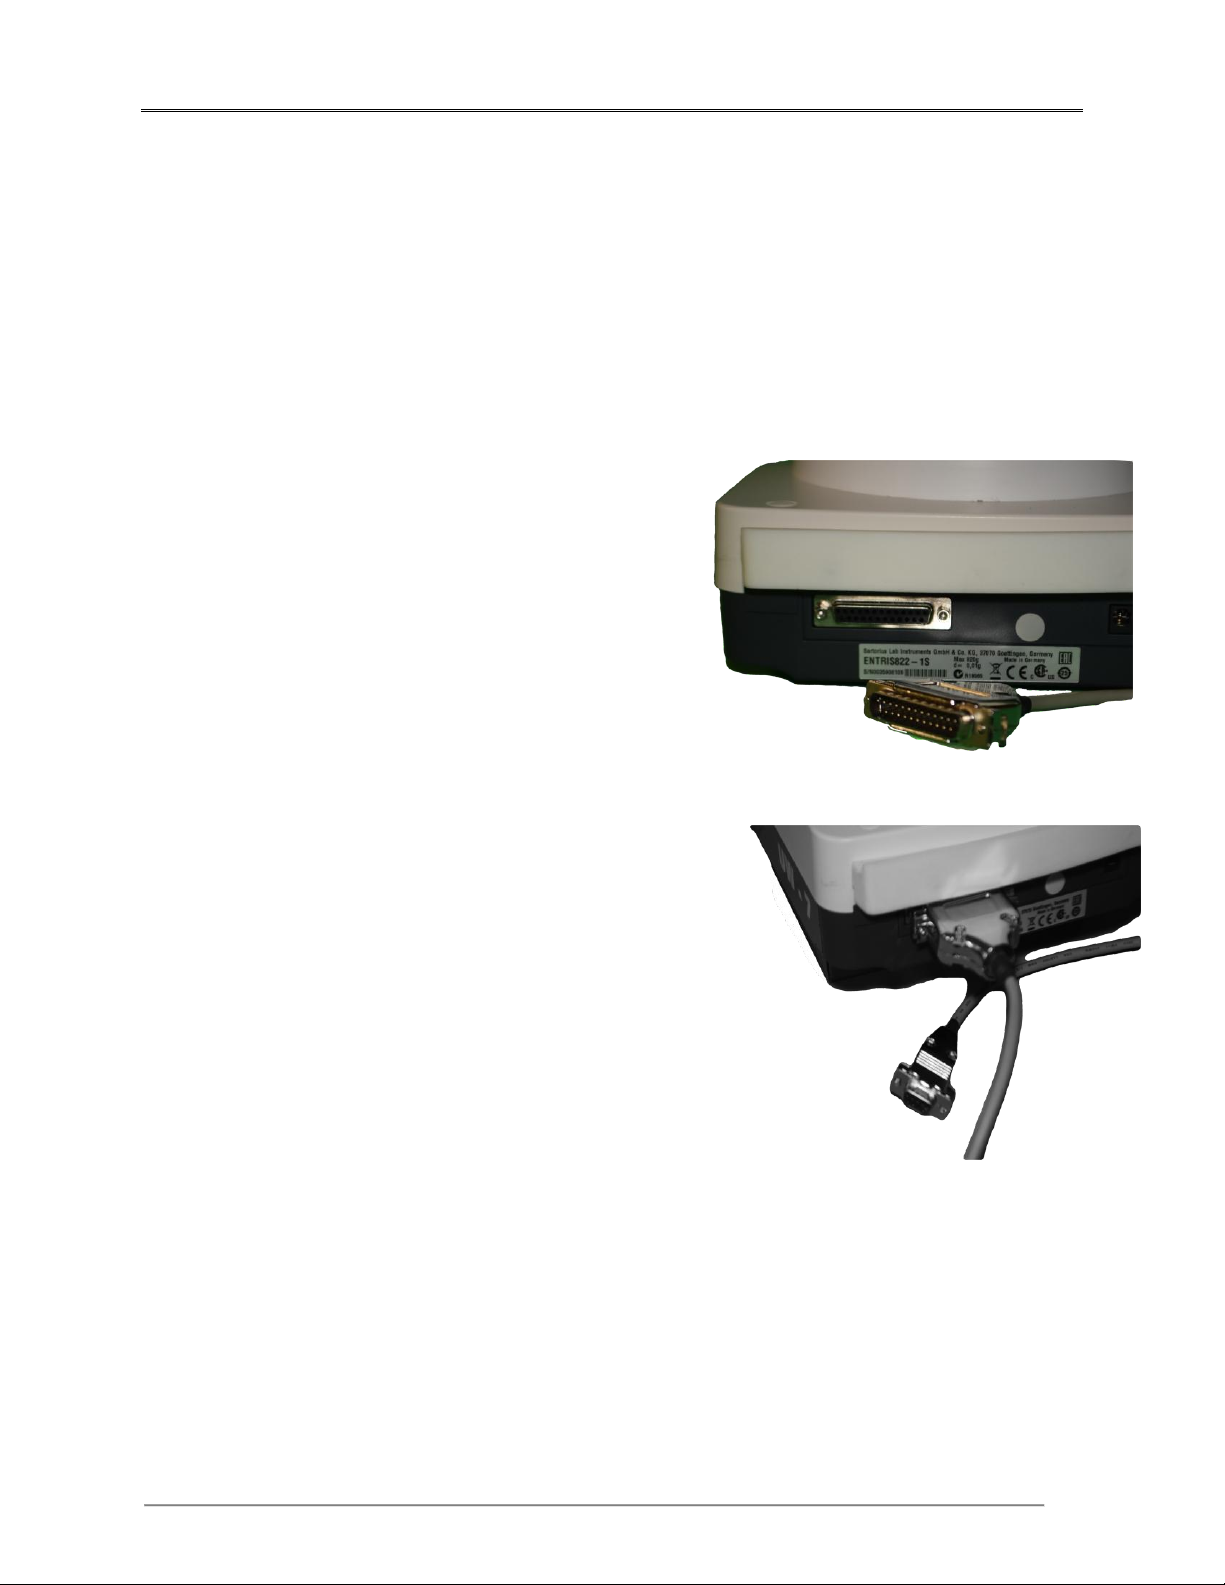
The UW-7 is equipped with a custom 22-pin female RS-232 port located at the rear of
the instrument. A serial printer or a computer may be connected to the UW 7 via this
port. Printing with the UW-7 means that the LCD contents are sent to the printer
whenever the Print key on the UW-7’s front panel is pressed.
Connecting to a Computer
Using a computer in conjunction
with the UW-7 requires the
following steps:
1. Be certain that the power is off on
the UW-7.
2. Attach the UW-7 to the computer using
a serial interface to USB cable provided by
Bowles Corporation only as shown here.
3. Turn on the UW-7.
4. You will need software to
communicate with the UW-7.
Terminal emulation software such
as Windows Hyper Terminal
custom software may be used.
5. Configure the software’s
communications settings for the port
you are using to a baud rate of 1200
bps, 7 data bits, odd parity, 1 stop
bit, and select “hardware
handshaking” if that setting is
available. Refer to your computer
software’s documentation or seek
help for the correct procedure.
Communications Protocol
TM
or
Communication with the UW-7 is full duplex. There are two commands
that may be sent to the UW-7 in the form of two byte 7-bit ASCII strings:
Escape P returns the current LCD contents as 22 characters including
terminating return and linefeed characters.
Escape T zeros the UW-7 display but returns no characters.
Page 39
Bowles Corporation UW 7
35
4
Chapter 4: Safety, Maintenance, Storage & Shipping
Inside This Chapter
Recommended Procedures and Precautions
Calibration Check Procedures
Maintenance
Service
Returning the UW-7 for Calibration
Battery Module Replacement
Storage
Repackaging and Shipping
Page 40
Bowles Corporation UW 7
36
100
Gram Weight
Calibration Weight
Adapter Pedestal
Recommended Procedures and Precautions
When using the UW-7 to test ultrasound devices, follow the safety precautions
specified by the ultrasound manufacturer.
Do not use any coupling medium other than degassed and distilled water.
Do not spill water on the front or rear panel.
Do not apply more than 30 W of input power to the UW-7.
Do not operate the UW-7 for more than 45 minutes to 1 hour before
changing the water (see Preparing the Distilled and Degassed Water on
page 26).
Calibration Weight Check Procedures
You can check to make sure the UW-7 is operating within proper tolerances using
the 100-gram weight supplied with the unit. The weight supplied is an OMIL
class M1 weight that will weigh between 49.92 and 50.09 or (99.88 and 100.22)
grams. This procedure is NOT a substitute for regular annual calibration by
the manufacturer. No facility should issue an annual calibration sticker for the
UW7 based on having performed only a calibration weight check even if they are
using certified weights (see page 38).
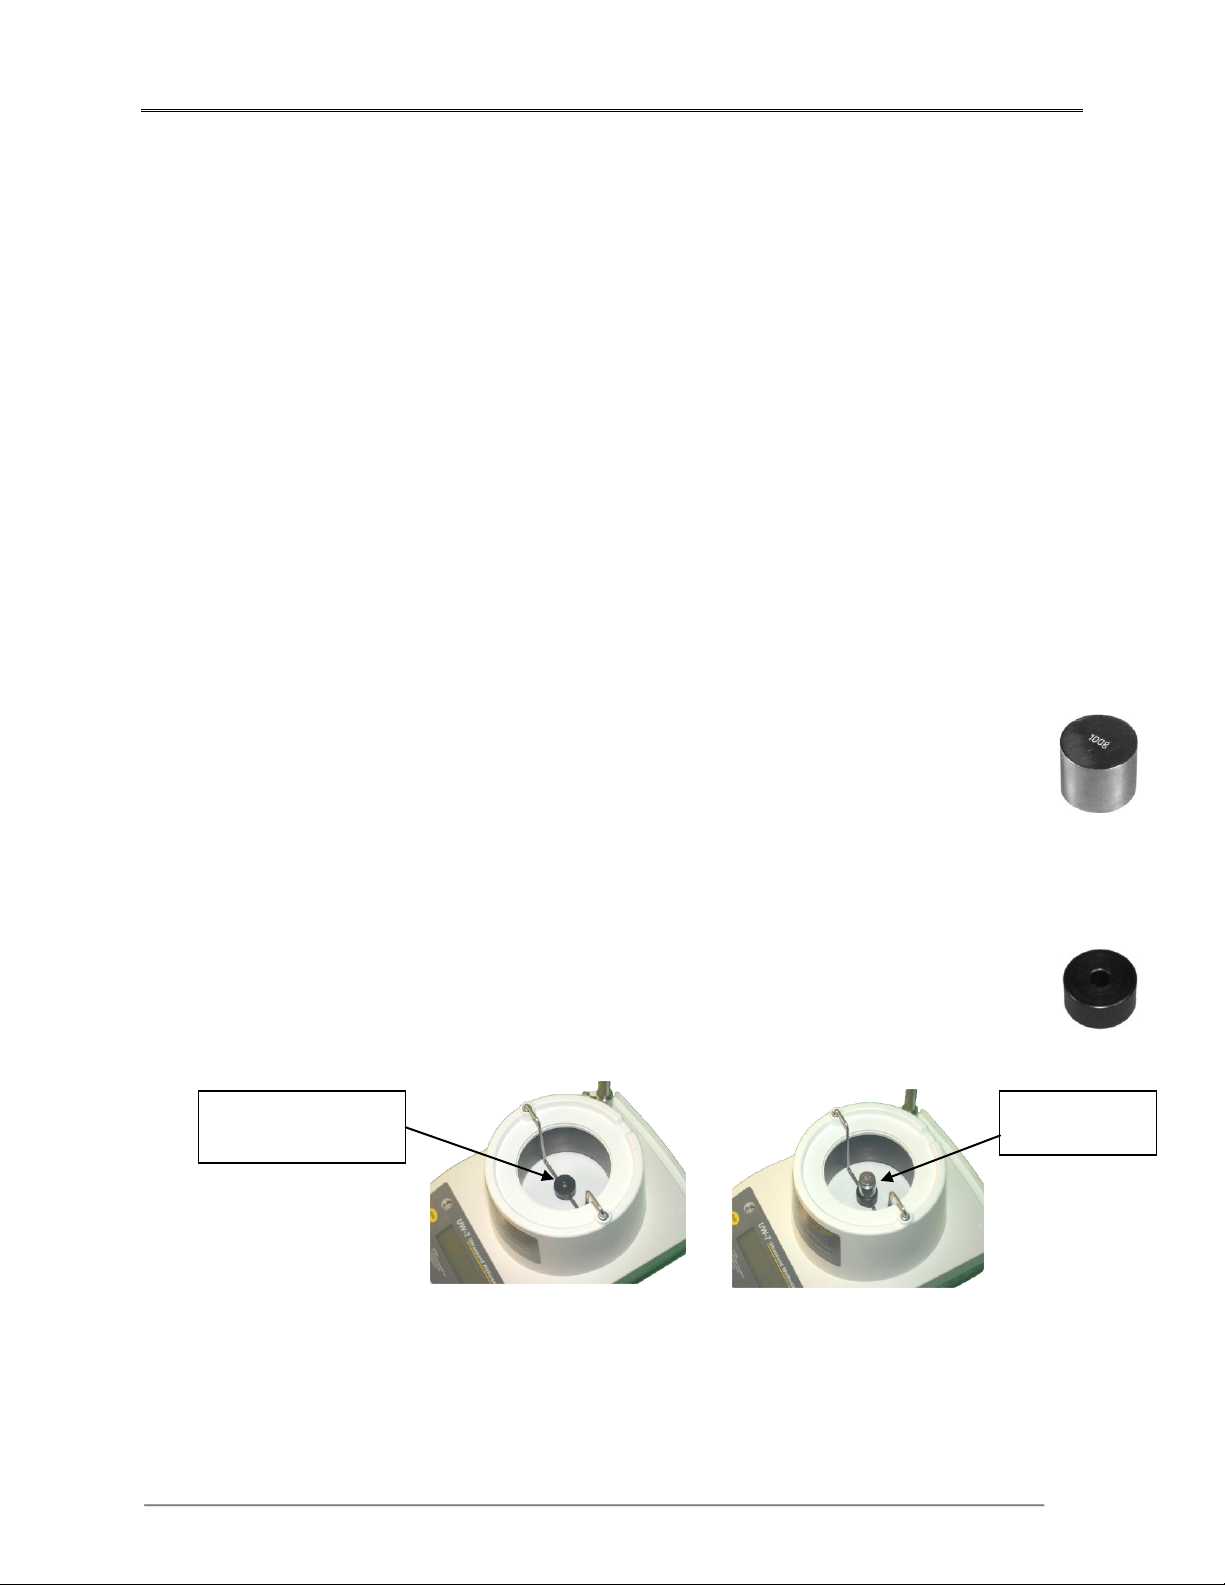
1. The unit should be off at the beginning of this procedure. Remove the cone.
Place the calibration weight adaptor pedestal on the cone-mounting pin. This
provides a stable platform upon which the 100 gram checks weight will be placed.
2. Turn the unit on and allow it to warm up for 5 minutes.
3. Press the MODE button until the unit displays in grams.
4. Zero the display.
5. Place the calibration check weight on the pedestal. Allow the
reading to settle down for 5 to 10 seconds. Take the reading.
Page 41

Bowles Corporation UW 7
37
6. If the reading is 99.80 or 100.90 grams, the unit is in good working
order. Remove the calibration check weight, but leave the
calibration weight adaptor pedestal on the cone mounting pin. It is
normal for the unit to take 5 seconds to 10 seconds to completely
return to zero.
7. If the unit is outside of these ranges, then the unit should be
returned to the manufacturer for repair and/or calibration.
Maintenance
Maintenance of the UW-7 power meter is straightforward, requiring little more than
keeping it clean. It is important to keep dust and dirt out of the transducer tank.
Rinsing the tank with clean water before use, along with proper storage in the carrying
case, is all that is required. It is also important that the cone and hanger be removed
and stored in the carrying case after use.
Do not use any type of cleaner in the tank or on the transducer cone. The use of a light
detergent and non-abrasive cleaning pad is acceptable on the exterior of the unit.
Service
The mechanical assembly of the UW-7 contains no parts that can be serviced by
the user. The unit should be returned to Bowles Corporation for repair or
calibration. The alignment and adjustment parameters are critical to the
performance of the UW-7 and can be performed only at the factory.
For service, package the UW- 7 according to the Repackaging and Shipping
instructions in this chapter. Failure to do so may void the warranty.
Call Bowles Customer Service at 802-425-3447 for shipping instructions.
Page 42
Bowles Corporation UW 7
38
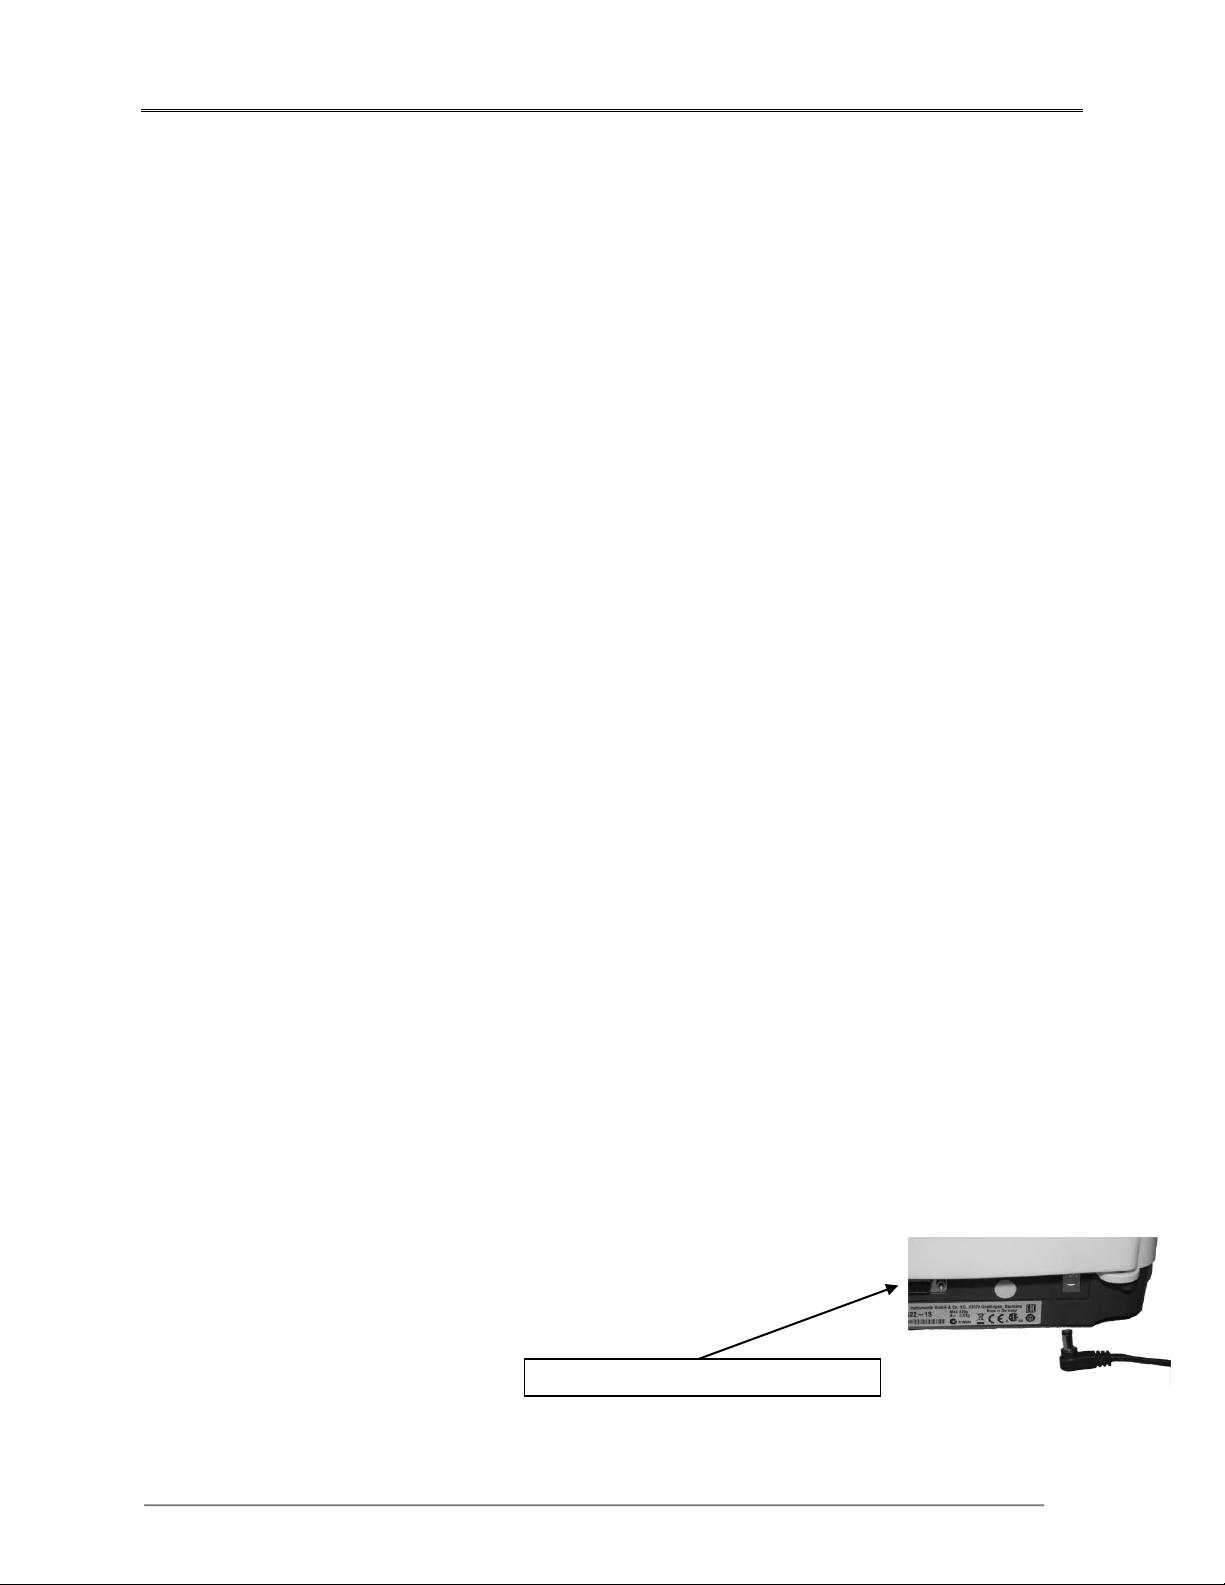
Transformer Unit Power Jack
Returning the UW-7 for Recalibration
The UW-7 should be recalibrated annually by Bowles Corporation. Annual
calibration is not the same thing as a calibration weight check, which can only verify
that the unit is or is not performing within its acceptable range at any given moment in
time. It cannot determine how close to the edge of its range the unit may be. This
means that the next time the unit is used, it may no longer be within the acceptable
range.
No facility should issue an annual calibration sticker for the UW-7 based on
having performed only a calibration weight check even if they are using certified
weights.
When Bowles performs an annual calibration on a UW-7, we start with a weight
check, using annually certified weights with ten times the accuracy of the check
weight provided with the unit. We then run an acoustic verification on the unit. If the
unit readings are acoustically out of range, we access and re-set the internal parameter
readings to their optimal setting. This essentially restores the scale to its best possible
readings, and provides the confidence that, barring misuse or accidental damage, the
unit will remain well within that range for another year.
For annual calibration, call Bowles Customer Service at 802-425-3447 to obtain a
Return Authorization Number and form and shipping instructions.
Pack the UW-7 according to the Repackaging and Shipping procedures outlined in this
chapter. Failure to do so may void the warranty. Approved shipping boxes are
available from Bowles if needed.
Using Battery Power Module
To use the Li Ion power module, plug the cord in to the power receptacle at the rear of
the unit.
To power up the module press the power button to turn the battery on. This module
will last about 35 hours before needing recharge.
Page 43
Bowles Corporation UW 7
39
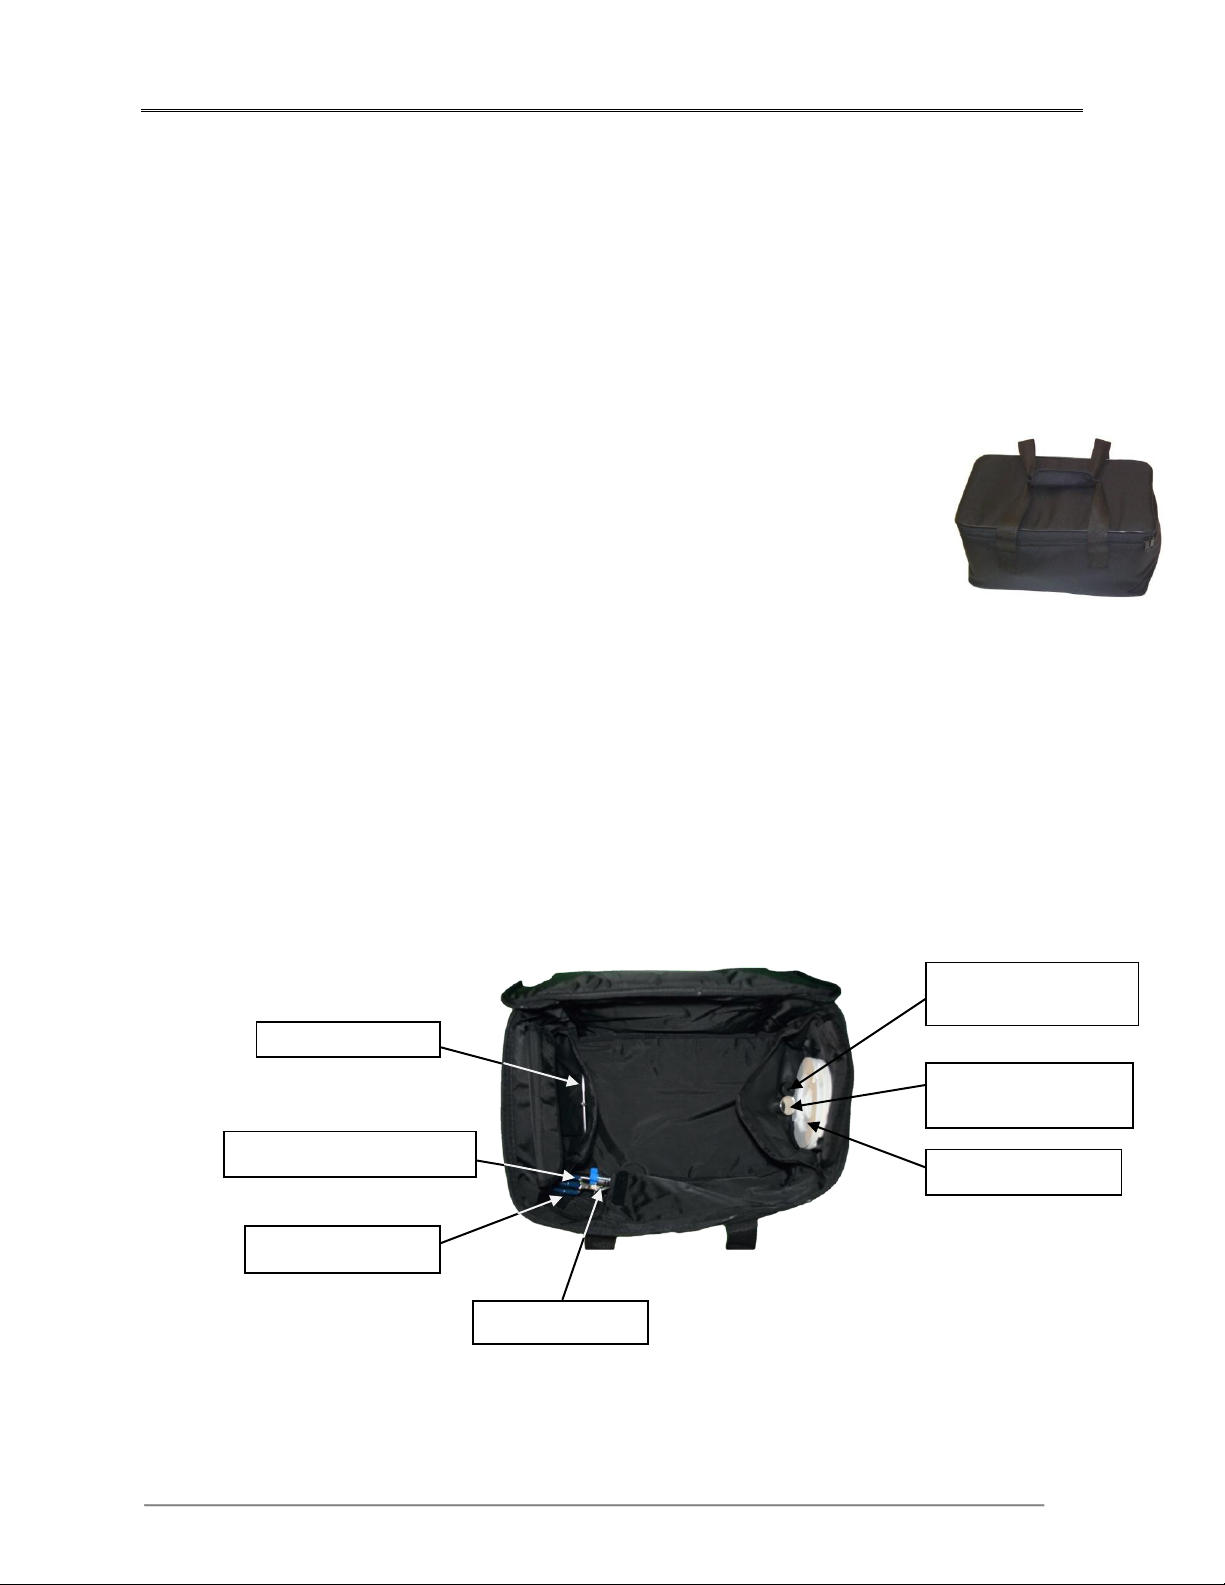
Cone Hanger
Universal Clamp Post
Clamp Support
Clamp Hook
Calibration Weight
Adapter Pedestal
Calibration Check
Weight
Centering Rings
Storage
The UW-7 must be stored in an upright position on a flat surface that is relatively free
of vibration. The unit should be stored in the carrying bag supplied with the unit. The
storage environment should be free of dust and other foreign particles.
The UW-7 must have the cone removed from the tank and be fully
drained for storage. Permanent damage may result if this is not
done.
The UW-7 should be protected from temperature extremes and high
humidity that can cause condensation within the unit and should be
stored away from corrosive fumes and vapors.
Repackaging and Shipping
When the UW-7 is shipped to Bowles for warranty service or repair, the unit
should be shipped in the original packing and carrying case; other forms of
commercially available packing are not recommended and may void the
warranty.
If the original customized packaging set has been damaged or lost, contact
Bowles for a replacement packaging set.
Repackage the instrument according to the following procedure:
Figure 4-1
Page 44
Bowles Corporation UW 7
40
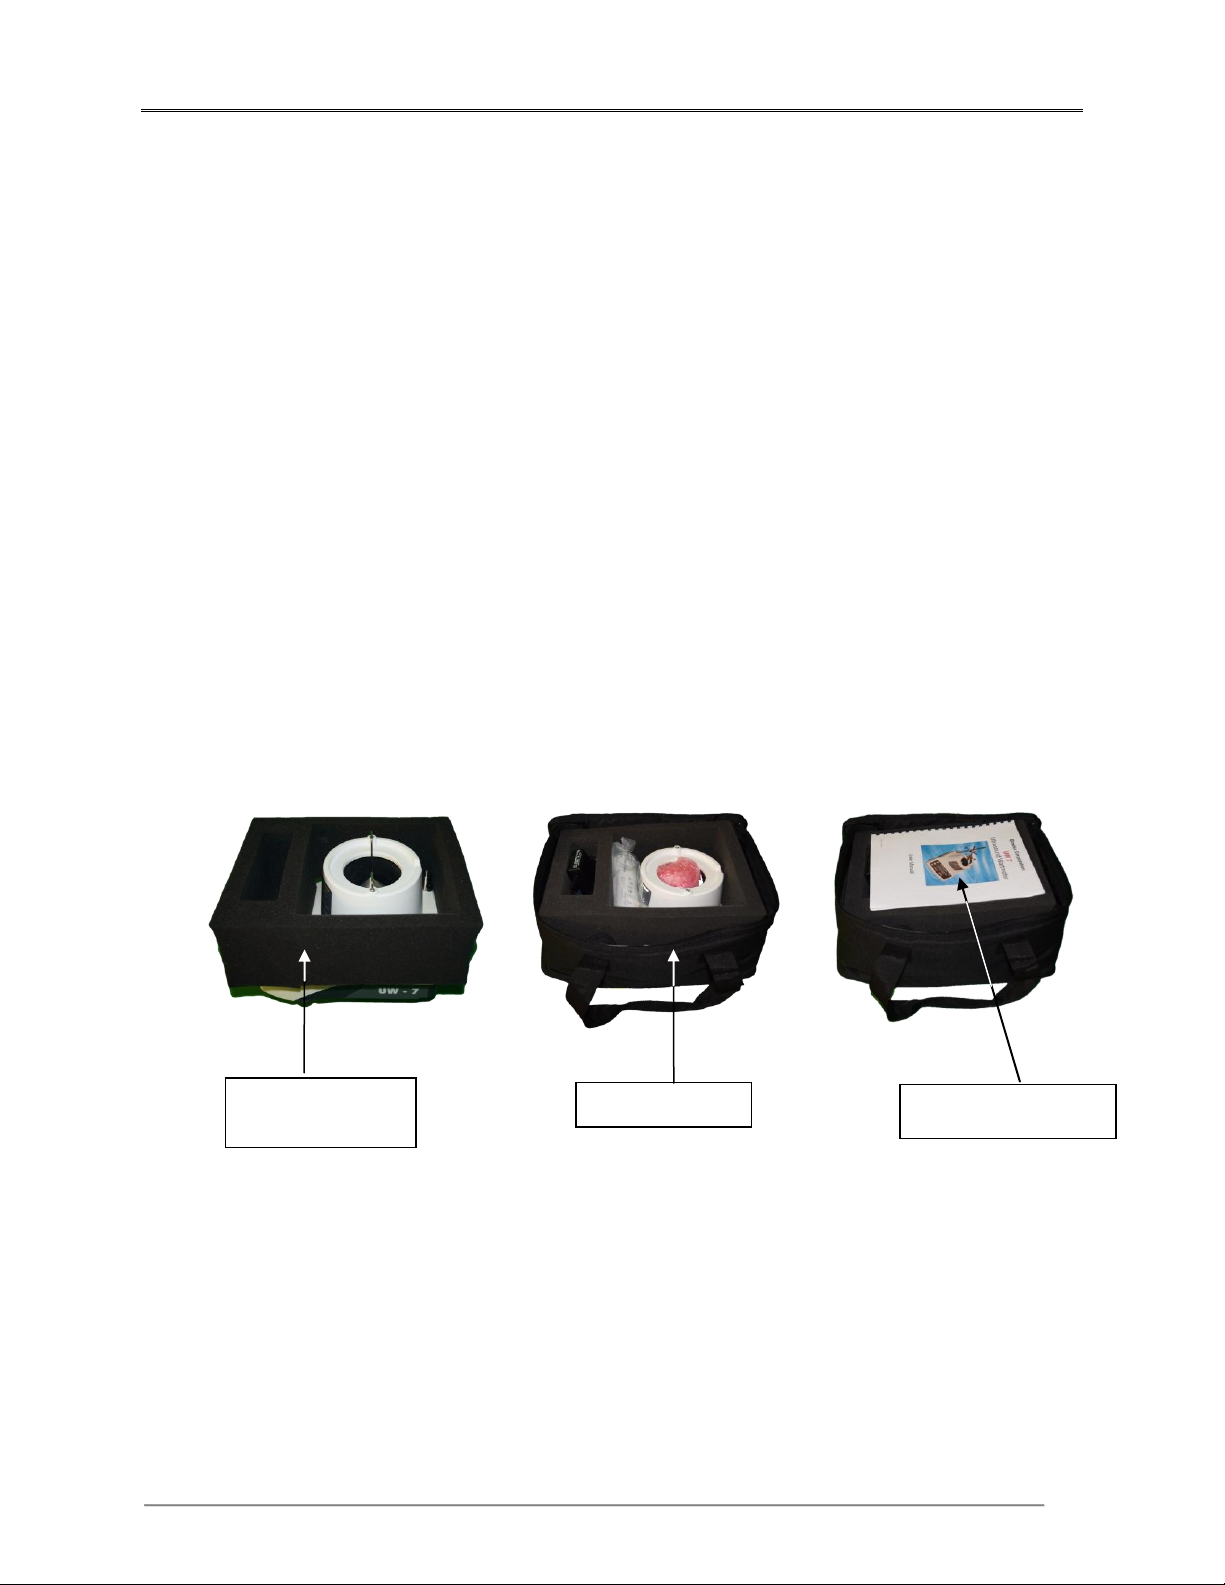
Protective Foam
storage ring
Carrying Case
Operator’s Manual
Unplug the wall transformer from the unit, if used. Store it in its box in
the top left pocket, as shown in Figure 4-1.
Remove the universal transducer clamp from the clamp support post. Store
in front pocket of carrying bag along with the clamp hook.
Remove all the centering rings from the tank. Remove the cone hanger
from the tank. Store the centering rings and cone hanger in right side
pocket of the carrying bag.
Screw the transducer clamp support post. Store it in front pocket of the
carrying bag.
Wrap cone well in bubble wrap affixed with tape and place it in the tank.
Use masking tape or equivalent to secure the cone hanger mounts for
shipping. Failure to do so may void the warranty and cause damage to the
unit.
Place the UW-7 into the carrying bag.
Make sure all accessories are in their individual compartments and the
cover flaps are closed in the carrying bag with the exception of the
Transducer Cone.
Figures 4-2-3&4
Place the gray foam insert around the UW-7 unit in the carrying bag as
shown in Figure 4-2.
Zip the canvas bag cover closed.
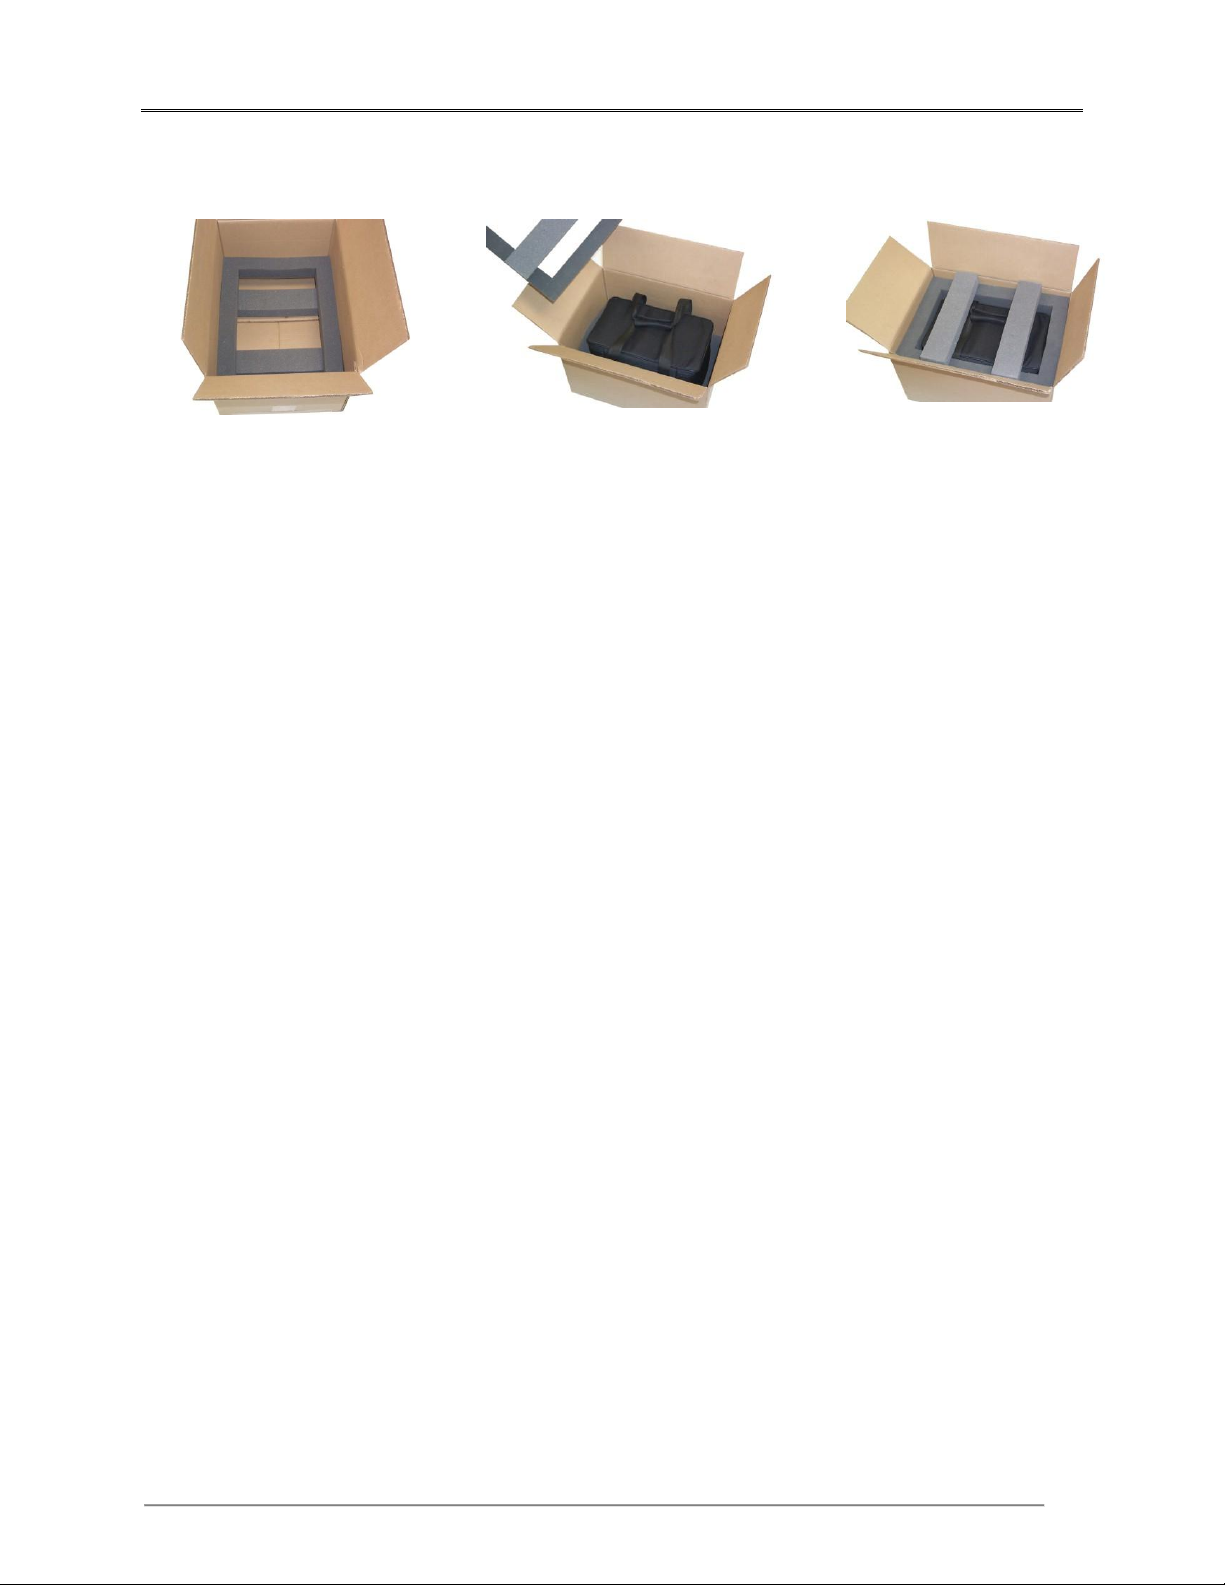
Pack the UW-7 in its original customized packaging material and shipping
box. Call Bowles for a replacement set if needed. FAILURE TO USE
THE ORIGINAL PACKAGING MATERIAL MAY RESULT IN
DAMAGE TO THE UNIT AND MAY VOID THE WARRANTY!
Page 45
Bowles Corporation UW 7
41
Proper placement of the foam inserts when re-using the original packaging
Before the UW-7 is returned to Bowles, make sure you have addressed each item in
the following checklist:
Obtain a Return Authorization Number and Form from Bowles
Customer Service (802-425-3447). If the original customized packaging
set is damaged or lost, request a replacement set from Bowles.
Completely fill out a copy of the RMA form on page 47 of this manual
and include it with your return. (Alternatively, Bowles can email or fax
you a copy of this form when you call for the RMA number.) Include a
statement of what is required of the Bowles Service Department. State
whether the unit requires calibration, cleaning, or repair. Describe any
issues you are experiencing. Make sure contact information is clear.
Follow the procedure on page 39 of this manual to properly package the
unit in its customized shipping materials and preserve its warranty
Write the Return Authorization number on, or near, the shipping label.
Mark the shipping box clearly as FRAGILE.
Mark the shipping box clearly with arrows indicating THIS END UP.
Insure the UW-7 for its full value.
Page 46

Bowles Corporation UW 7
42
Page 47
Bowles Corporation UW 7
43
A
Appendix A: Troubleshooting Guide
Page 48

Bowles Corporation UW 7
44
Error
Code
Description
Corrective Action
LOW
Indicates that an under-load is sensed.
This error usually occurs when neither
the cone nor the calibration weight
adapter pedestal is in place on the load
cell.
Unit needs to be turned off before
placement of cone or pedestal. Replace the
cone, or if checking the operating range,
place the calibration weight adapter on the
cone-mounting pin. The condition may
also indicate defective electronics or load
cell. If the condition cannot be cleared,
return the unit to the factory for service.
HIGH
Indicates that there may be an excessive
force applied to the load cell.
Remove excessive load from the load cell
immediately. If this condition occurs
without any weight on the load cell, this
indicates either defective electronics or a
damaged load cell. Turn the unit off and
back on again to see if the error clears. If
the error repeats, the unit must be returned
to the factory for service. If this error
occurs during a calibration check with the
100 gram check weight but the unit seems
to read normally without the weight on,
this indicates that the unit needs to be
recalibrated. The onboard processor only
allows readings up to 5% over 800 grams.
The processor will display the HIGH error
code for any readings above this range.
SYS.Err
This symbol is displayed indicates a
serious problem. Possible causes
include:
Something is causing the load cell to
function out of specification.
Rough or improper handling of the
unit.
Liquids or other materials spilled
onto the electronics.
Return the unit to the factory service center
for evaluation and repair.
The UW-7 will display an error code if improper use or an abnormal condition is detected.
Consult the following table for possible error codes, the probable cause, and corrective action.
Communication failures between the UW-7 and a printer or a PC are usually caused by the serial
cable or incorrect parameter settings. Troubleshoot as follows:
1. Verify that the correct serial cable is being used. The correct cable is Bowles PN: 1200B-232 or equivalent 22-pin “straight-through” to USB cable.
2. If attempting to communicate with a PC, verify that the serial cable is connected to the
desired port and that the port settings are 1200, 7, N, 1.
3. If attempting to interface with a printer, check the printer’s settings.
Page 49

Bowles Corporation UW 7
45
Other Issues
Unit does not return to 0.00 +/- .01 watts after taking readings.
Allow at least 10 seconds for the reading to return to zero.
There is a possibility that air bubbles have collected under the cone causing a
slight change in the buoyancy. Gently spin the cone to help dislodge them and
lightly tap the sides of the unit while tipping the unit on edge until all air bubbles
appear to be removed.
If allowing 10 seconds more does not allow reading to return to zero, then the unit
and water have probably not fully temperature equalized. Allow the unit to sit
while turned on for at least 10 more minutes then re-zero the unit and try again.
Repeat the 10-minute settling time if zero drift persists.
Readings do not stabilize and slowly decrease.
This condition usually indicates that the water has absorbed too much air and
should be replaced with fresh water. When too much air is in the water, air
bubbles tend to build up in the sound beam and bounce some of the sound away
from the cone, thus lowering the reading.
Unit fails to power up or battery drains quickly.
Verify there is a fresh 15 v Li Ion Battery Power module plugged properly into
the unit. If the battery fails to hold up for approx.36 hours’ operation, this
indicates a problem with the electronics. Return the unit to Bowles, for factory
service. Remember, when on battery power, the unit will run until it is powered
down.
Use the recommended power transformer to power the unit. If the unit still fails
to power up or the transformer runs hot, this indicates a problem with the
electronics. Return the unit to Bowles for Factory Service.
Numbers and letters appear to the left of the display.
Should the display readout (for example, USERDEF) or other digits appear, then
the Service Menu Codes have been inadvertently entered and your unit’s
calibration and communications setups could be affected. Usually, you can power
the unit down and restart it and it should clear the code. If it doesn’t clear the
code, call Bowles Customer Service 802-425-3447 for instruction to get out of the
Service Menu Codes without affecting the operation of your UW-7 and voiding
the warranty.
Page 50

Bowles Corporation UW 7
46
Page 51
Bowles Corporation UW 7
47
Return Materials Authorization Form
RMA Number: ____________
Customer Name and Address:
_____________________________ Date: ____________________
_____________________________ Phone Number: ____________
_____________________________ Fax Number: ______________
_____________________________ Contact Name: _____________
Contact Email: _____________
Unit Serial Number: __________
Reason for Return:
______________________________________________________________________
______________________________________________________________________
______________________________________________________________________
______________________________________________________________________
Bowles Product Return Policy
This policy refers to any products or parts being returned to Bowles Corp whether
customer owned, leased, or rented; whether under warranty or not.
NO products or parts should be shipped to Bowles Corp. without first contacting us for a
Return Materials Authorization Number (RMA) which should then be clearly displayed
on the exterior of the package. Packages delivered without an RMA number or this
RMA form will not be evaluated until the RMA form is received.
Follow the procedure on pages 39-41 of the product manual to properly package the
unit in its customized shipping materials. If the manual is not available, contact us for a
pdf copy of those instructions. Failure to follow this procedure may void the
warranty and subject the unit to shipping damage.
Bowles Corporation
445 Long Point Road
N. Ferrisburgh, VT 05473
T: 802-425-3447
F: 802-425-2896
 Loading...