

Page 1

BOUNDLESS TECHNOLOGIES
ADDS 5600RM Remote Management Serv er
Administrator’s Guide
Page 2

ADDS 5600RM Administration Guide
ADDS 5600RM REMOTE MANAGEMENT SERVER
Administrator’s guide
ADDS by Boundless Technologies 1
Page 3

ADDS 5600RM Administration Guide
T able of contents
Introduction ___________ 3
Getting started _________ 4
Understanding the 5600RM___ 4
Setting up the 5600RM ______ 5
Default configuration _____________ 5
First connection _________________ 5
Configuring the Network Drive______ 6
Remote Management Licensing_____ 9
Overview of the 5600RM Tabs_ 9
5600 List Tab ___________________ 9
Scheduled actions Tab ___________ 10
Files Tab______________________ 10
Options Tab ___________________ 11
Logs Tab______________________ 11
Disconnect Tab_________________ 12
Upgrading the 5600RM_______________ 13
Manage 5600 Terminals__ 14
First Discovery____________ 14
Press discover__________________ 14
Groups _______________________ 15
Providing Group Name by DHCP Tag 16
Control Panel_____________ 17
Main panel ____________________ 17
Discover___________________________ 18
Display all _________________________ 18
Adding 5600 Terminals_______________ 19
Add a group________________________ 20
Export ____________________________ 20
Current Selection____________________ 20
Actions on the selection_______________ 20
list __________________________ 20
ADDS 5600 dialog box ___________ 21
Properties section____________________ 22
Immediate actions___________________ 22
Group 5600’s ______________________ 22
Note for “Get configuration” __________ 22
Note for “Send configuration” _________ 22
Administration _____________________ 23
Group dialog box _______________24
Properties section ___________________ 24
Immediate actions___________________ 24
Configuration locking________________ 25
Resource Files ____________25
Configuration files_______________25
Firmware______________________25
Add a Firmware from an external server _ 25
Add a Firmware with RM network drive _ 26
Messages______________________26
Schedule actions __________27
Logs____________________28
Advanced _____________29
Server options ____________29
Firmware______________________29
Date and time__________________30
Keyboard______________________ 30
Network_______________________ 30
Application options ________31
Administrator authentification _____31
Desktop manager authentification __31
Language _____________________ 31
Communication settings __________ 31
Scheduled actions page.__________31
Licensing______________________31
Network Drive__________________32
INI Files_________________32
Illustrations ___________39
ADDS by Boundless Technologies 2
Page 4

ADDS 5600RM Administration Guide
Introduction
Congratulations on purchasing the ADDS 5600RM Remote Management
Server. The ADDS 5600RM is a web-based application that enables you to fully take
control of ADDS 5600 Linux Based Terminals (LBT) installed on your network.
The ADDS 5600 provides powerful and flexible computing capabilities for
networks that have many types of servers as well as Web resources. The ADDS 5600
can initiate simultaneous, multiple connections to Windows 2003 Servers, Windows
2000 Servers, Windows NT Terminal Servers, UNIX-based servers, mainframes,
minicomputers, intranets, and the Internet.
This Administrator’s guide is primarily intended for system administrators. It
aims to describe how to set up and to use the ADDS 5600RM Server. Please note
that it does not aim to describe the workings of servers systems or the meanings of
network related terms.
This guide is divided into the following sections:
Getting Started
Discover and group 5600 Terminals ADDS
Instructions for a quick installation
5600 listing and immediate
actions
Define and plan actions
Advanced
ADDS by Boundless Technologies 3
Create and schedule actions
Advanced configuration
Page 5

ADDS 5600RM Administration Guide
Getting started
By following the simple setup
instructions, the ADDS 5600RM Remote
Management Server will be installed on
your network within a few minutes.
Understanding the ADDS 5600RM
The ADDS 5600RM (Terminal Management Server) software is embedded
software that turns an ADDS 5600 Linux Based Terminal into a Management Server.
The ADDS 5600RM acts as a standalone appliance preventing installation of
software on a Windows or UNIX server.
The ADDS 5600RM just needs to be connected to the network, a keyboard,
mouse or monitor are not necessary.
The ADDS 5600RM comes with following core components:
- Apache Web Server
- SQLite DataBase
- PHP middleware
All data used (configuration file, new firmware, message) or generated (logs,
inventory list) by the ADDS 5600RM are stored on a remote Network Drive.
Once installed, the Administrator will only need to use Internet Explorer or
Mozilla Browser to access the ADDS 5600RM in a secure connection (Https).
ADDS by Boundless Technologies 4
Page 6
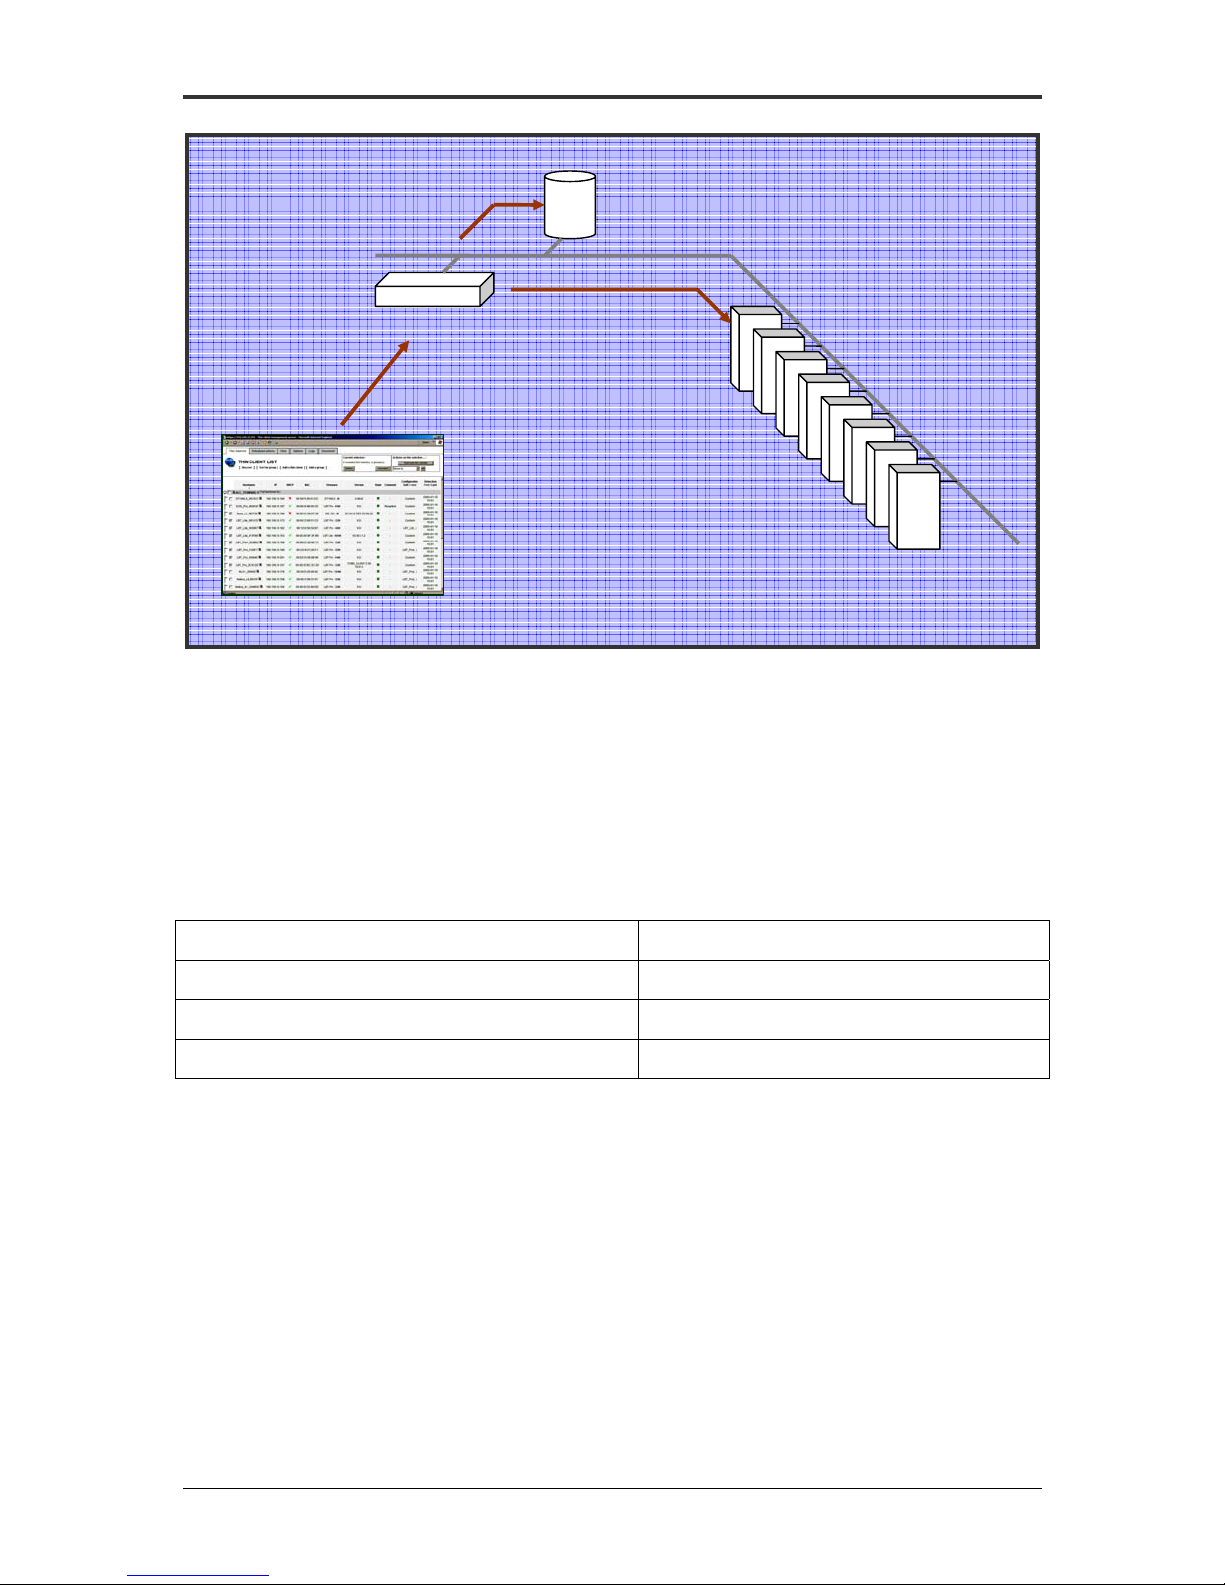
ADDS 5600RM Administration Guide
Data storing
via SMB
ADDS 5600RM
Server
Https
Web-Browser
(Administrator desktop)
Encrypted and
tunnelled data
Figure 1 – ADDS 5500RM Diagram
Network
Drive
ADDS 5600
Linux Based
Terminals
Setting up the ADDS 5600RM - Terminal Management
Server (TMS)
Default configuration
At first start up, The ADDS 5600RM inherits the following default settings:
Static IP Address 192.168.0.1
Gateway 192.168.0.10
Username super-admin
Password (none)
First connection
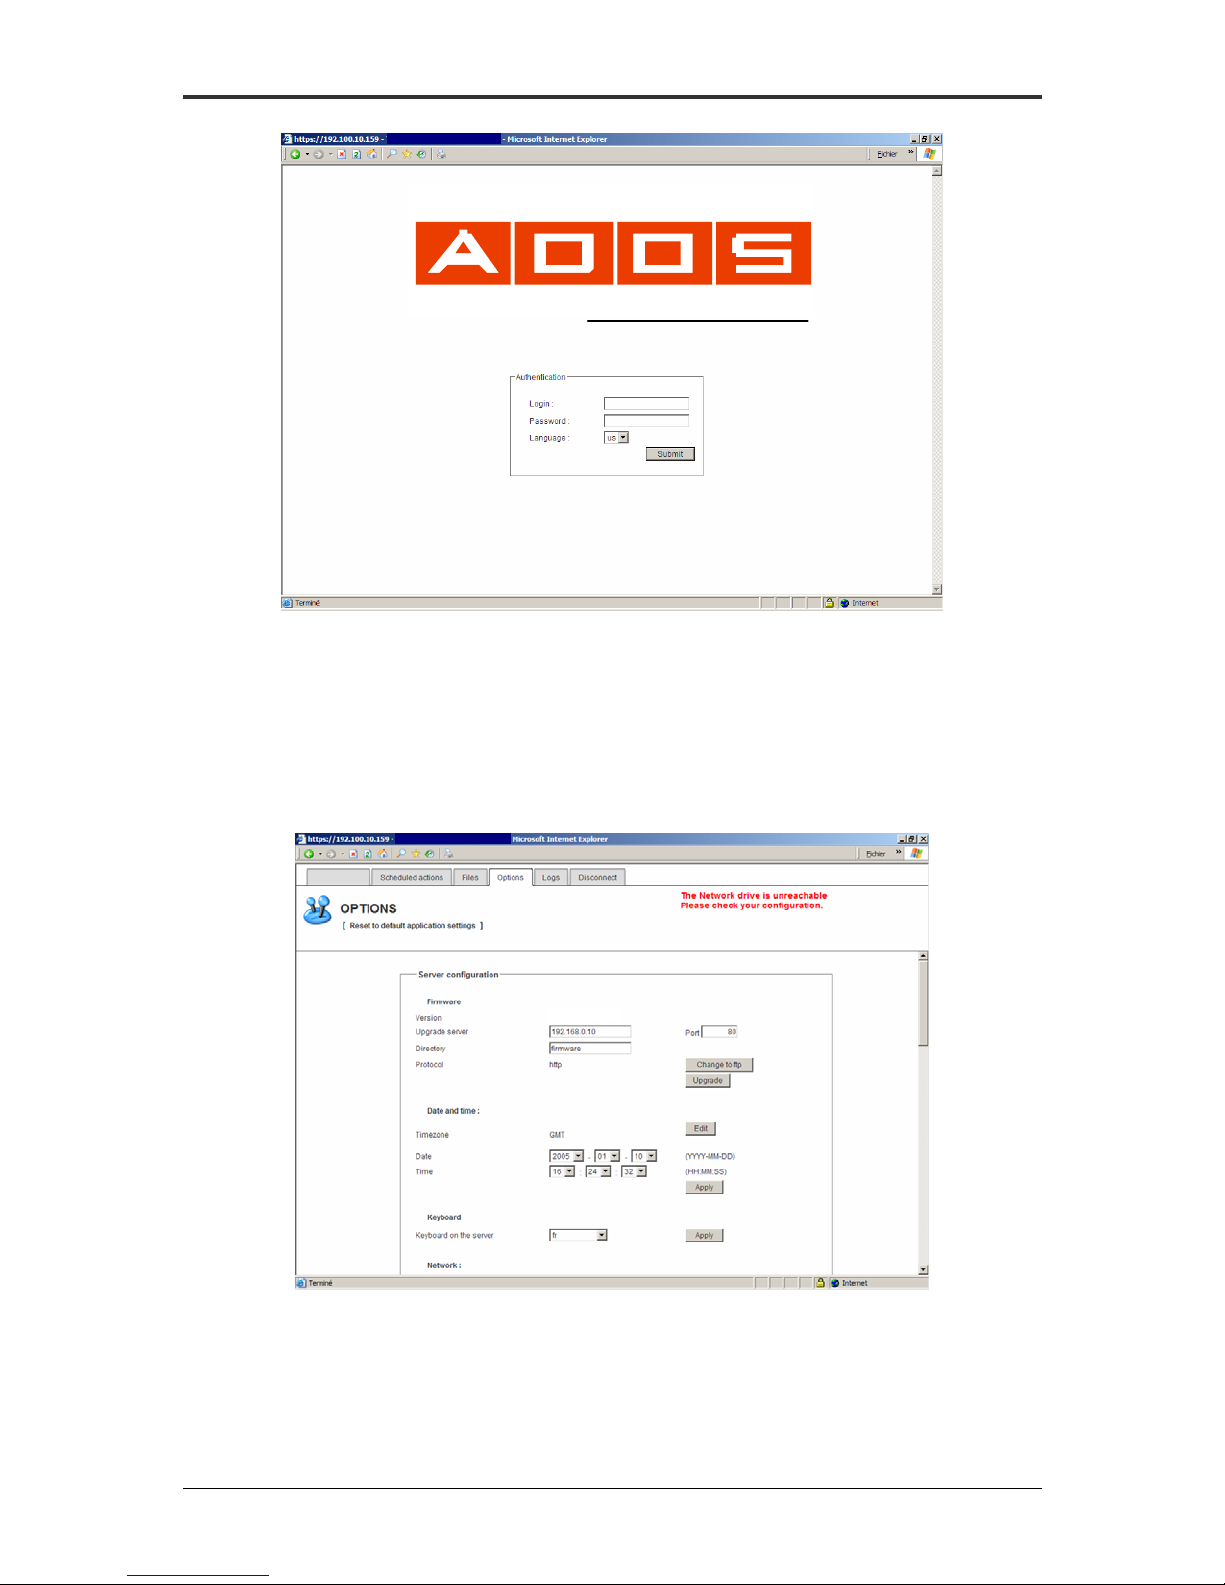
While connecting to the 5600RM (TMS), the Administrator will be prompted to
enter its username and password. Eventually, the Administrator can select either to
load the Graphical User Interface in English or in French.
ADDS by Boundless Technologies 5
Page 7
Terminal management server
5600RM
ADDS 5600RM Administration Guide
REMOTE MANAGEMENT
SERVER
Figure 2 - Login screen
Configuring the Network Drive
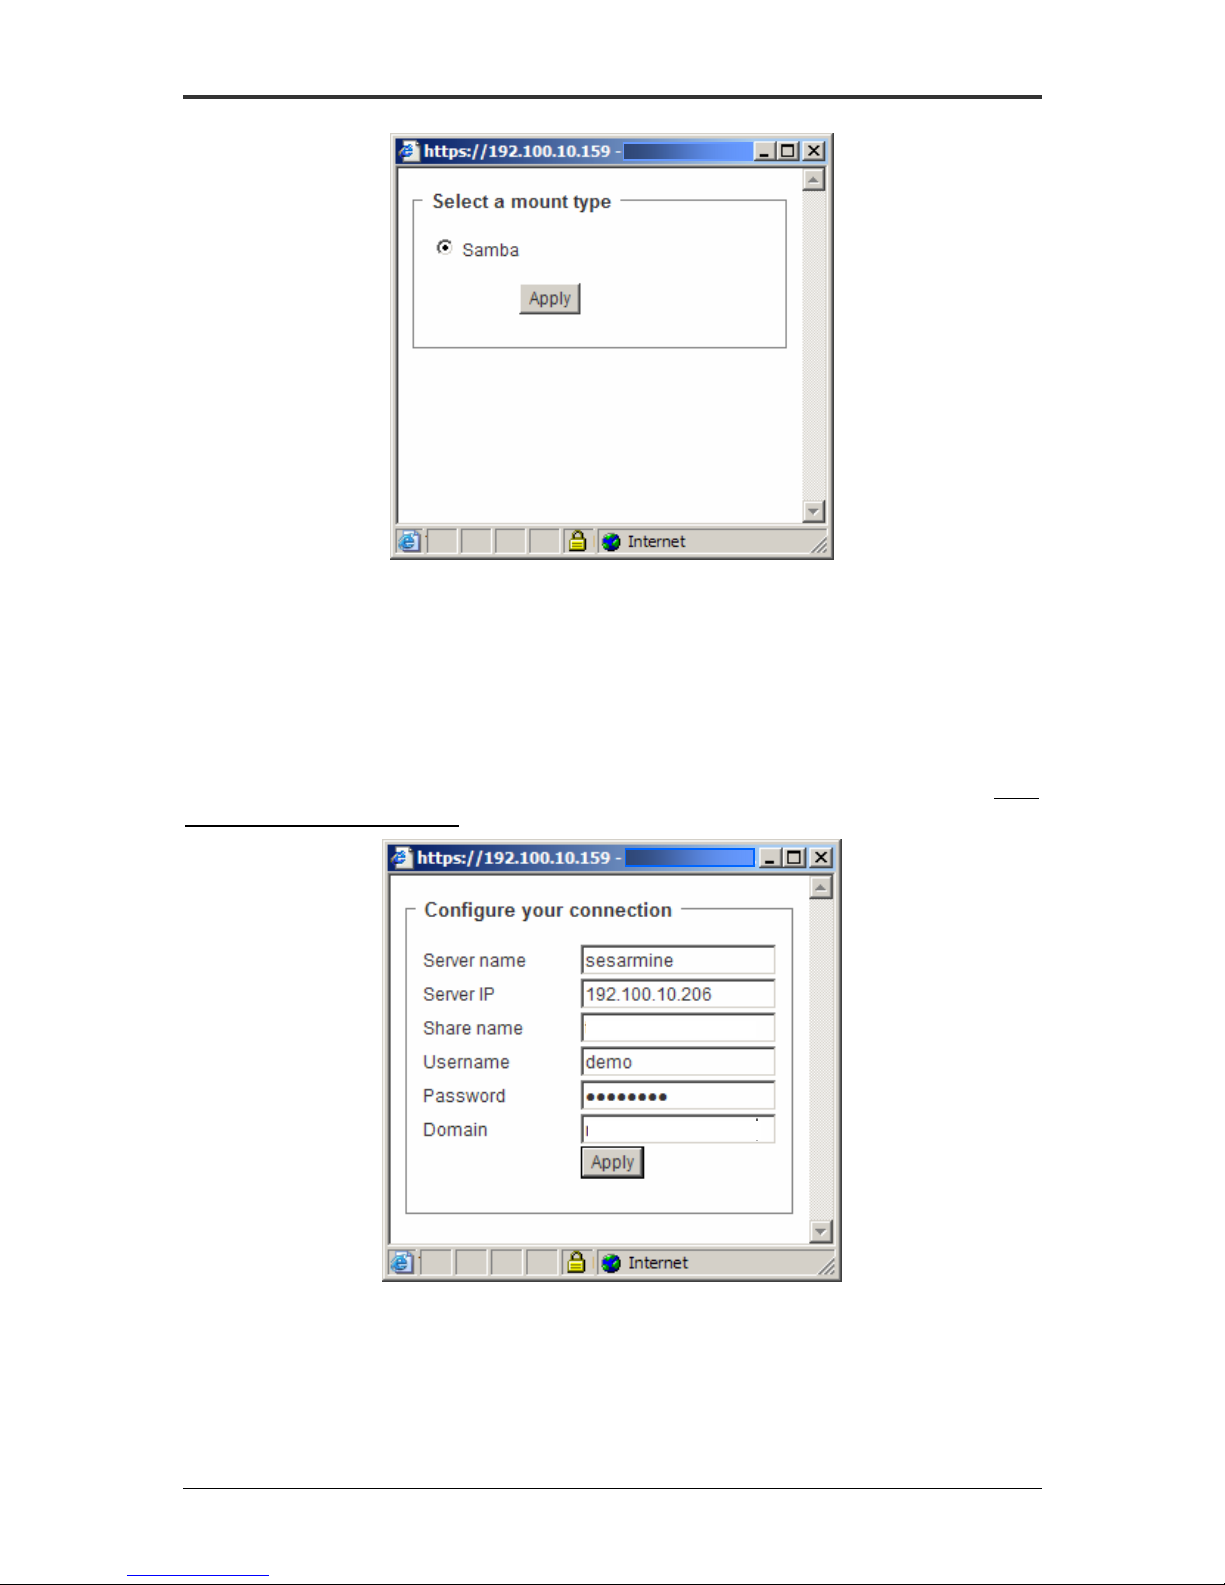
Once logged on, the ADDS 5600RM will require to configuring the Network
Drive parameters. Without the Network Drive configured, the 5600RM will not be
able to perform. Every attempt to click on another Tab or the Options will be
blocked.
Terminal List
TMS Server 1.0
By clicking the Edit button of the Network Drive section, the Administrator will
be prompted to create the Network Drive.
ADDS by Boundless Technologies 6
Figure 3 - Network Drive unreachable
Page 8
ADDS 5600RM Administration Guide
Figure 4 - Create Network Drive
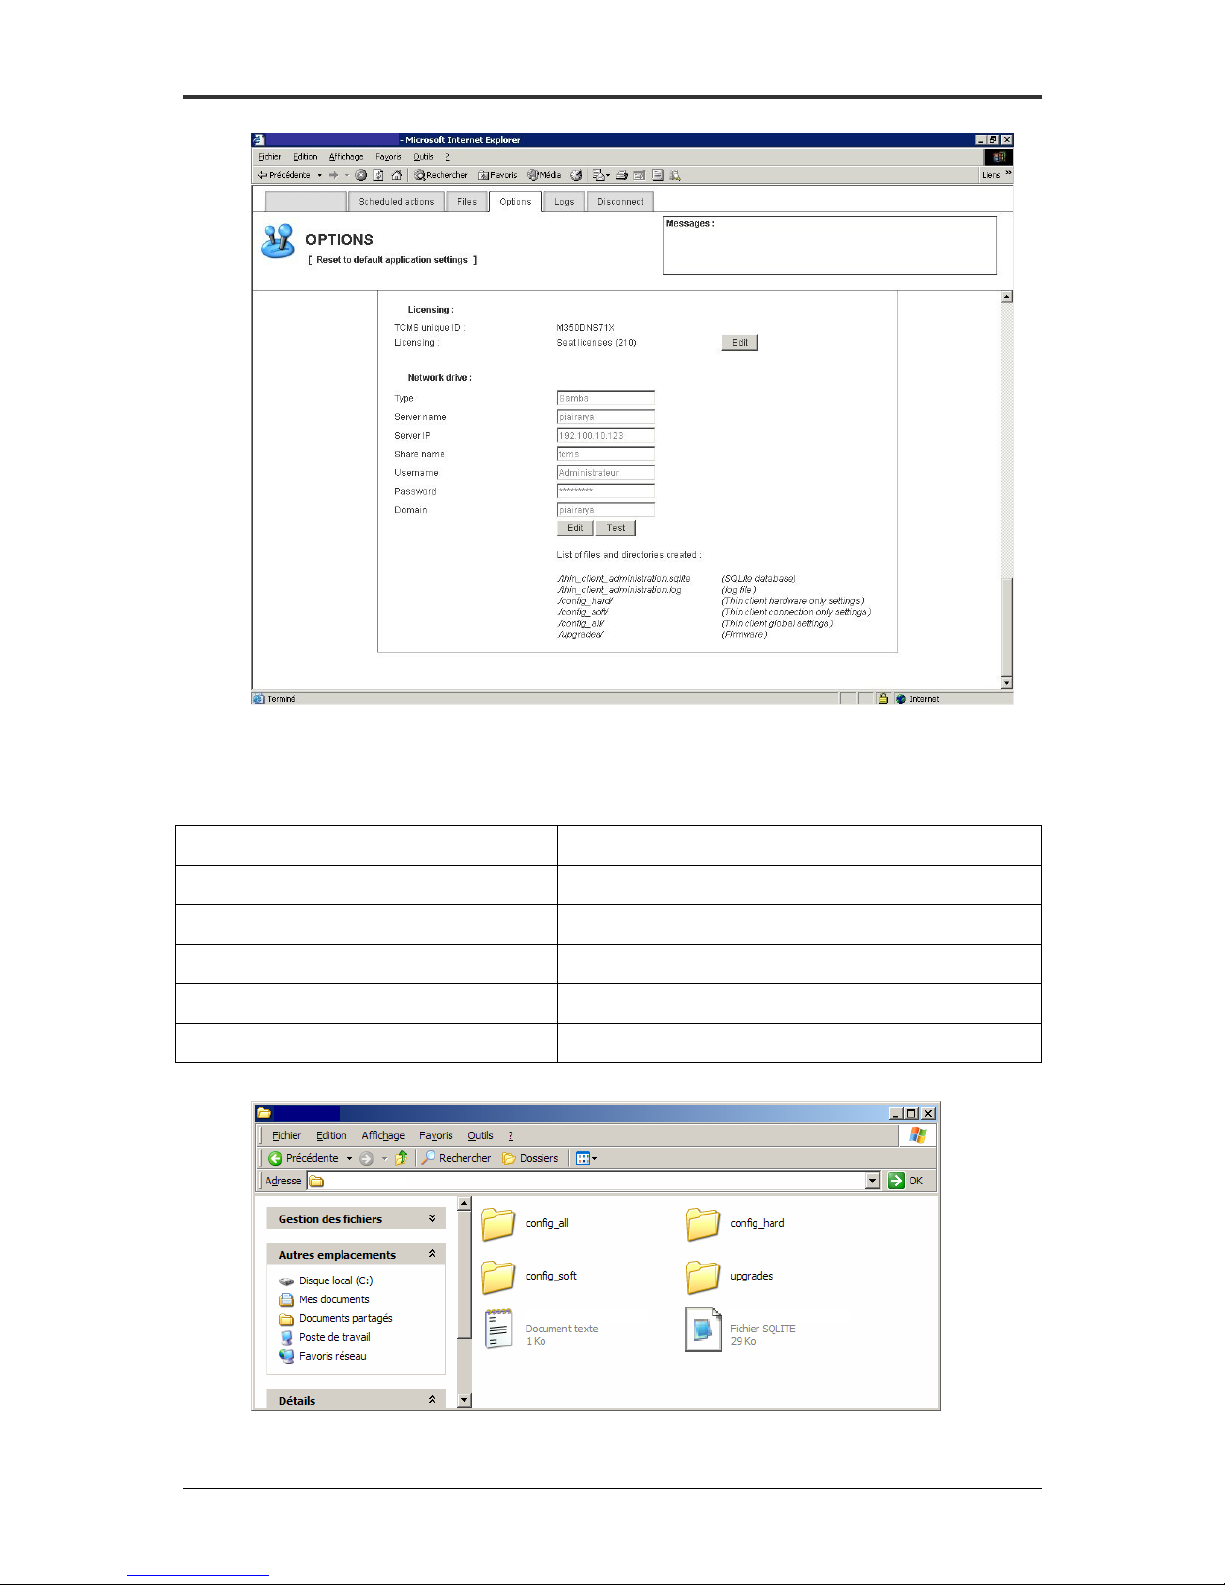
Once mount type is selected, the Network Drive parameters can be set. The
Network Drive can be a Samba UNIX Network Drive or a Windows share drive (with
Read and Write access rights)
In case of a Windows share drive, the username and password provided shall
be valid either as a local user on the share drive Windows machine, a W indows NT
Domain user or an Active Directory User. In any case, the identification protocol shall
be NTLM and not Kerberos.
Figure 5 - Configure Network Drive
Once applied, the Network Drive should be up and running, enabling the
ADDS 5600RM (TMS) to store its data.
ADDS by Boundless Technologies 7
Page 9
Terminal management server
Terminal List
ADDS 5600RM Administration Guide
Figure 6 - Network Drive configured
For a better understanding of the ADDS 5600RM (TMS), the Administrator can
browse the Network Drive and check out its content.
config_all folder Contains Global configuration files
config_soft folder Contains Software only configuration files
config_hard folder Contains Hardware only configuration files
upgrades folder Contains Firmware upgrades
terminal_administration (TXT) Contains the logs
Terminal_administration (SQLITE) Contains Database entries
TMS_data
C:\tms_data
ADDS by Boundless Technologies 8
Terminal_administration
Figure 7 - Content of Network Drive
Terminal_administration
Page 10
ADDS 5600RM Administration Guide
3
ADDS 5600RM Licensing
By default, the ADDS 5600RM (TMS) features temporary licenses for a limited
number of seats. Additional licenses can be purchased to extend the number of
clients that can be browsed by ADDS 5600RM.
Overview of the ADDS 5600RM Tabs
For ease of use, the ADDS 5600RM (TMS) is designed around a set of tabs.
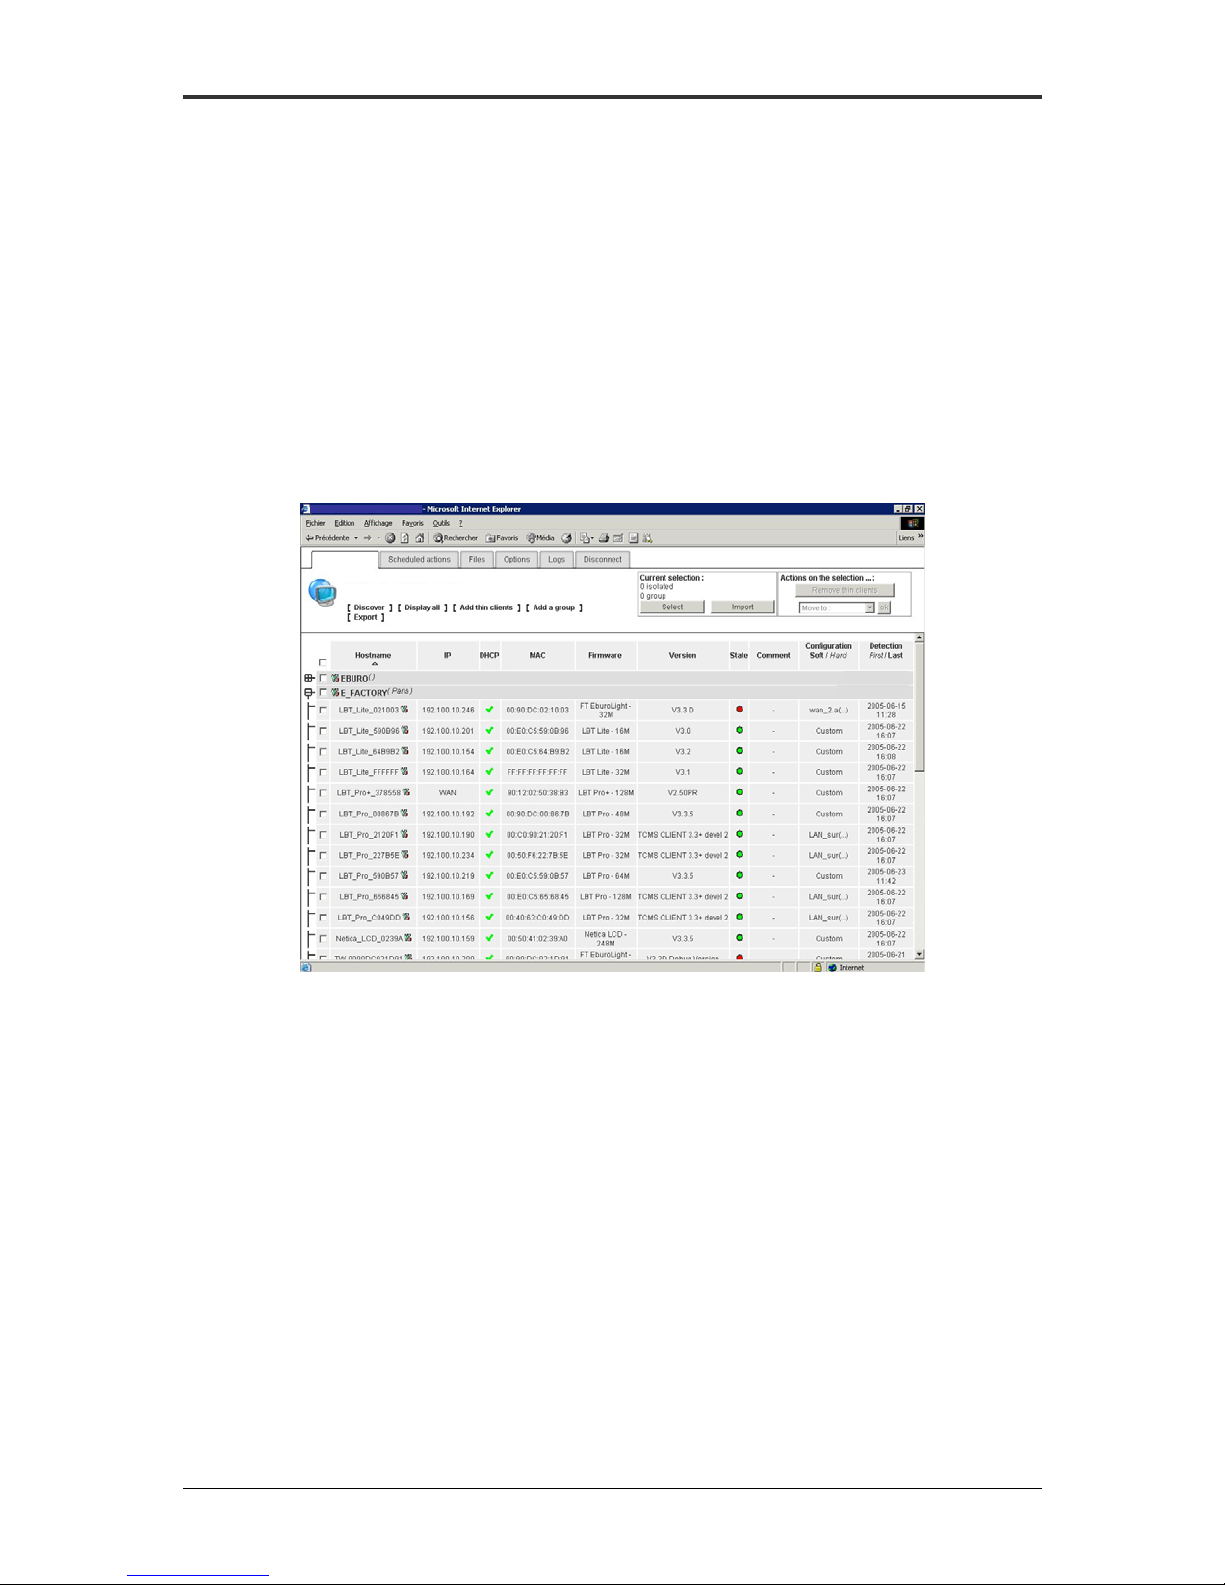
Terminals (ADDS 5600) List Tab
This tab displays the list of terminals (ADDS 5600’s) that have been
discovered on the network, they may be sorted by group or not.
Terminal management server
Terminal List
TERMINAL LIST
Figure 8 – Terminals ( ADDS 5600) List Tab
terminals
18 terminals
ADDS by Boundless Technologies 9
Page 11
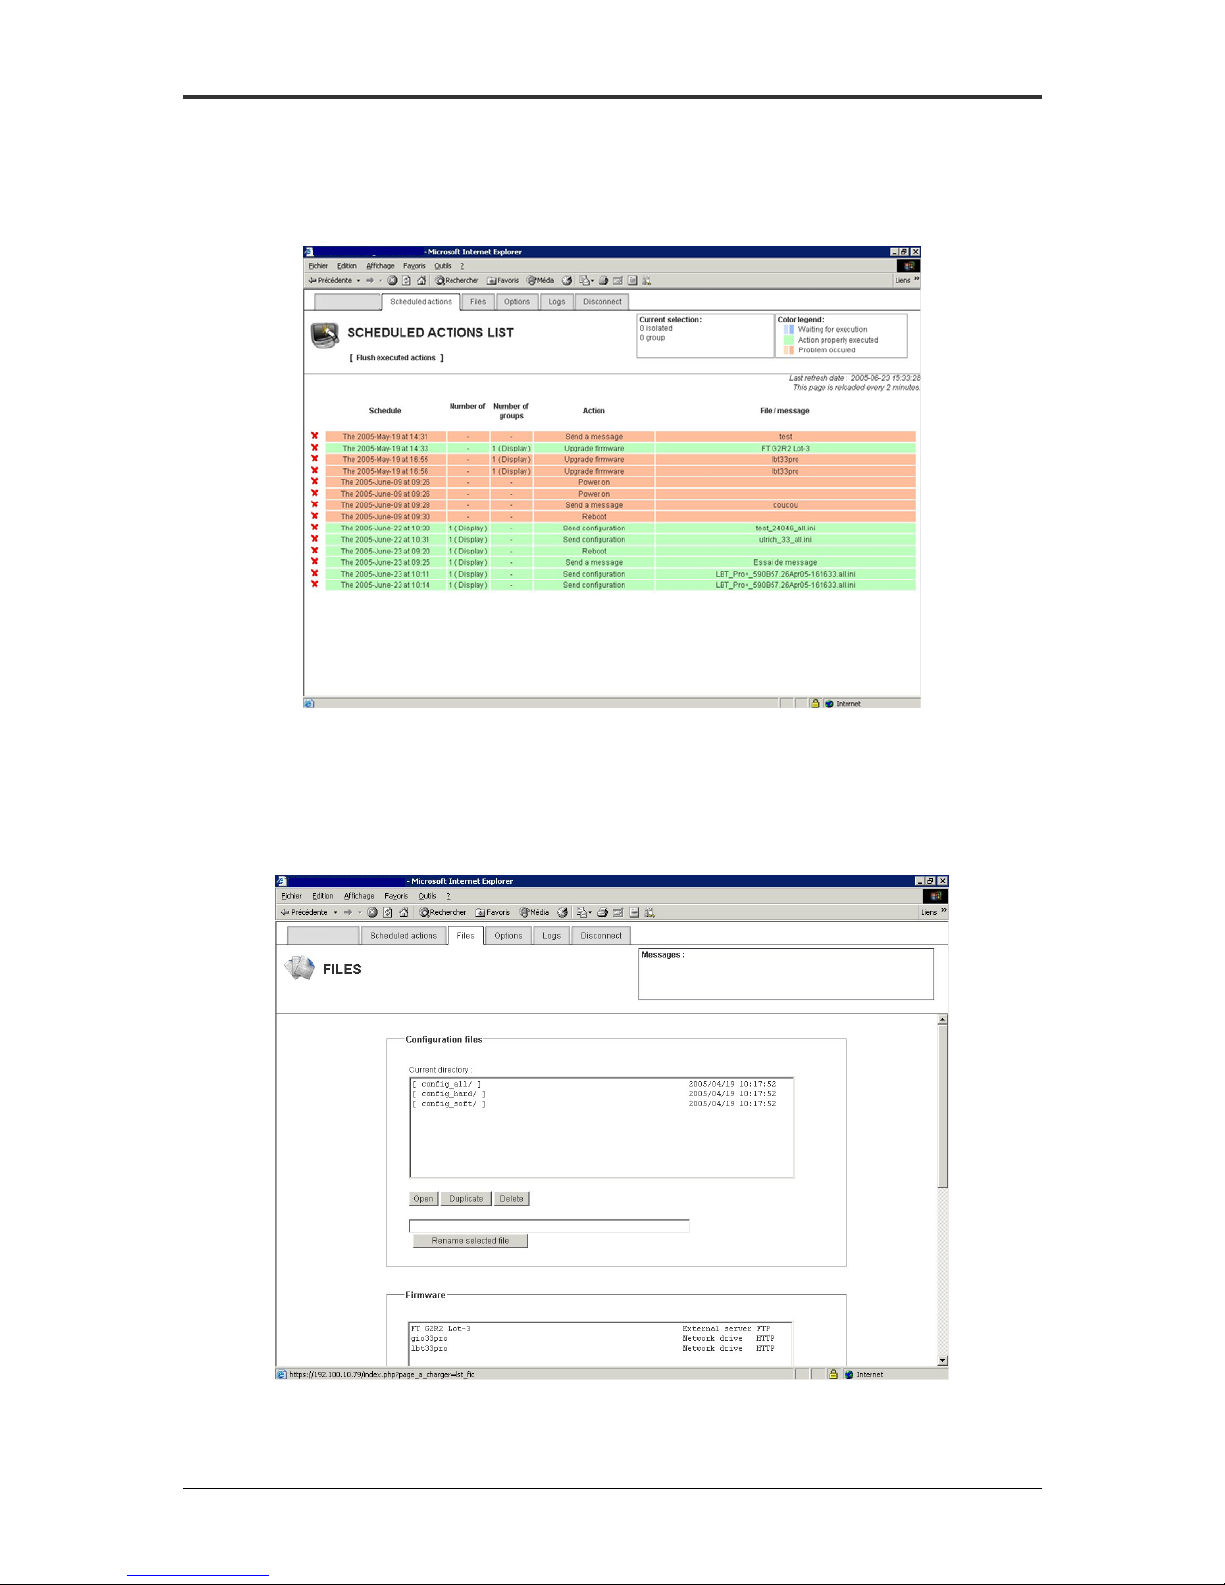
Scheduled actions Tab
This Tab is the entry point for the creation of scheduled actions.
Terminal management server
Terminal List
(You must select at least one terminal to create a scheduled action)
terminals
ADDS 5600RM Administration Guide
Figure 9 - Scheduled Action Tab
Files Tab
This tab displays resources that the ADDS 5600RM (TMS) uses when
performing actions. This can be configuration files, new firmware and messages.
Terminal management server
Terminal List
ADDS by Boundless Technologies 10
Figure 10 - Files Tab
Page 12
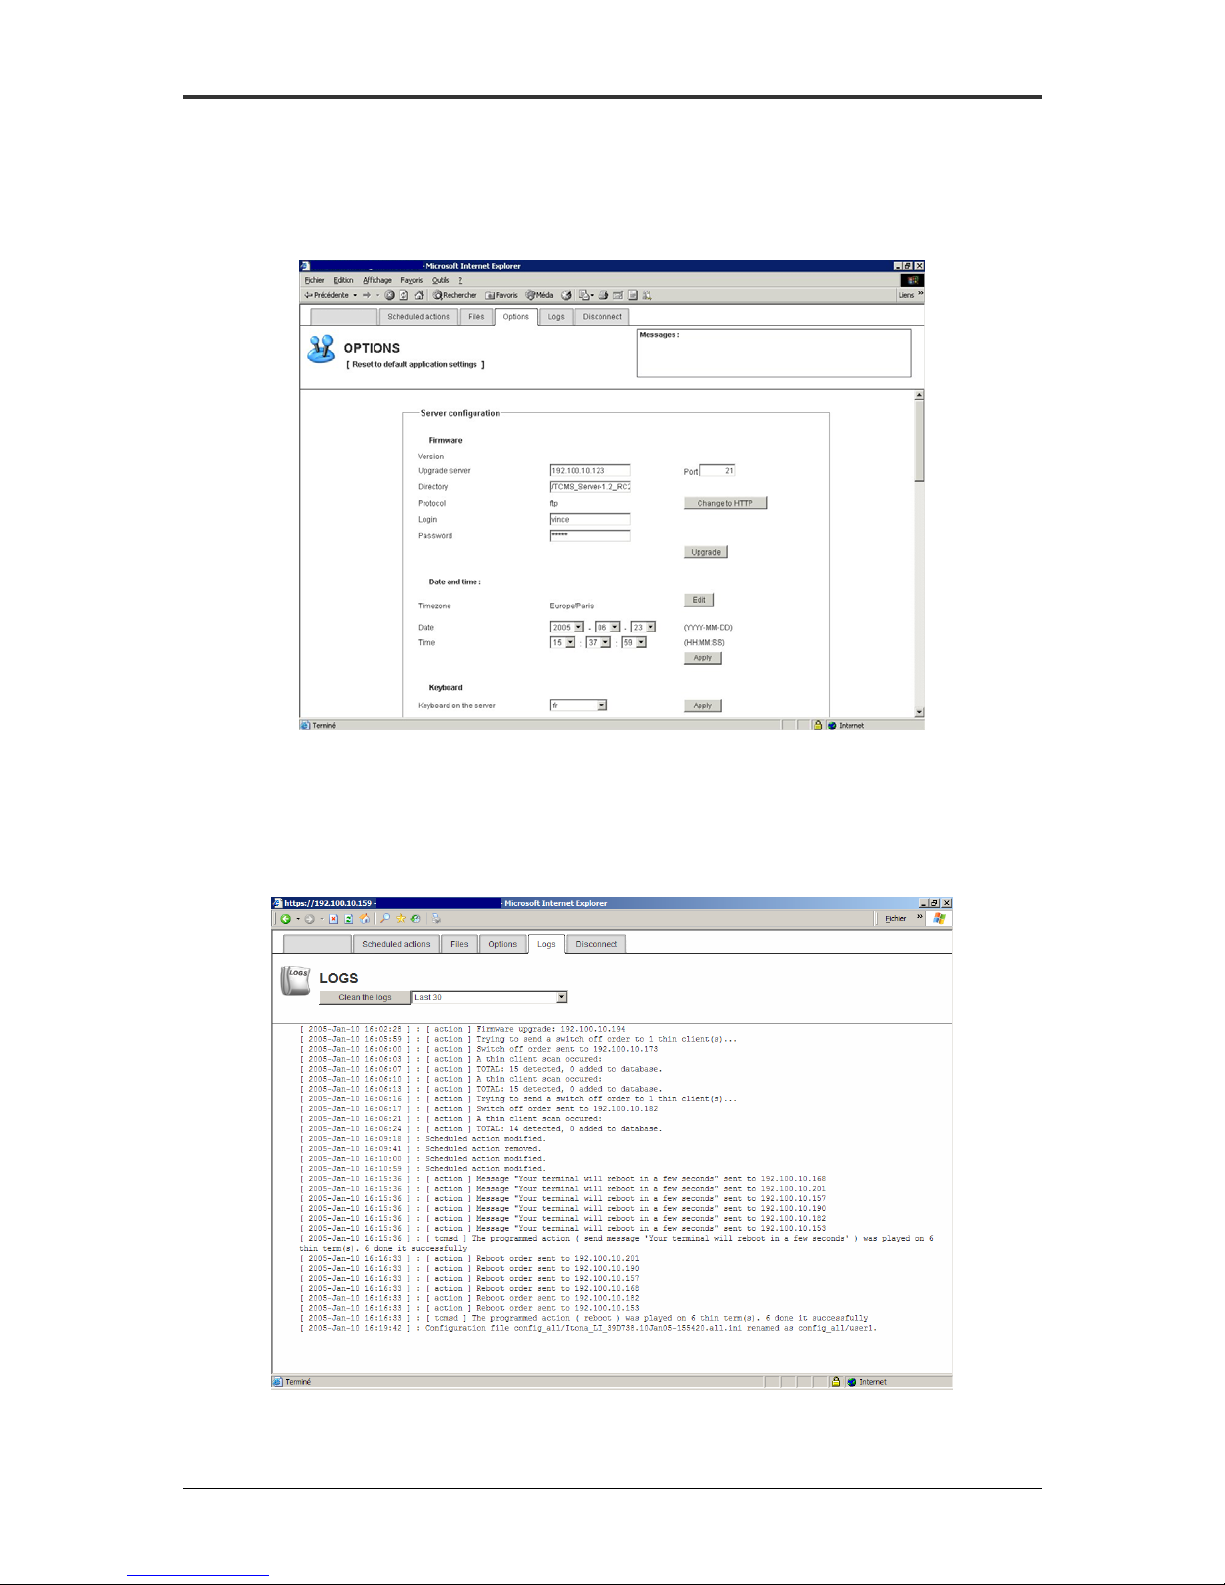
Options Tab
This Tab enables to configure server settings and application settings.
Terminal management server
Terminal list
ADDS 5600RM Administration Guide
TMS Server 1.2 RC2
Logs Tab
This Tab display logs issued by the ADDS 5600RM, terminal management
server.
Terminal list
Figure 11 - Options Tab
Terminal management server
ADDS by Boundless Technologies 11
Figure 12 - Logs Tab
Page 13
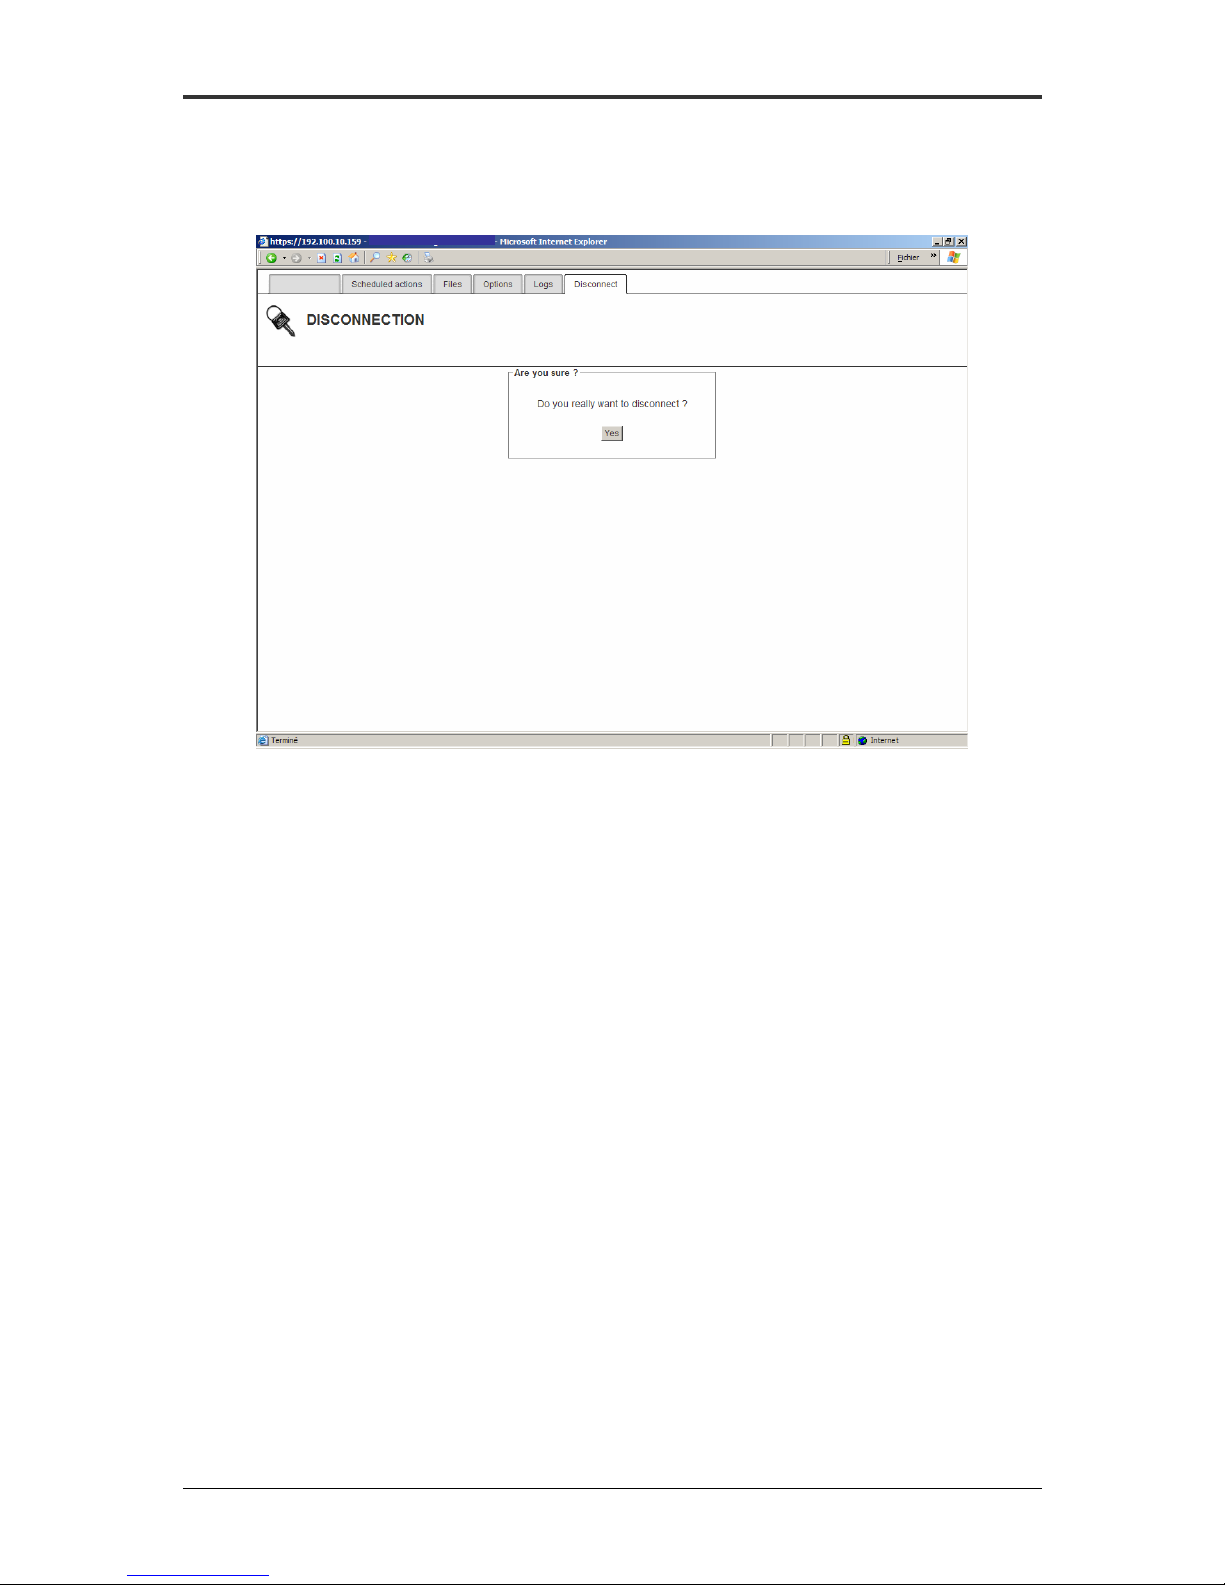
Disconnect Tab
This Tab shall be used in case the Administrator wants to disconnect from the
server.
Terminal management server
Terminal list
ADDS 5600RM Administration Guide
Figure 13 - Disconnect Tab
ADDS by Boundless Technologies 12
Page 14

ADDS 5600RM Administration Guide
Upgrading the ADDS 5600RM (TMS)
You can upgrade the ADDS 5600RM using HTTP or FTP server. You must
configure the followings before processing upgrade:
- “Upgrade server” : Enter the IP address of http server or ftp server
containing the upgrades files
- “Port” : Enter port number of http server (default 80) or ftp server (default
21)
- “Directory”: Enter the exact path where the files are stored
Moreover, when using ftp protocol, you have to specify a username and password.
ADDS by Boundless Technologies 13
Page 15
ADDS 5600RM Administration Guide
Manage Terminals
This section describes how to list &
organize ADDS 5600 Terminals and how
to perform immediate actions.
First Discovery
This section covers the first discovery of thin clients.
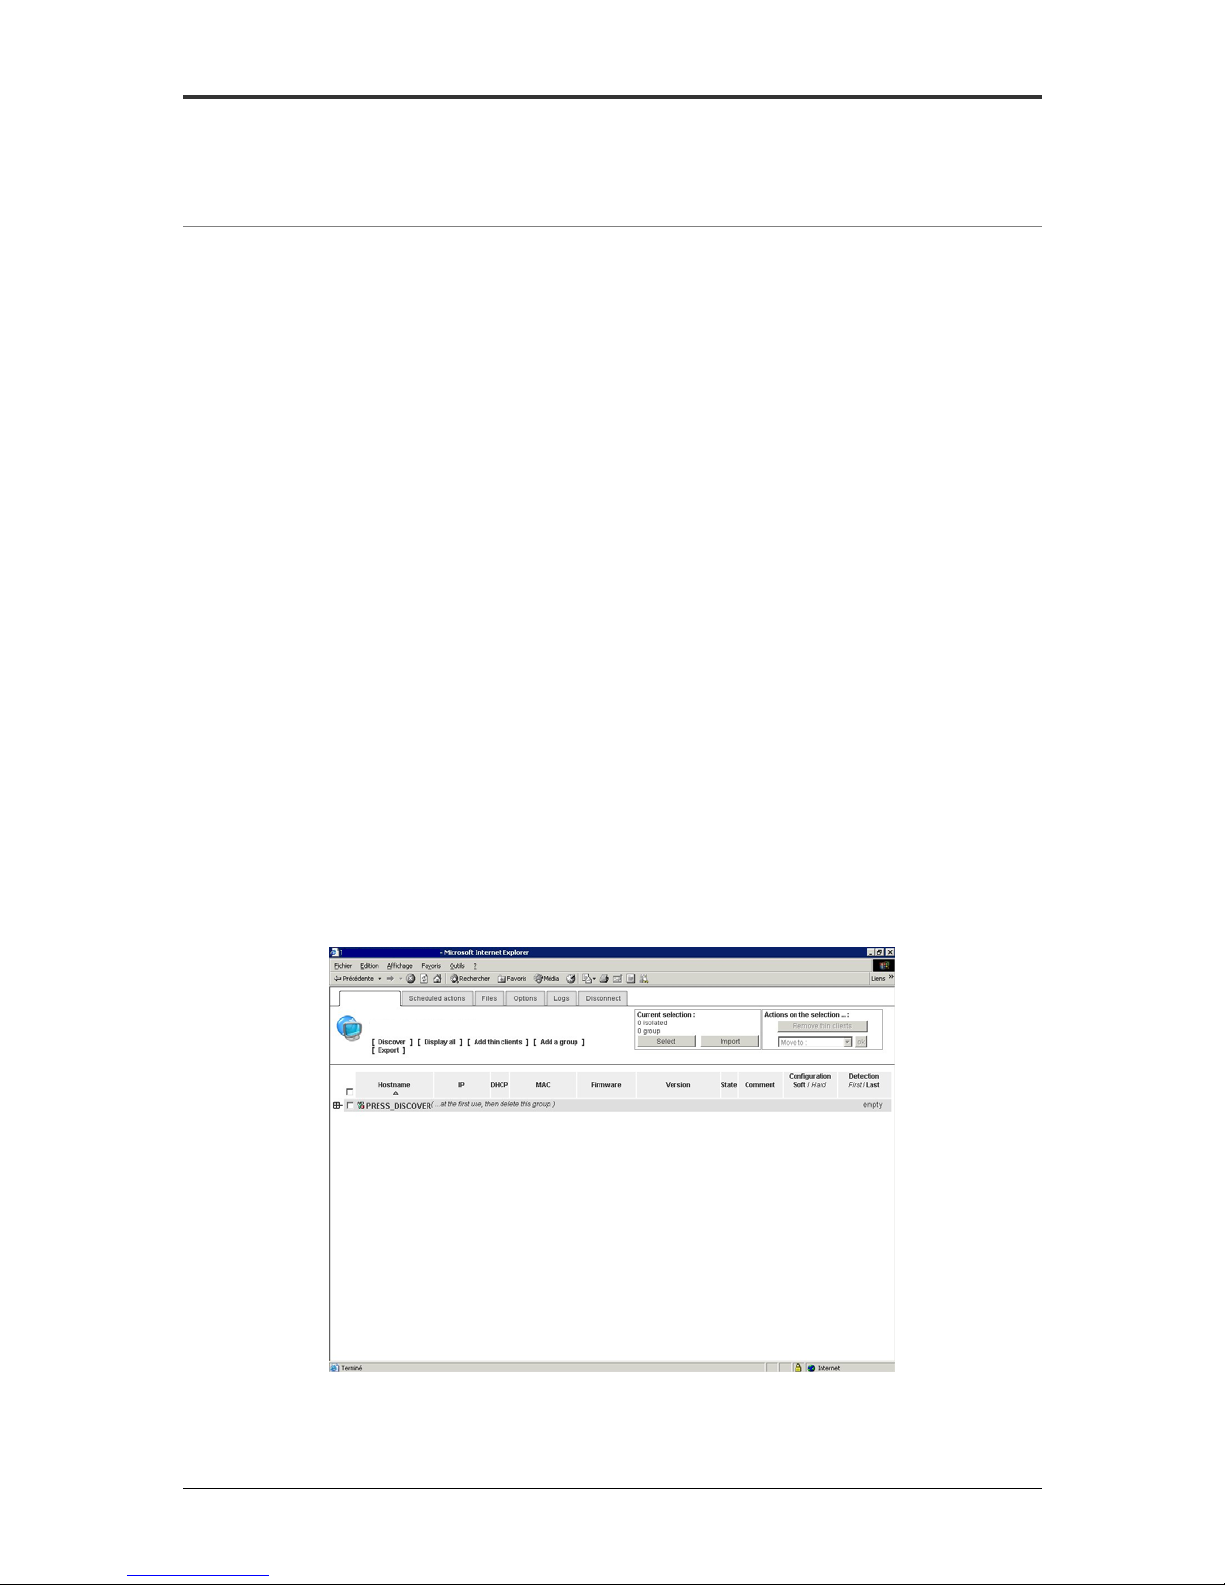
Press discover
At first use, the Terminal database does not contain any input, except a group
named “Press_Discover”. Therefore, Administrator is prompted to perform a Thin
Client broadcast using the « Discover » button. Later, at anytime, the Administrator
can « refresh » the database entries by using « Discover » button again.
Terminal management server
Terminal list
TERMINAL LIST
ADDS by Boundless Technologies 14
Figure 14 - Press discover
Page 16
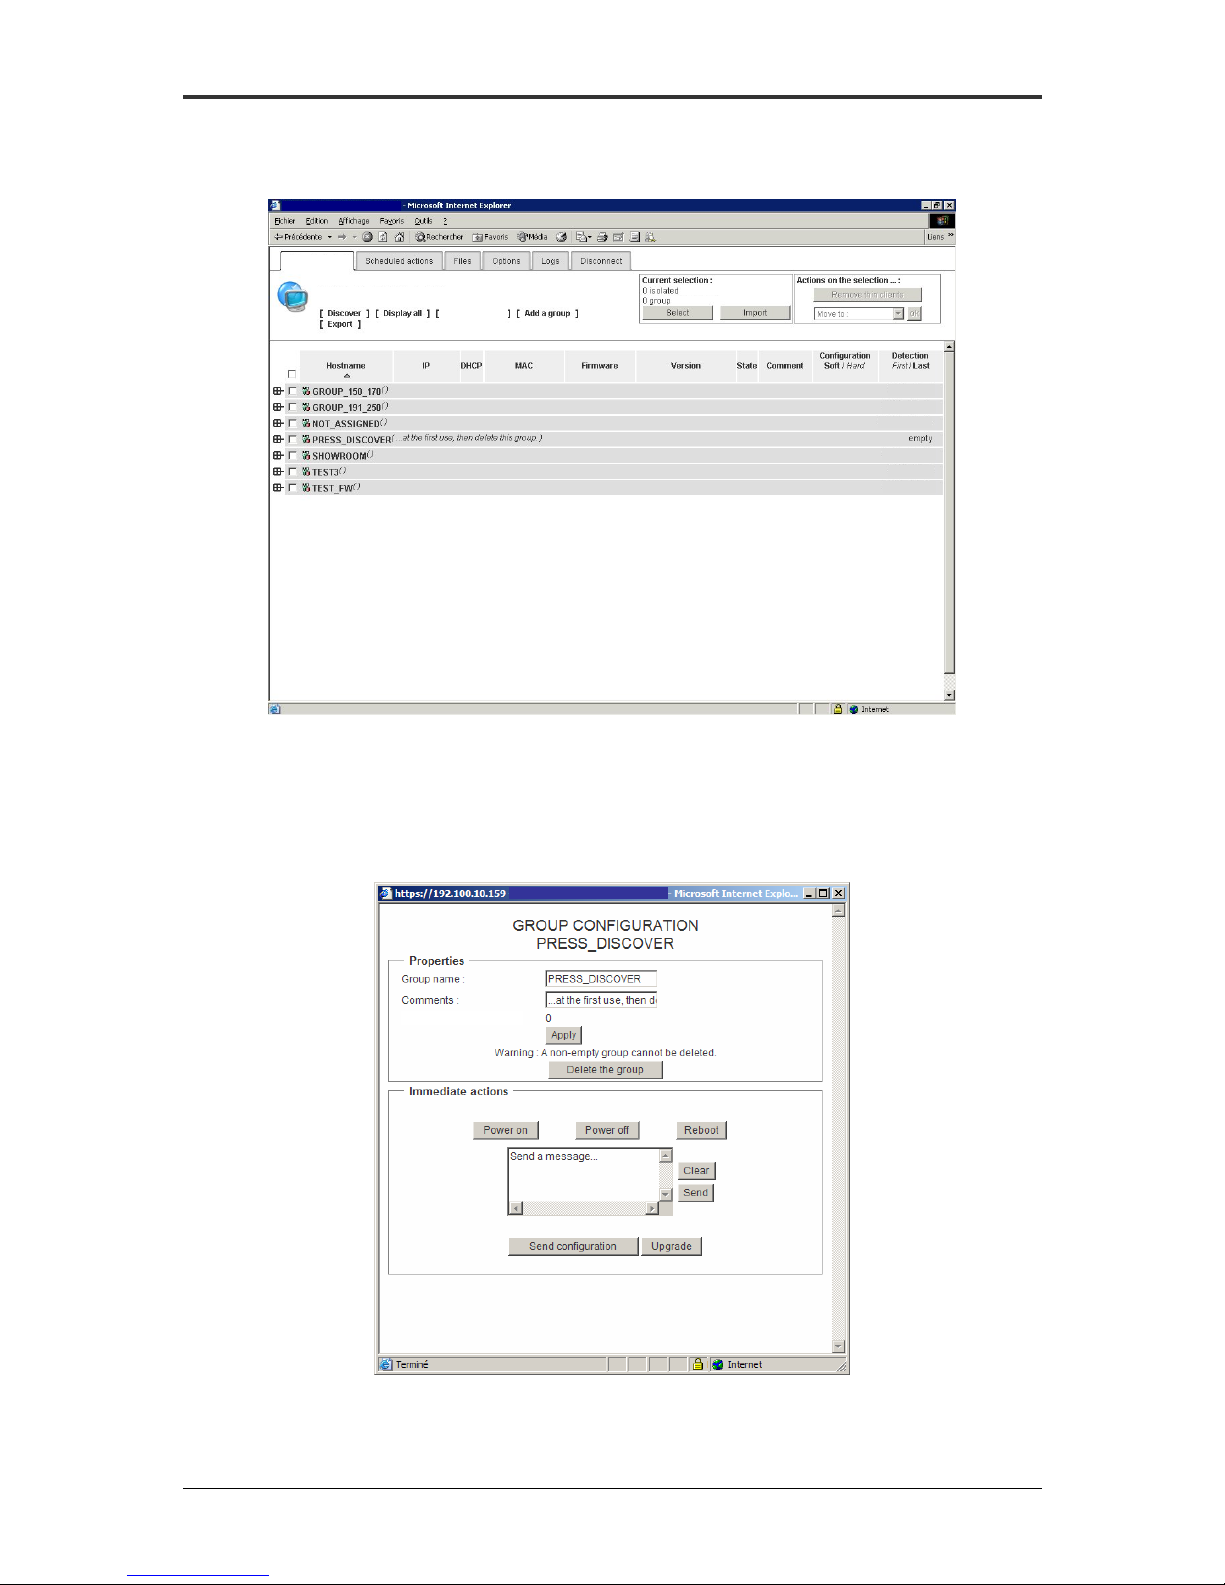
Once Discover button is pressed, the ADDS 5600RM will start broadcasting the
network and collect information.
Terminal management s erver
Terminal list
ADDS 5600RM Administration Guide
TERMINAL L IST
Groups
The PRESS_DISCOVER group can be removed invoking the group properties
dialogbox (toolbox icon).
Add terminals
Figure 15 - Group
Terminal management server
1 terminal
2 terminals
13 terminals
7 terminals
1 terminal
3 terminal s
ADDS by Boundless Technologies 15
Number of terminals:
Figure 16 - Press_Discover group dialog box
Page 17
ADDS 5600RM Administration Guide
13
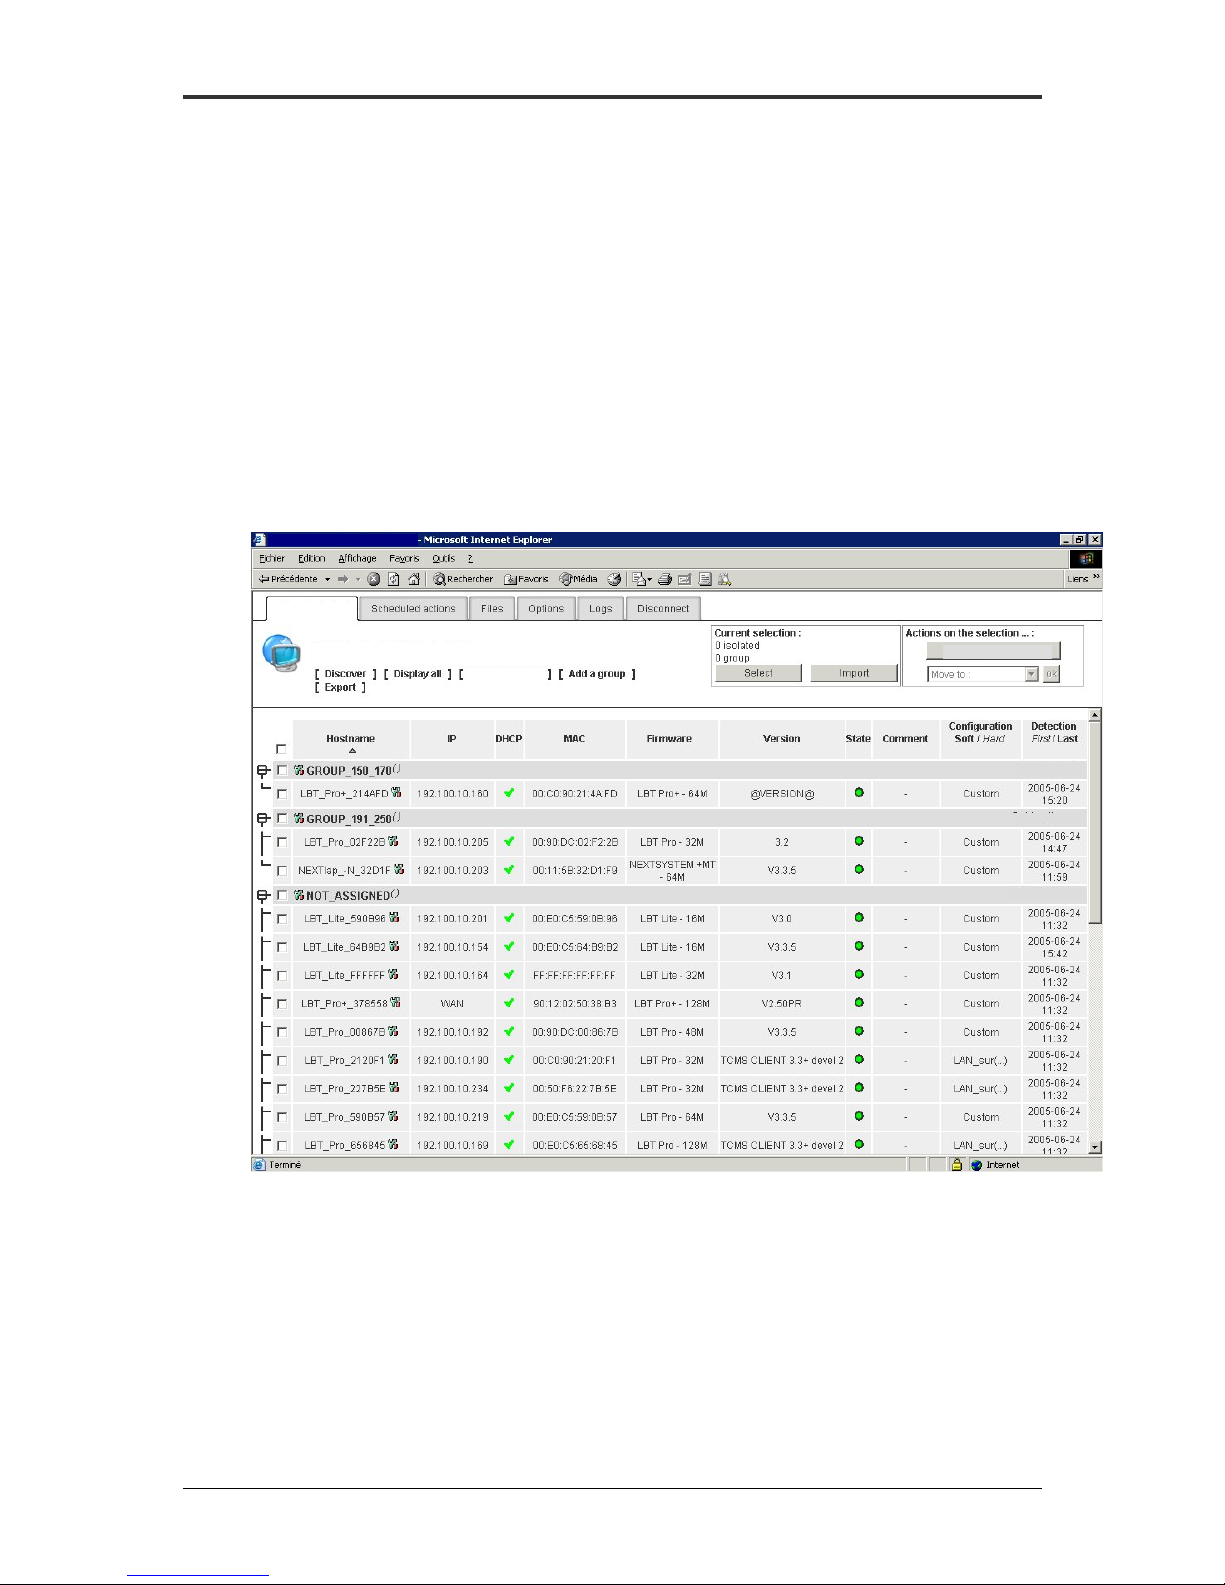
Once Press_Discover group is removed, Administrator can browse the entire
list of terminals (ADDS 5600’s). All terminals are sorted out by groups. These groups
are created using information provided by the terminals
By default, the Group Name is set to “NOT_ASSIGNED”.
This value can be changed manually on the terminal during Startup Wizard.
Afterwards, the value can no longer be edited manually on the terminal, as this task
has to be done on the ADDS 5600RM (TMS server) directly (move a terminal from a
group to another one).
As shown in the Terminal screenshot, the TMS configuration details can be
provided by the DHCP server. In that case, the Group Name might also be provid ed
using DHCP Tag. In that case, the terminal will always register into the TMS server
with the Group Name provided by the DHCP Tag. If the group does not exist on TMS,
it will be auto-created.
Terminal management server
Terminal list
TERMINAL LIST
Remove Terminals
Add Terminals
1 Terminal
2 Terminals
Terminals
Figure 17 - Entire List of Terminals
Providing Group Name by DHCP Tag
The terminal group can be provided by a DHCP server. To do so, a predefined
option has to be configured on your server (Please refer to your Supplier’s DHCP
documentation).
ADDS by Boundless Technologies 16
Page 18
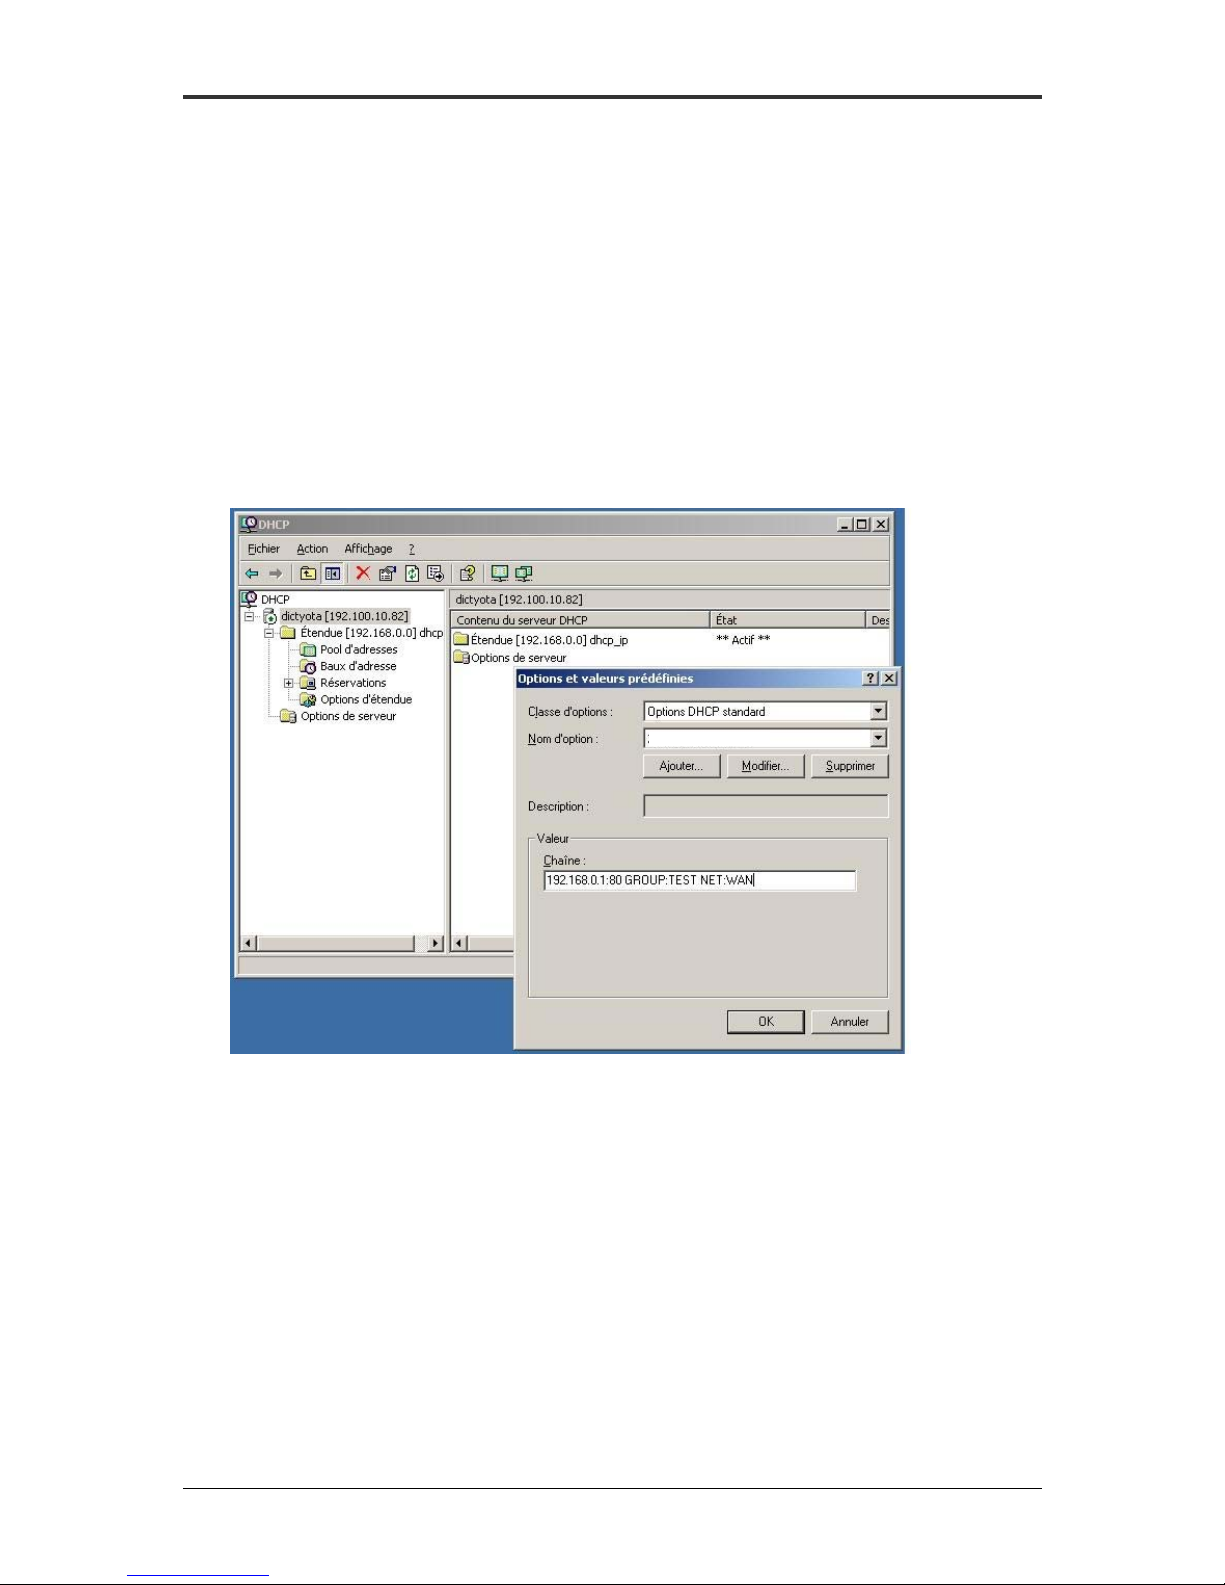
The Tag code is 210. The name of the Tag can be “TMS Manager”.
The value is a string with following syntax:
IP:PORT GROUP:NAME_OF_THE_GROUP NET:TYPE
Where:
IP is the IP address of the TCMS server
PORT is the port number
NAME is the name of the group
TYPE is either LAN or WAN
ADDS 5600RM Administration Guide
210 TMS Manager
Figure 18 - DHCP Tag
Control Panel
The Terminal Tab can be divided into several sections.
Main panel
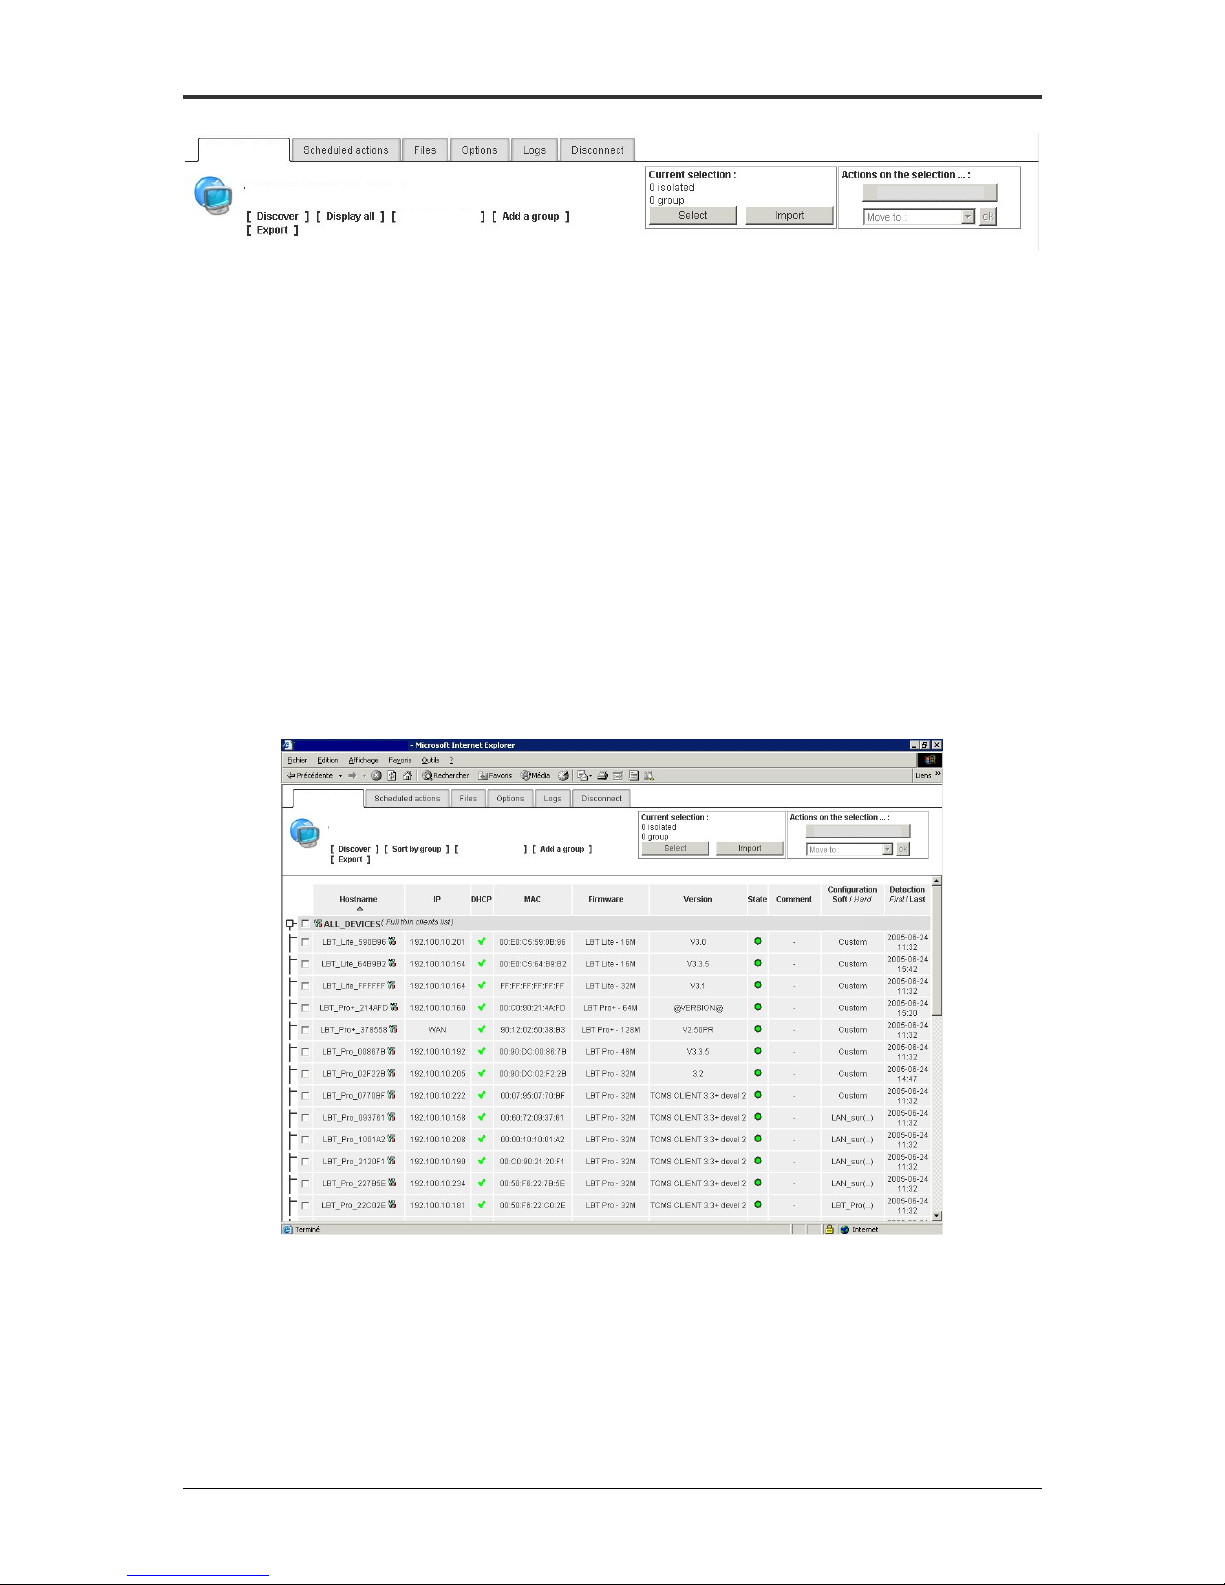
The main panel contains 5 buttons Discover / Display all / Add terminals / Add
a group / Export. Further to these buttons, the main panel enables to memorize a
terminal selection and performing an action on the selection.
ADDS by Boundless Technologies 17
Page 19
Terminal list
ADDS 5600RM Administration Guide
TERMINAL LIST
Add terminals
Figure 19 - Main panel
Remove terminals
Discover
This button allows the broadcast process to start. This might take several
seconds or minutes depending on the size of the database.
In case of terminals located behind a WAN network, TMS (ADDS 5600RM) will
not be able to detect them by broadcast and neither to send them any direct action
(“Power On”, “Get Configuration”, “Shadow”…).
For such NAT’d nework architecture, we suggest to have the Terminals autoregistering themselves into the TMS (ADDS 5600RM) server. Make sure this is being
properly configured within the Terminal Setup Manager. At each bootup, and if
needed every x minutes, the Terminals (ADDS 5600) will connect to TMS in order to
update the database and, if required, they will execute the action previously set.
Display all
This button enables to display all terminals without sorting them out by group.
Terminal management server
Terminal list
TERMIN AL LIST
Add terminals
Remove Terminals
27 terminals
Figure 20 - Display all
ADDS by Boundless Technologies 18
Page 20
ADDS 5600RM Administration Guide
Add terminals (ADDS 5600’s)
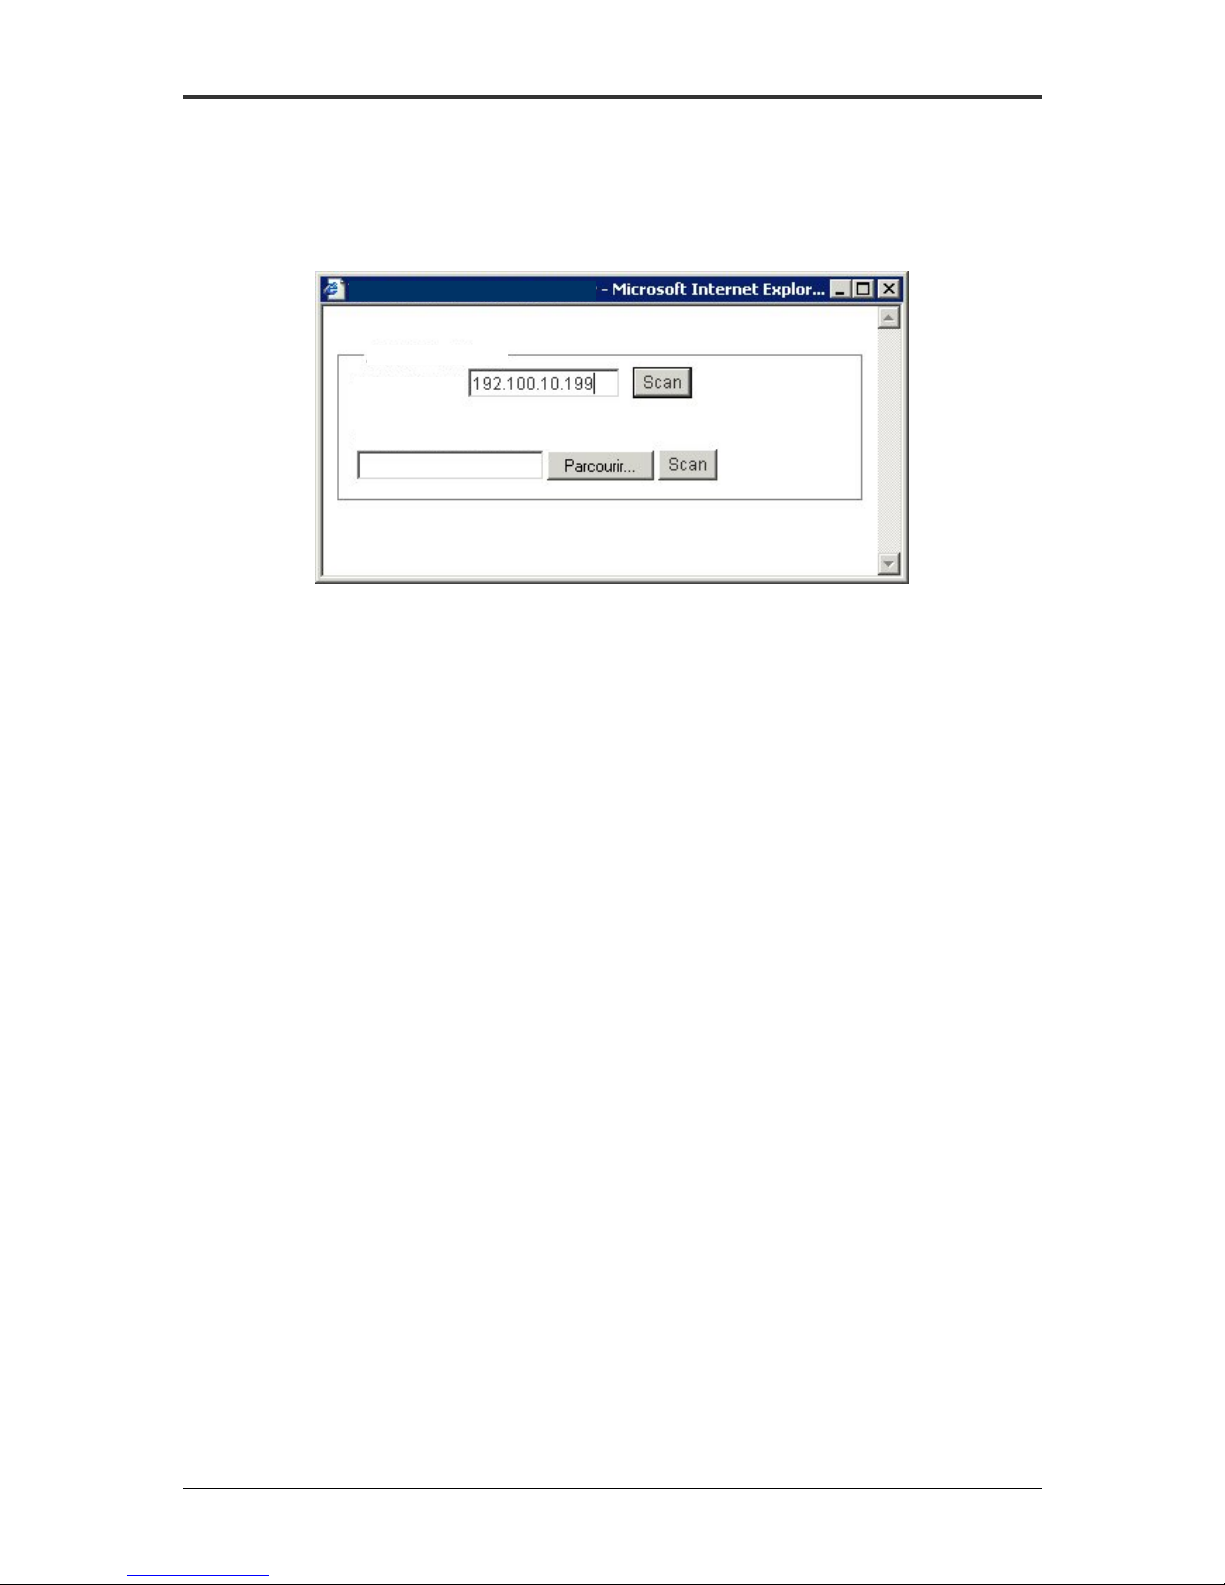
This button enables to add manually one or several terminal(s) into the
database. This can be useful when an active network device blocks UDP broadcasts.
Terminal management server
Add Terminals
Terminal IP:
Add terminals from file:
Figure 21 - Add a terminal
- Add one terminal
Add the terminal IP adress then press Add. TMS will check that the unit is
available on the network and if so, will add it into the database.
- Add several terminals
Adding several terminals requires to import a .csv file that contains a list of
terminals. Once the .csv file is imported, TMS will prompt to scan those
terminals in order to retrieve all the Terminal information.
- Structure of the .csv file
The .csv file shall contain the following string in the first line:
IP;MAC
Afterwards, each line shall contain the IP Adress value and the MAC Adress
value following based on the same syntax above.
Please note that the IP Adress filed is mandatory.
ADDS by Boundless Technologies 19
Page 21
ADDS 5600RM Administration Guide
Add a group
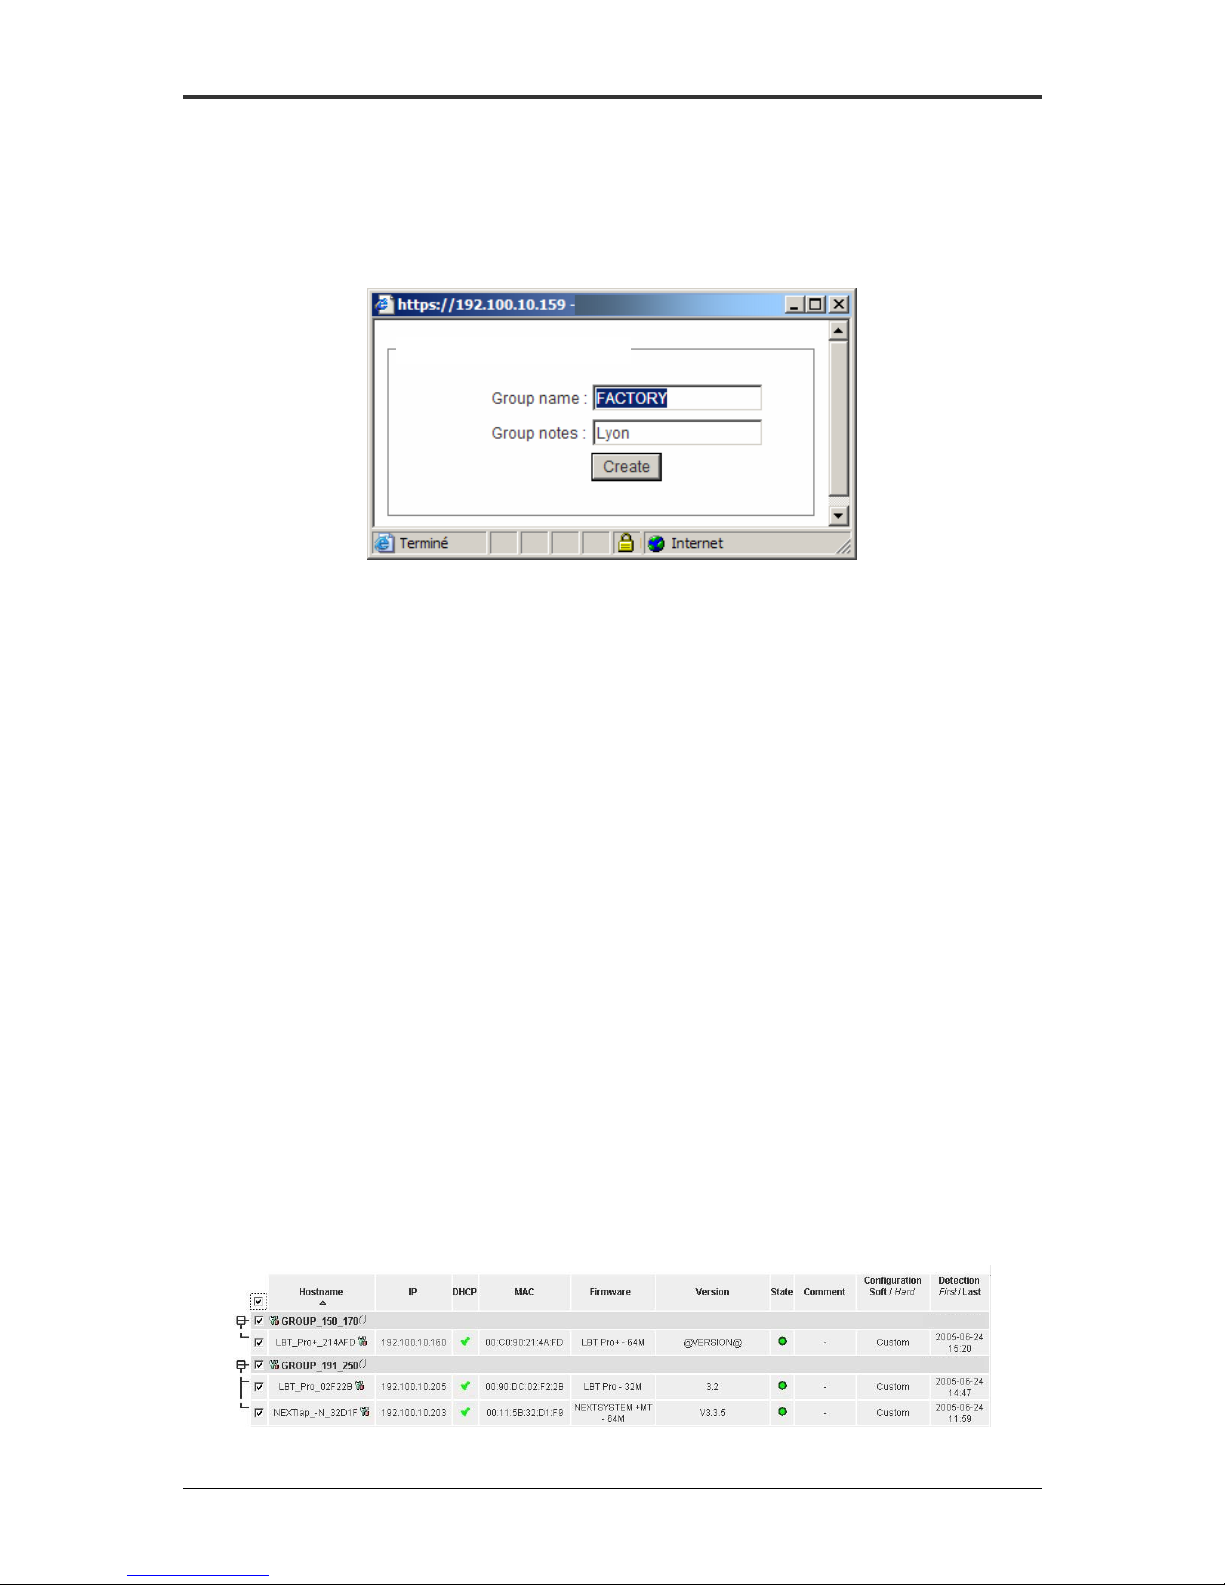
This button enables to add a new group into the database. Once done, the
Administrator can move terminals into this new group.
Terminal management s…
Create a Terminal group
Figure 22 - Add a group
Export
You can export the content of the database as a .cvs file. This function can be
used to perform data processing using a third-party tool.
Current Selection
This menu shall be used before any processing action on a set of terminals.
For this purpose, you can select or unselect manually terminal(s) and group(s) using
the checkboxes of the Terminal list. Once done, you have to press “Select” button to
confirm the selection.
If needed, you can also load a selection by importing a .csv file.
Actions on the selection
This menu can be used in order to move a selection to another location or to
remove the selection from the database.
Terminal list
This panel displays the content of the database.
1 terminal
ADDS by Boundless Technologies 20
2 terminals
Page 22
ADDS 5600RM Administration Guide
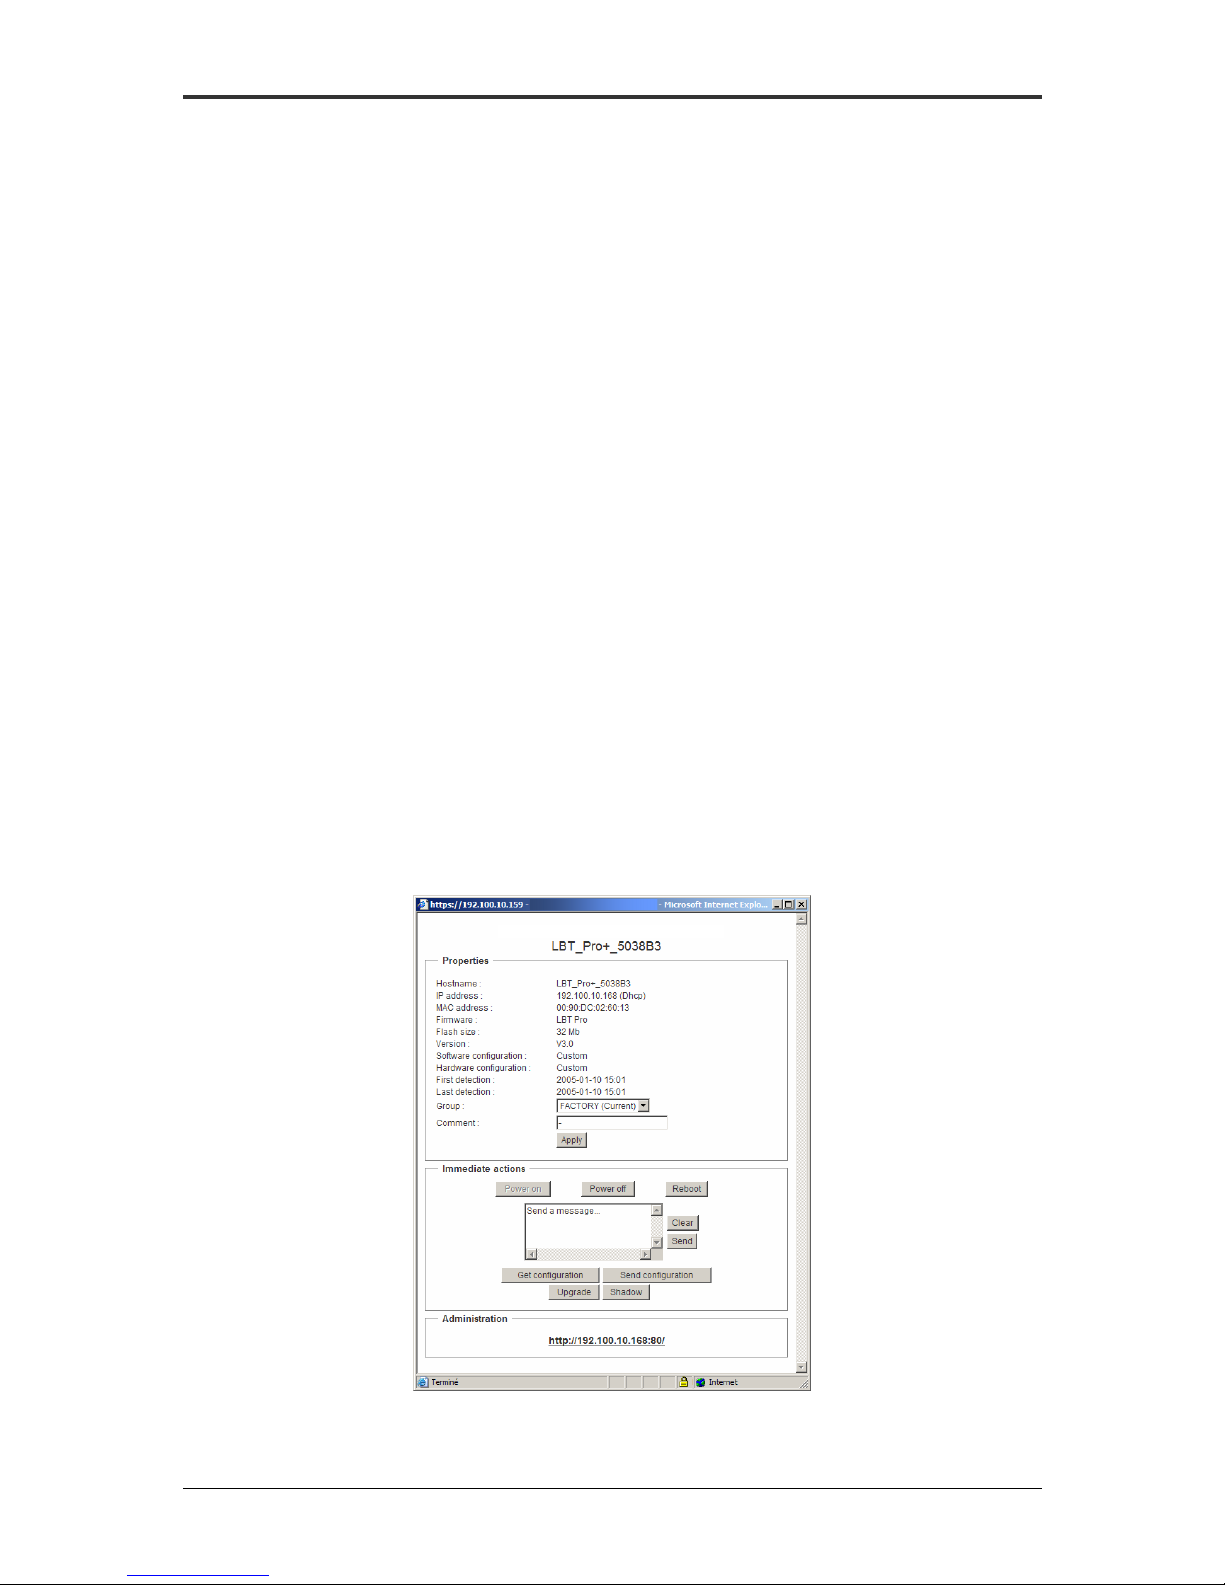
Figure 23 - Terminal list
Each terminal is displayed as a line within the Terminal table. For each terminal,
TMS will provide the following informations:
o Hostname : Unit name
o IP Adress: : IP address on the network
o DHCP : DHCP Mode (green cross) or Static Mode (red
cross)
o MAC Adress : Unit physical adress
o Firmware : Name of the firmware with flash size in MB
o Version : Firmware version number
o State : Current state of the unit (Online / Offline)
o Comment : Custom field (Inventory number, location…)
o Configuration files : Current hardware of software configuration file
used by the unit
o Detection date : Date of the first or last detection by TMS
Administrator can select to sort out the list by any of the above fields.
Terminal dialog box
By pressing on the toolbox icon on a terminal entry, Adminsitrator can invoke
the Terminal dialog box. The dialog box features 3 sections.
Terminal management server
TERMINAL CONFIGURATION
ADDS by Boundless Technologies 21
Figure 24 - Terminal di alog box
Page 23

ADDS 5600RM Administration Guide
Properties section
This section displays the basic information of the terminal. It also enables to
shift the unit to another group. Lastly, it enables to fill in the Comment field in order
to reflect an inventory number or a physical location …
Immediate actions
Immediate actions are frequently used actions that can be p erformed without
requiring to create a scheduled action. Once applied, these actions will be instanttly
executed.
o Power On : Wake-on-Lan the unit
o Power Off : Shutdown the unit
o Reboot : Restart the unit
o Send a message : Display a message on the unit screen
o Get configuration : Export the configuration file from the unit
o Send configuration : Import a configuration file into the unit
o Upgrade : Upgrade the fimware version
o Shadow : Shadow the unit
Group Terminals (ADDS 5600’s)
You can modify the thin client’s group. For that, choose the new group in the
drop-down list Group
Note for “Get configuration”
You can export the current configuration of the terminal as file. All the settings
will be stored as a .INI text file into the TMS server. When pressing on “Get
configuration”, you will prompt it to choose a configuration type (Hardware, software
or both). See Advanced section for more details on .INI files.
Note for “Send configuration”
You can import a configuration file from TMS to the unit. P ress on the button
“Send configuration”. and select the directory where the configuration file is stored:
- Directory Config_all : Hardware and software configuration
- Directory Config_hard : Hardware configuration only
- Directory Config_soft : Software configuration only
ADDS by Boundless Technologies 22
Page 24
ADDS 5600RM Administration Guide
Administration
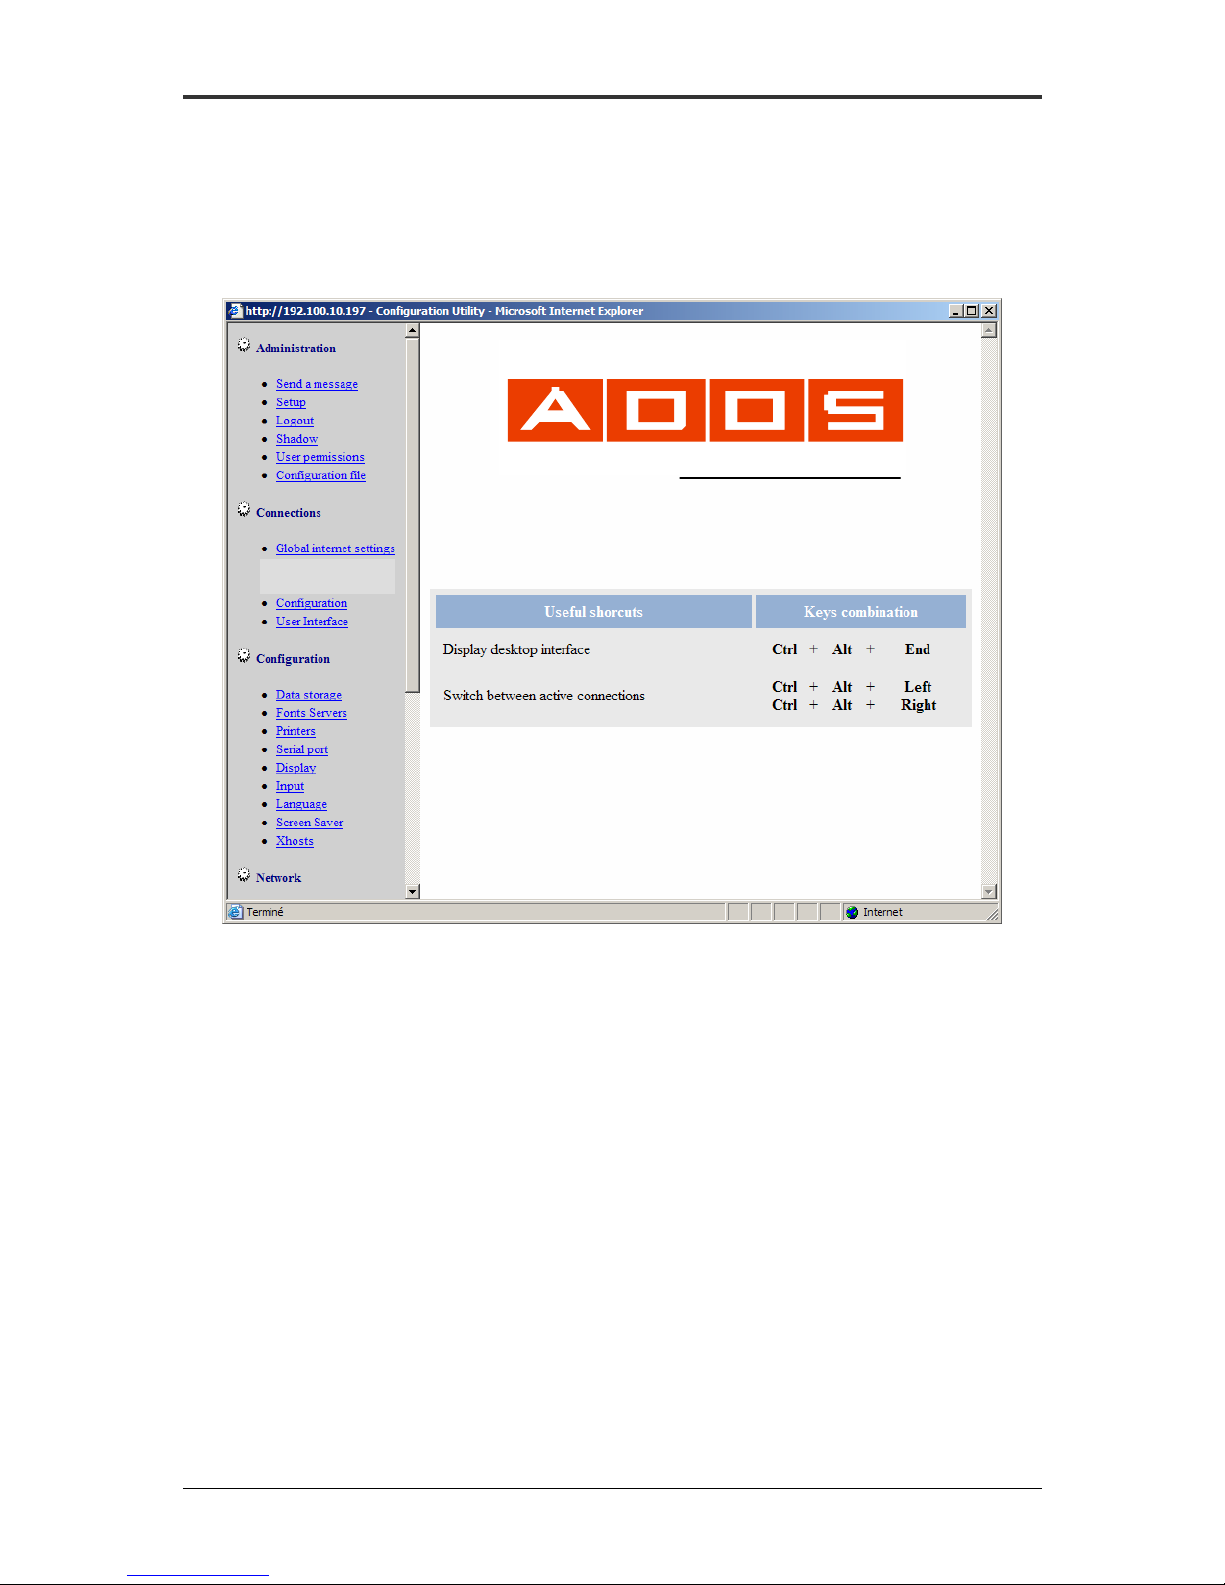
By clicking on the IP address of the terminal, the Administrator can invoke the
Web-server of the unit. Please notice that this bypasses all rights set locally on the
unit. For instance, even if the http administration is disabled on the unit, TMS will be
able to connect to the web-server.
REMOTE MANAGEMENT
5600RM
SERVER
Figure 25 - HTTP Administration
ADDS by Boundless Technologies 23
Page 25
Group dialog box
r
Terminal management serve
Number of terminals:
ADDS 5600RM Administration Guide
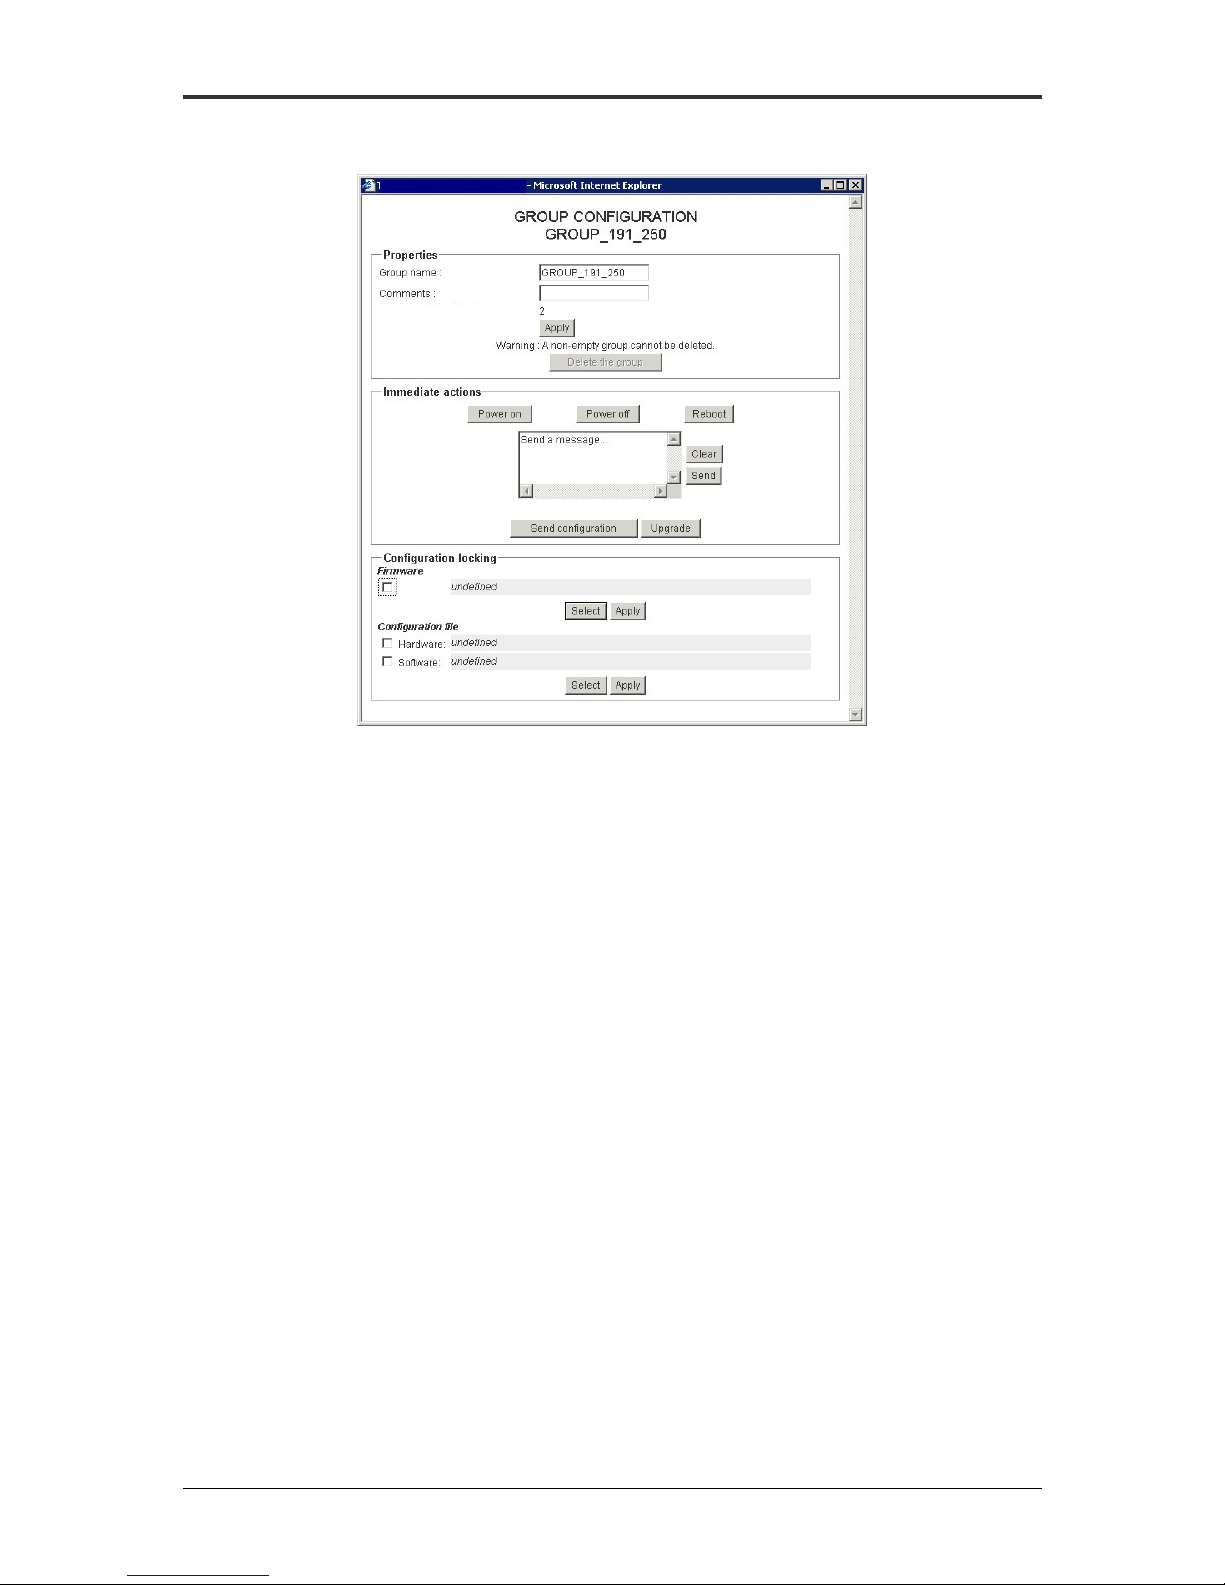
Figure 26 - Group dial og box
By pressing on the toolbox icon on a Group entry, Administrator can invoke
the Group dialog box. The dialog box features 3 sections.
Properties section
This section displays the basic information of the group. It also enables to
delete the group. Lastly, it enables to fill in the Comment field in order to reflect an
inventory number or a physical location …
Immediate actions
Immediate actions are frequently used actions that can be performed without
requiring to create a scheduled action. Once applied, these actions will be instantatly
executed.
o Power On : Wake-on-Lan the unit
o Power Off : Shutdown the unit
o Reboot : Restart the unit
o Send a message : Display a message on unit screen
o Send configuration : Import a configuration file into the unit
o Upgrade : Upgrade the fimware version
ADDS by Boundless Technologies 24
Page 26
ADDS 5600RM Administration Guide
Configuration locking
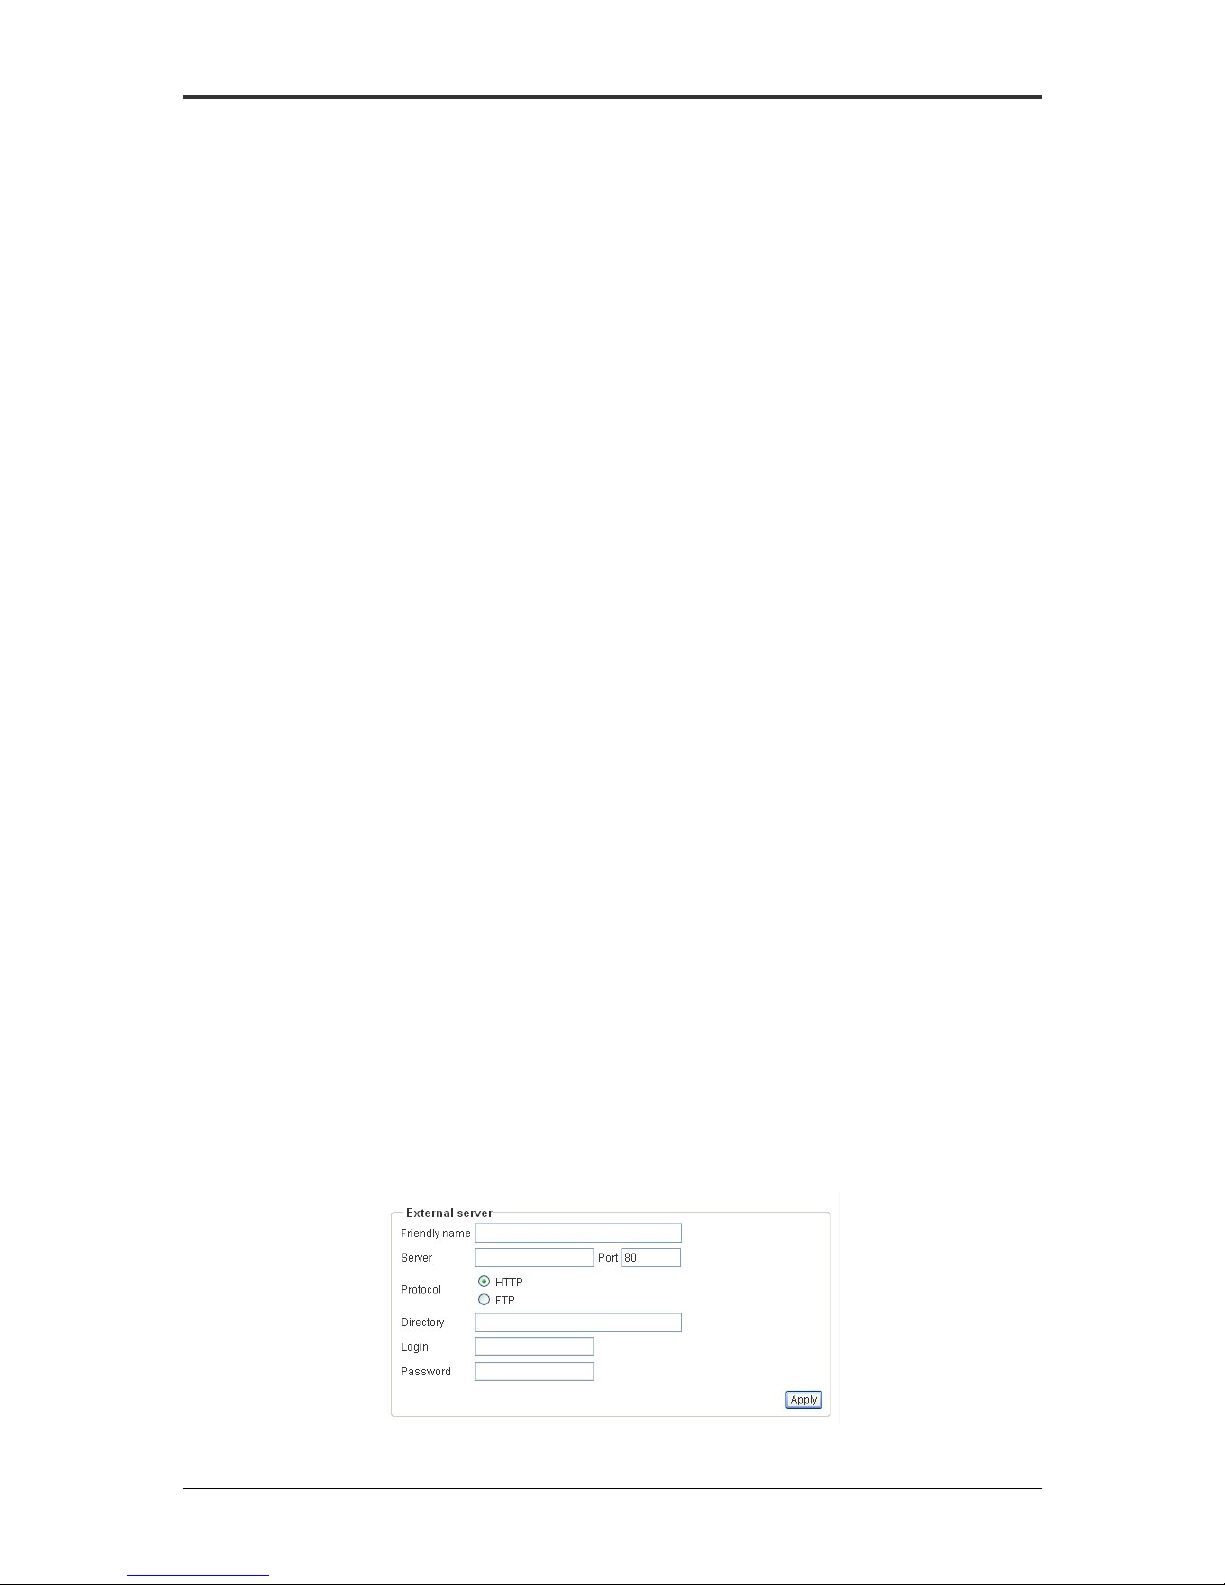
TMS provides the possibility to lock a configuration or a firmware.
When the thin client is detected, TMS checks the thin client version. If the value does
not match, then terminal is upgraded.
Resource Files
Configuration files
This section enables to open, duplicate or delete terminal configuration files.
These configuration files can be hardware, software or both. These INI files are
usually created from existent terminals. (For further information, see the section
Advanced)
Firmware
This section enables to manage firmware. You can add or delete a firmware.
Add a Firmware from an external server
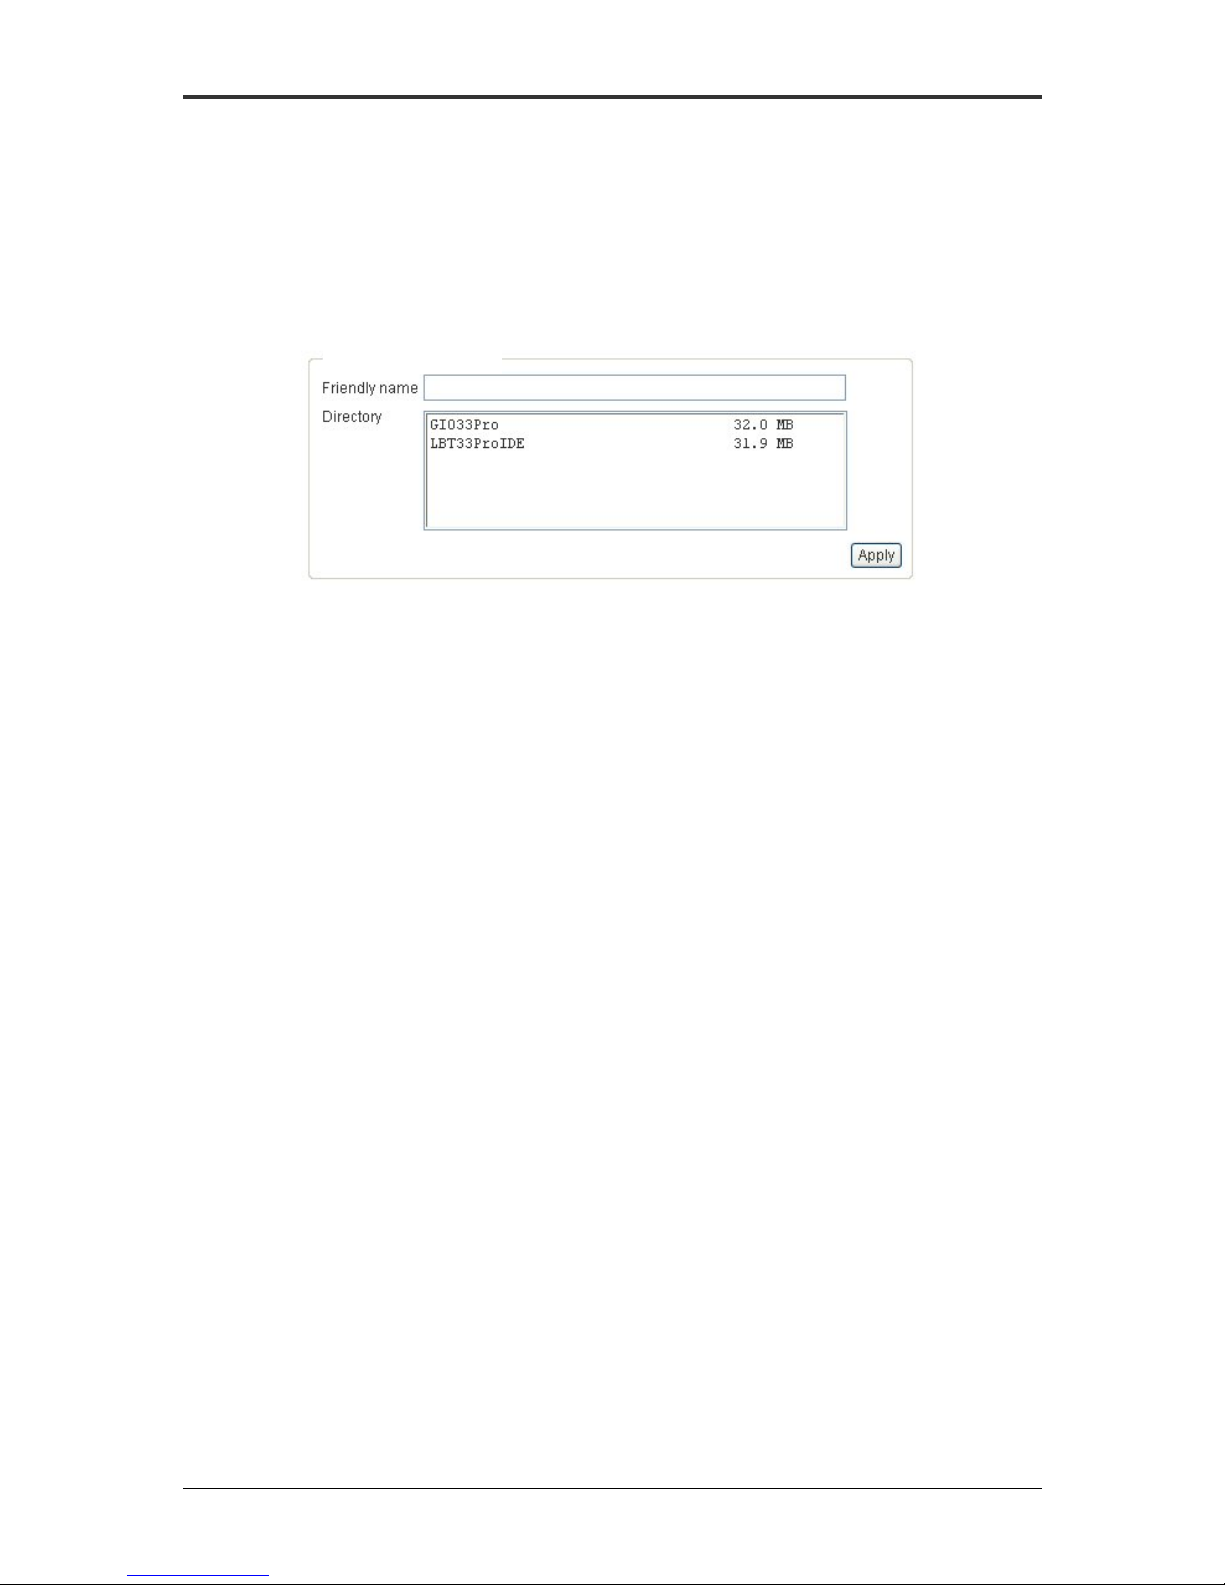
You can add a firmware from a HTTP or a FTP server. You shall configure the
followings:
- “Upgrade server” : Enter the IP address of http server or ftp server
containing the upgrade files
- “Port” : Enter port number of http server (default 80) or ftp server (default
21)
- “Directory”: Enter the exact path where the files are stored
Moreover, if using a ftp protocol, you have to specify a username and password.
ADDS by Boundless Technologies 25
Page 27
ADDS 5600RM Administration Guide
Figure 27 - External server
Add a Firmware with TMS network drive
The firmware displayed in the GUI are the ones available in the TMS network
driver.
TMS network drive
Figure 28 - TMS network drive
Messages
In this section, you can create messages to be sent to Terminals.
ADDS by Boundless Technologies 26
Page 28
ADDS 5600RM Administration Guide
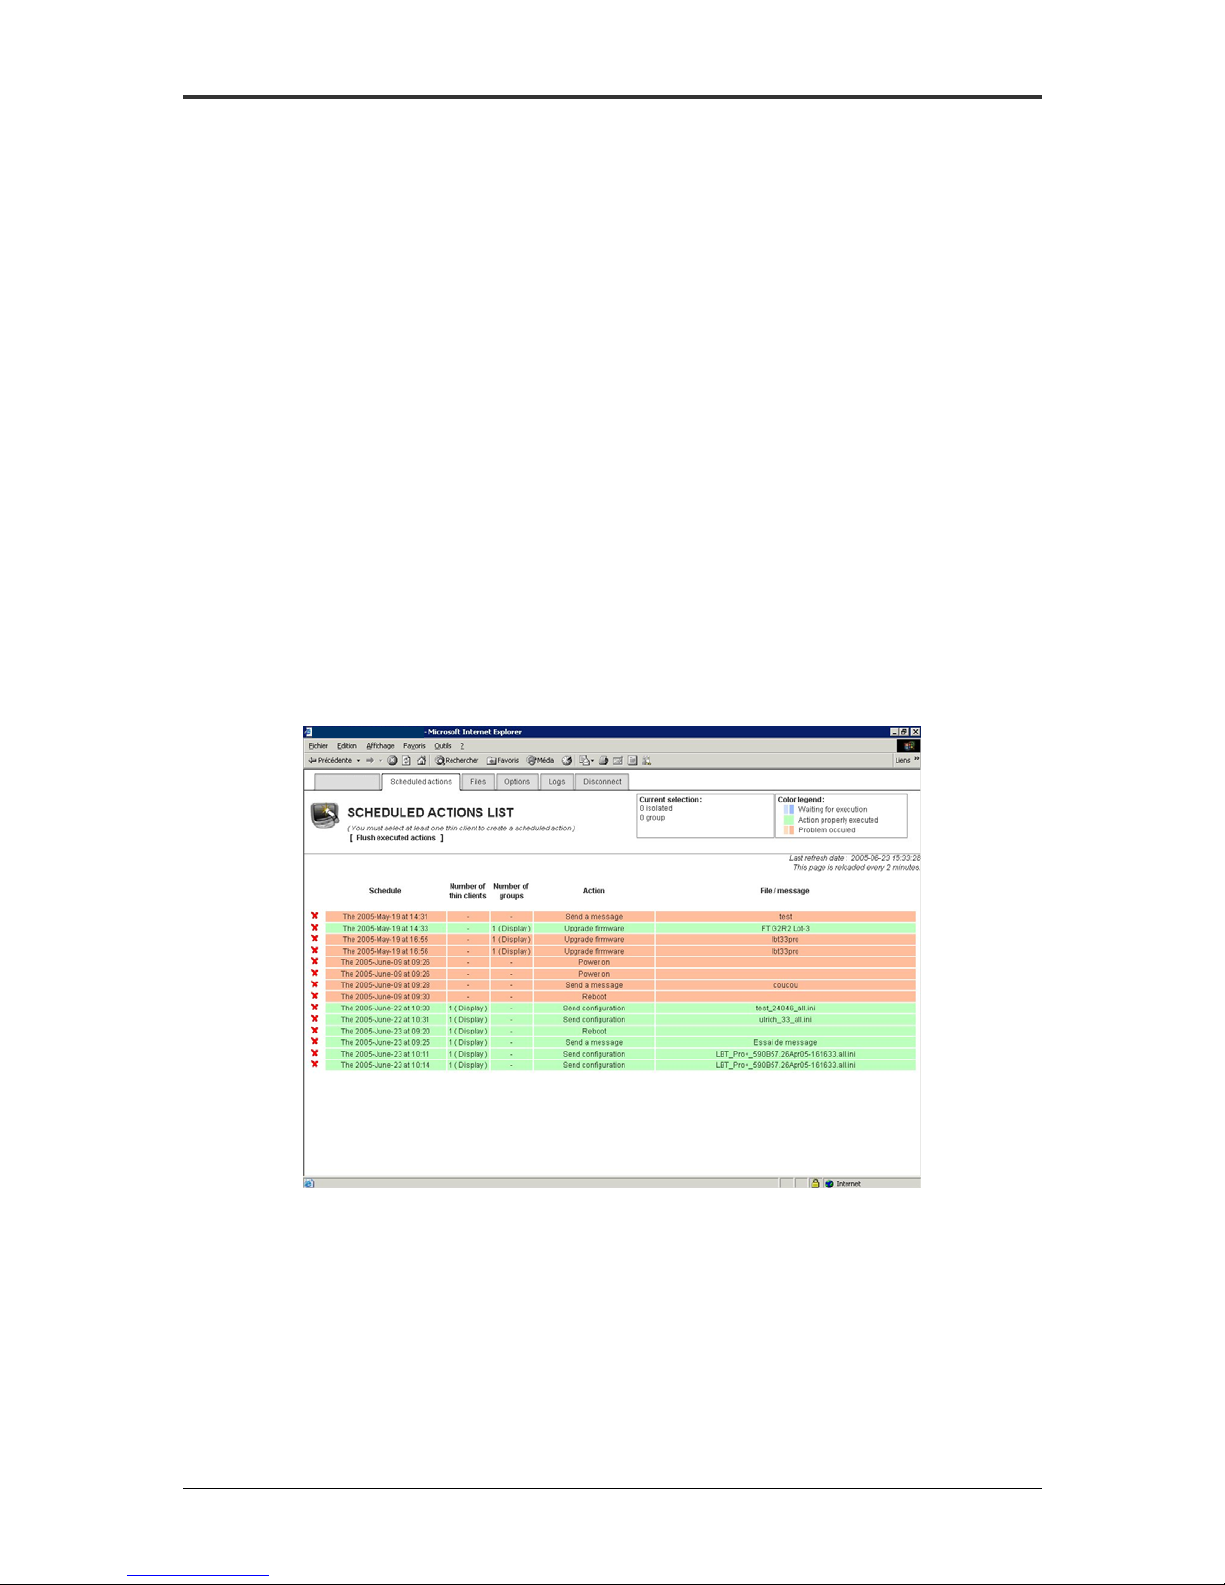
Schedule actions
TMS enables to create sheduled actions. For that purpose, you will need first
to select terminals on which the action shall be executed.
Once you made a Terminal selection, then you can click on the button “Create
a scheduled action” (This button will not be displayed if you don’t select at least one
terminal).
In the area “select an action”, select the type of action you need to execute.
For the actions “Upgrade firmware, Send Configuration and Send message”, you will
have to select an item in the drop-down lists.
In the area “Schedule the action”, select the timeframe to execute the action.:
- Now : The action will start as soon as you press the “Apply” button
- At a particular date and time : The action will start at the selected date
and time.
- At next reboot : The action will be performed when the thin client(s) will
reboot.
Terminal management serv er
Terminal list
Figure 29 - Scheduled a ctions
ADDS by Boundless Technologies 27
Page 29
ADDS 5600RM Administration Guide
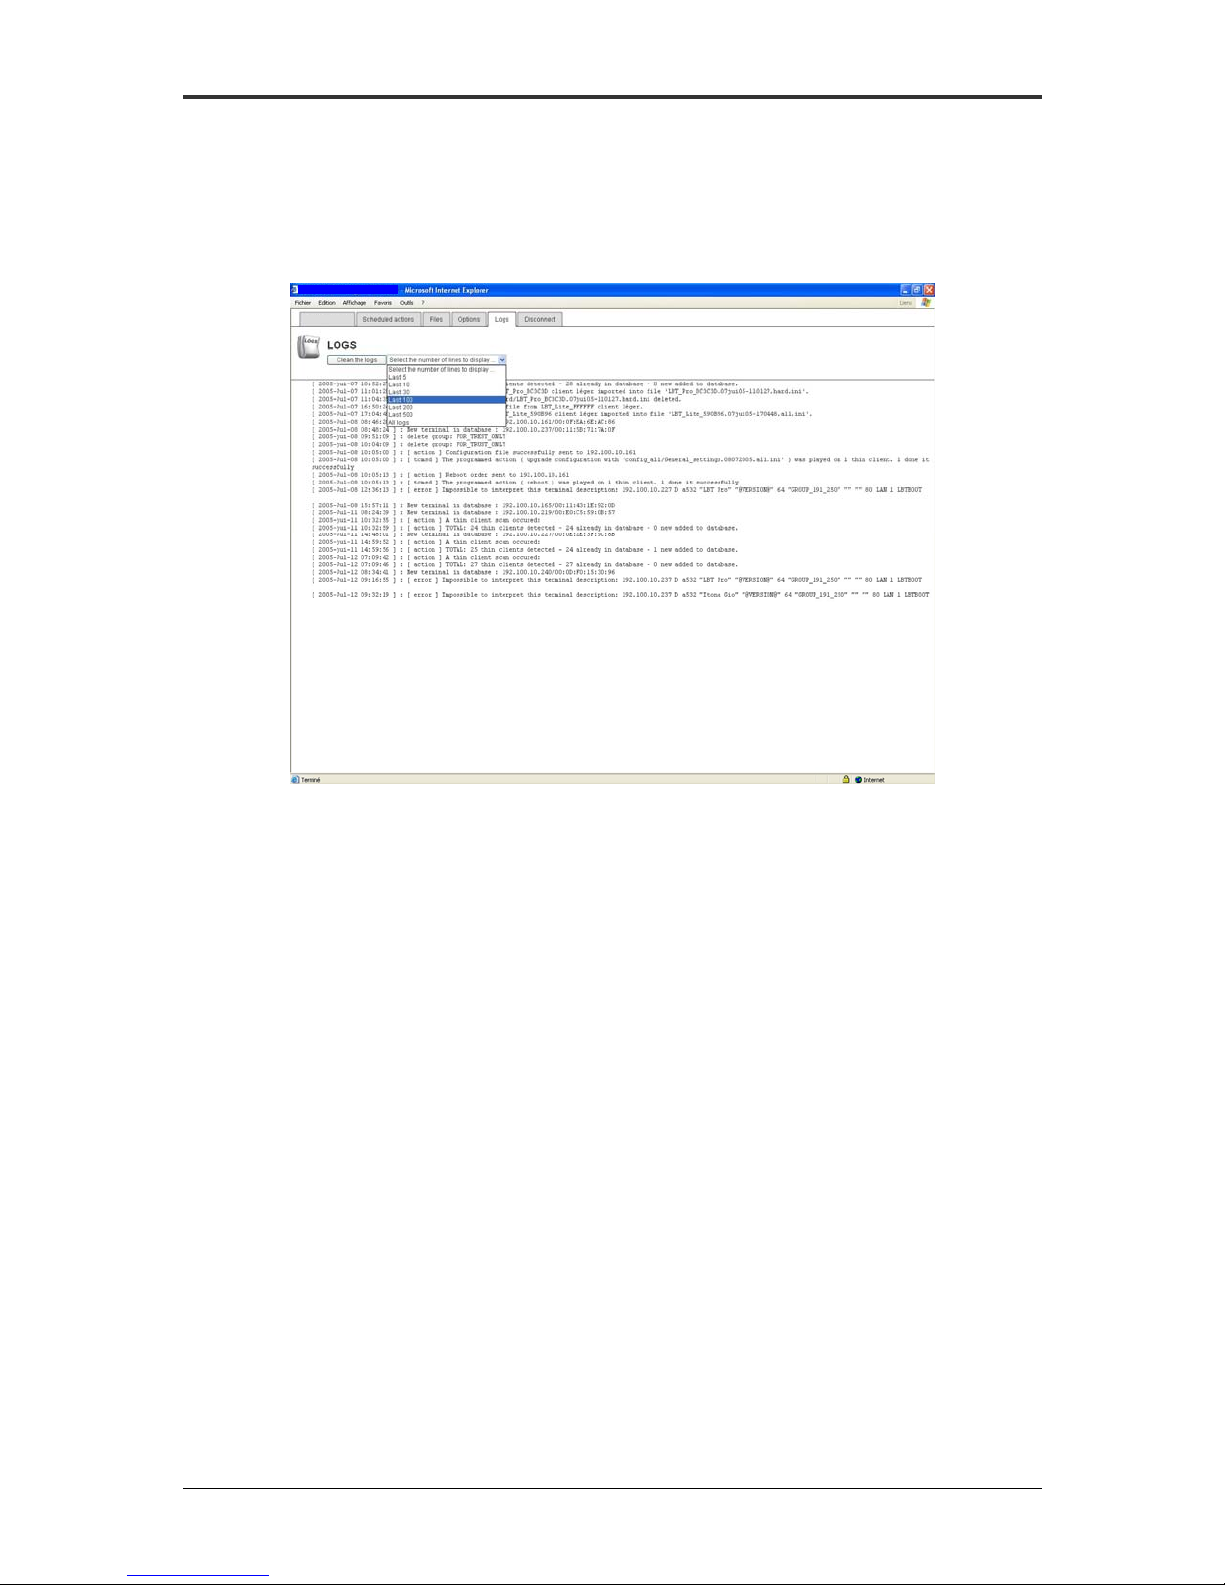
Logs
You can view all differents TMS logs. For that purpose, press on the Logs tab.
This tab can display last 5, 10, 30, 100, 200, 500 or all logs.
Terminal management server
Terminal list
Figure 30 - Logs
ADDS by Boundless Technologies 28
Page 30
ADDS 5600RM Administration Guide
Advanced
This section is intended to Administrator
for an advanced configuration and use
of TMS server.
Server options
Firmware
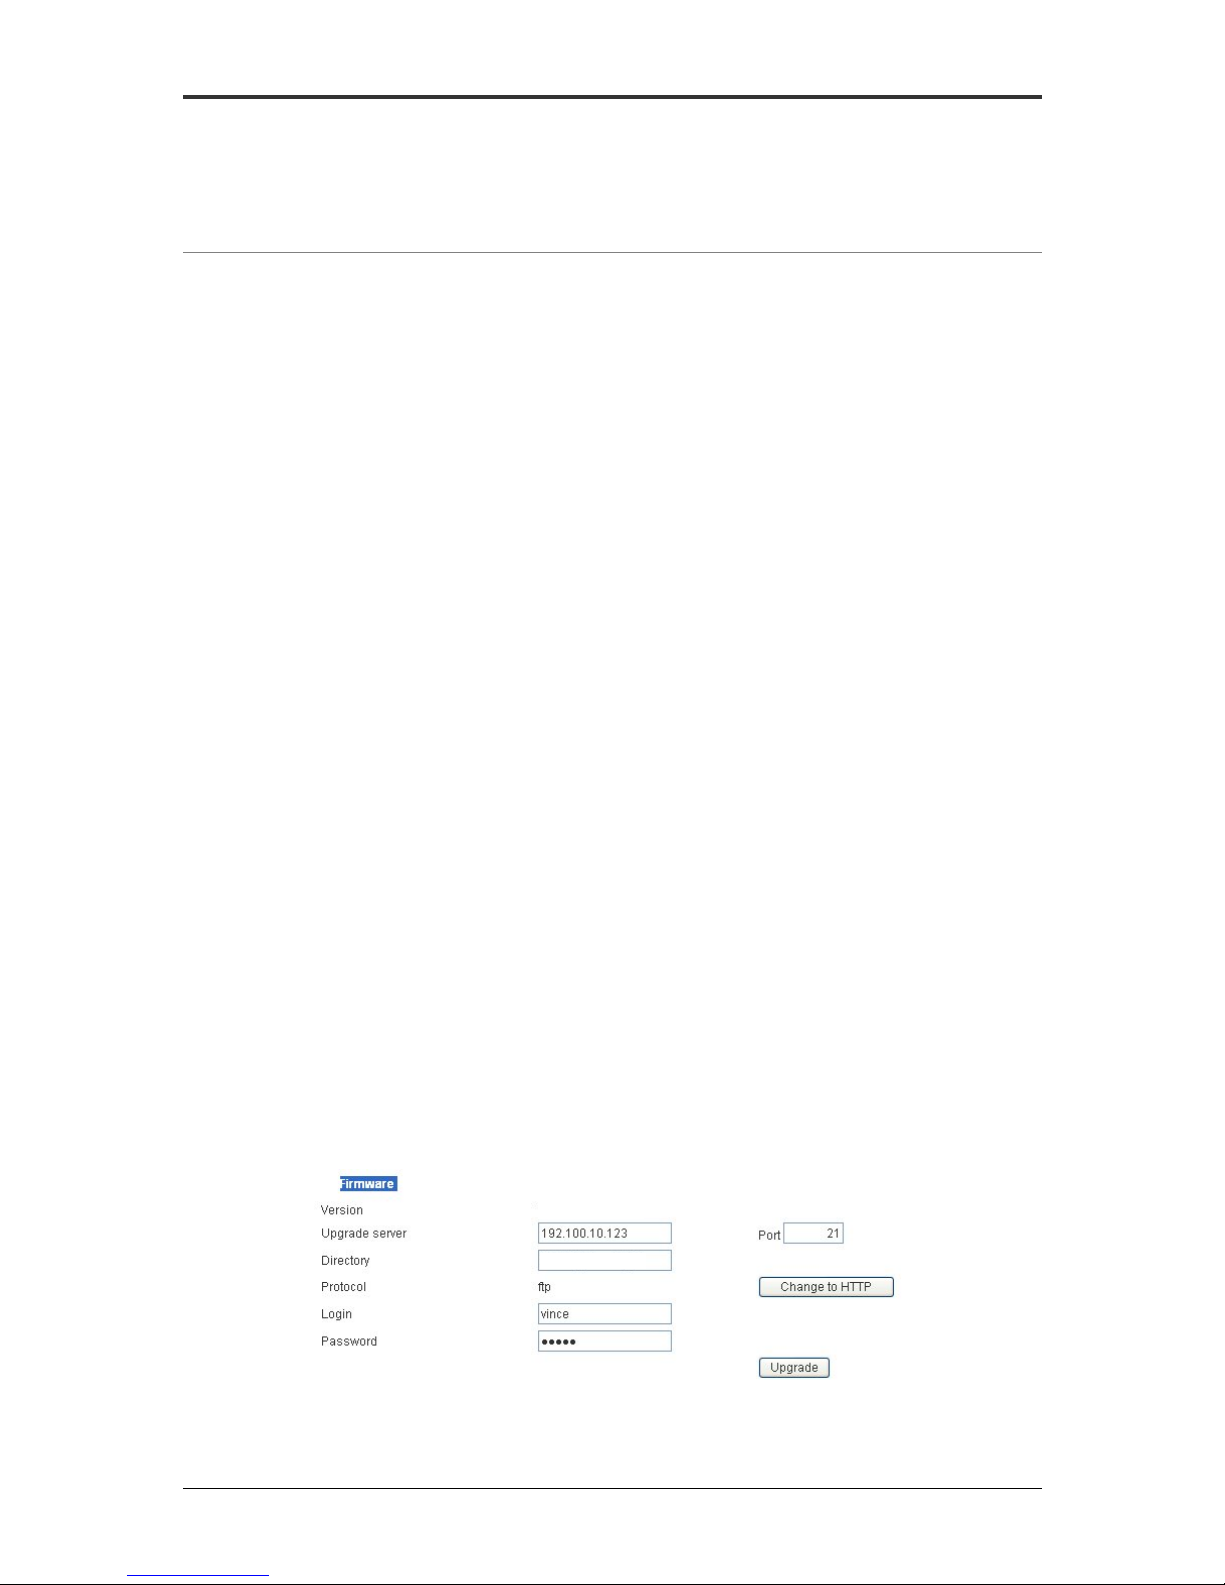
This section explains how to upgrade TMS server using HTTP or FTP server.
You shall configure the followings before processing upgrade:
- “Upgrade server” : Enter the IP address of http server or ftp server
containing the upgrades files
- “Port” : Enter port number of http server (default 80) or ftp server (default
21)
- “Directory”: Enter the exact path where the files are stored
Moreover, when using ftp protocol, you have to specify a username and password
ADDS by Boundless Technologies 29
TMS Server 1.2
TMS_Server1_2
Figure 31 - Firmware
Page 31
ADDS 5600RM Administration Guide
Date and time
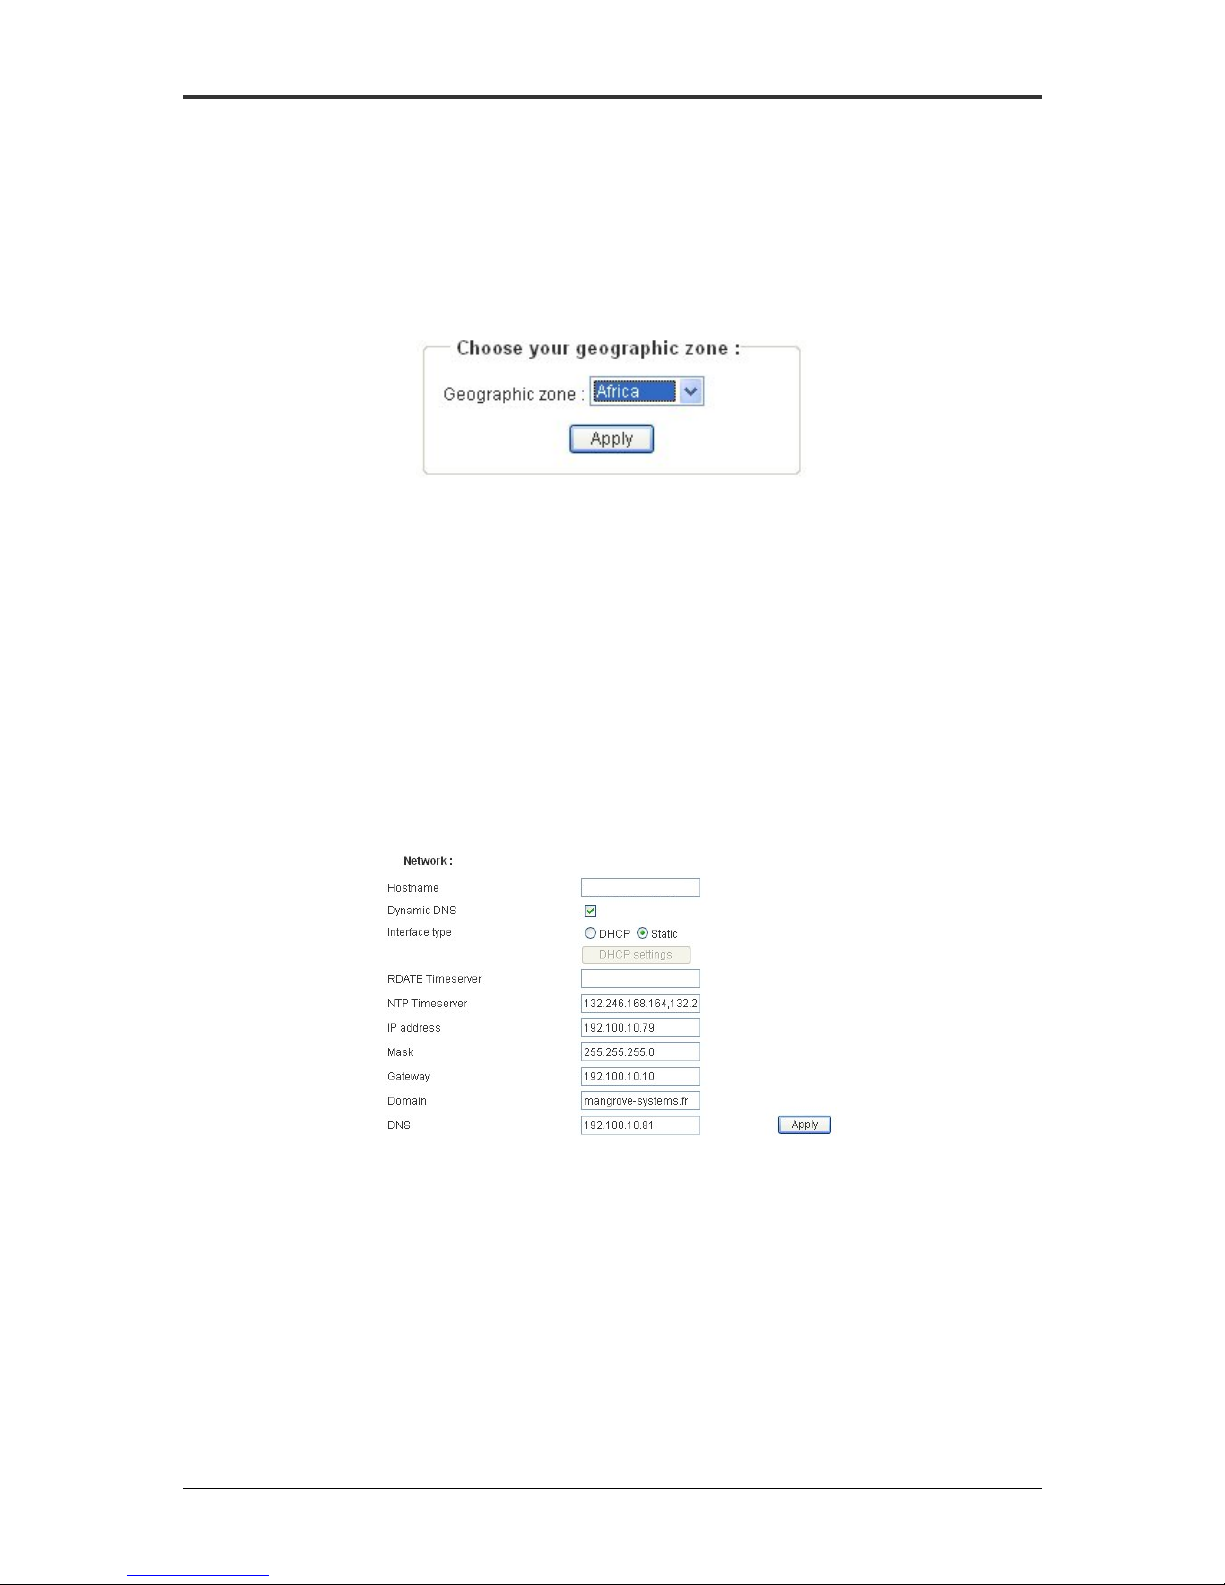
You can adjust date and time.When you press the button “Edit”, you can
choose your geographic zone.
Figure 32 - Geographic Zone
Keyboard
You can choose the keyboard type.
Network
You can configurate your network settings. Enter the IP address for TMS
server, then the DNS server, the gateway etc…
TMS_srv_support
Figure 33 - Network
ADDS by Boundless Technologies 30
Page 32
ADDS 5600RM Administration Guide
Application options
Administrator authentification
At first use of TMS, for security reasons, we advise changing the super-admid
password. You can also change the name of the super-admin.
Desktop manager authentification
At the fist use of TMS, for security reason, we advise changing the admin
password. You can also change the name of the admin.
Language
You can choose the Interface language of TMS.
Communication settings
You can configure broadcast addresses and the communication port.
Scheduled actions page.
You can configure the time when the scheduled page is reloaded.
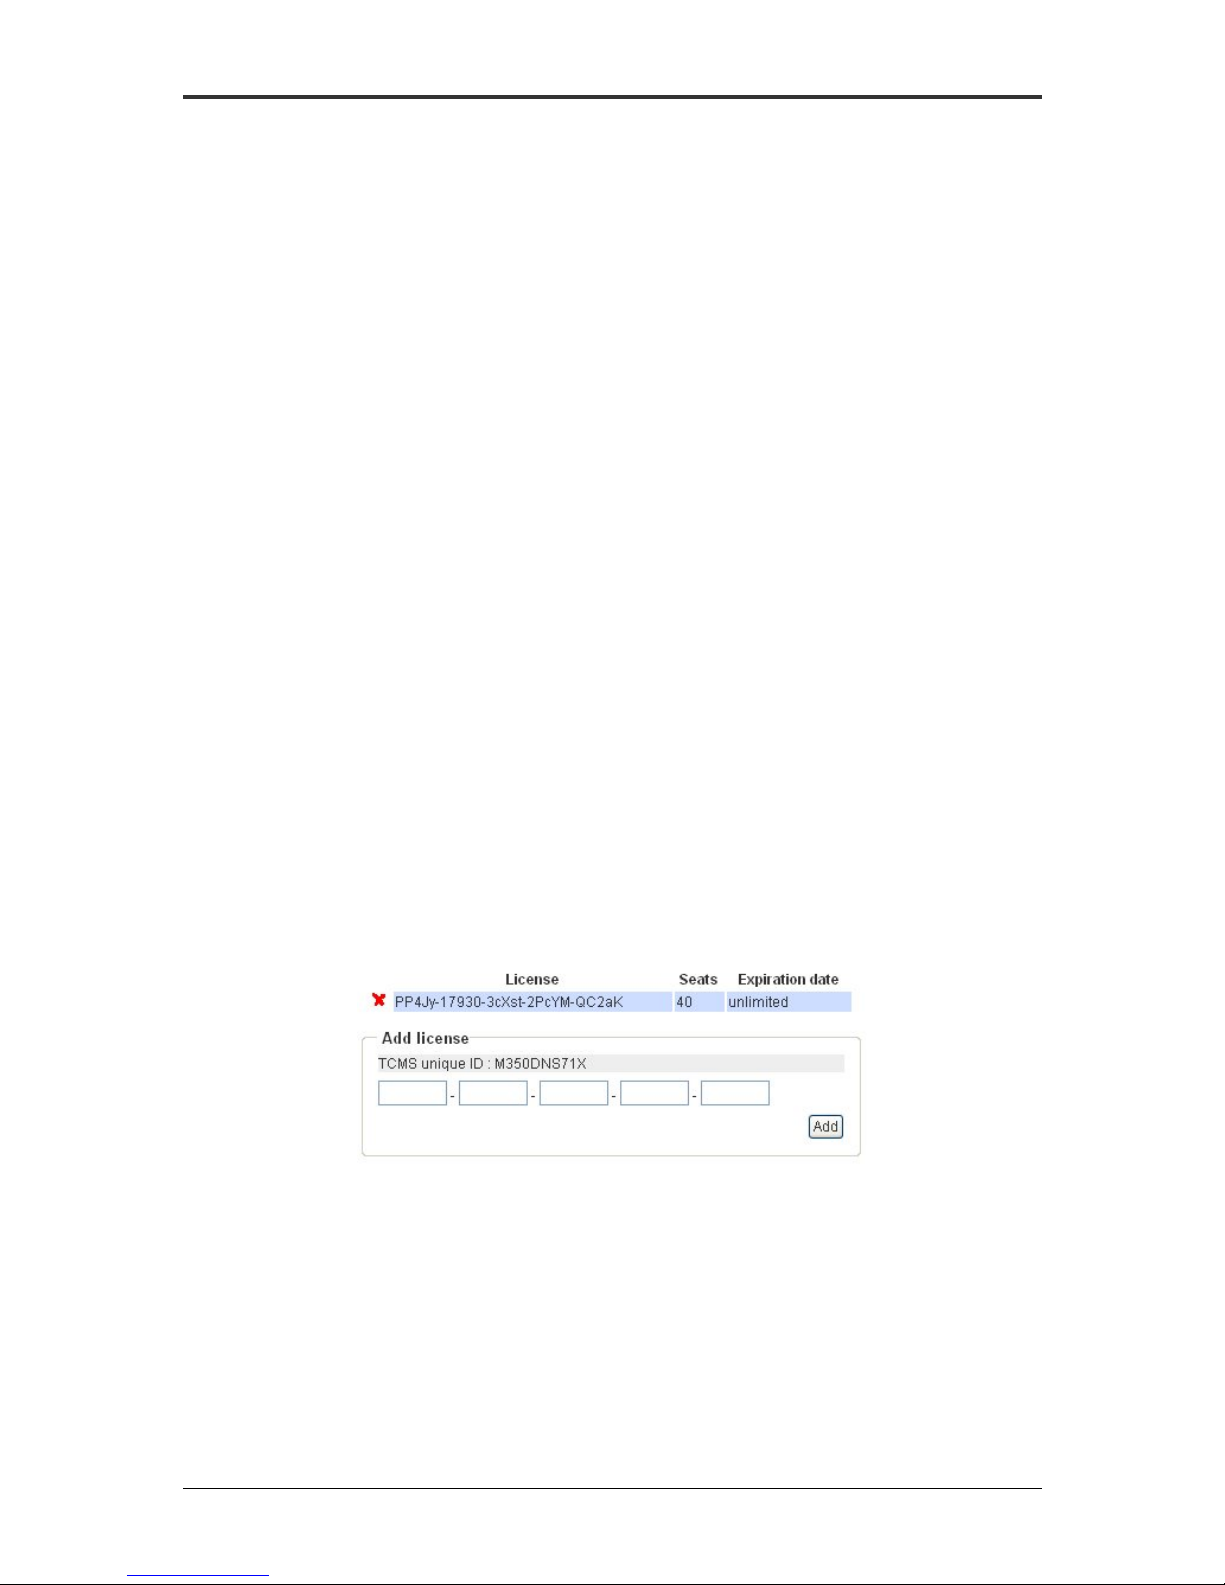
Licensing
By default, TMS features temporary licenses for a limited number of seats.
Additional licenses can be purchased to extend the number of terminals that can be
browsed by TMS.
Figure 34 - License
ADDS by Boundless Technologies 31
Page 33

ADDS 5600RM Administration Guide
Network Drive
Once mount type is selected, the Network Drive parameters can be setup. The
Network Drive can be a Samba UNIX Network Drive or a Windows share drive (with
Read and Write access rights)
If using a Windows share drive, the username and password provided shall be
valid either as a local user on the share drive Windows machine, a Windows NT
Domain user or an Active Directory User. In any case, the identification protocol shall
be NTLM and not Kerberos.
Once applied, the Network Drive should be up and running, enabling TMS to
store its data.
INI Files
These Files are the terminal configurations. They are obtained to download
from the terminal in the terminal configuration box.
Here is a type file :
[LBT_CONFIG_HARDWARE]
0=LBT_ADMIN_CONFIG
1=LBT_ADMIN_CGI_CONFIG
2=LBT_USER_CONFIG
3=LBT_WM_CONFIG
4=LBT_KEYBOARD_CONFIG
5=LBT_PRINTER:bureau_stef
6=LBT_PRINTER:mauvaise
7=LBT_UPGRADE_CONFIG
8=LBT_NETWORK_CONFIG
9=LBT_LANGUAGE_CONFIG
10=LBT_MOUSE_CONFIG
11=LBT_SSAVER_CONFIG
12=LBT_SCREEN_CONFIG
13=LBT_TOUCHSCREEN_CONFIG
14=LBT_TIMEZONE_CONFIG
15=LBT_USB_CONFIG
16=LBT_SERIAL_PORT_CONFIG:ttyS0
17=LBT_SERIAL_PORT_CONFIG:ttyS1
18=LBT_POWERMANAGEMENT_CONFIG
19=LBT_TOUCHPAD_CONFIG
20=LBT_MONITOR_CONFIG
[LBT_ADMIN_CONFIG]
AdminAllowRemoteAdmin=on
AdminAllowRemoteShadow=on
AdminAllowRemoteShadowAsking=off
AdminAllowRemoteShadowWarning=off
AdminAllowSsh=off
HTTP_PORT=80
PASSWORD=
TCMS_Address=192.100.10.78
TCMS_Boot_Contact=on
TCMS_Group=SHOWROOM
ADDS by Boundless Technologies 32
Page 34

TCMS_Net=LAN
TCMS_Regular_Contact=1
[LBT_ADMIN_CGI_CONFIG]
AdminCGIreadonly=
AdminCGIroot=
[LBT_USER_CONFIG]
AdminCGIreadonly=
AdminCGIroot=
CONFIG_FILE=/tmp/config/manager
LOGIN=manager
NAME=Desktop Manager
PASSWORD=
[LBT_WM_CONFIG]
AUTOHIDETB=autohide
DFORMAT=0
LBTWM=on
MAILCHECKBELLALARM=off
MAILCHECKDELAY=
MAILCHECKENABLE=off
MAILCHECKPOPUPALARM=off
MAILCHECKPROTOCOL=
MAILLOGIN=
MAILPASSWORD=
MAILSERVERPATH=
MAILSERVERPORT=
MAILSERVERURL=
SHOWPLUGINICONS=off
TBLOCATION=
[LBT_KEYBOARD_CONFIG]
DEADKEYS=on
KBDELAY=250
KBRATE=20.0
KEYBOARD=fr
NUMLOCK=on
[LBT_PRINTER:bureau_stef]
LPDQUEUENAME=bureau_stef
LPRNOSPOOL=
LPRPAGEEJECT=
LPRWINDRIVER=
PAPERSIZE=a4
PLACE=network_smb
PRINTERNAME=bureau_stef
PRINTERPORT=
PRINTERTYPE=postscript
REMIPADDR=
REMOTEPNAME=
SAMBASHARENAME=bureau_stef
SERVICE=HPLJ4
SHAREDVIALPD=on
SHAREDVIASAMBA=off
SMBLOGIN=root
SMBPASSWD=ATTENTION
SRVIP=192.100.10.123
SRVNAME=
THCLASS=
THENABLE=no
ADDS 5600RM Administration Guide
ADDS by Boundless Technologies 33
Page 35

ADDS 5600RM Administration Guide
THID=0
THMAXKEEPALIVE=10
THNAME=
TYPECHOICE=PS
WORKGROUP=MANGROVE
[LBT_PRINTER:mauvaise]
LPDQUEUENAME=mauvaise
LPRNOSPOOL=
LPRPAGEEJECT=
LPRWINDRIVER=
PAPERSIZE=none
PLACE=local
PRINTERNAME=mauvaise
PRINTERPORT=LPT1
PRINTERTYPE=postscript
REMIPADDR=
REMOTEPNAME=
SAMBASHARENAME=mauvaise
SERVICE=
SHAREDVIALPD=on
SHAREDVIASAMBA=off
SMBLOGIN=
SMBPASSWD=
SRVIP=
SRVNAME=
THCLASS=
THENABLE=no
THID=0
THMAXKEEPALIVE=10
THNAME=
TYPECHOICE=PS
WORKGROUP=
[LBT_UPGRADE_CONFIG]
DIRECTORY=/home/eledoux/upgrades/TCMS_CLIENT_3.3+_devel_2
HOST=192.100.10.75
PASSWORD=rp,zqm!p
PORT=21
TYPE=ftp
USER=eledoux
[LBT_NETWORK_CONFIG]
DYNDNS=
NTPSERVERS=132.246.168.164,132.246.168.148,207.46.130.100
SAMBALMB=
SAMBAWG=mangrove-systems.fr
TIMESERVER=
[LBT_LANGUAGE_CONFIG]
LANGUAGE=fr
[LBT_MOUSE_CONFIG]
MOUSELH=off
MOUSESPEED=1
MOUSETIMEOUT=0
MOUSETYPE=PS/2
[LBT_SSAVER_CONFIG]
ENABLE=on
MODE=image
ADDS by Boundless Technologies 34
Page 36

PASSWORD=
TIMEOUT=3
[LBT_SCREEN_CONFIG]
DEPTH=16
FORCE=off
RES=800x600-75
[LBT_TOUCHSCREEN_CONFIG]
DEVICE=
DRIVER=elographics
ENABLE=off
MAXX=3600
MAXY=3600
MINX=600
MINY=600
REPORTDELAY=1
UNTOUCHDELAY=3
[LBT_TIMEZONE_CONFIG]
REGION=
ZONE=GMT
[LBT_USB_CONFIG]
BROWSE_USB=on
[LBT_SERIAL_PORT_CONFIG:ttyS0]
CSIZE=8
FLOWCONTROL=Software
MAP_CI=0
MAP_ENABLE=0
MAP_MODE=other
MAP_PORT=1000
MAP_TO=0
PARITY=even
SPEED=9600
STOPBITS=1
[LBT_SERIAL_PORT_CONFIG:ttyS1]
CSIZE=8
FLOWCONTROL=Software
MAP_CI=0
MAP_ENABLE=0
MAP_MODE=other
MAP_PORT=1000
MAP_TO=0
PARITY=even
SPEED=9600
STOPBITS=1
[LBT_POWERMANAGEMENT_CONFIG]
BATTERY_HALT_LEVEL=10
BATTERY_WARN_LEVEL=20
LONGRUN_MODE=performance
SHUTDOWN_PROCESS=0
[LBT_TOUCHPAD_CONFIG]
ENABLE=off
[LBT_MONITOR_CONFIG]
DPMS_OFF=2400
ADDS 5600RM Administration Guide
ADDS by Boundless Technologies 35
Page 37

ADDS 5600RM Administration Guide
DPMS_STANDBY=1200
DPMS_SUSPEND=1800
[LBT_CONFIG_RESOURCES]
RC0=/tmp/config/icons.ini:0644:0:22@@@@ FILE_BEGIN @@@@
[Setup Manager]
Name=Setup Manager
Exec=launch "lbt setup" "Setup Manager"
Icon=/usr/X11R6/lib/X11/icewm/icons/setup_32x32.xpm
Pos=64 64
[end]
[Connection Manager]
Name=Connection Manager
Exec=launch "lbt connections" "Connection Manager"
Icon=/usr/X11R6/lib/X11/icewm/icons/folder_32x32.xpm
Pos=64 128
[end]
[Xpdf]
Name=Xpdf
Exec=launch "userexec xpdf" Xpdf
Icon=/usr/share/xpdfIcon.xpm
Pos=-100 -100
[end]
@@@@ FILE_END @@@@
RC1=/tmp/config/exports.ini:0644:0:3@@@@ FILE_BEGIN @@@@
EXPORT_FTP="no"
EXPORT_SMB="no"
@@@@ FILE_END @@@@
RC2=/tmp/config/xfs:0644:0:1@@@@ FILE_BEGIN @@@@
@@@@ FILE_END @@@@
RC3=/tmp/config/Printers/Default_Printer:0644:0:2@@@@ FILE_BEGIN @@@@
DEFPRINT="bureau_stef"
@@@@ FILE_END @@@@
RC4=/tmp/config/.thinprint.rc:0644:0:2@@@@ FILE_BEGIN @@@@
[PRINTERS]
@@@@ FILE_END @@@@
RC5=/tmp/config/.thp_port:0644:0:2@@@@ FILE_BEGIN @@@@
th_port=4000
@@@@ FILE_END @@@@
RC6=/tmp/config/ser2net.conf:0644:0:78@@@@ FILE_BEGIN @@@@
#
# This is an example configuration file for ser2net. It has the following
# format:
# <TCP port>:<state>:<timeout>:<device>:<options>
# TCP port
# Name or number of the TCP/IP port to accept con
ADDS by Boundless Technologies 36
Page 38

ADDS 5600RM Administration Guide
# nections from for this device. A port number may
# be of the form [host,]port, such as 127.0.0.1,2000
# or localhost,2000. If this is specified, it will
# only bind to the IP address specified. Otherwise
# it will bind to all the ports on the machine.
#
# state Either raw or rawlp or telnet or off. off disables
# the port from accepting connections. It can be
# turned on later from the control port. raw enables
# the port and transfers all data as-is between the
# port and the long. rawlp enables the port and
# transfers all input data to device, device is open
# without any termios setting. It allow to use
# /dev/lpX devices and printers connected to them.
# telnet enables the port and runs the telnet proto# col on the port to set up telnet parameters. This
# is most useful for using telnet.
#
# device The name of the device to connect to. This
# must be in the form of /dev/<device>.
#
# options
# Sets operational parameters for the serial port.
# Options 300, 1200, 2400, 4800, 9600, 19200, 38400,
# 115200 set the various baud rates. EVEN, ODD, NONE
# set the parity. 1STOPBIT, 2STOPBITS set the number
# of stop bits. 7DATABITS, 8DATABITS set the number
# of data bits. [-]XONXOFF turns on (- off) XON/XOFF
# support. [-]RTSCTS turns on (- off) hardware flow
# control and [-]LOCAL turns off (- on) monitoring of
# the modem lines. The "remctl" option allow remote
# control (ala RFC 2217) of serial-port configuration.
# A banner name may also be specified, that banner will
# be printed for the line. If no banner is given, then
# no banner is printed.
#
# or...
# BANNER:<banner name>:banner
# This will create a banner, if the banner name is given in the
# options of a line, that banner will be printed. This takes the
# standard "C" \x characters (\r is carraige return, \n is newline,
# etc.). It also accepts \d, which prints the device name, and
# \p, which prints the TCP port number. Banners can span lines if
# the last character on a line is '\'. Note that you *must* use
# \r\n to start a new line.
#
# Note that the same device can be listed multiple times under different
# ports, this allows the same serial port to have both telnet and raw
# protocols.
BANNER:banner1:Welcome to ser2net TCP port \p device \d\r\n\
second line \
third line\r\n
BANNER:banner2:this is ser2net TCP port \p device \d\r\n\
second line \
third line\r\n
BANNER:banner3:this is ser2net TCP port \p device \d\r\n\
second line alksjdf;lasjkdfl;asdjfasf asdfljas;fldkjasfl; askjdfas\
ADDS by Boundless Technologies 37
Page 39

ADDS 5600RM Administration Guide
third line kasldfjas;lkfjasl;fja;slfjasl;f aslfjasl;fjasl;f\
asl;fjasl;f\r\n\
alks alskdjf ;asldfj ;aslfkja s;fljas ;fjasfl;a sfl;kasj f;lafasf asfkj\
askld fjas;ldfjasl;fj alskfjal;sdfjasl;fsal;kfjas;l fjasl;fjasl;\
kfjasl;fsa\
askljdf ;asfj l;asfjasl;kf jasfl;kjas f;lasjfl; asfklas fl;asjf l;safjs;a
1000:off:0:/dev/ttyS0:remctl LOCAL 9600 EVEN 1STOPBIT 8DATABITS -RTSCTS
XONXOFF
1000:off:0:/dev/ttyS1:remctl LOCAL 9600 EVEN 1STOPBIT 8DATABITS -RTSCTS
XONXOFF
@@@@ FILE_END @@@@
RC7=/tmp/config/hosts:0644:0:1@@@@ FILE_BEGIN @@@@
@@@@ FILE_END @@@@
RC8=/tmp/config/diskmount/local.ini:0666:0:1@@@@ FILE_BEGIN @@@@
@@@@ FILE_END @@@@
RC9=/tmp/config/mixer.settings:0354:1:0@@@@ FILE_BEGIN @@@@
M1T<``$='``!'1P``1T<``$='``!'1P``1T<``$='``!'1P``1T<``$='``!'
M1P``1T<``$='``!'1P``1T<``$='``!D9```1T<``$='``!D9```9&0``&1D
*``!'1P``1T<`````
`
end
@@@@ FILE_END @@@@
ADDS by Boundless Technologies 38
Page 40

ADDS 5600RM Administration Guide
Illustrations
FIGURE 1 – TMS DIAGRAM......................................................................................................................................... 5
FIGURE 2 - LOGIN SCREEN.................................... ..................................................................................... .................. 6
FIGURE 3 - NETWORK DRIVE UNREACHABLE .............................................................................................................6
FIGURE 4 - CREATE NETWORK DRIVE......................................................................................................... ................ 7
FIGURE 5 - CONFIGURE NETWORK DRIVE................................................................................................................... 7
FIGURE 6 - NETWORK DRIVE CONFIGU RED.................................................. ........................................... .................... 8
FIGURE 7 - CONTENT OF NETWORK DRIVE ........ ..................................................................................... .................... 8
FIGURE 8 - TERMINAL LIST TAB ................................................................................................................................. 9
FIGURE 9 - SCHEDULED ACTION TAB ........................................................................... .......................................... ..10
FIGURE 10 - FILES TAB..............................................................................................................................................10
FIGURE 11 - OPTIONS TAB......................................................................................................................................... 11
FIGURE 12 - LOGS TAB...................................................................................... .......................................... .............. 11
FIGURE 13 - DISCONNECT TAB.................... .......................................... .................................................................... 12
FIGURE 14 - PRESS DISCOVER.................................................................................................................................... 14
FIGURE 15 - GROUP......................................................................................... .......................................... ................ 15
FIGURE 16 - PRESS_DISCOVER GROUP DIAL OG BOX......................... ........................................................................15
FIGURE 17 - ENTIRE LIST OF TERMINALS.................................................................................................................. 16
FIGURE 18 - DHCP TAG................................................................................................................................... ......... 17
FIGURE 19 - MAIN PANEL............................................... ........................................................................................... 18
FIGURE 20 - DISPLAY ALL................................................ ......................................................................................... 18
FIGURE 21 - ADD A TERMINAL............................................................................................. ..................................... 19
FIGURE 22 - ADD A GROUP................................. ..................................................................................... .................. 20
FIGURE 23 - TERMINAL LIST........................ .............................................................................................................. 21
FIGURE 24 - TERMINAL DIALOG BOX ..................................................................... ................................................... 21
FIGURE 25 - HTTP ADMINISTRATION............................................... ........................................................................23
FIGURE 26 - GROUP DIALOG BOX ..................................... .......................................... ............................................... 24
FIGURE 27 - EXTERNAL SERVER........................... ........................................... ..........................................................26
FIGURE 28 - TMS NETWORK DRIVE ........................................... .......................................... .....................................26
FIGURE 29 - SCHEDULED ACTIONS ............................ .......................................... ...................................................... 27
FIGURE 30 - LOGS......................................................................................................................................................28
FIGURE 31 - FIRMWARE.............................................................................................................................................29
FIGURE 32 - GEOGRAPHIC ZONE.................................................................. ............................................................. 30
FIGURE 33 - NETWORK......................................... ........................................... .......................................................... 30
FIGURE 34 - LICENSE............................................................................................................................ ..................... 31
ADDS by Boundless Technologies 39
Page 41

ADDS 5600RM Administration Guide
TMS Administrator’s guide – Ref. TMSADMIN_GUIDE_1.2
© 2004 by Mangrov e Sys tem s SAS .
Parc L’Eclipse – Rue du Conillot, 50400 Granville, France
E-mail:[email protected]
Web: For the most recent vers ion of t his man ual, please vi sit Mang rove’s Web sit e at
http://www.ma ng ro v e -s ys t em s .com/download.html
This manual is copyrighted by Mangrove Systems SAS. All rights are reserved. This document
may not, in whole or in part, be copied, photocopied, reproduced, translated, or reduced to any electronic
medium or machine-readable form without prior consent.
ICA® is a registered trademark of Citrix Systems, Inc. MetaFrame ™ is a trademark of Citr ix
Systems, Inc. Ericom® and PowerTerm® are registered trademarks of Ericom® Software Ltd.
Microsoft®, Windows®, Windows® NT® and Windows® 2000 are either registered trademarks or
trademarks of Microsoft Corporation. Java® is a registered trademark of Sun Microsystems, Inc.
ThinPrint® is a registered trademark of ThinPrint GmbH. All other products and corporate names
appearing in this manual may or may not be registered trademarks or copyrights of their respective
companies, and are used only for identification or explanation and to the owner’s benefit.
Disclaimer: The information provided in this manual is intended for instructional purposes only
and is subject to change without notice. Mangrove Systems SAS accepts no responsibility or liability for
errors, omissions , or m islea di ng in forma tio n that ma y be co n tai ned in t his manu a l.
Granville FR, Jan. 05.
ADDS by Boundless Technologies 40
 Loading...