

Page 1
BY OUNDLESS ECHNOLOGIE
S
B T
Linux-Based Terminal
User’s Manual
Page 2

TABLE OF CONTENTS
CHAPTER 1 Product Review.............................................................. ..........................................1
1.1 LBTs ..........................................................................................................................1
1.2 Terminal Specifications..............................................................................................1
1.3 Terminal Features......................................................................................................2
1.4 Terminal Overview.....................................................................................................2
1.4.1 Connecting the Terminal ................................................ .................................2
1.4.2 Connector Descriptions...................................................................................3
CHAPTER 2 Initial Terminal Setup...............................................................................................5
2.1 Hot-keys Functions....................................................................................................5
2.2 Setup Wizard.............................................................................................................5
2.2.1 Display Settings................................................................................................5
2.2.2 Locale...............................................................................................................6
2.2.3 Network Configuration ......................................................................................6
2.2.3.1 Use the IP information supplied by DHCP................................................6
2.2.3.2 Specify a static IP address........................................................................7
2.2.3.3 Name Servers...........................................................................................7
2.2.4 Finish the Setup Wizard..................................................................................8
CHAPTER 3 Connections Management ......................................................................................8
3.1 Using the Connections Properties Sheet...................................................................8
3.2 Using the Configure Properties Sheet .......................................................................9
3.3 Creating New Connections........................................................................................9
3.3.1 Choosing a Connection Protocol ......................................................................9
3.4 RDP Connections......................................................................................................10
3.4.1 General .............................................................................................................10
3.4.2 Display ..............................................................................................................10
3.4.3 Local Resources................................................................................................10
3.4.4 Programs...........................................................................................................11
3.4.5 Performance......................................................................................................11
3.5 ICA Connections........................................................................................................12
3.5.1 Creating a New ICA Connection Entry..............................................................12
3.5.2 Connecting to a Citrix Server ............................................................................13
3.5.3 Changing a Connection Entry...........................................................................13
3.5.3.1 To change the properties of a connection entry ........................................13
3.5.3.2 Specifying an Application to Run after Connecting to a Citrix Server ........14
3.5.3.3 Specifying Logon Information....................................................................15
3.5.3.4 Changing the Window Properties..............................................................15
3.5.3.5 Setting Connection Entry Options .............................................................16
3.5.3.6 Configuring Firewall Settings ....................................................................17
3.6 Web Browser Connection..........................................................................................18
3.6.1 To Make a New Web Browser Connection........................................................18
3.6.2 To Start a Web Browser Connection.............. .................................................. .19
3.7 X11 Client..................................................................................................................19
CHAPTER 4 Terminal Properties ........................................................................................... ......20
4.1 General Tab...............................................................................................................20
4.1.1 Reset the terminal to factory default property settings......................................20
4.2 Display Configuration.................................................................................................21
4.2.1 Enable Screen Saver........................................................................................21
4.3 Control Panel Tab......................................................................................................22
4.3.1 System ...............................................................................................................22
4.3.2 Keyboard Properties...........................................................................................23
4.3.2.1 Locale.......................................................................................................23
Page 3

4.3.2.2 Repeat................................. ...................................................... ...............23
4.3.3 Sound Volume....................................................................................................23
4.3.4 Date/Time Properties..........................................................................................24
4.3.5 NFS....................................................................................................................24
4.3.6 FTP Update........................................................................................................24
4.3.7 Thin Printer.........................................................................................................25
4.3.8 Security Control..................................................................................................25
4.3.9 Network Configuration........................................................................................26
4.3.10 Startup................................................................................................................26
4.3.11 WMMode............................................................................................................27
4.3.12 Printer ................................................................................................................28
4.3.13 VNC Server Password .......................................................................................28
CHAPTER 5 Advanced Function ....................... ..........................................................................29
5.1 VNC Client Viewer.....................................................................................................29
5.2 xterm .........................................................................................................................29
5.3 System Info ...............................................................................................................30
5.3.1 CPU Info..............................................................................................................30
5.3.2 Memory Info ........................................................................................................30
CHAPTER 6 Desktop Mode .............................................................................. ............................31
6.1 Connections................................................................................................................31
6.1.1 RDP Connection .................................................................................................31
6.1.2 ICA Connection ...................................................................................................33
6.1.3 VNC Client Viewer..............................................................................................43
6.1.4 WEB Browser......................................................................................................44
6.2 Connection manager .................................................................................................44
6.3 Control Panel ............................................................................................................45
1
Page 4

1. Product Overview
A
A
A
A
1.1 LBTs
LBTs (Linux -based Terminals) are designed to connect to WTS (Windows Terminal Server) servers via
RDP (Remote Desktop Protocol), or Windows NT applications server via ICA (Independent Computing
Architecture). RDP is the Window s CE-based prot ocol for conne cting to Wi ndows te rminal serv ers. ICA is
a distributed presentation services protocol for Windows NT server, allowing an application's user
interface to execute on a Linux -based terminal while t he application's logic executes on the server.
1.2 Terminal Specifications
CPU VIA Eden 1.0 GHz
RAM 128MB DDR-SDRAM standard, expandable to 512MB
Flash Memory 32MB CF card standard, expandable to 512MB
Flash upgrade utility via Ethernet
Resolution
16 million palette supports all VESA monitors
Refresh Rate Flicker-free, up to 85Hz
Video Memory Graphics utilizes system RAM
udio Support Full 16 bit stereo FM synthesis, 8 bit mini Microphone in
Networking Protocols 10/100 Base T Fast Ethernet, Twisted Pair (RJ45)
TCP/IP with DNS, DHCP and PPP
Load balancing supported by Citrix ICA
Remote modem dial up with Citrix ICA
Communications Protocols MS RDP / Citrix ICA/ Go-Global Client
One Parallel Port Bi-directional centronics compatible, DB-25
One Serial Port DB-9 pin male connector with RS-232C, up to 115.2K bps
One Display Port
USB Port Four USB ports
udio Port
KB & Mouse Interface Enhanced PS/2 keyboard and mouse interface
Extensible Slot One PCMCIA slot
One PCI slot
One Smart Card Reader
Operation System Linux Embedded
Set-up & Configuration Local power-on boot, simple start-up wizard for set-up
Server Operating System
Support
Termi nal Emulations Console ANSI, VT 420/320/220/100/52, Wyse 120/60/50+/325
Support TVI 925, TVI 910+, ADDS A2, IBM3270, IBM5250.
Resolution up to 1280x1024 / 60 Hz SVGA 32 bit to True color.
1600x1200 / 60 Hz SVGA 32 bit to High color.
nalogue VGA type video output (DB-15)
udio out, Microphone In
Configurable automatic login, Multi-language KB support,
Multiple auto-startup support
GO-GLOBAL:
Go-Global f o r Windows
Go-Global for UNIX
RDP:
Microsoft Windows NT4.0 + TSE.
Microsoft Windows 2000 Server Family.
Microsoft Windows 2003 Server Family.
Microsoft Windows XP with RDP protocol
ICA:
Citrix Winframe
Microsoft Windows NT4.0 + TSE+ Citrix Metaframe
Microsoft Windows 2000 + Citrix Metaframe.
Microsoft Windows 2000/ Windows 2003 + Citrix MetaframeXP
.
1
Page 5
1.3 Terminal Features
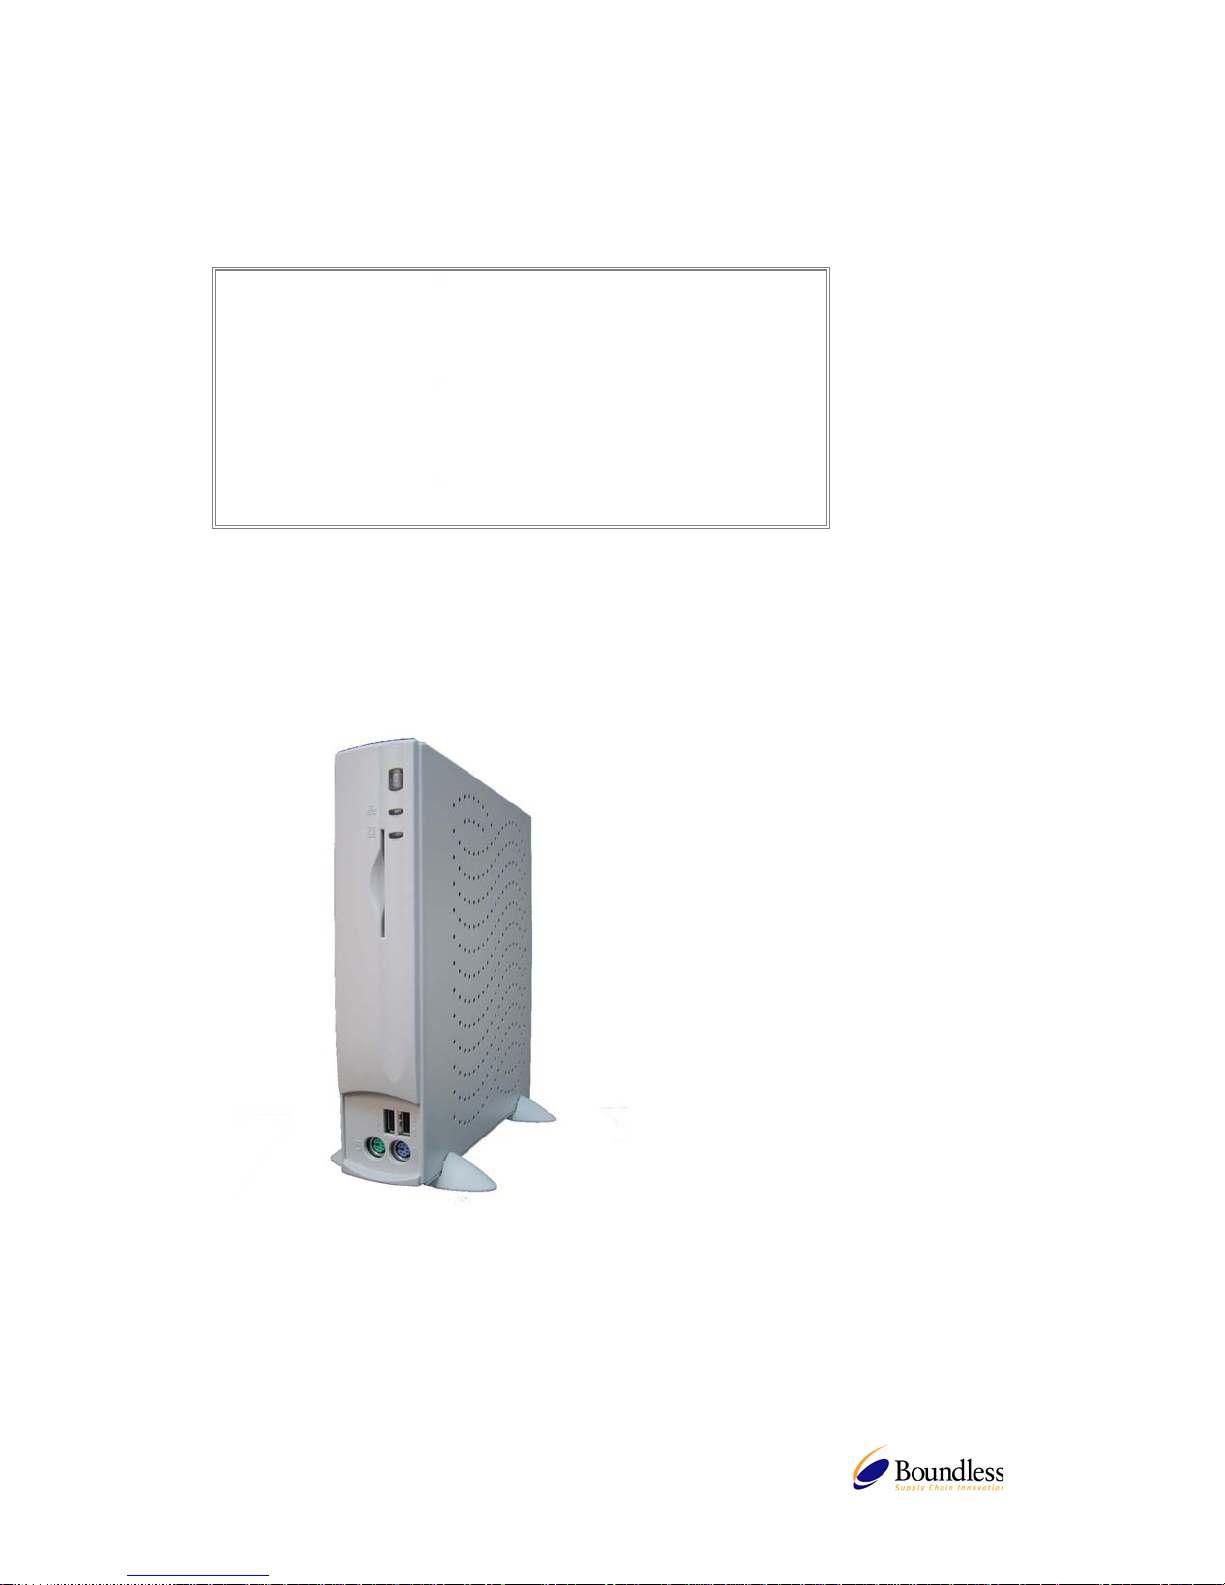
Physical Characteristics
Height 232 mm (11.21 in)
Width 51 mm (2.08 in)
Depth 202 mm (10.41 in)
Net Weight 2.20 kgs (4.85 lbs)
Power Cord 6 ft (1.83m)
Environmental
Operating Temperature 5 to 40℃ (41 to 104℉)
Non-operating Temperature -40to 60℃ (-40 to 150℉)
Operating Humidity 20% to 80%, non-condensing
Operating Altitude 0 to 10,000 ft ASL
Nonoperating Altitude 0 to 40,000 ft ASL
Regulatory
EMC Terminal/Power Brick FCC B, CE, CB, CUL, C-TICK, BSMI,
Safety Power Brick UL1950, CB IEC60950.
Installation
1.4 Terminal Overview
1.4.1 Connecting the Terminal
Follow these instructions to connect the terminal to its peripheral devices:
A. Connect the keyboard to the keyboard connector.
B. Connect the mouse to the mouse connector.
2
Page 6
C. Connect the 10/100-T network cable to the RJ-45 network connector.
D. Connect the power cord and the adapter to the power connector with AC outlet.
E. Connect the power cord to the power connector with AC outlet.
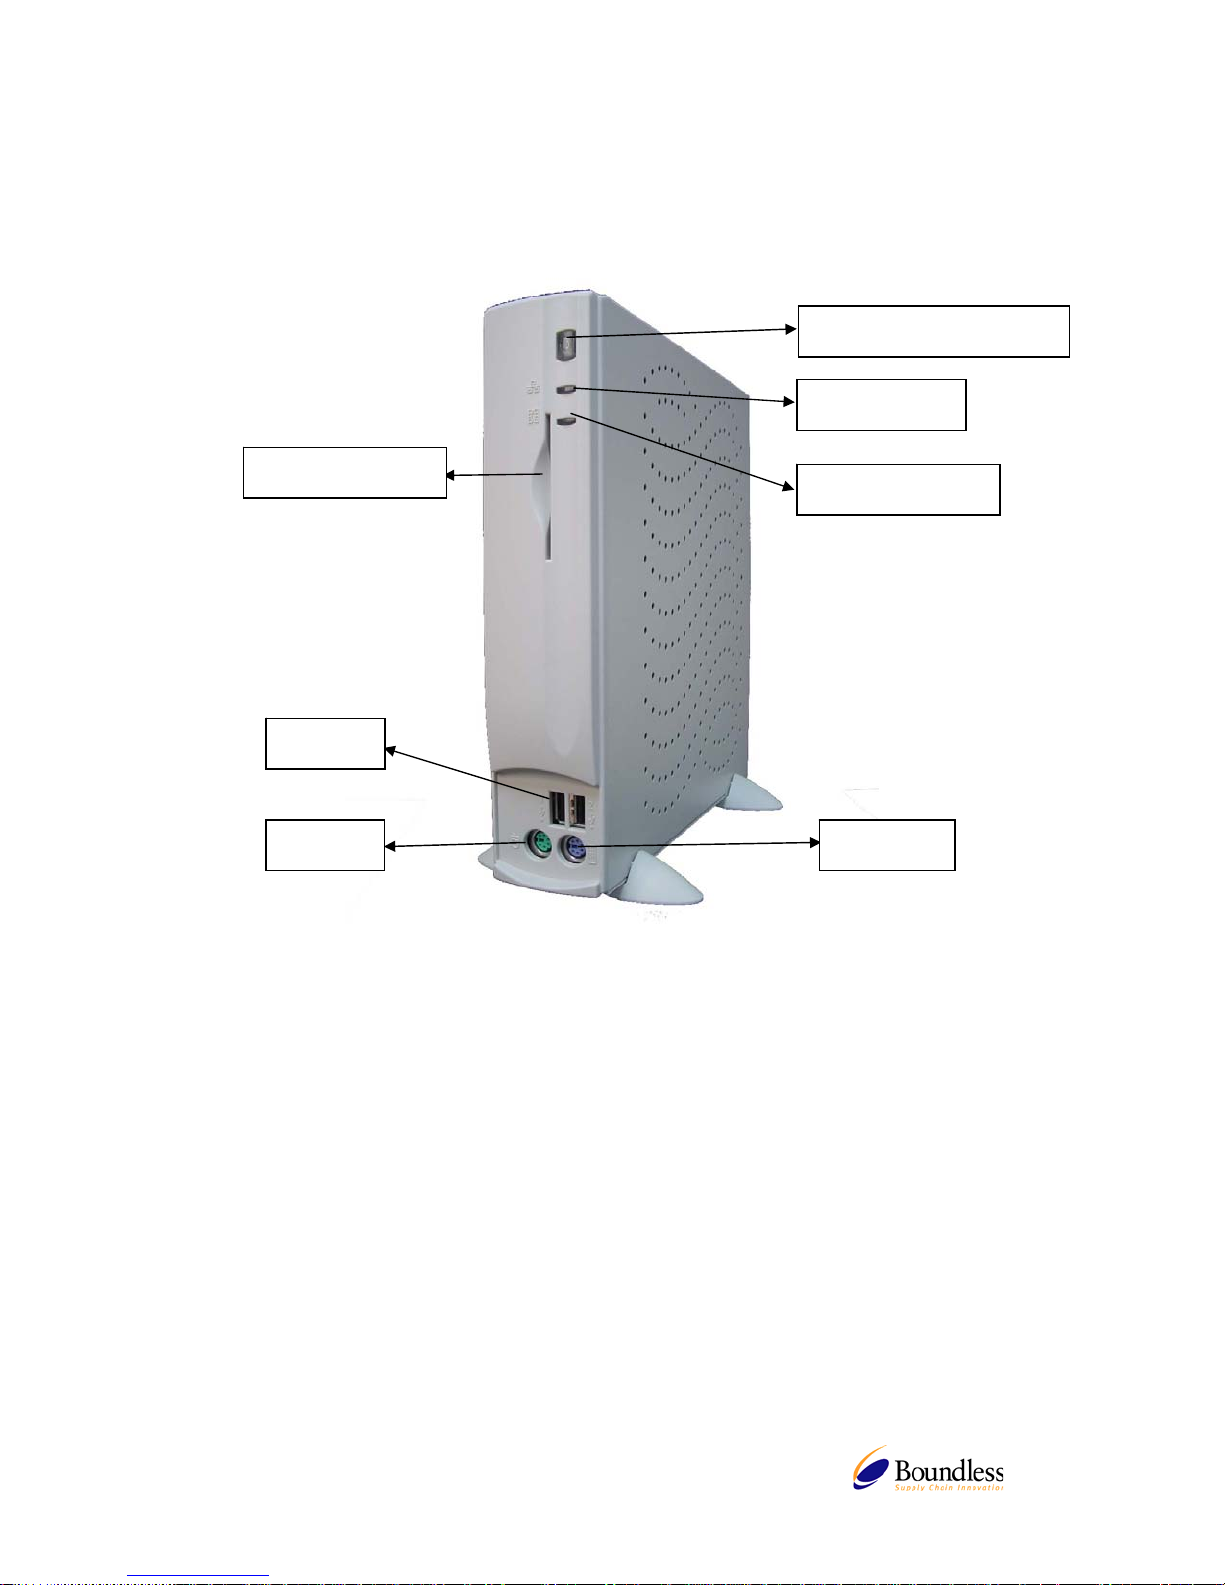
Power Switch & LED
LAN Activ e
Smart Card Slot
Smart Card LED
USB 2.0
Mouse
1.4.2 Connector Descriptions
LAN LED Indicators
This LED indicates the link (amber), activity (amber) status of network conditions. The detailed
information is explaine d as fo llows:
z Link Indicator (amber )
This LED lights to indicate a successful network connection.
z Activity Indicator (amber)
This LED lights when the re is network packets sent or received through the RJ-45 port.
USB 2.0 Port
These connectors can be u sed for the USB devices.
PS/2 Mouse Connector
This connector is fo r a mouse using a PS/2 plu g (mini DIN).
PS/2 Keyboard Connector
This connector is for a standard keyboard using a PS/2 plug (mini DIN).
RJ-45 Network Connector
Keyboard
3
Page 7
This connector can be used to connect the built-in 32-bit 10/100-T Ethernet network LAN Controller to a
host or Hub.
Audio output Connector
This connector is used to connect to an outward speaker.
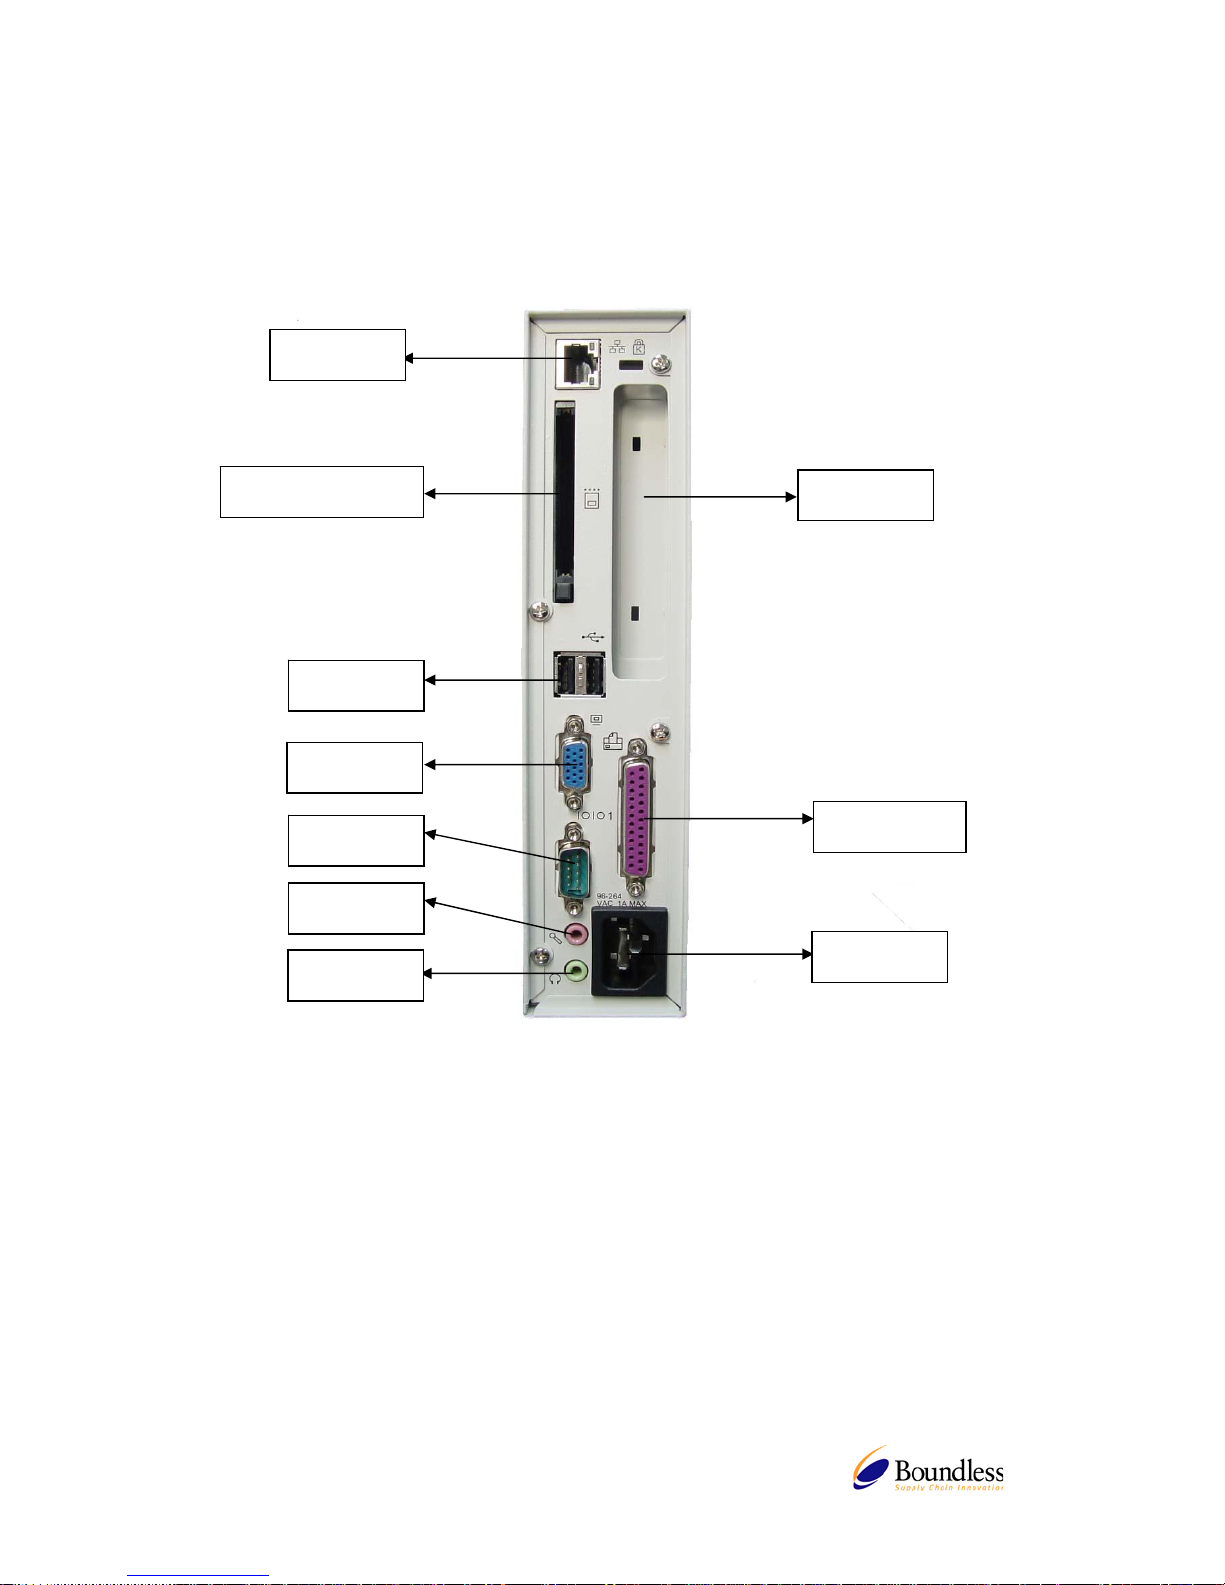
LAN
PCMCIA SLOT
DVI CON.
USB 2.0
VGA
SERIAL
PARALLEL
MIC
SPEAKER
VGA Connector
This connector is for displaying on a standard VGA compatible device.
Serial Port Connectors
These connectors can be used for the serial device such as a modem device.
Parallel Port Connector
This connector can be used for a printer connection.
Power Connector
This connector is for connecting the power cord with the terminal and the AC outlet.
PCMCIA Slot
This slot is an optional slot, basically for Wireless LAN adapter.
DVI CON.
This slot is an optional slot for DVI Monitor
4
AC
Page 8
Smart Card Slot
This slot is an optional slot only for Smart Card-related applications.
2. Initial Terminal Setup
2.1 Hot-keys Functions
Ctrl+Alt+Up/Down Arro w
Use this function to switch sessions.
Ctrl+Alt+End:
Use this function to go back to the Windows list.
Ctrl+Alt+Home:
Use this function to activate the Start menu.
2.2 Setup Wizard
The Setup Wizard lets you set terminal network configuration and termi nal display parameters. Any
future changes can be made using the Terminal Properties dialog box. You can launch this dialog box
anywhere in the program at any time by pressing the [F2] key.
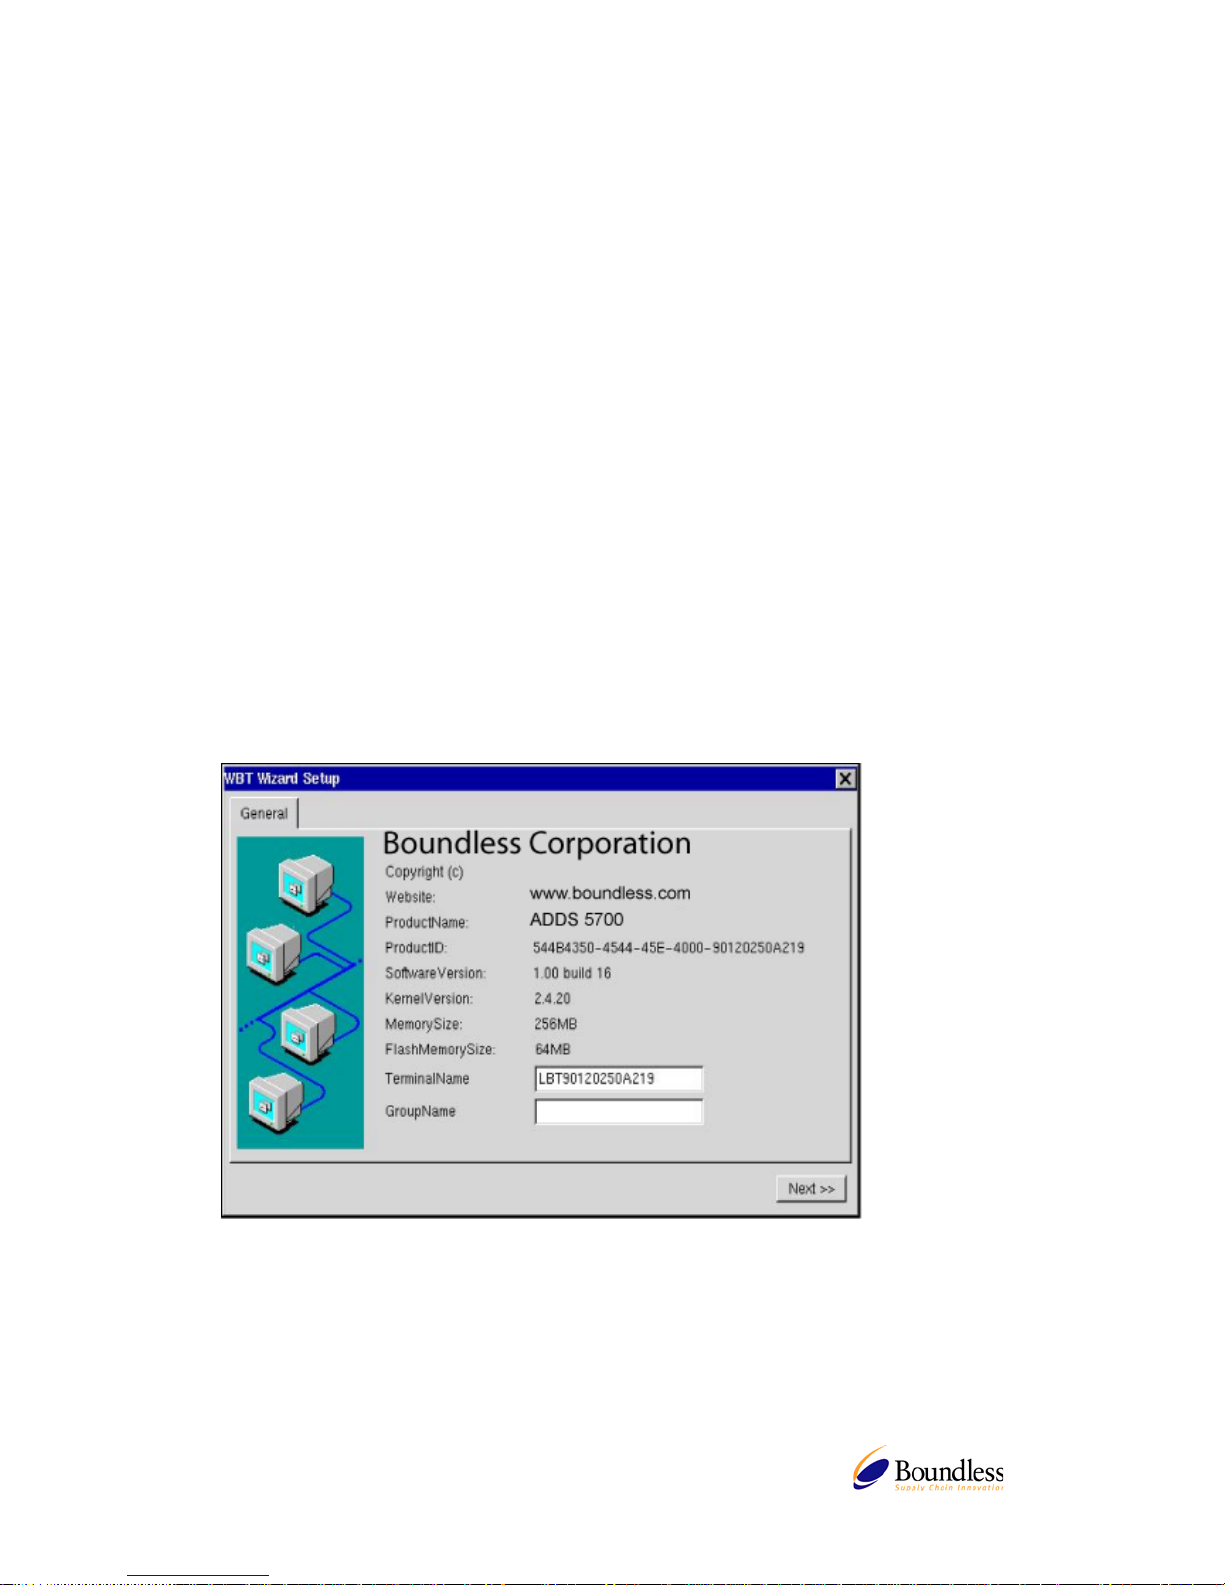
There are seven dialog boxes that display in succession during the process. Each dialog box is
self-explanatory. Some dialog boxes are informational and require n o user input. Other dialog boxe s will
prompt you for network and display information.
General
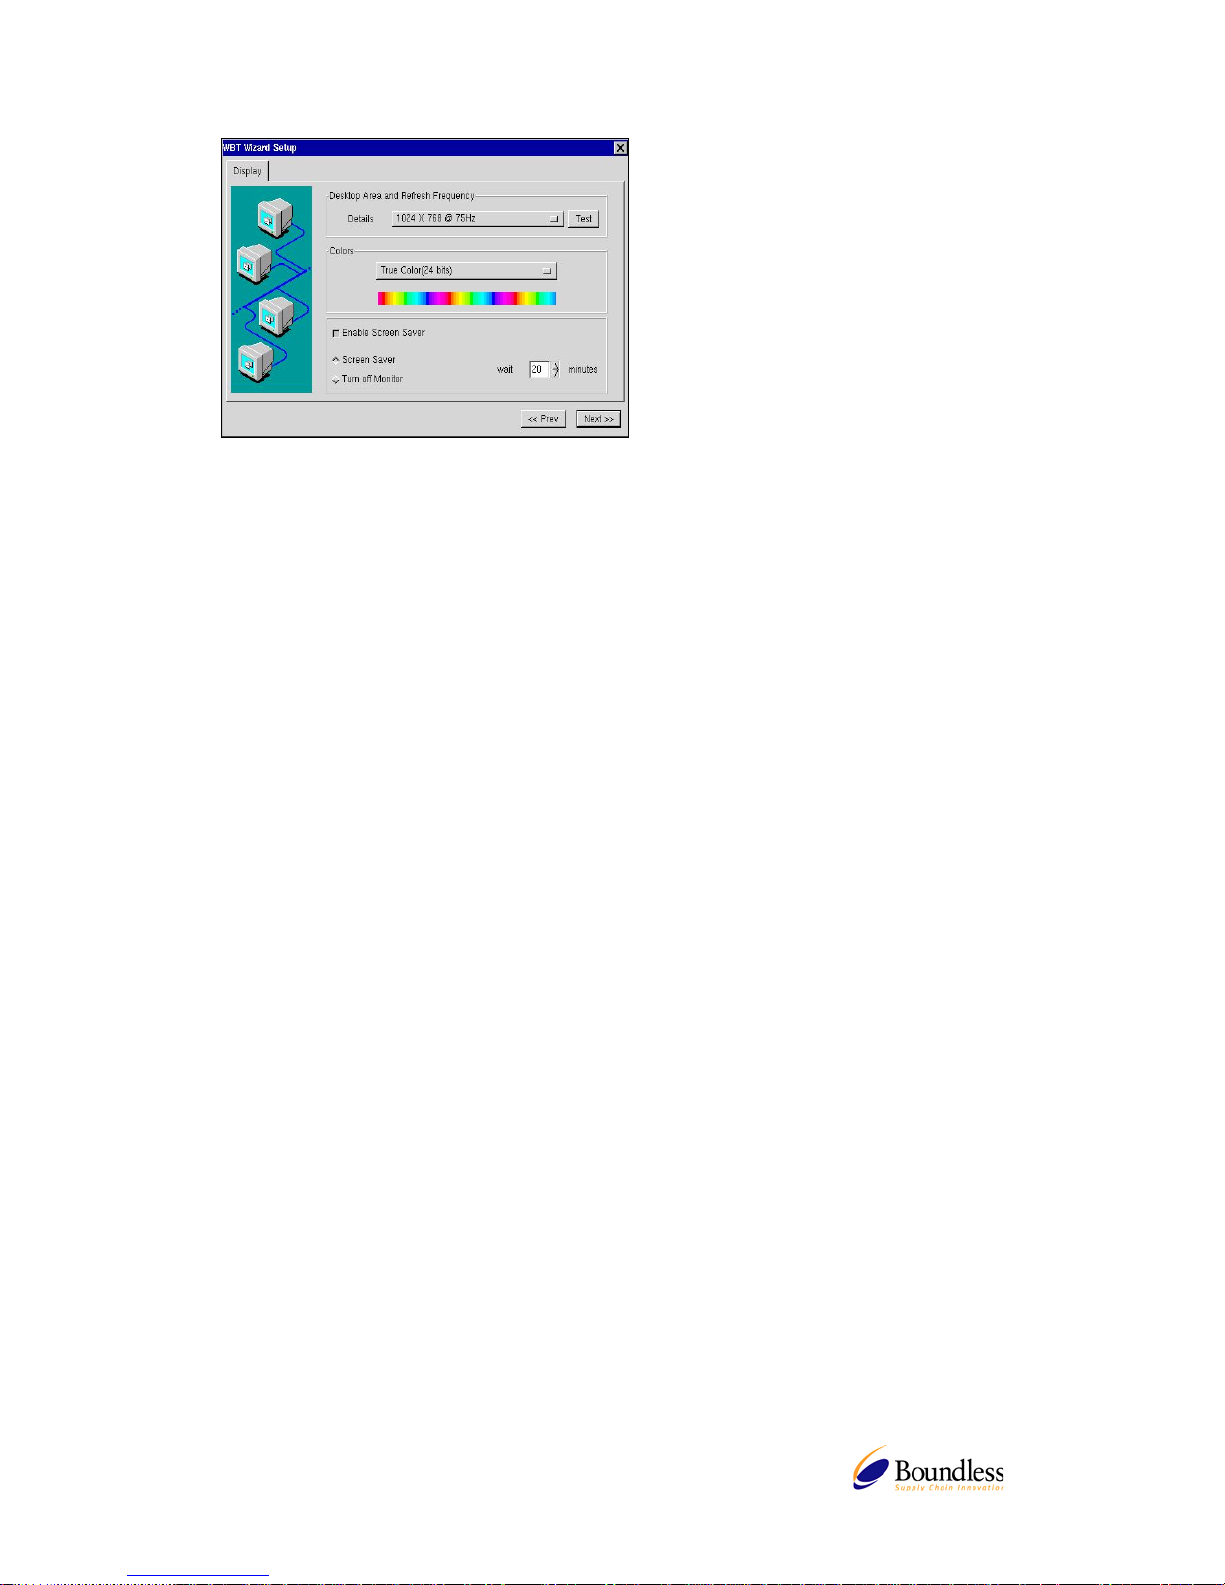
2.2.1 Display Settings
The monitor support several k inds of resolu ti ons. If you w ant to te st it, choo se the de sired reso luti on from
the list box and click Test.
5
Page 9
6
Page 10
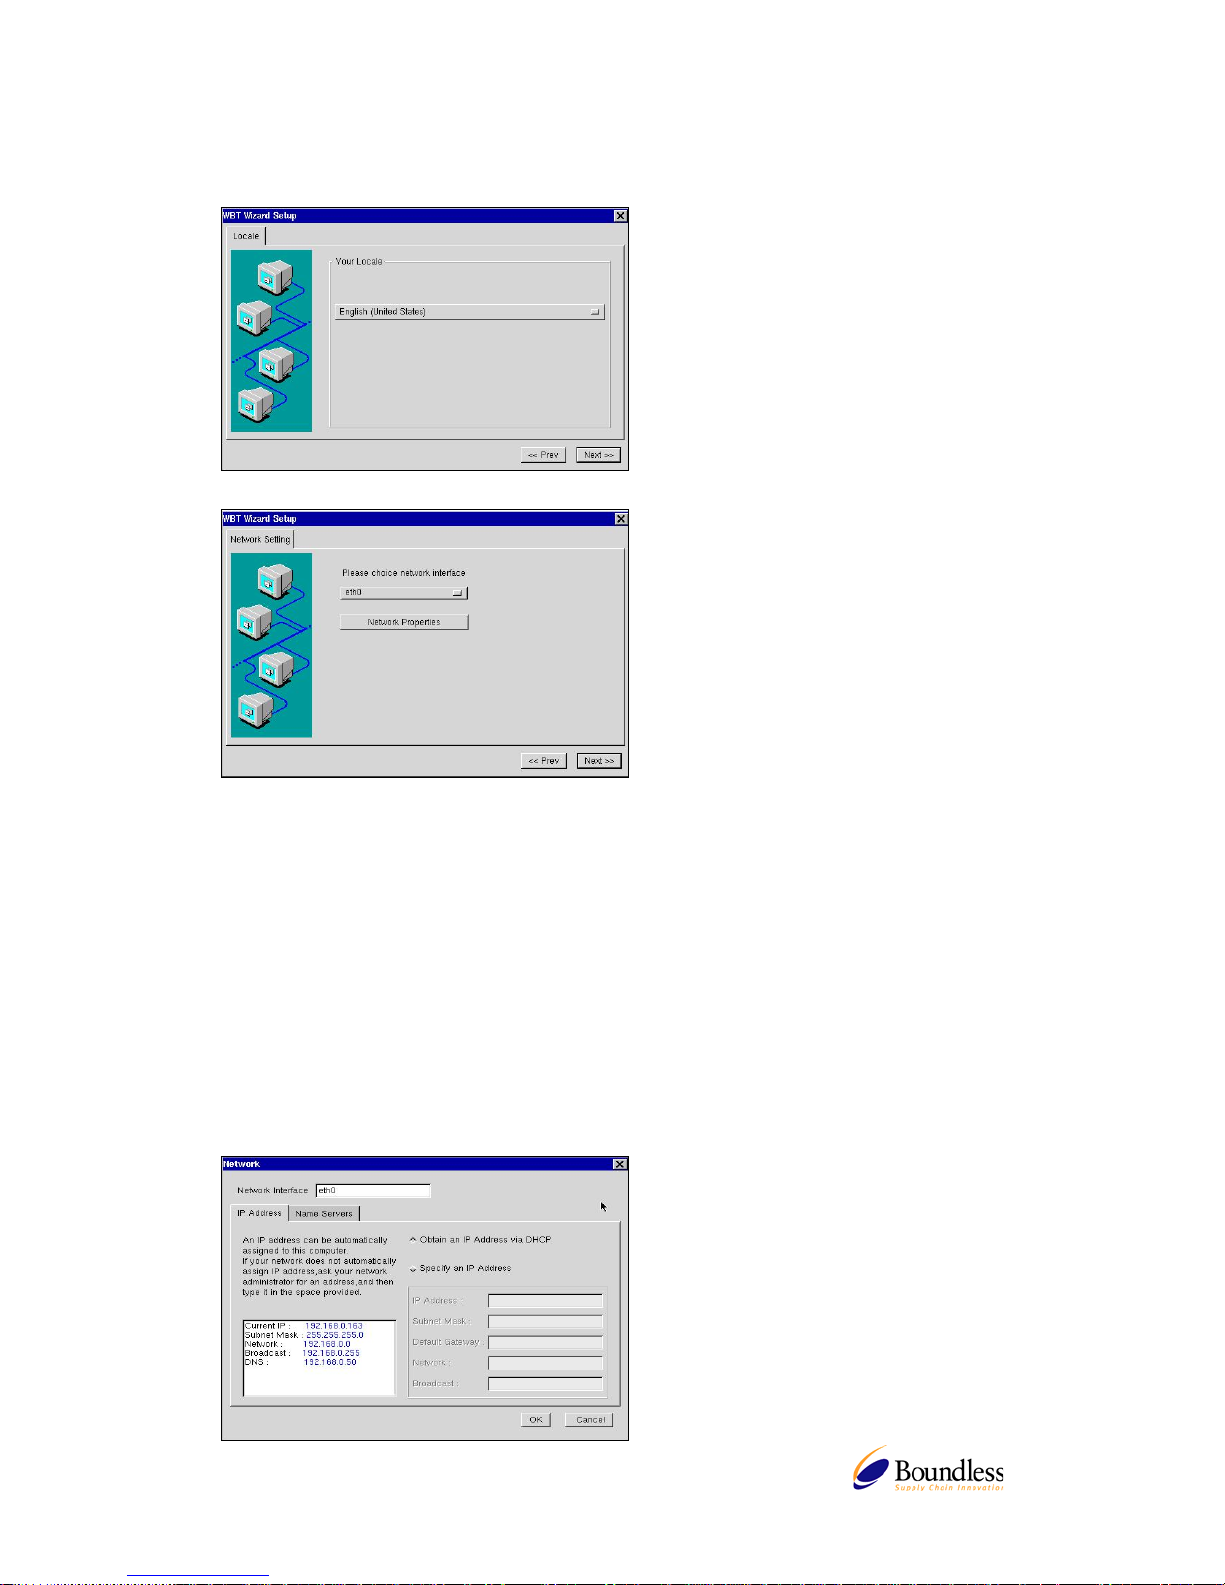
2.2.2 Locale
Set up the keyboard locale for the local device.
2.2.3 Network Configuration
Network attached device must contain a unique network identifier. If the network is using TCP/IP as a
communication protocol, t hese identifiers are calle d IP addresses. The followi ng series of screens will
allow you to choose from two different methods of assigning the IP addresses.
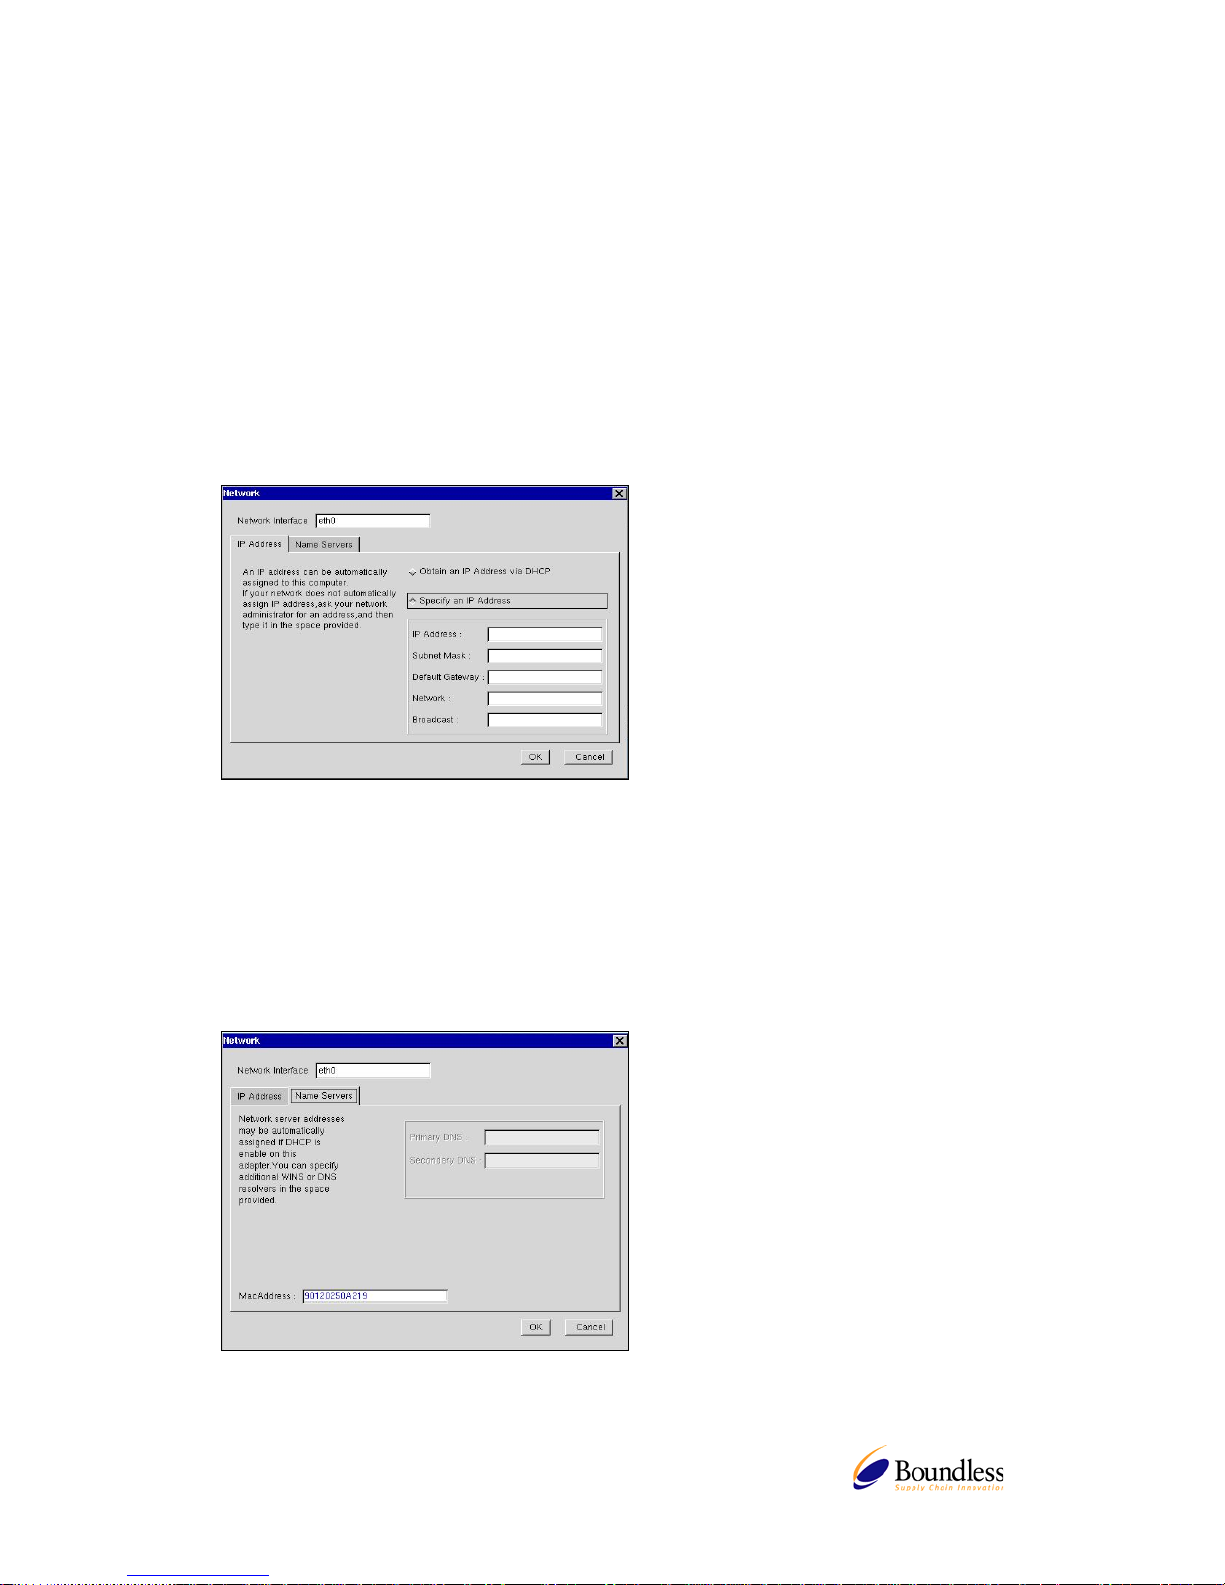
2.2.3.1 Use the IP information supplied by DHCP
If your network provides DHCP (Dynamic Host Configuration Protocol) service and you want it to provide
the terminals IP information, leave the first option selected.
The terminal can get its IP address through a DHCP service by default. The DHCP will automatically
assign an IP address that is drawn from a pool of available I P addresses, w hen a terminal un it is powered
on and a request is broadcast over the network.
Use the IP information supplied by DHCP. If you need to specify static IP address for the terminal, select
the second option. The option is select ed au toma tical ly if your netw ork does n ot pro vide a D HCP service,
or if the unit is not properly connected to the network. In these cases, leave the second option selected.
IP Address
7
Page 11
2.2.3.2 Specify an IP address
If the method you selected on the prior screen was to enter a static IP address, the below screen will
appear. You will be required to ent e r the following information ont o the sc re e n.
IP address
Required for identifying this unit to the network. The format will follow the standard addressing format.
Subnet Mask
Required for designating which network the IP address is a part of.
Gateway
Optional address which identifies the machine through which a subnet communicates with another
network.
Specify an IP Address
2.2.3.3 Name Servers
The screen shown below will appear only if you choose the Static IP Addressing method. The DHCP
method will provide this information required using a name resolution service.
Terminal servers typically support both DNS (Domain Naming Service) and WINS (Windows Internet
Naming Service) name resolution serv i ces . This scre en allows the terminal unit to use one or both of
these resolution services. To enab le DNS, WINS, or both, che ck the corres pond ing box. In the text b oxes,
enter the following information as appropriate for each. Click OK.
Name Servers
8
Page 12
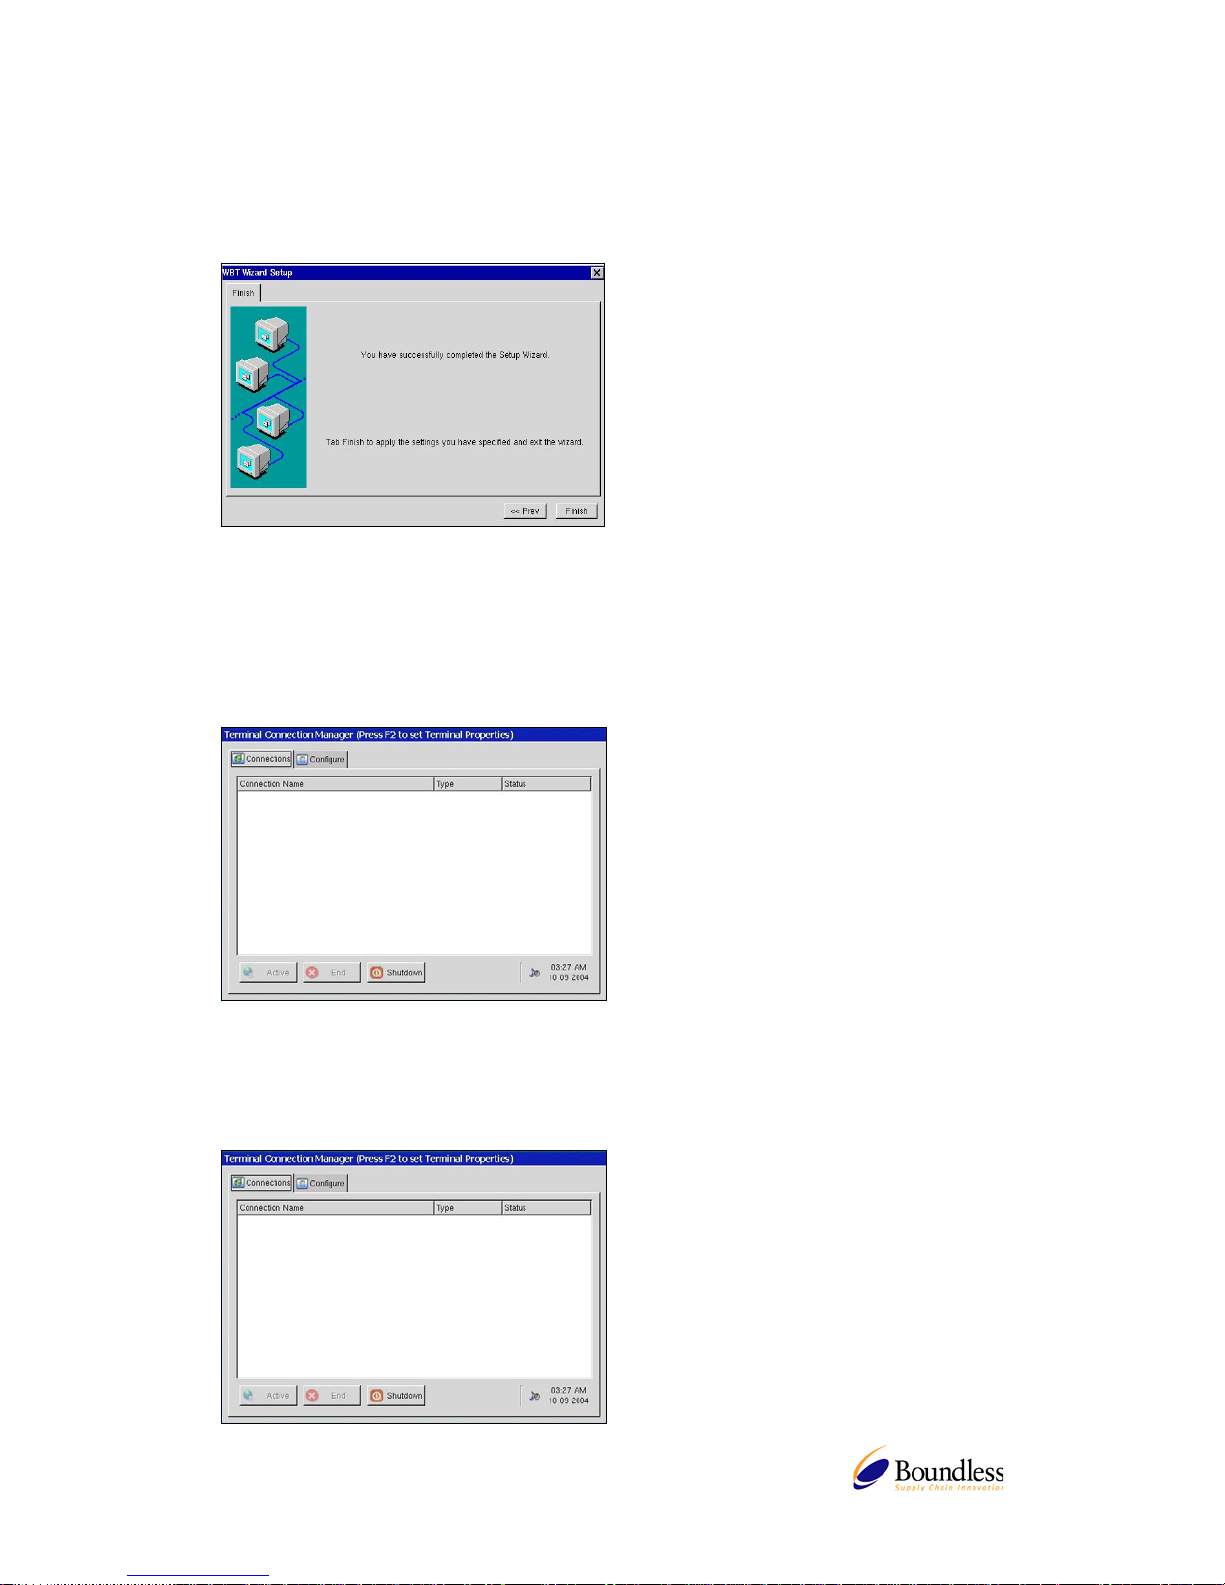
2.2.4 Finish the Setup Wizard
To review or change settings made on previous pages, click Back; to apply the settings, click Finish. To
change these settings after you have finished the Setup Wizard, press [F2] key to display the Terminal
Properties sheet.
Finish
3. Connections Management
The Terminal Connection Manager dialog box is designed to help you manage your terminal's network
connections. The dialog box displays after boot, and consists of the Connections properties sheet an d
the Configure properties sheet. The following figure shows the Terminal Connection Manager dialog
box.
Terminal Connection Manager
3.1 Using the Connections Properties Sheet
The functions of the Connections properties sheet are used to make (connect to) terminal
network connections. The following figure shows the
Connections Properties Sheet
Connections properties sheet.
9
Page 13
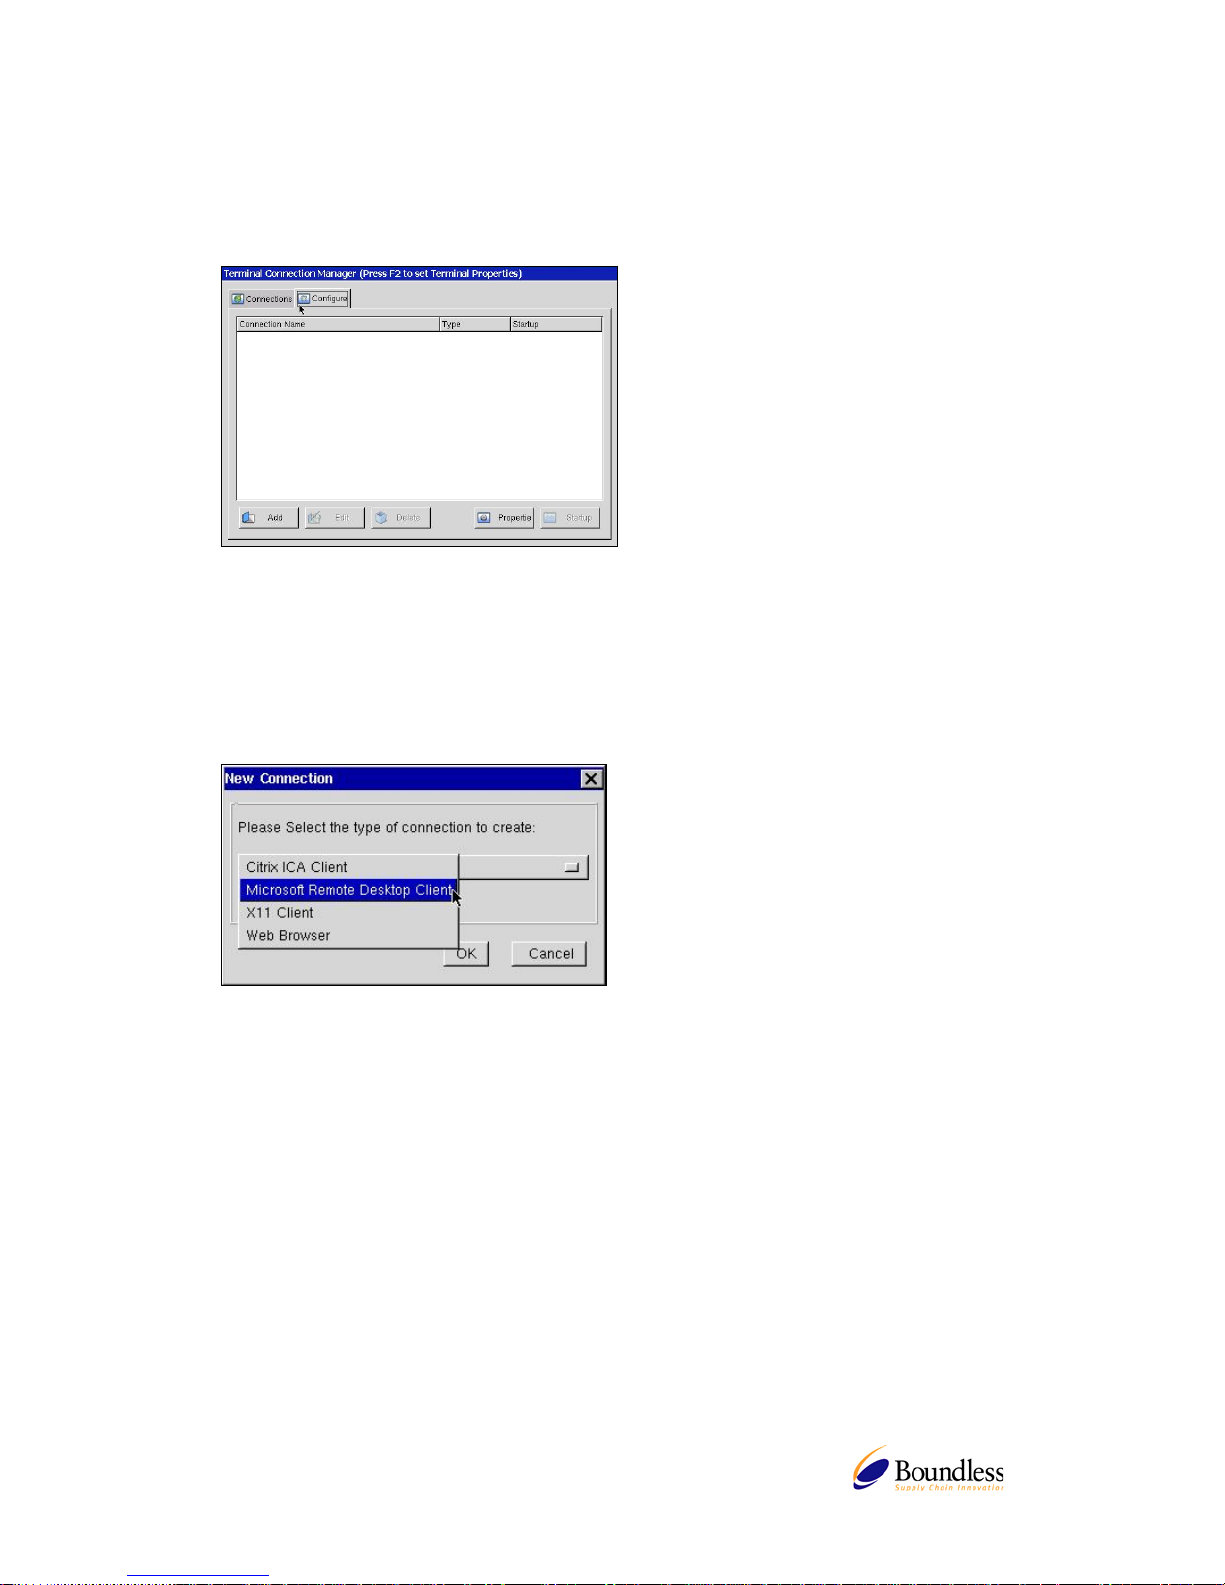
3.2 Using the Configure Properties Sheet
The Configure properties sheet allows the user to Add, Edit, Delete, and configure connections. The
following figure shows the Configure properties sheet.
Configure Properties Sheet
3.3 Creating New Connections
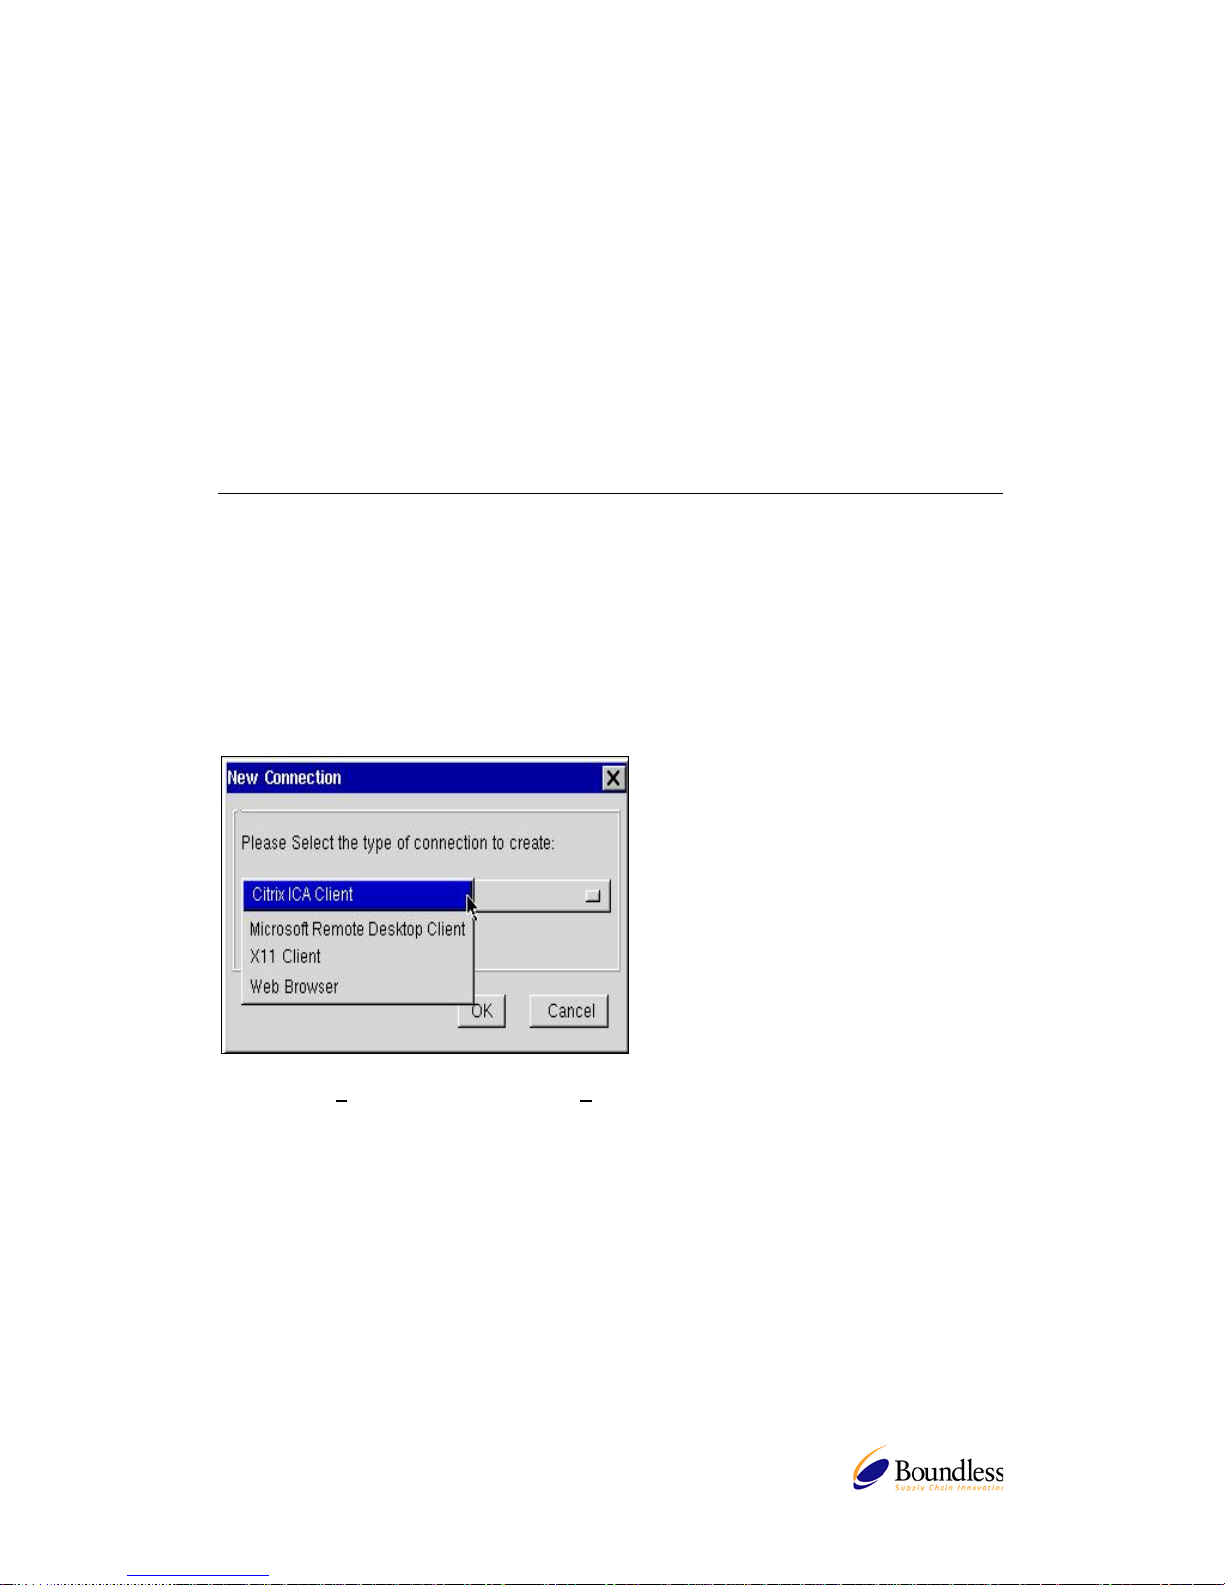
The New Connection dialog box is used to create new network connections. This dialog box is invoked
by: Clicking on the Configure tab in the Terminal Connection Manager dia log box. Clicking on Add
command button on the Configure properties sheet. The following figure shows the New Connection
dialog box.
New Connection Dialog Box
3.3.1 Choosing a Connection Protocol
Use the scroll list sh own in t he dial og box a bove to sele ct the type of con nection prot ocol y ou want . When
you choose from the list abo ve, y ou a re de cid ing w hi ch conn ect ion prot ocol you want to use to connect to
a server. Six selections are available:
Microsoft Remote Desktop Client
RDP (Remote Desktop Protocol) prot ocol, through which connects to a LBT (Linux –Based
Terminal) server. Refer to chapter 3.4 for RDP Connections.
Citrix ICA Client
ICA (Independent Computing Architecture) protocol, through which connects to an ICA
(Winframe/Metaframe) server. Refer to chapter 3.5 for ICA Connections.
Web Browser
Connects to the Internet dire ctly via Mo zilla. Th ere are diff erent v ersion s of Mozil la in Linux LBTs. It
depends on the capacity of the RAM of y our WBT. Refe r to chapt er 3.6 fo r the Inte rnet appl icatio ns.
VNC Viewer
VNC (Virtual Network Computing) protocol, through which connects to a VNC (WinVNC) server.
Refer to chapter 5.1 for all details.
10
Page 14
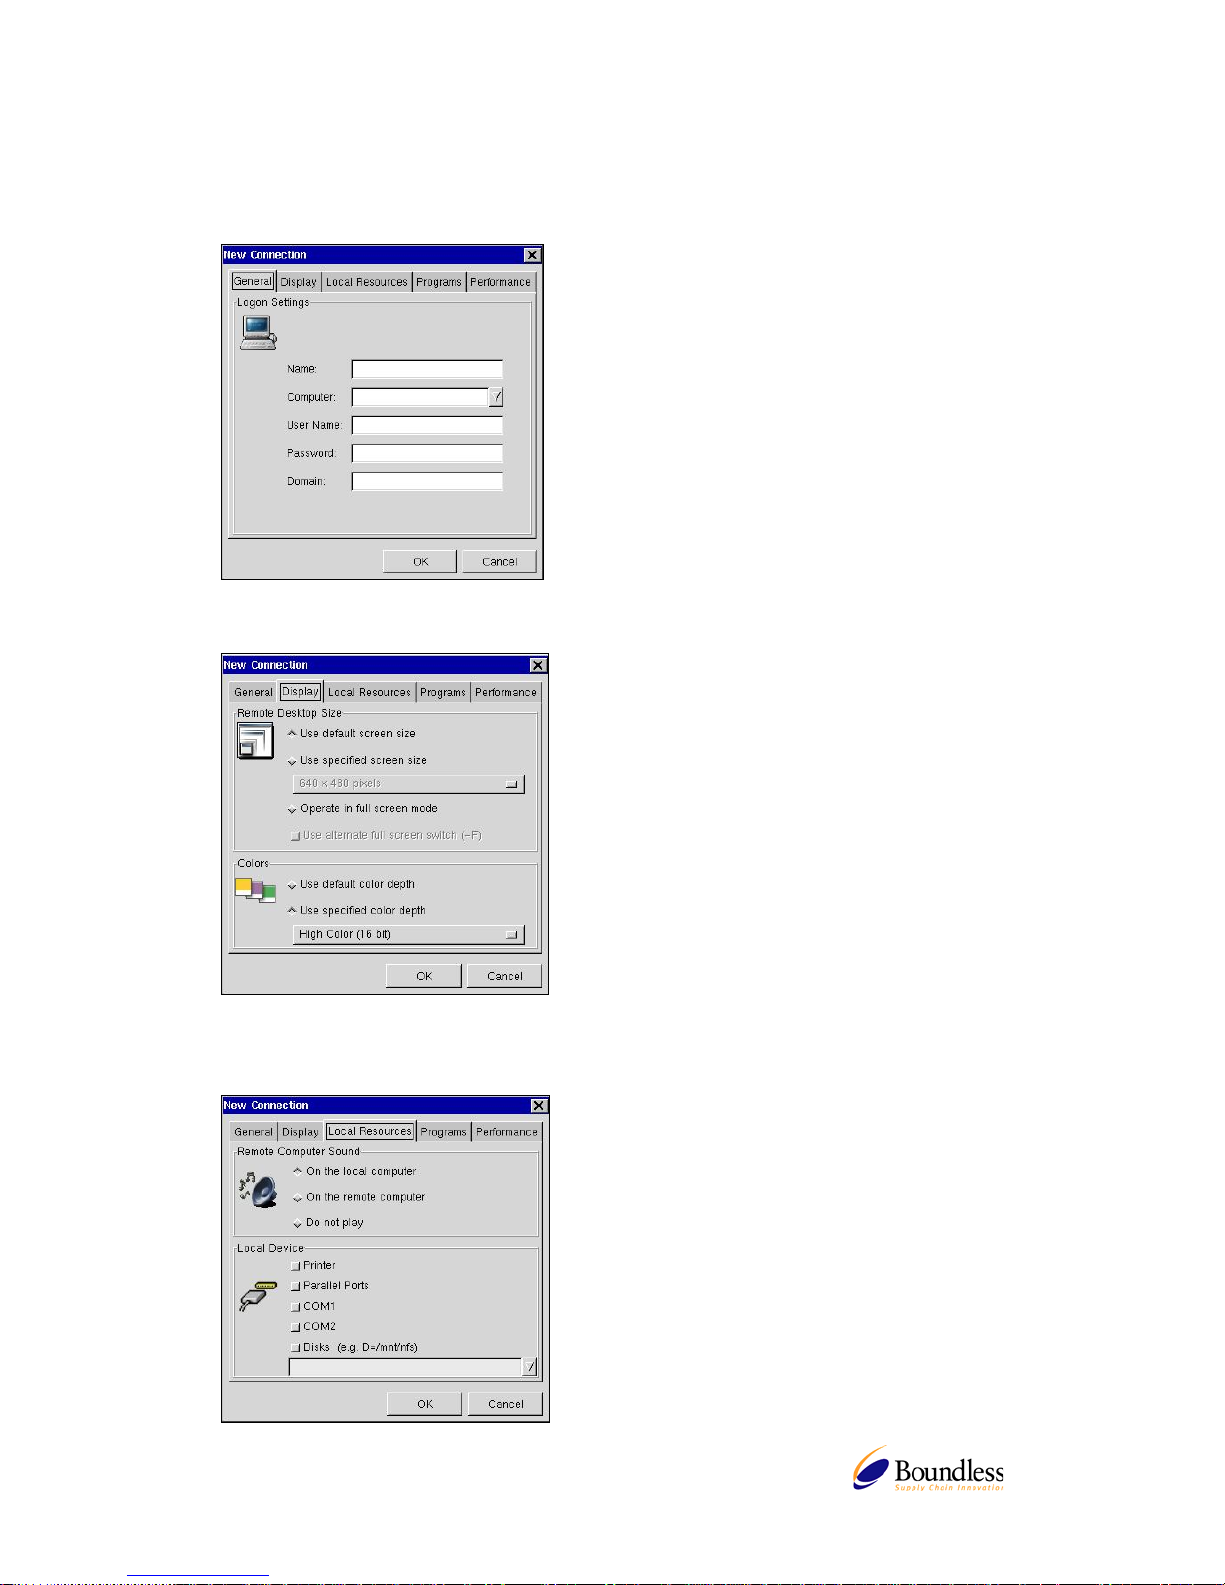
3.4 RDP Connections
3.4.1 General
You can type the Computer name, User name, Password, and Domain on this page.
3.4.2 Display
You can choose the size of your remote desktop and set the color quality.
3.4.3 Local Resources
You can set the sound on this page. Choosing “Bring to this computer”. It could bring the
sounds from the server to the client device.
11
Page 15
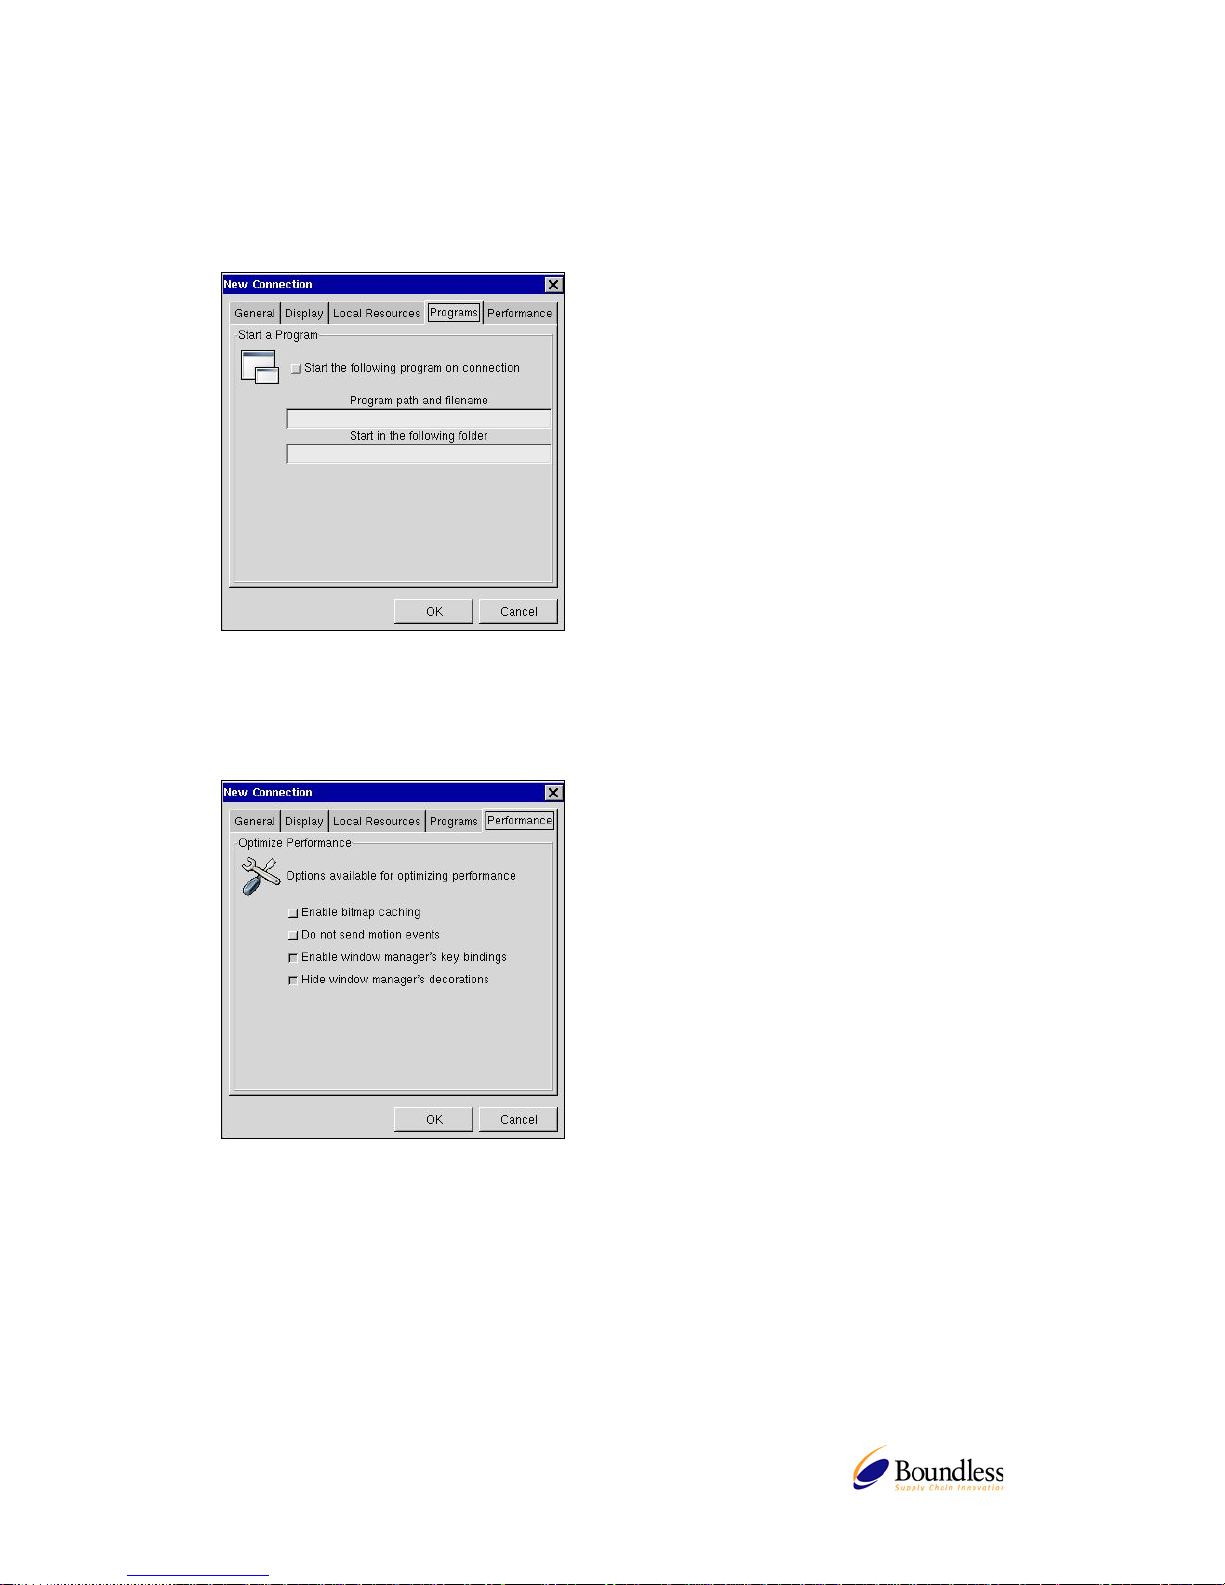
3.4.4 Programs
If you want to start a program while connection, you can click Start the following program on
connection . You can also specify path and file name when you specify a program.
3.4.5 Performance
The Performance properties sheet lets you optimize the performance with connections.
12
Page 16
3.5 ICA Connections
Use this application to create a Citrix ICA connection. Choose the Network Connection or Dial-In
Connection for the remote application.
3.5.1 Creating a New ICA Connection Entry
You can configure and run two types of ICA sessions:Citrix server connections and published
applications.
Citrix server connections allow you to remo tely control a session on a Citrix server from your WBT.
Published applications are specific applications set up by an administrator for remote users to run.
Note
steps, you set the essential item s you need to conne ct to a Citrix se rver from y our WBT. See “Changin g a
Connection Entry” for more information about how to change the other properties for a connection entry.
3.5.1.1 To create a new connection entry
a. In the Terminal Connection Manag e r dialog box, click the Configure tab.
b. Click Add.
c. In the New Connection dialog box, click the list box and select Citrix ICA Client. Click OK.
d.
Citrix server connections let you access the desktop of a specific Citrix server; you can run any
applications available on the desktop, in an y order.
When connected, you are presented wit h the appli cat i on its e lf .
This procedure describes the simplest way to create a connection entry. When you follow these
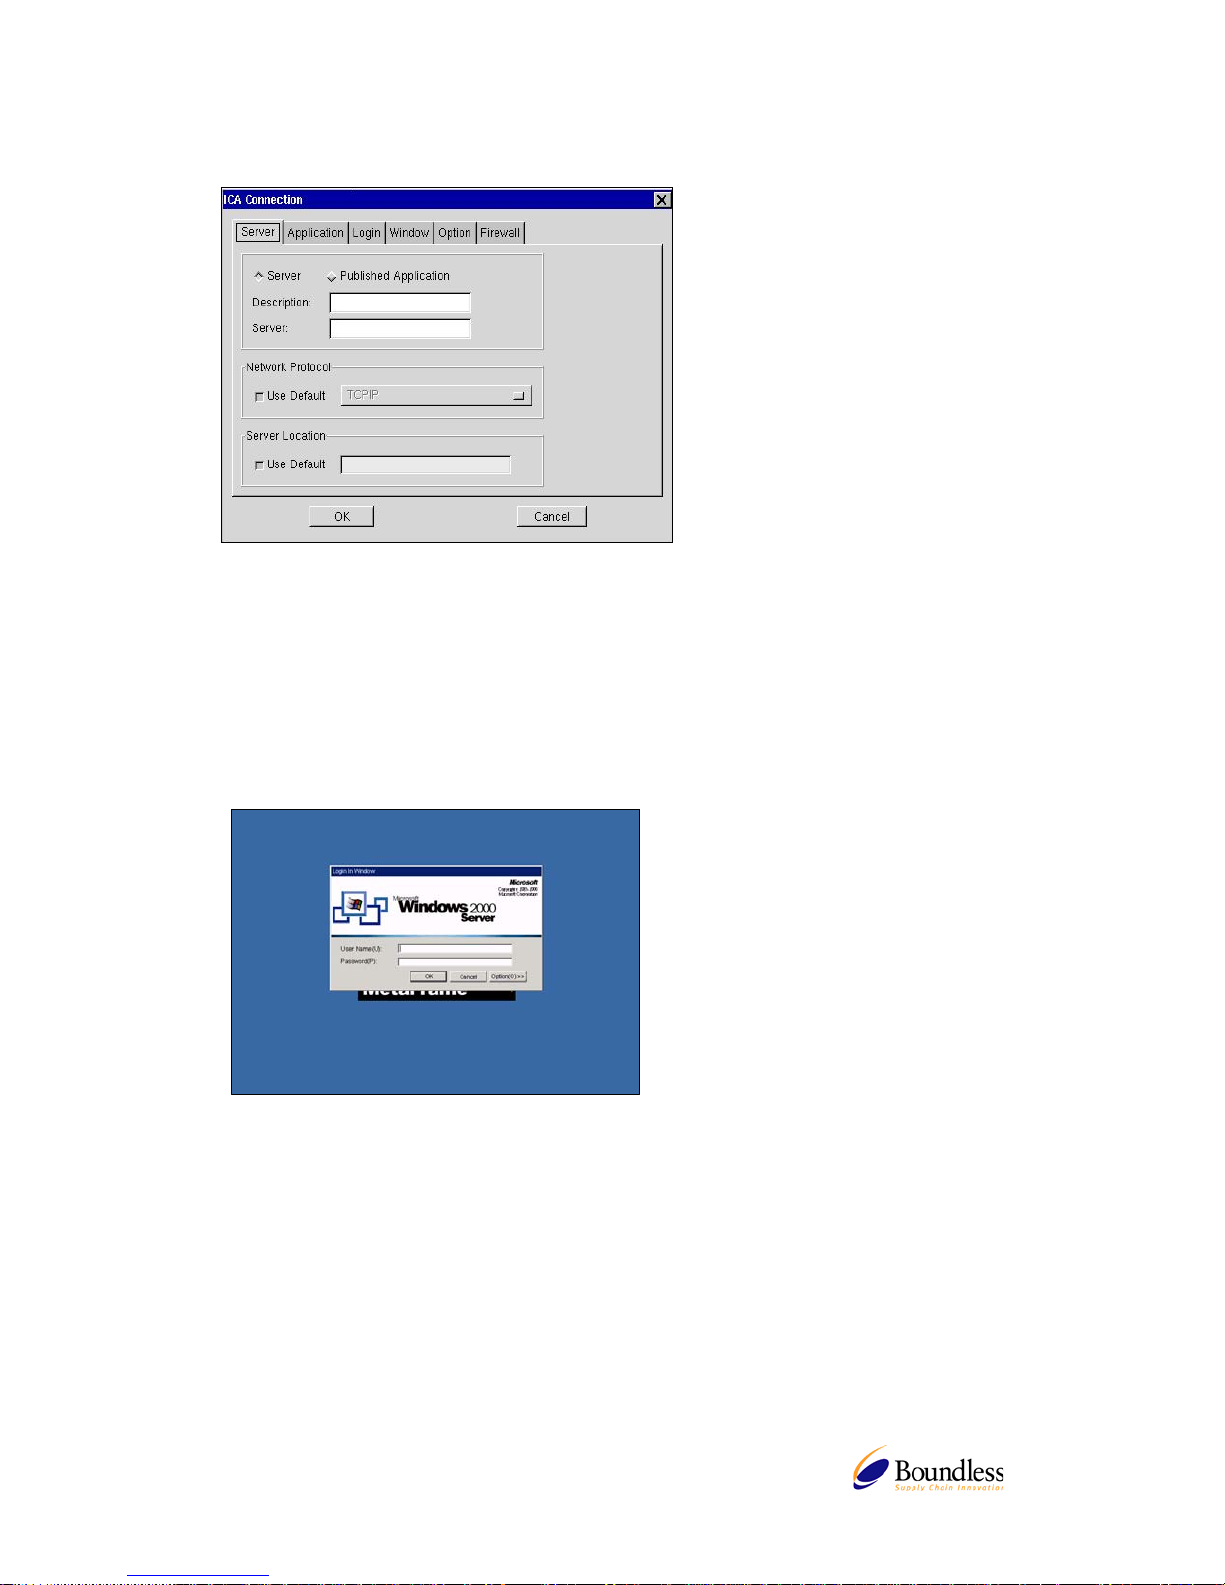
d.5.3.5 Click S
erver to connect to a server or Published Application to connect to a published
application.
1. Click Server or Published Applicati on.
2. For a server connection, type the name or IP address of the MetaFrame server or select the name
from the pop-up menu to the right of the Server field. —or—
For a published appl ication, type the name of th e published applicatio n or select the name from th e
pop-up menu to the right of the Server field.
3. If you have typed the name of the MetaFrame server or published application, in the Description
field, type a unique description for the entry. The description is used to identify the connection in the
Citrix ICA Client window. If you have selected a server or published application from the pop-up
menu, a default description is automatically added.
4. Click OK to save the entry or Cancel to exit the Properties dialog box without saving the entry.
13
Page 17
3.5.2 Connecting to a Citrix Server
3.5.2.1 To start a previously defined connection
a. In the Terminal Conne ction Manager dialog box, click the Connections tab.
b. Select the desired connection name and click Connect.
If you specified a valid user name and password in the conne ction entry, you are logged in as that user.
If no user name and password are present in the entry or the information is incorrect, the server logon
dialog box appears. Enter a valid user name and password for the Citrix server and click “OK” to log on
3.5.3 Changing a Connection Entry
This section describes how to change properties for an existing connection entry.
.
3.5.3.1 To change the properties of a connection entry
In the Terminal Connection Manager dialog box, click the Configure tab.
a.
b. Click the name of the connection entry that you want to change.
c. Click Edit to display the Edit Connection Details dialog box.
d. Make the desired changes.
e. Click OK to save your changes.
14
Page 18
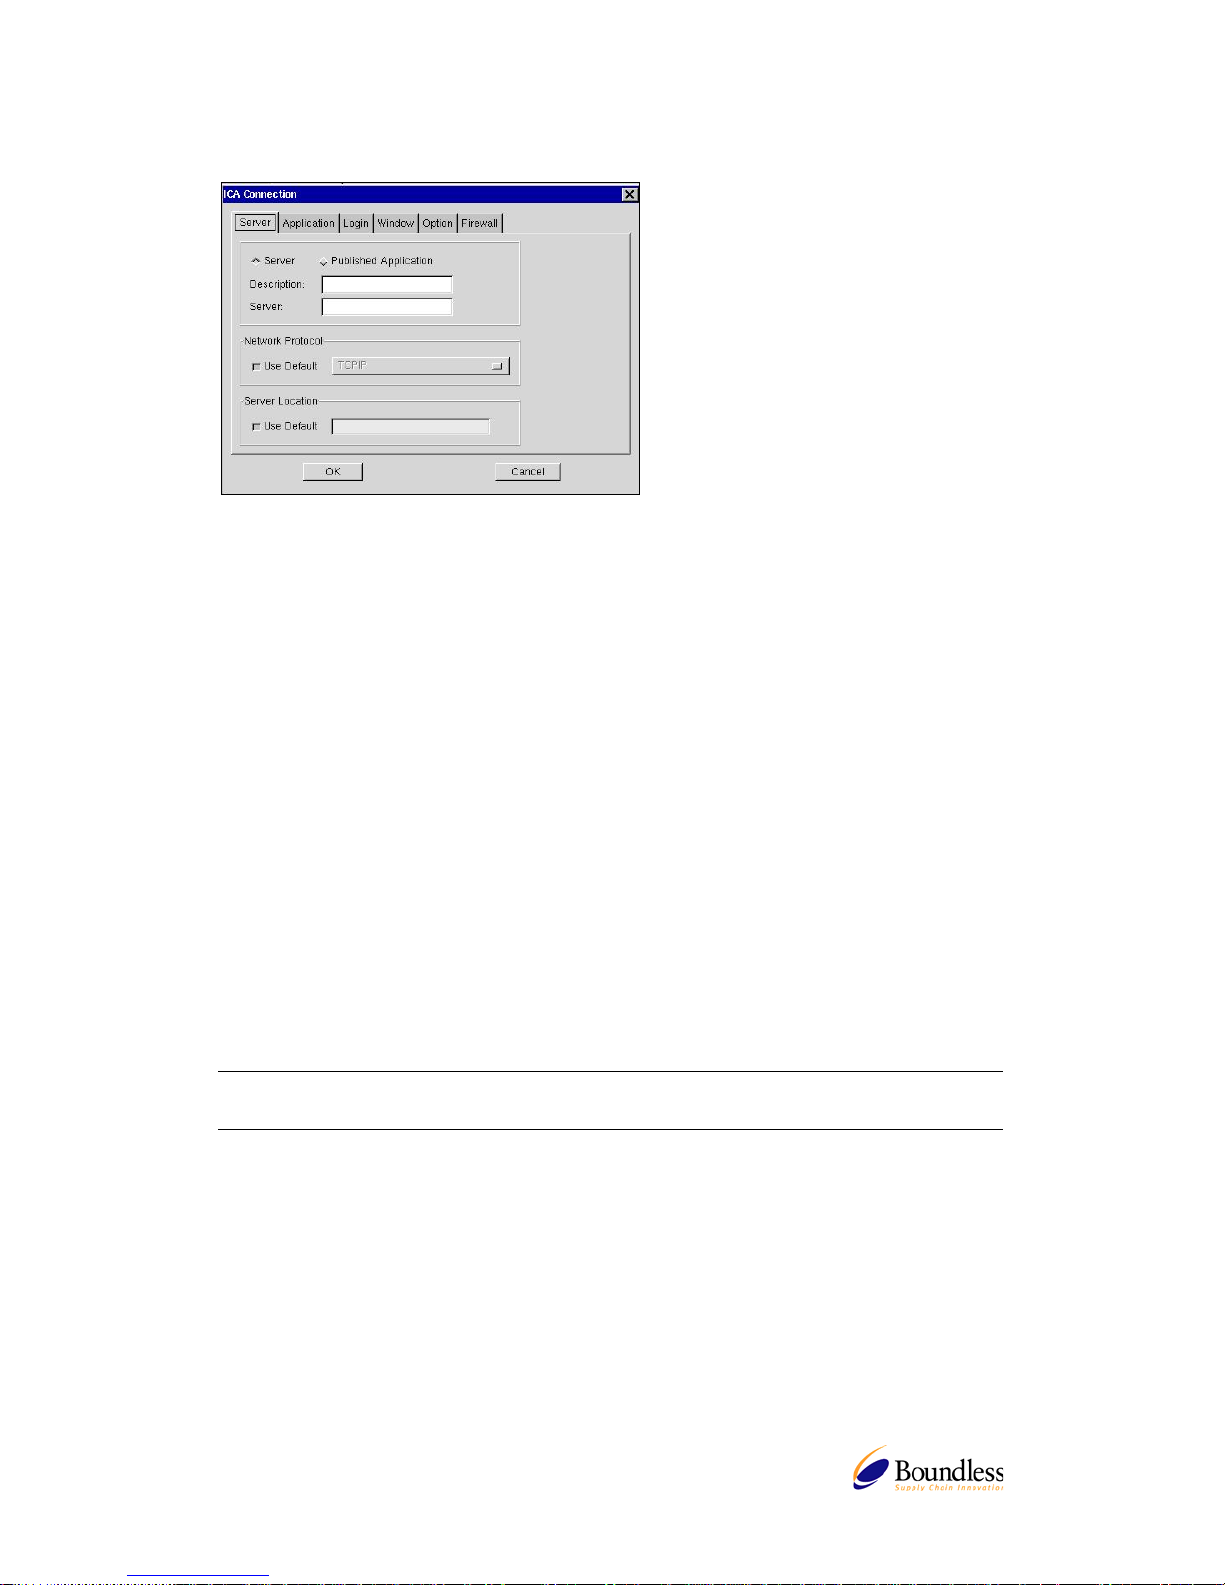
The Edit Connection Details dialog box contains the following tabs:
a. The Server tab, where you can set the server or published application name to which to connect.
b. The Application tab, where you can specify an application to run after connecting to a Citrix server,
see section 3.5.3.2 “Specifying an Application to Run after Connecting to a Citrix Server” for more
information.
The
c.
d. The Window tab, where you can set the number of colors used for the ICA Client window, see
e.
f. The Firewall Settings tab, where you can configure the client to use a SOCKS proxy and alternate
Logon tab, where you can set the user name, password, and domain to log in to the Citrix
server automatically, see section 3.5.3.3 “Specifying Logon Information” for more information.
section 3.5.3.4 “Changing the Window Properties” for more information.
The Options
configure sound support, see section 3.5.3.5 “Setting Connection Entry Options” for more
information.
address re-mapping, see section 3.5.3.6 “Configuring Firewall Settings” for more information.
, where you can control
tab
the connection between the Cit rix serv er and your WBT and
3.5.3.2 Specifying an Application to Run after Connecting to a Citrix Server
Use the Application tab to specify an application to run after connecting to a Citrix server. If you specify
an application, you do not see the Window s deskt o p when y ou conne ct a nd the conn ect i on is clos ed
when you exit the application.
This tab does not apply to connection entries for published applications. Any value entered is
Note
ignored.
a. In the Terminal Connection Manager dialog box, click Configure.
b. Select the connection entry that you wan t to chang e an d cli c k Edit.
c. Click the Application tab.
d.
In the Command Line box, specify the path and file name of th e application to be run after
connecting to the Citrix s erve r. For ex ample , to lau nch Notepad autom at ically afte r connec ting to the
Citrix server, type:
e. In the Working Directory box, specify the working directory to be used with the application. If you
use Notepad to work on documents in the C:\My Documents directory, type C:\My Documents.
f. Click OK to save your changes.
C:\Wtsrv\Notepad.exe
15
Page 19
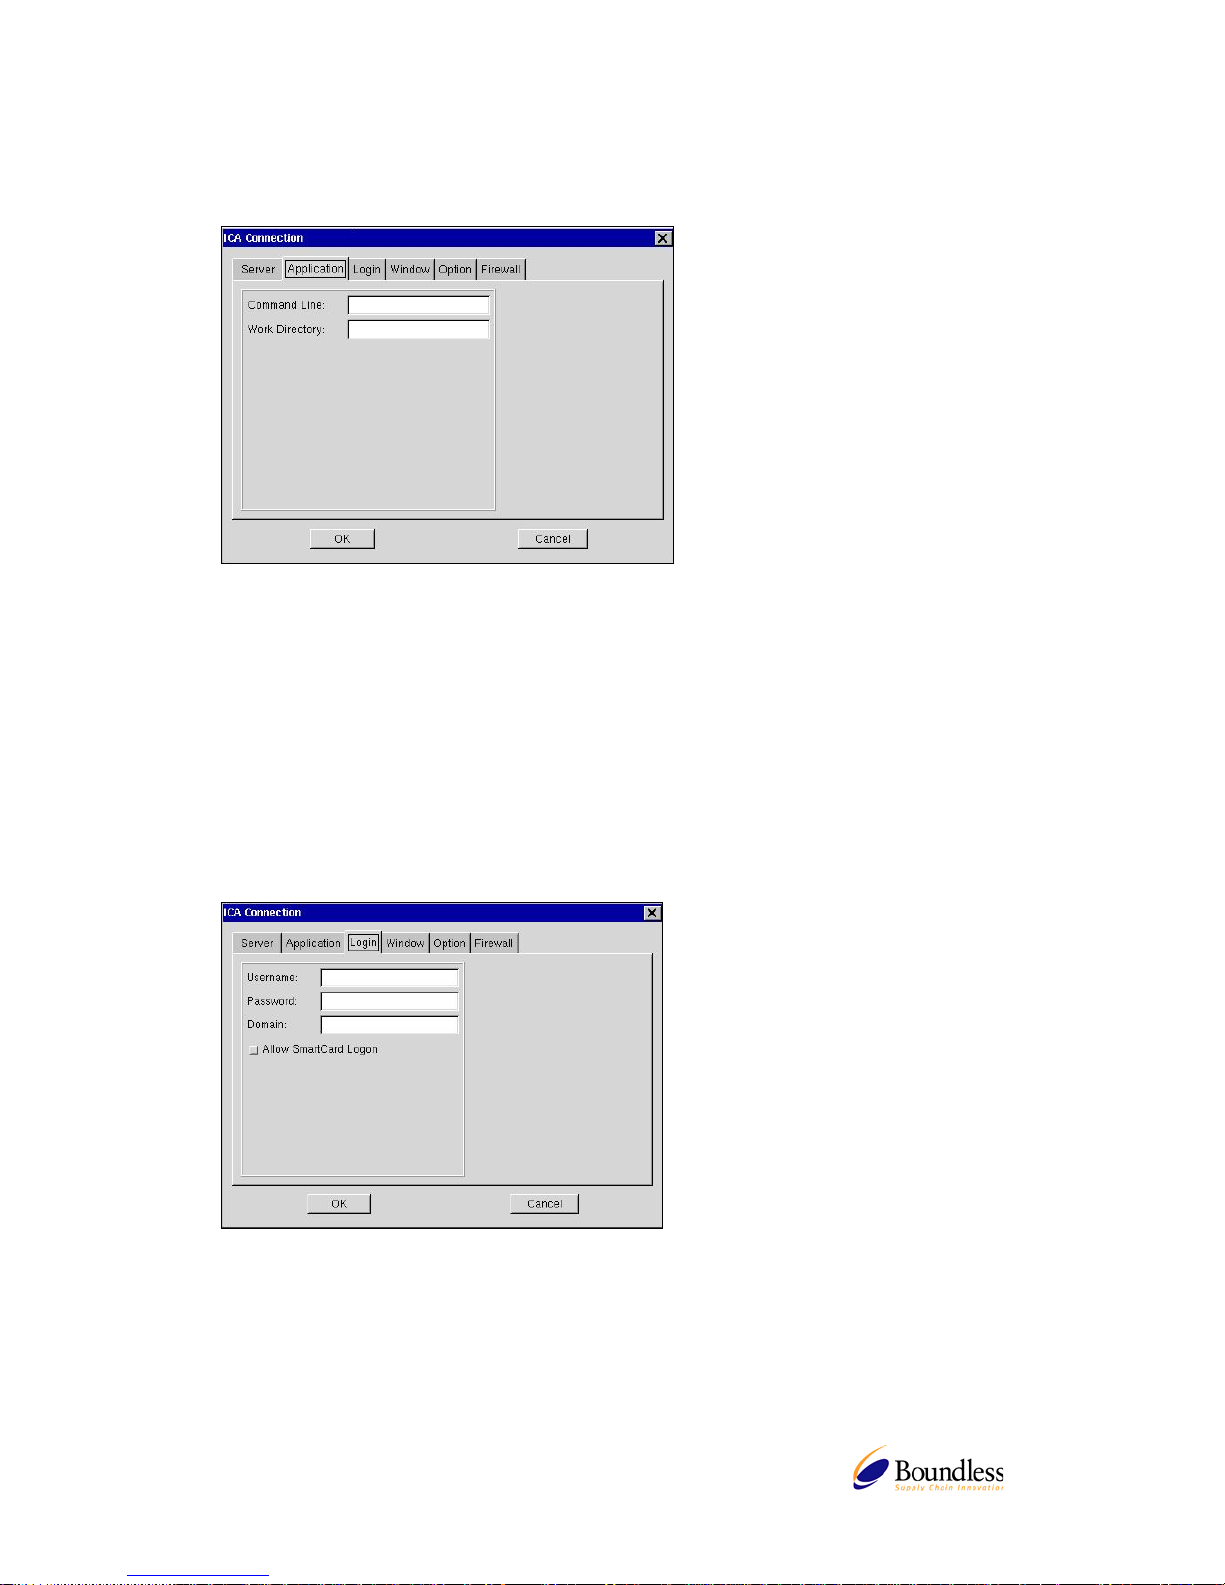
When you log on to the Cit rix serve r, Notepad begins. In Notepad, if you sele ct Open from the File menu,
the C:\My Documents directory is displayed.
3.5.3.3 Specifying Logon Information
You can include the settings needed to log on to the Citrix server as part of the connection entry. This
saves time when connecting to the server but is less secure.
a. In the Terminal Connection Manager dialog box, click Configure.
b. Select the connection entry that you want to change and click Edit.
c. Click the Logon tab.
d. Type a valid user name, domain, and password. If you leave these box es blank, you are prompted
for your user name, domain, and password each time you connect to the Citrix server or published
application.
e. Click OK to save your changes.
3.5.3.4 Changing the Window Properties
Use the Window tab to change the number of colors to use for ICA connections made using the
connection entry.
a. In the Terminal Connection Manag e r dialog box, click Configure.
b. Select the connection entry that y ou want to change and click Edit.
c. Click the Window tab.
16
Page 20
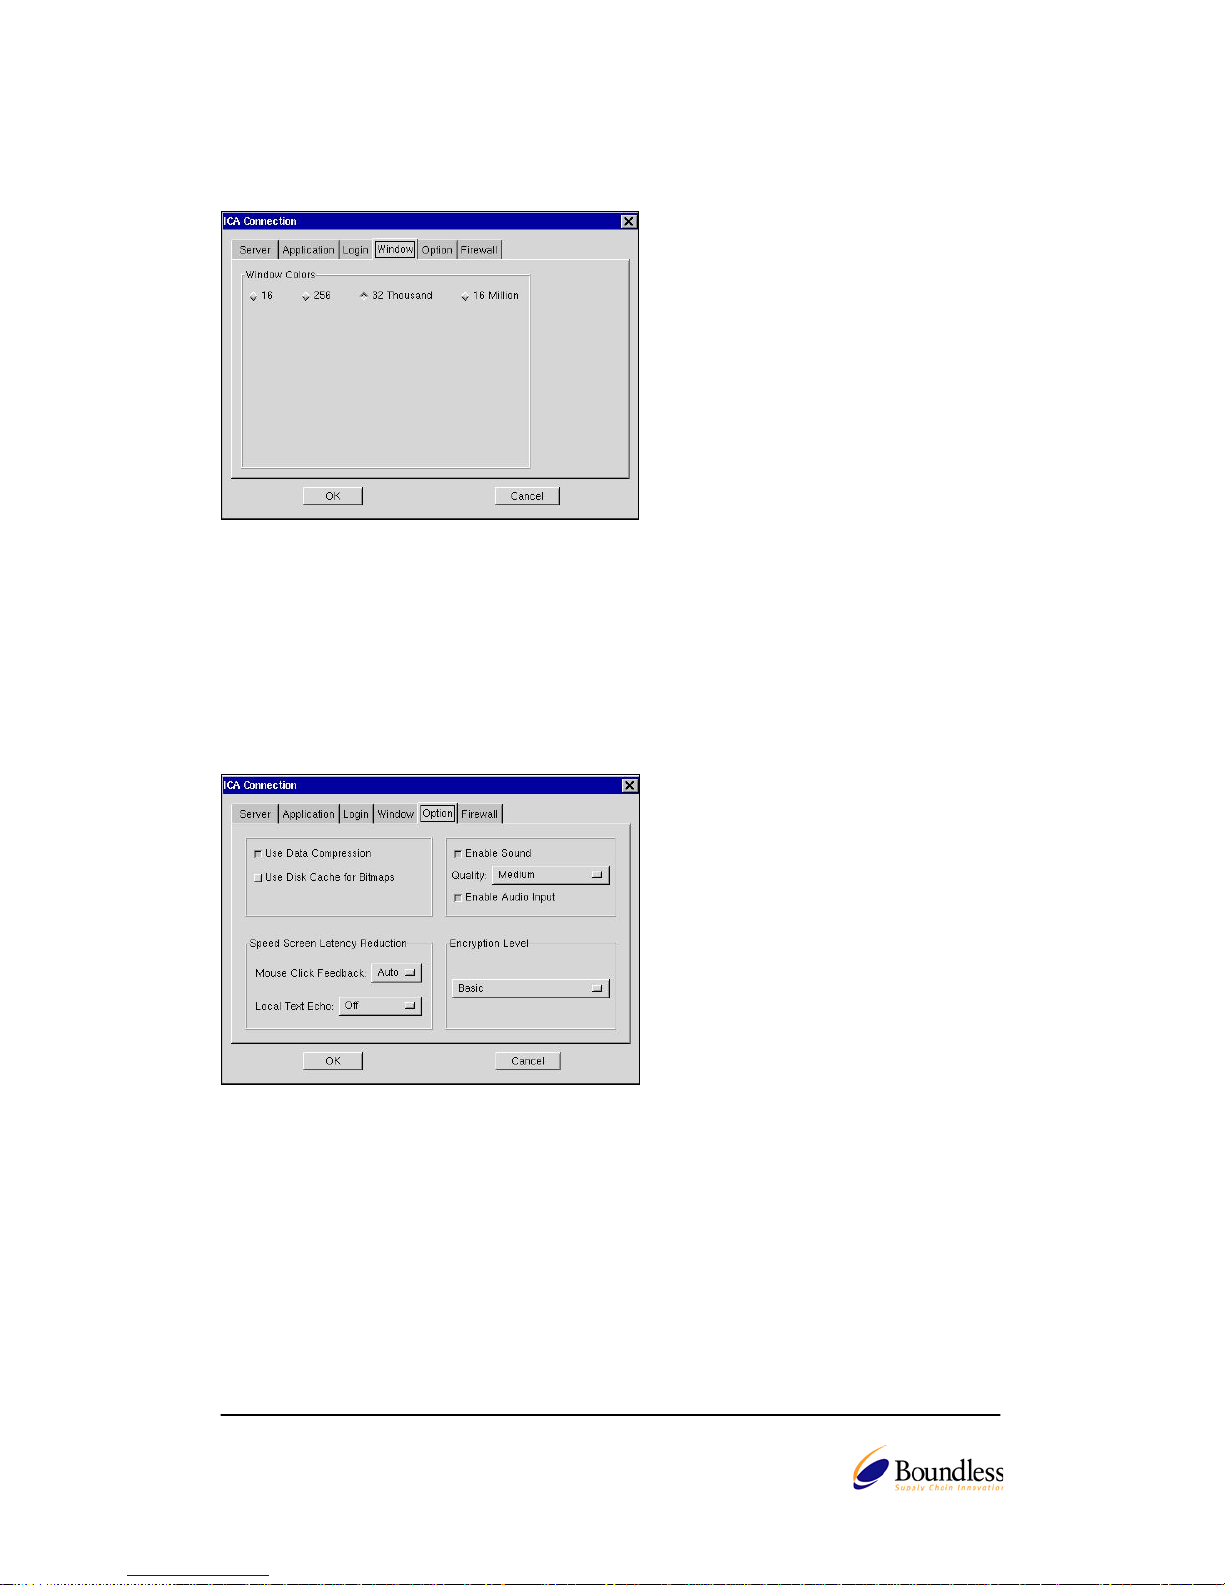
d. In the Window Colors box, set the number of window colors to 16, 256, 32 Thousand or 16 Million.
Click OK to save your changes.
e.
3.5.3.5 Setting Connection Entry Options
Use the Options tab to set opt io ns spe cifi c to t he con necti on ent ry, such as data compression and sound
support.
a. In the Terminal Connection Manag e r dialog box, click Configure.
b. Select the connection entry that y ou want to change and click Edit.
c. Click the Options tab.
d. Click Use Data Compression to reduce the amount of data transferred between the ICA Client and
the Citrix server. If your connection is bandwidth-limited, enabling compression can increase
performance. If your client device is on a high-speed LAN, you may not need compression. If you
have sufficient bandwidth, leave compression off to conserve processing power on the Citrix server.
e. Enable the Bitmap Cache
Bitmap caching stores commonly-used bitmaps (images) locally on your client s o that they do not
have to be transferred over the ICA connection every time they are needed.
f. Speed Screen Latency Reduction
SpeedScreen Latency Reduction improves performance over high latency connections by providing
instant feedback to the user in response to typed data or mouse clicks.
Note:SpeedScreen Latency Reduction will work only when it is available on the MetaFrame server you
17
Page 21

are connecting to and has been enabled. See your MetaFrame server documentation for more
details.
z To change Speed Screen settings
In the Speed Screen section there are two list boxes, Local Text Echo and Mouse Click Feedback.
Local Text Echo accelerates display of the input text , effe ctiv ely shie ldi ng you f rom expe rie ncin g lat en cy
on the network. Mouse Click Feedback provides visual feedback of a mouse click, in that the mouse
pointer is immediately changed to an hourglass indica tor. Select a mode from the drop-down list:
a. For slower connections (for example if you are connecting over a WAN or a dial-in connection),
set mode to On to decrease the delay between user input and screen display.
b. For faster connections (for example, if you are connecting over a LAN), set mode to Off.
c. If you are not certain of the connection speed, se t the mode to Auto to turn SpeedScreen on
or off depending on the la tency of the connection. You can override Auto mode using the
Toggle Speed Screen hotkey.
Note:Local text echo does not support input using IME.
d. Click Enable Sound to enable sound suppo rt. From th e pull-dow n list, sel ect one of th e following
quality levels.
High. This value provides the g reatest audio quality but should be used only w hen bandwidth
consumption is not a con c ern.
Medium. Using this value results in less bandwidth co nsumption than when using High.
Compression of sound data provides greater bandwidth efficiency but reduces sound quality somewhat.
This value is recommended for most LAN-based connection s.
Low. This value offers the most efficient use of bandwidth but also decreases sound quality
severely. This value is recommended for low-bandwidt h connections, including most modem
connections.
e. Click OK to save your changes.
3.5.3.6 Configuring Firewall Settings
If you are using a SOCKS proxy server to limit access to your Citrix servers, you must configure the ICA
Client to connect to Citrix servers through a SOCKS proxy server. You can configure a default SOCKS
proxy for all connections or use only a SOCKS proxy with a specific connection file. To do the former one
please refer to the section
To configure a SOCKS proxy server for a specific connection entry
a. In the Terminal Connection Manag e r dialog box, click Configure.
b. Select the connection entry that y ou want to change and click Edit.
c. Click the Firewall Settings tab.
18
Page 22
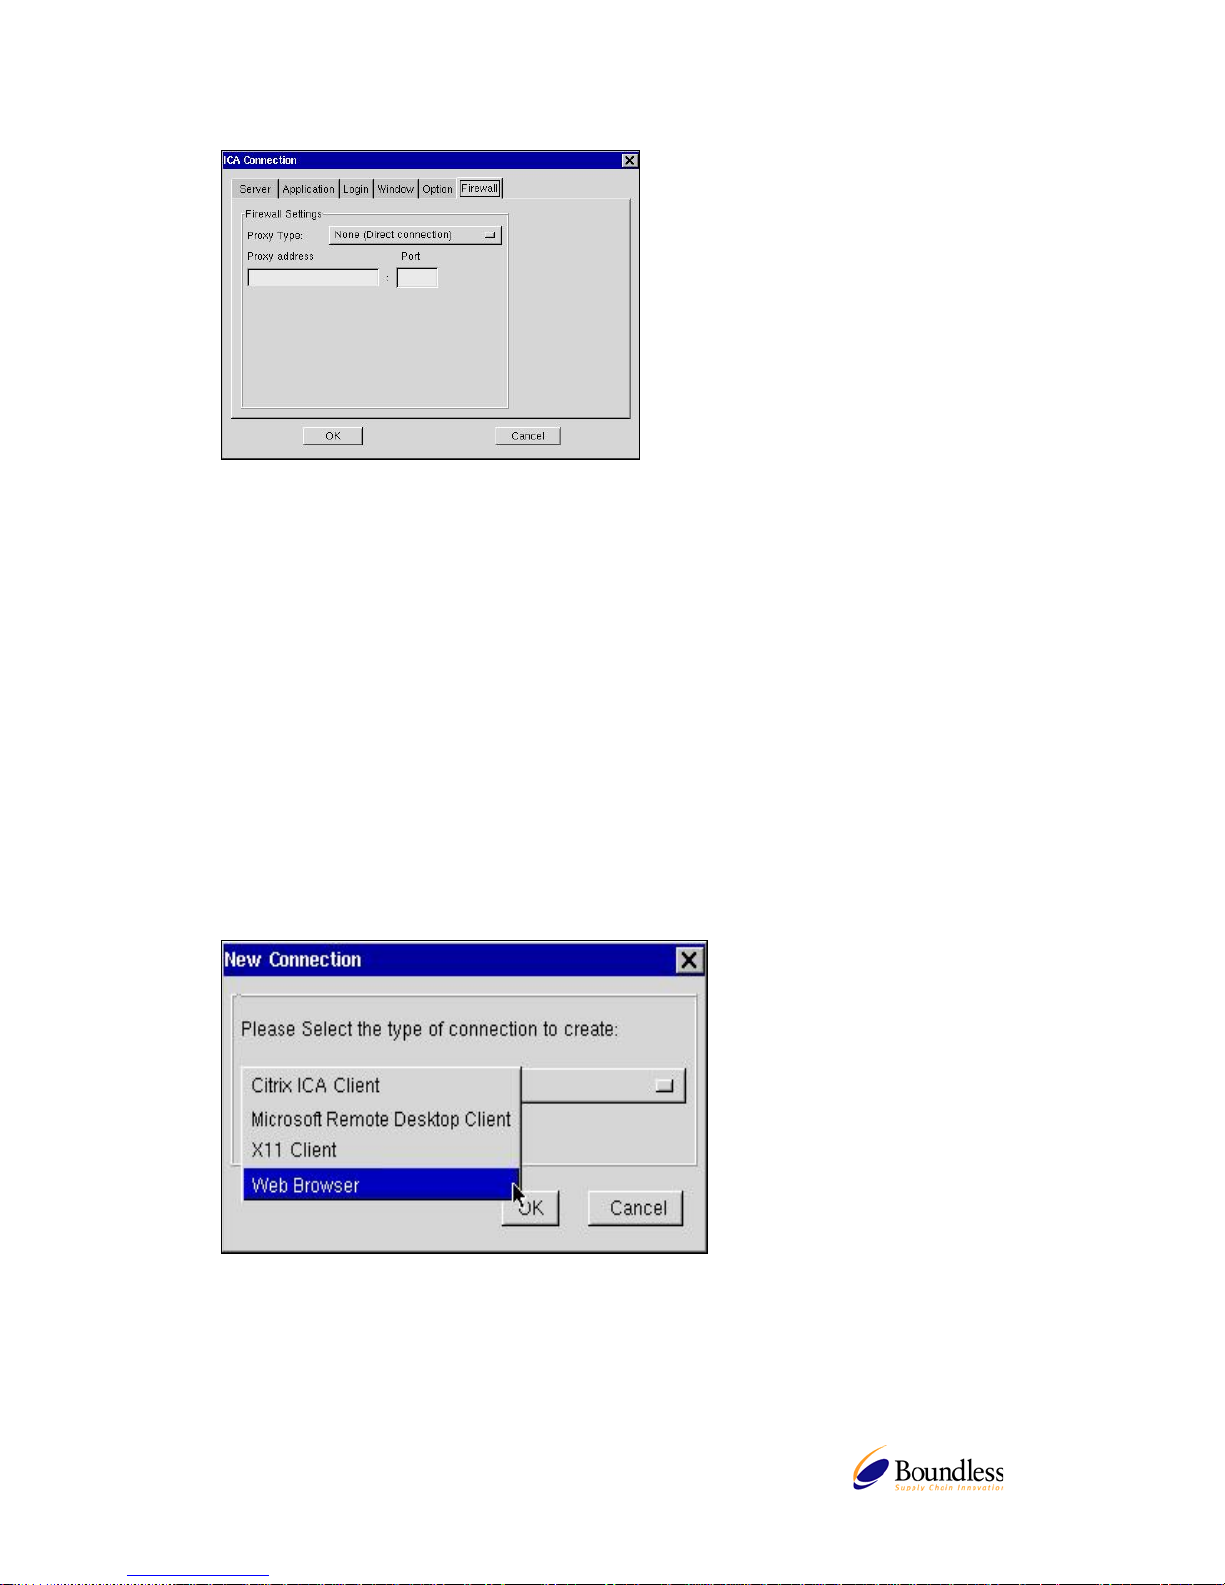
d. Select Socks for Proxy Type.
e. In the Proxy Address box, enter the SOCKS proxy server’s IP address.
f. In the Port box, enter the proxy server's port number (if different than 1080).
g. Click OK to save your changes.
3.6 Web Browser Connection
This is an optional function for your LBT, check your vender for this support before your purchase. This
local browser connection wi ll require m ore RAM util izatio n and powerf ul CPU to have bet ter perform ance.
This LBT is equipped with a CPU of outstanding speed to offer y ou a local browser session you never
experience before.
3.6.1 To Make a New Web Browser Connection
To make a new connection follow the below steps: In Terminal Connection Manager dialog box click on
Configure tab, click on Add to add a new connection, scroll through the list in the box, choose Web
Browser. Then click on OK to continue.
The following figure shall now appear. T ype the connection name and connection URL, click on OK to
complete this connection. This Web connection will now show on the Terminal Connection Manager.
19
Page 23
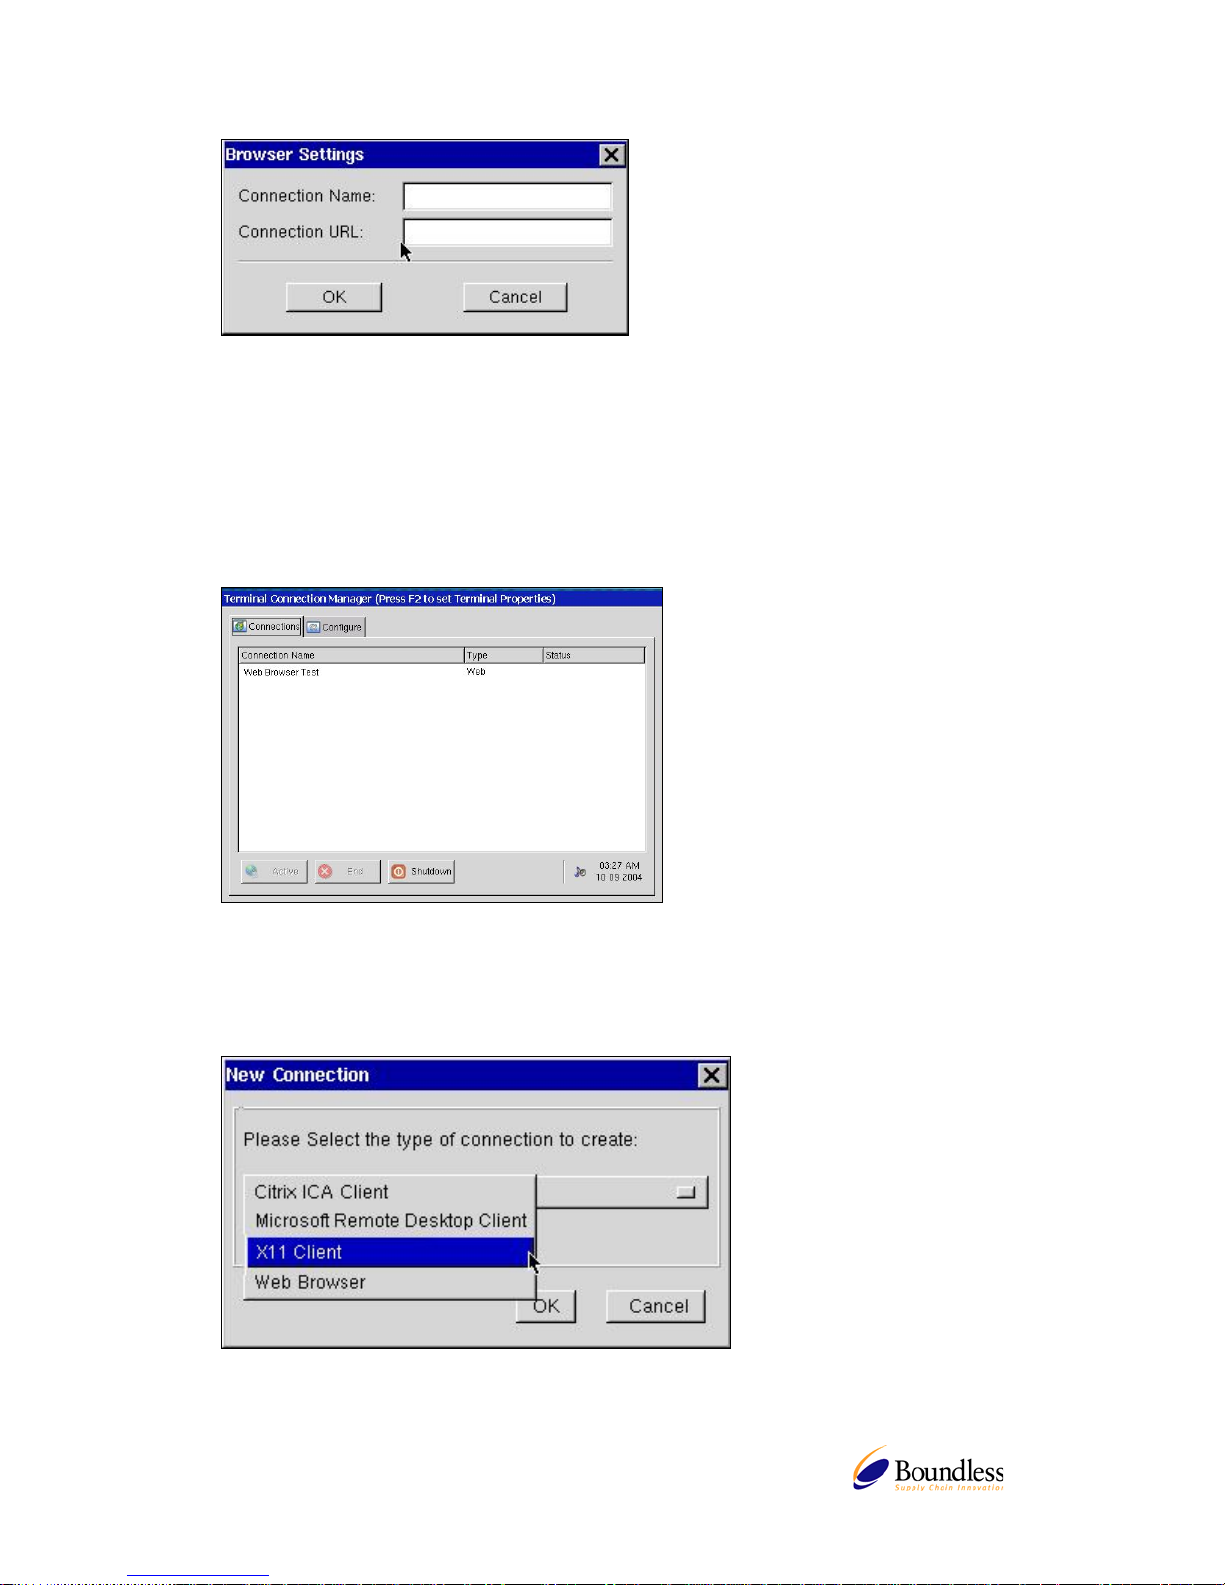
3.6.2 To Start a Web Browser Connection
To start this connection, first enter the Terminal Connection Manager, then click on Connec tions tab,
double click this W eb connection. If your network settings have be en correctly set up then this is going to
work.
3.7 X11 Client
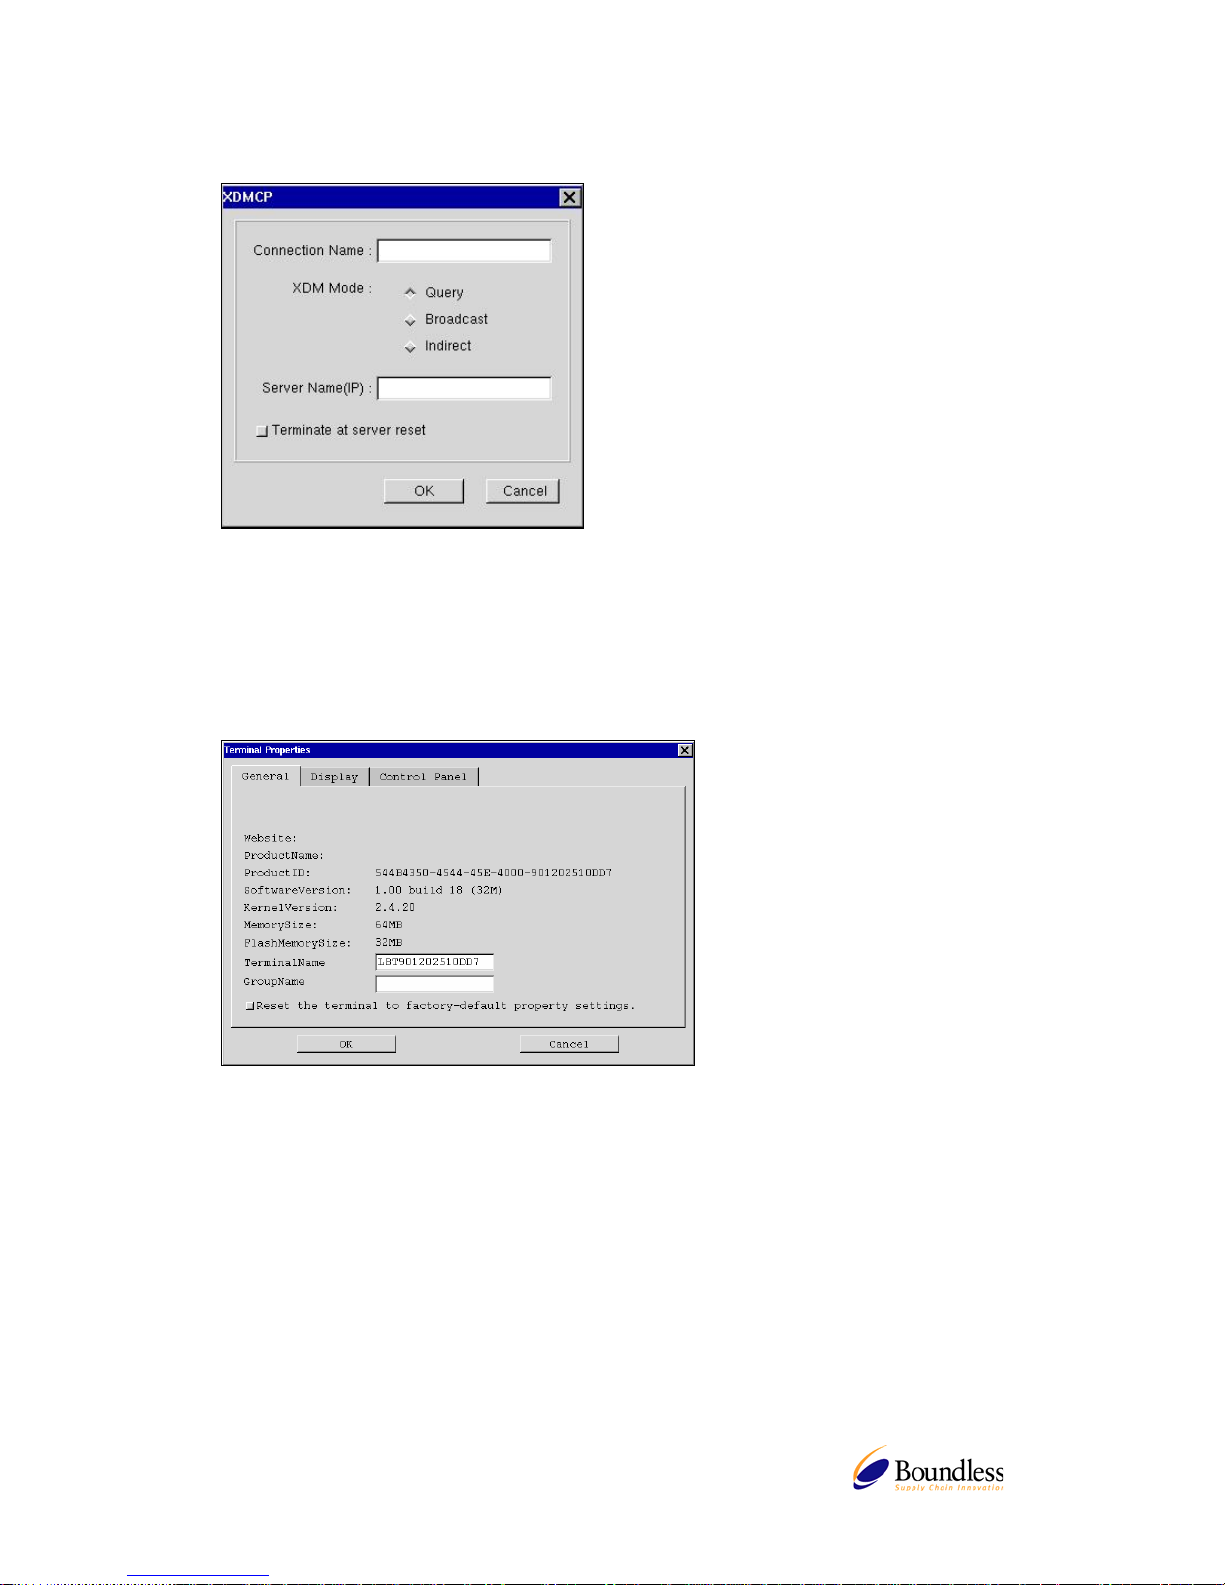
The X Display Manager Control Protocol (XDMCP) is used by X terminals (and X servers in general) to
set up an X session with a remote system over the network. After filling out the Server IP, click OK
button to connect.
20
Page 24
XDMCP
4. Terminal Properties
Terminal properties can be reset at any time during the normal terminal operation. In any connection you
can just press the hot-keys “Ctrl+Alt+End” to return to Terminal Connection Manager dialog box. By
pressing the [F2] key to invoke the Terminal Properties dialog box.
4.1 General Tab
The following figure shows the dialog box.
In this dialog box it describes all the general information about this WBT. The information may vary from
that shown in above figure.
4.1.1 Reset the terminal to factory-default property settings
Tick the “Reset the terminal to factory default property settings” and click on “OK”, this LBT will ask
for rebooting this system to take effect the setting change.
21
Page 25
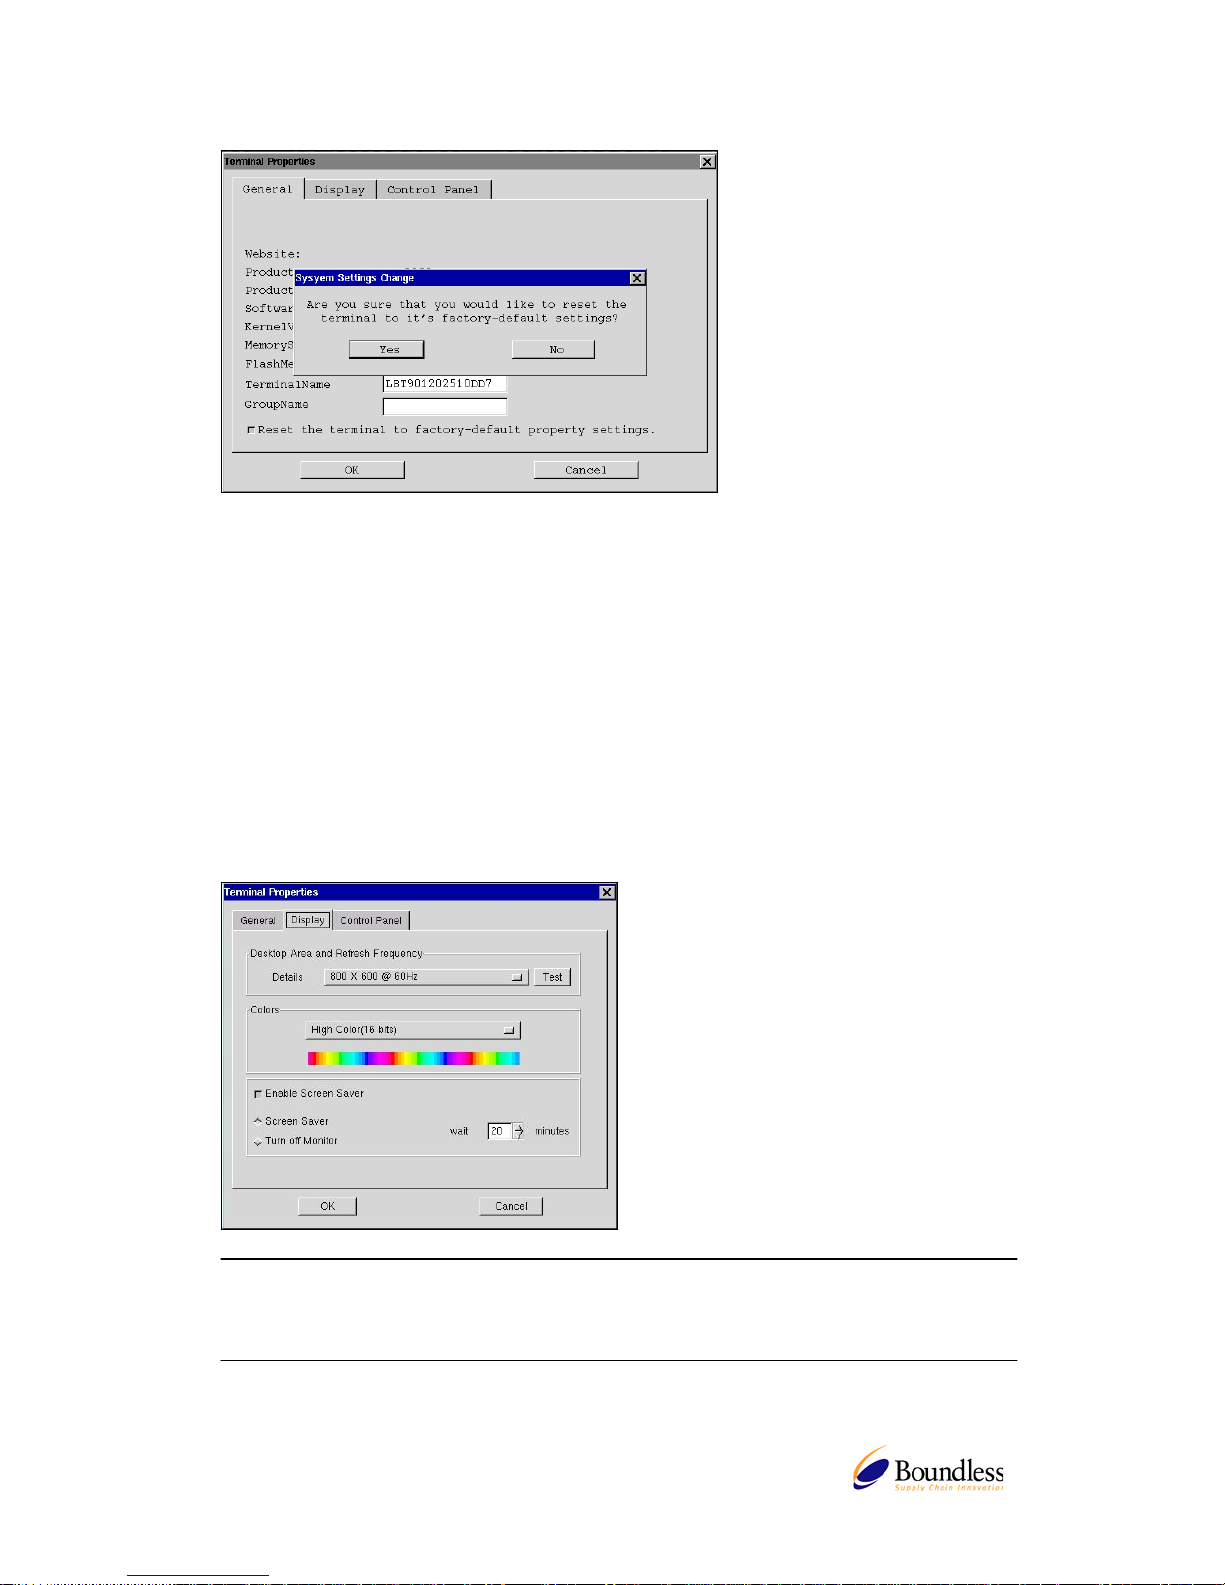
4.2 Display Configuration
The Display properties let you configure the terminal's display screen. The following figure shows the
properties. You can also Test your display after selecting one Desktop Area and Refresh Frequency, the
new testing mode will appear. The graphics adapter will be set to the new mode temporarily for about 5
seconds so you can determine whether your display works properly.
Display Properties
Note:How to display DVI on an LCD Panel?
Before powering on the terminal, the terminal must be connected to the LCD Panel with the DVI
cable. Once connected, power on the terminal. The 5700 displays the DVI output on the LCD
panel, without the need to do additional settings.
4.2.1 Enable Screen Saver
22
Page 26
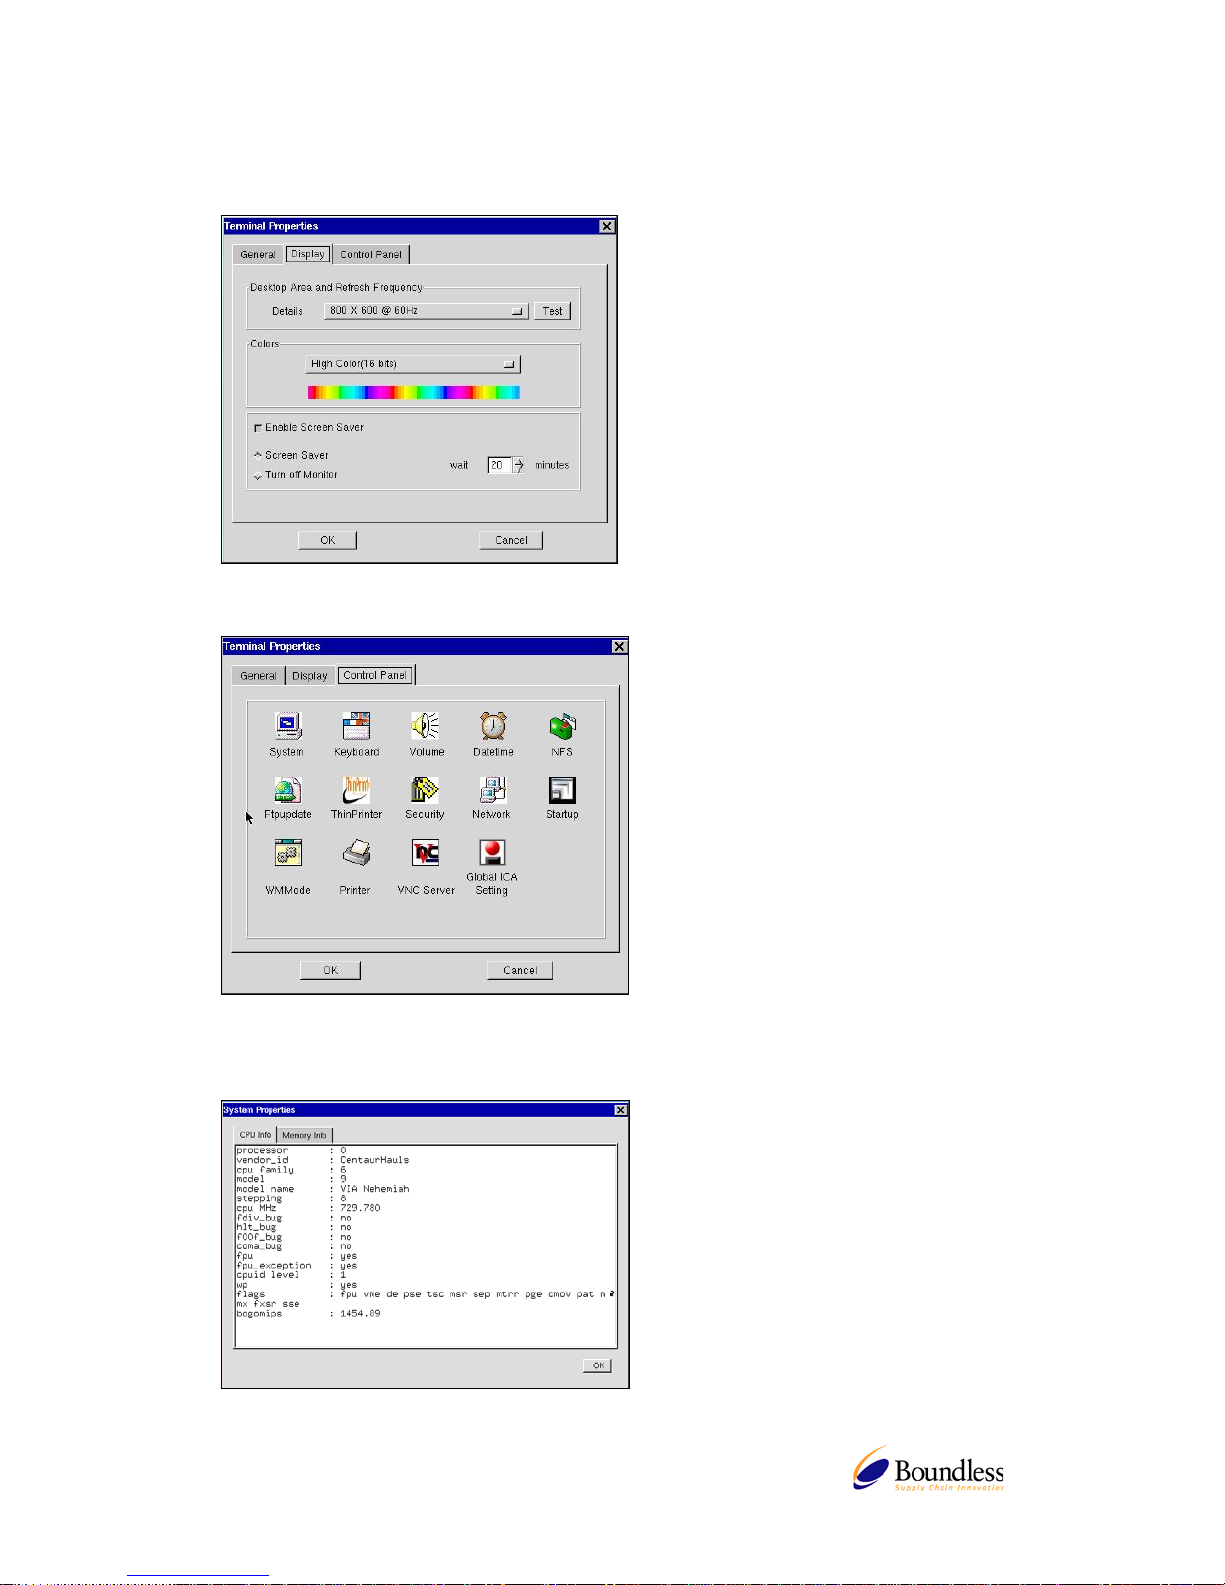
Click on the “Enable Screen Saver” and you can configure your desired way to enable the screen saver
for this LBT. There are two options to choose: Sc reen Save r and Turn Off Monit o r. You can lea ve th i s
LBT to activate the function automatically according to the time you set.
4.3 Control Panel Tab
4.3.1 System
By clicking on the “CPU Info ” icon, the CPU inf ormation wil l be di splay ed. (m odel name、cpu spee d, etc..)
23
Page 27
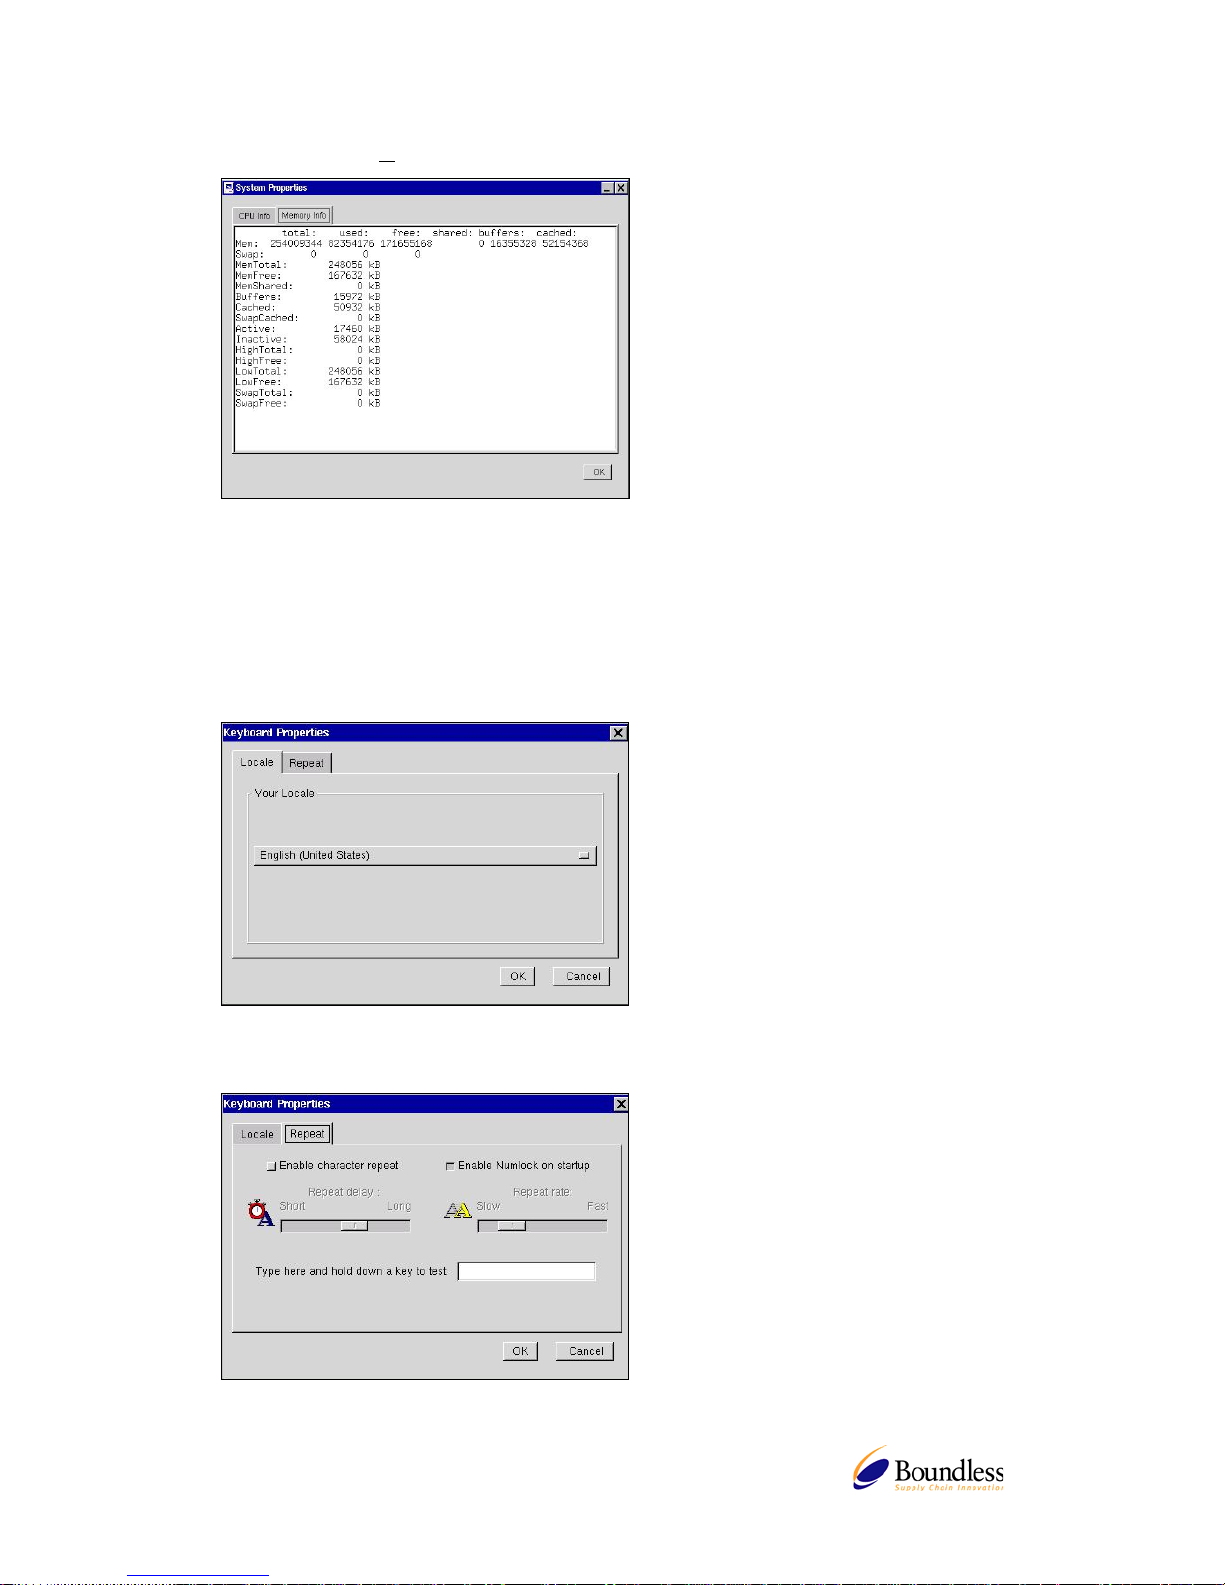
By clicking on the “M
emory Info” tab, you can watch used state of the memory.
4.3.2 Keyboard Properties
The Keyboard properties sheet lets you conf i g ure you r termi n a l 's key boa rd. In voke th i s prop e rtie s shee t
by clicking on the Keyboard icon. The following figure shows the properties sheet.
4.3.2.1 Locale
Set up the keyboard locale for the local device.
4.3.2.2 Repeat
24
Page 28
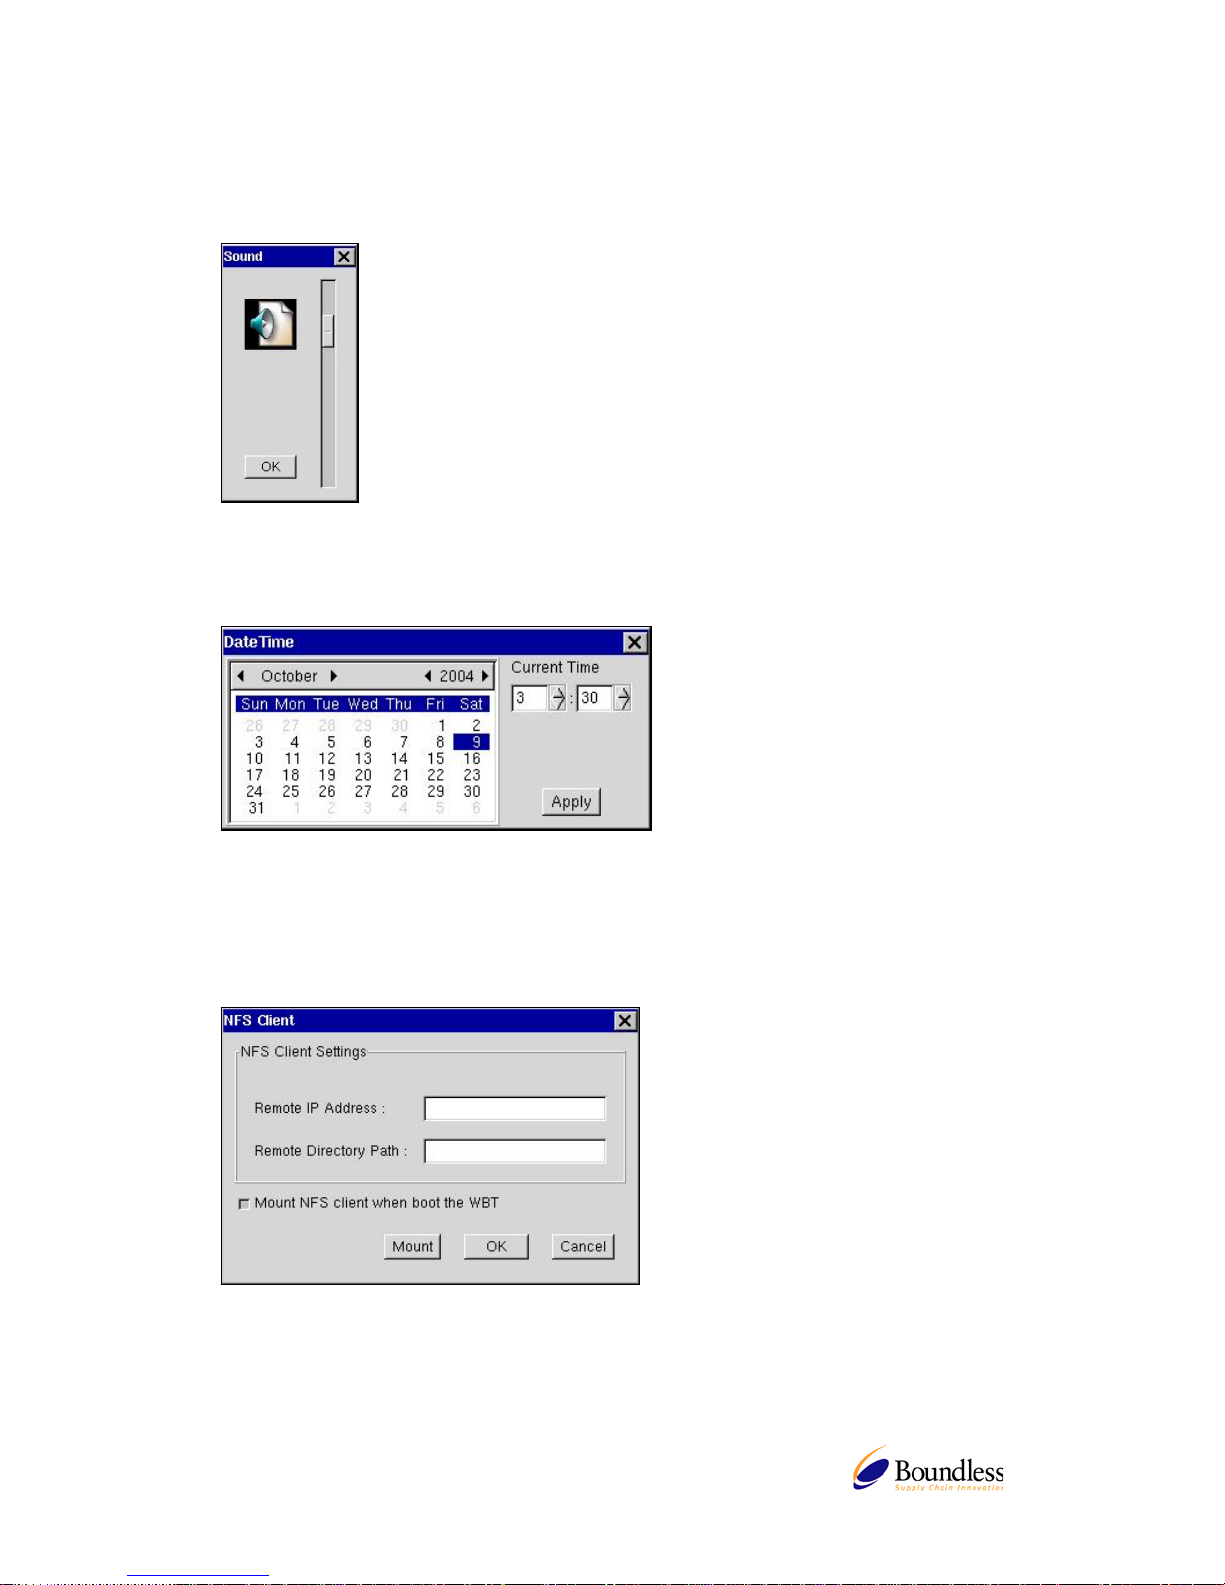
4.3.3 Sound Volume
Adjust the Volume of the LBT.
4.3.4 Date/Time Properties
User can set up your local time for this device .
4.3.5 NFS
The Network File System (NFS) was developed to allow machines to mount a disk partition on a remote
machine as if it were on a loc al hard d rive. Thi s allow s for fa st, seamle ss shar ing of fi les across a netwo rk.
You can set remote IP address and di re ct ory path.
NFS Client
4.3.6 FTP Update
The FTP Update lets you update new firmware. Key in Server Name, File Name, User ID and
Password for the location of the new firmware. Click Update Now icon, the upda te Stat us wi ll be sh ow in
the Status Window. This LBT has outstanding function that allows FTP updating the latest BIOS/
25
Page 29
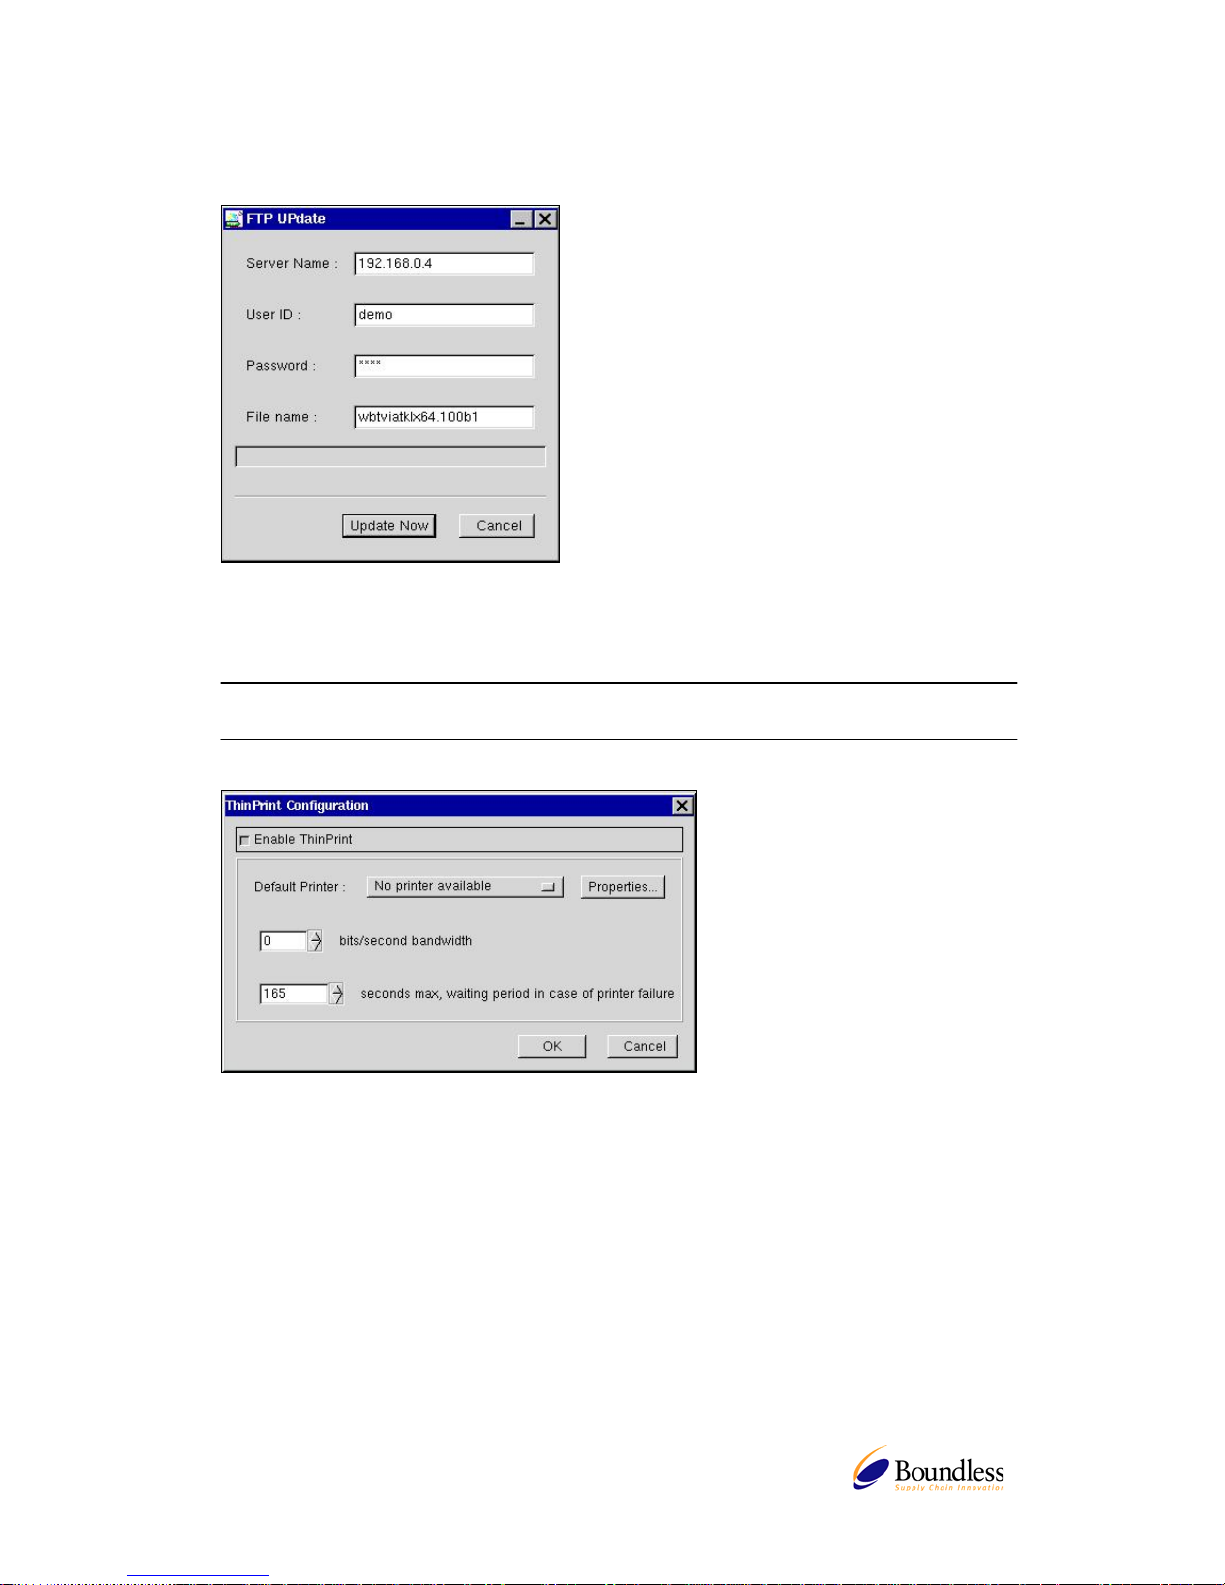
bootloader. The procedure is the same as updating firmware show as above. Make sure the file name is
correct.
4.3.7 Thin Printer
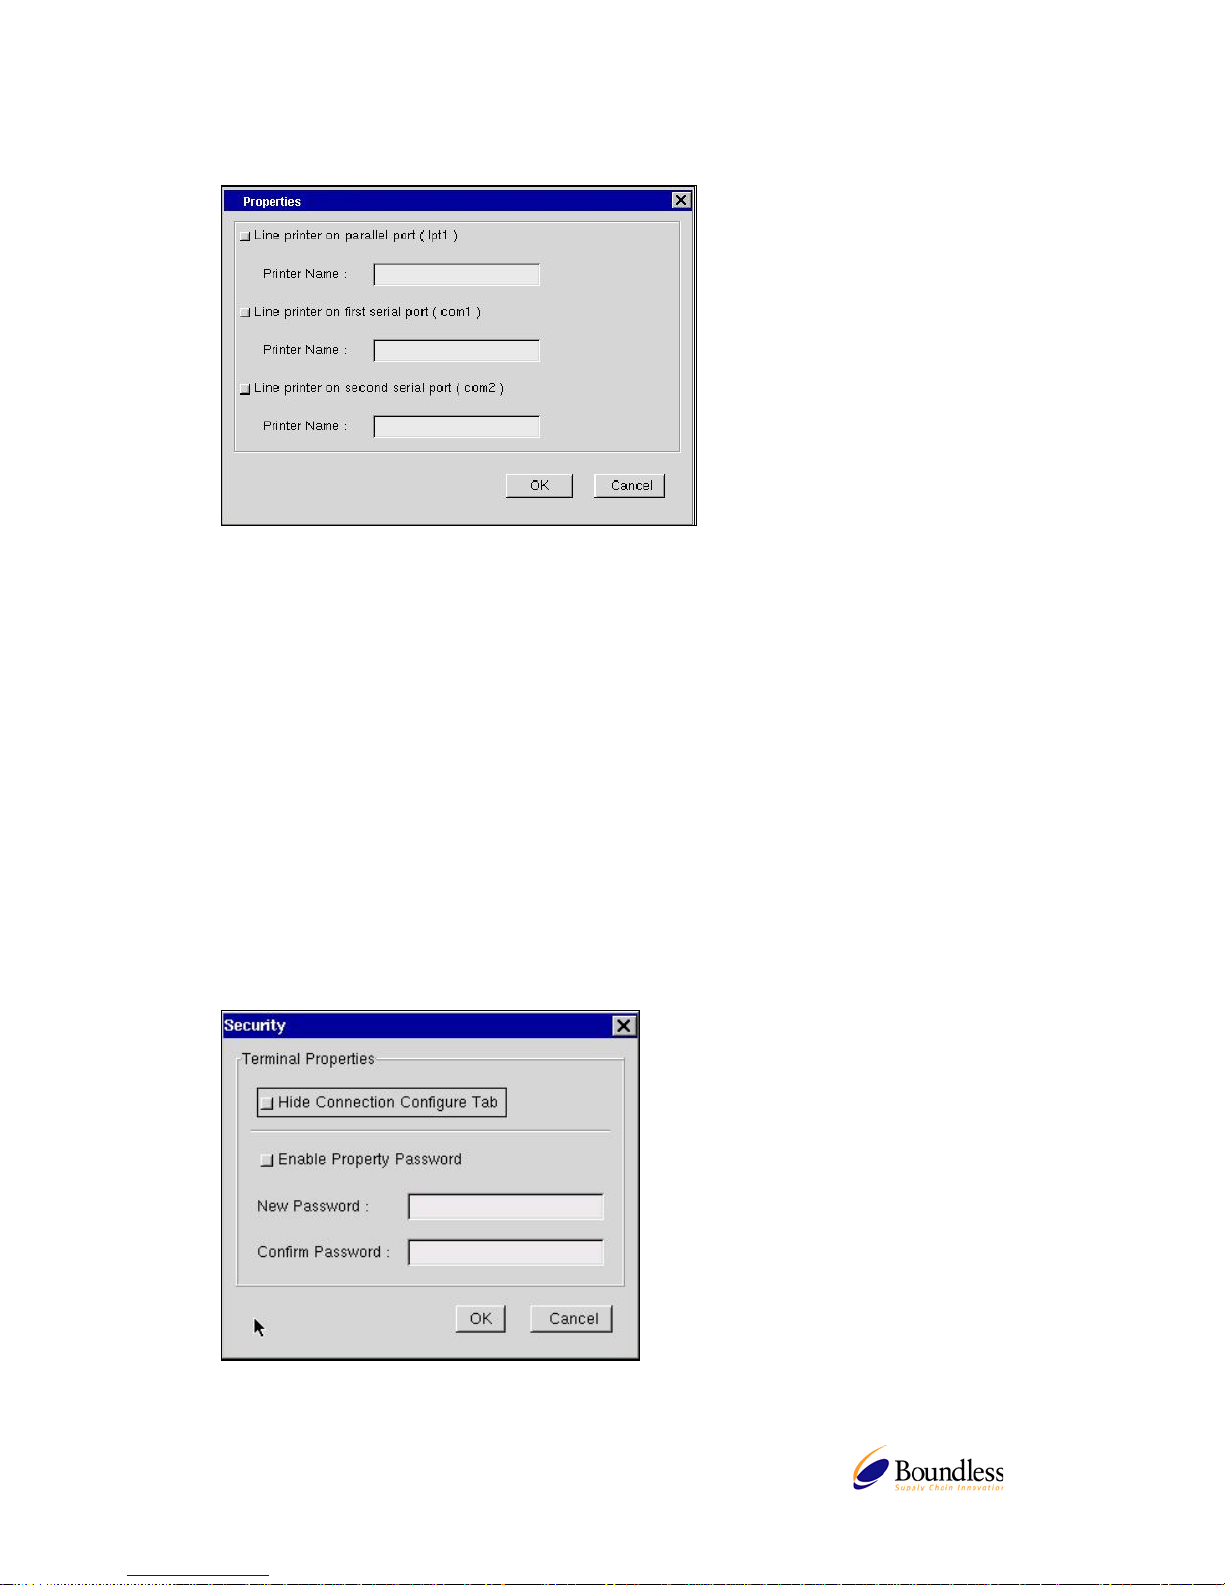
By clicking Enable ThinPrint can set your ThinPri nt Cl ie nt.
Note:About ThinPrint Server Engine Termi nal Services configuration. Please see your ThinPrint
documentation for more details.
26
Page 30
Properties
4.3.8 Security Control
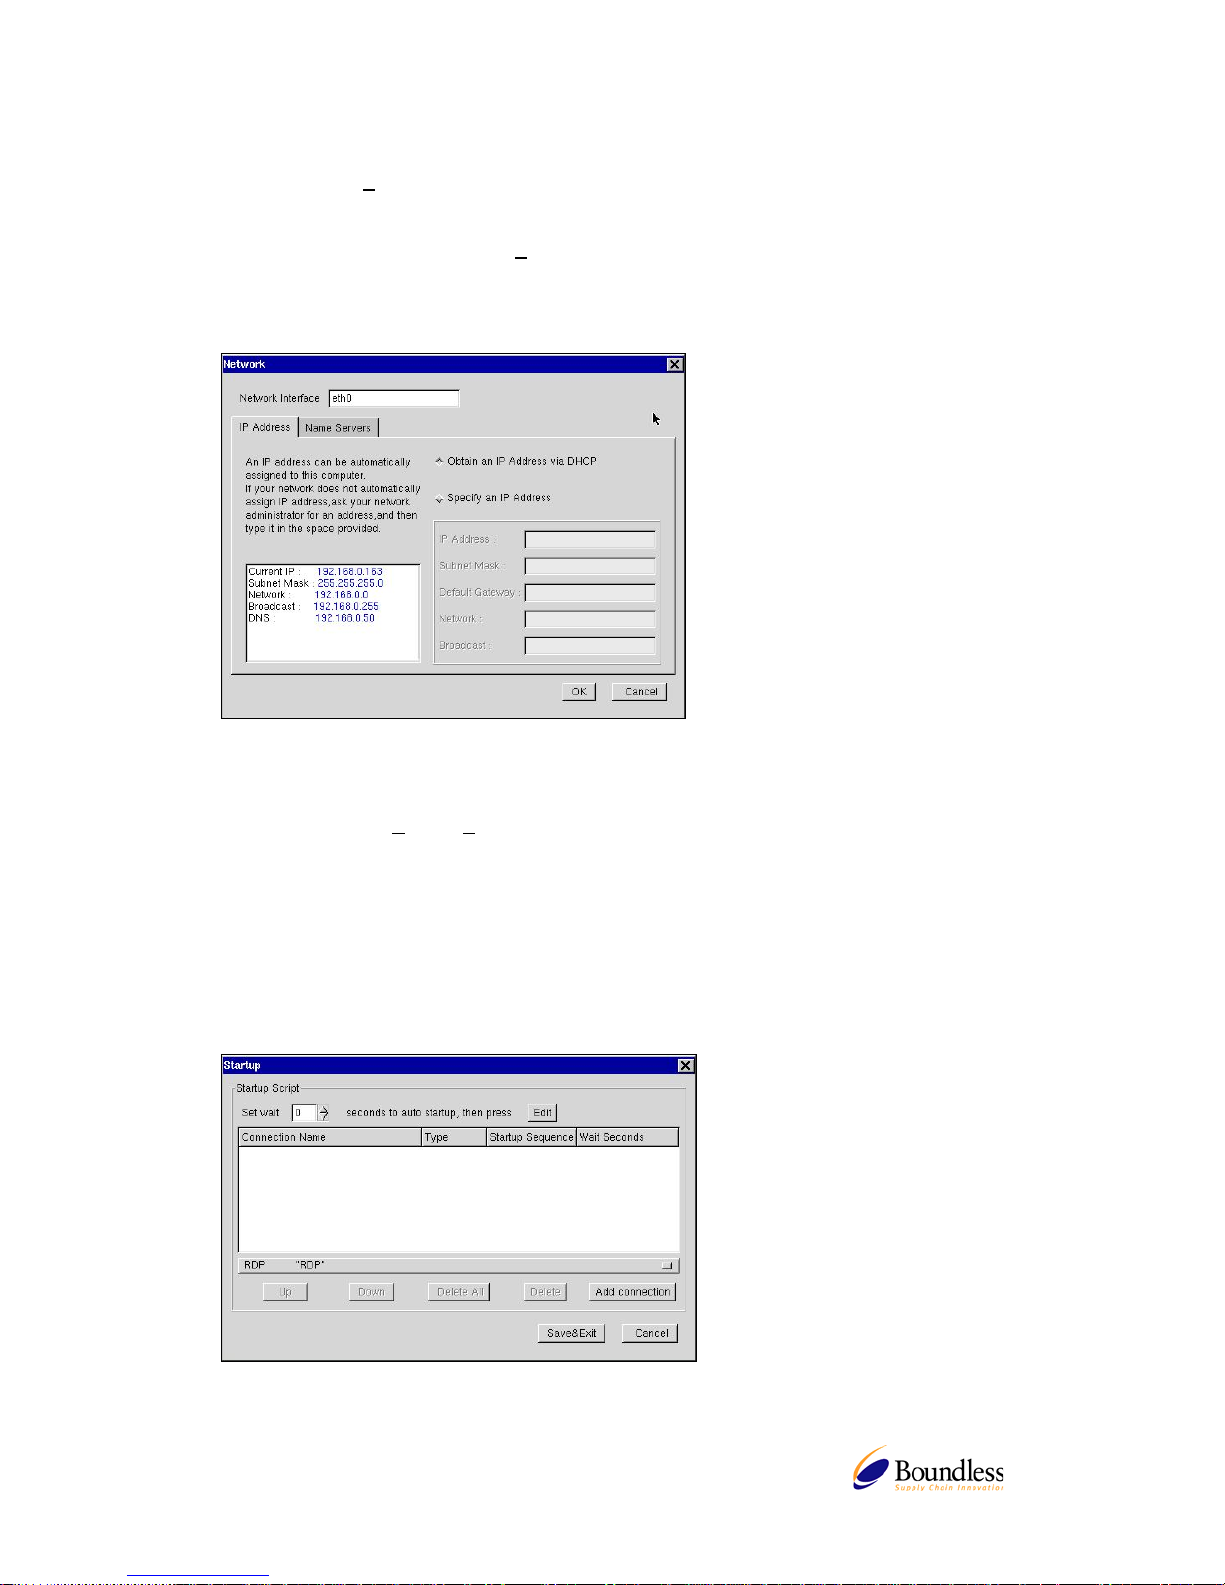
Use the Security properties sheet to access security features. Click to enable terminal security, and
deactivate the Terminal Connection Manager function and the Hide Terminal Connection Configure
Tab function. By default the Terminal Connection Manager function is enabled but the Hide Terminal
Connection Configure Tab function is disabled.
Enable “Enable Property Password” then type the new password on the “New Password“ column, and
then re-type it again on the “Confirm Password“ column. Both password columns must be identical.
When you click OK, the f uncti ons i n the Contro l Pan el w ill be p rotecte d. If y ou w ant to u se the se fun ction s,
the LBT will ask for your user name and password.
Security
27
Page 31
4.3.9 Network Configuration
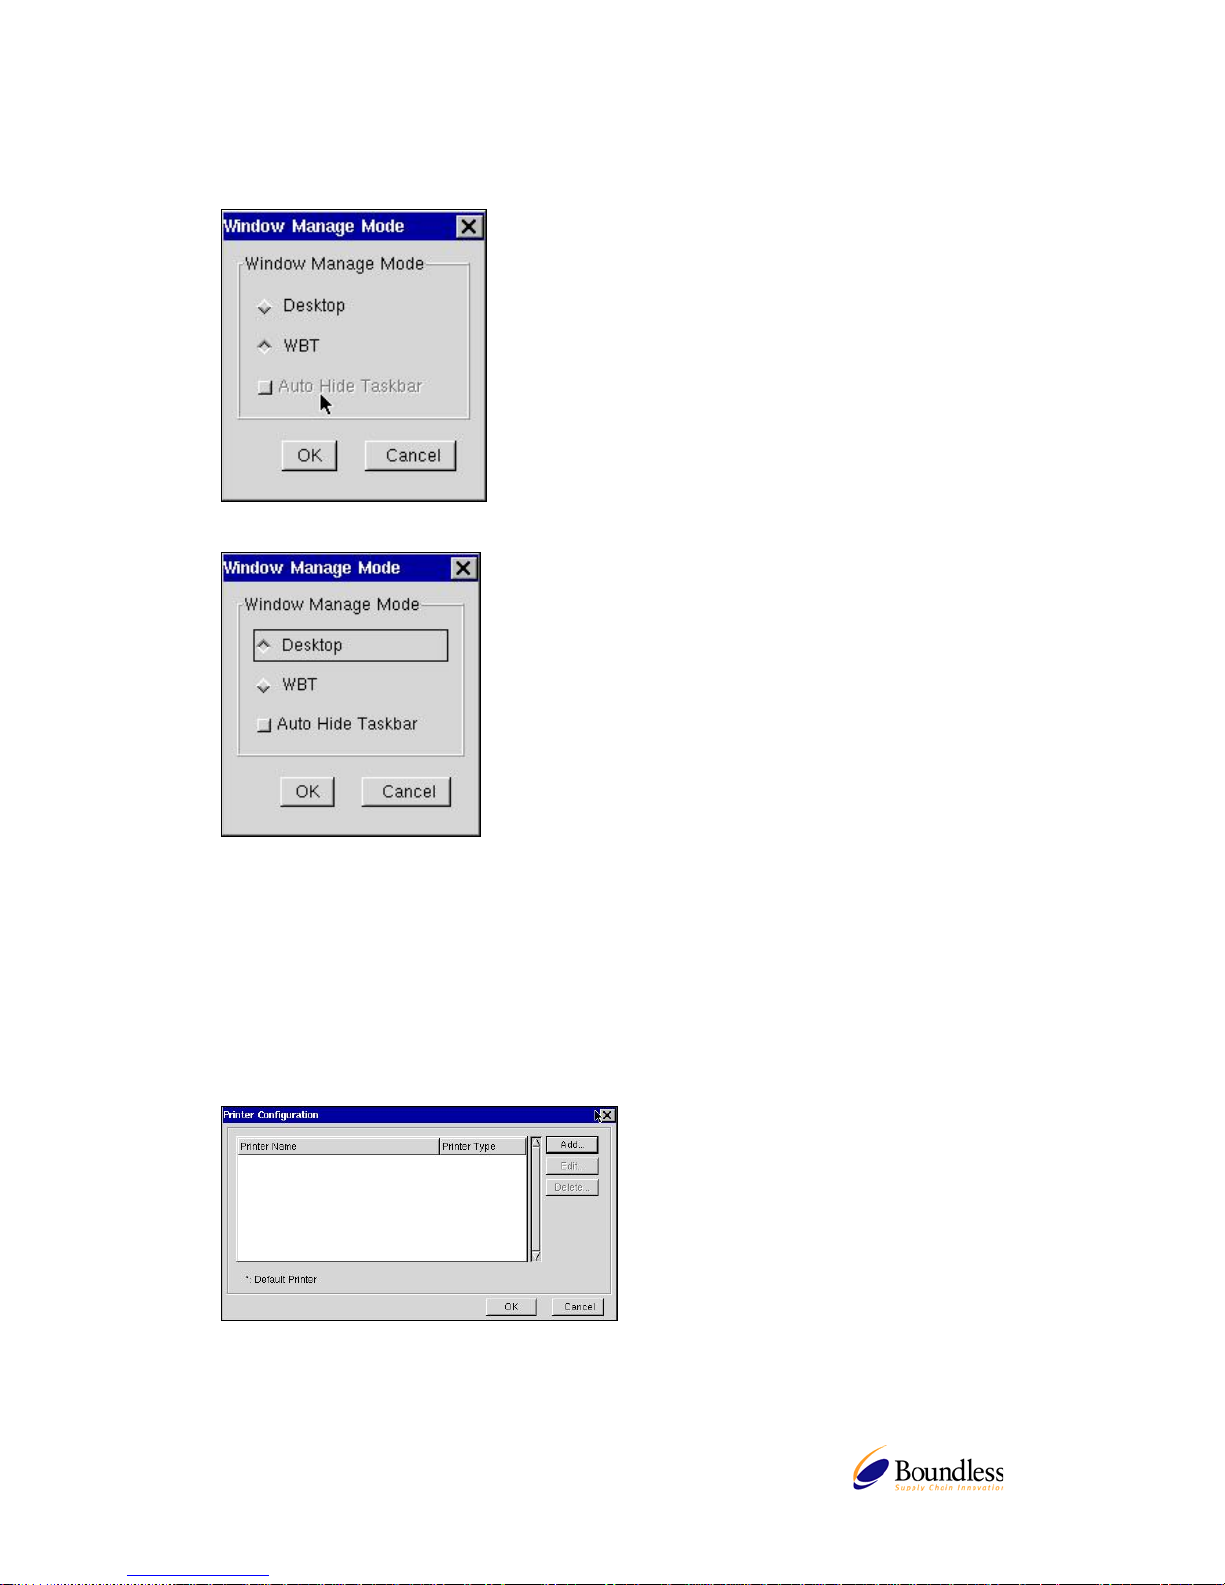
By clicking on the “Network” icon, all the existing network information will be displayed.
The Network properties sheet lets you set up a method for SNMP upgrades. Invoke this
properties sheet by clicking on the
dialog box. The following figure shows the
server, then click on Obtain an IP address via DHCP from a DHCP server to automatically
get an IP address. Or you may specify an IP address by yourself.
“Network” icon in the Control Panel tab of Terminal Properties
Network properties sheet. If you have a DHCP
4.3.10 Startup
You can use the Startup function to connect auto matically after boot. Click “Add connection” in the list
of Startup Script. Use “U
function works successfully, make sure the user names and passwords for all selected connections have
been set up properly.
Startup
p” and “Down” to set the priority of starting all the connections. Befo re this
4.3.11 WMMode
28
Page 32
You can use the WMMode function to change the WBT mode or Desktop mode.
If you switch to Desktop mode, pl ease reference to Chapter 6.
4.3.12 Printer
The terminal supports Local Print. If you want to connect this terminal with a Local Printer, then click
Printer.
Click Add to select the manufacturer and model of your printer. If your printer name is not listed, check
with your printer document and select one that is close to the printer you a re using.
29
Page 33
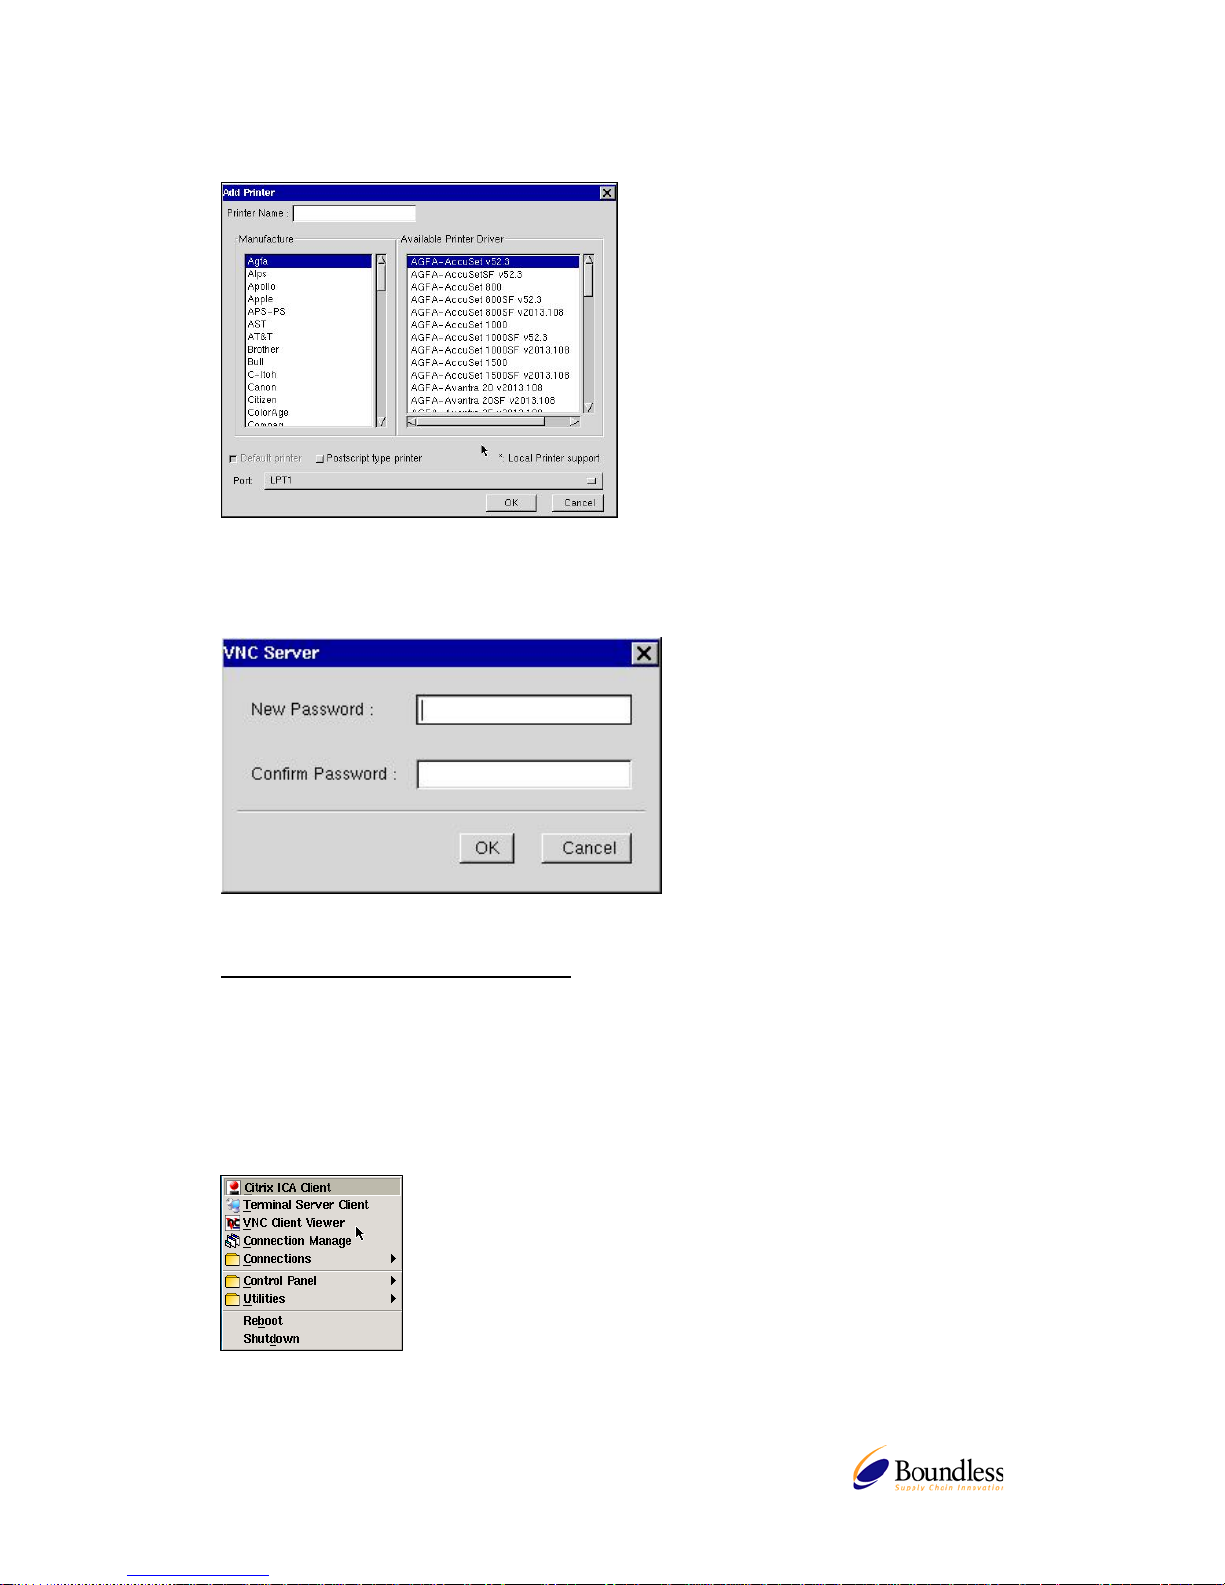
Select one of the ports, LPT1, COM1, COM2 or USB port that you want to use to communicate with your
local printer.
4.3.13 VNC Server Password
You can use this to set the VNC server password for VNC Client login.
Note:Default password is “password”
5. Advanced Function
5.1VNC Client Viewer
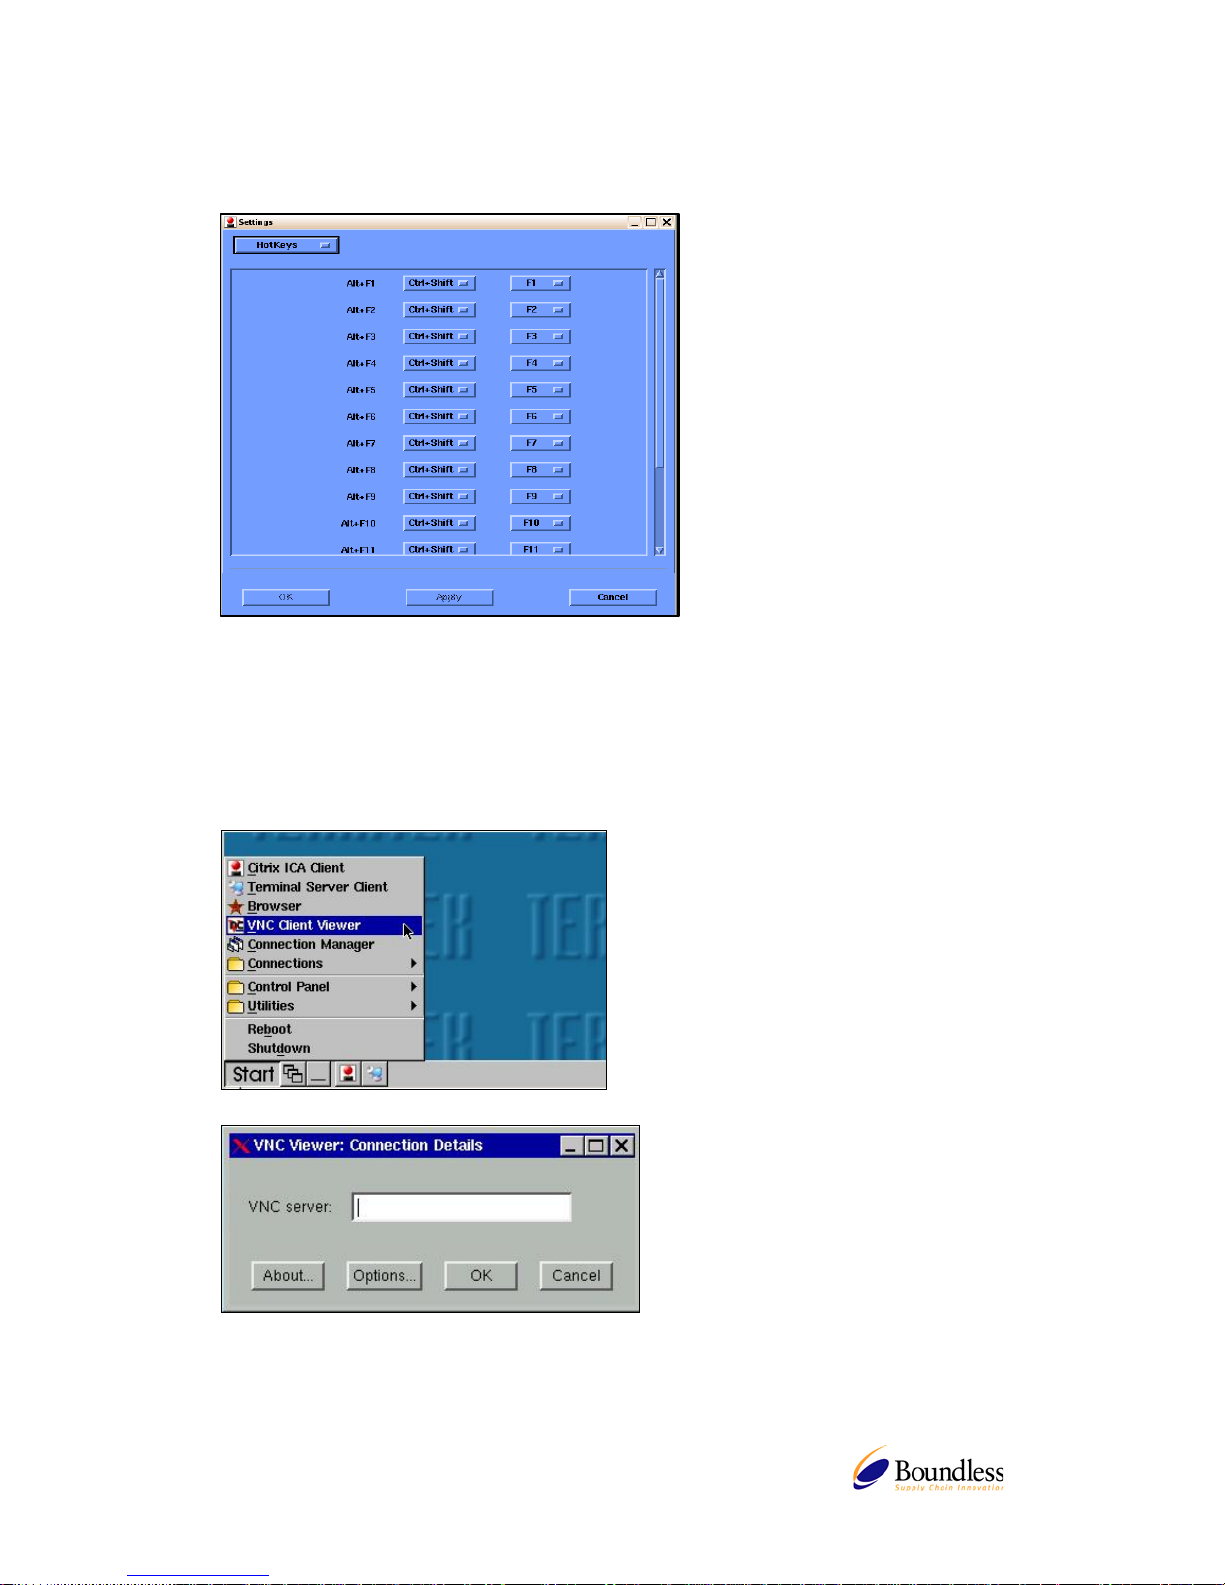
In Desktop mode, click Start menu and you will see the “VNC Client Viewer” function. The figure is
below.
Virtual network computing (VNC) is a great tool for remote desktop viewing and manipulation. Its core
function is to allow the user use the VNC client to conne ct to a ho st runn ing th e VNC server and rem ote ly
use the server's desktop. VNC software makes it possible to view and fully-interact with one computer
from any other computer or mobile device anywhere on the Internet. Keyboard and mouse updates are
30
Page 34
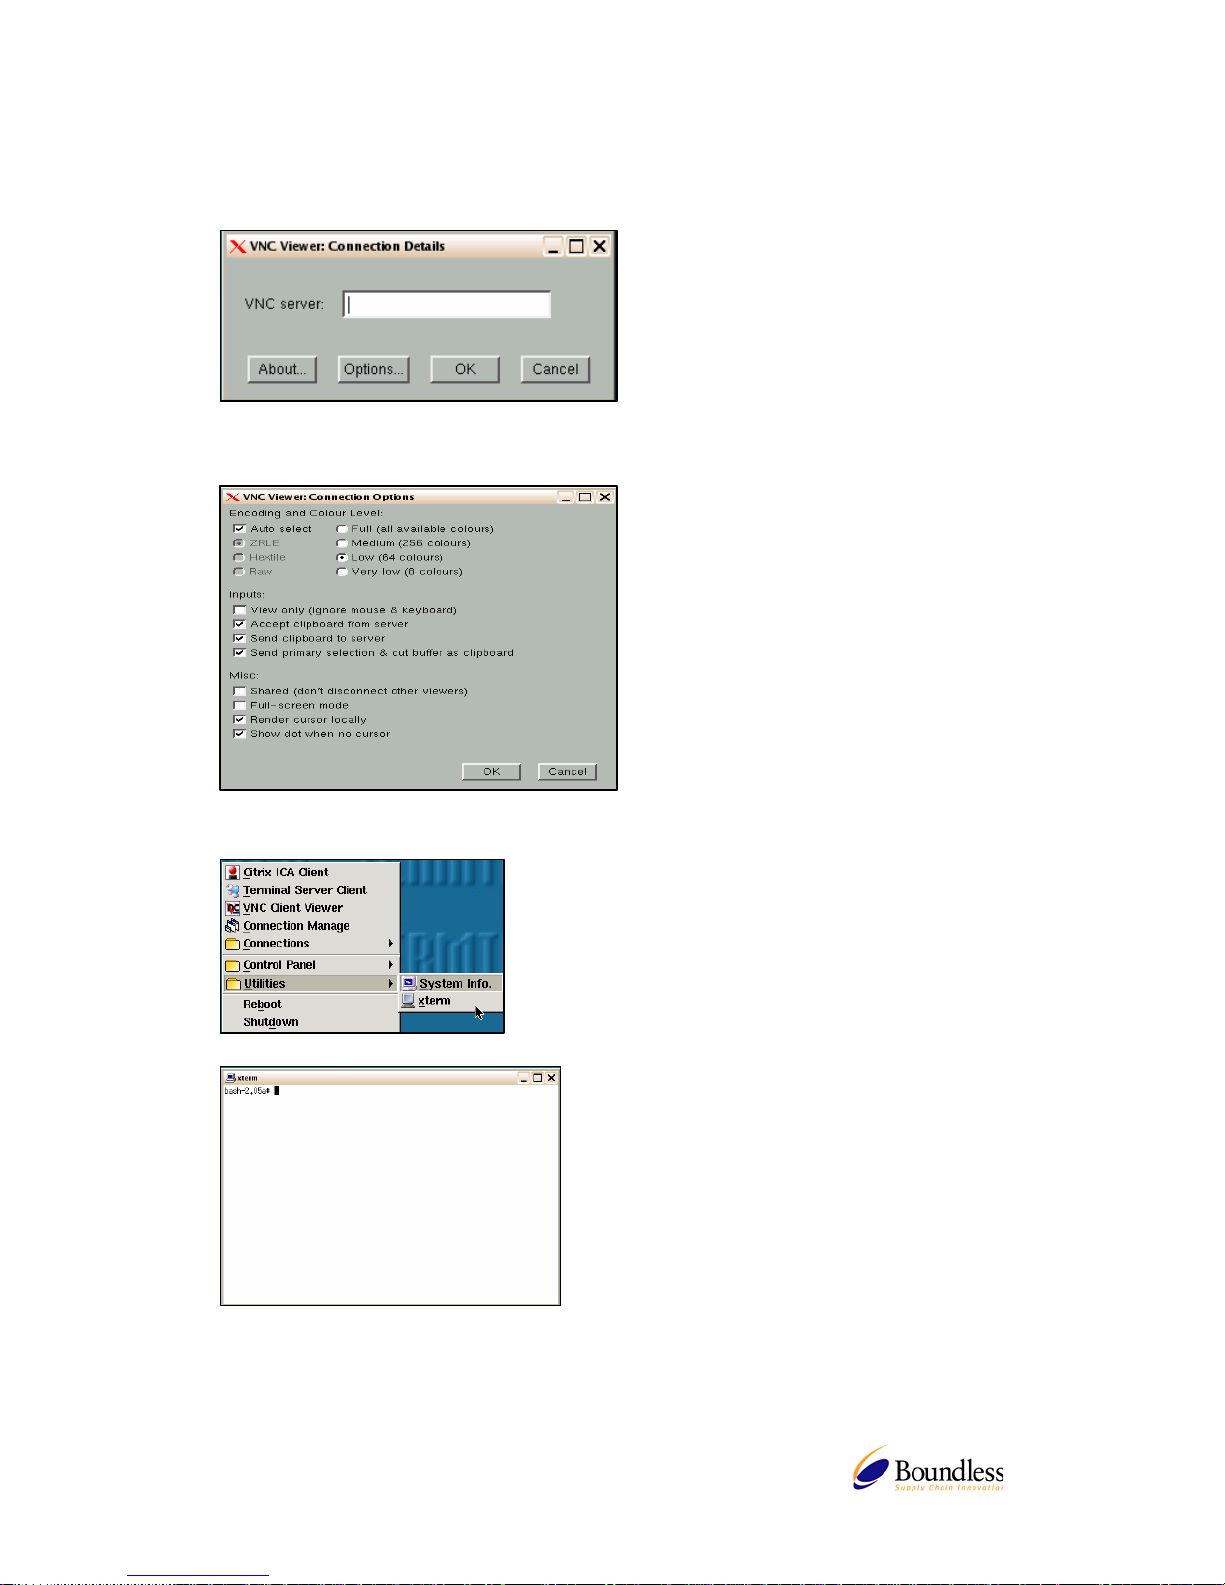
sent to the server, and snapshots of the server's desktop are compressed and sent back to t he client via
the VNC protocol. The figure is below.
VNC Viewer:Connection Details
You can also set the VNC Viewer by clicking options. The figure is below.
VNC Viewer:Connection Options
5.2 xterm
In Desktop mode, click StartÆ Utilities and you will see the “xterm” function. The figure is below.
xterm
5.3 System Info.
Click StartÆUtilities and you will see the “System Info”. The figure is below.
31
Page 35
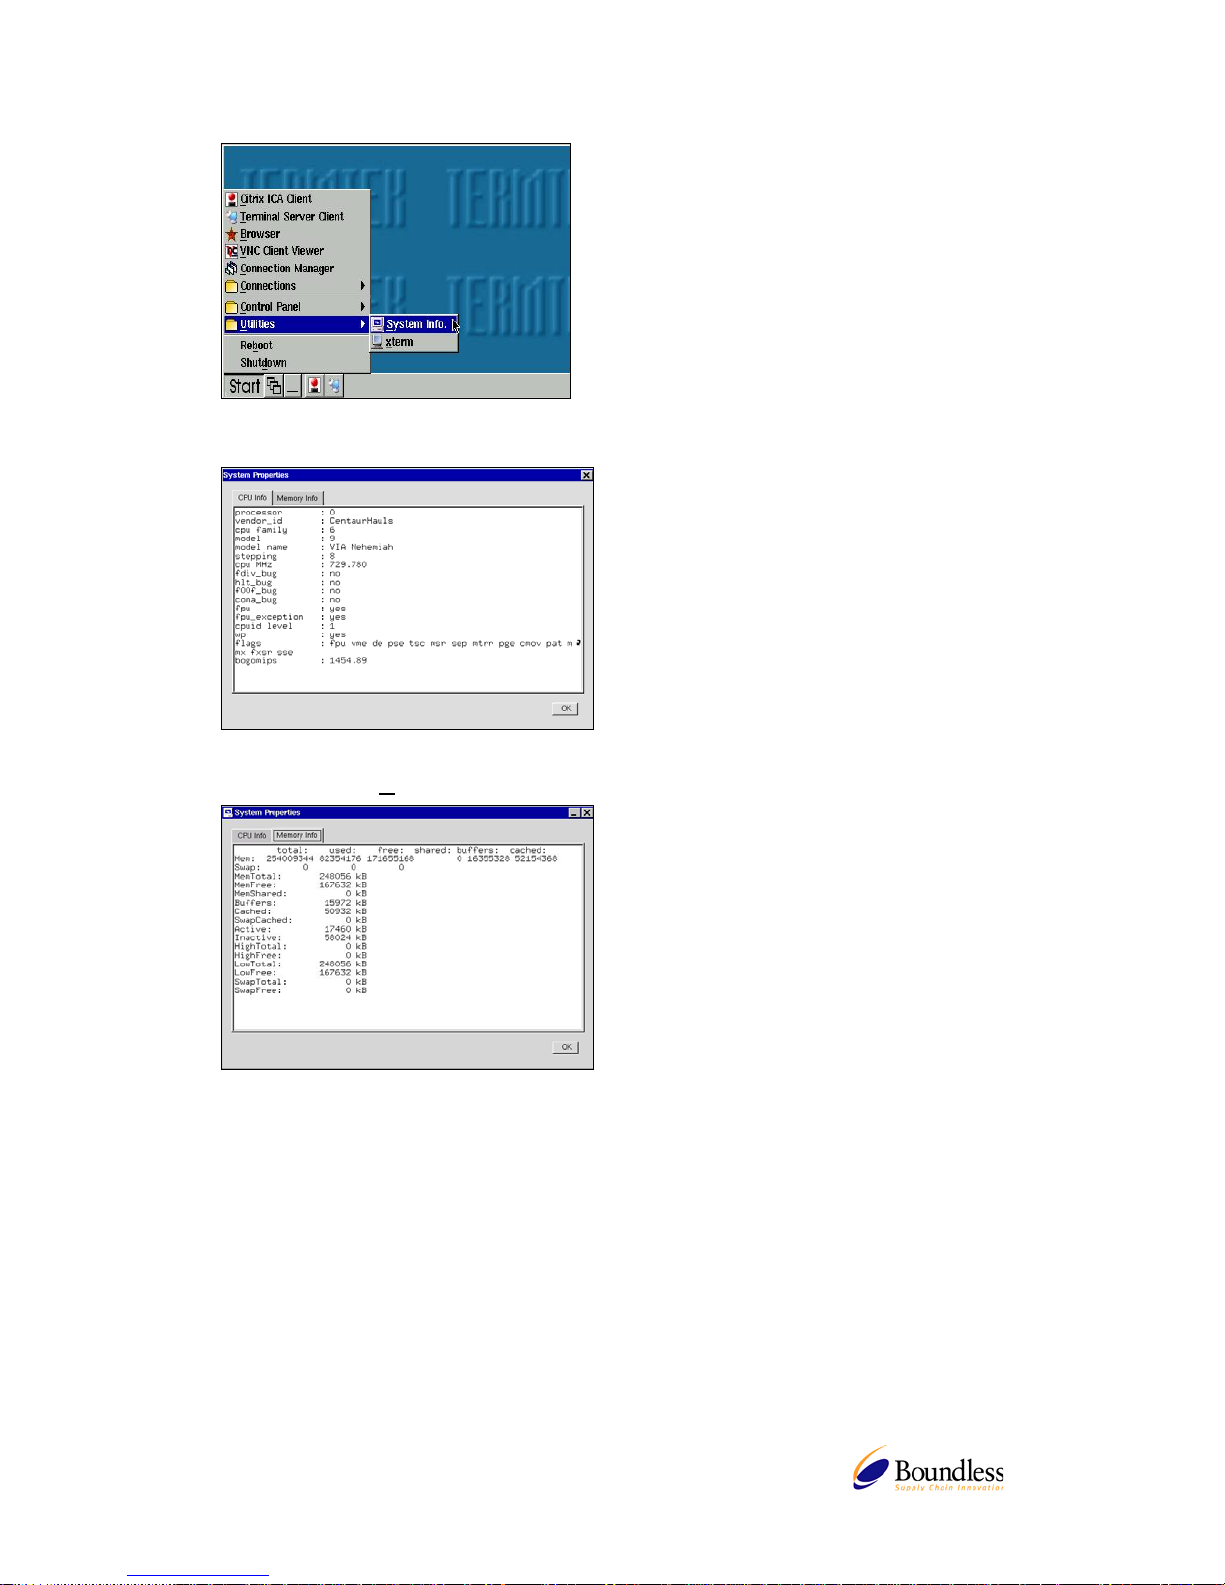
5.3.1 CPU Info
By clicking on the “CPU Info” icon, all about the CPU information will be displayed.
5.3.2 Memory Info
By clicking on the “M
emory Info” tab, you can watch used state of the memory.
6. Desktop Mode
6.1 Connections
6.1.1 RDP Connection
Click the icon “Terminal Server Client” on the taskbar or click StartÆ Terminal Server Client
and you will see the screen below.
32
Page 36
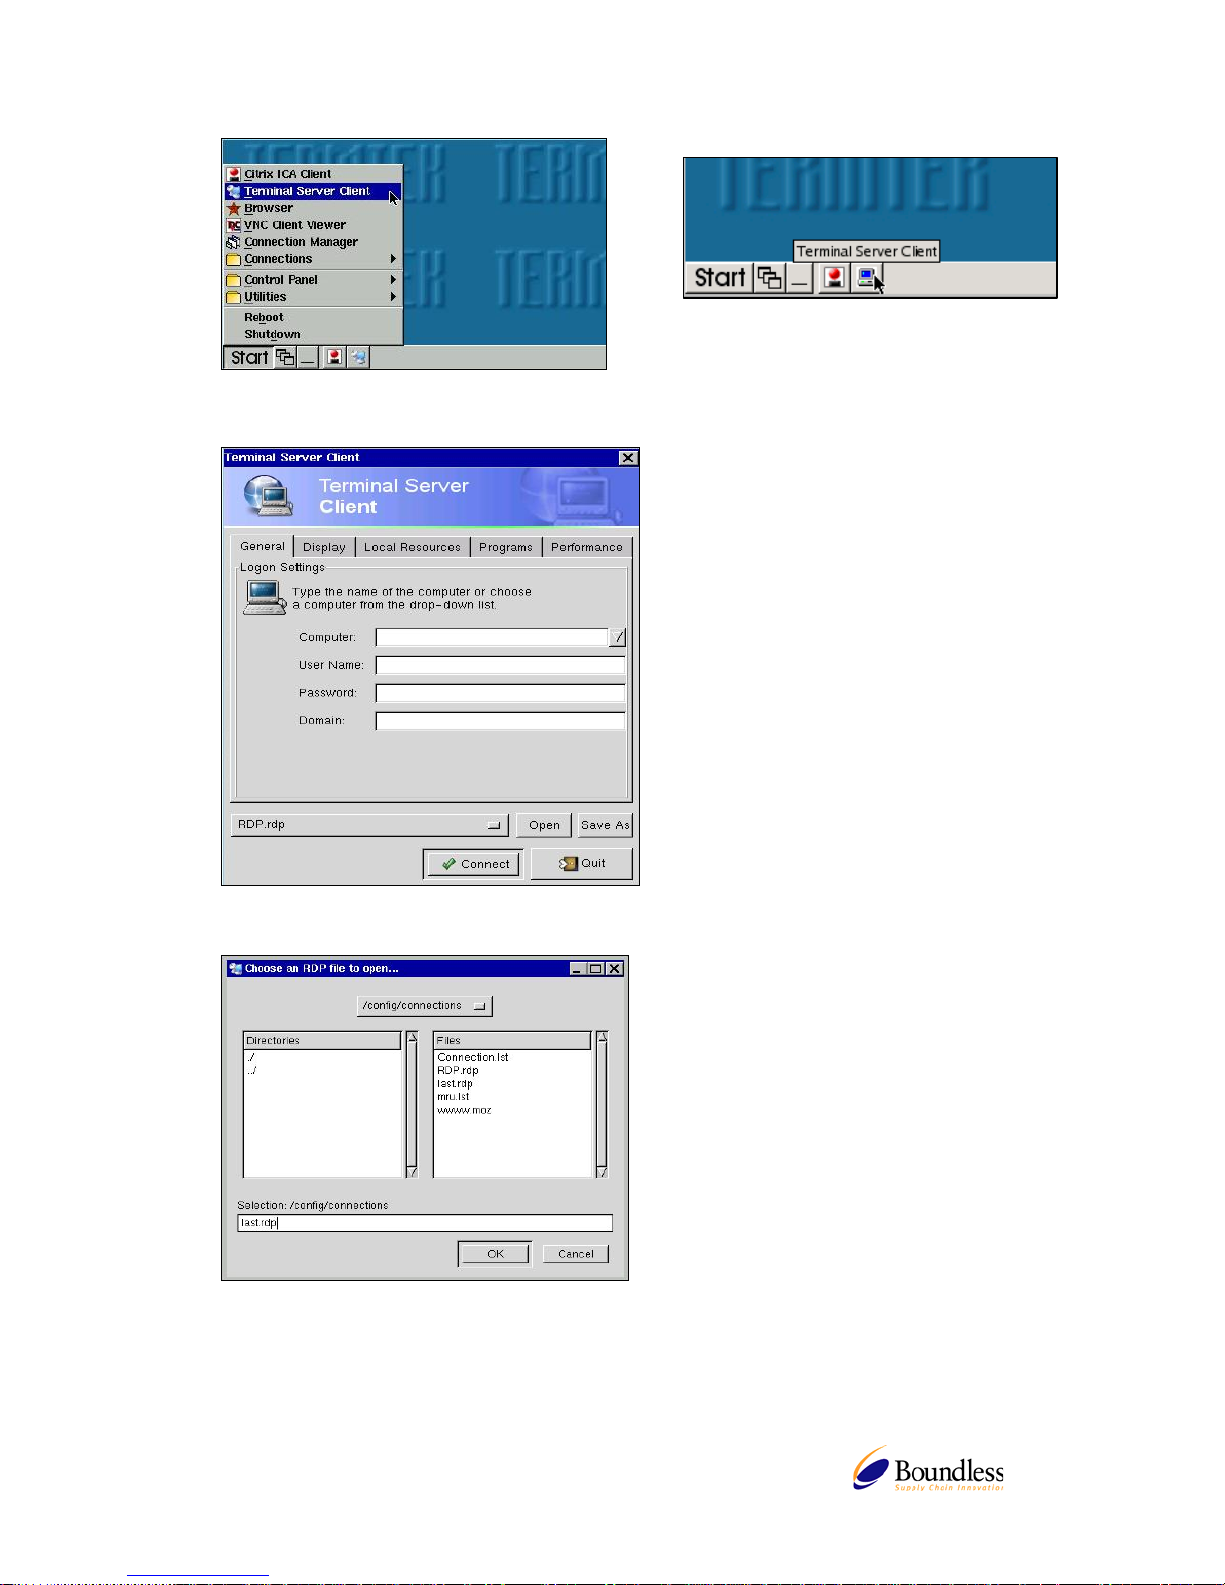
6.1.1.1 General
You can type the Computer name, User name, Password, and Domain on this page.
You can click “Save As” to save your connections.
6.1.1.2 Display
You can choose the size of your remote desktop and set the color quality. If you click
33
Page 37
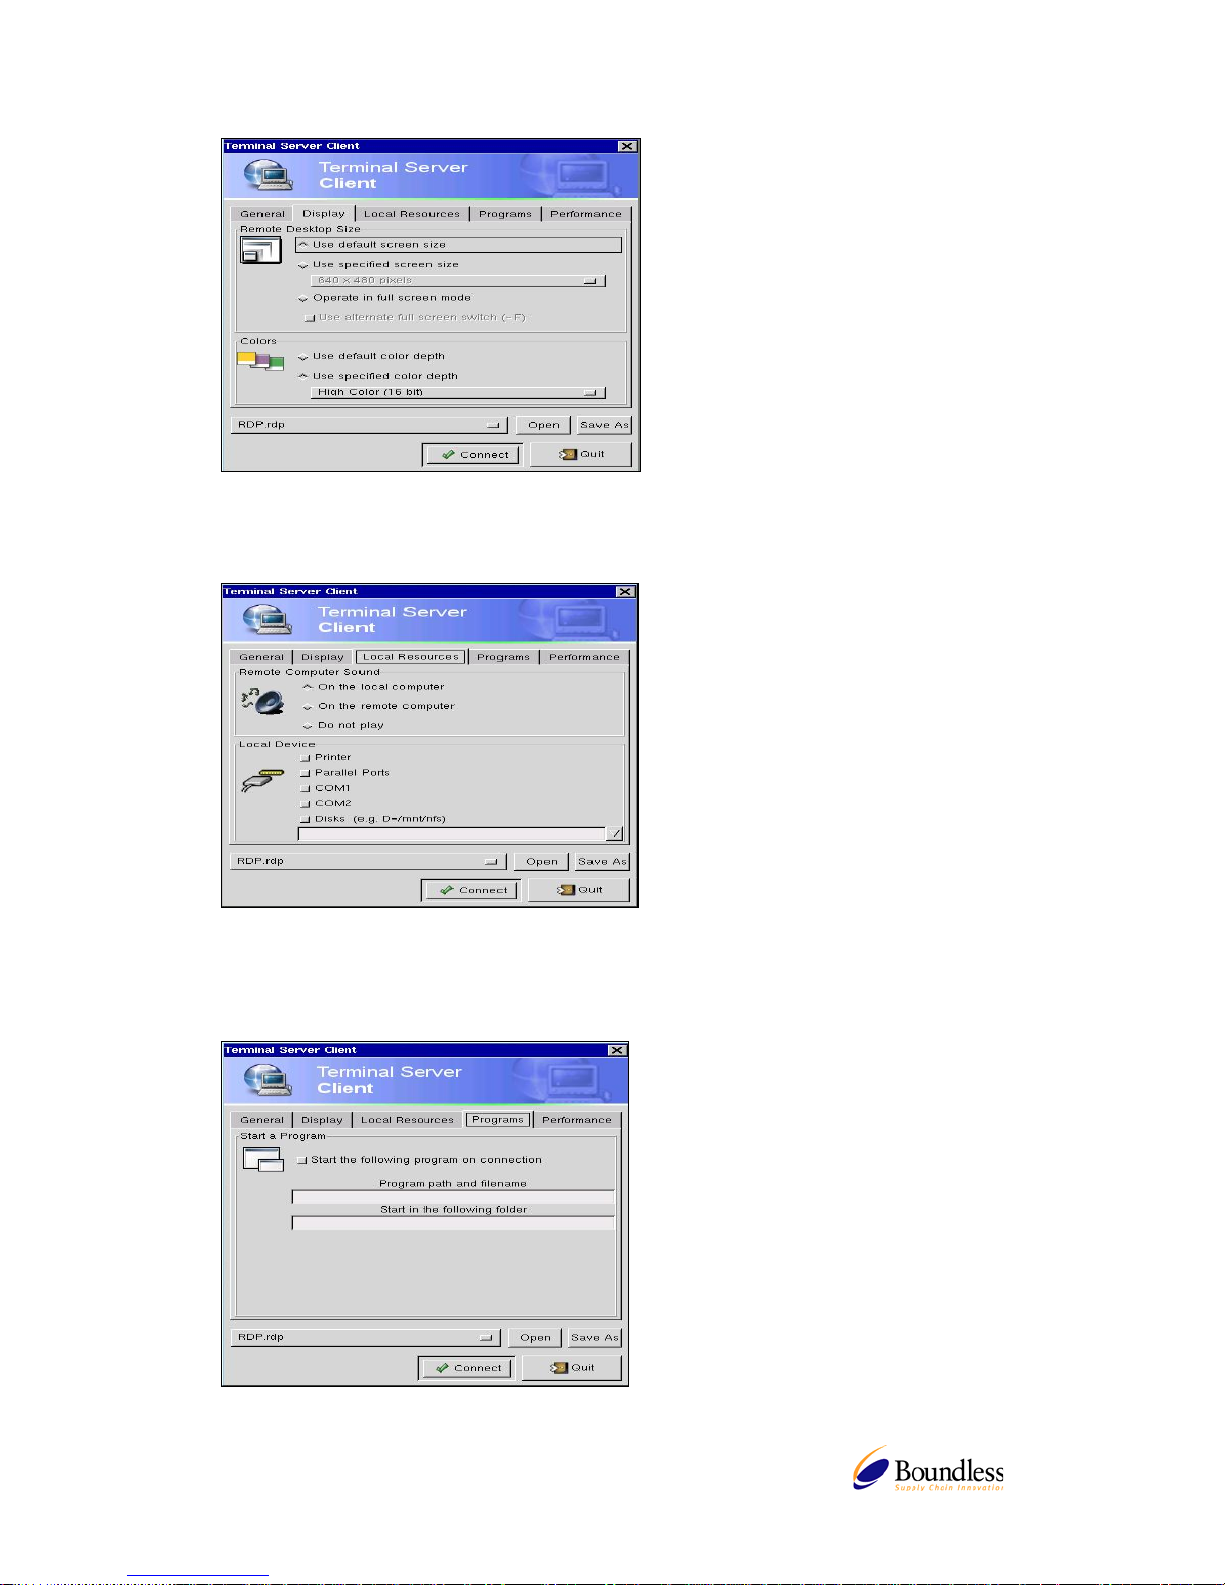
6.1.1.3 Local Resources
You can set the sound on this page. Choosing “Bring to this computer”. It will bring the sound
from the server to the client device.
6.1.1.4 Programs
If you want to start a program at connection, you can click Start the following program on
connection . You can also specify path and file name when you specify a program.
6.1.1.5 Performance
34
Page 38
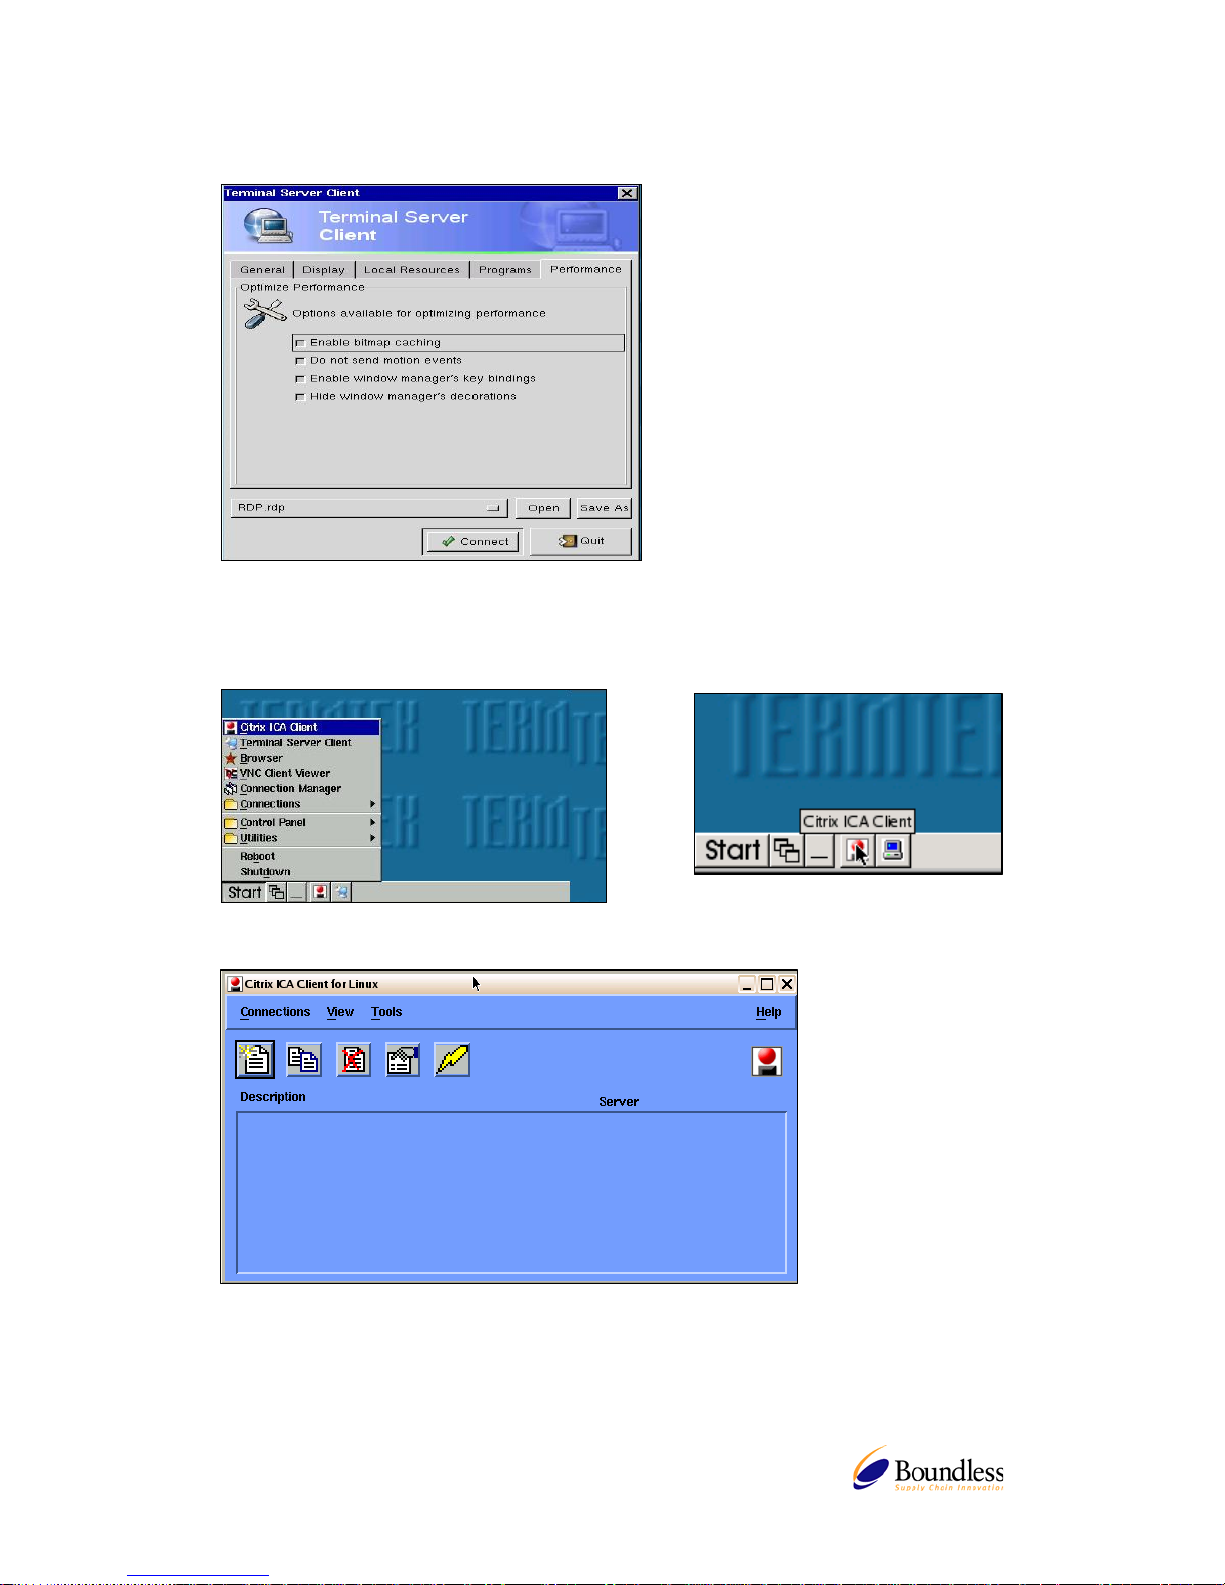
The Performance properties sheet lets you optimize the performance with connections.
6.1.2 ICA Connection
Click the icon “Citrix ICA Client” on the taskbar or click S t artÆ Citrix ICA Client and you will see
the screen below.
Citrix ICA Client for Linux
6.1.2.1 Creating a New ICA Connection Entry
35
Page 39
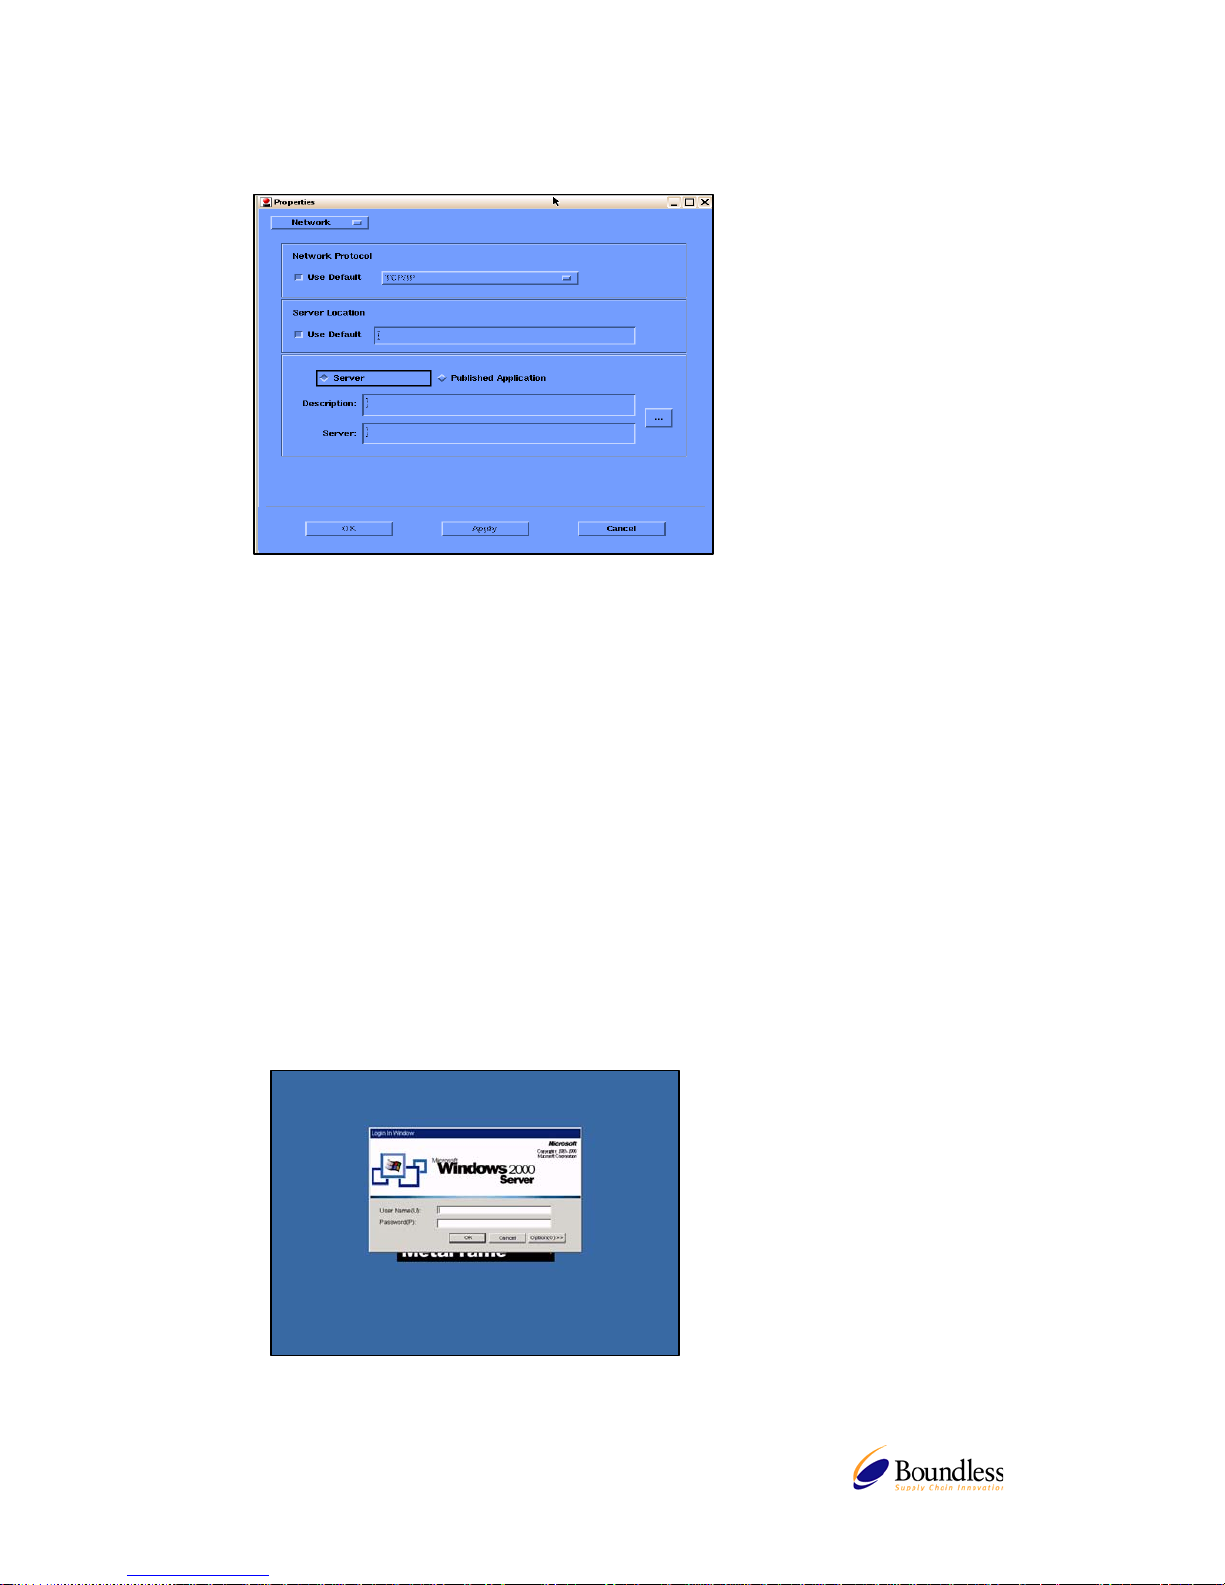
5. Start the ICA Client. From the Entry menu, click New, or click the New icon on the toolbar.
The Properties dialog box appears with the Network page displayed.
6. Click Server or Published Application.
7. For a server c onnection, type the name or IP address of the MetaFrame server or select
the name from the pop-up menu to the right of the Server field. —or—
For a published application, type the name of the published application or select the name
from the pop-up menu to the right of the Server field.
8. If you have typed the name of the MetaFrame server or published application, in the
Description field, type a unique description for the entry. The description is used to
identify the connection in the Citrix ICA Client window. If you have selected a server or
published application from the pop-up menu, a default description is automatically added.
9. Click OK to save the entry or Cancel to exit the Properties dialog box with out saving th e
entry.
6.1.2.2 Connecting to a Citrix Server
Double-click the name of the Connection Entry that you want to open in the Citrix ICA Client
window. Alternatively, select the name of the connection entry and click Connect from the
Entry menu or click the Connect icon.
6.1.2.3 Changing a Connection Entry
This section describes how to change properties for an existing connection entry.
36
Page 40
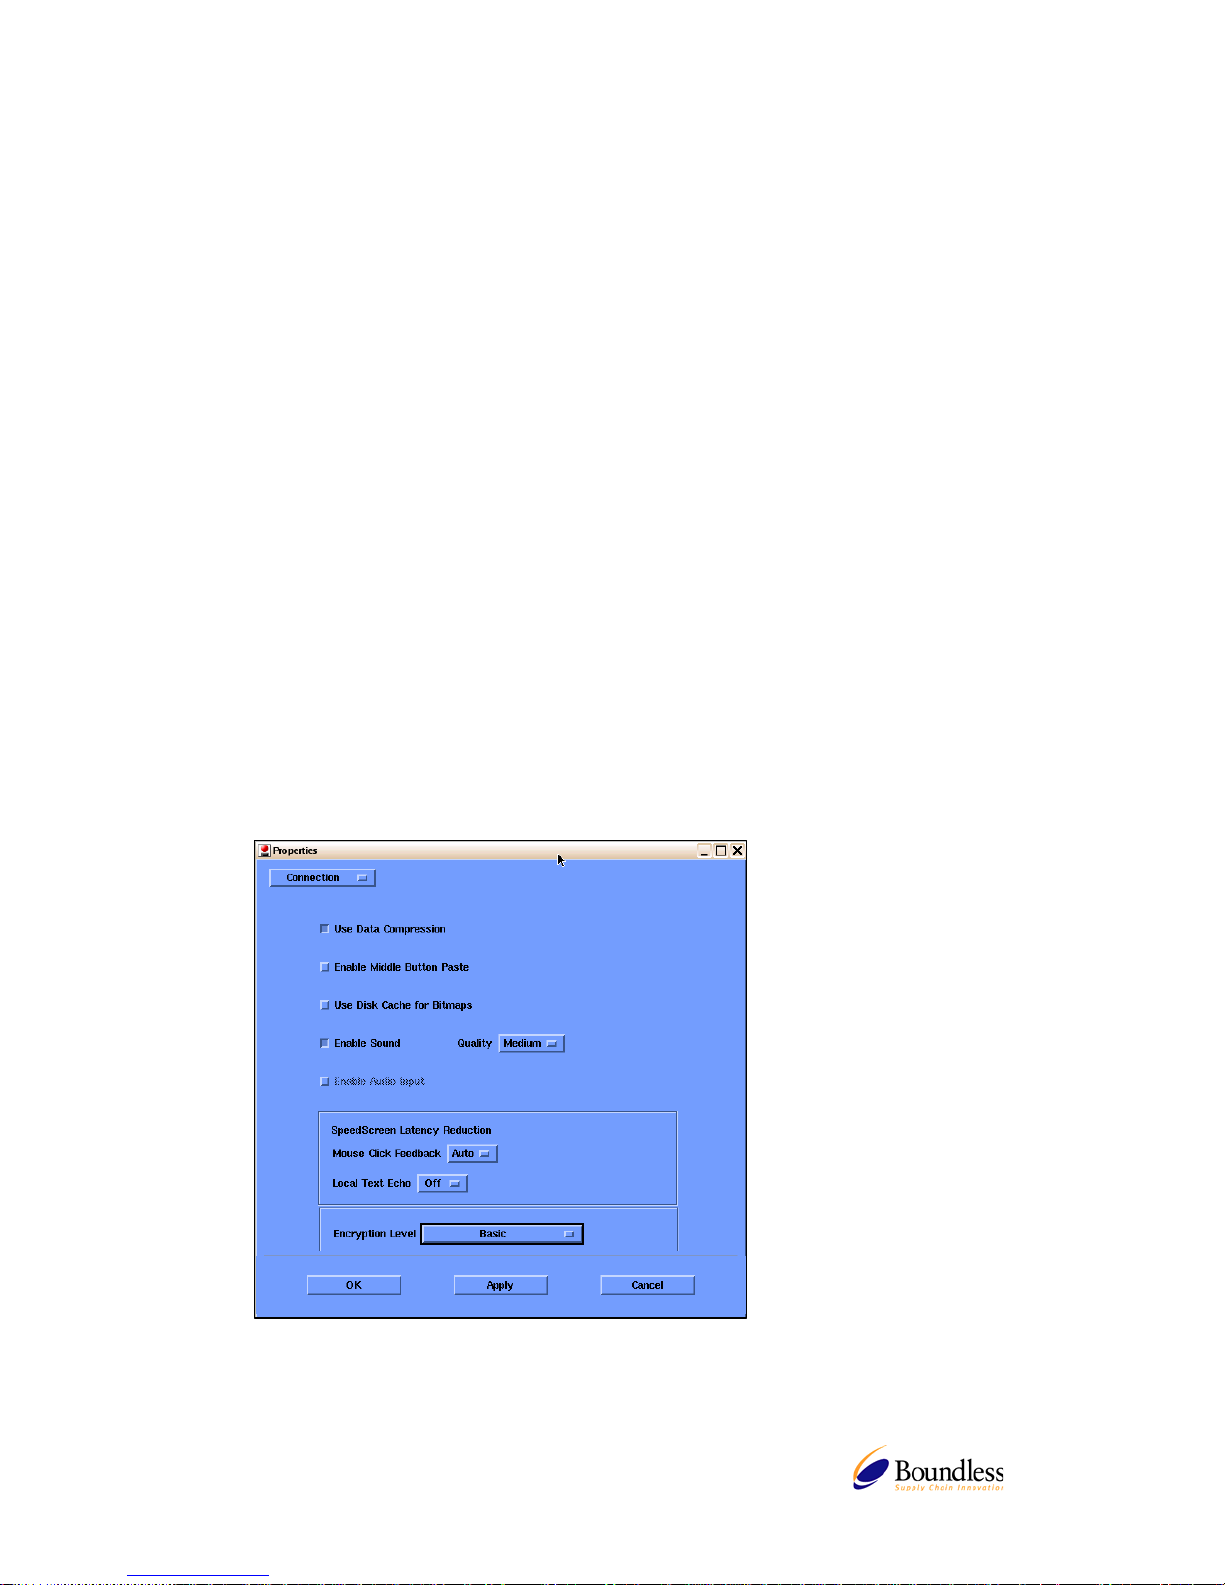
6.1.2.3.1 Configuring Network Properties
Use the Network page in the Properties dialog box to specify a connection with a MetaFrame
server and the network protocol to use.
z To change the network properties for a connection entry
1. From the main ICA Client window, select the connection entry that you want to change.
2. From the Entry menu, click Properties.
3. From the Properties dialog box, select Network from the drop-down list to display the
Network page:
4. Adjust the properties as required:
a. Enter a description of the connection in the Description field.
b. Click Server to configure a connection to a MetaFrame server. Click Published
Application to configure a connection to a publish e d application. You can specify a
server either by its name or its IP address. Click the…button (“browse”) to get a list of
Servers or P ublished Applications.
6.1.2.3.2 Improving Performance over a Low-Bandwidth Connection
If you are using ICA over a low-bandwidth connection, such as a modem or cellular telephone,
there are a number of changes that you can make to your client configuration and the way you
use the client to improve performance.
z Change your ICA Client configuration—Changing your client configuration, as
described below, can reduce the bandwi dth that ICA requires and improve performance
z Change the way you use the client—Changing the way you use the client can also
reduce the bandwidth required for a high-performance connection
z Use the latest MetaFrame server and ICA Clients—Citrix is continually enhancing and
improving ICA performance with each release, and many performance features require
the latest client and server software in order to function.
Changing your ICA Client Configuration
On devices with limited processing power, or where limited bandwidth is available, there is a
37
Page 41

trade-off between performance and functionality. The ICA Client provides both user and
administrator with the ability to choose an acceptable mixture of rich functionality and
interactive performance. Making one or more of these changes can reduce the bandwidth that
your connection requires and improve performance.
Enable the Bitmap Cache
Bitmap caching stores commonly used bitmaps (images) locally on your client so that they do
not have to be transferred over the ICA connection every time they are needed.
z To enable bitmap caching
1. From the ICA Client window, select the connection entry that you want to change.
2. From the Properties page, select Connection from the drop-down list to display the
Connection page.
3. Select Use Disk Cache for Bitmaps. Click OK.
Data Compression
Data compression reduces the amount of data transferred across the ICA session. This
requires additional processor resources to compress and decompress the data, but it can
increase performance over bandwidth-limited connections.
z To enable data compression
1. From the ICA Client window, select the connection entry that you want to change.
2. From the Properties page, select Connection from the drop-down list to display the
Connection page.
3. Select Use Data Compressi on to reduce the amount of data transferred ac ross the ICA
session.
SpeedScreen Latency Reduction
SpeedScreen Latency Reduction improves performance over high latency connections by
providing in stant feedb ack to the user in response to typed data or mouse clicks.
Note:SpeedScreen Latency Reduction will work only when it is available on the MetaFrame
server you a re connecting to and has been enabled. S ee your MetaFrame server
documentation for more details.
z To change SpeedScreen settings
2. From the ICA Client window, select the connection entry that you want to change.
3. From the Properties page, select Connection from the drop-down list to display the
Connection page.
4. In the SpeedSc reen section ther e ar e two list boxes, Local Text Echo and Mouse Click
Feedback. Local Text Echo accelerates display of the input text, effectively shielding you
from experiencing latency on the network. Mouse Click Feedback provides visual
feedback of a mouse click, in that the mouse pointer is immediately changed to an
hourglass indicator. Select a mode from the drop-down list:
a. For slower connections (for example if you are connecting over a WAN or a dial-in
connection), set mode to On to decrease the delay between user input and screen
display.
b. For faster connections (for example, if you are connecting over a LAN), set mode to
Off.
c. If you are not certain of the connection speed, set the mode to Auto to turn
SpeedScreen on or off depending on the latency of the connection. You can override
Auto mode using the Toggle SpeedScreen hotkey.
Note:Local text echo does not support input using IME.
38
Page 42
Reduce the Window Size
Change the window size to the minimum you can comfortably use.
Reduce the Number of Colors
Reduce the number of colors to 256.
Reduce Sound Quality
If you are using sound, reduce the sound quality to the minimum setting or disable client audio
mapping.
Changing the Way You Use the Client
ICA technology is highly optimized and typically does not have high CPU and bandwidth
requirements. However, if you are using a very low-bandwidth connection, you should
consider the following to preserve performance:
1. Avoid accessing large files using client drive mapping. When you access alarge file
with client drive mapping, the file is transferred over the ICA connection. On slow
connections, this may take a long time.
2. Avoid printing large documents on local client printers. When you print a document
on a local client printer, the print file is transferred over the ICA connection. On slow
connections, this may take a long time.
3. Avoid playing multimedia content. Playing multimedia content uses a lot of bandwidth
and can cause reduced performance.
6.1.2.3.3 Specifying an Application to Run at Connection
Use the Application page in the Properties dialog box to specify an applic ation to run when
you connect using the connection entry. If you specify an application, you do not see the
MetaFrame server desktop when you connect and the connection is closed when you quit the
application.
z To specify an application to run at connection
1. From the ICA Client window, select the connection entry that you want to change.
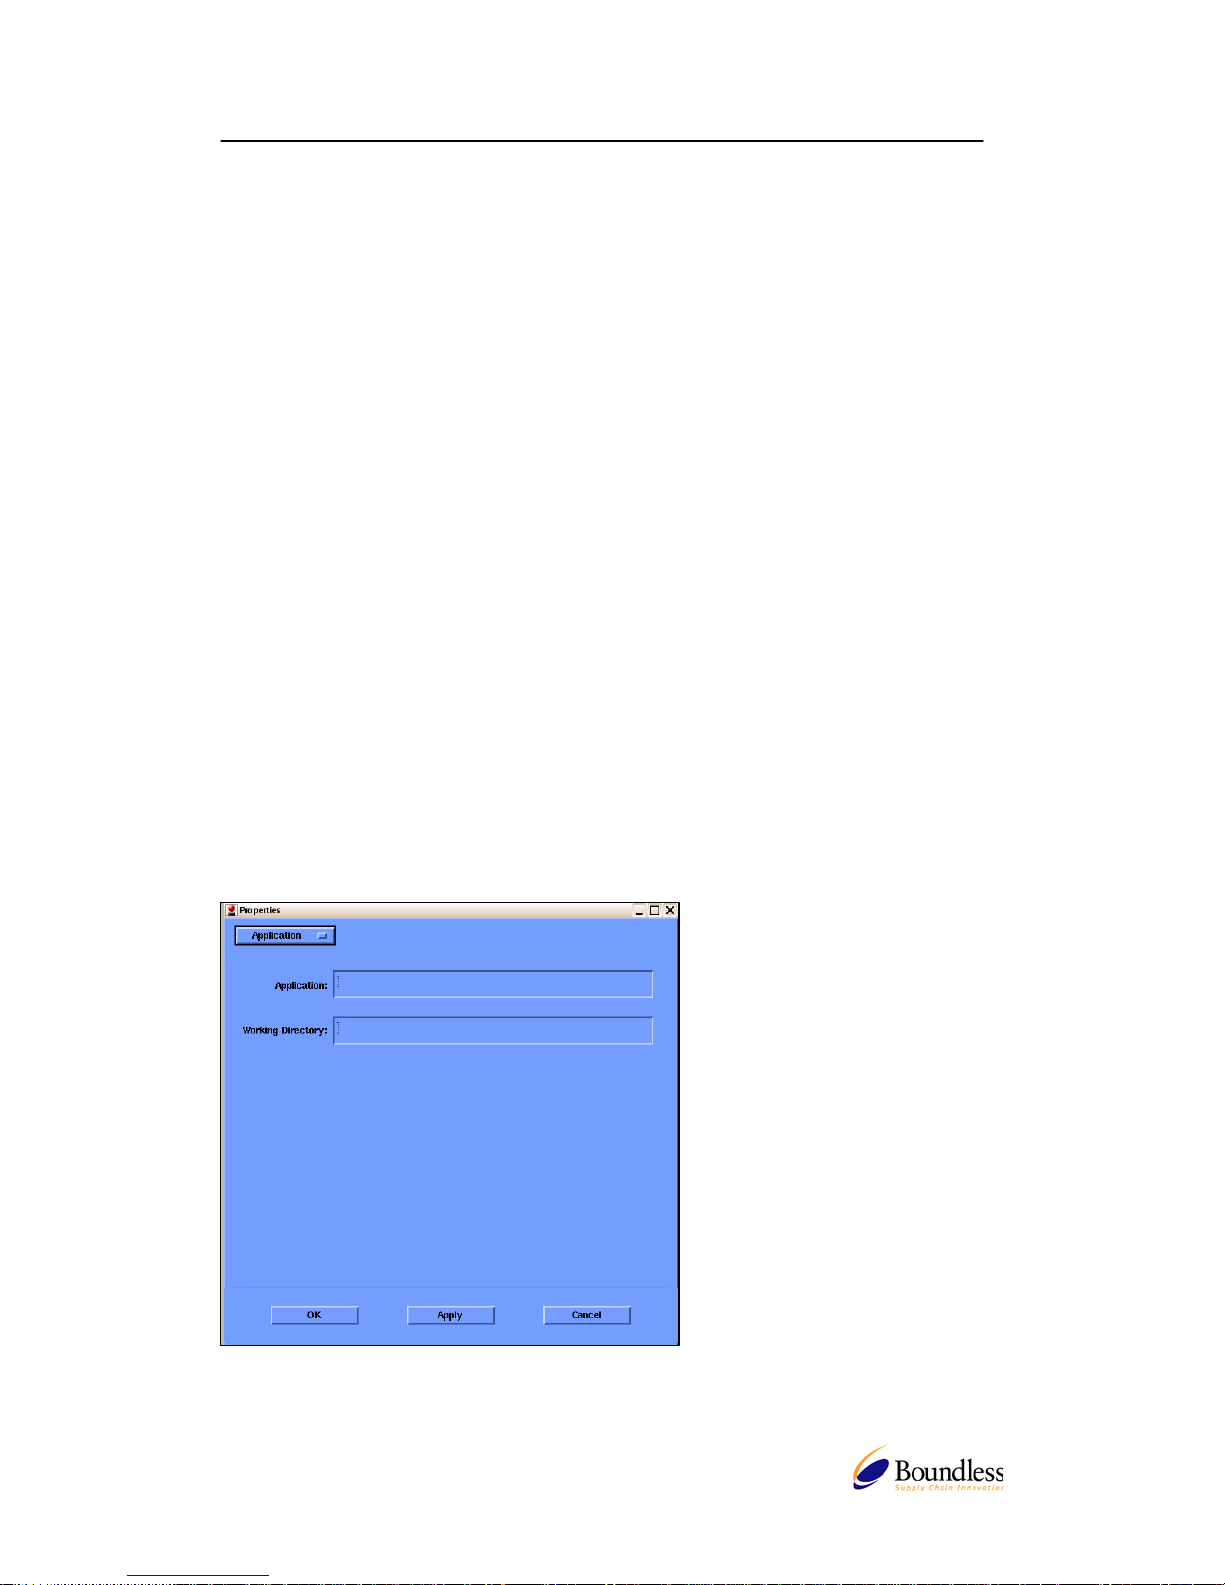
2. From the Properties page, select Application from the drop-down list to display the
Application page.
3. In the Application field, you can specify the pathname of an application to be run after
connecting to a MetaFrame server.
39
Page 43
4. In the Working Directory field, you can specify the pathname of a directory to be used
with the application.
Note:If the entry you are configuring is a connection to a published application, the
Application dialog box will not be available.
6.1.2.3.4 Changing the Window Properties
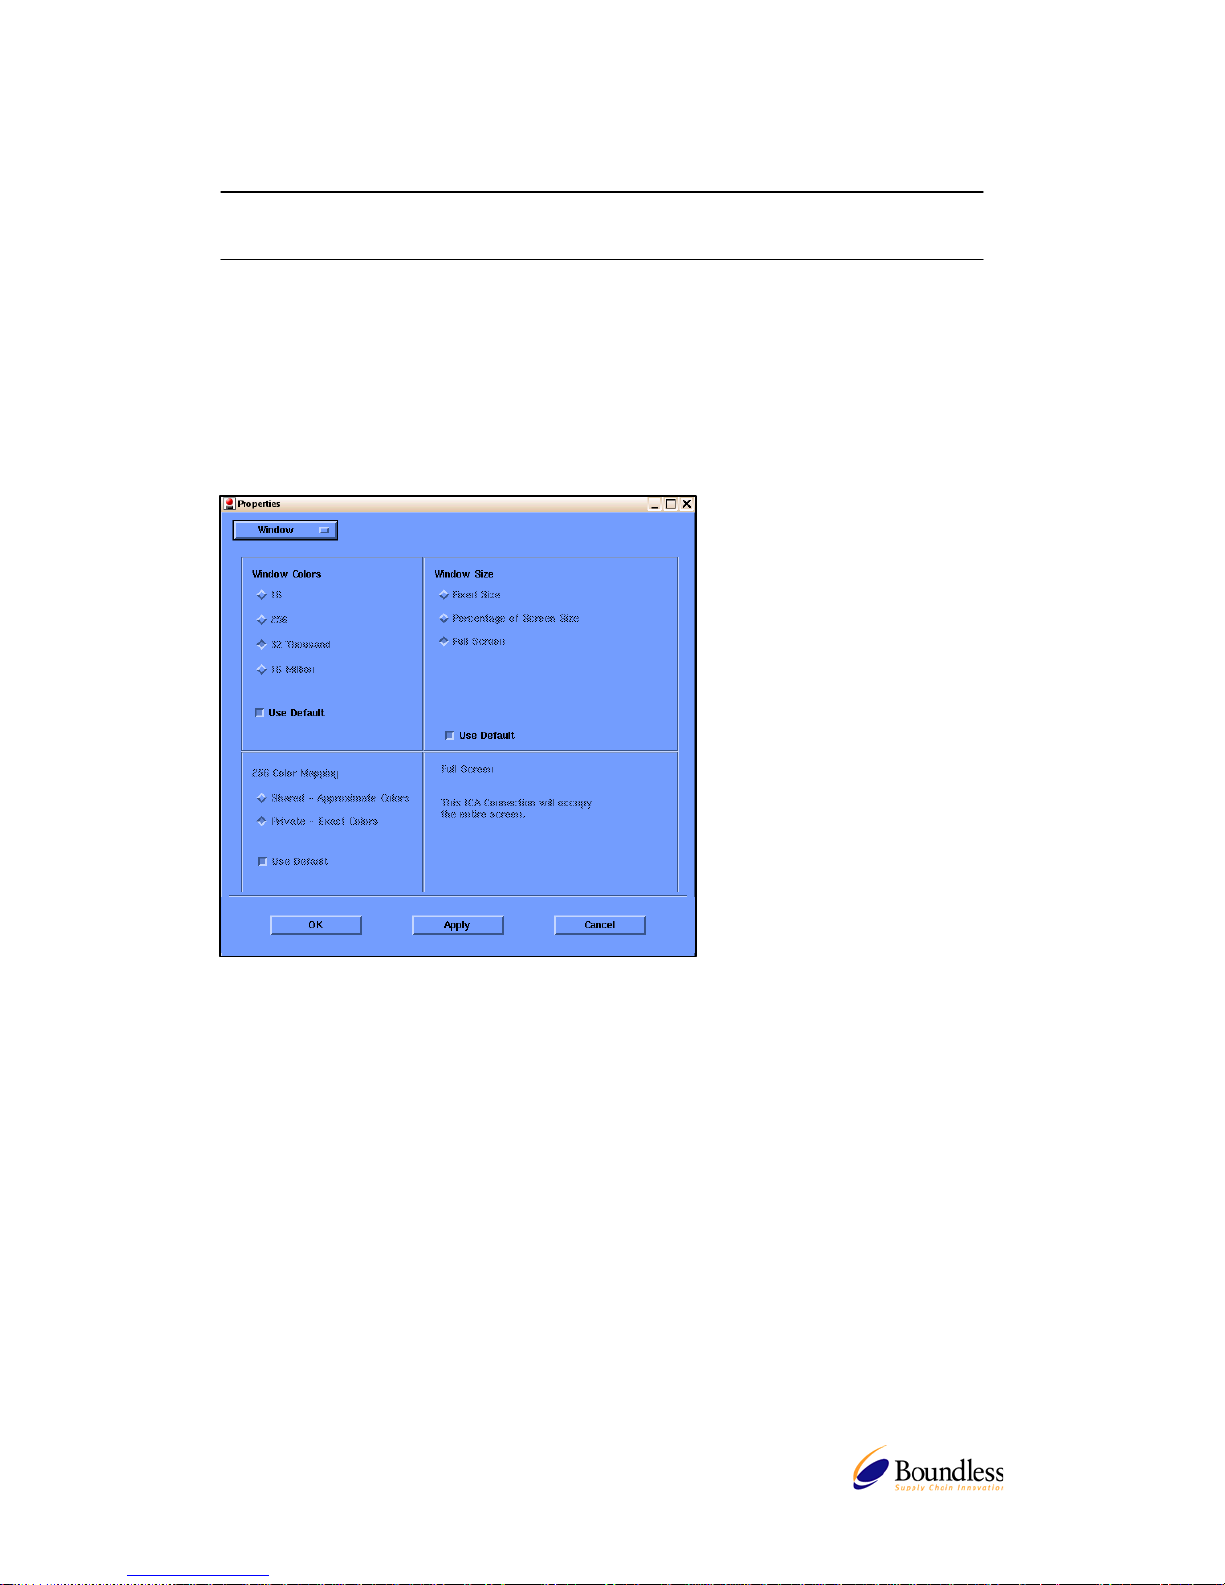
Use the Window page to change the window size and number of colors used for a particular
connection.
z To configure the window properties
1. Select the connection entry you want to change.
2. From the Properties page, select Window from the drop-down list to display the Window
page.
z Window Size allows you to select from Fixed Size, Percentage of Screen Size, or Full
Screen. Selecting Fixed Size or Percentage and type the size (in pixels) or percentage
in the Window Size boxes. If you are connec t i ng t o a published appli cation you can als o
select Seamless. Seamless integrates local and remote windows on the desktop.
z Window Colors allows you to set the numbe r of wind ow colors to 16, 256, 32 Thousand ,
or 16Million. Your display must be capable of displaying the resolution and color depth
you select. You can only specify a color depth greater than 256 colors on Version 6.0 and
later clients.
z 256 Color Mapping allows you to set u p 256 color sess ions to use approximate or exac t
colors. Use Shared - Approxima te Colors to eliminate color flashing when switching
context. Note that if other applications have allocated all 256 colors, the client will use a
private col or map.
z In each case, se lect Use De fault to use the d efault w indow size or window colors setting.
6.1.2.3.5 Configuring Login Properties
The Login page allows you to enter login details of your ICA connection so that you do not
40
Page 44
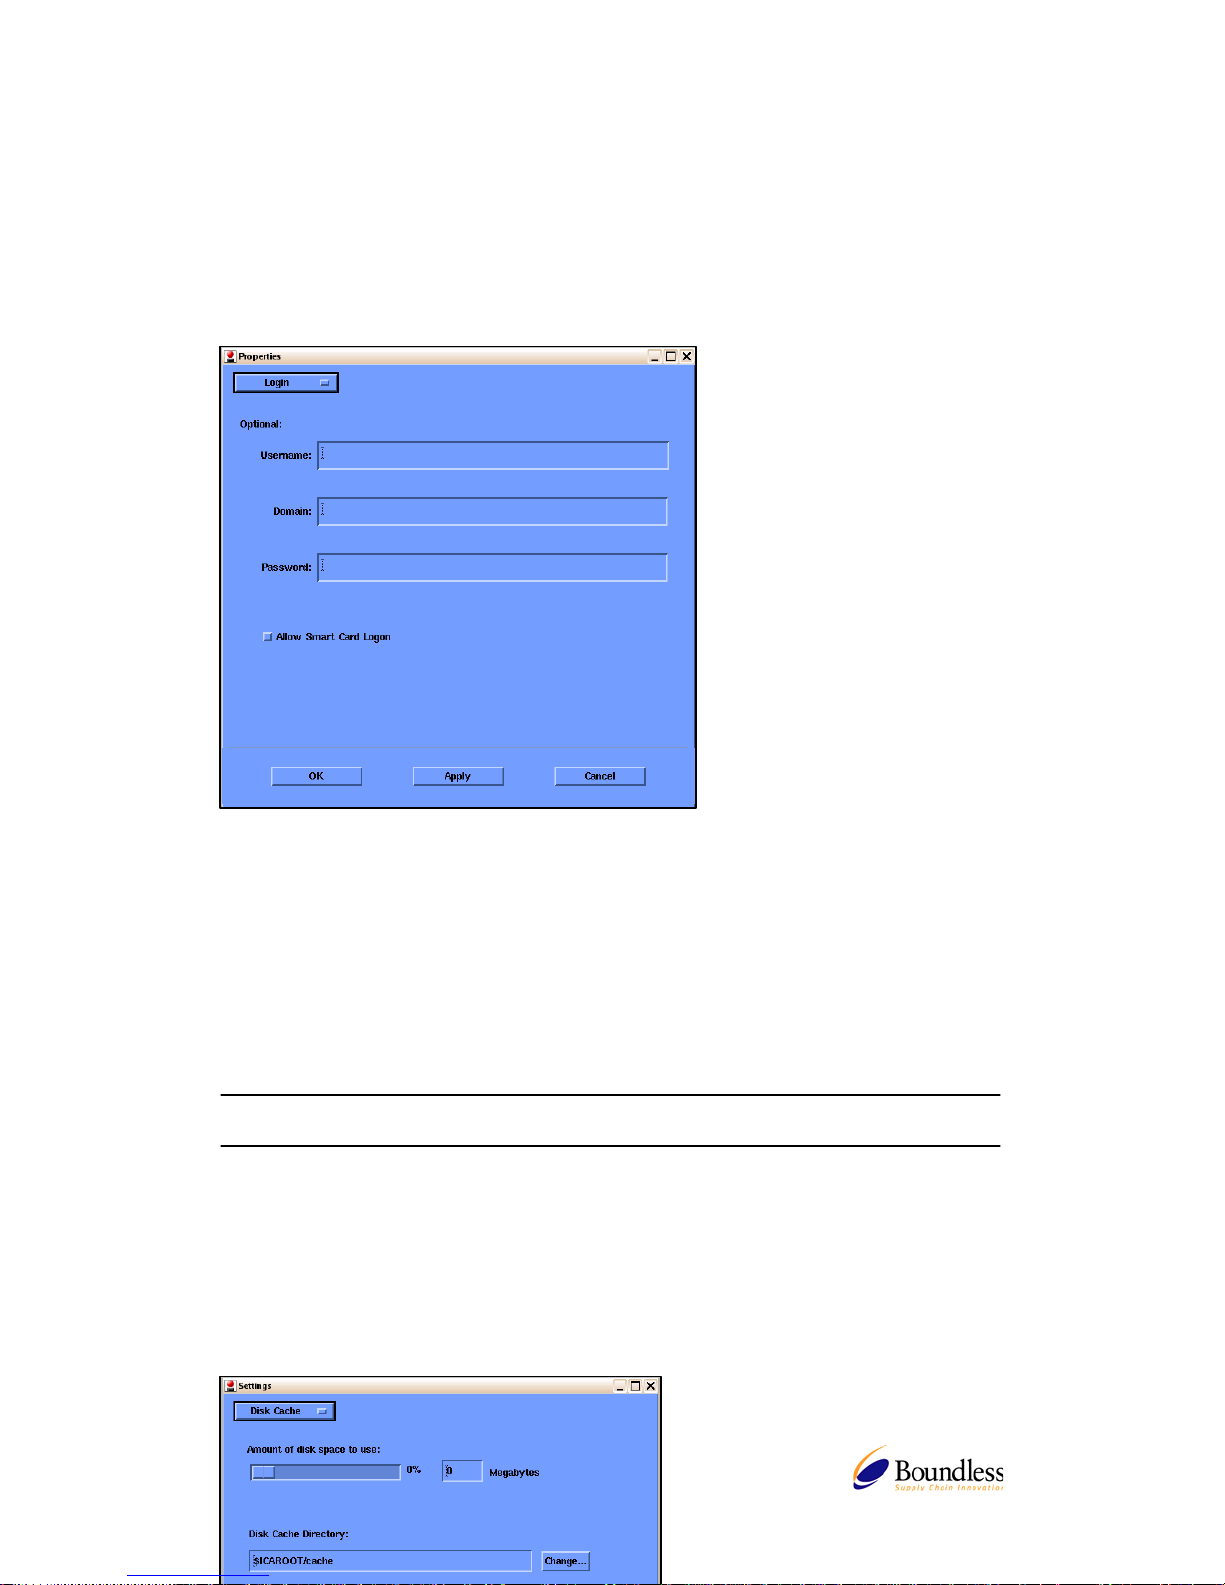
need to type them in each time you connect.
z To configure login properties
1. From the Citrix ICA Client window, select the connection entry that you want to change.
2. From the Properties page, select Login from the drop-down list to display the Login
page.
3. Type your Username, Domain (optional), and Password for the connection. To enable
smart card login, select Allow Smart Card Logon.
6.1.2.4 Changing Default Settings
This section describes how to change settings that apply for all connection entries on the
workstation. It also describes how to change the default settings that are used when you
create a new connection entry. You may want to do this if you prefer to use a particular setting;
for example, a window size that is different from the suggested setting.
6.1.2.4.1 Changing Settings for the Disk Cache
Use the Disk Cache page in the Settings dialog box to control the location, size, and contents
of the disk cache.
Note:The disk cache is used only if it is enabled for a particular connection.
To adjust the settings for the disk cache
1. From the Option menu, click Settings.
2. From the Settings dialog box, select Disk Cache from the drop-down list. This displays
the Disk Cache page:
41
Page 45

3. To set the maximum size of the cache, adjust the Amount of disk space to use slider to
show a percentage of the disk, or type in the maximum size you want to allow.
4. To change t he location of the cache, set the Disk Cache Directory as appropriate by
clicking the Change button and browsing to your desired location. If you change the
location of a cache on a workstation, make sure that you clear the old cache first.
5. To set the minimum size of bitmaps to cache, adjust the The minimum size bitmap that
will be cached is slider. The size setting is displayed next to the slider.
6. To clear the cache, click the Clear Cache Now button. Citrix does not recommend that
you clear the cache if any ICA connections are open. Before clearing the cache, verify that
all ICA connections are closed.
Note:An administrator can view information about the bitmap cache settings for an ICA
connection using the Cache tab in Citrix Server Administration. See your server
documentation for more details.
6.1.2.4.2 Configuring Auto Client Reconnect
z To change the auto client reconnection settings for a connection entry
1. From the main ICA Client window, select the connection entry that you want to change.
2. From the Entry menu, click Properties.
3. From the drop-down list, click Auto Reconnect.
4. Select Enable Auto Reconnect and, if required, enter values for Maximum Retries and
Seconds Delay Before Retrying Reconnect.
5. Click OK.
Note:Auto client reconnect works in the same way regardless of whether a user has logged on
conventionally or with a smart card. Users who log in to a MetaFrame session using a smart
card will be automatically reconnected should their session fail and will not have to reenter
their PIN number, provided that their smart card remains in the smart card reader.
42
Page 46
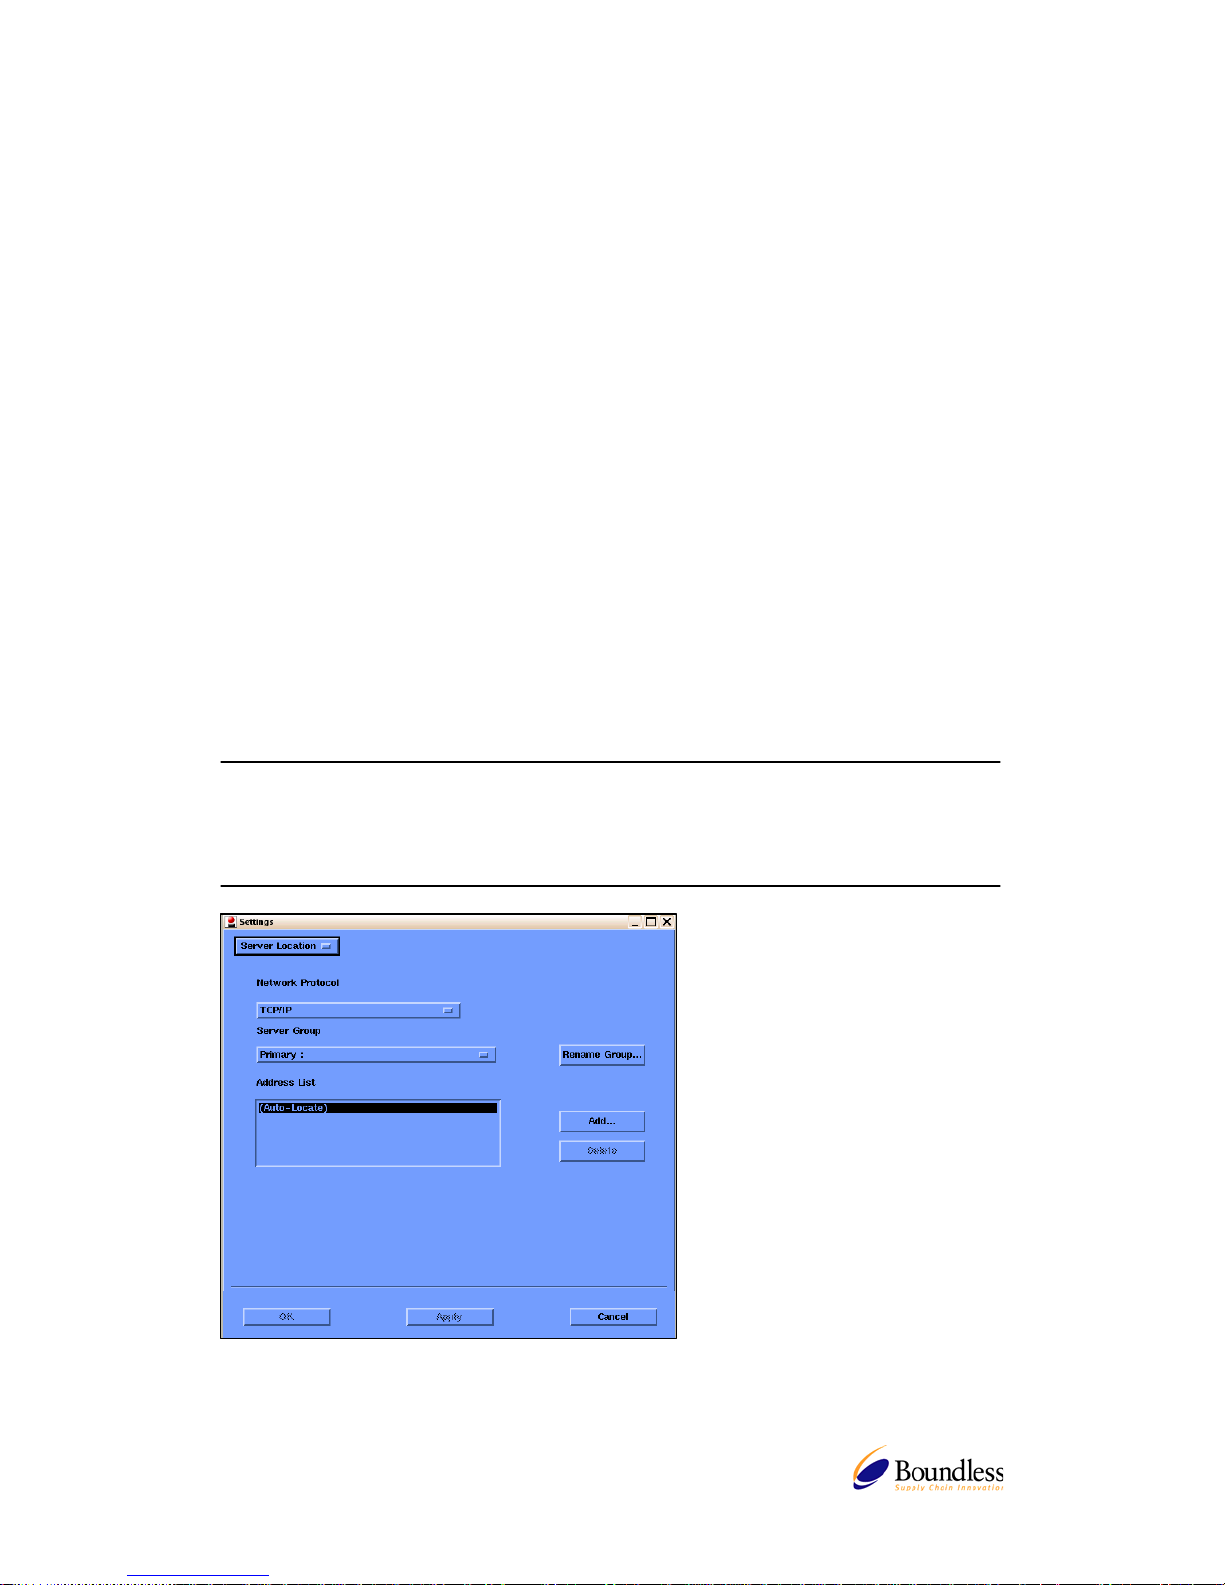
6.1.2.4.3 Configuring Server Location and Business Recovery
z To configure server location and business recovery
1. From the Settings page, select Server Location from the drop-down list to display the
Server Location page:
2. Select the required network protocol from the drop-down list.
3. Click Add to display the Add Server Location Address dialog box.
4. Enter t he name or IP address of a MetaFrame server.
5. To define other server groups, select the required group from the Server Group and
repeat steps 3 and 4.
6. Click OK.
Note:For the TCP/IP+HTTP and SSL/TLS+HTTPS protocols, if you do not enter an IP
address, you must have a MetaFrame server on your network mapped to the default
name of ica. Domain name, where domain name is a TCP/ IP domain name.
TCP/IP+HTTP and SSL/TLS+HTTPS server location do not support the (Auto-Locate)
function.
6.1.2.4.4 Configuring Hotkeys
Hotkeys are used to control the behavior of the client and as substitutes for the standard
43
Page 47
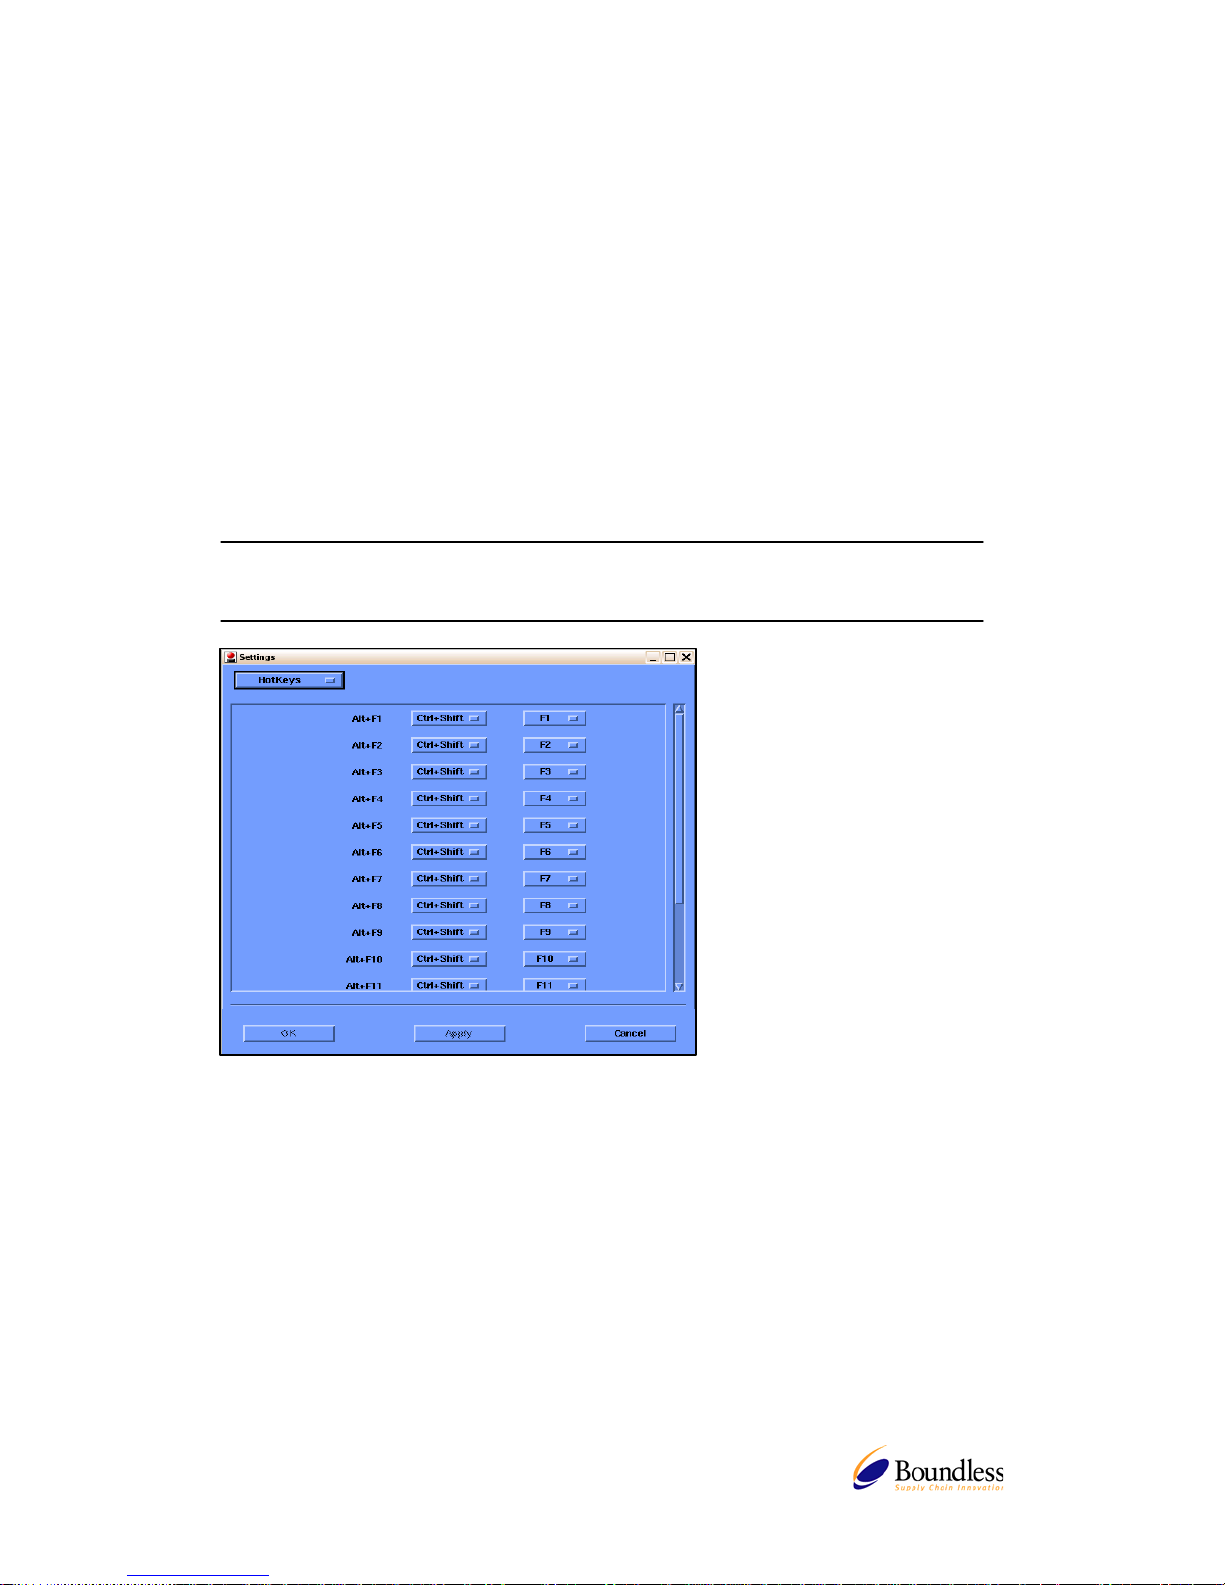
Windows hotkeys for a published application. For example, if you w anted to close the current
window on a Windows PC, you would press ALT+F4. This key combination closes the session
in X Windows. Hotkey functionality allows you to map common key combinations like ALT+F4
to a key combination such as ALT+CTRL+F4 that will be ignored by your local operating
system. When you press this new combination, the ICA UNIX Client will send ALT+F4 to the
MetaFrame server, closing the current window.
z To display the hotkey settings
1. From the Settings page, select Hotkeys from the drop-down list:
2. On the Hotkeys pages, you can define alternative key combinations for the hotkeys <Alt>
<F1> to <Alt> <F12>, ALT+TAB, ALT+SHIFT+TAB, and Toggle Speed screen, -which are
reserved for u s e by X Wi nd o ws .
3. By def ault, these key combinations are generated by <Alt> <Ctrl> <F1> to <Alt> <Ctrl>
<F12>, but you can change the definitions by selecting alternative keys from the pop-up
menus.
4. Any <Alt> key combinations not used by your X Window manager can be used as normal
within the ICA session.
Note:If you want to use the PC key combination <Ctrl> <Alt> <Delete> during the connection
session, use the key combination <Ctrl> <Alt> <Enter> or <Ctrl> <Alt> <Return>.
6.1.2.4.5 Configuring Preferences
z To configure the preference settings
1. Select Preferences from the drop-do wn list in the Settings dialog box to display the
Preferences page:
2. Adjust the settings as required, for example:
a. In the Keyboard Layout field, click the…button (“browse”) to select your input locale
from the list. Input locale is the language you want to type in.
b. In the Keyboard Type (Client) field, click the…button (“browse”) to select your
correct workstation keyboard type from the list.
c. In the Keyboard Type (Server) field, click the…button (“browse”) to select the
specific physical keyboard type you are using from the list. If you are using a
Japanese keyboard, select it. For all others, use the default (standard 105 key
keyboard).
d. Select Enable Windows Alert Sounds if you want Windows aler t sounds to be
44
Page 48
played using the UNIX workstation sound system.
e. Select Allow Automatic Client Updates to allow the client software at this
workstation to be automatically updated when a newer version is available.
6.1.3 VNC Client Viewer
Virtual network computing (VNC) is a great tool for remote desktop viewing and manipulation.
Its core function is to allow the user to use the VNC cli ent to con nect to a ho st ru nning the VNC
server and remotely use the server's desktop. VNC software makes it possible to view and
fully-interact with one computer from any other computer or mobile device anywhere on the
Internet. Keyboard and m ouse updates are sent to the server, and snapshots of t he server's
desktop are compressed and sent back to the client via the VNC protocol. The figure is below.
VNC Viewer:Connection Details
You can also set the VNC Viewer by clicking options. The figure is below.
VNC Viewer:Connection Options
6.1.4 WEB Browser
Directly click Browser to open a Mozilla Web Browser.
45
Page 49
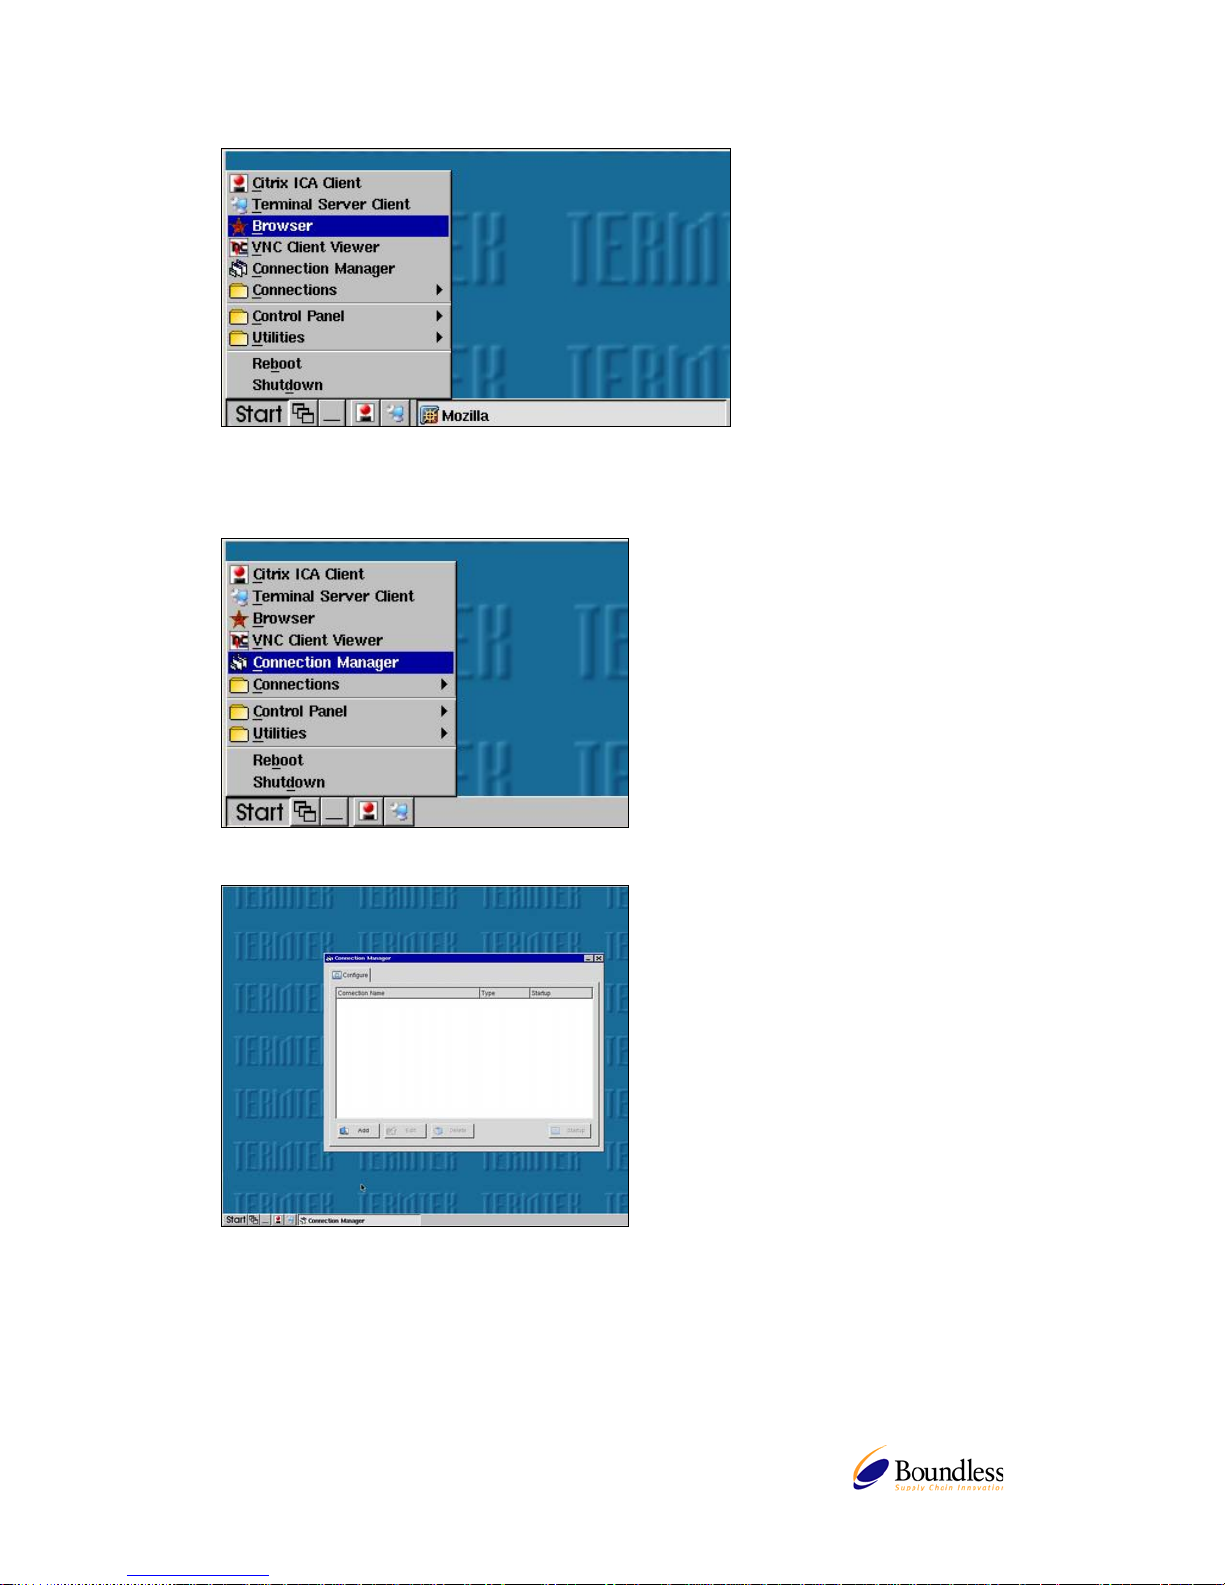
6.2 Connection manager
Please reference to Chapter 3.
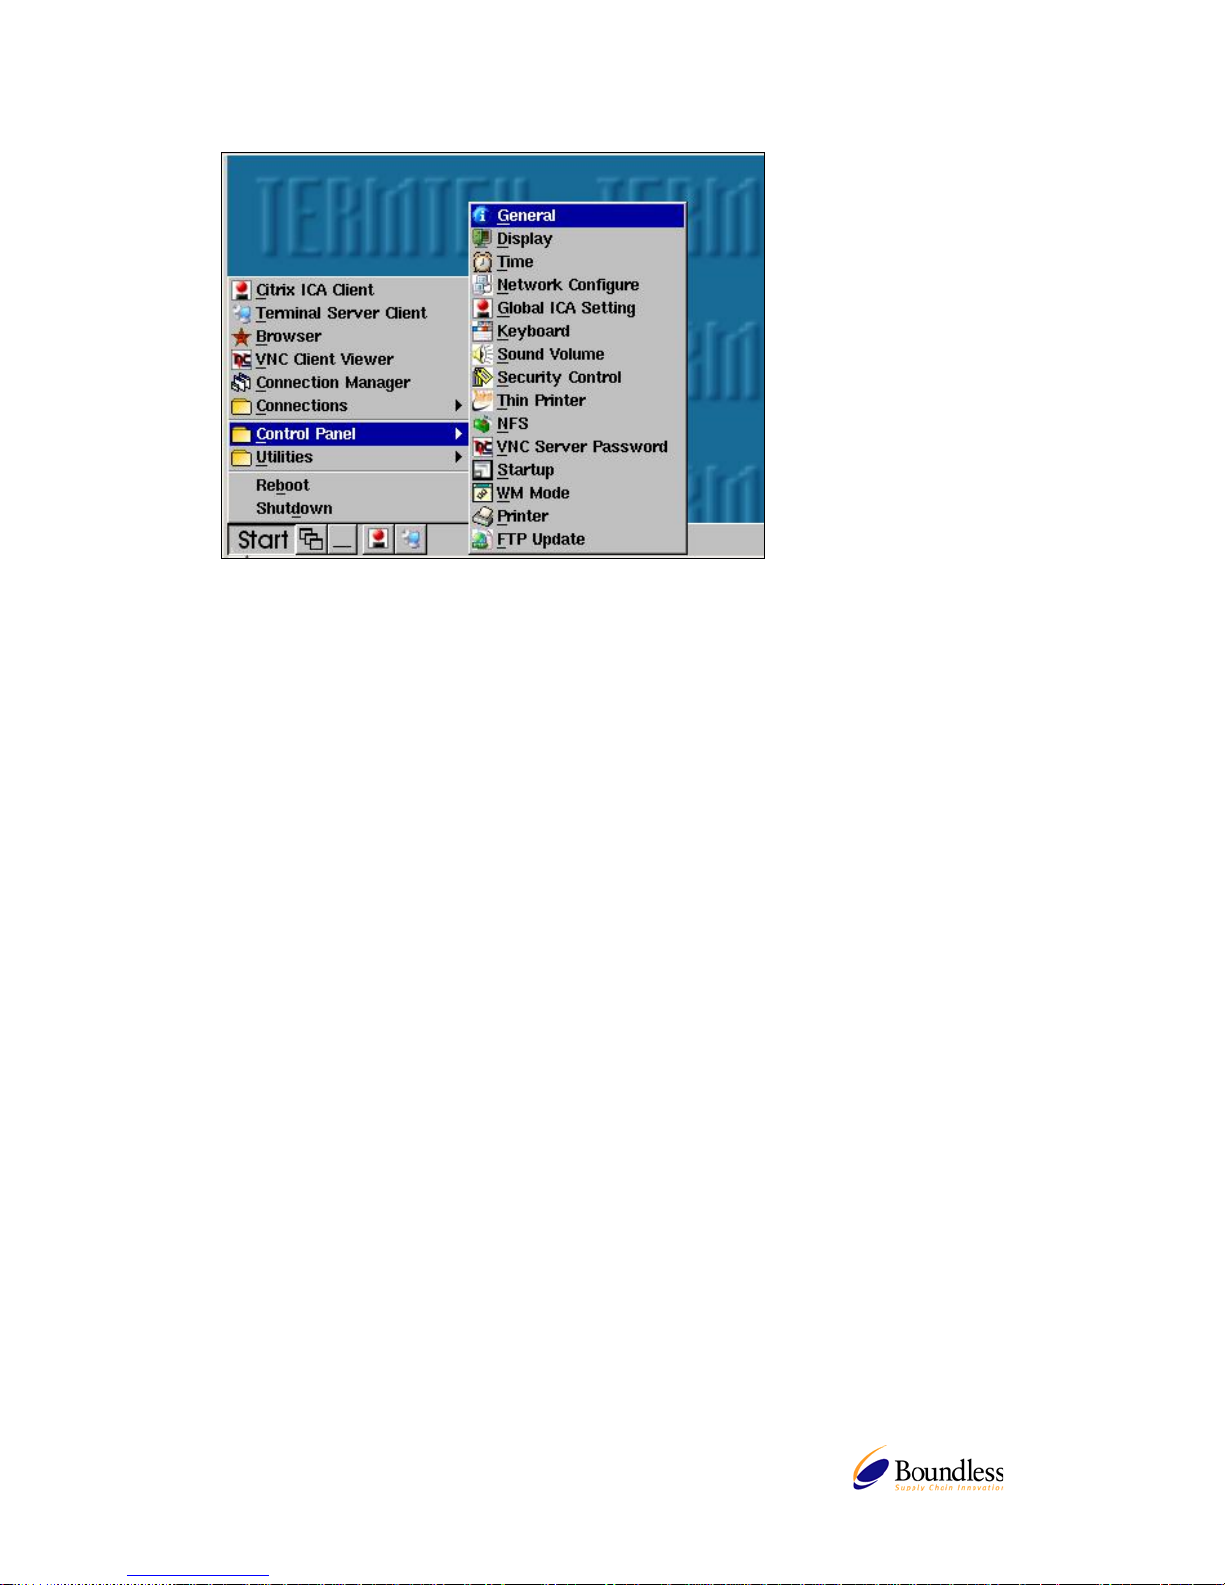
6.3 Control Panel
Please reference to Chapter 4
46
Page 50
47
 Loading...