

Page 1
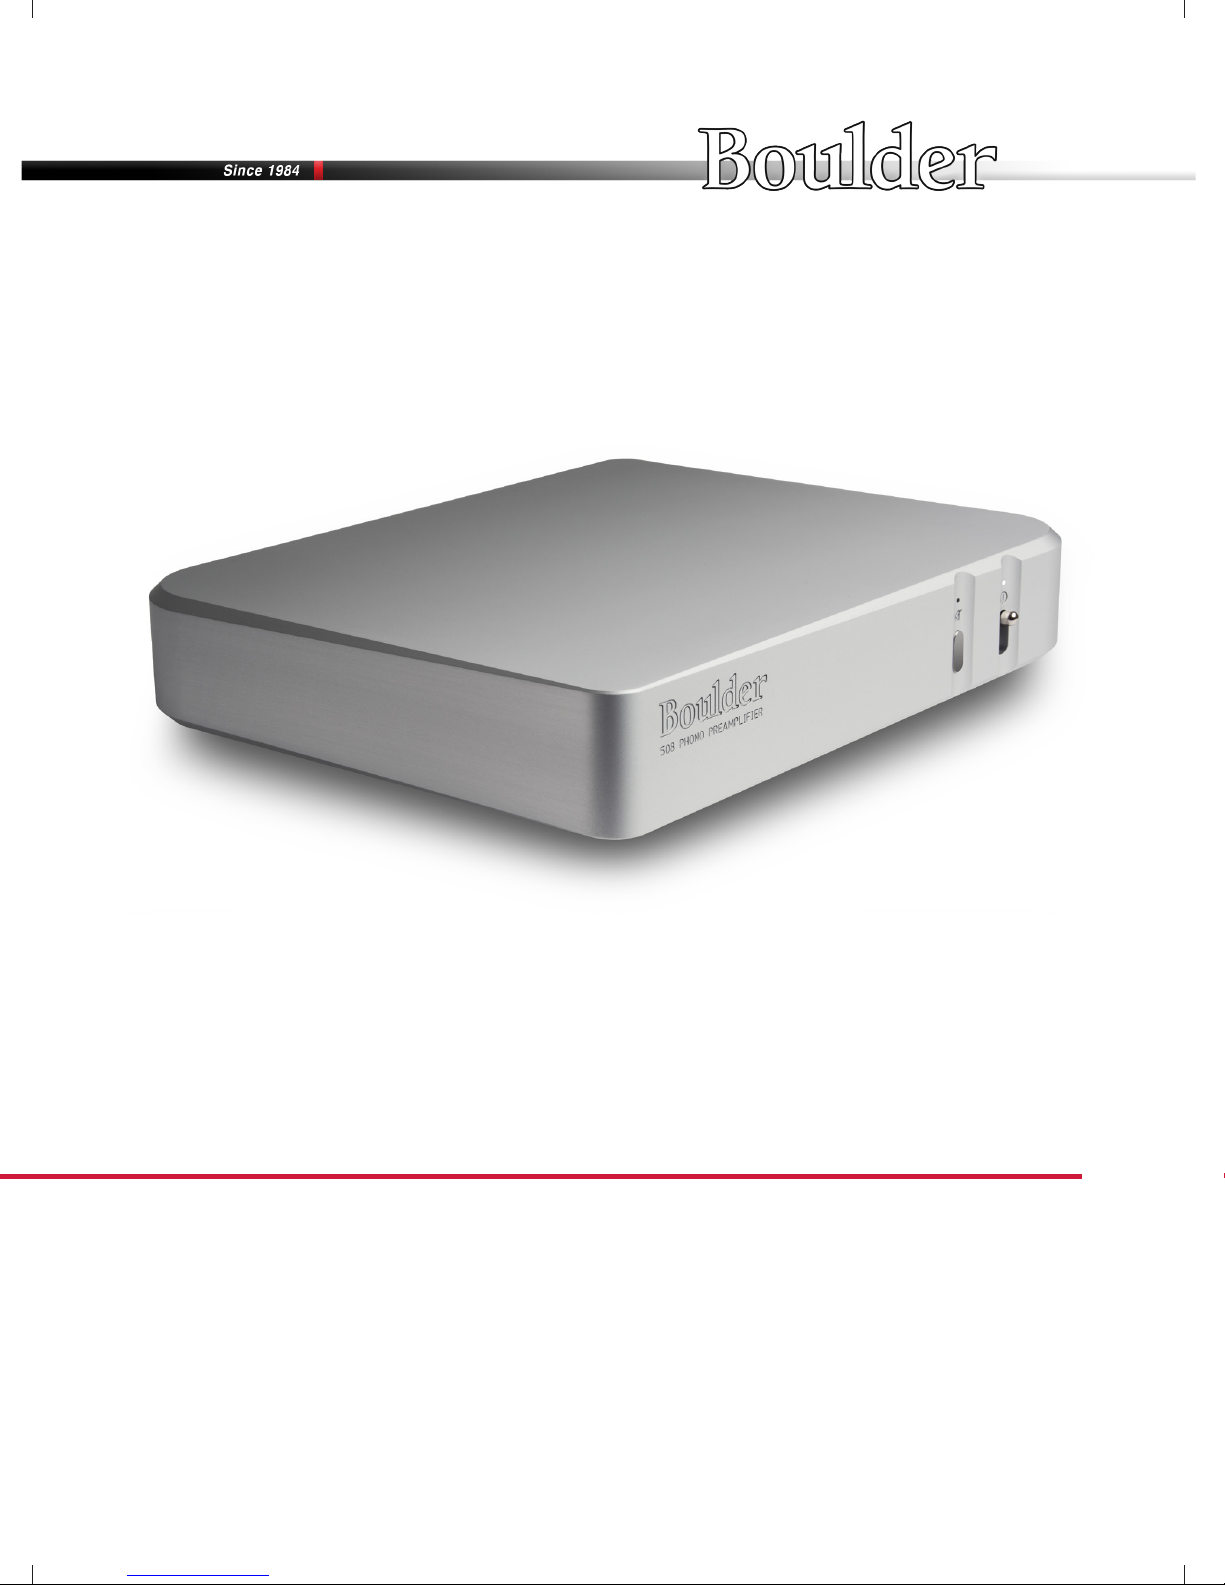
508 Phono Preamplier
6/1/2018
Rev. 1.0
P/N: 91053
Boulder Ampliers, Inc.
255 S. Taylor Ave.
Louisville, CO 80027
(303) 449-8220
www.boulderamp.com
Page 2

About
About Boulder Ampliers, Inc.
Boulder was founded in 1984 and is the last high-performance audio
manufacturer operating in North America to still perform all of its own
design, engineering and manufacturing in-house. While this form of
production may be more costly than outsourcing, the resulting quality
control and reliability of the nished products are never compromised.
In 2016, Boulder moved into a new, purpose-built production facility to
increase manufacturing efciency and offer space for expansion to meet
the needs of future growth.
Page 3

Thank You
Congratulations and thank you for selecting the Boulder 508 Phono
Preamplier for your high-performance sound system. We are certain it
will provide you with many years of listening pleasure.
The 508 represents the concerted efforts of numerous Boulder designers,
engineers, and technicians working to bring you the best audio playback
components in the world. Please take a few moments to read through this
instruction manual prior to using your 508. This will help you understand
the many functions and capabilities of the phono preamplier. It will also
allow you to maximize the convenience and performance for which it was
engineered.
Your Boulder 508 Phono Preamplier has undergone extensive laboratory
tests for safety, functionality and technical excellence. In addition, it has
been individually subjected to rigorous listening trials in our sound room
utilizing a wide range of musical material. No product ever leaves our
factory until we are totally satised that it achieves its full potential.
Page 4

Table of Contents
Getting Started
Introduction •••••••••••••••••••••••••••••••••••••••••••••••••••••••••1-1
Audio Features ••••••••••••••••••••••••••••••••••••••••••••••••••••••1-1
Operational Features ••••••••••••••••••••••••••••••••••••••••••••••••• 1-1
Unpacking and Care •••••••••••••••••••••••••••••••••••••••••••••••••• 1-2
Before You Start •••••••••••••••••••••••••••••••••••••••••••••••••••••1-2
How to Clean the Casework ••••••••••••••••••••••••••••••••••••••••••• 1-3
Placement and Installation of the 508 •••••••••••••••••••••••••••••••••••1-3
Turntable Connection Types •••••••••••••••••••••••••••••••••••••••••••1-4
Connecting a Turntable ••••••••••••••••••••••••••••••••••••••••••••••• 1-5
Connecting the Outputs to a Balanced Preamplier •••••••••••••••••••••••1-6
Connecting the Outputs to an Unbalanced Preamplier •••••••••••••••••••• 1-7
Moving Coil or Moving Magnet Selection •••••••••••••••••••••••••••••••• 1-8
Connection to AC Mains• • • • • • • • • • • • • • • • • • • • • • • • • • • • • • • • • • • • • • • • • • • • • • • 1-8
Operation
Power •••••••••••••••••••••••••••••••••••••••••••••••••••••••••••••• 2-1
Mute •••••••••••••••••••••••••••••••••••••••••••••••••••••••••••••••2-1
Equalization ••••••••••••••••••••••••••••••••••••••••••••••••••••••••• 2-2
Appendix
Technical Specications ••••••••••••••••••••••••••••••••••••••••••••••• 3-1
Weights & Dimensions ••••••••••••••••••••••••••••••••••••••••••••••••3-2
508 Phono Preamplier Dimension Diagram ••••••••••••••••••••••••••••• 3-3
Troubleshooting •••••••••••••••••••••••••••••••••••••••••••••••••••••• 3-4
Notes ••••••••••••••••••••••••••••••••••••••••••••••••••••••••••••••• 3-5
Page 5

Introduction
The 508 Phono Preamplier embodies years of development and is directly descended from the legendary 2008 Phono Preamplier, one of the
Getting Started
greatest Phono Preamps ever developed. Here are some of the features
that set the 508 apart from the competition:
Audio features:
• Fully-balanced operation from input to output.
• Surface-mount design (SMD) circuitry wherever possible.
• One pair of balanced inputs on XLR connectors.
Getting Started
• Fully-balanced audio path from input to output.
• Loading settings match a wide range of cartridge loading
settings.
Operational features:
• Compact chassis design.
• Switchable gain for MM (moving magnet) or MC (moving coil)
cartridges.
• Casework machined from a solid block of aluminum.
• Extremely robust and quiet power supply.
• Ultra-low power consumption.
1-1
Page 6

Getting Started
Unpacking and Care
The 508 Phono Preamplier features nely nished casework. Please use
care when unpacking, lifting, and installing the preamplier to avoid damage to the metalwork and furniture. The 508 Phono Preamplier weighs
11.5 lbs. (5.2 kg).
Be sure to save all packing materials! The 508 is shipped in a foam wrap to
protect the phono preamplier’s ne nish. Try not to damage this wrap in
the event that the unit must be transported elsewhere in the future.
Before You Start
You should have received a large, heavy box. The pieces included inside
the box are:
Getting Started
1. 508 Phono Preamplier
2. Instruction Manual
3. Unbalanced PHRCA phono adaptors
4. AC Mains Power Cable
If any of these pieces are missing or damaged, please contact your
authorized Boulder dealer immediately before continuing with the
installation.
1-2
Page 7

How to Clean the Casework
If the 508 must be cleaned, use only a soft, lint-free cloth moistened with
plain water.
Getting Started
Never use any type of chemical cleaner unless recommended by your
dealer or the Boulder factory.
Do not use bleach! Bleach will remove the anodized surface of the case-
work.
Never use any type of abrasive to clean the casework.
If you have any questions, please contact your authorized Boulder dealer.
Getting Started
Placement and Installation
Your Boulder 508 Phono Preamplier is designed to reduce the effects that
external magnetic elds and radio frequencies (RF) have on its circuitry.
While placement is not critical, because of the high gain of the 508, known
magnetic elds should be avoided whenever possible. Power transformers
in other pieces of nearby equipment should be placed a minimum of 12
inches (30 cm) away.
Because it is heavy, the 508 must be placed on a sturdy, stable surface.
Do not place in an enclosed rack without ventilation. The 508 must have at
least 2 inches (5 cm) of airspace around the chassis for proper cooling and
airow.
Be sure to leave access to the AC mains and interconnect cables when
installing the phono preamplier. Depending on how easy it is to access
the back panel of the 508, it may be wise to pre-install the power and
interconnect cables before placement.
1-3
Page 8

Getting Started
Turntable Connection Types
To get started listening, you only need to connect a turntable to the 508 as
you would any other phono preamplier. Please take note of the following:
The 508 can be connected to many different types of analog turntables
and will provide excellent sound quality for each. To fully realize the sonic
potential of your 508 Phono Preamplier, use balanced cable connections
with XLR terminations whenever possible. Balanced XLR cables minimize
interference from magnetic, hum, and RF sources.
Getting Started
1-4
Page 9
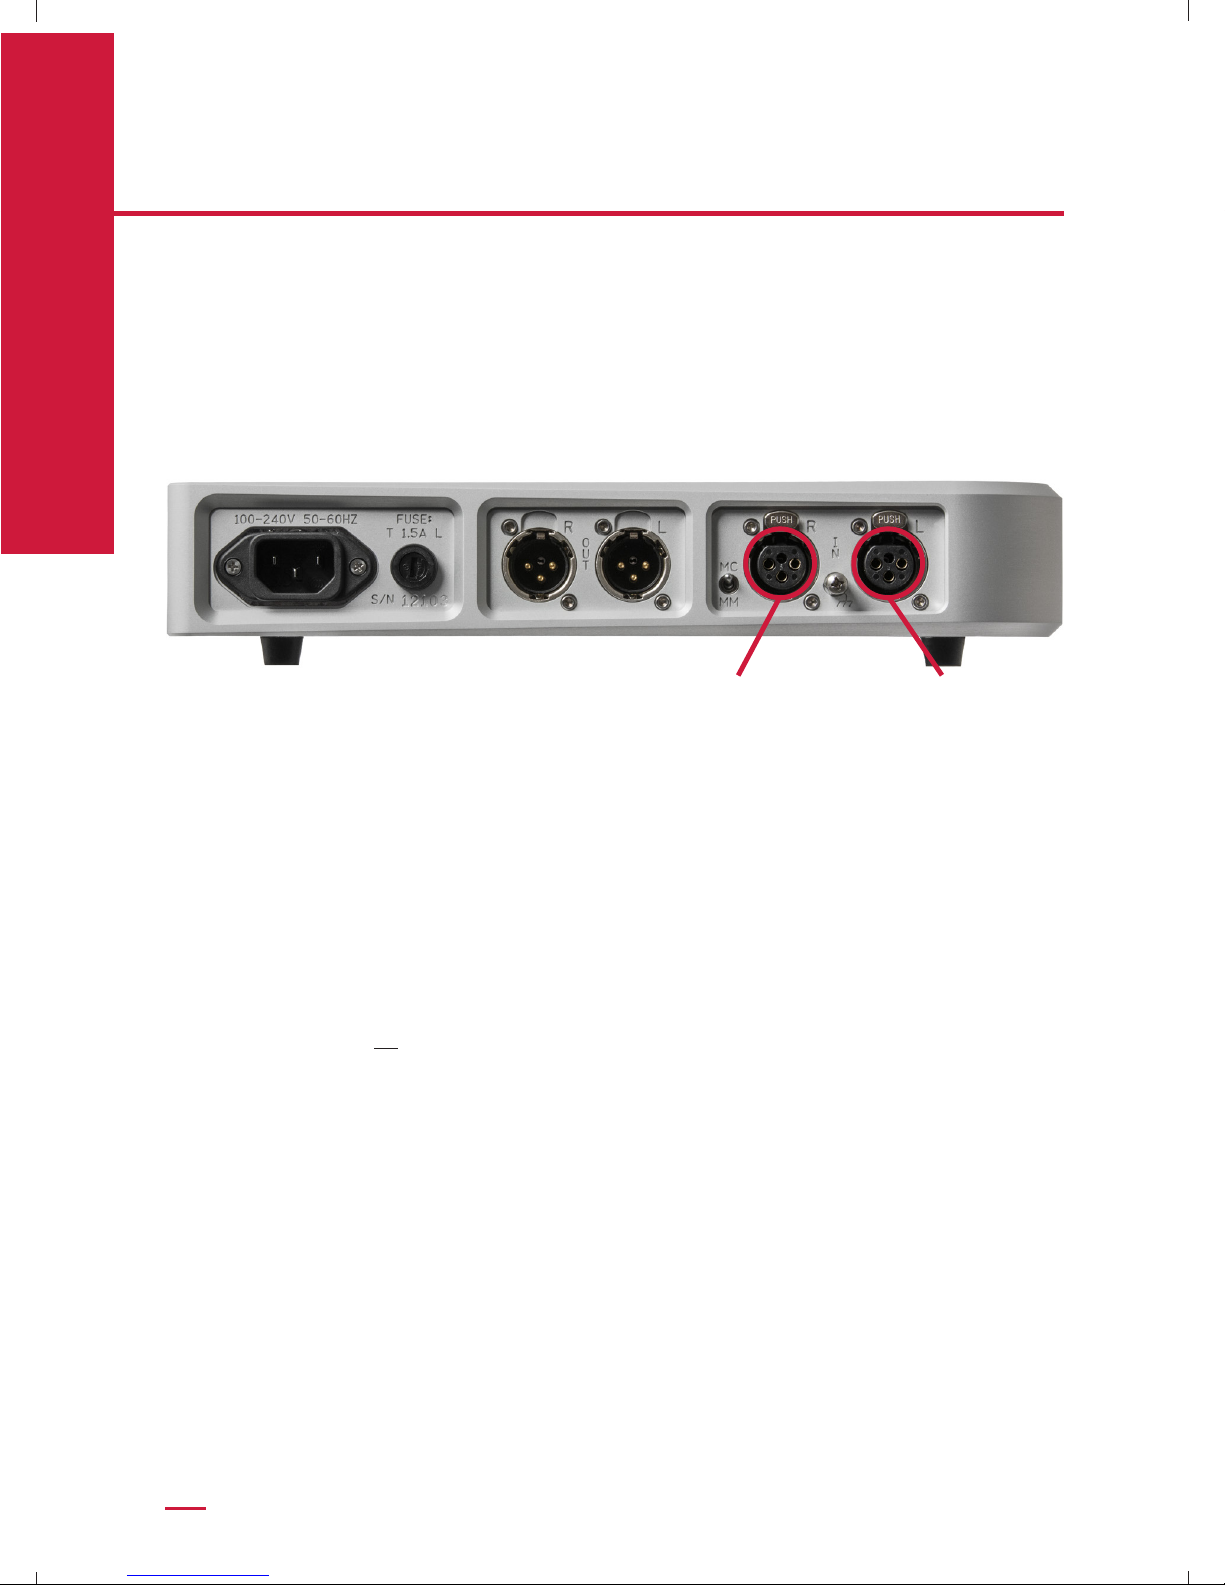
Connecting a Turntable
Because a phono cartridge is an intrinsically balanced source, balanced
inputs are provided on the 508. Connect the output cables from your
Getting Started
turntable to the LEFT and RIGHT CHANNEL input connections of the 508.
Please follow the following instructions to avoid picking up hum in the
system:
Getting Started
Right Channel Left Channel
Do not short pin 1 (chassis/ground) to either pin 2 or 3 of the XLR
connector at any point in the cable, turntable chassis, or tonearm. This will
cause hum in the system. Pins 2 and 3 must only be connected directly to
the cartridge pins. Proper wiring diagrams are shown on the next page.
Use only a connection from pin 1 of the turntable’s XLR connector to the
turntable chassis or the provided ground wire from the 508’s rear panel
chassis screw terminal to the turntable chassis. Using both may form a
ground loop, which will cause hum.
RCA connections can be accommodated. If your turntable does not
have XLR connections, one pair of Boulder PHRCA Phono Adaptors is
provided. These will convert the 508’s inputs to RCA and give acceptable
performance. A separate ground wire is also provided.
CAUTION: If your turntable does not have XLR connectors, do not use the
Boulder ABL2 input adaptor or any other “standard” RCA phono to XLR
adaptors. These are not intended for phono use, as they short pin 1 to pin
3 and will cause hum in your system. Only use the Boulder PHRCA Phono
Adaptors.
1-5
Page 10
Getting Started
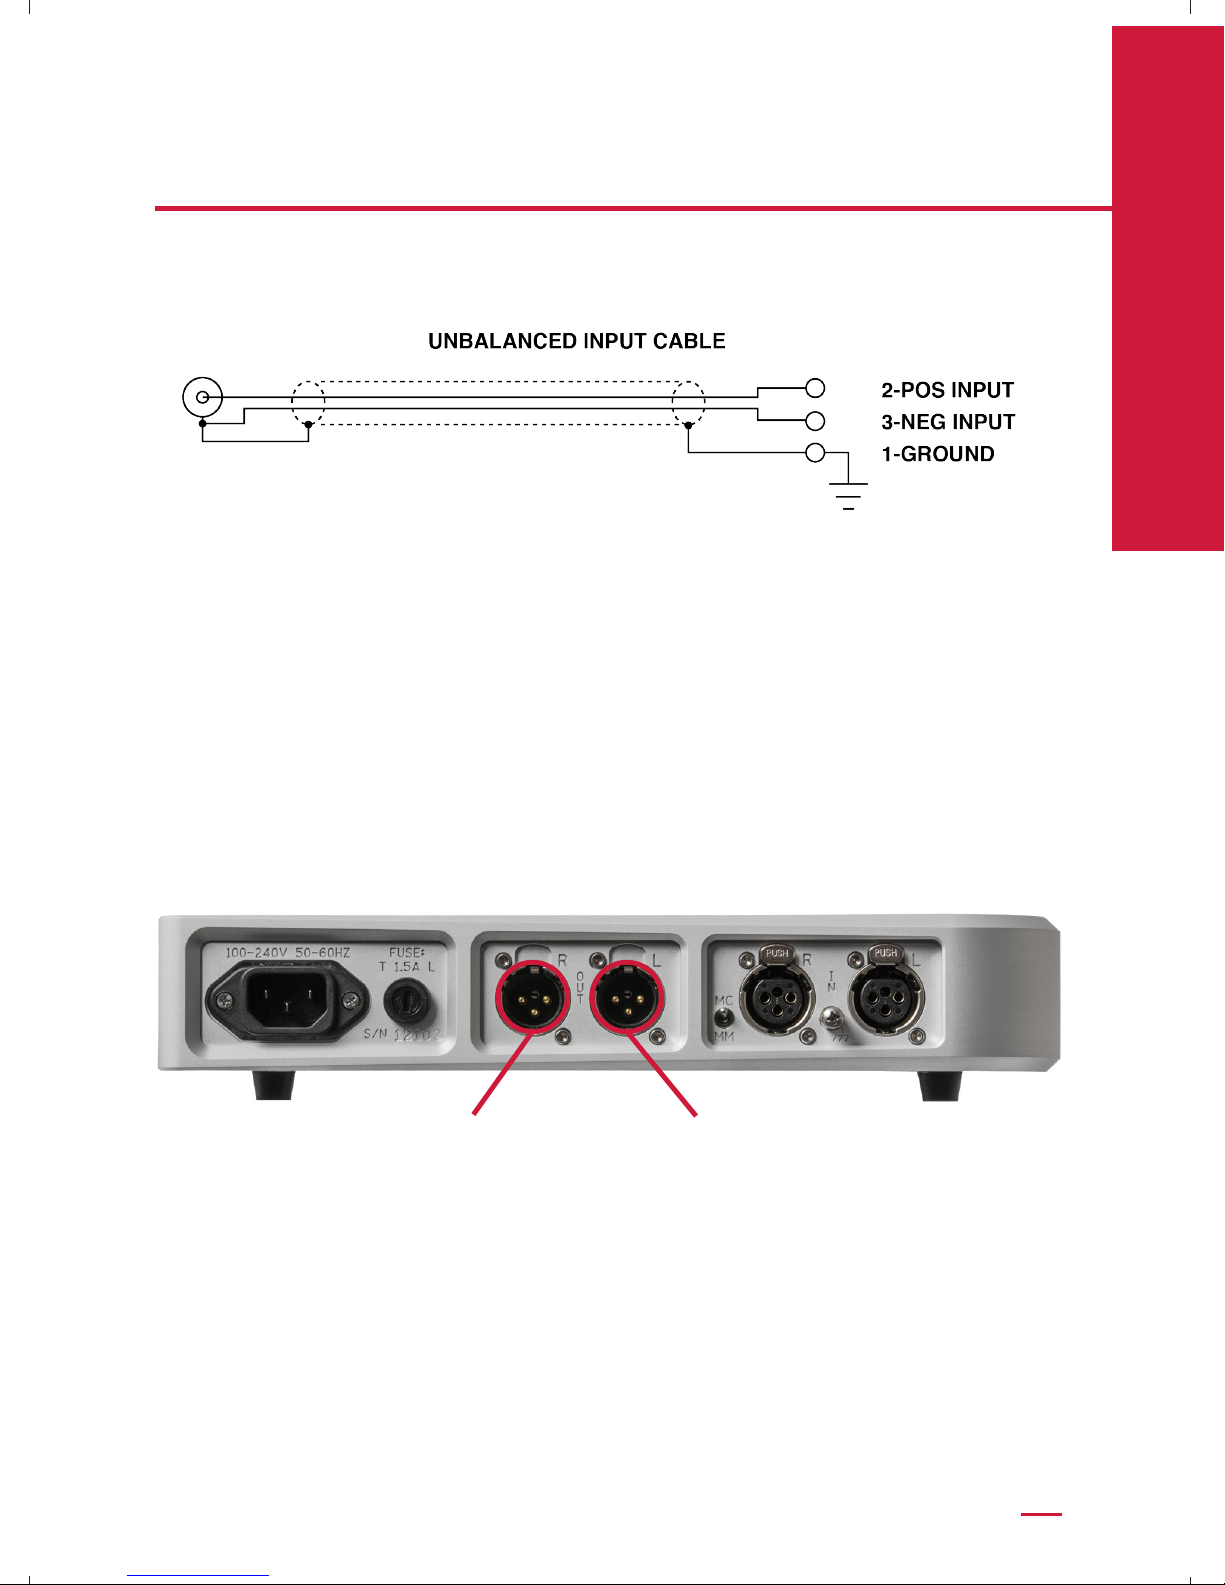
Connecting the Outputs to a Balanced Preamplier
With the low output impedance of the 508 Phono Preamplier, distances of
more than 50 meters between the 508 and preamplier are practical.
Getting Started
Connect the LEFT and RIGHT OUTPUT interconnects from the 508 to
your preamplier. To maintain the best sound quality, Boulder recommends
that balanced interconnections always be used.
Right Output Left Output
1-6
Page 11
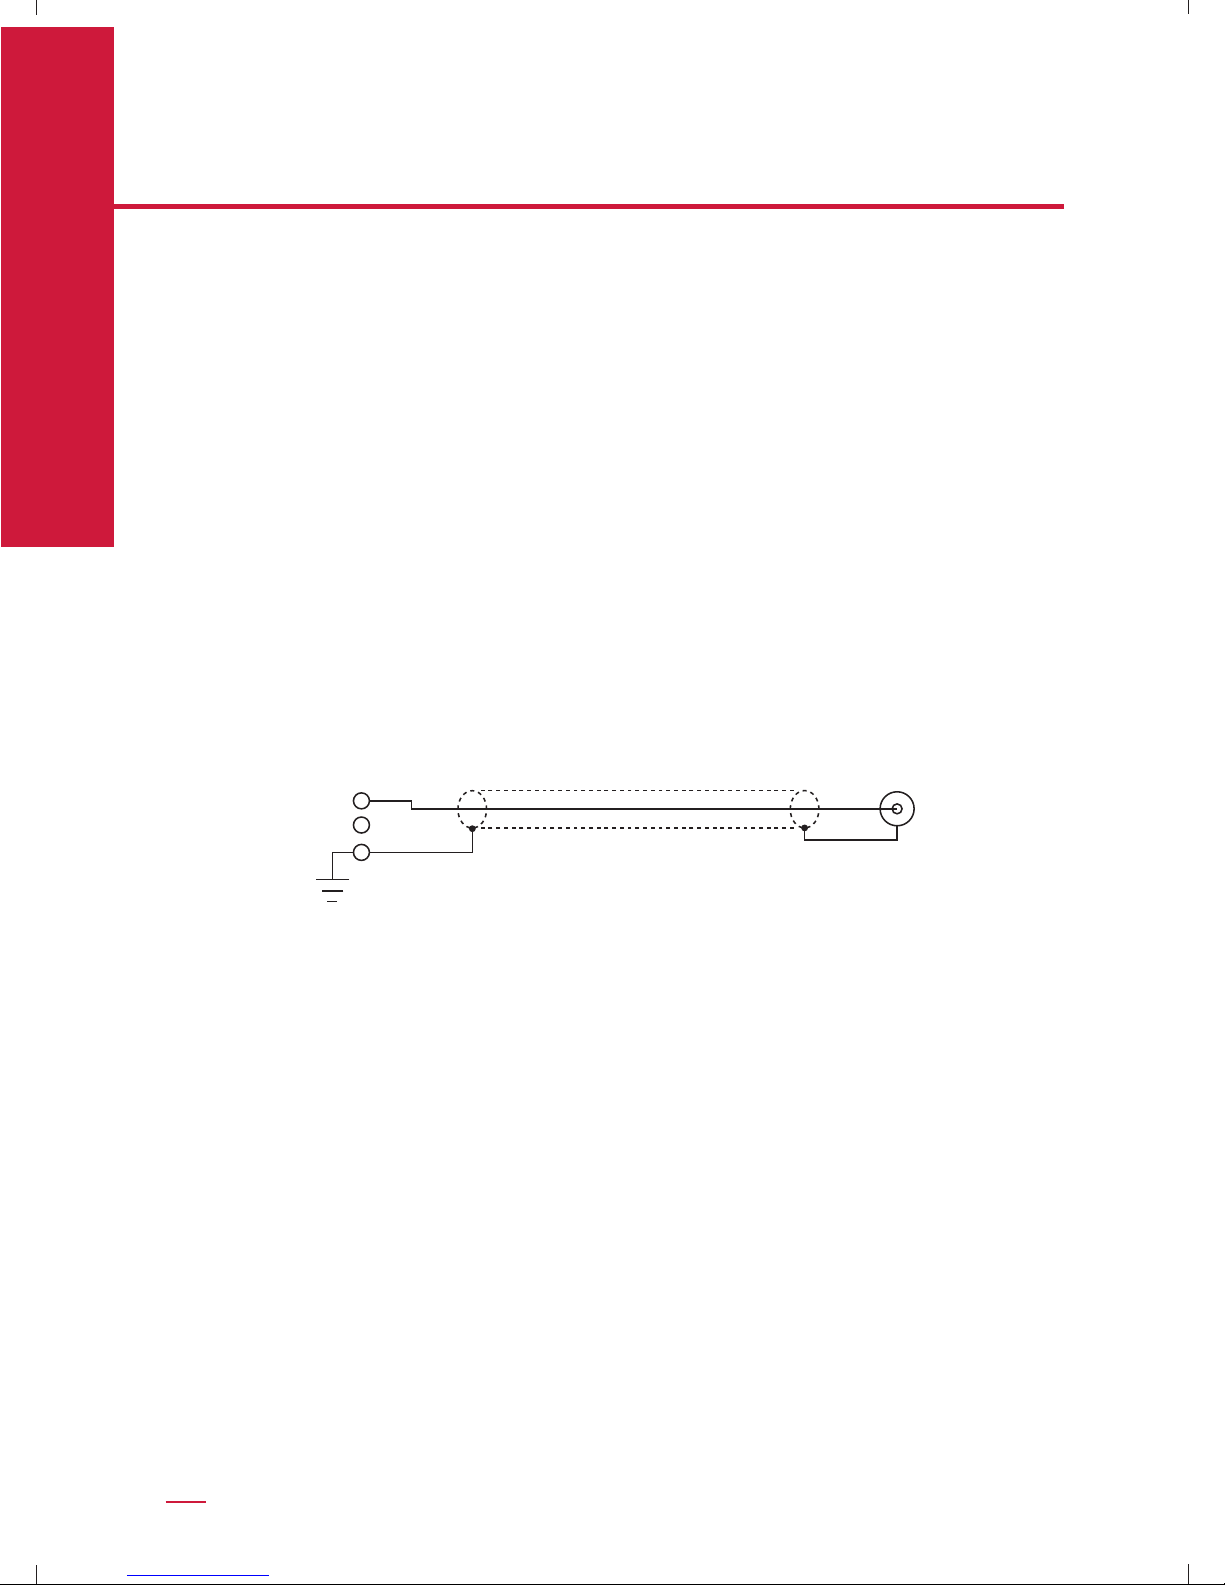
Connecting the Outputs to an Unbalanced Preamplier
UNBALANCED OUTPUT CABLE
UNBALANCED
A special cable is required to make this connection. This cable connects
pin 1 to the shield and pin 2 to the center pin of the RCA. It leaves the neg-
Getting Started
ative output (pin 3) unconnected.
Connecting the unused output pin (usually pin 3) to ground will cause
excessive ground currents and degrade performance. Use an ohmmeter or
continuity checker to determine how your cable is wired.
NOTE: The 508 Phono Preamplier conforms to the standard of pin 2 as
high or “hot” for all balanced analog inputs and outputs.
Getting Started
2-POS OUTPUT
3-NEG OUTPUT
1-GROUND
LINE PREAMP
INPUT
1-7
Page 12
Getting Started
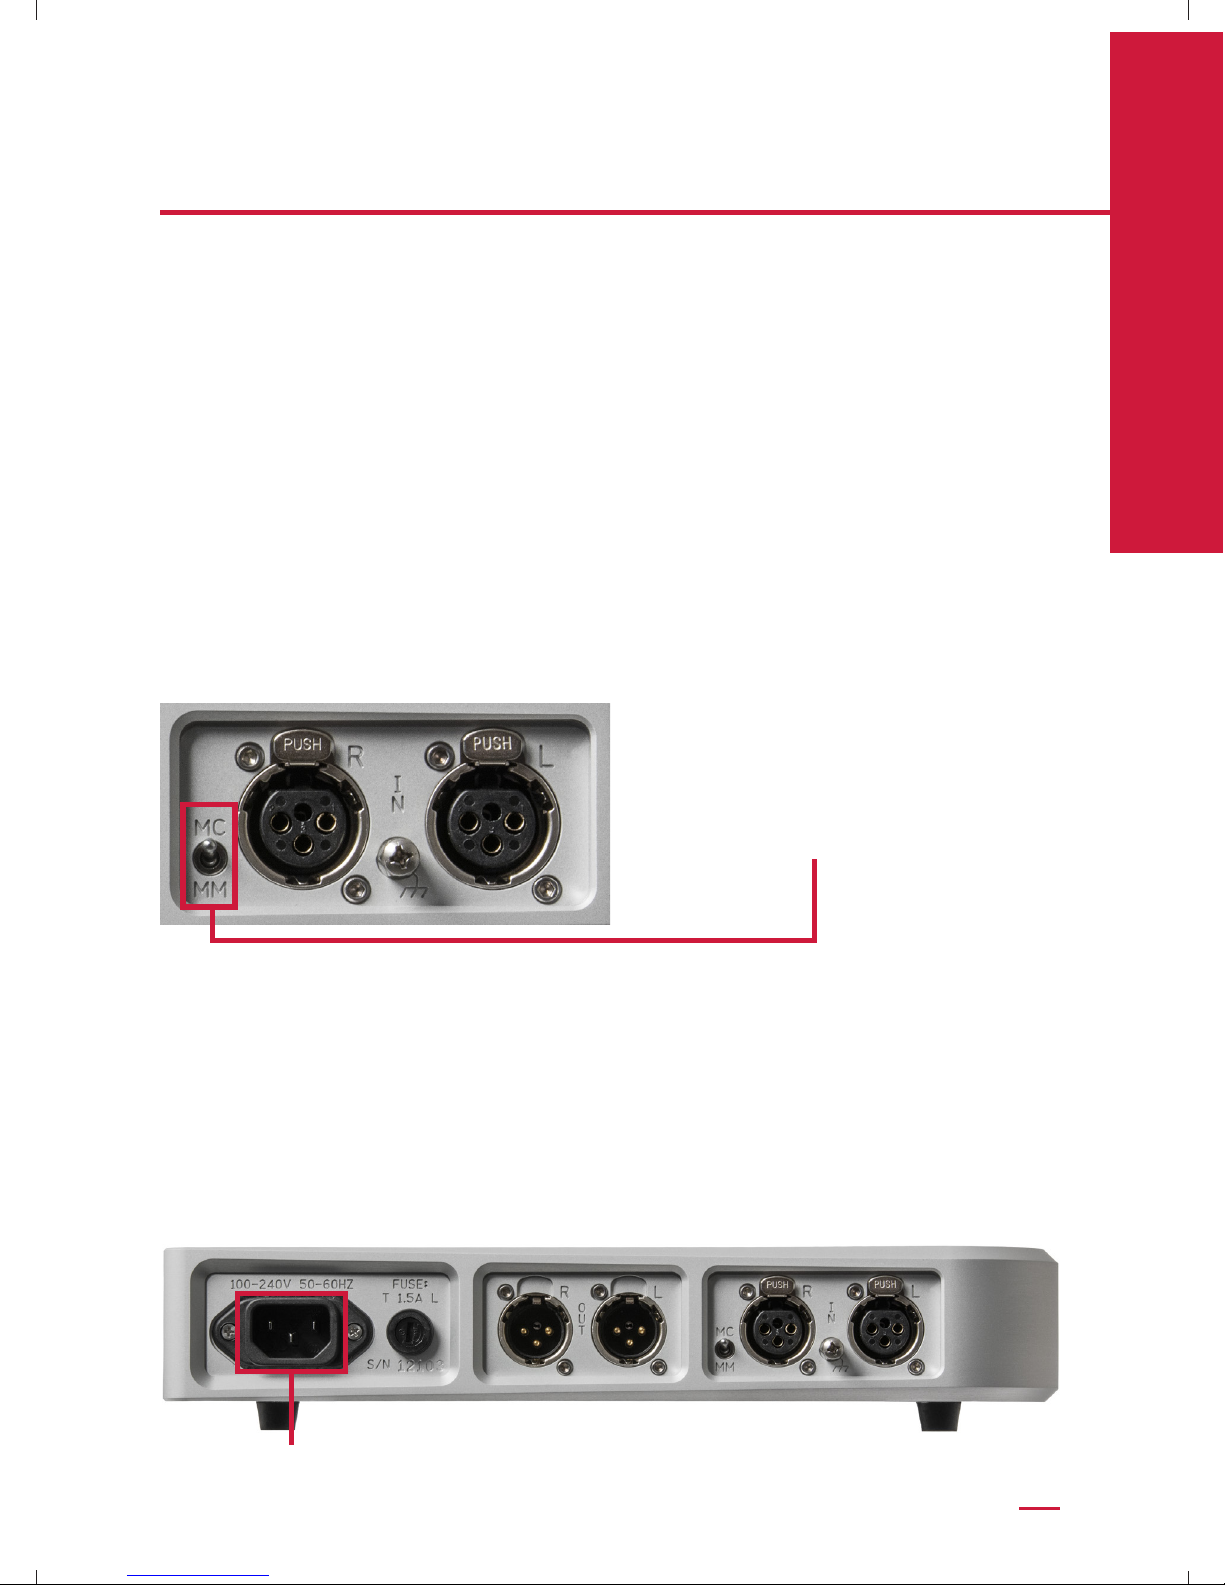
Moving Coil or Moving Magnet Selection
Set the Rear Panel Cartridge Selection Switch to either MC (Moving
Coil) or MM (Moving Magnet) depending on the type of cartridge mounted
to your turntable.
In the MC position, the resistive cartridge loading is 100Ω. When the Rear
Panel Cartridge Selection Switch is set to the MC position, an additional
low-noise 26 dB gain stage is inserted at the input for a total of 70 dB of
gain.
In the MM position, the resistive cartridge loading is 47kΩ. This is the
recommended impedance for MM. Total gain in the MM position is 44 dB.
Getting Started
Cartridge Selection Switch
Connection to AC Mains
Your 508 Phono Preamplier is supplied with an AC mains power cord
appropriate for the location where it was purchased.
Connect the AC power cord to the AC Power Input connection on the rear
panel of the 508 as shown and plug the other end into the AC mains outlet.
AC Mains
1-8
Page 13
Operation
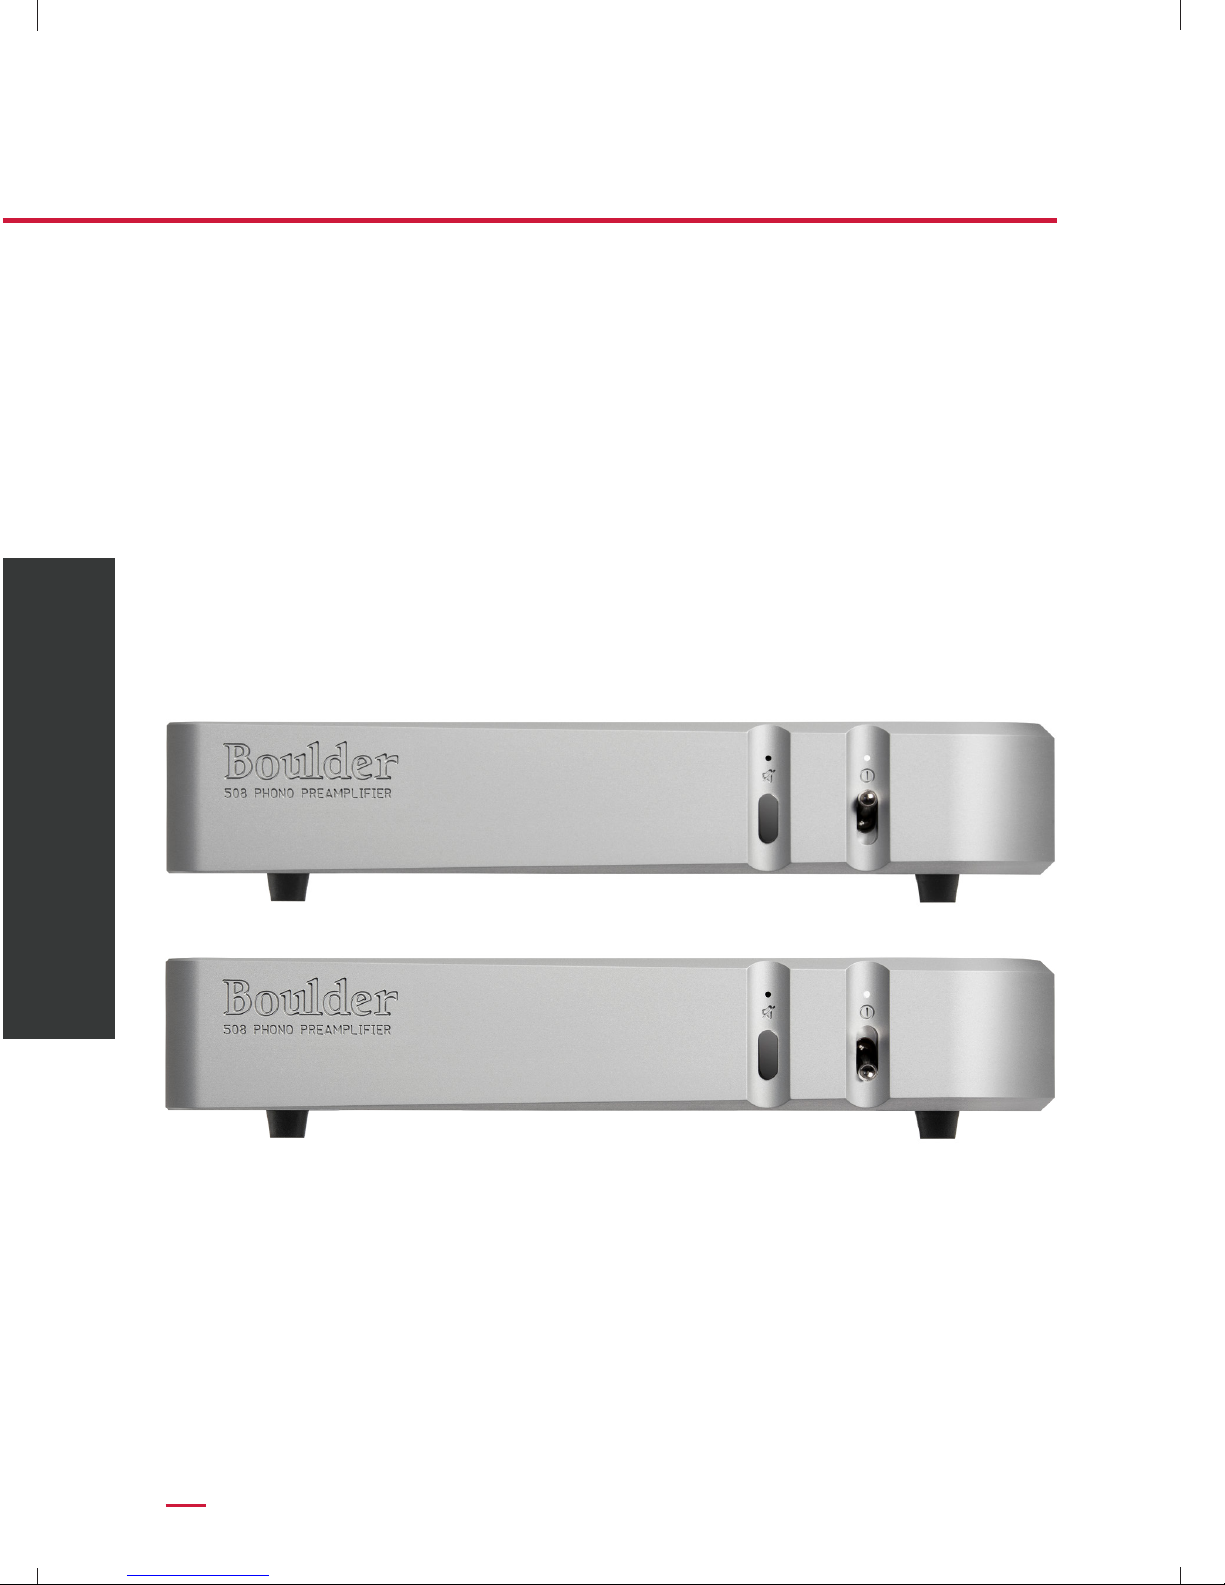
Power
With all of your connections made, you are now ready to listen to your
Boulder 508 Phono Preamplier.
To turn the 508 ON, move the large Power Switch located on the front
panel upwards. The small LED above the Power Switch will turn white and
the 508 will automatically unmute when it is ready for listening.
To turn the 508 OFF, move the large Power Switch located on the front
panel downwards. The small LED above the Power Switch will not be
illuminated when the 508 is turned off.
Power Switch ON
Operation
Mute
The Boulder 508 Phono Preamplier provides a Mute feature that is turned
on by two different methods.
First, the outputs are muted for 35 seconds when the 508 is powered
Power Switch OFF
on.
2-1
Page 14
Operation
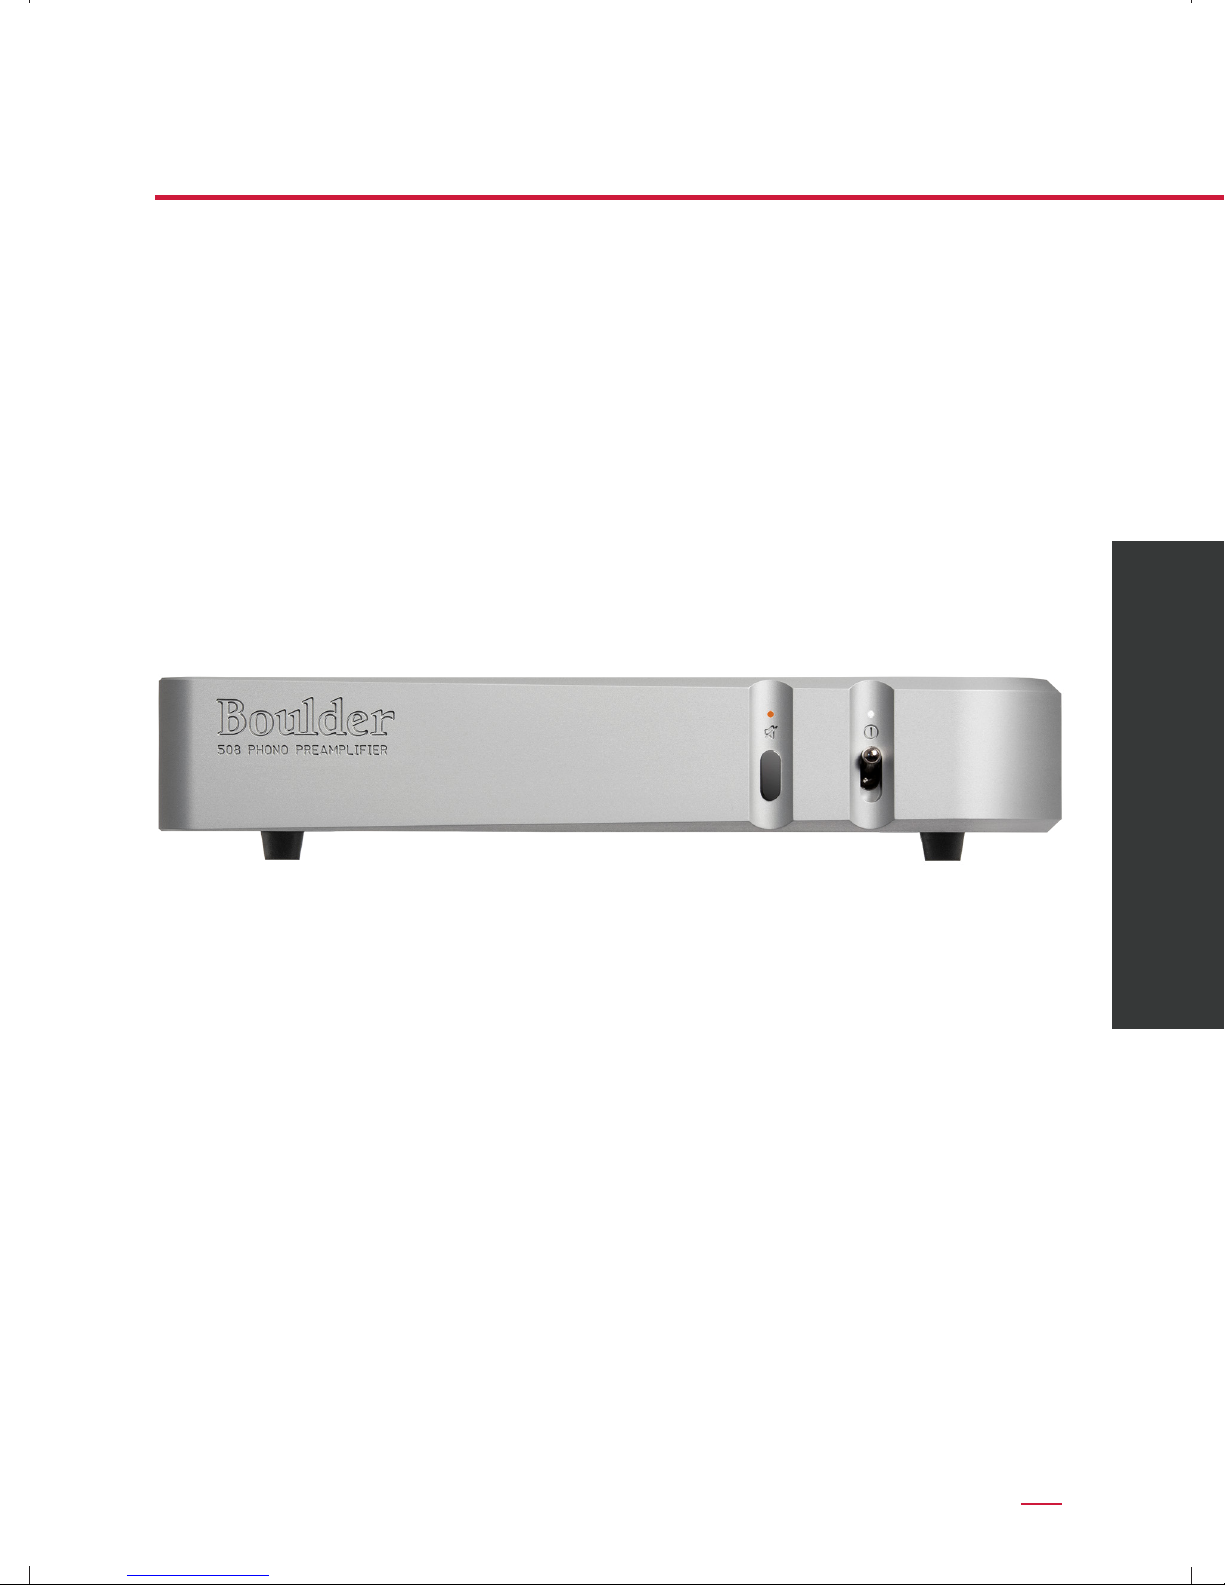
Second, the outputs can be temporarily muted at any time for your conve-
nience. To temporarily mute the output, press the front panel MUTE button.
When the 508 is in Mute mode, the small LED above the Mute button will
illuminate amber.
Pressing the MUTE button a second time will restore normal output and
the LED will not be illuminated.
When the 508 is turned OFF, the outputs will be muted.
Mute ON
Operation
Equalization
The Boulder 508 Phono Preamplier provides the standard RIAA record
equalization curve. This curve is appropriate for all records produced and
manufactured after 1954.
2-2
Page 15

Appendix
Technical Specications
Balanced Inputs 1 x 3-pin balanced XLR
Balanced Outputs 1 x 3-pin balanced XLR
Maximum Output Level 16 Vrms
Distortion, THD 0.01%
1 kHz Gain, RIAA MC: 70 dB, MM: 44 dB
Noise (EIN), MC 116 nanovolts at, 20 Hz to 20 kHz
Frequency Response, 20 Hz to 20kHz RIAA: ±0.50 dB, 20Hz to 20kHz
Low Cut Filter -3dB @ 10Hz, 18dB/Octave
Input Impedance MC: 100Ω, MM: 47kΩ
Output Impedance 100Ω Balanced
Power Requirements 90-120V / 200-240V, 50 - 60 Hz
Power Consumption 15W Max
All specications measured at 240 VAC mains Power.
Appendix
3-1
Page 16

Appendix
Weights and Dimensions
508 Phono Preamplier Chassis: 11.5” W x 9.45” D x 2.3” H
(11.5 lbs.)
29.2 cm W x 24 cm D x
5.8cm H (5.26 kg)
Shipping:
18” W x 20” D x 5” H
(16 lbs.)
45.7 cm W x 50.8 cm D x
12.7 cm H (48.4 kg)
Appendix
3-2
Page 17
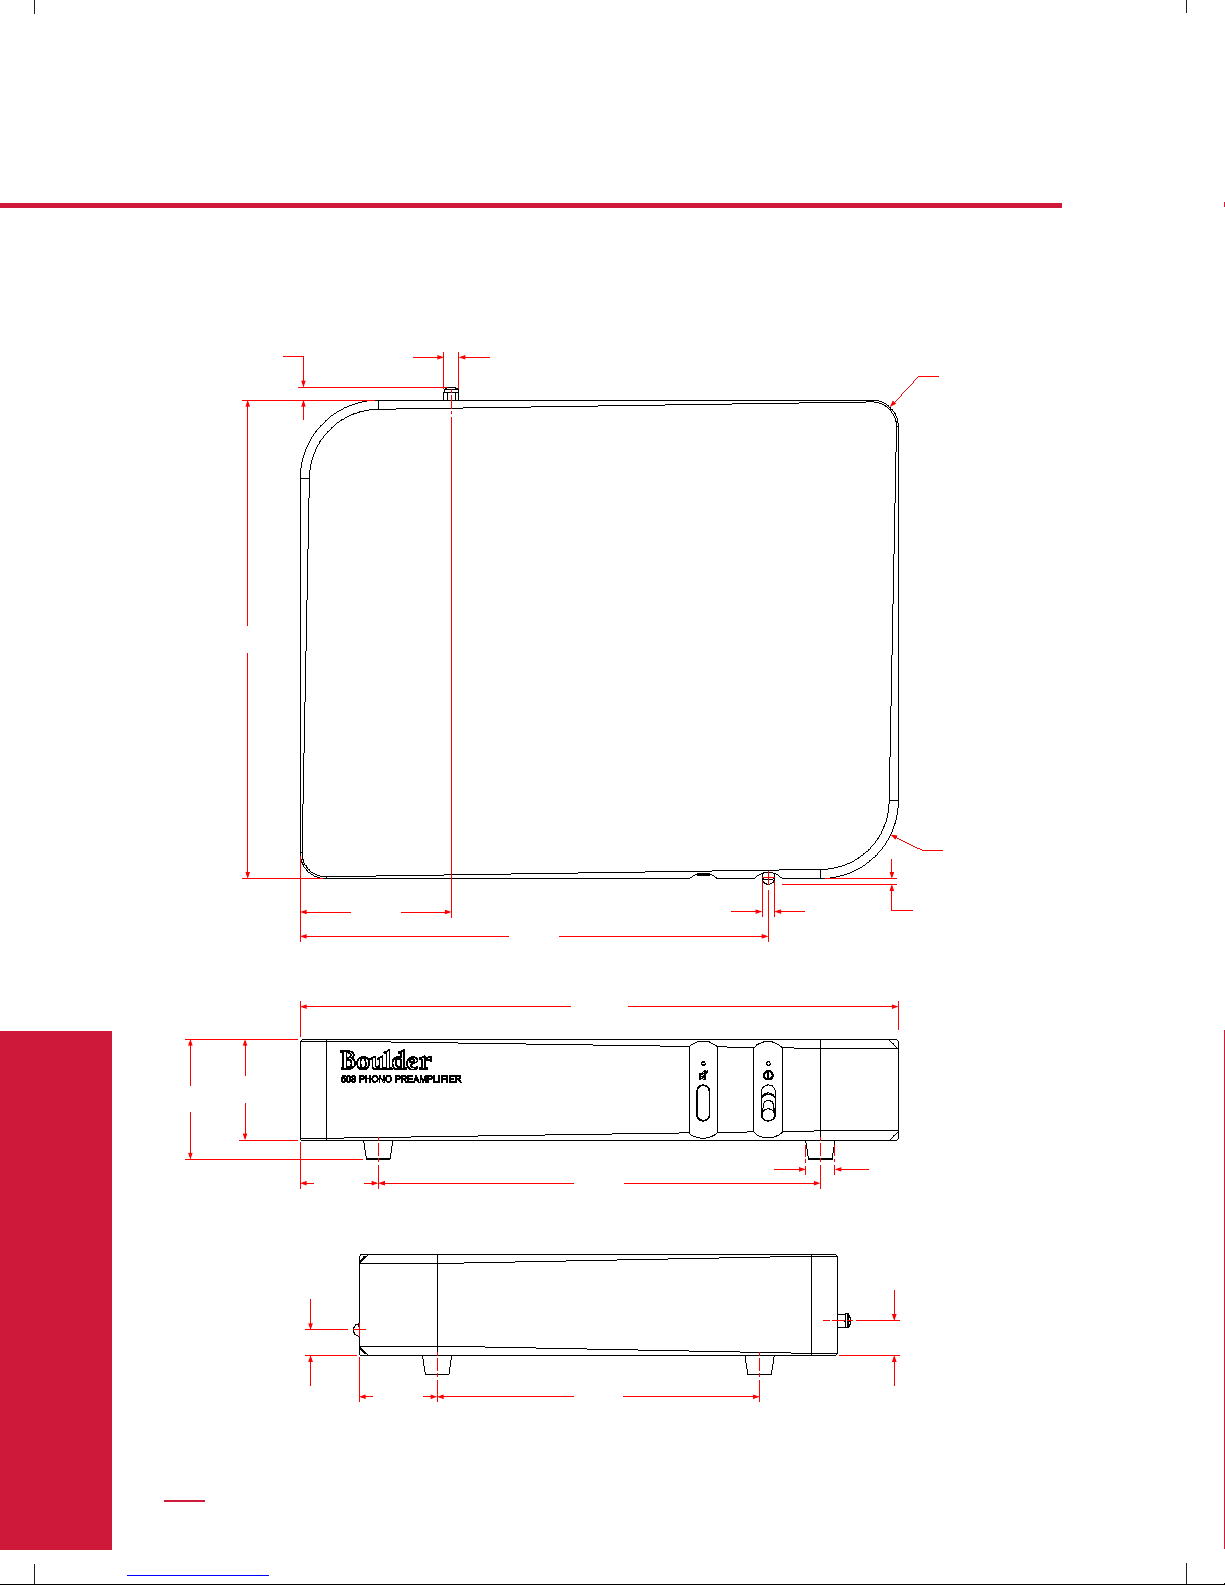
508 Phono Preamplier Dimensions (Inches)
BOULDER AMPLIFIERS, INC.
508 PHONO PREAMPLIFIER
OUTSIDE DIMENSIONS
TOP
9.200
.250
.289
.109
Ø.239
R .500, 2 PL
R 1.500, 2 PL
9.000
2.908
6.200
.487
1.500
BOULDER AMPLIFIERS, INC.
508 PHONO PREAMPLIFIER
OUTSIDE DIMENSIONS
BOULDER AMPLIFIERS, INC.
508 PHONO PREAMPLIFIER
OUTSIDE DIMENSIONS
Appendix
.250
9.200
.289
2.908
9.000
11.500
Ø.239
R .500, 2 PL
R 1.500, 2 PL
.109
1.940
2.310
1.500 8.500
Appendix
.487
1.500
3-3
6.200
Ø.562, 4 PL
.662
Page 18
Appendix
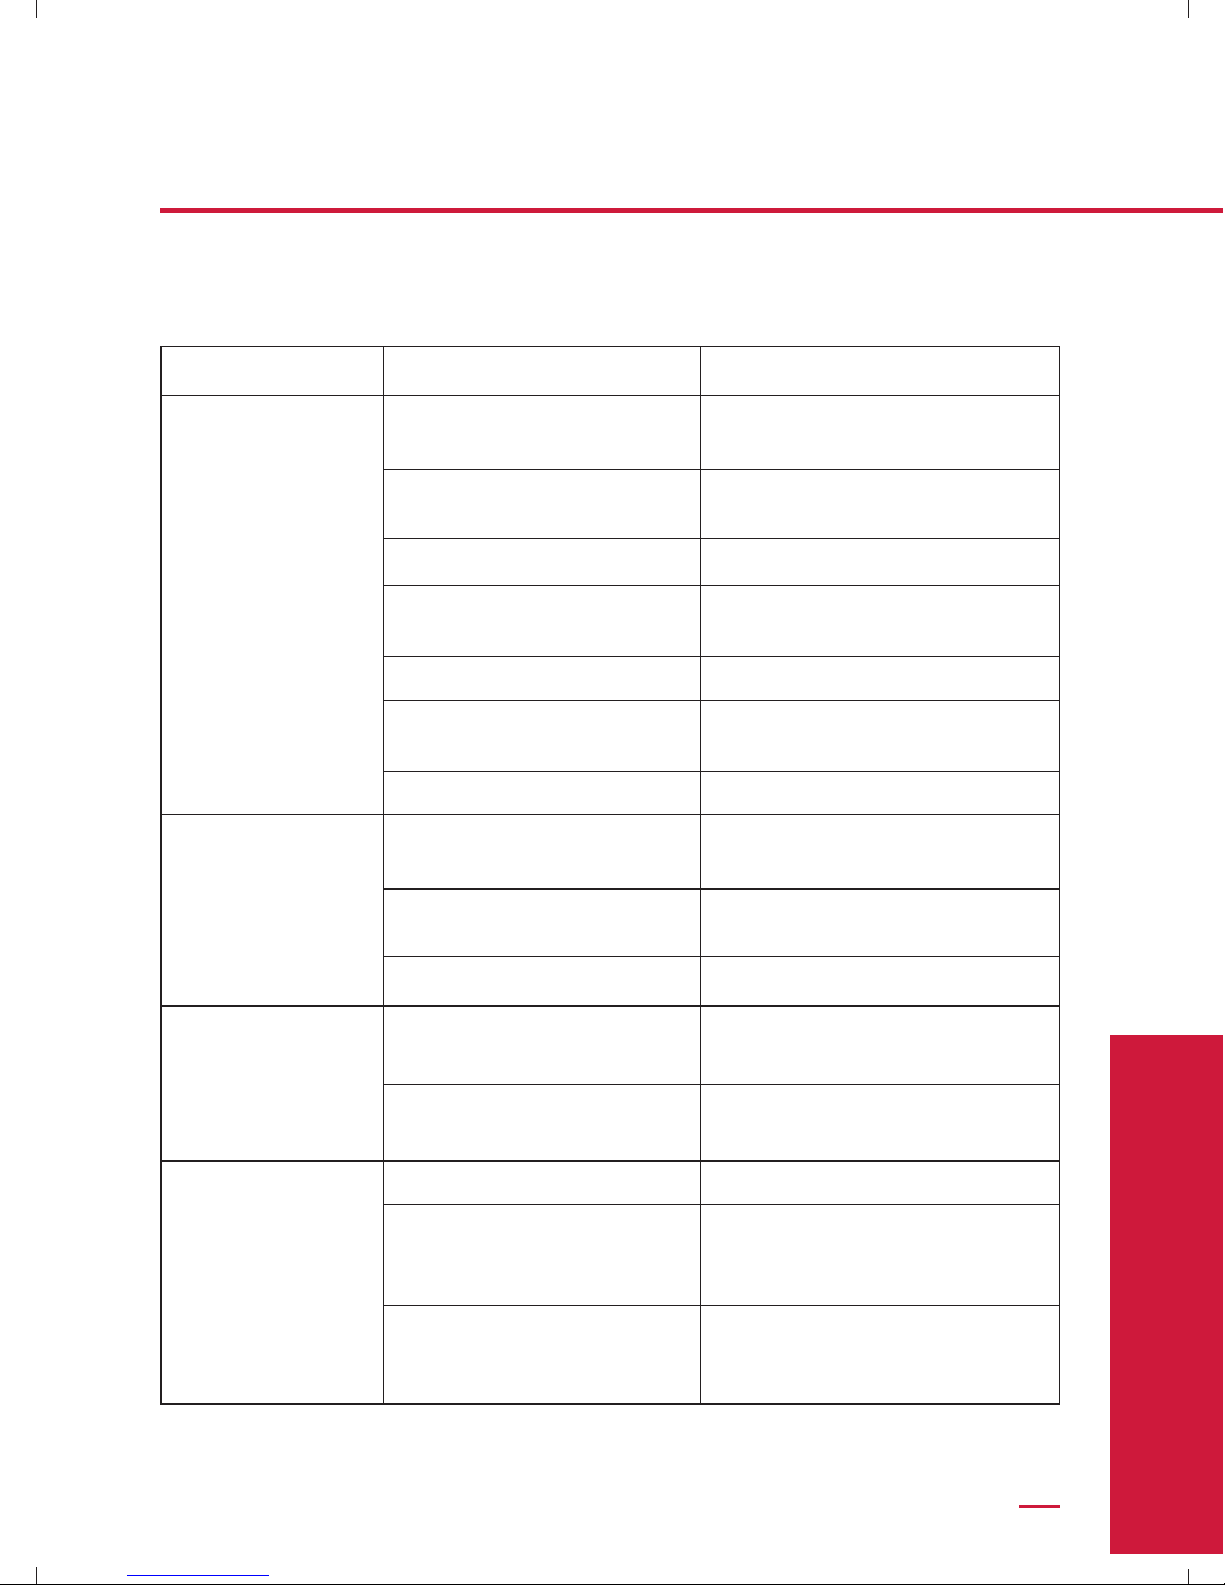
Troubleshooting
SYMPTOM CAUSE REMEDY
No power indication Power Switch is not in ON
position
508 is not plugged in Connect power cord to AC mains
508’s fuse is blown Replace 508’s fuse
Home circuit breaker is
tripped
Low line voltage Have line voltage checked
Defective power cable Have power cable tested or
Defective 508 Return 508 to dealer for service
Red LED indicator 508 is Muted Press Mute button to take 508 out
Phono preamplier is booting upWait until boot process completes
Defective power supply Return 508 to dealer for service
Move Power Switch to ON
position
outlet
Reset home circuit breaker
replaced
of Mute mode
White power
indication, but
no sound
Hum through loudspeakers
No signal from one channel
of turntable
No signal out to preamplier Check cables and connections to
No ground connection Check or install ground wire
Duplicate ground connection Use only one ground wire to
508 or turntable is too close
to another component’s
power supply
Check turntable cables and
connections
preamplier
Appendix
turntable or use the ground in a
balanced cable
Move 508 and/or turntable away
from power supply
3-4
Page 19

Notes:
Appendix
Appendix
3-5
Page 20

Appendix
Notes:
Appendix
3-6
Page 21

 Loading...