

Page 1
Improvement and changes to specifications, design and this manual, may be made at any time
without prior notice.
A
ll rights reserved.
Rev1.0
24-004-2865-00
ADT-MP
3
User Manual
User Manual
It is important to read this instruction book prior usingyour new product for the first time.
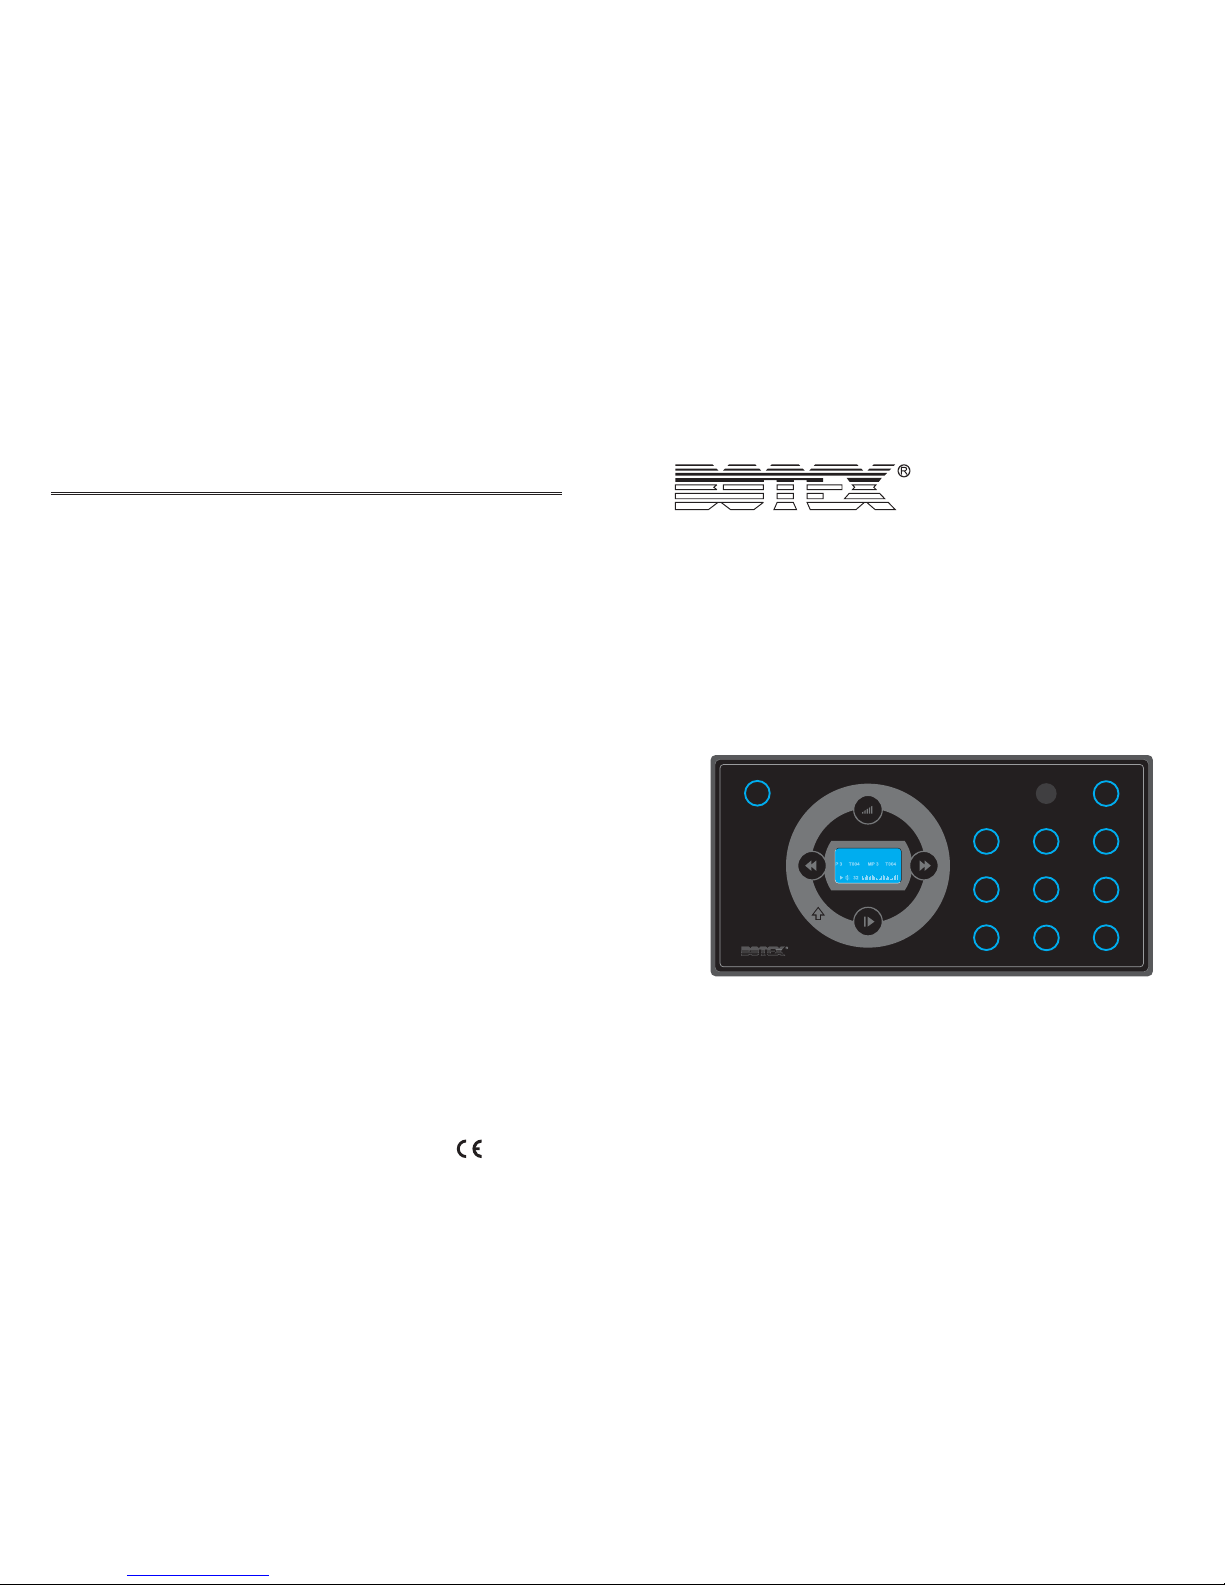
ADT-MP3
MODE
MUTE
MP3
FM PRESET
MUSIC LED DMX
SCENE TIMER SENSOR
OFF
M
2
3
5
4
6
8
7 9
1
Page 2
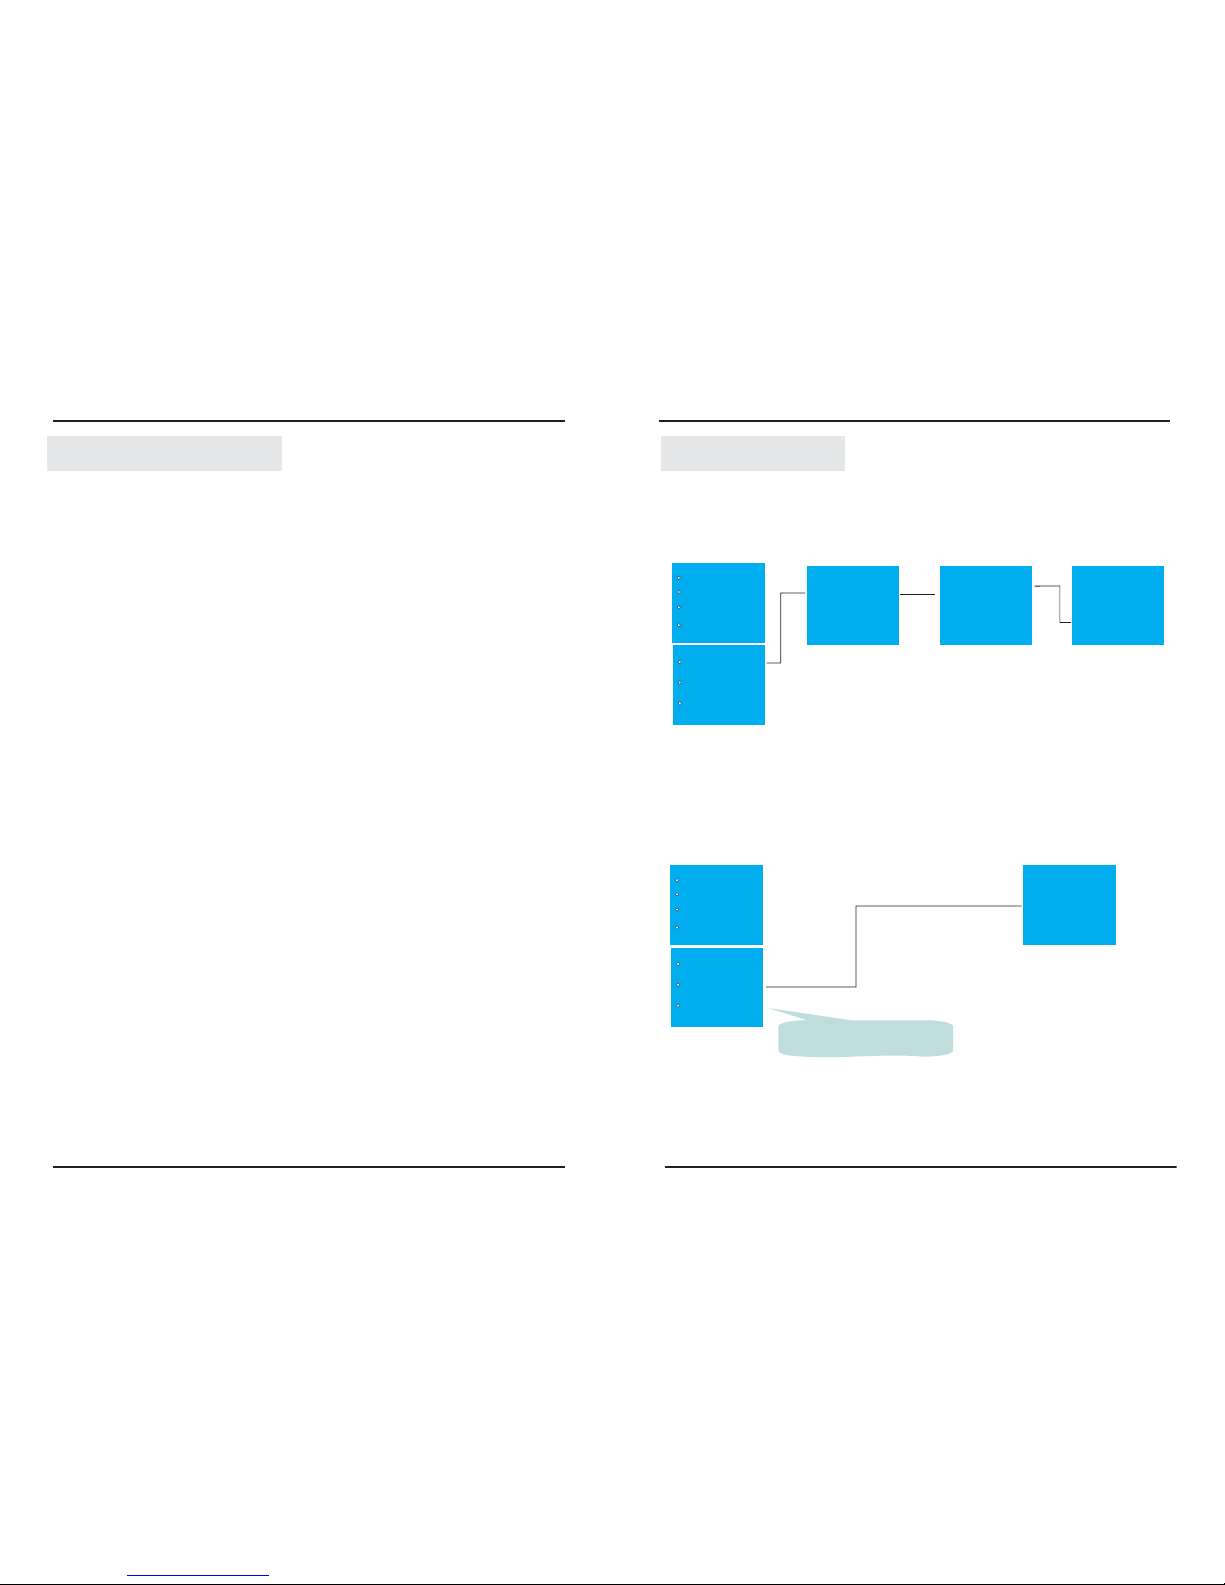
Table of Contents
Delivery Packet.................................................................................................................1
Features............................................................................................................................1
Control Panel View............................................................................................................3
Physical Dimensions.........................................................................................................2
Operation Guide
1. MP3 MODE............................................................................................................6
2. PRESET MODE.....................................................................................................6
Specification......................................................................................................................2
Manual Conventions....................................................................................................6
MODE..........................................................................................................................6
Operation on MP3 Player...........................................................................................15
1. MP3 MENU INSTRUCTIONS.............................................................................15
2. BROWSE............................................................................................................15
3. FUNCTION MODE..............................................................................................16
4. PLAYBACK MODE.............................................................................................17
Remote Controller Operation......................................................................................18
3. MAIN MENU..........................................................................................................7
3.1. DATE & TIME..................................................................................................7
3.2. SCENE EDIT...................................................................................................8
3.2.1. MUSIC SETTING......................................................................................8
3.2.2. LED...........................................................................................................9
3.3. EVENT EDIT..................................................................................................11
3.4. SET OFF DELAY...........................................................................................13
3.5. SET PASSWORD.........................................................................................14
5. PLAYBACK Submenu.........................................................................................16
Rear panel View................................................................................................................5
3.2.3. 6 CHANNEL DMX.....................................................................................9
Appendix I
Junction Box Instructions..........................................................................................21
Appendix II
Menu Chart...............................................................................................................23
Introduction.......................................................................................................................1
25
Appendix II
Enter Password
**********
Change Password
Program Enable
Key Sound
Load Default
New Password
**********
Firmware Version
ADT_MP3
Rev 1.0
2009/04/20
Return toMP3 playback mode
Set Password
Firmware Version
MP3 Player
Date&Time
Scene Edit
Event Edit
Set OffDelay
Set Password
Firmware Version
MP3 Player
Date&Time
Scene Edit
Event Edit
Set OffDelay
6.)Firmware Version
5.)Set Password
Page 3
24
Appendix II
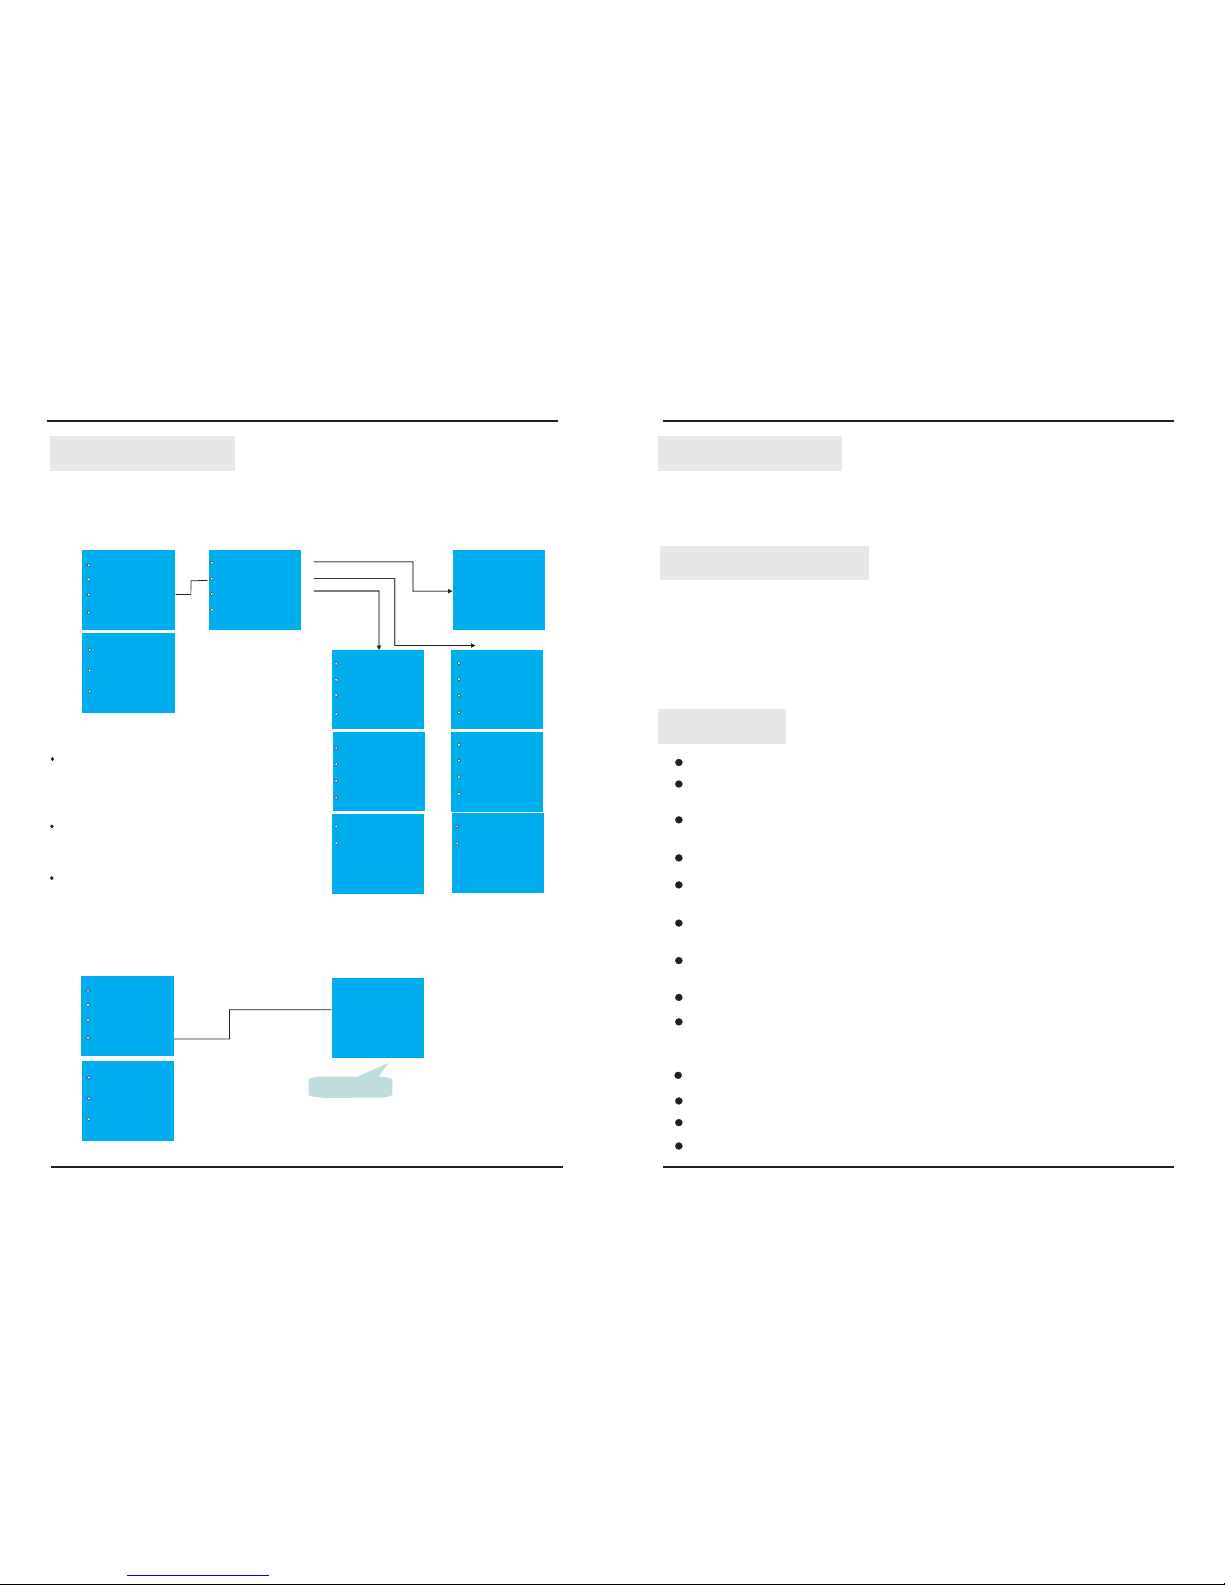
Preset: 01
Preset Enable:ON
Time On: 08:00
Time Off: 09:00
Preset: 01
Preset Enable: ON
Start Time: 08:00
Stop Time: 11:00
LED Limit: 100%
AMP Volume:100%
Folder Select: 01
Song Select: 03
Fadetime:
00S
FM Radio: 97.1
Fadetime:
00S
FM Radio: 97.1
Max Limit:
100%
AMP Volume: 100%
Folder Select: 01
Song Select: 03
Running Select
Timer or
Sensor Trigger
Set Password
Firmware Version
MP3 Player
Date&Time
Scene Edit
Event Edit
Set OffDelay
Running Select
Timer Edit
Sensor Trigger
Sensor Delay:10Min
Set OffDelay
00 S
Can beset as 0~60s
Set Password
Firmware Version
MP3 Player
Date&Time
Scene Edit
Event Edit
Set OffDelay
3.)Event Edit
4.)Set Off Delay
The EVENTworks only whenit was triggeredby the external
sensor, it will take the parameters definedin EVENT asa
guideline, theother undefined parameters will beas the
same asthe raised preset.
In timermode, the timedscene will takeplace in sequence
according to the TIMEON as youpreset. Only onescene
would takeplace during any period, and it willtake the
parameters definedin TIMER asa guideline, the other
undefined parameterswill be asthe same asthe raised
preset.
When youmanually raise thescene, the definedparameters in
TIMER andEVENT which willnot work formanual raising.
Rules:
Introduction
1
Congratulations and thank you for purchasing our ADT-MP3.
The ADT-MP3 is a combination of built-in MP3 player and amplifier with touch interface.
It is compact and easy to operation.
Features
Touch interface.
Built-in MP3 player
---- Allows to transmit and save music files via USB or MICRO SD card.
Built-in amplifier
---- Enables to drive external speaker directly(10W single track).
3 channels PWM output drive 3 ways LED,
---- 380MA per channel, 1.2 A in total(trough network line).
Allows to save and play 9 scenes, including the control for built-in MP3
player and amplifier(such as song selection and volume level, etc.).
External Man-body moving-sensor triggers scene output( lighting and music).
Enables to set the program of playback different scene in different period, the
limitative brightness , music volume in specified period, and the fade time of
playback or shutdown a scene.
Timing function----Each scene can be set to timed start or shut.
Infrared remote control.
Function memory and Power failure protection.
3 ways LED output, 6 channels DMX, the fadetime can be set
for each scene .
separately
AUX input
---- Automatically switch to external output once has AUX input.
Emergency trigger function (links to the fire alarm contact)
Delivery Packet
Check for transport damage.You should be in possession of the following items:
1 ADT-MP3 1 Manual
1 Man-body moving sensor 1 Junction Box MP3
1 LED remote controller
Should you discover transport damage after unpacking the equipment, inform the hauler
immediately. Never connect a damaged device. You may also contact your supplier.
Page 4
Specification
Power Supply..................................................................................JUNCTION BOX MP3
Housing.......................................................................................................Ploycarbonate
Operation Temperature.........................................................................0 degC~+40 degC
Storage Temperature.......................................................................-20 degC ~ +70 degC
Dimensions...........................................................................................76 x 120 x 15.5(mm)
Weight........................................................................................................................230g
Connector.......................................................................................................2 RJ45 ports
Physical Dimensions
2
Speaker/Power Consumption...............................................................10W Single Track
.....................................3Way LED Output
Output...............................................................3CH PWM output,380mA/CH, Total 1.2 A
......................................6CH DMX Output
..........................................IR EYE sensor
.....External Man-Body moving-sensor triggers scene output
Accessories........................................................Remote Controller(including)
23
Appendix II
MENU CHART
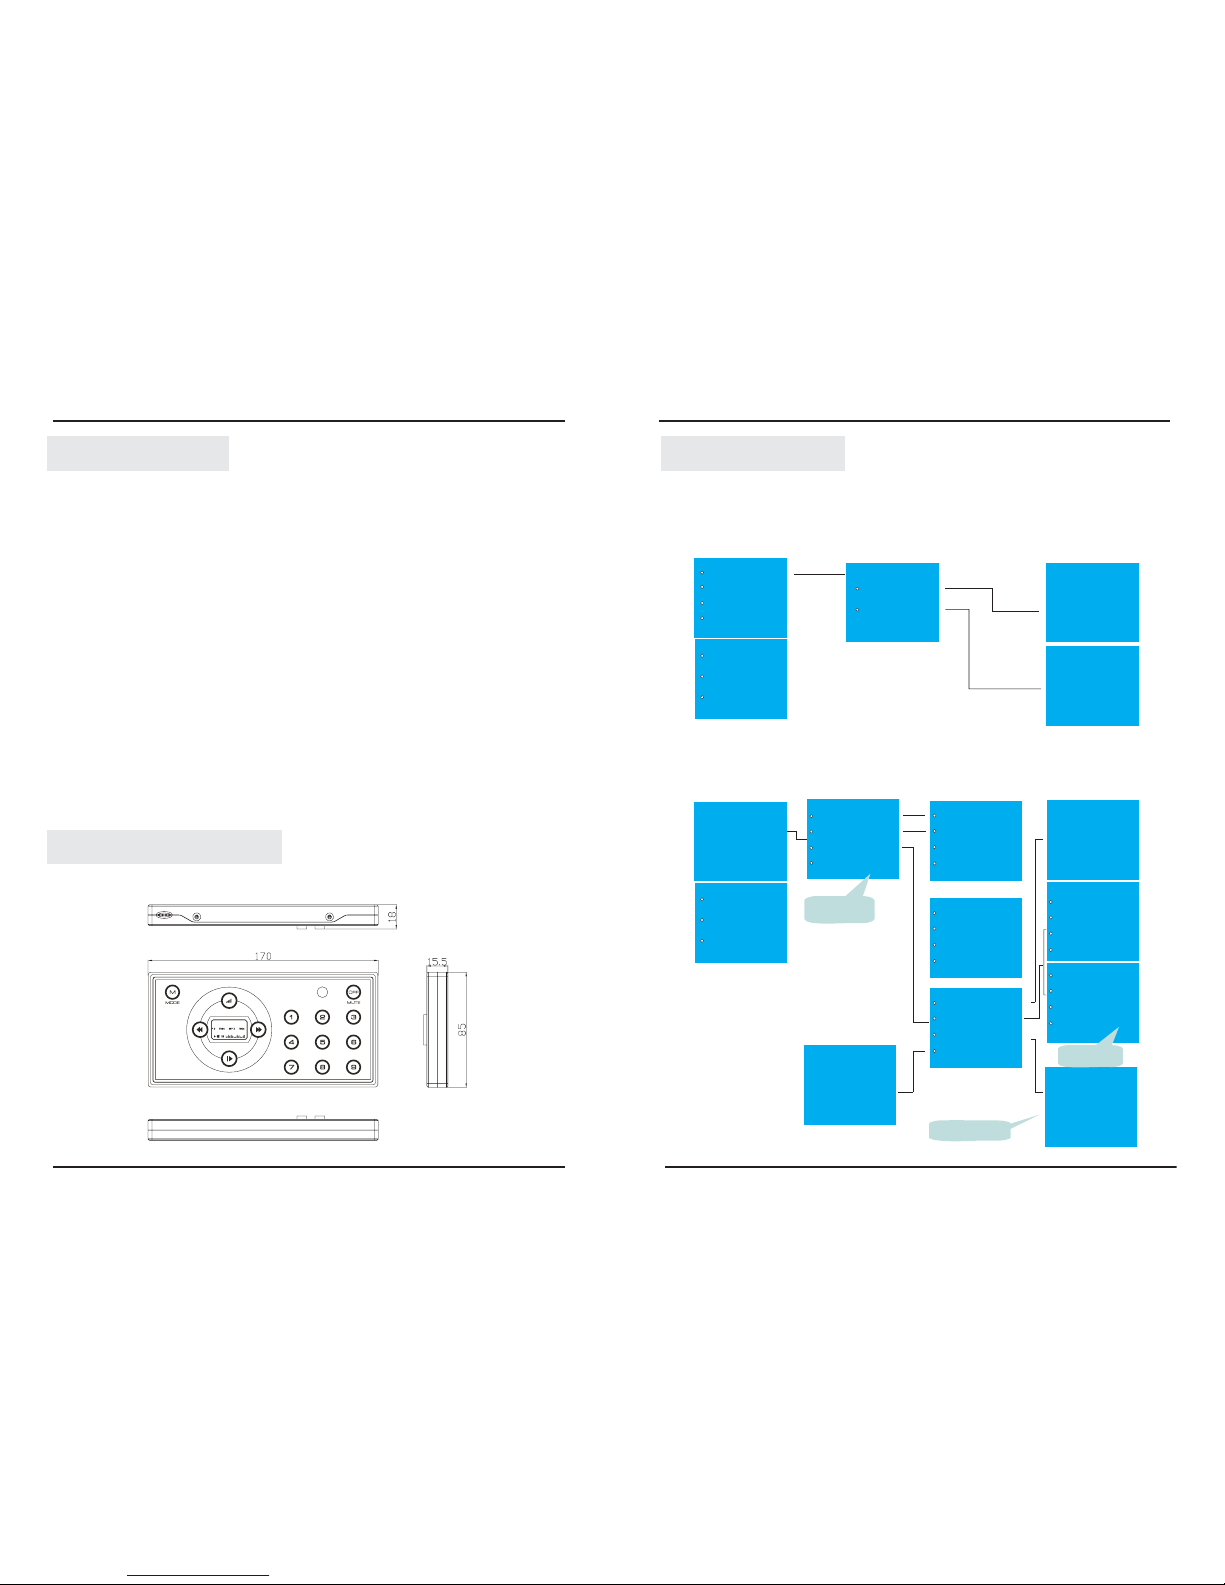
Date
Time
Date
2009/03/29 TUE
Time
12:35:28
Date&Time
Scene Edit
Event Edit
Set OffDelay
Set Password
Firmware Version
MP3 Player
Music Setting
LED
6 ChannelDMX
Fadetime:10S
Preset : 01
Auto Program: 01
Auto Speed: 50 S
CH_1: 100%
CH_2: 100%
CH_3: 100%
Max Limit: 100%
Scene: 01
Channel_1: 000
Channel_2: 000
Channel_3: 000
Channel_4: 000
Channel_5: 000
Channel_6: 000
Fadetime: 00S
Running Select
Scene
AutoProgram
DmxAddress
Folder Select: 01
Song Start : 03
FM Radio : 89.8
Amp Volume: 80%
Running Select
Scene or
AutoProgram
DMX Address
001
Fadetime can
be setas 0-15S
0-60S,1-60Min
Date&Time
Scene Edit
Event Edit
Set OffDelay
Set Password
Firmware Version
MP3 Player
1.)Date & Time
2.)Scene Edit
Fadetime can
be setas 0-60S
Page 5
22
Appendix I
6
Dimmable port for 3 ways LED(Driven by PWM), 380mA per channel, 1.2A max.
.LED Out
7
The input port for the external Man-body moving sensor module. It is important
to distinguish the input end for power, earthed and signal prior to link moving
sensor with it.
.Sensor
8
The emergent contact which links the fire alarm.
.EMERGENT CONTACT
9
Can be set as NC(normal close) and NO(normal open).
.EMERGENT CONTACT SET
When set it as NC, the emergent contact is closed in normal state. Once a fire
alarm happened, the emergent contact disconnects and the device goes into
emergent state. At this time, all of the LEDs lit and the amplifier is in mute.
.
When set it as NO, the emergent contact is open in normal state. Once a fire
alarm happened, the emergent contact closes and the device goes into
emergent state. At this time, all of the LEDs lit and the amplifier is in mute.
.
Once the fire alarm was canceled, if want return to normal working state, the
user may press the power button to power off the unit, and then power on it,
the unit will exit the fire alarm state and go into normal working state.
.
MODE
MUTE
MP3
FM
PRESET
PRESET
MUSIC
LED
DMX
SCENE
TIMER
SENSOR
OFF
M
2
3
5
4
6
8
7
9
1
Control Panel View
3
AMP_VOLUME
MUTE/OFF
PLAY/PAUSE
NEXT
PREVIOUS
MP3_VOLUME
MODE
MP3/
USER
AUX_IN
MINI_USB
PRESET 1-9
Page 6
4
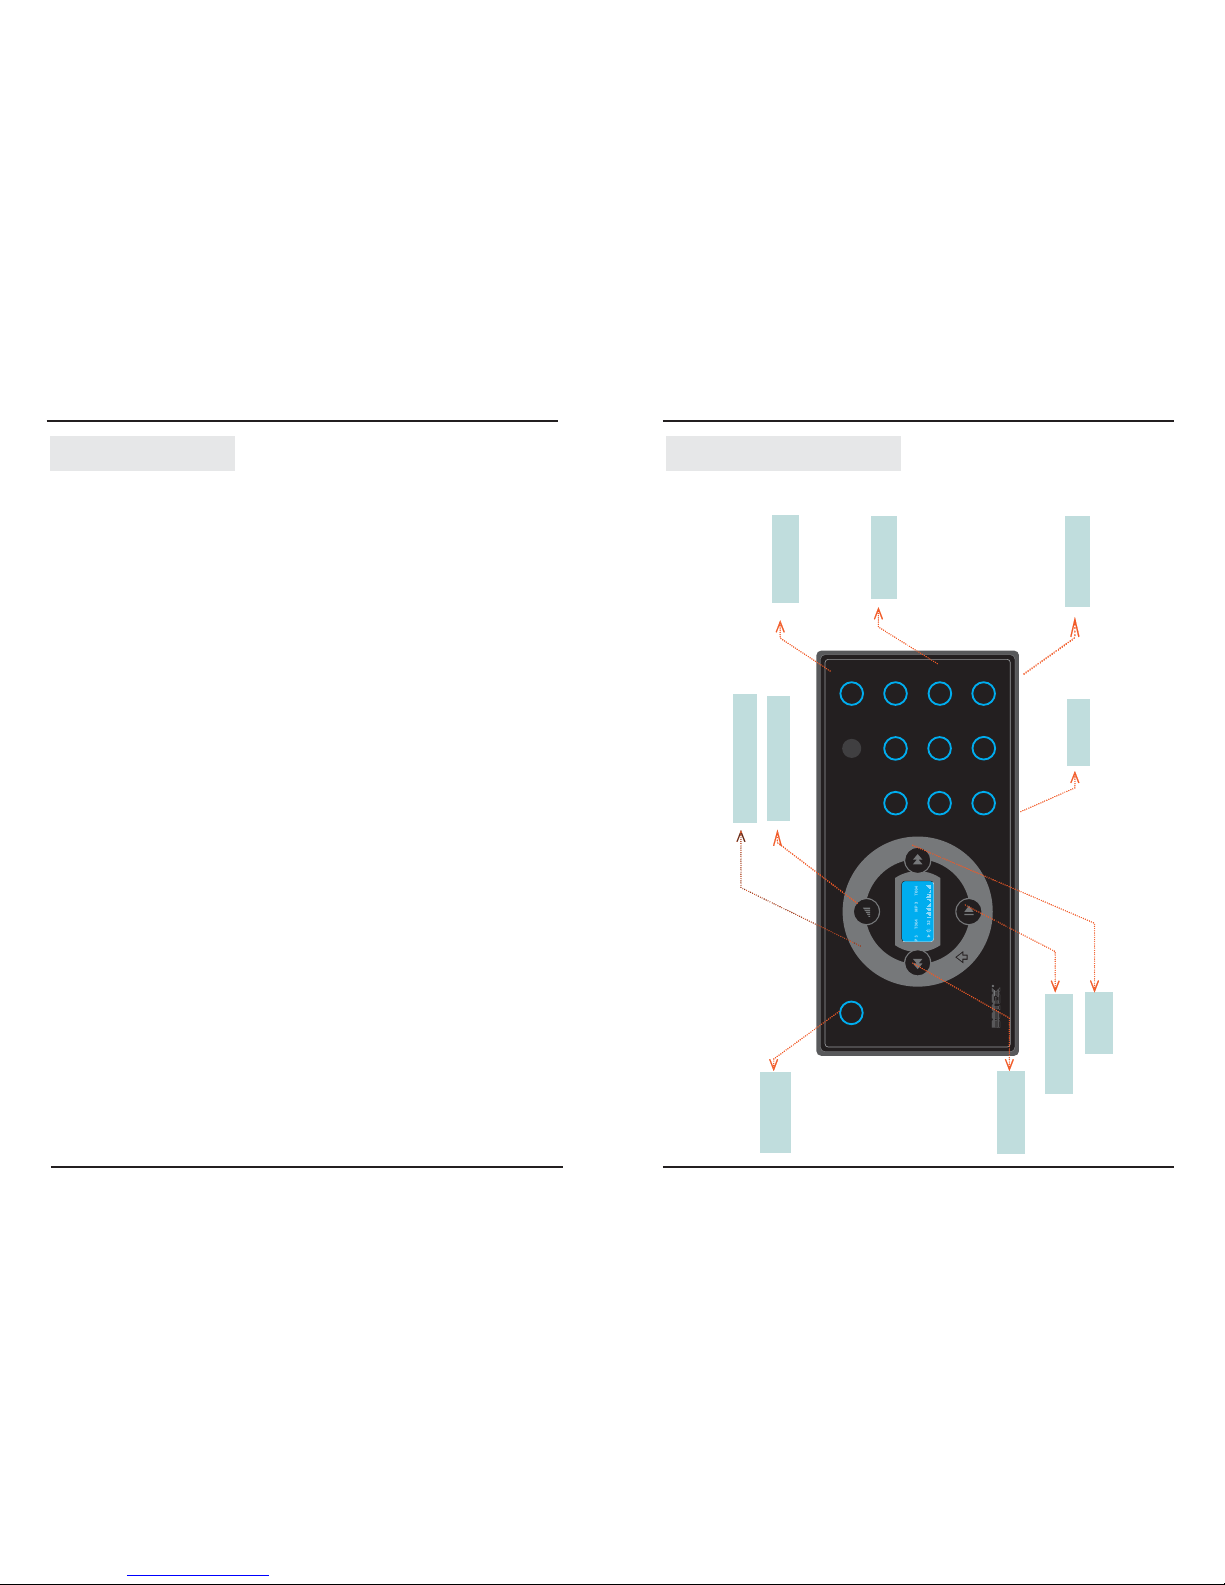
1.MODE Button
2.Touch Toggle
3.MUTE(OFF) Button
Used to alternate the working mode, confirm your selection and enter into the
next menu, hold on press it will return to the main menu.
Master controller. Controls the value of PWM, Volume, fadetime, etc.
Used to mute or off the unit.
4.Button 1~9
5.PLAY Button " "
6.VOLUME Button " "
Used to play and store the built-in 9 scenes.
Used to power on device, play and stop MP3 player.
Used to enter into the volume adjustment interface.
7.NEXT Button " "
9.PRV Button " "
10.SHIFT Button" "
Used to enter into the next item, forward, increase volume.
Used to go back to the last item, backward, decrease volume.
Used to enter into the menu of SCENE, TIMER, SENSOR, MUSIC, LED, DMX,
MP3 ,FM and PRESET.
11.LCD
Displays the current working state.
12.INFRARED SENSOR
Receives the signal from the external remote controller.
13.USB Port
Used to connects your PC for transmit music files.
14.AUX IN
Used to connects the external audio source.
Control Panel View Appendix I
21
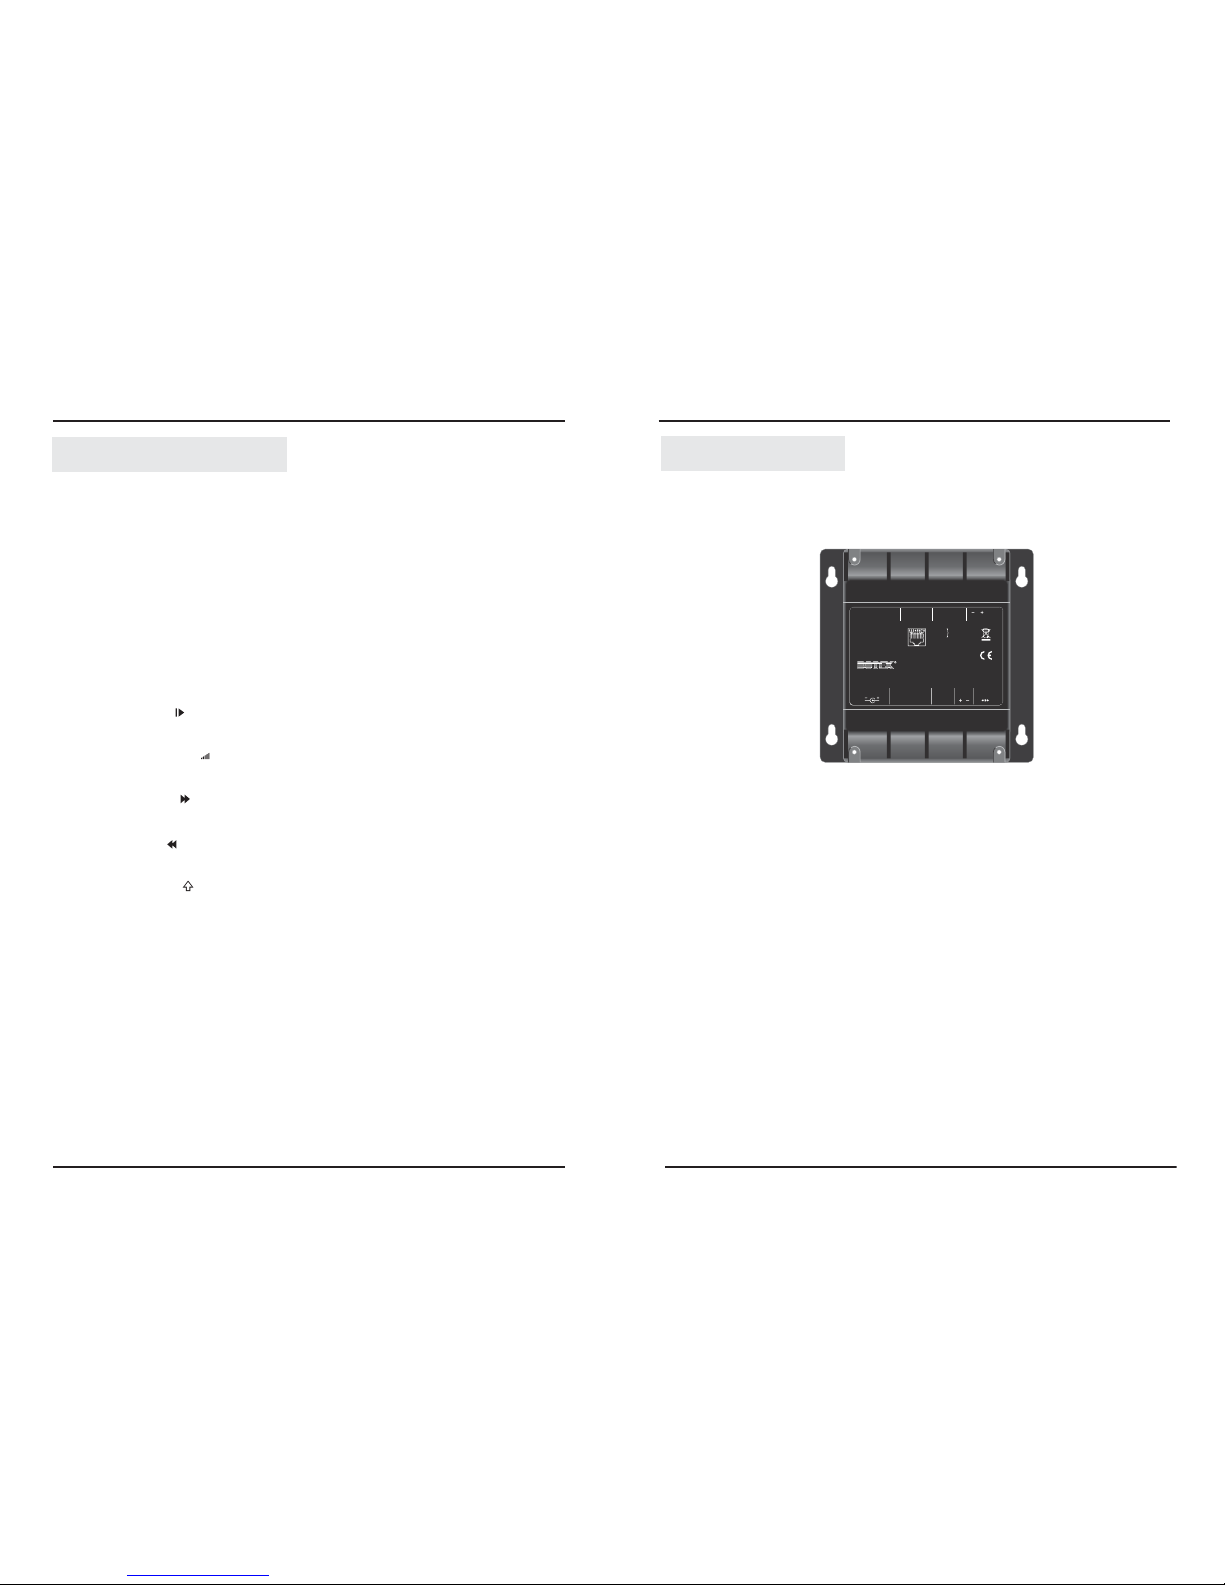
JUNCTION BOX MP3 INSTRUCTIONS
2
Connects the port B of ADT-MP3. It's configuration as following.
.Port B
1
Connects the port A of ADT-MP3. It's configuration as following.
.Port A
1 = DMX OUT +
2 = DMX OUT +
3 = Emergent Contact
4,5 = GND
6 = Emergent Contact Set
7,8 = +24V
1= LED 1
2= LED 2
3= LED 3
4= Moving Sensor
5= GND
6= Speaker +
7,8= +24V
3
Outputs 6 channels DMX signal.
.DMX Out
4
Connects the external speaker box.
.Speaker +, -
5
Power Input port, 24V DC, 2.5A Min.
.Power In
TOPANEL TOPANEL
Madein P.R.C.
RoHS
JUNCTION BOXMP3
DMXOUT
SPEAKER
GNDD-D+
POWERIN:
24VDC,2.5A Min.
LEDOUT SENSOR
NO
NC
+24V
+5V
S+ GND
AB
380mA/CH,1.2A MAX.
1.DMX OUT +
2.DMX OUT -
3.Emergent Contact
4;5. GND
6.Emergent Contact Set
7;8. +24V
1.LED 1
2.LED 2
3.LED 3
4.Moving Sensor
5.GND
6.Speak+
7;8. +24V
380mA/CH,
1.2AMAX.
Emergent
ContactSet
LED1
LED2 LED3
Emergent
Contact
Page 7
2)"PRESET + 1~9":Press PRESET firstly, and press the figure button 1~9 may
raise the PRESET 1~9.
Operation Guide
4)"FOLDER+x/x+x": Press FOLDER firstly, and then press the figure button
you can select to play the folder from local memory or SD card folder 1~8.
For example,
a.)Press FOLDER+1~8, you can go to the local memory folder MUSIC1~8;
b.) Press FOLDER+01~08,you can go to the SD card folder MUSIC1~8.
NOTE:
1)Effective distance from ADT-MP3 to LED Remote controller shall be limited
within the range of 6m. Otherwise, it results out of control.
20
3)"FREQ + x+x+x" / "x+x+x+x": Press FREQ firstly, and then press the followed
figure button orderly, this function is only available in the range of 870~1080. For
example, press "FREQ+8+9+8" you can enter into FM menu and it's frequency is
89.8MHZ.
The folder name must be named as MUSIC1,MUSIC2,MUSIC3, MUSIC4,MUSIC5,
MUSIC6,MUSIC7,MUSIC8 in both local memory and SD card prior to save your
music files into the folder. Otherwise, your music file can't be read by MP3 player.
5)"SONG + x+x": Press SONG firstly, and then press the followed figure button
you can select the music from the current folder. If you want to select the 8th
music from the current folder, you must press SONG+0+8, the music will be
raised and played. Otherwise, your selection will be void.
6)Press Scan, the unit automatically starts to search the broadcasting station.
After the scanning complete the unit will reserve those found stations, back to
FM mode, and then locate the first station.
Audio Repeat
ADT MP3 is playing MUSIC1~7
ADT MP3 is playing MUSIC8
AUDIO REPEAT
Folder(MUSIC1~7)
The current song
PLAY MODE
While the ADT MP3 is playing the folder MUSIC1~7, the player will repeat
playback MUSI1~7. While the unit is playing the folder MUSIC8, the player will
repeat playback the current song. As the following form shows,
The folder name must be named as MUSIC1,MUSIC2,MUSIC3, MUSIC4,MUSIC5,
MUSIC6,MUSIC7,MUSIC8 in both local memory and SD card prior to save your
music files into the folder. Otherwise, your music file can't be read by MP3 player.
Special Note:
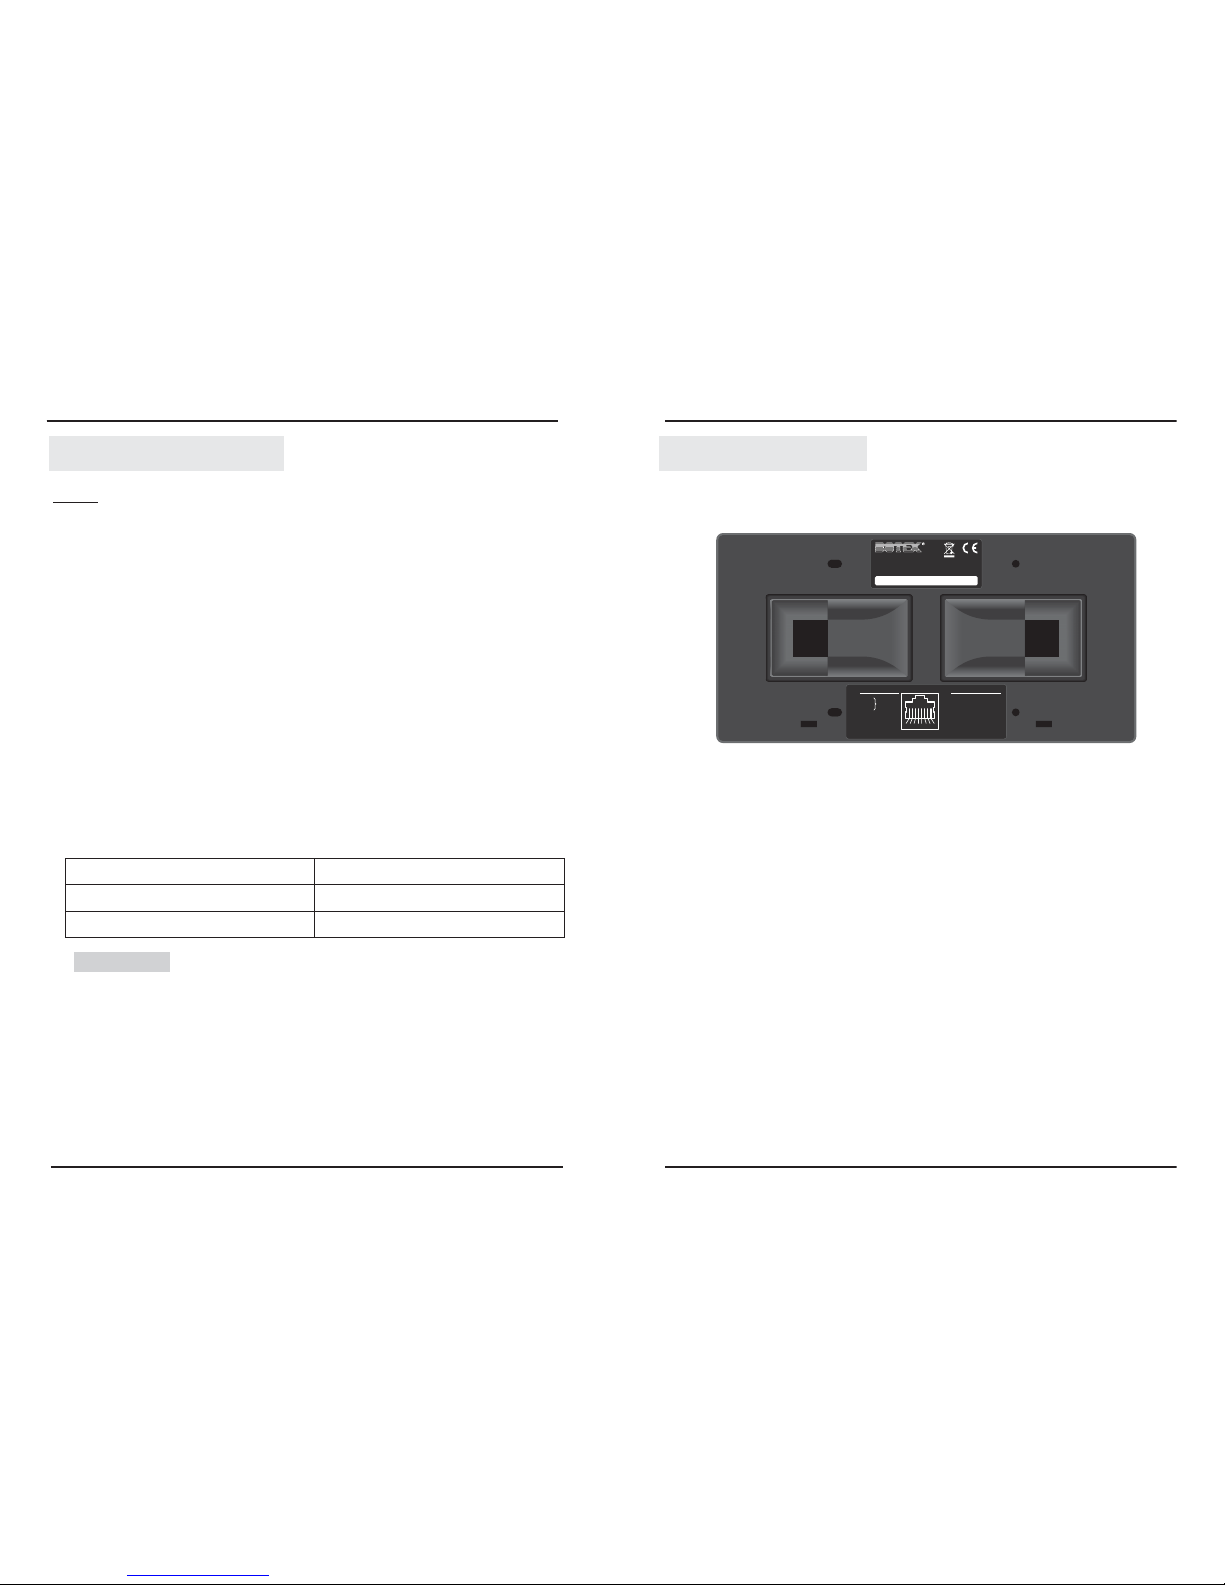
Rear Panel View
Connects the port B of Junction Box Mp3. It's configuration as following.
2.Port B
1.Port A
Connects the port A of Junction Box Mp3. It's configuration as following.
1 = DMX OUT +
2 = DMX OUT +
3 = Emergent Contact
4,5 = GND
6 = Emergent Contact Set
7,8 = +24V
1= LED 1
2= LED 2
3= LED 3
4= Moving Sensor
5= GND
6= Speaker +
7,8= +24V
5
A
1
2
3
4
5
6
7
8
1.DMX OUT +
2.DMX OUT -
3.Emergent Contact
4;5. GND
6.Emergent Contact Set
7;8. +24V
BA
1.LED 1
2.LED 2
3.LED 3
4.Moving Sensor
5.GND
6.Speak+
7;8. +24V
380mA/CH.
1.2AMAX.
B
ADT-MP3
Madein P.R.C.
RoHS
PatentPending
Warning:Never Reverse Aand B
Page 8
Operation Guide
MODE
In MP3 Mode, the user may use the touch toggle to control the output volume of the
amplifier.
1. MP3 MODE
The users may use the button 1~9 to raise the assigned value , including the value of
the 3channles LED dimmer, 6channels DMX, PWM, volume, song selection, fadetime,
etc.
Hold on press tapShift button( ), meanwhile to button 1~9, the user may enter into
the corresponding function mode----SCENE, TIMER,...PRESET.
2. PRESET MODE
MANUAL CONVENTIONS
The following conventions are used throughout this manual.
Tap is an act of pressing any buttons, the button takes effects immediately.
Press is an act of pressing any buttons, the button dose not take effects until
release the fingers.
Hold on Press is an act of pressing any buttons for 1.2 seconds or above
till the button takes effects.
6
By means of the button(Like as MODE, PLAY, VOLUME, PREV and NEXT) in the
interface, the user may use the unit as a normal MP3 player.
The ADT-MP3 is available in MP3 MODE and PRESET MODE, the following contents
detailed the information.
Once entered into the menu you desired, you may
1)press its button for 2 seconds, the parameter you set which will be saved in the Scene.
2)tap its button, you can raise the prior value.
The detail information you can refer to " " on page 13.OPERATION ON MP3 PLAYER
Button 0~9
Keys
Functions
FREQ
SONG
ON/OFF
PRESET
BEEP
VOLUME +
VOLUME -
PREV
Switches key tone between on and off.
PRESET+"1~9" to raise the PRESET 1~9.
"SONG+x+x" to select the song you want to play.
"FREQ+x+x+x/x+x+x+x" to select frequency.
May be used with the key of Preset,FREQ,Folder,Song.
Powers on or off the unit.
In MP3 mode, it is used to play or pause the MP3 player.
Operation Guide
MP3
FOLDER
FM
BRIGHTNESS
Selects MP3 mode.
"FOLDER+x/x+x",Selects Music folder you want to open.
Decreases to the value of Brightness.for the external
3 ways LED
Automatically scanning the broadcasting station.
NEXT
PLAY/STOP
BRIGHTNESS
SCAN
Mutes the audio output, tap it again will resume audio output.
MUTE
Increases to the value of Brightness for the external
3 ways LED.
Selects FM mode.
In preset mode, it is used to select the option .
In MP3 mode, it is used to select the next music or forward .
In preset mode, it is used to select the option .
In MP3 mode, it is used to select the previous music or backward.
In preset mode, it is used to select the option .
Holding the key down will gradually decrease to the minimum
value of volume.
Holding the key down will gradually increase to the maximum
value of volume.
19
Page 9
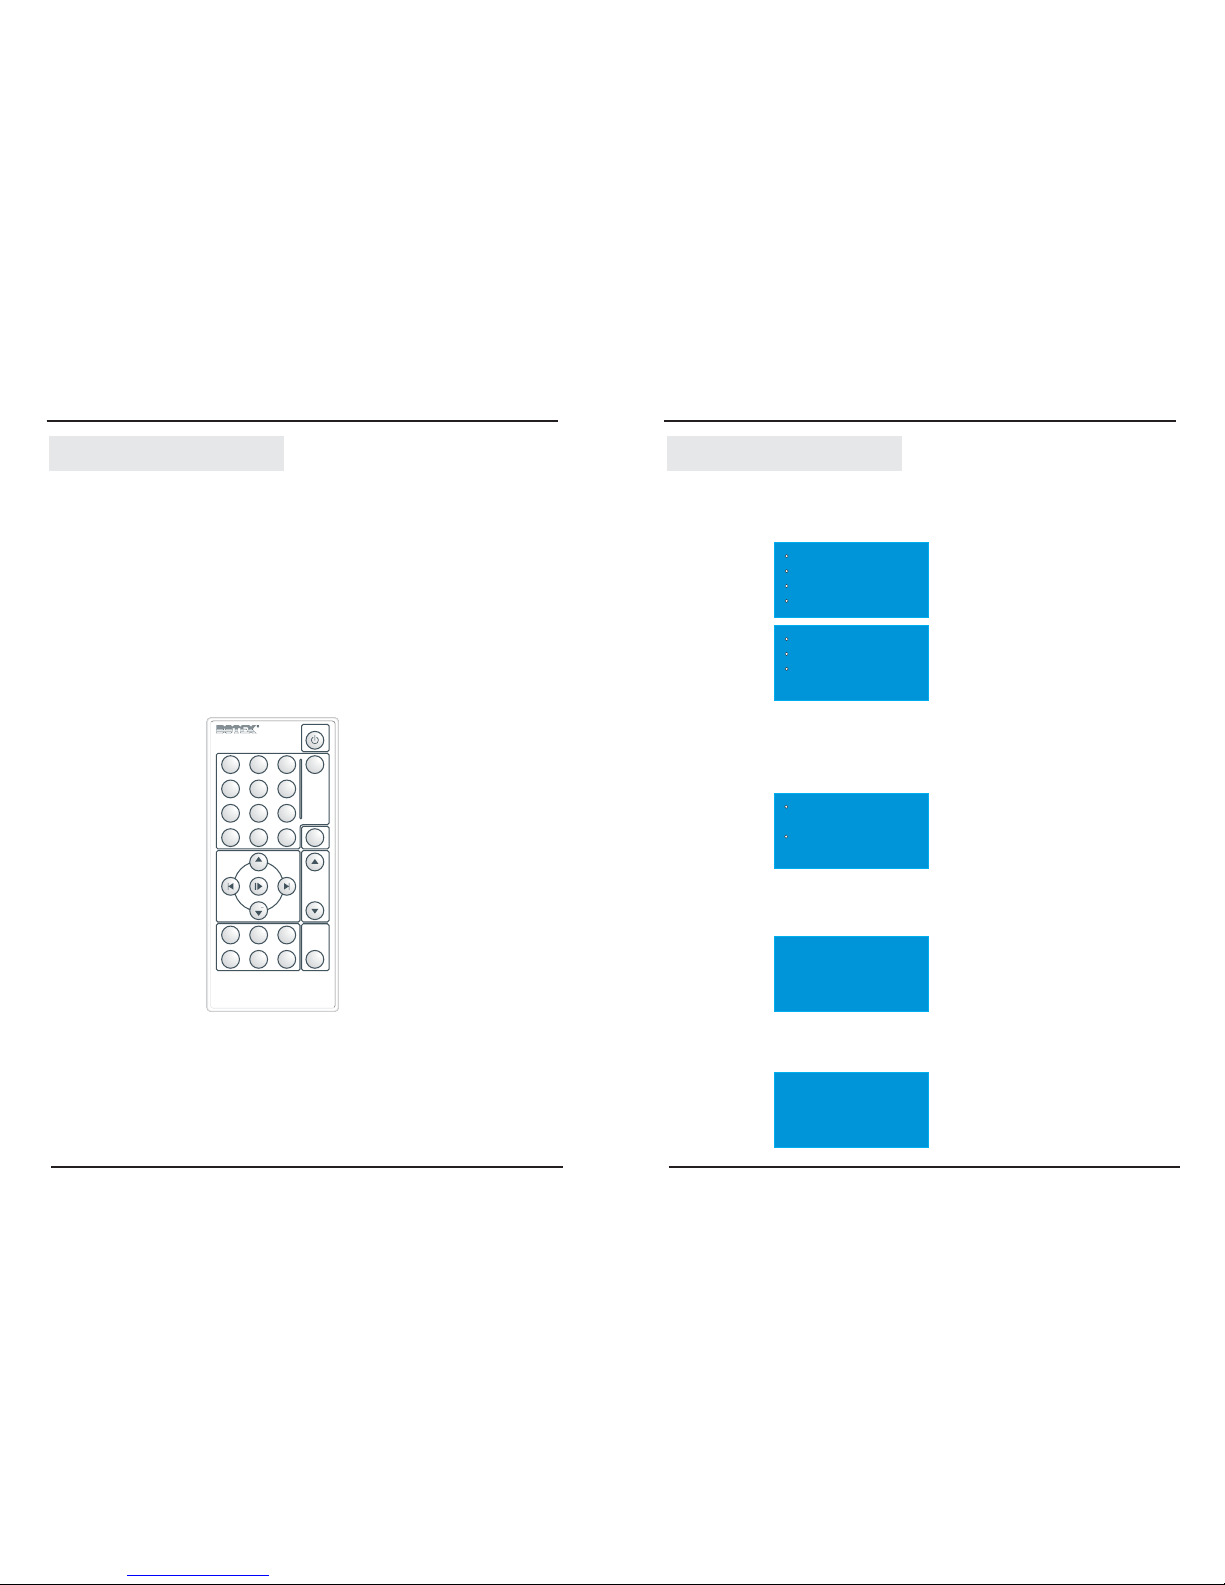
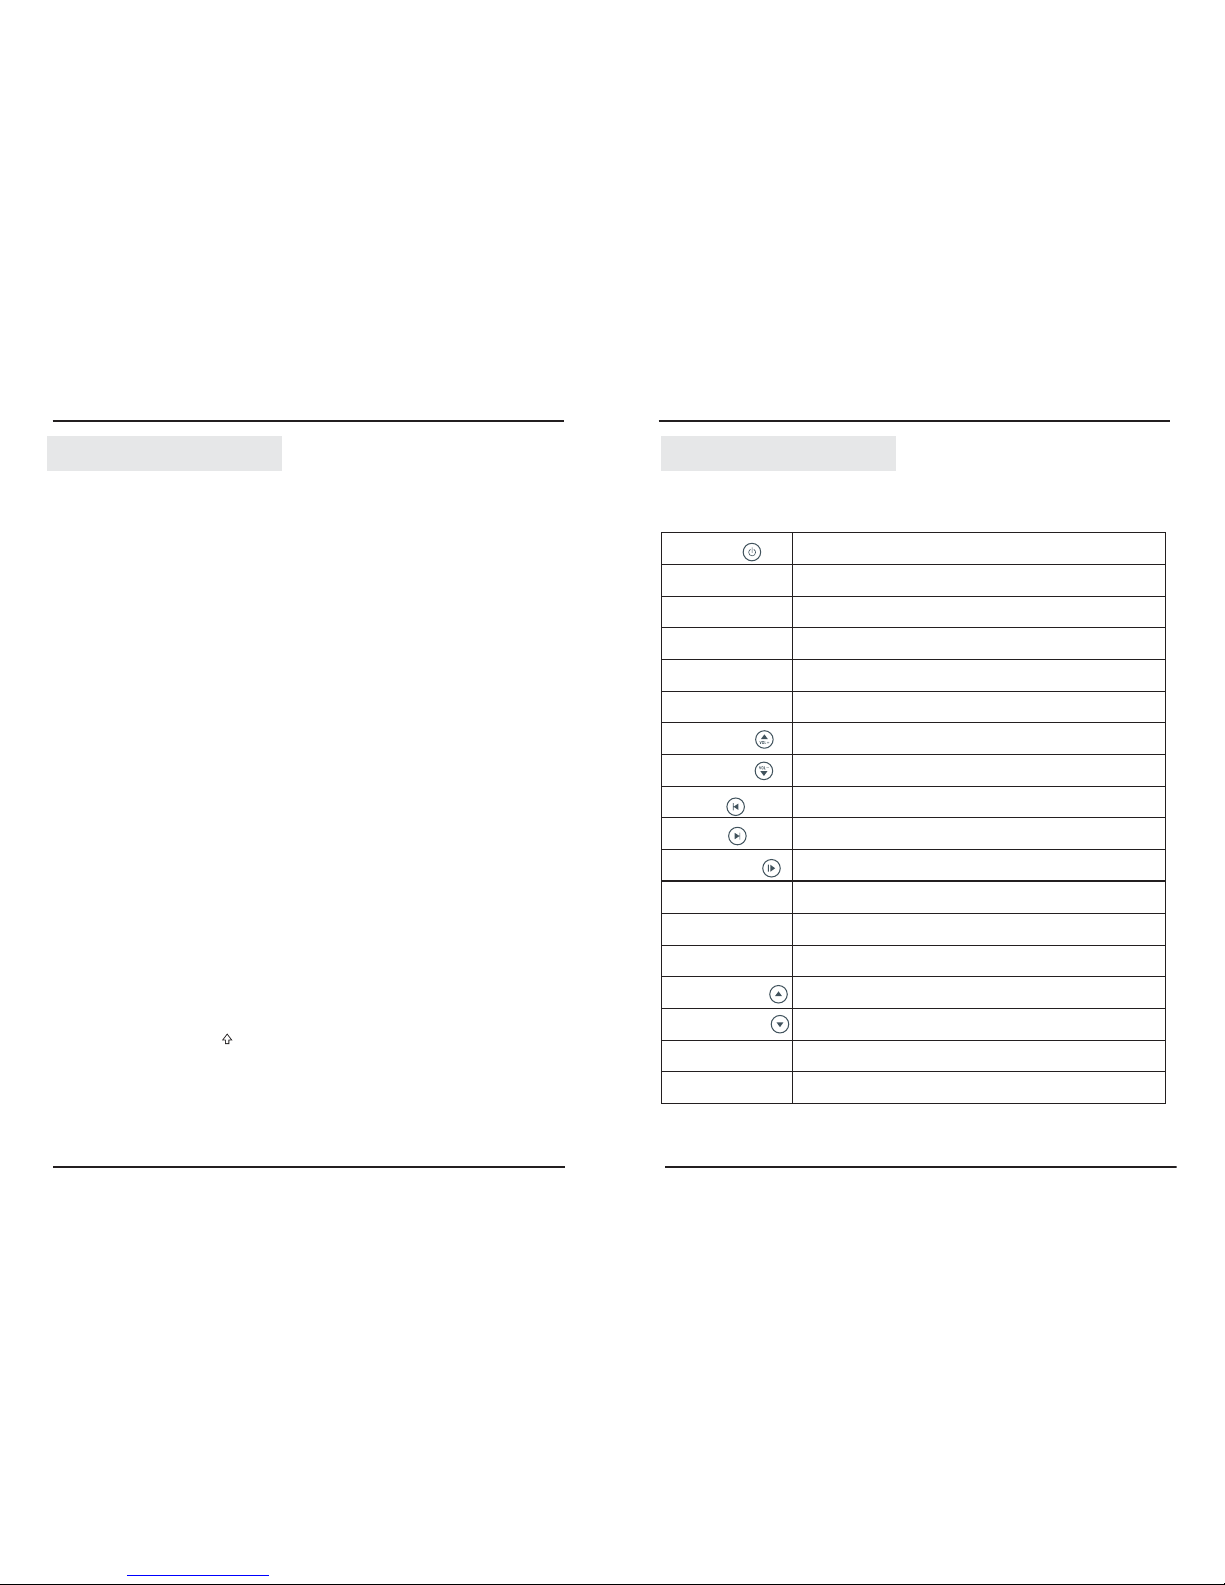
Remote Controller Operation
A built-in IR EYE sensor enables you operator your ADT-MP3 by remote
controller.
Operation Instructions
1. Before operation, make sure the batteries(3V, CR2025) have been
installed into the remote controller properly.
2. There are 10 dedicated figure(0~9) keys, FREQ, SONG, ON/OFF, PRESET,
BEEP, VOLUM+/-, PREV, NEXT, PLAY,MP3, FOLDER, FM,
BRIGHTNESS +/-, MUTE, SCAN & MUTE keys on the remote controller
interface.
The detailed function will be illustrated in the following table.
ADT-MP3 Remote Controller
Operation Guide
1
8
ADT-MP3 RC
PRESET
SONG
ON/OFF
1
2
3
4
5
6
78
9
0
FREQ
VOL+
VOL
MUTE
SCAN
FREQFM
SONG
MP3
FOLDER
BRIGHTNESS
BEEP
7
3. MAIN MENU
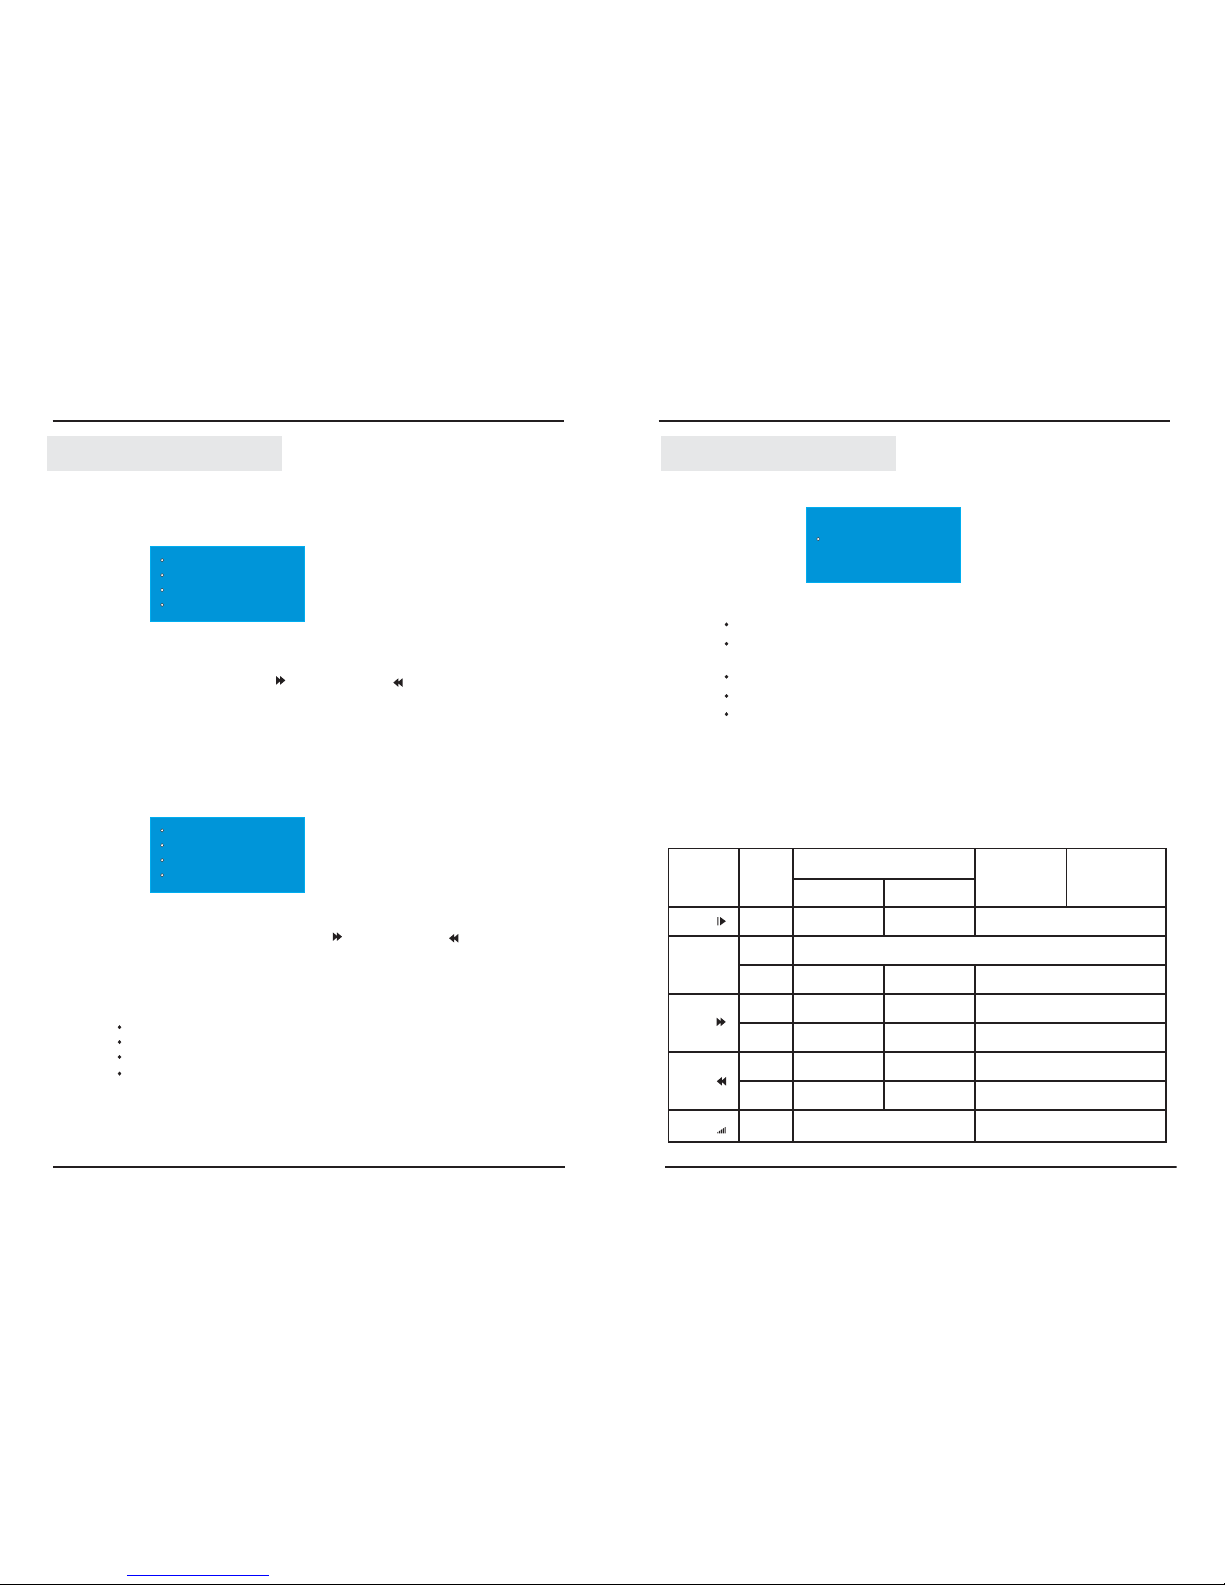
Press Shift + PRESET(button 1) to enter into main menu, the LCD shows you as below.
Operation Guide
In Date & Time submenu, you can separately set the Date and Time by tap the
VOLUME , PRV or NEXT button.
Date
Time
Date
2009/03/29 TUE
Time
12:35:28
3.1) Date & Time
Date &Time
Scene Edit
Event Edit
Set Off Delay
Set Password
Firmware Version
MP3 Player
To select and enter into Date, the LCD shows you as below. Now the user.can tap the
VOLUME button to move the cursor, and use PRV or NEXT button to adjust the
year, month and date
To select and enter into Time, the LCD shows you as below. Now the user.can tap the
VOLUME button to move the cursor, and use PRV or NEXT button to adjust the hour,
minute and second
Page 10
Operation Guide
8
CH_1: 100%
3.2) SCENE EDIT
Music Setting
LED
6 ChannelDMX
Fadetime: 10S
The user may preset the music, the external LED (driven by 3 channels PWM ), the 6
channels DMX and raise the fadetime of the scene in this menu.
The user may tap the NEXT Button " " or PRV Button " " move the cursor to
select the submenu, and then press MODE button to enter.
Fold Select: 01
Song Start: 03
FM Radio: 89.8
Amp Volume: 80%
3.2.1) Music Setting
The user may operate the following actions:
Amp Volume: to set the volume of the amplifier
Folder Select: selects the music folder you want to use
Song Start: to select the music you want to play
FM Radio: to set the frequency of the radio
To select and enter into SCENE EDIT Submenu, the LCD shows you as below.
Note: The user may enter into this mode by shortcut of pressing button "Shift + MUSIC"
at a time.
Likewise, the user may tap the NEXT Button " " or PRV Button " " move the cursor
to select the submenu, and then press MODE button to enter.
Act
State Of
Playback
Sub-menu
Standby
Playing
Standby
Sub-menu
Tap
Hold on
Press
Tap
Volume
N/A
Enter Standby
Sub-menu
Playback
Next song
Last song
Keep browsing
forward
Keep browsing
backward
Stop
Enter intomain menu
Enter Playback
Sub-menu
Next song
and play
Forward
Last song
and play
Backward
Exit fromSub-menu
Keep moving
forward
Move theSub-menu
Keep moving
backward
Confirm selectionor
Enter intothe next
Move theSub-menu
Button
Play
Mode
Next
Prev
Vol
Tap
Tap
Tap
Hold on
Press
Hold on
Press
5. PLAYBACK MODE
The above operation may be briefly expressed by the following form.
Operation Guide
Intro
Repeat
The device allows you select repeat the folder or all music files.
Equalizer: allows you select the equalizer like Natural, Rock, POP,etc.
SRS WOW Mode: allows you select the SRS WOW, user settings or
Disable SRS WOW.
Repaly time: allows you set the Replay time
Replay gap: allows you set the Replay gap
Exit: goes back MP3 interface
17
Page 11
On/Off device
While the device is running, Play " " button may off the device
and enter into Standby. While the device Stand by, Play " " button
may on the device.
Hold on Press
Hold on Press
While the device is playing music, Play " ", the device pauses playback,
While the device is pausing, Play " " button to resume playback.
Tap
Tap
While the device is recording, Play " " button, the device pauses record.
While the device is in Sub-Menu, Play " " button to exit from Sub-menu.
Tap
Tap
Operation Guide
3. FUNCTION MODE
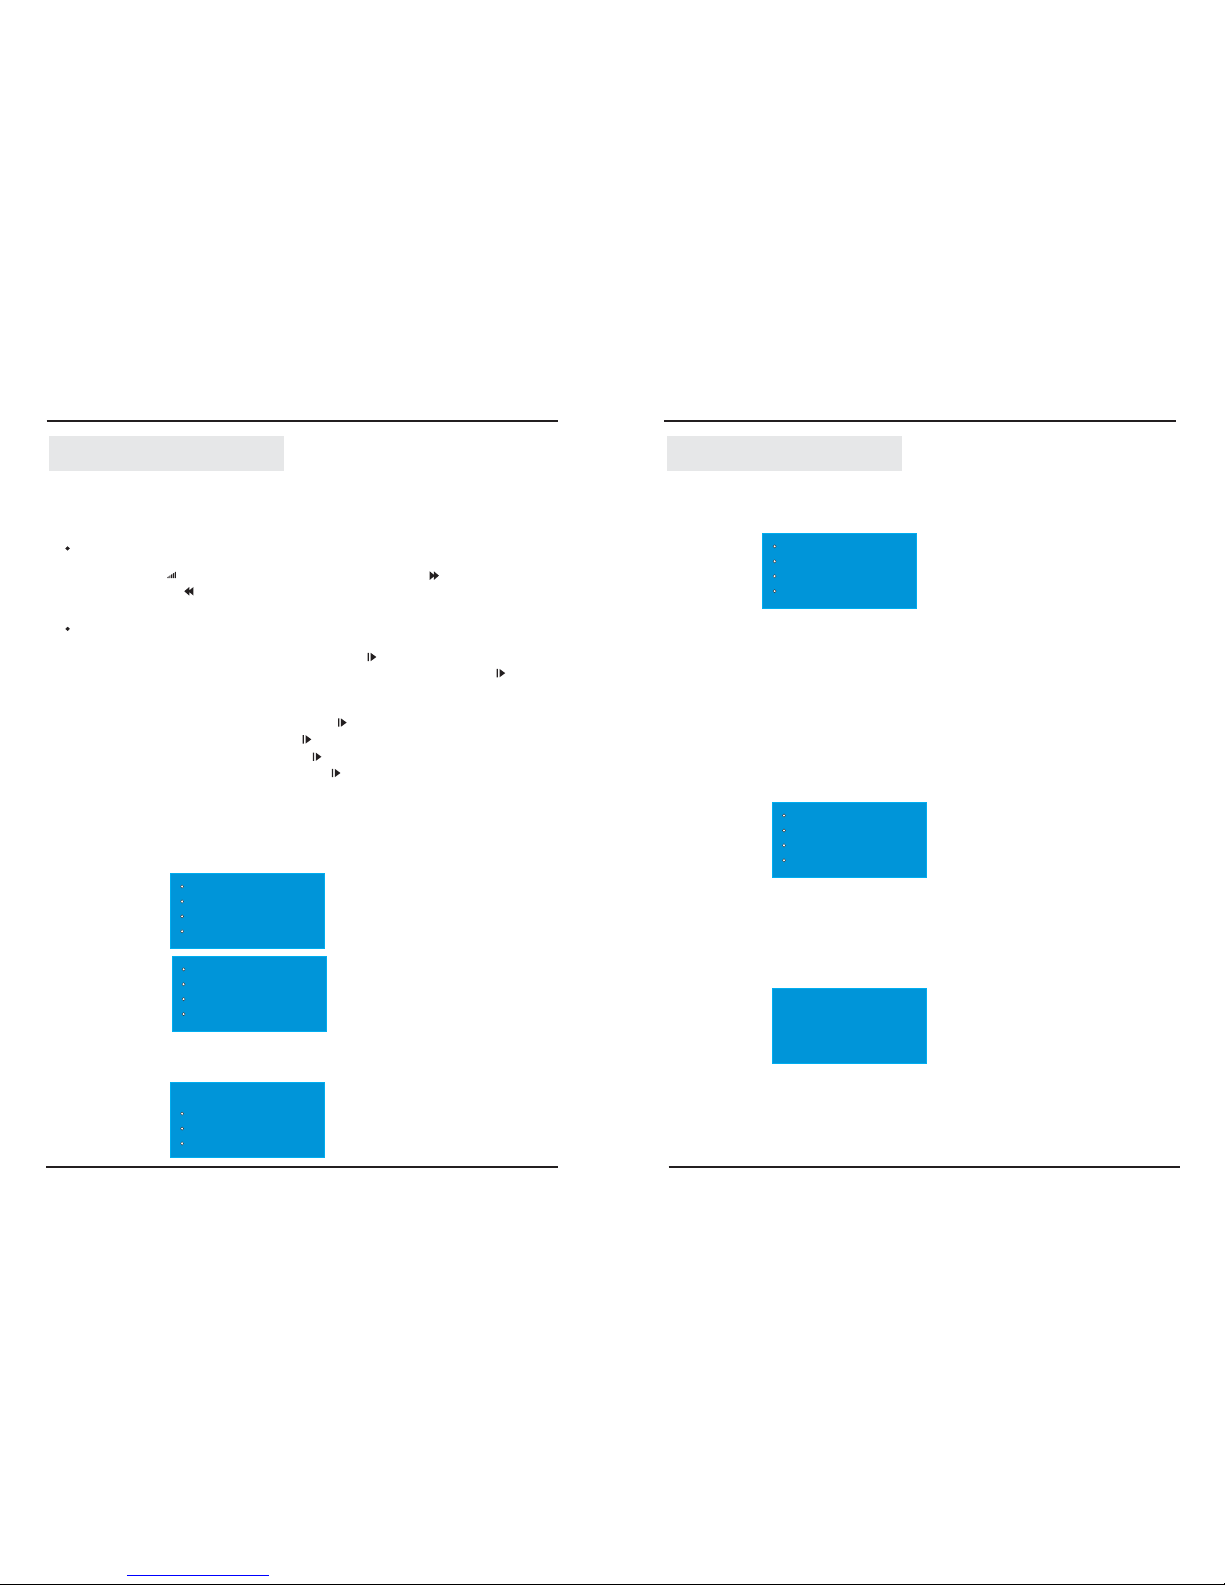
The user may enter into any function mode from Main Menu.
Volume Adjustment
Tap VOLUME " " to activate Volume function. Use NEXT " " to increase the
volume and PRE " " to decrease the volume.
4.PLAYBACK SUBMENU
While the device is playing music, Mode you can enter into Playback Submenu.TAP
Reboot
Equalizer
SRS WOWMode
TempoRate
Replay
Replay time
Replay Gap
Exit
Use "NEXT" or PREV" select your option, then MODE button to enter into
Submenu. Choose Reboot, the LCD shows
Tap
Repeat Folder
Repeat All
Random
Repeat
16
Operation Guide
9
CH_1: 100%
CH_2: 100%
CH_3: 100%
Max Limit: 100%
3.2.2) LED
To select and enter into LED mode, the LCD shows you as below.
The user may set the intensity for the external LED (which was driven by 3 ways
PWM) and the max intensity.
3.2.3) 6 CHANNEL DMX
In main menu, to select and enter into 6 CHANNEL DMX, the LCD shows you
Running Select
Scene
AutoProgram
DMX Address
Note: The user may enter into this mode by shortcut of pressing button "Shift + LED"
at a time.
Running Select
The Running Select mode allows you separately set the work mode(Scene or
AutoProgram) for the 6 channels DMX
Scene or
AutoProgram
Running Select
Page 12
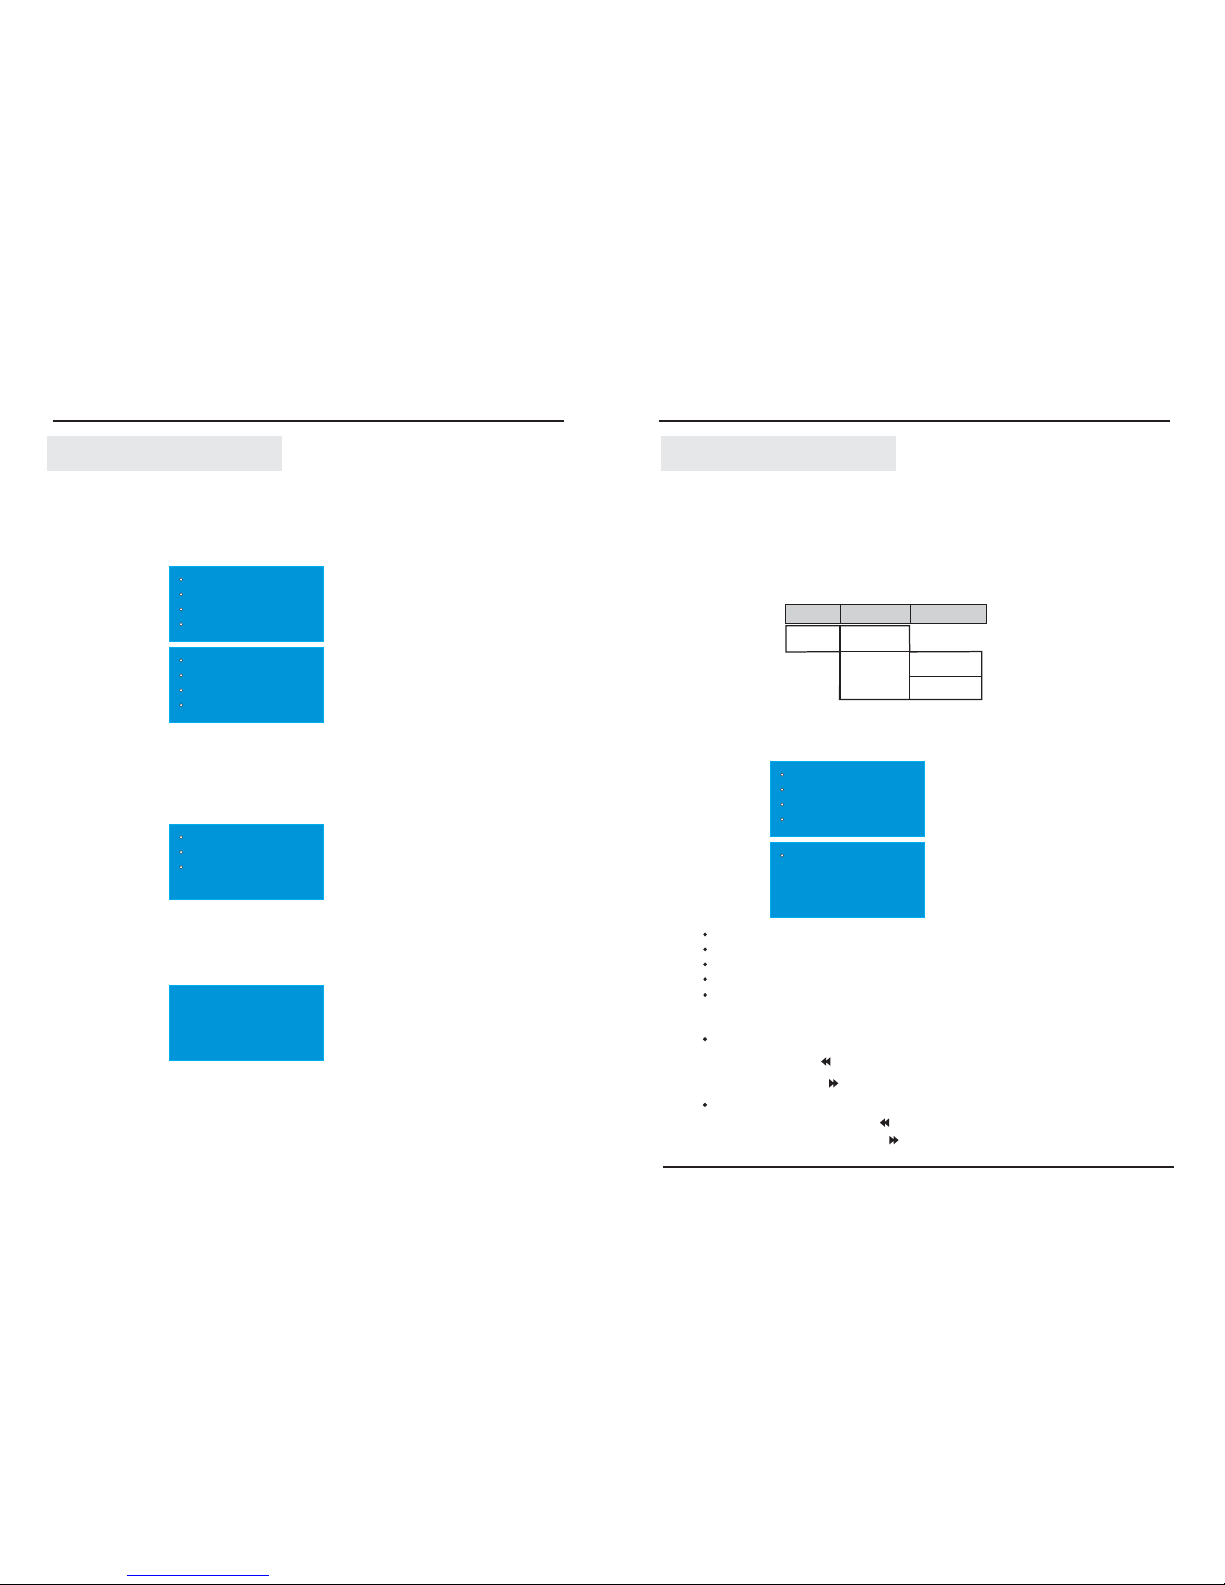
In Scene mode, the 6 channels DMX value and the fadetime( in the range of 0~60
seconds) can be set separately.
AUTO_PROGRAM
The user can select the built-in program(1~10) or the auto program. The running
speed can be set in the range of 0~60Min.
Preset: 01
Auto Program: 01
Auto Speed: 50 S
DMX Address
The user can set the initial address for the DMX output.
DMX Address
001
Operation Guide
Channel_4 000
Channel_5 000
Channel_6 000
Fadetime 00S
Scene 01
Channel_1 000
Channel_2 000
Channel_3 000
Scene
Also, the user may enter into 6 Channel DMX mode directly by shortcut of pressing button
"Shift + DMX" at a time.
10
OPERATION ON MP3 PLAYER
The MP3 player menu consists of the Main Menu and Sub-menu, the Sub-menu
consists of the Playback Sub-menu(the device is playing music) and the Standby
Sub-menu(the device stops playing ).
1. MP3 MENU INSTRUCTIONS
The user may the MODE button to enter into main menu. And
can use "NEXT" or PREV" select your option, then MODE button to
enter into submenu.
Hold on Press
Tap
Operation Guide
15
Local Folder
Card Folder
Delete
Delete All
Exit
Local Folder: shows you the Local music folders
Card Folder: shows you the music folders in local card
Delete: deletes a file
Delete All: delete all files
Exit: go back to MP3 interface
Forward/ Backward while device is playing music
To Hold on Press the PRV " " button to backward.
To Hold on Press the NEXT " " button to forward .
2. BROWSE
Browse and select song
To the PRV " " button to browse and select the previous song.Tap
To the NEXT " " button to browse and select the next song.Tap
Menu
Main Menu
SubMenu
Playback
Standby
Level 2Level 1 Level 3
Page 13
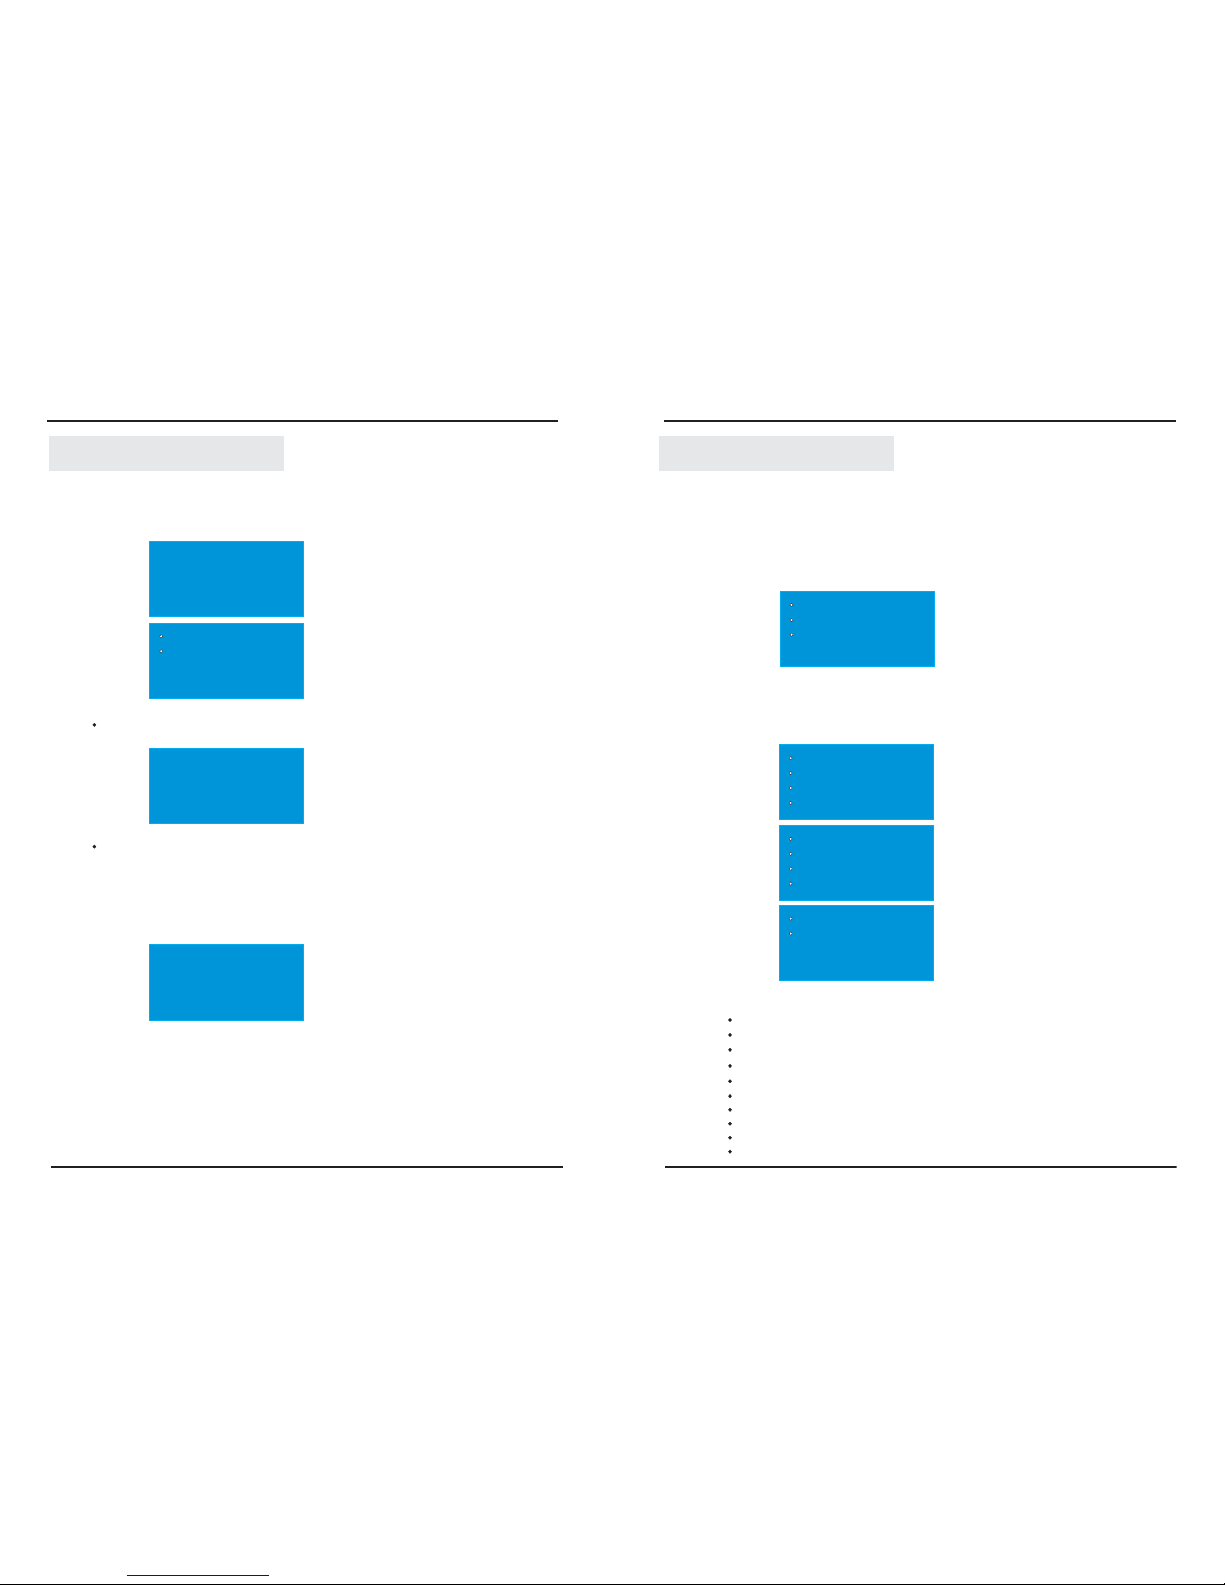
3.5) SET PASSWORD
It is required to input the user password prior to enter into this submenu.
Enter Password
******
Change Password
Load Default
Change Password: allows you change the user password.
Load Default: restore all of the parameters as the default setting.
3.6) FIRMWARE VERSION
This submenu is used to view the current software version.
Firmware Version
ADT_MP3
Rev1.0
2009/04/20
3.7) MP3 PLAYER
This submenu is used to exit the current mode and go back to MP3 mode.
New Password
******
Operation Guide
14
Operation Guide
3.3) EVENT EDIT
Entered into timer menu, you may press the button 1~9 to select and edit the
assignment of timed trigger the scene .
Preset: 01
Preset Enable: ON
Time On: 08:00
Time Off: 09:00
LED Limit: 100%
AMP Volume: 100%
Folder Select: 01
Song Select: 03
Fadetime: 00S
FM Radio: 97.1
The assignment includes:
Time Off: to set the time of turning off a scene
LED Limit: to set the max intensity of the LED
AMP Volume: to set the volume of the amplifier
Folder Select: to choose the MP3 folder you want to play
Preset: to select the scene you want to edit
Preset Enable: to turn on or turn off a scene
Time On: to set the time of turning on a scene
Song Select: to choose the music file you want to play
Fadetime: to set the fadetime to triger the scene
FM Radio: to set the frequency for the radio
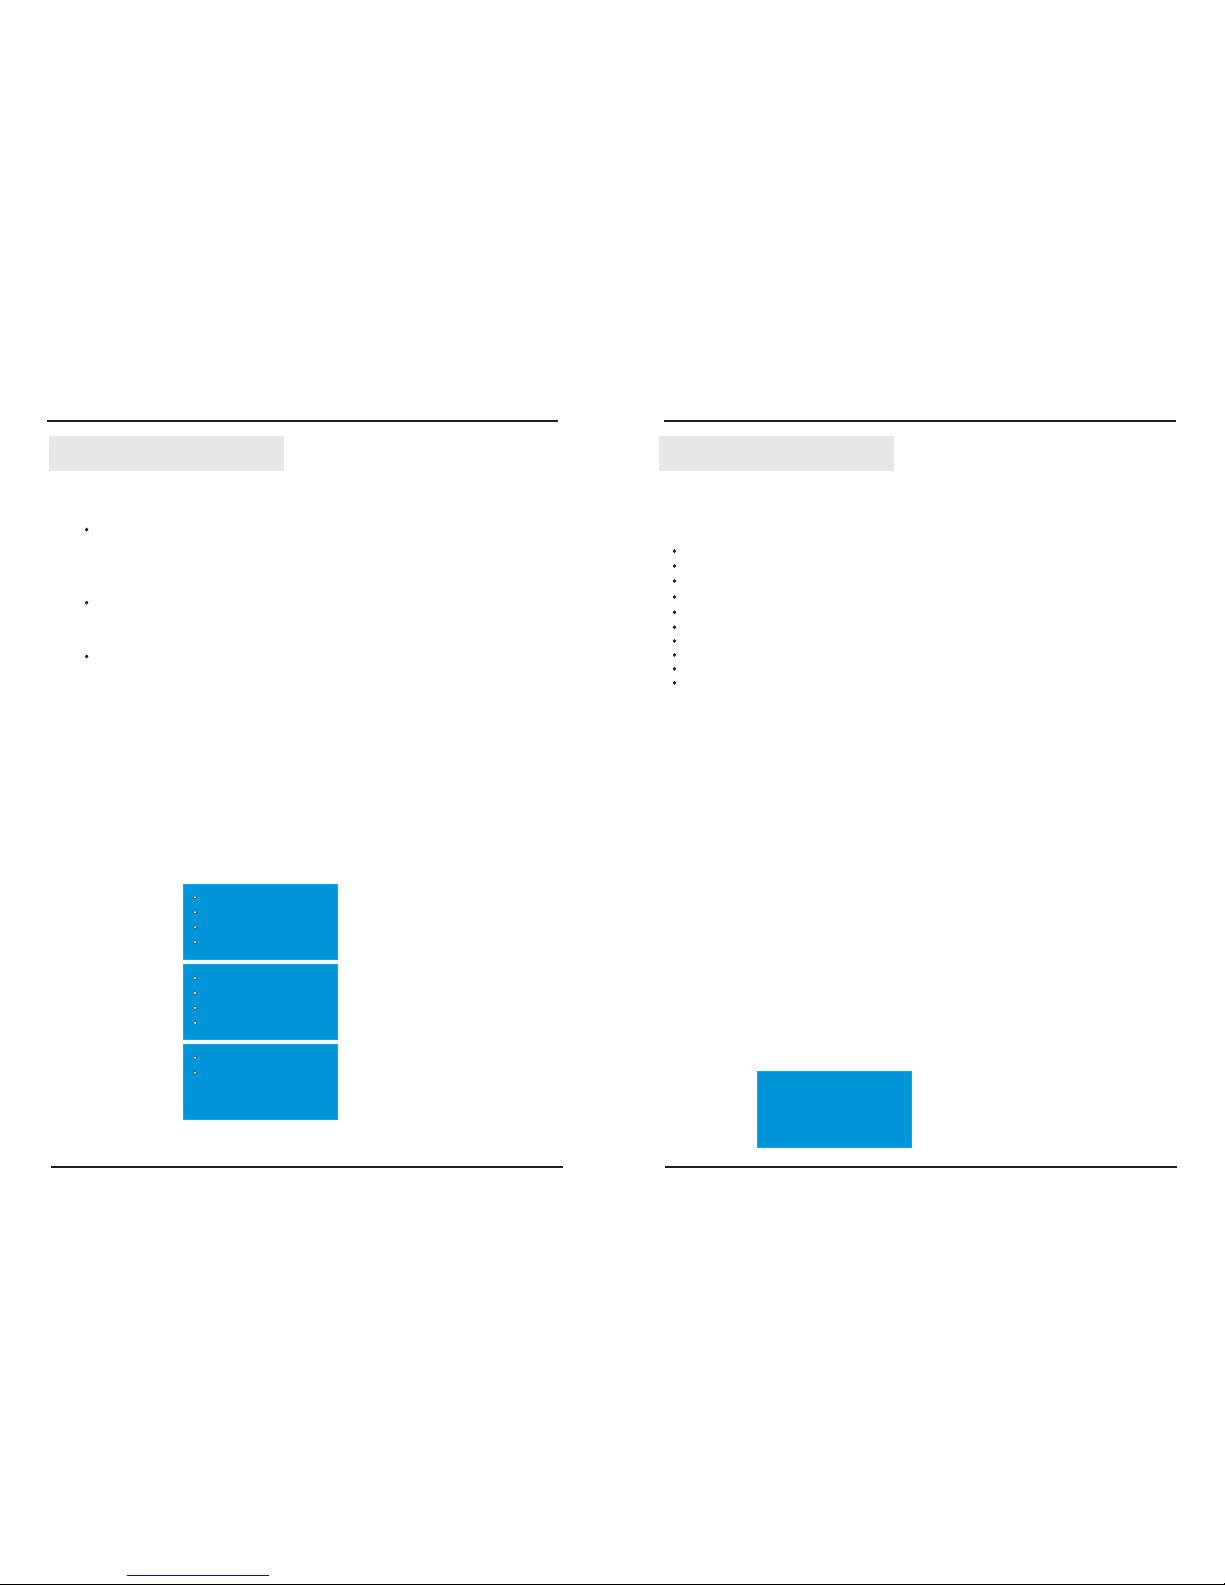
In Event Edit submenu, you can select the running program which includes TIMER
mode and SENSOR TRIGGER mode. The TIMER mode is used to timed turn on or
off the scene. If it is required to turn on or off the scene by triggering the external
sensor, you have to choose SENSOR TRIGGER mode.
Running Select
Sensor Trigger
Timer Edit
Timer Edit
11
Page 14
Operation Guide
SENSOR TRIGGER
In this mode, you may press the button 1~9 to select and edit the external sensor
to trigger the scene .
Preset: 01
Preset Enable: ON
Start Time: 08:00
Stop Time: 09:00
MAX Limit: 100%
AMP Volume: 100%
Folder Select: 01
Song Select: 03
Fadetime: 00S
FM Radio: 97.1
Rules:
The EVENT works only when it was triggered by the external sensor, it will
take the parameters defined in EVENT as a guideline, the other undefined
parameters will be as the same as the raised preset.
In timer mode, the timed scene will take place in sequence according to
the TIME ON as you preset. Only one scene would take place during any
period, and it will take the parameters defined in TIMER as a guideline,
the other undefined parameters will be as the same as the raised preset.
12
When you manually raise the scene, the defined parameters in TIMER and
EVENT which will not work for manual raising.
Can go into to the FM menu directly.by shortcut of pressing button "Shift + FM" at a
time
Operation Guide
The Fadetime may be adjusted in the range of 0~15 seconds.
Note:
If the external sensor was triggered during the preset period, the unit will raise the scene
in the corresponding period.
This submenu is used to set the delay time in the range of 0~60S for power on or off
the unit.
3.4) SET OFF_DELAY
Set Off delay
00 S
13
The user may operate the following actions:
Stop Time: to set the time of turning off a scene
MAX Limit: to set the max intensity of the LED
AMP Volume: to set the volume of the amplifier
Folder Select: to choose the MP3 folder you want to play
Preset: selects the scene you want to use the external sensor to trigger
Preset Enable: to turn on or turn off a scene
Start Time: to set the time of turning on a scene
Song Select: to choose the music file you want to play
Fadetime: to set the fadetime of the sensor triggers the scene
FM Radio: to set the frequency for the radio
 Loading...