

Page 1
Directions for Use
Mode d’emploi
Gebrauchsanweisung
Gebruiksaanwijzing
Instrucciones de uso
Istruzioni per l’uso
Instruções de Utilização
en fr de nl es it pt-EU el no da sv sk hu pl bg hr ro sl cs
Freelink™ Remote Control
Directions for Use
Οδηγίες χρήσης
Bruksanvisning
Brugsanvisning
Käyttöohje
Bruksanvisning
Návod k použití
Návod na použitie
Használati utasítások
Instrukcja obsługi
Указания за употреба
Upute za upotrebu
Instrucțiuni de utilizare
Navodila za uporabo
92395488-02
Content: MP92395488-02 REV A
Page 2
Clinician Remote Control Directions for Use
en
Guarantees
Boston Scientic Corporation reserves the right to modify, without prior notice, information relating to its
products in order to improve their reliability or operating capacity.
Drawings are for illustration purposes only.
Trademarks
The Bluetooth® word mark and logos are registered trademarks owned by the Bluetooth SIG, Inc. and
any use of such marks by Boston Scientic Neuromodulation Corporation is under license.
WaveWriter Alpha™ and FreeLink™ are trademarks of Boston Scientic Corporation or its afliates.
All other trademarks are the property of their respective owners.
Additional Information
For Indications and related information, see the Indications DFU. For contraindications, warnings,
precautions, adverse events summary, physician instructions, storage and handling, component
disposal, and contact information for Boston Scientic, refer to the Information for Prescribers DFU for
your system. For other device-specic information not included in this manual, labeling symbols, and
warranty information, refer to the appropriate DFU for your System as listed on your Reference Guide.
Thorough this document, the WaveWriter Alpha™ and WaveWriter Alpha 16 Systems will be referred to
as the WaveWriter Alpha System. WaveWriter Alpha™ Prime and WaveWriter Alpha Prime 16 Systems
will be referred to as the WaveWriter Alpha Prime Systems.
Product Model Numbers
Model Number Description
SC-5270 Freelink™ Remote Control
SC-6386 Pairing Magnet
SC-5572-1 SC-5572-1A Freelink Remote Control Kit
Note: Only the device models that are appropriate for your region will be provided.
Clinician Remote Control Directions for Use
92395488-02 ii of iv
Page 3

en
Table of Contents
Description ............................................................................................................................................... 1
Cautions ...........................................................................................................................................................1
Remote Control Features ........................................................................................................................1
Basic Operation ....................................................................................................................................... 2
Unlocking the RC .............................................................................................................................................2
Turning Therapy On/Off ....................................................................................................................................2
Selecting Your Language/Screen Preference ..................................................................................................2
The Home Screen ............................................................................................................................................3
Adjusting Stimulation Amplitude from the Home Screen ..................................................................................4
The Main Menu .........................................................................................................................................4
Accessing the Main Menu ................................................................................................................................4
Program Selection and Activation ....................................................................................................................5
Selecting Stimulation Areas to Modify Programs..............................................................................................6
Saving Modied Programs ...............................................................................................................................8
Restoring Programs .........................................................................................................................................9
Copying Programs ..........................................................................................................................................10
Deleting Programs ..........................................................................................................................................11
Managing Schedules ......................................................................................................................................12
Entering a Therapy Rating .............................................................................................................................16
Accessing System Settings ............................................................................................................................17
Remote Settings .............................................................................................................................................17
System Info ....................................................................................................................................................20
Accessing the Clinician Menu .............................................................................................................. 22
Stimulator Search and Linking .......................................................................................................................24
Clear Link .......................................................................................................................................................26
Impedances ....................................................................................................................................................27
Reset Stimulator .............................................................................................................................................27
CP Mode: Stimulator ......................................................................................................................................28
Exit Clinician Mode .........................................................................................................................................28
MRI Mode ................................................................................................................................................29
Enabling MRI Mode ........................................................................................................................................29
Disabling MRI Mode .......................................................................................................................................32
MRI Mode Error Screens ................................................................................................................................34
Charge Stimulator Now Screen (Rechargeable Stimulators Only) .................................................................35
Charge Stimulator Now or Disable MRI Mode Screen (Rechargeable Stimulators Only) ..............................36
Stimulator Battery Low Screen Due to ERI or EOS (Non-Rechargeable Stimulators Only) ...........................37
ERI or EOS During MRI Mode .......................................................................................................................38
Impedances Out Of Range Screen ................................................................................................................39
Stimulator Error Screen ..................................................................................................................................40
Recharging the RC ................................................................................................................................41
Clinician Remote Control Directions for Use
92395488-02 iii of iv
Page 4

Clinician Remote Control Directions for Use
en
Troubleshooting ....................................................................................................................................43
Bluetooth Help ................................................................................................................................................43
No Program to Run Screen ............................................................................................................................44
Invalid Program Screen ..................................................................................................................................44
Unsupported Stimulator Screen .....................................................................................................................45
System Settings Reset Screen .......................................................................................................................45
Stimulator Error Screen ..................................................................................................................................46
Remote Error Screen .....................................................................................................................................46
End of Programmed Service ................................................................................................................47
Non-rechargeable IPG Battery Status .................................................................................................48
Icon Description ....................................................................................................................................49
Clinician Remote Control Directions for Use
92395488-02 iv of iv
Page 5
en
Description
Description
The Freelink™ Remote Control (RC) is a handheld device that allows you to communicate with and
control the Stimulators.
Cautions
• Keep the RC dry. It should not be exposed to moisture.
• Do not connect the RC USB port to any other device except to the RC charger provided with it.
• Keep the RC away from pets, pests and children to avoid damage to the device.
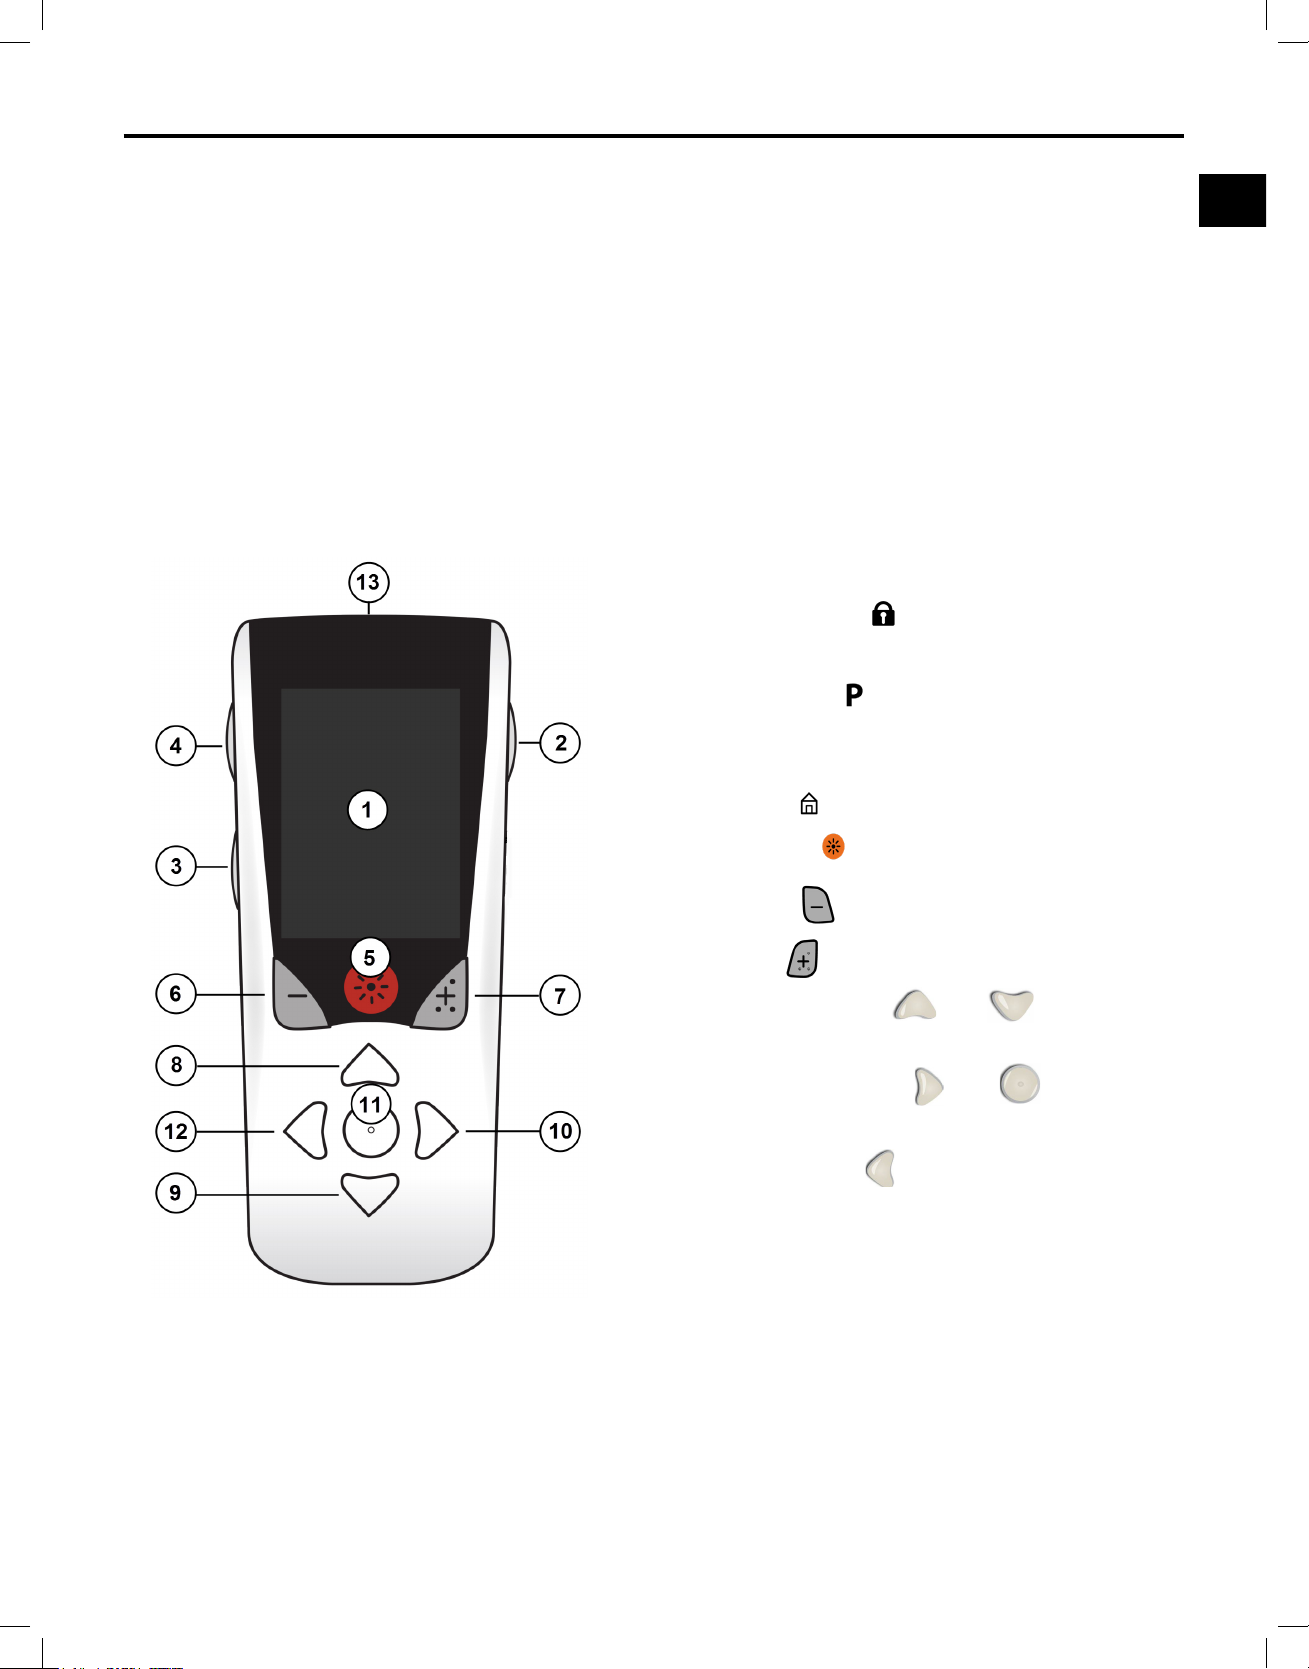
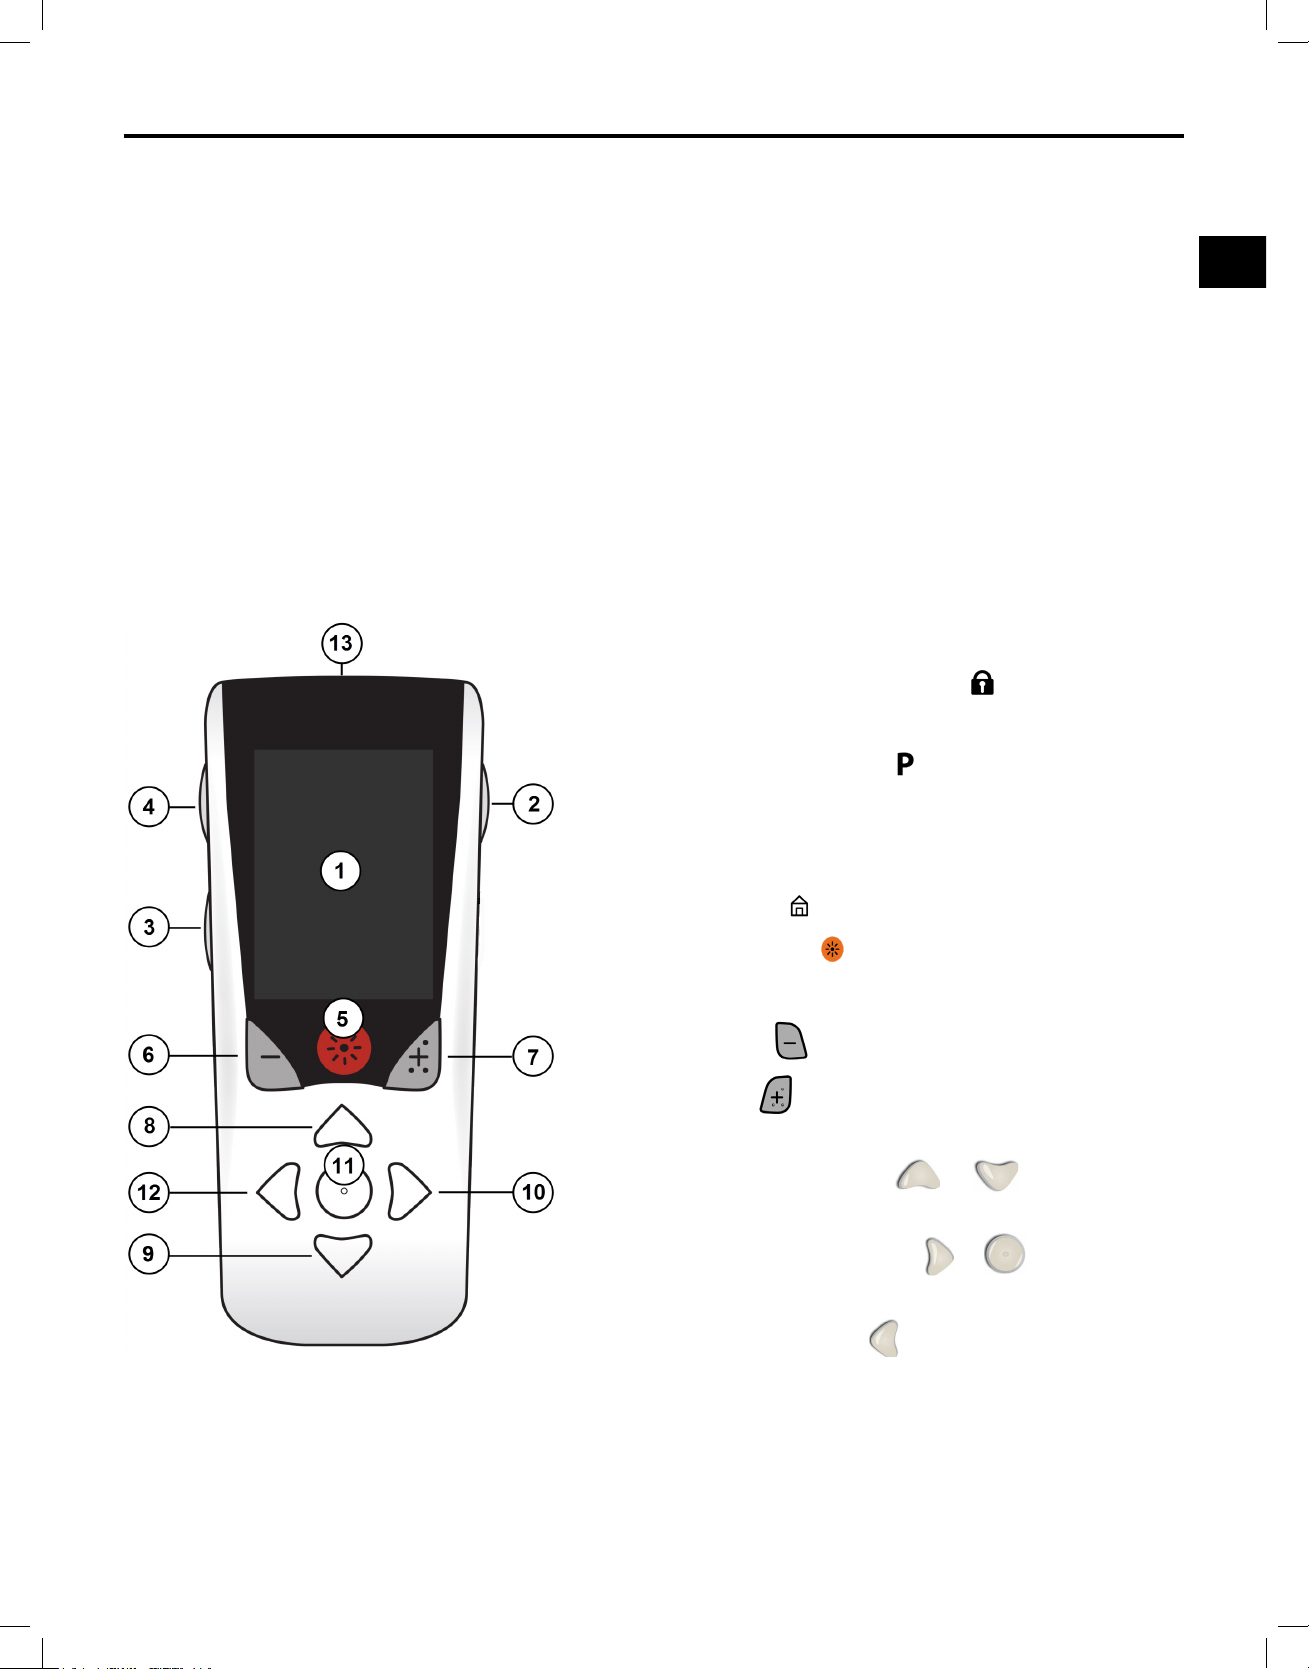
Remote Control Features
1. Screen: displays all menus, icons, and messages
2. Lock/Unlock Button
Control from sleep mode.
3. Programs Button
menu. Also acts as a shortcut (press and hold) to
prepare the Stimulator for connection to the CP.
: unlocks the Remote
: Displays the Programs
4. Home Button
5. Therapy Button
6. Minus Button
7. Plus Button
8, 9. Navigation Buttons
scrolling through a selected menu
10, 11. Navigation Buttons
selection
12. Navigation Button
screen
13. USB Port (not shown): allows recharging of the
Remote Control with the USB power supply.
: displays the Home screen.
: Turns Therapy ON or OFF
: Decreases selected parameter
: Increases selected parameter
and : allows
and : makes a
: returns to the previous
Clinician Remote Control Directions for Use
92395488-02 1 of 1077
Page 6

Clinician Remote Control Directions for Use
en
Basic Operation
The RC communicates with the Stimulator through a Bluetooth® Low Energy telemetry link. The RC
has a typical communication range of up to 3 meters (9.8 ft) with the Boston Scientic WaveWriter
Alpha™ or WaveWriter Alpha Prime Implantable Pulse Generator, and a typical communication range
of up to 6 meters (19.7 ft) with the compatible Boston Scientic External Trial Stimulator.
As an operator of this device, perform only the following service and maintenance tasks on the device:
• Recharging, see “Recharging the RC” on page 41
• Cleaning
Ensure that this device is not in use while performing service and maintenance tasks.
Unlocking the RC
The RC goes into idle (or sleep) mode when not in use. It can be reactivated by pressing the Lock/
Unlock
button on the right side of the RC.
Turning Therapy On/Off
Press the Therapy ON/OFF
button at any time to turn the Stimulator on or off.
Selecting Your Language/Screen Preference
The RC allows you to choose either an iconic screen or a text screen in one of the languages provided.
Refer to “Languages” on page 19 for additional instructions.
Note: Throughout this manual, the English text screen is shown paired with the corresponding iconic
screen.
Note: All features of the RC listed in this manual may not be available to you (for example, Schedules).
The settings displayed are dependent on the RC, Stimulator, and therapy congurations.
Clinician Remote Control Directions for Use
92395488-02 2 of 1077
Page 7
en
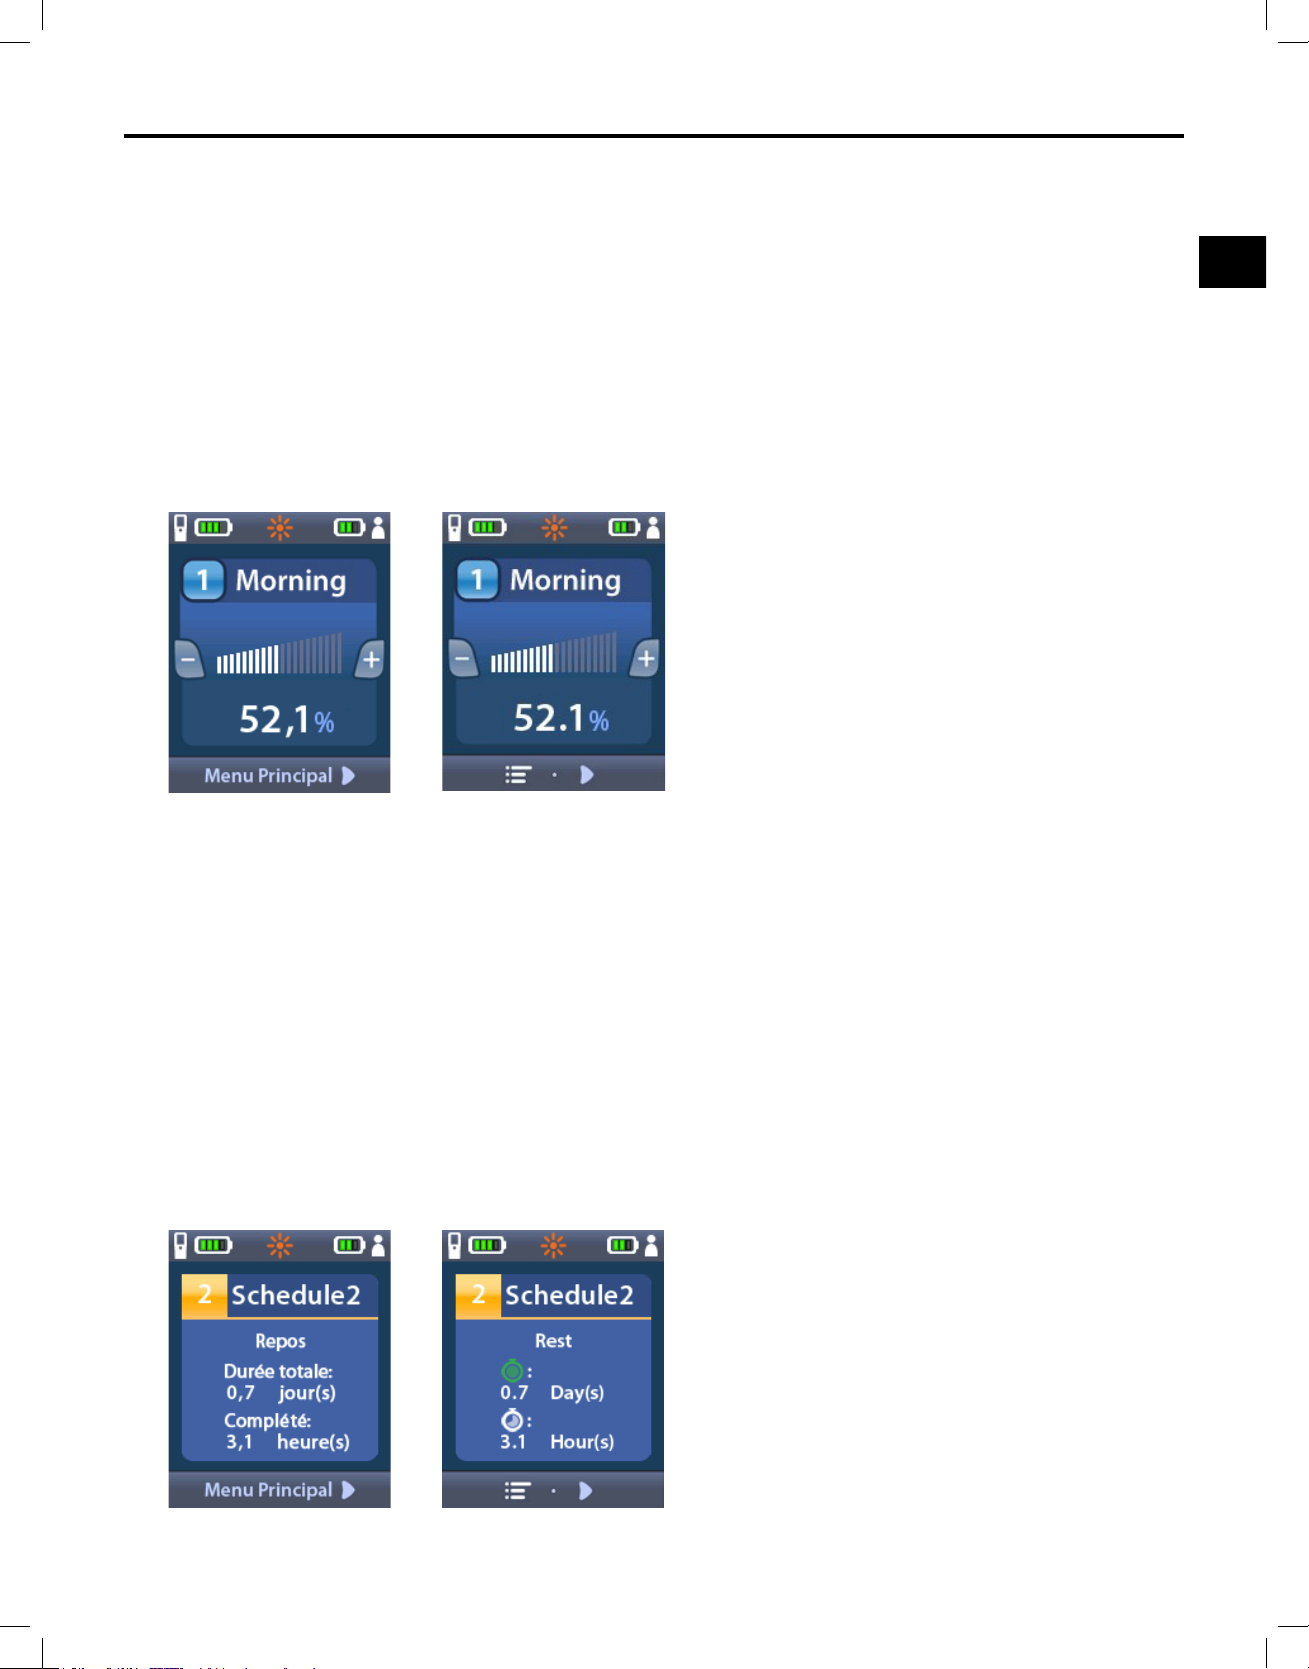
The Home Screen
Basic Operation
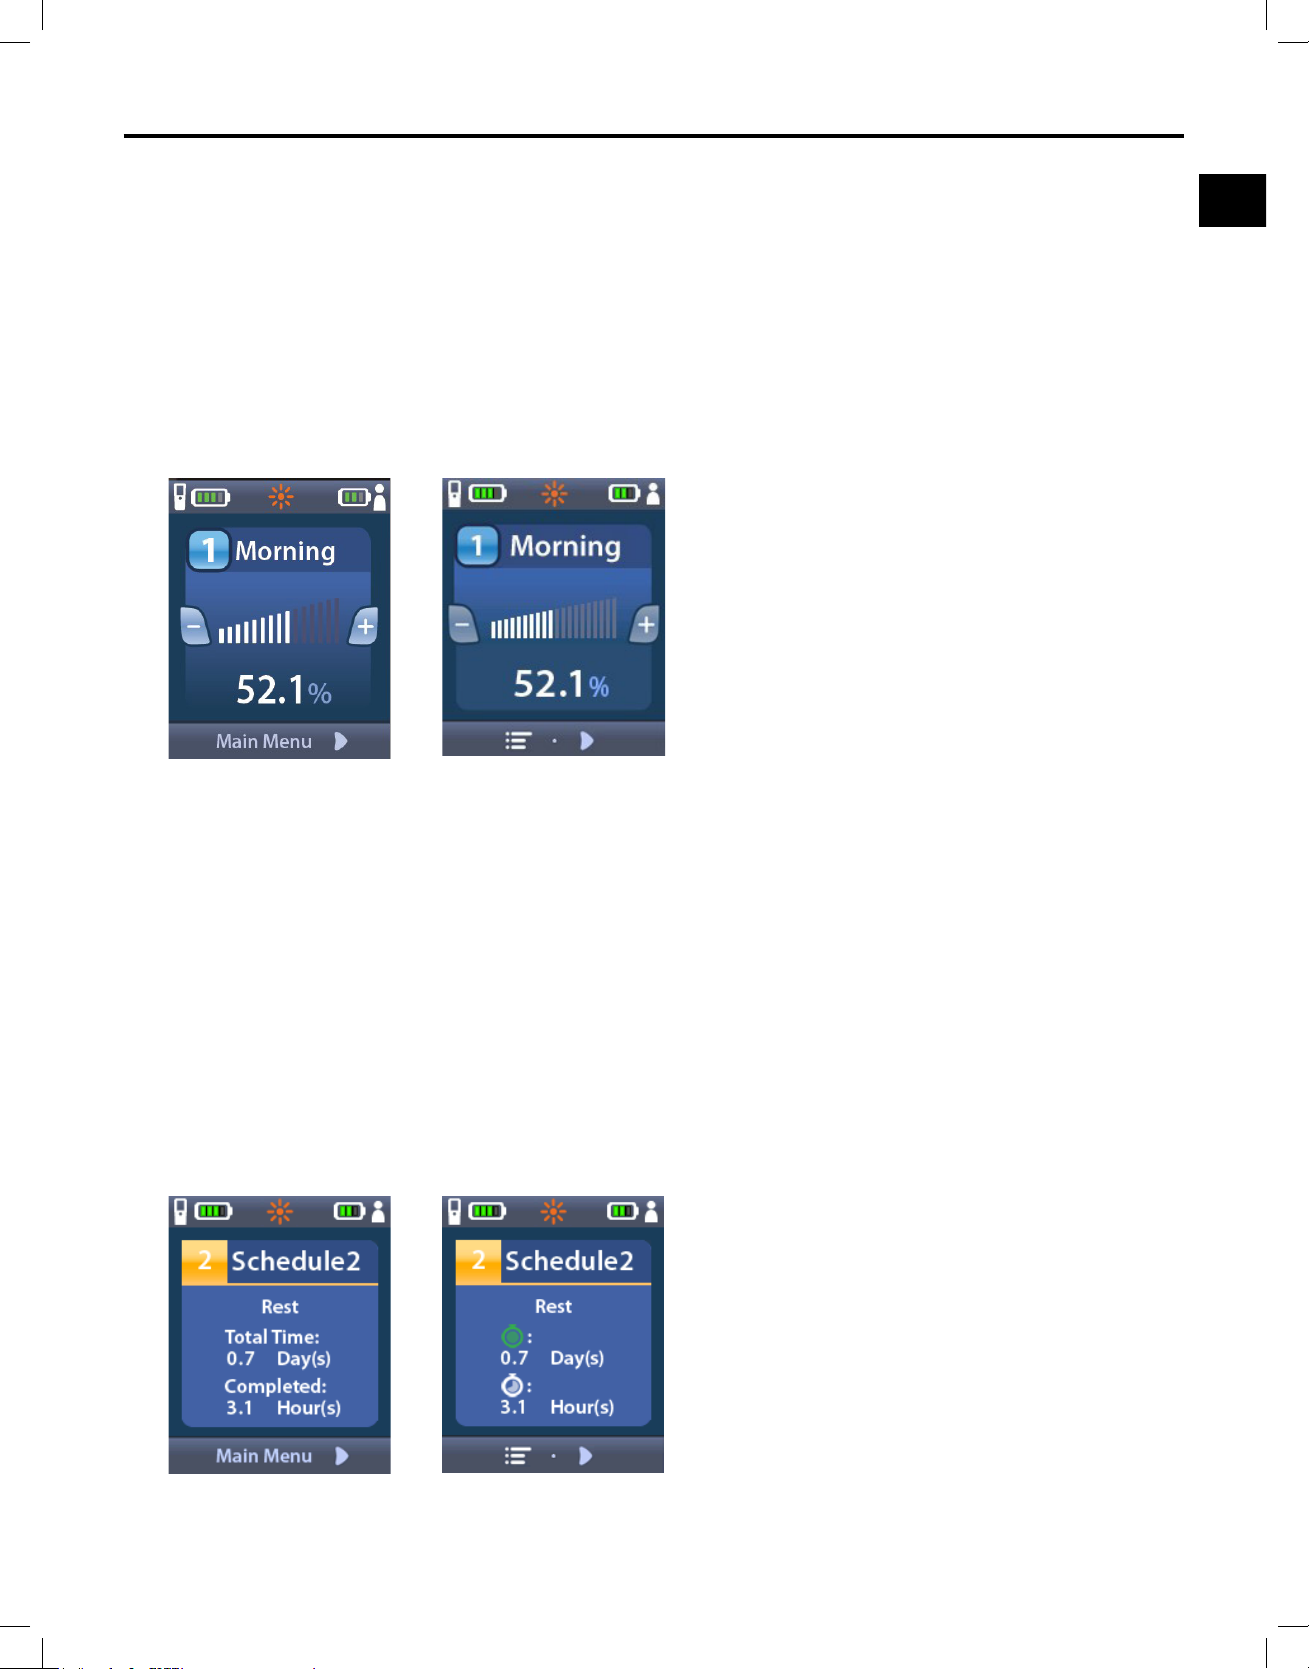
The Remote Control (RC) Home screen displays information for the specic Stimulator and stimulation
therapy programmed. If a program is running, the Home Screen will display the following information:
• Name of the Program
• Number of the Program
• Stimulation Amplitude (Level) selected, as both a graph and a percentage of the maximum available
limit
Example: Home Screens for Stimulators with Active Program
Note: When the RC connects to a non-rechargeable Stimulator, the RC will not display the Stimulator
battery icon in the upper right corner of the Home screen.
If a Schedule is running, the Home Screen will display the following information about the Schedule and
the Programs within the Schedule:
• Number of the Schedule
• Name of the Schedule
• Number of the active Program within the Schedule
• Name of the active Program within the Schedule
• Total Time that the active Program will run
• Time that elapsed for the active Program
Example: Home Screens for Stimulators with Active Schedules
Clinician Remote Control Directions for Use
92395488-02 3 of 1077
Page 8
Clinician Remote Control Directions for Use
en
Adjusting Stimulation Amplitude from the Home Screen
1. Press the Home
button on the left side of the RC to view the Home screen.
Note: When the RC connects to a non-rechargeable Stimulator, the RC will not display the
Stimulator battery icon in the upper right corner of the home screen.
2. Press the Minus
3. Press the Plus
button to decrease the level of stimulation.
button to increase the level of stimulation.
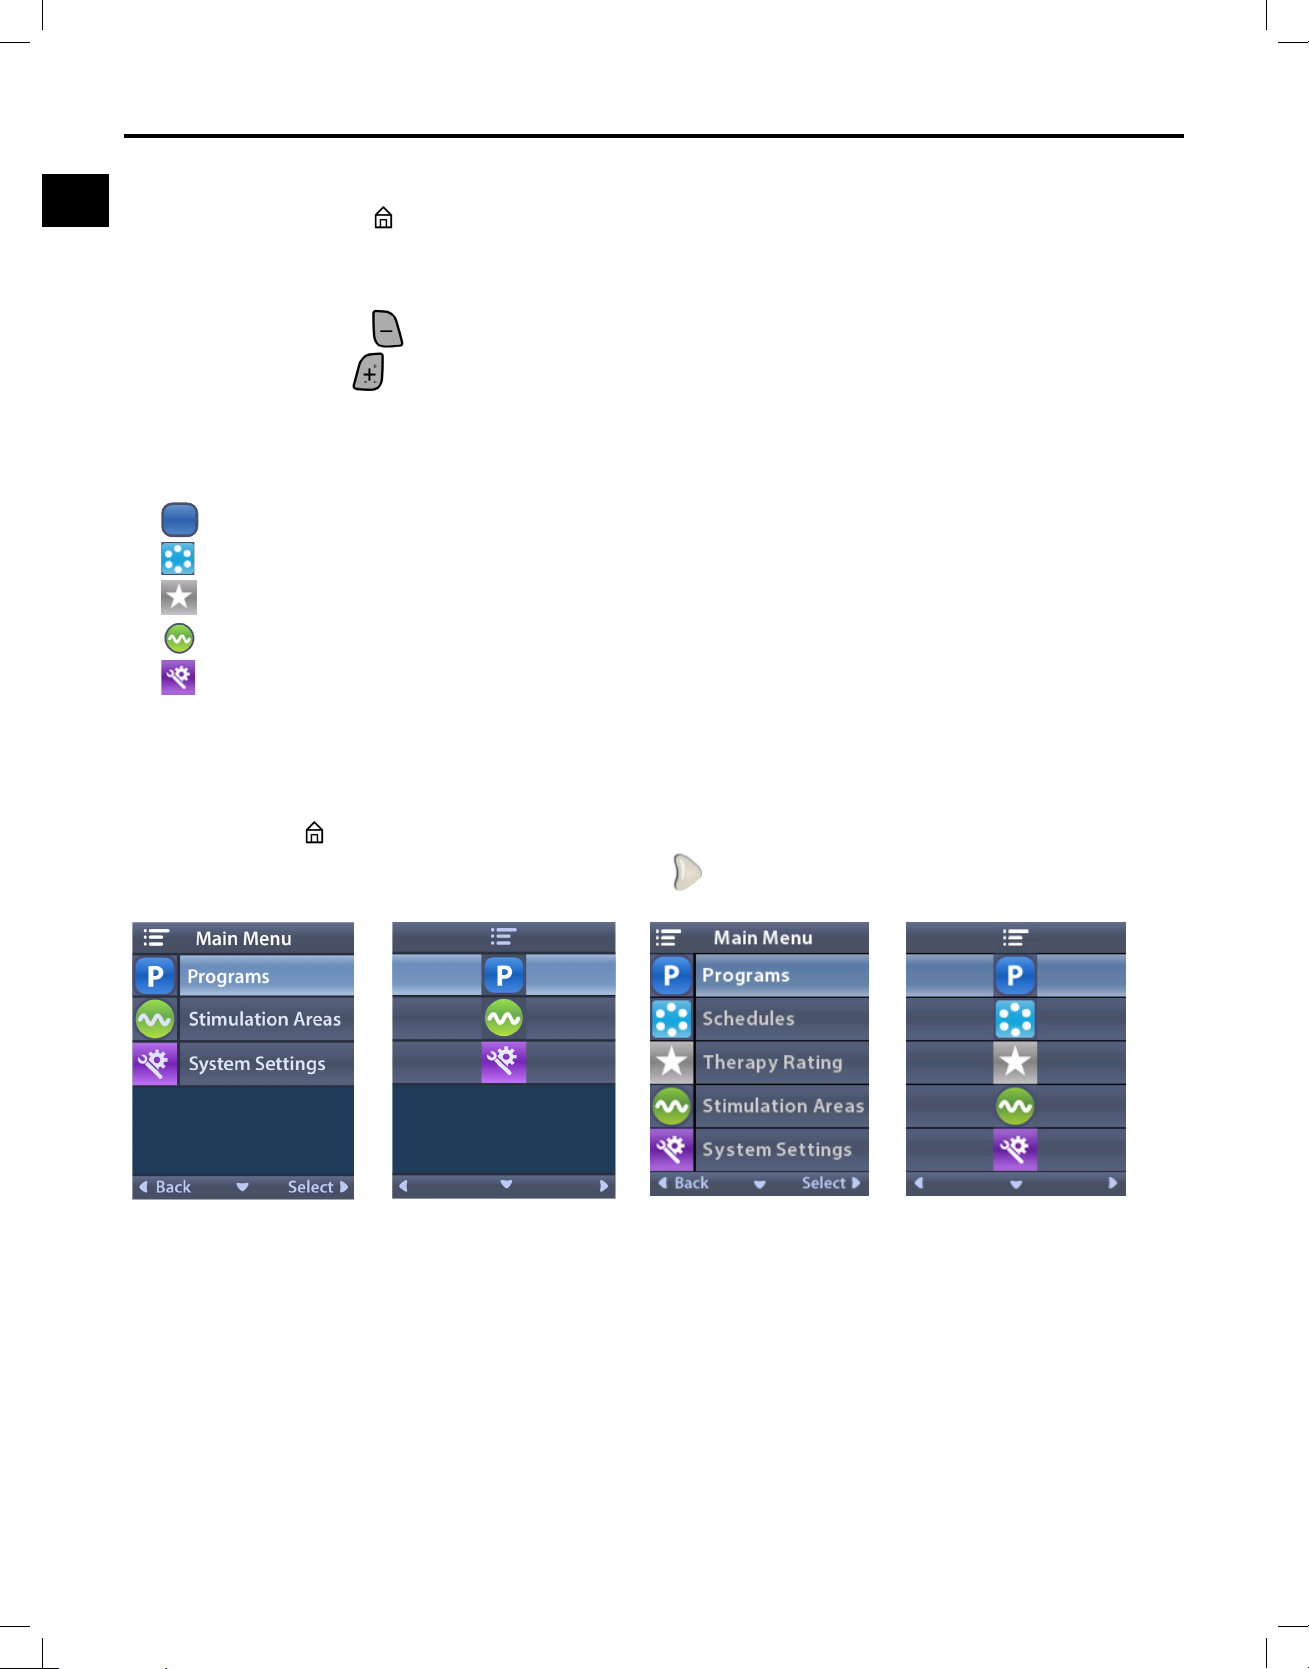
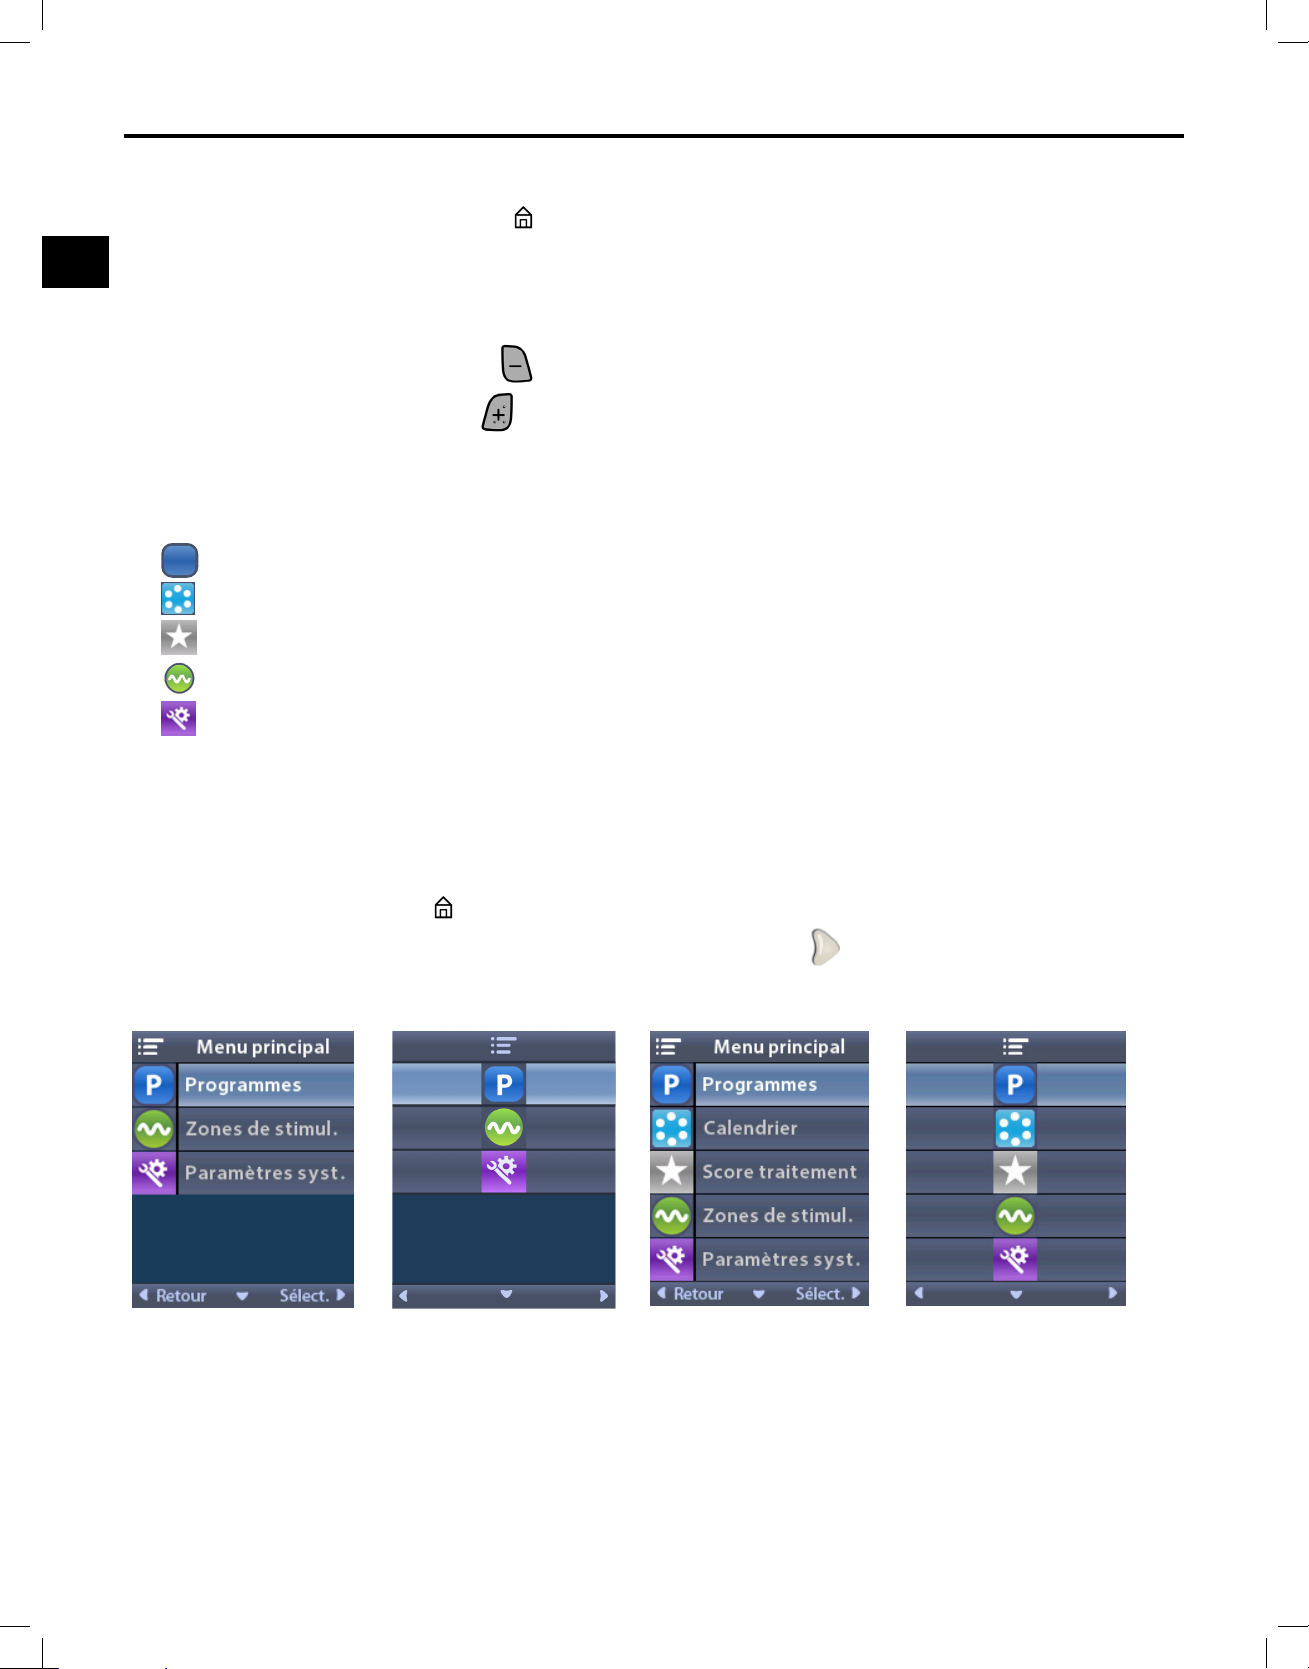
The Main Menu
The Main Menu provides access to the following options:
P
•
•
•
•
•
Accessing the Main Menu
Note: Depending on stimulator congurations, some selection may be unavailable.
Programs
Schedules
Therapy Rating
Stimulation Areas
System Settings
1. Press the
button on the left side of the RC to display the Home screen:
2. From the Home screen, press the Right Arrow
button to select the Main Menu.
Clinician Remote Control Directions for Use
92395488-02 4 of 1077
Page 9
en
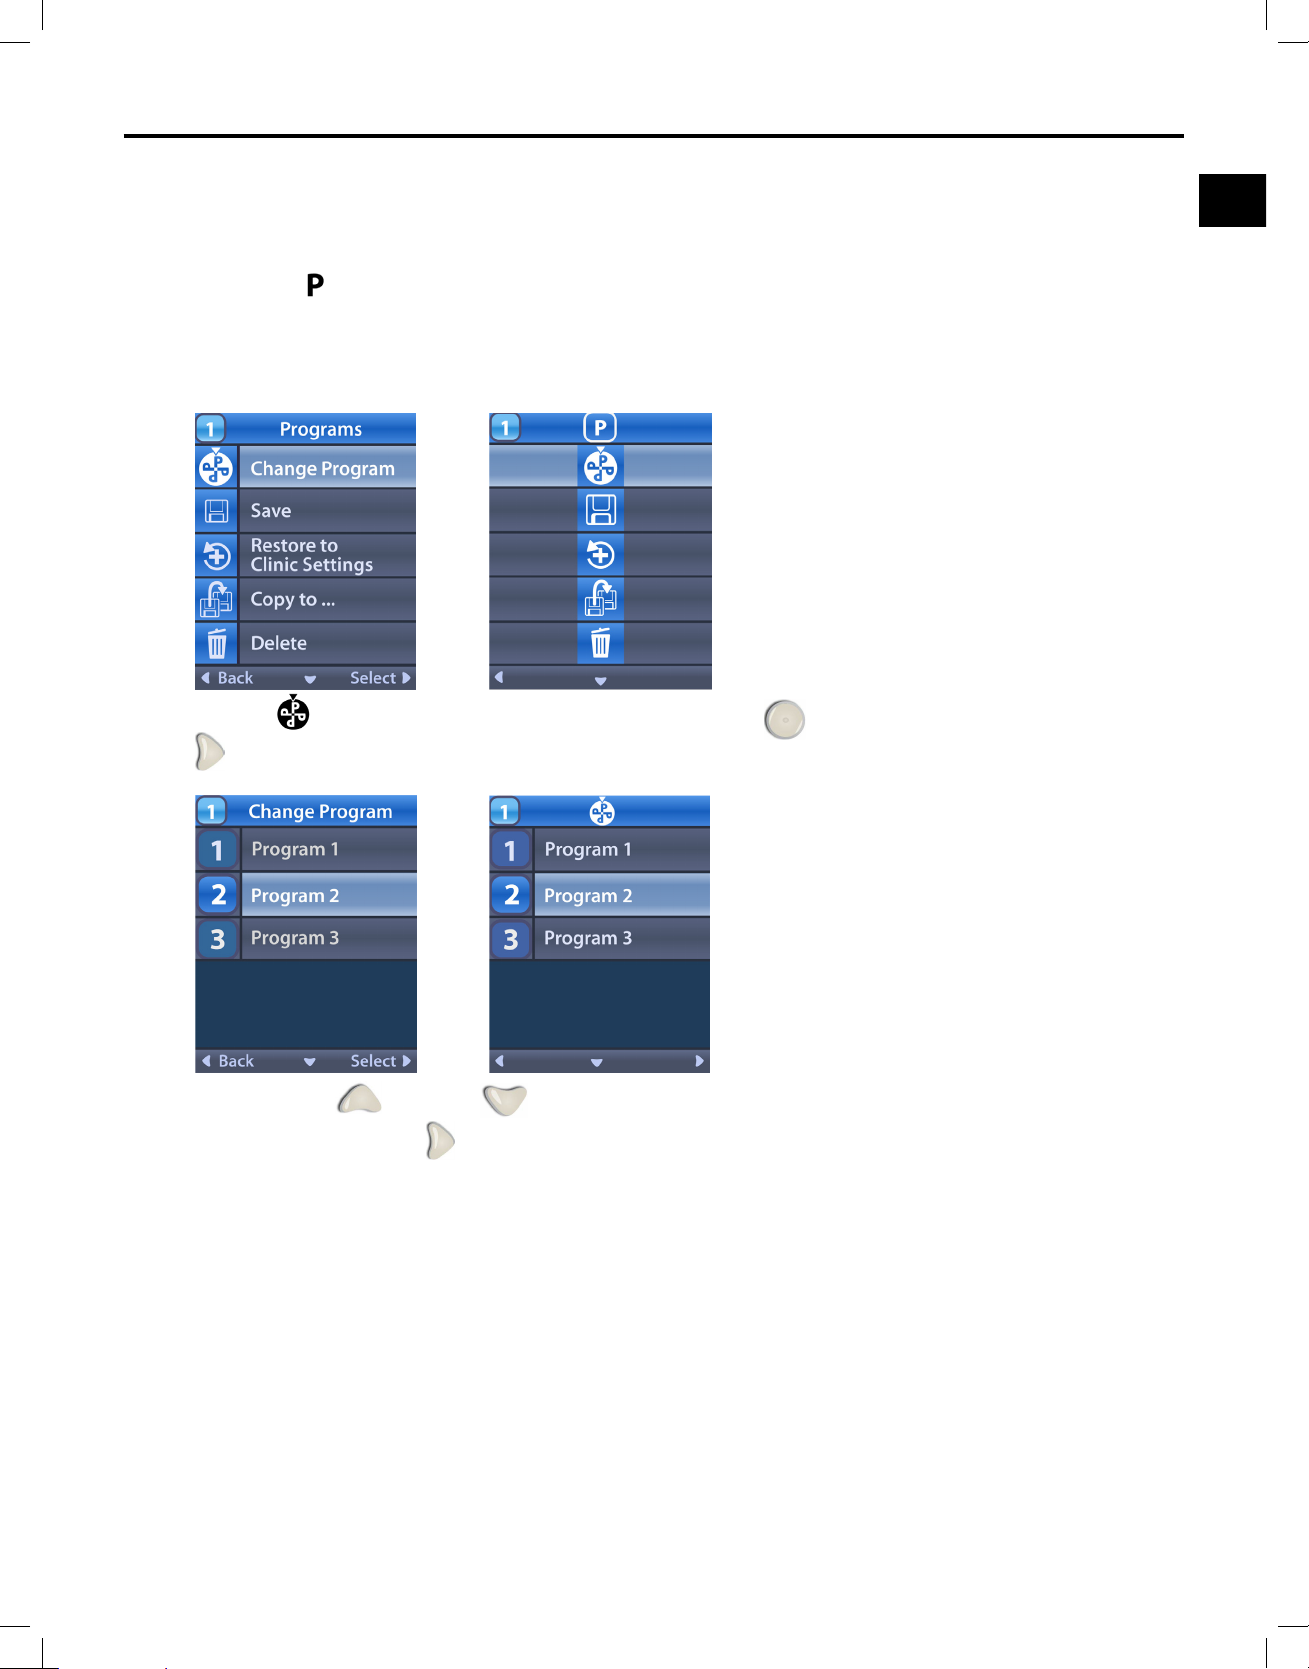
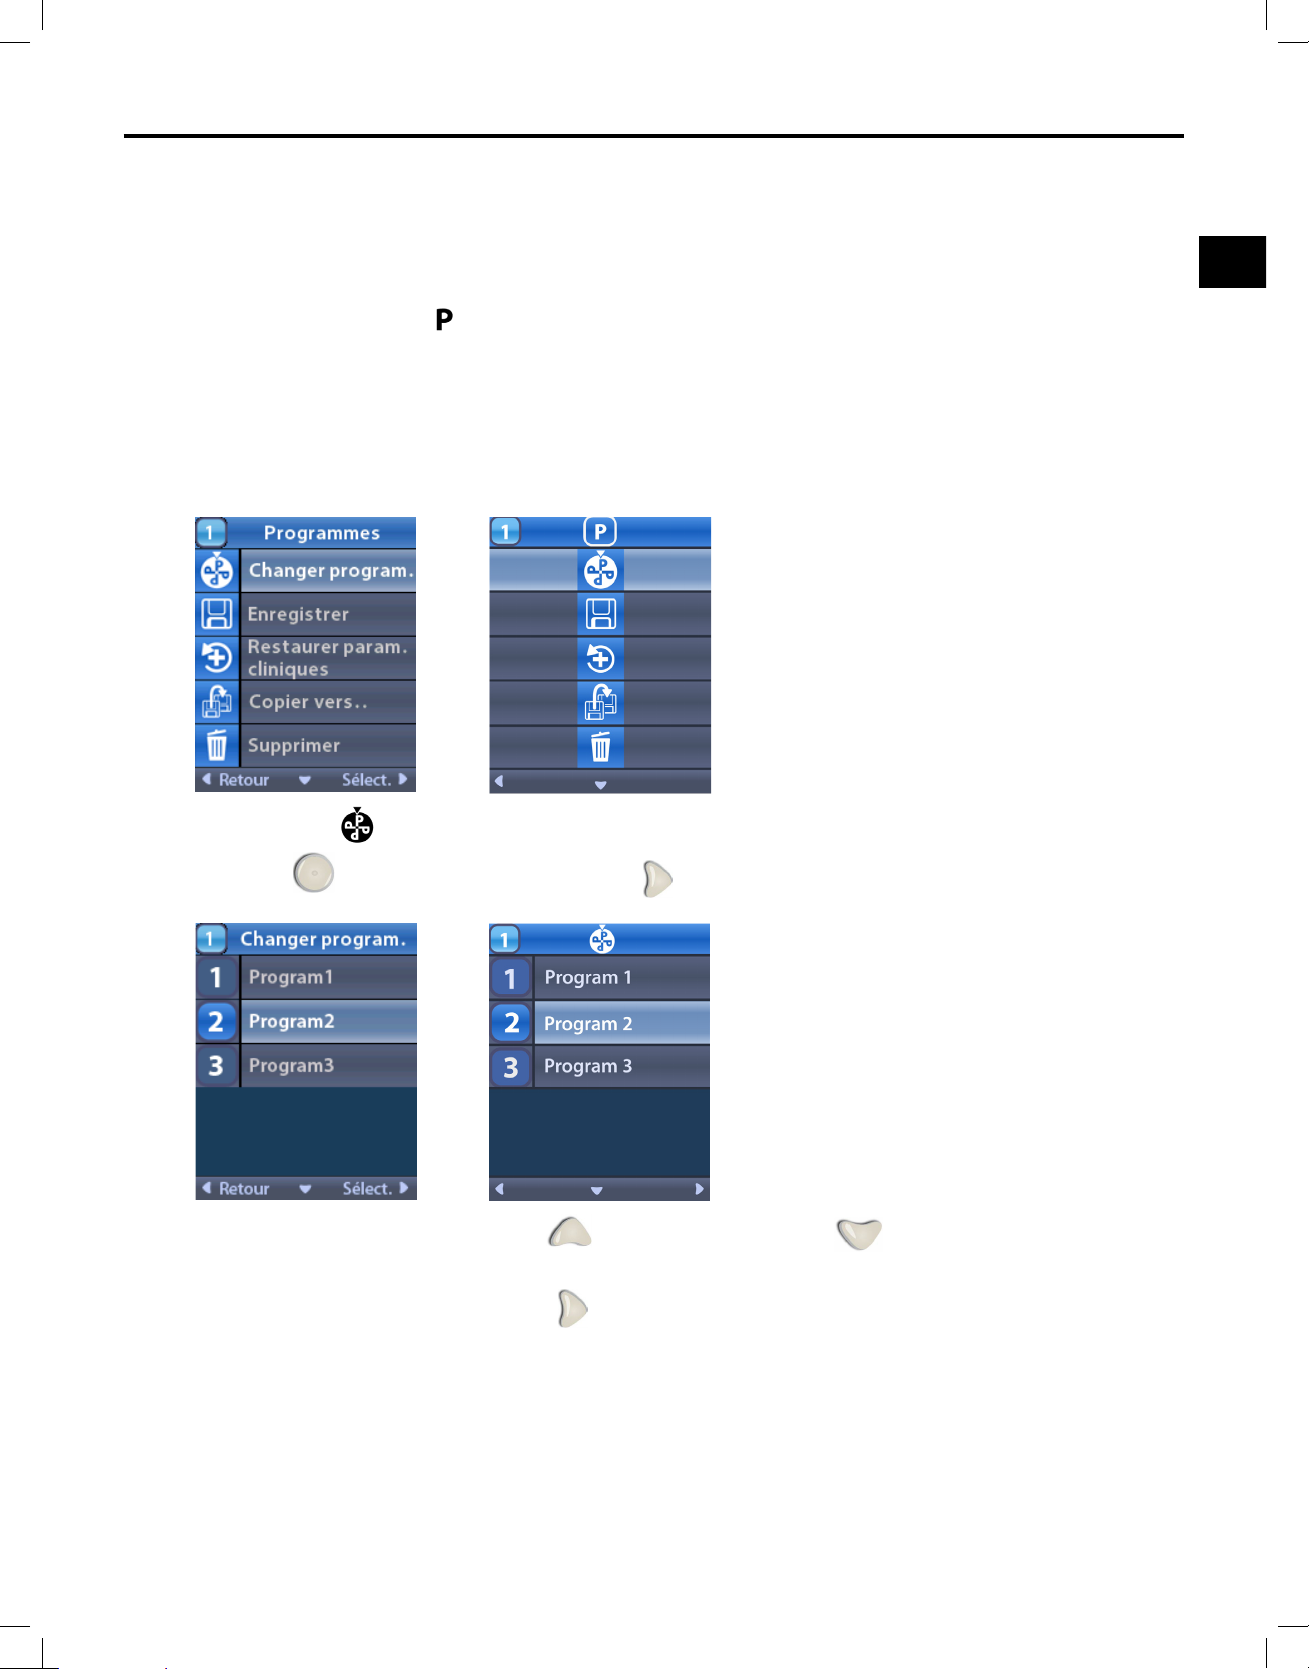
Program Selection and Activation
The Main Menu
The Programs Menu allows patients to change to another program, save modications to Programs,
restore programs to clinic settings, and delete programs.
1. Press the
button on the left side of the RC to display the Programs screen.
Note: You can also navigate to the Programs menu from the Main Menu. Refer to Accessing
the Main Menu for additional instructions.
2. Select Change Program by pressing the Selection button or pressing the Right Arrow
button.
3. Press the Up or Down Arrow buttons to navigate to the desired Program.
4. Press the Right Arrow
button to Select the Program.
Clinician Remote Control Directions for Use
92395488-02 5 of 1077
Page 10
Clinician Remote Control Directions for Use
en
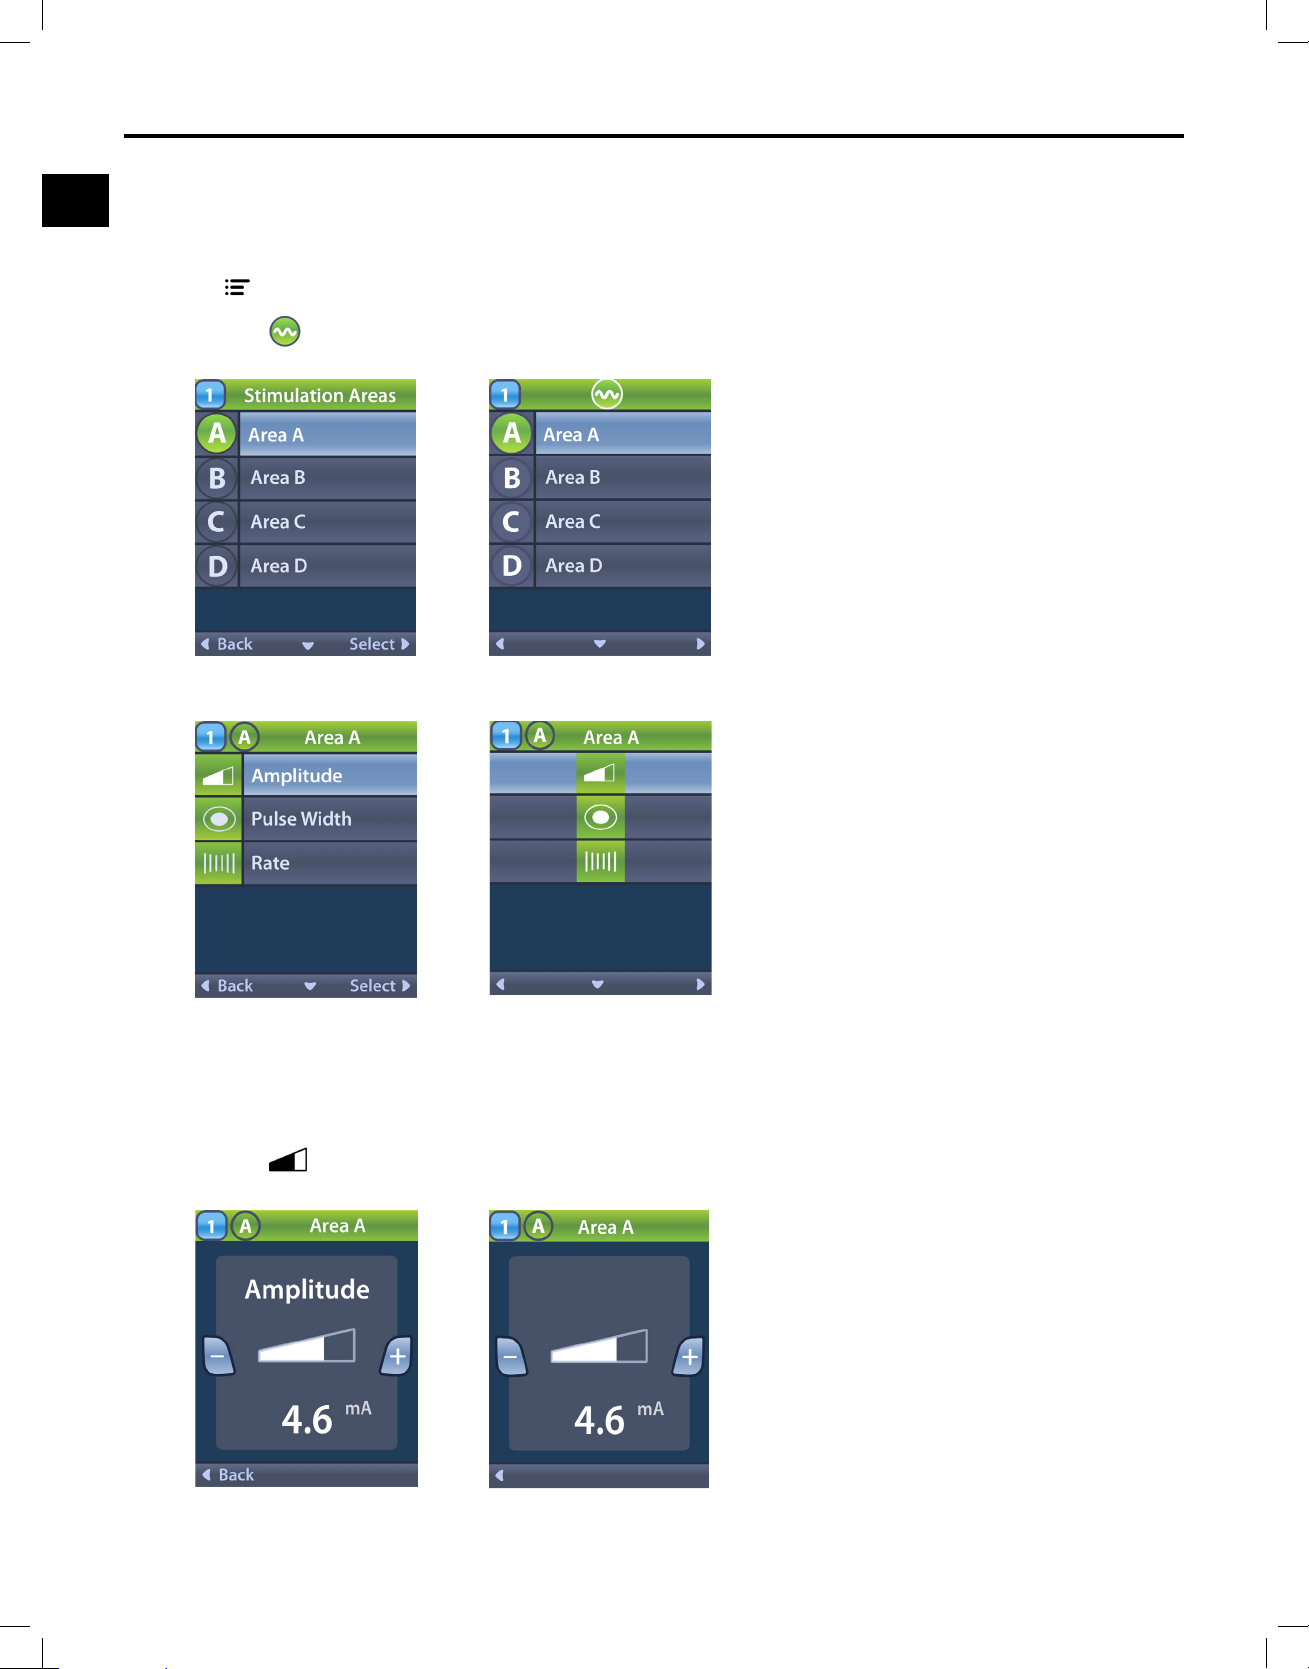
Selecting Stimulation Areas to Modify Programs
Each Program can include settings for up to four Stimulation Areas. Each Stimulation Area is identied
by a letter and a name. These Stimulation Areas control Amplitude, Pulse Width, and Rate.
From the
1. Select
Select the desired area. The Area screen displays with the following parameters options:
Main Menu:
Stimulation Areas. The Stimulation Areas screen displays.
2. Select the parameter that you would like to modify.
Amplitude
From the Area screen:
1. Select
Clinician Remote Control Directions for Use
92395488-02 6 of 1077
Amplitude.
Page 11
en
2. Press the Minus button to decrease the Amplitude (level) of stimulation.
3. Press the Plus
button to increase the Amplitude (level) of stimulation.
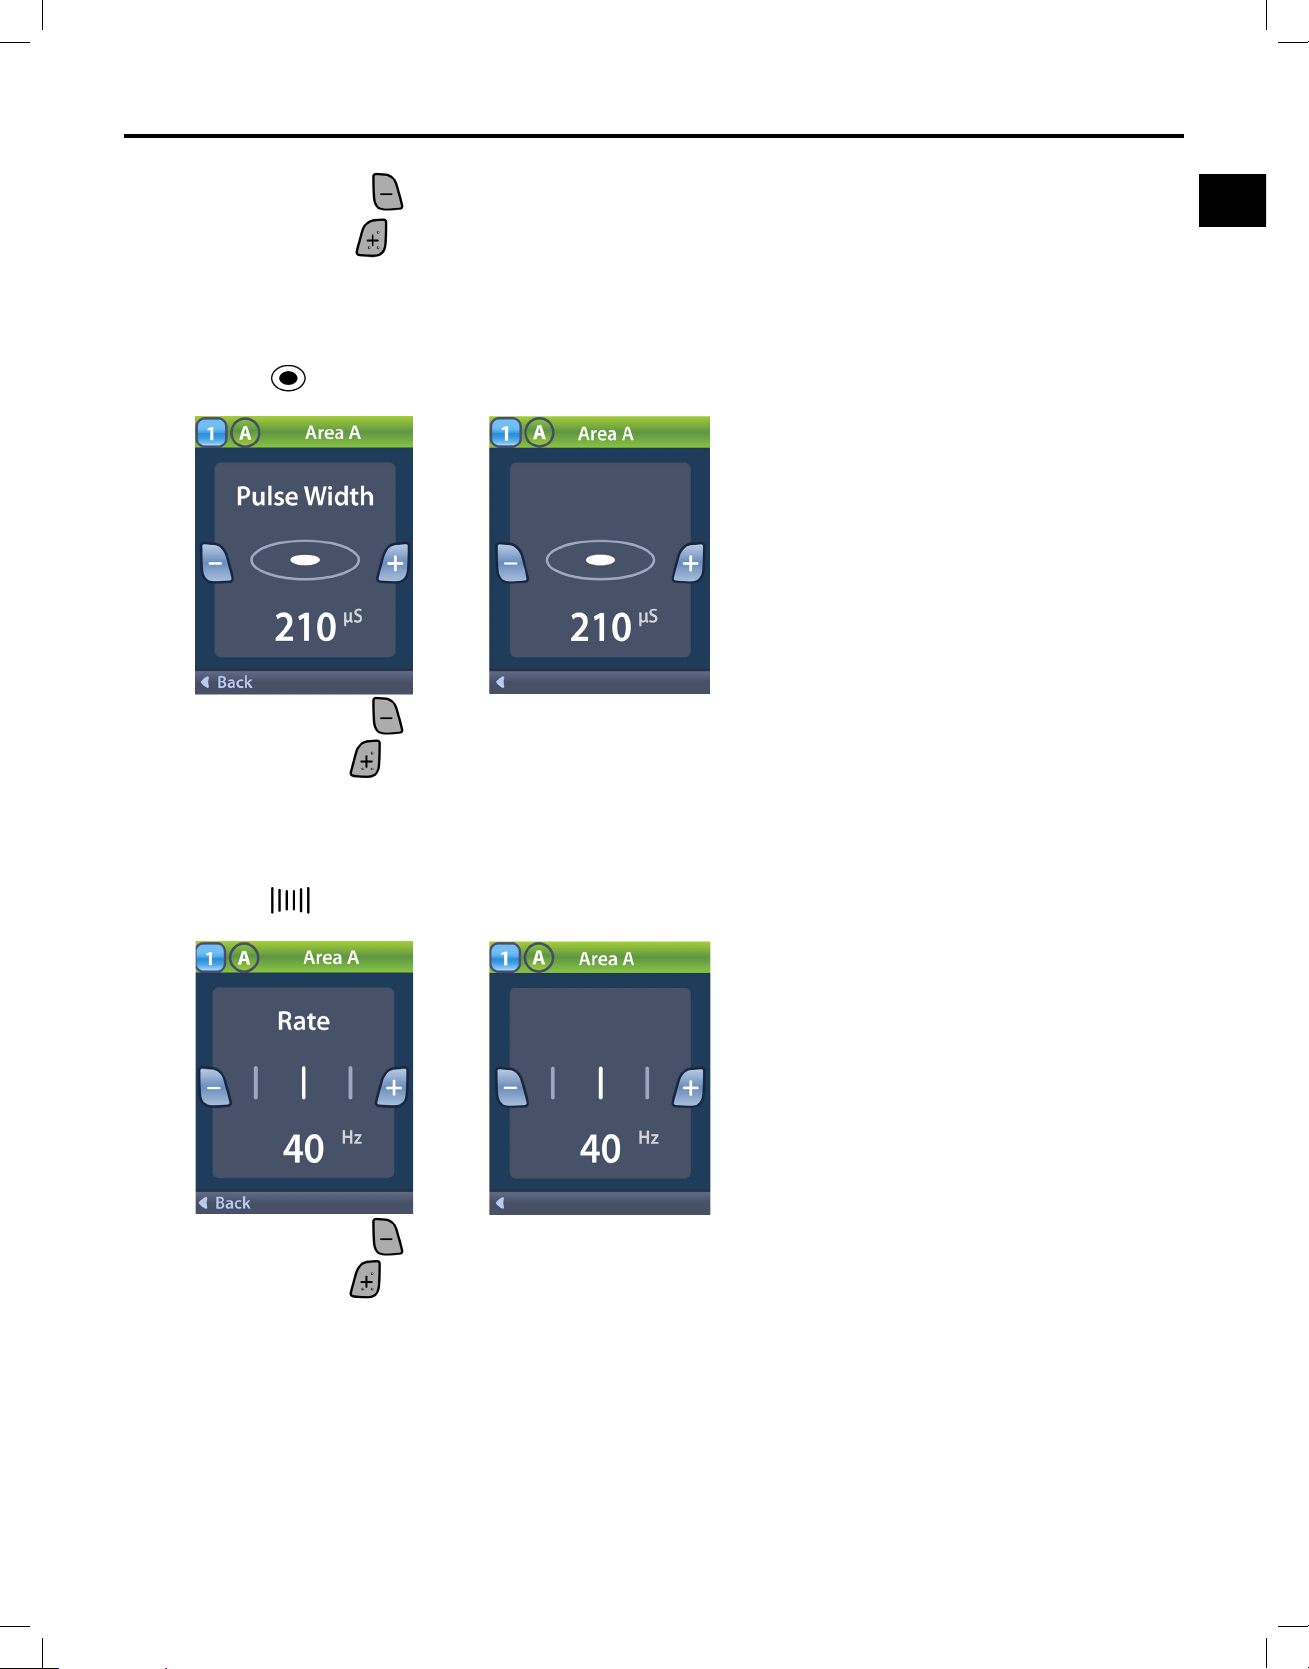
Pulse Width
From the Area screen:
The Main Menu
1. Select
Pulse Width.
2. Press the Minus button to decrease the Pulse Width.
3. Press the Plus
button to increase the Pulse Width.
Rate
From the Area screen:
1. Select
Rate.
2. Press the Minus button to decrease the Rate.
3. Press the Plus
button to increase the Rate.
Clinician Remote Control Directions for Use
92395488-02 7 of 1077
Page 12
Clinician Remote Control Directions for Use
en
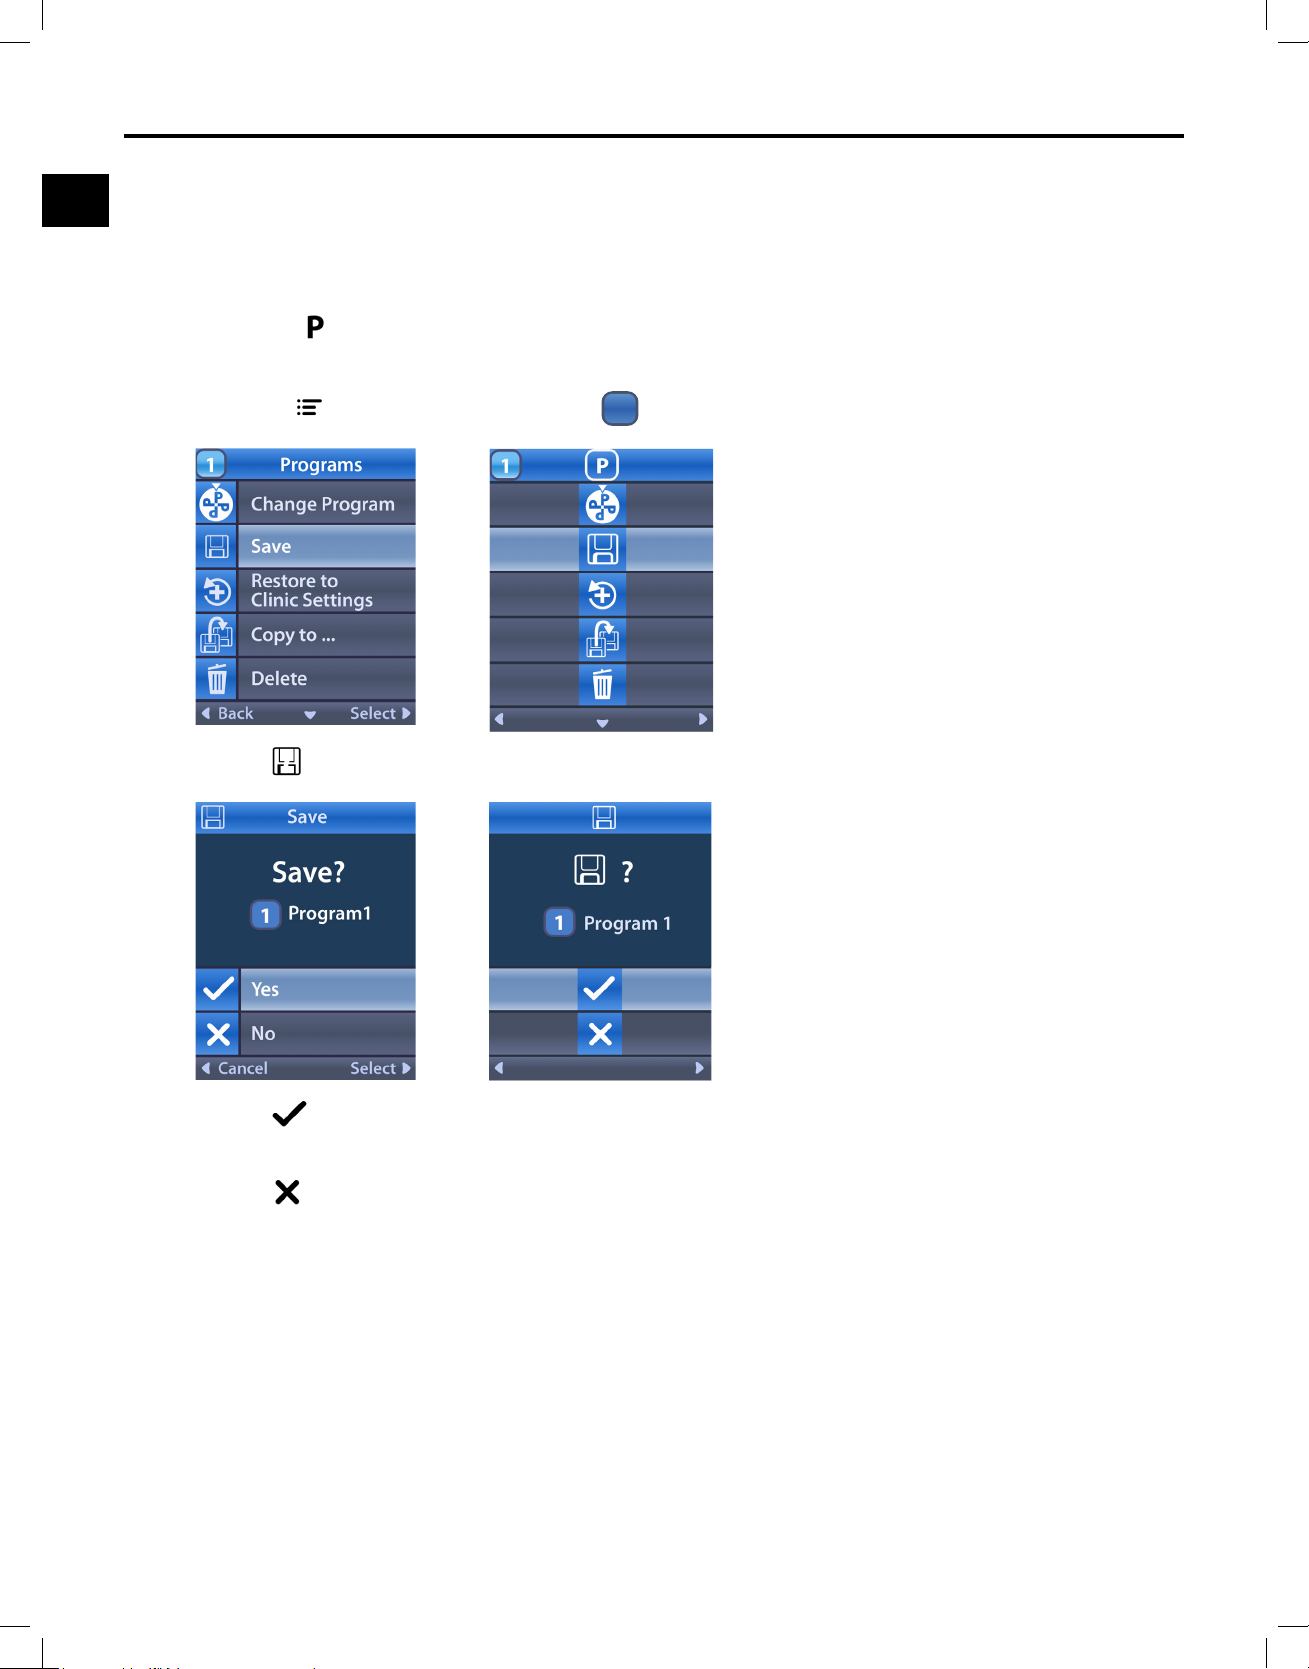
Saving Modied Programs
If the stimulation amplitude, pulse width, or rate have been changed, the new settings can be saved as
the default stimulation for that Program. The new settings will remain until a new change is saved or the
Program is restored to its Clinic Settings. Refer to Restoring Programs for additional information.
1. Press the
button the left side of the RC.
or
From the
Main Menu screen, select P Programs
2. Select Save. The Save ? screen displays.
3. Select Yes to save.
or
Select
Clinician Remote Control Directions for Use
92395488-02 8 of 1077
No to discard.
Page 13
en
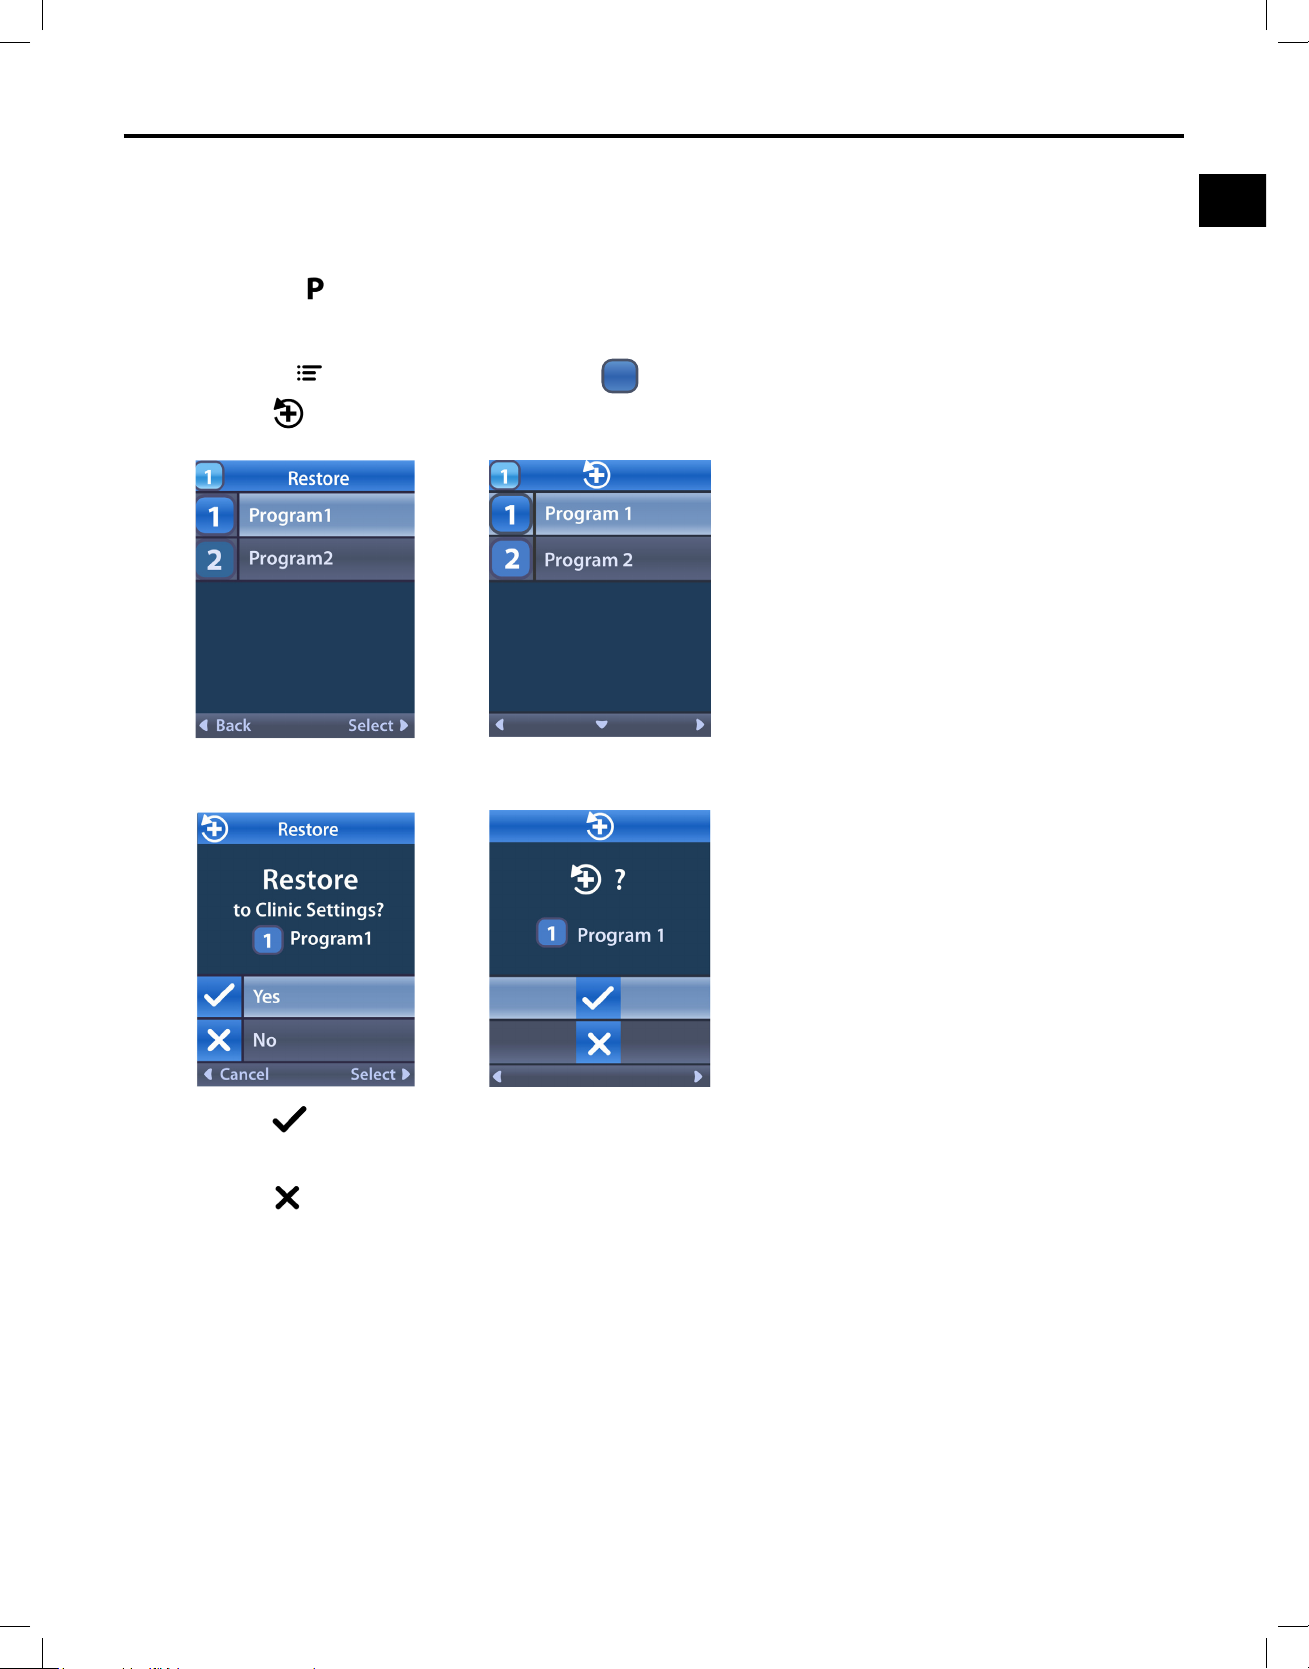
Restoring Programs
The Main Menu
Restoring Programs removes saved changes to a Program and resets the Program to the original
Clinic Settings.
1. Press the
button on the left side of the RC.
or
From the
2. Select
Main Menu screen, select P Programs.
Restore to Clinic Settings. The Restore screen displays.
3. Select the Program you want to restore. The Restore conrmation screen displays.
4. Select Yes to restore the Program to the Clinic Settings.
or
Select
No to cancel the action.
Clinician Remote Control Directions for Use
92395488-02 9 of 1077
Page 14
Clinician Remote Control Directions for Use
en
Copy to...
3
Program3
Yes
No
Overwrite?
SelectBack
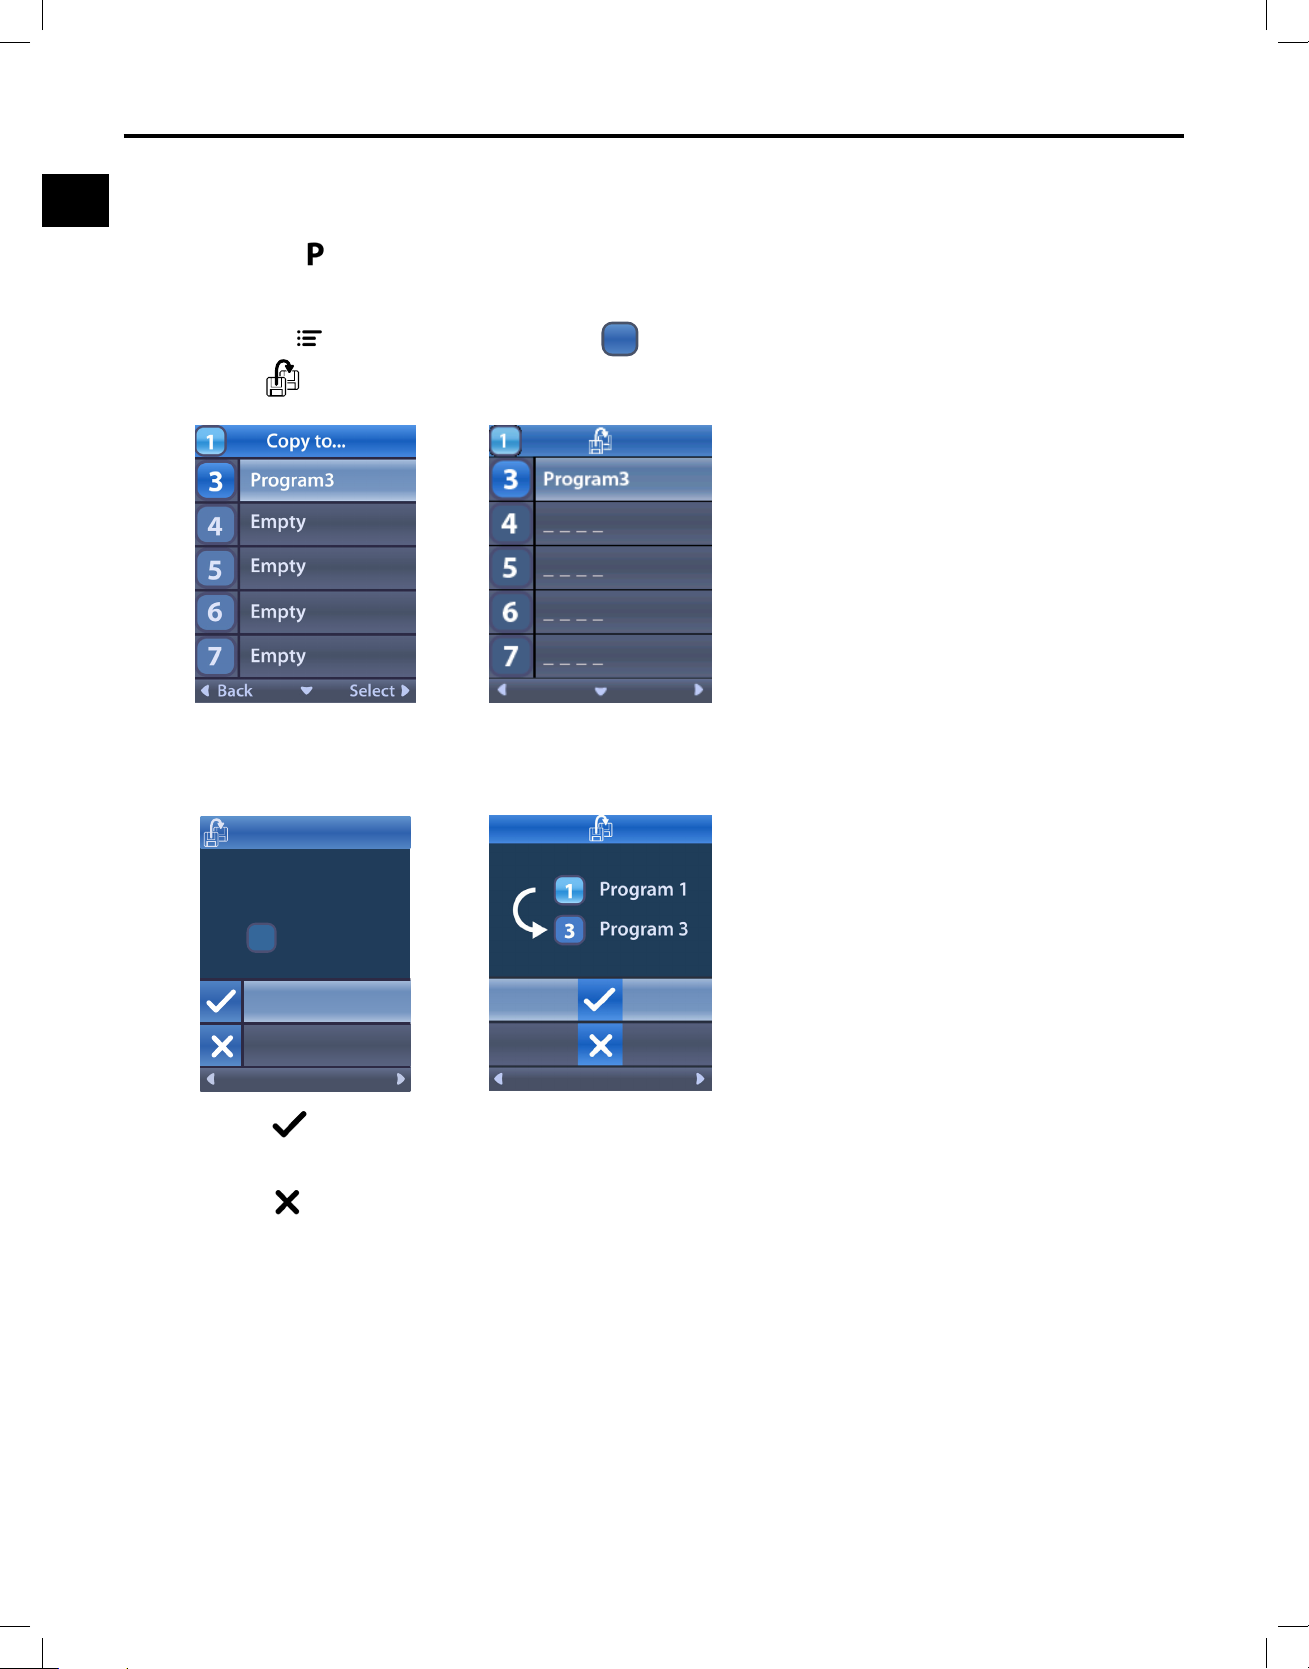
Copying Programs
You can copy an existing Program to a new Program.
1. Press the
or
button on the left side of the RC.
From the
2. Select
Main Menu screen, select P Programs.
Copy to... .
3. Select the Program that you want to copy the current Program to.
4. The Overwrite? screen displays if you are not copying to an empty slot.
Clinician Remote Control Directions for Use
92395488-02 10 of 1077
5. Select Yes to Overwrite the Program.
or
Select
No to cancel the action.
The Copy to... conrmation screen displays.
Page 15
en
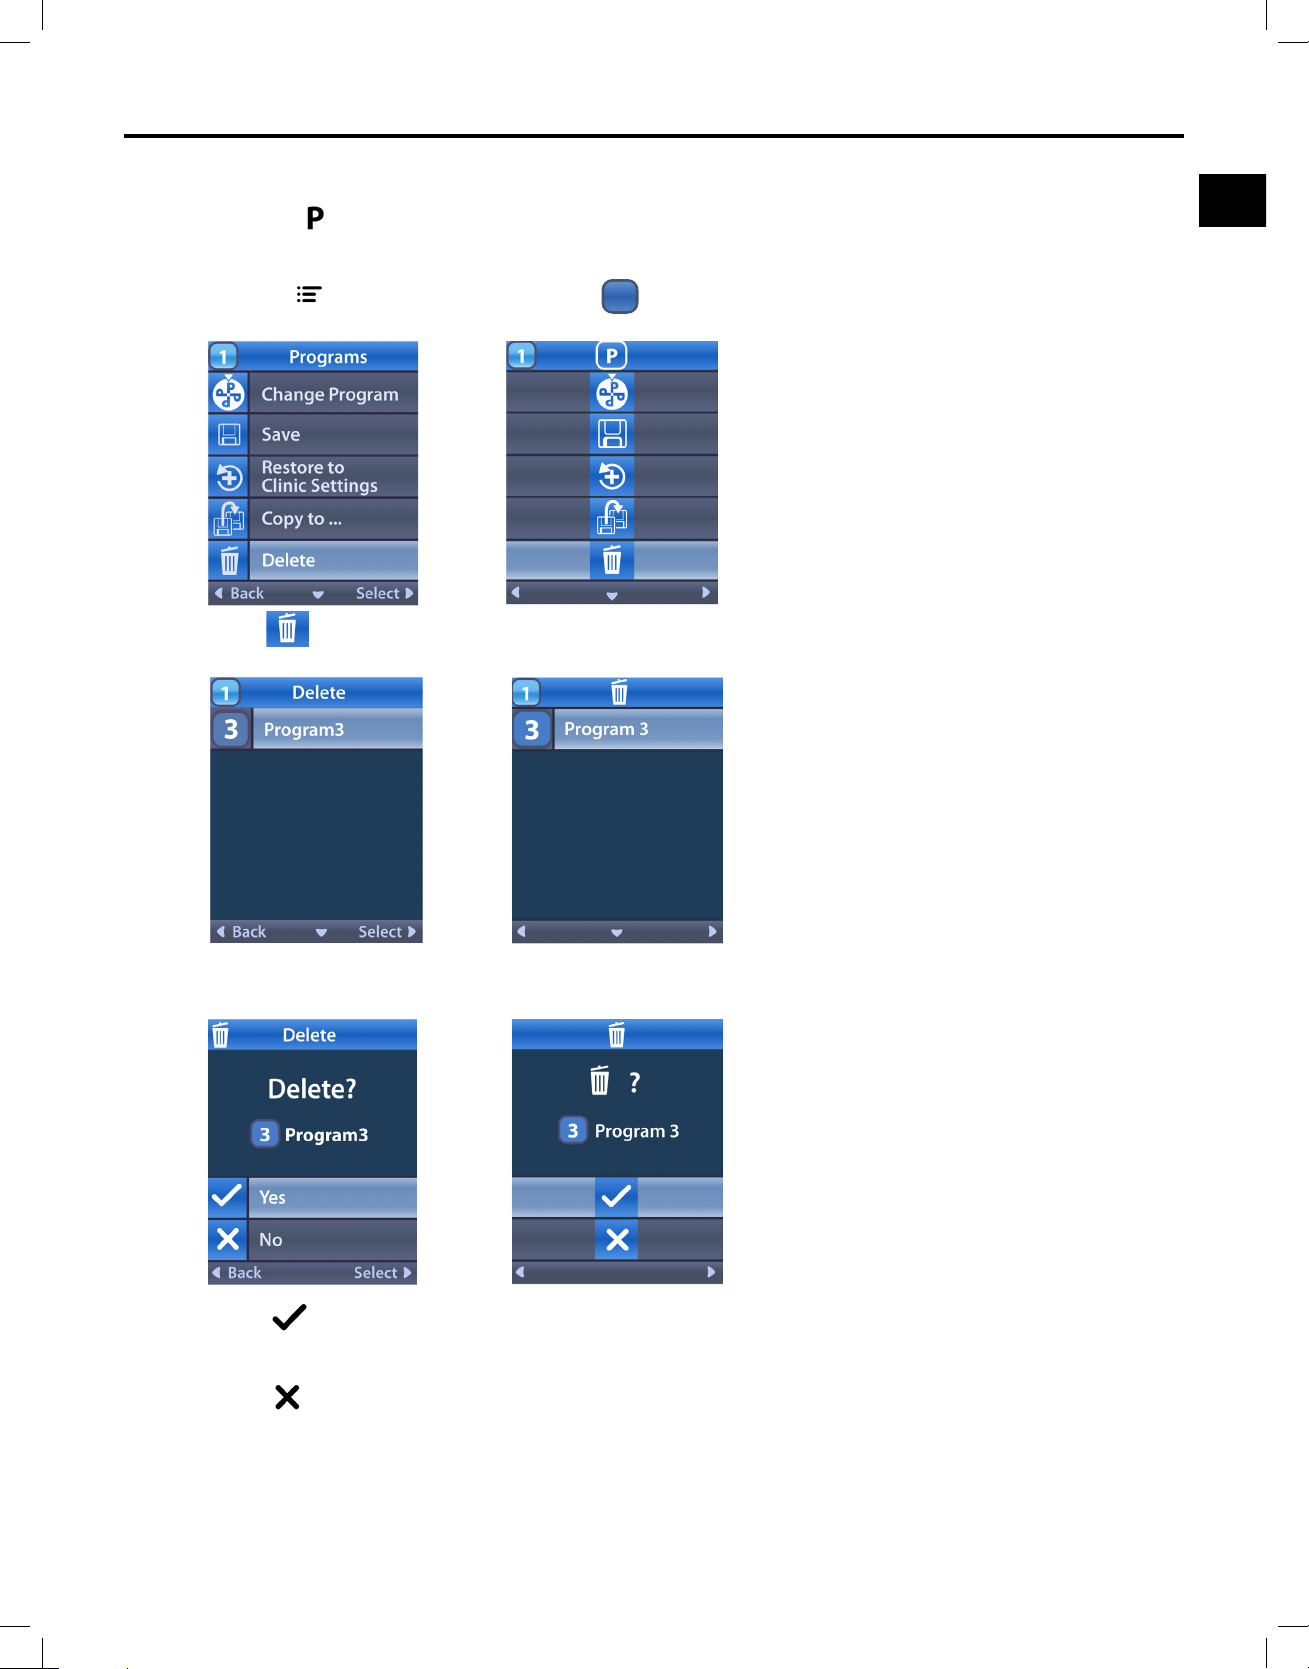
Deleting Programs
The Main Menu
1. Press the
button on the left side of the RC.
or
From the
Main Menu screen, select P Programs.
2. Select Delete.
3. Select the Program to delete.
4. Select Yes to Delete the selected program.
or
Select
No to cancel the action.
Clinician Remote Control Directions for Use
92395488-02 11 of 1077
Page 16
Clinician Remote Control Directions for Use
en
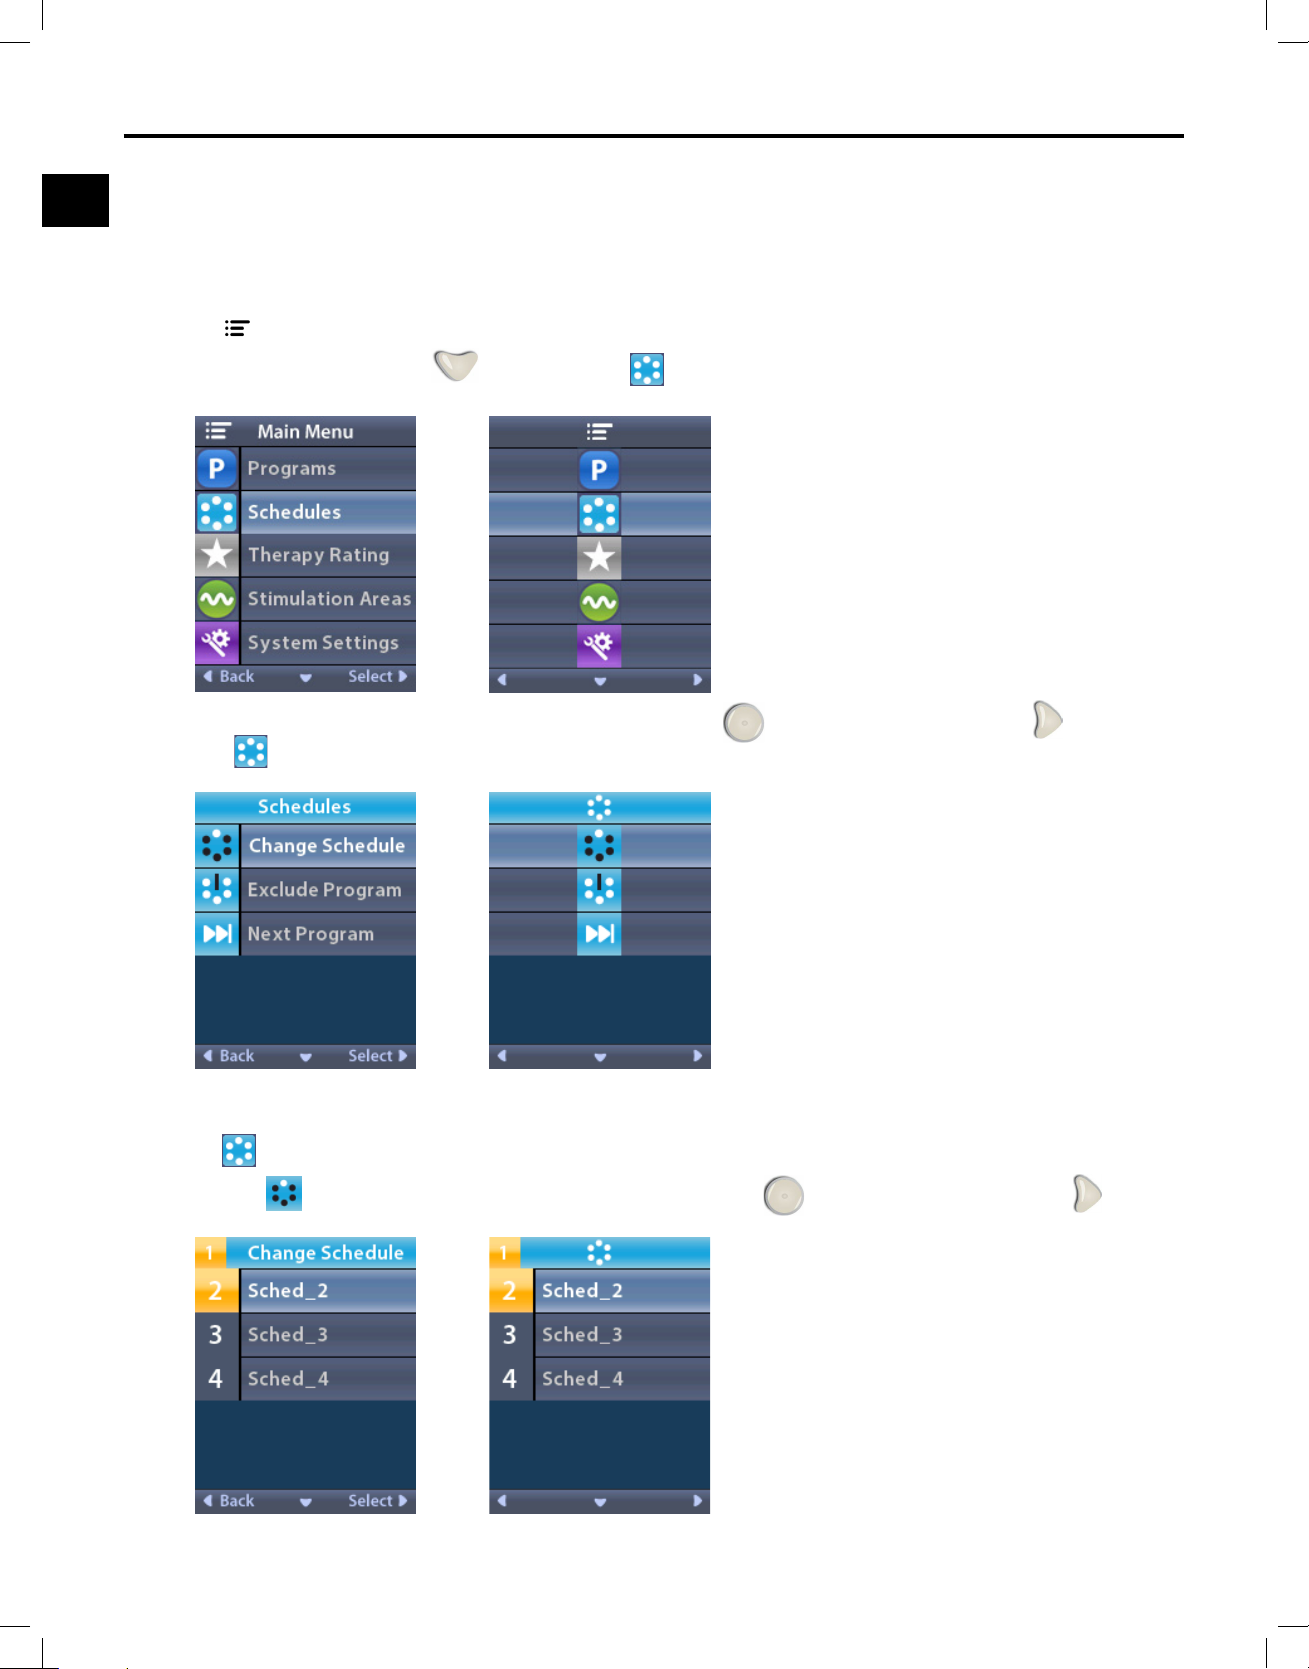
Managing Schedules
Schedules allows patients to select and change to a different schedule, exclude programs from a
schedule, or advance to the next program in a schedule.
Note: Depending on the stimulator congurations, some selections may be unavailable.
From the
1. Press the Down Arrow
Main Menu:
to navigate to Schedules.
2. Once Schedules is highlighted, press the Selection button or the Right Arrow to access
the
Schedules Menu screen.
Selecting or Changing to a Different Schedule
From the
1. Select
Clinician Remote Control Directions for Use
92395488-02 12 of 1077
Schedules Menu:
Change Schedule by pressing the Selection button or the Right Arrow button.
Page 17
The Main Menu
en
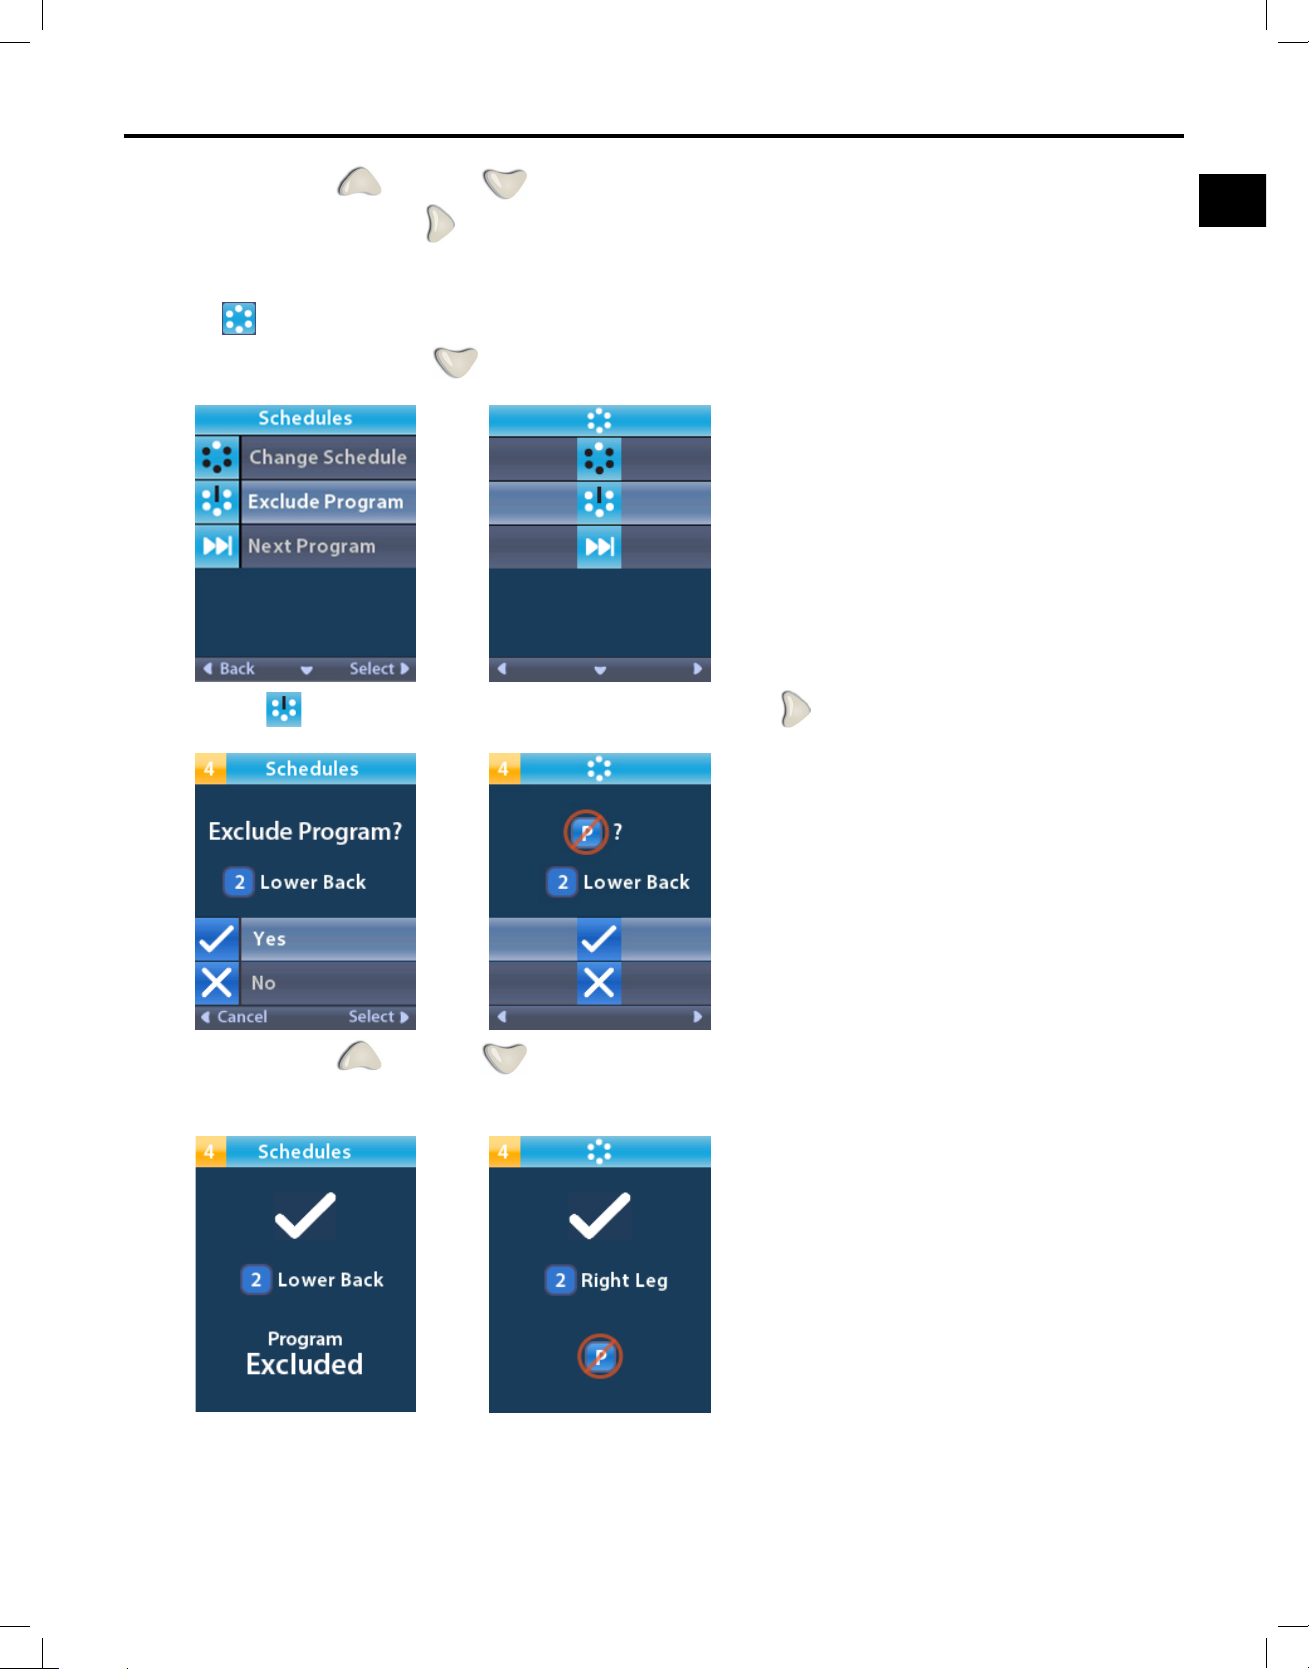
2. Press the Up or Down Arrow buttons to navigate to the desired Schedule.
3. Press the Right Arrow
button to Select the Schedule.
Exclude Program from a Schedule
From the
1. Press the Down Arrow
Schedules Main Menu:
button to navigate to Exclude Program.
2. Select Exclude Program by pressing the Right Arrow
3. Press the Up or Down Arrow buttons to select Yes or No at the prompt.
4. If Yes is selected, the Program Excluded screen displays.
Clinician Remote Control Directions for Use
92395488-02 13 of 1077
Page 18
Clinician Remote Control Directions for Use
en
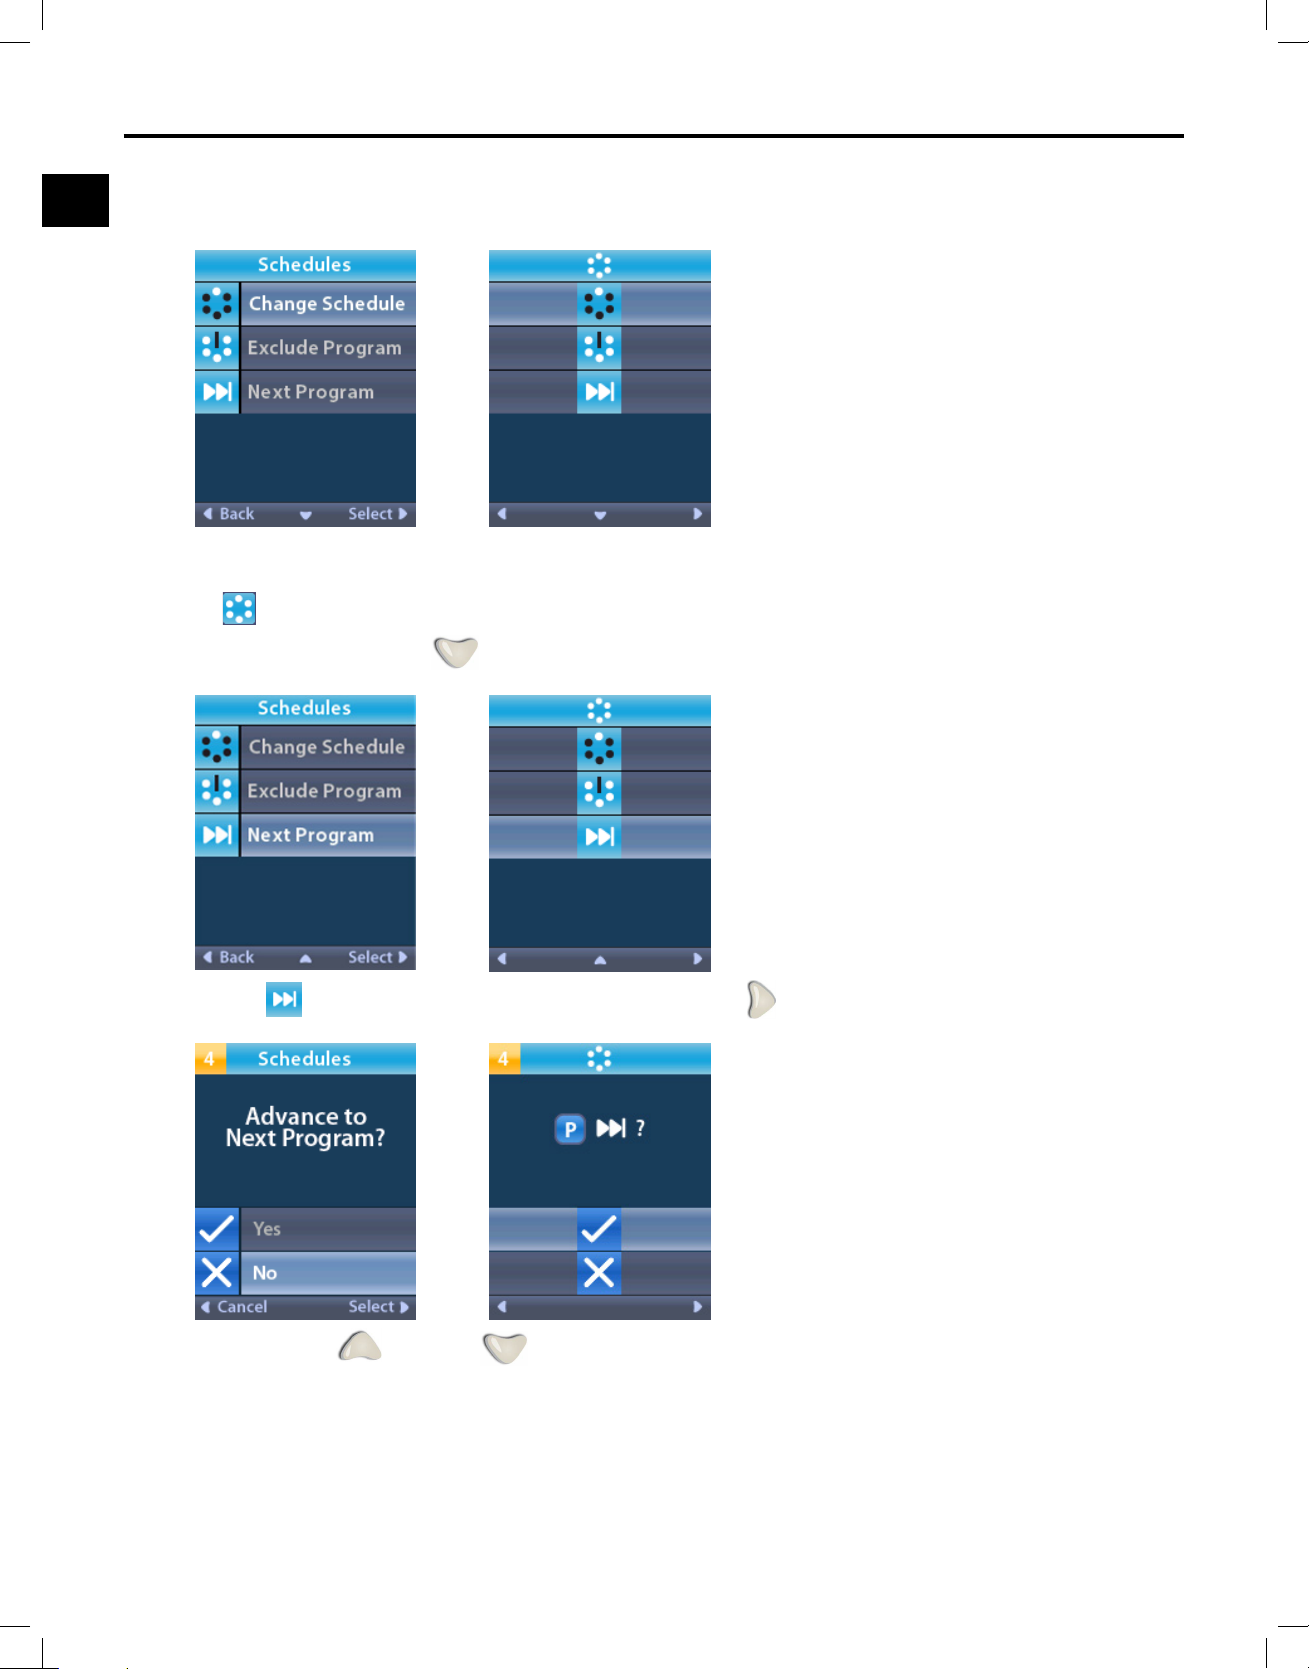
5. If No is selected, the program will not be excluded and you will be redirected to the Schedules
Menu:
Advance Program within a Schedule
From the
1. Press the Down Arrow
Schedules Menu:
button to navigate to Next Program.
2. Select Next Program by pressing the Right Arrow
3. Press the Up or Down Arrow buttons to select Yes or No at the prompt.
Clinician Remote Control Directions for Use
92395488-02 14 of 1077
Page 19
The Main Menu
en
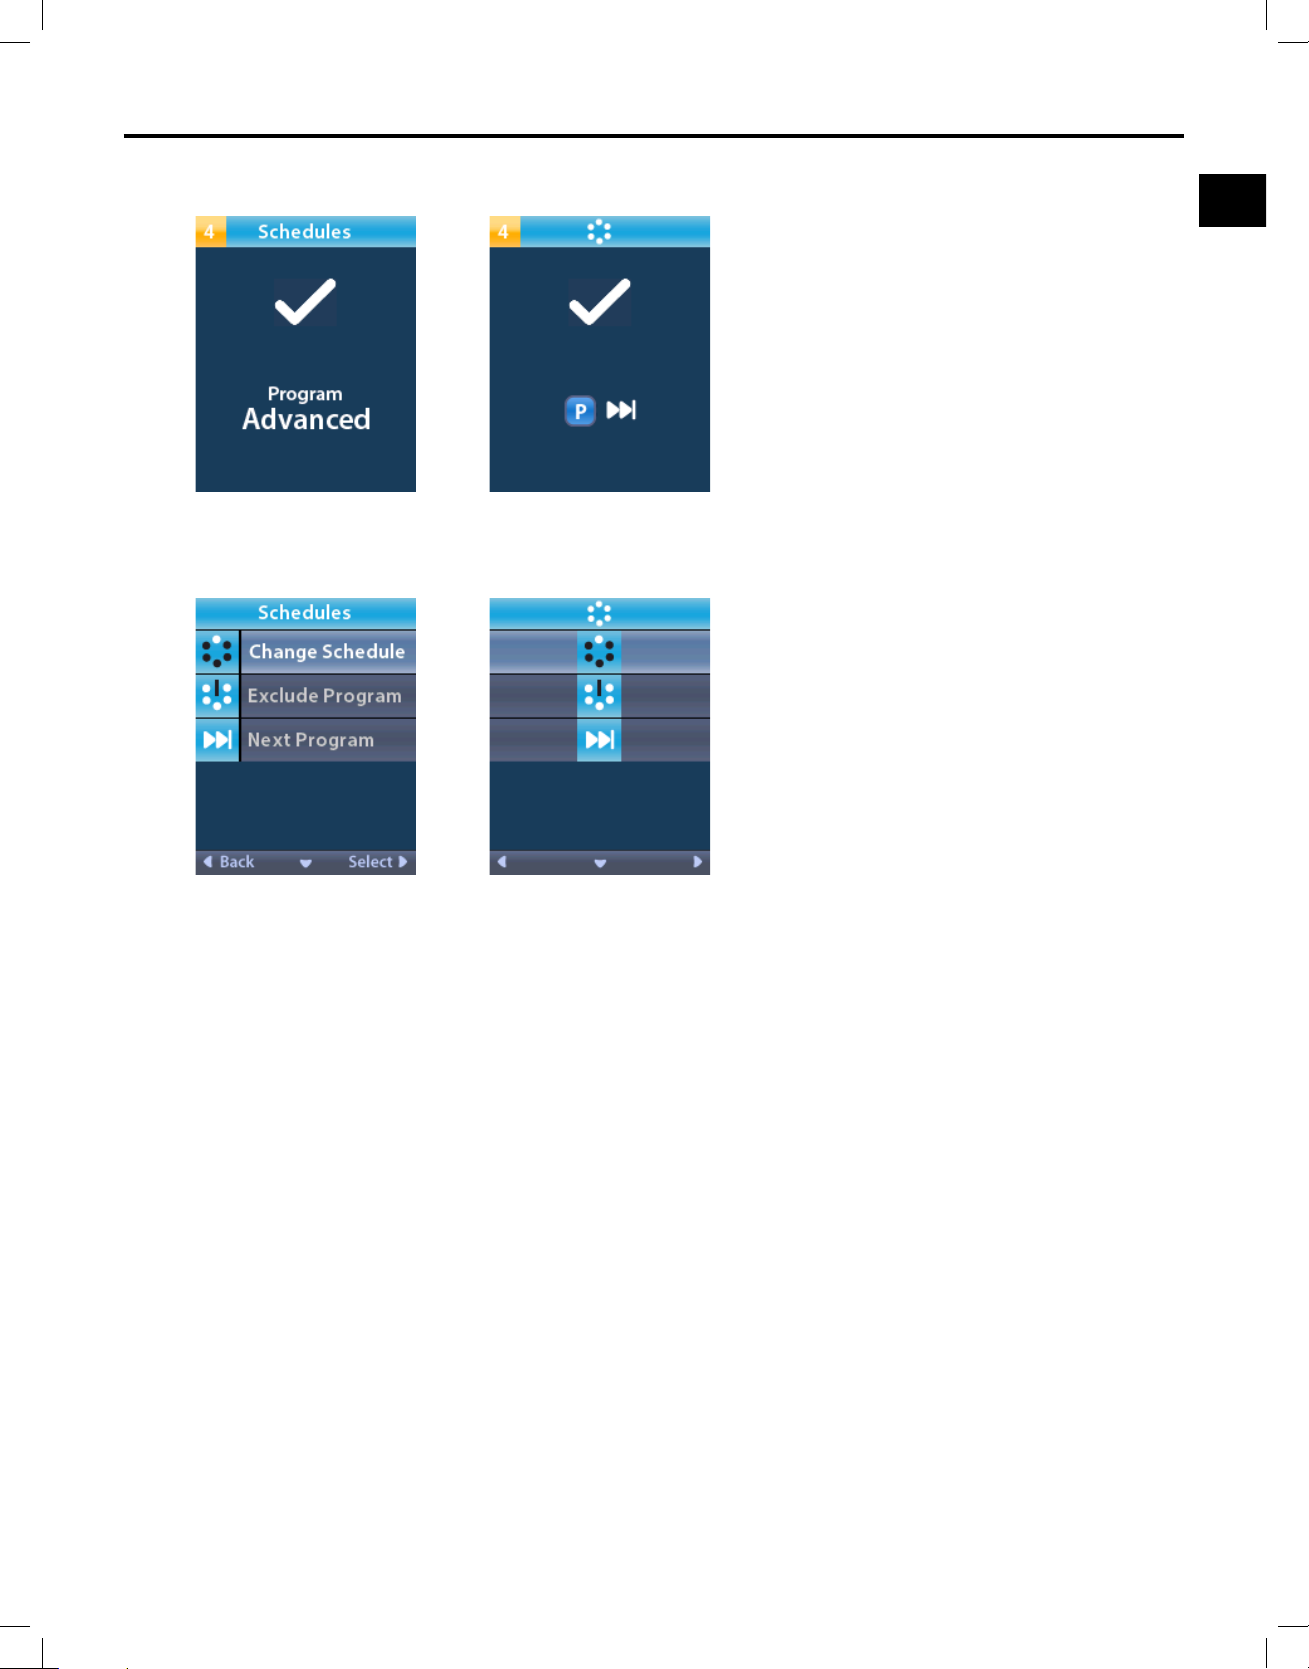
4. If Yes is selected, the Program Advanced screen displays:
5. If No is selected, the program will not be advanced and you will be redirected to the Schedules
Menu:
Clinician Remote Control Directions for Use
92395488-02 15 of 1077
Page 20
Clinician Remote Control Directions for Use
en
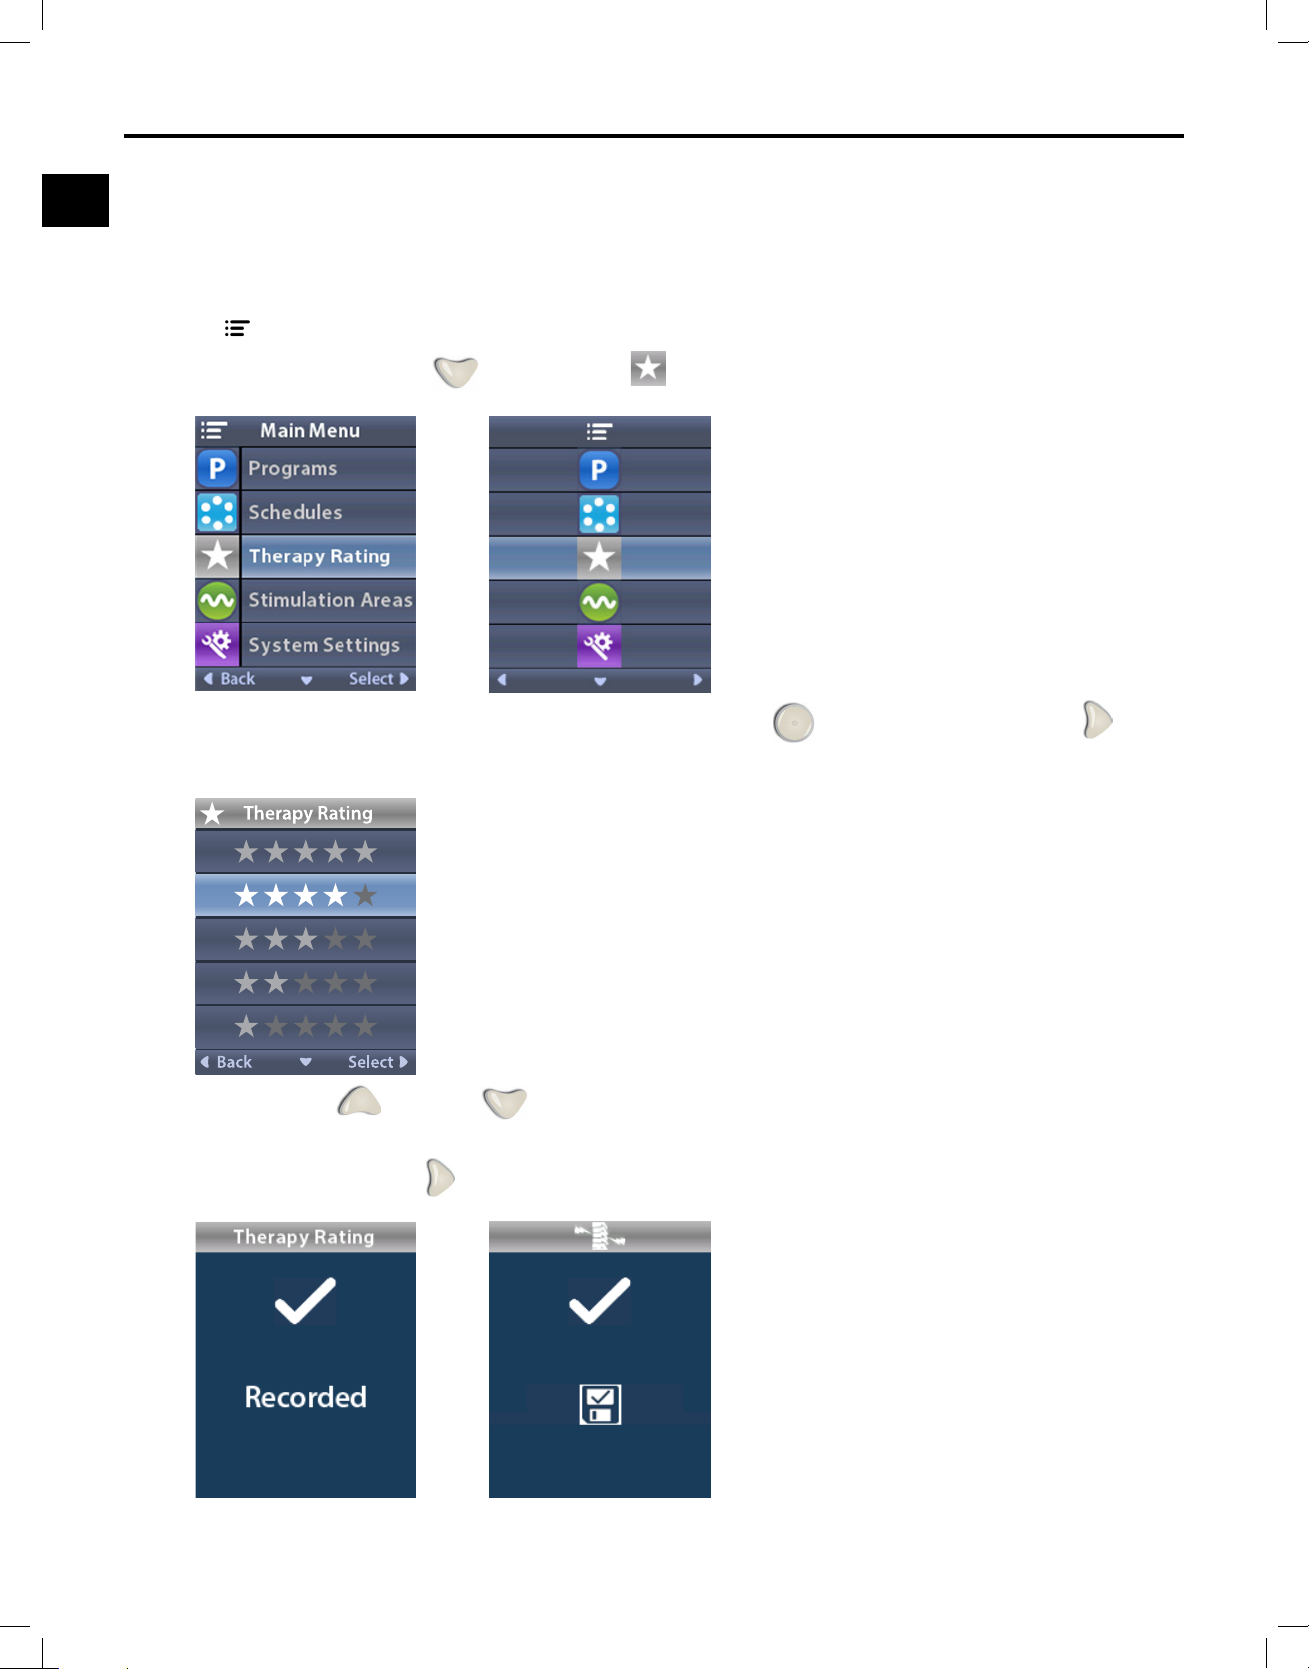
Entering a Therapy Rating
The Therapy Rating is a way for the patient to communicate real time preferences to different therapy
types. Their preferences are recorded on a ve star rating scale.
Note: Depending on stimulator congurations, some selections may be unavailable.
From the
1. Press the Down Arrow
Main Menu:
to navigate to Therapy Rating.
2. Once Therapy Rating is highlighted, press the Selection button or the Right Arrow to
access the Therapy Rating screen.
3. Press the Up or Down Arrow buttons to navigate to the rating of the therapy at that
moment.
4. Press the Right Arrow
Clinician Remote Control Directions for Use
92395488-02 16 of 1077
button to make a selection.
Page 21
en
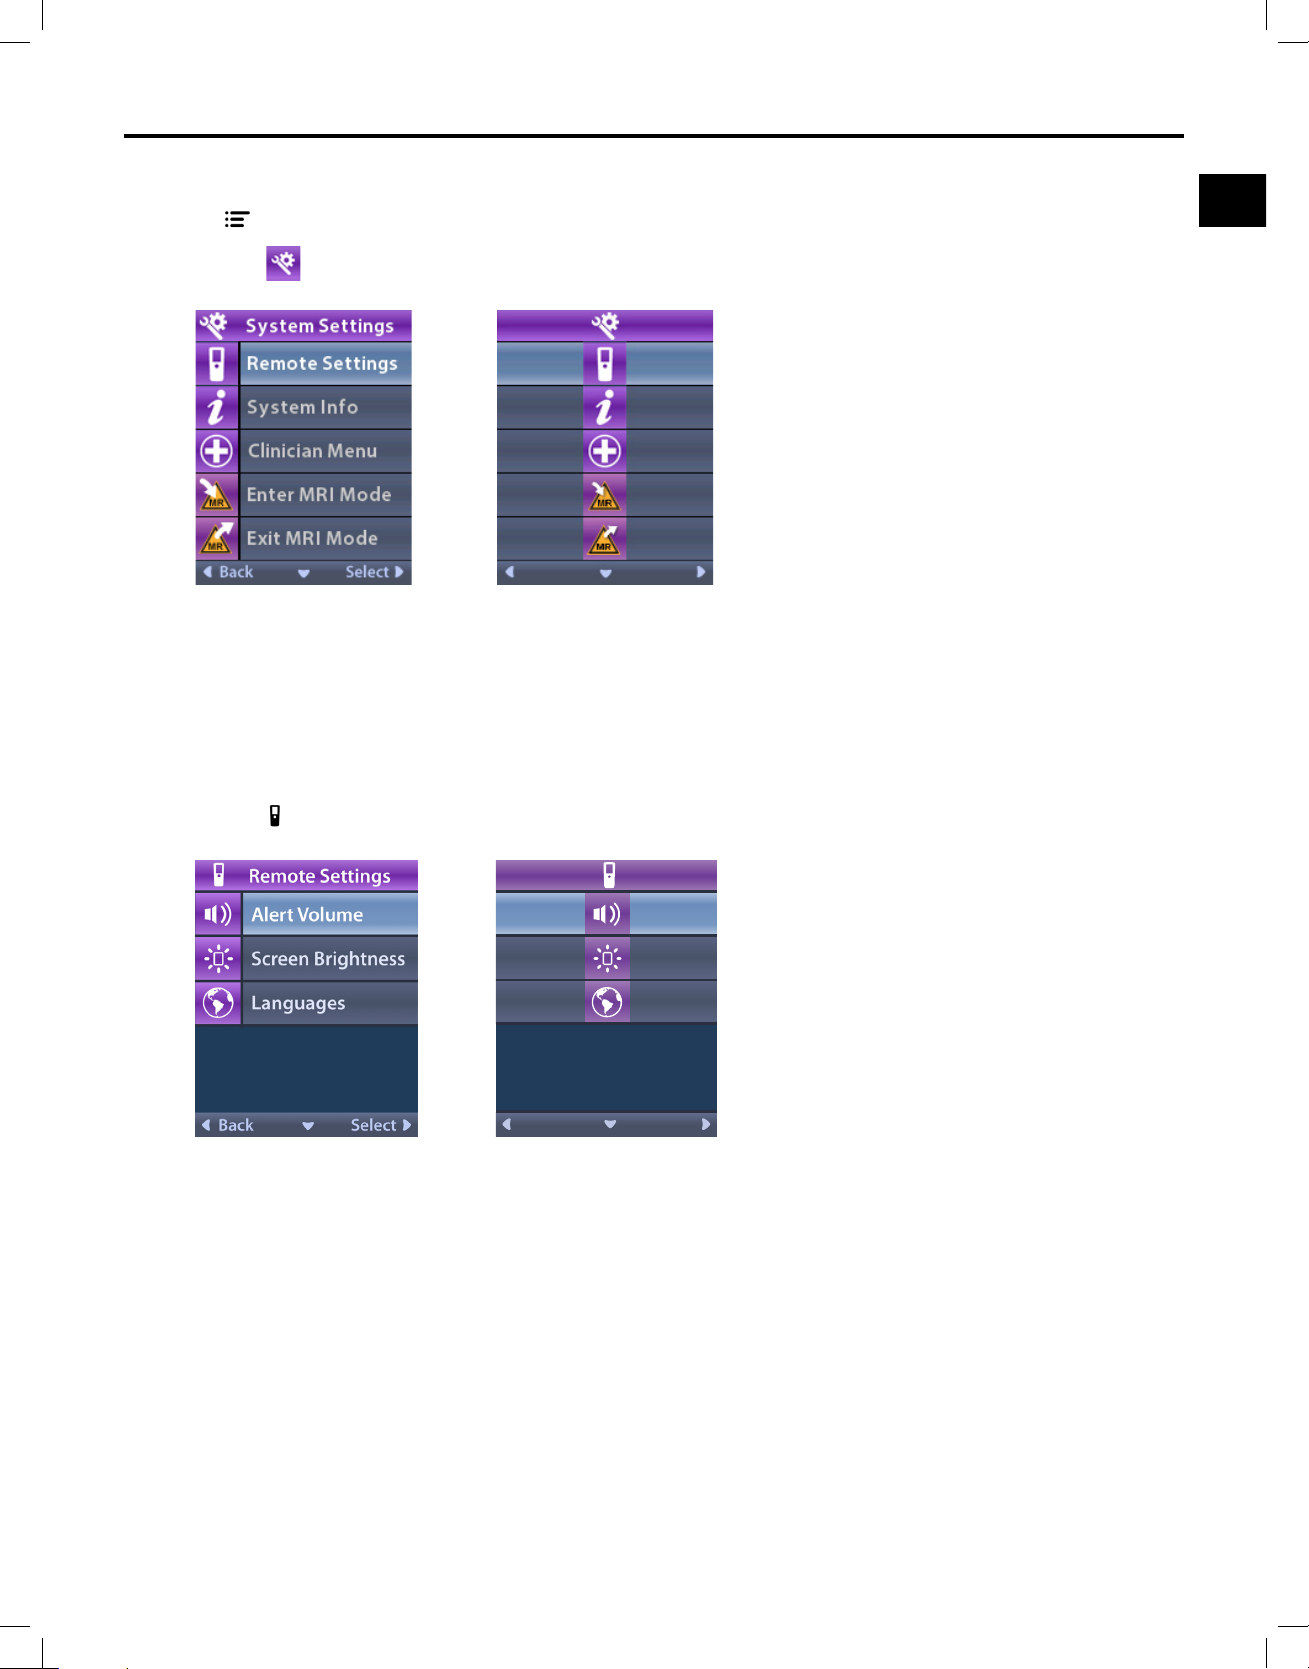
Accessing System Settings
The Main Menu
From the Main Menu:
1. Select
System Settings. The System Settings screen displays.
Remote Settings
The Remote Settings option allows you to adjust the Alert Volume, Screen Brightness, and to select
your language preference.
From the System Settings menu:
1. Select
Remote Settings to display the Remote Settings menu.
Clinician Remote Control Directions for Use
92395488-02 17 of 1077
Page 22
Clinician Remote Control Directions for Use
en
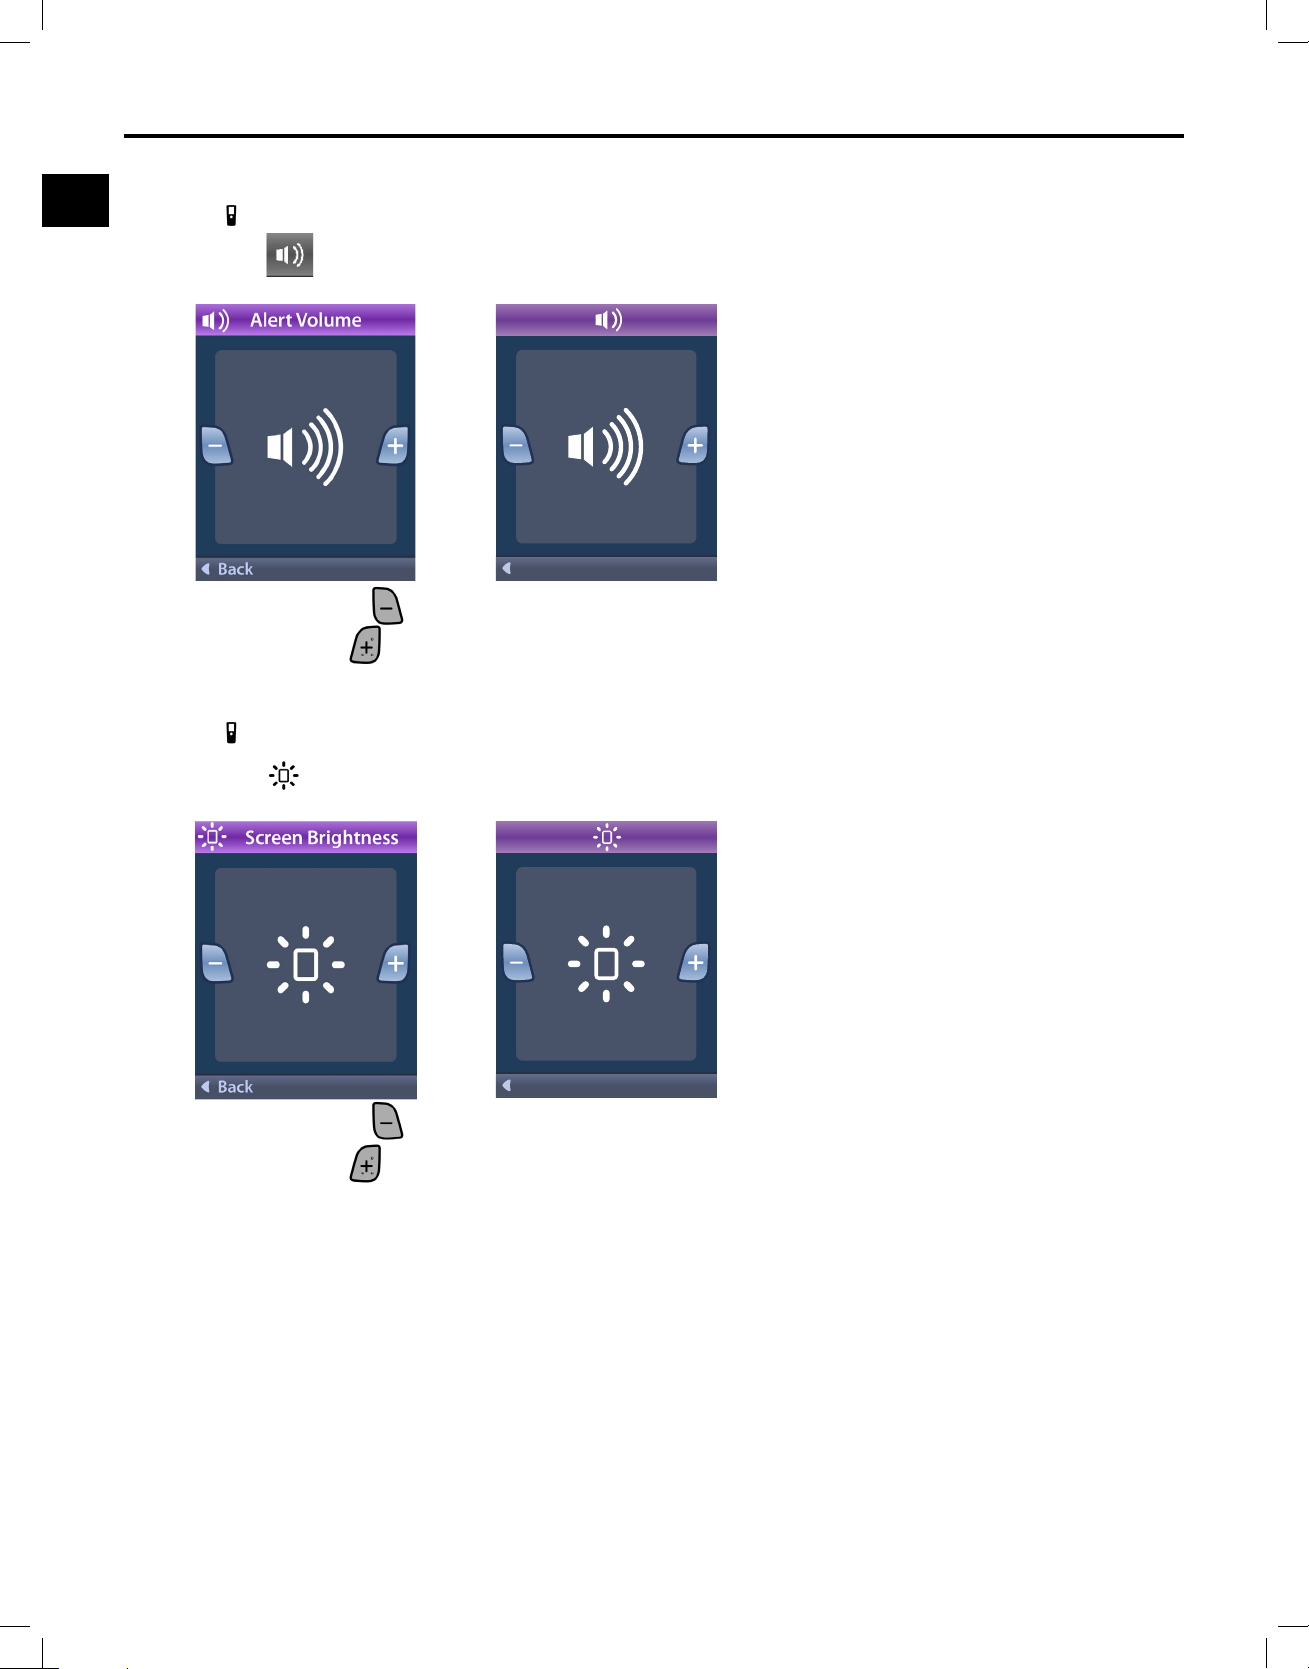
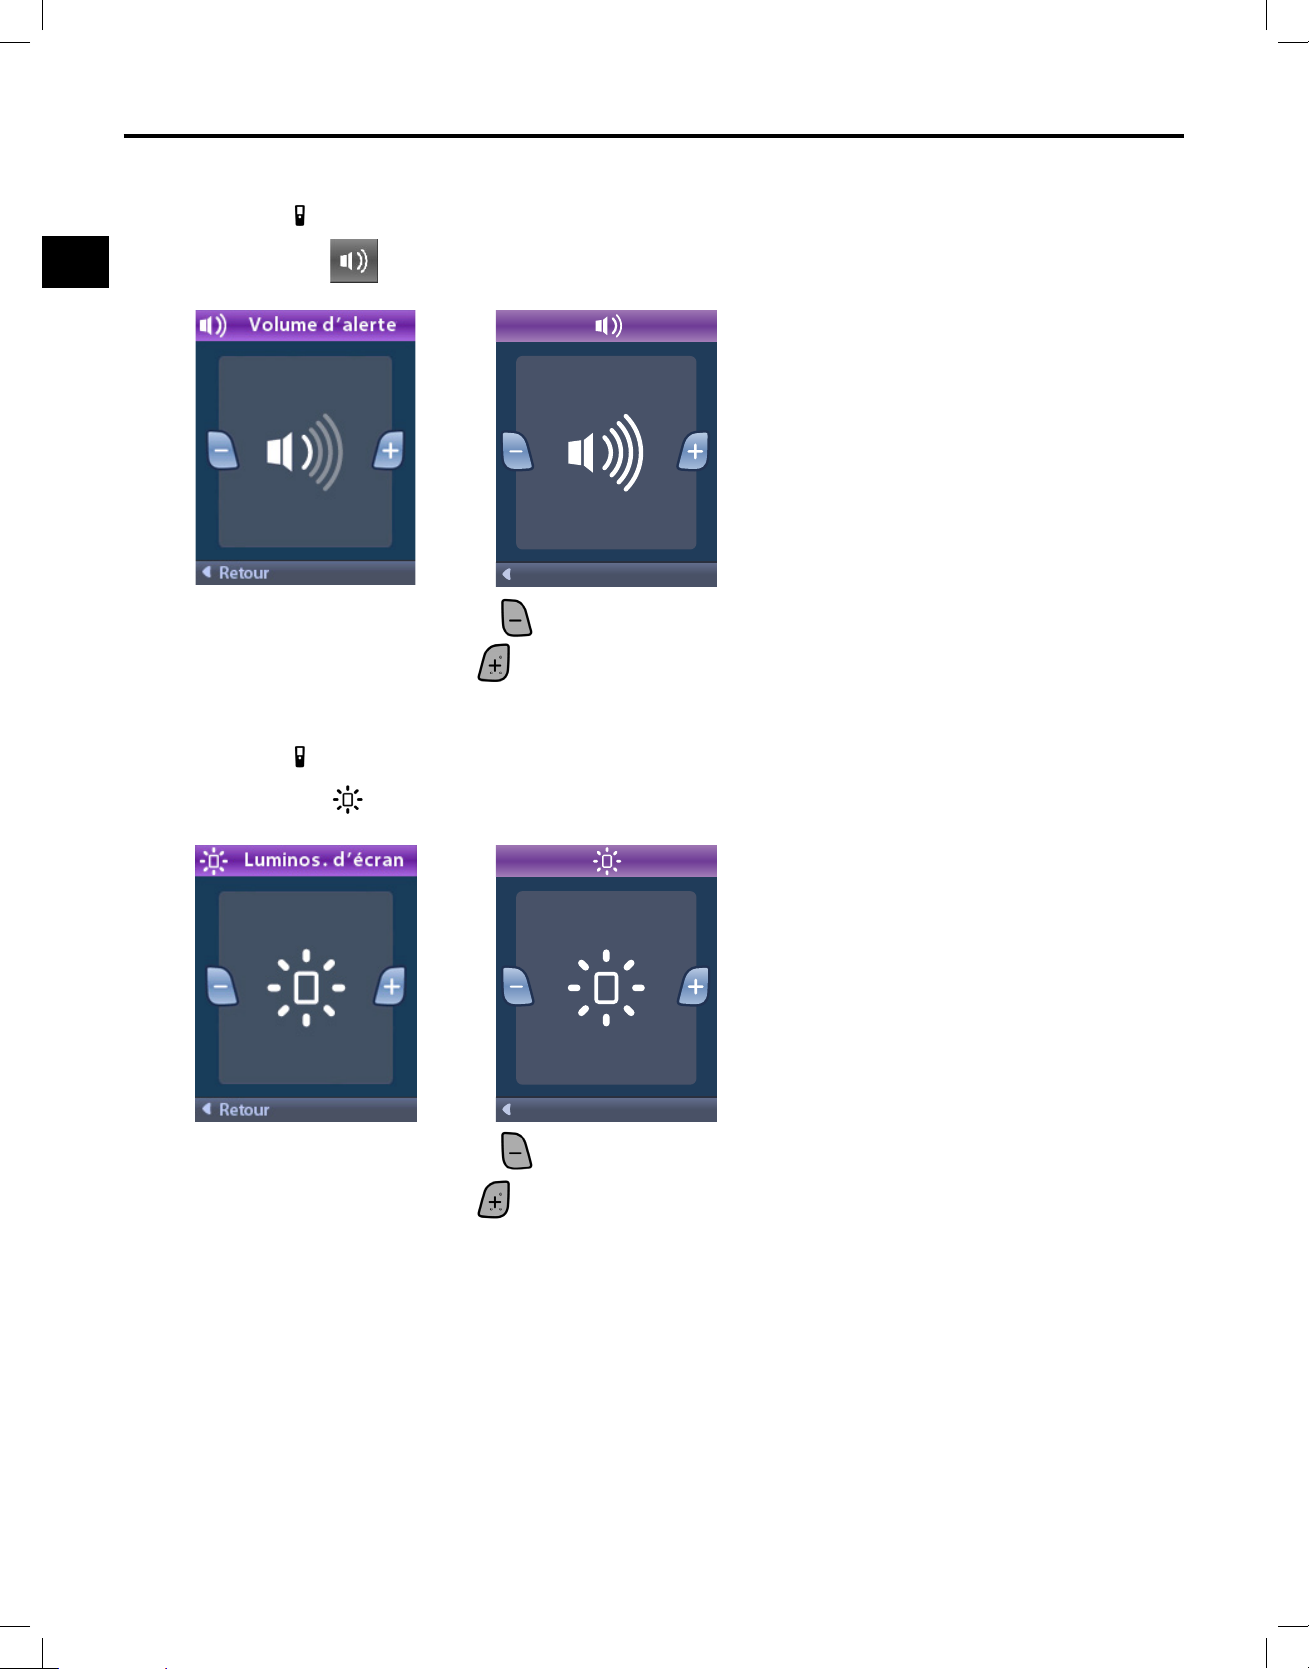
Alert Volume
From the
1. Select
Remote Settings menu:
Alert Volume.
2. Press the Minus button to decrease the Alert Volume
3. Press the Plus
button to increase the Alert Volume.
Screen Brightness
From the
1. Select
Remote Settings menu:
Screen Brightness.
2. Press the Minus button to decrease the brightness
3. Press the Plus
Clinician Remote Control Directions for Use
92395488-02 18 of 1077
button to increase the brightness.
Page 23
en
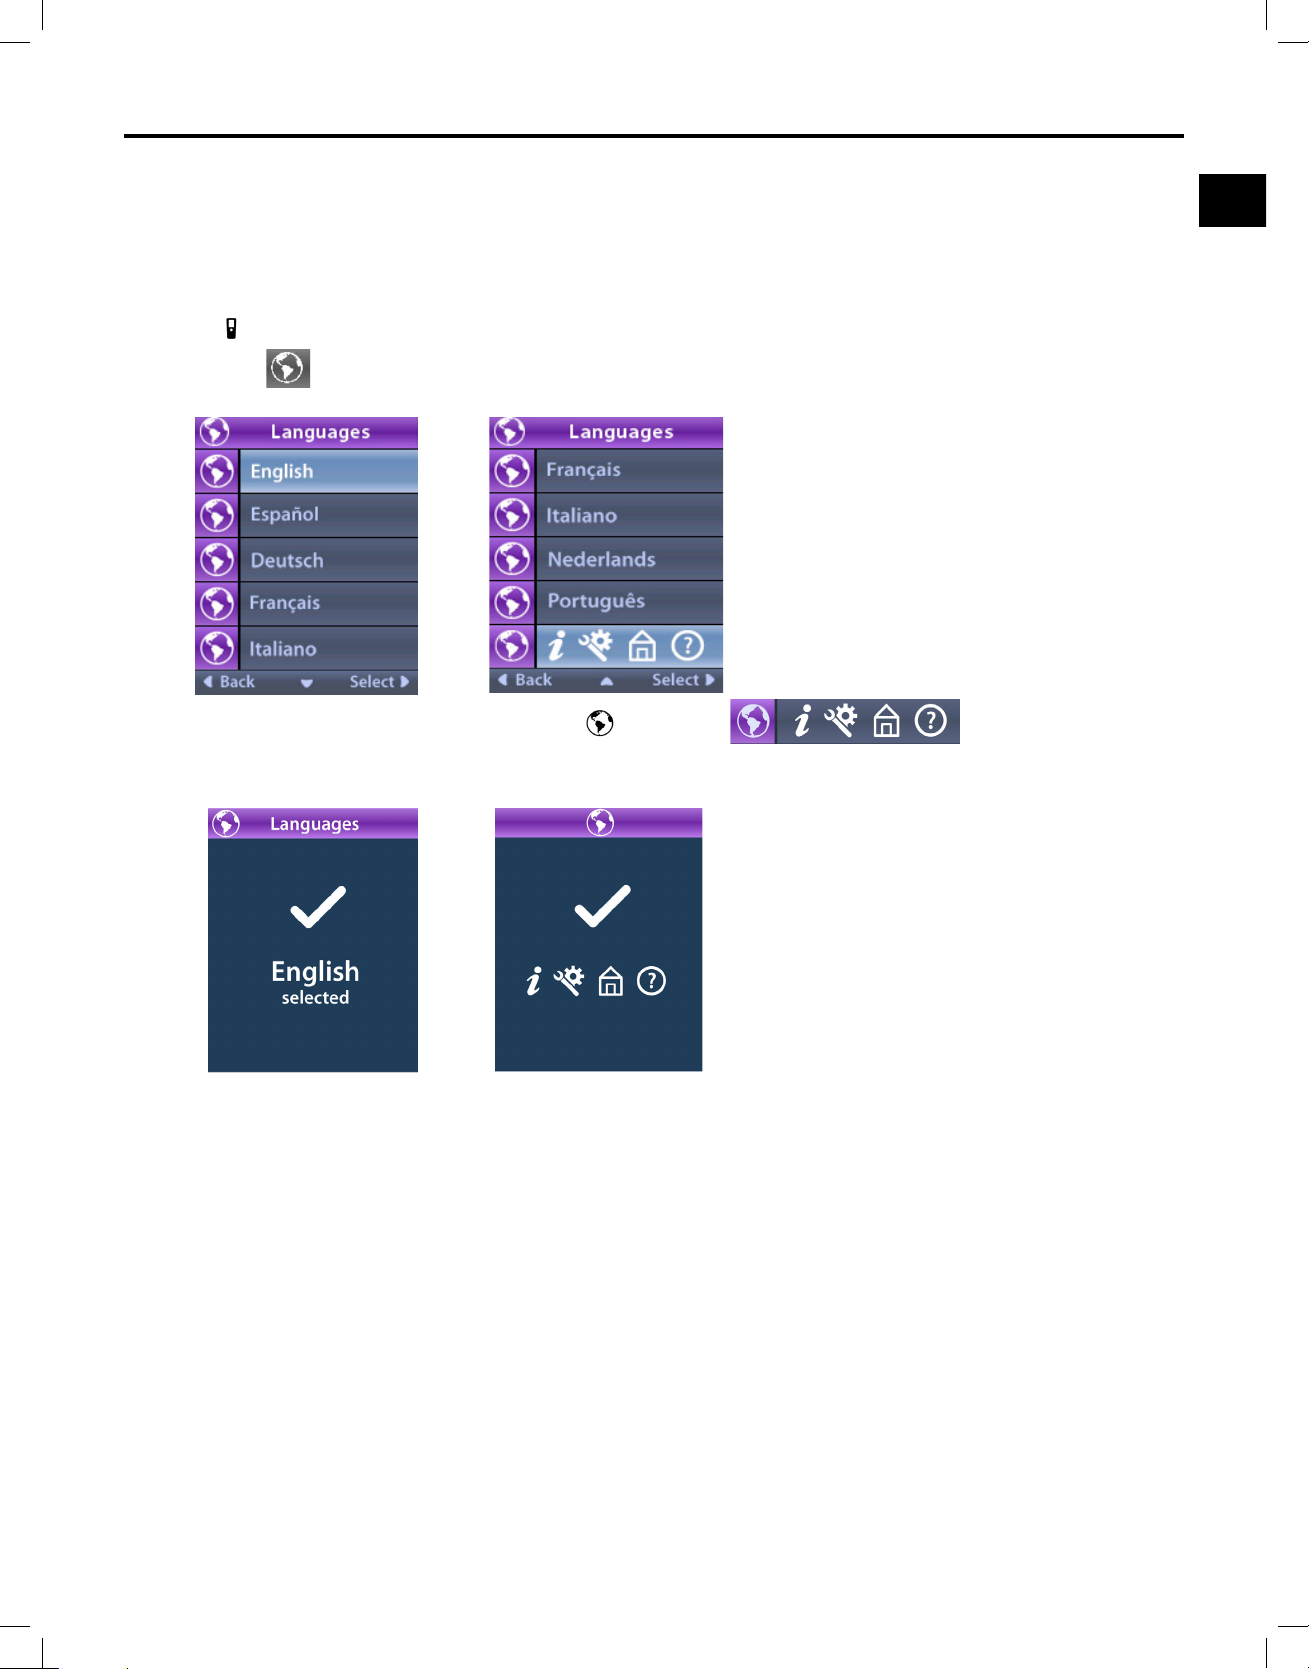
Languages
The Main Menu
The RC allows you to congure your system to display one the following:
• Text screen in one of the languages provided
• Iconic screen
From the
1. Select
Remote Settings menu:
Languages.
2. Select the desired language, such as English or iconic display.
The Languages conrmation screen displays to conrm your selection.
Clinician Remote Control Directions for Use
92395488-02 19 of 1077
Page 24
Clinician Remote Control Directions for Use
en
System Info
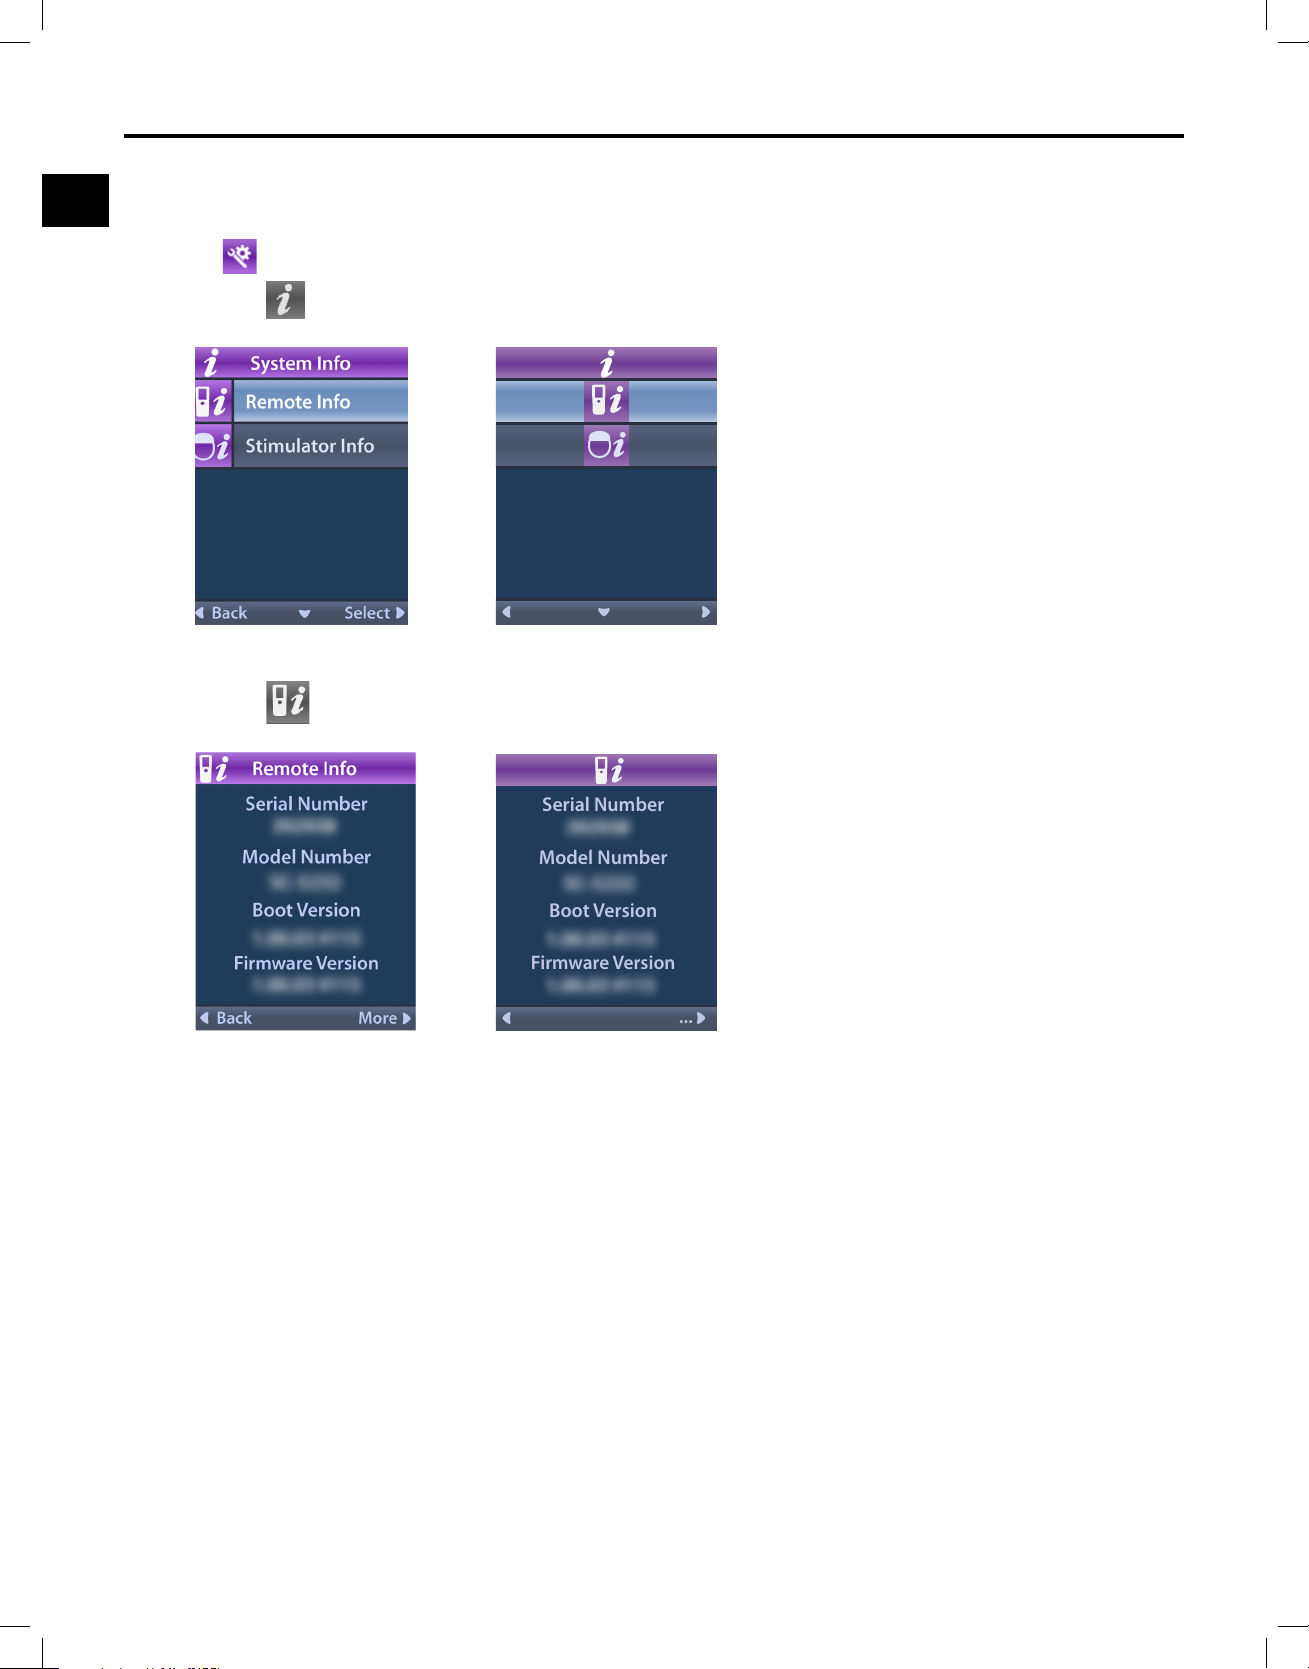
The System Info menu gives you the option of viewing information regarding the RC or the Stimulator.
From the
System Settings menu:
1. Select
Remote Info
2. Select
System Info.
Remote Info to view the Remote Info screen.
Serial Number
Model Number
Boot Version
Firmware Version
...
The Remote Info screen displays the following information:
• Serial Number
• Model Number
• Boot Version
• Firmware Version
Clinician Remote Control Directions for Use
92395488-02 20 of 1077
Page 25
en
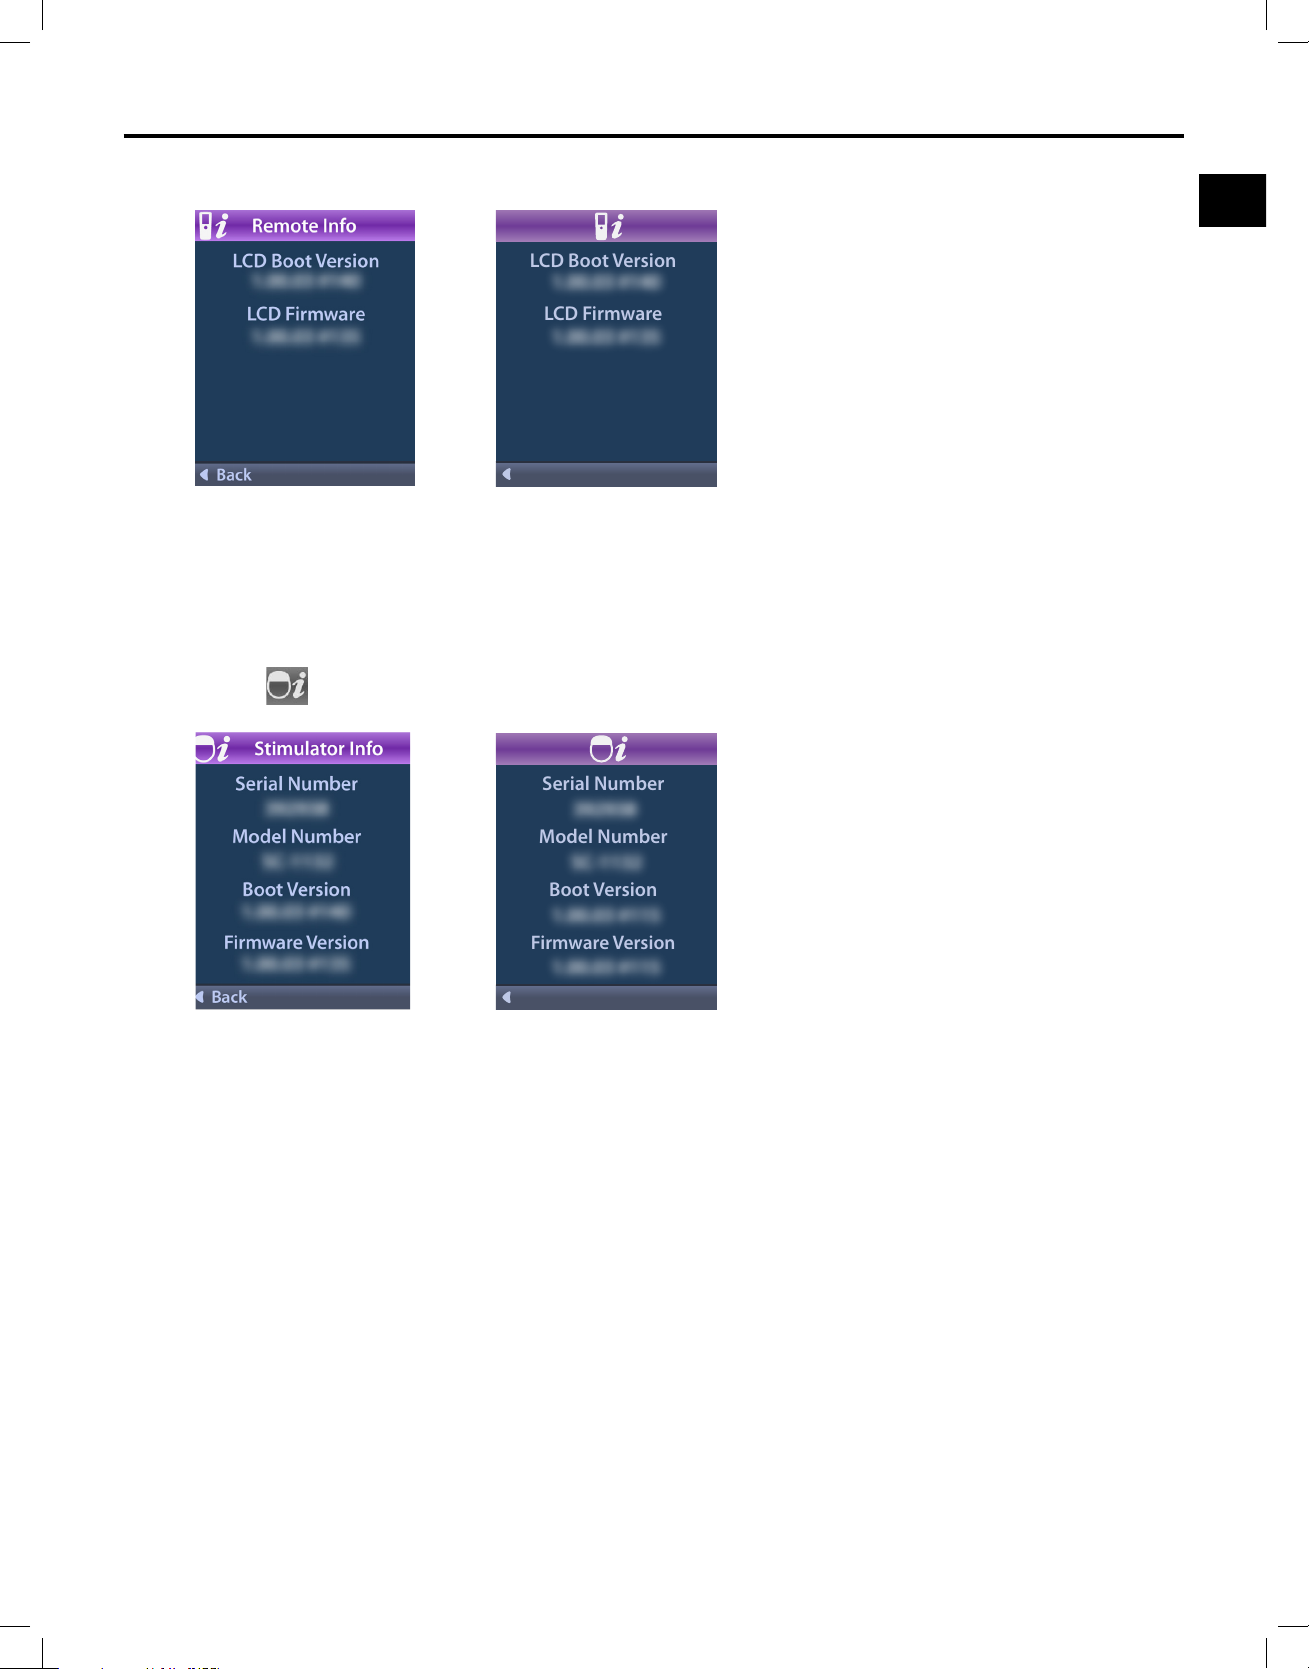
Select More to view additional Remote Info.
LCD Boot Version
LCD Firmware
The Remote Info screen displays the following additional information:
• LCD Boot Version
• LCD Firmware
Stimulator Info
The Main Menu
1. Select
Stimulator Info to view the Stimulator Info screen.
Serial Number
Model Number
Boot Version
Firmware Version
The Stimulator Info screen displays the following information:
• Serial Number
• Model Number
• Boot Version
• Firmware Version
Note: The Model number and Serial number for the Trial Stimulator can be found by removing the
battery compartment cover on the Trial Stimulator.
Clinician Remote Control Directions for Use
92395488-02 21 of 1077
Page 26
Clinician Remote Control Directions for Use
en
Accessing the Clinician Menu
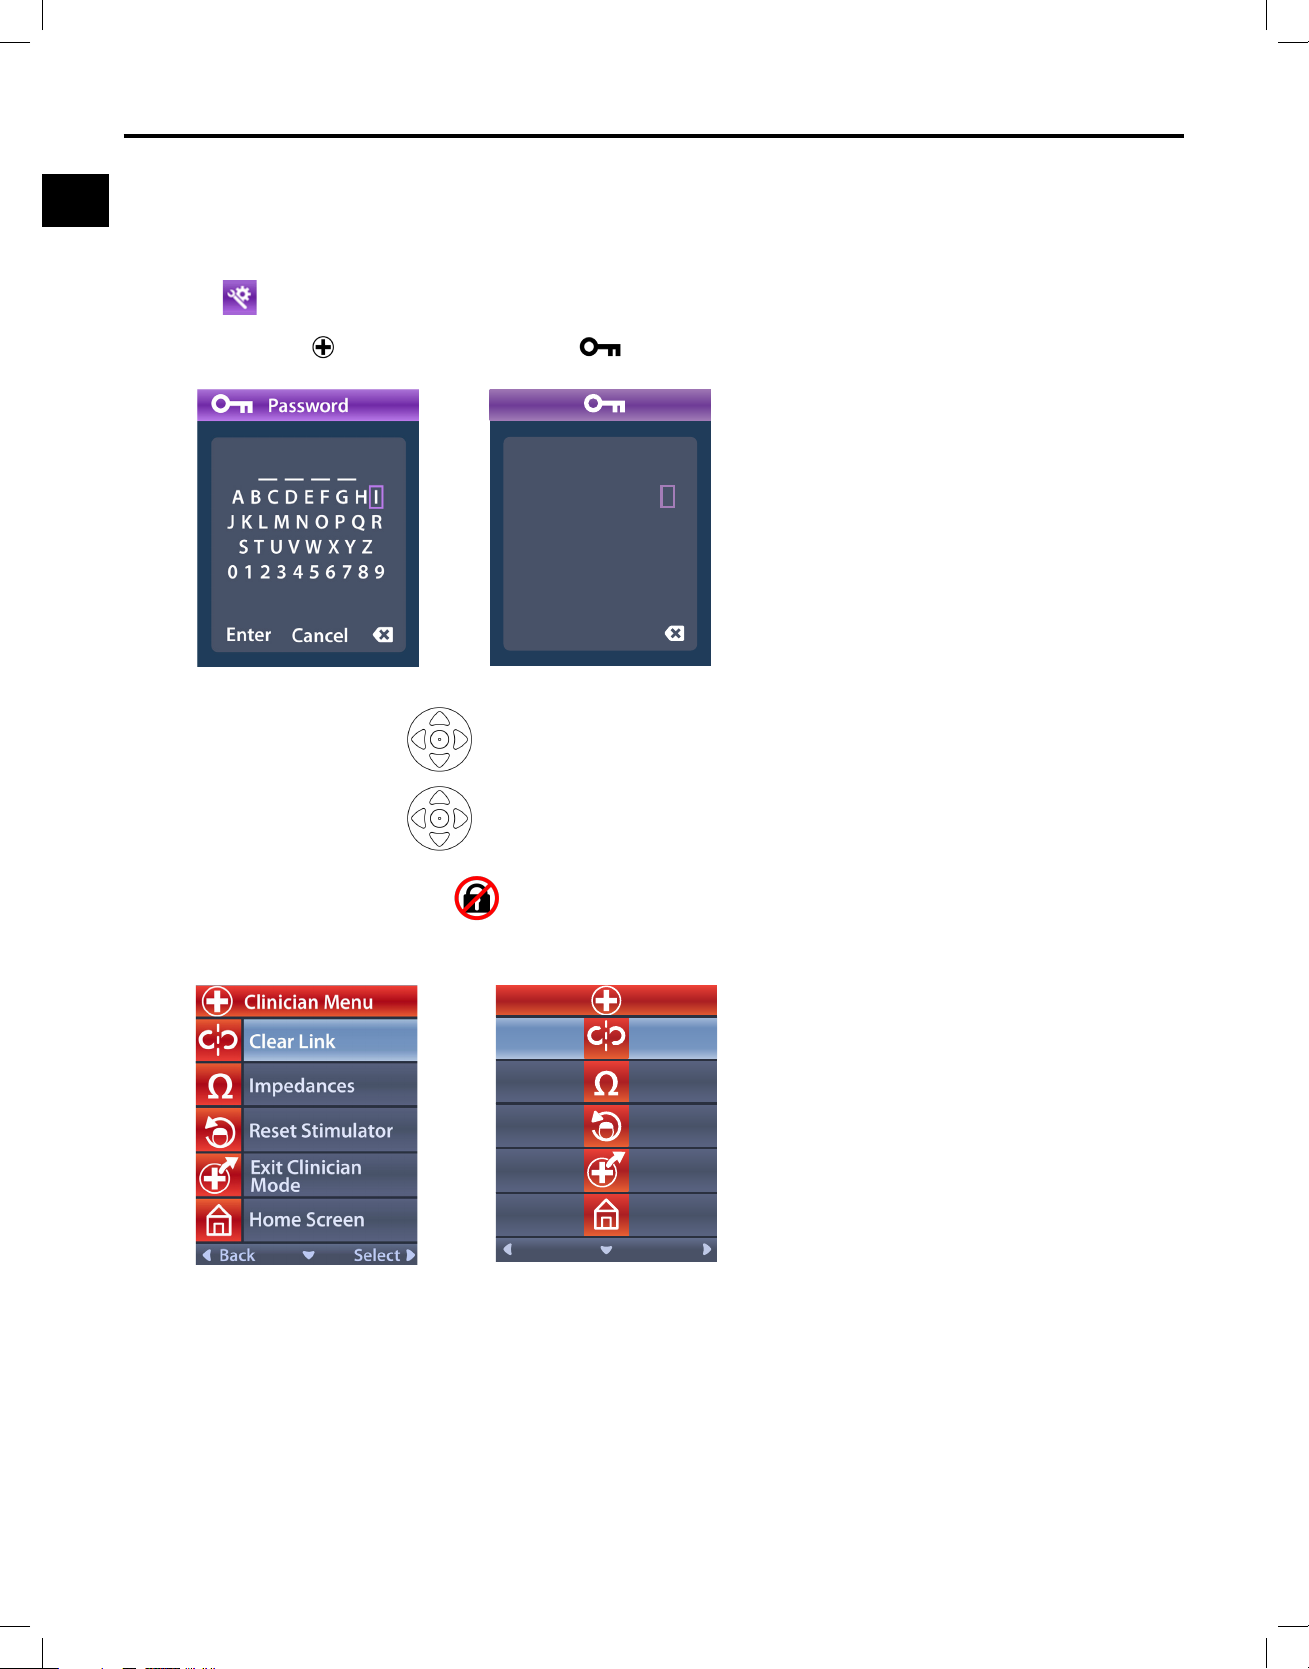
The Clinician Menu allows you to link to a Stimulator, clear the link to a Stimulator, check impedances,
and reset the Stimulator. To enter the Clinician Menu you must enter a password.
From the
1. Select the
System Settings menu:
Clinician Menu. The Password screen displays.
_ _ _ _
A B C D E F G H I
J K L M N O P Q R
S T U V W X Y Z
0 1 2 3 4 5 6 7 8 9
Enter
2. Use the Navigation buttons to Enter your password.
Or
Cancel
Use the Navigation
If the password is incorrect, the
buttons to Cancel.
Invalid Password screen displays. If the password is correct, the
Clinician Menu displays.
Note: If the remote is not linked to a Stimulator, the Stimulator Search option displays on the Clinician
Menu instead of the Clear Link option.
Clinician Remote Control Directions for Use
92395488-02 22 of 1077
Page 27
Accessing the Clinician Menu
en
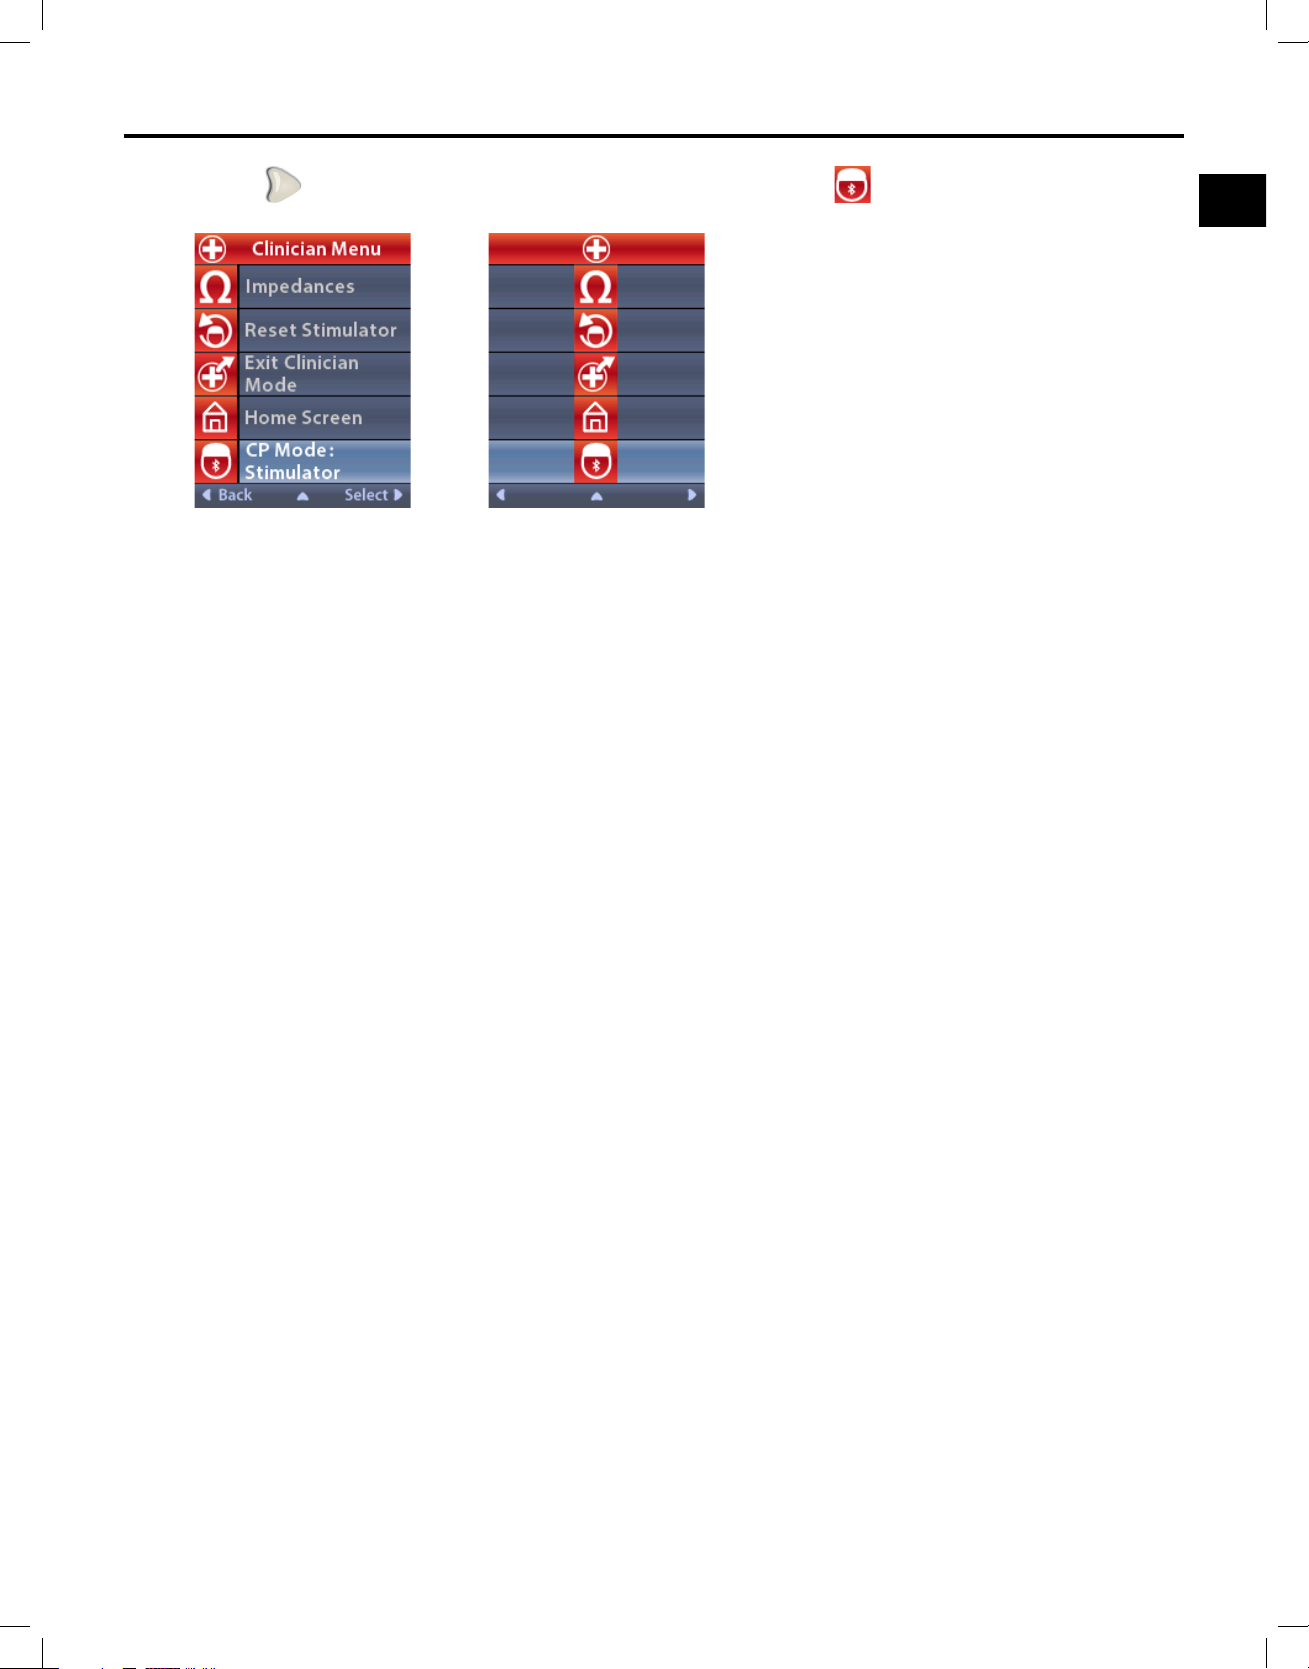
3. Select to view additional Clinician Menu options, such as CP Mode: Stimulator.
Clinician Remote Control Directions for Use
92395488-02 23 of 1077
Page 28
Clinician Remote Control Directions for Use
en
Stimulator Search and Linking
A Stimulator and Remote Control must be linked in order to communicate. A Remote Control that is
intended to be utilized by the patient must be linked as the ‘Patient Remote.’ The Stimulator will only
recognize one remote control device at a time as the Patient Remote; however, the Stimulator can be
linked to a second Remote Control by establishing a temporary link.
A temporary link is intended only for clinician use when the Patient Remote is not available. If a new
Remote Control device is assigned as the Patient Remote, any devices previously linked as the Patient
Remote will be cleared. Once a link between a Stimulator and Remote Control has been established,
they will remain linked unless the link is cleared.
The Clinician Menu allows you to search for a Stimulator and link to it. Stimulators that communicate
using Bluetooth Low Energy, must be placed into Pairing Mode in order to link to a Remote Control.
In order to place an IPG into Pairing Mode:
• Place the Pairing Magnet directly over the Stimulator for at least 2 seconds.
• Then remove the Pairing Magnet.
- Magnet pairing may be used on an IPG that is implanted or in the packaging.
Note: Once the magnet is removed, the Stimulator will automatically complete a device reset cycle.
This device reset cycle will take several seconds to complete. During this reset cycle, the
Stimulator will not provide stimulation and cannot communicate. Once the reset is complete,
the Stimulator will return to normal operation.
In order to place ETS into Pairing Mode:
• Press and hold
on the ETS until the battery indicator light ashes, alternating between green and
yellow.
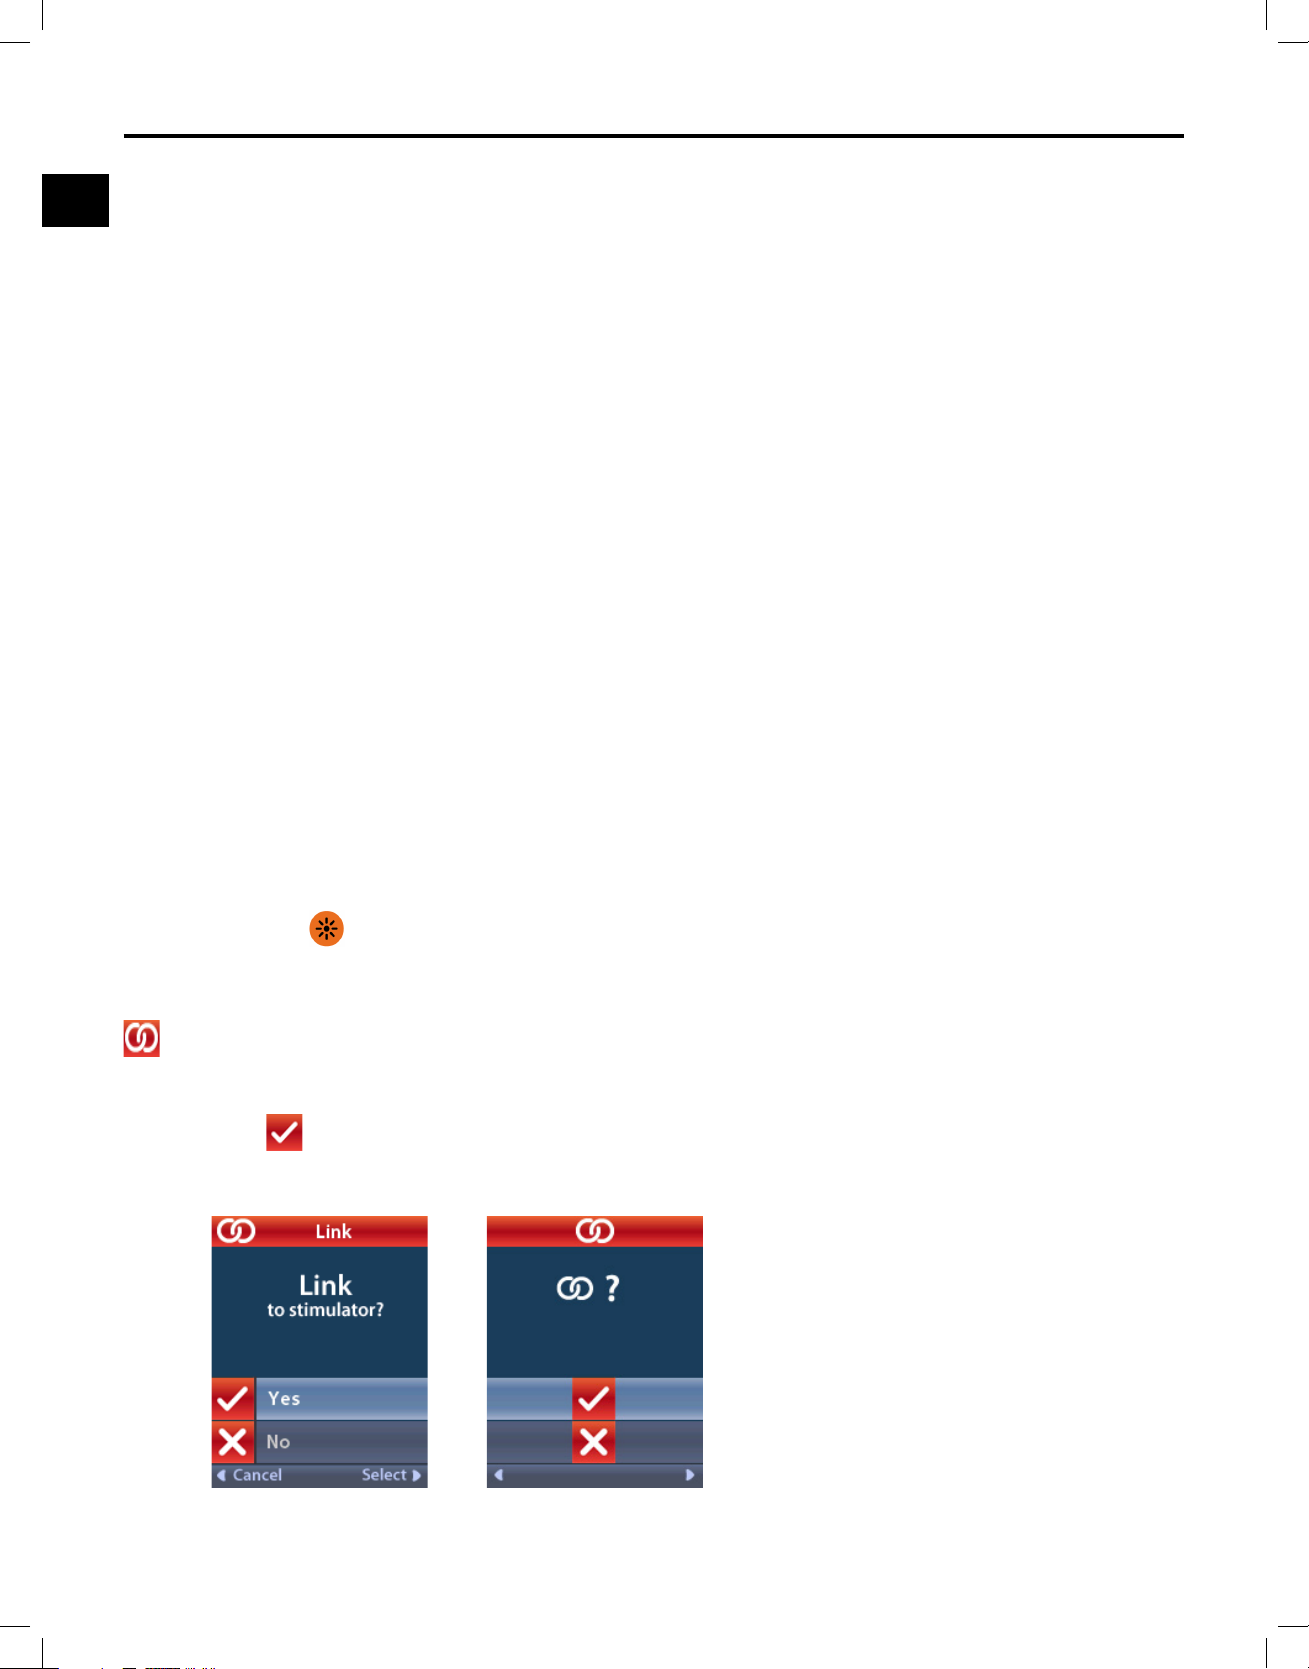
If the Remote Control is not currently linked to a Stimulator, when the Remote Control is unlocked, the
Link to Stimulator? screen may automatically display.
From the Clinician Menu:
1. Select
Yes to link to the Stimulator. The Stimulator Search screen displays. Skip to Step 3
of this section.
Clinician Remote Control Directions for Use
92395488-02 24 of 1077
Page 29
Accessing the Clinician Menu
en
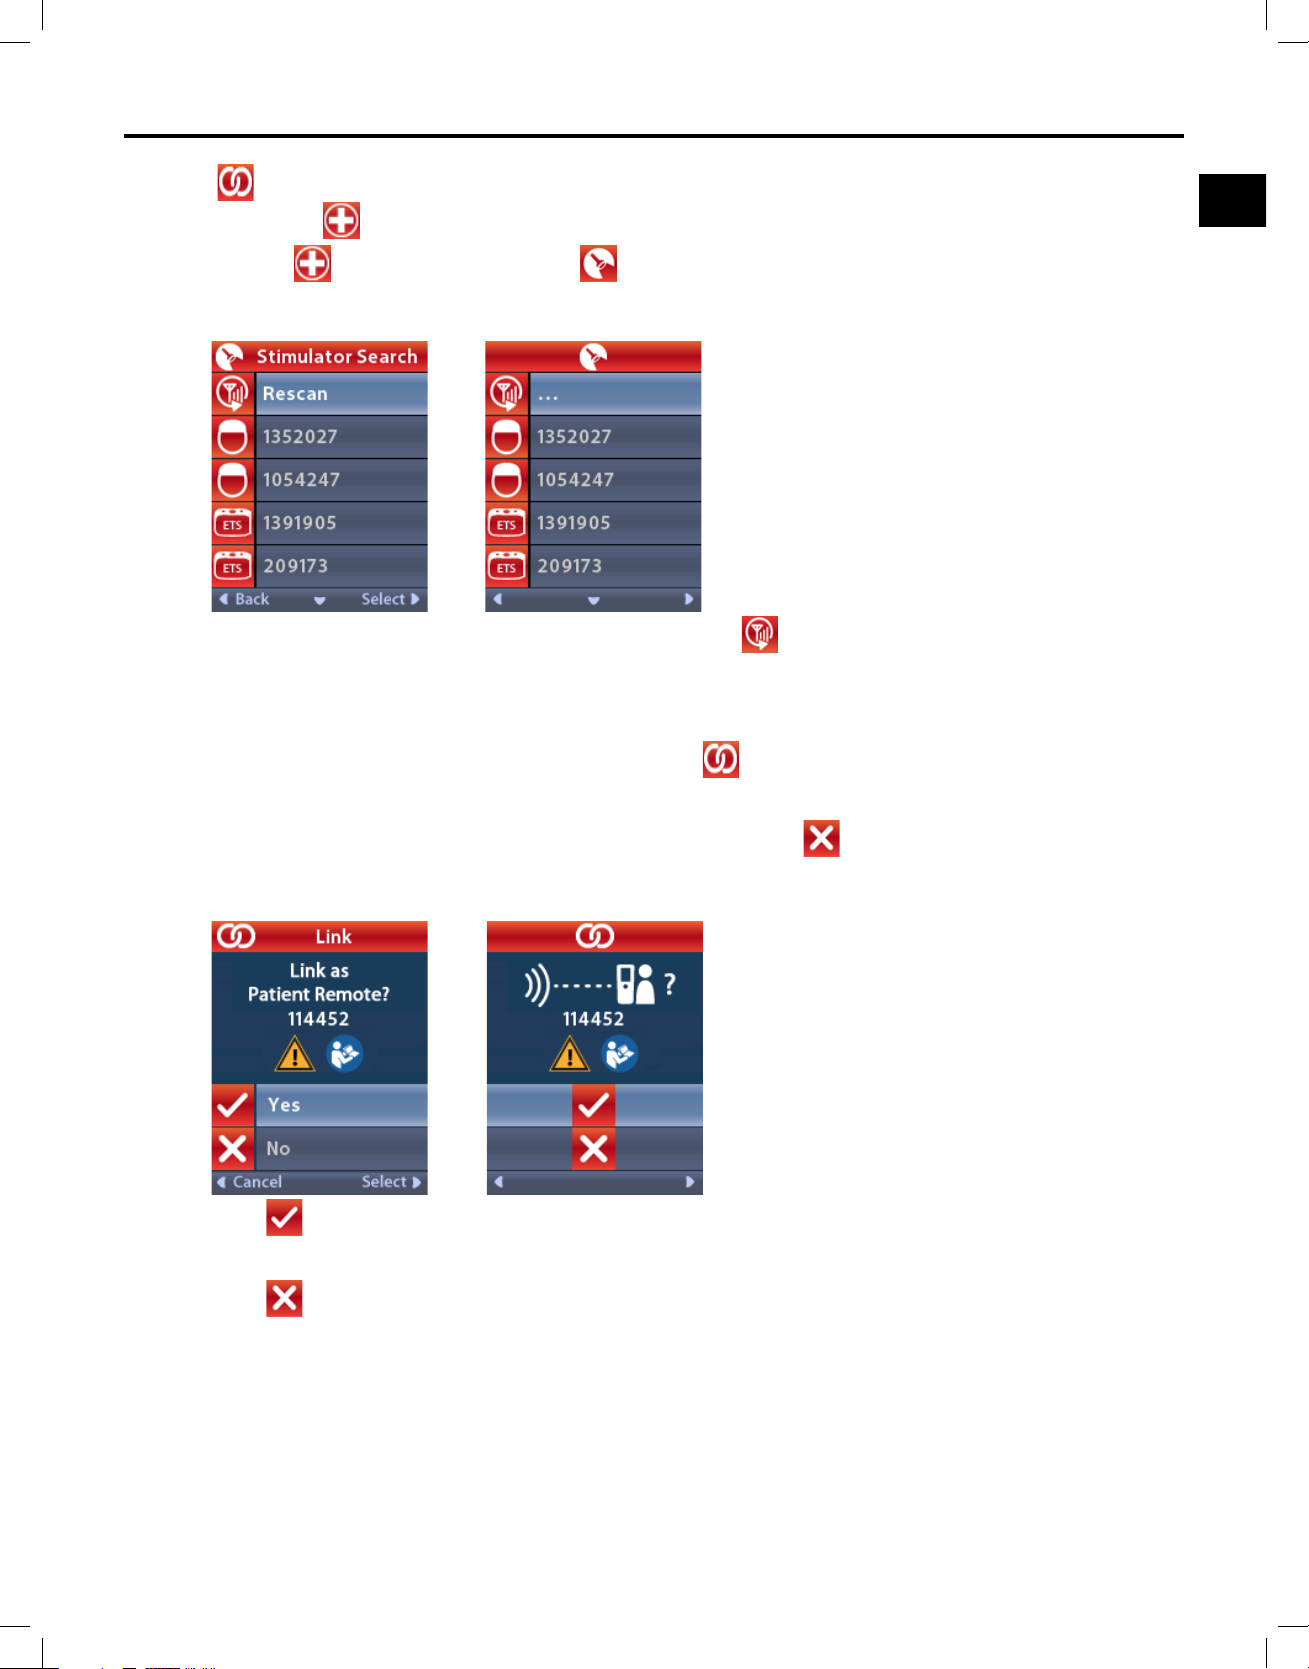
If the Link to Stimulator? screen does not automatically display, you can manually initiate
linking from the
Clinician Menu.
2. From the
Clinician Menu, select Stimulator Search. The Stimulator Search screen
displays.
3. If the desired Stimulator has not been located, select Rescan.
Note: Stimulators that utilize communication must be in Pairing Mode in order to appear on
the Stimulator Search screen and link.
4. Select the Stimulator that you wish to link to. The
Link as Patient Remote? screen displays
with the Stimulator serial number. A Remote Control that is intended to be utilized by the patient
at home should be linked as the Patient Remote. Selecting
No will create a temporary link
with the Stimulator for use in the clinic.
5. Select Yes to link as Patient Remote to the Stimulator.
or
Select
No to temporarily link to the Stimulator for use in the clinic or to cancel the action.
Clinician Remote Control Directions for Use
92395488-02 25 of 1077
Page 30
Clinician Remote Control Directions for Use
en
Clear Link
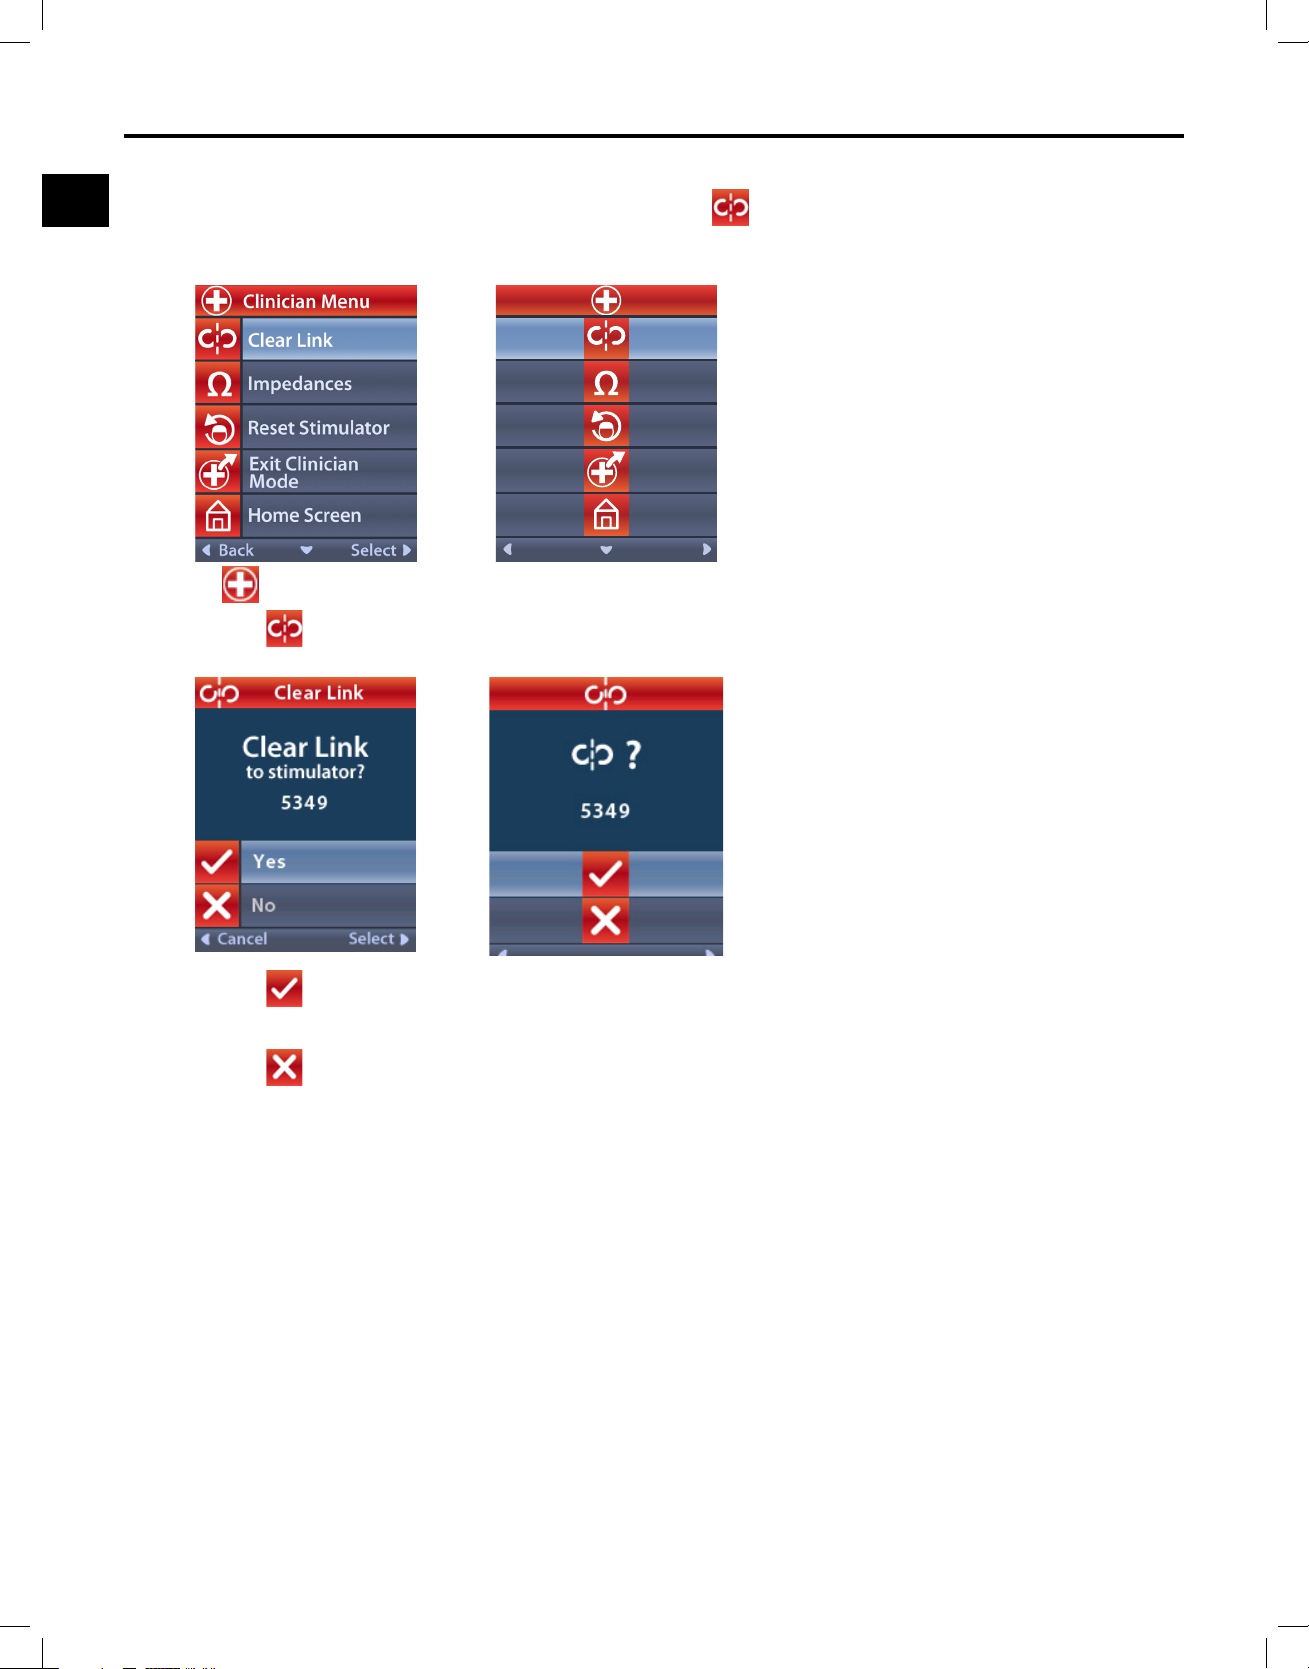
If the Remote Control is linked to a Stimulator, the
Clinician Menu.
From the Clinician Menu:
1. Select
Clear Link. The Clear Link to Stimulator? screen displays.
Clear Link option displays on the
2. Select Yes to clear the link to the Stimulator.
or
Select
Clinician Remote Control Directions for Use
92395488-02 26 of 1077
No to cancel the action.
Page 31
en
Impedances
Accessing the Clinician Menu
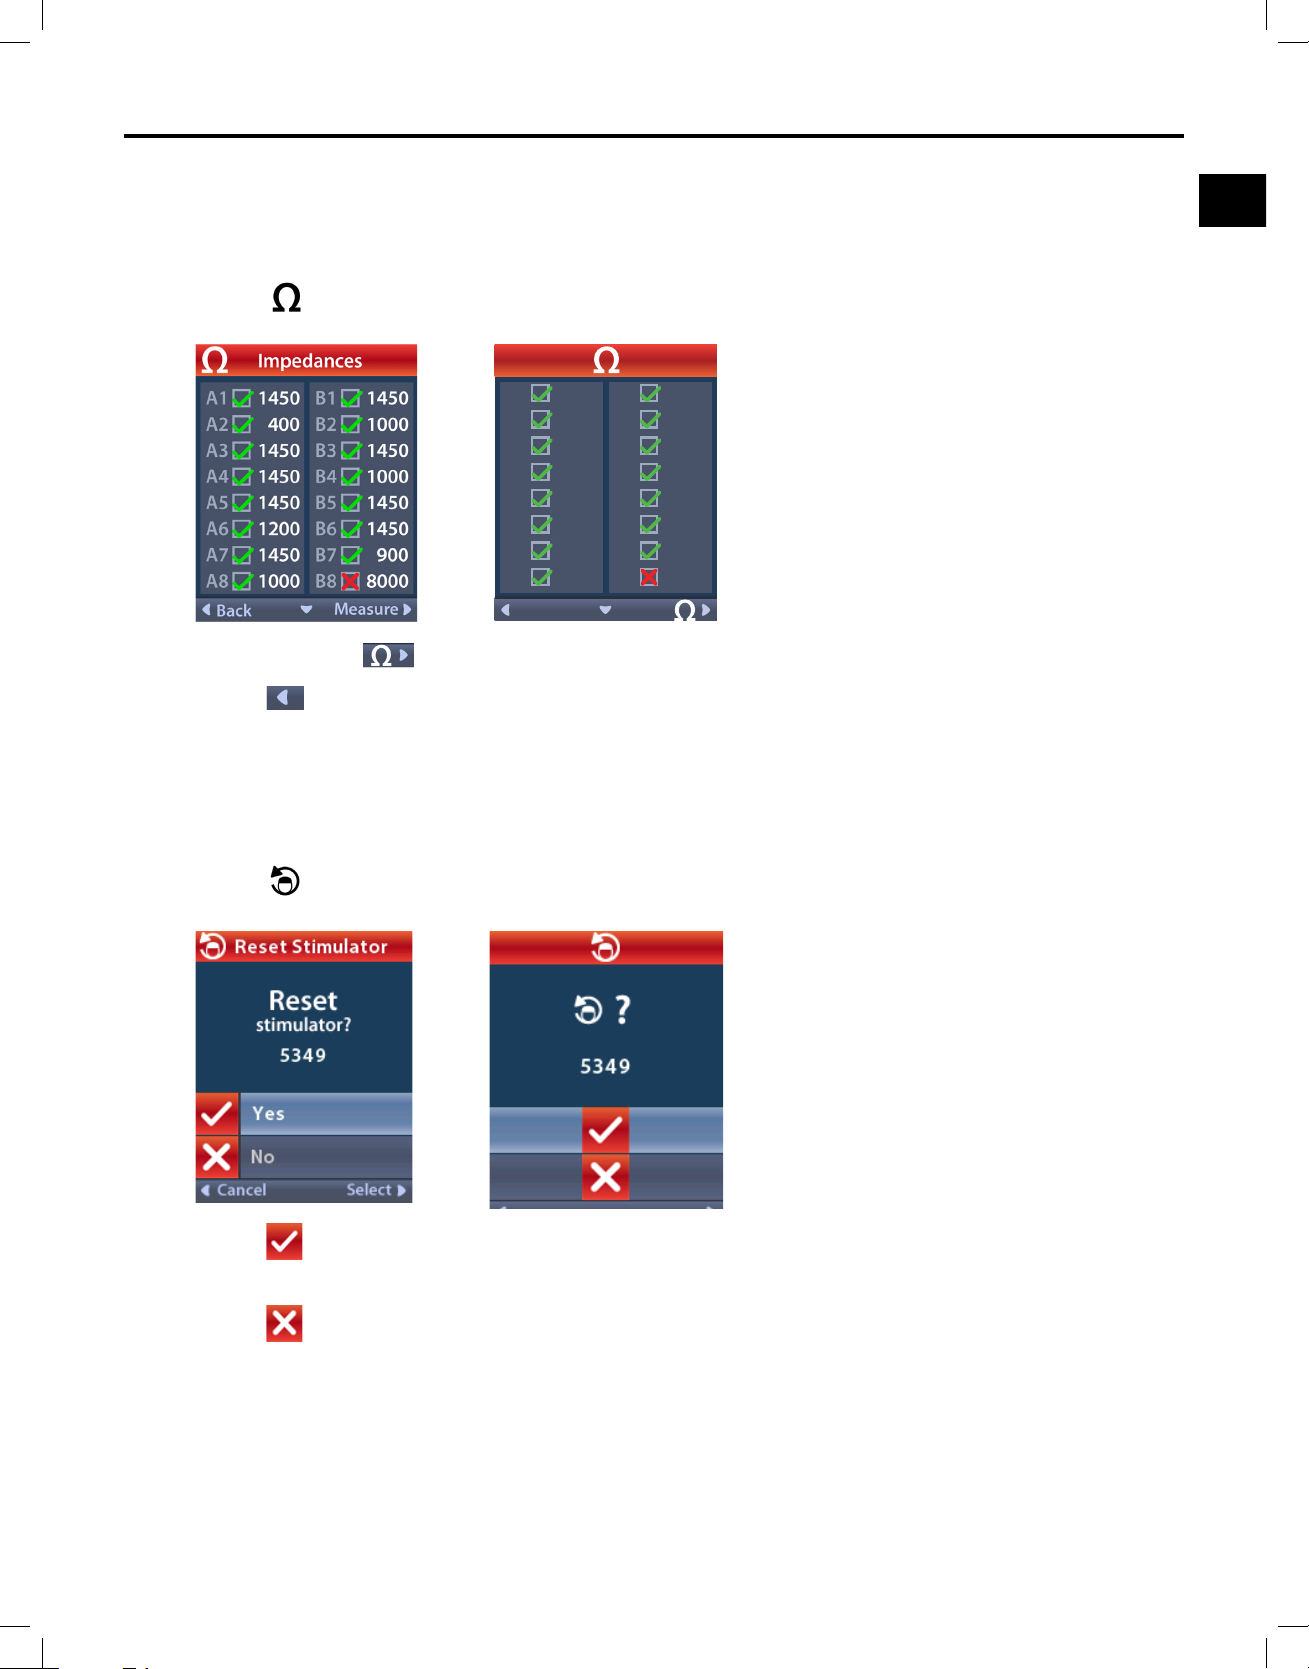
You can use the RC to check impedances.
From the Clinician Menu:
1. Select
Impedances. The Impedances screen displays.
2. Select Measure to check impedances.
3. Select
Back to go back to the Clinician Menu.
Reset Stimulator
1450A1
400A2
1450A3
1450A4
1450A5
1200A6
1450A7
1000A8
1450B1
1000B2
1450B3
1000B4
1450B5
1450B6
900B7
8000B8
You can use the RC to reset the Stimulator.
From the Clinician Menu:
1. Select
Reset Stimulator. The Reset Stimulator? screen displays.
2. Select Yes to reset the Stimulator.
or
Select
No to cancel the action.
Clinician Remote Control Directions for Use
92395488-02 27 of 1077
Page 32
Clinician Remote Control Directions for Use
en
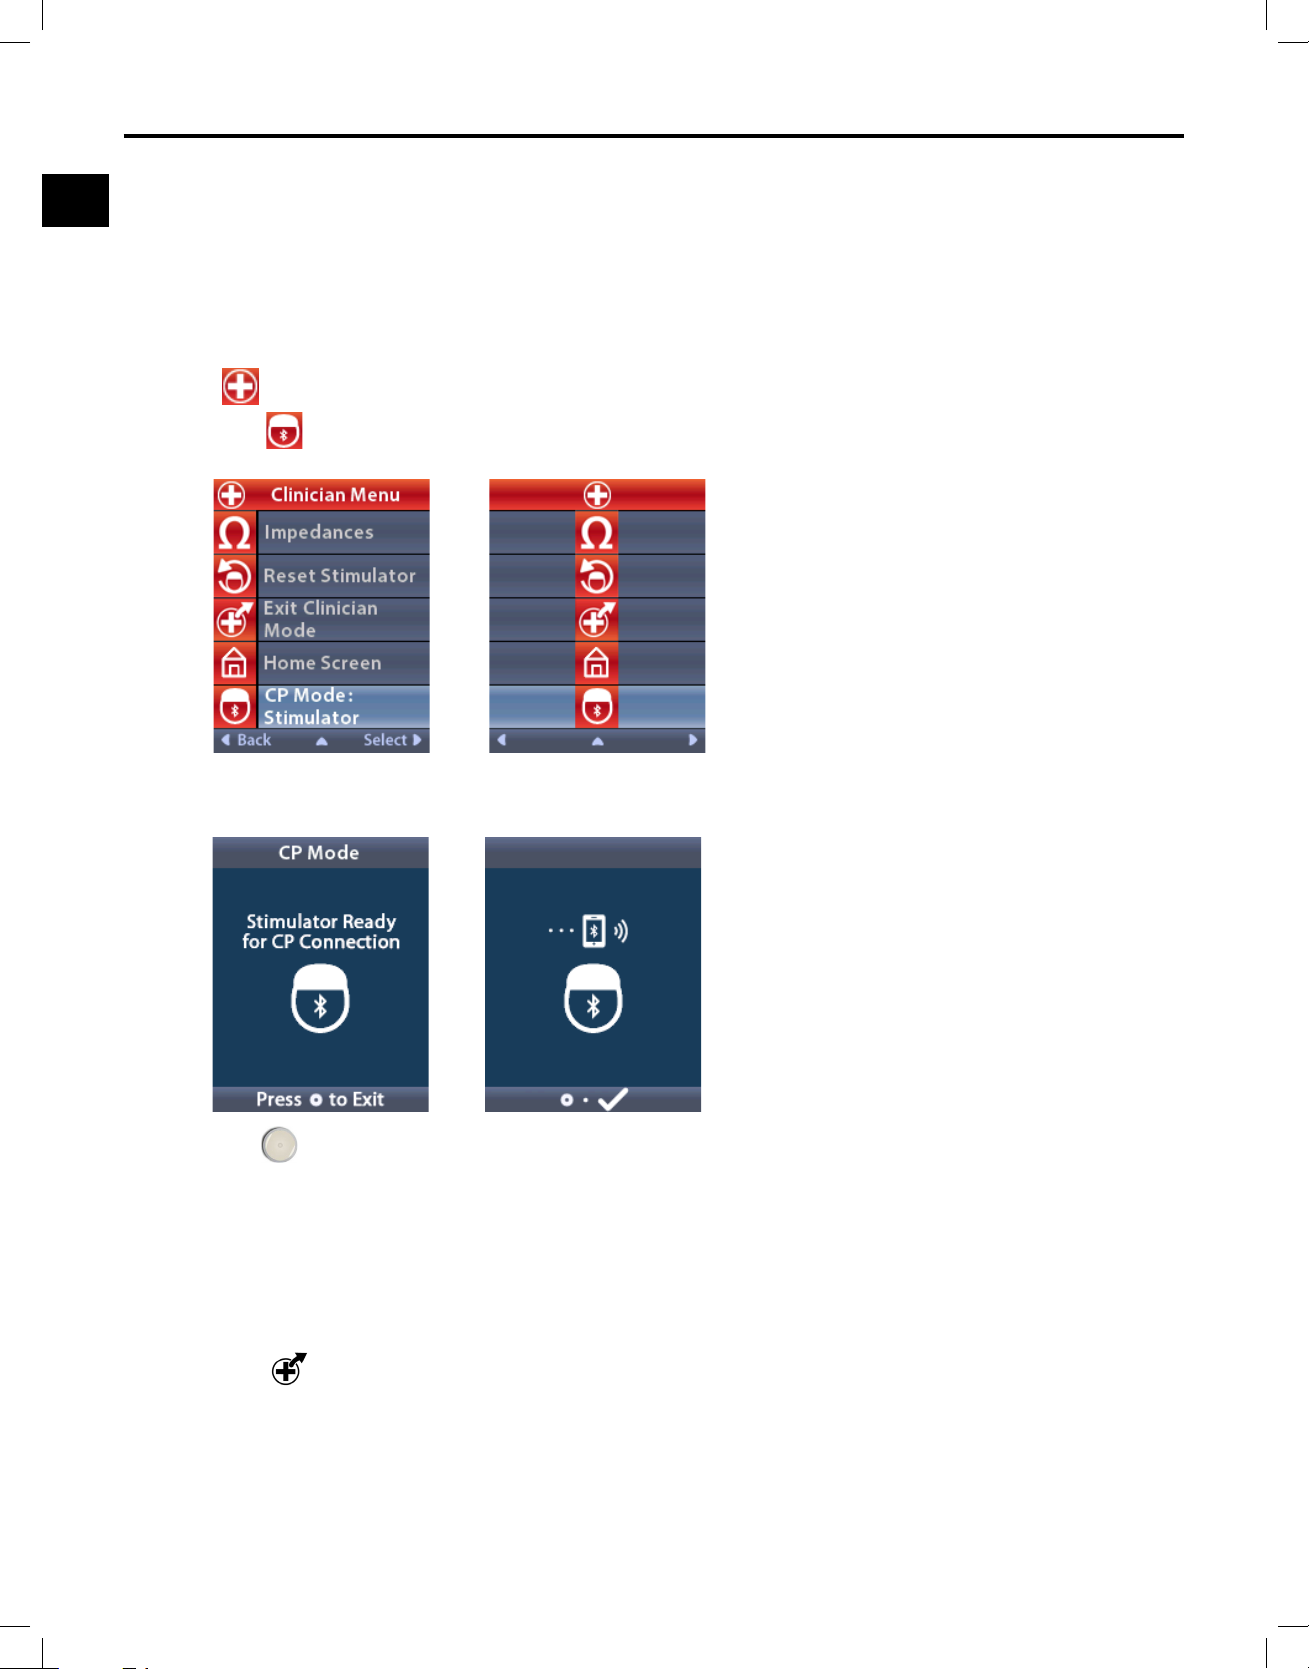
CP Mode: Stimulator
The Remote Control can be used to establish communication between the implanted Stimulator (IPG)
and Clinician Programmer (CP) for device programming. The Stimulator can be placed into CP Mode
(Pairing Mode) by following the steps below. Alternatively, from the Lock Screen, press and hold the P
button (approximately 5 seconds) until the screen displays “Stimulator Ready for CP Connection”. This
will place the Stimulator into CP Mode (Pairing Mode) so that the CP may connect to it.
From the
1. Select
Clinician Menu:
CP Mode: Stimulator.
2. Connect the CP to the Stimulator and proceed with device programming.
3. Press to exit CP Mode.
Note: CP Mode (Pairing Mode) must be enabled for the CP to connect to and program the
Stimulator using Bluetooth communication.
Exit Clinician Mode
From the Clinician Menu:
1. Select
Clinician Remote Control Directions for Use
92395488-02 28 of 1077
Exit Clinician Mode. The System Settings screen displays.
Page 33
en
MRI Mode
MRI Mode
A patient implanted with an MR Conditional System for Spinal Cord Stimulation (SCS) can undergo an
MR Conditional Scan when all instructions listed in the ImageReady™ Full Body MRI Guidelines for
WaveWriter Alpha and WaveWriter Alpha Prime SCS Systems are followed. Contact Boston Scientic
Technical Support or go to www.bostonscientic.com/manuals for the latest version of this manual.
Enabling MRI Mode
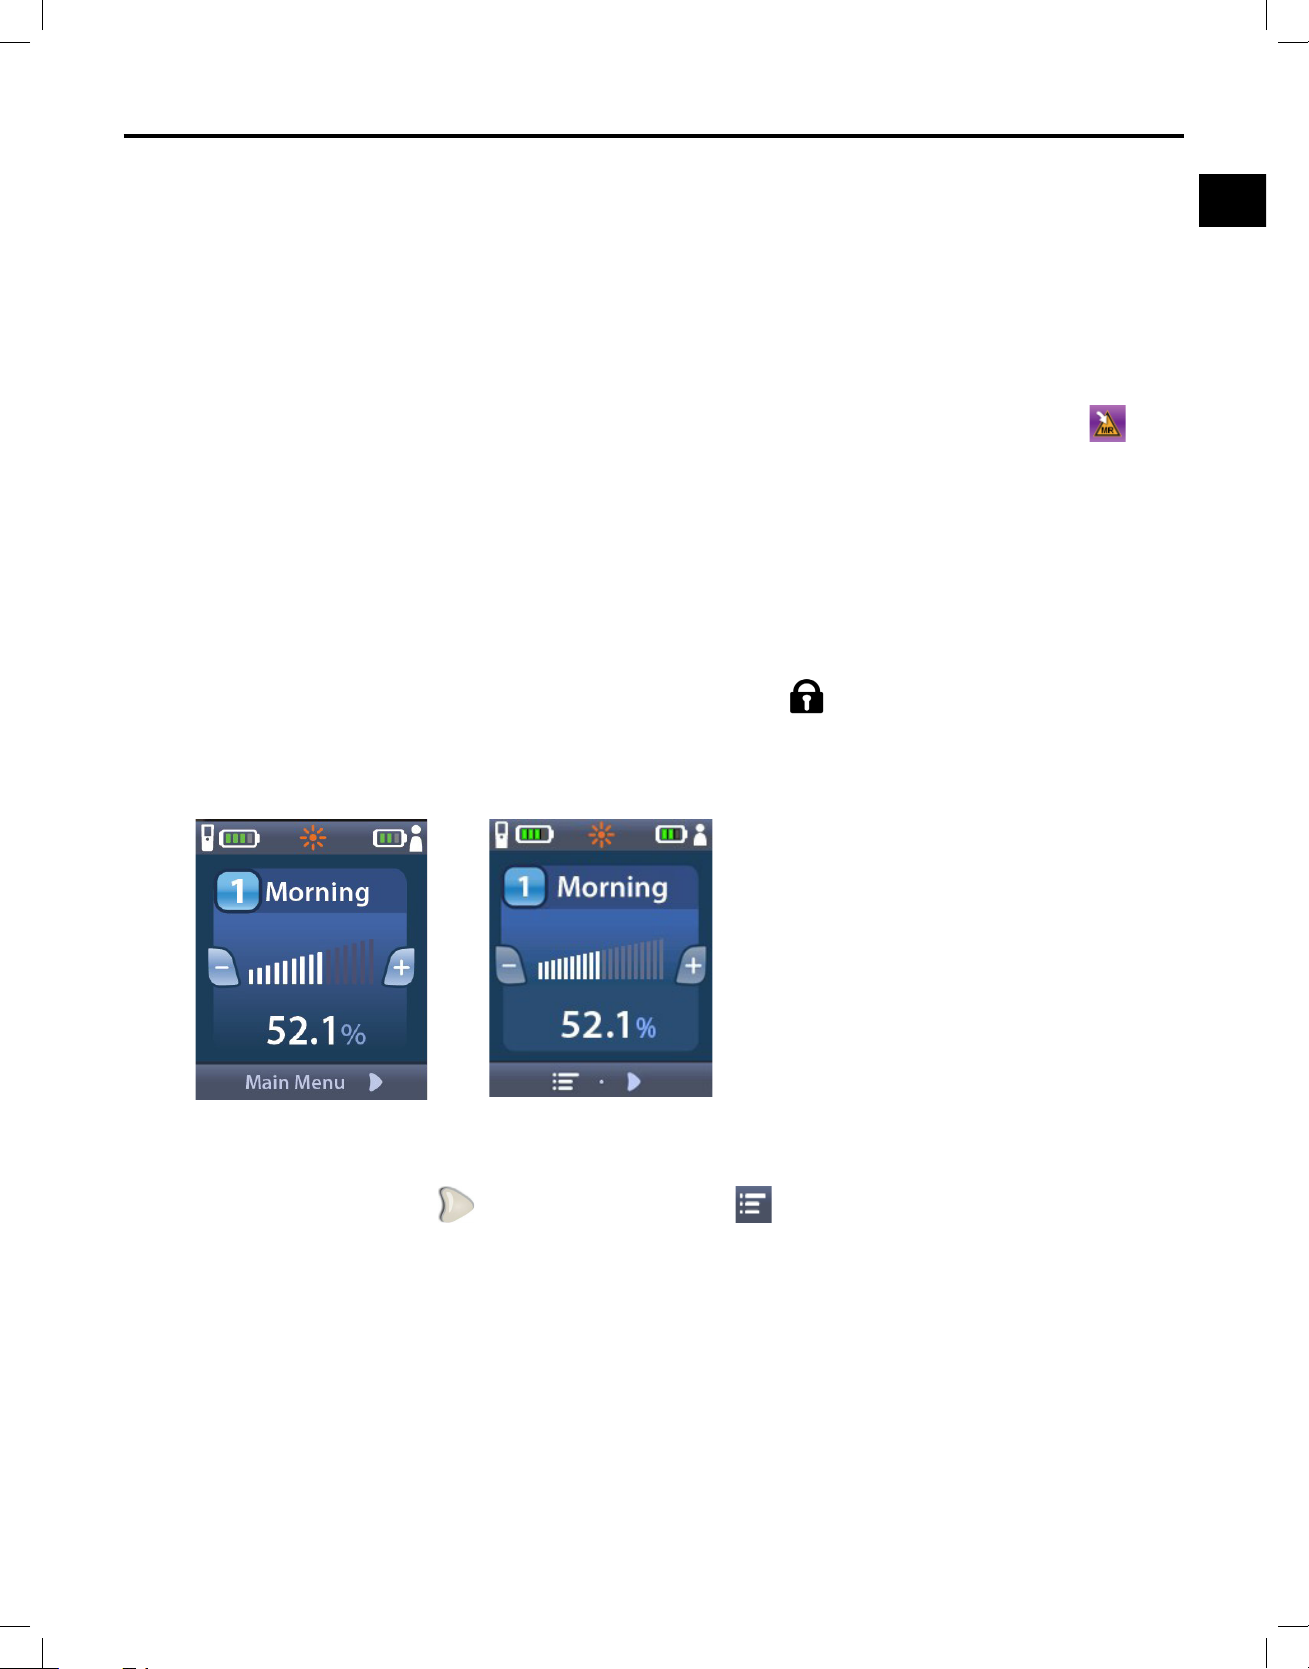
When the Remote Control is linked to an MR Conditional Stimulator, the Enter MRI Mode icon
will
appear on the System Settings screen. The Remote Control must be used to enable MRI Mode on the
Stimulator before performing an MRI scan on a patient. The stimulation therapy is automatically turned
OFF when MRI Mode is enabled.
Warning: Do not perform an MRI scan if MRI Mode is not enabled. Scanning under different
conditions may result in patient injury or device malfunction.
To enable MRI Mode:
1. Unlock the Remote Control by pressing the Lock/Unlock
button on the right side of the
Remote Control.
2. After unlocking the Remote Control, the Home screen appears.
Note: The Remote Control may display either a text screen in one of the languages provided or
an iconic screen.
3. Press the Right Arrow
button to navigate to the Main Menu.
Clinician Remote Control Directions for Use
92395488-02 29 of 1077
Page 34
Clinician Remote Control Directions for Use
en
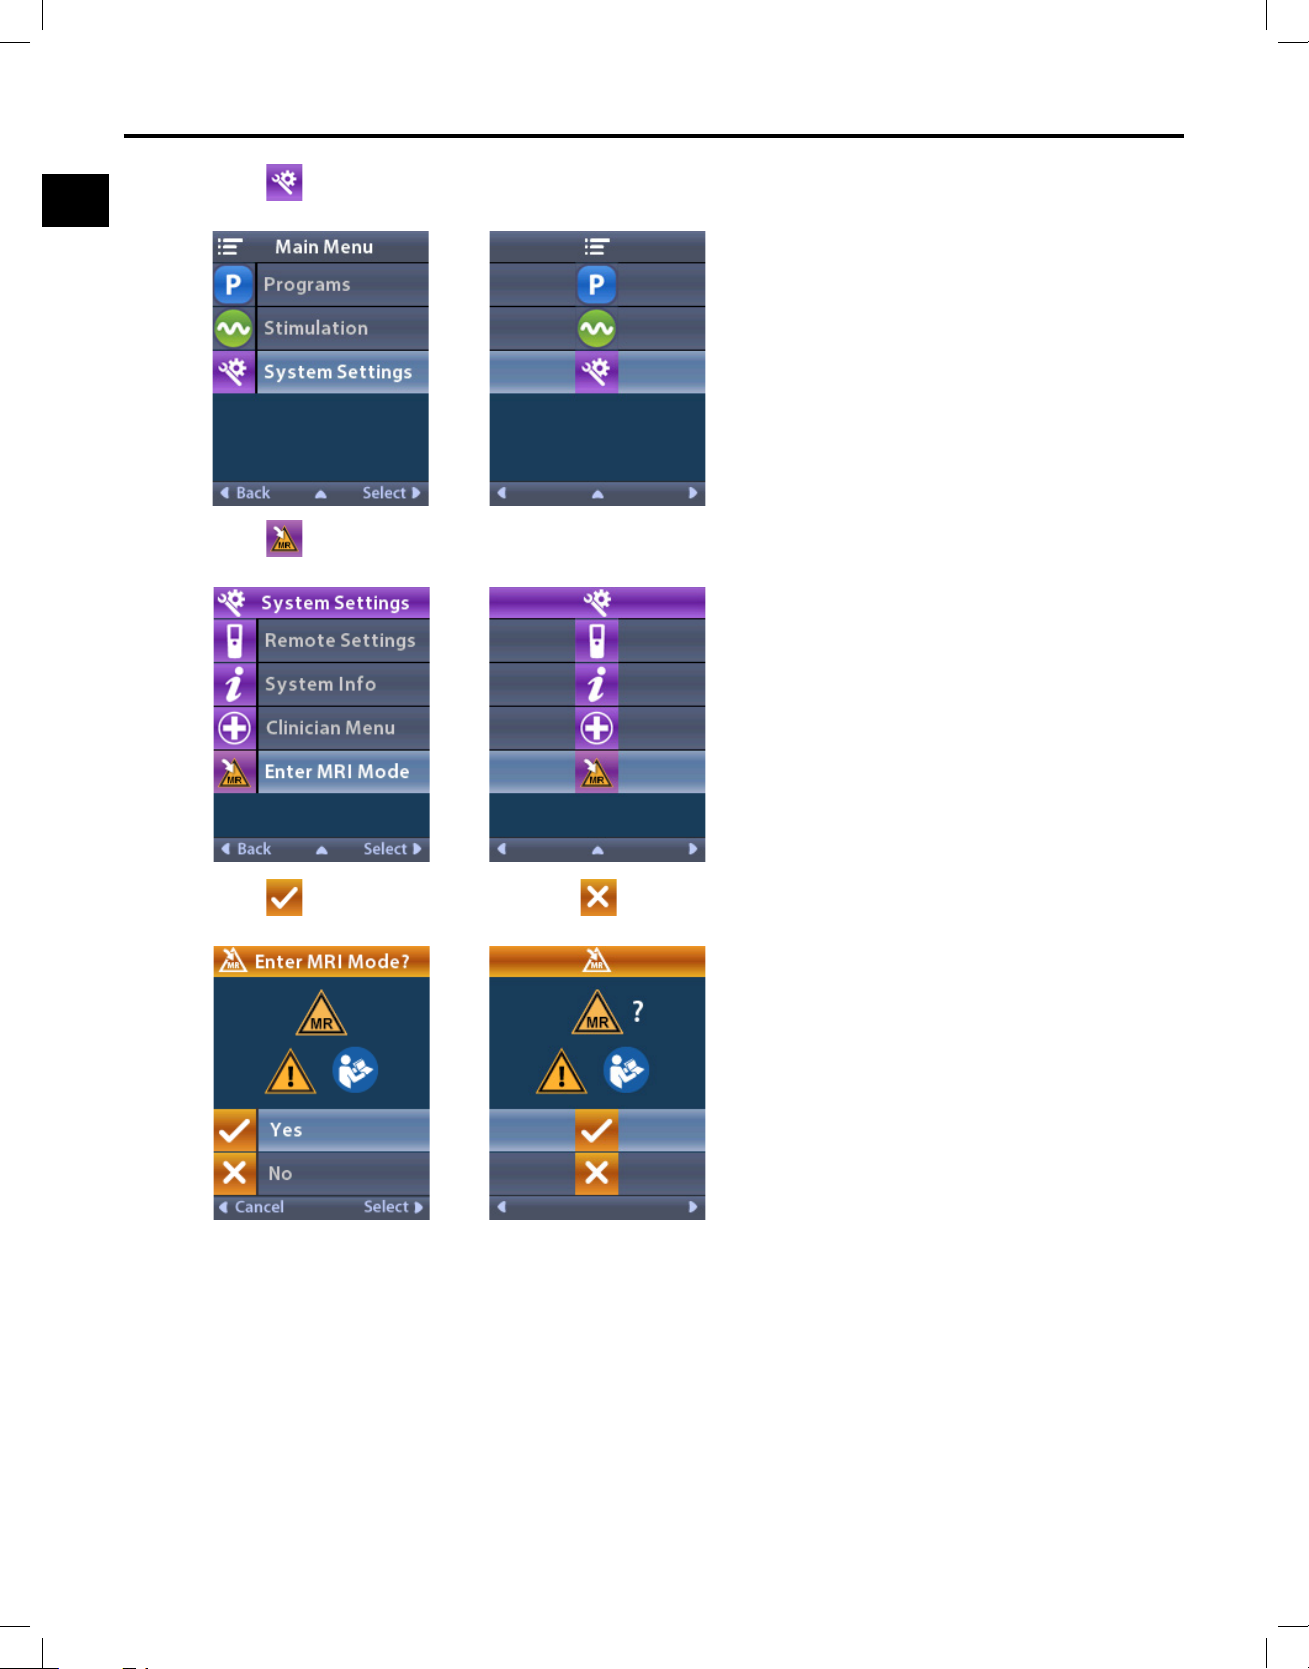
4. Select System Settings.
5. Select Enter MRI Mode.
6. Select Yes to enter MRI Mode or No to cancel the action.
Clinician Remote Control Directions for Use
92395488-02 30 of 1077
Page 35
MRI Mode
en
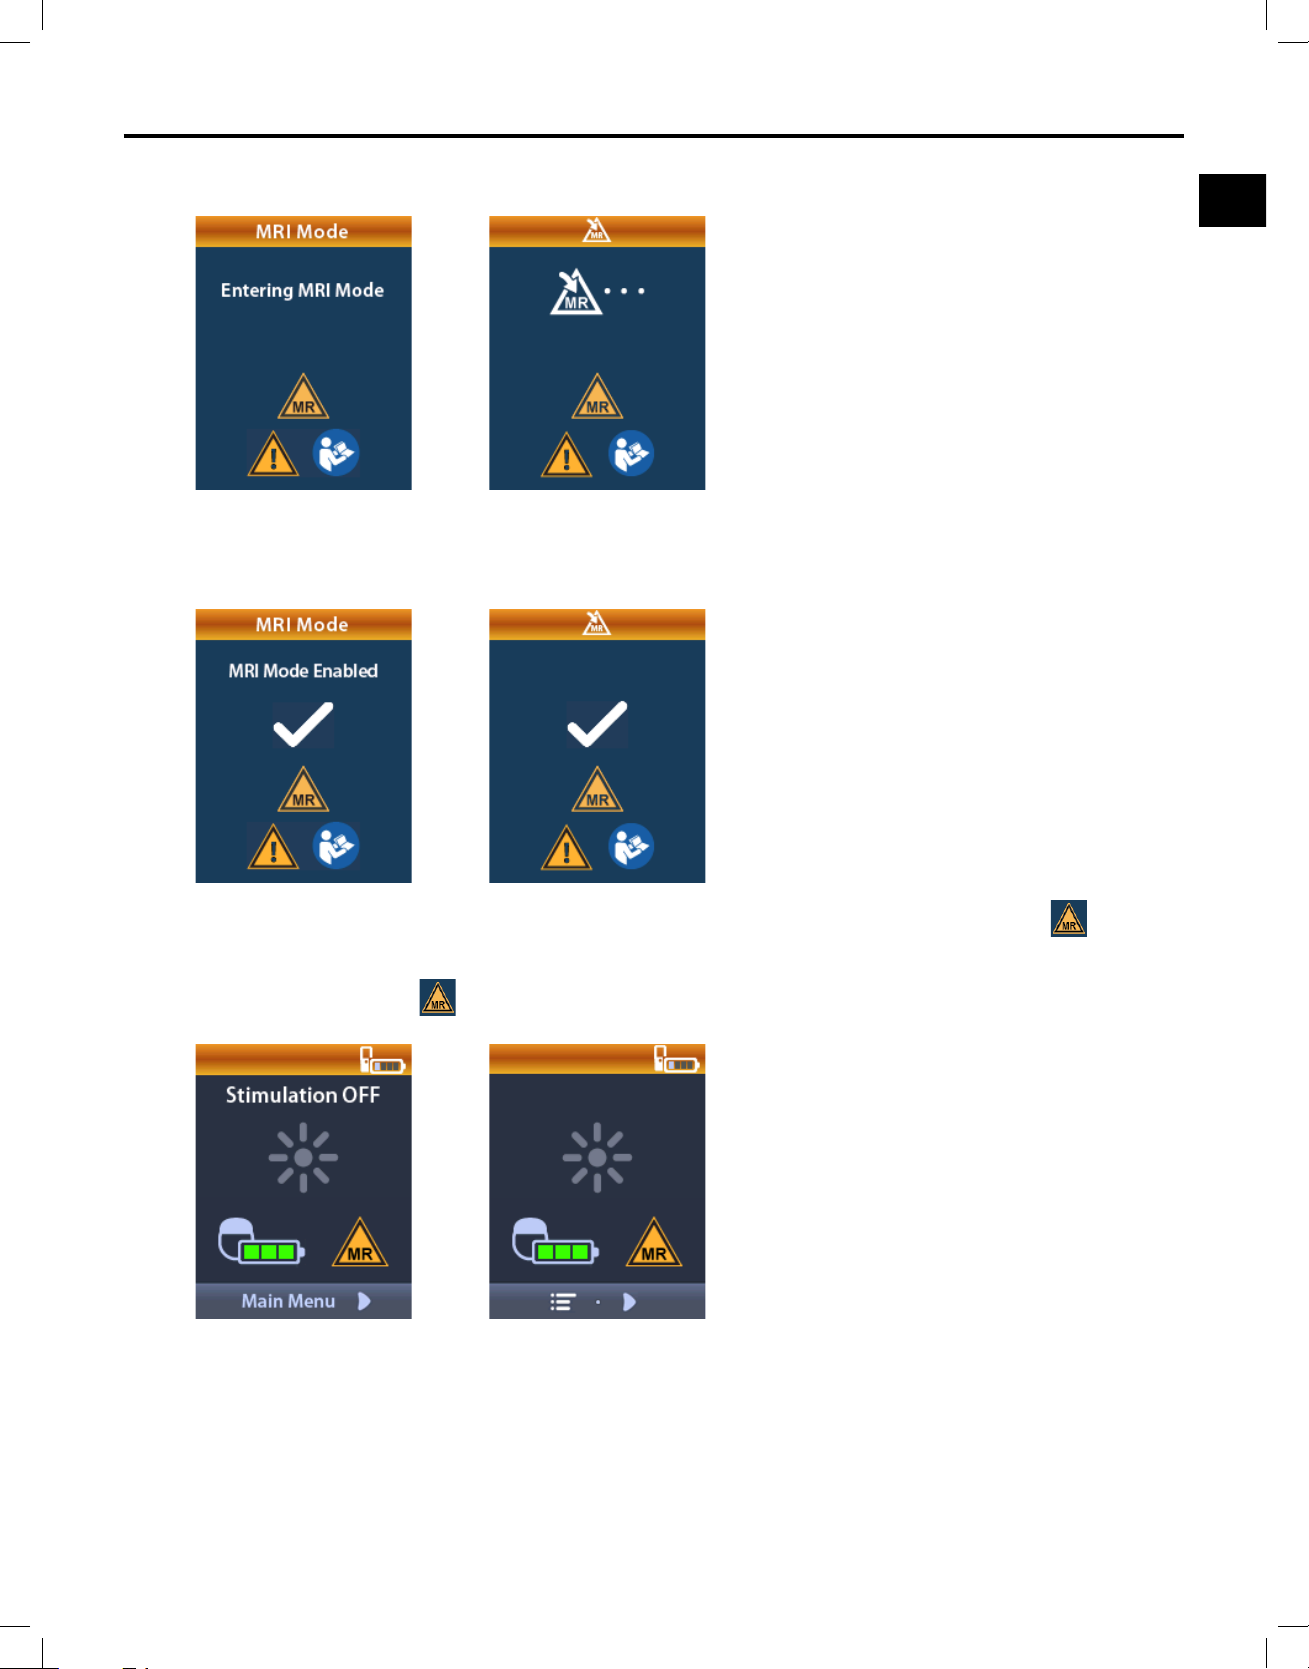
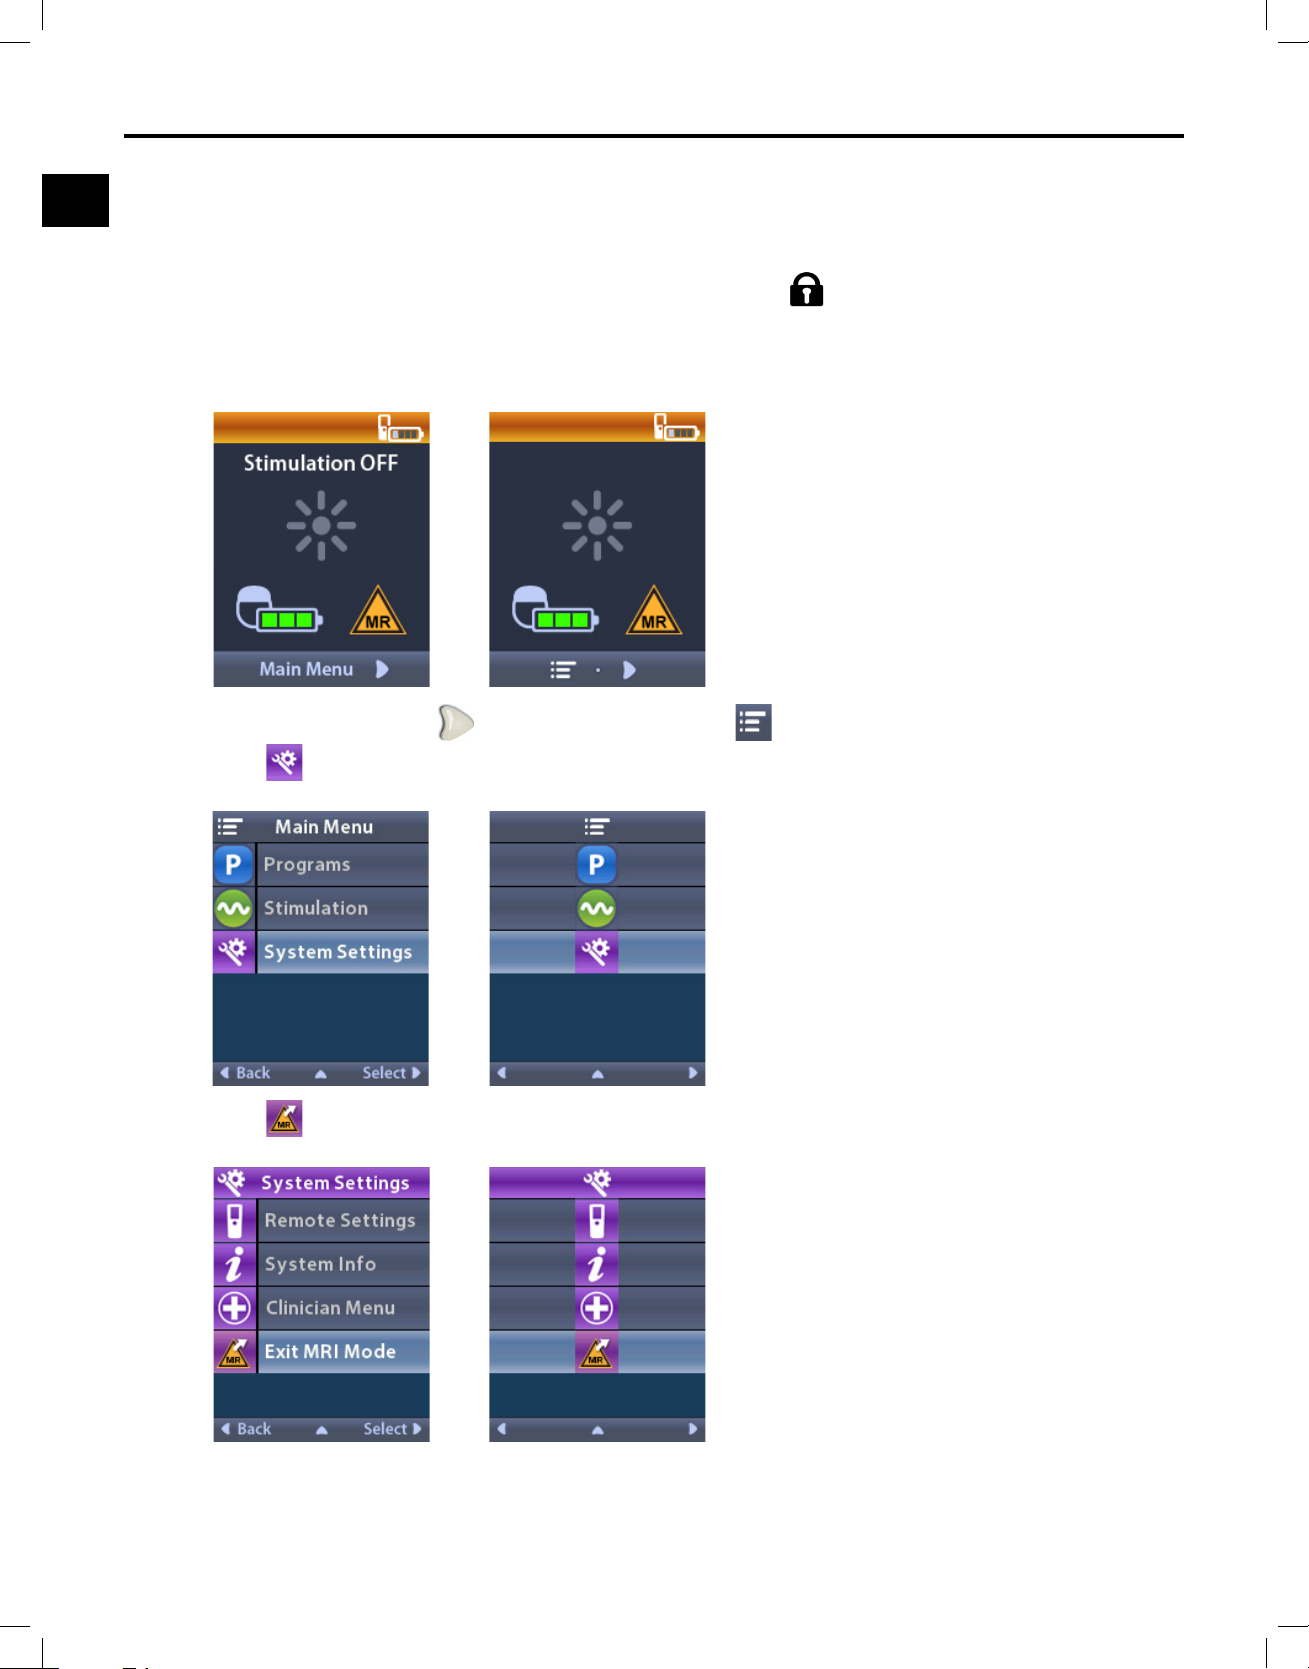
7. The System performs a series of checks before MRI Mode is enabled.
8. If MRI Mode is enabled, stimulation therapy is turned OFF and the MRI Mode Enabled
conrmation screen is displayed.
9. The Home screen on the Remote Control will display the MR Conditional Symbol if MRI
Mode is enabled. Always conrm that the Home screen of the Remote Control displays the MR
Conditional Symbol
before performing an MRI scan on the patient.
Clinician Remote Control Directions for Use
92395488-02 31 of 1077
Page 36
Clinician Remote Control Directions for Use
en
Disabling MRI Mode
Upon completion of the MRI scan, the Remote Control must be used to disable the MRI Mode.
To disable MRI Mode:
1. Unlock the Remote Control by pressing the Lock/Unlock
button on the right side of the
Remote Control.
2. After unlocking the Remote Control, the Home screen appears.
3. Press the Right Arrow button to navigate to the Main Menu.
4. Select
System Settings.
5. Select Exit MRI Mode.
Clinician Remote Control Directions for Use
92395488-02 32 of 1077
Page 37
en
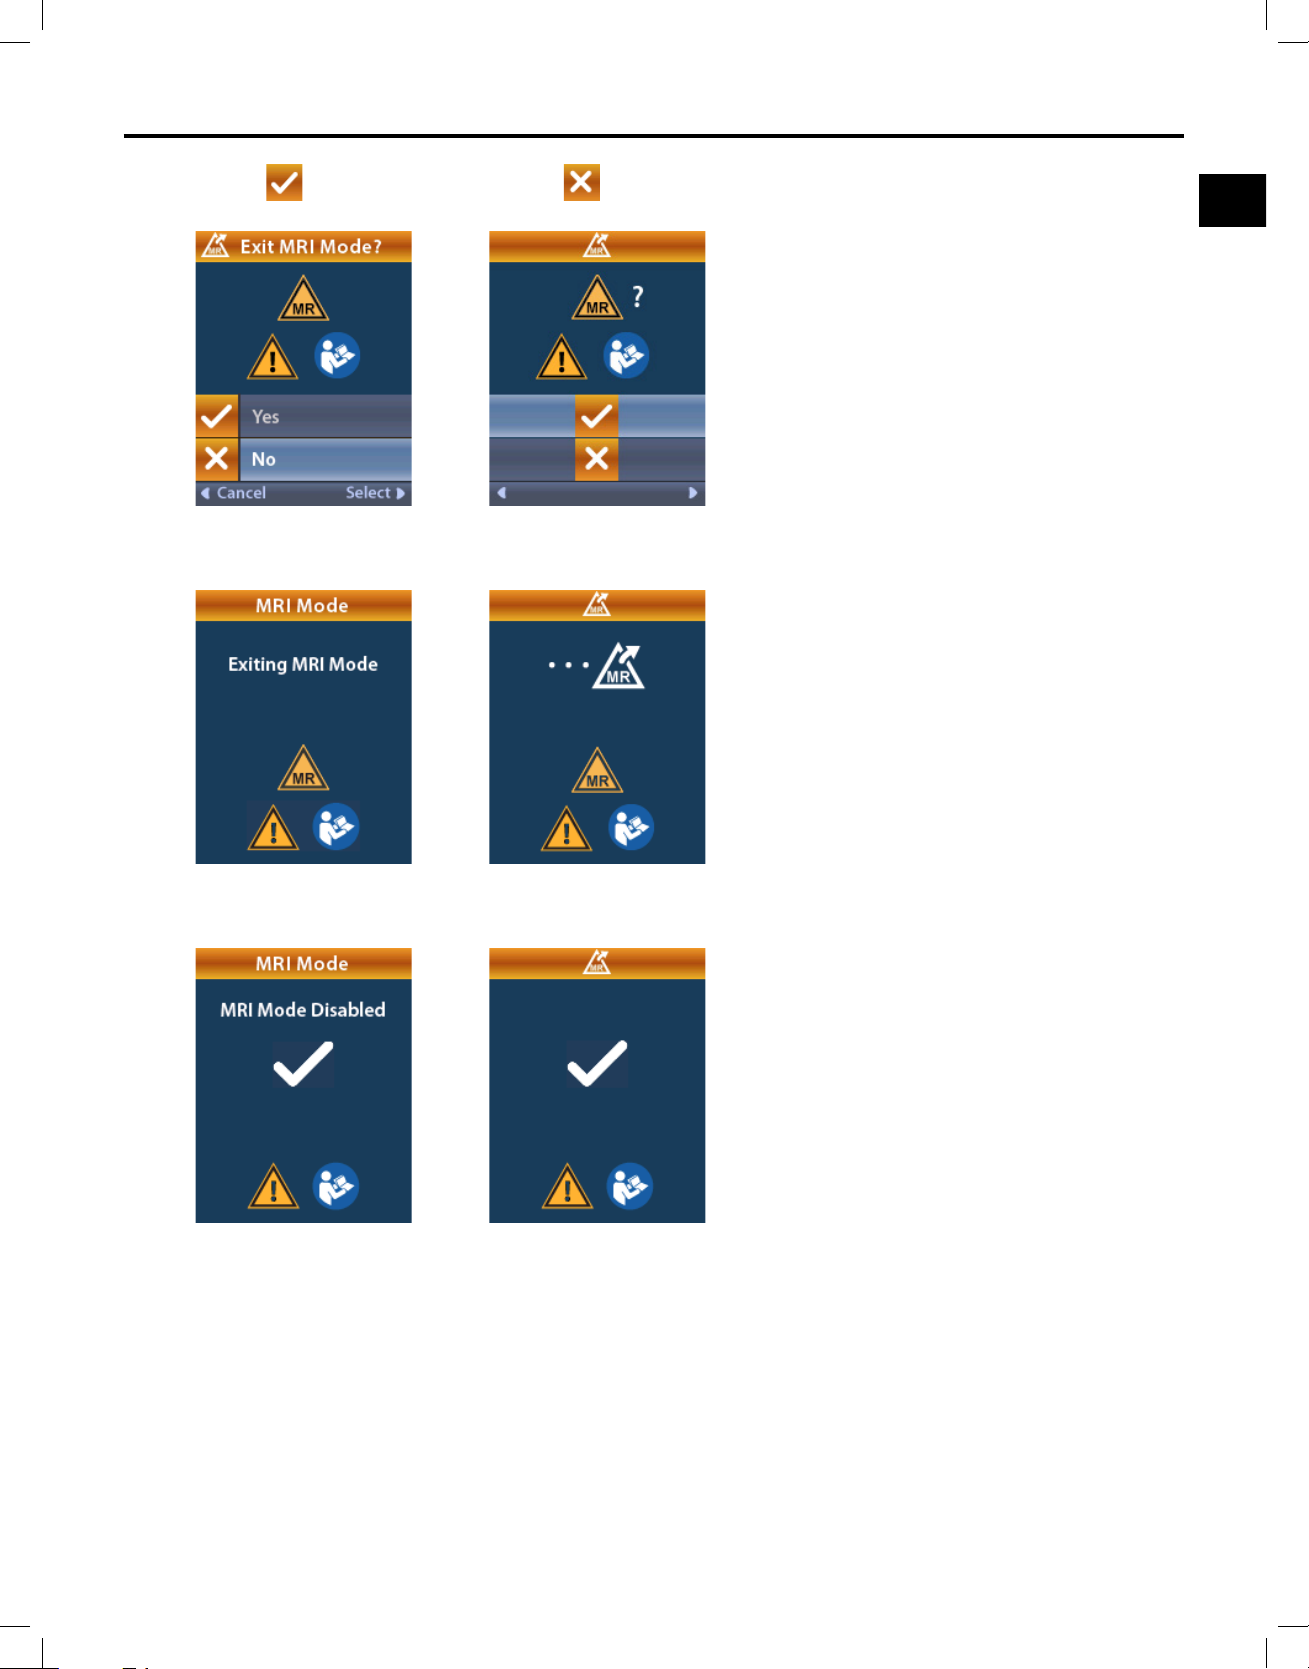
6. Select Yes to exit MRI Mode or No to cancel the action.
7. The Stimulator performs a series of checks before disabling MRI Mode.
MRI Mode
8. If MRI Mode is disabled, the MRI Mode Disabled conrmation screen is displayed.
Note: The Stimulator will retain the stimulation therapy and program settings that were set
before MRI Mode was enabled. If the stimulation therapy was ON before MRI Mode was
enabled, then disabling MRI Mode turns the stimulation therapy back ON. If stimulation therapy
was OFF before MRI Mode was enabled, then disabling MRI Mode keeps the stimulation
therapy OFF.
Clinician Remote Control Directions for Use
92395488-02 33 of 1077
Page 38
Clinician Remote Control Directions for Use
en
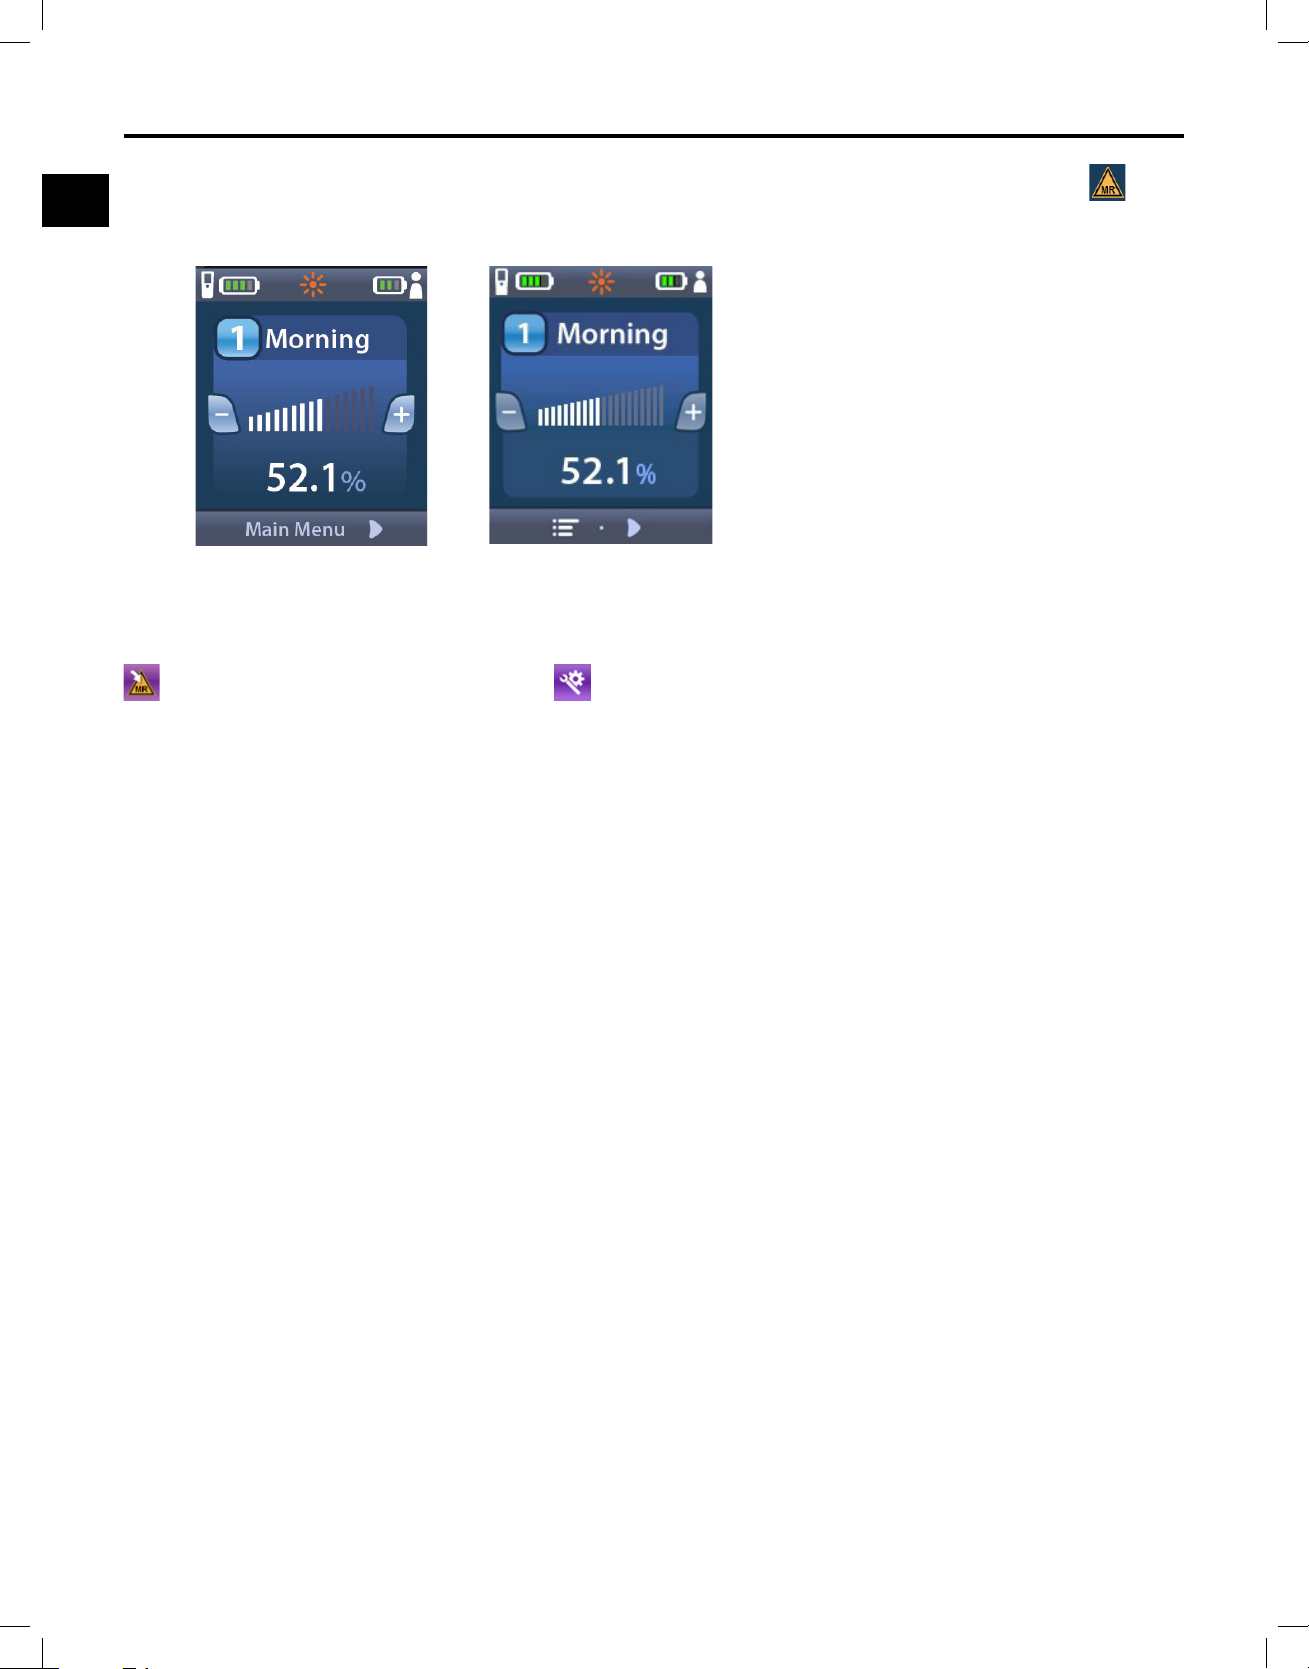
9. The Home screen on the Remote Control will not display the MR Conditional Symbol once
MRI Mode is disabled.
MRI Mode Error Screens
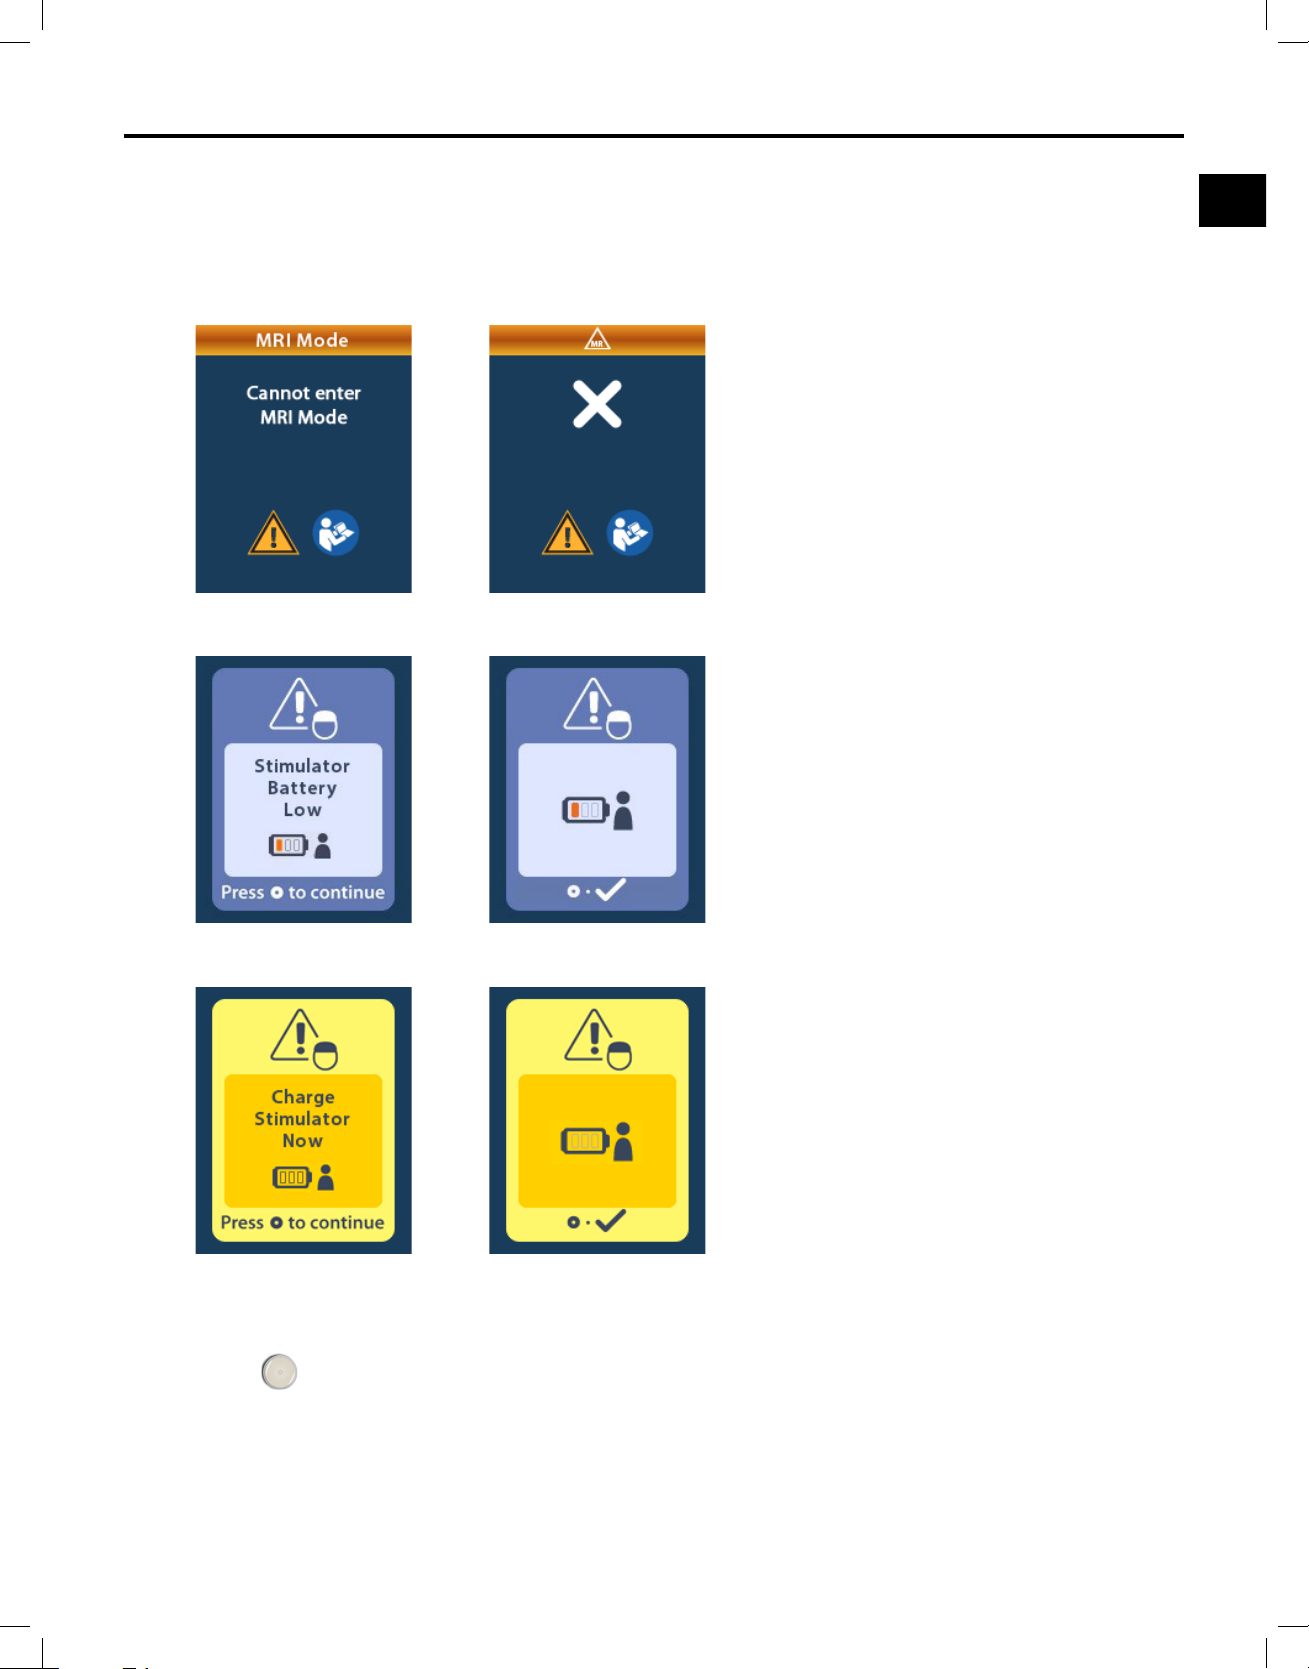
The System performs a series of checks prior to entering MRI Mode. These checks are performed once
Enter MRI Mode is selected from the System Settings. The Remote Control will display error
screens if:
• The Stimulator battery is low.
• The Impedance check detects an anomaly.
• There is an error in the Stimulator.
Clinician Remote Control Directions for Use
92395488-02 34 of 1077
Page 39
en
Charge Stimulator Now Screen (Rechargeable Stimulators Only)
MRI Mode
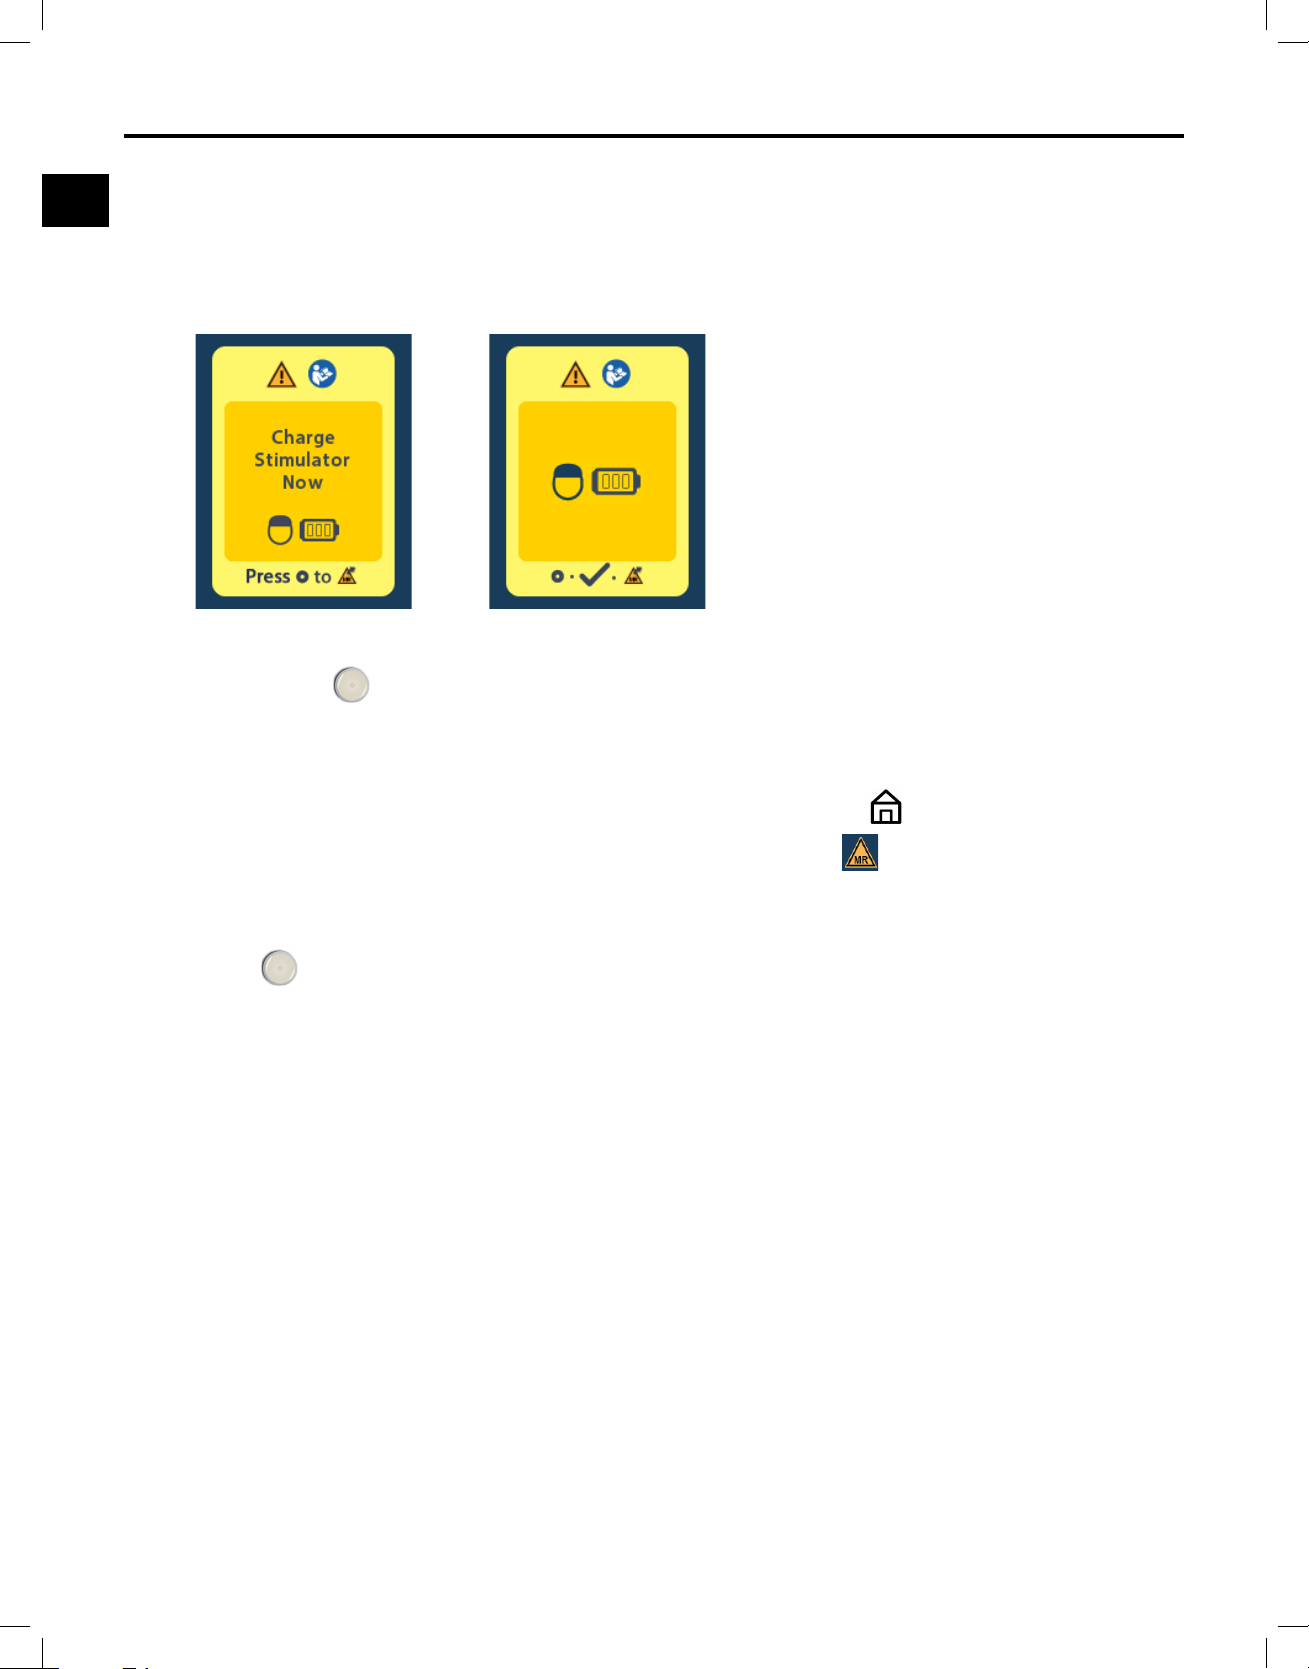
The Stimulator battery must be fully charged before MRI Mode is enabled. If the Stimulator battery is
not fully charged, the Remote Control will display one of the following messages instructing the patient
to charge the Stimulator before enabling MRI Mode.
Warning: Always check the Stimulator battery to ensure that it is fully charged before performing a
scan on the patient.
1. Press
to dismiss the error message and return to the Remote Control Home screen.
2. Instruct the patient to charge the Stimulator.
3. Enable MRI Mode once the Stimulator is fully charged.
Clinician Remote Control Directions for Use
92395488-02 35 of 1077
Page 40
Clinician Remote Control Directions for Use
en
Charge Stimulator Now or Disable MRI Mode Screen (Rechargeable
Stimulators Only)
If MRI Mode has already been enabled and the Stimulator battery power falls below the recommended
value, the Remote Control will display a message instructing the patient to charge the Stimulator.
To charge the Stimulator without disabling MRI Mode:
1. Do not press
.
2. Instruct the patient to charge the Stimulator.
3. Check the Remote Control to conrm that the error message has cleared.
4. Navigate to the Home screen on the Remote Control by pressing
Remote Control and conrm that the MR Conditional Symbol
on the side panel of the
is displayed on the Home
screen.
The patient can also disable the MRI Mode before charging the Stimulator:
1. Press
to disable the MRI Mode.
2. Instruct the patient to fully charge the Stimulator.
3. Check the Remote Control to conrm that the error message has cleared.
4. Enable MRI Mode by following instructions in the “Enabling MRI Mode” section of this manual.
Caution: The Charger and Remote Control are MR Unsafe and must not be brought into the
MRI scanner room.
Clinician Remote Control Directions for Use
92395488-02 36 of 1077
Page 41
MRI Mode
en
Stimulator Battery Low Screen Due to ERI or EOS (Non‑Rechargeable
Stimulators Only)
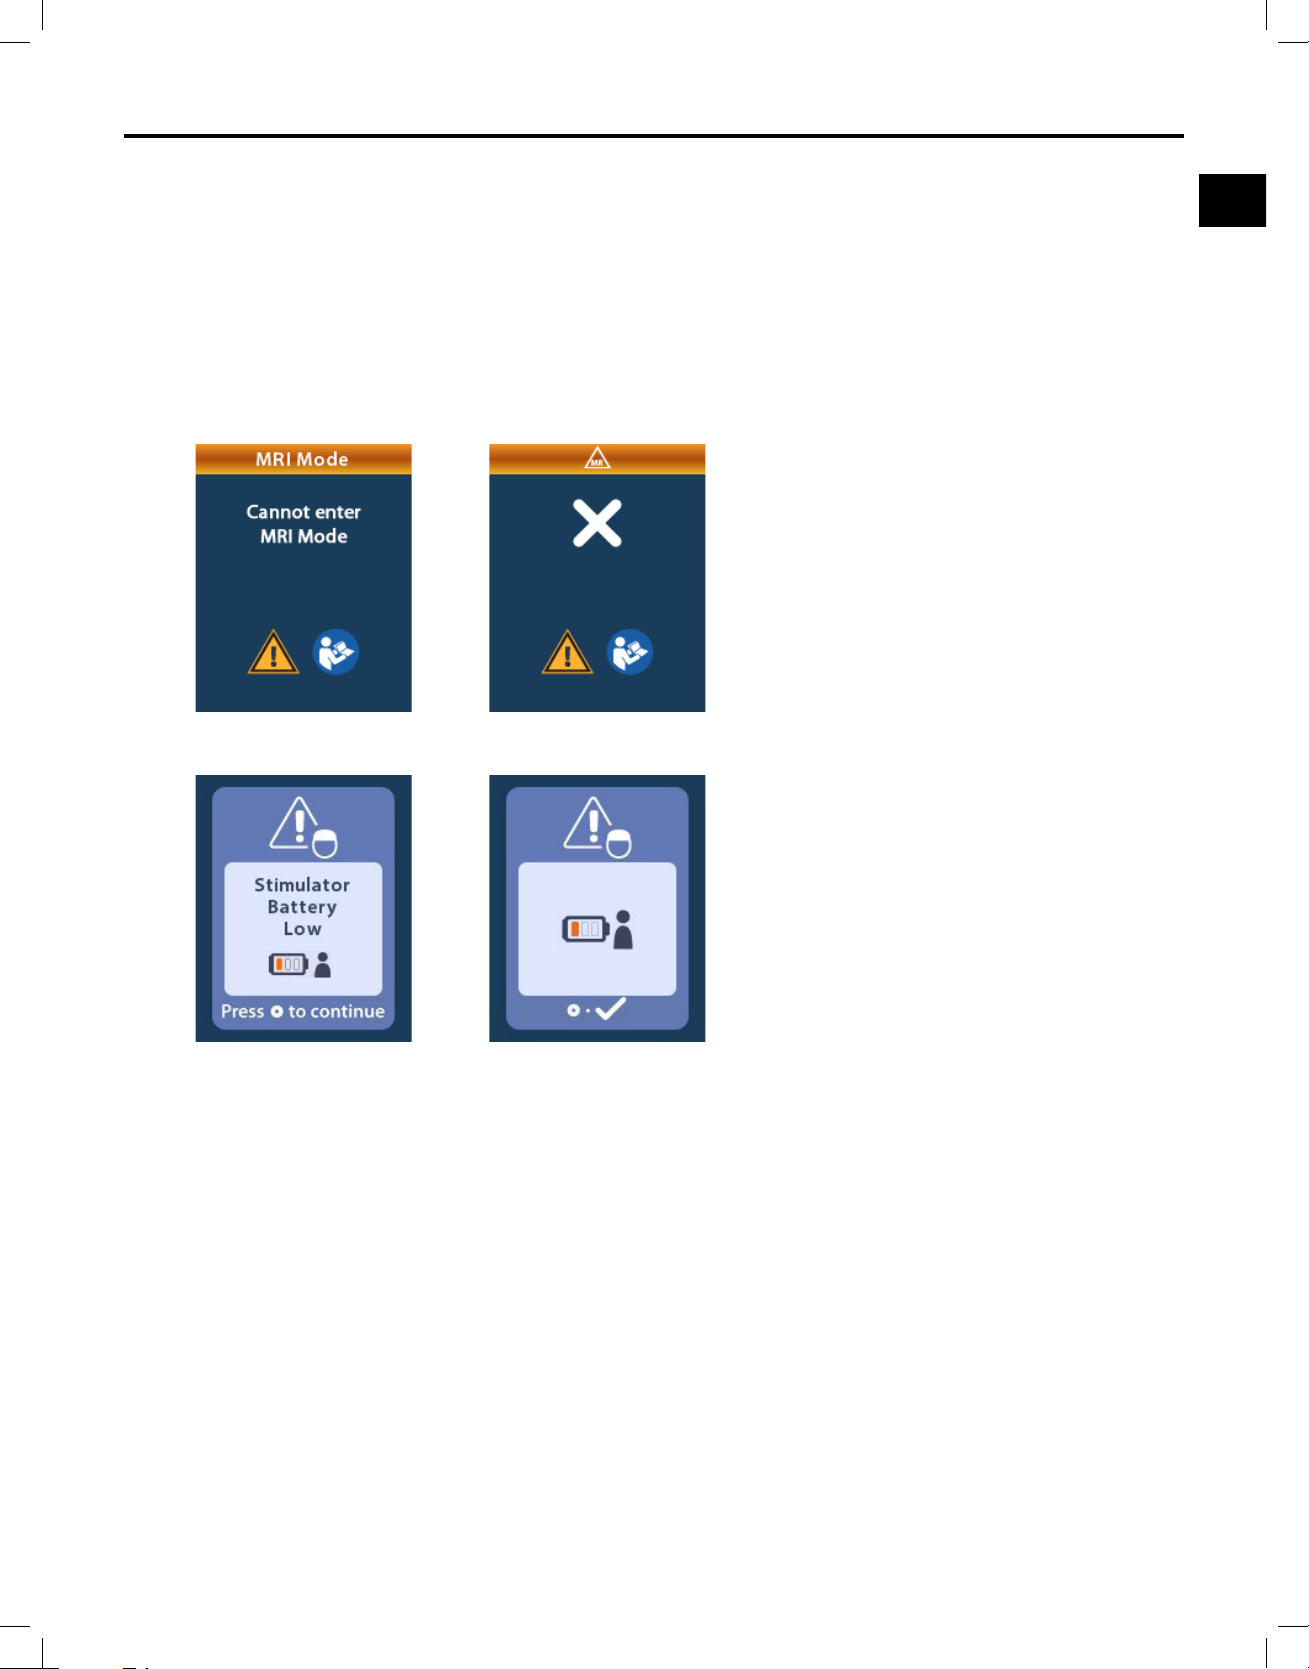
A Stimulator that has entered the Elective Replacement Indicator (ERI) or End of Service (EOS) period
cannot be placed into MRI Mode. MRI Mode will not be enabled and the Remote Control will display
“Cannot enter MRI Mode” and then “Stimulator Battery Low” messages.
Warning: Do not perform an MRI scan if MRI Mode is not enabled. Scanning under different
conditions may result in patient injury or device malfunction.
Clinician Remote Control Directions for Use
92395488-02 37 of 1077
Page 42
Clinician Remote Control Directions for Use
en
ERI or EOS During MRI Mode
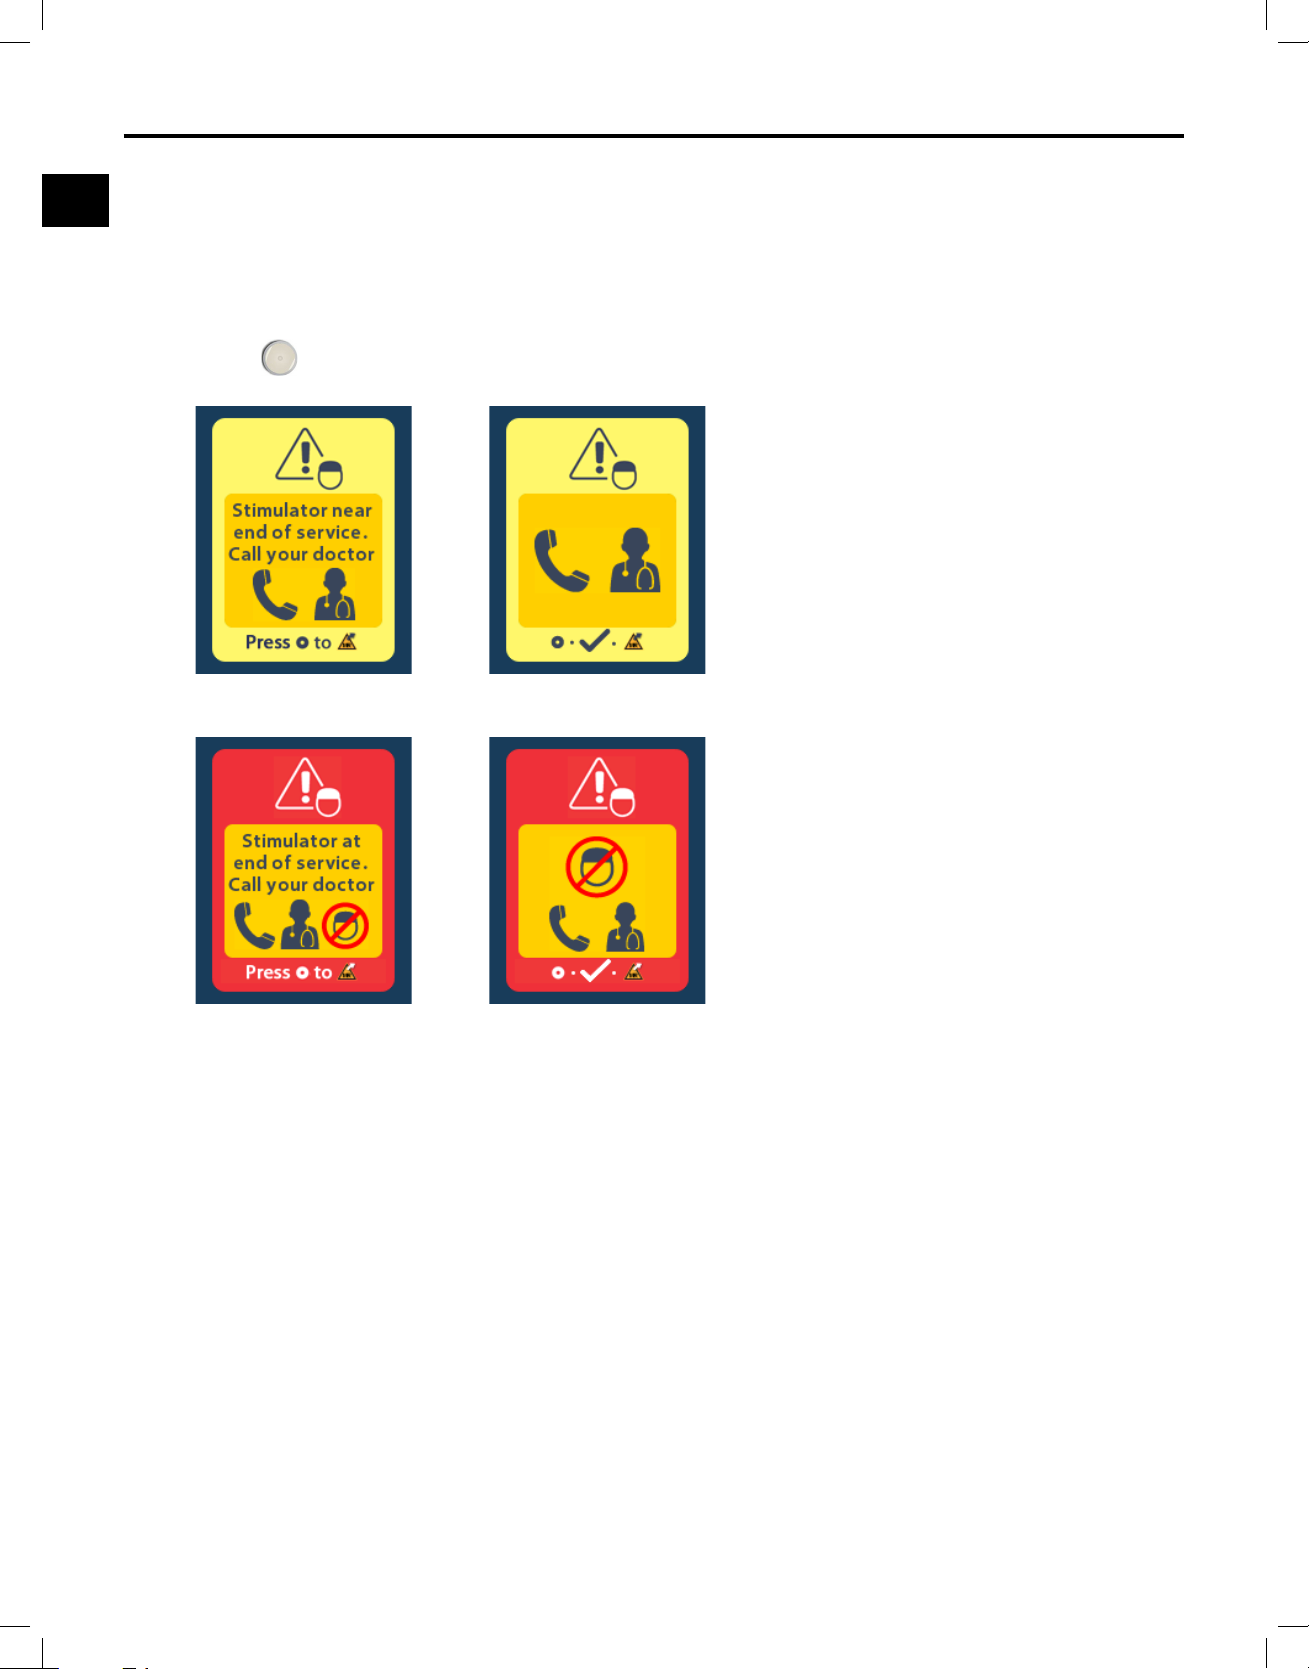
If MRI Mode has already been enabled and the Stimulator battery power falls below the threshold,
the Remote Control will display a message informing the patient that the Stimulator has entered the
Elective Replacement Indicator (ERI) period or has reached End of Service (EOS) of the device.
The patient can disable MRI Mode:
1. Press
to disable the MRI Mode.
2. Check the Remote Control to conrm that the Stimulator battery error message still appears.
See the “ERI (Elective Replacement Indicator) Screen (For Non-Rechargeable Stimulator Only)”
section of this manual.
Caution: The Remote Control is MR Unsafe and must not be brought into the MRI scanner
room.
Warning: Do not perform an MRI scan if MRI Mode is not enabled. Scanning under different
conditions may result in patient injury or device malfunction.
Clinician Remote Control Directions for Use
92395488-02 38 of 1077
Page 43
en
Impedances Out Of Range Screen
MRI Mode
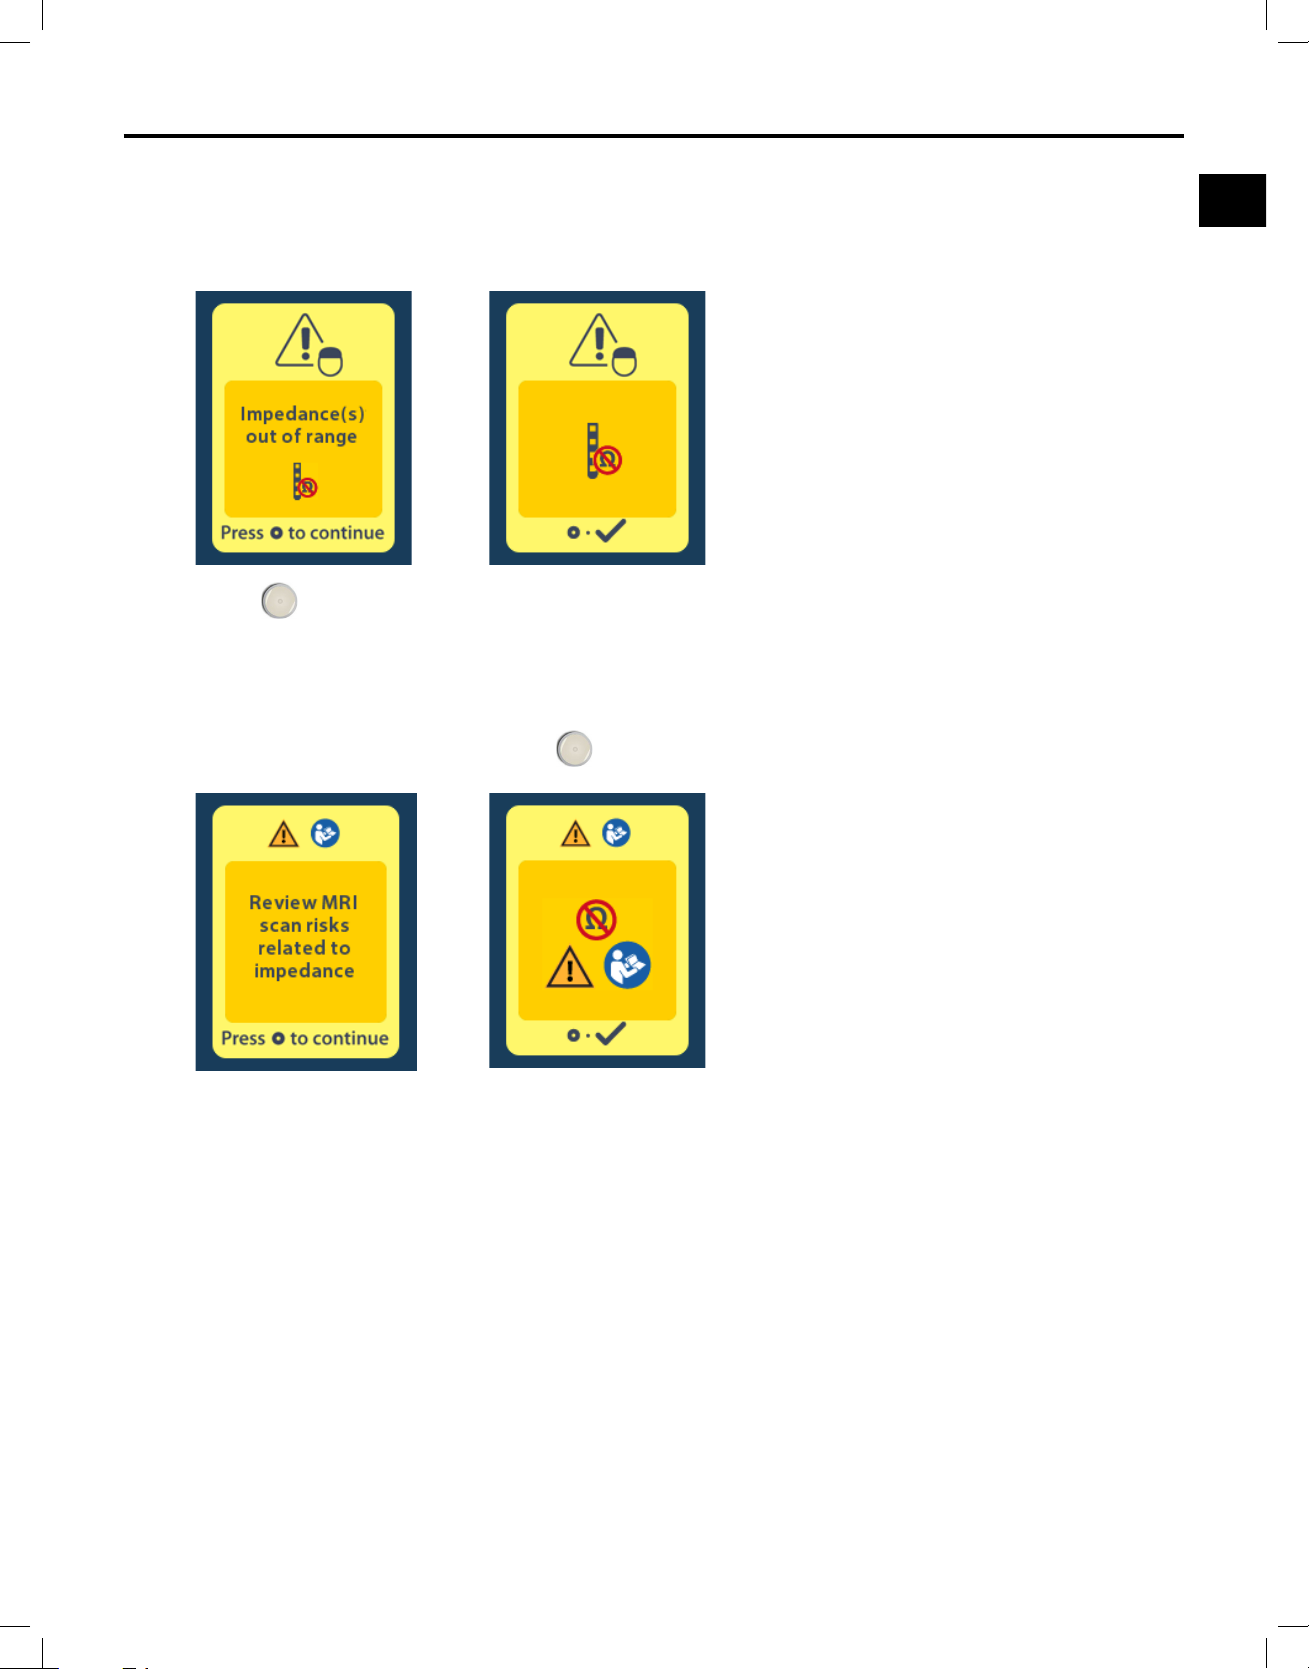
The impedances must be within the acceptable range before MRI Mode is enabled. If the impedances
are not within the acceptable range, the Remote Control will display an error message.
1. Press to continue.
2. The Remote Control displays a new message instructing the user to review the MRI scan
risks related to abnormal impedances. Review the “Impedance Out of Range” section in the
ImageReady Full Body MRI Guidelines for WaveWriter Alpha and WaveWriter Alpha Prime SCS
Systems before proceeding. Press
to continue.
Clinician Remote Control Directions for Use
92395488-02 39 of 1077
Page 44
Clinician Remote Control Directions for Use
en
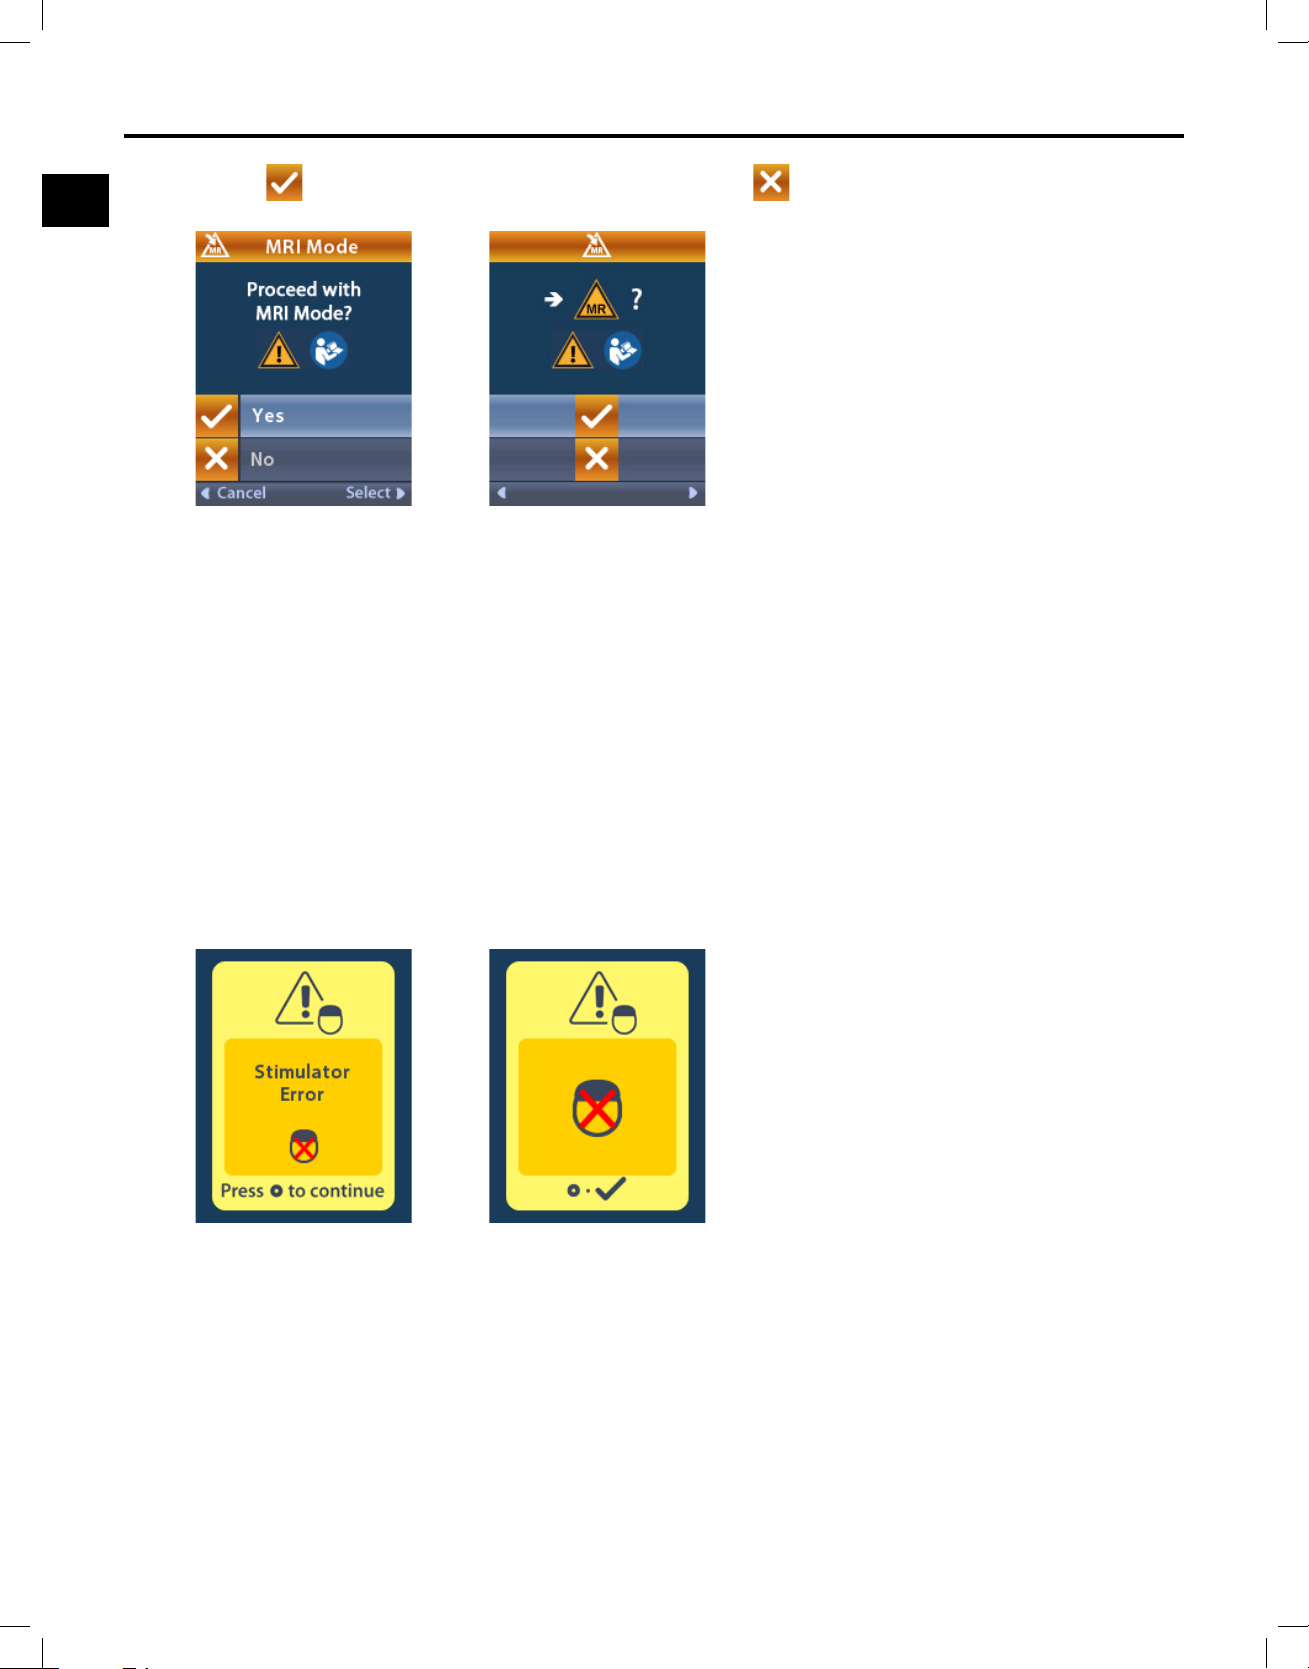
3. Select Yes to proceed with enabling MRI Mode or No to cancel the action.
Warning: An MRI scan is not recommended when the impedances are not within the acceptable
range. Higher or lower than normal impedances could indicate compromised Stimulator-Lead
integrity. Scanning under these conditions may increase the risk of potential adverse effects that
are listed in the “Safety Information” section of the ImageReady Full Body MRI Guidelines for
WaveWriter Alpha and WaveWriter Alpha Prime SCS Systems.
Stimulator Error Screen
If the system check fails due to a Stimulator error, MRI Mode will not be enabled and the Remote
Control will display the Stimulator Error screen. Do not perform an MRI scan if this error is displayed.
Instruct the patient to contact the healthcare provider managing their System or Boston Scientic
Technical Support.
Clinician Remote Control Directions for Use
92395488-02 40 of 1077
Page 45
en
Recharging the RC
Recharging the RC
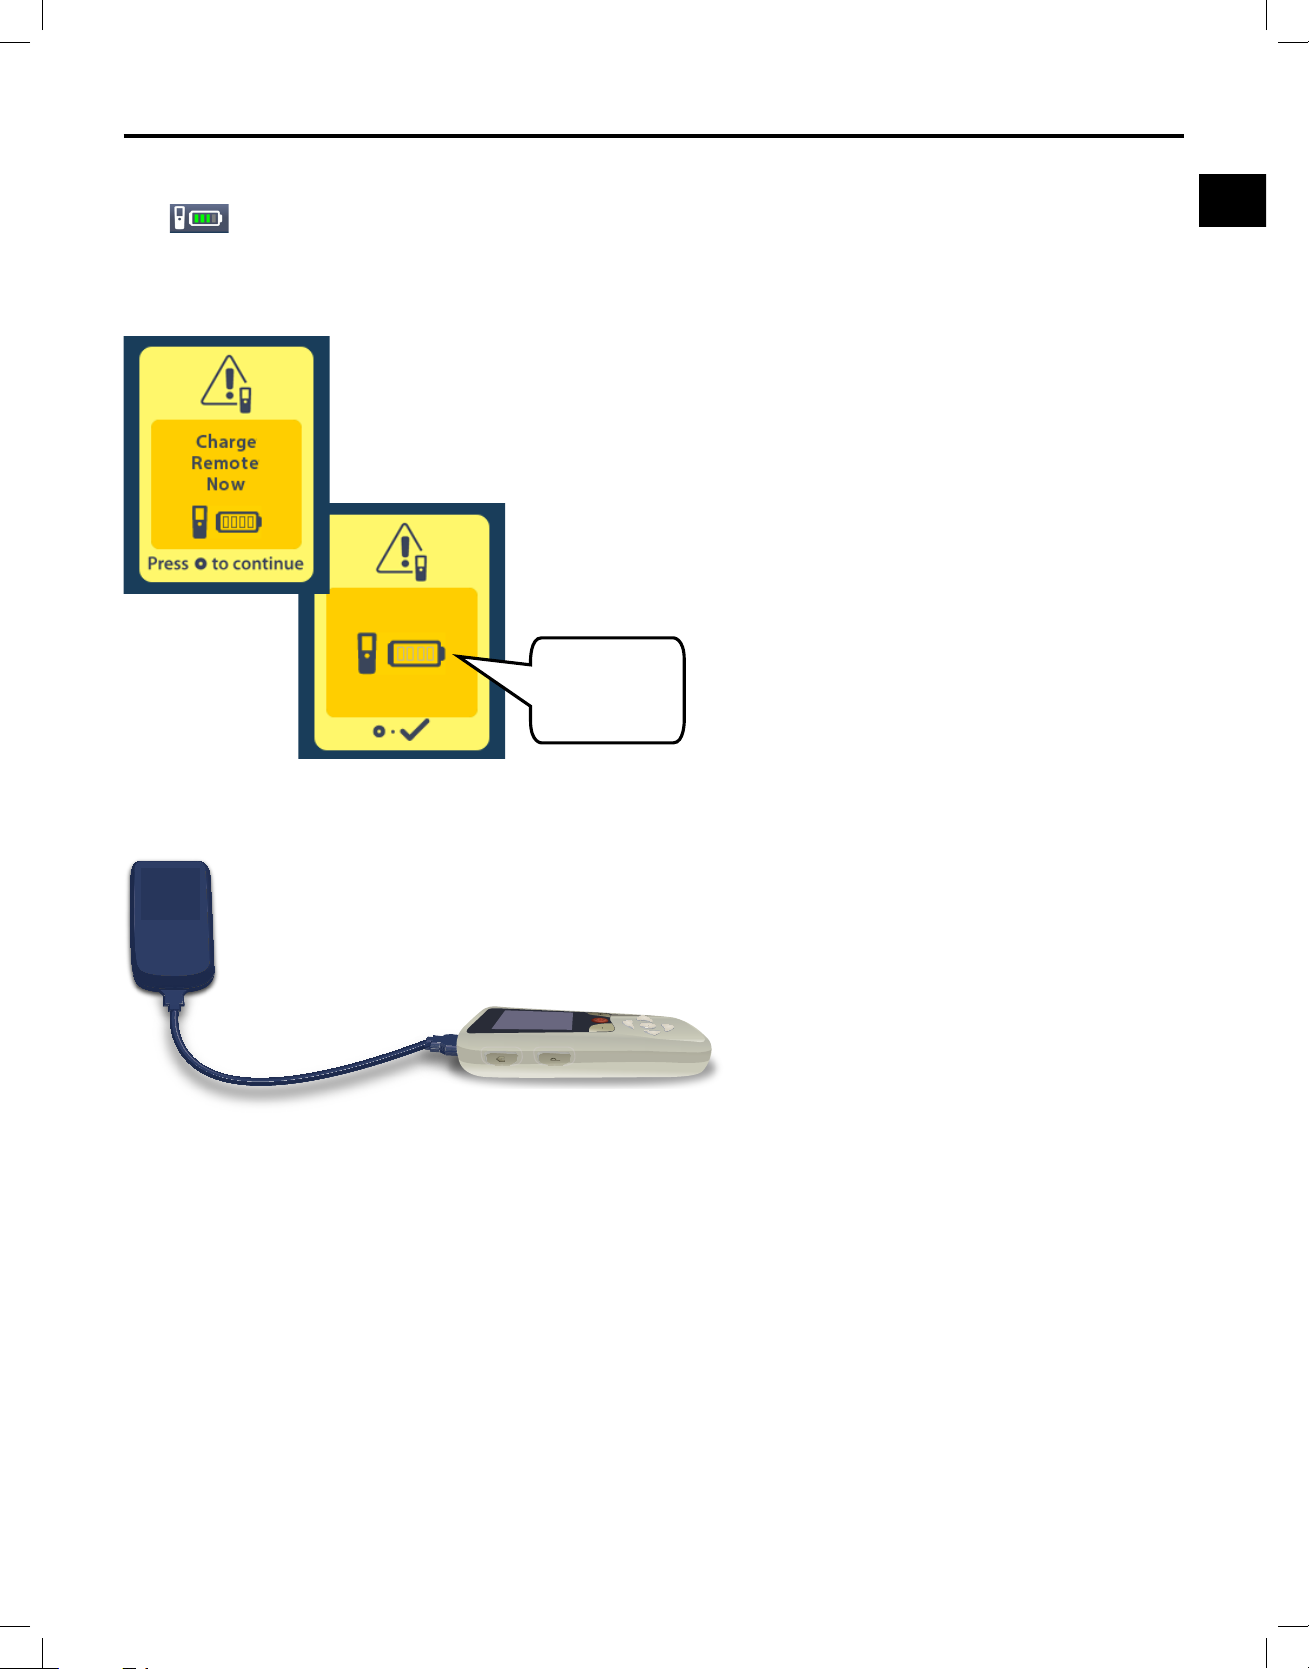
The icon at the top left of the Home screen indicates the charge level of the RC battery.
The RC will display messages reminding you to recharge the RC or the Stimulator if the battery power
is low.
Charge
Remote Now
Recharge the RC battery by connecting the RC to the USB-Power Supply provided with the RC. The
RC battery has a typical service life of 400 charging cycles.
Clinician Remote Control Directions for Use
92395488-02 41 of 1077
Page 46
Clinician Remote Control Directions for Use
en
External Trial Stimulator or Rechargeable Stimulator Only
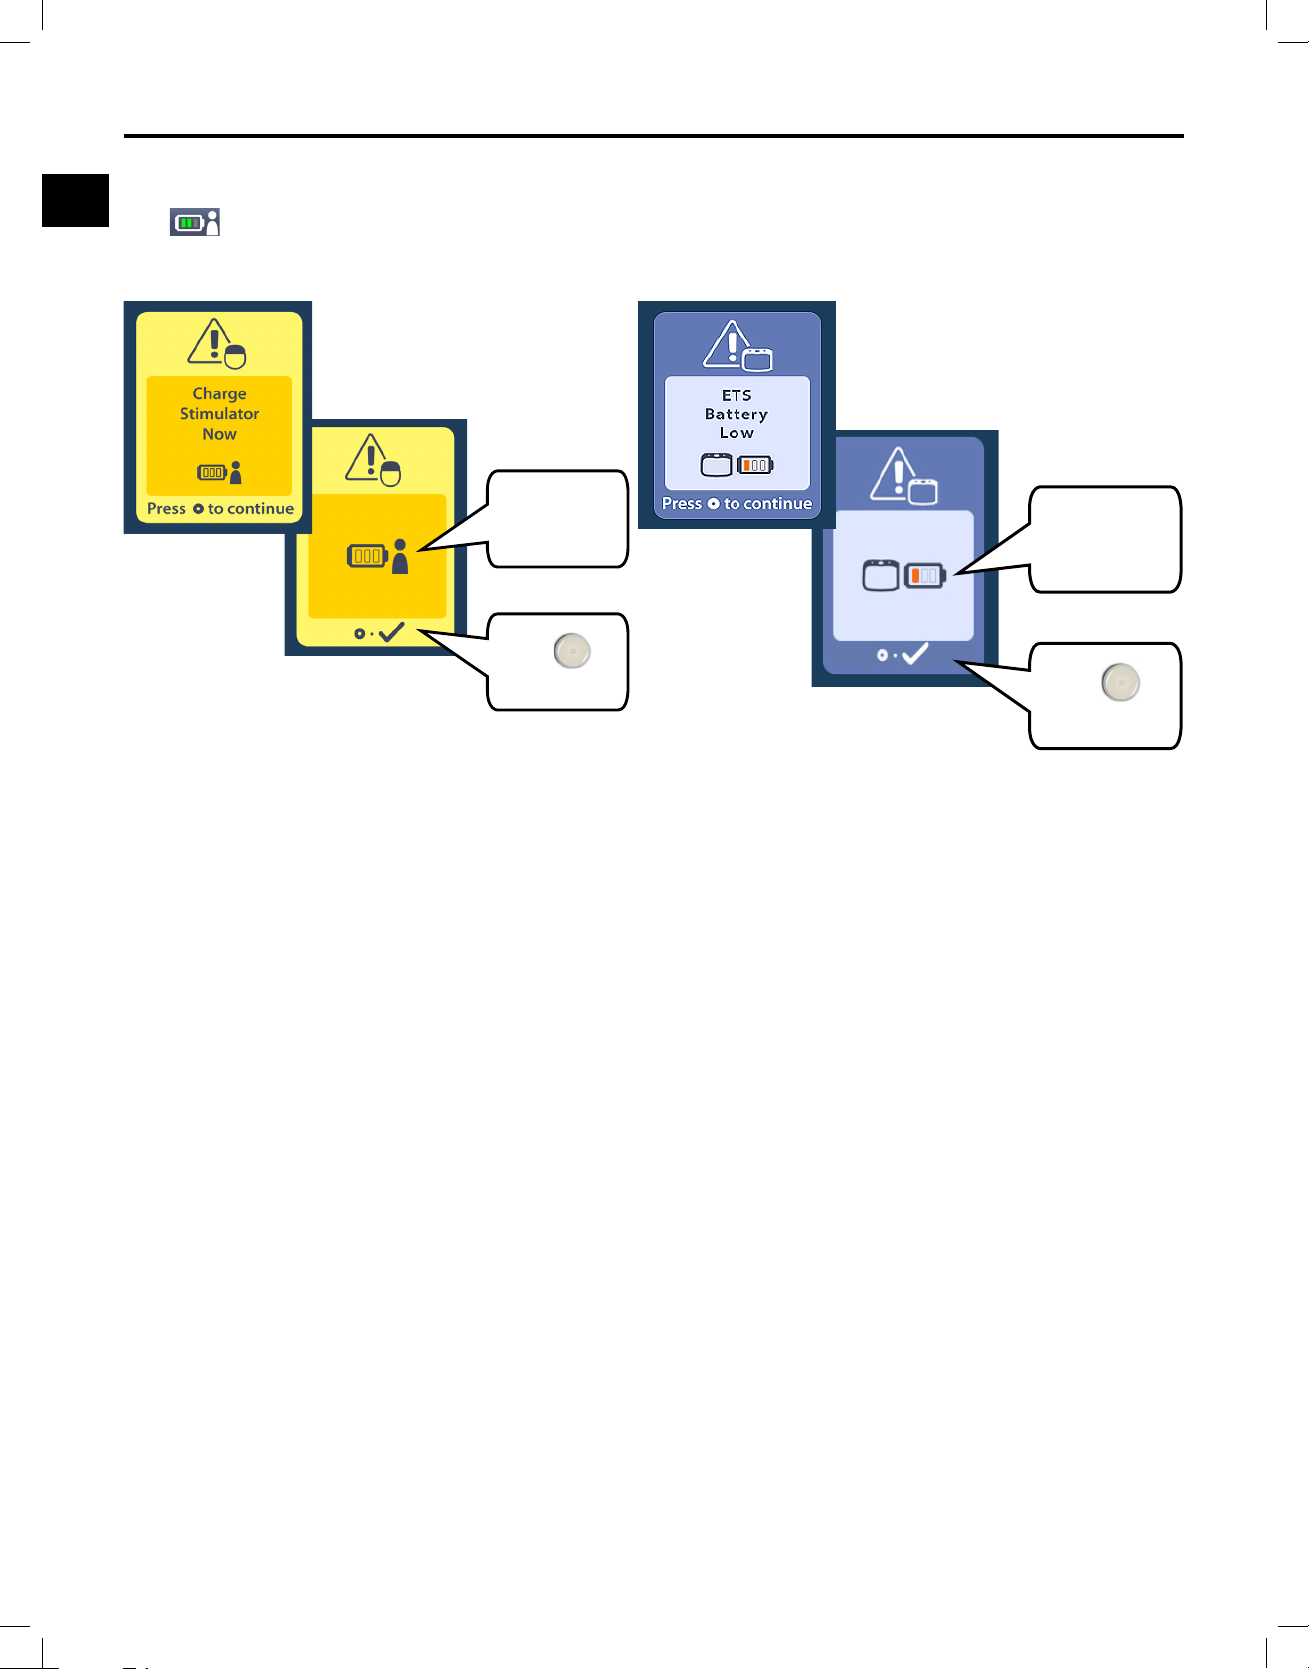
The
icon at the top right of the Home screen indicates the charge level of the Stimulator battery.
The RC will display messages reminding you to recharge the Stimulator if the battery power is low.
Charge
Stimulator
Now
Press to
continue.
Charge
Stimulator
Now
Press to
continue.
Clinician Remote Control Directions for Use
92395488-02 42 of 1077
Page 47
Troubleshooting
en
Troubleshooting
Bluetooth Help
Common sources of interference, such as Wi-Fi routers, cordless phones, Bluetooth wireless streaming
devices, baby monitors, and microwave ovens, can affect wireless communication. You will continue
to have access to the Remote Control menus even if the Remote Control is outside its effective
communication range with the Stimulator. If you enter a command to change your settings or programs
while the Remote Control is outside of its effective communication range, you will have several seconds
to move the Remote Control within range of the Stimulator to send the command. After the command
is received by the Stimulator, the Remote Control will make a double-beep then display the requested
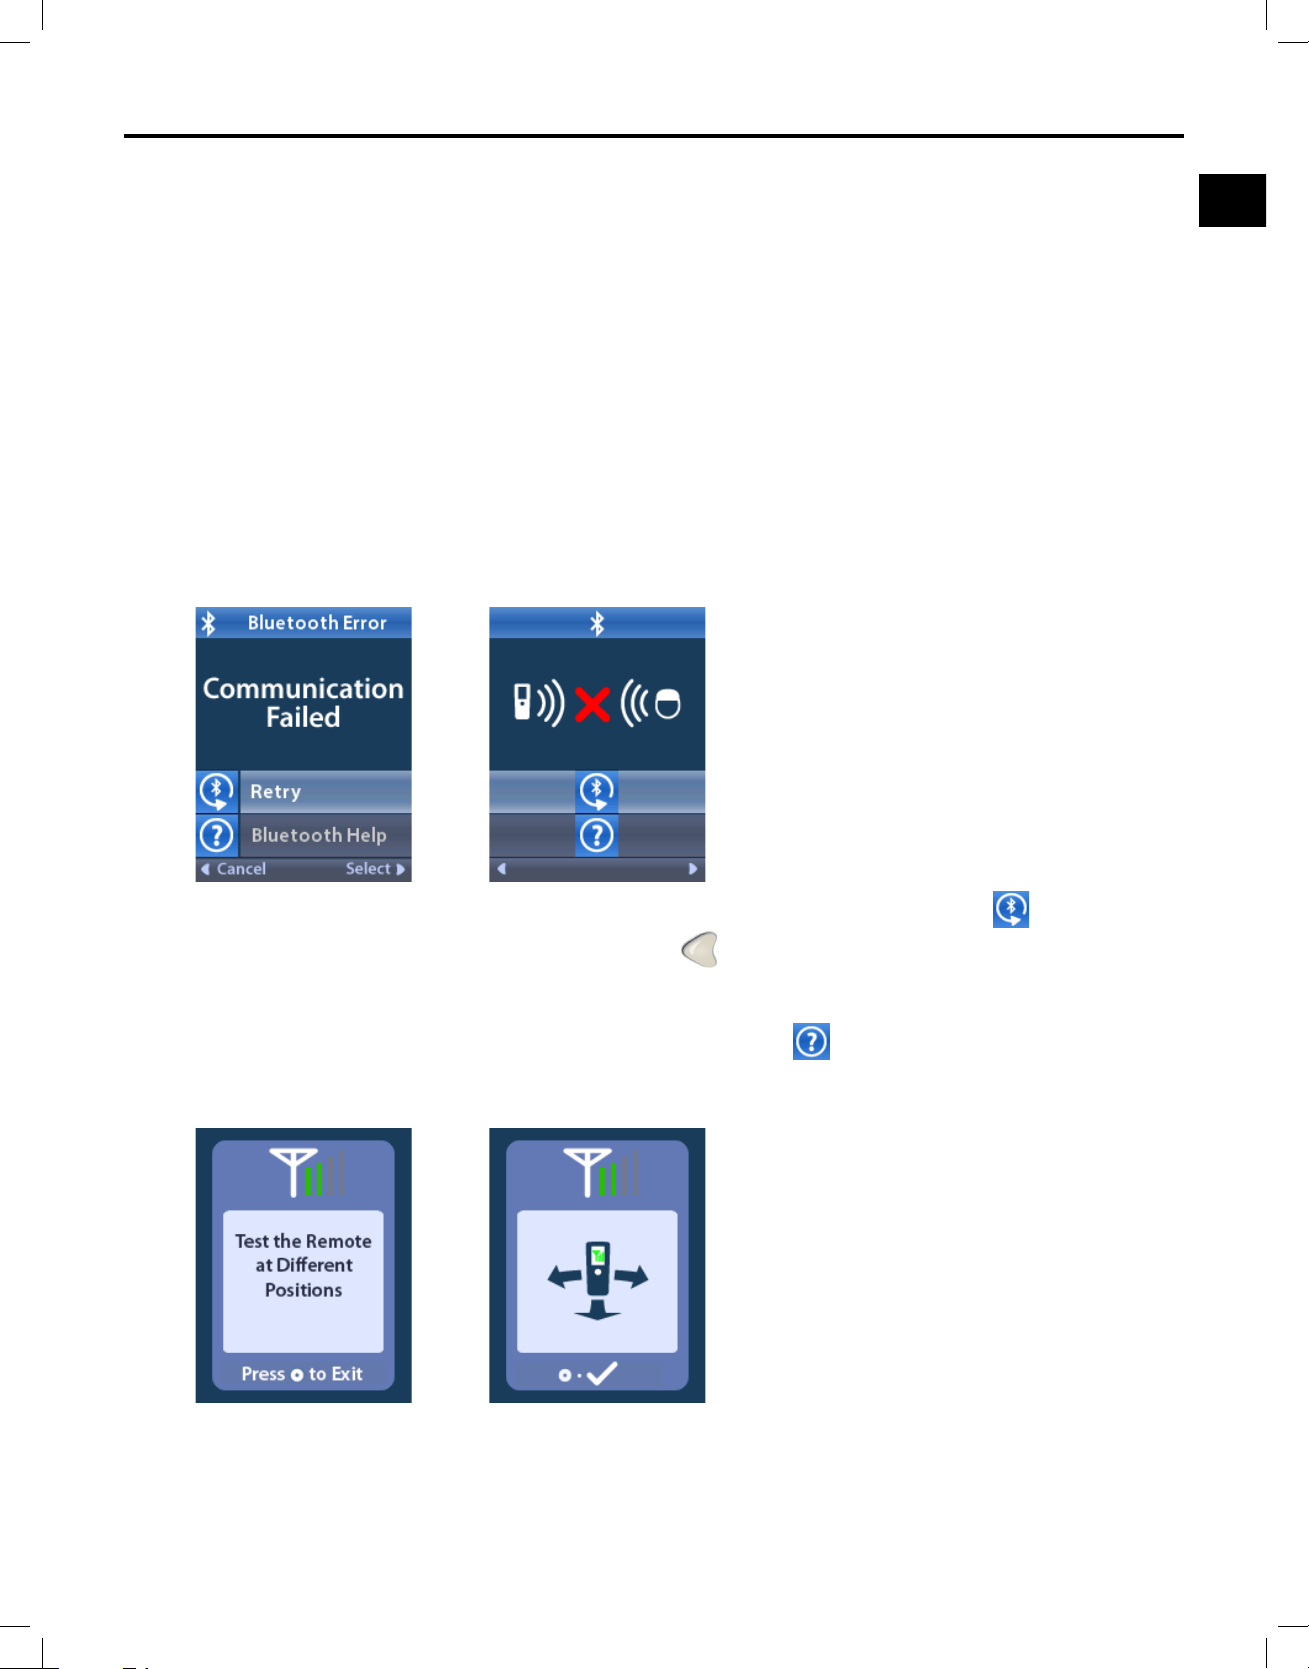
change on the screen. If the Remote Control is unable to communicate with the Stimulator, the
Bluetooth Error message will appear:
To retry communication with the Stimulator – this resends the last command – select Retry. To
cancel communication and return to the screen, press
.
The Bluetooth Help tool is also available to assist you in improving communication between the Remote
Control and the Stimulator. To use the Bluetooth Help tool, select
Bluetooth Help. The following
screen will be displayed:
Clinician Remote Control Directions for Use
92395488-02 43 of 1077
Page 48
Clinician Remote Control Directions for Use
en
0
P
P
?
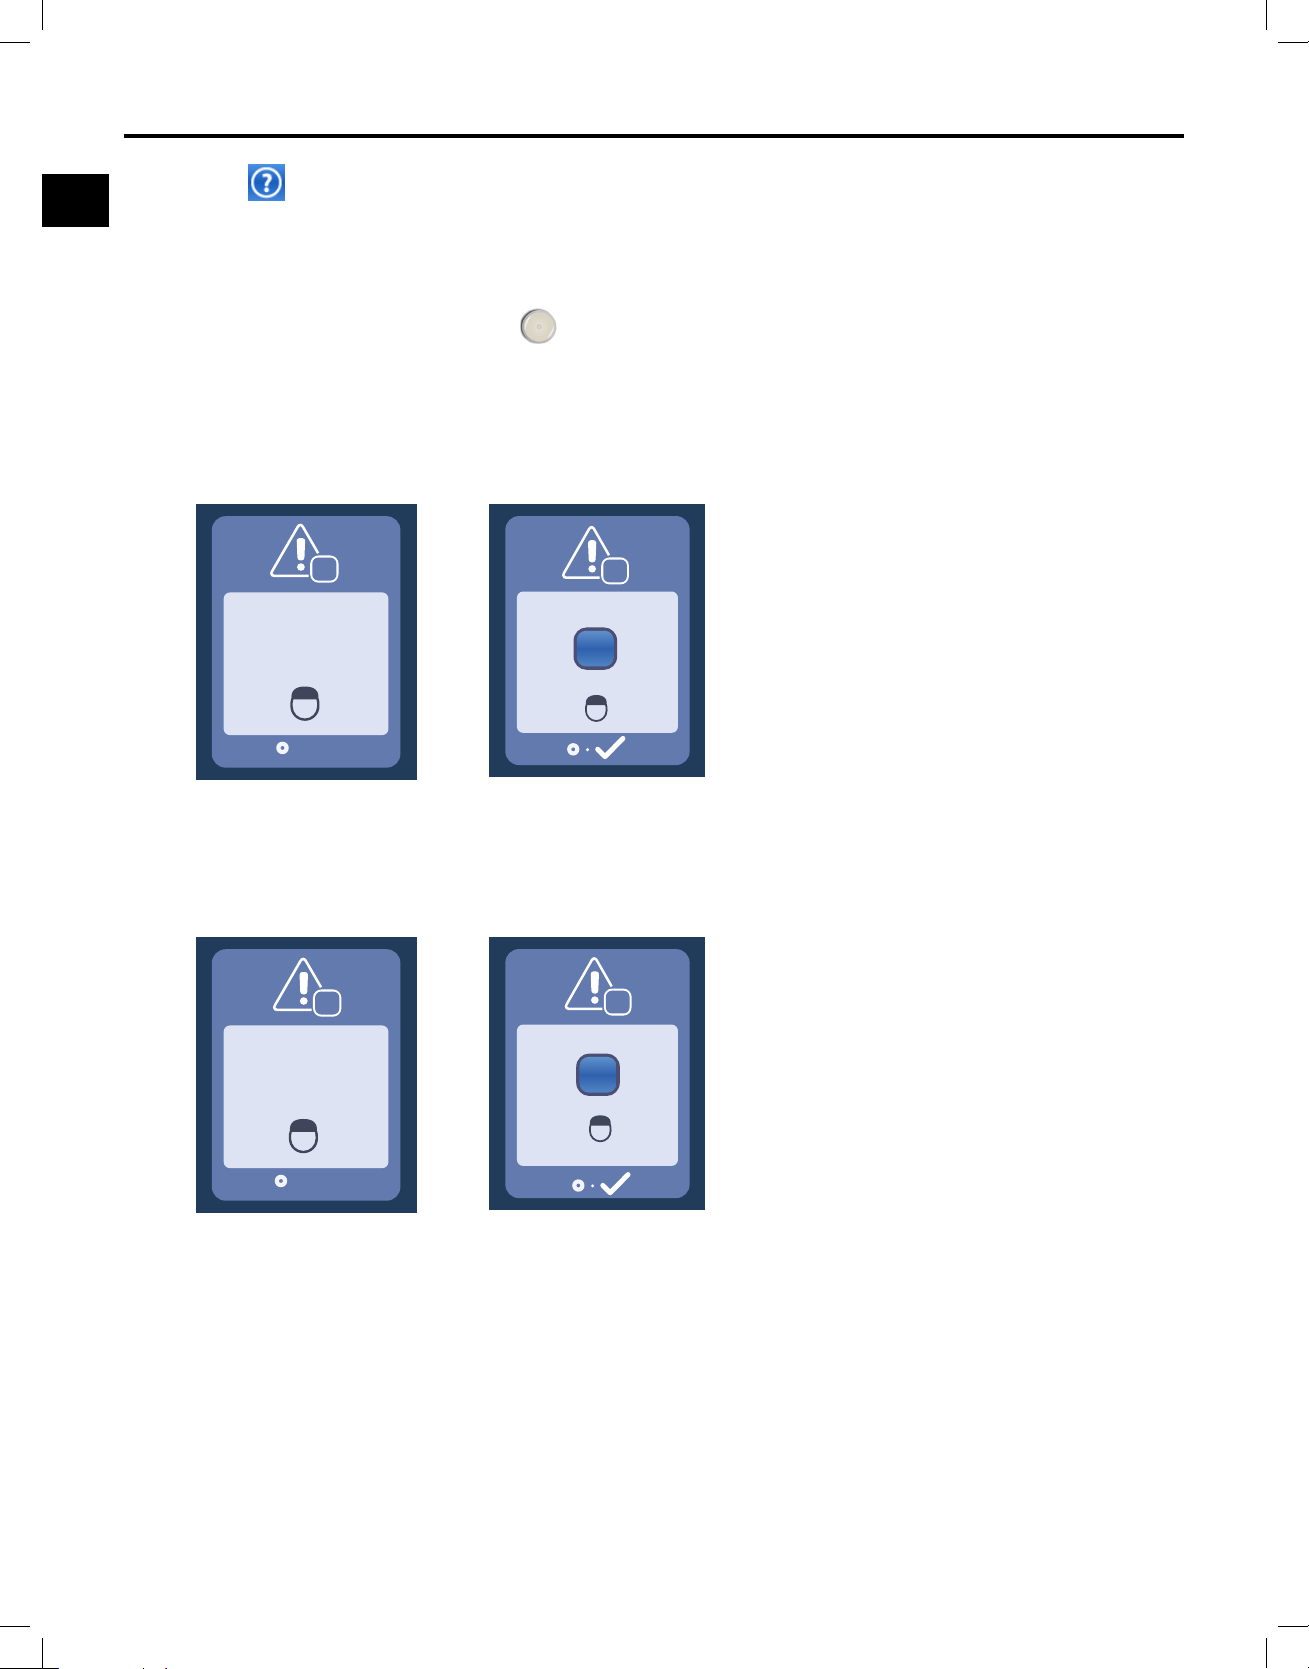
Once in the Bluetooth Help screen, the Remote Control will automatically scan for the connected
Stimulator. Once communication is established, the telemetry bars will indicate the strength of the
wireless communication. The number of bars will change depending on the distance and orientation
of the Remote Control from the Stimulator. This tool will continue to measure the strength of
communication for 60 seconds or until
is pressed.
No Program to Run Screen
This screen is displayed when the Stimulator has no Programs to run.
P
No Program
to Run
Press to continue
Invalid Program Screen
This screen is displayed when the Stimulator attempts to run an invalid Program.
P
P
Invalid
Program
Press to continue
Clinician Remote Control Directions for Use
92395488-02 44 of 1077
Page 49
en
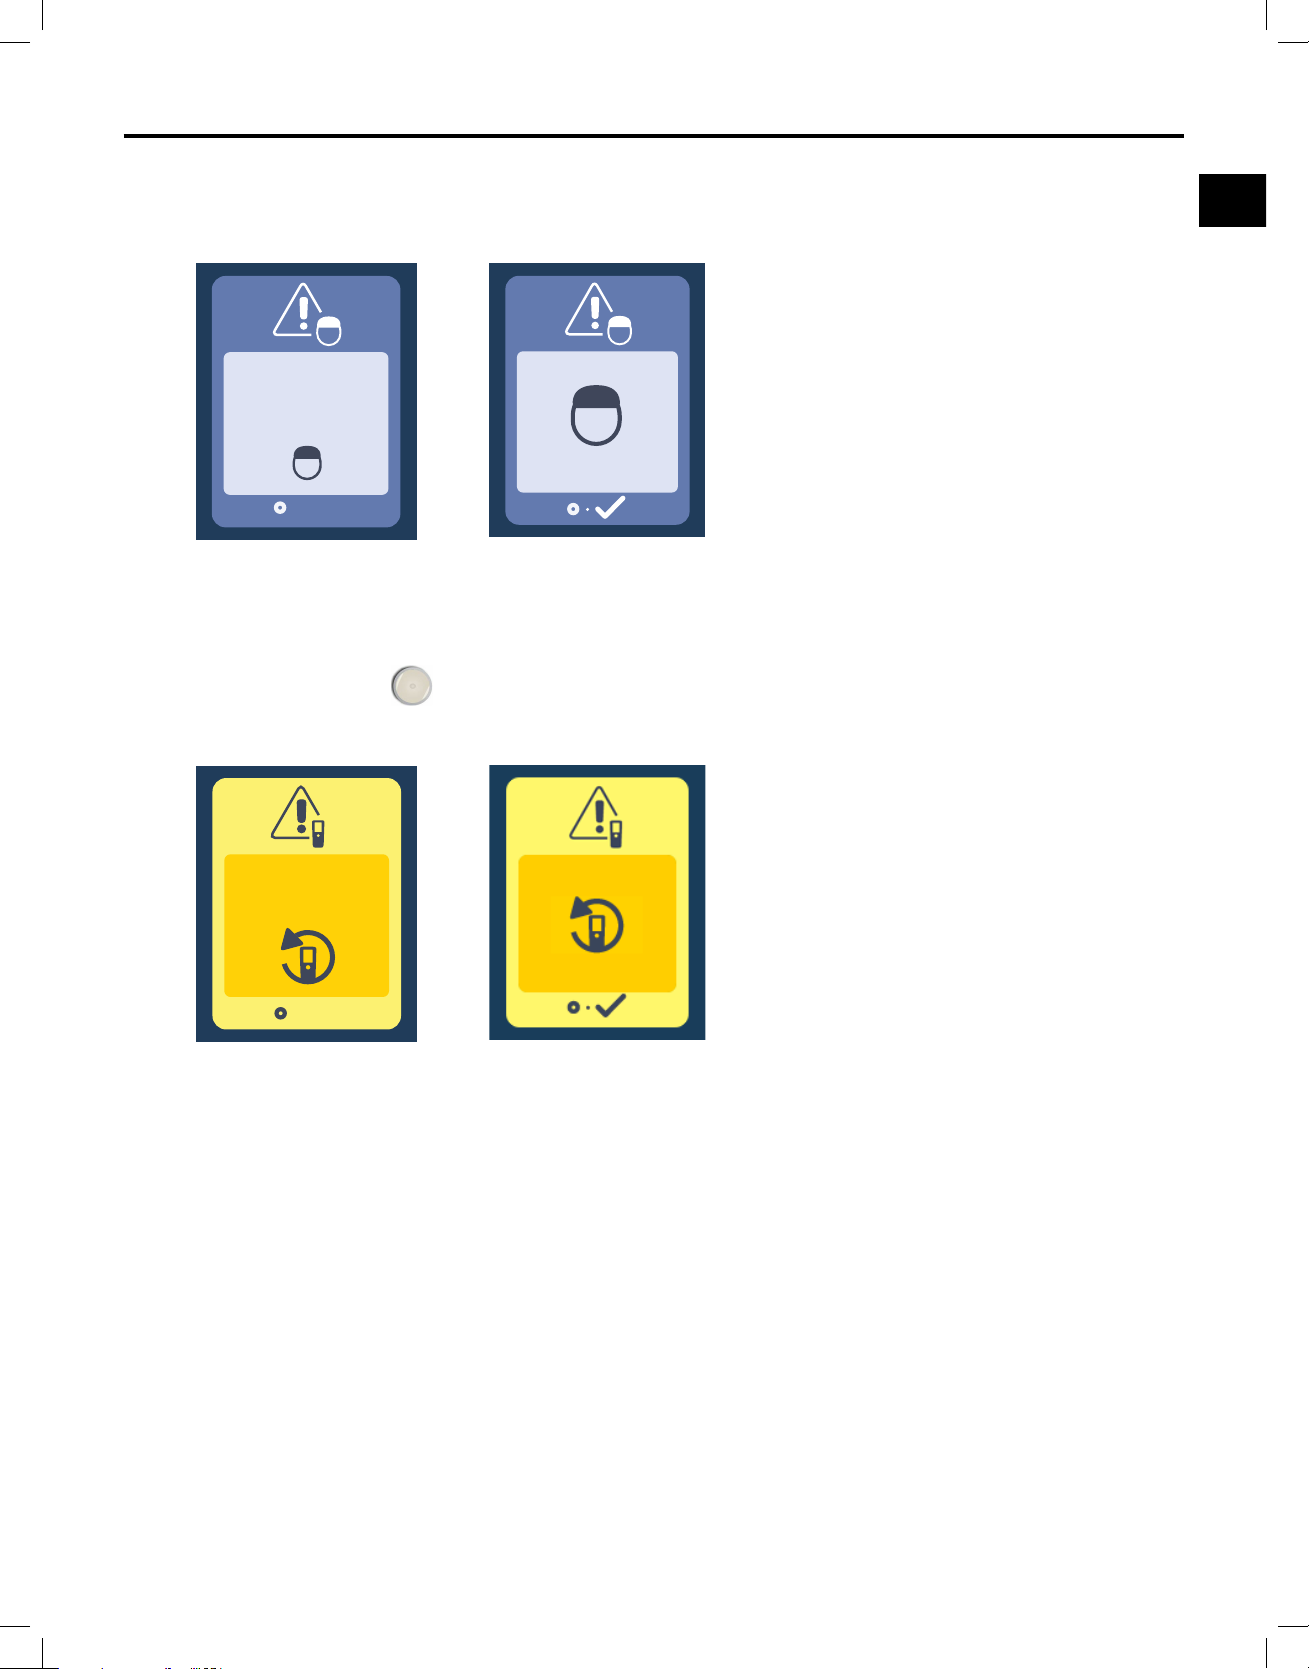
Unsupported Stimulator Screen
?
Troubleshooting
This screen is displayed when the Remote Control detects an incompatible Stimulator.
Unsupported
Stimulator
?
Press to continue
System Settings Reset Screen
This screen is displayed when the Remote Control experiences an error and a reset of the Remote
Control is required. Press
to continue. Programs will not be deleted, but all system settings (for
example, language and volume settings) will be restored to the default factory settings.
System Settings
Reset
Press to continue
Clinician Remote Control Directions for Use
92395488-02 45 of 1077
Page 50
Clinician Remote Control Directions for Use
en
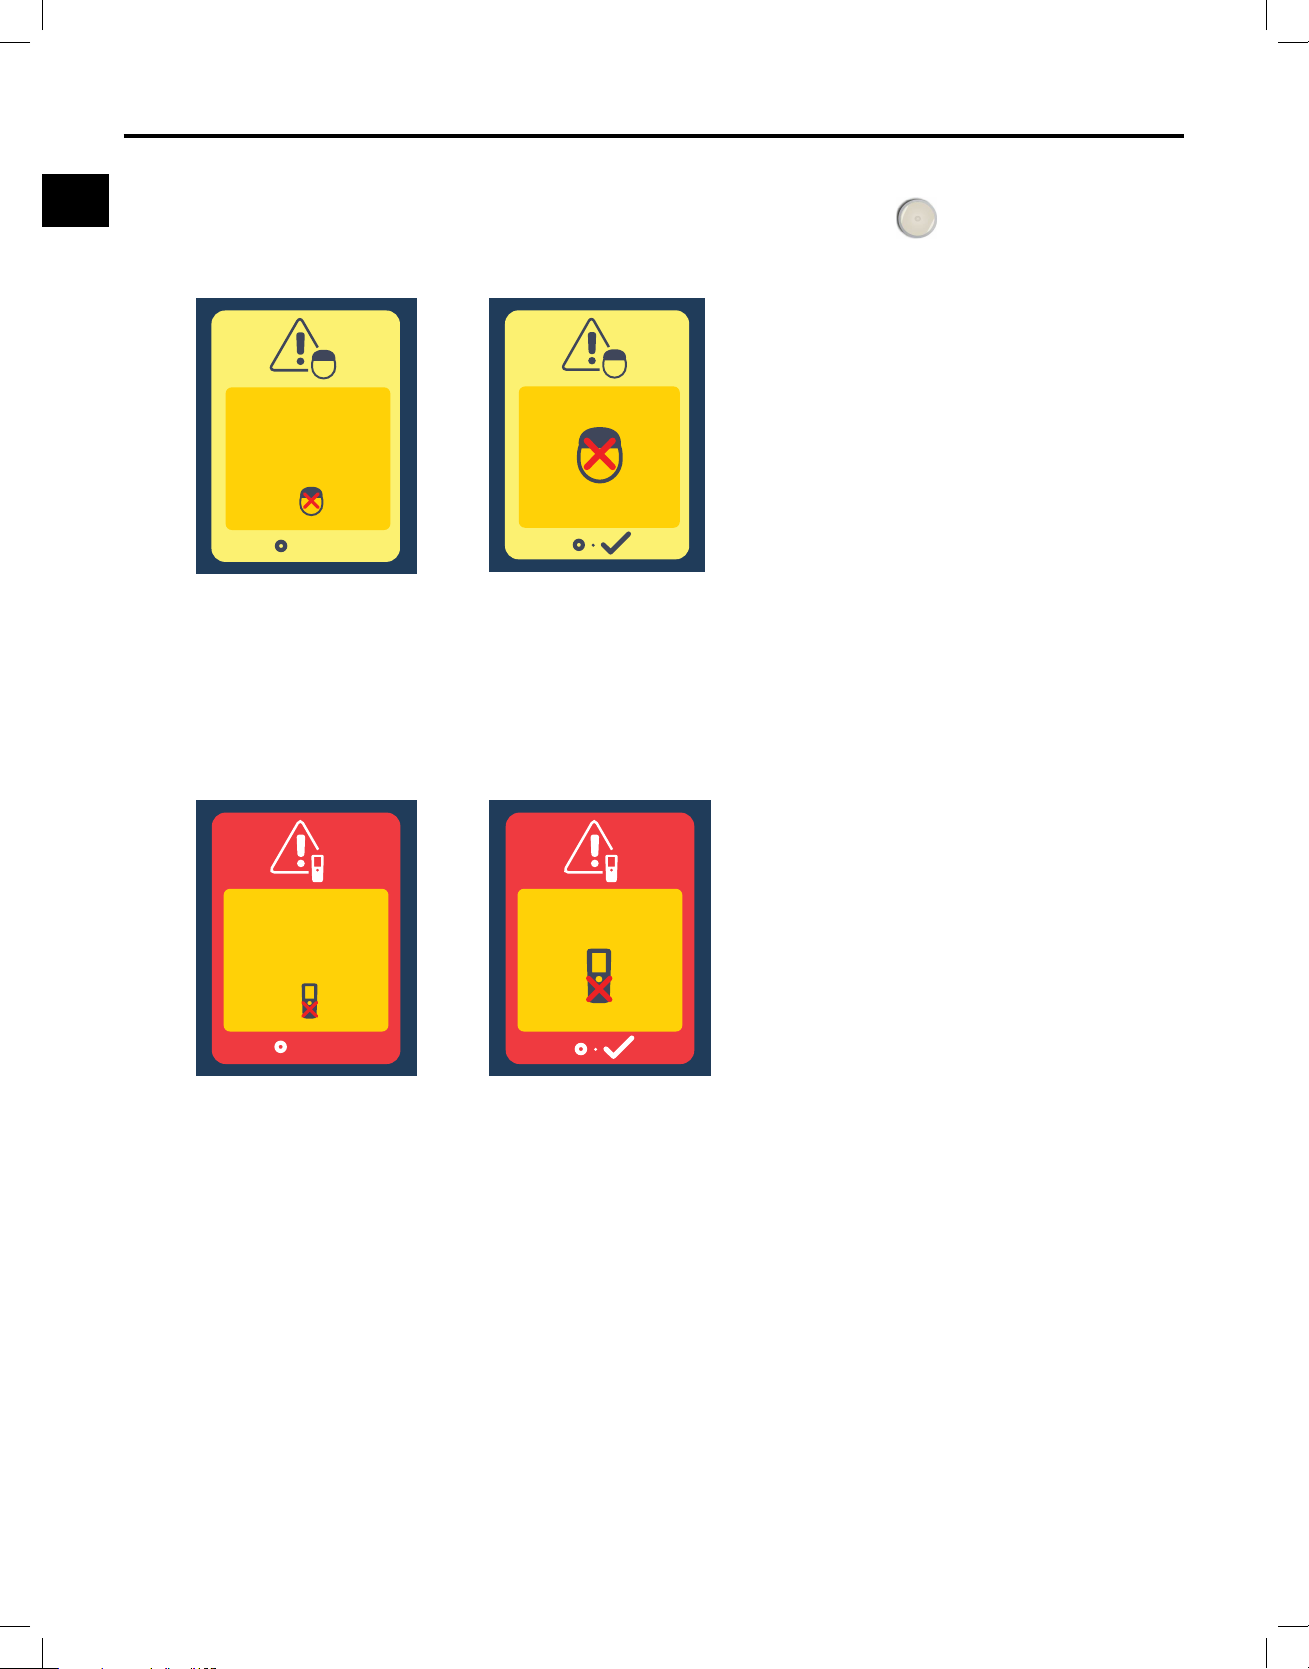
Stimulator Error Screen
This screen is displayed when there is a non-critical Stimulator error. Press
to acknowledge the
message and continue.
Stimulator
Error
Press to continue
Remote Error Screen
This screen is displayed when there is a critical error on the Remote Control, which makes the Remote
Control unusable. Please contact Boston Scientic Technical Support to order a replacement Remote
Control.
Remote
Error
Press to continue
Clinician Remote Control Directions for Use
92395488-02 46 of 1077
Page 51
en
End of Programmed Service
End of Programmed Service
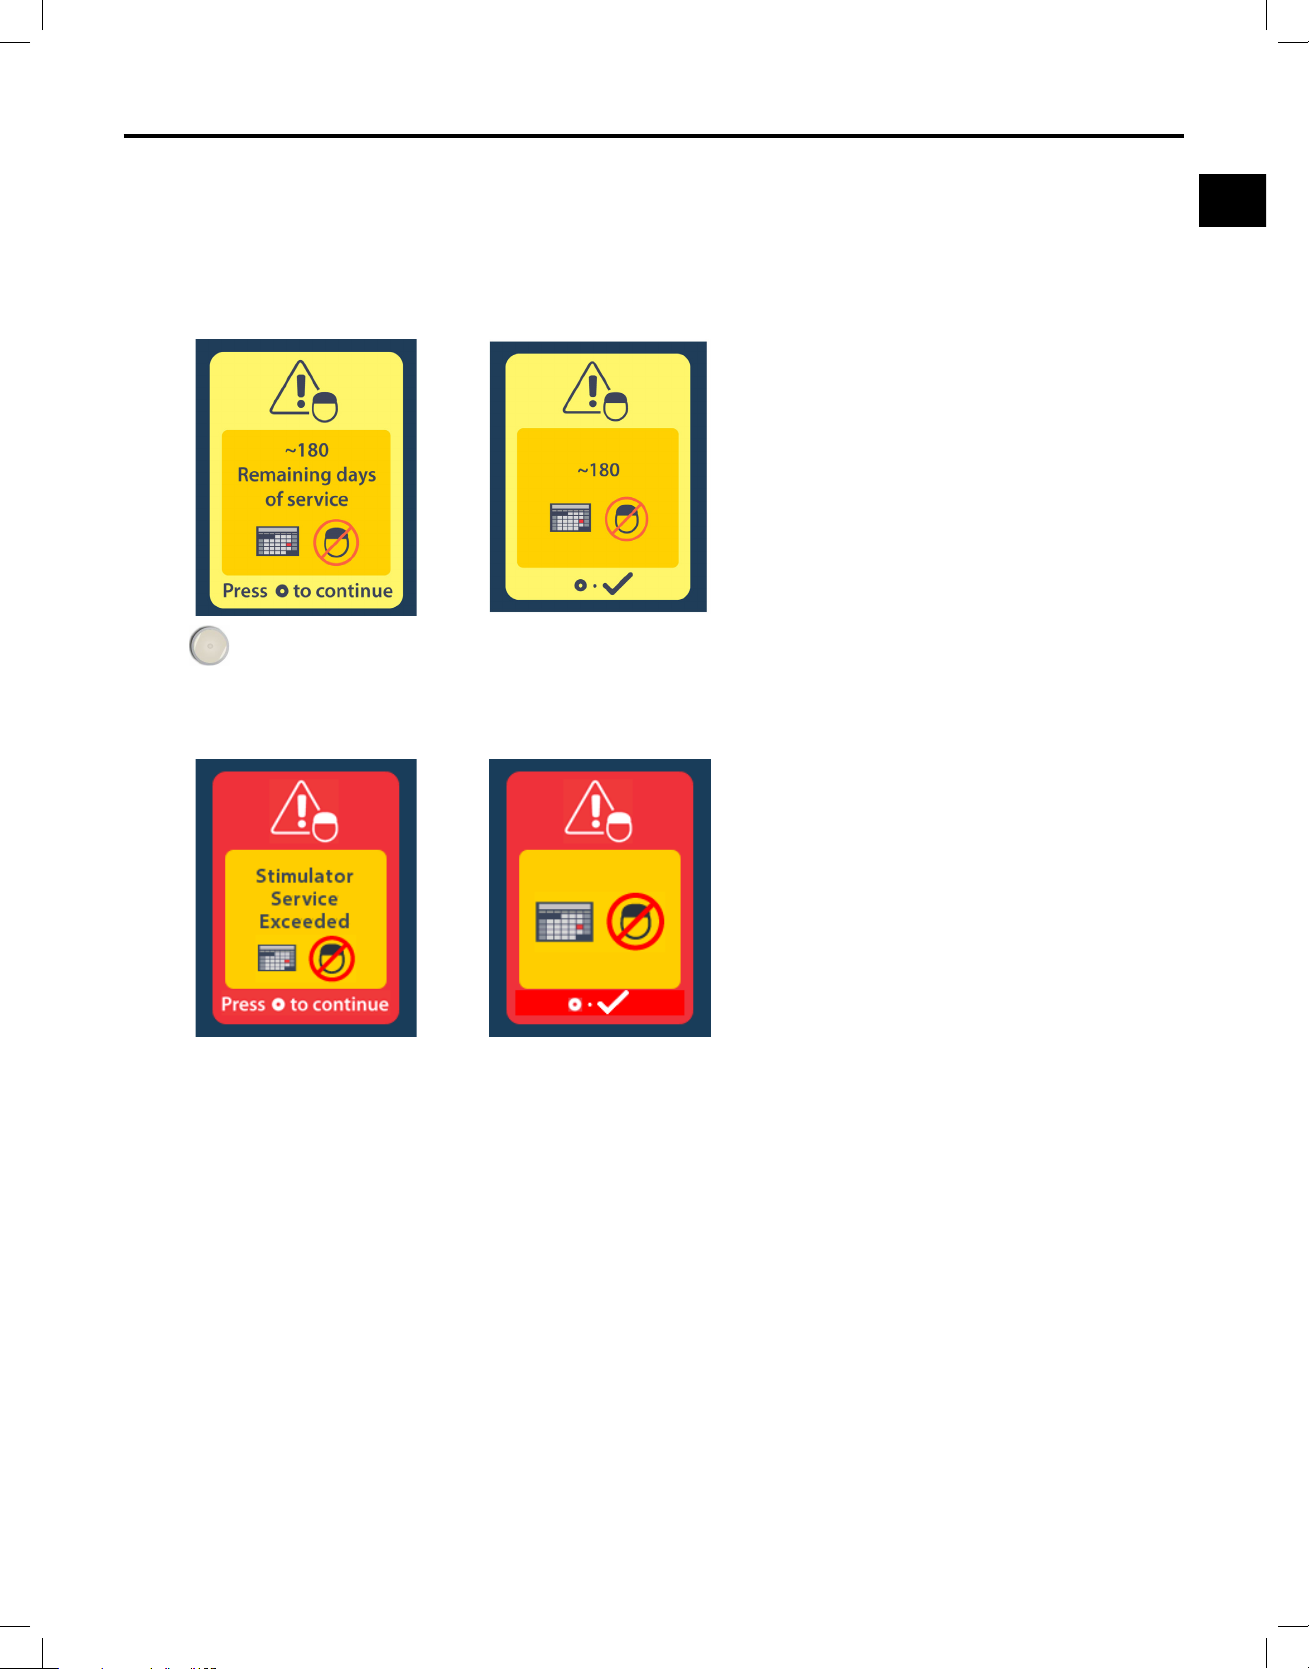
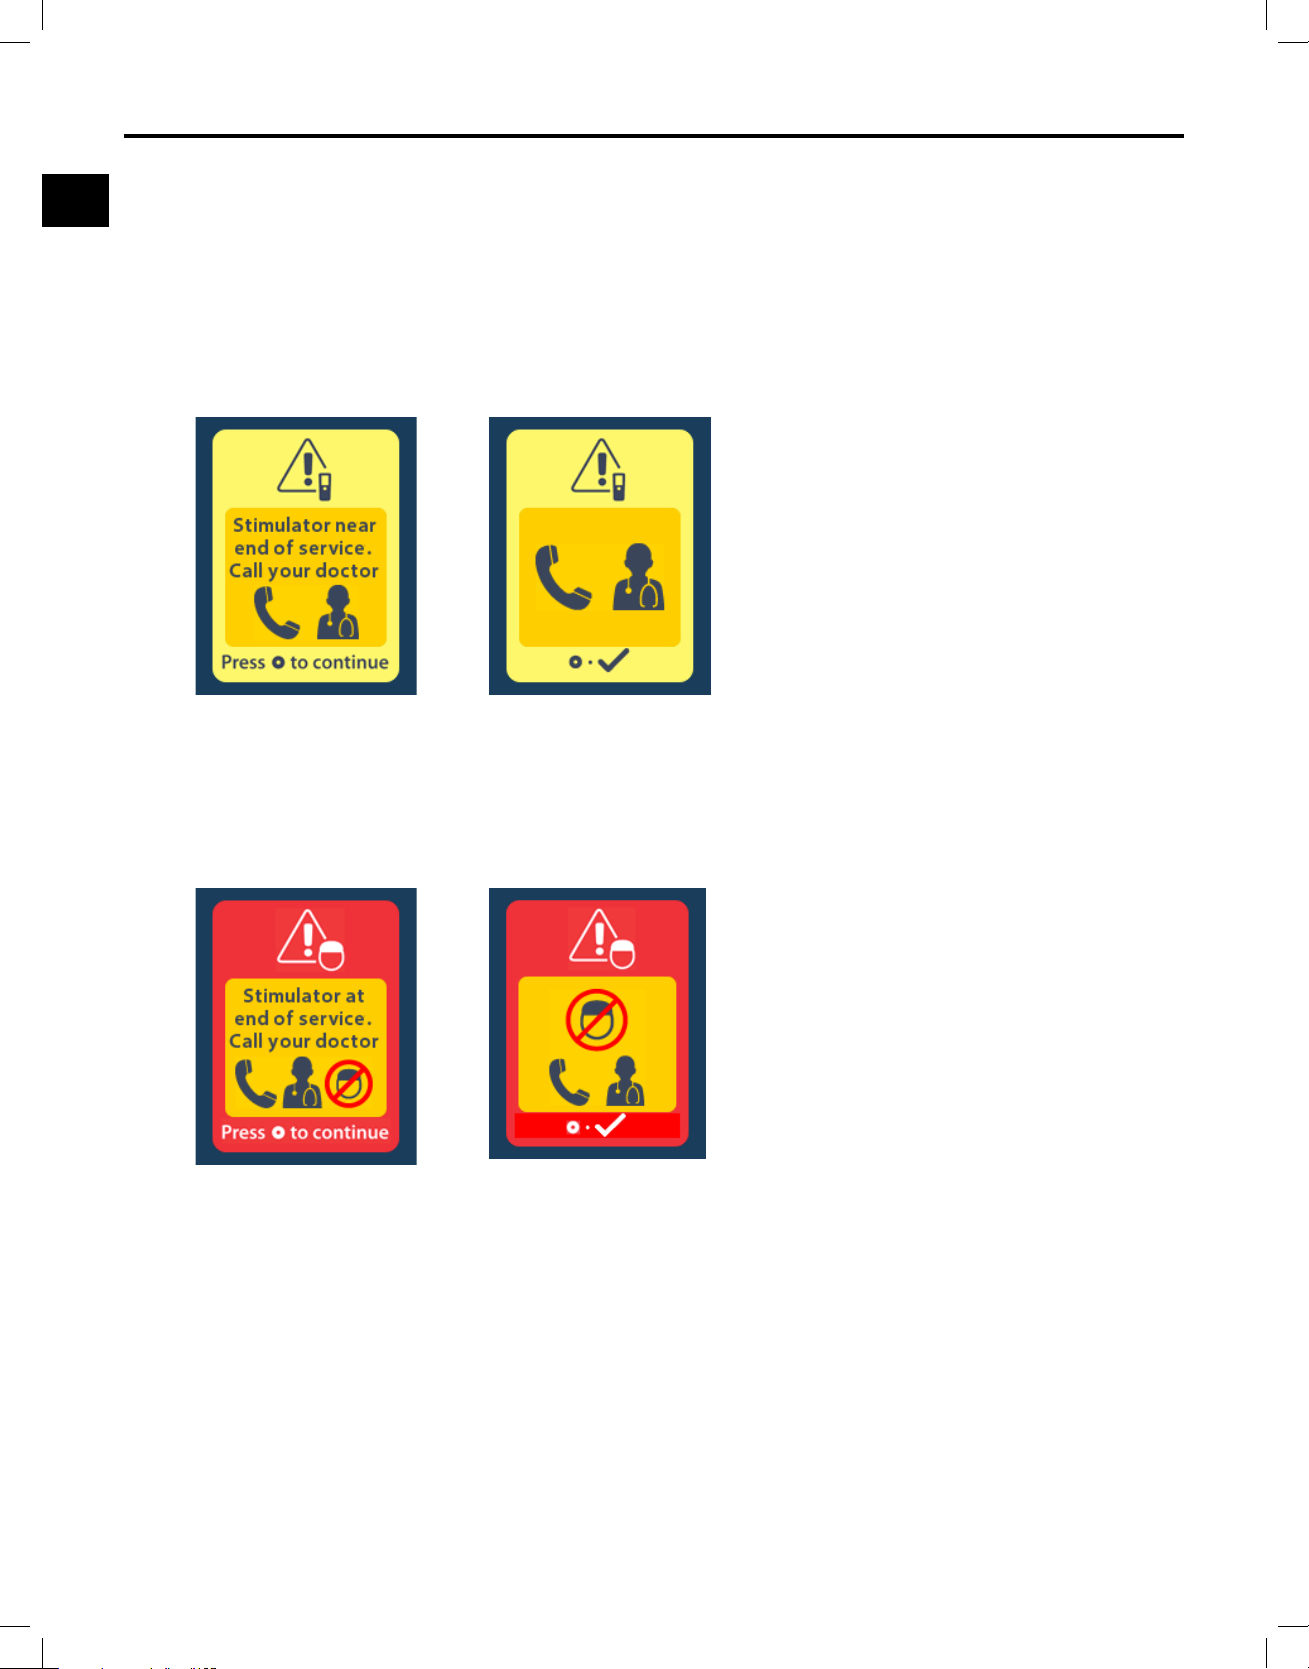
The Stimulator software has been programmed to end service after a dened period. When the
Stimulator is within approximately 180 days of the end of its programmed period, the RC will display
the following on-screen message.
Press to clear the message. The message will reappear approximately weekly until the end of the
Stimulator’s programmed period is reached. When the end of its programmed period is reached,
the RC will display the following on-screen message.
Clinician Remote Control Directions for Use
92395488-02 47 of 1077
Page 52
Clinician Remote Control Directions for Use
en
Non-rechargeable IPG Battery Status
ERI (Elective Replacement Indicator) Screen
The implanted non-rechargeable Stimulator is nearing end of service. Changes made to the stimulation
therapy will not be saved, and stimulation therapy will not be available soon. Advise the patient to
contact their healthcare provider to report this message. Press the select key to clear this information
screen. This screen will appear whenever the RC is activated.
End of Battery Life Screen
The implanted non-rechargeable Stimulator has reached its end of service. Stimulation therapy is not
available. Advise the patient to call their healthcare provider.
Clinician Remote Control Directions for Use
92395488-02 48 of 1077
Page 53
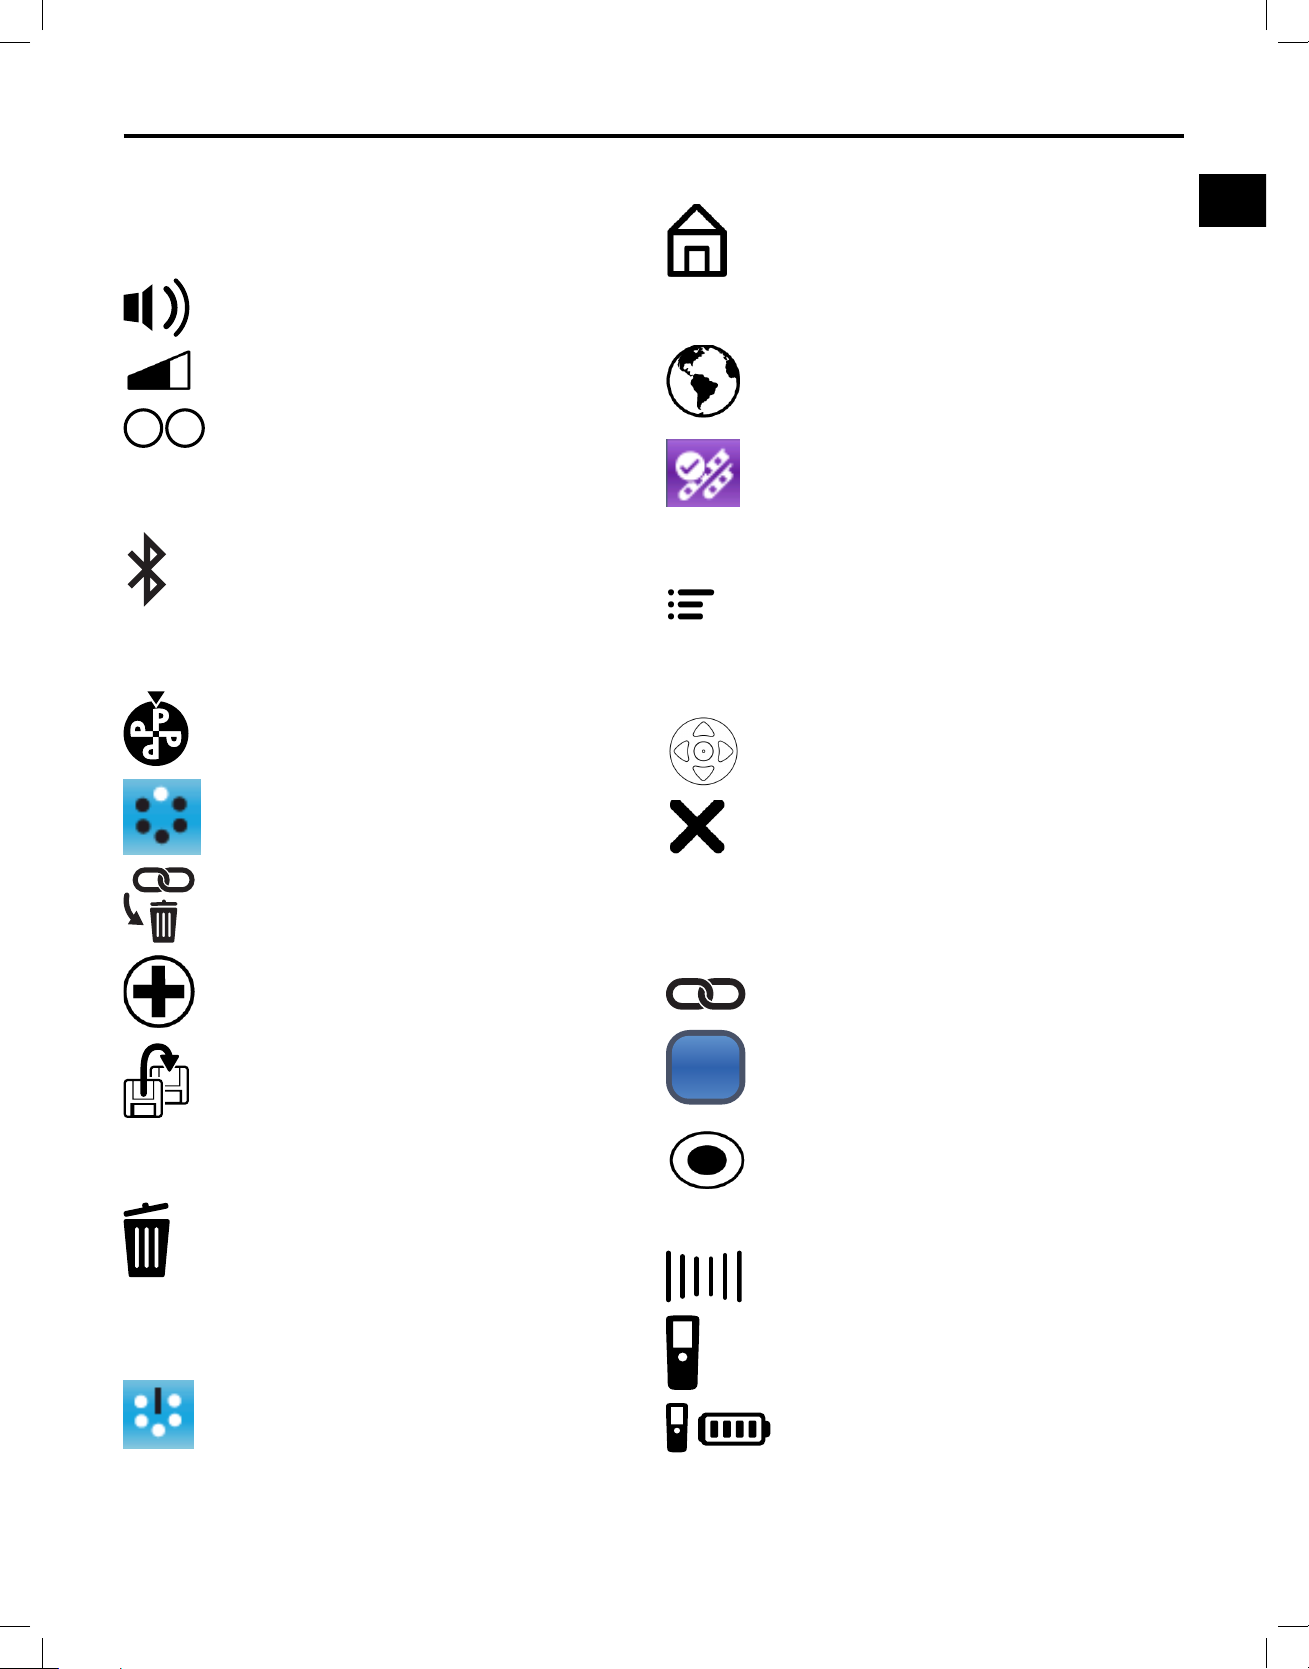
Icon Description
en
...
Icon Description
A
Alert Volume
Amplitude
A B
Areas
B
Bluetooth Settings
C
Change Program
H
Home
L
Languages
Lead Check
M
Main Menu
N
Navigation
Change Schedule
Clear All Pairings
Clinician Menu
Copy to
D
Delete Program
E
No
P
Pair New Device
P
Program
Pulse Width
R
Rate
Remote
Exclude Program
Remote Battery
Clinician Remote Control Directions for Use
92395488-02 49 of 1077
Page 54
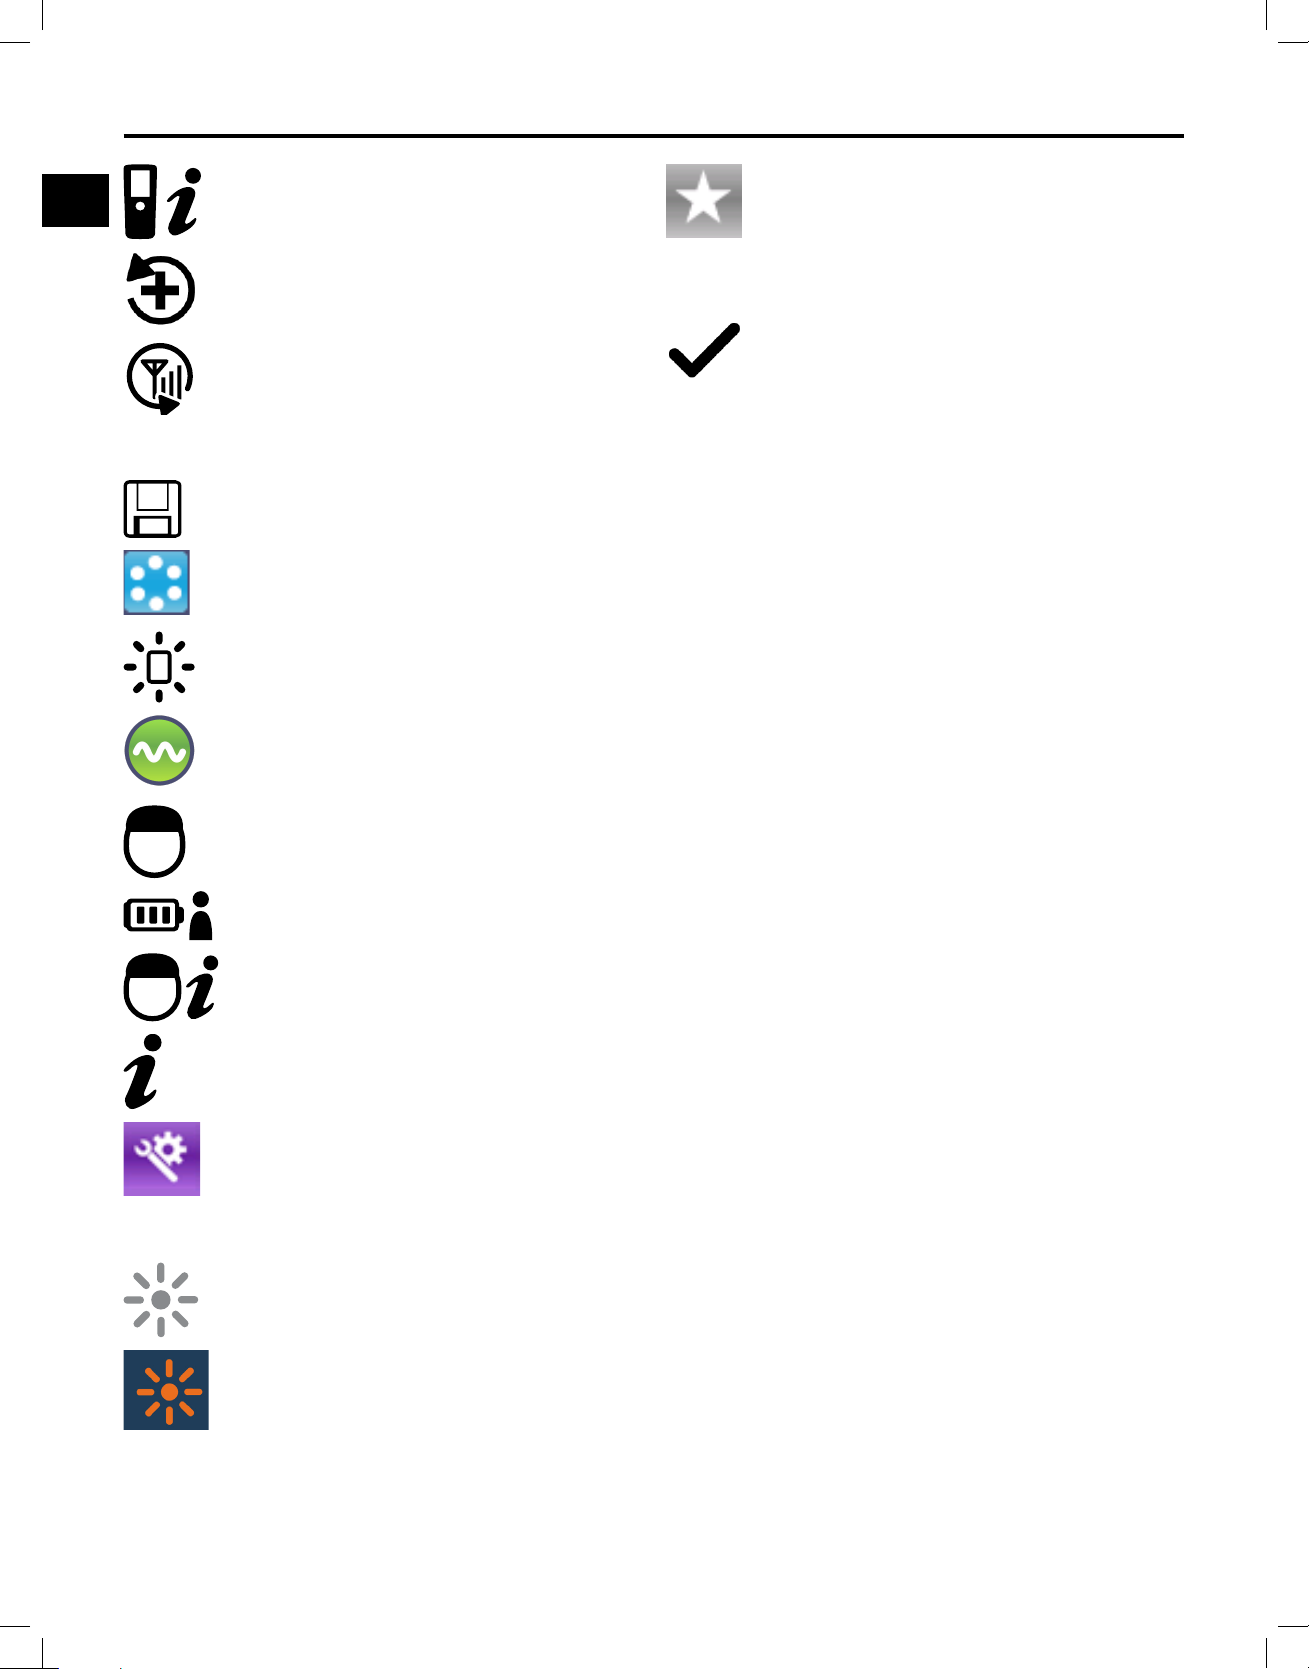
Clinician Remote Control Directions for Use
en
Remote Information
Restore to Clinic Settings
Retry
S
Save Program
Schedules
Screen Brightness
Stimulation Area
Therapy Rating
Y
Yes
Stimulator
Stimulator Battery
Stimulator Information
System Info
System Settings
T
Therapy OFF
Therapy ON
Clinician Remote Control Directions for Use
92395488-02 50 of 1077
Page 55

en
This page intentionally left blank
Clinician Remote Control Directions for Use
92395488-02 51 of 1077
Page 56
Mode d'emploi de la télécommande du médecin
fr
Garanties
BostonScienticCorporationseréserveledroitdemodier,sanspréavis,lesinformationsrelativesà
sesproduitsdanslebutd’améliorerleurabilitéouleurcapacitédefonctionnement.
Lesdessinsetschémassontprésentésàdesnsd'illustrationuniquement.
Marques commerciales
LamarqueetlelogoBluetooth®sontdesmarquesdéposéesappartenantàBluetoothSIG,Inc.et
touteutilisationdecesmarquesparBostonScienticNeuromodulationCorporations’effectuesous
licence.
WaveWriterAlpha™ et FreeLink™sontdesmarquescommercialesdeBostonScienticCorporation
oudesesliales.
Touteslesautresmarquescommercialesappartiennentàleurspropriétairesrespectifs.
Informations supplémentaires
Pourconnaîtrelesindicationsetlesinformationsconnexes,consulterlesIndications d'utilisation.
Pourconnaîtrelescontre-indications,lesmisesengarde,lesprécautions,lerécapitulatifdeseffets
indésirables,lesinstructionsdestinéesauxmédecins,lesinstructionsdestockageetdemanipulation,
lesrèglesdemiseaurebutdescomposantsetlescoordonnéesdeBostonScientic,consulterle
Manuel d'informations destiné aux médecinsdusystème.Pourtouteautreinformationrelativeàcet
appareiletnoninclusedansleprésentmanuel,ainsiquepourconnaîtrelessymbolesdesétiquettes
etlesdétailsdesgaranties,sereporteraumoded'emploidusystème,répertoriédansleGuide de
référence.
LessystèmesWaveWriterAlpha™etWaveWriterAlpha16sontdésignéssouslenomdesystème
WaveWriterAlphadanscedocument.LessystèmesWaveWriterAlpha™PrimeetWaveWriter
AlphaPrime16sontdésignéssouslenomdesystèmeWaveWriterAlphaPrime.
Références des produits
Numéro de modèle Description
SC-5270 Télécommande Freelink™
SC-6386 Appairagedel'aimant
SC-5572-1SC-5572-1A Kit de télécommande FreeLink
Remarque : seuls les modèles d'appareils adaptés à la région de l'utilisateur seront fournis.
Mode d’emploi de la télécommande du médecin
92395488-02 52 sur 1077
Page 57

fr
Table des matières
La description ...................................................................................................................................... 55
Avertissements............................................................................................................................................55
Fonctionnalités de la télécommande .................................................................................................55
Fonctionnement de base .................................................................................................................... 56
Déverrouillagedelatélécommande............................................................................................................56
Activation/désactivationdutraitement.........................................................................................................56
Sélectiondelapréférencedelangue/d'afchagedesécrans.....................................................................56
Écrand'accueil.............................................................................................................................................57
Réglagedel'amplitudedestimulationdansl'écrand'accueil......................................................................58
Le Menu principal ................................................................................................................................ 58
AccèsàMainMenu(Menuprincipal)..........................................................................................................58
Sélectionetactivationd'unprogramme.......................................................................................................59
Sélectiondezonesdestimulationpourmodierlesprogrammes..............................................................60
Enregistrementdesprogrammesmodiés..................................................................................................62
Rétablissementdeprogrammes..................................................................................................................63
Copiedeprogrammes.................................................................................................................................64
Suppressiondeprogrammes.......................................................................................................................65
Gestiondesplannings.................................................................................................................................66
Saisied'unscoredetraitement...................................................................................................................70
Accèsauxparamètresdusystème..............................................................................................................71
RemoteSettings(Paramètresdelatélécommande)...................................................................................71
SystemInfo(Infossystème)........................................................................................................................74
Accès à Clinician Menu (Menu du médecin) .....................................................................................76
Recherche du stimulateur et association.....................................................................................................78
ClearLink(Annulerl'association)................................................................................................................80
Impédances.................................................................................................................................................81
ResetStimulator(Réinitialisationdustimulateur)........................................................................................81
CPMode:Stimulator(ModePM:stimulateur)............................................................................................82
SortiedumodeClinician(Médecin).............................................................................................................82
Mode IRM ..............................................................................................................................................83
ActivationdumodeIRM...............................................................................................................................83
DésactivationdumodeIRM.........................................................................................................................86
Écransd'erreurdumodeIRM......................................................................................................................88
ÉcranChargeStimulatorNow(Chargerlestimulateurmaintenant)(Stimulateursrechargeables
uniquement).................................................................................................................................................89
ÉcranChargeStimulatorNow(Rechargerlestimulateurdèsmaintenant)ouDisableMRIModeScreen
(DésactiverlemodeIRM)(Stimulateursrechargeablesuniquement).........................................................90
Mode d’emploi de la télécommande du médecin
92395488-02 53 sur 1077
Page 58

Mode d'emploi de la télécommande du médecin
fr
Écrandebatteriedestimulateurfaibleenraisondel'IREoudelaFVU(stimulateursnon-rechargeables
uniquement).................................................................................................................................................91
SélectiondumodeIREouFVU...................................................................................................................92
ÉcranImpedancesOutOfRange(Impédanceshorsplage).......................................................................93
ÉcranStimulatorError(Erreurdustimulateur)............................................................................................94
Recharge de la télécommande ...........................................................................................................95
Dépannage ........................................................................................................................................... 97
AideBluetooth.............................................................................................................................................97
ÉcranNoProgramtoRun(Aucunprogrammeàexécuter).........................................................................98
ÉcranInvalidProgram(Programmenonvalide)..........................................................................................98
ÉcranUnsupportedStimulator(Stimulateurnonprisencharge)................................................................99
ÉcranSystemSettingsReset(Réinitialisationdesparamètresdusystème)..............................................99
Écran Stimulator Error(Erreurdustimulateur)..........................................................................................100
Écran Remote Error(Erreurdelatélécommande)....................................................................................100
Fin de vie programmée ..................................................................................................................... 101
État de batterie du GII non rechargeable ........................................................................................102
Description des icônes ..................................................................................................................... 103
Mode d’emploi de la télécommande du médecin
92395488-02 54 sur 1077
Page 59
La description
fr
La description
LatélécommandeFreelink™estunappareilportablepermettantdecommuniqueravecles
stimulateursetdelescontrôler.
Avertissements
• Garderlatélécommandeausec.Ellenedoitpasêtreexposéeàl'humidité.
• NepasconnecterleportUSBdelatélécommandeàundispositifautrequelechargeurdela
télécommandefourniaveccelle-ci.
• Maintenirlatélécommandehorsdelaportéedesenfants,desanimauxnuisiblesetdesanimauxde
compagnieand'éviterd'endommagerledispositif.
Fonctionnalités de la télécommande
1. Écran :afchetouslesmenus,icônesetmessages.
2.Bouton Verrouiller/Déverrouiller
télécommandelorsqu'elleestenmodeveille.
3.Bouton des programmes
Programs(Programmes).Sertégalementderaccourci
(lemaintenirenfoncé)pourpréparerlestimulateuràla
connexionauPM.
4.Bouton Accueil
5.Bouton Traitement
traitement.
6.Bouton Moins
7.Bouton Plus
sélectionné.
8,9.Boutons de navigation
denaviguerdansunmenusélectionné.
10,11.Boutons de navigation
d'effectuerunesélection.
:afchel'écrand'accueil.
:activeoudésactivele
:réduitleparamètresélectionné.
:augmenteleparamètre
:afchelemenu
:déverrouillela
et : permettent
et : permettent
12.Bouton de navigation
l'écranprécédent.
13.Port USB (nonreprésenté):permetderechargerla
télécommandeàl'aidedel'alimentationUSB.
Mode d’emploi de la télécommande du médecin
:permetderetournerà
92395488-02 55 sur 1077
Page 60

Mode d'emploi de la télécommande du médecin
fr
Fonctionnement de base
latélécommandecommuniqueaveclestimulateurviauneliaisontélémétriqueBluetooth®àbasse
consommation.Latélécommandeauneportéedecommunicationtypejusqu'à3m(9,8pieds)avecles
générateursd'impulsionsimplantablesWaveWriterAlpha™ouWaveWriterAlphaPrimeetuneportée
decommunicationtypejusqu'à6m(19,7pieds)aveclesstimulateursd'essaiexternescompatiblesde
BostonScientic.
L'utilisateurnedoitréaliserquelestâchesd'entretienetdemaintenancesuivantessurcedispositif:
• Recharge,consulterlasection«Rechargedelatélécommande»,page95
• Nettoyage
Vérierquecedispositifn'estpasutilisépendantlaréalisationdestâchesd'entretienetde
maintenance.
Déverrouillage de la télécommande
Lorsqu'ellen'estpasutilisée,latélécommandesemetenmodeinactif(ouveille).Ellepeutêtre
réactivéeenappuyantsurleboutonde
verrouillage/déverrouillagesituéàsadroite.
Activation/désactivation du traitement
Appuyeràtoutmomentsurleboutond'activation/dedésactivationdutraitement
pouractiverou
désactiverlestimulateur.
Sélection de la préférence de langue/d'afchage des écrans
Latélécommandepermetdechoisirunécranavecdesicônesouunécranavecdutextedans
l'unedeslanguesdisponibles.Consulterlasection«Languages(Langues)»,page73 pour plus
d'instructions.
Remarque : dans ce manuel, les écrans de texte en anglais sont présentés côte à côte avec les
écrans à icônes correspondants.
Remarque : il est possible que certaines fonctionnalités de télécommande présentées dans ce
manuel (par exemple, Plannings) ne soient pas disponibles. Les paramètres afchés
dépendent de la télécommande, du stimulateur et de la conguration du traitement.
Mode d’emploi de la télécommande du médecin
92395488-0256sur1077
Page 61
Fonctionnement de base
fr
Écran d'accueil
L'écrand'accueildelatélécommandeafchedesinformationsconcernantspéciquementle
stimulateuretletraitementparstimulationprogrammé.Siunprogrammeestencoursd'exécution,
l'écrand'accueilafchelesinformationssuivantes:
• Nomduprogramme
• Numéroduprogramme
• Amplitude(niveau)destimulationsélectionnée,sousformedegraphiqueetdepourcentagedela
limitemaximaledisponible.
Exemple : écrans d'accueil de stimulateurs ayant un programme actif
Remarque : lorsque la télécommande se connecte à un stimulateur non rechargeable, elle n'afche
pas l'icône de la batterie du stimulateur dans le coin supérieur droit de l'écran d'accueil.
Siunplanningestencoursd'exécution,l'écrand'accueilafchelesinformationssuivantessurle
planningetlesprogrammesduplanning:
• Numéroduplanning
• Nomduplanning
• Numéroduprogrammeactifdansleplanning
• Nomduprogrammeactifdansleplanning
• Duréetotaled'exécutionduprogrammeactif
• Duréeécouléepourleprogrammeactif
Exemple : écrans d'accueil de stimulateurs ayant des plannings actifs
Mode d’emploi de la télécommande du médecin
92395488-02 57 sur 1077
Page 62
Mode d'emploi de la télécommande du médecin
fr
Réglage de l'amplitude de stimulation dans l'écran d'accueil
1.AppuyersurleboutonAccueil
àgauchedelatélécommandepourafcherl'écrand'accueil.
Remarque : lorsque la télécommande se connecte à un stimulateur non rechargeable, elle
n'afche pas l'icône de la batterie du stimulateur dans le coin supérieur droit de
l'écran d'accueil.
2.AppuyersurleboutonMoins
3.AppuyersurleboutonPlus
pourdiminuerleniveaudestimulation.
pouraugmenterleniveaudestimulation.
Le Menu principal
Main Menu(Menuprincipal)donneaccèsauxoptionssuivantes:
P
•
• Schedules(Plannings)
• Therapy Rating(Scoretraitement)
• Stimulation Areas(Zonesdestimulation)
• System Settings(Paramètresdusystème)
Accès à Main Menu (Menu principal)
Programs(Programmes)
Remarque : en fonction de la conguration du stimulateur, certaines sélections ne sont pas
disponibles.
1.Appuyersurlebouton
2.Depuisl'écrand'accueil,appuyersurlaècheversladroite
àgauchedelatélécommandepourafcherl'écrand'accueil:
pour sélectionner Main Menu
(Menuprincipal).
Mode d’emploi de la télécommande du médecin
92395488-02 58 sur 1077
Page 63
Le Menu principal
fr
Sélection et activation d'un programme
LemenuPrograms(Programmes)permetauxpatientsdesélectionnerunautreprogramme,
d'enregistrerlesmodicationsapportéesauxprogrammes,derétablirlesparamètrescliniquesdes
programmesetdesupprimerdesprogrammes.
1.Appuyersurlebouton
àgauchedelatélécommandepourafcherl'écranPrograms
(Programmes).
Remarque : il est également possible d'accéder au menu Programs (Programmes) depuis
Main Menu (Menu principal). Consulter la section Accès à Main Menu (Menu
principal) pour de plus amples instructions.
2.Sélectionner ChangeProgram(Changerdeprogramme)enappuyantsurleboutonde
sélection
ousurlaècheversladroite .
3.Appuyersurlaècheverslehaut etlaècheverslebas pour accéder au
programmevoulu.
4.Appuyersurlaècheversladroite
poursélectionnerleprogramme.
Mode d’emploi de la télécommande du médecin
92395488-02 59 sur 1077
Page 64
Mode d'emploi de la télécommande du médecin
fr
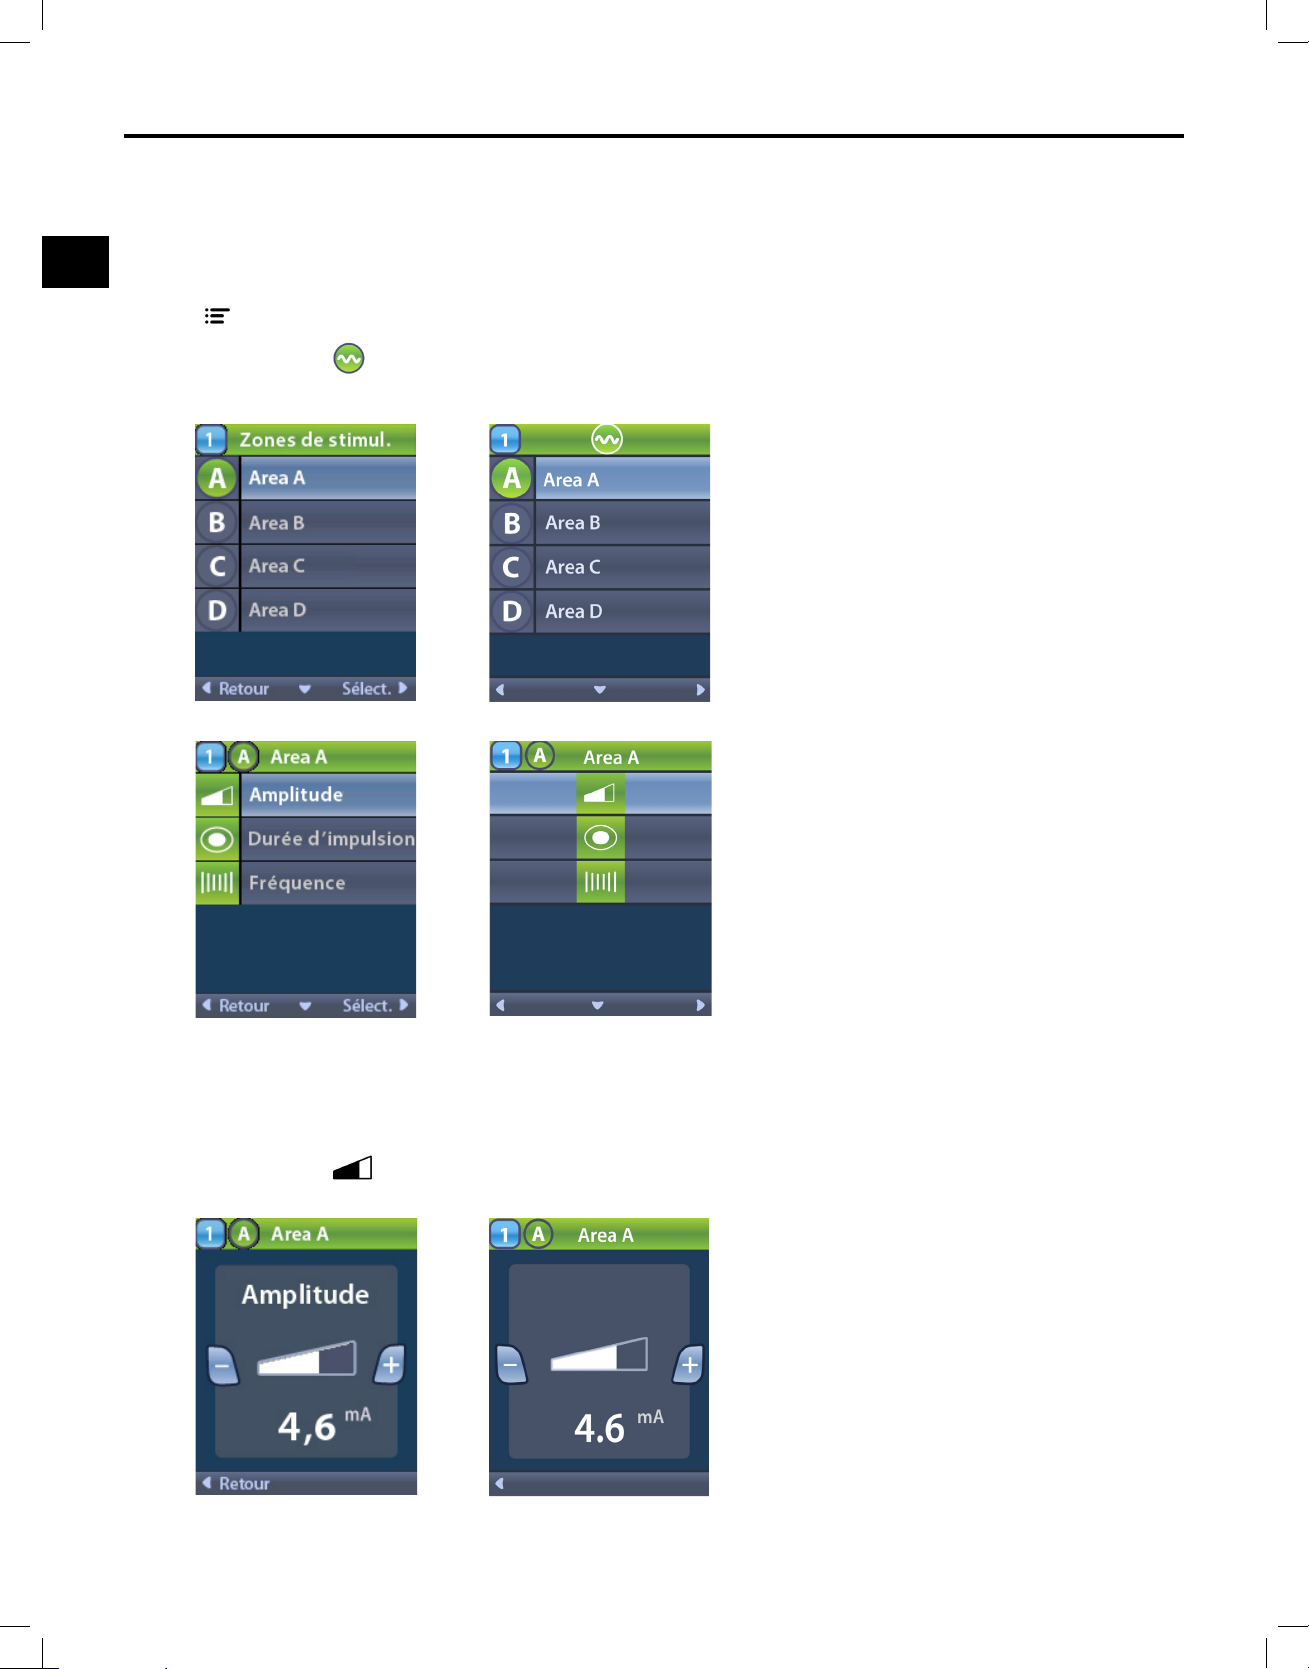
Sélection de zones de stimulation pour modier les programmes
Chaqueprogrammepeutcomporterdesparamètrespourunmaximumdequatrezonesdestimulation.
Chacuned'ellesestidentiéeparunelettreetunnom.Ceszonesdestimulationcontrôlentl'amplitude,
la largeurd'impulsionetlafréquence.
Depuis
Main Menu(Menuprincipal):
1.Sélectionner
StimulationAreas(Zonesdestimulation).L'écranStimulationAreas(Zonesde
stimulation)apparaît.
Sélectionnerlazonevoulue.L'écranArea(Zone)apparaîtaveclesoptionsdeparamètressuivantes:
2.Sélectionnerleparamètreàmodier.
Amplitude
Depuisl'écranArea(Zone):
1.Sélectionner
Mode d’emploi de la télécommande du médecin
92395488-0260sur1077
Amplitude.
Page 65
Le Menu principal
fr
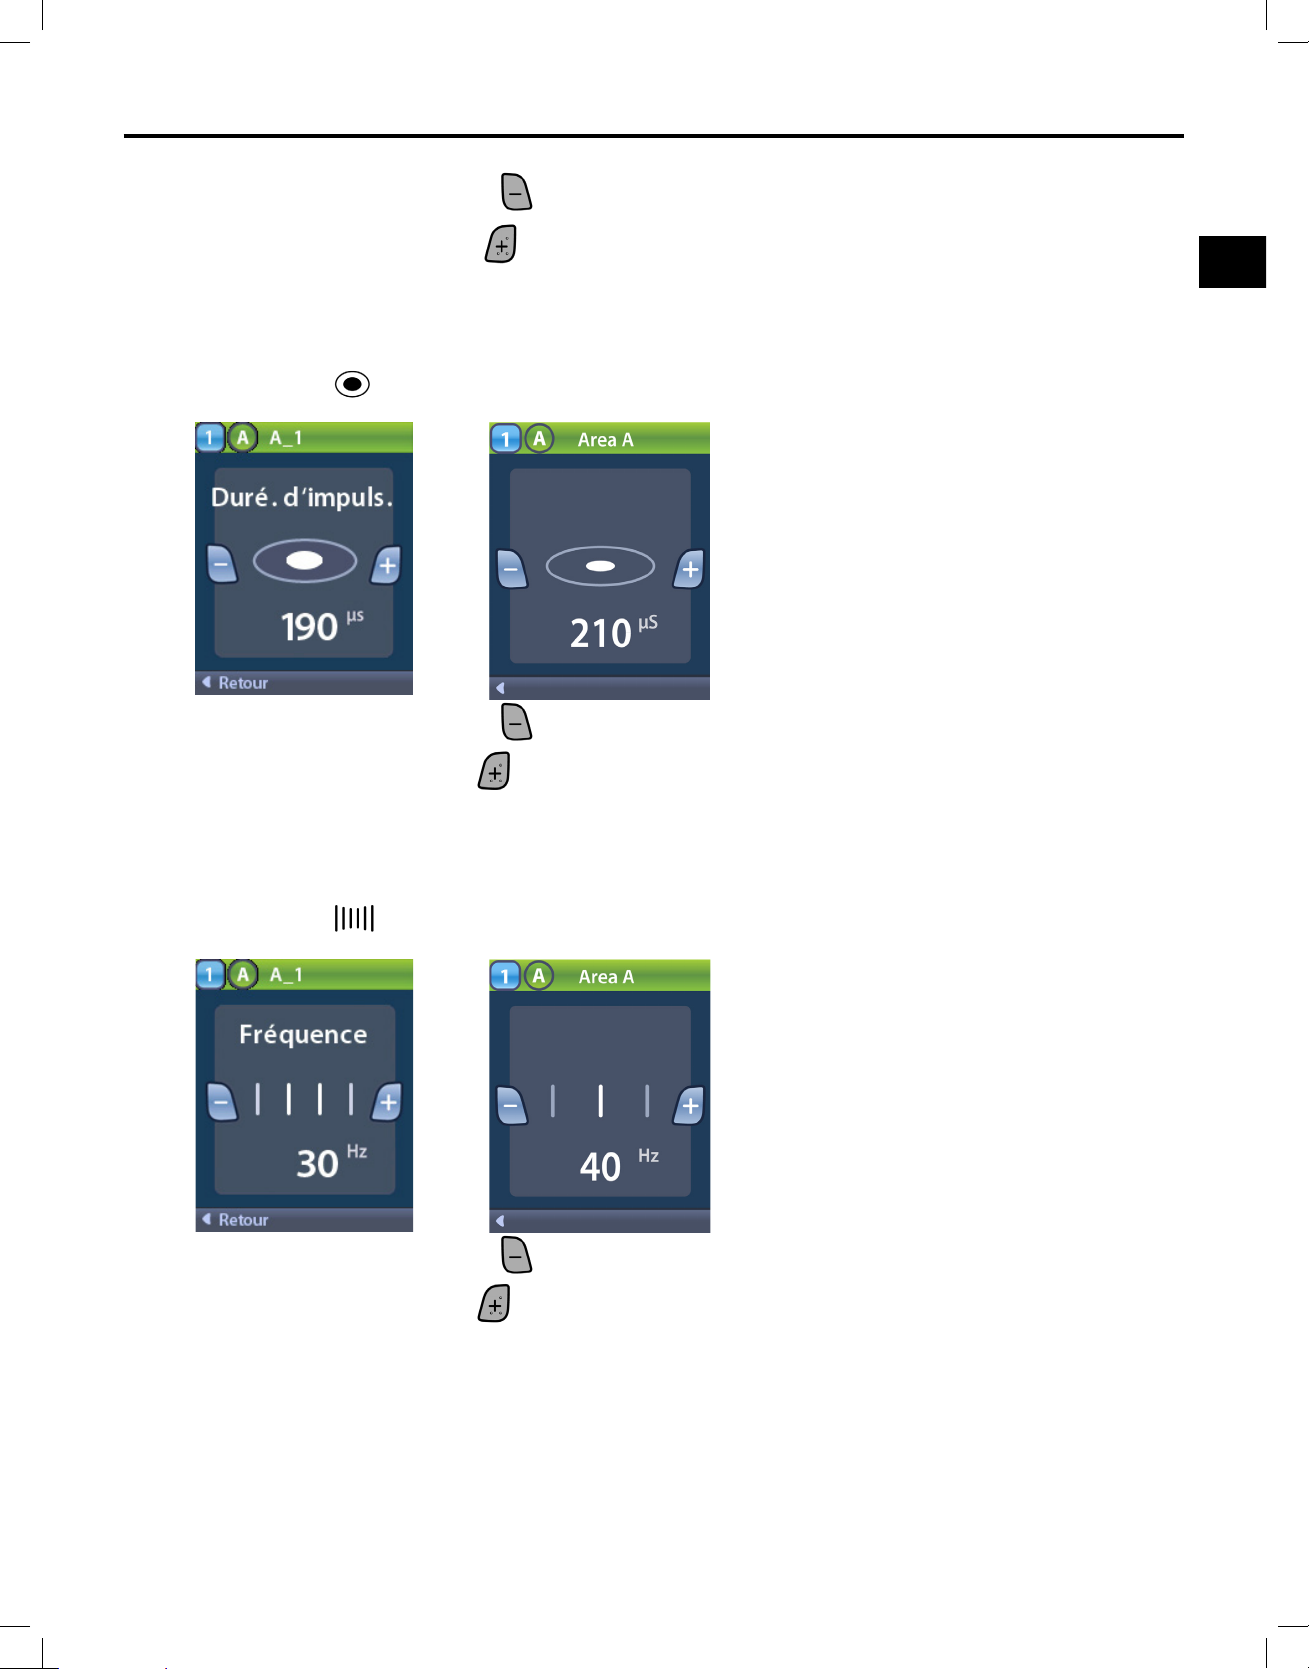
2.AppuyersurleboutonMoins pourdiminuerl'amplitude(leniveau)destimulation.
3.AppuyersurleboutonPlus
pouraugmenterl'amplitude(leniveau)destimulation.
Pulse Width (Largeur d'impulsion)
Depuisl'écranArea(Zone):
1.Sélectionner
Pulse Width (Largeur d'impulsion).
2.AppuyersurleboutonMoins pourdiminuerlalargeurd'impulsion.
3.AppuyersurleboutonPlus
pouraugmenterlalargeurd'impulsion.
Rate (Fréquence)
Depuisl'écranArea(Zone):
1.Sélectionner
Rate(Fréquence).
2.AppuyersurleboutonMoins pourdiminuerlafréquence.
3.AppuyersurleboutonPlus
pouraugmenterlafréquence.
Mode d’emploi de la télécommande du médecin
92395488-0261sur1077
Page 66
Mode d'emploi de la télécommande du médecin
fr
Enregistrement des programmes modiés
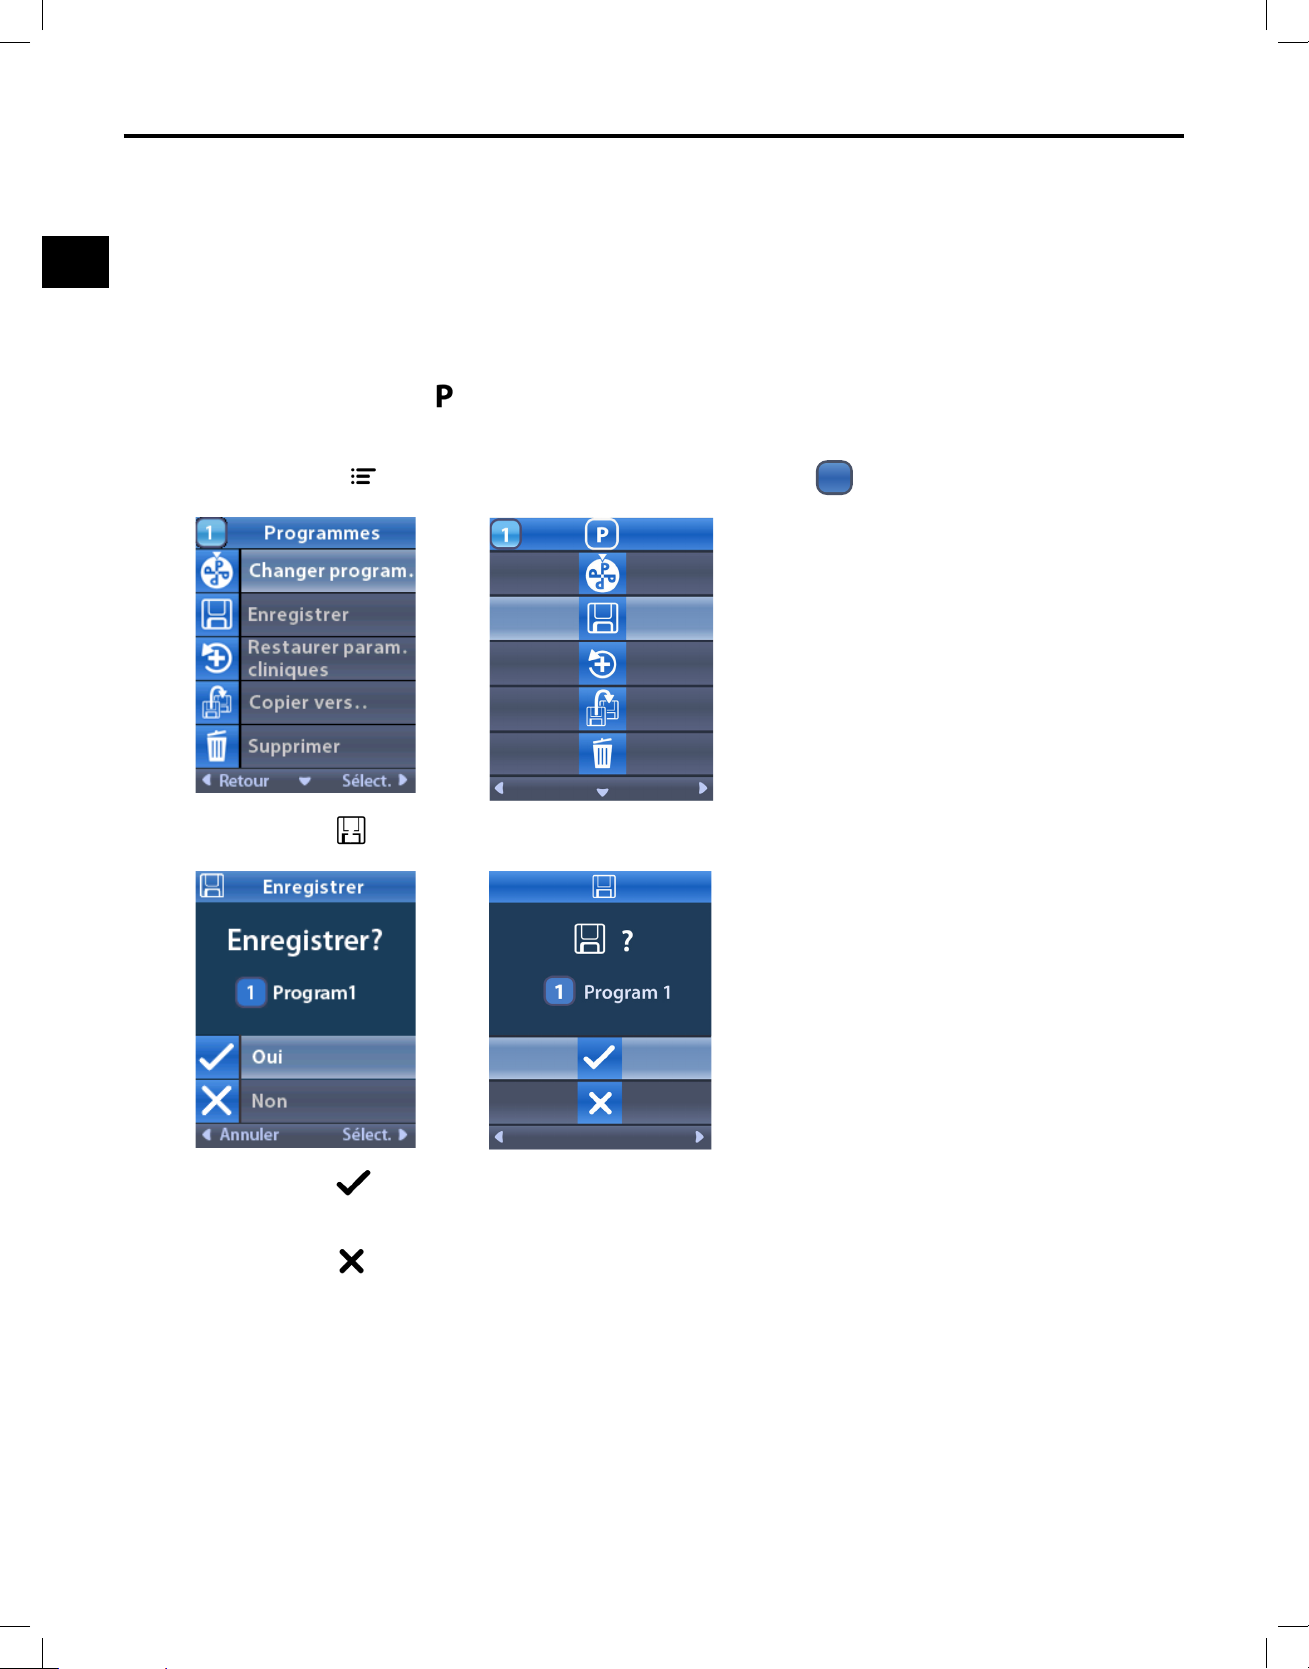
Sil'amplitude,lalargeurd'impulsionoulafréquencedestimulationestmodiée,ilestpossible
d'enregistrerlesnouveauxparamètrescommeparamètresdestimulationpardéfautpource
programme.Lesnouveauxparamètressontalorsutilisésjusqu'àcequ'unenouvellemodicationsoit
enregistréeoujusqu'àcequelesparamètrescliniquesduprogrammesoientrétablis.Consulterla
sectionRétablissementdeprogrammespourensavoirplus.
1.Appuyersurlebouton
àgauchedelatélécommande.
ou
Depuisl'écran
MainMenu(Menuprincipal),sélectionnerPPrograms(Programmes).
2.Sélectionner Save(Enregistrer).L'écranSave?(Enregistrer?)apparaît.
3.Sélectionner Yes(Oui)pourenregistrer.
ou
Sélectionner
Mode d’emploi de la télécommande du médecin
92395488-0262sur1077
No(Non)pourannuler.
Page 67
Le Menu principal
fr
Rétablissement de programmes
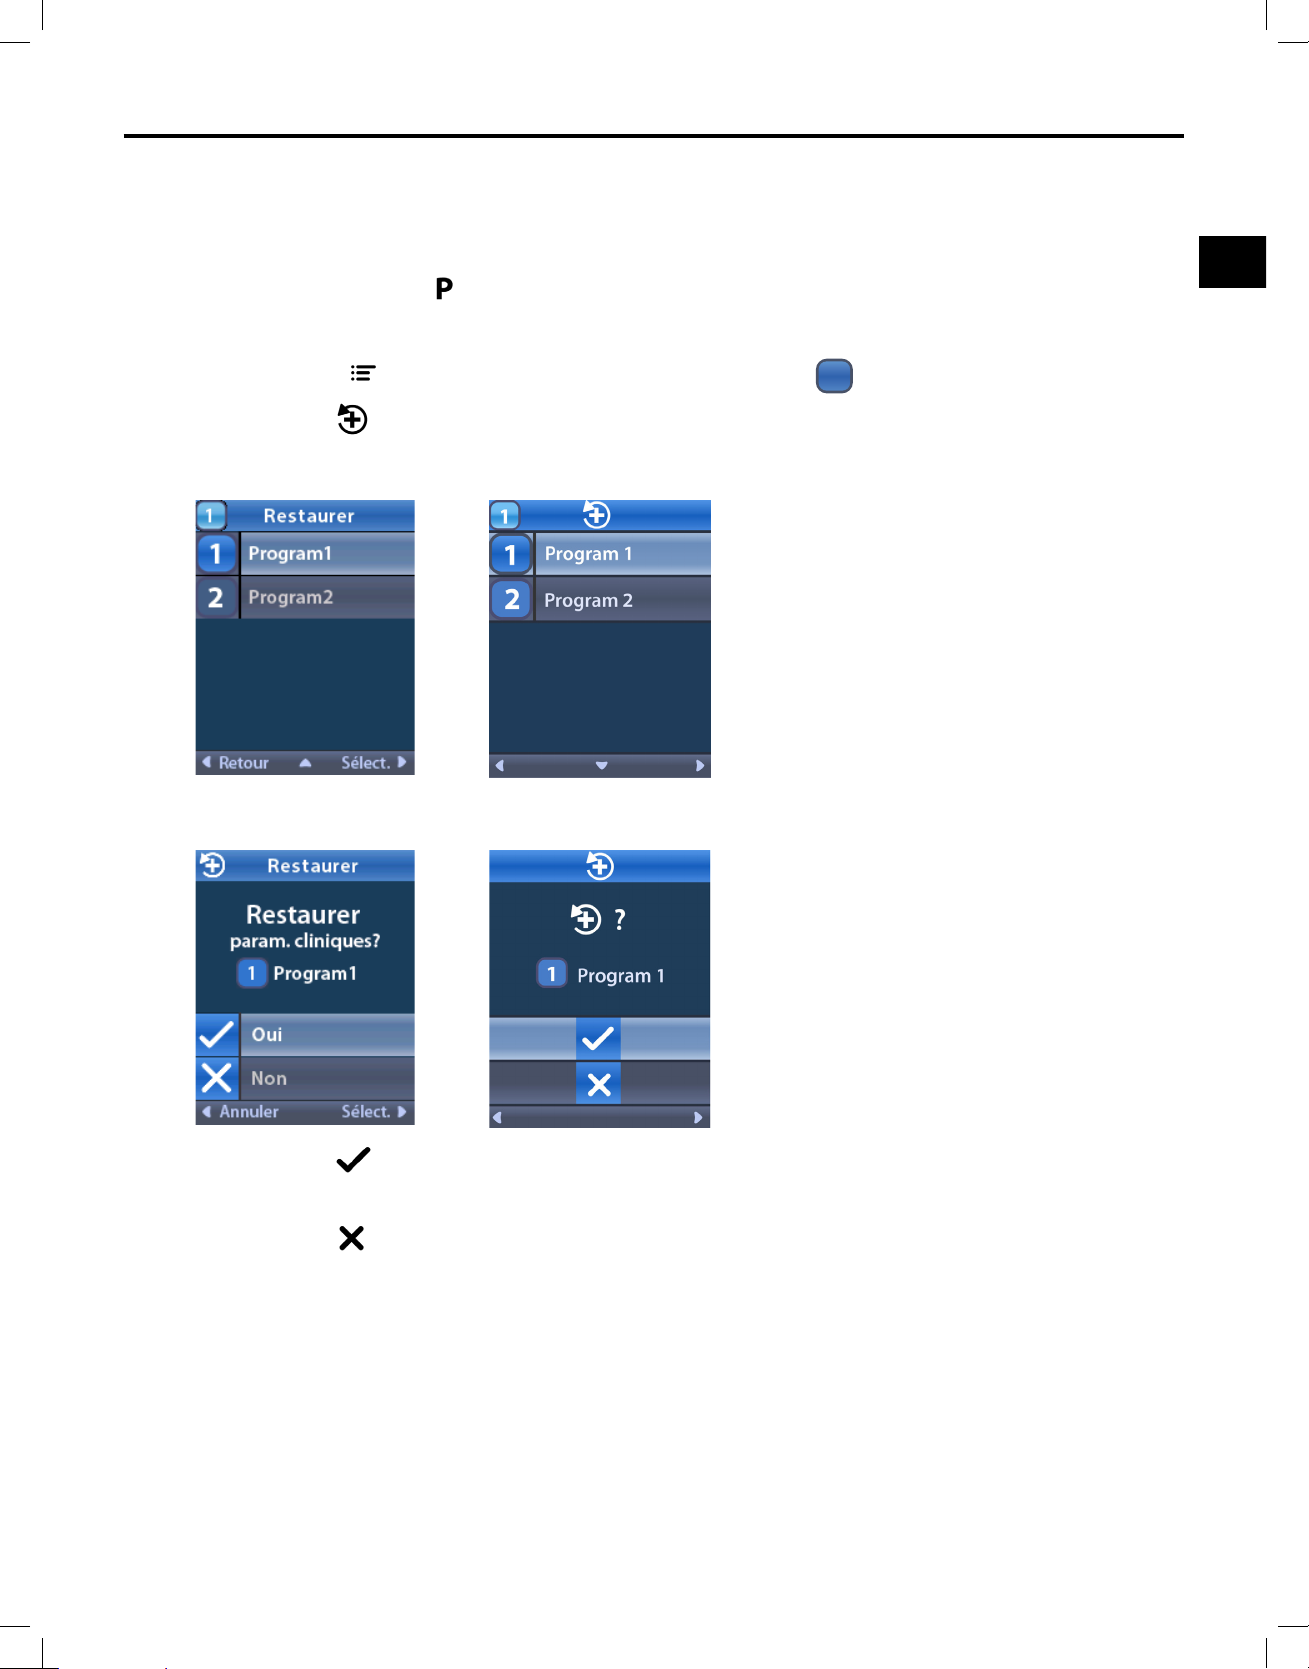
Lerétablissementdeprogrammessupprimeleschangementsenregistrésapportésàunprogrammeet
rétablitlesparamètrescliniquesoriginauxduprogramme.
1.Appuyersurlebouton
ou
àgauchedelatélécommande.
Depuisl'écran
2.Sélectionner
MainMenu(Menuprincipal),sélectionnerPPrograms(Programmes).
RestoretoClinicSettings(Rétablirlesparamètresprogrammésenclinique).
L'écranRestore(Rétablir)apparaît.
3.Sélectionnerleprogrammeàrétablir.L'écrandeconrmationRestore(Rétablir)apparaît.
4.Sélectionner Yes(Oui)pourrétablirlesparamètrescliniquesduprogramme.
ou
Sélectionner
No(Non)pourannulerl'action.
Mode d’emploi de la télécommande du médecin
92395488-0263sur1077
Page 68
Mode d'emploi de la télécommande du médecin
fr
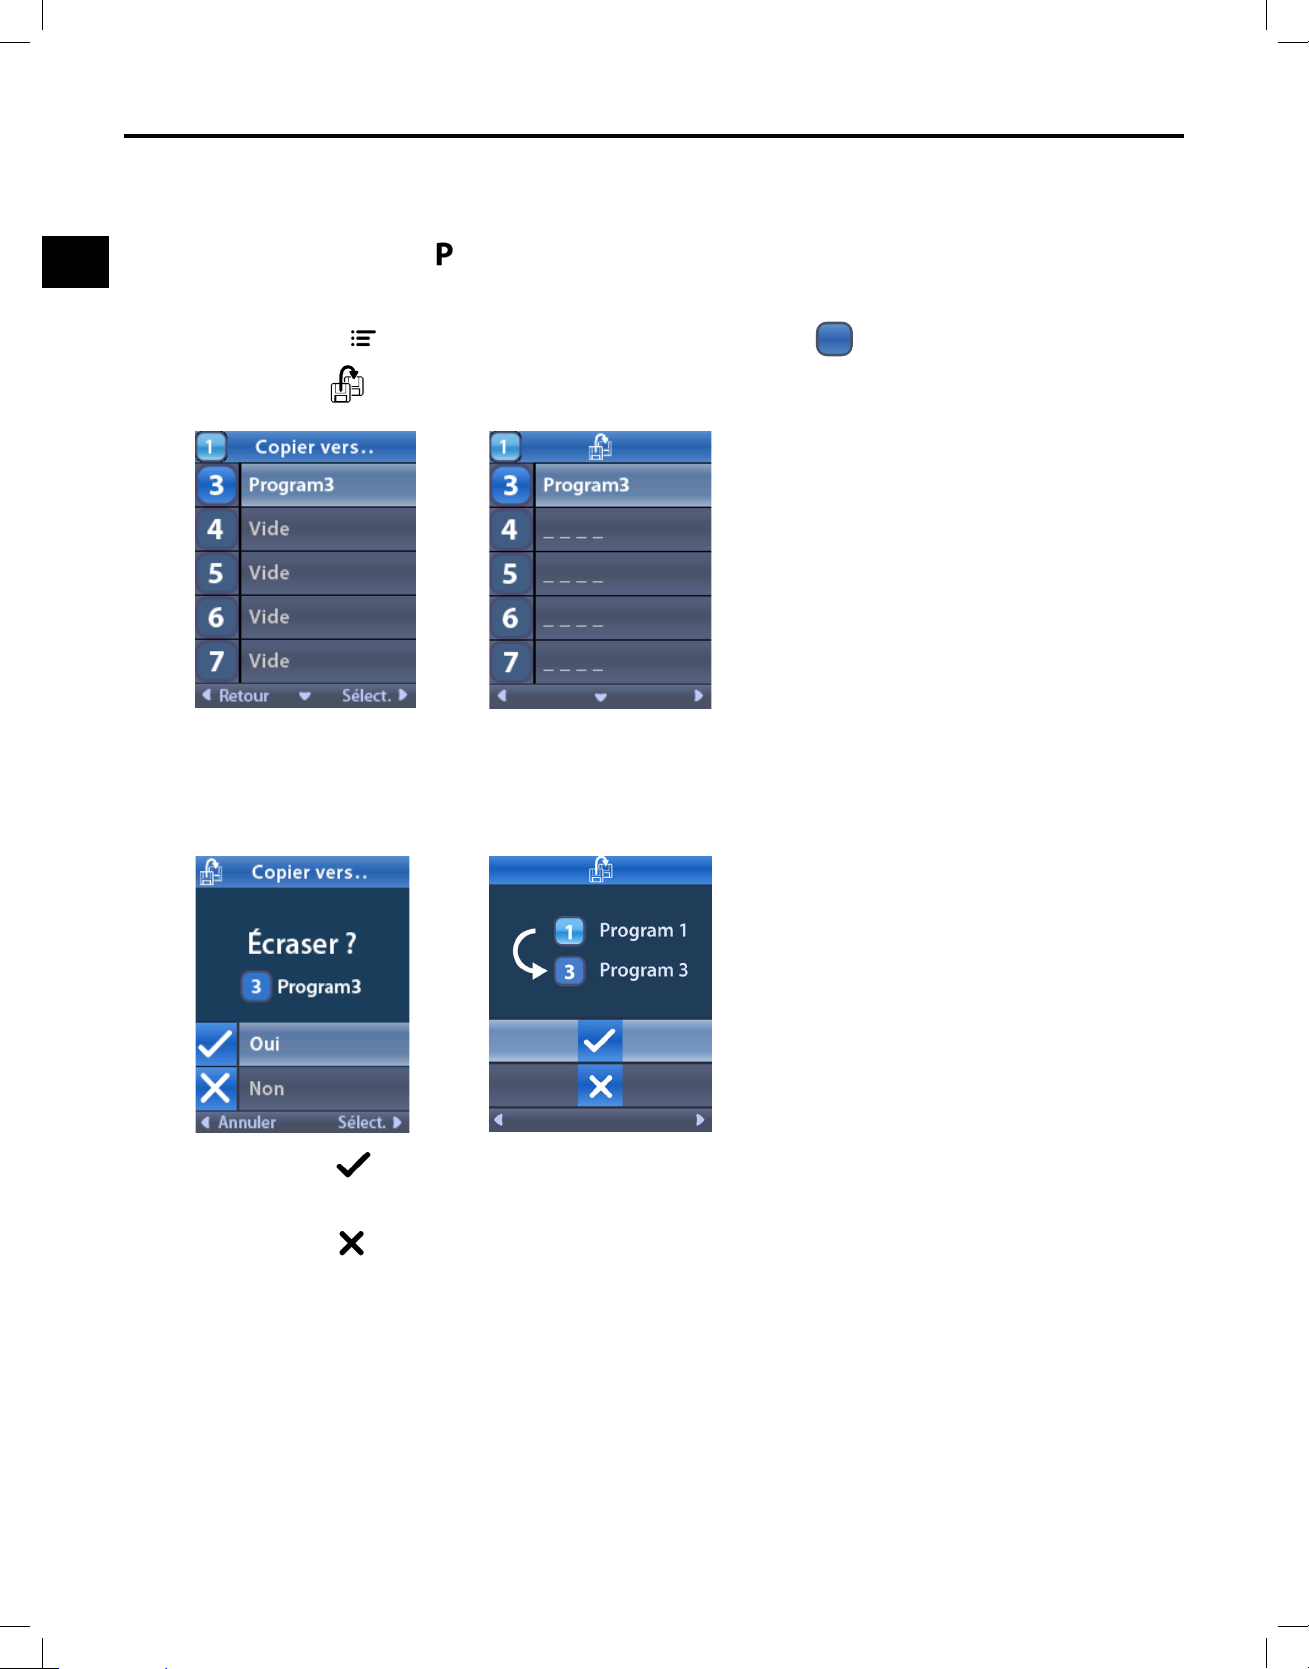
Copie de programmes
Ilestpossibledecopierunprogrammeexistantversunnouveau.
1.Appuyersurlebouton
ou
Depuisl'écran
2.Sélectionner
MainMenu(Menuprincipal),sélectionnerPPrograms(Programmes).
Copyto...(Copiervers...).
àgauchedelatélécommande.
3.Sélectionnerleprogrammeverslequelcopierleprogrammeencours.
4.L'écranOverwrite?(Remplacer?)apparaîtsilacopienes'effectuepasversunemplacement
vide.
5.Sélectionner Yes(Oui)pourconrmerleremplacementduprogramme.
ou
Sélectionner
No(Non)pourannulerl'action.
L'écrandeconrmationCopyto...(Copiervers...)apparaît.
Mode d’emploi de la télécommande du médecin
92395488-0264sur1077
Page 69
fr
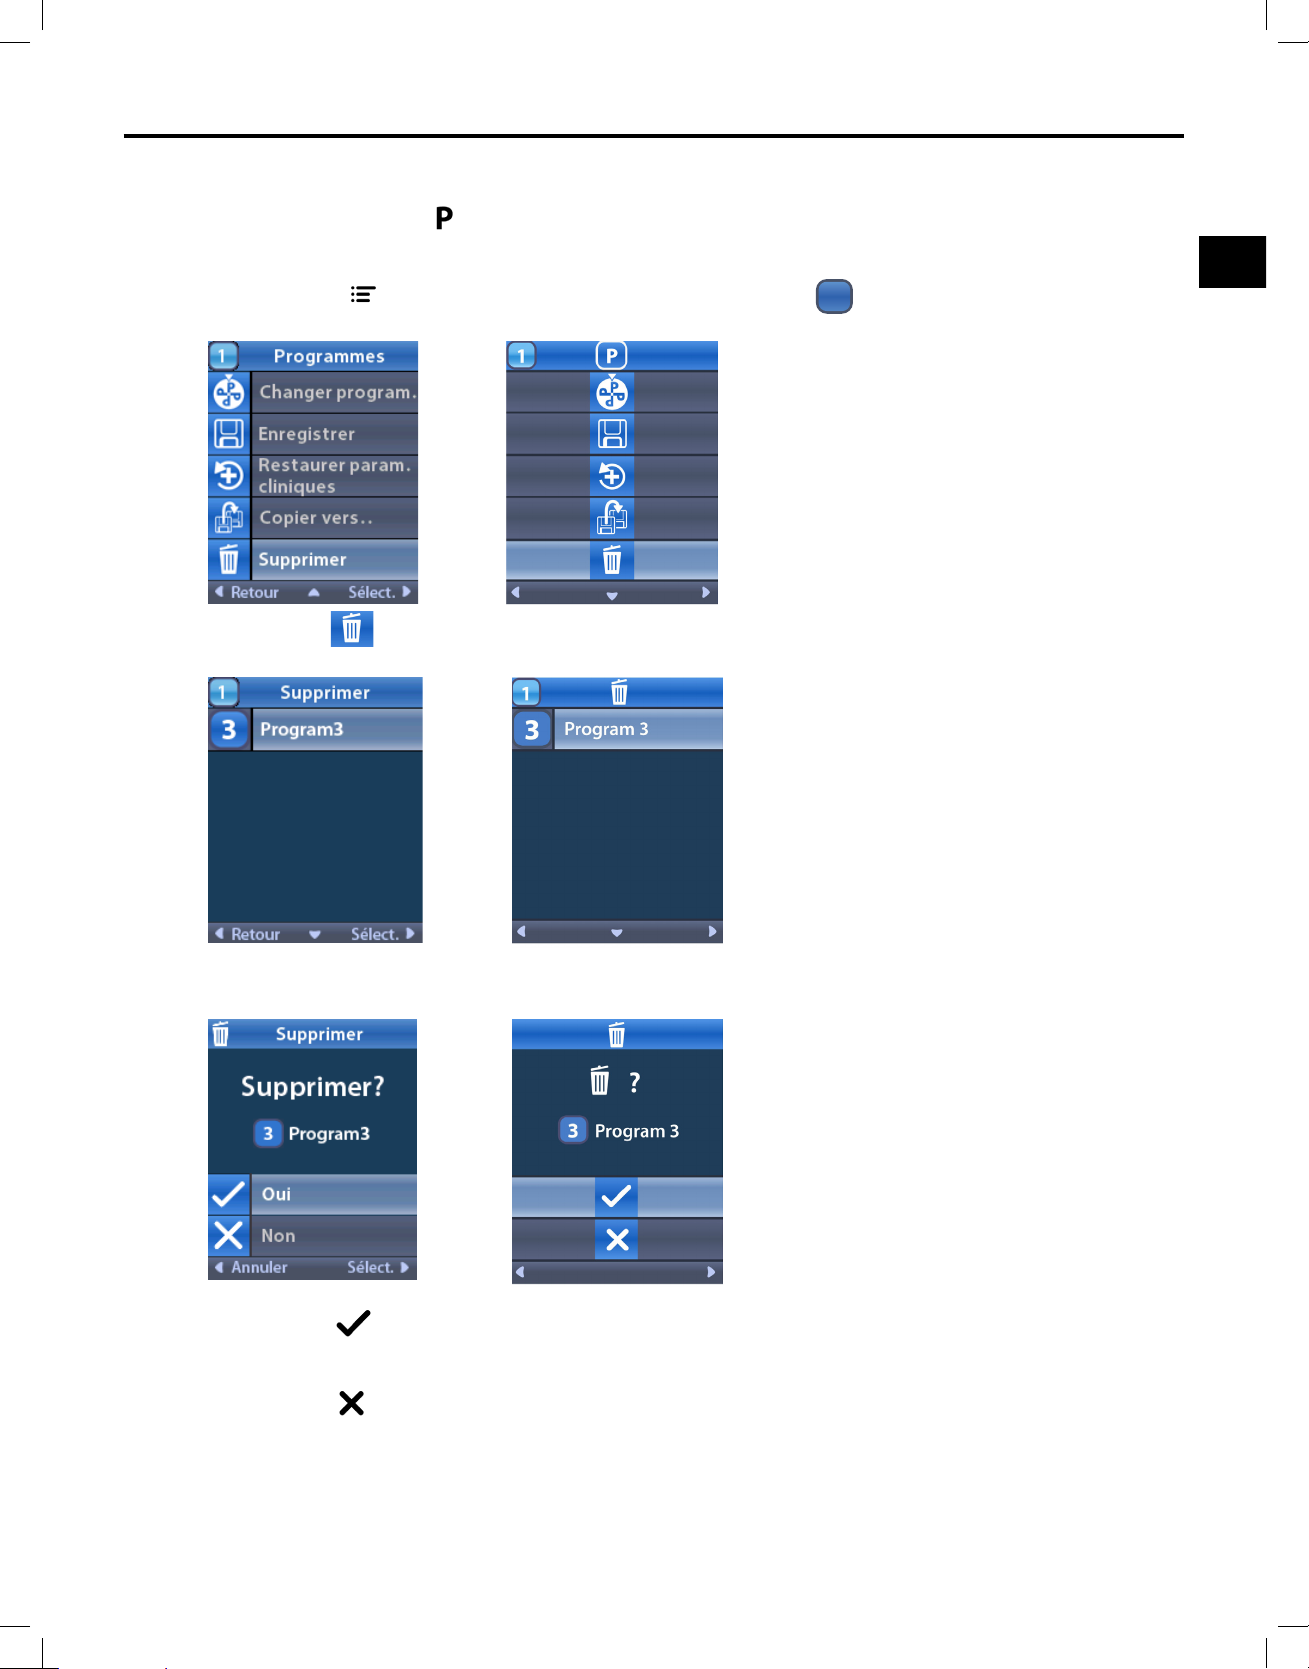
Suppression de programmes
Le Menu principal
1.Appuyersurlebouton
àgauchedelatélécommande.
ou
Depuisl'écran
MainMenu(Menuprincipal),sélectionnerPPrograms(Programmes).
2.Sélectionner Delete(Supprimer).
3.Sélectionnerleprogrammeàsupprimer.
4.Sélectionner Yes(Oui)pourconrmerlasuppressionduprogrammesélectionné.
ou
Sélectionner
No(Non)pourannulerl'action.
Mode d’emploi de la télécommande du médecin
92395488-0265sur1077
Page 70
Mode d'emploi de la télécommande du médecin
fr
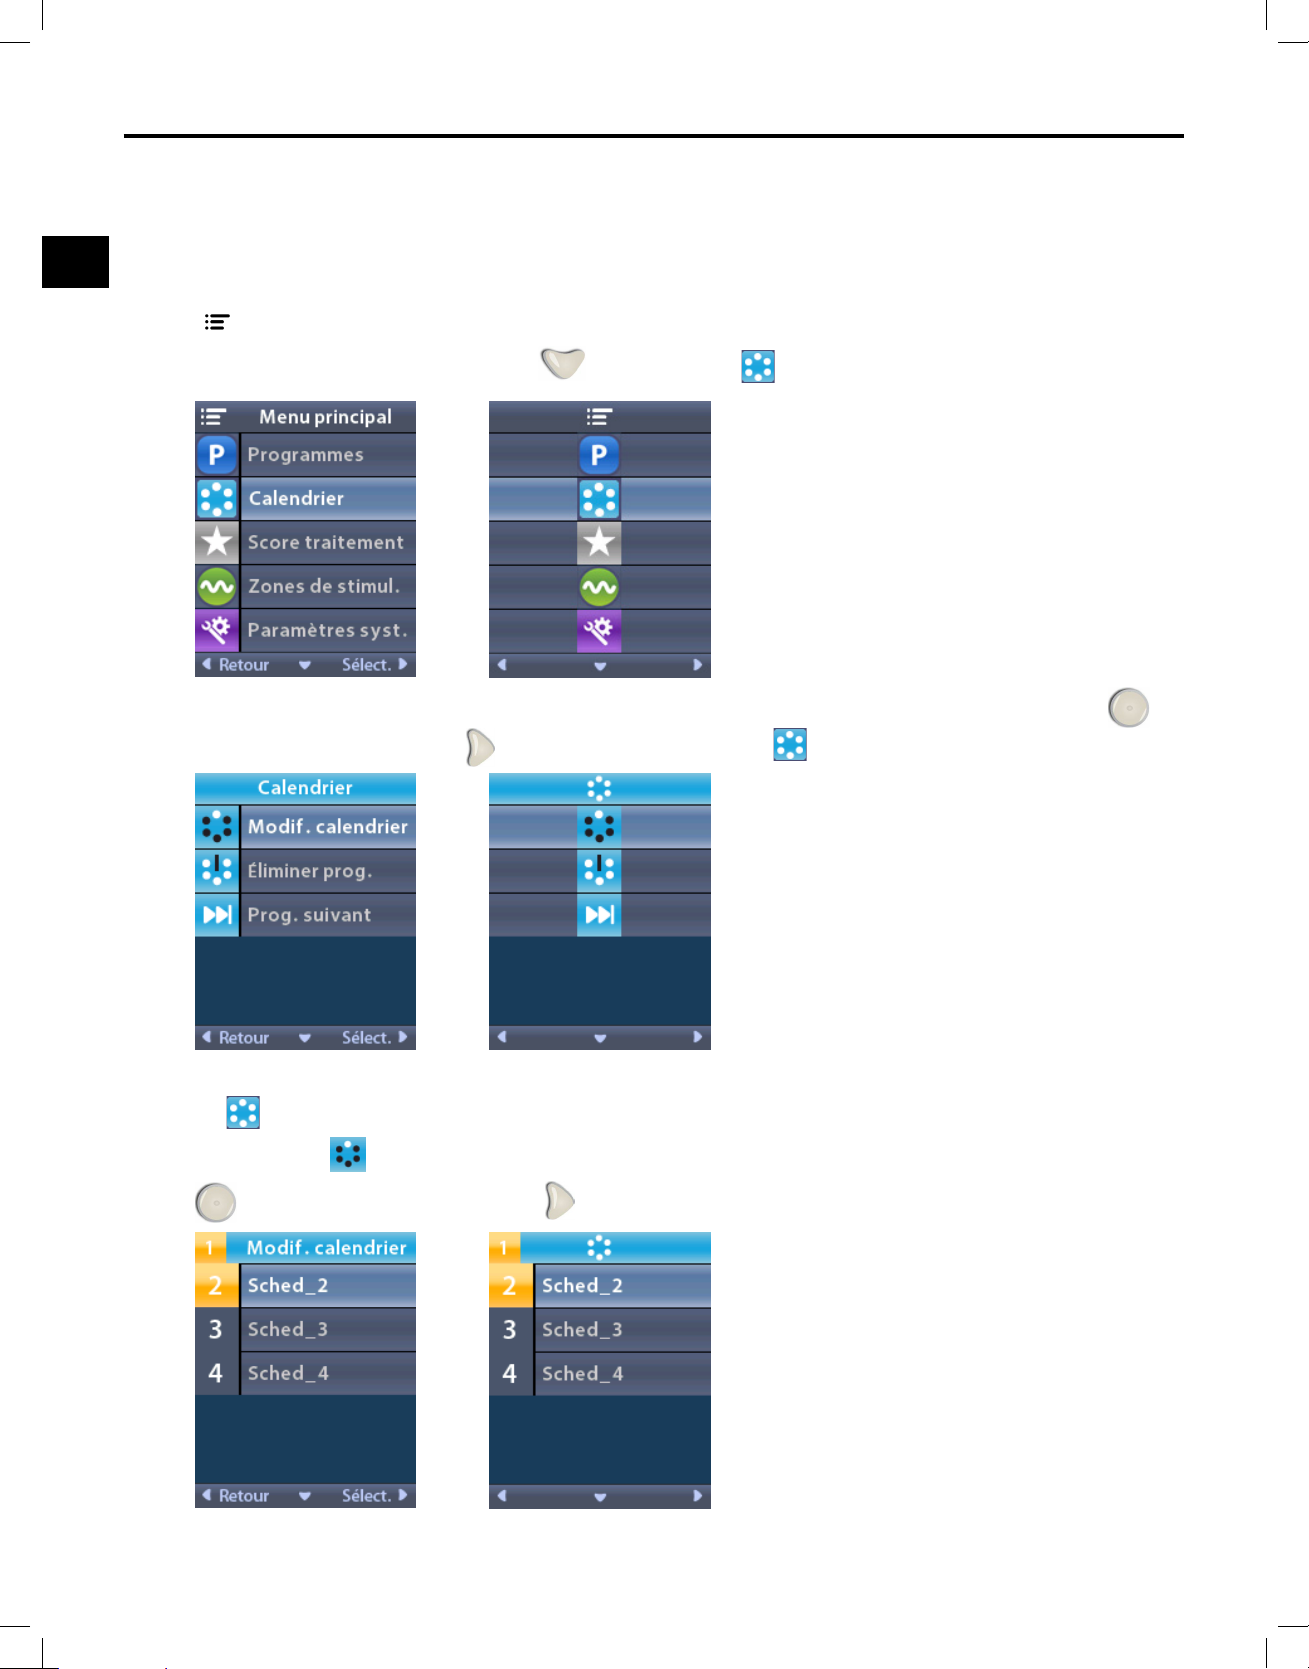
Gestion des plannings
Lesplanningspermettentauxpatientsdesélectionnerunplanningdifférent,d'excluredesprogrammes
d'unplanningoudepasserdirectementauprogrammesuivantdansunplanning.
Remarque : en fonction de la conguration du stimulateur, certaines sélections ne sont pas disponibles.
Depuis
1.Appuyersurlaècheverslebas
Main Menu(Menuprincipal):
pour atteindre Schedules(Plannings).
2.Unefoisl'optionSchedules(Plannings)sélectionnée,appuyersurleboutondesélection ou
surlaècheversladroite
pouraccéderàl'écrandu menuSchedules(Plannings).
Sélection ou passage à un autre planning
Depuis le
1.Sélectionner
menu Schedules (Plannings):
ChangeSchedule(Modierplanning)enappuyantsurleboutondesélection
ousurlaècheversladroite
Mode d’emploi de la télécommande du médecin
92395488-0266sur1077
.
Page 71
Le Menu principal
fr
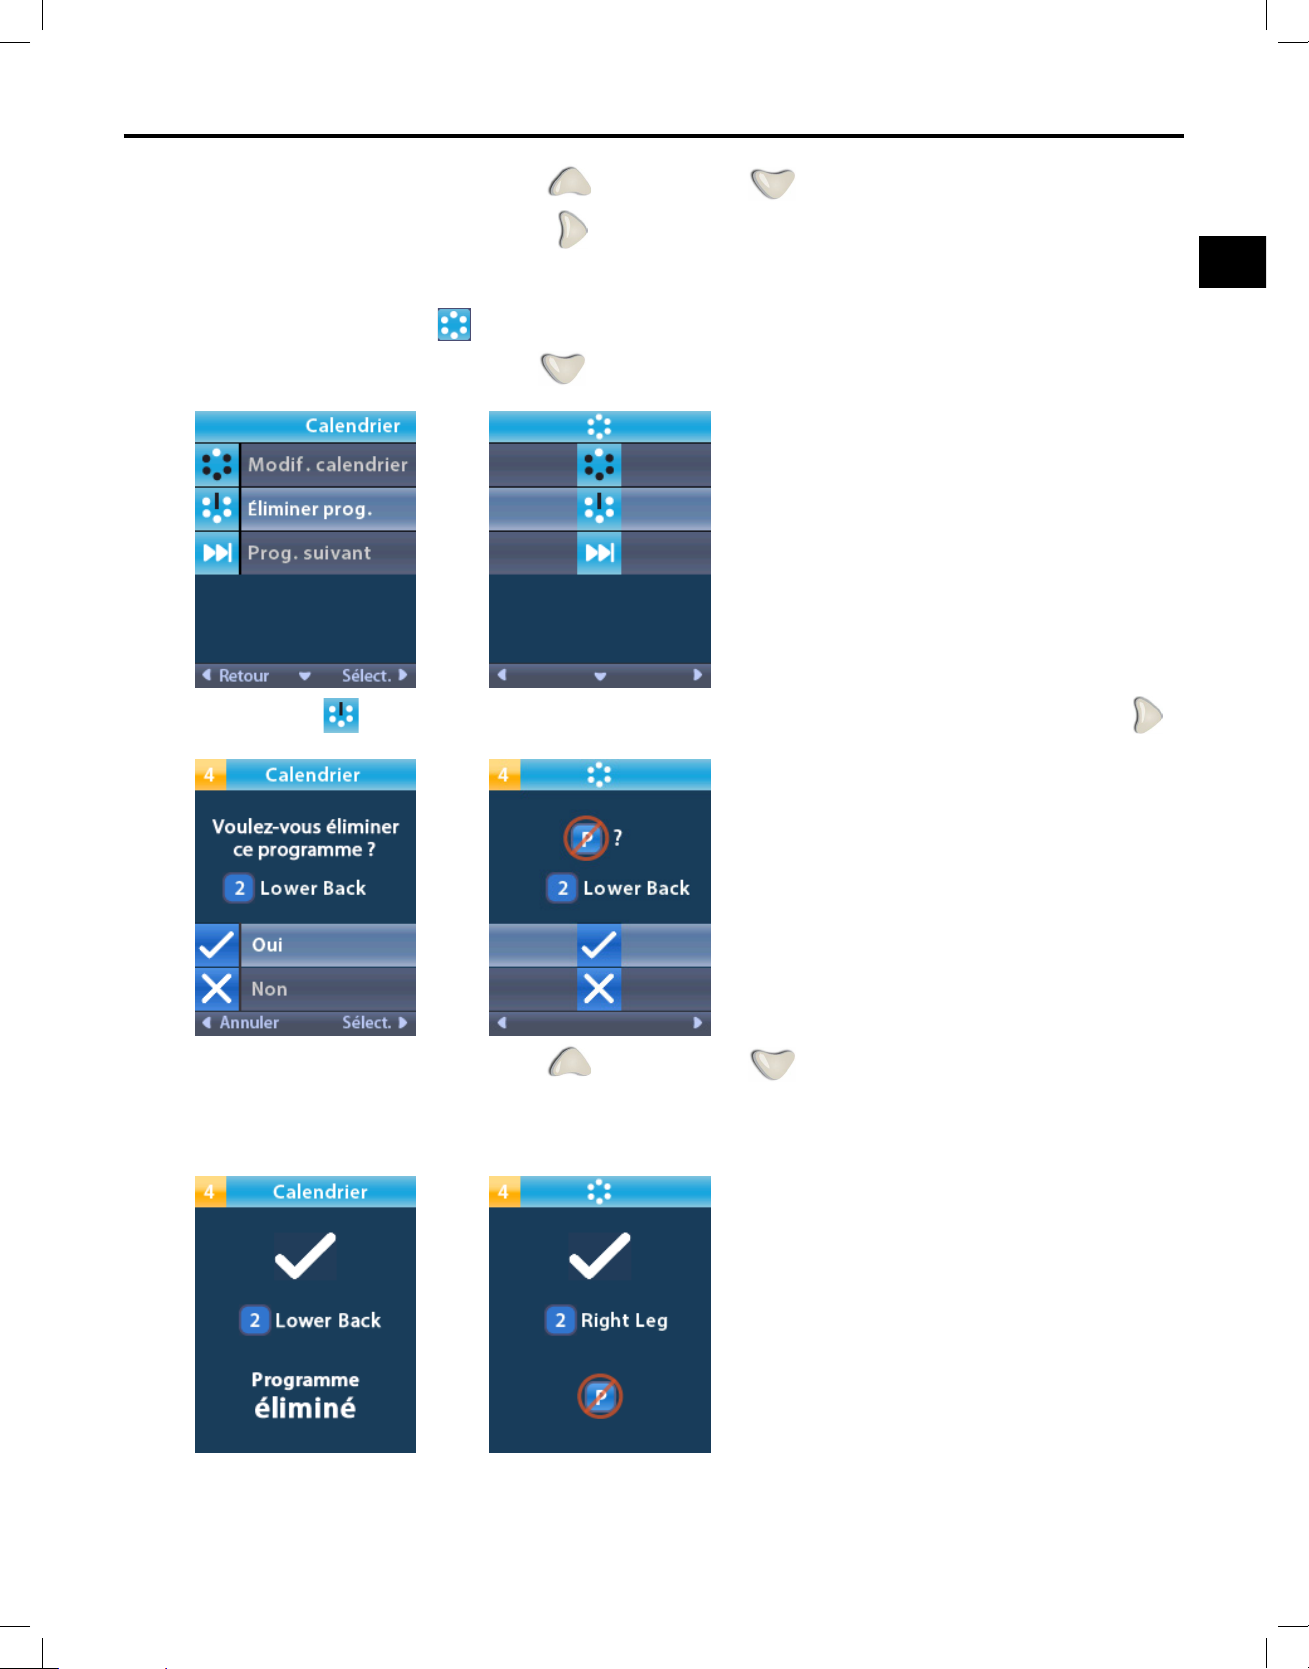
2.Appuyersurlaècheverslehaut ouverslebas pouratteindreleplanningsouhaité.
3.Appuyersurlaècheversladroite
poursélectionnerleplanning.
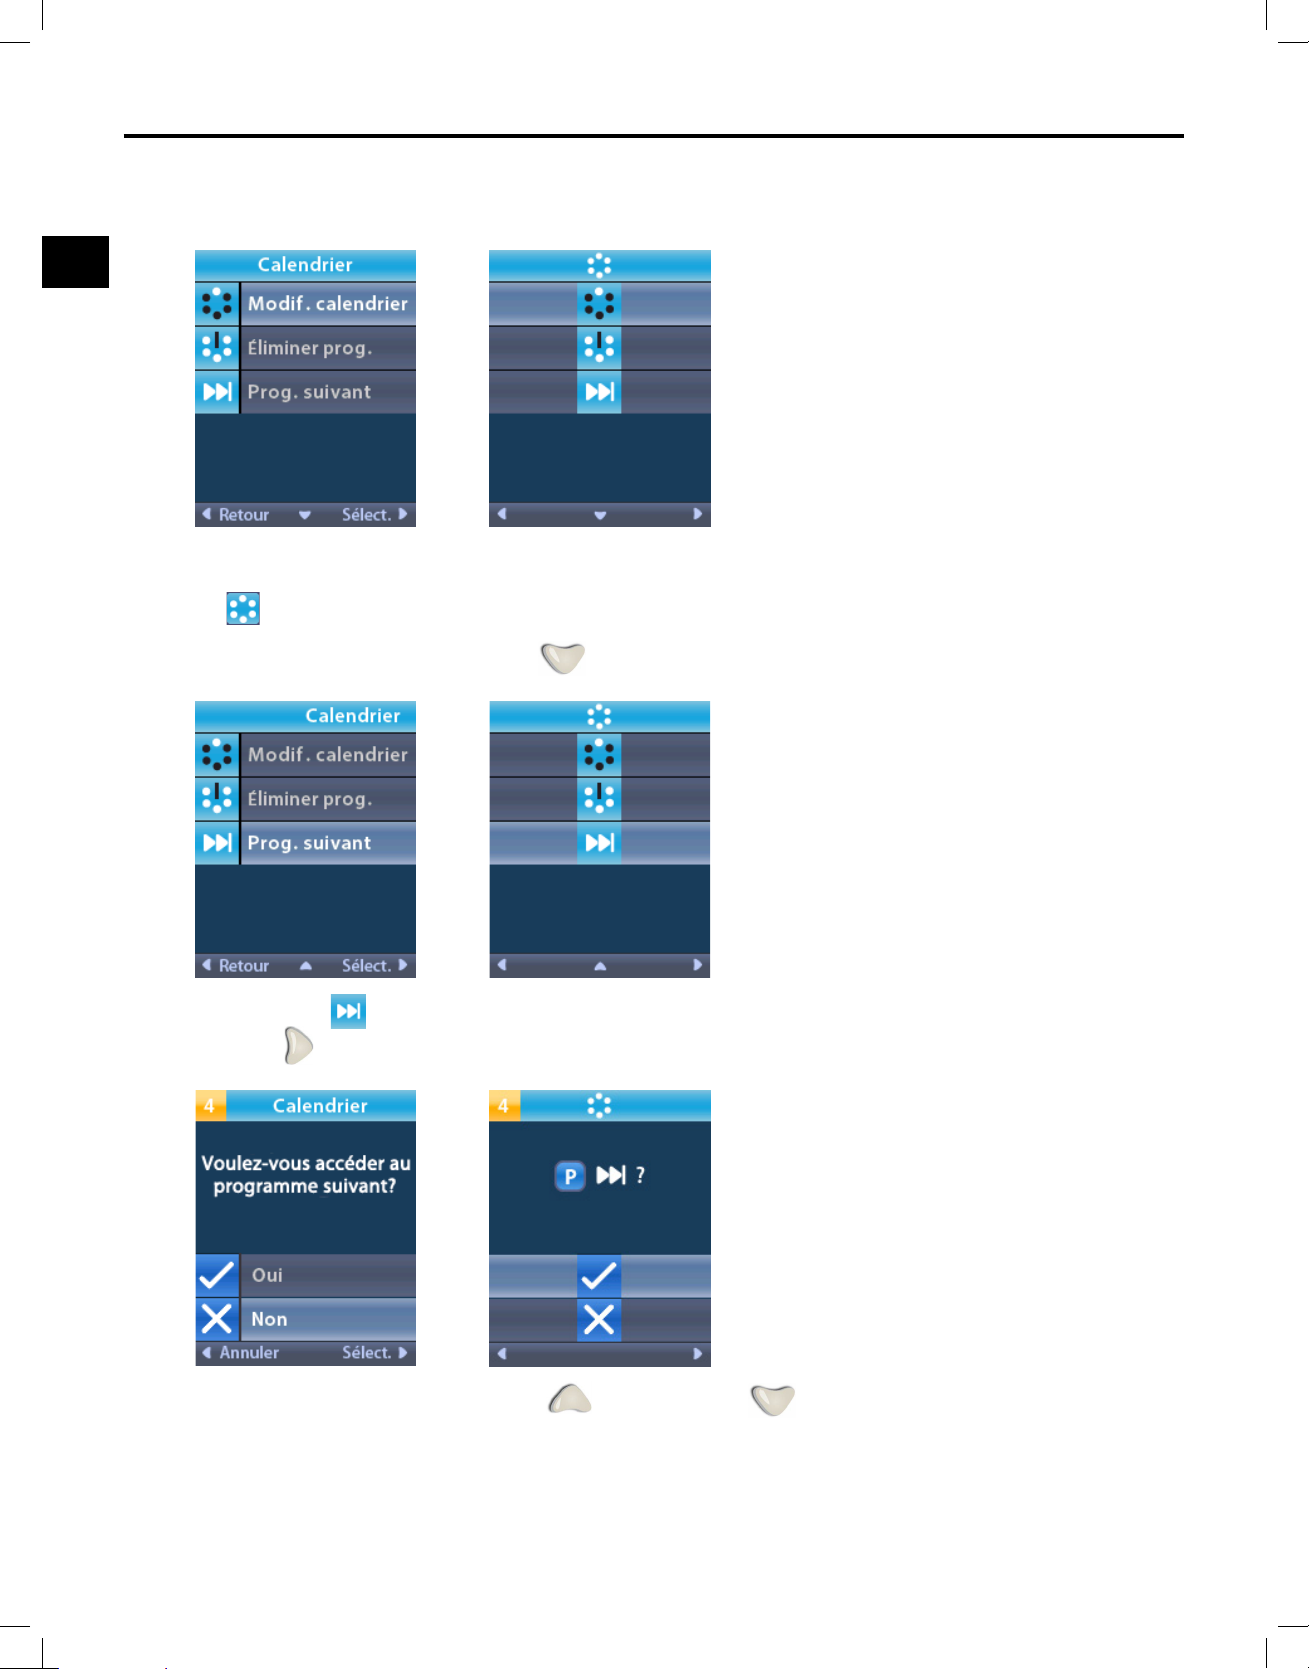
Exclusion d'un programme du planning
Depuis le menu principal de
1.Appuyersurlaècheverslebas
Schedules(Plannings):
pouratteindreExcludeProgram(Exclureprogramme).
2.Sélectionner ExcludeProgram(Exclureprogramme)enappuyantsurlaècheversladroite .
3.Appuyersurlaècheverslehaut ouverslebas poursélectionnerYes(Oui)ouNo
(Non)àl'invite.
4.SiYes(Oui)estsélectionné,l'écranProgramExcluded(Programmeexclu)apparaît.
Mode d’emploi de la télécommande du médecin
92395488-0267sur1077
Page 72
Mode d'emploi de la télécommande du médecin
fr
5.SiNo(Non)estsélectionné,leprogrammen'estpasexcluetlemenuSchedules(Plannings)
s'afche:
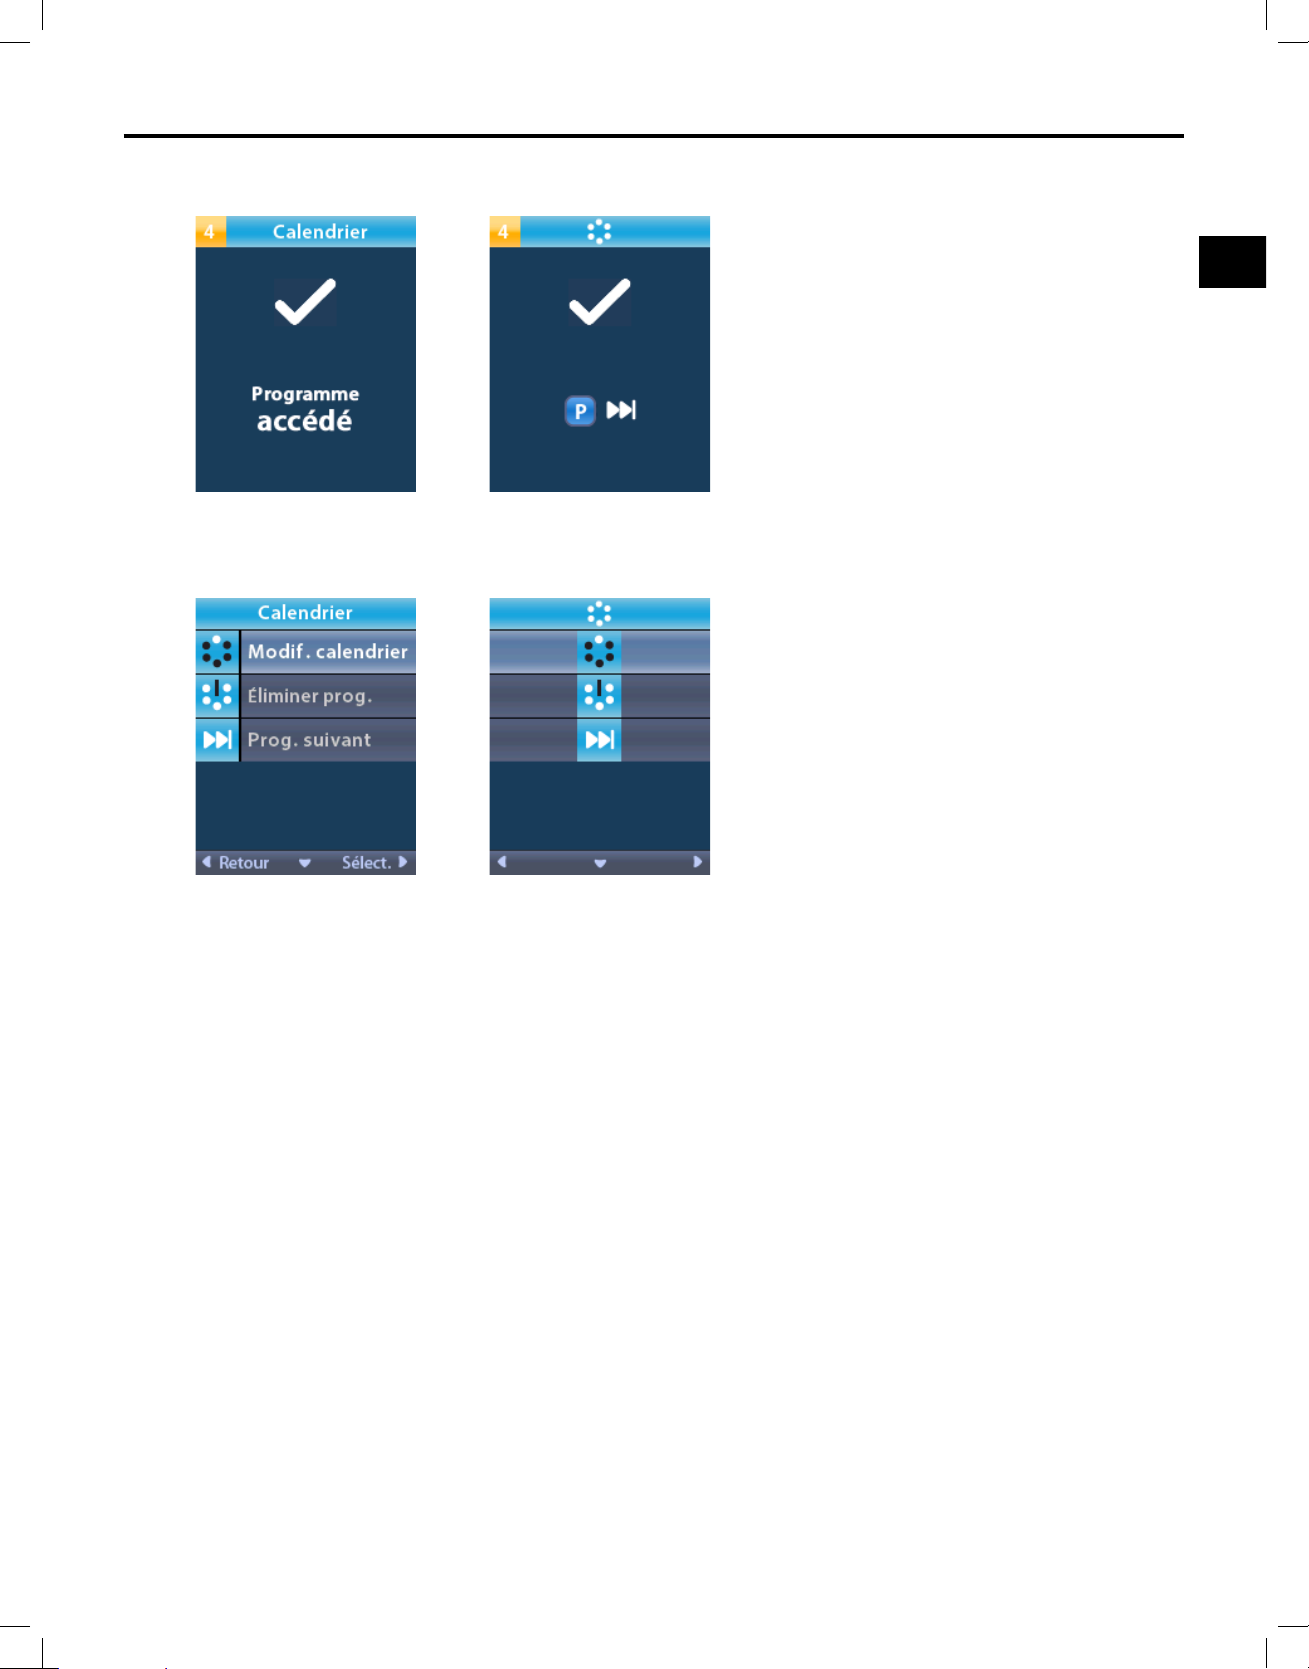
Avancement d'un programme dans un planning
Depuis le
1.Appuyersurlaècheverslebas
menu Schedules(Plannings):
pouratteindreleprogrammesuivant.
2.Sélectionner NextProgram(Programmesuivant)enappuyantsurlaèchevers
la droite .
3.Appuyersurlaècheverslehaut ouverslebas poursélectionnerYes(Oui)ouNo
(Non)àl'invite.
Mode d’emploi de la télécommande du médecin
92395488-0268sur1077
Page 73
Le Menu principal
fr
4.SiYes(Oui)estsélectionné,l'écranProgramAdvanced(Avanceprogramme)apparaît:
5.SiNo(Non)estsélectionné,l'utilisateurn'avancepasd'unprogrammeetlemenuSchedules
(Plannings)estafché:
Mode d’emploi de la télécommande du médecin
92395488-0269sur1077
Page 74
Mode d'emploi de la télécommande du médecin
fr
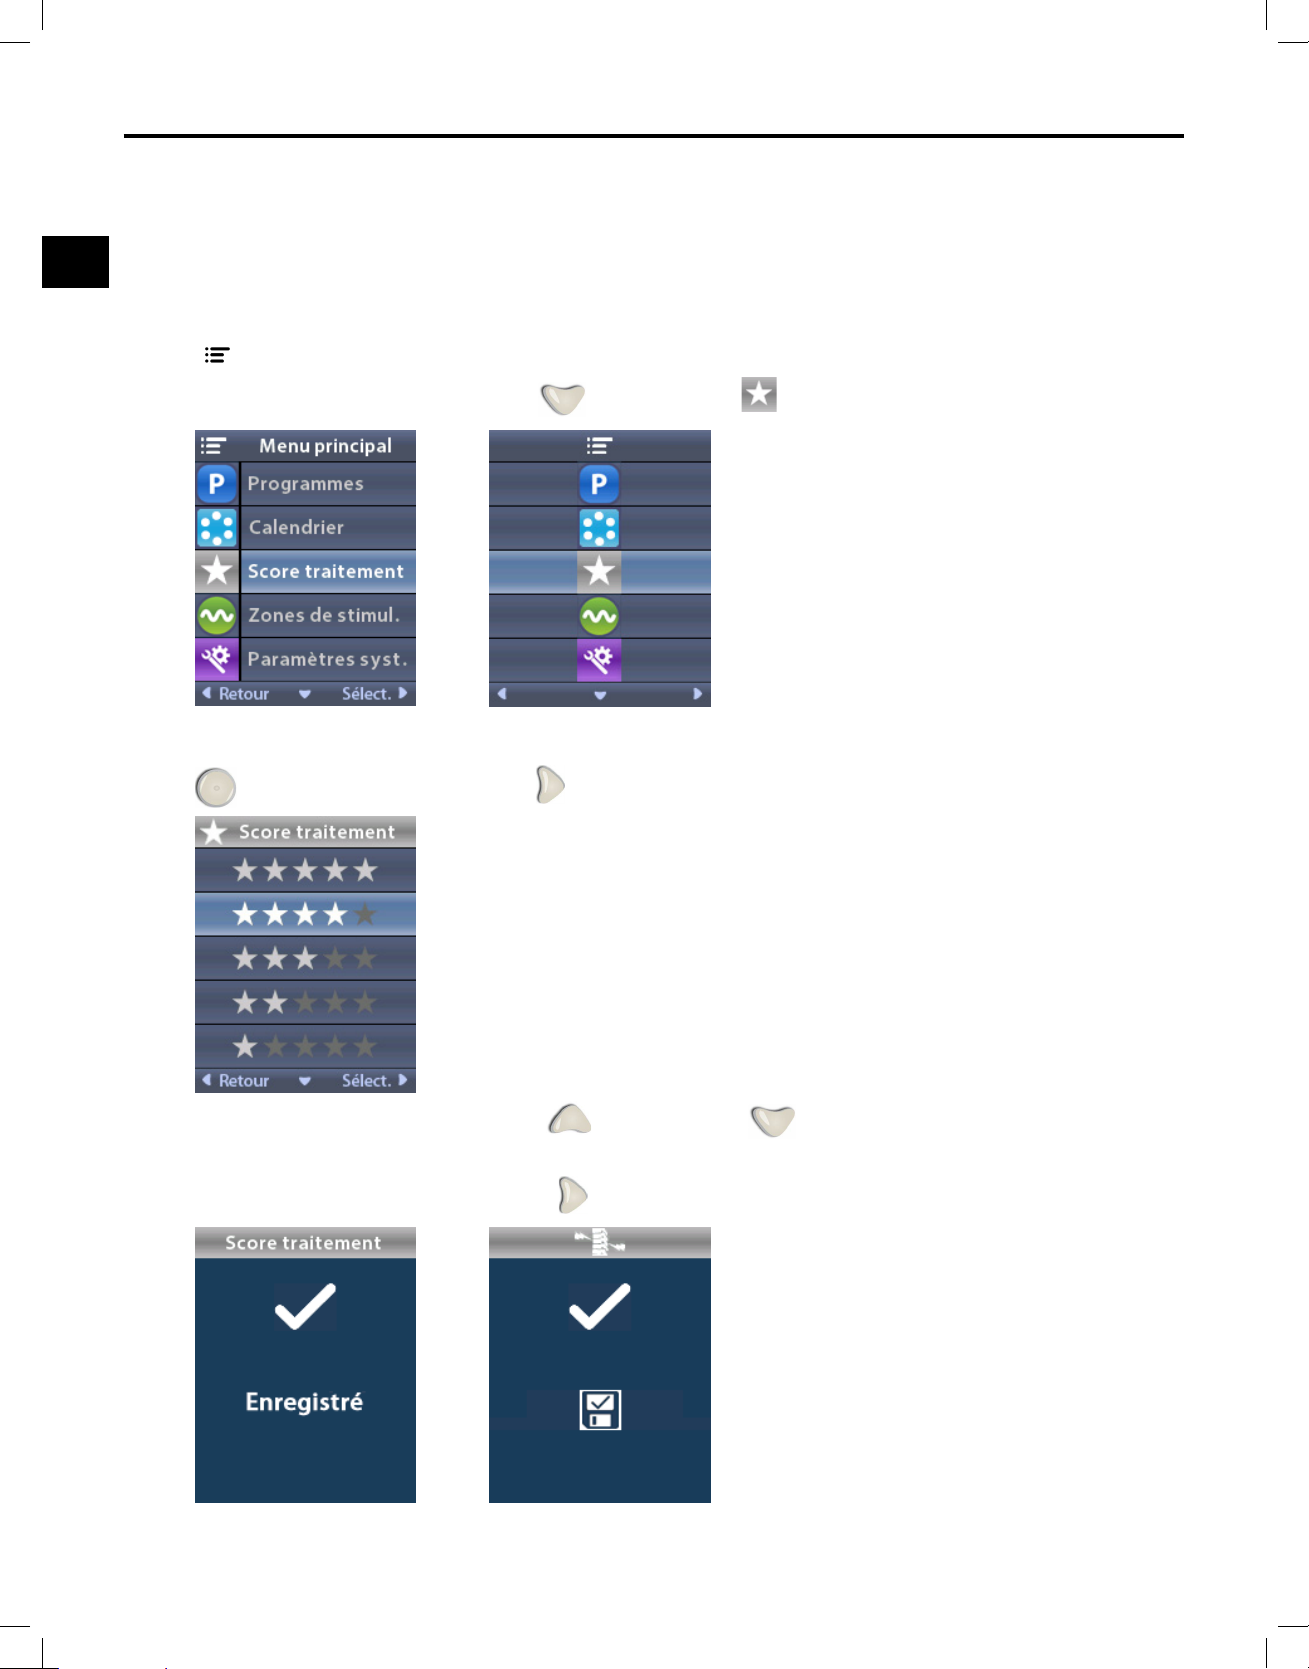
Saisie d'un score de traitement
Lescoredetraitementpermetau/àlapatient(e)decommuniquerdespréférencesentempsréel
concernantdifférentstypesdetraitements.Lespréférencesdu/delapatient(e)sontenregistréessur
uneéchelledecotationàcinqétoiles.
Remarque : en fonction de la conguration du stimulateur, certaines sélections ne sont pas disponibles.
Depuis
1.Appuyersurlaècheverslebas
Main Menu(Menuprincipal):
pour atteindre TherapyRating(Scoretraitement).
2.UnefoisqueTherapyRating(Scoretraitement)estsélectionné,appuyersurleboutondesélection
ousurlaècheversladroite pouraccéderàl'écranTherapyRating(Scoretraitement).
3.Appuyersurlaècheverslehaut ouverslebas pour atteindre le score de traitement
àcemoment-là.
4.Appuyersurlaècheversladroite
Mode d’emploi de la télécommande du médecin
92395488-02 70 sur 1077
pourfaireunesélection.
Page 75
fr
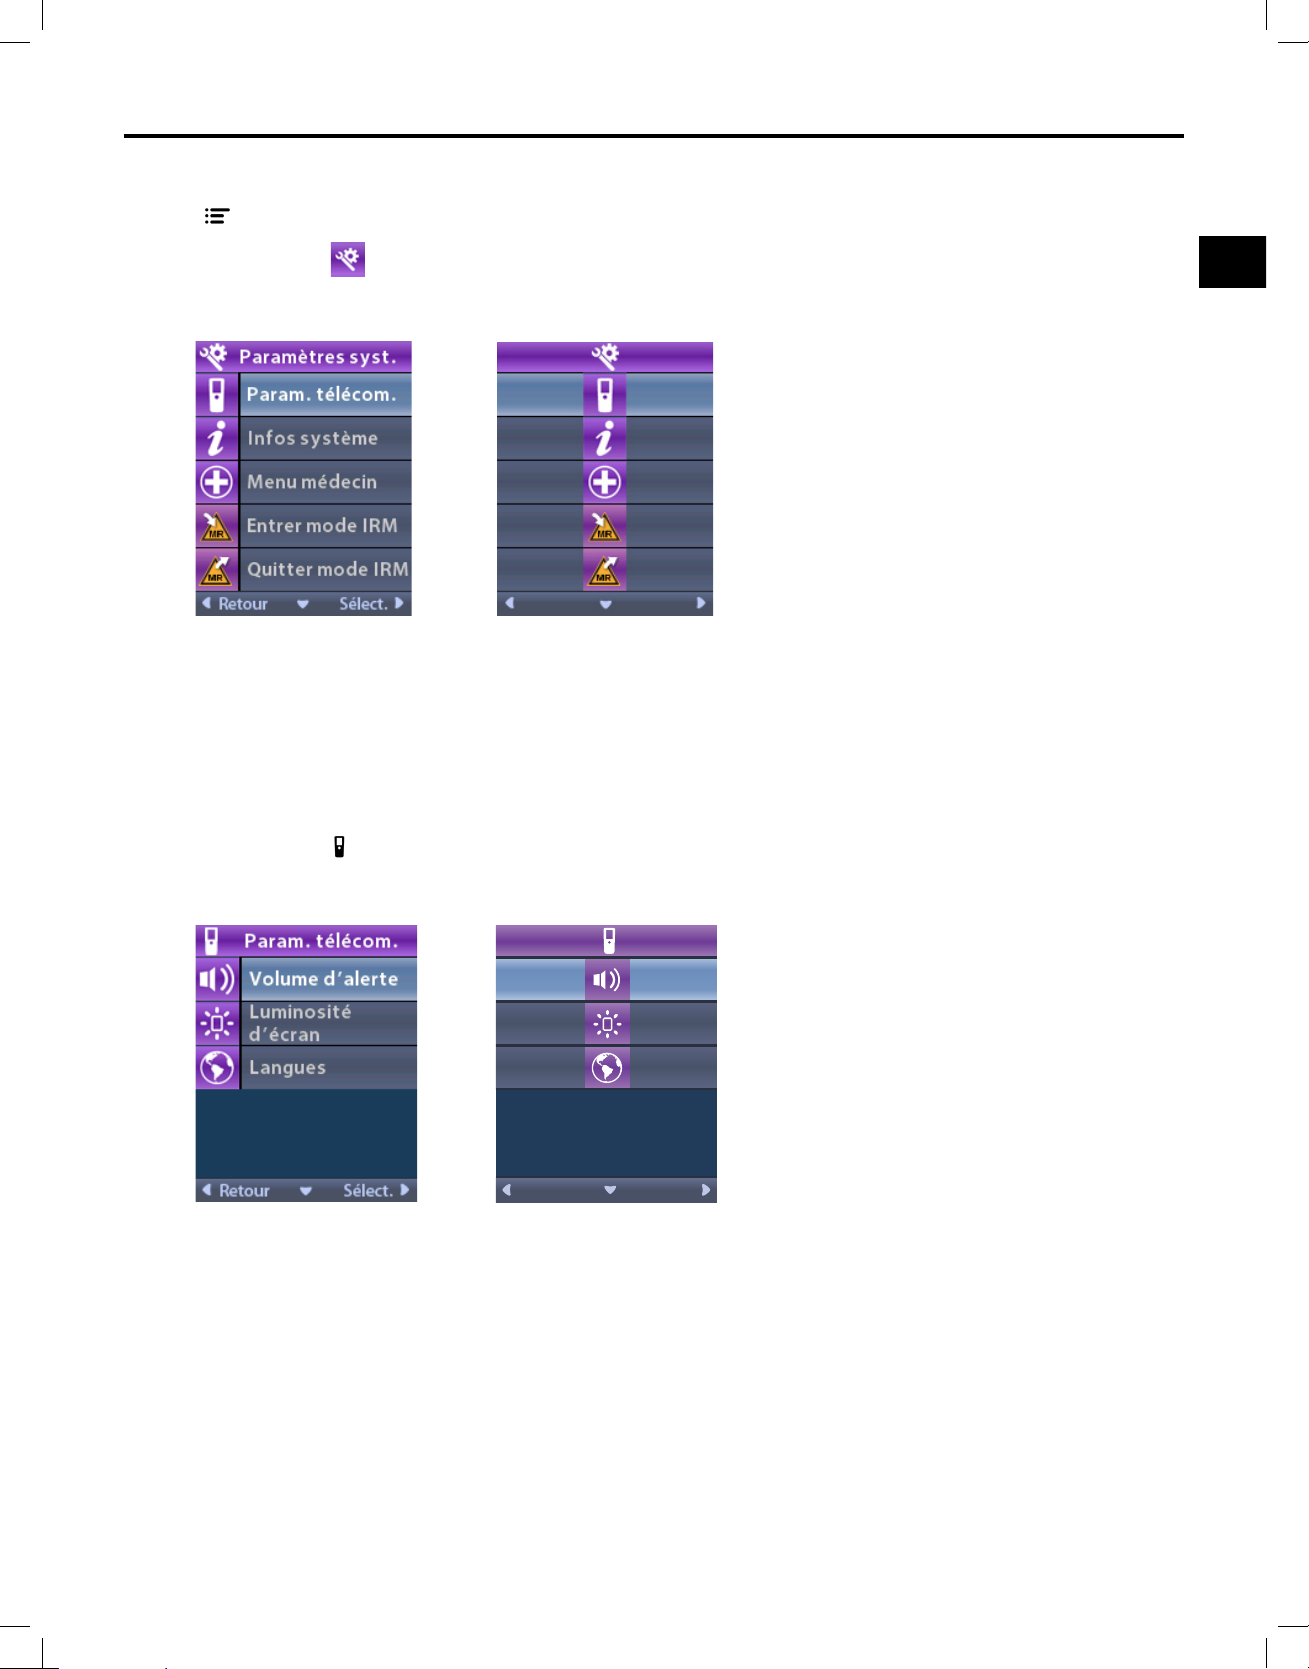
Accès aux paramètres du système
Depuis Main Menu(Menuprincipal):
Accès aux paramètres du système
1.Sélectionner
System Settings(Paramètresdusystème).L'écranSystemSettings
(Paramètresdusystème)apparaît.
Remote Settings (Paramètres de la télécommande)
L'optionRemoteSettings(Paramètresdelatélécommande)permetderéglerlevolumedel'alarmeet
la luminositédel'écran,ainsiquedesélectionnerlalangue.
Dans le menu System Settings(Paramètresdusystème):
1.Sélectionner
RemoteSettings(Paramètresdelatélécommande)pourafcherlemenu
RemoteSettings(Paramètresdelatélécommande).
Mode d’emploi de la télécommande du médecin
92395488-02 71 sur 1077
Page 76
Mode d'emploi de la télécommande du médecin
fr
Alert Volume (Volume de l'alarme)
Depuis le menu
1.Sélectionner
Remote Settings(Paramètresdelatélécommande):
AlertVolume(Volumedel'alarme).
2.AppuyersurleboutonMoins pourdiminuerlevolumedel'alarme.
3.AppuyersurleboutonPlus
pouraugmenterlevolumedel'alarme.
Screen Brightness(Luminositédel'écran)
Depuis le menu
Remote Settings(Paramètresdelatélécommande):
1.Sélectionner
ScreenBrightness(Luminositédel'écran).
2.AppuyersurleboutonMoins pourdiminuerlaluminosité.
3.AppuyersurleboutonPlus
pouraugmenterlaluminosité.
Mode d’emploi de la télécommande du médecin
92395488-02 72 sur 1077
Page 77
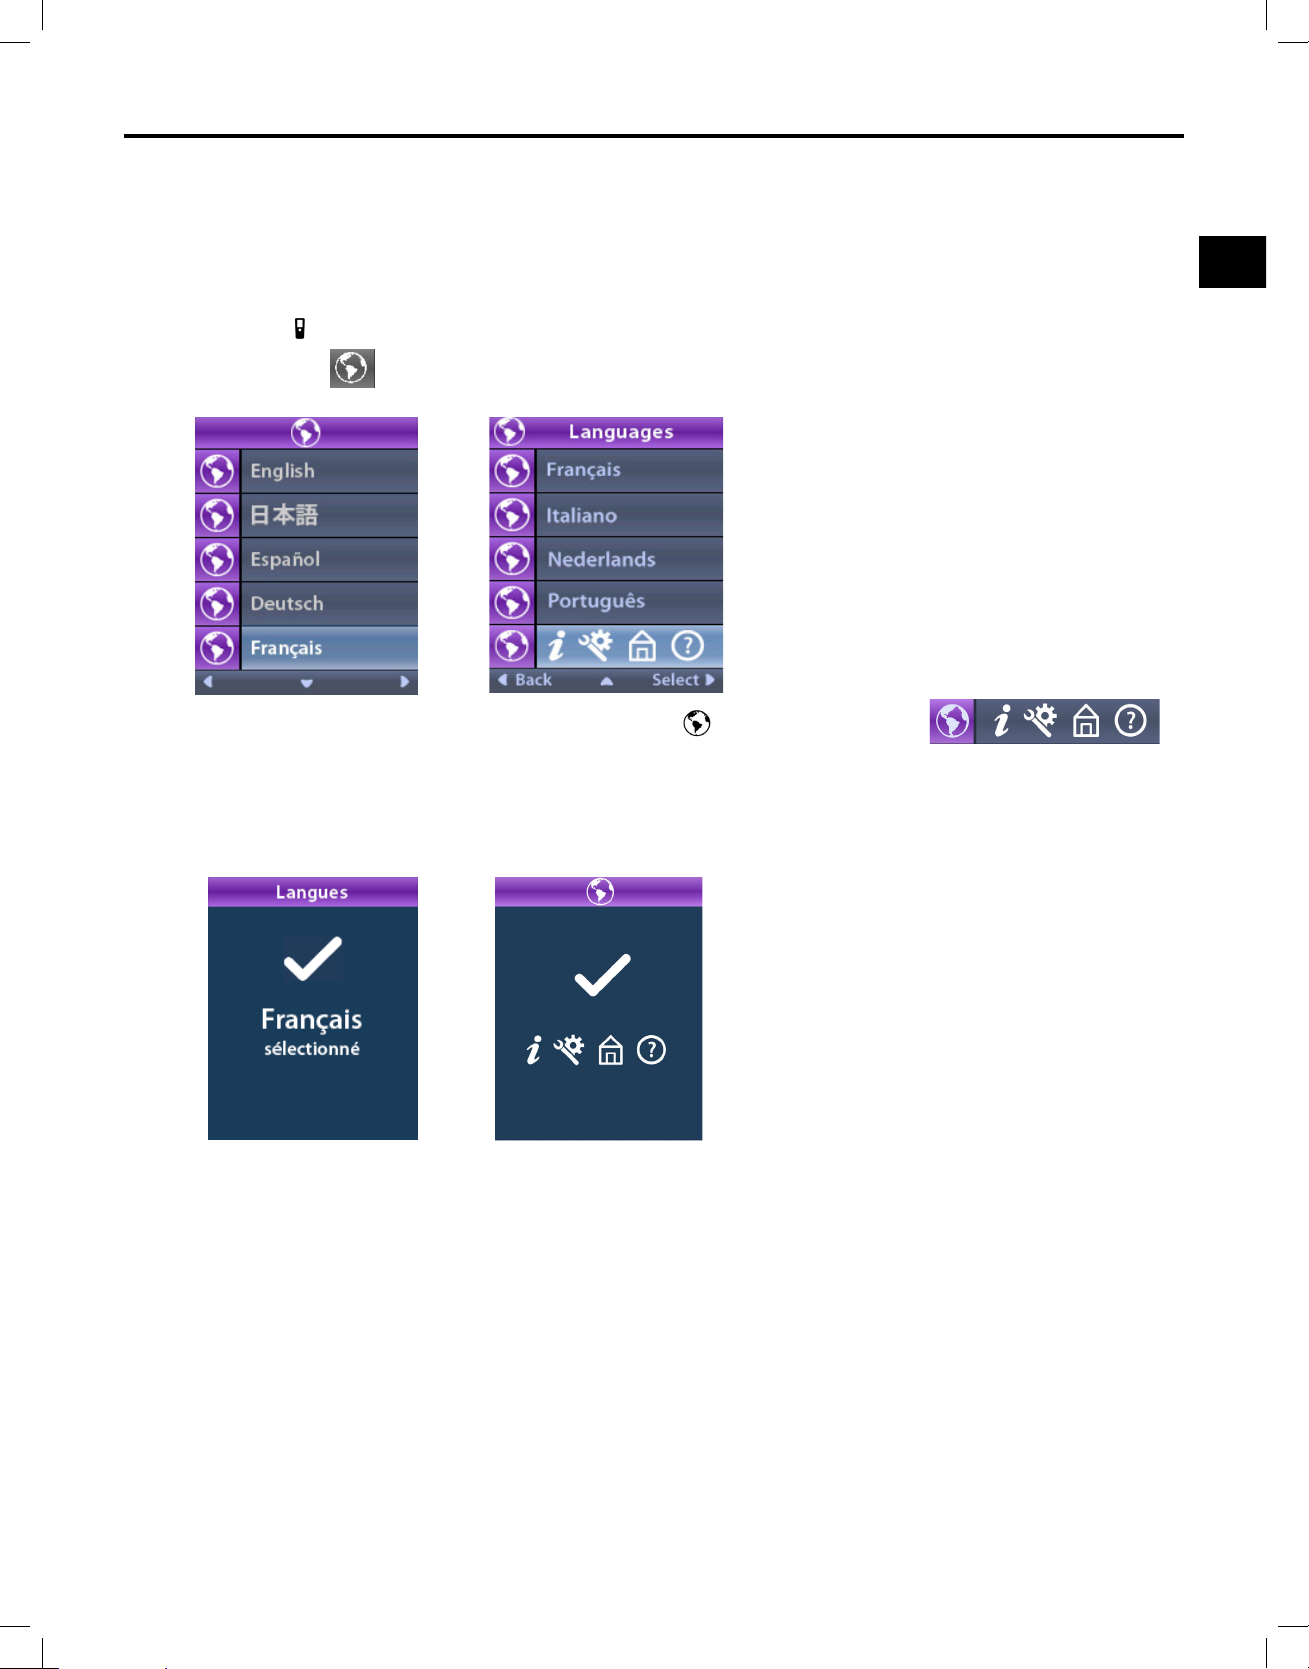
Accès aux paramètres du système
fr
Languages (Langues)
Latélécommandepeutêtreconguréepourafcherlesécransdel'unedesfaçonssuivantes:
• Écranavecdutextedansl'unedeslanguesdisponibles
• Écranavecdesicônes
Depuis le menu
1.Sélectionner
Remote Settings(Paramètresdelatélécommande):
Languages(Langues).
2.Sélectionnerlalanguesouhaitée,parexemple English(Anglais)ou
pourl'afchagesousformed'icônes.
L'écranLanguagesConrmation(Conrmationdeslangues)apparaîtpourconrmer
lasélection.
Mode d’emploi de la télécommande du médecin
92395488-02 73 sur 1077
Page 78
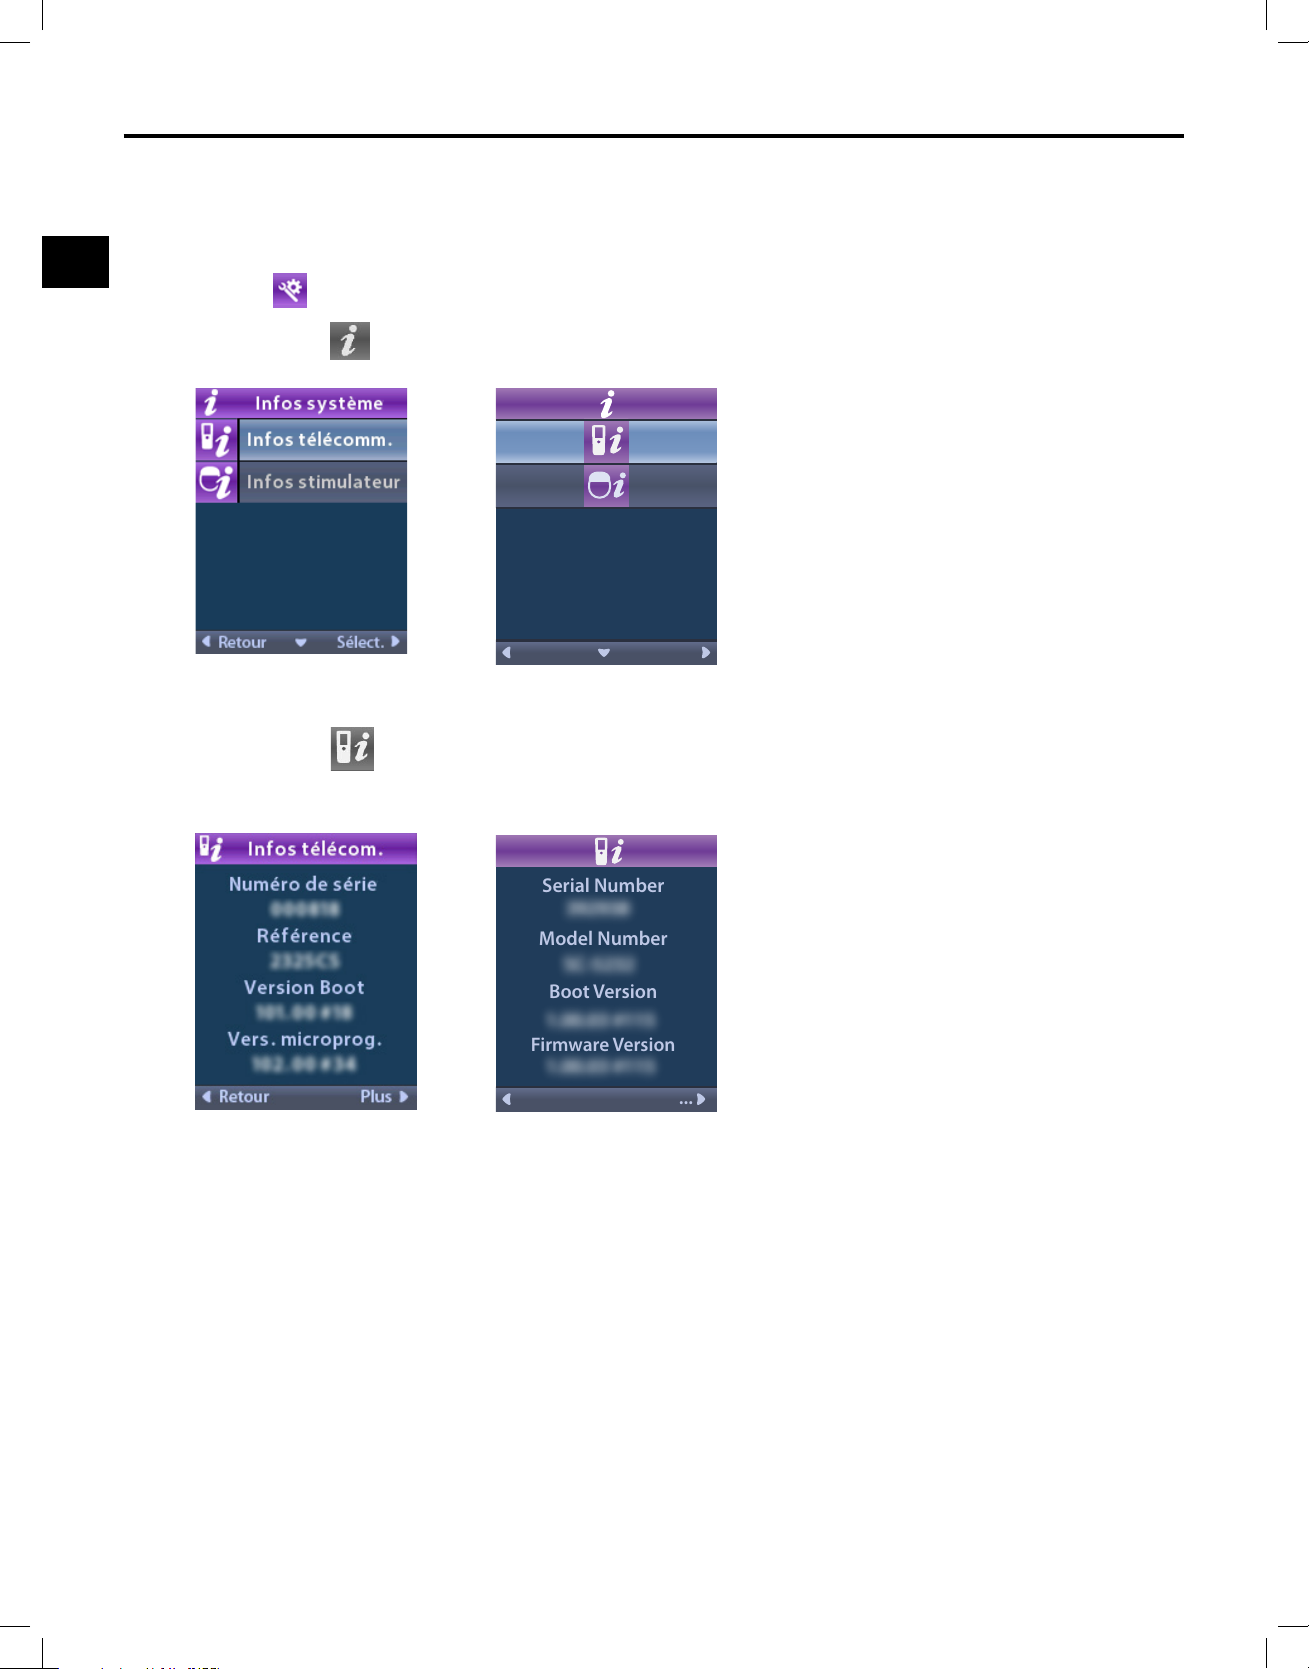
Mode d'emploi de la télécommande du médecin
fr
System Info (Infos système)
Le menu System Info(Infossystème)permetdeconsulterdesinformationsconcernantla
télécommandeoulestimulateur.
Dans le menu
1.Sélectionner
System Settings(Paramètresdusystème):
SystemInfo(Infossystème).
Remote Info (Informations sur la télécommande)
2.Sélectionner
RemoteInfo(Informationssurlatélécommande)pourafcherl'écranRemote
Info(Informationssurlatélécommande).
Serial Number
Model Number
Boot Version
Firmware Version
...
L'écranRemoteInfo(Informationssurlatélécommande)afchelesinformationssuivantes:
• Serial Number(Numérodesérie)
• Model Number(Numérodemodèle)
• Boot Version (Versiond'initialisation)
• Firmware Version(Versiondumicroprogramme)
Mode d’emploi de la télécommande du médecin
92395488-02 74 sur 1077
Page 79
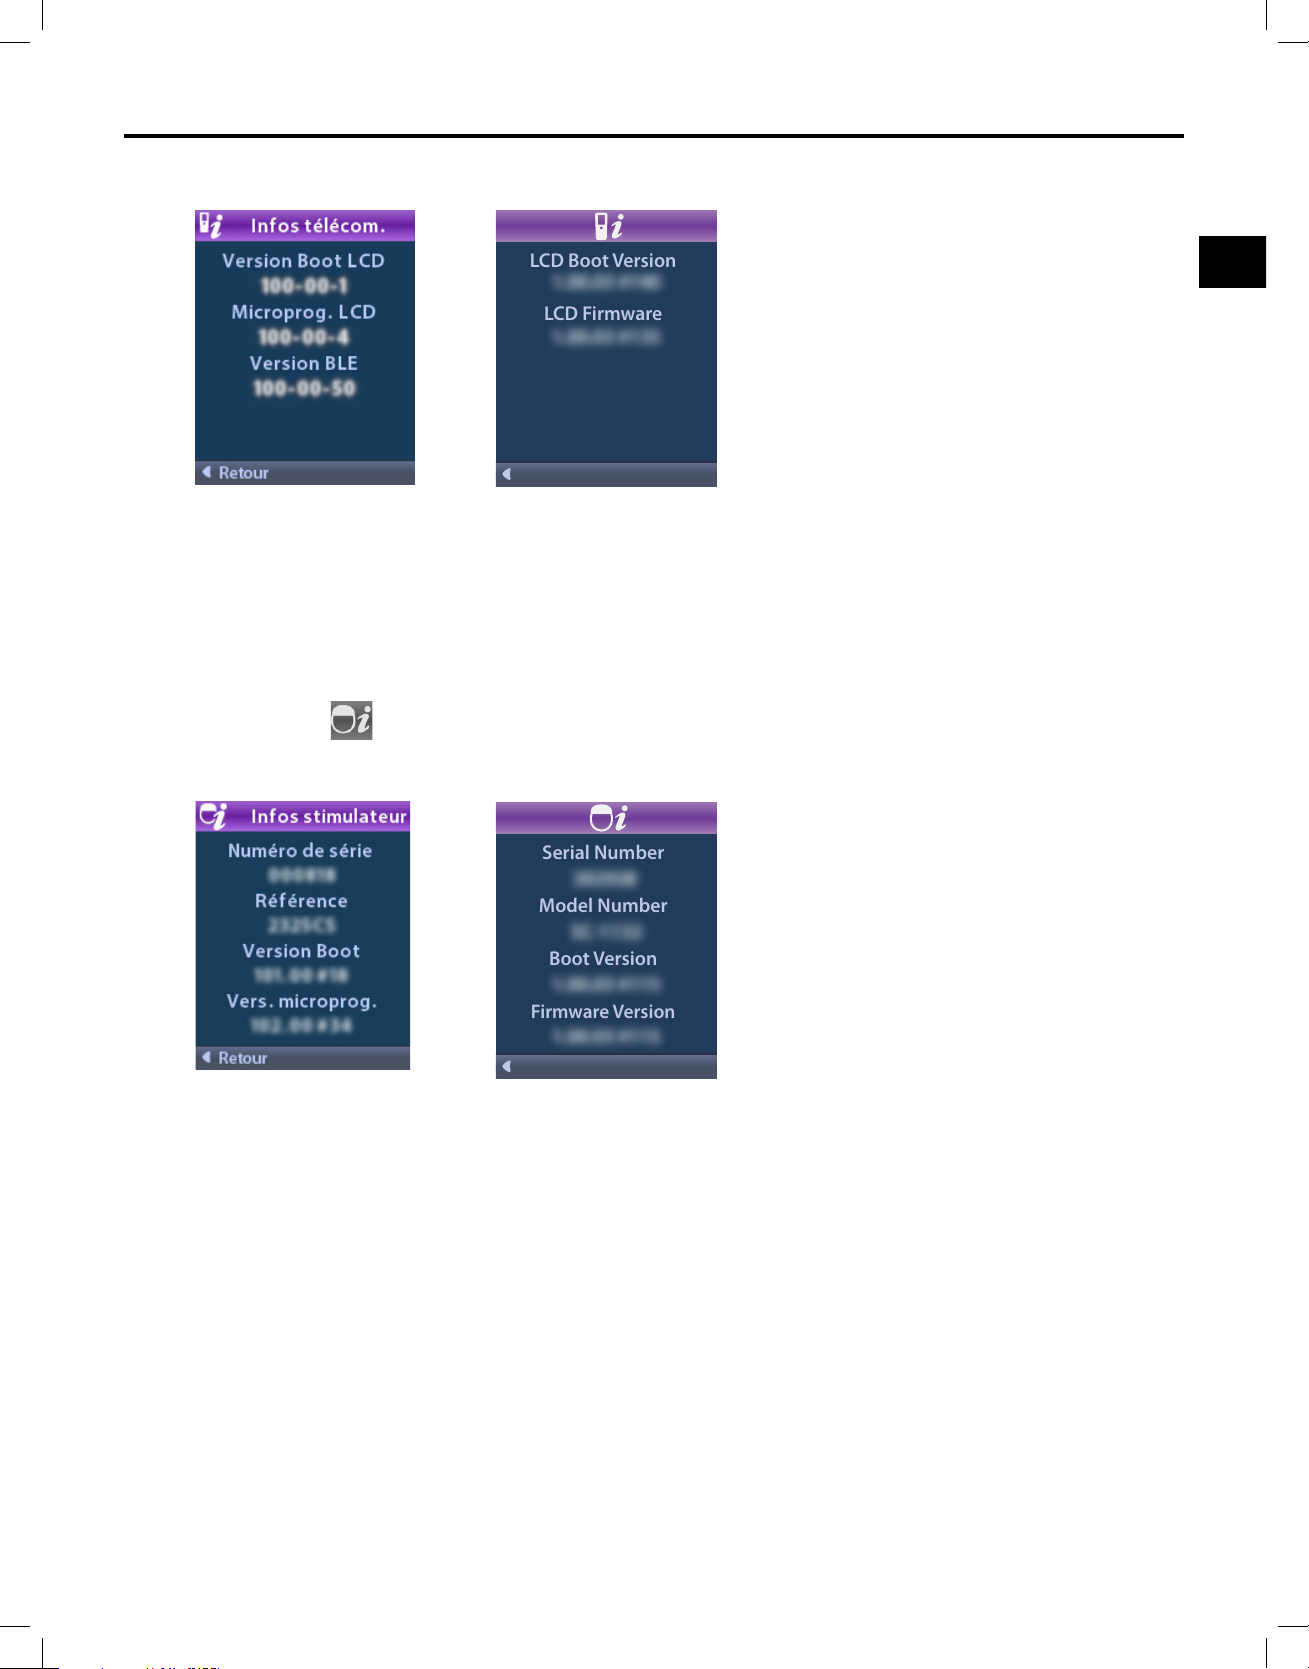
Accès aux paramètres du système
fr
SélectionnerMore(Plus)pourafcherdesinformationssupplémentairessurlatélécommande.
LCD Boot Version
LCD Firmware
L'écranRemoteInfo(Informationssurlatélécommande)afchelesinformationssupplémentaires
suivantes:
• LCD Boot Version(Versiond'initialisationLCD)
• LCD Firmware(MicroprogrammeLCD)
Stimulator Info
1.Sélectionner
(Informations sur le stimulateur)
StimulatorInfo(Informationssurlestimulateur)pourafcherl'écranStimulator
Info(Informationssurlestimulateur).
Serial Number
Model Number
Boot Version
Firmware Version
L'écranStimulatorInfo(Informationssurlestimulateur)afchelesinformationssuivantes:
• Serial Number(Numérodesérie)
• Model Number(Numérodemodèle)
• Boot Version(Versiond'initialisation)
• Firmware Version(Versiondumicroprogramme)
Remarque : pour connaître la référence et le numéro de série du stimulateur d'essai, retirer le
couvercle du compartiment de la batterie du stimulateur d'essai.
Mode d’emploi de la télécommande du médecin
92395488-02 75 sur 1077
Page 80
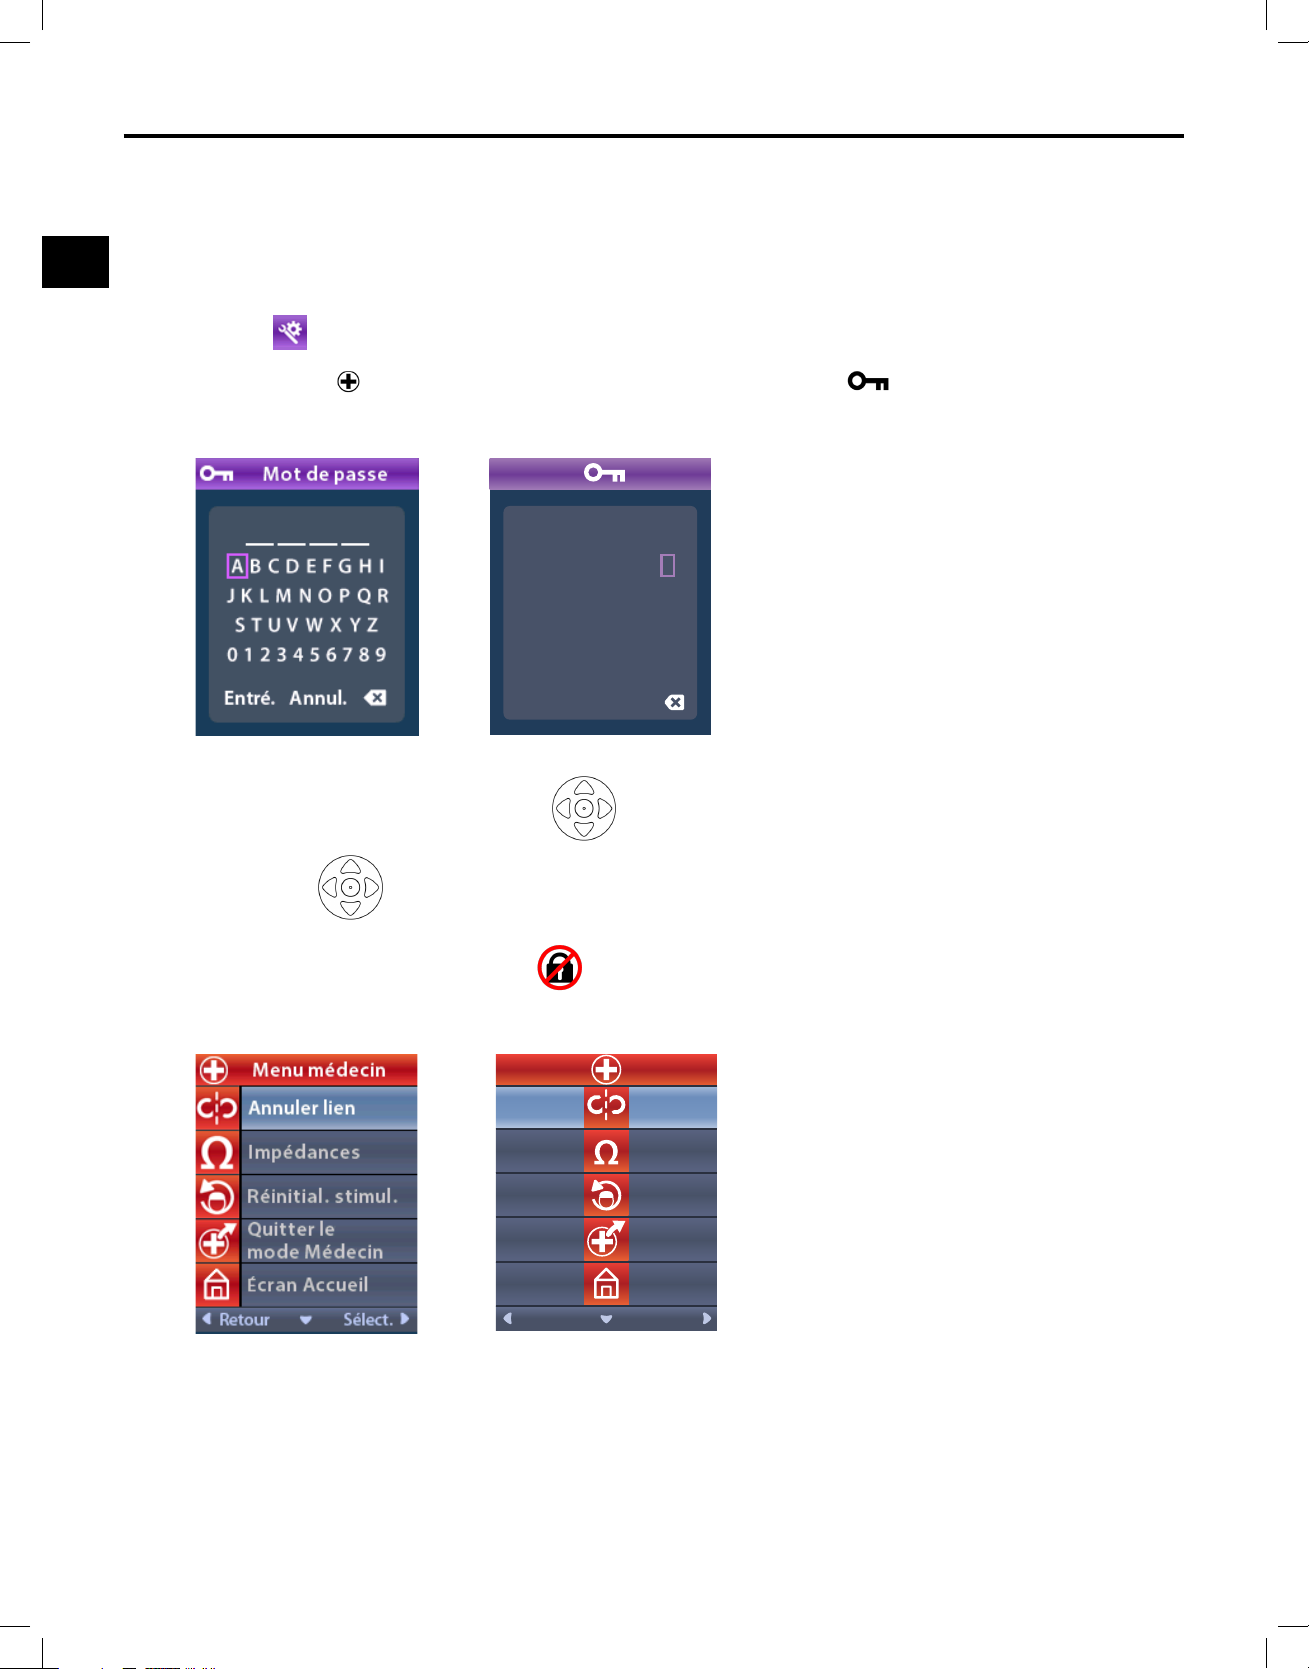
Mode d'emploi de la télécommande du médecin
fr
Accès à Clinician Menu (Menu du médecin)
Clinician Menu(Menudumédecin)permetd'associerlatélécommandeàunstimulateuroudela
dissocier,devérierlesimpédancesetderéinitialiserlestimulateur.PouraccéderàClinicianMenu
(Menudumédecin),saisirunmotdepasse.
Dans le menu
1.Sélectionner
SystemSettings(Paramètresdusystème):
Clinician Menu(Menudumédecin).L'écran Password(Motde
passe)apparaît.
_ _ _ _
A B C D E F G H I
J K L M N O P Q R
S T U V W X Y Z
0 1 2 3 4 5 6 7 8 9
Enter
2.Utiliserlesboutonsdenavigation poursaisirlemotdepasse.
Ou
Cancel
Utiliserles
Silemotdepasseestincorrect,l'écran
boutonsdenavigationpoursélectionnerCancel(Annuler).
Invalid Password(Motdepassenonvalide)apparaît.
S'ilestcorrect,ClinicianMenu(Menudumédecin)apparaît.
Remarque : si la télécommande n'est associée à aucun stimulateur, l'option Stimulator Search
(Recherche du stimulateur) apparaît dans Clinician Menu (Menu du médecin) au lieu de
l'option Clear Link (Annuler l'association).
Mode d’emploi de la télécommande du médecin
92395488-0276sur1077
Page 81
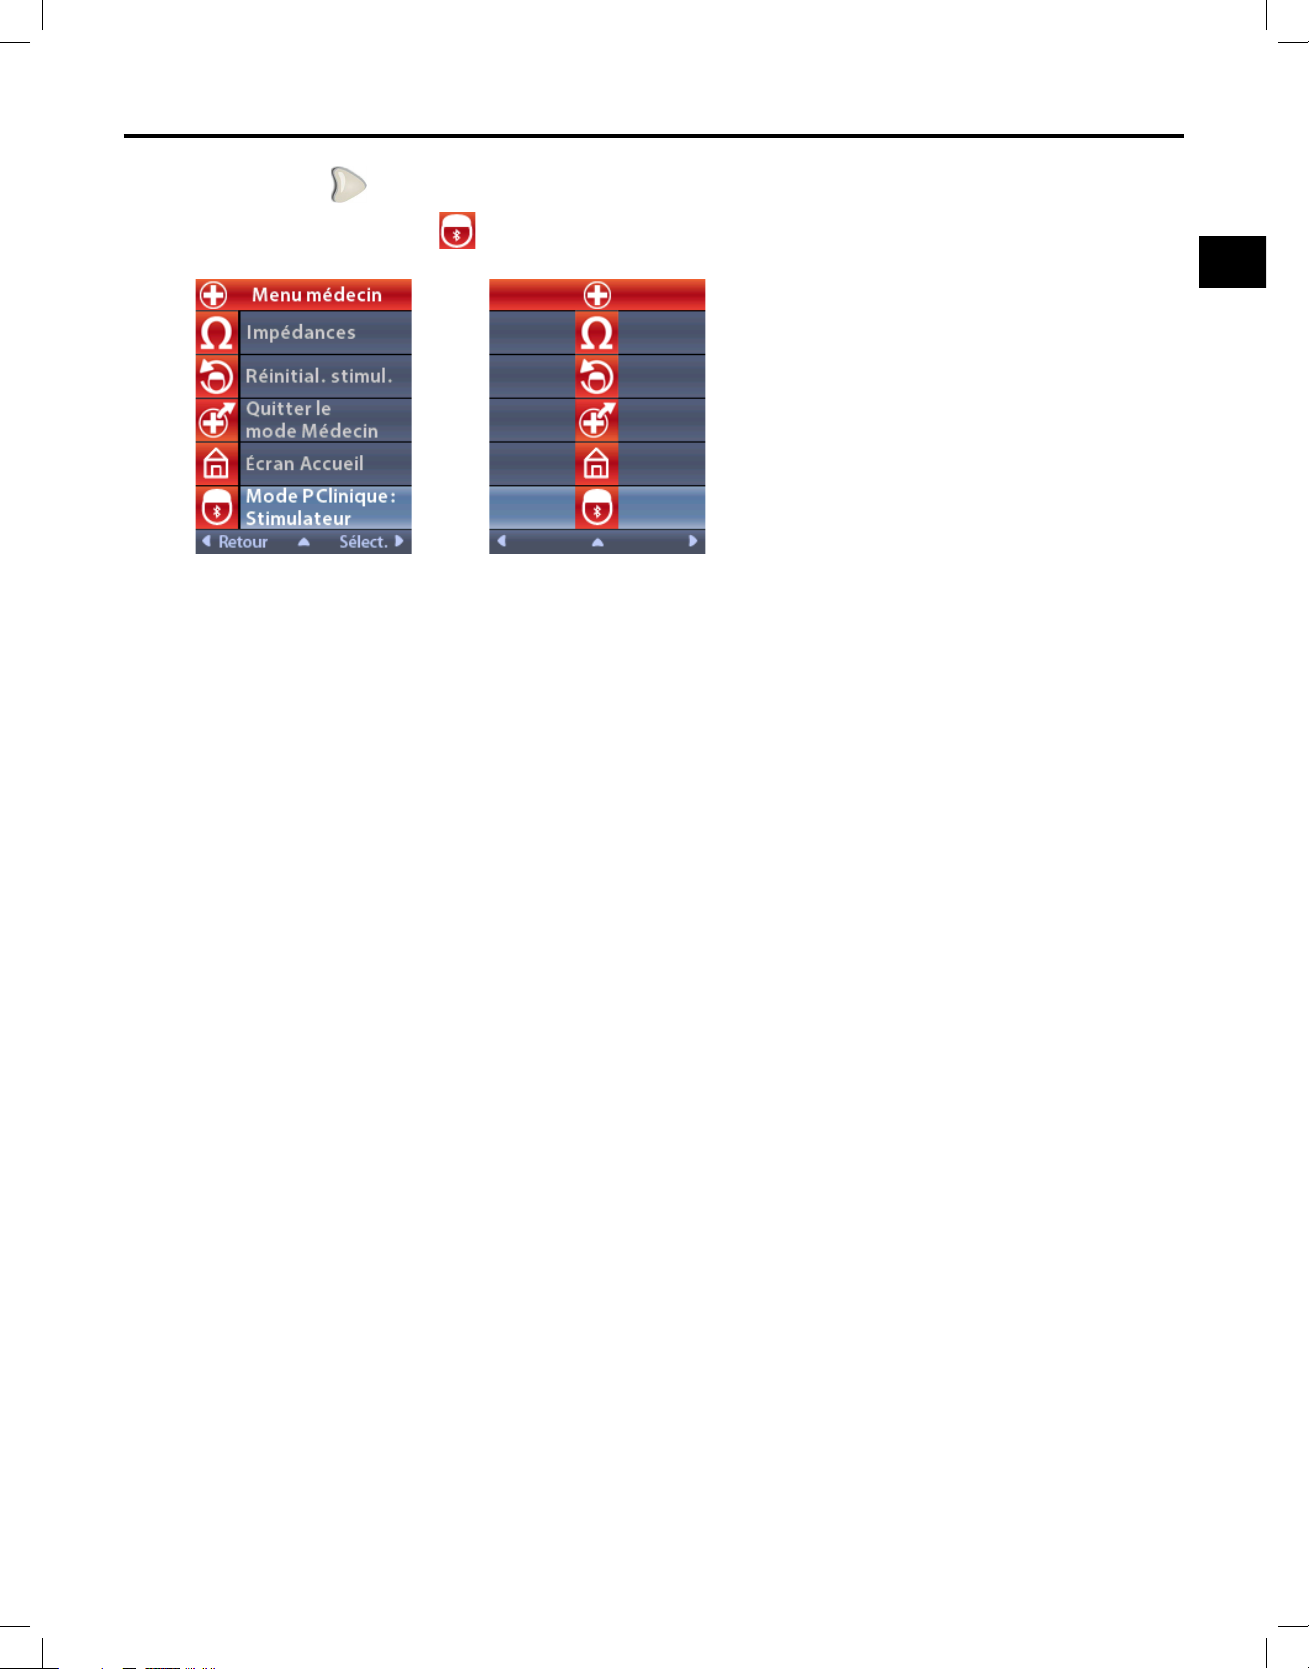
Accès à Clinician Menu (Menu du médecin)
fr
3.Sélectionner pourafcherdesoptionssupplémentairesdeClinician Menu (Menu du
médecin)
,tellesquele CP Mode : Stimulator(ModePM:stimulateur).
Mode d’emploi de la télécommande du médecin
92395488-02 77 sur 1077
Page 82
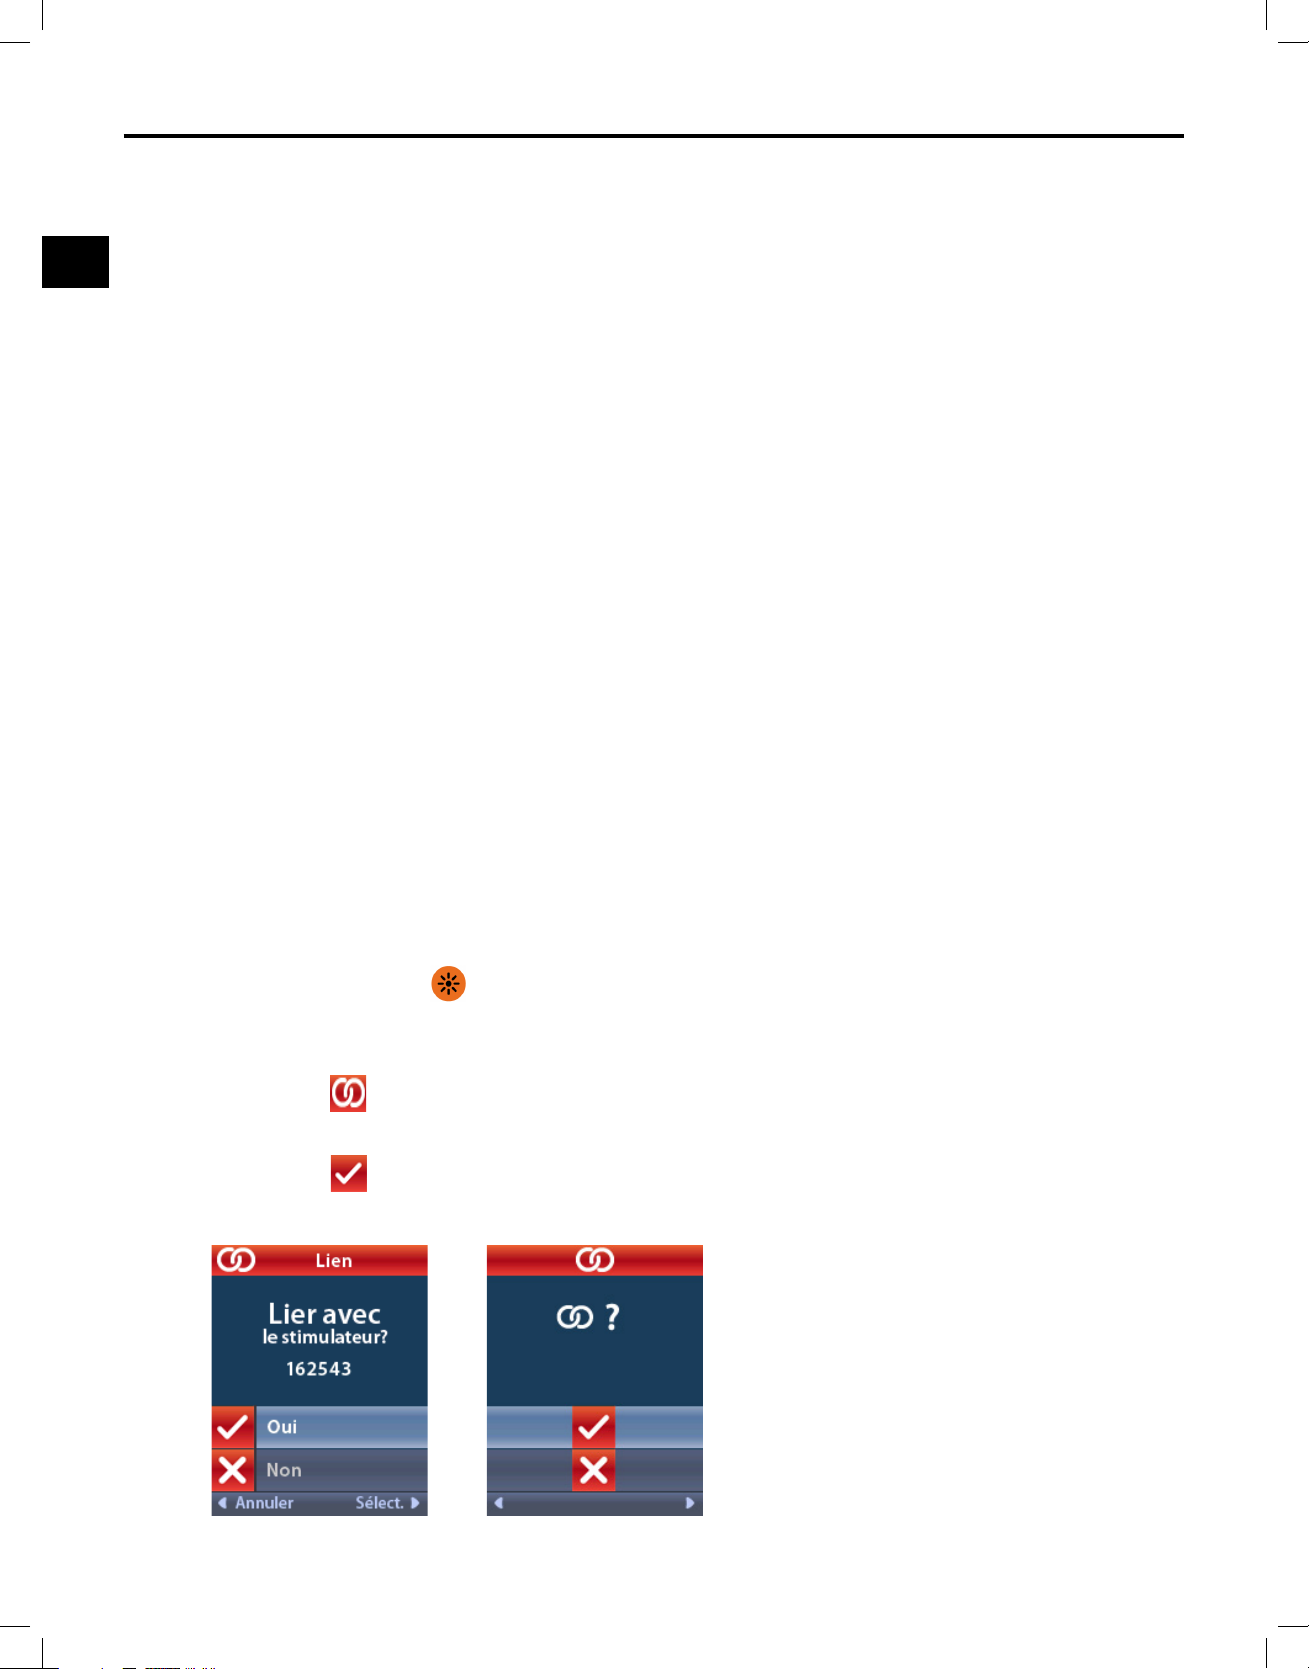
Mode d'emploi de la télécommande du médecin
fr
Recherche du stimulateur et association
Unstimulateuretunetélécommandedoiventêtreassociéspourpouvoircommuniquer.Une
télécommandedestinéeàêtreutiliséeparle/lapatient(e)doitêtreassociéeentantque
«télécommandedu/delapatient(e)».Lestimulateurnereconnaîtqu'uneseuletélécommandeàlafois
commeétantlatélécommandedu/delapatient(e);cependant,lestimulateurpeutêtreassociéàune
secondetélécommandeenétablissantuneassociationtemporaire.
Uneassociationtemporaireestdestinéeuniquementàl'usagedesmédecinslorsquelatélécommande
du/delapatient(e)n'estpasdisponible.Siunenouvelletélécommandeestattribuéecomme
télécommandedu/delapatient(e),touslesdispositifsprécédemmentassociéscommetélécommande
du/delapatient(e)sonteffacés.Unefoisqu'uneassociationentreunstimulateuretunetélécommande
aétéétablie,ilsrestentassociés,saufsil'associationestsupprimée.
Clinician Menu(Menudumédecin)permetderechercherunstimulateuretdel'associeràla
télécommande.LesstimulateursquicommuniquentparconnexionBluetoothbasseconsommation
doiventêtreplacésenmodePairing(Appairage)and'êtreassociésàunetélécommande.
AndeplacerunGIIenmodePairing(Appairage):
• Placerl'appairagedel'aimantdirectementsurlestimulateurpendantaumoins2secondes.
• Retirerensuitel'appairagedel'aimant.
- L'appairagedel'aimantpeutêtreutilisésurunGIIquiestimplantéoudansl'emballage.
Remarque : une fois l'aimant retiré, le stimulateur effectue automatiquement un cycle de
réinitialisation du dispositif. Ce cycle de réinitialisation du dispositif dure plusieurs
secondes. Pendant ce cycle de réinitialisation, le stimulateur ne fournit pas de
stimulation et ne peut pas communiquer. Une fois la réinitialisation terminée, le
stimulateur reprend son fonctionnement normal.
AndeplacerleSEE(stimulateurd'essaiexterne)enmodePairing(Appairage):
• Maintenirenfoncéel'option
surleSEE,jusqu'àcequelevoyantdelabatterieclignote,en
alternantentrelevertetlejaune.
Silatélécommanden'estpasactuellementassociéeàunstimulateur,lorsquelatélécommandeest
déverrouillée,l'écran
Link to Stimulator?(Associeraustimulateur?)peuts'afcherautomatiquement.
Depuis Clinician Menu(Menudumédecin):
1.Sélectionner
Yes(Oui)pourassocierlatélécommandeaustimulateur.L'écranStimulator
Search(Recherchedustimulateur)apparaît.Passeràl'étape3decettesection.
Mode d’emploi de la télécommande du médecin
92395488-02 78 sur 1077
Page 83
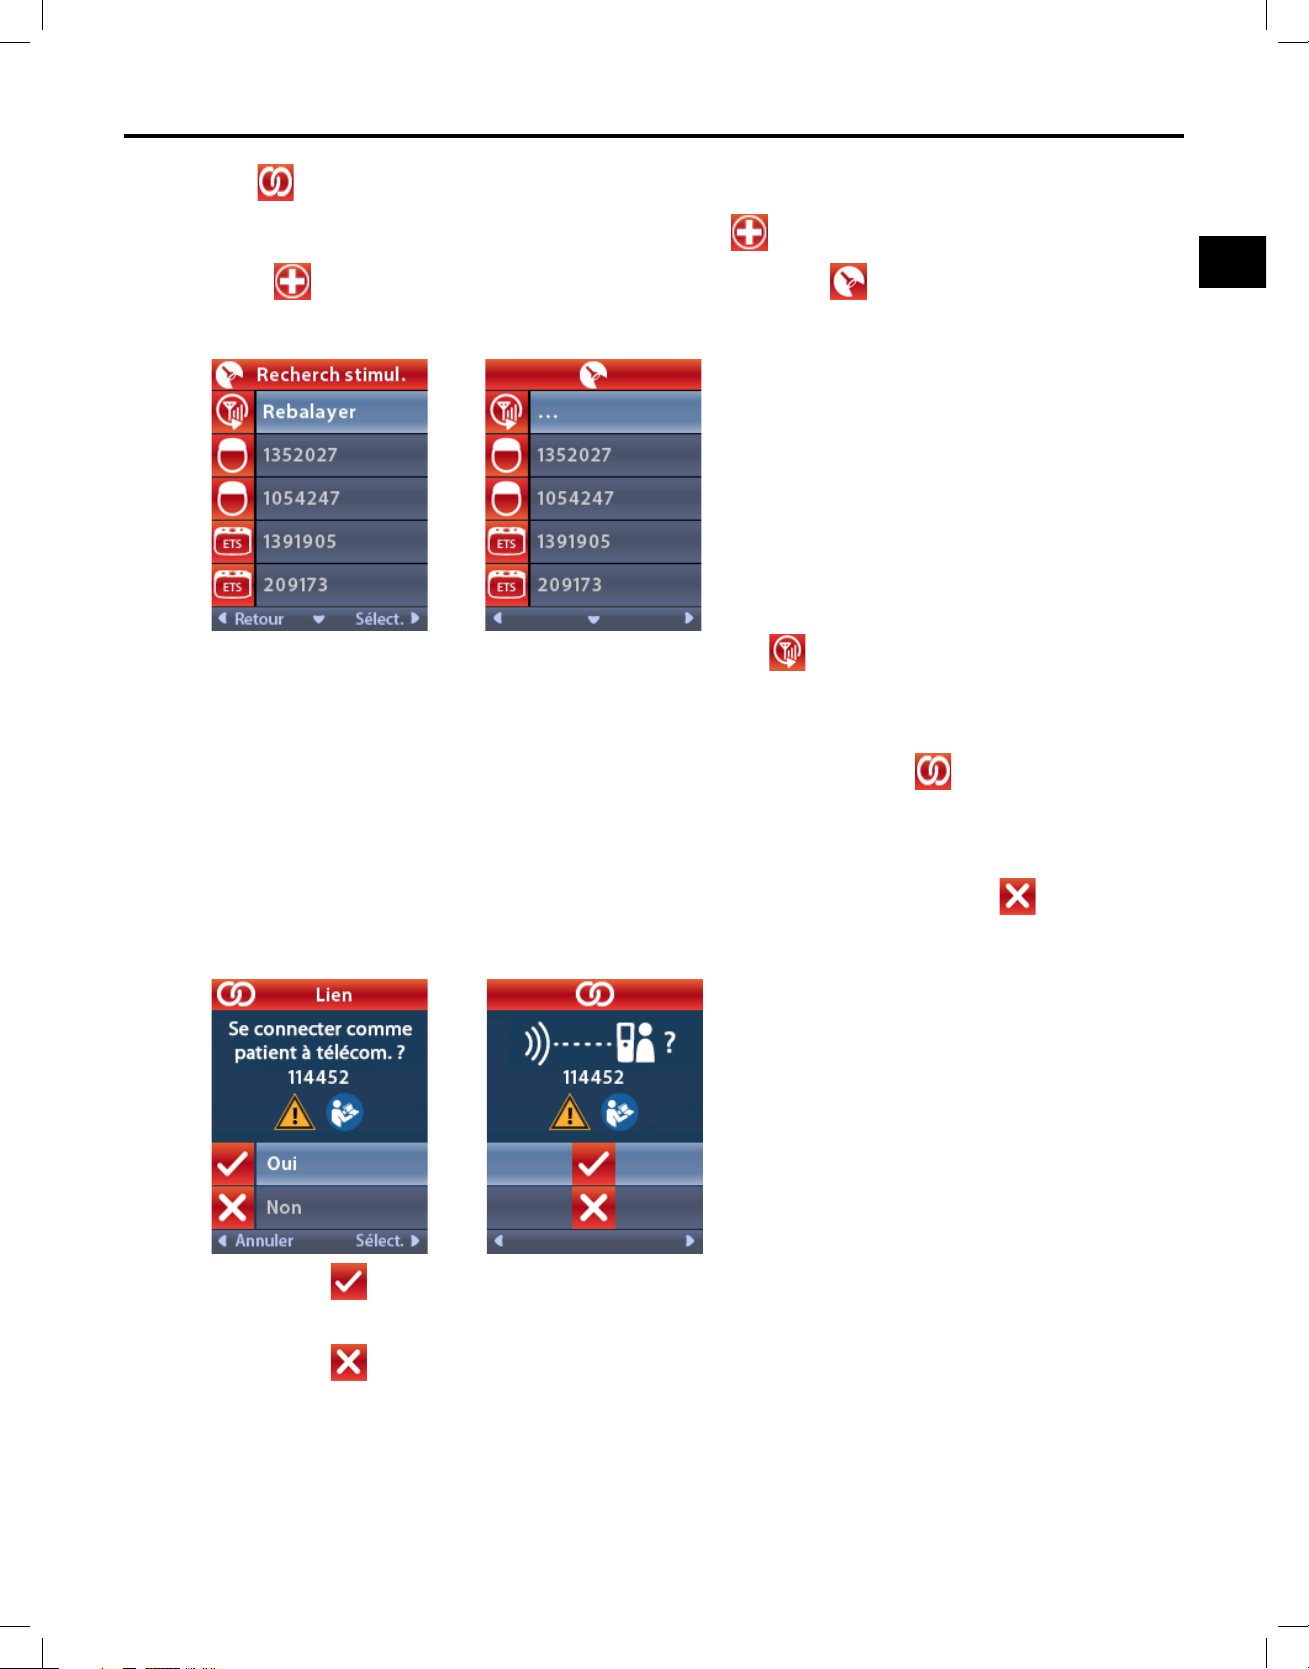
Accès à Clinician Menu (Menu du médecin)
fr
Sil'écran Link to Stimulator?(Associeraustimulateur?)nes'afchepasautomatiquement,ilest
possibledelancermanuellementl'associationàpartirde
2.Depuis
Clinician Menu(Menudumédecin),sélectionner Stimulator Search
Clinician Menu(Menudumédecin).
(Recherchedustimulateur).L'écranStimulator Search(Recherchedustimulateur)apparaît.
3.Silestimulateurvoulun'apasétélocalisé,sélectionner Rescan(Chercherànouveau).
Remarque : les stimulateurs qui utilisent la communication doivent être en mode Pairing
(Appairage) an d'apparaître sur l'écran et le lien de recherche de stimulateur.
4.Sélectionnerlestimulateurauquelassocierlatélécommande.L'écran
Link as Patient
Remote?(Associercommetélécommandedu/delapatient(e)?)s'afcheaveclenumérode
sériedustimulateur.Unetélécommandedestinéeàêtreutiliséeparle/lapatient(e)àdomicile
doitêtreassociéeentantquetélécommandedu/delapatient(e).Sélectionner
No(Non)
pourétabliruneassociationtemporaireaveclestimulateurenvuedesonutilisationenclinique.
5.Sélectionner Yes(Oui)pourassocierlatélécommandedu/delapatient(e)austimulateur.
ou
Sélectionner
No(Non)pourétabliruneassociationtemporaireaveclestimulateurenvuede
sonutilisationencliniqueoupourannulerl'action.
Mode d’emploi de la télécommande du médecin
92395488-02 79 sur 1077
Page 84
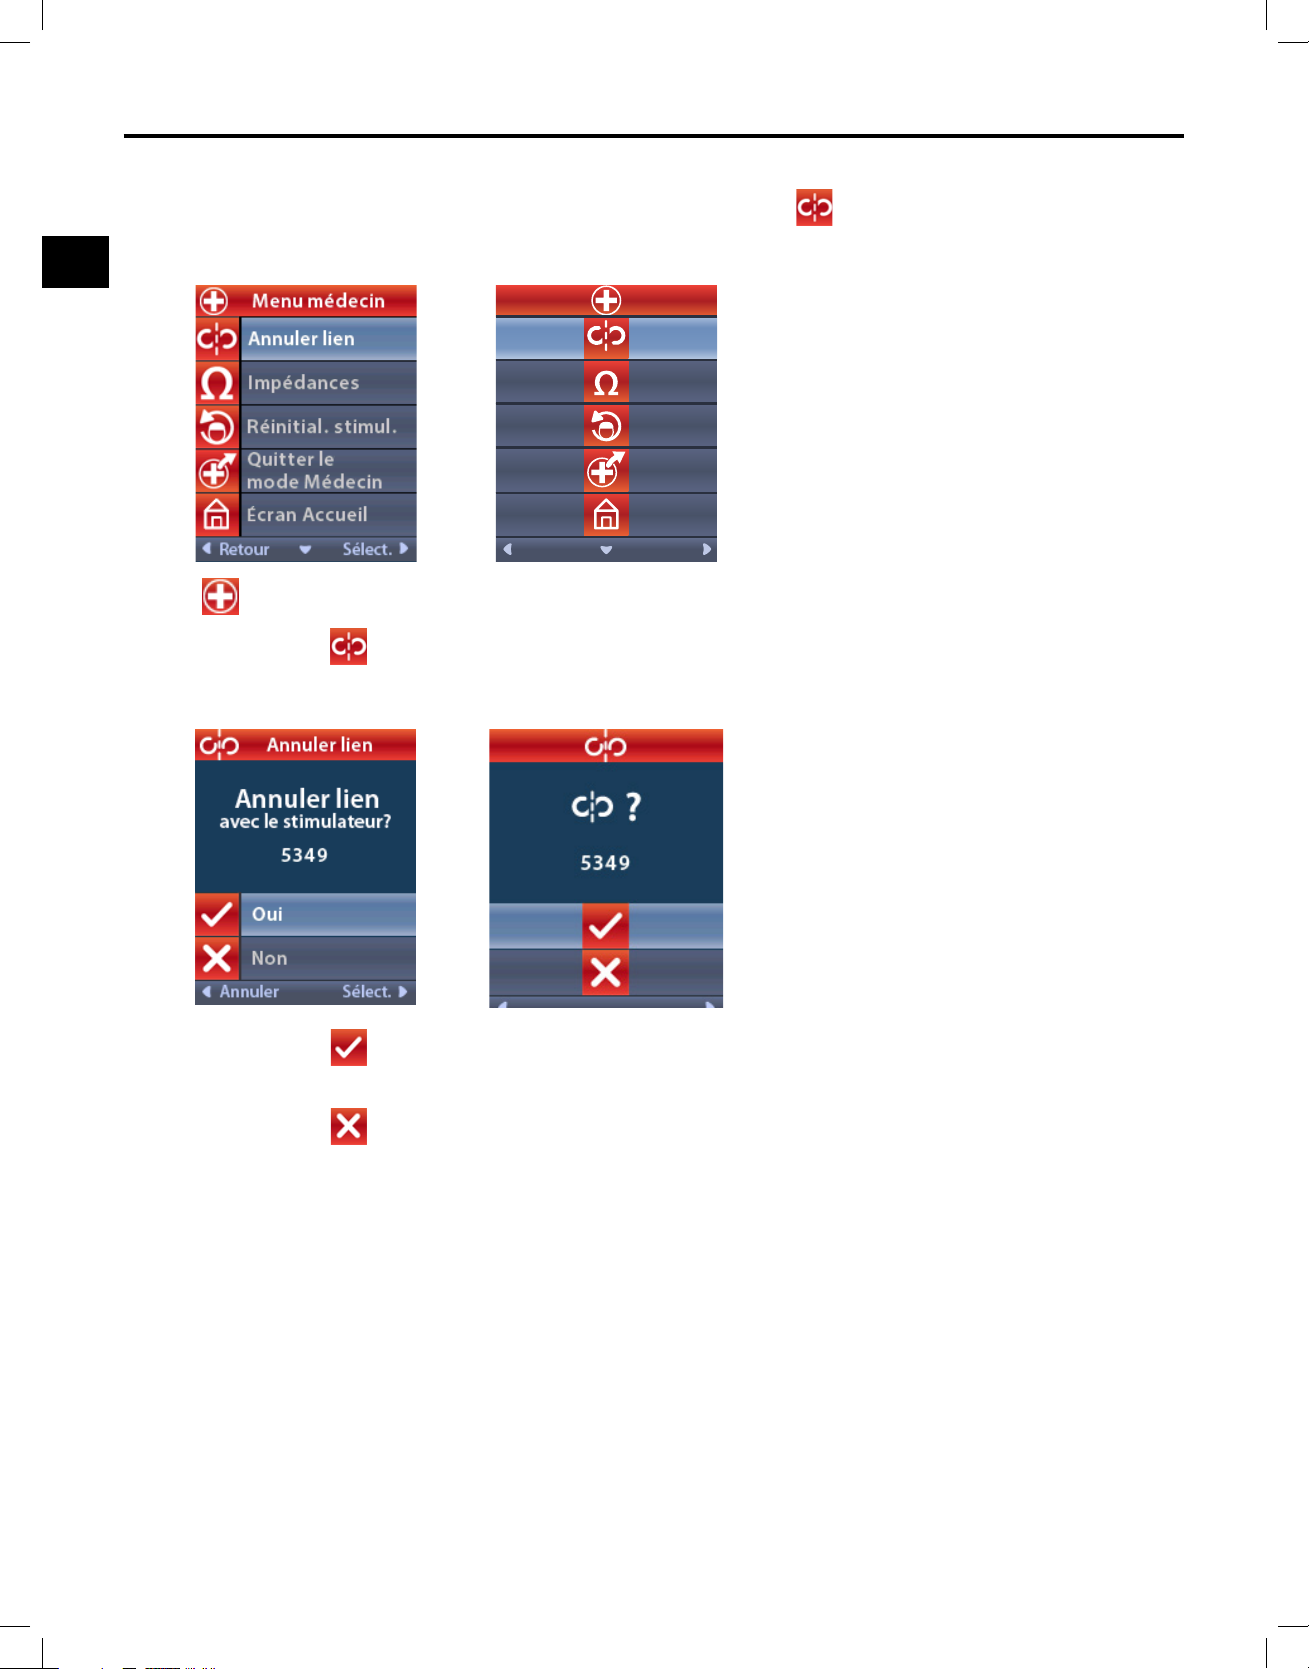
Mode d'emploi de la télécommande du médecin
fr
Clear Link (Annuler l'association)
Silatélécommandeestassociéeàunstimulateur,l'option
Clear Link(Annulerl'association)
apparaît dans Clinician Menu(Menudumédecin).
Depuis Clinician Menu(Menudumédecin):
1.Sélectionner
Clear Link(Annulerl'association).L'écranClear Link to Stimulator?(Annuler
l'associationaustimulateur?)apparaît.
2.Sélectionner Yes(Oui)pourannulerl'associationaustimulateur.
ou
Sélectionner
Mode d’emploi de la télécommande du médecin
92395488-02 80 sur 1077
No(Non)pourannulerl'action.
Page 85
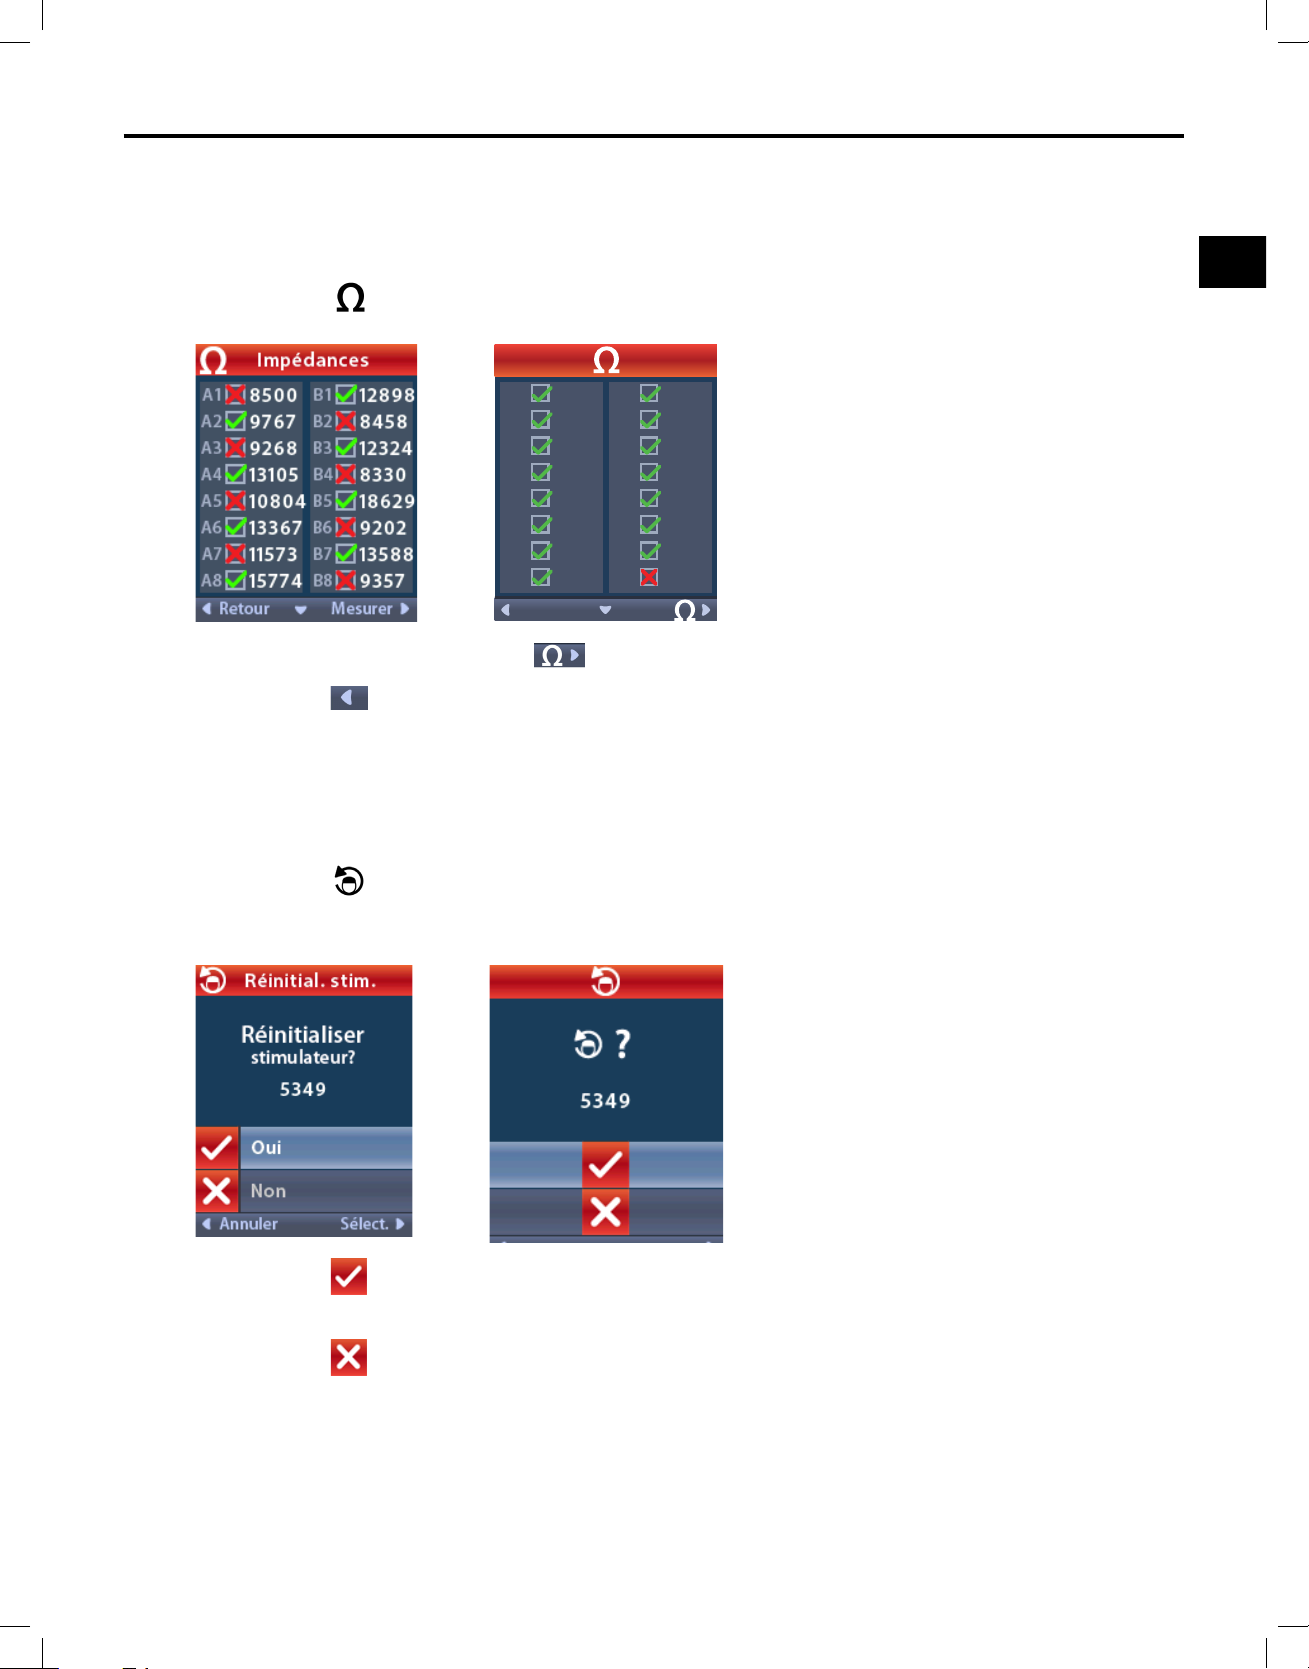
Accès à Clinician Menu (Menu du médecin)
fr
Impédances
Ilestpossibled'utiliserlatélécommandepourvérierlesimpédances.
Depuis ClinicianMenu(Menudumédecin):
1.Sélectionner
Impedances(Impédances).L'écranImpedances(Impédances)apparaît.
1450A1
400A2
1450A3
1450A4
1450A5
1200A6
1450A7
1000A8
1450B1
1000B2
1450B3
1000B4
1450B5
1450B6
900B7
8000B8
2.SélectionnerMeasure(Mesurer) pourvérierlesimpédances.
3.Sélectionner
Back(Précédent)pourreveniràClinicianMenu(Menudumédecin).
Reset Stimulator (Réinitialisation du stimulateur)
Ilestpossibled'utiliserlatélécommandepourréinitialiserlestimulateur.
Depuis Clinician Menu(Menudumédecin):
1.Sélectionner
ResetStimulator(Réinitialiserlestimulateur).L'écranResetStimulator?
(Réinitialiserlestimulateur?)apparaît.
2.Sélectionner Yes(Oui)pourréinitialiserlestimulateur.
ou
Sélectionner
No(Non)pourannulerl'action.
Mode d’emploi de la télécommande du médecin
92395488-02 81 sur 1077
Page 86
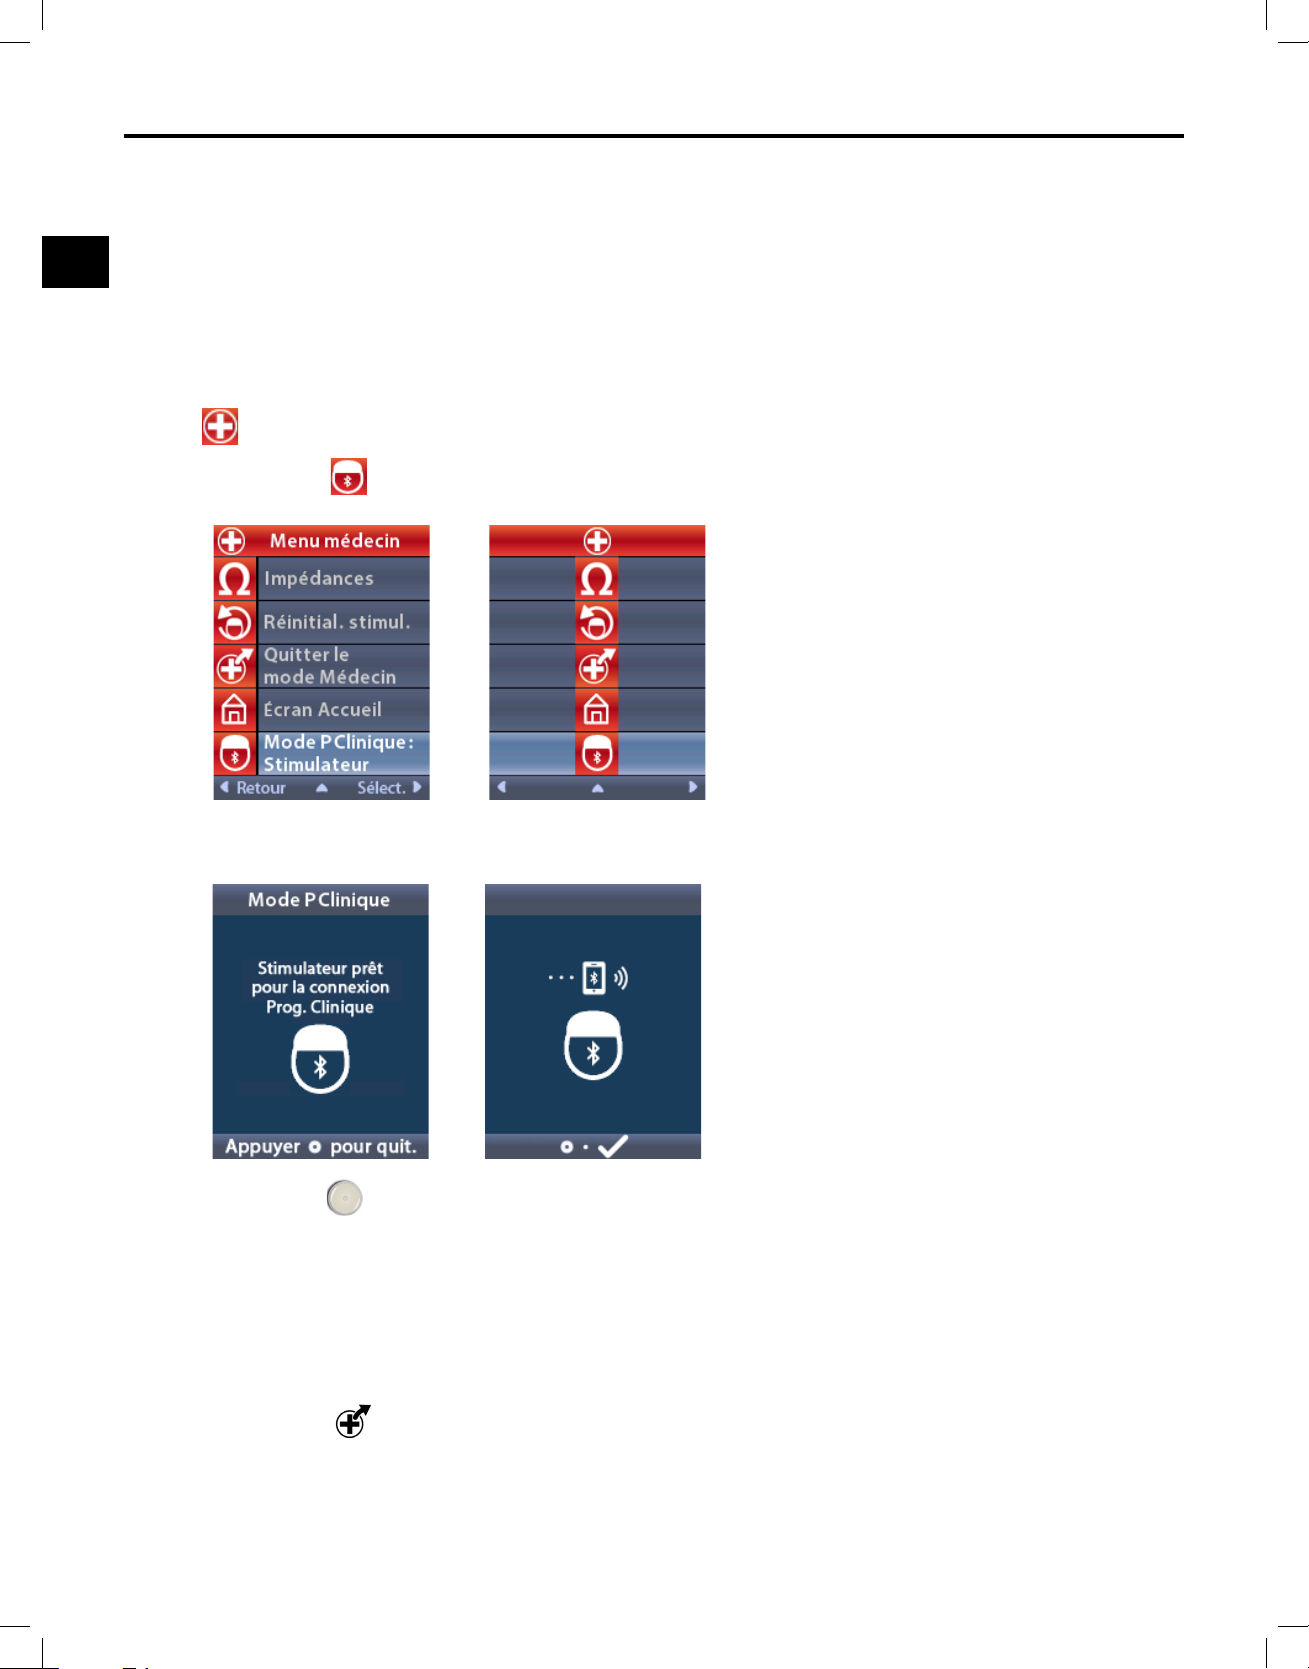
Mode d'emploi de la télécommande du médecin
fr
CP Mode: Stimulator (Mode PM : stimulateur)
Latélécommandepeutêtreutiliséepourétablirlacommunicationentrelestimulateurimplanté(GII)
etleprogrammateurdumédecin(PM)pourlaprogrammationdudispositif.Lestimulateurpeutêtre
verrouillage,demaintenirleboutonPenfoncé(environ5secondes),jusqu'àcequel'écranafche
«StimulatorReadyforCPConnection»(StimulateurprêtpourlaconnexionPM).Lestimulateurest
alorsplacéenmodePM(moded'appairage)anqu'unPMpuisses'yconnecter.
placéenmodePM(moded'appairage)enprocédantcommesuit.Ilestpossible,depuisl'écrande
Depuis
1.Sélectionner
Clinician Menu(Menudumédecin):
CP Mode: Stimulator(ModePM:stimulateur).
2.ConnecterlePMaustimulateuretprocéderàlaprogrammationdudispositif.
3.Appuyersur pourquitterlemode PM.
Remarque : le mode PM (mode Appairage) doit être activé pour que le PM puisse se connecter
au stimulateur et le programmer en utilisant la communication Bluetooth.
Sortie du mode Clinician (Médecin)
Depuis Clinician Menu(Menudumédecin):
1.Sélectionner
Exit Clinician Mode(QuitterlemodeMédecin).L'écranSystemSettings
(Paramètresdusystème)apparaît.
Mode d’emploi de la télécommande du médecin
92395488-02 82 sur 1077
Page 87
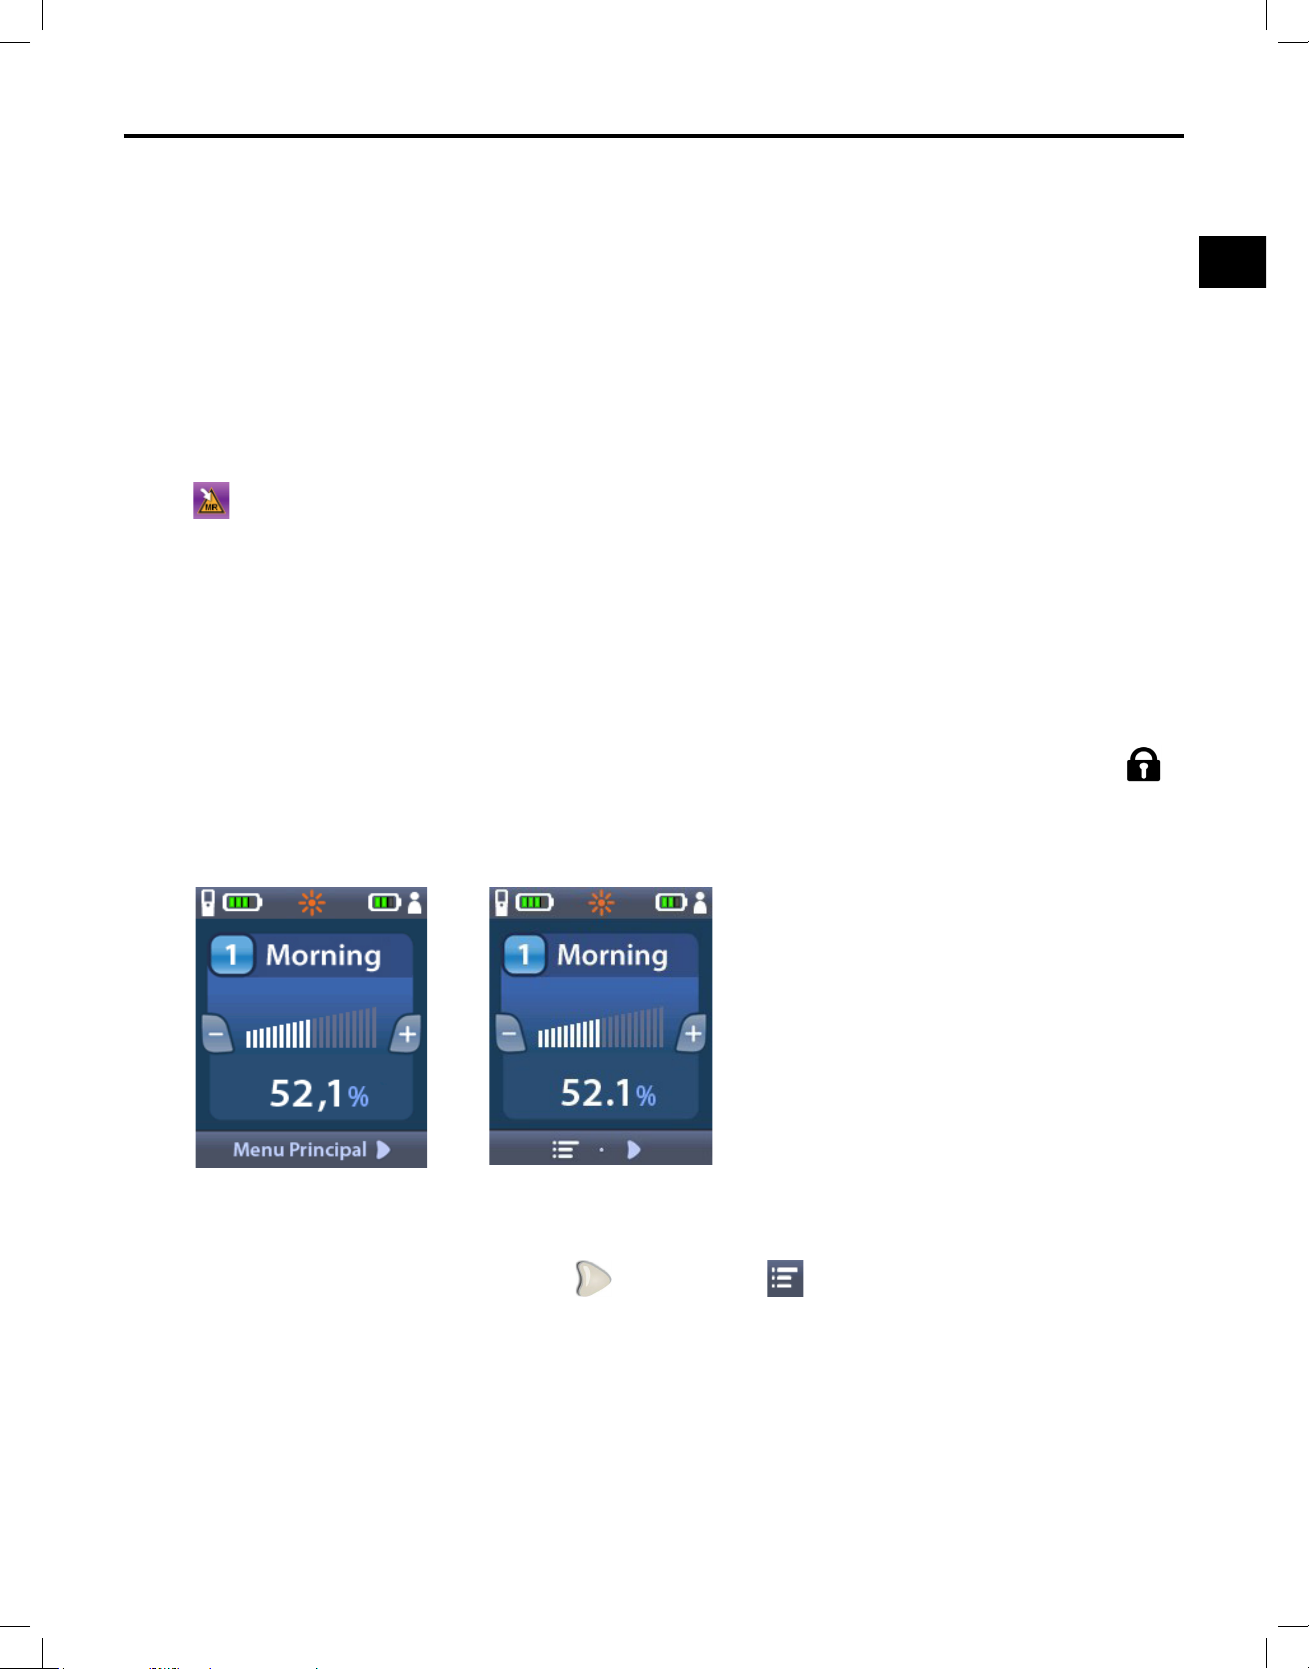
Mode IRM
fr
Mode IRM
Un(e)patient(e)implanté(e)avecunsystèmedecompatibilitéconditionnelleavecl’IRMpourla
stimulationmédullaire(SCS)peutsubirunexamenparIRMlorsquetouteslesinstructionsénumérées
danslesdirectivesdesexamensd'IRMImageReady™ du corps entier des systèmes WaveWriter Alpha
et WaveWriter Alpha Prime SCSsontrespectées.Contacterl'assistancetechniqueBostonScienticou
accéderàwww.bostonscientic.com/manualspourobtenirladernièreversiondecemanuel.
Activation du mode IRM
Lorsquelatélécommandeestassociéeàunstimulateuraveccompatibilitéconditionnelleavecl’IRM,
l’icône
s'afchesurl’écranSystemSettings(Paramètresdusystème).Avantdeprocéderàun
examend'IRMsurunpatient,latélécommandedoitêtreutiliséepouractiverlemodeIRMsurle
stimulateur.Letraitementparstimulationestautomatiquementdésactivélorsdel’activationdumodeIRM.
Mise en garde : ne pas effectuer d'IRM si le mode IRM n'est pas activé. Le non-respect de ces
conditionspeutnuireau/àlapatient(e)ouentraînerundysfonctionnementdu
dispositif.
PouractiverlemodeIRM:
1.Déverrouillerlatélécommandeenappuyantsurleboutondeverrouillage/déverrouillage
surlecôtédroitdelatélécommande.
2.Unefoislatélécommandedéverrouillée,l'écrand'accueilapparaît.
Remarque : la télécommande peut afcher soit un écran textuel dans l'une des langues
fournies, soit un écran avec des icônes.
3.Appuyersurlaèche vers la droite
pourrevenirà Main Menu(Menuprincipal).
Mode d’emploi de la télécommande du médecin
92395488-02 83 sur 1077
Page 88
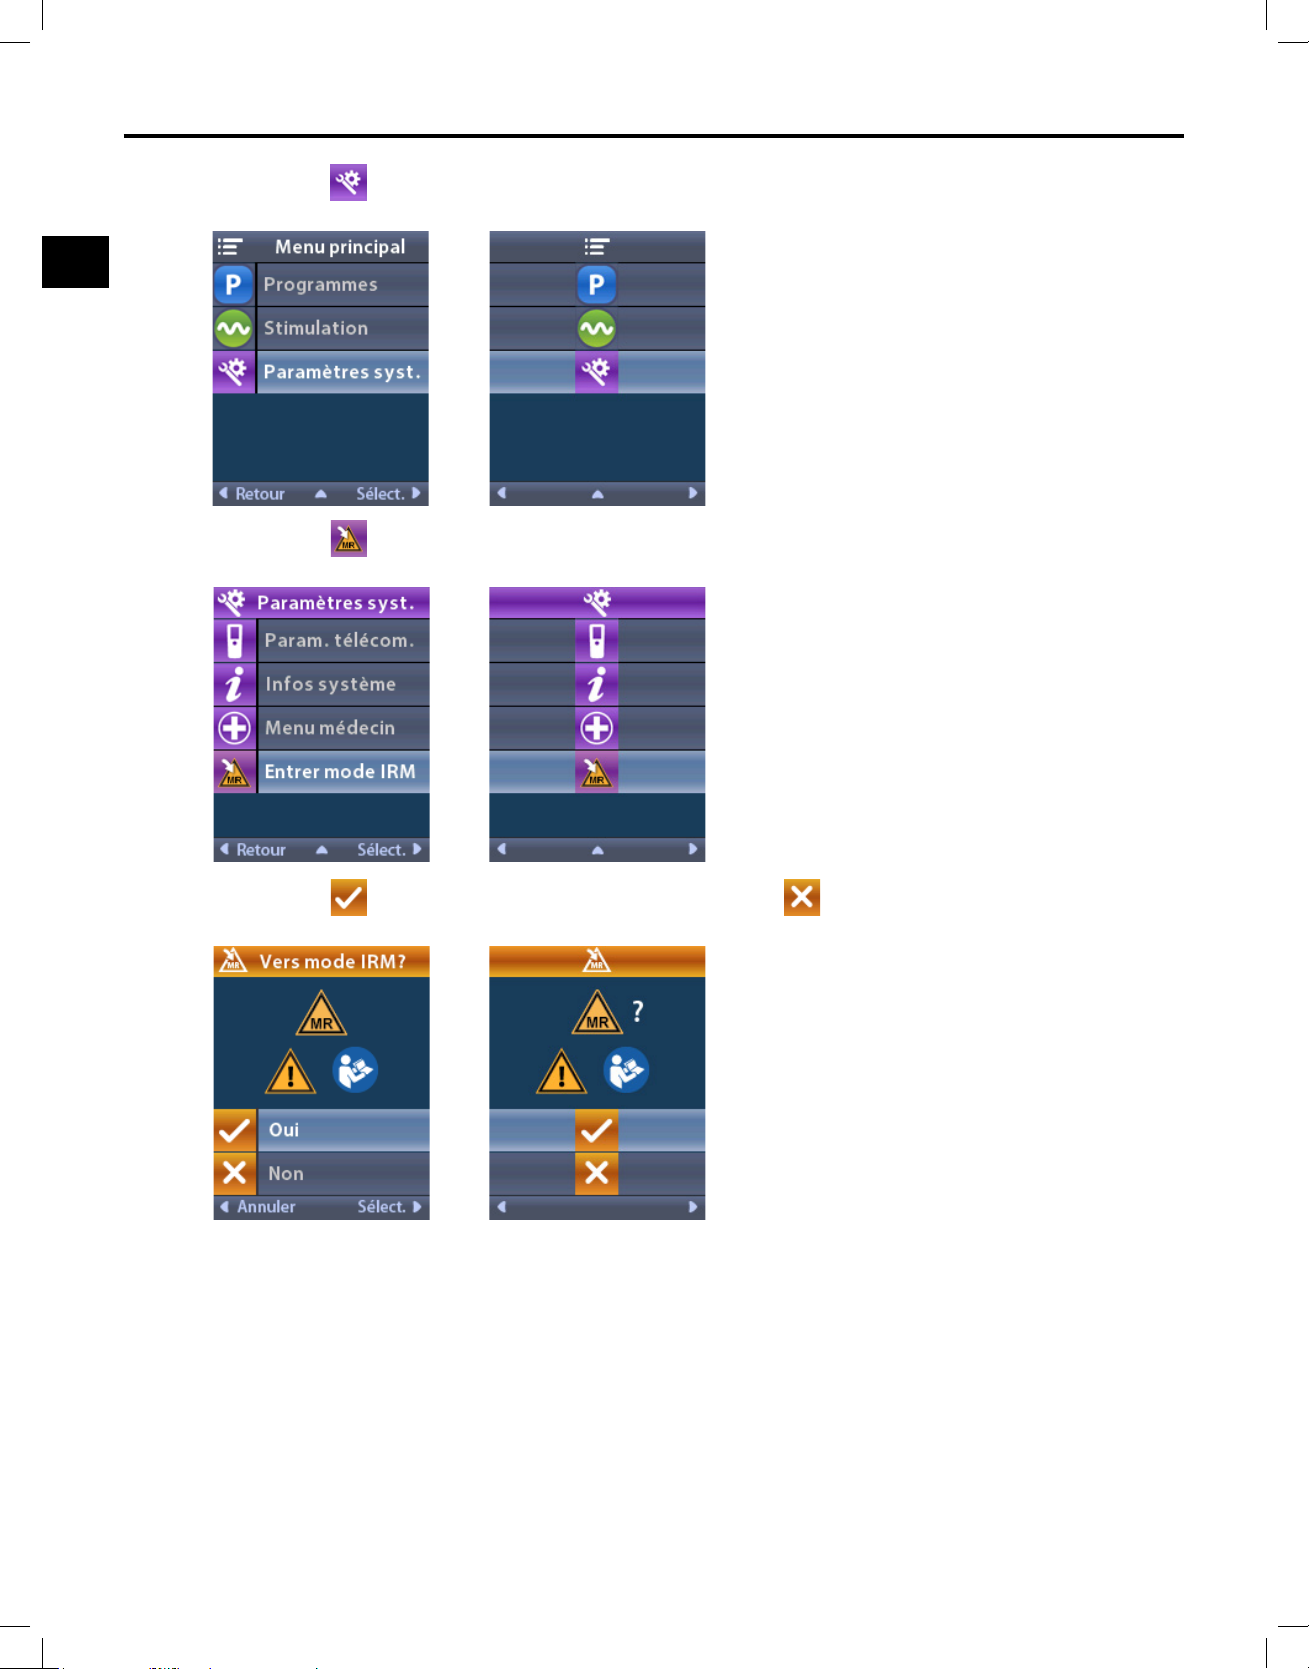
Mode d'emploi de la télécommande du médecin
fr
4.Sélectionner System Settings(Paramètresdusystème).
5.Sélectionner Enter MRI Mode(AccéderaumodeIRM).
6.Sélectionner Yes(Oui)pourpasserenmodeIRMou No(Non)pourannulerl'action.
Mode d’emploi de la télécommande du médecin
92395488-02 84 sur 1077
Page 89
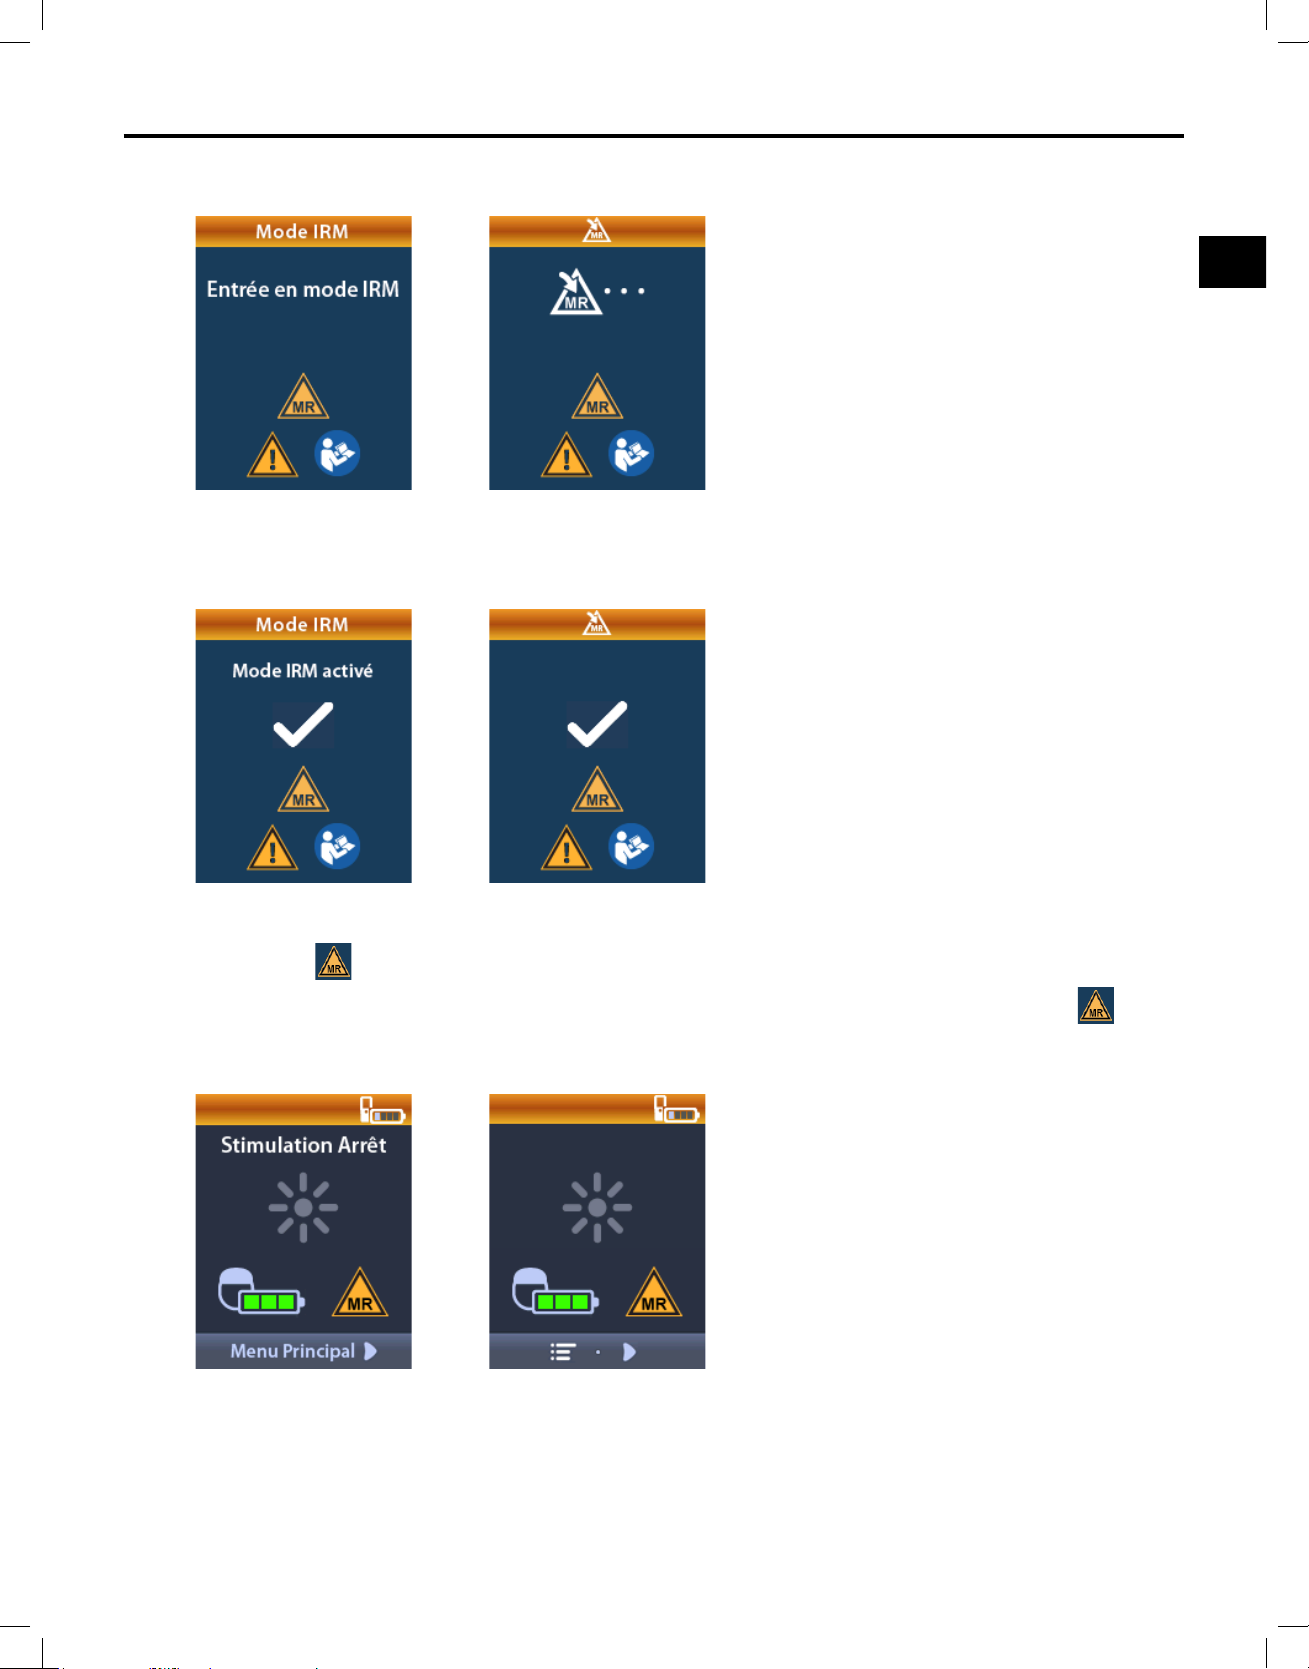
Mode IRM
fr
7.LesystèmeeffectueunesériedevéricationsavantquelemodeIRMnesoitactivé.
8.SilemodeIRMestactivé,letraitementparstimulationestdésactivéetl'écrandeconrmation
MRI Mode Enabled(ModeIRMactivé)apparaît.
9.L'écrand'accueildelatélécommandeafchelesymboledecompatibilité conditionnelle
avec l’IRM
latélécommandeafchelesymboleMR de compatibilité conditionnelle avec l’IRM
unefoisquelemodeIRMestactivé.Toujoursvérierquel'écrand'accueil de
avant
d'effectueruneIRMsurle/lapatient(e).
Mode d’emploi de la télécommande du médecin
92395488-02 85 sur 1077
Page 90
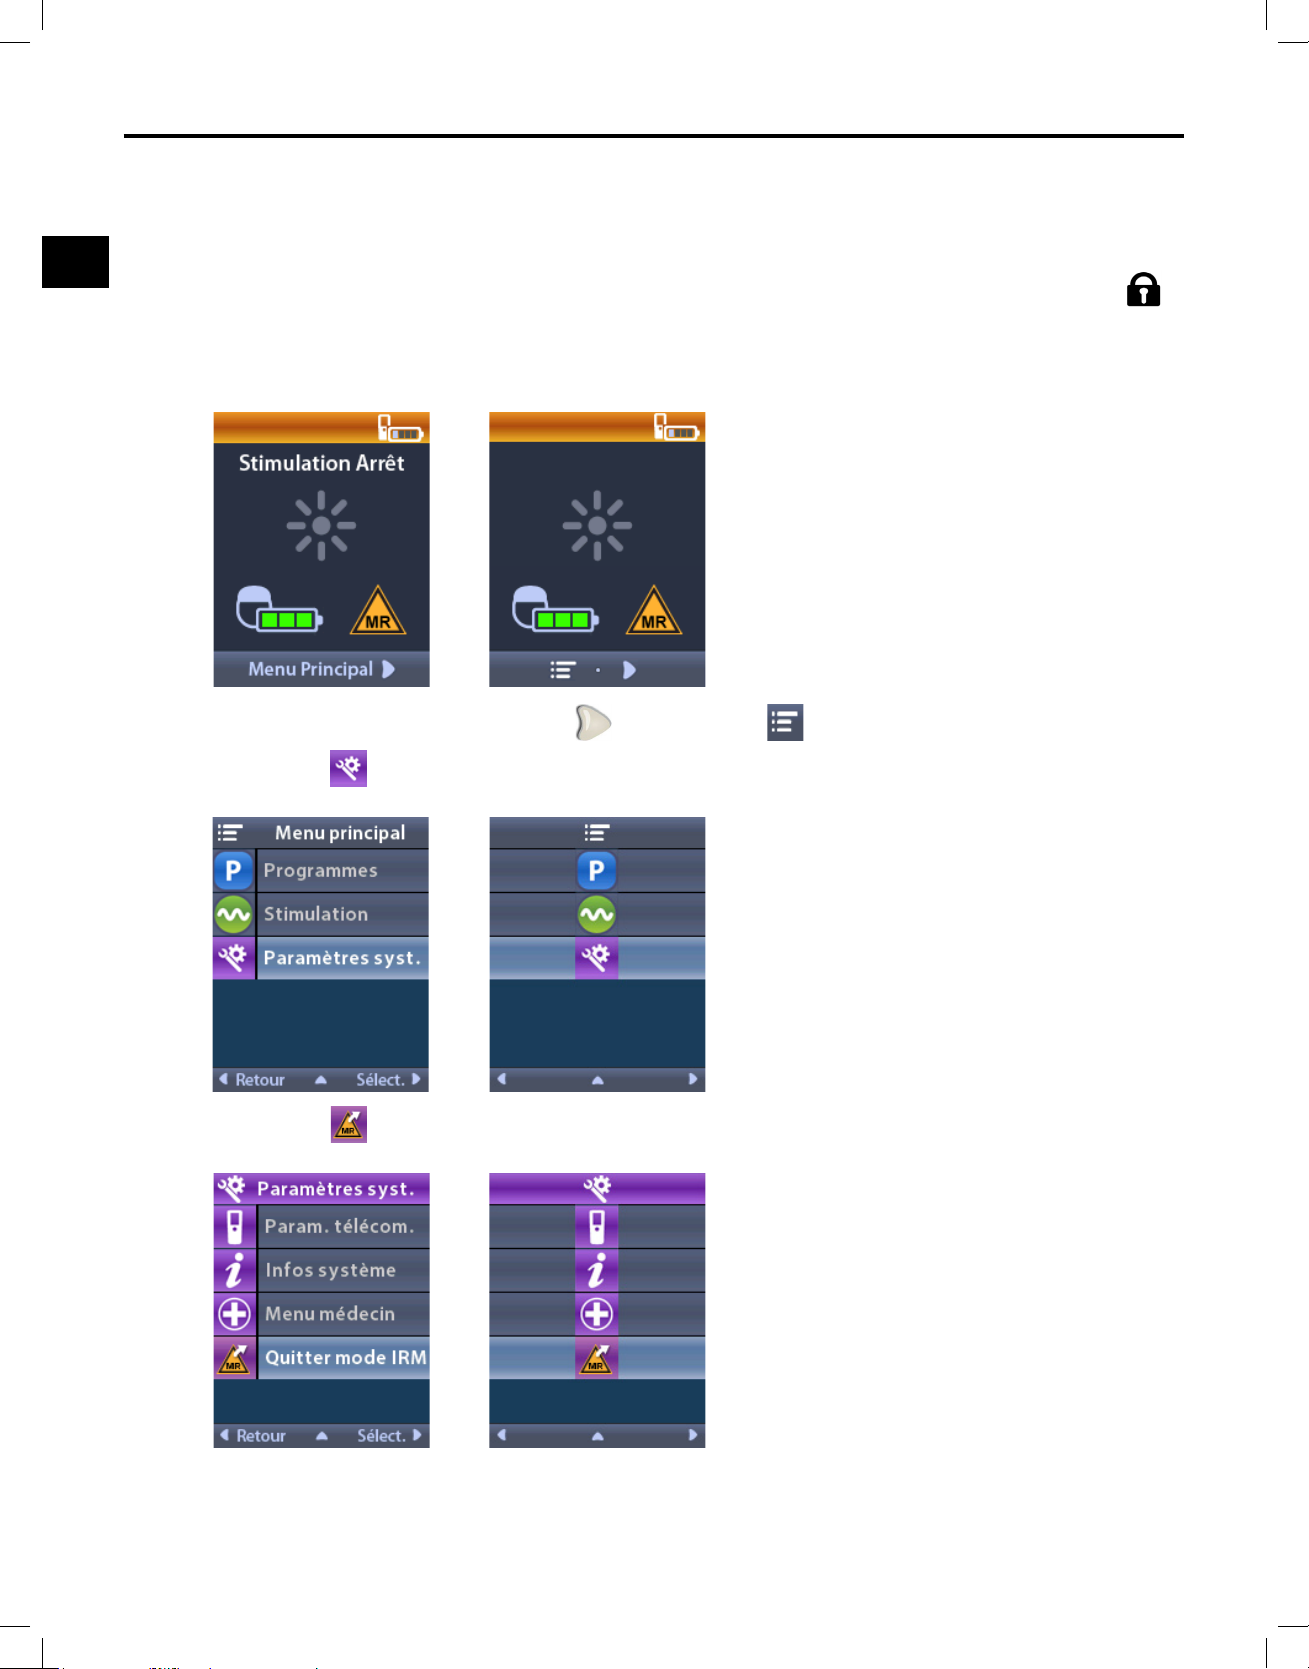
Mode d'emploi de la télécommande du médecin
fr
Désactivation du mode IRM
Unefoisl'examend'IRMterminé,latélécommandedoitêtreutiliséepourdésactiverlemodeIRM.
PourdésactiverlemodeIRM:
1.Déverrouillerlatélécommandeenappuyantsurleboutondeverrouillage/déverrouillage
surlecôtédroitdelatélécommande.
2.Unefoislatélécommandedéverrouillée,l'écrand'accueilapparaît.
3.Appuyersurlaèche vers la droite pourrevenirà Main Menu(Menuprincipal).
4.Sélectionner
System Settings(Paramètresdusystème).
5.Sélectionner Exit MRI Mode(QuitterlemodeIRM).
Mode d’emploi de la télécommande du médecin
92395488-0286sur1077
Page 91
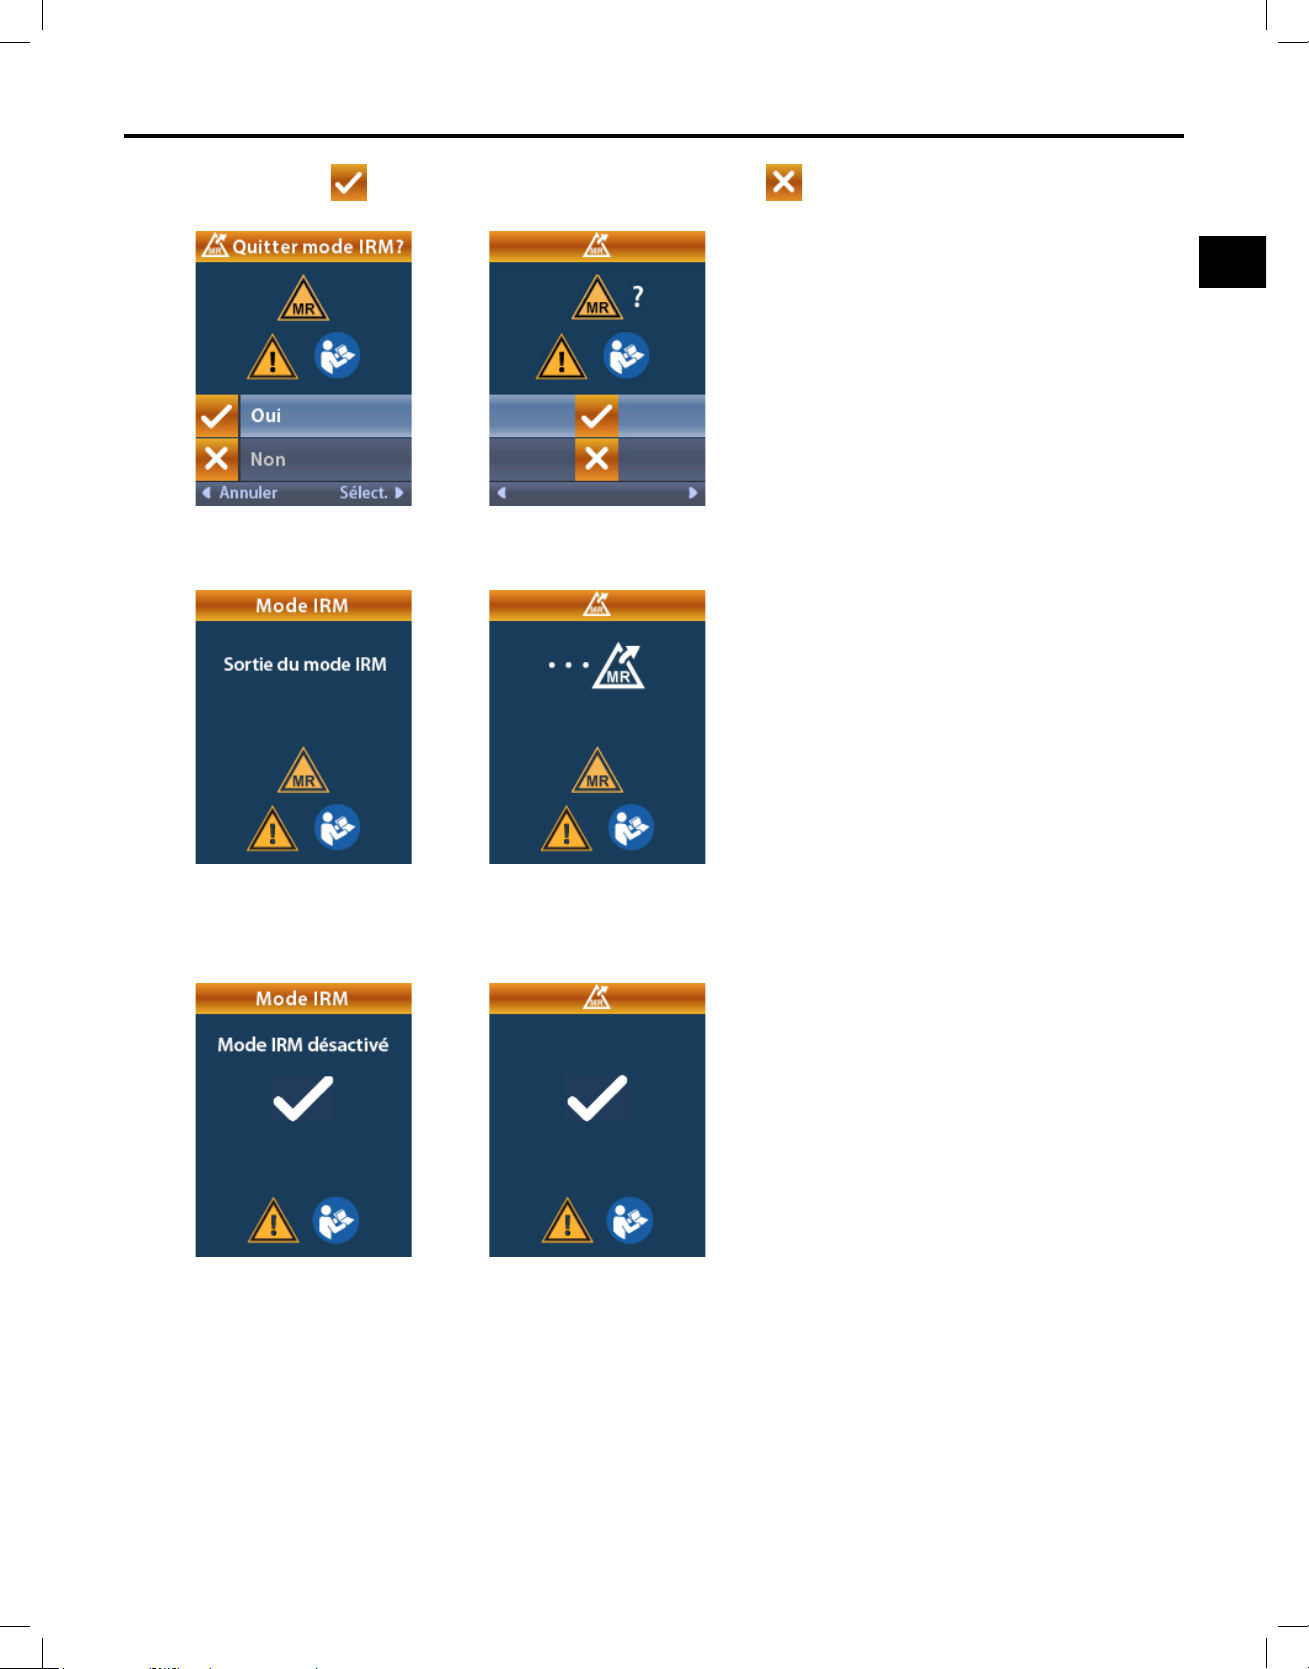
Mode IRM
fr
6.Sélectionner Yes(Oui)poursortirdumodeIRMou No(Non)pourannulerl'action.
7.LestimulateureffectueunesériedevéricationsavantdedésactiverlemodeIRM.
8.SilemodeIRMestdésactivé,l'écrandeconrmationMRI Mode Disabled(ModeIRM
désactivé)s'afche.
Remarque : le stimulateur conserve les paramètres de traitement par stimulation et de
programme dénis avant l'activation du mode IRM. Si le traitement par stimulation était activé
avant l’activation du mode IRM, la désactivation du mode IRM réactive alors le traitement par
stimulation. Si le traitement par stimulation était désactivé avant l’activation du mode IRM, la
désactivation du mode IRM maintient le traitement par stimulation désactivé.
Mode d’emploi de la télécommande du médecin
92395488-02 87 sur 1077
Page 92
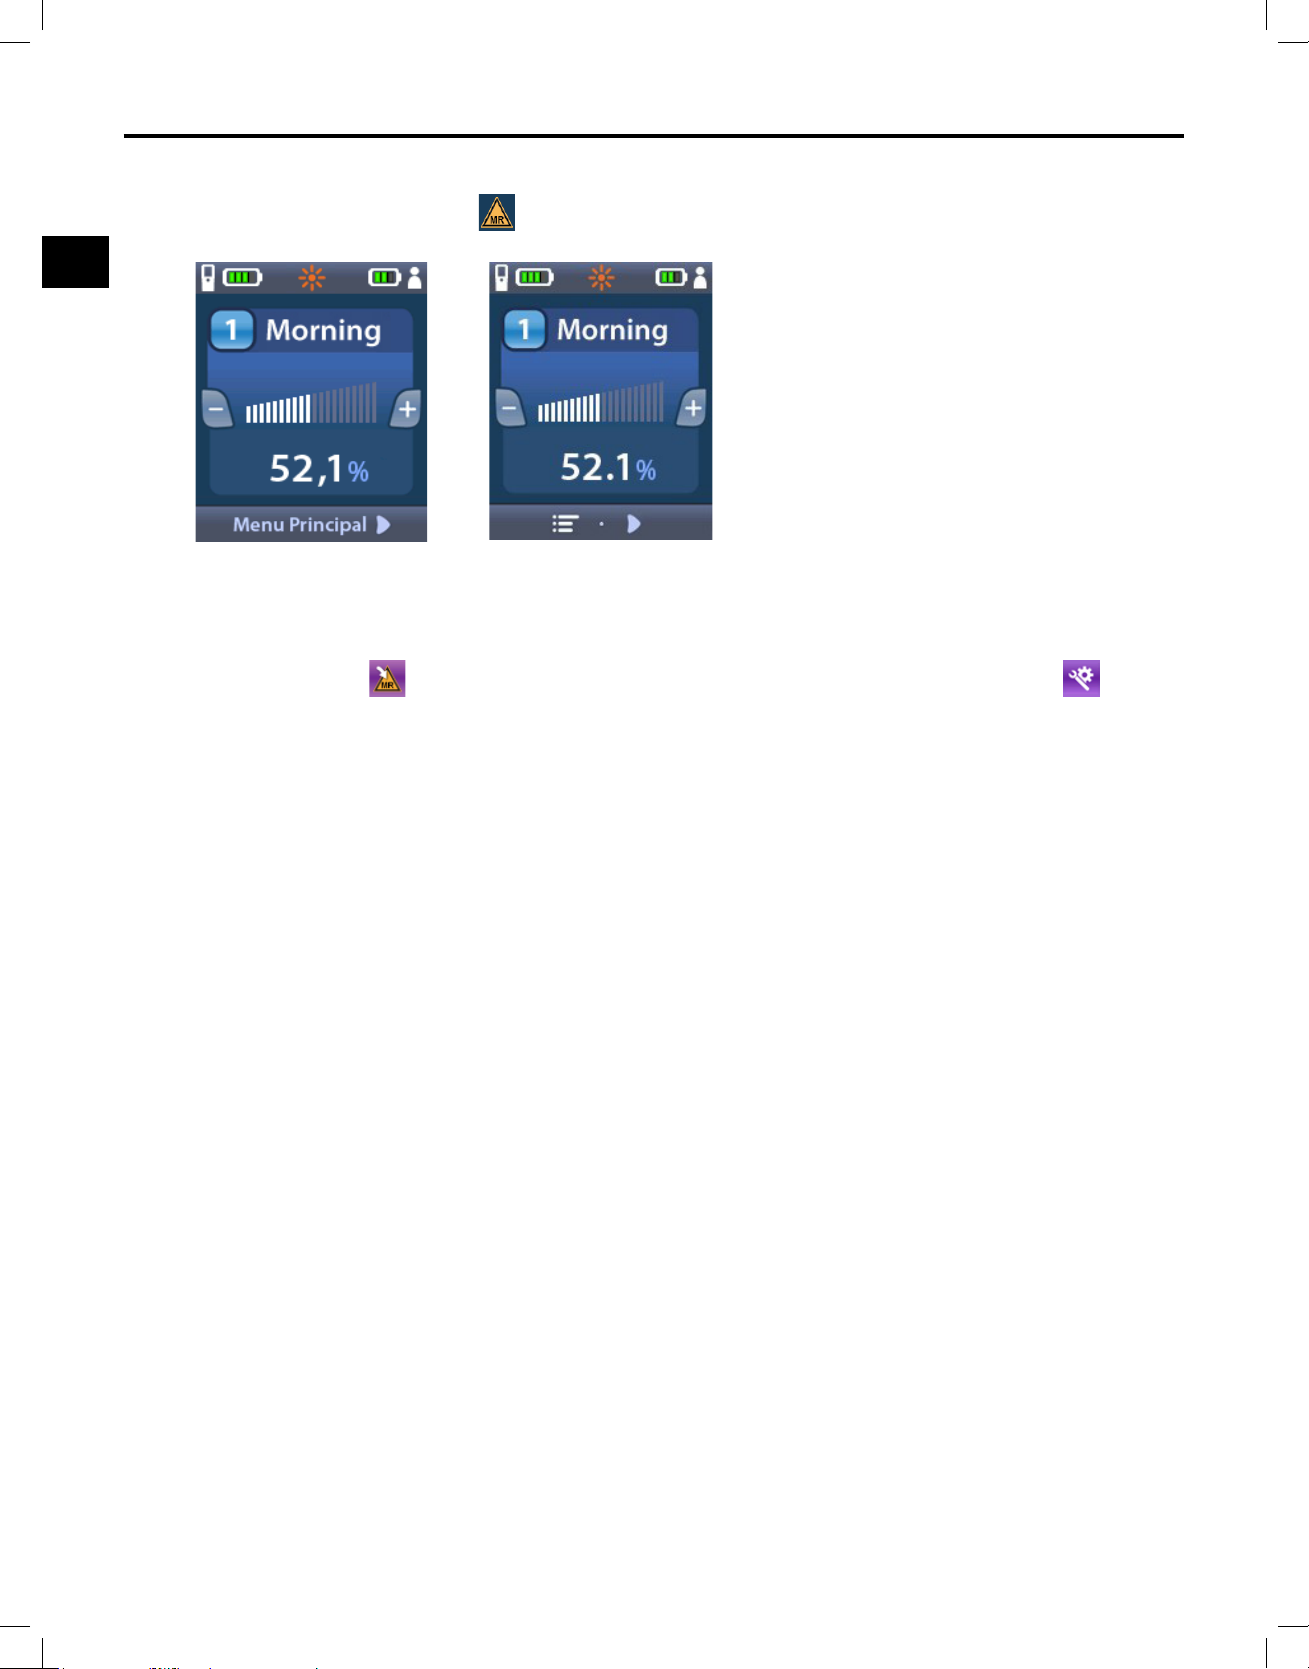
Mode d'emploi de la télécommande du médecin
fr
9.L'écrand'accueildelatélécommanden'afchepaslesymboledecompatibilité
conditionnelle avec l’IRM
unefoislemodeIRMdésactivé.
Écrans d'erreur du mode IRM
LesystèmeeffectueunesériedevéricationsavantdepasserenmodeIRM.Cesvéricationssont
effectuéesunefoisque
Enter MRI Mode(AccéderaumodeIRM)estsélectionnédans
System Settings(Paramètressystème).Latélécommandeafchedesécransd'erreursi:
• Labatteriedustimulateurestfaible.
• Lecontrôled'impédancedétecteuneanomalie.
• Ilyauneerreurdustimulateur.
Mode d’emploi de la télécommande du médecin
92395488-02 88 sur 1077
Page 93
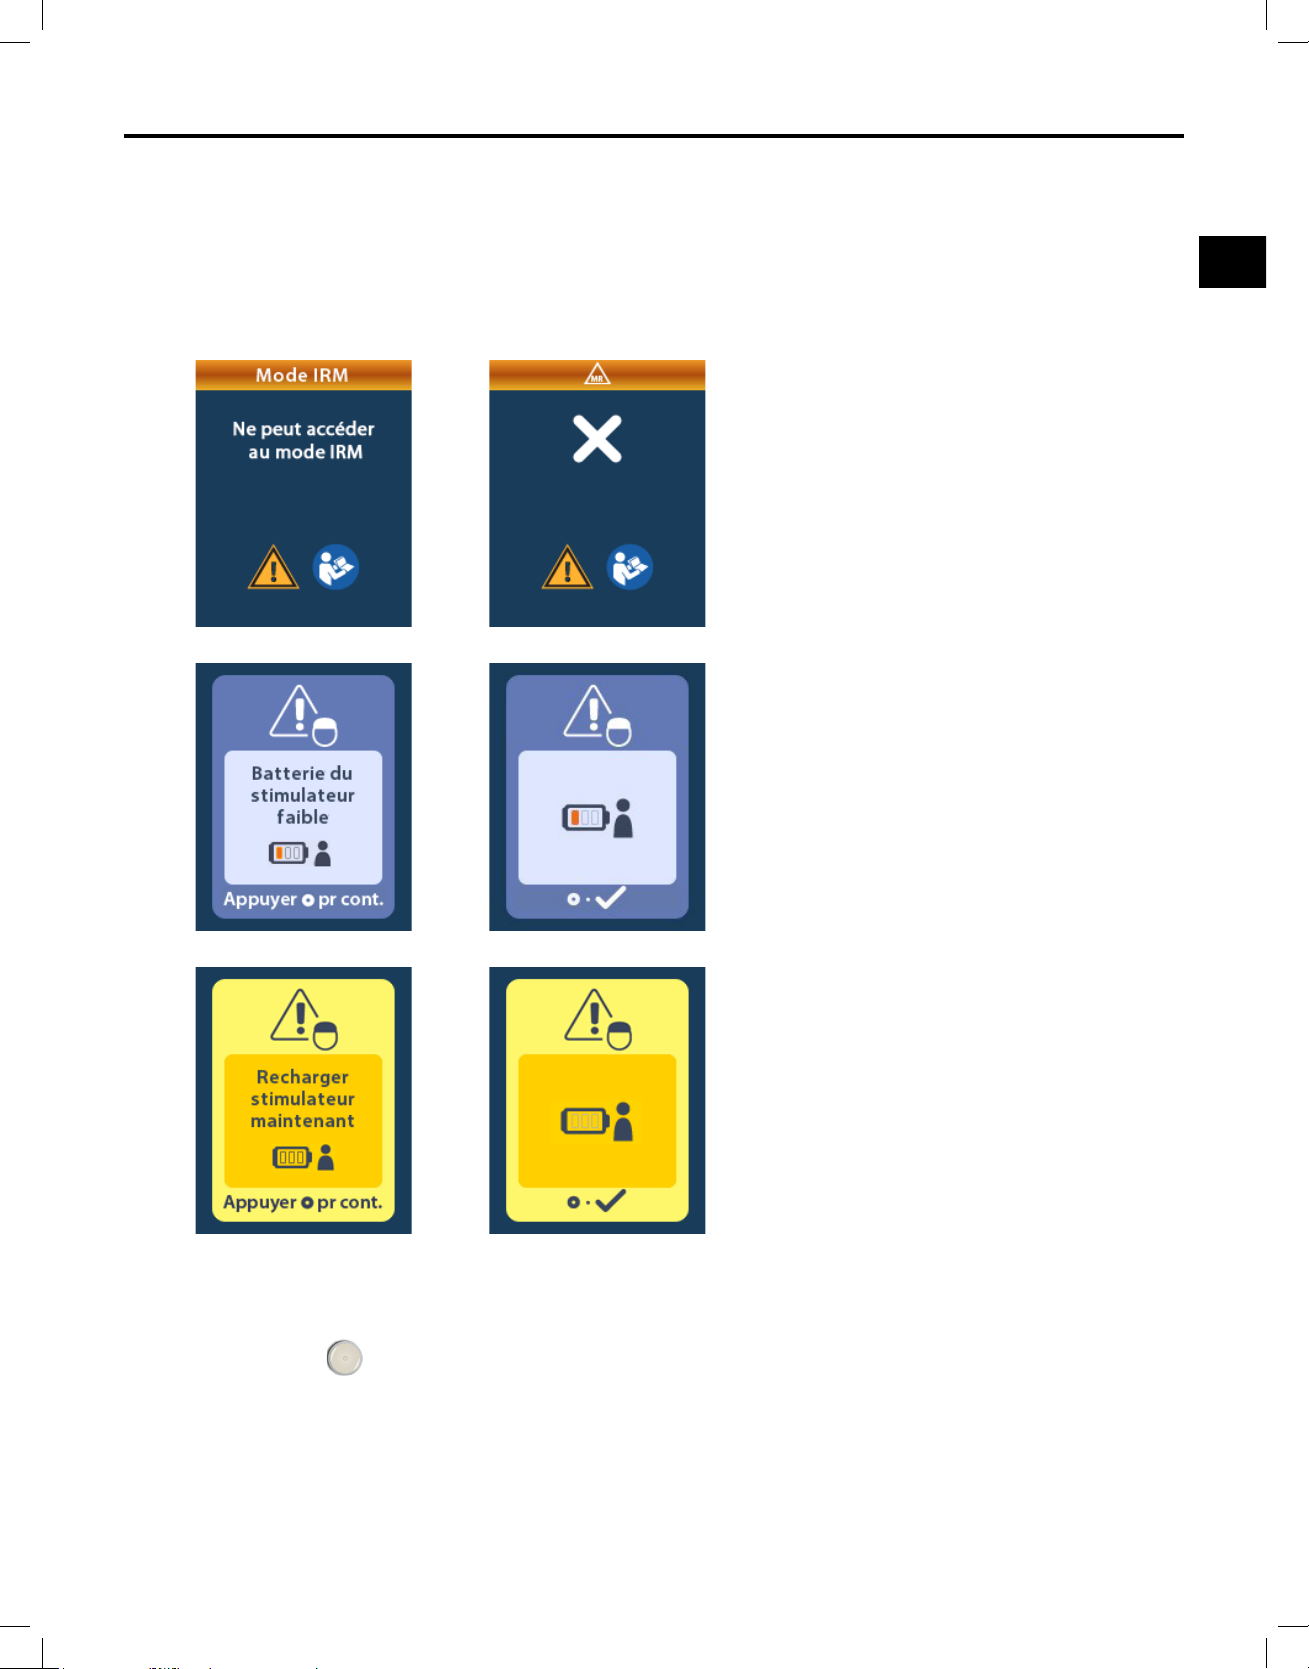
Mode IRM
fr
Écran Charge Stimulator Now (Charger le stimulateur maintenant)
(Stimulateurs rechargeables uniquement)
LabatteriedustimulateurdoitêtrecomplètementchargéeavantquelemodeIRMnesoitactivé.Sila
batteriedustimulateurn'estpascomplètementchargée,latélécommandeafchel'undesmessages
suivantsdemandantau/àlapatient(e)dechargerlestimulateuravantd'activerlemodeIRM.
Mise en garde : toujours vérier la batterie du stimulateur pour s'assurer qu'elle est complètement
chargée avant d'effectuer un examen sur le/la patient(e).
1.Appuyersur
pourignorerlemessaged'erreuretreveniràl'écrand'accueildela
télécommande.
2.Demanderau/àlapatient(e)dechargerlestimulateur.
3.ActiverlemodeIRMunefoisquelestimulateurestcomplètementchargé.
Mode d’emploi de la télécommande du médecin
92395488-02 89 sur 1077
Page 94
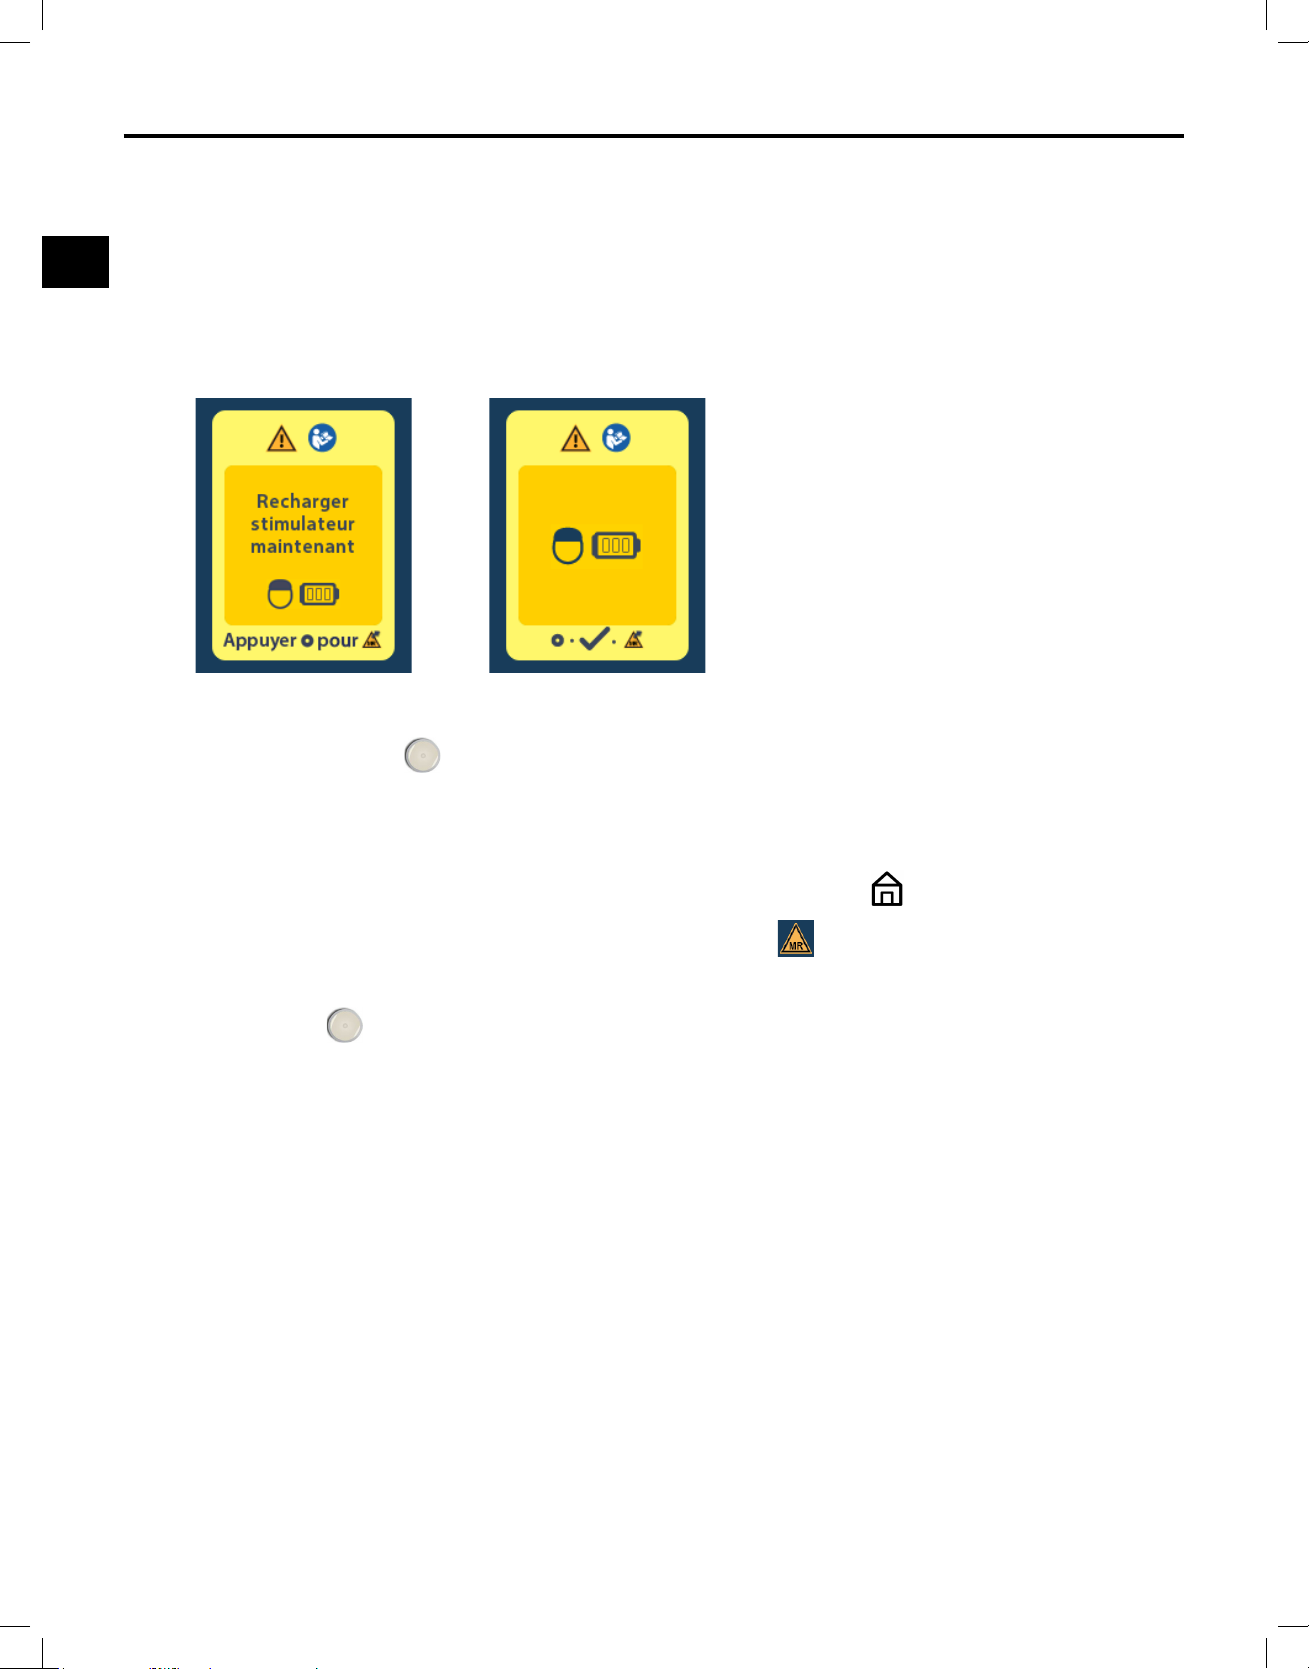
Mode d'emploi de la télécommande du médecin
fr
Écran Charge Stimulator Now (Recharger le stimulateur dès maintenant)
ou Disable MRI Mode Screen (Désactiver le mode IRM) (Stimulateurs
rechargeables uniquement)
SilemodeIRMadéjàétéactivéetquelapuissancedelabatteriedustimulateurtombeendessousde
lavaleurrecommandée,latélécommandeafcheunmessagedemandantau/àlapatient(e)decharger
lestimulateur.
PourchargerlestimulateursansdésactiverlemodeIRM:
1.Nepasappuyersur
.
2.Demanderau/àlapatient(e)dechargerlestimulateur.
3.Vérierlatélécommandepourconrmerquelemessaged'erreuraétéeffacé.
4.Accéderàl'écrand'accueil de la télécommande en appuyant sur
le symbole de compatibilité conditionnelle avec l’IRM
estafchésurl'écrand'accueil.
sur son côtéetvérierque
Le/lapatient(e)peutégalementdésactiverlemodeIRMavantderechargerlestimulateur:
1.Appuyersur
pourdésactiverlemodeIRM.
2.Demanderau/àlapatient(e)dechargercomplètementlestimulateur.
3.Vérierlatélécommandepourconrmerquelemessaged'erreuraétéeffacé.
4.ActiverlemodeIRMensuivantlesinstructionsdelasection« Activation du mode IRM » de ce
manuel.
Avertissement : le chargeur et la télécommande sont incompatibles avec les examens d'IRM et
ne doivent pas être introduits dans la salle d'examen IRM.
Mode d’emploi de la télécommande du médecin
92395488-02 90 sur 1077
Page 95
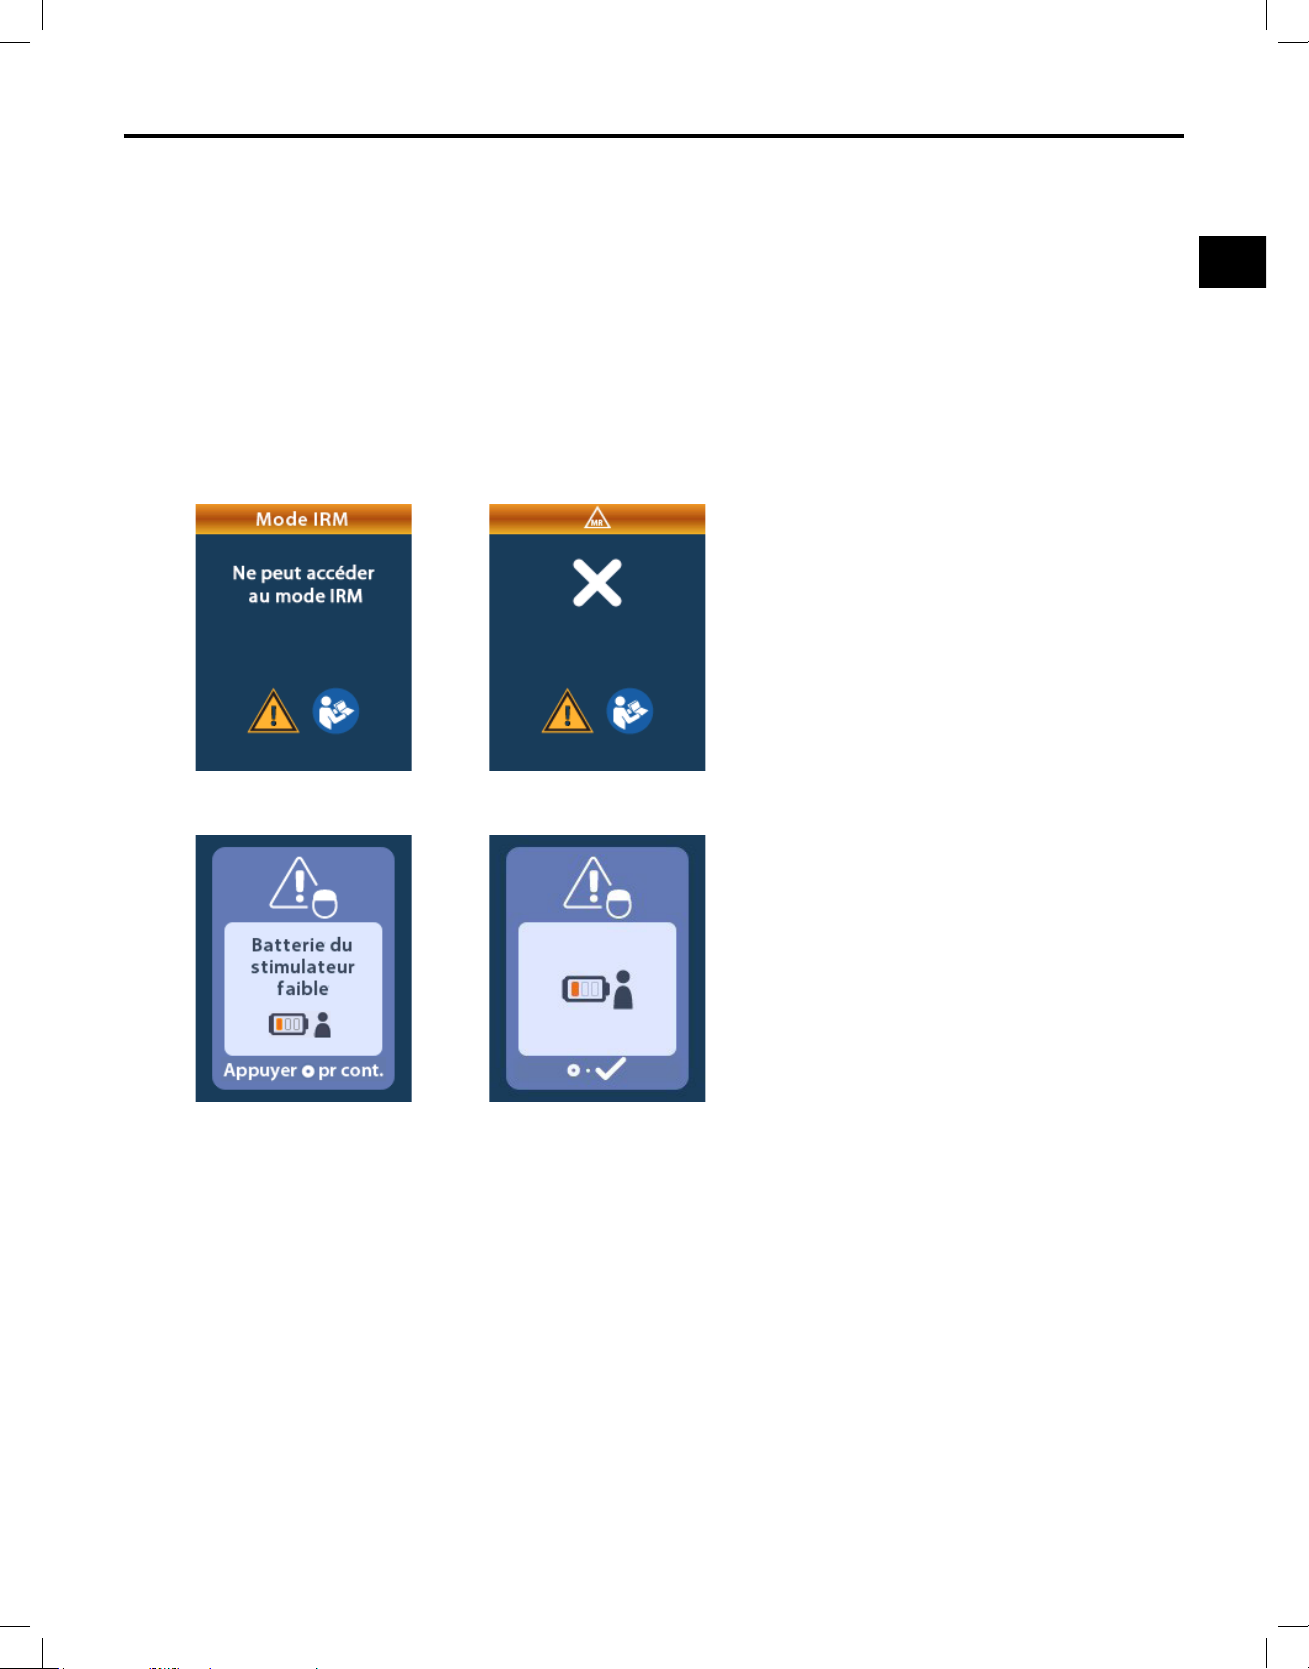
Mode IRM
fr
Écran de batterie de stimulateur faible en raison de l'IRE ou de la FVU
(stimulateurs non-rechargeables uniquement)
UnstimulateurquiestentrédanslapériodeaveclessignauxIndicateurderemplacementélectif(IRE)
ouFindeservice(FVU)activésnepeutpasêtreplacéenmodeIRM.LemodeIRMn'estpasactivéet
latélécommandeafchelesmessages«CannotenterMRIMode»(NepeutaccéderaumodeIRM),
puis«StimulatorBatteryLow»(Batteriedustimulateurfaible).
Mise en garde : ne pas effectuer d'IRM si le mode IRM n'est pas activé. Le non-respect de ces
conditionspeutnuireau/àlapatient(e)ouentraînerundysfonctionnement
dudispositif.
Mode d’emploi de la télécommande du médecin
92395488-02 91 sur 1077
Page 96
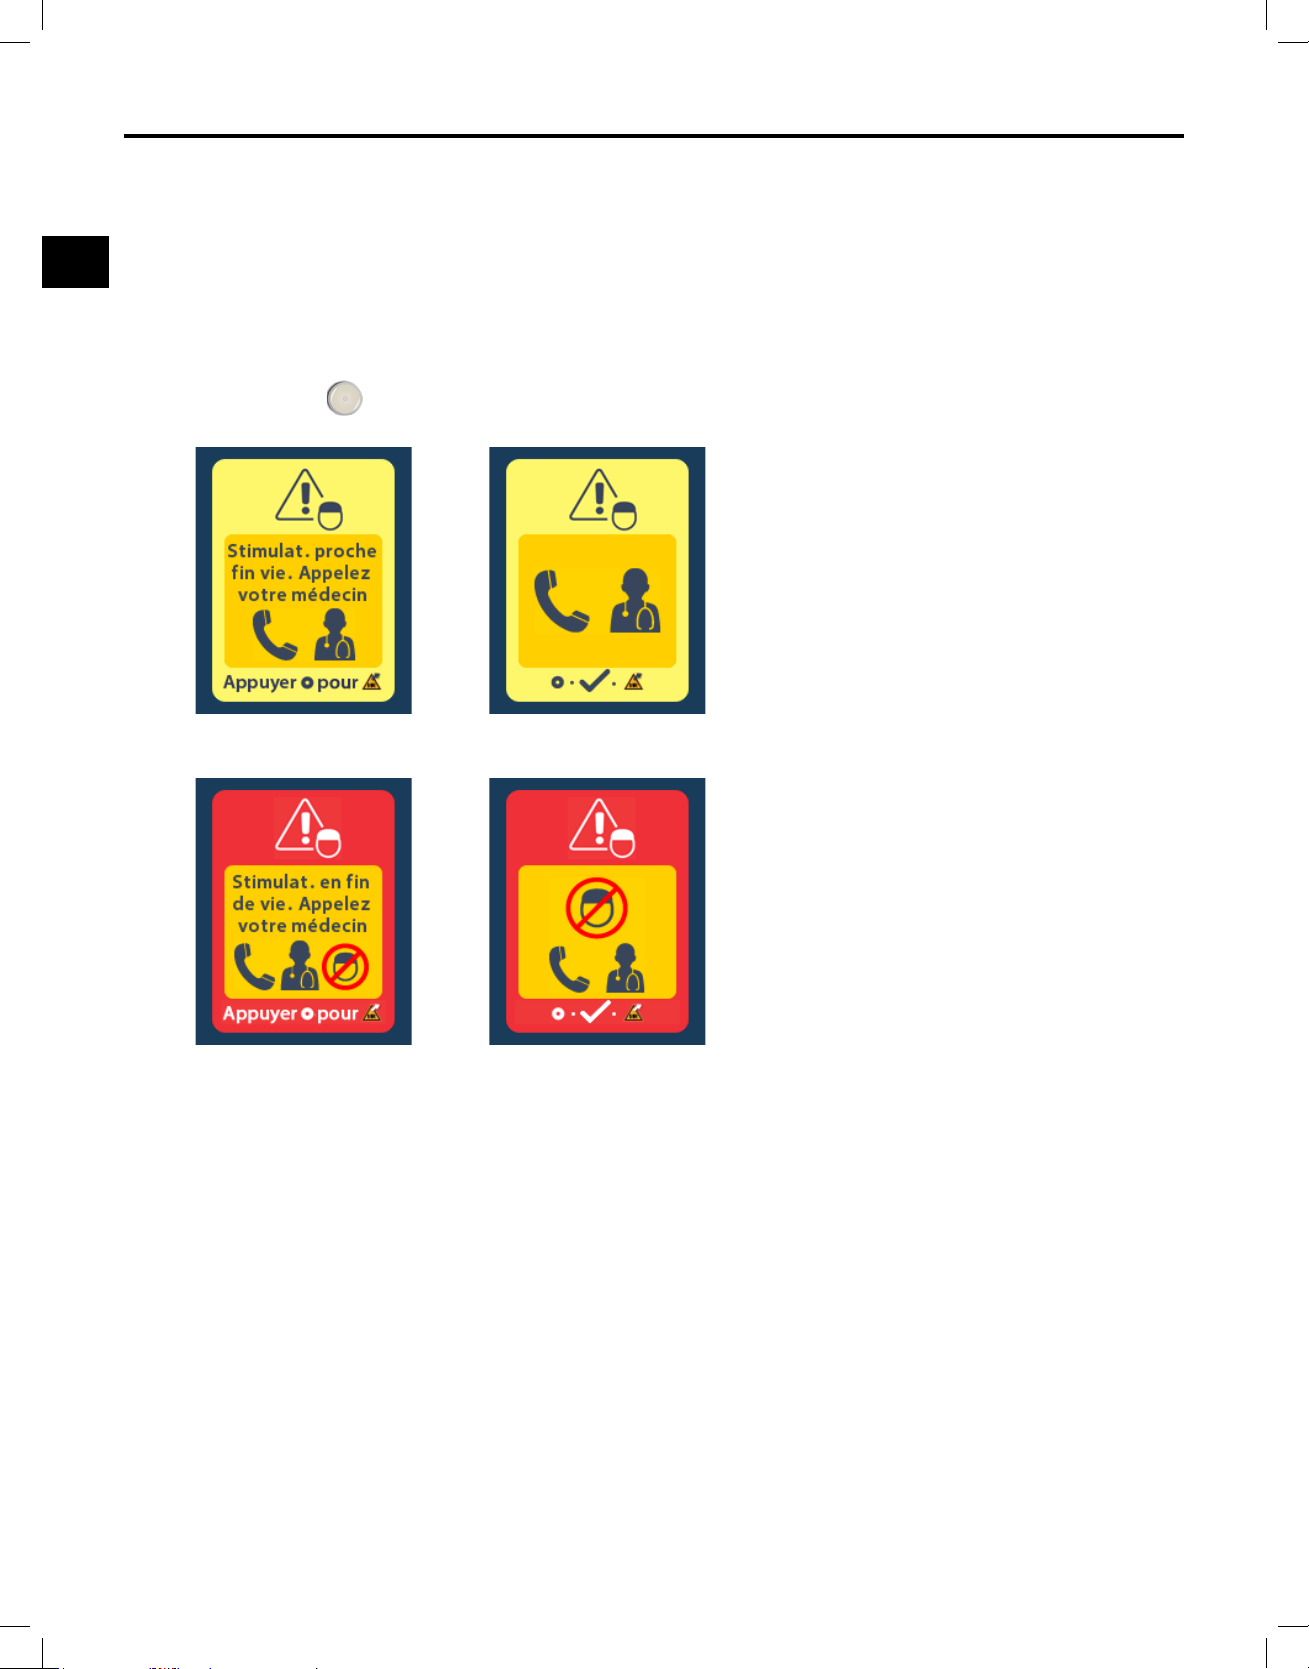
Mode d'emploi de la télécommande du médecin
fr
Sélection du mode IRE ou FVU
SilemodeIRMadéjàétéactivéetquel'alimentationdelabatteriedustimulateurtombeendessous
delavaleurseuil,latélécommandeafcheunmessageindiquantau/àlapatient(e)quelestimulateur
(FVU)del'appareil.
Le/lapatient(e)peutdésactiverlemodeIRM:
estentrédanslapériodedel'indicateurderemplacementélectif(IRE)ouaatteintlandevieutile
1.Appuyersur
pourdésactiverlemodeIRM.
2.Vérierlatélécommandepourconrmerquelemessaged'erreurdelabatteriedustimulateur
s'afchetoujours.Consulterlasection« Écran IRE (indicateur de remplacement électif) (pour
les stimulateurs non rechargeables uniquement) » decemanuel.
Avertissement : la télécommande est incompatible avec les examens d'IRM et ne doit pas être
introduite dans la salle d'examen IRM.
Mise en garde : ne pas effectuer d'IRM si le mode IRM n'est pas activé. Le non-respect de ces
conditions peut nuire au/à la patient(e) ou entraîner un dysfonctionnement du dispositif.
Mode d’emploi de la télécommande du médecin
92395488-02 92 sur 1077
Page 97
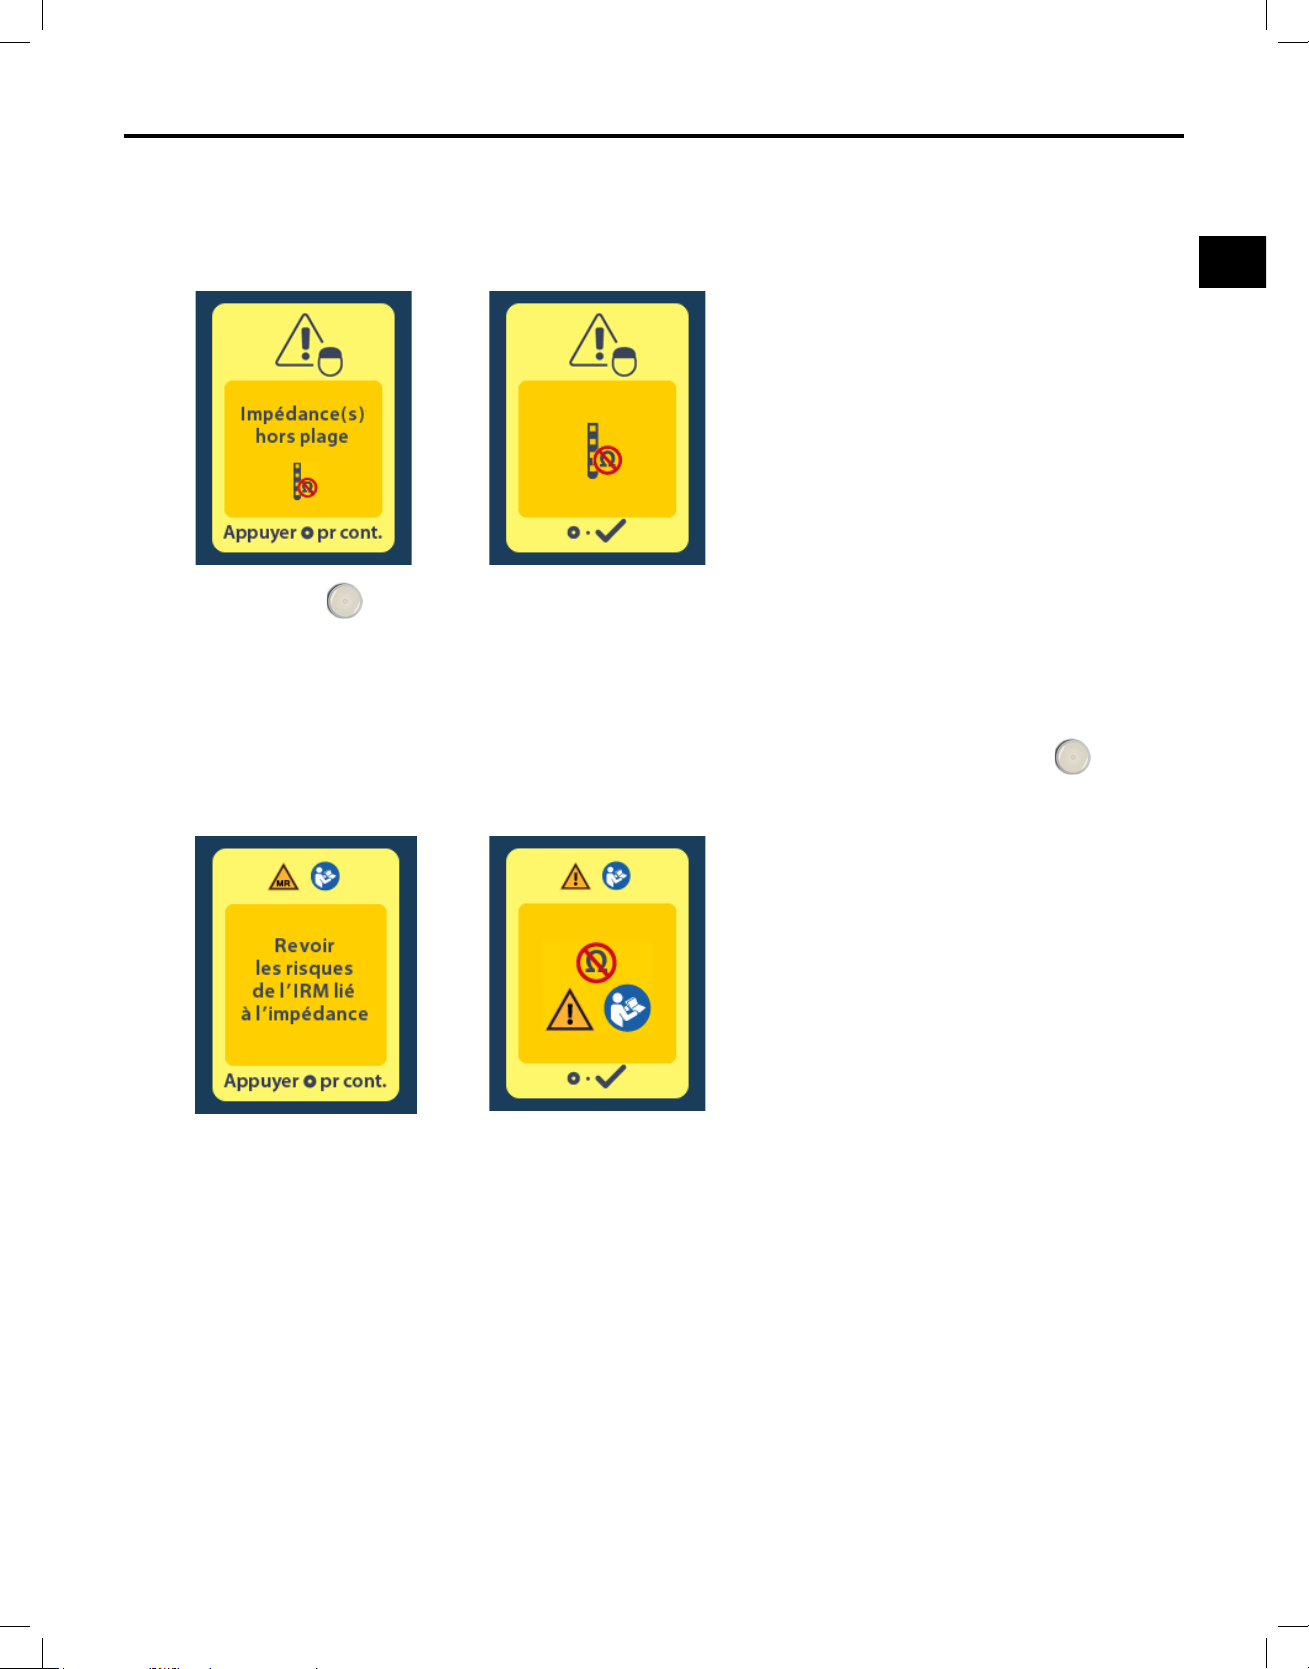
Mode IRM
fr
Écran Impedances Out Of Range (Impédances hors plage)
LesimpédancesdoiventêtredanslaplageacceptableavantquelemodeIRMnesoitactivé.Siles
impédancesnesontpasdanslaplageacceptable,latélécommandeafcheunmessaged'erreur.
1.Appuyersur pourcontinuer.
2.Latélécommandeafcheunnouveaumessagedemandantàl'utilisateurdeconsulterles
risquesdel'IRMliésauximpédancesanormales.Relirelasection« Impédance hors plage »
desdirectivesrelativesàl'examenducorpsentierparIRMImageReady pour les systèmes
WaveWriter Alpha et WaveWriter Alpha Prime SCSavantdecontinuer.Appuyersur
pour
continuer.
Mode d’emploi de la télécommande du médecin
92395488-02 93 sur 1077
Page 98
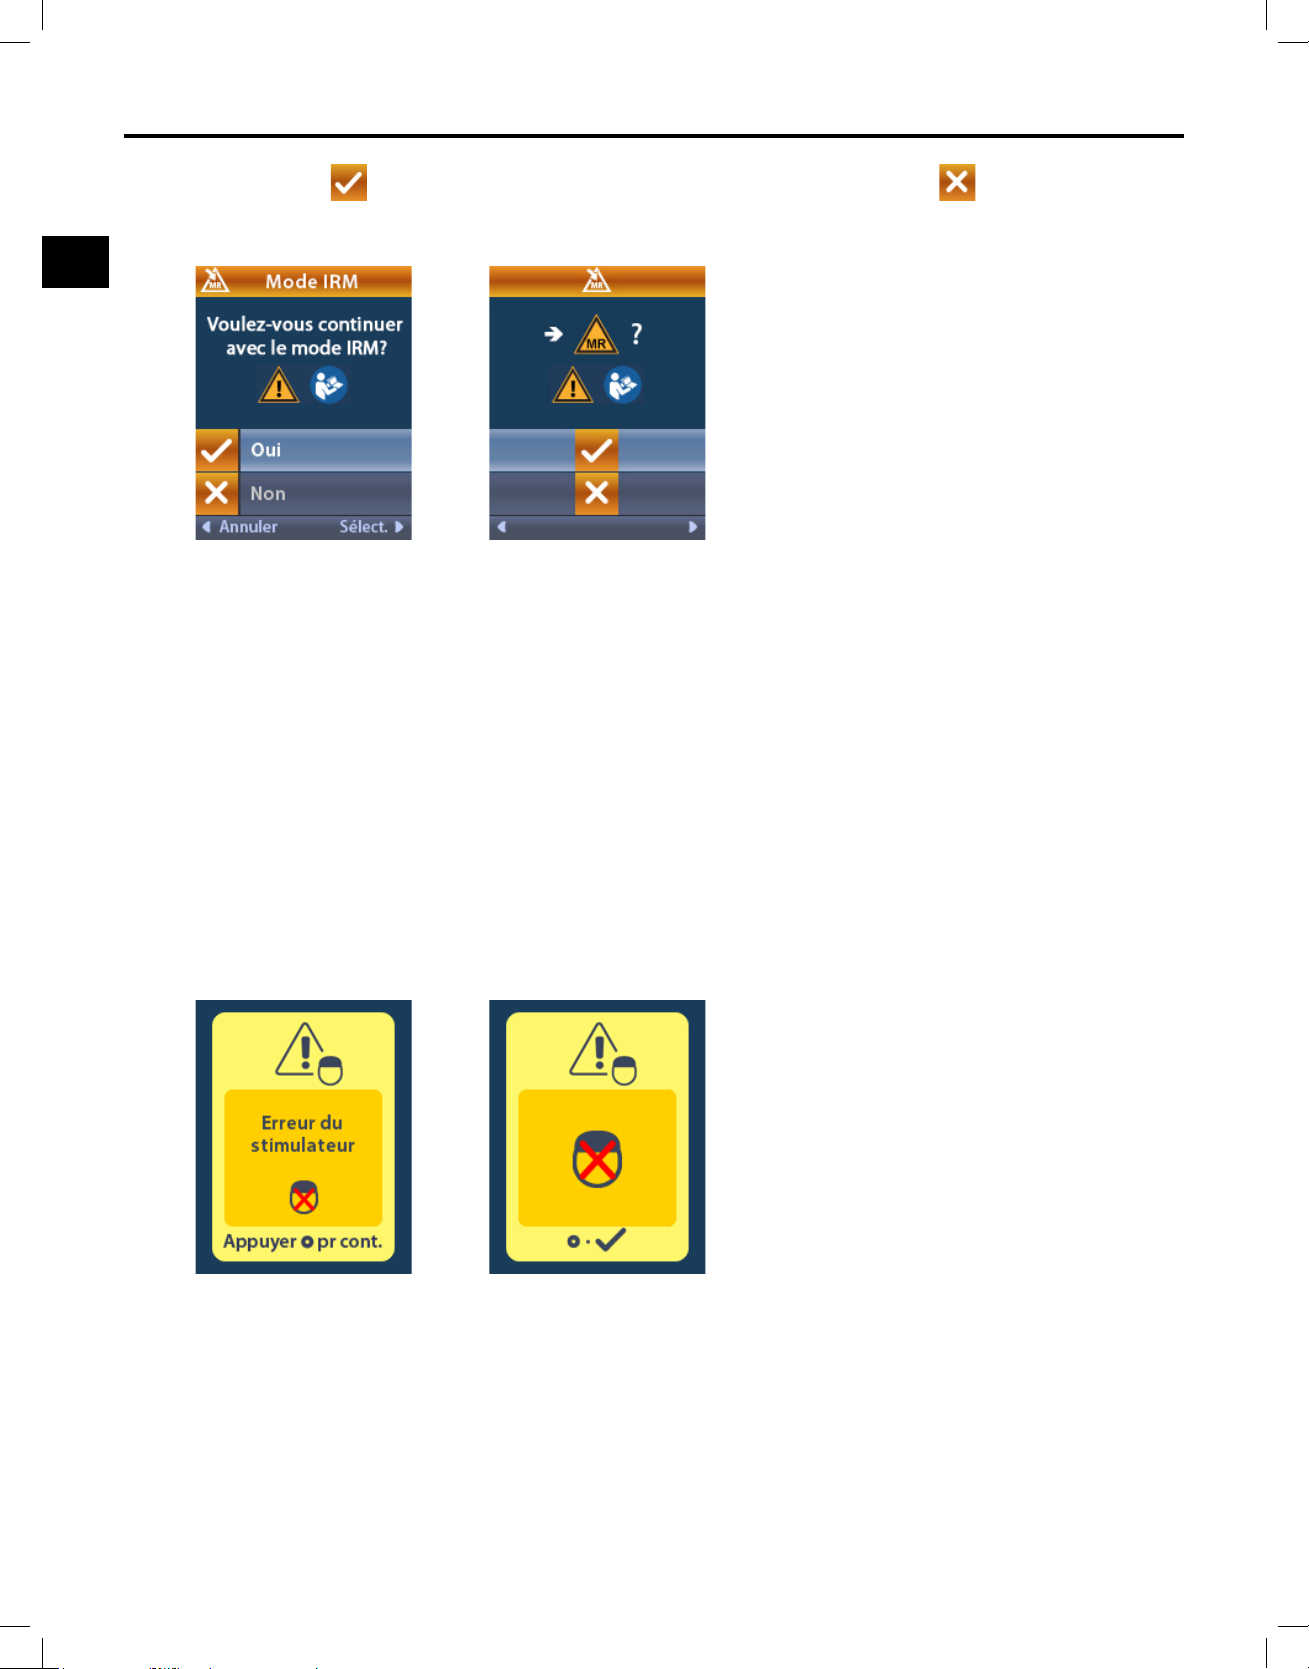
Mode d'emploi de la télécommande du médecin
fr
3.Sélectionner Yes(Oui)pourprocéderàl'activationdumodeIRMou No(Non)pour
annulerl'action.
Mise en garde : un examen d'IRM n'est pas recommandé lorsque les impédances ne sont pas
dans la plage acceptable. Des impédances supérieures ou inférieures à la normale peuvent
indiquer que l'intégrité des sondes du stimulateur est compromise. Effectuer un examen dans
ces conditions peut augmenter le risque d'effets indésirables potentiels qui sont énumérés
dans la section « Informations de sécurité » des directives d'examen du corps entier par IRM
ImageReady pour les systèmes WaveWriter Alpha et WaveWriter Alpha Prime SCS.
Écran Stimulator Error (Erreur du stimulateur)
Silavéricationdusystèmeéchoueenraisond’uneerreurdustimulateur,lemodeIRMn'estpas
activéetlatélécommandeafchel'écranStimulator Error(Erreurdustimulateur).Nepaseffectuer
d'examend’IRMsicetteerreurs’afche.Demanderau/àlapatient(e)decontacterleprofessionnelde
santéenchargedesonsystèmeouleservicetechniquedeBostonScientic.
Mode d’emploi de la télécommande du médecin
92395488-02 94 sur 1077
Page 99
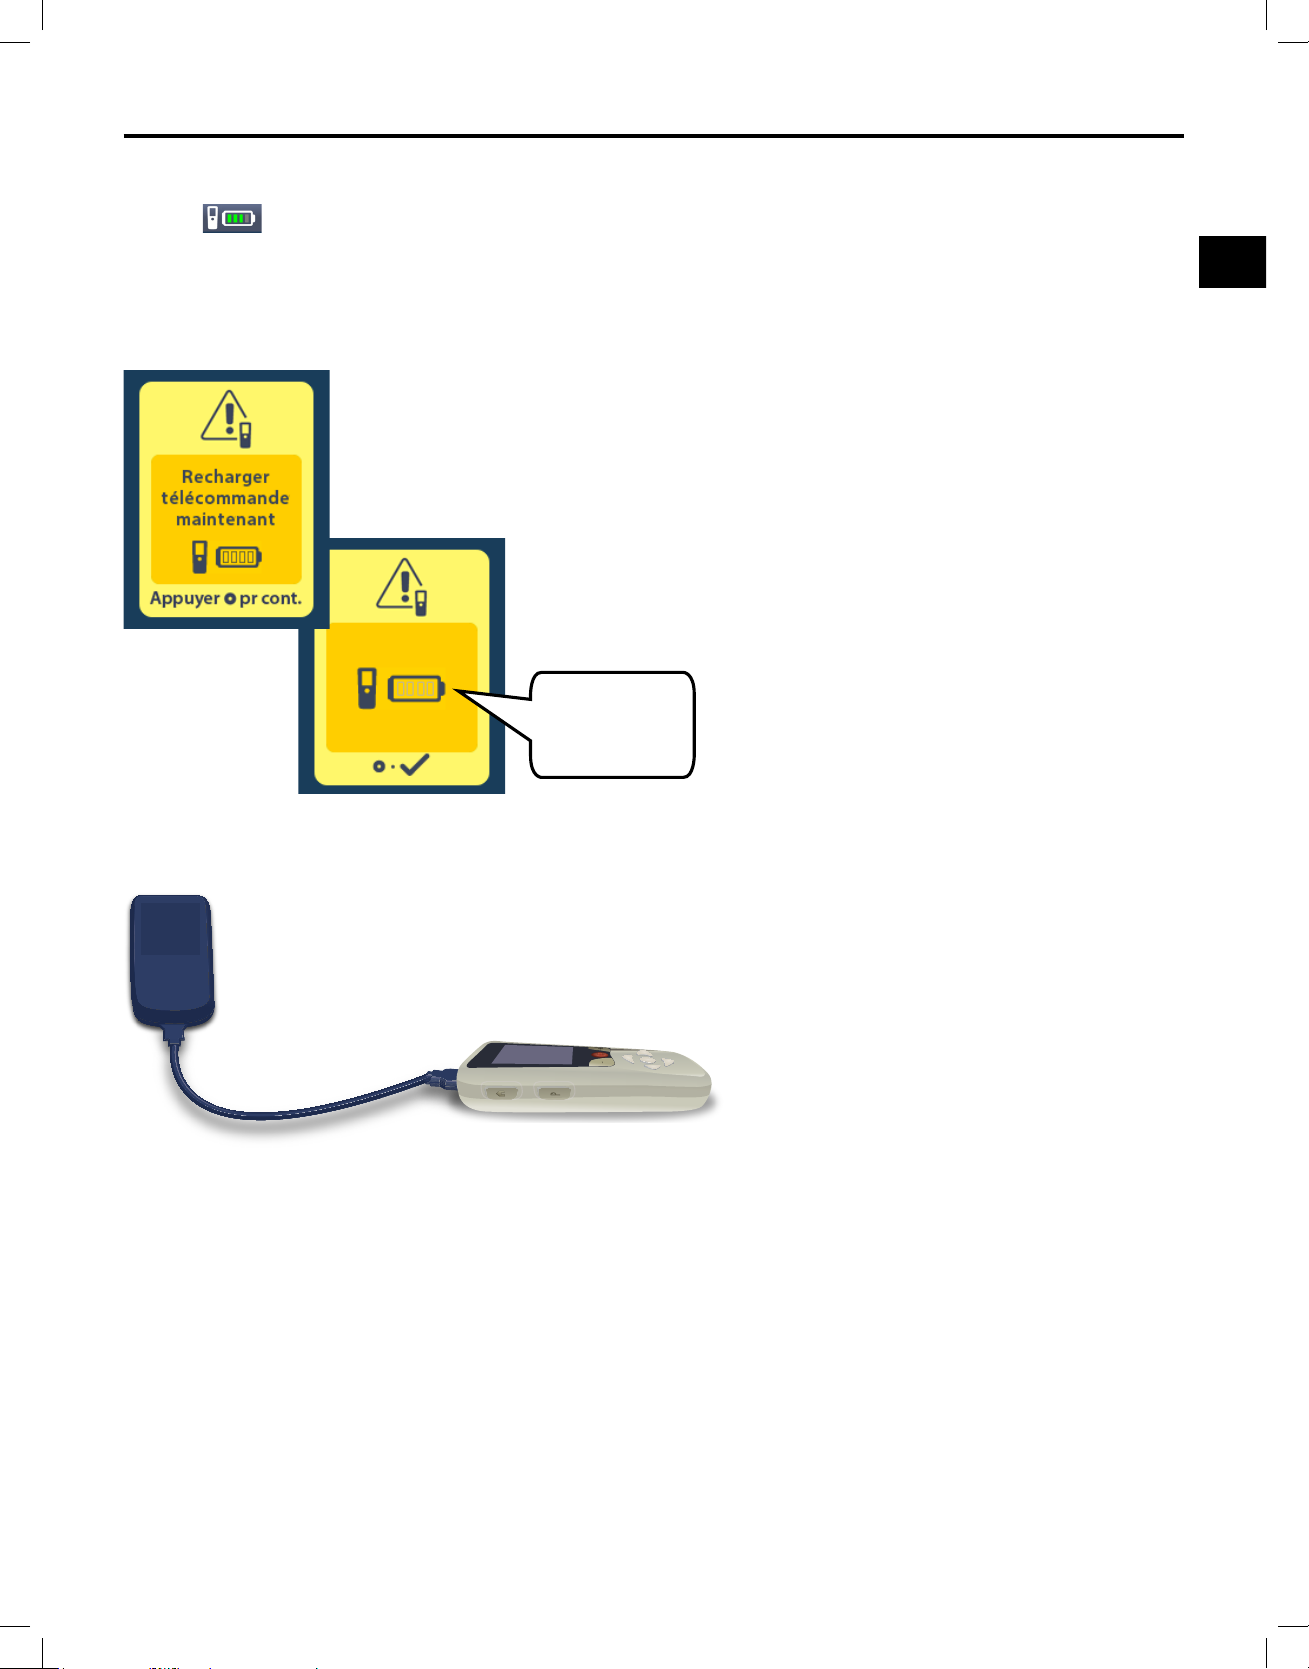
Recharge de la télécommande
fr
Recharge de la télécommande
L'icône enhautàgauchedel'écrand'accueilindiqueleniveaudechargedelabatteriedela
télécommande.
Latélécommandeafchedesmessagesrappelantderechargerlatélécommandeoulestimulateur si
lapuissancedelabatterieestfaible.
Rechargerla
télécommande
dès maintenant
Rechargerlabatteriedelatélécommandeenconnectantcelle-ciàl'alimentationUSBfournie.La
batteriedelatélécommandeauneduréedevienormalede400cyclesdecharge.
Mode d’emploi de la télécommande du médecin
92395488-02 95 sur 1077
Page 100
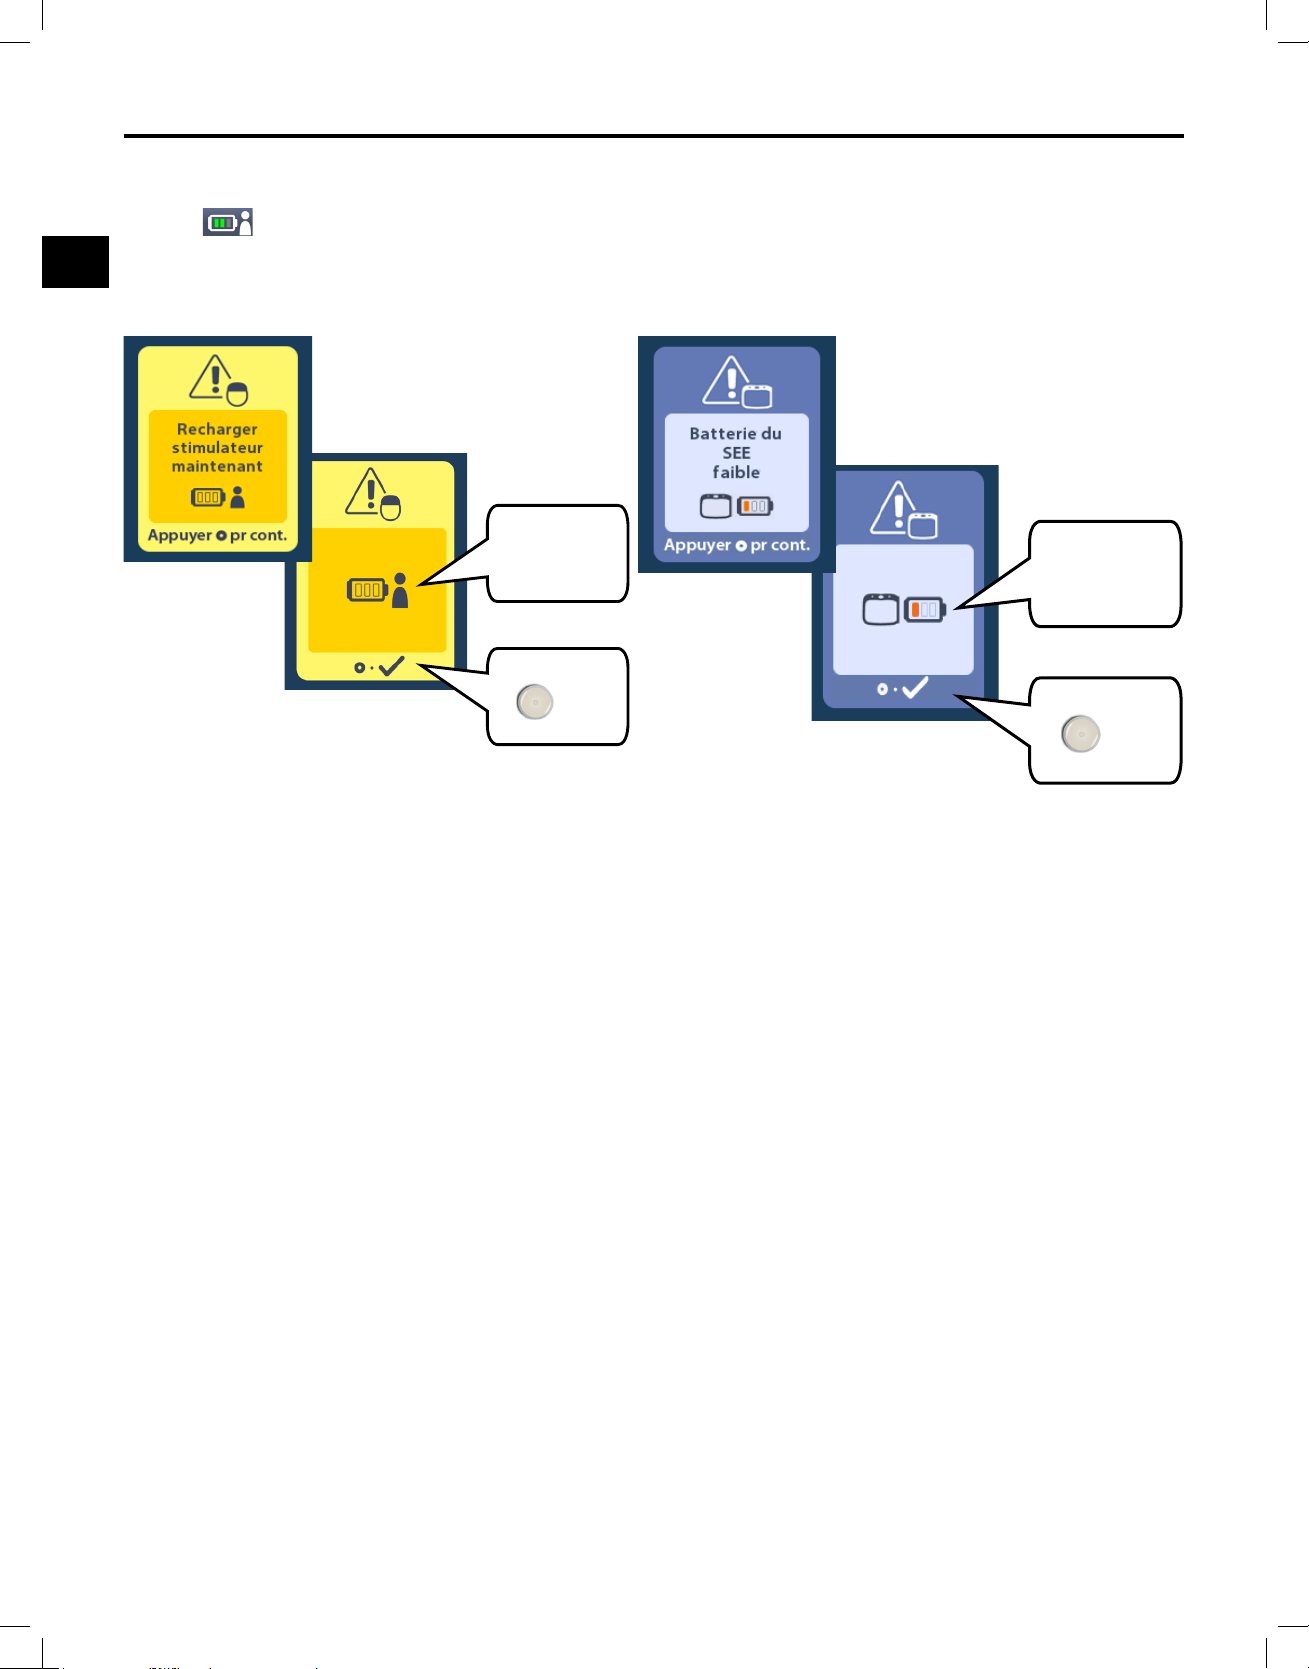
Mode d'emploi de la télécommande du médecin
fr
Stimulateur d'essai externe ou stimulateur rechargeable seulement
L'icône
enhautàdroitedel'écrand'accueilindiqueleniveaudechargedelabatterie du
stimulateur.Latélécommandeafchedesmessagespourrappelerderechargerlestimulateurlorsque
leniveaudechargedelabatterieestfaible.
Rechargerle
stimulateur dès
maintenant
Appuyer sur
pour
continuer.
Rechargerle
stimulateur dès
maintenant
Appuyer sur
pour
continuer.
Mode d’emploi de la télécommande du médecin
92395488-0296sur1077
 Loading...