

Page 1

XB6
XB8
Powered Subwoofer Featuring BassTrac
®
Page 2
Important Safety Instructions
This symbol found on the apparatus
indicates hazards arising from dangerous voltages.
This symbol found on the apparatus
indicates the user should read all safety
statements found in the user manual.
This symbol found on the apparatus
indicates double insulation.
1. Read these instructions.
2. Keep these instructions.
3. Heed all warnings.
4. Follow all instructions.
5. Do not use this apparatus near water.
6. Clean only with dry cloth.
7. Do not block any ventilation openings. Install
accordance with the manufacturer's instructions.
8.
9.
10.
11. Only use attachments/accessories specified by
12.
13.
Do not install near any heat sources such as radiators, heat registers, stoves, or other apparatus
(including amplifiers) that produce heat.
Do not defeat the safety purpose of the polarized
or grounding-type plug. A polarized plug has
two blades with one wider than the other.
A grounding type plug has two blades and a
third grounding prong. The wide blade or the
third prong are provided for your safety. If the
provided plug does not fit into your outlet,
consult an electrician for replacement of the
obsolete outlet.
Protect the power cord from being walked on
or pinched particularly at plugs, convenience
receptacles, and the point where they exit
fr
om the apparatus.
the manufacturer.
Unplug this apparatus during lightning stor
or when unused for long periods of time.
Refer all ser
Servicing is required when the apparatus has
been damaged in any way
ply cord or plug is damaged, liquid has been
vicing to qualified ser
vice personnel.
, such as power
ms
-sup-
Warning! To reduce the risk of fire or electric
shock, do not expose this apparatus to rain or
moisture.
This symbol found on the apparatus indicates that the apparatus must be placed in a
separate collection facility for electronic
waste and not disposed of with household
waste.
spilled or objects have fallen into the apparatus, the apparatus has been exposed to rain or
moisture, does not operate normally, or has
been dropped.
14. Maintain a minimum distance of 50 mm around
the front, rear and sides of the apparatus for
in
15. No naked flame sources, such as lighted
16. The apparatus shall not be exposed to drip-
17. Either the power inlet connector on the rear of
18. To completely disconnect this apparatus from
19. The mains plug of the power supply cor
sufficient ventilation. The ventilation should not
be impeded by covering the ventilation openings or placing on or around the apparatus
items such as newspapers, table-cloths, curtains, etc.
candles, should be placed on the apparatus.
ping or splashing. No objects filled with liquids, such as vases, shall be placed on the
apparatus.
the apparatus or the power plug at the wall
must remain accessible, to be able to disconnect power from the apparatus.
the AC Mains, disconnect the power supply
cor
d plug from the AC receptacle.
remain readily operable.
d shall
2
Page 3

Specifications*
XB8 XB6
Frequency Response (±3dB) 26–150Hz 29–150Hz
Subwoofer Amplifier Power 900 watts dynamic power output 625 watts dynamic power output
FTC Rated Power: 300 watts @ 50 Hz FTC Rated Power: 200 watts @ 50 Hz
into 4 ohms at less than 1% THD+N
Subwoofer Crossover 50–150Hz 50–150Hz
24dB/octave low-pass 24dB/octave low-pass
LFE Input Yes Yes
Crossover Bypass Yes Yes
Bass Unit 12" (305mm) DCD 12" (305mm) DCD
Enclosure Type Ported, Front Firing Ported, Front Firing
Dimensions (HxWxD) 13.75 x 15.55 x 16.42" 13.75 x 15.55 x 13.94"
(with feet and (350 x 395 x 417mm)
rear connectors)
into 4 ohms at less than 1% THD+N
(350 x 395 x 354mm)
Weight 31 lbs (14.1kg) 28 lbs (12.7kg)
*In keeping with our policy of continual product improvements, specifications are subject to change without notice.
Description
Boston’s XB6 and XB8 subwoofers deliver the dynamic bass foundation that is essential for lifelike reproduction of
movie soundtracks and music in the home. These attractive powered subwoofers will complement any stereo or
home theater sound system with their impressive bass output and compact size.
®
Both subwoofers utilize our rugged Deep Channel
engineering facility in Peabody, Massachusetts. Every one is tested as it comes off the line to be within ±1dB of the
lab reference unit, an incredibly tight tolerance. The amplifiers have built-in variable crossovers that allow them to
easily achieve a seamless blend with the main speakers, while a 24dB/octave lowpass filter pr
from being easily localized by ear, increasing placement flexibility. A crossover bypass function is provided for use
with home theater electr
Because of their high-power
essive deep bass and high output from remarkably compact enclosures. In addition, they feature BassTrac
impr
onics that perform their own bass management.
ed amplifiers and computer
a proprietary Boston-designed circuit that tracks the input signal to the subwoofer and prevents its amplifier from
being driven into audible distortion. The benefit: the bass stays clean and strong at any listening level.
Design (DCD) bass unit designed in Boston’s state-of-the-art
events the subwoofers
-optimized tunings, the XB6 and XB8 are capable of
®
,
Auto on-off amplifier switching and easily accessible controls make the XB6 and XB8 subwoofers as convenient to
use as they are exciting to listen to.
3
Page 4
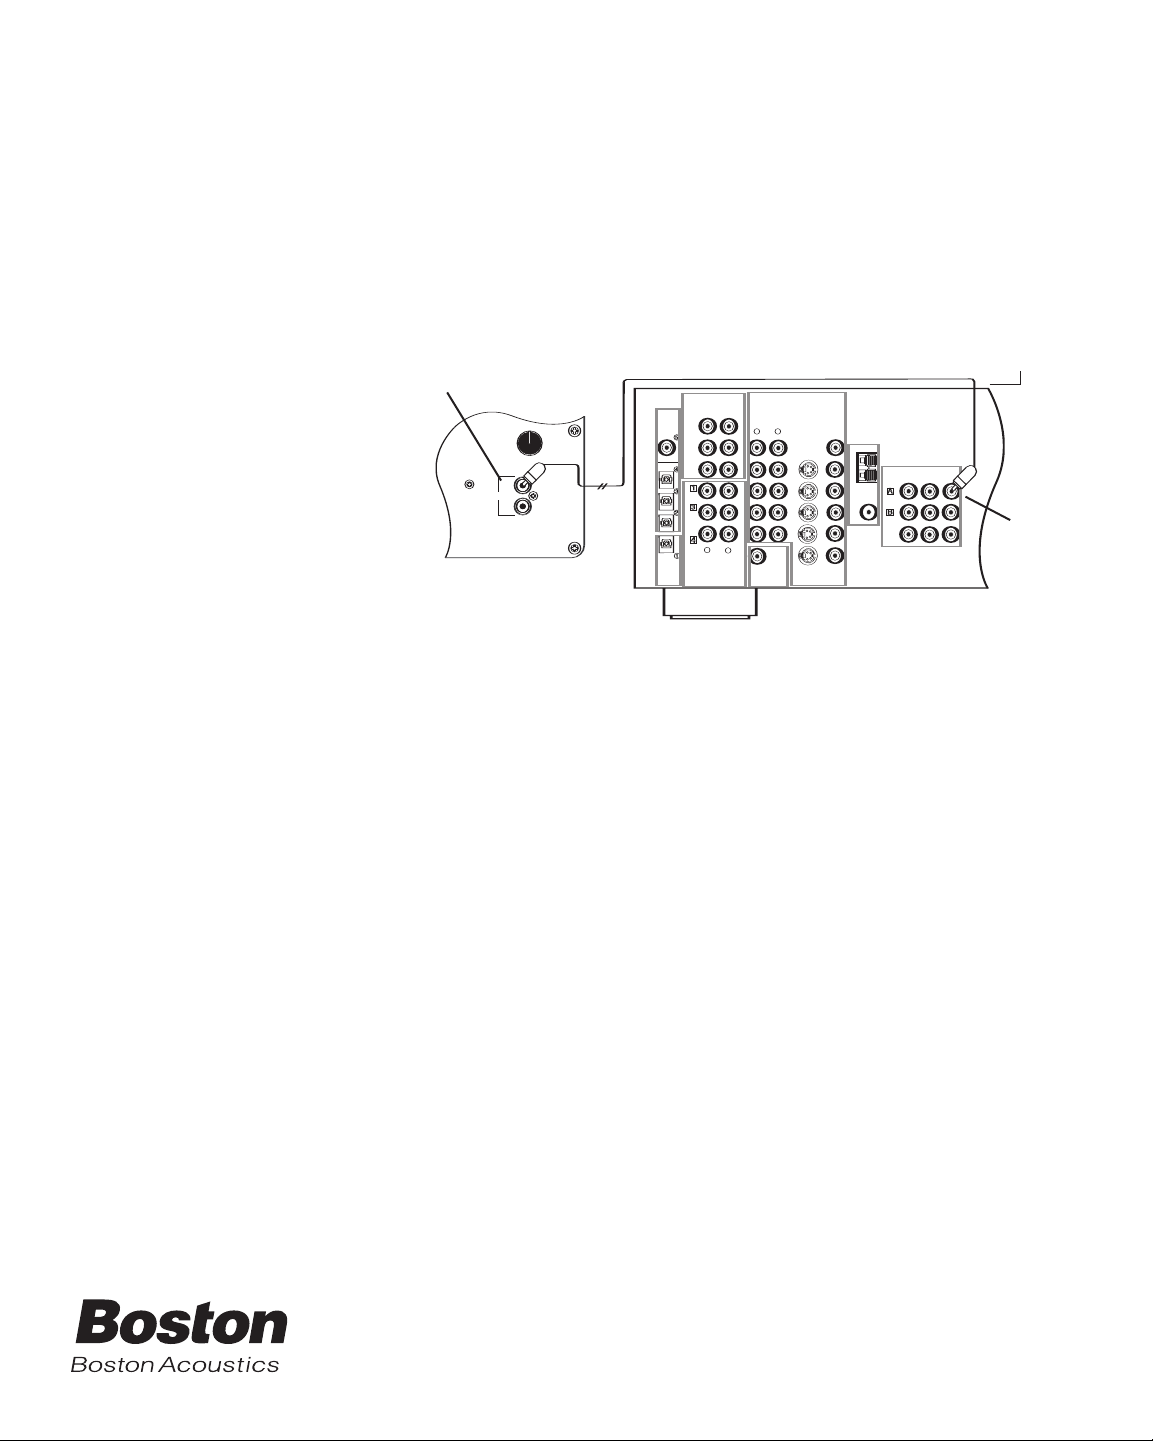
Connections
NOTE:
using the power toggle switch located in the lower left corner of the rear panel. The auto-on circuitry only activates or
deactivates the power amplifier. Make sure your subwoofer and receiver are unplugged when making the connection.
Line level: Use one of the “line level in” jacks with most systems. These inputs accept the line-level signal from
your receiver’s subwoofer output. When using the
out the high frequencies and sends the remaining low frequencies to the subwoofer power amplifier.
Speaker level:
accept both left and right channel speaker signals from your receiver. NOTE: Certain receivers use speaker grounding
circuits that may be incompatible with external powered audio products, such as powered subwoofers. When speaker
wire is used instead of line level cables, this incompatibility can sometimes result in an audible hum when the receiver
is turned off or switched to a different speaker channel. See page 8 for more information.
Power is always supplied to the subwoofer electronics unless it is unplugged or switched to the off position
“use crossover control” input, the subwoofer’s circuitry filters
Use these high-level terminals with receivers that do not have subwoofer output. The speaker inputs
How to Connect Using the Speaker Terminals
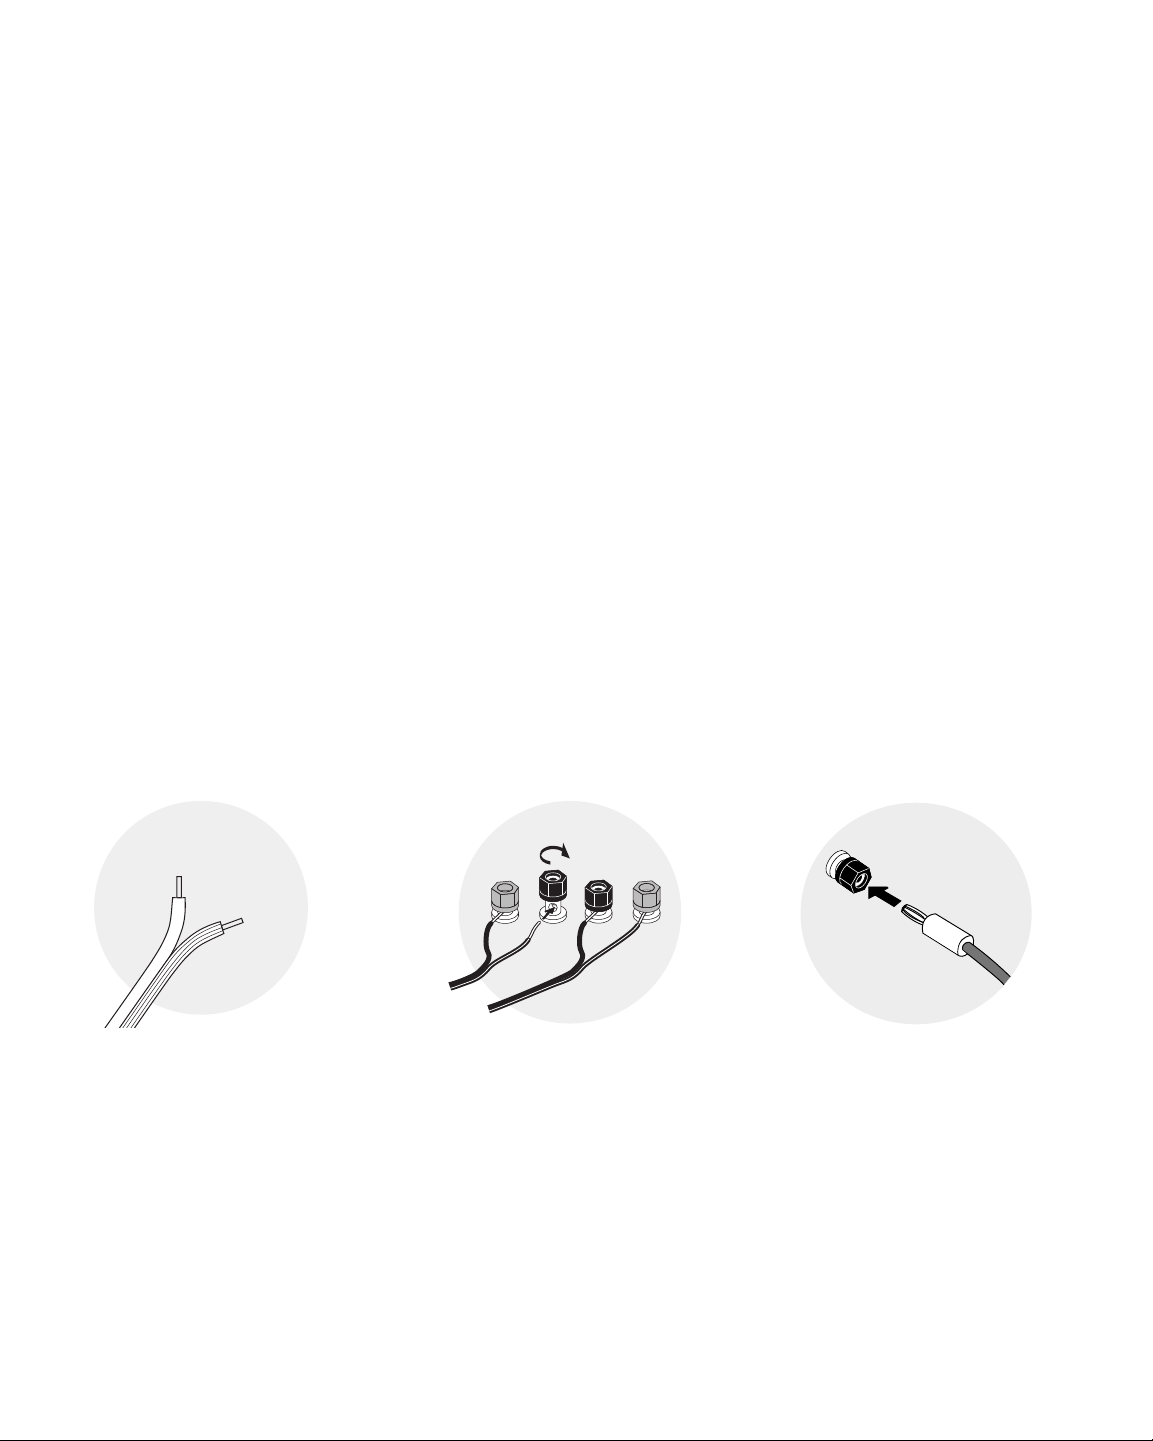
We recommend 18-gauge wire or thicker for runs up to 15 feet (4.5m), and 16-gauge wire or thicker for longer runs.
Separate the first few inches of the wire conductors. Strip off 1⁄2-inch (12mm) of insulation from the ends of each
speaker wire to expose the two conductors and tightly twist the wire strands.
WARNING:
the speaker
To prevent electrical shock hazard, always switch off the amplifier or receiver when making connections to
.
When making all connections, be sure to connect the + (red) on the speaker to the + (red) on the amplifier, and
the – (black) on the speaker to the – (black) on the amplifier.
–
+
IMPORTANT: Typically, one side
e is smooth. Connect this side
the wir
to the – (black) connection. The other
side has a rib or stripe. Connect this to
ed) connection.
+ (r
the
of
Using the five-way binding posts:
The binding posts permit easy connection to banana plugs, spade lugs, and
3
bare wire. Insert the wire in the hole (as shown on left) or a
over the post and tighten. For banana plugs, remove the red and black caps
from the end-holes and insert either dual or single banana plugs (as shown
on right).
/8-inch spade lug
Using this Manual – XB6 versus XB8
NOTE: The rear amplifier panels of the XB6 and the XB8 are virtually the same. Although the instructional images
on the following pages depict the XB6’s rear panel, the XB8 connects, functions and operates in exactly the same
manner.
4
Page 5
CAUTION: Disconnect supply cord
before replacing fuse. For continued
protection against risk of fire, replace only
with same type fuse.
ATTENTION: Debrancher avant de
remplacer le fusible. Utiliser un fusible de
rechange de même type.
* use crossover control: removes high
frequencies; use with sources lacking suitable
filtering (most products without Dolby Digital
or DTS), or where manual control is desired.
** bypass crossover control: direct to woofer;
use with sources having built-in crossover
controls or bass management (most products
with Dolby Digital or DTS).
T 2.5A L 250V
on
off
power
CAUTION
RISK OF ELECTRIC SHOCK
DO NOT OPEN
AVIS: RISQUE DE CHOC ELECTRIQUE-NE PAS OUVRIR
left right
speaker level in
50
80 120
150
crossover (Hz)
power indicator
0 º
180º
polarity
use
crossover
control *
bypass
crossover
control **
line level in
p
ower mode
on
auto
P
owered Subwoofer
Featuring BassTrac
®
XB6
Use only with a 250V fuse
Employer uniquement avec
un fusible de 250V
Use only with a 250V fuse
Employer uniquement avec
un fusible de 250V
RL RR
FRONT A
LL
SURROUNDFRONT B CENTER
SPEAKERSYSTEMS
FRONTA OR B, CENTER, SURR, SURR BACK
:MINIMUM
6OHMS
FRONTA AND B : MINIMUM 8 OHMS
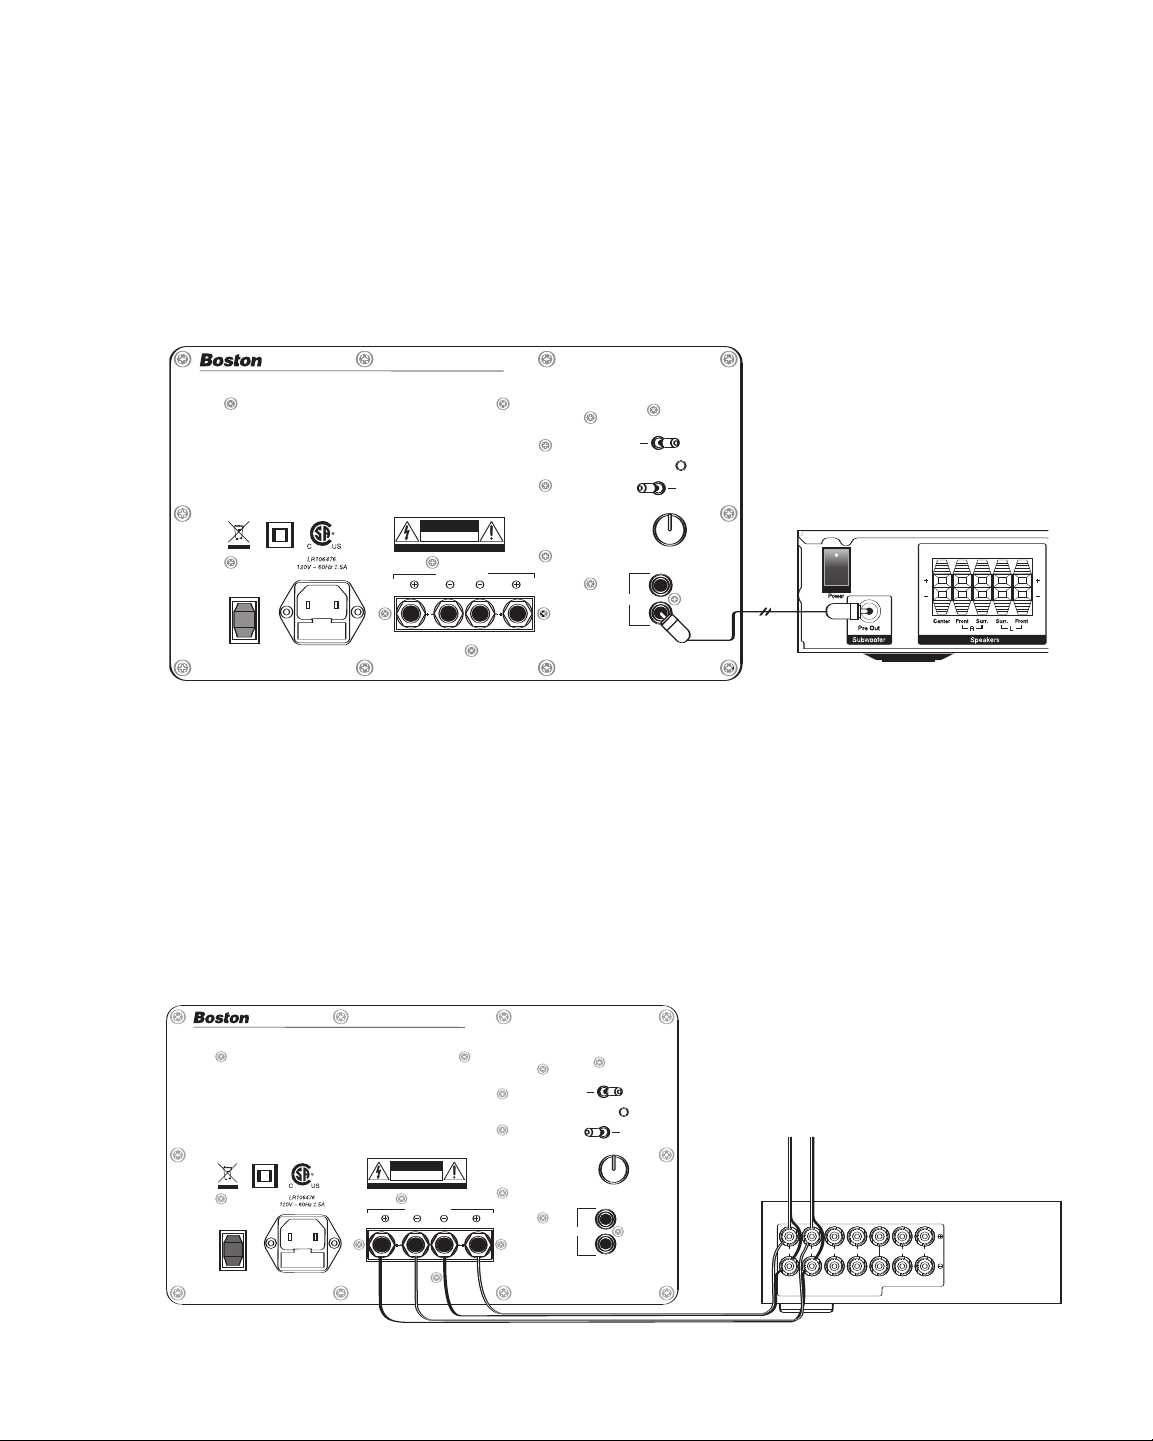
Connecting the Subwoofer to Digital Home Theater Systems
P
owered Subwoofer
Featuring BassTrac
®
XB6
CAUTION: Disconnect supply cord
before replacing fuse. For continued
protection against risk of fire, replace only
w
ith same type fuse.
ATTENTION: Debrancher avant de
remplacer le fusible. Utiliser un fusible de
rechange de même type.
*
use crossover control: removes high
frequencies; use with sources lacking suitable
f
iltering (most products without Dolby Digital
or DTS), or where manual control is desired.
** bypass crossover control: direct to woofer;
u
se with sources having built-in crossover
controls or bass management (most products
w
ith Dolby Digital or DTS).
on
o
ff
p
ower
CAUTION
RISK OF ELECTRIC SHOCK
DO NOT OPEN
A
VIS: RISQUE DE CHOC ELECTRIQUE-NE PAS OUVRIR
l
eft right
speaker level in
50
80 120
1
50
crossover (Hz)
power indicator
0 º
180º
polarity
u
se
crossover
control *
b
ypass
c
rossover
control **
l
ine level in
p
ower mode
on
auto
U
se only with a 250V fuse
Employer uniquement avec
un fusible de 250V
T
2.5A L 250V
Digital 5.1, 6.1 and 7.1 home theater electronics dedicate one channel (the “.1”) to reproduce the special low-frequency (LFE) information (such as explosions and thunder) contained in digitally-encoded soundtracks.
Select ”subwoofer-yes“ from your receiver’s set-up menu. Hooked up this way, the receiver’s amplifier is relieved
of having to reproduce the difficult low bass signals that can drive the receiver into audible distortion.
Use an RCA cable (not included), as shown, to connect your digital receiver’s subwoofer output to the subwoofer.
Connect the other end to the XB6 or XB8 jack labeled “bypass crossover control” underneath “line level in”.
back of receiver
subwoofer out
If you do not wish to run RCA cables to your subwoofer, you may use speaker wire to connect the subwoofer in parallel
with your main speakers (see diagram below). The subwoofer does not present any additional load to your receiver.
Select “subwoofer-no” from your receiver’s set-up menu. This sends the LFE signal to the main left and right speakers,
and thus, to the subwoofer. Consult your receiver’s owner’s manual for more details.
When using the speaker wire hookup, the subwoofer’s built-in crossover is engaged. As a starting point, set the crossover
control on the subwoofer about 10Hz higher than the lower limit of your main speakers’ bass response. Fine-tune the
crossover setting by ear for the smoothest blend with your main speakers. The best setting of the crossover control will
depend on speaker placement and personal preference.
Be sur
ed) and
(r
e to connect
– to – (black).
+ to +
5
speakers
right
front
left
to main speakers
back of receiver
Page 6
Powered Subwoofer
F
eaturing BassTrac
®
XB6
CAUTION: Disconnect supply cord
b
efore replacing fuse. For continued
p
rotection against risk of fire, replace only
w
ith same type fuse.
A
TTENTION: Debrancher avant de
r
emplacer le fusible. Utiliser un fusible de
r
echange de même type.
* use crossover control: removes high
frequencies; use with sources lacking suitable
f
iltering (most products without Dolby Digital
or DTS), or where manual control is desired.
** bypass crossover control: direct to woofer;
use with sources having built-in crossover
c
ontrols or bass management (most products
with Dolby Digital or DTS).
T 2.5A L 250V
on
off
p
ower
CAUTION
R
ISK OF ELECTRIC SHOCK
DO NOT OPEN
AVIS: RISQUE DE CHOC ELECTRIQUE-NE PAS OUVRIR
l
eft right
speaker level in
5
0
80 120
1
50
c
rossover (Hz)
p
ower indicator
0º
1
80º
p
olarity
u
se
c
rossover
c
ontrol *
b
ypass
crossover
c
ontrol **
l
ine level in
p
ower mode
on
a
uto
Use only with a 250V fuse
Employer uniquement avec
un fusible de 250V
Use only with a 250V fuse
Employer uniquement avec
un fusible de 250V
Connecting the Subwoofer to Stereo or Dolby®Pro Logic®Systems
50
80 120
150
crossover (Hz)
0 º
180 º
polarity
on
off
power
For stereo or Dolby Pro Logic systems, the easiest method is to use the same speaker wire connections as shown on page 5.
You may also use the “sub out” connection from your receiver to the input on the subwoofer marked “use crossover con-
trol.” When using speaker wire or the “use crossover control” input, the subwoofer’s built-in crossover is engaged. As a
starting point, set the crossover control on the subwoofer about 10Hz higher than the lower limit of your main speakers’
bass response (for Boston Acoustics front speakers, refer to the included “Optimal Crossover Settings…”sheet).
Fine-tune the crossover setting by ear for the smoothest blend with your main speakers. The best setting of the crossover
control will depend on speaker placement and personal preference.
back of receiver
Controls
Main power switch
Completely turns all
power to the amplifier
either
rides the
switch. This switch must
be turned on before
setting the power mode
switch (see next page).
on or offand over
power mode
Volume (on top panel)
Adjusts the sound level of
the subwoofer. A typical set-
-
ting is around 11 o’clock, as
shown.
ossover (Hz)
Cr
Adjusts the frequency of
the lowpass filter for the
subwoofer. This control is
inactive when using the
“bypass cr
input jack.
6
ossover contr
subwoofer out
Polarity (0° or 180°)
Selects r
egular (0°) or inverted
(180°) polarity for the subwoofer. Set this switch to provide the fullest, most dynamic
ol”
bass. The effect of phase will
be most audible on low-frequency per
cussion instr
or music with a continuously
epeating bass line.
r
uments
Page 7

M
E
N
U
/
E
N
T
E
R
I
N
P
U
T
S
E
L
E
C
T
D
O
W
N
U
P
L
E
F
T/
-
R
I
G
H
T/
+
/
E
X
I
T
V
O
L
U
M
E
PO
W
ER
/ST
A
N
DB
Y
on
auto
on
auto
Controls (Continued)
power indicator
off
on
auto
ower indicator:This two-
P
color power status light will be
red when the Power Mode
Switch is set to
any audio signal present) and
green when set to “on” mode.
“auto” (without
Power mode switch
ote:The Main Power Switch needs to be in the “on”position before this switch is
N
active.
Auto:
When set to this position, the subwoofer’s auto-on
circuitry turns the amplifier on when an audio signal is
presented (turning the
“power indicator” light green), and
turns it off in approximately 15 minutes if no signal is detected (turning the
“power indicator” red).
It will not light up at all until
the Main Power switch is set
“on” position.
to the
On: When set to this position, the subwoofer’s auto-on
circuitry is bypassed and the amplifier will remain on
whether an audio signal is present or not (the “power
indicator”
light stays green).
Placement
Place the subwoofer next to a wall or in a corner near your main speakers. Typically, the sound is best when the
subwoofer is within 15 feet (4.5m) of the main speakers. However, the sharp 24dB/octave crossover roll-off permits
placement farther from the main speakers if necessary. Since the ear is unable to localize the low frequencies of the
subwoofer, the bass still appears to come from the main speakers. In most cases, the subwoofer may be placed
anywhere in the listening room.
The level of bass output from the subwoofer will vary at different positions in a room. When placed near walls, its
loudness is emphasized. Corner placement provides the most bass output, while placement near only one wall will
provide somewhat less bass. Placement completely away from walls may produce too little bass. Regardless of how
you place the subwoofer, you can adjust the subwoofer’s level with its volume control. If you move the subwoofer,
recheck the setting of the polarity switch. Use the setting that yields the louder and more dynamic sound.
IMPORTANT: Do not place the subwoofer where there is a chance of contact between the rear panel and drapes or
furniture.
Position subwoofer
in corner for maximum
bass output
7
Page 8
If Speaker Wire Connections Cause the Subwoofer to Hum
50
80 120
150
crossover (Hz)
u
se
crossover
control *
bypass
crossover
control **
line level in
A
UDIO
AUDI
O
AUDIO
AUDIO
VIDEO
VIDEO
VIDEO
VIDEO
S VIDEO
S VIDEO
V
-AUX
V
-AUX
IN
IN
VCR
VCR
O
UT
O
UT
D-TV
D-TV
/CBL
/CBL
DVD
DVD
S
VIDEO
S
VIDEO
VIDEO
VIDEO
SUB
SUB
WOOFER
WOOFER
M
ONITOR OUT
M
ONITOR OUT
OUTPUT
OUTPUT
M
ONITOR
M
ONITOR
O
UT
O
UT
D
-TV
D
-TV
/CBL
/CBL
DVD
DVD
C
D
C
D
F
M
F
M
ANT
ANT
IN
IN
(PLAY)
(PLAY)
M
D
M
D
/
CD-R
/
CD-R
O
UT
O
UT
(REC)
(REC)
7575ΩΩ
U
NBAL.
U
NBAL.
TUNER
TUNER
C
OMPONENT VIDEO
C
OMPONENT VIDEO
DIGITAL
DIGITAL
OUTPUT
OUTPUT
DIGITAL
DIGITAL
I
NPUT
I
NPUT
6 CH INPUT
6 CH INPUT
CD
CD
COAXIAL
COAXIAL
R
R
L
L
R
R
L
L
M
AIN
M
AIN
S
UB
S
UB
WOOFER
WOOFER
D
VD
D
VD
M
D/CD-R
M
D/CD-R
M
D/CD-R
M
D/CD-R
OPTICAL
OPTICAL
O
PTICAL
O
PTICAL
D-TV/CBL
D-TV/CBL
Y
Y
P
P
B
B
/
C
/
C
B
B
P
P
R
R
/C
/C
R
R
S
URROUNDSURROUND
C
ENTER
C
ENTER
AM
AM
A
NT
A
NT
GND
GND
Certain receivers use speaker grounding circuits that may be incompatible with external powered audio products, such as
powered subwoofers. When speaker wire is used instead of line level cables, this incompatibility can result in an audible
hum when the receiver is turned off or switched to a different speaker channel.
If this should happen with your Boston Acoustics subwoofer, you will need to make a ground cable and connect it to either
RCA line input on the subwoofer and any unused RCA line input or output on your receiver (see diagram). The proper
ground cable for this application should consist of two male RCA plugs that have their negative outside terminals (or
"sleeve") connected to each other by any length of single conductor copper cable. The inside positive (or "pin")
terminals should not be wired in either plug.
If you do not wish to make your own
use either RCA jack
single conductor (-) RCA to (-) RCA ground cable
grounding cable, please contact the
Boston Acoustics Customer Service
Department directly (see below) and we
will promptly ship one to you of suitable
length at no charge
.
back of subwoofer
back of receiver
use any
available
RCA jack
If Service Seems Necessary
First, contact the dealer from whom you purchased the XB6 or XB8. If that is not possible, write to:
Customer Service
Boston Acoustics, Inc.
300 Jubilee Drive
Or visit our web site at:
www.bostonacoustics.com
Or email us at:
custserv@bostona.com
Peabody, MA 01960 U.S.A.
We will promptly advise you of what action to take. If it is necessary to return your unit to the factory, please ship
it prepaid. After it has been repaired, we will return it freight prepaid in the U.S. and Canada.
Limited Warranty
For one year from the date of purchase, Boston Acoustics will repair for the original owner any defect in materials
or workmanship that occurs in nor
our responsibilities are to use the system according to the instructions supplied, to provide safe and secure
Y
transpor
tation to an authorized Boston Acoustics ser
form of your sales slip when requesting service.
Excluded from this warranty is damage that results from abuse, misuse, improper installation, accidents, shipping, or
epairs/modifications by anyone other than an authorized Boston Acoustics service representative. This warranty is
r
limited to the Boston Acoustics pr
does not cover the cost of removal or reinstallation.
This warranty is void if the serial number has been removed or defaced.
This warranty gives you specific legal rights, and you may also have other rights which vary from state to state.
mal use of the subwoofer, without charge for parts and labor.
epresentative, and to present proof of purchase in the
vice r
oduct and does not cover damage to any associated equipment. This war
300 Jubilee Drive
Peabody, MA 01960 U.S.A.
978.538.5000
www.bostonacoustics.com
BassTrac, Boston, Boston Acoustics, Deep Channel are registered trademarks of
Boston Acoustics, Inc. Dolby and Pro Logic are registered trademarks of Dolby
Laboratories Licensing Corporation.
© 2006 Boston Acoustics, Inc. All rights reserved.
Specifications subject to change without notice.
ranty
142-002501-0
Page 9

XB6
XB8
Subwoofer amplificado con BassTrac
®
Page 10

Instrucciones de seguridad
importantes
La presencia de este símbolo en el aparato indica riesgos derivados de voltajes
peligrosos.
La presencia de este símbolo en el aparato
indica que el usuario debe leer todas las
directrices de seguridad del manual de
usuario.
La presencia de este símbolo en el aparato
indica un aislamiento doble.
1. Lea estas instrucciones.
2. Guarde estas instrucciones.
3. Respete todas las advertencias.
4. Siga todas las instrucciones.
5. No utilice este aparato cerca del agua.
6. Límpielo solamente con un paño seco.
7. No bloquee ninguna de las aberturas de ventilación.
siguiendo las instrucciones del fabricante.
o con conexión a tierra. Los enchufes
tomacorriente y del punto por el que
menta
8.
9.
10.
11.
12.
Instálelo
No lo instale en las proximidades de fuentes de calor,
tales como radiadores, rejillas de calefacción, estufas u
otros aparatos (incluyendo amplificadores) que produzcan calor.
No soslaye el propósito de seguridad del enchufe
polarizado
polarizados tienen dos clavijas, una más ancha que
la otra. Los enchufes con conexión a tierra tienen
dos clavijas planas y una tercera de conexión a tierra. La clavija plana ancha o la tercera clavija se proporcionan para mantener su seguridad. Consulte a
un electricista para que reemplace y actualice el
tomacorriente si el enchufe que se incluye no encaja en él.
Proteja el cable para que no pueda pisarse
ni estrangularse, en particular a la altura de los
enchufes, del
sale del aparato.
Use solamente aditamentos/accesorios especi
ficados por el fabricante.
Desenchufe este aparato cuando haya tor
eléctrica o cuando no vaya a utilizarse por largos
períodos de tiempo.
Advertencia! Para reducir el riesgo de incendios o
descargas eléctricas, este aparato no se debe
exponer a la lluvia o a la humedad.
La presencia de este símbolo indica que el aparato debe depositarse en un recipiente de recolección reservado a los desechos electrónicos y que
no debe desecharse con los residuos domésticos.
13.
14. Mantenga una distancia mínima de 50 mm alrededor
15. No coloque sobre el aparato velas encendidas
16. El aparato no debe estar expuesto a salpicaduras ni
17. El conector de entrada de alimentación de la parte
18. Para desconectar completamente el aparato de la
-
19
Confíe la reparación a personal técnico cualificado.
necesario reparar el aparato si ha sufrido cualquier
tipo de daño; por ejemplo, si se ha dañado el cable
de alimentación o el enchufe, si se ha derramado
líquido o han caído objetos dentro del aparato, si
éste estuvo expuesto a la lluvia o a la humedad, si
no funciona normalmente o si se cayó.
de la parte frontal, trasera y lateral del aparato para
proporcionar suficiente ventilación. No obstaculice la
circulación de aire por su interior cubriendo las aberturas de ventilación o colocando sobre el aparato o
alrededor objetos como periódicos, manteles, cortinas u otros objetos.
u otros objetos con llamas desprotegidas.
goteos. No se deben colocar objetos llenos con
líquidos, como jarrones, sobre el aparato.
trasera del aparato o el enchufe de alimentación
deben permanecer siempre accesibles, para poder
desconectar la alimentación del aparato.
red eléctrica CA, desconecte el enchufe del cable de
alimentación del receptáculo CA.
El enchufe del cable que se conecta al suministr
corriente de la red debe poderse utilizar pronta y
fácilmente.
Es
o de
2
Page 11

Especificaciones*
XB8 XB6
R
espuesta de frecuencia
(±3 dB) 26-150 Hz 29–150 Hz
Potencia del amplificador
del subwoofer
Crossover (Separador
de frecuencias) del subwoofer
Entrada LFE Sí Sí
Derivación del separador
de frecuencias Sí Sí
Unidad de graves 305 mm (12 in.) DCD 305 mm (12 in.) DCD
Tipo de carcasa Con puertos, activación frontal Con puertos, Activación frontal
Salida de potencia dinámica de 900 vatios Salida de potencia dinámica de 625 vatios
P
otencia FTC nominal: 300 vatios a 50 Hz Potencia FTC nominal: 200 vatios a 50 Hz
en 4 ohmios a menos de 1% THD+N
50–150 Hz 50–150 Hz
24 dB/octava (paso bajo) 24 dB/octava (paso bajo)
en 4 ohmios a menos de 1% THD+N
Dimensiones
(alt x anch x long) 350 x 395 x 417 mm
(con patas y (13.75 x 15.55 x 16.42 in.) (13.75 x 15.55 x 13.94 in.)
conexiones traseras)
Peso 14,1 kg. (31 lbs) 12,7 kg (28 lbs)
*Manteniendo nuestra política de continua mejora del producto, las especificaciones están sujetas a cambio sin previo aviso.
350 x 395 x 354 mm
Descripción
Los subwoofer XB6 y XB8 de Boston ofrecen la base de graves dinámica esencial para la reproducción de bandas sonoras de
películas y música en casa con los sonidos más reales. Estos atractivos subwoofers amplificados complementarán cualquier
equipo de sonido estéreo o de cine en casa con su impresionante salida de graves y su tamaño compacto.
®
Ambos subwoofers utilizan nuestra resistente unidad de graves Deep Channel
ingeniería avanzada de Boston situadas en Peabody, Massachusetts (EE.UU.). Todas las unidades se prueban al terminar su montaje para garantizar que se encuentran a ±1 dB de la unidad de referencia de laboratorio, una tolerancia increíblemente estricta.
Los amplificador
es disponen de un separador de frecuencias variable integrado que facilita una per
altavoces principales, mientras que un filtro de paso bajo de 24 dB/octava evita que el oído pueda localizar el subwoofer con facilidad, aumentando así la flexibilidad de ubicación. También se incluye una función de derivación del separador de frecuencias para
su uso con equipos electrónicos de cine en casa que realicen su propia gestión de graves.
Debido a sus potentes amplificador
es y al ajuste optimizado por or
denador, los XB6 y XB8 son capaces de ofrecer una impresionante salida de agudos y graves profundos desde un dispositivo increíblemente compacto. Además, incluyen BassTrac
circuito patentado diseñado por Boston que realiza un seguimiento de la señal de entrada al subwoofer y evita que el amplificador produzca una distorsión audible. La ventaja: graves limpios y potentes en cualquier nivel de audición.
Design (DCD), diseñada en las instalaciones de
fecta combinación con los
®
, un
La conmutación automática de encendido y apagado del amplificador y unos controles de fácil acceso hacen que los subwoofers
XB6 y XB6 resulten tan cómodo de usar como emocionante de escuchar.
3
Page 12

Conexiones
NOTA:
u
dido automático solamente activa o desactiva el amplificador de potencia. Asegúrese de que el subwoofer y el receptor están dese
Nivel de línea: utilice una de las tomas “line level in” (Entrada nivel de línea) con la mayoría de los sistemas. Estas entradas
admiten la señal de nivel de línea procedentes de la salida del subwoofer del receptor. Al utilizar la entrada
trol”
cuencias bajas al amplificador de potencia del subwoofer.
Nivel de altavoz:
altavoz admiten señales de altavoz de canal izquierdo y derecho procedentes del receptor.
cuitos de toma de tierra de altavoz que pueden ser incompatibles con productos de sonido amplificados externos, como por ejemplo, subwoofers amplificados. Cuando se utiliza cable de altavoz en lugar de cables de nivel de línea, esta incompatibilidad puede,
ocasionalmente, causar un zumbido audible cuando el receptor esté apagado o conectado en un canal de altavoz diferente. Véase
la página 8 para más información.
los sistemas electrónicos del subwoofer reciben alimentación en todo momento, a menos que se desenchufe o se apague
tilizando el conmutador de alimentación situado en la esquina inferior izquierda del panel trasero. El sistema de circuitos de encen-
nchufados cuando realice la conexión.
“use crossover con-
(Usar control separador de frecuencias), los circuitos del subwoofer filtran las frecuencias altas y envían el resto de fre-
utilice estos terminales de alto nivel con receptores que no tengan una salida de subwoofer. Las entradas de
NOTA: algunos receptores utilizan cir-
Conexión mediante los terminales de altavoz
Para longitudes de hasta 4,5 m (15 ft.) se recomienda un cable de calibre 18 y un calibre 16 o superior para longitudes mayores. Separe los primeros centímetros de los conductores del cable. Retire 12 mm (
cable de cada altavoz para exponer los dos conductores y tuerza fuertemente los hilos del cable.
ADVERTENCIA:
iones con el altavoz
para evitar riesgos de descarga eléctrica, apague siempre el amplificador o el receptor cuando realice las conex-
.
1
⁄2in.) de aislante de ambos extremos del
Al realizar todas las conexiones, asegúrese de conectar el terminal
– (negro) del altavoz con el – (negro) del amplificador.
+ (rojo) del altavoz con el + (rojo) del amplificador y el
–
+
ANTE:
T
IMPOR
lado
del cable es liso. Conecte este lado
en la conexión
senta una marca o estría. Conéctelo en la
conexión + (roja).
– (negra). El otro lado pr
egla general, un
por r
Uso de bornes de conexión de cinco vías:
conexión con clavijas tipo banana, pernos de pala y cables pelados. Inserte el cable
-
e
en el orificio (como se muestra a la izquierda) o un terminal de pala de
borne de conexión y apriételo. Para terminales tipo banana, retire las cubiertas roja
y negra de los orificios finales e inserte los terminales tipo banana sencillos o dobles
(como se muestra a la derecha).
los bornes de conexión facilitan la
3
/8 in. en el
Uso de este manual – XB6 en comparación con XB8
NOTA:los paneles traser
ciones de las páginas siguientes muestran el panel trasero del XB6, el XB8 se conecta, funciona y se utiliza exactamente de la
misma manera.
os del amplificador del XB6 y el XB8 son prácticamente iguales. Aunque las imágenes de las instr
uc-
4
Page 13

CAUTION: Disconnect supply cord
before replacing fuse. For continued
protection against risk of fire, replace only
with same type fuse.
ATTENTION: Debrancher avant de
remplacer le fusible. Utiliser un fusible de
rechange de même type.
* use crossover control: removes high
frequencies; use with sources lacking suitable
filtering (most products without Dolby Digital
or DTS), or where manual control is desired.
** bypass crossover control: direct to woofer;
use with sources having built-in crossover
controls or bass management (most products
with Dolby Digital or DTS).
T 2.5A L 250V
on
off
power
CAUTION
RISK OF ELECTRIC SHOCK
DO NOT OPEN
AVIS: RISQUE DE CHOC ELECTRIQUE-NE PAS OUVRIR
left right
speaker level in
50
80 120
150
crossover (Hz)
power indicator
0 º
180º
polarity
use
crossover
control *
bypass
crossover
control **
line level in
power mode
on
auto
Powered Subwoofer
Featuring BassTrac
®
XB6
Use only with a 250V fuse
Employer uniquement avec
un fusible de 250V
Use only with a 250V fuse
Employer uniquement avec
un fusible de 250V
RL RR
FRONT A
LL
SURROUNDFRONT B CENTER
SPEAKERSYSTEMS
FRONTA OR B, CENTER, SURR, SURR BACK
:MINIMUM
6OHMS
FRONTA AND B : MINIMUM 8 OHMS
Conexión del subwoofer a sistemas digitales de cine en casa
Powered Subwoofer
Featuring BassTrac
®
XB6
CAUTION: Disconnect supply cord
before replacing fuse. For continued
protection against risk of fire, replace only
w
ith same type fuse.
ATTENTION: Debrancher avant de
remplacer le fusible. Utiliser un fusible de
rechange de même type.
*
use crossover control: removes high
f
requencies; use with sources lacking suitable
f
iltering (most products without Dolby Digital
or DTS), or where manual control is desired.
** bypass crossover control: direct to woofer;
use with sources having built-in crossover
controls or bass management (most products
with Dolby Digital or DTS).
o
n
o
ff
p
ower
CAUTION
RISK OF ELECTRIC SHOCK
DO NOT OPEN
AVIS: RISQUE DE CHOC ELECTRIQUE-NE PAS OUVRIR
l
eft right
speaker level in
50
8
0 120
1
50
crossover (Hz)
power indicator
0 º
180º
polarity
u
se
crossover
control *
b
ypass
c
rossover
c
ontrol **
l
ine level in
p
ower mode
on
auto
U
se only with a 250V fuse
E
mployer uniquement avec
un fusible de 250V
T 2.5A L 250V
Los equipos electrónicos de cine en casa 5.1, 6.1 y 7.1 tienen un canal (el “.1”) reservado para la reproducción de la información de baja
recuencia (low-frequency, LFE) especial (por ejemplo, explosiones y truenos) de las pistas de audio codificadas digitalmente.
f
Seleccione la opción de activación del subwoofer del menú de configuración del receptor. Al conectarse de esta manera, el amplificador
el receptor deja de reproducir las difíciles señales de los graves bajos que pueden hacer que el receptor genere distorsiones audibles.
d
Utilice un cable RCA (no incluido), como se muestra, para conectar la salida del subwoofer del receptor digital al subwoofer. Conecte el
otro extremo a la toma del XB6 o XB8 identificada como
debajo de
(Entrada nivel de línea).
“bypass crossover control” (Control de derivación de separador de frecuencias)
parte posterior del receptor
salida del subwoofer
Si no desea conectar cables RCA al subwoofer, puede utilizar un cable de altavoz para conectar el subwoofer en paralelo con los altavoces principales (véase el siguiente diagrama). El subwoofer no presenta ninguna carga adicional para el receptor.
Seleccione la opción de desactivación del subwoofer en el menú de configuración del receptor. Esto envía la señal LFE a los altavoces principales izquierdo y derecho, y por lo tanto, al subwoofer. Consulte el manual de usuario del receptor para obtener una información más detallada.
Al utilizar la conexión de los cables de altavoz se activa el separador de frecuencias integrado en el subwoofer. En primer lugar, establezca el control del separador de frecuencias del subwoofer aproximadamente 10 Hz por encima del límite mínimo de respuesta de graves
de los altavoces principales. Ajuste la configuración del separador de frecuencias escuchando hasta obtener la mejor combinación con
los altavoces principales. La configuración del control del separador de frecuencias más adecuada dependerá de la ubicación de los
altavoces y sus preferencias personales.
Asegúrese de conectar + a +
ojo) y
(r
– a – (negr
o
).
5
altavoces
frontales
derecha
a altavoces
izquierda
principales
parte posterior del receptor
Page 14

Powered Subwoofer
F
eaturing BassTrac
®
XB6
CAUTION: Disconnect supply cord
b
efore replacing fuse. For continued
p
rotection against risk of fire, replace only
w
ith same type fuse.
A
TTENTION: Debrancher avant de
r
emplacer le fusible. Utiliser un fusible de
r
echange de même type.
* use crossover control: removes high
frequencies; use with sources lacking suitable
f
iltering (most products without Dolby Digital
or DTS), or where manual control is desired.
** bypass crossover control: direct to woofer;
use with sources having built-in crossover
c
ontrols or bass management (most products
with Dolby Digital or DTS).
T 2.5A L 250V
on
off
p
ower
CAUTION
R
ISK OF ELECTRIC SHOCK
DO NOT OPEN
AVIS: RISQUE DE CHOC ELECTRIQUE-NE PAS OUVRIR
l
eft right
speaker level in
5
0
80 120
1
50
c
rossover (Hz)
p
ower indicator
0º
1
80º
p
olarity
u
se
c
rossover
c
ontrol *
b
ypass
crossover
c
ontrol **
l
ine level in
p
ower mode
on
a
uto
Use only with a 250V fuse
Employer uniquement avec
un fusible de 250V
Use only with a 250V fuse
Employer uniquement avec
un fusible de 250V
Conexión del subwoofer a sistemas estéreo o Dolby®Pro Logic
50
80 120
150
crossover (Hz)
0 º
180 º
polarity
on
off
power
®
Para sistemas estéreo o Dolby Pro Logic, el método más sencillo consiste en utilizar las mismas conexiones del cable de altavoz que se muestran
en la página 5. También se puede usar la conexión de salida de subwoofer del receptor hasta la entrada del subwoofer marcada como
rossover control” (Usar control separador de frecuencias).
c
uando se utiliza el cable de altavoz o la entrada “use crossover control”(Usar control
C
“use
separador de frecuencias), se activa el separador de frecuencias integrado del subwoofer. En primer lugar, establezca el control del separador
de frecuencias del subwoofer aproximadamente 10 Hz por encima del límite mínimo de respuesta de graves de los altavoces principales (para
altavoces frontales de Boston Acoustics, consulte la información incluida sobre la configuración óptima del separador de frecuencias).
Ajuste la configuración del separador de frecuencias escuchando hasta obtener la mejor combinación con los altavoces principales. La
configuración del control del separador de frecuencias más adecuada dependerá de la ubicación de los altavoces y sus preferencias personales.
parte posterior del
receptor
Controles
Interruptor de alimentación
principal
Enciende o apaga la ali
mentación del amplificador
por completo e ignora el interruptor de
de alimentación). Este interruptor se debe establecer en la
posición
de establecer el inter
power mode (Modo de
alimentación) (véase la página
siguiente).
power mode (Modo
on (Encendido) antes
uptor
r
Volume (Volumen)
(en el panel superior)
-
Ajusta el nivel de sonido del
subwoofer. En general, se considera correcta una posición cercana a las 11 en punto, tal y
como se muestra.
Cr
ossover (Separador
de frecuencias) (Hz):
Ajusta la frecuencia del filtro de
paso bajo del subwoofer. Este
control permanece inactivo
cuando se utiliza la entrada
“bypass cr
(Control de derivación del separador de fr
6
ossover contr
ecuencias).
salida del subwoofer
Polarity (Polaridad) (0° o 180°):
Selecciona la polaridad normal (0°)
o invertida (180°) para el subwoofer. Configure este conmutador para proporcionar los graves
más completos y dinámicos. El
ol”
efecto de la fase será más audible
con instrumentos de percusión de
ecuencia o música con una
baja fr
línea de graves de repetición continua.
Page 15

M
E
N
U
/
E
N
T
E
R
I
N
P
U
T
S
E
L
E
C
T
D
O
W
N
U
P
L
E
F
T/
-
R
I
G
H
T/
+
/
E
X
I
T
V
O
L
U
M
E
PO
W
ER
/ST
A
N
DB
Y
on
auto
on
auto
Controles (Continuación)
power indicator
off
on
auto
Interruptor de modo de alimentación
Power indicator (Indicador de encendido): esta luz de estado de encendido
de dos colores se iluminará en rojo
cuando el interruptor de modo de
encendido esté en la posición “auto”
(Automático) (sin ninguna señal de
udio presente) y verde cuando se
a
encuentre en modo
“on” (Encendido).
No se iluminará hasta que el interruptor de encendido principal se
encuentre en la posición “on”
(Encendido).
Nota: el interruptor de encendido principal debe estar en la posición de encendido para que este interruptor esté activado.
Auto (Automático):
cuando se encuentre en esta posición, el sistema de
circuitos de encendido automático del subwoofer activará el amplificador
cuando haya presente una señal de audio (encendiendo la luz verde de
“power indicator” (Indicador de encendido)), y lo desactivará si transcurren
aproximadamente 15 minutos sin detectar ninguna señal (la luz de
“power
indicator” (Indicador de encendido) cambiará a rojo).
On (Encendido):
cuando se encuentra en esta posición, el circuito de
encendido automático del subwoofer se derivará y el amplificador permanecerá encendido independientemente de que hay presente una
señal de audio (la luz “power indicator” (Indicador de encendido) permanecerá verde.
Ubicación
Coloque el subwoofer junto a una pared o en una esquina cerca de los altavoces principales. Por lo general, el sonido será mejor cuando el subwoofer se encuentre a 4,5 m (15 pies) de los altavoces principales. Sin embargo, la configuración equilibrada del separador de frecuencias de 24
dB/octava permite una ubicación más alejada de los altavoces principales en caso necesario. Dado que el oído no puede localizar las bajas frecuencias del subwoofer, sigue pareciendo que los graves provienen de los altavoces principales. En la mayoría de los casos, el subwoofer puede
colocarse en cualquier lugar de la sala donde se desee escuchar.
El nivel de salida de graves del subwoofer puede variar dependiendo de su posición en una habitación. Si se coloca cerca de las paredes, los
graves se refuerzan. La ubicación en una esquina proporciona la mayor salida de graves, mientras que si se coloca cerca de una sola pared se
obtiene un sonido ligeramente menos grave. Si se coloca totalmente alejado de las paredes, es posible que se obtenga unos graves demasiado
escasos. Independientemente de cómo coloque el subwoofer, puede ajustar su nivel con el control de volumen. Si desplaza el subwoofer, vuelva a revisar la configuración del conmutador de polaridad. Utilice la configuración que proporciona el sonido más potente y dinámico.
IMPORTANTE: no coloque el subwoofer en un lugar donde haya posibilidad de contacto entre el panel trasero y telas o muebles.
Coloque el subwoofer
en un esquina para obtener
la salida máxima de graves
7
Page 16

Si la conexión de cable de altavoz hace que el subwoofer
50
80 120
150
crossover (Hz)
u
se
crossover
control*
bypass
crossover
control**
linelevel in
A
UDIO
AUDI
O
AUDIO
AUDIO
VIDEO
VIDEO
VIDEO
VIDEO
SVIDEO
S VIDEO
V
-AUX
V
-AUX
IN
IN
VCR
VCR
O
UT
O
UT
D-TV
D-TV
/CBL
/CBL
DVD
DVD
S
VIDEO
S
VIDEO
VIDEO
VIDEO
SUB
SUB
WOOFER
WOOFER
M
ONITOR OUT
M
ONITOR OUT
OUTPUT
OUTPUT
M
ONITOR
M
ONITOR
O
UT
O
UT
D
-TV
D
-TV
/CBL
/CBL
DVD
DVD
C
D
C
D
F
M
F
M
ANT
ANT
IN
IN
(PLAY)
(PLAY)
M
D
M
D
/
CD-R
/
CD-R
O
UT
O
UT
(REC)
(REC)
7575Ω
Ω
U
NBAL.
U
NBAL.
TUNER
TUNER
C
OMPONENT VIDEO
C
OMPONENT VIDEO
DIGITAL
DIGITAL
OUTPUT
OUTPUT
DIGITAL
DIGITAL
I
NPUT
I
NPUT
6CH INPUT
6 CH INPUT
CD
CD
COAXIAL
COAXIAL
R
R
L
L
R
R
L
L
M
AIN
M
AIN
S
UB
S
UB
WOOFER
WOOFER
D
VD
D
VD
M
D/CD-R
M
D/CD-R
M
D/CD-R
M
D/CD-R
OPTICAL
OPTICAL
O
PTICAL
O
PTICAL
D-TV/CBL
D-TV/CBL
Y
Y
P
P
B
B
/
C
/
C
B
B
P
P
R
R
/C
/C
R
R
S
URROUNDSURROUND
C
ENTER
C
ENTER
AM
AM
A
NT
A
NT
GND
GND
emita un zumbido
Algunos receptores utilizan circuitos de toma de tierra de altavoz que pueden ser incompatibles con productos de sonido amplificados
xternos, como por ejemplo, subwoofers amplificados. Cuando se utiliza cable de altavoz en lugar de cables de nivel de línea, esta
e
incompatibilidad puede causar un zumbido audible cuando el receptor esté apagado o conectado en un canal de altavoz diferente.
Si ocurre esto con el Subwoofer de Boston Acoustics, debe fabricar un cable de toma de tierra y conectarlo a
RCA del subwoofer y cualquier entrada o salida de línea RCA
do para esta aplicación debe constar de dos enchufes RCA con sus terminales exteriores
sin usar del receptor (véase el diagrama). El cable de toma de tierra adecua-
negativos (o “manguitos”) conectados entre sí por
cualquier entrada de línea
un cable simple de cobre conductor. Los terminales internos positivos (o “bornes”) no deben conectarse en ninguno de los terminales.
Si no desea crear su propio cable de toma
utilizar cualquier toma RCA
conductor sencillo (-) RCA a cable de toma a tierra (-) RCA
a tierra, póngase en contacto directamente con Boston Acoustics Customer Service
Department (véase a continuación) y recibirá
inmediatamente uno de la longitud que necesite de forma gratuita.
parte posterior del subwoofer
parte posterior del receptor
utilizar
cualquier
toma RCA
disponible
Procedimiento en caso de reparación
En primer lugar, póngase en contacto con el distribuidor del que adquirió el XB6 o XB8. Si no es posible, escriba a:
Customer Service
Boston Acoustics, Inc.
300 Jubilee Drive
Peabody, MA 01960 EE.UU.
O bien, visite nuestro sitio Web en:
www.bostonacoustics.com
O bien, envíenos un mensaje de
correo electrónico a:
custserv@bostona.com
Le aconsejaremos inmediatamente sobre las medidas que debe tomar. Si resulta necesario devolver la unidad a la fábrica,
remítala con los portes pagados. Una vez reparada, se devolverá con los portes pagados en EE.UU. y Canadá.
Garantía limitada
A partir de la fecha de compra, Boston Acoustics reparará para el propietario original cualquier defecto de material o mano de
obra derivado del uso normal del subwoofer, sin coste por piezas o mano de obra.
Es responsabilidad del usuario utilizar el sistema de acuerdo con las instrucciones facilitadas, proporcionar
un transpor
ueba al solicitar una reparación.
pr
te seguro hasta un centr
Quedan excluidos de esta garantía los daños causados por abuso, mala utilización, accidentes, envío o reparaciones o modificaciones r
garantía está limitada al pr
tía no cubr
Esta garantía quedará anulada si el número de serie se ha eliminado o deformado.
Esta garantía le confiere derechos legales específicos, además de los que pueda tener en función de su lugar de residencia.
ealizadas por cualquier persona que no sea un representante del servicio técnico autorizado por Boston Acoustics. Esta
oducto de Boston Acoustics y no cubr
e el coste de r
ecogida o r
o de reparación autorizado de Boston Acoustics y presentar el recibo de compra como
e los daños causados a cualquier equipo asociado. Esta garan
einstalación.
300 Jubilee Drive
Peabody
978.538.5000
www
, MA 01960 EE.UU.
.bostonacoustics.com
BassTrac, Boston, Boston Acoustics y Deep Channel son marcas registradas de
Boston Acoustics, Inc. Dolby y Pro Logic son marcas registradas de Dolby
Laboratories Licensing Corporation.
© 2006 Boston Acoustics, Inc. Reservados todos los derechos.
Las especificaciones están sujetas a cambio sin previo aviso.
-
142-002501-0
Page 17

XB6
XB8
Caisson de graves doté de la technologie BassTrac
®
Page 18

Consignes importantes en
matière de sécurité
Ce symbole figurant sur l’appareil
indique des risques associés à des tensions dangereuses.
Ce symbole figurant sur l’appareil invite
l’utilisateur à lire tous les messages de
sécurité contenus dans ce manuel.
Ce symbole figurant sur l’appareil
indique une double isolation.
1. Lire les instructions suivantes.
2. Conserver ce document.
3. Respecter tous les avertissements.
4. Suivre toutes les instructions.
5. Ne pas utiliser cet équipement près d’un point
d’eau.
6. Nettoyer uniquement avec un chiffon sec.
7. Ne pas bloquer les orifices d’aération. Procéder à l’installation
8.
9.
10.
11. N’utiliser que des périphériques et des accessoires
12. Débrancher l’appareil en cas d’orage ou lorsqu’il
Ne pas installer près d’une source de chaleur, telle que
des radiateurs, des registres de chaleur, des fours ou
d’autres appareils (y compris des amplificateurs) qui
produisent de la chaleur.
Ne pas neutraliser la sécurité de la prise de terre
polarisée. Une prise polarisée comporte deux plots,
un plus large que l’autre. Une prise de terre est composée de deux plots et d’une broche de mise à la
terre. Le plot le plus large ou la troisième broche
sont fournis pour la sécurité de l’opérateur. Si la prise
fournie ne rentre pas dans la prise secteur, faire
appel à un électricien afin qu’il remplace cette
dernière, devenue obsolète.
Éviter de piétiner ou pincer le cordon d’alimentation,
particulièrement au niveau de la fiche, des
tiples et aux points de sortie de l’appareil.
spécifiés par le fabricant.
n’est pas utilisé pendant une période pr
conformément aux instructions du fabricant.
ou
prises mul-
olongée.
Avertissement! Afin de réduire le risque
d’incendie et de choc électrique, ne pas
exposer cet appareil à la pluie ou à l’humidité.
Ce symbole placé sur l’appareil indique que
celui-ci doit être recyclé séparément dans un
centre de collecte d’appareils électroniques
et non pas éliminé dans les ordures
ménagères.
13.
14. Maintenir une distance minimum de 50 mm par rap-
15. Ne pas placer de sources de flammes nues, telles
16. Ne pas exposer l’appareil à un suintement ou à des
17. Le connecteur d’alimentation à l’arrière de l’appareil
18. Pour déconnecter totalement l’alimentation secteur
19. La prise secteur doit être disponible à tout moment
Confier tous les travaux d’entretien à un personnel
qualifié.
subi des dommages, tels que de l’endommagement
du cordon d’alimentation ou de la prise, lorsque du
liquide a été renversé ou que des objets sont
tombés dans l’appareil, en cas d’exposition aux
intempéries et à l’humidité, en cas d’anomalie de
fonctionnement ou de chute de l’appareil.
port à l’avant, l’arrière et les côtés de l’appareil pour
assurer une ventilation suffisante. Pour assurer une
ventilation adéquate, ne pas obstruer les évents de
ventilation ou l’appareil avec des objets tels que des
journaux, des nappes, des rideaux, etc.
que des bougies allumées, sur l’appareil.
éclaboussures. Les objets remplis de liquides, tels
que des vases, ne doivent pas être placés sur l’appareil.
ou la prise murale d’alimentation doit demeurer
accessible, afin de pouvoir couper l’alimentation de
l’appareil.
de l’appareil, débrancher la fiche d’alimentation électrique de la prise c.a.
pour le cor
Un entretien est requis lorsque l’appareil a
don d'alimentation.
2
Page 19

Caractéristiques*
XB8 XB6
Réponse en fréquence (±3 dB) 26–150 Hz 29–150 Hz
Puissance d’amplification du Puissance dynamique de sortie de 900 W Puissance dynamique de sortie de 625 W
caisson de graves
Répartiteur de caisson de graves 50–150Hz 50–150 Hz
Entrée LFE
(effet basses fréquences) Oui Oui
Dérivation
opérée par le répar
Unités de basses 305 mm (12 in.) DCD 305 mm (12 in.) DCD
Type d’enceinte Contre-résonnant, bombardement avant Contre-résonnant, bombardement avant
Dimensions (HxLxP) 350 x 395 x 417 mm 350 x 395 x 354mm
(avec pieds et connecteurs arrière) (13.75 x 15.55 x 16.42 in.) (13.75 x 15.55 x 13.94 in.)
Poids 14,1 kg (31 lbs) 12,7 kg (28 lbs)
*Conformément avec notre stratégie d’amélioration continue des produits, les spécifications sont sujettes à modifications sans préavis.
titeur
Puissance nominale FTC : 300 W à 50 Hz
4 ohms à moins de 1 % THD+N
filtre passe-bas 24 dB/octave filtre passe-bas 24 dB/octave
Oui
,
Puissance nominale FTC : 200 W à 50 Hz
4
ohms à moins de 1 % THD+N
Oui
,
Description
Les caissons de graves XB6 et XB8 de Boston offrent des basses dynamiques indispensables à une reproduction fidèle de bandes sonores et de musique chez soi. Grâce à la puissance de ses basses et à son aspect compact, cet élégant caisson de graves
constitue le complément idéal de tout système home-cinéma ou hi-fi.
®
Ces deux caissons de graves dotés de notre système de basses Deep Channel
bureau d’études à la pointe du progrès de Peabody, dans le Massachussetts. Chaque unité a fait l’objet d’un test à la sortie de
l’usine pour vérifier que sa puissance n’affichait pas de variation de plus d’1 dB par rapport aux spécifications du laboratoire, une
tolérance extrêmement faible. Les amplificateurs sont dotés d’un répar
monie parfaite avec les hauts-parleurs principaux, tandis qu’un filtre passe-bas de 24 dB/octave empêche les caissons de graves
d’être facilement identifiés à l’oreille, offrant ainsi davantage d’options de positionnement. Une fonction de dérivation du répartiteur est proposée pour les éléments électroniques d’un système home-cinéma capables d’autogérer leurs basses.
En raison de la puissance de leur amplificateur et de leur syntonisation optimisée par or
mettent d’obtenir des basses profondes ainsi qu’une puissance de sortie impressionnante à partir d’une enceinte exceptionnellement compacte. Par ailleurs, elles sont munies de la technologie BassTrac
le signal d’entrée jusqu’au caisson de graves et empêche son amplificateur d’être affecté par une distorsion sonore. L’intérêt
? Les basses restent nettes et profondes à presque tout niveau d’écoute.
Grâce à la mise en marche/arrêt automatique de l’amplificateur et à l’aspect accessible des commandes, les caissons de graves
XB6 et XB8 s’imposent en tant que produits faciles à utiliser et agréables à écouter.
3
Design (DCD) ultra-robuste a été conçu dans notre
titeur variable intégré qui facilite la réalisation d’une har-
dinateur
®
, un circuit breveté conçu par Boston qui suit
, les unités XB6 et XB8 per-
Page 20

Connexions
REMARQUE :
’interrupteur à bascule situé dans l’angle inférieur gauche du panneau arrière. Les circuits de mise en marche automatique ont pour seule
l
fonction d’activer ou de désactiver l’amplificateur de puissance. Bien débrancher le caisson de graves et le récepteur avant de réaliser
ne connexion.
u
Niveau de ligne : Utiliser des prises jack marquées « line level in » (entrée de ligne) sur la plupart des systèmes. Ces prises reçoivent
le signal de niveau de ligne provenant de la sortie du caisson de graves du récepteur. Les circuits du caisson de graves filtrent les
fréquences et envoient les basses fréquences restantes à l’amplificateur de puissance du caisson lors de l’utilisation de l’entrée
use crossover control » (utiliser la commande du répartiteur).
«
Niveau du haut-parleur :
du haut-parleur reçoivent les signaux des canaux droit et gauche du haut-parleur provenant du récepteur.
teurs utilisent des circuits de mise à la masse pouvant s’avérer incompatibles avec des produits audio externes tels que des caissons de
graves. Lorsque le fil de raccordement du haut-parleur est utilisé à la place de câbles de niveau de ligne, cette incompatibilité peut parfois entraîner un ronflement sonore lorsque le récepteur est éteint ou commuté sur un autre canal du haut-parleur. Pour plus d’informations, voir page 8.
Le caisson de graves est alimenté en permanence, sauf s’il est débranché ou mis en position désactivée (off) à l’aide de
Utiliser les bornes de niveau élevé avec des récepteurs non dotés de sortie de caisson de graves. Les prises
REMARQUE : Certains récep-
Connexion à l’aide des bornes du haut-parleur
Nous recommandons un fil de calibre 18 minimum pour des longueurs de 4,5 m (15 ft) et de calibre 16 minimum pour des
longueurs supérieures. Séparer les premiers centimètres des conducteurs de fils. Dénuder l’isolant sur 12 mm (1/2-inch) en partant des extrémités de chaque fil du haut-parleur afin d’exposer les deux conducteurs et de torsader les brins de fil en les serrant
bien.
AVERTISSEMENT :
de connexions sur le haut-parleur
Afin d’éviter tout risque de choc électrique, toujours éteindre l’amplificateur ou le récepteur lors de la réalisation
.
Veiller à connecter la borne
à la borne
- (noire) de l’amplificateur.
+ (rouge) du haut-parleur à la borne + (rouge) de l’amplificateur, et la borne - (noire) du haut-parleur
–
+
IMPOR
côtés
du fil est lisse. Connecter ce côté à la
– (noire). Connecter l’autr
borne
doté d’une nervure ou d’une bande, à la
borne – (noire).
Généralement, un des
e côté,
À l’aide des bornes de connexion à cinq conducteurs :
xion permettent une connexion facile aux fiches banane, aux cosses à fourches et aux
fils nus aériens. Insérer le fil dans le trou (comme indiqué à gauche) ou une cosse à
3
fourche de
déposer les capuchons rouge et noir des trous d’extrémité et insérer des fiches
banane simples ou doubles (comme indiqué à droite).
/8 pouce sur la borne et serrer. En ce qui concerne les fiches banane,
Les bornes de conne-
ANT :
T
Utilisation du manuel : comparaison XB6 - XB8
e des unités XB6 et XB8 sont quasiment identiques. Bien que les images
REMARQUE : Les panneaux de l’amplificateur ar
didactiques des pages suivantes illustrent le panneau arrière de l’unité XB6, l’unité XB8 se connecte et fonctionne exactement
de la même manièr
e.
rièr
4
Page 21

CAUTION: Disconnect supply cord
before replacing fuse. For continued
protection against risk of fire, replace only
with same type fuse.
ATTENTION: Debrancher avant de
remplacer le fusible. Utiliser un fusible de
rechange de même type.
* use crossover control: removes high
frequencies; use with sources lacking suitable
filtering (most products without Dolby Digital
or DTS), or where manual control is desired.
** bypass crossover control: direct to woofer;
use with sources having built-in crossover
controls or bass management (most products
with Dolby Digital or DTS).
T 2.5A L 250V
on
off
power
CAUTION
RISK OF ELECTRIC SHOCK
DO NOT OPEN
AVIS: RISQUE DE CHOC ELECTRIQUE-NE PAS OUVRIR
left right
speaker level in
50
80 120
150
crossover (Hz)
power indicator
0 º
180º
polarity
use
crossover
control *
bypass
crossover
control **
line level in
p
ower mode
on
auto
P
owered Subwoofer
Featuring BassTrac
®
XB6
Use only with a 250V fuse
Employer uniquement avec
un fusible de 250V
Use only with a 250V fuse
Employer uniquement avec
un fusible de 250V
RL RR
FRONT A
LL
SURROUNDFRONT B CENTER
SPEAKERSYSTEMS
FRONTA OR B, CENTER, SURR, SURR BACK
:MINIMUM
6OHMS
FRONTA AND B : MINIMUM 8 OHMS
Connexion du caisson de graves à des systèmes numériques
P
owered Subwoofer
Featuring BassTrac
®
XB6
C
AUTION: Disconnect supply cord
b
efore replacing fuse. For continued
p
rotection against risk of fire, replace only
with same type fuse.
ATTENTION: Debrancher avant de
r
emplacer le fusible. Utiliser un fusible de
r
echange de même type.
* use crossover control: removes high
frequencies; use with sources lacking suitable
filtering (most products without Dolby Digital
or DTS), or where manual control is desired.
** bypass crossover control: direct to woofer;
use with sources having built-in crossover
controls or bass management (most products
with Dolby Digital or DTS).
on
o
ff
power
CAUTION
RISK OF ELECTRIC SHOCK
DO NOT OPEN
AVIS: RISQUE DE CHOC ELECTRIQUE-NE PAS OUVRIR
left right
s
peaker level in
5
0
80 120
150
crossover (Hz)
power indicator
0
º
180º
polarity
u
se
crossover
control *
b
ypass
crossover
control **
line level in
p
ower mode
on
a
uto
U
se only with a 250V fuse
E
mployer uniquement avec
un fusible de 250V
T
2.5A L 250V
de home-cinéma
Les circuits électroniques de systèmes de home-cinéma 5.1, 6.1 et 7.1 consacrent un canal (« 1 ») à la reproduction d’informations basses
fréquences (LFE) (telles que des explosions et les grondements du tonnerre) contenues dans des bandes sonores à codage numérique.
Sélectionner « subwoofer-yes » (caisson de graves - oui) à partir du menu de configuration du récepteur. Ainsi branché, l’amplificateur du récepteur n’a plus besoin de reproduire les difficiles signaux de basse fréquence susceptibles de provoquer une distorsion sonore du récepteur.
Utiliser un câble RCA (non fourni), comme indiqué, afin de connecter la sortie du caisson de graves du récepteur numérique au caisson
de graves. Connecter l’autre extrémité de la prise jack XB6 ou XB8 marquée
répartiteur) à l’entrée
« line level in » (entrée de niveau de ligne).
« bypass crossover control » (dérivation de la commande de
panneau arrière du récepteur
sortie du caisson de graves
Si un acheminement des câbles RCA vers le caisson de graves n’est pas souhaité, le fil du haut-parleur peut être utilisé pour connecter le
caisson en parallèle avec les haut-parleurs principaux (voir schéma ci-dessous). Le caisson de graves ne constitue pas de char
mentaire pour le récepteur.
Sélectionner « subwoofer-no » (caisson de graves - non) dans le menu de configuration du récepteur. Le signal LFE (effet basses fréquences)
est ainsi envoyé aux haut-parleurs principaux gauche et droit et, par conséquent, au caisson de graves. Pour plus d’informations, consulter le mode d’emploi du récepteur.
En cas de branchement à l’aide du fil du haut-parleur, le répartiteur intégré du caisson de graves est activé. Pour commencer, régler le
répartiteur du caisson de graves à environ 10 Hz au-delà de la limite inférieure de la réponse en basses fréquences des haut-parleurs principaux. Effectuer un réglage précis du répartiteur à l’oreille afin d’obtenir un accord le plus pur possible avec les haut-parleurs principaux.
Le paramétrage de la commande du répartiteur dépend du positionnement du haut-parleur et des préférences de l’utilisateur.
Veiller à connecter la borne + sur la borne +
ouge) et la bor
(r
ne – à la bor
ne – (noir
e
).
5
avant
haut-
parleurs
droit
gauche
vers les haut-parleurs
principaux
panneau arrière du récepteur
ge supplé-
Page 22

Powered Subwoofer
F
eaturing BassTrac
®
XB6
CAUTION: Disconnect supply cord
b
efore replacing fuse. For continued
p
rotection against risk of fire, replace only
w
ith same type fuse.
A
TTENTION: Debrancher avant de
r
emplacer le fusible. Utiliser un fusible de
r
echange de même type.
* use crossover control: removes high
frequencies; use with sources lacking suitable
f
iltering (most products without Dolby Digital
or DTS), or where manual control is desired.
** bypass crossover control: direct to woofer;
use with sources having built-in crossover
c
ontrols or bass management (most products
with Dolby Digital or DTS).
T 2.5A L 250V
on
off
p
ower
CAUTION
R
ISK OF ELECTRIC SHOCK
DO NOT OPEN
AVIS: RISQUE DE CHOC ELECTRIQUE-NE PAS OUVRIR
l
eft right
speaker level in
5
0
80 120
1
50
c
rossover (Hz)
p
ower indicator
0º
1
80º
p
olarity
u
se
c
rossover
c
ontrol *
b
ypass
crossover
c
ontrol **
l
ine level in
p
ower mode
on
a
uto
Use only with a 250V fuse
Employer uniquement avec
un fusible de 250V
Use only with a 250V fuse
Employer uniquement avec
un fusible de 250V
Connexion du caisson de graves aux systèmes stéréo ou Dolby
50
80 120
150
crossover (Hz)
0 º
180 º
polarity
on
off
power
Pro Logic
®
®
Pour les systèmes stéréo ou Dolby Pro Logic, la méthode la plus simple est d’utiliser les mêmes fils de raccordement du haut-parleur que ceux
indiqués à la page 5.
Il est également possible d’utiliser la connexion « sub out » (sortie caisson de graves) entre le récepteur et l’entrée du caisson de graves
arquée
m
parleur ou d’utilisation de l’entrée
use crossover control. »Le répartiteur intégré du caisson de graves est activé en cas de branchement à l’aide du fil du haut-
«
« use crossover control » (utiliser la commande du répartiteur). Pour commencer, régler le répartiteur
du caisson de graves à environ 10 Hz au-delà de la limite inférieure de la réponse en basses fréquences des haut-parleurs principaux.
Effectuer un réglage précis du répartiteur à l’oreille afin d’obtenir un accord le plus pur possible avec les haut-parleurs principaux.
Le paramétrage de la commande du répartiteur dépend du positionnement du haut-parleur et des préférences de l’utilisateur.
panneau arrière du récepteur
Commandes
Commutateur d’alimentation principal
Met entièrement sous ten-
ou hors tension l’amplifi-
sion
cateur et neutralise la
mande d’alimentation
commande doit être mise sur
on (marche) avant de
configurer le bouton
mode
com-
. Cette
power
(voir page suivante).
Volume (sur panneau
supérieur)
Règle le niveau sonore du caisson de graves. Le réglage se
situe généralement autour de
11 heures.
Crossover (répartiteur) (Hz)
Règle la fréquence du filtre
passe-bas du caisson de
graves. Cette commande est
inactive lors de l’utilisation de
la prise jack d’entrée
crossover control »
du répartiteur).
6
« bypass
(dérivation
sortie du caisson de graves
ou 180°
Polarité (0
°
Sélectionne une polarité or
)
e
dinair
(0°) ou inversée (180°) pour le caisson de graves. Régler ce bouton
de sorte à obtenir les basses les
plus profondes et dynamiques
possibles. L’effet de phase est plus
audible sur des instr
uments à per
cussion basse fréquence ou sur
des musiques caractérisées par
une ligne de basse à répétition
continue.
-
Page 23

M
E
N
U
/
E
N
T
E
R
I
N
P
U
T
S
E
L
E
C
T
D
O
W
N
U
P
L
E
F
T/
-
R
I
G
H
T/
+
/
E
X
I
T
V
O
L
U
M
E
PO
W
ER
/ST
A
N
DB
Y
on
auto
on
auto
Commandes (suite)
power indicator
off
on
auto
Témoin de mise sous tension : Ce
émoin à deux couleurs passe au
t
rouge lorsque le bouton Power
ode (Mode de mise sous tension)
M
est mis sur
tout signal) et au vert lorsqu’il est mis
en mode de fonctionnement
« auto » (en l’absence de
(« on »).
Commutateur Power mode (mise sous tension)
emarque :
R
doit être mis en position de marche (
Auto :
our que ce bouton puisse fonctionner, le commutateur d’alimentation principal
P
« on »).
Dans cette position, le circuit de mise en marche automa-
tique du caisson de graves met l’amplificateur sous tension
orsqu’un signal audio est détecté (le voyant «
l
ower indicator »
p
passe au vert) et le met hors tension au bout de 15 minutes en l’absence de signal (le voyant
« power indicator » passe au rouge).
Il ne s’allume pas tant que le commutateur d’alimentation principal
est en position de marche
(« on »).
marche automatique du caisson de graves est dérivé et
l’amplificateur reste sous tension, qu’un signal audio soit détecté ou pas (le voyant «
power indicator » reste vert).
Positionnement
Placer le caisson de basse près d’un mur ou d’un angle à proximité des haut-parleurs principaux. En général, pour obtenir le meilleur
son, le caisson de graves doit être situé à 4,5 m (15 ft) des haut-parleurs principaux. Toutefois, l’affaiblissement marqué du chevauchement 24 dB/octave permet d’effectuer un positionnement plus éloigné des haut-parleurs principaux si nécessaire. Étant donné que
l’oreille n’est pas capable d’identifier les basses fréquences du caisson de graves, les basses donnent toujours l’impression de provenir
des haut-parleurs principaux. Dans la plupart des cas, le caisson de graves peut être positionné n’importe où dans la salle d’écoute.
Le niveau de puissance des basses provenant du caisson varie en fonction de son emplacement dans une pièce. La sonie est accentuée lorsqu’il est placé près d’un mur. Le positionnement dans un angle permet d’obtenir la puissance de fréquences basses la plus
élevée, tandis qu’un placement près d’un seul mur offre un niveau de basses plus faible. Un positionnement loin de tout mur risque
de produire une fréquence de basses trop faible. Quel que soit l’endroit où est placé le caisson de graves, son niveau peut être ajusté
à l’aide de la commande de volume. En cas de déplacement du caisson de graves, vérifier à nouveau le paramétrage du commutateur de polarité. Opter pour le paramètre offrant le son le plus élevé et le plus dynamique.
IMPORTANT : Ne pas placer le caisson de graves dans un endroit présentant un risque de contact entre le panneau arrière et des
tentures ou des meubles.
« ON » (marche) : Dans cette position, le circuit de mise en
Placer le caisson de
graves dans un angle de
te à obtenir une fréquence
sor
de basses maximale
7
Page 24

Si les fils de raccordement du haut-parleur provoquent
50
80 120
150
crossover (Hz)
u
se
crossover
control *
bypass
crossover
control **
line level in
A
UDIO
AUDI
O
AUDIO
AUDIO
VIDEO
VIDEO
VIDEO
VIDEO
S VIDEO
S VIDEO
V
-AUX
V
-AUX
IN
IN
VCR
VCR
O
UT
O
UT
D-TV
D-TV
/CBL
/CBL
DVD
DVD
S
VIDEO
S
VIDEO
VIDEO
VIDEO
SUB
SUB
WOOFER
WOOFER
M
ONITOR OUT
M
ONITOR OUT
OUTPUT
OUTPUT
M
ONITOR
M
ONITOR
O
UT
O
UT
D
-TV
D
-TV
/CBL
/CBL
DVD
DVD
C
D
C
D
F
M
F
M
ANT
ANT
IN
IN
(PLAY)
(PLAY)
M
D
M
D
/
CD-R
/
CD-R
O
UT
O
UT
(REC)
(REC)
7575ΩΩ
U
NBAL.
U
NBAL.
TUNER
TUNER
C
OMPONENT VIDEO
C
OMPONENT VIDEO
DIGITAL
DIGITAL
OUTPUT
OUTPUT
DIGITAL
DIGITAL
I
NPUT
I
NPUT
6 CH INPUT
6 CH INPUT
CD
CD
COAXIAL
COAXIAL
R
R
L
L
R
R
L
L
M
AIN
M
AIN
S
UB
S
UB
WOOFER
WOOFER
D
VD
D
VD
M
D/CD-R
M
D/CD-R
M
D/CD-R
M
D/CD-R
OPTICAL
OPTICAL
O
PTICAL
O
PTICAL
D-TV/CBL
D-TV/CBL
Y
Y
P
P
B
B
/
C
/
C
B
B
P
P
R
R
/C
/C
R
R
S
URROUNDSURROUND
C
ENTER
C
ENTER
AM
AM
A
NT
A
NT
GND
GND
un ronflement
Certains récepteurs utilisent des circuits de mise à la masse pouvant s’avérer incompatibles avec les produits audio tels que des caissons
de graves. Lorsque le fil de raccordement du haut-parleur est utilisé à la place de câbles de niveau de ligne, cette incompatibilité peut
entraîner un ronflement sonore lorsque le récepteur est éteint ou commuté sur un autre canal du haut-parleur.
Si cela se produisait avec le caisson de graves Boston, fabriquer un câble de mise à la terre, le connecter à
son de graves et à toute entrée ou sortie de ligne RCA
application doit se composer de deux fiches mâles RCA dont les bornes extérieures
disponible du récepteur (voir schéma). Un câble de mise à la terre adapté à cette
négatives (ou « manchons ») sont interconnectés par
l’entrée de ligne RCA du cais-
une longueur variable de câble de cuivre à conducteur unique.
Les bornes positives intérieures (ou
« broches ») ne doivent être connectées à
utiliser une prise
jack RCA
câble de masse RCA (-) - RCA (-) à un conducteur
aucune des fiches.
Pour ceux qui ne souhaitent pas fabriquer un
câble de mise à la terre eux-mêmes, contacter
directement le service clientèle de Boston
Acoustics (voir page suivante); nous nous
ferons le plaisir d’en fournir un gratuitement
.
panneau arrière du caisson
de graves
Si un entretien s’avère nécessaire
panneau arrière
du récepteur
utiliser
n’importe
quelle
prise jack
RCA
disponible
Contacter d’abord le revendeur auprès de qui l’unité XB6 ou XB8 a été achetée. En cas d’impossibilité, nous envoyer un
courrier à l’adresse suivante :
Customer Service
Boston Acoustics, Inc.
300 Jubilee Drive
Ou visiter notre site web:
www.bostonacoustics.com;
ou nous contacter par courrier
électronique à l’adresse suivante:
custserv@bostona.com
Peabody, MA 01960 États-Unis
Nous recommanderons rapidement la marche à suivre. S’il s’avère nécessaire de retourner le caisson de graves à l’usine,
l’expédier en port payé. Une fois le produit réparé, nous le réexpédierons en port payé aux États-Unis ou au Canada.
Garantie limitée
Boston Acoustics s’engage à effectuer toutes les réparations, pour le compte de l’acheteur d’origine et ce, dans un délai d’un
an à compter de la date d’achat, relatives à tout défaut de matériaux ou vice de fabrication survenant suite à une utilisation du
caisson de graves conforme à l’usage prévu, sans facturer de frais de pièces ou de main d’œuvre au propriétaire.
Il incombe au propriétaire d’utiliser le système conformément aux instructions fournies, de choisir un moyen de transport
sûr pour le renvoi de l’appareil à un représentant agréé de Boston Acoustics et de présenter une preuve d’achat (ticket de
caisse) lors de toute demande de réparation.
Cette garantie ne s’applique pas aux dommages résultant d’un usage abusif ou inadéquat, d’une mauvaise installation, du trans
por
t ou de réparations ou modifications exécutées par une personne autr
garantie est limitée au produit Boston Acoustics et ne couvre pas les dommages subis par tout équipement associé. Cette
garantie ne couvre pas le coût de la désinstallation ou de la réinstallation.
L’absence ou l’invisibilité du numéro de série annulera la garantie.
Cette garantie confèr
peut également jouir d’autres droits.
e des dr
oits particuliers à son propriétaire ; selon l’état dans lequel l’appareil est utilisé, le propriétaire
300 Jubilee Drive
Peabody, MA 01960
États-Unis
978.538.5000
www.bostonacoustics.com
BassTrac, Boston, Boston Acoustics et Deep Channel sont des marques déposées
de Boston Acoustics ; Inc. Dolby et Pro Logic sont des marques déposées de Dolby
Laboratories Licensing Corporation.
© 2006 Boston Acoustics, Inc. Tous droits réservés.
Spécifications sujettes à modifications sans préavis.
e que le technicien agréé Boston Acoustics. Cette
-
142-002501-0
 Loading...