

Boston Acoustics CR67, CR97, CRC7, CR77 User Manual
High performance compact speakers
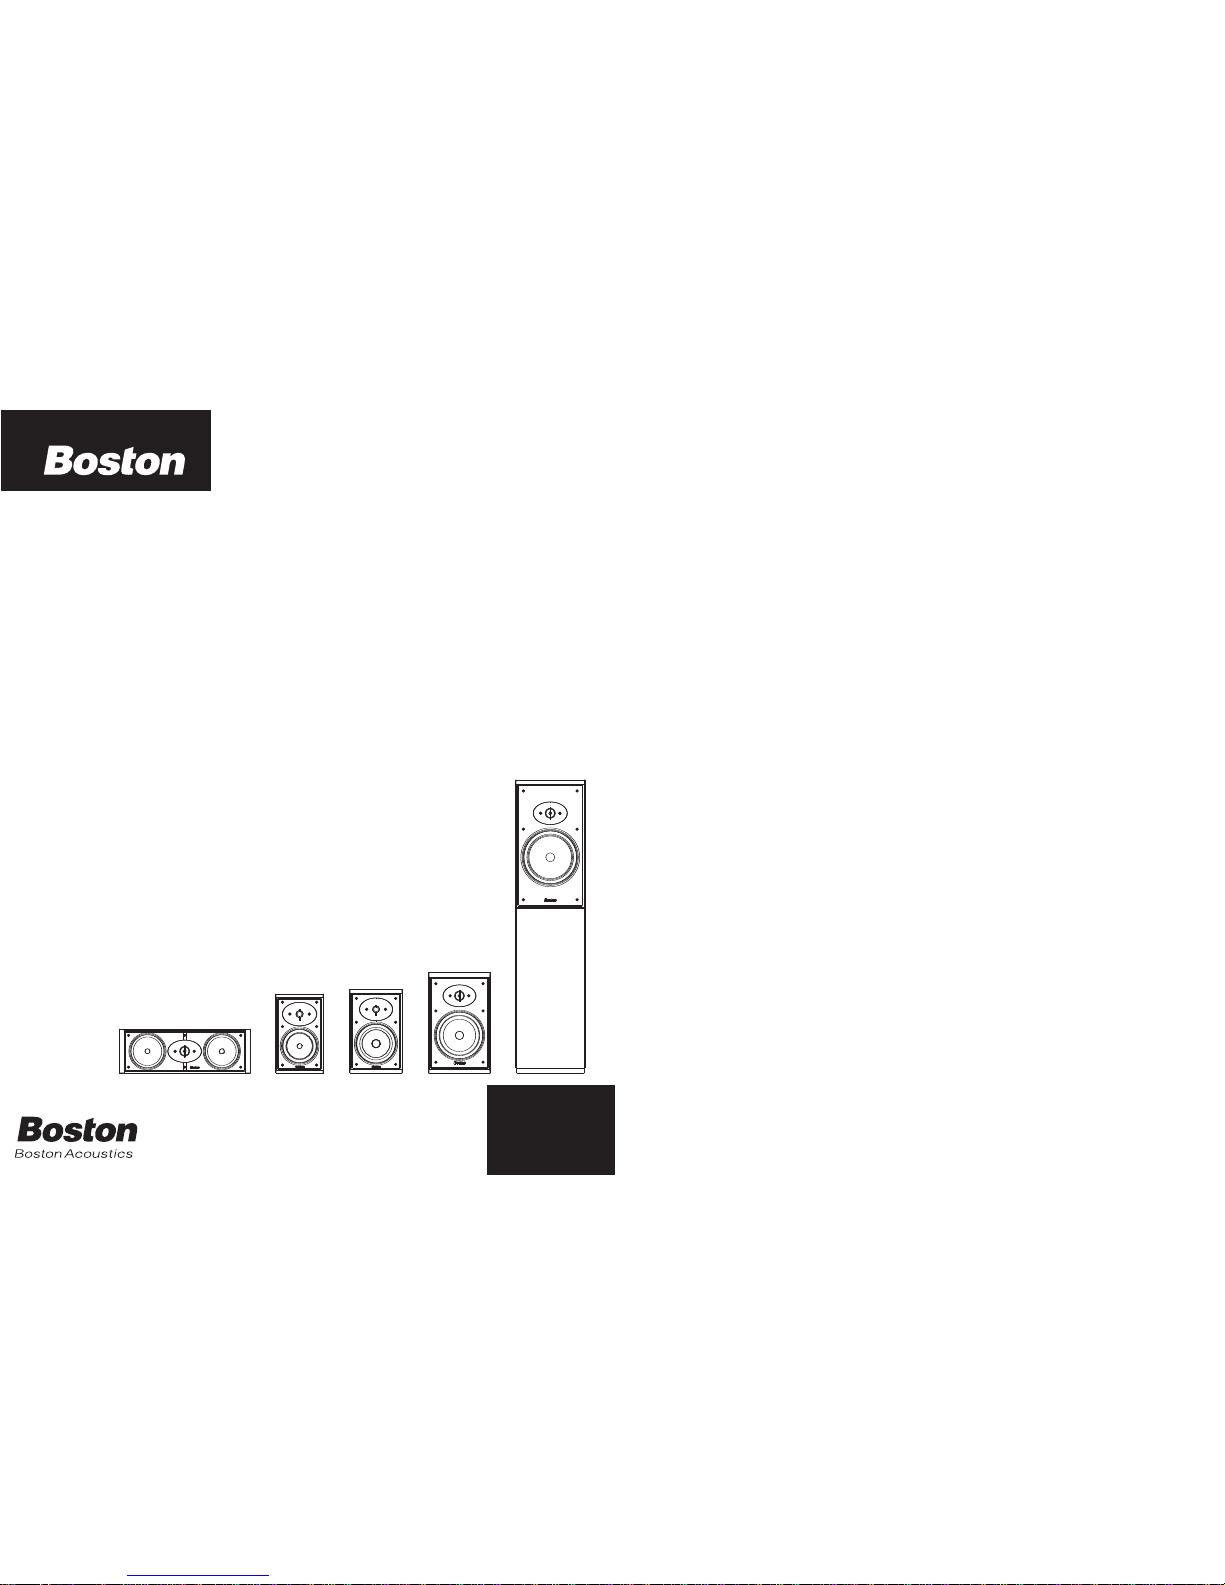
CR97
CR77
CR67
CR57
CRC7
ENGLISH
ESPAÑOL
FRANÇAIS
DEUTSCH
ITALIANO
CR97 • CR77 • CR67 • CR57 • CRC7
ENGLISH
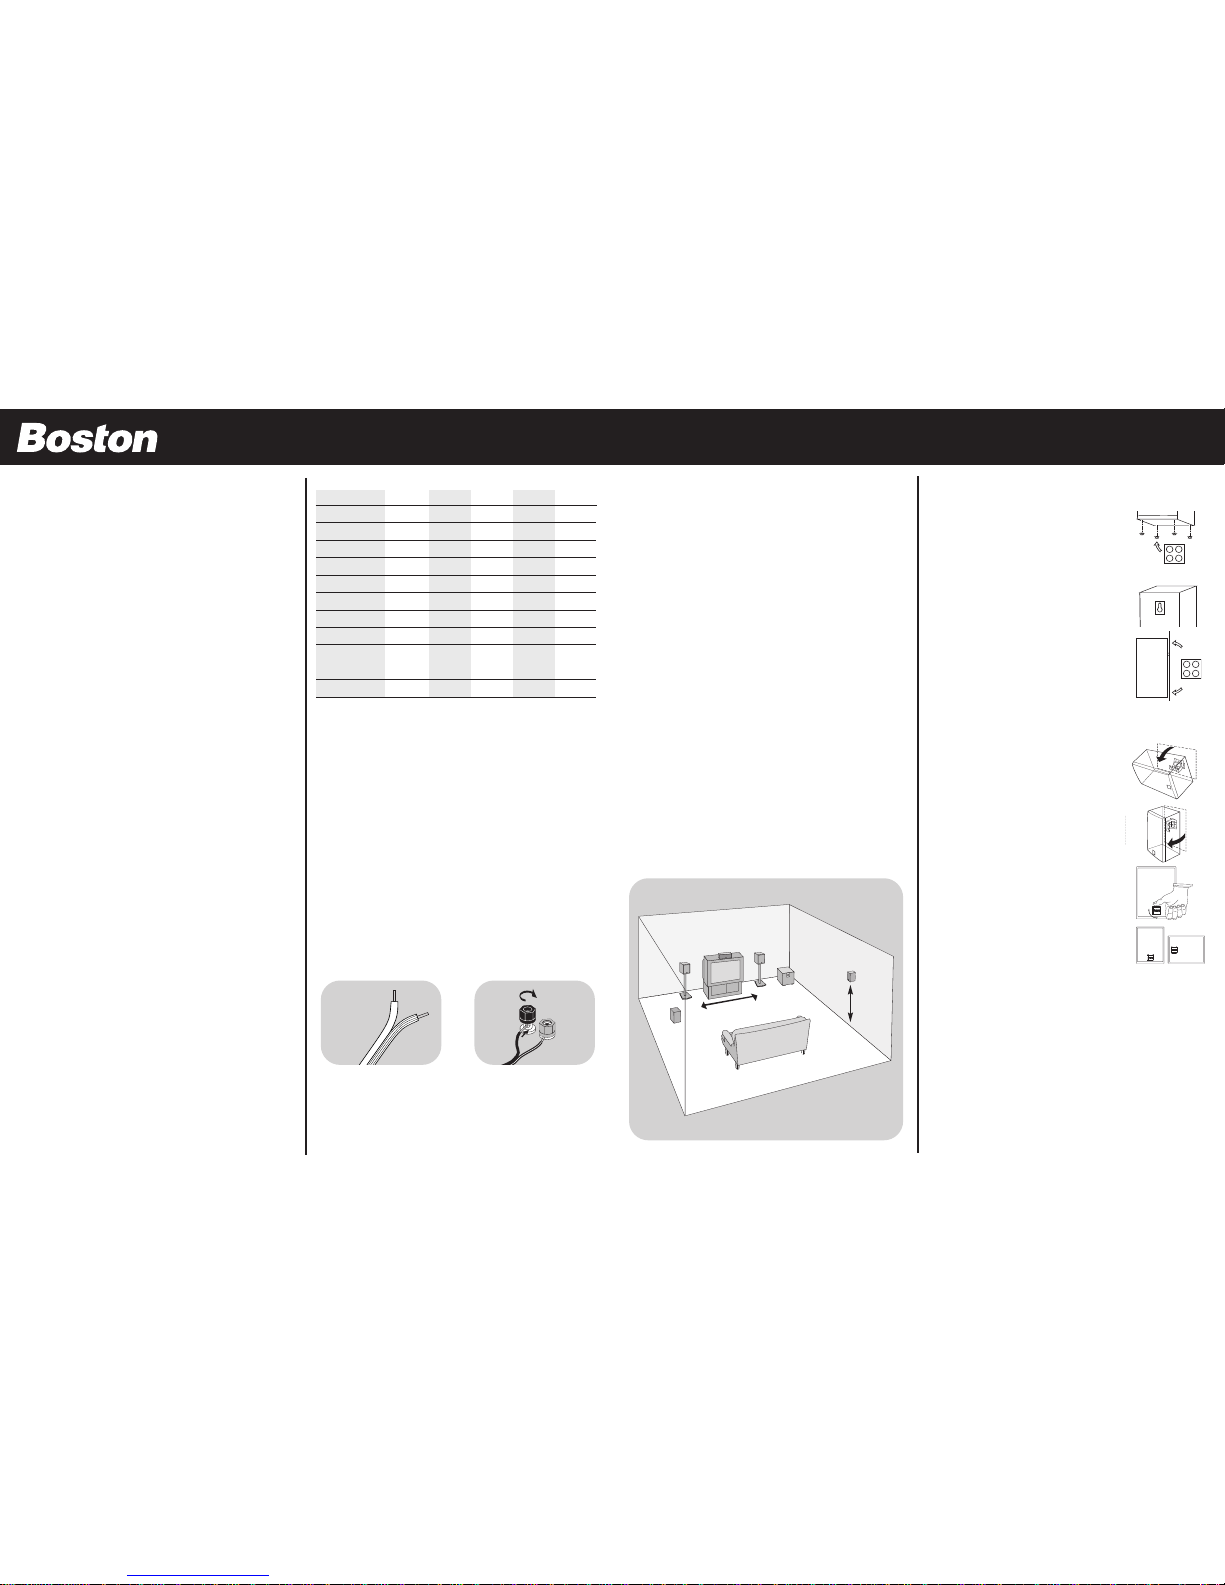
How to Place Your Speakers
For a standard stereo (two-channel) application most people like to hear a
realistic soundstage, as they would from a good seat in a concert hall. To
achieve this effect, place the speakers 6 to 12 Ft. (2–4m) apart, so they form
a triangle with your favorite listening position.
For home theater applications place the left and right speakers on each
side of the television, as you would place them in a stereo application. Place
center channel speaker as shown below, with the front of the speaker flush
with the front of the television (the center speaker can be placed either
above or below the television).
When using the CR speakers as surround speakers, they can be placed on
the side or back walls. Recommended placement is above ear level on the
side walls behind the listening position. However, experimentation will yield
the best possible results for every room. If possible, permanent mounting
of the CR speaker should only be done after the optimum location is
determined.
When using the CR speakers in a home theater application you will want to
add a subwoofer. There are many Boston solutions available; the best solution depends on available space and the size of the room. To discover all of
the options available, please consult your Boston Acoustics dealer.
For all applications, the speakers should be at least 18-inches (0.6m) from
the corners of the room. Putting the speakers too close to a corner can produce an unnatural bass reinforcement that detracts from their balanced,
uncolored sound. If a speaker must be placed near a corner, move it away
from the wall directly behind it to preserve its natural tonal balance.
Description
Continuing in the tradition of our critically acclaimed
Compact Reference series, the new CR series products
are versatile, high performance bookshelf and floorstanding loudspeakers designed to deliver accurate,
natural reproduction.
Special care has been taken to optimize the speakers
components for maximum performance. The bass and
midrange units utilize phase plugs that conduct heat
away from the voice coil, thus increasing power handling and maximizing output. The woofer cones and
surround geometry were designed and optimized with
Finite Element Analysis (FEA) computer modeling technology, for strong bass and smooth midrange.
High frequencies are handled by Boston’s exclusive 1inch (25mm) or
3
⁄4-inch (19mm) Kortec tweeter mounted
in an innovative new wide dispersion projection tweeter baffle. This remarkable driver produces an extremely
smooth, flat response well beyond the audible range.
An aluminum heatsink attached to the tweeter’s back
plate dissipates heat quickly and efficiently, assuring
cool, trouble free operation—even at very high power
levels.
All the drive units are designed at Boston’s Peabody,
Massachusetts facility using state-of-the art computerdesign programs, and are built on Boston’s proprietary
production lines to an incredible ±1dB—perhaps the
industry’s tightest tolerance. The CRC7, CR77, and
CR97 feature MagnaGuard
®
‚ magnetic shielding for
safe placement near any sized television set.
The drivers are positioned very closely to each other for
smooth, uniform radiation in both the horizontal and
vertical planes. The rear-mounted vent is smoothly
flared to reduce port turbulence, and all speakers feature five-way binding posts, allowing wiring with virtually any cable.
IMPORTANT: Typically, one side
of the wire is smooth. Connect
this side to the – (black) connec
tion. The other side has a rib or
stripe. Connect this to the + (red)
connection.
Using the five-way binding posts:
The binding posts per
mit easy
connection to banana plugs,
spade lugs, and bare wire. Insert
the wire in the hole and tighten.
+
Left
Speaker
Right
Speaker
5-8 ft.
(1.6-2.6m)
How to Connect Your Speakers
Correctly wiring your speakers is important for achieving the best sound
quality. Wiring should take just a few minutes, but it’s important to do it carefully, since incorrect wiring (such as reversed connections) can result in a
poor soundstage and poor bass.
We recommend 18-gauge wire or thicker for runs up to 18ft. (6m), and 16gauge wire or thicker for longer runs.
Separate the first few inches of the wire
conductors. Strip off about 1⁄2-inch (12mm) of insulation from the ends of
each speaker wire to expose the two conductors and tightly twist the wire
strands.
WARNING:
To prevent electrical shock hazard, always switch off the ampli-
fier or receiver when making connections to the speaker.
When making all connections, be sure to connect the + (red) on the speaker to
the + (red) on the amplifier, and t
he – (black) on the speaker to the – (black)
on the amplifier.
6-12 ft. (2-4m)
Right
Surround
Speaker
Center
Speaker
Left
Surround
Speaker
Subwoofer
Mounting Options
Your CR speakers have several convenient mounting options:
STAND OR SHELF:
Peel off the included rubber feet from their adhesive backing and stick them
on to the four bottom corners of each speaker.
KEYHOLE BRACKET:
Consult a knowledgeable installer regarding the proper hardware to use
on your wall surface. A 1-inch (25mm) long wall
anchor is recommended for hollow walls.
Regardless of the type of wall fastener used, the
screw head diameter should be between 5⁄16 and 3⁄8inch (8 to 9.5 mm) to fit properly inside the keyhole
and slide down on to the slot. Apply the rubber
feet the rear of the speaker to prevent any scratching or marring of the wall surface.
Note: The CRC7 features two keyhole brackets allowing vertical or horizontal placement—perfect for using three in an L/C/R application around a wall mounted flat panel television.
CRB BRACKET:
This optional stand-off/swivel
bracket can be purchased from your dealer or
ordered directly from Boston Acoustics. The CRB
attaches to the back of the speaker using the four
mounting holes located at either side of the keyhole bracket. Instructions on how to attach this
bracket to the speaker and mount the assembly to
the wall are supplied in the CRB kit.
Rotating the Logo
The CR grille logo can be rotated 90° in either
direction when mounting the speaker horizontally
or to maintain symmetry from left to right. The
logo is spring loaded; to rotate the logo, simply
spin it into the desir
ed position.
Listening Levels and Power
Handling
The listed power recommendations assume you will operate your system
in a way that will not produce distortion. Even thes
e rugged speakers can
be damaged by a modest amplifier if it produces distortion. If you hear a
harsh, gritty noise, turn down the volume. Prolonged or repeated operation of your speaker with a distorted signal from the amplifier can cause
damage that is not covered by the warranty.
If Service Seems Necessary
First, contact the dealer fr
om whom you pur
chased the speakers. If that is
not possible, write to:
Boston Acoustics, Inc. 300 Jubilee Drive, Peabody, MA 01960 U.S.A.
W
e will promptly advise you of what action to take.
High performance compact speakers
S
PECIFICA
TIONS
Frequency Response (±3dB)
Recommended Amplifier Power
Nominal Impedance
Sensitivity [1 watt (2.83v) at 1m]
Bass unit
Passive Radiator
Tweeter
Crossover Frequency
Dimensions (without CRB)
(H x W x D)
Net W
eight
80Hz-20kHz 80Hz-20kHz 62Hz-20kHz 52Hz-20kHz 40Hz-20kHz
15-100 watts
10-75 watts 15-100 watts 15-100 watts 15-125 watts
8 ohms 8 ohms 8 ohms 8 ohms 8 ohms
89dB
89dB 89dB 89 dB 91 dB
4
1
⁄2" (115mm) 4 1⁄2" (115mm) 5 1⁄4" (135mm) 6 1⁄2" (165 mm) 7" (180 mm)
4
1
⁄2" (115mm) N/A N/A N/A N/A
1" (25mm) Kortec
®
3
⁄4" (19mm) Kortec
®
3
⁄4" (19mm) Kortec®1" (25mm) Kortec®1" (25mm) Kortec
®
2400Hz 2600Hz 2600Hz 2400Hz 2400Hz
5
1
⁄4 x 15 1⁄2 x 6 3⁄16"9 1⁄4 x 5 5⁄8 x 6 1⁄4" 10 1⁄8 x 6 3⁄8 x 8 11⁄16" 12 1⁄4 x 7 1⁄2 x 11 1⁄16" 34 1⁄2 x 8 3⁄16 x 12 1⁄4"
134 x 394 x 157mm 235 x 142 x 159mm 257 x 162 x 220mm 311 x 191 x 281mm 376 x 207 x 310mm
11 lbs (5.0 kgs)
5.3 lbs (2.6 kgs) 7.7 lbs (3.5 kgs) 13.5 lbs (6.2 kgs) 33 lbs (15 kgs)
CRC7 CR57 CR67 CR77 CR97

CR97 • CR77 • CR67 • CR57 • CRC7
ESPAÑOL
E
SPECIFICACIONES
Respuesta de frecuencia (±3 dB)
Amplificador de potencia r
ecom.
Impedancia nominal
Sensibilidad [1 W (2,83 V) a 1 m]
Unidad de bajos
Radiador pasivo
Altavoz de agudos
Frecuencia de intermodulación
Dimensiones (sin CRB)
(Al x An x P)
Peso neto
80 Hz-20 kHz 80 Hz-20 kHz 62 Hz-20 kHz 52 Hz-20 kHz 40Hz-20kHz
15-100 W 10-75 W 15-100 W 15-100 W 15-125 W
8 ohm 8 ohm 8 ohm 8 ohm 8 ohm
89dB
89 dB 89 dB 89 dB 91 dB
115 mm 115 mm 135 mm 165 mm 180 mm
115 mm N/A N/A N/A N/A
25 mm Kortec
®
19 mm Kortec®19 mm Kortec®25 mm Kortec®25 mm Kortec
®
2.400 Hz 2.600 Hz 2.600 Hz 2.400 Hz 2.400 Hz
134 x 394 x 157 mm 235 x 142 x 159 mm 257 x 162 x 220 mm 311 x 191 x 281 mm 376 x 207 x 310 mm
5 kg 2,6 kg 3,5 kg 6,2 kg 15 kg
CRC7 CR57 CR67 CR77 CR97
Colocación de los altavoces
Para una aplicación estereofónica estándar (de dos canales), la mayoría de las personas desea oír un sonido real, como si ocupasen una buena butaca en una sala de
conciertos. Para lograr este efecto, coloque los altavoces de 2 a 4 m de separación
entre ellos, de modo que formen un triángulo con su posición de escucha favorita.
Para aplicaciones de cine casero, coloque los altavoces izquierdo y derecho
a cada lado de la televisión, como lo haría en una aplicación estereofónica.
Coloque el altavoz del canal central como se muestra más abajo, con la
parte delantera del altavoz y la del televisor niveladas (el altavoz central se
puede colocar por encima o por debajo de la televisión).
Cuando use los altavoces CR como altavoces ambientales, se pueden colocar
en las paredes laterales o en la trasera. La colocación recomendada es por encima del nivel de audición en la pared lateral, detrás de la posición de escucha.
Sin embargo, conseguirá los mejores resultados posibles para cada sala experimentando distintas colocaciones. Si fuese posible, sólo deberá realizarse un
montaje permanente del altavoz CR una vez determinada la colocación óptima.
Cuando use los altavoces CR en un cine casero, querrá añadir un altavoz de
graves. Boston dispone de muchas soluciones; la mejor de ellas depende
del espacio disponible y del tamaño de la sala. Para conocer todas las
opciones disponibles, consulte al proveedor de Boston Acoustics.
Para todas las aplicaciones, los altavoces deben estar al menos a 0,6 m de las
esquinas de la habitación. Si los pone demasiado cerca de una esquina, se producirá un refuerzo de graves nada natural que reduce el sonido equilibrado y sin
adornos. Si tiene que colocar un altavoz cerca de una esquina, retírelo de la
pared que está directamente detrás para preservar el equilibrio de tono natural.
Descripción
Siguiendo con la tradición de nuestra aclamada serie
Compact Reference, los nuevos productos de esta serie
son unos altavoces versátiles, de altas prestaciones,
tanto para estantería como para el suelo, diseñados
para proporcionar una reproducción fiel y natural.
Se ha tenido un cuidado especial en optimizar los componentes de los altavoces para obtener las máximas prestaciones. Las unidades de graves y de frecuencias medias
utilizan conectores de fase que alejan el calor de la bobina móvil de altavoz, aumentando así la gestión de potencia y maximizando la salida. Los conos del altavoz de
graves y la geometría ambiental se han diseñado y optimizado con la tecnología de modelado informatizado de
análisis de elementos finitos (FEA) para conseguir unos
graves fuertes y unas frecuencias medias suaves.
Las altas frecuencias se gestionan mediante el altavoz de
agudos Kortec de 25 mm o 19 mm exclusivo de Boston,
instalado en una innovadora y nueva caja acústica de altavoz
de agudos de proyección con dispersión amplia. Este asombroso controlador produce una respuesta plana extremadamente suave muy por encima del rango audible. Un disipador térmico de aluminio instalado en la placa posterior
del altavoz de agudos disipa de forma rápida y eficaz el
calor, asegurando un funcionamiento frío y sin problemas,
incluso a niveles de potencia muy altos.
Todas las unidades están diseñadas en la fábrica de
Boston en Peabody (Massachussets) usando la más avanzada tecnología informática, y están construidos en las
línea de producción propiedad de Boston con una tolerancia increíble de ±1 dB, quizá la más pequeña del sector. Los CRC7, CR77 y CR97 incorporan el blindaje magnético MagnaGuard
®
‚ para poder colocarlos de forma
segura cerca de cualquier aparato de televisión, independientemente del tamaño.
Los controladores se colocan muy cerca el uno del otro para
obtener una radiación suave y uniforme en los planos horizontal y vertical. La ventilación trasera está suavemente acampanada para reducir las turbulencias del puerto, y todos los
altavoces incorporan bornes de conexión de cinco vías, lo que
permite realizar el cableado con prácticamente cualquier
cable.
IMPORTANTE: Normalmente, un
lado del cable es liso. Conecte
este lado a la conexión – (negra).
El otr
o lado tiene una ner
vadura
o estría. Conecte este lado a la
conexión + (roja).
Uso de los bornes de conexión de
cinco vías: los bornes de conexión
facilitan la conexión a enchufes con
punta cónica, per
nos de pala y cable
pelado. Inserte el cable en el orificio
y apriételo.
+
Altavoz
izquier
do
Altavoz
der
echo
1,6 – 2,6 m
Conexión de los altavoces
El cableado correcto de sus altavoces es importante para obtener la mejor
calidad del sonido. Esta operación sólo le llevará unos minutos, pero hay que
hacerla con cuidado, porque una conexión equivocada (como conexiones
invertidas) puede dar como resultado sonidos y graves de mala calidad.
Aconsejamos utilizar un cable de calibre 18 o superior para instalaciones de hasta 6 m
y calibre 16 o superior para longitudes mayores. Separe los primeros centímetros de
los conductores de cable. Pele unos 12 mm de aislante de los extremos de cada cable
de los altavoces para dejar al aire los dos conductores y tréncelos firmemente.
ADVERTENCIA:
Para impedir descargas eléctricas, apague siempre el
amplificador o el receptor cuando los conecte a los altavoces.
Cuando realice todas las conexiones, asegúrese de conectar el polo + (rojo)
del altavoz al + (rojo) del amplificador, y el – (negro) del altavoz al – (negro) del
amplificador.
Altavoces compactos de altas prestaciones
2 – 4 m
Altavoz
ambiental
derecho
Altavoz
central
Altavoz
ambiental
izquierdo
Altavoz
de graves
Opciones de instalación
Los altavoces CR disponen de varias opciones de instalación, todas ellas cómodas:
SOPORTE O ESTANTE:
Retire el papel protector del adhesivo de los pies de goma y péguelos
en las cuatro esquinas de cada altavoz.
SOPORTE DE BOCALLAVE:
Consulte a un
instalador con experiencia en relación con los accesorios de ferretería adecuados para usar en la superficie
de la pared. Se aconseja la utilización de un ancla de
pared de 25 mm de longitud para paredes huecas.
independientemente del tipo de sujeción de pared
que se haya usado, el diámetro de la cabeza del tornillo debe tener entre 8 y 9,5 mm para que encaje correctamente dentro de la bocallave y se pueda deslizar
en la ranura. Coloque los pies de goma por detrás del
altavoz para evitar que se ralle o estropee la pared.
Nota: El CRC7 incorpora soportes de bocallave que posibilitan la colocación vertical u horizontal, y que son
perfectos para usar tres en una aplicación I/C/D sobre una televisión de
panel plano sobre pared.
SOPORTE CRB:
Este soporte fijo/oscilante opcional
se puede comprar a un proveedor o solicitarse directamente a Boston Acoustics. El CRB se acopla a la parte
posterior del altavoz con los cuatro orificios de montaje
situados a cada lado del soporte de bocallave. El kit del
CRB contiene las instrucciones para colocar este soporte
en el altavoz e instalar el conjunto en la pared.
Giro del logotipo
El logotipo de la rejilla del CR se puede girar 90° en
cualquier dirección cuando se monta en una posición
horizontal o para mantener la simetría de izquierda a
derecha. El logotipo está accionado por un muelle; para
girarlo, sólo tiene que rotarlo hasta la posición que
desee.
Volumen y potencia
Las recomendaciones anteriores sobre potencia dan por sentado que gestionará su sistema para que no distorsione. Incluso con un amplificador de
poca potencia que pr
oduce distorsiones, estos altavoces r
esistentes se
pueden estropear. Si oye un ruido estridente, baje el volumen. Un funcionamiento prolongado o repetido del altavoz con una señal distorsionada
del amplificador puede pr
ovocar daños que no están cubier
tos por la garantía.
Si parece necesaria una reparación
En primer lugar, diríjase al proveedor al que compró los altavoces. Si no es
posible, escriba a:
Boston Acoustics, Inc. 300 Jubilee Drive, Peabody
, MA 01960 EE.UU.
Le contestaremos lo antes posible indicándole los pasos a seguir.
 Loading...