

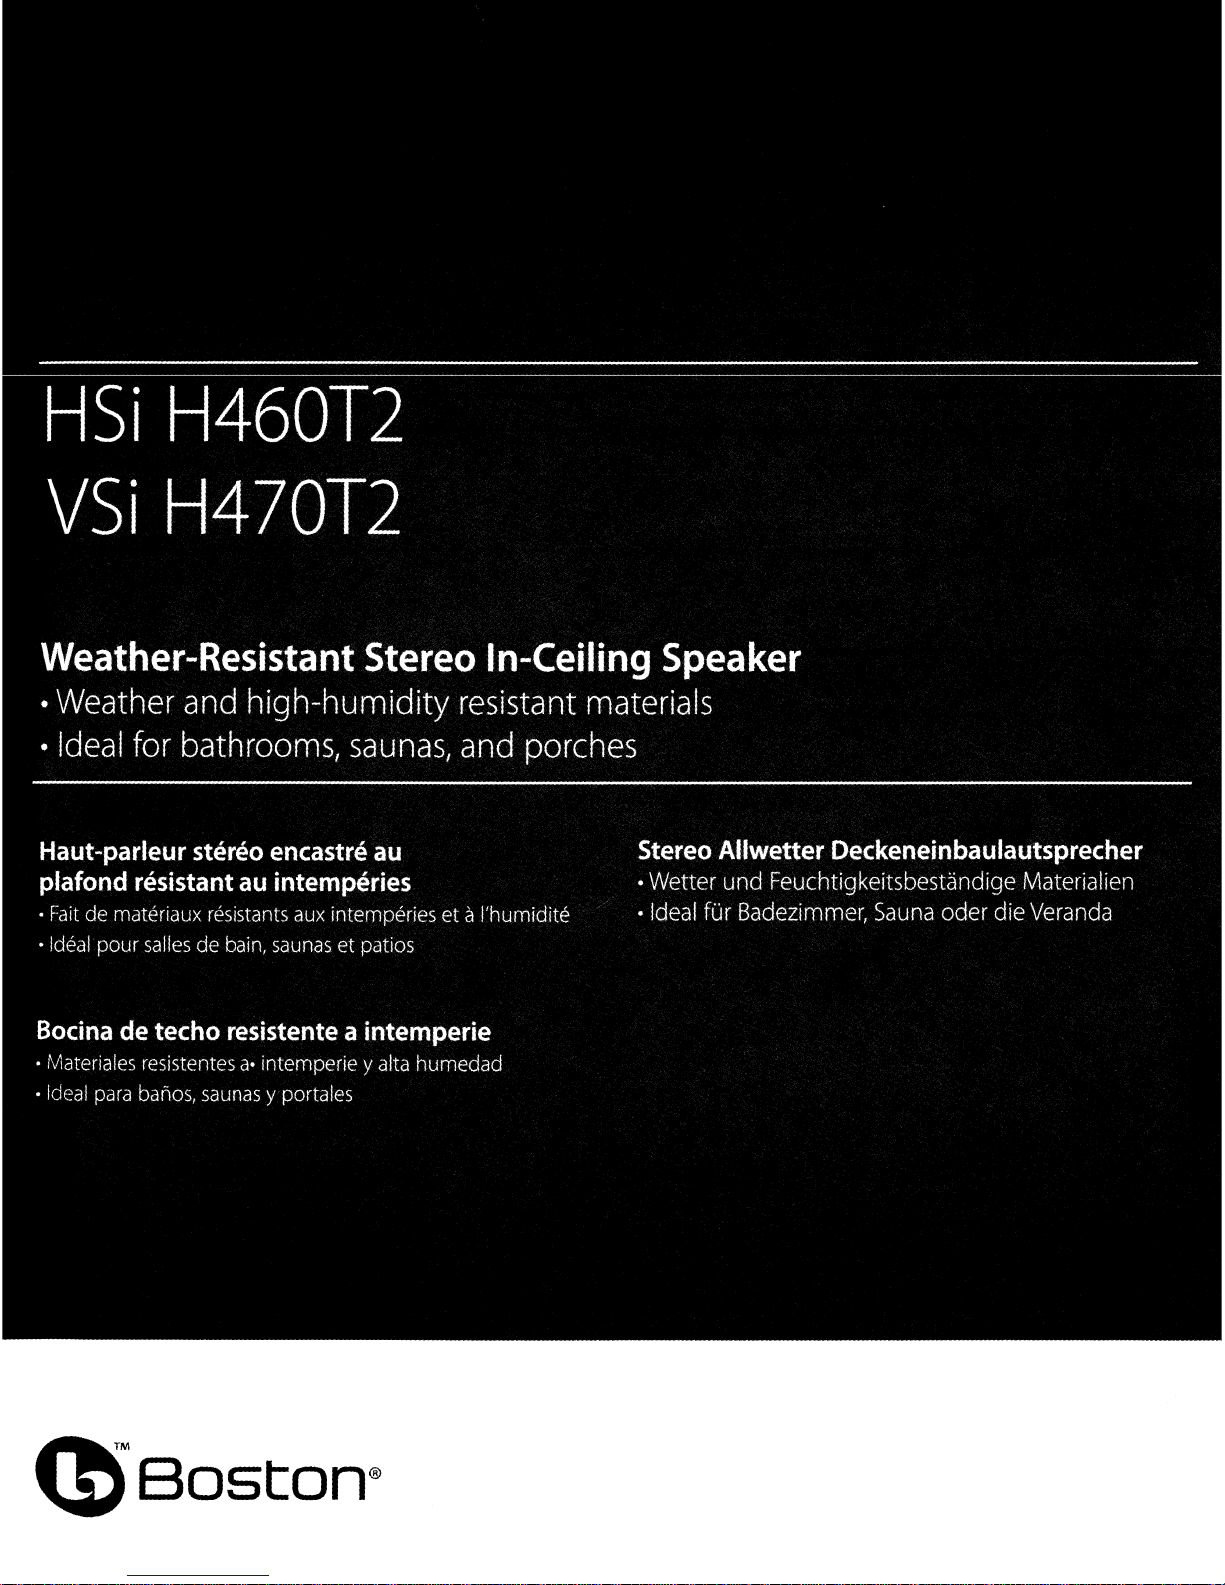
Page 1
Page 2

-2-
Page 3
Contents
Contenido
Sommaire
Inhalt
Configuration
Introduction
Specifications
Parts List 5
Placement/Location Tips 5
InstallationTips 10
Wiring
Installation Instructions 14
Painting 17
Listening Levelsl
Power Handling 18
Contact
Guide 2
Info
12
18
Introduction
Gufadeconfiguraci6n
3
Introducci6n
.4
Especificaciones 4
Lista
de
piezas 5
Sugerencias sobre
la colocaci6n 5
Sugerencias sobre
la
instalaci6n 10
Cableado 12
Instrucciones
Pintura 17
Manejodela potencia
y los niveles
Informaci6ndecontacto
de
de
audici6n 18
Introduccion
instalaci6n
.....
14
18
2
Guidedeconfiguration
.3
Introduction
Specifications 4
Liste des
Conseils d'installation
d'emplacement
Conseils d1nstallation 10
Cablage 12
Instructions d'installation 14
Peinture 17
Niveaux d'ecoute
Contr61edepuissance 18
Infodecontact
composants
Introduction'
2
Konfigurationsanleitung
EinfOhrung 3
3
Technische Daten
Teileliste 5
5
I
Hinweise
5
Installationsort
Tips
Installation 10
Verkabelung 12
Anleitungen zur Installation
Lackierung 17
zur
optimalen
zum
optimalen
.....
2
.4
.5
14
I
Horpegel/PowerHandling 18
18
Kontaktinformationen
18
EinfUhrung
Boston Acoustics
VSi
H470T2
speakers for single location stereo
in-ceiling installations.They
for bathrooms,
humidity locations.They
designed for outstanding durability
as
wellasoutstanding sonic
performance. Rubber surrounds,
coated steel or aluminum hardware,
aluminum grilles, specially coated
crossover networks and speaker
cones made
other protected materials help in
protecting these speakers from the
elements.
Both models
two-channel inputs,
speaker
to
stereo speaker orto operate
as
both a side and rear channel for a
single locations.
HSi
H460T2 and
are
high-humidity
saunas
or other high-
are
of
polypropylene or
can
be set for one or
allOWing
functionasa single
are
as
ideal
the
a or
VSiH470T2
The
VSi
H470n
can
be configured
for diffuse
surround speaker
above the listening
installer
for diffuse operation. In this
application, the
allOWing the"null"
the listener. Turning the
can
installed.
or
direct operation.Ifthe
is
located directly
area,
the
can
configure the speaker
T2
island rotates,
to
be directed at
nisland
be done after the speaker
is
VSiH470T2
Cuandoseusan
de cine casero, tanto
VSi
H470T2sepueden configurar
para que funcionen en modo difuso
o directo.
esta
situado directamente por encirnadela
ador puede configurario para que
funcione en
aplicaci6n,
mite dirigire'"nulo"
de
despues de instalarse
VSi
para entradas de uno y dos canales,
permitiendo que
como
como canal lateral y trasero, desde
una ubicaci6n (mica en
zona de audici6n,elinstal-
la
isla n puede realizarse
Tanto
el
H470T2sepueden configurar
un
canal ambiental (mico 0
en aplicaciones
el
como e
Sielaltavoz ambiental
modo
difuso.Enesta
la
islaT2gira,10que per-
al
oyente.EIgiro
el
altavoz.
HSi
H460n
como
el
el
altavoz funcione
el
techo.
VSiH470T2
Utili
sees
en applications de theatre,
les
VSi
H470n
peuvent etre config-
ures pour un fonctionnement direct
ou de diffusion.
est situee directementau-dessus du
site d'ecoute, 11nstallateur peut configurer I'enceinte pour un fonctionnement de diffusion.
application,l'ilotT2 tourne,
permet de diriger
diteur. L'ilotT2 peut etre tourne apres
I'installation de I'enceinte.
La
HSi
peuvent etre configures pour
entrees aunou deux canaux,
permet que
fonctionner en tant que canal
Surround simple ou en tantque canal
lateral et posterieur
unique emplacement au plafond.
Si
I'enceinte Surround
Ie
H460netla
les
enceintes peuvent
Dans
cette
ce
«zero»
vers
VSi
H470T2
des
ce
apartir d'un
qui
I'au-
qui
VSi
H470T2
Bei
Cinemaanwendungen konnen
der
VSi
H470n
im direkten oder diffusen Modus konfiguriert werden.
Wenn sich
Lautsprecher
Horbereich befindet, kann
Installateurden LautsprecherfUr den
diffusen Betrieb konfigurieren.
dieser
Applikation
Insel,
so
dass
Horergerichtetwerden kann. Die
Insel kann gedreht werden, nachdem derLautsprecher installiert worden ist.
Sowohl der
der
VSi
H470T2 konnen
2-Kanal-Eingang verwendet werden,
damit
der
Surround-Kanal funktioniert, oder
konnen zur Abstrahlung zur Seite
oder nach hinten von einem einzelnen Deckeninstallationspunkt aus
eingesetzt werden.
der
direkt
die "Null-Achse" zum
HSi
Lautsprecher
uber
rotiert
H460T2
mit1-oder
als
Surround-
dem
der
Bei
die T2-
n-
als
auch
einzelner
sie
-3-
Page 4
Thank
you!
iGracias!
Merci
!
Danke!
Thank you for selecting Boston
Acoustics in-ceiling loudspeakers.
Your speaker
to
deliveryearsofstunning
audio performance.
Please
place in
later.
have experience
speakers, please read
Tips
as
VSi
H470T2 specific information.
Enjoy your
T2
speaker.
has
been designed
keep your manual in a
case
you needtorefertoit
For
professional installers
with
the
they
contain
HSi
new
Boston Acoustics
in-ceiling
Installation
H460T2 and
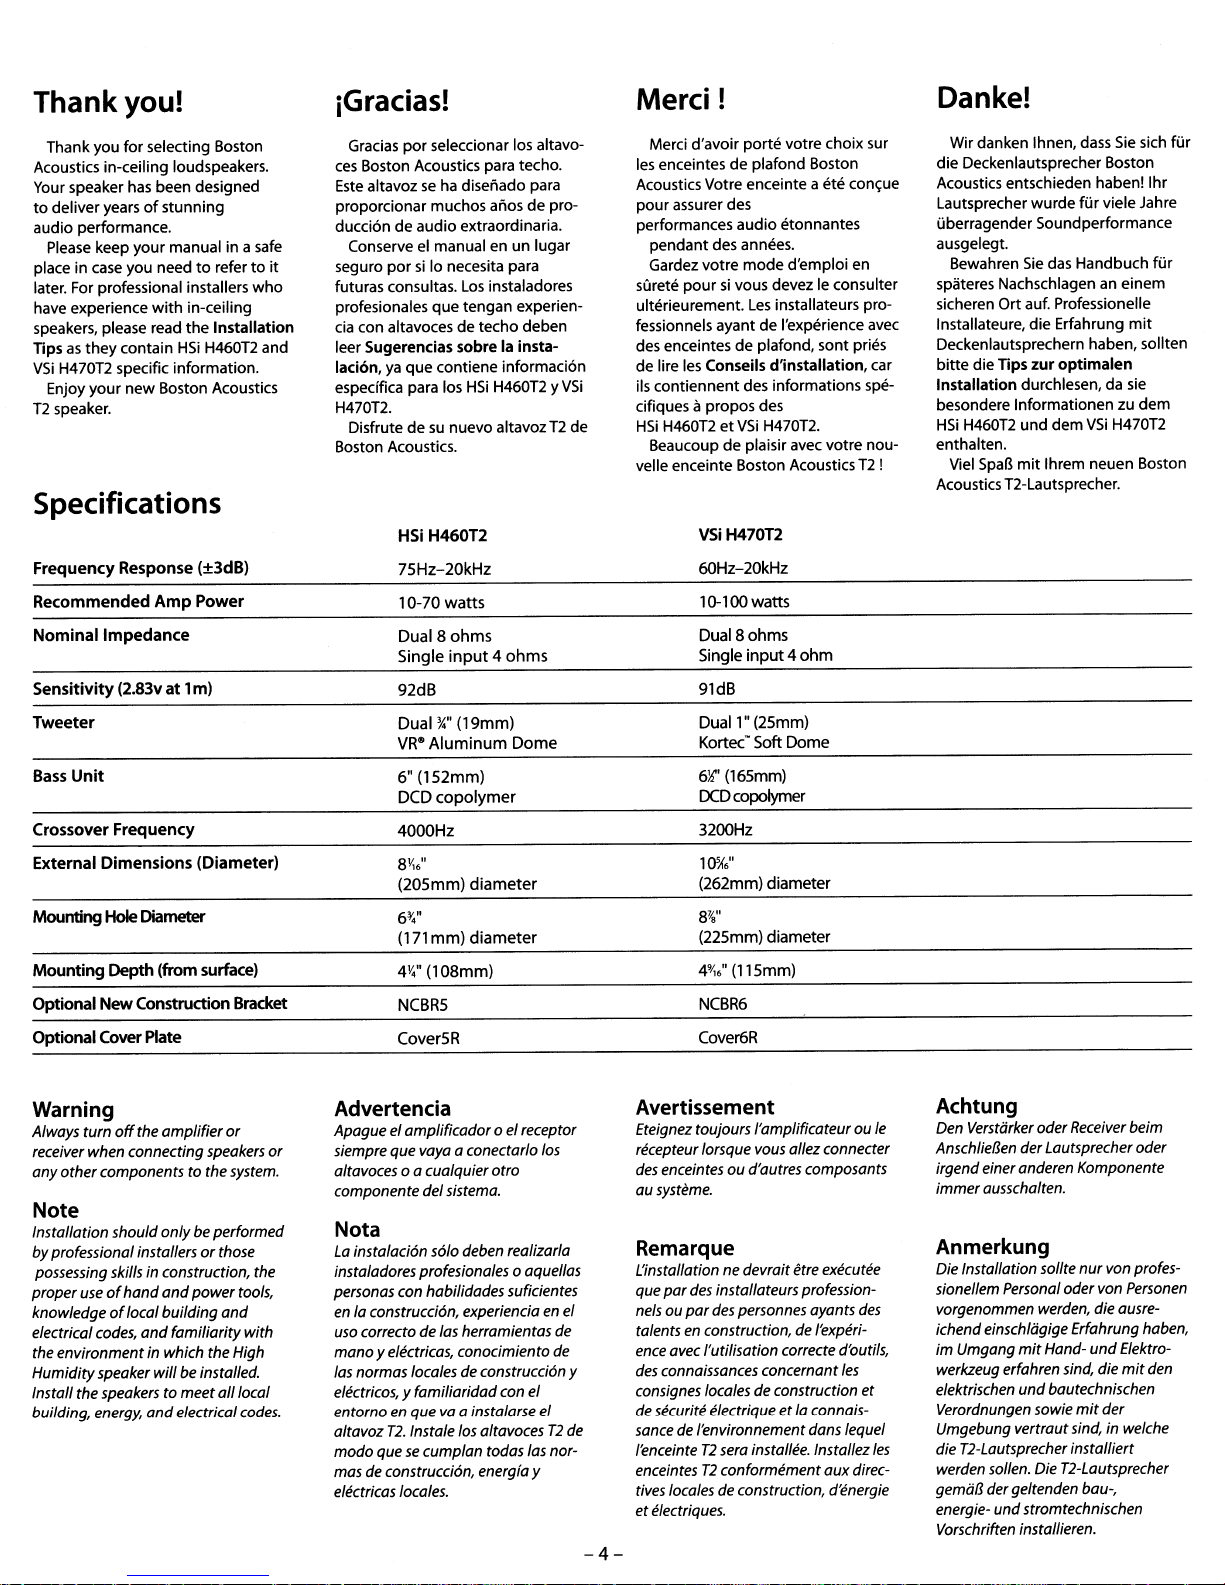
Specifications
Frequency
Recommended
Nominal
Sensitivity
Tweeter
Bass
Crossover
External
Mounting
Mounting
Optional
Optional
Impedance
Unit
Frequency
Dimensions
Hole
Depth
New
Cover Plate
Response
(2.83vat1
Construction Bracket
Amp
Diameter
(from
(±3dB)
Power
m)
(Diameter)
surface)
safe
who
Gracias
por
seleccionar los altavo-
ces
Boston Acoustics para techo.
Este
altavozseha
proporcionar muchos alios
ducci6n de audio extraordinaria.
Conserve el manual en
seguro
por
futuras consultas.
profesionales que tengan experiencia
con altavoces de techo deben
leer Sugerencias sabre la instalacion,
ya
especifica para los
H470T2.
Disfrute de
Boston Acoustics.
HSi
75Hz-20kHz
10-70
Dual8
Single
92dB
Dual%"(19mm)
VR-
6"
DCD
4000Hz
811,6
(20Smm)
diseliado para
de
pro-
un
lugar
si10necesita para
Los
instaladores
que contiene informaci6n
HSi
H460T2 Y
su
nuevo altavozT2de
H460T2
watts
ohms
input4ohms
Aluminum
(152mm)
copolymer
11
diameter
VSi
Dome
6¥.."
(171
mm)
diameter
4V."
(108mm)
NCBRS
Cover5R
Merci d'avoir porte votre choix sur
les
enceintes de plafond Boston
Acoustics Votre enceinte a ete
pour assurer des
performances audio etonnantes
pendant des annees.
Gardez votre mode d'emploi
surete poursivous devezIeconsulter
ulterieurement.
fessionnels ayant de I'experience avec
des enceintes de plafond, sont pries
de lire les Conseils d'installation, car
ils contiennent des informations specifiques it propos des
HSi
H460T2 et
Beaucoup de plaisir avec votre nou-
velle enceinte Boston Acoustics
Les
installateurs pro-
VSi
H470T2.
VSiH470T2
60Hz-20kHz
10-100watts
Dual80hms
Single
input4ohm
91dB
Dual 1"(25mm)
Kortec- Soft
6J!'
(165mm)
DCD
3200Hz
Dome
copolymer
con<;ue
en
T2
10',{.'
(262mm) diameter
87,(,"
(225mm) diameter
40/,."
(11Smm)
NCBR6
Cover6R
Wir danken Ihnen,
die Deckenlautsprecher Boston
Acoustics entschieden haben! Ihr
Lautsprecher wurde fUr viele Jahre
uberragender Soundperformance
ausgelegt.
Bewahren
spateres Nachschlagenaneinem
sicheren Ortauf. Professionelle
Installateure, die Erfahrung
Deckenlautsprechern haben, sollten
bitte die Tips
Installation durchlesen,dasie
besondere Informationen zu dem
HSi
H460T2
enthalten.
!
Viel
Acoustics T2-Lautsprecher.
Spal3
Sie
das Handbuch
zur
und
dem
mit
Ihrem neuen Boston
dass
optimalen
VSi
H470T2
Sie
mit
sich
fUr
fUr
Warning
Always turn
receiver when connecting speakers
any
off
the
amplifier
other
components to the system.
or
or
Advertencia
Apagueel
siempre
altavoces
componentedelsistema.
amplificador
que
°a cualquier
Note
Installation should
by
professionalinstallersorthose
possessing skills in construction, the
properuseofhand
knowledgeoflocal
electricalcodes,
the
environmentinwhich the High
Humidity
Install the speakerstomeet
building, energy,
speaker
only
be performed
and
power
building
and
familiarity
will
be installed.
and
electricalcodes.
and
all
tools,
with
local
Nota
La
instalaci6n
instaladores profesionales 0 aquellas
personas con habilidades suficientes
en la construcci6n, experiencia en
uso correcto de las herramientas de
mano
y electricas, conocimiento de
las normaslocales de construcci6n y
eJectricos, y
entorno en que va a instalarse el
T2.
altavoz
modo
mas de construcci6n, energiay
electricas locales.
Instale los altavocesT2de
quesecumplan
vaya a conectarlo los
°el receptor
otro
5610
deben realizarla
familiaridad
con
el
todas las nor-
Avertissement
Eteignez toujours /'amplificateur
recepteur lorsque vous allez connecter
des
enceintesoud'autres composants
ausysteme.
ou
Ie
Remarque
L'installation ne devrait etre executee
que
par
des
installateurs profession-
el
nels ou
par
des
personnes ayants
talents en construction, de /'experience avec /'utilisation correcte d'outils,
des
connaissances concernant
consignes locales de construction
desecurite electriqueetla
sance de /'environnement dans lequel
l'enceinteT2sera installee. Installez
enceintesT2conformement
tives localesdeconstruction, d'energie
et
electriques.
les
connais-
aux
des
et
les
direc-
Achtung
Den Verstiirker oder Receiver beim
Anschlief1en der Lautsprecher oder
irgendeineranderen Komponente
immer
ausschalten.
Anmerkung
Die Installation sollte
sionellem Personal oder von Personen
vorgenommen werden, die ausreichendeinschliigige Erfahrung haben,
im
Umgang
werkzeug erfahren sind, die
elektrischen
Verordnungen sowie
Umgebung vertraut sind,inwelche
die T2-Lautsprecher installiert
werden sollen. Die T2-Lautsprecher
gemiif1 der geltenden bau-,
energieVorschriften installieren.
mit
und
und
nur
von profes-
Hand-
und
Elektro-
mit
bautechnischen
mit
der
stromtechnischen
den
-4-
Page 5
Included
Contiene
Inclus
Lieferumfang
• Speaker
w/scrim cloth
•Grille
•Paint shield
• Cutout template
• Screwdriver
bit
(VSi
H470T2 only)
PlacementILocation
Tips
Exterior locations
some protection from
are preferred. Unprotected
deteriorate more quickly over time.
high-humidity
Boston
speakers can also be used in
bathrooms and
locations.
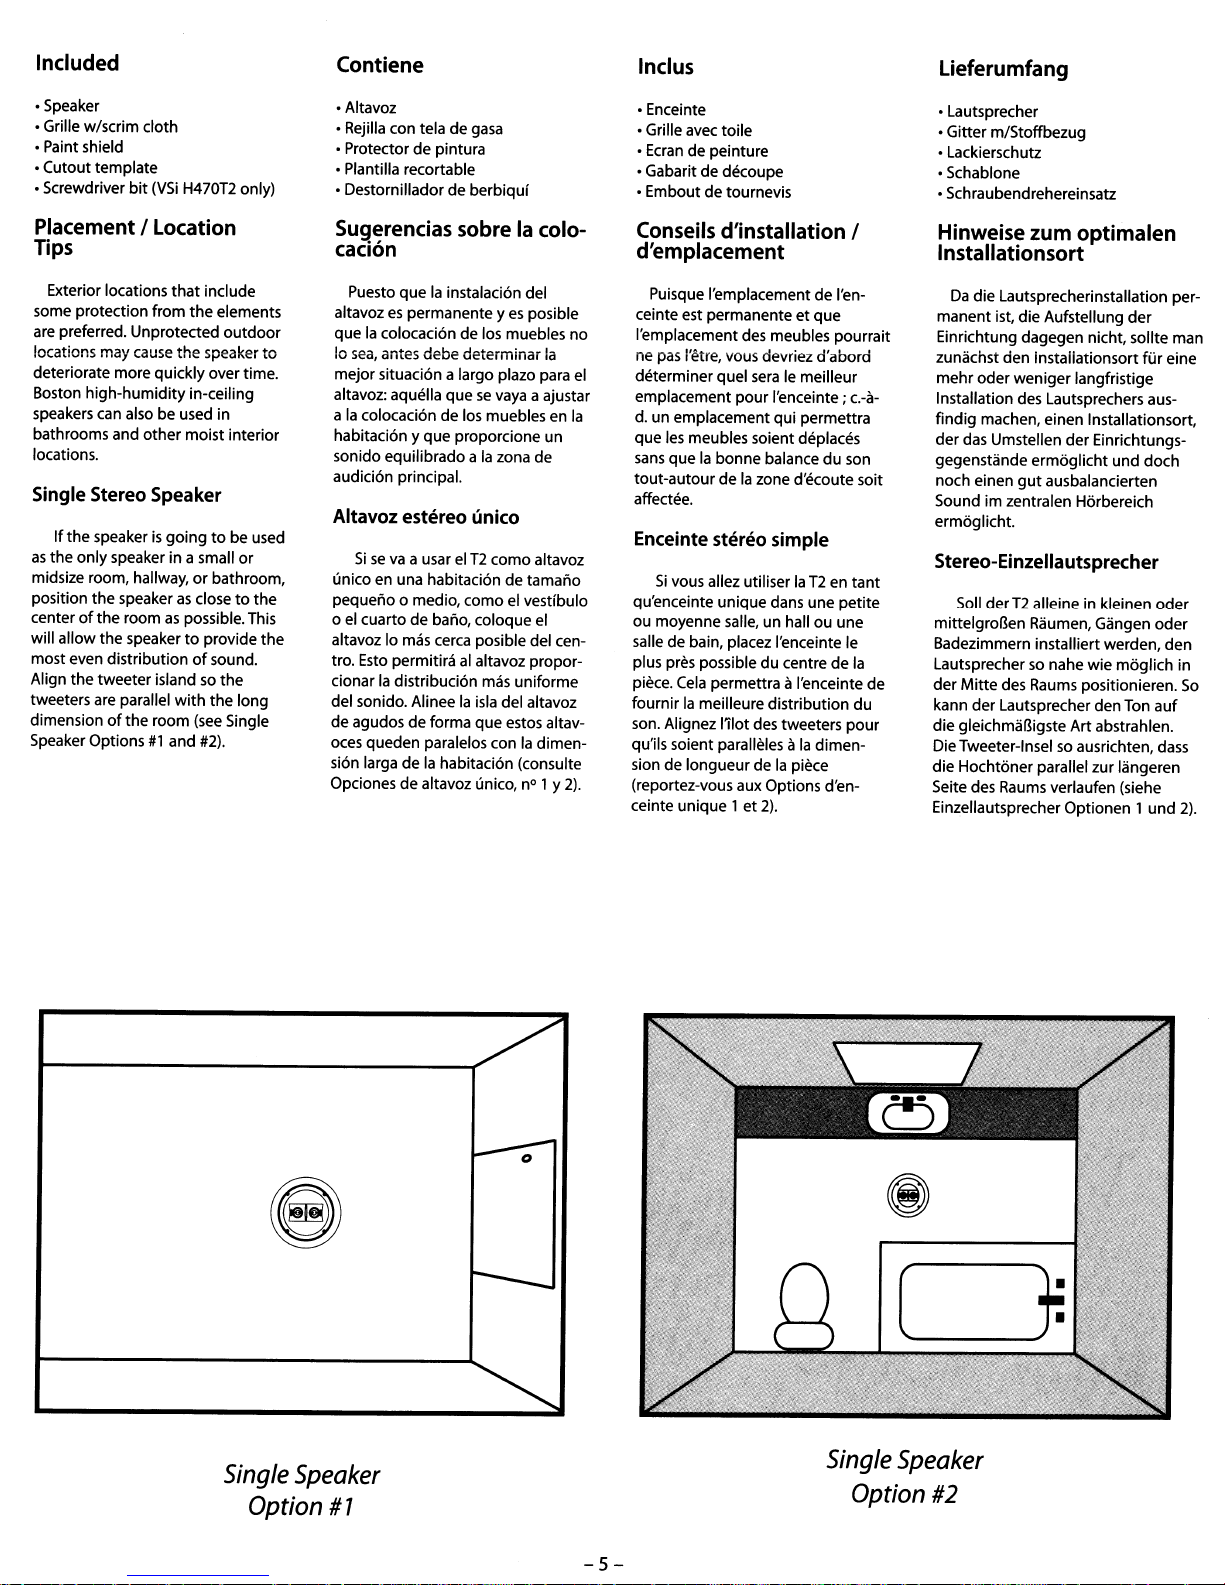
Single
Stereo
If
the
speakerisgoingtobe used
as
the only speaker in a small or
midsize room, hallway,
the
position
centerofthe
will allow the speaker
most even distributionofsound.
Align the tweeter island
tweeters are parallel
dimension
Speaker Options
of
that
include
the
elements
outdoor
in-ceiling
other
moist interior
Speaker
or
bathroom,
speakerasclosetothe
roomaspossible. This
to
provide
so
the
with
the
long
the room
#1
(see
and #2).
Single
the
• Altavoz
• Rejilla con tela de
• Protectordepintura
• Plantilla recortable
• Destornillador
Sugerendas
gasa
de
berbiqui
sobrelacolo-
cadon
Puesto
quelainstalacion del
es
altavoz
que
10
mejor situacion a largo plazo para el
altavoz: aquella que
a
habitacion y que proporcione un
sonido equilibrado a
audicion principal.
Altavoz
unico en una habitacion de tamano
pequeno
o el cuarto de bano, coloque el
altavoz
tro.
cionar
del sonido. Alinee
de agudos de forma que estos altavoces queden paralelos con
sion larga de
Opciones de altavoz unico, n° 1y
permanente yesposible
la
colocaciondelos muebles
sea,
antes
debe deteimiiiar
se
vaya a ajustar
la
colocacion de los mueblesen
la
zona de
estereo
Siseva
a usar elT2como altavoz
0 medio, como el vestibulo
10
mas cerca posibledel cen-
Esto
permitiraalaltavoz propor-
la
distribucion mas uniforme
unico
la
isla del altavoz
la
habitacion (consulte
la
dimen-
no
la
2).
• Enceinte
• Grille avec toile
Ecran
de peinture
•
• Gabarit de decoupe
• Embout de tournevis
Conseils
d'installation I
d'emplacement
Puisque I'emplacement de I'enceinte est permanente et que
I'emplacement des meubles pourrait
fie
pas
I'etre,
vous
devr'iez
d'abord
determiner quel
emplacement pour I'enceinte ; c.-a-
la
d.
un emplacementqui permettra
les
meubles soient deplaces
que
sans
quelabonne balanceduson
tout-autour
affectee.
Enceinte
seraIemeilleur
delazone d'ecoute soit
stereo
simple
• Lautsprecher
m/Stoffbezug
• Gitter
• Lackierschutz
·Schablone
·Schraubendrehereinsatz
Hinweise
zum
optimalen
Installationsort
Da
die Lautsprecherinstallation permanent ist, die Aufstellung
Einrichtung dagegen nicht, sollte man
zunachst den instaiiationsort fUr eine
mehr oder weniger langfristige
Installation des Lautsprechers aus-
findig machen, einen Installationsort,
der das Umstellen der Einrichtungsgegenstande ermoglicht und doch
noch einen
Sound im zentralen Horbereich
ermoglicht.
gut
ausbalancierten
der
Stereo-Einzellautsprecher
Si
vous allez utiliserlaT2entant
qu'enceinte unique dans une petite
ou moyenne salle, un hall ou une
la
dimen-
Ie
du
salle de bain, placez I'enceinte
plus pres possible du centredela
piece.
Cela
permettra a I'enceinte de
la
fournir
son. Alignez l'ilot des tweeters pour
qu'ils soient paralleles a
sion de longueur
(reportez-vous aux Options d'enceinte unique 1et
meilleure distribution
delapiece
2).
5011
derT2alleine in kleinen oder
mittelgroBen Raumen, Gangen
Badezimmern installiertwerden, den
Lautsprecher
der
Mitte
kann
die gleichmaBigste Art abstrahlen.
DieTweeter-Insel
die Hochtoner parallel zur langeren
Seite des Raums verlaufen (siehe
Einzellautsprecher Optionen 1 und
so
nahe wie moglich in
des Raums positionieren.
der
Lautsprecher den Ton auf
so
ausrichten, dass
oder
So
2).
e
Single
Speaker
Option
#7
/
l.----;-
----
~
-5-
Single
Option
Speaker
#2
Page 6
Surround Speaker
Altavoz ambiental
Enceinte Surround
Surround-Lautsprecher
When using the speakersassurround speakers, you will
locate the speakers on opposite
sides
of
the
room, located parallel
with
or
behind
the
for
sixofthe
is
used.
the
of
the
speaker
Once each
installed,
fine-tuned by rotating the tweeter
island and switching between direct
and diffuse modes.
only)
We
have provided placement
options
installation scenarios. The diagrams
note location, tweeter island
location, and which mode (direct or
diffuse)
want
to
listening area.
speakers
(VSi
is
can
be
H470T2
most common
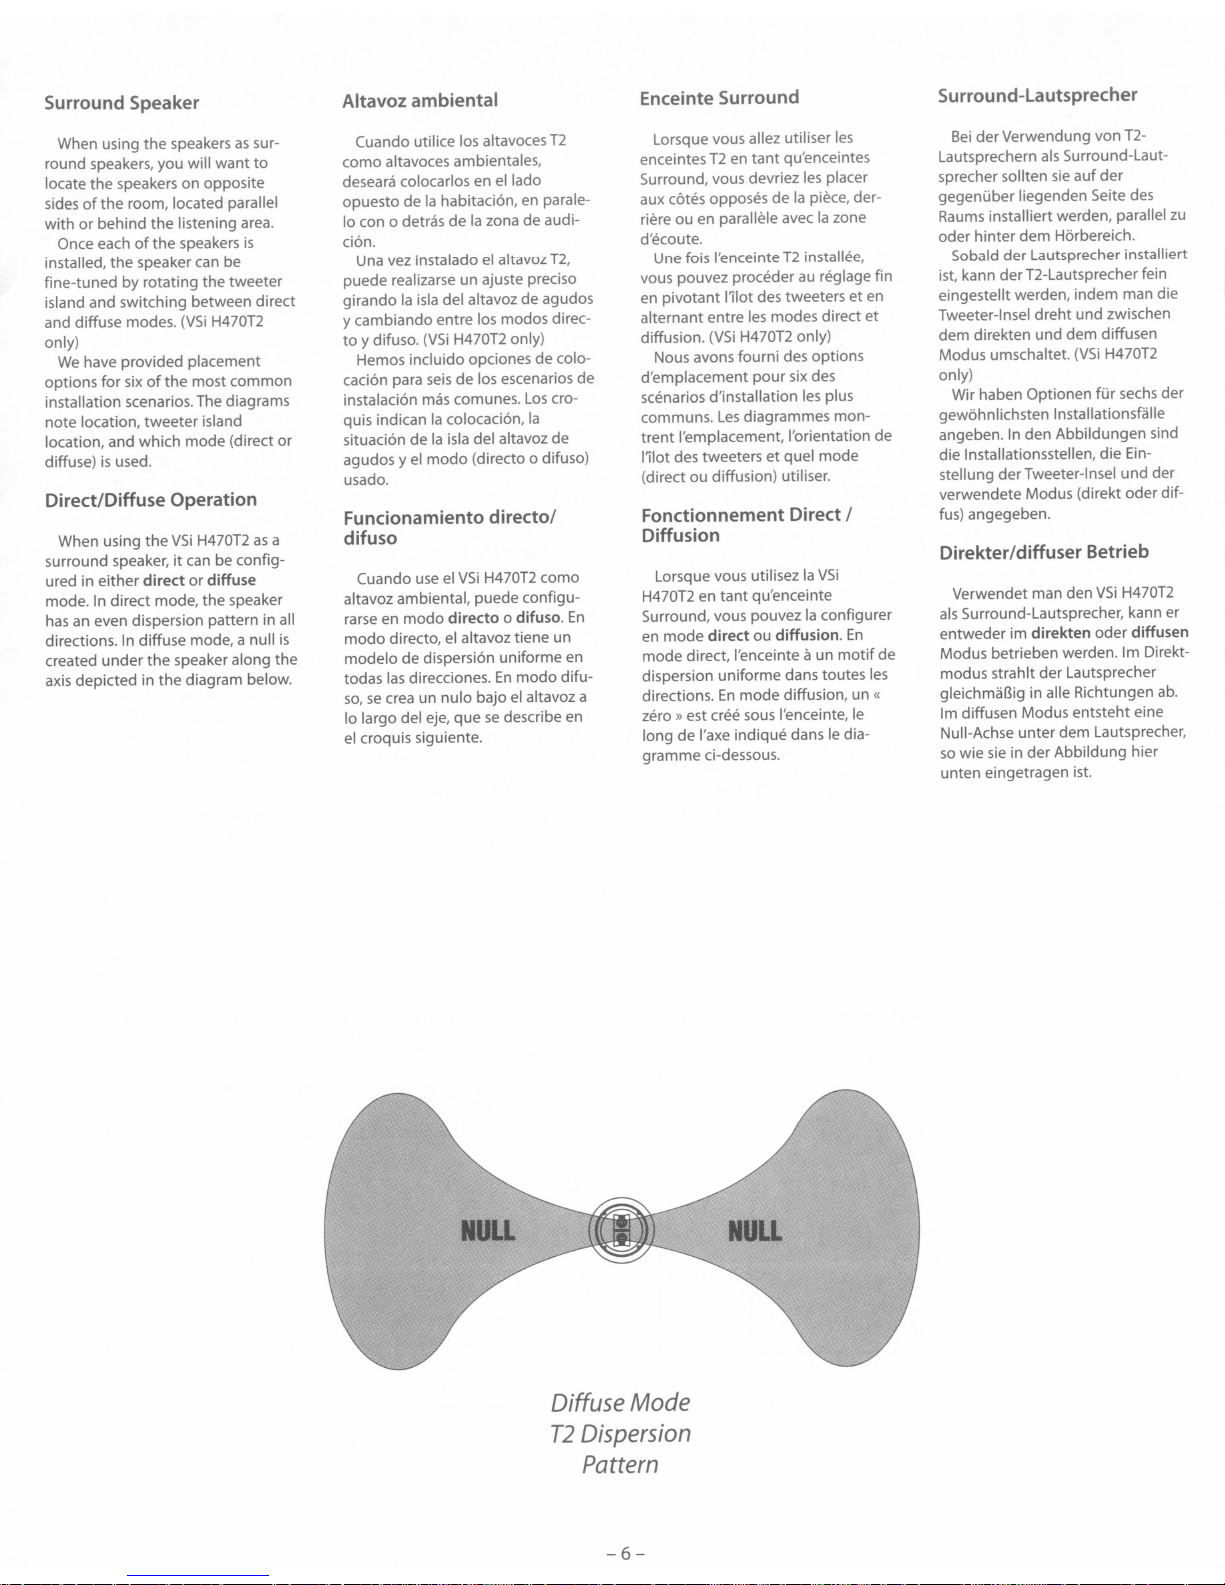
Direct/Diffuse Operation
When using
surround speaker,
ured in either
mode.Indirect mode, the speaker
hasaneven dispersion pattern in all
directions.
created under
axis
depicted in
the
VSi
H470T2asa
it
can be config-
directordiffuse
In
diffuse mode, a null
the
speaker along the
the
diagram below.
Cuando utilice los altavoces
como altavoces ambientales,
deseara colocarlos en
opuesto de
10
con 0 detras delazona de audi-
cion.
Una vez instalado
puede realizarse un ajuste preciso
girando
y cambiando entre los modos direc-
to
y difuso.
Hemos incluido opciones de colocacion para
instalacion
quis indican
situacion delaisla del altavoz de
agudos y
usado.
Funcionamiento
la
habitacion,enparale-
el
la
isla
del altavoz de agudos
(VSi
H470T2 only)
seis
de los escenarios de
mas
comunes.
la
colocacion,
el
modo
(directo 0 difuso)
directo/
el
lado
altavoz
Los
la
T2
T2,
cro-
difuso
Lorsque vous allez utiliser
enceintesT2en
Surround, vous devriez
aux cotes opposes de
riere ou en parallele avec
d'ecoute.
Une fois I'enceinte
vous pouvez proceder
en
pivotant
alternant entre
diffusion.
Nous avons fourni des options
d'emplacement
scenarios d'installation
communs.
trent
I'emplacement, I'orientation de
1110t
des tweetersetquel mode
(direct ou diffusion) utiliser.
tant
1110t
des tweeterseten
les
(VSi
modes directet
H470T2 only)
pour
Les
diagrammes mon-
Fonctionnement Direct/
Diffusion
les
qu'enceintes
les
placer
la
piece, der-
la
zone
T2
installee,
au
reglage fin
six des
les
plus
Bei
derVerwendung von
Lautsprechern
sprecher sollten
gegenuber liegenden Seite des
Raums
oder hinter dem Horbereich.
Sobald der Lautsprecher installiert
ist, kann derT2-Lautsprecher fein
eingestellt werden, indem man die
Tweeter-Insel dreht und zwischen
dem direkten und dem diffusen
Modus umschaltet.
only)
Wir haben Optionen
gewohnlichsten Installationsfalle
angeben. In den Abbildungen sind
die Installationsstellen, die Einstellung derTweeter-lnsel und der
verwendete Modus (direkt oder diffus)
angegeben.
als
Surround-Laut-
sie
installiert werden, parallel
aufder
(VSi
H470T2
fUr
T2-
sechs
der
zu
Direkter/diffuser Betrieb
Cuando
useelVSi
altavoz ambiental, puede configurarse
en
is
modo
modo
directo,elaltavoz tiene un
modelo de dispersion uniforme
todas
las
so,secrea un nulo bajoelaltavoz a
10
el
direcciones.Enmodo
largo del eje, quesedescribe
croquis siguiente.
H470T2 como
directo
0 difuso.
En
en
difu-
en
Lorsque vous utilisezlaVSi
H470T2 en
Surround, vous pouvez
en
mode direct, I'enceinte aun
dispersion uniforme dans toutes
directions.Enmode diffusion, un «
zero» est cree sous I'enceinte,
long de I'axe indique dansIediagramme ci-dessous.
mode
tant
direct
qu'enceinte
la
ou diffusion.
configurer
En
motif
Ie
les
de
Verwendet man den
als
Surround-Lautsprecher, kann er
entweder im
Modus betrieben werden.
modus strahlt der Lautsprecher
gleichmaBig in aile Richtungen
1m
diffusen Modus entsteht eine
Null-Achse unter dem Lautsprecher,
so
wie
unten eingetragen ist.
direkten
sie
in der Abbildung hier
VSi
H470T2
oder diffusen
1m
Direkt-
abo
Diffuse Mode
T2
Dispersion
Pattern
-6-
Page 7

Surround
• Direct mode
•Tweeters
Placement
face
Option
front and back
#1
Opci6ndecolocaci6n
ambientalnO1
•Mododirecto
•Altavoces de agudos hacia
yatras
el
frente
Optiondeplacement
• Mode Direct
•Tweeters diriges
en
arriere
en
Surround
avant et
1
Option
fUr
Surround-Installation
•Direkter Modus
Die
Hochttiner sind nach vorne und
•
nach hinten ausgerichtet
1
Surround
•Diffuse mode
•Tweeters
Placement
face
Option
front and back
#2
Surround
Opci6ndecolocaci6n
ambientalnO2
•Mododifuso
•Altavoces de agudos hacia
yatras
Placement
el
frente
Option #1
Optiondeplacement
•Mode diffusion
•Tweeters diriges
en
arriere
en
Surround
avant
2
Option
fur
Surround-Installation
• Diffuser Modus
et
•Die Hochttinersind nach vorne und
nach hinten ausgerichtet
2
Surround
Placement
-7-
Option
#2
Page 8

Surround Placement Option #3
• Direct
mode
•Tweeters face
front
and back
Opci6ndecolocaci6n
nO
ambiental
•
Modo
3
directo
•Altavoces de agudos haciaelfrente
yatras
I·
-,
_.'
. '.: . '
~
~.-
. . .
Optiondeplacement Surround 3
•
Mode
Direct
•Tweeters diriges en avant
et
en arriere
Front
8-12
feet
(2.4-3.6m)
'.:',
,\'$.".,
...
",
-,'
~....,~~.~
-,.~
..~.-
"",
..
"
..
:-;-'.'.''J''~/
".
Option fUr Surround-Installation 3
• Direkter Modus
• Die Hochtoner sind nach vorne
nach hinten ausgerichtet
und
Surround Placement Option #4
• Diffuse mode
•Tweeters face side walls
Surround
Opciondecolocacion
ambiental n° 4
•
Modo
difuso
•Altavoces de agudos hacia
las
paredes laterales
Placement
Optiondeplacement Surround 4
• Mode diffusion
•Tweeters diriges vers
lateraux
Option
#3
les
murs
Option
fOr
Surround-Installation 4
• Diffuser Modus
• Die Hochtoner sindzuden
Seitenwanden gerichtet
Surround
Placement
-8-
Option
#4
Page 9

Surround Placement Option #5
• Side speakers-diffuse mode
•
Rear
speaker-direct mode
•Tweeters face front and back
Opcion de colocacion
nO
ambiental
• Altavoces laterales-modo difuso
•Altavoz trasero-modo directo
•Altavoces de agudos hacia el frente
yatras
5
Option de placement Surround 5
• Enceintes laterales-modediffusion
• Enceinte arriere-mode direct
•Tweeters diriges en avant et
en arriere
Front 7
~
8-12 feet
(2.4-3.6m)
•I
Option
fur
Surround-Installation 5
•Seitlicher Speaker-Diffuser Modus
• Ruckseitiger SpeakerDirekter Modus
• Die Hochtonersind nach vorne und
nach hinten ausgerichtet
Surround Placement Option #6
• Side speakers-diffuse mode
•
Rear
speakers-direct mode
•Tweeters face front and back
Surround Placement Option
Opcion de colocacion
ambiental
• Altavoces laterales-modo difuso
•Altavoz
• Altavoces de agudos haciaelfrente
yatras
nO
6
trasero-modo
directo
I·
#5
Option de placement Surround 6
• Enceintes laterales-mode diffusion
• Enceinte arriere-mode direct
•Tweeters diriges en avant
en arriere
Front
8-12 feet
(2.4-3.6m)
•I
Option
fur
Surround-Installation 6
• Seitlicher Speaker-Diffuser Modus
• Ruckseitiger Speaker-
et
Direkter Modus
• Die Hochtoner sind nach vorne
nach hinten ausgerichtet
und
4-10
feet
(1.2-3m)
Surround Placement Option
-9-
#6
Page 10

Installation
Tips
Sugerencias
sobre
Conseils
Tips
zur
optimalen
Required
Behind
must be 1-inch (25mm)
around
New
Performanceofyour Boston
Acoustics loudspeakercan be
enhanced
filled
insulation.
insulation
paper backing facing
remove
behind
(Consult local
compliance.)
Taking steps
rigidityofthe
using additional drywall screws,
and/or
adhesive between
andjoistsadjacent
location,
performance.
Clearances
the
mounting
the
mounting
Construction
if
the
ceiling cavity
with
standard fiberglass
If
thereisalready
in
the
ceiling
the
backinginthe
the
installation location.
building
to
increase
mounting
the
useofa construction
the
will
further
hole.
the
codes for
drywall
to
the
enhance
of
that
surface, there
clearance
has
speaker,
area
the
surface by
speaker
la
instalaci6n
Espacio
Detrasdela
instalacion, debe haber25mm
pulgada)deespacio Iibre alrededor
del orificio
Nueva
Pueden mejorarse las prestaciones
is
a
del altavoz Boston Acoustics
lena
de
aislante en
leno
quite
delacolocaciondela
(Consulte las normas locales sobre
construccion para cumplirlas.)
Se
izando los pasos necesarios para
aumentar
de instalacion, utilizando tornillos adicionales para panel
sivo especial para
entre el panel
acentes a
Iibre
necesario
1----
I
/
superficie
de
instalacion.
222mm
....
/"
8".'
--
.....
de
......
"-
/ \
I
1-
__
6""
__
I
l7lmm
-1
\ /
\ /
" /
......
HSI460n
/'
construccion
siserei-
la
cavidad del techo con aislante
fibradevidrio estandar.Siya
la
pared
que
tieneunrel-
de
papel enfrente del altavoz,
el relleno enlazona de detras
instalacion.
mejoraran
las
prestaciones real-
la
rigidezdela
de
la
colocacion del altavoz.
superficie
de
yeso un adhe-
la
construccion
yeso y las vigas ady-
(1
.-j
\
I
hay
d'installation
Distances
Derrierelasurfacedemontage,
vous devezdisposer
25mm(1
montage.
",.
/ "
/ \
/ \
"
\ 225mm J
\ I
\ /
" /
"
...............
Nouvelle
Les
enceinte Boston Acoustics peuvent
etre ameliorees lorsque
piafond est remplie avecdeI'isolation
standard en fibre de verre.
a deja
type avec un recouvrement en papier dirige vers I'enceinte, eliminez
recouvrement situe derriere I'emplacement d1nstallation. (Consultez
la
conformite avec les directives
locales
Si
vous prenez des mesures
augmenterlarigidite delasurface
de
montageen utilisantdes vis de
fixation supplementaires
adhesifs
parois
I'emplacement
teront egalement une amelioration
des performances.
exigees
d'un
pouce) autourdutrou de
:~~~~
/
.....
espace
"
8%'
_-,.-'
VSl470n
construction
performancesdevotre
de
11solation installee,
de
construction.)
de
construction entre les
et
les poutres adjacentes a
de
\
",./
la
cavite
du
et/ou
I'enceinte, appor-
S'il
pour
des
du
Installation
Raumanforderungen
fOr
die
Installation
de
y
Ie
Hinter der Einbauflache muss sich
urn die Einbauoffnung ein Freiraum
von
25mmbefinden.
Neukonstruktion
Die Leistungen Ihres Boston
Acoustics-Lautsprechers konnen
verbessert werden, wenn
Deckenoffnung
Glasfasermaterial gefUllt wird.
Befindet sich in
dem
Lautsprecher bereits eine
Isolierung
diese Verstarkung hinter
Einbauoffnung entfernen.
etwaige Konformitatsfragen gelten
dieortlichen Bauverordnungen.)
Noch bessere Leistungen konnen
durch die Verwendung von Schrauben und/oder von Bauklebern zwis-
chen derGipswand
Deckenbalkeninder
Installationsstelle des Lautsprechers
zurVersteifung von Gipsplatten
erhalten werden.
mit
der
mit
Papierverstarkung,
die
Standard-
Wand
hinter
der
(FOr
und
den
Nahe
der
Joist--
Ceiling
Material
--
Diagram
-10-
#1
--
--
--
Fiberglass
Additional
Adhesive
lining
drywall
between
screws
studs
and
drywall
Page 11

Bass
Management
If
you are using
loudspeaker
processor and subwoofer, set the
management controlto·small"for
HSi
H460T2 and
Consult your surround-sound
receiverorprocessor manual for
instructionsonchanging
management settings.
Optional
New
Construction
For
new
we offer
The
guide
new
NCB
brackets
when
Model
HSiH460T2
VSi
H470T2
your
High
VSi
the
Humidity
H470T2.
bass
for
drywall.
with
a surround-sound
the
Brackets
construction installations,
construction brackets.
actasa perfect
cutting
Bracket
NCBR8
NCBR6
Transformers
We
have provided spaceonthe
crossover boardsofthe
and
VSi
H470T2 for
25/70-volt distribution transformers.
To
Remove
If
you needtoremove the grille,
gently liftitoutatthe
sharp,
awlorthe
grille pick.
Grille
pointed
instrument
optional Boston Acoustics
HSi
mounting
edges.
suchasan
H460T2
two
Use
bass
the
a
Gesti6ndegraves
Si
utilizaelaltavozT2 con una
procesadoradesonido ambiental y
un altavoz de graves, configure la
gestion del control de graves en
"small" (pequeno) para los equipos
HSi
H460T2 Y
Consulte las instrucciones sobre
como cambiar los parametros de
gestiondegraves en el manual del
receptor 0laprocesadoradesonido
ambiental.
Soportes
construcciones
Para
ciones nuevas, ofrecemos nuevos
soportesdeconstruccion.
soportes
perfecta cuandosecorta el panel de
yeso.
Modelo
HSi
VSiH470T2
VSi
H470T2.
opcionales
para
nuevas
instalaciones en construc-
NCB
H460T2
actuan
Abrazadera
NCBR8
NCBR6
como
Los
una guia
la
Transformadores
Hemos dejado espacio entre los
paneles de union de los equipos
HSi
H460T2 yVSi H470T2 para
instalaciondedos transformadores
de
distribucion de 25/70
Para
retirarlarejilla
Si
necesita
ella suavemente
Utilice un instrumento afilado
acabado en punta, como un punzon
o el pico de rejilla opcional
Boston Acoustics.
quitarlarejilla, tire de
por
los bordes.
la
V.
de
Gestion
Si
T2
Surroundetun subwoofer, reglez
contr61e de gestion des
small» (faible)
HSi
ConsultezIemode
votre recepteur ou processeur
Surround
propos delamodification des
reglagesdegestion de
Supports
nouvelle
Pour des installations dans de
nouvelles constructions, nous dispo
constructions.
font
effectuerladecoupe.
des
vous allez utiliser votre enceinte
avec un processeurdeson
H460T2etVSi
basses
pour
les
H470T2.
pour
des instructions a
option
basses
enceintes
d'emploi de
basses.
nels pour
construction
sons
de supports
officedeguide
Les
pour
supports
parfait
nouvelles
NCB
pour
a«
Modele Support
HSiH460T2
VSiH470T2
NCBR8
NCBR6
Transformateurs
Nous avons prevu un espace sur
les
circuitsdetransition des
H460T2 etVSi H470T2
tage de deux transformateurs de
distribution de 25/70
Pour
retirerlagrille
Si
vous avez besoin de retirer
grille, soulevez-Ia doucement sur
bords. Utilisez un instrument pointu,
tel qu'un auneouIe
grille
optionnel
de Boston Acoustics.
HSi
pourIemon-
V.
poin.;on
la
les
de
Steuerung
der
Basswiedergabe
Verwenden
Ie
einem Surround-Soundprozessor und
Subwoofer, stellen
derBasswiedergabe auf"small·
(niedrig)
VSi
H470T2.
Lesen
Anderung der Basswiedergabe in
dem
Sound-Receivers oder -Prozessors.
Optionale
Sie
fUr
den
Sie
die Anleitungen zur
Handbuch Ihres Surround-
Bugel
Neukonstruktionen
Fur Neukonstruktionen konnen
neue Einbaubugel verwendet werden. Die NCB-Bugel dienen
Fuhrungselemente beim Ausschneiden der Gipsplatten.
Modell
HSiH460T2
VSiH470T2
Trafos
Wir haben
Frequenzweichen des
und
25/70VoltTrafos geschaffen.
Abnehmen
Soli das Gitter entfernt werden,
leicht an den Kanten ausheben.
Einen scharfen spitzen Gegenstand
wie eine Dorn
Acoustics
Gitterhaken verwenden.
des
auf
VSi
H470T2 Platz
des
oder
auf
Anfrage erhaltlichen
IhrenT2-Speaker
Sie
die Steuerung
HSi
H460T2
und den
fur
als
Bligel
NCBR8
NCBR6
den Platten der
HSi
H460T2
fur
zwei
Gitters
den bei Boston
mit
es
-11-
Page 12

Wiring
Depending on the application,
there are several differentways
wire the speaker.
Cableado
En
funci6n delaaplicaci6n, hay varias
to
formas diferentes de cablear el altavoz
T2.
Cablage
Selon I'application,iIya
ferentes manieres de cabler I'enceinteT2.
dif-
Verkabelung
Je
nach Anwendung
schiedene Anschlussmoglichkeiten
desT2-Speakers.
gibtesver-
Single Stereo Speaker
If
your speakerisgoingtobe used
as
the sole stereo speaker, refertothe
diagram below.
1.
Set
the
input
jumper
(located on
the back
Dual
2.
Connect the wirestothe terminals
Input
you have retained proper polarity
(see
3.
Set
found on the front
to
WARNINGS
Check
correctly maintained,
will
occurtothe
covered
Check
the
jumperissettoDualInput
If
the
Mode,
speaker
not
be
of
theT2speaker)tothe
Input
Setting
(see
"A"
and
Input
"B'~
Check that
2).
the
Direct/Diffuse switch,
of
the speaker,
Direct
(see
3).
(VSi
H470T2 only)
your
wiring.
If
polarityisnot
bass
performance
suffer
and
possible
damage
speaker
thatwould not
under warranty.
the
input
setting.
Verify
speakerissetinSingle
damage
can
occurtoboth
andyour amplifier that would
covered
under
warranty.
'~
••••••••
-e
•••••••••••
1).
Setting.
Input
can
that
the
be
C!H!)
••
Altavoz estereo unico
Sivaa usarelT2
estereo unico, consulte el croquis siguiente.
1.
Coloque el puente de entrada (situadoenla
enlaopci6n de entrada dual (ver 1).
2.
Conecte los cables en los terminales
de entrada
ha
conservadolapolaridad carrecta
(ver
2).
3.
Configure el interruptor Directo/
Difuso, situado en
del altavoz, en Directo (ver
H470T2 only)
ADVERTENCIAS
Compruebe el cableado.
mantiene correctamentelapolaridad,
rendimientodelos
pueden
producirse
quenoestarfan
Compruebe la configuraciondeentra-
Compruebe
da.
figurado
conlaopci6ndeentrada
Sielaltavoz
mododeentrada
ducirse
danos
enelamplificador,
porlagarantfa.
como altavoz
parte trasera del altavoz
"An
y
"B".
Compruebe que
la
parte frontal
3).
Sinose
bajos
sera
menory
danosenel
cubiertos
queelpuente
altavoz
porlagarantfa.
estcl
con-
dual.
esta
configurado
(mica,
tantoenel
quenoestan
pueden
altavoz
Speaker Outputs
como
pro-
como
cubiertos
T2)
(VSi
Enceinte stereo simple
Si
vous allez utiliser votre enceinte
T2
comme unique enceinte stereo,
reportez-vous
dessous.
1.
Placez
I'arrieredeI'enceinte
position «Dual
2.
Connectez les cables aux bornes
«
Input
vous de maintenir
recte (voir
3.
PositionnezIecommutateur
«Direct/Diffuse» situe aI'avant
de
(VSi
AVERTISSEMENTS
el
Verifiez
correcte
formances
et
if
y a danger
de
l'enceinte
parlagarantie.
Verifiez les parametres d'entree.
Verifiez
sur
«Dual Input
mode«Single
d'endommagementsdeI'enceinte
de
votre
couverts
'0
,
au
diagramme ci-
Ie
cavalier d'entree (situe a
A »
et«InputB».
2).
I'enceinte a« Direct (voir 3).
H470T2 only)
votre
cablage.
n'est
pas
maintenue,
des
basses
d'endommagements
quinesont
queIecavalier
».
Si
Input
amplificateur, quinesont
parlagarantie.
T2)ala
Input
»(voir 1).
la
polarite cor-
Silapolarite
seront
pas
est
positionne
l'enceinte
»,
if
y a
Assurez-
les
reduites
couverts
est
risque
per-
en
et
pas
Stereo-Einzellautsprecher
SolllhrT2-Speaker
Stereolautsprecher dienen, beziehen
Sie
sich
auf
die Abbildung hier
unten.
1.
Die Eingangs-Steckbrucke (hinten
am T2-Speaker) aufDual
Input
Setting (doppelter
Eingang) (siehe
2.
Die Drahte an die Eingangskontakte
anschlieBen. Kontrollieren,
die
richtige Polaritat eingehalten
wird
(siehe
3.
Den Schalter Direct/Diffuse
der
Vorderseite des Laut-
sprechers
3).
(VSi
H470T2 only)
ACHTUNG
DieVerkabelung kontrollieren.
Wird
die
Polaritat nicht
leidet
die
Qualitat
darunter und
beschadigt
werden;
fdllt nicht unter
Die Eingangseinstellungen
lieren.
Stellen
Steckbriicke
(doppelter
der
Lautsprecher
Modus
k6nnen
Verstarker
Schaden
auf DualInput
Eingang)
eingestellt
der
Lautsprecher
beschddigt
fallt nicht unter
Garantieleistung.
als
einziger
1)
stellen.
Input"A"
auf
und Input"B"
2).
Direct stellen (siehe
eingehalten,
der
Basswiedergabe
die
Lautsprecher
dieser
die
Garantieleistung.
Sie
sicher,
dass
eingestellt
auf
den
Single
(einzelner
und
werden;
die
dass
an
k6nnen
Schaden
kontrol-
die
Setting
ist.
Input
Eingang),
der
dieser
1st
Diagram
-12
-
3
#2
Page 13

Surround
If
your speakerisgoingtobe used
as
a surround speaker, refertothe
diagram below.
Set
1.
the backofthe
Input
2.
Connect
"A"
retained proper polarity
The speaker can be configured for
3.
either directordiffuse
H470T2) when used in this application (see
that
settingstodetermine which setting
tion. configuraciones para determinar
Speaker
the
input
jumper
(located on
Setting
only. Check
you experiment
works better for yourapplica-
speaker)toSingle
(see
1). altavoz
the
speaker wiretoInput
that
you have
mode
3).Itis
recommended
with
(see
2).
(VSi
both
Altavoz ambiental
Sivaa usar elT2como altavoz
ambiental, consulte el croquis
siguiente. reportez-vous au diagramme ci-
Coloqueelpuentedeentrada
1.
(situado enlaparte trasera del
VSi
de
Conecte el cable del altavoz
2.
alaentrada
ha
recta (ver
3.EIaitavozT2 puedeconfigurarse
tantoenmodo
difuso cuandoseuse en esta
aplicaci6n (ver
que
cualdeelias funciona mejor para
la
aplicaci6n.
H470T2) enlaopci6n
entrada (mica (ver 1). ala position « Single
"A~
Compruebe que
conservadolapolaridad cor-
2).
directo
como
3).Esaconsejable modes direct ou diffusion (voir
experimente con ambas
s610
Su
Enceinte
Si
T2
comme enceinte Surround, Speaker dienen, beziehen
dessous.
1.
Conneetez les cables d'enceinte a
2.
«
vous de maintenirlapolarite correcte (voir
3.
Sous cette application, I'enceinte
T2
3).
d'essayer les deuxconfigurations empfohlen, beide Einstellungen
pour
convient
cation. finden.
Surround
vous allez utiliser votre enceinte
Placez
Ie
I'arriere de I'enceinte
1).
cavalier d'entree (situe a
Input
A » uniquement. Assurez- Kontrollieren,
2).
peut etre configuree
Nous vous recommandons setzt werden (siehe
determinerquel reglage
Ie
mieux avotre appli-
VSi
Input
pour
H470T2)
» (voir
les
rround-Speaker
Solllhr
T2-Speaker
auf
die Abbildung hier unten.
Die Eingangs-Steckbrucke (hin-
1.
ten am
VSi
Single
Input
Eingang) (siehe 1) stellen.
Das
Lautsprecherkabel nur an
2.
den
Eingang"A" anschlieBen.
Polaritat eingehalten
2).
3.
DerT2-Speaker kann in dieser
Betriebsart entweder im direkten
oderimdiffusen Moduseinge-
auszuprobieren, urn
Anwendung ideaIeEinstellung zu
als
Surround-
H470T2-Speaker)
Setting (einzelner
dass
die richtige
wird
3).Eswird
die
Sie
fUr
sich
auf
(siehe
Ihre
~
GGCi)Ci)GGG
....
GGGGGGGGGG
•••••
Speakor
0u1pUts
'0
••
2
I
Diagram
3
#3
-13-
Page 14

Installation
I
nstrucciones
Instructions
Anleitungen
Instructions
WARNING
Always
turn off
the
amplifieror
when
connecting
componentstothe
speakers
system.
Important
Installation should onlybeperformed
by
professional
possessing
experience
andpower
building and electrical
familiarity with
which
Install
building,
installers or
skillsinconstruction,
with
the
proper
tools,
knowledge oflocal
the
environment
the
speaker
willbeinstalled.
the
speaker
to meetalllocal
energy,
and electrical
Tools You'll Need
A utility knife, jigsaw, or other tool
for cutting the required hole in
the
mounting surface.
A
#2
Phillips screwdriver.
• Awire cutter
preparing the speaker wires.
A pencil.
or
stripperfor
Retrofit Installations
1.
Mark the outlineofthe
installation hole using the
supplied template
#4).
Make a
small
hole at the
center
of
the speaker location.
bent
to
confirm
pieceofwire
(see
Insert a long
and rotate
are no obstructions behind the
chosen location
orany other
those
use
codes,
(see
diagram
that
diagram
receiver
ofhand
and
in
codes.
there
#5).
de
instalaci6n
ADVERTENCIA
Apagueelamplificador0elreceptor
siempre
que
vaya
alta
nente
voces
0 a cualquier otro
del
sistema.
aconectarlo
los
compo-
Importante
La
instalaci6n
instaladores
personas
en
la
construcci6n,
uso
correctodelas
manayelectricas,
las
normas
electricos,
entornoenquevaainstalarse el
altavoz
de
modo
normasdeconstrucci6n,
eJectricas
s610
deben
realizarla
profesionales0aquellas
con
habiJidades
localesdeconstrucci6n y
y familiaridad
de
graves.
quesecumplan
locales.
suficientes
experienciaenel
herramientas
conocimiento
con
Ins
taleelaltavoz
todas
energia
de
de
el
las
y
Herramientas necesarias
Una
navaja multiuso, sierra de
vaiven u otra herramienta para
cortar el orificio
en
la
superficiedeinstalacion.
Un destornillador Phillips
• Un cortador de alambre 0 separador para preparar los cables del
altavoz.
• Un lapicero.
quesenecesita
nO
2.
Instalaciones adaptadas
1.
Marque el perfil del orificio de
la
instalacion usando
se
incluye (consulte el cro-
que
nO
4).
quis
orificio en
que vaya acolocarse el altavoz.
Inserte un trozo largo
doblado y gfrelo para confirmar
que
de
suite el croquis n°
Realice
el
centro
no
hay obstrucciones detras
la
colocacion elegida (con-
plantilla
un pequeno
dellugar
de
cable
5).
en
d'installation
AVERTISSEMENT
Eteignez
toujours /'amplificateurouIe
recepteur
des
ausysteme.
Important
L'installationnedevrait
que
nelsoupar
talentsenconstruction,del'experi-
ence
des
consignes
de
sancedel'environnement
T2
l'enceinteT2sera
l'enceinteT2conformement aux
tives
et
Outils
besoin
Installations existantes
1.
lorsque
enceintesoud'autres
par
des
avec
/'utiJisation
connaissances
localesdeconstruction et
securite
localesdeconstruction, denergie
electriques.
dont
Un couteau detravail, une scie
sauteuse ou un autre
decouperlacavite requise dans
la
surfacedemontage.
Tournevis Phillips
Des
pinces d'electricien ou des
pinces
adenuder pour
ration des cables.
Un stylo.
MarquezIecontour delacavite
d'installation
fourni (voirdiagramme 4).
un petit trou au centredeI'emplacement de I'enceinte. Inserezy un long
tourner afin de confirmer
a
pas
d'obstacles derriere I'emplacement choisi (voir diagramme
vous
allez
composants
etre
installateurs
des
personnes
electriqueetla
profession-
correcte
concernant
dans
installee.
vous aurez
outil
#2.
aI'aide
du
fiI
de fer plie et faites-Ie
5).
connecter
executee
ayants
d'outils,
les
connais-
lequel
Installez
pour
la
prepa-
gabarit
Percez
qu'i1
des
direc-
n'y
zur
Installation
ACHTUNG
Den
Verstarker
AnschlieBen
irgend
immer
oder
der
Lautsprecher
einer
anderen
ausschalten.
Receiver
beim
oder
Komponente
Wichtig
Die
Installation sollte nur
sionellem
vorgenommen
ichend einschlagige
im
werkzeug
elektrischen
ordnungen
vertraut
installiert
Lautsprecher
bautechnischen,
stromtechnischen
installieren.
Umgang
sind,wodie
Personal
werden,
mit
erfahren
und
sowie
werden
gemaB
Hand-
von
profes-
oder
von
Personen
die
ausre-
Erfahrung
und
Elektro-
sind,
die
mit
bautechnischen
mit
der
Umgebung
T2-Lautsprecher
sollen.
Die
T2-
der
geltenden
energie-
und
Verordnungen
Erforderliches Werkzeug
Ein
Messer,
eine
Sage
oder ein
anderes Werkzeug zum Ausschneiden
Kreuzschlitzschraubendreher
der
Einbauoffnung.
2.
Ein
Drahtschneider oder eine
Abisolierzange.
Ein
Bleistift.
Nachrustungen
1.
Den Umriss
offnung
ten
Abb.
Mitte
offnung bohren.
gebogenes
Loch einfilhren und drehen, um
sicherzustellen,
Einbaustelle keine Hindernisse
vorhanden sind (siehe Abb.
der
Installations-
mit
Hilfe der beigeliefer-
Schablone markieren (siehe
4).
Ein
kleines
Loch
in der
der Lautsprecher-Einbau-
Ein
langes
StUck
Draht in
dass
hinter der
haben,
den
Ver-
Nr.
das
5).
2.
Cut the installation hole.
3.
Run
the wire from
location
an
the
extra
cutout.
to
foot
the
amplifier
the cutout. Allow for
(300mm)ofwire at
2.
Corteelorificio de instalacion.
3.
Coloque el cable desdelacolocacion del amplificador hasta el
recorte. Deje cable sobrante (300
mm) en el recorte.
Diagram
#4
-14-
Diagram #5
2.
DecoupezIetrou d'installation.
3.
AcheminezIecable depuis I'am-
plificateur jusqu'au trou decoupe.
Laissez
depasserIecable d'environ
mm(lpied) du trou.
300
2.
Die Einbauoffnung aussagen.
3.
Das
Kabel
yom
Verstarker bis zur
Ausschnittstelle ziehen. Etwa
em Kabel an
zugeben.
der
Ausschnittstelle
30
Page 15

Todas
las
All Installations
1.
Strip
~-inch
(1
1.
from
strands together. The speaker
jack will accept
to
(up
banana plugs.
Connect
2.
being careful
polarity. cuidado de mantener
3.
Slide
(see
diagram #6). 3. Deslice el altavoz hacia el recorte
2mm)ofinsulation
the
wire,
and
twist
the
wire
either
12-gauge) or single pelado(hasta un calibre 12) como
the
wiretothe
the
speaker
bare wire altavozT2acepta
speaker,
to
retain
proper
into
the
cutout
Pele12mm(~pulgada)deaislante del cable
unir
un
c6nica.
2.
Conecteelcablealaltavoz con
correcta. 3.
(consulte
instalaciones
el
croquis
ygire
los hilos.EIconector
enchufe sencillo con
el
tanto
la
nO
6).
Toutes
1.
cable para
del de I'enceinteT2accepte des
el cable
punta
2.
polaridad
installations
Denudez 12
torsadez les brins.
cables denudes (jusqu'au calibre
12)
ou des fiches « banane».simpies.
Connectez
en observant
polarite correcte.
Glissez I'enceinte danslacavite Polaritat achten.
decoupee (voir diagramme
les
Aile
Installationen
mm
(W')
du
cable
Le
receptacle
cables aI'enceinte ausgefuhrt werden.
de
maintenir
et
la
6).
12mmKabelmantel entfernen
1.
und die Aderenden verdrillen. Der
Anschluss
Buchse kann
(bis 12-gauge, etwa 2 mm) oder
einem einzelnen Bananenstecker
Das
2.
anschlie3en, dabei
Den Lautsprecher in die Einbau-
3.
offnung einsetzen (siehe Abb. 6).
an
mit
Kabelanden Lautsprecher
dieT2-Speaker-
blankem Draht
auf
die richtige
4. Tighten
the
screws. The
pivot
into
speakertothe
(see
position
diagram #7).
four Phillips
mounting
and
mounting
mounting
arms
clamp
surface
will
NOTE
The
tweeterislandcanberotated 780
degrees,
allowingyoutoredirect
withoutloosening the entire speaker
reposition the tweeter island.
the
WARNING
Do
NOT
overtighten the mounting
the
null
to
screws.
4. Apriete los cuatro tornillos de
soporte Phillips.
soporte pivotaran ensuposici6n
ysujetaran el altavoz a
de
instalaci6n (consulte
cie
croquis
nO
Los
brazos
la
superfi-
7).
NOTA
La
isla del altavozdeagudos puede
780
girarse
redirigir
todo
del a/ravoz
grados,10queIepermite
el
nulo
sin
el
altavozpara reeolocar la isla
necesidaddesoltar
de
agudos.
ADVERTENCIA
No
apriete
exeesivamente
desoporte.
los
tomillos
Diagram
de
el
#6
4. Serrez
REMARQUE
L7/0t
780
diriger
ter
/7/ot
AVERTISSEMENT
NE
de
les
montage.
pivoteront en position
ancreront I'enceinte a
de montage(voirdiagramme
degres,eequi
/'eneeinte
des
JAMAIS
montage.
quatre vis Phillips
Les
brasdemontage
des
tweeterpeutetre pivote sur
Ie
tweeters.
vous
«zero"
complete pouratteindre
serrer
permettra
sans
avoirademon-
exeessivement
et
la
surface
les
de
de
4. Die vier Kreuzschlitzschrauben
anziehen. Die Einbaubugel klap-
pen in Position und klemmen
den Lautsprecher an
7).
Einbauflache fest (siehe Abb. 7).
ANMERKUNG
Die
Tweeter-Insel
gedreht
werden,
Achse
neu
den
positionierung der Tweeter-Insellosen
zu
ausgerichtet wird, ohne
gesamten Lautspreeherzur
miissen.
der
um
780
0
Neu-
kann
wodureh die Null-
ACHTUNG
Die
vis
Befestigungsschrauben nicht
fest
anziehen.
zu
Diagram
-15
-
#7
Page 16

s.
Rotate the tweeter island by
touching the outside edges
only--do
tweeters
determine the best direction in
which
plane, please read
Speaker section found on pages
6 through
to
not
directly
(see
diagram #8).
position
9.
the
the
touch
tweeter
Surround
To
the
5.
Para
girarlaisla del altavoz de
agudos, toque solo los bordes
exteriores,
mente los altavoces (consulte el
croquis n°
mejor direccion paralacolocadon del plano del altavoz de
agudos,
ambiental
no
toque
directa-
8).
Para
determinar
leafaseccion Altavoz
en
las
paginas 6 a
5.
s.
Pivotez l'ilotdes tweeters en ne
touchant que les bords exterieurs - ne
tweeters
la
9.
gramme 8). Pour determiner
meilleure direction pour les
tweeters, veuillez vous reporter
fa
section Enceinte Surround,
aux pages
touchezjamais
directement
6 a
9.
les
(voir dia-
la
a
DieTweeter-Inselanden
enkanten fassen und drehen - die
Hochtonernie
(siehe Abb.
Richtung ausfindig
diedie Hochtoner ausgerichtet
werden sollten, lesen
Kapitel Surround-Speakervon
6 bis
Seite
direkt
8).
Um
9.
AuB-
beriihren
die beste
zu
machen, in
Sie
bitte
das
6.
Insert the grille into the slots in
the baffle by gently applying
pressure along the edge
(see
diagram #9).
NOTE
If
you
wish
to paint
your
speakers
grilles,itshouldbedone
installationofthe
see
the
Painting
prior
grille.
Please
instructions.
Diagram
6.
Insertelarejillaenlas
la
pantalla acustica aplicando
una suave presion a
borde (consulte
el
croquis
ranuras de
10
largo del
nO
9).
NOTA
or
to
5i
desea
debera
rejilla.
tenidas
pintar
hacerlo
Consulte
en
Pintura.
los
alta
voces0rejillas,
antesdeinstalar
las
instrucciones
la
con-
#8
6.
Inserezlagrille dans
du
baffle en poussant legere-
ment
sur
les
bards (voir dia-
gramme
9).
REMARQUE
5i
vous
ou
les
grilles,
avant
d'installer
vous
reporter
Peinture.
souhaitez
peindre
vous
les
aux
instructions
les
rainures
les
enceintes
devriezcefaire
grilles.
Veuillez
de
6.
Das
Gitter in die
Lautsprechergehause einsetzen
undamRand
(siehe Abb. 9).
SchUtze
leicht andrucken
ANMERKUNG
Wollen
5ie
Ihren
Lautsprecher
das
Gitter
lackieren,sotun
bitte
vor
der
Lesen
5ie
dazu
Lackierung.
Installation
die
des
Anleitungen
im
oder
5ie
das
Gitters.
zur
Diagram
-16-
#9
Page 17

Painting
The
Speaker
The
speaker may be painted before
or
after installation. The speaker
already been primed.
1.
Insert
into
the
secure
(see
diagram #10).
2.
Paint
spray paint, apply
If
you are applying paint
brushorroller,
apply
helps prevent excessive p'aint
buildup
3.
After
finger pullstoremove the paint
sheild.
The
Speaker Grille
1.
Carefully remove
the insideofthe
in a clean location
reinstallation.
2.
Paint
spray paint, apply
Ifyou are applying paint
brushorroller,
apply
helps prevent
holes in
3.
After
the
cloth and grille logo.
4.
Logo included
Peel
off
Frame
the
supplied
frameofthe speaker and
with
the
frame.Ifyou
two
very
andU
the
paint has dried,
the
grille.Ifyou are using
two
very
the
paintisdry, reinstall the
and place.
paint
tapeifnecessary.
two
thin
the paint and
light
coats. This
"onthe frame.
runs
the
cloth from
grille.
for
two
thin
the paint and
light
coats. This
paint
from filling
grille.
with
paint
has
shield
are
using
light
coats.
with
use
the
Setitaside
later
light
coats.
with
a
mask.
Pintura
EI
marco
EI
despues delainstalaci6n.AIaltavoz
yaseIehaaplicado primer.
1.
Inserte el protector de pintura
incluido enelmarco del altavoz
(consulte el croquisnO10).
2.
Pinteelmarco.5iva
tura pulverizada, aplique dos
a
capas ligeras.5iva
tura con una brocha 0 rodillo,
disuelvalapintura y aplique dos
capas
evitar queseformen acumulaciones y Uregueros"de pintura en
el
3.
Cuandosehaya secadolapintura,
con los dedos.
La
1.
Quite
instalada con una sujeci6n
uadhesiva~
posterior reinstalaci6n.
2.
Quite con cuidadolatela del
interior delarejilla. Dejela aparte
en un lugar Iimpio parasuposte-
the
rior reinstalaci6n.
3.
Pintelarejilla.5iva
tura pulverizada, aplique dos
capas Iigeras.5iva
tura con una brocha 0 rodillo,
disuelvalapintura y aplique dos
capas
evitar quelapintura tape los orificios delarejilla.
4.
Cuando este
vuelva a colocarlatela y el
logotipodela
del
altavoz puede pintarse antes 0
marco.
quite el protector de pintura
rejilla
altavoz
a aplicar pin-
muy
Iigeras.
Esto
del
altavoz
ellogotipodela
Dejela aparte para
a utilizar pin-
a aplicar pin-
muy
Iigeras.
Esto
secalapintura,
rejilla.
a utilizar pin-
ayuda a
rejilla.
tipo
ayuda a
Esta
su
Peinture
Le
cadredeI'enceinte
Vous
pouvez peindre I'enceinte
avant ou apres I'installation.
~enceinte
la
1.
2.
3.
La
1.
2.
3.
4.
a deja ete traitee avec de
peinture de fond.
Inserez I'ecran de peinture fourni
dansIecadredeI'enceinte (voir
diagramme
PeignezIecadre.5ivous utilisez
delapeinture en aerosol,
appliquez deux legeres couches.
5i
vous I'appliquezavec un
pinceau ou un rouleau, diluez
peintureetappliquez deux
couches tres legeres.
des accumulations de peinture
des « ecoulements » surIecadre.
Patientezjusqu'acequelapein-
ture soit secheetretirez I'ecran
de peinture par
manipulation.
10).
les
levres de
Cela
grilledeI'enceinte
EnlevezIelogo delagrille.IIest
fixe avec une attache « tie-tack
Mettez-Iedecote pourIeremonter ulterieurement.
Enlevez
prudemmentIetissu a
l"tnterieur delagrille. Mettez-Ie
de cote dans un endroit propre
pourIeremonter ulterieurement.
Peignezlagrille.5ivous utilisez
delapeinture en aerosol,
appliquez deux legeres couches.
5i
vous I'appliquez avec un
pinceau ou un rouleau, diluez
peinture et appliquezdeux
couches tres legeres.
emplkhera
bouche
Patientez quelapeinture
secheetreplacezIetissuetIe
logo.
quelapeinture ne
les
trous delagrille.
Cela
evitera
se
Lackierung
Die Lautsprecherblende
Der Lautsprecher kann vor oder
nach der Installation lackiert werden. Der Lautsprecher ist bereits
die Lackierung vorbereitet.
1.
Den beigelieferten Lackierschutz
in die Lautsprecherblende einsetzen (siehe Abb.
2.
Den Rahmen lackieren. Wenn 5ie
einen 5praylackverwenden, tra-
gen 5ie zwei leichte Schichten
auf. Wenn
la
et
».
la
Burste oder eine Rolle auftragen,
verdunnen 5ie den Lack
gen
Sie
Schichten auf. Dadurch werden
ubermaBige Lackansammlungen
und"Lacktranen"
Rahmen vermieden.
3.
Nach demTrocknen des
den Lackierschutz
Fingern abziehen.
Das
Lautsprechergitter
1.
Das
Gitter -Logo entfernen.Esist
mit
einem Klip befestigt. Heben
Sieeszu
Wiederverwendung auf.
2.
Entfernen
auf
der Innenseite des Gitters.
Heben
Ort
zur spateren Verwendung
auf.
3.
Gitter lackieren. Wenn
Spraylack verwenden, tragen
zwei leichte Schichten auf. Wenn
Sie
den Lack
oder eine Rolle auftragen,
verdunnen 5ie den
gen
Sie
Schichten auf. Dadurch wird vermieden, dass der
im Gitter ausfUlit.
4.
Wenn der Lack trocken ist, den
Stoffund das Gitter-Logo wieder
anbringen.
10).
Sie
den Lack
zwei sehr
r spateren
Sieesan
zwei sehr dunne
dunne
auf
mit
Sie
vorsichtig den Stoff
einem sauberen
mit
einer Burste
Lack
Lack
mit
einer
und
dem
Lacks,
den
Sie
einen
und
tra-
die Locher
fur
tra-
Sie
Diagram #10
-17
-
Page 18

Power
Handling/
Listening Levels
Manejode la potencia y
los niveles de audici6n
Niveaux'ecoutel
Controledepuissance
Power Handling/Horpegel
The power recommendations
speaker assume
operate
will
not
rugged speakers can be damaged
by
an amplifierifitisproducing
distortion.
If
you hear a harsh,
turn
down
repeated operationofyour speaker
with
a distorted signal from the
amplifier can cause damage
not
coveredbythe warranty.
If
Service Seems
that
you will
the
amplifier in a way
produce distortion.
gritty
the volume. Prolonged
for
that
Even
sound,
that
Necessary
First, contactthe dealer from
you purchased the product.
Or contactusvia e-mail at:
USA
and
Canada:
support@bostona.com
Japan: ba_info@dm-holdings.com.
Asia/Pacific countries:
service@dm-singapore.com
We
will
promptly
actiontotake.Ifitisnecessary
return your speakerstothe
please shipitprepaid. Afterithas
been repaired, we
freight prepaid in
and Canada.
advise youofwhat
will
the
whom
to
factory,
return
it
United States
the
our
is
Las
recomendaciones de potencia
para el altavoz presuponen que hara
funcionarelamplificador de forma
que no produzca distorsion. Incluso
nuestros altavoces mas resistentes
pueden averiarsesiel
or
produce distorsion.
Si
escucha un sonido molesto 0
distorsionado, baje el volumen.
funcionamiento prolongado 0
repetido del altavoz con una serial
distorsionada del amplificador
puede provocar darios que no estan
cubiertos porlagarantfa.
Si
parece necesaria una
reparaci6n
Primero, pongase en contacto con
distribuidoralcualhacomprado
producto.
opongase en contacto con
nosotros
electronico:
Estados Unidos y Canada:
support@bostona.com
Japen: ba_info@dm-holdings.co
Asia/paises
service@dm-singapore.com
Le
accion tomar.Sies
devolver un altavoz alafabrica,
rogamos que10envfe con franqueo
prepago. Despues delareparacion,
10
transporte pagados solo en Estados
Unidos y Canada.
por
medio de un correo
del
Pacifi co:
indicaremos de inmediato que
devolveremos con costas de
amplificador
necesario
Un
Ie
Les
recommandations donnees
pour "enceinte supposent
utiliserez I'amplificateur de maniere
ane
pas
produire de distorsions.
Meme nos robustes enceintes peuvent etre endommagees par un
amplificateur produisant deladistorsion.
Si
vous entendez un son
grincheux ou deforme, reduisez
volume.Lefonctionnement prolonge ou repetitifdevotreenceinte
avec un signal provenant
amplificateur en distorsion
entrainer des endommagements
non
couverts parlagarantie.
que
d'un
peut
vous
Ie
Die Angaben hinsichtlich der
Leistungsdaten des Lautsprechers
setzen voraus, dass
Lautsprechersoeinsetzen werden,
dass keine Verzerrungen auftreten.
Sogar unsere robusten Lautsprecher
konnen durch einen verzerrenden
Verstarker Schaden davontragen.
Horen
Sie
groben
Sound, verringern
Lautstarke. Wenn
Lautsprecher
Zeitraum
dieser Oberlastung aussetzen, konnen sie beschadigt werden. Solche
Schaden sind
Herstellergarantie nicht abgedeckt.
hinweg
Sie
den
einen kratzenden,
Sie
Sie
Ihre
uber
einen langeren
oder wiederholt
durch
die
die
Demande de service
apres-vente
el
el
Veuillez contacter en premier lieu
revendeur aupres duquel vous avez
acheteceproduit.
Ou veuillez nous contacter
par
e-mail:
Etats-UnisetCanada:
support@bostona.com
Japon : ba_info@dm-holdings.com
Paysdel'Asie/Pacifi
service@dm-singapore.com
Nous vous informerons rapidement
des mesures aprendre.
devez retourner aI'usine votre haut-
parleur veuillez I'expedier dans un
colis prepaye. Apreslareparation,
vous
sera
retourne en fret prepaye
aux Etats-Unisetau
que:
Si
Canada.
Ie
vous
iI
Falls ein Kundendienst
notwendig
Nehmen
dem
Handler auf, bei dem
Produkt
Oder kontaktieren
pe E-Mail unter:
USA
und
support@bostona.com
Japan: ba_info@dm-holdings.com
Asien/Pazifi sche Region:
service@dm-singapore.com
Wir werden Ihnen umgehend
teilen, wie
ten. Fallsesnotwendig
Lautsprecher den Herstellerzuruckzusenden,soversenden
bitte
frei. Nach
den
wir
Kanada ebenfalls frei zurucksenden.
scheint
Sie
zunachst Kontakt
gekauft
haben.
Kanada:
Sieweiter
der
Sie
in den
USA
mit
Sie
das
Sie
uns
mit-
vorgehen
sein sollte,
Sie
diese
Reparatur wer-
undin
5011-
-18
-
Page 19

ForEUCustomers Only
This
symbol found on the product
indicates thatthe product must
be
disposedofwith household
not
waste.
Instead.itmaybeplaced
in aseparate collection facility
for electronic
to a retailer when purchasing
similar product.
paid to recycle this product.
Doing this contributes to
and
recycling. minimizes
effects on the environment
and
human health and avoids
fines for incorrectdisposal.
waste
The
or returned
producer
reuse
adverse
any
Solo
para
c1ientesdela
Este
simbolo que
producto indica que
ser
eliminado conlabasura
tica.
En
vezdeesto,
en
un puntode recogida
para
desechos
devuelto a un detallistaalcomprar
un producto si-milar.
ha
pagado
to. Haciendo esto contribuye a
reutilizar y
efectos adversos sobreelmedioambiente y
cualquier multa por
incorrecta.
para
reciclar,
la
salud
electronicos 0
reciclar
UE
apareceenel
este
no debe
domes-
debe colocarse
separada
EI
fabricante
este
produc-
minimiza
humana yevita
una
los
eliminacion
Pour
les
clientsdeI'UE
Ce
symbole
que
Ie
avec
les
plutot etre place
tion
de
aux
dechets electroniques ou
11
un detaillant lorsque
un produit semblable.
paye
pourrecyclerceproduit,cequi
contribue
ce
qui minimise
sur
I'environnement etlasante
humaine. toutenevitant
amendes encouruesencas
nation incorrecte.
surIeproduit indique
produitnedoit
dechets domestiques.IIdoit
collecte
11
reutiliser et recycler et
dans
separee
les
effets
uniquement
pas
une installa-
destinee
vous
Le
etre jete
rem
is
achetez
fabricant a
nefastes
des
d'elimi-
Nur
fOr
Kundeninder
Dieses
auf
dem
Symbol
weist
darauf
Produkt
nicht
mit
entsorgt
werden
sammelstelle
abgegeben
Obergeben
Produkt
hat
fOr
bezahlt.
Wiederverwertung
bei
minimiert
auf
die
Gesundheit
fOr
unsachgemasse
oder
werden,
erworben
das
Recycling
Dies
Umwelt
und
fOr
tragt
schadliche
und
EU
Produkt
angebrachte
hin,
dass
das
dem
HausmOIl
darf.Esmuss
Elektronikschrott
dem
wenn
wird.
dieses
zur
und
die
vermeidet
Entsorgung.
bei
Handler
ein
ahnliches
Der
Hersteller
Produktes
zum
Recycling
Auswirkungen
menschliche
Geldbussen
einer
-19
-
Page 20

300
Jubilee
Drive,
Peabody,
bostonacoustics.com
©
2008
Boston
Acoustics,
Inc.
Boston,
Boston
trademarks
are
subject to
and
the
BIA
ellipse symbolisatrademarkofBoston
registered trademarksofDolby
change
without notice. ©
Laboratories.
2008
MA
01960
Acoustics,
the
Boston
Acoustics
Acoustics,
DTSisaregistered trademarksofDTS,
Boston
Acoustics,
Inc.
142-Q03S37-{)
USA
logo,
Inc.
Dolby Digital,
Kortec
andVRare
and
Inc.
Specifications
Dolby
registered
Pro
Logic
are
Page 21

C!>soston"
HSi
250•HSi
460•HSi
460T2
HSi
H460T2 •
HSi
N640T2 •
VSi
560
•
6
3
.4"
(171 mm)
•
HOLE
CUnlNG
TEMPLATE
300 Jubilee Drive, Peabody,MA01960
USA
bostonacoustics.com
Make sure the template is centered before scoring the outline on the mounting surface.
Behind the mounting surface: There must be a 1" (25mm) clearance around the mounting hole.
Cut holetoexact sizeoftemplate. See installation instructions for details.
Use this template
to
score the proper size hole forthe HSi 250, HSi 460, HSi 460T2,
HSi H460T2, HSi N640T2, or
VSi
560 speaker system.
Page 22

~
Boston
Acoustics·
Product Registration
for
U.S.
and Canada purchases only.
Boston
Thank you for purchasing a Boston Acoustics product.
Your
feedback will help us to continue providing
acoustiCS.
consumers with the best possible products and service. Data provided Is the confidential
property
of
Boston
Acoustics,
Inc. and Is
not
distributedorsoldtothird
parties.
Please print below, or register your new product online
at:
bostonacoustics.com/prodreg
First Name _
Last Name _
Street Address _
Apt.
# _
City _
State _
ZIP _
E-mail _
Phone _
Age Group:
Under
20 20 to 29 30to39
40
to
49 50
to
59
60 to 69
70
to 79
80 and over
Marital Status:
Single _ Married
Gender: Male Female
Education:
High School _ Some College _ Associate/Jr. College Degree _ 4-Year College Degree _ Graduate School
What type of Boston Acoustics product did you purchase? Home StereolTheater Car In-Wall/ln-Ceiling _ Multimedia/PC
Date of Purchase
__
----'/
__
----'/
_
Model Name Serial
# _
(locatedona silver lebel
on
the outsideofpackaging.)
Store Name City _
State _
How did you hear about this product?
Boston Acoustics advertisement Store salesperson _ Store advertisement Magazine review _
Store display _ Online review _ Trade show _
PC
manufacturer _
Friend/family_
Other
What other brand(s) and model(s) did you consider when making this purchase?
Brand(s) _
Model(s) _
Thank
you
for
completing
this
form.Ifyou
have
any
technical questionsorare interested In
other
Boston
Acoustics
products,
visituson
the
Webatbostonacoustlcs.com,orcall (978) 538·5000.
e2007
Boston
Acoustics.
Inc.
All
Rights Reserved. 142-001601-3
Page 23

l
...
Boston
acoustlcs~
ATTN: PRODUCT REGISTRATION
BOSTON ACOUSTICS INC
300 JUBILEE DR
PEABODY MA 01960-4030
111
••••••
111.1
•••11••11••••1••111
•••••
11.11
•••11•••11•••1•••
11
Postage
Required
Post Office will
not deliver
without proper
postage.
 Loading...