

Page 1

HSi480
HSi
460
HSi
470
HSiN740
HSi
In-Ceiling
Speaker
Systems
HSi
altavoces
eneltecho
Sistemas
empotrados
de
HSi460T2
HSiN640T2
Systemes d'enceintes HSi-Deckenencastrees
plafond
dans
Ie
HSidela serie
Lautsprechersysteme
Page 2

Contents
Contenido
Table des matieres
Inhalt
Thank you! 2
Specifications
Introduction .4
Speaker Placement .4
InstallationTips 6
Installation Instructions 8
Painting
Listening
Power Handling
Limited Warranty
Levels
and
10
11
11
iGracias!
.3
Especificaciones
Introducci6n .4
Ubicaci6n de los altavoces
Consejos paraelmontaje 6
Instrucciones de montaje 8
Pintura 10
Niveles de audici6n
Manejo de potencia
Garantia Iimitada
.....
11
11
.3
Merci! .3
.3
Specifications .3
Introduction .4
.4
Emplacement des enceintes
Conseils d'installation 6
Instructions d'installation 8
Peinture
Gestion delapuissance et
differents niveaux d'ecoute
Garantie limitee
...
Vielen Dank!
Specifications 3
EinfUhrung 4
..
10
11
11
Platzierung der Lautsprecher
.4
Tipps zur Installation 6
Installationsanweisungen 8
Lackierung 10
Lautstarkeneinstellungenl
Leistungsverarbeitung
Ein-geschrankte Garantie
....
.3
.4
11
11
Thank
Thank you for selecting Boston
Acoustics' in-ceiling loudspeakers.
Your speakers have been
designed
ning audio performance.
Please
placeincase
later.
who
ing
Installation
tains
Enjoy your
speakers.
you!
to
deliver
yearsofstun-
keep
your manualina
you need to
For
the professional installers
have
experience with in-ceil-
speakers,
HSi-
please
Tips
sectionsasit con-
specific information.
new
HSi
safe
refertoit
read
the
in-ceiling
iGracias!
Gracias
para empotrar eneltecho Boston
Acoustics'.
diseriados para proporcionarle
arios de impresionante audicion y
rendimiento.
Conserve
seguro parsinecesita consultarlo
mas
adores profesionales con experiencia
empotrados, consulten los apartados Consejos
Antes del montaje,yaque contienen informacion especifica
sabre.
Disfrute de
por
elegir los altavoces
Sus
altavoces han sido
el
manual en un lugar
tarde.Enel
enelmontaje de altavoces
caso
de instal-
paraelmontaje y
sus
nuevas altavoces.
Merei!
Nous vous remercions d'avoir
choisi
les
enceintes
dans
Ie
Acoustics'.
conc;:ues
formances audio inegalees pendant de nombreuses annees.
Mettez ce manuel en lieu sur
afin deIeretrouver facilement en
cas
professionnels doivent consulter
les
et Avant de proceder aI'installa-
tion, qui contiennent des informations specifiques sur
encastrees dans
Nous esperons
apprecierez vas nouvelles
enceintes.
plafond
Ces
pour
de
besoin.
sections Conseils d'installation
encastr~es
de
installateurs
les
enceintes
plafond.
que
Boston
ant
ete
vous
enceintes
produire des per-
Les
Ie
Vielen Dank!
Vielen Dank
Boston Acoustics' DeckenLautsprechern. Ihre Lautsprecher
werden Ihnen auf Jahre hinaus
beeindruckende
bieten.
Heben
an
einem sicheren
auf,
dass
benotigen.
Installateure, die viel Erfahrung
mit
Decken-Lautsprechern haben,
sollten die Abschnitte
Installation" und"Vor derInstallation"
lesen, da diese Abschnitte
Informationen enthalten, die
speziell
Viel
Lautsprechern.
fUr
die Auswahl von
Tonleistungen
Sie
das
Handbuch bitte
Ort
fUr
Sieesspater noch einmal
fUr
die Madelle gelten.
Spaf3
mit
den
Berufliche
,;Tipps
fur die
Ihren neuen
Fall
-2-
Page 3
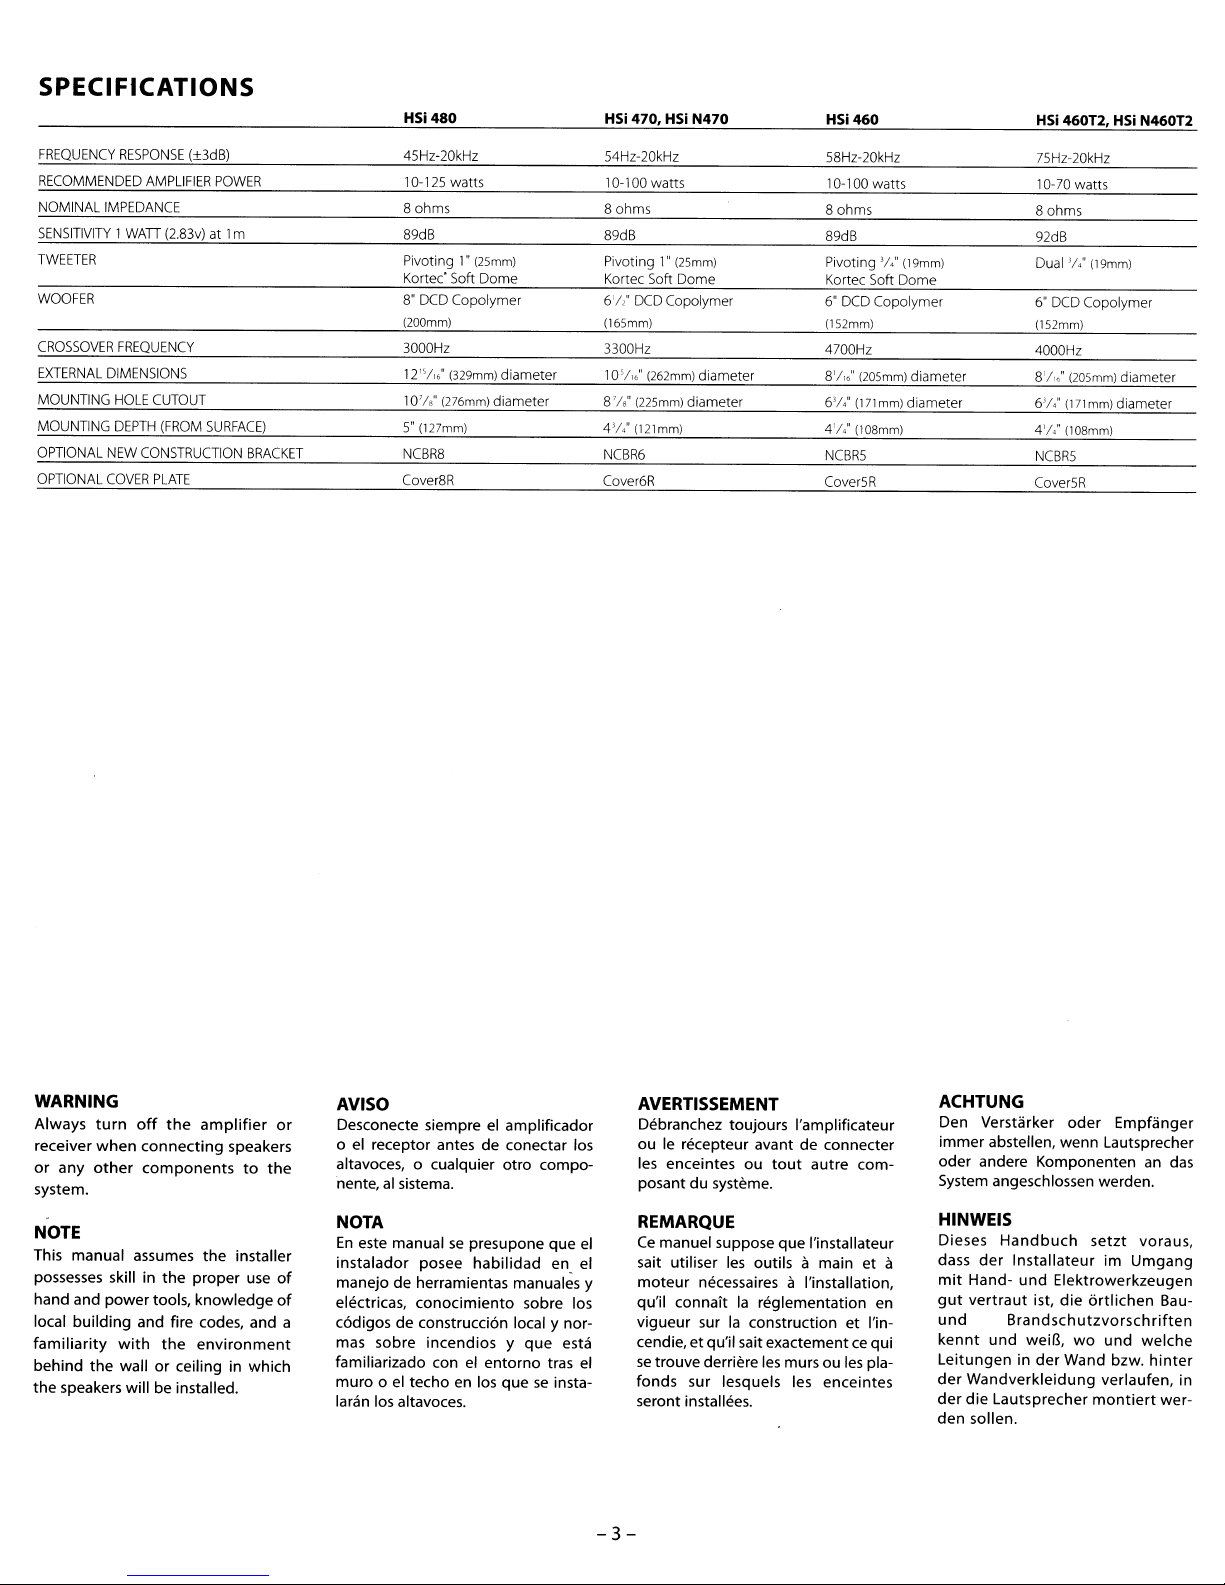
SPECIFICATIONS
HSi480 HSi470,HSiN470 HSi460
HSi460T2,HSiN460T2
FREQUENCY
RECOMMENDED
NOMINAL
SENSITIVITY
TWEETER
WOOFER
CROSSOVER
EXTERNAL
MOUNTING
MOUNTING
OPTIONAL
OPTIONAL
RESPONSE
IMPEDANCE
1WAIT
FREQUENCY
DIMENSIONS
HOLE
DEPTH
NEW
COVER
(+3dB)
AMPLIFIER
CUTOUT
CONSTRUCTION
PLATE
POWER
(2.83v)at1m
(FROM
SURFACE)
BRACKET
45Hz-20kHz
10-125
watts
8 ohms
89dB
Pivoting
1"
Kortec'
8"
(200mm) (16Smm) (152mm)
3000Hz
12"/,," (329mm) diameter
10'/,' (276mm) diameter
5"
NCBR8 NCBR6
Cover8R
(2Smm) Pivoting1"(25mm) Pivoting '/." (19mm)
Soft
Dome Kortec
DCD
Copolymer 6'/,"
(127mm) 4'/," (121mm)
54Hz-20kHz 58Hz-20kHz
10-100
watts
80hms 8 ohms 8 ohms
89dB
Soft
Dome
DCD
Copolymer
3300Hz
10'/,;
(262mm) diameter 8'/,," (20Smm) diameter 8'/,." (205mm) diameter
(22Smm) diameter 6'/,"
8'/,"
Cover6R
10-
100
89dB
Kortec
6"
DCD
4700Hz
(171
4'/," (108mm)
NCBR5 NCBR5
CoverSR CoverSR
watts
Soft
Dome
Copolymer
mm)
diameter
75Hz-20kHz
10-70
watts
92dB
Dual'/;'
(19mm)
6"
DCD
Copolymer
(152mm)
4000Hz
6'/;'
(171
mm)
4'/." (108mm)
diameter
WARNING
Always
receiver
or
system.
any
turn
when
other
off
NOTE
This
manual
possesses skill in
hand
local
bUilding
familiarity
behind
the
speakers
assumes
and
power
and
with
the
wallorceilinginwhich
willbeinstalled.
the
amplifier
connecting
componentstothe
the
tools,
the
the
proper
knowledge
fire codes,
environment
speakers
installer
use
and
or
AVISO
Desconecte siempre el
o el receptor antesdeconectar
altavoces,
nente, al sistema.
NOTA
En
este
manualsepresupone
instalador
of
manejodeherramientas manuales y
of
electricas,
c6digosdeconstrucci6n local y
a
mas
sobre
familiarizado con el
muro
0 el
laran los altavoces.
0 cualquier
posee
habilidad
conocimiento
incendiosyque
techo
entorno
en los
amplificador
otro
queseinsta-
los
compo-
que
en el
sobre los
nor-
esta
tras el
AVERTISSEMENT
Debranchez
ouIerecepteur avantdeconnecter
les
enceintesoutout
posantdusysteme.
toujours
REMARQUE
Ce
manuel
el
sait utiliser
moteur
qu'il
vigueur
cendie,etqu'il sait
se
trouve
fonds
seront installees.
suppose
les
outilsamain
necessaires a I'installation,
connaitlareglementation
surlaconstructionetI'in-
derriere les
sur lesquels les
-3-
I'amplificateur
autre
com-
que
I'installateur
et
en
exactementcequi
mursoules pla-
enceintes
ACHTUNG
Den
Verstarker
immer
abstellen,
oder
andere
System angeschlossen werden.
HINWEIS
a
Dieses
dass
mit
gut
und
kennt
Leitungeninder
der
der
den
Handbuch
der
InstallateurimUmgang
Hand-
und
vertraut
Brandschutzvorschriften
und
weil3,wound
Wandverkleidung
die
Lautsprecher
sollen.
oder
Empfanger
wenn
Komponenten
ist,
Lautsprecher
setzt
Elektrowerkzeugen
die
6rtlichen
Wand
bzw.
verlaufen,
montiert
an das
voraus,
Bau-
welche
hinter
in
wer-
Page 4

Introduction
Introduccion
Introduction
Einfiihrung
Boston Acoustics
HSiSystems
In-ceiling
sive
decorating
Given the intelligent engineering
inside,
presence known
earsinthe room. Our
direct descendantsofour
acclaimed Boston Reference
Every
designedtofacilitate incredible, lifelike
sound with a minimum
(the breaking up
tions) and maximum dispersion (widespread
sound
locations.
speakers
lineage.
Styled
scheme.
an
HSi
screw, cone, grille, and bevel
sound).
in
a wide rangeofinstallation
withanimpres-
to blend into
speaker will make its
to
any setofcritical
HSi
speakers
speakers.
of
of
The
diffraction
sound by obstruc-
resultisoptimum
any
are
highly
Speaker
Placement
HSi460,HSi470,HSiN740
HSi480
Since the speaker installationispermanent and the furniture placement
may not
be,
the best long-term location for the
speakers-one
date future relocation
in
the room, while still providing wellbalanced sound
ing
Within reason, wherever the speakers
optimum
place the speakers 8
they form a triangle with the listening
area.
place each speaker at
tance from the prime listening position.
rooms,
evenly.
align the speakers with the light fixtures and other ceiling details.
you should first determine
that will accommo-
of
the furniture
to
area.
look right, they'll sound right.
resultsina music system,
For
the most balanced sound,
For
optimum
use
For
(See diagram on
the primary listen-
to12feet apart
an
equal dis-
coverageinlarge
twotothree pairs spaced
the
sakeofappearance,
next
page.)
For
Sistemasdealtavoces
Boston Acoustics
Altavoces empotradoseneltecho de
excelente diseno. Disenados
grarse encualquier estilo decorativo.
al
gran
Dado
con que cuentan, un sistema
patente a cualquier oido criticoenla
sala.
Nuestros
directamente de nuestros sistemas de
altavoces de
giados.
is
escuadrahasido
un sonido natural increible con minima
difraccion (disgregacion del sonido a
causa
de obstrucciones) y maxima dispersion (sonido envolvente).
es
un sonido optimoenuna amplia
gama de ubicaciones.
desarrollo de ingenieria
sistemas
alta
calidad, altamente elo-
Cada
tornillo, cono,
disenado
Ubicacion
altavoces
HSi460, HSi470,HSi N740
HSi480
Dado quelainstalacion de los altav-
es
permanente, mientras que
oces
del mobiliario
deberia determinar previamente
mejor ubicacion definitiva de
oces,
aquella queseacomode a
futura colocacion de
habitacion y
sonido equilibrado a
de audicion.
Dentro de
altavoces queden bien sonaran bien.
Para
so
lograr
mUSicales,
distancia entre ellos de
de manera que formen un triangulo
el
con
un sonido equilibrado debe situar
altavoz alamisma distancia delaposicion principal de audicion.
cobertura optima
grandes,
dos de manera uniforme.
un resultado armonico, alinee
ces
con
tos decorativos del techo.
pod
que
10
razonable, alii donde
los
maximosresultados
coloque
area
de audicion.
uti
lice
dos 0
las
tomas de luz y otros elemen-
HSi
para
HSisehara
HSi
descienden
para
EI
de
los
ria
no serlo, usted
los
mueblesenla
proporcione
la
principal
los
altavocesauna
2,5a3,5
Para
conseguir
Para
en
habitaciones
tres
pares
Para
conseguir
los
inte-
rejilla
facilitar
resultado
los
altav-
un
area
los
metros,
cada
obtener
espacia-
altavo-
Systemesd'enceintes
HSideBoston Acoustics
Des
enceintes encastrees dansle
issues
plafond
tigieuse,
sortes de decors.
Graceasa
un systeme
immediatement par toutes
nesaI'oure
en
y
effet
systemes de reference Bostonsivantes
ont
qui
matiere de qualite sonore. Chaque
cone, grille et biseau est
permettre
naturels
tion (fragmentation du
les
obstacles) et un
persion
ite de son
que
soit
installees.
d'une tradition pres-
Au
style adaptable a toutes
construction intelligente,
HSi
est reconnaissable
fine.
Nos
les
descendants directs de
etabli
les
normes actuelles
des
sons
avec
un minimum de diffrac-
(son
alarge diffusion).Une qual-
optimaleenresulte, quel
I'endroit
Emplacement des
enceintes
la
HSi460,HSi470,HSiN740
la
HSi480
la
Puisque I'installation des enceintes
est permanente, mais que
des meubles ne I'est
vous devez
Ie
pour
tenir comptedudeplacement futur
des meubles dans
assurant un son equilibre alazone d'ecoute principale.
En
des enceintes a I'air correct,
de bonne qualite. Pour des resultats
optimaux, separez
tout
d'abord selectionner
meilleur
emplacement
les
enceintes. L'endroit ideal
regie genera
Ie,siI'emplacement
2,50 m a 3,70 m de maniere a
qu'elles forment un triangle avec
zone d'ecoute. Pour equilibrerIeson
mieux possible, placez
enceinte a egale distance du lieu d'ecoute
principal.
taille,
grande
d'enceintes
unes
des
Pour
des
enceintes
ments
installesauplafond.
autres
raisons
avec
Dans
utilisez
deux ou trois
situeesaegaIedistance
pourunresultat
esthetiques,
les
luminaires et
les
systemes
maximum
la
les
person-
HSi
con<;:u
incroyablement
son
causee par
de dis-
OU
elles
la
position
pas
forcement,
possible
piece,
tout
Ie
son
enceintes de
chaque
les
pieces de
optimal.
alignez
autres
sont
nos
en
vis,
pour
sont
doit
en
sera
ce
paires
les
les
ele-
HSi-Systeme von Boston
Acoustics
Decken-Lautsprecher
beeindruckenden Sortiment. Stile
aile Dekors.
Durch die intelligenten technischen
Innenkomponenten wird ein
System
von jedem kritischen Ohr in
Raum
einem
Systeme
allgemein geschatzten
Lautsprecher-systeme. Jede
jeder
Trichter,
Einfassung
unglaubliche, lebensechte Klang bei
minimaler Beugung (Klangstorungen
durch Hindernisse) und maximaier
Dispersion (Klangverteilung) erzeugt
wird.
gehoren geformte Rahmen, die die
Steifigkeit
Ausrichtung der Treiber-Komponenten
sorgen
Klanggenauigkeit).Das
Klang
maier
Montageorten.
erkannt. Unsere
sind
direkte Nachfolger unserer
jedes Ziergitter und jede
istsoausgefUhrt,
Zu
den Funktionsmerkmalen
verbessern
(fUr
bei
einer breiten Auswahl
Platzierung
Lautsprecher
HSi460,HSi470,HSiN740
HSi480
Da
diese Lautsprecher permanent
installiert werden, die Platzierung des
Mobilars jedoch
ist,
sollten
am besten geeigneten
Lautsprecher bestimmen, der ein
zukunftiges Umstellen des Mobilars im
Raum
berucksichtigt und auch in
diesem
Klangverteilung in der Zuhorerzone
ermoglicht.
1m
Grol3en
Wenn die Lautsprecher-platzierung
aussieht,
la
Optimalen Klang einer Stereoanlage
Ie
erhalten
bis
3,6
m voneinanderentferntsoangebracht werden,
Zuhorerzone ein Dreieck bilden. Um
eine moglich ausgeglichene
Klangverteilung
Lautsprecherden gleichen Abstend von
der Zuhorerzone haben. Wenn in
grol3eren Raumen optima
Klangverteilung gewunscht
zwei oder drei Lautsprecherpaare
ichmal3igen Abstanden aufgestellt werden. Um ein gefalliges Aussehen
erzielen, sollten die Lautsprecher mit
Beleuchtungskorpern und anderen
Deckenmerkmalen
bzw.
mit diesen ausgerichtet werden.
u.U.
Sie
zunachst den langfristig
Fall
eine
gut
und
Ganzen
stimmt
Sie,
wenn die Lautsprecher
dass
zu
erzielen, sollten aile
in
mit
einem
HSi-
HSi-
Boston
Reference
Schraube,
dass
der
und
fUr
die
exakte
beispiel
Resultat
lose
ist
opti-
der
nicht permanent
art
fUr
die
ausgeglichene
giltfolgendes:
auch der Klang.
sie
Einklang gebracht
ist,
mit
gut
der
sollten
in
gle-
fUr
an
2,4
Ie
zu
-4-
Page 5

HSi460T2,HSiN640T2
The
HSi
460T2 and
designed for
ways,
there
loudspeakers. This
with
coil wooferallows for the reproduction
of
both
music from a single speaker location.
The
should ideally be centered above the
primary listening
tweeters pointed into the primary listening
use
bathrooms, and closets where
is
not enough room for a pair
its
two
tweeters and dual voice
the left and right channel
HSi
46012 and
area.
HSi
N640T2
are
in small rooms, hall-
two
input
speaker
HSi
N640T2
area,
with
the
two
O
....
·~--.,..S-...,1-2.,..fe-et---~·
(2.~.6m)
HSi460T2,HSiN640T2
EI
HSi
46012 and
concebido
pequenas, banos
nohay espacio suficiente
of
altavoces.
con
altavoz de
duccion de
of
cho e Izquierdo desde un altavoz individual.
N640T2enla
con
dos
parasuusoenhabitaciones
0 armarios
Este
sus
Lo
idealescentrarelHSi
los
haciaelarea
altavoz de dos entradas
dos altavoces de agudos y
graves
dual permitelarepro-
los
canales
zona prima
dos altavoces de agudos dirigi-
prima
0
HSi
N640T2hasido
para
de musica dere-
460T2 Y
riadeescucha,
riadeescucha.
en
donde
un par de
su
HSi
HSi460T2,HSiN640T2
L:enceinte
con~ue
piece, une
n'offrant
pour installer une paire d'enceintes.
Cette enceinte
porte deux haut-parleurs d'aigus
tweeters»)et un haut-parleur de
graves
les
istrement
ment.
La
460T2/HSi N64012sesitue au-des
delazone d'ecoute principale, hautparleurs d'aigus orientes
HSi
460T2/HSi
pour s'utiliser dans une petite
salle
de bain ou un placard
pas
suffisamment de place
N640T2
est
a deux entrees com-
adouble bobine pour restituer
voies droite et gauche de I'enreg-
apartir d'un seul emplace-
position ideaIede I'enceinte
vers
HSi
sus
celle-ci.
HSi460T2,HSiN640T2
Der Lautsprechertyp
N64012 wurde speziell zur Installation
in kleineren Raumen wie beispielsweise BadernlToiletten und
Einbauschranken entwickelt.
normalgro~e
Platz finden. Diese zwei Input-
(<<
Lautsprecher
und
dem
ermbglichen die Simulation eines
rechten und eines linken Musikkanals
von einer einzigen
Lautsprecherposition
Der
Lautsprecher
H6rbereich zentriert werden, und die
beiden Tweeter sollten
Hbrbereich deuten.
Lautsprecher keinen
mit
ihren zwei Tweetern
Dual Voice Coil Woofer
HSi
460T2/HSi N640T2 -
so
lite uber dem primaren
HSi
46012 IHSi
in
aus.
in
den primaren
denen
HSi470,
HSi
N740,
HSi
480, HSi460
HSi460T2,HSiN640T2
-5-
Page 6

Installation Tips
Consejos para el
Conseils
Tipps zur
Required Clearances
Behind the mounting surface, there
must be
around the
l-inch
(25mm) clearance
mounting
hole.
I//~~<'\I
I \
I
\ 276mm I
\ /
\ /
New
Construction
Performanceofyour loudspeaker can
be
enhancedifthe ceiling cavity
filled
with
standard fiberglass insula-
tion.Ifthereisalready insulationinthe
has
wall that
the
speaker,
area
(Consult local building codes for compliance.)
Taking steps to increase the rigidity
of
the
additional drywall screws, and/or the
use
between the drywall and joists adjacent
to
the speaker location, will further
enhance performance.
a paper backing facing
remove the backinginthe
behind the installation location
mounting
of
a construction adhesive
surface by using
montaje
Espacios Iibres necesarios
Detras delasuperficie de montaje
debe haber
espacio del montaje.
1Q7/s"
" /
'......
---
HSi
Construcci6n nueva
Los
mejorarse
is
lena
dar.Siel
aislante tiene una
al
trasera
altavoz. (Consultelanormativa local de
edificaci6n para actuar conforme a
misma.)
Ademas,
se
roca
superficie de montaje, ylo poniendo
adhesivo de construcci6n entre
tacos y
25mmIibres alrededor del
I
.....'"
480
resu
Itados del altavoz pueden
silacavidadenel
de aislante de fibra de vidrio estan-
muroyatiene aislamiento, y
altavoz, quiteelpapel enlaparte
del
utilizan pijas 0 tornillos
que incrementenlarigidez de
las
zona
area
dondeseubicara
los
resultados mejoraran
vigas
adyacentesalaltavoz.
[?
/ \
I \
\
\ /
\ /
muroserel-
de papel frente
para
tabla
los
d'installation
Degagements necessaires
Derrierelasurfacedemontage, un
degagement
present autour
de25mm
du
~~.;:~~
/---
/ ,
/
" /
,
el
el
la
si
la
...........
'\
2~~~'~
I
'"
HSi
470
HSi
N740
Constructions neuves
Les
performances de
peuvent etre ameliorees en remplissantlacavite murale
fibre de verre standard.
isole
et queladoublure en papier de
I'isolant fait face a I'enceinte, retirez
celle-ci a cet endroit.
Ie
reglement de securite delaconstruc-
tion en vigueur.)
Laugmentation delarigiditedela
surfacedemontage obtenue par I'utilisation de
supplementaires
adhesif de construction entre
nerie
aux
formances encore meilleures.
vis
pour
et/ou
secheetles
enceintes permet d'obtenir
doit
trou de montage.
etre
--8
.....
/ '
/
I \
\ )
\ /
" /
......
vos
enceintes
avec
un isolant en
SiIemur
est
deja
(Veillez
a respecter
mac;onnerie
poutrelles contigues
seche
I'emploi d'un
la
mac;on-
des
per-
Installation
Erforderliche
Mindestabstande
Hinter der Montageflache muss
das
Montageloch ein Spiel von25mm
vorhanden sein.
3
/4"-
222mm
--
'\
'"
HSi
460
HSi
460T2
HSi
N640T2
Neubauten
Die Leistung Ihres Lautsprechers
verbessert werden,
Wandhohlraum
Glaswollisolierung gemllt wird. Wenn
die Wand bereits isoliert ist
Isolierung uber eine Papierdeckschicht
verfUgt, die
zeigt, sollte diese Deckschicht im
hinter der Montagestelle entfernt wer-
den. (Dabei mussen aile 6rtlichen
Bauvorschriften eingehalten werden.)
Durch Schritte zur Verstarkung der
Steifigkeit der Montageflache,
Anbringen zusatzlicher Schrauben
den Gipskartonplatten und/oder den
Einsatz
eines Klebstoffs zwischen den
Gipskartonplatten und den
unmittelbarer Nahe
wird die Leistung weiter verbessert.
mit
in
Richtung Lautsprecher
wenn
gew6hnlicher
z.B.
Pfosten
des
Lautsprechers
und
Bereich
dUTch
um
kann
der
die
an
in
Joist---";"''';'''
Ceiling
Material---~8=!,
....!._....!.....!..._--
~::==========::~=~,
; "
, f
; "
\ \
,,4
\ :
\ \ , I
\ \ / I
\ 1 J I
\.~\ / i I
~
" /J):
, f I
, f f
\ \ I I
\ i \ /.~"
1$
\ I @ I
::n
..:.....;.:...----
.....;.....;..;~---
'j
I
4/
Fiberglass
Additional
Adhesive
lining
drywall
between
screws
studs
and
-6-
drywall
Page 7

Installation
Tips
(cont.)
Consejos
paraelmontaje
(cant.)
Conseifs d'installation (suite)
Tipps
zur
Installation (Forts.)
Bass
Management
If you
are
using your loudspeakers
with
a surround sound processor and
a subwoofer, set
ment
controlasfollows:
•
HSi
480,
Bass
management controlto"Large"
•
HSi
460,
Set
Bass
"Small"
• Consult you surround receiver or
processor manual for instructions on
changing the
tings.
Damp
Locations
If the loudspeakers
damp
location (kitchen, bathroom),
they
should be positionedsothat
moisture cannot collect inside them.
the
bass
manage-
HSi
470,
HSi
N740 -
HSi
460T2,
HSi
N640T2 -
management control
bass
management set-
are
installedina
Optional Brackets for
New
Construction
For
new
we offer
The
guide when cutting
construction installations,
new
NCB
construction brackets.
brackets actasa perfect
the
wallboard.
Model Bracket
HSi
480
HSi
470
HSi
N740
HSi460
HSi460T2
HSi
N640T2
NCBR8
NCBR6
NCBR6
NCBR5
NCBR5
NCBR5
Transformers
We
have provided space on the
crossover boards for
25/70-volt distribution transformer.
To
Remove Grille
If
you
gently
sharp
awl
grille pick.
needtoremove
liftitoutatthe
pointed
or
the
optional
instrument
mounting
the
grille,
edges. Use a
suchasan
Boston Acoustics
Set
Controldegraves
Si
usa
los altavoces
de
sonido envolvente y un
sigue:
sonido envolvente 0 del proce-
el
480,
HSi
470,
de
graves en "Large"
460,
H5i
460T2,
las
instrucciones para cambiar
to
procesador
subwoofer, fije
como
•
HSi
control
(Grande)
•
HSi
Fijeelcontroldegraves en "Small"
(Pequeno)
• Consulte enelmanual del receptor
de
sador
los
parametros de control de graves.
Instalaci6n en lugares
humedos
Si
los
altavocesseinstalanenun lugar
humedo(cuarto de bano, cocina) deben
colocarse de
no
traspaseasu
Soportes
tal
modo quelahumedad
interior.
~pcionales
construcclon nueva
Para
instalacionesenconstrucciones
nuevas ofrecemos soportes de obra
opcionales.
perfectamente de guias
de carton-yeso.
Model
HSi
HSi
HSi
HSi
HSi46012
HSi
Transformadores
a
Paraelmontaje de transformadores
de 25/70 voltios, hemos dispuesto
cioenlos
480
470
N740
460
N640T2
crossovers.
Los
soportes
Bracket
Para quitar la rejilla
Si
necesita quitarlarejilla,
con cuidado por
una herramienta afilada y puntiaguda,
como un punzon, 0laganzua opcional
de Boston Acoustics
DSi
con un
control de graves
HSi
N740 -
Fije
HSi
N64012 -
para
NCB
sirven
paraelcorte
NCBR8
NCBR6
NCBR6
NCBR5
NCBR5
NCBR5
los
para
levantela
extremos. Utilice
tal
efecto.
espa-
Gestion des basses
Lorsque
les
enceintes sont utilisees
avec un processeur ambiophonique
une enceinte d'extremes-graves
subwoofer
el
basses
•
la
sur « Large» (grande).
•
mettre
basses
• Consulter
I'amplificateur ou
ambiophonique pour savoir
ment
tion
»),
reglerlagestion des
comme
indique ci-dessous.
HSi
480,
HSi
470,
commande de gestion des
HSi
460,
HSi
460T2,
la
commandedegestion des
sur « Small» (petite).
Ie
guide d'utilisation
modifier
des
les
basses.
Emplacements humides
Lorsque
lees
bains, cuisine) elles
posees
ne
les
dans un lieu humide, (salle de
s'accumule
enceintes sont instal-
de
fa<;on
ace que
pas
Supports de fixation
facultatifs
pour
constructions neuves
Pour
les
structions neuves, nous offrons des
supports speciaux.
ideaux pour servir de guides lors de
decoupe des murs.
installations dans
Model Bracket
HSi480
HSi
470
HSi
N740
HSi
460
HSi
46012
HSi
N640T2
NCBR8
NCBR6
NCBR6
NCBR5
NCBR5
NCBR5
Transformateurs
Un espace a ete prevu sur
Ions en bois pour
mateur de distribution
monter
Retrait de la grille
Pour retirerlagrille, soulevez-Ia delicatement en
Utilisez un instrument pointu affile, tel
qu'un poin<;on ou I'instrument Boston
Acoustics prevu
la
tenant par
acet effet
HSi
N740 : mettre
HSi
N640T2 :
du
processeur
reglages de ges-
doivent
etre dis-
l'humidite
aI'interieuri.
des
Ces
supports sont
les
un transfor-
de25V-70
les
(en
option).
basses
de
com-
con-
croisil-
V.
bards.
Bassregelung
Wenn
Sie
einem Surround-Klangprozessor
et
Subwoofer
(<<
Bassregelung
werden:
•
HSi
Bassregelung auf
•
HSi
Bassregelung auf"Klein"
• Anweisungen zum Andern der
Bassregelungen
bitte
Surround-Empfangers bzw.
Prozessors.
verwenden,
480,
460,
HSi
dem
den
wie
HSi
46012,
Feuchte Montageorte
Wenn die Lautsprecheraneinem
feuchten Montageort installiert werden,
(Badezimmer,
tioniert werden,
Feuchtigkeit ansammeln
Kuche)
dass
Optionale Halterungenfur
Neubauten
Fur
die Montageinneuen Gebauden
bieten wir besondere Halterungen.
NCB-Halterungen sind eine idea
Richtlinie, wenn Gipskartonplatten
geschnitten werden.
Model Bracket
HSi
la
HSi
HSi
HSi
HSi
HSi
480
470
N740
460
460T2
N640T2
NCBR8
NCBR6
NCBR6
NCBR5
NCBR5
NCBR5
Transformatoren
Wir haben
Verbindungskarten Platz
Montage eines 25/70-V-Verteilertrafos
vorgesehen.
Entfernen des Ziergitters
Wenn das Ziergitter entfernt wer-
muss,
den
Kanten vorsichtig heraus. Verwenden
Sie
Ahle
Ziergitterspitz von Boston Acoustics.
heben
dazu ein spitzesWerkzeug wie eine
oder
Lautsprecher
folgt
470,
HSi
"GroG"
HSi
entnehmen
Handbuch Ihres
sollten
sich
kann.
auf
Sie
diesesanden
den optionalen
mit
und
muss die
eingestellt
N470 -
N640T2
Sie
siesoposi-
darin keine
Die
den
fUr
die
-
Ie
-7-
Page 8

Installation
Instrucciones
de
Instructions
Installationsan-
Instructions
WARNING
Always turn
receiver when connecting speakers
anyothercomponents to the system.
NOTE
This
possesses
hand
and
local building
familiarity
behind the wallorceiling in which the
speakers
Tools
1.
A utility knife, jig
for cutting the required hole
mounting surface.
2.A#2
3.
A wire cutter or stripper for preparing the speaker wires.
4.
A pencil.
Retrofit Installations
1.
Mark the outlineofthe installation
hole using the supplied template.
Make a small hole at the center
the speaker location. Insert a long,
bent piece
confirm that there
tions behind the chosen location.
2.
Cut the installation hole.
3.
Run
location
extra footofwireatthe cutout.
off
the
amplifier
manual
assumes the installer
skill in the proper
power
tools, knowledge
and
fire
with
the
will
be installed.
You'll
Need
saw,
Phillips screwdriver.
of
wire and rotate
the wire from the amplifier
to
the cutout. Allow for
codes,
environment
or other tool
are
no obstruc-
use
and
in
the
montaje
AVISO
or
or
of
of
a
of
to
an
Apague siempre el amplificador 0 el
receptor al conectar alta
cualquierotro componente al
NOTA
En
este
instaladorposee habilidaden el mane-
jodeherramientas manuales y etectricas,
vigentes
sobre incendios
do con elentorno tras el muro
en
manualsepresupone que el
conocimiento sobre los c6digos
de
construcci6n localy normas
y que
los
queseinstalarcln
Herramientas necesarias
1.
Una
navaja multiusos, una
caladora u otra herramienta
cortarelagujero adecuadoenla
superficie de montaje.
2.
Un destornillador de estrella 0 cruz
del numero
3.
Un cortador de alambre 0 un
pelacables
dodelos
4.Unlapiz.
2.
para
altavoces.
Instalaciones para
montaje trasero
1.
Marqueelcontorno del agujero con
la
plantilla suministrada.
pequeno agujeroenel
ubicacion del
bre
curvado y dele
gurarse
traserosenla
2.
Corteelagujero
3.
Tiendaelcable
hastaelfinal.
necesario.
altavoz.
de que no
posicion
Corte a30cm
voces
sistema.
estcl
familiariza-
0 techo
los
altavoces.
sierra
para
prepararelcablea-
el
Haga
centro de
Metaunalam-
vueltas
para
hay
elegida.
paralainstalacion.
desdeelamplificador
ase-
obstaculos
masde10
d'installation
AVERTISSEMENT
0
un
la
Oebranchez toujours I'amplificateur
ouIerecepteur
enceintesoutout
systeme.
avant
de connecter
autrecomposant
REMARQUE
Ce
manuelsuppose que l'installateur
sait
utiliser
les
moteur
qu'iI
connait
vigueursur la construction
et
qu'iIsaitexactementcequisetrouve
derriere
lesquels
Outils
1.
Un
couteau, une
ou
tout
decouper I'orifice necessaire dans
la
surface de montage.
2.
Un
tournevis cruciforme
3.
Une pince coupante ou adenuder
pour preparer
4.Uncrayon noir
outilsamain
necessaires a /'installation,
la reglementation en
les
murs ou
les
enceintes seront installees.
les
et
l'incendie,
pia
fonds sur
necessaires
scie
fils
adecouper
NO.2.
des
enceintes.
autre outil capable
les
Installations ameliorees
1.
TracezIecontour de I'orifice d'in-
stallation en utilisantIegabarit
fourni.
Faites
de
ceinte.lnserez-y un grand morceau
de cable replie,etfaites tourner
celui-ci afin de vous assurer qu'il
n'existe aucun obstacle derriere
I'endroit choisi.
2.
Decoupez I'orifice d'installation.
3.
AmenezIecable
fice que vous venez
en prevoyant 30 cmdecable sup-
plementaire.
un petit trouaucentre
I'endroitOUsera
de
placee I'en-
I'ampli a I'ori-
de
decouper,
du
et
de
weisungen
ACHTUNG
Den
les
Verstdrker
abstel/en,
Komponenten an
angeschlossen
HINWEIS
Oieses
der Instal/ateur im Umgang
a
und Elektrowerkzeugen versiert
6rtlichen Bauvorschriften kennt und
welche Leitungen in der Wand bzw. hinter der Wandverkleidung verlaufen, in
der die Lautsprecher montiert werden
sol/en.
BenotigteWerkzeuge
1.
Ein
oder anderes Werkzeug zum
Ausschneiden des
Lochs
2.
Einen
Gr6~e
3.
Eine Drahtzange
Drahtstripper zur Vorbereitung der
Lautsprecherkabel.
4.
Einen Bleistift.
Einbauineinefertige
1.
Den Umriss
mit
der mitgelieferten Maske anzeichnen.
auszuschneidenden Flache ein
kleines Loch erzeugen.
StUck
Loch einschieben, umzuprufen,
dass
keine
2.
Das
3.
Das
eben erzeugten Ausschnitt verlegen.
An
der Ausschnittstelle etwa 30 em
extra Kabellange vorsehen.
oder Empfdnger immer
wenn
Lautsprecher
werden.
Handbuch setzt voraus,
Exaktormesser, eine Stichsage
aus
der Montageflache.
Kreuzschlitz-Schraubendreher,
2.
des
In
gebogenen Drahts in das
hinter der gewahlten Stelle
Hindernisse
Montageloch schneiden.
Kabel
vom
oder
das
mit
und
Brandschutz-
weiB,wound
notwendigen
oder
Flache
Installationslochs
der
Mitte
Ein
vorhanden
Verstarker zum
andere
System
dass
Hand-
ist,
einen
langes
sind.
die
der
-8-
Page 9

Installation Instructions (cant.)
All
Installations
1.
Strip 1/2-inch(13mm)ofinsulation
from the wire, and twist the wire
strands together. The
jack will accept either bare wire up
to
12-gauge,orsingle banana
plugs.(HSi 460,
4601214guage.)
2.
Connect the wiretothe
3.
Slide the speaker into the cutout.
4.
Tighten the 4 Phillips
screws. The
pivot into position and clamp the
speaker
mounting
to
the mounting surface.
Important: Do
screws.
HSi
not
overtighten
HSi
N640T2,
speaker.
mounting
arms will
speaker
HSi
the
Instrucciones de Instalaci6n (cont.)
Todas las instalaciones
1.
Pele13mm
retuerza
hilos.EIconector del altavoz
acepta
como
(HSi
acepta
como
2.
Conecteelcablealaltavoz.
3.
Introduzcaelaltavozenel
4.
Apriete
de montaje.
giraran
dran
del montaje.
Importante:
los tornillos.
del aislante del cable y
el
extremo
para
agrupar
tanto alambre de calibre
c1avijas
sencillas
460,
HSi
tanto alambre de calibre
c1avijas
sencillas
los
tornillos de estrella 0 cruz
Los
hastasuposicion y manten-
el
altavoz sujeto ala superficie
no
tipo
N640T2,
HSi
tipo
agujero.
brazos
de montaje
apriete demasiado
banana.
460T2
banana.)
los
HSi
12
14
Instructions d'instollation (suite)
Toutes installations
1.
Denudez13mm
sadez
les
La
fiche de I'enceinte
les cables
diametre
bre
12,oules
simples.
460T2
denudes
mumdecalibre
es
bananes
2.
Connectez
3.
Introduisez I'enceinte dans I'orifice
decoupe.
4.
Revissez
les
ports de fixation pivotent
tion et fixent I'enceinte
face de fixation.
Important:
excessivement.
de cable, et
fils soupies ensemble.
maximum
(HSi
accepte
d'un
Ie
vis
Ne resserrez pas les vis
HSi
denudes
460,
simples.)
cable aI'enceinte.
de fixation.
fiches
HSi
N640T2,
les cables
diametre
14,oules
de
bananes
surlasur-
tor-
accepte
d'un
cali-
HSi
maxi-
fich-
Les
sup-
en
posi-
Installationsanweisungen (Forts.)
Aile Installationen
1.13mm
2.
3.
4.
Wichtig: Die Schrauben
anziehen.
Isolierung vom
manteln,
zusammendrehen. Der
Lautsprecheranschluss
entweder
AWG
Gabelschuhstecker
HSi
AWG
Gabelschuhstecker
Das
anschlief3en.
Den Lautsprecher in den
Ausschnitt schieben.
Die Kreuzschlitz-Befestigungsschrauben festziehen. Die
Montagearme schwenken in die
Einbaustellung und klemmen den
Lautsprecher
Montageflache
und
blanken Draht bis
12
N640T2,
HSi
14
Kabelanden Lautsprecher
Kabel
die Drahtlitzen
oder einfache
auf.
oder
Draht bis
auf.
an
nicht
(HSi
)
460T2
fest.
ent-
HSi-
nimmt
zu
460,
zu
einfache
der
zu fest
Si
If you wish to paint your speakers or
grilles, itshould be done prior
lation
of
the grille.
Please
to
see
Painting instructions.
instal-
the
quiere pintar
rejillas debera hacerlo antes de
instalacion delarejilla. Consulte
instrucciones para pintarlos.
los
altavoces 0
las
las
Si
la
vous voulez peindre
les
grilles, faites-Ie avant I'installa-
ou
tion des grilles. Veuillez consulter
instructions de peinture qui suivent.
-9-
les
enceintes
les
Wenn die Lautsprecher oder
Ziergitter lackiert werden sollen,
dies vor der Installation des Ziergitters
geschehen (siehe Anweisungen zum
Lackieren).
muss
Page 10

Installation Instructions (cont.) Instrucciones de Instalaci6n (cont.)
Instructions d'installation (suite)
Installationsanweisungen (Forts.)
Aim the pivoting tweeter toward
5.
the prime listening position by
460,
HSi
480
only.) Do not
ofthe
470,
pressing on the edge
er
island.
(HSi
N740 and
press
Insert the grille into the slots in the
6
baffle by gently applying pressure
along the edge.
HSi
on the tweeter dome.
Painting
The SpeakerFrame
The
speakers may be painted before
or after they
already primed.
1.
Insert the supplied paint mask into
the frame
2.
Paint the frame. If you
spray
you
or roller, thin the paint and apply
two
vent excessive paint
"runs" on the frame.
3.
After the paint
finger pulls
mask.
are
installed. They
of
the
speaker.
paint, apply
are
applying paint with a brush
very light
two
light coats.
coats.
This helps pre-
buildup
has
dried,
to
remove the paint
are
tweet-
using
use
HSi
are
the
If
or
Dirijaeltweeter giratorio hacia
5.
posicion optima de audici6n
sionando en
de
isla
460,
480)
sobre
Insertelarejillaenlas
6.
bafle presionando ligeramente
los
extremos.
el
extremo delabase
del altavoz de agudos. (HSi 460, HSi 470,
HSi
470,
HSi
No presione directamente
la
rejilla.
N740YHSi
ranuras
Pintura
EI
marco del altavoz
Los
altavoces pueden pintarse antes
la
o despues de
fabrica con
1.
Insertelaplantilla (mascara)
pintar suministradaenel
altavoz.
2.
Pinteelmarco.5iutiliza pintura
spray,
utiliza pincel 0 rodillo, diluyalapintura
yaplique dos
Esto
traci6n de pintura y
la
de
3.
Una
lugares
retirarla.
instalacion. Vienen de
base
para
pintura 0 primer.
aplique dos
evitaraelexceso
misma.
vez
secalapintura, tire de
previstosenla
capas
capas
el
muydelgadas.
de concen-
"corrimiento"
mascara
la
pre-'
del haut-parleuramembrane
en
OrientezIetweeter pivotant
5.
zone d'ecoute principale en HochtonlautsprecherinRichtung
appuyant surIeile de tweeter. (HSi derHaupthbrzone, indem
N'appuyez
tweeter.
Inserezlagrille dans
6.
appuyant legerement
bords. indem
pas
Peinture
Coffrets desenceintes
Les
enceintes peuvent etre peintes
para
marco del
ligeras.
para
en
los
avant ou
ont
1 Inserez
2.
5i
3.
apres
deja
fourni
ceinte.
PeignezIecoffret.Sivous utilisez
de
appliquez deux couches legeres.
vous appliquezlapeinture avec un
pinceau ou un rouleau, diluez-Ia et
appliquez deux couches tres
legeres. Vous eviterez ainsi une
accumulation
ture ou des coulees sur
Une fois
utilisez
Ie
masque de peinture.
leur installation.
re~u
une couche de fond.
Ie
masqueapeinture
dansIecoffretdeI'en-
la
peinture
quelapeinture est seche,
les
languettes
vers
la
5.
Richten
Sie
den schwenkbaren
HSi
N740, HSi 480) der Kante des Tweeterinsel. (HSi
surlad6mee
du
460,
HSi
470, HSi N740, HSi
480) Drucken 5ie nicht aufdas
les
fentes du Hochtonlautsprecher-Schutzgitter.
sur
en
ses
Fugen
Sie
6.
5chlitze in der Schallwand ein,
sichtig andrucken.
das Ziergitter in die
Sie
entlang der Kante vor-
Lackierung
Lautsprecherrahmen
Die Lautsprecher kbnnen vor oder
Elles
au
pistolet,
excessive de pein-
Ie
coffret.
pour
retirer
nach der Installation lackiert werden.
5i
5ie sind bereits
versehen.
1.
Legen 5ie die mitgelieferte
Lackierungsmaske in den
Lautsprecherrahmen.
2.
Lackieren
den
dunne Schichten aufgetragen werden.
oder einer
tragen wird, verdunnen
Lack
dunne 5chichten
ubermal3ig dicke
Lackansammlungen oder
,;rranen"
3.
Nach
ziehen
an
den Fingerlaschen
mit
Sie
den
Lack
aufspruhen, mussen zwei
Wenn
Lack
Walze
und tragen dann zwei ganz
aufdem
dem
Trocknen des
5ie
die Lackierungsmaske
einer Grundierung
Rahmen.
mit einem
aus
der
auf.
Dies
Rahmen.
Wenn
Dose
Sie
verhindert
abo
5ie
erst
an
5ie
Pinsel
aufge-
den
Lack-
Lacks
-10
-
Page 11

The Speaker Grille
1.
Remove the grille logo. Itismounted
with
a "tie tack" style fastener.
Setitaside for later reinstallation.
2.
Carefully remove the cloth from
the inside
in
lation.
3.
Paint the grille. If you
spray paint, apply
you
or roller, thin the paint and apply
two
vent paint from filling the holes on
the grille.
4.
After the paintisdry, reinstall the
cloth and grille logo.
of
the grille.
a clean location for later reinstal-
are
applying paint with a brush
very lightcoats. This helps pre-
two
light coats. If
Setitaside
are
using
Listening Levels
Power Handling
The power recommendations for the
speakers
the amplifier in a way that will
duce
speakers
fier
down
with adistorted signal from the amplifier can cause damage that
ered by the warranty.
assume that you will operate
not
pro-
distortion.
can
ifitis
producing distortion.
If
you hear a harsh, gritty sound, turn
the
repeated operationofyour speaker
Even
our
rugged
be damaged byanampli-
volume. Prolonged
is
not
cov-
Limited Warranty
Boston Acoustics warrantstothe
original purchaser
speakers
defectsinmaterials and workmanship
for a period
purchase.
use the system according
instructions supplied,toprovide
and secure transportation
authorized Boston Acoustics service
representative, and
purchase in the formofyour
when requesting service.
age that results from abuse, misuse,
improper installation, accidents, shipping,
one other thananauthorized Boston
Acoustics service representative.
AC0uStics
damage
This warranty does not cover the cost
of
number
defaced.
that
Your responsibilities
Excluded from this warranty
or
repairs/ modifications
This warranty
product and does
to
removal or reinstallation.
This warranty
has been removed
This warranty gives you specific legal
of
our
HSi
they
will be free
of5years
any associated equipment.
from thedate
are
to
present proof
is
limitedtothe Boston
is
void if the serial
loud-
to install and
to
the
safe
to
sales
slip
is
dam-
byany-
not
cover
La
rejilla delaltavoz
1.
Quite ellogo delarejilla.
do
mediante un
cion apresion. Dejelo aparte
posterior instalacion.
2.
Quite cuidadosamentelatela del
interior de
en
instalacion.
3.
Pintelarejilla.Siutiliza pintura
spray,
utiliza pincel 0 un rodillo, diluya
pintura y aplique dos
gadas.
ra
y el"corrimiento"delamisma.
4.
Cuandolapintura este
acolocar
Niveles
la
sitio limpio
aplique dos
Esto
evitaraelexceso
la
tela
de
Manejodepotencia
Las
recomendaciones sobre poten-
cia
de los altavoces asumen que
amplificadorseajustara de
se
produzca distorsion acustica.
no
Incluso nuestros robustos altavoces
pueden
ser
daliadosencaso
amplificadorseencuentre produciendo
distorsion.
Siseproduce un sonido aspero y
"arenoso':
or
longado del altavoz con
torsionada del amplificador puede
causar
por
bajeelvolumen.EIuso pro-
averiasenel
la
garantfa.
Garantia limitada
Boston Acoustics garantizaalcomprador original de
contra defectosenmateriales y mana
of
de obra por un periodo de 5 alios a
partir de
of
el
formes a
istradas,
an
aciondeseguraaun
tante
la
of
pra
servicios
originados por
to,
o modificaciones lIevadas a cabo por
personas ajenas
do
ductos Boston Acoustics y no cubre
danos de ningun equipo asociado.
garantfa no incluyeeldesmontajenila
reinstalacion.
do
or
derechos legales especificos,
la
fecha de compra.
La
responsabilidad del comprador
correcto uso e instalacion con-
las
instrucciones sumin-
el
transporte con
oficialdeBoston Acoustics y
presentaciondefacturadecom-
cuandoserequieran
tecnicos.
Se
excluyen de
accidentes, transporte, reparaciones
de Boston Acoustics. .
Esta
garantia
Esta
garantfaseanularasisehaquita-
0 borrado
Esta
garantfa otorgaalcomprador
esta
el
maltrato,
al
esta
el
numero de
Esta
capas
capas
logo.
ligeras.
seca,
monta-
de inser-
para
muy del-
de pintu-
vuelva
sistema
rejilla. Dejela aparte
parasuposterior
yel
audici6n
manera
que
de que
una
selial dis-
altavoz no cubiertas
los
altavoces
garantia
uso
servicio autoriza-
limitada a
contrat-
represen-
nuestros
los
danos
incorrec-
los
serie.
sin
HSi
pro-
los
Esta
per-
Grille des enceintes
1.
RetirezIelogo delagrille.IIest fixe
su
en
Si
la
el
avec une attache genre
cravate».Mettez-Ie de cote.
2.
OtezIetissu de I'interieur de
grille. Mettez-Ie de cote dans un
endroit propre.
3.
Peignezlagrille.Sivous utilisez de
la
peintureaupistolet, appliquez
deux couches lege
appliquez
pinceau ou un rouleau, diluez-Ia et
appliquez deux couches tres
legeres.
peinture ne remplisse
la
grille.
4.
Une fois
reinstallezIetissu etIelogo de
grille.
Gestion
la
Vous
eviterez ainsi que
quelapeinture est
de
puissance
differents niveaux
d'ecoute
el
Les
recommandations de
des enceintes supposent que vous
utiliserez I'ampli de telle maniere qu'il
produira aucune distorsion. Malgre leur
robustesse,
endommagees par I'ampli
les
SiIeson
baissez
longee
un signal deforme
endommagement
vert par
nos
enceintes peuvent etre
sons.
est
discordant et strident,
Ie
volume. l:utilisation pro-
ou
repetee des enceintes avec
la
garantie.
Garantie limitee
es
Boston
Acoustics
nos
initial de
exemptes de tout defaut de fabrication et
de main-d'oeuvre pendant une periode
de 5
l:acheteur devra avoir installe et utiliseIesysteme conformementaumode
d'emploi fourni,
sans
Boston Acoustics
preuve d'achat (facture ou ticket de
caisse)
Cette garantie
mage resultant
ou
transport
modifications
personne
agree par Boston Acoustics.
Cette garantie est Iimitee
duit
pas
associe.
retrait etde
enceintes
ans
suivantladate
accident aun reparateur agree par
avecsademandede reparation.
inadequat,
Boston Acoustics, et ne couvre
I'endommagementdumateriel
en
d'un
ou
de
effectuees par
autre
Ellenecouvre
la
reinstallation.
« epingle a
res.Sivous
peinture avec un
les
trous de
seche,
la
et
puissance
s'il
deforme
peut
provoquer un
qui n'est
garantit aI'acheteur
assurerIetransport
et
exclut
d'un
qu'un
pas
HSi
qu'elles
d'achat.
presenter une
tout
usage
accident,
reparations
reparateur
au
pasIecout du
cou-
seront
dom-
abusif
toute
pro-
du
ou
Lautsprecher-Ziergitter
1.
Entfernen
Es
Legen
la
Installation zur
2.
Entfernen
von der Innenseite
Legen
Installation
Sie
ist
mit
einem Bindestift befestigt.
Sie
Sie
Sie
an
abo
3.
Lackieren
Sie
zwei dunneSchichten aufgetragen
la
la
werden. Wenn Lack
Pinsel
Dose aufgetragen wird, verdunnen
Sie
zwei ganz dunne Schichten
Damit wird verhindert.
die Locher
fUllen.
4.
Nachdem der
installieren
Ziergitter-Logo.
Sie
den
erst den
das
Lack
aufspruhen, mussen
oder einer Walze
Lack
des
Sie
Lautstarkeneinste
lIungen/Leistungs
verarbeitung
ne
Die Leistungsempfehlungen
Lautsprecher
Verstarker
keinen Verzerrungen kommt. Sogar
unsere robusten Lautsprecher konnen
durch einen Verstarker beschadigt
werden, derVerzerrungen erzeugt.
Wenn
horen, reduzieren
Ein
lange andauernder oder wiederholter Betrieb des Lautsprechers
einem
Verstarker kann Schaden verursachen, die nicht durch die Garantie
gedeckt
Setzen
so
betrieben wird,
Sie
scharfe, schleifende Tone
verzerrten Signal
si
nd.
Eingeschrankte
Garantie
Fur
die Dauer von 5 Jahren ab
Kaufdatum garantiert Boston
Acoustics dem Originalbesitzer unserer HSi-Lautsprecher,
von Material- und
Herstellungsmangeln sind.
Ihnen obliegt
den mitgelieferten Anweisungen
installieren undzuverwenden,
einen sicheren Transportzueiner
befugten Reparaturstelle von Boston
Acoustics
Anforderung von Reparaturen einen
Kaufnachweis
vorzulegen.
Von der Garantie ausgeschlossen
sind Schaden, die durch missbrauchliche' Verwendung, unsachgemal3en
es,
zu
in
Form einer Quittung
das Ziergitter-Logo.
es
zur spateren
Seite.
vorsichtig
eszur spateren
einem sauberen
Ziergitters mit
das
Sie
das
sorgen und bei
das
des
Ziergitter.
und tragen dann
Lack
Tuch und
voraus,
die Lautstarke.
dass
System
Tuch
Ziergitters.
Wenn
mit
einem
aus
dass
trocken ist,
fUr
dass
dasseszu
vom
diese
gemal3
art
der
auf.
sich
Lack
das
die
der
mit
Frei
fUr
zu
-11-
Page 12

rights. and you may
rights which vary from state
If
Service
Seems
also
have other
to
state.
Necessary
First,
contact the dealer from
you
purchased the
not possible, write to:
Boston Acoustics, Inc.
100
Corporate Drive
Mahwah,
Or
contadusvia
support@bostona.com
We
will promptly advise youofwhat
action to take. If it
return your speakertothe factory,
please ship it prepaid. After it
repaired, we will return it freight prepaidinthe United
NJ
speakers.
07430
e-mail
is
States
If that
U.S.A.
at:
necessary
has
and
Canada.
whom
been
juicio de otros derechos que pueda
tener en
el
estado donde
Sisenecesita
servicio tecnico
Dirfjaseala
sistema.Siesto noesposible, escriba
is
Boston Acoustics, Inc.
100
Mahwah,
o p6ngase
travesdenuestra
support@bostona.com
to
En
el
procedimiento que debe
fuera
fabrica,Ierogamos10haga
pagados.
10
devolveremos con portes pagados
en
los
tienda donde adquiri6
Corporate Drive
NJ
07430
en
contado con nosotros a
pagina
un breve plazoIecomunicaremos
necesario devolver
Una
vez
reparadoelsistema,
Estados
Unidos y
resida.
U.S.A.
web,
los
altavoces a
con portes
Canada.
seguir.
Cette garantie
retrait oudedegradation du numero
de
serie.
Cette
tains droits particuliers
vez
el
a:
egalement
supplementaires
pays aI'autre.
Pour
toute
est
garantie
disposerdedroits
pouvant
demande
vous
reparation
Contactez
duquel
enceintes.Sicela
ecrivez
Si
Boston Acoustics, Inc.
100
Mahwah,
Ou
contactez-nous par courrier electronique
support@bostona.com
Nous vous indiquerons
marche asuivre.
er un article
er en
effectuee, nous vous
port
Canada).
Ie
voGus
detaillant aupres
avez achete
n'est
aI'adresse suivante :
Corporate Drive
NJ
07430
a:
Si
vous devez renvoy-
aI'usine, veuillez I'expedi-
port
paye.
Une foislareparation
paye (aux ttats-Unisetau
annulee en
donne
et
vous pou-
varier
pas
U.S.A.
sans
Ie
renverrons en
cas
d'un
de
possible,
delai
de
cer-
les
Einsatz, falsche Installation, Unfalle,
Transport
Anderungen, die
befugten Reparaturstelle von Boston
Acoustics vorgenommen wurden, ent-
standen.
Diese
das
deckt keine Schadenanzugeh6rigen
Geraten. Diese Garantie deckt auch
keine Kosten
erneute Installation.
Wenn die Seriennummer entfernt
oder unkenntlich gemacht worden
gilt
Diese Garantie verleiht Ihnen bes-
timmte
Sie
nach Bundesstaat oder Land unterschiedlich
oder
Reparaturen bzw.
Garantie beschrankt sich auf
Produkt von Boston Acoustics
fUr
den Ausbau oder die
diese Garantie nicht.
Rechte. Daruber hinaus haben
mitunter
weitere Rechte, die je
sein
k6nnen.
Reparaturanforderung
Wenden
Fachhandler, von
Lautsprecher gekauft haben. Wenn dies
la
nicht m6glich
Boston Acoustics, Inc.
100
Mahwah,NJ07430
Oder nehmen
Website
support@bostona.com
Sie
sich
ist,
schreiben
Corporate Drive
Sie
mit
uns Kontakt auf:
nicht
von einer
und
bitte erstanden
dem
Sie
die
Sie
an:
U.S.A.
uber folgende
ist,
Wir werden Ihnen unverzuglich mit-
teilen, wie
der Lautsprecher
geschickt werden
ihn bitte frachtfrei zuruck. Nach der
Reparatur wird er in den
Kanada frachtfrei an
sandt.
Sie
vorgehen sollen. Wenn
an
das
Werk zuruck-
muss,
senden
USA
Sie
zuruckge-
Sie
und
in
300
Jubilee
bostonacoustics.com
Drive,
Peabody,MA01960
USA
Boston,
Boston
Acoustics,
of
trademarks
without
© 2008 Boston Acoustics,
Boston Acoustics,lnc. Specifications
notice.
the Boston Acoustics logo,
Inc.
and
Kortec
are
subjecttochange
are
registered
142-003569-1
Page 13

HSi
270•HSi
470•HSi
470T2
HSi
N740•CS
270•VSi
570•VSi
H470T2
8~8"
(225mm)
HOLE
CUTTING
TEMPLATE
Cut holetoexact sizeoftemplate.
See
installation instructions
for
details.
Use
this
templatetoscore
the
proper
size hole
for
the
HSi
270,
HSi
470,
HSi
470T2
HSi
N740,CS270,
VSi
570,orVSi
470T2 speaker system.
Make sure
the
templateiscentered before scoring
the
outlineonthe
mounting
surface.
Behind
the
mounting
surface: There
must
be a 1" (25mm) clearance around
the
mounting
hole.
300 Jubilee Drive, Peabody, MA 01960
USA
bostonacoustics.com
 Loading...