

Boston CPS 12Wi, CPS 8Wi, CPS 10Wi Service Manual

Classic
CPS 12Wi, CPS 10Wi, CPS 8Wi
Wireless-Ready Subwoofers
Español
Subwoofers Boston
Classic Series
Manual del Propietario /
Instrucciones de Seguridad /
Información de Cumplimiento
Français
Caissons de graves Boston
Classic Series / Guide de
l’utilisateur / Instructions
de sécurité / Informations
relatives à la conformité

Specifications CPS 12Wi CPS 10Wi CPS 8Wi
Frequency Range:
25Hz – 150Hz 28Hz – 150Hz 31Hz – 150Hz
Amplier Power: 400 watts RMS 300 watts RMS 200 watts RMS
(850 watts Peak) (650 watts Peak) (350 watts Peak)
Bass Driver: 12” (305mm) DCD 10” (254mm) DCD 8” (203mm) DCD
Dimensions: (H x W x D) 1511⁄16 x 167⁄16 x 17” 137⁄8 x 1411⁄16 x 17” 111⁄2 x 123⁄16 x 153⁄8”
(397 x 416 x 431mm) (352 x 372 x 431mm) (292 x 309 x 389mm)
Weight: 48.5 lbs 40 lbs 26 lbs
(22kg) (16.8kg) (11.7kg)
Introduction
Boston Acoustics Classic Series Wireless-Ready Subwoofers
Thank you for choosing Boston Acoustics. The Classic Series Wireless Ready subwoofers incorporate high-quality components
that produce the legendary Boston Sound. The subwoofers are ideally suited for use in a high-quality 5.1 channel home
theater or stereo music system. They are capable of impressive deep bass and high output from remarkably compact
enclosures. In addition, they feature BassTrac®, a proprietary Boston-designed circuit that tracks the input signal to the
subwoofer and prevents its amplifier from being driven into audible distortion. The benefit: the bass stays clean and strong
at any listening level.
Features
• PlaywirelesslywiththeoptionalWT50WirelessTransmitter
• 12”,10”,and8”woofers
• 200to400wattsRMS
• High-outputfront-ring,front-porteddesign

3
Amplier Power: 400 watts RMS 300 watts RMS 200 watts RMS
(850 watts Peak) (650 watts Peak) (350 watts Peak)
Bass Driver: 12” (305mm) DCD 10” (254mm) DCD 8” (203mm) DCD
Dimensions: (H x W x D) 1511⁄16 x 167⁄16 x 17” 137⁄8 x 1411⁄16 x 17” 111⁄2 x 123⁄16 x 153⁄8”
(397 x 416 x 431mm) (352 x 372 x 431mm) (292 x 309 x 389mm)
Weight: 48.5 lbs 40 lbs 26 lbs
(22kg) (16.8kg) (11.7kg)
Introduction
Boston Acoustics Classic Series Wireless-Ready Subwoofers
Thank you for choosing Boston Acoustics. The Classic Series Wireless Ready subwoofers incorporate high-quality components
that produce the legendary Boston Sound. The subwoofers are ideally suited for use in a high-quality 5.1 channel home
theater or stereo music system. They are capable of impressive deep bass and high output from remarkably compact
enclosures. In addition, they feature BassTrac®, a proprietary Boston-designed circuit that tracks the input signal to the
subwoofer and prevents its amplifier from being driven into audible distortion. The benefit: the bass stays clean and strong
at any listening level.
Features
• PlaywirelesslywiththeoptionalWT50WirelessTransmitter
• 12”,10”,and8”woofers
• 200to400wattsRMS
• High-outputfront-ring,front-porteddesign
• DeepChannel®Design(DCD)woofersformorebassfromlessamplierpower
• BassTraccircuitryfortight,distortion-freebassatalloutputlevels
• Adjustablecrossoverfrequencyandvolumecontrol
• Switchablepolarity
• Signal-sensingautomaticaudio-oncircuitry
• Speakerandlinelevelinputs
• Ultra-rigidreinforcedcabinetry
digital receiver
Connections
After your speakers are properly placed, you are ready to wire your system.
NOTE: Power is always supplied to the subwoofer electronics unless it is unplugged or switched to the Mute position using
the Audio On switch located on the rear panel. The auto-on circuitry only activates or deactivates the power amplifier. Make
sure your subwoofer and receiver are unplugged when making the connection (230v models include a main power switch
which turns off all power of the subwoofer).
Power: When plugging your subwoofer in be sure to use a wall outlet, or dedicated electrical outlet. Some receivers will
provide a switched outlet. Do not use this. These on-board electrical outlets do not offer the amount of current or proper
isolation required by a power amplifier, such as the one in your subwoofer.
Line level or LFE: On most systems use the line level input or the LFE input. These inputs accept the line-level signal from
your receiver’s subwoofer output. Your receiver’s manual should indicate which input is most appropriate.
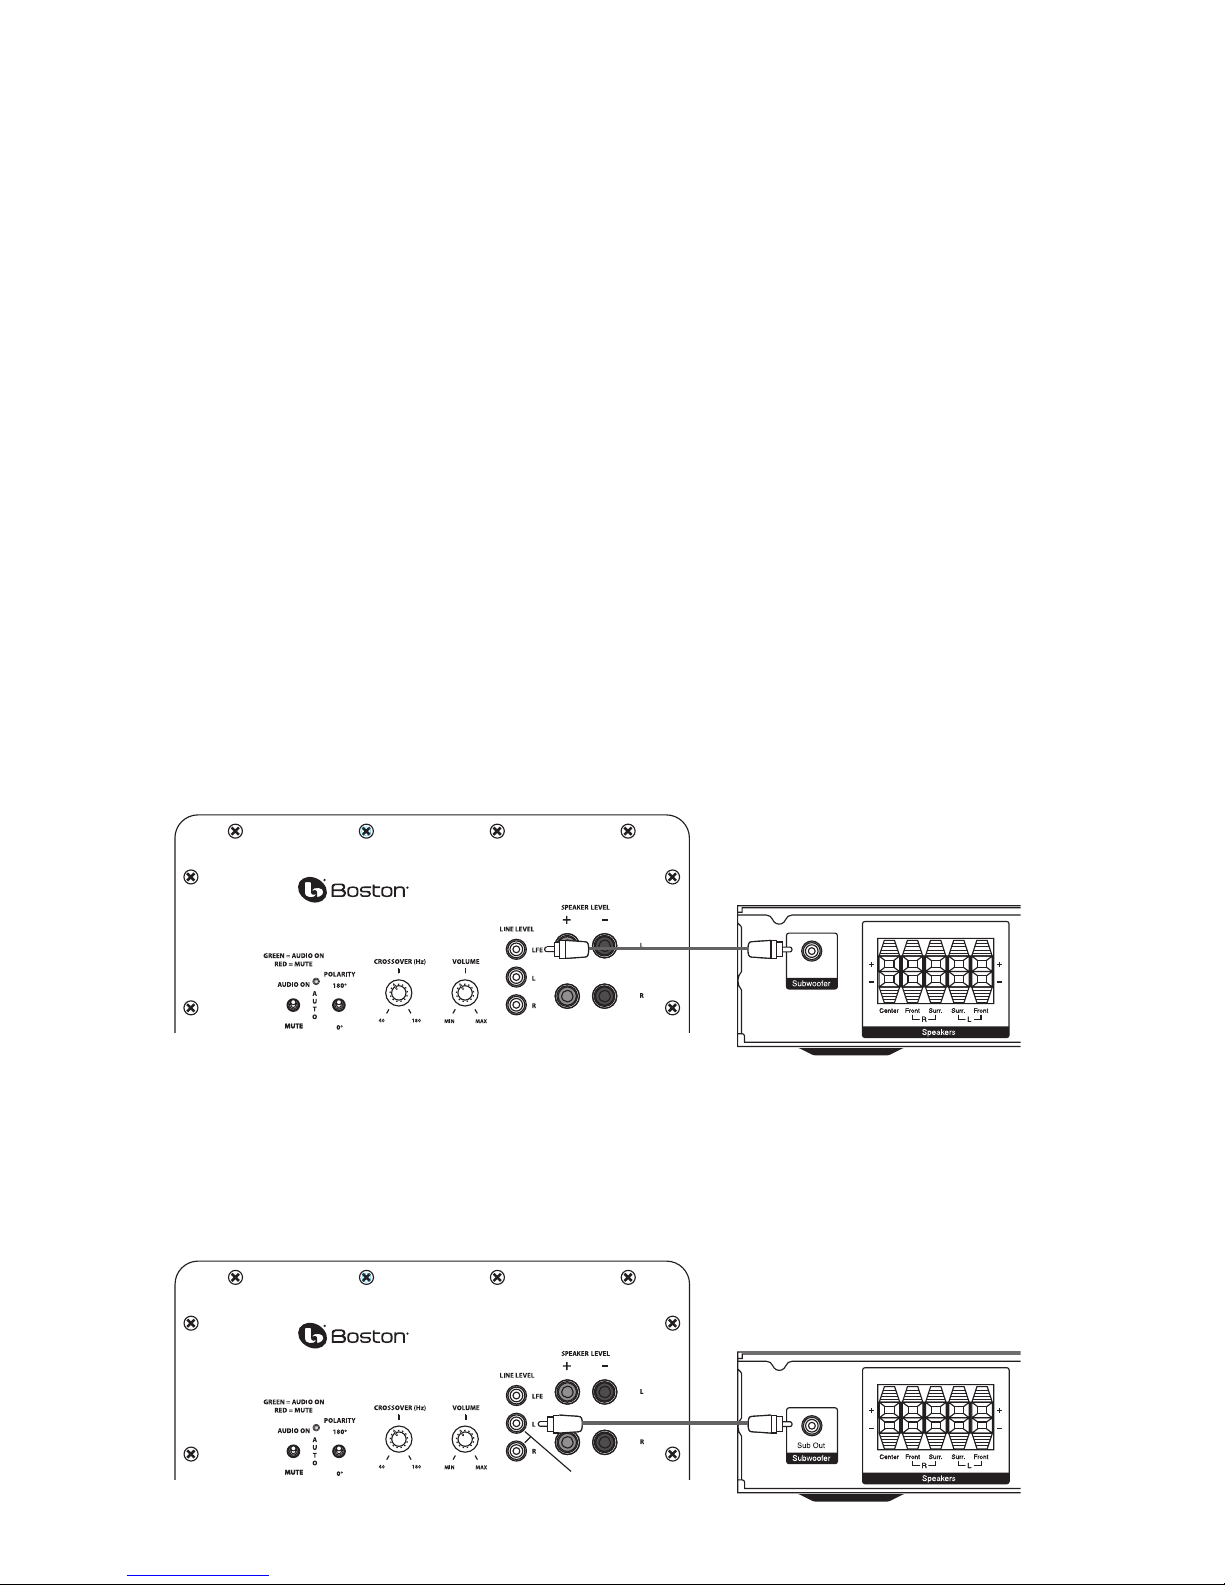
Connecting the Subwoofer to Digital Home Theater Systems Using LFE
Digital 5.1, 6.1 and 7.1 home theater electronics dedicate one channel (the “.1”) to reproduce the special low-frequency effects
(LFE) information (such as explosions and thunder) contained in digitally-encoded soundtracks.
Select ”subwoofer-yes” from your receiver’s set-up menu. Hooked up this way, the receiver’s amplifier is relieved of having
to reproduce the difficult low bass signals that can drive the receiver into audible distortion. In some cases it can also depend
on several other settings within a receiver. We recommend consulting your receiver manual for further assistance in this area.
Use an RCA cable (not included), as shown, to connect your digital receiver’s LFE/subwoofer output to the subwoofer.
CPS 12 Wi
Sub Out
Connect the other end to the Line Level/LFE input.
Connecting the Subwoofer to Stereo or Dolby® Pro Logic®
For stereo or Dolby Pro Logic systems use the “sub out” connection from your receiver to the input on the subwoofer marked
“L” or “R”.
CPS 12 Wi
receiver
use either input
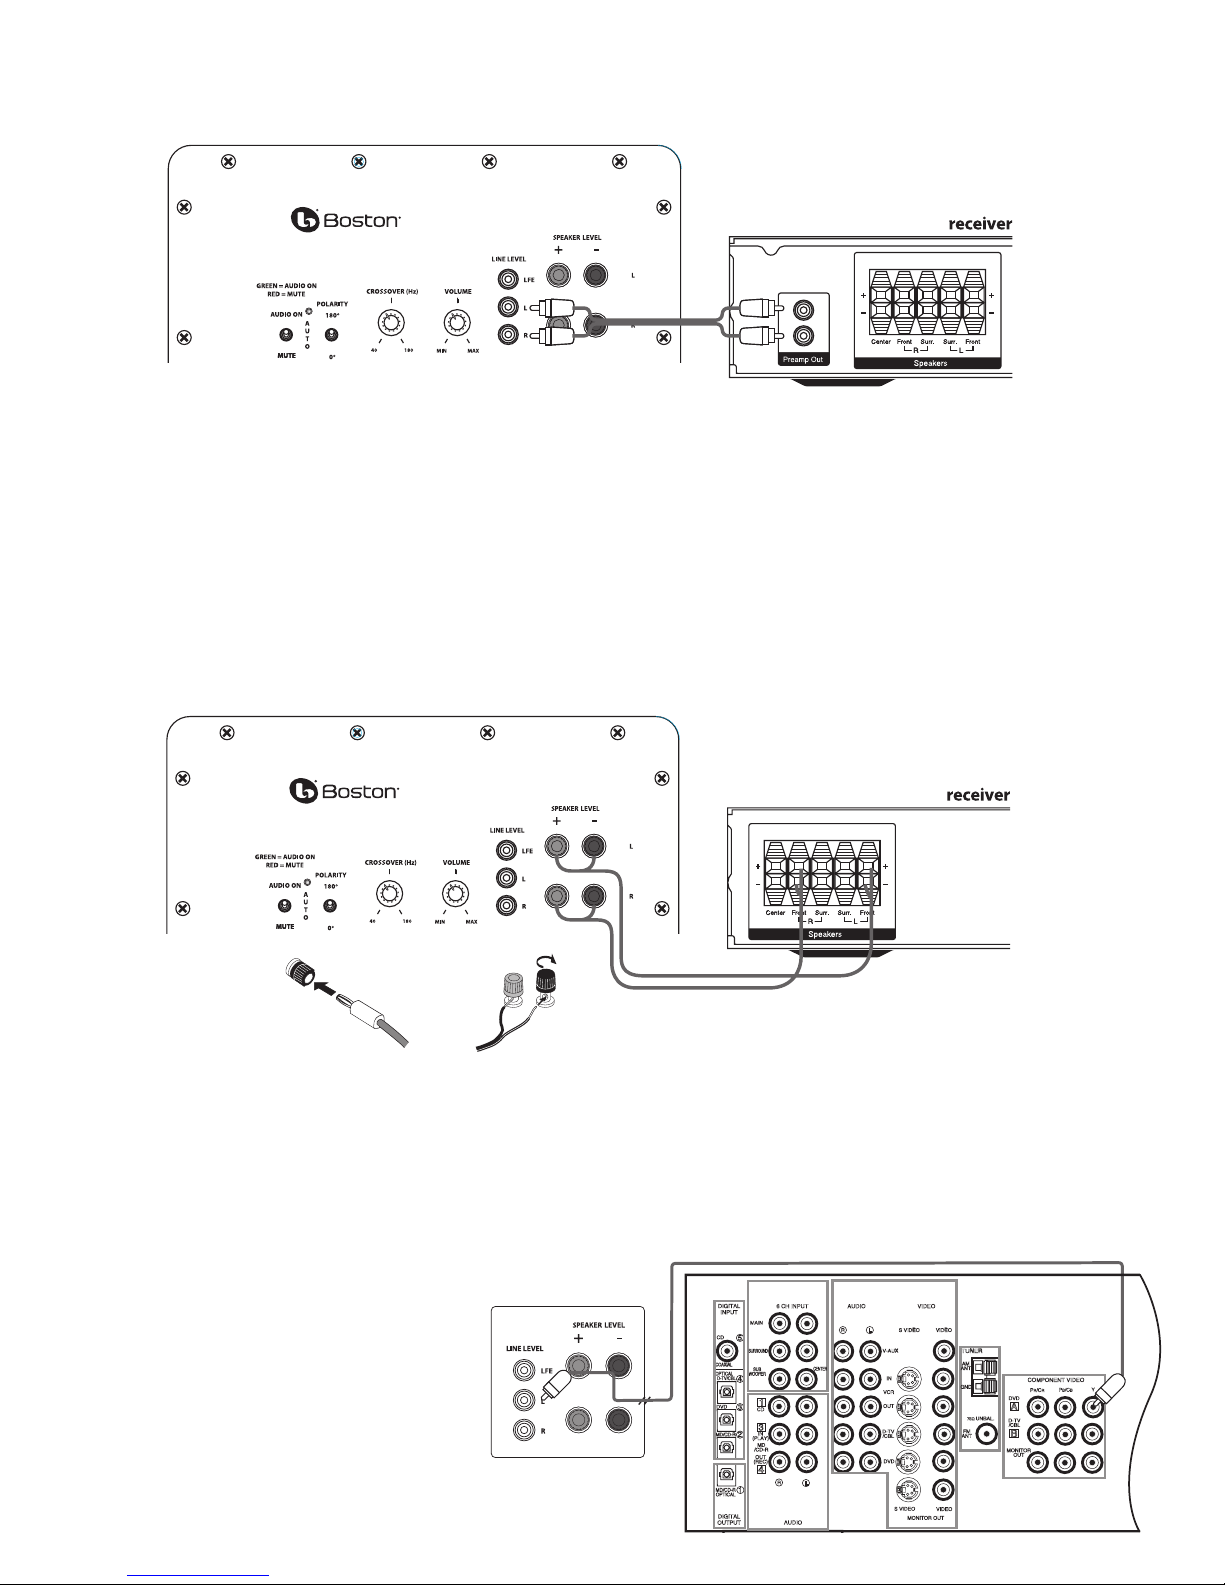
Connecting to Electronics Without a Subwoofer Output
If the receiver in your system does not have a subwoofer or LFE output you can connect the CPS Wi subwoofer to a preamp
output. Use a stereo RCA cable (not included) to connect the preamp outputs to the “L” and “R” Line Level inputs.
CPS 12 Wi
Adjusting the Crossover Control
When using the Line Level inputs (not the LFE input) the subwoofer’s built-in crossover is engaged. As a starting point, set the
crossover control on the subwoofer about 10Hz higher than the lower limit of your main speakers’ bass response. Fine-tune
the crossover setting by ear for the smoothest blend with your main speakers. The best setting of the crossover control will
depend on speaker placement and personal preference.
Speaker level
Use these high-level terminals with receivers that do not have subwoofer output. The speaker inputs accept both left and
right channel speaker signals from your receiver. When using a home theater receiver, set the speaker type to “Large.” The large
setting will produce a fuller sound.
CPS 12 Wi
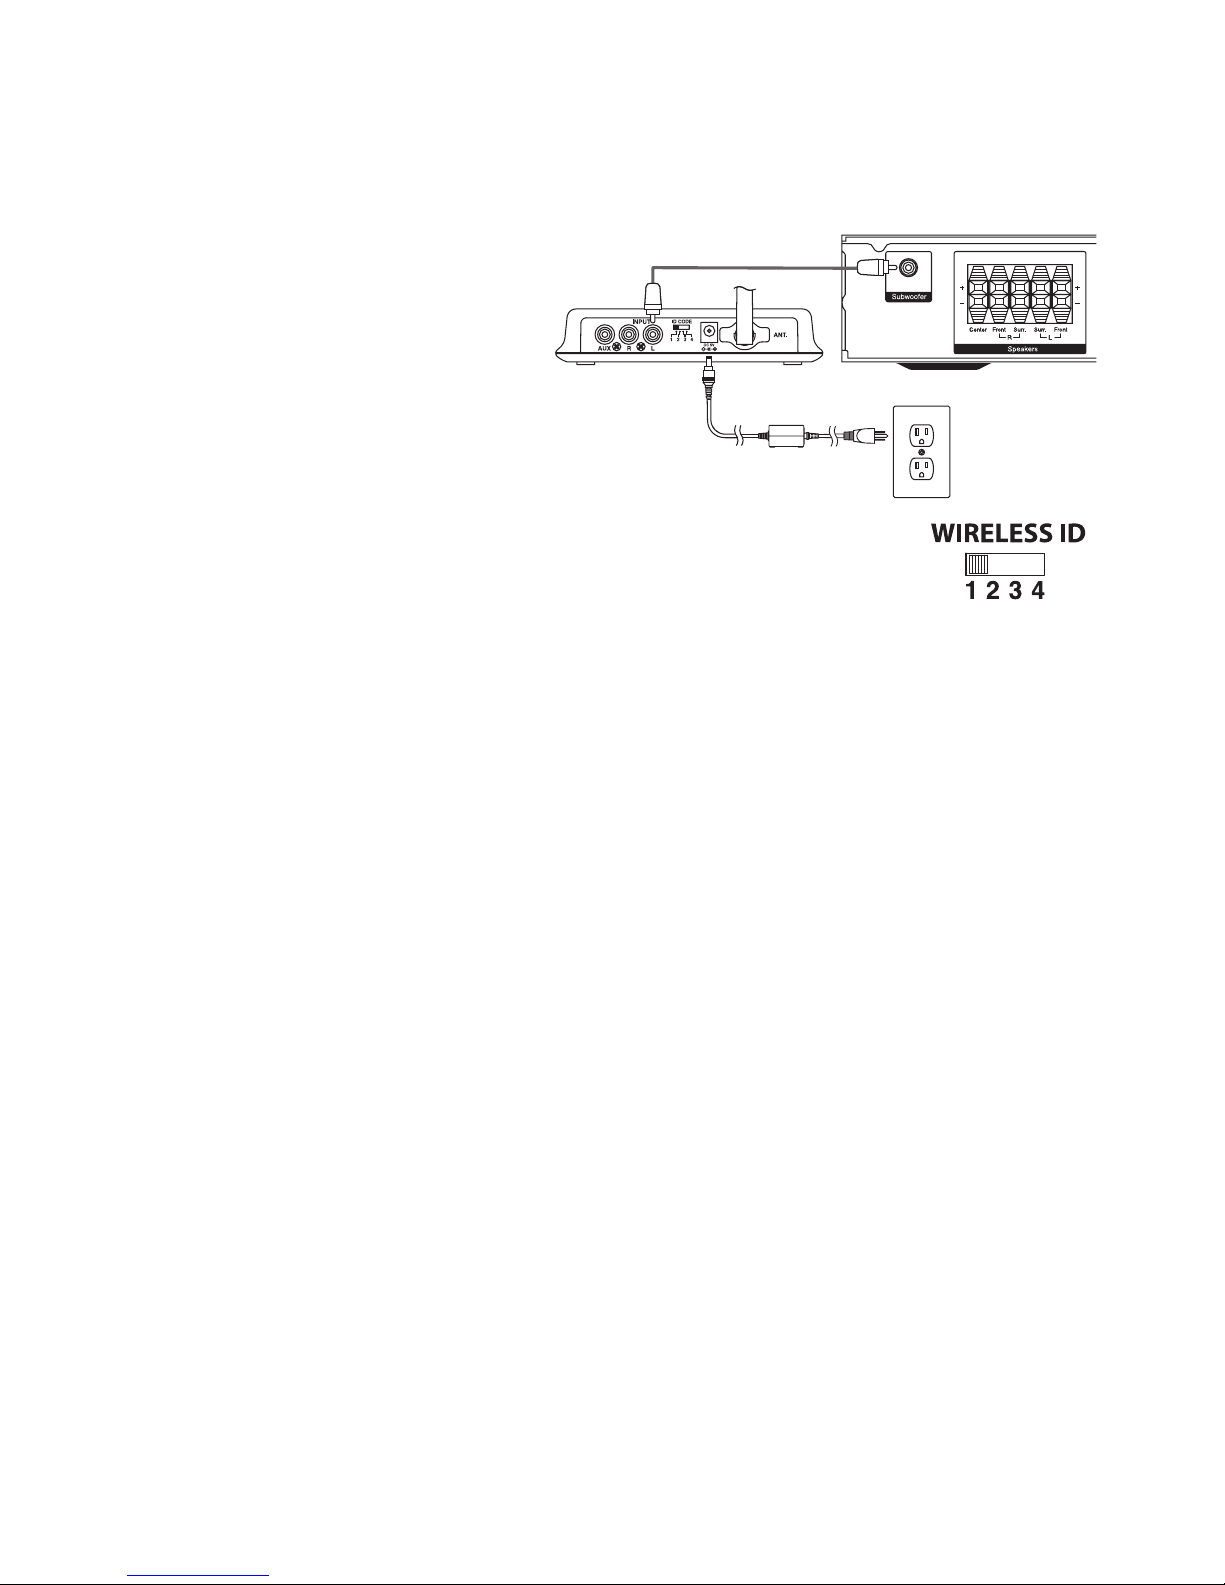
Note
Certain receivers use speaker grounding circuits that may be incompatible with external powered audio products, such as powered subwoofers. When speaker wire is used instead of line level cables, this incompatibility can result in an audible hum when
the receiver is turned off or switched to a different speaker channel.
If this should happen with your Boston Acoustics subwoofer, you will need to make a ground cable and connect it to either RCA
line input on the subwoofer and any unused
RCA line input or output on your receiver
(see diagram). The proper ground cable for
this application should consist of two male
RCA plugs that have their negative outside
terminals (or “sleeve”) connected to each
other by any length of single conductor
copper cable. The inside positive (or “pin”)
terminals should not be wired in either plug.
or
use either RCA jack
back of subwoofer
single conductor (-) RCA to (-) RCA ground cable
DIGITAL
INPUT
CD
COAXIAL
OPTICAL
D-TV/CBL
DVD
MD/CD-R
MD/CD-R
OPTICAL
DIGITAL
OUTPUT
MAIN
SURROUND
SUB
WOOFER
CD
IN
(PLAY)
MD
/CD-R
OUT
(REC)
6 CH INPUT
R
AUDIO
CENTER
L
AUDIO VIDEO
L
R
V-AUX
IN
VCR
OUT
D-TV
/CBL
DVD
S VIDEO
MONITOR OUT
VIDEOS VIDEO
VIDEO
TUNER
AM
ANT
GND
75ΩUNBAL.
FM
ANT
DVD
D-TV
/CBL
MONITOR
OUT
COMPONENT VIDEO
PR/CR
use any available RCA jackback of receiver
Y
B
PB/C
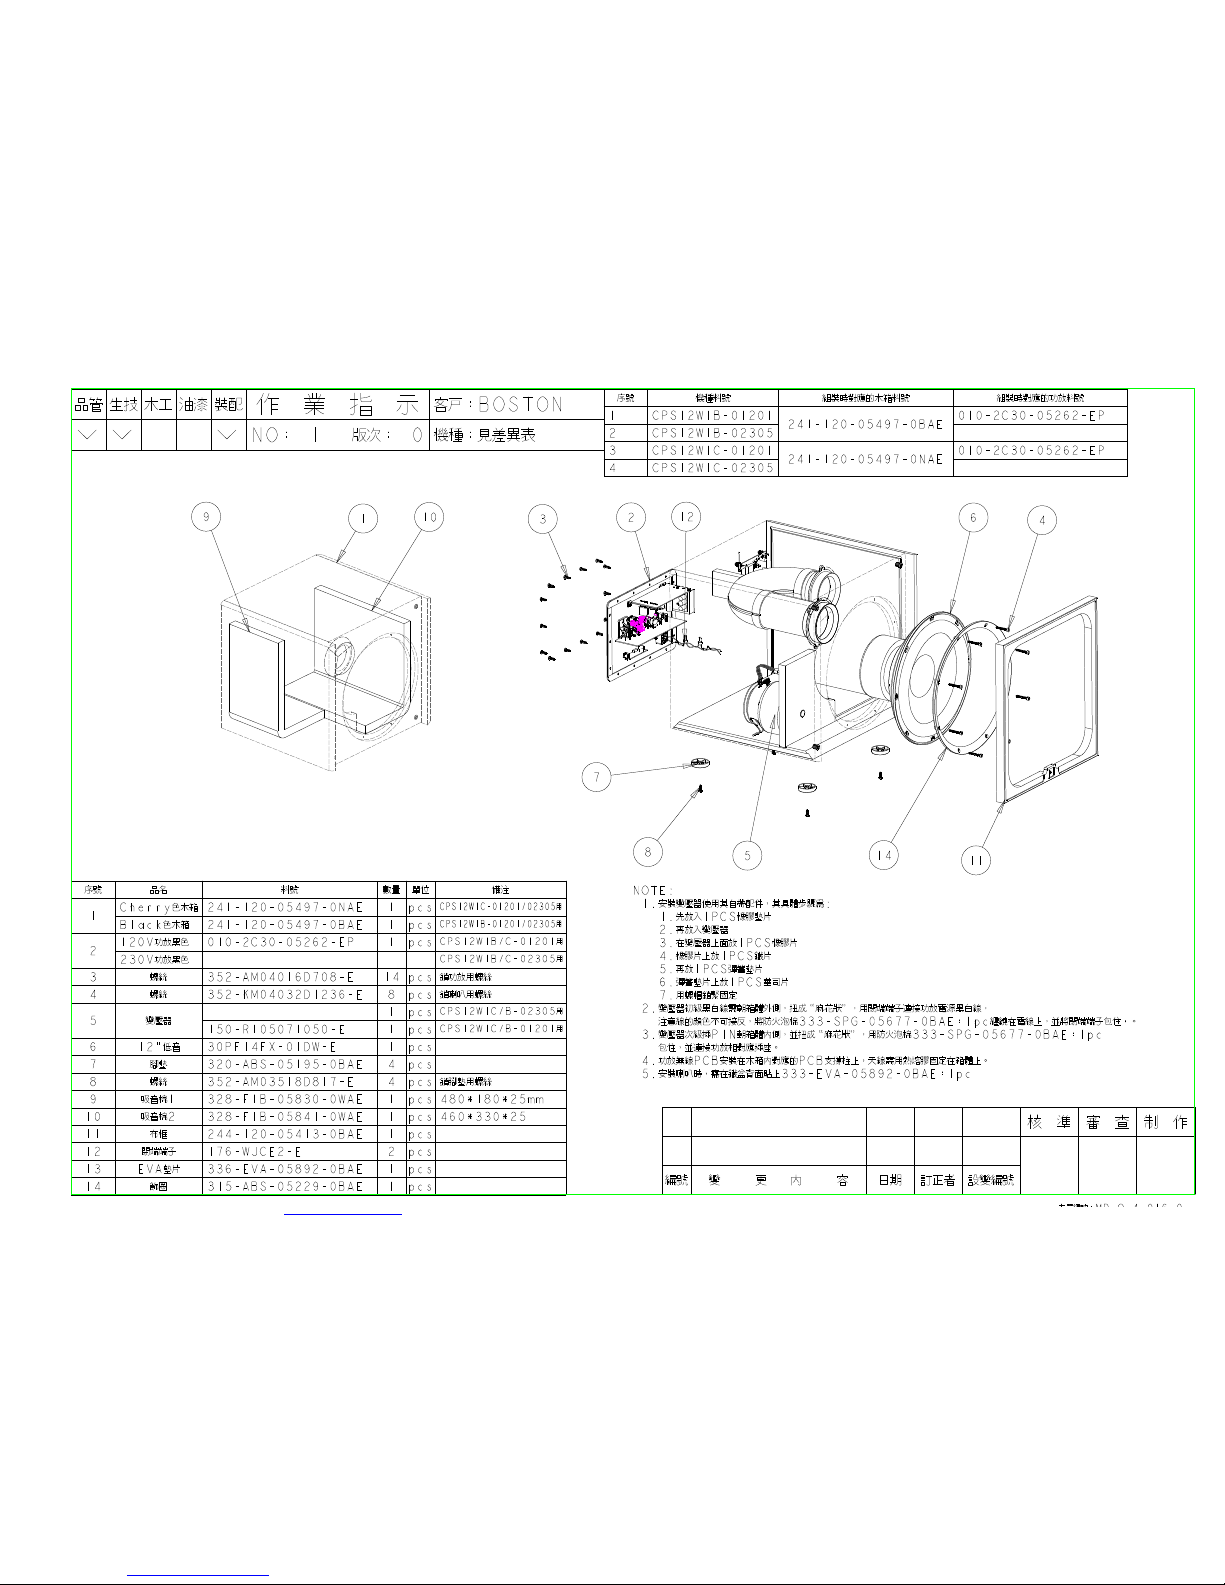
Optional WT 50 Wireless Transmitter
Transmitter Power
Plug the transmitter power supply into a power outlet. The transmitter power supply requires very little power so you can
plug it into an auxiliary power outlet on the receiver. Plug the connector on the power supply cable into the transmitter
power input labeled 5V DC.
Wireless ID Switches
Both the CPS Wi Subwoofer and optional WT 50 Wireless
Transmitter have Wireless ID switches (located on the rear
of the subwoofer and transmitter). The various switch
settings change the digital identification code of the
wireless signal the WT 50 sends to the subwoofer. The two
switches must be set to the same position. Typically you’ll
never need to adjust these switches. They are included in
case you have more than one CPS Wi subwoofer in your
house. Use different Wireless ID switch settings so the
subwoofers won’t interfere with each other.
Note: Do not connect the same audio source to the subwoofer and WT 50 wireless transmitter at
the same time.
WT 50 Transmitter Receiver
Power supply cord
Operation
Audio On/Auto/Mute
Plug the subwoofer’s AC cord into a wall outlet. Do not use the outlets on the back of the receiver. Set the audio switch
to the desired setting.
AUDIO ON – The subwoofer audio is always on.
AUTO – The subwoofer audio will turn on whenever a signal is detected. If no signal is detected after several minutes, it will
automatically enter the Mute mode.
MUTE – The subwoofer is muted and will not produce any sound. You may want to unplug your subwoofer if you will not be
using it for some time or wish to conserve electricity. (On 230v models only, you may turn off the main power switch, located
next to the power cord)
An LED indicator next to the Polarity switch indicates what mode the subwoofer is in:
OFF – The subwoofer is unplugged (or the main power switch is off on 230v models)
RED – Mute (No signal detected, Amp Off)
GREEN – Audio On (Signal detected, Amp On)
The subwoofer will automatically enter the Mute mode after several minutes when no signal is detected from your system.
The subwoofer audio will then turn ON instantly when a signal is detected.
Polarity Control
(0° or 180°): Selects regular (0°) or inverted (180°) phase for the subwoofer. Set this switch to provide the fullest, most
dynamic bass. The effect of phase will be most audible on low-frequency percussion instruments or music with a continuously
repeating bass line.
Crossover Control
Adjusts the frequency of the low pass filter for the subwoofer. Note: This control is not active when using the LFE input jack.
Volume Control
Turn the subwoofer Volume control to the 11 o’clock position. If no sound emanates from the subwoofer, check the AC-line
cord, Audio On switch, Power switch (on 230v models), and input cables.
Adjust the subwoofer Volume control until you hear a match between the main speaker and subwoofer. Bass response should
not overpower the room but rather be adjusted so there is a natural blend across the entire musical range.
7

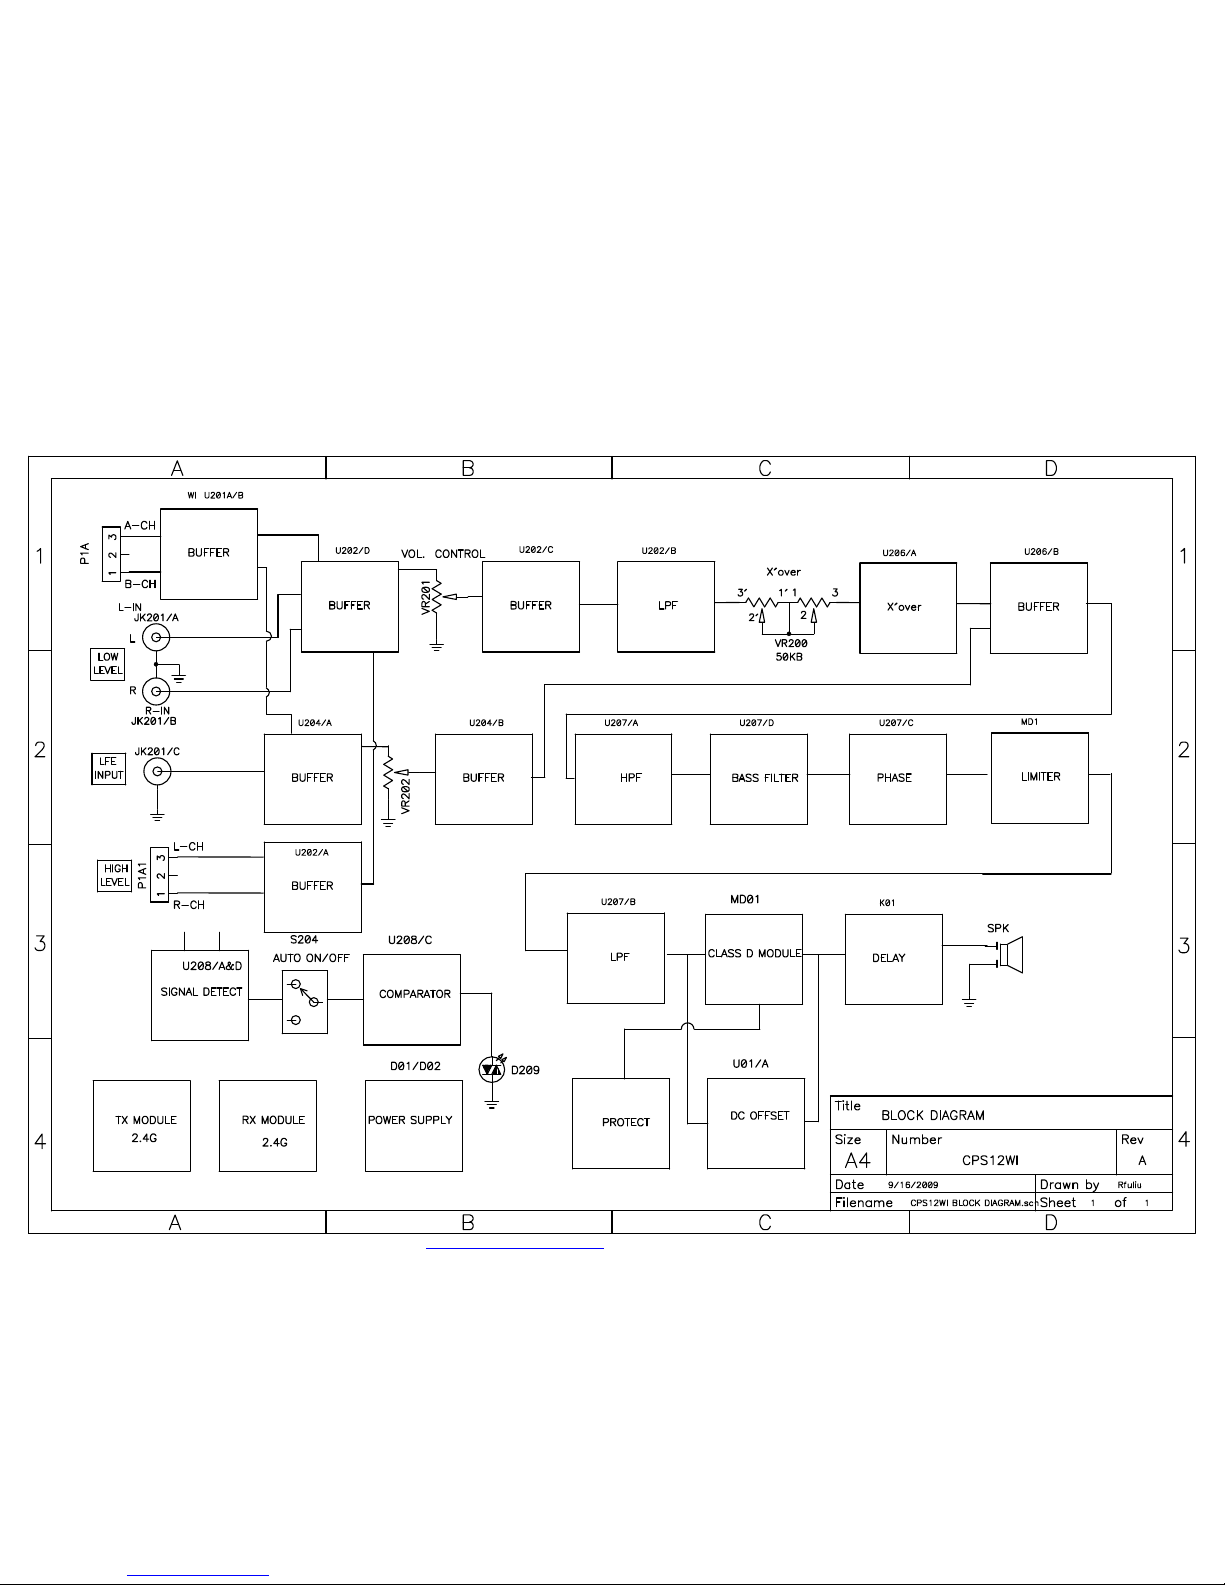
CPS12Wi Service Parts
Component Item Component Description
110-002215 WOOFER 12"
111-001728 TRIM RING WOOFER CPS12Wi
120-003408 GRILLE ASSEMBLY CPS12Wi
120-003409 AMP ASSY W/O XFMR CPS12Wi 120V
120-003413 AMP ASSY W/O XFMR CPS12Wi 230V
120-003350
DISPLAY CARTON W/LABEL CPS12Wi BLK
120-003351
DISPLAY CARTON W/LABEL CPS12Wi CHERRY
126-000115 XFMR ASSEMBLY CPS12Wi 120V
126-000158 XFMR ASSEMBLY CPS12Wi 230V
132-000160
FUSE 5.0A 250V 20MM TIME LAG (for 120V model)
132-000161
FUSE 2.5A 250V 20MM TIME LAG (for 230V model)
137-001591 FOOT CPS10
137-001634 DETACHABLE POWER CORD 120V
137-001635 DETACHABLE POWER CORD 230V
140-000618 SCREW,HEX CAP,WFR
140-000619 SCREW,PHILIPS,AMP
141-002808 EPS TOP&BOTTOM SET CPS10/12Wi
142-003789
MANUAL CPS 8Wi 10Wi 12Wi
154-000308 TERMINAL CRIMP INSULATED CLOSED-END
PDF 檔案以 "FinePrint pdfFactory Pro" 試用版建立 http://www.fineprint.com
PDF 檔案以 "FinePrint pdfFactory Pro" 試用版建立 http://www.fineprint.com
1
1
2
2
3
3
4
4
DD
CC
BB
AA
Title
NumberRevisionSize
A4
Date:2009/9/16Sheet of
File:D:\My File\..\Main.SchDocDrawn By:
Pre\Main
BN20090031.1
11
Mike
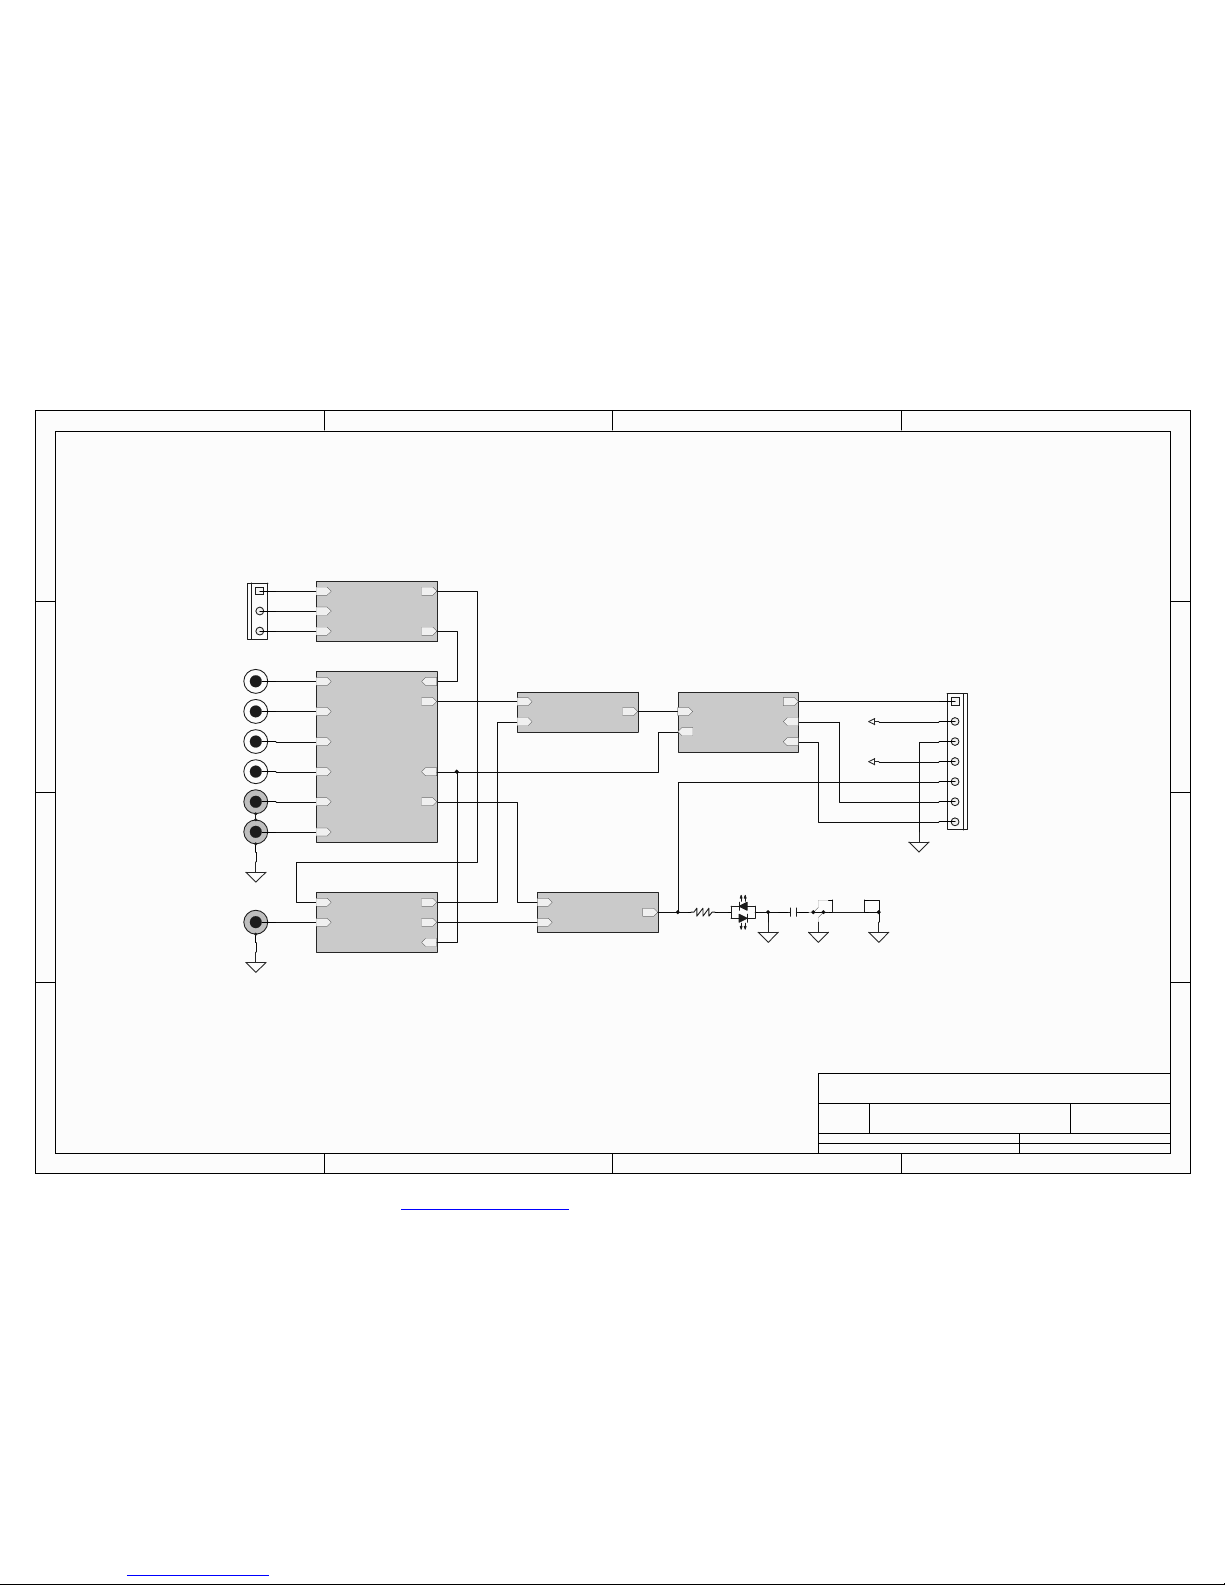
WI_A
WI_RTN
WI_B WO_A
WO_B
U_Buffer_WI
Buffer_WI.SchDoc
P201
JK201A
313G-05
JK201B
313G-05
JK203B
JK203D
JK203A
JK203C
Normal
LFE
Out
U_SUM_total
SUM_total.SchDoc
P202
+15V
-15V
IN2
IN1
Out
U_Auto
Auto.SchDoc
R310
1K5/1206
G
R
D216
BK201
FGFG
C279
CD104
IN
Out
VcD+
VcD-
Limiter_S
U_Output
Output.SchDoc
LLin
LRin
WI_normal
HRin+
HLin+
HLin-
HRin-
Out
Auto_S1
Limiter_S1
U_SUM_RL
SUM_RL.SchDoc
LFEin
WI_LFE Out
Auto_S2
Limiter_S2
U_SUM_LFE
SUM_LFE.SchDoc
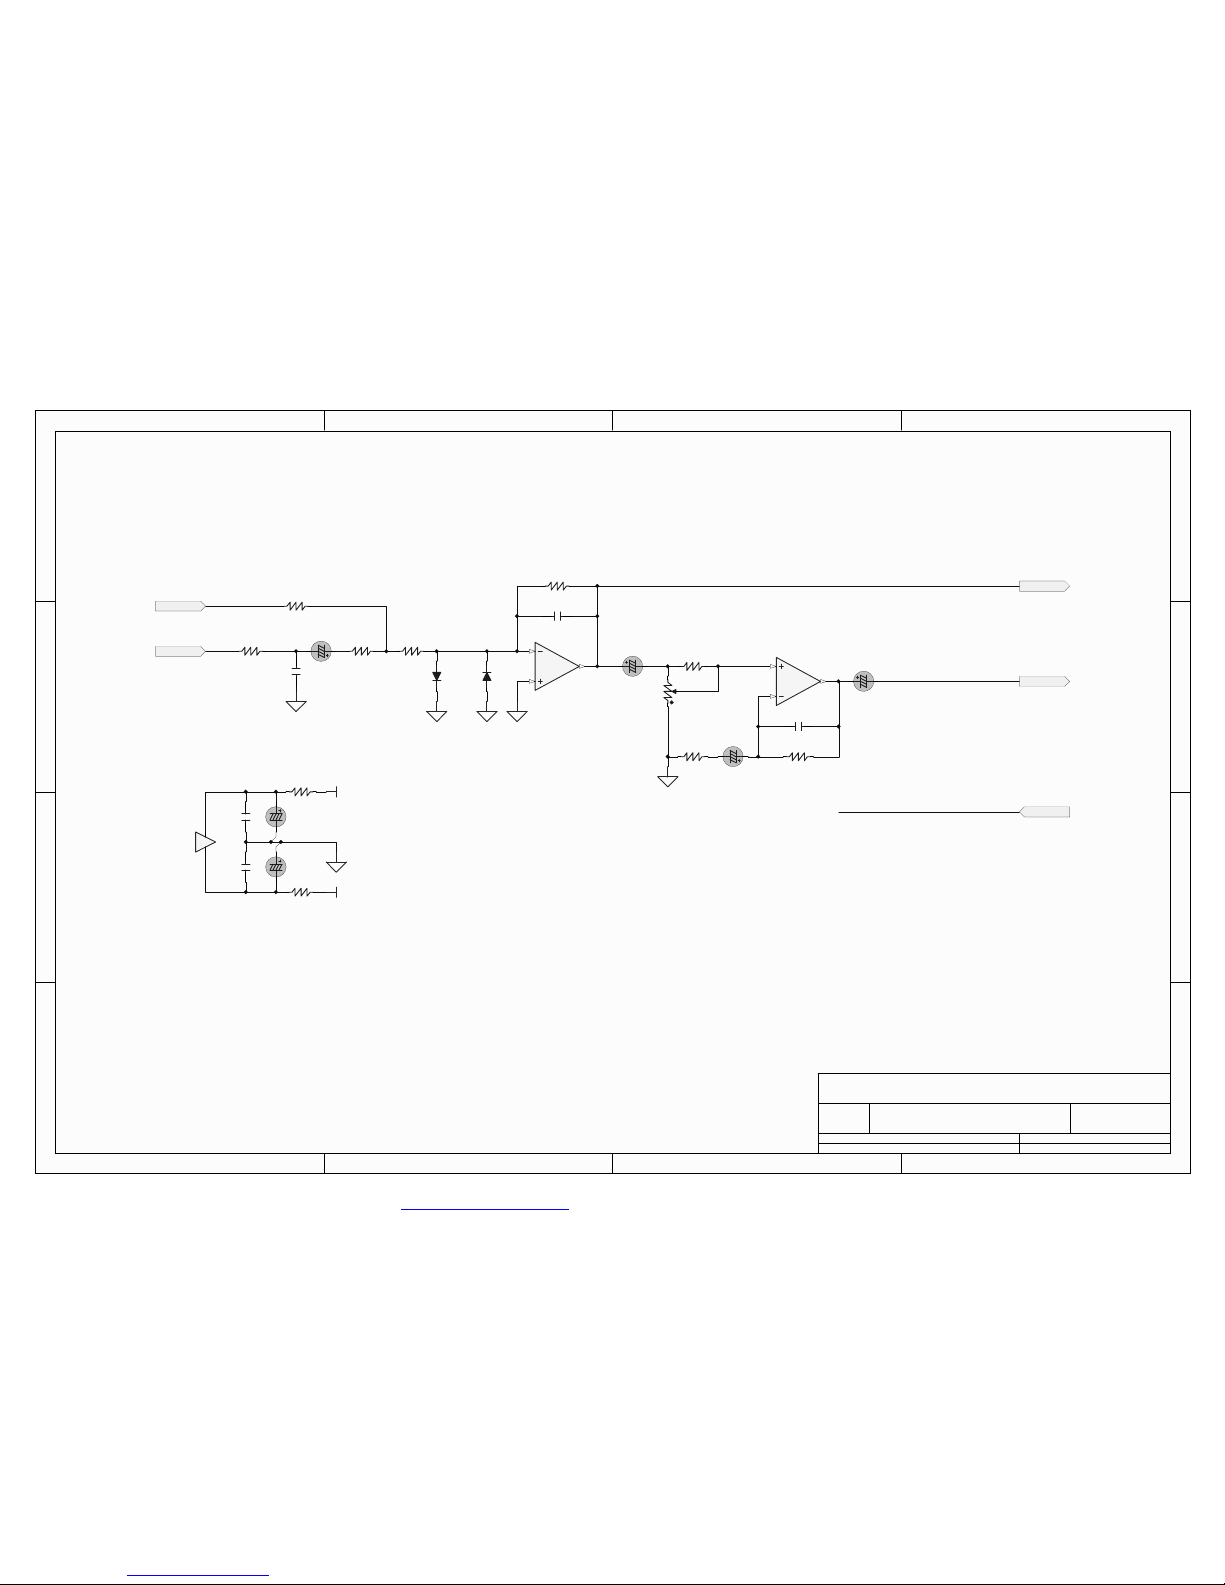
PDF 檔案以 "FinePrint pdfFactory Pro" 試用版建立 http://www.fineprint.com
1
1
2
2
3
3
4
4
DD
CC
BB
AA
Title
NumberRevisionSize
A4
Date:2009/9/16Sheet of
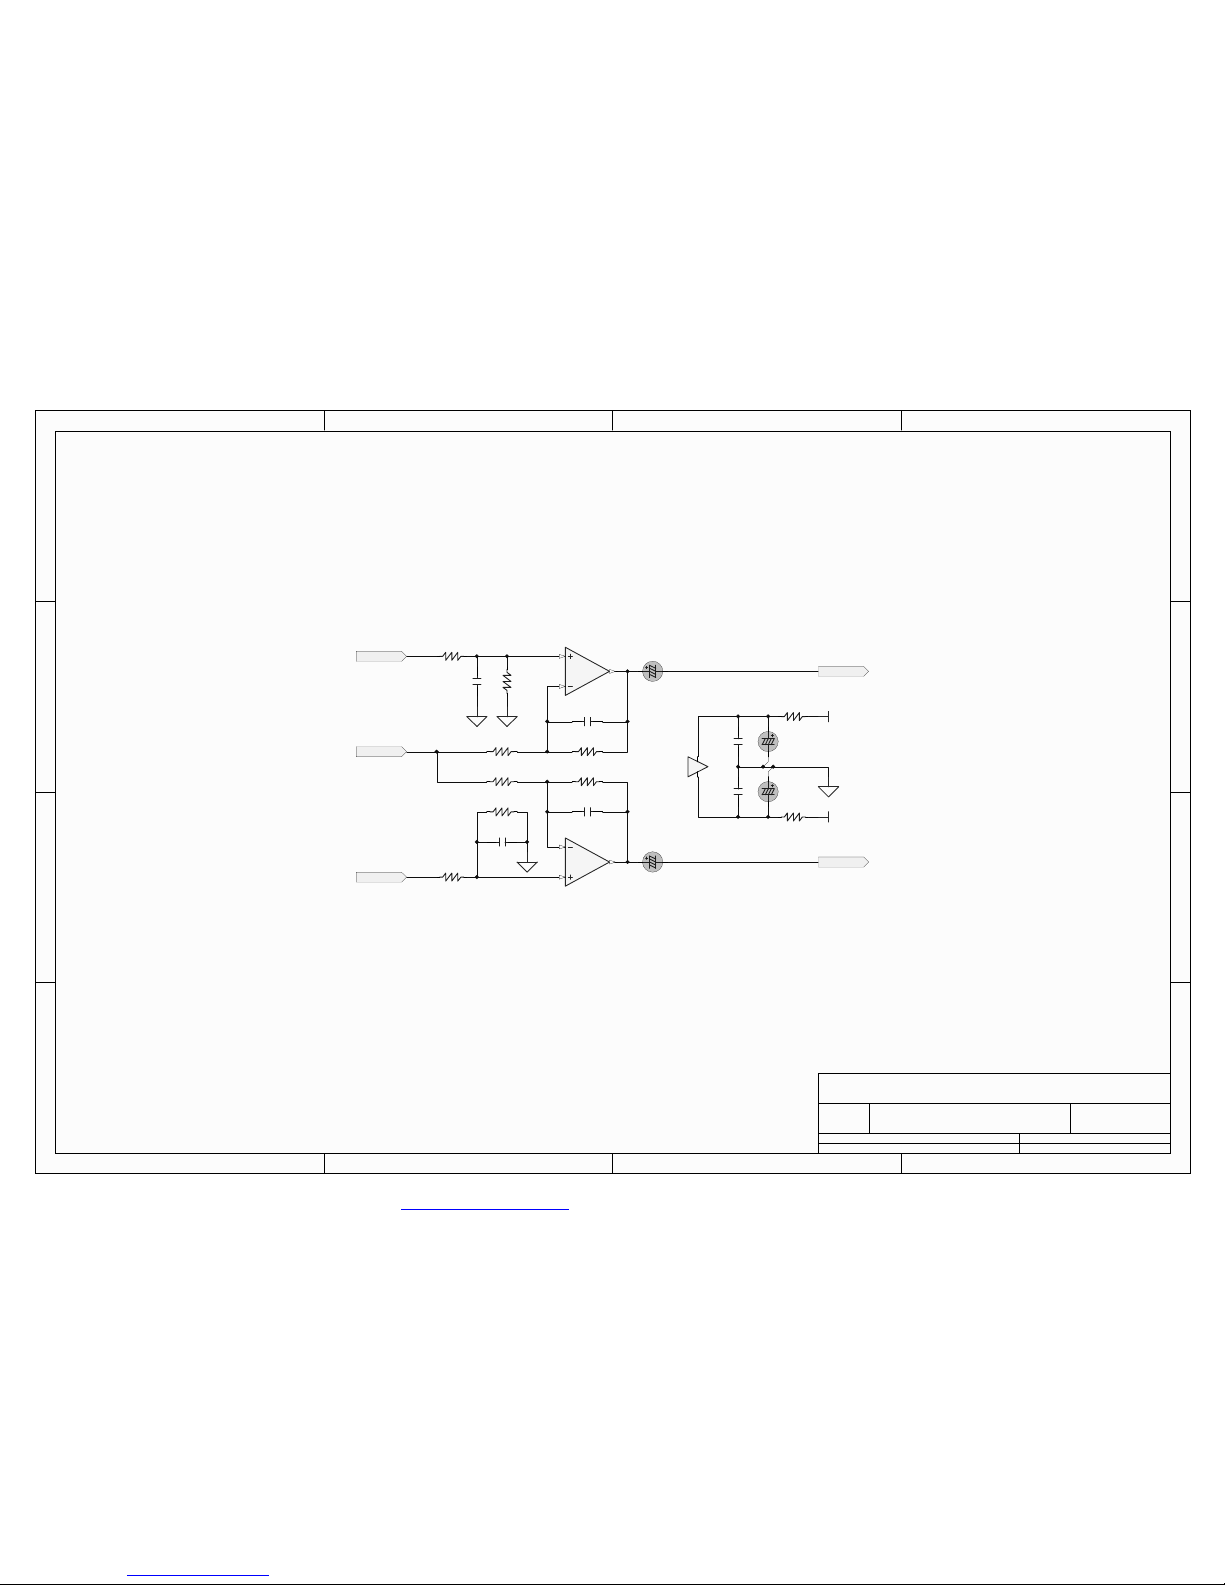
File:D:\My File\..\Buffer_WI.SchDocDrawn By:
Pre\Main\Buffer_WI
BN20090031.1
22
Mike
U201B
4558M
R201
10K0
R202
20K0
C201
470p
R203
10K0
C202
470p
R204
20K0
WI_A
R207
10K0
R208
20K0
WI_RTN
U201A
4558M
C204
470p
R205
10K0
WI_B
R206
20K0
C203
470p
C205
10u/50V
C206
10u/50V
U201C
4558M
C207
CD104
C208
100u/16V
C209
CD104
C210
100u/16V
+15V
-15V
WO_A
WO_B
R209
100
R210
100
PDF 檔案以 "FinePrint pdfFactory Pro" 試用版建立 http://www.fineprint.com
1
1
2
2
3
3
4
4
DD
CC
BB
AA
Title
NumberRevisionSize
A4
Date:2009/9/16Sheet of
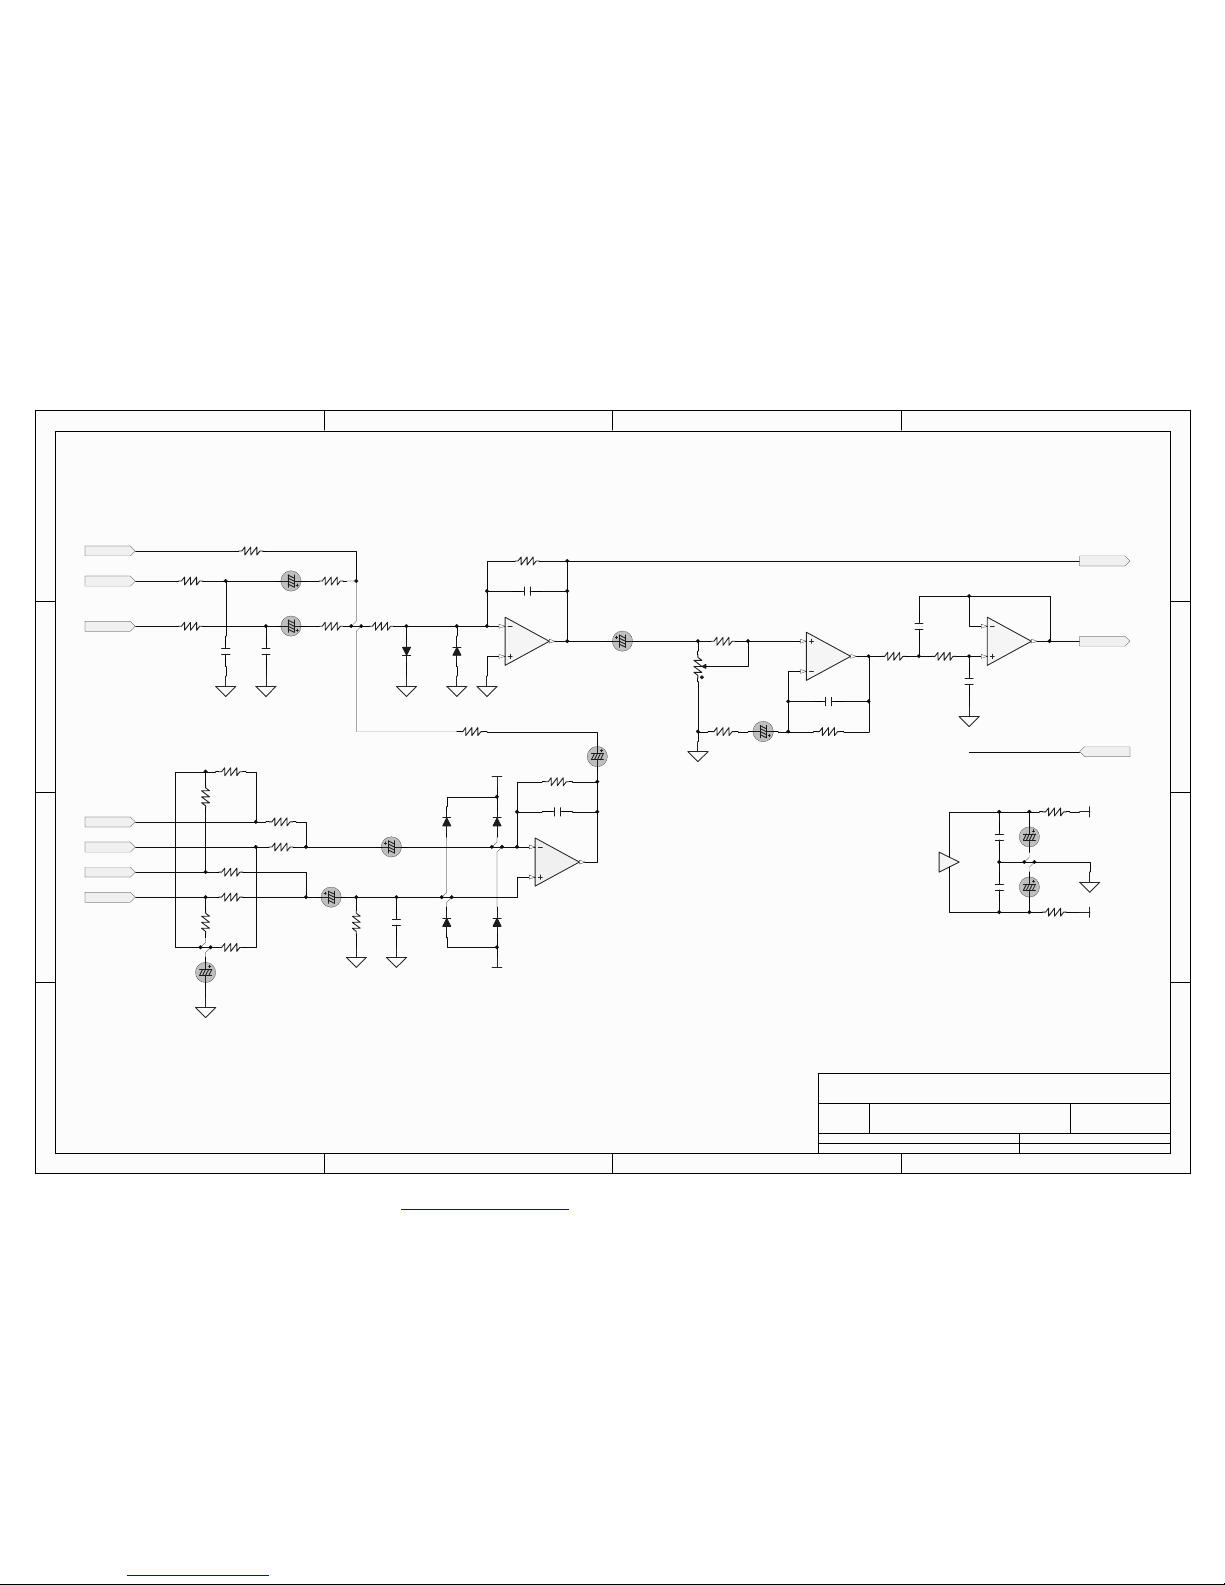
File:D:\My File\..\SUM_RL.SchDocDrawn By:
Pre\Main\SUM_RL
BN20090031.1
33
Mike
U202D
2060M
R217
10K
C215
470p
D202
NI
D201
NI
R214
20K
R212
20K
C212
10u/50V
C214
10u/50V
R211
150
R213
150
C213
220p
C211
220p
LLin
LRin
R215
20K
WI_normal
U202A
2060M
R227
4K75
C220
220p
D203NID204
NI
D206
NI
+15V
-15V
R226
4K75
C218
220p
D205
NI
R218
90K9
R222
90K9
R219
90K9
C217
10u/50V
C219
10u/50V
R223
90K9
HRin+
HLin+
HLin-
HRin-
R220
1K0/1W
R221
1K0/1W
R224
1K0/1W
R225
1K0/1W
C216
100u/50V
C221
10u/50V
R228
10K
R216
47R
R234
16K9
U202C
2060M
C225
MSC683
C226
MSC333
U202B
2060M
C222
10u/50V
Out
Auto_S1
C227
CD104
C228
100u/16V
C229
CD104
C230
100u/16V
+15V
-15V
R235
100
R236
100
U202E
2060M
R229A
A10K
R230
15K0
C223
470p
R231
18K
C224
47u/16V
R232
1K
R233
16K9
Limiter_S1
V1.0 Changes :
(1) Cancel MD201
PDF 檔案以 "FinePrint pdfFactory Pro" 試用版建立 http://www.fineprint.com
1
1
2
2
3
3
4
4
DD
CC
BB
AA
Title
NumberRevisionSize
A4
Date:2009/9/16Sheet of
File:D:\My File\..\SUM_LFE.SchDocDrawn By:
Pre\Main\SUM_LFE
BN20090031.1
44
Mike
R252
10K
C238
470p
D210
NI
D209
NI
R249
10K
R250
20K
C237
10u/50V
R248
150
C236
220p
C234
10u/50V
R229B
A10K
R253
15K0
C240
470p
R254
18K
C239
47u/16V
R255
1K
LFEin
WI_LFE
U204A
4558M
U204B
4558M
U204C
4558M
C242
CD104
C243
100u/16V
C244
CD104
C245
100u/16V
+15V
-15V
R256
100
R257
100
C241
10u/50V
Out
Auto_S2
R251
47R
Limiter_S2
V1.0 Changes :
(1) Cancel MD202
PDF 檔案以 "FinePrint pdfFactory Pro" 試用版建立 http://www.fineprint.com
 Loading...