

Page 1
Page 2

2
Compatible with PAL DVD (Video
CD) and NTSC DVD (Video CD)
This player can play discs recorded in
either PAL or NTSC format.
• A single LSI chip now integrates all
major DVD playback circuit functions
including MPEG2 decoder, video D/A
converter, and audio decoders.
• L/R stereo analog audio outputs for
connection to existing head unit aux
inputs. Video output is composite
video.
• Supplied remote handles
multi-function software (multi-language
audio-track/subtitle, multi-angle, multistory, etc.), plus all basic functions.
USE THIS PRODUCT SAFELY
Use the Proper Power Supply
This product is designed to operate with
a 12 volt DC, negative ground battery
system.
Protect the Disc Mechanism
Avoid inserting any foreign objects into
the disc driver of this player. Failure to
observe this may cause malfunction due
to the precise mechanism of this unit.
Use Authorized Service Centers
Do not attempt to disassemble or adjust
this precision product. Please refer to the
Service Center list included with this
product for service assistance.
FEATURES
Page 3

3
CONTENTS
Safety Information......................................................................................................4
Disc Notes...................................................................................................................5
The Player ...................................................................................................................6
Remote Control ..........................................................................................................7
Location and Function of Keys...............................................................................7
Preparing the Remote Control................................................................................9
General Operation ....................................................................................................10
Turn the unit On/Off ..............................................................................................10
Basic Play .............................................................................................................10
DVD Video Menu Play...........................................................................................10
Menu Function......................................................................................................10
Advanced Operation ................................................................................................11
Repeat Play/Paragraph Repeat Play ....................................................................11
On-screen Display Function .................................................................................11
Goto Function.......................................................................................................11
Zoom Function .....................................................................................................12
Special Function for DVD .....................................................................................12
Special Function for VCD and CD ........................................................................13
Data Disc Play Operation .....................................................................................13
Setup..........................................................................................................................14
System Setup .......................................................................................................14
Language Setup ...................................................................................................14
Audio Setup ..........................................................................................................14
Trouble Shooting ......................................................................................................15
Specifications ...........................................................................................................16
Page 4

4
CAUTION:
MOBILE DVD PLAYER IS A CLASS I
LASER PRODUCT. HOWEVER THIS
MOBILE DVD PLAYER USES A
VISIBLE/INVISIBLE LASER BEAM
WHICH COULD CAUSE HAZARDOUS
RADIATION EXPOSURE IF DIRECTED.
BE SURE TO OPERATE THE MOBILE
DVD PLAYER CORRECTLY AS
INSTRUCTED.
USE OF CONTROLS OR
ADJUSTMENTS OR PERFORMANCE OF
PROCEDURES OTHER THAN THOSE
SPECIFIED HEREIN MAY RESULT IN
HAZARDOUS RADIATION EXPOSURE.
DO NOT OPEN COVERS AND - DO NOT
REPAIR YOURSELF. REFER SERVICING
TO QUALIFIED PERSONNEL.
WARNING:
• TO REDUCE THE RISK OF FIRE OR
ELECTRIC SHOCK, DO NOT EXPOSE
THIS EQUIPMENT TO RAIN OR
MOISTURE.
• TO REDUCE THE RISK OF FIRE OR
ELECTRIC SHOCK, AND ANNOYING
INTERFERENCE, USE ONLY THE
RECOMMENDED ACCESSORIES.
• THIS DEVICE IS INTENDED FOR
CONTINUOUS OPERATION.
This product incorporates copyright
protection technology that is protected
by method claims of certain U.S. patents
and other intellectual property rights
owned by Macrovision Corporation and
other rights owners. Use of this
copyright protection technology must be
authorized by Macrovision Corporation,
and is intended for home and other
limited viewing uses only unless
otherwise authorized by Macrovision
Corporation. Reverse engineering or
disassembly is prohibited.
SAFETY INFORMATION
Region Management Information
Region Management Information:
This Mobile DVD Player is designed and
manufactured to respond to the Region
Management Information that is recorded
on a DVD disc. If the Region number
described on the DVD disc does not
correspond to the Region number of this
Mobile DVD Player, this Mobile DVD
Player cannot play this disc.
Page 5

DISC NOTES
5
Disc formats supported by this player
DVD
12 cm disc
Video CD
12 cm disc
CD
12 cm disc
MP3
12 cm disc
MPEG4
12 cm disc
Handling and Cleaning
• Dirt, dust, scratches and warping disc
will cause misoperation.
• Do not place stickers or make
scratches on discs.
• Do not warp discs.
• A disc should always be kept in its
case when not in use to prevent from
damage.
• Do not place discs in the following
places:
1. Direct sunlight
2. Dirty, dusty and damp areas
3. Near car heaters
4. On the seats or dashboard
Disc Cleaning
Use a dry soft cloth to wipe the surface.
If the disc is quite dirty, use a soft cloth
slightly moistured with isopropyl (rubbing)
alcohol. Never use solvents such as
benzine, thinner or conventional record
cleaners as they may mar the surface of
the disc.
Note:
A disc may become somewhat scratched
(although not enough to make it
unusable) depending on your handle it
and conditions in the usage environment.
Note these scratches are not an
indication of any problem with the player.
Preparing New Discs with Rough
Spots
A new disc may have rough edges on its
inside and outside edges. If a disc with
rough edges is used, the proper setting
will not be performed and the player will
not play the disc. Therefore, remove the
rough edges in advance by using a ball
point pen or pencil as shown on the right.
To remove the rough edges, press the
side of the pen or pencil against the
inside and outside edges of the disc.
Rough spots
on inside edge
Ball point pen
or pencil
Rough spots on
outside edge
Label side up
Do not touch
the underside
of the disc
Do not bend
Wipe the disc from center
toward the outside edge
Page 6
6
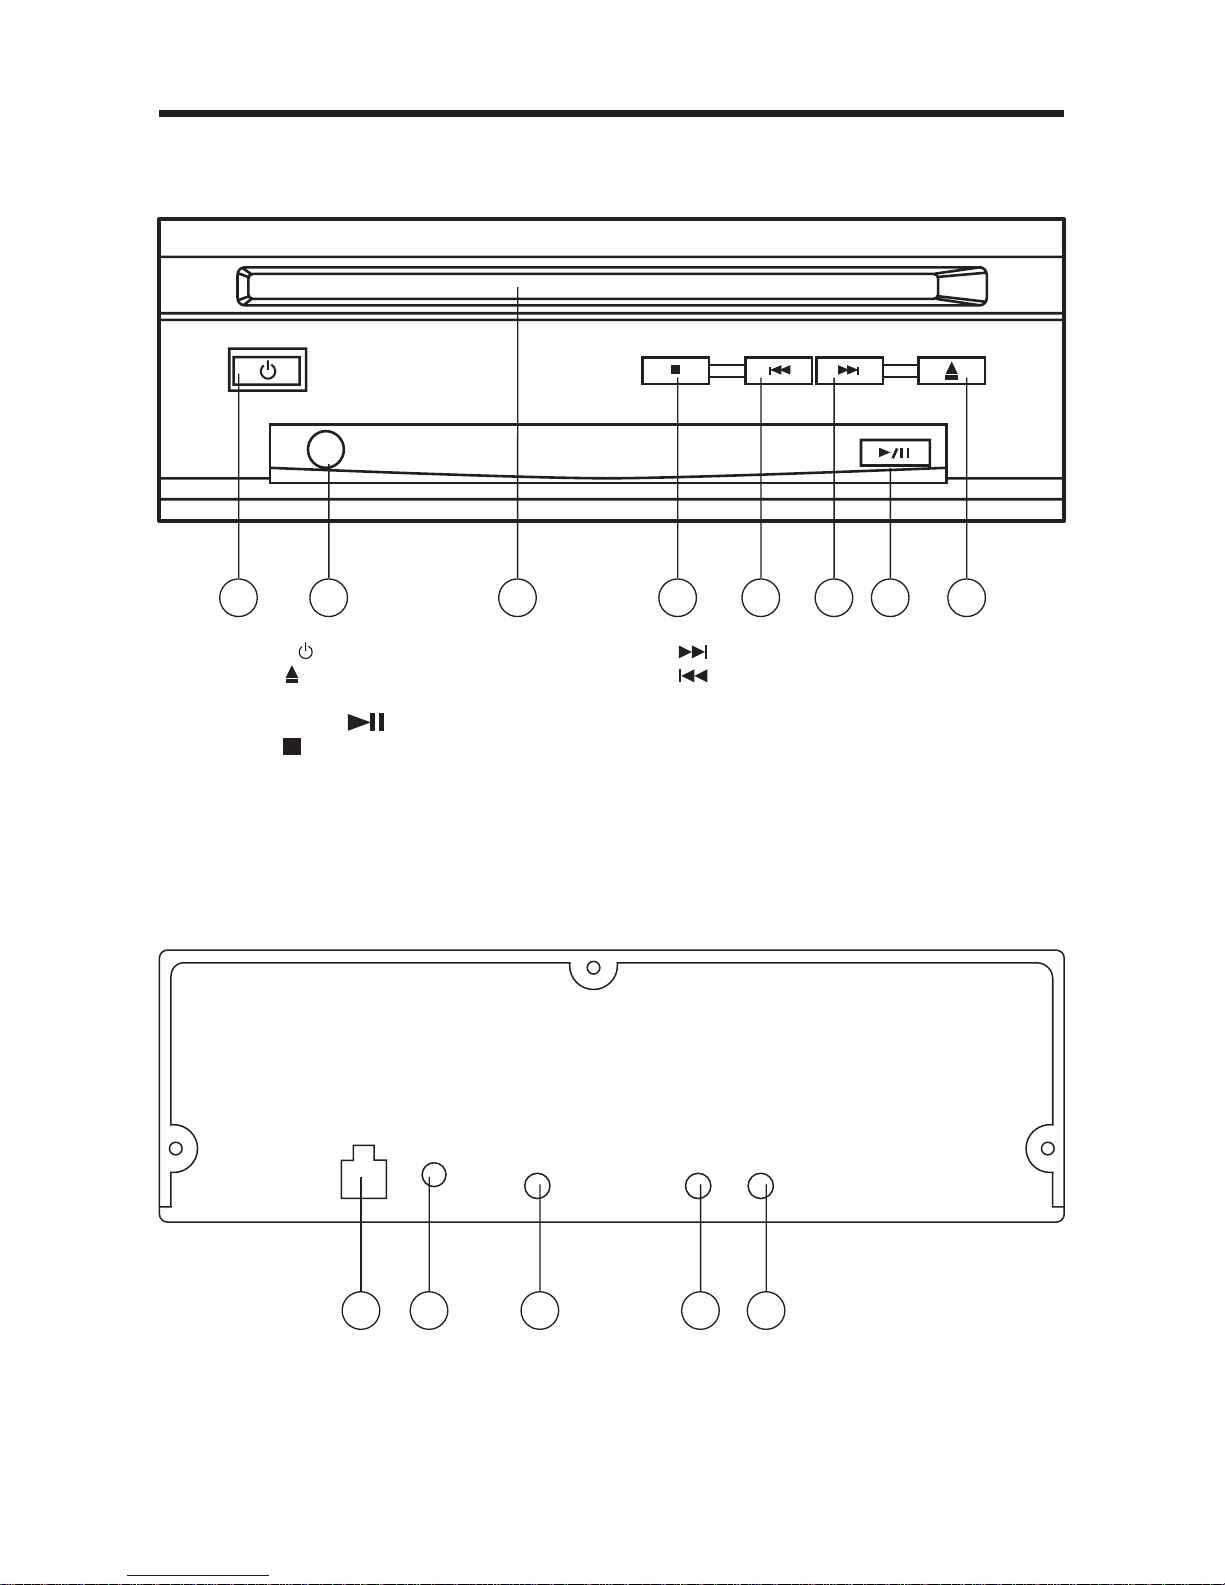
THE PLAYER
FRONT VIEW
BACK VIEW
1. POWER ( )
2. EJECT ( )
3. DISC SLOT
4. PLAY/PAUSE ( )
5. STOP ( )
9. DC 12V IN
10. DC 12V OUT
11. REMOTE
12. AUDIO OUTPUT L/R
13. VIDEO OUTPUT
131211109
2467581 3
6. /CH+
7. /CH-
8. IR
Page 7

7
Location and Function of Keys
REMOTE CONTROL
4
24
25
22
23
21
20
19
15
14
1
2
3
6
5
8
7
10
13
12
9
11
17
16
18
Page 8

8
REMOTE CONTROL
1. MODE Press to change the mode.
2.
POWER Press to turn the unit ON or OFF.
3.
Press it for the first time to pre-stop playback, press it again to
stop playback.
4. GOTO
Press to select the bookmark that you set.
5. AUDIO On multi-audio soundtrack disc, press to change the AUDIO
soundtrack.
For VCD/CD press to change the sond mode.
6. SUB-T Changing of the SUBTITLE language on multi-subtitle language
DVD disc.
7. REPEAT Switch the Repeat mode of discs.
8. A-B A-B repeat allows a passage to be repeated continuously.
9.
/
Press to skip to the next track and press to skip back one
track.
10. ZOOM Allows the picture to be increased in size.
11.
/ Press to search forward rapidly & to search reverse rapidly.
12. 0-9 Numeric buttons
13. PROG Allows the track played in the order you programmed.
14. 10+
Digital selecting button, cooperatively used with numeric buttons.
15. MENU Display the adjustment items, such as Bright, Contrast, Color,
Tint, and Screen.
16.
/ , / In some menus, / , / buttons served as cursor buttons to
select
item left/right, ahead/back.
17. ENTER Confirm the Track/Chapter selected with the numeric buttons or
selected with the cursor buttons on TV screen.
18. SETUP
In DVD mode, press to display the SETUP menu.
19. ANGLE Changing of the view angle on multi-angle DVD disc.
20. VOL+/- Press VOL+/- to increase / decrease the volume level.
21. TITLE/PBC
In DVD mode, press TITLE button to display the TITLE menu
stored in DVD disc.
In VCD mode, press PBC button to change the PBC on or off.
22. Press it to mute the sound, press it again will resume the sound.
23. Press to play the disc, press it again to pause playback.
24.
EJECT Press it to eject the disc from the disc slot.
25. DISP Display statistical disc information during playback.
Page 9

9
Preparing the Remote Control
Inserting the Battery
1. Open the battery compartment cover.
2. Insert the new battery. Make sure
that the positive and negative
terminals of the battery are oriented
as indicated.
3. Close the cover.
• Battery: a button cell lithium battery
(CR2025 3V)
Using the Remote Control
Face the remote control towards left side
of the front panel.
Operation angle: About 30 degree in
each the direction of the left front panel.
REMOTE CONTROL
Page 10

10
GENERAL OPERATION
Normal Playback X2 X4 X8 X20
TURNING THE UNIT ON/OFF
Turning on the Player
After all connections are completed
correctly, Press
power button on the
front panel to turn on the power. When
the unit is on, it will search the disc
automatically. If there is a disc in the disc
slot, the unit will start playback
automatically.
Turning off the Player
When the power is on press button on
the front panel or on the remote control
to turn off the power.
Loading a Disc
Insert the disc into the disc slot with the
printed side facing up, the player will play
the disc automatically.
Removing a Disc
When the disc stops playing, press
eject
button on the front panel or on the remote
control to eject the disc.
BASIC PLAY
Stopping Playback
- Press
button on the remote control
or on the front panel one time to prestop the unit playback. When
/ button
on the front panel or on the remote
control is pressed, normal playback will
continue.
- Press
button twice to stop the
playback and go back to the DVD
LOGO.
Pausing Play
Pressing
on the remote control or
/
on the front panel during playback will
stop playback temporarily. To return to
normal playback, press or /.
If you play a DVD/VCD/SVCD, press
/
on the remote control again to stop at the
next picture (step function). If you play a
CD/MP3/Picture CD, pressing on the
remote control again is ineffective.
RAPID FORWARD/RAPID REVERSE
Press / button on the remote
during playback.
Each time the button is pressed, the
speed of rapid forward/reverse changes
according to the disc as follows.
DVD/VCD/CD/MP3:
Slow Motion Playback (For DVD Only)
Press / button on the remote control
during play.
Each time the button is pressed, the
speed of slow forward/reverse changes
according to the disc as follows.
DVD:
In slow motion state, press ENTER or
on the remote control or / on the front
panel to recover normal playback.
Skipping Track
Press
/ buttons on the remote
control during playback.
Press
to skip to the next track, and
press
to skip to the previous track.
Note:
For some VCD2.0 discs (PBC-playback
control),
/ buttons may be
unavailable.
Volume Level Adjustment
Pressing VOL+/- button on the remote
control to increase or decrease the volume
level.
DVD VIDEO MENU PLAY
When playing a DVD disc in the DVD player:
1) The disc will be played automatically
and stop at menu picture.
2) Use
/ , / cursor buttons on the
remote control to move between the
highlight bars in the menu.
3) Press ENTER button on the remote
control to confirm the selected item.
MENU FUNCTION
Press the MENU button on the remote
control during DVD mode will return to
the menu stored in the current disc.
Normal Playback SF1/2 SF1/3 SF1/4
SF1/7 SF1/6 SF1/5
Page 11

1/1 ENG 5.1CH 1/4 ENG OFF
DVD TT 1/2 CH 1/1 00:00:01
DVD TT 1/2 CH 1/1 00:13:53
C-
DVD TT 1/2 CH 1/1 00:00:03T
DVD TT 1/2 CH 1/1 00:29:27TDVD TT 1/2 CH 1/1 00:01:02C
1) Item: TT
Function: Display the current title
number and total title
number.
2) Item: CH
Function: Display the current chapter
number and total chapter
number.
3)
Item:
Function: Display the played time of
the whole disc.
4) C-: Display the remaining time of the
current chapter.
5) T: Display the player time of time
current title.
6) T-: Display the remaining time of the
current title.
7) C: Display the played time of the current
chapter.
8)
Display the current disc’s LANGUAGE,
AUDIO TYPE, SUBTITLE LANGUAGE
and PLAY ANGLE.
For VCD:
VCD TT 1/2 CH 1/1 00:03:15
VCD TT 1/2 CH 1/ 00:13:53
C-
VCD TT 1/2 CH 1/1 00:00:03T
VCD TT 1/2 CH 1/1 00:29:27TDVD TT 1/2 CH 1/1 00:01:02C
The meaning of the menu is the same
with the DVD menu above.
GOTO FUNCTION
FOR DVD:
Press GOTO button, the screen will display
the following message:
Use the number keys to input the desired
Title, Chapter or Time, then press ENTER
key to confirm.
FOR VCD (WITH PBC OFF)/CD/MP3:
ADVANCED OPERATION
REPEAT PLAY/ PARAGRAPH REPEAT
PLAY
Repeat play: When you want to repeat
playing the whole disc or a track or a
chapter in the disc.
1) Press REPEAT button repeatedly to
select different repeat modes.
2) For different kinds of disc, pressing
REPEAT button has different effects.
For DVD:
For VCD/SVCD/CD/MP3:
Note: REPEAT feature does not support
VCD2.0 (with PBC ON).
Paragraph Repeat Play: When you
want to repeat playing a desired
paragraph.
A-B repeat allows a passage to be
repeated continuously.
1) Press A-B button first at the start of
the required passage.
REPEAT A -
2) Press A-B button again at the end of
the passage.
REPEAT A - B
3) Then the unit will repeat playing the
passage you just set from A to B.
4) To revert to normal playback, press A-
B button again.
REPEAT CANCEL
ON-SCREEN DISPLAY FUNCTION
Press the DISP button during playback
to display the console information of the
current disc on the screen.
For DVD:
Once you press DISP button you will
see the information as the following
order.
11
REP:[OFF] REP:[CHAPTER] REP:[TITLE]
REP:[REP ALL]
REP:[OFF] REP:[REP1] REP:[REPALL]
1/1 ENG 5.1CH 1/4 ENG OFF
Page 12

ADVANCED OPERATION
12
You can input the Track and Time then
press ENTER key to confirm.
ZOOM FUNCTION
Allows the picture to be increased in size.
Press ZOOM button on the remote control
to toggle among 2 scale, 3 scale and 4
scale, 1/2 scale,1/3 scale, 1/4 scale.
When the scale is 1/4 times, press ZOOM
button again to cancel the zoom function.
During Zoom mode, press
/ , /
buttons to move pictures up, down, left,
or right direction.
SPECIAL FUNCTIONS FOR DVD
Multi-subtitle Language Function
Press SUB-T during playback. The
following information will be shown on
the screen.
: OFF
Each time the button is pressed, the
subtitle language changes in sequential
order.
Notes:
- The language number is different
according to the disc.
- Some discs only contain one subtitle
language.
Multi-audio Language Function
Press AUDIO during playback. The
following information will be shown on
the screen.
: [1 ENGLISH]
Each time the button is pressed, the
audio soundtrack language changes in
sequential order.
Notes:
- The language number is different
according to the disc.
- Some discs only contain one
soundtrack language.
Multi-angle Function
Press ANGLE during playback. The
following information will be shown on
the screen.
ANGLE 1
Each time the button is pressed, the
angle changes in sequential order.
Notes:
- The angle number is different
according to the disc.
- The function only works for discs
having scenes recorded at different
angles.
FREQUENTLY ASKED QUESTIONS
• When inserting a DVD disc, why it can’t
be played, just showing “region error”?
It is because that the DVD player and
the discs all have the “REGION CODE”.
If the region number described on the
DVD disc does not correspond to the
region number of this DVD player, the
unit cannot play the disc.
• When inserting a DVD disc, there is a
window shown on the screen that
requires entering 4 characters
password, why?
It is because that the current disc has
“Parental Control” level, and the player’s
parental level is set below the level of
the disc, you should enter the correct
password to play the disc normally.
NOTE:
• For how to set the “Parental Control”
level, please refer to “SETUP\LOCK” in
the following page.
ATTACHMENT: PARENTAL CONTROL
DVD discs have a parental level assigned
to the disc. The range of parental controls
is from 1 to 8. The player can be set in a
similar way. If the player’s parental level
is set to 8 it will play all discs. If the player’s
parental level is set below 8, only discs
with a lower or equal parental level will
play.
For example if the player is set to 5, only
discs with parental control ratings of 5, 4,
3, 2, & 1 will play. To play a higher rated
disc you must change the player’s rating
to a higher number.
For example, consider a disc that generally
is suitable for most audiences, and is
ZOOM 2 ZOOM 3 ZOOM 4 ZOOM 1/2
ZOOM OFF ZOOM 1/4 ZOOM 1/3
[ 1/3]
Page 13

ADVANCED OPERATION
13
files in the media player below.
Note:
• After you have programmed the tracks,
press PROG button can switch between
program play and normal play.
• Press ENTER button to exit the edit
interface.
DATA DISC PLAY OPERATION
When you insert a data disc including
audio (MP3), movie (MPEG), picture (JPG)
files into the disc slot, the following media
play window will be shown on the screen:
1)Use
/ or / cursor button to select
the items you want to program.
2)The items you selected will become
highlight.
3) Input the sequence number you want
to program by numeric buttons (0-9,10+)
on the remote control.
4) Press OK or select “play” operation
button on the bottom area to program
playback.
NOTE:
For audio CD, the play interface and
operation is similar with the Music page
operation. For details, please refer to the
description of Music page above.
rated as level 2 for the most part. However
in the middle there are also scenes rated
at 5 & 7 (not suitable for children).
Alternative scenes with lower rating are
included.
The player plays the highest rated scene
that the parental setting allows.
A section of the disc can have several
different sequences that vary in parental
control level. In the above example of a
disc with parental control, the player will
show a different section depending on
the parental control level set in the player’s
menu. In this way parents can control the
content of films and there is no indication
that any censorship has occurred.
The meaning of the levels 1 to 8 varies
depending upon the country and the type
of content on the disc.
The parental control levels are:
Unlock
1 Kid safe
2G
3PG
4 PG 13
5 PG-R
6R
7 NC-17
8 Adult
SPECIAL FUNCTIONS FOR VCD AND
CD
For VCD and CD discs, there is one special
function “Program Play” which makes it
different from DVD discs.
• The function is effective in PBC OFF
mode. Press PROG button can activate
program edit interface.
• For how to set the program menu,
please refer to the operation of the audio
Prog-
1 [
]5[] 9[ ] 13[ ]
2 [
]6[] 10[ ] 14[ ]
3 [
]7[] 11[ ] 15[ ]
4 [
]8[] 12[ ] 16[ ]
Play Clear
Prog-
1__:__ 5__:__ 9__:__ 13__:__
2__:__ 6__:__ 10__:__ 14__:__
3__:__ 7__:__ 11__:__ 15__:__
4__:__ 8__:__ 12__:__ 16__:__
Play Clear
TCTCTCTC
Page 14

In DVD mode, when the disc is playing or
in the stop mode, press SETUP on the
remote control to enter setup menu.
• When the cursor is on the topside, use
/ buttons to move between the
different pages.
• Press
button to move the cursor to
the setup page below and then you can
use
/ buttons to move between the
different setup options.
• Press
/
button to display the choice
list for each setup option and then use
/ buttons and ENTER button to
change your selection.
SYSTEM SETUP
When you open the setup menu, you will
see the system setup page at first, see
below:
1) TV SYSTEM: Change the TV mode
among NTSC, PAL and AUTO.
2) SCREEN SAVER: Change the SCREEN
SAVER on or off.
3) TV TYPE: Change the TV TYPE among
4:3PS, 4:3LB and 16:9.
4) PASSWORD: Change the PASSWORD
lock or unlock, the default PASSWORD
is “3308”.
5) RATING: Change the parental RATING
among 1KID SAFE, 2G, 3PG, 4PG13,
5PG-R, 6R, 7NC-17, 8ADULT.
6) DEFAULT: Restore the system setup to
the default setup.
LANGUAGE SETUP
• When you open the setup menu, you
will see the language setup page :
14
SETUP
You can change the OSD / AUDIO /
SUBTITLE / MENU language between
ENGLISH /GERMAN / SPANISH /
FRENCH / PORTUGUESE / ITALIAN /
(RUSSIAN) (RUSSIAN only for MENU
LANG).
AUDIO SETUP
• When you open the AUDIO menu, you
will see the following picture:
1) AUDIO OUT: Change among
SPDIF/OFF, SPDIF/RAW and
SPDIF/PCM.
2) KEY: Change among -4, -2, 0, +2, +4.
TV SYSTEM
SCREEN SAVER
TV TPE PASSWORD
RATING
DEFAULT
EXIT SETUP
SYSTEM SETUP
OSD LANGUAGE
AUDIO LANG
SUBTITLE LANG
MENU LANG
EXIT SETUP
LANGUAGE SETUP
AUDIO OUT
KEY
EXIT SETUP
AUDIO SETUP
Page 15

TROUBLE SHOOTING
15
If it appears that your DVD unit is faulty,
first consult this checklist. It may be that
something simple has been overlooked.
Under no circumstances should you
try to repair the player yourself, as
this will invalidate the warranty. Only
qualified service personnel can
remove the cover or service this
player.
NO POWER
• Check if the POWER button on the front
of the player is set to ON.
• Check if AC or DC power plug of the
mains unit is properly connected.
• Check if there is power at the AC or DC
outlet.
• Check if the voltage of the battery is
too low.
NO PICTURE
• Select the correct TV or AV input.
• Check the video connection.
DISTORTED PICTURE
• Check the disc for fingerprints and clean
with soft cloth, wiping from center to
edge.
• Sometimes a small amount of picture
distortion may appear. This is not a
malfunction.
COMPLETELY DISTORTED PICTURE
• The disc format is not according to the
TV-set used (PAL/NTSC).
NO COLOR IN PICTURE
• The disc format is not according to the
TV-set used (PAL/NTSC).
DISC DOES NOT PLAY
• Ensure the disc label is upwards.
• Clean the disc.
• Check if the disc is defective by
trying another disc.
NO SOUND
• Check audio connections.
• If using a HIFI amplifier, try another
sound source.
NO RETURN TO START-UP SCREEN
WHEN DISC IS REMOVED
• Press
POWER to turn off the unit,
then press it again to turn on the unit.
THE PLAYER DOES NOT RESPOND TO
THE REMOTE CONTROL
• Aim the remote control directly at the
sensor on the front of the player.
• Avoid all obstacles which may interfere
with the signal path.
• Inspect or replace the remote control
battery.
DISTORTED OR B/W PICTURE
• The disc format is not according to the
TV-set used (PAL/NTSC).
BUTTONS DO NOT WORK
• Turn the player off and on with the
power on/off button on the side of the
player.
Page 16

SPECIFICATIONS
16
88-V1742-50
Supply Voltage : 12V DC (11V-15V), test voltage 14.4V, negative
ground
Current Consumption : Less than 2A
Battery Charge Voltage : 12V DC
Signal System : Compositive video 1.0 0.2Vp-p 75
Discs Played : (1) DVD-VIDEO Disc
(2) Compact Disc
(CD-DA/CD-R/CD-RW/MP3)
(3) VIDEO CD
Audio Output Level : 10K
(2 ch 2.0 0.5 Vrms)
Audio Signal Output
Characteristics : (1) Frequency Response :
20 Hz - 20 KHz
(2) S/N Ratio : 80 dB (JIS)
(3) Wow and Flutter : Below measurement
limits
Note:
Specifications and design are subject to modification, without notice, due to
improvements in technology.
This product incorporates copyright protection technology that is protected by
method claims of certain U.S. patents and other intellectual property rights
owned by Macrovision Corporation and other rights owners. Use of this
copyright protection technology must be authorized by Macrovision
Corporation, and is intended for home and other limited viewing uses only
unless otherwise authorized by Macrovision Corporation. Reverse engineering
or disassembly is prohibited.
Page 17

 Loading...