

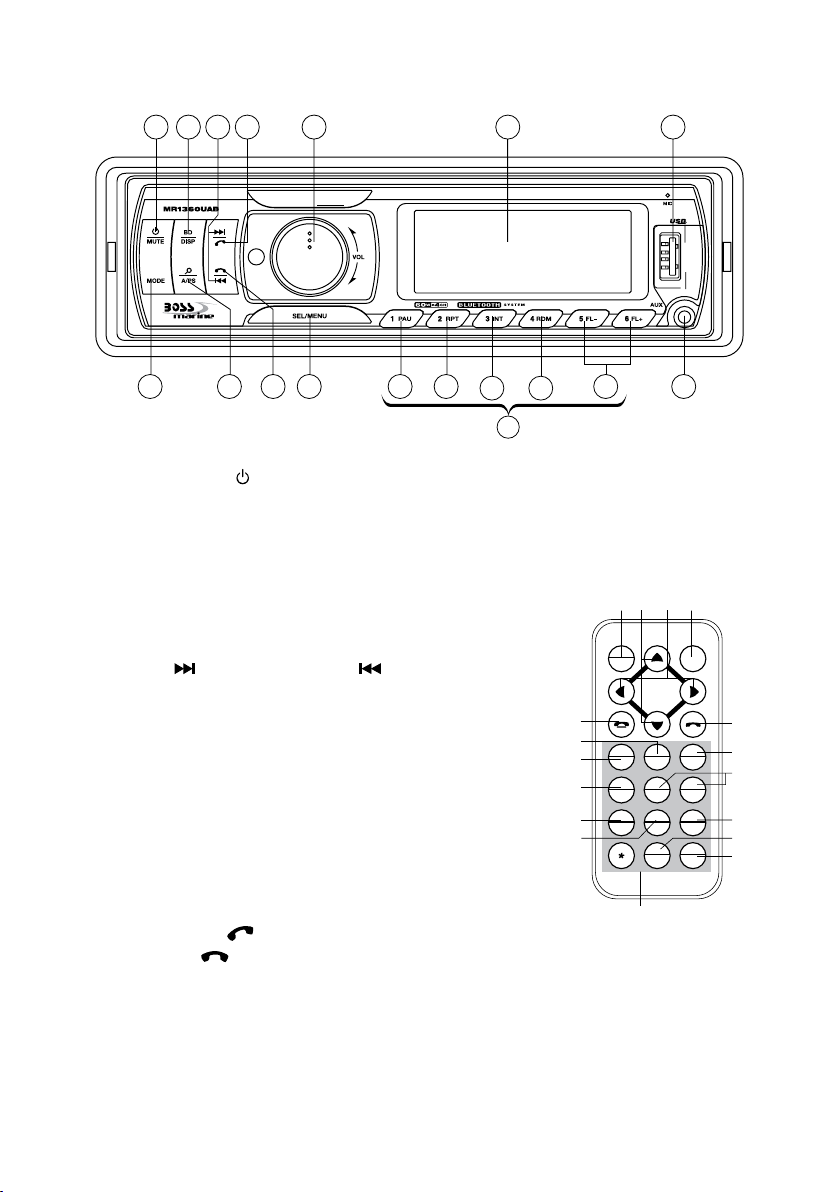
LOCATION OF PARTS AND CONTROLS
1312
(1-6)
4
2 9 166 171 7
10 11 151435 8 18
2 9 166 171 7
10 11 151435 8 18
1312
4
(1-6)
1. POWER ON/OFF ( ) / MUTE (MUTE)
2. VOL UP/VOL DOWN
3. FUNCTION SELECT BUTTON: BASS/TREBLE/BALANCE/FADER /
EQ/VOLUME LEVEL/STEREO/LOUDNESS/LOCAL/ADJUST CLOCK (SEL/MENU)
4. PRESET STATIONS (1,2,3,4,5,6)
5. MODE BUTTON (MODE)
37
1 5
6. BAND / DISPLAY BUTTON (BD/DISP)
7. AUTOMATIC OR MANUAL TUNING
(FREQ UP
OR FREQ DOWN /
TRACK/SEARCH BUTTON)
8. AUTO SEEK SEARCH TUNING (A/PS)
9. LCD DISPLAY
10. PAUSE BUTTON (PAU)
11. REPEAT BUTTON (RPT)
12. INTRO BUTTON (Preview all Tracks) (INT)
13. RANDOM BUTTON (RDM)
14. SEARCH PREVIOUS / NEXT FOLDER (FL- / FL+)
PWR
MUTE
18
11
PAU
10
1
RDM
13
4
LOC
19
7
20
VOL
TUNE/SEEK
VOL
RPT2INT
FL-5FL+
ST8EQ
BAND0SEL
MODE
3
6
9
#
15. AUX IN
16. USB PORT
17. ANSWER CALL (
18. END A CALL (
)
)
4
(1,2,3,4,5,6)
22 (1,2...,9,0,
,#)
*
19. LOCAL/DISTANT BUTTON (LOC)
20. STEREO/MONO BUTTON (ST)
21. EQUALIZER CONTROL (EQ)
22. PHONE NUMBER
17
12
14
21
6
3
2
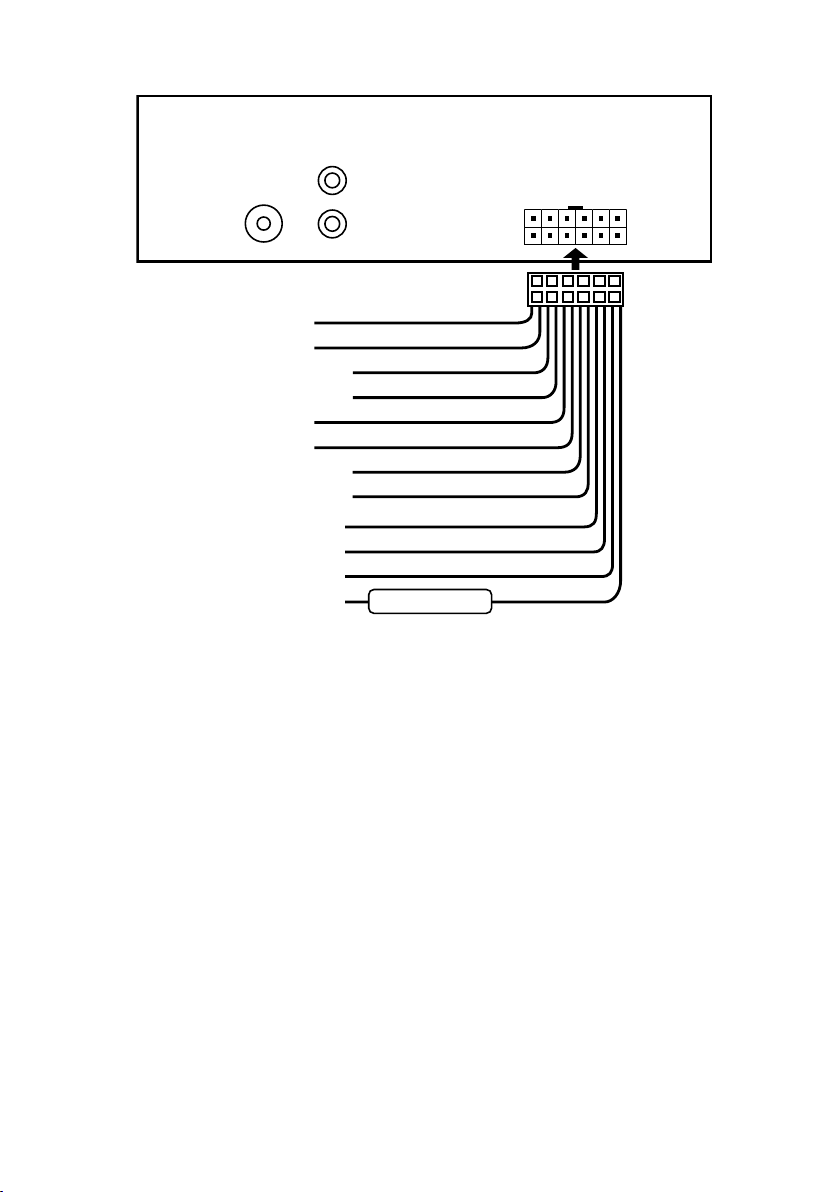
WIRE CONNECTION
FRONT
OUTPUT
ANTENNA
CONNECTOR
FRONT RIGHT
SPEAKER
FRONT LEFT
REAR LEFT
SPEAKER
(+12V) IGNITION KEY
REMOTE (300mA)
(+12V) MEMORY
L(WHITE)
R(RED)
SPEAKER
REAR RIGHT
SPEAKER
GROUND
GREY/BLACK(-)
GREY(+)
WHITE/BLACK(-)
WHITE(+)
GREEN(+)
GREEN/BLACK(-)
VIOLET(+)
VIOLET/BLACK(-)
RED
BLUE
BLACK
FUSE 10A
YELLOW
Front Pre-Amp Output:
Left (White), Right (Red)
Note: Red Wire must be connected by car ignition key in order to avoid that car battery being drained
when the car will be not used for long period.
Maintenance
FUSE REPLACEMENT
If the fuse blows, check the power connection and replace the fuse. If the fuse blows again after the replacement, there may be an internal malfunction. In this case, consult your nearest repair center.
Warning
Use the specied fuse amperes for each lead. Use of a higher fuse amperes may cause serious damage.
3

INSTALLATION
7
1
2
3
4
4
6
5
6
6
8
9
5
53mm
182mm
3
2
182mm
53mm
4
1
1
2
567
PRECAUTIONS
• Choose the mounting location carefully so that the unit will not interfere with the normal driving functions of the driver.
• Avoid installing the unit where it would be subject to high temperatures, such as from direct sunlight
or where it would be subject to dust, dirt or excessive vibration.
• Use only the supplied mounting hardware for a safe and secure installation.
• Be sure to remove the front panel before installing the unit.
MOUNTING EXAMPLE
Installation in the dashboard
Bend these
claws, if necessary
put the sponge
into two side the
hole from back
side of this unit
put the sponge into hole
Note: Keep the release key in a safe place as you may need it in the future to remove the unit from the car.
TO SUPPORT THE UNIT
1. UNIT
2. RELEASE CASE
3. DASH BOARD
4. HEX NUT
5. LOCK WASHER
Dashboard
6. PLAIN WASHER
7. CAR BODY
8. REAR SUPPORT STRAP
9. TAPPING SCREW
4

OPERATING INSTRUCTIONS
VOLVOL
VOLVOL
1 2 3 4 5
2 sec.
CLOCK
1. POWER ON/OFF / MUTE
Press and hold this key to switch the unit on and off.
If you just press this key briey, it will turn to MUTE. To return to sound, press it briey again.
2. VOLUME UP/DOWN
Turn the VOL knob
3. SELECT / MENU
Press the SEL knob to adjust BASS/TREB/BAL/FAD. To select other functions, continue to press the
SEL knob until the desired function is shown on the display. See Figure 1.
Fig. 1 Selection of sound control functions
1. VOL 2. BAS 3. TRB 4. BAL 5. FAD
Press and hold SEL to adjust below function:
EQ
SEL
SEL
EQ MODE
Turn VOL knob to select one of the settings EQ OFF/CLASS/ROCK/POP/EQ FLAT.
AVOL
Turn the VOL knob to set the volume level, with which the device is to be set when turned on.
STEREO/MONO
When FM signal is weak or distorted, reception may improve by turn VOL knob to select MONO.
LOUDNESS
Turn the VOL knob to the Loudness ON or OFF function.
or
to increase or decrease the volume levels.
SEL SEL SEL SEL SEL
AVOL
SEL
STEREO
SEL
LOUD
SEL
LOC
SEL
ADJUST
LOCAL
“Local” position in areas with strong signal will cause radio to stop at only strong stations. During manual
tuning (LOC appears). Select Distant position in areas with weak signal. Turn the “VOL” knob to set the
LOCAL ON/OFF.
ADJUST CLOCK
Turn the VOL knob to anti-clockwise for hours and turn VOL knob to clockwise for minutes.
4. PRESET STATIONS
Six numbered preset button store and recall stations for each band.
Storing a station:
1. Select a band
2. Choose your favorite station
3. Hold a preset button longer than one second. Preset station number appears in the display when
station is saved.
Recall a station:
1. Select band
2. Press a preset button for less than one second to select stored station.
5. MODE BUTTON
By pressing this key, user can select. AUX/TUNER/SD/USB/BT mode.
5

6. BAND / DISPLAY BUTTON
Press this button to select the desired band. FM1---FM2---FM3---AM1---AM2.
DISPLAY INFO
: Press and hold BD button to show the clock.
7. AUTOMATIC OR MANUAL TUNING (FREQ UP OR FREQ DOWN )
(A) RADIO MODE
When pressed for less than 1 second, these keys operate as MANUAL tuning mode.
When pressed longer than 1 second they operate as AUTOMATIC tuning mode.
If the keys are not pressed for 3 seconds, they will return to SEEK mode again.
(B) MP3/WMA PLAYER MODE
When pressed for less than 1 second, they will operate as TRACK UP or TRACK DOWN mode.
When pressed longer than 1 second they will operate as CUE or REVIEW mode.
8. AUTOMATICALLY STORE STATIONS
Select six strong stations and store them in selected band.
1. Select a band
2. Hold A/PS button for more than three seconds. The new stations replace stations already stored in
that band.
Preset Scan
Scan stations stored in current band
1. Select a band
2. Press A/PS for more than one second but less than three seconds. Radio pauses for ve seconds
at each station. Press A/PS again to stop scanning when desired station is reached.
9. LCD DISPLAY
The Liquid Crystal Display will display the current state of the unit.
6

MP3/WMA CONTROL
TRACK/SEARCH BUTTON
FORWARD AND REVERSE TRACK SEARCH
Press and release to advance to next track or to return to the beginning of the current track (track number
will be displayed.) Press and hold to fast forward or reverse . Play will begin at the point when
you release the button.
10. PAUSE BUTTON ‘PAU’
During “PLAY”, press ‘PAU’ button to “PAUSE”. Press it again to resume play.
Note: Press and hold PAU button to play rst title on the storage medium.
11. REPEAT BUTTON ‘RPT’
When this button is pressed, ‘RPT’ indication is displayed and play of the selected track will be continually
repeated.
RPT ONE - the current track is repeated.
RPT DIR - the current directory is repeated.
RPT ALL - all tracks are repeated.
12. INTRO BUTTON (Preview all Tracks) ‘INT’
Press this button to display ‘INT’. Each track will play for a few seconds successively. Press again to
stop intro and listen to selected track.
13. RANDOM BUTTON ‘RDM’
When this button is pressed, ‘RDM’ is displayed and each track will play in random instead of normal
sequence. To cancel RANDOM mode, press ‘RDM’ button again.
14. SEARCHPREVIOUS/NEXTFOLDER:(IncaseofMP3/WMAles)‘FL-/FL+’
Press preset button 5 to search previous folder / Press preset button 6 to search next folder
15. FRONT AUX IN
An external audio source (e.g. portable MP3 player) can be connected to the AUX IN socket to be
played back by the vehicle loudspeakers.
• Connect the AUX IN socket with the audio output of the external device.
Connecting it to Portable MP3 Player
16. USB PORT
The device is equipped with a USB interface. MP3 or WMA les stored on these media can be played.
1. Plug your USB storage medium into the USB port.
2. The player automatically switches to the input used and starts playback.
3. See the section on operations common for audio les on how to control USB playback.
Note:
• Due to the great variety of USB, we cannot guarantee that all media will be recognized and that
all operational functions will be available with this device. This is due to different manufacturing
requirements.
• You cannot operate USB hard drives.
7

HOW TO SELECT MP3/WMA FILES
Searching by Track:
• Press “A/PS”, then search track is activated.
• Turn “VOL” knob to left or right, select rst digit desired. (ex. 000->100->200....)
• Press “SEL” button to select second, third or fourth.... digit desired. (ex. 010->013->023...)
• Press “1 PAU”, the song selected will start.
Searching by Character:
• Press “A/PS” twice, then character search mode is activated.
• Turn “VOL” knob to left or right, you can select the desired letter. The songs with the same character
that you selected by / is displayed.
• Press “1 PAU”, the song selected will start.
Searching by Folder:
• Press “A/PS” 3 times, then folder search is activated.
• Turn “VOL” knob to left or right, you can select the desired folder.
• Press “1 PAU”, the song selected will start.
8

BLUETOOTH OPERATION
Pairing and Connecting a mobile device
Activate the Bluetooth function on your mobile phone and conduct a search for Bluetooth devices. After
a successful search the entry “BOSS AUDIO” appears for the device in the display of the mobile phone.
Select this entry for the connection and for the subsequent password request enter the password “0000”
for the device. You may possibly have to conrm the connection structure once more.
Note: Press MD button the voice output between mobile phone and speakers. A2DP can’t convert the
sound output.
Call accept/end
With an incoming call you will hear the call signal via the speakers attached to the device and via your
mobile telephone. The call number is shown in the device’s display.
• You accept an incoming call by pressing the button.
• You end the call by pressing the button.
Rejecting a call
With an incoming call press the button to reject that call.
Redial
Head unit: Press and hold button in BT mode to redial last phone number.
Audio streaming (A2DP)
The device uses the A2DP prole (Advanced Audio Distribution Prole) and therefore can playback your
mobile phone’s audio data. Select an audio le from your mobile phone and start the playback. The device’s
display will show BT mode and the audio data will be played back via the speakers connected to the device.
Notice: On the mobile phone it may possibly be necessary to switch playback via the Bluetooth stereo
headset. Consult the operating manual of your mobile phone for more information.
Memory Backup
This unit is equipped with built-in memory I.C. to save user settings such as tuner preset stations and
audio control settings. In the event of a power loss (i.e. battery disconnect, unit unplugged,etc...) the settings will not be lost.
9

TECHNICAL SPECIFICATIONS
MP3/WMA PLAYER SECTION
Signal to noise ratio > 60 dB
Channel separation > 50 dB (1kHz)
Frequency response 20Hz - 15 kHz
TUNER (FM)
Frequency range 87.5-109 MHz
Channel step 200 kHz
Sensitivity 2.8 µV
Stereo separation 30 dB
Signal to noise ratio 50 dB
TUNER (AM)
Frequency range 530-1710 KHz
Usable sensitivity 32 dB
Pre-Amp Output
Output 1V (max.)
Impedance 10k Ohm
GENERAL
Power supply 12V DC (10.8-15.6V allowable)
Speaker impedance 4 or 8 Ohm
Output power 4 x 60 Watts
Fuse 10A
Note: Specications and design may be subject to change without prior notice.
10
 Loading...