

Page 1

Page 2
Page 3

!
1
:
$
f'
$l
i
.
.
. . .
.
.
:
.
. .
.
.
. . . .
. .
. .
.
.
. .
. .
.
.
. .
. .
.
*.
*.
. . . . .
.
*.
.
:
.
-.
. .
,
. .
.
,
.
, . , . ,
:
.
:
*.
. . .
4.
*.
*.
3.
. .
.
. .
.
. . . . .
. . .
.
. . . . . . .
. . .
. . .
.
:
.
.
:
:
*
:
:
*.
. . .
. .
0
. .
:
0
rn
:
:
.
(Ow
7
..
. .
. .
. .
T
Page 4
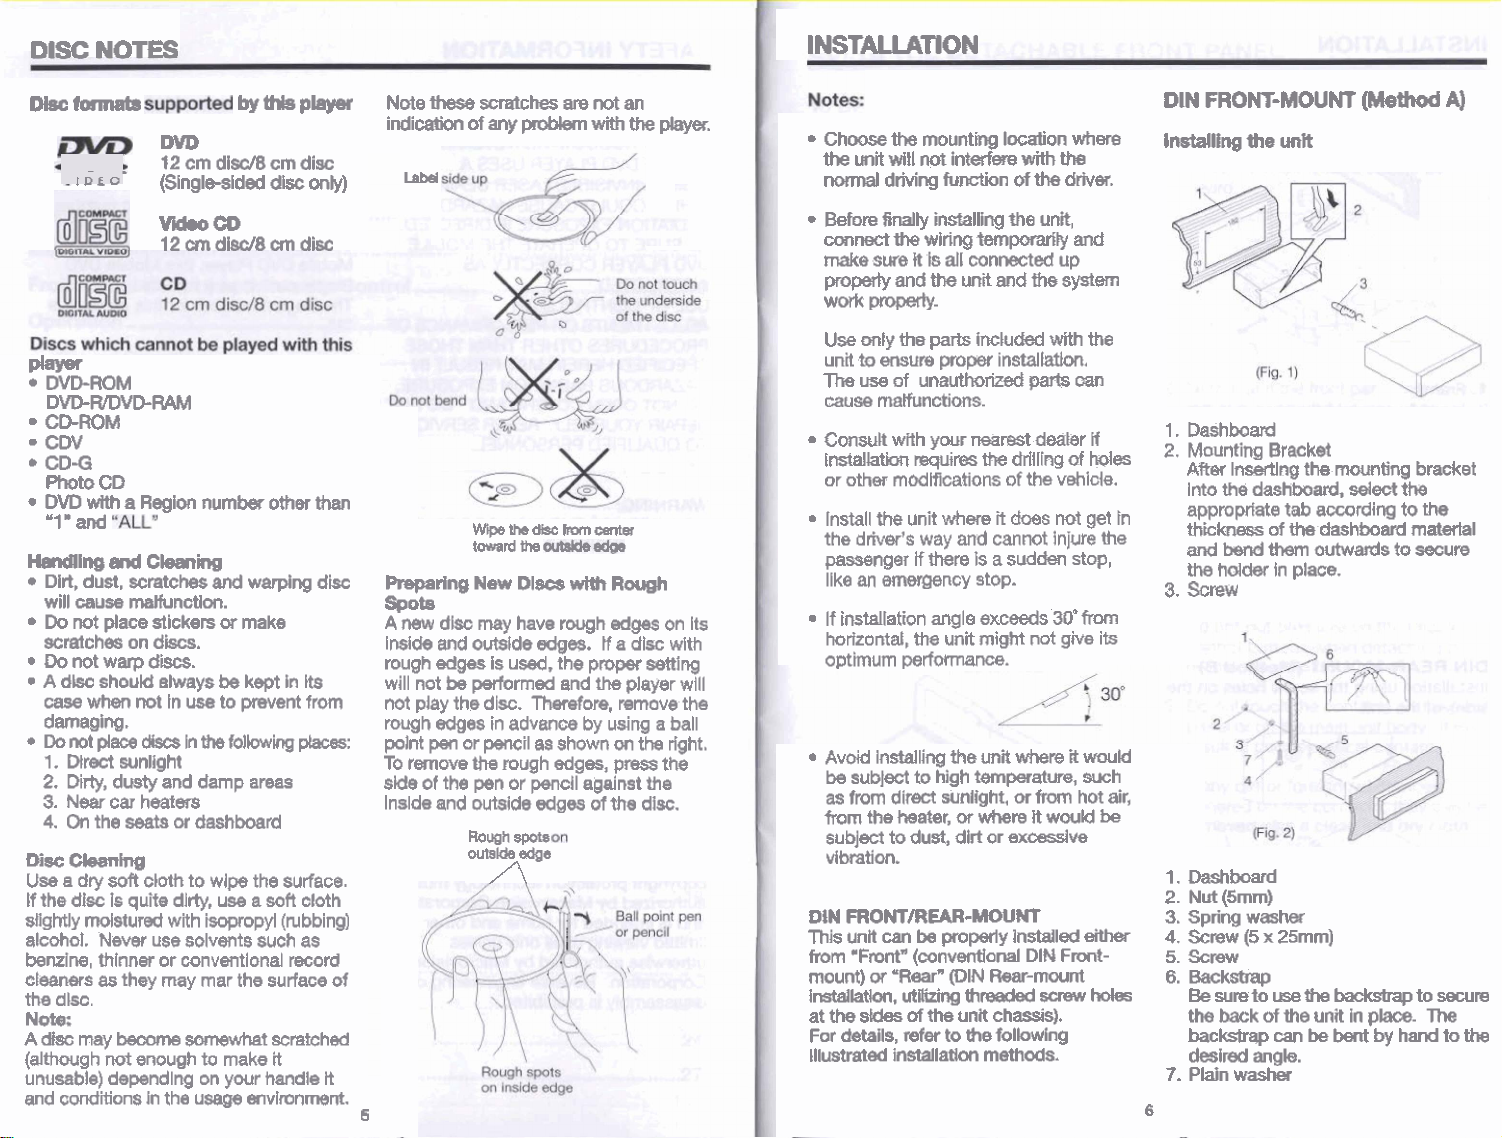
DISC
Okc
player
NOTES
fmmW
I
D
0'
WD-ROM
DVD-WWD-RAM
CPROM
cw
CD-G
PhotoCD
MID
with
a
Region
'1
"
and
Hmtdllngand
Dlrt,
dust,
will
cauw
D4
mot
scratches
Do
not
A
dlsc
case
dama~iw.
Do
not
1.
Dtreet
2.
Dirty,
3.
Near
4.
On
Dis
Cleaning
Use
a
dry
If
the
disc
dlgMly
molstumd
alcohol.
bemine,
cleaners
the
dlsc.
N*:
A
db~
may
(although
unusable)
and
cordiiona
Cleaning
scratches
mahnctlon.
place
on
warp
should
when
not
place
dim
sunlight
dusty
car
heatera
the
seats
soft
cloth
Is
quite
Never
thinner
as
they
become
not
enough
depending
In
by
thls
Em disc/8
(Singlgslded
cm
disc
WdroCD
12ctndisc/8crndii
number
stickers
discs.
and
or
other
warping
make
ti-.
elways
use
or
k~
In
use
to
In
the
follwvi
and
damp
or
dashboard
to
wlpg
dlrty,
use
with
isopropyl
solvents
conventional
may
mar
the
somewhat
to
make
on
your
the
usage
kept
in
vent
areas
the
surface.
a
soft
(rubbing)
such
record
surface
scratched
it
handle
envlronmnt.
player
disc
only)
than
disc
b
from
m:
cloth
as
of
it
Note
these
indication
Label
Preparing
SPob
A
new
Inside
rough
will
not b performed
not
play
rough
pint
pen
To
remove
side
of
Inslde
6
scratches
of
anv
Droblem
-. .
WrpewmcHsehwnEanter
toward
the
New
Dl-
dk
may
have
and
outside
edges
the
edges
or
the
the
pn
and
outside
Rough
outalde
is
used,
dl%.
in
advan-
pencil
rough
or
spots
adge
dgw.
the
Therefore,
as
shown
edges,
pencil
edges
A
am
not
an
with the
with
Rough
rough
edges
tf
a
dlsc
pm
end
the
player
remove
by
using a ball
on
press
against
of
the
daver.
-
on
with
alng
will
the
the
right,
the
the
disc.
Its
INSTALLATION
DIN
FRONT-MOUNT
Choose
the
normal
Before
connect
make
prom
work
Use
unit
The
cause
Consult
tnstallath
or
Install
the
passenger
Ilke
If installation angle exceeds
horizontal,
optimum
Avoid
be
as
from
subject
the
unit
wiH
drking
finally
the
sure
it
and
propxly-
only
the
fo
ensure
use
of
mamnctions.
wRh
modifications
the
unit
driver's
mquirm
other
tf
an
emergency
tha
performance.
Installing
subject
from
dim
the
to
to
heater,
dust,
mounting location
not
interfere
function
installing
wiring
Is
all
the
parts
proper
unauthorized
your
where
way
and
there
unit
the
high
sunlight,
or
dirt
with
of
the
the
unit,
temporarily
connected
unit
and
the
included
instalMort.
parts
neamt
dealer
the
drlillng
of
the
it
does
cannot
Is
a
sudden
stop.
might
not
unit
where
tempratwe,
or
from
where R would
or
excessive
with
Injure
30"from
where
#a
driver.
and
up
system
the
om
H
of
Mes
vehlde.
mot
get
the
stop,
give
its
it
would
such
hot
h
In
air,
InstaJling
1.
Dashboard
2.
Mounting
Afiw
Into
the
appro
thickness
and
kd
the
hddw
3.
Screw
the
unit
Brackei
lnsertlng
dashboard,
@ate
tab
of
the
them
In
place.
vibration.
1.
Dashboard
2.
Nut
otn
FRONTIREAR-MOUNT
This
unil
can
be
from
'FrontA
mount)
or
l~~.
at
the
sWes
For
details,
Illustrated installath
properly
(conventional
'Rear"
(DIN
ut~thre&edgcrewholes
of
the
refer
to
installed
DIN
Rear-mount
unit chassis).
the
following
methods.
either
Front-
6
(5mrn)
3.
Spring
washer
4.
Screw
(5
x
back
washer
25rnm)
of
the
can
angb.
5.
Screw
6.
Backsttap
Besuwto~the~toseurre
the
backstrap
hired
7.
Plain
(WthOd
the
mounting
select
amrding
dashboard
outwads
unit
in
be
bent
the
to
to
place-
by
hand
A)
bracket
the
m&&al
sure
The
to
the
Page 5
I
USING
ToOetadrtheawrt~
THE
DETACHABLE
FRQNTPANEL
To
binstall
the
Fmnt
Panel
i.
Flame
2.
~~~the~fnthe
rndfmmdpsdlWk&~
wfraffle.
-*
dcmwwds.aRd.=
3.
h,
fm&dbh
~'~~~~~ofttre
WtWm
m1lngfher~~R~to
mthedfrrrmthe-.
(What-lWlmM
~~
h-dlWdlck
a-
with
the
unit
l.Presstb~button@PEN),Um
thefrontpmelwillbe~dorm.
2.
RamwetfrefrontpaWby~W#18R
tnthemtddledpullingRtWafdyou.
3.Forsafdm@ng,sdorethefFontpanel
in
thet
supplkl
immedlatdy
~
pt&h
after
-Q~B
being
casg
m.
1.PustrhfrontpanelIntothemaln
bdy,
A
'click'
swnd
should
be
heard.
2.
NobthatlftheM~~tolock
in
buttonmaynotfmdmandd~
mt=m-seg-.
Pw&g
wiM
1.Donotdropthefrontpand.
2.
Do
control
minstalling
3.
Donoatouchmcont~mthe~
panel
~ItInpooa~c~.
not
oa
pm~erfy,
the
OPEN
ths
front
put
pressure
buttons
the
on
ttm
m
button
and
pad
again.
on
the
when
front
dn
dkphy
detaching
panel.
unit
body*
then
ar
It
may
or
4.
~~~~metpdplate~the
m&nbdy.
m.
AWWd~bddb
1
4.
IanydMor~~
dhWonthecontacts.#eycanbe
remod
5.
Doncrt~theftont~tohbh
~or~~liifn
anywhere.
with a clean
and
dry
cloth.
Page 6

Page 7

FRONT
PANEL
CONTROL
AND
REMOTE
COPlTROL
FRONT
1.
fi
POWEWMUTE
2.
EJECT
3.
OPEN
4.
SOURCE
5.
ENTER
8.
ILL
9.
,/a
continuous
10.
BAND
1 1.
WASPS
12.
SELECT
13.
+/-
14.
AWJQ
l5Alw-E
16.
DW
17.
SUBTITLE
PANEL
play
CONTROL
FmsPOWERtotwn~~nitUNorOF~
hold
*~laylng~*the~
mwfrontm
~DVDwE;DCorAVlorRADIQ
Conflm
key
Pressnbstattfwwardn!@d~8*to~
mm
~;essrto~kipt0~~traek8~~to~
back
~theVFDdlspfayb~tnass~
AND
to
ordectedwtththeu~rsor~
one
mute
the
track
mca
REMOTE
Tr-er
to
PAUSE
CONTROL
Pms
qaln
with
onTVm
to
resume
Pressad
the
number
Page 8

Page 9

~mMPtAY(Wf0rCDC)
Wing
on
Press
-
Preset
Scanning
~AS/PSbutton(11)~tosean
~~.
from
next
at
the
same
last
charrnel
Ftqueney
disphyd
STA~STOR~
PmSanyaleofthe~butt0n~(21)
(Mi
toM6)to~a~tdIna
Ttlii~on~
preset
number
pwt
memory
of
pmset
@linki@
and
number
stored.
mmwy
for
5
seconds.
finlshed
of
whkh
is
memwy-
Pressandhddapsetbuttwrtostore
the
wmt
station
fn
that
iwtlan.
SEtEeT
Press
ptevious
LOADING
-
-
-
-
-
SUECfTRACKS
DurSng
CDC
+I-)
buttom
track
Track
K~I
forward
CDC
button
PAUSE
Press
plaw.
REPEAT
Keep
the
me
~d~~~tmt~mtthedisc:
It qdn
PRMEW
Pms
eachtraekanthauumtdii.
agaln
opath,
(7)
or
number
hokling
play
(6) b released.
b/ll
Press
holding
to
SCN
to
to
the
previous
shows
44 / H
or
fast
reverse.
starts fram
PLAYING
button
It
again
THE
SAME
RPT
track.
stop
rw.
ALL
TRACKS
button
to
play
stop
intro
pm
me
to
the
track.
on
display.
button
when
(9)
to
pause CDC
to
resume
TRACK
hutton
(22)
several
and
(23)
and
for
several
listen
Release
first
11
11
(SKIP
following
(6)
to
fast
/
H
play.
to
repeat
kee~
PES
seconds
Pressti
to
tmcks.
-
-
-
(n
of
RIS)
the
current
tt
again
DlSC
D.DW.UP
disc w next
TWI
the
tgnitkn
positiun,
P~WS
the
POWER
Press
SOURCE
DVD
mode.
Press
the
OPEN
panel
wlll
fold
Insert the
UP.
Press
Let
pms
Remove
the
the
WECf
disc
OP€M
panel
the
m.
Note:
Do
mng
unit
OPEN
remove
the
powered
button
LED
I
I
button
P4)
to
dim
to
in
cancel
buttons
play
random
the
function.
(25)
disc.
CD/CDC/DVD
on
to
the
accessory
button,
button
(4)
to
button
(3),
down
slowfy.
with
printed side
button
(3).
fully
fold
down,
button
(2)
to
eject.
disc
and
close
the
EJECT
up.
(3)
disc
buttMl(2)
b
not
when
press
dlsc
8H
order.
to
select
the
then
the
while
is
ejecting
tracks
select
front
facing
front
with
the
I
the
II
I
1'
OPERATION
STOPPING
-
Brlef
atop
WAY
normal
-
f%ess
the
TdChapt~~.
RAPII)H)RWARD/FtAPlDREUERS€
Fms
Eaehtlme~buttoniSpressed,the
speed
ding
8KIPPlwfRACK
Ress
playback
PLAY
presstheSrOPbutton
the
unit
playback,
button
(9)
it
can
playback.
STOP
button
(1
phyback
H
of
A
and
& * butm
rapid
foward/twme
to
the
/r
(SKIP
to
skip
go
disc
+/-)
to
next
hackto
(6)
as
buttons
(Illto
when
press
continuous
1)
twice
to
inW
during
play.
changes
follow.
(7)
ar
preylorrs
stop
during
track
Note:
Far
some
VCD2.0
playbackcontrd),~/~(SKIP+/-)butt=
fi
may
be
unavdlable.-
PAUSE
-
Press
playback.
ONGREEN
-the
playback
current
&am@:
WD:
Numb,
(dl
it
agaln
DlSF
to
dlsc
(1)
Fms
Nmm
Total
prctum)
bmn
to
return
'IsMAy
button
dw
on
the
Dl-
Total
Chapter
(9)
the
m.
for
dWng
di
(PSG
W*k-
to
narmal
FUPlmQN
(16)durlng
contents
the
first
time:
Number*
Number
of
Cww
of
#Is
the
the
Title
of
the
dlsc
will
cum
be
shwvn
on
the
along
with
the
dapsd
(2)
Press
MSP
for
(3)
Press
015P
(4)
Press
OlSP
(5)RessOlSPforthefifthtime:
Themes~age~nthe~willbe*d.
video
CD/SVCWCD:
EachtlmeDBPispssed,them~e
displayd
fdlowf"g
ISME
MP3:
Each
dispfayd
CHAPTER
I
MULTt-AUDIO
DVD:
Pm
pla)rback.
Each
of
chanp
1PI
on
smm
offleP:
~SI~
tkne
DISP
is
on
rn
-CHAPTER
FUNCTION
AUDIO
tlme
audio
button
the
button
soundtrack
qugmu
being
flu-
tlme.
the
second
for
the
for
the
fwrth
changes
pressed,
changee
(1 4)
during
Fs
mwid.
language
played
display,
time:
third
time:
time:
tn
ih
REMAIV
the
message
as
follows:
REMA1kl
number
J
Page 10

BILL
Qq
w
44
VUX3
:
fl9w
:
:
dsIa
:
'Jno103
U!
pelsn!Pe
mleS
NOll3NnJ
pm
~se~uo3
.dOiSa
'~~~1103
BLR
s$eWwl
lanq
ew
emJm
lahe]
eQ
eS3WWl
44
o~
manoma
10LUN03
sseu~qB!~q
'W
IWW
]su~tou
w3
pua
enlm
Page 11

Page 12

Page 13

DuolwoI
NO]
2
Page 14

dma
--
--
3Wd
Sam
--
-
39Vd
Ytld
Mi-
-1
1;
1-
Page 15

GENERAL
Power
Supply
Chassis
Weight
Tone
-
-
-
Maximum
-
Line
Subwmfer
Currefit
-
-
Signal
Channel
F-w
Video
FM
Frequency
IF
Mtb@
Sterfa
MW
Frequency
IF
Senskivity
Dlrnenslions
Cantrols
Bass
(at
Treble
(at
Mlddle
Output
With
Power
Olrt
Level
output
Gammptim
wm
Power
WiW
Power
to
Noise
Separation
Response
Signal
coverage
(SN
%paration
coverage
(SN
Requirements
I
QO
HZ)
10
KHZ)
Power
amplifier
hpljfer
Amplifer
Ratiu
=
26
dB)
=
26
dB)
:
DC
f
2Vob,
than
1M
Negative
60
dB
1
.OVpp
MHz
U&
:
17~~178p)x~rnrn
:
7"~7~xt.Q~
:
2.5
kg
:
5.5
Ib
:
More
:
MmthanrndB
:
20H~-20KHz
:
wrnposite
:
87.5to
:
10.7
MHz
:
5uVN
:
s3OdB
:
522tu1620
:
450KHz
:
35dBu
Ground
175
n
load)
Notw
8pmifidons
trnp~vemms
and
in
design
we
technology.
sub@
to
modilkation,
without
ndice,
due
t6
 Loading...