

Page 1
CONTENTS
DVD470B/DVD490T User’s Manual - Contents
U S E R ’ S M A N U A L
1 General and safety precautions
3 Features
3 What is included?
4 DVD player controls and features
6 Remote control
8 Remote control battery replacement
8 Remote IR sensor
9 A/V output connections
10 A/V input connections on front panel
10 TV Antenna connection (DVD490T)
11 Amplfiier connections
12 Vehicle power connections
13 TV Mode setup and operation
14 Basic operations
15 Playback mode (PBC)
16 Other playback operations
17 MP3 playback
18 System settings
21 Troubleshooting
22 Specifications
Congratulations on your purchase
of a DVD Player.
It has been designed, engineered
and manufactured to bring you the
highest level of performance and
quality, and will afford you years of
listening pleasure.
Thank you for making your
choice for car audio entertainment!
DVD470B
DVD Player
DVD490T
DVD Player with Built in TV Tuner
page
Page 2

DVD470B/DVD490T User’s Manual
Page 3
DVD470B/DVD490T User’s Manual - page 1
General precautions
Safety precautions
Before installing and using your new
DVD Player, please become
familiar with all the information
contained in this manual.
Please keep this manual in a safe place
for future reference.
• This disc player is a Class 1 Laser
Product. It uses a visible/invisible laser
beam that could cause hazardous
radiation if exposed directly to the
consumer. Use of controls,
adjustments, or procedures other than
those specified in this manual may
result in hazardous radiation exposure.
• Do not open or attempt to repair
this unit yourself. Refer any repairs to
a qualified service technician.
• Be sure that the volume level of the
player does not interfere with the
driver’s hearing. The driver must be
aware and be able to react to sound
outside the vehicle.
• This product should not be used
with an installed video screen which
is visible to the driver of the vehicle.
• In some states and countries, the
viewing of images on a screeen inside
a vehicle is illegal, even by people
other than the driver. Be sure that the
installation and operation of this
system is in compliance with local
rules and regulations.
Installation precautions
Choose a mounting location in your
vehicle where the unit will not distract
or otherwise interfere with the driver’s
ability to control the vehicle.
Before final installation, temporarily
connect the wiring according to the
diagram near the end of this manual,
check it to ensure that it has been
connected properly, and test the unit
to make sure it is working correctly.
Use only the installation parts and
hardware provided with the unit to
ensure proper installation. Using other
parts can cause malfunction and
possible damage to your DVD
player.
If installation requires drilling holes or
other modifications to the vehicle,
consult with your nearest dealer or
professional car audio installer.
Do not install this unit at an angle in
excess of 30º from horizontal, as it
may affect performance.
Avoid installing the unit in a location
which is subject to high temperatures,
direct sunlight, hot air from such
sources as heaters or exhaust lines,
or where it will be subject to contact
with dust, dirt, moisture or excessive
vibration.
Turn the unit off before cleaning it, and
clean it only with a dry, soft cloth.
SHOCK HAZARD! Do not open the
case of this product. There are
dangerous voltages present within the
unit. There are no user-serviceable
parts within the unit.
Page 4

DVD470B/DVD490T User’s Manual - page 2
Moisture on pick-up lens
Operating precautions
In humid climates, moisture may
condense or even freeze on the pickup lens which reads the data from
your disc. This may cause temporary
failure of the player.
Should this occur, turn the player on
without a disc, and leave it on for a
while. The unit will warm up and the
moisture will evaporate. In freezing
weather, this may take 1-2 hours.
Turn the unit off when it is not in use.
Do not switch the player between ON
and OFF rapidly. Please wait about
10 seconds between turning the unit
ON after turning it OFF, and vice versa.
Do not use broken, scratched, dusty,
oily or warped discs in the player.
Do not attempt to insert anything other
than 12 cm (4-3/4”) diameter discs in
the player.
Notes on using this product
This device complies with Part 15 of
the FCC rules.
Operation is subject the following two
conditions:
(1) This device may not cause harmful
interference, and
(2) This device must accept any
interference received, including
interference that may cause
undesireable operation.
Changes or modifications not
expressly approved by the party
responsible for compliance could void
the user’s authority to operate this
device.
This disc player is designed and
manufactured to respond to the
Region Management Information that
is recorded on a DVD disc. If the
Region number described on the DVD
does not correspond to the Region
number of the player, the disc will not
play properly.
Should this unit fail to operate
properly, please return the unit to your
authorized dealer.
Page 5

DVD470B/DVD490T User’s Manual - page 3
Features What is included?
This DVD player features the following:
• Multiformat compatibility:
DVD, Video-CD, CD, DVCD, CDR and
MP3
• Reads 12 cm diameter discs
• Front panel AUX video input jack
for other sources, such as video games
and cameras
• Last position memory
• Parental programming lock
• Freeze-frame, frame-by-frame,
and slow motion playback
• Multiple aspect ratio switching
between widescreen, letterbox and
pan-scan display formats
• Switch between different audio
tracks on DVDs (if available on disc)
• Multiple language subtitles
(if available on disc)
• Multiple viewing angles
(if available on disc)
• Auto-off
Unit powers off when the ignition is
turned off
When first unpacking your new DVD
player, please check first that the
package contains all of the items
below. If something is missing, contact
the store where you purchased the
player.
• DVD Player
• Remote control
• Remote IR sensor
• (2) AAA size batteries (for remote)
• RCA input cable
• Power cord with inline fuse
• Mounting slide bracket
• Removal key
• Front bezel (trim frame)
• Cigarette lighter power cord
• 3.5mm cord for use with optional
AC/DC adaptor
Page 6
Front Panel Controls
DVD470B/DVD490T User’s Manual - page 4
2
109
POWER
Press to turn unit ON or OFF.
1
8 11 12 13
4 5
7
3
6
1
UP/DOWN/LEFT/RIGHT
Use these keys to navigate the menu
of a DVD or the system’s menu.
2
ENTER
Press this button to execute the
selected command, or to select a
menu.
3
FAST REVERSE/FAST FORWARD
While playing a disc, pressing one of
these will cause it to play the disc in
that direction at a faster speed. Press
again up to three more times to further
increase speed. Press a fifth time to
return to normal speed playback.
4
VOLUME UP/DOWN
Use these buttons to adjust volume
to desired level.
6
DISC EJECT
Press this button to eject the disc
from the player.
7
MODE
Press this button to select the function
or display desired.
8
MENU (SETUP)
This button displays the DVD player’s
Setup menu. The Setup menu enables
you to enter the settings required for
the DVD player to work properly with
the other video equipment in your
mobile video system.
9
PLAY/PAUSE
When the player is in Stop, Pause,
Slow Play, Fast Forward or Fast
Reverse, pressing this button will
resume normal playback. If pressed
while in playback mode, the program
will pause.
10
STOP
Press this button to pause playback.
The unit will remember where in the
program you have stopped, should
you wish to resume by pressing PLAY.
Pressing STOP a second time clears
the last position memory.
11
PREVIOUS TRACK/NEXT TRACK
When playing a DVD, press these
keys to go to previous or next chapter.
When playing a SVCD or other type
of disc, press this key to go to
previous or next track.
12
13
5
Page 7
Front Panel Features
DVD470B/DVD490T User’s Manual - page 5
Rear Panel Features
4
DISC SLOT
1
3
5
1
DISPLAY
2
2
VIDEO INPUT JACK
4
AUX OUTPUT JACK
5
AUDIO INPUTS (R & L)
3
1 2 3 4 5 6 7 8
RF IN
1
VIDEO OUTPUT
2
LEFT AUDIO OUTPUT
3
RIGHT AUDIO OUTPUT
4
REMOTE SENSOR (EYE) INPUT
5
DIGITAL AUDIO OUTPUT
(COAXIAL)
6
S-VIDEO OUTPUT
7
POWER CONNECTION
8
Page 8
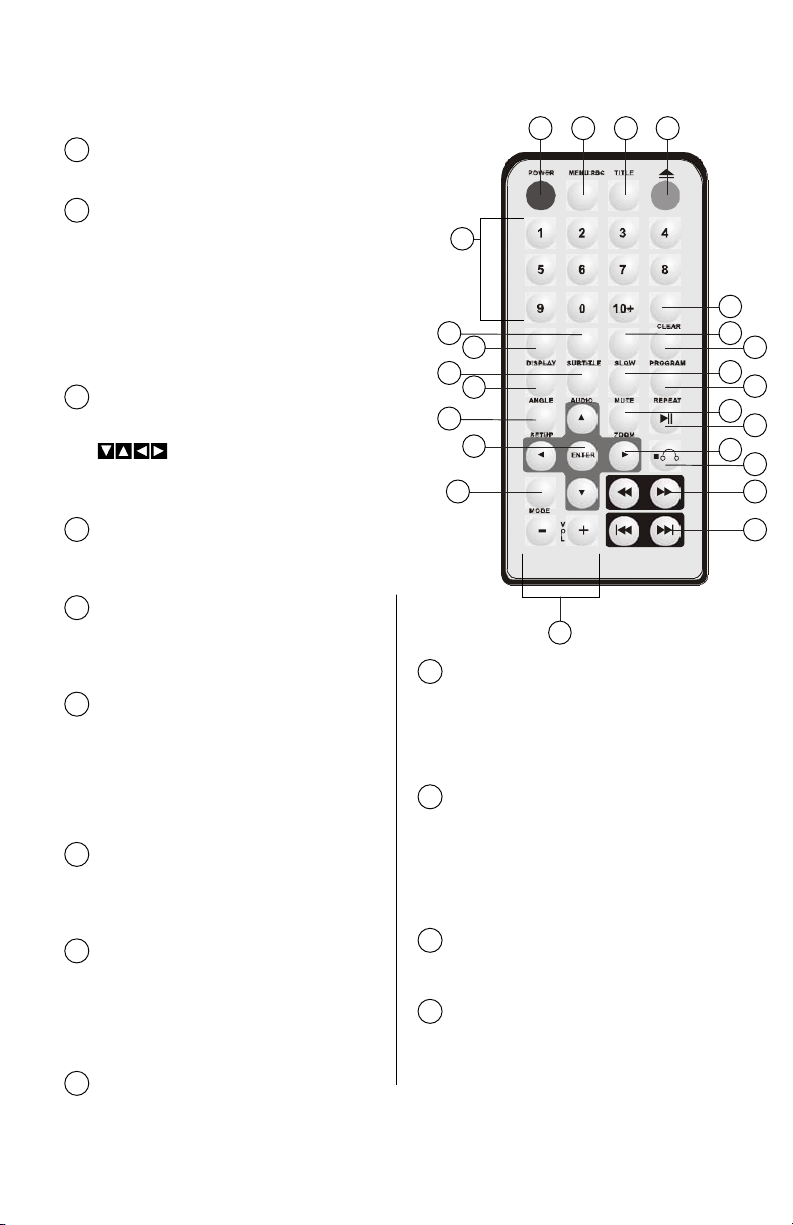
Remote Control
DVD470B/DVD490T User’s Manual - page 6 DVD470B/DVD490T User’s Manual - page 7
POWER
Press to turn unit ON or OFF.
1
24
1 2 3 4
5
6
7
8
9
10
11
12
13
14
15
16
17
23
22
21
20
19
18
MENU/PBC
While playing a DVD, pressing this
key displays the disc’s options menu.
Press this key to shift to PBC mode.
For a DVD/SVCD disc, if PBC is not
enabled, press the STOP button, then
press MENU/PBC to enable the PBC
mode.
2
TITLE
Press this button to display the title
menu of the DVD disc. Use the
buttons to navigate and
select the desired item. Press ENTER
to play.
3
DISC EJECT
Press this button to eject the disc
from the player.
4
CLEAR
During programming operations,
pressing this button will cancel the
number entered.
5
SLOW
Press this button to play the disc at
reduced speed in either forward or
backward mode. Press again to
reduce speed further, up to four times.
Pressing a fifth time returns the
playback to normal speed.
6
PROGRAM
Press this button to select or change
the track playback order (not available
on all discs).
7
MUTE
Press this button to switch off the
audio during playback. Press again
to restore the audio. Note: This
function only affects the analog audio
output.
8
REPEAT
Pressing this button repeats the
chapter, title or disc.
9
ZOOM
Press to enlarge the image on the
screen. Press up to two times more
for additional enlargement. Press
again and playback resumes at
normal size.
10
PLAY/PAUSE
When the player is in Stop, Pause,
Slow Play, Fast Forward or Fast
Reverse, pressing this button will
resume normal playback. If pressed
while in playback mode, the program
will pause.
11
UP/DOWN/LEFT/RIGHT
Use these keys to navigate the menu
of a DVD or the system’s menu.
12
STOP
Press this button to pause playback.
The unit will remember where in the
program you have stopped, should
you wish to resume by pressing PLAY.
Pressing STOP a second time clears
the last position memory.
13
Page 9

FAST REVERSE/FAST FORWARD
While playing a disc, pressing one of
these will cause it to play the disc in
that direction at a faster speed. Press
again up to three more times to further
increase speed. Press a fifth time to
return to normal speed playback.
14
PREVIOUS TRACK/NEXT TRACK
When playing a DVD, press these
keys to go to previous or next chapter.
When playing a SVCD or other type
of disc, press this key to go to
previous or next track.
15
VOLUME UP/DOWN
Use these buttons to adjust volume
to desired level.
16
MODE
Press this button to select the function
or display desired.
17
ENTER
Press this button to execute the
selected command, or to select a
menu.
18
SETUP
This button displays the DVD player’s
Setup Menu. This allows the setup of
the player for the particular video
equipment installed.
19
ANGLE
When playing a DVD with multi-angle
scenes, press ANGLE to play the
video from different viewing angles.
Each time the button is pressed, the
scene will be played from a different
angle.
20
AUDIO
Press this button to select the
language to be played back on the
disc. Each press of the button will
provide the audio in a different
language (if available).
21
DISPLAY
Press this button to show the total
elapsed or remaining playing time.
22
SUBTITLE
Pressing this button will cause
subtitles of the program playing to be
displayed. Successive pressings of
the buttons will display subtitles in
the different languages available.
23
BUTTONS 0-9
These buttons are used to enter
numbers, such as track number, DVD
chapter or number, etc.
BUTTON 10+
When the number to be entered
exceeds 9, first press the 10+ button
and then use the 0-9 buttons to enter
the second digit.
23
Page 10

Remote Control Battery Replacement
DVD470B/DVD490T User’s Manual - page 8
Slide open the battery door on the remote as shown below. Insert two AAA batteries,
observing proper polarity as shown on the battery door. Replace the battery door.
Remote IR Sensor
If you need to mount the DVD player in a location which is inaccessible, or where
the line-of-sight between the remote control and the face of the player is interrupted,
connect the Remote Sensor as shown in the diagram below.
Mount the Remote Sensor in a convenient location which is in direct line-of-sight
with the use location of the remote control. Point the remote control at the sensor
to operate the player.
Page 11

A/V Output Connections to Video Monitor
DVD470B/DVD490T User’s Manual - page 9
Using standard video output (RCA type)
DVD Player
Video Monitor
Using S-Video output
Video Monitor
DVD Player
– OR –
S-VIDEO CABLE
This disc player sends video output signals simultaneously to both the S-Video and
the RCA Video outputs. However, ONLY ONE of these can be connected at a time.
Please connect the player using one of the two methods shown.
Page 12

A/V Input Connections (using Front Panel Inputs)
DVD470B/DVD490T User’s Manual - page 10
DVD PLAYER
TV SET
TV Antenna Connection (DVD490T only)
This disc player offers you the option of using the auxiliary front panel A/V input
jacks to connect a video game, digital camera/camcorder or other units you wish
to use in your mobile video system.
A/V Input Source
Video Game, Camera, etc.
DVD Player
RED
WHITE
YELLOW
DVD Player
Page 13

Amplifier Connections
DVD470B/DVD490T User’s Manual - page 11
Using standard audio output (RCA type)
DVD PLAYER
TV SET
Using Digital Audio (coaxial) output
– OR –
This disc player offers you a choice of analog (RCA) or digital (coaxial) audio outputs
to connect to your amplifier.
AUDIO INPUTS
AUDIO INPUTS
Page 14

Vehicle Power Connections
DVD470B/DVD490T User’s Manual - page 12
About the power receptacle
Follow the connection diagram below. The cable provided for this connection has
two inline fuses and a choke assembly with fuse.
Please note: The yellow wire should be connected directly to the vehicle’s battery.
The power receptacle for the DVD player is shown at left.
The output receptacle has a 12V remote output. This
connection provides +12V at 0.5A when the player is on. This
output is for use as an extra ON/OFF control for an external
amplifier or other device.
RED
Ignition switch
(ACC +)
YELLOW
+12V DC (BATT +)
BLACK
Ground (BATT -)
Remote out
Choke Box
BLUE
Page 15

DVD470B/DVD490T User’s Manual - page 13
TV Mode setup
(DVD490T only)
To set up the DVD player to use in the
TV Tuner mode, press MODE once.
Press SETUP and select “Auto Search”
from the menu.
Press the button. The player will
automatically scan for and memorize
the available TV channels. This
completes the TV Tuner Mode setup.
When you want to watch in TV mode,
press the MODE button once.
Press the buttons to select a
channel for viewing. You can also select
a channel by entering the number
directly from the numeric keypad. For
numbers above 9, for example, like 18,
first press the 10+ button and then the
8 button.
Press MODE once again. This will put
the tuner within the player in a Fine
tune mode. Channels can be fine-tuned
by using the buttons.
TV Mode operation
(DVD490T only)
Page 16

Basic operations
DVD470B/DVD490T User’s Manual - page 14
Please note: If while this disc is playing,
the picture is not shown full-screen, or
some part of the picture is hidden, the
TV Format is probably set incorrectly.
The TV Format is selectable between
NTSC and PAL formats.
Refer to the System Setup instructions
elsewhere in this manual for instructions
on setting up the TV format.
After installation is complete and you
have installed the batteries in the remote
control, you are ready to operate the
player. Turn on all other related audio
and video equipment first. Be sure to
check that your TV/Video monitor is
switched to the Video Input mode.
PLAYBACK WITH MENU
If the DVD disc has a menu system, and
the PBC (Playback Control) mode is
engaged, you can display the menu
which will allow you to select the program
to playback by pressing either
MENU/PBC or TITLE.
The screen will display a menu of items
from which to select from for that
particular disc. Please note that discs
vary widely in the menu options they
offer.
Use the cursor buttons ( ) to
highlight the item you wish to select.
Press ENTER to select this item.
Some discs offer a series of menus which
open to offer a wide variety of choices.
You can continue to navigate the menu
further using a combination of the cursor
buttons and the ENTER button.
SLOW PLAY
During playback, you can reduce the
playback speed by pressing the SLOW
button. Each additional press of the
SLOW button further reduces the
playback speed up to a maximum of
three speed reductions. The fourth button
press returns the playback to normal
speed.
You may apply the SLOW feature to
playback in reverse as well as in the
forward direction.
PLAYING A DISC
Press POWER to turn the player on.
Load a single disc into the slot, label side
up. The disc will be taken in automatically.
The unit will identity the disc format, and
will display it on the monitor. After a few
seconds, it will begin to play the disc
automatically. If a disc title or menu
displays on the screen, you can use the
cursor buttons ( ) on the
player face or remote, or the number pad
on the remote to pick the title or menu
selection.
Any time you wish to pause the playback,
press PLAY/PAUSE.
SHOULD I USE THE FRONT PANEL
OR THE REMOTE?
Most functions can be controlled by either
the front panel or the remote, although
there are a few functions which appear
on one or the other only. The description
of the operations which follow apply to
either method of controlling the player.
FAST FORWARD and FAST REVERSE
Pressing the button during playback
mode will cause the playback to speed
up. Each additional press up to a total
of four presses will step up the speed
further. The fifth press will return the
playback to normal playing speed.
Likewise, pressing the button will
cause the player to play rapidly in the
reverse direction. Pressing more times
causes further speed increase in the
reverse direction, up to a total of four
presses. The fifth press returns the
playback to normal playing speed.
Page 17

DVD470B/DVD490T User’s Manual - page 15 DVD470B/DVD490T User’s Manual - page 16
Please note: Only certain types of discs
will permit track selections in this manner.
Playback Control (PBC)
The DVD player incorporates a popular
feature called “Playback Control” which
is used only with VCD and S-VCD discs.
When PBC mode is enabled, all the song
titles on the disc will appear on the
screen, and the user can select his
favorite song directly.
After the song has played, the screen
with all the song titles will return, so the
user can select another song.
To enable PBC mode, press the
MENU/PBC button.
Please note: When playing discs other
than VCD and S-VCD discs, it may be
necessary to disable PBC mode first, by
pressing the MENU/PBC button once.
This manual notes some of those
situations. If your DVD player does not
seem to be working properly, always
check to see if PBC mode is enabled,
and press MENU/PBC once to turn it
off and try again.
Using the SKIP buttons to select
During playback, you can use the
and buttons to skip ahead or skip
back one or more tracks or chapters.
SELECTING A TRACK
There are three basic ways to select a track
with the DVD player:
1- using the SKIP buttons ( and ),
2– entering a track number using the
numeric keypad, or
3– making a selection from a displayed
track list.
Selecting from a displayed track list
For DVD discs, press MENU/PBC or
TITLE to display the track list. Use the
buttons to select a track and then
press ENTER to play the selection.
For non-DVD discs, during playback
press the MENU/PBC button to display
the track list. Then enter the track
numbers directly using the numeric
keypad.
Use the numbered keypad to select
Using the numeric keypad, enter the track
number you wish to view. If a hand icon
appears when you try this, one of
the following conditions is present:
• the tracks on the disc are not numbered
• the track number you entered is larger
than the number of tracks on the disc
• PBC mode is on (disable it by pressing
the PBC button).
Page 18

Other playback operations
SUBTITLE LANGUAGE
Press SUBTITLE to view and select the
available subtitle languages.
Please note: This feature is only available
on DVD discs, and only if subtitles in
different languages have been recorded
to the disc.
REPEAT PLAY
For DVD discs, pressing REPEAT once
during playback will repeat the chapter.
Press this button again to repeat the title.
Pressing a third time will exit the repeat
feature.
For non-DVD discs, when PBC is off,
pressing REPEAT will cause the track
currently being played to repeat. Pressing
REPEAT again will cause the entire disc
to be repeated. Pressing a third time will
exit the repeat feature.
PROGRAM PLAY
This feature allows you to select the
particular chapters and/or tracks you
want to see, and determine the order in
which they are played.
The first step in programming is to turn
off the PBC mode, and press the STOP
button.
Press PROGRAM. The feature is now
ready and the screen displays the
following:
Press the number key to enter the number
of the chapter(s) or track(s) to be played.
For example, to play track 5, followed
by tracks 3 and 6, enter 5, 3, 6. If you
enter an incorrect number, press CLEAR
to erase that entry.
Press PLAY and the selected chapters
and/or tracks will be played.
Please note: This feature is only available
on certain kinds of discs.
Program : P00:00
DISPLAYING PLAYING TIME/STATUS
Press DISPLAY. The screen will display
the current elapsed play time. Press
DISPLAY again to view the remaining
time.
Please note: The format of the
information displayed is subject to the
type of disc being played.
ADJUSTING BASS, TREBLE AND
BALANCE
Press ENTER to enter the Settings
selection mode.
Press the keys to select the BASS
setting, then press the buttons to
adjust the bass level between -12 and
+12.
In a similar manner, you can use the
buttons to access the settings for
Treble and Balance.
If there is no entry made within 5 seconds
of the pressing of the ENTER button,
the player will automatically exit the
Settings selection mode.
Page 19

DVD470B/DVD490T User’s Manual - page 17
MP3 Playback
Playback of MP3 files on this player may
be done in one of two different modes:
1– “with menu” mode
2– “no menu” mode
The factory default for this player is the
“without menu” mode. If you wish to
change the MP3 playback mode, please
refer to the Settings section in the column
entitled “SmartNav Settings” instructions
on how to do so.
“NO MENU” MP3 PLAYBACK
This mode is also called “first play” mode.
After a disc is inserted and is read, the
player will stop, and display “STOP” on
the front panel.
Press a number key to select a file to be
played, or press PLAY to start playing
from the first file on the disc.
Pressing PREVIOUS or NEXT while
playing an MP3 track will play the
previous or next track on the disc.
Please note: These files may be in either
MP3 or MPEG format. If an MP3 file is
being played, pressing DISPLAY will
show you the file playback time.
“WITH MENU” MP3 PLAYBACK
Press EJECT and remove any disc loaded
in the player. Load the MP3 disc. Press
STOP. The screen will display the
following menu:
Using the buttons, highlight
the desired folder or file for playing and
then press PLAY. The option list will
display some play modes.
When the buttons are used to
highlight a certain option, the
buttons may have to be used to select
a play mode.
After the selection is completed, use the
buttons to move the highlight to
the folder or file to be played.
Finally, press PLAY/PAUSE to start play.
Pressing STOP while playing returns you
to the menu screen.
Please note: It may be necessary to press
the PLAY/PAUSE button twice to start play.
Please note:
1– If the PROGRAM button is pressed (or
the programming function is selected
through the main menu while an MP3 disc
is playing) an error in operation may occur.
2– After a jpeg file is read by the player,
press the PLAY/PAUSE button to start the
player.
3– If the disc contains multiple formats,
the LEFT/RIGHT buttons may not function
when trying to use the menu. In this case,
use the PREV and NEXT buttons to view
the track numbers in the play listing, or
use the number keypad to enter the track
numbers directly.
Page 20

DVD470B/DVD490T User’s Manual - page 18
System Settings
Please note: Any time you are in Setup
Mode, you can exit the mode by pressing
the SETUP button.
The Setup Menu Main Page:
Highlight indicates the current selection
Press the SETUP button to display the
system setup menu:
Press the keys to highlight the
desired operation.
Press ENTER to display the sub-menu
for that operation, and press the
button to enter the right side of the submenu.
Press the buttons to highlight each
of the menu pictures. Press the
button to move to the left side of the
sub-menu.
Press the buttons to move the
highlight to the Main Page topic and
press ENTER return to the main menu
page.
Press the buttons to move the
highlight to “Exit Setup” and then press
ENTER to leave the Setup mode.
TV SCREEN ASPECT RATIO
Three different screen aspect ratios are
available with this DVD player. These are
Normal (Pan-scan), Letter Box and
Widescreen. Being able to change aspect
ratios will enable you to match the screen
to the disc being played.
Press the SETUP button to display the
system menu. Use the
buttons to highlight “General Setup.”
Press ENTER and the General Setup
menu screen will be displayed:
Press the button to move to the right
side of the menu. Press the
buttons to highlight your aspect ratio
selection, choosing from Normal/PS,
Normal/LB or Wide. Press ENTER to
select that item.
Use the buttons to move the
highlight to “Main Page.” Press ENTER
to return to the Main Menu.
In the Main Menu, use the
buttons to highlight “Exit Menu” and
press ENTER to exit the menu system.
Page 21

DVD470B/DVD490T User’s Manual - page 19 DVD470B/DVD490T User’s Manual - page 20
Please note: If you intend to use the
analog (RCA) audio outputs, be sure to
set the SPDIF output setting to “OFF”
to avoid mixed signals.
Please note: If you are unsure which
setting applies to your application, we
suggest you first try SPDIF/PCM. The
PCM system incorporates additional
decoding processes which may enhance
the viewing.
COAXIAL AUDIO OUTPUT
If you are using the coaxial terminal to
output the digital audio signal, the system
must be set up to either SPDIF/RAW or
SPDIF/PCM.
Press the SETUP button to display the
Setup Menu. Use the buttons
to highlight “Audio Setup.” Press the
ENTER button, and the following screen
will be displayed:
Use the buttons to highlight
“SPDIF OUTPUT” and then press ENTER.
Press the button to move to the right
side of the menu, and use the
buttons to highlight SPDIF/RAW or
SPDIF/PCM, and press ENTER.
Press the SETUP button to exit the Setup
Menu.
PARENTAL GUIDANCE
Parents who wish to limit their children’s
viewing content based on its rating (e.g.,
PG-13) can set up a password-based
system to limit the player to only showing
movie programs at or below this rating.
Begin this setup procedure by making
sure there are no discs in the player.
Press the SETUP button to display the
SETUP screen. Use the
buttons to highlight “Preferences” and
then press ENTER. The Preferences page
will appear on your monitor:
Press the buttons to highlight
“Parental,” then use the button to
move to the right side of the screen.
Use the buttons to highlight the
desired parental control level. Then press
ENTER.
The player will ask you for a password.
The factory default is “3308.” Enter a
password of your choice using the
numeric keypad. Press SETUP to exit
the menu system.
Page 22

System Settings, continued
SMART NAV FEATURE
The SmartNav feature is used to set how
you wish to navigate an MP3, MPEG or
JPEG disc. The two modes available are
“With Menu” and “No Menu.” These two
options are discussed on page 17 of this
manual.
Press SETUP to display the System
Menu. Use the buttons to highlight
“Preferences” and press ENTER. The
Preference menu is then displayed:
Press the buttons to highlight
“SmartNav,” and press ENTER. Use the
button to move to the sub-menu on
the right side of the screen.
Use the buttons to highlight either
“No Menu” or “With Menu” as desired.
Then press ENTER. Press SETUP to exit
the menu system.
MENU DISPLAY LANGUAGE
This DVD player is programmed to offer
you the on-screen menu system in the
following five languages:
English • French • Spanish • Chinese
Japanese
Press the SETUP button to display the
Setup Menu. Use the buttons
to highlight “Preferences.” Press the
ENTER button and the Preferences
screen will appear.
Use the buttons to highlight
“Subtitle” and then press ENTER.
Press the button to move to the right
side of the menu, and use the
buttons to highlight the preferred menu
and subtitle language, and press ENTER.
Press the SETUP button to exit the Setup
Menu.
Page 23

Troubleshooting
DVD470B/DVD490T User’s Manual - page 21
If you experience operation or performance problems with this product, compare your
installation with the electrical wiring diagram on the previous page. If problems persist,
read the following troubleshooting tips which may help eliminate the problems.
No sound. Volume is set to minimum.
Wiring not properly
connected.
System settings are not
correct.
Adjust volume to desired level.
Check wiring connections.
Review and correct all system
systems settings if necessary.
Disc will not play. Disc not inserted into
player properly.
Disc is damp or dirty.
Eject disc and reinsert into the
loading slot.
Make sure disc is clean, dry and
undamaged before using in the
DVD player.
Remote control
does not function
properly.
Batteries are dead.
Remote is not being used
in direct line-of-sight with
the player or remote IR
sensor.
Replace batteries.
Be sure when being used, the
remote is being pointed directly
toward the player or remote IR
sensor (if installed).
Screen image is
distorted.
Disc is damp, dirty,
damaged or defective.
Internal error causing
malfunction.
If possible, clean and dry the
disc. Check for warps,
scratches and contamination
before reinserting the disc.
Shut the player OFF. Wait ten
minutes, then turn the unit ON
and see if problem continues.
If it does, take your player to a
qualified service technician for
repair.
Player controls do
not function
properly.
Internal error causing
malfunction.
Shut the player OFF. Wait ten
minutes, then turn the unit on
and see if problem continues.
If it does, take your player to a
qualified service technician for
repair.
SYMPTOM CAUSE REMEDY
Page 24

Specifications
DVD470B/DVD490T User’s Manual - page 22
DVD; SVCD; DVCD; VCD 1.0, 1.1 and 2.0 (micro
laser video/audio disc); CD-DA (common music
laser CD); MP3 audio disc; CD-R and CD-RW
MPEG1; MPEG2; PCM, Dolby Digital, DTS
MPEG1; MPEG2; PCM, Dolby Digital, DTS,
analog stereo
NTSC or PAL, Video: 1.0 Vp-p
mixed stereo: 0.65Vrms
RCA, A/V outputs, high-resolution system
(S-Video) output, coaxial digital audio output
DVD: 20Hz - 20kHz ± 1 dB
> 90dBA
3 lbs (1.4 kg)
7-3/32” x 6-11/16” x 2” (180 x 170 x 50mm)
DVD PLAYER
Playable disc formats
Video formats
Audio formats
Video signal output
Audio signal output
Output types
Frequency response
Audio signal-to-noise ratio
Net weight
Dimensions
DVD470B
Mobile DVD Player
DVD490T
Mobile DVD Player with Built-in TV Tuner
All specifications subject to change without notice.
DVD490T
Mobile DVD Player with Built-in TV Tuner
Additional specifications for:
VHF (CH-2-13): 55.25 - 211.25 MHz
UHF (CH 14-69): 471.25 - 819.25 MHz
35 dbu
40 dbu
TV TUNER
TV Frequency Range
Maximum sensitivity
Usable color sensitivity
 Loading...