

Page 1

AUDIO SYSTEMS
CH1500DSE
CH3000DSE
C ON T E N T S
Congratulations! 3
Specifications 3
Features 4
Installation 6
Low Level Input/ Speaker/ Power wiring 7
Bridging Two Amplifiers 8
Electrical Wiring 9
Precautions 10
Troubleshooting 11
Page 2

A M P L I F I E R S
Co ngr atu lations on your purchase of a BOSS Audio Systems CHAOS car audio amplifier.
CH AOS C las s D amplifiers are designed and engineered in the USA to the highest level
of q ual ity , and w ill a fford you years of listening enjoyment.
Th e CHA OS Cl ass D a mplifiers incorporate a DC-to-DC switching power supply which
ha s bee n des ign ed to p rov ide a mple headroom for even the most demanding peaks
an d dyn ami c ran ge found on modern recordings.
AUDIO SYSTEMS
3
Power Max (2 Ohms)
Power RMS (4 Ohms)
Power RMS (1 Ohm)
S/ N Rat io
Low Pass Crossover (Variable)
Sub Sonic
Phase Shift
Fr equ enc y Res ponse
In put S ens itivity
Input Impedance
Fuse Rating
Dimensions
(9-5/16"W x 2-3/16"H x ...)
CH1500DSE
800 Watts Mono
540 Watts Mono
1500 Watts Mono
10 0 dB
50Hz-150Hz
15Hz-40Hz
0~ 180
50Hz-150Hz
100mV-2V/2V-8V
10K Ohm
20A x 2
11-1/2"(L)
O
CH3000DSE
2200 Watts Mono
1200 Watts Mono
3000 Watts Mono
10 3 dB
50Hz-150Hz
15Hz-40Hz
0~ 180
20Hz-300Hz
100mV-2V/2V-8V
10K Ohm
35A x 3
O
16"(L)
Page 3
A M P L I F I E R S
F E A T U R E S
AUDIO SYSTEMS
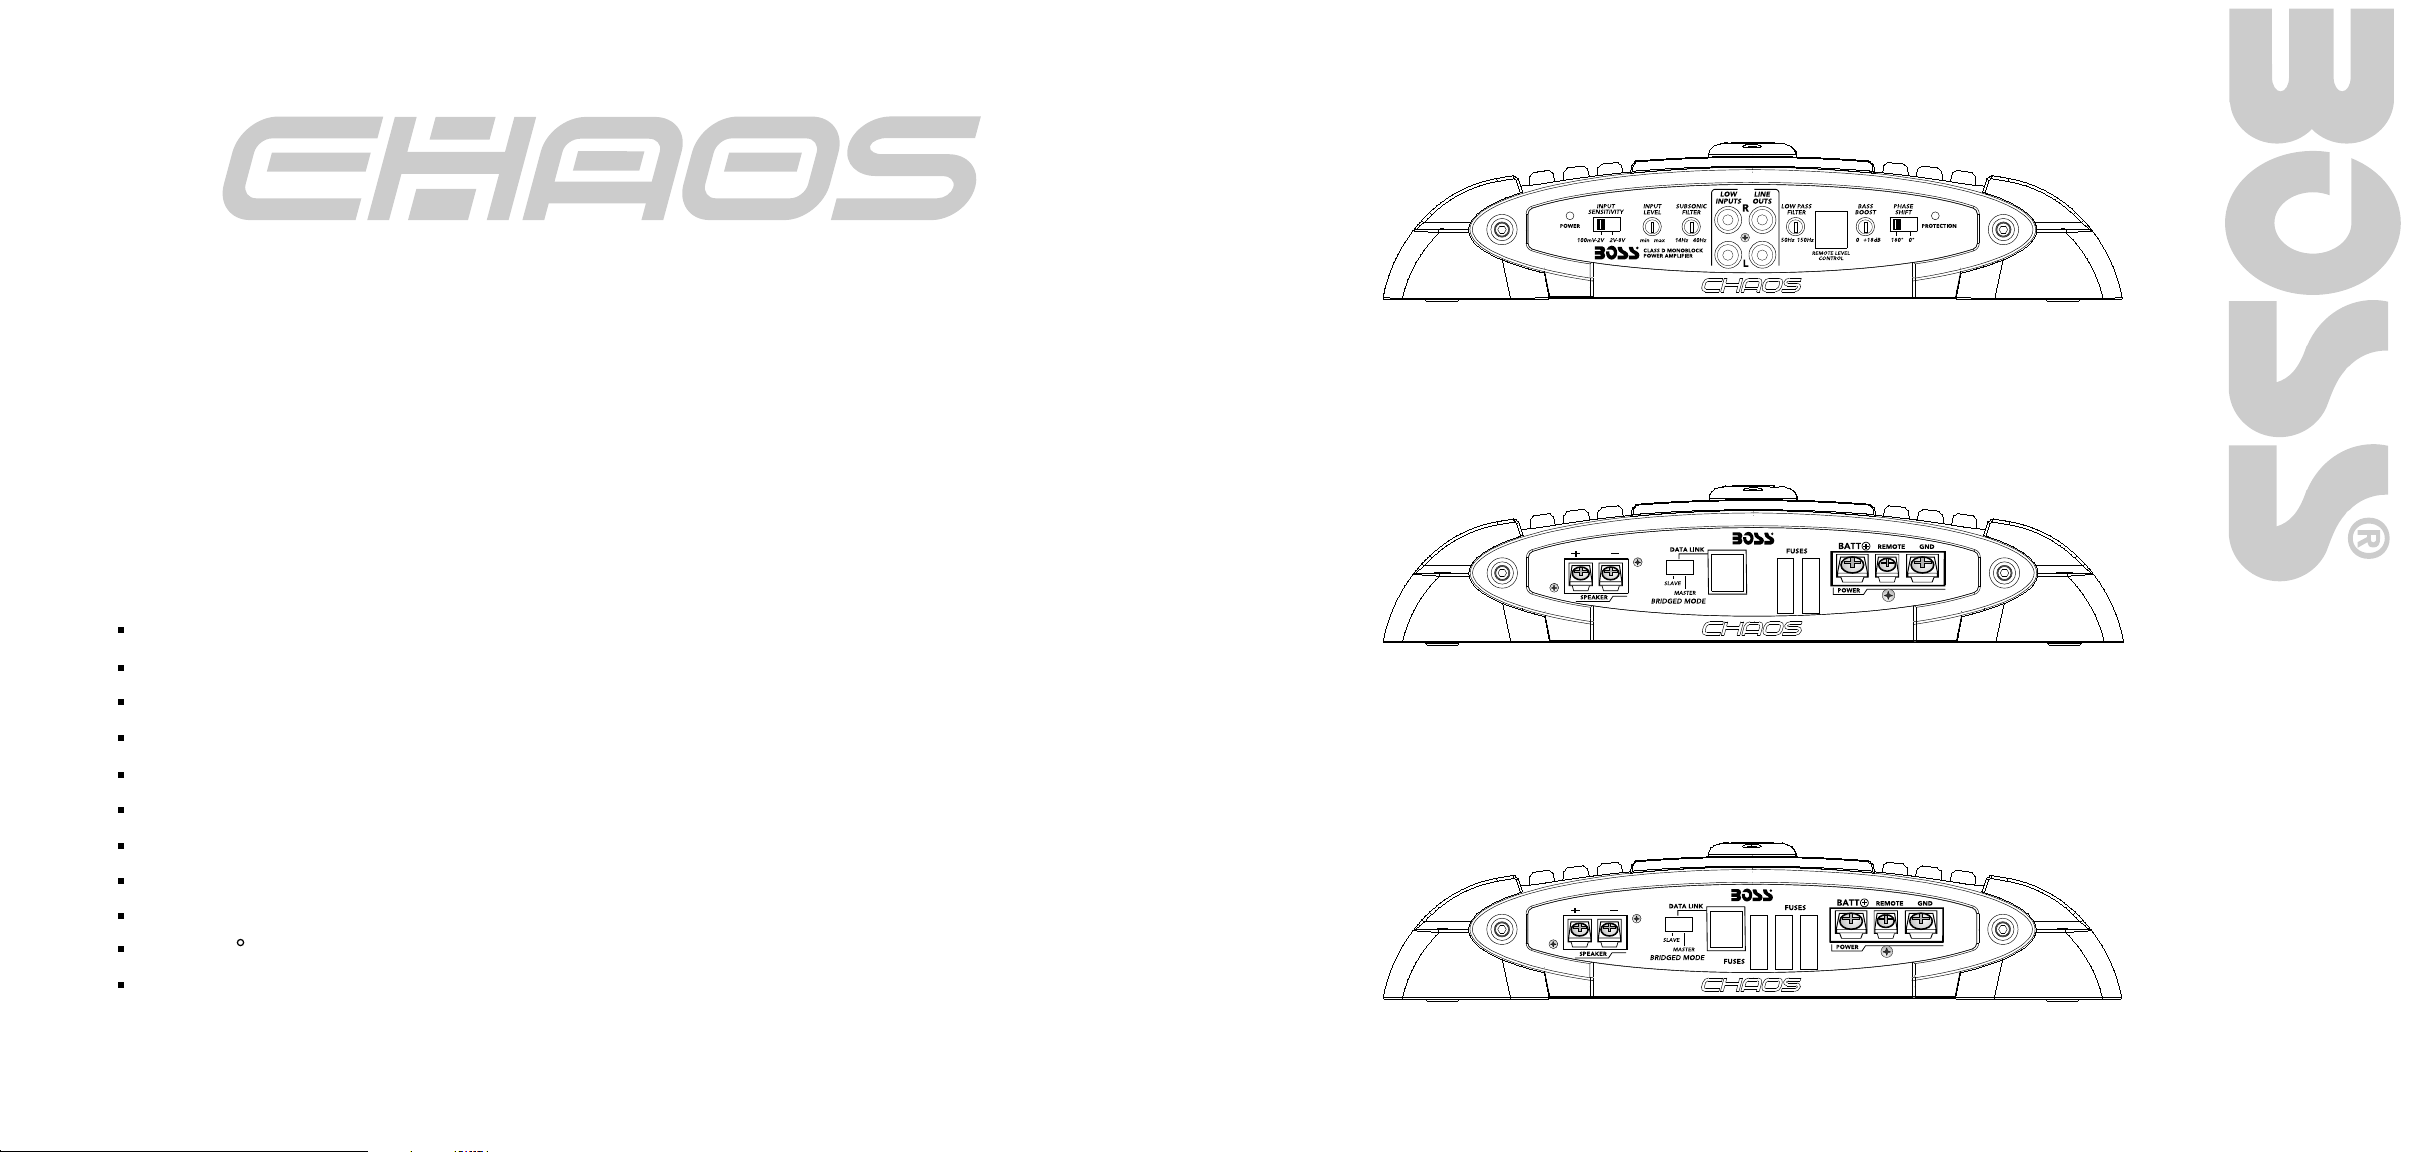
CH1500 D S E and CH3000DSE Fro n t
4
CLASS-D MONOBLOCK AMPLIFIE R
CH1500DSE and CH3000DSE
One Ohm Stable MonoBlock amplifier
MOSFET Power Supply
PWM (Pulse Width Modulation) System
Glass/epoxy Printed Circuit Board
Nickel-plated RCA Input and Bypass Output jacks
Nickel-plated Speaker and Power Terminals
Protection Circuitry Against Thermal, Overload and Short Circuit Faults
Variable Subsonic Filter (15Hz-40Hz, 24dB/octave)
Variable Low Pass Filter (50Hz-150Hz, 24dB/octave)
0/180 Phase Selector
Remote Subwoofer Level Control
CH1500 D S E Rear
5
CH3000 D S E Rear
Page 4

AUDIO SYSTEMS
Instal l a tion
Imp o rtant In s tallati on Consid eration s a nd Prec autions
The design philosophy of this amplifier requires strict adherence to proper installation and
load impedance instructions. The minimum recommended impedance is 1 Ohms.
The fuse rating for the CH1500DSE is 40 amperes (2 x 20A fuses) and the CH3000DSE carries a
fuse rating of 105 amperes (3 x 35A fuses). Although sufficient for normal working conditions,
overloading of the amplifier may cause these fuses to blow. Please try to avoid overloading
the amp in this manner.
1
Mount the amplifier so that air flow is not restricted.
2
Mount the amplifier to a solid surface, as these amplifiers are extremely heavy.
3
Take extreme caution when mounting the amplifier, so as not to damage the chassis
with a drill or screwdriver.
4
Run a 4 gauge wire from the battery, using a fuse within 18 (457mm) of the positive
battery terminal. The purpose of this fuse is to protect the battery in the event that
this wire accidentally contacts the chassis ground on its run to the amplifier.
5
Place the fuse holder near the amplifier on the 12V POSITIVE lead.
6
Run a 4 gauge wire (as short as possible) to the closest chassis ground point.
Be sure to remove the paint at the connection to the chassis of the vehicle for a good
electrical connection.
7
Run a 16 gauge (or larger) wire to the remote turn-on lead of the head unit.
Connect the speaker(s) as per the wiring diagrams in this manual.
8
9
Using RCA interconnect cables, connect all line inputs and outputs per the wiring
diagrams which follow if possible, keep the RCA cords away from the 12V power and
Ground wiring.
10
Set the controls as described in the following sections of this manual.
,,
Low Leve l I n puts / Remote Connectio n s
CH1500 D S E and CH3000DSE
Fr om O ut pu ts
of
He ad U ni t
To I np ut s of
Sa te ll it e
Am pl if ie r
Speake r / P o wer Connections
CH1500 D S E and CH3000DSE
To RE MOTE SU BWOOF ER
LEV EL CONT ROL
76
While these amplifiers are designed to operate with a minimum load of 1 Ohm, it is highly
recommended that you design your system to operate with 2 Ohms minimum impedance.
Operating a CHAOS digital amp with a speaker impedance load of under 1 Ohm may
result in poor sound quality and serious damage to the amplifier circuitry. Damage to your
amplifier caused by operating with a load of less than 1 Ohm is not covered under the
warranty for this product.
SP EAK ER I MP E DAN C E
1 - 8 OH MS !
Ca pacit or
NO TE : The amp lifie r may rec eive it s in put sig nal fro m a head un it or signa l proce ssors s ubwoo fe r outpu t.
Di strib ution B lock
Page 5

Ele c trical W i ring
Al l BOS S CHA OS series power amplifiers are equipped with easy top access
sc rew t erm ina ls. These terminals are n in o rde r to en sur e exc ell ent
el ect ric al co nta ct an d to re sist corrosion.
Wh en ma king electrical connections to the amplifier, please observe the following:
Us e at le ast 8 g aug e or he avi er wi re for power and ground connections.
Wi re th e amp lif ier d ire ctl y to the car b attery. Make sure there is circuit protection
(s uch a s a fus e) on t he po sit ive p ower lead, within 18 inches of the battery.
Fo r the g rou nd co nne cti on, u se the shortest possible wire to a good chassis
gr oun d poi nt.
Wi re th e Rem ote c onn ect ion t o the r emote turn-on lead of your equalizer or head
un it. I n som e cas es th is ma y be the power antenna lead of the head unit.
ic kel -pl ate d
AUDIO SYSTEMS
SP EAK ER I MP E DAN C E
2 - 8 OH MS !
Ca pa citor
Ca pa citor
Di st ribut io n Block
Di st ribut io n Block
(B RIDGED SWITCH : SLA VE P OS IT IO N)
Rem o te Subwo o fer Level C ontro l
Yo ur BO SS CH AOS digital amplifier is equipped with a dashboard mount remote
su bwo ofe r lev el co ntrol. Run the supplied dashboard remote control from the front
pa nel o f you r amp lifier. By turning the level knob clockwise, you will increase the
ou tpu t of lo w fre que ncies.
Fus e s
Fu ses p rot ect b oth t he am plifier and the electrical system of your vehicle from
fa ult y con ditions. If you must replace the fuse in your CHAOS amplifier, use a fuse
of e xac tly t he sa me type and rating. A different type or rating may result in damage
or c aus e a fir e.
Mou n ting the A m plifier
Ma rk th e loc ati on fo r the m ounting screw holes by positioning the amplifier where
yo u wis h to in stall it and use a scribe (or one of the mounting screws) inserted in
ea ch mo unt ing hole to mark the mounting surface. If the mounting surface is carpeted,
me asu re th e hol e centers and mark with a felt tip pen.
Dr ill p ilo t hol es in t he mo unting surface for the mounting screws and insert the mounting
sc rew s int o the se holes. Tighten them securely.
No te: B efo re be gin nin g your installation, be sure to take note of any wires, lines or
ot her d evi ces i n your vehicle which may be located behind any mounting surface.
98
Page 6

AUDIO SYSTEMS
Pre cautions
Be for e you d ril l or cu t any h oles, investigate your car's layout very carefully. Take care
wh en yo u wor k near the gas tank, fuel lines, hydraulic lines and electrical wiring.
Do n ot op era te th e amp lif ier w hen it is not mounted. Attach all audio system components
se cur ely w ithin the automobile to prevent damage, especially in case of an accident.
Do n ot mo unt t his a mplifier so that the wire connections are unprotected or in a pinched
co ndi tio n, or l ike ly to b e dam aged by nearby objects.
Be for e mak ing o r bre aking power connections in your system, disconnect the vehicle
ba tte ry. C onf irm that your head unit or other equipment is turned off while connecting
th e inp ut ja cks a nd sp eaker terminals.
If y ou ne ed to r epl ace t he po wer f use, replace it only with a fuse identical to that supplied
wi th th e system. Using a fuse of different type or rating may result in damage to your
sy ste m which isn't covered by the manufacturer's warranty.
Troubles h o ot i ng
Be fore removing your amplif ier, r efer to the list below and foll ow the suggested
pr oced ures. Always test the s peak ers and their wires first.
Am pli fie r wil l not
po wer u p
Pr ote cti ons L ED
co mes o n whe n
th e amp lif ier i s
po wer ed up
No O utp ut
Ch eck f or go od gr ound connection.
Ch eck t hat R emo te Input (turn-on) at amplifier has at least 3 volts DC
pr ese nt.
Ch eck t hat t here is ba ttery power on the + terminal.
Ch eck a ll fu ses.
Ch eck t hat P rot ection LED is not lit. If it is lit, shut off amplifier briefly and
th en re pow er it .
Ch eck f or sh ort c irc uits on speaker leads.
Tu rn do wn th e vol ume control on the head unit to prevent overdriving.
Re mov e spe ake r lea ds, a nd re set the amplifier.
If t he Pr ote cti on LE D still comes on, then the amplifier is faulty.
Ch eck t hat a ll fuses are OK.
Ch eck t hat a mpl ifier is properly grounded.
Ch eck t hat R emo te Input (turn-on) at amplifier has at least 3 volts DC
pr ese nt.
Ch eck t hat R CA pa tch c ord s are p lugged into correct inputs.
Ch eck s pea ker wiring.
1110
Lo w Out put
Hi gh hi ss in
sp eak ers
Re set L eve l Con tro l.
Ch eck C ros sover Control settings.
Di sco nne ct al l RCA i nputs to the amplifiers. If the hiss disappears, then
pl ug in t he co mpo nent driving the amplifier and unplug its inputs. If hiss
di sap pea rs, g o on un til t he faulty/noisy component is found.
In o rde r to ob tai n the b est s ubj ect ive S/N ratio, set the Input Level to the
lo wes t lev el po ssible which still delivers the volume level you desire.
Page 7

Troubles h o ot i ng , c o nt .
Hi gh sq uea l noi se
fr om sp eak ers
Ch eck a ll RC A int erconnects. High squealing noises are almost always caused
by R CA ca ble s wit h poo r gro unding. Always use high-quality RCA interconnects
in y our a udi o sys tem.
AUDIO SYSTEMS
12
Di sto rte d sou nd
Am pli fie r get s
ve ry ho t
En gin e noi se
(s tat ic ty pe)
En gin e noi se
(a lte rna tor w hin e)
Ch eck t hat t he Le vel control(s) is set to match the signal level of the head unit. Always
be gin a t the l owe st setting.
Ch eck t hat c ros sover frequencies have been properly set.
Ch eck f or sh ort c irc uits on the speaker leads.
Ch eck t hat t he minimum speaker impedance for that model is correct.
Ch eck t hat t her e is good airflow around the amplifier. In some applications, an external
co oli ng fa n may b e req uired.
Ch eck a ll RC A int erc onnects. Engine static noises are almost always caused by RCA
ca ble s wit h poo r gro unding. Always use high-quality RCA interconnects in your
au dio s yst em.
Ch eck t hat t her e are n o shorts between speaker leads or RCA grounds and the vehicle
ch ass is. C heck that the head unit is properly grounded.
 Loading...