


WAVE
Owner’s Guide | Bedienungsanleitung | Notice d’utilisation | Manuale di istruzioni | Gebruiksaanwijzing
®
RADIO II
Safety Information
Français Español English
WARNING:
To reduce the risk of fire or electrical shock, do not expose the product to rain or moisture.
WARNING: The apparatus should not be exposed to dripping or splashing, and objects filled with liquids,
such as vases, should not be placed on the apparatus. As with any electronic products, take care not to spill
liquids into any part of the system. Liquids can cause a failure and/or a fire hazard.
CAUTION: To reduce the risk of electric shock, do not disassemble this product unless you are qualified.
Refer servicing to qualified service personnel.
The lightning flash with arrowhead symbol within an equilateral triangle alerts the user to the presence of uninsulated
dangerous voltage within the system enclosure that may be of sufficient magnitude to constitute a risk of electrical
shock.
The exclamation mark within an equilateral triangle, as marked on the system, is intended to alert the user to the
presence of important operating and maintenance instructions in this owner’s guide.
CAUTION:
WARNING:
recharge, disassemble, heat above 100ºC (212ºF) or incinerate. Dispose of used batteries promptly. Replace only with a battery of the
correct type and model number.
To prevent electric shock, match the wide blade of the line cord plug to the wide slot of the AC (mains) receptacle. Insert fully.
K
eep the remote control battery away from children. It may cause a fire or chemical burn if mishandled. Do not
Please dispose of used batteries properly,
following any local regulations. Do not incinerate.
WARNING: No naked flame sources, such as lighted candles, should be placed on the apparatus.
Note: The product label is located on the bottom of the product.
Please read this owner’s guide
Please take the time to follow the instructions in this owner’s guide carefully. It will help you set up and operate your system
properly and enjoy all of its advanced features. Please save this owner’s guide for future reference.
This product conforms to all EU Directive requirements as applicable by law. The complete Declaration of Conformity can be
found at: www.Bose.com/static/compliance.
©1994-2005 Bose Corporation. No part of this work may be reproduced, modified, distributed or otherwise used without prior
written permission. All trademarks referenced herein are property of Bose Corporation. The Wave
trademark of Bose Corporation.
2
®
radio II design is a registered

Contents
Setting Up Your Wave® Radio II . . . . . . . . . . . . . . . . . . . . . . . . . . . . . . . . . . . . . . . . . . . . . . . . . . . . . . . . . 4
Unpacking . . . . . . . . . . . . . . . . . . . . . . . . . . . . . . . . . . . . . . . . . . . . . . . . . . . . . . . . . . . . . . . . 4
Selecting a location . . . . . . . . . . . . . . . . . . . . . . . . . . . . . . . . . . . . . . . . . . . . . . . . . . . . . . . . . 4
Connecting to power . . . . . . . . . . . . . . . . . . . . . . . . . . . . . . . . . . . . . . . . . . . . . . . . . . . . . . . . 5
Setting the clock . . . . . . . . . . . . . . . . . . . . . . . . . . . . . . . . . . . . . . . . . . . . . . . . . . . . . . . . . . . . 6
A Brief Introduction to Some Special Features . . . . . . . . . . . . . . . . . . . . . . . . . . . . . . . . . . . . . . . . 7
Introduction . . . . . . . . . . . . . . . . . . . . . . . . . . . . . . . . . . . . . . . . . . . . . . . . . . . . . . . . . . . . . . . 7
Special Features . . . . . . . . . . . . . . . . . . . . . . . . . . . . . . . . . . . . . . . . . . . . . . . . . . . . . . . . . . . . 7
Operating Your Wave
Remote control operating guide . . . . . . . . . . . . . . . . . . . . . . . . . . . . . . . . . . . . . . . . . . . . . . . . 8
Reading the display . . . . . . . . . . . . . . . . . . . . . . . . . . . . . . . . . . . . . . . . . . . . . . . . . . . . . . . . . 9
Turning the Wave
Controlling the volume . . . . . . . . . . . . . . . . . . . . . . . . . . . . . . . . . . . . . . . . . . . . . . . . . . . . . . . 9
Setting up automatic shutoff (Sleep) . . . . . . . . . . . . . . . . . . . . . . . . . . . . . . . . . . . . . . . . . . . . 9
Listening to FM/AM Radio . . . . . . . . . . . . . . . . . . . . . . . . . . . . . . . . . . . . . . . . . . . . . . . . . . . . . . . 10
Turning the radio on . . . . . . . . . . . . . . . . . . . . . . . . . . . . . . . . . . . . . . . . . . . . . . . . . . . . . . . . . 10
Tuning the radio . . . . . . . . . . . . . . . . . . . . . . . . . . . . . . . . . . . . . . . . . . . . . . . . . . . . . . . . . . . . 10
Storing a radio station to memory (Presets) . . . . . . . . . . . . . . . . . . . . . . . . . . . . . . . . . . . . . . . 11
TALK RADIO mode . . . . . . . . . . . . . . . . . . . . . . . . . . . . . . . . . . . . . . . . . . . . . . . . . . . . . . . . . . 11
Setting and Using The Alarm . . . . . . . . . . . . . . . . . . . . . . . . . . . . . . . . . . . . . . . . . . . . . . . . . . . . . 12
Setting the alarm . . . . . . . . . . . . . . . . . . . . . . . . . . . . . . . . . . . . . . . . . . . . . . . . . . . . . . . . . . . 12
Waking to a radio station . . . . . . . . . . . . . . . . . . . . . . . . . . . . . . . . . . . . . . . . . . . . . . . . . . 12
Setting the alarm time . . . . . . . . . . . . . . . . . . . . . . . . . . . . . . . . . . . . . . . . . . . . . . . . . . . . 12
Using the alarm . . . . . . . . . . . . . . . . . . . . . . . . . . . . . . . . . . . . . . . . . . . . . . . . . . . . . . . . . . . . 13
Stopping a sounding alarm . . . . . . . . . . . . . . . . . . . . . . . . . . . . . . . . . . . . . . . . . . . . . . . . 13
Turning alarm on and off . . . . . . . . . . . . . . . . . . . . . . . . . . . . . . . . . . . . . . . . . . . . . . . . . . 13
Snoozing an alarm . . . . . . . . . . . . . . . . . . . . . . . . . . . . . . . . . . . . . . . . . . . . . . . . . . . . . . . 13
®
radio II . . . . . . . . . . . . . . . . . . . . . . . . . . . . . . . . . . . . . . . . . . . . . . . . . . . . 8
®
radio II on and off . . . . . . . . . . . . . . . . . . . . . . . . . . . . . . . . . . . . . . . . . . . 9
English Français NederlandsDeutsch Italiano Italiano SvenskaNederlands
Connecting Other Equipment . . . . . . . . . . . . . . . . . . . . . . . . . . . . . . . . . . . . . . . . . . . . . . . . . . . . . 14
Rear panel input/outputs . . . . . . . . . . . . . . . . . . . . . . . . . . . . . . . . . . . . . . . . . . . . . . . . . . . . . 14
Connecting an external FM antenna . . . . . . . . . . . . . . . . . . . . . . . . . . . . . . . . . . . . . . . . . . . . 14
Using headphones . . . . . . . . . . . . . . . . . . . . . . . . . . . . . . . . . . . . . . . . . . . . . . . . . . . . . . . . . . 15
Using your Wave
Connecting your Wave
Personalising Your Wave
®
radio II with other audio equipment . . . . . . . . . . . . . . . . . . . . . . . . . . . . . . 16
®
radio II to a Lifestyle® system . . . . . . . . . . . . . . . . . . . . . . . . . . . . . . 16
®
radio II . . . . . . . . . . . . . . . . . . . . . . . . . . . . . . . . . . . . . . . . . . . . . . . . . 18
The set-up menu . . . . . . . . . . . . . . . . . . . . . . . . . . . . . . . . . . . . . . . . . . . . . . . . . . . . . . . . . . . 18
Adjusting the snooze time . . . . . . . . . . . . . . . . . . . . . . . . . . . . . . . . . . . . . . . . . . . . . . . . . . . . 19
Changing the Radio Data System (RDS) information setting . . . . . . . . . . . . . . . . . . . . . . . . . . 19
Changing the clock time format . . . . . . . . . . . . . . . . . . . . . . . . . . . . . . . . . . . . . . . . . . . . . . . . 20
Adjusting the display brightness . . . . . . . . . . . . . . . . . . . . . . . . . . . . . . . . . . . . . . . . . . . . . . . 20
Setting the room code . . . . . . . . . . . . . . . . . . . . . . . . . . . . . . . . . . . . . . . . . . . . . . . . . . . . . . . 21
Enabling the low-power mode . . . . . . . . . . . . . . . . . . . . . . . . . . . . . . . . . . . . . . . . . . . . . . . . . 21
Performing a system reset . . . . . . . . . . . . . . . . . . . . . . . . . . . . . . . . . . . . . . . . . . . . . . . . . . . . 22
Maintaining Your Wave
®
radio II . . . . . . . . . . . . . . . . . . . . . . . . . . . . . . . . . . . . . . . . . . . . . . . . . . . 23
Cleaning . . . . . . . . . . . . . . . . . . . . . . . . . . . . . . . . . . . . . . . . . . . . . . . . . . . . . . . . . . . . . . . . . . 23
Replacing the remote control battery . . . . . . . . . . . . . . . . . . . . . . . . . . . . . . . . . . . . . . . . . . . . 23
Troubleshooting . . . . . . . . . . . . . . . . . . . . . . . . . . . . . . . . . . . . . . . . . . . . . . . . . . . . . . . . . . . . 24
Customer service . . . . . . . . . . . . . . . . . . . . . . . . . . . . . . . . . . . . . . . . . . . . . . . . . . . . . . . . . . . 24
Limited warranty . . . . . . . . . . . . . . . . . . . . . . . . . . . . . . . . . . . . . . . . . . . . . . . . . . . . . . . . . . . . 24
Technical information . . . . . . . . . . . . . . . . . . . . . . . . . . . . . . . . . . . . . . . . . . . . . . . . . . . . . . . . 24
Index . . . . . . . . . . . . . . . . . . . . . . . . . . . . . . . . . . . . . . . . . . . . . . . . . . . . . . . . . . . . . . . . . . . . . . . . 26
3
Setting Up Your Wave
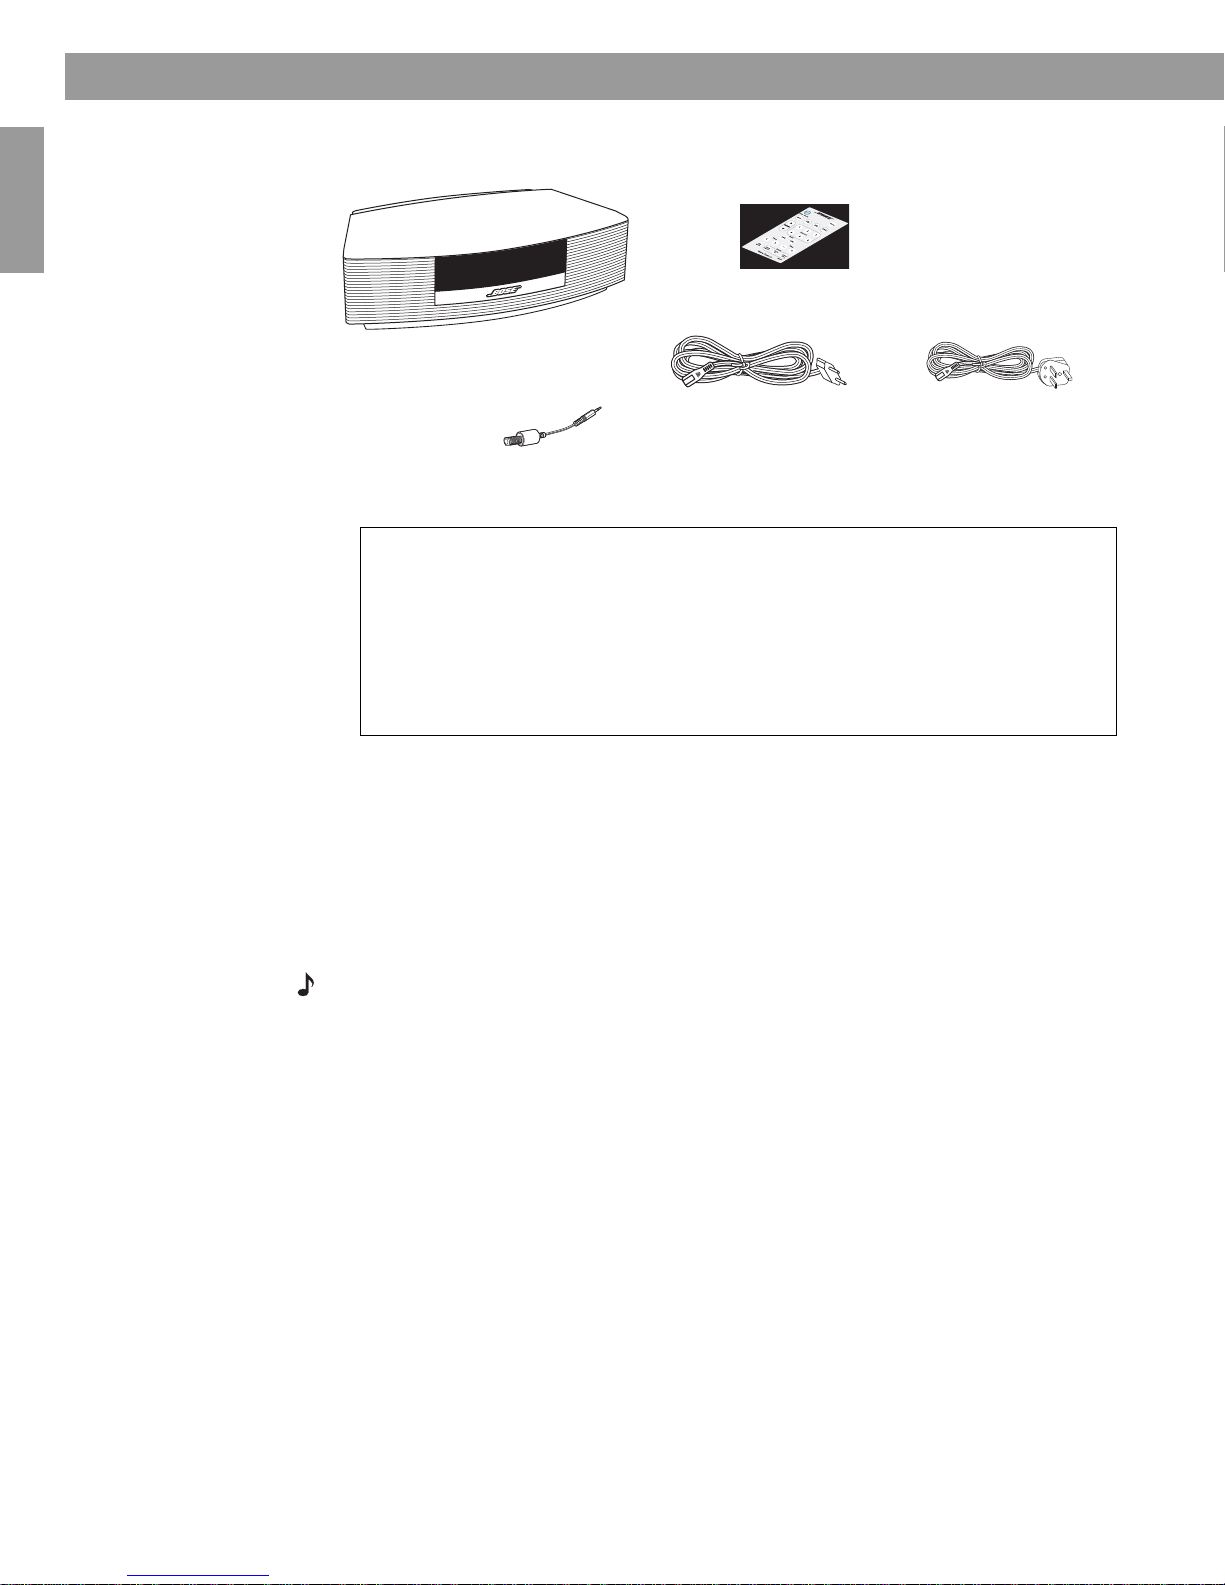
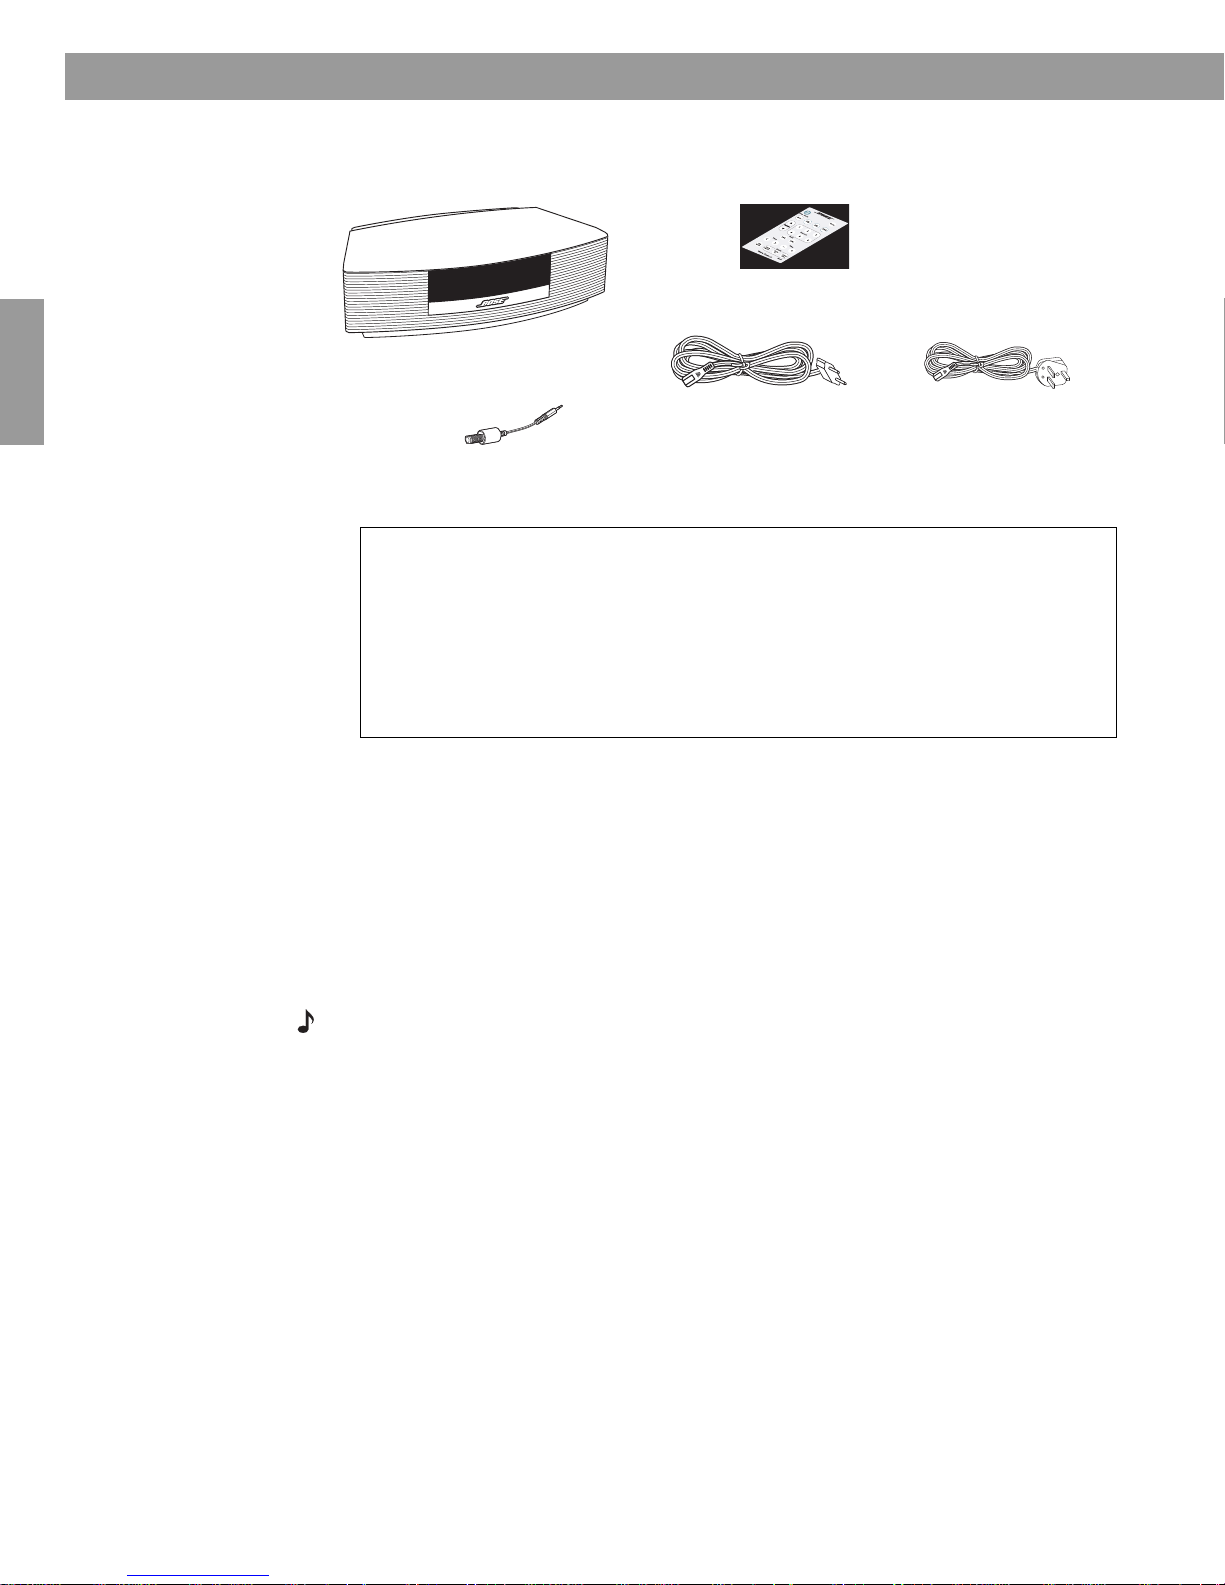
Wave® radio II
Euro power cord*
Remote control
(battery pre-installed)
®
*In the UK the appropriate
power cord is included.
For your records
Now is a good time to record the serial number of your new Wave® radio II. The
serial number is located on the bottom of the enclosure.
Serial number __________________________
Purchase date__________________________
We suggest you keep your sales receipt with this owner’s guide.
Antenna adapter
Unpacking
Français Español English
®
Radio II
Please check the packaging for the following items:
Selecting a location
• Place your Wave® radio II on a table or other flat surface.
• To enjoy maximum performance, place your Wave
will be listening.
• For best performance, place your Wave
placing directly in a corner.
Note:
• DO NOT place your Wave
®
radio II on a metal surface. It could interfere with
AM reception.
• DO NOT place your Wave
equipment, it generates some heat.
• DO NOT use your Wave
®
radio II on a heat-sensitive surface. Like all electrical
®
radio II in a damp location or any other place where
moisture can get inside.
4
®
radio II within half a metre of a wall, and avoid
®
radio II across the room from where you
Connecting to power
1
2
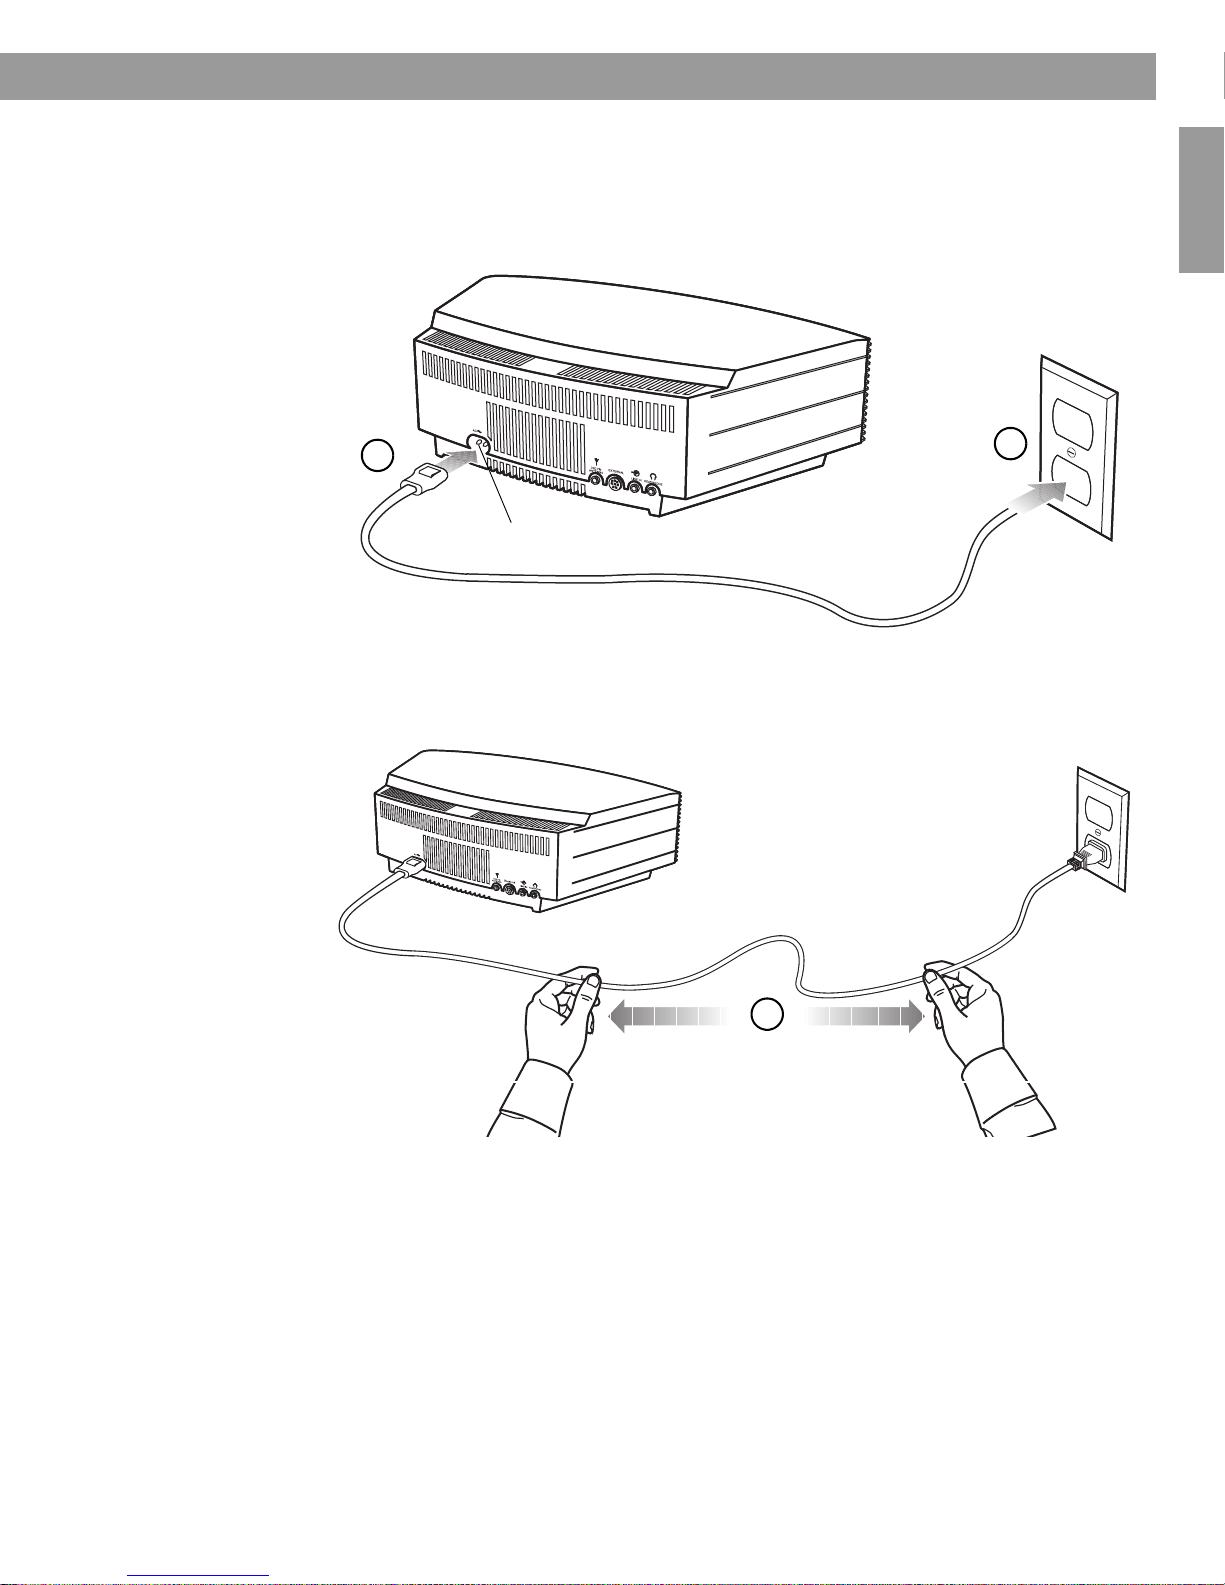
AC POWER connector
3
1. Insert the small end of the power cord into the connector labelled AC POWER on the rear
2. Plug the power cord into an electrical outlet.
panel of your Wave
®
radio II.
Setting Up Your Wave
®
Radio II
English FrançaisEspañol
3. Unwind and straighten the power cord to ensure the best FM reception. Your
®
Wave
radio II uses the power cord as an FM antenna.
5
Setting Up Your Wave
Setting the clock
®
Radio II
Français Español English
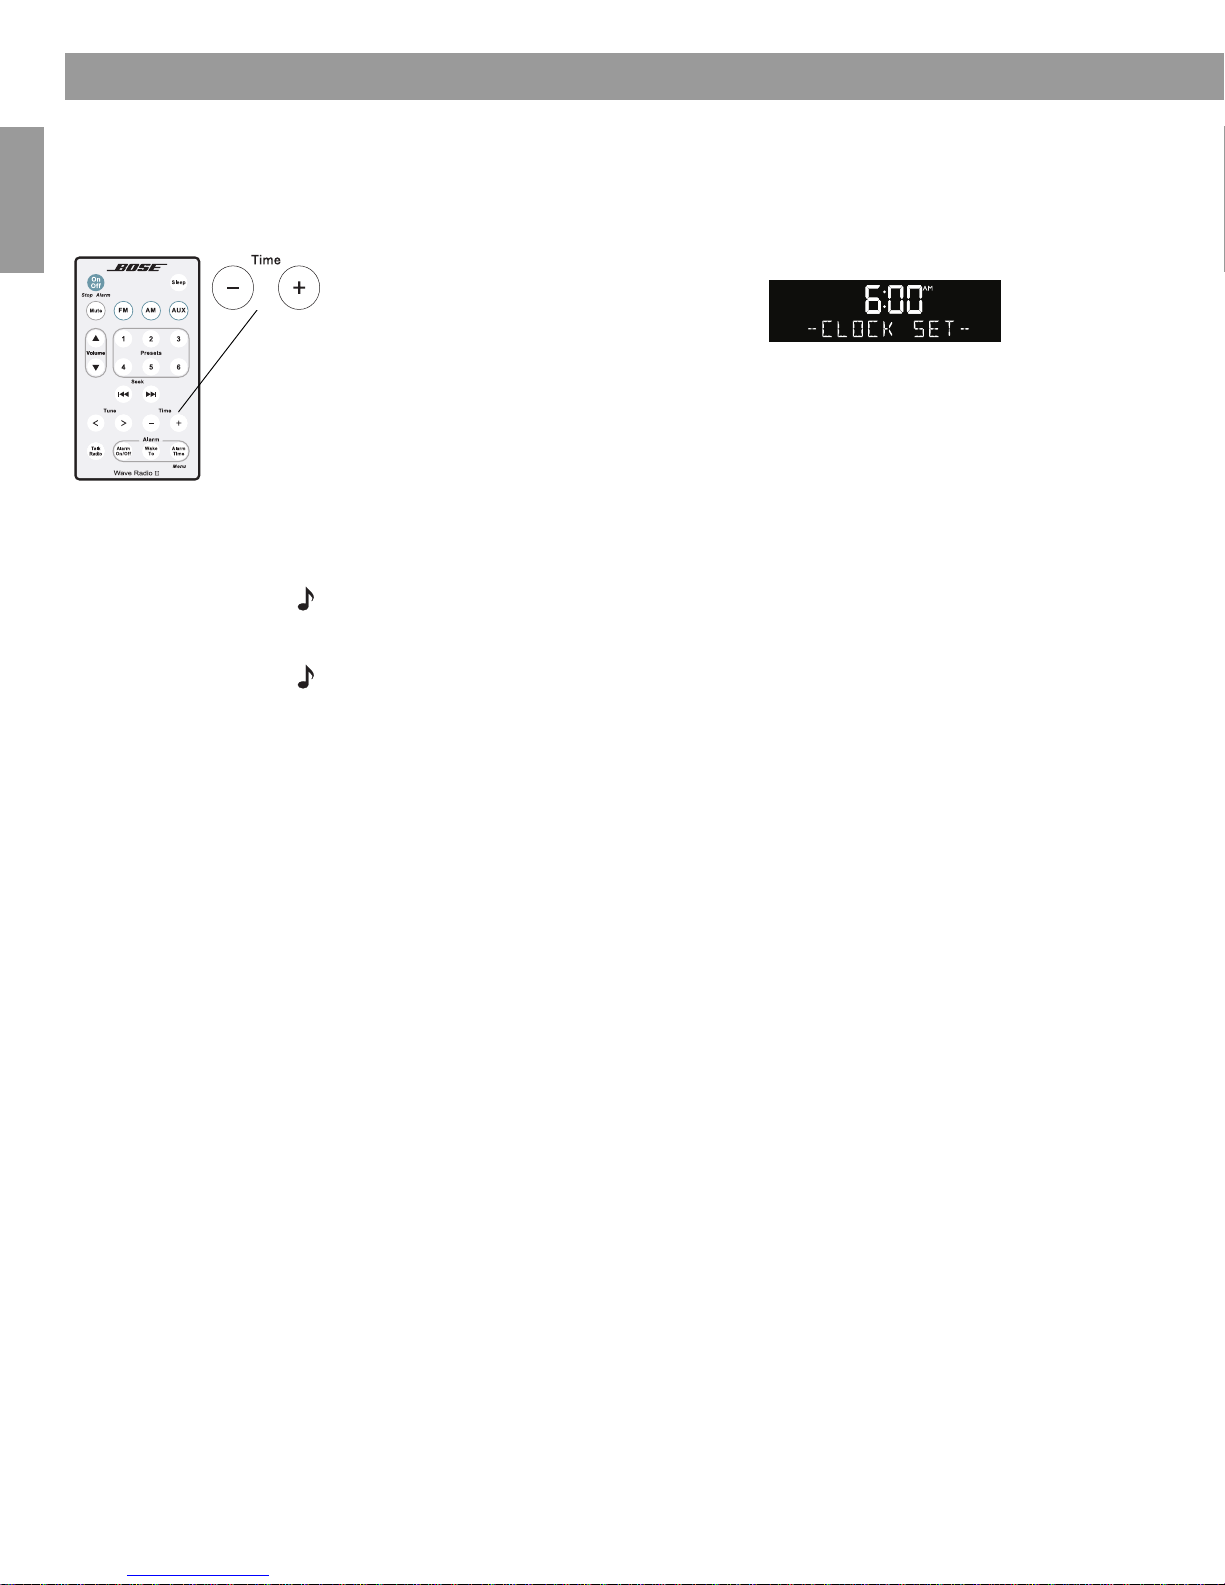
After plugging in your Wave® radio II, set the clock using the remote.
radio
II
is easily operated using the remote control. Just aim the remote at the front panel and
press the buttons.
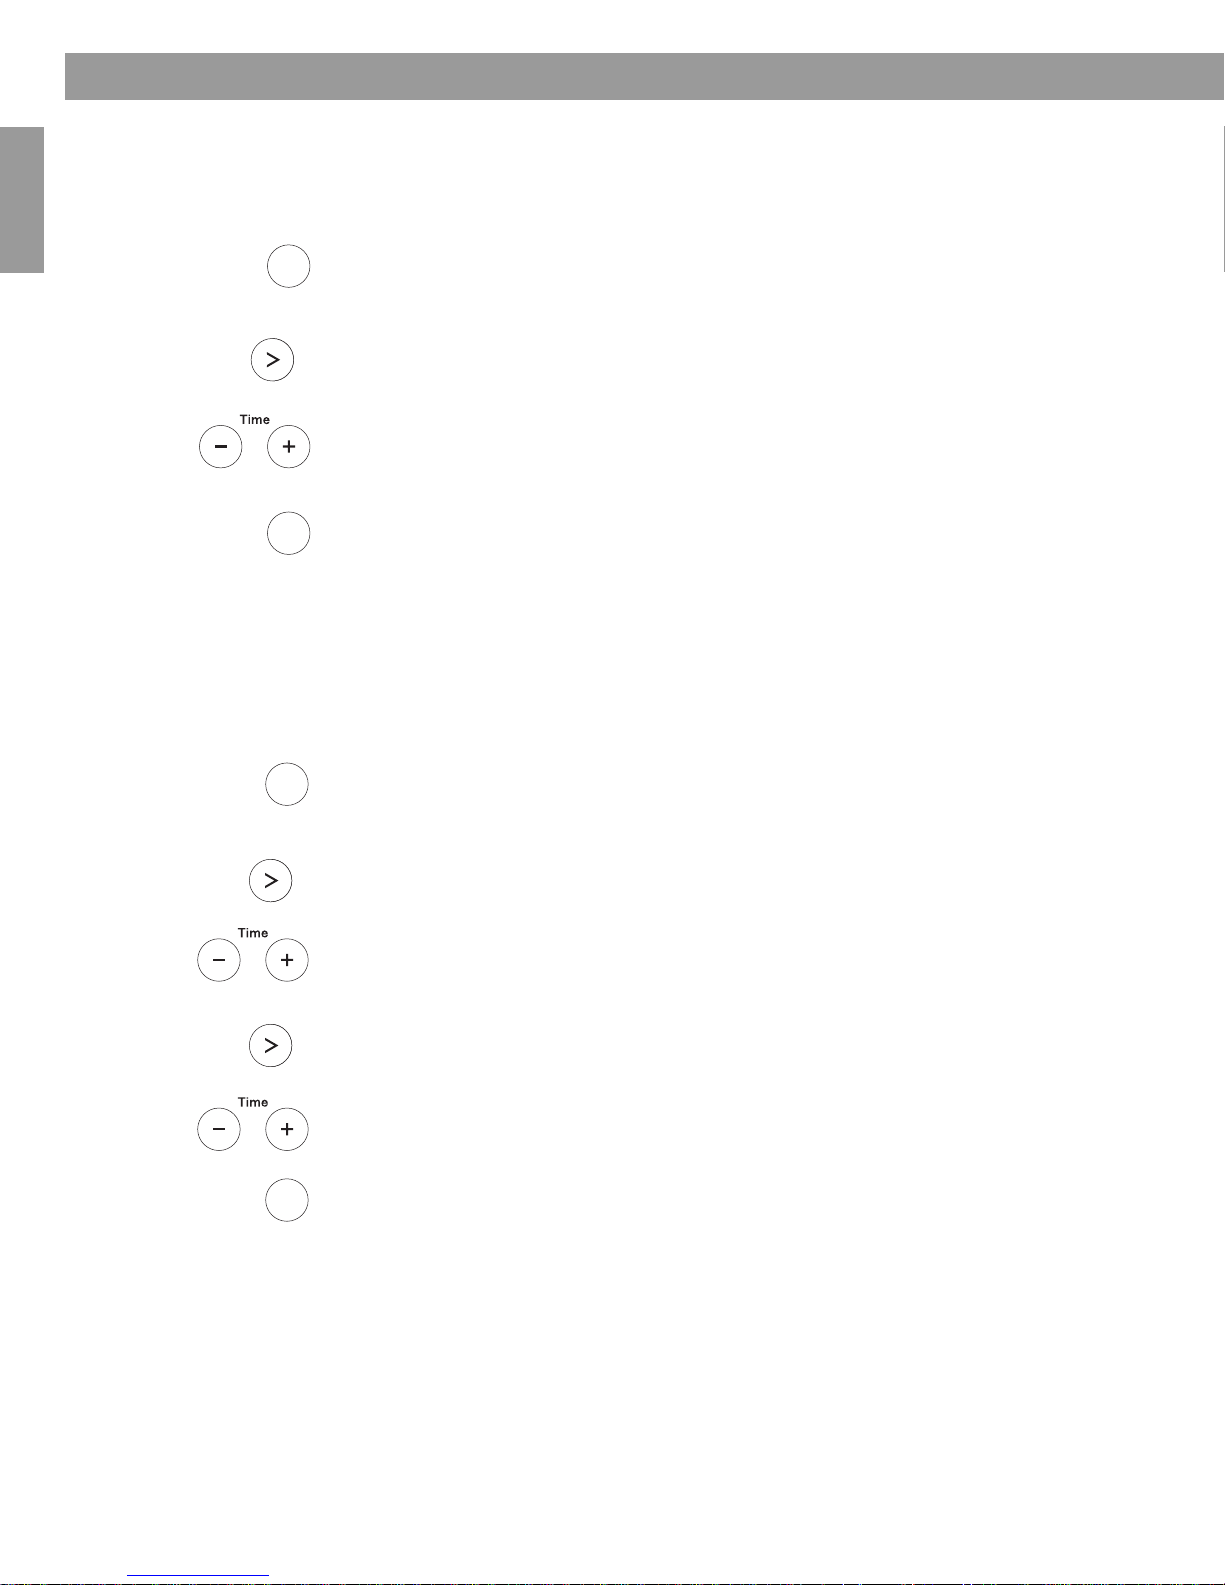
1. Press and hold Time – or Time + until
– CLOCK SET – appears on the display.
2. Press Time – to adjust the displayed time backwards or press Time + to adjust the
displayed time forwards until it matches the current time. You can also press and hold for
rapid adjustment.
3. Wait five seconds for the system to exit the clock set-up mode automatically.
To change the clock display from 12-hour (AM/PM) time to 24-hour (military) time, see
“Changing the clock time format” on page 20.
Note: In the event that the Wave
are stored in backup memory for up to 48 hours. This feature retains the systems settings when
you unplug and move the unit or when a power outage occurs.
Note: Press-and-hold operations require holding the button down for at least one second.
®
radio II loses power, the clock time and other system settings
You r Wa ve®
6

Introduction
Dual tapered
waveguides
A Brief Introduction to Some Special Features
Thank you for purchasing the Bose® Wave® radio II, an elegant way to bring high
quality sound into any room.
Over fourteen years of research by Bose
Corporation brings you the benefits of
award-winning patented acoustic
waveguide speaker technology. Using this
technology, a tube efficiently transfers
energy from a small speaker to the
outside air over a wide range of low
frequencies. And, long waveguides,
folded into intricate patterns, fit into
products small enough to be placed
comfortably in your home. Your Wave
radio II features new dual tapered
waveguide speaker technology,
connecting two speakers to two 66 cm
tapered waveguides which combine to
produce unprecedented instrument
timbre from a system this size.
®
English FrançaisEspañol
Special Features
Alarm settings let you wake to your favourite radio station
You can set your Wave® radio II to wake you to your favourite radio station. For more details,
see “Waking to a radio station” on page 12.
The set-up menu allows you to personalise system operation
Factory system settings have been set to satisfy most owners. If you wish to change the
settings, see “Personalising Your Wave
The set-up menu allows you to change the following system settings to your liking:
• Snooze time • Display brightness level
• Clock time format (12- or 24-hour)
®
radio II” on page 18.
•Bose
• Reset to factory settings
®
link room code
7
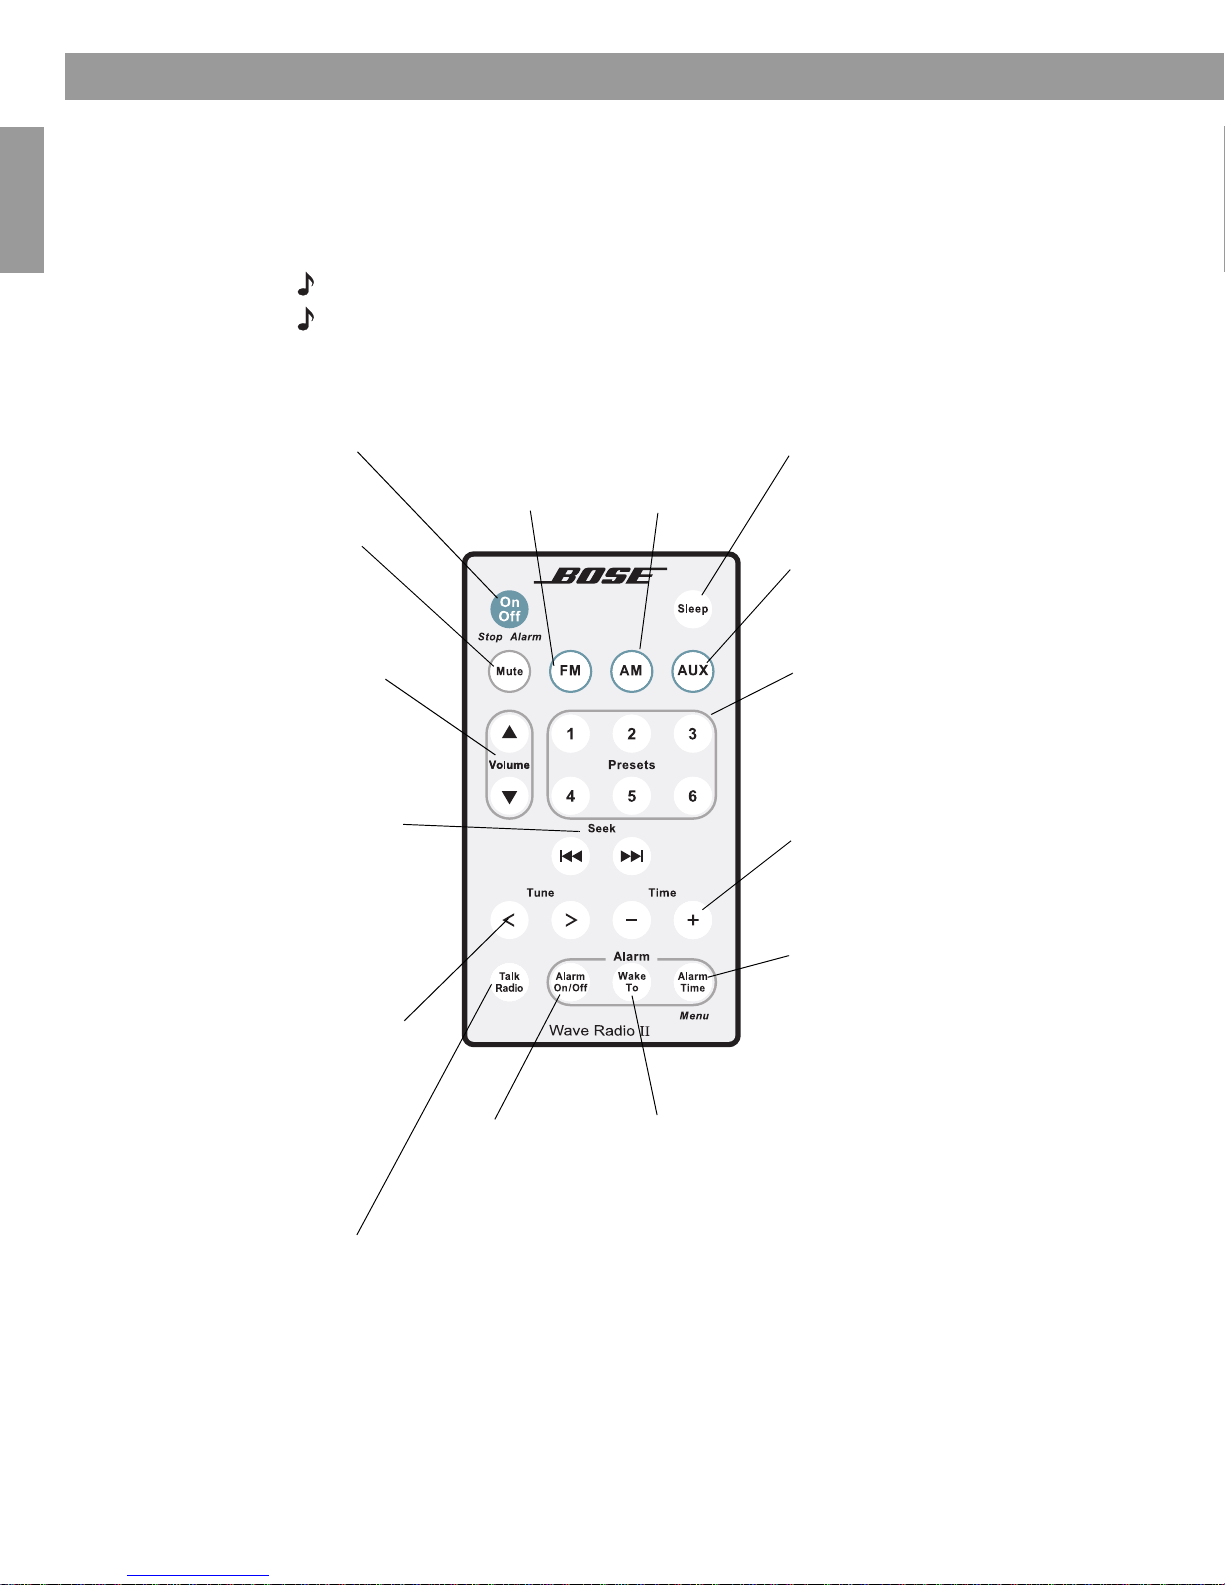
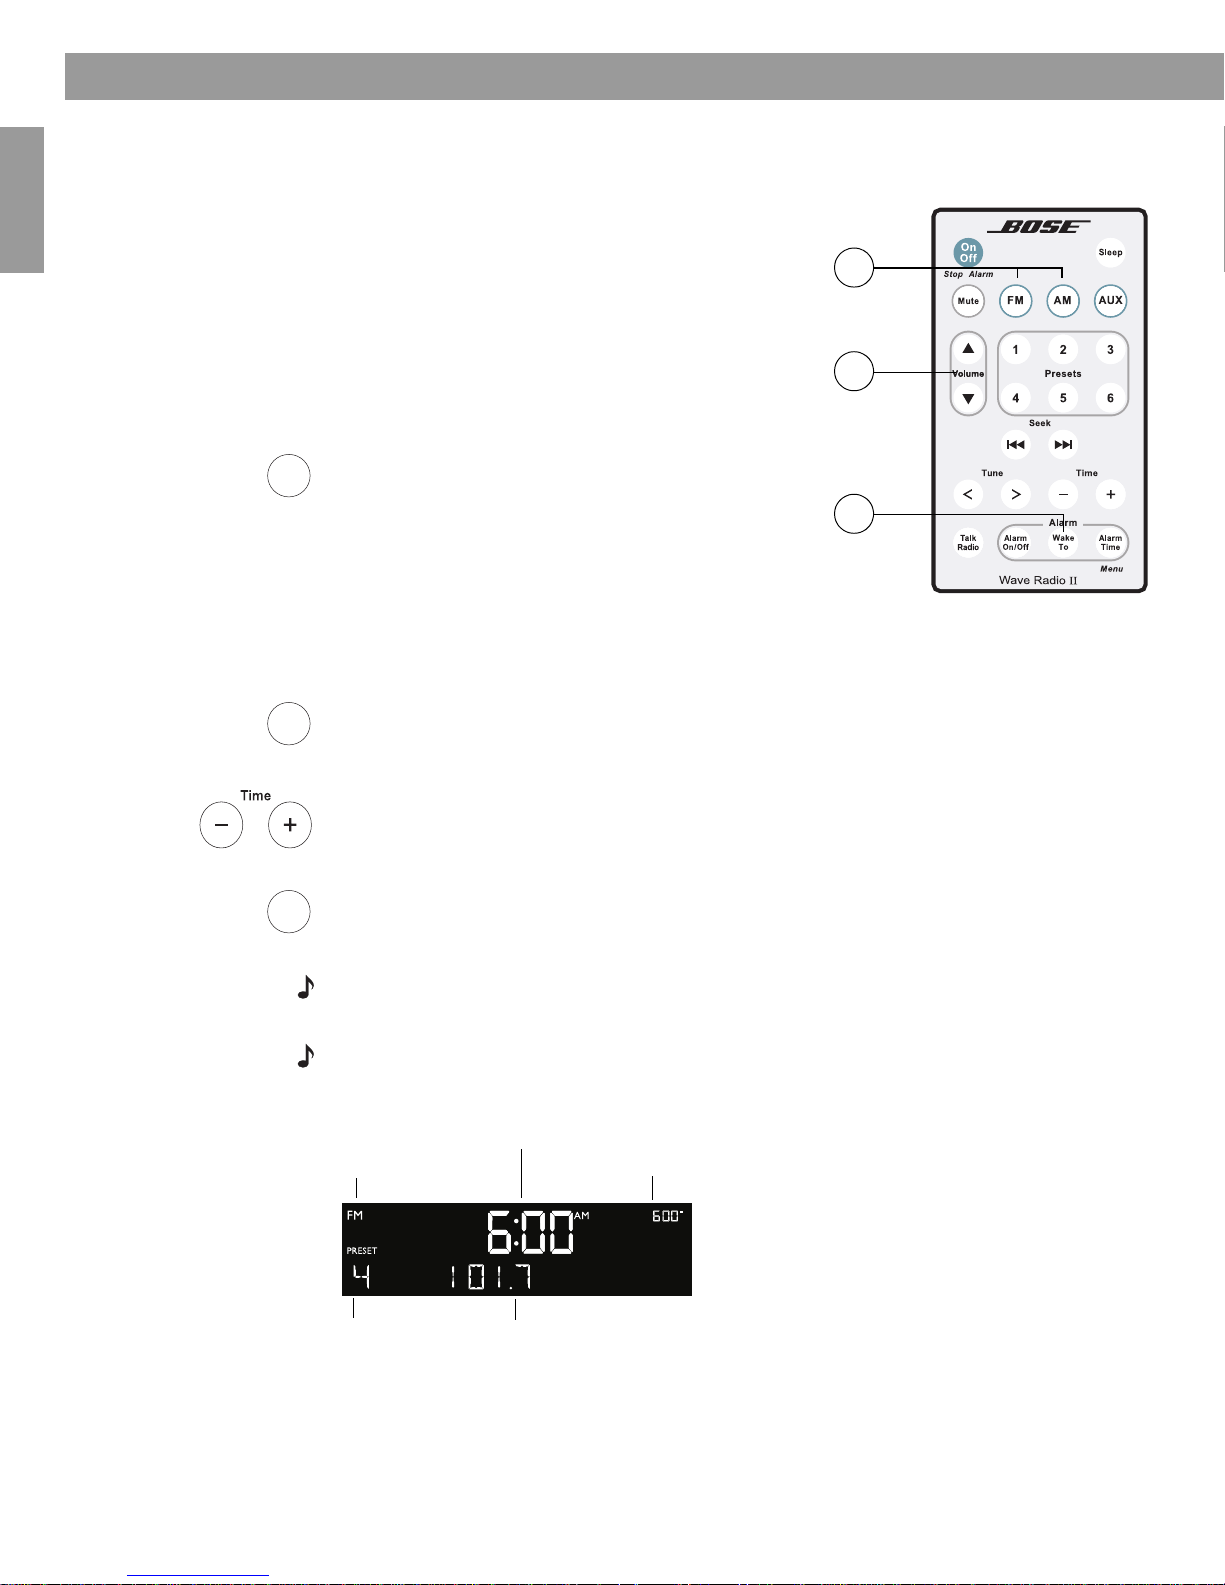
Operating Your Wave
On/Off (Stop Alarm)
• Turns the power on or off (page 9).
• Stops a sounding alarm (page 13).
Sleep
• Snoozes a sounding alarm (page 13).
• Sets unit to shut off automatically after
10-90 minutes (page 9).
Volume
• Turns volume up or down (page 9).
Mute
• Press to silence audio (page 9).
• Press again to restore audio.
Presets
• Press: recalls a stored radio station
(page 11).
• Press and hold: stores a radio station for
quick recall (page 11).
Seek
• Press: finds the next radio station with
a strong signal (page 10).
• Press and hold: rapidly moves forwards/
backwards through radio frequencies
with a strong signal (page 10).
Tune
• Press: skips to next/previous radio
frequency (page 10).
• Press and hold: rapidly moves
forwards/backwards through radio
frequencies (page 10).
Time
• Sets clock time (page 6).
• In Alarm Set mode, sets alarm time
(page 12).
Alarm On/Off
• Turns alarm on
or off (page 13).
Talk Radio
• Turns TALK RADIO mode on or off for
AM or FM (page 11).
AUX
• Press to hear audio from an external
source connected to the AUX IN input
(page 16).
Alarm Time
• Press once: enters alarm time set-up
mode (page 12).
• Press and hold: enters the set-up menu
(page 18).
FM
• Turns on the
radio.
• Switch from
FM to AM
(page 10).
Wake To
• Press and hold: sets
the currently playing
radio station as the
alarm sound
(page 12).
AM
• Turns on the
radio.
• Switch from
AM to FM
(page 10).
®
radio II
Remote control operating guide
You r Wav e® radio II is easily operated using the remote control. Just aim the remote at the front
panel and press the buttons. The remote normally works within 6 metres of the front panel.
Throughout this owner’s guide you will see button icons to the left of the operating
instructions. These icons refer to buttons located on the remote control.
Note: Press-and-hold operations require holding the button down for at least one second.
Note: Pressing FM, AM, or AUX automatically turns on the Wave
selected.
®
radio II to the source
Français Español English
8
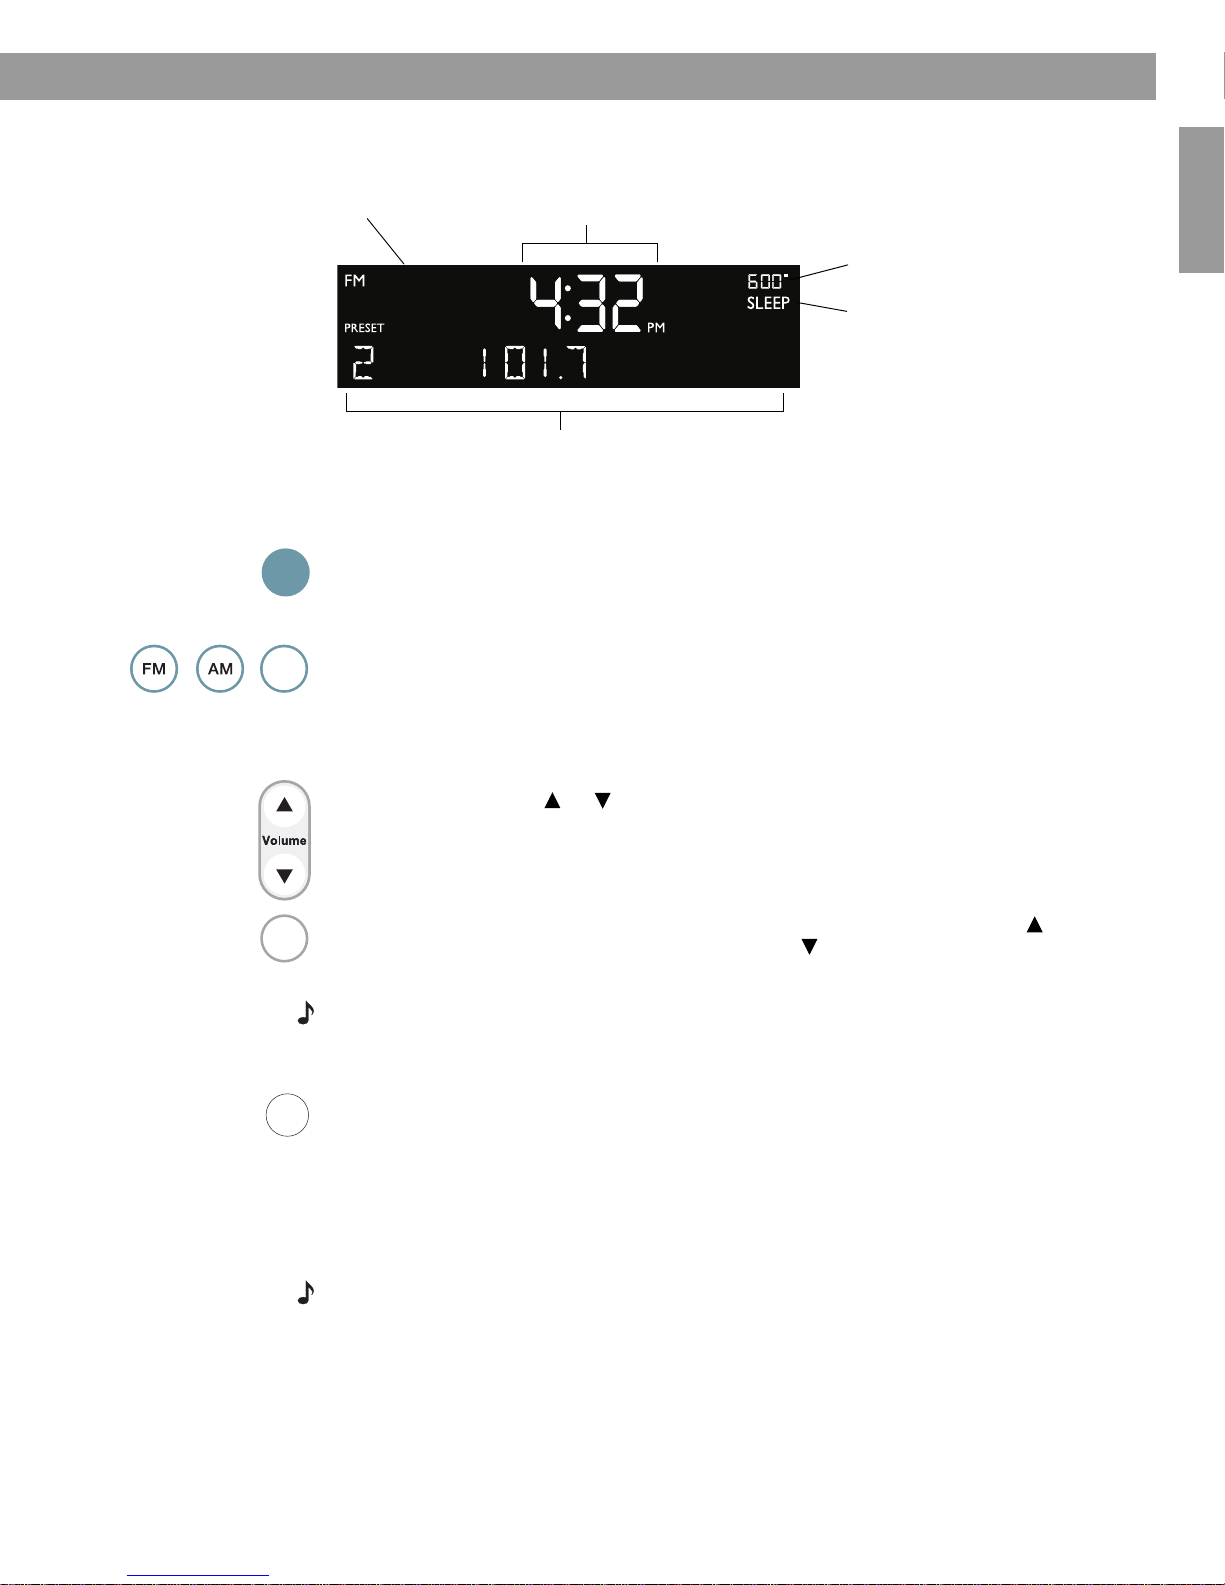
Reading the display
Clock time in 12-hour (AM/PM)
time or 24-hour (military) format
Displays operating information for the active
source or the set-up menu.
Alarm time appears when alarm is
set.
SLEEP appears when the sleep
timer is activated.
FM, AM, AUX or Bose® link
appears for the selected source.
On
Off
AUX
Mute
Sleep
®
Turning the Wave
radio II on and off
Operating Your Wave® radio II
English FrançaisEspañol
Press On/Off once to turn the Wave®
source played.
OR
Press any source button to turn the Wave
not turn on an auxiliary source (such as your TV), so turn that on first.
Controlling the volume
Press and hold Volume or to adjust the volume level. VOLUME - 0 (silent) to 99
(loud) appears on the display to indicate the level.
Press Mute to silence the Wave
To lower the volume before unmuting, press Volume while muted.
Note: When the Wave
Setting up automatic shutoff (Sleep)
Press Sleep to set the Wave®
• After pressing Sleep, SLEEP - 30 MIN appears on the display and the sleep timer
begins counting down. If your Wave
immediately set the sleep time. The last source selected will start playing as the sleep
timer counts down.
• While the SLEEP setting is displayed, press Sleep again to set the sleep timer to
10-90 minutes (in 10-minute increments) or OFF.
Note: While in sleep timer set-up mode, if more than 10 seconds elapses between button
presses, the Wave
®
radio II will automatically exit the sleep timer set-up mode.
• To review the remaining sleep time, press Sleep.
• To cancel the sleep timer, press On/Off.
radio II on or off. The Wave® radio II turns on to the last
®
radio II on to that source. Pressing the AUX does
®
radio II. Press Mute again, or press Volume to unmute.
®
radio II is off, the volume can only be adjusted between 10 and 75.
radio II to shut off automatically after a selected period of time.
®
radio II is off, press Sleep to turn it on and
9
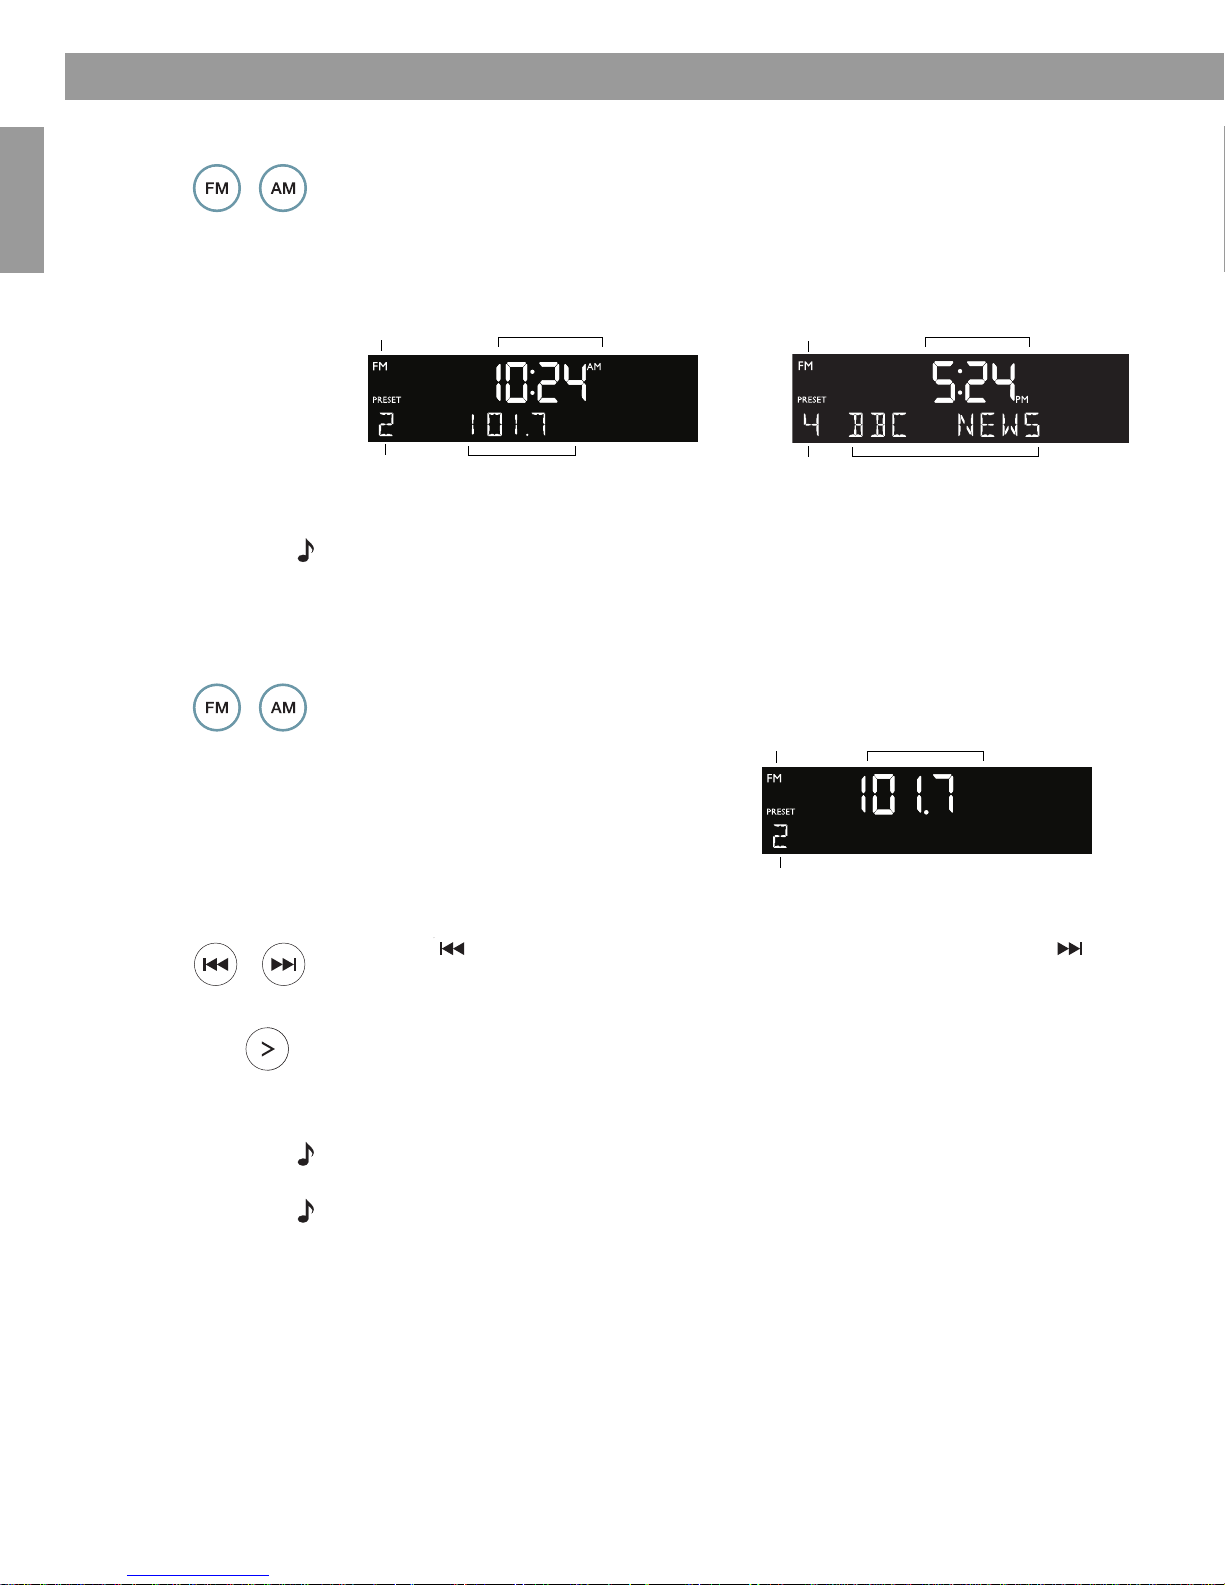
Listening to FM/AM Radio
Clock time
Selected
preset station
FM
source
Station
frequency
FM display – Active RDS
FM display – No RDS information
Clock time
Selected
preset station
FM
source
RDS information
FM
source
Selected preset
station
Station
frequency
Display while tuning
When you press FM, AM, Seek or Tune
to tune to a radio station, the frequency
appears in the centre of the display while
you are tuning.
Seek
Turning the radio on
Français Español English
Tuning the radio
Press FM or AM to turn on the radio to the FM or AM station last selected. Press FM or AM
again to switch between FM and AM.
When the radio is playing, radio station information is displayed. If RDS is enabled (ON) in the
system set-up menu (see page 19), RDS information appears in place of the station
frequency.
Note: The Radio Data System (RDS) is a system that transmits useful information, such as
station name, programme information and the current time. RDS is used only on FM and RDS
information is displayed only if it is included in the FM broadcast signal.
Tune
Press FM or AM to switch between FM and AM.
Press Seek to find a lower frequency station with a strong signal; press Seek to find
a higher frequency station with a strong signal.
Press Tune < to manually tune to a lower frequency; press Tune > to manually tune to a
higher frequency.
Press and hold Tune < to move rapidly down through the frequency band; press and hold
Tune > to move rapidly up through the frequency band.
Note: Five seconds after releasing FM, AM, Tune or Seek, the clock time returns to the centre
of the display and the radio frequency appears below it.
Note: If AM reception is weak, rotate your Wave
®
radio II clockwise or anticlockwise to improve
AM reception. If FM reception is weak, make sure the power cord is straightened as much as
possible. To improve FM reception, you can install an external FM antenna. See
“Connecting an external FM antenna” on page 14.
10
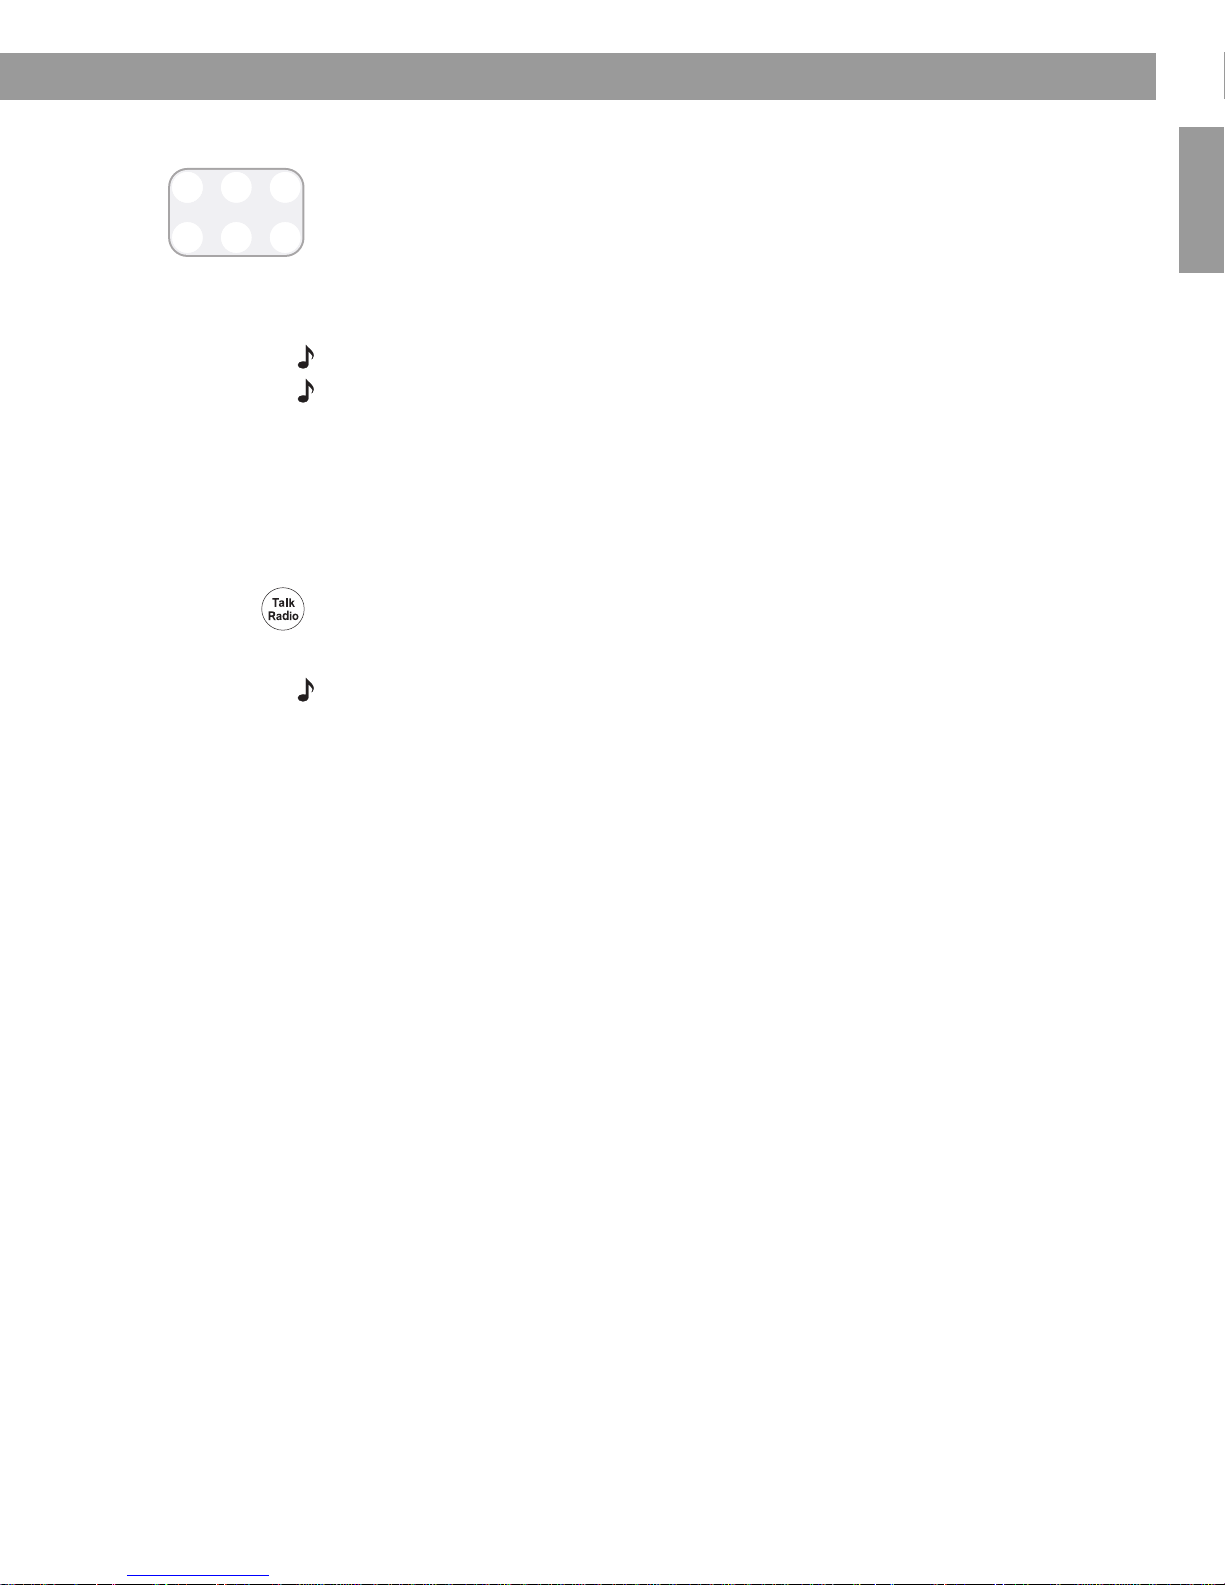
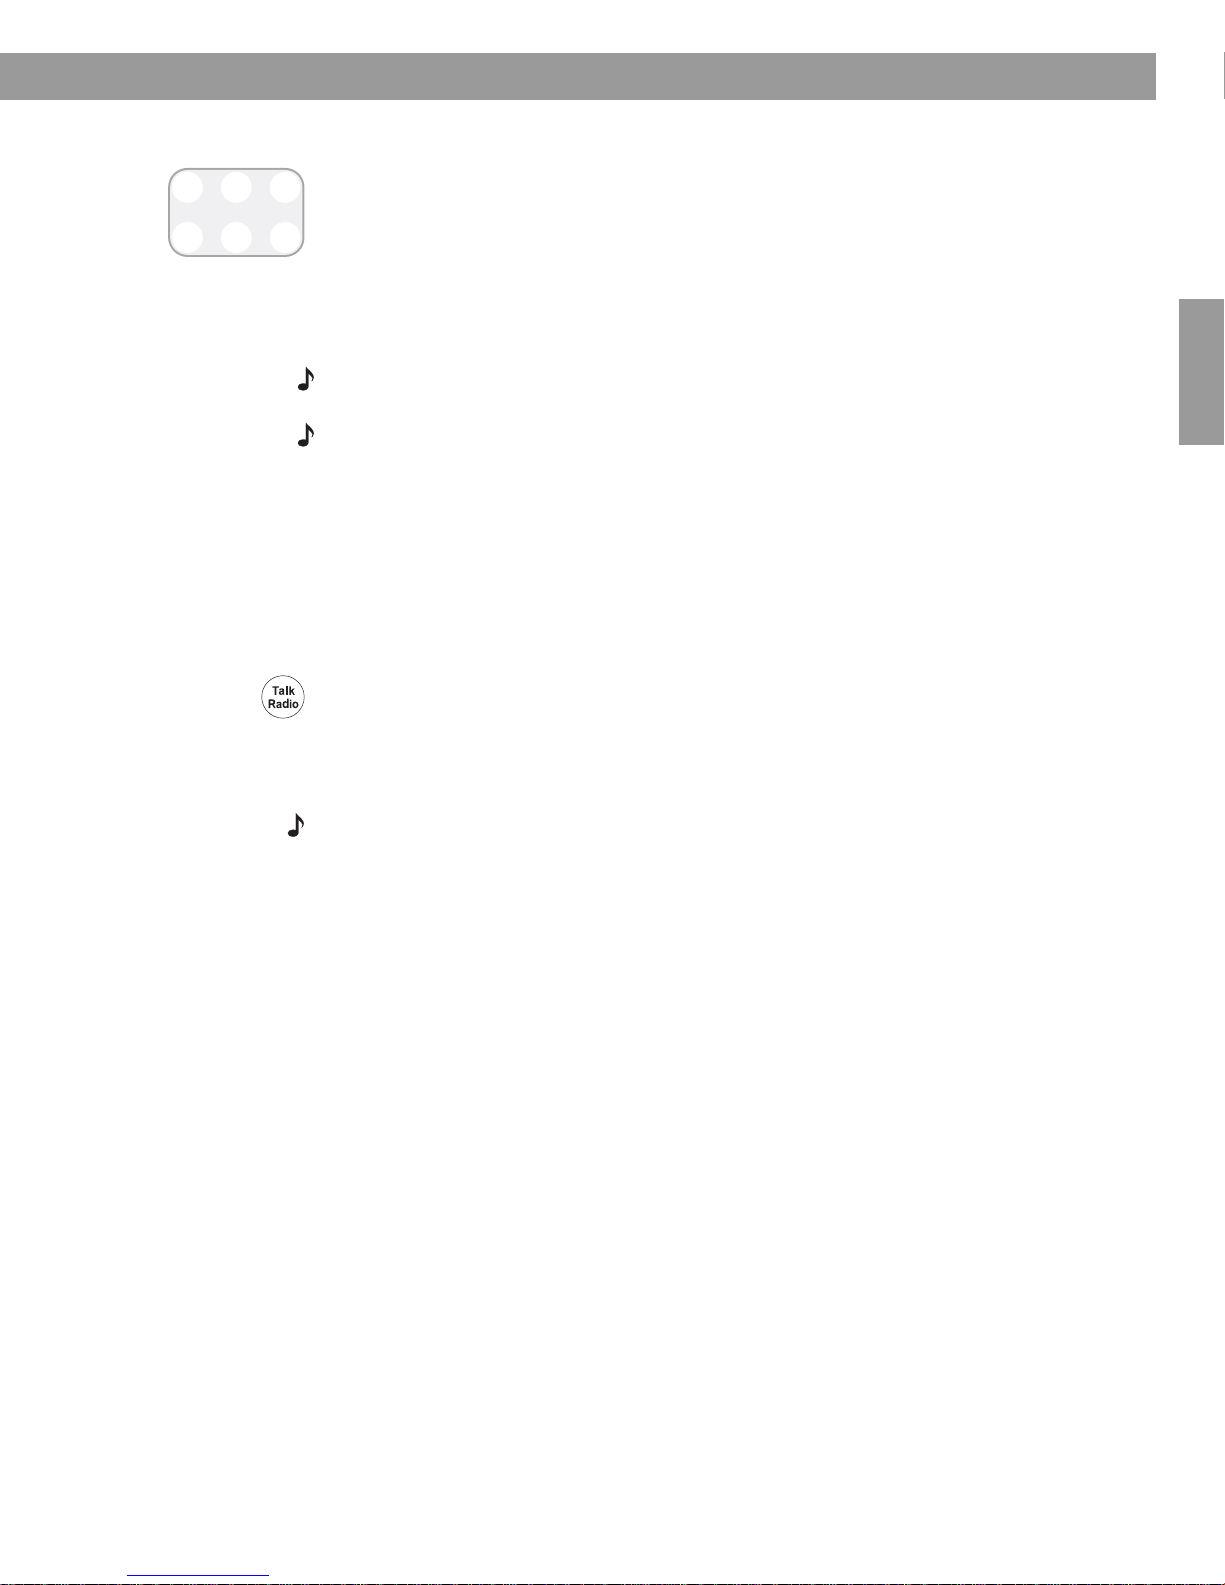
Storing a radio station to memory (Presets)
Presets
123
456
You can store up to six FM and six AM radio stations for quick recall using the
1. Tune to the station you want to save as a preset.
2. Press and hold one of the six
Presets
preset number and station frequency appear on the display.
3. Press one of the Presets buttons to quickly tune to a previously stored FM or AM
station.
Note: Storing a preset will replace any station previously stored to that preset number.
Note: During a power outage, stored presets are saved in a backup memory system.
TALK RADIO mode
Talk radio broadcasts can be greatly affected by either the microphone selection or the
boosting of low frequencies by some radio stations. They do so in an attempt to improve
speech when heard through conventional radios. In high-quality audio products, this results in
sound that is unnatural or bass heavy. By selecting the TALK RADIO mode, your Wave
automatically adjusts to compensate for artificially boosted low frequencies.
When the radio is playing, press Ta lk R ad io twice to change the TALK RADIO mode setting.
When on, TALK RADIO– ON is displayed. When off, TALK RADIO– OFF is displayed.
Listening to FM/AM Radio
Presets
buttons until you hear a double beep and the
buttons.
®
radio II
English FrançaisEspañol
Note: The TALK RADIO setting is automatically cancelled when you tune to another station,
switch to another source or turn your Wave
®
radio II off.
11
Setting and Using The Alarm
Wake
To
Alarm
Time
Alarm
Time
FM radio alarm
Alarm time flashing
Preset number
Radio station frequency
Alarm time
Example: alarm is set to play radio station Preset 4,
101.70 FM, at 6:00 A.M.
3
1
2
Press and hold
for at least
one second
Setting the alarm
Français Español English
Waking to a radio station
1. Turn on your Wave® radio II and select
the radio station you would like
to wake to.
2. Adjust the volume to the level you would like
to wake to.
3. Press and hold Wake To until you hear a
double beep. Your alarm is now set to wake
you to your chosen radio station.
Setting the alarm time
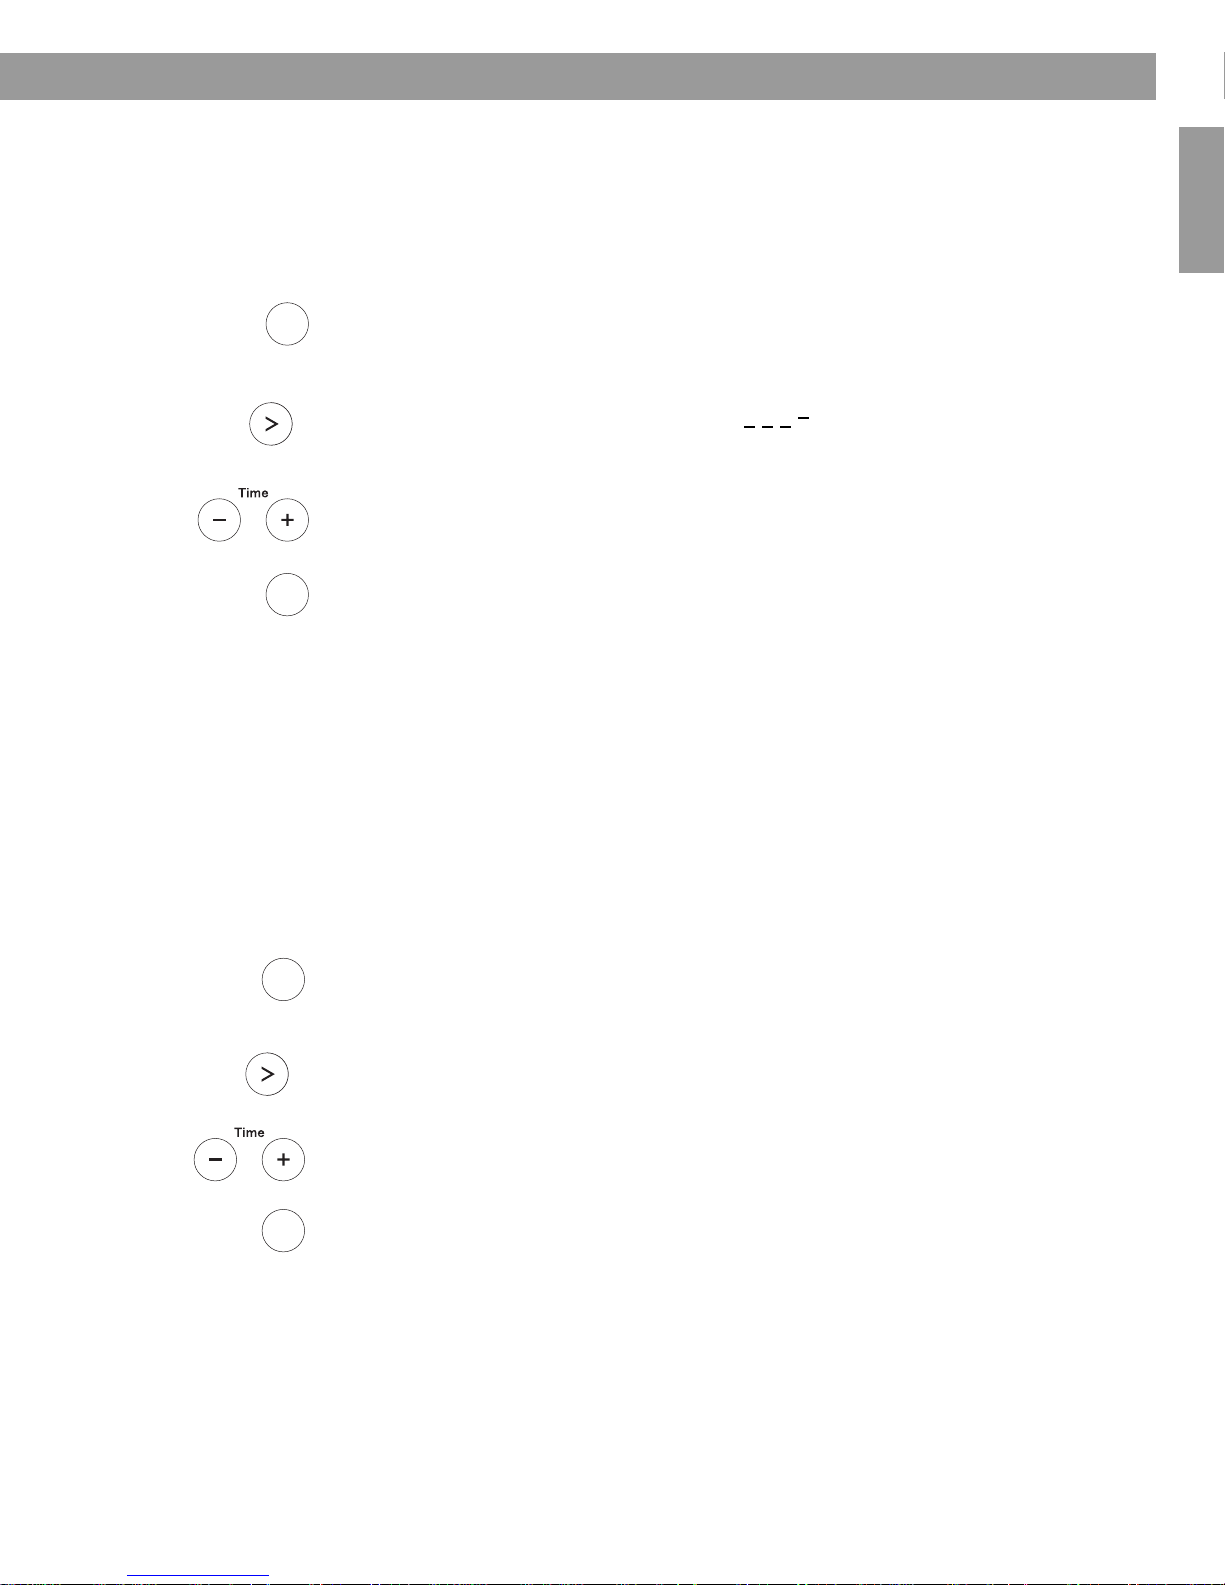
1. Press Alarm Time to enter the alarm time set-up mode. The alarm time is displayed in
the centre of the display and flashes in the upper right corner.
2. Press Time – or Time + to set your wake-up time.
3. Press Alarm Time again. Your alarm time is now set.
Note: While in alarm time set-up mode, if more than 10 seconds elapses between button
presses, the Wave
®
radio II will automatically exit the alarm time set-up mode.
Note: To confirm the alarm time and Wake To settings, press Alarm Time. Alarm time and
Wake To settings will be displayed for 10 seconds.
12
Using the alarm
Alarm
On/Off
Sleep
Setting and Using The Alarm
English FrançaisEspañol
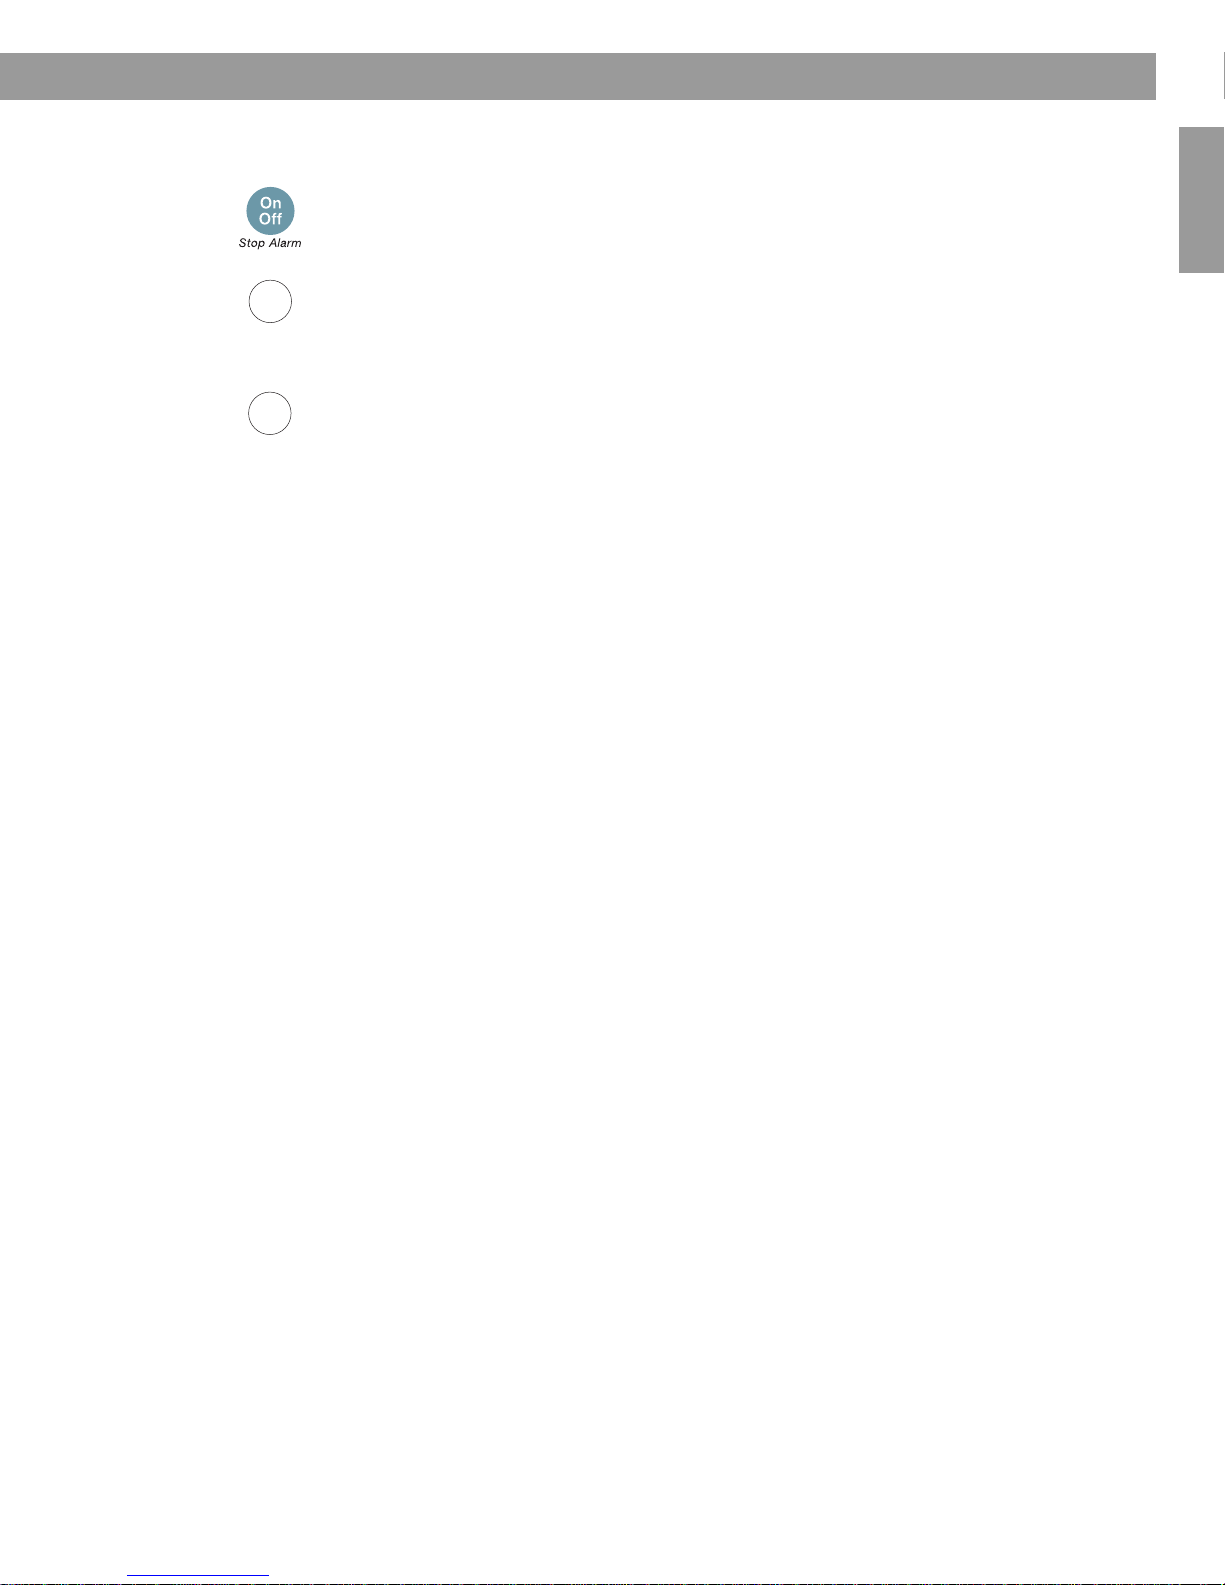
Stopping a sounding alarm
Press On/Off (Stop Alarm) to stop a sounding alarm and reset it for the next day.
Turning alarm on and off
Press Alarm On/Off to turn alarm on or off. It’s on when the alarm time is displayed in the
upper right-hand corner. It’s off when the alarm time is not visible in the upper right-hand
corner of the display.
Snoozing an alarm
Press Sleep to snooze a sounding alarm.
During the snooze time, SNOOZE is displayed. After the snooze time expires, the alarm
sounds again. Pressing Sleep again will silence the alarm again for another 10 minutes.
(Factory default is 10 minutes for the snooze time. See “Adjusting the snooze time” on
page 19.
13
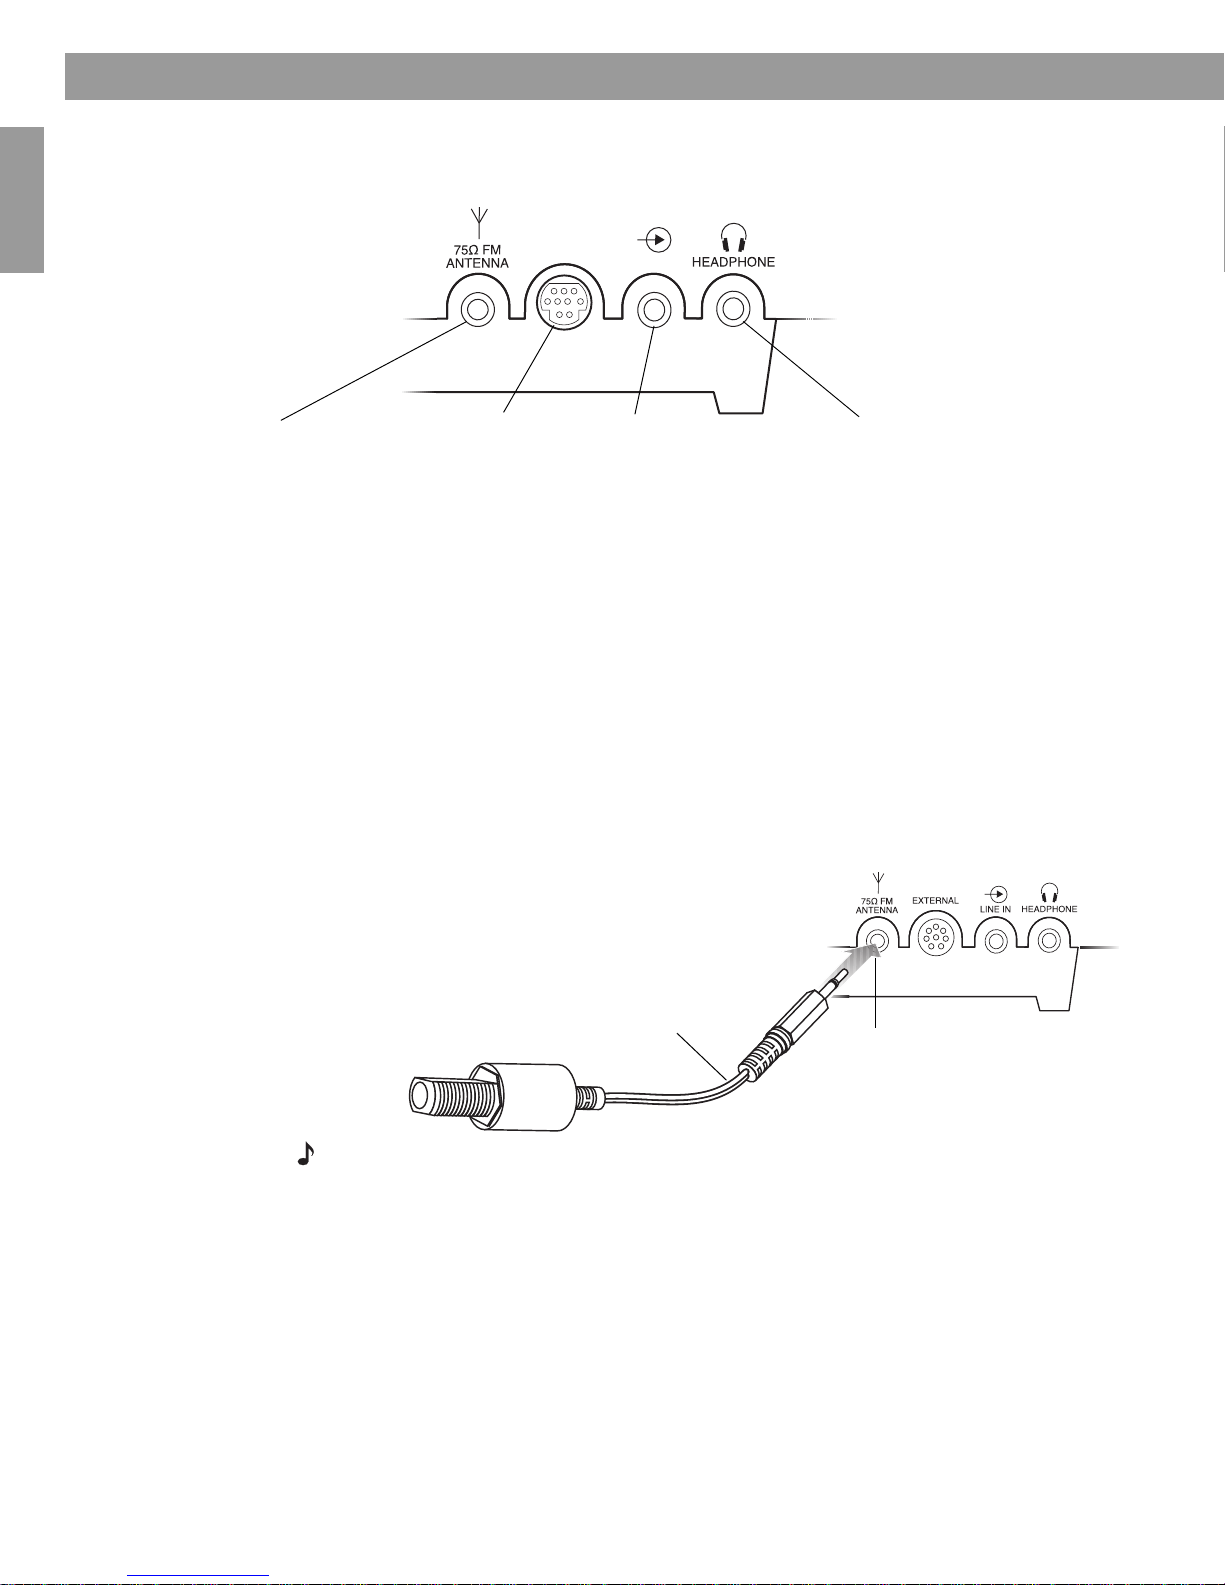
Connecting Other Equipment
Bose link
AUX IN
EXTERNAL
75Ω FM ANTENNA
A 3.5 mm (
1
/8") FM
antenna connector.
Bose® link connector
Connects to Bose
®
link-
enabled Lifestyle
®
systems.
AUX IN
A 3.5 mm (
1
/8") stereo input
connector for connecting
external sources.
HEADPHONE
A 3.5 mm (
1
/8") stereo headphone
connector. The Wave
®
radio II
speakers are muted when
headphones are connected.
75Ω FM ANTENNA connector
Antenna adapter
Rear panel input/outputs
The rear panel of your Wave® radio II provides connections for external equipment.
Connecting an external FM antenna
Français Español English
The Wave® radio II power cord includes a built-in FM antenna. If, after adjusting the position
of the power cord, you still experience poor reception, you may connect the system to an
external roof or cable antenna or an FM dipole antenna. An adapter is included for
connecting the system to an external roof or cable antenna, and an external FM dipole
antenna can be ordered through Bose
inside the back cover of this guide.
®
Customer Service. See the phone numbers listed
To connect an external roof or cable antenna using the antenna adapter:
• Plug the 3.5 mm (
the rear panel of your Wave
1
/8") plug of the antenna adapter into the 75Ω FM ANTENNA connector on
®
radio II.
• Connect the other end of the adapter to your external roof or cable antenna cable.
Note: Connecting the system to an external roof or cable antenna disables the built-in antenna,
and the FM signal will only be received through the external antenna. Disconnecting the external
antenna reactivates the built-in antenna
14

Connecting Other Equipment
Bose link
AUX IN
75Ω FM ANTENNA connector
FM dipole antenna (not included)
(Headphones not included)
HEADPHONE connector
Using headphones
To connect an external FM antenna:
• Plug the 3.5 mm (
rear panel of your Wave
1
/8") plug of the FM antenna into the 75Ω FM ANTENNA connector on the
®
radio II.
• Extend the ends of the antenna to establish optimum FM reception.
• Extend the ends of the antenna as far from the unit and other external equipment as
possible to establish optimum reception.
For private listening, connect headphones to the headphone connector on the rear panel of
the Wave
®
radio II.
• The speakers are automatically muted when you plug in your headphones.
English FrançaisEspañol
CAUTION: Long-term exposure to loud music may cause hearing damage. It is best to avoid
extreme volume when using headphones, especially for extended periods.
Note: The speakers will automatically unmute when headphones are disconnected from the
®
radio II. Because headphone volume levels may vary from speaker volume levels,
Wave
be sure to lower the volume of the Wave
®
radio II before connecting or disconnecting
headphones.
Note: If an alarm sounds while using headphones, it will sound through the Wave
®
radio II
speakers.
To change the volume level of headphones
Press Volume or to adjust the listening level of your headphones.
15
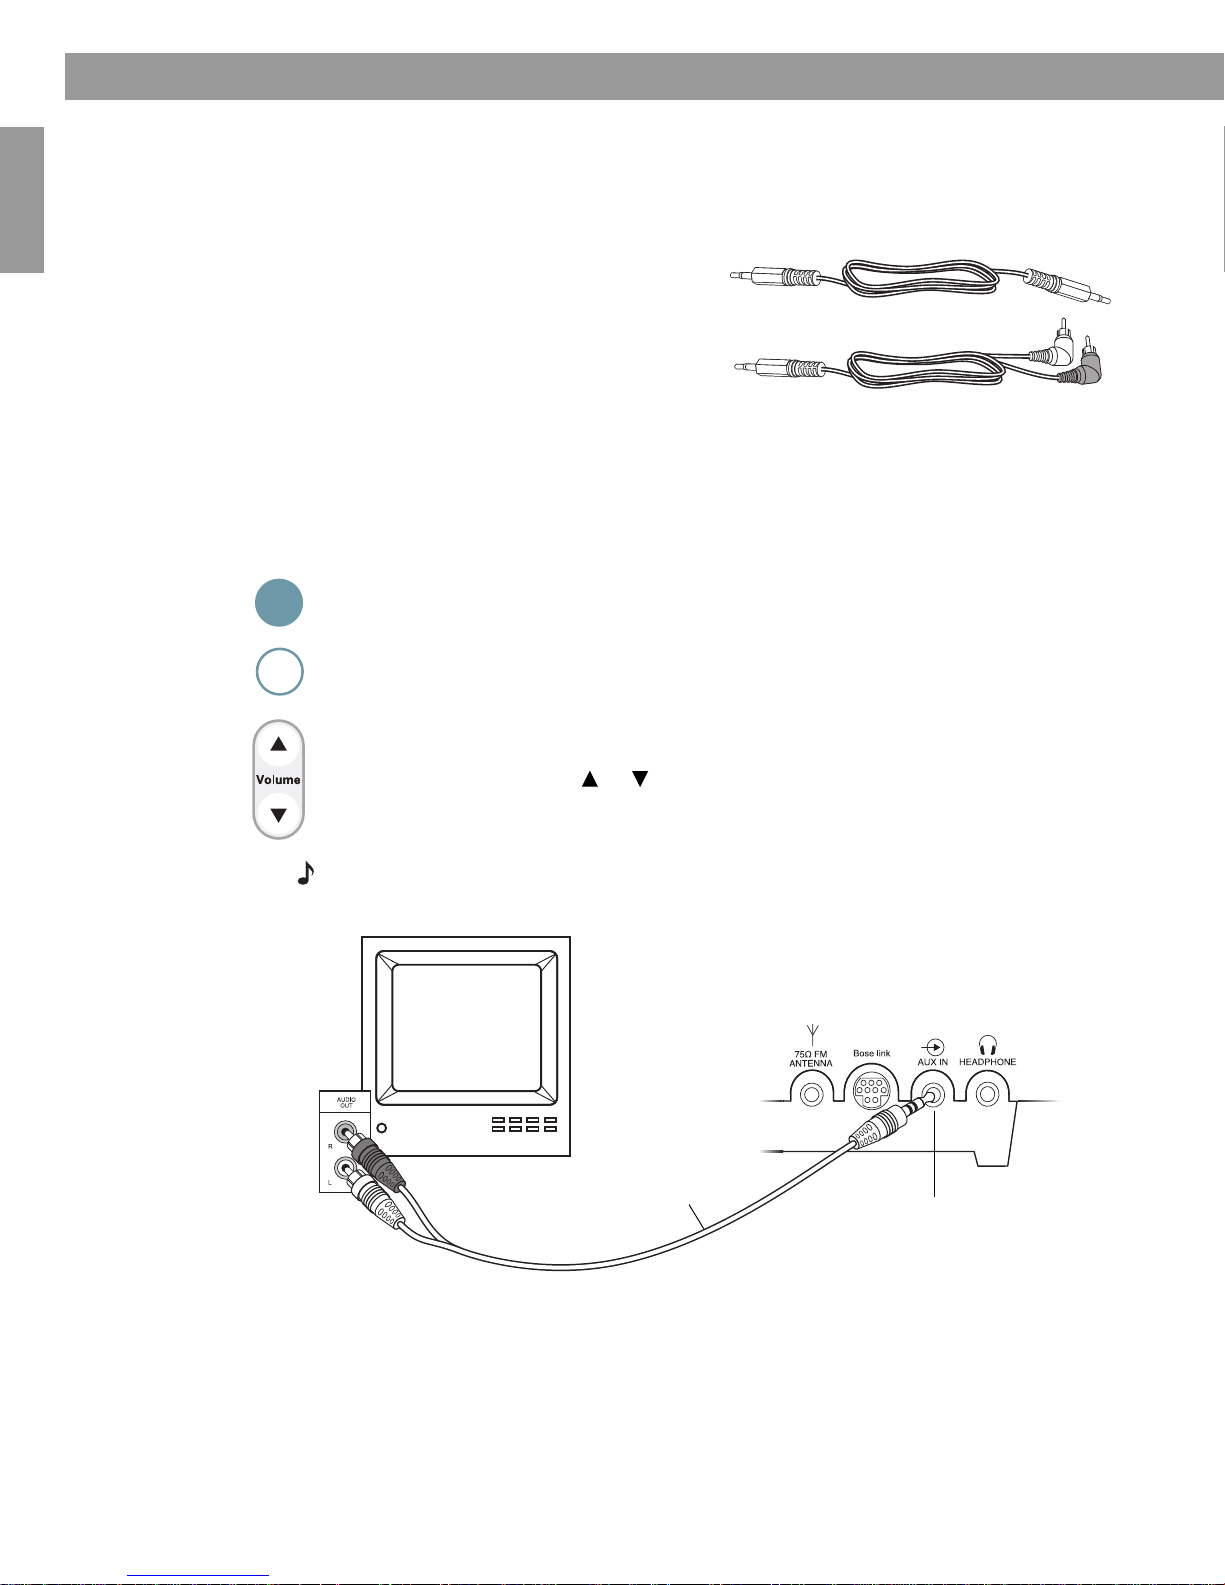
Connecting Other Equipment
• Male-to-male 3.5 mm (
1
/8") stereo cable
• Dual RCA male to
3.5 mm (
1
/8") male
stereo cable
AUX
Dual RCA male to 3.5mm (
1
/8")
male stereo cable
TV
AUX IN
connector
Using your Wave
Français Español English
®
radio II with other audio equipment
When using a TV, VCR, computer, video game or cassette tape player, you can enhance your
listening experience by playing the audio device through your Wave
Connecting an audio device to your Wave
To obtain the correct cable, contact Bose
®
radio II, requires one of the following cables:
®
Customer Service or visit a local electronics store.
®
radio II.
See the phone numbers listed inside the back cover of this guide.
To connect an audio device, such as your TV, to your Wave
®
radio II:
1. Connect one end of the stereo cable to the output of the audio device.
2. Connect the other end of the cable to the AUX IN connector on the rear panel of your
®
Wave
radio II.
On
3. Turn on your Wave
Off
®
radio II and the audio device.
4. Press AUX.
5. Press and hold Volume or to adjust the listening level.
Note: If the volume level of your Wave
the volume level of the connected audio device.
Connecting your Wave
You can use your Wave® radio II as a multi-room expansion speaker system for a Bose® linkenabled Lifestyle
®
radio II to a Lifestyle
for room B. To change this setting, see “Setting the room code” on page 21.
Contact Bose
16
phone numbers listed inside the back cover of this guide.
®
radio II cannot be adjusted high enough, try to increase
®
system
®
home entertainment system. Your Wave® radio II was set up at the factory
®
Customer Service to obtain the required cables and instructions. See the
English FrançaisEspañol
Personalising Your Wave
®
radio II
Factory defaults have been set to satisfy most owners.
However, if you wish to adjust the system settings see
the instructions on pages 18 to 22.
17

Personalising Your Wave
Tune
Alarm
Time
Menu
Alarm
Time
Menu
The set-up menu
The set-up menu allows you to customise the operation of the Wave® radio II.
1. Press and hold Alarm Time (Menu) until -SET-UP MENU- is displayed.
®
radio II
2. Press Tune
> until the menu item you want to change is displayed.
3. Press Time – or Time + to change the value or selection.
4. Press Alarm Time (Menu) to exit the set-up menu or wait 10 seconds for the set-up
menu to end automatically.
Français Español English
Wave® radio II Set-up Menu
System Setting Menu Item Factory Setting Choices Description
Snooze Control SNOOZE- 10 MIN 10 MIN, 20 MIN,
Radio Data System
RDS- ON OFF, ON Enables (ON) or disables (OFF) the system to
(RDS) information
Clock Time
TIME- 12 HOUR 12-HOUR,
Format
Display High
BRIGHT HI- 12 8-15 Sets the display brightness level when the unit
Brightness Level
30 MIN, 40 MIN,
50 MIN, 60 MIN
24-HOUR
Determines the snooze time.
display RDS information.
Sets the clock display for 12-hour (AM/PM) or
24-hour (military) time.
detects high ambient light conditions.
Display Low
Brightness Level
Room Code ROOM- B
BRIGHT LO- 4 1-8 Sets the display brightness level when the unit
detects low ambient light conditions.
_ _ _ – B _ _ _ –, C _ _ – _,
D _ _ – –, E _ – _ _,
F _ – _ –, G _ – – _,
H _ – – –, I – _ _ _,
J – _ _ –, K – _ – _,
Sets the room code for your Wave
it is connected to your Lifestyle® system through a
Bose® link network.
The dashes following the room letter indicate how
the microswitches should be set on the Lifestyle
remote control.
®
radio II when
L – _ – –, M – – _ _,
N – – _ –, O – – – _
Low-power Mode LOW POWER- OFF OFF, ON Enables (ON) or disables (OFF) the low-power
mode. The low-power mode causes the system to
use less energy after you turn it off.
®
System Reset RESET ALL- NO NO, YES Restores the Wave
radio II to factory
settings.
®
18

Adjusting the snooze time
Alarm
Time
Menu
Alarm
Time
Menu
Tune
Alarm
Time
Menu
Alarm
Time
Menu
Tune
This setting determines the duration of time the system remains silent when the snooze
function is activated.
1. Press and hold Alarm Time (Menu) until -SETUP MENU- is displayed.
Personalising Your Wave® radio II
English FrançaisEspañol
2. Press Tune
> once until SNOOZE- 10 MIN is displayed.
3. Press Time – or Time + to change the snooze time to 10-60 minutes (in 10-minute
increments).
4. Press Alarm Time (Menu) to exit the set-up menu or wait 10 seconds for the
set-up menu to end automatically.
Changing the Radio Data System (RDS) information setting
This setting enables or disables your system to display RDS information. The RDS is a
system that transmits useful information, such as station name, programme information and
the current time. RDS is used only on FM and RDS information is displayed only if it is
included in the FM broadcast signal.
1. Press and hold Alarm Time (Menu) until -SETUP MENU- is displayed.
2. Press Tune
> twice until RDS- ON is displayed.
3. Press Time – or Time + to change RDS- ON to RDS- OFF.
4. Press Alarm Time (Menu) to exit the set-up menu or wait 10 seconds for the
set-up menu to end automatically.
5.
19
Personalising Your Wave® radio II
Alarm
Time
Menu
Alarm
Time
Menu
Tune
Alarm
Time
Menu
Alarm
Time
Menu
Tune
Tune
Changing the clock time format
You can choose to have the display show the time in 12-hour (AM/PM) or 24-hour (military)
time.
1. Press and hold Alarm Time (Menu) until -SETUP MENU- is displayed.
2. Press Tune
3. Press Time – or Time + to select 12 HOUR or 24 HOUR.
4. Press Alarm Time (Menu) to exit the set-up menu or wait 10 seconds for the set-up
menu to end automatically.
Français Español English
Adjusting the display brightness
The brightness level of the display automatically adjusts itself for low and high ambient light
conditions. This feature brightens the display for better visibility in high ambient light
conditions and dims the display making it less intrusive in low ambient light conditions. High
and low brightness settings can be set independently.
1. Press and hold Alarm Time (Menu) until -SETUP MENU- is displayed.
2. Press Tune
> four times until TIME- is displayed.
> five times until BRIGHT HI- is displayed.
3. Press Time – or Time + to set the high display brightness level to a value from 8-15.
4. Press Tune
5. Press Time – or Time + to set the low display brightness level from 1-8.
6. Press Alarm Time (Menu) to exit the set-up menu or wait 10 seconds for the
set-up menu to end automatically.
20
> once until BRIGHT LO- is displayed.
Setting the room code
Alarm
Time
Menu
Alarm
Time
Menu
Tune
You r Wa ve® radio II comes from the factory ready to operate as a second room (room code B)
when connected to a Bose
radio II with your Lifestyle
code to match that of the remote control you are using for that room.
Refer to your Lifestyle
Alarm
1. Press and hold Alarm Time (Menu) until -SETUP MENU- is displayed.
Time
Menu
Tune
2. Press Tune
the room letter indicate how the microswitches should be set on the Lifestyle
control. See your Lifestyle
3. Press Time – or Time + to select a room code other than room B.
Alarm
4. Press Alarm Time (Menu) to exit the set-up menu or wait 10 seconds for the set-up
Time
Menu
menu to end automatically.
Personalising Your Wave® radio II
®
link enabled Lifestyle® system. If you want to use your Wave®
®
system beyond a second room you will need to change the room
®
system operating guide for more information on room codes.
> seven times until ROOM- B is displayed. The dashes following
®
system operating guide for details.
®
remote
English FrançaisEspañol
Enabling the low-power mode
You r Wa ve® radio II has a low-power mode which causes the system to use less energy after
you turn it off. If the low-power mode is enabled, the display automatically turns off after 30
minutes. Just before the display goes blank, LOW POWER- ON is displayed.
In the low-power mode, the clock still runs normally, presets are maintained and if an alarm is
set, the system turns on at the programmed alarm time. While in the low-power mode,
pressing FM, AM, AUX or Preset 1 to 6 turns the system ON in the normal way. Pressing any
other remote key, or one that does not turn the system on, lights up the display for another 30
minutes and then turns it off again.
1. Press and hold Alarm Time (Menu) until -SETUP MENU- is displayed.
2. Press Tune
3. Press Time – or Time + to change LOW POWER- OFF to LOW POWER- ON.
4. Press Alarm Time (Menu) to exit the set-up menu or wait 10 seconds for the
set-up menu to end automatically.
> eight times until LOW POWER- OFF is displayed.
21

Personalising Your Wave® radio II
Performing a system reset
If you wish, you can restore your Wave® radio II to the original factory settings.
Alarm
1. Press and hold Alarm Time (Menu) until -SETUP MENU- is displayed.
Time
Menu
Tune
2. Press Tune
3. Press Time + to change RESET ALL- NO to RESET ALL- YES.
4. When PRESS 2 TO CONFIRM appears on the display, press Presets button 2. When
Alarm
5. Press Alarm Time (Menu) to exit the set-up menu or wait 10 seconds for the set-up
Time
Menu
Français Español English
> nine times until RESET ALL- NO is displayed.
the reset is complete, DEFAULTS RESET is displayed.
menu to end automatically.
22
Cleaning
See operating
instructions for types of
battery to be used
e operating
nstructions for types of
battery to be used
Maintaining Your Wave
®
radio II
Use only a soft dry cloth to clean the enclosure of your Wave® radio II. If necessary, you may
use a soft-bristled attachment to gently vacuum the front of the enclosure. Do not use any
liquid cleaning solutiuons, solvents, chemicals, alcohol, ammonia or abrasives.
English FrançaisEspañol
CAUTION: Do not allow liquids to spill into any openings in the enclosure. If liquids get into the
unit, turn it off immediately. Call Bose
service. See the list of phone numbers inside the back cover.
Replacing the remote control battery
WARNING: Keep the remote control battery away from children. It may cause a fire or chemical
burn if mishandled. Do not recharge, disassemble, heat above 212ºF (100ºC) or incinerate.
Dispose of a used battery promptly. Replace only with a battery of the correct type and model
number.
CAUTION: Danger of explosion if battery is incorrectly replaced. Replace only with Duracell,
Eveready, Energizer, Maxell, Toshiba or Shun Wo CR2032 or DL2032, 3-volt Lithium battery.
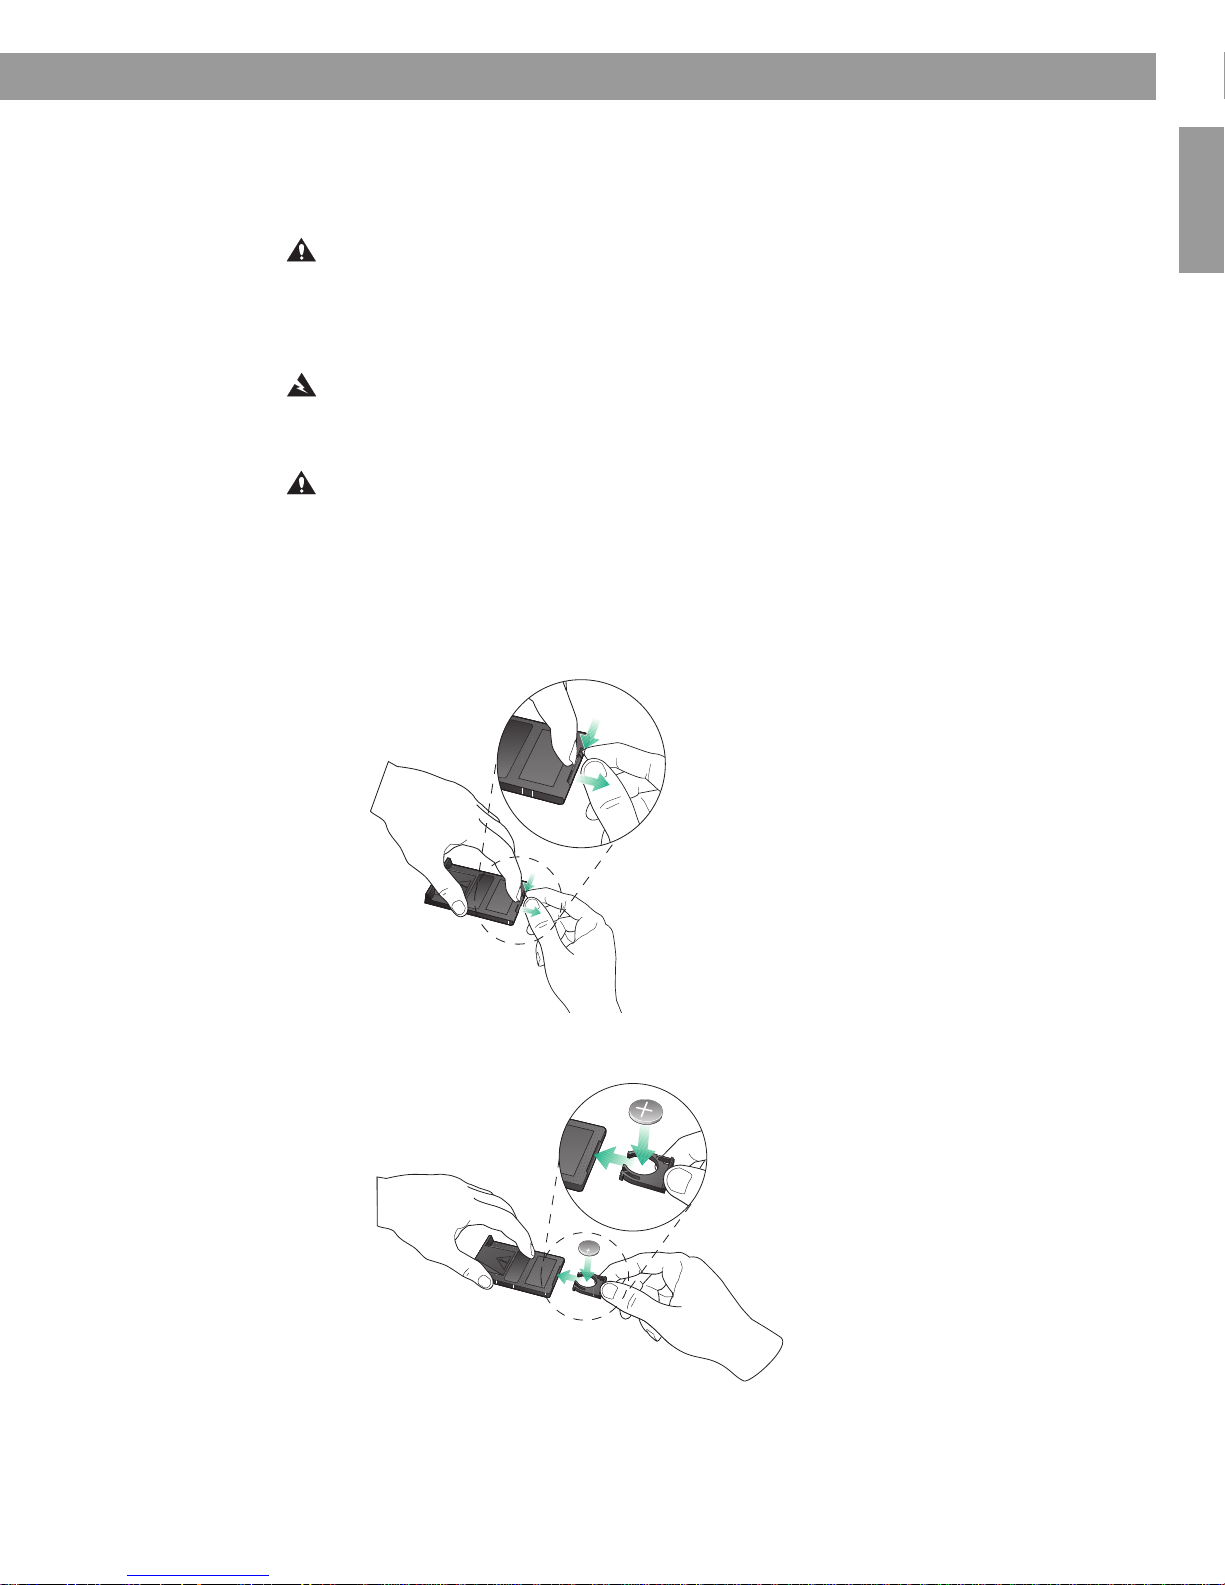
To replace the remote battery:
1. Place the remote face down on a flat surface.
2. Using your finger, push the tab lock to the side as shown and hold. Slide the battery
compartment open.
®
Customer Support as soon as possible to arrange for
3. Remove the old battery and install the new one with the plus (+) symbol facing up.
4. Gently slide the battery compartment closed. It locks automatically.
See operating
battery to be used
instructions for types of
23
Maintaining Your Wave® radio II
Troubleshooting
Problem What to do
System does not function • Make sure the power cord is fully plugged into an operating electrical outlet.
• Press On/Off to see if the display lights.
No sound • Turn the volume up.
• Press Mute.
• Check connections for an auxiliary source.
• Press AUX to listen to an external source connected to the AUX IN input.
• Make sure the external source is turned on.
• Disconnect headphones.
Remote control is
inconsistent or does not
work
Français Español English
AM reception is weak • Adjust the internal antenna by rotating the unit slightly one way and then the other.
FM reception is weak • Extend the power cord as much as possible. The power cord acts as an FM antenna.
No RDS information is
displayed
Display window is blank • Press any remote button and check if the display turns on. The low-power mode may
• Operate the remote control closer to the unit.
• Check that the remote control battery is installed with positive (+) polarity facing up.
• Replace the remote control battery.
• Check for interference from room lighting, sunlight or dust or dirt on lens.
• Try the unit in a different location.
• Move the unit farther from a TV, refrigerator, fluorescent lamps, halogen lamps, dimmer
switches or other electronic equipment that generates electrical noise.
• If neither suggestion works, you may be in an area of weak AM signal coverage.
®
• Try an external antenna. Call Bose
• Check the system set-up menu to make sure RDS- is set to ON.
• Make sure you are listening to an FM radio station.
• The station may not include RDS information in its broadcast signal. Contact the radio
station.
be enabled causing the display to power down 30 minutes after you turned the system
off. For more information, see “Enabling the low-power mode” on page 21.
• If this doesn’t work, call Bose Customer Service for help.
Customer Service to order an external FM antenna.
Customer service
If you lose your remote, additional remotes are available from Bose Customer Service.
For additional help in solving problems, contact Bose Customer Service. See the phone
numbers listed inside the back cover of this guide.
Limited warranty
You r B os e® Wave® radio II is covered by a limited transferable warranty.
Technical information
AC power rating
220V-240V~ 50/60Hz 60W
Dimensions
36.8 cm W x 21.9 cm D x 10.6 cm H (14.6" x 8.6" x 4.2")
Weight
3.9 kg (8.7 lb)
24

Maintaining Your Wave® radio II
Limited Warranty Policy and
Conditions of Sale
Bose Corporation
The Mountain
Framingham, MA 01701
What is covered:
All parts defective in material and workmanship. This limited
warranty for the Bose
tionality of the system for its normal, intended use as specified in
the Owner’s Guide and does not cover a malfunction that has
resulted from improper or unreasonable use or maintenance,
accident, excess moisture, improper packing, lightning, power
surges, or unauthorized tampering, alteration or modification
while not under the control of Bose. Bose systems are not
designed to be used in every environment, so please review your
Owner’s Guide.
WHERE PERMITTED, THE PROVISIONS OF THIS LIMITED
WARRANTY ARE IN LIEU OF ANY OTHER WRITTEN
WARRANTY, WHETHER EXPRESS OR IMPLIED, WRITTEN OR
ORAL, INCLUDING ANY WARRANTY OF MERCHANTABILITY
OR FITNESS FOR A PARTICULAR PURPOSE.
Notwithstanding the above, where applicable, if you qualify as a
“consumer” under the Magnuson-Moss Warranty Act, then you
may be entitled to any implied warranties allowed by law for the
period of the express warranty as set forth below.
For how long:
In countries where the duration of the warranty is not determined
by statute, the Bose Limited Warranty lasts two years from the
purchase date. For countries where minimum warranty terms are
determined by statute, the warranty term is the longer of the
statutory period or the term listed above.
What we will do:
We will repair or replace any defective parts within a reasonable
period of time and free of charge.
How you can obtain warranty service:
Providing you have a proof of purchase from an authorized
dealer, you can return the system to either a Bose Service
Agency or directly to Bose. Proof of purchase is not required
where it is excluded by statute.
To return a product, please:
1. Properly and carefully pack the product for shipping. If you
need a new shipping carton, contact Bose.
2. If you are returning the product directly to Bose, please
contact Bose to get a return reference number. Place this
number prominently on the outside of the carton.
3. If you are returning the product to a Bose Service Agency,
contact the agency for packing and shipping instructions.
4. Label and ship the product to the appropriate location.
®
Wave radio II (“system”) covers the func-
Other rights:
EXCLUSIVE REMEDY:
THIS LIMITED WARRANTY IS FULLY TRANSFERABLE
PROVIDED THAT THE CURRENT OWNER FURNISHES THE
ORIGINAL PROOF OF PURCHASE FROM AN AUTHORIZED
BOSE DEALER. THE MAXIMUM LIABILITY OF BOSE SHALL
NOT EXCEED THE ACTUAL PURCHASE PRICE PAID BY YOU
FOR THE PRODUCT. IN NO EVENT SHALL BOSE BE LIABLE
FOR SPECIAL, INCIDENTAL, CONSEQUENTIAL OR INDIRECT
DAMAGES. SOME PLACES DO NOT ALLOW LIMITATIONS ON
THE EXCLUSION OR LIMITATION OF RELIEF, SPECIAL,
INCIDENTAL, CONSEQUENTIAL OR INDIRECT DAMAGES OF
THE LIMITATION OF LIABILITY TO SPECIFIED AMOUNTS, SO
THE ABOVE LIMITATIONS OR EXCLUSIONS MAY NOT APPLY
TO YOU.
OTHER CONDITIONS:
FOR YOUR BENEFIT, WE RECOMMEND THAT YOU RECORD
YOUR SERIAL NUMBER(S), FOUND ON THE PRODUCT(S), AND
OTHER PURCHASE INFORMATION, AND KEEP IT WITH YOUR
PERSONAL RECORDS ALONG WITH PROOF OF
PURCHASE. IF NECESSARY, THIS INFORMATION WILL
ALLOW US TO BETTER SERVE YOUR NEEDS.
THIS LIMITED WARRANTY GIVES YOU SPECIFIC RIGHTS
SUBJECT TO SPECIFIED CONDITIONS. YOU MAY ALSO HAVE
OTHER LEGAL RIGHTS WHICH APPLY TO THE PRODUCT
YOU HAVE ACQUIRED. THESE LEGAL RIGHTS VARY FROM
STATE TO STATE OR COUNTRY TO COUNTRY. SOME PLACES
DO NOT ALLOW THE EXCLUSION, RESTRICTION OR MODIFICATION OF CERTAIN IMPLIED RIGHTS OR THEIR EFFECT. IN
THOSE SITUATIONS THIS LIMITED WARRANTY WILL ONLY
APPLY TO THE EXTENT THAT THE APPLICABLE LAW ALLOWS.
OTHER LAWS PROVIDE YOU WITH A STATUTORY CLAIM
AGAINST THE SELLER.
The laws of your state or country may provide you with legal
claims against the seller or manufacturer of this product. The
Limited Warranty does not affect those rights.
Remedies:
The provisions of this limited warranty are in lieu of any other
warranties or conditions, except those provided by law. This
Limited Warranty does not affect any legal rights provided to you
by law and does not preclude any legal remedy you may have
under the law.
This Limited Warranty is fully transferable provided that the
current owner furnishes the original proof of purchase from an
authorized Bose dealer.
This Limited Warranty is void if the label bearing the serial
number has been removed or defaced.
English FrançaisEspañol
25

Index
A
AC power 5
AC power rating 24
acoustic waveguide 7
alarm volume level 12
alarms, using the 13
AM 10
AM reception 24
AM/PM (12-hour) time 6, 18, 20
ambient light conditions 18, 20
audio device, connecting 16
audio equipment, other 16
automatic shutoff (Sleep) 9
AUX IN connector 14, 16
auxiliary source 9, 24
B
backup memory 6, 11
battery replacement 23
Français Español English
®
link 14, 16, 18, 21
Bose
brightness level 18, 20
C
cleaning 23
clock display 9
clock set-up mode 6
clock time 6, 9
clock time format 6, 20
clock, setting the 6
computer 16
connecting other equipment 14
connections 24
customer service 24
customizing operation 18
D
dimensions 24
dimmer switches 24
dipole antenna 14
display 9, 12, 24
display brightness 18, 20
E
electrical noise 24
electrical outlet 24
external equipment 14
external FM antenna 10, 14, 24
external source 14, 24
F
factory settings 7, 18, 22
factory snooze time setting 13
fluorescent lamps 24
FM 10
FM antenna 5, 14, 24
FM reception 5, 10, 15, 24
FM source 10
frequency band 10
H
halogen lamps 24
headphones 14, 15, 24
help in solving problems 24
I
internal antenna 24
L
Lifestyle
listening level 15, 16
listening to FM/AM radio 10
location, selecting a 4
low-power mode 21
®
systems 14, 16, 18, 21
M
military (24-hour) time 6, 18, 20
multi-room expansion 16
N
no sound 24
O
operating information 9
P
packaging 4
personalising 18
poor reception 14
power 5
power cord 4, 5, 10, 14, 24
power outage 6, 11
preset number 11
presets 11
press and hold operations 8
Q
quick recall 11
26

Index
R
radio alarm 12
Radio Data System 19
radio frequency 10
radio station 10, 11
rapid adjustment 6
RDS 19
rear panel 14, 15, 16
refrigerator 24
remote control 8
remote control battery 23, 24
restore audio 8
room code, setting 18, 21
S
second room 21
setting alarm 12
set-up menu 18, 20, 21
sleep timer set-up mode 9
snooze 13
snooze control 18
snooze time 13, 19
sounding alarm 13
station frequency 10, 11
stereo cable 16
stereo headphone connector 14
stereo input connector 14
stopping a sounding alarm 13
stored presets 11
storing a radio station 11
system operation 7
system reset 22
system settings 7, 9, 18, 19, 20, 21, 22
system set-up mode 22
T
talk radio broadcasts 11
TALK RADIO mode 11
tapered waveguide 7
technical information 24
time increment 19
troubleshooting 24
tuning the radio 10
turning alarm on and off 13
turning the radio on 10
TV 16, 24
U
unpacking 4
V
VCR 16
video game 16
volume level 9, 16, 24
W
wake to a FM/AM radio, setting 12
wake-up time 12
warranty 24
waveguide speaker technology 7
weak AM reception 24
weak FM reception 24
weak reception 10
weight 24
English FrançaisEspañol
27
Sicherheitshinweise
DanskDeutschItalianoNederlandsSvenska
WARNUNG:
Um Brände und Stromschläge zu vermeiden, darf dieses Produkt weder Regen noch Feuchtigkeit ausgesetzt werden.
WARNUNG: Schützen Sie das Gerät vor tropfenden oder spritzenden Flüssigkeiten, und stellen Sie keine mit
Flüssigkeiten gefüllten Gefäße (z. B. Vasen) auf das Gerät. Wie bei allen elektronischen Geräten dürfen niemals
Flüssigkeiten ins Innere gelangen, weil es sonst zu Fehlfunktionen oder Bränden kommen kann.
ACHTUNG: Um Stromschläge zu vermeiden, darf dieses Gerät nur von qualifiziertem Personal auseinander
genommen werden. Wenden Sie sich bei allen Reparatur- und Wartungsarbeiten nur an qualifiziertes Kundendienstpersonal.
Das Blitzsymbol mit Pfeilspitze in einem gleichseitigen Dreieck weist den Benutzer auf nicht isolierte, gefährliche
elektrische Spannung innerhalb des Systemgehäuses hin. Es besteht die Gefahr von Stromschlägen!
Das Ausrufezeichen in einem gleichseitigen Dreieck, wie es auf dem Gerät angebracht ist, soll den Benutzer auf
tige Bedienungs- und Wartungsanweisungen in dieser Bedienungsanleitung aufmerksam machen.
wich
ACHTUNG:
entsprechenden Schlitz. Überzeugen Sie sich vom korrekten Sitz des Steckers.
WARNUNG:
der Batterie kann ein Brand oder eine chemische Reaktion ausgelöst werden. Laden Sie die Batterien nicht neu auf, nehmen Sie sie
nicht auseinander und erhitzen Sie die Batterien nicht über 100ºC (212ºF) bzw. verbrennen Sie keine Batterien. Entsorgen Sie leere
Batterien umgehend. Verwenden Sie nur Batterien vom vorgeschriebenen Typ und der entsprechenden Modellnummer.
Stecken Sie zur Vermeidung von Stromschlägen den breiten Kontakt des Netzkabelsteckers vollständig in den
Bewahren
Sie die Batterie der Fernbedienung außerhalb der Reichweite von Kindern auf. Bei fehlerhaftem Umgang mit
Leere Batterien müssen getrennt entsorgt werden
und gehören nicht in den Hausmüll. Verbrennen Sie keine Batterien.
WARNUNG: Stellen Sie keine brennenden Kerzen und kein offenes Licht auf das Gerät.
Hinweis: Das Etikett mit der Produktbezeichnung befindet sich auf der Unterseite des Geräts.
Bitte lesen Sie diese Bedienungsanleitung aufmerksam durch.
Beachten Sie alle Hinweise sorgfältig. Die Anleitung unterstützt Sie beim Aufbau und ordnungsgemäßen Betrieb des Systems
und der Bedienung seiner modernen Funktionen. Bewahren Sie diese Bedienungsanleitung zum späteren Nachschlagen auf.
Dieses Produkt erfüllt alle vorgeschriebenen EU-Richtlinien. Die vollständige Konformitätserklärung ist einsehbar unter
www.Bose.com/static/compliance.
©1994-2005 Bose Corporation. Dieses Dokument darf ohne vorherige schriftliche Genehmigung weder ganz noch teilweise
reproduziert, verändert, vertrieben oder auf andere Weise verändert werden. Alle hier genannten Warenzeichen sind Eigentum der
Bose Corporation. Das Design des Wave
2
®
radio II ist ein eingetragenes Warenzeichen der Bose Corporation.

Inhalt
Wave® Radio II aufstellen . . . . . . . . . . . . . . . . . . . . . . . . . . . . . . . . . . . . . . . . . . . . . . . . . . . . . . . . 4
Auspacken . . . . . . . . . . . . . . . . . . . . . . . . . . . . . . . . . . . . . . . . . . . . . . . . . . . . . . . . . . .
Standort auswählen . . . . . . . . . . . . . . . . . . . . . . . . . . . . . . . . . . . . . . . . . . . . . . . . . . . . . . . .
An das Stromnetz anschließen . . . . . . . . . . . . . . . . . . . . . . . . . . . . . . . . . . . . . . . . . . . . . . . . . 5
Uhrzeit einstellen . . . . . . . . . . . . . . . . . . . . . . . . . . . . . . . . . . . . . . . . . . . . . . . . . . . . . .
Kurzeinführung in einige Sonderfunktionen . . . . . . . . . . . . . . . . . . . . . . . . . . . . . . . . . . . . . . . . . . 7
Einführung . . . . . . . . . . . . . . . . . . . . . . . . . . . . . . . . . . . . . . . . . . . . . . . . . . . . . . . . . . .
Sonderfunktionen . . . . . . . . . . . . . . . . . . . . . . . . . . . . . . . . . . . . . . . . . . . . . . . . . . . . . . . . .
®
Radio II bedienen . . . . . . . . . . . . . . . . . . . . . . . . . . . . . . . . . . . . . . . . . . . . . . . . . . . . . . . . 8
Wave
Benutzung der Fernbedienung . . . . . . . . . . . . . . . . . . . . . . . . . . . . . . . . . . . . . . . . . . . . . . . . . 8
Display ablesen . . . . . . . . . . . . . . . . . . . . . . . . . . . . . . . . . . . . . . . . . . . . . . . . . . . . . . . . .
®
Wave
radio II ein- und ausschalten . . . . . . . . . . . . . . . . . . . . . . . . . . . . . . . . . . . . . . . . . . . . 9
Lautstärke einstellen . . . . . . . . . . . . . . . . . . . . . . . . . . . . . . . . . . . . . . . . . . . . . . . . . . . . . .
Automatische Ausschaltfunktion (Sleep) einrichten . . . . . . . . . . . . . . . . . . . . . . . . . . . . . . . . . 9
FM/AM (UKW/MW)-Radio verwenden . . . . . . . . . . . . . . . . . . . . . . . . . . . . . . . . . . . . . . . . . . . . . . 10
Radio einschalten . . . . . . . . . . . . . . . . . . . . . . . . . . . . . . . . . . . . . . . . . . . . . . . . . . . . . . . .
Radio einstellen . . . . . . . . . . . . . . . . . . . . . . . . . . . . . . . . . . . . . . . . . . . . . . . . . . . . . . .
Radiosender speichern (Presets) . . . . . . . . . . . . . . . . . . . . . . . . . . . . . . . . . . . . . . . . . . . . . . . 11
TALK RADIO-Modus . . . . . . . . . . . . . . . . . . . . . . . . . . . . . . . . . . . . . . . . . . . . . . . . . . . . . . . .
. . . . . 4
. 4
. . . . . 6
. . . . . 7
. . 7
. . . 9
. . . 9
. . . 10
. . . . . 10
11
English FrançaisDeutsch
Weckfunktion einstellen und verwenden . . . . . . . . . . . . . . . . . . . . . . . . . . . . . . . . . . . . . . . . . . . . 12
Weckfunktion einstellen . . . . . . . . . . . . . . . . . . . . . . . . . . . . . . . . . . . . . . . . . . . . . . . . . . . . .
. 12
Wecken über Radio . . . . . . . . . . . . . . . . . . . . . . . . . . . . . . . . . . . . . . . . . . . . . . . . . . . . . . 12
Weckzeit einstellen . . . . . . . . . . . . . . . . . . . . . . . . . . . . . . . . . . . . . . . . . . . . . . . . . . . . . . 1
Weckfunktion verwenden . . . . . . . . . . . . . . . . . . . . . . . . . . . . . . . . . . . . . . . . . . . . . . . . . . . . . 1
Wecker nach Ertönen des Wecktons abstellen . . . . . . . . . . . . . . . . . . . . . . . . . . . . . . . . . 13
Weckfunktion ein- bzw. ausschalten . . . . . . . . . . . . . . . . . . . . . . . . . . . . . . . . . . . . . . . . . 13
Nachweckfunktion . . . . . . . . . . . . . . . . . . . . . . . . . . . . . . . . . . . . . . . . . . . . . . . . . . . . . . . 13
Externe Komponenten anschließen . . . . . . . . . . . . . . . . . . . . . . . . . . . . . . . . . . . . . . . . . . . . . . . . 1
Ein- und Ausgänge auf der Rückseite . . . . . . . . . . . . . . . . . . . . . . . . . . . . . . . . . . . . . . . . . . . 14
Externe FM-Antenne anschließen . . . . . . . . . . . . . . . . . . . . . . . . . . . . . . . . . . . . . . . . . . . . . . 14
Kopfhörer verwenden . . . . . . . . . . . . . . . . . . . . . . . . . . . . . . . . . . . . . . . . . . . . . . . . . . . . . . .
®
Wave
radio II mit anderen Audiokomponenten verwenden . . . . . . . . . . . . . . . . . . . . . . . . . . 16
®
Wave
Radio II an ein Lifestyle® System anschließen . . . . . . . . . . . . . . . . . . . . . . . . . . . . . . . 16
®
Radio II anpassen . . . . . . . . . . . . . . . . . . . . . . . . . . . . . . . . . . . . . . . . . . . . . . . . . . . . . . . . 18
Wave
Einstellungsmenü . . . . . . . . . . . . . . . . . . . . . . . . . . . . . . . . . . . . . . . . . . . . . . . . . . . . . . . . .
Nachweckzeit einstellen . . . . . . . . . . . . . . . . . . . . . . . . . . . . . . . . . . . . . . . . . . . . . . . . . . . . .
. 15
. . 18
. 19
Einstellung für die Radio Data System (RDS)-Informationen ändern . . . . . . . . . . . . . . . . . . . . 19
Uhrzeitformat ändern . . . . . . . . . . . . . . . . . . . . . . . . . . . . . . . . . . . . . . . . . . . . . . . . . . . . . . .
Helligkeit der Anzeige einstellen . . . . . . . . . . . . . . . . . . . . . . . . . . . . . . . . . . . . . . . . . . . . . . . .
Raumcode einstellen . . . . . . . . . . . . . . . . . . . . . . . . . . . . . . . . . . . . . . . . . . . . . . . . . . . . . . .
Energiesparmodus . . . . . . . . . . . . . . . . . . . . . . . . . . . . . . . . . . . . . . . . . . . . . . . . . . . . . . . . .
. 20
20
. 21
. 21
System-Zurückstellung vornehmen . . . . . . . . . . . . . . . . . . . . . . . . . . . . . . . . . . . . . . . . . . . . . 22
Wartung und Pflege des Wave
Reinigung . . . . . . . . . . . . . . . . . . . . . . . . . . . . . . . . . . . . . . . . . . . . . . . . . . . . . . . . . . .
®
Radio II . . . . . . . . . . . . . . . . . . . . . . . . . . . . . . . . . . . . . . . . . . . . 23
. . . . . . 23
Batterie der Fernbedienung austauschen . . . . . . . . . . . . . . . . . . . . . . . . . . . . . . . . . . . . . . . . 23
Fehlersuche . . . . . . . . . . . . . . . . . . . . . . . . . . . . . . . . . . . . . . . . . . . . . . . . . . . . . . . . . .
Kundendienst . . . . . . . . . . . . . . . . . . . . . . . . . . . . . . . . . . . . . . . . . . . . . . . . . . . . . . . . . . .
Eingeschränkte Garantie . . . . . . . . . . . . . . . . . . . . . . . . . . . . . . . . . . . . . . . . . . . . . . . . . . . . .
Technische Daten . . . . . . . . . . . . . . . . . . . . . . . . . . . . . . . . . . . . . . . . . . . . . . . . . . . . . . . . .
Index . . . . . . . . . . . . . . . . . . . . . . . . . . . . . . . . . . . . . . . . . . . . . . . . . . . . . . . . . . . . . .
. . . . . 24
. . . 25
25
. . 25
. . . . . . . . . . 27
2
3
4
3
Wave
Wave® radio II
Euro-Netzkabel*
Fernbedienung
(eingesetzte Batterie)
®
*In Großbritannien wird das
landestypische Netzkabel
ausgeliefert.
Für Ihre Unterlagen
Notieren Sie sich jetzt die Seriennummer des Wave® radio II. Die Seriennummer
befindet sich auf der Gehäuseunterseite.
Seriennummer__________________________
Kaufdatum _____________________________
Bewahren Sie die Kaufquittung mit dieser Bedienungsanleitung auf.
Antennenadapter
Auspacken
DanskDeutschItalianoNederlandsSvenska
®
Radio II aufstellen
Überprüfen Sie den Verpackungskarton auf folgenden Inhalt:
Standort auswählen
• Stellen Sie das Wave® radio II auf einen Tisch oder eine andere ebene Fläche.
• Für einen optimalen Musikgenuss sollten Sie den Wave
dass Sie sich beim Musikhören gegenüber der Anlage befinden.
• Die Anlage sollte dabei höchstens 60 cm Abstand zur Wand haben und nicht in einer Ecke
steh
en.
Hinweis:
• Stellen Sie das Wave® radio II NICHT auf eine Metalloberfläche. Es könnte den
AM-Empfang (MW) stören.
• Stellen Sie das Wave
®
radio II NICHT auf eine hitzeempfindliche Oberfläche. Wie alle
elektrischen Geräte erzeugt es Wärme.
• Verwenden Sie das Wave
®
radio II NIEMALS in feuchter Umgebung.
®
radio II so im Raum aufstellen,
4

An das Stromnetz anschließen
1
2
Netzanschluss
3
1. Stecken Sie das kleine Ende des Stromkabels in die Buchse mit der Aufschrift AC POWER
auf der Rückseite des Wave
2. Verbinden Sie das Netzkabel mit einer Steckdose.
®
radio II.
Wave
®
Radio II aufstellen
Dansk Italiano SvenskaDeutsch Nederlands
3. Für einen optimalen FM-Empfang (UKW) sollten Sie das Netzkabel abwickeln und
glätten. Beim Wave
®
radio II dient das Netzkabel gleichzeitig als FM-Antenne.
5

Wave
®
Radio II aufstellen
Uhrzeit einstellen
DanskDeutschItalianoNederlandsSvenska
Nach Anschluss des Wave® radio II an die Stromversorgung können Sie mit Hilfe der
Fernbedienung die Uhrzeit einstellen.
bedient werden. Richten Sie die Fernbedienung auf die Vorderseite das Wave
drücken Sie die entsprechenden Tasten.
1. Drücken und halten Sie Time – oder Time +
bis – CLOCK SET – au
angezeigt wird.
2. Drücken Sie Time –, um die Uhrzeit zurückzustellen, oder drücken Sie Time +, um die
Zeit vorzustellen. Wenn Sie die Tasten gedrückt halten, ändert sich die Uhrzeit im
Schnelldurchlauf.
3. Nach fünf Sekunden wird der Einstellmodus für die Zeit automatisch beendet.
weise zum Ändern der Uhrzeitanzeige vom 12-Stund
Hin
finden Sie unter „Uhrzeitformat ändern“ auf Seite 20.
f dem Display
Das Wave® radio II kann mit der Fernbedienung bequem
en- (AM/PM) in den 24-Stunden-Modus
®
radio II, und
Hinweis:
und weitere Systemeinstellungen 48 Stunden lang im Sicherungsspeicher gespeichert. Dies
verh
verloren gehen.
Hinweis:
Sekunde.
Für den Fall, dass die Stromversorgung des Wave® radio II ausfällt, werden die Uhrzeit
indert, dass bei einem Stromausfall oder beim Umstellen des Geräts Systemeinstellungen
Wenn Sie Tasten gedrückt halten, erfolgt die Wirkung mit einer Verzögerung von einer
6

Einführung
Duale konische
Wellenleiter
Kurzeinführung in einige Sonderfunktionen
Vielen Dank für den Kauf des Bose® Wave® radio II. Sie haben sich damit für eine elegante
und qualitativ hochwertige Anlage entschieden.
14 Jahre Forschungsarbeit der Bose
Corporat
der preisgekrönten und patentierten
Acoustic WaveguideLautsprechertechnologie. Kernstück
dieser Technologie ist ein akustisches
Rohr, das die Energie eines kleinen
Lautsprechers sehr effizient an die
Umgebungsluft überträgt und dabei den
vollen Tieftonbereich abdeckt. Außerdem
haben wir lange Wellenleiter so geformt,
dass sie in kompakte Produkte passen
und bei Ihnen zu Hause überall bequem
aufgestellt werden können. Das Wave
radio II ist mit der neuen dualen Tapered
Waveguide-Lautsprechertechnologie
ausgestattet. Bei dieser Technologie sind
die beiden Lautsprecher an zwei 66 cm
lange konische Wellenleiter
angeschlossen, die bei einem Gerät dieser Größe für ein beispielloses Klangerlebnis sorgen.
ion bringen Ihnen die Vorzüge
®
Dansk Italiano SvenskaDeutsch Nederlands
Sonderfunktionen
Weckfunktion über Radio
Sie können das Wave® radio II so einstellen, dass Sie mit Ihrem Lieblingsstück von radio.
Weitere Informationen finden Sie unter „Wecken über Radio“ auf Seite 12.
Über das Einstellungsmenü persönliche Einstellungen für die
Bedienung des Geräts vornehmen
Die werksseitigen Einstellungen werden den meisten Benutzern genügen. Wenn Sie dennoch
die Einstellungen ändern möchten, finden Sie Informationen hierzu unter „Wave
anpassen“ auf Seite 18.
Über das Einstellungsmenü können Sie folgende Systemeinstellungen entsprechend Ihren
Bedürf
nissen anpassen:
• Nachweckzeit (Snooze) • Display-Helligkeit
• Uhrzeitformat
•Bose
®
Link-Raumcode
(12- oder 24-Stunden)
• Wiederherstellen der We
rkseinstellungen
®
Radio II
7

Wave
On/Off (Stop Alarm)
• Schaltet das Gerät ein
bzw. aus (Seite 9).
• Stellt den Weckton ab
(Seite 13).
Sleep
• Schaltet die Nachweckfunktion ein (Weckton
wird für eine gewisse Zeit ausgesetzt)
(Seite 13).
• Bei Aktivierung dieser Funktion schaltet sich
die Anlage nach 10-90 Minuten automatisch
aus (Seite 9).
Volume
• Regelt die Lautstärke (Seite 9).
Mute
• Stummschalten der Anlage (Seite 9).
• Bei wiederholtem Drücken wird die
Stummschaltung aufgehoben.
Presets
• Beim
Drücken:
Aufruf eines gespeicherten
Radiosenders (Seite 11).
• Drücken und Halten der Taste:
Radiosender
wird für Schnellwahl gespeichert (Seite 11).
Seek
• Drücken: Sendersuchlauf zum
nächsten starken Signal (Seite 10).
• Drücken und Halten: Schneller
Sendersuchlauf vorwärts/rückwärts
durch Frequenzen mit starkem Signal
(Seite 10).
Tune
• Drücken: Springt zur nächsten/
vorherigen Radiofrequenz (Seite 10).
• Drücken und Halten: Läuft schnell
vorwärts/rückwärts durch die
Radiofrequenzen (Seite 10).
Time
• Einstellung der Uhrzeit (Seite 6).
• Im Weckmodus wird mit dieser Taste die
Weckzeit eingestellt (Seite 12).
Alarm On/Off
• Schaltet
Weckfunktion
ein bzw. aus
(Seite 13).
Talk Radio
• Schaltet den Modus TALK RADIO
für AM oder FM ein bzw. aus
(Seite 11).
AUX
• Drücken Sie diese Taste, um eine externe,
über den AUX IN-Eingang angeschlossene
Tonquelle wiederzugeben (Seite 16).
Alarm Time
• Einmal drücken: Auswahl des
Einstellmodus für die Weckzeit (Seite 12).
• Drücken und Halten: Auswahl des
Einstellungsmenüs (Seite 18).
FM
• Schaltet das Radio ein.
• Bei erneutem Drücken erfolgt ein
Wechsel zwischen FM (UKW)
und AM (MW) (Seite 10).
Wake To
• Drücken und Halten:
Stellt den aktuellen
Radiosender als
Weckton ein
(Seite 12).
AM
• Schaltet das Radio ein.
• Bei erneutem Drücken erfolgt ein
Wechsel zwischen AM (MW) und
FM (UKW) (Seite 10).
®
Radio II bedienen
Benutzung der Fernbedienung
DanskDeutschItalianoNederlandsSvenska
Das Wave® radio II kann mit der Fernbedienung bequem bedient werden. Richten Sie die
Fernbedienung auf die Vorderseite das Wave
®
radio II, und drücken Sie die entsprechenden
Tasten. Die Fernbedienung funktioniert auf eine Entfernung von bis zu 6 m zum Gerät.
In dieser Bedienungsanleitung werden links neben den Bedienungsanweisungen Symbole
angezeigt. Diese Symbole beziehen sich auf die Tasten der Fernbedienung.
Hinweis:
Wenn Sie Tasten gedrückt halten, erfolgt die Wirkung mit einer Verzögerung von einer
Sekunde.
Hinweis: We
nn Sie auf FM, AM, oder AUX drücken, wechselt das Wave®
radio II automatisch
zur ausgewählten Quelle.
8

Display ablesen
Uhrzeit im 12-Stunden- (AM/
PM) oder 24-Stunden-Format
Zeigt aktuelle Informationen für die ausgewählte
Quelle oder das Einstellungsmenü an.
Die Weckzeit wird nur bei
aktivierter Weckfunktion
angezeigt.
SLEEP wird bei aktivierter
Einschlaffunktion angezeigt.
Je nach Auswahl wird FM, AM, AUX
oder Bose
®
Link angezeigt.
On
Off
AUX
Mute
Sleep
Wave
®
Radio II bedienen
Dansk Italiano SvenskaDeutsch Nederlands
Wave
®
radio II ein- und ausschalten
Durch einmaliges Drücken von On/Off wird das Wave®
®
radio II aktiviert nach dem Einschalten die zuletzt verwendete Tonquelle.
Wave
ODER
Drücken Sie die Taste einer Tonquelle, um das Wave®
starten. Nach
dem Drücken von AUX wird die externe Komponente (wie z. B. der Fernseher)
nicht automatisch eingeschaltet. Schalten Sie daher zuerst die jeweilige Komponente ein.
Lautstärke einstellen
Halten Sie Volume oder gedrückt, um die Lautstärke einzustellen. Auf dem Display
wird der Lautsärkepegel als VOLUME - 0 (stumm) bis 99
Drücken Sie auf Mute, um das W
ave®
radio II in den Stummmodus zu versetzen. Bei
wiederholtem Drücken der Mute-Taste oder der Volume
Lautstärke wiederhergestellt. Um die Lautstärke vor dem Wiederherstellen leiser zu stellen,
drüc
ken Sie während der Stummschaltung auf Volume
Hinweis:
Wenn das Wave®
radio II ausgeschaltet ist, kann nur eine Lautstärke zwischen 10 und 75
gewählt werden.
Automatische Ausschaltfunktion (Sleep) einrichten
radio II ein- bzw. ausgeschaltet. Das
radio II mit dieser Komponente zu
(laut) angezeigt.
-Taste wird die vorherige
.
Drücken Sie Sleep, damit sich das Wave®
• Nachdem Sie auf Slee
angezeigt, und die Zeit für die automatische Ausschaltfunktion beginnt abzulaufen. Wenn
das Wave
und sofort die automatische Ausschaltzeit festlegen. Während des Ablaufens der für die
automatische Ausschaltfunktion eingestellten Zeit wird die zuletzt eingestellte Tonquelle
wiedergegeben.
• Drücken Sie während der Anzeige der SLE
autom. Ausschaltfunktion auf eine Zeit von 10-90 Minuten (in 10-Minuten-Schritten)
oder auf OFF (Aus) zu stellen.
Hinweis:
mehr als 10 Sekunden vergehen, beendet das Wave
• Um die verbleibende Zeit bis zum Auss
• Drücken Sie auf On/Of
radio II nach einer festgelegten Zeit ausschaltet.
p gedrückt haben, wird auf dem Display SLEEP - 30 MIN
®
radio II ausgeschaltet ist, können Sie es durch Drücken auf Sleep einschalten
E
P-Einstellung erneut auf Sleep, um die
Wenn beim Einstellen der autom. Ausschaltfunktion zwischen dem Drücken der Tasten
chalten anzuzeigen, drücken Sie auf Sleep.
f, um die automatische Ausschaltfunktion zu deaktivieren.
®
radio II automatisch diesen Modus.
9

FM/AM (UKW/MW)-Radio verwenden
Uhrzeit
Ausgewählter
programmierter
Radiosender
FM-
Quelle
Sender-
frequenz
FM-Display – RDS aktiv
FM-Display – Keine RDS-Information
Uhrzeit
Ausgewählter
programmierter
Radiosender
FM-
Quelle
RDS-Information
FM-
Quelle
Ausgewählter
programmierter Sender
Sender-
frequenz
Anzeige während des
Sendersuchlaufs
Wenn Sie auf FM, AM, Seek oder Tune
drücken, um einen Radiosender
einzustellen, wird im Display die Frequenz
angezeigt.
Seek
Radio einschalten
DanskDeutschItalianoNederlandsSvenska
Drücken Sie auf FM oder AM, um das Radio mit dem letzten gewählten FM oder AM-Sender
einzuschalten. Drücken Sie erneut FM oder
AM, um zwischen FM- und AM-Empfang zu
wechseln.
Bei eingeschaltetem Radio wird der Radiosender angezeigt. Wenn im Einstellungsmenü der Anlage
RDS aktiviert (ON) ist (siehe Seite 19), wird anstatt der Senderfrequenz die RDS-Information
angezeigt.
Hinweis: Mit dem Radio Data System (RDS) werden nützliche Informationen, wie z. B.
Sendername, Programminformationen und die aktuelle Uhrzeit übertragen. RDS steht nur für
Send
er im FM-Bereich (UKW) zur Verfügung und auch dort nur dann, wenn der entsprechende
Sender RDS-Daten überträgt.
Radio einstellen
Tune
Drücken Sie auf FM oder AM, um zwischen FM und AM zu wechseln.
D
rücken Sie auf Seek , um im niedrigeren Frequenzbereich einen Sender mit starkem
Signal zu suchen; drücken Sie auf Seek
, um im oberen Frequenzbereich einen Sender
mit starkem Signal zu suchen.
Drücken Sie auf
Tune <
, um manuell eine niedrigere Frequenz einzustellen, oder auf
Tune >
manuell eine höhere Frequenz einzustellen.
Halten Sie die Taste Tune < gedrückt, um schnell den niedrigeren Frequenzbereich zu
durchlaufen. Oder halten Sie Tune > gedrückt, um schnell die oberen Frequenzen zu
durchlaufen.
Hinweis:
wieder die Uhrzeit und darunter die Freq
Fünf Sekunden nach dem Loslassen der Taste
uenz des Radiosenders angezeigt.
FM, AM, Tune
oder
Seek
wird im Display
, um
Hinweis: Bei schwachem AM-Empfang sollten Sie das Wave ® radio II etwas nach rechts oder
links drehen. Wenn der FM-Empfang zu schwach ist, sollten Sie das Netzkabel so weit wie
mö
glich auslegen. Alternativ können Sie zum Verbessern des FM-Empfangs auch eine externe
FM-Antenne anschließen. Siehe „Externe FM-Antenne anschließen“ auf Seite 14.
10
Radiosender speichern (Presets)
Presets
123
456
Sie können bis zu sechs FM- und sechs AM-Radiosender für die Schnellwahl unter
Verwendung der
Presets
1. Wählen Sie einen Sender aus, den Sie für die Schnellwahl speichern möchten.
2. Halten Sie eine der sechs
ertönt und die Speichernummer und die Senderfrequenz im Display angezeigt werden.
3.
Drücken Sie eine der
Sender zu gelangen.
Hinweis: Wenn Sie einem Sender eine Schnellwahltaste zuweisen (Preset), wird dadurch der
Sender, der zuvor unter dieser Taste gespeichert war, ersetzt.
Hinweis:
Während eines Stromausfalls werden die gespeicherten Programme im
Sicherungsspeicher des Geräts verwahrt.
TALK RADIO-M odus
Die Tonqualität von Sprachbeiträgen im Radio kann erheblich durch die Art des verwendeten
Mikrofons und durch Erhöhen niedriger Frequenzen beeinflusst werden. Einige Radiosender
greifen zu diesen Maßnahmen, um die Sprachqualität bei herkömmlichen Radios zu
verbessern. Bei hochwertigen Audioprodukten führt dies zu einem unnatürlichen Klang oder zu
starken Bässen. Durch Auswahl des TALK RADIO-Modus gleicht das Wave
automatisch künstliche erhöhte Niedrigfrequenzen aus.
FM/AM (UKW/MW)-Radio verwenden
-Tasten speichern.
Presets
Presets
-Tasten solange gedrückt, bis ein doppelter Piepton
-Tasten, um schnell zu einem gespeicherten FM- oder AM-
®
radio II
Dansk Italiano SvenskaDeutsch Nederlands
Um die Einstellungen für den TALK RADIO-Modus zu ändern, drücken Sie bei laufendem
Radio zweimalig auf Tal
Bei aktiviertem TALK RADIO wird TA
k R ad io .
LK RADIO– ON angezeigt. Bei deaktiviertem TALK
RADIO wird TALK RADIO– OFF angezeigt.
Hinweis:
Sender oder einer anderen Quelle wechseln oder das Wave
Der TALK RADIO-Modus wird automatisch deaktiviert, wenn Sie zu einem anderen
®
radio II ausschalten.
11

Weckfunktion einstellen und verwenden
Wake
To
Alarm
Time
Alarm
Time
FM-Radiowecker
Weckzeit blinkt
Speichernummer
des Senders
Frequenz des Radiosenders
Weckzeit
Beispiel: Der Wecker ist auf den programmierten
Radiosender Nummer 4, auf die FM-Frequenz
101,70 und auf 6:00 Uhr früh eingestellt.
3
1
2
Halten Sie die
Taste
mindestens
eine Sekunde
lang gedrückt
Weckfunktion einstellen
DanskDeutschItalianoNederlandsSvenska
Wecken über Radio
1. Schalten Sie das Wave® radio II ein und
wählen Sie den Radiosender bzw. mit dem
weckt werden möchten.
Sie ge
2. Stellen Sie die Lautstärke auf den Pegel, mit
dem Sie
Halten Sie Wake To solange gedrückt, bis
3.
geweckt werden möchten.
Sie einen doppelten Piepton hören. Der
ker ist jetzt auf den ausgewählten
Wec
Radiosender bzw. eingestellt.
Weckzeit einstellen
1.
Drücken Sie auf Alarm Time, und geben Sie die Weckzeit ein. Die Weckzeit wird in der
Mitte des Displays und blinkend in der rechten oberen Ecke angezeigt.
Drücken Sie zum Einstellen der Weckzeit auf Time – oder Time +.
2.
Drücken Sie erneut auf Alarm Time. Die Weckzeit ist jetzt eingestellt.
3.
Hinweis:
Sekunden vergehen, wird dieser Modus automatisch beendet.
Hinweis:
Alarm Time. Die
angezeigt.
Wenn beim Einstellen der Weckzeit zwischen dem Drücken der Tasten mehr als 10
Bestätigen Sie die Weckzeit und die entsprechenden Einstellungen durch Drücken von
Weckzeit und die entsprechenden Einstellungen werden 10 Sekunden lang
12

Weckfunktion verwenden
On
Off
Stop Alarm
Wecker nach Ertönen des Wecktons abstellen
Drücken Sie auf On/Off (Stop Alarm), um bei Ertönen des Wecktons den Wecker
abzustellen und für den nächsten Tag neu zu stellen.
Weckfunktion ein- bzw. ausschalten
Alarm
On/Off
Sleep
Drücken Sie auf Alarm On/Off, um die Weckfunktion ein- bzw. auszuschalten. Wenn die
Weckfunktion eingeschaltet ist, wird im Display rechts oben die Weckzeit angezeigt. Wenn
die We
ckfunktion ausgeschaltet ist, wird die Weckzeit nicht im Display angezeigt.
Nachweckfunktion
Drücken Sie auf Sleep, um beim Ertönen des Wecktons die Nachweckfunktion zu aktivieren.
Während der Nachweckzeit wird
abgelaufen ist, ertönt der Weckton erneut. Durch erneutes Drücken von Sleep wird der
Weckton erneut unterbrochen und der Wecker noch einmal für 10 Minuten ausgesetzt.
(Werksseitig ist eine Nachweckzeit von 10 Minuten eingestellt. Siehe „Nachweckzeit
einstellen“ auf Seite 19.)
Weckfunktion einstellen und verwenden
Dansk Italiano SvenskaDeutsch Nederlands
im Display SNOOZE angezeigt. Nachdem die Nachweckzeit
13

Externe Komponenten anschließen
Bose link
AUX IN
EXTERNE
75Ω FM-ANTENNE
Ein 3,5 mm FMAntennenanschluss
Bose® Link-Anschluss
Zum Anschluss von mit
Bose
®
Link ausgestatteten
Lifestyle
®
Systemen.
AUX IN
Eine 3,5 mm
Stereoeingangsbuchse zum
Anschluss externer
Komponenten
KOPFHÖRER
Ein 3,5 mm StereokopfhörerAnschluss. Die Lautsprecher
des Wave
®
radio II werden
bei Anschluss der Kopfhörer
stummgeschaltet.
75Ω FM ANTENNA-Anschluss
Antennenadapter
Ein- und Ausgänge auf der Rückseite
An der Rückseite des Wave® radio II können verschiedene externe Komponenten
angeschlossen werden.
DanskDeutschItalianoNederlandsSvenska
Externe FM-Antenne anschließen
Das Netzkabel des Wave
Ausrichtung des Netzteils noch immer schlechter Empfang vorliegt, können Sie das System mit
einer externen Dach- oder Kabelantenne oder einer FM-Dipol-Antenne verbinden. Ein Adapter
zum Verbinden des Systems mit einer externen Dach- oder Kabelantenne liegt bei. Sie können
eine passende externe FM-Dipolantenne über den Kundenservice von Bose
entsprechenden Telefonnummern finden Sie auf der hinteren Umschlagseite innen.
®
radio II enthält eine eingebaute FM-Antenne. Wenn nach
®
bestellen. Die
So schließen Sie eine externe Dach- o
der Kabelantenne mit Hilfe des
Antennenadapters an:
• Verbinden Sie den 3,5 mm Stecker des Antennenadapters mit dem als
gekennzeichneten Anschluss auf der Rückseite des Wave
®
radio II.
• Verbinden Sie das andere Ende des Adapters mit dem Kabel der Dach- od
75Ω FM ANTENNA
er Kabelantenne.
Durch den Anschluss einer externen Dach- oder Kabelantenne wird die eingebaute Antenne
deaktiviert, und das FM-Signal wird ausschließlich über die externe Antenne empfangen. Die
ei
ngebaute Antenne ist wieder aktiv, sobald die externe Antenne vom System getrennt wird.
14

So schließen Sie eine externe FM-Antenne an:
Bose link
AUX IN
75Ω FM-Antennenanschluss
FM-Dipolantenne (nicht im Lieferumfang enthalten)
(Kopfhörer nicht im Lieferumfang enthalten)
KOPFHÖRER-Anschluss
• Verbinden Sie den 3,5 mm Stecker der FM-Antenne mit dem als
gekennzeichneten Anschluss auf der Rückseite des Wave
• Für besten FM-Empfang sollten die Antennenenden möglichst weit ausgebreitet werden.
• Legen Sie die Antennenarme so weit wie möglich vom System und anderen Komponenten
entf
Kopfhörer verwenden
Externe Komponenten anschließen
ernt aus, um einen optimalen Empfang zu erzielen.
®
radio II.
75Ω FM-ANTENNA
Dansk Italiano SvenskaDeutsch Nederlands
Wenn Sie ungestört Musik oder radio hören möchten, können Sie am Kopfhöreranschluss auf
der Rückseite des Wav e
• Die Lautsprecher werden beim Anschluss de
ACHTUNG:
Laute Musik kann zu Gehörschäden führen. Wenn Sie Kopfhörer benutzen, sollten
®
radio II einen Kopfhörer anschließen.
s Kopfhörers automatisch stummgeschaltet.
Sie extreme Lautstärken vermeiden, insbesondere wenn Sie die Köpfhörer über einen längeren
Zeitr
aum verwenden.
Hinweis: Die Lautsprecher werden automatisch wieder aktiviert, sobald die Kopfhörer vom
®
radio II abgezogen werden. Da sich die Lautstärke der Kopfhörer von der Lautstärke der
Wave
Lautsprecher unterscheiden kann, sollten Sie die Lautstärke des Wave
®
radio II vor dem
Anschluss bzw. Trennen der Kopfhörer herunterregeln.
Hinweis:
Wenn der Wecker aktiviert wird, während Sie Kopfhörer verwenden, wird der Weckton
über die Lautsprecher des Geräts abgegeben.
So regeln Sie die Lautstärke der Kopfhörer:
Drücken Sie auf Vo
ume oder , um den Hörpegel für die Kopfhörer einzustellen.
l
15

Externe Komponenten anschließen
• Stecker/Stecker 3,5 mm Stereokabel
• Dual RCA-Stecker auf
3,5 mm
Stereokabelstecker
AUX
Dual RCA-Stecker
auf 3,5 mm
Stereokabelstecker
Fernsehgerät
AUX IN-
Anschluss
Wave
DanskDeutschItalianoNederlandsSvenska
®
radio II mit anderen Audiokomponenten verwenden
Sie können ein Fernsehgerät, einen Videorekorder, einen Computer, eine Spielkonsole oder einen
Kassettenrekorder über das Wave
Zum Anschließen eines Audiogerätes an das Wave
®
radio II abspielen, um das Hörerlebnis zu erhöhen.
®
radio II benötigen Sie je eines der folgenden
Kabel:
Die benötigten Kabel können Sie über den Kundenservice von Bose® oder in einem
Elektrofachgeschäft vor Ort beziehen. Die entsprechenden Telefonnummern finden Sie auf
der hinteren Umschlagseite innen.
So schließen Sie ein Audiogerät, wie z. B. Ihr Fernsehgerät, an das Wave
an:
1. Verbinden Sie das eine Ende des Stereok
2. Verbinden Sie das andere Ende mit dem AUX IN-
abels mit dem Ausgang des Audiogerätes.
Anschluss auf der Rückseite des Wave®
radio II.
On
3.
Off
Schalten Sie das Wave® radio II und das Audiogerät ein.
®
radio II
Wave
4.
Drücken Sie auf AUX.
5.
Halten Sie Volume oder gedrückt, um den Hörpegel einzustellen.
Hinweis:
Wenn die Lautstärke trotz maximaler Lautstärkeregelung des Wave® radio II nicht
ausreicht, sollten Sie die Lautstärke am Audiogerät erhöhen.
®
Radio II an ein Lifestyle
®
System anschließen
Sie können Ihr Wave® radio II auch als Multi-Room-Erweiterungslautsprechersystem
zusammen mit einem Bose
Das Wave
Einstellung finden Sie unter „Raumcode einstellen“ auf Seite 21.
Wenden Sie sich an den Kundendienst von Bose
Anleitungen zu beziehen. Die entsprechenden Telefonnummern finden Sie auf der hinteren
16
Umschlagseite innen.
®
®
radio II ist werksseitig auf Raum B eingestellt. Hinweise zum Ändern dieser
Link-fähigenLifestyle® Home Entertainment System betreiben.
®
, um die entsprechenden Kabel und

Dansk Italiano SvenskaDeutsch Nederlands
Wave
®
Radio II anpassen
Die werksseitigen Einstellungen dürften für die meisten
Benutzern ausreichend sein. Wenn Sie dennoch die
Systemeinstellungen ändern möchten, finden Sie die
Anweisungen dazu auf den Seiten 18 bis 22.
17
Wave
Tune
Alarm
Time
Menu
Alarm
Time
Menu
®
Radio II anpassen
Einstellungsmenü
DanskDeutschItalianoNederlandsSvenska
Mit dem Einstellungsmenü können Sie die Bedienung des Wave® radio II an Ihre persönlichen
Vorlieben anpassen.
1.
Halten Sie Alarm Time (Menu) gedrückt, bis -SETUP MENU- angezeigt wird.
2. Drücken Sie so oft auf T
3. Drücken Sie auf Time – o
4. Drücken Sie auf Alarm
une >, bis der gewünschte Menüeintrag angezeigt wird.
der Time +, um den Wert bzw. die Auswahl zu ändern.
Time (Menu), um das Einstellungsmenü zu verlassen, oder
warten Sie einfach 10 Sekunden. Nach Ablauf dieser Zeit wird das Einstellungsmenü
automatisch beendet.
Einstellungsmenü des Wave® radio II
Werkseitige
Systemeinstellung Menüobjekt
Einstellung der
Nachweckzeit
Radio Data
System(RDS)Informati
Uhrzeit-Format TIME- 12 HOUR 12-HOUR,
onen
SNOOZE- 10 MIN 10 MIN, 20 MIN,
RDS- ON OFF, ON Aktiviert (ON) bzw. deaktiviert (OFF) die Anzeige
Einstellu
Auswahlmöglich
ng
keiten Beschreibung
30 MIN, 40 MIN,
50 MIN, 60 MIN
24-HOUR
Legt die Nachweckzeit fest.
der RDS-Informationen
Stellt die Uhranzeige auf das 12-Stunden-Format
(AM/PM) oder
24-Stunden-Format.
Helle Displayanzeige BRIGHT HI- 12 8-15 Justiert die Helligkeit des Displays, wenn vom
Dunkle
Displayanzeige
Raumcode ROOM- B
Energiesparmodus LOW POWER- OFF OFF, ON Aktiviert (ON) oder deaktiviert (OFF) den
System zurücksetzen RESET ALL- NO NO, YES Stellt das Wave
BRIGHT LO- 4 1-8 Justiert di
_ _ _ – B _ _ _ –, C _ _ – _,
D _ _ – –, E _ – _ _,
F _ – _ –, G _ – – _,
H _ – – –, I – _ _ _,
J – _ _ –, K – _ – _,
L – _ – –, M – – _ _,
N – – _ –, O – – – _
System sehr
wird.
System sehr geringes Umgebungslicht festgestellt
wird.
Legt den Raumcode für das Wave
sofern es über ein Bose® Link mit einem Lifestyle®
System verbunden ist.
Der Gedankenstrich hinter dem Buchstaben des
Raumes zeigt an, wie die Microswitches an der
Fernbedienung des Lifestyle® Systems eingestellt
werden müssen.
Energiesparmodus. Im Energiesparmodus
verbraucht das Gerät nach dem Abschalten
weniger Strom.
einstellungen zurück.
helles Umgebungslicht festgestellt
e Helligkeit des Displays, wenn vom
®
radio II fest,
®
radio II wieder auf die Werks-
18

Nachweckzeit einstellen
Alarm
Time
Menu
Alarm
Time
Menu
Tune
Alarm
Time
Menu
Alarm
Time
Menu
Tune
Mit dieser Einstellung wird die Dauer der Ruhepause des Geräts bei aktivierter Nachweckfunktion festgelegt.
1.
Halten Sie Alarm Time (Menu) solange gedrückt, bis -SETUP MENU- angezeigt wird
Wave
®
Radio II anpassen
Dansk Italiano SvenskaDeutsch Nederlands
2. Drücken Sie einmal auf T
3. Drücken Sie auf Time – o
une >, bis SNOOZE- 10 MIN angezeigt wird.
der Time +, um eine Nachweckzeit zwischen 10 und 60
Minuten auszuwählen (in 10-Minuten-Schritten).
4. Drücken Sie A
larm Time (Menu), um das Einstellungsmenü zu verlassen, oder warten
Sie einfach 10 Sekunden. Nach Ablauf dieser Zeit wird das Einstellungsmenü
automatisch beendet.
Einstellung für die Radio Data System (RDS)-Informationen ändern
Mit dieser Einstellung wird die Anzeige von RDS-Informationen aktiviert bzw. deaktiviert. Das
RDS ist ein System, mit dem nützliche Informationen, wie z. B. Sendername,
Programminformationen und die aktuelle Uhrzeit angezeigt werden. RDS steht nur für Sender
im FM-Bereich (UKW) zur Verfügung und auch dort nur dann, wenn der entsprechende
Sender RDS-Daten überträgt.
1.
Halten Sie Alarm Time (Menu) solange gedrückt, bis -SETUP MENU- angezeigt wird.
2. Drücken Sie zweimal auf T
3. Drücken Sie auf Time – o
4. Drücken Sie auf Alarm
warten Sie 10 Sekunden, bis das Einstellungsmenü automatisch beendet wird.
une >, bis RDS- ON angezeigt wird.
der Time +, um von RDS- ON auf RDS- OFF zu wechseln.
Time (Menu), um das Einstellungsmenü zu beenden, oder
19

Wave
Alarm
Time
Menu
Alarm
Time
Menu
Tune
Alarm
Time
Menu
Alarm
Time
Menu
Tune
Tune
®
Radio II anpassen
Uhrzeitformat ändern
DanskDeutschItalianoNederlandsSvenska
Sie können die Uhrzeit im 12-Stunden-Format (AM/PM) oder im 24-Stunden-Format
anzeigen lassen.
1.
Halten Sie Alarm Time (Menu) solange gedrückt, bis -SETUP MENU- angezeigt wird.
2. Drücken Sie viermal auf Tu
3. Drücken Sie auf Time – o
4. Drücken Sie auf Alarm
warten Sie einfach 10 Sekunden. Nach Ablauf dieser Zeit wird das Einstellungsmenü
automatisch beendet.
Helligkeit der Anzeige einstellen
Die Helligkeit der Anzeige passt sich selbständig an eine helle oder dunkle Umgebung an. Bei
starkem Umgebungslicht wird das Display aufgehellt und bei geringem Umgebungslicht
abgedunkelt. Die Einstellungen für starke und geringe Helligkeit können separat vorgenommen
werden.
1.
Halten Sie Alarm Time (Menu) solange gedrückt, bis -SETUP MENU- angezeigt wird.
2. Drücken Sie fünfmal auf T
ne >, bis TIME- angezeigt wird.
der Time +, um 12 HOUR oder 24 HOUR auszuwählen.
Time (Menu), um das Einstellungsmenü zu verlassen, oder
une >, bis BRIGHT HI- angezeigt wird.
3. Drücken Sie Tim
einzustellen.
4. Drü
cken Sie einmal auf T
5. Drücken Sie Tim
einzustellen.
6. Drücken Sie auf Alarm
warten Sie 10 Sekunden, bis das Einstellungsmenü automatisch beendet wird.
20
e – oder Time +, um die Helligkeit auf einen Wert zwischen 8 und 15
une >, bis BRIGHT LO- angezeigt wird.
e – oder Time +, um die Helligkeit auf einen Wert zwischen 1 und 8
Time (Menu), um das Einstellungsmenü zu beenden, oder

Raumcode einstellen
Alarm
Time
Menu
Alarm
Time
Menu
Tune
Das Wave® radio II wird werksseitig so ausgeliefert, dass bei Anschluss eines Bose® Linkfähigen Lifestyle
Wenn Sie Ihr Wave
verwenden möchten, müssen Sie den Raumcode ändern, damit er mit dem von der
Fernbedienung verwendeten Code übereinstimmt.
Wave
®
Systems standardmäßig der zweite Raum (Raumcode B) ausgewählt ist.
®
radio II mit einem Lifestyle® System über einen zweiten Raum hinaus
®
Radio II anpassen
Dansk Italiano SvenskaDeutsch Nederlands
Alarm
Time
Menu
Tune
Alarm
Time
Menu
Energiesparmodus
Weitere Hinweise zu Raumcodes finden Sie in
er Bedienungsanleitung für das Lifestyle®
d
System.
1.
Halten Sie Alarm Time (Menu) solange gedrückt, bis -SETUP MENU- angezeigt wird.
2. Drücken Sie siebenmal auf T
une >, bis ROOM- B angezeigt wird. Der
Gedankenstrich hinter dem Buchstaben des Raumes zeigt an, wie die Microswitches an
der Fern
bedienung des Lifestyle
hierzu finden Sie in der Bedienungsanleitung des Lifestyle
3. Drücken Sie auf Time – o
4. Drücken Sie auf Alarm
Time (Menu), um das Einstellungsmenü zu verlassen, oder
®
Systems eingestellt sein müssen. Weitere Hinweise
®
Systems.
der Time +, um einen anderen Raumcode als B auszuwählen.
warten Sie einfach 10 Sekunden. Nach Ablauf dieser Zeit wird das Einstellungsmenü
automatisch beendet.
Das Wave® radio II verfügt über einen Energiespar-Modus, durch den das Gerät nach dem
Abschalten weniger Strom verbraucht. Wenn der Energiesparmodus aktiviert ist, schaltet sich
das Display automatisch nach 30 Minuten aus. Kurz bevor das Display ausgeschaltet wird,
erscheint die Anzeige LOW POWER- ON.
Im Energiesparmodus läuft die Uhrzeit normal weiter, die Einstellungen bleiben unverändert
un
d bei
aktivierter Weckfunktion wird das Gerät zur eingestellten Weckzeit eingeschaltet.
Wenn Sie im Energiesparmodus auf FM, AM, AUX oder Preset 1 bis 6 drücken, wird das
Gerät ganz normal eingeschaltet. Wenn Sie eine andere Taste der Fernbedienung drücken
oder eine Taste, bei der das Gerät nicht eingeschaltet wird, ist das Display wieder 30 Minuten
lang aktiv und wird anschließend wieder ausgeschaltet.
1.
Halten Sie Alarm Time (Menu) solange gedrückt, bis -SETUP MENU- angezeigt wird.
2. Drücken Sie achtmal auf T
3. Drücken Sie auf Time
une >, bis LOW POWER- OFF angezeigt wird.
– oder Time +, um von LOW POWER- OFF auf LOW POWER- ON
zu wechseln.
4. Drücken Sie auf Alarm
Time (Menu), um das Einstellungsmenü zu beenden, oder
warten Sie 10 Sekunden, bis das Einstellungsmenü automatisch beendet wird.
21

Wave
®
Radio II anpassen
System-Zurückstellung vornehmen
Bei Bedarf können Sie das Wave® radio II auf die ursprünglichen Werkseinstellungen
zurückstellen.
DanskDeutschItalianoNederlandsSvenska
Tune
Alarm
1.
Time
Menu
Halten Sie Alarm Time (Menu) solange gedrückt, bis -SETUP MENU- angezeigt wird.
2. Drücken Sie neunmal auf T
une >, bis RESET ALL- NO angezeigt wird.
3. Drücken Sie auf Time +, u
zu ändern.
4. Wenn PRESS
Presets-Taste 2 drücken. Sobald die Zurückstellung abgeschlossen ist, wird
DEFAULTS RESET angezeigt.
Alarm
Time
Menu
5. Drü
cken Sie auf Alarm
warten Sie einfach 10 Sekunden. Nach Ablauf dieser Zeit wird das Einstellungsmenü
automatisch beendet.
m die Einstellung von RESET ALL- NO in RESET ALL- YES
2 TO CONFIRM auf dem Display angezeigt wird, müssen Sie die
Time (Menu), um das Einstellungsmenü zu verlassen, oder
22

Wartung und Pflege des Wave
See operating
instructions for
types of
battery to be used
e operating
nstructions for types of
battery to be used
See operating
instructions for types of
battery to be used
Reinigung
Reinigen Sie das Gehäuse des Wave® radio II ausschließlich mit einem trockenen Tuch. Bei
Bedarf können Sie die Gehäusevorderseite auch mit einem weichen Bürstenaufsatz
vorsichtig absaugen. Verwenden Sie auf keinen Fall flüssige Reinigungslösungen,
Chemikalien, Alkohol oder Scheuermittel.
ACHTUNG:
Auf keinen Fall darf Feuchtigkeit ins Innere des Gerätes gelangen. Falls doch
Flüssigkeit in das Gerät gelangt, schalten Sie es sofort aus. Rufen Sie umgehend den Bose
Kundendienst an. Die entsprechenden Telefonnummern finden Sie auf der hinteren
Umschlagseite innen.
Batterie der Fernbedienung austauschen
WARNUNG: Bewahren Sie die Batterien der Fernbedienung außerhalb der Reichweite von
Kindern auf. Bei fehlerhaftem Umgang mit der Batterie kann ein Brand oder eine chemische
Reak
tion ausgelöst werden. Laden Sie keine Batterien neu auf, nehmen Sie sie nicht auseinander
und erhitzen Sie die Batterien nicht über 100ºC (212ºF) bzw. verbrennen Sie keine Batterien.
Entsorgen Sie leere Batterien umgehend. Verwenden Sie nur Batterien vom vorgeschriebenen
Typ und der entsprechenden Modellnummer.
ACHTUNG:
bzw. DL2032 3-Volt Lithium-Batteri
Shun Wo.
So tauschen Sie die Batterie der Fernbedienung aus:
Bei Einsatz falscher Batterien besteht Explosionsgefahr! Verwenden Sie nur CR2032
en von Duracell, Eveready, Energizer, Maxell, Toshiba oder
®
Radio II
Dansk Italiano SvenskaDeutsch Nederlands
®
1. Legen Sie die Fernbedienung mit der Oberseite nach unten auf eine ebene Oberfläche.
2. Schieben Sie den Verschluss mit dem Finger zur
Seite, wie in der Abbildung gezeigt, und
halten Sie ihn offen. Öffnen Sie die Batterieabdeckung.
3. Entnehmen Sie die alte Batterie, und setzen Sie die neue mit dem Pluszeichen (+) nach
oben ein.
4. Drücken Sie die Batterieabdeckung vorsichtig zu. Sie rastet automatisch ein.
23

Wartung und Pflege des Wave
®
Radio II
Fehlersuche
Problem Lösung
DanskDeutschItalianoNederlandsSvenska
System funktioniert nicht • Stellen Sie sicher, dass das Netzkabel ordnungsgemäß mit einer stromführenden
kdose verbunden ist.
Stec
• Drücken Sie auf On/Of
Kein Ton • Erhöhen Sie die Lautstärke.
• Drücken Sie auf Mute.
• Überprüfen Sie die Anschlüsse zusätzlicher externer Komponenten.
• Drücken Sie auf AU
Eingang angeschlossen ist.
• Prüfen Sie, ob die Komponente eingeschaltet ist.
• Falls Kopfhörer angeschlossen sind, entfernen Sie diese.
f, um zu prüfen, ob das Display aufleuchtet.
X,
um eine externe Komponente zu überprüfen, die an den AUX IN-
Fernbedienung funktioniert
i
cht oder nur fehlerhaft
n
Schwacher AM-Empfang • Ändern Sie die Stellung der internen Antenne, indem Sie das Gerät je etwas zur Seite
Schwacher FM-Empfang • Legen Sie das Netzkabel so weit wie möglich aus.
Es werden keine RDS-
rmationen angezeigt
Info
Anzeigefenster ist leer • Drücken Sie eine beliebige Taste auf der Fernbedienung, um zu prüfen, ob sich das
Das
• Verringern Sie den Abstand zwischen Fernbedienung und dem Gerät.
• Überprüfen Sie, ob die Batterie der Fernbedienung mit dem Pluszeichen (+) nach oben
elegt ist.
eing
• Tauschen Sie die Batterie der Fernbedienung aus.
• Überprüfen Sie, ob Störungen durch die Raumbeleuchtung oder Sonnenlicht bzw.
u
b oder eine verschmutzte Linse verursacht werden.
Sta
• Stellen Sie das Gerät an einem anderen Standort auf.
en (links und rechts).
dreh
• Stellen Sie das Gerät weiter entfernt von Fernsehern, Kühlschränken, Neonröhren,
enlampen, Dimmschaltern oder sonstigen elektronischen Geräten auf, die
Halog
elektrische Störfelder verursachen.
• Falls keiner dieser Ratschläge hilft, befinden Sie sich eventuell in einem Gebiet mit
hwac
sc
• Verwenden Sie eine externe Antenne. Externe FM-Antennen können Sie beim Bose
Kundendienst bestellen.
• Stellen Sie sicher, dass in den Systemeinstellungen RDS- auf ON gestellt ist.
• Vergewissern Sie sich, dass ein FM (UKW)-Sender eingestellt ist.
• Der Sender überträgt eventuell keine RDS-Informationen. Wenden Sie sich an den
Radiosender.
Display ein
Ausschalten des Geräts noch 30 Minuten in diesem Modus. Weitere Hinweise finden
Sie unter „Energiesparmodus“ auf Seite 21.
• Wenn Sie zur Lösung des Problems zusätzliche
an den Bose Kundendienst.
hem AM-Empfang.
Das Netzkabel dient als FM-Antenne.
schaltet. Falls der Energiesparmodus aktiviert ist, bleibt das Display nach
Hilfe benötigen, wenden
Sie sich bitte
®
24

Kundendienst
Falls Sie Ihre Fernbedienung verloren haben, können Sie beim Bose Kundendienst eine neue
bestellen.
Eingeschränkte Garantie
Auf das Bose® Wave® radio II wird eine übertragbare eingeschränkte Garantie gewährt. Details
zur beschränkten Garantie sind auf der Registrierungskarte des Produkts angegeben. Diese ist
Teil des Lieferumfangs. Füllen Sie bitte den Informationsteil der Karte aus, und schicken Sie
diese an Bose. Ihre eingeschränkte Garantie ist jedoch unabhängig davon gültig.
Technische Daten
Spannungsversorgung
220 V-240 V~ 50/60 Hz 60 W
Abmessungen
36,8 cm x 21,9 cm x 10,6 cm (BxTxH)
Wartung und Pflege des Wave
®
Radio II
Dansk Italiano SvenskaDeutsch Nederlands
Gewicht
3,9 kg
25

Wartung und Pflege des Wave
®
Radio II
Beschränkte Garantie und
Verkaufsbedingungen
DanskDeutschItalianoNederlandsSvenska
Umfang
Alle Teile mit Material- oder Verarbeitungsfehlern. Diese
beschränkte Garantie für das Bose
umfasst die Funktionalität des Systems im Hinblick auf dessen
sachgemäßen und in der Bedienungsanleitung vorgesehenen
Gebrauch. Sie gilt nicht für Fehlfunktionen, die durch
unsachgemäße Bedienung oder Wartung, durch Unfall,
übermäßige Feuchtigkeit, ungeeignete Verpackung,
Blitzschäden, Stromstöße oder nicht genehmigte Eingriffe,
Umbauten oder Änderungen, die nicht unter der Aufsicht von
Bose vorgenommen wurden, entstanden sind. Die Systeme von
Bose können nicht in jeder Umgebung eingesetzt werden.
Informieren Sie sich hierzu in der Bedienungsanleitung.
SOWEIT ZULÄSSIG, GELTEN DIE BESTIMMUNGEN DIESER
BESCHRÄNKTEN GARANTIE UNTER AUSSCHLUSS ALLER
ANDEREN SCHRIFTLICHEN GARANTIEN, OB VERTRAULICHE
ODER GESETZLICHE, SCHRIFTLICHE ODER MÜNDLICHE,
EINSCHLIESSLICH DER GARANTIE DER HANDELSÜBLICHKEIT
ODER EIGNUNG FÜR EINEN BESTIMMTEN ZWECK.
Wenn Sie ungeachtet des Vorangegangenen gemäß des
Magnuson-Moss Warranty Acts als „Konsument“ gelten, dann
haben Sie möglicherweise Anspruch auf alle gesetzlichen
Garantien für die Dauer der unten dargelegten vertraglichen
Gewährleistung.
Garantiezeit:
In den Ländern, in denen die Dauer der Garantie nicht gesetzlich
vorgeschrieben ist, dauert die beschränkte Garantie von Bose
zwei Jahre ab Kaufdatum. Bei Kauf in Ländern, in denen eine
Mindestgarantie gesetzlich vorgeschrieben ist, gilt die
gesetzlich vorgeschriebene Mindestgarantie, soweit sie die oben
aufgeführten Garantielaufzeiten überschreitet.
Verpflichtungen von Bose:
Alle defekten Teile werden von Bose kostenfrei innerhalb eines
angemessenen Zeitraums repariert oder ersetzt.
Geltendmachung der Garantieansprüche:
Unter der Voraussetzung, dass Sie einen Kaufbeleg eines BoseVertragshändlers haben, können Sie das System entweder an
eine Bose-Reparaturwerkstatt oder direkt an Bose zurückgeben.
Soweit dies gesetzlich ausgeschlossen ist, ist die Erbringung
eines Kaufbelegs entbehrlich.
Zur Rückgabe eines Produkts gehen Sie wie folgt vor:
1. Verpacken Sie das Gerät sachgemäß und vorsichtig für den
Versand. Falls Sie einen neuen Versandkarton benötigen,
wenden Sie sich bitte an Bose.
2. Wenn Sie das Produkt direkt an Bose zurückgeben wollen,
dann fordern Sie bitte bei Bose eine Reklamationsnummer
an. Schreiben Sie diese Nummer deutlich auf die Außenseite
des Kartons.
3. Wenn Sie das Produkt an eine Bose-Reparaturwerkstatt
zurückgeben möchten, dann wenden Sie sich an die Werkstatt,
um Anweisungen zu Verpackung und Versand zu erhalten.
4. Beschriften Sie das Gerät, und senden Sie es an die
entsprechende Adresse.
Bose Corporation
The Mountain
Framingham, MA 01701, USA
®
Wave Radio II („System“)
Weitere Ansprüche:
EXKLUSIVE RECHTSFOLGE:
DIESE BESCHRÄNKTE GARANTIE IST VOLL ÜBERTRAGBAR
UNTER DER VORAUSSETZUNG, DASS DER MOMENTANE
BESITZER DEN ORIGINAL-KAUFBELEG EINES BOSEVERTRAGSHÄNDLERS VORLEGEN KANN. DIE
HAFTPFLICHTHÖCHSTGRENZE FÜR BOSE ÜBERSTEIGT
NICHT DEN TATSÄCHLICHEN KAUFPREIS, DER FÜR DIESES
PRODUKT GEZAHLT WURDE. BOSE IST IN KEINEM FALL FÜR
SCHÄDEN IM EINZELFALL, ZWEITRANGIGE SCHÄDEN,
FOLGESCHÄDEN ODER MITTELBARE SCHÄDEN HAFTBAR. IN
EINIGEN LÄNDERN SIND GARANTIEBESCHRÄNKUNGEN
SOWIE DER AUSSCHLUSS ODER DIE BESCHRÄNKUNG VON
RECHTSMITTELN UND ANSPRÜCHEN AUF ERSATZ VON
BESONDEREN, BEILÄUFIG ENTSTANDENEN ODER
MITTELBAREN SCHÄDEN SOWIE BESCHRÄNKUNGEN DER
HAFTUNGSSUMME NICHT GESTATTET, SO DASS IN DIESEM
FALL DIE OBEN GENANNTEN EINSCHRÄNKUNGEN UND
AUSSCHLÜSSE NICHT GELTEN.
WEITERE BEDINGUNGEN:
WIR EMPFEHLEN IHNEN, SICH DIE SERIENNUMMER, DIE SIE AUF
DEN PRODUKTEN FINDEN, UND WEITERE KAUFINFORMATIONEN
ZU NOTIEREN UND MIT IHREN PERSÖNLICHEN UNTERLAGEN
UND ZUSAMMEN MIT DEM KAUFBELEG AUFZUBEWAHREN.
WENN NÖTIG, SIND WIR MIT HILFE DIESER INFORMATIONEN IN
DER LAGE, BESSER AUF IHRE BEDÜRFNISSE EINZUGEHEN.
AUFGRUND DIESER BESCHRÄNKTEN GARANTIE STEHEN
IHNEN UNTER BESTIMMTEN VORAUSSETZUNGEN
BESTIMMTE RECHTE ZU. DANEBEN KÖNNEN IHNEN IM
HINBLICK AUF DAS VON IHNEN ERWORBENE PRODUKT
WEITERE RECHTE ZUSTEHEN. DIE AUSGESTALTUNG DIESER
RECHTE HÄNGT VON DEM LAND AB, IN DEM SIE LEBEN. IN
EINIGEN LÄNDERN IST DER AUSSCHLUSS, DIE
BESCHRÄNKUNG ODER DIE ÄNDERUNG BESTIMMTER
IMPLIZIERTER RECHTE BZW. IHRER AUSWIRKUNGEN
UNTERSAGT. IN DIESEN LÄNDERN ENTFALTET DIE
VORLIEGENDE BESCHRÄNKTE GARANTIE IHRE WIRKUNG
NUR INSOWEIT, WIE DIES GESETZLICH ERLAUBT IST. IN
EINIGEN LÄNDERN GIBT ES EINEN GESETZLICHEN
GEWÄHRLEISTUNGSANSPRUCH GEGEN DEN VERKÄUFER.
In Ihrem Land ist möglicherweise ein gesetzlicher
Gewährleistungsanspruch gegen den Verkäufer oder Hersteller
dieses Produkts vorgesehen. Die beschränkte Garantie hat auf
diese Ansprüche keine Auswirkung.
Rechtsfolgen:
Die Bestimmungen dieser beschränkten Garantie ersetzen
jegliche anderen Garantien oder Vereinbarungen, ausgenommen
gesetzliche Bestimmungen. Sämtliche Ansprüche, die Ihnen
gesetzlich zustehen, bleiben von der vorliegenden beschränkten
Garantie unberührt. Die beschränkte Garantie schließt keine
Rechtsmittel aus, die Ihnen gesetzlich zustehen.
Diese Garantie ist voll übertragbar unter der Voraussetzung, dass
der momentane Besitzer den Original-Kaufbeleg eines BoseVertragshändlers vorlegen kann.
Die vorliegende beschränkte Garantie verfällt, wenn der
Aufkleber mit der Seriennummer entfernt oder beschädigt wurde.
26

Index
0-9
12-Stunden-Format (AM/PM) 18
24-Stunden-Anzeige 6
24-Stunden-Format 18, 20
A
Abmessungen 25
Abstellen des Wecktons 13
Acoustic Waveguide 7
AM 10
AM/PM (12-Stunden)-Anzeige 6, 20
AM-Empfang 24
Anpassen 18
Anpassen der Bedienung 18
Anschluss externer Komponenten 14
Anschlüsse 24
Audikomponenten, andere 16
Audiogerät, anschließen 16
Auspacken 4
automatische Ausschaltfunktion, Einstellmodus 9
automatisches Ausschalten (Sleep) 9
AUX IN-Anschluss 14, 16
B
Batterie der Fernbedienung 23, 24
Batterien wechseln 23
Bedienung des Geräts 7
Benutzen des FM/AM-Radios 10
Betrieb, Informationen zum laufendem 9
®
Link 14, 16, 18, 21
Bose
C
Computer 16
D
Dimmschalter 24
Dipolantenne 14
Display 9, 12, 24
E
Ein- und Ausschalten der Weckfunktion 13
Einstellen des Radios 10
Einstellung der Nachweckzeit 18
Einstellungsmenü 18, 20, 21
elektrisches Störfeld 24
Energiesparmodus 21
Ertönen des Wecktons 13
externe FM-Antenne 10, 14, 24
externe Komponente 9, 24
externe Komponenten 14
F
Fehlersuche 24
Fernbedienung 8
Fernsehgerät 16, 24
FM 10
FM-Antenne 5, 14, 24
FM-Empfang 5, 10, 15, 24
FM-Quelle 10
Frequenz des Radiosenders 10
Frequenzbereich 10
G
Garantie 25
gespeicherte Sender 11
Gewicht 25
H
Halogenlampe 24
Helligkeit 18, 20
Helligkeit der Anzeige 18, 20
Hörpegel 15, 16
I
interne Antenne 24
K
Kein Ton 24
Kopfhörer 14, 15, 24
Kühlschrank 24
Kundendienst 24, 25
L
Lautstärkepegel 9, 16, 24
Lautstärkepegel beim Wecken 12
Lifestyle
®
Systeme 14, 16, 18, 21
M
Multi-Room-Erweiterung 16
N
Nachweckfunktion 13
Nachweckzeit 13, 19
Neonröhre 24
Netzanschluss 5
Netzkabel 4, 5, 10, 14, 24
P
Presets 11
Deutsch
27

Index
R
Radio Data System 19
Radio einschalten 10
Radiosender 10, 11
Radiowecker 12
Raumcode, einstellen 18, 21
RDS 19
Registrierungskarte 25
Reinigung 23
Rückseite 14, 15, 16
S
Deutsch
schlechter Empfang 14
Schnelldurchlauf 6
Schnellwahl 11
schwacher AM-Empfang 24
schwacher Empfang 10
schwacher FM-Empfang 24
Senderfrequenz 10, 11
Sicherungsspeicher 6, 11
Spannungsversorgung 25
Speichern eines Radiosenders 11
Speichernummer 11
Spielkonsole 16
Sprachbeiträge im Radio 11
Standort, auswählen 4
Steckdose 24
Stereoeingangsbuchse 14
Stereokabel 16
Stereokopfhörer-Anschluss 14
Strom 5
Stromausfall 6, 11
Stummschaltung aufheben 8
Systemeinstellungen 7, 9, 18, 19, 20, 21, 22
Systemeinstellungs-Modus 22
System-Zurückstellung 22
U
Uhranzeige 9
Uhrzeit 6, 9
Uhrzeit, einstellen 6
Uhrzeitformat 6, 20
Umgebungslicht 18, 20
V
Verpackungskarton 4
Videorekorder 16
W
Waveguide-Lautsprechertechnologie 7
Wecken mit FM/AM-Radio, Einstellung 12
Weckfunktion einstellen 12
Weckfunktion, Verwenden der 13
Weckton 13
Weckzeit 12
Werkseinstellungen 7, 18, 22
werksseitige Einstellung der Nachweckzeit 13
Z
Zeit-Einstellmodus 6
Zeitschritte 19
zweiter Raum 21
T
TALK RADIO-Modus 11
Tapered Waveguide 7
Tasten gedrückt halten 8
technische Daten 25
28

Deutsch
29

Informations de sécurité
Français Español English
AVERTISSEMENT :
Afin de limiter les risques d’incendie ou d’électrocution, n’exposez pas l’appareil à la pluie ou à l’humidité.
AVERTISSEMENT : Protégez-le de tout risque de ruissellement ou d’éclaboussure. Ne placez pas
d’objets contenant des liquides, tels que des vases, sur l’appareil. Comme avec tout appareil électronique,
veillez à ne pas renverser de liquides sur aucune partie de l’appareil. Les liquides peuvent provoquer des
pannes et/ou un risque d’incendie.
ATTENTION : Afin de limiter les risques d’électrocution, ne démontez pas ce produit à moins de disposer des qualifications
requises. Adressez-vous à un réparateur qualifié.
Le symbole représentant un éclair avec une flèche à l’intérieur d’un triangle équilatéral est utilisé pour prévenir
l’utilisateur de la présence d’une tension électrique dangereuse non is
d’un niveau suffisamment élevé pour représenter un risque d’électrocution.
Le symbole représentant un point d’exclamation à l’intérieur d’un triangle équilatéral, tel qu’il figure sur la radio, signale
à l’utilisateur la présence d’instructions importantes relatives au fonctionnement et à l’entretien de l’appareil dans cette
notice d’installation.
ATTENTION :
prise d’alimentation. Veillez à l’insérer complètement.
Afin d’éviter tout risque d’électrocution, insérez bien la fiche du cordon d’alimentation dans la fente correspondante de la
olée à l’intérieur de l’appareil. Cette tension est
AVERTISSEMENT : Conservez la pile de la télécommande hors de portée des enfants. En cas de manipulation inappropriée, elle
risque de provoquer un incendie ou des br
température supérieure à 100 °C et ne l’incinérez pas. Débarrassez-vous des piles usagées de manière appropriée. Remplacez la pile
uniquement par une pile de même type, portant la même référence.
ûlures chimiques. Ne la rechargez pas, ne la démontez pas, ne la portez pas à une
Veillez à vous débarrasser de vos piles usagées
conformément aux réglementations locales. Ne les incinérez pas.
AVERTISSEMENT : Ne placez jamais d’objets enflammés, tels que des bougies allumées, sur l’appareil.
Remarque : L’étiquette d’identification du produit est située au-dessous de l’appareil.
Veuillez lire cette notice d’utilisation
Prenez le temps de lire attentivement les instructions de cette notice d’utilisation. Elles vous seront précieuses pour installer et
utiliser correctement votre chaîne et vous aideront à tirer le meilleur parti de sa technologie. Conservez cette notice d’utilisation
pour référence ultérieure.
Ce produit est conforme à toutes les directives de la Communauté Européenne qui s’y appliquent. L’attestation complète de
conformité est disponible à l’adresse www.bose.com/static/compliance/
©1994-2005 Bose Corporation. Toute reproduction, modification, distribution ou autre utilisation, même partielle, de ce document est
interdite sans autorisation écrite préalable. Toutes les marques déposées auxquelles le présent document fait référence sont la
propriété de Bose Corporation. La conception de la Wave
2
®
radio II est une marque déposée de Bose Corporation.

Sommaire
Installation de la Wave® Radio II . . . . . . . . . . . . . . . . . . . . . . . . . . . . . . . . . . . . . . . . . . . . . . . . . . . 4
Déballage . . . . . . . . . . . . . . . . . . . . . . . . . . . . . . . . . . . . . . . . . . . . . . . . . . . . . . . . . . .
Choix d’un emplacement . . . . . . . . . . . . . . . . . . . . . . . . . . . . . . . . . . . . . . . . . . . . . . . . . . . . . 4
Branchement . . . . . . . . . . . . . . . . . . . . . . . . . . . . . . . . . . . . . . . . . . . . . . . . . . . . . . . . . . .
Réglage de l’heure . . . . . . . . . . . . . . . . . . . . . . . . . . . . . . . . . . . . . . . . . . . . . . . . . . . . . . .
®
Présentation de la Wave
Radio II . . . . . . . . . . . . . . . . . . . . . . . . . . . . . . . . . . . . . . . . . . . . . . . . . 7
Introduction . . . . . . . . . . . . . . . . . . . . . . . . . . . . . . . . . . . . . . . . . . . . . . . . . . . . . . . . . .
Fonctions spéciales . . . . . . . . . . . . . . . . . . . . . . . . . . . . . . . . . . . . . . . . . . . . . . . . . . . . . . .
®
Fonctionnement de la Wave
Notice d’utilisation de la télécommande
Lecture de l’affichage . . . . . . . . . . . . . . . . . . . . . . . . . . . . . . . . . . . . . . . . . . . . . . . . . . . . . .
Mise en marche et arrêt de la Wave
Radio II . . . . . . . . . . . . . . . . . . . . . . . . . . . . . . . . . . . . . . . . . . . . . 8
. . . . . . . . . . . . . . . . . . . . . . . . . . . . . . . . . . . . . . . . . 8
®
Radio II . . . . . . . . . . . . . . . . . . . . . . . . . . . . . . . . . . . . . 9
Réglage du volume . . . . . . . . . . . . . . . . . . . . . . . . . . . . . . . . . . . . . . . . . . . . . . . . . . . . . . . . .
Programmation de l’arrêt automatique (veille)
. . . . . . . . . . . . . . . . . . . . . . . . . . . . . . . . . . . . . 9
. . . . . . 4
. . . 5
. . . 6
. . . . . 7
. . 7
. . 9
. 9
English FrançaisEspañol
Écoute d’une station de radio FM/AM . . . . . . . . . . . . . . . . . . . . . . . . . . . . . . . . . . . . . . . . . . . . . . 1
Mise en marche de la radio . . . . . . . . . . . . . . . . . . . . . . . . . . . . . . . . . . . . . . . . . . . . . . . . . . .
Réglage de la radio . . . . . . . . . . . . . . . . . . . . . . . . . . . . . . . . . . . . . . . . . . . . . . . . . . . . . . .
. . . 10
Mémorisation d’une station de radio (préréglages) . . . . . . . . . . . . . . . . . . . . . . . . . . . . . . . . . 11
Mode TALK RADIO . . . . . . . . . . . . . . . . . . . . . . . . . . . . . . . . . . . . . . . . . . . . . . . . . . . . . . . . .
Réglage et utilisation de l’alarme . . . . . . . . . . . . . . . . . . . . . . . . . . . . . . . . . . . . . . . . . . . . . . .
. 11
. . . 12
Réglage de l’alarme . . . . . . . . . . . . . . . . . . . . . . . . . . . . . . . . . . . . . . . . . . . . . . . . . . . . . . . . . 12
Réveil avec une station de radio . . . . . . . . . . . . . . . . . . . . . . . . . . . . . . . . . . . . . . . . . . . . 12
Réglage de l’heure de l’alarme . . . . . . . . . . . . . . . . . . . . . . . . . . . . . . . . . . . . . . . . . . . . . 12
Utilisation de l’alarme . . . . . . . . . . . . . . . . . . . . . . . . . . . . . . . . . . . . . . . . . . . . . . . . . . . . .
Arrêt de l’alarme . . . . . . . . . . . . . . . . . . . . . . . . . . . . . . . . . . . . . . . . . . . . . . . . . . . . . . . .
. . . 13
. 13
Activation et désactivation de l’alarme . . . . . . . . . . . . . . . . . . . . . . . . . . . . . . . . . . . . . . . 13
Différer l’alarme . . . . . . . . . . . . . . . . . . . . . . . . . . . . . . . . . . . . . . . . . . . . . . . . . . . . . . . .
Branchement d’autres appareils . . . . . . . . . . . . . . . . . . . . . . . . . . . . . . . . . . . . . . . . . . . . . . . . . .
. 13
. 14
Entrées/Sorties sur le panneau arrière . . . . . . . . . . . . . . . . . . . . . . . . . . . . . . . . . . . . . . . . . . . 14
Branchement d’une antenne FM externe . . . . . . . . . . . . . . . . . . . . . . . . . . . . . . . . . . . . . . . . . 14
Utilisation d’un casque . . . . . . . . . . . . . . . . . . . . . . . . . . . . . . . . . . . . . . . . . . . . . . . . . . . . . .
Utilisation de la Wave
Connexion de la Wave
Personnalisation de la Wave
®
radio II avec d’autres appareils audio . . . . . . . . . . . . . . . . . . . . . . . . . 16
®
radio II à une chaîne Lifestyle® . . . . . . . . . . . . . . . . . . . . . . . . . . . . . 16
®
Radio II . . . . . . . . . . . . . . . . . . . . . . . . . . . . . . . . . . . . . . . . . . . . . . 18
Menu de configuration . . . . . . . . . . . . . . . . . . . . . . . . . . . . . . . . . . . . . . . . . . . . . . . . . . . . . .
. 15
. 18
Réglage du délai de rappel d’alarme . . . . . . . . . . . . . . . . . . . . . . . . . . . . . . . . . . . . . . . . . . . . 19
Modification du paramètre d’affichage des informations RDS (Radio Data System) . . . . . . . 19
Modification du format d’affichage de l’heure . . . . . . . . . . . . . . . . . . . . . . . . . . . . . . . . . . . . . 20
Réglage de la luminosité de l’affichage . . . . . . . . . . . . . . . . . . . . . . . . . . . . . . . . . . . . . . . . . . 20
Réglage du code de salle . . . . . . . . . . . . . . . . . . . . . . . . . . . . . . . . . . . . . . . . . . . . . . . . . . . . .
21
Activation du mode d’économie d’énergie . . . . . . . . . . . . . . . . . . . . . . . . . . . . . . . . . . . . . . . . 21
Réinitialisation de la chaîne . . . . . . . . . . . . . . . . . . . . . . . . . . . . . . . . . . . . . . . . . . . . . . . . . .
®
Entretien de la Wave
Radio II. . . . . . . . . . . . . . . . . . . . . . . . . . . . . . . . . . . . . . . . . . . . . . . . . . . . . 23
Nettoyage . . . . . . . . . . . . . . . . . . . . . . . . . . . . . . . . . . . . . . . . . . . . . . . . . . . . . . . . . . . .
. 22
. . . . . 23
Remplacement de la pile de la télécommande . . . . . . . . . . . . . . . . . . . . . . . . . . . . . . . . . . . . 23
Dépannage . . . . . . . . . . . . . . . . . . . . . . . . . . . . . . . . . . . . . . . . . . . . . . . . . . . . . . . . . . .
Service clients . . . . . . . . . . . . . . . . . . . . . . . . . . . . . . . . . . . . . . . . . . . . . . . . . . . . . . . .
Garantie limitée . . . . . . . . . . . . . . . . . . . . . . . . . . . . . . . . . . . . . . . . . . . . . . . . . . . . . . . .
Informations techniques . . . . . . . . . . . . . . . . . . . . . . . . . . . . . . . . . . . . . . . . . . . . . . . . . . . . .
Index . . . . . . . . . . . . . . . . . . . . . . . . . . . . . . . . . . . . . . . . . . . . . . . . . . . . . . . . . . . . . .
. . . . . 24
. . . . . 24
. . . . . 24
. 24
. . . . . . . . . . 26
0
10
3

Installation de la Wave
Wave® radio II
Cordon d’alimentation
(Europe)*
Télécommande
(pile incluse)
®
*Au Royaume-Uni, le
cordon d’alimentation
approprié est fourni.
Renseignements à conserver
Profitez de ce moment pour noter le numéro de série de votre nouvelles Wave®
radio II . Le numéro de série figure au bas de l’enceinte.
Numéro de série ________________________
Date d’achat ___________________________
Nous vous conseillons de conserver votre facture ainsi vec cette notice
d’utilisation.
Adaptateur d’antenne
Déballage
Français Español English
®
Radio II
Vérifiez que le carton d’emballage contient bien les éléments suivants :
Choix d’un emplacement
• Placez votre Wave® radio II sur une table ou toute autre surface plane.
• Pour bénéficier d’une qualité de so
l’endroit où vous vous installerez pour l’écouter.
• Pour jouir d’une meilleure écoute, installez votre
maximum et évitez de l’installer dans un coin.
Remarque :
• NE PLACEZ PAS votre Wave® radio II sur une surface métallique, car un tel support
pourrait produire des interférences avec la réception de bande AM.
• NE PLACEZ PAS votre Wave
tout équipement électrique, cette chaîne produit de la chaleur.
• N’UTILISEZ pas votre Wave
exposant votre chaîne à l'humidité.
n optimum, placez votre Wave® radio II à l’opposé de
®
radio II sur une surface sensible à la chaleur. À l’instar de
®
radio II dans une pièce humide ou dans tout autre endroit
Wave® radio II à 60 cm du mur au
4

Branchement
1
2
Connecteur AC POWER
3
Installation de la Wave
1.
Branchez l’extrémité la plus petite du cordon d’alimentation dans le connecteur
situé à l’arrière de votre Wave
2. Branchez le cordon d’alimentation sur une prise électrique.
®
radio II
.
®
Radio II
AC POWER
English FrançaisEspañol
3. Pour une meilleure réception FM, déroulez complètement le cordon d’alimentation. Votre
Wave
®
radio II utilise en effet le cordon d’alimentation comme antenne FM.
5
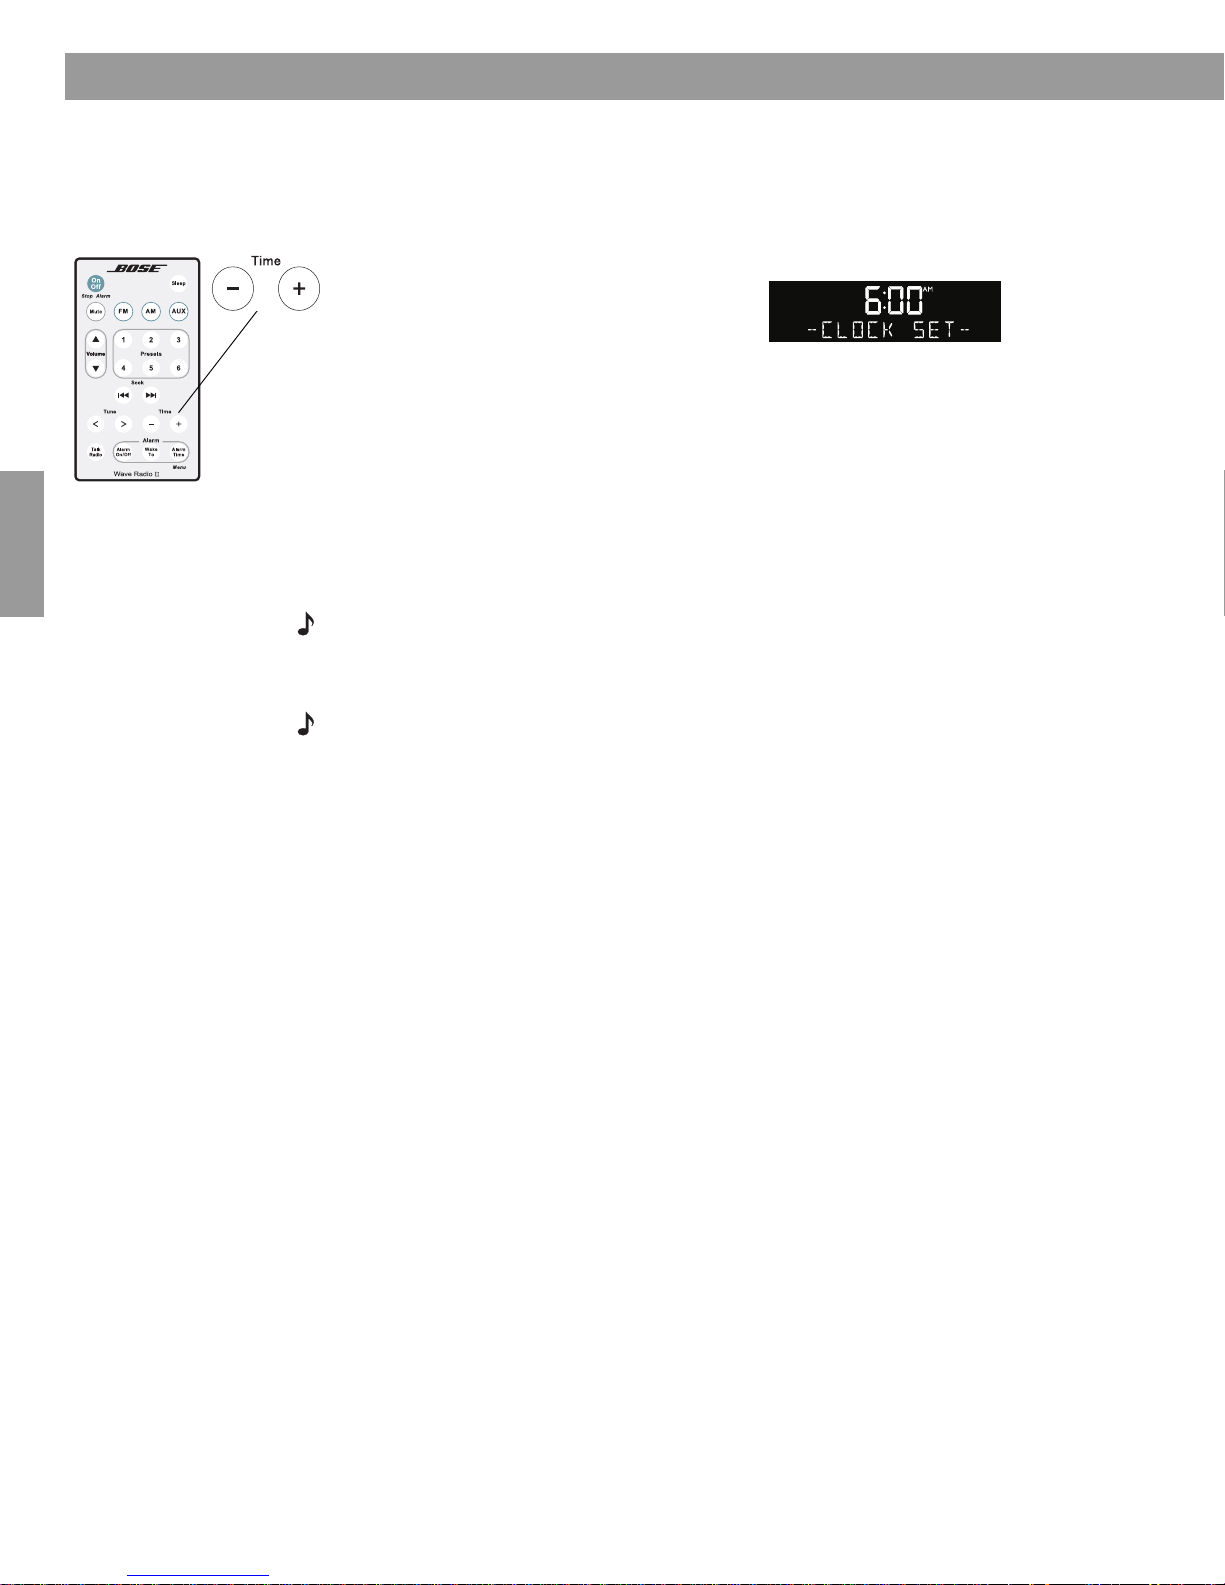
Installation de la Wave
Réglage de l’heure
®
Radio II
Français Español English
Une fois votre Wave®
télécommande vous permet d’utiliser votre
pointer vers la face avant de la chaîne et d’appuyer sur les touches.
1. Maintenez la touche Time – ou la touche
Time + enfoncée jusqu’à ce que
– CLOC
2. Appuyez sur Time – pour réduire l’heure affichée et sur Time + pour l’augmenter.
Procédez ainsi jusqu’à ce que l’heure souhaitée apparaisse. Maintenez les touches
enfoncées pour accélérer le défilement des chiffres.
Patientez cinq secondes, la chaîne quitte automatiquement le mode de réglage de l’heure.
3.
Pour passer du format d’affichage 12 heures (AM/PM) au format d’affichage 24 heures,
reportez-vous à la section « Modification du format d’affichage de l’heure », page 20.
Remarque :
autres paramètres de la chaîne pendant 48 heures. Cette fonction de sauvegarde permet ainsi
de c
onserver vos paramètres lorsque vous débranchez la chaîne pour la déplacer ou en cas de
coupure de courant.
Remarque :
devez appuyer dessus pendant au moins une seconde.
K SET – s’af
En cas de coupure de courant, la Wave® radio II garde en mémoire l’heure et les
Chaque fois qu’il vous est demandé de maintenir une touche enfoncée, vous
radio II branchée, réglez l’heure à l’aide de la télécommande. La
Wave®
fiche à l’écran.
radio II en toute simplicité. Il vous suffit de la
6

Introduction
Double guides
d’ondes
coniques
Présentation de la Wave
Nous vous remercions d’avoir acheté la Wave® radio II de Bose®. Grâce à elle, vous pourrez
jouir d’un son d’une qualité exceptionnelle dans toutes les pièces de votre habitation.
Après plus de quatorze ans de recherche,
Bose Corp
bénéficier de sa technologie brevetée
d’enceinte à guide d’onde acoustique,
récompensée à maintes reprises. Grâce à
cette technologie, l’énergie est transférée
d’une petite enceinte à l’air libre via un
tube, sur une large gamme de basses
fréquences. Par ailleurs, les guides
d’ondes larges, concentrés en un
schéma complexe, s’adaptent désormais
à des produits de dimensions plus
réduites qui trouvent leur place chez un
particulier. Votre Wave
de la nouvelle technologie d’enceintes à
double guides d’ondes coniques, qui relie
deux enceintes à deux guides d’ondes
coniques qui s’associent pour produire
un son instrumental d’une qualité
inégalée pour une chaîne de cette taille.
oration vous fait aujourd’hui
®
radio II est dotée
®
Radio II
English FrançaisEspañol
Fonctions spéciales
Vous réveiller avec votre station de radio
Vous pouvez régler l’alarme de votre Wave radio II® afin qu’elle vous réveille avec votre
station de radio préféré. Pour plus d’informations, reportez-vous à la section « Réveil avec
une station de radio », page 12.
Personnaliser le fonctionnement de la chaîne à l’aide du menu de
configuration
Les paramètres par défaut ont été définis afin de satisfaire la plupart des utilisateurs. Pour les
modifier, reportez-vous à la section « Personnalisation de la Wave® Radio II », page 18.
Le menu de configuration vous permet également de modifier les paramètres suivants :
• L’heure du rappel d’alarme • La luminosité de
l’affichage
• Le format d’affichage de l’heure (sur 12 ou 24 heures)
• Le code de salle Bose
• La restauration des
para
mètres par défaut
®
link
7

Fonctionnement de la Wave
On/Off (Stop Alarm)
• Permet d’allumer et
d’éteindre la chaîne (page 9).
• Permet d’arrêter l’alarme
(page 13).
Sleep
• Permet de stopper momentanément
l’alarme (page 13).
• Permet de programmer l’arrêt
automatique de la chaîne après 10 à 90
minutes (page 9).
Volume
• Permet de baisser ou d’augmenter
le volume (page 9).
Mute
• Permet de couper le son (page 9).
• Appuyez de nouveau sur cette
touche pour remettre le son.
Presets
• Appuyez : Sélectionne une station de
radio mémorisée (page 11).
• Maintenez cette touche enfoncée :
Mémorise une station de radio (page 11).
Seek
• Appuyez : Recherche la station de
radio suivante ayant un signal
puissant (page 10).
• Maintenez cette touche enfoncée :
Navigue rapidement entre les
fréquences radio ayant un signal
puissant (page 10).
Tune
• Appuyez : Passe à la fréquence radio
précédente/suivante (page 10).
• Maintenez cette touche enfoncée :
Passe rapidement d’une fréquence
radio à une autre (page 10).
Time
• Permet de régler l’heure (page 6).
• En mode de réglage de l’alarme, cette
touche permet également de régler
l’alarme (page 12).
Alarm On/Off
• Permet d’activer et
de désactiver
l’alarme (page 13).
Talk Radio
• Cette touche désactive ou
active également le mode
TALK RADIO pour la bande
AM ou la bande FM (page 11).
AUX
• Permet d’écouter de l’audio provenant
d’une source externe branchée sur
l’entrée AUX IN (page 16).
Alarm Time
• Appuyez une fois : Active le mode de
réglage de l’alarme (page 12).
• Maintenez cette touche enfoncée : Entre
dans le menu de configuration (page 18).
FM
• Permet d’allumer la radio.
• Appuyez de nouveau sur
cette touche pour basculer
entre la bande FM et la
bande AM (page 10).
Wake To
• Maintenez cette touche
enfoncée : Définit la
station de radio
actuellement écoutée
comme sonnerie
d’alarme (page 12).
AM
• Permet d’allumer la radio.
• Appuyez de nouveau sur
cette touche pour basculer
entre la bande AM et la
bande FM (page 10).
®
Radio II
Notice d’utilisation de la télécommande
Français Español English
La télécommande vous permet d’utiliser votre Wave®
radio II en toute simplicité. Il vous suffit de
la pointer vers la face avant de la chaîne et d’appuyer sur les touches. Elle fonctionne jusqu’à une
distance de 6 mètres.
Dans cette notice, vous trouverez des icônes à gauche des explications de fonctionnement
Ces icônes représentent les touches de la télécommande.
Remarque :
Chaque fois qu’il vous est demandé de maintenir une touche enfoncée, vous
devez appuyer dessus pendant au moins une seconde.
Remarque :
radio II
Les touches FM, AM, ou AUX permettent d’allumer automatiquement la Wave®
sur la source sélectionnée.
8

Lecture de l’affichage
Heure au format 12 heures
(AM/PM) ou 24 heures.
Affiche des informations de fonctionnement sur
la source active ou le menu de configuration.
Heure de l’alarme si elle est
programmée.
Le mot SLEEP apparaît si la mise
en veille est programmée.
Source sélectionnée : FM, AM,
AUX ou Bose
®
link.
On
Off
AUX
Mute
Sleep
Fonctionnement de la Wave
®
Radio II
English FrançaisEspañol
Mise en marche et arrêt de la Wave
Appuyez une fois sur On/Off pour allumer ou éteindre la Wave®
marche sur la dernière source choisie.
OU
Appuyez sur l’une des touches permettant de sélectionner une source pour allumer la Wave®
radio II sur celle-ci. Appuyer sur la touche AUX ne permet pas de mettre en marche la source
auxiliaire (par exemple votre téléviseur). Vous devez l’allumer au préalable.
Réglage du volume
Maintenez les touches Volume ou enfoncées pour régler le niveau sonore. Celui-ci
s’affiche de la façon suivante : VOLUME - 0 (silencieux) à 99
Appuyez sur Mute po
nouveau sur Mute ou sur Volume
Volume
Remarque :
pendant qu’il est coupé.
Lorsque la Wave® radio II est éteinte, le volume peut uniquement être réglé entre 10
et 75.
ur couper le son de la Wave®
®
Radio II
. Pour baisser le son avant de le remettre, appuyez sur
radio II. Celle-ci se met en
(fort).
radio II. Pour remettre le son, appuyez de
Programmation de l’arrêt automatique (veille)
Appuyez sur Sleep pour programmer l’arrêt automatique de la Wave®
défini.
• Lorsque vous appuyez sur la touche Sleep, SLEEP -
s’amorce. Si votre Wave
programmer immédiatement la mise en veille. La dernière source sélectionnée se lance
pendant le décompte de la mise en veille.
Remarque :
automatiquement le mode de programmation de la mise en veille.
• Lorsque SLEEP e
délai de mise en veille entre 10 et 90 minutes (par intervalles de 10 minutes) ou sur la
touc
• Pour connaître le temps restant avant la mise en veille, appuyez sur Sleep.
• Pour annuler la mise en
radio II après un délai
®
radio II est arrêtée, appuyez sur Sleep pour l’allumer et
30 MIN s’affiche et le décompte
st affiché, appuyez de nouveau sur la touche Sleep pour définir le
he OFF.
Au bout de 10 secondes sans appuyer sur une touche, la Wave® radio II quitte
veille, appuyez sur On/O
ff.
9

Écoute d’une station de radio FM/AM
Heure
Station préréglée
sélectionnée
Source
FM
Fréquence de
la station
Affichage FM – RDS activé
Affichage FM – Aucune information RDS
Heure
Station préréglée
sélectionnée
Source
FM
Informations RDS
Source
FM
Station préréglée
sélectionnée
Fréquence de
la station
Affichage lors du réglage
Lorsque vous appuyez sur FM, AM, Seek
ou Tune pour régler une station de radio,
la fréquence apparaît au centre de
l’affichage.
Seek
Mise en marche de la radio
Appuyez sur FM ou AM pour allumer la radio sur la dernière station FM ou AM sélectionnée.
Appuyez de nouveau sur FM ou AM pour
inversement.
Des informations s’affichent sur la station de radio écoutée. Si le RDS est activé (ON) dans le
menu d
de la fréquence de la station.
e configuration de la chaîne (voir page 19), les informations RDS s’affichent à la place
passer de la bande FM à la bande AM et
Français Español English
Réglage de la radio
Tune
Remarque : Le RDS (Radio Data System) est un système qui transmet des informations
pratiques, telles que le nom de la station, le programme et l’heure actuelle. Le RDS ne fonctionne
que
sur la bande FM et les informations RDS ne s’affichent que si elles sont incluses dans le
signal FM diffusé.
Appuyez sur FM ou AM pour passer de la bande FM à la bande AM et inversement.
Appuyez sur Seek pour rechercher une station de fréquence plus faible avec un signal
puissant ou sur Seek
Appuyez sur Tune <
pour rechercher une station de fréquence plus élevée.
pour régler manuellement une fréquence plus faible ou sur Tune > pour
régler une fréquence plus élevée.
Maintenez la touche Tune < en
foncée pour faire défiler rapidement toutes les fréquences de
la bande vers le bas. Procédez de même avec Tune > pour faire défiler rapidement toutes les
fréquences de la bande vers le haut.
Remarque :
s’affiche de nouveau après cinq secondes et la fréquence de la radio apparaît en dessous.
Remarque :
mieux recevoir le signal. Si la réception FM est faible, vérifiez que le cordon d'alimentation est
bien
déroulé. Pour améliorer la réception FM, vous pouvez installer une antenne FM externe.
Pour p
lus d’informations, reportez-vous à la section « Branchement d’une antenne FM externe »,
page 14.
10
Lorsque vous cessez d’appuyer sur les touches FM, AM, Tune ou Seek, l’heure
Si la réception AM est faible, changez l’orientation de votre Wave® radio II afin de

Écoute d’une station de radio FM/AM
Presets
123
456
Mémorisation d’une station de radio (préréglages)
Vous pouvez mémoriser jusqu’à 6 stations FM et 6 stations AM afin de les sélectionner
rapidement en appuyant sur les touches
1. Réglez la station à mémoriser.
2. Maintenez l’une des 6 to
uches
double « bip » et que le chiffre préréglé et la fréquence de la station s’affichent.
Presets
Presets
.
enfoncée jusqu’à ce que vous entendiez un
English FrançaisEspañol
Mode TALK RADIO
3. Appuyez sur l’une des touches Pr
esets pour écouter la station FM ou AM
correspondante mémorisée.
Remarque :
Lorsque vous mémorisez une station, vous remplacez la station qui était
précédemment associée à ce chiffre.
Remarque :
En cas de coupure de courant, les préréglages enregistrés sont gardés en mémoire.
Dans les émissions radio, la qualité de la diffusion dépend en grande partie du microphone
utilisé et du niveau des basses fréquences pratiqué par certaines stations. Ce type de procédé
est employé dans le but d’améliorer la diffusion auprès des auditeurs possédant des radios
conventionnelles. Pour les personnes équipées d’appareils audio de grande qualité, le son ainsi
obtenu semble artificiel ou comporte trop de basses. Le mode TALK RADIO de votre Wave
®
radio II effectue automatiquement l’ajustement nécessaire pour compenser ces fréquences
artificiellement décalées dans les basses.
Lorsque vous écoutez la radio, appuyez deux fois sur Ta lk Ra di o pour activer ou désactiver
le mode TALK RADIO.
Lorsque ce mode est actif, TAL
K RAD IO– ON est affiché. Lorsqu’il est désactivé, TAL K
RADIO– OFF est affiché.
Remarque :
station ou de source, ou que vous éteignez votre Wave
Le mode TALK RADIO est automatiquement désactivé lorsque vous changez de
®
radio II.
11

Réglage et utilisation de l’alarme
Wake
To
Alarm
Time
Alarm
Time
Alarme avec radio FM
Heure de l’alarme (clignotante)
Numéro préréglé
Fréquence de la station de radio
Heure de l’alarme
Exemple : L’alarme est réglée pour se déclencher à
6 h avec la station de radio préréglée n°4 (101.7 FM).
3
1
2
Maintenez la
touche enfoncée
pendant au moins
une seconde.
Réglage de l’alarme
Français Español English
Réveil avec une station de radio
1. Allumez votre Wave® radio II et sélectionnez
la station de radio avec laquelle vous
souhaitez vous réveiller.
2. Réglez le volume au niveau souhaité pour
réveiller.
vous
Appuyez sur Wake To et maintenez la touche
3.
enfoncée jusqu’à ce que vous entendiez un
double « bip ». V
réglée pour v
otre alarme est à présent
ous réveiller avec la station de
radio choisie.
Réglage de l’heure de l’alarme
1.
Appuyez sur Alarm Time pour activer le mode de réglage de l’alarme. L’heure de
l’alarme apparaît au centre de l’affichage et clignote dans l’angle supérieur droit.
Appuyez sur Time – ou Time + pour régler l’heure de réveil.
2.
Appuyez de nouveau sur Alarm Time. Votre alarme est à présent réglée.
3.
Remarque :
Au bout de 10 secondes sans appuyer sur une touche, la Wave® radio II quitte
automatiquement le mode de réglage de l’alarme.
Remarque :
Pour confirmer l’heure de l’alarme et les paramètres Wake To, appuyez sur Alarm
Time. Les deux réglages s’affichent pendant 10 secondes.
12

Utilisation de l’alarme
On
Off
Stop Alarm
Arrêt de l’alarme
Appuyez sur On/Off (Stop Alarm) pour arrêter l’alarme lorsqu’elle sonne et la remettre au
jour suivant.
Activation et désactivation de l’alarme
Alarm
On/Off
Sleep
Appuyez sur Alarm On/Off pour activer ou désactiver l’alarme. L’alarme est activée lorsque
l’heure à laquelle elle a été réglée est affichée dans l’angle supérieur droit. L’alarme est
désact
droit de l’affichage.
Différer l’alarme
Appuyez sur Sleep pour différer l’alarme lorsqu’elle sonne.
Quand l’heure de l’alarme est différée, SNOOZE
se déclenche de nouveau. Vous pouvez alors appuyer de nouveau sur Sleep pour différer,
une fois encore, l’alarme de 10 minutes. (Par défaut, le délai d
sur 10 minutes. Reportez-vous à la section « Réglage du délai de rappel d’alarme », page 19.
Réglage et utilisation de l’alarme
ivée lorsque l’heure à laquelle elle a été réglée n’est pas visible dans l’angle supérieur
s’affiche. Une fois le délai écoulé, l’alarme
rappel de l’alarme est réglé
e
English FrançaisEspañol
13

Branchement d’autres appareils
Bose link
AUX IN
ANTENNE FM
EXTERNE 75
Ω
Connecteur
d’antenne FM
de 3,5 mm.
Connecteur de réseau
Bose
®
Link
Permet de connecter des
chaînes Lifestyle
®
dans un
réseau Bose
®
Link.
AUX IN
Connecteur d’entrée stéréo
de 3,5 mm pour le
branchement de sources
externes.
CASQUE
Connecteur stéréo pour
casque de 3,5 mm. Les
enceintes de la Wave
®
radio II
sont coupées lorsqu’un
casque est connecté.
Connecteur 75Ω de l’antenne FM
Adaptateur d’antenne
Entrées/Sorties sur le panneau arrière
Le panneau arrière de votre Wave®
d’appareils externes.
Français Español English
Branchement d’une antenne FM externe
Le cordon d’alimentation de la Wave®
avoir réglé la position du cordon d’alimentation, la qualité de votre réception reste mauvaise,
vous pouvez également connecter la chaîne à une antenne extérieure ou à un récepteur de
TV câblée ou bien encore à une antenne dipôle FM. Un adaptateur est fourni pour la
connexion à une antenne extérieure ou au récepteur du câble. Vous pouvez commander une
antenne dipôle FM auprès du service clientèle de Bose
numéros de téléphone qui figure sur l’avant-dernière page de cette notice.
Pour connecter la chaîne à une antenne extérieure ou à un récepteur de TV câblée
à l’aide de l’adaptate
• Branchez la prise de 3,5 mm (
situé sur le panneau arrière de votre Wave®
• Connectez l’autre extrémité de l’adaptateur à l’antenne extérieure ou au récepteur de TV
câblée.
ur :
radio II dispose de connecteurs pour le branchement
radio II est équipé d’une antenne FM intégrée. Si, après
®
. Reportez-vous à la liste des
1
/8") de l’adaptateur dans le connecteur 75Ω FM ANTENNA
radio II.
Remarque : Une fois la chaîne connectée à une antenne extérieure ou à un récepteur de TV
câblée, l’antenne intégrée est désactivée et le signal FM ne sera reçu que par l’antenne
extér
ieure. Il suffit de déconnecter l’antenne extérieure pour rétablir l’antenne intégrée.
14

Pour connecter une antenne externe FM :
Connecteur 75Ω FM ANTENNA
Antenne FM dipôle (non fournie)
(Casque non fourni)
Connecteur HEADPHONE
• Insérez la fiche de 3,5 mm de l’antenne FM dans le connecteur
le panneau arrière de votre Wave
• Déployez les extrémités de l’antenne afin d’obtenir une réception FM optimale.
• Déployez les extrémités de l’antenne en les positionnant aussi loin que possible de la
chaîn
Utilisation d’un casque
Branchement d’autres appareils
®
radio II.
e et des appareils externes afin d’obtenir une réception FM optimale.
75Ω FM ANTENNA situé sur
Bose link
English FrançaisEspañol
AUX IN
Pour écouter de la musique sans faire de bruit, branchez un casque sur le connecteur prévu à
cet effet sur le panneau arrière de la Wave
®
radio II.
• Le son des enceintes est automatiquement coupé lorsque vous branchez un casque.
ATTENTION :
L’écoute prolongée de musique à volume élevé peut causer des troubles auditifs.
Il est déconseillé d’utiliser un casque en réglant le volume au maximum, en particulier pendant de
long
ues durées.
Remarque : Le son des enceintes est automatiquement rétabli lorsque vous débranchez le
casque de la Wave
de volume des enceintes, assurez-vous de diminuer le volume de la Wave
®
radio II. Le niveau de volume d'un casque pouvant être différent du niveau
®
radio II avant de
brancher ou de débrancher un casque.
Remarque :
les enceintes de la Wave
Lorsqu’une alarme se déclenche lors de l’utilisation d’un casque, elle est émise par
®
radio II.
Pour modifier le volume du casque :
Appuyez sur la touche Vol
ume ou afin de régler le niveau d’écoute de votre casque.
15

Branchement d’autres appareils
• Câble stéréo mâle/mâle de 3,5 mm
• Câble stéréo mâle double RCA/mâle de 3,5 mm
AUX
Câble stéréo mâle
double RCA/
mâle 3,5 mm
Téléviseur
Connecteur
AUX IN
Utilisation de la Wave
Français Español English
On
Off
®
radio II avec d’autres appareils audio
Lorsque vous utilisez un téléviseur, un magnétoscope, un ordinateur, une console de jeux
vidéo ou un lecteur de cassettes, vous pouvez profiter d’un plus grand plaisir d’écoute en
diffusant le son de l’appareil audio sur votre Wave
Le branchement d’un appareil audio sur votre Wave
®
radio II.
®
radio II nécessite l’utilisation de l’un des
câbles suivants :
Vous pouvez vous procurer le câble approprié auprès du service clients de Bose® ou d’un
magasin d’articles électroniques. Reportez-vous à la liste des numéros de téléphone qui
figure sur l’avant-dernière page de cette notice.
Pour brancher un appareil audio, tel qu’un téléviseur, sur votre Wave
®
radio II :
1. Branchez l’une des extrémités du câble stéréo sur la prise de sortie de l’appareil audio.
2. Branchez l’autre extrémité du câble sur le connecteur AU
®
arrière de votre Wave
3.
Mettez la Wave®
4.
Appuyez sur la touche AUX.
radio II.
radio II et l’appareil audio sous tension.
X IN situé sur le panneau
5.
Appuyez sur la touche Volume ou et maintenez-la enfoncée afin de régler le niveau
d’écoute.
Remarque :
suffisamment élevé, essayez d’augmenter le volume de l'appareil audio connecté.
Connexion de la Wave
Si le volume de votre Wave® radio II ne peut pas être réglé sur un niveau
®
radio II à une chaîne Lifestyle
®
Vous pouvez utiliser votre Wave® radio II en tant que système d’enceintes d’expansion afin
d’étendre l’écoute à plusieurs pièces pour un système audio Lifestyle
Link. Votre Wave
modifier ce paramètre, reportez-vous à la section « Réglage du code de salle », page 21.
Pour vous procurer les câbles requis et obtenir des instructions, contactez le service clients
de Bose
16
page de cette notice.
®
. Reportez-vous à la liste des numéros de téléphone qui figure sur l’avant-dernière
®
®
radio II est configurée par défaut pour être utilisée dans la pièce B. Pour
dans un réseau Bose®

English FrançaisEspañol
Personnalisation de la Wave
®
Radio II
Les paramètres par défaut ont été définis afin de satisfaire la
plupart des utilisateurs.
Cependant, si vous souhaitez modifier les paramètres de la
chaîne, reportez-vous aux instructions des pages 18 à 22.
17

Personnalisation de la Wave
Tune
Alarm
Time
Menu
Alarm
Time
Menu
Menu de configuration
®
Radio II
Français Español English
Paramètres de
la chaîne
Commande de
rappel d’alarme
Le menu de configuration vous permet de personnaliser le fonctionnement de la Wave®
1.
Appuyez sur la touche Alarm Time (Menu) et maintenez-la enfoncée jusqu’à ce que le
message -SETUP MENU- s’af
2.
Appuyez sur la touche
Tune > jusqu’à ce que l’élément de menu à modifier s’affiche.
fiche.
3. Appuyez sur la touche Time – ou Time + pour modifier la valeur ou la sélection.
4. Appuyez sur
la touche Alarm Time (Menu) pour quitter le menu de configuration ou
attendez 10 secondes pour qu’il se ferme automatiquement.
Menu de configuration de la Wave® radio II
Élément de
menu
SNOOZE- 10 MIN 10 MIN, 20 MIN,
Paramètre par
défaut Options Description
30 MIN, 40 MIN,
50 MIN, 60 MIN
Définit le délai de rappel d’alarme.
radio II.
Informations RDS
(Radio Data
System)
Format de l’heure TIME- 12 HOUR 12 HOUR
Niveau élevé de
luminosité de
l’
affichage
Niveau faible de
luminosité de
l’
affichage
Code de salle ROOM- B
Mode d’économie
d’én
ergie
Réinitialisation de
la c
haîne
RDS- ON OFF, ON Active (ON) ou désactive (OFF) l’affichage des
24-HOUR
BRIGHT HI- 12 8-15 Définit le niveau de luminosité de l’affichage
BRIGHT LO- 4 1-8 Définit le niveau de luminosité de l’affichage
_ _ _ – B _ _ _ –, C _ _ – _,
D _ _ – –, E _ – _ _,
F _ – _ –, G _ – – _,
H _ – – –, I – _ _ _,
J – _ _ –, K – _ – _,
L – _ – –, M – – _ _,
N – – _ –, O – – – _
LOW POWER- OFF OFF, ON Active (ON) ou désactive (OFF) le mode
RESET ALL- NO NO, YES Restaure les paramètres par défaut de la Wave®
informations RDS.
Définit l’affichage de l’heure sur le
format 12 heures (AM/PM) ou sur le
format 24 heures.
lorsque la chaîne détecte une luminosité ambiante
importante.
lorsque la chaîne détecte une faible luminosité
ambiante.
Définit le code de salle de votr
lorsque celle-ci est connectée à votre chaîne
Lifestyle® via un réseau Bose® Link.
Les tirets figurant à la suite de chaque lettre de
code de salle indiquent le positionnement des
commutateurs sur la télécommande Lifestyle®.
d’économie d’énergie. Le mode d’économie
d’énergie permet à la chaîne d’utiliser moins
d’énergie une fois hors tension.
radio II.
e Wave® radio II
18

Réglage du délai de rappel d’alarme
Alarm
Time
Menu
Alarm
Time
Menu
Tune
Alarm
Time
Menu
Alarm
Time
Menu
Tune
Ce paramètre détermine le délai durant lequel la chaîne reste silencieuse lorsque la fonction
d’alarme est activée.
1.
Appuyez sur la touche Alarm Time (Menu) et maintenez-la enfoncée jusqu’à ce que le
message -SETUP MENU- s’af
Personnalisation de la Wave
fiche.
®
Radio II
English FrançaisEspañol
Appuyez une fois sur la touche
2.
Tune > afin d’afficher le message
SNOOZE- 10 MIN.
3. Appuyez sur la touche Time – ou Time + afin de définir le délai de rappel d’alarme sur
une durée comprise entre 10 et 60 minutes (par incréments de 10 minutes).
4. Appuyez sur
la touche Alarm Time (Menu) pour quitter le menu de configuration ou
attendez 10 secondes pour qu’il se ferme automatiquement.
Modification du paramètre d’affichage des informations RDS (Radio Data
System)
Ce paramètre active ou désactive l’affichage des informations RDS sur votre chaîne. Le
système RDS (Radio Data System) transmet des information
la station, des informations sur le programme en cours et l’heure actuelle. Le système RDS
ne
fonctionne que sur bande FM et les informations RDS ne s’affichent que si elles sont
incl
uses dans le signal FM diffusé.
1.
Appuyez sur la touche Alarm Time (Menu) et maintenez-la enfoncée jusqu’à ce que le
message -SETUP MENU- s’af
fiche.
s pratiques, telles que le nom de
2. Appuyez deux fois sur la touche Tune
3. Appuyez sur
paramètre RDS- OFF.
4. Appuyez sur
attendez 10 secondes pour qu’il se ferme automatiquement.
> afin d’afficher le message RDS- ON.
la touche Time – ou Time + pour passer du paramètre RDS- ON au
la touche Alarm Time (Menu) pour quitter le menu de configuration ou
19

Personnalisation de la Wave
Alarm
Time
Menu
Alarm
Time
Menu
Tune
Alarm
Time
Menu
Alarm
Time
Menu
Tune
Tune
®
Radio II
Modification du format d’affichage de l’heure
Vous pouvez choisir d’afficher l’heure au format 12 heures (AM/PM) ou au format 24 heures.
Appuyez sur la touche Alarm Time (Menu) et maintenez-la enfoncée jusqu’à ce que le
1.
message -SETUP MENU- s’af
fiche.
2. Appuyez
3. Appuyez sur
4. Appuyez sur
quatre fois sur la touche Tune > afin d’afficher le message TIME-.
la touche Time – ou Time + afin de sélectionner 12 HOUR ou 24 HOUR.
la touche Alarm Time (Menu) pour quitter le menu de configuration ou
attendez 10 secondes pour qu’il se ferme automatiquement.
Français Español English
Réglage de la luminosité de l’affichage
Le niveau de luminosité de l’affichage se règle automatiquement afin de s’adapter à une
luminosité ambiante faible ou élevée. Cette fonctionnalité éclaircit l’affichage pour assurer
une meilleure v
le rendre moins gênant dans des conditions de faible luminosité ambiante. Les niveaux de
luminosité faible et élevé peuvent être réglés individuellement.
1.
Appuyez sur la touche Alarm Time (Menu) et maintenez-la enfoncée jusqu’à ce que le
message -SETUP MENU- s’af
2. Appuyez cinq fois sur la touche T
isibilité dans des conditions de luminosité ambiante élevée et l’assombrit pour
fiche.
une > afin d’afficher le message BRIGHT HI-.
3. Appuyez sur la touche Time –
une valeur comprise entre 8 et 15.
4. Appuyez une fois sur la touche T
5. Appuyez sur
une valeur comprise entre 1 et 8.
6. Appuyez sur
attendez 10 secondes pour qu’il se ferme automatiquement.
20
ou Time + pour définir le niveau de luminosité élevée sur
une > afin d’afficher le message BRIGHT LO-.
la touche Time – ou Time + pour définir le niveau de luminosité faible sur
la touche Alarm Time (Menu) pour quitter le menu de configuration ou

Réglage du code de salle
Alarm
Time
Menu
Alarm
Time
Menu
Tune
Votre Wave®
lorsqu’elle est connectée à une chaîne Bose
utiliser votre Wave
devez modifier le code de salle pour le faire correspondre à celui de la télécommande que
vous utilisez dans cette pièce.
Reportez-vous à la notice d’utilisation de votre chaîne Lifestyle
les codes de salle.
Tune
Alarm
Time
Menu
Appuyez sur la touche Alarm Time (Menu) et maintenez-la enfoncée jusqu’à ce que le
1.
message -SETUP MENU- s’af
2. Appuyez se
Les tirets figurant à la suite de chaque lettre de code de salle ind
des commutateurs sur la télécommande Lifestyle
de votre chaîne Lifestyle
Personnalisation de la Wave
radio II est livrée prête à fonctionner dans une deuxième salle (code de salle B)
®
radio II avec votre chaîne Lifestyle® dans une pièce supplémentaire, vous
®
Lifestyle® reliée à un réseau. Si vous souhaitez
®
pour plus d’informations sur
®
Radio II
fiche.
pt fois sur la touche Tune > afin d’afficher le message ROOM- B .
iquent le positionnement
®
®
pour plus d’informations.
. Reportez-vous à la notice d’utilisation
English FrançaisEspañol
3. Appuyez sur la
touche Time – ou Time + pour sélectionner un code de salle différent du
code de salle B.
Alarm
Time
4. Appuyez sur
Menu
attendez 10 secondes pour qu’il se ferme automatiquement.
la touche Alarm Time (Menu) pour quitter le menu de configuration ou
Activation du mode d’économie d’énergie
Votre Wave®
d’énergie une fois hors tension. Lorsque le mode d’économie d’énergie est activé, l’écran
d’affichage s’éteint automatiquement après 30 minutes. Juste avant que l’écran ne s’éteigne,
le mess
En mode d’économie d’énergie, l’horloge fonctionne toujours normalement, les présélections
sont
conservées et, si vous avez réglé une alarme, la chaîne se met sous tension à l’heure
programmée. En mode d’économie d’énergie, le fait d’appuyer sur les touches FM, AM, AUX
ou Preset 1 à 6 met la chaîne sous tension de façon normale. Le fait d’appuyer sur toute autre
touche de la télécommande, c’est-à-dire sur une touche ne permettant pas de mettre la
chaîne sous tension, active l’écran pour une nouvelle période de 30 minutes, puis l’éteint à
n
o
uveau.
1.
Appuyez sur la touche Alarm Time (Menu) et maintenez-la enfoncée jusqu’à ce que le
message -SETUP MENU- s’af
radio II possède un mode d’économie d’énergie qui lui permet d’utiliser moins
e LOW POWER- ON s’affiche.
ag
fiche.
Appuyez huit fois sur la touche
2.
3. Appuyez sur la touche Time – ou Time + pour passer du paramètre LOW POWER-
OFF au paramètre LOW POWER- ON.
4. Appuyez sur
attendez 10 secondes pour qu’il se ferme automatiquement.
Tune > afin d’afficher le message
LOW POWER- OFF
.
la touche Alarm Time (Menu) pour quitter le menu de configuration ou
21
Personnalisation de la Wave
Réinitialisation de la chaîne
®
Radio II
Français Español English
Tune
Si vous le souhaitez, vous pouvez restaurer les paramètres par défaut de votre Wave®
Alarm
Time
Menu
Appuyez sur la touche Alarm Time (Menu) et maintenez-la enfoncée jusqu’à ce que le
1.
message -SETUP MENU- s’af
2. Appuyez neuf fois sur la touche T
3. Appuyez sur la touche Time + pour passer du paramètre R
fiche.
une > afin d’afficher le message RESET ALL- NO.
ESET ALL- NO au paramètre
RESET ALL- YES.
4. Lorsque le message PRESS
2 TO CONFIRM s’affiche à l’écran, appuyez sur la touche
Presets 2 pour confirmer votre choix. Une fois la réinitialisation termin
DEFAULTS RESET s’affiche.
z sur
Alarm
Time
Menu
5. Appuye
attendez 10 secondes pour qu’il se ferme automatiquement.
la touche Alarm Time (Menu) pour quitter le menu de configuration ou
radio II.
ée, le message
22

Nettoyage
See operating
instructions for types of
battery to be used
e operating
nstructions for types of
battery to be used
Utilisez uniquement un chiffon doux et sec pour nettoyer le boîtier de votre Wave®
nécessaire, vous pouvez utiliser un aspirateur muni d’une brosse douce pour dépoussiérer la
face avant du boîtier. N’utilisez pas de liquides de nettoyage, de solvants, de produits
chimiques, d’alcool, d’ammoniac ou d’abrasifs.
ATTENTION :
à l’intérieur de l’appareil, mettez-le im
®
Bose
dès que possible en vue d’une réparation. Reportez-vous à la liste des numéros de
Veillez à ce qu’aucun liquide ne pénètre dans les ouvertures. Si un liquide pénètre
médiatement hors tension. Contactez le service clients de
téléphone qui figure sur l’avant-dernière page de cette notice.
Remplacement de la pile de la télécommande
AVERTISSEMENT : Conservez la pile de la télécommande hors de portée des enfants. En cas
de manipulation inappropriée, elle risque de provoquer un incendie ou des brûlures chimiques.
Ne la r
echargez pas, ne la démontez pas, ne la portez pas à une température supérieure à
100° C et ne l’incinérez pas. Débarrassez-vous de la pile usagée de manière appropriée.
Remp
lacez-la uniquement par une pile de même type, portant la même référence.
ATTENTION :
Utilisez uniquement une pile au li
CR2032 ou DL2032, de 3 V.
Pour remplacer la pile de la télécommande :
1. Posez la télécommande à l’envers sur une surface plane.
2. Poussez du doigt la languette
enfoncée. Faites glisser le couvercle du compartiment de la pile pour l’ouvrir.
La pile risque d’exploser lorsqu’elle est remplacée par une pile inappropriée.
thium Duracell, Eveready, Energizer, Maxell, Toshiba ou Shun Wo
de sûreté comme le montre l’illustration et maintenez-la
Entretien de la Wave
®
Radio II
radio II. Si
English FrançaisEspañol
3. Retirez la pile usagée et installez la nouvelle pile avec le symbole plus (+) vers le haut.
4. Faites glisser doucement le compartiment de la pile pour le refermer. Il se bloque
automatiquement.
See operating
battery to be used
instructions for types of
23

Entretien de la Wave
Dépannage
Problème Mesure corrective
La chaîne ne
fonct
Aucun son n’est
émis.
La télécommande
fonctionne mal ou
pas du tout.
La réception de la
Français Español English
bande AM est de
uv
ma
La réception de la
bande FM est de
mauv
Aucune
information RDS
’affiche.
ne s
L’écran d’affichage
est éteint.
ionne pas.
aise qualité.
aise qualité.
• Vérifiez que le cordon d’alimentation est correctement branché sur une prise secteur en état de
fonctionnement.
• Appuyez sur la touche On/O
•
Augmentez le niveau du volume.
• Appuyez sur la touche Mute.
• Vérifiez les branchements de la
• Appuyez sur la touche
• Assurez-vous que la source externe est sous tension.
• Débranchez le casque.
• Rapprochez la télécommande de la chaîne.
• Vérifiez que la pile de la télécommande est installée avec la face portant le signe + vers le haut.
• Remplacez la pile de la télécommande.
• Vérifiez l’absence d’interférences dues à l’éclairage de la pièce, à la lumière du soleil ou à la
présence de pous
• Essayez d’installer la chaîne à un autre endroit.
• Réglez l’antenne interne en faisant légèrement pivoter la chaîne d’un côté puis de l’autre.
• Placez la chaîne à distance d’un téléviseur, d’un réfrigérateur, d’une lampe fluorescente, d’une
lampe halogène, d’un variateur de lumière ou de tout autre appareil électronique générant un
bruit électrique.
• Si aucune de ces mesures ne fonctionne, vous vous trouvez peut-être dans une zone de faible
uv
co
• Déroulez le cordon d’alimentation autant que possible. Le cordon d’alimentation assure la
fonc
• Essayez d’utiliser une antenne externe. Contactez le
une antenne FM externe.
• Consultez le menu de configuration de la chaîne afin de vérifier que la fonction RDS- e
sur ON.
• Vérifiez que vous écoutez une station de radio FM.
• La station de radio n’inclut peut-être pas d’informations RDS dans son signal d’émission.
Con
• Appuyez sur n’importe quelle touche de la télécommande et vérifiez si l’écran s’allume. Il est
possible que le mode d’économie d’énergie soit activé, provoquant la désactivation de
l’écran 30 minutes après que vous ayez mis la chaîne hors tension. Pour plus d’informations,
e
portez-vous à la section « Activation du mode d’économie d’énergie », page 21.
r
• Si cette procédure ne fonctionne pas, contactez le service clients de Bose pour obtenir de l’aide.
®
Radio II
AUX
sière ou de saleté sur la lentille.
erture du signal AM.
tion d’antenne FM.
actez la station de radio.
t
f
f pour vérifier que l’écran d’affichage s’allume.
sour
ce auxiliaire.
pour écouter une source externe connectée à l’entrée
service clients
de Bose® pour commander
AUX IN
.
st réglée
Service clients
Si vous perdez votre télécommande, vous pouvez en commander une autre auprès du service
clients de Bose. Pour obtenir de l’aide en cas de problème, contactez le service clients de
Bose. Reportez-vous à la liste des numéros de téléphone qui figure sur l’avant-dernière page
de cette notice.
Garantie limitée
Votre chaîne Bose® Wave® est couverte par une garantie limitée transférable.
Informations techniques
Puissance nominale
220V-240 V~ 50/60 Hz 60 W
Dimensions
36,8 cm x 21,9 cm x 10,6 cm
Poids
3,9 kg
24

Entretien de la Wave
®
Radio II
Garantie limitée et conditions de
vente
Bose Corporation
The Mountain
Framingham, MA 01701
Couverture :
Tout défaut de pièces et main-d'œuvre. La présente
garantie limitée de Wave® radio II de Bose
fonctionnement de la chaîne dans le cadre d'une utilisation
normale et conformément aux instructions mentionnées dans la
notice d'utilisation. Elle ne couvre pas les dysfonctionnements
résultant d'une utilisation ou maintenance incorrecte ou
anormale, d'un accident, d'une humidité excessive, d'un
emballage incorrect, de la foudre, d'une surtension électrique, ni
d'une manipulation ou modification non-autorisée. L'utilisation
des systèmes Bose est limitée à certains environnements ;
reportez-vous à votre notice d'utilisation.
LES DISPOSITIONS DE LA PRÉSENTE GARANTIE
LIMITÉE REMPLACENT TOUTE AUTRE GARANTIE,
EXPRESSE OU IMPLICITE, ÉCRITE OU ORALE, Y COMPRIS
TOUTE GARANTIE DE POTENTIEL COMMERCIAL OU
D'ADÉQUATION À UN OBJECTIF PARTICULIER.
Malgré les dispositions ci-dessus, le cas échéant, si vous êtes
considéré comme un « consommateur » selon les termes du
Magnuson-Moss Warranty Act, vous pouvez bénéficier de toute
garantie implicite autorisée par la loi pour la période de validité
de la garantie explicite, telle que définie ci-dessous.
Durée de la garantie :
Dans les pays où la durée de la garantie n'est pas fixée par la loi,
la garantie limitée Bose a une durée de validité de deux ans à
compter de la date d'achat. Dans les pays où la durée minimum
de garantie est fixée par la loi, la durée de garantie applicable est
la période la plus longue entre la durée légale et la durée indiquée
ci-dessus.
Engagement de notre part :
Réparer ou remplacer toute pièce défectueuse, dans un délai
raisonnable, et ce gratuitement.
Comment bénéficier du service de garantie :
Renvoyez le produit ainsi que la preuve de son achat auprès d'un
revendeur Bose agréé, à un centre de réparation Bose ou bien
directement à Bose. La preuve d'achat n'est pas nécessaire si
son retour est exclu par la loi.
Pour renvoyer un produit, veuillez :
1. Emballer avec soin le produit avant de l'envoyer. Si vous
avez besoin d'un nouveau carton d’emballage, contactez
Bose Corporation.
2. Si vous renvoyez le produit directement à Bose, veuillez
contacter Bose pour obtenir un numéro de retour. Inscrivezle visiblement sur le carton.
3. Si vous renvoyez le produit à un centre de réparation Bose,
contactez le centre pour connaître les instructions
d’emballage et d’expédition.
4. Étiqueter et expédier le colis au centre Bose adéquat.
®
couvre le
Autres droits :
RECOURS EXCLUSIF :
CETTE GARANTIE LIMITÉE EST TOTALEMENT TRANSFÉRABLE
À CONDITION QUE LE PROPRIÉTAIRE ACTUEL FOURNISSE
L'ORIGINAL DE LA PREUVE D'ACHAT AUPRÈS D'UN
REVENDEUR BOSE AGRÉÉ. LA RESPONSABILITÉ MAXIMUM
DE BOSE NE POURRA EXCÉDER LE PRIX D'ACHAT RÉEL QUE
VOUS AVEZ PAYÉ POUR LE PRODUIT. EN AUCUN CAS BOSE
NE PEUT ÊTRE TENU RESPONSABLE DE DOMMAGES
PARTICULIERS, FORTUITS, SECONDAIRES OU INDIRECTS.
CERTAINES LÉGISLATIONS N'ADMETTENT PAS LES LIMITES
RELATIVES À L'EXCLUSION OU À LA LIMITATION DES
RÉPARATIONS, DES DOMMAGES PARTICULIERS, FORTUITS,
SECONDAIRES OU INDIRECTS OU LA LIMITATION DE LA
RESPONSABILITÉ À DES MONTANTS SPÉCIFIÉS. PAR
CONSÉQUENT LES LIMITATIONS OU EXCLUSIONS CI-DESSUS
PEUVENT NE PAS ÊTRE APPLICABLES DANS VOTRE CAS.
AUTRES CONDITIONS :
NOUS VOUS RECOMMANDONS D'INSCRIRE LE NUMÉRO DE
SÉRIE FIGURANT SUR VOTRE PRODUIT ET LES AUTRES
INFORMATIONS RELATIVES À VOTRE ACHAT ET DE LES
CONSERVER PARMI VOS DOCUMENTS PERSONNELS AVEC
VOTRE PREUVE D’ACHAT. SI NECESSAIRE, CES
INFORMATIONS NOUS PERMETTRONT DE MIEUX RÉPONDRE
À VOS BESOINS.
CETTE GARANTIE LIMITÉE VOUS CONFÈRE DES DROITS
PARTICULIERS SOUMIS À DES CONDITIONS SPÉCIFIÉES.
VOUS POUVEZ ÉGALEMENT BÉNÉFICIER D'AUTRES DROITS
JURIDIQUES LIÉS AU PRODUIT QUE VOUS AVEZ ACHETÉ.
CES DROITS PEUVENT VARIER D'UN PAYS OU D'UN ÉTAT À
L'AUTRE. CERTAINES LÉGISLATIONS N'ADMETTENT PAS
L'EXCLUSION, LA RESTRICTION OU LA MODIFICATION DE
CERTAINS DROITS IMPLICITES OU DE LEURS EFFETS. DANS
CES SITUATIONS, LA PRÉSENTE GARANTIE LIMITÉE
RESPECTE LES CONDITIONS DÉFINIES PAR LA LOI EN
VIGUEUR. D'AUTRES LOIS VOUS DONNENT LE DROIT DE
DÉPOSER UNE RÉCLAMATION LÉGALE CONTRE LE
VENDEUR.
Les lois de votre pays ou état peuvent vous donner le droit de
présenter des réclamations légales contre le vendeur ou le
fabriquant du produit. La présente garantie limitée ne porte pas
atteinte à ces droits.
Recours :
Les dispositions de la présente garantie remplacent toutes autres
garanties ou conditions, à l’exception de celles définies par la loi
en vigueur. La présente garantie limitée ne porte pas atteinte au
droits conférés par la loi et ne s'oppose pas aux recours
juridiques autorisés par la loi.
Cette garantie limitée est totalement transférable à condition que
le propriétaire actuel fournisse l'original de la preuve d'achat
auprès d'un revendeur Bose agréé.
Cette garantie limitée est annulée si l’étiquette portant le numéro
de série de l’appareil a été retirée ou effacée.
English FrançaisEspañol
25

Index
A
AC POWER 5
Activation et désactivation de l’alarme 13
Affichage 9, 12
Affichage de l’heure 9
Affichage sur 12 heures (AM/PM) 18, 20
Affichage sur 24 heures 18, 20
Aide pour résoudre les problèmes 24
Alarme déclenchée 13
Alarme radio 12
Alarme, utilisation 13
Antenne dipôle 14
Antenne FM 5, 14, 24
Antenne interne 24
Antenne FM externe 10, 14, 24
Appareil audio, autre 16
Appareil audio, connexion 16
Appareils externes 14
Arrêt automatique (veille) 9
Français Español English
Arrêt de l’alarme 13
Aucun son émis 24
B
Bande AM 10
Bande de fréquences 10
Bande FM 10
Branchement 5
Branchement d’autres appareils 14
Branchements 24
Bruit électrique 24
C
Câble stéréo 16
Carton d’emballage 4
Casque 14, 15, 24
Chaînes Lifestyle
Chiffre préréglé 11
Code de salle, réglage 18, 21
Commande de rappel d’alarme 18
Connecteur AUX IN 14, 16
Connecteur d’entrée stéréo 14
Connecteur stéréo pour casque 14
Console de jeux vidéo 16
Cordon d'alimentation 4, 5, 10, 14, 24
Coupure de courant 6, 11
®
14, 16, 18, 21
D
Déballage 4
Délai de rappel d’alarme 13, 19
Délai de rappel d’alarme par défaut 13
Dépannage 24
Deuxième salle 21
Dimensions 24
E
Écoute d’une station de radio FM/AM 10
Écran d’affichage 24
Émissions radios 11
Emplacement, choix 4
Expansion dans plusieurs pièces 16
F
Fonctionnement de la chaîne 7
Format d'affichage 12 heures (AM/PM) 6
Format d'affichage 24 heures 6
Format de l’heure 6, 20
Fréquence de radio 10
Fréquence de station 10, 11
G
Garantie 24
Guide d’onde acoustique 7
Guide d’onde conique 7
H
Heure 6, 9
Heure de réveil 12
Heure, réglage 6
I
Incrément de temps 19
Informations de fonctionnement 9
Informations techniques 24
L
Lampes fluorescentes 24
Lampes halogènes 24
Luminosité ambiante 18, 20
Luminosité de l’affichage 18, 20
M
Magnétoscope 16
Maintien d’une touche enfoncée 8
Mauvaise réception 14
Mauvaise réception de la bande AM 24
Mauvaise réception de la bande FM 24
Mémoire 6, 11
Mémorisation d’une station de radio 11
Menu de configuration 18, 20, 21
Mise en marche de la radio 10
Mode d’économie d’énergie 21
Mode de configuration de la chaîne 22
Mode de programmation de la mise en veille 9
Mode de réglage de l’heure 6
Mode TALK RADIO 11
26

Index
N
Nettoyage 23
Niveau d’écoute 15, 16
Niveau de luminosité 18, 20
O
Ordinateur 16
P
Panneau arrière 14, 15, 16
Paramètres de la chaîne 7, 9, 18, 19, 20, 21, 22
Paramètres par défaut 7, 18, 22
Personnalisation 18
Personnalisation du fonctionnement 18
Pile de la télécommande 23, 24
Poids 24
Préréglages (presets) 11
Préréglages enregistrés 11
Prise secteur 24
Puissance nominale 24
R
Radio Data System 19
RDS 19
Réactivation du son 8
Réception de la bande AM 24
Réception faible 10
Réception FM 5, 10, 15, 24
Réfrigérateur 24
Réglage de l’alarme 12
Réglage de la radio 10
Réglage rapide de l’heure 6
Réinitialisation de la chaîne 22
Remplacement de la pile 23
Report 13
Réseau Bose
Réveil avec une radio FM/AM, réglage 12
®
Link 14, 16, 18, 21
S
Sélection rapide 11
Service clients 24
Source auxiliaire 9, 24
Source externe 14, 24
Source FM 10
Station de radio 10, 11
T
Technologie d’enceinte à guide d’onde 7
Télécommande 8
Téléviseur 16, 24
V
Variateurs de lumière 24
Volume 9, 16, 24
Volume de l’alarme 12
English FrançaisEspañol
27

Informazioni sulla sicurezza
AVVERTENZA:
per ridurre il rischio di incendio o di scosse elettriche, il prodotto non deve essere esposto a pioggia o umidità.
AVVERTENZA: l'apparato deve essere tenuto lontano da gocce o schizzi e non deve essere utilizzato come
base per oggetti colmi di liquidi, quali vasi. Come per qualsiasi prodotto elettronico, è importante che all'interno
delle parti del sistema non penetrino liquidi che potrebbero provocare guasti e/o incendi.
ATTENZIONE: per ridurre il rischio di scosse elettriche, il prodotto deve essere smontato solo da una
persona qualificata. Gli interventi di assistenza devono essere affidati a personale qualificato.
Il simbolo del fulmine con la punta a freccia all'interno di un triangolo equilatero mette in guardia l'utente contro
tensioni pericolose non isolate all'interno del telaio del sistema, di entità
scossa elettrica.
Il simbolo del punto esclamativo racchiuso all'interno di un triangolo equilatero, che appare sul sistema, rimanda
l'utente alla lettura delle importanti istruzioni di uso e manutenzione contenute in questo manuale.
ATTENZIONE:
corrente CA.
AVVERTENZA:
causare un incendio o un'ustione chimica. Non deve essere ricaricata, smontata, esposta a temperature superiori a 100ºC o bruciata.
Le pile usate devono essere smaltite tempestivamente e sostituite solo con pile del tipo e modello appropriati.
per evitare scosse elettriche, occorre inserire a fondo il polo largo del connettore nell'apertura larga della presa di
l
a pila del telecomando deve essere tenuta fuori dalla portata dei bambini. Se maneggiata in modo scorretto, può
tale da presentare un potenziale pericolo di
Le pile usate devono essere smaltite correttamente,
attenendosi alle normative locali. Non devono essere bruciate.
AVVERTENZA: sull'apparecchio non devono essere collocate candele accese o altre sorgenti di fiamme libere.
Nota: l’etichetta identificativa è situata sul fondo del prodotto.
Legga questo manuale di istruzioni
Segua scrupolosamente le istruzioni riportate in questo manuale, che consentono di configurare e utilizzare correttamente il
sistema e sfruttare appieno tutte le funzionalità avanzate di cui dispone. Conservi questo manuale quale riferimento per il futuro.
Questo prodotto è conforme a tutte le direttive EU prescritte dalla legge. La dichiarazione di conformità completa è disponibile
all’indirizzo: www.Bose.com/static/compliance.
Svenska Nederlands Italiano Français Italiano Deutsch Dansk English
©1994-2005 Bose Corporation. Nessuna parte di questo documento può essere riprodotta, modificata, distribuita o usata in altro
modo senza previa autorizzazione scritta. Tutti i marchi citati nel presente documento sono di proprietà della Bose Corporation. Il
design del Wave
®
radio II è un marchio registrato della Bose Corporation.
2

Sommario
Impostazione del Wave® Radio II . . . . . . . . . . . . . . . . . . . . . . . . . . . . . . . . . . . . . . . . . . . . . . . . . . 4
Disimballaggio . . . . . . . . . . . . . . . . . . . . . . . . . . . . . . . . . . . . . . . . . . . . . . . . . . . . . . . .
Scelta della collocazione . . . . . . . . . . . . . . . . . . . . . . . . . . . . . . . . . . . . . . . . . . . . . . . . . . . .
Alimentazione . . . . . . . . . . . . . . . . . . . . . . . . . . . . . . . . . . . . . . . . . . . . . . . . . . . . . . . . .
Impostazione dell’orologio . . . . . . . . . . . . . . . . . . . . . . . . . . . . . . . . . . . . . . . . . . . . . . . . . . . .
Cenni su alcune funzioni speciali . . . . . . . . . . . . . . . . . . . . . . . . . . . . . . . . . . . . . . . . . . . . . . . .
Introduzione . . . . . . . . . . . . . . . . . . . . . . . . . . . . . . . . . . . . . . . . . . . . . . . . . . . . . . . . . .
Funzioni speciali . . . . . . . . . . . . . . . . . . . . . . . . . . . . . . . . . . . . . . . . . . . . . . . . . . . . . . .
®
Funzionamento del Wave
radio II . . . . . . . . . . . . . . . . . . . . . . . . . . . . . . . . . . . . . . . . . . . . . . . . . 8
Istruzioni per l’uso del telecomando . . . . . . . . . . . . . . . . . . . . . . . . . . . . . . . . . . . . . . . . . . . . 8
Lettura del display . . . . . . . . . . . . . . . . . . . . . . . . . . . . . . . . . . . . . . . . . . . . . . . . . . . . . . .
Accensione e spegnimento del Wave
®
radio II . . . . . . . . . . . . . . . . . . . . . . . . . . . . . . . . . . . . 9
Controllo del volume . . . . . . . . . . . . . . . . . . . . . . . . . . . . . . . . . . . . . . . . . . . . . . . . . . . . . . .
Impostazione dello spegnimento automatico (Sleep) . . . . . . . . . . . . . . . . . . . . . . . . . . . . . . . 9
. . . . . 4
. 4
. . . . . 5
6
. . 7
. . . . . 7
. . . . . 7
. . . 9
. 9
English Deutsch FrançaisDansk Italiano Italiano SvenskaNederlands
Ascolto della radio FM/AM . . . . . . . . . . . . . . . . . . . . . . . . . . . . . . . . . . . . . . . . . . . . . . . . . . . .
Accensione della radio . . . . . . . . . . . . . . . . . . . . . . . . . . . . . . . . . . . . . . . . . . . . . . . . . . . . . .
Sintonizzazione della radio . . . . . . . . . . . . . . . . . . . . . . . . . . . . . . . . . . . . . . . . . . . . . . . . . . .
. . . 10
. 10
. 10
Memorizzazione di una stazione radio (Presets) . . . . . . . . . . . . . . . . . . . . . . . . . . . . . . . . . . . 11
Modalità TALK RADIO . . . . . . . . . . . . . . . . . . . . . . . . . . . . . . . . . . . . . . . . . . . . . . . . . . . . . . .
Impostazione e utilizzo della sveglia . . . . . . . . . . . . . . . . . . . . . . . . . . . . . . . . . . . . . . . . . . . . . . .
. 12
Impostazione della sveglia . . . . . . . . . . . . . . . . . . . . . . . . . . . . . . . . . . . . . . . . . . . . . . . . . . . . 12
Sveglia con una stazione radio . . . . . . . . . . . . . . . . . . . . . . . . . . . . . . . . . . . . . . . . . . . . . 12
Impostazione dell’ora della sveglia . . . . . . . . . . . . . . . . . . . . . . . . . . . . . . . . . . . . . . . . . . 12
Uso della sveglia . . . . . . . . . . . . . . . . . . . . . . . . . . . . . . . . . . . . . . . . . . . . . . . . . . . . . . . .
. . . 13
Spegnimento della sveglia . . . . . . . . . . . . . . . . . . . . . . . . . . . . . . . . . . . . . . . . . . . . . . . . . 13
Attivazione e disattivazione della sveglia . . . . . . . . . . . . . . . . . . . . . . . . . . . . . . . . . . . . . . 13
Spegnimento della sveglia per un determinato periodo di tempo . . . . . . . . . . . . . . . . . . . 13
Collegamento di altre apparecchiature . . . . . . . . . . . . . . . . . . . . . . . . . . . . . . . . . . . . . . . . . . . . . .
Ingressi/uscite sul pannello posteriore . . . . . . . . . . . . . . . . . . . . . . . . . . . . . . . . . . . . . . . . . . . 14
Collegamento di un’antenna FM esterna . . . . . . . . . . . . . . . . . . . . . . . . . . . . . . . . . . . . . . . . . 14
Uso delle cuffie . . . . . . . . . . . . . . . . . . . . . . . . . . . . . . . . . . . . . . . . . . . . . . . . . . . . . . . .
Uso del Wave
Collegamento del Wave
Personalizzazione del Wave
®
radio II con altre apparecchiature audio . . . . . . . . . . . . . . . . . . . . . . . . . . . . . 16
®
radio II a un sistema Lifestyle® . . . . . . . . . . . . . . . . . . . . . . . . . . . . 16
®
radio II . . . . . . . . . . . . . . . . . . . . . . . . . . . . . . . . . . . . . . . . . . . . . . . 18
Menu di impostazioni . . . . . . . . . . . . . . . . . . . . . . . . . . . . . . . . . . . . . . . . . . . . . . . . . . . . . . .
. . . . . 15
. 18
Regolazione della frequenza di riattivazione della sveglia (snooze) . . . . . . . . . . . . . . . . . . . . . 19
Modifica dell’impostazione RDS (Radio Data System) . . . . . . . . . . . . . . . . . . . . . . . . . . . . . . . 19
Modifica del formato dell’ora . . . . . . . . . . . . . . . . . . . . . . . . . . . . . . . . . . . . . . . . . . . . . . . . . .
Regolazione della luminosità del display . . . . . . . . . . . . . . . . . . . . . . . . . . . . . . . . . . . . . . . . . 20
Impostazione del codice ambiente . . . . . . . . . . . . . . . . . . . . . . . . . . . . . . . . . . . . . . . . . . . . . . 21
Attivazione della modalità basso consumo . . . . . . . . . . . . . . . . . . . . . . . . . . . . . . . . . . . . . . . 21
Reimpostazione del sistema . . . . . . . . . . . . . . . . . . . . . . . . . . . . . . . . . . . . . . . . . . . . . . . . . . . 2
®
Manutenzione del Wave
Pulizia . . . . . . . . . . . . . . . . . . . . . . . . . . . . . . . . . . . . . . . . . . . . . . . . . . . . . . . . . . . .
radio II . . . . . . . . . . . . . . . . . . . . . . . . . . . . . . . . . . . . . . . . . . . . . . . . . . 23
. . . . . . . . 23
Sostituzione della pila del telecomando . . . . . . . . . . . . . . . . . . . . . . . . . . . . . . . . . . . . . . . . . . 23
Risoluzione dei problemi . . . . . . . . . . . . . . . . . . . . . . . . . . . . . . . . . . . . . . . . . . . . . . . . . . . .
Assistenza tecnica . . . . . . . . . . . . . . . . . . . . . . . . . . . . . . . . . . . . . . . . . . . . . . . . . . . . . . .
Garanzia limitata . . . . . . . . . . . . . . . . . . . . . . . . . . . . . . . . . . . . . . . . . . . . . . . . . . . . . . .
Dati tecnici . . . . . . . . . . . . . . . . . . . . . . . . . . . . . . . . . . . . . . . . . . . . . . . . . . . . . . . . . .
Indice . . . . . . . . . . . . . . . . . . . . . . . . . . . . . . . . . . . . . . . . . . . . . . . . . . . . . . . . . . . . .
. . . . . . . . . . 27
. 24
. . . 25
. . . . . 25
. . . . . . 25
11
14
20
2
3

Impostazione del Wave
Wave® radio II
Cavo di
alimentazione Euro*
Telecomando
(pila preinstallata)
®
*Nel Regno Unito è fornito il cavo di
alimentazione appropriato.
Informazioni importanti
A questo punto è consigliabile annotare il numero di serie del Wave® radio II. Il
numero di serie è situato sul fondo del prodotto.
Numero di serie_________________________
Data d’acquisto ________________________
Si consiglia di conservare lo scontrino fiscale insieme a questo manuale.
Adattatore di antenna
Disimballaggio
Verifichi che nella confezione sia presente quanto segue:
®
Radio II
Scelta della collocazione
• Posizioni il Wave® radio II su un tavolo o su un’altra superficie piana.
• Per ottenere prestazioni ottima
rispetto alla postazione di ascolto.
• Per ottimizzare le prestazioni, collochi il Wave
eviti di posizionarlo direttamente in un angolo.
Nota:
• NON collochi il Wave® radio II su una superficie metallica, che potrebbe interferire con la
ricezione AM.
• NON collochi il Wave
apparecchiature elettriche, genera calore.
• NON utilizzi il W
sia esposto all’umidità.
ave® radio II in un luogo umido o in qualunque altro luogo in cui il prodotto
Svenska Nederlands Italiano Français Italiano Deutsch Dansk English
li, collochi il Wave® radio II nella parte opposta dell’ambiente
®
radio II su una superficie sensibile al calore. Come tutte le
®
radio II a 60 cm di distanza da una parete ed
4

Alimentazione
1
2
Connettore AC POWER
3
Impostazione del Wave
1. Inserisca l’estremità piccola del cavo di alimentazione nel connettore contrassegnato
dall’etichetta AC POWER sul pannello posteriore del Wave
2. Colleghi il cavo di alimentazione a una presa di corrente.
®
radio II.
®
Radio II
English Deutsch FrançaisDansk Italiano Italiano SvenskaNederlands
3. Srotoli e raddrizzi il cavo di alimentazione per ottimizzare la ricezione FM. Nel Wave®
radio II, il cavo di alimentazione svolge la funzione di antenna FM.
5

Impostazione del Wave
®
Radio II
Impostazione dell’orologio
Dopo avere collegato il Wave® radio II all’alimentazione, imposti l’orologio utilizzando il
telecomando.
puntare il telecomando verso il pannello frontale e premere i pulsanti.
1. Prema e tenga premuto Time – oppure
Time + finché
dicitura – CLOCK SET –.
2. Prema Time – per ridurre oppure Time + per aumentare il valore visualizzato fino a
impostare l’ora corrente. Per una regolazione rapida, è possibile anche premere e tenere
premuto il pulsante.
Il Wave® radio
sul display non compare la
II
può essere gestito facilmente dal telecomando. È sufficiente
3. Dopo cinque secondi il sistema uscirà automaticamente dalla modalità impos
orologio.
Per cambiare il formato dell’ora dal formato 12 ore (AM/PM) al formato 24 ore, faccia
ri
ferimento alla sezione “Modifica del formato
Nota:
in caso di interruzione dell’alimentazione, l’ora e altre impostazioni del Wave® radio II
verranno mantenute nella memoria di backup per un massimo di 48 ore. Questa funzionalità
cons
ente di mantenere le impostazioni del sistema quando si scollega e si sposta l’unità oppure
quando si verifica un’interruzione di corrente.
Nota:
quando un’operazione richiede la pressione prolungata di un pulsante, la pressione dovrà
essere protratta per almeno un secondo.
dell’ora” a pagina 20.
tazione
Svenska Nederlands Italiano Français Italiano Deutsch Dansk English
6

Introduzione
Doppie guide
d'onda coniche
Cenni su alcune funzioni speciali
Grazie per avere acquistato il sistema musicale Bose® Wave®, un modo elegante per
diffondere in qualsiasi ambiente un suono di alta qualità.
La rinomata e brevettata tecnologia dei
diff
usori acustici a guida d’onda è il frutto
di oltre quattordici anni di ricerca della
Bose Corporation. Grazie a questa
tecnologia, un tubo trasferisce
efficacemente l’energia da un piccolo
diffusore all’aria esterna su un’ampia
gamma di basse frequenze. Inoltre, le
lunghe guide d’onda, ripiegate a formare
intricati percorsi, possono essere inserite
in prodotti sufficientemente piccoli per un
ambiente domestico. Il Wave
dotato della nuova tecnologia dei
diffusori a doppia guida d’onda conica,
per il collegamento di due diffusori a due
guide d’onda coniche da 26" che si
combinano producendo un timbro
strumentale senza precedenti per un
sistema di queste dimensioni.
®
radio II è
English Deutsch FrançaisDansk Italiano Italiano SvenskaNederlands
Funzioni speciali
Funzioni sveglia per svegliarsi al suono della stazione radio
Può configurare il Wave® radio II per essere svegliato della stazione radio. Per maggiori
dettagli, faccia riferimento alla sezione “Sveglia con una stazione radio” a pagina 12.
Personalizzazione del funzionamento del sistema tramite il menu di
impostazioni
Le impostazioni del sistema preconfigurate in fabbrica soddisfano le esigenze della maggior
parte degli utilizzatori. Se desidera modificare le impostazioni, faccia riferimento alla sezione
“Personalizzazione del Wave
Tramite il menu di impostazioni è possibile modificare a piacere le seguenti impostazioni del
sistema:
• Frequenza di riattivazione della sveglia • Luminosità del display
• Formato 12 ore o 24 ore per l’orologio
®
radio II” a pagina 18.
• Codice ambiente Bose
®
• Ripristino delle impostazioni
di fab
brica
link
7

Funzionamento del Wave
On/Off (Stop Alarm)
• Accende o spegne il sistema
(pagina 9).
• Spegne una sveglia attiva
(pagina 13).
Sleep
• Spegne la sveglia per un determinato periodo
di tempo (pagina 13).
• Imposta lo spegnimento automatico
dell'unità dopo 10-90 minuti (pagina 9).
Volume
• Alza o abbassa il volume (pagina 9).
Mute
• Consente di disattivare l'audio
(pagina 9).
• Una seconda pressione consente di
riattivare l'audio.
Presets
•
Pressione:
richiama una stazione radio
memorizzata (pagina 11).
• Pressione prolungata:
memorizza una
stazione radio per il richiamo rapido
(pagina 11).
Seek
•
Pressione:
trova la successiva stazione
radio con segnale forte (pagina 10).
•
Pressione prolungata:
scorre rapidamente
in avanti/indietro le frequenze radio con
segnale forte (pagina 10).
Tune
•
Pressione:
passa alla frequenza radio
successiva/precedente (pagina 10).
•
Pressione prolungata:
si sposta
rapidamente in avanti/indietro tra le
frequenze radio (pagina 10).
Time
• Imposta l'ora (pagina 6).
• In modalità di impostazione della sveglia,
imposta l'ora della sveglia (pagina 12).
Alarm On/Off
• Accende o
spegne la sveglia
(pagina 13).
Talk Radio
• Attiva o disattiva la modalità TALK
RADIO per AM o FM (pagina 11).
AUX
• Consente di ascoltare l'audio da una
sorgente esterna collegata all'ingresso AUX
IN (pagina 16).
Alarm Time
• Una pressione: attiva la modalità di
impostazione dell'ora della sveglia
(pagina 12).
• Pressione prolungata: entra nel menu di
impostazione (pagina 18).
FM
• Accende la radio.
• Premendo nuovamente
si passa da FM a AM e
viceversa (pagina 10).
Wake To
• Pressione
prolungata: imposta
la stazione radio per
la sveglia
(pagina 12).
AM
• Accende la radio.
• Premendo nuovamente
si passa da AM a FM e
viceversa (pagina 10).
®
radio II
Istruzioni per l’uso del telecomando
Il Wave® radio
II
può essere gestito facilmente dal telecomando. È sufficiente puntare il
telecomando verso il pannello frontale e premere i pulsanti. Il telecomando funziona entro un
raggio di circa 6 metri dal pannello frontale.
Nel presente manuale, sulla sinistra delle istruzioni per l’uso sono riportate delle icone che
rappresentano i pulsanti presenti sul telecomando.
Nota:
quando un’operazione richiede la pressione prolungata di un pulsante, la pressione dovrà
essere protratta per almeno un secondo.
Nota:
premendo FM, AM, o AUX, viene attivata la sorgente selezionata sul Wave® radio II.
Svenska Nederlands Italiano Français Italiano Deutsch Dansk English
8

Lettura del display
Ora in formato 12 ore (AM/PM)
o 24 ore
Vengono visualizzate informazioni sul funzionamento
per la sorgente attiva o il menu di impostazioni.
L'ora della sveglia compare
quando è impostata la sveglia.
SLEEP compare quando è attivo il
timer sleep.
Viene visualizzata la dicitura FM, AM, AUX
o Bose
®
link in base alla sorgente
selezionata.
On
Off
AUX
Mute
Sleep
Funzionamento del Wave
®
radio II
English Deutsch FrançaisDansk Italiano Italiano SvenskaNederlands
Accensione e spegnimento del Wave
Prema On/Off una volta per accendere o spegnere il Wave® radio II. Verrà attivata l’ultima
sorgente utilizzata sul Wave
OPPURE
Prema il pulsante corrispondente alla sorgente che desidera attivare sul Wave® radio II.
Premendo AUX n
on viene accesa una sorgente esterna, ad esempio il televisore. Occorrerà
quindi accendere tale apparecchio prima di procedere.
Controllo del volume
Prema e tenga premuto Volume o per regolare il livello del volume. Il livello di volume
viene indicato sul display con VOLUME - da
Prema Mute p
nuovamente Mute oppure prema Volume
l’audio, prema Vol
quando il Wave® radio II è spento, il volume può essere regolato solo tra 10 e 75.
Nota:
er disattivare l’audio sul Wave® radio II. Per riattivare l’audio, prema
ume quando l’audio è azzerato.
®
radio II
®
radio II.
0 (silenzio) a 99 (livello massimo).
. Per abbassare il volume prima di riattivare
Impostazione dello spegnimento automatico (Sleep)
Prema Sleep per impostare lo spegnimento automatico del Wave® radio II dopo un
determinato periodo di tempo.
• Dopo avere premuto Sleep sul display compar
conto alla rovescia del timer. Se il Wave
e impostare immediatamente l’ora di spegnimento. Allo scadere del tempo impostato
per il timer sleep, viene attivata l’ultima sorgente selezionata.
Nota:
dall’ultima pressione dei tasti, il Wave
• Quando è visualizzata l’impostazione SLEEP, pr
il timer sleep su 10-90 minuti (a incrementi di 10 minuti) o su OFF.
quando è attiva la modalità di impostazione del timer sleep, se trascorrono più di 10 secondi
• Per verificare il tempo rimanente prima dello spegnimento, prema Sleep.
• Per annullare il timer sleep, prema On/Of
®
radio
®
radio II è spento, prema Sleep per accenderlo
e la dicitura SLEEP - 30 MIN e inizia il
ema nuovamente Sleep per impostare
II
uscirà automaticamente da tale modalità.
f.
9

Ascolto della radio FM/AM
Ora
Stazione
memorizzata
selezionata
Sorgente FM
Frequenza
della stazione
Display FM – RDS attivo
Display FM – Nessuna informazione RDS
Ora
Stazione
memorizzata
selezionata
Sorgente FM
Informazioni RDS
Sorgente FM
Stazione memorizzata
selezionata
Frequenza della
stazione
Display durante la sintonizzazione
Quando si preme FM, AM, Seek o Tune
per sintonizzarsi su una stazione radio, al
centro del display viene visualizzata la
frequenza.
Seek
Accensione della radio
Prema FM o AM per accendere la radio e sintonizzarsi sull’ultima stazione FM o AM
selezionata. Prema nuovamente FM o AM per pas
viceversa.
Quando la radio è accesa, vengono visualizzate le informazioni re
la funzione RDS è attivata (ON) nel menu di impostazioni del sistema (vedere pagina 19), al
posto della frequenza vengono visualizzati i dati RDS.
Nota: il sistema RDS (Radio Data System) trasmette informazioni utili, quali il nome della
stazione, informazioni sul programma e l’ora corrente. Il sistema RDS funziona solo nella banda
FM e le informazi
trasmissione FM.
sare dalla banda FM alla banda AM e
lative alla stazione radio. Se
oni RDS vengono visualizzate solo se sono presenti nel segnale della
Sintonizzazione della radio
Prema FM o AM per passare dalla banda FM alla banda AM e viceversa.
P
rema Seek per trovare la precedente stazione con segnale forte e Seek per trovare
la successiva stazione radio con segnale forte.
Tune
Prema Tune < p
> per sintonizzarsi manualmente su una frequenza superiore.
Prema e tenga premuto Tune
frequenza oppure Tune > per spostarsi rapidamente verso l’alto nella banda di frequenza.
Nota:
cinque secondi dopo avere rilasciato il pulsante FM, AM, Tune o Seek, al centro del
display viene visualizzata nuovamente l’ora e immediatamente sotto compare la frequenza
Nota:
se la ricezione AM è debole, ruoti il Wave® radio II in senso orario o antiorario per
migliorarla. Se la ricezione FM è debole, si assicuri che il cavo di alimentazione sia steso il più
possib
ile. Per migliorare la ricezione FM, è possibile installare un’antenna FM esterna. Vedere
“Collegamento di un’antenna FM esterna” a pagina 14.
er sintonizzarsi manualmente su una frequenza inferiore oppure Tune MP3
< per spostarsi rapidamente verso il basso nella banda di
radio.
Svenska Nederlands Italiano Français Italiano Deutsch Dansk English
10

Memorizzazione di una stazione radio (Presets)
Presets
123
456
È possibile memorizzare fino a sei stazioni FM e sei stazioni AM per il richiamo rapido mediante
i pulsanti
1. Si sintonizzi sulla stazione che desidera memorizzare come preset.
2. Prema e tenga premuto uno dei sei pulsanti
Presets
.
doppio “bip” e sul display non compaiono il numero di preset e la frequenza della
stazione.
Ascolto della radio FM/AM
Presets
fino quando non viene emesso un
English Deutsch FrançaisDansk Italiano Italiano SvenskaNederlands
3. Prema uno dei pulsanti Presets
Nota:
eliminata.
Nota:
backup.
Modalità TALK RADIO
Le trasmissioni radiofoniche di tipo “talk radio” (parlato) risentono particolarmente della scelta
del microfono o del potenziamento delle basse frequenze operato da alcune emittenti con
l’obiettivo di migliorare la qualità della voce ascoltata su radio tradizionali. Nei prodotti audio di
alta qualità, tuttavia, questo produce un suono innaturale o troppo ricco di bassi. Selezionando
la modalità TALK RADIO, il Wave
basse frequenze potenziate artificialmente.
Quando è accesa la radio, prema due volte Ta lk Ra di o per modificare l’impostazione della
modalità TALK RADIO.
Quando è attiva, sul display compare TAL
compare TALK RADIO– OFF.
Nota:
stazione o un’altra sorgente o si spegne il Wa
per sintonizzarsi rapidamente su una stazione FM o AM
precedentemente memorizzata.
assegnando un numero di preset a una stazione, l’assegnazione precedente viene
durante un’interruzione di corrente, i preset memorizzati vengono salvati in una memoria di
®
radio II effettua una regolazione automatica compensando le
K RAD IO– ON . Quando non è attiva, sul display
l’impostazione TALK RADIO viene annullata automaticamente quando si seleziona un’altra
ve® radio II.
11
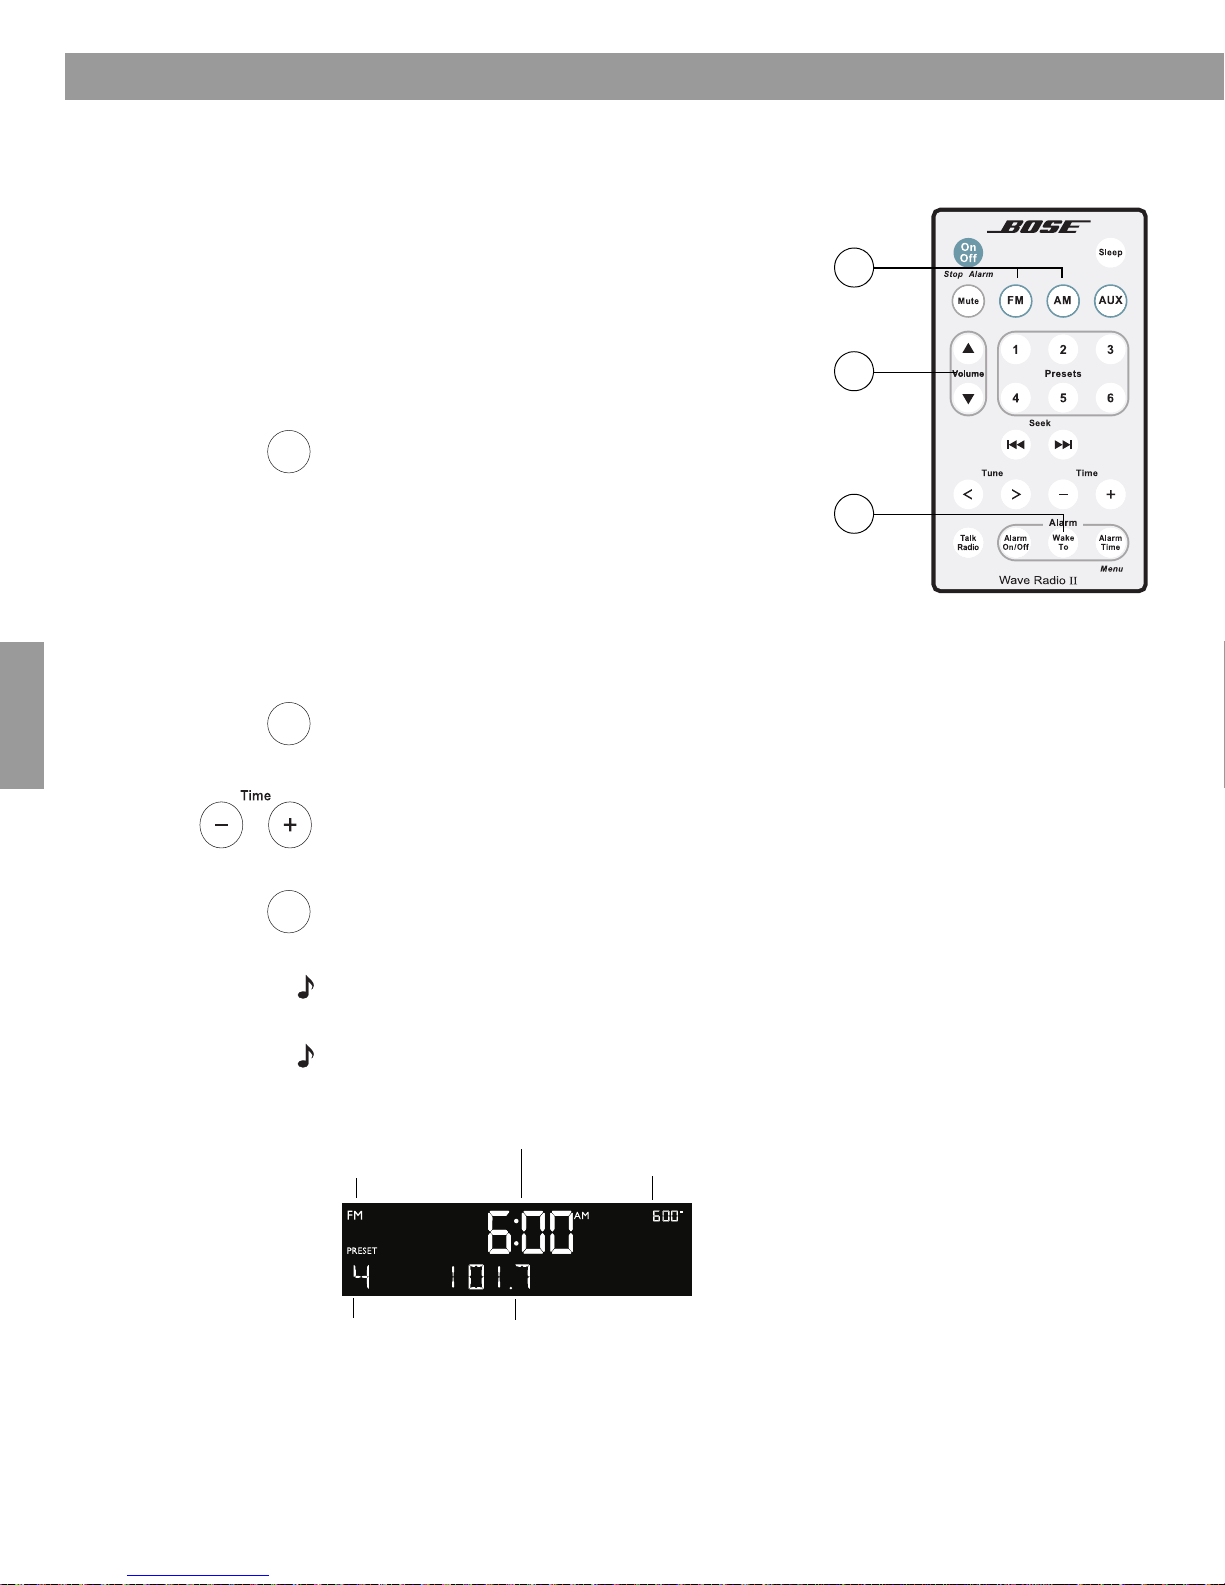
Impostazione e utilizzo della sveglia
Wake
To
Alarm
Time
Alarm
Time
Radiosveglia FM
Ora della sveglia che lampeggia
Numero di preset
Frequenza della stazione radio
Ora della sveglia
Esempio: la sveglia è impostata per la riproduzione
del Preset 4 di stazione radio, 101.70 FM, alle 6.00.
3
1
2
Prema e tenga
premuto
per almeno
un secondo
Impostazione della sveglia
Sveglia con una stazione radio
1. Accenda il Wave® radio II e selezioni
la stazione radio che desidera
ascoltare al risveglio.
2. Regoli il vo
lume sul livello desiderato.
Prema e tenga premuto Wake To finché non
3.
viene emesso un doppio bip. In questo modo,
all’ora impost
ata per la sveglia verrà riprodotta
la stazione radio.
Impostazione dell'ora della sveglia
1.
Prema Alarm Time per attivare la modalità di impostazione dell’ora della sveglia. L’ora
della sveglia viene visualizzata al centro del display e lampeggia
2.
Prema Time – o Time + per impostare l’ora della sveglia.
Prema nuovamente Alarm Time. La sveglia è impostata.
3.
in alto a destra.
quando è attiva la modalità di impostazione dell’ora della sveglia, se trascorrono più di 10
Nota:
secondi dall’ultima pressione dei tasti il Wave
Nota:
per confermare l’ora della sveglia e le impostazioni Wake To, prema Alarm Time. L’ora
della sveglia e le impostazioni Wake To rimarranno vis
Svenska Nederlands Italiano Français Italiano Deutsch Dansk English
12
®
radio II uscirà automaticamente da tale modalità.
ualizzate per 10 secondi.
Uso della sveglia
On
Off
Stop Alarm
Alarm
On/Off
Sleep
Impostazione e utilizzo della sveglia
Spegnimento della sveglia
Prema On/Off (Stop Alarm) per spegnere la sveglia e reimpostarla per il giorno successivo.
Attivazione e disattivazione della sveglia
Prema Alarm On/Off per attivare o disattivare la sveglia. La sveglia è attiva quando l’ora
della sveglia è visualizzata nell’angolo in alto a destra. Non è attiv
non è visualizzata nell’angolo superiore destro del display.
Spegnimento della sveglia per un determinato periodo di tempo
Prema Sleep per spegnere la sveglia e fare in modo che si riattivi dopo un determinato
periodo di tempo (funzione snooze).
Nell’intervallo tra una disa
compare la dicitura SNOOZE. Allo scadere dell’intervallo, la sveglia suona nuovamente.
Premendo nuovamente Sleep la sveglia viene spenta per altri 10 minuti (intervallo
preconfigurato). Vedere “Regolazione della frequenza di riattiv
pagina 19.
ttivazione e la successiva riattivazione (snooze), sul display
a quando l’ora della sveglia
a
zione della sveglia (snooze)” a
English Deutsch FrançaisDansk Italiano Italiano SvenskaNederlands
13

Collegamento di altre apparecchiature
Bose link
AUX IN
EXTERNAL
75Ω FM ANTENNA
Un connettore per
antenna FM da 3,5 mm.
Connettore Bose® link
Per il collegamento a
sistemi Lifestyle
®
che
supportano la tecnologia
Bose
®
link.
AUX IN
Un connettore di ingresso
stereo da 3,5 mm per
collegare sorgenti esterne.
HEADPHONE
Un connettore per cuffie stereo da
3,5 mm. Quando viene collegata
una cuffia, viene azzerato il
volume sui diffusori del Wave
®
radio II.
Connettore 75Ω FM ANTENNA
Adattatore di antenna
Ingressi/uscite sul pannello posteriore
Il pannello posteriore del Wave® radio
Collegamento di un’antenna FM esterna
Il cavo di alimentazione del Wave® radio II include un’antenna FM integrata. Se dopo avere
regolato la posizione del cavo di alimentazione la ricezione è ancora scarsa, può collegare il
sistema ad un’antenna esterna sul tetto o cablata oppure ad un’antenna FM a dipolo. Insieme
al prodotto è fornito un adattatore che consente di collegare il sistema ad un’antenna esterna
sul tetto o cablata. Per ordinare un’antenna FM a dipolo esterna, si rivolga al centro di
Assistenza Tecnica della Bose
copertina del presente manuale.
®
. Consulti i numeri di telefono elencati nella terza pagina di
II consente di collegare apparecchiature esterne.
Per collegare un’antenna esterna sul tetto o ca
blata utilizzando l’adattatore di
antenna:
• Inserisca la spina da 3,5 mm (
ANTENNA
sul pannello posteriore del Wave® radio II.
1
/8") dell’adattatore di antenna nel connettore 75Ω FM
• Colleghi l’estremità opposta dell’adattatore al cavo dell’antenna esterna sul tetto o cablata.
collegando il sistema ad un’antenna esterna sul tetto o cablata, l’antenna integrata viene
disattivata e il segnale FM verrà ricevuto solo attraverso l’antenna esterna. Scollegando l’antenna
es
terna verrà riattivata l’antenna integrata.
Svenska Nederlands Italiano Français Italiano Deutsch Dansk English
14

75Connettore Ω FM
ANTENNA
Antenna FM dipolo (non inclusa)
Uso delle cuffie
(Cuffie non incluse)
Connettore HEADPHONE
Collegamento di altre apparecchiature
Per collegare un'antenna FM esterna:
• Inserisca lo spinotto da 3,5 mm dell’antenna FM nel connettore
pannello posteriore del Wave
• Allarghi i rami dell’antenna per trovare la ricezione FM ottimale.
• Allontani le estremità dell’antenna il più possib
per ottimizzare la ricezione.
®
radio II.
ile dall’unità e dall’apparecchiatura esterna
75Ω FM ANTENNA sul
Bose link
AUX IN
English Deutsch FrançaisDansk Italiano Italiano SvenskaNederlands
Per l’ascolto in cuffia, colleghi la cuffia all’apposito connettore sul pannello posteriore del
®
radio II.
Wave
• Il volume dei diffusori viene azzerato automati
ATTENZIONE:
l’esposizione prolungata ad un livello sonoro elevato può causare danni all’udito.
È sconsigliabile tenere un volume troppo alto quando
camente quando viene collegata la cuffia.
si utilizzano le cuffie, soprattutto per un
ascolto prolungato.
Nota: quando le cuffie vengono scollegate dal Wave® radio II, l’audio dei diffusori viene
automaticamente riattivato. Dato che il volume in cuffia può essere diverso da quello dei diffusori,
è consigliabile abbassare il volume del Wave® radio II prima di collegare o scollegare le
cuffie.
se suona una sveglia durante l’ascolto in cuffia, il segnale di allarme verrà emesso tramite i
Nota:
diffusori del Wave
®
radio II.
Per regolare il volume delle cuffie
Prema Volume
o per regolare il livello di ascolto delle cuffie.
15

Collegamento di altre apparecchiature
• Cavo stereo maschio-maschio da 3,5 mm
• Cavo stereo da doppio RCA maschio a maschio
3,5 mm
AUX
Cavo stereo da
doppio RCA
maschio a
maschio 3,5mm
Televisore
Connettore
AUX IN
Uso del Wave
®
radio II con altre apparecchiature audio
Quando utilizza un televisore, un videoregistratore, un computer, un video game o un lettore
di cassette, può migliorare la resa acustica collegando il dispositivo audio al Wave
Per collegare un dispositivo audio al Wave
®
radio II è necessario uno dei seguenti cavi:
Per procurarsi il cavo appropriato, contatti il centro di Assistenza Tecnica della Bose® o si
rechi presso un negozio di elettronica locale. Faccia riferimento all’elenco di numeri di
telefono riportati sulla retrocopertina di questo manuale.
Per collegare un dispositivo audio, ad
1. Colleghi un’estre
mità del cavo stereo all’uscita del dispositivo audio.
esempi
o il televisore, al Wave® radio II:
2. Colleghi l’estremità opposta del cavo al connettore AUX
®
Wave
radio II.
On
3.
Off
Accenda il Wave® radio II e il dispositivo audio.
4.
Prema AUX.
®
radio II.
IN sul pannello posteriore del
5.
Prema e tenga premuto Volume o per regolare il livello di ascolto.
Nota:
se non riesce a regolare il volume del Wave® radio II su un livello sufficientemente alto,
provi ad alzare il volume del dispositivo audio collegato.
Collegamento del Wave
®
radio II a un sistema Lifestyle
Il Wave® radio II può essere utilizzato come sistema di diffusori per l’espansione multiambiente di un sistema per l’intrattenimento domestico Lifestyle
®
link. Il Wave® radio II è preconfigurato per l’ambiente B. Per modificare questa
Bose
impostazione, faccia riferimento alla sezione “Impostazione del codice ambiente” a
pagina 21.
Svenska Nederlands Italiano Français Italiano Deutsch Dansk English
Per ottenere i cavi e le istruzioni necessarie, si rivolga al centro di Assistenza Tecnica della
®
Bose
. Faccia riferimento all’elenco di numeri di telefono riportati sulla retrocopertina di
questo manuale.
16
®
®
che supporta la tecnologia

English Deutsch FrançaisDansk Italiano Italiano SvenskaNederlands
Personalizzazione del Wave
®
radio II
Le impostazioni preconfigurate in fabbrica soddisfano le
esigenze della maggior parte degli utilizzatori.
Se tuttavia desidera modificare le impostazioni del sistema,
faccia riferimento alle istruzioni riportate nelle pagine 18-22.
17

Personalizzazione del Wave
Tune
Alarm
Time
Menu
Alarm
Time
Menu
Menu di impostazioni
Il menu di impostazioni consente di personalizzare il funzionamento del Wave® radio II.
1.
Prema e tenga premuto Alarm Time (Menu) finché sul display non compare la dicitura SETUP MENU-.
®
radio II
2. Prema T
3. Prema Time – o
4. Prema Alarm Time (Menu) per
une > finché non viene visualizzata la voce di menu che desidera modificare.
Time + per cambiare il valore o la selezione.
uscire dal menu di impostazioni oppure attenda 10
secondi e il menu di impostazioni si chiuderà automaticamente.
Menu di impostazioni del Wave® radio II
Impostazione di
sistema
Controllo snooze SNOOZE- 10 MIN 10 MIN, 20 MIN,
Informazioni RDS
(Radio Data
System)
Formato
dell'ora
Voce di menu
RDS- ON OFF, ON Attiva (ON) o disattiva (OFF) la
TIME- 12 HOUR 12-HOUR,
Impostazione
predefinita Opzioni Descrizione
30 MIN, 40 MIN,
50 MIN, 60 MIN
24-HOUR
Specifica l'intervallo di riattivazione della sveglia
visualizzazione delle informazioni RDS.
Imposta il formato 12 ore (AM/PM) o il
formato 24 ore per la visualizzazione dell'ora.
Alto livello di
luminosità del
disp
lay
Basso livello di
luminosità del
disp
lay
Codice ambiente ROOM- B
Modalità basso
consumo
Reimpostazione
del si
stema
BRIGHT HI- 12 8-15 Imposta il livello di luminosità del display quando
BRIGHT LO- 4 1-8 Imposta il livello di luminosità del display quando
LOW POWER- OFF OFF, ON Attiva (ON) o disattiva (OFF) la modalità basso
RESET ALL- NO NO, YES Ripristina nel Wave® radio II le impostazioni
Svenska Nederlands Italiano Français Italiano Deutsch Dansk English
_ _ _ – B _ _ _ –, C _ _ – _,
D _ _ – –, E _ – _ _,
F _ – _ –, G _ – – _,
H _ – – –, I – _ _ _,
J – _ _ –, K – _ – _,
L – _ – –, M – – _ _,
N – – _ –, O – – – _
l'unità rileva che l'ambiente è molto illuminato.
l'unità rileva che l'ambiente è scarsamente
illuminato.
®
Imposta il codice ambiente per il Wave
quando è collegato al sistema Lifestyle® tramite
una rete Bose® link.
I trattini che seguono la lettera dell'ambiente indicano
come devono essere impostati i mini-selettori sul
telecomando Lifestyle®.
consumo. In questa modalità il sistema consuma
meno energia quando è spento.
preconfigurate in fabbrica.
radio II
18

Personalizzazione del Wave
Alarm
Time
Menu
Alarm
Time
Menu
Tune
Alarm
Time
Menu
Alarm
Time
Menu
Tune
Regolazione della frequenza di riattivazione della sveglia (snooze)
Questa impostazione specifica l’intervallo di tempo durante il quale il sistema non deve
emettere alcun suono quanto è attiva la funzione snooze.
1.
Prema e tenga premuto Alarm Time (Menu) finché sul display non compare -SETUP
MENU-.
®
radio II
English Deutsch FrançaisDansk Italiano Italiano SvenskaNederlands
2. Prema una volta Tune
3. Prema Time – o
>. Verrà visualizzata la voce SNOOZE- 10 MIN.
Time + per impostare l’intervallo tra la disattivazione della sveglia
e la successiva riattivazione (snooze) su 10-60 minu
4. Prema Alarm Time (Menu) per
uscire dal menu di impostazioni oppure
attenda 10 secondi e il menu di impostazioni si chiuderà automaticamente.
Modifica dell’impostazione RDS (Radio Data System)
Questa impostazione consente di attivare o disattivare la visualizzazione delle informazioni
RDS. Il sistema RDS trasmette informazioni utili, quali il nome della stazione, informazioni sul
programma e l’ora corrente. Questo sistema funziona solo nella banda FM e le informazioni
RDS vengono visualizzate solo se sono presenti nel segnale della trasmissione FM.
1.
Prema e tenga premuto Alarm Time (Menu) finché sul display non compare -SETUP
MENU-.
2. Prema due volte Tu
ne >. Verrà visualizzata la voce RDS- ON.
ti (a incrementi di 10 minuti).
3. Prema Time – o
4. Prema Alarm Time (Menu) per
attenda 10 secondi e il menu di impostazioni si chiuderà automaticamente.
Time + per cambiare l’impostazione da RDS- ON a RDS- OFF.
uscire dal menu di impostazioni oppure
19

Personalizzazione del Wave
Alarm
Time
Menu
Alarm
Time
Menu
Tune
Alarm
Time
Menu
Alarm
Time
Menu
Tune
Tune
Modifica del formato dell’ora
L’ora può essere visualizzata sul display nel formato 12 ore (AM/PM) o nel formato 24 ore.
Prema e tenga premuto Alarm Time (Menu) finché sul display non compare -SETUP
1.
MENU-.
®
radio II
2. Prema quattro volte Tu
3. Prema Time – o
ne >. Verrà visualizzata la voce TIME-.
Time + per selezionare 12 HOUR (formato 12 ore) o 24 HOUR (formato
24 ore).
ema Alarm Time (Menu) per
4. Pr
secondi e il menu di impostazioni si chiuderà automaticamente.
Regolazione della luminosità del display
Il livello di luminosità del display si regola automaticamente in base alle condizioni di
illuminazione dell’ambiente. L’illuminazione del display viene aumentata per migliorare la
visibilità in ambienti molto illuminati e viene ridotta per evitare una luce eccessiva in ambienti
scarsamente illuminati. Le impostazioni di luminosità alta e bassa possono essere
configurate in modo indipendente.
1.
Prema e tenga premuto Alarm Time (Menu) finché sul display non compare -SETUP
MENU-.
uscire dal menu di impostazioni oppure attenda 10
ema cinque volte Tu
2. Pr
3. Prema Time – o
compreso tra 8 e 15.
4. Prema una volta Tune
5. Prema Time – o
valore compreso tra 1 e 8.
6. Prema Alarm Time (Menu) per
secondi e il menu di impostazioni si chiuderà automaticamente.
Svenska Nederlands Italiano Français Italiano Deutsch Dansk English
20
ne >. Verrà visualizzata la voce BRIGHT HI-.
Time + per impostare il livello di alta luminosità del display su un valore
>. Verrà visualizzata la voce BRIGHT LO-.
Time + per impostare il livello di bassa luminosità del display su un
uscire dal menu di impostazioni oppure attenda 10
 Loading...