

Using NEXTONE SPECIAL EDITOR
NEXTONE SPECIAL EDITOR is editor software that lets you create your own personalized sounds by using the Nextone Special to edit detailed settings for the
preamp, power amp, and eects.
Getting Ready to Use NEXTONE SPECIAL EDITOR
Installing the USB Driver
Before you use NEXTONE SPECIAL EDITOR, the appropriate USB driver for
the product you’re using must be installed on your computer.
1. From the product support page, download the NEXTONE
Driver.
To obtain the latest USB driver, access the following URL, and
download and install the appropriate driver for the product you’re
using.
http://www.boss.info/support/
2. Double-click the downloaded NEXTONE Driver.
Installation begins.
Proceed with the installation as directed by the installation screens.
When the screen indicates “Installation has been completed.” click
the [Close] button.
The NEXTONE Driver has been installed on your computer.
Installing NEXTONE SPECIAL EDITOR
Windows Users
1. Unpack the Zip le.
Starting NEXTONE SPECIAL EDITOR
1. Use a USB cable to connect the Nextone Special to
your computer, and then turn on the power of the
Nextone Special.
MEMO
You can edit patches even if the Nextone Special is not connected to
your computer via a USB cable.
However, you can’t save the result of editing a patch. In order to save
the edited patch, you’ll need to be connected to the Nextone Special.
2. In the [Start] menu, choose [All Programs]
SPECIAL EDITOR] & [NEXTONE SPECIAL EDITOR].
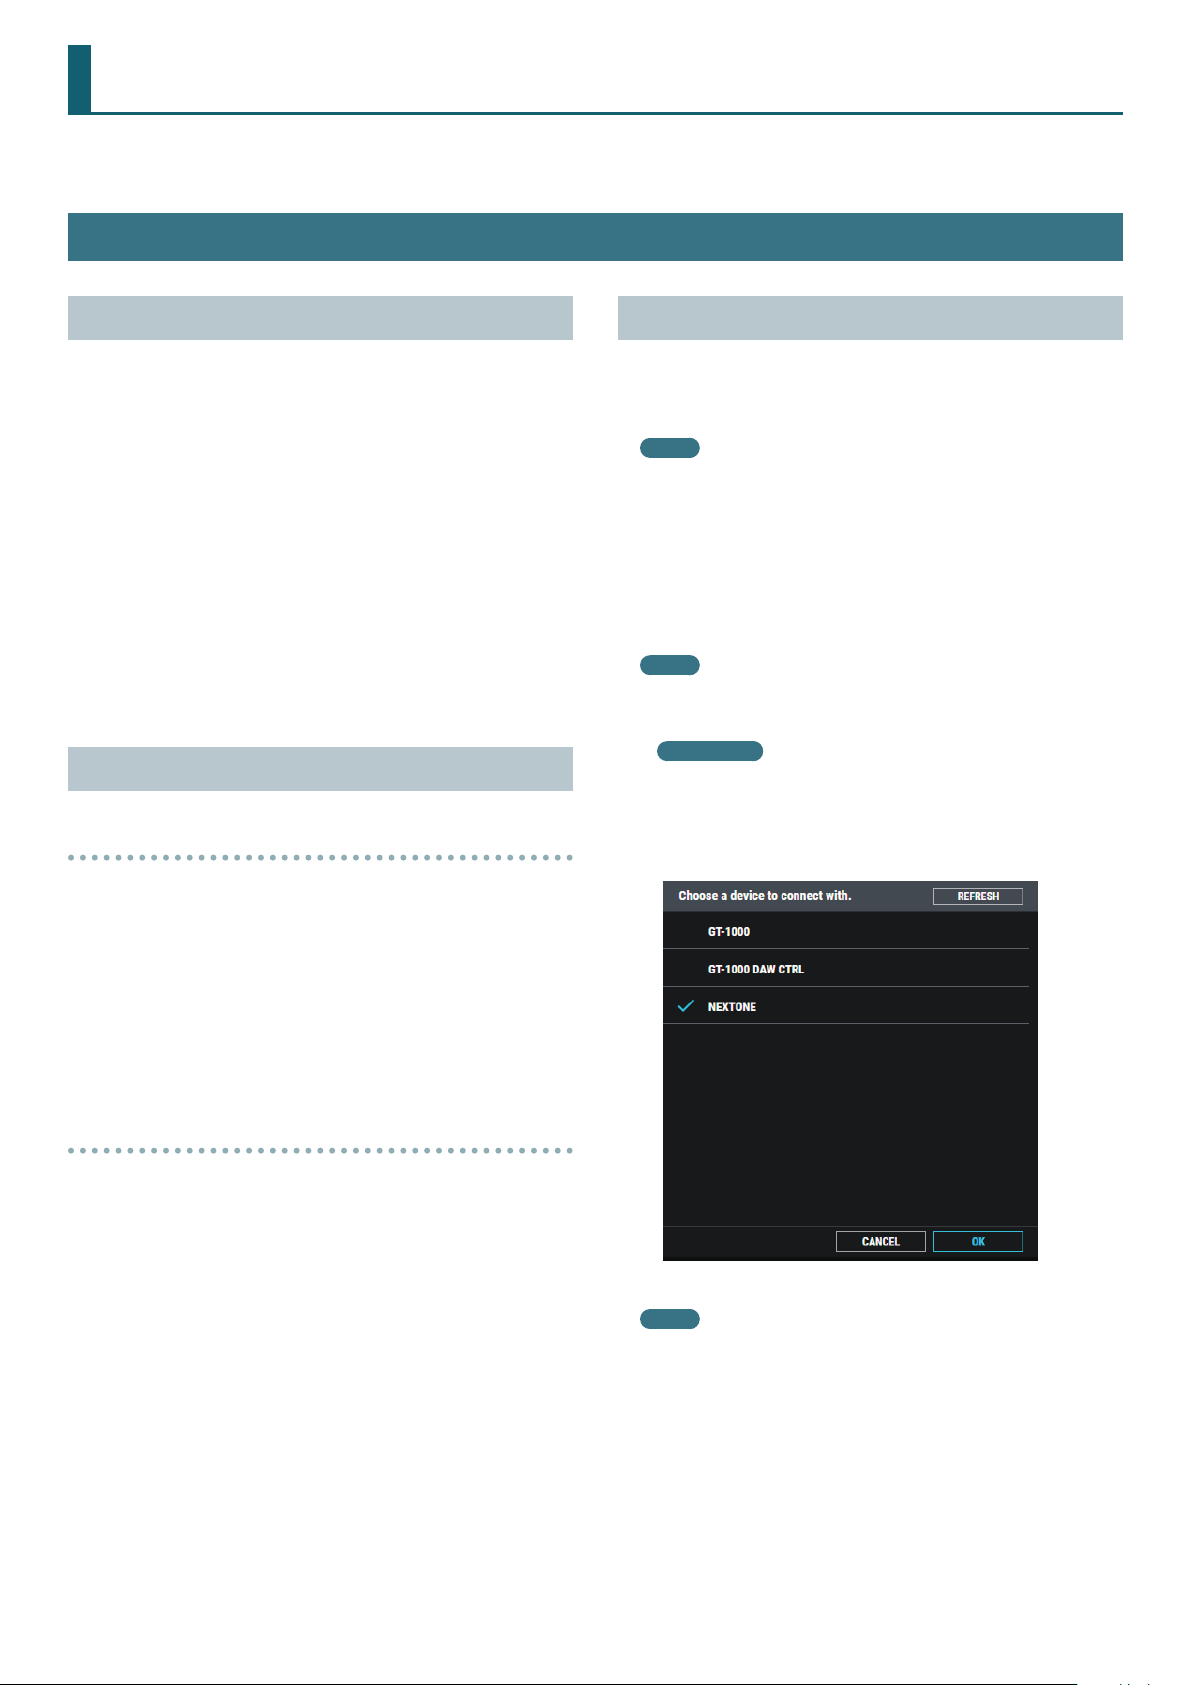
The rst time you start up, the dialog box “Choose a device connect
with.” appears.
MEMO
On the second and subsequent startups, the device is selected
automatically.
Mac OS users
From the Finder, in the application/BOSS/NEXTONE folder, doubleclick [NEXTONE SPECIAL EDITOR (.app)].
3. Choose “Nextone Special,” and click the [OK] button.
&
[NEXTONE
2. Double-click “NEXTONE SPECIAL EDITOR Installer.exe.”
Installation begins.
3. Proceed with installation as directed by the install screens.
4. When the screen indicates “Completing the
NEXTONE SPECIAL EDITOR Setup Wizard,” click the [Finish]
button.
Mac Users
1. Unpack the Zip le.
2. Double-click “NEXTONE SPECIAL EDITOR Installer.pkg.”
Installation begins.
3. Proceed with installation as directed by the install screens.
4. When the screen indicates “The installation was successful.
The software was installed.,” click the [Close] button.
NEXTONE SPECIAL EDITOR starts.
MEMO
Since data will be loaded from the Nextone Special, it may take some
time until you can use NEXTONE SPECIAL EDITOR.
© 2020 Roland Corporation
1
01
Using NEXTONE SPECIAL EDITOR
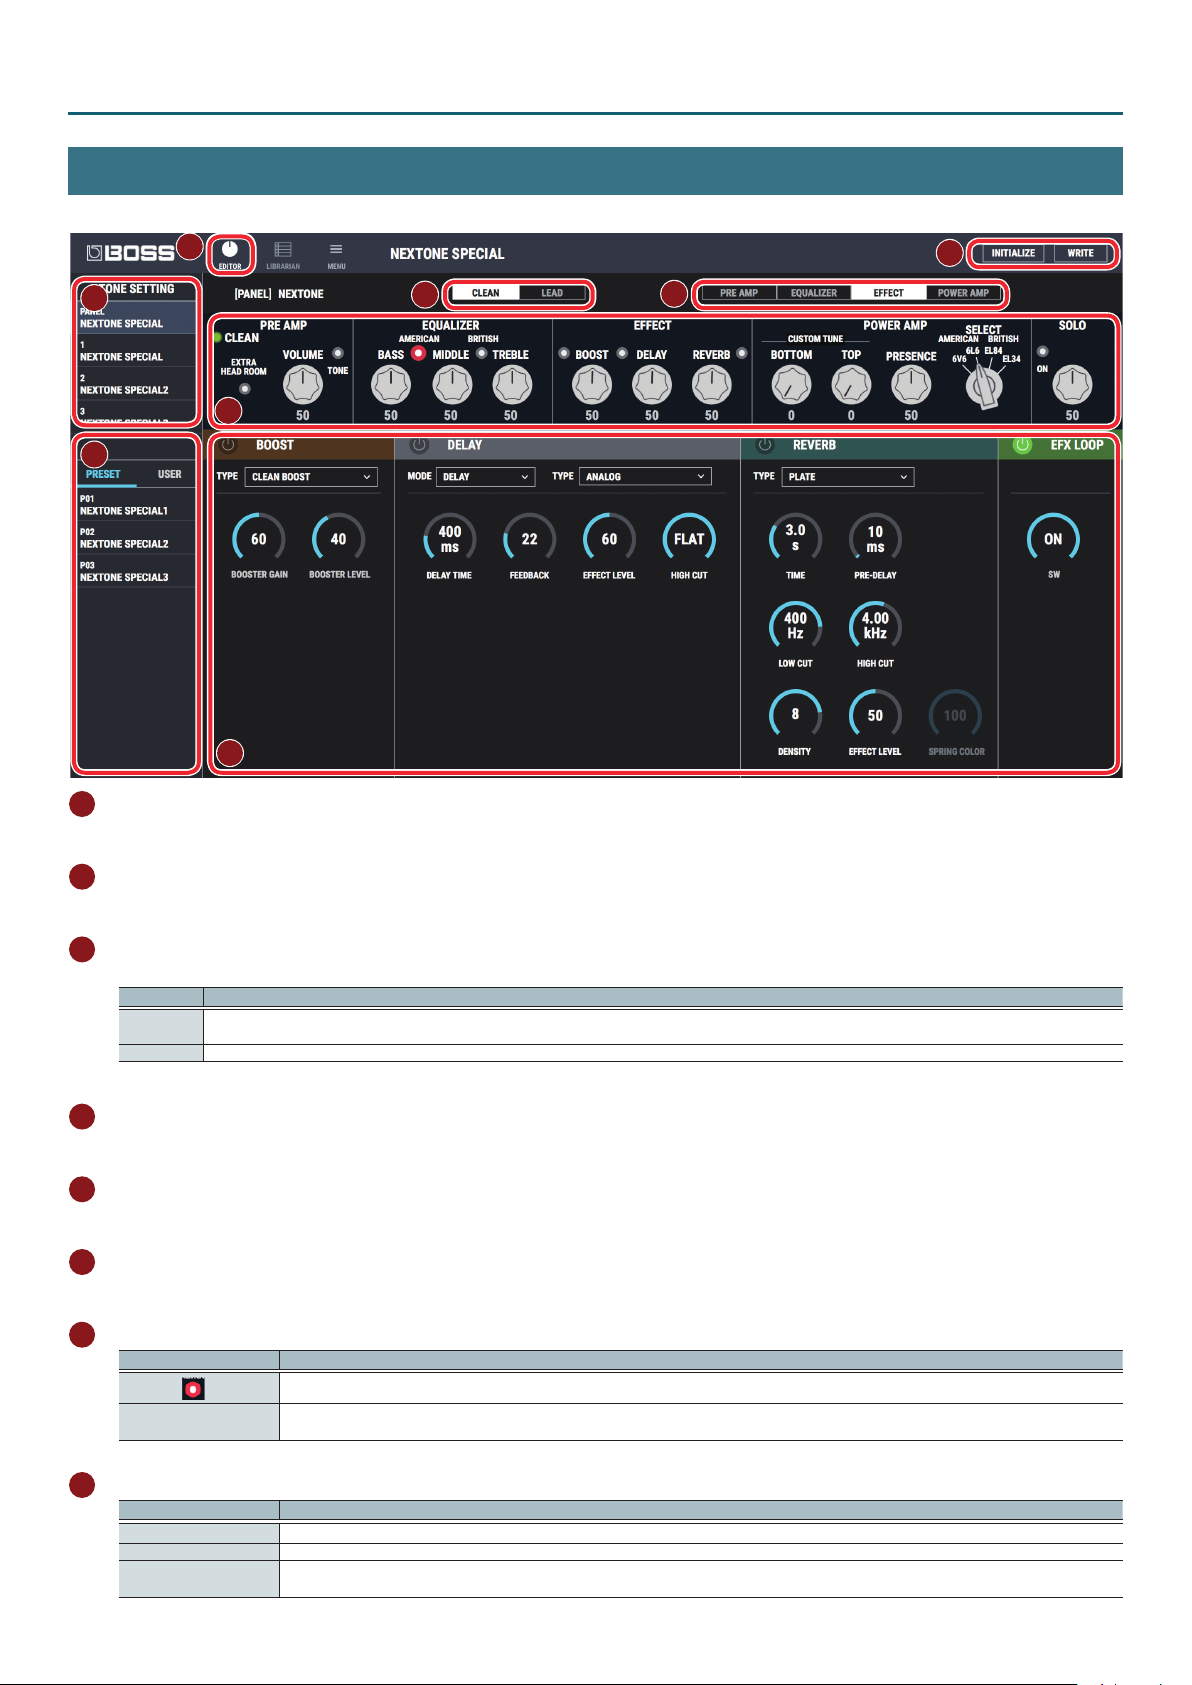
Editor Screen
Here you can use your PC/Mac to edit Nextone Special sounds. You can create dierent settings for the CLEAN channel and LEAD channel.
1
6
2
4
7
3
8
1 [EDITOR] button
If a dierent screen is shown, click this to access the EDITOR screen.
5
2 Tone setting select area
Switches between tone settings on this unit.
3 Patch select area
Preamp, power amp, and eect settings for the CLEAN channel and the LEAD channel are collectively called a “patch.”
Type Explanation
PRESET
USER You can save up to 99 of the patches you edit as user patches.
These are preset patches saved in the NEXTONE SPECIAL EDITOR.
You cannot overwrite the preset patches, but you can edit them and save the result as a user patch.
4 [CLEAN] / [LEAD] button
Switches between the CLEAN channel and the LEAD channel. Settings of the knobs and buttons can be made individually for each channel.
5 [PREAMP] / [EQUALIZER] / [EFFECT] / [POWER AMP] button
Switches between displays in the parameter edit area.
6 [INITIALIZE] button / [WRITE] button
These buttons initialize or save tones.
7 PANEL editing area
Type Explanation
Indicators
Parameter dials
Click an indicator to switch the corresponding parameter on/o.
Drag these dials up and down to set their values.
You can hover over the values with the cursor and change them using the up/down buttons, or use the computer keyboard to input a number.
8 Parameter editing area
Type Explanation
Eect ON/OFF button Click to turn the power on/o.
Parameter box Click a parameter box to show a list, where you can select the TYPE, MODE and VARIATION.
Parameter dials
Drag the dial of each parameter up or down to edit its value (you can also use the mouse wheel to edit the value).
You can double-click, and then enter a numeric value from your computer keyboard, or directly select a value from a list.
2
Using NEXTONE SPECIAL EDITOR
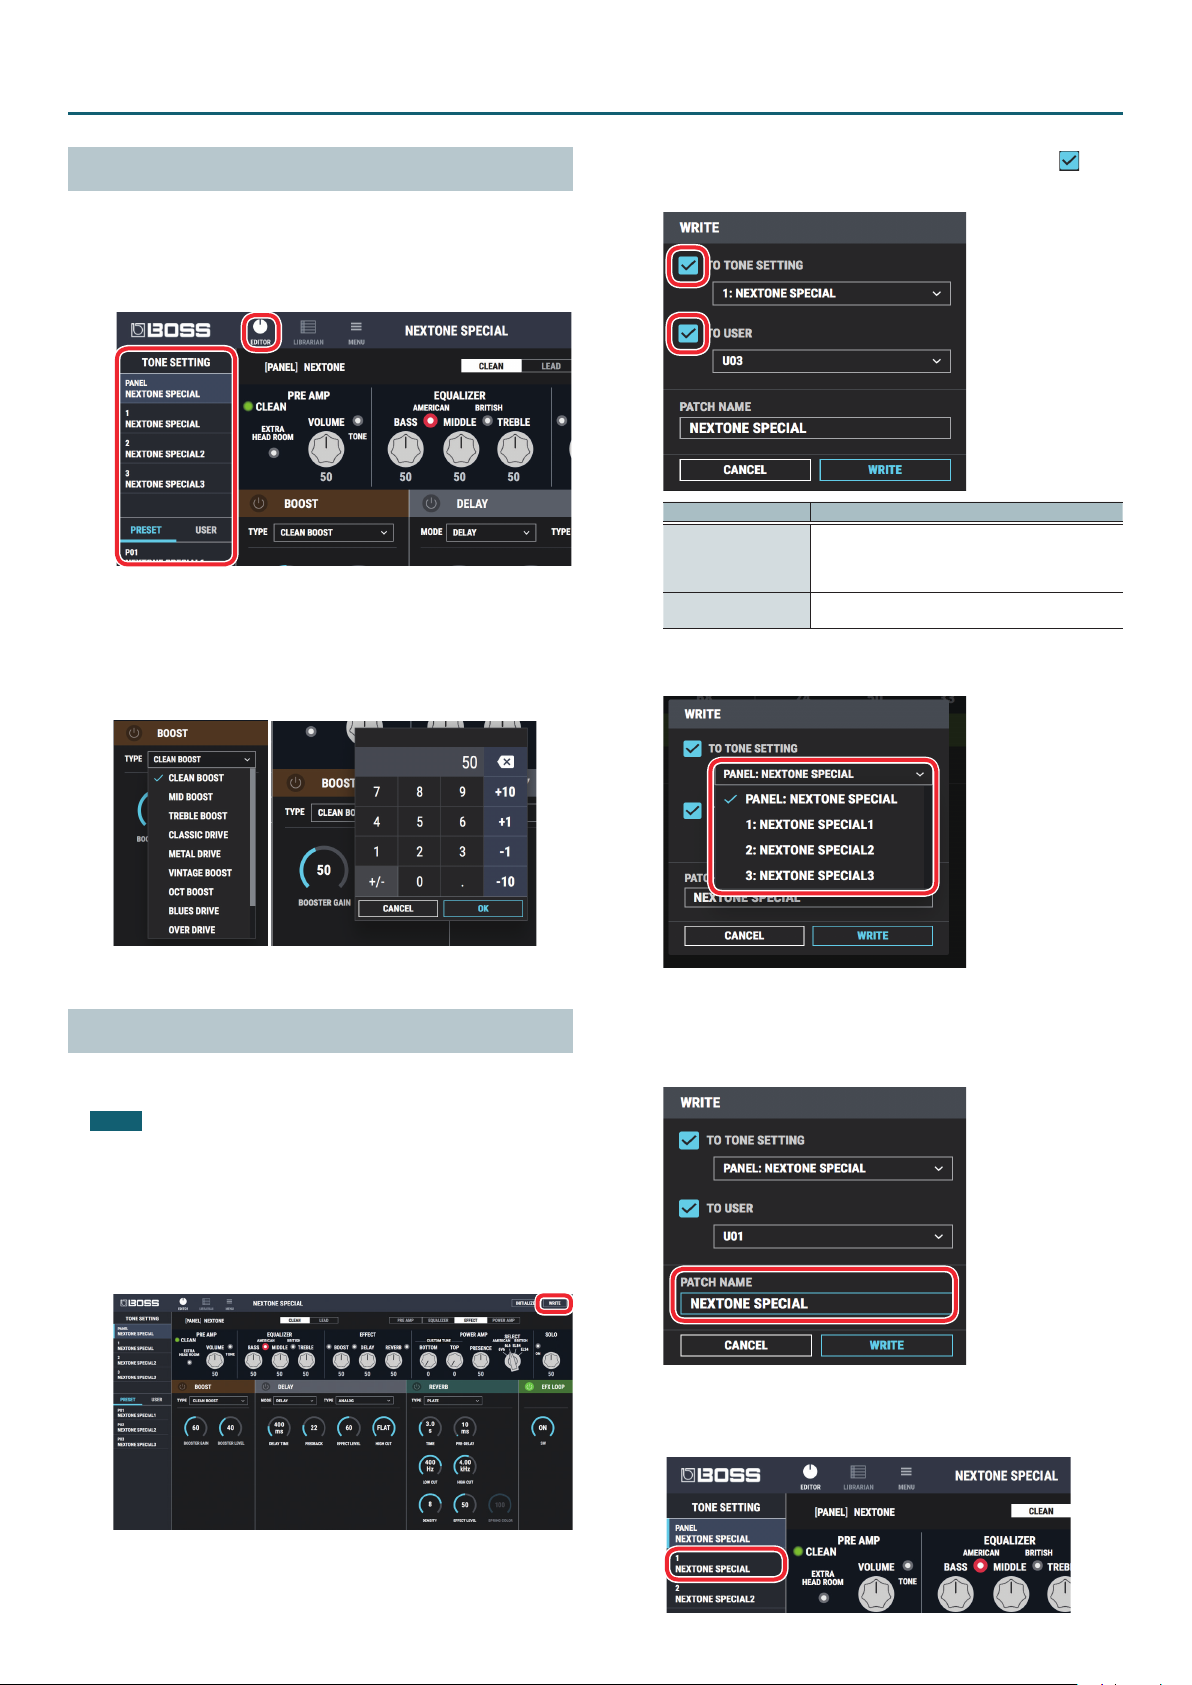
Editing a Patch
1. At the top of NEXTONE SPECIAL EDITOR screen, click the
[EDITOR] button.
2. Click the patch that you want to edit.
3. Edit the parameter.
You can drag a parameter’s dial up or down to edit its value (you can
also use the mouse wheel to edit the value).
You can also double-click, and then enter a numeric value from your
computer keyboard.
2. Select and click the save destination. A check mark is
shown next to that destination.
Destination (write to) Explanation
TO TONE SETTING
TO USER Saves to a user patch in the PATCH select area. (p. 2)
Saves to PANEL or CH1–3 of the Nextone Special.
When PANEL is selected, only the parameters that
cannot be operated on this unit are written to
memory.
3. Select and click a save destination in the pulldown menu.
Saving Edited Settings (WRITE)
Here’s how to save the edited settings of PRE AMP, POWER AMP, and
EFFECTS settings of CLEAN/LEAD channels as a USER Patch.
NOTE
When you save, the user patch of the selected number is overwritten;
the original settings cannot be recovered. Select a user patch that
you don’t mind overwriting.
1. In the upper right of the NEXTONE SPECIAL EDITOR screen,
click the [WRITE] button.
4. If you want to change the name of the user patch, click
the user patch name eld. You can use your computer
keyboard to enter a user patch name.
5. Click [WRITE].
The settings of the new patch are saved in the specied destination.
The “WRITE” dialog box appears.
3
Using NEXTONE SPECIAL EDITOR
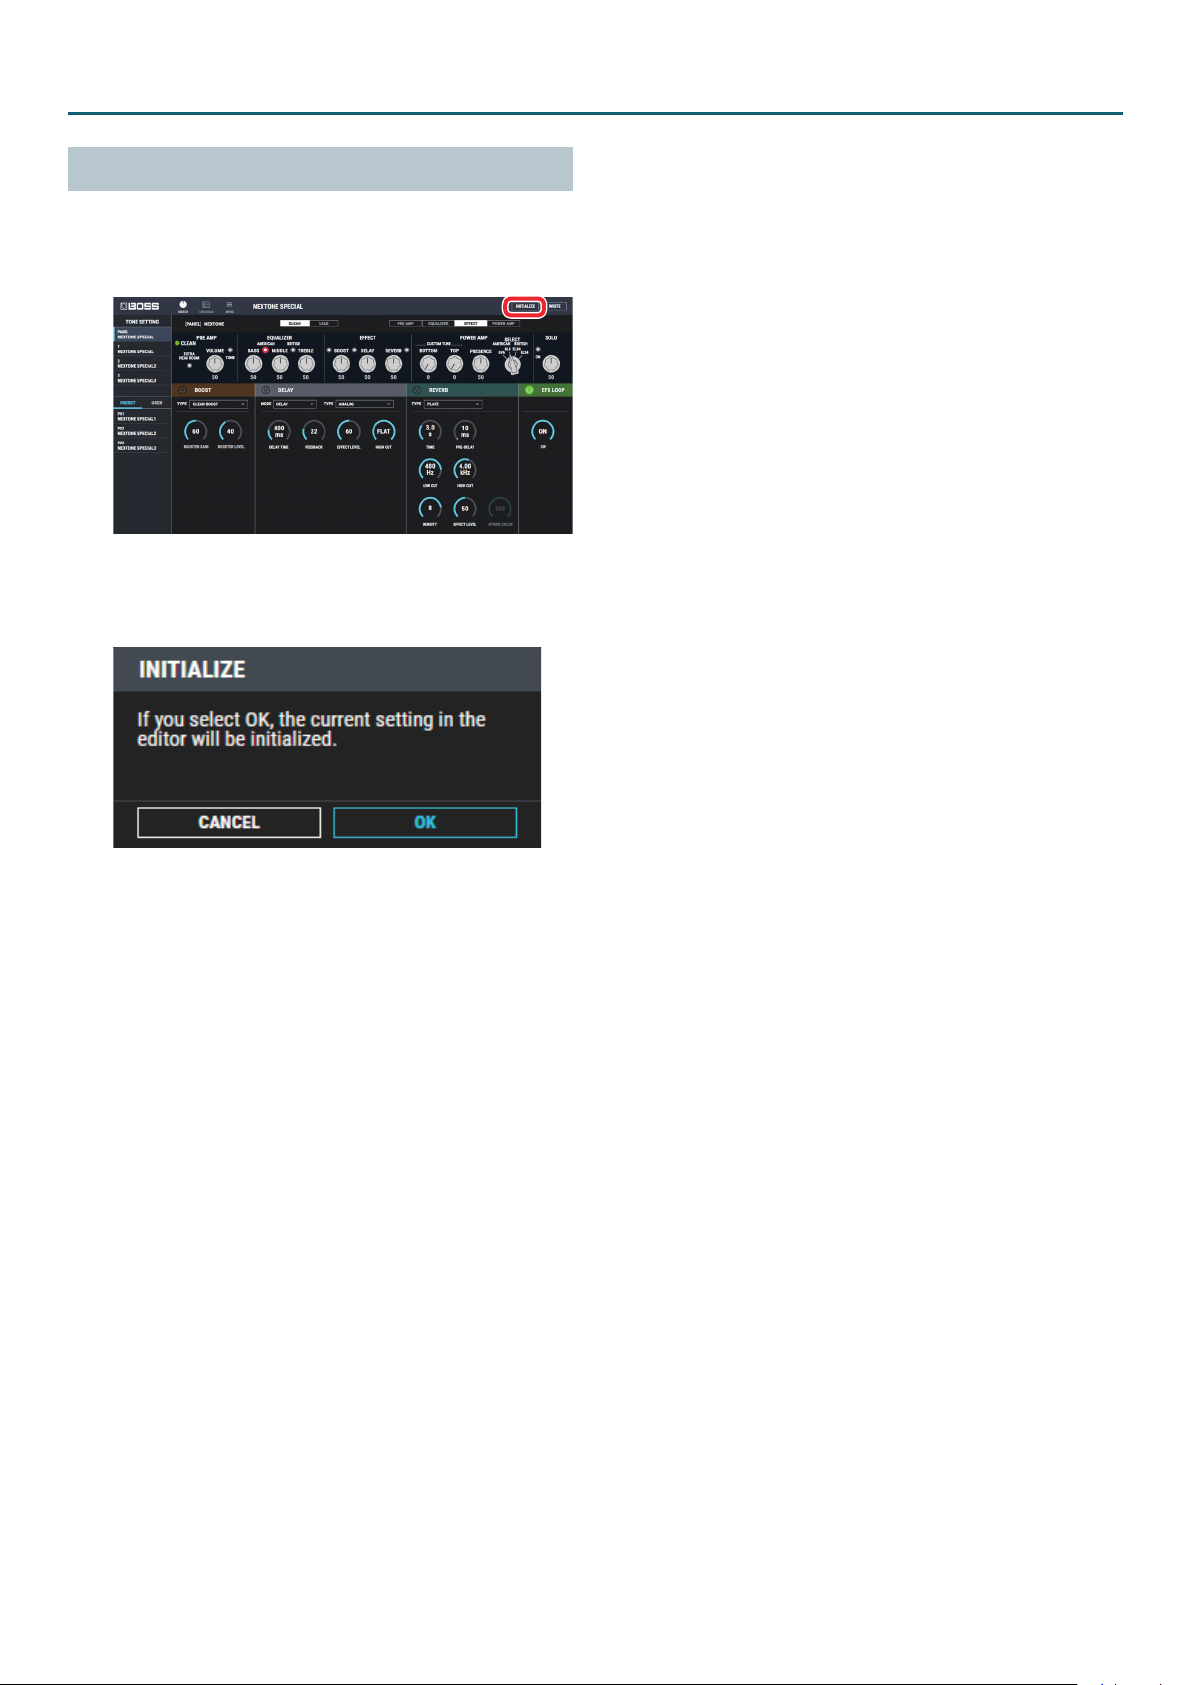
Initializing the USER Patch (INITIALIZE)
Here’s how to discard the settings and return to the factory-set settings.
1. In the upper right of the NEXTONE SPECIAL EDITOR screen,
click the [INITIALIZE] button.
2. A conrmation message appears.
If you decide to cancel, press the [EXIT] button.
To execute, press the [OK] button.
3. This initializes the user patch.
4
Using NEXTONE SPECIAL EDITOR
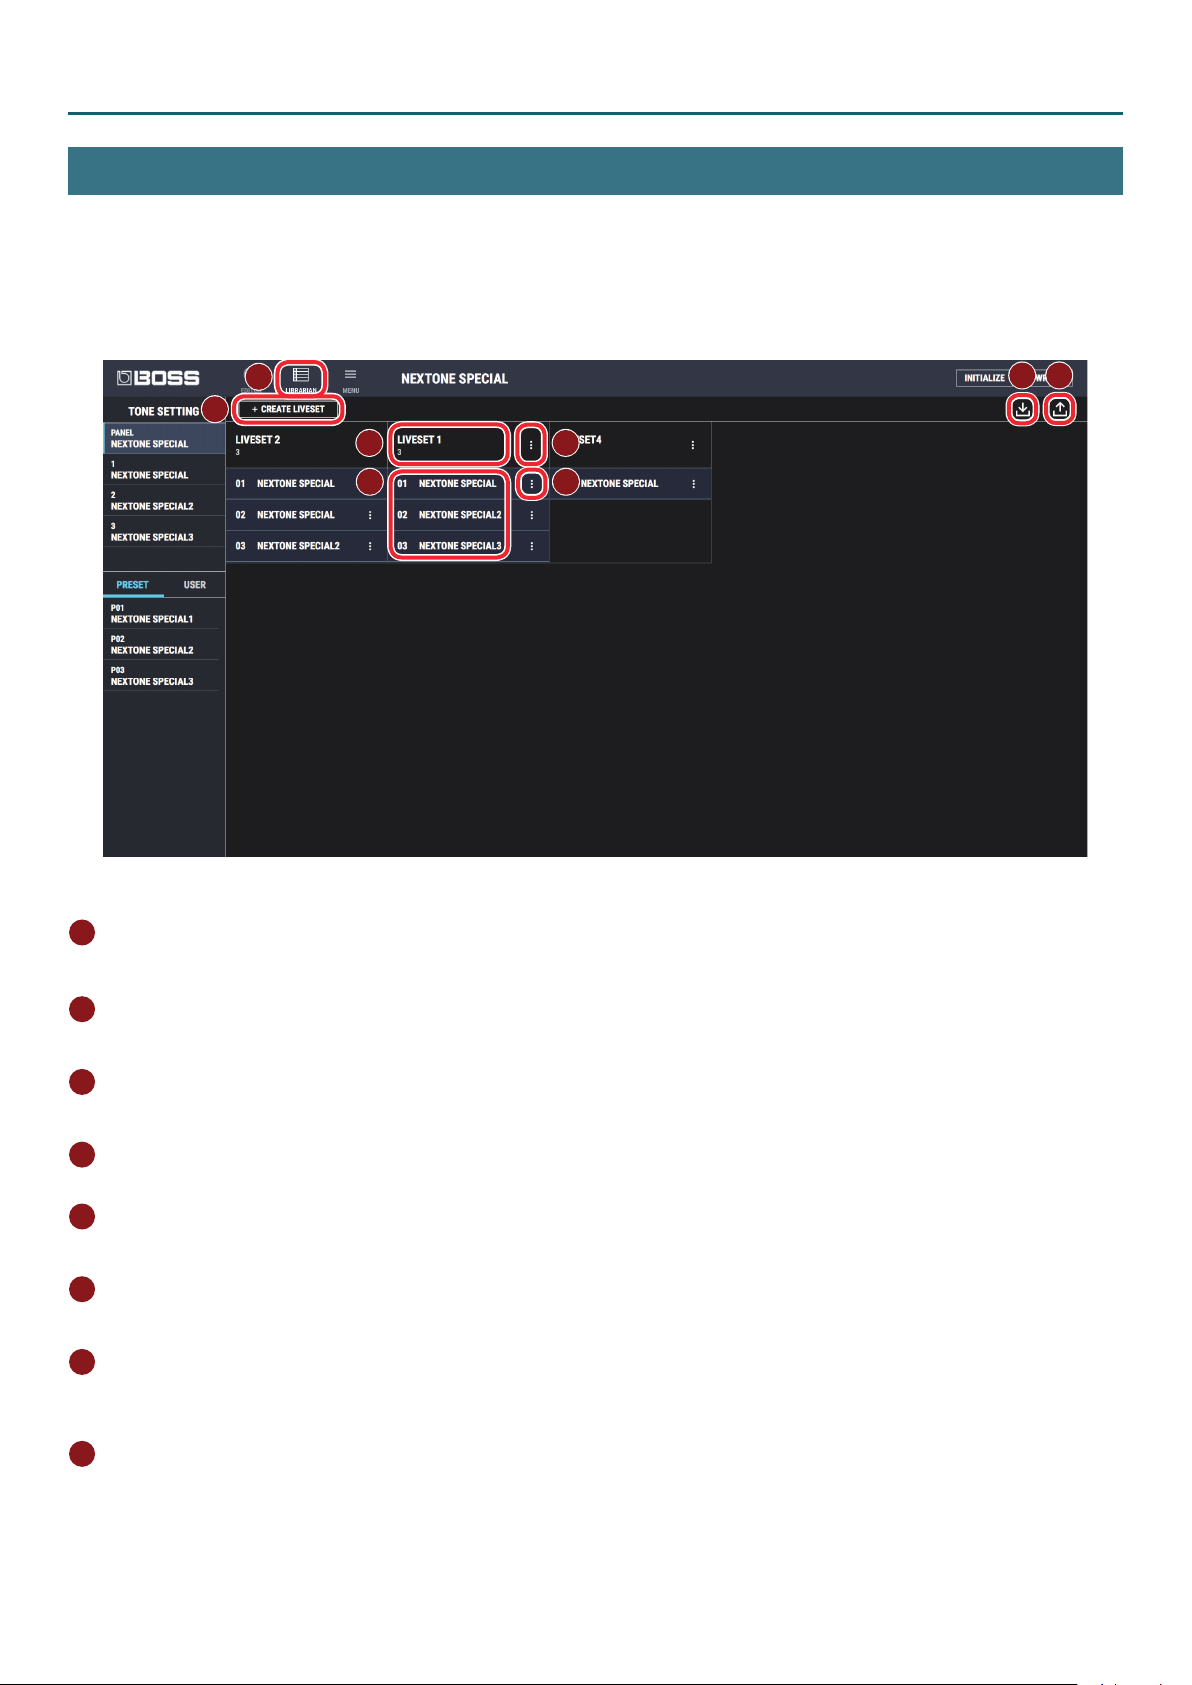
LIBRARIAN Screen
User patches saved in the Nextone Special can be backed up.
LIVESET
A liveset is a group of multiple tone settings. There can be a maximum of 50 settings.
You can select favorite settings and save up to 3 of them together in a liveset.
1
2
3
5 6
4
7
8
1 [LIBRARIAN] button
If a dierent screen is shown, click this to access the LIBRARIAN screen.
2 [CREATE LIVESET] button
Press this button to create a new empty liveset.
3 Liveset name
Shows the name of the liveset and the number of patches.
4 Liveset name edit button
Click this to edit the name of the liveset. You can click the trash can symbol to delete the liveset.
5 User memory list
Lists the tone settings that are saved in the liveset. You can drag them to change their order.
6 Tone setting name edit button
Click this to edit the name of the user memory. You can click the trash can symbol to delete the user memory.
7 [Import] button
This lets you import all of the Nextone Special unit’s tone settings into the LIBRARIAN, or import a LIBRARIAN le from your computer into the
LIBRARIAN.
8 [Export] button
This lets you export a liveset to the Nextone Special unit, or export a liveset and save it on your computer.
5
Using NEXTONE SPECIAL EDITOR
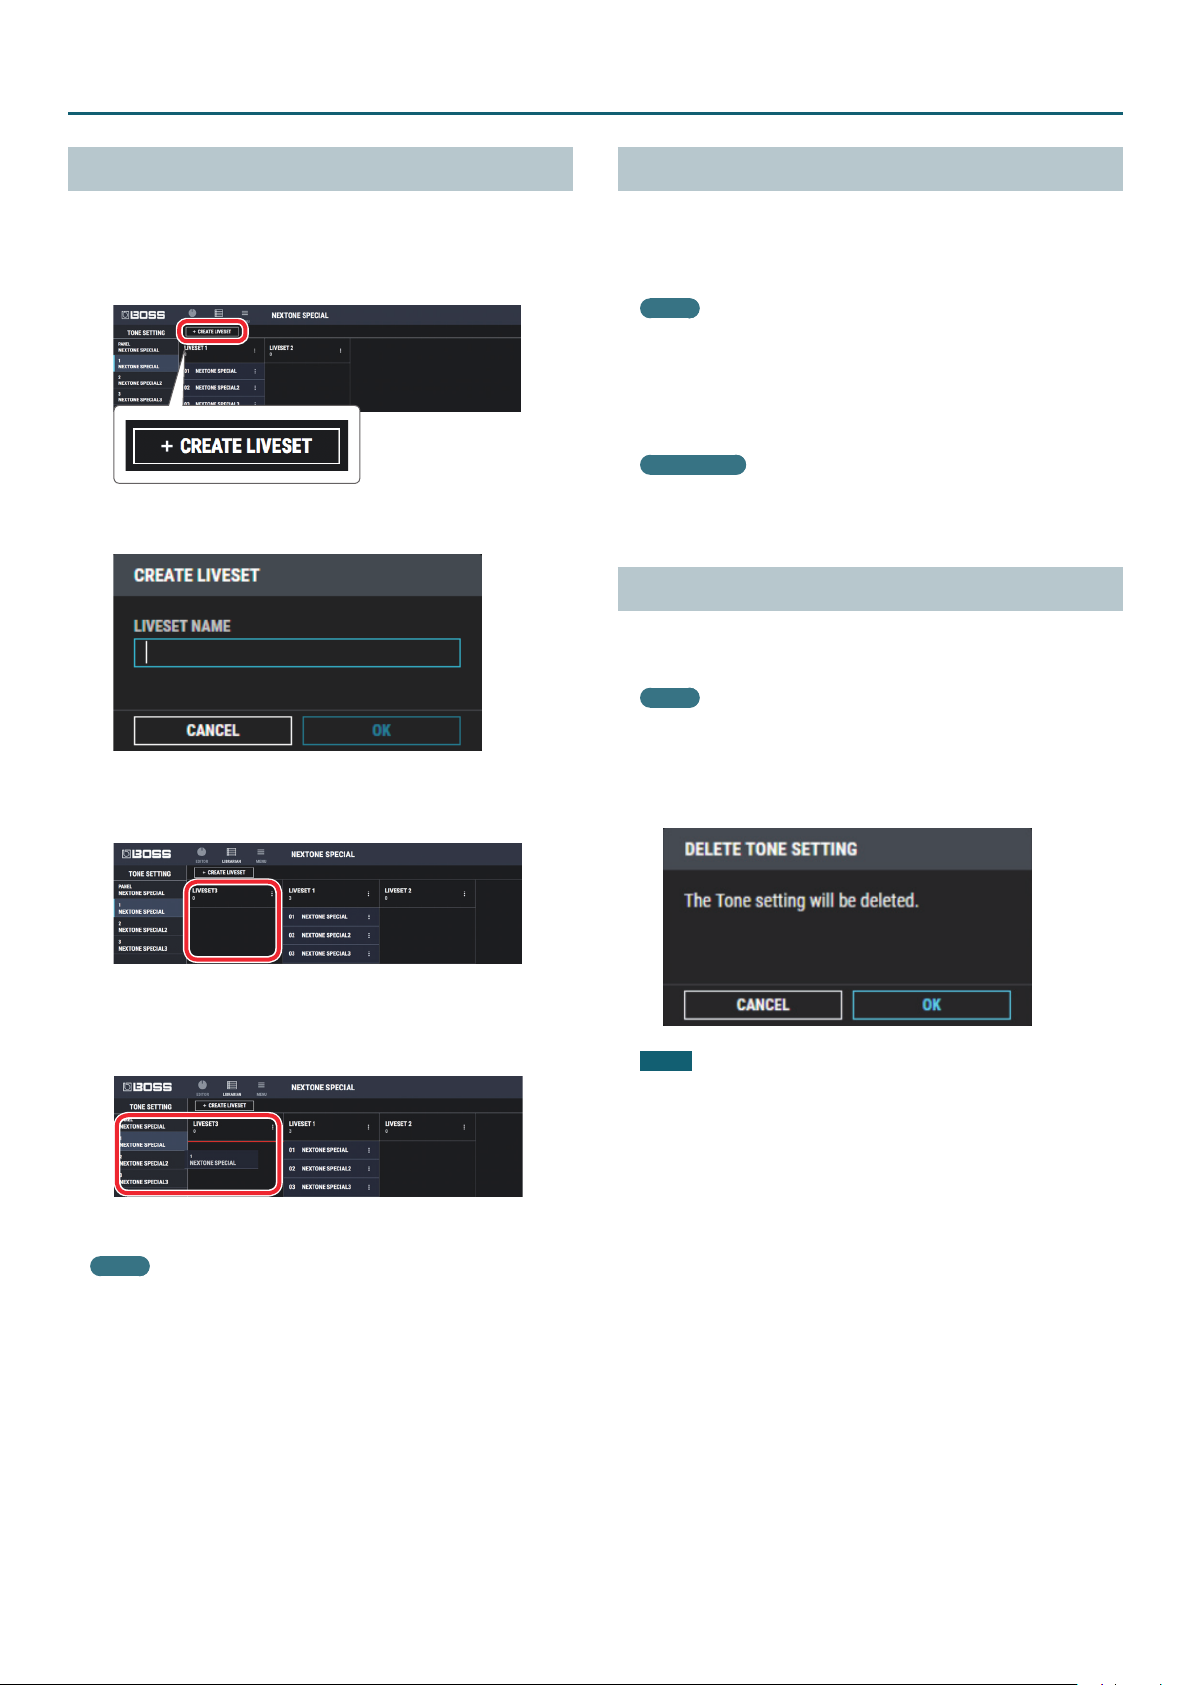
Creating an Original Liveset
You can collect your favorite tonesettings to create an original liveset.
1. At the top of the TONE STUDIO screen, click the [CREATE
LIVESET] button.
2. Input a name for the liveset.
Moving Tone Settings
Here’s how to move a tone setting to another liveset or to an Nextone Special
tone setting.
1. Click the tone setting that you want to move.
MEMO
You can also select and move multiple tone settings as described in
“Selecting multiple tone settings” (p. 8).
2. Drag and drop the selected tone setting to the desired
copy-destination.
Mac OS users
While holding down your computer keyboard’s [option] key, drag
and drop.
Deleting Tone Settings
Here’s how to delete an unwanted tone setting.
1. Click the tone setting that you want to delete.
MEMO
You can also select and delete multiple tone settings as described in
“Selecting multiple tone settings” (p. 8).
3. Click the [OK] button.
An empty liveset containing no tone settings is created.
4. From the tone setting list at the left of the TONE STUDIO
screen, drag and drop your favorite tone settings into the
new liveset.
The selected tone settings are registered in the new liveset.
MEMO
5 A maximum of 3 tone settings can be registered in one liveset.
If inserting tone settings would cause the liveset to exceed 3
tone settings, the tone settings that exceed 3 are not inserted (a
message is displayed).
5 Tone settings that are registered in another liveset can also be
dragged and dropped into the new liveset.
5 You can drag and drop the tone settings in the liveset to change
their order.
5 TONE STUDIO lets you create up to 50 livesets. If you want to
create and save more than 50 livesets, use the EXPORT TO FILE
function to save existing livesets on your computer.
2. Press your computer keyboard’s [Delete] key.
The “DELETE TONE SETTING” message appears.
NOTE
Deleted tone settings cannot be recovered. If you decide not to
delete, click the [CANCEL] button.
3. Click the [OK] button.
The selected tone settings are deleted.
6

Using NEXTONE SPECIAL EDITOR
Editing a Liveset Name
1. Click the [ ] button located at the right of the name of the
liveset that you want to edit.
2. Edit the liveset name, and click the [ ] button.
Rearranging Livesets
Here’s how to rearrange the livesets that are displayed.
Deleting a Liveset
Here’s how to delete a liveset that you no longer need.
1. Click the [ ] button located at the right of the name of the
liveset that you want to delete.
2. Click the [ ] button.
The “Delete liveset” message appears.
1. Click the liveset that you want to rearrange.
2. Drag and drop the liveset name.
The liveset moves to the position indicated by the red line.
NOTE
The deleted liveset cannot be recovered. If you decide to cancel
without deleting, click the [CANCEL] button.
3. Click the [OK] button.
The selected liveset is deleted.
7

Using NEXTONE SPECIAL EDITOR
Copying Tone Settings
Here’s how to copy a tone setting to another liveset or to an Nextone Special
tone setting.
1. Click the tone setting that you want to copy.
MEMO
You can also select and copy multiple tone settings as described in
“Selecting multiple tone settings” (p. 8).
2. Drag and drop the selected tone settings onto the desired
copy-destination.
NOTE
When you drop the tone settings, they are overwritten onto the tone
settings of the selected red area, and the original settings cannot be
recovered. Select tone settings that you don’t mind overwriting.
Selecting multiple tone settings
By using your computer’s mouse and keyboard together, you can select
multiple tone settings.
Selecting a range of tone settings
Here’s how to select a range of consecutive tone settings.
1. Click the rst tone setting that you want to select.
2. While holding down your computer keyboard’s [Shift] key,
click the last tone setting that you want to select.
The rst through last tone settings that you click are selected.
Selecting tone settings individually
Here’s how to select just the individual tone settings that you click.
1. While holding down your computer keyboard’s the [Ctrl]
key if you’re on Windows or the [Command] key if you’re on
Mac, click a tone setting that you want to select.
The tone setting you click is selected. The selected tone setting is
highlighted.
2. If you want to select other tone settings, repeat step 1.
If you hold down the [Ctrl] key and click a selected (highlighted) tone
setting once again, the selection is cleared (that tone setting is no
longer highlighted).
MEMO
5 If you select non-consecutive tone settings and copy them, they
are copied as successive tone settings.
5 A maximum of 3 tone settings can be registered in one liveset.
If inserting tone settings would cause the liveset to exceed 3
tone settings, the tone settings that exceed 3 are not inserted (a
message is displayed).
5 Tone settings that are registered in a liveset can be copied to your
own liveset or to a new liveset.
The dierence between operations when
selecting and copying multiple tone settings
When you drag and drop the selected tone settings, the copy result
will dier depending on your mouse operation.
Drag and drop when a red area is shown at the copydestination (overwrite copy)
The tone settings are copied to the area indicated by the red color.
Drag and drop between copy-destination tone settings
(insert)
The tone settings are inserted at the position of the red line.
Subsequent tone settings are moved backward.
8

Using NEXTONE SPECIAL EDITOR
Importing All the Tone Settings into the LIBRARIAN (IMPORT FROM Nextone Special)
Here’s how to import all of the Nextone Special’s tone settings into
LIBRARIAN.
All tone settings are saved as a liveset.
1. In TONE STUDIO screen, click the [LIBRARIAN] button.
2. At the top of the TONE STUDIO screen, click the [Import]
button.
3. Click the [Nextone Special] button.
5. Click the [OK] button.
The tone settings are saved as a liveset in the LIBRARIAN.
Exporting a LIBRARIAN Liveset to the
Nextone Special (EXPORT TO Nextone Special)
Here’s how a liveset that you saved can be restored to the Nextone Special’s
user patch.
1. At the top of the TONE STUDIO screen, click the [Export]
button.
The CREATE LIVESET screen appears.
4. Enter the liveset name, and click the [OK] button.
Import begins. If you decide to cancel during the operation, click the
[CANCEL] button.
It will take some time to import all of the Nextone Special’s tone
settings. When import is nished, the message “Completed.” appears.
2. From SELECT LIVESET, select the liveset that you want to
export.
3. Click the [Nextone Special] button.
Export begins. If you decide to cancel during the operation, click the
[CANCEL] button.
When export is nished, the message “Completed.” appears.
4. Click the [OK] button.
The selected liveset is written back into the Nextone Special.
9

Using NEXTONE SPECIAL EDITOR
Restoring a Tone Setting to the Nextone Special
Here’s how to select a tone setting from a liveset that you saved, and
restore it back to the Nextone Special.
1. Drag the tone setting that you want to restore and
drop it onto the desired user patch number of the
Nextone Special.
NOTE
When you drop a tone setting, it overwrites the tone setting of the
selected number; the original settings cannot be recovered. Select a
user tone setting that you don’t mind overwriting.
Saving a Liveset to a Computer (EXPORT TO FILE)
A liveset that you backed up can be exported to your computer (Export).
1. At the top of the TONE STUDIO screen, click the [Export]
button.
2. From SELECT LIVESET, select the liveset that you want to
export.
3. Click the [FILE] button.
The “Save As” dialog box appears.
4. Enter a name and save-destination, and click the [Save]
button.
A liveset le (.tsl) is created at the save-destination.
Ways to use an exported liveset
5 Use a USB ash drive to copy the liveset to a dierent computer.
5 Sent the liveset via email to another Nextone Special user.
Importing a Liveset from a Computer into the
MEMO
You can also select multiple tone settings as described in “Selecting
multiple tone settings” (p. 8).
LIBRARIAN (IMPORT FROM FILE)
A liveset that you exported to a computer can be imported into a TONE
STUDIO library (Import).
1. At the top of the TONE STUDIO screen, click the [Import]
button.
2. Click the [FILE] button.
The “Open” dialog box appears.
3. Select the liveset le (extension: .tsl) that you want to
import into the library, and click the [Open] button.
The liveset is imported into the LIBRARIAN.
10

Using NEXTONE SPECIAL EDITOR
MENU Screen
You can adjust the global settings of the Nextone Special from the MENU screen.
For details on each setting item, refer to “MENU (GLOBAL SETTING)” (p. 16) of the following chapter, “Parameter List.”
2
3
4
5
6
7
8
9
10
11
1
1 [MENU] button
If a dierent screen is shown, click this to access the MENU screen.
2 INPUT SETTING
This adjusts the level of the signal that is input from the guitar to the Nextone Special’s INPUT.
3 EFX LOOP
These are settings for the EFFECT LOOP (SEND/RETURN) jacks.
4 SYSTEM EQ
Here you can adjust the overall tonal character of the entire Nextone.
5 LINE OUT
Species the sound of the LINE OUT/PHONES/USB Primary Out.
6 USB SETTING
Here you can edit the USB audio settings.
7 RESET GLOBAL SETTINGs
This returns the global settings edited in MENU to their factory-set state.
8 OWNER’S MANUAL
This starts a web browser on your computer and opens a site where you can download the Nextone Special
owner’s manual.
9 DEVICE SETTING
Here’s how to select the device controlled by NEXTONE SPECIAL EDITOR.
10 VERSION
This displays version information for the NEXTONE SPECIAL EDITOR.
11 ALL DATA BACKUP
Here’s how all data saved in the Nextone Special can be backed-up to the computer.
INPUT SETTING
This adjusts the level of the signal that is input from the guitar to the
Nextone Special’s INPUT.
Value
-20 dB–0–+20 dB
EFX LOOP
These are settings for the EFFECT LOOP (SEND/RETURN) jacks.
You can turn this on or o for each patch in the Editor screen. (p. 15)
SYSTEM EQ
Here you can adjust the overall tonal character of the entire
Nextone Special. For details, refer to “SYSTEM EQ” (p. 16) of the following
chapter, “Parameter List.”
11

Using NEXTONE SPECIAL EDITOR
LINE OUT
Species the sound of the LINE OUT/PHONES/USB Primary Out.
USB SETTING
Here you can make USB-related settings for when the Nextone Special is
connected to a computer via USB.
RESET GLOBAL SETTINGs
This returns the global settings edited in MENU to their factory-set state.
OWNER’S MANUAL
This starts a web browser on your computer and opens a site where you
can download the Nextone Special owner’s manual.
DEVICE SETTING
Here’s how to select the device controlled by NEXTONE SPECIAL EDITOR.
Click SELECT DEVICE, and from the list choose [NEXTONE].
VERSION
This displays version information for the NEXTONE SPECIAL EDITOR.
ALL DATA BACKUP
Saving All Nextone Special Settings to the Computer
(ALL DATA BACKUP)
Here’s how all data saved in the Nextone Special can be backed-up to the
computer.
1. Click the [TO FILE] button.
The “Save As” dialog box appears.
2. Input a name and save-destination, and click the [Save]
button.
Export begins. It will take some time for all data to be exported.
When the operation is nished, the message “Completed.” appears.
3. Click the [OK] button.
An all data le (.alb le) is created in the save-destination.
Restoring an All Data File from the Computer to the Nextone Special
(ALL DATA RESTORE)
Here’s how an all data le previously saved on the computer can be
restored to the Nextone Special.
1. Click the [FROM FILE] button.
The “Open” dialog box appears.
2. Select the all data le (extension: .alb) that you want to
restore, and click the [Open] button.
Import begins. Since all data is being imported, this will take some
time. When the operation is nished, the message “Completed.”
appears.
3. Click the [OK] button.
All data is restored to the Nextone Special.
12
NOTE
When you restore, all data is overwritten, and cannot be returned to
its previous settings.

Parameter List
PRE AMP
TONE
Here you can edit details of the Nextone Special’s TONE.
Parameter Value Explanation
ON/OFF OFF, ON Turns this eect on/o.
TYPE (CLEAN)
TYPE (LEAD)
LEVEL 0–100
BRIGHT 1
BRIGHT 2
FAT 1
FAT 2
NS
This eect reduces the noise and hum picked up by guitar pickups.
Parameter Value Explanation
ON/OFF OFF, ON Turns this eect on/o.
THRESHOLD 0–100
RELEASE 0–100
Make the mid- and high-frequency ranges
sparkle, producing a crisp sound.
* If you choose BRIGHT 2, you can use the
LEVEL dial to adjust the depth of the setting.
Produce a fat tone.
* If you choose FAT 2, you can use the LEVEL
dial to adjust the depth of the setting.
Adjusts the depth of the setting.
* Only when TYPE is BRIGHT 2 or FAT 2.
Adjust this parameter as appropriate for the
volume of the noise. If the noise level is high, a
higher setting is appropriate. If the noise level
is low, a lower setting is appropriate. Adjust this
value until the decay of the guitar sound is as
natural as possible.
* High settings for the threshold parameter
may result in there being no sound when
you play with your guitar volume turned
down.
Adjusts the time from when the noise
suppressor begins to function until the noise
level reaches “0.”
EQUALIZER TYPE
Here you can specify the type of the unit’s top panel EQUALIZER ([BASS] /
[MIDDLE] / [TREBLE] knobs).
Parameter Value Explanation
AMERICAN
TYPE
MID DEEP OFF, ON
AMERICAN 2
BRITISH
BRITISH 2
American type.
British type.
Turning this on increases the amount of cut for
the middle range.
PREAMP IN CH EQ/PREAMP OUT CH EQ
Here you can adjust the tonal character of the CLEAN and LEAD channels.
PARAMETRIC
You can make adjustments for four frequency regions.
Parameter Value Explanation
ON/OFF OFF, ON Turns this eect on/o.
LOW CUT FLAT, 20 Hz–800 Hz
LOW GAIN -20–+20 dB
LOW-MID FREQ 20 Hz–10.0 kHz
LOW-MID Q 0.5–16
LOW-MID GAIN -20–+20 dB
HIGH-MID FREQ 20 Hz–10.0 kHz
HIGH-MID Q 0.5–16
HIGH-MID GAIN -20–+20 dB
HIGH GAIN -20–+20 dB
HIGH CUT
LEVEL -20–+20 dB
630 Hz–12.5 kHz,
FLAT
Sets the frequency at which the low
cut lter begins to take eect. When
“Flat” is selected, the low cut lter will
have no eect.
Adjusts the low frequency range
tone.
Species the center of the frequency
range that will be adjusted by the
LOW-MID GAIN.
Adjusts the width of the area aected
by the EQ centered at the LOW-MID
FREQ. Higher values will narrow the
area.
Adjusts the low-middle frequency
range tone.
Species the center of the frequency
range that will be adjusted by the
HIGH-MID GAIN.
Adjusts the width of the area aected
by the EQ centered at the HIGH-MID
FREQ. Higher values will narrow the
area.
Adjusts the high-middle frequency
range tone.
Adjusts the high frequency range
tone.
Sets the frequency at which the high
cut lter begins to take eect. When
“FLAT” is selected, the high cut lter
will have no eect.
Adjusts the overall volume level of
the equalizer.
EQUALIZER
GRAPHIC
You can make adjustments for ten frequency regions.
Parameter Value Explanation
31Hz
62Hz
125Hz
250 Hz
500 Hz
1 kHz
2 kHz
4 kHz
8 kHz
16 kHz
LEVEL -12–+12dB Adjusts the overall volume level of the equalizer.
13
-12–+12dB Adjust the volume of each frequency band.

Parameter List
EFFECT
BOOST
Here you can edit details of the Nextone Special’s BOOST.
Parameter Value Explanation
ON/OFF OFF, ON Turns this eect on/o.
CLEAN BOOST Produces a clean tone that has punch.
MID BOOST
TREBLE BOOST A booster that has bright characteristics.
CLASSIC DRIVE A natural drive sound.
METAL DRIVE
TYPE
BOOSTER GAIN 0–120 Adjusts the gain.
BOOSTER LEVEL 0–100 Adjusts the volume
COMP SUSTAIN 0–100
COMP LEVEL 0–100 Adjusts the volume.
VINTAGE BOOST A weighty drive sound.
OCT BOOST A fuzz sound with rich harmonic content.
BLUES DRIVE
OVER DRIVE This produces sweet, mild distortion.
DISTORTION
COMP
A booster with unique characteristics in the
midrange. Produces sound suitable for solos.
This is distortion sound that is ideal for
performances of heavy ris.
This produces distortion that faithfully
reproduces the nuances of picking.
This gives a basic, traditional distortion
sound.
This is an eect that produces a long sustain
by evening out the volume level of the input
signal.
Adjusts the range (time) over which lowlevel signals are boosted. Larger values will
result in longer sustain.
DELAY
Here you can adjust the delay or tremolo.
MODE: DELAY
Parameter Value Explanation
ON/OFF OFF, ON Turns this eect on/o.
SDE-3000
TYPE
DELAY TIME 1 ms–2000 ms Adjusts the delay time.
FEEDBACK 0–100
HIGH CUT
EFFECT LEVEL 0–120 Adjusts the volume of the delay sound.
MOD RATE 0–100
MOD DEPTH 0–100
RANGE 8 kHz, 17 kHz
FILTER OFF, ON
FEEDBACK
PHASE
DELAY PHASE NORMAL, INV
MOD SWITCH OFF, ON
ANALOG This gives a mild analog delay sound.
TAPE ECHO
630 Hz–12.5 kHz,
FLAT
NORMAL, INV
This models the sound of the Roland
SDE-3000.
This setting provides the characteristic
wavering sound of the tape echo.
Adjusts the volume that is returned to
the input. A higher value will increase the
number of the delay repeats.
This sets the frequency at which the high
cut lter begins to take eect. When “FLAT”
is selected, the high cut lter will have no
eect.
* Only when TYPE is ANALOG or TAPE
ECHO.
Adjusts the modulation rate of the delay
sound.
* Only when TYPE is SDE-3000.
Adjusts the modulation depth of the delay
sound.
* Only when TYPE is SDE-3000.
Models the way in which the SDE-3000’s
frequency response is aected by the delay
range.
* Only when TYPE is SDE-3000.
Turns the lter on/o. If this is on, a naturalsounding eect is obtained when you’re
using the delay as an echo.
* Only when TYPE is SDE-3000.
Species the phase of the delay sound
feedback. Selecting INV inverts the phase.
Only when TYPE is SDE-3000.
Species the phase of the delay sound.
Selecting INV inverts the phase.
* Only when TYPE is SDE-3000.
Turns the modulation on/o.
* Only when TYPE is SDE-3000.
MODE: TREMOLO
Parameter Value Explanation
RAT E 20m s–2000 ms
DEPTH 0–100 Adjusts the depth of the eect.
WAVE SHAPE 0–100
LEVEL 0–100 Adjusts the volume.
14
Adjusts the frequency (speed) of the volume
change.
Adjusts changes in volume level. A higher
value will steepen wave’s shape.

Parameter List
REVERB
Parameter Value Explanation
ON/OFF OFF, ON Turns this eect on/o.
Simulates plate reverberation (a reverb
PLATE
TYPE
TIME 0.1 s–10.0 s Adjusts the length (time) of reverberation.
PRE DELAY 0 ms–500 ms
LOW CUT FLAT, 20 Hz–800 Hz
HIGH CUT 630 Hz–12.5 kHz, FLAT
DENSITY 0–10 Adjusts the density of the reverb sound.
EFFECT LEVEL 0–100 Adjusts the volume of the reverb sound.
SPRING COLOR 0–100
SPRING
HALL
unit that uses the vibration of a metallic
plate). Provides a metallic sound with a
distinct upper range.
This simulates the sound of a guitar amp’s
built-in spring reverb.
Simulates the reverberation in a concert
hall. Provides clear and spacious
reverberations.
Adjusts the time until the reverb sound
appears.
This sets the frequency at which the low
cut lter begins to take eect. When “Flat”
is selected, the low cut lter will have no
eect.
This sets the frequency at which the high
cut lter begins to take eect. When
“FLAT” is selected, the high cut lter will
have no eect.
Adjust the unique tone of the spring
reverb.
EFX LOOP
This turns the EFFECT LOOP (SEND/RETURN) jack on/o.
POWER AMP
Parameter Value Explanation
BIAS 0–100
SAG -50–+50
CHARACTER SHAPE
Parameter Value Explanation
ON/OFF OFF, ON Turns this eect on/o.
LOW GAIN -12.0–+12.0 dB
LOW-MID FREQ 20 Hz–10.0 kHz
LOW-MID Q 0.5–16
LOW-MID GAIN -12.0–+12.0 dB
HIGH-MID FREQ 20 Hz–10.0 kHz
HIGH-MID Q 0.5–16
HIGH-MID GAIN -12.0–+12.0 dB
HIGH GAIN -12.0–+12.0 dB
LEVEL -12.0–+12.0 dB
This parameter determines the operating point
of the vacuum tube.
Lowering this setting produces class B
operation, creating aggressive distortion with
a sense of speed. Raising this setting produces
class A operation, creating smooth sustain with
crispness and clarity.
This parameter adjusts the power supply’s
driving capability.
Lowering the this setting causes the voltage
to decrease according to the signal that is
being input, producing a distinctive sense of
compression. Raising this setting minimizes
any voltage decrease related to the input
signal, producing a solid sound.
Adjusts the low frequency range
tone.
Species the center of the frequency
range that will be adjusted by the
LOW-MID GAIN.
Adjusts the width of the area aected
by the EQ centered at the LOW-MID
FREQ. Higher values will narrow the
area.
Adjusts the low-middle frequency
range tone.
Species the center of the frequency
range that will be adjusted by the
HIGH-MID GAIN.
Adjusts the width of the area aected
by the EQ centered at the HIGH-MID
FREQ. Higher values will narrow the
area.
Adjusts the high-middle frequency
range tone.
Adjusts the high frequency range
tone.
Adjusts the overall volume level of
the equalizer.
15

Parameter List
MENU (GLOBAL SETTING)
INPUT SETTING
This adjusts the level of the signal that is input from the guitar to the
Nextone Special’s INPUT.
Value
-20 dB–0–+20 dB
EFX LOOP
These are settings for the EFFECT LOOP (SEND/RETURN) jacks.
Parameter Value Explanation
POSITION POST AMP, POST REV
MODE SERIES, PARALLEL
SEND LEVEL 0–100%
RETURN LEVEL 0–100%
Species the position at which the external
eect unit is connected.
Species whether the external eect unit is
connected in series or in parallel.
Adjusts the volume of the output to the
external eects device.
Adjusts the volume of the input from the
external eects device.
SYSTEM EQ
Here you can adjust the overall tonal character of the entire
Nextone Special. You can make adjustments for four frequency regions.
PARAMETRIC
Parameter Value Explanation
SW OFF, ON Turns this eect on/o.
POSITION
LOW CUT FLAT, 20 Hz–800 Hz
LOW GAIN -20–+20 dB
LOW-MID FREQ 20 Hz–10.0 kHz
LOW-MID Q 0.5–16
LOW-MID GAIN -20–+20 dB
HIGH-MID FREQ 20 Hz–10.0 kHz
HIGH-MID Q 0.5–16
HIGH-MID GAIN -20–+20 dB
HIGH GAIN -20–+20 dB
HIGH CUT
LEVEL -20–+20 dB
INPUT
OUTPUT
630 Hz–12.5 kHz,
FLAT
Places the EQ immediately after the
Nextone Special’s INPUT.
Places the EQ after the pre-amp and
eects.
Sets the frequency at which the low
cut lter begins to take eect. When
“Flat” is selected, the low cut lter will
have no eect.
Adjusts the low frequency range
tone.
Species the center of the frequency
range that will be adjusted by the
LOW-MID GAIN.
Adjusts the width of the area aected
by the EQ centered at the LOW-MID
FREQ. Higher values will narrow the
area.
Adjusts the low-middle frequency
range tone.
Species the center of the frequency
range that will be adjusted by the
HIGH-MID GAIN.
Adjusts the width of the area aected
by the EQ centered at the HIGH-MID
FREQ. Higher values will narrow the
area.
Adjusts the high-middle frequency
range tone.
Adjusts the high frequency range
tone.
Sets the frequency at which the high
cut lter begins to take eect. When
“FLAT” is selected, the high cut lter
will have no eect.
Adjusts the overall volume level of
the equalizer.
* The EFX LOOP setting is valid if a plug is connected to the RETURN jack.
GRAPHIC
Parameter Value Explanation
31Hz
62Hz
125Hz
250 Hz
500 Hz
1 kHz
2 kHz
4 kHz
8 kHz
16 kHz
LEVEL -12.0–+12.0dB Adjusts the overall volume level of the equalizer.
16
-12.0–+12.0dB Adjust the volume of each frequency band.

Parameter List
LINE OUT
Species the sound of the LINE OUT/PHONES/USB Primary Out.
Value Explanation
REC A distantly-miked sound for recording.
LIVE A close-miked sound for live.
BLEND
A sound providing a good blend of closed-miked and distantly-miked
sound that can be broadly used for live or recording.
USB SETTING
Here you can make USB-related settings for when the Nextone Special is
connected to a computer via USB.
RESET GLOBAL SETTINGs
This returns the global settings edited in MENU to their factory-set state.
OWNER’S MANUAL
This starts a web browser on your computer and opens a site where you
can download the Nextone Special owner’s manual.
DEVICE SETTING
Here’s how to select the device controlled by NEXTONE SPECIAL EDITOR.
Click SELECT DEVICE, and from the list choose [NEXTONE].
Parameter Value Explanation
LOOP BACK OFF, ON
OUT LEVEL 0–200%
PRIMARY
IN LEVEL 0–200%
OUT LEVEL 0–200%
SECONDARY
IN LEVEL 0–200%
MEMO
For more about “PRIMARY” and “SECONDARY,” refer to “Block Diagram” at
the end of the Owner’s Manual.
If this is ON, the sound from the computer
is mixed with the sound of the Nextone Special
and sent to the computer.
Adjusts the level of the sound that is output
to the computer after passing through the
Nextone Special’s pre amp and eects.
Adjusts the level of the input sound from the
computer. At this time, the input sound from
the computer is mixed at the nal stage of the
Nextone Special.
The guitar sound that is input to the
Nextone Special, is output without change.
Adjusts the input level from the computer to the
Nextone Special’s pre amp.
VERSION
This displays version information for the NEXTONE SPECIAL EDITOR.
17
 Loading...