

Page 1

Guide & User Manual
Page 2

Should any original component prove defective in terms of workmanship within its warranty period, we will replace it.
Warranty period for our bicycles is as follows.
Rigid frames & forks – 1 year
Suspension frame & forks – 1 year
Carbon & all other components – 1 year
Exclusions: Tyres, Inner Tubes & Accessories
This warranty does not include labour and transportation charges. The company cannot accept any responsibility for
consequential or special damage. This warranty applies only to the
original retail purchaser who must produce proof of
purchase in order to validate any claim. This warranty applies only in the case of defective components and does not
cover the effects of normal wear, nor damage caused by accident, abuse, excessive loads, neglect, improper assembly,
improper maintenance or the addition of any item inconsistent with the original intended use of the bicycle.
No bicycle is indestructible and no claims can be accepted for damage caused by improper use, competition use,
stunt
riding, ramp jumping or similar activities. Claims MUST be submitted through your retailer.
Your statutory rights are not affected.
All of our bicycles conform to one of the following standards:
The company reserves the right to change or amend any specification without notice.
All information is correct at time of printing.
Please refer to the bicycle frame for the relevant ISO standard.
Standard Guarantee for
MV Sports Ltd
Maximum Weight Limit
ISO 4210-1 / ISO 4210-2 = City, Trekking, Mountain & Road bicycles - Maximum permissible total weight limit of rider,
bicycle and luggage = 135kg
ISO mark 4210-6 = Young Adult bicycles - Maximum permissible total weight limit of rider, bicycle and luggage = 90kg
ISO 8098 = Young children - Maximum permissible total weight limit of rider, bicycle and luggage = 60kg”
Page 3

Your Bicycle - Owner’s Responsibility
In this manual we describe and illustrate how to ride safely and keep your bicycle in a safe, trouble
free operating condition.
Owner’s Responsibility and Important Points
Your new Bicycle and this manual comply with the safety requirements laid down in the new ISO
4210:2014 - Safety requirements for Bicycles and ISO 8098 - Safety Standard for young Children’s
bicycles.The new standards bring together the older separate standards: (EN 14781, 14766, 14765,
14764).
It comprises of 9 parts covering: Terms & Denitions, Requirements, Common Test Methods, Braking
Test Methods, Steering Test Methods, Frame & Fork Test Methods, Wheel & Rim Test Methods,
Pedals & Crank Test Methods and Saddles & Seatpost Test Methods.
These 9 parts share a common test method to ensure the quality and safety of all cycles supplied,
the test methods for each intended cycle use may be dierent such as the mass, height, load or cycle
duration, ISO 4210 applies to Road, Mountain, City & Trekking and young adult cycles, but does not
apply to specialised types of cycles such as Tandems, Stunt or competition bikes.
The second part of the new standard is ISO 8098, this species the safety and performance
requirements and test methods for the design, assembly and testing of sub-assemblies and fully
assembled bicycles for young children - this standard is dened by saddle height. This standard is
dened by bikes with a maximum saddle height of more than 435mm and less than 635mm so in
relation to our MV Sports bikes this will apply to bikes of 12”,14”,16” and some 18” wheel bicycles,
it is not applicable to special types of bicycles such as BMX bicycles. Your new bicycle will have the
relevant standard where applicable visibly labeled either on the outer box or main frame of the cycle
near the cranks.
Page 4

Contents
Location of Parts with Routine Maintenance......................... .
Safe Cycling and Safety Tips....................................................
Setting Up Your Bike................................................................
Seat Adjustment............................................................................
Handlebars and Stems..................................................................
Cotterless Cranks Adjustment......................................................
Brakes..........................................................................................
Derailleur Gears / Fixed-Hub Gears.............................................
Suspension..................................................................................
Tyre Care and Wheel Adjustments...............................................
Nutted /Quick Release Type Wheels...........................................
Rim Wear Line Limit Indicator......................................................
Fitment of Bell..............................................................................
Maintenance................................................................................
Mechanical Safety Checklist......................................................
Cleaning and Lubrication.........................................................
Table of Recommended Torque Values....................................
Fitting Accessories.....................................................................
5
6
7-15
7-8
8-9
9
9-11
12-13
13
14
14-15
15
15
16-17
17
18
19
20
Page 5
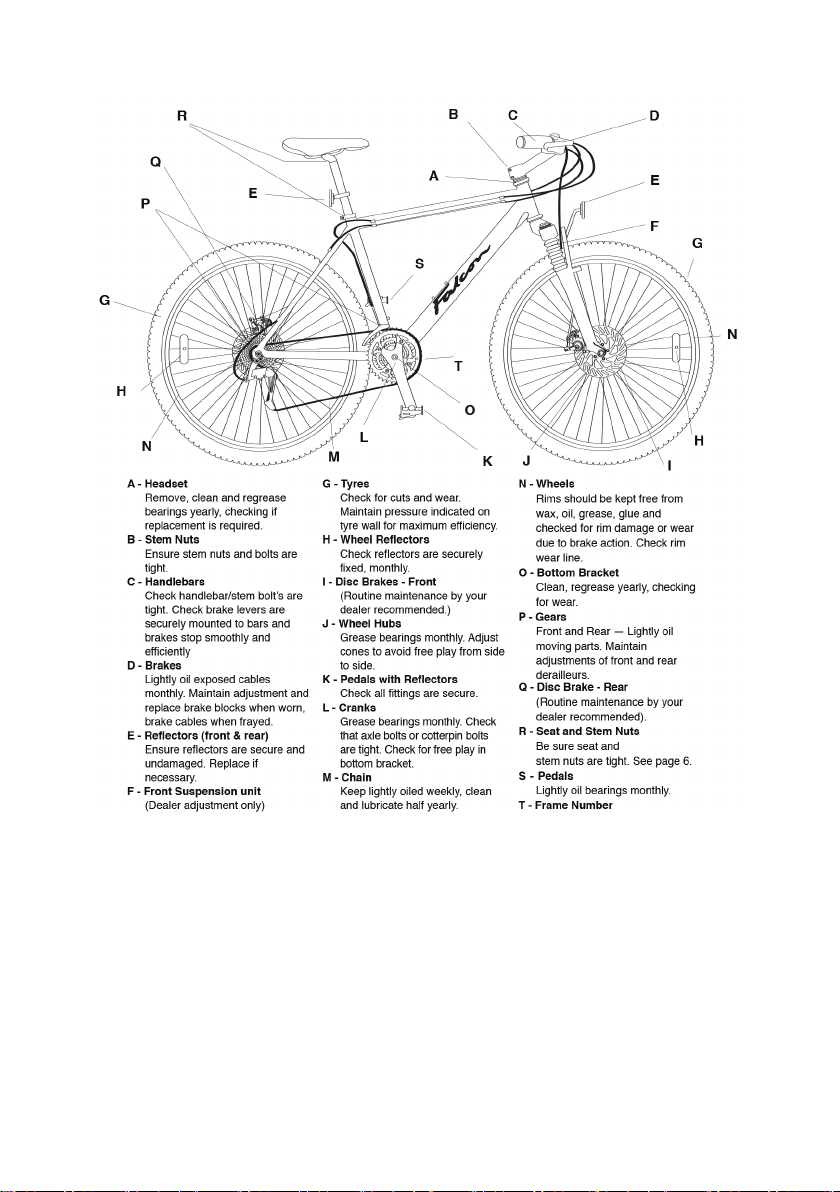
Location of Parts with Routine Maintenance
Refer to table of recommended torque values - page 19.
Half Yearly - Remove and clean, lubricate chain, derailleur gears and all cables. Check and replace as
required.
Yearly - Remove, clean and regrease hub axles, bottom bracket set and headset.
NB - Wash cycle weekly with warm soapy water and polish dry with a soft cloth. Do not pressure wash.
5
Page 6

Safe Cycling and Safety Tips
Before you ride your bicycle at any time make sure it is in a safe operating condition. Particularly check that
your:
• Bicycle’s nuts, bolts and parts are tight and not worn or damaged.
• Riding position is comfortable (refer to pages 7-8).
• Brakes are operating eectively.
• Steering is free with no excessive play.
• Wheels run true and hub bearings are correctly adjusted.
• Wheels are properly secured and locked to frame/fork.
• Tyres are in good condition and inated to correct pressure.
• Pedals are securely tightened to pedal cranks.
• Gears are correctly adjusted.
• All reectors are in position.
After you have made any adjustments to your bicycle, check that all nuts and bolts are securely tightened and
cables are free from kinks and xed securely to the bicycle frame.
Every six months (more frequently if high mileage or subject to heavy use) your bicycle should be
professionally checked to ensure that it is in correct and safe working order.
To Ensure Your Safety
• Do not ride on same side of road as oncoming trac.
• Do not ride two side by side.
• Do not carry a passenger unless cycle is equipped to do so.
• Do not swerve in and out of trac.
• Do not hang items over the handlebars to impede steering or catch in
the front wheel.
• Do not hold on to another vehicle.
• Do not ride too close behind another vehicle.
• Always wear a helmet
CAUTION: Wet Weather Riding. No brakes work as well under wet or icy conditions as they do under dry
conditions. In wet weather special precautions must be taken to assure safe stopping. Ride slower than normal
and apply your brakes well in advance of anticipated stops.
CAUTION: Night Riding. We recommend you minimise the time you ride after dark. If you should have to be
out on your bicycle at night you must comply with the law, use a headlight (white) and a tail-light (red) on your
bicycle in addition to the all-around reectors that are tted. For added safety wear light coloured clothing with
reective stripes. Check that the bicycle reectors are rmly secured in their correct position, clean and not
obscured. Damaged reectors must be replaced immediately.
Riding Position
It is important that you and your bicycle are tted to each other, not only for comfort and riding ease but for
control and safety. Normally your Dealer will custom t your bicycle to you but the following few pages should
help you to nd your most comfortable, safe and ecient position.
6
Page 7
Setting Up Your Bike
Seat Adjustment
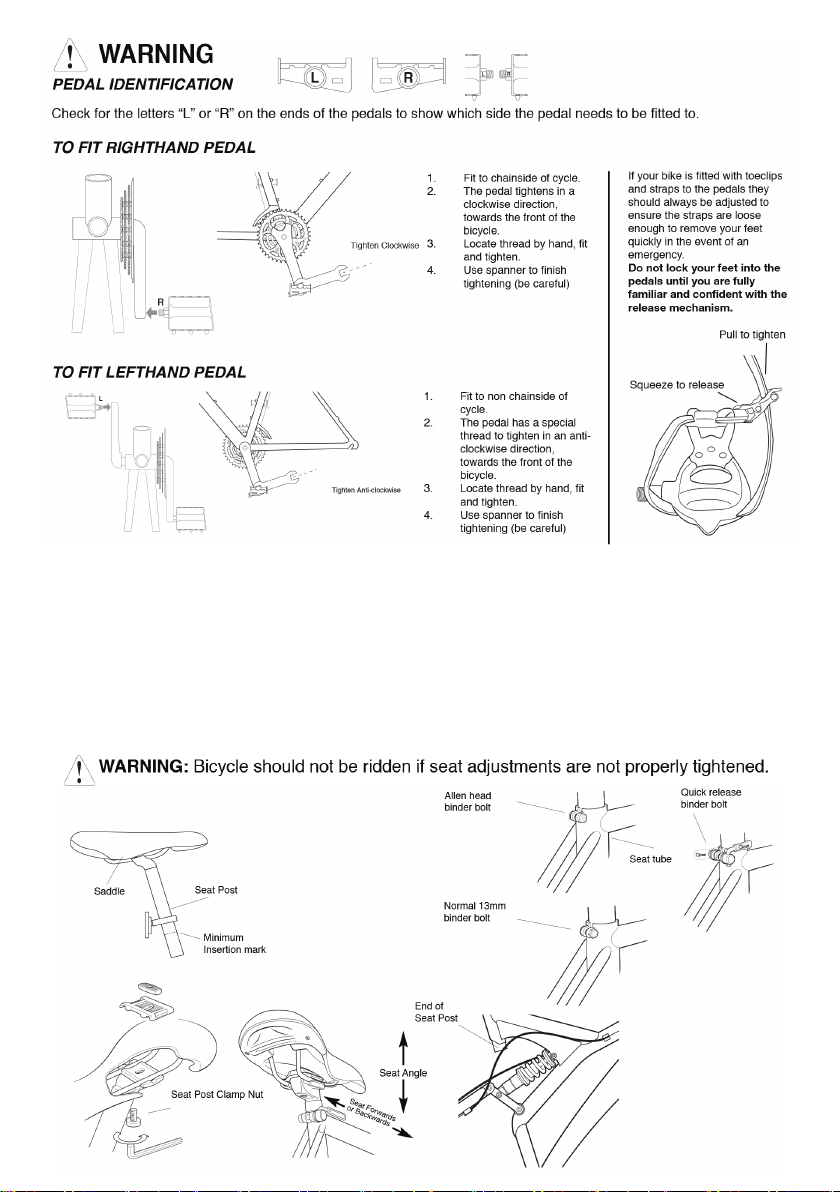
Loosen the nut on the seat-post clamp enough to allow the saddle to move backwards or forwards. The seat
can then be aligned and the angle can also be adjusted. It is recommended that the seat be parallel to the
ground. To adjust the seat up and down, loosen the binder-bolt on the seat tube, position the seat and retighten the binder-bolt.
CAUTION: Insert the seat-post to a point above the insertion mark. The MINIMUM INSERTION MARK should
not be visible. Securely tighten the seat-post binder bolt by using an Allen key or a 13 mm spanner. Test by
grasping the seat and attempting to turn. Keep tightening until the seat will no longer turn. Refer to table of
recommended torque values on page 19.
Seat posts dier according
to saddle types and
accordingly the procedure
for tting varies. If in
doubt consult your dealer.
Seat Post adjustment—
Suspension frames.Take
care when inserting seat
post that the protruding
end cannot interfere with
the frame suspension unit
during use. If in doubt
consult your dealer about
adjustment.
7
Page 8

Saddle Angle
The seat should be horizontal or parallel with the ground.
Slight variation around the horizontal may suit individual
comfort but if excessive angles are felt necessary check
other aspects of your position.
Saddle Height
The correct seat height is determined by sitting on the
seat with your leg fully extended. Your heel (in at shoes)
should just touch the pedal when it is positioned at its
lowest point. When riding normally with the ball of your
foot on the pedal your knee should be slightly exed at the
bottom of the pedal stroke (see diagram following).
Saddle Forwards/Backwards Position
With the ball of one foot on the pedal and the cranks
parallel to the ground the saddle should be adjusted
backwards or forwards to a position whereby the pedal
centre is directly below the knee joint.
Very small changes in saddle position can have
a substantial eect on performance and comfort.
Consequently, whenever you make a change to your
saddle position, make only one directional change at a
time and make the changes in small increments, until you
have found the point at which you are most comfortable.
Handlebars and Stems
As your cycle may be tted with a standard ‘quill’ stem or an A-Head
stem, you must check that all the bolts are tight before cycling.
Standard Stem: Loosen expander bolt so that expander wedge is not
tight in bottom of handlebar stem. Gently tap the top of the expander bolt
to further loosen the wedge, if necessary. When the expander wedge is
loose, move the handlebars up or down until you nd the optimum height
at which you can easily reach the brake levers and comfortably grasp the
handlebars. Usually this height is level with, or slightly lower than, the top
of the saddle. Be sure the stem is in line with the front wheel.
Caution: A minimum insertion ring is marked on the handlebar stem and
this marking should remain in the head tube. Under no circumstances
should the minimum height insertion mark be visible on the handlebar
stem. It must be down in the head tube.
When desirable height has been achieved, align the handlebar with the
front wheel and securely tighten expander bolt. It is extremely important
to tighten the expander bolt suciently, so that when the wheel is held
between your legs and the handlebars are twisted, the handlebars do not
move. Do not over tighten, as it may increase risk of injury to the rider.
Position grip portion of handlebars horizontally and securely tighten the binder bolt.
Refer to table of recommended torque values on page 19.
Note: Whenever the handlebar stem is removed from the head tube then the expander bolt should be lightly
greased.
Note: On some bikes, raising the stem requires brake cable adjustment.
8
Page 9

A-Head Stem: Has 2 steerer clamp bolts on the back of the stem,
which clamp around the steerer tube. Loosen these bolts to align
the stem with the front wheel. Re-tighten the steerer clamp bolts.
Caution: Do not adjust the top compression bolt, this should be
pre-set to eliminate bearing play, overtightening will cause
premature wear.
Contact your retailer for service.
Handlebar Position: The position of the handlebar should be set to
allow a comfortable and easy reach of both gear control and brake
levers. When riding, your weight should be so balanced that your hands rest lightly on the handlebars. This
prevents strain on wrists and forearms when pedalling. If you alter the riding position, remember to tighten all
nuts and bolts securely.
Refer to table of recommended torque values on page 19.
Cotterless Cranks Adjustment
To ensure trouble free operation it is important that the nuts securing the lefthand and righthand chainwheel to
the bottom bracket axle are tightened as securely as possible.
It is strongly recommended that the tightness of the nuts be checked after the rst two weeks of use and a
maximum of three monthly intervals thereafter.
IMPORTANT
Brakes
The Braking action of a bicycle is generated through friction between the brake pads and either the wheel rim
or a wheel mounted braking disc. To make sure that you have maximum friction available, keep your wheel
rims (or disc brake rotors) and brake blocks clean. Ensure they are free of dirt, lubricants, waxes and polish.
Do not allow a build up of road or trail dirt on the rims as this can act as an abrasive and cause rims to wear to
a point where the sidewall could fail.
For safe riding it is important to completely understand the operation of your bicycle’s brake system. Improper
use of your bicycle’s brake system may result in a loss of control or an accident, which could lead to severe
injury.
Because each bicycle may handle dierently, be sure to learn the proper braking technique (including
brake lever pressure and bicycle control characteristics) and operation of your bicycle. This can be done by
consulting your professional bicycle dealer and this owner’s manual, and by practicing your riding and braking
technique.
It is very important that parent’s or carers ensure that their children are properly instructed in the use of this
bicycle, paying particular attention to the safe use of the braking system.The bicycle is equipped with two
independant brake mechanisms. One on the front wheel and the other on the rear wheel. The brakes are
operated by hand levers fastened to the handlebars. The right lever controls the front brake and the left lever
controls the rear brake.
WARNING
9
Page 10

To Stop with Safety:
1. Operate the rear brake (left lever) slightly before the front brake (right lever).
2. Apply rm pressure to both front and rear brake levers.
Caution: If the front brake is applied with too much pressure, the rider may be thrown o the bicycle.
3. Never apply the front brake on a turn. This is especially dangerous when cornering or riding on slippery or
loose surface roads.
Caution: Brakes are less eective in wet weather. Ride slower and allow more distance for stopping.
Note: Do not ride your bicycle if the braking system is not working correctly. If you are in doubt, take your
bicycle to your dealer for assessment or repair.
Brake Adjustment Procedure - Caliper Brakes
The brakes on your bicycle should have been adjusted correctly by your dealer. However, as cables do
stretch, it is important to check the adjustment of your brakes after your rst ride. Most brakes will need some
adjustments after being used the rst few times. Your brakes are correctly adjusted when there is a 1.5 mm
gap between the brake blocks and the brake track of the wheel rim.
Do not adjust brakes to allow brake blocks to contact wheel rim when brake levers are in the o position. The
ne adjustment of the brakes is made by the following procedure:
1. Turn adjustor (A) to set blocks (C) just clear of rim by 1.5 mm.
2. Ensure that the brake blocks meet the rim parallel and central to the rim brake tracks. Adjust by nuts (D) if
necessary, then tighten securely.
3. When all ne adjustment is taken up on adjuster (A), it will be necessary to reset the cables as follows:
a. Turn adjuster (A) all the way down as far as it will go into its mounting.
b. Loosen cable clamp bolt (B). Press both brake shoes rmly against wheel rim.
c. Pull brake cable wire through its clamp bolt.
d. Tighten cable clamp bolt (B) securely.
Note: If one brake shoe is closer to the rim than the other rst check that the wheel has been centred between
the forks then adjust the brakes as necessary.
To adjust brakes that have central Caliper adjuster (E) simply turn screw as shown until brakes centralise.
Brake Maintenance - Caliper brakes
To maintain cable brakes in ecient working order, regularly check the brake adjustment and lightly lubricate
brake pivotsand springs. Oil the exposed parts of the innerwire to prevent corrosion. Slow or inecient braking
often indicates that the brake cables themselves require lubrication or replacement. As this job requires the
removal of the complete brake cable,we recommend strongly that this service is done professionally.
Note: To assure smooth braking, wheels must run true and be correctly adjusted, with the rim brake tracks
free fromdents and kinks. The brake blocks should be in correct alignment with the rim brake track. See your
dealer if you are in any doubt regarding wheel and brake adjustment.
10
Page 11

Protect yourself from frayed cable ends by maintaining the alloy end caps tted over the inner wire ends.
Brakes should function freely and release fully. If brakes bind, rst check for cleanliness and proper lubrication.
If brakes still bind, return your bicycle to your dealer for adjustment.
To centre side pull brakes rst slacken the retaining nut and then centre the brake using a spanner on the front
retaining nut.
CAUTION: Before riding, test your brakes. Make sure that the quick release mechanism is returned to its
normal correct position, otherwise your brakes will not operate eectively.
Cable Quick Release
To release the brake inner cable from the V brake, squeeze the two brake arms together until the brake blocks
contact the rim and remove the inner cable lead pipe from the cable end bracket.
To re-connect again squeeze the two brake arms together and relocate the inner cable pipe in the cable end
bracket.
Brake Block Replacement- Caliper and V Brakes
All brake blocks are provided with grooves that indicate the wear on each block.
When thegrooves are worn down to a at surface, replace the blocks (in pairs)
immediately.
Brake Maintenance - Disc Brakes
Your cycle may arrive with factory tted disc brakes - the latest technology in cycle braking!
“V” Brake System
If you have purchased your cycle from a professional cycle shop your brakes should have been set up
correctly. You will only have to do routine maintenance as the brake pads wear. If you purchased your cycle
from a mail-order source you may have to set up the brakes before you use your cycle. Please refer to the
disc brake leaet that accompanies the cycle. If you do not have such a leaet please take your cycle to a
professional cycle shop.
11
Page 12

Derailleur Gears
There are many types of derailleur systems on the market. If your bike is tted with derailleur gears refer to
the specic component maker’s leaet supplied with your bicycle or check the technical documents from the
component makers website before you make any adjustments. If in doubt visit your local retailer to obtain
assistance.
Introduction
The derailleur gear is so named because it works on the derailing principle to move the chain from one
sprocket to another. The number of gears is determined by multiplying the number of sprockets on the rear
freewheel by the number of chainrings on the front crank set. By using dierent combinations of sprocket and
chainwheel sizes, a wide range of gear ratios are available. The highest gear is when the large chainwheel is
coupled with the small sprocket and the lowest gear is when the small chainwheel is combined with the largest
rear sprocket. The wide range of gears allows you to attempt all prevailing conditions while pedalling at the
constant and ecient rate of sixty revolutions per minute.
Derailleur Gear Maintenance
To help ensure that your derailleur gear works eciently and to prolong its life, it must be kept clean and free
from excess dirt build up and should be properly lubricated.
Gear Changing
The rider’s left gear lever controls the front derailleur and chain wheels. The function of the front derailleur is to
move the chain between the larger and smaller chain rings.
The rider’s right gear lever controls the rear derailleur and sprockets.
The function of the rear derailleur is to move the drive chain from one gear sprocket to another. The large
rear sprockets generate low gears for hill climbing. The small rear sprockets develop high gear ratios for
speedwork and downhill riding.
The small front chainring produces low gear ratios while the larger front chainrings produce higher gear ratios.
To operate your derailleur gear system eciently and reduce damage, wear and reduce noise to a minimum,
avoid using the maximum crossover gear ratios of large chainring/large rear sprocket, small chainring/small
rear sprocket.#
Caution: For positive gear selection, observe these four precautions:
1. Change only when pedals and wheels are moving in a forward motion.
2. Reduce pedal pressure while changing gears.
3. Never back pedal when changing gear.
4. Never force the gear levers.
Gear selection should be made in anticipation of need since forward motion of the bicycle is required when
changing gear. It is advisable to change to a low gear before stopping in order to be in the proper gear when
you start up. On hills, change gear early while still maintaining forward pedalling speed.
Note. To understand the function and to carry out adjustments and maintenance of the unique gear system
tted on your bicycle please refer to the manufacturer’s leaets provided within your manual pack.
12
Page 13

Fixed / Hub Gears
If your bike is tted with a rear hub gear or single speed free wheel the chain
tension should be checked monthly to prevent premature wear of the system.
Lift the chain at it’s mid point of the bottom chain run (as indicated in the
diagram). Chain tension is ideal if you can lift the chain vertically by 12mm.
If the chain moves in excess of the 12mm it needs to be re tensioned as
follows.
Loosen both of the rear wheel nuts, slide the wheel backwards, make sure
the wheel is central inthe frame and tighten the wheel nuts to secure the
wheel. Recheck the chain tension again and rotate the pedals backward to
make sure there are no tight spots in the rotation. A tight spot indicates that
the chain is too tight.
Suspension
Your cycle may be tted with suspension units built into parts of the frame and forks. We recommend these
are only serviced by your dealer as required. More details may be found in the suspension manufacturer’s
handbook.
Pre Load Adjustment
We recommend that for optimum safe riding Pre-Load should be set as follows.
1. Pre-Load alters the amount of bottom bracket drop when seated on the saddle. We strongly recommend
you set Pre-Load so as to experience no more than 1” (25mm) of sag. Measured as a decrease in bottom
bracket height when the riders weight is applied to the bike.To adjust Pre-Load, grasp knurled adjuster (A) and
spring, and either:
2. Increase Pre-Load by turning to compress the spring
3. Decrease Pre-Load by turning to allow spring extension.
13
Page 14

Tyre Care and Wheel Adjustments
To obtain maximum life and full benet from your tyres, it is essential to maintain the recommended pressure
indicated on the tyre sidewall. Hard braking and skidding greatly reduces tyre life. Make sure your tyres do
not come into contact with oil, petrol, paran or other rubber solvents. Make sure that your wheels run true
and are in correct alignment to avoid chang the tyre sidewall against the bicycle frame or fork tubes. Tyres
should regularly be inspected for wear and cuts. Check that the tyre tread pattern is clearly showing all around
the outside edge of the tyre. Check there are not any breaks, cuts or uneven wear in the tyre. Tyres should be
replaced if damaged. Tyre punctures can be caused by careless riding over sharp stones, holes in the road,
or by hitting curbstones. If you are storing your bicycle for a long period of time, it is advisable to store the bike
with the tyres o the ground to prevent them from becoming distorted. To inate tyres, a foot pump or normal
bicycle inator tted with a suitable valve connector should be used along with an accurate tyre pressure
gauge. Wheels should be checked regularly for spoke tension. Perform this check more frequently if the
bicycle is used on rough roads.
Caution: Your front wheel comes with a retention device to keep the
wheel axle from disengaging from the fork-ends if the wheel nuts or the
quick-release are incorrectly assembled. These devices are of two types.
1: Small protrusions machined or formed on the outer face of the fork-
ends.
2: Shaped washers that contain a small tab/prong that engages in a hole
within the fork-end.
Front Wheel
Nutted Type Wheels
Disengage the brake quick release lever if your bicycle is so equipped.
Loosen both axle nuts by turning in a counter clockwise direction. Remove
axle nuts,washers, and axle retention device if tted. Remove the front
wheel. The axle cone bearing adjustment should permit smooth rotation
of wheel with the cone locknut securely fastened against axle cone to
prevent loosening.
Replace the front wheel between the fork blades ensuring that the
projecting tab/prong of the retention device are securely tted into the
slot in the fork ends or with standard washers securely in position butting
against the protrusions on the fork end. Securely tighten all wheel nuts
ensuring that the wheel is central within the forks. Refer to page 19 for recommended torque settings.
Note.Reset brake quick release mechanism and check brake for proper operation.
The wheels tted to this bicycle are not suitable for the tting of Tubeless Tyres. Please consult your local
dealer forthis upgrade.
Rear Wheel
Move the chain onto the smallest rear sprocket. Disengage the brake quick release lever if your bicycle is so
equipped.Loosen both axle nuts by turning in a counter clockwise direction. Pull the derailleur mechanism gear
rearwards for additional clearance. Remove the rear wheel by sliding forward or down and out of the frame.
To install wheel, locate the top section of the chain on the small sprocket and replace the wheel into the frame
by pushing back and centralising between the chainstays. While holding the wheel in this position, tighten the
axle nuts in a clockwise direction securely ensuring that the wheel is central within the chainstays. Refer to
page 17 for recommended torque settings.
The wheel should turn freely and have no side play.
Reset rear brake quick release mechanism and check brake for proper operation.
WARNING! Do not attempt to ride the cycle until you are absolutely sure that all quick release levers are fully closed and
securely tightened.
14
Page 15

Front Wheel
1. To remove the front wheel, rst release the front wheel brake. Then open the quick release lever on the axle
and pull the wheel from the forks.
2. To install, t wheel into forks with quick release lever on the left side. Close quick-release, and tighten
adjuster until snug. Release quick-release lever and further tighten adjuster approximately 3/4 of a turn. Lock
and check that the quick-release has engaged the fork ends. It may be necessary to tighten or loosen the
adjuster slightly.
Note. Reset brake quick release mechanism and check brake for proper operation.
3. Wheel must be clear of frame and fork by at least 1-5mm.
4. The wheel should turn freely and have very little side-play.
5. Check quick release lever is in the correct and fully locked position before each ride.
Rear Wheel
1. Use same procedure as for standard rear wheel, with the exception of loosening axle nuts. Operate the
quick release lever by pulling away from the wheel 180° to release the wheel from the frame.
2. When installing the rear wheel, position the wheel centrally in the frame, folding back the lever, then, when
in position fold the lever into its closed position.
3. Check quick release lever is in the correct and fully locked position before each ride.
4. Reset rear brake quick release mechanism and check brake for proper operation.
Rim Wear Line Limit Indicator
If your bicycle is tted with disc brakes to the front and rear, the following explanation is not applicable and can
be ignored.
Quick Release Type Wheels
Invisible Safety Line
This type of safety line is manufactured into the aluminium extrusion of the rim. It is invisible until worn out.
Under excessive wear the safety line will become visible so the rim no longer has a continuous braking
surface. It will appear as if there were a hole or groove in the surface.
Visible Safety Line
This type of safety line is already machined and is visible in the aluminium braking surface. When the rim has
been subjected to extended braking and the rim surface is suciently worn to warrant replacement, the safety
line will disappear and the rims braking surface will be one continuous smooth surface.
THE RIM MUST BE REPLACED BY A PROFESSIONAL CYCLE MECHANIC BEFORE THE BIKE IS
RIDDEN.
Fitment of Bell
1. Remove screw from bell clamp.
2. Position in a convenient spot near the left hand or right hand handlebar
grip.
3. Replace screw & tighten securely.
4. Rotate the “Ping Arm” to a comfortable position.
Position Bell on left hand or right hand side of
the handlebar as required.
15
Page 16

Maintenance
We recommend your new bike is checked and serviced at regular intervals to ensure its performance,
reliability and your safety.
Wherever possible we recommend that service, maintenance and repairs are undertaken by your local dealer.
If this is not possible please review the following detail as a guide.
Service
Warning: Technological advances have made bicycles and bicycle components more complex, and the pace
of innovation is increasing. It is impossible for this manual to provide all the information required to properly
repair and/or maintain your bicycle. In order to help minimize the chances of an accident and possible injury,
it is critical that you have any repair or maintenance that is not specically described in this manual performed
by your dealer. Equally important is that your individual maintenance requirements will be determined by
everything from your riding style to geographical location. Consult your dealer for help in determining your
maintenance requirements.
Warning: Many bicycle service and repair tasks require specialist knowledge and tools. Do not begin any
adjustments or service on your bicycle until you have learned from your dealer how to properly complete them.
Improper adjustment or service may result in damage to the bicycle or in an accident that can cause serious
injury or death.
Service Intervals
Some service and maintenance can and should be performed by the owner, and requires no special tools or
knowledge beyond what is presented in this manual.
The following are examples of the type of service you should perform yourself. All other service, maintenance
and repair should be performed in a properly equipped facility by a qualied bicycle mechanic, using the
correct tools and procedures specied by the manufacturer.
Break-in Period
Your bike will last longer and work better if you break it in before riding it hard. Control cables and wheel
spokes may stretch or “seat” when a new bike is rst used and may require readjustment by your dealer. Your
Mechanical Safety Check will help you identify some things that need readjustment. But even if everything
seems ne to you, it is best to take your bike back to the dealer for a check up. Dealers typically suggest you
bring the bike in for a 30 day check up. Another way to judge when it is time for the rst check up is to bring
the bike in after 10 to 15 hours of on-road use. But if you think something is wrong with the bike, take it to your
dealer before riding it again.
After Every Long or Hard Ride
If the bike has been exposed to water or grit, or at least every 100 miles, clean it by wiping it clean and lightly
oil the chain with Teon lubrication or a synthetic based chain lube. Then, very importantly, wipe o excess
oil. For general cycle lubrication, we suggest using lightweight mineral based oil that is commonly available
in most bike shops or hardware stores. If you have any further questions please talk to your dealer as an
incorrect lubricant can damage the painted surfaces.
• Squeeze the front brake and rock the bike forward and back. If you feel a clunk with each forward and
backward movement of the bike, you probably have a loose headset. Have your dealer check it.
• Lift the front wheel o the ground and turn the handlebar to the left and right. If you feel any binding or
roughness in the steering you may have a tight headset, have your dealer check it.
• Grab one pedal and rock it towards and away from the centre line of the bike; then do the same with the
other pedal. Anything feel loose? If so have your dealer check it.
• Take a look at the brake pads. Starting to look worn or not hitting the wheel rim squarely? Time to have the
dealer adjust or replace them
• Carefully check the control cables and cable housings, any rust? Kinks? Fraying? If so have your dealer
replace them.
• Squeeze each adjoining pair of spokes on either side of each wheel between your thumb and index nger.
Do they feel about the same? If any feel loose, have your dealer check the wheel.
• Changing components on your bike with non-genuine parts may compromise the safety of your bicycle and
void the warranty. Please check with your dealer before changing any safety-critical components on your bike.
16
Page 17

• Check to make sure that all parts and accessories are still secure, and tighten any that are not. When
replacement parts are necessary, be sure to use factory authorized replacement parts from your local
authorized dealer.
• Check the frame, particularly in the area around all tube joints; the handlebars; the stem and the seat post for
any deep scratches, cracks or discoloration. These are signs of stress-caused fatigue and indicate that a part
is at the end of its useful life and needs to be replaced.
Warning: Like any mechanical device, a bicycle and its components are subject to wear and stress. Dierent
materials and mechanisms wear or fatigue from stress at dierent rates and have dierent life cycles. If a
component’s life cycle is exceeded the component can suddenly and catastrophically fail, causing serious
injury or death to the rider. Scratches, cracks, fraying and discolouration are signs of stress-caused fatigue
and indicate that a part is at the end of its useful life and needs to be replaced. While the materials and
workmanship of your bicycle or of individual components may be covered by a warranty for a specied period
of time by the manufacturer, this is no guarantee that the product will last the term of the warranty. Product life
is often related to the kind of riding you do and to the treatment to which you submit the bicycle. The bicycle’s
warranty is not meant to suggest that the bicycle cannot be broken or will last forever. It only means that the
bicycle is covered subject to the terms of the warranty.• Hubs run smoothly with no sideways play
Before each ride:
Mechanical Safety Checklist
• Check both wheel axles are secure in the frame & forks
• Check tyres are not worn and are within the recommended pressure limits as indicated on the side wall. It is
good practice to carry tyre levers and a puncture repair kit at all times
• Check handlebar assembly is tight and rotates freely
• Check the function of the braking system while stationary
• Check the gear shifters operate correctly
• Rotate each wheel ensuring it rotates freely. Pay special attention to mudguards and ttings if you have
them. Ensure they are properly secure and do not foul the wheels
• Check the saddle and seat post are secure and adjusted
• Check the pedals are secure and the chainwheel crank arms are free of lateral movement
• Check lights, reectors and bell are all in good working order
• During riding note any unusual noises, rattles, creaking or change in performance and immediately check
nuts and bolts for tightness. Inspect for other possible damage and go through the check list above. If in any
doubt do not ride the bicycle and take it to your dealer for a service.
Monthly and after long or hard rides, the following additional checks/maintenance should be
completed:
• Clean, degrease and lubricate your bike
• Inspect tyres for wear, damage and punctures
• Check no spokes are loose, broken or missing
Annual service and inspection:
If you have any doubts about completing and following service and inspection you must seek the services
of the professional cycle technician at your local dealer. It is good practice before commencing any service/
inspection to thoroughly clean and degrease your bicycle.
Inspect and maintain:
• Frame, forks and suspension parts for damage, cracks, corrosion and deformation
• Wheels for damage, balancing, spoke tension and rim wear
• Brake levers, brake blocks/pads, brake control cables and inner wire
• Chain for corrosion, sti links and stretch. (Failure to maintain the chain will considerably reduce the
performance and life span of the whole gear system).
• Chainwheel cranks are securely fastened to the axle at the correct torque
• Front and rear gears for damage, wear and alignment
• Disassemble headset, clean, re-grease and reassemble making sure to inspect bearings for wear
• Remove seat post from frame, clean and re-grease before retting.
17
Page 18

Cleaning and Lubrication
Regular washing and lubrication not only keeps your bicycle looking in top condition but will actually assist in
maintaining its original performance and prolongs the life expectancy of the mechanical components.The chain
is the most important component to keep clean as it is the part that wears the teeth on the rear sprocket, the
rear gear and the chainset. It is also the key part which transfers your eort into forward motion. If it is clean it
is ecient and it is not damaging the gear system.
18
Page 19

Table of Recommended Torque Values
Only refer to the table of recommended torque values when you have no specic component user manual
supplied for that part or the details areprinted on the component itself.
11
12
1
1A
10
2
9
3
13
7
5
6
8
Important Note: These values are to be used only as a guide.
Some components require dierent torque settingsand are
indicated on the component itself or in the specic component
literature supplied with this bicycle or on thecomponent
manufacturer’s website online.
4
19
(Hexagonal Head)
(Allen Head)
(Hexagonal Head)
(Allen Head)
Page 20

Fitting Accessories
Can I t a child seat to my new bicycle?
If your bicycle has a standard rigid frame then many aftermarket rear child seats will t (these usually clamp to
the seat-tube just above the front cranks/front derailleur). We suggest talking through the many options at your
nearest specialist cycle retailer who will be able to advise you on the many features and benets of the various
brands, and price points.
Please note, in general it can be dicult due to the smaller size and tube shapes to t rear carriers on ladies
style frames as they generally have limited clearance for the brackets, or require the saddle to be raised too
much for clearance. This can make the
bike unsafe or uncomfortable to use. We
therefore recommend tting rear child
carriers upon men’s style frames.
If your bicycle is a full suspension
bike (meaning it has a rear shock or
suspension unit) these are not suitable
for any type of front or rear cycle carrier
that mounts to the cycles frame. The
only exception is a child trailer or buggy
that ts to the rear axle of the bike.
Can I t a rear luggage carrier to my new bicycle?
Rear carriers can be tted in general to all rigid or traditional diamond shaped frames across our range, Many
of our frames (model dependant) will have specic mounting tabs on the frame to aid the tting of a rear
luggage rack.
Full suspension frames are not suitable for rear carriers. Traditional carriers cannot be tted to full suspension
bikes. One alternative to this could be to purchase a seatpost mounted rear carrier (such as the one pictured
below), although bear in mind we do not recommend carrying more than 10 kg in this way. If further luggage
carrying ability is required, a cycle trailer that bolts upon the rear axle is another good option.
20
Page 21

National legal requirements when using your bicycle upon the road in the UK
Your new bicycle is required by law if being used upon the road to have white wheel reectors, a front white
reector, a rear rear reector, orange pedal reectors and a bell – all our adult cycles are supplied with these
as standard – please ensure they are tted and clean/visible at all times to ensure your safety and that of other
road users, for further up to date on road cycling information please take the time to read the highway code
upon the gov.uk website – this has in-depth information upon the current rules and regulations for cycling in
the uk
https://www.gov.uk/guidance/the-highway-code/rules-for-cyclists-59-to-82
21
Page 22

You can email us at:
technical.support@mvsports.com
www.mvsports.co.uk
MV Sports cycles are designed in the UK
Distributed by MV Sports Ltd, 35 Tameside Drive, B35 7AG
 Loading...