


T4S/T8S ToneMatch®
Mixer
Quick Start Guide
Guía de inicio rápido
Guide de démarrage rapide
Kurzanleitung
Guida rapida
Beknopte handleiding

Important Safety Instructions
Names and Contents of Toxic or Hazardous Substances and Elements
Please read and keep all safety and use instructions.
1. Read these instructions.
2. Keep these instructions.
3. Heed all warnings.
4. Follow all instructions.
5. Do not use this apparatus near water.
6. Clean only with a dry cloth.
7. Do not block any ventilation openings. Install in accordance with the
manufacturer’s instructions.
8. Protect the power cord from being walked on or pinched, particularly at plugs,
convenience receptacles, and the point where they exit from the apparatus.
9. Only use attachments/accessories specified by the manufacturer.
10. Use only with the cart, stand, tripod, bracket, or table specified by the
11. Unplug this apparatus during lightning storms or when unused for long periods
12. Refer all servicing to qualified personnel. Servicing is required when the
manufacturer or sold with the apparatus. When a cart is used, use
caution when moving the cart/apparatus combination to avoid injury
from tip-over.
of time.
apparatus has been damaged in any way such as power-supply cord or plug is
damaged, liquid has been spilled or objects have fallen into the apparatus, the
apparatus has been exposed to rain or moisture, does not operate normally, or
has been dropped.
Regulatory Information
This device complies with part 15 of the FCC Rules and with Industry Canada licenseexempt RSS standard(s). Operation is subject to the following two conditions: (1)
This device may not cause harmful interference, and (2) this device must accept any
interference received, including interference that may cause undesired operation.
This product conforms to all applicable EU directive requirements. The
complete Declaration of Conformity can be found at
www.Bose.com/compliance.
Information About Products That Generate Electrical Noise (FCC Compliance
Notice for US)
Note: This equipment has been tested and found to comply with the limits for a Class
A digital device, pursuant to part 15 of the FCC Rules. These limits are designed to
provide reasonable protection against harmful interference when the equipment is
operated in a commercial environment. This equipment generates, uses, and can
radiate radio frequency energy and, if not installed and used in accordance with
the instruction manual, may cause harmful interference to radio communications.
Operation of this equipment in a residential area is likely to cause harmful
interference in which case the user will be required to correct the interference at
one’s own expense.
Changes or modifications not expressly approved by Bose Corporation could void
the user’s authority to operate this equipment.
Shielded cables are required to maintain regulatory compliance.
This product complies with the Canadian ICES-003 Class A specifications.
CAN ICES-3(A)/NMB-3(A)
This product meets all EN55103-2 immunity requirements for E2 electromagnetic
environment.
WARNINGS/CAUTIONS:
This product contains magnetic material. Consult your physician on whether
this might aect you implantable medical device.
• This product is not intended for installation or use in indoor water facility areas
(including, without limitation, indoor pools, indoor water parks, hot tub rooms,
saunas, steam rooms and indoor skating rinks).
• To reduce the risk of fire or electrical shock, do NOT expose this product to rain,
liquids or moisture. Not applicable for products rated IPX4-9.
• Keep the product away from fire and heat sources. Do NOT place naked flame
sources, such as lighted candles, on or near the product.
• Do NOT make unauthorized alterations to this product.
• Do NOT use a power inverter with this product.
• Do NOT use in vehicles or boats.
• Use this product only with the power supply provided.
• Do NOT place or install the bracket or product near any heat sources, such as
fireplaces, radiators, heat registers or other apparatus (including amplifiers) that
produce heat.
• Do not use the ToneMatch® T4S/T8S mixer with a tripod/stand that is unstable.
The mixer is only designed for use on a ¼" screw (6 mm), and the tripod/stand
must be capable of supporting a device with a minimum weight of 1.9 kg (4.1 lbs)
and an overall size of 214 x 311 x 83 mm (8.4 x 12.25 x 3.25 inches). Using a tripod/
stand that is not designed to support the size and mass of the T4S/T8S mixer
may lead to an unstable and hazardous condition that could result in injury.
• Contains small parts which may be a choking hazard. Not suitable for
children under age 3.
NOTES:
• The speaker wire and interconnect cables included with this system are not
approved for in-wall installation. Please check your local building codes for the
correct type of wire and cable required for in-wall installation.
• Where the mains plug or an appliance coupler is used as the disconnect device,
the disconnect device shall remain readily operable.
• Due to ventilation requirements, Bose does not recommend placing the product
in a confined space such as in a wall cavity or in an enclosed cabinet.
Toxic or Hazardous Substances and Elements
0
0
0
0
0
Polybrominated
diphenylether
(PBDE)
0
0
0
0
0
Lead
Mercury
Cadmium
Hexavalent
(Pb)
(Hg)
Part Name
PCBs
Metal parts
Plastic parts
Speakers
Cables
This table is prepared in accordance with the provisions of SJ/T 11364.
0: Indicates that this toxic or hazardous substance contained in all of the homogenous materials for
this part is below the limit requirement of GB/T 26572.
X: Indicates that this toxic or hazardous substance contained in at least one of the homogenous
materials used for this part is above the limit requirement of GB/T 26572.
This symbol means the product must not be discarded as household
waste, and should be delivered to an appropriate collection facility for
recycling. Proper disposal and recycling helps protect natural resources,
human health, and the environment. For more information on disposal and
recycling of this product, contact your local municipality, disposal service,
or the shop where you bought this product.
X
X
00
X
X
(Cd)
0
0
0
0
0
0
0
0
0
(CR(VI))
0
0
0
0
0
Polybrominated
Biphenyl (PBB)
For China:
仅适用于海拔 2000m 以下地区安全使用
Only suitable for use at areas with altitude less than 2000 m.
2 - English
Provided by DCE Safety

Introduction
Product Overview
Take control of your music with T4S and T8S ToneMatch® mixers, compact 4 and 8 channel interfaces designed for performers.
Engineered with powerful DSP engines and intuitive user controls, they oer studio-quality EQ, dynamics and eects
processing. Sound great with integrated Bose® ToneMatch® processing and zEQ, especially when connected to a Bose L1 or F1
system for full end-to-end tonal control. Play confidently on stage with these rugged ToneMatch mixers using tactile controls,
easy-to-read LED displays and scene recall. ToneMatch mixers, the ultimate on-stage companions for performing artists.
Product Features
Powerful Audio Processing
• Updated, studio-quality eects with advanced digital
audio processing
• Eects include compressor, limiter, de-esser, noise gate,
chorus, flanger, phaser, tremolo, delay, and reverb
• Bose® ToneMatch® processing for natural-sounding vocals
and instruments
• zEQ focuses the sound of ToneMatch presets for eective
adjustments on the fly
• Independent ToneMatch, EQ, dynamics and eects per
channel
• Dedicated reverb for Aux sends, and a global shared
reverb for use across all channels
• Master output EQ helps compensate for venue acoustics
• Full end-to-end tonal optimization when used with Bose L1
and F1 systems
Seamless Live Control
• Tactile controls and indicators designed for live on-stage
use by musicians and DJs
• Fast-learning user interface
• Built-in tap tempo delay, chromatic tuner, and recallable scenes
• LED display and illuminated controls are easy to read and
use, even on dimly-lit stages
High-Density Connectivity
• Unprecedented connectivity and control in a small digital
stereo mixer
• Four (T4S) or eight (T8S) high-quality audio preamps with
XLR-combo jacks for microphones or instruments, and
switchable phantom power
• Two Aux inputs for additional sources two (T4S) or four
(T8S) Aux sends
• USB-A and -B for USB drive playback or PC/Mac interfacing
• ToneMatch outputs for digital audio and power (T4S only)
• Balanced ¼” TRS and XLR (T8S only) stereo outputs
• Independent headphone output
Convenient Gig-Ready Features
• Rugged enclosure with a protective magnetic cover to
protect controls and connectors
• Includes a ToneMatch cable for connecting to a Bose L1
Model II or L1 Model 1S system for digital audio and power
(T4S), or includes a universal power supply (T8S)
• Bottom insert allows you to use standard camera
mounting accessories to keep your ToneMatch mixer
within reach
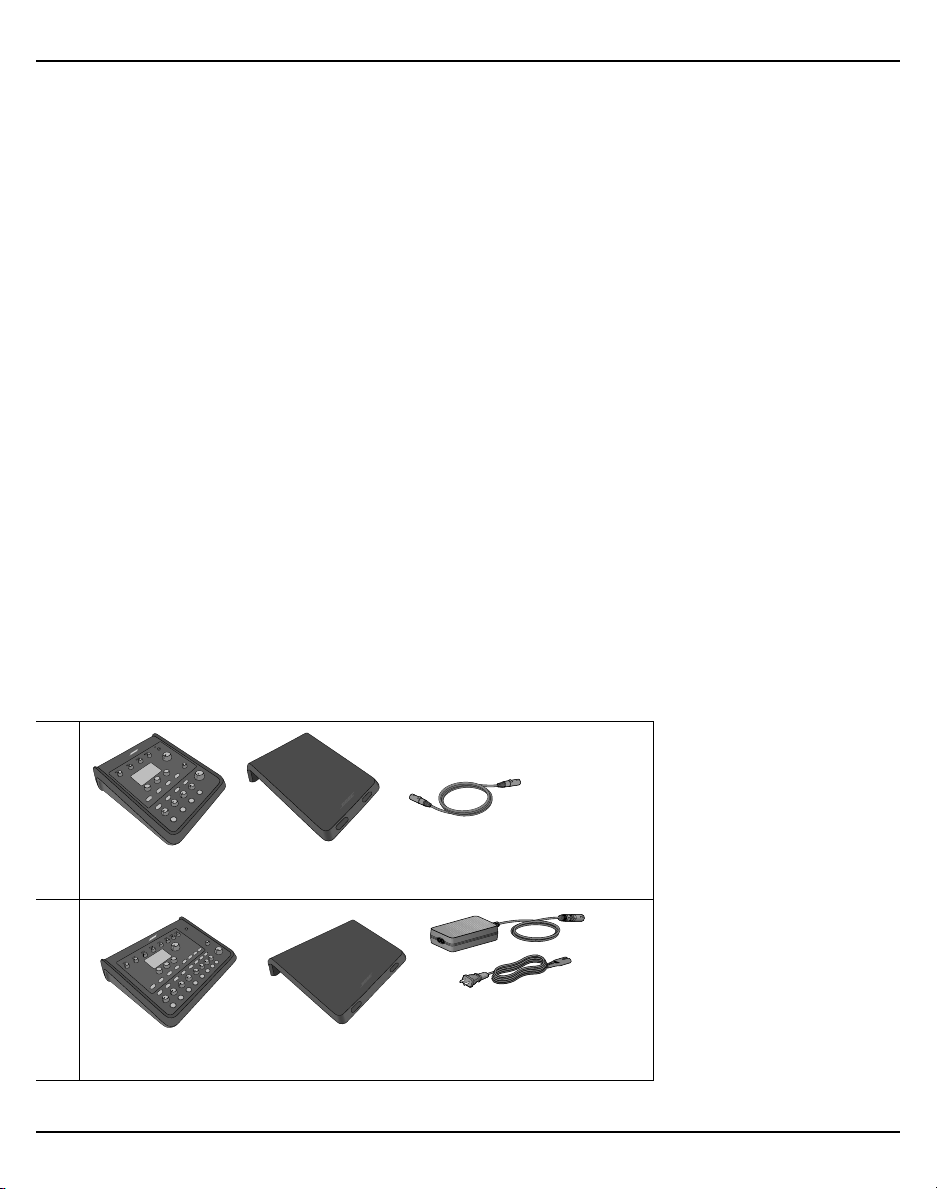
Unpacking
See the following table for what your mixer carton will include:
T4S
T4S ToneMatch mixer and cover ToneMatch Cable
T8S
ToneMatch power supplyT8S ToneMatch mixer and cover
Note: Refer to the complete owner’s guide (online at www.Bose.com) for more information about operation, factory settings,
and care and maintenance.
English - 3
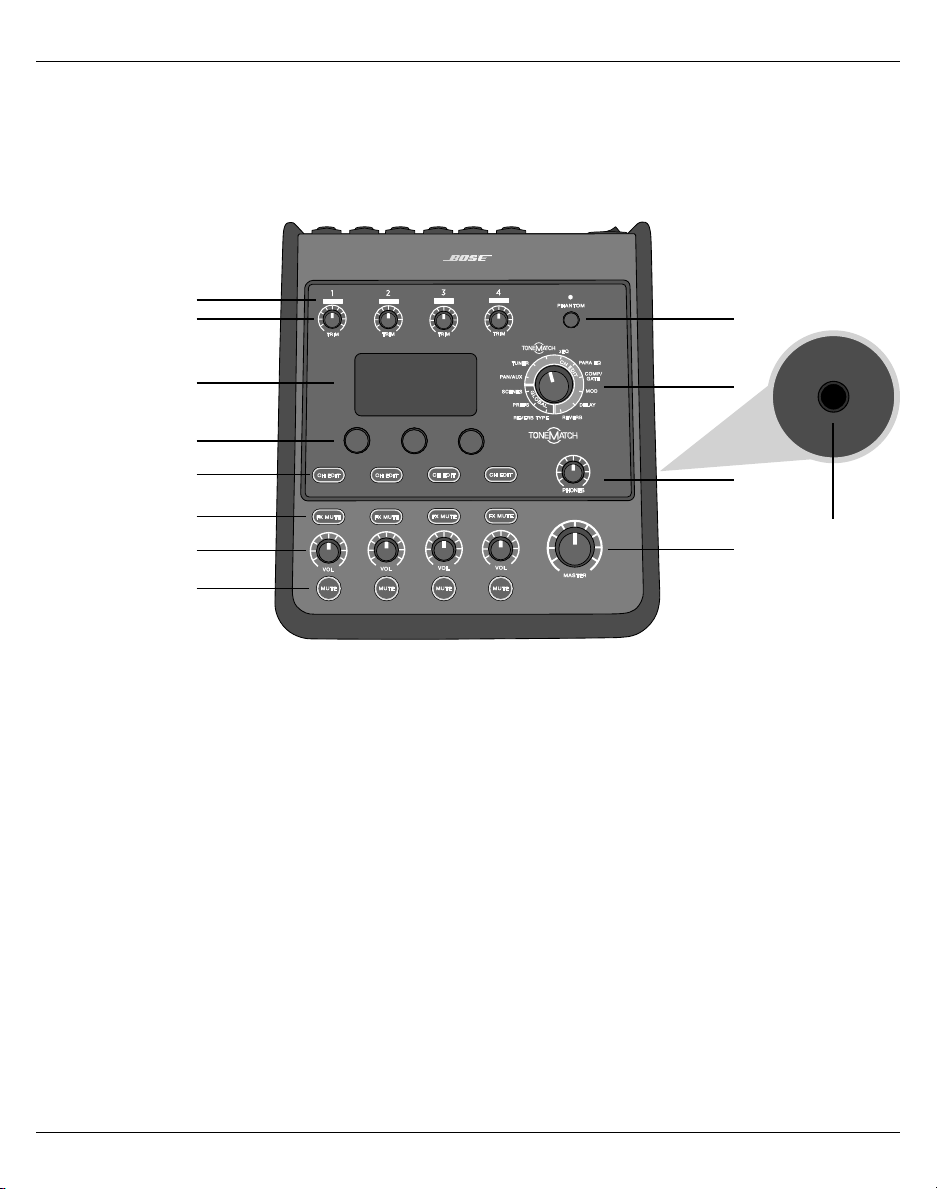
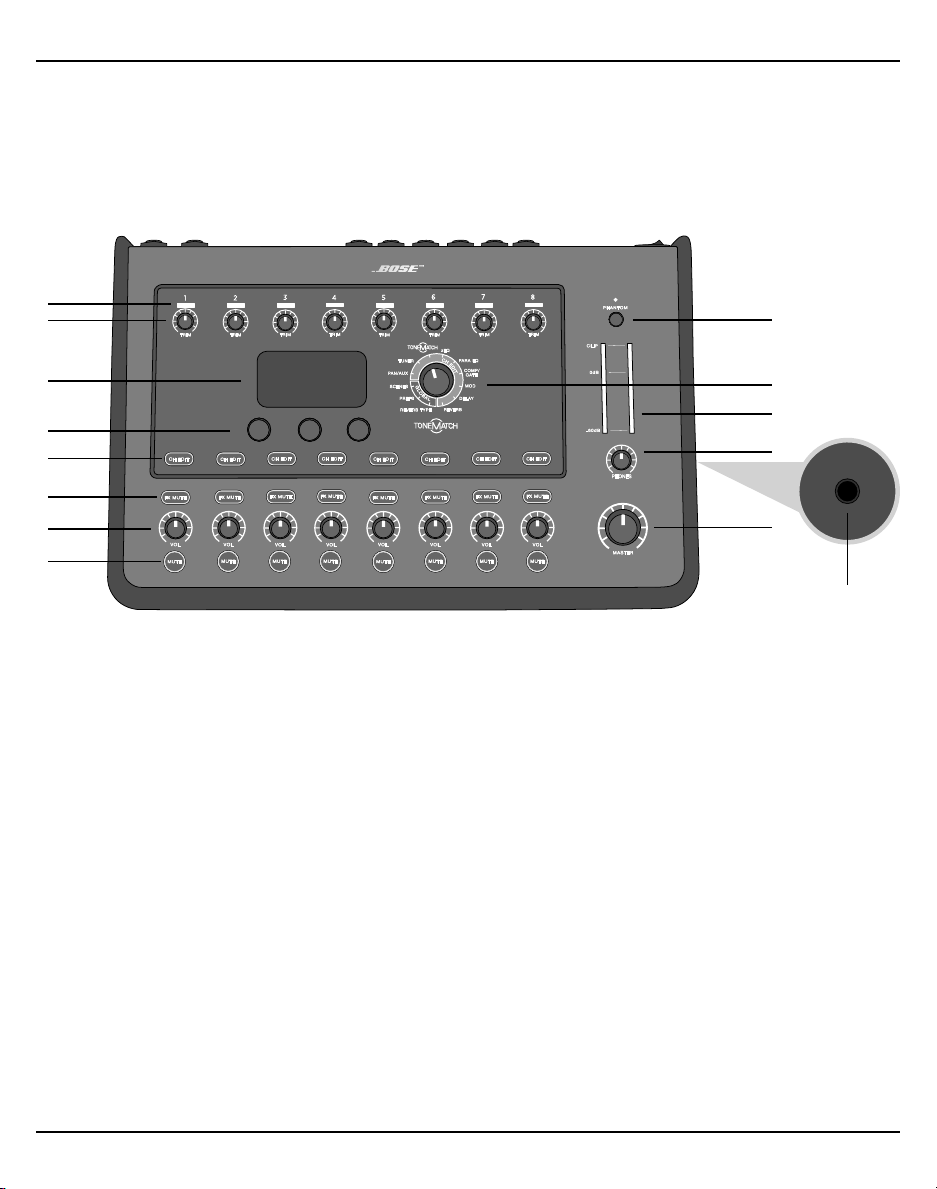
Control and Connection Panels
T4S ToneMatch® Mixer
Control Panel
Figure 1. T4S Control Panel
q
w
d
e
s
r
t
y
u
a
f
o
i
q INPUT SIGNAL/CLIP LEDs (1-4) – Displays the input signal status in color:
Green: Indicates the presence of an input signal
Red: Indicates input source clipping
w TRIM CONTROLS (1-4) – Adjusts the input sensitivity for the respective channel.
e DISPLAY – Provides function menus and system information.
r EDITING CONTROLS – These three rotary/push-button controls allow you to select or adjust items/values
appearing on the display.
t CH EDIT BUTTONS (1-4) – Selects the channel you want to modify.
y FX MUTE BUTTONS (1-4) – Bypasses the Mod, Delay, and Reverb eects on the selected channel.
u VOLUME CONTROLS (1-4) – Adjusts the volume level for the respective channel.
i MUTE BUTTONS (1-4) – Silences the audio output for the respective channel.
o MASTER VOLUME CONTROL – Adjusts the overall output level.
a HEADPHONE VOLUME CONTROL – Adjusts the volume level of the headphone output.
s ROTARY SELECTOR – Allows access to both global and channel-related parameters, which are adjusted
using the editing controls.
d PHANTOM POWER SWITCH – Applies +48V power to input channels 1-4. A red LED indicates that phantom
power is on.
f HEADPHONE JACK – For use with headphones only, with a minimum impedance of 24Ω.
4 - English

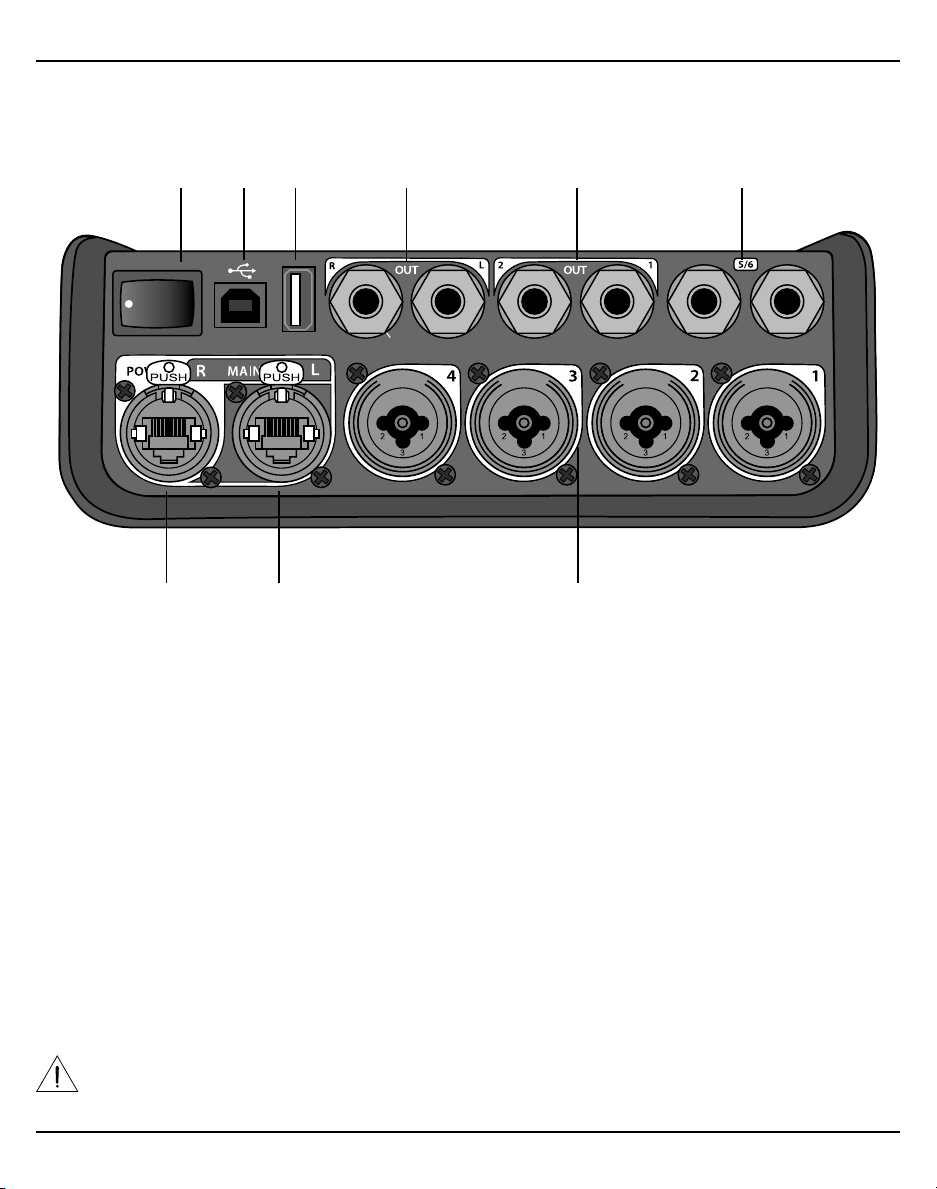
Connection Panel
Figure 2. T4S Connection Panel
q w e r t y
Control and Connection Panels
MONO
M
USB AUDIO
( )
uio
q POWER SWITCH – Turns the mixer on or o.
w USB 2.0 TYPE-B – A USB interface that allows you to connect the mixer to your computer.
e USB 2.0 TYPE-A – A USB interface that allows you to stream audio from your flash drive.
r ANALOG L/R OUTPUT – Main analog output. Accepts ¼ TRS balanced or TS unbalanced cables.
t AUX OUTPUT – Two user-definable analog outputs. Can be configured for a pre-fader, post-EQ, and eects,
or post-fader output. Accepts ¼ TRS balanced cables.
y AUX IN – Analog input channels 5/6. Accepts ¼ TRS balanced or TS unbalanced cables for line-level
inputs. Can be used for stereo input signals.
u INPUTS 1-4 – Analog input channels 1-4. Accepts XLR balanced cables for microphones or ¼" TRS balanced
or TS unbalanced cables for high-impedance inputs, such as guitars.
i DIGITAL MAIN OUTPUT L – Connect digitally in stereo to two L1® Model 1S/II systems. Note: Only used in
stereo with Digital Main Output R.
o POWER PORT/DIGITAL MAIN OUTPUT R – A digital output used by the L1 Model 1S/II system. Delivers
power to the T4S mixer from the L1 Model 1S/II power stand. Can also deliver power from an AC outlet via
a ToneMatch power supply (not included with the T4S). Accepts the included ToneMatch® cable.
CAUTION: Although the ToneMatch port accepts a standard RJ-45 connector, do NOT connect the T4S
to a computer or phone network.
English - 5

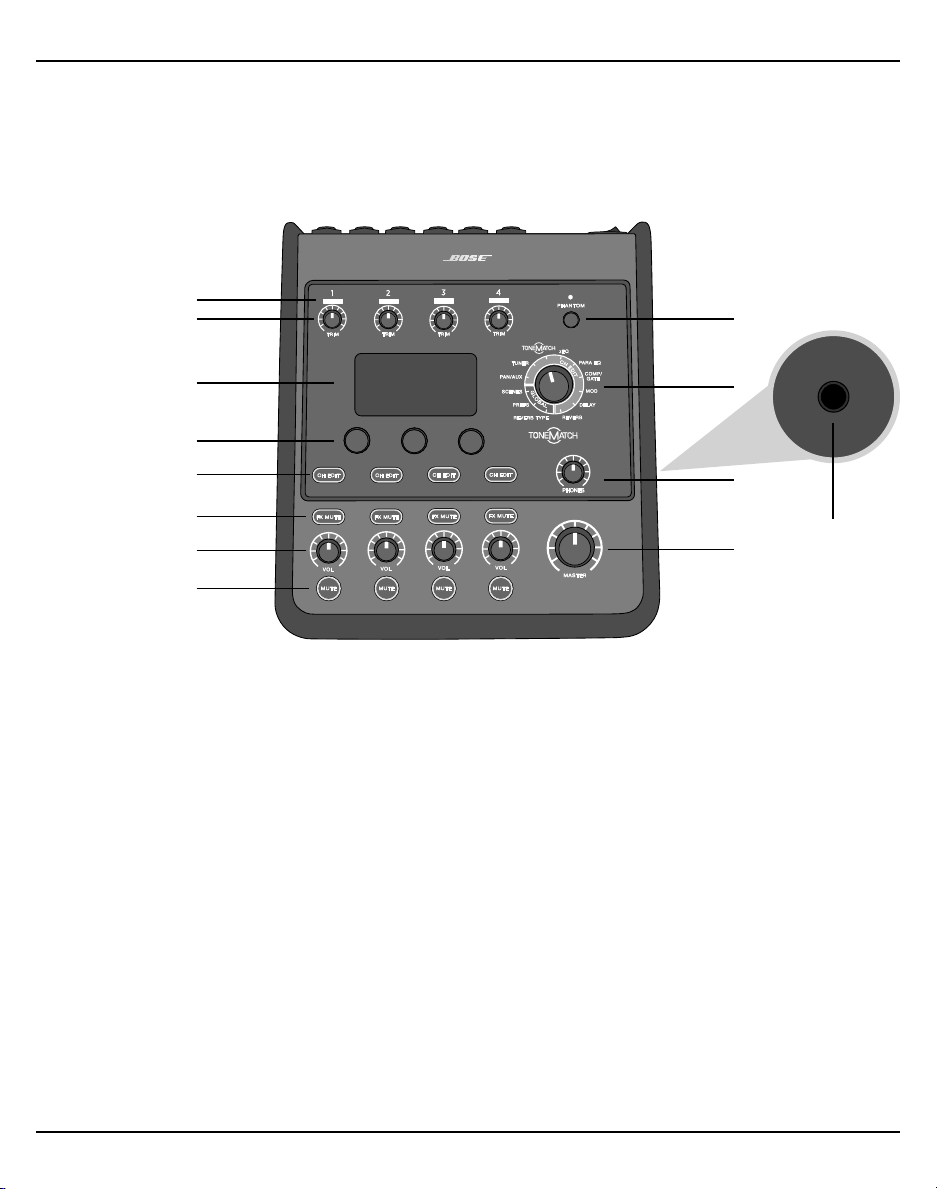
Control and Connection Panels
T8S ToneMatch® Mixer
Control Panel
Figure 3. T8S Control Panel
q
w
e
f
d
s
r
t
a
y
u
o
i
g
q INPUT SIGNAL/CLIP LEDs (1-8) – Displays the input signal status in color:
Green: Indicates the presence of an input signal
Red: Indicates input source clipping
w TRIM CONTROLS (1-8) – Adjusts the input sensitivity for the respective channel.
e DISPLAY – Provides function menus and system information.
r EDITING CONTROLS – These three rotary/push-button controls allow you to select or adjust items/values
appearing on the display.
t CH EDIT BUTTONS (1-8) – Selects the channel you want to modify.
y FX MUTE BUTTONS (1-8) – Bypasses the Mod, Delay, and Reverb eects on the selected channel.
u VOLUME CONTROLS (1-8) – Adjusts the volume level for the respective channel.
i MUTE BUTTONS (1-8) – Silences the audio output for the respective channel.
o MASTER VOLUME CONTROL – Adjusts the overall output level.
a HEADPHONE VOLUME CONTROL – Adjust the volume level of the headphone output.
s STEREO OUTPUT METER – Allows you to visually measure your output level.
d ROTARY SELECTOR – Allows access to both global and channel-related parameters, which are adjusted
using the editing controls.
f PHANTOM POWER SWITCH – Applies +48V power to input channels 1-8. A red LED indicates that phantom
power is on.
g HEADPHONE JACK – For use with headphones only, with a minimum impedance of 24Ω.
6 - English

Connection Panel
Figure 4. T8S Connection Panel
q w e r t y
M
( )
USB AUDIO
MAIN OUT
Control and Connection Panels
MONO
uio
q POWER SWITCH – Turns the mixer on or o.
w USB 2.0 TYPE-B – A USB interface that allows you to connect the mixer to your computer.
e USB 2.0 TYPE-A – A USB interface that allows you to stream audio from your flash drive.
r ANALOG L/R OUTPUT – Main analog output. Accepts ¼ TRS balanced and TS unbalanced cables.
t AUX OUTPUT – Four user-definable analog outputs. Can be configured for a pre-fader, post-EQ, and
eects, or post-fader output. Accepts ¼" TRS balanced or TS unbalanced cables.
y AUX IN – Analog input channels 9/10. Accepts ¼ TRS balanced or TS unbalanced cables for line-level
inputs. Can be used for stereo input signals.
u INPUTS 1-8 – Analog input channels 1-8. Accepts XLR balanced cables for microphones or ¼ TRS balanced
or TS unbalanced cables for high-impedance inputs, such as guitars.
i XLR STEREO OUTPUT – Stereo analog output. Accepts XLR balanced cables for stereo output.
o DIGITAL POWER PORT – For use w/ ToneMatch power supply (see “Connecting the ToneMatch® Power
Supply” on page 12).
Note: The T8S is NOT designed to connect digitally to the L1® Model 1S/II.
CAUTION: Although the ToneMatch port accepts a standard RJ-45 connector, do NOT connect the T8S
to a computer or phone network.
English - 7

System Setup
Removing/Attaching the Cover
The T4S/T8S ToneMatch® mixer comes out of the carton with a cover installed on the top panel. The cover is
designed to protect the control panel while transporting or storing the mixer.
To remove the cover:
1. Place thumbs on notches on front of cover and slide cover forward.
2. Grab cover by the back and lift to remove it.
To attach the cover:
1. Slide cover over the mixer, from back to front.
2. The magnetized cover will engage on its own and secure itself to the mixer.
Figure 5. Removing and attaching the cover
8 - English

System Setup
Mounting Options
The T4S/T8S comes with a ¼ (6 mm) mounting screw insert. This enables it to be mounted onto a number
of available products that include a ¼" (6 mm) mounting screw, including a camera tripod stand.
Mounting the T4S/T8S on a Camera Tripod Stand
1. Extend the camera tripod legs and secure at desired height.
2. Remove the bracket from the top of the camera tripod stand and secure the bracket to the bottom of the
T4S/T8S with the screw. Make sure the small indentation on the T4S/T8S and the bump on the bracket
are aligned. See Figure 6.
3. Secure the bracket with the T4S/T8S back onto the camera tripod stand. See Figure 8.
Figure 6. Securing bracket to T4S Figure 8. Mounting T4S to tripod stand using bracket
Figure 7. Bracket attached to T4S
WARNING: Do not use the ToneMatch® T4S/T8S mixer with a tripod/stand that is unstable. The mixer
is only designed for use on a ¼" screw (6 mm), and the tripod/stand must be capable of supporting
a device with a minimum weight of 1.9 kg (4.1 lbs) and an overall size of 214 x 311 x 83 mm (8.4 x 12.25
x 3.25 inches). Using a tripod/stand that is not designed to support the size and mass of the T4S/T8S
mixer may lead to an unstable and hazardous condition that could result in injury.
English - 9

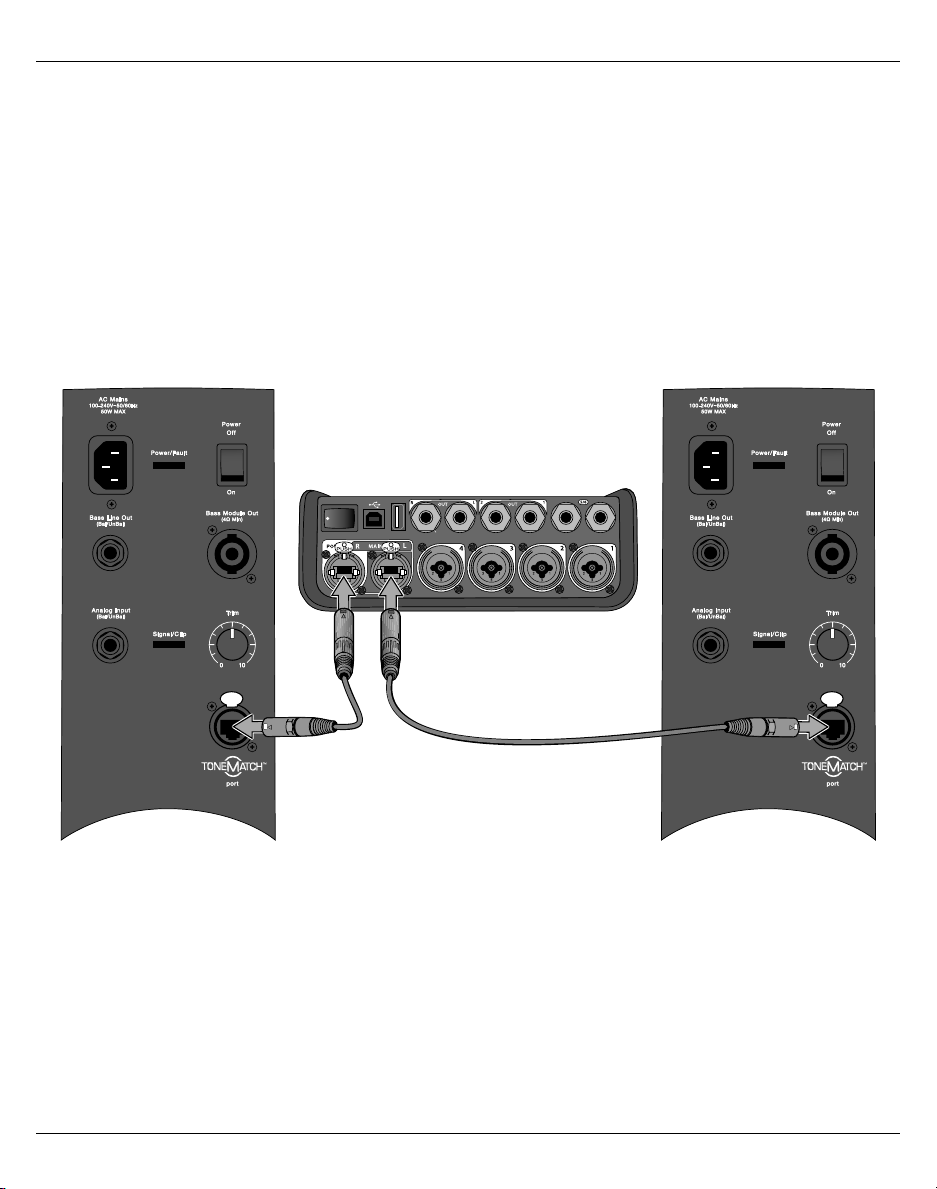
System Setup
Connecting the T4S via Digital Connection
1. Make sure the L1 Model 1S/II and T4S are powered o and the T4S Master volume control is set to
minimum.
2. Plug one end of the ToneMatch® cable into the Power port/Digital Main Output R on the T4S. Plug the
other end of the ToneMatch cable into the ToneMatch port on the power stand.
Note: To connect the T4S to two L1 Model 1S/II power stands, connect a second power stand to the Digital
Main Output L port on the T4S using a ToneMatch cable.
3. Turn on the mixer and then turn on the L1 Model 1S/II power stand.
4. Connect your instruments and adjust levels. Refer to the complete owner's guide at www.Bose.com for
complete operation information.
Figure 9. Two L1 model II systems connected to a T4S via digital connection
MONO
USB AUDIO
M
( )
Note: The T8S cannot be connected digitally and cannot be powered by the L1 Model 1S/II.
10 - English

System Setup
US
O
M
Connecting the T4S/T8S via Analog Connection
1. Make sure the device you are connecting to and the T4S/T8S are powered o and the T4S/T8S Master
volume control is set to minimum.
2. Using XLR balanced cables, connect one or two devices to the XLR Stereo Outputs of your T8S (see
Figure 10).
Note: The T4S/T8S can be connected to a device via the Analog R Output port using a ¼" TRS cable (sold
separately). Plug the other end of the TRS cable into the Analog Input port of the device. To connect the
T4S/T8S to two devices, connect a second device to the Analog L Output port on the T4S/T8S using a ¼"
TRS cable.
3. Connect a ToneMatch® power supply to the Power port of the T4S/T8S and plug it into a live AC outlet.
Refer to “Connecting the ToneMatch® Power Supply” on page12.
4. Turn on the T4S/T8S mixer and then turn on the device.
5. Connect your instruments and adjust levels. Refer to the complete owner's guide at www.Bose.com for
complete operation information.
Figure 10. Two F1 systems connected to a T8S via analog connection
B AUDI
AIN OUT
USB AUDIO
MONO
MAIN OUT
M
( )
English - 11

System Setup
Connecting the ToneMatch® Power Supply
The ToneMatch power supply provides power for the T4S/T8S mixer.
1. Plug the power supply cable into the T4S/T8S Power port.
2. Plug one end of the AC power cord into the power supply.
3. Plug the other end of the power cord into a live AC power outlet.
4. Switch the T4S/T8S power switch to the ON position.
Note: Power supply included with T8S is required for operation of the T8S. Power supply is not included with
the T4S and is not required for operation of the T4S.
Figure 11. Connecting T4S to power supply
12 - English
System Setup
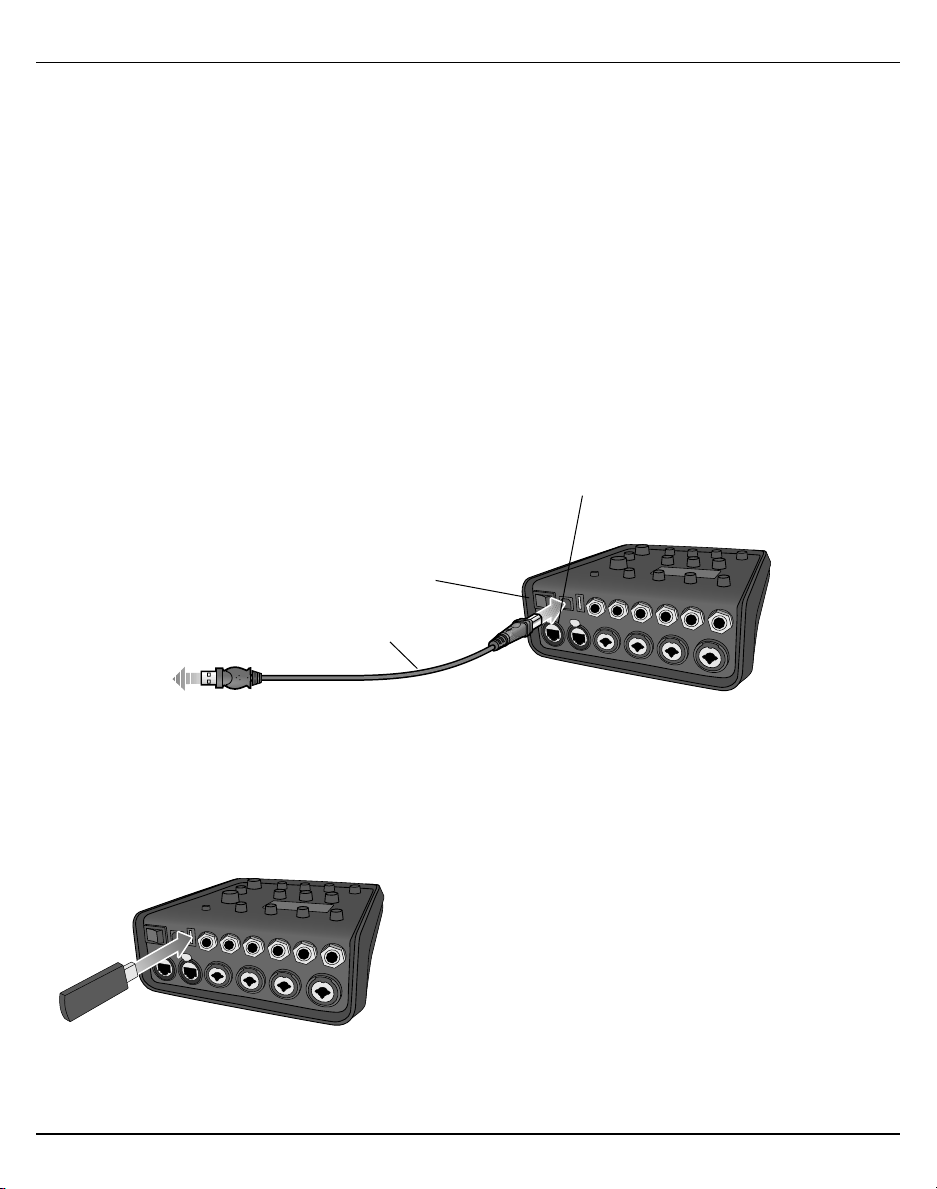
Connecting the T4S/T8S to Your Computer
The T4S/T8S provides a USB port for connecting it to a computer. This allows you to download performance
scenes to a computer or install system updates. Visit www.Bose.com/livesound for details on updating your
system.
When connected to a computer, you also can use the T4S/T8S as a general-purpose USB audio device for
recording/playback.
Note: The T4S/T8S operates at 48 kHz/24-bit. When using the T4S/T8S with recording software, you may
need to configure the software settings for 48 kHz/24-bit operation.
Note: Connecting the T4S/T8S to your computer requires a USB cable (Type A to Type B, not supplied).
1. Connect the mixer to a power source (ToneMatch® power supply for T4S/T8S or an L1 Model 1S/II for T4S only).
2. Plug one end of the USB cable into the mixer's USB 2.0 Type-B port (Figure 12).
3. Plug the other end of the USB cable into a USB port on your computer.
4. Turn on the mixer.
Figure 12. T4S-to-USB connection
ToneMatch port – To an L1 Model 1S/II
system or an ToneMatch power supply
Power switch
USB cable
(Type A to Type B)
To computer
USB port
Connecting a Flash Drive to the T4S/T8S
Plug in a USB 2.0/3.0 flash drive loaded with WAV/MP3 files into the USB 2.0 Type-A port to playback audio
tracks to your mixer.
Figure 13. Connecting a flash drive to the T4S
English - 13

Additional Information
Contact Information
Visit us on the web at www.Bose.com.
Americas
(USA, Canada, Mexico, Central America, South
America)
Bose Corporation
Framingham, MA 01701 USA
Corporate Center: 508-879-7330
Americas Professional Systems,
Technical Support: 800-994-2673
Australia
Bose Pty Limited
Unit 3/2 Holker Street
Newington NSW Australia
61 2 8737 9999
Belgium
Bose N.V. / S.A
Limesweg 2, 03700
Tongeren, Belgium
012-390800
China
Bose Electronics (Shanghai) Co Ltd
25F, L’Avenue
99 Xianxia Road
Shanghai, P.R.C. 200051 China
86 21 6010 3800
France
Bose S.A.S
26-28 avenue de Winchester
78100 St. Germain en Laye, France
01-30-61-63-63
Germany
Bose GmbH
Max-Planck Strasse 36D 61381
Friedrichsdorf, Deutschland
06172-7104-0
Hong Kong
Bose Limited
Suites 2101-2105, Tower One, Times Square
1 Matheson Street, Causeway Bay, Hong Kong
852 2123 9000
India
Bose Corporation India Private Limited
Salcon Aurum, 3rd Floor
Plot No. 4, Jasola District Centre
New Delhi – 110025, India
91 11 43080200
Italy
Bose SpA
Centro Leoni A – Via G. Spadolini
5 20122 Milano, Italy
39-02-36704500
Japan
Bose Kabushiki Kaisha
Sumitomo Fudosan Shibuya Garden Tower 5F
16-17, Nanpeidai-cho
Shibuya-Ku, Tokyo, 150-0036, Japan
TEL 81-3-5489-0955
www.bose.co.jp
The Netherlands
Bose BV
Nijverheidstraat 8 1135 GE
Edam, Nederland
0299-390139
United Kingdom
Bose Ltd
1 Ambley Green, Gillingham Business Park
KENT ME8 0NJ
Gillingham, England
0870-741-4500
Importer Information
European Union
Bose Products B.V., Gorslaan 60, 1441 RG
Purmerend, The Netherlands
China
Bose Electronics (Shanghai) Company
Limited, Part C, Plan 9, No. 353 North Riying
Road, China (Shanghai) Pilot Free Trade Zone
Taiwan
Bose Taiwan Branch, 9F-A1, No. 10, Section 3,
Minsheng East Road, Taipei City 104, Taiwan
Tel: +886-2-2514 7676
Mexico
Bose de México, S. de R.L. de C.V., Paseo de
las Palmas 405-204, Lomas de Chapultepec,
11000 México, D.F.
Tel: +5255 (5202) 3545
See website for other countries
Additional Information
Refer to the complete owner’s guide (online at www.Bose.com) for more information about operation, factory
settings, and care and maintenance. To request a printed copy, use the phone numbers provided.
Limited Warranty
Your product is covered by a limited warranty. Visit www.pro.Bose.com for warranty details.
The warranty information provided with this product does not apply in Australia and New Zealand. See our
website at www.bose.com/au/warranty or www.bose.com/nz/warranty for details of the Australian and New
Zealand warranty.
Date of Manufacture
The eighth digit in the serial number indicates the year of manufacture; “6” is 2006 or 2016.
14 - English

Instrucciones importantes de seguridad
Nombres y contenidos de las sustancias o elementos tóxicos o peligrosos
Lea y conserve todas las instrucciones de uso y
seguridad.
1. Lea estas instrucciones.
2. Guarde estas instrucciones.
3. Preste atención a las advertencias.
4. Siga todas las instrucciones.
5. No use este aparato cerca del agua.
6. Límpielo solamente con un paño seco.
7. No obstruya ninguna abertura de ventilación. Realice la instalación conforme a las
instrucciones del fabricante.
8. Proteja el cable de alimentación para que nadie lo pise o lo perfore, especialmente en
enchufes, receptáculos de tomas múltiples y en el punto donde salen del dispositivo.
9. Use solamente los accesorios especificados por el fabricante.
10. Use solamente con el carro, el soporte de piso, el trípode, el soporte o la mesa
11. Desenchufe este aparato durante tormentas eléctricas o cuando no lo utilice durante
12. Derive todas las tareas de mantenimiento a personal calificado. Se requieren tareas
especificados por el fabricante o vendidos con el dispositivo. Cuando se usa un
carro, tenga precaución al moverlo con el dispositivo para evitar lesiones por
tropiezos.
períodos prolongados.
de mantenimiento si el aparato se daña de alguna manera; por ejemplo, si se daña el
enchufe o el cable de alimentación, si se derrama líquido o si caen objetos dentro del
aparato, si se expone el aparato a la lluvia o la humedad, si no funciona normalmente o
si se ha caído.
Información regulatoria
Este dispositivo cumple con la parte 15 de las reglas de la FCC y con las normas RSS sin
licencia de la industria canadiense. El funcionamiento está sujeto a las siguientes dos
condiciones: (1) este dispositivo no debe provocar interferencias dañinas y (2) este dispositivo
debe aceptar cualquier interferencia recibida, incluida la interferencia que puede causar un
funcionamiento no deseado.
Este producto cumple con todos los requisitos correspondientes de la
Directiva de la UE. La Declaración de conformidad completa puede
encontrarse en www.Bose.com/compliance.
Información acerca de productos que generan ruido eléctrico (aviso de cumplimiento de la
FCC para EE.UU.)
Nota: Este equipo ha sido sometido a pruebas y se ha comprobado que cumple con los límites
de un dispositivo digital Clase A, de acuerdo con la Parte 15 de las reglas de la FCC. Estos
límites están diseñados para proporcionar una protección razonable contra interferencias
perjudiciales cuando el equipo se utiliza en un entorno comercial. Este equipo genera, usa y
puede irradiar energía de radiofrecuencia y, si no se instala y se usa conforme a lo indicado en
el manual de instrucciones, podría causar una interferencia perjudicial a las comunicaciones
de radio. El funcionamiento de este equipo en un área residencial podría llegar a provocar
interferencias perjudiciales, en cuyo caso el usuario deberá corregir dichas interferencias por
cuenta propia.
Los cambios o las modificaciones no aprobados expresamente por Bose Corporation podrían
invalidar la autoridad del usuario para operar el equipo.
Se requieren cables aislados para mantener el cumplimiento de las reglamentaciones.
Este producto cumple con las especificaciones Clase A de la normativa canadiense ICES-003.
CAN ICES-3(A)/NMB-3(A)
Este producto cumple con todos los requisitos de inmunidad de EN55103-2 para un entorno
electromagnético E2.
ADVERTENCIAS/PRECAUCIONES:
Este producto contiene materiales magnéticos. Consulte con su médico si esto podría
llegar a afectar un dispositivo médico implantado.
• Este producto no está diseñado para ser instalado ni utilizado en zonas de instalaciones
acuáticas en interiores (incluidos, entre otros, piscinas techadas, parques acuáticos
techados, jacuzzis, saunas, salas de vapor y pistas de patinaje techadas).
• Para reducir el riesgo de incendio o descarga eléctrica, NO exponga este producto a la
lluvia, líquidos o humedad. No aplicable para productos con clasificación IPX4-9.
• Mantenga el producto lejos del fuego y de fuentes de calor. NO coloque encima ni cerca
del producto fuentes de llamas expuestas, como velas encendidas.
• NO realice alteraciones no autorizadas a este producto.
• NO use un convertidor de corriente con este producto.
• NO lo use en vehículos o embarcaciones.
• Use este producto únicamente con la fuente de alimentación suministrada.
• NO instale ni coloque el soporte ni el producto cerca de fuentes de calor, como chimeneas,
radiadores, rejillas de calefacción u otros aparatos (incluidos amplificadores) que
produzcan calor.
• No utilice el mezclador T4S/T8S ToneMatch® con un trípode o soporte que sea inestable.
El mezclador solo está diseñado para su uso en un tornillo de ¼” (6 mm), y el trípode o
soporte debe ser capaz de soportar un dispositivo con un peso mínimo de 1.9 kg (4.1 lb) y
un tamaño total de 214 x 311 x 83 mm (8.4 x 12.25 x 3.25 pulgadas). Es posible que el uso de
un trípode o soporte que no esté diseñado para soportar el tamaño y el peso del mezclador
T4S/T8S provoque una condición inestable y peligrosa que podría causar lesiones.
• Contiene piezas pequeñas que pueden provocar asfixia. No recomendable para
niños menores de 3 años.
NOTAS:
• El cable del altavoz y los cables de interconexión que se incluyen con este sistema
no están aprobados para instalaciones en pared. Compruebe los códigos locales de
edificación para verificar cuáles son los tipos correctos de alambre y cable requeridos para
instalaciones en pared.
• Si se utiliza la clavija de conexión de red eléctrica o un acoplador del artefacto como el
dispositivo de desconexión, el dispositivo de desconexión deberá permanecer listo para
funcionar.
• Debido a los requisitos de ventilación, Bose no recomienda colocar el producto en
espacios reducidos, como una cavidad de pared o un gabinete cerrado.
Sustancias y elementos tóxicos o peligrosos
0
0
0
0
0
Bifenilo
polibromado
(PBB)
Plomo
Mercurio
Cadmio
Hexavalente
(Pb)
Nombre de parte
PCBs
Partes metálicas
Partes plásticas
Altavoces
Cables
Esta tabla se preparó conforme a las cláusulas de SJ/T 11364.
O: Indica que esta sustancia tóxica o peligrosa contenida en todos los materiales homogéneos para
esta parte es inferior al requisito de límite de GB/T 26572.
X: Indica que esta sustancia tóxica o peligrosa que está presente en al menos uno de los materiales
homogéneos utilizados para esta parte se encuentra por encima del requisito de límite de GB/T
26572.
Este símbolo significa que el producto no debe desecharse como residuo
doméstico y debe enviarse a una planta para tratamiento de residuos apropiada
para su reciclado. Una eliminación y un reciclado adecuados ayudan a proteger
los recursos naturales, la salud humana y el medioambiente. Para obtener más
información acerca de la eliminación y el reciclado de este producto, comuníquese
con su municipalidad local, un centro de servicios de desecho o la tienda donde
compró este producto.
(Hg)
X
0
X
0
00
0
X
0
X
(Cd)
(CR(VI))
0
0
0
0
0
Difeniléter
polibromado
0
0
0
0
0
(PBDE)
0
0
0
0
0
Proporcionado por DCE Safety
Español Latinoamérica - 2
Introducción
Descripción general del producto
Tome el control de su música con los mezcladores T4S y T8S ToneMatch®: interfaces compactas de 4 y 8 canales pensadas para intérpretes.
Diseñados con poderosos motores DSP y controles de usuario intuitivos, ofrecen un ecualizador con calidad de estudio y procesamiento de
dinámica y efectos. Suene genial con el procesamiento y el zEQ integrados de Bose® ToneMatch®, especialmente cuando se conecte a un sistema
de sonido Bose L1 o F1 para un control tonal integral y completo. Toque con confianza en el escenario con estos robustos mezcladores mediante
controles táctiles, pantallas LED fáciles de leer y memoria de escena. Mezcladores ToneMatch®: los mejores compañeros de escena para intérpretes.
Características del producto
Procesamiento poderoso de audio
• Efectos actualizados y de calidad de estudio con
procesamiento de audio digital avanzado
• Los efectos incluyen compresor, limitador, de-esser, compuerta
de ruido, chorus, flanger, phaser, tremolo, retraso (delay) y
reverberación
• Procesamiento Bose® ToneMatch® para voces e instrumentos
con sonido natural
• El zEQ enfoca el sonido de las preselecciones ToneMatch para
ajustes eficaces sobre la marcha
• ToneMatch, ecualizador, dinámica y efectos independientes por
canal
• Reverberación dedicada para envíos auxiliares y reverberación
global compartida para usar en todos los canales
• El ecualizador de salida maestro ayuda a compensar la acústica
del lugar
• Optimización tonal integral y completa cuando se usa con los
sistemas de sonido Bose L1 y F1
Control en vivo continuo
• Controles e indicadores táctiles diseñados para que músicos y
DJ los usen en vivo en el escenario
• Interfaz del usuario fácil de aprender
• Retraso tap tempo, afinador cromático y escenas memorizables
incorporados
• Pantalla LED y controles iluminados que son fáciles de leer y
usar, incluso en escenarios con poca luz
Conectividad de alta densidad
• Conectividad y control sin precedentes en un pequeño
mezclador estéreo digital
• Cuatro (T4S) u ocho (T8S) preamplificadores de audio de alta
calidad con conectores combinados XLR para micrófonos o
instrumentos y alimentación phantom conmutable
• Dos entradas auxiliares para fuentes adicionales y dos (T4S) o
cuatro (T8S) envíos auxiliares
• USB-A y -B para reproducción de unidades USB o interfaz PC/Mac
• Salidas ToneMatch para audio digital y alimentación
(únicamente T4S)
• Salidas estéreo TRS y XLR de ¼” (6 mm) balanceadas
(únicamente T8S)
• Salida de audífonos independiente
Características convenientes para conciertos
• Carcasa resistente con una cubierta magnética para proteger
los controles y conectores
• Incluye un cable ToneMatch para conectar a un sistema Bose L1
Model II o L1 Model 1S para audio digital y alimentación (T4S),
o incluye una fuente de alimentación universal (T8S)
• La inserción inferior le permite utilizar accesorios estándar de
montaje de cámara para mantener su mezclador ToneMatch al
alcance de la mano
Desempaque
Lea la siguiente tabla para ver lo que incluye la caja de su mezclador:
T4S
Mezclador T4S ToneMatch y cubierta Cable ToneMatch
T8S
Mezclador T8S ToneMatch y cubierta
Nota: Consulte la guía completa del propietario (en línea en www.Bose.com) para obtener más información sobre el funcionamiento, la
configuración de fábrica, el cuidado y el mantenimiento.
3 - Español Latinoamérica
Fuente de alimentación
ToneMatch

Mezclador T4S ToneMatch®
Panel de control
Figura 1. Panel de control de T4S
q
w
Paneles de control y conexión
d
e
s
r
t
y
u
a
f
o
i
q LED DE SEÑAL DE ENTRADA/CLIPEO (1-4): Muestra el estado de la señal de entrada en color:
Verde: Indica la presencia de una señal de entrada
Rojo: Indica el clipeo de la fuente de entrada
w CONTROLES DE RECORTE (1-4): Ajusta la sensibilidad de entrada para el canal correspondiente.
e PANTALLA: Proporciona menús de funciones e información del sistema.
r CONTROLES DE EDICIÓN: Estos tres controles rotativos/interruptores que se giran o presionan le permiten
seleccionar o ajustar los elementos o valores que aparecen en la pantalla.
t BOTONES DE EDICIÓN DE CANALES (1-4): Selecciona el canal que desee modificar.
y BOTONES DE SILENCIAMIENTO DE EFECTOS (1-4): Pasa por alto los efectos de modulación, retraso y
reverberación en el canal seleccionado.
u CONTROLES DE VOLUMEN (1-4): Ajusta el nivel de volumen del canal respectivo.
i BOTONES DE SILENCIO (1-4): Silencia la salida de audio del canal respectivo.
o CONTROL DE VOLUMEN MAESTRO: Ajusta el nivel de salida general.
a CONTROL DE VOLUMEN DE LOS AUDÍFONOS: Ajusta el nivel de volumen de la salida de los audífonos.
s SELECTOR GIRATORIO: Permite acceder tanto a parámetros globales como de canal, que se ajustan mediante los
controles de edición.
d INTERRUPTOR DE ALIMENTACIÓN PHANTOM: Aplica alimentación de +48 V a los canales de entrada 1-4. Un LED
rojo indica que la alimentación phantom está encendida.
f CONECTOR DE AUDÍFONOS: Para uso con audífonos solamente, con una impedancia mínima de 24 .
Español Latinoamérica - 4
Paneles de control y conexión
Panel de conexión
Figura 2. Panel de conexión de T4S
q w e r t y
MONO
M
USB AUDIO
( )
uio
q INTERRUPTOR DE ALIMENTACIÓN: Enciende o apaga el mezclador.
w USB 2.0 TIPO B: Una interfaz USB que le permite conectar el mezclador a su computadora.
e USB 2.0 TIPO A: Una interfaz USB que le permite reproducir audio desde su unidad flash.
r SALIDA L/R ANALÓGICA: Salida analógica principal. Acepta cables TRS balanceados o TS no balanceados de
1/4” (6 mm).
t SALIDA DE AUDIO: Dos salidas analógicas definibles por el usuario. Puede configurarse para una salida pre-fader,
post-EQ, de efectos o post-fader. Acepta cables TRS balanceados de 1/4” (6 mm).
y ENTRADA AUXILIAR: Canales de entrada analógica 5/6. Acepta cables TRS balanceados o TS no balanceados de
1/4” (6 mm) para entradas a nivel de línea. Puede utilizarse para señales de entrada estéreo.
u ENTRADAS 1-4: Canales de entrada analógica 1-4. Acepta cables XLR balanceados para micrófonos o cables TRS
balanceados o TS no balanceados de 1/4” (6 mm) para entradas de alta impedancia, como guitarras.
i SALIDA PRINCIPAL DIGITAL L: Se conecta digitalmente en estéreo a dos sistemas L1® Model 1S/II. NOTA:
Solamente se utiliza en estéreo con salida principal digital R.
o PUERTO DE ALIMENTACIÓN/SALIDA PRINCIPAL DIGITAL R: Salida digital que usa el sistema L1® Model 1S/II.
Proporciona alimentación al mezclador T4S desde el soporte de alimentación L1 Model 1S/II. También puede
suministrar alimentación desde una toma de CA a través de una fuente de alimentación ToneMatch (no incluida
con el T4S). Acepta el cable ToneMatch® incluido.
PRECAUCIÓN: Aunque el puerto ToneMatch acepta un conector RJ-45 estándar, NO conecte el T4S a una
computadora o red telefónica.
5 - Español Latinoamérica
Mezclador T8S ToneMatch®
Panel de control
Figura 3. Panel de control de T8S
Paneles de control y conexión
q
w
e
f
d
s
r
t
a
y
u
o
i
g
q LED DE SEÑAL DE ENTRADA/CLIPEO (1-8): Muestra el estado de la señal de entrada en color:
Verde: Indica la presencia de una señal de entrada
Rojo: Indica el clipeo de la fuente de entrada
w CONTROLES DE RECORTE (1-8): Ajusta la sensibilidad de entrada para el canal correspondiente.
e PANTALLA: Proporciona menús de funciones e información del sistema.
r CONTROLES DE EDICIÓN: Estos tres controles rotativos/interruptores que se giran o presionan le permiten
seleccionar o ajustar los elementos o valores que aparecen en la pantalla.
t BOTONES DE EDICIÓN DE CANALES (1-8): Selecciona el canal que desee modificar.
y BOTONES DE SILENCIAMIENTO DE EFECTOS (1-8): Pasa por alto los efectos de modulación, retraso y
reverberación en el canal seleccionado.
u CONTROLES DE VOLUMEN (1-8): Ajusta el nivel de volumen del canal respectivo.
i BOTONES DE SILENCIO (1-8): Silencia la salida de audio del canal respectivo.
o CONTROL DE VOLUMEN MAESTRO: Ajusta el nivel de salida general.
a CONTROL DE VOLUMEN DE LOS AUDÍFONOS: Ajusta el nivel de volumen de la salida de los audífonos.
s MEDIDOR DE SALIDA ESTÉREO: Permite controlar visualmente el nivel de salida.
d SELECTOR GIRATORIO: Permite acceder tanto a parámetros globales como de canal, que se ajustan mediante los
controles de edición.
f INTERRUPTOR DE ALIMENTACIÓN PHANTOM: Aplica alimentación de +48 V a los canales de entrada 1-8. Un LED
rojo indica que la alimentación phantom está encendida.
g CONECTOR DE AUDÍFONOS: Para uso con audífonos solamente, con una impedancia mínima de 24 .
Español Latinoamérica - 6

Paneles de control y conexión
Panel de conexión
Figura 4. Panel de conexión de T8S
q w e r t y
USB AUDIO
MAIN OUT
M
( )
MONO
uio
q INTERRUPTOR DE ALIMENTACIÓN: Enciende o apaga el mezclador.
w USB 2.0 TIPO B: Una interfaz USB que le permite conectar el mezclador a su computadora.
e USB 2.0 TIPO A: Una interfaz USB que le permite reproducir audio desde su unidad flash.
r SALIDA L/R ANALÓGICA:
Salida analógica principal. Acepta cables TRS balanceados y TS no balanceados de
1/4” (6 mm).
t SALIDA DE AUDIO: Cuatro salidas analógicas definibles por el usuario. Puede configurarse para una salida pre-
fader, post-EQ, de efectos o post-fader. Acepta cables TRS balanceados o TS no balanceados de 1/4” (6 mm).
y ENTRADA AUXILIAR – Canales de entrada analógica 9/10. Acepta cables TRS balanceados o TS no balanceados
de ¼” (6 mm) para entradas a nivel de línea. Puede utilizarse para señales de entrada estéreo.
u ENTRADAS 1-8: Canales de entrada analógica 1-8. Acepta cables XLR balanceados para micrófonos o cables TRS
balanceados o TS no balanceados de 1/4” (6 mm) para entradas de alta impedancia, como guitarras.
i SALIDA ESTÉREO XLR: Salida analógica estéreo. Acepta cables XLR balanceados para salida estéreo.
o PUERTO DE ALIMENTACIÓN DIGITAL: Para usar con la fuente de alimentación ToneMatch (consulte “Conexión de
la fuente de alimentación ToneMatch®” en la página 12).
NOTA: El T8S NO está diseñado para conectarse digitalmente al L1® Model 1S/II.
PRECAUCIÓN: Aunque el puerto ToneMatch acepta un conector RJ-45 estándar, NO conecte el T8S a una
computadora o red telefónica.
7 - Español Latinoamérica

Configuración del sistema
Quitar y colocar la cubierta
El mezclador T4S/T8S ToneMatch® se entrega de fábrica con una cubierta instalada en el panel superior. La cubierta
está diseñada para proteger el panel de control mientras se transporta o almacena el mezclador.
Para quitar la cubierta:
1. Coloque los pulgares en las ranuras de la parte frontal de la cubierta y deslice la cubierta hacia delante.
2. Agarre la cubierta por la parte posterior y levántela para retirarla.
Para colocar la cubierta:
1. Deslice la cubierta sobre el mezclador, de atrás hacia delante.
2. La cubierta magnetizada se enganchará por sí sola y se asegurará al mezclador.
Figura 5. Quitar y colocar la cubierta
Español Latinoamérica - 8

Configuración del sistema
Opciones de montaje
El T4S/T8S viene con una inserción de tornillo de montaje de ¼” ( mm). Esto permite que pueda montarse en
trípodes y soportes que incluyan un tornillo de montaje de ¼” (6 mm), incluido un trípode de cámara.
Montaje del T4S/T8S en un trípode de cámara
1. Extienda las patas del trípode de cámara y asegúrelas a la altura deseada.
2. Retire el soporte de la parte superior del trípode de cámara y fije el soporte a la parte de abajo del T4S/T8S con
el tornillo. Asegúrese de que la pequeña hendidura en el T4S/T8S y el relieve en el soporte estén alineados. Vea
la Figura 6.
3. Fije el soporte con el T4S/T8S incorporado en el trípode de cámara. Vea la Figura 8.
Figura 6. Fijación del soporte al T4S
Figura 7. Soporte fijado al T4S
Figura 8. Montaje del T4S en el trípode mediante el uso de soporte
ADVERTENCIA: No utilice el mezclador T4S/T8S ToneMatch® con un trípode o soporte que sea inestable. El
mezclador solo está diseñado para su uso en un tornillo de ¼” (6 mm), y el trípode o soporte debe ser capaz de
soportar un dispositivo con un peso mínimo de 1.9 kg (4.1 lb) y un tamaño total de 214 x 311 x 83 mm (8.4 x 12.25
x 3.25 pulgadas). Es posible que el uso de un trípode o soporte que no esté diseñado para soportar el tamaño y
el peso del mezclador T4S/T8S provoque una condición inestable y peligrosa que podría causar lesiones.
9 - Español Latinoamérica
Configuración del sistema
Conectar el T4S mediante conexión digital
1. Asegúrese de que el L1 Model 1S/II y el T4S estén apagados y que el control de volumen maestro del T4S esté al
mínimo.
2. Enchufe un extremo del cable ToneMatch® en el puerto de alimentación/la salida principal digital R del T4S.
Enchufe el otro extremo del cable ToneMatch en el puerto ToneMatch del soporte de alimentación.
Nota: Para conectar el T4S a dos soportes de alimentación L1 Model 1S/II, conecte un segundo soporte de
alimentación al puerto de salida principal digital L del T4S mediante un cable ToneMatch.
3. Encienda el mezclador y, a continuación, encienda el soporte de alimentación de L1 Model 1S/II.
4. Conecte sus instrumentos y ajuste los niveles. Consulte la guía completa del propietario en www.Bose.com para
obtener más información sobre el funcionamiento.
Figura 9. Dos sistemas L1 Model II conectados a un T4S mediante conexión digital
MONO
USB AUDIO
M
( )
Nota: El T8S no se puede conectar digitalmente y el L1 Model 1S/II no puede alimentarlo.
Español Latinoamérica - 10

Configuración del sistema
US
O
M
Conexión del T4S/T8S mediante conexión analógica
1. Asegúrese de que el dispositivo al que se está conectando y el T4S/T8S estén apagados y que el control de
volumen maestro del T4S/T8S esté al mínimo.
2. Mediante cables balanceados XLR, conecte uno o dos dispositivos a las salidas estéreo XLR de su T8S (Vea la
Figura 10).
Nota: El T4S/T8S se puede conectar a un dispositivo a través del puerto de salida analógica R mediante un cable
TRS de ¼” (6 mm) (se vende por separado). Enchufe el otro extremo del cable TRS en el puerto de entrada
analógica del dispositivo. Para conectar el T4S/T8S a dos dispositivos, conecte un segundo dispositivo al puerto
de salida analógica L del T4S/T8S mediante un cable TRS de ¼” (6 mm).
3. Conecte una fuente de alimentación ToneMatch® al puerto de alimentación del T4S/T8S y conéctelo a una toma
de CA. Consulte “Conexión de la fuente de alimentación ToneMatch®” en la página 12.
4. Encienda el mezclador T4S/T8S y luego encienda el dispositivo.
5. Conecte sus instrumentos y ajuste los niveles. Consulte la guía completa del propietario en www.Bose.com para
obtener más información sobre el funcionamiento.
Figura 10. Dos sistemas F1 conectados a un T8S mediante conexión analógica
B AUDI
AIN OUT
USB AUDIO
MONO
MAIN OUT
M
( )
11 - Español Latinoamérica

Configuración del sistema
Conexión de la fuente de alimentación ToneMatch®
La fuente de alimentación ToneMatch proporciona alimentación para el mezclador T4S/T8S.
1. Enchufe el cable de alimentación en el puerto de alimentación T4S/T8S.
2. Enchufe un extremo del cable de alimentación de CA en la fuente de alimentación.
3. Enchufe el otro extremo del cable de alimentación en una toma de alimentación de CA activa.
4. Coloque el interruptor de encendido del T4S/T8S en la posición ON (Encendido).
Nota: Para el funcionamiento del T8S se necesita la fuente de alimentación suministrada con el T8S. La fuente de
alimentación no se incluye con el T4S y no es necesaria para el funcionamiento del T4S.
Figura 11. Conexión del T4S a la fuente de alimentación
Español Latinoamérica - 12

Configuración del sistema
Conexión del T4S/T8S a su computadora
El T4S/T8S tiene un puerto USB para conectarlo a una computadora. Esto le permite descargar escenas de
actuaciones a una computadora o instalar actualizaciones del sistema. Visite www.Bose.com/livesound para obtener
detalles sobre la actualización del sistema.
Cuando se conecta a una computadora, también puede utilizar el T4S/T8S como un dispositivo de audio USB de
propósito general para grabar/reproducir.
Nota: El T4S/T8S opera a 48 kHz/24-bit. Cuando utilice el T4S/T8S con un software de grabación, es posible que
necesite configurar los ajustes del software para el funcionamiento a 48 kHz/24-bit.
Nota: Para conectar el T4S/T8S a la computadora se requiere un cable USB (tipo A a tipo B, no suministrado).
1. Conecte el mezclador a una fuente de alimentación (fuente de alimentación ToneMatch® para T4S/T8S o un L1 Model 1S/
II para T4S solamente).
2. Enchufe un extremo del cable USB en el puerto USB 2.0 tipo B del mezclador (Figura 12).
3. Conecte el otro extremo del cable USB a un puerto USB de su computadora.
4. Encienda el mezclador.
Figura 12. Conexión de T4S a USB
Puerto ToneMatch: A un sistema L1 Model 1S/II
o a una fuente de alimentación ToneMatch
Interruptor de encendido
Cable USB
(tipo A a tipo B)
Al puerto USB de
la computadora
Conexión de una unidad flash al T4S/T8S
Conecte una unidad flash USB 2.0/3.0 cargada con archivos WAV/MP3 en el puerto USB 2.0 tipo A para reproducir
pistas de audio en su mezclador.
Figura 13. Conexión de una unidad flash al T4S
13 - Español Latinoamérica

Información de contacto
Visite nuestra página web en www.Bose.com.
Américas
(EE.UU., Canadá, México, Centroamérica y
Sudamérica)
Bose Corporation
Framingham, MA 01701, EE.UU.
Centro corporativo: 508-879-7330
Americas Professional Systems,
Soporte técnico: 800-994-2673
Australia
Bose Pty Limited
Unit 3/2 Holker Street
Newington NSW, Australia
61 2 8737 9999
Bélgica
Bose N.V. / S.A
Limesweg 2, 03700
Tongeren, Bélgica
012-390800
China
Bose Electronics (Shanghái) Co Ltd
25F, L’Avenue
99 Xianxia Road
Shanghái, P.R.C. 200051, China
86 21 6010 3800
Francia
Bose S.A.S
26-28 Avenue de Winchester
78100 St. Germain en Laye, Francia
01-30-61-63-63
Alemania
Bose GmbH
Max-Planck Strasse 36D 61381
Friedrichsdorf, Alemania
06172-7104-0
Hong Kong
Bose Limited
Suites 2101-2105, Tower One, Times Square
1 Matheson Street, Causeway Bay, Hong Kong
852 2123 9000
India
Bose Corporation India Private Limited
Salcon Aurum, 3rd Floor
Plot No. 4, Jasola District Centre
Nueva Delhi – 110025, India
91 11 43080200
Italia
Bose SpA
Centro Leoni A – Via G. Spadolini
5 20122 Milano, Italia
39-02-36704500
Japón
Bose Kabushiki Kaisha
Sumitomo Fudosan Shibuya Garden Tower 5F
16-17, Nanpeidai-cho
Shibuya-Ku, Tokio, 150-0036, Japón
TEL 81-3-5489-0955
www.bose.co.jp
Países Bajos
Bose BV
Nijverheidstraat 8 1135 GE
Edam, Países Bajos
0299-390139
Reino Unido
Bose Ltd
1 Ambley Green, Gillingham Business Park
KENT ME8 0NJ
Gillingham, Inglaterra
0870-741-4500
Información adicional
Información de firma
importadora
Unión Europea
Bose Products B.V., Gorslaan 60, 1441 RG
Purmerend, Países Bajos
China
Bose Electronics (Shanghai) Company Limited,
Part C, Plan 9, N.° 353 North Riying Road, China
(Shanghai) Pilot Free Trade Zone
Taiwán
Bose Taiwan Branch, 9F-A1, No.10, Section 3,
Minsheng East Road, Taipei City 104, Taiwán
Tel.: +886-2-2514 7676
México
Bose de México, S. de R.L. de C.V. Paseo de las
Palmas 405-204, Lomas de Chapultepec, 11000
México, D.F.
Tel.: +5255 (5202) 3545
Visite el sitio web para consultar por otros países
Información adicional
Consulte la guía completa del propietario (en línea en www.Bose.com) para obtener más información sobre el
funcionamiento, la configuración de fábrica, el cuidado y el mantenimiento. Para solicitar una copia impresa, use los
teléfonos suministrados.
Garantía limitada
El producto está cubierto con una garantía limitada. Visite www.pro.Bose.com para ver detalles de la garantía.
La información de la garantía de este producto no se aplica a Australia ni a Nueva Zelanda. Visite nuestro sitio web
en www.bose.com/au/warranty o www.bose.com/nz/warranty para ver detalles de la garantía en Australia y Nueva
Zelanda.
Fecha de fabricación
El octavo dígito del número de serie indica el año de fabricación; p. ej., "6" es 2006 o 2016.
Español Latinoamérica - 14

Instructions importantes relatives à la sécurité
Noms et quantités des substances ou éléments toxiques ou dangereux
yle
Merci de lire et de conserver le manuel d’instruction et
de respecter les consignes de sécurité.
1. Veuillez lire ces consignes.
2. Veuillez conserver ces consignes.
3. Respectez tous les avertissements.
4. Suivez toutes les consignes.
5. N’utilisez pas cet appareil à proximité d’eau ou de toute autre source d’humidité.
6. Utilisez uniquement un chion sec pour le nettoyage.
7. Ne bloquez jamais les orifices d’aération. Suivez les instructions du fabricant pour
l’installation.
8. Protégez le cordon d’alimentation contre les risques de piétinement ou de pincement,
notamment au niveau des fiches, des prises de courant et des branchements à l’appareil.
9. Utilisez uniquement les accessoires spécifiés par le fabricant.
10. Utilisez uniquement le chariot, le support, le trépied, l’équerre ou la table
11. Débranchez cet appareil pendant les orages ou au cours des longues périodes de
12. Confiez toute réparation à du personnel qualifié. Une réparation est nécessaire lorsque
spécifié(e) par le fabricant ou vendu(e) avec l’appareil. Si vous utilisez un
chariot, faites attention à ne pas faire basculer l’ensemble chariot/appareil.
non-utilisation.
l’appareil a été endommagé de quelque façon que ce soit (endommagement du cordon
d’alimentation ou de la fiche électrique, renversement d’un liquide ou de tout objet sur
l’appareil, exposition de l’appareil à la pluie ou à l’humidité, mauvais fonctionnement,
chute de l’appareil, etc.).
Informations réglementaires
Cet appareil est conforme à la partie15 de la réglementation de la FCC et au(x) standard(s)
RSS exempté(s) de licence d’Industrie Canada. Son fonctionnement repose sur les deux
conditions suivantes: (1) cet appareil ne doit pas provoquer d’interférences et (2) cet
appareil doit tolérer les interférences externes, y compris celles qui peuvent provoquer un
fonctionnement anormal.
Ce produit est conforme à toutes les directives en vigueur de l’Union
européenne. La déclaration de conformité complète est disponible
www.Bose.com/compliance.
Informations sur les produits générateurs de bruit électrique (Déclaration de conformité
FCC pour les États-Unis)
Remarque: Ce matériel a fait l’objet de tests prouvant sa conformité aux limites imposées
aux appareils numériques de classeA, conformément à la partie 15 des réglementations de la
FCC. Ces limites sont conçues pour orir une protection raisonnable contre les interférences
nuisibles lorsque l’appareil est utilisé en environnement commercial. Cet appareil génère,
utilise et est susceptible d’émettre de l’énergie à certaines fréquences radio. À ce titre, s’il
n’est pas installé ou utilisé conformément aux instructions, il est susceptible de perturber les
communications radio. L’utilisation de cet équipement dans une zone résidentielle risque de
provoquer des interférences nuisibles, auquel cas l’utilisateur devra remédier au problème à
ses propres frais.
Toute modification non autorisée expressément par Bose Corporation est susceptible
d’annuler le droit de l’utilisateur à utiliser cet appareil.
Des câbles blindés doivent être utilisés pour assurer le respect des réglementations.
Ce produit est conforme aux spécifications de la réglementation ICES-003 classeA du
Canada.
CAN ICES-3(A)/NMB-3(A)
Ce produit répond aux critères d’immunité de la normeEN55103-2 pour les environnements
électromagnétiques classésE2.
AVERTISSEMENTS/PRÉCAUTIONS:
Ce produit contient des composants magnétiques. Consultez votre médecin afin de
savoir si ces composants peuvent avoir une incidence sur un dispositif médical
implanté.
• Ce produit n’est pas destiné à être monté ou utilisé dans des installations humides en
intérieur (par exemple piscine intérieure, parc aquatique intérieur, baignoire à remous,
sauna, hammam, patinoire intérieure, etc.).
• Pour limiter les risques d’incendie ou d’électrocution, n’exposez PAS cet appareil à la pluie,
à toutes formes de liquides ou à l’humidité. Ne s’applique pas aux produits dont l’indice de
protection est IPX4-9.
• Tenez le produit à l’écart du feu et des sources de chaleur. Ne placez JAMAIS d’objets
enflammés, tels que des bougies allumées, sur l’appareil ou à proximité.
• Veillez à NE PAS eectuer de modifications non autorisées sur ce produit.
• Veillez à NE PAS utiliser un convertisseur continu-alternatif avec ce produit.
• Veillez à NE PAS utiliser cet appareil dans des véhicules ou des bateaux.
• Utilisez ce produit uniquement avec l’adaptateur d’alimentation fourni.
• N’INSTALLEZ PAS le support ou le produit à proximité d’une source de chaleur, telle
qu’une cheminée, un radiateur, une arrivée d’air chaud ou tout autre appareil (notamment
des amplificateurs) produisant de la chaleur.
• N’utilisez PAS le mixeur ToneMatch® T4S/T8S sur un trépied/socle instable. Seule une vis
de 6mm peut être utilisée pour fixer ce mixeur. Par ailleurs, le trépied/socle doit pouvoir
supporter un appareil d’un poids minimum de 1,9kg et de dimensions hors tout de
214x311x83mm. L’utilisation d’un trépied incompatible avec les dimensions et le poids
du mixeur T4S/T8S n’assurera pas une stabilité susante, ce qui peut être dangereux et
provoquer des blessures.
• Certaines petites pièces présentent un risque de suocation. Ne pas laisser à la
portée des enfants de moins de 3 ans.
REMARQUES:
• Les câbles d’enceintes et d’interconnexion fournis avec cet appareil ne sont pas
compatibles avec une installation encastrée. Consultez la réglementation locale pour
connaître le type de câblage requis pour une installation encastrée.
• Lorsque l’alimentation de secteur ou la prise multiple est utilisée comme dispositif de
débranchement de l’appareil, le dispositif de débranchement doit rester facilement
accessible.
• Pour assurer une ventilation correcte, Bose déconseille de placer ce produit dans un
espace confiné tel qu’une cavité murale ou un placard fermé.
Substances ou éléments toxiques ou dangereux
Chrome
Plomb
Mercure
Cadmium
(Pb)
Nom
Cartes de circuitsimprimés
Pièces métalliques
Pièces en plastique
Enceintes
Câbles
Les données de ce tableau sont conformes aux dispositions de la norme SJ/T 11364.
O: indique que la quantité de cette substance toxique ou dangereuse contenue dans tous les
composants homogènes de cette pièce est inférieure à la limite définie dans GB/T 26572.
X: indique que la quantité de cette substance toxique ou dangereuse contenue dans au moins un
descomposants homogènes de cette pièce est supérieure à la limite définie dans GB/T 26572.
Ce symbole signifie que le produit ne doit pas être jeté avec les déchets ménagers,
mais doit être déposé dans un centre de collecte approprié pour recyclage. La
mise au rebut adéquate et le recyclage permettent de protéger les ressources
naturelles, la santé humaine et l’environnement. Pour plus d’informations sur
l’élimination et le recyclage de ce produit, contactez votre mairie, votre service
d’enlèvement des ordures ou le magasin où vous avez acheté ce produit.
(Hg)
X
0
X
0
00
0
X
0
X
(Cd)
Hexavalent
0
0
0
0
0
(CR(VI))
0
0
0
0
0
Biphényle
polybromé
(PBB)
Éther de diphén
polybromé
0
0
0
0
0
(PBDE)
0
0
0
0
0
2 - Français
Fourni par DCE Safety

Introduction
Présentation
Prenez le contrôle de votre musique grâce aux mixeurs ToneMatch® T4S et T8S : des interfaces compactes 4 et 8 canaux, conçues pour
les musiciens et chanteurs. Dotés de puissants moteurs DSP et de réglages intuitifs, ils orent des capacités d’égalisation ainsi que des
traitements dynamiques et des eets dignes d’un studio. Le traitement Bose® ToneMatch® et la fonction zEQ intégrés sont synonymes
d’un son de grande qualité, en particulier si vous reliez le mixeur à un système Bose L1 ou F1: vous bénéficiez alors d’un contrôle tonal
de bout en bout! Dotés de commandes tactiles, d’un écranLCD très lisible et d’une fonction de mémorisation des scènes, les mixeurs
ToneMatch sont des appareils ultra-robustes qui vous procureront toute la confiance nécessaire pour vous donner à fond sur scène. Les
mixeurs ToneMatch sont des partenaires de choix pour les véritables performers.
Caractéristiques
Traitement audio ultra-performant
• Nouveaux eets dignes d’un studio, avec traitement audio
numérique avancé
• Les eets disponibles sont les suivants: compresseur, limiteur,
déesseur, noise gate, chœur, flanger, phaser, trémolo, délai et
réverbération
• Traitement Bose® ToneMatch® assurant un son naturel sur les
voix comme sur les instruments
• La fonction zEQ permet d’aner le son des préréglages
ToneMatch, pour eectuer des ajustements ecaces à la volée
• Réglage indépendant par canal des paramètres ToneMatch,
d’égalisation, de traitement dynamique et d’eets
• Réverbération dédiée sur les départsAux et réverbération
globale répartie sur tous les canaux
• L’égalisation de sortie principale assure une adaptation
optimale à l’acoustique du local
• Optimisation tonale complète de bout en bout en cas
d’utilisation avec les systèmes Bose L1 ou F1
Utilisation intuitive sur scène
• Commandes tactiles et indicateurs destinés aux musiciens et
DJ se produisant sur scène
• Interface utilisateur rapide à maîtriser
• Délai au tempo par pression sur une touche (Tap Tempo), accordeur
chromatique et scènes mémorisables intégrés
• L’écranLED et les commandes rétro-éclairéessont faciles à lire
et utiliser, y compris sur des scènes sombres
Connectivité haute densité
• Une connectivité et un niveau de contrôle sans précédent sur
un mixeur numérique stéréo aussi compact
• Quatre (T4S) ou huit (T8S) préamplis orant un son de
grande qualité dotés de connecteursCombo (XLR/jack) pour
microphones ou instruments et d’une alimentation fantôme
commutable
• 2 entrées Aux pour sources de signal supplémentaires 2 (T4S)
ou 4 (T8S) départsAux
• Ports USB typeA et typeB pour la lecture de clésUSB ou
l’interface avec un PC/Mac
• Sorties ToneMatch transportant le signal audionumérique et la
tension d’alimentation (T4S uniquement)
• Sorties symétriques stéréo sur jack TRS¼” et XLR (T8S
uniquement)
• Sortie casque indépendante
Fonctions ultra-pratiques en concert
• Boîtier robuste avec capot de protection aimanté assurant la
protection des commandes et des connecteurs
• Câble ToneMatch fourni pour la connexion à un système
BoseL1 modèle II ou à un système L1 modèle1S transportant
le signal audionumérique et la tension d’alimentation (T4S), ou
alimentation électrique universelle fournie (T8S)
• Un insert fileté sur le fond du boîtier permet d’utiliser des
supports pour appareil photo afin de garder votre mixeur
ToneMatch à portée de main
Déballage
Reportez-vous au tableau suivant pour connaître le contenu de l’emballage du mixeur:
T4S
Mixeur T4S ToneMatch et capot de protection Câble ToneMatch
T8S
Mixeur T8S ToneMatch et capot de protection
Remarque: Consultez la notice d’utilisation complète (en ligne sur www.Bose.com) pour obtenir plus d’informations sur le
fonctionnement, les paramètres d’usine ainsi que l’entretien du produit.
Alimentation secteur
ToneMatch
Français - 3
Panneaux de commande et de connexion
Mixeur ToneMatch® T4S
Panneau de commande
Figure1. Panneau de commande T4S
q
w
d
e
s
r
t
y
u
a
f
o
i
q
INDICATEURS DE PRÉSENCE DE SIGNAL D’ENTRÉE/ÉCRÊTAGE (1-4) – leur couleur indique l’état du signal d’entrée:
Vert: Indique la présence d’un signal d’entrée
Rouge: Indique l’écrêtage de la source d’entrée
w RÉGLAGES DE GAIN (TRIM) (1-4) – Réglage de la sensibilité d’entrée pour chaque canal.
e AFFICHEUR – Accès aux menus des fonctions et aux informations système.
r COMMANDES – Ces trois boutons-poussoirs rotatifs permettent de sélectionner ou d’ajuster les éléments/valeurs
achés.
t BOUTONS CH EDIT (1-4) – Sélection du canal que vous souhaitez modifier.
y BOUTONS FX MUTE (1-4) – Coupure des eets Mod (modulation), Delay (délai) et Reverb (réverbération) pour
chaque canal.
u RÉGLAGES DE VOLUME (1-4) – Réglage du volume pour chaque canal.
i BOUTONS MUTE (1-4) – Coupure de la sortie audio pour chaque canal.
o RÉGLAGE DE VOLUME GLOBAL (MASTER) – Réglage du niveau de sortie général.
a RÉGLAGE DE VOLUME CASQUE – Réglage du volume de la sortie casque.
s SÉLECTEUR ROTATIF – Accès aux paramètres globaux et propres à chaque canal, qui sont ensuite réglés à l’aide
des autres commandes.
d INTERRUPTEUR MARCHE/ARRÊT FANTÔME – Activation d’une tension fantôme de +48V sur les connecteurs
d’entrée1 à 4. Une diode rouge indique que l’alimentation fantôme est activée.
f PRISE CASQUE – Pour les casques uniquement, d’une impédance minimale de 24Ω.
4 - Français

Panneau de connexion
Figure2. Panneau de connexion T4S
q w e r t y
Panneaux de commande et de connexion
MONO
M
USB AUDIO
( )
uio
q INTERRUPTEUR MARCHE/ARRÊT – Mise en marche/Arrêt du mixeur.
w USB 2.0 TYPEB – Interface USB permettant de connecter le mixeur à votre ordinateur.
e USB 2.0 TYPEA – Interface USB permettant la lecture de fichiers audio depuis votre cléUSB.
r SORTIE L/R ANALOGIQUE – Sortie analogique principale. Chaque connecteur accepte des câbles TRS ¼
(symétriques) ou TS (asymétriques).
t SORTIE AUXILIAIRE – Deux sorties analogiques paramétrables par l’utilisateur. Se configurent avant fader, après
égalisation et eets ou après post-fader. Chaque connecteur accepte des câbles TRS ¼ symétriques.
y
ENTRÉE AUXILIAIRE – Canaux d’entrée analogiques 5/6. Chaque connecteur accepte des câbles TRS ¼ (symétriques)
ou TS (asymétriques) pour des entrées au niveau ligne. Peuvent être utilisés pour les signaux d’entrée stéréo.
u
ENTRÉES1-4 – Canaux d’entrée analogiques1 à 4. Reçoit des câblesXLR symétriques pour microphones ou des câbles
TRS ¼" (symétriques) ou TS (asymétriques) pour des sources d’entrée haute impédance, par exemple des guitares.
i SORTIE NUMÉRIQUE PRINCIPALE L – Pour connexion numérique en stéréo à deux systèmes L1® modèle 1S/II.
Remarque: S’utilise exclusivement en stéréo avec la sortie numérique principale R.
o
PORT D’ALIMENTATION/SORTIE NUMÉRIQUE PRINCIPALE R – Une sortie numérique utilisée par le système L1 modèle
1S/II. Alimente le mixeur T4S à partir du socle amplificateur du système L1 modèle 1S/II. Peut également alimenter le
mixeur à partir de l’alimentation secteur ToneMatch branchée à une prise secteur (non fournie avec le T4S). Reçoit le
câble ToneMatch® fourni.
ATTENTION: Bien que le port ToneMatch utilise un connecteur RJ-45 standard, NE connectez JAMAIS le T4S à
un réseau informatique ou téléphonique.
Français - 5

Panneaux de commande et de connexion
Mixeur ToneMatch® T8S
Panneau de commande
Figure3. Panneau de commande T8S
q
w
f
e
r
t
d
s
a
y
u
o
i
g
q INDICATEURS DE PRÉSENCE DE SIGNALIGNAL D’ENTRÉE/ÉCRÊTAGE (1-8) – leur couleur indique l’état du signal
d’entrée:
Vert: Indique la présence d’un signal d’entrée
Rouge: Indique l’écrêtage de la source d’entrée
w RÉGLAGES DE GAIN (TRIM) (1-8) – Réglage de la sensibilité d’entrée pour chaque canal.
e AFFICHEUR – Accès aux menus des fonctions et aux informations système.
r
COMMANDES – Ces trois boutons-poussoirs rotatifs permettent de sélectionner ou d’ajuster les éléments/valeurs achés.
t BOUTONS CH EDIT (1-8) – Sélection du canal que vous souhaitez modifier.
y BOUTONS FX MUTE (1-8) – Coupure des eets Mod (modulation), Delay (délai) et Reverb (réverbération) pour
chaque canal.
u RÉGLAGES DE VOLUME (1-8) – Réglage du volume pour chaque canal.
i BOUTONS MUTE (1-8) – Coupure de la sortie audio pour chaque canal.
o RÉGLAGE DE VOLUME GLOBAL (MASTER) – Réglage du niveau de sortie général.
a RÉGLAGE DE VOLUME CASQUE – Réglage du volume de la sortie casque.
s INDICATEUR DE NIVEAU DE SORTIE STÉRÉO – Permet de mesurer et de visualiser le niveau de sortie.
d SÉLECTEUR ROTATIF – Accès aux paramètres globaux et propres à chaque canal, qui sont ensuite réglés à l’aide
des autres commandes.
f INTERRUPTEUR MARCHE/ARRÊT FANTÔME – Envoi d’une tension d’alimentation fantôme +48V sur les
connecteurs d’entrée1 à 8. Une diode rouge indique que l’alimentation fantôme est activée.
g PRISE CASQUE – Pour les casques uniquement, d’une impédance minimale de 24Ω.
6 - Français

Panneau de connexion
Figure4. Panneau de connexion T8S
q w e r t y
USB AUDIO
MAIN OUT
M
( )
Panneaux de commande et de connexion
MONO
uio
q INTERRUPTEUR MARCHE/ARRÊT – Mise en marche/Arrêt du mixeur.
w USB 2.0 TYPEB – Interface USB permettant de connecter le mixeur à votre ordinateur.
e USB 2.0 TYPEA – Interface USB permettant la lecture de fichiers audio depuis votre cléUSB.
r SORTIE L/R ANALOGIQUE – Sortie analogique principale. Chaque connecteur accepte des câbles TRS ¼ TRS
(symétriques) ou TS (asymétriques).
t SORTIE AUXILIAIRE – Quatre sorties analogiques paramétrables par l’utilisateur. Se configurent avant fader,
après égalisation et eets ou après fader. Chaque connecteur accepte des câbles TRS ¼" (symétriques) ou TS
(asymétriques).
y ENTRÉE AUXILIAIRE – Canaux d’entrée analogiques 9/10. Chaque connecteur accepte des câbles TRS ¼
(symétriques) ou TS (asymétriques) pour des entrées au niveau ligne. Peuvent être utilisés pour les signaux
d’entrée stéréo.
u
ENTRÉES 1-8 – Canaux d’entrée analogiques1 à 8. Reçoit des câblesXLR symétriques pour microphones ou des câbles
TRS ¼ (symétriques) ou TS (asymétriques) pour des sources d’entrée haute impédance, par exemple des guitares.
i SORTIE ANALOGIQUE XLR – Sortie analogique stéréo. Reçoit des câblesXLR symétriques pour sortie stéréo.
o PORT D’ALIMENTATION NUMÉRIQUE – Pour une utilisation avec l’alimentation secteur ToneMatch (voir
«Connexion de l’alimentation secteur ToneMatch®» à la page12).
Remarque: Le T8S N’EST PAS PRÉVU pour une connexion numérique au système L1® modèle 1S/II.
ATTENTION: Bien que le port ToneMatch utilise un connecteur RJ-45 standard, NE connectez JAMAIS le T8S à
un réseau informatique ou téléphonique.
Français - 7

Configuration du système
Retrait/mise en place du couvercle
Le mixeur T1 ToneMatch® T4S/T8S est livré d’origine avec un capot placé sur son panneau supérieur. Ce capot est
destiné à protéger le panneau de commande lorsque le mixeur est transporté ou rangé.
Pour retirer le capot:
1. Placez vos pouces sur les encoches situées à l’avant du capot et poussez-le.
2. Saisissez ensuite le capot par l’arrière et soulevez-le pour l’extraire.
Pour remettre le capot en place:
1. Faites glisser le capot sur le mixeur de l’arrière vers l’avant.
2. Le capot magnétique s’enclenchera tout seul sur le mixeur.
Figure5. Retrait et mise en place du capot
8 - Français

Configuration du système
Options de montage
Le mixeur T4S/T8S est équipé d’un insert fileté de diamètre mm (1/4"). Cela permet de le fixer sur un certain
nombre de supports dotés d’une vis de montage de 6mm (1/4"), y compris un trépied pour appareil photo.
Montage du T4S/T8S sur un trépied d’appareil photo
1. Sortez les pieds du trépied et fixez-les à la hauteur souhaitée.
2. Retirez la semelle située sur la partie supérieure du trépied d’appareil photo et fixez-la à la partie inférieure du
T4S/T8S à l’aide de la vis. Veillez à bien emboîter la petite saillie de la semelle dans l’encoche du T4S/T8S. Voir
Figure6.
3. Refixez au trépied la semelle à présent vissée au T4S/T8S. Voir Figure8.
Figure6. Fixation de la semelle au T4S Figure8. Montage du T4S sur un trépied à l’aide d’une semelle
Figure7. Semelle vissée au T4S
AVERTISSEMENT: N’utilisez PAS le mixeur ToneMatch® T4S/T8S sur un trépied/socle instable. Seule une vis
de 6mm peut être utilisée pour fixer ce mixeur. Par ailleurs, le trépied/socle doit pouvoir supporter un appareil
d’un poids minimum de 1,9kg et de dimensions hors tout de 214x311x83mm. L’utilisation d’un trépied
incompatible avec les dimensions et le poids du mixeur T4S/T8S n’assurera pas une stabilité susante, ce qui
peut être dangereux et provoquer des blessures.
Français - 9

Configuration du système
Connexion du T4S en numérique
1. Assurez-vous que le système L1 modèle 1S/II et le T4S sont hors tension et que le réglage du niveau de sortie
général (MASTER) du T4S est réglé au minimum.
2. Branchez une extrémité du câble ToneMatch® sur le port d’alimentation/ sortie numérique principale R du T4S.
Branchez l’autre extrémité du câble ToneMatch au port ToneMatch du socle amplificateur.
Remarque: Pour connecter le T4S à deux socles amplificateurs L1 modèle 1S/II, connectez un second socle
amplificateur au connecteur de la sortie numérique principale L du T4S à l’aide d’un câble ToneMatch.
3. Mettez successivement le mixeur, puis le socle amplificateur L1 modèle 1S/II sous tension.
4. Connectez vos instruments et réglez les niveaux. Consultez la notice d’utilisation complète sur le site
www.Bose.com pour obtenir des informations exhaustives sur le fonctionnement de l’appareil.
Figure9. Deux systèmes L1 modèle II connectés à un T4S en numérique
MONO
USB AUDIO
M
( )
Remarque: Le T4S ne peut pas être connecté en numérique et ne peut pas être alimenté par le système L1
modèle1S/II.
10 - Français

Configuration du système
US
O
M
Connexion du T4S/T8S en analogique
1. Assurez-vous que l’appareil que vous connectez au T4S/T8S est hors tension et que le réglage du niveau de
sortie général (MASTER) du T4S/T8S est réglé au minimum.
2. À l’aide de câblesXLR symétriques, connectez un ou deux appareils aux sorties stéréos XLR du T8S (voir Figure10).
Remarque: Le T4S/T8S peut être connecté à un appareil via le connecteur la sortie analogique R à l’aide d’un
câble TRS ¼" (vendu séparément). Branchez l’autre extrémité du câble TRS au connecteur d’entrée analogique
de l’appareil. Pour connecter le T4S/T8S à deux appareils, branchez un second appareil au connecteur de sortie
analogique L du T4S/T8S à l’aide d’un câble TRS ¼".
3. Branchez l’alimentation secteur ToneMatch® au port d’alimentation du T4S/T8S, puis reliez-la à une prise secteur
sous tension. Reportez-vous à la rubrique: «Connexion de l’alimentation secteur ToneMatch®» à la page12.
4. Mettez sous tension le mixeur T4S/T8S, puis l’appareil.
5. Connectez vos instruments et réglez les niveaux. Consultez la notice d’utilisation complète sur le site
www.Bose.com pour obtenir des informations exhaustives sur le fonctionnement de l’appareil.
Figure10. Deux systèmes F1 connectés à un T8S en analogique
B AUDI
AIN OUT
USB AUDIO
MONO
MAIN OUT
M
( )
Français - 11

Configuration du système
Connexion de l’alimentation secteur ToneMatch®
L’alimentation secteur ToneMatch alimente en électricité le mixeur T4S/T8S.
1. Branchez le câble de l’alimentation électrique au port d’alimentation du T4S/T8S.
2. Branchez une extrémité du cordon d’alimentation secteur à l’alimentation secteur.
3. Branchez l’autre extrémité du cordon à une prise secteur sous tension.
4. Mettez le commutateur secteur du T4S/T8S en position ON.
Remarque: L’alimentation fournie avec le T8S est nécessaire à son fonctionnement. L’alimentation n’est pas fournie
avec le T4S et n’est pas nécessaire à son fonctionnement.
Figure11. Connexion du T4S à l’alimentation
12 - Français

Configuration du système
Connexion du T4S/T8S à votre ordinateur
Le port USB du T4S/T8S permet d’eectuer une connexion à un ordinateur, afin de transférer sur l’ordinateur
des fichiers de configuration de session ou d’installer des mises à jour du système. Pour obtenir des informations
concernant les mises à jour, visitez la page www.Bose.com/livesound.
Lorsque le T4S/T8S est connecté à un ordinateur, il est également possible de l’utiliser comme périphérique audio
standard (interface USB) pour l’enregistrement/la lecture.
Remarque: Le T4S/T8S travaille en 48kHz/24bits. Pour utiliser le T4S/T8S avec un logiciel d’enregistrement, il peut
être nécessaire de paramétrer le logiciel pour fonctionner en 48kHz/24bits.
Remarque: Pour connecter le T1 à un ordinateur, utilisez un câble USB typeA à typeB (non fourni).
1. Branchez le mixeur à une source d’alimentation (alimentation secteur ToneMatch® pour T4S/T8S ou un système L1
modèle 1S/II pour le T4S uniquement).
2. Branchez une extrémité du câble sur le port USB 2.0 typeB (Figure12).
3. Connectez l'autre extrémité à un port USB de l'ordinateur.
4. Mettez sous tension le mixeur.
Figure12. Connexion T4S vers USB
Port ToneMatch – Vers un système L1 modèle
1S/II ou une alimentation électrique ToneMatch
Interrupteur marche/arrêt
Câble USB
(typeA à typeB)
Vers le port USB
de l’ordinateur
Connexion d’une cléUSB au T4S/T8S
Branchez une cléUSB 2.0/3.0 contenant des fichiers au format WAV/MP3 au port USB 2.0 typeA pour lire des
contenus audio sur votre mixeur.
Figure13. Connexion d’une cléUSB au T4S
Français - 13

Informations supplémentaires
Contact
Rendez-vous sur notre site Web à l’adresse www.Bose.com.
Amériques
(États-Unis, Canada, Mexique, Amérique Centrale,
Amérique du Sud)
Bose Corporation
Framingham, MA 01701 USA
Siège: 508-879-7330
Assistance technique systèmes
professionnels pour les Amériques: 800-994-2673
Australie
Bose Pty Limited
Unit 3/2 Holker Street
Newington NSW Australie
61 2 8737 9999
Belgique
Bose N.V. / S.A
Limesweg 2, 03700
Tongeren, Belgique
012-390800
Chine
Bose Electronics (Shanghai) Co Ltd
25F, L’Avenue
99 Xianxia Road
Shanghai, P.R.C. 200051 Chine
86 21 6010 3800
France
Bose S.A.S
26-28 avenue de Winchester
78100 Saint-Germain-en-Laye, France
01 30 61 63 63
Allemagne
Bose GmbH
Max-Planck Strasse 36D 61381
Friedrichsdorf, Allemagne
06172-7104-0
Hong Kong
Bose Limited
Suites 2101-2105, Tower One, Times Square
1 Matheson Street, Causeway Bay, Hong Kong
852 2123 9000
Inde
Bose Corporation India Private Limited
Salcon Aurum, 3rd Floor
Plot No. 4, Jasola District Centre
New Delhi – 110025, Inde
91 11 43080200
Italie
Bose SpA
Centro Leoni A – Via G. Spadolini
5 20122 Milano, Italie
39-02-36704500
Japon
Bose Kabushiki Kaisha
Sumitomo Fudosan Shibuya Garden Tower 5F
16-17, Nanpeidai-cho
Shibuya-Ku, Tokyo, 150-0036, Japon
81-3-5489-0955
www.bose.co.jp
Pays-Bas
Bose BV
Nijverheidstraat 8 1135 GE
Edam, Pays-Bas
0299-390139
Royaume-Uni
Bose Ltd
1 Ambley Green, Gillingham Business Park
KENT ME8 0NJ
Gillingham, Angleterre
0870-741-4500
Coordonnées des importateurs
Union européenne
Bose Products B.V., Gorslaan 60, 1441 RG
Purmerend, Pays-Bas
Chine
Bose Electronics (Shanghai) Company Limited,
Part C, Plan 9, No. 353 North Riying Road, China
(Shanghai) Pilot Free Trade Zone
Taïwan
Bose Taiwan Branch, 9F-A1, No. 10, Section 3,
Minsheng East Road, Taipei City 104, Taïwan
Tél: +886-2-2514 7676
Mexique
Bose de México, S. de R.L. de C.V., Paseo de las
Palmas 405-204, Lomas de Chapultepec, 11000
México, D.F.
Tél.: +5255 (5202) 3545
Voir le site Web pour les autres pays
Informations supplémentaires
Consultez la notice d’utilisation complète (en ligne sur www.Bose.com) pour obtenir plus d’informations sur le
fonctionnement, les paramètres d’usine ainsi que l’entretien du produit. Pour demander une copie imprimée, utilisez
les numéros de téléphone correspondant à votre pays.
Garantie limitée
Cet appareil est couvert par une garantie limitée. Rendez-vous sur www.pro.Bose.com pour de plus amples
informations concernant la garantie.
Les informations de garantie fournies avec ce produit ne s’appliquent pas en Australie et en Nouvelle-Zélande.
Consultez notre site Web www.bose.com/au/warranty ou www.bose.com/nz/warranty pour plus d’informations sur
les conditions de garantie en Australie et Nouvelle-Zélande.
Date de fabrication
Le huitième chire du numéro de série indique l’année de fabrication; par exemple, «6» correspond à 2006 ou à 2016.
14 - Français

Wichtige Sicherheitshinweise
Namen und Inhalt der giftigen oder gefährlichen Stoe oder Elemente
Bitte lesen Sie alle Sicherheitshinweise und
Gebrauchsanleitungen durch und bewahren Sie sie auf.
1. Lesen Sie die folgenden Anweisungen.
2. Bewahren Sie die Anweisungen auf.
3. Beachten Sie alle Warn- und Sicherheitshinweise.
4. Befolgen Sie alle Anweisungen.
5. Verwenden Sie dieses Gerät nicht in der Nähe von Wasser.
6. Reinigen Sie das Gerät nur mit einem sauberen, trockenen Tuch.
7. Achten Sie darauf, dass die Lüftungsönungen nicht blockiert sind. Stellen Sie
das Gerät nur in Übereinstimmung mit den Herstelleranweisungen auf.
8. Verlegen Sie das Netzkabel so, dass es keine Stolpergefahr darstellt und
nicht beschädigt werden kann– insbesondere im Bereich von Steckern und
Steckdosen und dort, wo das Netzkabel aus dem Gerät herausgeführt wird.
9. Verwenden Sie nur Zubehör-/Anbauteile, die vom Hersteller zugelassen sind.
10. Verwenden Sie für das Gerät nur Rollwagen, Ständer, Dreibeine,
11. Ziehen Sie das Netzkabel bei Gewitter oder bei längerer Nichtbenutzung des
12. Lassen Sie jegliche Reparatur- und Wartungsarbeiten nur von qualifiziertem
Halterungen oder Tische, die vom Hersteller zugelassen sind oder
zusammen mit dem Gerät verkauft werden. Falls Sie einen Rollwagen
verwenden, dürfen Sie die Einheit aus Gerät und Rollwagen nur mit
Vorsicht bewegen, damit Verletzungen durch ein mögliches Umkippen
ausgeschlossen sind.
Gerätes aus der Steckdose.
Fachpersonal durchführen. Wartungsarbeiten sind in folgenden Fällen nötig:
Bei jeglichen Beschädigungen wie z.B. des Netzkabels oder Netzsteckers,
wenn Flüssigkeiten oder Gegenstände in das Gehäuse gelangt sind, das Gerät
Regen oder Feuchtigkeit ausgesetzt wurde, fallen gelassen wurde oder nicht
ordnungsgemäß funktioniert.
Gesetzliche Hinweise
Dieses Gerät erfüllt die Bestimmungen in Teil 15 der FCC-Vorschriften und die
lizenzfreien Standards von Industry Canada. Der Betrieb unterliegt den beiden
folgenden Bedingungen: (1) dieses Gerät darf keine Störungen verursachen und (2)
dieses Gerät muss jegliche Störungen tolerieren, einschließlich Störungen, die zu
unerwünschten Betriebsstörungen führen.
Dieses Produkt entspricht allen Anforderungen der geltenden EURichtlinien. Die vollständige Konformitätserklärung ist einsehbar unter
www.Bose.com/compliance.
Informationen über Produkte, die elektrische Störungen verursachen (Hinweis zur
FCC-Einhaltung für die USA)
Hinweis: Dieses Gerät wurde geprüft. Es stimmt mit den Grenzwerten für digitale
Geräte der Klasse A gemäß Teil 15 der FCC-Vorschriften überein. Diese Grenzwerte
sollen einen angemessenen Schutz gegen elektromagnetische Störungen beim
Betrieb in gewerblicher Umgebung gewährleisten. Dieses Gerät erzeugt und
verwendet Hochfrequenzstrahlung und kann sie auch aussenden. Daher verursacht
das Gerät, wenn die Installation und Benutzung nicht in Übereinstimmung mit
dieser Bedienungsanleitung erfolgt, möglicherweise Störungen des Funkverkehrs.
Beim Betrieb dieses Geräts in Wohngebieten können erhebliche Störungen des
Funkverkehrs verursacht werden. Eventuell daraus entstehende Kosten trägt allein
der Benutzer des Geräts.
Veränderungen am Gerät, die nicht durch die Bose Corporation autorisiert wurden,
können zur Folge haben, dass die Betriebserlaubnis für das Gerät erlischt.
Abgeschirmte Kabel müssen den gesetzlichen Vorschriften entsprechen.
Dieses Produkt erfüllt die kanadische Richtlinie ICES-003, Klasse A.
CAN ICES-3(A)/NMB-3(A)
Dieses Produkt erfüllt alle Anforderungen nach EN55103-2 für elektromagnetische
Verträglichkeit.
WARNHINWEISE:
Dieses Produkt enthält magnetische Materialien. Wenden Sie sich an Ihren
Arzt, wenn Sie wissen möchten, ob dies den Betrieb Ihres implantierten
medizinischen Geräts beeinflussen kann.
• Dieses Produkt ist nicht für die Installation oder Verwendung in Feuchtbereichen
(zum Beispiel Schwimmbädern, Wasserparks, Räume mit Whirlpools, Saunas,
Dampfbäder und Eislaufbahnen) gedacht.
• Um Brände und Stromschläge zu vermeiden, darf dieses Produkt NICHT Regen,
Flüssigkeiten oder Feuchtigkeit ausgesetzt werden. Gilt nicht für Produkte mit
Klassifizierung IPX4 bis IPX9.
• Halten Sie das Produkt von Feuer und Wärmequellen fern. Stellen Sie KEINE
brennenden Kerzen oder Ähnliches auf das Gerät oder in die Nähe des Geräts.
• Nehmen Sie KEINE nicht genehmigten Änderungen an diesem Produkt vor.
• Verwenden Sie KEINEN Wechselrichter mit diesem Produkt.
• Verwenden Sie das Produkt NICHT in Fahrzeugen oder Booten.
• Verwenden Sie dieses Produkt nur mit dem im Lieferumfang enthaltenen Netzteil.
• Montieren oder platzieren Sie das Gerät NICHT in der Nähe von Wärmequellen
wie Heizkörpern, Wärmespeichern oder anderen Geräten (auch Verstärkern), die
Wärme erzeugen.
• Bringen Sie das ToneMatch® T4S/T8S Mischpult nicht an einem instabilen
Stativ an. Das Mischpult ist ausschließlich für die Anbringung mit einer ¼-ZollMontageschraube (6mm) vorgesehen und das Stativ muss mindestens ein Gerät
mit einem Gewicht von 1,9kg und einer Gesamtgröße von 214×311×83mm
tragen können. Bei Verwendung eines Stativs, das nicht auf die Größe und Masse
des T4S/T8S Mischpults ausgelegt ist, kann es zu Instabilität und gefährlichen
Situationen kommen, die zu Verletzungen führen können.
• Enthält kleine Teile, die verschluckt werden können: Erstickungsgefahr!
Nicht geeignet für Kinder unter drei Jahren.
HINWEISE:
• Die mit diesem System mitgelieferten Lautsprecher- und Verbindungskabel
sind nicht für den Wandeinbau zugelassen. Bitte sehen Sie in Ihren örtlichen
Bauvorschriften wegen des korrekten Kabeltyps nach, der für den Wandeinbau
erforderlich ist.
• Falls Sie den Netzstecker oder eine Mehrfachsteckdose verwenden, um das Gerät
von der Stromversorgung zu trennen, sollten Sie sicherstellen, dass Sie jederzeit
auf den Stecker zugreifen können.
• Aufgrund der Belüftungsanforderungen sollten Sie das Produkt nicht in
einem geschlossenen Raum, zum Beispiel in einer Wandnische oder in einem
geschlossenen Schrank, aufstellen.
Gefährliche Stoe oder Elemente
0
0
0
0
0
Polybromiertes
Diphenylether
(PBDE)
0
0
0
0
0
Kadmium
(Cd)
0
0
0
0
0
Sechswertiges
Chrom
(CR(VI))
0
0
0
0
0
Polybromiertes
Biphenyl (PBB)
Quecksilber
Blei
(Hg)
Name des Teils
PCBs
Metallteile
Kunststoteile
Lautsprecher
Kabel
Diese Tabelle wurde in Übereinstimmung mit den Bestimmungen von SJ/T 11364 erstellt.
0: Gibt an, dass dieser giftige oder gefährliche Sto, der in allen homogenen Materialien für dieses Teil
enthalten ist, unter den Grenzwerten gemäß GB/T 26572 liegt.
X: Gibt an, dass dieser giftige oder gefährliche Sto, der in mindestens einem der homogenen
Materialien enthalten ist, die für dieses Teil verwendet wurden, über den Grenzwerten gemäß GB/T
26572 liegt.
(Pb)
X
0
X
0
00
0
X
0
X
Dieses Symbol bedeutet, dass das Produkt nicht mit dem Hausmüll entsorgt
werden darf, sondern bei einer geeigneten Recycling-Sammelstelle abgegeben
werden muss. Die ordnungsgemäße Entsorgung und das Recycling tragen dazu
bei, die natürlichen Ressourcen, die Gesundheit und die Umwelt zu schützen.
Weitere Informationen zur Entsorgung und zum Recycling dieses Produkts
erhalten Sie von Ihrer zuständigen Kommune, Ihrem Entsorgungsdienst oder
dem Geschäft, in dem Sie dieses Produkt gekauft haben.
Von DCE Safety zur Verfügung gestellt
Deutsch– 2
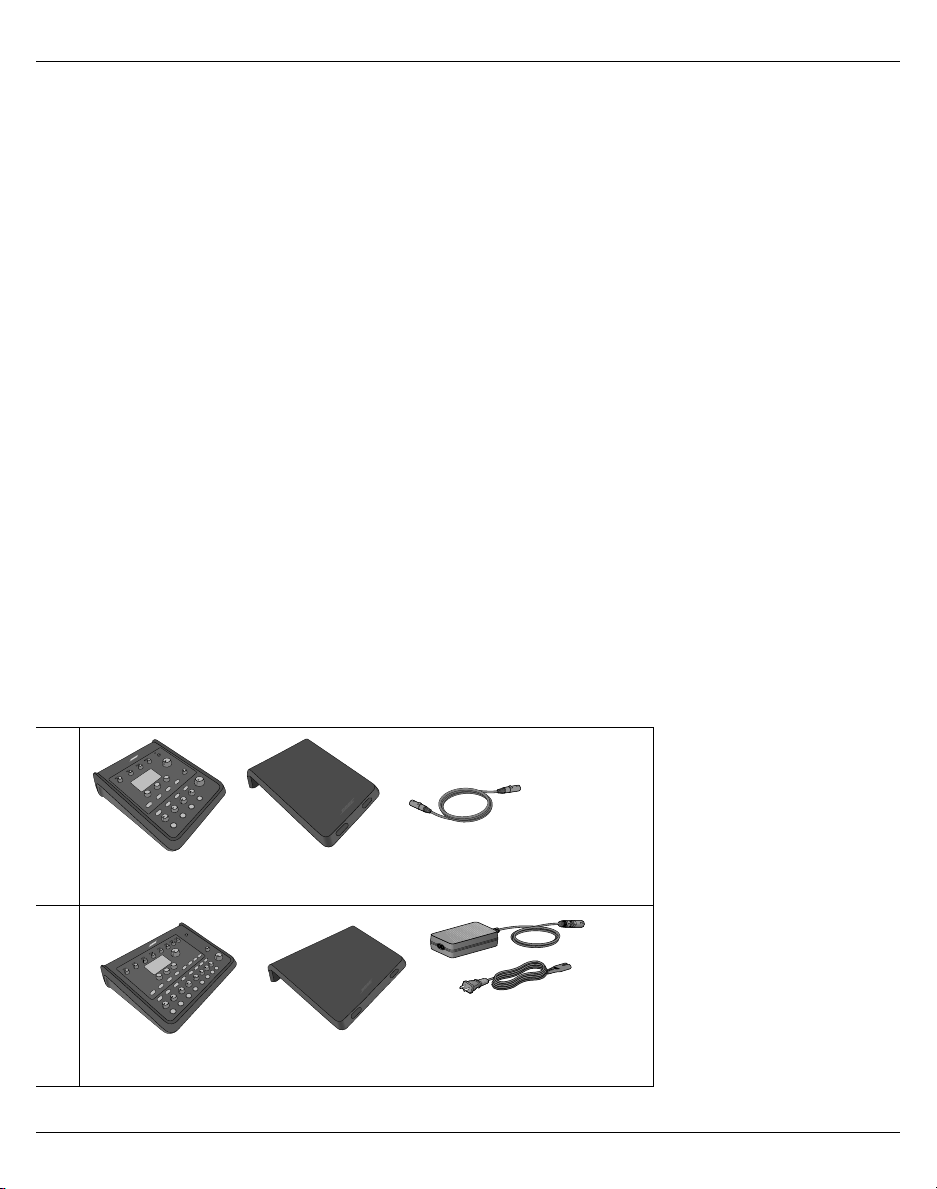
Einführung
Produktübersicht
Die Welt der Musik gehört Ihnen: Die T4S und T8S ToneMatch® Mischpulte bieten Musikern eine kompakte Schnittstelle mit
4bzw. 8Kanälen. Die leistungsstarken DSP-Engines und die intuitiven Steuerelemente überzeugen mit EQ-, Dynamik- und
Eektverarbeitung in Studioqualität. Mit der integrierten Bose® ToneMatch® Signalverarbeitung und dem zEQ beeindrucken
Sie Ihr Publikum, insbesondere im Verbund mit einem Bose L1 oder F1 System. So behalten Sie jederzeit die durchgehende
Kontrolle über den Klang. Diese robusten ToneMatch Mischpulte mit den grigen Steuerelementen, den leicht ablesbaren LEDAnzeigen und den immer wieder abrufbaren Szenarien liefern die ideale Grundlage für Ihren souveränen Auftritt. ToneMatch
Mischpulte sind die ultimativen Bühnenbegleiter für jeden Künstler, der etwas auf sich hält.
Produktmerkmale
Leistungsstarke Audioverarbeitung
• Topaktuelle Eekte in Studioqualität mit moderner
digitaler Audioverarbeitung
• Verfügbare Eekte: Kompressor, Limiter, De-Esser, Noise
Gate, Chorus, Flanger, Phaser, Tremolo, Delay, Hall und
viele mehr
• Bose® ToneMatch® Signalverarbeitung für Stimmen und
Instrumente mit naturgetreuem Klang
• zEQ justiert den Klang der ToneMatch-Presets zielgerichtet
für eine schnelle, eektive Anpassungen
• Unabhängige ToneMatch, EQ-, Dynamik- und
Eekteinstellung pro Kanal
• Halleekt für AUX-Sends, globaler gemeinsamer Hall über
alle Kanäle hinweg
• Masterausgang-EQ zur Anpassung der Akustik am
Veranstaltungsort
• Durchgehende Klangoptimierung bei Verwendung im
Verbund mit Bose L1 und F1 Systemen
Mühelose Livesteuerung
• Grige Steuerelemente und klare Anzeigen für Musiker
und DJs im Live-Einsatz
• Schnell erlernbare Bedienelemente
• Tap-Tempo-Verzögerung, Stimmgerät und wiederabrufbare
Szenarien integriert
• Leicht ablesbare LED-Anzeige und beleuchtete
Steuerelemente für die einfache Bedienung auch bei
schwachem Bühnenlicht
Anschlüsse auf engstem Raum
• Unvergleichliche Anschluss- und Steuerungsmöglichkeiten
in einem kompakten Digital-Stereo-Mischpult
• Vier (T4S) oder acht (T8S) hochwertige AudioVorverstärker mit XLR-Kombianschlüssen (für Mikrofone
oder Instrumente) und zuschaltbarer Phantomspeisung
• Zwei AUX-Eingänge für Zuspielgeräte
• Zwei (T4S) oder vier (T8S) AUX-Sends
• USB-A und USB-B für Wiedergabe über USB-Laufwerk oder
als PC-/Mac-Schnittstelle
• ToneMatch Ausgänge für digitalen Audio- und
Stromanschluss (nur T4S)
• Symmetrische 6,35-mm-Klinke- und (nur T8S) XLRStereoausgänge
• Unabhängiger Kopfhörerausgang
Komfortable Funktionen für jeden Auftritt
• Robustes Gehäuse mit Schutzabdeckung
(Magnethalterung) zum Schutz der Steuerelemente und
Anschlüsse
• Mit ToneMatch Kabel zum Anschließen an ein Bose L1
ModelII oder L1 Model 1S System für digitalen Audio- und
Stromanschluss (T4S) bzw. mit Universalnetzteil (T8S)
• Einsatz an der Unterseite zum Anbringen an
handelsübliche Kamerastative, sodass das ToneMatch
Mischpult immer in Griweite bleibt
Auspacken
Lieferumfang des Mischpults:
T4S
T4S ToneMatch Mischpult und Abdeckung ToneMatch Kabel
T8S
ToneMatch NetzteilT8S ToneMatch Mischpult und Abdeckung
Hinweis: Weitere Informationen zur Bedienung, zu den werkseitigen Einstellungen sowie zu Pflege und Wartung sind der
Bedienungsanleitung zu entnehmen (online unter www.Bose.com).
3– Deutsch

T4S ToneMatch® Mischpult
Bedienfeld
Abbildung1. T4S Bedienfeld
q
w
Steuerelemente und Anschlussleisten
d
e
s
r
t
y
u
a
f
o
i
q EINGANGSSIGNAL-/ÜBERSTEUERUNGSANZEIGEN (1–4): Farbige Darstellung des Eingangssignalmodus.
Grün: Anliegendes Eingangssignal
Rot: Übersteuerung des Eingangs
w TRIMREGLER (1–4): Anpassen der Eingangsempfindlichkeit für den jeweiligen Kanal.
e ANZEIGE: Funktionsmenüs und Systeminformationen.
r EDIT-CONTROL: Drei Regler mit Druck-/Drehfunktion zum Auswählen oder Anpassen von Optionen/
Werten in der Anzeige.
t CH-BEARBEITUNGSTASTEN (1–4): Auswahl des gewünschten Kanals.
y EFFEKT-STUMMSCHALTUNGSTASTEN (1–4): Deaktivieren der Mod-, Verzögerungs- und Halleekte im
ausgewählten Kanal.
u LAUTSTÄRKEREGLER (1–4): Anpassen der Lautstärke für den jeweiligen Kanal.
i STUMMSCHALTUNGSTASTEN (1–4): Stummschalten der Audioausgabe für den jeweiligen Kanal.
o MASTER-LAUTSTÄRKEREGELUNG: Anpassen des Gesamtausgangspegels.
a KOPFHÖRER-LAUTSTÄRKEREGELUNG: Anpassen der Lautstärke für den Kopfhörerausgang.
s DREHREGLER: Einstellen von globalen und kanalspezifischen Parametern (Anpassen mit der Edit-Control).
d PHANTOMSPEISUNGSSCHALTER: Anlegen einer Spannung von +48V an den Eingangskanälen1–4. Wenn
eine rote LED-Anzeige leuchtet, ist die Phantomspeisung aktiviert.
f KOPFHÖRERBUCHSE: Nur für Kopfhörer mit einer Impedanz von mindestens 24Ω.
Deutsch– 4

Steuerelemente und Anschlussleisten
Anschlussleiste
Abbildung2. T4S Anschlussleiste
q w e r t y
MONO
M
USB AUDIO
( )
uio
q EIN/AUS-SCHALTER: Ein- und Ausschalten des Mischpults.
w USB2.0 TypB: USB-Schnittstelle zum Anschließen des Mischpults an den Computer.
e USB2.0 TypA: USB-Schnittstelle zum Streamen von Audiosignalen von einem Flash-Laufwerk.
r ANALOGE AUSGÄNGE (L/R): Hauptausgang für die analoge Audioausgabe. Für symmetrische Klinke- oder
asymmetrische Klinke-Kabel (6,35mm).
t AUX-AUSGANG: Zwei benutzerdefinierbare Analogausgänge. Konfiguration für Pre-Fader, Post-EQ und
Eekte bzw. Post-Fader-Ausgang möglich. Für symmetrische 6,35-mm-Klinke-Kabel.
y AUXIN: Analogeingangskanäle5/6. Für symmetrische Klinke- oder asymmetrische Klinke-Kabel (6,35mm)
für Line-Pegel-Eingänge. Für Stereo-Eingangssignale geeignet.
u EINGÄNGE1–4:
symmetrische
Gitarren.
i HAUPTDIGITALAUSGANG (L): Digitaler Stereoanschluss für zwei L1® Model 1S/II Systeme. Hinweis: Nur im
Stereobetrieb mit Hauptdigitalausgang (R).
o
STROMANSCHLUSS/HAUPTDIGITALAUSGANGR: Digitalausgang für das L1 Model 1S/II System. Die
Stromversorgung des T4S Mischpults Erfolgt über den Standfuß des L1 Model 1S/II. Mit dem ToneMatch
Netzteil (nicht im Lieferumfang des T4S enthalten) ist auch die Stromversorgung über eine Netzsteckdose
möglich. Für das im Lieferumfang enthaltene ToneMatch® Kabel.
VORSICHT: An den ToneMatch Anschluss kann ein handelsüblicher RJ-45-Stecker angeschlossen
werden. Das T4S darf jedoch NICHT mit einem Computer oder einem Telefonnetz verbunden werden.
Analogeingangskanäle1–4. Für symmetrische XLR-Kabel (für Mikrofone) sowie für
Klinke
- oder asymmetrische
Klinke
-Kabel (6,35mm) für hochohmige Eingangssignale wie
5– Deutsch

T8S ToneMatch® Mischpult
Bedienfeld
Abbildung3. T8S Bedienfeld
Steuerelemente und Anschlussleisten
q
w
e
f
d
s
r
t
a
y
u
o
i
g
q EINGANGSSIGNAL-/ÜBERSTEUERUNGSANZEIGEN (1–8): Farbige Darstellung des Eingangssignalmodus.
Grün: Anliegendes Eingangssignal
Rot: Übersteuerung des Eingangs
w TRIMREGLER (1–8): Anpassen der Eingangsempfindlichkeit für den jeweiligen Kanal.
e ANZEIGE: Funktionsmenüs und Systeminformationen.
r EDIT-CONTROL: Drei Regler mit Druck-/Drehfunktion zum Auswählen oder Anpassen von Optionen/
Werten in der Anzeige.
t CH-BEARBEITUNGSTASTEN (1–8): Auswahl des gewünschten Kanals.
y EFFEKT-STUMMSCHALTUNGSTASTEN (1–8): Deaktivieren der Mod-, Verzögerungs- und Halleekte im
ausgewählten Kanal.
u LAUTSTÄRKEREGLER (1–8): Anpassen der Lautstärke für den jeweiligen Kanal.
i STUMMSCHALTUNGSTASTEN (1–8): Stummschalten der Audioausgabe für den jeweiligen Kanal.
o MASTER-LAUTSTÄRKEREGELUNG: Anpassen des Gesamtausgangspegels.
a KOPFHÖRER-LAUTSTÄRKEREGELUNG: Anpassen der Lautstärke für den Kopfhörerausgang.
s STEREO-AUSGANGSMESSGERÄT: Optische Anzeige des Ausgangspegels.
d DREHREGLER: Einstellen von globalen und kanalspezifischen Parametern (Anpassen mit der Edit-Control).
f PHANTOMSPEISUNGSSCHALTER: Anlegen einer Spannung von +48V an den Eingangskanälen1–8. Wenn
eine rote LED-Anzeige leuchtet, ist die Phantomspeisung aktiviert.
g KOPFHÖRERBUCHSE: Nur für Kopfhörer mit einer Impedanz von mindestens 24Ω.
Deutsch– 6

Steuerelemente und Anschlussleisten
Anschlussleiste
Abbildung4. T8S Anschlussleiste
q w e r t y
USB AUDIO
MAIN OUT
M
( )
MONO
uio
q EIN/AUS-SCHALTER: Ein- und Ausschalten des Mischpults.
w USB2.0 TYPB: USB-Schnittstelle zum Anschließen des Mischpults an den Computer.
e USB2.0 TYPA: USB-Schnittstelle zum Streamen von Audiosignalen von einem Flash-Laufwerk.
r ANALOGE AUSGÄNGE (L/R): Hauptausgang für die analoge Audioausgabe. Für symmetrische Klinke- oder
asymmetrische Klinke- Kabel (6,35mm).
t AUX-AUSGANG: Vier benutzerdefinierbare Analogausgänge. Konfiguration für Pre-Fader, Post-EQ und
Eekte bzw. Post-Fader-Ausgang möglich. Für symmetrische TRS- oder asymmetrische Klinke- Kabel
(6,35mm).
y AUXIN: Analogeingangskanäle9/10. Für symmetrische Klinke- oder asymmetrische Klinke- Kabel
(6,35mm) für Line-Pegel-Eingänge. Für Stereo-Eingangssignale geeignet.
u EINGÄNGE1–8: Analogeingangskanäle1–8. Für symmetrische XLR-Kabel (für Mikrofone) sowie für
symmetrische Klinke- oder asymmetrische Klinke- Kabel (6,35mm) für hochohmige Eingangssignale wie
Gitarren.
i XLR-STEREOAUSGANG: Stereo-Analogausgang für symmetrische XLR-Kabel.
o DIGITALER STROMANSCHLUSS: Für das ToneMatch Netzteil (siehe „ToneMatch® Netzteil anschließen“ auf
Seite12).
HINWEIS: Das T8S kann NICHT digital mit einem L1® Model 1S/II verbunden werden.
VORSICHT: An den ToneMatch Anschluss kann ein handelsüblicher RJ-45-Stecker angeschlossen
werden. Das T8S darf jedoch NICHT mit einem Computer oder einem Telefonnetz verbunden werden.
7– Deutsch

Systemeinrichtung
Abdeckung abnehmen/anbringen
Das T4S/T8S ToneMatch® Mischpult wird mit angebrachter Abdeckung auf dem oberen Bedienfeld geliefert.
Die Abdeckung schützt das Bedienfeld beim Transportieren oder Aufbewahren des Mischpults.
So wird die Abdeckung abgenommen:
1. Mit beiden Daumen auf die Aussparungen an der Vorderseite der Abdeckung drücken und die Abdeckung
nach vorne ziehen.
2. Die Abdeckung an der hinteren Kante fassen und abheben.
So wird die Abdeckung angebracht:
1. Die Abdeckung von hinten nach vorn auf das Mischpult aufschieben.
2. Die Magnethalterung der Abdeckung haftet von selbst und rastet am Mischpult ein.
Abbildung5. Abdeckung abnehmen und anbringen
Deutsch– 8

Systemeinrichtung
Montagemöglichkeiten
Das T4S/T8S ist mit einer ¼-Zoll-Gewindehalterung (mm) ausgestattet. Das Gerät lässt sich daher
an verschiedenen handelsüblichen Produkten mit einer ¼-Zoll-Montageschraube (6mm) anbringen,
beispielsweise an einem Kamerastativ.
T4S/T8S an einem Kamerastativ anbringen
1. Die Beine des Kamerastativs ausziehen und in der gewünschten Höhe fixieren.
2. Die Halterung oben am Kamerastativ abnehmen und mit der Schraube an der Unterseite des T4S/T8S
befestigen. Die kleine Einkerbung am T4S/T8S mit dem Vorsprung an der Halterung ausrichten. Siehe
Abbildung6.
3. Die Halterung mit dem T4S/T8S wieder auf dem Kamerastativ befestigen. Siehe Abbildung8.
Abbildung6. Halterung am T4S befestigen Abbildung8. T4S mit Halterung auf dem Stativ anbringen
Abbildung7. Halterung am T4S
HINWEIS: Bringen Sie das ToneMatch® T4S/T8S Mischpult nicht an einem instabilen Stativ an. Das Mischpult
ist ausschließlich für die Anbringung mit einer ¼-Zoll-Montageschraube (6mm) vorgesehen und das Stativ
muss mindestens ein Gerät mit einem Gewicht von 1,9kg und einer Gesamtgröße von 214×311×83mm tragen
können. Bei Verwendung eines Stativs, das nicht auf die Größe und Masse des T4S/T8S Mischpults ausgelegt
ist, kann es zu Instabilität und gefährlichen Situationen kommen, die zu Verletzungen führen können.
9– Deutsch

Systemeinrichtung
T4S über Digitalanschluss verbinden
1. Das L1 Model 1S/II und das T4S müssen ausgeschaltet und die Master-Lautstärkeregelung am T4S muss
auf den kleinsten Wert eingestellt sein.
2. Das ToneMatch® Kabel mit dem Stromanschluss/Hauptdigitalausgang(R) am T4S verbinden. Den anderen
Stecker des ToneMatch Kabels mit dem ToneMatch Anschluss am Standfuß verbinden.
Hinweis: Soll das T4S an zwei L1 Model 1S/II Standfüße angeschlossen werden, muss der zweite Standfuß
über ein ToneMatch Kabel mit dem Hauptdigitalausgang(L) am T4S verbunden werden.
3. Zuerst das Mischpult und dann den L1 Model 1S/II Standfuß einschalten.
4. Die Instrumente anschließen und die Pegel einstellen. Ausführliche Anweisungen sind der
Bedienungsanleitung unter www.Bose.com zu entnehmen.
Abbildung9. Zwei L1 Model II Systeme mit Digitalanschluss an einem T4S
MONO
USB AUDIO
M
( )
Hinweis: Das T8S kann nicht digital angeschlossen und nicht über das L1 Model 1S/II mit Strom versorgt werden.
Deutsch– 10

Systemeinrichtung
US
O
M
T4S/T8S über Analoganschluss verbinden
1. Das anzuschließende Gerät und das T4S/T8S müssen ausgeschaltet und die Master-Lautstärkeregelung
am T4S/T8S muss auf den kleinsten Wert eingestellt sein.
2. Ein oder zwei Geräte über symmetrische XLR-Kabel mit den XLR-Stereoausgängen am T4S/T8S
verbinden (siehe Abbildung10).
Hinweis: Das T4S/T8S kann über ein 6,35-mm-Klinke-Kabel (separat erhältlich) am Analogausgang(R)
mit einem Gerät verbunden werden. Den anderen Stecker des Klinke Kabels mit dem Analogeingang des
Geräts verbinden. Soll das T4S/T8S mit zwei Geräten verbunden werden, muss das zweite Gerät über ein
6,35-mm-Klinke-Kabel mit dem Analogausgang(L) am T4S/T8S verbunden werden.
3. Ein ToneMatch® Netzteil mit dem Stromanschluss am T4S/T8S verbinden und an eine Netzsteckdose
anschließen. Siehe „ToneMatch® Netzteil anschließen“ auf Seite12.
4. Zuerst das T4S/T8S Mischpult und dann das Gerät einschalten.
5. Die Instrumente anschließen und die Pegel einstellen. Ausführliche Anweisungen sind der
Bedienungsanleitung unter www.Bose.com zu entnehmen.
Abbildung10. Zwei F1 Systeme mit Analoganschluss an einem T8S
B AUDI
AIN OUT
USB AUDIO
MONO
MAIN OUT
M
( )
11– Deutsch

Systemeinrichtung
ToneMatch® Netzteil anschließen
Das ToneMatch Netzteil versorgt das T4S/T8S Mischpult mit Strom.
1. Das Netzkabel mit dem Stromanschluss am T4S/T8S verbinden.
2. Das Netzkabel an das Netzteil anschließen.
3. Den anderen Stecker des Netzkabels an eine Netzsteckdose anschließen.
4. Den Ein/Aus-Schalter des T4S/T8S in die Position „EIN“ bringen.
Hinweis: Das T8S wird mit dem im Lieferumfang enthaltenen Netzteil betrieben. Im Lieferumfang des T4S ist
kein Netzteil enthalten, da zum Betrieb dieses Geräts kein Netzteil erforderlich ist.
Abbildung11. T4S an die Stromversorgung anschließen
Deutsch– 12
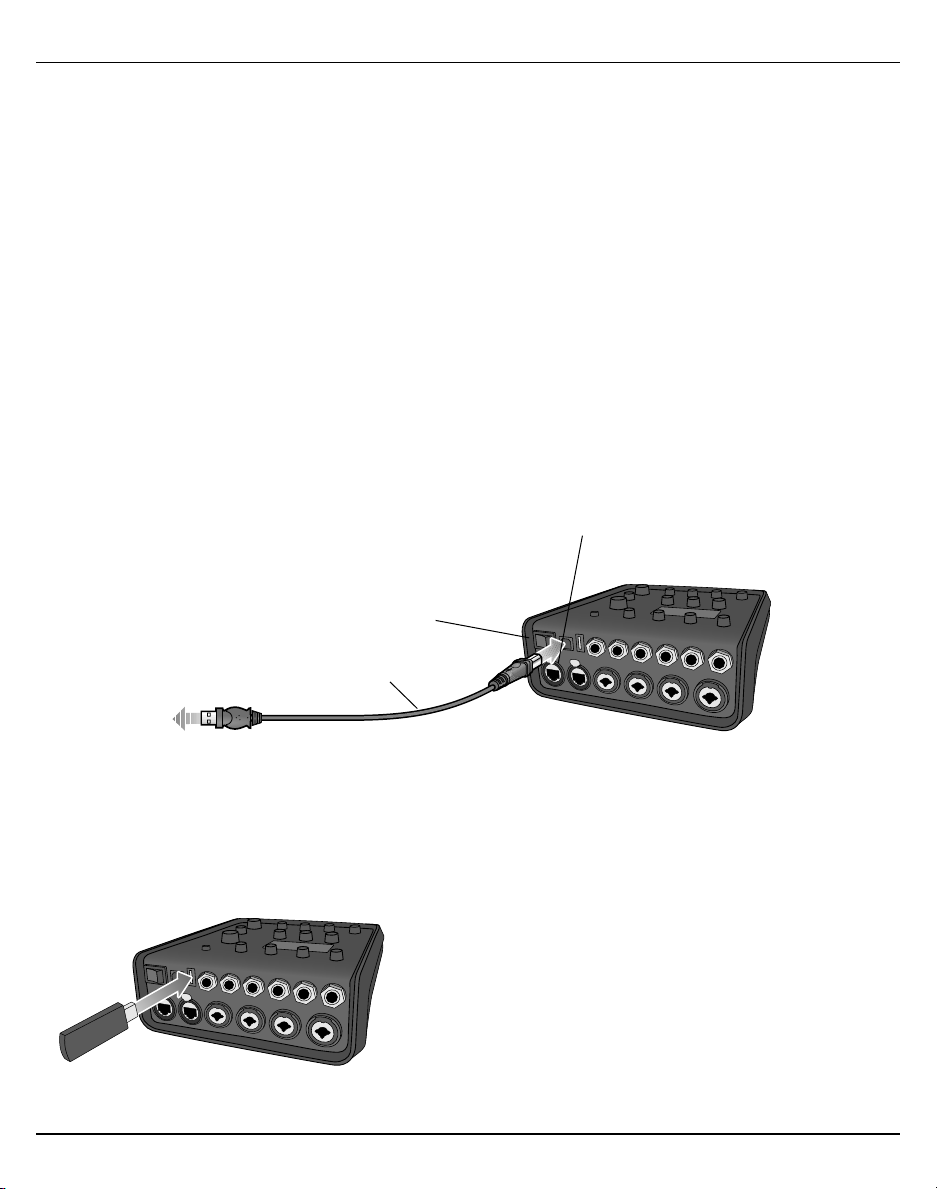
Systemeinrichtung
T4S/T8S mit dem Computer verbinden
Das T4S/T8S lässt sich über den USB-Anschluss mit einem Computer verbinden. So können Auftrittsszenarien
auf einen Computer heruntergeladen oder Systemaktualisierungen installiert werden. Weitere Informationen
zum Aktualisieren des Systems sind unter www.Bose.com/livesound zu finden.
Wenn das T4S/T8S mit einem Computer verbunden ist, kann es als USB-Audiogerät für die Aufnahme/
Wiedergabe fungieren.
Hinweis: Das T4S/T8S wird mit 48kHz/24Bit betrieben. Bei Verwendung einer Aufnahme-Software müssen
die Software-Einstellungen entsprechend für 48kHz/24Bit konfiguriert werden.
Hinweis: Das T4S/T8S wird über ein USB-Kabel (TypA auf TypB, nicht im Lieferumfang enthalten) mit dem
Computer verbunden.
1. Das Mischpult an eine Stromversorgung anschließen (ToneMatch® Netzteil bzw. [nur T4S] L1 Model 1S/II).
2. Das USB-Kabel mit dem USB-2.0-Anschluss (TypB) am Mischpult verbinden (Abbildung12).
3. Den anderen Stecker des USB-Kabels mit einem USB-Anschluss am Computer verbinden.
4. Das Mischpult einschalten.
Abbildung12. USB-Verbindung für T4S
ToneMatch Anschluss: Zu einem L1 Model 1S/II
System oder einem ToneMatch Netzteil
Ein/Aus-Schalter
USB-Kabel
(TypA auf TypB)
Zum USBAnschluss am
Computer
Flash-Laufwerk mit dem T4S/T8S verbinden
Zur Wiedergabe von Audio-Tracks über das Mischpult ein USB-2.0/3.0-Flash-Laufwerk mit WAV-/MP3Dateien mit dem USB-2.0-Anschluss (TypA) verbinden.
Abbildung13. Flash-Laufwerk mit dem T4S verbinden
13– Deutsch

Kontaktinformationen
Besuchen Sie unsere Website unter www.Bose.com.
Nord- und Südamerika
(USA, Kanada, Mexiko, Mittelamerika, Südamerika)
Bose Corporation
Framingham, MA 01701 USA
Corporate Center: 508-879-7330
Americas Professional Systems,
Technischer Support: 800-994-2673
Australien
Bose Pty Limited
Unit 3/2 Holker Street
Newington NSW Australia
61 2 8737 9999
Belgien
Bose N.V. / S.A
Limesweg 2, 03700
Tongeren, Belgien
012-390800
China
Bose Electronics (Shanghai) Co Ltd
25F, L’Avenue
99 Xianxia Road
Shanghai, P.R.C. 200051 China
86 21 6010 3800
Frankreich
Bose S.A.S
26-28 avenue de Winchester
78100 St. Germain en Laye, France
01-30-61-63-63
Deutschland
Bose GmbH
Max-Planck-Straße 36D 61381
Friedrichsdorf, Deutschland
06172-7104-0
Hongkong
Bose Limited
Suites 2101-2105, Tower One, Times Square
1 Matheson Street, Causeway Bay, Hong Kong
852 2123 9000
Indien
Bose Corporation India Private Limited
Salcon Aurum, 3rd Floor
Plot No. 4, Jasola District Centre
New Delhi – 110025, India
91 11 43080200
Italien
Bose SpA
Centro Leoni A – Via G. Spadolini
5 20122 Milano, Italy
39-02-36704500
Japan
Bose Kabushiki Kaisha
Sumitomo Fudosan Shibuya Garden Tower 5F
16-17, Nanpeidai-cho
Shibuya-Ku, Tokyo, 150-0036, Japan
TEL 81-3-5489-0955
www.bose.co.jp
Niederlande
Bose BV
Nijverheidstraat 8 1135 GE
Edam, Nederland
0299-390139
Großbritannien
Bose Ltd
1 Ambley Green, Gillingham Business Park
KENT ME8 0NJ
Gillingham, England
0870-741-4500
Zusätzliche Informationen
Informationen zu
Importeuren
Europäische Union
Bose Products B.V., Gorslaan 60, 1441 RG
Purmerend, Niederlande
China
Bose Electronics (Shanghai) Company
Limited, Part C, Plan 9, No. 353 North Riying
Road, China (Shanghai) Pilot Free Trade Zone
Taiwan
Bose Taiwan Branch, 9F-A1, No. 10, Section 3,
Minsheng East Road, Taipei City 104, Taiwan
Tel: +886-2-2514 7676
Mexiko
Bose de México, S. de R.L. de C.V., Paseo de
las Palmas 405-204, Lomas de Chapultepec,
11000 México, D.F.
Tel.: +5255 (5202) 3545
Weitere Länder siehe Website
Zusätzliche Informationen
Weitere Informationen zur Bedienung, zu den werkseitigen Einstellungen sowie zu Pflege und Wartung sind
der Bedienungsanleitung zu entnehmen (online unter www.Bose.com).
Eingeschränkte Garantie
Für Ihr Produkt gilt eine eingeschränkte Garantie. Informationen zur Gewährleistung finden Sie unter
www.Bose.com.
Die mit dem Produkt mitgelieferten Garantieangaben gelten nicht in Australien und Neuseeland. Nähere
Informationen zu unserer Garantie in Australien und Neuseeland finden Sie auf unserer Website unter
www.bose.com/au/warranty bzw. www.bose.co/nz/warranty.
Herstellungsdatum
Die achte Zier in der Seriennummer gibt das Herstellungsjahr an: „6“ ist 2006 oder 2016.
Deutsch– 14

Informazioni importanti sulla sicurezza
Nome e contenuto delle sostanze o degli elementi tossici o pericolosi
Leggere e conservare tutte le istruzioni per la
sicurezza e per l'uso.
1. Leggere queste istruzioni.
2. Conservare queste istruzioni.
3. Prestare attenzione a tutte le avvertenze.
4. Seguire tutte le istruzioni.
5. Non utilizzare l'apparecchio in prossimità di acqua.
6. Per la pulizia utilizzare un semplice panno asciutto.
7. Non ostruire le aperture di ventilazione. Installare il prodotto in conformità con
le istruzioni fornite dal produttore.
8. Fare in modo che il cavo di alimentazione non venga calpestato o schiacciato,
soprattutto in corrispondenza di spine, prese e nel punto di uscita
dall'apparecchio.
9. Utilizzare solo sistemi di fissaggio/accessori specificati dal produttore.
10. Utilizzare solo carrelli, supporti, treppiedi, stae o tavoli specificati dal
11. Scollegare l'apparecchio durante i temporali o quando non utilizzato per lunghi
12. Adarsi a personale qualificato per tutti gli interventi di assistenza. Gli
produttore o venduti insieme all'apparecchio. Quando si utilizza un
carrello, prestare attenzione durante lo spostamento dell'insieme
carrello/apparecchio per evitare di rovesciarlo causando danni.
periodi di tempo.
interventi di assistenza si rendono necessari in caso di danni di qualsiasi
tipo all'apparecchio; ad esempio se il cavo di alimentazione o la spina sono
danneggiati, se è stato versato liquido o sono caduti oggetti sull'apparecchio,
se l'apparecchio è stato esposto a pioggia o umidità, se non funziona
normalmente o è caduto.
Informazioni sulle normative
Questo dispositivo è conforme alla parte 15 delle Norme FCC e agli standard
Industry Canada RSS esenti da licenza. Il funzionamento è soggetto alle due
seguenti condizioni: (1) il dispositivo non può causare interferenze dannose e (2)
deve accettare le interferenze ricevute, incluse quelle che potrebbero causare un
funzionamento indesiderato del dispositivo.
Questo prodotto è conforme a tutti i requisiti pertinenti delle direttive UE.
La dichiarazione di conformità completa è disponibile all’indirizzo
www.Bose.com/compliance.
Informazioni sui prodotti che generano interferenze elettriche (Conformità FCC
per gli Stati Uniti)
Nota: questa apparecchiatura è stata sottoposta a collaudo ed è risultata conforme
ai limiti relativi ai dispositivi digitali di Classe A previsti dalla Parte 15 delle norme
FCC. Tali limiti sono stati fissati allo scopo di assicurare un'adeguata protezione
da interferenze nocive quando l'apparecchiatura è utilizzata in un'installazione
commerciale. Questa apparecchiatura genera, utilizza e può irradiare energia a
radiofrequenza e, se non installata e utilizzata in conformità con il manuale di
istruzioni, può causare interferenze con le locali comunicazioni radiofoniche. L'utilizzo
di questa apparecchiatura in un'area residenziale può provocare interferenze nocive,
nel qual caso l'utente dovrà adottare misure correttive a proprie spese.
Eventuali modifiche o alterazioni non espressamente approvate da Bose Corporation
possono rendere nulla l'autorizzazione dell'utente all'utilizzo dell'apparecchiatura stessa.
La conformità alle normative richiede l'utilizzo di cavi schermati.
Questo prodotto è conforme alle specifiche canadesi ICES-003 di Classe A.
CAN ICES-3(A)/NMB-3(A)
Il prodotto è conforme a tutti i requisiti di immunità EN55103-2 per ambienti
elettromagnetici di tipo E2.
AVVISI/AVVERTENZE:
Questo prodotto contiene materiale magnetico. Rivolgersi al proprio medico
per gli eventuali eetti del prodotto sui dispositivi medici impiantabili attivi.
• Il prodotto non deve essere installato o utilizzato in aree di servizio o
intrattenimento vicine all'acqua (ad es. piscine coperte, parchi acquatici al chiuso,
sale con vasche riscaldate, saune, bagni turchi e piste di pattinaggio al chiuso).
• Per ridurre il rischio di incendio o scosse elettriche, questo prodotto NON deve
essere esposto a pioggia, liquidi o umidità. Non si applica ai prodotti con grado
di protezione IPX4-9.
• Tenere il prodotto lontano dal fuoco e da fonti di calore. NON collocare sorgenti di
fiamme libere (ad esempio, candele accese) sul prodotto o in prossimità di esso.
• NON apportare alterazioni non autorizzate al prodotto.
• NON utilizzare un power inverter con questo prodotto.
• NON utilizzare all'interno di veicoli o imbarcazioni.
• Utilizzare questo prodotto esclusivamente con l'alimentatore fornito in dotazione.
• NON posizionare o installare la staa o il prodotto in prossimità di fonti di calore,
quali caminetti, termosifoni, radiatori o altri apparati (inclusi amplificatori) che
emettano calore.
• Non utilizzare il mixer ToneMatch® T4S/T8S su treppiedi/stativi instabili. Il mixer
è progettato per l'utilizzo solo su supporti con filettatura da 6mm, con un
treppiede/stativo in grado di sostenere dispositivi di peso pari ad almeno 1,9 kg
e dimensioni d'ingombro pari a 214 x 311 x 83 mm. L'uso di un treppiede/stativo
non progettato per supportare le dimensioni e la massa del mixer T4S/T8S può
portare a condizioni di instabilità e pericolo e causare infortuni.
•
Contiene pezzi di piccole dimensioni che possono rappresentare un
pericolo di soocamento. Non adatto per bambini di età inferiore a 3 anni.
NOTE:
• I cavi per diusori e di interconnessione forniti in dotazione con questo sistema
non sono approvati per l'installazione all’interno di muri. Consultare le norme
locali per l'edilizia per individuare i tipi di cavi richiesti per l'installazione
all’interno di muri.
• La spina dell'alimentazione o dell'accoppiatore deve essere raggiungibile
facilmente e rapidamente se utilizzata come dispositivo di spegnimento.
• A causa dei requisiti di ventilazione, Bose sconsiglia di posizionare il prodotto in
spazi chiusi o angusti, ad esempio nicchie a parete o armadietti.
Sostanze ed elementi tossici o pericolosi
Cromo
0
0
0
0
0
Bifenile
polibromurato
(PBB)
Piombo
Mercurio
Cadmio
(Pb)
Nome parte
Circuiti stampati
Parti di metallo
Parti di plastica
Diusori
Cavi
Questa tabella è stata messa a punto in accordo a quanto previsto dallo standard SJ/T 11364.
0: indica che la quantità della sostanza tossica o pericolosa contenuta in tutti i materiali omogenei della parte è
inferiore al limite previsto dallo standard GB/T 26572.
X: indica che la quantità della sostanza tossica o pericolosa contenuta in almeno uno dei materiali omogenei
della parte è superiore al limite previsto dallo standard GB/T 26572.
Questo simbolo indica che il prodotto non deve essere smaltito come
rifiuto domestico, ma consegnato a una struttura di raccolta appropriata
per il riciclo. Uno smaltimento e un riciclo corretti aiutano a preservare
le risorse naturali, la salute e l'ambiente. Per ulteriori informazioni sullo
smaltimento e sul riciclo di questo prodotto, rivolgersi alle autorità locali,
al servizio di smaltimento dei rifiuti o al negozio presso il quale è stato
acquistato.
(Hg)
X
0
X
0
00
0
X
0
X
(Cd)
esavalente
(CR(VI))
0
0
0
0
0
Difeniletere
polibromurato
0
0
0
0
0
(PBDE)
0
0
0
0
0
2 - Italiano
A cura di DCE Safety

Introduzione
Descrizione generale del prodotto
I mixer ToneMatch® T4S e T8S, compatti a 4 e 8 canali, sono specificatamente progettati per fornire all'artista il pieno controllo
della propria musica. Grazie ai potenti motori DSP e alle intuitive opzioni di controllo, orono EQ, dinamica e processing degli
eetti con qualità da studio. L'integrazione del processing Bose® ToneMatch® e la funzione zEQ garantiscono un sound ottimo,
specialmente in caso di collegamento a un sistema Bose L1 o F1 per il pieno controllo timbrico end-to-end. Questi robusti mixer
ToneMatch consentono esibizioni convincenti, grazie ai controlli tattili, ai display a LED di facile lettura e al richiamo di scenari. I
mixer ToneMatch sono i compagni di palco definitivi per l'esibizione degli artisti.
Caratteristiche del prodotto
Potente elaborazione audio
• Eetti aggiornati in qualità da studio con digital audio
processing evoluto
• Gli eetti includono compressore, limiter, de-esser, noise
gate, chorus, flanger, phaser, tremolo, delay e riverbero
• Elaborazione Bose® ToneMatch® per un suono più naturale
da voci e strumenti.
• zEQ focalizza il sound dei preset ToneMatch per apportare
regolazioni ecaci in un attimo
• ToneMatch, EQ, dinamica ed eetti indipendenti per canale
• Riverbero dedicato per le mandate AUX e riverbero
condiviso globale da utilizzare su tutti i canali
• Il master output EQ contribuisce a compensare l'acustica
del locale
• Ottimizzazione completa end-to-end della timbrica se
utilizzato con sistemi Bose S1 ed F1
Controllo fluido in tempo reale
• Comandi tattili e indicatori progettati per l'utilizzo da parte
di musicisti e DJ durante le esibizioni on stage dal vivo
• Interfaccia utente intuitiva
• Funzione tap tempo delay incorporata, accordatore cromatico,
e e scenari richiamabili
• Il display a LED e i controlli luminosi sono facili da leggere
e utilizzare, anche su palchi scarsamente illuminati
Alta densità di connessioni disponibili
• Connettività e possibilità di controllo mai viste prima su un
piccolo mixer digitale
• Quattro (T4S) o otto (T8S) preamplificatori audio di alta
qualità con jack combo XLR per microfoni o strumenti,
e phantom power commutabile
• Due ingressi Aux per sorgenti aggiuntive, due (T4S)
o quattro (T8S) mandate Aux
• USB di tipo A e B per la riproduzione da unità USB o
l'interfacciamento con PC/Mac
• Uscite ToneMatch per audio digitale e alimentazione
(solo T4S)
• Uscite stereo TRS 1/4" e XLR (solo T8S)
• Uscita indipendente per cua
Pratiche funzioni Gig-Ready
• Robusto box con cover magnetica protettiva per
proteggere controlli e connettori
• Include un cavo ToneMatch per il collegamento a un
sistema Bose L1 Model II o L1 Model 1S per audio digitale
e alimentazione (T4S), oppure un alimentatore universale
(T8S)
• L'inserto sul lato inferiore consente di utilizzare gli accessori
più comuni per il montaggio di una foto/telecamera e
tenere così il mixer ToneMatch a portata di mano
Disimballaggio
Vedere la seguente tabella per i contenuti della confezione del mixer:
T4S
Mixer T4S ToneMatch e cover Cavo ToneMatch
T8S
Alimentatore ToneMatchMixer T8S ToneMatch e cover
Nota: vedere il manuale di istruzioni completo (online all'indirizzo www.Bose.com) per ulteriori informazioni sul
funzionamento, le impostazioni di fabbrica e la manutenzione.
Italiano - 3

Pannelli di controllo e collegamento
Mixer T4S ToneMatch®
Pannello di controllo
Figura 1 Pannello di controllo T4S
q
w
d
e
s
r
t
y
u
a
f
o
i
q INDICATORI SIGNAL/CLIP (1-4) – Visualizzano lo stato del segnale in ingresso in base al colore:
Verde: indica la presenza di un segnale in ingresso
Rosso: indica clipping sulla sorgente d'ingresso
w CONTROLLI DI TRIM (1-4) – Regolano la sensitività in ingresso per il rispettivo canale.
e DISPLAY – Visualizza i menu delle funzioni e le informazioni sul sistema.
r CONTROLLI DI EDITING – I tre controlli rotativi a pulsante consentono di selezionare o regolare le voci/i
valori che appaiono sul display.
t PULSANTI CH EDIT (1-4) – Selezionano il canale da modificare.
y PULSANTI FX MUTE (1-4) – Escludono gli eetti Mod, Delay e Riverbero sul canale selezionato.
u CONTROLLI DEL VOLUME (1-4) – Regolano il livello del volume per il rispettivo canale.
i PULSANTI MUTE (1-4) – Disattivano l'uscita audio per il rispettivo canale.
o CONTROLLO DI VOLUME MASTER – Regola il livello d'uscita generale.
a CONTROLLO DI VOLUME DELLE CUFFIE – Regola il livello del volume per l'uscita cue.
s SELETTORE ROTATIVO – Consente l'accesso ai parametri globali e relativi ai canali, che vengono regolati
utilizzando i controlli di editing.
d INTERRUTTORE PHANTOM POWER – Alimenta i canali d'ingresso 1-4 a +48 V. L'accensione di un LED
rosso indica l'attivazione della phantom power.
f JACK PER CUFFIE – Da utilizzare esclusivamente con cue con un'impedenza minima di 24 .
4 - Italiano

Pannello di collegamento
Figura 2 Pannello di collegamento T4S
q w e r t y
Pannelli di controllo e collegamento
MONO
M
USB AUDIO
( )
uio
q INTERRUTTORE DI ACCENSIONE – Accende e spegne il mixer.
w USB 2.0 TIPO B – Interfaccia USB che consente di collegare il mixer al computer.
e USB 2.0 TIPO A – Interfaccia USB che consente lo streaming audio da un flash drive.
r USCITA ANALOGICA L/R – Uscita analogica principale. Compatibile con cavi con connettori da 6 mm
bilanciati TRS o sbilanciati TS.
t USCITA AUX – Due uscite analogiche definibili dall'utente. Possono essere configurate come uscita pre-
fader, post-EQ ed eetti, o come uscita post-fader. Compatibili con cavi con connettori da 6 mm TRS
bilanciati.
y INGRESSO AUX – Canali analogici di ingresso 5/6. Compatibili con cavi con connettori da 6 mm TRS
bilanciati o TS sbilanciati per ingressi a livello linea. Possono essere utilizzati per ingressi di tipo stereo.
u INGRESSI 1-4 – Canali analogici di ingresso 1-4. Compatibili con cavi XLR bilanciati per microfoni o con cavi
con connettori da 6 mm TRS bilanciati o TS sbilanciati per ingressi ad alta impedenza, ad esempio da una
chitarra.
i USCITA DIGITAL MAIN L – Collegabile in digitalmente in stereo a due sistemi L1® Model 1S/II.
Nota: utilizzabile in stereo esclusivamente con l'uscita Digital Main R.
o PORTA DI ALIMENTAZIONE/USCITA DIGITAL MAIN R – Uscita digitale utilizzata dal sistema L1 Model 1S/
II. Alimenta il mixer T4S dalla base di alimentazione L1 Model 1S/II. Può inoltre fornire alimentazione da
una presa AC tramite un alimentatore ToneMatch (non in dotazione con il T4S). Compatibile con il cavo
ToneMatch® fornito in dotazione.
ATTENZIONE: nonostante la porta ToneMatch sia compatibile con un connettore RJ-45 standard, NON
collegare il T4S a una rete di computer o telefonica.
Italiano - 5

Pannelli di controllo e collegamento
Mixer T8S ToneMatch®
Pannello di controllo
Figura 3 Pannello di controllo T8S
q
w
e
f
d
s
r
t
a
y
u
o
i
g
q LED INPUT SIGNAL/CLIP (1-8) – Visualizzano lo stato del segnale in ingresso in base al colore:
Verde: indica la presenza di un segnale in ingresso
Rosso: indica clipping sulla sorgente d'ingresso
w CONTROLLI DI TRIM (1-8) – Regolano la sensibilità in ingresso per il rispettivo canale.
e DISPLAY – Visualizza i menu delle funzioni e le informazioni sul sistema.
r CONTROLLI DI EDITING – I tre controlli rotativi a pulsante consentono di selezionare o regolare le voci/i
valori che appaiono sul display.
t PULSANTI CH EDIT (1-8) – Selezionano il canale da modificare.
y PULSANTI FX MUTE (1-8) – Escludono gli eetti Mod, Delay e Riverbero sul canale selezionato.
u CONTROLLI DEL VOLUME (1-8) – Regolano il livello del volume per il rispettivo canale.
i PULSANTI MUTE (1-8) – Disattivano l'uscita audio per il rispettivo canale.
o CONTROLLO DI VOLUME MASTER – Regola il livello d'uscita generale.
a CONTROLLO DI VOLUME DELLE CUFFIE – Regola il livello del volume per l'uscita cue.
s VU METER PER L'USCITA STEREO – Consente di misurare visivamente il livello in uscita.
d SELETTORE ROTATIVO – Consente l'accesso ai parametri globali e relativi ai canali, che vengono regolati
utilizzando i controlli di editing.
f INTERRUTTORE PHANTOM POWER – Alimenta i canali d'ingresso 1-8 a +48 V. L'accensione di un LED
rosso indica l'attivazione della phantom power.
g JACK PER CUFFIE – Da utilizzare esclusivamente con cue con un'impedenza minima di 24 .
6 - Italiano

Pannelli di controllo e collegamento
Pannello di collegamento
Figura 4 Pannello di collegamento T8S
q w e r t y
USB AUDIO
MAIN OUT
M
( )
MONO
uio
q INTERRUTTORE DI ACCENSIONE – Accende e spegne il mixer.
w USB 2.0 TIPO B – Interfaccia USB che consente di collegare il mixer al computer.
e USB 2.0 TIPO A – Interfaccia USB che consente lo streaming audio da un flash drive.
r USCITA ANALOGICA L/R – Uscita analogica principale. Compatibile con cavi con connettori da 6 mm
bilanciati TRS o sbilanciati TS.
t USCITA AUX – Quattro uscite analogiche definibili dall'utente. Possono essere configurate come uscita
pre-fader, post-EQ ed eetti, o come uscita post-fader. Compatibile con cavi con connettori da 6 mm TRS
bilanciati o sbilanciati TS.
y INGRESSO AUX – Canali analogici di ingresso 9/10. Compatibili con cavi con connettori da 6 mm TRS
bilanciati o TS sbilanciati per ingressi a livello linea. Possono essere utilizzati per per ingressi di tipo
stereo.
u
INGRESSI 1-8 – Canali analogici di ingresso 1-8. Compatibili con cavi XLR bilanciati per microfoni o con cavi con
connettori da 6 mm TRS bilanciati o TS sbilanciati per ingressi ad alta impedenza, ad esempio da una chitarra.
i USCITA STEREO XLR – Uscita analogica stereo. Compatibile con cavi XLR bilanciati per l'uscita stereo.
o PORTA DI ALIMENTAZIONE DIGITALE – Da utilizzare con l'alimentatore ToneMatch (vedere "Collegamento
dell'alimentatore ToneMatch®" a pagina 12).
Nota: il mixer T8S NON è progettato per la connessione digitale al sistema L1® Model 1S/II.
ATTENZIONE: nonostante la porta ToneMatch sia compatibile con un connettore RJ-45 standard, NON
collegare il T8S a una rete di computer o telefonica.
Italiano - 7
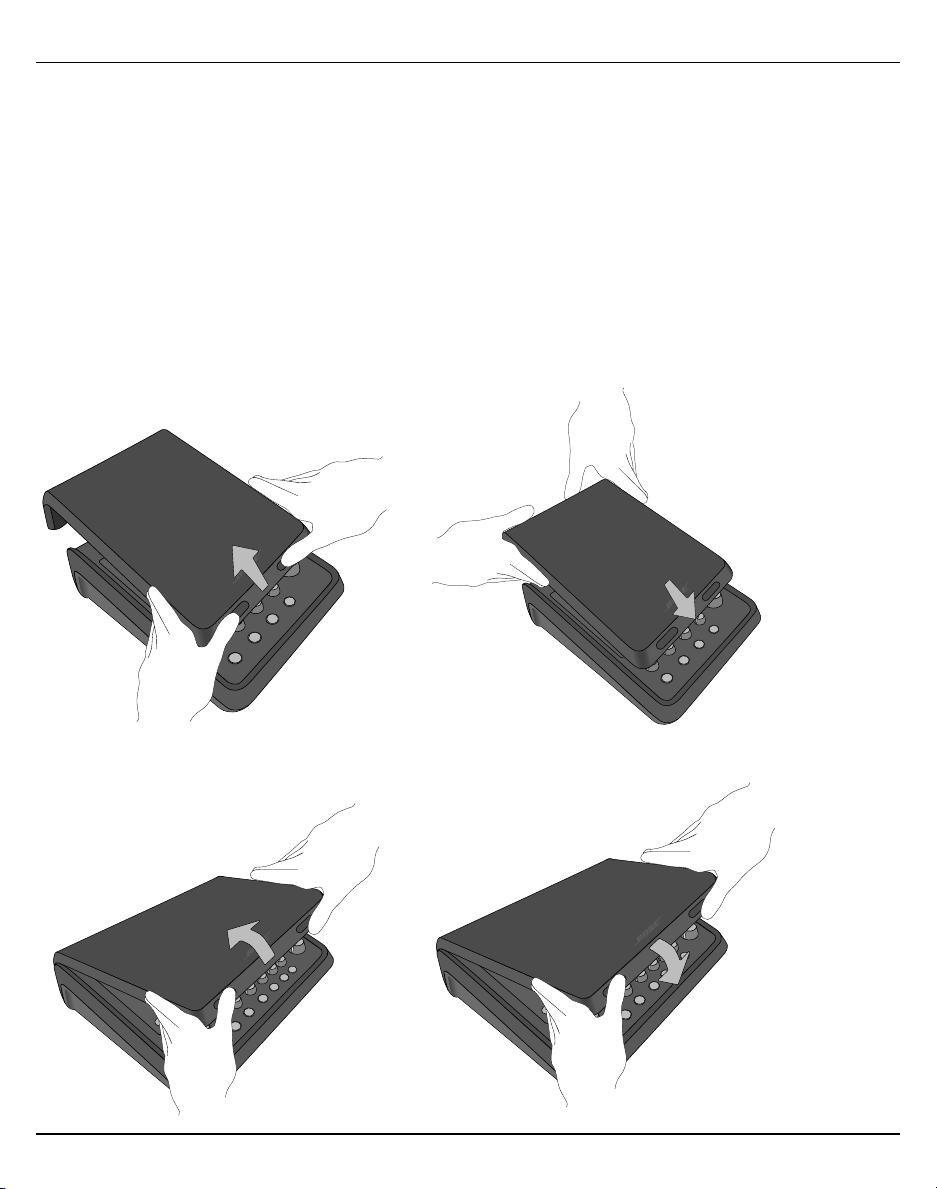
Configurazione del sistema
Rimozione/installazione della cover
Il mixer T4S/T8S viene imballato con la cover installata sul pannello superiore. La cover è progettata per
proteggere il pannello di controllo durante il trasporto o l'immagazzinaggio del mixer.
Per rimuovere la cover:
1. Porre i pollici sulla parte anteriore della cover e farla scorrere in avanti.
2. Aerrare e sollevare la parte posteriore della cover per rimuoverla.
Per installare la cover:
1. Far scorrere la cover sul mixer, dalla parte posteriore verso quella anteriore.
2. La cover magnetica si blocca automaticamente fissandosi al mixer.
Figura 5 Rimozione e installazione della cover
8 - Italiano

Configurazione del sistema
Opzioni di montaggio
Il mixer T4S/T8S è dotato di un inserto per vite di fissaggio da 6 mm. Ciò ne consente il sostegno su diversi
prodotti che siano dotati di vite di fissaggio da 6 mm, inclusi i treppiedi per foto/videocamere.
Fissaggio del mixer T4S/T8S su treppiede per foto/videocamera
1. Aprire le gambe del treppiede e bloccarlo all'altezza desiderata.
2. Rimuovere la staa dalla parte superiore del treppiede per foto/videocamera e fissarla con la vite alla
parte inferiore del mixer T4S/T8S. Verificare che la piccola rientranza sul mixer T4S/T8S sia perfettamente
allineata alla protuberanza sulla staa. Vedere la Figura 6.
3. Fissare la staa con il mixer T4S/T8S nuovamente sul treppiede. Vedere la Figura 8.
Figura 6 Fissaggio della staa al mixer T4S Figura 8 Montaggio del mixer T4S sul treppiede tramite
Figura 7 Staa fissata al mixer T4S
la staa
AVVERTENZA: non utilizzare il mixer ToneMatch® T4S/T8S su treppiedi/stativi instabili. Il mixer
è progettato per l'utilizzo solo su supporti con filettatura da 6 mm, con un treppiede in grado di
sostenere dispositivi di peso pari ad almeno 1,9 kg e dimensioni d'ingombro pari a 214 x 311 x 83 mm.
L'uso di un treppiede non progettato per supportare le dimensioni ed il peso del mixer T4S/T8S può
portare a condizioni di instabilità e pericolo e causare infortuni.
Italiano - 9

Configurazione del sistema
Collegamento del mixer T4S tramite connessione digitale
1. Verificare che il sistema L1 Model 1S/II e il mixer T4S siano spenti e che il controllo di volume master di
quest'ultimo sia impostato al minimo.
2. Collegare un'estremità del cavo ToneMatch® alla porta di alimentazione/uscita Digital Main R del mixer T4S.
Collegare l'altra estremità del cavo ToneMatch alla porta ToneMatch presente sulla base di alimentazione.
Nota: per collegare il mixer T4S a due basi di alimentazione L1 Model 1S/II, collegare la seconda base di
alimentazione alla porta dell'uscita Digital Main L del mixer T4S con un cavo ToneMatch.
3. Accendere il mixer, quindi accendere la base di alimentazione L1 Model 1S/II.
4. Collegare gli strumenti e regolare i livelli. Vedere il manuale di istruzioni completo all'indirizzo
www.Bose.com per informazioni di funzionamento dettagliate.
Figura 9 Due sistemi L1 Model II collegati a un mixer T4S tramite connessione digitale
MONO
USB AUDIO
M
( )
Nota: non è possibile connettere digitalmente il mixer T8S né alimentarlo dal sistema L1 Model 1S/II.
10 - Italiano

Configurazione del sistema
US
O
M
Collegamento del mixer T4S/T8S tramite connessione analogica
1. Verificare che il dispositivo da collegare e il mixer T4S/T8S siano spenti e che il controllo di volume master
di quest'ultimo sia impostato al minimo.
2. Collegare uno o due dispositivi alle uscite stereo XLR del mixer T8S (vedere la Figura 10) tramite cavi XLR
bilanciati.
Nota: il mixer T4S/T8S può essere collegato a un dispositivo tramite la porta di uscita analogica R con
un cavo con connettore TRS da 6 mm (venduto separatamente). Collegare l'altra estremità del cavo TRS
alla porta d'ingresso analogico del dispositivo. Per collegare il mixer T4S/T8S a due dispositivi, collegare il
secondo dispositivo alla porta di uscita analogica L dell'unità con un cavo TRS da 6 mm.
3. Collegare un alimentatore ToneMatch® alla porta di alimentazione del mixer T4S/T8S e inserirlo in una
presa AC funzionante. Vedere "Collegamento dell'alimentatore ToneMatch®" a pagina 12.
4. Accendere il mixer T4S/T8S, quindi il dispositivo collegato.
5. Collegare gli strumenti e regolare i livelli. Vedere il manuale di istruzioni completo all'indirizzo
www.Bose.com per informazioni di funzionamento dettagliate.
Figura 10 Due sistemi F1 collegati a un mixer T8S tramite connessione analogica
B AUDI
AIN OUT
USB AUDIO
MONO
MAIN OUT
M
( )
Italiano - 11

Configurazione del sistema
Collegamento dell'alimentatore ToneMatch®
L'alimentatore ToneMatch eroga alimentazione al mixer T4S/T8S.
1. Collegare il cavo dell'alimentatore alla porta di alimentazione del mixer T4S/T8S.
2. Collegare un'estremità del cavo di alimentazione AC all'alimentatore.
3. Collegare l'estremità opposta del cavo di alimentazione a una presa elettrica AC funzionante.
4. Portare l'interruttore di accensione del mixer T4S/T8S in posizione ON.
Nota: l'alimentatore fornito in dotazione col mixer T8S è necessario per utilizzare il prodotto. L'alimentatore
non viene fornito in dotazione col mixer T4S, che non lo richiede.
Figura 11 Collegamento del mixer T4S all'alimentatore
12 - Italiano

Configurazione del sistema
Collegamento del mixer T4S/T8S al computer
Il mixer T4S/T8S è dotato di una porta USB per il collegamento a un computer. Questo consente di
scaricare scenari operativi in un computer o di installare aggiornamenti al sistema. Per ulteriori dettagli
sull'aggiornamento del sistema, visitare il sito www.Bose.com/livesound.
Quando è collegato a un computer, il mixer T4S/T8S può essere utilizzato anche come dispositivo audio USB
generico per la registrazione e la riproduzione.
Nota: il mixer T4S/T8S funziona a 48 kHz/24 bit. Utilizzando il mixer T4S/T8S con software di registrazione,
potrebbe essere necessario configurare il software per il funzionamento a 48 kHz/24 bit.
Nota: per collegare il mixer T4S/T8S al computer, è richiesto un cavo USB (da tipo A a tipo B, non fornito in dotazione).
1. Collegare il mixer a una sorgente di alimentazione (un alimentatore ToneMatch® per il mixer T4S/T8S o un
sistema L1 Model 1S/II, solo per il mixer T4S).
2. Collegare un'estremità del cavo USB alla porta USB 2.0 tipo B del mixer (Figura 12).
3. Collegare l'altra estremità del cavo USB a una porta USB del computer.
4. Accendere il mixer.
Figura 12 Connessione del mixer T4S alla porta USB
Porta ToneMatch – A un sistema L1® Model
1S/II o a un alimentatore ToneMatch.
Pulsante di accensione
Cavo USB
(da tipo A a tipo B)
Alla porta USB
del computer
Collegamento di un Flash Drive al mixer T4S/T8S
Inserire un'unità flash USB 2.0/3.0 sulla quale siano memorizzati file WAV/MP3 nella porta USB 2.0 tipo A per
riprodurre le tracce audio con il mixer.
Figura 13 Collegamento di un'unità flash al mixer T4S
Italiano - 13

Informazioni aggiuntive
Recapiti
Visitare il sito Web all'indirizzo www.Bose.com.
America
(USA, Canada, Messico, America centrale,
Sudamerica)
Bose Corporation
Framingham, MA 01701 USA
Sede centrale: 508-879-7330
Americas Professional Systems,
Assistenza tecnica: 800-994-2673
Australia
Bose Pty Limited
Unit 3/2 Holker Street
Newington NSW Australia
61 2 8737 9999
Belgio
Bose N.V. / S.A
Limesweg 2, 03700
Tongeren, Belgio
012-390800
Cina
Bose Electronics (Shanghai) Co Ltd
25F, L’Avenue
99 Xianxia Road
Shanghai, P.R.C. 200051 Cina
86 21 6010 3800
Francia
Bose S.A.S
26-28 avenue de Winchester
78100 St. Germain en Laye, Francia
01-30-61-63-63
Germania
Bose GmbH
Max-Planck Strasse 36D 61381
Friedrichsdorf, Germania
06172-7104-0
Hong Kong
Bose Limited
Suites 2101-2105, Tower One, Times Square
1 Matheson Street, Causeway Bay, Hong Kong
852 2123 9000
India
Bose Corporation India Private Limited
Salcon Aurum, 3rd Floor
Plot No. 4, Jasola District Centre
New Delhi – 110025, India
91 11 43080200
Italia
Bose SpA
Centro Leoni A – Via G. Spadolini
5 20122 Milano, Italia
39-02-36704500
Giappone
Bose Kabushiki Kaisha
Sumitomo Fudosan Shibuya Garden Tower 5F
16-17, Nanpeidai-cho
Shibuya-Ku, Tokyo, 150-0036, Giappone
TEL 81-3-5489-0955
www.bose.co.jp
Paesi Bassi
Bose BV
Nijverheidstraat 8 1135 GE
Edam, Paesi Bassi
0299-390139
Regno Unito
Bose Ltd
1 Ambley Green, Gillingham Business Park
KENT ME8 0NJ
Gillingham, Inghilterra
0870-741-4500
Informazioni sugli
importatori
Unione Europea
Bose Products B.V., Gorslaan 60, 1441 RG
Purmerend, Paesi Bassi
Cina
Bose Electronics (Shanghai) Company
Limited, Part C, Plan 9, No. 353 North Riying
Road, Cina (Shanghai) Pilot Free Trade Zone
Taiwan
Bose Taiwan Branch, 9F-A1, No. 10, Section 3,
Minsheng East Road, Taipei City 104, Taiwan
Tel: +886-2-2514 7676
Messico
Bose de México, S. de R.L. de C.V., Paseo de
las Palmas 405-204, Lomas de Chapultepec,
11000 Messico, D.F.
Tel.: +5255 (5202) 3545
Per gli altri Paesi, consultare il sito Web.
Informazioni aggiuntive
Vedere il manuale di istruzioni completo (online all'indirizzo www.Bose.com) per ulteriori informazioni sul
funzionamento, le impostazioni di fabbrica e la manutenzione. Per richiedere una copia cartacea, utilizzare i
numeri telefonici forniti.
Garanzia limitata
Questo prodotto è coperto da una garanzia limitata. Visitare l'indirizzo www.pro.Bose.com per i dettagli sulla
garanzia.
Le informazioni sulla garanzia fornite con questo prodotto non sono valide in Australia e Nuova Zelanda. Per i
dettagli sulla garanzia per Australia e Nuova Zelanda, consultare il nostro sito Web all'indirizzo
www.bose.com/au/warranty o www.bose.com/nz/warranty.
Data di produzione
L'ottava cifra del numero di serie corrisponde all'anno di produzione; ad esempio "6" indica 2006 o 2016.
14 - Italiano

Belangrijke veiligheidsinstructies
Namen van en gehalte aan giftige of gevaarlijke stoen of elementen
Lees alle veiligheidsinstructies en de
gebruiksaanwijzing door en bewaar deze.
1. Lees deze instructies door.
2. Bewaar deze instructies.
3. Neem alle waarschuwingen in acht.
4. Volg alle instructies.
5. Gebruik dit apparaat niet in de buurt van water.
6. Alleen met een droge doek reinigen.
7. Zorg dat u de ventilatieopeningen niet blokkeert. Installeer het apparaat
volgens de instructies van de fabrikant.
8. Zorg dat er niet op het netsnoer wordt gestaan of gelopen en dat het niet
wordt afgekneld, met name bij de stekkers en stopcontacten en het punt waar
deze uit het apparaat komen.
9. Gebruik uitsluitend aansluitstukken/accessoires die door de fabrikant worden
gespecificeerd.
10. Gebruik het apparaat uitsluitend in combinatie met het verrijdbare
11. Haal de stekker van dit apparaat uit het stopcontact bij onweer of als het
12. Laat alle reparaties en onderhoud over aan bevoegde medewerkers. Reparatie
plateau, het statief, de beugel of de tafel die door de fabrikant worden
vermeld of samen met het apparaat worden verkocht. Als u een
verrijdbaar plateau gebruikt, moet u het apparaat en het plateau
voorzichtig verplaatsen zodat deze niet kunnen omvallen en letsel veroorzaken.
langere tijd niet wordt gebruikt.
is vereist als het apparaat is beschadigd, zoals wanneer het snoer of de
stekker van de voeding is beschadigd, wanneer er vloeistof in het apparaat
is terechtgekomen of voorwerpen in het apparaat zijn gevallen, wanneer het
apparaat is blootgesteld aan regen of vocht, niet normaal werkt of is gevallen.
Wettelijk verplichte informatie
Dit apparaat voldoet aan deel 15 van de FCC-voorschriften en de RSS-norm(en) van
Industry Canada voor vergunningsvrije apparaten. Op het gebruik zijn de volgende
twee voorwaarden van toepassing: (1) Dit apparaat mag geen schadelijke storing
veroorzaken, en (2) dit apparaat moet bestand zijn tegen alle externe storing,
waaronder storing die een ongewenste werking tot gevolg kan hebben.
Dit product voldoet aan alle vereisten van de van toepassing zijnde
EU-richtlijnen. De volledige conformiteitsverklaring kunt u vinden op
www.Bose.com/compliance.
Informatie over producten die elektrische ruis genereren (FCC Compliance Notice
voor de VS)
Opmerking: Dit apparaat is getest en voldoet aan de limieten voor een digitaal
apparaat van de klasse A, volgens deel 15 van de FCC-voorschriften. Deze
limieten zijn bedoeld om redelijke bescherming te bieden tegen schadelijke
storing bij installatie in een handelsomgeving. Dit apparaat genereert en gebruikt
radiofrequente energie en kan deze uitstralen en het kan, als het niet wordt
geïnstalleerd en gebruikt volgens de instructies, schadelijke storing veroorzaken aan
radiocommunicatie. Gebruik van dit apparaat in een woonwijk kan schadelijke storing
veroorzaken. In dit geval moet de gebruiker de storing op eigen kosten verhelpen.
Veranderingen of aanpassingen die niet uitdrukkelijk zijn goedgekeurd door Bose
Corporation kunnen leiden tot het vervallen van de bevoegdheid van de gebruiker
om dit apparaat te gebruiken.
Afgeschermde kabels zijn vereist om de regelgeving na te leven.
Dit product voldoet aan de specificaties van de Canadese ICES-003 klasse A.
CAN ICES-3(A)/NMB-3(A)
Dit product voldoet aan alle immuniteitsvereisten van EN55103-2 voor een E2
elektromagnetische omgeving.
WAARSCHUWINGEN:
Dit product bevat magnetisch materiaal. Raadpleeg uw arts om te vragen of
dit invloed kan hebben op uw geïmplanteerde medische hulpmiddel.
• Dit product is niet bedoeld voor installatie of gebruik in overdekte ruimten voor
wateractiviteiten (waaronder overdekte zwembaden, overdekte waterparken,
stoomruimten, sauna’s, bubbelbadkamers en overdekte ijsbanen).
• Om het risico op brand of elektrische schokken te verlagen, mag dit product
NIET worden blootgesteld aan regen, vloeistof of vocht. Niet van toepassing op
producten met IPX4-9-classificatie.
• Houd het product uit de buurt van vuur en warmtebronnen. Plaats GEEN open
vlammen, zoals brandende kaarsen, op of bij het product.
• Er mogen GEEN wijzigingen aan dit product worden aangebracht door
onbevoegden.
• Gebruik GEEN omvormer in combinatie met dit product.
• Gebruik het NIET in voertuigen of boten.
• Dit product mag alleen worden gebruikt met de bijgeleverde voeding.
• Plaats of installeer de beugel of het product NIET in de buurt van
warmtebronnen, zoals open haarden, radiatoren, verwarmingsroosters of andere
apparaten (waaronder versterkers) die warmte produceren.
• Gebruik de ToneMatch® T4S/T8S mixer niet in combinatie met een instabiel statief.
De mixer is uitsluitend ontworpen voor gebruik met een schroef van ¼" (6 mm). Het
statief moet een apparaat met een minimaal gewicht van 1,9 kg en een afmeting van
214 x 311 x 83 mm kunnen dragen. Als u een statief gebruikt dat niet is ontworpen
voor het gewicht en de afmetingen van de T4S/T8S mixer, kan dit leiden tot
gevaarlijke situaties met mogelijk letsel tot gevolg.
• Bevat kleine onderdelen die verstikkingsgevaar kunnen vormen. Niet
geschikt voor kinderen jonger dan 3 jaar.
OPMERKINGEN:
• De bij dit systeem geleverde luidsprekerdraad en kabels zijn niet geschikt voor
montage in de muur. Raadpleeg de plaatselijke bouwvoorschriften voor het juiste
type bedrading en kabels voor installatie in een muur.
• Wanneer de stekker of aansluiting van een apparaat als stroomonderbreker wordt
gebruikt, dient deze stroomonderbreker steeds goed bereikbaar te zijn.
• Omwille van de ventilatievereisten raadt Bose af om het product in een besloten
ruimte te plaatsen, zoals in een nis in de muur of een dichte kast.
Giftige of gevaarlijke stoen en elementen
Zeswaardig
Lood
Kwik
(Pb)
Naam onderdeel
PCBs
Metalen onderdelen
Plastic onderdelen
Luidsprekers
Kabels
Deze tabel is opgesteld in overeenstemming met de bepalingen van SJ/T 11364. 0: Geeft aan dat het gehalte aan
deze giftige of gevaarlijke stof in alle homogene materialen van dit onderdeel onder de maximaal toegelaten
waarden in GB/T 26572 ligt.
X: Geeft aan dat de giftige of gevaarlijke stof in minstens één van de voor dit onderdeel gebruikte homogene
materialen boven de maximaal toegelaten waarden in GB/T 26572 ligt.
Dit symbool betekent dat het product niet mag worden weggegooid
als huishoudelijk afval en naar een geschikt inzamelpunt voor recycling
moet worden gebracht. Het op de juiste wijze afvoeren en recyclen
helpt natuurlijke hulpbronnen, de menselijke gezondheid en het milieu
te beschermen. Voor meer informatie over het afvoeren en recyclen van
dit product neemt u contact op met de gemeente waar u woont, de
afvalverwerkingsdienst of de winkel waar u dit product hebt gekocht.
(Hg)
X
0
X
0
00
0
X
0
X
Cadmium
(Cd)
0
0
0
0
0
chroom
(CR(VI))
0
0
0
0
0
Polybroombifenyl
(PBB)
0
0
0
0
0
Polybroomdifenyle-
ther
(PBDE)
0
0
0
0
0
Verstrekt door DCE Safety
Nederlands - 2

Inleiding
Productoverzicht
Neem de controle over uw muziek in handen met de T4S en T8S ToneMatch® mixers, compacte 4- en 8-kanaals interfaces ontworpen
voor artiesten. Deze mixers zijn voorzien van krachtige DSP-engines en intuïtieve bediening en bieden EQ, dynamiek en eecten van
studiokwaliteit. Geweldig geluid dankzij de ingebouwde Bose® ToneMatch®-verwerking en zEQ, zeker wanneer aangesloten op een
Bose L1 of F1 system voor volledige toonregeling. Sta zelfverzekerd op het podium met deze robuuste ToneMatch mixers met tactiele
bediening, goed afleesbare led-displays en oproepbare scènes. ToneMatch mixers, de ultieme podiumpartners voor artiesten.
Producteigenschappen
Krachtige audioverwerking
• Actuele eecten van studiokwaliteit met geavanceerde
digitale audioverwerking
• Inclusief eecten als compressor, limiter, de-esser, noise
gate, chorus, flanger, phaser, tremolo, delay en reverb
• Bose® ToneMatch®-verwerking voor natuurlijke zang en
instrumenten
• zEQ stelt het geluid van ToneMatch-presets scherp voor
snelle, eectieve aanpassingen
• Onafhankelijke ToneMatch, EQ, dynamiek en eecten per
kanaal
• Speciale reverb voor Aux sends en een gedeelde reverb
voor alle kanalen
• EQ op de master helpt bij het compenseren voor de
akoestiek van de locatie
• Volledige toonoptimalisatie in combinatie met Bose L1 en
F1 systems
Naadloze livebediening
• Tactiele bediening en indicators ontworpen voor
liveoptredens door muzikanten en dj’s
• Gebruiksvriendelijke interface
• Ingebouwde tempovertraging, chromatische tuner en
oproepbare scènes
• Led-display en verlichte bedieningselementen zijn eenvoudig
af te lezen en te gebruiken, zelfs op donkere podiums
Uitgebreide aansluitmogelijkheden
• Ongeëvenaarde aansluit- en regelmogelijkheden voor een
kleine digitale stereomixer
• Vier (T4S) of acht (T8S) hoogwaardige
audiovoorversterkers met XLR-comboaansluitingen
voor microfoons of instrumenten en schakelbare
fantoomvoeding
• Twee aux-ingangen voor extra bronnen, twee (T4S) of vier
(T8S) aux sends
• USB-A en -B voor afspelen vanaf USB-stick of om uw pc/
Mac aan te sluiten
• ToneMatch-uitgangen voor digitale audio en voeding
(alleen T4S)
• Gebalanceerde ¼" TRS- en XLR-stereo-uitgangen (XLR
alleen T8S)
• Onafhankelijke hoofdtelefoonuitgang
Handige functies voor optredens
• Robuuste behuizing met magnetische beschermplaat om
de bedieningselementen en aansluitingen te beschermen
• Inclusief een ToneMatch-kabel om een Bose L1 Model II of
L1 Model 1S system voor digitale audio en voeding (T4S)
aan te sluiten of universele voeding (T8S)
• Statiefaansluiting aan de onderkant om accessoires als
camerastatieven te bevestigen zodat uw ToneMatch
binnen handbereik blijft
Uitpakken
Zie de volgende tabel voor de inhoud van de doos:
T4S
T4S ToneMatch mixer en beschermplaat ToneMatch-kabel
T8S
ToneMatch-voedingT8S ToneMatch mixer en beschermplaat
Opmerking: Raadpleeg de volledige gebruikershandleiding (online op www.Bose.com) voor meer informatie over de
bediening, fabrieksinstellingen en onderhoud.
3 - Nederlands

T4S ToneMatch® mixer
Bedieningspaneel
Figuur 1. T4S bedieningspaneel
q
w
Bedienings- en aansluitpanelen
d
e
s
r
t
y
u
a
f
o
i
q INGANGSSIGNAAL/CLIPPING-LEDs (1-4) – Geeft de status van het ingangssignaal aan met kleuren:
Groen: geeft aan dat er een ingangssignaal is
Rood: geeft aan dat het ingangssignaal clipt (overstuurt)
w TRIM-REGELAARS (1-4) – Hiermee wordt de ingangsgevoeligheid van het desbetreende kanaal ingesteld.
e DISPLAY – Hier worden functiemenu’s en systeeminformatie weergegeven.
r EDIT-KNOPPEN – Met deze drie draai-/drukknoppen kunt u items/waarden die op de display verschijnen
selecteren of instellen.
t CH EDIT-KNOPPEN (1-4) – Hiermee selecteert u het kanaal dat u wilt aanpassen.
y FX MUTE-KNOPPEN (1-4) – Hiermee deactiveert u de eecten Mod, Delay en Reverb voor het
geselecteerde kanaal.
u VOLUMEREGELAARS (1-4) – Hiermee stelt u het volume van het desbetreende kanaal in.
i DEMPKNOPPEN (1-4) – Hiermee schakelt u het geluid uit voor het desbetreende kanaal.
o MASTER-VOLUMEKNOP – Hiermee stelt u het algehele uitgangsniveau in.
a HOOFDTELEFOONVOLUMEKNOP – Hiermee past u het niveau van de hoofdtelefoonuitgang aan.
s DRAAIKNOP – Hiermee krijgt u toegang tot zowel de algemene als de kanaalspecifieke parameters. Deze
stelt u in met de daarvoor bedoelde knoppen.
d SCHAKELAAR FANTOOMVOEDING – Hiermee schakelt u +48 V fantoomvoeding in op de ingangskanalen
1-4. Een rode led geeft aan dat fantoomvoeding is ingeschakeld.
f HOOFDTELEFOONAANSLUITING – Alleen voor gebruik van hoofdtelefoons, met een minimale impedantie
van 24 Ω.
Nederlands - 4

Bedienings- en aansluitpanelen
Aansluitpaneel
Figuur 2. T4S aansluitpaneel
q w e r t y
MONO
M
USB AUDIO
( )
uio
q AAN/UIT-SCHAKELAAR – Hiermee schakelt u de mixer aan of uit.
w USB 2.0 TYPE B – Een USB-aansluiting waarmee u de mixer kunt aansluiten op uw computer.
e USB 2.0 TYPE A – Een USB-aansluiting waarmee u audio vanaf uw USB-stick kunt streamen.
r ANALOGE L/R-UITGANG – Analoge hoofduitgang. Geschikt voor ¼ gebalanceerde TRS-kabels of
ongebalanceerde TS-kabels.
t
AUX-UITGANG – Twee door de gebruiker definieerbare analoge uitgangen. Kunnen worden geconfigureerd
voor een pre-fader, post-EQ en eecten of post-fader-uitgang. Geschikt voor ¼ gebalanceerde TRS-kabels.
y AUX-INGANG – Analoge ingangskanalen 5/6. Geschikt voor ¼ gebalanceerde TRS-kabels of
ongebalanceerde TS-kabels voor lijningangssignaal. Kunnen gebruikt worden voor stereo-ingangssignalen.
u INGANGEN 1-4 – Analoge ingangskanalen 1-4. Geschikt voor gebalanceerde XLR-kabels voor microfoons of
¼" gebalanceerde TRS-kabels of ongebalanceerde TS-kabels voor ingangssignalen met hoge impedantie,
zoals gitaren.
i DIGITALE HOOFDUITGANG L – Digitale stereoaansluiting voor twee L1® Model 1S/II systems.
Opmerking: Alleen voor stereogebruik met digitale hoofduitgang R.
o VOEDINGSPOORT/DIGITALE HOOFDUITGANG R – Een digitale uitgang die wordt gebruikt door het
L1 Model 1S/II system. Hiermee wordt vermogen van de L1 Model 1S/II power stand naar de T4S mixer
geleverd. Hiermee kan ook vermogen van een stopcontact via een ToneMatch-voeding worden geleverd
(niet inbegrepen bij de T4S). Hierop past de bijgeleverde ToneMatch®-kabel.
WAARSCHUWING: Sluit de T4S NIET aan op een computer- of telefoonnetwerk, ook al is de
ToneMatch-poort geschikt voor een standaard RJ-45-connector.
5 - Nederlands
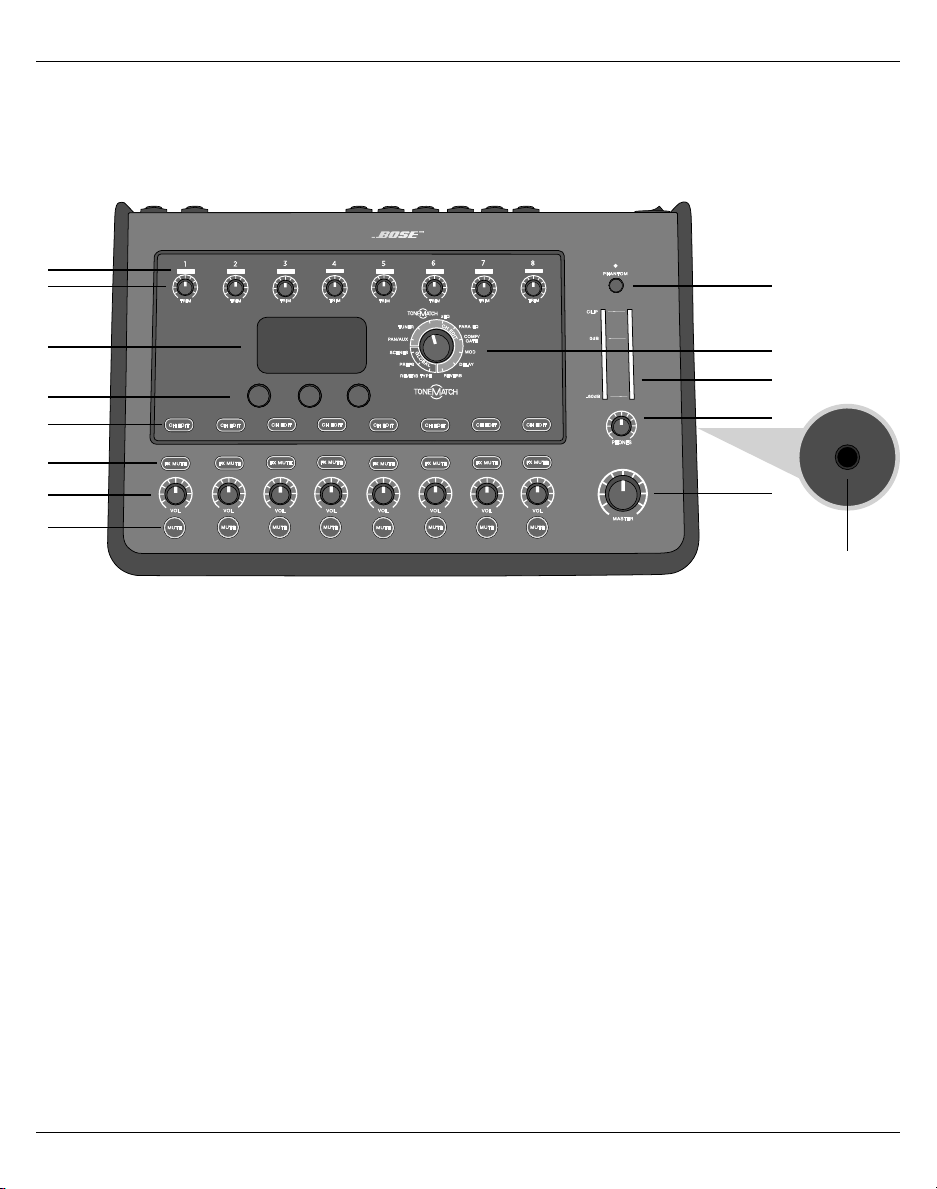
T8S ToneMatch® mixer
Bedieningspaneel
Figuur 3. T8S bedieningspaneel
Bedienings- en aansluitpanelen
q
w
e
f
d
s
r
t
a
y
u
o
i
g
q INGANGSSIGNAAL/CLIPPING-LEDs (1-8) – Geeft de status van het ingangssignaal aan met kleuren:
Groen: geeft aan dat er een ingangssignaal is
Rood: geeft aan dat het ingangssignaal clipt (overstuurt)
w TRIM-REGELAARS (1-8) – Hiermee wordt de ingangsgevoeligheid van het desbetreende kanaal ingesteld.
e DISPLAY – Hier worden functiemenu’s en systeeminformatie weergegeven.
r EDIT-KNOPPEN – Met deze drie draai-/drukknoppen kunt u items/waarden die op de display verschijnen
selecteren of instellen.
t CH EDIT-KNOPPEN (1-8) – Hiermee selecteert u het kanaal dat u wilt aanpassen.
y FX MUTE-KNOPPEN (1-8) – Hiermee deactiveert u de eecten Mod, Delay en Reverb voor het
geselecteerde kanaal.
u VOLUMEREGELAARS (1-8) – Hiermee stelt u het volume van het desbetreende kanaal in.
i DEMPKNOPPEN (1-8) – Hiermee schakelt u het geluid uit voor het desbetreende kanaal.
o MASTER-VOLUMEKNOP – Hiermee stelt u het algehele uitgangsniveau in.
a HOOFDTELEFOONVOLUMEKNOP – Hiermee past u het niveau van de hoofdtelefoonuitgang aan.
s STEREO-UITGANGSMETER – Hierop kunt u het uitgangsniveau aflezen.
d DRAAIKNOP – Hiermee krijgt u toegang tot zowel de algemene als de kanaalspecifieke parameters. Deze
stelt u in met de daarvoor bedoelde knoppen.
f SCHAKELAAR FANTOOMVOEDING – Hiermee schakelt u +48 V fantoomvoeding in op de ingangskanalen
1-8. Een rode led geeft aan dat fantoomvoeding is ingeschakeld.
g HOOFDTELEFOONAANSLUITING – Alleen voor gebruik van hoofdtelefoons, met een minimale impedantie
van 24 Ω.
Nederlands - 6

Bedienings- en aansluitpanelen
Aansluitpaneel
Figuur 4. T8S aansluitpaneel
q w e r t y
USB AUDIO
MAIN OUT
M
( )
MONO
uio
q AAN/UIT-SCHAKELAAR – Hiermee schakelt u de mixer aan of uit.
w USB 2.0 TYPE B – Een USB-aansluiting waarmee u de mixer kunt aansluiten op uw computer.
e USB 2.0 TYPE A – Een USB-aansluiting waarmee u audio vanaf uw USB-stick kunt streamen.
r ANALOGE L/R-UITGANG – Analoge hoofduitgang. Geschikt voor ¼ gebalanceerde TRS-kabels en
ongebalanceerde TS-kabels.
t AUX-UITGANG – Vier door de gebruiker definieerbare analoge uitgangen. Kunnen worden geconfigureerd
voor een pre-fader, post-EQ en eecten of post-fader-uitgang. Geschikt voor ¼" gebalanceerde TRSkabels of ongebalanceerde TS-kabels.
y AUX-INGANG – Analoge ingangskanalen 9/10. Geschikt voor ¼ gebalanceerde TRS-kabels of
ongebalanceerde TS-kabels voor lijningangssignaal. Kunnen gebruikt worden voor stereo-ingangssignalen.
u INGANGEN 1-8 – Analoge ingangskanalen 1-8. Geschikt voor gebalanceerde XLR-kabels voor microfoons of
¼ gebalanceerde TRS-kabels of ongebalanceerde TS-kabels voor ingangssignalen met hoge impedantie,
zoals gitaren.
i XLR-STEREO-UITGANG – Analoge stereo-uitgang. Geschikt voor gebalanceerde XLR-kabels voor stereo-
uitgang.
o DIGITALE VOEDINGSPOORT – Voor gebruik met de ToneMatch-voeding (zie ‘De ToneMatch®-voeding
aansluiten’ op pagina 12).
Opmerking: De T8S is NIET ontworpen om digitaal op de L1® Model 1S/II te worden aangesloten.
WAARSCHUWING: Sluit de T8S NIET aan op een computer- of telefoonnetwerk, ook al is de
ToneMatch-poort geschikt voor een standaard RJ-45-connector.
7 - Nederlands

Opstelling van het systeem
De beschermplaat verwijderen/bevestigen
Wanneer u de T4S/T8S ToneMatch® mixer uit de doos haalt, bevindt zich een beschermplaat op het
bovenpaneel. De plaat is bedoeld om het bedieningspaneel van de mixer te beschermen tijdens het transport
of wanneer u deze ergens opslaat.
Ga als volgt te werk om de beschermplaat te verwijderen:
1. Plaats uw duimen op de uitsparingen aan de voorzijde van de beschermplaat en schuif deze naar voren.
2. Pak de beschermplaat vast aan de achterkant en til deze op om hem te verwijderen.
Ga als volgt te werk om de beschermplaat te bevestigen:
1. Schuif de beschermplaat van achter naar voren over de mixer.
2. De magnetische beschermplaat klikt vanzelf vast op de mixer.
Figuur 5. De beschermplaat verwijderen/bevestigen
Nederlands - 8

Opstelling van het systeem
Bevestigingsmogelijkheden
De T4S/T8S is voorzien van een ¼ ( mm) statiefaansluiting. Hiermee kan deze op verschillende verkrijgbare
producten met een bevestigingsschroef van ¼" (6 mm) worden bevestigd, zoals een camerastatief.
De T4S/T8S op een camerastatief bevestigen
1. Schuif de poten van het camerastatief uit en stel deze in op de gewenste hoogte.
2. Verwijder de beugel bovenaan het camerastatief en bevestig deze met de schroef aan de onderzijde van
de T4S/T8S. Zorg ervoor dat de kleine uitsparing in de T4S/T8S en de verhoging op de beugel op één lijn
liggen. Zie figuur 6.
3. Bevestig de beugel met de T4S/T8S aan het camerastatief. Zie figuur 8.
Figuur 6. Beugel aan T4S bevestigen Figuur 8. T4S aan statief bevestigen met beugel
Figuur 7. Beugel bevestigd aan T4S
WAARSCHUWING: Gebruik de ToneMatch® T4S/T8S mixer niet in combinatie met een instabiel statief.
De mixer is uitsluitend ontworpen voor gebruik met een schroef van ¼" (6 mm). Het statief moet een
apparaat met een minimaal gewicht van 1,9 kg en een afmeting van 214 x 311 x 83 mm kunnen dragen.
Als u een statief gebruikt dat niet is ontworpen voor het gewicht en de afmetingen van de T4S/T8S
mixer, kan dit leiden tot gevaarlijke situaties met mogelijk letsel tot gevolg.
9 - Nederlands

Opstelling van het systeem
De T4S digitaal aansluiten
1. Zorg ervoor dat de L1 Model 1S/II en T4S zijn uitgeschakeld en dat de Master-volumeregelaar op de T4S
dicht staat.
2. Sluit het ene uiteinde van de ToneMatch®-kabel aan op de voedingspoort/digitale hoofduitgang R van de
T4S. Sluit het andere uiteinde van de ToneMatch-kabel aan op de ToneMatch-poort op de power stand.
Opmerking: Om de T4S op twee L1 Model 1S/II power stands aan te sluiten, moet u een tweede power
stand met een ToneMatch-kabel aansluiten op de digitale hoofduitgang L-poort van de T4S.
3. Schakel eerst de mixer in en vervolgens de L1 Model 1S/II power stand.
4. Sluit uw instrumenten aan en stel de niveaus in. Raadpleeg de volledige gebruikershandleiding op
www.Bose.com voor alle bedieningsinformatie.
Figuur 9. Twee L1 model II systems digitaal aangesloten op een T4S
MONO
USB AUDIO
M
( )
Opmerking: De T8S kan niet digitaal worden aangesloten en werkt niet met de L1 Model 1S/II.
Nederlands - 10

Opstelling van het systeem
US
O
M
De T4S/T8S analoog aansluiten
1. Zorg ervoor dat het aan te sluiten apparaat en de T4S/T8S zijn uitgeschakeld en dat de Mastervolumeregelaar op de T4S/T8S dicht staat.
2. Sluit een of twee apparaten met gebalanceerde XLR-kabels aan op de XLR-stereo-uitgangen van uw T8S
(zie figuur 10).
Opmerking: De T4S/T8S kan met een ¼" TRS-kabel (afzonderlijk verkrijgbaar) via de analoge
R-uitgangspoort op een apparaat worden aangesloten. Sluit het andere uiteinde van de TRS-kabel aan op
de analoge ingangspoort van het apparaat. Om de T4S/T8S op twee apparaten aan te sluiten, moet u een
tweede apparaat met een ¼" TRS-kabel aansluiten op de analoge L-uitgangspoort van de T4S/T8S.
3. Sluit een ToneMatch®-voeding aan op de voedingspoort van de T4S/T8S en sluit deze vervolgens aan op
een werkend stopcontact. Raadpleeg ‘De ToneMatch®-voeding aansluiten’ op pagina 12.
4. Schakel eerst de T4S/T8S mixer in en vervolgens het apparaat.
5. Sluit uw instrumenten aan en stel de niveaus in. Raadpleeg de volledige gebruikershandleiding op
www.Bose.com voor alle bedieningsinformatie.
Figuur 10. Twee F1 systems analoog aangesloten op een T8S
B AUDI
AIN OUT
USB AUDIO
MONO
MAIN OUT
M
( )
11 - Nederlands

Opstelling van het systeem
De ToneMatch®-voeding aansluiten
De ToneMatch-voeding levert voeding aan de T4S/T8S mixer.
1. Sluit de voedingskabel aan op de voedingspoort van de T4S/T8S.
2. Sluit het ene uiteinde van het netsnoer aan op de voedingseenheid.
3. Sluit het andere uiteinde van het netsnoer aan op een werkend stopcontact.
4. Zet de aan/uitschakelaar van de T4S/T8S op ON.
Opmerking: De T8S kan niet werken zonder de meegeleverde voeding. De T4S kan zonder netvoeding
werken; deze wordt niet meegeleverd.
Figuur 11. T4S aansluiten op voeding
Nederlands - 12

Opstelling van het systeem
De T4S/T8S aansluiten op uw computer
De T4S/T8S is voorzien van een USB-poort die kan worden aangesloten op uw computer. Hiermee kunt u
scènes downloaden naar een computer of systeemupdates installeren. Ga naar www.Bose.com/livesound
voor meer informatie over het updaten van uw systeem.
Als uw systeem is aangesloten op een computer, kunt u de T4S/T8S ook als standaard-USB-audioapparaat
gebruiken voor opnemen/afspelen.
Opmerking: De T4S/T8S werkt met 48 kHz/24-bit. Wanneer u de T4S/T8S gebruikt in combinatie met
opnamesoftware, moet u de software configureren voor 48 kHz/24-bit.
Opmerking: Om de T4S/T8S aan te sluiten op uw computer hebt u een USB-kabel nodig (type A naar type B,
wordt niet meegeleverd).
1. Sluit de mixer aan op een voedingsbron (ToneMatch®-voeding voor T4S/T8S of een L1 Model 1S/II voor T4S).
2. Sluit het ene uiteinde van de USB-kabel aan op de USB 2.0 type-B-poort van de mixer (figuur 12).
3. Steek het andere uiteinde van de USB-kabel in een USB-poort van uw computer.
4. Schakel de mixer in.
Figuur 12. T4S-aansluiting via USB
ToneMatch-poort – Naar een L1 Model 1S/II
system of een ToneMatch-voeding
Aan/uit-schakelaar
USB-kabel
(type A naar type B)
Naar de USBpoort van de
computer
Een USB-stick aansluiten op de T4S/T8S
Steek een USB 2.0/3.0-stick met WAV/MP3-bestanden in de USB 2.0 type-A-poort om muzieknummers op
uw mixer af te spelen.
Figuur 13. USB-stick aansluiten op de T4S
13 - Nederlands

Contactgegevens
Ga naar onze website op www.Bose.com.
Amerika
(VS, Canada, Mexico, Centraal-Amerika,
Zuid-Amerika)
Bose Corporation
Framingham, MA 01701 VS
Corporate Center: 508-879-7330
Americas Professional Systems,
Technische ondersteuning: +1 800 994 26 73
Australië
Bose Pty Limited
Unit 3/2 Holker Street
Newington NSW Australië
+61 2 87 37 99 99
België
Bose N.V. / S.A
Limesweg 2, 03700
+31 12 39 08 00
China
Bose Electronics (Shanghai) Co Ltd
25F, L’Avenue
99 Xianxia Road
Shanghai, Volksrepubliek China 200051 China
+86 21 60 10 38 00
Frankrijk
Bose S.A.S
12 rue de Temara
78100 St. Germain en Laye, Frankrijk
+33 1 30 61 63 63
Duitsland
Bose GmbH
Max-Planck Strasse 36D 61381
Friedrichsdorf, Duitsland
+49 6172 710 40
Hongkong
Bose Limited
Suites 2101-2105, Tower One, Times Square
1 Matheson Street, Causeway Bay, Hongkong
+852 2123 90 00
India
Bose Corporation India Private Limited
Salcon Aurum, 3rd Floor
Plot No. 4, Jasola District Centre
New Delhi – 110025, India
+91 11 43 08 02 00
Italië
Bose SpA
Centro Leoni A – Via G. Spadolini
5 20122 Milaan, Italië
+39 2 36 70 45 00
Japan
Bose Kabushiki Kaisha
Sumitomo Fudosan Shibuya Garden Tower 5F
16-17, Nanpeidai-cho
Shibuya-Ku, Tokio, 150-0036, Japan
+81 3 54 89 09 55
Nederland
Bose Products B.V.
Gorslaan 60 1441 RG
Purmerend, Nederland
0299-390139
Verenigd Koninkrijk
Bose Ltd
1 Ambley Green, Gillingham Business Park
KENT ME8 0NJ
Gillingham, Engeland
+44 870 741 45 00
Aanvullende informatie
Gegevens importeur
Europese Unie
Bose Products B.V., Gorslaan 60, 1441 RG
Purmerend, Nederland
China
Bose Electronics (Shanghai) Company
Limited, Part C, Plan 9, No. 353 North Riying
Road, China (Shanghai) Pilot Free Trade Zone
Taiwan
Bose Taiwan Branch, 9F-A1, No. 10, Section 3,
Minsheng East Road, Taipei City 104, Taiwan
+886 2 25 14 76 76
Mexico
Bose de México, S. de R.L. de C.V., Paseo de
las Palmas 405-204, Lomas de Chapultepec,
11000 México, D.F.
+52 55 52 02 35 45
Raadpleeg de website voor andere landen
Aanvullende informatie
Raadpleeg de volledige gebruikershandleiding (online op www.Bose.com) voor meer informatie over de
bediening, fabrieksinstellingen en onderhoud. Als u een gedrukt exemplaar wilt aanvragen, gebruikt u de
telefoonnummers die u hebt ontvangen.
Beperkte garantie
Het product wordt gedekt door een beperkte garantie. Ga naar www.pro.Bose.com voor garantie-informatie.
De bij dit product verstrekte garantie-informatie is niet van toepassing in Australië en Nieuw-Zeeland. Meer
info over de garantie in Australië en Nieuw-Zeeland vindt u op www.bose.com/au/warranty en
www.bose.com/nz/warranty.
Fabricagedatum
Het achtste cijfer in het serienummer geeft het fabricagejaar aan. ‘6’ is 2006 of 2016.
Nederlands - 14

©2017 Bose Corporation, All rights reserved.
All trademarks are the property of their respective owners
Framingham, MA 01701-9168 USA
www.Bose.com
AM806045 Rev. 00
November 2017
 Loading...