

Page 1
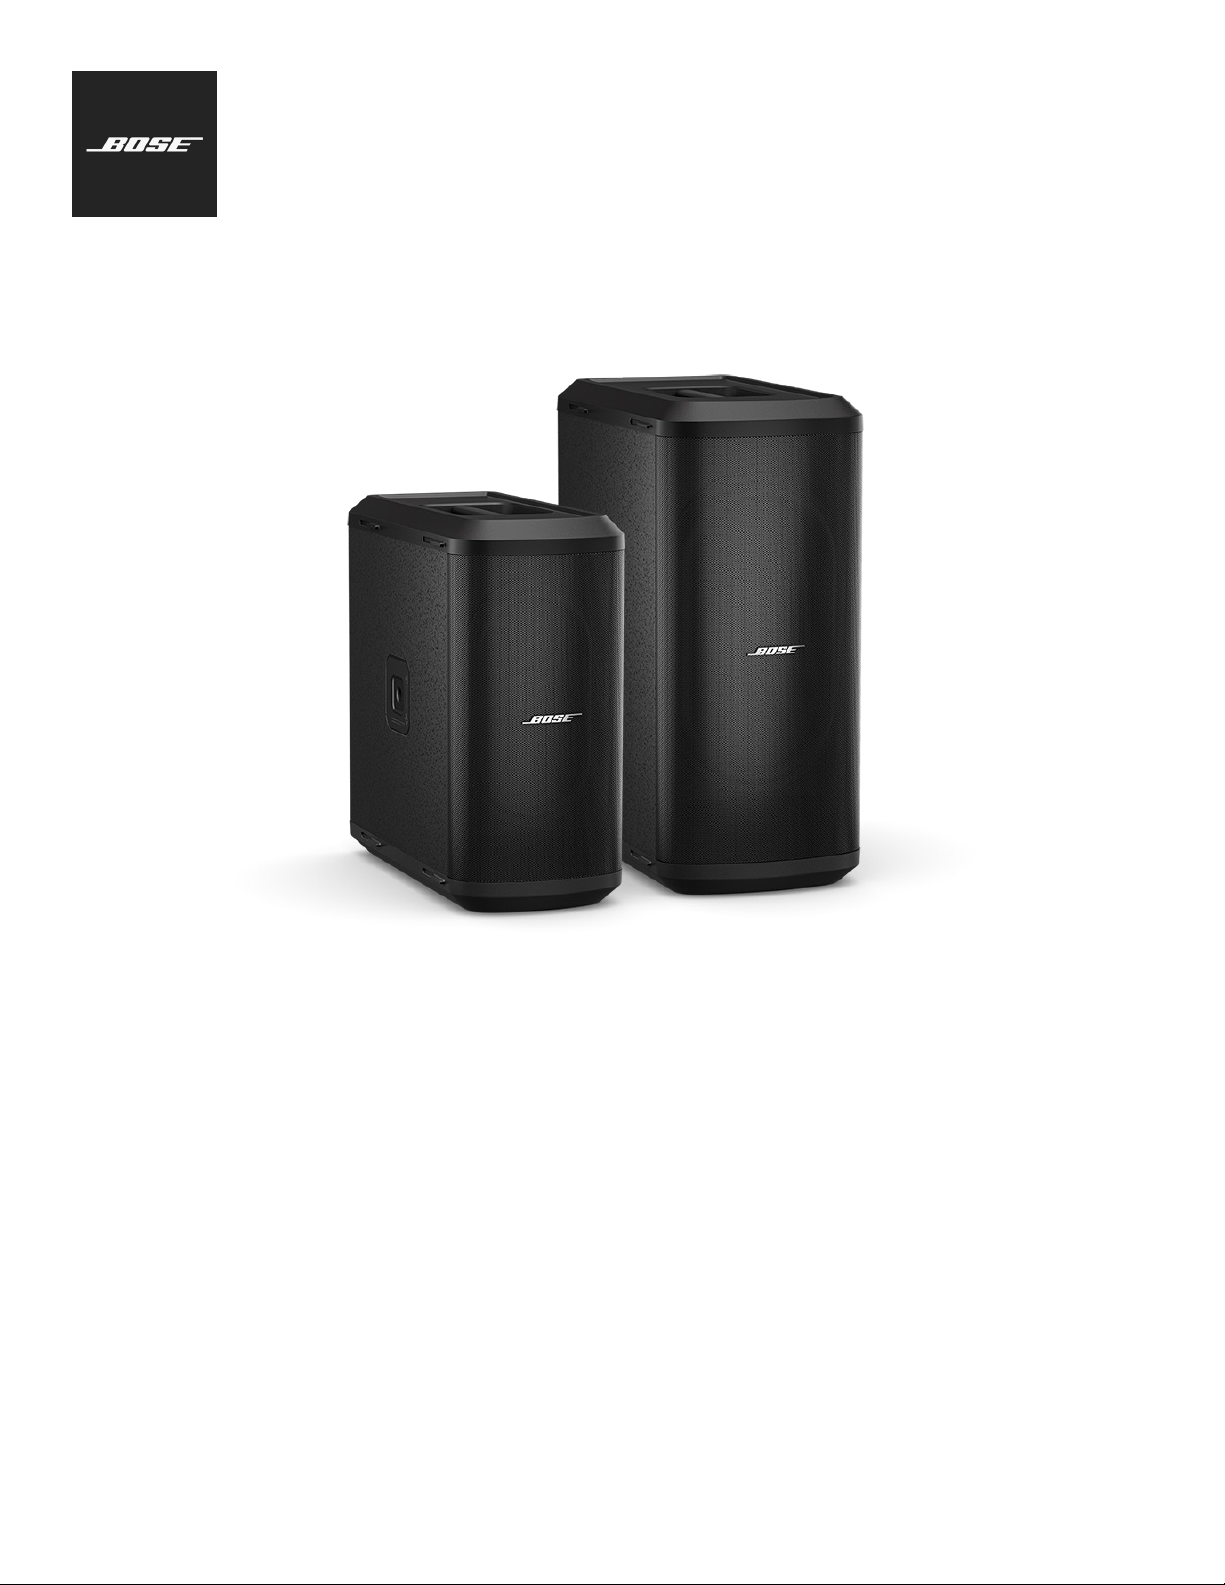
Sub1 & Sub2
Powered Bass Modules
Owner's Guide
Page 2

Important Safety Instructions
PRO.BOSE.COM
Please read and keep all safety and use instructions.
Important Safety Instructions
Bose Corporation hereby declares that this product is in compliance with the
essential requirements and other relevant provisions of Directive 2014/53/EU and
all other applicable EU directive requirements. The complete declaration of
conformity can be found at: www.Bose.com/compliance.
1. Read these instructions.
2. Keep these instructions.
3. Heed all warnings.
4. Follow all instructions.
5. Do not use this apparatus near water.
6. Clean only with a dry cloth.
7. Do not block any ventilation openings. Install in accordance with the manufacturer’s
instructions.
8. Do not install near any heat sources such as radiators, heat registers, stoves, or other
apparatus (including amplifiers) that produce heat.
9. Do not defeat the safety purpose of the polarized or grounding-type plug. A polarized
plug has two blades with one wider than the other. A grounding type plug has two
blades and a third grounding prong. The wide blade or the third prong are provided for
your safety. If the provided plug does not fit into your outlet, consult an electrician for
replacement of the obsolete outlet.
10. Protect the power cord from being walked on or pinched, particularly at plugs,
convenience receptacles, and the point where it exits from the apparatus.
11. Only use attachments/accessories specified by the manufacturer.
12. Use only with the cart, stand, tripod, bracket, or table specified by the
manufacturer or sold with the apparatus. When a cart is used, use caution
when moving the cart/apparatus combination to avoid injury from tip-over.
13. Unplug this apparatus during lightning storms or when unused for long periods of time.
14. Refer all servicing to qualified personnel. Servicing is required when the apparatus has
been damaged in any way such as power-supply cord or plug is damaged, liquid has been
spilled or objects have fallen into the apparatus, the apparatus has been exposed to rain or
moisture, does not operate normally, or has been dropped.
WARNINGS/CAUTIONS
This symbol on the product means there is uninsulated, dangerous voltage within
the product enclosure that may present a risk of electrical shock.
This symbol on the product means there are important operating and maintenance
instructions in this guide.
Contains small parts which may be a choking hazard. Not suitable for children
under age 3.
This product contains magnetic material. Consult your physician on whether this
might aect your implantable medical device.
Use at altitude less than 2000meters only.
This symbol on the product means there is a tip-over hazard when using a pole
mount.
Do not alter, modify, or remove the sliding cover over the power input of the Sub1/
Sub2. There is uninsulated, dangerous voltage within the product enclosure that
may present a risk of electrical shock.
• The pole-mount M20 threaded insert on the Sub1 and Sub2 is designed to support a
pole of up to 1.3 meters (51 inches) with a Bose S1 Pro mounted on the pole. Do not use
the Sub1 or Sub2 with a pole exceeding 1.3 meters (51 inches) in height or a loudspeaker
weight that exceeds 7.1 kilograms (15.7 pounds). Using a pole/loudspeaker combination
that exceeds either of these limits or creates an unstable mounting scenario may lead to
a hazardous condition that could result in injury.
• Do NOT make unauthorized alterations to this product.
• Do NOT use in vehicles or boats.
• Do NOT place the product in a confined space such as in a wall cavity or in an enclosed
cabinet while in use.
• Keep the product away from fire and heat sources. Do NOT place naked flame sources,
such as lighted candles, on or near the product.
• To reduce the risk of fire or electrical shock, do NOT expose the product to rain, liquids,
or moisture.
• Do NOT expose this product to dripping or splashing and do not place objects filled with
liquids, such as vases, on or near the product.
• Do NOT use a power inverter with this product.
• Provide an earth connection or ensure the socket outlet incorporates a protective
earthing connection before connecting the plug to the mains socket outlet.
• Where the mains plug or an appliance coupler is used as the disconnect device, the
disconnect device shall remain readily operable.
Regulatory Information
The product, in accordance with the Ecodesign Requirements for Energy Related Products
Directive 2009/125/EC, is in compliance with the following norm(s) or document(s): Regulation
(EC) No. 1275/2008, as amended by Regulation (EU) No. 801/2013.
Power Modes
Required Power State Information
Power consumption in specified power mode, at
230V/50Hz input
Time after which equipment is automatically
switched into mode
Power consumption in networked standby if all
wired network ports are connected and all wireless
network ports are activated, at 230V/50Hz input
Network port deactivation/activation procedures.
Deactivating all networks will enable standby
mode.
Sub1 Sub2
Dimensions (H ×W ×D)
Net Weight
Input Rating 100–240VAC, 3A, 50/60Hz 100–240VAC, 4A, 50/60Hz
Initial turn on inrush
current
Inrush current after AC
mains interruption of 5s
Shielded cables are required to maintain regulatory compliance.
The product label is located on the bottom of the product.
Model: 431389G1 / 431389G2. The CMIIT ID is located on the bottom of the product.
CAN ICES-3(B)/NMB-3(B)
Information About Products That Generate Electrical Noise (FCC Compliance Notice for US)
NOTE: This equipment has been tested and found to comply with the limits for a Class B digital
device, pursuant to Part 15 of the FCC Rules. These limits are designed to provide reasonable
protection against harmful interference in a residential installation. This equipment generates,
uses, and can radiate radio frequency energy and, if not installed and used in accordance with
the instructions, may cause harmful interference to radio communications. However, there is
no guarantee that interference will not occur in a particular installation. If this equipment does
cause harmful interference to radio or television reception, which can be determined by turning
the equipment o and on, the user is encouraged to try to correct the interference by one or
more of the following measures:
• Reorient or relocate the receiving antenna.
• Increase the separation between the equipment and receiver.
• Connect the equipment into an outlet on a circuit dierent from that to which the
receiver is connected.
• Consult the dealer or an experienced radio/TV technician for help.
Changes or modifications not expressly approved by Bose Corporation could void the user’s
authority to operate this equipment.
53.0 ×25.0 ×53.0cm
(20.9 ×9.8 ×20.9in)
16.1kg
(35.5lb)
14.9A at 120V; 29.3A at 230V 15.2A at 120V; 28.6A at 230V
5.8A at 120V; 32.0A at 230V 2.6A at 120V; 6.1A at 230V
Standby
≤ 0.5 W N/A*
4 hours N/A*
*Product does not utilize a networked
standby mode for a Bluetooth®
connection and does not have the
ability to be configured to a network
via Wi-Fi® or Ethernet
69.0 ×30.5 ×55.0cm
(27.2 ×12.0 ×21.7in)
23.4kg
(51.7lb)
Networked
Standby
N/A*
2 • English Sub1/Sub2 Powered Bass Module • Owner's Guide
Page 3
PRO.BOSE.COM
Important Safety Instructions
This device complies with part15 of the FCC Rules and with ISED Canada’s license-exempt
RSS standard(s). Operation is subject to the following two conditions: (1) This device may not
cause harmful interference, and (2) this device must accept any interference received, including
interference that may cause undesired operation.
This symbol means the product must not be discarded as household waste, and
should be delivered to an appropriate collection facility for recycling. Proper
disposal and recycling helps protect natural resources, human health, and the
environment. For more information on disposal and recycling of this product,
contact your local municipality, disposal service, or the shop where you bought
this product.
China Restriction of Hazardous Substances Table
Names and Contents of Toxic or Hazardous Substances or Elements
Toxic or Hazardous Substances and Elements
Lead
Mercury
Part Name
PCBs X O O O O O
Metal Parts X O O O O O
Plastic
Parts
Speakers X O O O O O
Cables X O O O O O
This table is prepared in accordance with the provisions of SJ/T 11364.
O: Indicates that this toxic or hazardous substance contained in all of the
X: Indicates that this toxic or hazardous substance contained in at least
(Pb)
O O O O O O
homogeneous materials for this part is below the limit requirement of
GB/T 26572.
one of the homogeneous materials used for this part is above the limit
requirement of GB/T 26572.
Cadmium
(Hg)
(Cd)
Hexavalent
(CR(VI))
Polybrominated
Biphenyl (PBB)
Polybrominated
diphenylether
(PBDE)
Taiwan Restriction of Hazardous Substances Table
Equipment name: Sub1/Sub2 Type designation: 431389G1 / 431389G2
Restricted substances and its chemical symbols
(Cd)
Hexavalent
chromium
(Cr+6)
Polybrominated
biphenyls (PBB)
Lead
Mercury
Unit
PCBs −
Metal Parts −
Plastic
Parts
Speakers −
Cables −
Note 1: “○” indicates that the percentage content of the restricted substance does not exceed
Note 2: The “−” indicates that the restricted substance corresponds to the exemption.
(Pb)
○ ○ ○ ○ ○ ○
the percentage of reference value of presence.
Cadmium
(Hg)
○ ○ ○ ○ ○
○ ○ ○ ○ ○
○ ○ ○ ○ ○
○ ○ ○ ○ ○
Polybrominated
diphenyl ethers
(PBDE)
Date of Manufacture: The eighth digit in the serial number indicates the year of manufacture;
“0” is 2010 or 2020.
China Importer: Bose Electronics (Shanghai) Company Limited, Part C, Plant 9, No. 353 North
Riying Road, China (Shanghai) Pilot Free Trade Zone
EU Importer: Bose Products B.V., Gorslaan 60, 1441 RG Purmerend, The Netherlands
Mexico Importer: Bose de México, S. de R.L. de C.V. , Paseo de las Palmas 405-204, Lomas de
Chapultepec, 11000 México, D.F. For service or importer information, call +5255 (5202) 3545
Taiwan Importer: Bose Taiwan Branch, 9F-A1, No. 10, Section 3, Minsheng East Road, Taipei
City 104, Taiwan. Phone Number: +886-2-2514 7676
Bose Corporation Headquarters: 1-877-230-5639
Wi-Fi is a registered trademark of Wi-Fi Alliance®
Bose, L1, and SubMatch are trademarks of Bose Corporation.
All other trademarks are the property of their respective owners.
The Bose Privacy Policy is available on the Bose website.
©2020 Bose Corporation. No part of this work may be reproduced, modified, distributed or
otherwise used without prior written permission.
Please complete and retain for your records.
The serial and model numbers are located on the product label on the bottom of the
product.
Serial number: ___________________________________________________
Model number: ___________________________________________________
Warranty Information
This product is covered by a limited warranty.
For warranty details, visit global.bose.com/warranty.
English • 3Owner's Guide • Sub1/Sub2 Powered Bass Module
Page 4

Contents
PRO.BOSE.COM
Overview 5
Package Contents ..................................................................................................................................................................................... 5
Optional Accessories ...............................................................................................................................................................................5
Setup 6
Connections and Controls .....................................................................................................................................................................6
Connecting Power .....................................................................................................................................................................................7
Connecting Directly to a Power Outlet ..................................................................................................................................... 7
Connecting to an L1 Pro32 with a SubMatch Cable............................................................................................................. 8
AutoO/Low-power Standby ....................................................................................................................................................... 8
Inputs and Outputs ...................................................................................................................................................................................9
Line Input ..............................................................................................................................................................................................9
Line Output ..........................................................................................................................................................................................9
Settings ..........................................................................................................................................................................................................9
Phase/Pattern ......................................................................................................................................................................................9
Level ...................................................................................................................................................................................................... 10
Line Input EQ ..................................................................................................................................................................................... 10
Line Output EQ ................................................................................................................................................................................. 10
Sub1/Sub2 Orientation .......................................................................................................................................................................... 10
Using the Pole-mount Insert with an S1 Pro ...........................................................................................................................11
Care & Maintenance 12
Cleaning Your Sub ....................................................................................................................................................................................12
Troubleshooting ........................................................................................................................................................................................12
4 • English Sub1/Sub2 Powered Bass Module • Owner's Guide
Page 5
PRO.BOSE.COM
Overview
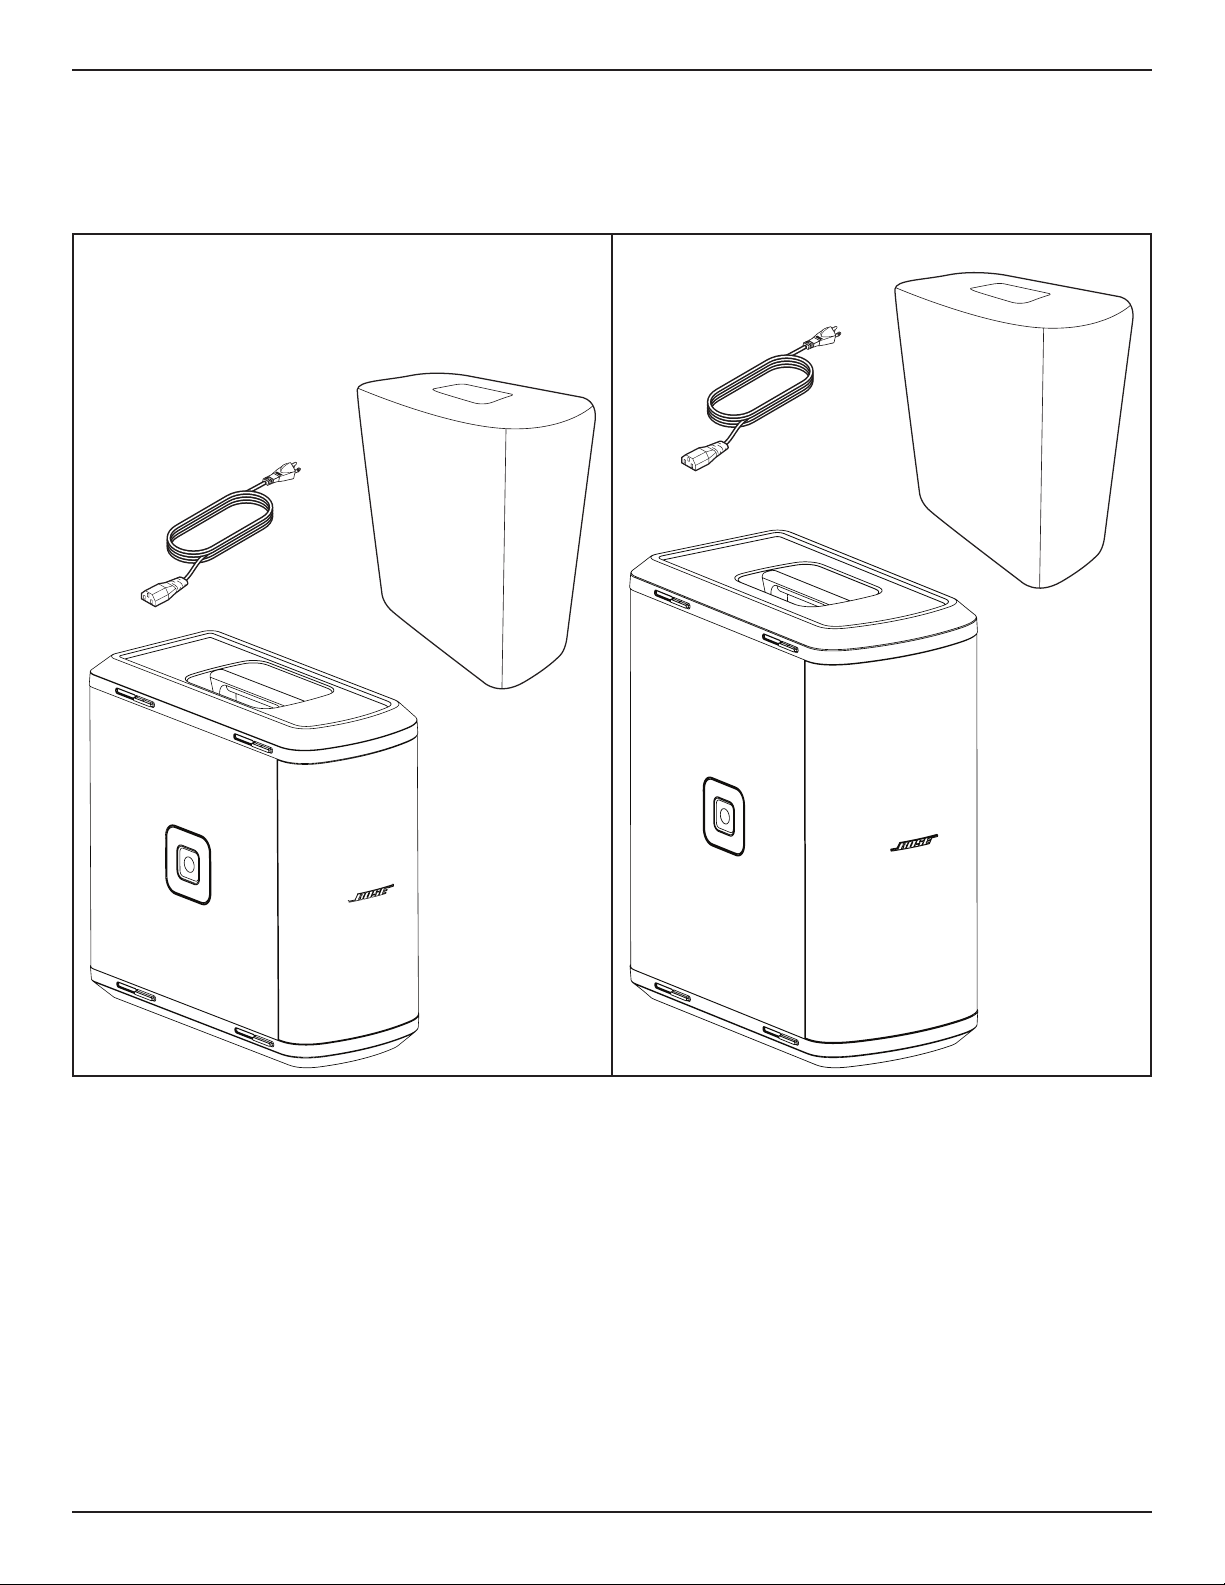
Package Contents
Overview
Sub1 Sub2
Optional Accessories
• Sub1/Sub2 Roller Bag
• Sub1/Sub2 Adjustable Speaker Pole
• SubMatch Cable
For additional information on Sub1/Sub2 accessories, visit PRO.BOSE.COM.
English • 5Owner's Guide • Sub1/Sub2 Powered Bass Module
Page 6

Setup
Setup
Connections and Controls
PRO.BOSE.COM
q
w
e
f
PHASE/PATTERN
CARDIOID
LINE IN 1LINE IN 2 LINE IN EQ
LPF
LINE OUT 1LINE OUT 2 LINE OUT EQ
FULL
HPF
SUBMATCH
THRU
r t y
SUBMATCH
IN
u
LEVEL
L1
d
s
a
o
i
q Standby Button: Press the button to
power on the Sub. The LED will illuminate
white while the Sub is on.
w Line Inputs: Analog input for connecting
an L1 Pro or other line-level audio source.
Compatible with XLR, TRS balanced, and
TS unbalanced cables.
e Line Outputs: Use an XLR cable to
connect the line-level output to a
loudspeaker.
r SubMatch Thruput: Connect an additional
Sub bass module with a SubMatch cable.
Up to two Sub1 or Sub2 powered bass
modules can be powered by a single L1
Pro32 via SubMatch connection.
t Power Input Cover: Prevents
simultaneous use of the SubMatch Input
and Power Input. Slide the cover to reveal
the power input that is needed for setup.
y SubMatch Input: Connect the Sub to an
L1 Pro32 with a SubMatch cable.
u Power Input: IEC power cord connection.
i USB Port: USB-C connector for Bose
service use and firmware updates.
Note: This port is not compatible with
Thunderbolt 3 cables.
o Line Output EQ: Select between FULL
bandwidth or a multi-purpose HPF when
using Line Outputs. Press the button to
switch EQ settings. The corresponding
LED will illuminate white while selected.
a Line Input EQ: Select between an
optimized EQ for an L1 Pro or a multipurpose LPF when using Line Inputs.
Press the button to switch EQ settings.
The corresponding LED will illuminate
white while selected.
s Signal/Clip Indicator: The LED will
illuminate green when a signal is present
and will illuminate red when the signal is
clipping or the Sub is entering limiting.
Reduce the level or signal volume to
prevent signal clipping or limiting.
d Level Control: Adjust the level of audio
output. The Level Control does not aect
the Line Outputs. The 12 o’clock position
is recommended when in use with an
L1Pro32.
f Phase/Pattern Button: Adjust the polarity
of the Sub. Press the button to switch
polarity. The corresponding LED will
illuminate white while selected. Also
allows access to Cardioid mode when
using two identical Sub modules.
6 • English Sub1/Sub2 Powered Bass Module • Owner's Guide
Page 7

PRO.BOSE.COM
Setup
Connecting Power
There are two ways to connect a Sub to power: connecting to a power outlet or connecting to an L1 Pro32
with a SubMatch cable. The Power Input Cover prevents simultaneous connection of both power inputs. Only
one of the two power connections should be used at a time.
If connecting directly to a power outlet, slide the Power Input Cover to the left, concealing the SubMatch
Input. If connecting to an L1 Pro32 with a SubMatch cable, slide the Power Input Cover to the right,
concealing the Power Input.
WARNING: Do not alter, modify, or remove the sliding cover over the power input of the Sub1/Sub2.
There is uninsulated, dangerous voltage within the product enclosure that may present a risk of
electrical shock.
Connecting Directly to a Power Outlet
q w e
1. Plug the power cord into the Power Input.
2. Plug the other end of the power cord into a live electrical outlet.
Note: Do not power on the Sub until after you've connected your sources.
3. Press the Standby Button. The LED will illuminate white while the Sub is on.
English • 7Owner's Guide • Sub1/Sub2 Powered Bass Module
Page 8

Setup
Connecting to an L1 Pro32 with a SubMatch Cable
PRO.BOSE.COM
q
1. Plug the SubMatch cable into the SubMatch Input on a Sub1/Sub2.
2. Plug the other end of the SubMatch cable into the SubMatch Output of the L1 Pro32.
3. Plug the power cord into the Power Input on the L1 Pro32.
4. Plug the other end of the power cord into a live electrical outlet.
Note: Do not power on the L1 Pro or the Sub until after you've connected your sources. See the L1 Pro32
owner's guide at PRO.BOSE.COM for more information about connecting sources to an L1 Pro32.
5. Press the Standby Button on the L1 Pro32 then press the Standby Button on the Sub. The LEDs will
illuminate white while the L1 Pro and Sub are on.
Note: Press and hold the Standby Button for 10 seconds to reset the Sub to factory settings.
When using two Subs via SubMatch cable connection, first turn on the Sub connected directly to the
L1Pro32, then turn on the second Sub.
w e
L1 Pro32Sub1/Sub2
tr
AutoO/Low-power Standby
After four hours of no use, the Sub will enter AutoO/Low-power Standby mode to save power. To wake the
Sub from AutoO/Low-power Standby mode, press the Standby Button.
Note: Disable AutoO/Low-power Standby mode by pressing and holding the Phase/Pattern Button and Line
Output EQ button simultaneously for 10 seconds. Enable AutoO/Low-power Standby mode by repeating this
step. Disabling AutoO/Low-power Standby mode will result in higher energy usage when the Sub is not in
use.
8 • English Sub1/Sub2 Powered Bass Module • Owner's Guide
Page 9

PRO.BOSE.COM
PHASE/PATTERN
CARDIOID
PHASE/PATTERN
CARDIOID
Setup
Inputs and Outputs
Line Input
Analog input for connecting an L1 Pro or other line-level audio source. Compatible with XLR, TRS balanced,
and TS unbalanced cables. Use Line Input 1 (Left) and Line Input 2 (Right) together for stereo applications.
Line Output
Use an XLR cable to connect the line-level output to a loudspeaker. Use Line Output 1 (Left) and Line
Output2 (Right) together for stereo applications.
Settings
Phase/Pattern
Adjust the polarity of the Sub. Press the button to switch between positive
polarity (+) and inverted polarity (–). The corresponding LED will illuminate
white while selected. Choose the polarity that sounds best for your
application.
Cardioid Mode
Cardioid mode is for use with a stack of two identical Sub modules, which
allows for most of the sound energy to be focused in front of the Sub stack
while reducing the sound energy that is generated behind the Sub stack. Press and hold the button for four
seconds to select CARDIOID. The LED will illuminate white while selected. Press and hold again to switch
back to +. Cardioid mode should only be used in a stacked configuration of two identical Sub modules, with
the top Sub facing the coverage area and the bottom Sub facing the non-coverage area. Set the Phase/
Pattern of the top Sub to + and the Phase/Pattern of the bottom Sub to CARDIOID. When adjusting the level
of the stacked subs in Cardioid mode, be sure that the Level Control is set to the same position on both Subs.
See the below diagrams for Sub stack orientation and coverage patterns.
Cardioid Stack Configuration
PHASE/PATTERN
Facing
coverage area
CARDIOID
Facing non-
coverage area
PHASE/PATTERN
CARDIOID
Coverage Patterns (Top View)
Cardioid Mode O Cardioid Mode On
Top Sub
Bottom
Sub
Top Sub
Bottom
Sub
English • 9Owner's Guide • Sub1/Sub2 Powered Bass Module
Page 10

Setup
LINE OUT EQ
FUL
HPF
LINE OUT EQ
FUL
HPF
LINE IN EQ
LP
LINE IN EQ
LP
PRO.BOSE.COM
Level
Adjust the level of audio output from the Sub. Begin with the Level Control set to a low setting and increase
the level until the Signal/Clip Indicator illuminates green. The Level Control does not aect the Line Outputs.
The 12 o’clock position is recommended when in use with an L1Pro32. If using two Subs with a single L1 Pro, it
is recommended that the Level Control is set to the same position on both Subs.
Line Input EQ
Change the EQ of both Line Inputs by pressing the Line Input EQ button until the
corresponding LED for your desired EQ illuminates white. Use L1 to apply an input
EQ optimized for L1 Pro products; use LPF to apply a low-pass filter to the inputs.
When a Sub is connected to an L1 Pro32 with a SubMatch cable, the Line Input EQ
will be fixed to L1.
F
L1
F
L1
Line Output EQ
Change the EQ of both Line Outputs by pressing the Line Output EQ button
until the corresponding LED for your desired EQ illuminates white. Use FULL for
full frequency or HPF to apply a high-pass filter to the outputs.
Note: If using the Sub with an S1 Pro, press and hold the Line Output EQ button
for four seconds to enable an EQ specifically optimized for use with an S1 Pro.
The HPF LED will illuminate green. To deactivate the S1 Pro EQ, press and hold for
four seconds.
L
L
Sub1/Sub2 Orientation
WARNING: Do not place the equipment in an unstable location. The equipment could become unstable
leading to a hazardous condition, which could result in injury.
CAUTION: Do not stack more than two Subs together. Only stack two Subs of the same model.
For horizontal configurations, adjust the logo by rotating it.
For stacked configurations, the Sub includes four interlocking feet that will attach to another
Sub of the same model. When stacking Subs horizontally, always make sure the feet lock
together before connecting power and sources.
Interlocking
feet
M20 insert
Interlocking
feet
10 • English Sub1/Sub2 Powered Bass Module • Owner's Guide
Page 11

PRO.BOSE.COM
LINE OUT 1
INPUT
INPUT
LINE OUT EQ
FUL
LINE IN 1
LINE IN EQ
LP
L1
Setup
Using the Pole-mount Insert with an S1 Pro
WARNING: The pole-mount M20 threaded insert on the Sub1 and Sub2 is designed to support a pole
of up to 1.3 meters (51 inches) with a Bose S1 Pro mounted on the pole. Do not use the Sub1 or Sub2
with a pole exceeding 1.3 meters (51 inches) in height or a loudspeaker weight that exceeds 7.1
kilograms (15.7 pounds). Using a pole/loudspeaker combination that exceeds either of these limits or
creates an unstable mounting scenario may lead to a hazardous condition that could result in injury.
The Sub1/Sub2 includes a pole-mount M20 threaded insert. The insert is compatible with the Bose Sub1/Sub2
Adjustable Speaker Pole accessory, designed for use with the Bose S1 Pro system (for more information, see
the Adjustable Speaker Pole owner's guide at PRO.BOSE.COM).
*Alternate Connection
This scenario requires a
specialized cable or adapter.
Connect a 3.5-millimeter (⅛inch) TRS cable to the Aux
Input of the S1 Pro. Channel3
of the S1 Pro is a pure linelevel input and can provide a
slightly wider range of volume
control of a line out signal
*
from a Sub1 or Sub2. The
Aux Input of the S1 Pro is an
unbalanced line-level input.
HPF
L
F
English • 11Owner's Guide • Sub1/Sub2 Powered Bass Module
Page 12

Care & Maintenance
PRO.BOSE.COM
Care & Maintenance
Cleaning Your Sub
Clean the product enclosure using only a soft, dry cloth. If necessary, carefully vacuum the grille of the Sub.
CAUTION: Do not use any solvents, chemicals, or cleaning solutions containing alcohol, ammonia, or
abrasives.
CAUTION: Do not use any sprays near the product or allow liquids to spill into any openings.
Troubleshooting
Problem What to do
No power • Make sure you have power at the AC outlet. Try operating a lamp or other
equipment from the same AC outlet or test the outlet using an AC outlet
tester.
• If powered from an L1 Pro32 with a SubMatch cable, ensure the L1 Pro32 is
turned on, and not in AutoO/Low-power Standby mode.
No sound • Make sure your Sub is turned on.
• Make sure your source is plugged into the Line Input.
• Make sure the volume is turned up on your source.
• Make sure the Level Control is turned up on the Sub.
• Make sure the Sub isn't in AutoO/Low-power Standby mode.
Standby LED is flashing
red (thermal fault)
Standby LED is solid red
(system fault)
With nothing plugged
into the Sub, a light hum
or buzz is heard
Audio source sounds
distorted
Excessive hum when
daisy-chaining multiple
units
• Turn o the Sub and wait 30 minutes before turning it back on.
• Move the Sub to a cooler location.
• Move the Sub to a location that has more ventilation.
• Contact Bose customer service. Visit worldwide.Bose.com/contact.
• Using an AC outlet tester, test the AC outlet the Sub is plugged into for
reversed or open (hot, neutral, and/or ground) contacts.
• If using an extension cord, plug the Sub directly into the outlet.
• Turn down volume on the source.
• Turn down Level Control.
• Try a dierent source.
• Ensure the level on the daisy-chained unit(s) is not set too high.
12 • English Sub1/Sub2 Powered Bass Module • Owner's Guide
Page 13

Page 14

©2020 Bose Corporation, All rights reserved.
Framingham, MA 01701-9168 USA
PRO.BOSE.COM
AM853574 Rev. 00
October 2020
 Loading...