

Page 1
®
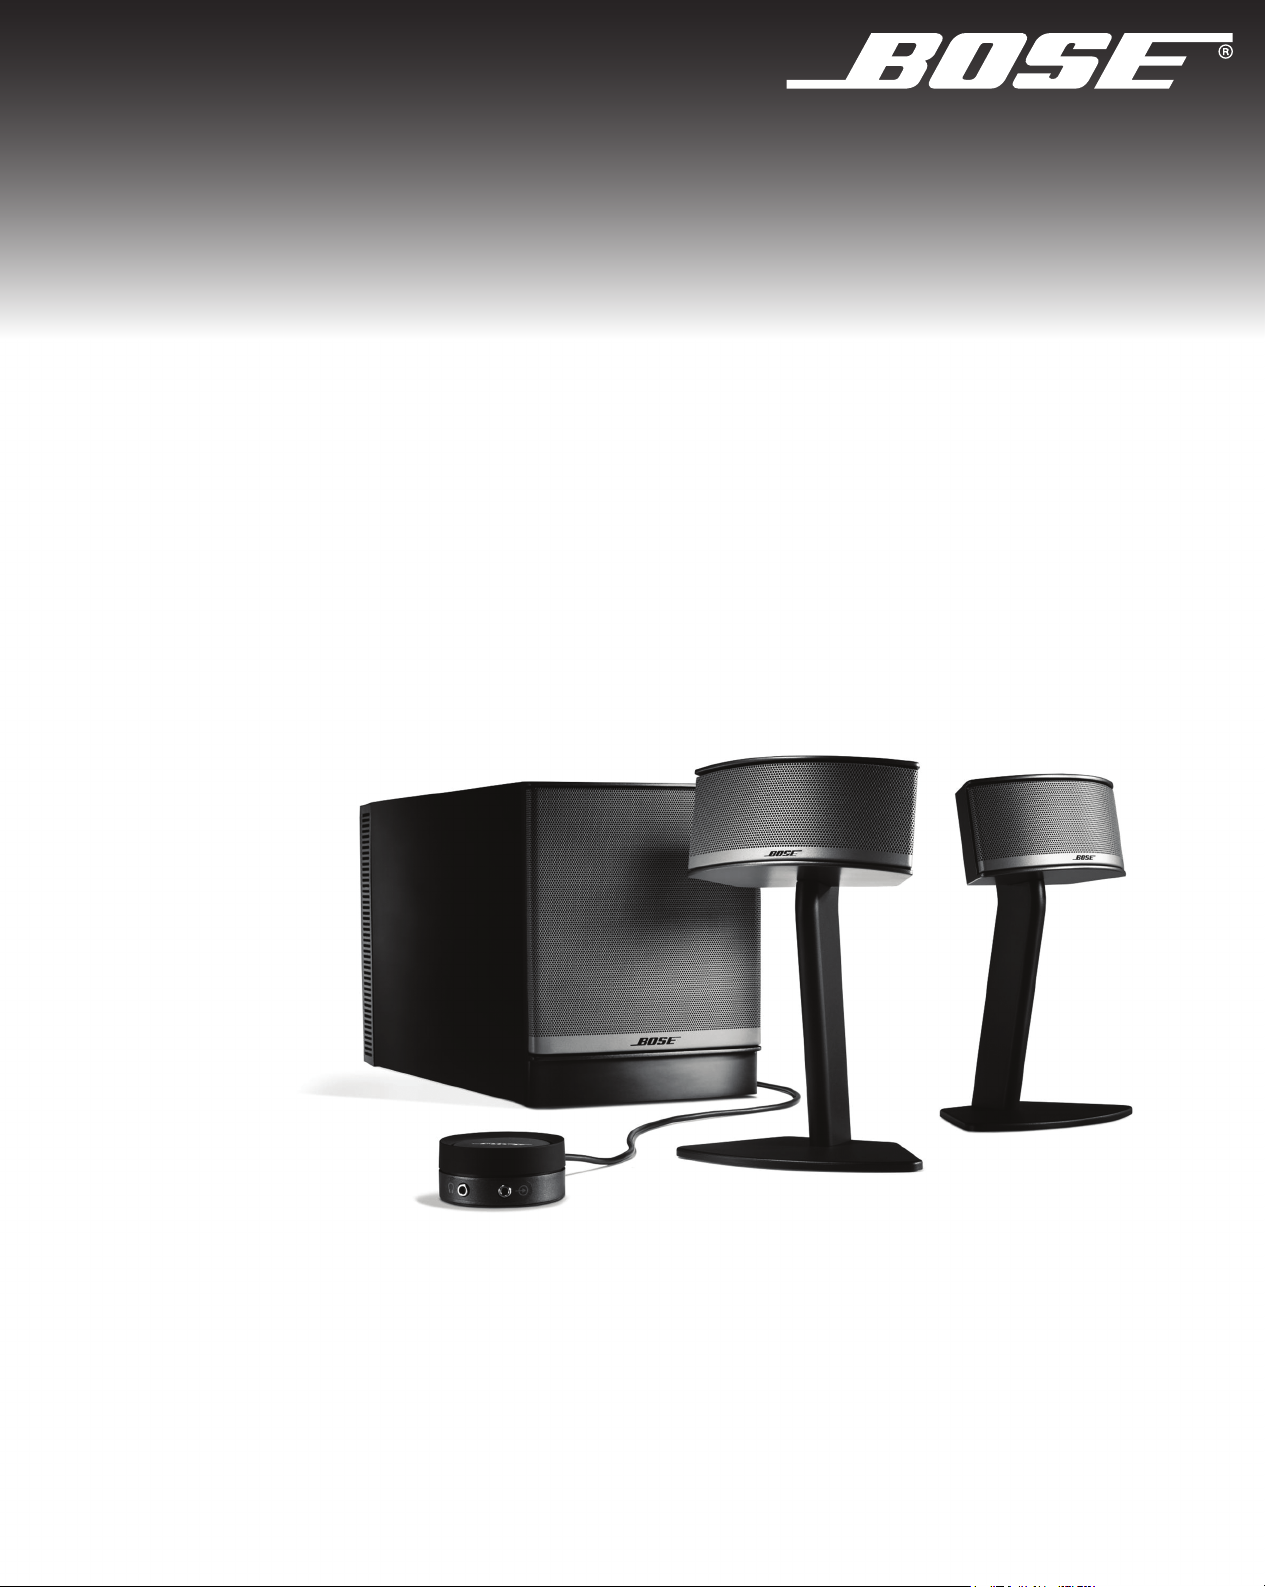
COMPANION
MULTIMEDIA SPEAKER SYSTEM
Owner’s Guide
Guía de usario
Notice d’utilisation
5
owners.bose.com/companion5
Page 2
Welcome, new owner.
A site just for you.
Thank you for choosing the Companion® 5
multimedia speaker system from Bose.
We encourage you to visit us online at
owners.bose.com/companion5. This website
allows you to access helpful information about
your new Companion 5 system.
Visit the site to:
• Find setup tips and view FAQs.
• Learn more about your product.
• Register your Companion 5 system.
• Discover other Bose® products.
Just log on for a simple way to get the
most from your new Companion system.
owners.bose.com/companion5
Page 3
English FrançaisEspañol
SAFETY INFORMATION
Please read this guide
Please take the time to follow the instructions in this guide carefully. It will help you set up and operate your speaker
system properly. Please save this guide for future reference.
WARNING:
WARNING:
shall not be placed on the apparatus. As with any electronic products, use care
system. Liquids can cause a failure and/or a fire hazard.
WARNING:
receptacle. Insert fully.
WARNING:
CAUTION:
regulatory compliance, and system performance.
To reduce the risk of fire or electrical shock, do not expose the product to rain or moisture.
The apparatus shall not be exposed to dripping or splashing, and objects filled with liquids, such as vases,
The lightning flash with arrowhead symbol within an equilateral triangle alerts the user to the presence of
uninsulated dangerous voltage within the system enclosure that may be of sufficient magnitude to
cons
titute a risk of electrical shock.
The exclamation point within an equilateral triangle, as marked on the system, is intended to alert the user
to the presence of important operating and maintenance instructions in this owner’s guide.
To prevent electric shock, match the wide blade of the line cord plug to the wide slot of the AC (mains)
No naked flame sources, such as lighted candles, should be placed on or near the apparatus.
Make no modifications to the system or accessories. Unauthorized alterations may compromise safety,
not to spill liquids into any part of the
CAUTION:
using headphones, especially for extended periods.
This product conforms to the EMC Directive 2004/108/EC and to the Low Voltage Directive 2006/95/EC. The
complete Declaration of Conformity can be found on www.bose
Notes:
• Where the mains plug or appliance coupler is used as the disconnect device, such disconnect device shall remain
readily operable.
• This product must be used indoors. It is neither designed nor tested for use outdoors, in recreation vehicles, or on
boats.
©2007 Bose Corporation. No part of this work may be reproduced, modified, distributed or otherwise used without prior written permission.
Bose, C
property of their respective owner’s.
Long-term exposure to loud music may cause hearing damage. It is best to avoid extreme volume when
.com/static/compliance/index.html.
OMPANION, TrueSpace and Acoustimass are registered trademarks of Bose Corporation. All other trademarks referenced herein are
3
Page 4

IMPORTANT SAFETY INSTRUCTIONS
EnglishFrançais Español
1. Read these instructions – for all components before
using this product.
2. Keep these instructions – for futur
3. Heed all warnings – on the product and in the
guide.
4. Follow all instructions.
5. Do not use this apparatus near water or moisture – Do
not
laundry tub, in a wet basement, near a swimming pool, or
anywhere else that water or moisture are present.
6. Clean only with a dry cloth – and as
Corporation. Unplug this product from the wall outlet before
cleaning.
7. Do not block any ventilation openings. Install in
accord
ensure reliable operation of the product and to protect it
from overheating, put the product in a position and location
that will not interfere with its proper ventilation. For example,
do not place the product on a bed, sofa, or similar surface
that may block the ventilation openings. Do not put it in a
built-in system, such as a bookcase or a cabinet that may
keep air from flowing through its ventilation openings.
8. Do not install near any heat source
tors, heat registers, stoves, or other apparatus
(including amplifiers) that produce heat.
9. Do not defeat the safety purpose of the polarized or
grou
with one wider than the other. A grounding-type plug
has two blades and a third grounding prong. The
wider blade or third prong are provided for your
safety. If the provided plug does not fit in your outlet,
consult an electrician for replacement of the obsolete
outlet.
10. Protect the power cord from being walked on or
pinc
receptacles, and the point where they exit
from the apparatus.
11. Only use attachments/accessories specified by the
manufacturer
12. Use only with the cart, stand, tripod,
bracket or table specified by the manufacturer or sold with the apparatus.
When a cart is used, use caution when
moving the cart/apparatus combination
to avoid injury from tip-over.
13. Unplug this apparatus during lightning storms or
when unuse
damage to this product.
14. Refer all servicing to qualified se
vicing is required when the apparatus has been damaged in any way: such as power-supply cord or plug is
damaged; liquid has been spilled or objects have
fallen into the apparatus; the apparatus has been
exposed to rain or moisture, does not operate normally, or has been dropped – Do not attempt to service
this
expose you to dangerous voltages or other hazards. For help
in solving problems, contact Bose Customer Service. Refer
to the address sheet included with the system.
s product near a bathtub, washbowl, kitchen sink,
use thi
ance with the manufacturer’s instructions – To
nding-type plug. A polarized plug has two blades
hed, particularly at plugs, convenience
.
d for long periods of time – to prevent
product yourself. Opening or removing covers may
e reference.
owner’s
directed by Bose
s, such as radia-
rvice personnel. Ser-
15. To prevent risk of fire or electric shock, avoid overloading wall outlets, extension cords, or integral
convenience receptacles.
16. Do not let objects or liquids enter the product – as
they may touch dangerous voltage points or short-out parts
that could result in a fire or electric shock.
17. See product enclosure for safety related-markings.
18. Use proper power sources
proper power source, as described in the operating instructions or as marked on the product.
– Plug t
he product into a
Information about products that generate
electrical noise
If applicable, this equipment has been tested and found to
comply with the limits for a Class B digital device, pursuant
to Part 15 of the FCC rules. These limits are designed to
provide reasonable protection against harmful interference in
a residential installation. This equipment generates, uses,
and can radiate radio frequency energy and, if not installed
and used in accordance with the instructions, may cause
harmful interference to radio communications. However, this
is no guarantee that interference will not occur in a particular
installation. If this equipment does cause harmful
interference to radio or television reception, which can be
determined by turning the equipment off and on, you are
encouraged to try to correct the interference by one or more
of the following measures:
• Reorient or relocate the receiving antenna.
• Increase the separation between the equipment and
recei
ver.
• Connect the equipment to an outlet on a different circuit
than th
e one to which the receiver is connected.
• Consult the dealer or an experienced radio/TV technician
for help.
This product
specifications.
complies with the Canadian ICES-003 Class B
4
Page 5

English FrançaisEspañol
INTRODUCTION . . . . . . . . . . . . . . . . . . . . . . . . . . . . . . . . . . . . . . . . . . . . . . . . . . 6
CONTENTS
I
NTRODUCTION
SYSTEM SETUP
OPERATION
CONNECTING OTHER DEVICES
CARE AND MAINTENANCE
Your Companion
Setup help . . . . . . . . . . . . . . . . . . . . . . . . . . . . . . . . . . . . . . . . . . . . . . . . . . . . . . . . . . . . . 6
®
5 multimedia speaker system . . . . . . . . . . . . . . . . . . . . . . . . . . . . . . . . 6
4
5
13
15
16
SYSTEM SETUP . . . . . . . . . . . . . . . . . . . . . . . . . . . . . . . . . . . . . . . . . . . . . . . . . . 7
Unpacking . . . . . . . . . . . . . . . . . . . . . . . . . . . . . . . . . . . . . . . . . . . . . . . . . . . . . . . . . . . . . 7
For your records . . . . . . . . . . . . . . . . . . . . . . . . . . . . . . . . . . . . . . . . . . . . . . . . . . . . . . . . . 7
®
Placing yo
ur Companion
5 system . . . . . . . . . . . . . . . . . . . . . . . . . . . . . . . . . . . . . . . . . . 8
Positioning the speakers . . . . . . . . . . . . . . . . . . . . . . . . . . . . . . . . . . . . . . . . . . . . . . . 8
®
Positioning the Acoustimass
module . . . . . . . . . . . . . . . . . . . . . . . . . . . . . . . . . . . . . 9
Making system connections . . . . . . . . . . . . . . . . . . . . . . . . . . . . . . . . . . . . . . . . . . . . . . . 10
®
Windows
Windows
Mac OS
XP audio setup . . . . . . . . . . . . . . . . . . . . . . . . . . . . . . . . . . . . . . . . . . . . . . . . . 11
®
Vista audio setup . . . . . . . . . . . . . . . . . . . . . . . . . . . . . . . . . . . . . . . . . . . . . . . 13
®
X audio setup . . . . . . . . . . . . . . . . . . . . . . . . . . . . . . . . . . . . . . . . . . . . . . . . . . . 15
OPERATION . . . . . . . . . . . . . . . . . . . . . . . . . . . . . . . . . . . . . . . . . . . . . . . . . . . . . 16
System modes . . . . . . . . . . . . . . . . . . . . . . . . . . . . . . . . . . . . . . . . . . . . . . . . . . . . . . . . . . 16
Controlling the volume . . . . . . . . . . . . . . . . . . . . . . . . . . . . . . . . . . . . . . . . . . . . . . . . . . . . 16
Adjusting the bass . . . . . . . . . . . . . . . . . . . . . . . . . . . . . . . . . . . . . . . . . . . . . . . . . . . . . . . 1
CONNECTING OTHER DEVICES . . . . . . . . . . . . . . . . . . . . . . . . . . . . . . . . . . . . . . . 18
Connecting headphones . . . . . . . . . . . . . . . . . . . . . . . . . . . . . . . . . . . . . . . . . . . . . . . . . . 18
Connecting an audio device . . . . . . . . . . . . . . . . . . . . . . . . . . . . . . . . . . . . . . . . . . . . . . . 18
CARE AND MAINTENANCE . . . . . . . . . . . . . . . . . . . . . . . . . . . . . . . . . . . . . . . . . . 19
7
Cleaning your speaker system . . . . . . . . . . . . . . . . . . . . . . . . . . . . . . . . . . . . . . . . . . . . . . 19
Limited warranty . . . . . . . . . . . . . . . . . . . . . . . . . . . . . . . . . . . . . . . . . . . . . . . . . . . . . . . . 19
ubleshooting . . . . . . . . . . . . . . . . . . . . . . . . . . . . . . . . . . . . . . . . . . . . . . . . . . . . . . . . . 19
Tro
omer service . . . . . . . . . . . . . . . . . . . . . . . . . . . . . . . . . . . . . . . . . . . . . . . . . . . . . . . . 20
Cust
Produc
t specifications . . . . . . . . . . . . . . . . . . . . . . . . . . . . . . . . . . . . . . . . . . . . . . . . . . . . 20
Computer system recommendation . . . . . . . . . . . . . . . . . . . . . . . . . . . . . . . . . . . . . . . . . 20
5
Page 6

INTRODUCTION
You r Companion
INTRODUCTION
Setup help
EnglishFrançais Español
®
5 multimedia speaker system
Thank you for purchasing a Bose® Companion® 5 multimedia speaker system, which delivers
the superb acoustic performance needed to enjoy the full audio impact of music, movies,
games, and other entertainment sources from your computer.
Using TrueSpace
provide improved spaciousness, bold surround effects, and movie-like realism.
Your system includes:
• Two small, easy-to-place speakers on stands and an Acoustimass
• A USB cable to connect the system to your computer.
• A control pod that allows you to control system volume and connect headphones or portable audio players.
The setup instructions in this owner’s guide explain how your Companion 5 multimedia
speaker system easily connects to your computer.
®
digital surround signal processing technology, the small satellite speakers
®
module.
If you need additional help, please visit http://o
information.
wners.bose.com/Companion5 for more
6
Page 7
English FrançaisEspañol
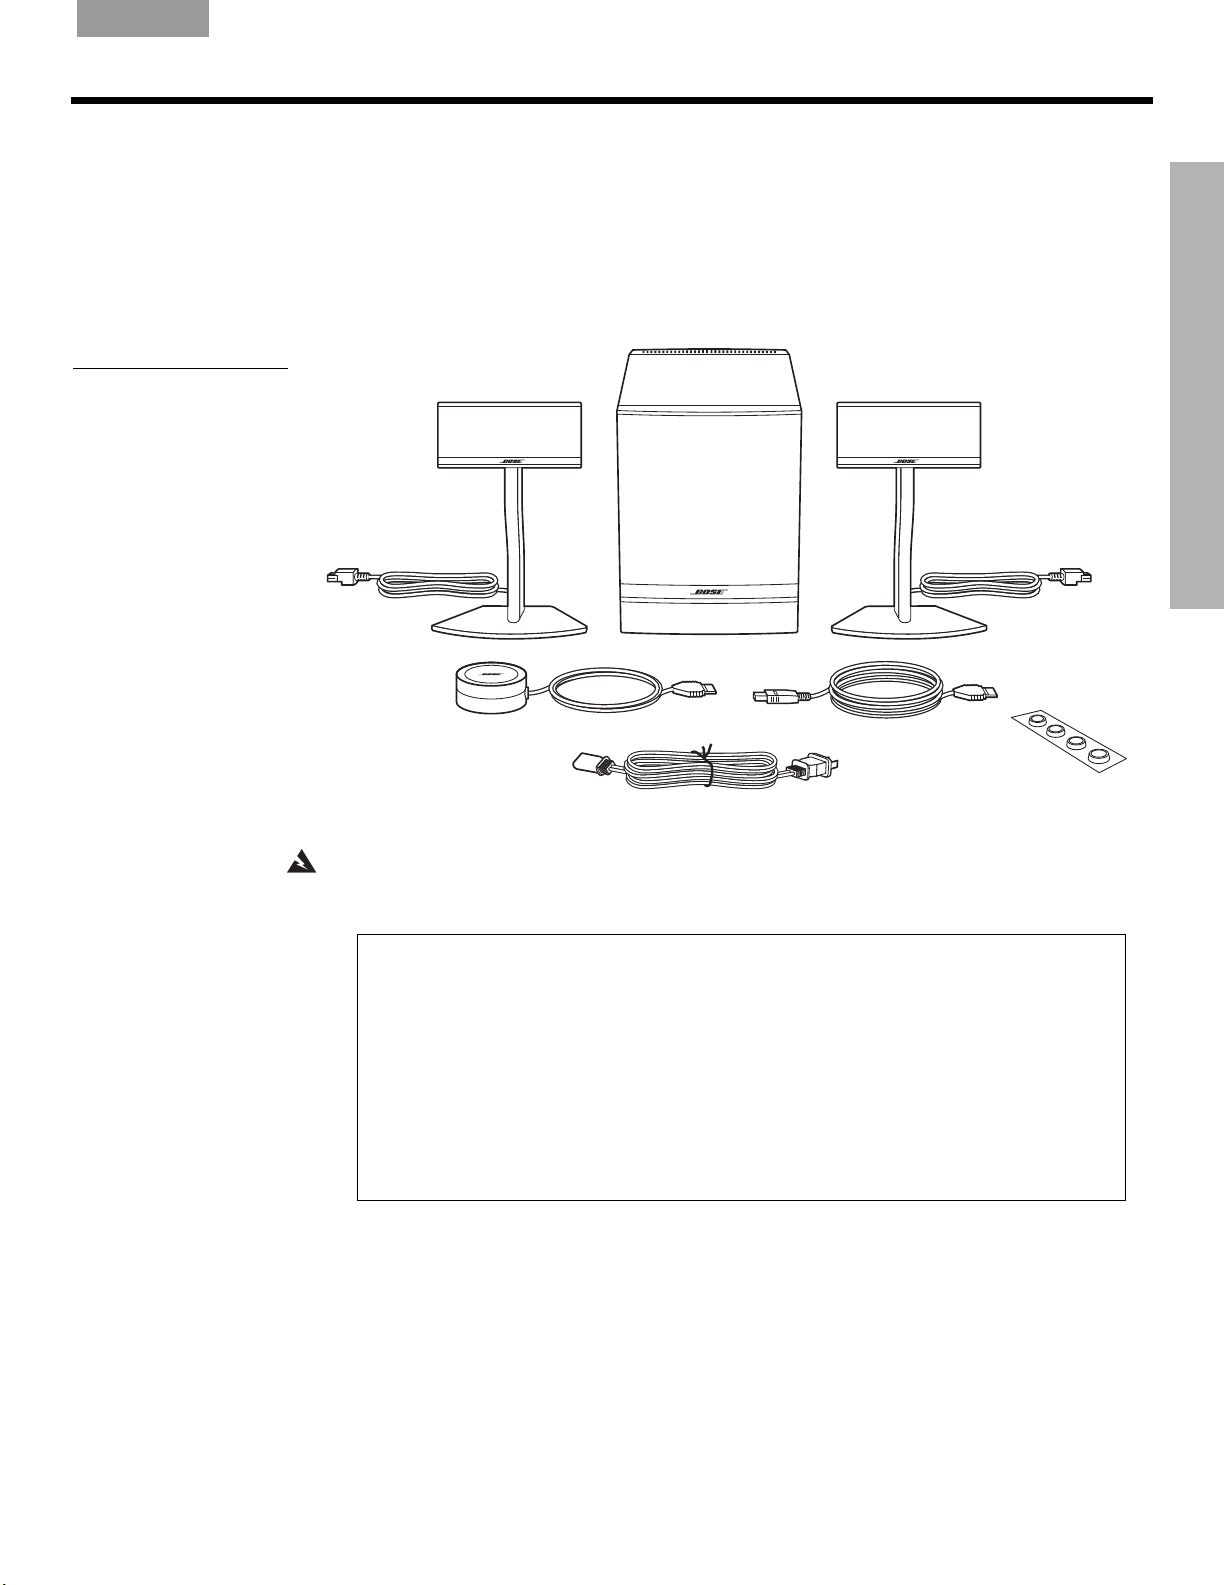
Acoustimass® module
Left speaker
Right speaker
Control pod
USB cable
*The appropriate power cord for your region is included.
Power cord*
Rubber feet for
Acoustimass module
For your records
Now is a good time to record the serial number of your new Companion® 5 system
here and on your product registration card. The serial number is located on the rear
of the Acoustimass module.
Serial number: ____________________________________
Purchase date: ____________________________________
We suggest you keep your sales receipt and a copy of your product registration
card together with this owner’s guide.
Unpacking
SYSTEM SETUP
Figure 1
Carton contents
Carefully unpack your system. Save all packing materials, which provide the safest way to
transport your system.
If any part of the system appears damaged, do not attempt to use it. Notify Bose or your
authorize
sheet included in the carton.
Check to be sure your system includes the parts shown in Figure 1.
d Bose
®
dealer immediately. For Bose contact information, refer to the address
SYSTEM SETUP
WARNING: To avoid danger of suffocation, keep plastic bags out of the reach of children.
7
Page 8

S
24 in (61 cm)
maximum
Acoustimass module
Left (L) speaker
Right (R) speaker
Control pod
YSTEM SETUP
Placing your Companion® 5 system
EnglishFrançais Español
Figure 2
Typical system setup
SYSTEM SETUP
For optimal performance, use the following guidelines to choose locations and positions for
the Acoustimass
®
module, speakers, and the control pod. Refer to Figure 2, which shows a
typical system setup.
Positioning the speakers
Proper positioning of the speakers will allow you to experience the audio surround effects
that your Companion
• Place the left and right speaker to the left and right of your computer monitor at about an
arm’s length
marked L (left) or R (right) to identify left/right placement.
• For optimum performance, position each speaker the same distance from you, and no
mo
re than
• Aim both speakers straight ahead. Do not angle them inward or outward.
• Keep the speakers away from adjacent large objects or cabinet surfaces. For example, if
your computer
inches away from any adjacent surface. Avoid placing the speakers inside cubby holes.
®
5 multimedia speaker system is designed to deliver.
away from where you are seated (Figure 2). The bead on each speaker cord is
24 inches (61 cm) apart.
desk includes a hutch, keep the outside edge of each speaker at least six
8
Page 9
English FrançaisEspañol
S
YSTEM SETUP
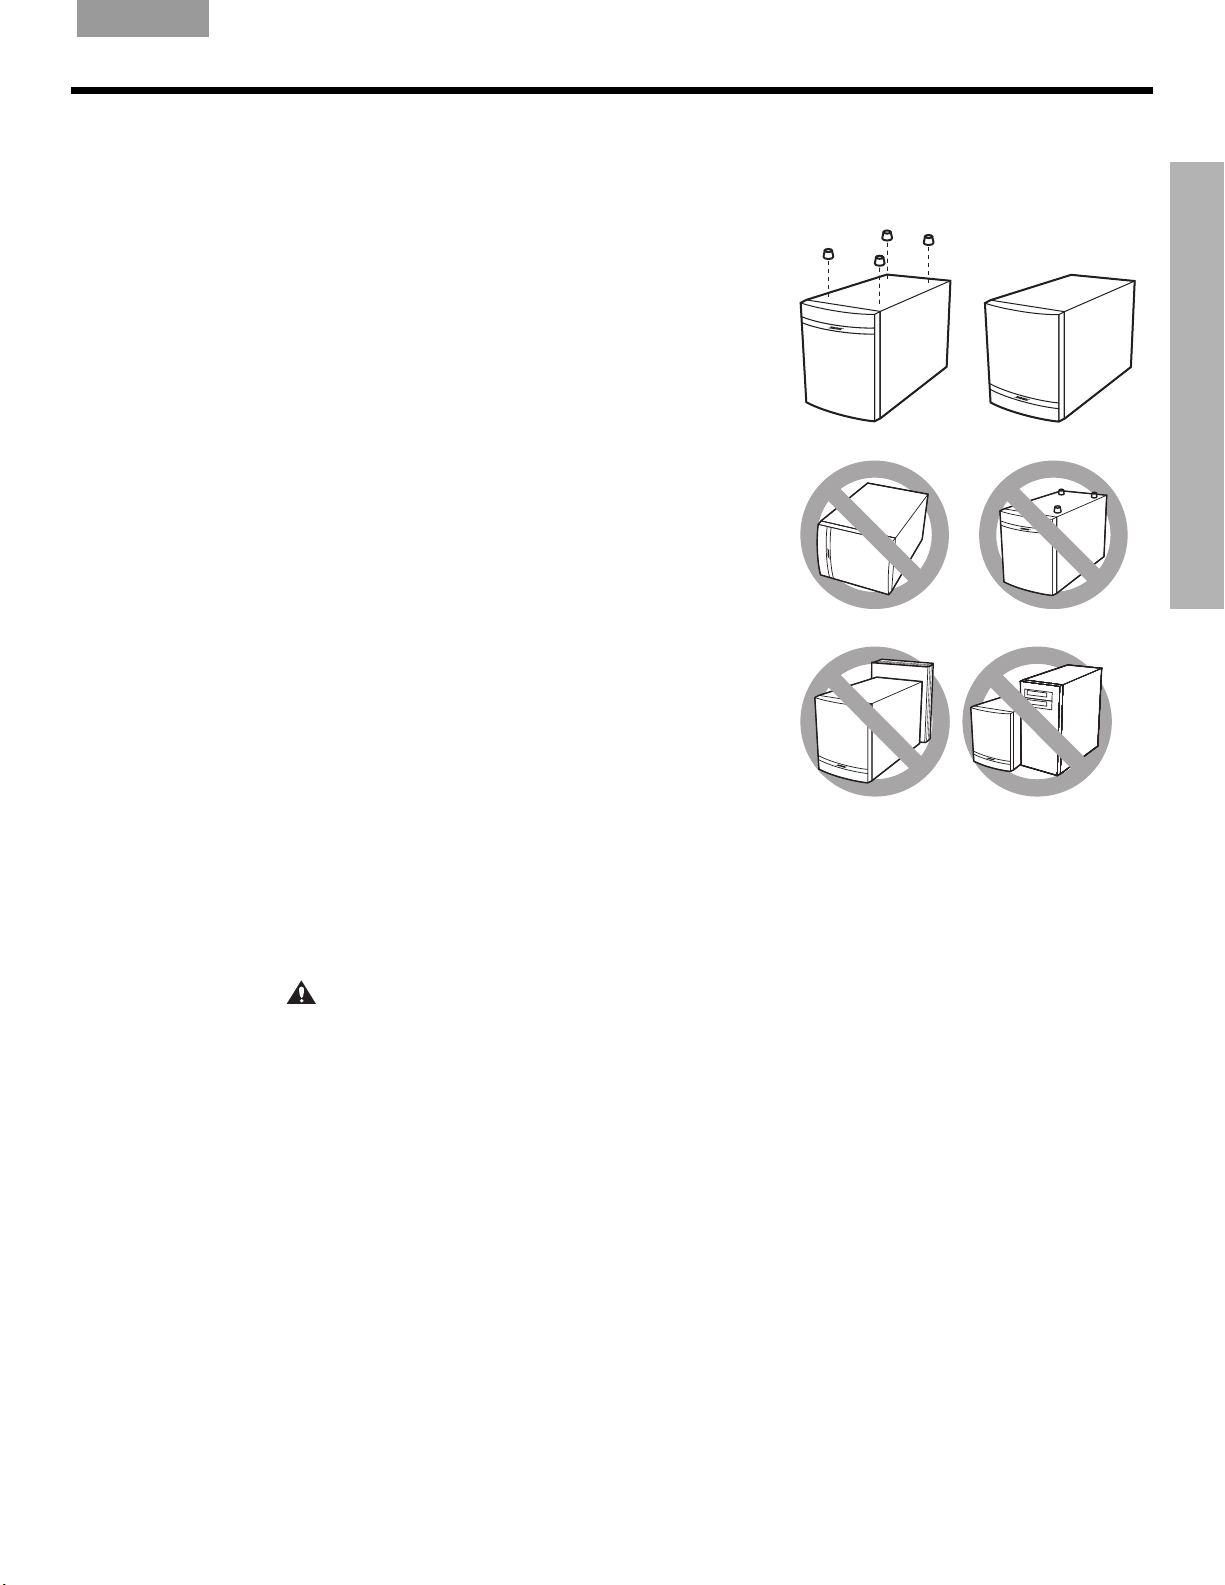
Positioning the Acoustimass® module
The Acoustimass® module is designed to be the unseen part of the speaker system.
For example, you can place it under your computer table or desk.
• Put one rubber foot on each corner of the
bottom panel of the module.
• Stand the module on its feet on a flat surface.
• DO NOT BLOCK the front grille of the module.
• DO NOT lay the module on its side or stand it
upside down.
SYSTEM SETUP
• DO NOT put any objects or equipment behind
it or beside it that may block the ventilation
openings at the rear of the module. Adequate
ventilation is necessary to prevent the module
from overheating.
• Place the module at least 6 inches (15 cm)
ay from
aw
to prevent the module from interfering with your
computer system.
• Keep the module away from heat sources such as radiators, baseboards, or quartz
heaters.
• Make sure the power cord can reach an AC (mains) outlet and the USB cable can reach
the USB conne
CAUTION:
within 6 inches (15 cm) of the Acoustimass
can erase magnetic media and interfere with the monitor.
the computer and computer monitor
ction on your computer.
Do not place computer monitors, floppy disks, hard drives, or other magnetic media
module. The magnetic field produced by this module
9
Page 10

S
Right (R) speaker
Left (L) speaker
Control
pod
Computer USB
Acoustimass module rear panel
3
2
1
4
YSTEM SETUP
Making system connections
The following steps and Figure 3 tell you how to make the system connections.
Before you start:
• Please read the entire setup procedure.
• Make sure your computer is on and the operating system is running.
PORTANT: Close all other
SYSTEM SETUP
• IM
1. Insert the red plug on the right (R) speaker cable into the R jack and insert the white plug
on the le
for each plug to fit correctly into its respective jack.
EnglishFrançais Español
software applications.
ft (L) speaker cable into the L jack. The R and L marks on the plugs must face up
Figure 3
Connection overview
2. Plug the control pod cable into the Control Pod
3. Plug one end of the power cord into the AC Input jack on
®
mass
module. Plug the other end into an AC (mains) outlet.
jack.
the rear panel of the Acousti-
4. Plug the appropriate end of the USB cable (supplied) into the To Computer
Acoustimass module. Plug the other end into a USB jack on your computer.
IMPORTANT: For optimum performance, connect the
USB cable directly to a
USB jack on your computer rather than connecting through a USB hub.
5. For Windows
For Windows
For Mac OS
®
XP computers, go to “Windows® XP audio setup” on page 11.
®
Vista computers, go to “Windows® Vista audio setup” on page 13.
®
X computers, go to “Mac OS® X audio setup” on page 15.
Note: Make sure all cable plugs are fully inserted into their respective jacks.
jack on the
10
Note: The Companion® 5 system does not have an AC power switch. The system turns on in
Standby mode when you plug in the power cord. See “System modes” on page 16.
Note:
Bose recommends using a safety agency-approved surge protector on all electronic
equipment. Voltage variations and spikes can damage electronic components in any system.
A quality suppressor can eliminate the vast majority of failures attributed to surges and may be
purchased at electronics stores.
Page 11

English FrançaisEspañol
Start
End
Windows® XP audio setup
S
YSTEM SETUP
Figure 4
“Found New Hardware”
typical message sequence
IMPORTANT!
Do not unplug any cables during this setup procedure.
For additional help with your audio setup, please visit
http://o
wners.bose.com/Companion5.
1. After plugging in the USB cable, wait for a series of “Found New Hardware” messages
to appear
on your computer screen (Figure 4) (this takes about 30 seconds). If any other
messages appear that interrupt this setup process, refer to “Troubleshooting” on
page 19.
Note: If you do not see these messages, the capability to display them may be disabled in your
computer. Wait two minutes before proceeding to the next step.
SYSTEM SETUP
11
Page 12
S
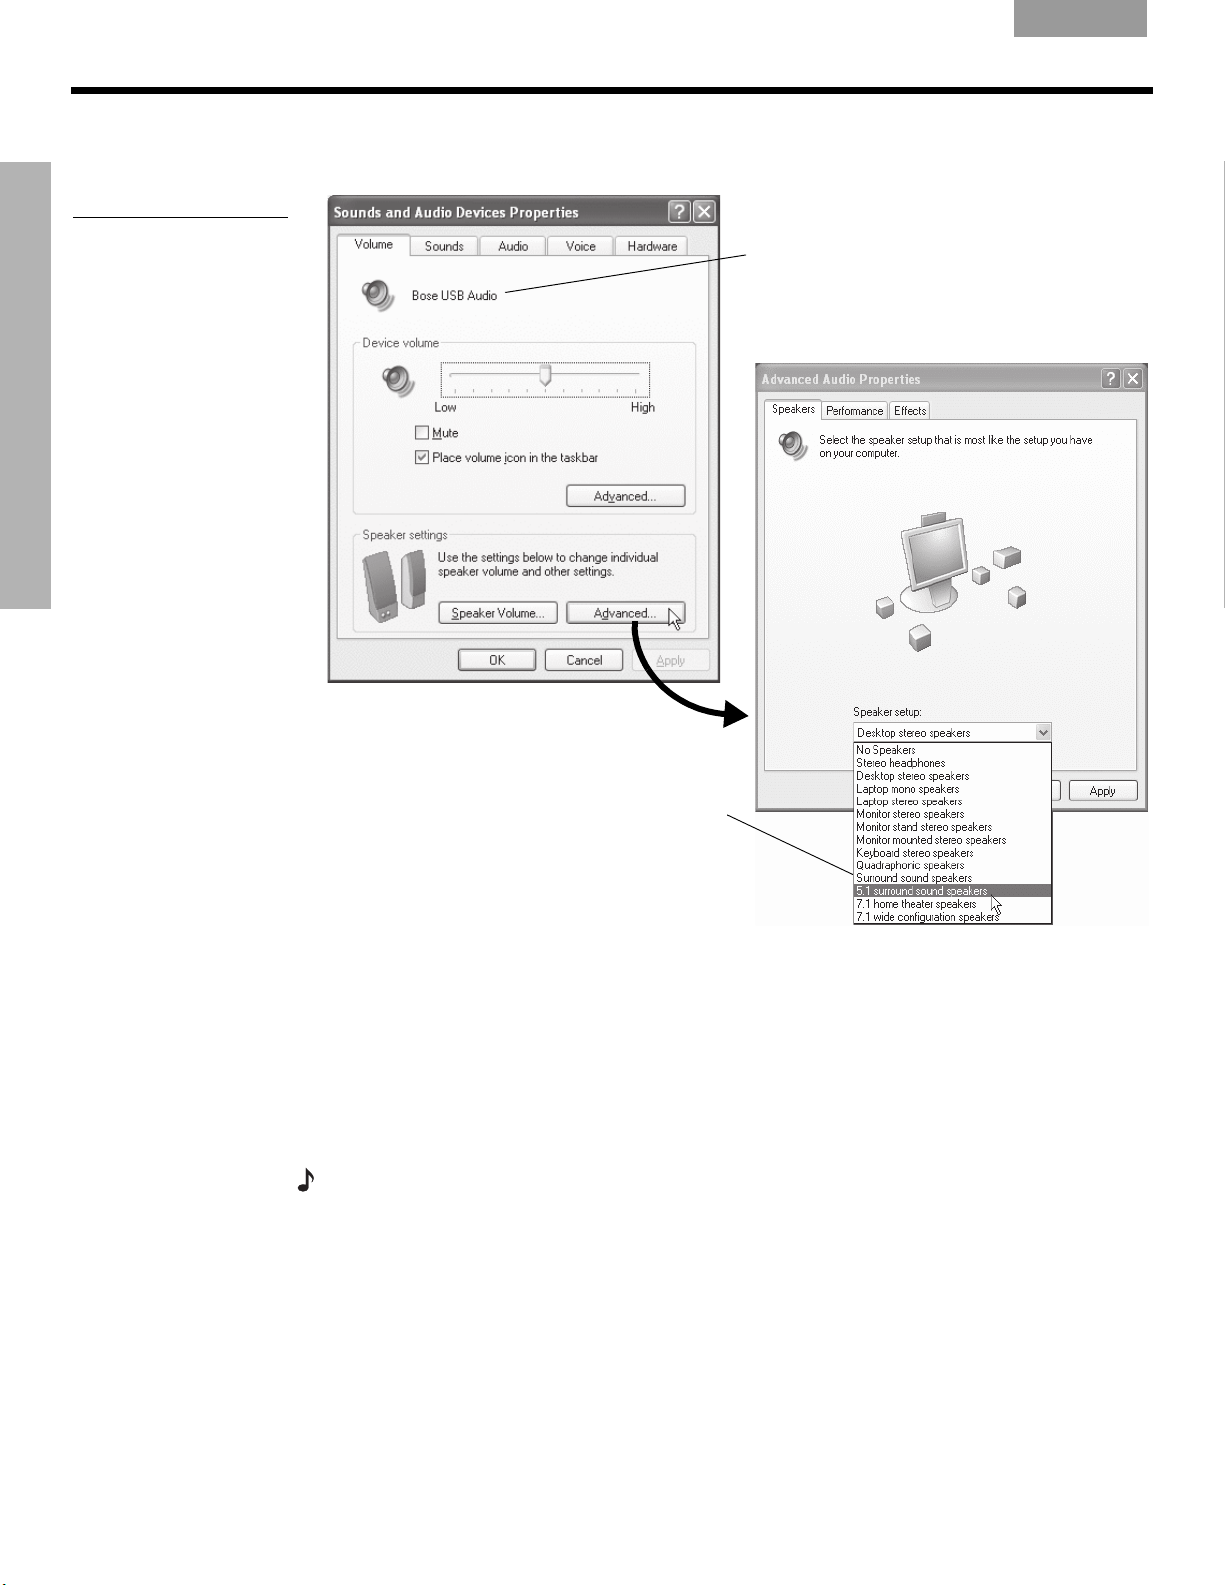
Connected USB device
Setting for the Companion 5 system
YSTEM SETUP
Figure 5
Sounds and Audio Devices
Properties and Advanced
Audio Properties
SYSTEM SETUP
EnglishFrançais Español
2. In the Windows XP Control Panel, open Sounds and Audio Devices
Properties (Figure 5).
3. Under the Volume tab, verify that Bose USB Audio is the connected USB device.
4. Under Speaker settings, click th
Properties.
5. In the Speaker setup drop list, select 5.1 surr
6. Click Apply and then OK.
Yo
Note:
perform this procedure again to check the settings.
e Advanced button to open Advanced Audio
ound sound speakers.
ur Companion
®
5 multimedia speaker system is now ready to use.
If you remove the USB connection to your Companion 5 system and plug it in again later,
12
Page 13

English FrançaisEspañol
Windows® Vista audio setup
S
YSTEM SETUP
Figure 6
Device driver installation
message
Figure 7
Device driver installation
status
IMPORTANT!
• Do not unplug any cables during this setup procedure.
• For additional help with your audio setup, please
visit
http://owners.bose.com/Companion5.
1. Plug in the USB cable. Wait for the device driver installation message to appear on your
computer sc
reen (Figure 6).
• If any other messages appear that interrupt this setup process, refer to “Troubleshooting” on page 19.
• If you do not see this messages, the capability to display it may be
disabled in your
computer. Wait two minutes before proceeding to the next step.
2. Click in the bubble to display the ins
talla9tion status (Figure 7). Wait for the installation to
finish.
SYSTEM SETUP
Figure 8
Control panel
3. Open the control panel and click Hardware and Sound (Figure 8).
13
Page 14

S
YSTEM SETUP
Figure 9
Sounds
SYSTEM SETUP
EnglishFrançais Español
4. Click Sound in the Hardware and Sound control panel (Figure 9).
Figure 10
Sound control panel
5. Verify that the Playback default setting (indicated by a green check) is Bose USB Audio.
If not Select Bose USB Audio and click Set Default
.
14
Your Companion® 5 multimedia speaker system is now ready to use.
Page 15
English FrançaisEspañol
Mac OS® X audio setup
S
YSTEM SETUP
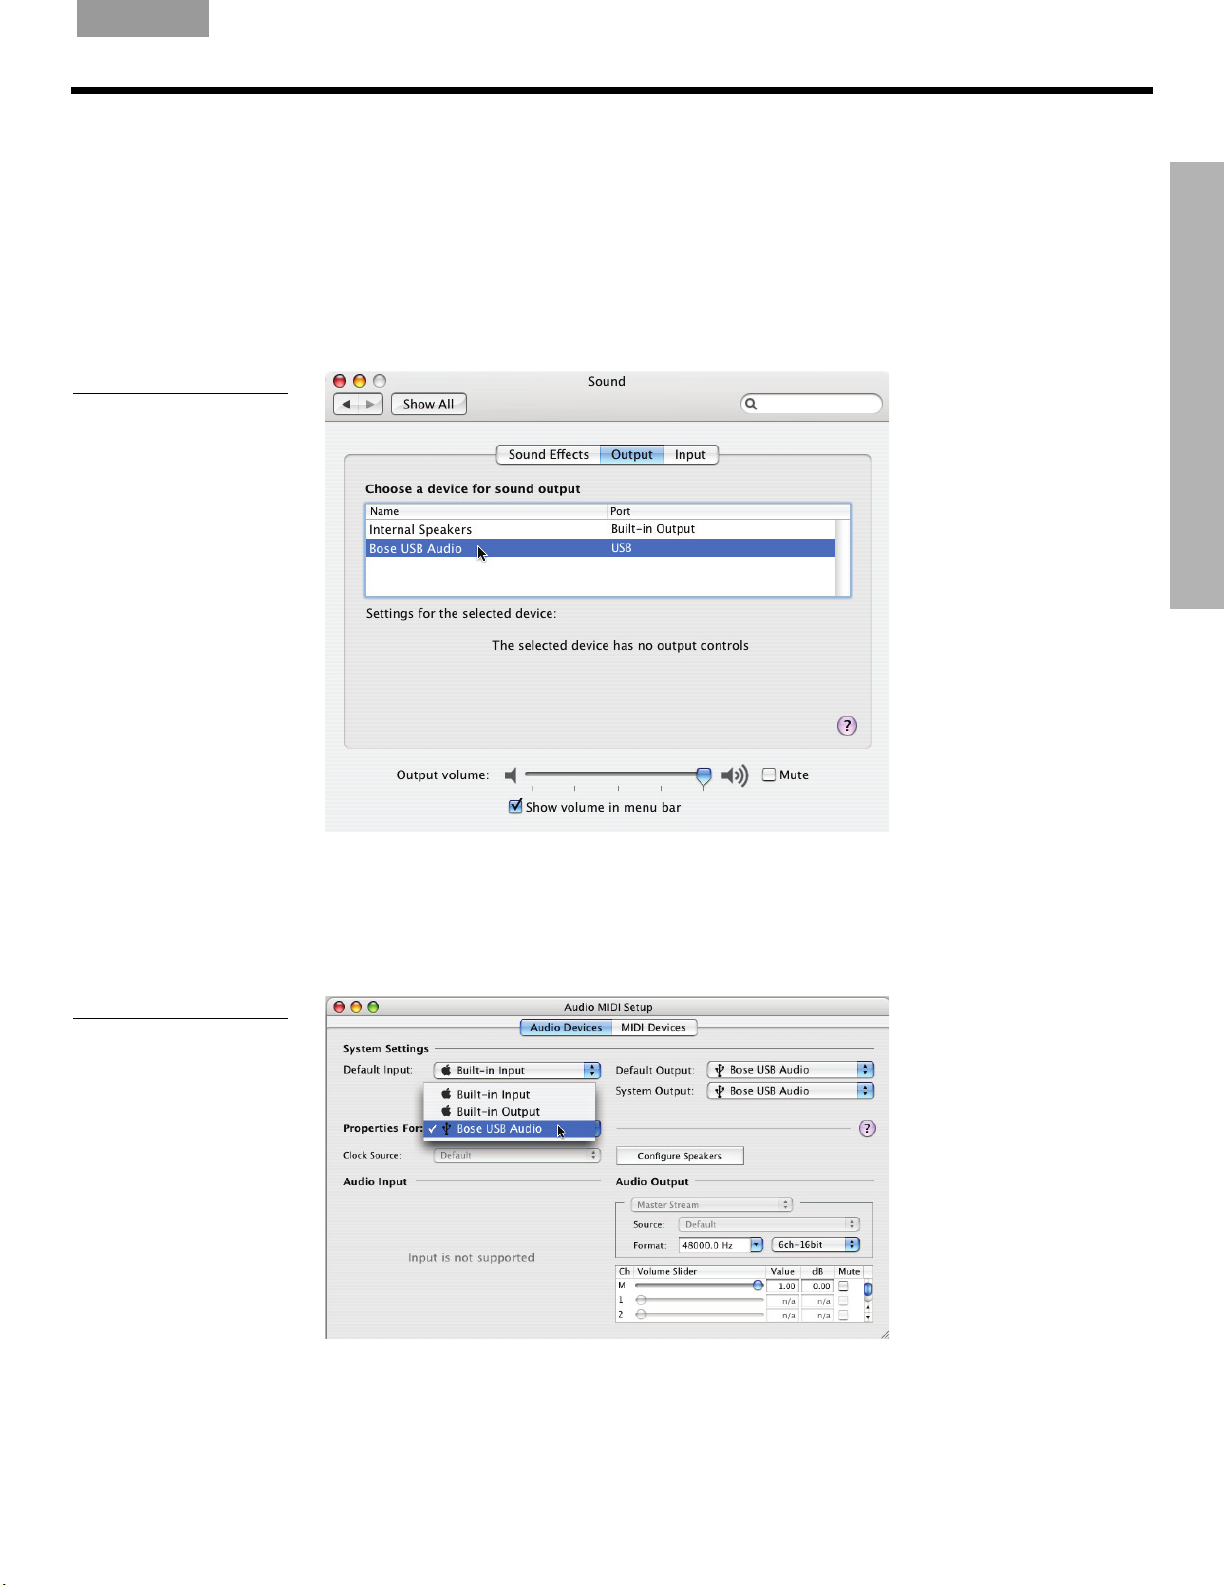
Figure 11
Mac OS® X sound
preferences
IMPORTANT!
SYSTEM SETUP
Do not unplug any cables during this setup procedure.
For additional help with your audio setup, please visit
http://o
1. In the System Preferences,
2. Choose Bose USB Audio fo
wners.bose.com/Companion5.
open the Sound control panel (Figure 11).
r sound output and close the control panel.
Figure 12
Audio MIDI Setup control
panel
3. In the Applications folder on your hard drive, open the Utilities folder.
4. Open the Audio MIDI Setup cont
5. Select Bose USB Audio for Pro
rol panel (Figure 12).
perties For, Default Output, and System Output.
Your Companion® 5 multimedia speaker system is now ready to use.
15
Page 16
OPERATION
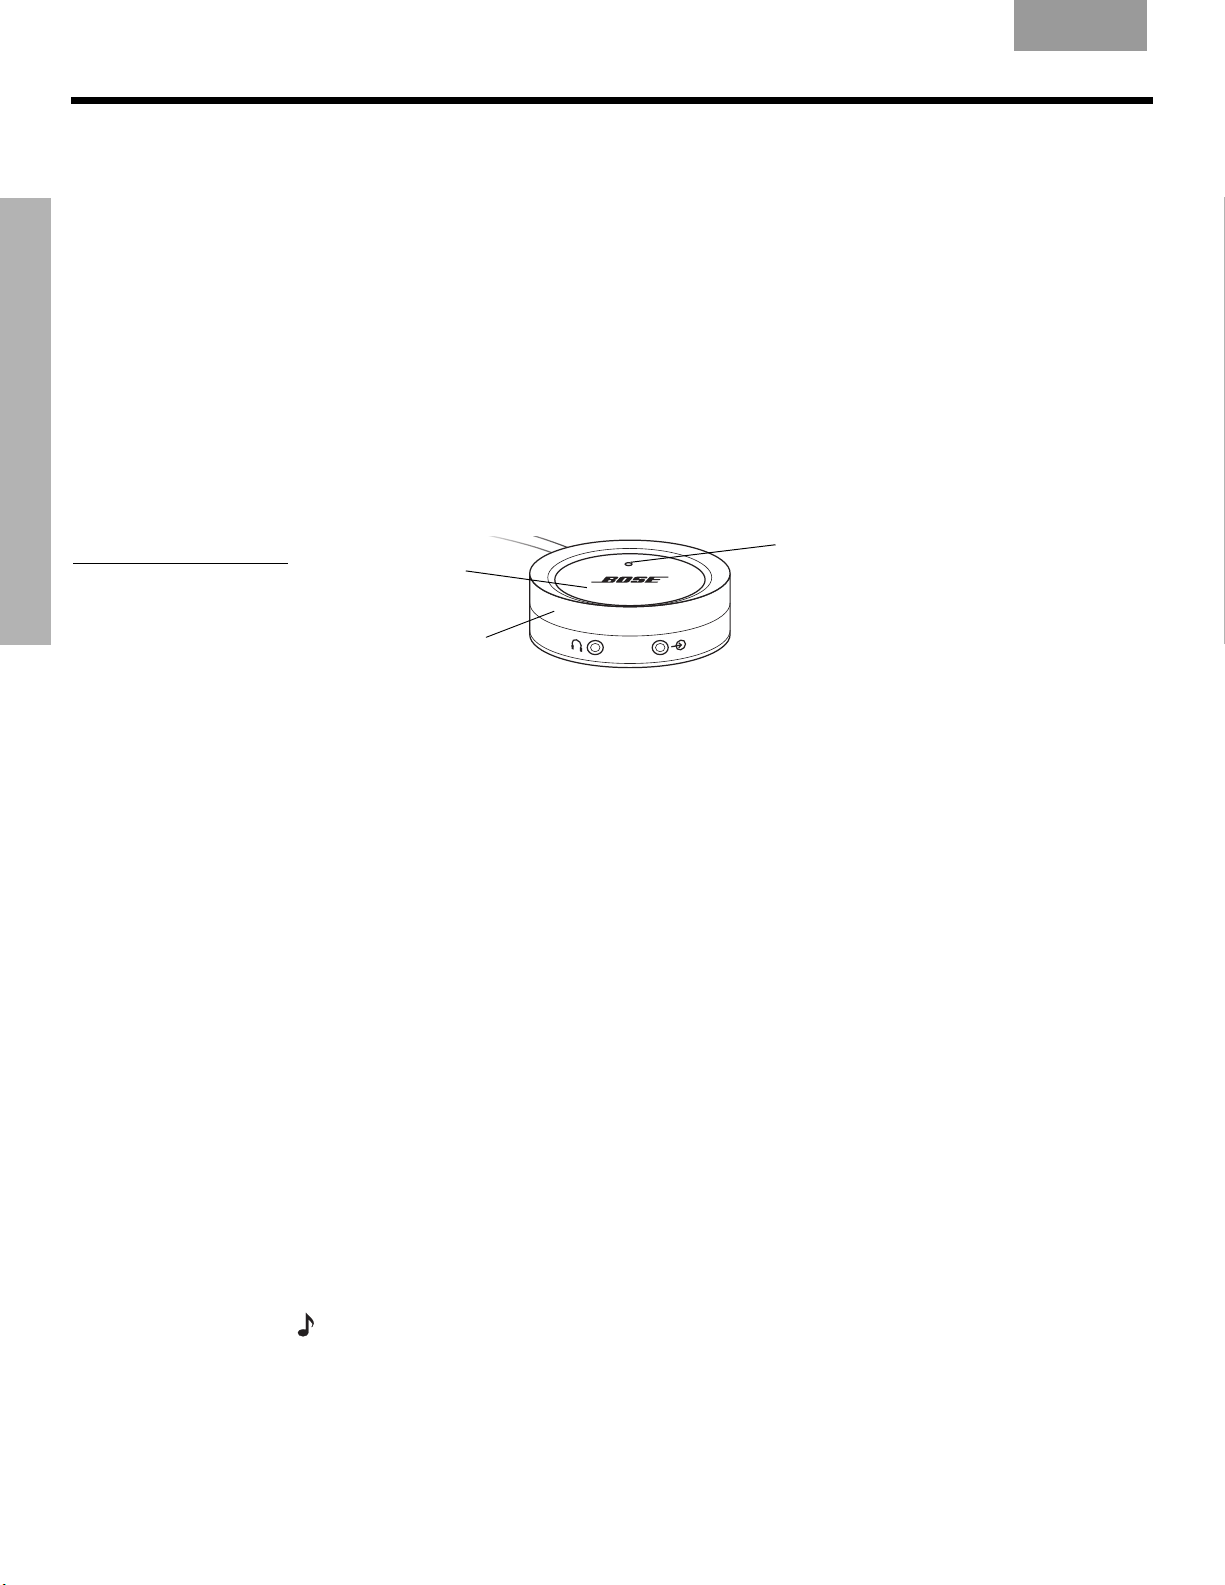
Mode switch
(touch-sensitive)
Mode indicator
• Amber = Muted mode
• Green = Active mode
• Red = Standby mode
Volume control ring
System modes
OPERATION
OPERATION
Figure 13
System controls and mode
indicator
Français Español
There are three system modes. Each system mode is identified by the color of the mode indicator on the control pod (Figure 13):
• Muted (Amber): The system speakers are silenced. You hear no audio from the computer
or any connected source. This mode is automatically selected when you connect headphones to the control pod.
• Active (Green): You hear the active sound source from the system speakers. The position
of the volume control ring sets the volume level.
• Standby (Red): The system is in an energy-saving mode. When both the USB connection
from your computer and the input signal of a connected audio source are inactive for several minutes, the system mutes the speakers and switches to Standby. The system returns
to the Muted mode when the USB connection becomes active again.
Touch the top center of the control pod to switch between the Muted and Active mode,
except when headphones are connected. Plugging in headphones always puts the system in
Muted Mode until they are removed.
English
IMPORTANT!
•The Companion
without any additional audio effects. Make sure you disable any audio effects
settings and close any effects applications running on your computer.
• Make sure the settings in your software application are correct for 5.1 surround
sound.
Controlling the volume
The volume control ring on the control pod (Figure 13) is the master volume control for any
audio coming from your computer or a device connected to the input jack. Rotate the ring
clockwise to increase the volume or counterclockwise to decrease it.
To set the volume level
To properly set the volume level, you need to adjust both the volume level of the source (your
PC or a connected source) and the Companion 5 system:
1. Set the Companion 5 system volume to minimum.
2. Set the source volume near maximum.
3. Start playing music.
4. Slowly increase the volume on the Companion 5 system control pod until the sound
reaches a comfortable level.
To mute the system
To silence the system, touch the mode switch on the control pod (indicator glows Amber).
Touch it again to unmute (indicator glows Green).
®
5 multimedia speaker system is designed to perform at its best
16
Note: The system output may be reduced by an internal protection feature if you play music at
full volume for a long period of time.
06.Operation.fm 10/08
Page 17

English FrançaisEspañol
Acoustimass rear
panel
Bass compensation:
•
3 to increase bass (+)
•
4 to decrease bass (–)
Adjusting the bass
O
PERATION
Figure 14
Bass compensation control
After listening to your speaker system, you may wish to adjust the sound. Use the bass
compensation control (Figure 14) on the Acoustimass
®
module.
OPERATION
06.Operation.fm 12/07
17
Page 18

CONNECTING OTHER DEVICES
Headphones output jack Audio input jack
Mode switch
Connecting headphones
To connect headphones, plug the headphones cord into the 3.5-mm stereo headphones
jack on the side of the control pod (Figure 15).
• Plugging in headphones automatically mutes the system speakers.
• After disconnecting headphones, touch the mode switch to hear sound from the speakers
again.
• To
adjust the volume level, use the volume control ring on the control pod.
Figure 15
Control pod connectors
CONNECTING OTHER DEVICES
CONNECTING OTHER DEVICES
Connecting an audio device
Français Español
English
To connect an audio device such as a CD/MP3 player, plug the audio cable from the
device into the 3.5-mm stereo input jack on the control pod.
To adjust the volume level, turn up the volume on the audio device and use the volume
contro
l ring on the control pod.
Note:
When listening to a connected audio device, alerts and sounds from your computer are
mixed with the sound from the audio device. You may need to adjust the volume control ring and
the volume
preferred levels.
levels in your computer and the connected device to hear both sources at your
18
Page 19

English FrançaisEspañol
Cleaning your speaker system
• To clean the surface of your speakers, Acoustimass® module, and control pod, use a soft
cloth. You may use an ammonia-free window cleaner to maintain the finish.
• Do not use any sprays near the speakers. Do not use any solvents, chemicals, or cleaning
solutions containing alcohol, ammonia, or abrasives.
• Do not allow liquids to spill into any openings.
• To clean the speaker grilles, vacuum them carefully.
Limited warranty
The Companion® 5 system is covered by a limited transferable warranty. Details of the limited
warranty are provided on the product registration card that came with your system. Please fill
out the information section on the card and mail it to Bose or register your product at
http://owners.bose.com/register. Failure to do so will not affect your limited warranty rights.
Troubleshooting
This table provides guidelines for solving problems that you may encounter. For additional
help, contact Bose directly or visit the Internet site at http://owners.bose.com/Companion5.
See the address sheet included in the carton for contact information.
CARE AND MAINTENANCE
CARE AND MAINTENANCE
Problem What to do
Setup was interrupted by
the message, “A problem occurred during
hardware installation.
Your new hardware might
not work properly.”
Setup was interrupted by
the message, “This USB
device can perform faster
if you connect it to a
Hi-Speed USB 2.0 port.
For a list of available
ports, click here.”
No sound from the
system.
• You may have removed the USB cable during the hardware installation process. Insert the
USB cable and start again.
• Try a different USB jack.
• You may have plugged into a USB hub that has a USB 1.0 device connected to it.
Remove the USB 1.0 device, or plug the Companion 5 system directly into a USB
2.0 port.
• Disconnect the USB cable from your computer and plug it in again.
• Make sure connections are secure (See “Making system connections” on page 10).
• Check your speaker cords for damage that may be causing an open or short circuit.
• Turn the volume ring on the control pod clockwise.
• If you are using a connected audio device, make sure it is plugged in and the volume
control on the device is turned up.
• Make sure the speaker system is in the Active mode (control pod indicator is Green).
• Disconnect headphones.
• Restart your digital audio application. Make sure mute is not set in the application and
that the volume is set at a reasonable level.
The entire speaker system sounds distorted.
• Decrease the volume at the sound source and increase the volume on the control pod.
• Disable the effects in any audio application running.
19
Page 20

C
ARE AND MAINTENANCE
Problem What to do
EnglishFrançais Español
I’m hearing clicks, pops,
and abnor
mal sounds on
my computer.
Sound from speakers is
not loud eno
ugh.
System sounds “tinny,”
too much t
One satellite speaker
CARE AND MAINTENANCE
does not
reble.
play or sounds
distorted.
Customer service
• This may be caused by connecting the speaker system to your computer through a USB
hu
b. Disconnect the Companion
®
5 system USB cable from the hub and plug it into a
USB jack on your computer.
• Increase the volume on your computer or other sound source.
• Make sure right (R) and left (L) speakers are on the correct sides of your computer moni-
tor. Check the L and R markings on the speaker cord behind each speaker.
®
• Make sure Bass Compensation control on the Acoustimass
module is not turned fully
counterclockwise.
• Check all connections between the satellite
speakers, control pod, sound source and the
Acoustimass module. Make sure all plugs are fully inserted into the jacks on the module.
• Make sure the speaker cord plug on the speaker in question is fully inserted into its jack
on the Ac
oustimass module.
• To determine if the problem is in the sound source or the Acoustimass module, connect a
nt sound source to the control pod. If the Companion 5 speaker system operates
differe
properly, the problem is in the original sound source. If the problem remains, then the
problem is in the Acoustimass module.
• Check balance levels on your sound source.
For additional help in solving problems, contact Bose® Customer Service. Refer to the
address sheet included with the system.
Product specifications
Power rating USA/Canada..................120VAC~ 50/60 Hz 300W
Dimensions Satellite speaker............8.85"H x 5.79"W x 3.83"D
Weight Satellite speaker............ 1.9 lb (0.85 kg)
Finish Acoustimass module..... Scratch-r
International...................220VAC-240VAC~ 50/60 Hz 300W
Japan.............................100VAC~ 50/60 Hz 300W
Acoustimass module.....8.58"H x 6.82"W x 16.74"D
Control pod ...................2.46"DIA x 1.12"H
Acoustimass module..... 18.3 lb (8.3 kg)
Control pod ................... 0.46 lb (0.21 kg)
Sate
llite speakers ..........Painted polymer finish
Computer system recommendation
• 1 GHz, minimum, Pentium processor or equivalent
• 256 MB RAM, minimum
•USB 2.0
®
•Microsoft Windows
• A compatible 5.1 surroundsound decoder residing on your computer
XP or later, or Mac OS® X 10.4.6 or later
(22.5 cm x 14.7 cm x 9.7 cm)
(21.8 cm x 17.3 cm x 42.5 cm)
(6.3 cm x 2.9 cm)
esistant, satin-finished vinyl
20
Page 21

©2009 Bose Corporation, The Mountain,
Framingham, MA 01701-9168 USA
AM322417 Rev.00
 Loading...