

Page 1

The Bose
®
Free Space
®
51 Speakers
Owner’s Guide
AM268612_00 _V.pdf • January 10, 2003
Page 2

For your records
Serial numbers are located on the bottom of each speaker.
Serial number: ____________________ and ______________________________
Dealer name: __________________________________________________________
Dealer phone: _____________________ Purchase date: ____________________
We suggest you keep your sales slip and warranty card together with this owner’s guide.
Declaration
of Conformity
We, the offerer:
Bose® Corporation, The Mountain
Framingham, MA 01701-9168 USA
acknowledge our sole responsibility, that the product:
Kind of equipment: Outdoor Speakers
Type designation: Free Space® 51
in accordance with EMC Directive 89/336/EEC and Article 10(1) of the Direc-
tive, is in compliance with the following norm(s) or document(s):
Technical regulations: EN50081-1, EN50082-1
Accredited by Bose Corporation
15 November 2002
Bose B.V., Nijverheidstraat 8 Nick Merks
1135 GE Edam, The Netherlands Vice President Europe
Merks
Manufacturer’s authorized EU
Representative
©2003 Bose Corporation. No part of this work may be reproduced, modified, distributed or otherwise used without
prior written permission.
2
AM268612_00 _V.pdf • January 10, 2003
Page 3

Where to find...
Setting Up . . . . . . . . . . . . . . . . . . . . . . . . . . . . . . . . . . . . . . . . . . . . . . . . . . . . . . . . . . . . . . . . . . . . . 4
Reference . . . . . . . . . . . . . . . . . . . . . . . . . . . . . . . . . . . . . . . . . . . . . . . . . . . . . . . . . . . . . . . . . . . . . 8
Contents
Before you begin . . . . . . . . . . . . . . . . . . . . . . . . . . . . . . . . . . . . . . . . . . . . . . . . . . . . . . . . . . . . 4
Unpacking the carton . . . . . . . . . . . . . . . . . . . . . . . . . . . . . . . . . . . . . . . . . . . . . . . . . . . . . . . . . 4
Required tools . . . . . . . . . . . . . . . . . . . . . . . . . . . . . . . . . . . . . . . . . . . . . . . . . . . . . . . . . . . . . . 4
Optional tools . . . . . . . . . . . . . . . . . . . . . . . . . . . . . . . . . . . . . . . . . . . . . . . . . . . . . . . . . . . . . . . 4
Decide if you need a professional installer . . . . . . . . . . . . . . . . . . . . . . . . . . . . . . . . . . . . . . . . . 4
Selecting the location for your speakers . . . . . . . . . . . . . . . . . . . . . . . . . . . . . . . . . . . . . . . . . . 5
Choosing the speaker cord (not provided) . . . . . . . . . . . . . . . . . . . . . . . . . . . . . . . . . . . . . . . . . 5
Making the connections . . . . . . . . . . . . . . . . . . . . . . . . . . . . . . . . . . . . . . . . . . . . . . . . . . . . . . . 6
Preparing the speaker cord . . . . . . . . . . . . . . . . . . . . . . . . . . . . . . . . . . . . . . . . . . . . . . . . . 6
Connecting the speaker cord to the speakers . . . . . . . . . . . . . . . . . . . . . . . . . . . . . . . . . . . 6
Connecting the speaker cord to the receiver/amplifier . . . . . . . . . . . . . . . . . . . . . . . . . . . . 6
Checking the connections . . . . . . . . . . . . . . . . . . . . . . . . . . . . . . . . . . . . . . . . . . . . . . . . . . . . . 7
Testing the connections . . . . . . . . . . . . . . . . . . . . . . . . . . . . . . . . . . . . . . . . . . . . . . . . . . . . . . . 7
Troubleshooting . . . . . . . . . . . . . . . . . . . . . . . . . . . . . . . . . . . . . . . . . . . . . . . . . . . . . . . . . . . . . 8
Customer service . . . . . . . . . . . . . . . . . . . . . . . . . . . . . . . . . . . . . . . . . . . . . . . . . . . . . . . . . . . . 8
Warranty period . . . . . . . . . . . . . . . . . . . . . . . . . . . . . . . . . . . . . . . . . . . . . . . . . . . . . . . . . . . . . 8
Cleaning your speakers . . . . . . . . . . . . . . . . . . . . . . . . . . . . . . . . . . . . . . . . . . . . . . . . . . . . . . . 8
Protecting the speaker cord . . . . . . . . . . . . . . . . . . . . . . . . . . . . . . . . . . . . . . . . . . . . . . . . . . . . 9
Technical Information . . . . . . . . . . . . . . . . . . . . . . . . . . . . . . . . . . . . . . . . . . . . . . . . . . . . . . . . . 9
AM268612_00 _V.pdf • January 10, 2003
3
Page 4
AM268612_00 _V.pdf • January 10, 2003
Setting Up
Before you begin
Thank you for purchasing your Bose
outdoor speakers are engineered to provide sound quality far beyond that of most outdoor
speakers. The speakers are also designed for permanent outdoor installation, and therefore
can withstand nature’s elements – so you can be confident they will perform for years to
come (see “Environmental capabilities”, page 9).
Unpacking the carton
Carefully unpack your Free Space 51 speakers and save all packing materials for possible
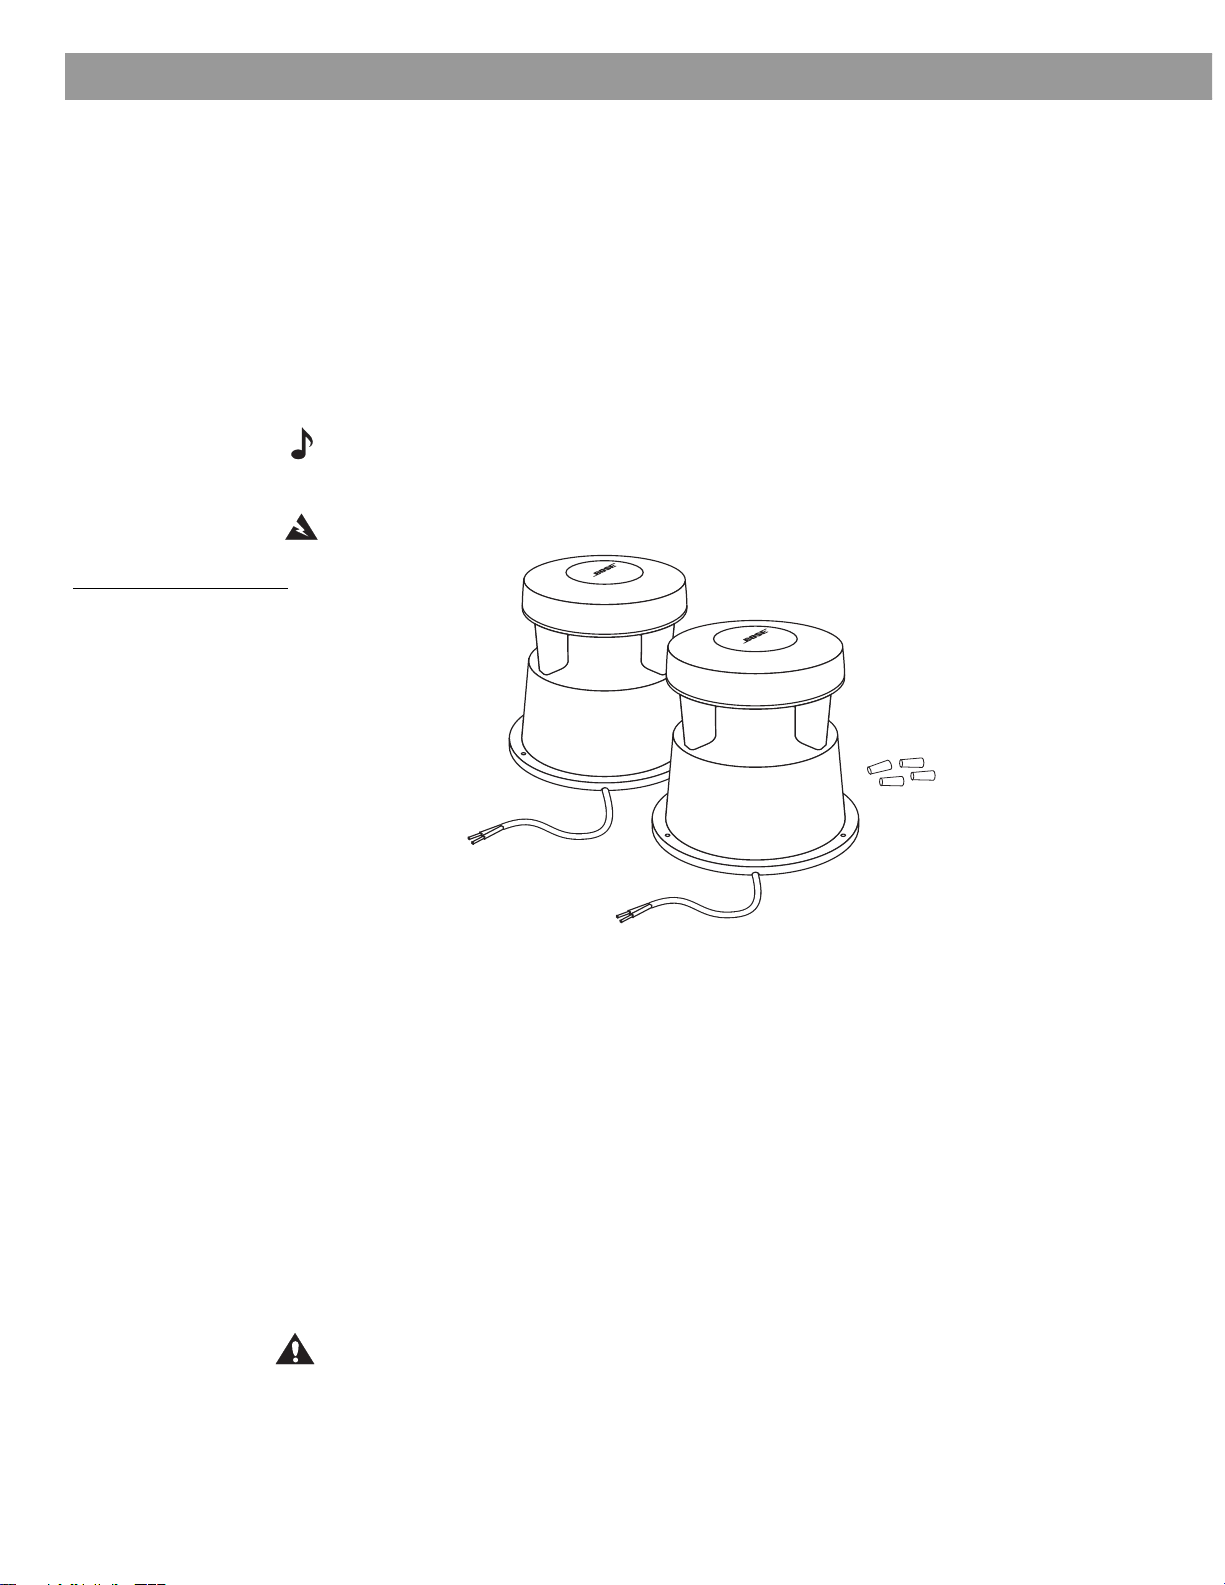
future use. Check that your system contains all parts identified in Figure 1. Do not attempt to
use your speakers if any components are missing or appear damaged. Instead, notify Bose
Corporation or your authorized Bose dealer immediately.
Note: Now is a good time to record the serial numbers located on the bottom of each Free
Space 51 speaker. Write both numbers on your warranty card and in the space provided on
page 2 of this owner’s guide.
WARNING: To avoid danger of suffocation, keep plastic bags out of the reach of children.
Figure 1
Package contents:
• 2 Free Space 51
speakers
• 4 wire nuts
®
Free Space
®
51 speakers. These high-performance
Required tools
You need the following items to complete this installation:
• Speaker cord (see “Choosing the speaker cord” on page 5)
• wire strippers
Optional tools
• Shovel or spade
• Phillips-head screwdriver (#2)
Decide if you need a professional installer
If you have any doubts about using these tools, or handling or cutting cord, now is a good
time to contact a professional installer. For customers who will install the speakers them-
selves, please follow the instructions provided in this owner’s guide.
CAUTION: Please read this owner’s guide completely before beginning the installation.
Failure to follow the instructions in this guide voids all warranties on your speakers. If you are
unsure of your ability to complete this process, consult a professional installer.
4
Page 5
•
Selecting the location for your speakers
Prior to installation, carefully select locations for your Free Space
speakers can be installed on almost any surface such as wood, concrete, or the ground.
When choosing a location, please keep the following guidelines in mind:
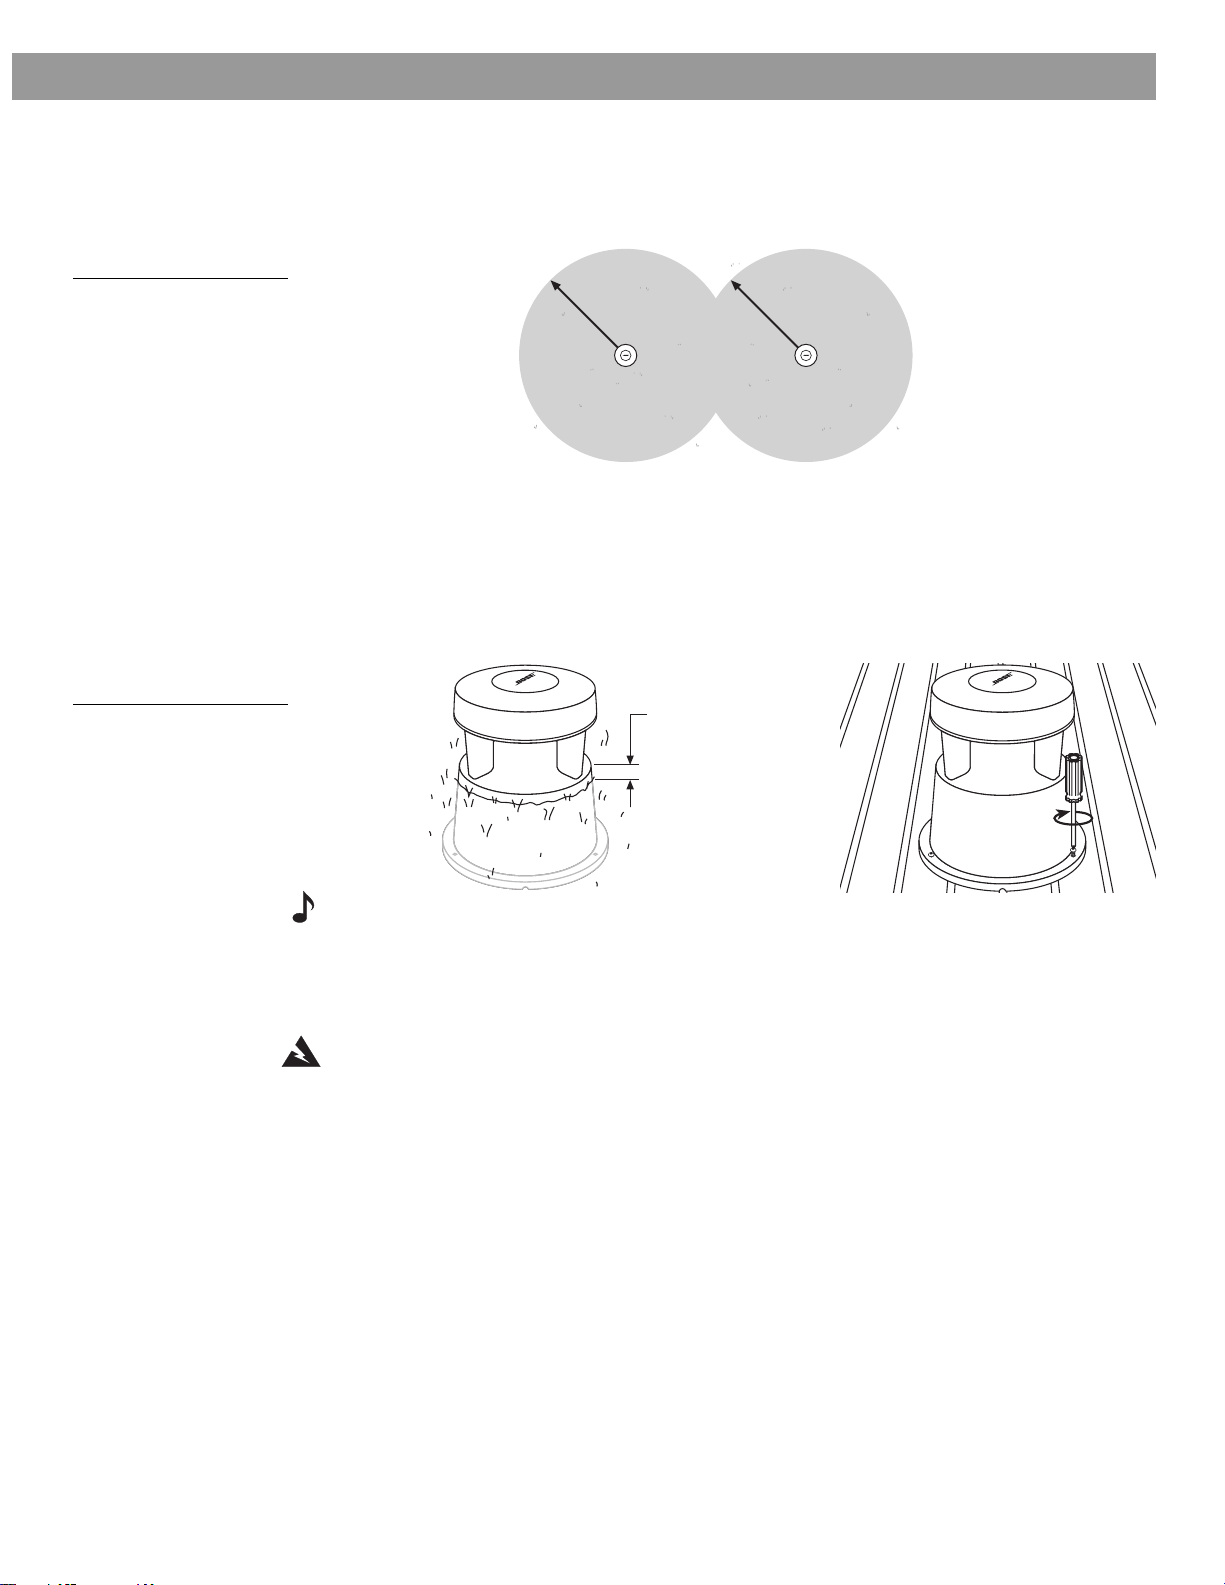
Figure 2
Speaker placement for
optimal coverage
• Select a level surface for your speakers. This will prevent movement or vibration during use.
• Place your speakers where the speaker cord cannot be tripped over, pinched, or pulled.
• Do not place your speakers in an area where water tends to collect.
• Do not bury your Free Space 51 speakers deeper than 1/2 inch (1.3 cm) (Figure 3a).
• Use wood screws to fasten the speaker to a wood surface, such as a deck, if desired
(Figure 3b).
(3-4 m)
(3-4 m)
Primary Coverage Area
Setting Up
®
51 speakers. The
Figure 3
Free Space 51 installation
(a) ground
If you want to connect two or more speakers to an Acoustimass
Note:
please contact Bose
Customer Service or a professional installer for assistance.
Choosing the speaker cord (not provided)
WARNING: Before running speaker cord through a wall or under ground, check your local
building code requirements, or contact an electrical installer.
• Use the proper gauge (thickness) of speaker cord. See “Cord recommendations” under
“Technical Information” on page 9 for proper gauge, or check with your authorized Bose
dealer.
• If your installation requires the cord to be buried in the ground, use direct-burial rated cable
or run the cord through a PVC piping channel. Always use moisture-resistant speaker cord.
• Place speakers and run cord before digging holes or burying cord.
If you think your speaker cord may be exposed to salt water or water containing chemicals
such as chlorine or fertilizers, you may use a silicone caulking material as added protection
for the speaker connections.
1/2"
(1.3 cm)
(b) deck
®
module or to other speakers,
®
.
.
AM268612_00 _V.pdf • January 10, 2003
5
Page 6
Setting Up
Making the connections
WARNING: Before making any connections, turn off your receiver or amplifier and unplug it
from the AC power (mains) outlet.
Preparing the speaker cord
Speaker cord consists of two insulated wires. Usually one is ribbed or red (+), and the other
plain or black (–). Direct-burial cable has a protective outer jacket around the wires.
Consider the following guidelines before cutting any cords:
• Measure the length of cord needed to connect each speaker to your receiver/amplifier
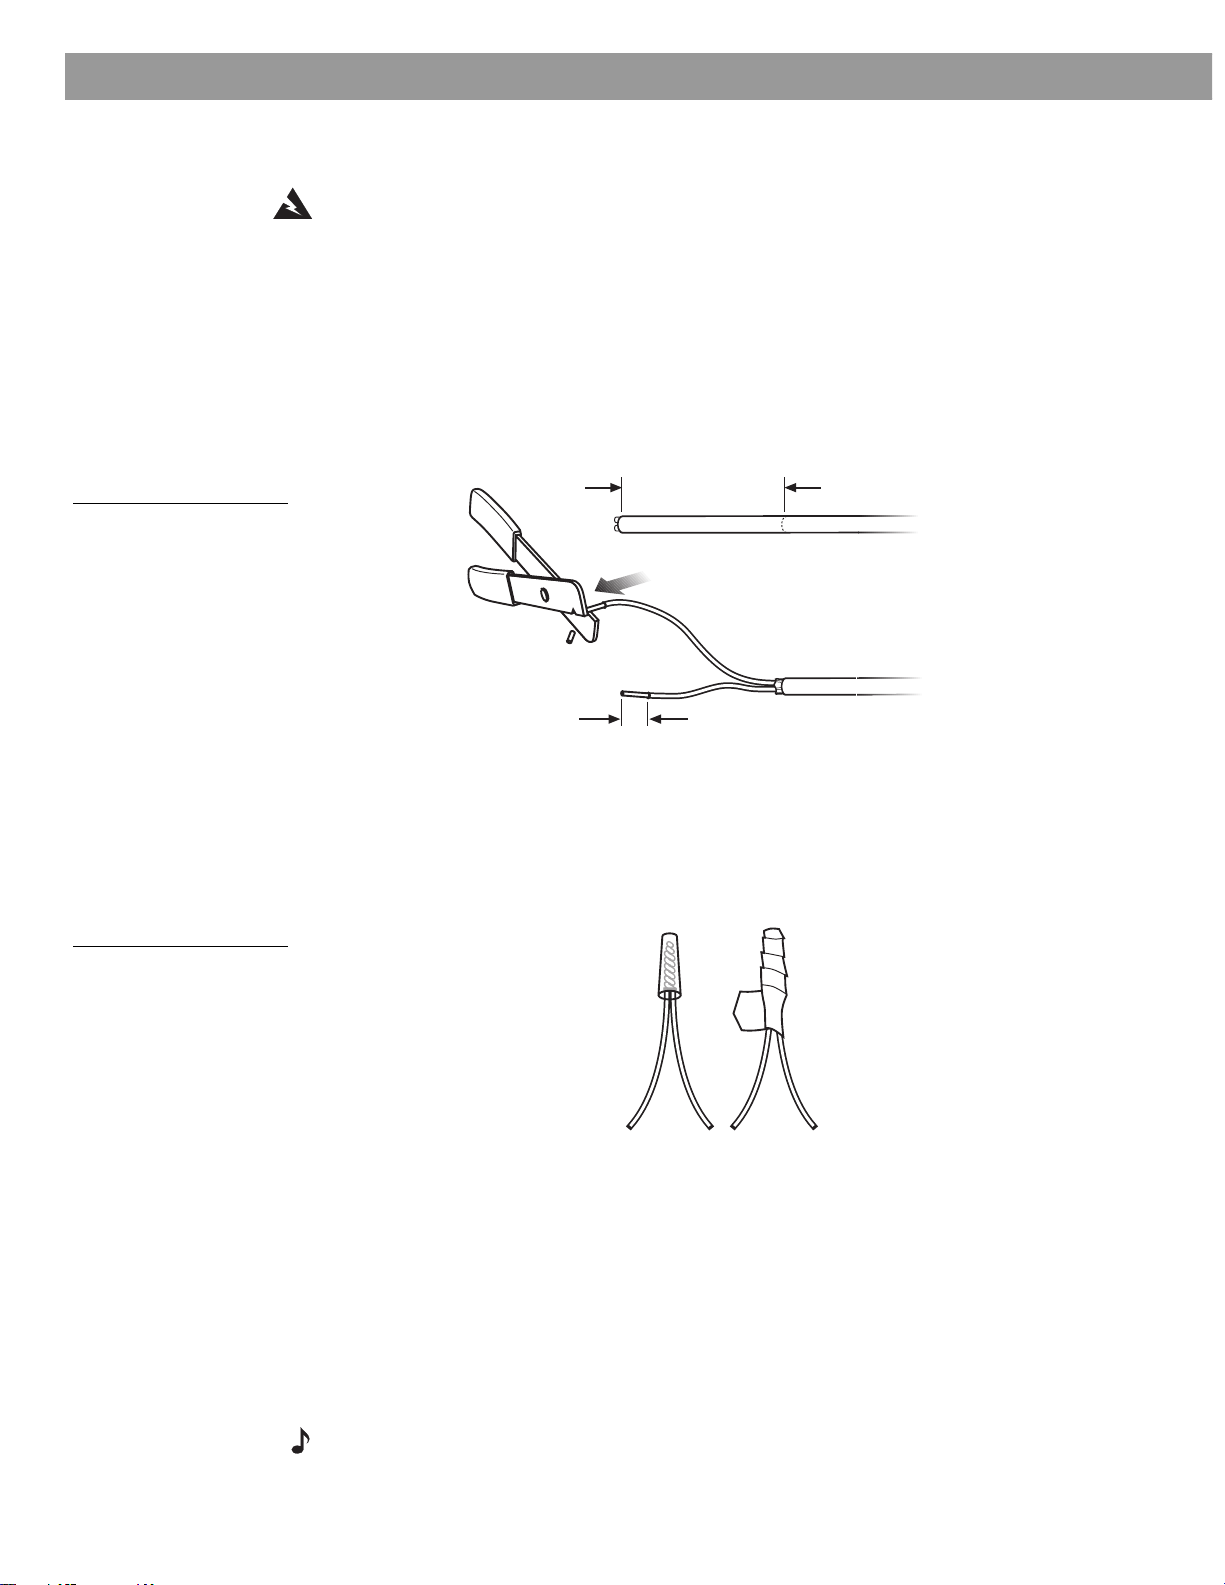
• Strip the outer jacket back 2". Strip the inner insulation on both wires back
(Figure 4).
1
/
" (1.3 cm)
2
Figure 4
Stripping the wires
Figure 5
Reinforcing the wire nuts
2 inches (5.0 cm)
Outer jacket
1
/2 inch (1.3 cm)
1/2 inch (1.3 cm)
Connecting the speaker cord to the speakers
1. Connect the positive (ribbed or red) speaker wire to the positive (red) wire from the
speaker cable. Twist the stripped wires together.
2. Secure the wire nuts with a twisting motion. If you prefer to reinforce the wire nuts, use
electrical tape (Figure 5).
3. Connect the negative (plain or black) wire to the negative (black) wire from the speaker
cable, as in steps 1 and 2 above.
Connecting the speaker cord to the receiver/amplifier
1. Connect the speakers on the left side of the listening area to the left channel of your
receiver/amplifier (Figure 6).
a. Attach the positive (ribbed) wire to the red (+) terminal.
b. Attach the negative (plain) wire to the black (–) terminal.
2. Connect the speaker on the right side of the listening area to the right channel of your
receiver or amplifier, as above.
Note: If your Free Space
secondary set of speakers, be sure to make the appropriate connections to the “B” channel.
6
AM268612_00 _V.pdf • January 10, 2003
®
51 speakers are being connected to your receiver/amplifier as a
Page 7

Figure 6
Connecting cord to receiver
Checking the connections
Check the speaker connections carefully. Make sure no loose strands of wire touch across
terminals. This could create short circuits and damage an amplifier or receiver.
Tighten any loose connections before you plug in the receiver/amplifier.
Setting Up
Testing the connections
To make sure your speakers operate correctly, follow these steps:
1. Center the balance control on your receiver/amplifier.
2. Set the stereo/mono control to MONO.
3. Play some passages of music containing deep bass through the speakers.
The sound should seem to come from a point between the two speakers. The bass should be
full and natural. If not, the connections may be reversed, causing the speakers to play out of
phase. To correct the problem, make sure all the cords are connected positive to positive (+
to +) and negative to negative (– to –).
AM268612_00 _V.pdf • January 10, 2003
7
Page 8

Reference
Troubleshooting
Problem What to do
No sound • Make sure the receiver is plugged in and turned on.
• Check to be sure the AC power (mains) outlet is working.
• Disconnect any headphones plugged into the headphone jack.
• Make sure the receiver is not set to MUTE.
• Refer to the owner’s guide that came with your receiver.
• Check connections to both the speakers and the receiver. Refer to “Making the
connections” on page 6. Correct any connection errors.
• If your Free Space
your receiver/amplifier, check that the connections have been made to the “B”
terminals, and that the “B” speakers are selected to play.
No sound from one speaker • Check that the balance control on your receiver/amplifier is centered.
• Check the cord connecting the receiver/amplifier to the silent speaker.
• Disconnect the working speaker from the receiver. Switch the cord of the silent
speaker from its original receiver terminals to the other set of terminals (that the
working speaker was originally attached to). If the speaker now works, the
problem is in your receiver. If the speaker does not work, continue below:
Remove the cord from the working speaker and connect it to the silent speaker
and either set of receiver terminals. If the speaker now works, the problem is in
the original speaker cord. If the speaker does not work, the problem is in the
speaker.
®
51 speakers are connected as a second set of speakers to
One speaker sounds distorted • Follow the same procedure for the problem of “No sound from one speaker,” as
outlined above.
Not enough bass or treble • Check the tonal balance setting on your receiver/amplifier.
• Adjust the bass and treble controls on the receiver.
• Check the connections to make sure they are correctly in phase
(+ to + and – to –). Refer to “Make the connections” on page 6.
Customer service
For additional help in solving problems, contact Bose
service centers and phone numbers enclosed in the shipping carton. Bose Corporation will
make every effort to correct problems within the terms of your warranty.
®
Customer Service. See the list of
Warranty period
Free Space 51 speakers are covered by a limited five-year transferable warranty. Details of
coverage are on the warranty card that came with your speakers. Please fill out the information section, detach, and mail it to Bose.
Cleaning your speakers
Use a cloth dampened in mild detergent and water to remove dust or dirt from the outside of
your Free Space 51 speakers. Or use a hose to rinse them thoroughly with fresh water. Do not
use enough pressure to force water into the drivers or the acoustic ports.
8
AM268612_00 _V.pdf • January 10, 2003
Page 9

Protecting the speaker cord
The bare ends of the speaker cord can be affected by exposure to the elements. This is especially true of salt water or water containing chemicals such as chlorine or fertilizer. You may
use a silicone caulking material, such as RTV adhesive, to protect the connections. It is commonly available at hardware stores. If you do use caulking, apply it only after the cords are
connected. Check the connections annually, and reapply as needed.
Technical Information
Protective features
• Environmentally resistant hardware
Driver complement
• One 4.5" (11.4 cm) environmental driver per speaker
Color
• Green
Dimensions
1
• 14
/
" (36.8 cm) diameter, 15" (38.1 cm) height
2
Weight
• 12 lb (5.4 kg) each
Compatibility
• Compatible with amplifiers or receivers rated 4 to 8 ohms
• 50W IEC continuous power-handling compatible with receivers and amplifiers rated
10-100W
Environmental capabilities
Designed to withstand:
• Salt fog, sun, high humidity (rain and snow)
• Temperature extremes (-40°F to 158°F; -40°C to 70°C)
• Permanent outdoor installation
Cord recommendations
Based on maximum frequency response deviation of ±0.5 dB
Gauge Length
18 (0.82 mm
16 (1.3 mm
14 (2.1 mm
12 (3.3 mm
Use direct-burial cable for outdoor installations.
2
) 20 ft (6 m) maximum
2
) 30 ft (9 m) maximum
2
) 50 ft (15 m) maximum
2
) 80 ft (24 m) maximum
Reference
AM268612_00 _V.pdf • January 10, 2003
9
Page 10

AM268612_00 _V.pdf • January 10, 2003
©2003 Bose Corporation, The Mountain,
Framingham, MA 01701-9168 USA
268612 AM Rev.00 JN30335
Page 11

OUR COMMITMENT
We
take great pride in designing eachofour products with the goalofproviding the high-
T0
YOU
est accuracy musical performance possible in the price rangeofthat product.
We
strive
reproduce the musical soundsascloselyaspossible to those ,)f the original performance.
And we strive to avoid flashy sounds suchasthose
associat~d
with accentuated bass
and/or treble frequencies. While those sounds may be initially attractive to the novice,
they are not real and are not enduring. In addition, we use only the highest quality parts
to
and the latest assembly and quality control techniques
of
life
Our reputation rests on our steadfast pursuit
our products.
of
this policy in sound systems for the home,
ensure the reliability and long
the automobile, and businesses.
At
Bose®
we reinvest 100%ofour earnings back into the company. This enables us to
support research that continually gives rise to new technologies for improving sound
reproduction.
as
When you purchase any product from Bose, we encourage you to compare it,
We
competitive products for musical accuracy.
believe that this process will enhance your
we do, to
to
BOSE
CORPORATION,
appreciationofthe product you select.
of
With best wishes from all
THE
MOUNTAIN, FRAMINGHAM, MA 01701-9168
us at Bose for many yearsofenjoyable listening.
USA
TEL.: 508.879,7330
FAX:
508,766.7543 WWW.BOSE,COM
Page 12

Page 13

Page 14

Pleasedonot
correspondencetothe
318
C
send
productsorother
address
below.
......BOSE®
PLACE
FIRST-CLASS
STAMP
HERE
PRODUCT
PO
BOX
13247
DENVER
CO
REGISTRATION
DEPARTMENT
80201-3247
11
••
1.11••11111111.
1.1
••
11
••
11.1.1.1.1••11.1.1.1
••
11
•••
1111.11
Page 15

Bose®
Product
Registration
And
Warranty
Information
Please complete and
return immediately
Register .online at:
http://www.bose.com/register
-ElO"~
Call 1-800-444-BOSE
For U.S. And Canadian Residents Only
©2002
Bose
262933AMRev.01JN21200
Corporation.
Page 16

.•
......----------~-----------------------------------------------------------------------...
IMPORTANTI IMPORTANTI IMPORTANTI
PLEASE COMPLETE AND RETURN IMMEDIATELY!
Register onlineathttp://www.bose.com/register
First
Name:
~,
--_:
Last
Name:
1 J
Address:
(number
and
street)
L-----'-------
Apt
#:
I
City:
I
Zip
Code/Postal
I 1 J -
2
Phone
L-e__
3
Emall
Address:
C
Check
4
DateofPurchase:
-_-_._I:
5
Please
1.JWave®
2.[jWave®
3.DWavelPC™
system
4.[Acoustic
5.[j141®
6.
D
151®speakers
7.
C 16F
~:I~
Number:
_ --__-
I I
hereifyou
__
!
--.J~__
indicate
Bose
radio
radio/CD
NEW
Wave®
speakers
M
speakers
Code:
would
(monthfday/year)
!_:_~~I
product(s)
interactive
music
NEW
8.[201®speakers
9,D25FM
speakers
10.0301®speakers
11.:J
601™speakers
12.0
701®
speakers
NEW
NEW
13,D901®speakers
14.
=:J
Acoustimass®3speakers
15.0Acoustimass5speakers
16.CAcoustimass6speakers
~______'_________LI~_
~
_-----L
I
__
_------'-_-'------"-----
--'---I
Country:
:_I_~:_I
_-_~
L~._-
liketohear
purchased:
system
_~
from
Bose®byemail.
17.CAcoustimass10speakers
18.0Acoustimass15speakers
19.D3·2·1
20.0UfestyJe®5music
21.[]Ufestyle®12theater
22.0
23.DLifestyle®28entertainment
24.
=:J
25.0
26.0Ufestyle®
27.[]VCS-1O®center
28.
=:J
29.0
30.
=:J
Lifestyle®20music
Ufestyle®35entertainment
Lifestyle®50theater
Headset
QuietComforFMheadset
Other,
Initial:
-------'I
1 I
~!
-,-!_-_:
entertainment
system
powered
speaker
X
please
specify
~~-------,-I_~
_~_L
'---------.I
State/Province:
1__1_
__
To._-__;
system
system
system
system
speakers
NEW
----'-,------'1_·
__'_'
__
L-
NEW
system
system
_..LJ
318C
NEW
NEW
6
Please
(Foundonthe10label
Serial
7
Where
1.C;Bose®
2.DBose
3.
=:J
Bose
4.0
Retail
Name:
5.DCatalog
6.
0
Other
7,JOther
~l
8a
00
you
8b
Which
1.0Lifestyle®
2.CWave®
3.
C
Automobile
4.
D
Acoustimass®
9
Date
of
1a
Including
(Example:
11
Dateofbirth
Male
Female
1.0
1.
=:J
12
Your
gender:
13
Your
marital
14
For
your
indicate
number(s):
was
product
1-800
Web
store
store
Web
own
any
ones?
system
radio/Acoustic
:till[
birth:
yourself,
01,
02, 03,04...
(month/year)ofthe
2.0
-M-o-nt-h
2.0
status:
primary
the
serial
number(s)ofthiS
attachedtoyour
1
purchased:
number
site
site
other
Bose
products?
Wave@
sound
system
speakers
(month/day/year)
whatisthe
1,0
)
li.J
- - . ----
Male
1.0
total
Married
residence,doyou:
productorconsult
system
:_-
--_.~
numberofpeople
other
adults
Year'
~
2,[JFemale
1.COwn
product.
1.
=:J
Yes
5.
L
Headset
6.0
Other
7.0
Other
L1
and
childreninyour
Male
1.[
1.0
2.JSingle
your
owner's
manual
2.0
No
Bose
speakers
------"----~~
livinginyour
household?
household:
Female
~------~
2.0
2.0
Month
l
Month
i_:~:
2.DRent
for
the
location.)
State:
I
Year
_:_~:_I
Year
15a
Please
We
value
15b
=:J
If
your
personality)ortelevision
hereifyou
letusknow
your
comments:
comments
permit
how
you
were
selected
broadcast,
these
commentstobe
are
enjoying
for
useinradio
print
your
advertising,orother
used
CONTINUEDONOTHER
•
new
Bose®
(Paul
Harveyorsome
with
referencetoyour
products.
media,
SID£
------
other
please
name.
radio
check
•
)2
~
I
I
I
I
I
I
I
I
I
I
I
I
I
I
I
I
I
I
I
r
I
I
I
I
I
I
I
I
I
I
I
I
I
I
I
I
I
I
t
I
I
I
I
I
I
I
I
I
I
I
J
I
I
I
I
I
I
I
t
I
1
I
I
I
I
I
I
I
I
I
I
I
J
I
I
I
I
I
I
I
I
I
I
I
:
:
:
'1
Page 17

• •
16
Which
best
describes
your
family
income?
1.JUnder
2.[$15,000-$24,999
3.
4.[$35,000-$49,999
5.[J$50,000-$74,999
6.0$75,000-$99,999
17
Education:
1,CSome
2.
3.]College
4.[Graduate
18
In
following
1.
2.
3.
4.
5.
6.
7.
19a
D
$15,000
0
$25,000-$34,999
(Please
check
high
school
0
Completed
the
last
Books/magazines
Children's
Clothes
Insurance/financial
MusicNideo/DVD
Travel
Other
Some
We
functionality.
regarding
high
degree
degree
six
(6)
months
items
through
products
Bose8systems
may
offer
software
Please
software
7.C$100,000-$124,999
8.0$125,000-$149,999
9.]$150,000-$174,999
10.]$175,000-$199,999
11.[$200,000-$249,999
12.0
which
category
school
has
anyoneinyour
the
mail
and/or
products
contain
software
upgradesinthe
check
hereifyoudonot
upgrades.
$250,000orover
appliestoyou)
household
over
the
Internet?
A.
Mail
J
o
o
LJ
o
[
D
whichiscritical
futuretoenhance
wanttobe
purchased
B.
for
their
your
contacted
anyofthe
Internet
o
]
D
J
o
[
D
operation.
system
•
19
19c
b D
Check
D
Check
companies
PLEASE
hereifyoudonot
hereifyoudonot
that
offer
new
FOLD
AND
wanttohear
wishtoreceive
and
exciting
SEAL
WITH
DO
NOT
STAPLE.
about
information
products
TAPE
other
and
BEFORE
Bose
from
services.
MAILING.
products.
other
reputable
•
Page 18

Ln,l'ite8Wa"an'tY
Bose®
Please Keep This Warranty Information
Card With Your Owner's Guide.
Whatiscovered:
All
parts
defectiveinmaterial
defect
that
has
excess
alterationormodification.
LimitationonLiability:
THE
PROVISIONSOFTHIS
RANTY,
MERCHANTABILITYORFITNESS
where
you
maybeentitledtoany
rantyasset
ranty
lasts,sothe
For
how
The
Bose
systems,
not
self-powered
Limited
Warranty.
tronics
excluding
headset
Limited
Whatwewill
We
will,atour
time
and
Whatwewill
Pay
shippingortransportation
What
you
1.
Return
Agency,
2.
Return
Corporation.Ifyou
cedures
a)
Contact
but
b)
Properly
ton,
resulted
moisture,
improper
WHETHER
EXPRESSORIMPLIED,
applicable,ifyou
forth
below.
above
long:
Limited
Warranty
and
powered
(amplified).
Warranty.
Additionally,
Powered
component
and
five
years
the
ear
cushions,
hasa1year
Warrantyonprofessional
do:
sole
option,
freeofcharge.
not
do:
mustdoto
product
with
or
product
with
mustbefollowed.
Bose
Corporation
may
notbelimited
packing
contact
Bose
and
from
packing,
LIMITED
qualifyasa
implied
Some
limitation
lasts
speaker
components,
Integrated,
speakers
for
the
speakers.
which
Limited
Warranty.
repairorreplace
charges
obtain
Warranty
proofofpurchase
proofofpurchase
electtoreturn
for
to;
the
productinthe
Corporation
Pro8uct
workmanship.
improperorunreasonable
lightning,
WARRANTY
FORAPARTICULAR
"consumer"
warranties
statesdonot
may
not
one
year
the
131®marine
have
products,
from
Service:
the
product
specific
foranew
This
limited
power
surges,orunauthorized
AREINLIEUOFANY
WRlTIENORORAL,
stereo,
haveaone
The
Please
fromanauthorized
original
PURPOSE.
under
the
allowedbylaw
applytoyou.
from
and
a 6
please
any
youtous.
fromanauthorized
return
carton
Warranty
Magnuson-Moss
allow
limitationsonhow
the
purchase
five
years
and
home
speakers
year
Limited
HeadsetXhasatwo
month
Limited
see
your
Owner's
refertoyour
defective
parts
directlytoBose
and
shipping
carton
for
availableata
information
warranty
useormaintenance,
INCLUDING
for
the
for
speaker
theater
Warranty.
Bose
Corporation,
instructions,
shipping.Ifyou
does
OTHER
ANY
Notwithstanding
Warranty
periodofthe
longanimplied
date
for
electronic
components
systems
haveathree
Warranty
term
year
Limited
The
Guide
for
Owner's
Guide
withinareasonable
dealertoa
Bose
dealer
the
which
needanew
nominal
charge;
continuedonother
not
cover
accident,
tampering,
WRITIEN
WAR-
WARRANTY
haveaone
QuietComfort™
details.
directlytoBose
the
Act,
express
products,
that
year
Limited
for
the
Warranty,
For
for
details.
period
Bose
Service
following
will
include
OF
above,
then
warwar-
are
year
elec-
the
of
pro-
car-
side
a
Page 19

Continued
from
other
c)
Labeling
and
Support,
Corporation.
warranty.
d)
Placing
ton.
Exclusive
This
limited
proofofpurchase
NOT
EXCEED
SHALL
BOSEBELIABLE
Some
placesdonot
consequentialorindirect
above
limitationsorexclusions
Other
conditions:
This
limited
vary
from
the
serial
shipping,
The
Mountain,
You
may
any
necessary
(Cartons
not
bearingareturn
Remedy:
warrantyisfully
fromanauthorized
THE
ACTUAL
allow
warranty
gives
countrytocountryorstatetostate.
number
has
been
side
freight
prepaid,toBose®
Framingham,MA01701-9168orthe
also
writetothis
return
transferable
PURCHASE
FOR
SPECIAL,
limitationsonthe
damages,orthe
may
you
specific
removedordefaced
addresstoobtain
authorization
not
number
authorization
provided
Bose
INCIDENTAL,
that
dealer.
PRICE
THE
PAIDBYYOU
CONSEQUENTIALORINDIRECT
exclusionorlimitationofrelief,
limitationofliabilitytospecified
applytoyou.
legal
rights,
and
This
limited
.
Corporation,
information
prominentlyonthe
number
where
the
current
owner
MAXIMUM
FOR
THE
you
may
also
warrantyisvoidifthe
Product
and
one
required
LIABILITYOFBOSE
PRODUCT.INNO
have
Technical
providedbyBose
about
this
outsideofthe
willberefused.)
furnishes
the
DAMAGES.
special,
incidental,
amounts,sothe
other
rights
label
limited
car-
original
SHALL
EVENT
which
bearing
Bose
Corporation
We
knowitwill
For
your
benefit,werecommend
and
other
purchase
proofofpurchase.Ifnecessary,
Model
NameorNumber:
Serial
Number(s):
Date
Purchased:
Dealer's
Name:
Dealer's
Address:
Please
refertoyour
Please
Bose
thanks
give
informationonthis
Owner's
send
any
Corporation,
(508)
879-7330ortoll-free
you
correspondence
••••
you
for
your
recent
yearsofsatisfaction.
that
you
record
your
card
and
Guide
keepitwith
will
allowusto
for
the
regarding
services
Framingham,MA01701-9168
this
or
The
information
warranty
Mountain,
Bose
serial
number(s),
your
personal
better
listofWarranty
product
to:
(800)
444-BOSE
product
foundonthe
records
serve
your
Service
information
purchase.
product(s),
along
with
needs.
_
_
_
_
Centers.
 Loading...