

Page 1

The Bose® Wave® Radio
Owner’ s Guide
January 4, 2002
AM189930_01_V.pdf
FPO
Page 2
Safety Instructions
WARNING
To reduce the risk of fire or electric shock, do not expose the Wave® radio to rain or moisture.
CAUTION
To reduce the risk of shock, do not remove the cover. There are no user-serviceable parts
inside. Refer servicing to authorized service personnel.
These CAUTION marks appear on the bottom of your Wave radio.
The lightning flash, with arrowhead symbol within an equilateral triangle, alerts the
user to uninsulated dangerous voltage within the system enclosure which may
cause electric shock.
The exclamation point, within an equilateral triangle as marked on the system,
alerts the user to important operating and maintenance instructions in this
owner’s guide.
CAUTION
RISK OF ELECTRICAL SHOCK—DO NOT OPEN
TO PREVENT ELECTRICAL SHOCK, DO NOT REMOVE COVER.
NO USER-SERVICEABLE PARTS INSIDE. REFER
SERVICING TO QUALIFIED PERSONNEL.
TO PREVENT FIRE OR SHOCK HAZARD, DO NOT EXPOSE
THIS UNIT TO RAIN OR MOISTURE.
AVIS
RISQUE DE CHOC ÉLECTRIQUE—NE PAS OUVRIR
AFIN DE PRÉVENIR UN CHOC ÉLECTRIQUE NE PAS
ENLEVER LE COUVERCLE ARRIÈRE. IL NE SE TROUVE À
L’INTÉRIEUR AUCUNE PIÈCE POUVANT ÊTRE RÉPARÉE PAR
LÚSAGER. S’ADRESSER À UN RÉPARATEUR COMPÉTENT.
CAUTION: To prevent electric
shock, match wide blade of plug to
wide slot, fully insert.
ATTENTION: Pour éviter les
chocs électriques, introduire la lame
la plus large de la fiche dans la
borne correspondante de la prise et
pousser jusqu’au fond.
This equipment has been tested and found to comply with the limits for a Class B digital
device pursuant to Part 15 of the FCC Rules. These limits are designed to provide reasonable
protection against harmful interference in a residential installation. This equipment generates,
uses, and can radiate radio frequency energy and, if not installed and used in accordance with
the instructions, may cause harmful interference to radio communications. However, this is no
guarantee that interference will not occur in a particular installation. If this equipment does
cause harmful interference to radio or television reception, which can be determined by turning
the equipment off and on, you are encouraged to try to correct the interference by one or more
of the following measures:
• Reorient or relocate the receiving antenna and the power cord.
• Increase the distance between the equipment and the receiver.
• Connect the equipment to an outlet on a different circuit than the one to which the
receiver is connected.
Note:
This digital apparatus does not
exceed the Class B limits for radio
noise emissions from digital apparatus
set out in the Radio Interference
Regulations of the Canadian Department of Communications.
Le présent appareil numérique n’émet
pas de bruits radioélectriques
dépassant les limites applicables aux
appareils numériques de la classe B
prescrites dans le Réglement sur le
brouillage radioélectrique édicté par
le Ministére des communications du
Canada.
• Consult the dealer or an experienced radio/TV technician for help.
Note:
Unauthorized modification of the
receiver could void the user’s
authority to operate this equipment.
2 January 4, 2002 AM189930_01_V.pdf
Page 3
For your safety
(
)
1. Read, Follow, And Save All Instructions – Read and follow the complete safety and ope rating
instructions in this owner’s guide before using the unit. Save this guide for future reference.
2. Pay Attention To Warnings – Observe all warnings on the unit and in the guide.
3. Do Not Let Objects Or Liquid Enter The Unit – Take care to prevent objects or liquids
from entering this unit. Do not use near a bathtub, washbowl, kitchen sink, laundry tub, in
a wet basement, near a swimming pool, or anywhere else that water is present. Clean only
as directed on page 18.
4. Maintain Proper Ventilation – Place the unit so nothing interferes with its proper ventilation.
Do not place on a bed, sofa, or similar surface that may block the ventilation openings. Do not put
it in a bookcase or cabinet that may keep air from flowing through its ventilation openings.
5. Avoid Excessive Heat – Do not place the unit near heat sources such as radiators, stoves,
or other appliances (including amplifiers) that produce heat.
6. Use Proper Power Sources – Plug the unit into a proper power supply, as described in the
operating instructions or as marked on the unit. This unit has a polarized alternating current
line plug (one blade is wider than the other). As a safety feature, the plug fits into the power
outlet only one way. If you have trouble inserting it, reverse the plug. If it still does not fit,
your outlet may be obsolete and needs to be replaced. Contact an electrician. Do not
change the plug to defeat this safety feature.
Safety Instructions
7. Protect The Power Cord – Route all power cords so that they are not likely to be walked on
or pinched. Pay particular attention to cords at plugs, at the point where the cord connects
to the unit, and at outlets on the unit.
8. Take Precautions When Unit Is Not In Use – If the unit will not be used for an extended
period, unplug from the outlet and remove the batteries.
9. Be Careful With Carts And Stands – Do not place this unit on an unstable cart, stand,
tripod, bracket, or table. The unit may fall, causing serious injury to a person or damage to
the unit. For advice on use of a particular cart, stand, tripod, bracket, or table, contact
Bose®Corporation. Be careful when moving the unit and cart combination. Quick stops,
excessive force, and uneven surfaces may cause it to overturn.
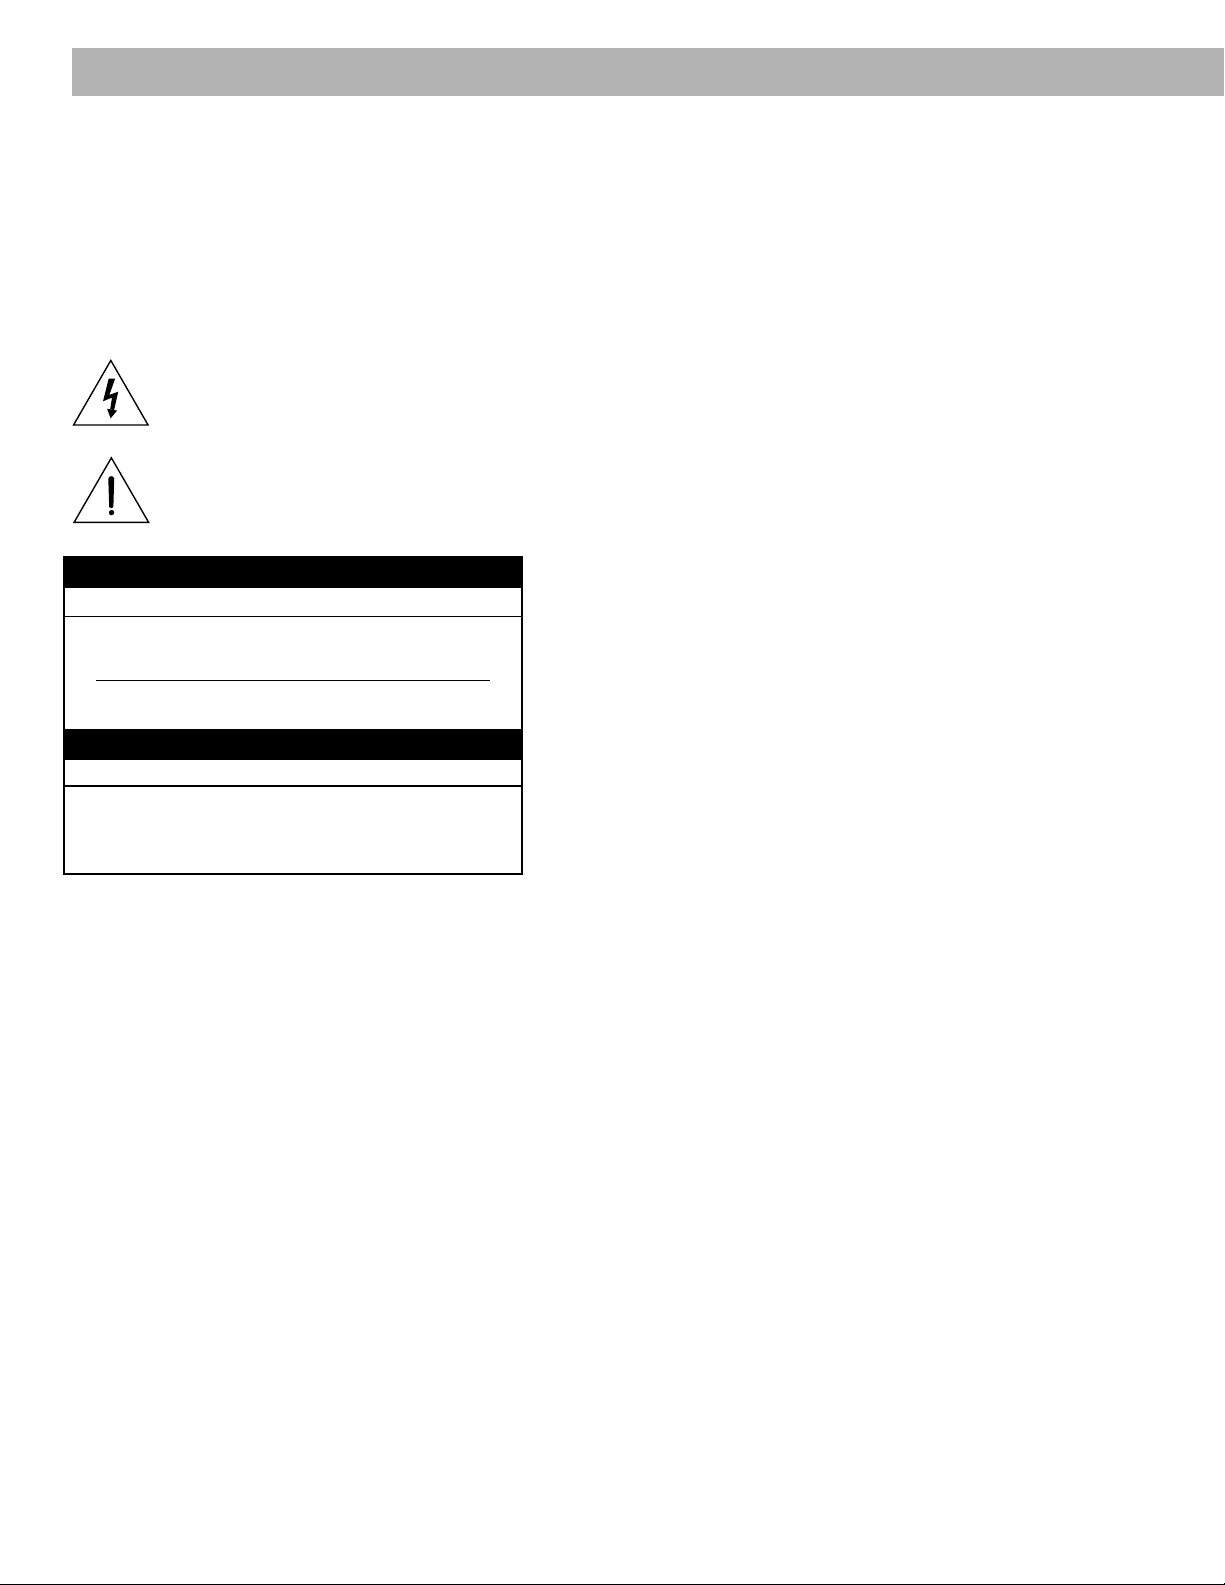
10. Avoid Power Lines – Do not install external antennas near overhead power lines or other
electric light or power circuits, nor where an antenna can fall into such circuits or power lines.
11. Ground All Outdoor Antennas – If an external antenna or cable system is connected to this
unit, be sure the antenna or cable system is grounded. This will provide some protection
against voltage surges and built-up static charges.
Section 810 of the National Electrical Code ANSI/NFPA No. 70 provides information with
respect to proper grounding of the mast and supporting structure, grounding of the lead-in
wire to an antenna discharge unit, size of the grounding conductors, location of antennadischarge unit, connection to grounding electrodes, and requirements for the ground
electrode. Refer to the antenna grounding illustration.
12. Obtain Authorized Service When It Is Indicated – Do not attempt to service this unit
yourself. All servicing should be provided by authorized service personnel when:
A. The power supply cord or the plug has been damaged, or
B. Objects have fallen or liquid has spilled into the unit, or
C. The unit has been exposed to rain, or
D. The unit does not appear to operate normally or exhibits a marked change in performance, or
E. The unit has been dropped or the cabinet damaged.
Antenna
Lead In Wire
Ground
Clamp
Electric
Service
Equipment
Antenna
Discharge Unit
(NEC Section 810-20)
Grounding
Conductors
(NEC Section 810-21)
Ground Clamps
Power Service Grounding
Electrode System
NEC ART 250 Part H
Note to CA TV system installer:
This reminder calls the CATV system
installer’s attention to Article 820-40 of
the NEC (of USA) that provides
guidelines for proper grounding. It
specifies that the cable ground shall be
connected to the grounding system of
the building, as close to the point of
cable entry as is practical.
AM189930_01_V.pdf January 4, 2002 3
Page 4

Contents
Please read this owner’ s guide
The Bose® Wave® radio is carefully engineered to provide sound quality far beyond other
radios. This guide will help you set up and operate your radio properly.
Where to find...
Safety Instructions
Cautions ................................................................................................................. 3
For your safety ....................................................................................................... 3
Setting Up
Unpack the carton.................................................................................................. 5
Install the batteries ................................................................................................. 5
Connect the power cord ........................................................................................ 6
The remote control ................................................................................................. 7
The Display
How to read the clock display ............................................................................... 8
How to read the radio display ................................................................................ 8
How to customize the display ................................................................................ 9
Functions
Radio functions .................................................................................................... 10
Clock functions .................................................................................................... 12
Other Components
Connecting other components ............................................................................ 16
Using other components...................................................................................... 17
Product Information
Maintaining the Wave radio ................................................................................. 18
For best radio reception ....................................................................................... 18
Features................................................................................................................ 18
Bose® Corporation
Warranty ............................................................................................................... 19
Customer service ................................................................................................. 19
4 January 4, 2002 AM189930_01_V.pdf
Page 5
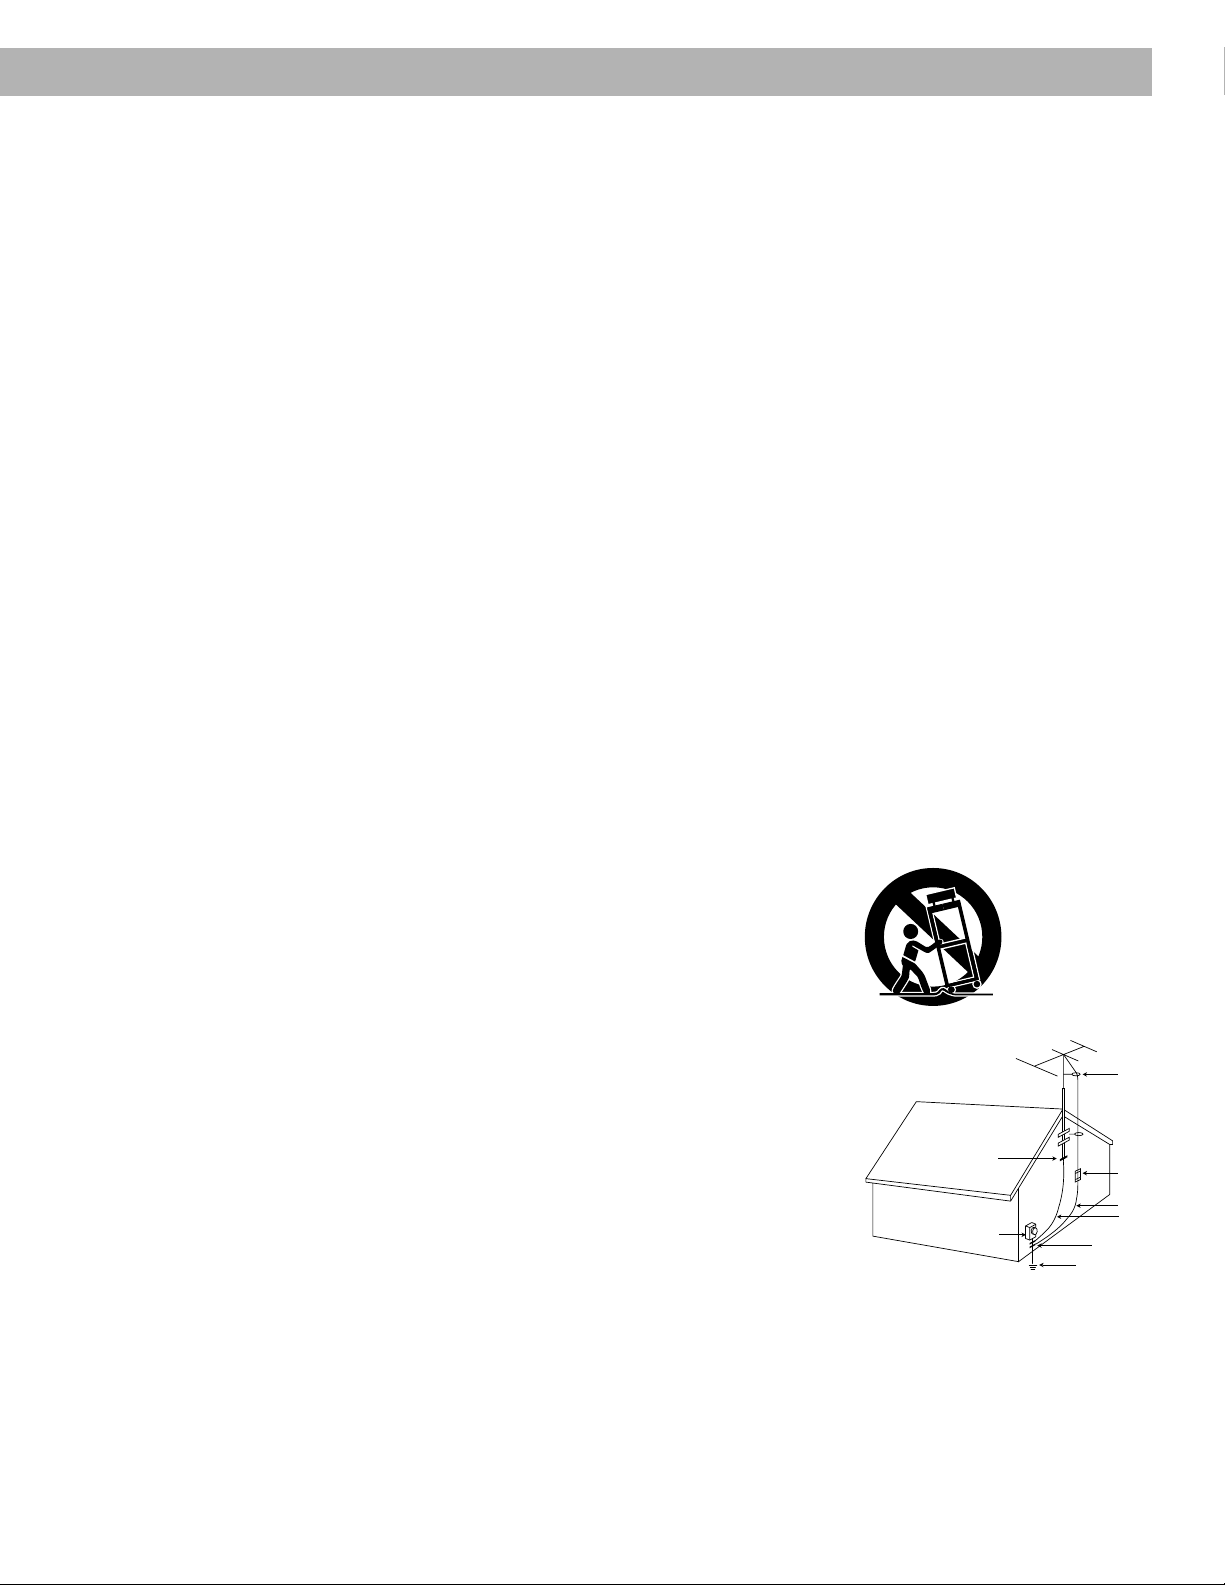
Unpack the carton
Carefully unpack the carton. Do not attempt to use the Wave® radio if any part appears
damaged. Instead, repack the carton and notify Bose® or your authorized Bose dealer immediately.
It is best to place the radio across the room from where you will be listening. Place the radio on
a table or other flat surface. Do not put it on a metal surface or table that could interfere with
AM reception. If you will use the radio with your television or VCR, do not place it on top of the
television. It may interfere with the picture quality.
Locate the power cord, AA batteries, remote control, and lithium battery.
Wave
radio
Power cord
Lithium
battery
®
EP
E
SL
T
I
M
E
A
L
A
R
M
A
T
S
G
N
I
N
U
T
2
1
PRESET STATIONS
5
4
E
M
U
L
O
V
M
A
X
U
A
M
F
EM
R
R
IVE
E
C
E
E R
V
A
W
IC
ST
U
O
C
A
3 AA batteries
.
3
6
E
T
U
M
Remote control
ON/OFF
-1
C
R
L AW
RO
T
N
O
C
TE
O
Setting Up
Figure 1
What comes with your radio.
• Wave radio
• Power cord
• Remote control
• Lithium battery
• AA batteries
Install the batteries
The Wave radio’s three AA batteries maintain the memory and backup alarm system for up to a
week during a power failure, or while the radio is unplugged. Operating without batteries leaves
the memory unprotected, but will not harm the radio. Use AA batteries (IEC-R6 in Europe),
available at many retail stores.
Note:
The batteries will not power the radio or
light the display.
1. Carefully turn your radio upside down (avoid
scratching its top).
2. Locate the battery compartment on the
bottom (see Figure 2).
3. Press the arrow on the cover to slide the
compartment open.
4. Place the batteries inside, matching the +
and – symbols with the symbols inside the
compartment.
5. Slide the cover back and turn the radio right
side up.
LR
++–
VARIABLE OUT
AUX IN
Figure 2
Installing the batteries.
AM189930_01_V.pdf January 4, 2002 5
Page 6
Setting Up
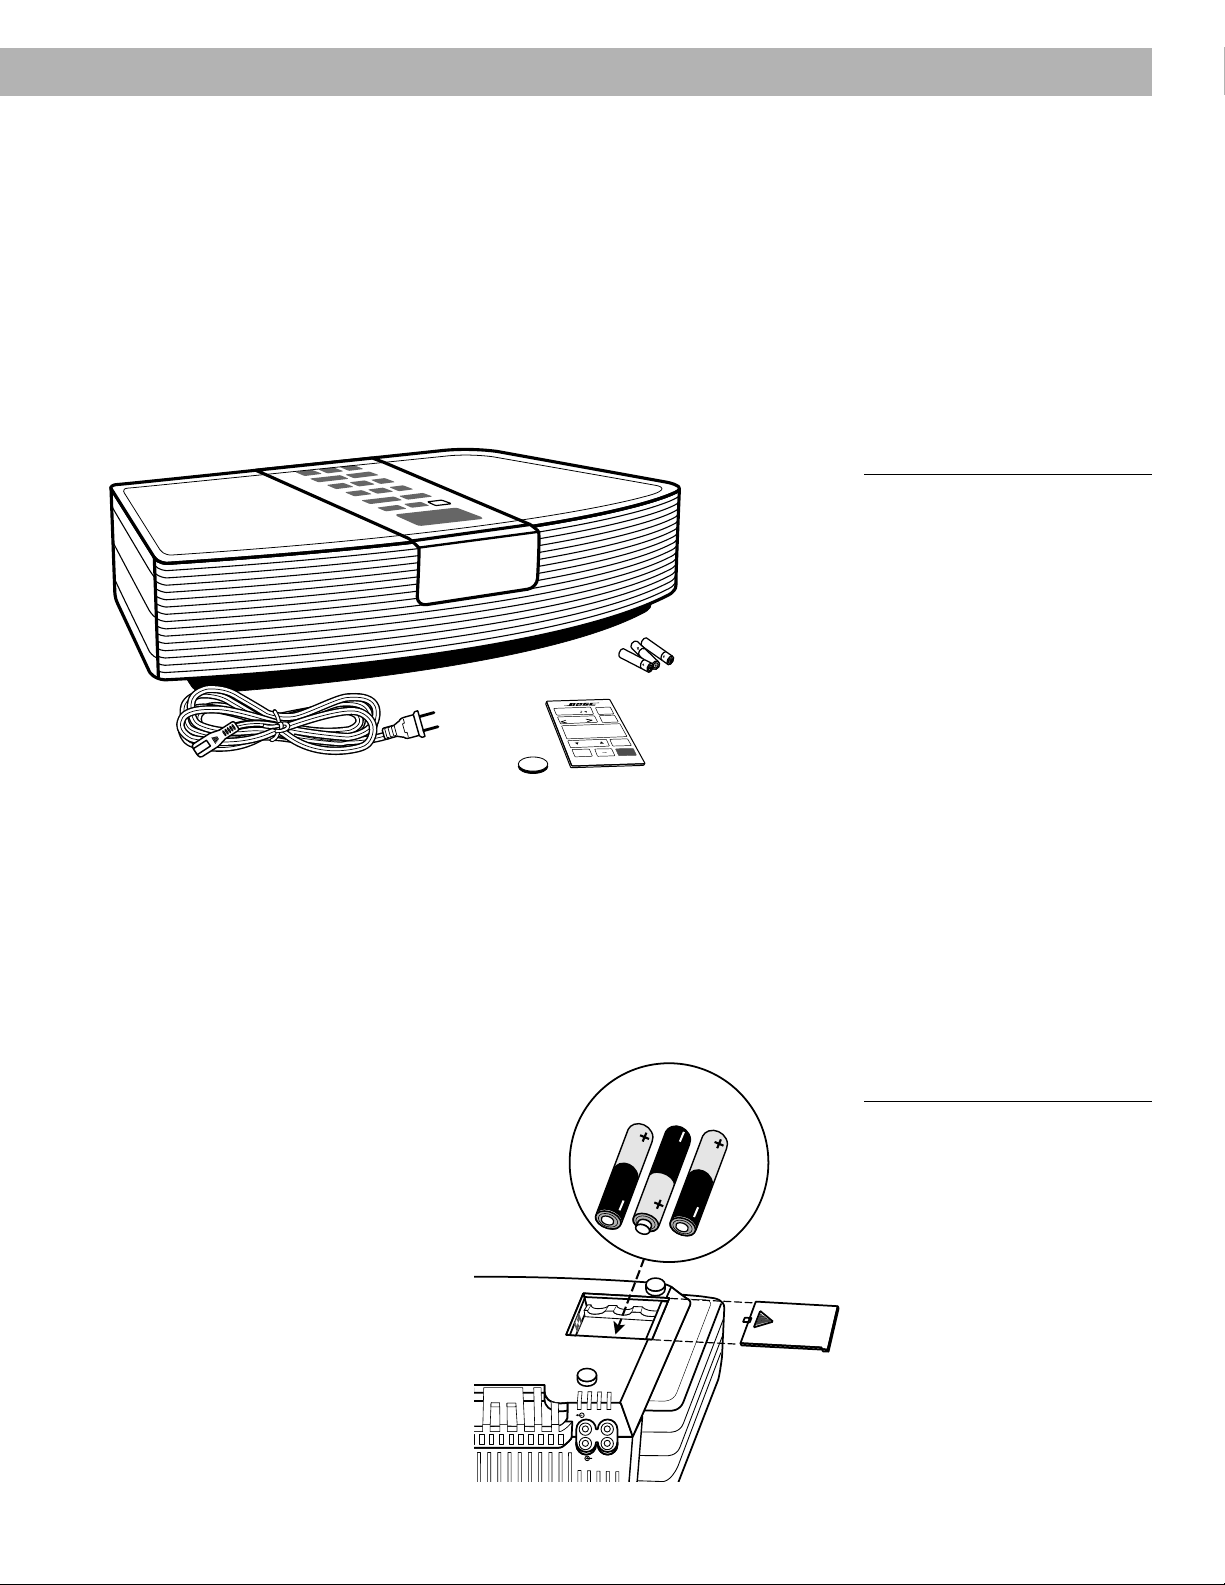
Connect the power cord
1. Plug the small end of the power cord into the power jack on the back of your radio (see
Figure 3). Line up the flat edge of the plug with the flat edge on the side of the jack.
RL
AUX IN
VARIABLE OUT
120V~AC
50/60Hz 50W
Figure 3
Connecting the power cord.
2. The FM antenna is built into the power cord. To improve FM reception, unwind the power
cord completely.
3. Plug the other end of the power cord into an electric outlet.
4. The display panel lights and the time display begins flashing after the power is connected.
Press the CLOCK SET button once to stop the flashing.
6 January 4, 2002 AM189930_01_V.pdf
Page 7

Setting Up
The remote control
Install the battery
Your Wave® radio remote control has a security lock to prevent children from reaching the small
battery. Follow these steps to insert or remove the battery.
1. Place the remote control upside down and face down (as shown in Figure 4a).
2. Insert the tip of a pen into the small hole in the security lock (Figure 4a). If your pen does
not have a long fine point, you can use a straightened paper clip instead.
3. Tilt the pen to push the lock in the direction shown by the arrow in Figure 4b. Push the
lock until the battery compartment clicks open.
Note:
If you have difficulty getting the lock to click open, use the pen to hold the lock to
the side while pulling the battery carrier out. You can place a thin coin or other object in
the battery carrier slot to help pull the battery carrier out.
a
battery to be used
instructions for types of
See operating
b
security
lock
battery carrier slot
Note:
Replace only with a Duracell,
Eveready, Maxell, or Toshiba
CR2032 or DL2032 lithium battery
(available at most electronics
stores). If you have difficulty finding
a replacement battery, contact
®
Bose
Customer Service (see
phone numbers on the inside back
cover).
Figure 4
Push the security lock toward the
battery carrier slot, until the battery
compartment lock clicks open.
rating
ons for types of
battery to be used
4. Slide the battery carrier out. Insert the battery into the battery carrier, with the + symbol
facing up, as shown in Figure 5.
5. Slide the battery carrier closed. Do not force it. It automatically locks in place.
See operating
battery to be used
instructions for types of
battery carrier
How to operate
Aim the remote control at your Wave radio. Use the remote keys in the same way you use the
radio control panel. The remote normally works up to 20 feet in front of the radio, and 6 feet to
either side. Replace the remote control battery when it stops operating, or its range seems
reduced (normally every year or two).
Figure 5
Insert the battery with the + symbol
facing up.
WARNING:
The remote control battery may
cause a fire or chemical burn if
mishandled. Keep it away from
children. Do not recharge,
disassemble, heat above 100˚C
(212˚F), or incinerate. Dispose of
used battery promptly. Replace
with a battery of the type and
model mentioned in the note
above. Using another battery may
cause a fire or explosion.
AM189930_01_V.pdf January 4, 2002 7
Page 8

The Display
How to read the clock display
[Numeric display] – Shows current time, wakeup time, time remaining before
automatic shutoff, station frequency, or volume setting.
Figure 6A
The clock display.
Lights to indicate
Alarm 1 is on.
SLEEP
Lights to indicate
Sleep Mode is selected.
One will light to
indicate AM or PM.
How to read the radio display
Lights to show auxiliary source, FM, or
Lights while
receiving FM
stereo broadcast.
Lights while
volume setting
is displayed.
Lights while
radio
automatically
searches for a
strong signal.
AM band selected.
AUX FM
STEREO
VOL AM
SEEK
PRESET
Lights when you
preset a station.
1 2 3 4 5 6
ALARM
AM
PM
ALARM 2
Lights when you select
a preset station.
Lights to indicate
sound selected for
Alarm 1.
Lights to indicate
sound selected for
Alarm 2.
Lights to indicate
Alarm 2 is on.
[Numeric display] –
Shows station
frequency, current
time, wakeup time,
time remaining before
automatic shutoff, or
volume setting.
Note:
The display automatically adjusts
as the light in your room changes.
In normal lighting the display is
bright. In darker rooms the display
dims.
Figure 6B
The radio display.
8 January 4, 2002 AM189930_01_V.pdf
Page 9

How to customize the display
Function Keys Action
The Display
AM/PM (12 hour)
or
Military (24 hour)
time
Clock or radio
mode
ON/OFF
CLOCK
SET
CLOCK
SET
and
ON/OFF
AM/FM
Press ON/OFF once to turn your Wave
®
radio off.
Hold down CLOCK SET and press ON/OFF
to switch between AM/PM (12 HR) or military
(24 HR) formats.
In clock mode, the display shows the time
while the radio is on; in radio mode, the display
shows the radio station that is selected.
With the radio turned on, hold down the
CLOCK SET button and press the AM/FM
button to switch between clock and radio modes.
AM189930_01_V.pdf January 4, 2002 9
Page 10

Radio Functions
Radio Control Operation
ON/OFF
AM/FM
AUX
SLEEP/SNOOZE
ON/OFF
AM/FM
VOLUME
To turn on/off
To shut off
automatically
To select AM
or FM
To adjust
volume
Press ON/OFF once to turn on (automatically selects the last
source played) or to turn off. Selecting any preset also turns
the radio on.
Press AM/FM to turn the radio on. Press again to
switch between FM and AM.
Press AUX once to listen to a component connected to the
AUX IN jacks. (This does not turn on the component).
Press SLEEP/SNOOZE to set automatic shutoff. The display
shows 75 minutes. Press again, or press and hold, to reduce
the time until shutoff to 60, 45, 30, 15, 10, 5, or 0 minutes.
Press ON/OFF to turn off the radio before automatic shutoff.
If the radio is off or in AUX mode, press AM/FM to select
the radio. Press again to select AM or FM.
While the radio is on or off, press either VOLUME button and
hold to reset the volume.
The display shows the volume level from 0 (soft) to 99 (loud).
TUNING
AM/FM
TUNING
TUNING
TUNING
PRESET STATIONS
PRESET STATIONS
To display
the station
To tune in
a station
To seek
a station
To preset up
to 6 AM and
6 FM stations
To tune in
a preset
If the display is in clock mode and the radio is on, press both
TUNING buttons simultaneously to display the current station
for several seconds.
Press and hold either TUNING button until the desired station
is selected.
Press and hold either TUNING button until you hear a beep.
Then release to find the next strong signal. Turn the volume
up, if necessary, to hear the beep.
Use the TUNING buttons to find the desired station. Then,
hold down any PRESET button until you hear a beep. The
station is now preset to that button.
Choose AM or FM. Press the PRESET button for the station
you want.
10 January 4, 2002 AM189930_01_V.pdf
Page 11

Remote Control Operation
Radio Functions
®
P
E
E
L
S
M
R
A
L
A
E
M
I
T
.
A
T
S
G
N
I
N
U
T
3
2
1
S
N
O
I
T
A
T
S
T
E
S
E
R
P
6
5
4
E
T
U
M
E
M
U
L
O
V
F
F
O
/
N
O
M
A
M
F
X
U
A
L
O
T
N
O
C
E
T
O
M
E
R
IO
D
A
R
E
V
A
W
To turn on/off
To shut off
automatically
To select AM
or FM
To adjust
volume
Press ON/OFF once to turn on (automatically selects the last
source played) or to turn off. Selecting any preset also turns
the radio on.
Press AM/FM to turn the radio on. Press again to
switch between FM and AM.
Press AUX once to listen to a component connected to the
AUX IN jacks. (This does not turn on the component).
Press SLEEP to set automatic shutoff. The display shows 75
minutes. Press again, or press and hold, to reduce the time
until shutoff to 60, 45, 30, 15, 10, 5, or 0 minutes.
Press ON/OFF to turn off the radio before automatic shutoff.
If the radio is off or in AUX mode, press AM/FM to select
the radio. Press again to select AM or FM.
While the radio is on or off, press either VOLUME button and
hold to reset the volume.
The display shows the volume level from 0 (soft) to 99 (loud).
Press MUTE to silence the radio.
Press again to restore volume.
ON/OFF
AM
FM
AUX
SLEEP
ON/OFF
AM
FM
VOLUME
MUTE
To display
the station
To tune in
a station
To seek a
station
To preset up
to 6 AM and
6 FM stations
To tune in
a preset
If the display is in clock mode and the radio is on, press STA.
Press and hold either TUNING button until the desired station
is selected.
Press and hold either TUNING button until you hear a beep.
Then release to find the next strong signal. Turn the volume
up, if necessary, to hear the beep.
Use the TUNING buttons to tune to the desired station. Then
hold down any PRESET button until you hear a beep. The
station is now preset to that button.
Choose AM or FM. Press the PRESET button for the station
you want.
TUNING
AM
FM
STA.
TUNING
TUNING
1 2 3
PRESET STATIONS
645
1 2 3
PRESET STATIONS
645
AM189930_01_V.pdf January 4, 2002 11
Page 12

Clock Functions
Radio Control Operation
CLOCK
SET
TUNING
ALARM
SET
TUNING
ALARM MODE
To set the
clock
To set
Alarm 1
wake up
time and
alarm sound
While holding down the CLOCK SET button,
press either TUNING button. The time display
changes slowly at first, then more quickly. It
stops when you release the TUNING button.
Note:
You can set the alarm with the radio on or off.
Hold down ALARM SET and press either TUNING
button. The time display changes slowly at first, then
more quickly. It stops when you release any button.
To change the Alarm 1 sound, press ALARM MODE.
For tone only, press until the (
) indicator lights.
When the alarm goes off, the tone volume gradually
increases to your preset level.
For radio only, press until the (
) indicator lights.
When the alarm goes off, the radio volume gradually
increases to your preset level.
For tone and radio, press until both indicators (
)
light. When the alarm goes off, the tone sounds. After
you press SLEEP/SNOOZE, the radio turns on.
ALARM
SET
TUNING
ALARM MODE
ALARM MODE
To set
Alarm 2
wake up
time and
alarm sound
Note:
You can set the alarm with the radio on or off.
Hold down ALARM SET and press ALARM MODE. The
Alarm 2 indicator flashes. You now have 10 seconds to
begin setting Alarm 2.
Note:
The Alarm 2 indicator must be flashing while setting
Alarm 2 wake up time or sound.
To set Alarm 2 wake up time, hold down ALARM SET and
press either TUNING button.
To change Alarm 2 sound, press ALARM MODE while the
Alarm 2 indicator flashes.
For tone only, press until the (
) indicator lights. When the
alarm goes off, the tone volume gradually increases to your
preset level.
For radio only, press until the (
) indicator lights. When the
alarm goes off, the radio volume gradually increases to your
preset level.
For tone and radio, press until both indicators (
) light.
When the alarm goes off, the tone sounds. After you press
SLEEP/SNOOZE, the radio turns on.
Note:
The Alarm 2 indicator continues flashing for 10
seconds after wake up time and sound are set.
12 January 4, 2002 AM189930_01_V.pdf
Page 13

Remote Control Operation
Clock Functions
®
P
E
E
L
S
M
R
A
L
A
E
IM
T
.
A
T
S
G
N
I
N
U
T
3
2
S
1
N
O
I
T
A
T
S
T
E
S
E
R
P
6
5
4
E
T
U
M
E
M
U
L
O
V
F
F
O
/
N
O
M
A
M
F
X
U
A
L
O
T
N
O
C
E
T
O
M
E
R
O
I
D
A
R
E
V
A
W
To set the
clock
To set
Alarm 1
wake up
time and
alarm sound
You cannot set the clock with the remote control.
Note:
You can set the alarm with the radio on or off.
Press TIME. The alarm indicator begins flashing.
Press either TUNING button. The time display changes
slowly at first, then more quickly. It stops when you
release any button.
Press TIME to return the display to the current time.
To change the Alarm 1 sound, press
For tone only, press until the (
) indicator lights. When
.
the alarm goes off, the tone volume gradually increases
to your preset level.
For radio only, press until the (
) indicator lights. When
the alarm goes off, the radio volume gradually increases
to your preset level.
For tone and radio, press until both indicators (
)
light. When the alarm goes off, the tone sounds. After
you press SLEEP, the radio turns on.
ALARMTIME
TUNING
ALARMTIME
To set
Alarm 2
wake up
time and
alarm sound
Note:
You can set the alarm with the radio on or off.
Press TIME, then
. The Alarm 2 indicator flashes. You
now have 10 seconds to begin setting Alarm 2.
Note:
The Alarm 2 indicator must be flashing while setting
Alarm 2 wake up time or sound.
To set Alarm 2 wake up time, press either TUNING button.
Press TIME to return to the regular display.
To change Alarm 2 sound, press TIME to return to regular
display. Then press
For tone only, press until the (
while the Alarm 2 indicator flashes.
) indicator lights. When the
alarm goes off, the tone volume gradually increases to your
preset level.
For radio only, press until the (
) indicator lights. When the
alarm goes off, the radio volume gradually increases to your
preset level.
For tone and radio, press until both indicators (
) light.
When the alarm goes off, the tone sounds. After you press
SLEEP, the radio turns on.
Note:
The Alarm 2 indicator continues flashing for 10
seconds after wake up time and sound are set.
ALARMTIME
ALARMTIME
AM189930_01_V.pdf January 4, 2002 13
Page 14

Clock Functions
Radio Control Operation
ON/OFF
ALARM
SET
ALARM
SET
VOLUME
ON/OFF
SLEEP/SNOOZE
ALARM MODE
To use
Auto Reset
To check
Alarm 1
To check
Alarm 2
To set the
volume of
the alarm
To snooze
While the alarm sounds, press ON/OFF once. The alarm
stops and resets to go off at the same time tomorrow. If you
do not turn off the alarm, it continues to sound for 30
minutes. Then it stops and resets to go off at the same time
tomorrow.
Press ALARM SET. The display shows the wake up time
for Alarm 1.
Simultaneously press both ALARM SET and ALARM MODE.
The display shows the wake up time for Alarm 2.
For the radio ( ), use the VOLUME buttons to set the volume.
For tone (
), choose the alarm sound (see page 12).
Set the alarm to go off. When the alarm sounds, press either
VOLUME button to adjust the volume.
Press ON/OFF to silence the alarm. This automatically resets
the alarm to repeat tomorrow.
When the alarm is in tone ( ) or radio ( ) mode, press
SLEEP/SNOOZE to pause the alarm for ten minutes.
When the alarm is in tone and radio ( ) mode, press
SLEEP/SNOOZE to pause the tone and hear the radio. The
tone sounds again in ten minutes. Press again to silence the
radio. The alarm indicator flashes while paused.
ALARM
SET
ON/OFF
ALARM MODE
ALARM
SET
PRESET STATIONS
ON/OFF
ALARM MODE
To stop
the alarm
To disable
Alarm 1
To disable
Alarm 2
To wake to
your favorite
station
Alarm
operation
during a
power failure
Press ON/OFF once. The indicators remain lit. The alarm
repeats tomorrow.
To turn off the alarm function, press ALARM MODE until
the (
) and ( ) indicators do not appear on the display.
The alarm must be reset for next use.
Hold down ALARM SET and press ALARM MODE. Alarm 2
flashes on the display. Release ALARM SET. Press ALARM
MODE until the (
) and ( ) indicators no longer appear.
Simultaneously press ALARM SET and any PRESET button.
The preset indicator and the station frequency flash on the
display.
Release the ALARM SET button. Alarm 1 plays this station
until you reset the alarm.
Press ON/OFF to silence. Backup batteries run the alarm
for approximately a week during power failure. To conserve
power, only the tone sounds, even if radio is selected. Normal
operation resumes when power is restored. Batteries should
be replaced after an extended power failure.
14 January 4, 2002 AM189930_01_V.pdf
Page 15

Remote Control Operation
Functions
®
P
E
E
L
S
M
R
A
L
A
E
M
I
T
.
A
T
S
G
IN
N
U
T
3
2
S
1
N
O
I
T
A
T
S
T
E
S
E
R
P
6
5
4
E
T
U
M
E
M
U
L
O
V
F
F
O
/
N
O
M
A
M
F
X
U
A
L
O
T
N
O
C
E
T
O
M
E
R
O
I
D
A
R
E
V
A
W
To use
Auto Reset
To check
Alarm 1
To check
Alarm 2
To set the
volume of
the alarm
To snooze
While the alarm sounds, press ON/OFF once. The alarm
stops and resets to go off at the same time tomorrow. If you
do not turn off the alarm, it continues to sound for 30
minutes. Then it stops and resets to go off at the same time
tomorrow.
Press TIME on your remote control. The display shows the
wake up time for Alarm 1. Press TIME again to return to
normal display.
Press TIME. Then press
. The display shows the wake
up time for Alarm 2.
Press TIME. Then press
. The normal display returns.
For the radio ( ), use the VOLUME buttons to set the volume.
For tone (
), choose the alarm sound (see page 13).
Set the alarm to go off. When alarm sounds, press either
VOLUME button to adjust the volume.
Press ON/OFF to silence the alarm. This automatically resets
the alarm to repeat tomorrow.
When the alarm is in tone ( ) or radio ( ) mode, press
SLEEP to pause the alarm for ten minutes.
When the alarm is in tone and radio ( ) mode, press
SLEEP on your remote control to pause the tone and hear the
radio. The tone sounds again in ten minutes. Press again to
silence the radio. The alarm indicator flashes while paused.
ON/OFF
ALARMTIME
TIME ALARM
VOLUME
ON/OFF
SLEEP
To stop
the alarm
To disable
Alarm 1
To disable
Alarm 2
To wake to
your favorite
station
Alarm
operation
during a
power failure
Press ON/OFF once. The indicators remain lit. The alarm
repeats tomorrow.
To turn off the alarm function, press until the ( )
and (
) indicators do not appear on the display. The
alarm must be reset for next use.
Press TIME. Then press . Alarm 2 flashes. Press
TIME again. Press
until the ( ) and ( ) indica-
tors no longer appear on the display.
Use the radio control panel to select this feature.
Press ON/OFF to silence. Backup batteries run the alarm for
approximately a week during power failure. To conserve power,
only the tone sounds, even if radio is selected. Normal operation resumes when power is restored. Batteries should be replaced after an extended power failure.
ON/OFF
ALARMTIME
TIME ALARM
ON/OFF
AM189930_01_V.pdf January 4, 2002 15
Page 16

Other Components
Connecting other components
Use your Wave® radio to improve the sound of a CD player, cassette player, or TV. You can also
use your radio as extension speakers for the Bose® Lifestyle® music system. Connect one of these
components to the right and left AUX IN jacks. Or add powered Bose speakers connected to the
right and left VARIABLE OUT jacks. Audio cables for these connections are available at electronics stores, or by calling Bose.
Most audio cables are color coded. Match the red plugs to the right (red) jack and the black or
white plugs to the left (white) jack (see Figure 7).
Connecting components or speakers to the VARIABLE OUT jacks will shut off the radio’s
speakers.
RL
AUX IN
120V~AC
50/60Hz 50W
Figure 7
Location of jacks to use in connecting other components.
VARIABLE OUT
Connect red
plugs here
RL
AUX IN
Connect white or
black plugs here
VARIABLE OUT
16 January 4, 2002 AM189930_01_V.pdf
Page 17

Connection at Connection at
Component Cable component Wave® radio
Other Components
Note
Portable CD or
tape player
CD player, tape
deck, or VCR
Television Audio output jacks
Bose® Lifestyle
®
music system
®
One miniplug-tostereo audio cable
One stereo audio
cable
TVs with stereo output
jacks need a standard
RCA cord.
TVs with single (mono)
audio output jacks use
a standard Y adapter.
TVs with earplug outlets
may need a special
earplug adapter.
25 to 100 foot stereo
cable with male-tomale RCA plugs.
Headphone jack (set
the headphone volume
control to 7).
Audio output jacks
If there are two sets of
outputs, use the fixed
outputs.
If there are two sets of
outputs, use the fixed
outputs.
TAPE (REC) jacks
AUX IN jacks
AUX IN jacks
AUX IN jacks To make sure the sound seems to
AUX IN jacks
Recording from your Wave radio
is not recommended because
connections to the VARIABLE
OUT jacks shut off the radio
speakers, preventing you from
monitoring the recording volume.
come from the screen, place the
Wave radio close to the TV.
To prevent interference with the TV
picture, do not place the Wave radio
directly on top of the TV.
Powered Bose
speakers
Use the audio-input
cables that came with
your speakers.
Speaker system input
as described in the
speaker owner’s
manual.
VARIABLE OUT jacks
Some Bose audio-input cables have
three connectors at each end. Use
only the two connectors that look
alike. DO NOT INSERT THE THIRD
CONNECTOR into the speaker’s
SYSTEM CONTROL jack.
Using other components
Choose your CD player, tape player, or other auxiliary source by pressing the AUX key. Adjust
the listening volume with the VOLUME keys. Control all other functions at the source, referring
to its owner’s manual, if necessary. Control your auxiliary powered speakers from the Wave
radio. If these speakers have a volume control, you may use it.
AM189930_01_V.pdf January 4, 2002 17
Page 18

Product Information
Maintaining the Wave® radio
The only necessary maintenance is periodic battery replacement and cleaning.
Replace the batteries
To protect your Wave radio’s memory and backup alarm system, replace the batteries every
year and when you have an extended power loss. Dead batteries may leak and cause damage.
Do not unplug your Wave radio from the power outlet while replacing the batteries. If you do
unplug it, you will need to reset the clock, alarm settings, and station presets. For further
information on replacing batteries, see “Install the batteries” on page 5.
For information on replacing the remote control battery, see “Install the battery” on page 7.
How to clean
Use only a cloth to clean the outside of the Wave radio. Do not use any solvents, chemicals, or
cleaning solutions containing alcohol, ammonia, or abrasives. Do not allow liquids to spill into
any openings on the radio. If necessary, you may use a soft-bristled attachment to gently
vacuum the front of the radio.
For best radio reception…
The Wave radio has an internal antenna. You may adjust the antenna by turning the radio
slightly.
You may adjust the FM antenna by moving the power cord. If you still have problems with FM
reception, you may need an external antenna. Call Bose® Customer Service to request one.
Features
• Acoustic Wave® speaker technology provides deep, full bass from a small enclosure.
• High performance stereo tuner allows 6 AM and 6 FM station presets.
• Automatic protection circuitry prevents speaker damage from excessive volume.
• Dual independent alarms let you set two wakeup times.
• Credit card-size remote offers convenient operation of the radio and clock functions.
Size
Dimensions
• 4.5"H x 14"W x 8"D (11.4 x 35.6 x 20.3 cm)
Weight
• 7 lb (3.2 kg)
Power rating
• USA/Canada: 120VAC~ 50/60 Hz 50W
18 January 4, 2002 AM189930_01_V.pdf
Page 19

Warranty period
The Bose Wave® radio is covered by a limited 1-year transferable warranty. Details of the
warranty are provided on the warranty card that came with your radio. Please fill out the
information section on the card and mail it to Bose.
Customer service
For additional help in solving problems, contact Bose customer service.
USA
1-800-637-8781 Monday through Friday, 8:00 a.m. to 9 p.m. ET
Canada
1-800-444-BOSE (1-800-444-2673) Monday through Friday, 9 a.m. to 5 p.m. ET
Bose® Corporation
AM189930_01_V.pdf January 4, 2002 19
Page 20

Warranty
© 1996 Bose Corporation
The Mountain, Framingham, MA 01701-9168 USA
JN97832 PN189930 Rev.01 AM189930 Rev.01
 Loading...