

Page 1
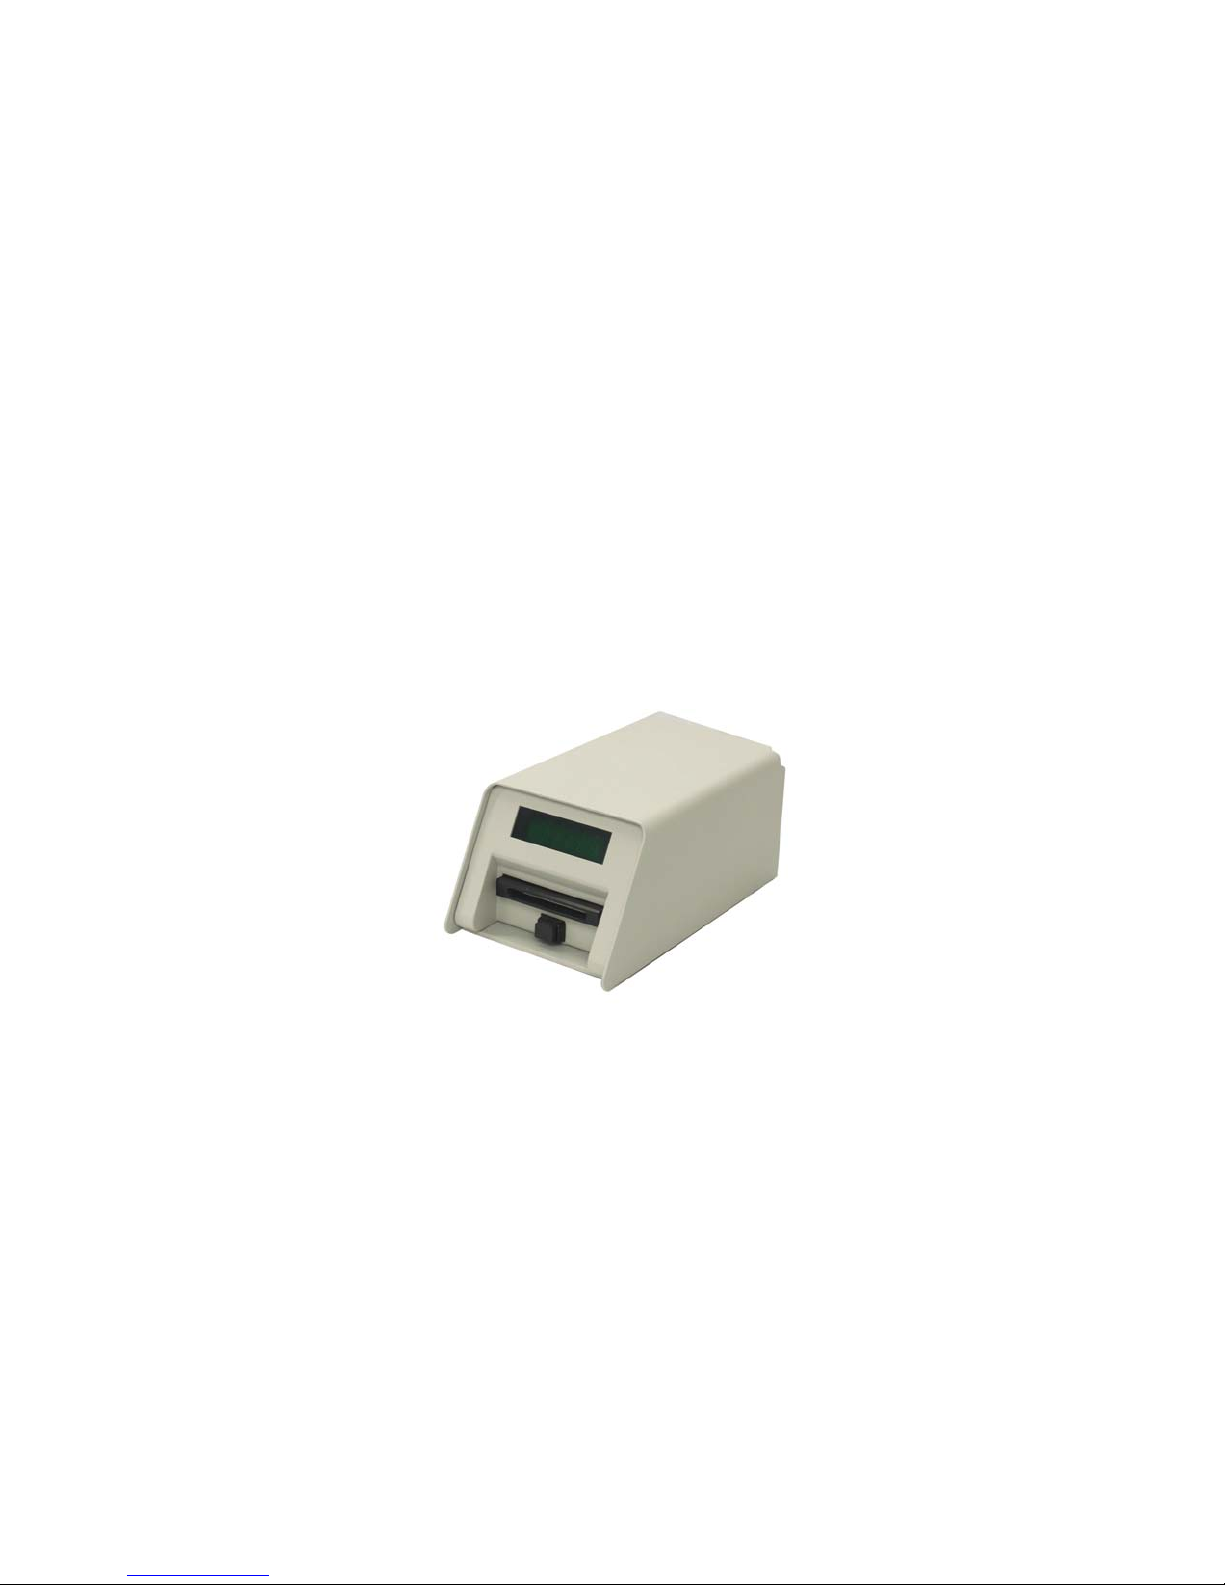
BBOOSSCCOOPP IINNCC..
CCaasshh CCaarrdd AAcccceessss aanndd DDeebbiitt RReeaaddeerr
IInnssttrruuccttiioonn MMaannuuaall
MMooddeell:: BBCC220011 SSeerriiaall
email: [email protected]
Boscop Inc.
159 Dana Hill Rd
New Hampton NH 03256
Phone: 603-744-2188
Fax: 603-744-2062
Page 2

SERIAL CARD READER BC201
Table of Contents:
Index:
1. Sales and Service
2. Overview
3. Set-Up
3.1 Setting The Dip Switches
3.2 ROM Code Settings
3.3 Parameter Set-Up
3.4 Site Code Information
3.5 Error Code Summary
4. Metering
5.1 Meter Readings
5.2 Clearing the Meters
5.3 To Obtain Meter Readings via Print Out
5.4 Printer Protocol
5.5 Seiko DPU-414 Setup
5. Installation
6.1 Serial Communication Protocol
6. Cash Card Reader Installation Data
7. Frequently Asked Questions and Explanation and Terms Used
8. Warranty
2
2
Page 3

1. Sales and Service
At Boscop Inc., complete customer satisfaction is our number one goal. As such,
customer support is readily available to satisfy any need you may have. Whether it's sales
information, a service requirement or just general inquiry, you can be assured of a prompt
response to your need(s).
If you require technical assistance advice or parts please contact Boscop Inc. and ask for
the Service Department.
If you are a new or existing customer with a new installation in mind, our highly qualified
sales staff will custom tailor a product solution for "your" particular needs. Simply
telephone Boscop Inc. at 603-744-2188 and ask for sales assistance.
BOSCOP INC.
Tel: (603)744-2188
Fax: (603)7442062
http://www.boscop.com
BOSCOP INC. . . . COMMITTED TO COMPLETE CUSTOMER SATISFACTION
3
3
Page 4

4
22..
OOVVEERRVVIIEEW
W
TThhaannkk yyoouu ffoorr ppuurrcchhaassiinngg BBoossccoopp IInncc.. BBCC220011 sseerriieess ccaarrdd rreeaaddeerr.. TThhee BBCC220011 ccaarrdd rreeaaddeerr iiss ccaappaabbllee
ooff ccoommmmuunniiccaattiinngg wwiitthh ccaasshh rreeggiisstteerrss,, ccoommppuutteerrss aanndd ootthheerr sseerriiaall ddeevviicceess tthhrroouugghh iittss 99 ppiinn sseerriiaall
.
WWhheenn aa ccaarrdd iiss iinnsseerrtteedd iinnttoo tthhee rreeaaddeerr tthhee vvaalluue
ppoorrtt.
ttrraannssmmiitttteedd ttoo tthhee aattttaacchheedd aapppplliiccaattiioonn.. TThhee aapppplliiccaattiioonn ppeerrffoor
nneeww vvaalluuee ttoo
IImmppoorrttaanntt NNootteess::
bbee wwrriitttteenn oonnttoo tthhee ccaarrdd aanndd tthhee ccaarrdd iiss uuppddaatteedd aanndd rreettuurrnneedd ttoo tthhee ccuussttoommeerr..
SSwwiittcchh 88 oonn BBaannkk CC mmuusstt bbee ooffff ffoorr mmoosstt aapppplliiccaattiioonnss ttoo wwoorrkk pprrooppeerrllyy..
e iiss ddiissppllaayyeedd oonn tthhee LLEEDD ddiissppllaayy aanndd
rmmss iittss ffuunnccttiioonnss,, tthheenn ttrraannssmmiittss tthhee
SSwwiittcchh 44 oonn BBaannkk AA sshhoouulldd bbee oonn ffoorr mmoosstt aapppplliiccaattiioonnss iinnvvoollvviinngg ddeebbiitt AApppplliiccaattiioonnss.. TThhee oonnllyy
ttiimmee iiss sshhoouulldd bbee ttuurrnneedd ooffff iiss iinn aa PPOOSS aapppplliiccaattiioonn wwhheerree iitt iiss ddeessiirraabbllee ttoo aadddd vvaalluuee ttoo aa ccaarrdd
tthhrroouugghh tthhee PPOOSS tteerrmmiinnaall oorr aallllooww ffoorr rreeffuunnddss ttoo tthhee ccaarrdd..
SSwwiittcchh 33 oonn BBaannkk AA mmuusstt bbee ooffff ffoorr mmoosstt PPOOSS aapppplliiccaattiioonnss ttoo wwoorrkk pprrooppeerrllyy.. TThhee OONN ppoossiittiioonn
ccaauusseess tthhee rreeaaddeerr ttoo vveerriiffyy tthhee eennccooddiinngg oonn tthhee ccaarrdd aatt eexxiitt bbuutt tthhee ddeellaayy iinn ccoommmmuunniiccaattiioonnss wwiillll
lliikkeellyy rreessuulltt iinn tthhee PPOOSS aapppplliiccaattiioonn iinntteerrpprreettiinngg aa ccoommmmuunniiccaattiioonn ffaaiilluurree..
TThhee ffoolllloowwiinngg mmaannuuaall sshhoouulldd aallllooww yyoouu ttoo iinnssttaallll aanndd sseett uupp yyoouurr sseerriiaall CCaarrdd RReeaaddeerr.. IIff yyoouu hhaavvee
aannyy qquueessttiioonnss,, pplleeaassee ccoonnttaacctt yyoouurr ddeeaalleerr oorr BBoossccoopp IInncc.. tteecchhnniiccaall ssuuppppoorrtt aatt 660033--774444--22118888..
4
Page 5
33..
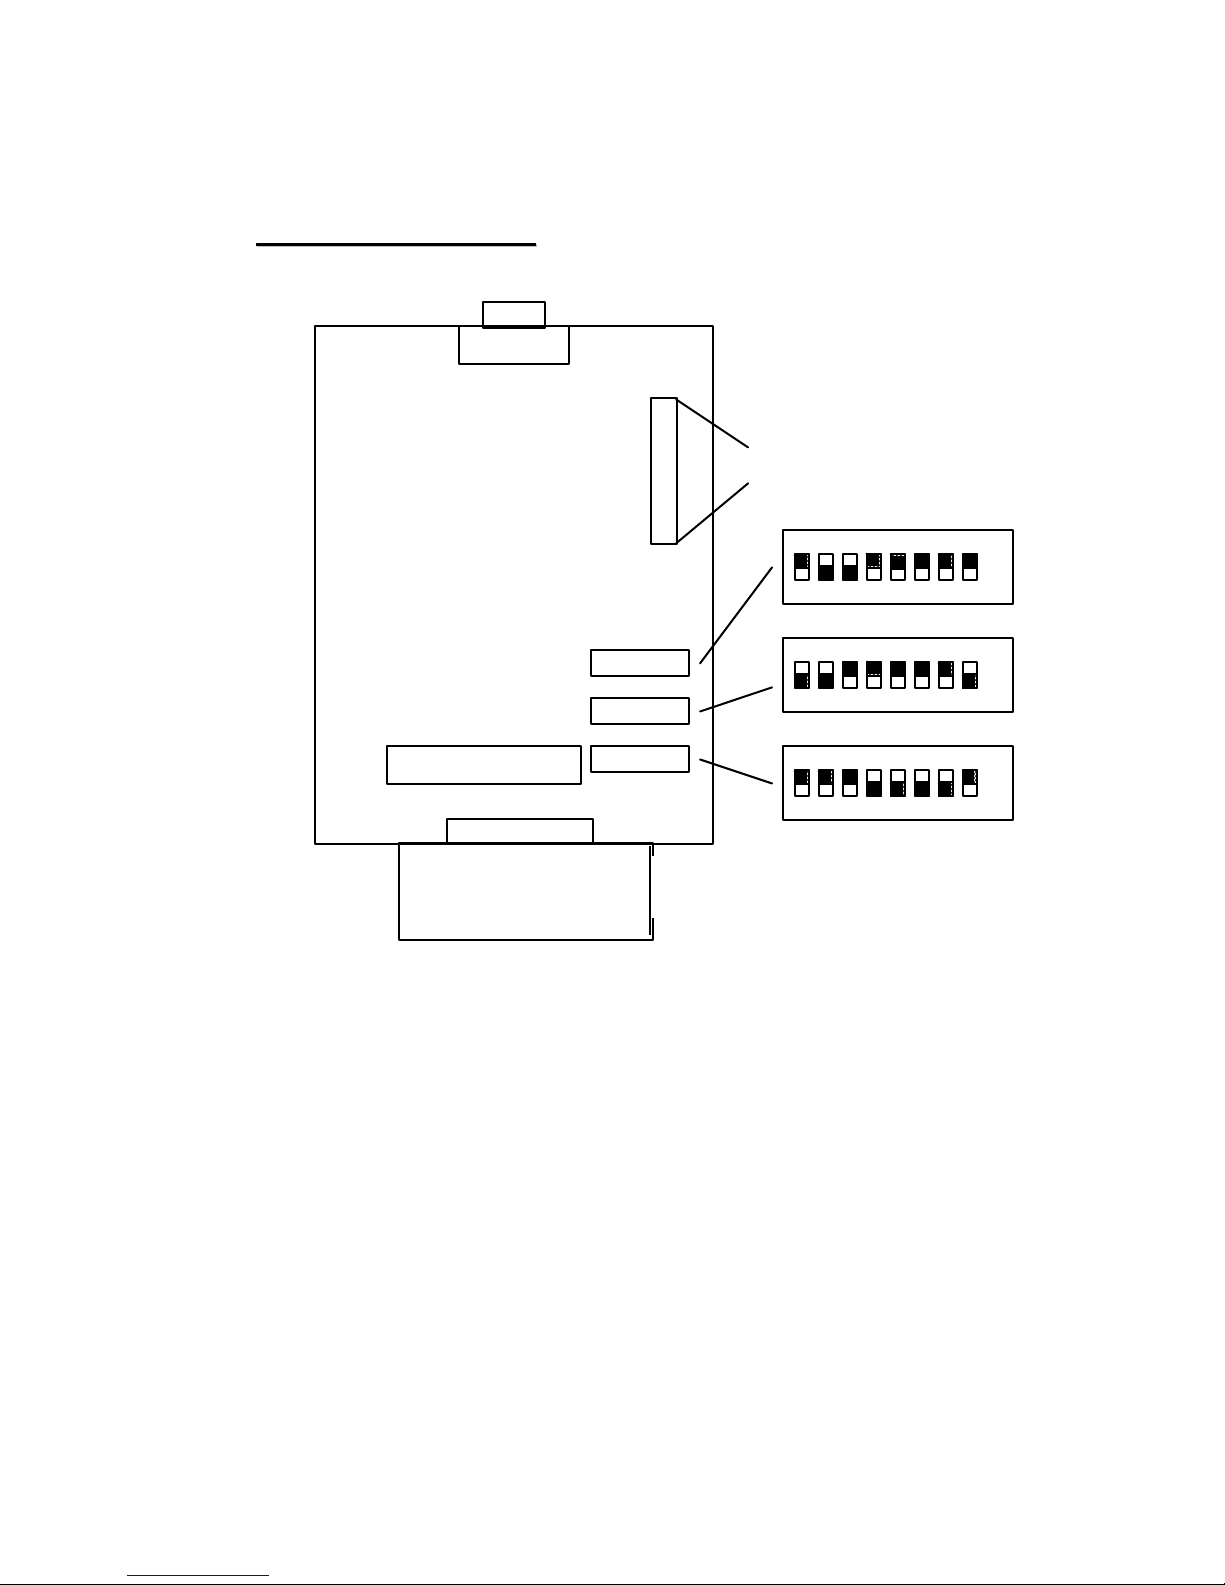
33..11 SSeettttiinngg tthhee DDiipp SSwwiittcchheess
SSeerriiaall PPoorrtt ttoo CCoommmmuunniiccaattee wwiitthh AApppplliiccaattiioonn
J3
Interface Control Cable
C onnector
87654321
ON
SSeettuupp
SW3
SW2
SW1
HHEELLLLO
HELLO
LE D D isplay
11)) UUnnpplluugg tthhee ppoowweerr ssuuppppllyy ffrroomm tthhee wwaallll oouuttlleett..
22)) TToo aacccceessss tthhee sswwiittcchheess iinnsseerrtt tthhee kkeeyy iinn tthhee bbaacckk ooff tthhee rreeaaddeerr aanndd ttuurrnn iitt 118800 ddeeggrreeeess,,
wwhhiicchh wwiillll uunnlloocckk tthhee ttrraannssppoorrtt ffrroomm tthhee ccoovveerr..
33)) RReemmoovvee tthhee ttrraanns
aatt tthhee ffrroonntt ooff tthhee rreeaaddeerr..
ttrraannssppoorrtt ccoommpplleetteellyy oouutt..
44)) TThhee s
55)) SSeett tthhee sswwiittcchheess aaccccoorrddiinngg ttoo yyoouurr ssiittee rreeqquuiirreemmeennttss aass ffoolllloowwss::
swwiittcchheess aarree llooccaatteedd oonn tthhee bbooaarrdd oonn ttoopp ooff tthhee ttrraannssppoorrtt..
Front of C ard R eader
NNOOTTEE:: SSWW 22 sshhoowwnn sseett ffoorr CC11AA RROOMM CCooddee..
sppoorrtt bbyy ppuusshhiinngg tthhee bbllaacckk ffrroonntt bbeezzeell wwhheerree tthhee ccaarrdd wwoouulldd bbee iinnsseerrtteedd
O
OOnnccee tthhee bbeezzeell hhaass cclleeaarreedd tthhee ffaaccee ppllaattee oonn tthhee cc
87654321
87654321
ON
ON
oovveerr,, sslliiddee tthhee
5
5
Page 6

6
DDIIPP SSWWIITTCCHH SSEETTTTIINNGGSS
'
BBAANNKK ''AA'
BBAANNKK ''BB''
BBAANNKK ''CC''
SSWW 11 ** OOFFFF -- AAllllooww OOlldd FFoorrmmaatt
SSWW 22 OOFFFF -- DDoo NNoott ""FFllaagg"" CCaarrdd
SSWW 33 OOFFFF -- DDoo nnoott VVEERRIIFFYY wwrriittee
SSWW 44 OOFFFF -- AAllllooww AApppplliiccaattiioonn ttoo CCrreeddiitt CCaarrdd VVaalluuee
SSWW 55 OOFFFF -- DDoo nnoott uussee SSEENNSSOORR 33
SSWW 66 ** OOFFFF -- DDoo nnoott aallllooww CCOOMMMMAANNDD CCAARRDDSS
SSWW 77 ** OOFFFF -- DDoo nnoott ppeerrffoorrmm TTE
SSWW 88 ** OOFFFF -- DDoo nnoott CCOONNVVEERRTT ccooddee
SSWW 11--44 ""RROOMM CCOODDEE"" sseeee sseeccttiioonn 33..22
SSWW 55--88 ""SSTTAARRTT BBYYTTEE"" sseeee sseeccttiioonn 33..22
SSWW 11--44 ""RROOMM ffoorr XXCCPP ssyysstteemmss,, sseett bbyy BBoossccoopp IInncc..
SSWW 55 OOFFFF -- TTOOGGGGLLEE ""HHEELLLLOO""
SSWW 66 OOFFFF -- HHOOLLDD ccaarrdd iiff bbaadd
SSWW 77 OOFFFF -- DDiissppllaayy TTeenntthh ooff aa CCeenntt
SSWW 88 OOFFFF --FFoorr uussee wwiitthh PPOOSS aanndd MMoosstt aapppplliiccaattiioonnss
**PPrreeffeerrrreedd sswwiittcchh sseettttiinnggss ffoorr nnoorrmmaall ooppeerraattiioonn..
Seeee ““IImmppoorrttaanntt NNootteess”” oonn PPaaggee 44
**** S
33..22 RROOMM CCooddee SSeettttiinnggss
TThhee ffoolllloowwiinngg ttaabbllee sshhoowwss tthhee sseettttiinnggss ttoo bbee uusse
ccooddeess.. IIff yyoouu ccaannnnoott llooccaattee yyoouurr RROOMM CCooddee oorr hhaavvee aannyy qquueessttiioonnss,, c
ssuuppppoorrtt ffoorr hheellpp..
CCOODDEE
4400AA
CC00AA
CC11AA
BB99AA
SSWWIITTCCHH 11
OONN -- RReejjeecctt OOlldd FFoorrmmaatt
** OONN -- ""FFllaagg"" CCaarrdd
****OONN -- VVEERRIIFFYY wwrriittee oonn rreettuurrnn
****OONN -- DDOO NNOOTT AAllllooww AApppplliiccaattiioonn ttoo CCrreeddiitt CCaarrdd VVaalluuee
** OONN -- UUssee SSEENNSSOORR 33
OONN -- A
A
llllooww CCOOMMMMAANNDD CCAARRDDSS
ESSTT
OONN -- PPeerrffoorrmm TTEESSTT ++ DDiiaaggnnoossttiicc DDaattaa oonn PPoowweerr--uupp
OONN -- CCOONNVVEERRTT ccooddee
OONN -- SSTTAATTIIOONNAARRYY ""HHEELLLLOO""
**OONN -- DDOONN''TT HHOOLLDD ccaarrdd iiff bbaadd
**OONN -- DDoonn''tt DDiissppllaayy TTeenntthh ooff aa CCeenntt
****OONN FFoorr uussee wwiitthh ssoommee PPrriinntt MMaannaaggeerr SSooffttwwaarree
CCoonnttaacctt BBoossccoopp ssuuppppoorrtt ffoorr mmoorree ddeettaaiillss..
edd oonn SSwwiittcchh BBaannkk 22 ffoorr ccoommmmoonn RROOMM
coonnttaacctt BBoossccoopp
OOffff
OOffff
OOnn
OOnn
22
OOffff
OOffff
OOffff
OOffff
33
OOffff
OOffff
OOffff
OOffff
44
OOffff
OOffff
OOffff
Onn
O
55
OOffff
OOffff
OOffff
OOnn
66
OOffff
OOffff
OOffff
OOnn
77
OOnn
OOnn
OOnn
OOffff
88
OOf
OOnn
OOnn
OOnn
f
6
Page 7

33..33 PPaarraammeetteerr SSeett--UUpp
IInn oorrddeerr ffoorr tthhee SSeerriiaall CCaasshh CCaarrdd RReeaaddeerr ttoo ooppeerraattee pprrooppeerrllyy,, iitt mmuusstt bbee iinniittiiaallllyy sseett uupp
uussiinngg tthhee ""SSeett PPaarraammeetteerrss"" ccaarrdd.. TThhiiss iiss oonnee ooff tthhrreeee ccoommmmaanndd ccaarrddss uusseedd bbyy tthhee
SSyysstteemm..
OOuuttlliinneedd bbeellooww iiss aa lliisstt ooff iinnssttrruuccttiioonnss ddeessccrriibbiinngg hhooww ttoo sseett tthhee rreeaaddeerr uupp..
11)) IInnsseerrtt tthhee ""SSeett PPaarraammeetteerrss"" CCaarrdd iinnttoo tthhee rreeaaddeerr mmoouutthh wwiitthh tthhee llaabbeell ffaaccee uupp..
22)) TThhee rreeaaddeerr wwiillll ttaakkee tthhee ccaarrdd aanndd tthhee ddiissppllaayy wwiillll sshhooww ""PPrree SSeett""..
33)) RReemmoovvee tthhee ccaarrdd ffrroomm tthhee rreeaaddeerr..
44)) TThhee ddiissppllaayy wwiillll ffllaasshh bbeettwweeeenn ""ii..dd.."" aanndd aa ""vvaalluuee"".. WWhheerree tthhee ""ii..dd.."" iiss tthhee MMaacchhiinnee
IIddeennttiiffiiccaattiioonn aanndd tthhee ""vvaalluuee"" iiss wwhhaatt iitt iiss sseett ttoo..
m
55)) IIff tthhee ppaarraam
66)) TToo cchhaan
eetteerr iiss sseett pprrooppeerrllyy,, pprroocceeeedd ttoo sstteepp 99..
nggee tthhiiss nnuummbbeerr,, pprreessss tthhee bbllaacckk ffrroonntt ppaanneell bbuuttttoonn
77)) TThhiiss wwiillll ccaauussee tthhee nnuummbbeerr ttoo ggoo ttoo 00 ((zze
88)) TToo iinnccrreeaassee tthhee vvaalluuee ooff tthhee nnuummbbeerr,, pprreessss aanndd hhoolldd tthhee bbllaacckk ffrroonntt ppaanneell bbuuttttoonn
uunnttiill tthhee ddeessiirreedd vvaalluuee iiss oobbttaaiinneedd.. TThhee bbuuttttoonn mmaayy bbee pprreesssseedd aanndd rreelleeaasseedd aass
mmaannyy ttiimmeess aass rreeqquuiirreedd iinn oorrddeerr ttoo aacchhiieevvee tthhee nnuummbbeerr.. IIff yyoouu eexxcceeeedd tthhee
nnuummbbeerr,, tthhee pprroocceessss wwiillll hhaavvee ttoo bbee rreeppeeaatteedd ffrroomm tthhee ssttaarrtt ((sstteepp 11))..
99)) IInn oorrddeerr ttoo aaddvvaannccee ttoo tthhee nneexxtt ppaarraammeetteerr,, iinnsseerrtt tthhee ""SSeett PPaarraammeetteerr"" ccaarrdd uunnttiill iitt
ssttooppss iinnssiiddee tthhee mmoouutthh aanndd rreemmoovvee iitt qquuiicckkllyy..
1100)) TThhee nneexxtt ppaarraammeetteerr wwiillll aappppeeaarr oonn tthhee ddiissppllaayy wwiitthh tthhee sseettttiinngg.. IIff iitt iiss nnoott sseett
pprrooppeerrllyy,, ffoollllooww sstteepp 66.. IIff iitt iiss sseett pprrooppeerrllyy,, pprroocceeeedd ttoo sstteepp 99..
1111)) RReeppeeaatt tthhiiss pprroocceessss uunnttiill aallll tthhee ppaarraammeetteerrss aarree sseett pprrooppeerrllyy.. AAtt tthhee llaasstt
ppaarraammeetteerr,, oonnccee tthhee ccaarrdd iiss iinnsseerrtteedd aanndd rreemmoovveedd qquuiicckkllyy,, tthhee ddiissppllaayy wwiillll sshhooww
""HHEELLLLOO"" wwhhiicchh iinnddiiccaatteess tthhaatt tthhee ccaarrdd rreeaaddeerr iiss iinn iittss iiddllee ssttaattee..
11.. II..DD..## .......................................... ((II..DD)) ............................ MMaacchhiinnee IIddeenntt.. ##,, ii..ee.. 11--MMuusstt bbee sseett ttoo 11
2.. SSIITTEE CCOODDEE 11
2
33.. SSIITTEE CCOODDEE 22
44.. SSIITTEE CCOODDEE 33
55.. LLAARRGGEESSTT CCAASSHH AAMMOOUUNNTT
66.. LLAARRGGEESSTT UUNNIITT AAMMOOUUNNTT
**** 00==DDiissaabblleedd ii..ee.. AAllllooww aannyy vvaalluuee ccaarrdd
oonnccee..
erroo))..
((SSIITTEE 11))
((SSIITTEE 22))
((SSIITTEE 33))
ffoorr mmoosstt aapppplliiccaattiioonnss cchheecckk tthhee
aapppplliiccaattiioonn && ddooccuummeennttaattiioonn ffoorr ddeettaaiillss..
CCooddee ffoorr GGrroouupp 11 –– YYoouurr SSiit
d
nnd
CCooddee ffoorr GGrroouupp 22 yyoouurr 2
CCooddee ffoorr GGrroouupp 33 yyoouurr 3
2
d
rrd
3
ssiittee ccooddee..
t
ee CCooddee
ssiittee ccooddee
((LLGG..CCAASSHH))
MMaaxx.. CCaasshh CCaarrdd aalllloowweedd.. ****
((LLGG..UUnnIItt))
MMaaxx.. UUnniitt CCaarrdd aalllloowweedd.. ****
7
7
Page 8

33..44 SSiittee CCooddee IInnffoorrmmaattiioonn
WWhheenn uussiinngg tthhee SSeerriiaall CCaarrdd RReeaaddeerr wwiitthh oollddeerr ssyysstteemmss tthhaatt rreeffeerrrreedd ttoo tthhee ssiittee ccooddee bbyy
wwhhaatt wwaass sseett oonn tthhee ddiipp sswwiittcchheess,, tthhee ssiittee ccooddee mmuusstt bbee ccoonnvveerrtteedd ttoo iittss ddeecciimmaall vvaalluuee..
TToo ccoonnvveerrtt tthhee sseettttiinngg ooff tthhee ""DDIIPP"" SSiittee//GGrroouupp ccooddee ttoo aa ddeecciimmaall nnuummbbeerr uussee tthhee
ffoolllloowwiinngg cchhaarrtt..
SSWWIITTCCHH ## 11
22
__________________________________________________________________________________________________________________________________
VVAALLUUEE
11
22
FFoorr eeaacchh sswwiittcchh iinn tthhee ""OONN"" ppoossiittiioonn,, aadddd tthhee ccoorrrreessppoonnddiinngg vvaalluuee ffrroomm tthhee aabboovvee
cchhaarrtt.. EExxaammppllee::
DDiipp SSwwiittcchh sseettttiinngg ooff oolldd uunniitt == ssiittee ccooddee 11334477
SSWW11 == OONN,, SSWW22 == OOFFFF,, SSWW33 == OONN,, SSWW44 == OONN,, SSWW55 == OOFFFF,
OOFFFF
AAdddd tthhee vvaalluueess ccoorrrreessppoonnddiinngg ttoo:: SSWW11 ++
DDiipp SSwwiittcchh sseettttiinngg..
TThhee DDeecciimmaall eeqquuiivvaalleenntt iiss:: 11 ++ 44 ++ 88 ++ 6644 == 7777 DDeecciimmaall sseettttiinngg aass sseett iinn tthhee
ppaarraammeetteerrss..
33
44
44
55
66
77
88
88
1166 3322 6644 112288
, SSWW66 == OOFFFF,, SSWW77 == OONN,, SSWW88 ==
SSWW33 ++ SSWW44 ++ SSWW77 ==
11334477
8
8
Page 9

33..55 EErrrroorr CCooddee SSuummmmaarryy
DDIISSPPLLAAYY
----------------------- EERR 11 --
EERR 22 --
EERR 33 --
EERR 44 --
EERR 55 --
EERR 66 --
EERR 77 --
EERR 88 --
EERR 99 --
EERR 1122 --
EERR 1133 --
EERR 1144 --
EERR 1155 --
EERR 1166 --
EERR 1177 --
EERR 1199 --
AA CCaarrdd wwaass nnoott pprrooppeerrllyy iinnsseerrtteedd oorr ssoommeetthhiinngg iiss bblloocckkiinngg oonnee ooff tthhee
sseennssoorrss
BBllaannkk CCaarrdd IInnsseerrtteedd:: CCaarrdd wwaass nnoott eennccooddeedd oorr ccaarrdd wwaass iinnsseerrtteedd tthhee
wwrroonngg wwaayy..
NNoo SSttaarrtt BByyttee EEnnccoouunntteerreedd:: DDeeffeeccttiivvee ddaattaa oonn ccaarrdd.. MMaaggnneettiicc hheeaadd
nneeeeddss ttoo bbee cclleeaanneedd uussiinngg aa cclleeaanniinngg ccaarrdd..
NNoo RROOMM CCooddee EEnnccoouunntteerreedd:: SSwwiittcchheess oonn BBaannkk 22 wweerree nnoott pprrooppeerrllyy
sseett..
FFiieelldd EErrrroorr:: DDeeffeeccttiivvee ddaattaa oonn ccaarrdd
NNo
LLRRCC NNoott CCoorrrreecctt:: DDeeffeeccttiivvee ddaattaa oonn ccaarrdd
LLRRCC iiss IInnvveerrtteedd ((FFllaaggggeedd)):: CCaarrdd wwaass rreemmoovveedd mmaannuuaallllyy dduurriinngg aa
ppoowweerr ooffff ssttaattee
SSiittee CCooddee EErrrroorr ((tthhee ccaarrdd iiss ffrroomm aannootthheerr ssyysstteemm)):: CChheecckk tthhaatt tthhee
pprrooppeerr ssiittee ccooddee iiss sseett uussiinngg tthhee SSEETT PPAARRAAMMEETTEERRSS ccaarrdd
MMoottoorr SSppeeeedd EErrrroorr:: PPrroobblleemm wwiitthh ccaarrdd rreeaaddeerr
CCoommmmaanndd CCaarrdd SSwwiittcchh NNoott ""OONN"":: SSwwiittcchh 66 oonn BBaannkk mmuusstt bbee oonn ttoo
eennccooddee,, cclleeaarr mmeetteerrss oorr sseett ppaarraammeetteerrss
IIlllleeggaall UUsseerr CCaarrdd:: CCaarrdd ccaannnnoott bbee uusseedd wwiitthh tthhiiss ssyysstteemm
IIlllleeggaall CCoommmmaanndd CCaarrdd:: TToo cclleeaarr mmeetteerrss,, tthhee ffrroonntt bbuuttttoonn mmuusstt bbee
hheelldd wwhhiillee ccaarrdd iiss iinnsseerrtteedd
IIlllleeggaall AAccccoouunntt CCaarrdd IInnsseerrtteedd:: CCaarrdd ccaannnnoott bbee uusseedd wwiitthh tthhiiss ssyysstteemm
IIlllleeggaall CCaarrdd FFoorrmmaatt:: TToo aacccceepptt ccaarrddss ffrroomm oollddeerr ssyysstteemmss sswwiittcchh 11 oonn
BBaannkk AA mmuusstt bbee ooffff
MMeemmoorryy EErrrroorr
o
EEnndd BByyttee FFoouunndd:: DDeeffeeccttiivvee ddaattaa oonn ccaarrdd
PPRROOBBLLEEMM
--------------------------
9
9
Page 10

0
4
..
4
MMeetteerriinng
g
44..11 MMeetteerr RReeaaddiinngg
TThhee BBCC220011 CCaarrdd RReeaaddeerr wwiillll pprroovviiddee aa nnuummbbeerr ooff ddiiffffeerreenntt rreeaaddiinnggss aass ttoo tthhee aaccttiivviittyy ooff
tthhee uunniitt..
IInn oorrddeerr ttoo rreettrriieevvee tthhee rreeaaddiinngg,, tthhee ooppeerraattoorr mmuusstt iinnsseerrtt tthhee ""RReeaadd MMeetteerr"" ccoonnttrrooll ccaarrdd..
TThhee BBCC220011 wwiillll rreeaadd tthhee ccaarrdd aanndd eejjeecctt iitt ffrroomm tthhee rreeaaddeerr.. O
ccaann bbee rreemmoovveedd ffrroomm tthhe
NNOOTTEE:: BBeeffoorree MMeetteerr rreeaaddiinnggss ccaann bbee ttaakkeenn vviiaa tthhee LLEEDD DDiissppllaayy,, tthhee rreeaaddeerr mmuusstt bbee
uunnpplluuggggeedd ((vviiaa tthhee 99 PPiinn DD--CCoonnnneeccttoorr)) ffrroomm tthhee aapppplliiccaattiioonn..
TThhee ddiissppllaayy wwiillll sshhooww ""rrdd..mmeett"" aanndd tthhee ttooggggllee bbeettwweeeenn ""CCAASSHH..rr11"" aanndd aa ""vvaalluuee"".. TThhee
BBCC220011 iiss iinnddiiccaattiinngg tthhee mmeetteerr rreeaaddiinngg aanndd tthhee vvaalluuee ooff tthhaatt rreeaaddiinngg..
TToo aaddvvaannccee ttoo tthhee nneexxtt rreeaaddiinngg,, tthhee ooppeerraattoorr mmuusstt ppuusshh tthhee ffrroonntt ppaanneell bbuuttttoonn oonnccee..
AA lliisstt ooff aallll tthhee rreeaaddiinngg iiss oouuttlliinneedd bbeellooww..
OOnnccee aallll tthhee rreeaaddiinnggss hhaavvee bbeeeenn ddiissppllaayyeedd,, tthhee ddiissppllaayy oonn tthhee BBCC220011 wwiillll sshhooww
""HHEELLLLOO"" wwhhiicchh mmeeaannss tthhee BBCC220011 iiss iinn iittss iiddllee ssttaattee..
Onnccee tthhiiss iiss ddoonnee,, tthhee ccaarrdd
e
mmoouutthh ooff tthhee rreeaaddeerr aallttooggeetthheerr..
0
1
1
Page 11

BC201 Meter Readings:
RRee--sseettttaabbllee MMeetteerrss::
CCAASSHH..rr11
CCAASSHH..AA11
CCAASSHH..rr22
CCAASSHH..AA2
CCAASSHH..rr33
CCAASSHH..AA33
UUNNIITT..rr11
UUNNIITT..AA11
UUNNIITT..rr22
UUNNIITT..AA22
UUNNIITT..rr33
UUNNIITTSS..AA33
CCAASSHH..rr
CCAASSHH..AA
UUNNIITT..rr
UUNNIITT..AA
nnCCCCAARRDD
nnUUCCAARRDD
EECCAASSHH
EEUUNNIITT
2
NNoonn--RReesseettttaabbllee MMeetteerrss::
1
ttCCSShh..rr11
ttCCSShh..AA11
ttCCSShh..rr22
ttCCSShh..AA22
ttCCSShh..rr33
ttCCSShh..AA33
ttUUnntt..rr1
ttUUnntt..AA11
ttUUnntt..rr22
ttUUnntt..AA22
ttUUnntt..rr33
ttUUnntt..AA33
ttCCSShh..rr
ttCCSShh..AA
ttUUnntt..rr
ttUUnntt..AA
ttCCCCAARRDD
ttUUCCAARRDD
ttEECCAASShh
ttEEUUnniitt
CCLLEEAArr
CCaasshh CCaarrddss VVaalluuee DDeedduucctteedd--SSiittee 11
CCaasshh CCaarrddss VVaalluuee AAddddeedd--SSiittee
CCaasshh CCaarrddss VVaalluuee DDeedduucctteedd--SSiittee 22
CCaasshh CCaarrddss VVaalluuee AAddddeedd--SSiittee 22
CCaasshh CCaarrddss VVaalluuee DDeedduucctteedd--SSiittee 33
CCaasshh CCaarrddss VVaalluuee AAddddeedd--SSiittee 33
UUnniittss CCaarrddss VVaalluuee DDeedduucctteedd--SSiittee 11
UUnniittss CCaarrddss VVaalluuee AAddddeedd--SSiittee 11
UUnniittss CCaarrddss VVaalluuee DDeedduucctteedd--SSiittee 22
UUnniittss CCaarrddss VVaalluuee AAddddeedd--SSiittee 22
UUnniittss CCaarrddss VVaalluuee DDeedduucctteedd--SSiittee 33
d
UUnniittss CCaarrddss VVaalluuee AAddd
CCaasshh CCaarrddss TToottaall CCaasshh DDeedduucctteedd
eedd--SSiittee 33
CCaasshh CCaarrddss TToottaall CCaasshh AAddddeedd
UUnniittss CCaarrddss TToottaall VVaalluuee DDeedduucctteedd
UUnniittss CCaarrddss TToottaall VVaalluuee AAddddeedd
TToottaall NNuummbbeerr CCaasshh CCaarrddss EEnnccooddeedd
TToottaall NNuummbbeerr UUnniittss CCaarrddss EEnnccooddeedd
TToottaall CCaasshh EEnnccooddeedd oonn CCaasshh CCaarrddss
TToottaall VVaalluuee EEnnccooddeedd oonn UUnniittss CCaarrddss
11
CCaasshh CCaarrddss VVaalluuee DDeedduucctteedd--SSiittee 11
CCaasshh CCaarrddss VVaalluuee AAddddeedd--SSiittee 11
CCaasshh CCaarrddss VVaalluuee DDeedduucctteedd--SSiittee 22
CCaasshh CCaarrddss VVaalluuee AAddddeedd--SSiittee 22
CCaasshh CCaarrddss VVaalluuee DDeedduucctteedd--SSiittee 33
CCaasshh CCaarrddss VVaalluuee AAddddeedd--SSiittee 33
UUnniittss CCaarrddss VVaalluuee DDeedduucctteedd--SSiittee 11
UUnniittss CCaarrddss VVaalluuee AAddddeedd--SSiittee 11
UUnniittss CCaarrddss VVaalluuee DDeedduucctteedd--SSiittee 22
UUnniittss CCaarrddss VVaalluuee AAddddeedd-
-SSiittee 22
UUnniittss CCaarrddss VVaalluuee DDeedduucctteedd--SSiittee 33
UUnniittss CCaarrddss VVaalluuee AAddddeedd--SSiittee 33
CCaasshh CCaarrddss TToottaall CCaasshh DDeedduucctteedd
T
CCaasshh CCaarrddss T
UUnniittss CCaarrddss TToottaall VVaalluuee DDe
oottaall CCaasshh AAddddeedd
edduucctteedd
UUnniittss CCaarrddss TToottaall VVaalluuee AAddddeedd
TToottaall NNuummbbeerr CCaasshh CCaarrddss EEnnccooddeedd
TToottaall NNuummbbeerr UUnniittss CCaarrddss EEnnccooddeedd
TToottaall CCaasshh EEnnccooddeedd oonn CCaasshh CCaarrddss
TToottaall VVaalluuee EEnnccooddeedd oonn UUn
TToottaall ## ooff MMeetteerr CClleeaarrss
niittss CCaarrddss
111
1
Page 12

44..22
CClleeaarriinngg TThhee MMeetteerrs
s
IInn oorrddeerr ttoo cclleeaarr tthhee mmeetteerrss,, tthhee ooppeerraattoorr mmuusstt iinnsseerrtt tthhee ""CClleeaarr MMeetteerrss"" ccoonnttrrooll ccaarrdd
wwhhiillee tthhee ffrroonntt ppaanneell bbuuttttoonn oonn tthhee BBCC220011 iiss pprreesssseedd.. TThhee ooppeerraattoorr mmuusstt hhoolldd tthhee
bbuuttttoonn wwhhiillee tthhee ccaarrdd iiss bbeeiinngg
IIff tthhee cclleeaarriinngg wwaass ssuucccceessssffuul
rreeaadd bbyy tthhee rreeaaddeerr..
l,, tthhee ddiissppllaayy wwiillll sshhooww ""88..88..88..88..88..88.."" tthheenn rreettuurrnn ttoo
““HHEELLLLOO””.. IIff tthhee ffrroonntt ppaanneell bbuuttttoonn wwaass nnoott hheelldd wwhhiillee tthhee cclleeaarr mmeetteerrss ccoonnttrrooll ccaarrdd wwaass
iinnsseerrtteedd,, tthhee ddiissppllaayy wwiillll sshhooww ""CCLLEEAARR"" iinnddiiccaattiinngg tthhaatt tthhee mmeetteerrss wweerree NNOOTT
CCLLEEAARREEDD..
IInn oorrddeerr ttoo cclleeaarr tthhee mmeetteerrss,, ssiimmppllyy iinnsseerrtt tthhee ccaarrdd aaggaaiinn wwiitthh tthhee ffrroonntt ppaanneell bbuuttttoonn
ddeepprreesssseedd
44..33 TToo oobbttaaiinn mmeetteerr rreeaaddiinnggss vviiaa PPrriinntt oouutt
CCoonnnneecctt PPrriinntteerr ttoo CCaarrdd RReeaaddeerr vviiaa tthhee 99 DD SSoocckkeett aatt tthhee rreeaarr ooff tthhee rreeaaddeerr..
11..
MMaakkee ssuurree PPrriinntteerr iiss ““OONN LLiinnee””..
22..
IInnsseerrtt RReeaadd MMeetteerrss CCoommmmaanndd CCaarrdd..
33..
44..44 PPrriinntteerr PPrroottooccooll
SSttaannddaarrdd RRSS223322 OOuuttppuutt
99660000 BBaauudd
OODDDD PPaarriittyy
88 DDaattaa BBiittss
11 SSttoopp BBiitt
→
→
PPiinn oouutt ffrroomm RReeaaddeerr ((99 PPiinn DD--CCoonnnneeccttoorr)) 2255 PPiinn
PPiinn 22 –– DDaattaa
PPiinn 33 –– RReecceeiivvee
PPiinn 55 –– GGrroouunndd
PPiinn 77 -- -- -PPiinn 88 -- -- --
ppiinn 22 RReecceeiivvee 33
ppiinn 33 DDaattaa 22
ppiinn 77 GGrroouunndd
99 PPiinn
112
2
Page 13

44..55 SSeeiikkoo DDPPUU 441144 SSeettuupp
RReeffeerr ttoo tthhee mmaannuuaall pprroovviiddeedd wwiitthh tthhee pprriinntteerr aanndd sseett aass sshhoowwnn bbeellooww..
1
DDIIPP SSWW--1
11.. ((OOFFFF)) :: IInnppuutt == SSeerriiaall
22.. ((OONN)) :: PPrriinnttiinngg SSppe
33.. ((OOFFFF)) :: AAuuttoo LLooaaddiinngg == OOFFFF
44.. ((OOFFFF)) :: AAuuttoo LLFF == OOFFFF
55.. ((OOFFFF)) :: SSeettttiinngg CCoommmmaanndd == DDiissaabbllee
66.. ((OOFFFF)) :: PPrriinnttiinngg
77.. ((OONN)) :: DDeennssiittyy
88.. ((OONN)) :: 110000 %%
DDIIPP SSWW--2
11.. ((OOFFFF)) :: PPrriinnttiinngg CCoolluummnnss == 8800
22.. ((OONN)) :: UUsseerr
33.. ((OONN)) :: CChhaarraacctteerr SSeelleecctt == NNoorrmmaall
44.. ((OONN)) :: ZZeerroo == NNoorrmmaall
55.. ((OONN)) :: IInntteerrnnaattiioonnaall
66.. ((OONN)) :: CChhaarraacctteerr
77.. ((OONN)) :: SSeett
88.. ((OOFFFF)) :: UU..SS..AA..
DDIIPP SSWW--33
11.. ((OONN)) :: DDaattaa LLeennggtthh == 88 BBiittss
22.. ((OOFFFF)) :: PPaarriittyy SSeettttiinngg == YYeess
33.. ((OONN)) :: PPaarriittyy CCoonnddiittiioonn == OOdddd
44.. ((OOFFFF)) :: BBuussyy CCoonnttrrooll == XXOONN//XXOOFFFF
55.. ((OOFFFF)) :: BBaauudd
66.. ((OONN)) :: RRaattee
77.. ((OONN)) :: SSeelleecctt
88.. ((OONN)) :: 99660000 bbppss
eeedd == HHiigghh
2
FFoonntt BBaacckk--uupp == OONN
113
3
Page 14

4
55.. IInnssttaallllaattiioonn
TThhee CCaarrdd RReeaaddeerr mmaayy bbee mmoouunntteedd iinn aannyy ccoonnvveenniieenntt llooccaattiioonn oonn,, oorr nneexxtt ttoo,, tthhee
ccoonnttrroolllleedd mmaacchhiinnee.. AAttttaacchh tthhee CCaarrdd RReeaaddeerr ttoo tthhee aapppplliiccaattiioonn vviiaa aa SSeerriiaall ccaabbllee
pplluuggggeedd iinnttoo tthhee 99 ““DDssuubbmmiinnaattuurree”” FFeemmaallee ssoocckkeett aatt tthhee bbaacckk ooff tthhee rreeaaddeerr.. PPlluugg tthhee
ttrraannssffoorrmmeerr aattttaacchheedd ttoo tthhee ccaarrdd rreeaaddeerr iinnttoo aa ssttaannddaarrdd AACC oouuttlleett oorr PPoowweerr bbaarr..
55..11 SSeerriiaall CCoommmmuunniiccaattiinng
TThhee SSeerriiaall CCoommmmuunniiccaattiioonn PPrroottooccooll ooff tthhee BBCC220011 iiss aass sshhoowwnn bbeellooww.. EEnnssuurree
tthhaatt tthhee ccoommmmuunniiccaattiioonn PPrroottooccooll ooff tthhee aattttaacchheedd aapppplliiccaattiioonn iiss sseett ttoo mmaattcchh..
BBooaarrdd
DDaattaa BBiittss
SSttoopp BBiittss
PPaarriittyy
OOddd
g PPrroottooccooll
99660000
88
11
d
4
1
1
Page 15

66..
CCaasshh CCaarrdd RReeaaddeerr IInnssttaallllaattiioonn DDaattaa
MMooddeell:: BBCC220011 VVEERR 33..0011 SSeerriiaall ##:: ____________________________
DDaattee ______________________ CCuussttoommeerr ___________________________________
AAddddrreessss _____________
CCoonnttaacctt __________________________________________________ TTeell ________________________________ FFaaxx__________________________________
EEqquuiippmmeenntt && MMooddeell
_________________________________________ CCiittyy____________________________________SSttaattee__________ ZZiipp____________
_
________________________ BBuuiillddiinngg ____________________
__________________________________________________________________________________________________________________________________
DDIIPP SSWWIITTCCHH SSEETTTTIINNGGSS
BBAANNKK ""AA"" ((OONN)) ____________________________ BBAANNKK ""BB"" ((OONN)) ____________________________ RROOMM
CCOODDEE______________________
BBAANNKK ""CC"" ((OONN)) ____________________________
SSIITTEE 11__________________ SSIITTEE 22__________________ SSIITTEE 33__________________
II..DD.. ## ______________ LLGG..CCAASSHH ________________ LLGG UUNNIITT ________________
PPAARRAAMMEETTEERR SSEETTTTIINNGGSS
AAPPPPLLIICCAATTIIOONN IINNFFOORRMMAATTIIOONN
NNOOTTEESS::
PPLLEEAASSEE CCOOMMPPLLEETTEE AANNDD FFAAXX TTOO BBOOSSCCOOPP IINNCC.. ((663300--332255--99220011))
115
5
Page 16

6
FFRREEQQUUEENNTTLLYY AASSKKEEDD QQUUEESSTTIIOONNSS
BC201 CARD READER/POS
For Error messages refer to Error code list.
When a transaction is made towards the card reader the display on the register comes up as “Reader
Not Responding”.
Check to see if the cable is connected to the reader and the Datasym board located at the back of
the register.
Check to see if the card reader Parameter ID is set to 1.
When a transaction is made the register displays an error message of “Card Verify Error”?
Turn switch 2 on Bank A to the off position.
When trying to add value to a card the value is added and the card ejected but the register displays
“Card Not Present”?
Set the R\A for that key to Auto Media = YES, Media = CASH, Cashcard = YES.
The register displays a Lock message.
Ensure that a Cashier button is depressed or a cashier is logged in.
The reader does not display the Hello message.
Ensure that the reader is getting power from the outlet. Plug the unit into another outlet in
another room. Check the power cable for any broken wires. If the unit is found to be the
problem, consult an Boscop Inc. Technician.
How to remove a card jam from a reader.
Unplug the reader and remove the reader from its case and locate the white gears on the right
side when facing the front. Turn the gears counterclockwise until card comes out. For stubborn
jams follow procedure above put push down on the roller at the underside of the reader.
How are the parameter settings set?
Use the Command Card SET PARAMETERS.
Print Queue displays a communication error between the reader and PC.
Check the serial communication cable as well as the power cable of the reader.
Make sure that the ID # is set to 1 in the reader parameters.
6
1
1
Page 17

4. EXPLANATION OF TERMS USED IN SERVICE
Audit Report
Printer:
Card Format The format of the data on the card is referred to as card
Card Format: There are 2 card formats available. They are ASU format
Card Reader: Device that accepts the card, determines the value of the
Card Size
/ CR-50
/ CR-80:
Card Track: The location of the magnetic stripe on the card. The
An optional serial printer that can be attached to the
printer output jack on the main board. When the printer is
attached and the device is requested to print, a hard copy
of the account information will be printed. Refer to the
specific product manual for details.
format. Often the format is named after the company that
manufactures the readers that utilize it.
Some formats are named for card the issuing body such as
MONDEX or VISACASH. Many ASU readers can be
setup to read other formats of cards through settings and or
specific firmware revisions.
and OTHER format. If the system is using cards from a
competitor’s system, then set the format to OTHER. If the
original system was provided by ASU Systems, set the
format to utilize the high security ASU card format. Refer
to the specific product manual for details.
card and transfers the value of the card to the control
board or enables the copier, etc. When the transaction is
finished and the eject button is pushed, the Card Reader
writes the new value onto the card and returns the card to
the customer. The Card Readers used are the 10XX-YY-Z
Series where XX = application, YY = card size (CR-50 or
CR-80) and, in the case of CR-80, Z determines the track
position on the card that the magnetic stripe is located (2,
4, 5).
Two standard card sizes are the CR-80 (typical credit card
size – approximately 54 mm.) and CR-50 (narrower card –
approximately 44 mm.) These are standard sized based on
ISO standards.
locations are based upon ISO standards. Some common
tracks are 5.5, 2, and 4 and, in the case of CR-50, centered.
The advantage to the CR-50 centered track is the card can
be read/written from either end.
117
7
Page 18

Command Card
Switch
An internal DIP switch located on the top board of the
reader that must be set correctly to allow use of command
cards. This is typically switch 6 on bank A (front DIP
switch) and it must be in the ON position to allow
command cards. For security reasons THIS SWITCH
MUST BE TURNED OFF EXCEPT WHEN USING
COMMAND CARDS!!!!!!!
Command Cards
Control Cards
Set-up Cards
Command Cards are used by various readers to do
Administrative tasks. Some of these tasks include: Setting
parameters, Reading meters, Clearing meters, Encoding
cash or units onto user cards, and Logging in or out
operators. See Command Card Switch section for
important note.
Communication
See Serial Port Section
port
Control Cards
See Command Cards
Eject Button: User accessible button on the front of Card Readers to
indicate that the user wants the card returned. This button
is also used to set parameters and exit meter-reading
routines.
High Field: A magnetic data stripe with high coercivity in the range of
4000 oersted. This is a higher security medium that takes
a much larger magnetic field to encode. Typically, the
write CCT drives through a 15-ohm resistor. See Low
Field.
LED LCD
Display
The display used to show information on status etc to the
user. There are two main types used by ITC Systems.
LED (Light Emitting Diode) and LCD (Liquid Crystal
Display) are the proper names for these displays.
Low Field: A magnetic data stripe with low coercivity in the range of
400 oersted. This is a lower security medium equivalent
to a typical bankcard that can easily be affected by a
magnetic field. Typically the write CCT drives through a
220 to 330 ohm resistor. See High Field.
Machine ID#: An arbitrary number the operator can assign to the device
to track which unit is making what copies. This number
will be printed on the audit reports if an audit report
printer is used. This ID number is critical for POS cash
register use where it must be set to 1.
118
8
Page 19

Parameter
/ Option
/ Command:
Administrator settable variables to determine how the
system will function, values to be charged, card
compatibility, etc. These are either numerical values, ON
/ OFF, Yes / No, or similar choices.
Power Supply
Power Adapter
Transformer
A Class 2 device (wall plug type) that converts the 120
volt power supplied by the mains to a lower AC or DC
Voltage. This lower voltage (typically 9 to 24 volts) is
then utilized by the controller. Using a class 2 device
makes the product safer as there is no direct path to 120
Volts.
Printer Settings: Typically printers are used to obtain meter and audit
readings. To allow for maximum versatility, most printers
and many controllers have settable parameters include:
Baud Rate, Parity, Data Bits, Stop Bits, Null Characters,
etc. The settings of the printer and controller must match
for proper printout. See Null for explanation.
RAM: Random Access Memory where the parameters and meters
are stored. The device will have a battery on the board to
keep this data even though the device is unplugged from
the wall. Random values in the meters and parameters
indicate that the battery may have failed. Parameters
being lost or, in the case of Card Readers, changing to 65
XXX or 520 values indicates loss of battery back up. In
these cases, the first item to check is the battery voltage.
Receipt Printer The receipt printer is a small printer dedicated to printing
receipts for transactions as they take place. There are
receipt printers available for the 1040 plus and 1035.
ROM Code: This is the last digit in the ROM Group Code (see STX
Code for proper settings).
Serial Port
Communication
port
Key Account
Software
Some Devices (1040 Plus, 7500 1010 etc) have a built in
serial communication port to interact with a computer or
Audit Report Printer to report meter readings. Special
communications packages are also available for some
devices to upload and download information including
parameters, account information and meter readings. (i.e.
7500 & Key Account 1010 and Actors)
Set-up Cards See Command Cards
119
9
Page 20

0
Site Code: This is a unique code assigned to the location so only
cards at that location can be used. Site Codes are assigned
in groups called ROM groups (see ROM and STX). Up to
3 Site Codes can be set on each Coin-Op for different
pricing applications.
Smart Card: A card with a memory chip embedded in it to store data
instead of storing data on a magnetic strip. The smart card
has exposed terminals for data transfer to a Smart Card
Reader device. The data contained on the smart card is
encrypted according to the specific application.
Software /
Firmware:
The program that runs within the controller. Contained on
an EPROM (or, in some cases, a microprocessor), it can
be easily upgraded by exchanging the EPROM. NOTE:
EPROMS are very fragile and sensitive to static electricity
so handling precautions should be observed. The label on
the EPROM does not necessarily indicate the orientation
of the EPROM to the socket! Always double check that
the notch on the EPROM matches the notch on the socket.
STX Code: This is the first digit(s) in the ROM Group. This is set by
determining the start byte(s) of the ROM Group Code.
For example, in ROM Group C1A, the start byte is “C”.
This is entered in DECIMAL (i.e. 12) at the parameter
STX Code.
ROM Group STX Code ROM Code
B9A 11 9
C0A 12 0
C1A 12 1
C2A 12 2
E70 231 0
E71 231 1
40A 4 0
Transformer
See Power Supply section
Troubleshoot: To diagnose a specific problem or malfunction in a device
through the process of elimination of working functions
and components vs. non-working functions and
components through a logical, methodical approach and
process.
0
2
2
Page 21

Warranty
BOSCOP INC. – WARRANTY AND LIABILITY CONTRACT
By issuing a Purchase Order or contracting with Boscop Inc. to carry out the supply of products, clients
are accepting the terms of this Warranty and Liability Contract.
This document states the warranty and liability offered by Boscop Inc. on any products we manufacture or
services we provide for our clients.
Boscop Inc. shall not be liable for any direct, indirect and/or consequential damages or losses, including loss of
use, revenue, profit incurred by the client, its customers and/or any third party as a result of the use of the work
carried out by Boscop Inc. for the client, including any loss resulting from equipment failure or malfunctions,
design or programming errors or any other use of the work carried out in this contract. The client specifically
waives any claim or recourse it may have against Boscop Inc. in any of the above instances.
When Boscop Inc. is manufacturing equipment, the equipment to be manufactured will be an exact replication
of previously manufactured product, or the prototype, unless specified otherwise by the client, in writing.
Boscop Inc. warrants all parts of new equipment for 90 Days, from date of invoice or if warranty card is on file,
from date on card, against DEFECTIVE MATERIAL OR WORKMANSHIP, but not against damage caused
by accident, abuse, faulty installation, or improper operation.
Boscop Inc. will repair, or at its option, replace without charge, F.O.B. factory, defective parts returned to its
factory, transportation charges prepaid. Boscop Inc.’ obligation under this warranty is limited to repair or
replacement as stated herein.
Any changes in design or improvements added to the line of equipment shall not create any obligation to in stall
same on equipment previously sold and delivered to the client.
Any unauthorized alteration of, or addition to, articles of the contractors manufacture voids this warranty.
Equipment returned for Warranty repair must be accompanied by a copy of the Bill of Sale as verification of
Purchase date. Equipment returned without a Bill of Sale will be charged to the customer at the normal repair
rates.
Mail to Boscop Inc. at once. The warranty period begins on the date your equipment is put
into service, but is effective only if this card is filed with Boscop Inc..
Please Print:
Part # __________________ Serial No. ______________________ Date _______________________
Name of Owner _______________________________________________________________________
Address ________________________________ City _________________ Prov & Zip _____________
Street Location of Equipment _______________________________________________________ _____
City, Province & Zip ___________________________________________________________________
Purchased from (Dist.) ___________________________________________________________ ______
Address _______________________________ City _________________ Prov & Zip _______________
Installed On: POS Coin Laundry_______________Copier_________________Computer____________
Vending Installation________________Laser Printer_______________Other _____________________
WARRANTY REGISTRATION CARD
221
1
 Loading...