

Page 1
RTS Model TR-240 Beltpack
Owners / Users Manual
(Preliminary Information)
General Description
The RTS model TR-240 beltpack
transceiver is intended for use as a wireless
full-duplex intercom radio to be worn on a
belt. Multiple TR-240 beltpacks can be used
with a BTR-240 base station transceiver or a
BTR-24 access point to communicate with
each other over-the-air.
The TR-240 uses the IEEE 802.11b
technology to transmit / receive within one
channel of the 1 – 11 (2.412 to 2.462 GHz)
allowable channels of the 2.4 GHz ISM
band. Its operation is license free.
The typical line-of-sight distances for the
system may be 300 feet.
The transmit and receive antennas are
internal to the beltpack so the unit has a
smaller profile. The outer case also provides
extra protection against possible damage to
the antennas.
The TR-240 is powered via an internal LiIon battery that will provide up to 8 hours of
run time at room temperature.
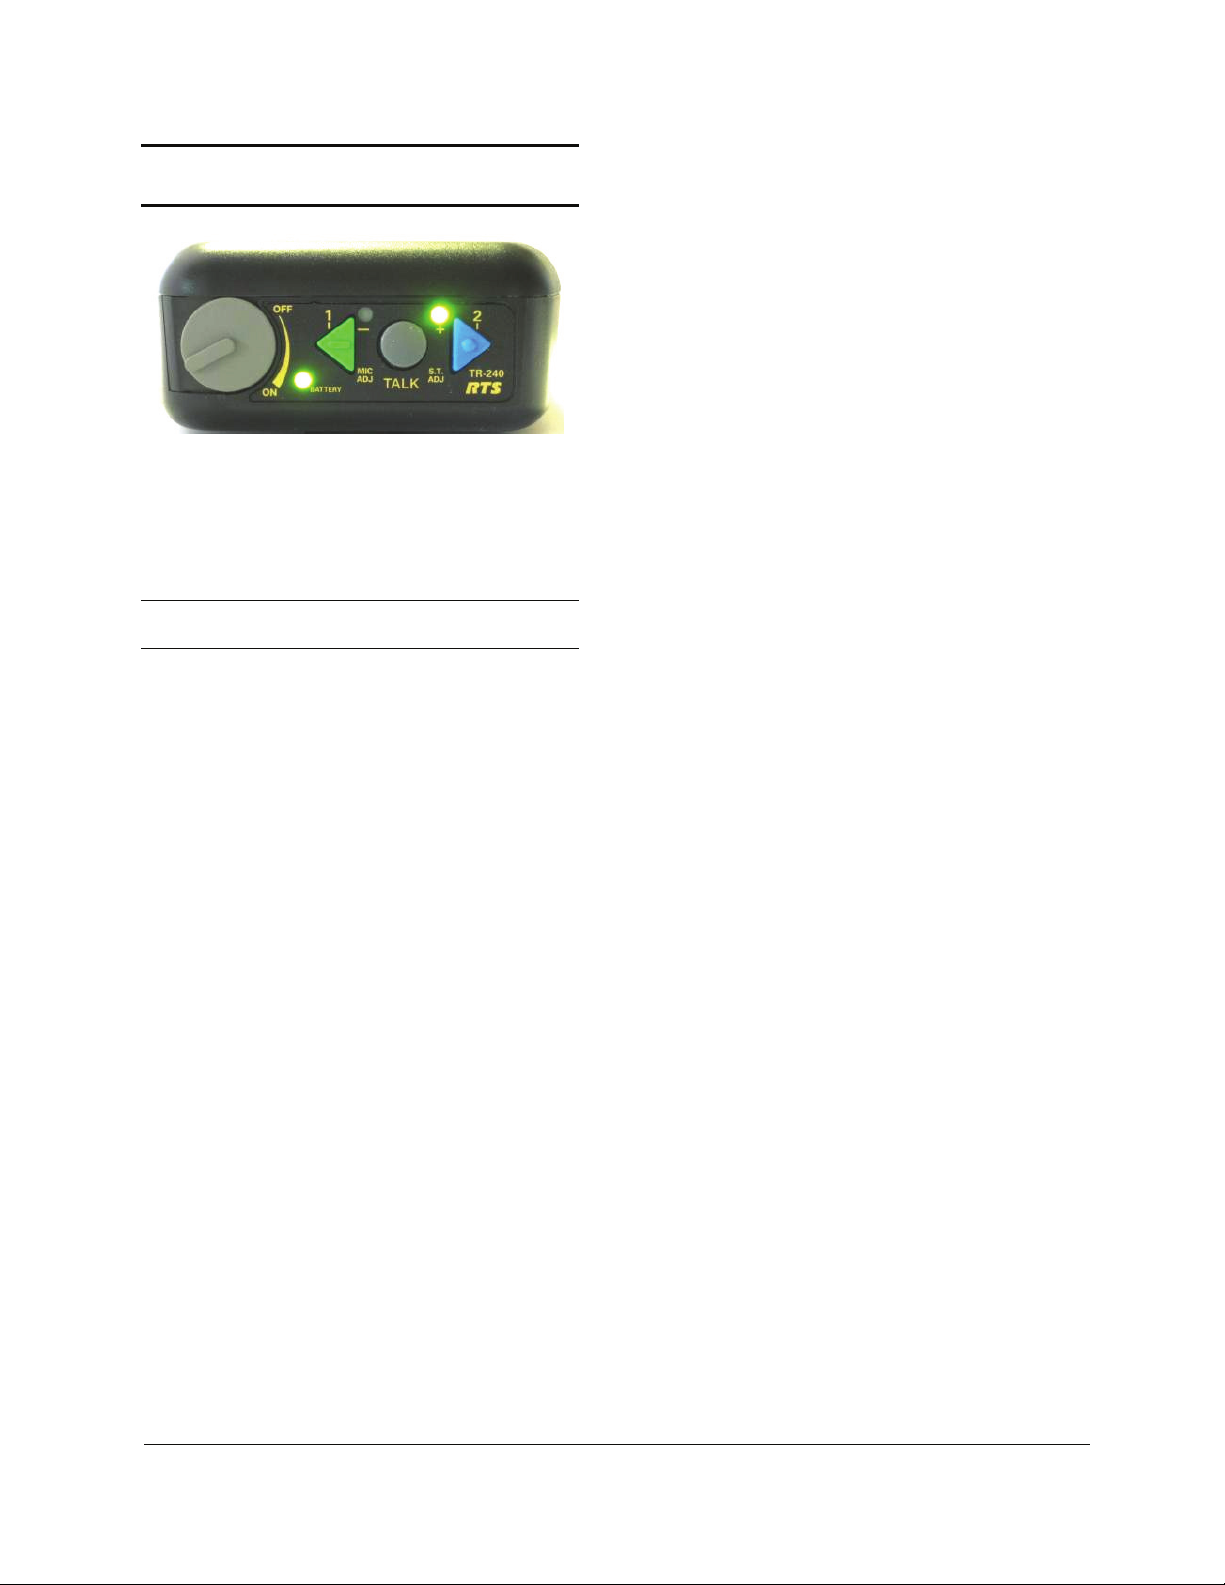
The top panel provides on/off/volume
control, channel select buttons and lights,
talk button and battery status light.
TR-240 Users Manual - Preliminary Page 1 of 7
Rev D – 3 / 09 / 2011
Page 2
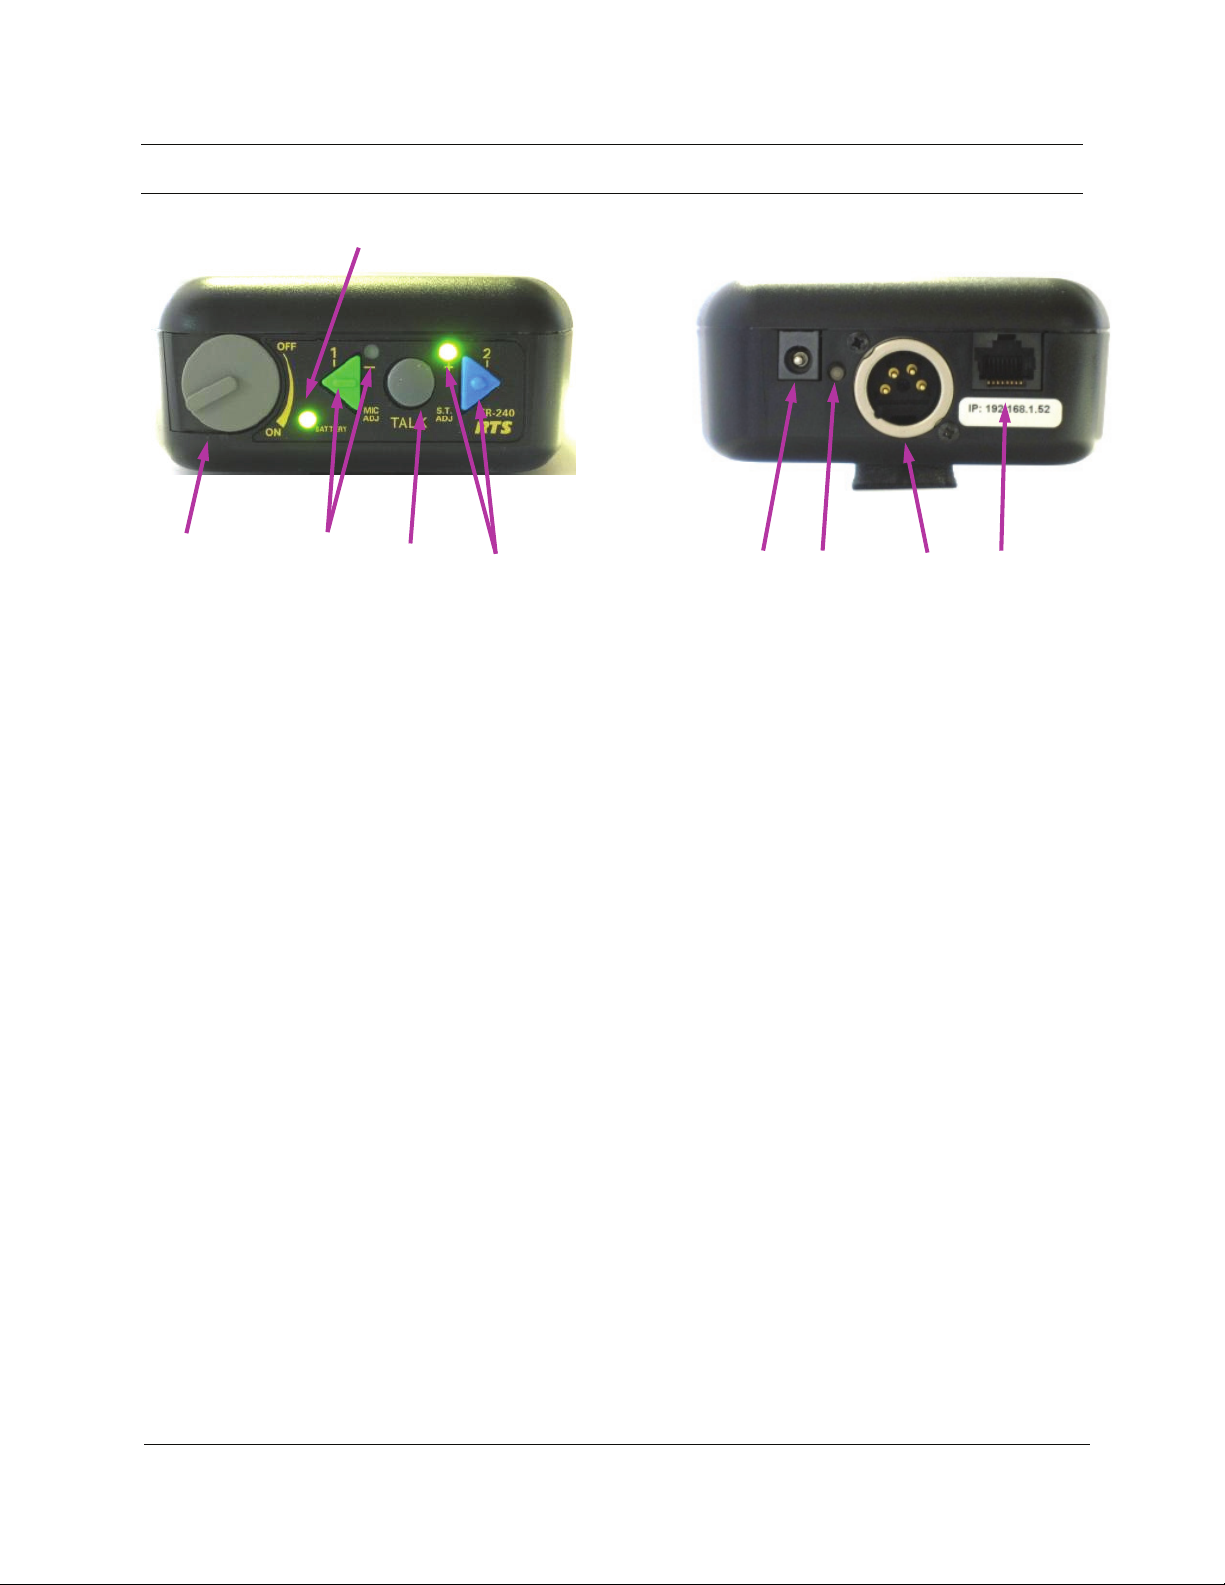
Controls and Connections
2
1
3
4
5
Top View
1. On/Off & Volume Control – Turns the beltpack
power on/off and controls headset volume.
2. Battery Light
a. GREEN = Battery OK
b. YELLOW = Battery Low (approx. 15 mins
c. RED = Battery Low (needs charged)
3. Channel 1 “Green” Button and Light – Selects the
“Channel 1” intercom. The green light next to the
button will illuminate upon selection.
4. Talk Button – When pressed the microphone path is
enabled.
a. Momentary – Pressed and hold for over ½
b. Latch on/off – Tap button and the
The active intercom channel light will remain
illuminated when the microphone path is enabled.
The active intercom channel light will blink when the
microphone path is disabled.
5. Channel 2 “Blue” Button and Light – Selects the
“Channel 2” intercom. The green light next to the
button will illuminate upon selection.
–
of use left)
second.
microphone path is enabled. Tap again to
turn off.
6
6. Charge Jack – Used to charge the Li-Ion battery.
Accepts a 5.5mm x 2.5mm plug with the center
positive. Must be supplied with a 12VDC regulated
power supply with at least a 400mA current capacity.
7. Charge Light
a. RED = Beltpack battery is charging.
b. GREEN = Beltpack battery is charged.
8. Headset Connector – Standard 4-pin XLR
connector.
a. Pin 1 = Microphone GND
b. Pin 2 = Microphone HOT
c. Pin 3 = Headphone +
d. Pin 4 = Headphone –
9. Programming Jack – This RJ-45 jack is used for
wired Ethernet connections, configuration, and to
update programming in the unit if ever needed.
Bottom View
.
8
97
TR-240 Users Manual - Preliminary Page 2 of 7
Rev D – 3 / 09 / 2011
Page 3

Operation
light will activate indicating the unit is
running.
Once a BTR-240 or BTR-24 is running, the TR240 may be switched on at anytime. The TR240 has key features that can be set during boot
and after the unit has booted. These settings
include the following:
• Mode of Operation
• Local Headset Configuration
1 Setting the Beltpack Mode
The TR-240 has three different and selectable
modes of operation: “wireless” mode, “wired”
mode, and “master wireless” mode. The normal
mode is “wireless”.
A TR-240 beltpack is configured to boot in one
of these modes by holding a specific button
sequence while the unit is booting.
NOTE: Once the TR-240 mode is set, it will
continue to boot in that mode until different
mode is selected on startup.
1.1 “Wireless” (Normal) Mode
In this configuration, a base station or access
point provides wireless coverage over the area
in which the beltpacks will be used.
1. Ensure that a BTR-240 base station or
BTR-24 access point is configured and
running the in the desired coverage area
of use.
2. Turn on the TR-240. The battery light
will turn green immediately indicating
power.
3. To place the TR-240 in “wireless” mode,
if not already set, press and hold the
<Talk> button as the beltpack boots.
4. After 20 seconds boot time, a voice
prompt “wireless” will be heard in the
5. Release the <Talk> button if it is being
pressed.
6. Use as normal.
NOTE: In “wireless” mode, the wired Ethernet
port is disabled.
1.2 “Wired” Mode
Beltpacks are directly connected to each other
via an Ethernet cable or through a building’s
Ethernet infrastructure. In “wired” mode, the
wireless transmitter is disabled.
1. Connect the TR-240 to an existing wired
network or computer using a standard
Ethernet cable.
2. Turn on the beltpack. The battery light
will turn green immediately indicating
power.
3. To place the TR-240 in “wired” mode, if
not already set, press and hold the <2>
(blue) button as the beltpack boots.
4. After 20 seconds boot time, a voice
prompt “wired” will be heard in the
headphone, followed by the current
software version.
5. Release the <2> button if it is being
pressed.
6. Use as normal.
NOTE: In “wired” mode, the wireless
transmitter is disabled.
1.3 “Master Wireless” Mode
A beltpack can be configured to act as a base
station and eliminate the need to have an actual
BTR-240 base station or BTR-24 access point.
This “master” beltpack may still be used for
audio just as a normal beltpack. In “master
wireless” mode, the wired Ethernet port is
disabled.
headphone and the “Channel 1” button
TR-240 Users Manual - Preliminary Page 3 of 7
Rev D – 3 / 09 / 2011
Page 4

1. Turn on the TR-240. The battery light
will turn green immediately indicating
power.
2. To place the TR-240 in “master
wireless” mode, if not already set, press
and hold the <1> (green) button as the
beltpack boots.
3. After 20 seconds boot time, a voice
prompt “master wireless” will be heard
in the headphone, followed by the
current RF channel (“channel xx”) of
operation.
4. Release the <1> button after the voice
prompt indicates the RF channel.
5. Use as normal.
NOTE: In “master wireless” mode, the wired
Ethernet port is disabled.
1.3.1 Setting the RF Channel
For a beltpack that is in “master wireless” mode,
the RF channel of operation can be selected.
1. Boot the TR-240 in “master wireless”
mode by holding the <1> (green) button
as the beltpack boots.
2. Once the TR-240 has successfully
booted, the unit will give voice prompts
indicating “master wireless” and
“channel xx”.
3. To change the RF channel of operation,
continue to press the <1> button after the
RF channel has been indicated by the
voice prompt. Another voice prompt
“RF Selection” will be heard to notify
the user that the RF channel can now be
changed.
4. After the “RF Selection” voice prompt is
heard, release all the buttons, and four
options can be made.
a. Press the <1> button to decrease
the RF channel of operation.
b. Press the <2> button to increase
the RF channel of operation.
c. Press the <Talk> button to
perform a ClearScan™ and select
the clearest RF channel that for
the current environment.
d. Press <1> + <2> simultaneously
to make the selection and exit the
RF selection mode.
5. Once the master beltpack is configured
and running, the other TR-240 beltpacks
should be booted in “wireless” (normal)
mode.
NOTE: Once an RF channel has been selected,
the unit will continue to boot and operate on that
channel until the user sets it to a different
channel.
2 Local Headset Configuration
There are several ways to configure the local
headset at the base station front panel. Settings
for the local headset include the following:
• Talk Button
• Channel Select Button
• Local Headset Volume
• Microphone and Sidetone Levels
2.1 Talk Button
Pressing the <Talk> button on the front panel
will enable and disable the audio path from the
headset microphone. The green talk light will
be illuminated when the microphone path is
enabled. The green talk light will blink when
the microphone path is disabled.
There are two different modes that dictate how
the <Talk> button behaves when pressed: Pushto-Latch and Momentary. The talk mode can be
toggled by pressing the <1> + <2> + <Talk>
buttons simultaneously for approx. 3 seconds
followed by a corresponding voice prompt.
TR-240 Users Manual - Preliminary Page 4 of 7
Rev D – 3 / 09 / 2011
Page 5

2.1.1 Push-to-Latch (default)
Tap the <Talk> button for less than ½ second
and the microphone path will latch and remain
enabled. Tap the <Talk> button again to turn
off the latch and disable the microphone path.
Press and hold the <Talk> button for longer
than ½ second and the microphone path will
continue to be enabled while the <Talk> button
is pressed. The microphone path will be
disabled when the <Talk> button is released.
2.1.2 Momentary
The microphone path will not latch when the
<Talk> button is tapped. The microphone path
will only be activated when the <Talk> button is
pressed.
2.2 Channel Select Button
Pressing the <1> button will activate the audio
from Intercom Channel 1 in the local headset.
Pressing the <2> button will activate the audio
from Intercom Channel 2 in the local headset.
Pressing the <1> + <2> buttons simultaneously
will activate both Intercom Channel 1 and
Channel 2 in the local headset.
The LEDs above each intercom channel button
will be illuminated when active. If the
microphone path is disabled from the talk
button, then the active intercom channel LEDs
will blink.
2.3 Local Headset Volume
The local headset volume can be controlled
from the front panel by turning the <Volume>
knob clockwise and counterclockwise to
increase and decrease the volume, respectively.
TR-240 Users Manual - Preliminary Page 5 of 7
Rev D – 3 / 09 / 2011
2.4 Microphone and Sidetone Levels
After a TR-240 has booted completely, the
microphone gain and sidetone level can be
adjusted. The defaults are:
Mic Gain = 4
Sidetone = 4
2.4.1 Microphone Gain Adjustment
Press the <1> + <Talk> buttons simultaneously
for approximately 3 seconds until a voice
prompt indicates that microphone adjust mode
has been entered. Continue holding the <Talk>
button down and use the <1> button to decrease
the level or the <2> button to increase the level.
As adjusting, voice prompts will indicate the
current level setting. When the desired level is
indicated by the voice prompt, quickly release
all the buttons for one second and that level will
be set.
2.4.2 Sidetone Level Adjustment
Press the <2> + <Talk> buttons simultaneously
for approximately 3 seconds until a voice
prompt indicates that sidetone adjust mode has
been entered. Continue holding the <Talk>
button down and use the <1> button to decrease
the level or the <2> button to increase the level.
As adjusting, voice prompts will indicate the
current level setting. When the desired level is
indicated by the voice prompt, quickly release
all the buttons for one second and that level will
be set.
Page 6

Specifications
Technology……………………………………… 2.4 GHz, IEEE 802.11b
Power……………………………………………. Internal Li-Ion 7.2V, 2000mAhr, Battery.
Typical battery life of 8 hours.
Current Draw……………………………………. 250mA typical with radio card active
RF Frequency Range……………………………. 802.11 Channels 1 – 11 (2.412 to 2.462GHz)
Modulation Technology………………………… CCK
Antennas………………………………………… Internal dipoles
RF Output Power (Terminated)…………… 20mW
Data rate.……………………………………….. 5.5 Mbps (locked into)
Sensitivity (Worst case)………………………… 5.5Mbps 10-5 BER @ -83dBm
Frequency Response…………………………….. 400 Hz to 3900 Hz
Dynamic Range…………………………………. 66 dB
Audio Output (headset)…………………………. 70mW, 300 Ohms (1% Distortion)
Beltpack Size……………………………………. 5.25L x 3.75W x 1.75H inches
Beltpack Weight………………………………… 12.9 oz (w/ battery)
FCC License…………………………………….. No License Required
FCC
This device complies with Part 15 of FCC rules.
Operation is subject to the following conditions:
1. This device may not cause harmful
interference.
2. This device must accept any interference
received, including interference that may
cause undesired operation.
3. Use only the manufacturer or dealer supplied
beltclip and/or accessories for this device.
4. This device must not be co-located or
operated in conjunction with any other
antenna or transmitter.
The beltpack is intended to be worn on the
belt of the user. Placing the beltpack in other
locations on the body may reduce
performance and void the user’s authority by
the FCC to operate.
CAUTION: Any changes or modification not
expressly approved by the party responsible
for compliance could void the user’s
authority to operate this equipment.
TR-240 Users Manual - Preliminary Page 6 of 7
Rev D – 3 / 09 / 2011
Page 7

Industry Canada
This device complies with Industry Canada RSS210 rules. Operation is subject to the following
conditions:
1. The device may not cause harmful
interference.
2. This device must accept any interference
received, including interference that may
cause undesired operation.
3. Use only the manufacturer or dealer supplied
beltclip and/or accessories for this device.
4. This device must not be co-located or
operated in conjunction with any other
antenna or transmitter.
The beltpack is intended to be worn on the belt
of the user. Wearing the beltpack in other
locations on the body may reduce performance
and void the user’s authority by Canada to
operate.
CAUTION: Any changes or modification not
expressly approved by the party responsible for
compliance could void the user’s authority to
operate this equipment.
Industrie Canada
Cet appareil est conforme avec Industrie
Canada RSS-210 des règles. Son
fonctionnement est soumis aux conditions
suivantes:
1. Le dispositif ne doit pas causer
d'interférences nuisibles.
2. Cet appareil doit accepter toute
interférence reçue, y compris les
interférences qui peuvent perturber le
fonctionnement.
3. Utilisez uniquement le fabricant ou le
revendeur attache-ceinture fournie et / ou
accessoires pour cet appareil.
4. Ce dispositif ne doit pas être co-implantés
ou exploités en conjonction avec une autre
antenne ou transmetteur.
La loco-commande est destiné à être porté à
la ceinture de l'utilisateur. Le port de la lococommande dans d'autres endroits sur le corps
peut réduire les performances et annuler
l'autorisation de l'utilisateur par le Canada de
fonctionner.
ATTENTION: Tout changement ou
modification non expressément approuvée
par la partie responsable de la conformité
pourraient annuler l'autorité de l'utilisateur à
utiliser cet équipement.
TR-240 Users Manual - Preliminary Page 7 of 7
Rev D – 3 / 09 / 2011
 Loading...