

Page 1

EVOLVE Portable Column Loudspeaker
en
Installation manual
Page 2

Page 3

EVOLVE Portable Column Loudspeaker Table of contents | en 3
Table of contents
1
1.1 Important safety instructions 4
1.2 FCC information 5
1.3 Precautions 7
1.4 Certifications 7
1.5 Notices 8
2
2.1 Shipping contents 10
3
3.1 System features 12
3.2 Quick setup 13
4
5
5.1 Amplifier DSP controls 15
5.2 System status 17
5.3 DSP control menu 18
6
7
7.1 Stereo pair of EVOLVE systems 25
7.2 Solo musician performance 26
8
8.1 Mono input 27
8.2 Stereo input 28
8.3 FX 29
8.4 AUX 30
8.5 MASTER 30
8.6 Microphone processing 30
8.7 Equalizer 31
8.8 Display 31
8.8.1 Menu 32
8.9 Indicators 35
9
10
10.1 Dimensions 40
10.2 Frequency response 41
Safety 4
Short information 10
Description 12
Installation 14
Amplifier DSP 15
Pairing the QuickSmart Mobile application 24
Recommended configurations 25
Mixer operation 27
Troubleshooting 37
Technical data 39
Electro-Voice Installation manual 2019-08 | 01 |
Page 4
4 en | Safety EVOLVE Portable Column Loudspeaker
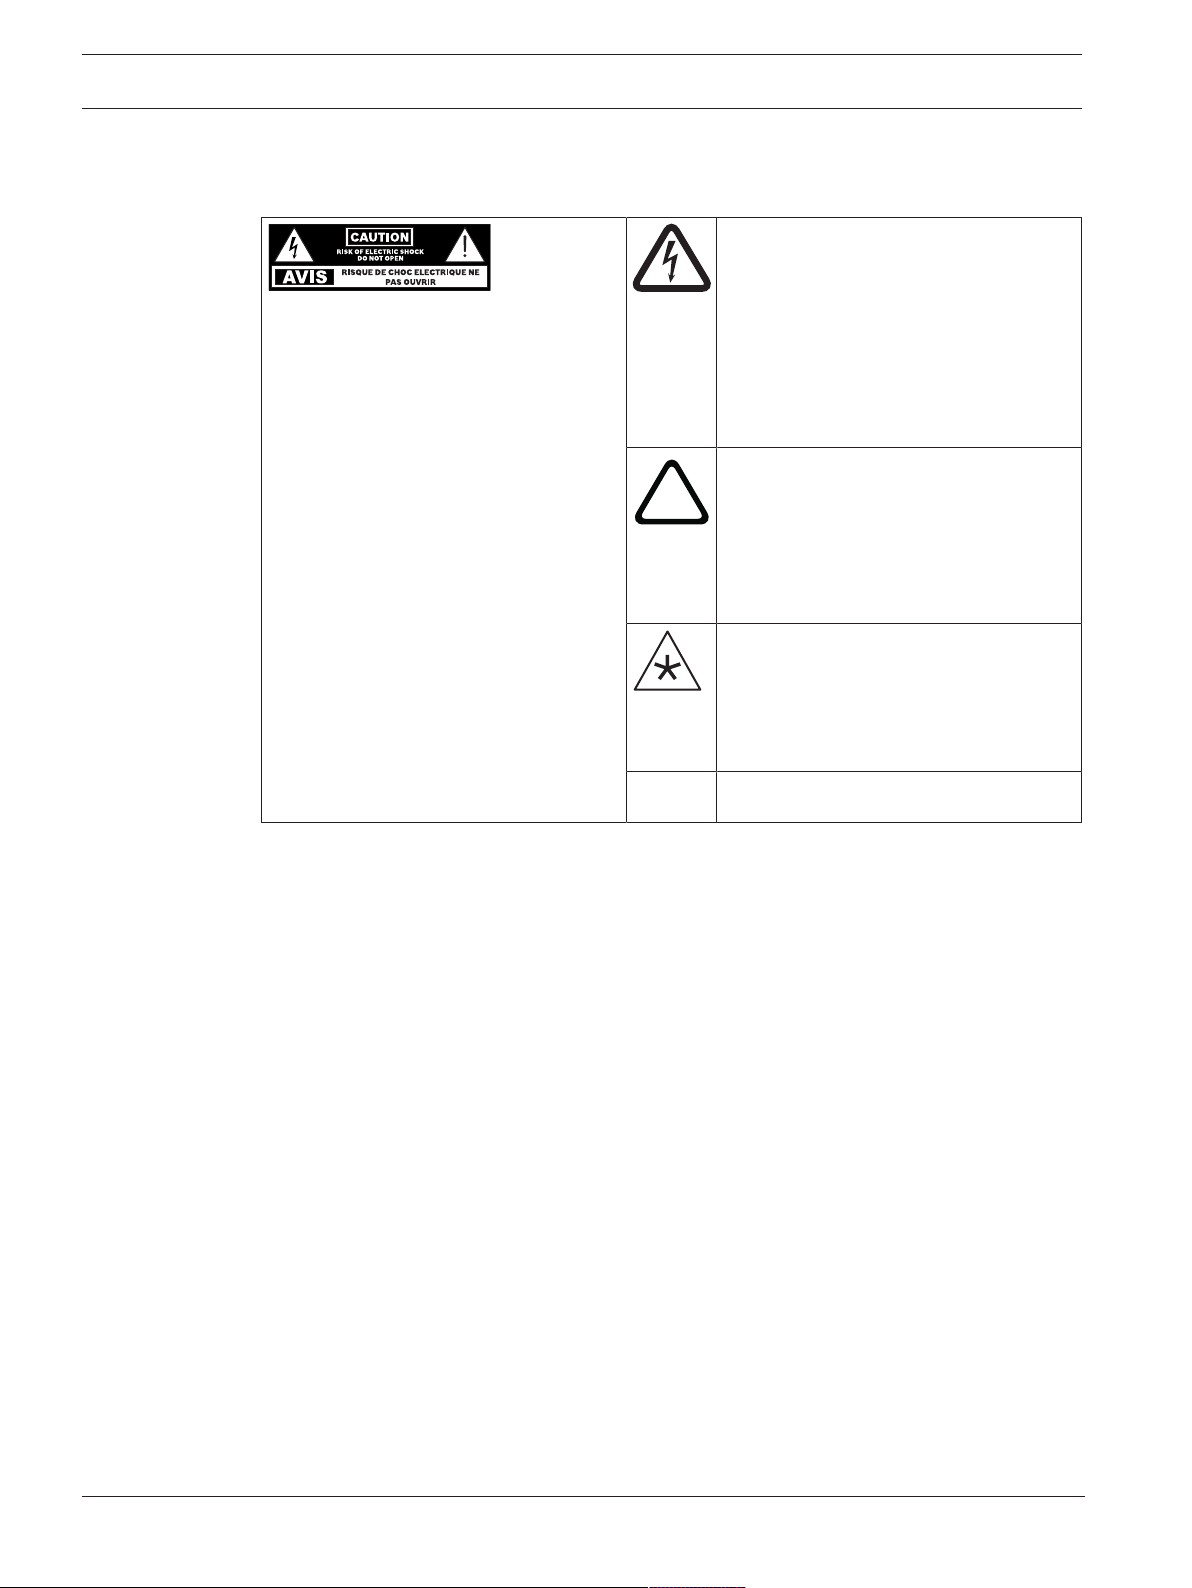
!
1 Safety
1.1 Important safety instructions
The lightning flash with arrowhead
symbol, within an equilateral triangle is
intended to alert the user to the
WARNING: TO REDUCE THE RISK OF
FIRE OR ELECTRIC SHOCK, DO NOT
OVEREXPOSE THIS APPLIANCE TO RAIN
OR MOISTURE
AVIS: RISQUE DE CHOC ELECTRIQUE,
NE PAS OUVRIR.
WARNING: THE MAINS PLUG OR AC
INLET IS USED AS A DISCONNECT
DEVICE. THE DISCONNECT DEVICE
SHALL REMAIN READILY OPERABLE.
WARNING: CONNECT ONLY TO MAINS
SOCKET WITH PROTECTIVE EARTHING
CONNECTION.
WARNING: TO REDUCE THE RISK OF
ELECTRIC SHOCK, DO NOT REMOVE
COVER (OR BACK) AS THERE ARE NO
USER-SERVICABLE PARTS INSIDE.
REFER SERVICING TO QUALIFIED
PERSONNEL.
presence of uninsulated “dangerous
voltage” within the product’s enclosure
that may be sufficient magnitude to
constitute a risk of electric shock to
persons.
The exclamation point within an
equilateral triangle is intended to alert
the user to the presence of important
operating and maintenance (servicing)
instructions in the literature
accompanying the appliance.
The asterisk within an equilateral
triangle is intended to inform the user to
necessary installation or removal
instructions regarding equipment or
hardware use relating to the system.
1. Read these instructions.
2. Keep these instructions.
3. Heed all warnings.
4. Follow all instructions.
5. Do not use this apparatus near water.
6. Clean only with a dry cloth.
7. Do not block any ventilation openings. Install in accordance with the manufacturer's
instructions.
8. Do not install near any heat sources such as radiators, heat registers, stoves, or other
apparatus (including amplifiers) that produce heat.
9. Do not defeat the safety purpose of the polarized or grounding-type plug. A polarized plug
has two blades with one wider than the other. A grounding type plug has two blades and
a third grounding prong. The wide blade or the third prong is provided for your safety. If
the provided plug does not fit into your outlet, consult an electrician for replacement of
the obsolete outlet.
10. Protect the power cord from being walked on or pinched particularly at plugs,
convenience receptacles, and the point where they exit from the apparatus.
11. Only use attachments/accessories specified by the manufacturer.
12. Use only with the cart, stand, tripod, bracket, or table specified by the manufacturer, or
with the apparatus. When a cart is used, use caution when moving the cart/apparatus
combination to avoid injury from tip-over.
13. Unplug the apparatus during lightning storms or when unused for long periods of time.
2019-08 | 01 | Installation manual Electro-Voice
Page 5
EVOLVE Portable Column Loudspeaker Safety | en 5
!
!
14. Refer all servicing to qualified service personnel. Servicing is required when the
apparatus has been damaged in any way, such as power-supply cord or plug is damaged,
liquid has been spilled or objects have fallen into the apparatus, the apparatus has been
exposed to rain or moisture, does not operate normally, or has been dropped.
15. No naked flame sources, such as lighted candles, should be placed on the apparatus.
16. To reduce the risk of fire or electric shock, do not expose this apparatus to rain or
moisture. The apparatus should not be exposed to dripping or splashing. Objects filled
with liquids, such as vases should not be placed on apparatus.
17. Do not block any ventilation openings. Install in accordance with the manufacturer's
instructions.
18. Minimum 60 cm (2 ft) distances around the apparatus for sufficient ventilation.
19. The ventilation should not be impeded by covering the ventilation openings with items,
such as newspapers, table-cloths, curtains, etc.
20. To completely disconnect AC power from this apparatus, the power supply cord must be
unplugged.
Warning!
This product is not designed to be suspended. Do NOT use handles or any other method to
suspend the loudspeaker. Handles on Electro-Voice loudspeakers are intended to only be
used for temporary transport by people.
Items, such as fiber rope, wire rope, cables, or other types of materials cannot be used to
suspend loudspeaker from the handles.
Caution!
Do not attempt to move this loudspeaker system when it is fully assembled.
You may damage the system or cause personal injury.
1.2 FCC information
This device complies with Part 15 of the FCC Rules. Operation is subject to the following two
conditions:
(1) This device may not cause harmful interference, and
(2) This device must accept any interference received, including interference that may cause
undesired operation.
Electro-Voice Installation manual 2019-08 | 01 |
Page 6

6 en | Safety EVOLVE Portable Column Loudspeaker
Notice!
This product has been tested and found to comply with the limits for a Class B digital device,
pursuant to Part 15 of the FCC Rules. These limits are designed to provide reasonable
protection against harmful interference in a residential installation. This product generates,
uses, and can radiate radio frequency energy and, if not installed and used in accordance
with the instructions, may cause harmful interference to radio communications.
However, there is no guarantee that interference will not occur in a particular installation. If
this product does cause harmful interference to radio or television reception, which can be
determined by turning the equipment off and on, the user is encouraged to try to correct the
interference by one or more of the following measures:
—Reorient or relocate the receiving antenna.
—Increase the separation between the equipment and receiver.
—Connect the equipment into an outlet on a circuit different from that to which the receiver is
connected.
—Consult the dealer or an experienced radio/TV technician for help.
Please take attention that changes or modification not expressly approved by the party
responsible for compliance could void the user’s authority to operate the equipment.
This equipment should be installed and operated with a minimum distance 20cm between the
radiator and your body.
ce matériel est conforme aux limites de dose d'exposition aux rayonnements, FCC / CNR-102
énoncée dans un autre environnement.cette eqipment devrait être installé et exploité avec
distance minimale de 20 entre le radiateur et votre corps.
This device complies with Industry Canada license-exempt RSS standard(s). Operation is
subject to the following two conditions:
(1) this device may not cause interference, and
(2) this device must accept any interference, including interference that may cause undesired
operation of the device.
Le présent appareil est conforme aux CNR d'Industrie Canada applicables aux appareils
radioexempts de licence. L'exploitation est autorisée aux deux conditions suivantes :
(1) l'appareil ne doit pas produire de brouillage, et
(2) l'utilisateur de l'appareil doit accepter tout brouillage radioélectrique subi, même si le
brouillage est susceptible d'en compromettre le fonctionnement.
Under Industry Canada regulations, this radio transmitter may only operate using an antenna
of a type and maximum (or lesser) gain approved for the transmitter by Industry Canada. To
reduce potential radio interference to other users, the antenna type and its gain should be so
chosen that the equivalent isotropically radiated power (e.i.r.p.) is not more than that
necessary for successful communication.
Conformément à la réglementation d'Industrie Canada, le présent émetteur radio peut
fonctionner avec une antenne d'un type et d'un gain maximal (ou inférieur) approuvé pour
l'émetteur par Industrie Canada. Dans le but de réduire les risques de brouillage
radioélectrique à l'intention des autres utilisateurs, il faut choisir le type d'antenne et son gain
de sorte que la puissance isotrope rayonnée équivalente (p.i.r.e.) ne dépasse pas l'intensité
nécessaire à l'établissement d'une communication satisfaisante.
2019-08 | 01 | Installation manual Electro-Voice
Page 7

EVOLVE Portable Column Loudspeaker Safety | en 7
!
!
!
!
1.3 Precautions
If an Electro-Voice loudspeaker is used outdoors on a sunny day, place the
loudspeaker in a shaded or covered area. The loudspeaker amplifiers have
protection circuits that temporarily shut the loudspeaker off when extremely
high temperatures are reached. This can happen on hot days when the
loudspeaker is in direct sunlight.
Do not use Electro-Voice loudspeakers in an environment where temperatures
are below 0°C (32°F) or exceed +35°C (95°F).
Never expose an Electro-Voice loudspeaker to rain, water, or high moisture.
Electro-Voice loudspeakers are easily capable of generating sound pressure
levels sufficient to cause permanent hearing damage to anyone within normal
coverage distance. Caution should be taken to avoid prolonged exposure to
sound pressure levels exceeding 90 dB.
1.4 Certifications
Brazil:
"Este equipamento não tem direito à proteção contra interferência prejudicial e não pode
causar interferência em sistemas devidamente autorizados"
Mexico:
“La operación de este equipo está sujeta a las siguientes dos condiciones: (1) es posible que
este equipo o dispositivo no cause interferencia perjudicial y (2) este equipo o dispositivo
debe aceptar cualquier interferencia, incluyendo la que pueda causar su operación no
deseada”
Singapore:
Republic of Korea:
United Arab Emirates:
Electro-Voice Installation manual 2019-08 | 01 |
Page 8
8 en | Safety EVOLVE Portable Column Loudspeaker
1.5 Notices
Old electrical and electronic appliances
Electrical or electronic devices that are no longer serviceable must be collected separately and
sent for environmentally compatible recycling (in accordance with the European Waste
Electrical and Electronic Equipment Directive).
To dispose of old electrical or electronic devices, you should use the return and collection
systems put in place in the country concerned.
Copyright and disclaimer
All rights reserved. No part of this document may be reproduced or transmitted in any form by
any means, electronic, mechanical, photocopying, recording, or otherwise, without the prior
written permission of the publisher. For information on getting permission for reprints and
excerpts, contact Electro-Voice.
All content including specifications, data, and illustrations in this manual are subject to change
without prior notice.
Notice!
Bluetooth® is available in select countries.
Contact your nearest Electro-Voice dealer or Electro-Voice distributor for more information.
The Bluetooth® word mark and logos are registered trademarks owned by Bluetooth SIG, Inc.
and any use of such marks by Bosch Security Systems, Inc. is under license. Other trademarks
and trade names are those of their respective owners.
2019-08 | 01 | Installation manual Electro-Voice
Page 9
EVOLVE Portable Column Loudspeaker Safety | en 9
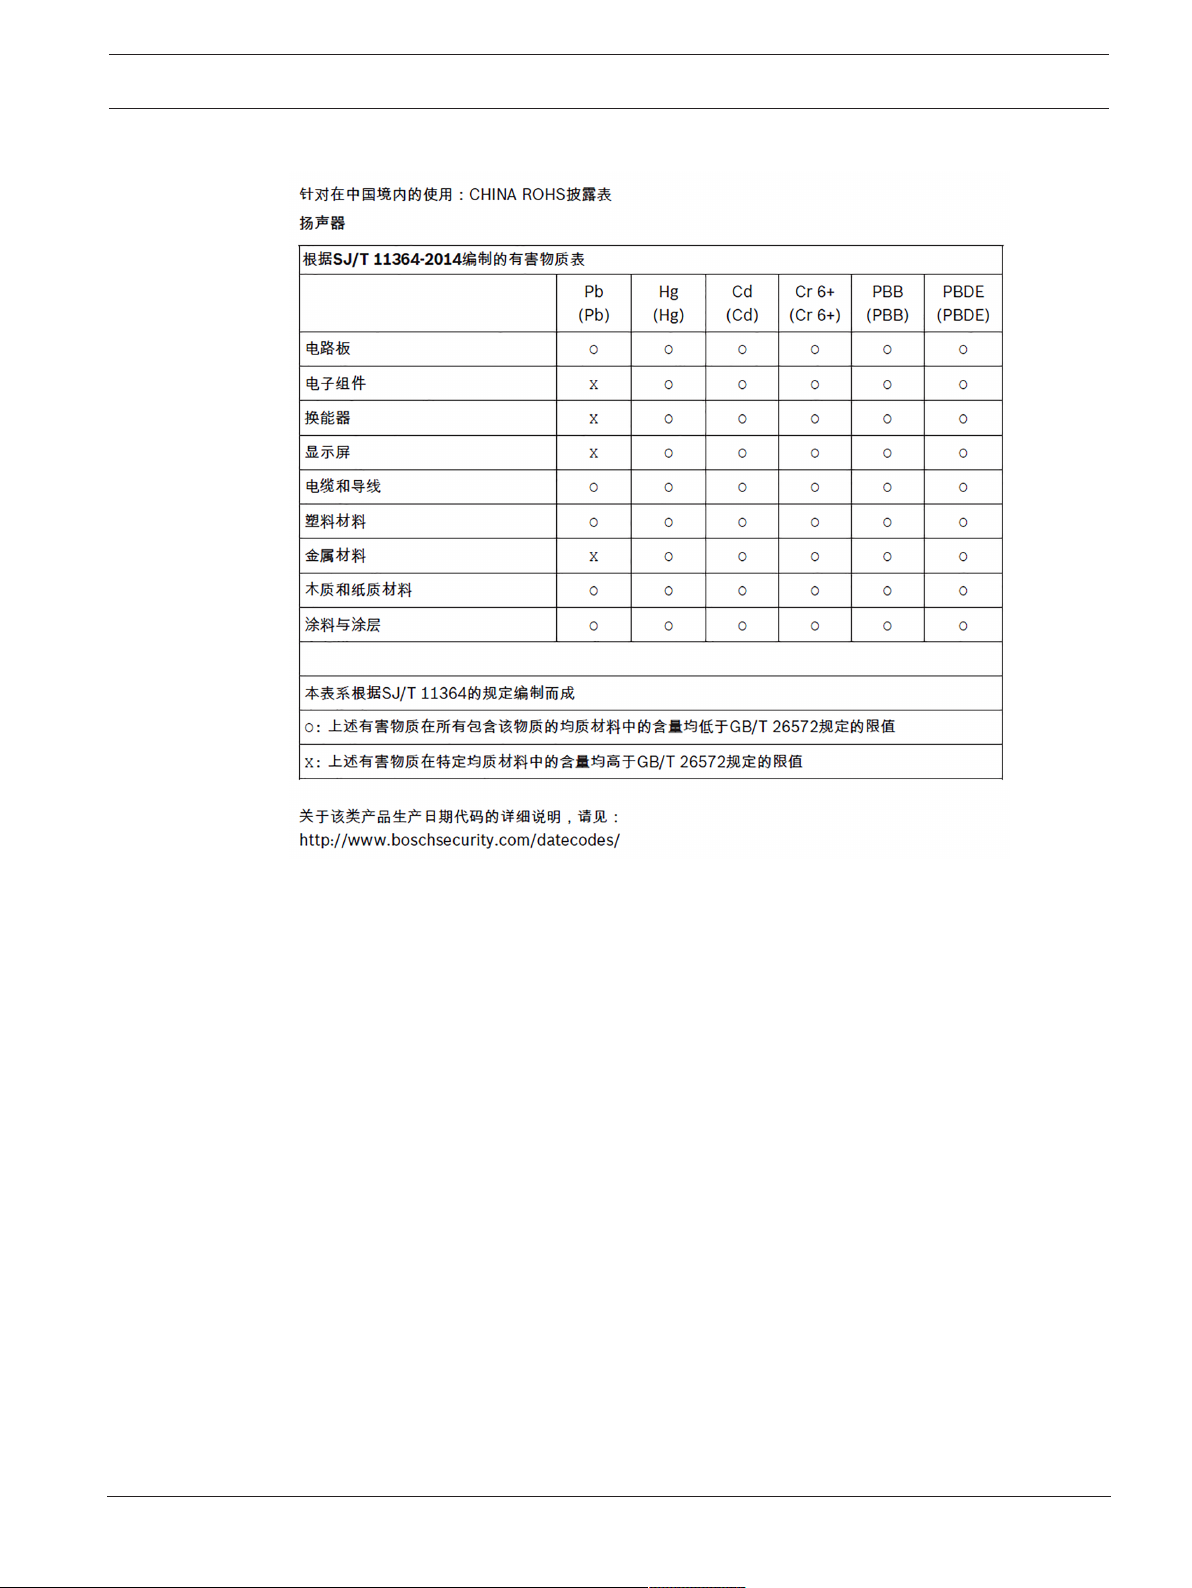
For use in China: CHINA ROHS DISCLOSURE TABLE
Electro-Voice Installation manual 2019-08 | 01 |
Page 10

10 en | Short information EVOLVE Portable Column Loudspeaker
2 Short information
The following table lists products in a family, with CTN (Commercial Type Number) and
identifying product name DESCRIPTION.
CTN Description
EVOLVE30M-US Portable column system, US, black
EVOLVE30M-EU Portable column system, EU AP, black
EVOLVE30M-GL Portable column system, no BT, black
EVOLVE30M-W Portable column system, global, white
EVOLVE30M-W-GL Portable column system, no BT, white
EVOLVE30M-SUBCVR Soft cover for EVOLVE 30M sub
EVOLVE30M-CASE Carrying case for EVOLVE 30M system
EVOLVE30M-PL-B Replacement pole for EVOLVE 30M, black
EVOLVE30M-PL-W Replacement pole for EVOLVE 30M, white
EVOLVE50M-US Portable column system, US, black
EVOLVE50M-EU Portable column system, EU AP, black
EVOLVE50M-GL Portable column system, no BT, black
EVOLVE50M-W Portable column system, global, white
EVOLVE50M-W-GL Portable column system, no BT, white
2.1 Shipping contents
Quantity Component
1 Column Speaker Array
1 Subwoofer
1 Sub pole (2 sections)
1 Power cord
1 Carrying bag
1 Installation manual
1 Warranty card
1 Safety manual
Tab.2.1: 2.1 EVOLVE30M-US, EVOLVE30M-EU, EVOLVE50M-US, EVOLVE50M-EU models
Quantity Component
1 Column Speaker Array
1 Subwoofer
1 Sub pole (2 sections)
2019-08 | 01 | Installation manual Electro-Voice
Page 11

EVOLVE Portable Column Loudspeaker Short information | en 11
Quantity Component
2 Power cords
1 Carrying bag
1 Installation manual
1 Warranty card
1 Safety manual
Tab.2.2: 2.1 EVOLVE30M-GL, EVOLVE30M-W, EVOLVE30M-W-GL, EVOLVE50M-GL, EVOLVE50M-W,
EVOLVE50M-W-GL models
Electro-Voice Installation manual 2019-08 | 01 |
Page 12

12 en | Description EVOLVE Portable Column Loudspeaker
3 Description
Thank you for choosing an Electro-Voice portable column system. Please take time to consult
the manual to understand all the features built into your EV system and fully utilize its
performance capabilities.
The EVOLVE portable column loudspeaker is a new entry and form factor in the Electro-Voice
portable sound portfolio. Designed to deliver an uncompromising combination of low-profile
aesthetics and superior audio performance, the EVOLVE sets a new standard for portable
columnar systems.
EVOLVE is designed to quickly and easily be transported and assembled. The compact design
of the subwoofer and convenient included carrying bag for the sub pole and column array
provide minimal resistance to getting excellent, professional sound anywhere you need it.
Installation is made easier via the symmetrical aluminum subwoofer pole with an integrated
wire assembly. The connection is secured by the magnetic assisted latching system, which
magnetically locks the sub pole in place.
The full-range column array and its six 2.8-inch drivers are directed using custom-designed
waveguides for consistent 120° coverage. The ported subwoofer enclosure houses a 10-inch
woofer that is supported by 15 mm wood for enhanced stiffness and acoustical performance.
The Class-D amplifier provides up to 1000 watts of output power: 500 watts to the subwoofer
and 500 watts to the column array. The input panel features EV's industry-leading
QuickSmartDSP interface—allowing intuitive navigation of system parameters via an LCD with
single-knob control—as well as multiple options for signal routing and inputs.
The new Electro-Voice QuickSmart Mobile application utilizes Bluetooth® Low Energy (BTLE)
technology for the wireless configuration, control, and monitoring of up to six EVOLVE
systems simultaneously. High-resolution Bluetooth® audio streaming adds convenience for
wireless music playback in breakout rooms, intermission, and musical accompaniment.
Bluetooth® is available in select countries.
Electro-Voice quality and testing procedures far exceed the industry norm to yield efficient
and effective electro-acoustic performance; this creates components that deliver an accurate,
linear response at the system’s highest output levels. When applied to EVOLVE, this
engineering philosophy results in a system that brings a new sonic benchmark to the column
speaker segment, all packaged in a sleek and portable enclosure that blends into the
background in any application from a lounge to a wedding reception.
3.1 System features
– EV QuickSmart Mobile application: quickly and wirelessly configure, control, and monitor
up to six EVOLVE systems simultaneously, and receive immediate notification during
critical performance conditions. Bluetooth® connectivity is available in select countries.
– High-quality Bluetooth® audio streaming for background music or musical
accompaniment. Bluetooth® connectivity is available in select countries.
– Ultra-wide 120° horizontal coverage via custom-designed waveguides and array-formed
40° asymmetrical vertical coverage means all acoustical energy is directed towards both
sitting and standing audiences.
– Ideal for portable applications. Light weight and intuitive assembly via the magnet
assisted sub pole make a quality performance easier than ever.
2019-08 | 01 | Installation manual Electro-Voice
Page 13
EVOLVE Portable Column Loudspeaker Description | en 13
FUSE T5AL/250V
REPLACE AS M ARKED
OPERATING VO LTAGE / TEGANGAN:
100-240V AC / 50-60 Hz
MAINS I N
POWER
ON OF F
– QuickSmartDSP provides best-in-class processing via EV's signature single-knob user
interface with LCD. Easy setup via four presets (Music, Live, Speech, Club), multi-band
EQ (low, mid, high), five user-programmable presets (Store and Recall settings), output
delay, phantom power, visual monitoring of limiter status, input level control and meters,
and master volume control to optimize gain structure.
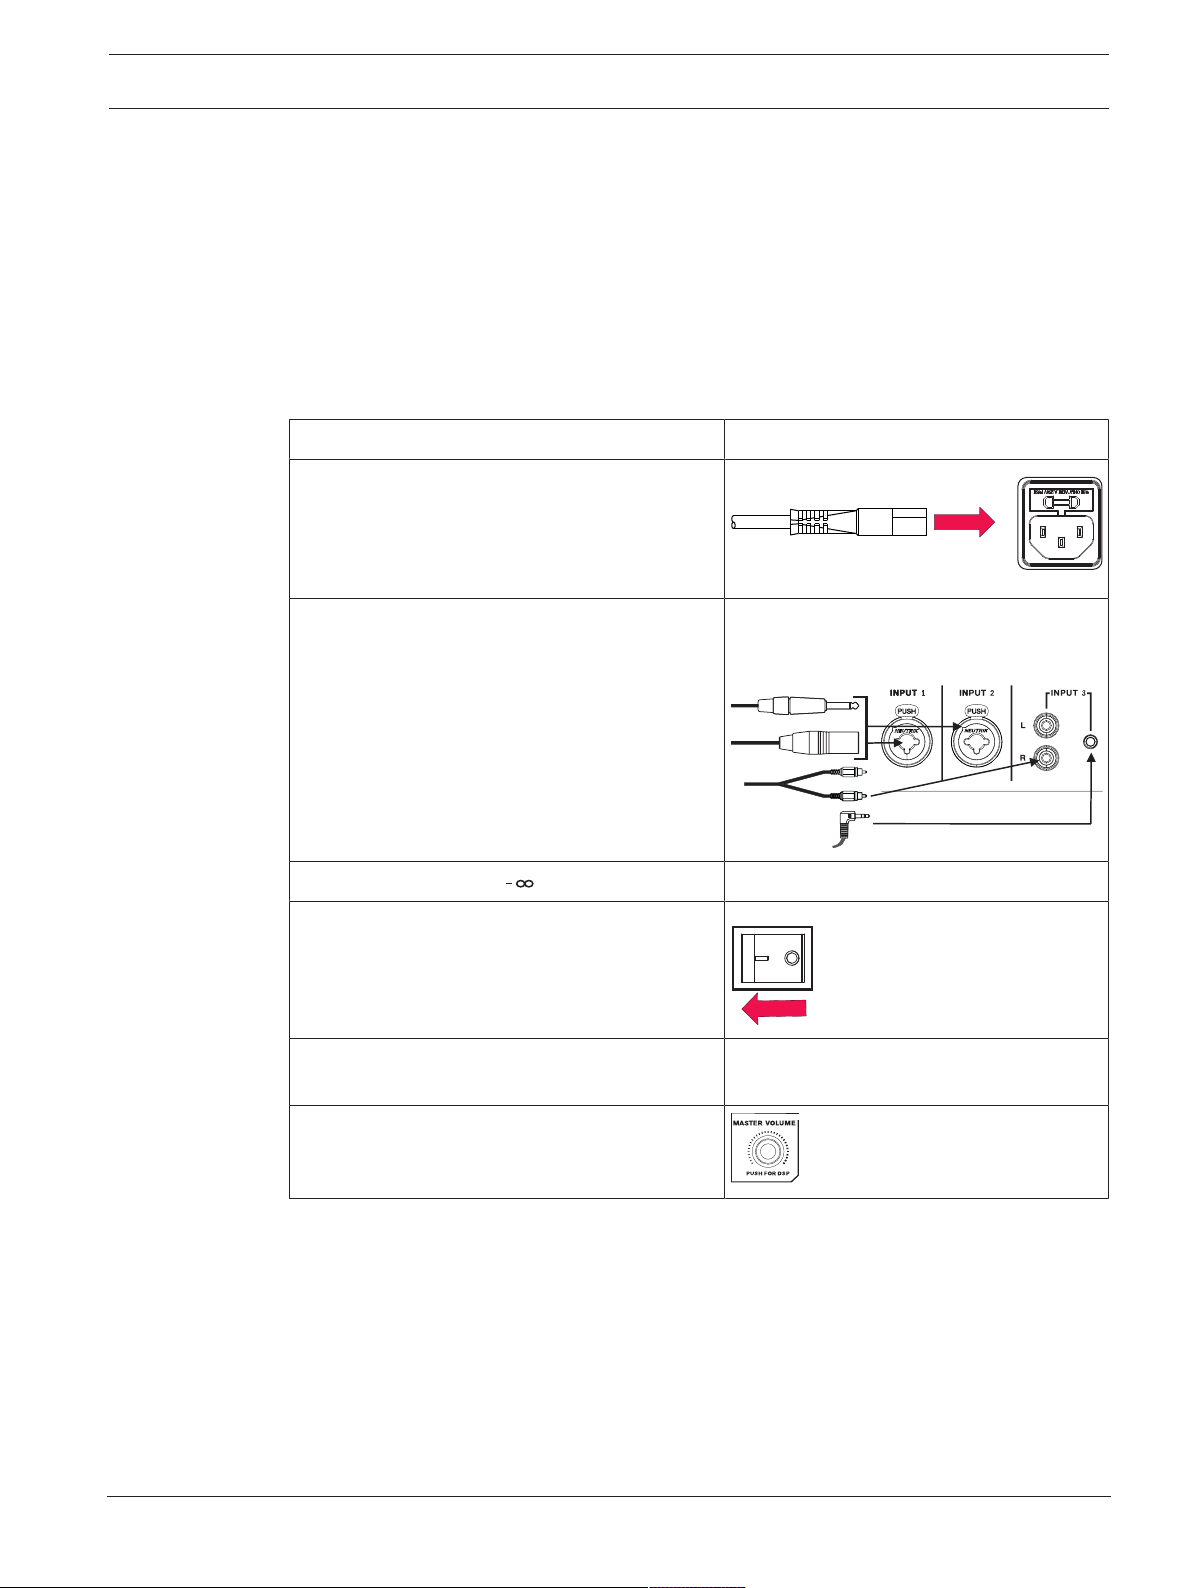
3.2 Quick setup
Subwoofer
To set up a subwoofer, do the following:
Step Illustration
Connect the AC power cord from a grounded
line receptacle to the MAINS IN.
Connect the XLR or TRS cables from an audio
source to INPUT 1 or INPUT 2 or connect the
RCA cable or 3.5 mm mini jack from an audio
source to INPUT 3.
Adjust the input gain to (infinity).
Switch POWER to ON.
From the DSP home screen, increase the input
gain to the desired sound output.
Adjust the MASTER VOL knob to the desired
volume.
Electro-Voice Installation manual 2019-08 | 01 |
Page 14

14 en | Installation EVOLVE Portable Column Loudspeaker
!
A
A
4 Installation
Assembling the loudspeaker system
Caution!
Do not attempt to move this loudspeaker system when it is fully assembled.
You may damage the system or cause personal injury.
1. Assemble the pole by connecting the two sections together.
The pole has magnets (A) at each end. The pole can be inserted on either end.
2. Place the column array loudspeaker on top of the subwoofer pole.
3. The column array loudspeaker system set up is complete.
4. Place the subwoofer on a level and stable surface.
To assemble the loudspeaker system, do the following:
2019-08 | 01 | Installation manual Electro-Voice
Page 15

EVOLVE Portable Column Loudspeaker Amplifier DSP | en 15
3
1
4
2
7 6
5
5 Amplifier DSP
5.1 Amplifier DSP controls
The amplifier has a combination of controls and connectors to ensure the most versatile
loudspeaker system.
Portable column system control and monitoring interface
The portable column system DSP control menu selections are available for the EVOLVE.
1. LCD – DSP control and monitoring interface.
2. MASTER VOL – Adjusts the sound level.
DSP – Scroll through the menu and select the available choices. Push the MASTER VOL
knob to enter the DSP menu.
3. INPUT 1-4,5/6 & 7/8 - Electronically balanced INPUT 1 thru INPUT 4 for the connection of
a line level signal source or a microphone. Establishing a connection is possible via TRS
or XLR-type plugs. INPUT 4 includes a HI-Z input below the TRS/XLR combo plug for
Electro-Voice Installation manual 2019-08 | 01 |
Page 16

16 en | Amplifier DSP EVOLVE Portable Column Loudspeaker
EVOLVE 50
FUSE T5AL/250V
REPLACE AS MARKED
OPERATING VOLTAGE / TEGANGAN:
100-240V AC / 50-60 Hz
MAINS IN
POWER
ON OFF
BOSCH SICHERHEITSSYSTEME GMBH
85626 GRASBRUNN, GERMANY
BOSCH SECURITY SYSTEMS, INC
14450 FAIRPORT, NY, USA
FOR INDONESIA ONLY:
IMPORTED BY / DIIMPOR OLEH
PT ROBERT BOSCH
JAKARTA, INDONESIA
www.electrovoice.com | MADE IN CHINA
10
11
connection to a high impedance instrument output via a TS plug. Stereo INPUT 5/6 for
connection of stereo line level signals. Connection is made using either two XLR-type,
RCA, or a single 1/8th inch stereo connector. Input 7/8 is reserved for stereo Bluetooth
audio connection.
4. INPUT Selection Buttons - Selects channels INPUT 1 through INPUT 7/8 for channel DSP
settings and individual level settings.
5. MIX OUT - The post-fader audio signals of INPUT 1 through INPUT 7/8are mixed and
passed to MIX OUT. The ratio of the input signals changes when the level controls INPUT
1 - 7/8 are adjusted. This feature allows the loudspeaker to act as a basic eight-channel
mixer that can send the mix to another loudspeaker via the MIX OUT socket.
6. FOOT SWITCH - ON/OFF control of DSP user selectable audio FX.
7. AUX OUT - Auxiliary audio output channel. A separate audio mix of INPUT1 - 7/8 is
controlled by individual channel AUX levels adjustable in DSP.
Notice!
Markings and statements on amplifier panel may vary.
8. MAINS IN – The device receives its power supply via the MAINS IN socket. Only the
provided power cord may be used. Connect the device only to a mains network, which
corresponds to the requirements indicated on the type plate.
9. POWER – AC switch for switching the power ON or OFF. The LCD screen lights up when
the power is turned ON, after approximately 3 seconds.
2019-08 | 01 | Installation manual Electro-Voice
Page 17

EVOLVE Portable Column Loudspeaker Amplifier DSP | en 17
1
5
2 3 4
8
6 7
5.2 System status
Normal
Figure5.1: Normal system status home screen with Bluetooth® status
1. LEVEL – Indicates the master gain of the system in dB. The range is from mute to +10 dB,
in 1 dB increments.
2. 1, 2, 3, 4, 5-6, 7-8 - VU meter displays the signal level of INPUT1 through 7/8 into the
amplifier. Input levels are independent of each other.
3. AUX - VU meter displays the signal level of the AUX output. AUX level is independent of
INPUT and MAIN levels.
4. MAIN - VU meter displays the signal level of the MAIN output. MAIN level is independent of
INPUT and AUX levels.
5. C - Control app; the available options are:
OFF - DISABLED
FLASHING - PAIRING MODE
SOLID - CONNECTED
6. 1 - Indicates the selected store function number. There are five user defined store
function numbers available.
7. E - Indicates the preset is not saved. When the preset is saved the E is not displayed.
8. S - Audio streaming; the available options are:
OFF - DISABLED
FLASHING - PAIRING MODE (120s)
SOLID - CONNECTED
Notice!
Bluetooth® is available in select countries.
Contact your nearest Electro-Voice dealer or Electro-Voice distributor for more information.
System protection
System protection limiters indicate when a system is exceeding recommended usage by
indicating CLIP or LIMIT on the LCD display.
CLIP
Electro-Voice Installation manual 2019-08 | 01 |
CLIP indicates the signal to the loudspeaker is too high, resulting in a clipped signal into the
loudspeaker. If CLIP is shown, reduce the input gain knob and/or the signal on the mixer or
source equipment.
Page 18

18 en | Amplifier DSP EVOLVE Portable Column Loudspeaker
LIMIT
LIMIT protects the loudspeaker from short-term peaks which can cause distortion. When
LIMIT is shown small on the screen, the limiter is active but keeps distortion under control.
The large LIMIT indicates the sound is negatively affected. Reducing the output volume
(MASTER VOL) is strongly recommended when the large limit indication is shown.
5.3 DSP control menu
MODE MUSIC (Default)
LIVE
SPEECH
CLUB
SUB LEVEL 0 dB (Default)
Mute, -80 dB to +10 dB
OUTPUT EQ 63 Hz 0 dB (Default)
-6 dB to +6 dB
100 Hz 0 dB (Default)
-6 dB to +6 dB
160 Hz 0 dB (Default)
-6 dB to +6 dB
250 Hz 0 dB (Default)
-6 dB to +6 dB
400 Hz 0 dB (Default)
-6 dB to +6 dB
630 Hz 0 dB (Default)
-6 dB to +6 dB
1 kHz 0 dB (Default)
-6 dB to +6 dB
1.6 kHz 0 dB (Default)
-6 dB to +6 dB
2.5 kHz 0 dB (Default)
-6 dB to +6 dB
4 kHz 0 dB (Default)
-6 dB to +6 dB
6.3 kHz 0 dB (Default)
-6 dB to +6 dB
FX1 Preset Bypass (Default)
EFFECTS 1-49
Output Bus 25% (Default)
[0%:1%:100%]
FX2 Preset Bypass (Default)
2019-08 | 01 | Installation manual Electro-Voice
Page 19

EVOLVE Portable Column Loudspeaker Amplifier DSP | en 19
EFFECTS 50-99
Output Bus 25% (Default)
[0%:1%:100%]
MIX OUT L + R (Default)
R
LED OFF
ON (Default)
LIMIT
CONTROL APP
INPUT INPUT 1
INPUT 2
INPUT 3
INPUT 4
INPUT 5
DISPLAY LCD DIM ON
OFF
BRIGHT 5 (Default)
1 to 10
CONTRAST 5 (Default)
1 to 10
STORE EXIT, 1, 2, 3, 4, 5, EXIT
RECALL EXIT, 1, 2, 3, 4, 5, EXIT
BLUETOOTH CONTROL
APP
OFF (Default)
OFF
STREAMING OFF (Default)
ON
PAIRING
RESET RESET ARE YOU SURE?
NO (Default)
YES
INFO [PRODUCT NAME]
[FIRMWARE VERSION]
©2019 Electro-Voice
EXIT
Tab.5.3: Portable column system DSP Control Menu
Electro-Voice Installation manual 2019-08 | 01 |
Page 20

20 en | Amplifier DSP EVOLVE Portable Column Loudspeaker
EXIT menu
The Exit menu is used to return to the home screen.
Notice!
The display returns to the home screen after two minutes of inactivity.
MODE menu
The Mode menu is used to configure the type of sound the subwoofer delivers.
– MUSIC – is used for recorded music playback and electronic dance music applications.
(Default)
– LIVE – is used for live sound applications.
– SPEECH – is used for spoken word applications.
– CLUB – is used for recorded electronic music playback.
SUB LEVEL Menu
The Sub Level menu allows independent gain control of the subwoofer output. Changes to
this parameter effectively change the crossover of the EVOLVE 50 system. The default setting
of 0 dB is recommended for best audio performance.
The range is MUTE, -80 dB to +10 dB.
The default is 0 dB.
OUTPUT EQ Menu
– The OUTPUT EQ menu is used to adjust the frequency response of the loudspeaker for
different applications or personal preference. There are 11 different EQ filters available
centered at the following frequencies. 63, 100, 160, 250, 400, 630, 1.0k, 1.6k, 2.5k, 4.0k,
& 6.3k Hz. The range of each filter is -6dB to +6dB. The default value for each filter is 0
dB.
MIX OUT menu
The Mix Out menu is used to select which signal of INPUT 5/6 & 7/8 AUX IN should be output
at MIX OUT and which signal should be delivered by the loudspeaker.
– L+R: The left and right signals of INPUT 5/6 & 7/8 are summed. The sum is output at MIX
OUT and is delivered by the loudspeaker. (Default)
– R: Only the right signal of INPUT 5/6 & 7/8 and the percentage of INPUTS 1-4 panned
right is output at MIX OUT. The loudspeaker will deliver only the left signal.
DISPLAY menu
The Display menu options are BACK, LCD DIM, BRIGHT, and CONTRAST.
LED menu
The LED menu shows power on and indicates limit. Available options for this selection are:
ON, OFF, LIMIT or CONTROL APP.
– ON - turns the LED on when the power to the loudspeaker is ON. (Default)
– OFF - turns the LED off.
– LIMIT - turns the LED off under normal operation. The LED brief blinking indicates the
limiter is activating. Short-term blinking is not critical because the integrated limiter
keeps distortion under control. Constant lighting of the LED indicates the sound is
negatively affected. If the LED is constantly lit, check the rear LCD for more information.
Reducing the output volume is strongly recommended.
– CONTROL APP - indicates if Bluetooth® on the portable column system is trying to pair or
is connected to a Bluetooth® enabled mobile device. In pairing mode the LED will flash
blue indicating it is ready to pair. The LED is solid blue when it is connected.
2019-08 | 01 | Installation manual Electro-Voice
Page 21

EVOLVE Portable Column Loudspeaker Amplifier DSP | en 21
The default is ON.
LCD DIM Menu
The LCD Dim menu is used to dim the display when the display is idle for 30 seconds.
Available options for this selection are: ON or OFF.
The default is ON.
BRIGHT Menu
The Bright menu is used to determine the brightness of the LCD.
The range is 1 to 10.
The default is five (5).
CONTRAST menu
The Contrast menu is used to increase or decrease the visibility of the LCD screen.
The range is 1 to 10.
The default is five.
STORE Menu
The Store menu allows you create up to five customized user settings. Available options for
this selection are: EXIT, 1, 2, 3, 4, and 5.
Notice!
The customized user setting name can contain a combination of alphanumeric characters
including spaces. The alphanumeric character range is A to Z and 0-9.
The name field length is 12 characters.
Storing customized user settings
To store customized user settings, do the following:
1. From the DSP menu, scroll to STORE.
2. Push the MASTER VOL knob to select STORE.
The store screen appears.
3. Push the MASTER VOL knob to select 1.
The Enter name for 1 screen appears.
4. Use the MASTER VOL knob to scroll through the characters.
The characters appear.
5. Push the MASTER VOL knob to select the desired character.
6. Turn the MASTER VOL knob to move to the next character entry.
Continue selecting characters until the desired name is entered.
7. Use the MASTER VOL knob to scroll to SAVE.
8. Push the MASTER VOL knob to select SAVE.
9. Repeat steps 3 through 8 to store additional customized user settings.
10. Select EXIT to return to the home screen.
RECALL Menu
The Recall menu allows you retrieve up to five customized user settings. Available options for
this selection are: EXIT, 1, 2, 3, 4, and 5.
Recalling customized user settings
To recall customized user settings, do the following:
1. From the DSP menu, scroll to RECALL.
2. Push the MASTER VOL knob to select RECALL.
The recall screen appears.
3. Push the MASTER VOL knob to select 1.
The selected item is loaded.
4. Select EXIT to return to the home screen.
Electro-Voice Installation manual 2019-08 | 01 |
Page 22

22 en | Amplifier DSP EVOLVE Portable Column Loudspeaker
BLUETOOTH
The Bluetooth menu options are CONTROL APP and STREAMING.
CONTROL APP menu
The Control App menu is used to enable the QuickSmart Mobile wireless control and
monitoring application. Available options for this selection are: ON or OFF.
The default is OFF.
Notice!
Bluetooth® is available in select countries.
Contact your nearest Electro-Voice dealer or Electro-Voice distributor for more information.
The Bluetooth® word mark and logos are registered trademarks owned by Bluetooth SIG, Inc.
and any use of such marks by Bosch Security Systems, Inc. is under license. Other trademarks
and trade names are those of their respective owners.
Turning Bluetooth® ON or OFF
To turn Bluetooth® ON or OFF, do the following:
1. From the DSP menu, scroll to CONTROL APP.
2. Select ON.
OR
Select OFF.
STREAMING
The Streaming menu is used to stream audio from your Bluetooth® enabled device to the
loudspeaker system. Available options for this selection are: PAIRING, ON or OFF.
The default is OFF.
Pairing the portable column system with your Bluetooth® enabled device
To pair the portable column system with your Bluetooth® enabled device, do the following:
1. From the DSP menu, scroll to STREAMING.
2. Select PAIRING.
PAIRING mode enables 120 seconds of visibility to Bluetooth® enabled devices.
3. On your mobile device, select EV EVOLVE to initiate the pairing process.
Once the device is paired, all device audio will be output through the EVOLVE 50 system.
Notice!
If connected with a mobile device, notification alerts and ring tones will also be played
through the system.
Disable these notifications or enable Airplane mode on your mobile device to prevent
unwanted interruptions during audio playback.
Turning streaming ON or OFF
To turn streaming ON or OFF, do the following:
1. From the DSP menu, scroll to STREAMING.
2. Select ON.
OR
Select OFF.
RESET menu
The Reset menu is used to reset the loudspeaker to original factory settings. Available options
for this selection are: NO or YES.
The default is NO.
2019-08 | 01 | Installation manual Electro-Voice
Page 23

EVOLVE Portable Column Loudspeaker Amplifier DSP | en 23
Resetting the system
To reset the system to original factory settings, do the following:
1. From the DSP menu, select RESET.
The "RESET ALL SETTINGS?" validation message appears.
2. Select YES.
The system is reset to the original factory settings.
Notice!
The reset menu item is used to revert the loudspeaker to the original factory default settings.
All user settings will be deleted. The user customized settings in the STORE and RECALL
menus return to <EMPTY>.
INFO menu
The Information menu is used to display the product name and firmware version.
Electro-Voice Installation manual 2019-08 | 01 |
Page 24

24 en | Pairing the QuickSmart Mobile application EVOLVE Portable Column Loudspeaker
6 Pairing the QuickSmart Mobile application
The EV QuickSmart Mobile app is available for download for the iOS 10 and higher tablets and
smart phones from the iTunes App Store or Android Marshmallow and higher tablets and
smart phones from the Google Play Store.
Notice!
The EV QuickSmart Mobile app is designed to only find speakers from Electro-Voice with
Bluetooth® enabled.
The EV QuickSmart Mobile app will not display other types of Bluetooth® devices, e.g.
phones, laptops, tablets, or headsets.
Notice!
Bluetooth® is available in select countries.
Contact your nearest Electro-Voice dealer or Electro-Voice distributor for more information.
Prior to pairing the EV QuickSmart Mobile app with loudspeakers by Electro-Voice ensure
Bluetooth® is enabled on the smart phone or tablet, and the loudspeaker.
First time pairing:
To pair the loudspeaker with the EV QuickSmart Mobile app, do the following:
1. Open the EV QuickSmart Mobile app.
2. Finding nearby speakers is displayed on the screen
The EV QuickSmart Mobile app is looking for available Bluetooth® enabled Electro-Voice
loudspeakers.
3. The available loudspeakers are displayed on the screen.
The app will display up to eight available loudspeakers.
4. Tap the loudspeaker you want to pair with the app.
The selected loudspeaker will have a red line under it acknowledging it is selected.
5. Repeat the previous step until all of the desired loudspeakers are selected.
6. Tap the red CONNECT button.
7. The app pairs with the desired loudspeaker.
The app can connect to up to six loudspeakers.
Subsequent pairing:
To pair the loudspeaker with the EV QuickSmart Mobile app, do the following:
1. Tap the EV QuickSmart Mobile app icon.
2. Finding nearby speakers is displayed on the screen
The EV QuickSmart Mobile app is looking for available Bluetooth® enabled Electro-Voice
loudspeakers.
3. The available loudspeakers are displayed on the screen.
The app will display up to eight available loudspeakers.
4. Tap the loudspeaker you want to pair with the app.
The selected loudspeaker will have a red line under it acknowledging it is selected.
5. Repeat the previous step until all of the desired loudspeakers are selected.
6. Tap the red CONNECT button.
7. The app pairs with the desired loudspeaker.
The app can connect to up to six loudspeakers.
2019-08 | 01 | Installation manual Electro-Voice
Page 25

EVOLVE Portable Column Loudspeaker Recommended configurations | en 25
L
R
7 Recommended configurations
7.1 Stereo pair of EVOLVE systems
R Right
L Left
Notice!
The direction of the arrow indicates the signal path.
Mode: Music
MIX-OUT: R
Tab.7.4: DSP settings for the portable column system
Electro-Voice Installation manual 2019-08 | 01 |
Page 26

26 en | Recommended configurations EVOLVE Portable Column Loudspeaker
B
A
7.2 Solo musician performance
A Guitar, conga drum, etc.
B Microphone
Notice!
The direction of the arrow indicates the signal path.
Mode: Live
Tab.7.5: DSP settings for the portable column system
2019-08 | 01 | Installation manual Electro-Voice
Page 27

EVOLVE Portable Column Loudspeaker Mixer operation | en 27
8 Mixer operation
8.1 Mono input
GAIN control
Rotary control for adjusting a MIC/LINE input’s sensitivity. These controls let you optimally
adjust the incoming signals to the mixer’s internal operation level. Slight adjustments can offer
the benefits of an improved S/N-ratio and provides you with the full bandwidth of the
EVOLVE’s outstanding sound capabilities. The following gain setting instruction is to be used
as a guide to help achieve a good signal input level:
Set the MASTER volume controls to their minimum values (counterclockwise).
Set the GAIN control and the corresponding channel VOLUME control to their center position.
Connect the sound source (microphone, instrument, etc.) to the desired MIC/LINE input.
Start the sound source at the highest volume level to be expected - respectively sing or speak
as loudly as possible directly (close up) into the microphone.
While playing the sound source or singing into the microphone, adjust the input level using the
GAIN control, so that during the loudest part, the PK LED does not light up. This is the basic
channel setting, leaving you with at least 6 dB of headroom, i.e. you have at least a range of 6
dB before signal clipping occurs.
If you intend to make further adjustments to the channel’s EQ setting, you should perform
steps 4 and 5 again, as changes in the sound shaping section also have an influence on the
channel’s overall level.
HI/MID/LO controls
The mixer’s EQ section allows for a broad difference in the shaping of the incoming audio
signal within three frequency bands. Turning one of the EQ level controls to the right
enhances/amplifies the corresponding frequency range while turning it to the left lowers/
attenuates the signal of that specific frequency band. Before you begin to alter the sound, all
EQ controls should be set to their neutral position, i.e. their marker points straight up (locked
in place). Try not to set the EQ controls to extreme positions. Usually, minor changes are
sufficient to produce the best results in the overall sound. You should use the natural
reproduction as a starting point and rely on your musically trained ear. The moderate use of
the MID control is the best remedy to avoid acoustical feedback. You should try to avoid using
this frequency range to an extreme level. Lowering the level in this band will provide you with
higher output and help reduce feedback. Adjust the LO control to your taste, to add more
“punch” to the sound of a kick drum or “body” to the vocals. Use the HI control in the same
way to provide cymbals and vocals with more treble for a more transparent sound.
FX control
The FX controls is used to set the amount of effect you require on that channel input to be
routed to the integrated FX effects unit. The signal path is split post VOLUME control so that
the volume setting also influences the amount of the signal that is fed to the FX unit. Using the
FX controls lets you easily assign an effect for groups of musical instruments or vocals. To
determine the desired level of the effect, you should start with the controls set at their center
and make individual adjustments from there on.
Please monitor the PK LED in the FX channels. The indicator should only light up briefly at the
occurrence of high signal peaks. If the indicator is constantly lit, you should lower the send
levels of those channels where the program peaks occur. For further information, please read
the paragraphs about the FX unit.
AUX control
The AUX control is primarily meant for establishing an independent mix, e.g. for monitor or a
second room/zone. The signal routing is always pre VOLUME control.
Electro-Voice Installation manual 2019-08 | 01 |
Page 28

28 en | Mixer operation EVOLVE Portable Column Loudspeaker
PK indicator
The peak indicator plays a key role when setting input levels. The PK (peak) LED on the
EVOLVE provides a visual indication of the risk of distortion before you hear it through the
connected speaker systems. The peak indicator checks the signal level pre and post of the
channel’s VOLUME control and indicates the maximum of both levels. If the PK LED blinks
frequently or lights continuously, the corresponding channel is likely to start clipping and you
will need to reduce the volume slightly. The peak LED are triggered at a level of -6 dB below
the point of distortion.
If lowering the channel VOLUME is not sufficient to reduce signal peaks, carefully turn the
GAIN control down.
Keeping an eye on the indicator during a performance is also a good idea, because some
changes in the bands dynamics or even a change in keyboard settings can easily lead to
channel clipping, resulting in the degradation of the overall sound.
VOLUME control
The VOLUME control sets the volume of the corresponding channels, resulting in a balanced
mix. The control should be positioned initially at “5”, leaving you with enough flexibility to
balance the mix. The overall volume is adjusted through the use of the master controls. Even
though the channel controls offer an additional level of +15dB, we would like to advise you to
exceed the “8” mark only in very few exceptional cases. If the PM502’s summing bus gets
“overloaded” with too many “high level” input channels, despite its special gain structure, the
summing amplifier could be driven into clipping.
The best signal to noise ratio can be achieved if channel volume and master volume controls
are set in the same range.
8.2 Stereo input
HI/MID/LO control
The mixer’s EQ section allows for a broad difference in the shaping of the incoming audio
signal within three frequency bands. Turning one of the EQ level controls to the right
enhances/amplifies the corresponding frequency range while turning it to the left lowers/
attenuates the signal of that specific frequency band. Before you begin to alter the sound, all
EQ controls should be set to their neutral position, i.e. their marker points straight up (locked
in place). Try not to set the EQ controls to extreme positions. Usually, minor changes are
sufficient to produce the best results in the overall sound. You should use the natural
reproduction as a starting point and rely on your musically trained ear. The moderate use of
the MID control is the best remedy to avoid acoustical feedback. You should try to avoid using
this frequency range to an extreme level. Lowering the level in this band will provide you with
higher output and help reduce feedback. Adjust the LO control to your taste, to add more
“punch” to the sound of a kick drum or “body” to the vocals. Use the HI control in the same
way to provide cymbals and vocals with more treble for a more transparent sound.
FX control
The FX controls is used to set the amount of effect you require on that channel input to be
routed to the integrated FX effects unit. The signal path is split post VOLUME control so that
the volume setting also influences the amount of the signal that is fed to the FX unit. Using the
FX controls lets you easily assign an effect for groups of musical instruments or vocals. To
determine the desired level of the effect, you should start with the controls set at their center
and make individual adjustments from there on.
2019-08 | 01 | Installation manual Electro-Voice
Page 29

EVOLVE Portable Column Loudspeaker Mixer operation | en 29
Please monitor the PK LED in the FX channels. The indicator should only light up briefly at the
occurrence of high signal peaks. If the indicator is constantly lit, you should lower the send
levels of those channels where the program peaks occur. For further information, please read
the paragraphs about the FX unit.
AUX control
The AUX control is primarily meant for establishing an independent mix, e.g. for monitor or a
second room/zone. The signal routing is always pre VOLUME control.
PK indicator
The peak indicator plays a key role when setting input levels. The PK (peak) LED on the
EVOLVE provides a visual indication of the risk of distortion before you hear it through the
connected speaker systems. The peak indicator checks the signal level pre and post of the
channel’s VOLUME control and indicates the maximum of both levels. If the PK LED blinks
frequently or lights continuously, the corresponding channel is likely to start clipping and you
will need to reduce the volume slightly. The peak LED are triggered at a level of -6 dB below
the point of distortion.
If lowering the channel VOLUME is not sufficient to reduce signal peaks, carefully turn the
GAIN control down.
Keeping an eye on the indicator during a performance is also a good idea, because some
changes in the bands dynamics or even a change in keyboard settings can easily lead to
channel clipping, resulting in the degradation of the overall sound.
VOLUME control
The VOLUME control sets the volume of the corresponding channels, resulting in a balanced
mix. The control should be positioned initially at “0”, leaving you with enough flexibility to
balance the mix. The overall volume is adjusted through the use of the master controls. Even
though the channel controls offer an additional level of +15dB, we would like to advise you to
exceed the “8” mark only in very few exceptional cases. If the EVOLVE column speaker’s
summing bus gets “overloaded” with too many “high level” input channels, despite its special
gain structure, the summing amplifier could be driven into clipping.
The best signal to noise ratio can be achieved if channel volume and master volume controls
are set in the same range.
8.3 FX
FX ON switch (with indicator)
This switch turns the internal FX unit on and the green LED turns on. Please keep in mind that
you can also use an external footswitch for turning the FX unit on or off. In this case, the LED
also shows the actual operational status of the FX unit. If you want to use a footswitch, the FX
ON switch has to be engaged first. The FX unit is activated and you can use the footswitch to
switch the selected effect program on or off.
FX to AUX control
This control allows you to add the FX output signal (pre volume control) to the AUX channel.
PK indicator
This indicates to the user that the internal FX unit is on the verge of clipping, e.g. at a level of
-6dB below the risk of overdrive. To achieve an adequate signal to noise ratio, please adjust
the FX units’ input level as follows:
1. Establish a “dry” mix - without effect settings - refer to the previous instructions.
2. Position the FX VOLUME control at the “5” mark.
3. Turn the FX/PARAMETER rotary control to select the desired FX program preset.
4. Press the FX ON switch.
Electro-Voice Installation manual 2019-08 | 01 |
Page 30

30 en | Mixer operation EVOLVE Portable Column Loudspeaker
5. Play the sound source connected to the desired input channel and adjust the desired
amount of the FX signal, using the FX controls of this input channel. Repeat this step for
all input channels that you want to include in your effect mix.
6. Monitor the PK LED so that it only lights up from time to time during signal peaks. When
clipping occurs, reduce the channels FX control level.
7. Use the FX to AUX control to add the effect mix to the AUX mix.
8. Use the FX VOLUME control to add the desired amount of the FX signal to the master mix.
Pay attention to the PK indicators when operating your EVOLVE to be able to respond quickly
when the signal levels exceed the normal range and start clipping.
VOLUME control
This control is used to determine the amount of effect added to the master mix. If you find
that you have to set these controls above the “8” mark, please check if the FX unit’s input
signals are adjusted properly.
8.4 AUX
Indicators
It is acceptable for the LIM indicator to flicker from time to time because the built in clip
limiter prevents distortion. If it is lit continuously, you are at risk of the degradation of your
speaker output. In that case, the volume level has to be reduced. The limiter threshold can be
edited in the OUTPUT SETTINGS menu, please refer to section Menu.
Below the LIM indicator, the EVOLVE offers a 3-segment LED chain for visual monitoring of the
output level of the signal. The meter’s 0dB mark is referenced to a 0dBu output signal at the
mixer output.
VOLUME control
The VOLUME control sets the volume of the summed audio signal at the AUX OUT output. The
signal present at this output can be selected in the AUX routing menu, please refer to section
Menu.
8.5 MASTER
Indicators
It is acceptable for the LIM indicator to flicker from time to time because the built in clip
limiter prevents distortion. If it is lit continuously, you are at risk of the degradation of your
speaker output. In that case, the volume level has to be reduced. The limiter threshold can be
edited in the OUTPUT SETTINGS menu, please refer to section Menu.
Below the LIM indicator, the EVOLVE column speaker offers a 3-segment LED chain for visual
monitoring of the output level of the signal. The meter’s 0dB mark is referenced to a 0dBu
output signal at the mixer output.
VOLUME control
Level controls to adjust the output signals of the left and right master outputs (MASTER A or
MASTER B). If post mode is selected for MASTER B (see section Menu) set the MASTER B
level control to its middle position for identical levels on MASTER A or B outputs.
8.6 Microphone processing
During operation the audio signal processing can be adjusted by using the switches
COMPRESSOR, TALK OVER or MUTE, this settings always affect the input signals of all MIC/
LINE channels. The current status is indicated by the corresponding LED next to each button.
Advanced microphone processing settings are available in the menu, please refer to section
Menu.
2019-08 | 01 | Installation manual Electro-Voice
Page 31

EVOLVE Portable Column Loudspeaker Mixer operation | en 31
Notice!
Effect of MIC PROCESSING
The AUX-Bus signal is only affected by MUTE, so COMPRESSOR or TALK OVER have no effect
on the AUX-Bus signal.
COMPRESSOR
Engage the COMPRESSOR switch to activate the integrated compressor. The compressor
reduces the dynamic range of audio signals. Once the signal exceeds a certain threshold, the
signal gets compressed, i.e. major input level changes result in minor output level changes.
Narrowing the dynamic range often allows for easier recording or mixing the audio signal.
TALK OVER
Engage the TALK OVER switch to activate the integrated ducking facility. The ducking facility
reduces the level of the signals at the STEREO inputs whenever a signal is present at the MIC/
LINE inputs. If there is no MIC/LINE signal present the STEREO signal automatically returns to
its preset level.
MUTE
Engage the MUTE switch to mute all MIC/LINE input signals.
8.7 Equalizer
The Evolve column speaker employs an 11-band equalizer. Eleven frequency bands offering
+/-6dB gain/reduction allow the shaping of the overall sound to meet your personal
preferences to optimally match it to the acoustic conditions of different locations.
Independent graphic equalizers for MASTER A, MASTER B or AUX (each adjustable via
hardware controls or the rotary encoder) are available in the menu, please refer to section
Menu.
8.8 Display
Home screen
The home screen appears after switching the EVOLVE column speaker on. After a few seconds
the currently selected effect (number and name) is displayed. If effect parameters have been
edited, an “E” is indicated next to the preset number. Turn the FX/PARAMETER rotary control
to select another effect.
In the lower part of the display settings of the channels MASTER A, MASTER B and AUX are
indicated, please refer to following table.
Icon Description
/MIC LO CUT in menu MIC PROCESSING is activated.
POST The master routing of channel B is set to Post.
M The channel is set to Mono.
Electro-Voice Installation manual 2019-08 | 01 |
Page 32

32 en | Mixer operation EVOLVE Portable Column Loudspeaker
Icon Description
DLY The delay of the channel is activated.
MAS. A PRE or MAX. A POST Indicates the AUX Mode setting of the AUX channel.
Equalizer control icon The hardware equalizer controls are used to edit the
equalizer settings of this channel.
EQ The equalizer setting of the channel is not set to flat.
LIM The threshold of the output limiter has been edited.
Speaker icon Indicates the Amp Routing. If a Dual Amp Routing is
selected speakers for output channel 1 or 2 are indicated.
Tab.8.6: Indicators in home screen
If the screensaver is activated the Dynacord logo and the device name (assigned in the DEVICE
SETUP menu) is indicated after some time.
8.8.1 Menu
Press the MENU/ENTER rotary encoder to access the menu.
In menu the MENU/ENTER rotary encoder is used for navigation and for selecting and editing
parameters. Turn the MENU/ENTER rotary encoder to the left or to the right to move the
cursor in the menu. Press the MENU/ENTER rotary encoder to select the highlighted menu
item. The value is shown in inverse font and can be edited by turning the MENU/ENTER rotary
encoder. Press the MENU/ENTER rotary encoder again to apply the edited parameter value.
Following table lists the content of the menu.
Menu item Subitems/parameter range
Description
(default setting in bold)
EDIT FX Depends on effect type. This dialog allows editing effect
parameters of the effect unit.
Select RESET to reset all
parameters to their default values.
AUDIO PLAYER – Folder/Track name
– Progress bar
– Buttons for Start/Pause/
Back/Forward
– REPEAT/RANDOM selection
– AUTO PLAY selection
This dialog allows to use the
integrated MP3 player.
When AUTO PLAY is selected the
playback of MP3 files will start
automatically when a USB drive is
connected.
MIC PROCESSING – LO CUT: Off, 80 Hz, 150 Hz When the low cut filter is activated,
frequencies below 80 Hz (or 150
Hz) are attenuated.
– COMPRESSOR PRESET:
Soft, Hard
– COMPRESSOR
The compressor settings allow
adjusting the microphone
processing to your application.
THRESHOLD: The range
depends on the selected
compressor preset.
2019-08 | 01 | Installation manual Electro-Voice
Page 33

EVOLVE Portable Column Loudspeaker Mixer operation | en 33
Menu item Subitems/parameter range
(default setting in bold)
– COMPRESSOR TYPE: 2:1
Ratio, 4:1 Ratio, Limiter,
Uplift Soft
– COMPRESSOR ATTACK:
1-1000 ms
– COMPRESSOR RELEASE:
50-10000 ms
– COMPRESSOR MAKEUP
GAIN: 0 - +6dB
– TALK OVER PRESET:
Announcer, Singer,
Instructor, Presenter
– TALK OVER THRESHOLD:
-50 - -10 dB
– TALK OVER DAMPING:
-100-0 dB
– TALK OVER ATTACK:
0-1000ms
– TALKOVER HOLD: 0.0-99.9s
– TALK OVER RELEASE:
0.1-30.0s
Description
The talk over settings allow
adjusting the microphone
processing to your application.
Please refer to section Microphone
processing (TALK OVER) for more
details.
SPEAKER PROC – Low Pass Notch: Flat,
Medium, High
This menu is used to edit the LPN
Speaker Processing filter setting of
the integrated power amplifiers.
Please refer to section Speaker
processing (LPN) for more details.
If the DIRECT DRIVE mode is
activated, the Low Pass Notch filter
is always bypassed.
MASTER A EQ – SLIDERS-LINK
MASTER B EQ
AUX EQ
– Frequency bands 63 Hz,
160 Hz, 400Hz, 1kHz,
2.5kHz, 6kHz, 12kHz
Activate the entry SLIDERS-LINK to
edit the levels of the corresponding
GEQ bands using the GEQ
hardware controls. If not activated,
edit the bands in the display using
the FX/PARAMETER rotary control.
MASTER ROUTING – MASTER A: Mono, Stereo When MASTER A is set to Stereo,
the MASTER A L/R signal is not
changed and outputted in stereo.
When Mono is selected the
MASTER A L/R signal is summed
and outputted in mono at MASTER
A L and also MASTER A R.
– MASTER B: Pre, Post;
Mono, Stereo
When MASTER B is set to Pre, the
audio signal is tapped pre MASTER
A volume control and therefore not
Electro-Voice Installation manual 2019-08 | 01 |
Page 34

34 en | Mixer operation EVOLVE Portable Column Loudspeaker
Menu item Subitems/parameter range
(default setting in bold)
– MAS. B Delay: : 0.0-50
Meters
Description
affected by the MASTER A control’s
setting. When MASTER B is set to
Post, the audio signal is tapped
post MASTER A volume control and
therefore affected by the MASTER A
control’s setting. This mode is
mainly used for subwoofers or
delay lines.
When MASTER B is set to Stereo,
the MASTER B L/R signal is not
changed and outputted in stereo.
When Mono is selected the
MASTER B L/R signal is summed
and outputted in mono at MASTER
B L and also MASTER B R.
The MASTER B signal can be
delayed up to 145.8 ms. The unit
can be switched between
milliseconds (ms), meters and feet.
OUTPUT SETTINGS – DIRECT DRIVE: Off,
On/50Hz HPF, On/70Hz
HPF
– AMP ROUTING: MASTER A,
MASTER B, AUX, Dual A - B,
Dual A - AUX, Dual B - AUX
– AUX Mode: AUX-Bus, MAS.
A Pre, MAS. A Post
Limiters:
– MASTER A: -10 - +11 dBu
– MASTER B: -10 - +11 dBu
– AUX Limiter: -10 - +11 dBu
DEVICE SETUP 1 – LCD Auto Dim: Off-60 Min.
– Dim Brightness: 0-100%
– Screensaver: Off-60 Min.
(default: Off)
– Personalize
In this menu you can configure
advanced features of the EVOLVE
column speaker outputs. Please
refer to the corresponding sections
for more details:
– 100 V Direct Drive
– Amplifier routing
– AUX sources
The audio limiter thresholds can be
set independently for the MASTER
A, MASTER B or AUX output signals.
After the time set here the display
brightness is dimmed. The
brightness of the display in dimmed
mode can be adapted to the
installation location.
After the time set here the
screensaver is activated. You can
personalize the device name shown
in the screensaver screen.
DEVICE SETUP 2 – Lock/Unlock: 0000-9999
– Lock Mode: Custom, Level
1,2,3
Enter a 4 digit PIN (password) to
lock certain parameters of the
EVOLVE column speaker. Please
refer to section Locking for more
details.
2019-08 | 01 | Installation manual Electro-Voice
Page 35

EVOLVE Portable Column Loudspeaker Mixer operation | en 35
Menu item Subitems/parameter range
INFORMATION – Firmware
Tab.8.7: Menu
8.9 Indicators
Description
(default setting in bold)
– Factory Reset Pressing the MENU/ENTER rotary
encoder opens a “Reset all
settings?” safety dialog box. Select
YES to reset the EVOLVE column
speaker to its factory settings.
Select NO to return to the DEVICE
SETUP menu. If the device is locked
a factory reset is not possible.
Indicates the firmware version
– Mains: Voltage and
frequency
– Int. Temp: Current and
maximum value
installed, the current supply voltage
and frequency and the internal
temperature of the device. The
entry Logging is for service only.
– Logging
Indicator Description
SPEAKER PROCESSING This indicator lights up blue when the internal speaker
processing of the EVOLVE column speaker is activated in the
menu. Please refer to section Speaker processing (LPN) for
more details about this mode.
100V DIRECT DRIVE This indicator lights up green when the 100V Direct Drive
mode is activated in the menu. Please refer to section 100 V
Direct Drive for more details about this mode.
AMP LIMIT This yellow indicator signals that you are operating the EVOLVE
column speaker at the internal power amp’s limit. Frequent
blinking of the LED is acceptable, since the amplifier’s
incorporated clip limiter prevents distortion. Continuous
lighting indicates that you have to be aware of degradation in
the output sound. In that case, the MASTER (or AUX) level has
to be reduced. The LIMIT LED also lights up if the output level
is reduced because of high amplifier temperature or too high
output current in abnormal load conditions.
AMP PROTECT This indicator lights up red when one of the EVOLVE column
speaker’s extensive protection circuits - against thermal
overload, HF-induction, Back-EMF, DC at the outputs, and short
circuit protection - is activated. When the EVOLVE column
speaker is in protect mode, the speaker outputs are disabled to
prevent the power amp from being damaged. In this case you
Electro-Voice Installation manual 2019-08 | 01 |
Page 36

36 en | Mixer operation EVOLVE Portable Column Loudspeaker
Indicator Description
should first check whether the ventilation slots are blocked.
Another cause could be that you have connected more than two
8 Ω speaker systems per power output in low-Z mode. Please
also disconnect the speakON or Euroblock connectors and
check the speaker cables for short circuits.
Tab.8.8: Front panel indicators
2019-08 | 01 | Installation manual Electro-Voice
Page 37

EVOLVE Portable Column Loudspeaker Troubleshooting | en 37
9 Troubleshooting
Problem Possible cause Action
1. No sound Amplifier Verify all the electronics are on, the signal
routing is correct, the source is active; the
volume is turned up, etc.
Correct/repair/replace as necessary. If there is
still no sound, the problem may be wiring.
Wiring Verify you have connected the correct cables to
the amplifier. Play something at a low level
through the amplifier. Connect a test
loudspeaker in parallel with the malfunctioning
line. If the sound level is gone or is very weak,
the line has a short in it (possibly a severe
scrape, pinch, or a missed connection). Using
the test loudspeaker, move down the line and
test each connection/junction until you find the
problem and correct it. Observe proper
polarity.
2. Intermittent
output such as
crackling or
distortion
3. Constant noise
such as
buzzing hissing
or humming
4. No sound
produced with
microphone
connected to
INPUT 1 or
INPUT 2
5. Sound is
distorted front
LED is OFF,
LCD screen
LIMIT is ON
Faulty connection Check all connections at amplifier and
loudspeakers to ensure they are all clean and
tight. If the problem persists, check the wiring.
See problem 1.
Defective source or
other electronic
device
Poor system
grounding or ground
loop
Input gain knob is not
in the MIC position
Microphone requires
phantom power.
Input gain knob is not
in the MIC position
Excessive input level Reduce the input level or loudspeaker level
Incorrect gain
structure or source
input (mixing console/
preamp) is overdriven
If noise is present, but no program material is
playing, evaluate each component as necessary
to isolate the problem. Most likely there is a
break in the signal path.
Check and correct the system grounding, as
required.
Slowly increase the input gain knob level to
engage the microphone pre-amp.
Use a dynamic microphone that does not
require phantom power (+15 V).
Slowly increase the input gain knob level to
engage the microphone pre-amp.
knobs to prevent limit.
Verify level controls of the source are properly
structured by using the VU meter indicator on
the LCD screen. If the VU meter bar is solid or
the system indicates LIMIT, the input or source
level is too high.
Electro-Voice Installation manual 2019-08 | 01 |
Page 38

38 en | Troubleshooting EVOLVE Portable Column Loudspeaker
Problem Possible cause Action
6. Microphone
produces
acoustic
feedback when
input level is
amplified
Incorrect gain
structure
Reduce the microphone levels at the mixing
console or input source. If the microphone is
connected directly to the speaker, reduce the
input level on the speaker. Positioning the
microphone close to the sound source
increases gain-before-feedback. See problem 6.
MODE is set to MUSIC Change the MODE to LIVE or SPEECH.
7. DSP menu is
locked
Microphone position
is too close to the
front of the
loudspeaker
The Menu Lock
function has been
Whenever possible setup the loudspeakers so
the microphone is behind them. If using the
loudspeaker in a monitor position, aim the
loudspeaker to the back of the microphone.
Press and hold the MASTER VOL knob for 5
seconds.
turned on.
8. QuickSmart
Mobile app
Enable Bluetooth® Ensure Bluetooth® is enabled on the
loudspeaker.
does not
detect the
loudspeaker
If these suggestions do not solve your problem, contact your nearest Electro-Voice dealer or
Electro-Voice distributor.
2019-08 | 01 | Installation manual Electro-Voice
Page 39

EVOLVE Portable Column Loudspeaker Technical data | en 39
10 Technical data
Frequency response (-3 dB)1: 43 Hz-20 KHz
Frequency range (-10 dB)1: 37 Hz-20 KHz
Maximum SPL2: 122 dB
Coverage (H x V): 120° x 40°
Amplifier rating: 1000 W
LF channel rating: 500 W
HF channel rating: 500 W
Crossover frequency: 200 Hz
Connectors: 6x XLR/TRS combo jack Input
1x 3.5 mm Input
1x Stereo RCA-type Input
1x 1/4" TRS Hi-Z input
1x 1/4" TRS Foot switch
1x XLR MIX Output
1x XLR AUX Output
Enclosure: Sub: 15 mm plywood
Column: Composite
Pole: Aluminum
Grille: Steel with black or white powder coat
Color: Black or white
Dimensions (HxWxD):
mm (in)
Sub: 530 x 345 x 471 (20.9 x 13.6 x 18.5)
Column: 825 x 102 x 172 (32.5 x 4.0 x 6.9)
Pole: 929 x 48.5 x 55 (36.6 x 1.9 x 2.2)
Net weight: Sub: 44.66 lb (20.3 kg)
Column: 10.34 lb (4.7 kg)
Pole: 2.75 lb (1.25 kg)
Sub cover: 0.9 lb (0.4 kg)
Bag for column and pole: 1.87 (0.85 kg)
Shipping weight: Sub box: 50.71 lb (23 kg)
Column box: 18.30 lb (8.3 kg)
Power consumption3: 100-240 V AC, 50-60 Hz, 1.5-0.6 A
1
Full-space measurement using music DSP preset.
2
Maximum SPL is measured at 1 m using broadband pink noise at maximum output.
3
Current rating is 1/8 power.
Electro-Voice Installation manual 2019-08 | 01 |
Page 40

40 en | Technical data EVOLVE Portable Column Loudspeaker
345 mm
530.0 mm
470 mm
492 mm
7 mm
930 mm
55 mm
48.5 mm
38.5 mm
789 mm
68 mm
37.9 mm
29.7 mm
102 mm
825 mm
121.2 mm
102.4 mm
102 mm
157.2 mm
121.2 mm
172.0 mm
108.7 mm
[13.58 in]
[6.8 in]
[6.2 in]
[4.8 in]
[4.0 in]
[32.5 in]
[4.0 in] [4.3 in]
[4.0 in]
[4.8 in]
[31.1 in]
[36.6 in]
[2.7 in]
[1.5 in]
[1.2 in]
[2.2 in]
[1.9 in]
[1.5 in]
[0.3 in]
[19.4 in]
[20.9 in]
[18.5 in]
471 mm
[18.54 in]
54.5 mm
2.1 in
48 mm
1.9 in
159 mm
6.3 in
319 mm
12.6 in
80 mm
3.1 in
10.1 Dimensions
Figure10.1: Dimensions EVOLVE (subwoofer left, spacer center, and column right)
Figure10.2: Dimensions EVOLVE short pole
2019-08 | 01 | Installation manual Electro-Voice
Page 41

EVOLVE Portable Column Loudspeaker Technical data | en 41
10.2 Frequency response
Figure10.3: Frequency response EVOLVE (Live Mode, Music Mode, Speech mode, and Club Mode)
Electro-Voice Installation manual 2019-08 | 01 |
Page 42

42 | Technical data EVOLVE Portable Column Loudspeaker
2019-08 | 01 | Installation manual Electro-Voice
Page 43

Page 44

Bosch Sicherheitssysteme GmbH
Robert-Bosch-Ring 5
85630 Grasbrunn
Germany
www.boschsecurity.com
© Bosch Sicherheitssysteme GmbH, 2019
Bosch Security Systems, Inc
12000 Portland Avenue South
Burnsville MN 55337
USA
www.electrovoice.com
© Bosch Security Systems, Inc., 2019
 Loading...