

Page 1
Blue Line D1-P
Tritech ® Detector
Installation Instructions
TriTech detector
installatiehandleiding
Notice d’installation du
détecteur TriTech
TriTech-Melder-
Installationsanleitungen
Istruzioni di installazione
del rilevatore TriTech
Instruções de instalação
do detector TriTech
Instrucciones de instalación
del detector TriTech
ϝᡔᴃ⌟఼ᅝ㺙䇈ᯢ
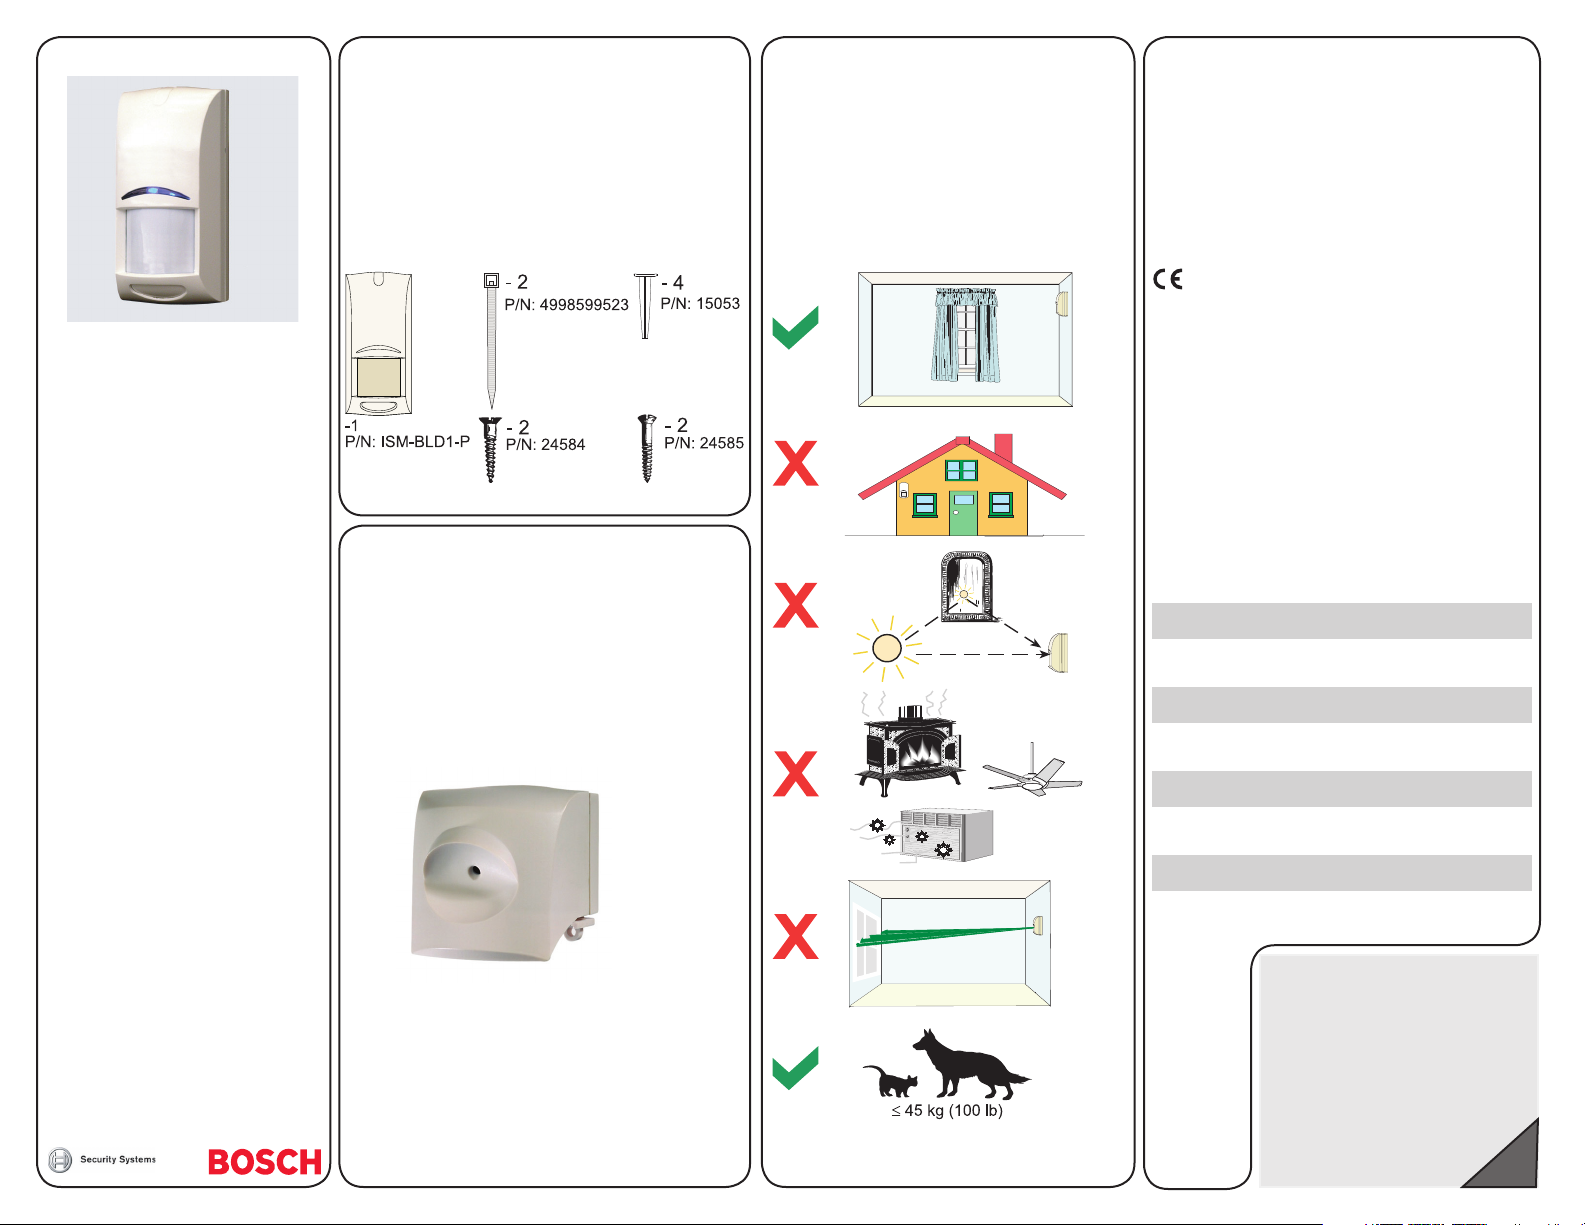
Parts List
Onderdelenlijst
Liste de pièces
Teileliste
Elenco dei componenti
Lista de peças
Lista de piezas
䳊䚼ӊ⏙
Options
Opties
Options de montage
Optionen
Opzioni
Opções
Opciones
ৃ䗝䚼ӊ
Installation Considerations
Aandachtspunten voor installatie
Conseils relatifs à l’installation
Montagehinweise
Informazioni sull’installazione
Notas de instalação
Consejos de instalación
ᅝ㺙⊼ᛣџ乍
Compliance
Naleving
Conformité
Normhinweise
Compliance
Compatibilidade
Conformidad
ヺড়㾘㣗
FCC and RSS-210
This device complies with Part 15 of the FCC Rules and
with RSS-210 of Industry and Science Canada. Operation is
subject to two conditions:
1.This device cannot cause harmful interference.
2.This device must accept any interference, including
interference that might cause undesired operation.
Changes or modifi cations not expressly approved by Bosch
Security Systems can void the user’s authority to operate
the equipment.
UL
Use only a Listed limited-power source.
SELV
Connect all wiring to a safety extra-low voltage (SELV)
circuit only.
Sluit alle bedrading uitsluitend aan op een circuit met een
extra lage veiligheidsspanning.
Prenez soin de connecter tous les câbles à un circuit à très
basse tension de sécurité (SELV).
Alle Drähte sind ohne Ausnahme an Niederspannung
anzuschließen.
Collegare tutti i cavi esclusivamente a un circuito SELV
(circuito di sicurezza a bassissima tensione).
Ligue todas as cablagens apenas a um circuito de
segurança de tensão extra baixa (SELV).
Conecte el cableado únicamente a un circuito de seguridad
para voltajes muy bajos (SELV).
ҙ䰤ᇚ᠔᳝ⱘ㒓䏃ϢᅝܼᵕԢ⬉˄6(/9˅⬉䏃䖲
DŽ
EIA/CCIR: ISM-BLA1-CM-C
NTSC/PAL: ISM-BLA1-CM-E
The pet immunity feature was not tested by UL.
www.boschsecuritysystems.com
TriTech® and Pet Friendly® are
registered trademarks of Bosch
Security Systems in the United States.
© 2004 Bosch Security Systems
4998153063D
1
Page 2
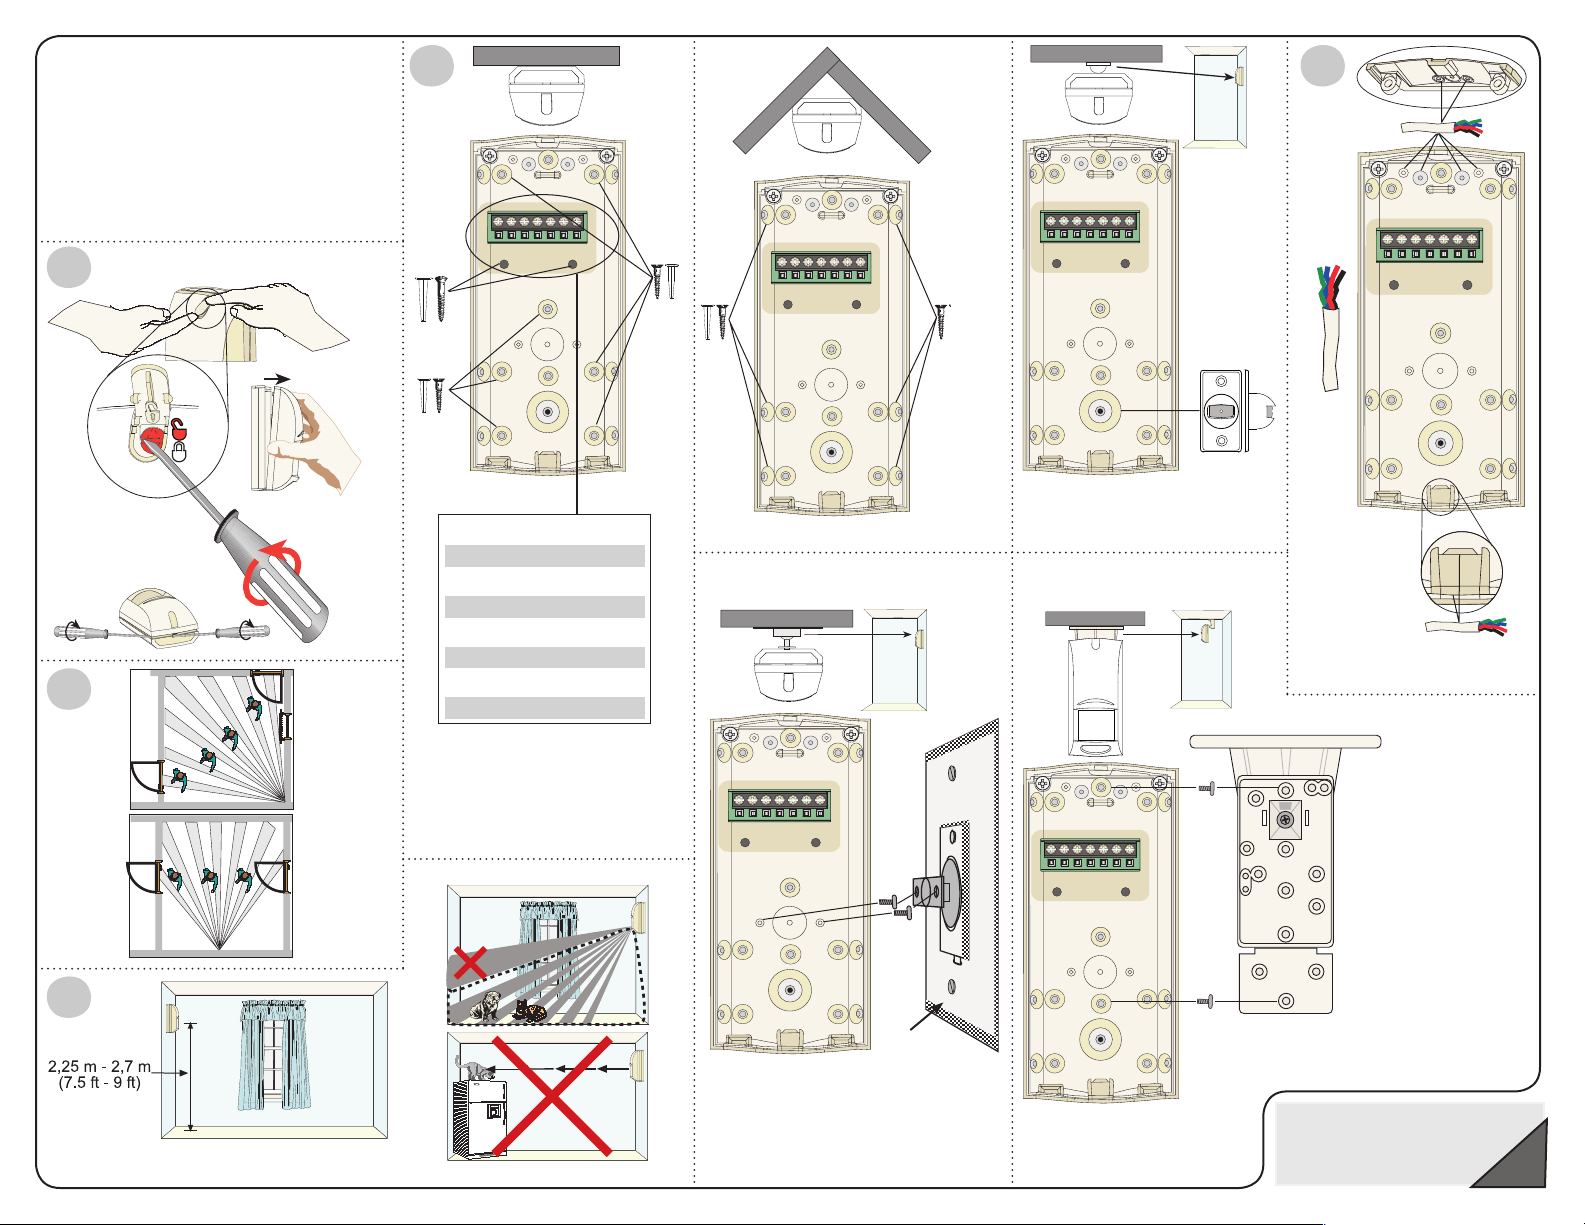
Installation
Installatie
Installation
Montage
Instalação
Installazione
Instalación
ᅝ㺙
54
1
1
2
X
2
3
B335
Wall tamper
Sabotage-optie voor muur
Autosurveillance mur
Abreißsabotageüberwachung
Antirimozione
Tamper de parede
Bucle de antisabotaje de pared
㺙䰆ᢚ
3
4-6
B328
B338
© 2004 Bosch Security Systems
4998153063D
2
Page 3

6 7
-
+
-
+
Tamper Contact: Connect to a 24-hour protection
circuit; maximum rating 125 mA, 28 VDC, 3 W.
Sabotagecontact: Verbinden met een 24-uurs
beschermingscircuit; Maximale belasting: 125 mA,
28 VDC, 3 W.
Contact d’autosurveillance : Connecter à un circuit
de protection fonctionnant 24h/24 ; capacité
maximale 125 mA, 28 Vcc, 3 W.
Sabotageschutzkontakt: Schließen Sie den Kontakt
an eine Sabotagelinie an. Max. 125mA, 28V DC,
3W.
Contatto antimanomissione: collegare a una zona
24 ore in centrale; potenza nominale massima di
125 mA, 28 V CC, 3 W.
Contacto do tamper: Ligue a um circuito de
protecção de 24 horas; capacidade máxima
de 125 mA, 28 VCC, 3 W.
Contacto de bucle antisabotaje: Conecte el circuito
de bucle de antisabotaje a un circuito de protección
24 horas; Valores máximos: 125 mA, 28 VDC, 3 W.
Digital Alarm: Activates optional
plug-in modules, 5 V normally,
grounded during alarm.
Digitaal alarm: Activeert optionele
plug-in modules, 5 V normaal,
geaard tijdens alarm.
Alarme à collecteur ouvert :
Active les modules enfi chables en
option, 5 V au repos, à la masse
lorsque l’alarme est active.
Digitaler Alarm: Aktiviert
optionale Steckmodule, 5 V
normal, 0 V während Alarm.
Allarme digitale: attiva moduli
plug-in opzionali, di norma 5 V,
chiude a terra durante l’allarme.
Alarme digital: Activa os módulos
de encaixe opcionais, normalmente
5 V, ligados à terra durante o
alarme.
Alarma digital: Activa los modos
enchufables opcionales; por lo
general 5V; actúa como toma de
tierra durante la alarma.
᭄ᄫ䄺˖▔⌏ৃ䗝ⱘᦦܹᓣ
ഫˈℷᐌᯊЎӣˈ䄺ᳳ䯈
ഄDŽ
䰆ᢚ㘨㒰˖䖲ࠄᇣᯊֱᡸ⬉䏃˗᳔乱
ᅮ↿ᅝˈӣⳈ⌕ˈ⪺DŽ
8
LED
Off
Uit
Arrêt
Aus
Spento
Desligado
Apagado
݇䯁
On
Aan
Marche
Ein
Acceso
Ligado
Encendido
ᠧᓔ
Microwave range adjustment
Aanpassing van radarbereik
Réglage de la portée hyperfréquence
Einstellung des Mikrowellenbereichs
Regolazione del range delle microonde
Regule o alcance do dispositivo de microondas
Ajuste del rango de microondas
ᖂ⊶㣗ೈ䇗ᭈ
Non-pet installations only: Pull to enable look-down zone.
Note: You cannot replace tape once it is removed.
Alleen voor installaties zonder huisdieren: Trekken om de
optionele kruipzone in te stellen.
Opmerking: U kunt de tape
niet terugplaatsen nadat die is verwijderd.
Si vous ne possédez pas d’animaux domestiques : Retirez
l’autocollant pour activer la détection verticale. Remarque : une
fois retiré, ne pas recoller l’autocollant.
Nur für Installationen an Orten ohne Haustiere: Ziehen, um
Unterkriechschutzzone zu aktivieren. Hinweis: Das Klebeband
kann nach dem Abnehmen nicht wieder aufgetragen werden.
Solo per le installazioni senza animali: Tirare per abilitare l’area
antistrisciamento. Nota: una volta rimosso il nastro non può più
essere riposizionato.
Apenas para as instalações sem animais domésticos: Retire
para activar a zona vista de cima (Ângulo 0°). Nota: Uma vez
retirada, a fi ta-cola não pode ser recolocada.
Únicamente para instalaciones sin animales domésticos: Tire
para activar la zona de vista ángulo cero. Nota: Una vez retirada,
la cinta no puede sustituirse.
ҙ䰤᮴ᅴ⠽ᅝ㺙˖ᩩϟ⫼׃㾚DŽ
⊼˖㛊ᏺϔᮺ⿏䰸᮴⊩ݡ䌈ϞDŽ
Alarm Relay: Maximum rating 125 mA, 28 VDC, 3 W.
Alarmrelais: Maximale belasting: 125 mA, 28 VDC, 3 W.
Relais d’alarme : Capacité maximale 125 mA, 28 Vcc, 3 W.
Alarmrelais: Max. 125mA, 28V DC, 3W.
Relè di allarme: potenza nominale massima di 125 mA, 28 V CC, 3 W.
Relé do alarme: Capacidade máxima de 125 mA, 28 VCC, 3 W.
Relé de alarma: Valores máximos: 125 mA, 28 VDC, 3 W.
䄺㒻⬉఼˖᳔乱ᅮ↿ᅝˈӣⳈ⌕ˈ⪺DŽ
© 2004 Bosch Security Systems
4998153063D
3
Page 4

Walk Test
Looptest
Test de marche
Gehtest
Teste de passagem
Walk Test
Prueba de paseo
ℹ⌟
LED On
1
LED Aan
LED Marche
LED Ein
LED Acceso
LED Ligado
LED Encendido
থܝѠᵕㅵᠧᓔ
2
4
Blue
Blauwe
Bleu
Blau
Blu
Azul
Azul
㪱
Yellow
Gele
Jaune
Gelb
Giallo
Amarelo
Amarillo
咘
Green
Groene
Vert
Grün
Verde
Verde
Verde
㓓
No activity
Power-up
Dual alarm
Microwave
alarm
PIR alarm
Geen activiteit
Opstarten
Tweevoudig
alarm
Radaralarm
PIR-alarm
Aucune activité
Alimentation
initiale
Alarme double
Alarme
hyperfréquence
Alarme IRP
Supervision: Tests itself every 3 h. If microwave fails, PIR continues to operate.
Supervisie: Test zichzelf elke 3 uur. Wanneer de radar uitvalt, blijft de PIR werken.
Contrôle : Test automatique toutes les 3 heures. En cas de défaillance du système
hyperfréquence, le système IRP prend le relais.
Überwachung: Alle 3 Stunden wird eine Selbstprüfung durchgeführt. Falls das
Mikrowellensystem versagt, erfolgt die Erkennung mit dem PIR-System.
Supervisione: Esegue un test automatico ogni 3 ore. Se il sensore a microonde si guasta, quello
PIR continua a funzionare.
Supervisão: Efectua um teste autónomo de 3 em 3 horas. Se o dispositivo de microondas falhar,
o PIR continua a funcionar.
Supervisión: El dispositivo efectúa una prueba cada 3 horas. Si las microondas fallan, los
infrarrojos pasivos siguen funcionando.
ⲥ⌟˖↣ᇣᯊ㞾㸠⌟䆩ϔDŽ㢹ᖂ⊶༅ᬜˈ3,5㒻㓁䖤㸠DŽ
Keine Aktivität
Starten
Dualer Alarm
Mikrowellen-alarm
PIR-Alarm
Nessuna
attività
Prima
alimentazione
Allarme
doppio
Allarme
microonde
Allarme PIR
Sem actividade Sin actividad
A iniciar
Alarme duplo
Alarme de
microondas
Alarme do PIR
Encendido
Alarma dual
Alarma de
microondas
Alarma de
infrarrojos pasivos
᮴⌏ࡼ
⬉⑤ࡼ
ঠ䄺
ᖂ⊶䄺
3,5䄺
Increase microwave adjustment slightly until range is met.
Pas de radar iets verder aan totdat het gewenste bereik wordt verkregen.
3
Power the detector. Wait at least 2 min.
Detector inschakelen. Wacht enminste
2 min.
Mettez le détecteur sous tension. Patientez
au moins 2 min.
Melder wird eingeschaltet. Wenigstens
2 Minuten lang warten.
Accendere il rilevatore. Attendere
2 minuti.
Ligar o detector. Aguardar no mínimo 2
minutos.
Encienda el detector. Espere al
menos 2 min.
Ў⌟఼կ⬉DŽㄝ㟇ᇥϸߚ䩳DŽ
Note: Have an installer test the detector at least yearly.
Opmerking: Laat de detector tenminste eens per jaar
door een installateur testen.
Remarque : faites tester le détecteur par un installateur
agréé au moins une fois par an.
Hinweis: Ein Installateur sollte den Melder wenigstens
einmal pro Jahr testen.
Nota: fare verifi care il rilevatore da un installatore almeno una volta all’anno.
Nota: Solicite a um instalador que teste o detector pelo menos uma vez por ano.
Nota: Haga que un instalador pruebe el detector al menos una vez al año.
Augmenter légèrement le réglage de l’hyperfréquence pour obtenir la portée requise.
Erhöhen Sie sich Mikrowelleneinstellung ein wenig, bis die Reichweite stimmt.
Aumentare leggermente la portata delle microonde fi no a quando non si raggiunge il range
desiderato.
Aumente ligeiramente a regulação do dispositivo de microondas até que consiga o alcance
pretendido.
Aumente ligeramente el ajuste de microondas hasta alcanzar el rango necesario.
ᖂࡴᖂ⊶䇗ᭈⳈ㟇䖒ࠄ㣗ೈDŽ
Microwave
Radar
Hyperfréquence
Mikrowelle
Microonde
Microondas
Microondas
ᖂ⊶
PIR
PIR
IRP
PIR
PIR
PIR
PIR
3,5
Look-down zone
Kruipzone (optioneel)
Zone de détection verticale
Unterkriechschutzzone
Area antistrisciamento
Zona vista de cima
Zona de vista ángulo cero
׃㾚
⊼˖䇋ᅝ㺙Ҏ⌟䆩⌟఼ˈ㟇ᇥ↣ᑈϔDŽ
Specifi cations
Technische specifi catie
Caractéristiques techniques
Current
Draw:
Standby
Power:
Technische Daten
Specifi che tecniche
Especifi cações
Especifi caciones
Humidity: 0 to 95% non-condensing
㾘Ḑ
Stroomverbruik: 15 mA op 12 VDC, Alarmstroomverbruik 22 mA
Relatieve vochtigheid: 0 tot 95% niet condenserend
Consommation : 15 mA à 12 Vcc, 22 mA en alarme
Humidité : de 0 à 95% sans condensation
Stromaufnahme: 15 mA bei 12 V DC, 22 mA (Alarmstrom)
Luftfeuchtigkeit: 0 bis 95%, nicht-kondensierend
Assorbimento di corrente: 15 mA @ 12 Vcc, corrente in allarme 22 mA
Umidità: Da 0 a 95% senza condensa
Consumo: 15 mA a 12 VCC, Consumo do alarme 22 mA
Humidade: 0 a 95% sem condensação
Consumo de corriente: 15 mA a 12 Vcc, 22 mA en alarma
Humedad: de 0 a 95% sin condensación
᳔⬉⌕˖ P$#9'&ǃ䄺⬉⌕P$
ᑺ˖ 㟇䴲ދޱ
-29°C to +49°C (-20°F to +120°F )
For UL Listed installations, the temperature range
is 0°C to +49°C (+32°F to +120°F)
µW: ISM-BLD1-P-F1 10.525 GHz
ISM-BLD1-P-F3 9.9 GHz
ISM-BLD1-P-F4 10.687 GHz
15 mA @ 12 VDC, alarm
current 22 mA
No internal standby battery.
For UL Listed product
installations, provide 4 h (60
mAh) standby power from the
control unit or by a UL Listed
burglary power supply.
(0 to 85% UL installations)
© 2004 Bosch Security Systems
4998153063D
4
 Loading...