

Bosch Benchmark HSLP451UC Maintance Manual
Built-In Steam Convection Oven
Models:
HSLP451UC

About This Manual . . . . . . . . . . . . . . . . . . . . 1
Safety . . . . . . . . . . . . . . . . . . . . . . . . . . . . . . 2
Getting Started . . . . . . . . . . . . . . . . . . . . . . .4
Parts and Accessories . . . . . . . . . . . . . . . . . . . . . . . 4
Control Panel . . . . . . . . . . . . . . . . . . . . . . . . . . . . 4
Oven Interior . . . . . . . . . . . . . . . . . . . . . . . . . . . . . 5
Oven Accessories . . . . . . . . . . . . . . . . . . . . . . . . . 5
Additional Accessories . . . . . . . . . . . . . . . . . . . . . 5
Before First Use . . . . . . . . . . . . . . . . . . . . . . 6
Water Tank . . . . . . . . . . . . . . . . . . . . . . . . . . . . . . . . . 6
Water Level Warnings . . . . . . . . . . . . . . . . . . . . . . 6
Set the Clock . . . . . . . . . . . . . . . . . . . . . . . . . . . . . . . 7
Setting Water Hardness Level. . . . . . . . . . . . . . . . . . 7
Clean Using the STEAM Mode . . . . . . . . . . . . . . . . . 7
Calibration. . . . . . . . . . . . . . . . . . . . . . . . . . . . . . . . . . 7
Basic Oven Settings . . . . . . . . . . . . . . . . . . . . . . . . . 8
Setting Options . . . . . . . . . . . . . . . . . . . . . . . . . . . 8
Operation . . . . . . . . . . . . . . . . . . . . . . . . . . .10
Start Cooking . . . . . . . . . . . . . . . . . . . . . . . . . . . . . . . 10
Preheating the Oven . . . . . . . . . . . . . . . . . . . . . . . 10
Rack Positions . . . . . . . . . . . . . . . . . . . . . . . . . . . . 10
Setting the Mode . . . . . . . . . . . . . . . . . . . . . . . . . . 10
Setting the Temperature . . . . . . . . . . . . . . . . . . . . 11
Editing Oven Settings . . . . . . . . . . . . . . . . . . . . . . 11
Oven Clear/Off . . . . . . . . . . . . . . . . . . . . . . . . . . . 11
Panel Lock . . . . . . . . . . . . . . . . . . . . . . . . . . . . . . 12
Kitchen Timer . . . . . . . . . . . . . . . . . . . . . . . . . . . . 12
Oven Timer . . . . . . . . . . . . . . . . . . . . . . . . . . . . . . 12
Multiple Timers . . . . . . . . . . . . . . . . . . . . . . . . . . . 12
Vegetables And Chicken Automatic Programs . . . 13
Steam Oven Modes . . . . . . . . . . . . . . . . . . . 14
Temperature Setting for Each Mode. . . . . . . . . . . . . 14
Steam . . . . . . . . . . . . . . . . . . . . . . . . . . . . . . . . . . 14
Steam Conv . . . . . . . . . . . . . . . . . . . . . . . . . . . . . . 14
Defrost . . . . . . . . . . . . . . . . . . . . . . . . . . . . . . . . . 14
Proof . . . . . . . . . . . . . . . . . . . . . . . . . . . . . . . . . . . 15
Dish Warming . . . . . . . . . . . . . . . . . . . . . . . . . . . . 15
Reheat . . . . . . . . . . . . . . . . . . . . . . . . . . . . . . . . . 15
European Conv . . . . . . . . . . . . . . . . . . . . . . . . . . . 15
Keep Warm . . . . . . . . . . . . . . . . . . . . . . . . . . . . . . 15
Slow Cook . . . . . . . . . . . . . . . . . . . . . . . . . . . . . . . 15
Chicken and Vegetables Programs . . . . . . . . . . . 15
Getting the Most Out of Your Steam
Oven . . . . . . . . . . . . . . . . . . . . . . . . . . . . . . .16
General Tips . . . . . . . . . . . . . . . . . . . . . . . . . . . . . . . 16
Cooking Recommendations . . . . . . . . . . . . . . . . . . . 17
Vegetables . . . . . . . . . . . . . . . . . . . . . . . . . . . . . . 17
Side Dishes and Legumes . . . . . . . . . . . . . . . . . . 18
Meat, Poultry, Fish . . . . . . . . . . . . . . . . . . . . . . . . 18
Slow Cooking Meat . . . . . . . . . . . . . . . . . . . . . . . . 20
Souffles, Casseroles, Additions to Soups . . . . . . . 20
Desserts, Compotes . . . . . . . . . . . . . . . . . . . . . . . 20
Cakes and Baked Goods . . . . . . . . . . . . . . . . . . . 21
Reheating Foods . . . . . . . . . . . . . . . . . . . . . . . . . 23
Defrosting . . . . . . . . . . . . . . . . . . . . . . . . . . . . . . . 23
Proofing Dough . . . . . . . . . . . . . . . . . . . . . . . . . . . 24
Juice Extraction . . . . . . . . . . . . . . . . . . . . . . . . . . 24
Frozen Products . . . . . . . . . . . . . . . . . . . . . . . . . . 24
Special Foods . . . . . . . . . . . . . . . . . . . . . . . . . . . . 25
Cleaning and Maintenance . . . . . . . . . . . . .26
Cleaning . . . . . . . . . . . . . . . . . . . . . . . . . . . . . . . . . . . 26
Cleaners . . . . . . . . . . . . . . . . . . . . . . . . . . . . . . . . 27
Steam Cleaning . . . . . . . . . . . . . . . . . . . . . . . . . . 27
Descale . . . . . . . . . . . . . . . . . . . . . . . . . . . . . . . . . 28
Rack Cleaning . . . . . . . . . . . . . . . . . . . . . . . . . . . 29
Maintenance . . . . . . . . . . . . . . . . . . . . . . . . . . . . . . . 29
Service . . . . . . . . . . . . . . . . . . . . . . . . . . . . .30
Before Calling Service . . . . . . . . . . . . . . . . . . . . . . . 30
Troubleshooting . . . . . . . . . . . . . . . . . . . . . . . . . . 30
Data Rating Label . . . . . . . . . . . . . . . . . . . . . . . . . 31
Service Information . . . . . . . . . . . . . . . . . . . . . . . . 31
Limited Product Warranty . . . . . . . . . . . . . .32
Customer Support, Accessories
& Parts . . . . . . . . . . . . . . . . . . . . . . back page
This BOSCH® appliance is made by
BSH Home Appliances Corporation
1901 Main Street, Suite 600
Irvine, CA. 92614
Questions?
1-800-944-2904
www.bosch-home.com/us
We look forward to hearing from you!

About This Manual
How This Manual is Organized
You can get the most out of your new appliance by reading this manual from beginning to end. This way you will
systematically get to know your appliance and become familiar with its operation and features.
The manual consists of the following sections:
• The “Safety” section provides information on how to safely operate your oven.
•“Getting Started” introduces you to the oven components and features.
• The “Operation” section offers you step-by-step instructions on how to operate your oven.
•In “Getting the Most Out of Your Appliance” you can find a list of many common foods with the appropriate oven
mode, temperature, rack position and bake time. This section also provides you with several bakeware and
preparation tips.
•“Cleaning and Maintenance” provides you with information on how to clean and care for the various oven parts.
• The “Service” section includes your warranty and do-it-yourself troubleshooting tips.
• Pay special attention to the important safety instructions in the “Safety” section.
Safety Definitions
WARNING
This indicates that death or serious injuries may occur as
a result of non-observance of this warning.
CAUTION
This indicates that minor or moderate injuries may occur
as a result of non-observance of this warning.
NOTICE: This indicates that damage to the appliance or
property may occur as a result of non-compliance with this
advisory.
Note: This alerts you to important information and/or tips.
English 1

Safety
IMPORTANT SAFETY INSTRUCTIONS
READ AND SAVE THESE INSTRUCTIONS
Before You Begin
INSTALLER: Please leave these instructions with this unit
for the owner.
OWNER: Please retain these instructions for future
reference.
WARNING
ELECTRICAL SHOCK HAZARD
Disconnect power before installing or servicing.
Before turning power ON, ensure that all
controls are OFF. Failure to do so can result in
death or electrical shock.
Safety Notes
This appliance is intended for domestic use only. This
appliance must only be used for food preparation.
Adults and children must not operate the appliance without
supervision,
• if they are physically or mentally incapable of doing
so; or
• if they have insufficient knowledge or experience.
Never let children play with the appliance.
DO NOT operate this appliance if it is not working properly,
or if it has been damaged. Contact an authorized servicer.
DO NOT obstruct oven vents.
DO NOT repair or replace any part of the appliance unless
specifically recommended in this manual. Refer all
servicing to a factory authorized service center.
Risk of Burns!
Hot steam may escape when the appliance door is opened.
Open the appliance door carefully during or after cooking.
When opening the door, do not lean over it. Ensure that,
depending on the temperature, steam is not visible.
DO NOT clean the appliance immediately after switching it
off. The water in the evaporator dish is still hot. Wait until
the appliance has cooled down.
Exercise caution when opening the appliance. Standing to
the side, open the door slowly and only slightly to let hot air
and/or steam escape. Keep your face clear of the opening
and ensure there are no children or pets near the unit. After
the hot air and/or steam is released, proceed with your
cooking. Keep oven doors shut unless necessary for
cooking or cleaning purposes. Do not leave open door
unattended.
Proper Installation and Maintenance
Have the installer show you the location of the circuit
breaker. Mark it for easy reference.
This appliance must be properly installed and grounded by
a qualified technician. Connect only to a properly grounded
outlet. Refer to Installation Instructions for details.
Local codes vary. Installer is responsible for ensuring that
the installation and grounding comply with all applicable
codes. Failure to follow appropriate local codes and
regulations may void the warranty.
DO NOT store or use corrosive chemicals, vapors,
flammables or nonfood products in or near this appliance.
The use of corrosive chemicals in heating or cleaning will
damage the appliance and could result in injury.
English 2
DO NOT heat or warm sealed food containers. Build-up of
pressure may cause the container to burst and cause
injury.
Always place oven racks in desired location while oven is
cool.
Never prepare food with large quantities of high proof
alcoholic beverages. Steam containing alcohol can ignite
inside the appliance. Use only small quantities of high proof
alcoholic beverages, and use caution when opening the
appliance door.

IMPORTANT SAFETY INSTRUCTIONS
READ AND SAVE THESE INSTRUCTIONS
Moist or damp potholders on hot surfaces may result in
burns from steam.
Interior surfaces of an oven become hot enough to cause
burns. During and after use, do not touch, or let clothing,
pot holders, or other flammable materials come in contact
with interior surfaces of the oven until they have had
sufficient time to cool. Other surfaces of the appliance may
become hot enough to cause burns. These surfaces
include oven vent openings, surfaces near these openings
and oven doors.
Small children must be kept at a safe distance from the
appliance.
Risk of Fire!
Never store combustible items in the cooking compartment.
Do not use aluminum foil or protective liners to line any part
of the appliance. Use of a foil liner could result in a shock or
fire hazard, or the obstruction of the flow of combustion and
ventilation air. Foil is an excellent heat insulator and heat
will be trapped beneath it. This will affect the cooking
performance and can damage the finish of the oven.
Causes of Damage
CAUTION!
• Do not place anything on the cooking compartment
floor. Do not cover it with aluminium foil. A build-up of
heat could damage the appliance.
• The cooking compartment floor and the evaporator
dish must always be kept clear.
• Aluminium foil in the cooking compartment must not
come into contact with the oven cavity or door panel.
This could cause permanent discoloration.
• Ovenware must be heat and steam resistant.
• When steaming with the perforated baking pan, always
insert the baking pan beneath it.
• If the door seal is very dirty, the appliance door will no
longer close properly during operation. The fronts of
adjacent units could be damaged. Always keep the
door seal clean and replace when necessary.
• Do not place anything on the open appliance door. The
appliance could be damaged.
• Do not carry or hold the appliance by the door handle.
The door handle cannot support the weight of the
appliance, and could break.
If materials inside an oven should ignite, keep door closed.
Turn off the appliance and disconnect the circuit at the
circuit breaker box.
Use this appliance only for its intended purpose as
described in this manual. For example, never use the
appliance for warming or heating the room. Never use the
appliance for storage.
Always have a working smoke detector near the kitchen.
In the event that personal clothing or hair catches fire, drop
and roll immediately to extinguish flames.
Smother flames from food fires other than grease fires with
baking soda. Never use water on cooking fires.
Have an appropriate fire extinguisher available highly
visible and easily accessible near the oven.
The cooking compartment in your appliance is made of
high grade stainless steel. Improper care can lead to
corrosion in the cooking compartment. Refer to the care
and cleaning instructions in this manual. Remove food
residues from the cooking compartment as soon as the
appliance has cooled.
State of California Proposition 65 Warnings:
This product contains chemicals known to the State of
California to cause cancer, birth defects or other
reproductive harm.
English 3
Getting Started
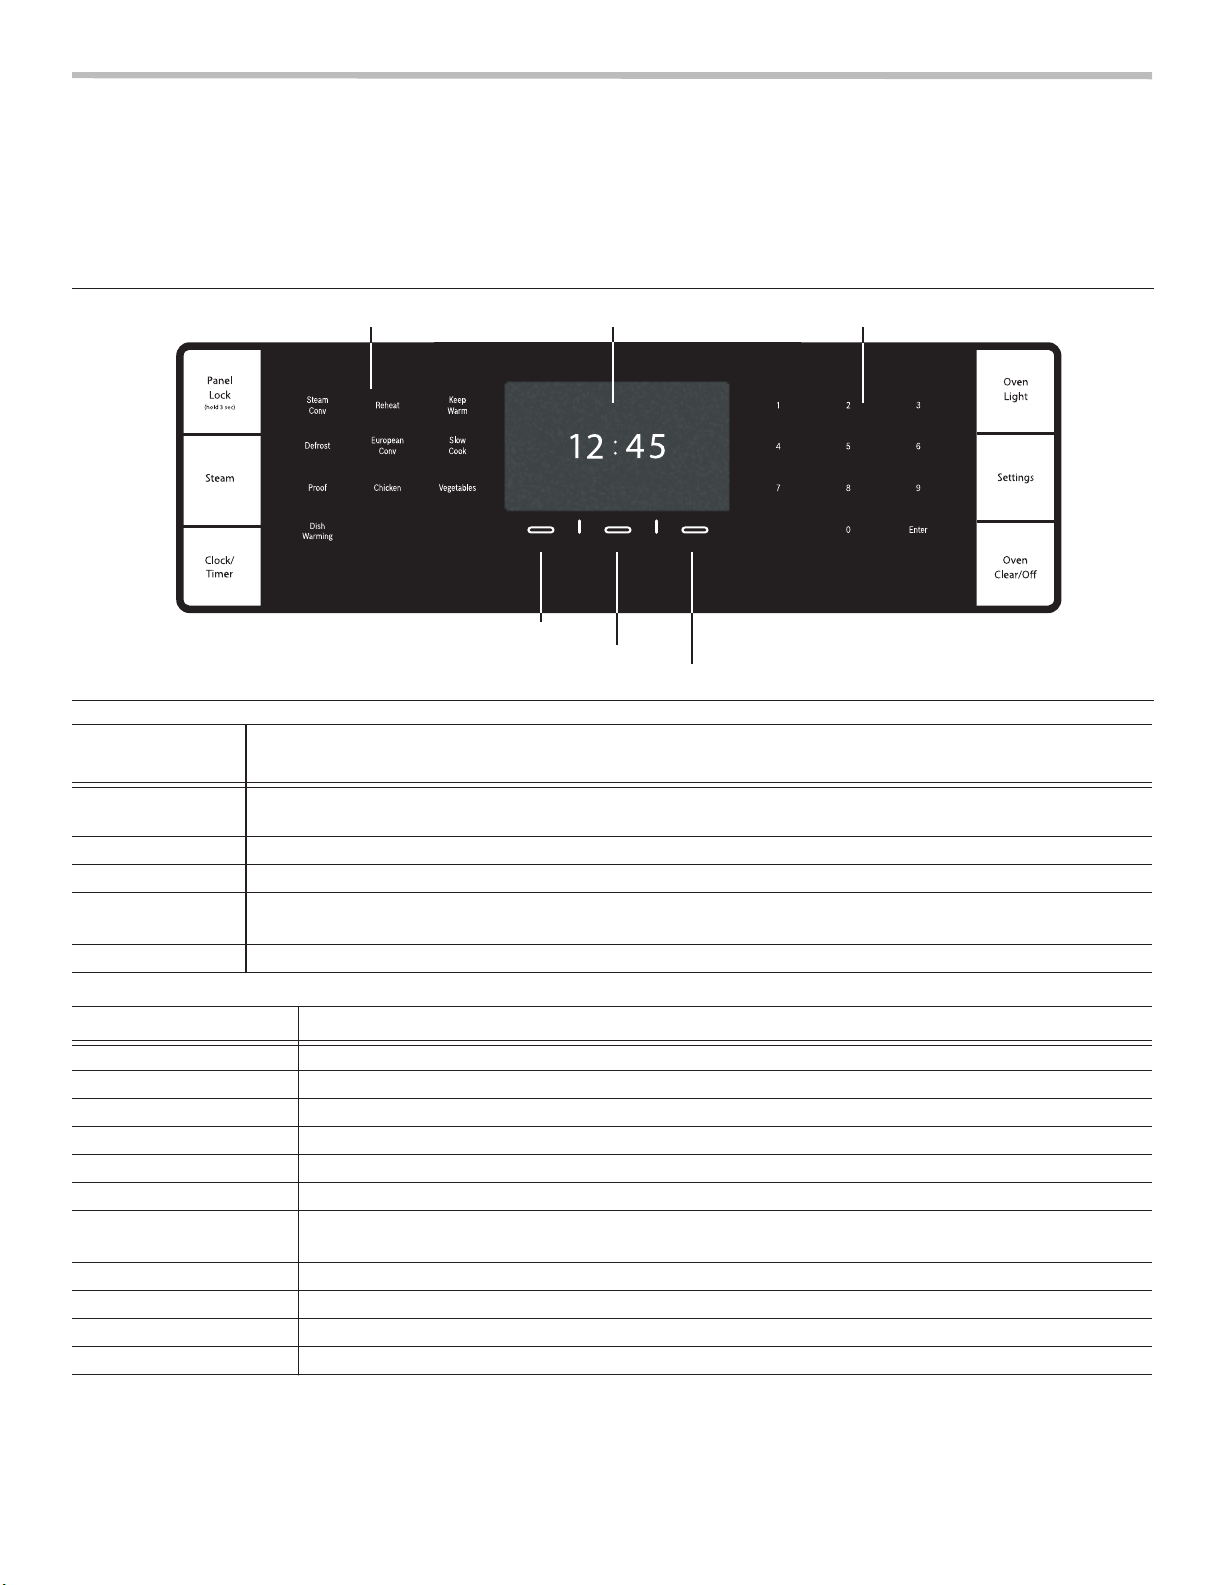
Parts and Accessories
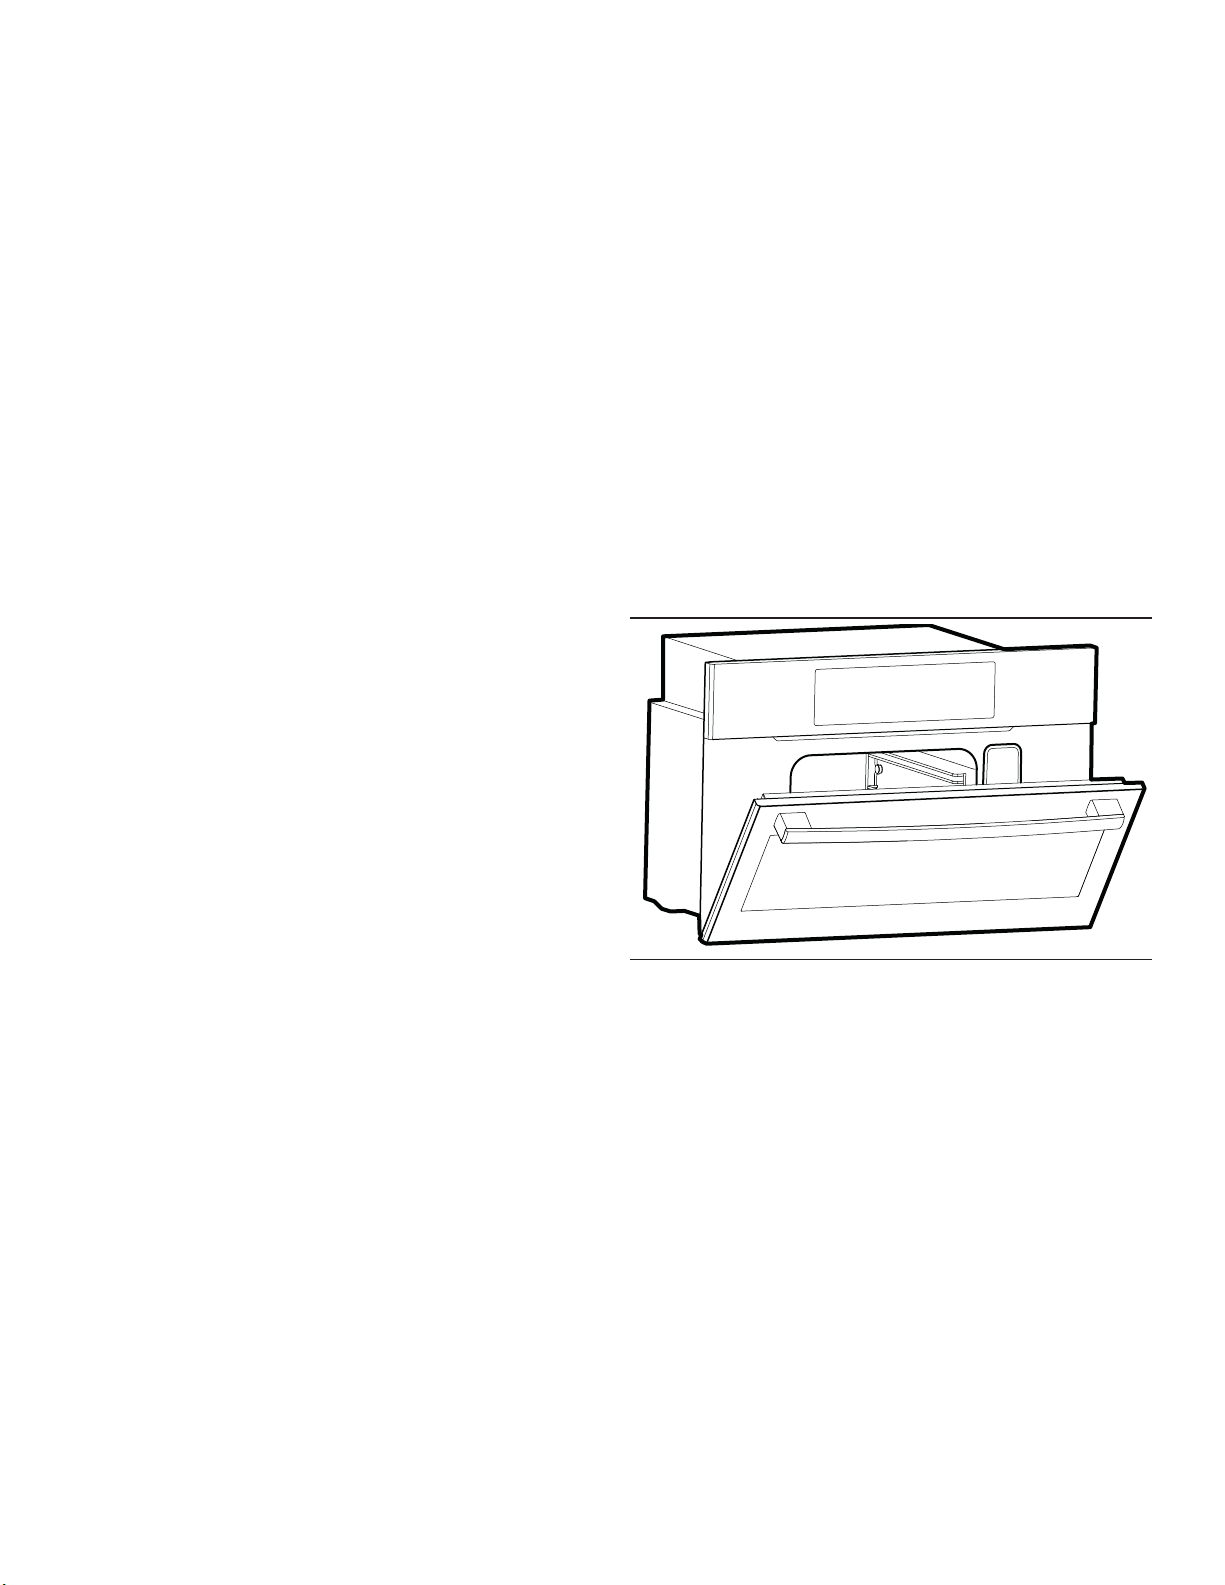
Control Panel
Mode Touchpad
Soft Key 1
FUNCTIONS
Panel Lock
Clock/Timer Sets the clock and timer functions.
Oven Light Turns oven light on or off.
Settings
Oven Clear/Off Turns the oven off.
You only have to press lightly on the touchpads to operate them. The touchpads will not work
if you press several of them at once, such as when cleaning them.
Press and hold for three seconds to turn the panel lock on or off. Prevents the oven from being turned
on.
User settings are available for the operator to customize the steam oven to their preference. Settings
can only be accessed from stand-by state.
Numeric TouchpadDisplay
Soft Key 2
Soft Key 3
COOKING MODE MODE FUNCTION
Steam For vegetables, fish, side dishes, for juicing fruit and for blanching.
Steam Conv Combines steam and convection oven modes. Use for meat, soufflés and baked goods.
Defrost Defrosts fruits, vegetables, meats and fish for cooking or serving.
Proof Proof (raises) yeast dough and sourdough.
Dish Warming Heats and keeps warm oven–safe ovenware, plates and bowls.
Reheat Gently reheats cooked foods in plated dishes and baking dishes.
European Conv
Keep Warm Keeps hot, cooked foods at serving temperature.
Slow Cook Slowly roasts meats so they remain very tender.
Chicken Automatic program setting for cooking chicken.
Vegetables Automatic program setting for cooking vegetables.
English 4
Operates as a convection oven, with no steam. Use for moist cakes, sponge cakes and braised
meat.
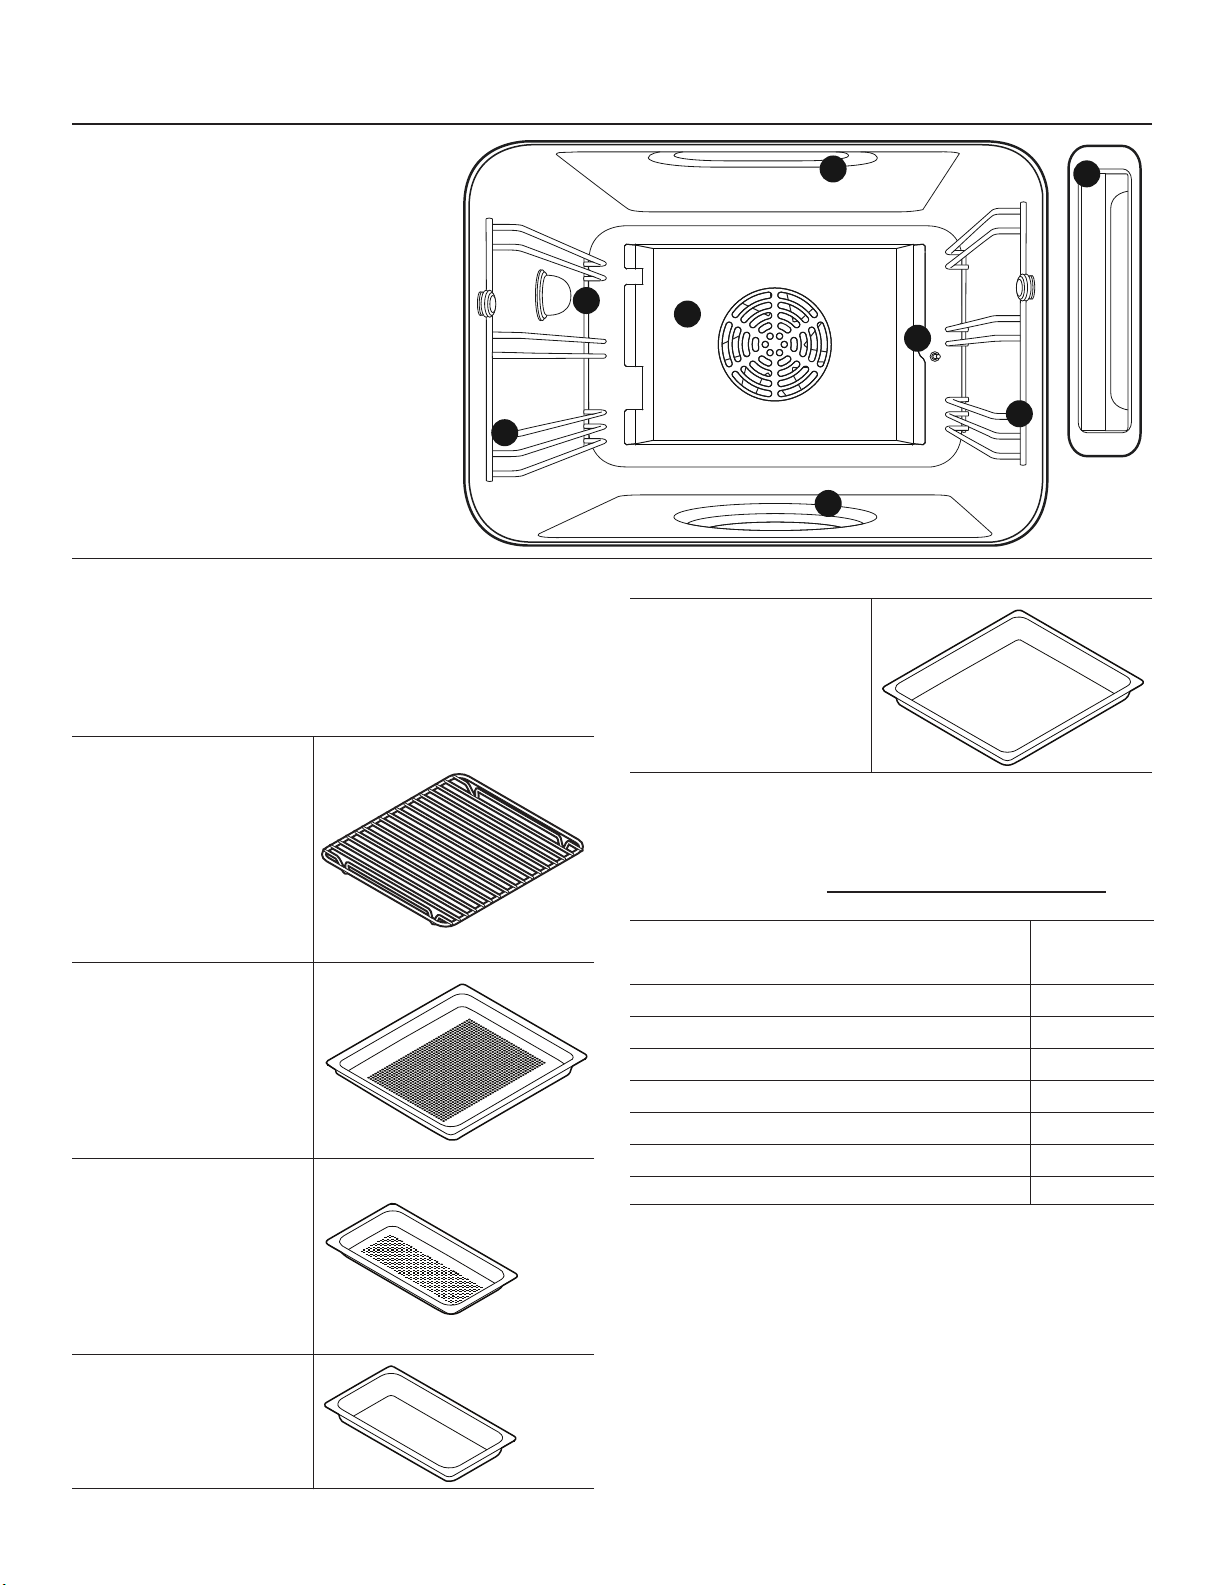
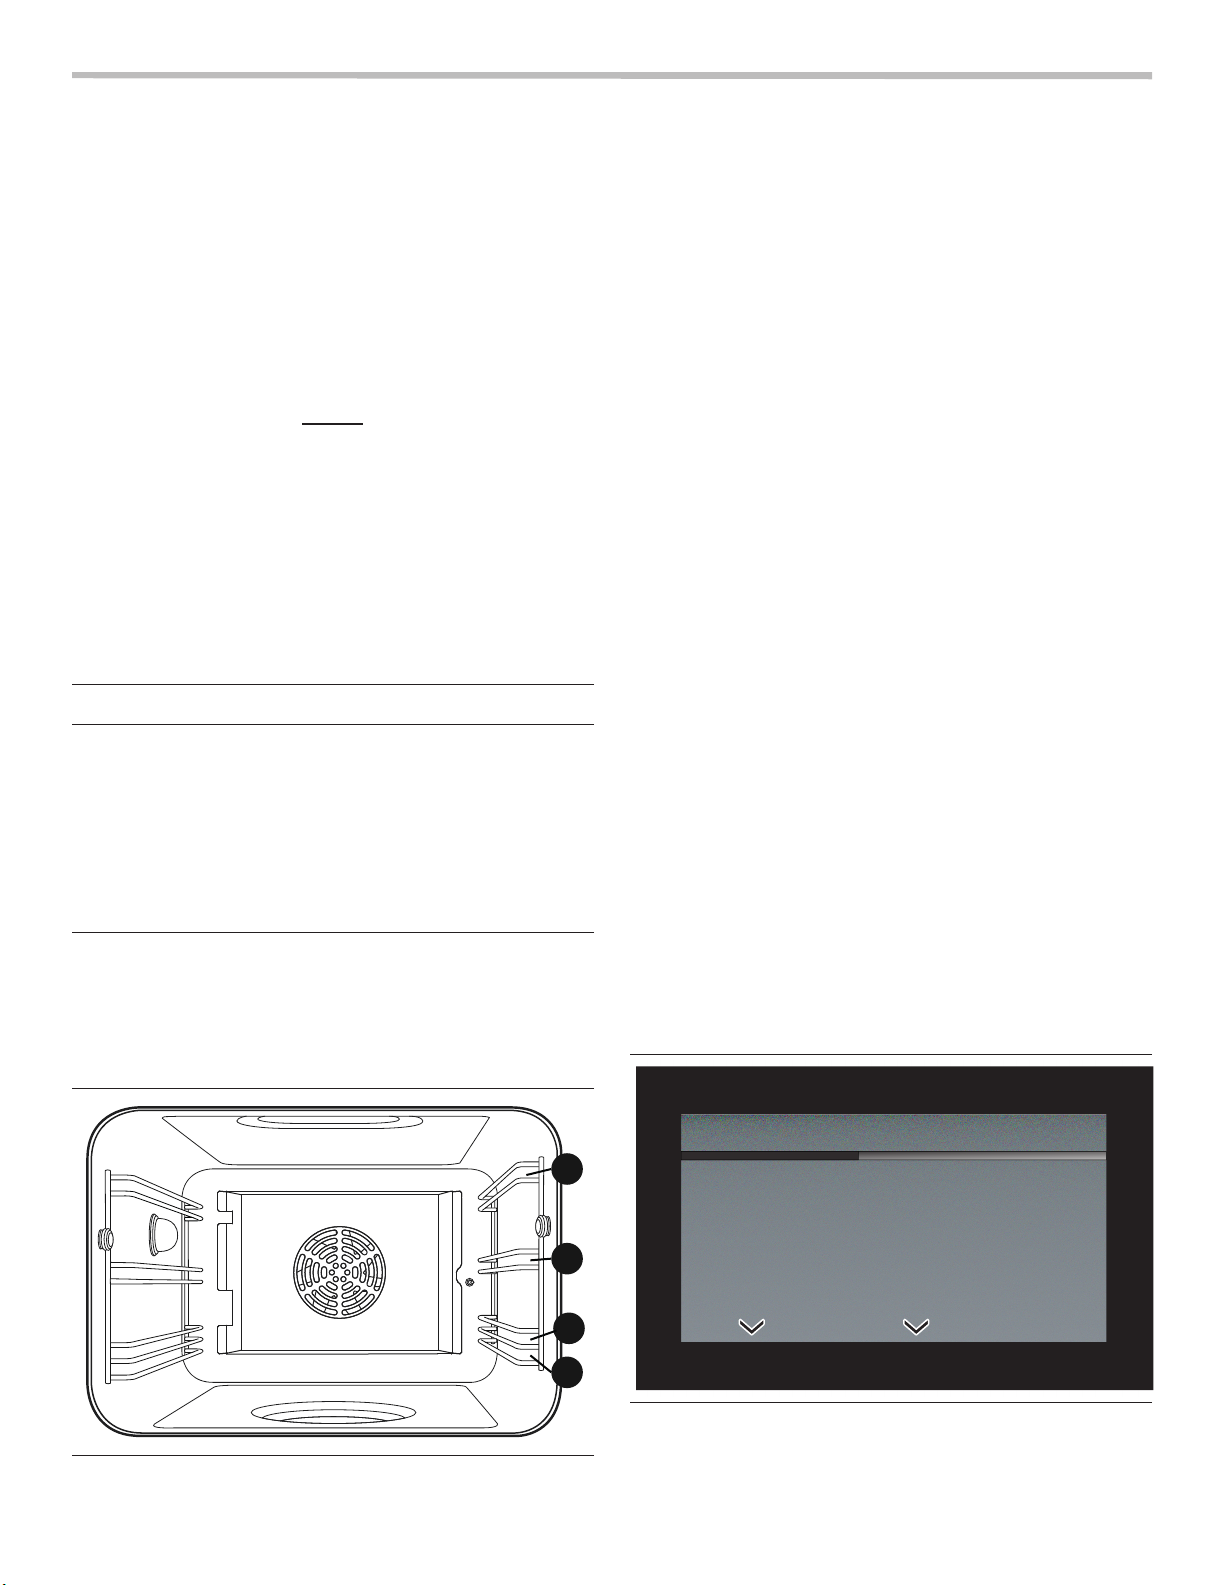
Oven Interior
1. Rack Guide
2. Water Tank
3. Evaporator Dish
4. Convection Cover
5. Oven Light
6. Temperature Sensor
7. Steam Vent
77
55
44
66
22
11
Oven Accessories
Clean the accessories thoroughly with soapy water and a
cloth before initial use. The following steam oven
accessories come with your steam oven:
Wire rack
(CSRACKH)
Use for support during
baking.
Place meats on the wire
rack with the baking pan
underneath and insert
both together into one
level.
Perforated baking pan,
full-size (CS2XLPH)
1ǫ” deep
Ideal for steaming fish or
large quantities of
vegetables, extracting
juice from berries, and
much more.
Perforated baking pan,
half-size
(CS1XLPH)
1ǫ” deep
Ideal for steaming fish or
vegetables, extracting
juice from berries, and
much more.
Baking pan, half-size
(CS1XLH)
1ǫ” deep
Use for smaller quantities
and for rice and cereals.
11
33
Baking pan, full-size
(CS2LH)
1ǩ” deep
Ideal for baking cakes
and catching dripping
liquid when steaming.
Additional Accessories
The following additional accessories can be purchased
through the e-store at www.bosch-home.com/us/store:
ACCESSORY
Perforated baking pan, full-size, 1ǫ'' deep CS2XLPH
Perforated baking pan, half-size, 1ǫ'' deep CS1XLPH
Baking pan, full-size, 1ǫ'' deep CS2XLH
Baking pan, half-size, 1ǫ'' deep CS1XLH
Baking pan, full-size, 1ǩ'' deep CS2LH
Wire rack CSRACKH
Descaling powder 00573828
ORDER
NUMBER
English 5
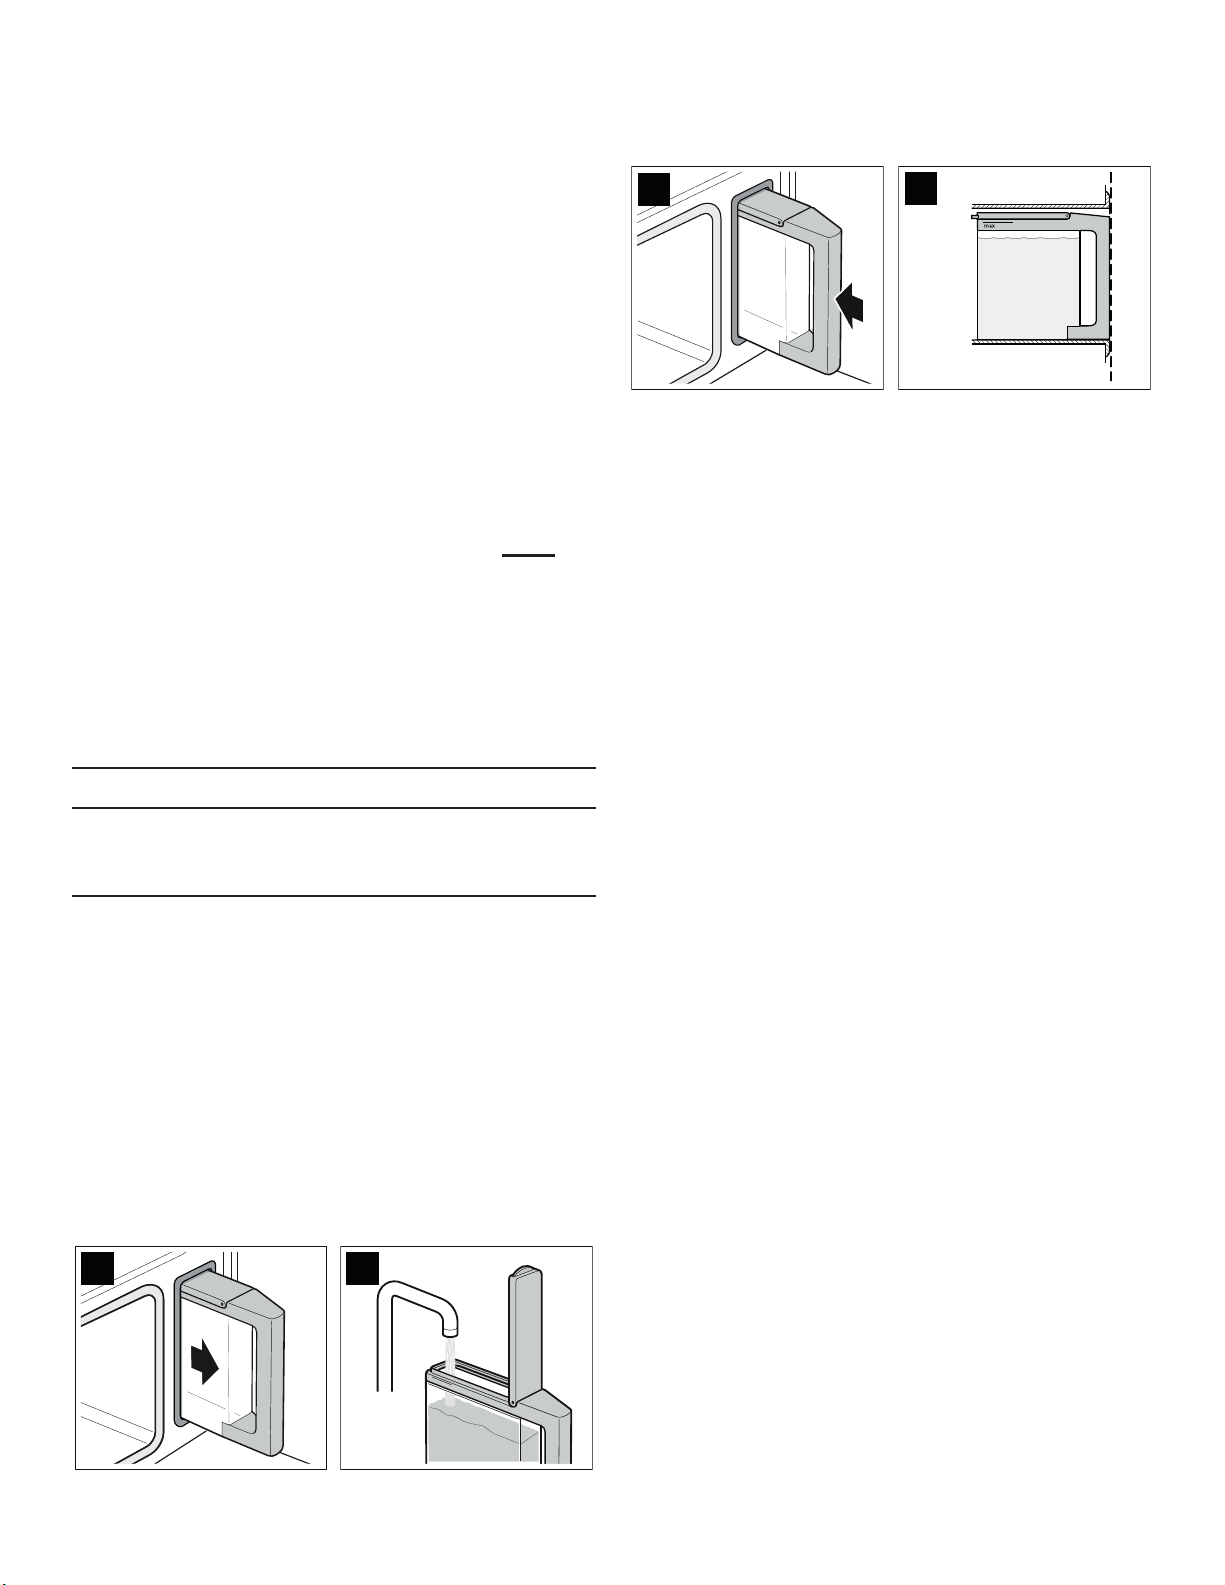
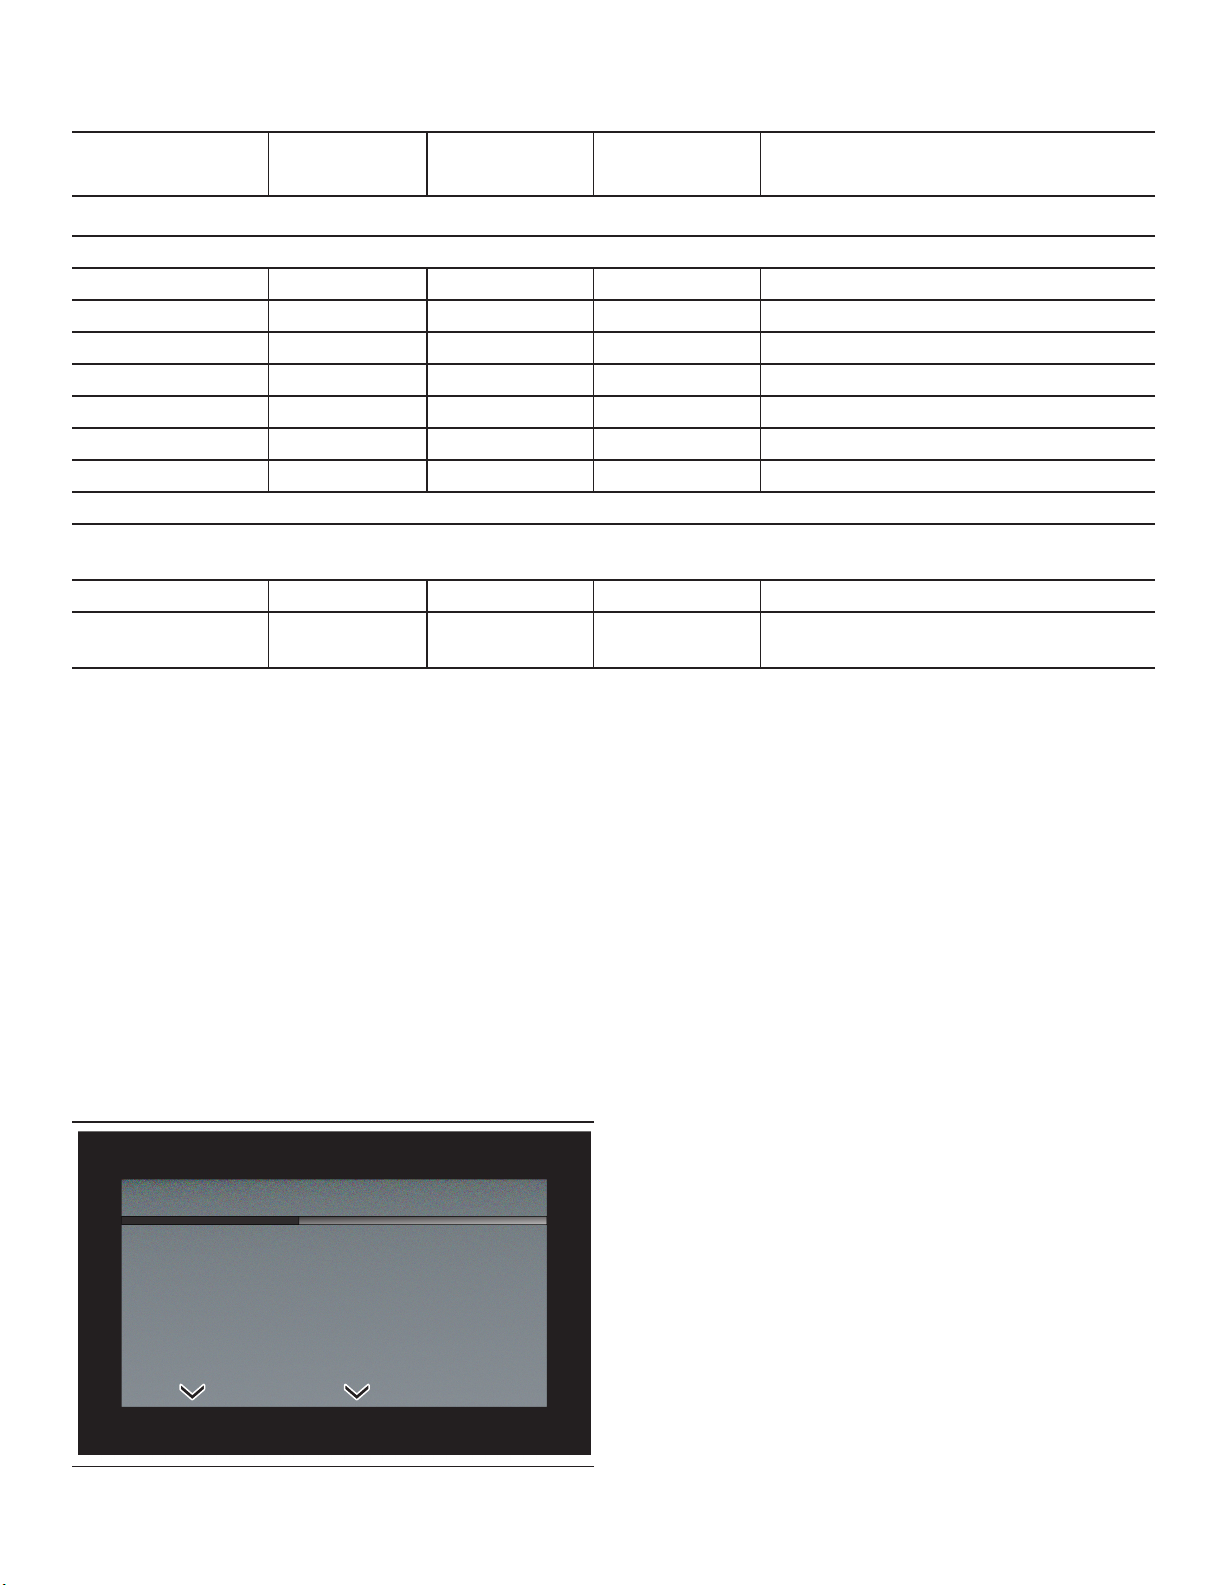
Before Using the Appliance
for the First Time
4. Close tank lid until it snaps.
5. Insert water tank completely (picture C).
6. The tank must be flush with the tank funnel (picture D).
• Appliance must be properly installed by a qualified
technician before use.
• Remove all packing materials from inside and outside
the oven.
• While cool, wipe with a clean, damp cloth and dry.
There may be a slight odor during first uses; this is
normal and will disappear.
• Read and understand all safety precautions and Use
and Care Manual information.
• Execute the following sections prior to operating:
Water tank
The water tank is on the right side of the steam oven. It
holds 1.4 quarts (1.3 L) of water. The water tank is not
dishwasher safe.
Important notes about the water used to fill the tank:
• Moisten the seal in the tank lid with some water before
using it for the first time.
• Use only fresh tap water or, if necessary, plain noncarbonated purchased water to fill water tank.
CAUTION
Use of inappropriate liquids can damage the
appliance! Do not fill the water tank with distilled water
or any other liquids.
• If your water is very hard (10 grains per gallon or
higher), we recommend using softened water.
• If your tap water is highly chlorinated (>40 mg/L), use
plain non-carbonated purchased water with a low
amount of chlorine.
Fill the Water Tank
1. Open door and remove water tank (picture A).
2. Moisten the seal in the tank lid with some water prior to
initial use.
3. Fill the water tank to the “MAX” line with cold water
(picture B).
&
EMPTY THE WATER TANK AFTER EACH USE.
1. Keep the water tank level while slowly pulling it out of
the appliance to ensure that no remaining water drips
down and out through the vent.
2. Pour out the water.
3. Thoroughly dry the seal of the tank lid and the slot
where the tank resides in the appliance. Prolonged
dampness could lead to a musty odor in the tank.
'
Water Level Warnings
The water tank must have enough water to generate the
steam needed for the cooking mode and time you are
using. As the water is converted to steam, the tank level will
drop during cooking. There are three different water levels
that are monitored by the control:
NONE: Tank Full
— Full tank, any oven mode can be run
— The steam oven can operate at 100% steam for
150 minutes without the need to refill the water
tank.
WATER LEVEL IS LOW: Tank with water
— Tank less than full but not empty.
TANK IS EMPTY: Tank is without water.
— A heating mode cannot be run without adding
sufficient water.
— Refill water tank to run a cooking mode.
.
A
English 6
%
PD[

Set the Clock
Clean With STEAM Mode Before First Use
The clock may only be set/edited from stand-by state.
To Set the Clock
1. Press CLOCK/TIMER button on the control panel.
2. Input the desired time using the numeric key pad.
3. Press the SET CLOCK (Soft Key 1).
4. Choose either AM or PM with the appropriate soft key.
— Display transitions to stand-by with the new clock
time.
For Daylight Savings Time Followers
The clock may be set up or back in a single hour increment
by doing the following:
1. Press CLOCK/TIMER button on the control panel.
2. Press SOFT KEY 2.
3. Select either -1 HOUR (Soft Key 1) or +1 HOUR (Soft
Key 3).
— The display immediately reverts to stand-by state.
Setting the Water Hardness Level
Check the water hardness using the test strip provided or
ask your water utility company.
Before using the steam oven for the first time, heat it once
while it is empty:
1. Fill and slide in the water tank. Close the oven door.
2. Select STEAM on the control panel.
3. Press ENTER.
4. Press the SOFT KEY 2 (Oven Timer).
5. Using the Numeric Touchpad, set the oven time for 20
minutes (0:20, in HR/MIN format).
6. Press ENTER.
— The oven will heat for 20 minutes and then stop.
— An audible tone will indicate the completion of the
function.
7. Press OVEN OFF/CLEAR or open the oven door.
8. Leave the door opened slightly until the oven cools.
See “After Oven Operation” on page 11.
This initial cleaning will also calibrate the steam oven to the
air pressure at your location.
Automatic Calibration
The steam oven automatically calibrates to adjust to the
pressure conditions in your area the first time steam is
used at 212°F (100°C).
1. Select the SETTINGS button on the control panel.
2. Press the SOFT KEY 2 to scroll through the options to
WATER HARDNESS.
3. Press ENTER.
4. Using the NUMERIC TOUCHPAD, input the hardness
level for your water type. The factory setting is 3.
1 = SOFTENED (0 – 17 mg/L)
2 = SOFT (18 – 60 mg/L)
3 = MEDIUM (61 – 120 mg/L)
4 = HARD (121 – 180 mg/L)
5 = VERY HARD (over 180 mg/L)
5. Press ENTER.
Unless you use softened water, you will need to descale
your steam oven at regular intervals (see “Descale” in the
“Care and Maintenance” section on page 28).
If you move or if your water source changes, you will need
to reset the water hardness value.
Calibrating the Steam Oven
1. Select the SETTINGS button on the control panel.
2. Press the SOFT KEY 2 to scroll through the options to
CALIBRATE.
3. Press ENTER.
— START CYCLE will flash on the display.
4. Select YES (Soft Key 2) to confirm. Select NO (Soft
Key 3) to return to the main menu.
— DONE will flash on the display screen.
5. Press ENTER.
Recalibrate the appliance manually if you should move to
ensure that the steam oven automatically adjusts to your
new location.
Recalibration is not necessary after a power failure.
Clean the Accessories
Wash the accessories thoroughly with soapy water and a
cloth before using them. Rinse well before use.
English 7

Basic Oven Settings
Setting Options
User settings are available for the customer to customize
the appliance to their liking. Many of these features should
be adjusted when the oven is first installed or after a move
to a new location. User settings can only be accessed from
stand-by state. If the Settings button is pressed while the
appliance is not in stand-by, the display will sound an error
tone.
Adjust Settings
1. Select the SETTINGS button on the control panel.
2. Press the SOFT KEY 2 to advance through the menu
options. The following table lists the available setting
options and their values.
ITEM DESCRIPTION OPTIONS
°F/°C (Temperature Units)
Brightness
Volume
Clock
Stand-by Clock
Language
Weight Unit Type
Customer Service Contact information only
Demo Mode
Steam Clean See page 27.
Descale See page 28.
Calibrate See page 7.
Water Hardness See page 7.
3. Press SOFT KEY 1 or the ENTER button on the control
panel to edit the setting that is in field.
4. Press SOFT KEY 3 in order to cycle through the
submenu options.
5. Set the option by pressing the ENTER key on the
control panel or by pressing SOFT KEY 1.
°F
°C
Low
Med
High
Low
Med
High
Off
12 hr
24 hr
On
Off
English
French
lbs
Kg
On
Off
°F/°C (TEMPERATURE UNITS): The temperature units
setting allows the user to switch between fahrenheit and
celsius units of temperature. The default temperature unit
setting is “Fahrenheit”.
BRIGHTNESS: The brightness setting allows the user to
adjust the brightness of the display. Switching between
values adjusts the backlighting of the display. The default
brightness setting is “High”.
VOLUME: The volume setting allows the user to adjust the
sound level of button presses. The default volume setting is
“High”.
CLOCK: The clock mode setting allows the user to select a
12 hour or 24 hour based clock. The default clock mode
setting is “12 hour”.
STAND-BY CLOCK: The stand-by clock setting allows the
user to disable the clock whenever the user interface goes
into stand-by state. The default stand-by clock display
setting is “On”.
LANGUAGE: The language setting allows the user to
select either English or French operating languages. The
default language setting is “English”.
WEIGHT UNIT TYPE: The weight unit setting allows the
user to switch between pounds (lbs.) and kilograms (Kg)
units of measure. The default weight unit setting is “lbs”.
CUSTOMER SERVICE: Contact information for the
Technical Service Department if your appliance needs
repair. Contains the following:
Visit us at: www.bosch-home.com/us
Or call 1-800-944-2904
DEMO MODE: Demo mode consists of 6 images cycled at
timed intervals. If any button is pressed, the user interface
appears to work as normal for the pressed button.
However, no real cooking mode information is passed to
the appliance. Therefore the oven will not heat up, preheat
will never end, self clean will not start, etc. After 30 seconds
with no input from the user, the display resumes the image
slide show.
STEAM CLEAN: You may use steam to dissolve food
residues and spills so that they can be easily wiped up.
Running the steam clean cycle takes 30 – 35 minutes. The
oven cannot be used for any other purpose while steam
cleaning is underway. Detailed instructions for steam
cleaning the oven are provided in the “Cleaning and
Maintenance” section of this manual starting on page 26.
The oven cannot be used for any other purpose while
steam cleaning is in progress.
English 8

Steam Cleaning requires 3 start/stop cycles to complete its
operation. Once started, the Steam Cleaning operation
cannot be aborted. The appliance will not operate again
until after the first and second rinse cycle to ensure that no
cleaning agent remains inside.
DESCALE: Descale the appliance at regular intervals. This
can prevent damage to the appliance. The appliance
automatically informs you when descaling is required.
Detailed instructions for descaling the steam oven are
provided in the “Cleaning and Maintenance” section of this
manual starting on page 26. The oven cannot be used for
any other purpose while descaling is in progress.
Descaling requires 3 start/stop cycles to complete its
operation. Once started, the Descaling operation cannot be
aborted. The appliance will not operate again until after the
first and second rinse cycle to ensure that no cleaning
agent remains inside.
Note:
If you use softened water, you will not need to descale the
steam oven.
WATER HARDNESS: The hardness of the tap or bottled
water (NEVER distilled water) you put in the water tank
should be determined and entered with this setting when
the appliance is installed. As explained on page 7, you may
either use water hardness strips or contact your local water
utility to find out the hardness of your tap water.
If you move or if your water source changes, you will need
to reset the water hardness value.
CALIBRATE:
pressure. The higher the altitude, the lower the air
pressure, and also the boiling point. The steam oven
automatically calibrates to adjust to the pressure conditions
in your area the first time steam is used at 212°F (100°C).
The boiling point depends on the air
English 9
Operation
Start Cooking
Using nine of the eleven modes available in your steam
oven requires similar steps. Using CHICKEN or
VEGETABLES automatic programs is somewhat different
and is described separately starting on page 13.
Preheating the Oven
Place food in steam oven before preheat unless using
KEEP WARM, SLOW COOK or EUROPEAN CONV
modes. In KEEP WARM, SLOW COOK or EUROPEAN
CONV modes, place food in oven after the oven has been
preheated.
Food needs to be in the oven during preheat for steam
modes because if the door is opened to put food inside
after the preheat cycle the steam will leave the cavity,
lowering the temperature, which may cause the food to be
undercooked.
CAUTION
Exercise caution when opening the appliance. Standing
to the side, open the door slowly and only slightly to let
hot air and/or steam escape. Keep your face clear of the
opening and make sure there are no children or pets
near the unit. After the hot air and/or steam is released,
proceed with your cooking. Keep doors shut unless
necessary for cooking or cleaning purposes. Do not
leave open doors unattended.
Rack Positions
The oven has four rack levels. The rack levels are
numbered bottom to top as shown in the figure below.
To Operate the Oven by Setting the Mode
First
1. Select the desired cooking mode.
— The display transitions to the mode setting screen
with the mode and the default temperature. The
temperature flashes, indicating that it may be
edited and that the mode has not yet started.
— The display will revert to stand-by state if a
selection is not made within 5 seconds.
2. Press buttons on the numeric keypad to set a
temperature.
— The display transitions to the temperature setting
screen flashing “--x” in the display, where x is the
numeric key pressed by the user.
— If the temperature in the display is outside the
allowable limits for the selected mode and ENTER
is pressed, an error tone will sound and the
allowed temperature range for that mode is shown
below the set temperature.
— Temperature control is not possible with
DEFROST, PROOF, KEEP WARM, and DISH
WARM, which have preselected temperatures.
When one of these modes is selected, the
temperature will appear on the display.
3. Press ENTER.
— If ENTER is not pressed after setting a temperature
other than the default temperature, the oven will
automatically start the cooking mode after 5
seconds at the entered temperature. If no input is
made to the default temperature, the display
screen will transition back to stand-by state after 5
seconds of inactivity.
— Display will indicate that the oven is preheating.
English 10
TIME O F D A Y
44
PREHEAT BAR
33
KITCHEN TIMER
22
11
OVEN STATUS
MODE
OVEN TIMER
TE M P °
To Operate the Oven by Setting the
Temperature First
1. From stand-by state, press the numeric touchpad
buttons to enter a desired temperature.
— The display transitions to the mode setting screen
flashing “--x” in the display, where x is the numeric
key pressed by the user.
— The display screen prompts the user to select a
mode.
2. Select the desired cooking mode.
3. Press ENTER.
— If the temperature in the display is outside the
allowable limits for the selected mode and ENTER
is pressed, an error tone will sound.
— For the modes with one dedicated temperature
(DEFROST, PROOF, KEEP WARM, DISH
WARM), once the error tone has sounded and the
default temperature appears on the display, the
user can initiate that particular mode by pressing
ENTER.
— The display will revert to stand-by state if a
selection is not made within 5 seconds.
— Once a selection has been made, the display will
indicate that the oven is preheating.
Automatic operation of the cooling blower
The cooling blower activates immediately for any of the
oven modes. If steam oven modes that use steam are
switched off (STEAM, STEAM CONV, REHEAT, etc.), the
cooling blower stays on for 10 minutes independent from
the oven temperature before shutting off. If heating modes
without steam are turned off, the cooling blower goes off
when the oven temperature falls below 230°F (110°C).
Oven Clear/Off
1. Press the OVEN CLEAR/OFF button to cancel the
cooking mode and return to the stand-by state screen.
— The temperature and mode clear from the display
screen. The cooling fan will continue to run.
After Oven Operation
1. After each use, leave the oven door open in the “atrest” position, until the interior has cooled down. Refer
to the illustration below.
To Edit Oven Settings During Operation
Change to a New Cooking Mode During Operation
1. Press the touchpad for the new desired cooking mode.
— The current running mode is immediately ended
and the display enters editing mode.
2. Press ENTER.
Change to a New Temperature During Operation
1. Press the button for the current running mode.
— The current mode continues to run, but the display
enters editing mode.
2. Press the numeric touchpad to enter a desired
temperature.
3. Press ENTER.
Door Operation During a Cooking Mode
If the door is opened during a mode that uses the steam
function, the cooling fan will cycle on and off five-six times
in succession to purge the excess steam.
If the oven is in an operation mode that uses the convection
fan, the convection fan will shut off automatically. Operation
will resume once the door is shut.
2. When cool, use a cleaning sponge to remove any
water remaining in the evaporator dish. Wipe down the
oven using the cleaning sponge and dry afterwards
using a soft cloth before closing the door.
IMPORTANT:
• Wipe down the oven cavity and the evaporator dish
with the sponge provided and dry well with a soft cloth
after each use.
• Remove food residue and spills from the oven
immediately after the appliance has cooled down.
Burned on residue is very difficult to remove at a later
time.
• Salts are very abrasive and can cause rust spots. The
steam oven cavity can rust if not properly cared for.
The display screen will prompt the user to close the oven
door.
English 11

Panel Lock
Oven Timer
The Panel Lock is a child safety mechanism to prevent
children from accidentally turning on the oven or changing
an oven setting.
The Panel Lock feature can only be turned on from standby state. If the Panel Lock button is pressed in any state
other than stand-by, the display sounds a key error tone.
To Execute Panel Lock
1. Press and hold the PANEL LOCK button on the
touchpad for three seconds (press and hold for another
three seconds to deactivate).
— PANEL LOCKED will appear in the display.
Setting the Timers
Kitchen Timer
The kitchen timer can be used whether the oven is in
operation or not and it does not affect oven heating.
A kitchen timer may be set from the following states:
• any running cooking or heating mode.
• stand-by state.
The Oven Timer is intended to mechanically shut the oven
off when the desired cooking time is complete. The
maximum oven time is 11 hours and 59 minutes.
An oven timer may start from any mode editing or running
state. These instructions assume you have placed food in
the cooking space and have already selected a mode and
temperature.
NOTE:
Oven Timer is not available for Chicken or Vegetables
Automatic Programs.
Setting the Oven Timer
1. Press SOFT KEY 2 (Oven Timer).
2. Enter the desired time using the numeric touchpad to
set the time in the format HH:MM.
3. Press ENTER.
— Once started, the display shows the timer
countdown.
— When the timer reaches zero, the display indicates
“0:00” on its screen and sounds an alarm tone
every 10 seconds for 2 minutes.
4. After the timer has finished, it may be reset by pressing
the OVEN CLEAR/OFF or by opening the door.
Setting the Kitchen Timer in Stand-by State
1. Press the CLOCK/TIMER touchpad on the control
panel.
2. Enter the desired time using the numeric touchpad to
set the time in the format HH:MM.
3. Press SOFT KEY 3 (Set Timer).
— Once started, the display shows the timer
countdown.
— When the timer reaches zero, the display shows a
0:00 and sounds an alarm tone every 10 seconds
for 2 minutes.
4. After the timer has finished, it may be reset by pressing
the SOFT KEY 1 (Timer Off) or by opening the door.
Editing the Kitchen Timer
1. Press SOFT KEY 3 (Edit Kitchen Timer).
2. Set the new time using the numeric touchpad or SOFT
KEY 1 (Clear) to clear and exit the timer.
3. Press ENTER.
Editing the Oven Timer
1. Press SOFT KEY 2 (Edit Oven Timer).
2. Set the new time using the numeric touchpad.
3. Press ENTER.
Multiple Timers
It is possible to set a combination of both a Kitchen Timer
and an Oven Timer.
1. Set and edit the timers individually as instructed
previously.
— Both timers are displayed on the screen.
TIME O F D A Y
PREHEAT BAR
KITCHEN TIMER
OVEN TIMER
OVEN STATUS
MODE
TE M P °
English 12
KITCHEN TIMER
OVEN TIMER
VEGETABLES and CHICKEN Automatic Programs
FOOD
DEFAULT
WEIGHT
MIN. WEIGHT MAX. WEIGHT
ACCESSORIES AND RACK LEVELS
VEGETABLES
Wait until after cooking to season vegetables, including potatoes.
Cauliflower florets 1.0 lbs. (0.4 kg) 0.2 lbs. (0.1 kg) 4.5 lbs. (2 kg) Perforated (level 3) + baking pan (level 1)
Broccoli florets 1.0 lbs. (0.4 kg) 0.2 lbs. (0.1 kg) 4.5 lbs. (2 kg) Perforated (level 3) + baking pan (level 1)
Green beans 1.0 lbs. (0.4 kg) 0.2 lbs. (0.1 kg) 4.5 lbs. (2 kg) Perforated (level 3) + baking pan (level 1)
Green asparagus 1.0 lbs. (0.4 kg) 0.2 lbs. (0.1 kg) 4.5 lbs. (2 kg) Perforated (level 3) + baking pan (level 1)
Mixed veggie steam 1.0 lbs. (0.4 kg) 0.2 lbs. (0.1 kg) 4.5 lbs. (2 kg) Perforated (level 3) + baking pan (level 1)
Peeled potatoes 1.0 lbs. (0.4 kg) 0.2 lbs. (0.1 kg) 4.5 lbs. (2 kg) Perforated (level 3) + baking pan (level 1)
Unpeeled potatoes 1.0 lbs. (0.4 kg) 0.2 lbs. (0.1 kg) 4.5 lbs. (2 kg) Perforated (level 3) + baking pan (level 1)
CHICKEN
Weigh individual pieces of chicken. Enter the weight of the heaviest piece. DO NOT place pieces of chicken on top of
one another in the ovenware. You can marinate the pieces of chicken before cooking.
Whole chicken 3.5 lbs. (1.6 kg) 1.5 lbs. (0.7 kg) 5.0 lbs. (2.3 kg) Wire rack + baking pan (level 2)
Chicken portions 0.25 lbs.
(0.1 kg)
Setting the Automatic Program
0.1 lbs.
(0.04 kg)
0.75 lbs.
Wire rack + baking pan (level 2)
(0.36 kg)
4. Place food in steam oven at the indicated locations.
5. Close the oven door.
Choose the Food
1. Select either CHICKEN or VEGETABLES on the
control panel.
— The display screen will show a list of food
groupings.
2. Press SOFT KEY 2 (Food Type) to advance through
the menu options.
3. Press the ENTER button on the control panel to select
the desired food.
— The display will show the rack level (levels 1 – 3)
Set the Weight
6. Press the numeric touchpad buttons to adjust the
weight of the food you will be cooking.
— Each type of food has a maximum and minimum
weight setting.
7. Press ENTER.
— The display will show cooking time for the
particular choice of food.
— The oven will begin preheating.
and specific ovenware/accessories that should be
used.
PREHEAT BAR
TIME
KITCHEN TIMER
TIME O F D A Y
PAN TYPE AND RACK PLACEMENT
MODE
OVEN TIMER
TE M P °
English 13

Steam Oven Modes
Temperature Setting for Each
Mode
Different modes have different possible minimum and
maximum temperatures. The following table describes the
limits on setting the temperature ranges for each mode:
COOKING MODE
STEAM 95°F (35°C) 212°F (100°C)
STEAM CONV 250°F (121°C) 450°F (232°C)
DEFROST 110°F (43°C) only
PROOF 100°F (37°C) only
DISH WARMING 125°F (51°C) only
REHEAT 210°F (99°C) 360°F (182°C)
EUROPEAN CONV 95°F (35°C) 450°F (232°C)
KEEP WARM 140°F (60°C) only
SLOW COOK 140°F (60°C) 250°F (121°C)
CHICKEN Automatic Program
VEGETABLES Automatic Program
MINIMUM
TEMP.
MAXIMUM
TEMP.
Steam
The Advantages of Cooking with Steam:
• Almost no loss of nutrients: When steamed, food is
not immersed in water, so the vitamins and minerals do
not leach out. Studies have shown that steamed
broccoli, for example, contains 50% more vitamin C
than boiled broccoli.
• Low-fat cooking: Food can be cooked with low
amounts of fat or, depending on taste, with no fat at all.
When meat is steamed, the fat separates itself from the
meat and drips into the baking pan.
• Meat cooking: Cook a 14 lb. turkey in just 90 minutes
in the oven's Steam Conv mode. Golden on the outside; moist on the inside.
• Appetizing appearance: Foods retain their natural
color when cooked with steam. Cooked vegetables
look like they have been freshly harvested.
You rarely need to stir or turn the food, which means
that even delicate fish dishes retain their shape. Foods
do not dry out.
• Flavorful enjoyment: Steaming provides naturally
flavorful food that needs hardly any salt.
• Cooking a menu: With steam you can cook several
components of a menu at the same time, with little or
no seasoning, without the different flavors mixing.
Tips for Steaming
• Foods with similar cooking times may be cooked
together, saving energy and clean-up time.
• Place the baking pan underneath the perforated pan to
collect precipitate and food spills.
• Season vegetables after steaming.
Steam Conv
Steam and convection are used together with the Steam
Conv mode. Roasts get crispy on the outside and juicy on
the inside thanks to the combination of convection and
steam. Pastries get a nice, shiny surface and do not dry
out. Use convection steam for any foods you want to be
tender inside and roasted or crisped outside.
This combination is particularly suitable for cooking meat
and baking bread and rolls. Steam Conv also works
exceptionally well for roasting vegetables.
Tips for Steam Convection
• Season meat carefully – the slow roasting of the meat
intensifies the aromas and flavors.
• For meats and poultry, the temperature should not be
reduced. The temperature recommended in recipes
and cooking charts for meats and poultry should be
used.
• Use a meat thermometer to verify that the interior of the
meat is fully cooked.
Defrost
Use the Defrost function for defrosting food such as meat,
poultry, vegetables, pastries and cakes, bread and fruit.
Tips for Defrosting
• When defrosting poultry, set the food on the rack and
insert the baking pan beneath it. This prevents the food
from lying in the defrosting liquid.
• Turn, stir, or separate food about halfway through the
defrosting period.
• DO NOT refreeze food once it has been defrosted.
Food should be cooked immediately after the defrost.
• Defrost deep frozen, precooked meals according to the
manufacturer’s instructions.
English 14

Proof
The Proof mode maintains the warm, non-drafty
environment needed for proofing yeast leavened products.
Tips for Proofing
• Allow dough to thaw if frozen. Place dough in dish and
loosely cover.
• It is best to start with a cool oven when using the
proofing function.
• Use any rack level that accommodates the size of the
bowl or pan. Dough has “proofed” when it has doubled
in size.
• Do not open the oven door unnecessarily. Opening the
door will lower the temperature of the air in the oven
and lengthen the proofing time. Use the oven light to
check the rising of the dough.
Dish Warming
European Conv is most suitable for making sweet and
savory pastries, pot roasts, and various cakes; this mode is
not suitable for braising.
Tips for Convection Cooking
• For greatest efficiency, load oven to capacity whenever
possible.
• Do not cover foods. Covering the food inhibits the
cooking process.
• Preheat the oven first unless specified differently in the
recipe.
Keep Warm
The Keep Warm mode will keep hot, cooked foods at
serving temperature. ALWAYS start with hot food. DO NOT
use this mode to heat cold food other than for crisping
crackers, chips and dry cereal. DO NOT use the Keep
Warm mode to cook food.
Heats and keeps warm oven–safe ovenware, plates, and
bowls.
Place dishes in the oven before heating the oven. DO NOT
place cold dishes in an already warm oven as this may
cause thermal shock and may cause the dish to shatter.
Reheat
Reheat mode uses steam and hot air to gently restore food.
The combination of air and moisture in the Reheat mode
warms food evenly and without drying. Entrees,
casseroles, side dishes, and leftovers are warmed to
serving temperature without compromising quality.
Tips for Reheating
• If possible, arrange the food so that it is spread out
evenly on the dish.
• Food does not need to be stirred during Reheat.
• Reheat times vary for foods, so check food
occasionally to prevent overcooking.
• Reheat a plate of food, no cover necessary.
NOTES:
• Food may be kept hot in its cooking container or
transferred to a heat-safe serving dish.
• Allow time for the oven to preheat before placing warm,
cooked food in the oven.
• Do not open the oven door unnecessarily. Opening the
door will reduce the temperature of the oven. Use the
oven light to check the food.
Slow Cook
Slow Cook is ideal for cooking all tender cuts of meat that
will be cooked medium rare. The meat stays very moist and
is tender.
Cooking Tip for Slow Cooking
• Place the baking pan in the oven and preheat the oven
using Slow Cook mode. Sear the meat well on all
sides on the cooktop. Place the meat in the
preheated combination oven and continue to slow
cook.
European Conv
European Conv operates as a convection oven, with no
steam. During the European Conv mode, a heating
element at the back of the cooking compartment is heated.
The fan then circulates the hot air evenly around the food.
Multiple racks of foods can be cooked or large quantities of
foods can be cooked at the same time. Foods will cook
thoroughly without having to rotate pans.
Chicken and Vegetables
Automatic Programs
There are two sets of automatic programs for the steam
oven. These programs are grouped under menu classes
labeled “Chicken” and “Vegetables”. Both of the automatic
programs adjusts the modes, temperatures, and cooking
times based on the weight input by the user. Using the
automatic programming allows the user to prepare dishes
quickly and easily. See “VEGETABLES and CHICKEN
Automatic Programs” on page 13.
English 15

Getting the Most Out of Your Steam Oven
General Tips
Preheating the Oven
• Place oven rack in desired position before heating the
oven.
• Preheat the oven when using the Slow Cook,
European Conv, or Keep Warm modes.
• Place food in the steam oven before preheat for modes
that use steam. Food needs to be in the oven during
preheat for steam modes. If the door is opened to put
food inside after the preheat cycle then the steam will
leave the cavity, lowering the temperature, which may
cause the food to be undercooked.
WARNING
DO NOT use aluminum foil or protective liners to line any
part of the appliance, especially the oven bottom.
Installing these liners may result in risk of electric shock
or fire
.
Ovenware
If you use ovenware, always place it on the center of the
rack.
Converting Conventional Baking to
Convection Baking
Cooking temperatures versus traditional ovens may be 25
degrees less, and times may be about 25% faster, saving
valuable time and lowering energy costs.
To convert most recipes for baked items (cookies, cakes,
pies, etc.), reduce the oven temperature by 25°F (14°C).
For meats and poultry, the temperature should not be
reduced. The temperature recommended in recipes and
cooking charts for meats and poultry should be used.
Cooking an Entire Meal
You can cook entire meals at the same time in Steam
mode without mixing the flavors of the different food. Place
the food with the longest cooking time in the appliance first
and then add the remaining dishes at the appropriate time.
This will ensure that all dishes are ready at the same time.
The total cooking time will be longer when cooking an
entire meal, since every time the appliance door is opened,
some steam escapes and the appliance has to reheat.
Cooking Tables and Tips
The ovenware must be heat and steam resistant. Thickwalled ovenware extends the cooking time.
Use foil to cover food that would normally be prepared in a
water bath (such as when melting chocolate).
Distribute Food Evenly
Always distribute the food evenly in the ovenware. If the
food is placed unevenly in the ovenware, it will cook
unevenly.
Delicate Food
Do not layer delicate foods too high in the baking pan. It is
better to use two pans in this case.
The following in the Cooking Recommendations charts
contain a selection of dishes that can be easily prepared in
the steam oven. You can find out which oven mode,
accessories and cooking time are best suited for your dish.
If not specified otherwise, this information applies to dishes
placed in a cold appliance.
When steaming, the cooking times are based on the size of
the piece, not on the entire quantity of food. The appliance
can steam up to 14 lbs. (6.4 kg) of food.
Note the sizes of pieces listed in the tables. The cooking
time is shorter for smaller pieces and longer for larger
pieces. The quality and age of the food also affect the
cooking time. The values provided therefore serve only as
a guideline.
English 16

Cooking Recommendations
Vegetables
Place vegetables in the perforated pan and set at rack level 3. Place the baking pan underneath it at rack level 1. The
baking pan will catch any drippings.
FOOD SIZE ACCESSORIES OVEN MODE TEMPERATURE COOKING TIME
Artichokes Whole Perforated +
baking pan
Asparagus, green* Whole Perforated +
baking pan
Asparagus, white* Whole Perforated +
baking pan
Beets, red Whole Perforated +
baking pan
Broccoli Florets Perforated +
baking pan
Brussels sprouts Florets Perforated +
baking pan
Cabbage, green Shredded Perforated +
baking pan
Cabbage, red Shredded Perforated +
baking pan
Carrots Slices Perforated +
baking pan
Cauliflower Florets Perforated +
baking pan
Cauliflower Whole Perforated +
baking pan
Fennel Slices Perforated +
baking pan
Green beans – Perforated +
baking pan
Kohlrabi Slices Perforated +
baking pan
Leeks Slices Perforated +
baking pan
Peas – Perforated +
baking pan
Pea pods – Perforated +
baking pan
Spinach* – Perforated +
baking pan
Stuffed vegetables (zucchini,
eggplant, peppers)
Swiss Chard* Shredded Perforated +
Zucchini Slices Perforated +
* Preheat the appliance. Place food in oven before preheat unless using the Slow Cook or European Conv modes.
DO NOT
precook
vegetables
Baking pan
(level 2)
baking pan
baking pan
Steam 212ÛF (100ÛC) 30 – 35 min.
Steam 212ÛF (100ÛC) 7 – 12 min.
Steam 212ÛF (100ÛC) 10 – 15 min.
Steam 212ÛF (100ÛC) 40 – 50 min.
Steam 212ÛF (100ÛC) 8 – 10 min.
Steam 212ÛF (100ÛC) 20 – 30 min.
Steam 212ÛF (100ÛC) 25 – 35 min.
Steam 212ÛF (100ÛC) 30 – 35 min.
Steam 212ÛF (100ÛC) 10 – 20 min.
Steam 212ÛF (100ÛC) 10 – 15 min.
Steam 212ÛF (100ÛC) 30 – 40 min.
Steam 212ÛF (100ÛC) 10 – 14 min.
Steam 212ÛF (100ÛC) 15 – 20 min.
Steam 212ÛF (100ÛC) 15 – 20 min.
Steam 212ÛF (100ÛC) 4 – 6 min.
Steam 212ÛF (100ÛC) 5 – 10 min.
Steam 212ÛF (100ÛC) 8 – 12 min.
Steam 212ÛF (100ÛC) 2 – 3 min.
Steam Conv 320 – 360ÛF
(160 – 180ÛC)
Steam 212ÛF (100ÛC) 8 – 10 min.
Steam 212ÛF (100ÛC) 2 – 3 min.
15 – 30 min.
English 17

Side Dishes and Legumes
Add the appropriate amount of water or liquid. Example: 1:1.5 = for every 1/2 cup.
FOOD RATIO ACCESSORIES OVEN MODE TEMPERATURE COOKING TIME
Potatoes (unpeeled) Medium size Perforated (level 3) +
baking pan (level 1)
Potatoes (peeled) Quartered Perforated (level 3) +
baking pan (level 1)
Potato gratin – Baking pan (level 2) Steam 212ÛF (100ÛC) 35 – 45 min.
Brown rice 1:2 Baking pan (level 2) Steam 212ÛF (100ÛC) 30 – 40 min.
Long grain rice 1:2 Baking pan (level 2) Steam 212ÛF (100ÛC) 20 – 30 min.
Basmati rice 1:1.5 Baking pan (level 2) Steam 212ÛF (100ÛC) 20 – 30 min.
Parboiled rice 1:1.5 Baking pan (level 2) Steam 212ÛF (100ÛC) 15 – 20 min.
Lentils 1:2 Baking pan (level 2) Steam 212ÛF (100ÛC) 30 – 45 min.
Canellini beans,
pre-softened
Couscous 1:1 Baking pan (level 2) Steam 212ÛF (100ÛC) 6 – 10 min.
Dumplings – Perforated (level 3) +
1:2 Baking pan (level 2) Steam 212ÛF (100ÛC) 65 – 75 min.
baking pan (level 1)
Steam 212ÛF (100ÛC) 35 – 45 min.
Steam 212ÛF (100ÛC) 20 – 25 min.
Steam 205ÛF (95ÛC) 20 – 25 min.
Meat, Poultry, Fish
Insert rack and baking pan together at the same rack level. Once the roast is done, let it rest in the closed convection
steam oven for an additional 10 minutes after turning it off. This will help the meat retain its juices.
Using the Steam Conv mode makes the meat particularly tender and juicy on the inside while forming a crust on the
outside.
FOOD WEIGHT ACCESSORIES OVEN MODE TEMPERATURE
POULTRY
Chicken, whole 2.65 lbs.
(1.2 kg)
Chicken, halved per 1 lbs.
(0.4 kg)
Chicken breast per 0.33 lbs.
(0.15 kg)
Chicken pieces per 2.65 lbs.
(1.2 kg)
Duck, whole 4.5 lbs.
(2 kg)
Duck breast* per 0.77 lbs.
(0.35 kg)
Turkey, whole,
unstuffed
Turkey, whole,
unstuffed**
Rolled turkey roast 3.5 lbs.
Turkey breast 2 lbs. (1 kg) Wire rack + baking
* Sear first
** Use baking pan 1–5/8" deep (see Additional Accessories)
8 – 11 lbs. Wire rack + baking
12 – 14 lbs. Wire rack + baking
(1.5 kg)
Wire rack + baking
pan (level 2)
Wire rack + baking
pan (level 2)
Perforated (level 3) +
baking pan (level 1)
Wire rack + baking
pan (level 2)
Wire rack + baking
pan (level 2)
Wire rack + baking
pan (level 2)
pan (level 2)
pan (level 2)
Wire rack + baking
pan (level 2)
pan (level 2)
Steam Conv 360 – 375ÛF
(180 – 190ÛC)
Steam Conv 360 – 375ÛF
(180 – 190ÛC)
Steam 212ÛF (100ÛC) 15 – 25 min.
Steam Conv 360 – 375ÛF
(180 – 190ÛC)
Steam Conv /
European Conv
Steam Conv 360 – 375ÛF
Steam Conv 325ÛF (165ÛC) 50 – 75 min.
Steam Conv 325ÛF (165ÛC) 80 – 95 min.
Steam Conv 300 – 320ÛF
Steam Conv 300 – 320ÛF
340ÛF (170ÛC)/
410ÛF (210ÛC)
(180 – 190ÛC)
(150 – 160
(150 – 160ÛC)
ÛC)
COOKING
TIME
50 – 60 min.
35 – 45 min.
20 – 35 min.
60 – 80 min./
15 – 20 min.
10 – 15 min.
70 – 90 min.
60 – 80 min.
English 18

FOOD WEIGHT ACCESSORIES OVEN MODE TEMPERATURE
BEEF
Pot-roasted beef* 3.5 lbs.
(1.5 kg)
Filet of beef, medium* 2 lbs. (1 kg) Wire rack + baking
Thin slice of roast
beef, medium*
Thick slice of sirloin,
medium*
VEAL
Veal, bone-in 3.5 lbs.
Veal loin 2 lbs. (1 kg) Wire rack + baking
Breast of veal, stuffed 3.5 lbs.
PORK
Bone-in without rind 3.5 lbs.
Bone-in with rind 3.5 lbs.
Pork chop, boneless* 1.2 lbs.
Fillet in puff pastry 2 lbs. (1 kg) Baking pan (level 2) Steam Conv 360 – 390ÛF
Smoked pork on the
bone
Smoked pork ribs 1 lb. (0.4 kg) Baking pan (level 2) Steam 210ÛF (99ÛC) 45 – 60 min.
Rolled roast 3.5 lbs.
OTHER
Meat loaf (made from
ground meat)
Boned leg of lamb 3.5 lbs.
Loin of lamb on the
bone*
Wiener sausages – Perforated (level 3) +
FISH
Whole per 0.66 lbs.
Fillet per 3.5 lbs.
Trout, whole per 0.5 lbs.
* Sear first
** Use baking pan 1–5/8" deep (see Additional Accessories)
2 lbs. (1 kg) Wire rack + baking
2 lbs. (1 kg) Wire rack + baking
(1.5 kg)
(1.5 kg)
(1.5 kg)
(1.5 kg)
(0.5 kg)
2 lbs. (1 kg) Wire rack + baking
(1.5 kg)
1.2 lbs.
(0.5 kg)
(1.5 kg)
3.5 lbs.
(1.5 kg)
(0.3 kg)
(1.5 kg)
(0.2 kg)
Wire rack + baking
pan (level 2)
pan (level 2)
pan (level 2)
pan (level 2)
Wire rack + baking
pan (level 2)
pan (level 2)
Wire rack + baking
pan (level 2)
Wire rack + baking
pan (level 2)
Wire rack + baking
pan (level 2)
Wire rack + baking
pan (level 2)
pan (level 2)
Wire rack + baking
pan (level 2)
Baking pan (level 2) Steam Conv 340 – 360ÛF
Wire rack + baking
pan (level 2)
Wire rack + baking
pan (level 2)
baking pan (level 1)
Perforated (level 3) +
baking pan (level 1)
Perforated (level 3) +
baking pan (level 1)
Perforated (level 3) +
baking pan (level 1)
Reheat 285 – 300ÛF
(140 – 150ÛC)
Reheat 340 – 360ÛF
(170 – 180ÛC)
European Conv 340 – 360ÛF
(170 – 180ÛC)
European Conv 340 – 360ÛF
(170 – 180ÛC)
Steam Conv 320 – 360ÛF
(160 – 180ÛC)
Steam Conv 320 – 360ÛF
(160 – 180ÛC)
Steam Conv 285 – 320ÛF
(140 – 160ÛC)
Steam Conv 320 – 360ÛF
(160 – 180ÛC)
Steam/
Steam Conv
European Conv
Steam Conv 285 – 320ÛF
Steam Conv 250 – 285ÛF
Steam Conv 340 – 360ÛF
Steam Conv 340 – 360ÛF
Steam Conv 320 – 360ÛF
Steam 175 – 185ÛF
Steam 175 – 195ÛF
Steam 175 – 195ÛF
Steam 175 – 195ÛF
210ÛF (99ÛC)/
285 – 320ÛF
(140 – 160ÛC)
410 – 430ÛF
(140 – 160ÛC)
(140 – 160ÛC)
(180 – 200ÛC)
(120 – 140ÛC)
(170 – 180ÛC)
(170 – 180ÛC)
(170 – 180ÛC)
(160 – 180ÛC)
(80 – 85ÛC)
(80 – 90ÛC)
(80 – 90ÛC)
(80 – 90ÛC)
COOKING
TIME
100 – 140
min.
20 – 28 min.
40 – 55 min.
45 – 60 min.
50 – 70 min.
15 – 25 min.
75 – 120 min.
50 – 70 min.
20 – 25 min.
40 – 50 min.
20 min.
75 – 120 min.
40 – 60 min.
60 – 70 min.
70 – 80 min.
45 – 60 min.
60 – 80 min.
15 – 25 min.
12 – 18 min.
15 – 25 min.
10 – 20 min.
12 – 15 min.
English 19

FOOD WEIGHT ACCESSORIES OVEN MODE TEMPERATURE
Cod, filet per 0.33 lbs.
(0.15 kg)
Salmon, filet per 0.33 lbs.
(0.15 kg)
Clams, oysters 0.33 lbs.
(0.15 kg)
Haddock, perch filet per 0.5 lbs.
(0.2 kg)
Stuffed sole rolls – Perforated (level 3) +
Shrimp, large per 1 lb
(0.4 kg)
Shrimp, medium per 1 lb
(0.4 kg)
* Sear first
** Use baking pan 1–5/8" deep (see Additional Accessories)
Perforated (level 3) +
baking pan (level 1)
Perforated (level 3) +
baking pan (level 1)
Baking pan (level 2) Steam 212ÛF (100ÛC) 10 – 15 min.
Perforated (level 3) +
baking pan (level 1)
baking pan (level 1)
Perforated (level 3) +
baking pan (level 1)
Perforated (level 3) +
baking pan (level 1)
Steam 175 – 195ÛF
(80 – 90ÛC)
Steam 212ÛF (100ÛC) 8 – 10 min.
Steam 175 – 195ÛF
(80 – 90ÛC)
Steam 175 – 195ÛF
(80 – 90ÛC)
Steam 212ÛF (100ÛC) 8 – 13 min.
Steam 212ÛF (100ÛC) 5 – 8 min.
COOKING
10 – 14 min.
10 – 20 min.
10 – 20 min.
Slow Cooking Meat
FOOD WEIGHT ACCESSORIES TEMPERATURE COOKING TIME
Boned leg of lamb 2 – 3.5 lbs.
(1 – 1.5 kg)
Roast beef 3.5 – 5.5 lbs.
(1.5 – 2.5 kg)
Pork fillets – Baking pan (level 2) 175 – 195ÛF
Pork medallions – Baking pan (level 2) 175ÛF (80ÛC) 50 – 60 min.
Beef steaks approx. 1.2 in. thick Baking pan (level 2) 175ÛF (80ÛC) 40 – 80 min.
Duck breast – Baking pan (level 2) 175ÛF (80ÛC) 35 – 55 min.
Baking pan (level 2) 175ÛF (80ÛC) 140 – 160 min.
Baking pan (level 2) 175ÛF (80ÛC) 150 – 180 min.
50 – 70 min.
(80 – 90ÛC)
TIME
Souffles, Casseroles, Additions to Soups
FOOD ACCESSORIES OVEN MODE TEMPERATURE COOKING TIME
Lasagna Baking pan (level 2) Steam Conv 320 – 340ÛF
(160 – 170ÛC)
Souffles Souffle dish + wire rack
(level 2)
Semolina dumplings
Perforated (level 3) + baking pan (level 1)
Steam Conv 360 – 390ÛF
(180 – 200ÛC)
Steam 195ÛF (205ÛC) 7 – 10 min.
35 – 45 min.
15 – 25 min.
Desserts, Compotes
Compote: Weigh out the fruit, add approximately 1/3 of water and add sugar and spices to taste.
Rice pudding: Weigh out the rice and add 2.5 times as much milk. Add the rice and milk no higher than 1 inch up the
side of the accessory. Stir after cooking. The remaining milk will be absorbed quickly.
Yogurt: Heat the milk on the cooktop to 195ÛF (90ÛC). Remove from heat and let cool to 105ÛF (40ÛC). Heating the milk
is not required if using ultra high temperature (UHT) milk. Stir in one to two teaspoons of plain yogurt, or the appropriate
amount of yogurt starter per 100 ml of milk. Pour the mixture into clean glass jars and cover with lids. After it is done,
arrange it on preheated plates and add a warm sauce on top. After preparation, place the jars in the refrigerator to cool.
FOOD ACCESSORIES OVEN MODE TEMPERATURE COOKING TIME
Yeast dumplings Baking pan (level 2) Steam 212ÛF (100ÛC) 20 – 25 min.
English 20
FOOD ACCESSORIES OVEN MODE TEMPERATURE COOKING TIME
Egg custard Mold + wire rack (level 2) Steam 195 – 205ÛF
(90 – 95ÛC)
Sweet baked items
(such as rice pudding)
Rice pudding Baking pan (level 2) Steam 212ÛF (100ÛC) 25 – 35 min.
Yogurt Portion-sized jars + wire rack
Apple compote Baking pan (level 2) Steam 212ÛF (100ÛC) 10 – 15 min.
Pear compote Baking pan (level 2) Steam 212ÛF (100ÛC) 10 – 15 min.
Cherry compote Baking pan (level 2) Steam 212ÛF (100ÛC) 10 – 15 min.
Rhubarb compote Baking pan (level 2) Steam 212ÛF (100ÛC) 10 – 15 min.
Plum compote Baking pan (level 2) Steam 212ÛF (100ÛC) 10 – 15 min.
Ovenproof dish + wire rack
(level 2)
(level 2)
Steam Conv 320 – 340ÛF
(160 – 170ÛC)
Steam 105ÛF (40ÛC) 300 – 360 min.
15 – 20 min.
50 – 60 min.
Cakes and Baked Goods
Dark metal baking pans are recommended. The temperature and cooking time depend on the quantity and consistency
of the dough. Temperature ranges are therefore provided in the charts. Start with a lower temperature setting. This will
provide for more even browning. Use a higher temperature setting the next time, if necessary. DO NOT overfill the rack
or baking pan.
FOOD ACCESSORIES OVEN MODE TEMPERATURE COOKING TIME
CAKE IN MOLDS OR SPRINGFORM PANS
Sponge cake 10-inch tube pan + wire rack
(level 2)
Sponge flan base Ring + wire rack (level 2) European Conv 300 – 320ÛF
Delicate fruit flan, sponge Springform cake pan + wire
rack (level 2)
Sponge base (2 eggs) Ring + wire rack (level 2) European Conv 360 – 375ÛF
Sponge flan (6 eggs) Springform cake pan + wire
rack (level 2)
Shortcrust pastry base with
crust
Swiss flan Springform cake pan + wire
®
Bundt
Savory cakes Quiche dish + wire rack
Apple tart Flan base cake pan + wire
SHEET CAKES
Yeast cake
Swiss roll
Braided loaf
Strudel, sweet
Springform cake pan + wire
rack (level 2)
rack (level 2)
Bundt® cake pan + wire rack
(level 2)
(level 2)
rack (level 2)
Baking pan (level 2)
Baking pan (level 2)
Baking pan (level 2)
Baking pan (level 2)
European Conv 300 – 320ÛF
(150 – 160ÛC)
(150 – 160ÛC)
European Conv 300 – 320ÛF
(150 – 160ÛC)
(180 – 175ÛC)
European Conv 300 – 320ÛF
(150 – 160ÛC)
European Conv 300 – 320ÛF
(150 – 160ÛC)
European Conv 360 – 375ÛF
(180 – 175ÛC)
European Conv 300 – 320ÛF
(150 – 160ÛC)
European Conv 360 – 375ÛF
(180 – 175ÛC)
European Conv 340 – 375ÛF
(170 – 190ÛC)
Steam Conv /
European Conv
European Conv 360 – 375ÛF
Steam Conv 300 – 320ÛF
Steam Conv 320 – 360ÛF
300 – 320ÛF
(150 – 160ÛC)/
300 – 320ÛF
(150 – 160ÛC)
(180 – 175ÛC)
(150 – 160ÛC)
(160 – 180ÛC)
60 – 70 min.
30 – 45 min.
45 – 55 min.
12 – 16 min.
25 – 35 min.
40 – 50 min.
35 – 60 min.
35 – 45 min.
35 – 60 min.
35 – 50 min.
35 – 45 min.
35 – 45 min.
10 – 15 min.
25 – 35 min.
40 – 60 min.
English 21
 Loading...