

Bosch Benchmark HBLP651LUC, HSLP751UC, HBLP651UC, HEIP054U, HBLP651RUC Quick Guide
...
Electric Ovens
Quick Reference Guide
Built-in wall ovens, range ovens
IMPORTANT: This reference guide is not a substitute for the Use
& Care manual. Read and consult the appliance Use & Care
manual for important safety messages and additional
information regarding the use of your new appliance.
Prepare the Oven for Use
Set the Clock
See detailed instructions in your appliance’s Use and Care
manual. Procedure varies by appliance.
Perform a before-first-use cleaning
• Wipe the oven interior with a clean, damp cloth using a
mild dish detergent and wipe dry.
• To further reduce first-use odor, run a 30 minute bake
cycle at 350° F.
User Settings
Consult the Use & Care manual “User Settings” to set 12/24 hour
clock mode, Fahrenheit/Celsius temperature display, touchpad
sound, show clock, oven temperature offset, and auto convection
(select models only).
Oven Racks
Do not handle the rack when it is hot. Make sure the oven rack is
in the desired position before preheating the oven.
The oven has six rack
position guides numbered 1
to 6 starting from the bottom.
Refer to the table below or
the cooking charts in your
appliance’s Use & Care
manual for rack position to
use when baking.
Rack Position Usage
Position Best For
6 hamburgers, steaks
5 toasting bread, broiling most meats, melting
cheese
4 thicker meats
3 broiling poultry, most baked goods on cooking
sheet or baking pan, one rack, frozen convenience
foods, cakes, casseroles, frozen pizza
2 small roasts/poultry, bundt cakes, pies, breads
1 large roasts, turkey, angel food cake
Avoid Potential Damage to Oven Racks: Do not attempt to
clean an oven rack using the oven’s Self-Clean feature. The
intense heat will damage the rack’s finish and performance.
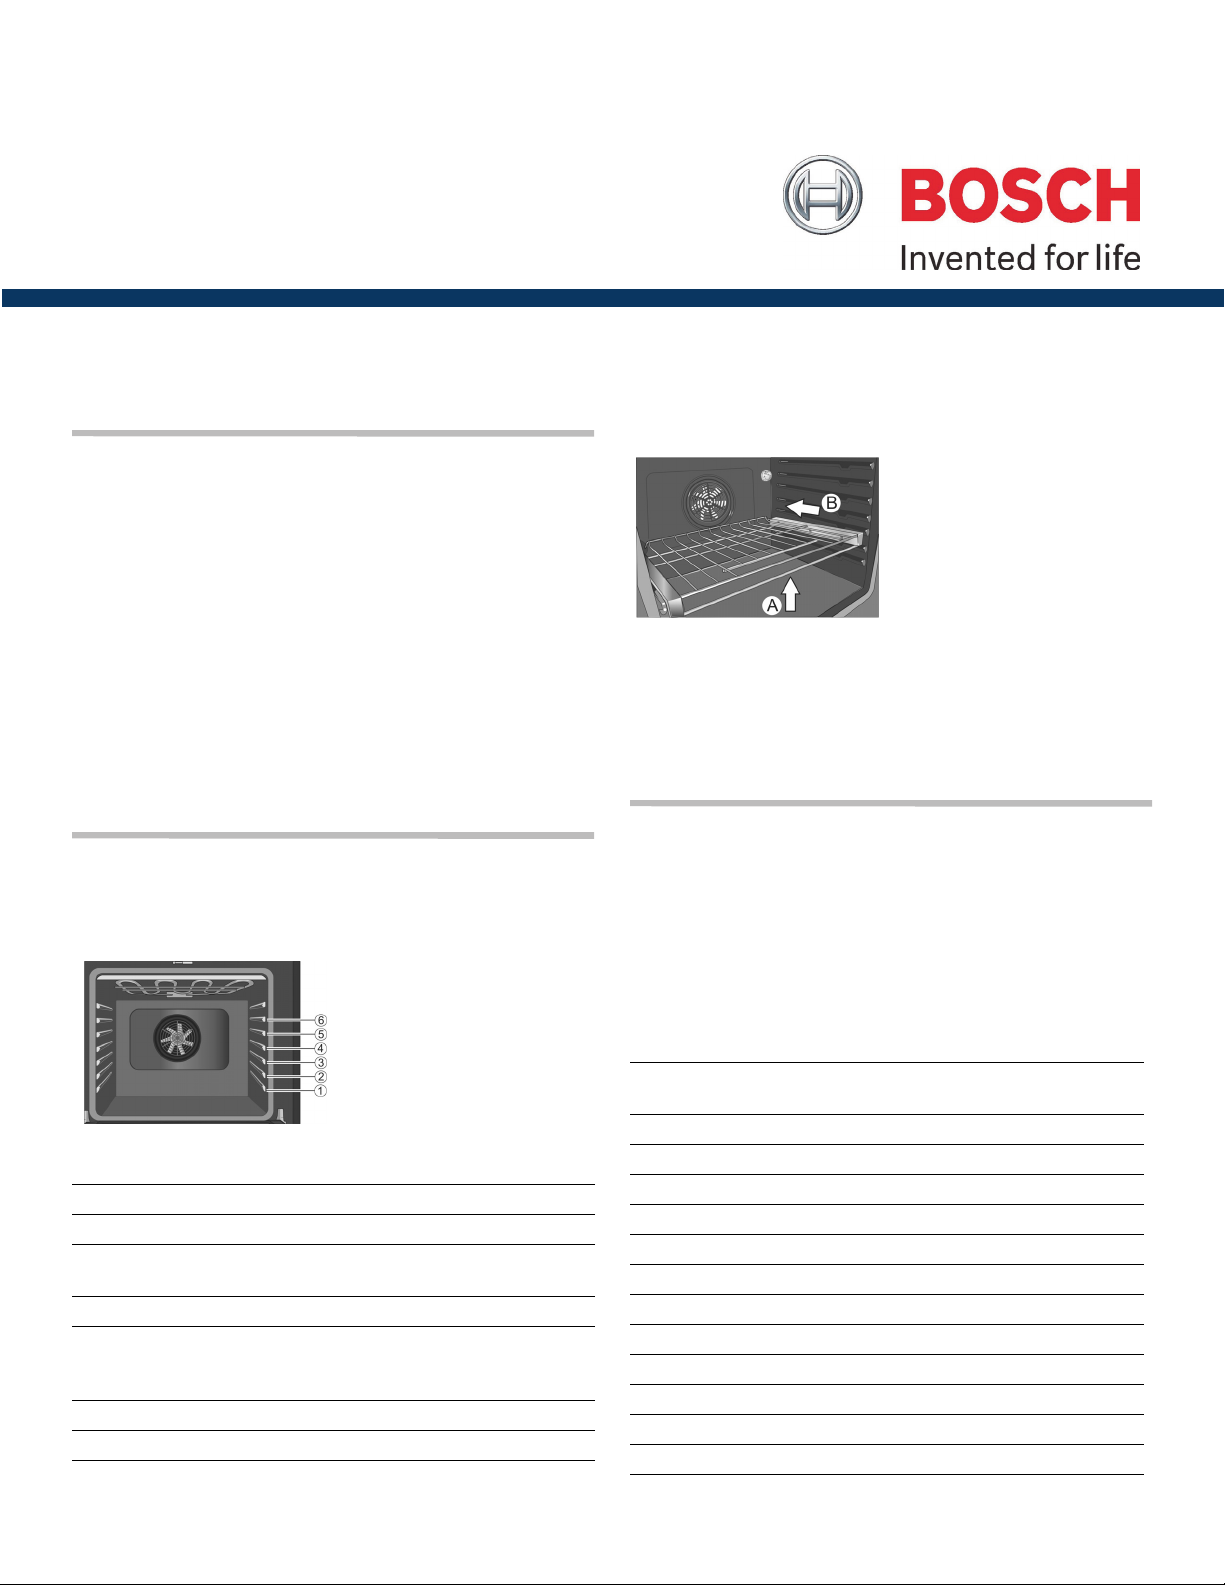
Inserting the Telescopic Rack
Hold the rack by both sides.
Slide it in above the position
guide until the back of the
rack is about 2 inches from
the back of the oven. Tilt the
front of the rack up slightly (A)
and finish pushing the rack
back (B).
The back of the rack drops into place. Pull the rack forward to
seat the back onto the rack position guide.
Lower the front of the rack to finish seating it on the guide. The
rack should be level and flat when properly inserted. Slide the
moveable part of the rack in and out a few times to make sure
the rack is securely anchored.
Oven Mode and Temperature
Setting the cooking mode and temperature
• Select the cooking mode you wish to use (see the cooking
mode chart on the next page for mode descriptions).
• Accept or change the default temperature (See detailed
instructions in your appliance’s Use and Care manual. The
procedure used to change the oven temperature varies by
appliance).
Allowed Temperature Range by Mode
Mode Lowest°FHighest°FDefault
°F
Bake 100 550 350
Roast 100 550 325
Broil (low 450°; high 550°) 450 550 High
Warm 140 225 170
Proof* 85 125 100
Convection Bake* 100 550 325
Convection Multi-Rack* 100 550 325
Convection Roast* 100 550 325
Pizza* 100 550 400
Convection Broil* (Low, High) 450 550 High
Frozen Foods* 100 550 400
EcoChef* 100 550 325
* some models only
English 1

Mode Description and Usage
Oven Mode Symbol Description Recommended Foods Usage Tips
Bake
Roast
Broil
Warm
Proof*
Convection
%
%
(
%
$
2
Bake*
Convection
:
Multi-Rack*
Convection
2
Roast*
Pizza*
Convection
2
4
Broil*
Frozen
‹
Foods*
Eco Chef*
9 CAUTION
* available in some models
Do not use the Warm mode to warm cold food. Maintain proper food temperature (USDA recommends 140°F or higher).
DO NOT keep food warm for longer than 1 hour.
Cooks with dry, heated air Variety of foods, such as cakes, cookies,
pastries, quick breads, quiche and
casseroles
Uses more intense heat from upper
element, more browning of exterior
Uses intense heat radiated from the
upper element
Maintains a low temperature in
order to keep food hot
Maintains a low temperature for
proofing bread or other yeast
doughs.
Similar to Bake, but air is circulated
by a fan at the back of the oven
Circulates heat uniformly using fan
and heating element in the back
Uses lower and more intense heat
from upper element than
Convection Bake with air circulated
by a fan
Similar to Bake, but air is circulated
from a fan at the back of the oven
that cycles on and off
Combines intense heat from upper
element with fan circulation
Uses all the heating elements as
well as the convection fan to evenly
distribute heat
Uses residual heat to reduce energy
consumption during cooking
Best suited for meats, poultry, less tender
cuts of meats and roasting vegetables
Tender cuts of meat (1" or less), poultry,
browning bread & casseroles
Keeping cooked foods at serving
temperature
Rising of bread dough containing yeast Loosely cover dough with a cloth for rising
Best for baked goods such as cakes,
cornbread, pies, quick breads, tarts, and
yeast breads
Use for biscuits, cookies, cream puffs,
cupcakes, dinner rolls, and muffins
Tender cuts of meat and poultry. Roasting
vegetables. Meats are more juicy and
moist than results with Roast mode
All types of pizza - fresh, frozen, prebaked
crust, ready-to-bake
Tender cuts of meat (more than 1"),
poultry and fish. Not for browning
Frozen convenience foods such as fish
sticks, chicken nuggets and french fries.
Tender cuts of meat and poultry Requires use of probe. Allow 5 - 10 minute
Best used with a single rack
Preheat not necessary. Use for cooking
bags and covered bakeware
Preheat oven 3 - 4 minutes. Use with rack in
pan to drain fat away.Turn meat once
To keep food moist, cover with lid or foil. To
keep food dry, do not cover
Reduce temperature 25°F from recipe. Use
for 1 or 2 racks of food
Reduce temperature 25°F from recipe. Use
for 2 and 3 racks of food
Preheat not necessary. Use recipe/cooking
chart temperature. Use open roasting pan
with rack
Preheat baking stone while preheating.
Crispy crust use oven rack. Best browning
use dark coated pizza pan
Preheat oven 3 - 4 minutes. Use with rack in
pan to drain fat away.Turn meat once
No preheating required
stand time outside the oven
Pan Placement
Baking results are better if pans are placed in the center of the
oven.
• Place a single pan in the center of the oven rack
• Allow 1” to 1 1/2” around pans
• Stagger pans if used on two racks so one pan is not above
another
Baking Pans and Dishes
Use light anodized or shiny metal bakeware for tender, light,
golden brown crusts.
Dark, rough or dull pans absorb heat and will result in a browner,
crisper crust. Follow the manufacturer’s recommendations in
selecting baking temperatures.
Insulated cookie sheets or bakeware will increase the length of
cooking time.
Use low-sided, uncovered pans for convection modes.
For Best Cooking Results
• Open the oven door as briefly as possible to avoid reducing
the oven temperature.
• Use the interior oven light to view the food through the oven
window rather than opening the door frequently.
• When using Convection baking modes (including MultiRack), set the oven temperature 25° lower than indicated in
conventional baking recipes or package directions.
• Preheat oven for baked goods and pizza.
English 2
 Loading...