

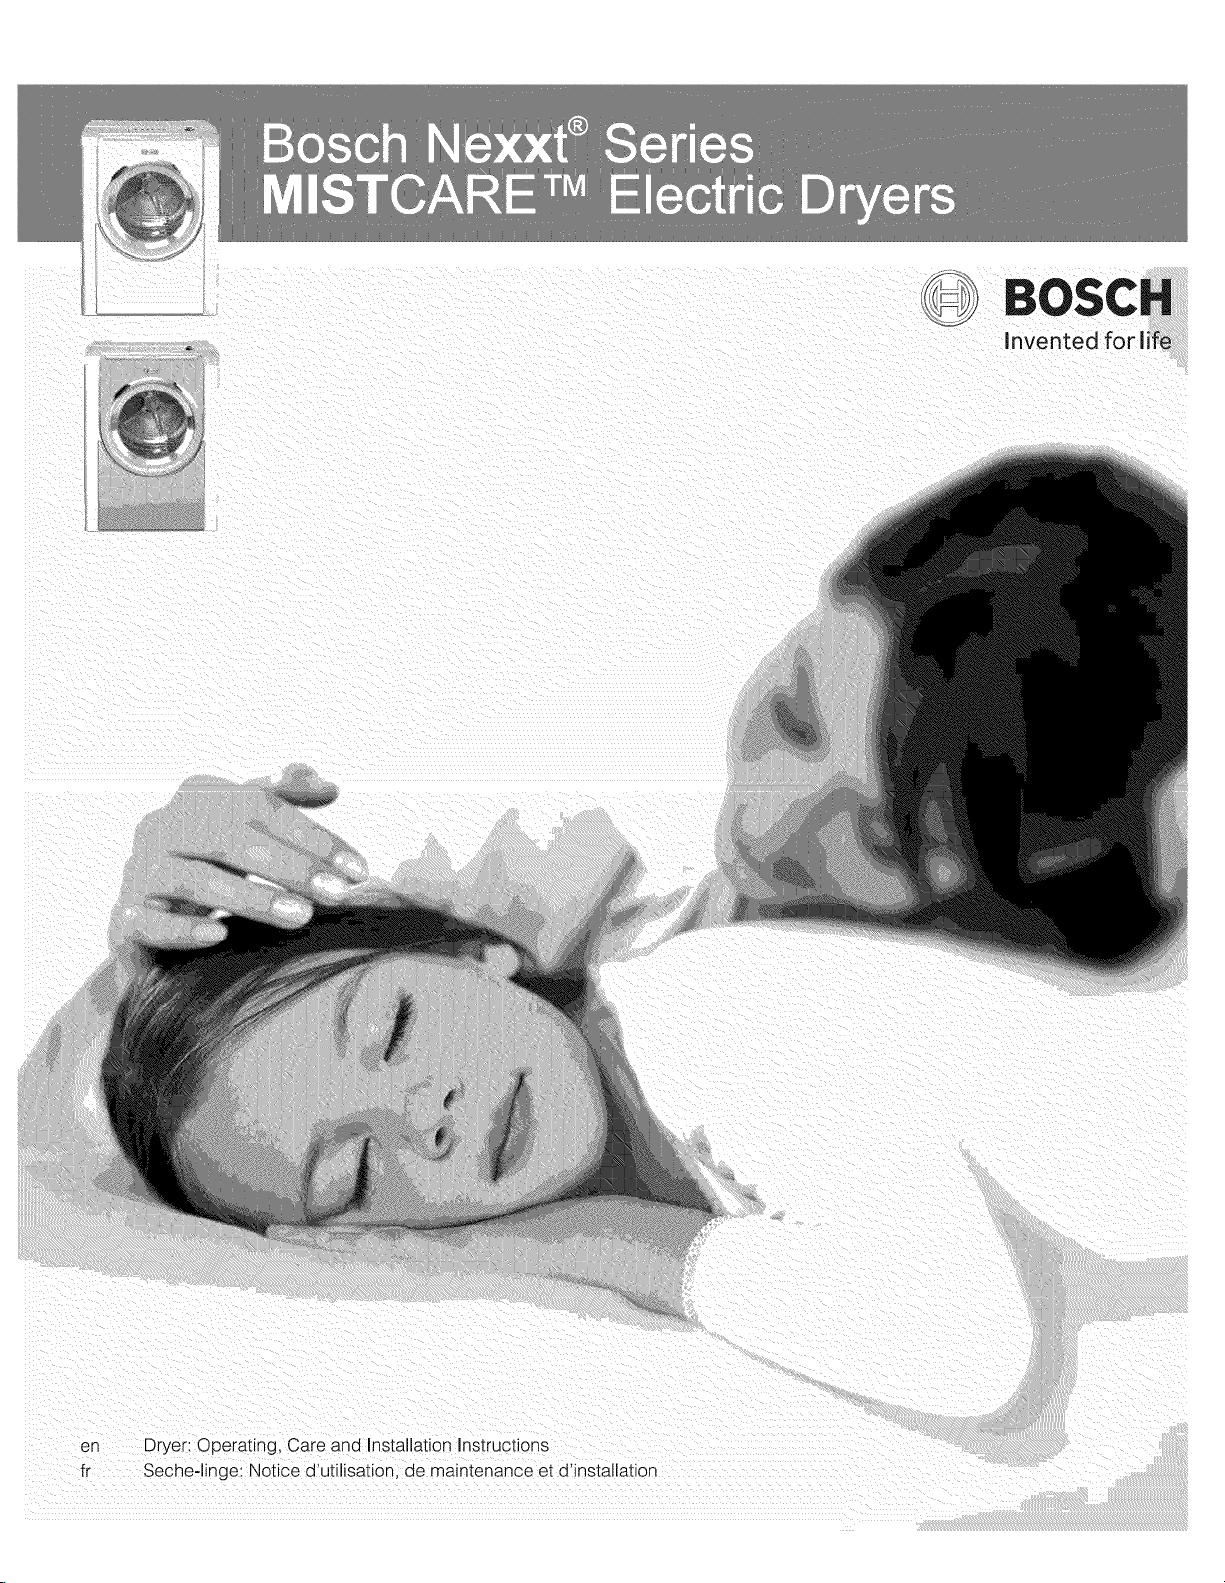
BOSCM
Invented for li_
en Dryer: Operating, Care and Installation Instructions
fr Seche-linge: Notice d'utilisation de maintenance et d'installation

Features and Benefits of Your New Dryer
DUOTRONIC ® Technology
Moisture and temperature levels are constantly monitored to
ensure precise drying results for awide array of fabrics.
Everything from T-shirts to baby blankets come out warm
and soft every time.
Constant monitoring ensures the lowest energy usage
possible, cutting consumption by up to 50% per year.
WRINKLEBLOCK TI_4
Sometimes you can't get your laundrYTrightwhen the buzzer
rings. Extended WRINKLEBLOCK gives you one hour
of intermittent tumbling, preventing creases from setting in
and, ultimately, reducing ironing time.
Stainless Steel Drum
Nexxt TI_4 dryers feature smooth stainless steel drums for the
gentlest of care.
180 ° Door Hinge
Finally, a dryer door that completely opens up to a full 180°
- making it easier to load and unload laundry. Washer and
dryer doors also open in opposite directions, so when set
up side by side, transferring your damp laundry to the dryer
becomes an effortless task.
Quiet Performance
Bosch laundry appliances use brushless motors,
suspended pump systems and special sound-deadening
material to keep them exceptionally quiet while in operation.
Which means they can be installed virtually anywhere in the
home without causing a disturbance.
Dryer Rack
The Nexxt TMdryer rack protects the most delicate fabrics or
a pair of tennis shoes, and it dries without the tumbling. Itis
standard on the Nexxt TMPremium model or available as an
accessory.
Lint Trap
Our lint trap is conveniently located in the appliance housing
below the dryer door for easy access. The linttrap's fine
mesh filter captures even the smallest lint particles. And to
increase drying efficiency, there's also a lint filter light that
illuminates should the filter need immediate cleaning.
MISTCARE TI_4
MISTCARE TI_4 programs utilize added moisture to help relax
fabric, ease wrinkling, and freshen cotton blend laundry
items to reduce odor.
AQUASTOP ® Hose
.....Ihe AQUAS IOP® Hose stops water flow in the event the
hose experiences flood-type leakage.

Table of Contents
Definitions ..........................................................................................
IMPORTANT SAFETY INSTRUCTIONS .................................................................
GROUNDING INSTRUCTIONS .......................................................................
INSTALLATION INSTRUCTIONS .......................................................................
Introduction .......................................................................................
Information concerning waste disposal ................................................................
Before installing the dryer ............................................................................
Installation - step by step ............................................................................
Electrical connection ...............................................................................
Exhaust air connection ..............................................................................
Accessories .......................................................................................
Preparing to transport the dryer - step by step ..........................................................
OPERATING INSTRUCTIONS .........................................................................
Panel ............................................................................................
Additional Safety information .........................................................................
Protection of the environment .........................................................................
Laundry ............................................................................................
Identification of fabrics ..............................................................................
Drying tips ........................................................................................
Program Selection Table .............................................................................
Options ..........................................................................................
Indicator of program sequence .......................................................................
Automatic programs ................................................................................
MISTCARE programs ...............................................................................
Special programs ..................................................................................
Time programs ....................................................................................
Operation ...........................................................................................
Using the dryer ....................................................................................
Cleaning the lint filter ................................................................................
Using the dryer rack (Option) .........................................................................
Cleaning and care ...................................................................................
Cleaning the dryer ..................................................................................
Cleaning the exhaust duct ...........................................................................
Cleaning the moisture sensor ........................................................................
Cleaning the bearing shield ..........................................................................
Change the light bulb ...............................................................................
Troubleshooting .....................................................................................
SERVICE and REPAIR ..............................................................................
STATEMENT OF LIMITED PRODUCT WARRANTY ......................................................
4
4
5
6
6
6
6
7
10
13
15
15
16
16
17
17
17
17
17
18
18
18
19
19
19
19
21
21
22
22
24
24
24
24
24
24
25
26
27
3
Congratulations on having selected a
Bosch clothes dryer, the choice of
those that demand exceptional drying
performance and care from their
clothes dryer.
This dryer complies with:
UL 2158/CAN/CSA-C22.2 No.
112-97 Clothes Dryers
A distinctive feature of your dryer is low
energy consumption.
An easy operation philosophy, a variety
of customized drying programs and a
solid touch and feel make this
appliance a user-friendly assistant in
your household.
The Bosch dryers offer the following
standard features:
- High efficiency precision drying
system
- Large stainless steel drum with a
capacity of up to 17.6 Ibs (8 kg)
- Large port hole (18"/457 mm), and
door interlock with automatic drum
stop function
- Exceptionally quiet operation
- Sensor controlled auto cycles
- Timed cycles
500 Series Dryer: 30 and 60
minutes
800 Series Dryer: 10 to
150 minutes (inincrements of 10
minutes)
- Short program for 1/2load
(25 minutes) (800 Series only)
Each dryer which leaves our factory
has undergone a thorough
performance test and is in full working
condition. If you have any questions
especially concerning installation of the
dryer - our customer service team will
be happy to assist you.
Further information and a selection of
our products can be found on our web
site:
www.boschappliances.com
Information
Please read and follow these operating
and installation instructions and all
other information enclosed with the
dryer.
Definitions
WARNING - This indicates that
death or serious injuries may
occur as a result of
non-observance of this warning.
CAUTION- This indicates that
minor or moderate injuries may
occur as a result of
non-observance of this warning.
NOTICE - This indicates that
damage to the appliance or
property may occur as a result of
non-observance of this warning.
D This symbol is used to draw the
user's attention to important
matters.
/k IMPORTANT SAFETY INSTRUCTIONS
flammable substance, such as
vegetable oil, cooking oil,
petroleum based oils or distillates,
To reduce the risk of fire, electric
shock, serious injury or death to
persons and/or damage when
using your dryer, follow basic
precautions, _ncluding the
following.
1. Read all instructions before using
the dryer. Bosch dryers are
provided with Operating, Care and
Installation Instructions.
2. Do not dry articles that have been
previously cleaned, washed,
soaked, or spotted with gasoline,
dry cleaning solvents, other
flammable, or explosive
substances as they give off vapors
that could ignite or explode.
To reduce the risk of fire, clothes,
cleaning rags, mop heads and the
like which have traces of any
waxes, fats, etc., must not be
placed in the dryer. These items
may contain some flammable
substance(s) even after washing,
which may smoke or catch fire by
themselves.
Do not place items exposed to
cooking oils in your dryer. Items
contaminated with cooking oils
may contribute to a chemical
reaction that could cause a load to
catch fire.
,
The dryer must only be used for its
intended purpose.
4.
Do not allow children to play on or
in the appliance at any time;
severe injury or death could
result. Children should be kept a
safe distance away from
appliances at all times. Children
should only be permitted within an
appliance's vicinity if under close,
constant adult supervision.
5. When children become old
enough to operate the appliance, it
is the legal responsibility of the
parents or legal guardians to
ensure that they are instructed in
safe practices by qualified
persons.
6. BEFORE THE APPLIANCE IS
REMOVED FROM SERVICE OR
DISCARDED, REMOVE THE
DOOR TO THE DRYING
COMPARTMENT.
7. Do not reach into the appliance if
the drum is rotating.
8. Do not install or store this
appliance where it will be exposed
to the weather or the elements,
such as water/moisture, dirt,
corrosive/salt air, and excessive
cold.
9. Do not tamper with the controls.
4

10. Do not repair or replace any part of
the appliance or attempt any
service unless specifically
recommended in the
user-maintenance instructions or
in published user repair
instructions that you understand
and have the skills to carry out.
11. Do not use fabric softeners or
products to eliminate static unless
recommended by the fabric
manufacturer.
12. Do not use heat to dry articles
containing foam rubber (may be
labeled latex foam) or similarly
textured rubber-like materials.
Foam rubber materials can ignite
by spontaneous combustion.
13. Do not dry articles containing
spunbonded olefin. Spunbonded
olefin can melt and can ignite by
spontaneous combustion.
14. Clean lint screen before and after
each load. Excess lint buildup can
damage the dryer and create a
potential fire hazard.
15. Keep area around the exhaust
opening and adjacent surrounding
areas free from the accumulation
of lint, dust and dirt. An obstructed
port might reduce the airflow and
cause overheating.
16. The interior of the machine and
exhaust duct should be cleaned
periodically by qualified service
personnel.
17. Removing any panel or cover,
including the light cover, may
expose live electrical circuits.
Always be sure to unplug the dryer
from the electrical supply before
attempting any service.
Disconnect the power cord by
grasping the plug, not the cord.
18. Store all laundry chemicals and
aids in a cool dry place according
to the manufacturer's instructions.
Make sure children cannot reach
them. Gasoline, combustible
materials and flammable vapors,
liquids, and substances that pose
a fire hazard must not be stored
near the dryer.
19. Do not sit on top of the dryer.
20. To avoid fire hazards, do not use
an extension cord, an adapter, or
any other non-manufacturer
supplied electrical connector or
cord, to connect the dryer to the
electrical supply. Dryers are
powerful machines, and must
have dedicated electrical outlets.
21.
Always check clothing pockets
and shake out all laundry items
before placing into dryer;
inappropriate objects can damage
the dryer and certain items like
cigarette lighters can pose a fire
hazard.
22.
To reduce the risk of fire and
electrical shock hazards, do not
use the dryer if the power cord is
frayed or damaged, or if the plugs
are loose.
23.
Do not operate the dryer if any
guards and/or panels have been
removed or ifany parts are missing
or broken.
24.
Do not bypass any safety devices.
25.
Do not use a plastic or non-metal
flexible duct with this dryer. Plastic
or non-metal flexible duct isa
potential fire hazard.
26.
Do not operate this dryer until you
are sure that the dryer has been
installed according to the
INSTALLATION INSTRUCTIONS
and that installation and electrical
grounding are in compliance with
all local regulations and/or other
applicable regulations and
requirements.
27.
Failure to install, maintain and/or
operate the dryer according to
the manufacturer's instructions
may result in injury and/or
damage.
28.
To avoid floor damage and mold
growth, do not let spills or
splashout to cause standing water
around or under the appliance.
29.
Make sure that all water
connections to the dryer have a
shut-off valve that is readily
accessible. Close the appliance
water shut-off valve(s) at the end
of each day of use.
30.
Check the fill hose connections on
a regular basis to ensure that they
are tight and not leaking.
Notes:
A The IMPORTANT
SAFEGUARDS and
WARNINGS presented in this
manual do not cover all
possible conditions that may
OCCUr.
Common sense, caution and
care must be exercised when
installing, maintaining or
operating the dryer.
B
Always contact your dealer,
distributor, service agent or
the manufacturer about any
problems or conditions that
you do not understand.
C
Follow the Safety Information
provided in the
INSTALLATION
INSTRUCTIONS and the
OPERATING
INSTRUCTIONS.
GROUNDING
INSTRUCTIONS
This appliance must be grounded. In
the event of malfunction or breakdown,
grounding will reduce the risk of electric
shock by providing a path of least
resistance for the electric current.
For CANADA
This appliance is equipped with a cord
having an equipment-grounding
conductor and a grounding plug.
The plug must be plugged into an
appropriate outlet that is properly
installed and grounded in accordance
with all local codes and ordinances.
Improper connection of the
equipment grounding conductor
can result in a risk of electric
shock.
Check with a qualified electrician
or service person if you are in
doubt as to whether the dryer is
_soperlygrounded.
NOT modify the plug
provided with the appliance.
If it will not fit the outlet, have
a proper outlet installed by
a qualified electrician.
KEEP THESE
INSTRUCTIONS FOR
FUTURE REFERENCE.
In case of change of ownership,
manual should be conveyed with the
dryer.
SAVE THESE
INSTRUCTIONS
5

INSTALLATION INSTRUCTIONS
Introduction
Read these installation instructions
completely and carefully. They will save
you time and effort and help to ensure
optimum dryer performance. Be sure to
observe all listed warnings and
cautions.
WARNING - Risk of Fire.
- Clothes dryer installation must be
performed by a qualified installer.
- Install the clothes dryer according
to the manufacturer's instructions
and local codes.
- Do not install a clothes dryer with
flexible plastic venting materials. If
flexible metal (foil type) duct is
installed, it must be of a specific
type identified by the appliance
manufacturer as suitable for
clothes dryers. Flexible venting
materials are known to collapse,
be easily crushed and trap lint.
These conditions will obstruct
clothes dryer airflow and increase
the risk of fire.
- To reduce the risk of severe injury
or death, follow all installation
instructions.
- SAVETHESE INSTRUCTIONS.
Inaddition to these instructions the
dryer must be installed in accordance
with all local codes or, inthe absence
of a local code:
- In Canada, in accordance with the
Canadian Electric Code C22.1 -
latest edition/Provincial and
Municipal codes and/or local
codes.
Information concerning
waste disposal
Disposal of the packaging
Keep children away from
shipping carton and packaging
components. Danger of
suffocation from plastic foil and
folding cartons.
All packaging materials are
environmentally friendly and can be
reused. Please dispose of packaging in
an environmentally friendly manner.
Please ask your dealer or inquire at
your local authority about the current
means of disposal.
Disposal of the old appliance
If appliance is no longer usable,
pullout main plug, cut off power
cord and discardwith main plug.
To prevent children from locking
themselves in the appliance,
remove the door.
Old appliances are not worthless
rubbish! Valuable raw materials can be
reclaimed from environmentally friendly
recycling.
Please ask your dealer or inquire at
your local authority about the current
means of disposal.
Before installing the dryer
Before installing the dryer to a
previously used ductwork system make
sure the system is clean. Professional
ductwork cleaning is recommended
annually and also when attaching your
dryer to a previously used ductwork
system.
Maintaining clean ductwork will reduce
drying time and will improve drying
performance.
Unpacking the appliance
The dryer is very heavy. Do not
lift it by yourself. Do not lift the
appliance by projecting
components (e.g. door) - due to
risk of breakage.
Remove the appliance
packaging carefully to prevent
damage to the surfaces.
Check the dryer for transportation
damage. Do not install a dryer which is
visibly damaged. If in doubt, contact
your dealer.
Supplied components
After removing the packaging,
immediately remove any objects
from the drum,

Useful Tools
The following tools are helpful during
installation:
1. T20 star head screwdriver
2. Philips screwdriver (#2)
3. Flat blade screwdriver
4. Open end wrench 1 in. (25mm)
5. Bubble level
1
2
3
4
D If space is very restricted, it is
recommended to fit the initial parts
of the exhaust duct to the dryer
before the dryer is moved to its
final installation location.
10. Move the dryer to its final location.
Do not slide dryer across the
floor if height-adjustable feet
have been extended. Feet and/or
dryer base may be damaged if
dryer is slid across floor with
height-adjustable feet extended.
11. Position and then level the dryer.
12. Connect the exhaust duct to the
exhaust air outlet on the dryer (see
page 13).
13. Insert the dryer electrical plug into
the wall receptacle (see page 10).
14. Read the operating instructions to
understand how your dryer
operates. (see page 16).
15. Conduct an appliance test:
E3 Check that the drum is empty.
E3 Close the dryer door.
E3 Switch the dryer to "Extra Dry"
and then press the "Start"
button.
E3
After 3-5 minutes press the
Stop button and open the door.
E3
If the interior of the dryer feels
warm, the dryer has been
connected properly.
Switch the dryer to "OFF".
E3
If the dryer does not work,
switch the dryer to "OFF".
Look in the troubleshooting
section (page 25) and find the
fault.
Checklist for Installation
1. Unpack the dryer.
2. Remove all objects from the drum.
3. Check the dryer for visible
damage.
4. Position the dryer near the
installation location (see page 7).
5. If required, change the door hinge
to the left (see page 15).
6. If required, install the side or
bottom exhaust air outlet on the
dryer (see page 15).
7. Check for "Y" connection, short
hose and AQUASTOP ® Hose
included with the dryer packaging
(see page 8).
8. Connect the water supply to the
back of the dryer (see page 8 for
detailed instructions).
9. Install exhaust ductwork if
necessary.
Follow the installation instructions
supplied by the appropriate
ductwork parts manufacturers (see
page 14)
The dryer should be level with all four
feet firmly on the ground. The dryer
must not wobble. Ifthe dryer is not level
or if it does wobble, the feet must be
adjusted. Adjust the height-adjustable
feet until the dryer does not rock and is
level, both front-to-back and
side-to-side.
E3
After making preliminary
adjustments, press down on each
corner of the dryer to make sure
the unit does not wobble. Ifit does
wobble, lower the foot on that
corner until the foot touches the
floor firmly.
Install the dryer and level side to side
and front to back. Use a bubble level.
Never remove the height-adjustable
feet!
Installation location
DO NOT install the dryer:
- outdoors
- inan environment with dripping
water,
- near flammable materials,
- in rooms which are at risk of frost,
- inrooms which may contain gas
or other fuels,
- incupboards with Iockable doors
or in alcoves.
The installation room must be well
ventilated, otherwise the dryer will
operate below optimum performance.
Do not operate the dryer at
temperatures above 104°F (40°C) or
below 41°F (5°C). Low temperatures
affect the automatic program sequence
and may prolong the drying times.
The installation surface for the dryer
must be clean, level and firm. Do not
install the appliance on carpets!
Compensate for uneven floors with the
height-adjustable feet.
The size of the installation area
depends on the dimensions of the
dryer. Ensure that there is adequate
room for the swivel range of the door!
7

Dimension Weight
a 27.0" (686mm) 125 Ibs
b 31.8" (808mm) (56kg)
with
c 37.2" (945mm) packaging
d 19.7"(500 mm)/ 143 Ibs
angle 170 180° (64kg)
If installing the dryer in a closet, observe
the minimum distances according to
the following table:
Minimum Installation Clearances
Closet
Sides 0" (0 mm)
Top 12"(305 mm)
Rear* 0" (0 mm)
* asclosetowallasventingor water
connectionwillallow.
Benefits of maintaining greater
distance (clearances) than the
minimum shown include:
• reduction of the risk of mold
formation behind the appliance.
• reduced noise transmission
• facilitation of installation and
service.
• more air cools the dryer, keeps
the dryer from overheating, and
improves drying performance.
If the dryer is installed in a small
room, the doors of the room must
be fitted with vents of a specified
minimum size. Refer to the
following figure for additional
information.
AQUASTOP ® Hose
Properly secured EXTERNAL hose
connections are the sole
responsibility of the customer. The
manufacturer assumes no
responsibilty or liability for
improperly installed EXTERNAL
hose or other connections.
The AQUASTOP ® Hose prevents
potential flooding if the hose leaks.
If the hose leaks, a red mark is
displayed and the water inlet is
blocked.
[3 An AQUASTOP ® Hose that has
activated cannot be reset. Contact
Customer Service for a
replacement hose (see page 26).
MISTCARE TMDryer Parts Supplied
The following parts are included with
the shipment of your dryer.
Important information concerning
minimum distances:
- Depending on the location of the
exhaust air connection, an
additional minimum distance of
51/2inch (14 cm) must be provided
on this side for ducts/brackets (see
page 15).
The dryer door is delivered with hinges
on the right.
If the door hinge isto be changed over
to the left see page 15.
Water Connection
Attach the dryer water supply hose to a
cold water faucet (the faucet must be
located within 4 ft (1.2 m) of the water
inlet valve on the back of the dryer).
It is recommended to have a water
supply pressure of 20 - 1O0 psi (1.37 -
6.89 bar) for best performance.
A "Y" connector is provided along with
a short hose (if needed) in order to
connect itto the cold water faucet.
2
3
4

1. "Y" connector
2. Short metal-braided inlet hose
3. Rubber washer
4. AQUASTOP ® Hose
Connecting the Inlet Hose
D The dryer must be connected to
the "Y" connector using the
AQUASTOP ® Hose. Do not use
an old hose.
1. Turn off the cold water faucet and
remove the washer water supply
hose.
4. Attach the short hose to the cold
water faucet. Tighten the
connection by hand until the
coupling is seated on the faucet.
5. Use pliers to tighten the
connection an additional
two-thirds turn.
10. Attach the right-an_le connector
on the AQUASTOP _ Hose to the
inlet valve located at the top left of
the dryer.
%
Check to see that the rubber
washer does not fall out, and is
properly seated in the right-angle
connector.
11.
Hand tighten the coupling until it
is seated on the connector. Do
not use pliers, hand tighten only.
%
Do not overtighten. Damage to
the coupling could result.
12. Turn on the water faucet.
13. Check for leaks around the "Y"
connector, faucet and all hoses.
2. Check to be sure that the rubber
washer is fully inserted and seated
in the female end of the short hose
prior to continuing. The rubber
washer is shown as item 3 inthe
supplied parts illustration. It is
illustrated separately from the hose
for clarity.
3. If space permits, attach the
internally threaded (female) end of
the "Y" connector directly to the
cold water faucet (option A as
shown inthe illustration above)
and continue to step 6.
For optional Installation with Y
Connector
If the "Y" connector cannot be
attached directly, use the short
hose provided to connect the "Y"
connector to the cold water faucet
(option B as shown nthe
illustration shown), and continue
with steps 4 through 5.
D Do not overtighten. Damage to
the coupling could result.
6. Attach the "Y" adapter to the short
hose. Tighten the coupling by
hand until it is firmly seated on the
hose.
7. Attach the washer cold water
supply hose to the "Y" connector.
Hand tighten.
8. Attach the dryer AQUASTOP ®
Hose to the other coupling of the
"Y" connector. Hand tighten.
g,
Tighten all three couplings on the
"Y" connector an additional
two-thirds turn using pliers.
%
Do not overtighten. Damage to
the coupling could result.
9

Electrical Connection
Power cord must be connected
by a qualified technician or a
licensed electrician only.
Connect to individual Branch
Circuit.
Do not use an adapter.
Do not use an extension cord.
Do not remove ground prong.
For CANADA
Your dryer comes with a power supply
cord, CSA listed in Canada.
The Bosch dryer requires a 4-wire
receptacle.
When installing the receptacle for the
dryer cord, ensure that the power
supply cord isaccessible when the
dryer is in the installed position.
The power cord should only be
replaced by a qualified technician or
licensed electrician. If you must replace
the power cord that was originally
supplied with your appliance, the
power cord must meet the following
requirement:
- 4-wire only
- UL and CSA listed
- 208 - 240 volt rated (minimum)
- 30 amps
- Type SRDT
- Five feet long (minimum)
Refer to page 39 for 4-wire installation
instructions.
Grounding instruction
This appliance must be grounded. In
the event of a malfunction or
breakdown, grounding will reduce the
risk of electric shock by providing a
path of least resistance for the electric
current.
Additional grounding procedure
- Never ground the dryer to plastic
plumbing lines, gas lines or water
pipes.
10

Connecting the Power Supply
Improper connection of the equipment grounding
conductor may result in electric shock. Have the
appliance checked by a qualified technician or
licensed electrician if you are in doubt as to
whether the dryer has been properly grounded.
Q emove the two screws fromthe terminal block cover
located at the top rear of the
appliance. This will expose
the terminal block assembly.
Loosen the bottom
screw of the grounding
strap. Straighten the
grounding strap so it is
vertical. Replace the
green screw in the
GROUND terminal hole. •
Make sure the grounding ......
strap does not touch the
back panel to avoid
tripping the circuit breaker
during dryer operation.
(4 wire)
Do not plug the end of the
power cord into a live
receptacle before connecting
power cord to appliance
terminaJs and closing the
junction/splitter box as
described below.
'_ii!!J!!_!!J_!!I_;¸;¸_ .__
i_i_i!!iiiii¸i_i_i!_!i_i_ii_ii_ii_i_!i_!i_i!!_!i!i!i!_ii_i_;!;_i_i_i_i_i!_i_i!_ii!_iiiiii!i_!_!i!!i!i!!i!!i!i_ii_i_ii_i_i_iiiiiiiii!i_ii_ii_i_!i_i_;;_;_;!i!¸i¸_!i!:_!i_I__i!__iN
terminal block
grounding strap
strain relief clamp
bracket for ,__
Q ix a strain relief
clamp (available
from an electrical or
building supply
outlet) to the angle
bracket. Tighten the ......................
nut to firmly fix the
clamp in place,
$
(_ Loosen the 2
labeled L and the
single screw labeled
N on the terminal
block. Also loosen ....
the screw on the
GROUND terminal.
Continued on the next page
screws
11
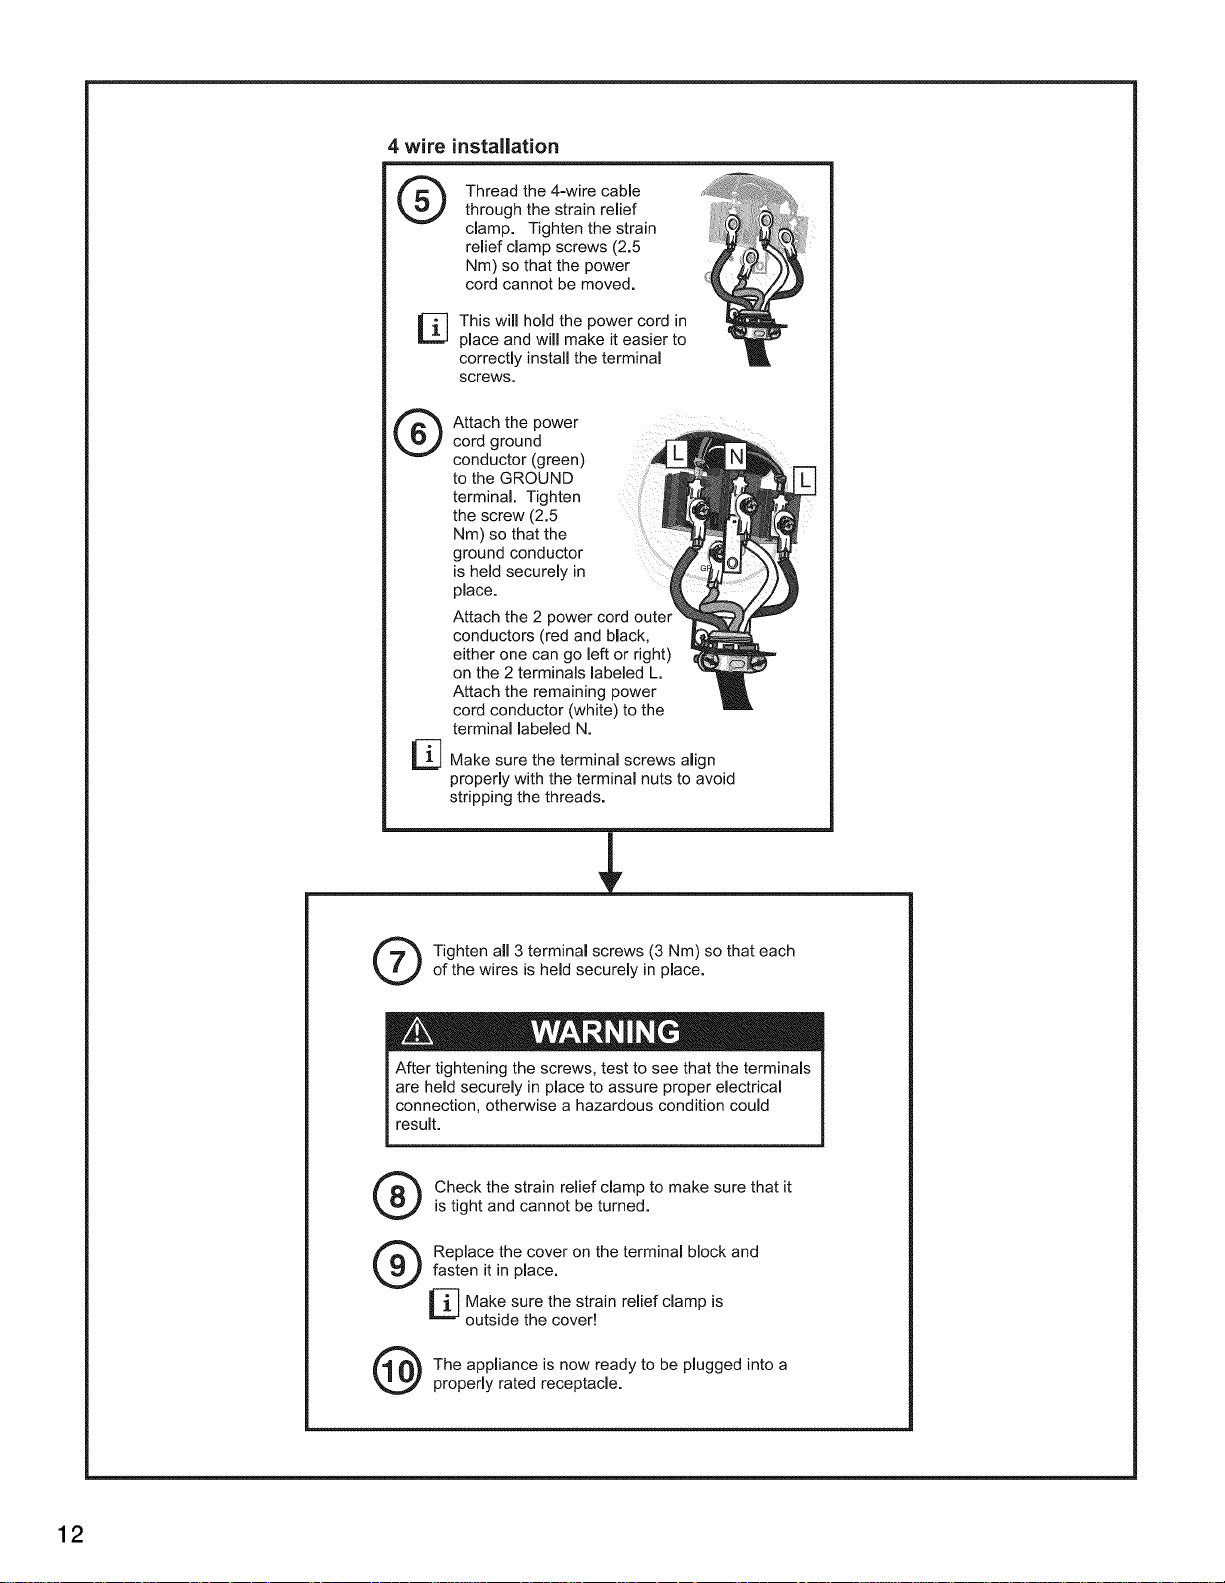
4 wire installation
Q Thread the 4=wire cable
®
through the strain relief
clamp. Tighten the strain
relief clamp screws (2.5
Nm) so that the power
cord cannot be moved.
This will hold the power cord in
place and will make it easier to
correctly install the terminal
screws.
Attach the power
cord ground
conductor (green)
to the GROUND .......
terminal. Tighten
the screw (2.5
Nm) so that the
ground conductor
is held securely in
place.
Attach the 2 power cord outer
conductors (red and black,
either one can go left or right)
on the 2 terminals labeled L.
Attach the remaining power
cord conductor (white) to the
terminal labeled N.
Make sure the terminal screws align
properly with the terminal nuts to avoid
stripping the threads.
12
Q ighten all 3 terminal screws (3 Nm) so that each
of the wires is held securely in place.
are held securely in place to assure proper electrical
connection, otherwise a hazardous condition could
result.
Q heck the strain relief clamp to make sure that it
Q eplace the cover on the terminal block and
is tight and cannot be turned.
fasten it in place.
Make sure the strain relief clamp is
outside the cover!
The appliance is now ready to be plugged into a
properly rated receptacle.

Exhaust air connection
The following warnings must be
adhered to without exception.
1. To reduce the risk of fire, this dryer
MUST BE EXHAUSTED
OUTDOORS.
2. To reduce the risk of fire, do not
use ductwork longer than
recommended. Refer to the
maximum ductwork length table
(see page 14).
3. DO NOT use a plastic, metal foil,
or any other non-metal duct with
this dryer. Only rigid or flexible
metal duct shall be used for
exhausting. Metal foil and flexible
metal ducting are NOT the same.
4. DO NOT use more than 2.4 m of
flexible metal ducting.
5. DO use a duct that is 4 inches
(102 mm)in diameter.
6. DO NOT exhaust the dryer into: a
chimney, wall, ceiling, concealed
space of a building, furnace cold
air duct, attic, crawl space, or any
other ductwork used for venting.
7. DO NOT install a flexible duct inan
enclosed wall, ceiling or floor.
8. DO NOT crush or kink the duct.
9. Do clean and inspect the exhaust
system on a regular basis; at least
once a year.
10. The exhaust duct must terminate
with an approved exhaust vent
hood to prevent back drafts or
entry of birds or other wildlife.
11. DO NOT use exhaust hoods with
magnetic latches.
12. DO NOT assemble the duct work
with screws or fasteners that
extend into the duct. They serve
as an accumulation point for lint.
Joints should be secured with
aluminum tape.
Exhaust air outlet on the dryer
The dryer is delivered with an exhaust
air outlet on the rear of the appliance.
To take account of the spatial
requirements and an existing exhaust
air system, the following connection
options are possible for the exhaust air
outlet:
- on right side of the appliance,
- on the underside of the appliance.
2
1 - Exhaustairoutletontherearofthe
appliance(standard)
2 - Exhaustair outletonthe side(optional)
3 - Exhaustair outletonthe undersideof
the appliance(optional)
Special exhaust air connections can be
obtained from your dealer, part supplier
or customer service for either
connection type (see page 15).
- Side exhaust kit
- Bottom exhaust kit
A qualified technician should change
the exhaust air outlet to the optional
connection location.
Ductwork
The dryer vent system moves moist air
away as your clothes tumble dry. You
can shorten drying times, save energy
and help ensure the safety of the
system by making sure your dryer's
exhaust duct system is properly
installed and maintained.
Important Points to Consider:
E3
Keep exhaust duct runs (total
length of the exhaust duct system
from the dryer to the exhaust hood
outside) as short as possible (refer
to the table "Maximum Ductwork
Length" on page 14.)
E3
Use the minimum number of
elbows needed when installing the
exhaust duct system. Avoid
placing two 90 degree elbows
adjacent to one another.
Check and clean the exhaust duct
system and exhaust hood at least
once each year, and any time you
suspect dryer performance is
decreased.
Remove accumulated lint to
prevent diminished air flow or
clogging of the system.
Professional cleaning is
recommended annually and when
attaching your dryer to a previously
used exhaust duct system.
Replace any plastic or metal foil
venting sections with rigid metal or
flexible metal ducting. Rigid metal
ducting is recommended.
%
Correct exhaust system installation
is the responsibility of the
consumer.
Problems that result from
incorrect installation are not
covered by the appliance
warranty.
Exhaust ducting which is longer than
specified in the maximum ductwork
length table on page 14 is not
permitted. Not adhering to this table
will extend drying time, cause lint to
accumulate and affect dryer
performance and dryer life-time.
13

i|n
i! _i ii__i_iiii I
All joints should be tight to avoid leaks.
The male end of each duct section
must point away from the dryer.
Whether connecting to an existing
venting system or a new venting
system, make sure that all ducting is
clean and free of lint.
The maximum permitted length for
rigid duct and for rigid duct used with
flexible metal duct is shown in the table
below. If using flexible metal ducting to
connect the appliance to the ductwork
system, the total length of flexible
metal duct used shall not exceed 2.4 m
and can only be used to connect the
dryer to the ductwork system. As the
table below shows, the maximum
overall ductwork length is reduced if
flexible ducting is used.
Maximum Ductwork Length
Numberof
90°Turns
or Elbows
Rigid Duct
FlexibleDuct
in
Combination
with Rigid
Duct
0 66 ft. 45 ft.
(2011 cm) (1372 cm)
1 56ft. 36 ft.
(1707cm) (1097cm)
2 48 ft. 29ft.
(1463cm) (884cm)
3 39ft. 22 ft.
(1189cm) (671cm)
4 30ft. 16ft.
(914cm) (488cm)
Note:
Side and bottom exhaust installations
have a 90°turn inside the dryer. Take
this into account when using the table
above.
More than two 90° turns are not
recommended. For best performance,
separate allturns by at least 4 ft. of
straight duct, including distance
between last turn and exhaust hood.
;OWthe
haust
ct to be
!onger than
necessary
O0
keep exhaust
duetrunsas
sho_ as
possible
crushing or
kinking the
exhaust
ducting
Exhaustventhood
The exhaust duct must end with an
approved exhaust vent hood with
swing out damper(s). DO NOT use an
exhaust vent hood with magnetic
latches.
To avoid exhaust restriction, the outlet
must be a minimum of 12 inches (30
cm) above ground level or any other
obstructing surface.
Required Ductwork Parts
The parts required for the exhaust air
system (elbows, lines, exhaust air
outlets) are not included in standard
delivery of the dryer (see the
Accessories section for information on
ordering parts.)
Professional installation of ductwork is
recommended.
14

Accessories
The following optional accessories for
your dryer may be obtained from
customer service (see page 26) or from
your local dealer. Please follow the
installation instructions supplied by the
appropriate manufacturer.
Side exhaust kit
part no. WTZ 1265
Note:
See notes on maximum number of
elbows on page 14.
D A special tool is required for cutting
the exhaust hole in the dryer side
panel.
For further information please
contact your local dealer.
Bottom exhaust kit
Dryer rack
part no. WTZ1290
Use the dryer rack to dry washable
woolen textiles (e.g. sweaters) and
shoes.
Left hinge kit
part no. WTZ1260 for white
part no. WTZ1260S for solid silver tone
and for duo-tone color
The door is hinged on the right side at
the factory. The door catch can be
reversed if necessary. Please contact
your dealer or our customer service
team (see page 26)
Pedestal Mounting Kit
8 inch pedestal accessory number
WTZ 1295 for solid white color
WTZ 1295S for solid tone silver
WTZ 1295P for duo tone silver/white
15 inch pedestal accessory number
WTZ 1500 for solid white color
WTZ 1500S for solid tone silver
WTZ 1500P for duo tone silver/white
WTZ 15000 for duo tone
champagne/white
If mounting the dryer on the pedestal
follow the instructions supplied with the
pedestal before proceeding any further.
Preparing to transport the
dryer - step by step
D These procedures should only be
performed by a qualified person.
1. Rotate the program selector
to "OFF".
2. Disconnect the power supply (turn
circuit breaker off, unplug the
appliance)
3. Turn off the water faucet
connected to the water supply
hose. Disconnect the water
supply hose.
4. Disconnect the exhaust duct from
the exhaust air outlet on the dryer.
5. Collect any accessories and
package them for shipment with
the appliance.
6. Close the door and secure with
adhesive tape.
7. Screw the height-adjustable feet of
the dryer into the housing to
prevent them from being damaged
during transportation.
,
Reinstallation of the Dryer at the
New Location - refer to the
Installation Instructions in this
manual (see page 6).
part no. WTZ 1270
Note:
See notes on maximum number of
elbows on page 14.
15
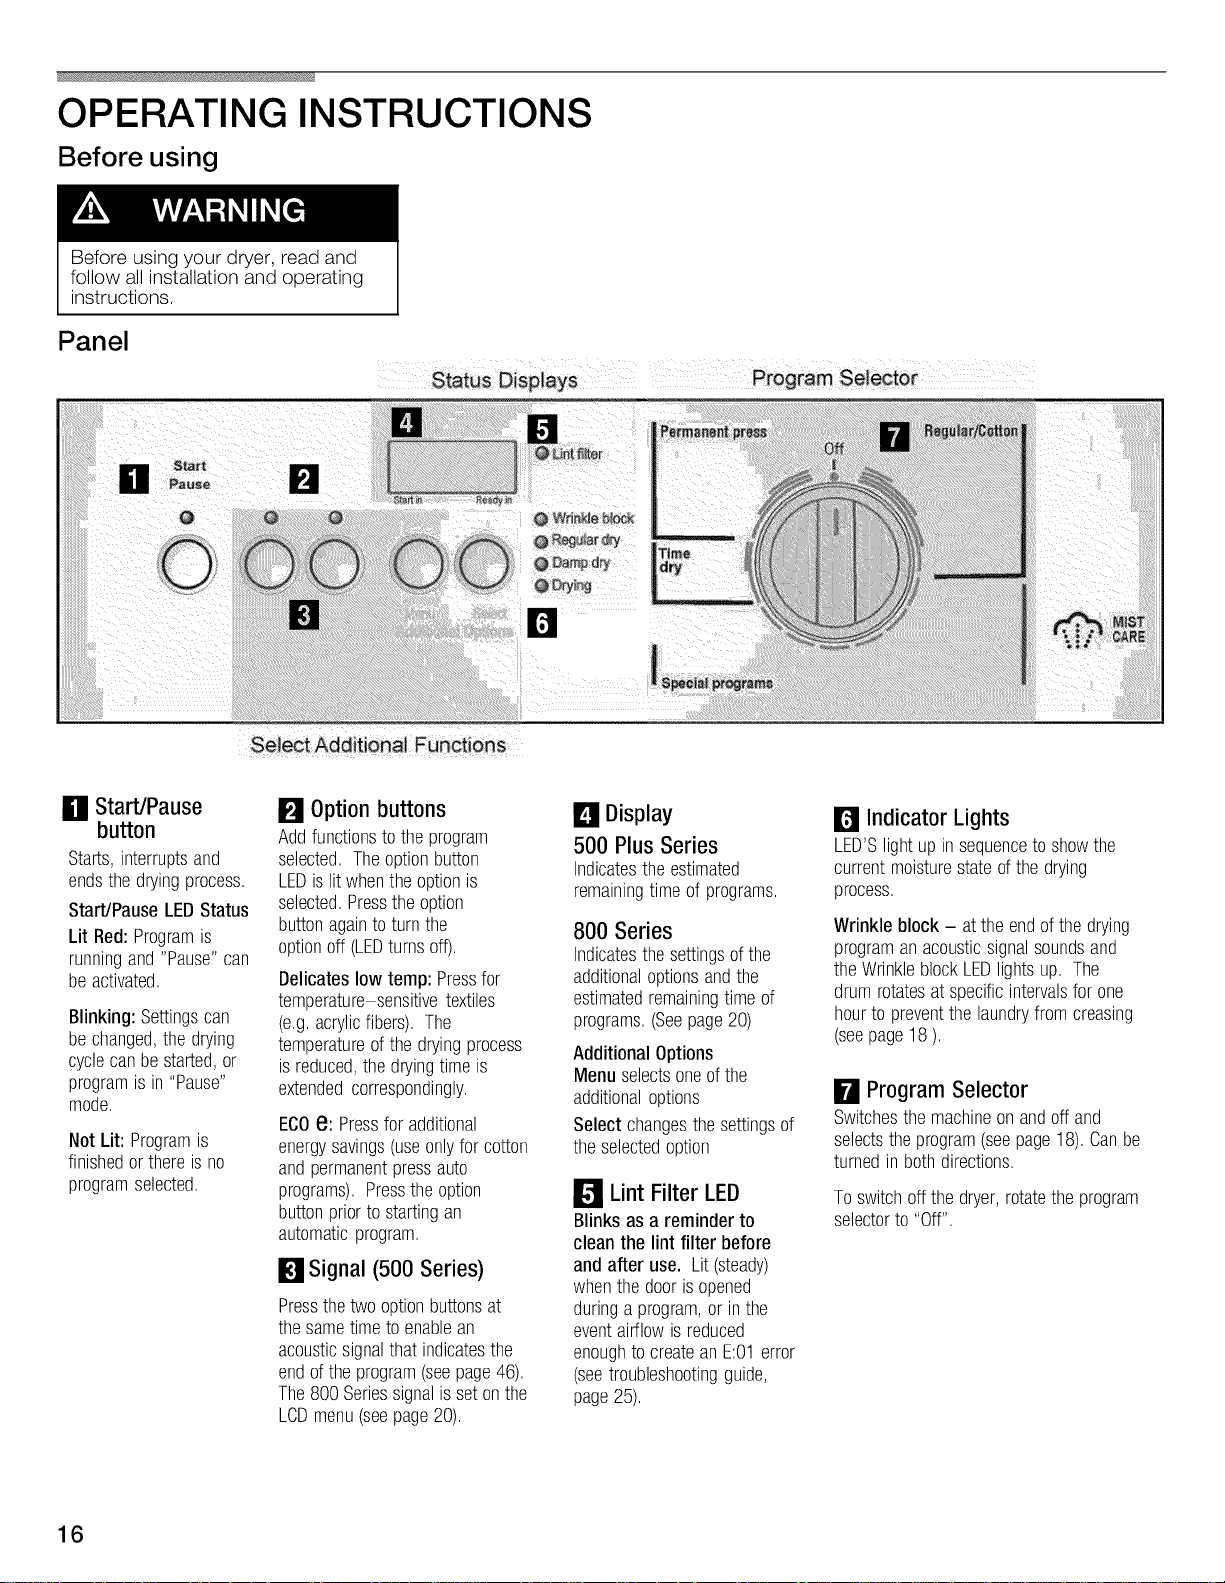
OPERATING INSTRUCTIONS
Before using
Before using your dryer, read and
follow all installation and operating
instructions.
Panel
L1 Start/Pause
button
Starts,interruptsand
endsthe dryingprocess.
Start/PauseLEDStatus
Lit Red:Programis
runningand"Pause"can
be activated.
Blinking: Settingscan
be changed,the drying
cyclecanbestarted,or
programis in"Pause"
mode.
Not Lit: Programis
finishedorthereisno
programselected.
Select Additional Functions
E! option buttons
Addfunctionsto theprogram
selected,Theoptionbutton
LEDislit whentheoptionis
selected.Pressthe option
buttonagaintoturn the
optionoff(LEDturnsoff).
Delicateslow temp: Pressfor
temperaturesensitivetextiles
(e.g.acrylicfibers). The
temperatureofthe dryingprocess
isreduced,thedryingtimeis
extendedcorrespondingly.
ECOe:Pressforadditional
energysavings(useonlyfor cotton
andpermanentpressauto
programs).Pressthe option
buttonpriortostartingan
automaticprogram.
Signal (500 Series)
Pressthetwo optionbuttonsat
thesametimeto enablean
acousticsignalthat indicatesthe
endofthe program(seepage46).
The800Seriessignalis setonthe
LOBmenu(seepage20).
IL_Display
500 Plus Series
Indicatesthe estimated
remainingtimeof programs.
800 Series
Indicatesthe settingsofthe
additionaloptionsandthe
estimatedremainingtime of
programs.(Seepage20)
AdditionalOptions
Menuselectsoneof the
additionaloptions
Select changesthesettingsof
theselectedoption
Lt Lint Filter LED
Blinksas a reminderto
cleanthe lint filter before
and after use. Lit(steady)
whenthe dooris opened
duringa program,or inthe
eventairflowisreduced
enoughto createan E:01error
(seetroubleshootingguide,
page25).
ir_ Indicator Lights
LED'Slight upin sequenceto showthe
currentmoisturestateofthe drying
process.
Wrinkle block - at theendofthe drying
programan acousticsignalsoundsand
theWrinkleblockLEDlightsup, The
drumrotatesatspecificintervalsfor one
hourto preventthelaundryfromcreasing
(seepage18),
H Program Selector
Switchesthemachineonandoffand
selectstheprogram(seepage18).Canbe
turnedin bothdirections.
Toswitchoff thedryer,rotatetheprogram
selectorto"Off".
16

Additional Safety
Information
Always follow the IMPORTANT
SAFETY INSTRUCTIONS
(see page 4).
Protection of the
environment
Tips on saving energy
To save energy, money and time,
Bosch recommends the following:
- Drain the laundry thoroughly!
Before drying, spin the laundry
thoroughly in the washing
machine. Use the highest possible
spin speed for the type of laundry!
Higher spin speeds reduce the
drying time and the energy
consumption.
- Use optimum load!
Use maximum recommended
loads. However, do not exceed
loads.
- Clean filter!
Clean the filter before and after
each drying process
(see page 22).
- Ventilate the room!
During the drying process provide
an adequate supply of fresh air.
- Do not dry unsuitable materials!
Do not dry rubberized or air-tight
items.
Clean and inspect the exhaust
system on a regular basis!
Blockages may extend drying time
or may cause the dryer to
malfunction.
Temporary
disconnection of
the dryer
Operate your dryer only when you are
at home. If you intend going on
vacation or are not using your dryer for
an extended period of time, you
should:
1. Turn off the circuit breaker.
2. Pull out the power supply plug if
possible.
3. Clean the lint filter.
4. Turn off the water supply.
Laundry
Identification of fabrics
Observe the treatment symbols on the
textile labels. They provide valuable
information as well as limitations about
the drying process.
Do not dry the following textiles in the
dryer:
- Air-tight textiles (e.g. rubberized)
Delicate fabrics (silk, synthetic
curtains)
5q
Dry woolen or wool-rich textiles
with dryer rack only!
%
Use the time program "Air fluff/No
heat" to dry articles containing
foam rubber or similarly textured
rubber-like materials.
Drying tips
In principle, the following applies to all
drying programs:
- To ensure a uniform drying result,
sort the laundry according to fabric
type and drying program.
- Fasten zippers, hooks and eyes.
Fasten loose belts, apron strings,
etc..
- Do not overdry easy-care laundry -
risk of wrinkling! Leave laundry to
dry in the air.
- Do not iron laundry immediately
after drying. Place the laundry in a
pile for a short while. Residual
moisture will then be distributed
uniformly.
- Knitted textiles (e.g. T-shirts,
cotton jersey laundry) often shrink
when dried for the first time. Do
not use the "Very dry/Extra dry"
program.
17
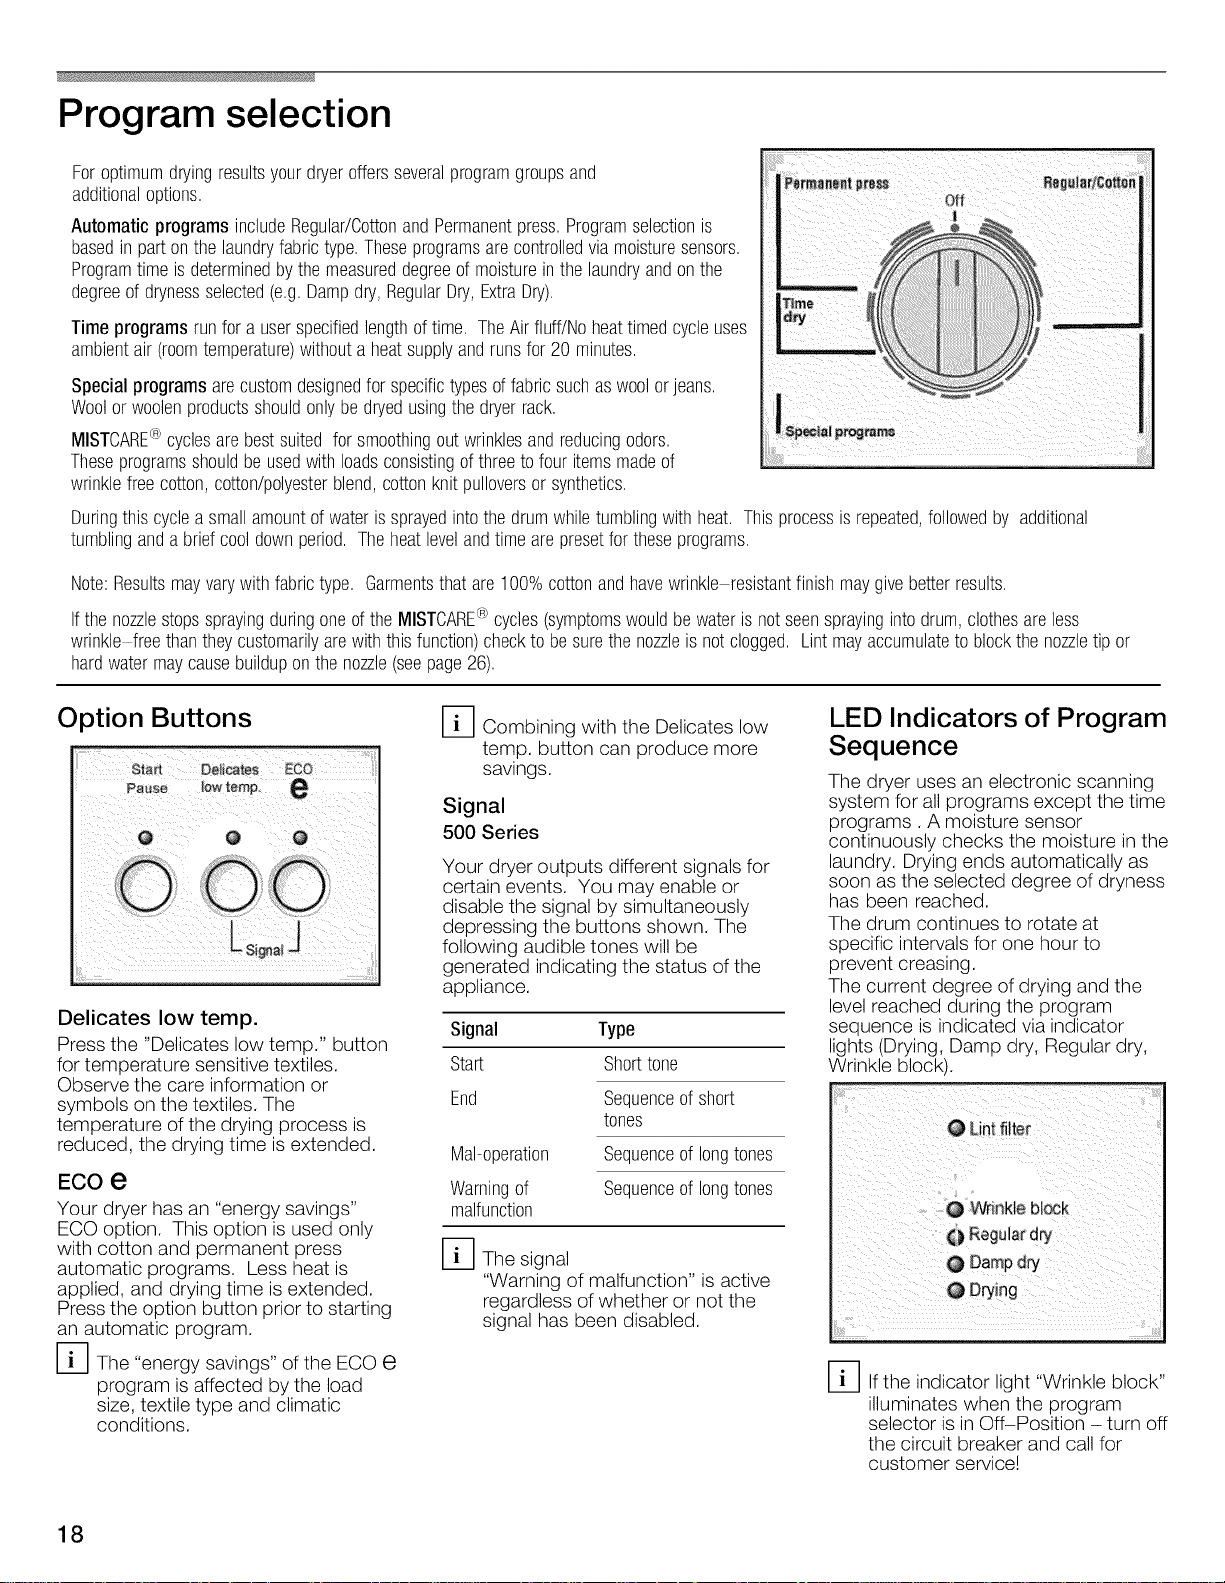
Program selection
Foroptimumdryingresultsyourdryeroffersseveralprogramgroupsand
additionaloptions.
Automatic programs includeRegular/CottonandPermanentpress.Programselectionis
basedinpartonthe laundryfabrictype.Theseprogramsarecontrolledvia moisturesensors.
Programtime is determinedbythemeasureddegreeofmoistureinthe laundryandonthe
degreeof drynessselected(e.g.Dampdry,RegularDry,ExtraDry).
Time programsrunfor a userspecifiedlengthoftime. TheAirfluff/Noheattimedcycleuses
ambientair(roomtemperature)withoutaheatsupplyand runsfor20 minutes.
Specialprograms arecustomdesignedfor specifictypesoffabricsuchas woolorjeans.
Woolor woolenproductsshouldonlybedryedusingthe dryerrack.
MISTCARE®cyclesarebestsuited forsmoothingoutwrinklesandreducingodors.
Theseprogramsshouldbeusedwithloadsconsistingof threeto fouritemsmadeof
wrinklefreecotton,cotton/polyesterblend,cottonknitpulloversor synthetics.
Duringthiscyclea smallamountofwaterissprayedintothe drumwhiletumblingwithheat. Thisprocessis repeated,followedby additional
tumblinganda briefcooldownperiod.Theheatlevelandtimearepresetfortheseprograms.
Note:Resultsmayvarywithfabrictype. Garmentsthatare 100%cottonandhavewrinkle resistantfinish maygivebetterresults.
Ifthenozzlestopssprayingduringoneof the MISTCARE®cycles(symptomswouldbewaterisnotseensprayingintodrum,clothesareless
wrinkle-freethan theycustomarilyarewiththis function)checkto besurethe nozzleis notclogged. Lint mayaccumulateto blockthe nozzletipor
hardwatermaycausebuilduponthenozzle(seepage26).
Option Buttons
pause _owtemp, e
Delicates low temp. Signal Type
Press the "Delicates low temp." button
for temperature sensitive textiles. Start Shorttone
Observe the care information or
symbols on the textiles. The End
temperature of the drying process is
reduced, the drying time is extended.
ECO e
Your dryer has an "energy savings"
ECO option. This option is used only
with cotton and permanent press
automatic programs. Less heat is
applied, and drying time is extended.
Press the option button prior to starting
an automatic program.
D The "energy savings" of the ECO e
program is affected by the load
size, textile type and climatic
conditions.
D Combining with the Delicates low
temp. button can produce more
savings.
Signal
500 Series
Your dryer outputs different signals for
certain events. You may enable or
disable the signal by simultaneously
depressing the buttons shown. The
following audible tones will be
generated indicating the status of the
appliance.
Sequenceof short
tones
Mal-operation Sequenceof longtones
Warningof Sequenceof longtones
malfunction
D The signal
"Warning of malfunction" is active
regardless of whether or not the
signal has been disabled.
LED Indicators of Program
Sequence
The dryer uses an electronic scanning
system for all programs except the time
programs. A moisture sensor
continuously checks the moisture in the
laundry. Drying ends automatically as
soon as the selected degree of dryness
has been reached.
The drum continues to rotate at
specific intervals for one hour to
prevent creasing.
The current degree of drying and the
level reached during the program
sequence is indicated via indicator
lights (Drying, Damp dry, Regular dry,
Wrinkle block).
_i i i i i _ i i _ _ i i_ i
e b!ock
dry
: _,_i¸
D If the indicator light "Wrinkle block"
illuminates when the program
selector is in Off-Position - turn off
the circuit breaker and call for
customer service!
18

Regular/Cotton ECOSENSOR
ForCottonsandcoloredsmadeof cottonor linen,Pressthe "Delicateslow temp,"optionbuttonfortemperature-sensitivetextiles,
Bedlinen,tablelinen,towels
Dampdry Bedlinenandtablelinen,towels,T-shirts,sportsshirts,overalls to beironed
T-shirts,sportsshirts,dresses,trousers,overalls,underwear
Terrytowels,kitchentowels,handtowels,bedlinen, underwear,cotton notto beironed
Regulardry socks
Terrytowels,kitchentowels,handtowels,bedlinen, underwear,cotton notto beironed,thickmulti-ply
Verydry socks
Extradry Terrybathrobesandterrybedlinen, particularlythickor multi-ply
Permanent press ECOSENSOR
Easy-care(drip-dry)laundrymadeofsyntheticandblendedfabric (e,g,cotton/polyester),Pressthe "Delicateslowtemp,"buttonfor very
temperature-sensitivetextiles,
Trousers,dresses,skirts,shirts,blouses,leggings,sportsclothingwith notto beironedor onlylightlyironed
Dampdry synthetic-richfibers, lingerie
Regulardry Shirts,blouses,sportsclothing notto beironed
Verydry Bedlinenandtablelinen,tracksuits,comforters,blankets notto beironed,thickmulti-ply
Cotton,cotton polyesterblends,commonknitsandsyntheticshirts,cottonblendpants,skirts,t shirtsandpullovers,
MISTCARE ® Refresh
Wrinklefreefabricsgivebestresults,
Helpssmoothoutwrinklesandreduceodors,Usewitha light load,suchasoneconsistingof 3 to4 shirts, Program
time is about16minutes,
MISTCARE ®Wrinkle relax Helpssmoothoutwrinkles,Usewitha lightload,suchasoneconsistingof 3to 4 shirts, Programtime isabout12
minutes,
Thisprogramisusedto refreshacottontextileloadthat hasbeendriedandhasbeenleftin thedrumof the dryerat
MISTCARE ¢ Touch up the endof the cycleovernight,This20 minuteprogramrefreshesthe loadto helpsmoothoutthewrinklescausedby
the loadpressingdownunderitsown weight,
Clothingcontainingfoam,rubber,orplasticmustbe refreshedona clothes-line or byusingtheAir fluff/Noheat
cycleasthesearticlesmayigniteduetotheheatof theMISTCARE® program,
Wool
Washablewoolentextiles(e,g,sweaters,woolenpullover,skirts)
Dry woolen or wool-rich textiles with dryer rack only!
Jeans Heavyjeanfabric
Quick(8ooSeries) Smallloads,loadsthatneeda shortdryingtime(e,g,sportsshirts,work outclothes(cotton,synthetic))
30 min., 60 min. (500Series)
Medium + requireddryingtime
(800Series)
Pre-driedtextileswithlowmoisturecontent,individualsmallitems,e,g,bathtowels,bathingsuits,dishcloths,
Forthe smallestloadingconditionfrom0,22Ib- 0,44 Ib(i,e,onesmalltowel),forthis atime dryprogramshouldbe
selected
Pressthe"Delicateslowtemp," buttonfortemperature-sensitivetextilesoption,
(800 Series) if you choose a
program with variable time (e.g. time
programs, wool care) the display
starts to flash. You have to set the
time,
Air fluff / Noheat (5ooSeries)
Air fluff / Noheat+ required
time(800Series)
Cottonsandcoloredsmadeof cottonorlinen,
Fresheningorairinglittlewornitemsof clothinganddryingofextremesensitivetextiles,
Forall textiletypesinclusivefoam rubber(e,g,pillows,stuffedtoys),plastic(e,g,showercurtains,tableclothes),
rubber(e,g,backedrugs),sheernylon,olefin,
19

Additional options
800 Series
D Before setting additional options,
choose a program with the
program selector!
Select the option to be changed with
the "Menu" button. Press the button to
move to the next option on the display.
The active symbol starts flashing.
The current active option setting is
displayed on the right.
These settings can now be changed
with the "Select" button. Press the
button to jump to the next possible
setting.
D Pressing the "Menu" button again,
saves the previously settings.
If you don't press any button for 10
seconds the settings are saved
automatically.
Symbol Settings Explanation
Q (0,5h steps)
ro
@
Function
Setsthedelaystarttime
ofthe dryer
(Startin,, hours!)
Extracare
(moregentlethan
"Delicates/Iowtemp,")
Child-prooflock(only
effectivewhilethe
programis running)
ExtraDryingTime
Userselectabledegreeof
dryness
Volumeofthe endsignal
andthedampdrysignal
Spinspeedoptimized
dryingtimecoordinates
the remainingtime
displayedfor the dryerto
thespin speedatwhich
thelaundrywas
previouslyspunin the
washingmachine
0-12h
0n/0ff
0n/0ff
0,1,2,3
(0-default, 1-dryer,
3-dryest)
Off,
medium,
maximum
4OO
60O
8OO
1000
1200
If you have chosen the additional option "Extra care" the "Delicates/
low temp." indicator light illuminates. Pressing the "Delicates/Iow
temp." button cancels the additional option "Extra care".
This additional option allows you to lock your settings to prevent
unintended use of the dryer.To start the dryer when the Safety
guard isactive: Press and hold the "Start/Stop" button for 4
seconds. To unlock this additional option when the dryer is running:
Press and hold the "Start/Stop" button for 4 seconds.
If you have chosen the steps 1 to 3 of the additional option "Degree
of dryness" the symbol-_-is displayed. 0 is standard setting - sym-
bol-_-is not displayed.
Your dryer outputs different signals for certain events. You may
enable or disable the signal by simultaneously depressing the
buttons shown.
To optimize the remaining time display, the spin speed at which the
laundry was previously spun inthe washing machine can be
entered by the user.
Event Signal
EnableSignal Shorttone
DisableSignal Twoshorttones
StartCycle Shorttone
EndCycle Sequenceofshorttones
Mal Operation Sequenceof longtones
Warningof Malfunction Sequenceof longtones(maximum
volume)
2O

Operation
Using the dryer
1. Open the door.
2. Check lint filter.
The filter should be cleaned before
and after using the dryer. Cleaning
the filter reduces the drying time
and saves energy. (See page 22
for lint filter cleaning instructions).
D Bleach may cause discoloration of
the dryer's colored surface.
Therefore, it is important to keep
bleach away from the colored
surface of your dryer. If any bleach
spills on the surface, use a moist
paper towel to thoroughly clean it
immediately
3. Rotate program selector to the
desired program.
Select the program which
corresponds to the laundry in the
dryer from the program selection
table (see page 18).
The dryer light turns on inside the
drum.
D The "Start/Stop" indicator light
starts flashing.
=
If required, select an available
option ("Delicates low temp" or
"ECO e") by pressing the
corresponding button (seefigure
above).
All available "Options" are
explained on page 18.
%
The estimated remaining time will
be displayed.
=
Place laundry inthe empty drum.
Put each piece of laundry into the
machine separately.
For best results the laundry to be
dried must be sorted according to
type of laundry and desired degree
of drying. For further information
see page 17.
%
Observe drying symbols of the
laundry manufacturer. If drying
woolen clothing and shoes, see
the information on page 22.
Ensure that there is only laundry in the
drum. Check that all items are
completely in the drum.
6. Close the door.
The "Start/Stop" indicator light
continues flashing.
D If the door has not been closed
properly, the dryer will not start.
7. Press the "Start/Stop" button. The
"Start/Stop" indicator light
illuminates.
O Lintfilter
V_in kle bmock
C) Regular dr_
O Damp dry
O Drying
%
At program end an acoustic signal
is emitted (if set) and the LED
"Wrinkle block" illuminates.
%
When the drying process is
complete (program or selected
time program ended), the drum
rotates at specific intervals for
1 hour.
This prevents the laundry from
creasing. The laundry remains
loose and fluffy until it is removed.
The laundry should be removed
before this time has elapsed.
8. Open the door.
9. Take the laundry out of the dryer.
10. Rotate the program selector
to "Off".
The dryer light goes out.
11. Clean the filter.
The filter should be cleaned after
each drying process. Cleaning the
filter reduces the drying time and
saves energy.
12. Close the door.
D The program starts with an
acoustic signal (if set).
If a standard program has been
selected, the indicator lights indicate
the progress of the program sequence.
21

Cleaning the lint filter
A dirty filter extends the drying time and
increases energy consumption.
The filter should be cleaned before and
after each drying process.
If a warning signal and an "E:01"
warning message are emitted during a
drying program, clean the filter
immediately and check the exhaust
duct.
D The program interrupts
automatically.
1. Switch off the dryer by turning the
program selector to "Off".
The inside of the door heats up
during the drying process.
3. Remove the lint filter.
4. Remove lint by stroking your hand
over the filter.
The filter should be lightly scrubbed
twice a year with warm soapy water.
The filter is clean when it no longer
holds water. The filter must be dried
thoroughly before being replaced.
5. Insert the filter.
6. Close the door.
Using the dryer rack
(Option, see page 15)
Use the dryer rack to dry washable
woolen textiles (e.g. sweaters) and
shoes. The dryer rack remains
stationary while the drum rotates.
Damp wool should not be moved, as it
has a tendency to matt. Drying shoes
without a rack could damage the drum.
D The dryer rack must be used for
drying with the wool cycle. If the
rack is not used, the sensor will
shut the dryer off after
approximately 7 minutes.
Dry only one item of clothing or
one paLrof shoes - maximum
dry load 2.2 Ibs (1 kg)! The
laundry must have been splun!
Only dry prewashed shoes. The
laundry must not touch the
drum.!tttt could jam and be
damaged. After using the dryer
rack, take it out of the dryer
immediately.
Inserting the dryer rack
1. Open the dryer door.
2. Check that the drum is empty.
4. Place the dryer rack horizontally
into the drum.
5. Place the dryer rack so that the
catches are inserted at the front in
the locating holes.
6. Insert the lint filter.
The lint filter must be inserted flush
with the drum edge!
Drying laundry items on the dryer
rack
1. Fold laundry to fit the dryer rack.
1
22
3. Remove the lint filter.
2. Place laundry loosely on the
basket. Do not crush! Laundry
must not touch the drum! Do not
allow items to hang over the dryer
rack!
3. Close the door.

4. Rotate program selector to "Time
dry/ .... min.".
Select the drying time according to
the laundry type.
Drying shoes on the dryer rack:
1. Prepare shoes.
Clean shoes to prevent the drum
from becoming soiled.
If preparing sports shoes, extend
the tongue.
Loosen or remove shoe-laces.
Remove insoles and heel pads.
4. Press the "Start/Stop" button. The
"Start/Stop" indicator light
illuminates.
5. If the item of clothing still contains
residual moisture after the
indicated drying time:
Fold the item of clothing so that
the damp parts are on the
outside.
E3
Restart the program and reduce
the drying duration depending
on the degree of residual
moisture.
6. After drying, spread and expose
the laundry to air for approx.
15 min. (shoes for approx.
30 min.).
7. Remove the lint filter.
2. Place shoes on the rack.
Directly on the dryer rack
or
Roll up atowel and place the
heels of the shoes on the towel.
This will ensure a more uniform
drying result.
8. Take the dryer rack out of the
drum.
9. Re-insert the lint filter.
3. Close the door.
23

Cleaning and care
Cleaning the dryer
TO AVOID
RISK OF EXPLOSION!
Never use solvents or highly
flammable liquids for cleaning.
Incorrect cleaning may damage the
dryer. Do not spray with a water jet.
Do not use scouring agents or
all-purpose cleaners. Do not use
steam cleaners.
Wipe the housing and fascia with a soft
cloth and soapy water only.
Wipe the drum, door seal and inside of
the door with a damp cloth only.
Cleaning the exhaust duct
Inspect and clean the exhaust ducting
at least once a year to prevent
clogging. A partially clogged exhaust
will lengthen the drying time and will
result in poor performance of the dryer.
13 Turn off the circuit breaker
13 Pull out power supply plug
13 Disconnect the duct from the
dryer.
13 Vacuum and reconnect the duct.
Cleaning the moisture
sensor
The moisture sensor has to be cleaned
because a fine layer of transparent
buildup is deposited on the sensors.
This deposit can easily be removed by
wiping the sensors (the two bars next
to the lint filter) with a cloth and a little
white vinegar.
Use white vinegar only!
Clean the moisture sensor once a
month.
Cleaning the bearing
shield
Over time, fluff from the drying process
collects inthe bearing shield.
This fluff can be easily removed using
your vacuum cleaner, at least once a
month.
Change the light bulb
The dryer light turns on inside the drum
when you open the door.
To change the light bulb:
13 Set program selector to "Off".
13 Turn off the circuit breaker.
13 Pull out power supply plug.
13 Open the door and locate the light
bulb on the upper left side of the
seal.
13 Loosen the screw of the cover and
open the cover.
13 Turn bulb counterclockwise.
Replace the bulb with a new
appliance bulb only (obtainable
through parts department).
%
Parts are available at
www.boschappliances.com
or by calling 1-800-944-2904.
Cl
Replace the cover and secure with
the screw.
Cl
Plug in dryer or reconnect power
supply.
24
Cleaning the MISTCARE TM
Nozzle
Once a year inspect the nozzle outlet.
If you suspect blockage, wipe the
outside of the nozzle with a cloth
moistened with vinegar. If the nozzle is
completely blocked, consult the
troubleshooting guide (see page 26) for
removal and cleaning instructions. If
the nozzle remains blocked, call
customer service (see page 26).

Troubleshooting
Before calling the customer service,
check whether you can rectify the fault
yourself by means of the following
TO AVOID RISK OF
ELECTRICAL SHOCK!
Repairs or replacement of parts
shall be carried out by qualified
technicians or licensed
electricians only_
Problem
Dryerdoesnotstart.
"Start!Stop"indicatorlightdoesnot
illuminate.
Programhasbeeninterrupted.
A warningsignalisemittedandthe
displayshows"E:O!".
Degreeof dryinghasnot beenreached
or thedryingtimeistoolong.
Displaymayindicate"E:03".
Drumlightdoesnotfunction.
illuminate."Wrinkleblock"indicator
lights.
Thedisplayshows"000".
Lintfilter LEDis blinkingafterlintfilter Blinkingof lintfilter LEDisnotanindicationof a Noactionrequired. Lightwillstopblinking.
hasbeencleaned problem.It is usedonlyas a reminder.
Possiblecause
Mainplugnot insertedat allor notinsertedcorrectly.
A fuseof powersupplyhastripped.
"Start/Stop"buttonnotpressed.
Noprogramselected.
Doornotclosed.
Ambienttemperaturebelow41°F(5°C.)
Lintfilter dirty.
Exhaustairduct isblockedortoo long.
Faultin programsequenceor malfunction.
Theroom/cabinetisnotadequatelyventilated.
Moisturesensordirty.
Exhaustair ductisblockedortoo long.
Lintfilter dirty.
Laundrywastoowet.
Unsuitableprogramselected.
Maximumdryingtime wasexceeded.
Motorlimittemperaturewasexceeded.
Degreeof drynessnot correctlyset
Noprogramselected.
Lightbulbdefective,lightbulbburnedout.
Nopowersupply.
Lightbulbis loose.
Faultin programsequenceor malfunction."StaWStop"indicatorlight doesnot
table.
If a fault cannot be rectified or a repair
is required:
Remedialaction
Insertmainplugcorrectly.
Replace/switchon fuse.
Press"Start/Stop"button.
Selectprogram.
Closedoor.
Increaseroomtemperature.
Cleanfilter as describedonpage22.
Switchoff/switchonagain.
Cleanexhaustairduct.Reduceexhaustair ductto
maximumlengthasdescribedon page14.
Switchoff/switchonagain.
Switchoffdryer,leavetocooldownfor30 min,
switchon again.
Restartprogram.
Provideanadequatesupplyoffreshair.
Switchoff/switchonagain.
Cleanmoisturesensoras describedon page24.
Switchoff/switchonagain.
Cleanexhaustairextraction.Reduceexhaustair duct
to maximumlengthasdescribedonpage14.
Switchoff/switchonagain.
Cleanfilter as describedonpage22.
Switchoff/switchonagain.
Spinlaundryat higherspeedinthe washing
machine.Switchoff/switchon again.
Selectprogramwithaid of the programselection
table(seepage18).Switchoff/switchonagain.
Cleanlintfilter (seepage22).
Checkexhaustairextraction.
Spinlaundryata higherspeedin yourwasher.
Switchoffdryer,leavetocooldownfor30 min.
Switchonagain.Startprogram.
800 Series,Changesettingsfor degreeof dryness,
seepage20
Selectprogram.
Changelightbulb,seepage24.
Guaranteepowersupply.
Tightenlightbulb. Removeandreinstallthecoveras
directedonpage24.
Switchoffdryer,leavetocooldownfor30 min,
switchon again.
Restartprogram.
1. Set program selector to "Off".
2. Turn off the circuit breaker.
3. Pull the main plug out of the
socket.
4. Call customer service
(see page 26).
25
Troubleshooting (continued)
Problem Possiblecause
Unusualnoise:thumpingsound Drumsuspensionrollersneedtime towarmup,
Unusualnoise:Steadyvibration
Unusualnoise:Rhythmic vibration
Wateris notsprayedintotheunit
duringMISTCARE+Mcycles
Dryeris notlevel,
Laundryballedupcausingloadto bounce,
Watertap(s)notturnedon,
AQUASTOP® Hosesafetyfeatureactivated,
Blockednozzle
Remedialaction
Noactionrequired,Assuspensionsystemrollers
warmupthumpingwill decreaseandshouldstop
within2 to 3 minutesof dryeruse
Levelthedryer(seeusermanualsection"Installation
Instructons"
Stopdryer,separateloaditems,restartdryer,
Turnonwatertap,
Confirmactivationof AQUASTOP® Hosebyvisual
inspectionofredindicatorin hose(seepage8),If
redindicatorshows(hoseisactivated)replacehose,
Removethenozzleusinga7/16 inchsocketwrench,
Placethenozzleintoa containerfilledwith enough
whitevinegartocoverthenozzle,Allowthenozzleto
soakforfive minuntes,thenscrubthe nozzletip
gentlywitha toothbrushto removeresidue,Rinse
thenozzleandreinsertit backinto thedryerand
handtighten,thentighten1 additionalturnwith the
wrench,
SERVICE and REPAIR
WARNING - Label all wires prior
to disconnection when servicing
controls. Wiring errors can cause
improper operation that could
cause senous damage to the
appliance or personal injury.
Verify .proper operation after
servicing.
The Bosch dryers require no special
care other than the care and cleaning
noted above.
D If you are having a problem with
your dryer, please refer to the
troubleshooting table on page 25,
before calling for service.
If service becomes necessary, contact
your dealer or installer or an authorized
service center. Do not attempt to repair
the appliance yourself. Any work
performed by unauthorized personnel
may void the warranty.
If you are having a problem with your
Bosch dryer and are not pleased with
the service you have received:
- First, please contact your installer
or the Bosch Authorized Service
Contractor in your area and
explain to them why you are not
satisfied. This will usually correct
the problem.
If after working with your installer
or service person the problem still
has not been resolved to your
satisfaction, please let us know by
either writing to us at,
BSH Home Appliances Corporation
5551 McFadden Avenue
Huntington Beach, CA 92649
or, calling us at
1-800-944-2904.
Please be sure to include, if writing, or
have available, if calling, the following
information:
- Model Number
- Serial Number
- Date of Original Purchase
- Date Problem Originated
- Explanation of Problem
Also, if writing, please be sure to
include a daytime telephone number
and a copy of the sales invoice.
You will find the model number and
serial number information on the rating
plate located on the inside of the front
panel.
The image below shows the
approximate location of the rating plate.
The model number has a rectangle
around it. The serial number is located
below the model number.
An example is shown below.
q
/
The manufacturer reserves the right to
make changes in the product or
manual without notification.
26

STATEMENT OF LIMITED PRODUCT WARRANTY
Bosch Nexxt ® Clothes Dryer
What this Warranty Covers & Who it Applies to: The limited warranty provided by BSH Home Appliances Corporation (Bosch)
in this Statement of Limited Product Warranty applies only to the Bosch Nexxt Clothes Dryer ('Product) sold to you, the first
using purchaser, but strictly conditioned on the Product having been purchased: (1)for your normal, household (non-commercial)
use, and has infact at alltimes only been used for normal household purposes (any commercial use or setting of the Product
automatically voids the warranty); (2) new at retail (not a display, "as is", or previously returned model) purchased directly by the
end-user consumer, and not for resale, or commercial use; and (3)within the United States or Canada, and has at all times
remained within the country of original purchase. The warranties stated herein apply only to the first purchaser of the Product and
are not transferable. The warranty is automatically void ifthe Product was a display model, sold "as is", tampered with, a
damaged or "scratch and dent" model, or a previously returned model, a free give-away, charitable donation or contest prize.
• Please make sure to return your registration card; while not necessary to effectuate warranty coverage, it is the best way for
Bosch to notify you inthe unlikely event of a safety notice or product recall.
How Long the Warranty Lasts: Bosch warrants that the Product is free from defects in materials and workmanship for a period
of three hundred sixty-five days (365) days from the date of purchase. The foregoing timeline begins to run upon the date of
purchase, and shall not be stalled, tolled, extended, or suspended, for any reason whatsoever.
Repair/Replace as Your Exclusive Remedy: During this warranty period, Bosch or one of its authorized service providers will
repair your Product without charge to you (subject to certain limitations stated herein) if your Product proves to have been
manufactured with a defect in materials or workmanship. If reasonable attempts to repair the Product have been made without
success, then Bosch will replace your Product (upgraded models may be available to you, in Bosch's sole discretion, for an
additional charge). All removed parts and components shall become the property of Bosch at its sole option. All replaced and/or
repaired parts shall assume the identity of the original part for purposes of this warranty and this warranty shall not be extended
with respect to such parts. Bosch's sole liability and responsibility hereunder is to repair manufacturer-defective Product only,
using a Bosch-authorized service provider during normal business hours. For safety and property damage concerns, Bosch
highly recommends that you do not attempt to repair the Product yourself, or use an un-authorized servicer; Bosch will have no
responsibility or liability for repairs or work performed by a non-authorized servicer. If you choose to have someone other than an
authorized service provider work on your Product, THIS WARRANTY WILL AUTOMATICALLY BECOME NULL AND VOID.
Authorized service providers are those persons or companies that have been specially trained on Bosch products, and who
possess, in Bosch's opinion, a superior reputation for customer service and technical ability (note that they are independent
entities and are not agents, partners, affiliates or representatives of Bosch). Notwithstanding the foregoing, Bosch will not incur
any liability, or have responsibility, for the Product if it islocated in a remote area (more than 100 miles from an authorized service
provider) or is reasonably inaccessible, hazardous, threatening, or treacherous locale, surroundings, or environment; in any such
event, if you request, Bosch would still pay for labor and parts and ship the parts to the nearest authorized service provider, but
you would still be fully liable and responsible for any travel time or other special charges by the service company, assuming they
agree to make the service call.
® _ _
Extended Limited Warranty:
LENGTHOFWARRANTY
2 YearLimitedWarranty
FromDateof Purchase
2 YearLimitedWarrantyonElectronics
FromDateof Purchase
2 YearLimitedWarrantyon Motor
FromDateof Purchase
Out of Warranty Product: Bosch is under no obligation, at law or otherwise, to provide you with any concessions, including
repairs, pro-rates, or Product replacement, once this warranty has expired.
Warranty Exclusions: The warranty coverage described herein excludes all defects or damage that are not the direct fault of
Bosch, including without limitation, one or more of the following: (1) use of the Product inanything other than its normal,
customary and intended manner (including without limitation, any form of commercial use, use or storage of an indoor product
outdoors, use of the Product inconjunction with air or water-going vessels); (2)any party's willful misconduct, negligence,
misuse, abuse, accidents, neglect, improper operation, failure to maintain, improper or negligent installation, tampering, failure to
SCOPEOFWARRANTY
Boschwillprovidereplacementparts,free of charge,for anycomponent
partthat provesdefectiveunderconditionsof normalhomeuse during
thefirst two yearsfromthedateof purchase,normal(non expedited)
shippingcostsincluded,laborchargesexcluded.
Boschwillrepairor replace,freeof charge,any microprocessororprinted
circuitboardthatprovesdefectiveunderconditionsof normalhomeuse
duringthefirst two yearsfromthedateof purchase,laborcharges
excluded.
Boschwillrepairor replace,freeof charge,anymotororcomponentpart
ofthe motorthatprovesdefectiveunderconditionsof normalhomeuse
duringthefirst two yearsfromthedateof purchase,laborcharges
excluded.
27

follow operating instructions, mishandling, unauthorized service (including self-performed "fixing" or exploration of the
appliance's internal workings); (3)adjustment, alteration or modification of any kind; (4)a failure to comply with any applicable
state, local, city, or county electrical, plumbing and/or building codes, regulations, or laws, including failure to install the product in
strict conformity with local fire and building codes and regulations; (5) ordinary wear and tear, spills of food, liquid, grease
accumulations, or other substances that accumulate on, in, or around the Product; and (6) any external, elemental and/or
environmental forces and factors, including without limitation, rain, wind, sand, floods, fires, mud slides, freezing temperatures,
excessive moisture or extended exposure to humidity, lightning, power surges, structural failures surrounding the appliance, and
acts of God. In no event shall Bosch have any liability or responsibility whatsoever for damage to surrounding property, including
cabinetry, floors, ceilings, and other structures or objects around the Product. Also excluded from this warranty are scratches,
nicks, minor dents, and cosmetic damages on external surfaces and exposed parts; Products on which the serial numbers have
been altered, defaced, or removed; service visits to teach you how to use the Product, or visits where there is nothing wrong with
the Product; correction of installation problems (you are solely responsible for any structure and setting for the Product, including
all electrical, plumbing or other connecting facilities, for proper foundation/flooring, and for any alterations including without
limitation cabinetry, walls, floors, shelving, etc.); and resetting of breakers or fuses. TO THE EXTENT ALLOWED BY LAW, THIS
WARRANTY SETS OUT YOUR EXCLUSIVE REMEDIES WITH RESPECT TO PRODUCT, WHETHER THE CLAIM ARISES IN
CONTRACT OR TORT (INCLUDING STRICT LIABILITY, OR NEGLIGENCE) OR OTHERWISE. THIS WARRANTY IS IN LIEU OF
ALL OTHER WARRANTIES, WHETHER EXPRESS OR IMPLIED. ANY WARRANTY IMPLIED BY LAW, WHETHER FOR
MERCHANTABILITY OR FITNESS FOR A PARTICULAR PURPOSE, OR OTHERWISE, SHALL BE EFFECTIVEONLY FOR THE
PERIOD THAT THIS EXPRESS LIMITED WARRANTY IS EFFECTIVE. IN NO EVENT WILL THE MANUFACTURER BE LIABLE FOR
CONSEQUENTIAL, SPECIAL, INCIDENTAL, INDIRECT, "BUSINESS LOSS", AND/OR PUNITIVE DAMAGES, LOSSES, OR
EXPENSES, INCLUDING WITHOUT LIMITATION TIME AWAY FROM WORK, HOTELS AND/OR RESTAURANT MEALS,
REMODELLING EXPENSES IN EXCESS OF DIRECT DAMAGES WHICH ARE DEFINITIVELY CAUSED EXCLUSIVELY BY Bosch,
OR OTHERWISE. SOME STATES DO NOT ALLOW THE EXCLUSION OR LIMITATION OF INCIDENTAL OR CONSEQUENTIAL
DAMAGES, AND SOME STATES DO NOT ALLOW LIMITATIONS ON HOW LONG IMPLIED WARRANTY LASTS, SO THE ABOVE
LIMITATIONS MAY NOT APPLY TO YOU. THIS WARRANTY GIVES YOU SPECIFIC LEGAL RIGHTS, AND YOU MAY ALSO
HAVE OTHER RIGHTS, WHICH VARY FROM STATETO STATE. No attempt to alter, modify or amend this warranty shall be
effective unless authorized in writing by an officer of BSH.
How to Obtain Warranty Service: To obtain warranty service for your Product, you should contact the nearest Bosch
authorized service center.
BSH Home Appliances Corporation - 5551 McFadden Avenue, Huntington Beach, CA 92649 / 800-944-2904
28

Dispositifs et avantages de votre nouveau seche-linge
Technologie DUOTRONIC ®
Les niveaux d'humidite et de temperature sont
constamment surveilles pour obtenir des resultats de
sechage precis avec une vaste gamme de textiles. Tout le
linge, des t-shirts a la layette de bebe, sort chaud et doux
quand vous le voulez,
Une surveillance permanente garantit la consommation
d'energie la plus faible possible et reduit le gaspillage de
jusqu'a 50 % par an.
WRINKLEBLOCK TI_4
Quand I'alarme se declenche, vous n'_tes pas toujours
satisfait de votre linge, La fonction WRINKLEBLOCK TM
VOUSdonne une heure de culbutage par intermittence, pour
eviter que le lingene se froisse et fondamentalement reduire
le temps de repassage,
Tambours en acier inoxydable
Le tambour du lave-linge Nexxt TM d'acier inoxydable pour
le plus leger de soin,
Charniere de porte & 180 °
Enfin, une porte de seche-linge qui s'ouvre jusqu'a 180°
pour faciliter le chargement et le dechargement du linge,
De plus, les portes des lave-linge et
seche-linge s'ouvrent en sens inverse. Le transfert du linge
humide au seche-linge se fait donc presque sans effort
Iorsque les appareils sont installes I'un a cOte de I'autre,
Fonctionnement silencieux
Les lave-linge Bosch font appel a des moteurs sans balais,
des systemes de pompage suspendus eta des materiaux
insonorisants pour qu'ils degagent extr_mement peu de
bruit pendant leur fonctionnement, Ceci signifie qu'il est
possible de les installer de facto n'importe ou dans la
maison, sans qu'ils ne g_nent personne,
R&telier de sechage
Le rAtelier de sechage Nexxt TM protege les textiles les plus
delicats ou une paire de chaussure de tennis par exemple,
et permet de les faire secher sans malaxage, IIest installe
standard sur le modele Nexxt TM Premium ou disponible
sinon comme accessoire,
Filtre & charpie
Notre filtre a charpie pratique est situe a la porte du
seche-linge pour un acces facile. Les petites mailles du
filtre a charpie retiennent m_me les plus petites particules
de charpie, Et pour assurer I'efficacite du sechage, un
voyant de filtre de charpie s'allume si le filtre a besoin d'un
nettoyage immediat.
MISTCARE TI_4
Les programmes MISTCARE TI_4 utilisent une quantite
d'humidite supplementaire pour assouplir les tissus,
eliminer lesfaux plis et rafra_chir les pieces de linge
composees d'un melange de coton en eliminant les odeurs,
Tuyau AQUASTOP ®
Le tuyau AQUASTOP ® arr_te I'ecoulement de I'eau s'il
detecte une fuite pouvant provoquer une inondation,
29
Table des mati res
Definitions ..........................................................................................
INSTRUCTIONS DE SI_CURITI_ IMPORTANTES .........................................................
Instructions de mise a laterre ........................................................................
Instructions d'installation .............................................................................
Introduction .......................................................................................
Informations sur la mise au rebut .....................................................................
Avant d'installer le seche-linge .......................................................................
Installation pas a pas ...............................................................................
Branchement electrique .............................................................................
Raccordement du conduit d'echappement .............................................................
Accessoires .......................................................................................
Preparation pas a pas au transport du seche-linge .......................................................
INSTRUCTIONS D'UTILISATION ......................................................................
Le bandeau de commande ..........................................................................
Informations de s6curite supplementaires ..............................................................
Protection de I'environnement ........................................................................
Linge ...............................................................................................
Determination de la nature du tissu ....................................................................
Conseils pour le sechage ............................................................................
Selection du programme .............................................................................
Options ..........................................................................................
Indicateur de deroulement du programme ..............................................................
Programmes automatiques ..........................................................................
Programmes MISTCARE TM . .........................................................................
Programmes assortis d'une duree ....................................................................
Utilisation ...........................................................................................
Utilisation du seche-linge ............................................................................
Nettoyage du filtre a peluches ........................................................................
Utilisation du tiroir de sechage (options) ................................................................
Nettoyage et entretien ................................................................................
Nettoyage du sechedinge ...........................................................................
Nettoyage du conduit d'echappement .................................................................
Nettoyage des capteurs d'humidite ...................................................................
Nettoyage de la fiasque .............................................................................
Changer I'ampoule de I'eclairage .....................................................................
Derangement et remedes .............................................................................
SERVICE ET REPARATIONS .........................................................................
I_NONCI_ DE GARANTIE DE PRODUIT LIMITI_E .........................................................
31
31
33
34
34
34
34
35
38
41
42
43
44
44
45
45
45
45
45
46
46
46
47
47
47
49
49
5O
5O
52
52
52
52
52
52
53
55
63
3O

Vous venez d'acheter un sechedinge
Bosch et nous vous en felicitons. Vous
venez de faire le m_me choix que font
tousles consommateurs attendant de
leur sechedinge des performances
exceptionnelles.
Ce seche-linge se conforme a la norme
UL 2158/CAN/CSA-22.2 No. 112-97.
Appareils de sechage des v_tements.
Ce seche linge offre une
caracteristique particulierement
interessante: il consomme peu
d'energie.
Une philosophie de fonctionnement
simple, tout un eventail de programmes
de sechage personnalises et un
agreable retour haptique attestant de la
robustesse de I'appareil font de ce
dernier un assistant pratique au service
de votre foyer.
Ce sechedinge Bosch offre les
caracteristiques standard suivantes:
- Systeme de sechage hautement
efficace et precis.
- Le grand tambour d'acier
inoxiydable avec une capacite
d'augmente a 17,6 livres (8 kg).
- Hublot grand format (18 po/457
mm), et dispositif de verrouillage _<
interlock _ avec arr_t automatique
de lafonction du tambour.
- Fonctionnement extr_mement
silencieux.
- Cycles automatiques contr61es par
des capteurs.
- Cycles chronometres
500 Series sechedinge: 30 et 60
minutes
800 Series seche-linge: 10
150 minutes (dans le graduations
de 10 minutes)
- Le programme court pour 1/p
chargement (25 minutes) (800
Series seulement)
Chaque seche-linge quittant notre
usine a subi des tests complets de
performances et se trouve en parfait
etat de marche. Si vous souhaitez
formuler quelque question que ce soit
notamment sur I'installation de votre
seche-linge, notre equipe du service
apres-vente se fera un plaisir d'y
repondre.
Vous trouverez d'autres informations et
tout un choix de nos produits sur le site
Web suivant:
www.boschappliances.com
Information
Veuillez s.v.p, lire et respecter
I'integralite de cette notice d'installation
et d'utilisation, ainsi que toutes les
informations qui ont ete fournies avec
ce seche-linge.
D6finitions
Avertissement - Ce symbole
vous previent d'un danger de
mort ou d'un risque debtessures
igraves si vous ne respectez pas
avertissement qui
I'accompagne.
PRUDENCE - Ce message
vous previent d'un risque de
btessures legeres ou
moyennement graves si vous ne
respectez pas cet avertissement.
NOTIFICATION - Ce message
vous previent d'un risque de
deg_ts pour I'appareil ou la
propriete est possible si vous ne
respectez pas cet avertissement.
D Ce symbole est destine a attirer
votre attention sur quelque chose
de particulier.
z INSTRUCTIONS DE SI=CURITI= IMPORTANTES
Pour reduire le risque d'incendie,
de choc electrique, de btessure
grave ou de mort et/ou risque de
dommages materiels pendant
I'utilisation de votre seche-linge,
veuillez prendre des precautions
de base incluant celles qui
suivent.
1. Veuillez liretoutes les instructions
avant d'utiliser le seche-linge. Les
seche-linge Bosch sont fournis
avec des instructions d'utilisation,
de soin et d'installation.
2. Ne faites pas secher des pieces de
linge qui ont ete prealablement
nettoyees, lavees et
tachees avec ou trempees dans le
I'essence, des solvants de
degraissage asec ou d'autres
substances degageant des
vapeurs susceptibles de
s'enflammer ou d'exploser.
Pour reduire le risque d'incendie,
ne mettez jamais dans le
seche-linge des v_tements,
chiffons de nettoyage, accessoires
de nettoyage a franges,
comportant des traces de toute
substance inflammable comme
I'huile vegetale, I'huile de cuisine,
les huiles ou produits
distilles a base de petrole, les
cires, les graisses, etc. Une ou
plusieurs substances
inflammables peuvent _tre restees
sur ces pieces de linge m_me
apres le lavage. Elles risquent de
se mettre a fumer ou de prendre
feu spontanement.
Ne mettez pas a secher dans
I'appareil des pieces de linge
exposees aux huiles de cuisson.
Ces pieces de linge contaminees
par les hiles de cuisson peuvent
contribuer a une reaction chimique
qui ferait prendre feu a la charge
de linge.
,
Le seche-linge ne devrait servir
qu'aux fins pour lesquelles il a ete
congu.
,
Lorsque les enfants arrivent a FAg
de faire marcher I'appareil, leurs
31

parent ou tuteurs legaux ont la
responsbilite de veiller ace que
des personnnes qualifees leur
ensignent des methodes
d'utilisation sores.
5. Ne laissez jamais les enfants jouer
dans ou sur I'appareil : il y a un
risque de blessures graves ou de
mort. Les enfants doivent _tre
tenus a une distance securitaire
des 61ectromenagers en tout
temps. Les enfants doivent _tre
laisses approcher un
61ectromenager seulement sous la
surveillance constance d'un
adulte.
6. AVANT DE METTRE L'APPAREIL
HORS SERVICE OU AU REBUT,
RETIRF7 LA PORTE DU
COMPARTIMENT DE SECHAGE.
7. N'introduisez pas les mains dans
I'appareil tandis que le tambour
tourne.
8. N'installez ou ne rangez pas cet
electrom6nager dans un endroit
ou ilsera expose aux
intemperies, a I'eau, a la
moisissure, a la salete, a un air
corrosif ou salin, ou au froid
extreme.
9. Ne cherchez pas a modifier les
commandes de I'appareil.
10. Ne tentez pas de reparer ni
remplacer quelque piece que ce
soit de I'appareil, ne le soumettez
pas a des operations de
maintenance autres que celles
specifiquement indiquees dans les
instructions de maintenance ou de
reparation et permises
I'utilisateur, ceci a condition que
vous en compreniez le contenu et
ayez I'habilite requise pour realiser
ces operations.
11. Pour supprimer 1'61ectricite
statique, n'utilisez pas
d'adoucissant ou produit pour
tissu, sauf si le fabricant le
recommande.
12. Ne vous servez pas de la chaleur
pour secher des articles contenant
du caoutchouc mousse (une
etiquette peut indiquer la presence
de mousse de latex) ou des
materiaux en caoutchouc textures
de fagon similaire. Les materiaux
contenant du caoutchouc mousse
peuvent, dans certaines
circonstances, s'enflammer et
brOler spontanement Iorsque
echauff6s.
13. Ne mettez pas de pieces de linge
contenant de I'olefine nontissee
par filage direct dans le
seche-linge. L'olefine nontissee
par filage direct peut prendre feu
spontanement.
14. Avant et apres le passage,
nettoyez les peluches d6posees
sur le filtre. L'accumulation
excessive de peluche peut causer
des dommages au seche-linge et
creer un risque d'incendie.
15. Veillez ace que la zone situee
autour de I'orifice de sortie et les
zones voisines soient
exemptes de bourres, peluches et
poussieres accumulees. Un orifice
obstrue risque de
reduire leflux d'air et causer la
surcharge.
16. IIfaudrait que le personnel de
service apres-vente qualifi6 nettoie
regulierement I'interieur de la
machine et le conduit
d'echappement d'air.
17. Si vous enlevez un capot ou
panneau quelconque, incluant le
couvercle de la lampe, vous
risquez de vous exposer a des
circuits electriques sous tension.
Enlever tout panneau,
incluant le panneau de service
rond a I'avant peut aussi vous
exposer a des ar_tes
coupantes, des pointes et des
surfaces chaudes. Debranchez
toujours I'alimentation
electrique avec de tenter toute
reparation. Debranchez le cordon
en tirant sur lafiche et non le
cordon.
18. Rangez tousles produits
chimiques et accessoires de
traitement du linge dans un endroit
sec et frais, en respectant les
instructions publiees par leurs
fabricants. Cet endroit dolt se
trouver hors de portee des
enfants. L'essence, les matieres
combustibles et les vapeurs,
liquides et substances
inflammables posant un risque
d'incendie ne doivent pas _tre
ranges pres du
seche-linge.
19. Ne vous asseyez pas sur le
seche-linge.
20. Pour reduire le risque d'incendie
ou de choc electrique, N'UTILISEZ
PAS de prolongateur ni
d'adaptateur pour raccorder le
seche-linge a une prise du secteur
electrique. Les seche-linge sont
des appareils puissants qui
necessitent leur propre circuit
electrique.
21. Toujours verifier le contenu des
poches des v_tements et secouer
les articles de votre lessive avant
de les placer dans le seche-linge
les objets inappropries peuvent
endommager le seche-linge et
certains articles tels que les
briquets peuvent constituer un
risque d'incendie.
22. Pour reduire les risques
d'incendie ou de choc electrique,
n'utilisez pas le seche-linge si le
cordon d'alimentation est effiloche
ou endommage ou si les prises
sont I&ches.
23. N'utilisez pas le seche-linge si des
gardes et ou des panneaux ont et6
enleves ou si des pieces sont
manquantes ou cassees.
24. Ne tentez pas de contourner un
dispositif de s6curite quelconque.
25. N'utilisez pas de conduit flexible
en plastique ou non metallique
avec ce seche-linge. Les conduits
en plastique ou non-metalliques
peut poser un risque d'incendie.
26. Ne faites pas marcher le
seche-linge si vous n'_tes pas
certain qu'il a 6te installe
conformement aux
INSTRUCTIONS D'INSTALLATION
et que I'installation et la mise a la
terre sont conformes aux
reglements Iocaux et/ou aux
autres reglements et exigences
applicables.
27. Tout manquement a installer,
entretenir et/ou faire marcher le
seche-linge en conformite avec les
instructions du fabricant peut
provoquer des dommages
corporels et/ou des d6gAts
materiels.
28. Pour eviter d'endommager le sol
ou laproliferation de moisissures,
ne laissez pas I'eau repandue ou
les eclaboussures en permanence
autour de I'appareil ou sous
celui-ci.
29. Assurez-vous que tousles
raccordements d'eau au
seche-linge sont dotes d'un
robinet d'arr_t d'acces facile.
Fermez le ou les robinets d'arr_t
d'eau de I'appareil apres
I'utilisation en fin de journee.
30. Verifiez regulierement les raccords
du boyau de remplissage pour
vous assurer qu'ils sont bien
serres et ne fuient pas.
32

Remarques :
A Les MISES EN GARDE et
AVERTISSEMENTS
IMPORTANTS figurant dans le
present manuel ne sauraient
envisager toutes les situations
possibles et imaginables.
Faites preuve de bon sens, de
prudence et de soin pendant
I'installation, I'entretien et
I'utilisation de ce seche-linge.
B Contacteztoujours votre
revendeur, distributeur, agent
du service apres-vente (SAV)
ou lefabricant en presence de
problemes ou situations vous
paraissant
incomprehensibles.
C Suivez toutes les consignes
de securite fournies dans les
INSTRUCTIONS
D'INSTALLATION et les
INSTRUCTIONS
D'UTILISATION.
Instructions de mise & la
terre
IIfaut imperativement raccorder ce
seche-linge a la terre. En cas de
dysfonctionnement ou de panne,
sa liaison avec la terre reduira le risque
de choc electrique en fournissant au
courant electrique un chemin de
passage a resistance electrique tres
reduite.
Pour le CANADA
Cet appareil est equipe d'un cordon
d'alimentation avec fil integre de
raccordement de I'appareil a la terre, et
d'une fiche de raccordement a laterre.
IIfaudra brancher lafiche dans une
prise femelle appropriee, reliee a la
terre conformement a la reglementation
et aux decrets Iocaux.
Le branchement inexpert du fil
charge de raccorder I'appareil a la
terre peut engendrer un risque de
choc electrique. Avec I'aide d'un
electricien agree ou d'un technicien
du service apres-vente (SAV),
verifiez en cas de doute que le
seche-linge est bien raccorde a la
terre.NE MODIFIEZ PAS LA FICHE
MALE accompagnant I'appareil. Si
elle ne rentre pas dans la prise,
demandez a un electricien agree de
vous installer une prise femelle
appropriee a ce seche-linge.
Conservez cette notice
afin de pouvoir la
consulter a nouveau
ulterieurement.
Si I'appareil dolt un jour changer de
proprietaire, remettez-lui le manuel en
m_me temps que le sechedinge.
CONSERVEZ CETTE NOTICE
33

Instructions. d'i nstal latio n
Introduction
Veuillez lire ces instructions
d'installation entierement et
soigneusement. Elles vous feront
economiser du temps et des efforts et
vous aideront a obtenir des
performances optimales de votre
seche-linge. Veillez a bien respecter
tousles avertissements et mises en
garde enonces.
AVERTISSEMENT- Risque
d'incendie.
- L'installation du seche-linge dolt
_tre realisee par un installateur
quail%.
- Installez le seche-linge
conformement aux instructions du
fabricant et aux codes Iocaux.
- Ne pas installer un seche-linge en
combinaison avec des materiaux
de ventilation fiexibles en
plastique. Si un conduit en metal
flexible (de type aluminium) est
installe, il dolt s'agir d'un type
specifique indique par lefabricant
de I'appareil electrome,nager
comme etant compatible avec les
seche-linge. Les materiaux de
ventilation flexibles sont reputes
comme pouvant s'affaisser,
s'ecraser facilement et
emprisonner la charpie. Ces
conditions auront tendance
bloquer la circulation de I'air du
seche-linge eta accroYtre le
risque d'incendie.
- Pour reduire le risque de graves
blessures ou de mort, suivez
toutes les instructions
d'installation.
- CONSERVEZ CES
INSTRUCTIONS.
Les presentes instructions d'utilisation
sont destinees a des installateurs
quali%s. Outre le respect de ces
instructions, vous devez installer le
sechoir conformement a toutes les
reglementations locales ou bien, en
I'absence de telles recommandations:
- Au Canada : conformez-vous au
Code Electrique Canadien C22.1 -
en son edition la plus recente / en
conformite avec la reglementation
edictee par la province de
residence, la reglementation
municipale et/ou locale.
Informations sur la mise
au rebut
Mise au rebut de I'emballage
EIoignez les enfants de tout carton
d'emballage et composants
d'emballage. Les feuilles en
plastique et les cartons pliants
comportent un risque
d'etouffement.
Tousles materiaux composant
remballage sont ecologiques et
recyclables. Pour contribuer vous aussi
la protection de la nature, mettez les
materiaux d'emballage au rebut de
fa_on respectueuse
de I'environnement.
Pour connUtre les circuits de mise au
rebut, veuillez consulter votre
revendeur ou les services competents
de votre mairie.
Mise au rebut de I'ancien
appareil
Si I'appareil ne dolt plus jamais
servir, debranchez sa fiche m_le de
la prise de courant, coupez son
cordon d'alimentation et jetez-le
avec lafiche m_le.
Pour emp_cher que des enfants ne
s'enferment dans I'ancien appareil et
risquent leur vie, detruisez le systeme
de fermeture du hublot ou retirez ce
dernier.
Les appareils anciens ne sont pas des
dechets sans valeur! Un recyclage
respectueux de I'environnement
permet de recuperer de precieuses
matieres premieres.
Pour connUtre les circuits de mise au
rebut, veuillez consulter votre
revendeur ou les services competents
de votre mairie.
Avant d'installer
le seche-linge
Deballage de I'appareil
Avant de connecter le seche-linge a un
systeme de conduits ayant deja servi,
veillez ace que le systeme soit propre.
IIest recommande de faire nettoyer
professionnellement le systeme de
conduits tousles ans et Iors de
I'installation du seche-linge a un
systeme de conduits ayant deja servi.
Un systeme de conduits propre
contribue a diminuer la duree de
sechage eta ameliorer I'efficacite du
seche-linge.
Ce seche-linge est tres Iourd.
Ne tentez pas de le soulever.
Ne tentez pas de soulever I'appareil
par certaines parties saillantes (sa
porte par ex.). Vous risqueriez de les
casser.
Retirez soigneusement tout
I'emballage de rappareil, ceci pour
emp_cher d'endommager des
surfaces.
Verifiez si le seche-linge a subi des
dommages Iors du transport.
N'installez pas un
seche-linge comportant des
dommages visibles. En cas de doute,
communiquez avec le marchand.
Accessoires fournis
Apres avoir retire I'emballage, sortez
tousles objets eventuellement
presents dans le tambour.
34

Outillage utile
Les outils suivants sont utiles pour
I'installation:
1. Toumevis de t_te d'etoile de T20
2. Toumevis Phillips (#2)
3. Tournevis a lame plate (#2)
4. Cle afourche (1 po/25mm)
5. Niveau a bulle
2
5
Installation pas & pas
1. Deballez le seche-linge.
2. Retirez tousles objets presents
dans le tambour.
3. Verifiez I'absence de degflts
apparents sur le seche-linge.
4. Placez le seche-linge a proximite
de son emplacement definitif
(consultez la page 36).
5. Si necessaire, deplacez les
charnieres du c6te gauche
(consultez la page 43).
6. Si necessaire, positionnez la sortie
d'evacuation de I'air sur le
seche-linge par le c6te ou par le
bas (voir page 42).
7. Verifiez le connecteur en ,,Y _>,le
tuyau court et leTuyau
AQUASTOP ® inclus dans
I'emballage du seche-linge (voir
page 37).
8. Connectez I'arrivee d'eau
I'arriere du seche-linge (voir page
37 pour obtenir des instructions
detaillees).
9. Installez des conduits
d'echappement au besoin.
Suivez les instructions
d'installation fournie par le
fabricant des pieces de conduits
(consultez la page 41)
DEn presence d'un espace tres
exigu, nous recommandons de
fixer I'orifice de depart du conduit
d'echappement sur le seche-linge
avant d'amener le seche-linge sur
son emplacement definitif.
10. Amenez leseche-linge sur son
emplacement definitif.
Ne faites pas glisser le
seche-linge sur le sol si ses pieds
reglabtes en hauteur se trouvent
1
3
4
en position sortie. Vous risquez
d'endommager les pieds et/ou
la base du s6che-linge si vous
le faites glisser sur le sol avec
les pieds en position sortie.
1. Positionnez le seche-linge et
mettez-le de niveau (consultez la
page 35).
IIfaudrait que le seche-linge se
retrouve bien a I'horizontale, avec
ses quatre pieds fermement en
appui sur le sol. Leseche-linge ne
dolt pas osciller. S'il n'est pas
parfaitement a I'horizontale ou s'il
oscille, il faudra corriger le reglage
des pieds. Vissez ou devissez les
pieds reglables en hauteur jusqu'a
ce que le seche-linge cesse de
s'agiter et se trouve parfaitement
fl I'horizontale, tant de I'avant vers
I'arriere que d'un cOte a I'autre.
%Vous devrez
eventuellement utiliser une
paire de pinces pour
maintenir le pied et
I'emp_cher de toumer avec
I'ecrou que vous serrrez. Si
le pied tourne, ce dernier
va modifier la hauteur du
coin.
12. Raccordez le conduit
d'echappement fl I'orifice prevu
cet effet sur le seche-linge
(consultez la page 41).
13. Branchez la fiche mille dans la
prise de courant murale (consultez
la page 38).
14. Veuillez lire les instructions
d'utilisation pour comprendre
comme votre seche-linge
fonctionne. (consultez la page 44).
15. Soumettez I'appareil a un test:
E3 Verifiez que le tambour
est vide.
E3
Fermez la porte du seche-linge.
E3
Commutez le seche-linge sur
,,Extra Dry_ (Tres sec) puis
appuyez sur le bouton Start.
E3
3 a 5 minutes plus tard,
appuyez sur le bouton Stop
puis ouvrez la porte.
E3
Si I'interieur du tambour para?t
chaud, ceci signifie que vous
avez connecte le seche-linge
correctement. Commutez
I'interrupteur sur ,<OFF_>.
E3
Si le seche-linge ne fonctionne
pas, commutez le seche-linge
sur ,<OFF_>.Consultezla section
de ces SERVICE ET
REPARATIONS consacree
au depannage (page 53)
et essayez de Iocaliser
le derangement.
35

Lieu d'installation
N'installez pas ce seche-linge '
- hors de Iocaux fermes par une
porte,
- dans un environnement ou de
I'eau goutte,
- pres de materiaux inflammables,
- darts des Iocaux comportant un
risque de gel,
- dans des Iocaux pouvant contenir
du gaz, de I'essence ou d'autres
combustibles,
- dans des placards a portes
fermant a cle et dans des alcoves.
Le local d'installation dolt _tre bien
aere, sinon le seche-linge fonctionnera
en dessous de ses performances
optimales.
Ne faites pas marcher le seche-linge
des temperatures superieures a 104 °F
(40 °C) et inferieures a 41 °F (5 °C). Les
basses temperatures affectent le
sequencement automatique des
programmes et peuvent allonger
la duree de sechage.
La surface sur laquelle se trouve
le seche-linge dolt _tre propre,
horizontale et dure. N'installez jamais
I'appareil sur des tapis et moquettes.
Compensez les irregularites du sol par
ses pieds reglables en hauteur.
Installez le sechoir, puis assurez sa
planeite lateralement et d'avant en
arriere. Utilisez un niveau a bulle.
N'enlevez jamais les pieds reglables en
hauteur!
Les dimensions de la surface
d'installation dependent de celles du
seche-linge. Verifiez qu'il reste
suffisamment de place pour que sa
porte puisse tourner!
a
Dimensions Poids
a 27,0" (686mm) 125 Ibs
b 31,8" (808mm) (56kg)
avec
c 37,2" (945mm) I'emballage
d 19,7" (500mm) 143 Ibs
angle 170- 180° (64kg)
Si vous installez le sechedinge dans un
placard d'encastrement, respectez les
distances minimums conformement au
tableau ci-dessous :
Distance minimum a respecter Iors de
I'installation
Placard
COtOs 0" (0 mm)
Dessus 12"(305 mm)
Arri_re* 0" (0 mm)
* laussiprosdu murquene lepermettent
I'@acuati0nde Fair 0u lebranchementde
I'eau.
Informations importantes sur les
distances minimums
Selon I'emplacement de lasortie
de I'evacuation de Fair,prevoyez
une distance supplementaire
minimale de 5,5 po (14 cm) de ce
cote pour latuyauterie/les
supports (voir page 41).
Avantages associes au maintien
d'une distance plus importante
(degagements) que le minimum
indique :
• reduction du risque de formation
de moisissure derriere I'appareil.
• reduction de la transmission du
bruit
• facilite d'installation et de
reparation
° davantage d'air disponible pour
refroidir le secheNinge afin
d'eviter qu'il ne chauffe trop et
amelioration des performances
de sechage.
Si le secheNinge est installe dans
une petite piece, les portes de la
piece doivent avoir des events
d'une taille minimum specifiee.
Consultez I'illustration ci-dessous
pour des renseignements
additionnels.
La porte du seche-linge a ete foumie
avec des charnieres sur la droite.
S'il faut les deplacer sur la gauche,
consultez la page 43.
36

Branchement de I'eau
Reliez le tuyau d'alimentation en eau
un robinet d'eau froide (celui-ci doit se
trouver a4 pi (1,2 m) de distance de la
vanne d'admission d'eau situee
I'arriere du seche-linge).
Une pression d'alimentation d'eau de
20 a 100 psi (1,37 a 6.89 bars) est
recommandee pour obtenir les
meilleures performances.
Un connecteur en ,<Y >>est fourni ainsi
qu'un tuyau court (en cas de besoin)
pour le relier au robinet d'eau froide.
Tuyau AQUASTOP ®
Le client est seul responsable de la
fixation solide des raccordements
EXTERIEURS de tuyau. Le fabricant
n'assume aucune responsabilite ou
obligation pour tout raccordement
EXTERIEUR de tuyau ou tout autre
raccordement mal effectu&
MISTCARE TM Pieces fournies pour le
seche-linge
Les pieces suivantes sont incluses
dans I'emballage de votre seche-linge.
2
3
4
1. Connecteur en ,<Y >_
2. Avant de continuer, verifiez que la
rondelle de caoutchouc est bien
introduite et positionnee sur
I'extremite femelle du tuyau court.
La rondelle de caoutchouc est
representee sous le numero 3 sur
I'illustration des pieces fournies.
Elle est illustree separement dans
la representation du tuyau pour
plus de clart&
3. Si I'espace le permet, reliez
I'extremite (femelle) auto-foreuse
du connecteur en ,<Y >>
directement au robinet d'eau
froide (option A comme le montre
I'illustration ci-dessus) et
continuez a I'etape 6.
Installation facultative du
connecteur en <<Y -
Si le connecteur en ,<Y >>ne peut
pas _tre relie directement, utilisez
le tuyau court fourni pour relier le
connecteur en ,<Y >_au robinet
d'eau froide (option B comme
represente sur I'illustration), et
continuez en passant aux
etapes 4 et 5.
Le tuyau AQUASTOP ® previent les
inondations possibles en cas de fuite
du tuyau.
En cas de fuite du tuyau, une marque
rouge s'affiche et I'arrivee d'eau est
coupee.
E3
Un tuyau AQUASTOP ® qui s'est
declenche ne peut pas _tre
reinitialis& Contactez le service
clientele pour obtenir un tuyau de
rechange (voir page 55).
2. Tuyau d'alimentation court en
metal tresse
3. Rondelle de caoutchouc
4. Tuyau AQUASTOP ®
Branchement du tuyau
d'alimentation
D Le seche-linge doit _tre connecte
au connecteur en ,<Y >>a I'aide du
tuyau AQUASTOP ®. Ne pas
utiliser un tuyau usag&
1. Fermez le robinet d'eau froide et
retirez letuyau d'alimentation de
I'eau du seche-linge.
i i!iii
4. Reliez le tuyau court au robinet
d'eau froide. Serrez la connexion
la main jusqu'a ce que le raccord
se mette bien en place sur le
robinet.
5. Utilisez une pince pour serrer la
connexion de 2/3 de tour en plus.
37

D Ne pas trop serrer. Vous pourriez
endommager le raccord.
6. Reliez le connecteur en _<Y _ au
tuyau court. Serrez leraccord a la
main jusqu'a ce qu'il soit bien en
place sur le tuyau.
7. Reliez le tuyau d'alimentation
d'eau froide du lave-linge au
connecteur en _,Y _. Serrez a la
main.
8. Reliez le tuyau AQUASTOP ® du
seche-linge a I'autre raccord du
connecteur en _,Y _. Serrez a la
main.
9. Serrez les trois raccords sur le
connecteur en ,,Y _ de 2/3 de tour
en plus a I'aide d'une pince.
D Ne pas trop serrer. Vous pourriez
endommager le raccord.
12. Ouvrez le robinet d'eau..
13. Verifiez s'il y a des fuites autour du
connecteur en _<Y _, du robinet et
de tousles tuyaux.
Branchement electrique
Le cordon d'alimentation doit _tre
raccorde par un technicien qualifie
ou par un
electricien agree uniquement.
Raccordez I'appareil a un circuit de
derivation individuel.
N'utilisez pas d'adaptateur.
N'utilisez pas de prolongateur.
Ne retirez pas la broche de
connexion a la terre.
Pour le CANADA
Votre seche-linge a ete livre equipe
d'un cordon d'alimentation figurant
dans la liste CSA canadienne.
Ce seche-linge requiert une prise
femelle a 4 ills.
Instructions de raccordement
& la terre
IIfaut imperativement raccorder ce
secheqinge a la terre. Siun
derangement ou une panne se produit,
le raccordement a la terre reduira le
risque de choc electrique vu que le
courant pourra s'echapper par un fil
offrant une faible resistance electrique.
Pour le Canada cet appareil est equipe
d'un cordon d'alimentation integrant un
fil de terre et une fiche de terre. IIfaut
raccorder lafiche a une prise femelle
reglementairement installee et dotee de
contacts eux-m_mes raccordes a la
terre, ceci en conformite avec la
reglementation et les ordonnances
locales.
Procedure additionnelle de
raccordement & la terre
Ne raccordez jamais le fil de terre
des conduites de plomberie en
plastique, a des conduites de gaz
ou a des conduites d'eau.
10. Reliez le connecteur a angle droit
sur le tuyau AQUASTOP _ a la
valve d'admission situee en haut
gauche du seche-linge.
D Verifiez que la rondelle de
caoutchouc ne tombe pas, et
qu'elle est correctement
positionnee sur le connecteur
angle droit.
11. Serrez le raccord a. la main
jusqu'a ce qu'il soit bien en place
sur le connecteur. Ne pas utilise
de pince. Serrez uniquement a la
main.
D Ne pas trop serrer. Vous pourriez
endommager le raccord.
Lorsque vous installez la prise femelle
recevant le cordon d'alimentation,
veillez bien ace qu'il reste accessible
une fois le seche-linge en position.
Le cordon d'alimentation ne devrait
_tre remplace que par un technicien
quail% ou un
electricien certi%. Utilisez un cordon
d'alimentation a quatre ills (consultez
Branchement d'un cordon electrique,
Etats-Unis, ci-dessous).
4-fils seulement
II Idoit figurer dans la liste UL
americaine et CSA.
II doit supporter au minimum une
tension comprise entre 208 et 240
volts.
- II doit supporter jusqu'a 30
amperes.
- IIdoit etre du type SRDT
- II doit mesurer au minimum 5 pieds
de long.
Voir page 39 pour 4-fils instructions
d'installation.
38

Branchernent de I'alimentation lectrique (4 fils)
hie branchez pas rextr_mit_ du
cordon d'alimentation darts une
Un mauvais raccordement du conducteur de
mise & la terre de r6quipement peut engendrer
un risque de choc 61ectrique. En cas de doute
sur la bonne mise a la terre du secheqinge, faites
verifier I'appareil par un technicien qualifi6 ou par
un electricien agr6e.
prise sous tension avant d'avoir
connect_ le cordon
d'alimentation aux bornes de
rappareil et coup6 le courant au
coffret de distribution comme
indiqu_ ci-dessous,
bomier
attache pou
mise & la terre
collier de serrage
support pou _11__
@
®
Enlevez des deux vis du
cache du bornier situ6e en
haut & rarri_re de rappareil.
Ceci exposera rassemblage
du bornier.
@
Q ixez un collier de serrage
Devissez la vis inferieure de
I'attache pour mise a la terre.
Redressez I'attache pour mise
la terre pour la mettre & la
verticale. Remettez la vis
verte en place dans le trou de
la borne de TERRE.
S'assurer que le bracelet de mise a la
terre n'est pas en contact avec le
panneau arri6re pour 6viter que le
disjoncteur nese declenche Iors du
fonctionnement de la secheuse,
(disponible aupres d'un
magasin de materiel
electrique ou de
construction) au support en
equerre. Serrez 1'6crou
pour mettre le support pour
collier de serrage bien en
place.
i_i_i!!iiil¸i¸ii_i_;_!i7i:_!_!!_!_!i7!;_i_i_!7!!i!i_i!i7i_ii_iii_ii!_!iiiiiiiii7_i_i_i!i!_i_!:_:!_i7_7;i_i_!i_i!_i_i_!ii!i_¸iii,iii_iiiii;i;ii:i_i!!_i_
Q 6vissez les 2 vis
marquees Let la
seule vis marquee N
sur le bornier.
D6vissez 6galement
la vis sur la borne de
TERRE.
Suite sur la prochaine page
39

Installation _ 4 fils
®
®
Faites passer le c&ble a 4 ills
travers le collier de serrage.
Serrez les vis du collier de
serrage (2,5 Nm) de fa£;on & ce
que le cordon d'alimentation
ne puisse pas 6tre d6plac6.
[_ eci maintiendra le cordon
d'alimentation en place et
facilitera rinstallation des bornes
de fixation.
Fixez le conducteur de
mise a la terre du cordon
d'alimentation (vert) a la
borne de TERRE. Serrez
la vis (2,5 Nm) de fa£;on
ce que le conducteur de .....
mise a la terre soit
maintenu bien en place.
Placez les 2 conducteurs
ext6rieurs du cordon
d'alimentation (rouge et noir, run
ou I'autre pouvant etre place
gauche ou a droite) sur les deux
bornes marqu6es L. Placez le
conducteur restant du cordon
d'alimentation (blanc) sur la
borne marqu6e N.
S'assurer que les bomes de raccordement
sont bien align6es sur les ecrous des
bornes pour eviter d'abfmer les filets.
40
Q errez les 3 bornes de raccordement de fa(_on &
ce que chacun des ills soit bien maintenu en
place.
Q nspectez le collier de serrage pour s'assurer qu'il
G emettez le cache en place sur le bornier et
est bien serr6 et ne tourne pas.
vissez-le.
[_ Assurez-vous le collier de
se situe en dehors du cache !
L'appareil est maintenant pr6t & _tre branch6 dans
une prise 61ectrique conforme.
que serrage

Raccordement du conduit
d'echappement
1. Pour reduire le risque d'incendie, il
faut que le conduit
d'echappement de ce seche-linge
aboutisse en plein air.
2. Pour reduire le risque d'incendie,
ne pas utiliser des gaines et
conduits plus longs que ce qui est
recommande. Reportez-vous au
tableau des Iongueurs de conduit
maximum (voir page 42).
3. NE PAS utiliser de conduits en
plastique, en feuille metaNique ou
tout autre conduit non metallique
avec ce seche-linge. Seul un
conduit en metal rigide ou flexible
dolt _tre utilise pour I'evacuation.
Les conduits en feuille metallique
et les conduits fiexibles ne sont
PAS identiques.
4. NE PAS utiNserplus de 2,4 m de
conduit en metal flexible.
5. UTILISER un conduit mesurant 4
pc (102 mm) de diametre.
6. NE PAS evacuer I'air du
seche-Nnge dans: une cheminee,
un mur, un plafond, tout vide
dissimule d'un b_timent, le
conduit d'air froid d'une
chaudiere, un grenier, un vide
sanitaire ou tout autre conduit ou
gaine d'aeration.
7. N'INSTALLEZ PAS un conduit
flexible dans un mur, plafond ou
plancher situe dans une enceinte.
8. N'ECRASEZ ET NE vrillez pas le
conduit.
9. Nettoyez et verifiez le circuit
d'echappement de fagon
reguliere, au minimum une fois par
an.
10. Le conduit d'echappement dolt se
terminer de maniere a emp_cher
tout refoulement d'air ou la
penetration d'oiseaux ou
d'animaux non domestiques.
11. N'UTILISF7 PAS de hottes
aspirantes equipees de
fermetures magnetiques.
12. NE PAS monter les conduits
I'aide de vis ou d'attaches qui
debouchent a rinterieur du
conduit. ENesconstituent un point
d'accumulation de la charpie. Les
joints doivent _tre obtures a I'aide
de ruban en aluminium.
Orifice de sortie d'air sur le
seche-linge
Ce seche-linge a ete livre avec un
orifice de sortie d'air a rarriere.
Pour tenir compte des imperatifs
architecturaux et de la presence d'un
systeme preexistant d'echappement
de I'air, ilest possible de placer I'orifice
de sortie a d'autres endroits :
- Sur le c6te droit de I'appareil,
- Sur la face inferieure de I'appareil.
2
3
1 - Orificedesortied'airsitu6a I'arri6rede
I'appareil(standard)
2 - Orificedesortied'airsurle c0t6(option)
3 - Orificedesortieflair surlaface
inf6rieure(option)
Des raccords d'echappement d'air
sont disponibles aupres de votre
marchand, d'un
fournisseur de pieces ou du service a la
clientele pour un type de connexion ou
rautre
(consultez la page 42).
- Kit de sortie par le c6te
- Kit de sortie par le bas.
II faudrait confier le changement
d'orifice de sortie d'air (passage de
rorifice standard a un orifice en option)
un technicien qualifie.
Conduit d'echappement
Le systeme d'evacuation du
seche-linge evacue I'air humide tandis
que vos v_tements sechent par
culbutage.
Vous pouvez ecourter laduree de
sechage, economiser de I'energie et
contribuer a assurer la securite du
systeme en veillant ace que le systeme
de conduits d'evacuation de votre
seche-Nnge soit correctement instaNe
et entretenu.
Points importants a. prendre en
compte :
_3
Les conduits d'echappement (la
Iongueur totale du seche-linge a la
hotte d'echappement exterieure)
doivent _tre aussi courts que
possible (reportez-vous au tableau
,<Longueur maximale du conduit -
la page 42.)
_3
Utiliser le moins de coudes
possibles necessaires pour
installer le systeme de conduits
d'evacuation. Eviter de placer
deux coudes a 90° adjacents I'un
I'autre.
_3
Verifiez et nettoyez le systeme de
conduit et la hotte d'echappement
au moins une fois par annee et
chaque fois que le rendement du
seche-linge diminue.
Eliminer les peluches accumulees
pour eviter la baisse de circulation
de I 'air ou I'obstruction du
systeme. IIest recommande de
faire nettoyer le systeme de
conduits une fois par an par un
service de nettoyage professionnel
et Iorsque vous raccordez votre
seche-linge a un systeme de
conduits d'evacuation utilise
anterieurement.
_3
Remplacer les sections de
ventilation en plastique ou en
feuille metallique par des conduits
metaNiques rigides ou fiexibles. II
est recommande d'utiliser
desconduits metaNiques rigides.
%
Le proprietaire a la responsabilite
de pourvoir a I'installation
adequate du systeme
d'evacuation.
Les problemes resultant d'une
mauvaise installation ne sont
pas couverts par la garantie qui
accompagne I'appareil.
Les conduits d'evacuation dont la
Iongueur est superieure aux
specifications du tableau des
Iongueurs de conduit maximum, page
42 ne sont pas autorises. Le non
respect des indications de ce tableau
aura pour effet de prolonger la duree
de sechage, d'entra_ner I'accumulation
de charpie et de nuire aux
performances du seche-linge ainsi
qu'a la duree de vie de ce dernier.
41
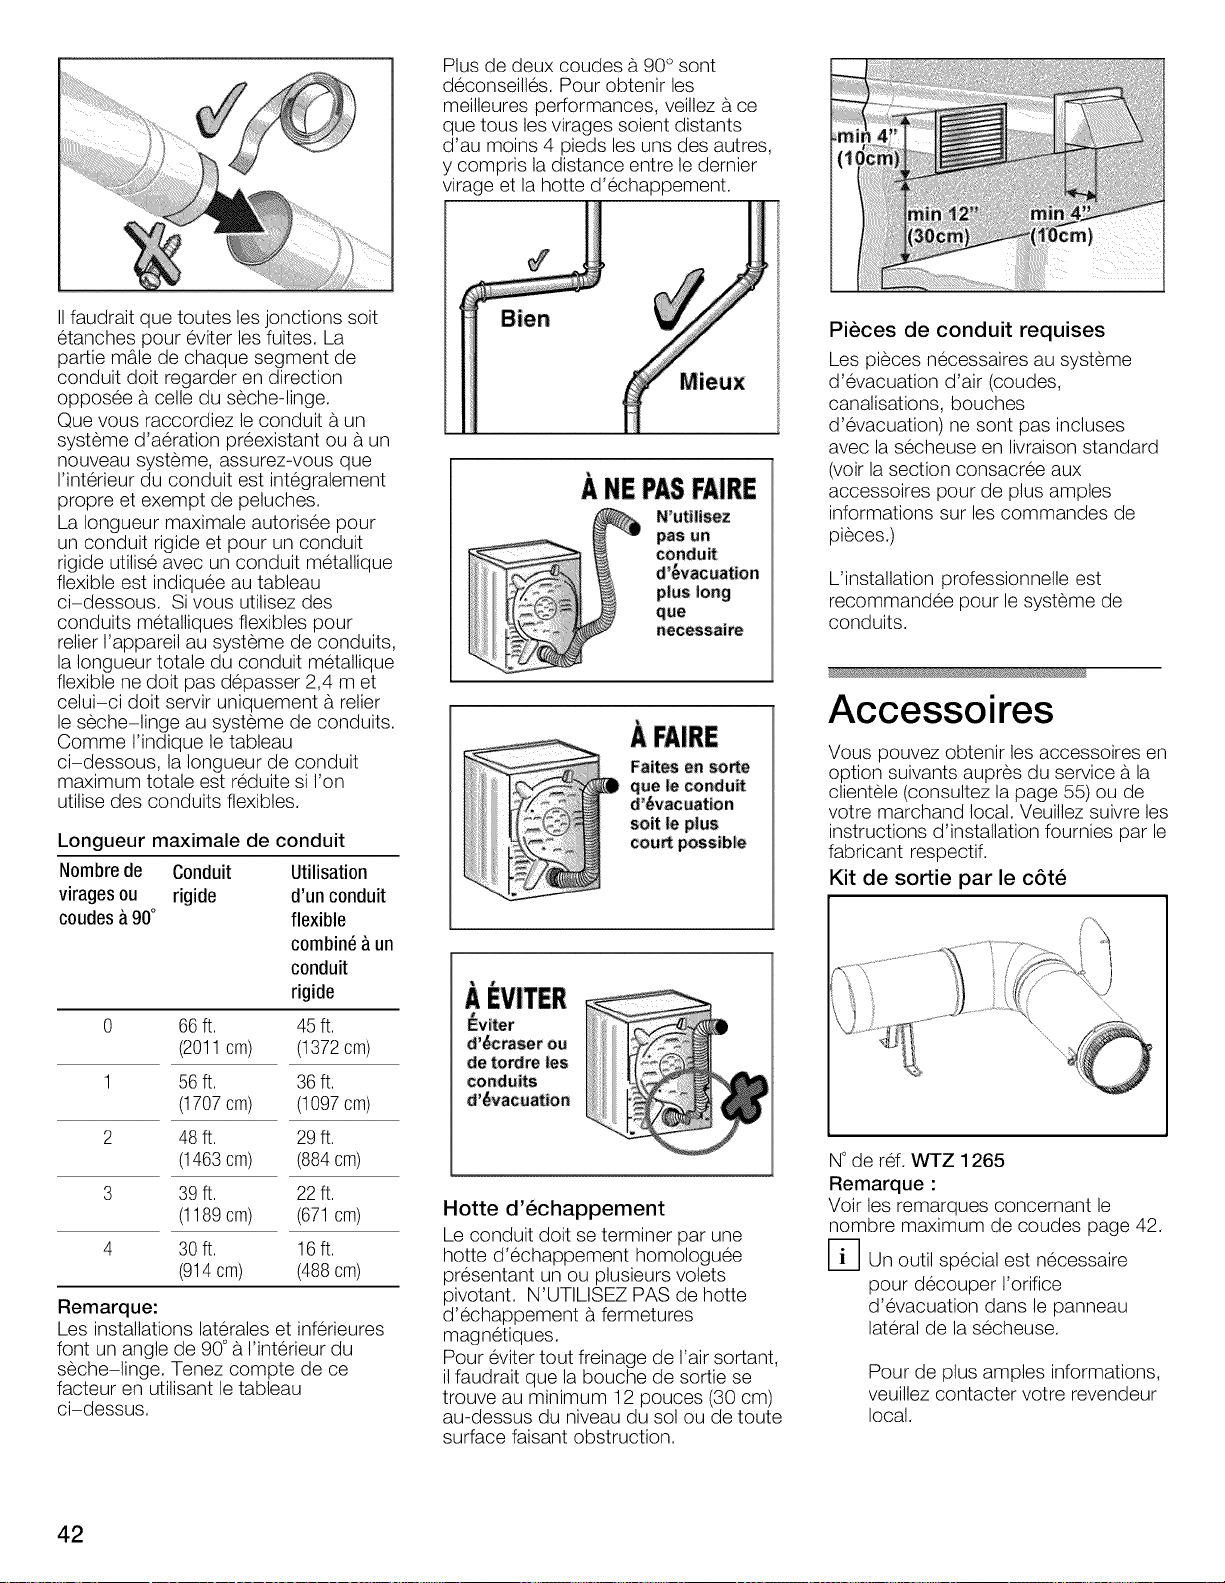
Plus de deux coudes a 90° sont
deconseilles. Pour obtenir les
meilieures performances, veillez ace
que tous les virages soient distants
d'au moins 4 pieds les uns des autres,
y compris la distance entre le dernier
virage et la hotte d'echappement.
ii _i ii__i_iiii I
IIfaudrait que toutes les jonctions soit
etanches pour eviter lesfuites. La
partie m_le de chaque segment de
conduit dolt regarder en direction
opposee a celle du seche-linge.
Que vous raccordiez leconduit a un
systeme d'aeration preexistant ou a un
nouveau systeme, assurez-vous que
rinterieur du conduit est integralement
propre et exempt de peluches.
La Iongueur maximale autorisee pour
un conduit rigide et pour un conduit
rigide utilise avec un conduit metallique
flexible est indiquee au tableau
ci-dessous. Sivous utilisez des
conduits metalliques flexibles pour
relier I'appareil au systeme de conduits,
la Iongueur totale du conduit metallique
flexible ne dolt pas depasser 2,4 met
celui-ci dolt servir uniquement a relier
le seche-linge au systeme de conduits.
Comme I'indique le tableau
ci-dessous, la Iongueur de conduit
maximum totale est reduite si I'on
utilise des conduits flexibles.
Longueur maximale de conduit
Nombrede Conduit Utilisation
viragesou rigide d'un conduit
coudesa 90° flexible
combin_a un
conduit
rigide
0 66 ft. 45 ft.
(2011cm) (1372cm)
1 56 ft. 36 ft.
(1707cm) (1097cm)
2 48 ft. 29 ft.
(1463cm) (884cm)
3 39 ft. 22 ft.
(1189cm) (671cm)
4 30ft. 16ft.
(914cm) (488cm)
Remarque:
Les installations laterales et inferieures
font un angle de 90°a I'interieur du
seche-linge. Tenez compte de ce
facteur en utilisant le tableau
ci-dessus.
A NEPASFAIRE
pusun
d'6vacuation
pluslong;
que
N'utilisez
necessaire
conduit
A FAIRE
Faitesen sorte
que le conduit
d'6vacuation
soit |e plus
cou_ possible
AEVITER
I_viter
d'6craser OU
detordre |es
conduits
d'_vacuation
Hotte d'echappement
Le conduit dolt se terminer par une
hotte d'echappement homologuee
presentant un ou plusieurs volets
pivotant. N'UTILISEZ PAS de hotte
d'echappement a fermetures
magnetiques.
Pour eviter tout freinage de I'air sortant,
i]faudrait que la bouche de sortie se
trouve au minimum 12 pouces (30 cm)
au-dessus du niveau du sol ou de toute
surface faisant obstruction.
Pieces de conduit requises
Les pieces necessaires au systeme
d'evacuation d'air (coudes,
canalisations, bouches
d'evacuation) ne sont pas incluses
avec la secheuse en livraison standard
(voir la section consacree aux
accessoires pour de plus amples
informations sur les commandes de
pieces.)
L'installation professionnelle est
recommandee pour le systeme de
conduits.
Accessoires
Vous pouvez obtenir les accessoires en
option suivants aupres du service a la
clientele (consultez la page 55) ou de
votre marchand local. Veuiliez suivre les
instructions d'instaliation fournies par le
fabricant respectif.
Kit de sortie par le c6te
N°de ref. WTZ 1265
Remarque :
Voir les remarques concernant le
nombre maximum de coudes page 42.
DUn outil special est necessaire
pour decouper I'orifice
d'evacuation dans le panneau
lateral de la secheuse.
Pour de plus amples informations,
veuiliez contacter votre revendeur
local.
42

Kit de sortie par le bas.
N°de ref. WTZ 1270
Remarque :
Voir les remarques concernant le
nombre maximum de coudes page 42.
Tiroir de sechage
N°de ref.WTZ 1290
Servez-vous du tiroir de sechage pour
secher les textiles lavables en laine (les
chandails par ex.) et les chaussures.
Charnieres gauches en kit
N°de ref. WTZ 1260 (Seche-Linge
Blancs)
N°de ref. WTZ 1260S (Seche-Linge
Argentes et deux tons)
La porte est installee en usine avec les
charnieres sur la droite. Le Ioquet de la
porte peut _tre inverse au besoin.
Veuillez communiquer avec votre
marchand ou le service a la clientele
(consultez la page 55).
Montage sur estrade
nombre accessoire de piedestal de 8
pouces
N°de ref. WTZ 1295 (Seche-Linge
Blancs)
N°de ref. WTZ 1295S (Seche-Linge
Argentes)
N°de ref. WTZ 1295P (Seche-Linge
Argentes de tonalite4 de duo)
nombre accessoire de piedestal de 15
pouces
WTZ 1500 pour la couleur blanche
pleine
WTZ 1500S pour I'argent pleine
WTZ 1500P pour I'argent de tonalite
de duo
WTZ 15000 de tonalite pour le
champagne de tonalite de duo
Si le seche-linge est monte sur un
piedestal, suivez les instructions
fournies avec celui-ci avant de
continuer.
Preparation pas & pas au
transport du seche-linge
D Ces procedures doivent _tre
effectuees uniquement par une
personne qualifiee.
1. Amenez leprogrammateur
sur ,<OFF>_.
2. Debranchez I'alimentation (couper
le courant au disjoncteur,
dcbrancher I'appareil).
3. Fermez le robinet d'eau connecte
au tuyau d'alimentation en eau.
Debranchez le tuyau
d'alimentation en eau.
4. Debranchez le conduit de I'orifice
d'echappement d'air situe contre
I'appareil.
5. Rassemblez tous les accessoires
et embaNez-les pour les expedier
avec I'appareil.
6. Fermez la porte et maintenez-la
fermee avec du ruban adhesif.
7. Revissez les pieds reglables
en hauteur dans le corps de
I'appareil pour emp_cher qu'ils
soient endommages pendant
le transport.
8. Reinstallation du seche-linge
dans un nouvel emplacement -
reportez-vous aux
instructions d'installation
contenues dans ce manuel
(consultez la page 34).
43
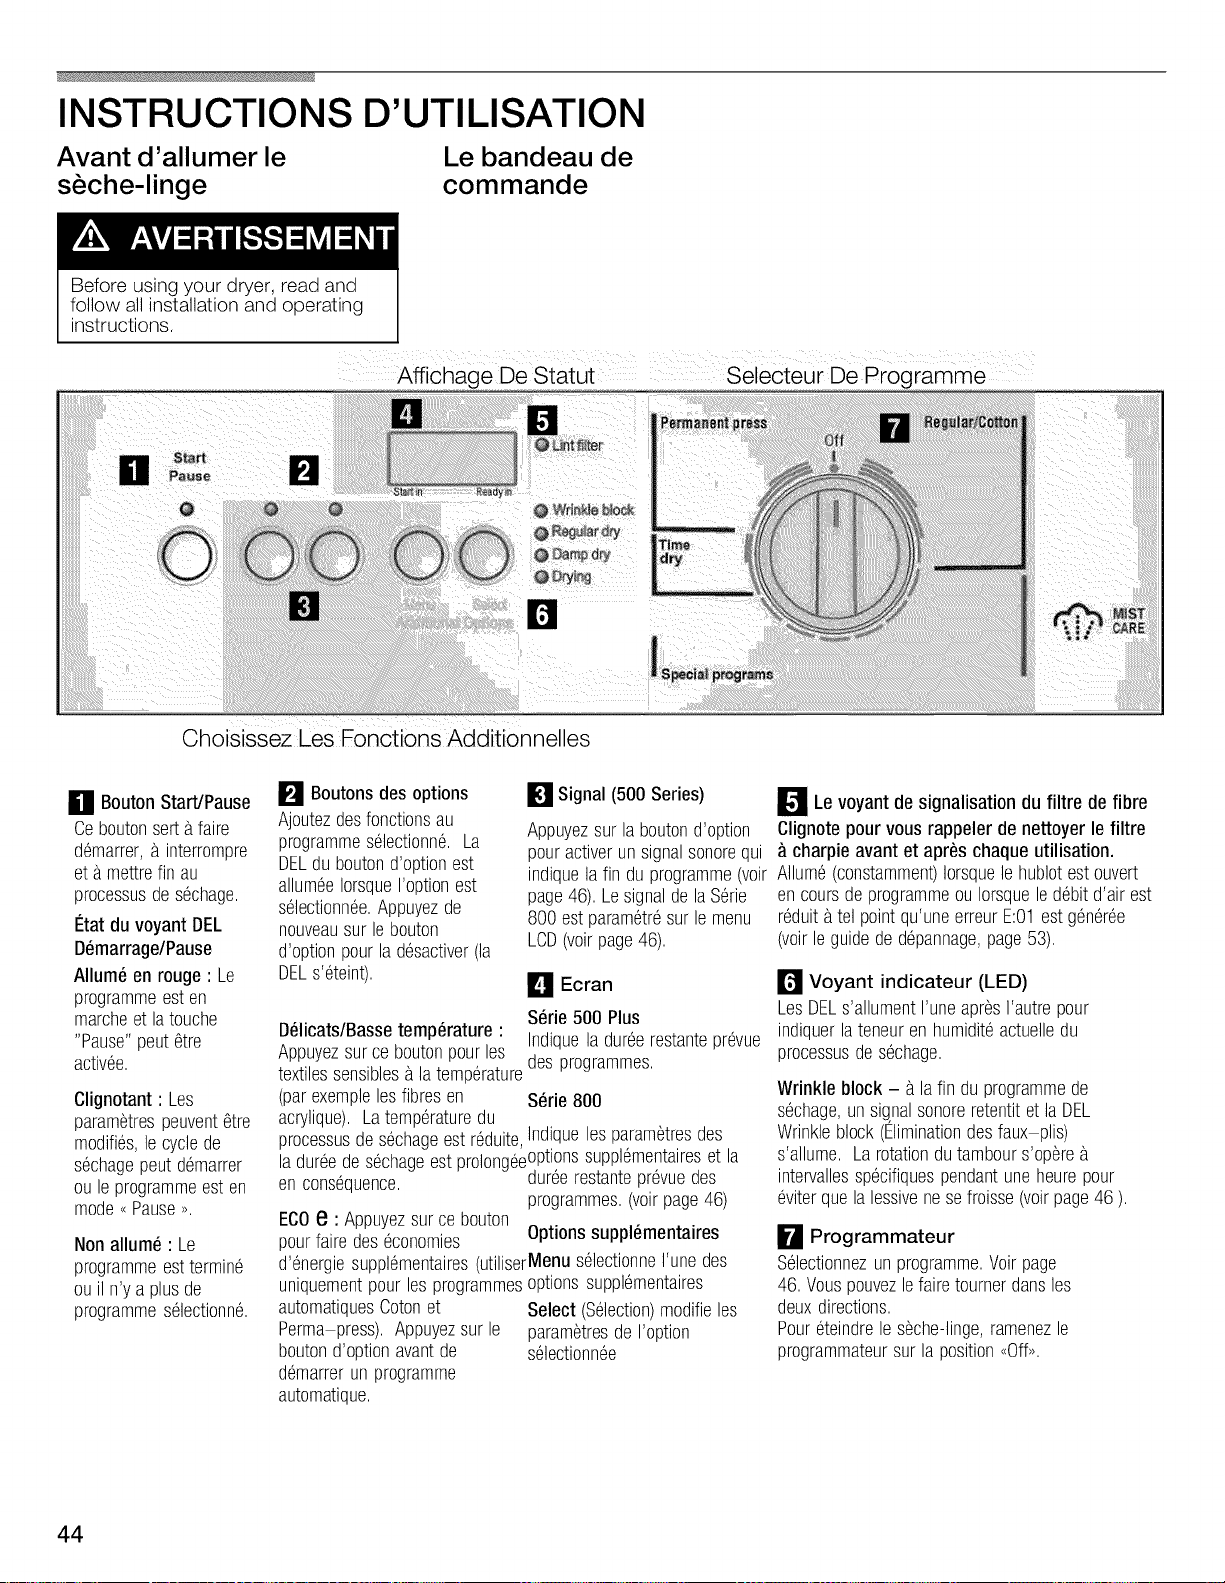
INSTRUCTIONS D'UTILISATION
Avant d'allumer le Le bandeau de
seche-linge commande
Before using your dryer, read and
follow all installation and operating
instructions.
Choisissez Les Fonctions Additionnelles
_1 BoutonStart/Pause
Ceboutonsertafaire
d6marrer,a interrompre
eta mettrefin au
processusdes6chage,
I_tatdu voyant DEL
D_marrage/Pause
Allum_ en rouge : Le
programmeesten
marcheet latouche
"Pause"peut_tre
activ6e,
Clignotant: Les
param_trespeuvent_tre
modifi6s,lecyclede
s6chagepeutdemarrer
ou leprogrammeesten
mode,<Pause,>.
Nonallum_ : Le
programmeesttermin6
ouil n'ya plusde
programmes@ctionn6,
E! Boutonsdes options
Ajoutezdesfonctionsau
programmes61ectionn&La
DELduboutond'optionest
allum6eIorsqueI'optionest
s61ectionn6e,Appuyezde
nouveausur le bouton
d'optionpourlad6sactiver(la
DELs'6teint),
D_licats/Bassetemperature :
Appuyezsur ce boutonpourles
textilessensiblesa latemp6rature
(parexemplelesfibresen
acrylique),Latemp6raturedu
processusdes6chageestr6duite,Indiquelesparam_tresdes
la dur@des6chageestprolonq6e°Pti°ns suppl6mentaireset la
en cons6quence, _ dur@restantepr@uedes
In Signal (500 Series)
Appuyezsur laboutond'option
pouractiverunsignalsonorequi
indiquela fin duprogramme(voir
page46). Lesignalde laS6rie
800est param6tr6surle menu
LCD(voirpage46).
_1_ Ecran
S6rie500 Plus
Indiqueladur6erestantepr@ue
desprogrammes,
S_rie800
programmes,(voirpage46)
ECOe : Appuyezsurcebouton
pourfairedes 6conomies Optionssuppl_mentaires
d'@ergiesuppl6mentaires(utiliserMenus61ectionneI'une des
uniquementpourles programmesoptionssuppl6mentaires
automatiquesCotonet Select(%ection) modifieles
Perma press),Appuyezsurle param_tresdeI'option
boutond'optionavantde s61ectionn6e
d6marrerunprogramme
automatique,
D Le de du defibrevoyant signalisation
Clignotepour vous rappeler de nettoyer le filtre
charpieavant et apres chaqueutilisation.
Allum6(constamment)Iorsquele hublotestouvert
en coursdeprogrammeou Iorsquele d6bitd'airest
r6duitatel pointqu'uneerreurE:01estg6n6r6e
(voirle guidede d@annage,page53),
_'_ Voyant indicateur (LED)
LesDELs'allumentI'uneapr_sI'autrepour
indiquerlateneuren humidit6actuelledu
processusdes6chage.
Wrinkle block - a lafin duprogrammede
s6chage,unsignalsonoreretentitet laDEL
Wrinkleblock(Eliminationdesfaux plis)
s'allume, La rotationdutambours'op_re
intervallessp6cifiquespendantuneheurepour
@iterquela lessivenesefroisse(voirpage46 ),
_i_ Programmateur
%lectionnezunprogramme,Voirpage
46,Vouspouvezlefairetournerdansles
deuxdirections,
Pour6teindrele s6che-linge,ramenezle
programmateursurla position,<Off>>,
filtre
44

Informations de
s6curit6
suppl6mentaires
Respectez toujours les,
INSTRUCTIONS DE SECURtTE
IMPORTANTES (volt page 31).
Protection de
I'environne-
ment
D branche-
ment temporaire
du s che-linge
Ne faites marcher votre seche-linge
que pendant que vous vous trouvez
votre domicile. En prevision d'un depart
en vacances ou si vous devez ne pas
utiliser le seche-linge pendant une
periode prolongee, vous devrez :
1. Ramener le disjoncteur en position
eteinte.
2. Debrancher la fiche m_le de
la prise de courant (si possible).
3. Nettoyer le filtre a peluches.
Ne sechez pas a rexces le linge
synthetique - risque de lefroisser !
Laissez ce linge finir de secher
I'air.
- Ne repassez pas le linge
immediatement apres le sechage.
Laissez le linge reposer en pile
pendant un petit moment. Ceci
permettra a I'humidite residuelle
de se repartir uniformement.
- Les textiles a mailles (par ex. les
t-shirts, le linge en coton tricote en
jersey) retrecit souvent Iors du
premier sechage au seche-linge.
N'utiNsez pas le programme ,<Very
dry/Extra dry>,(Tres sec/Extra sec).
Conseils pour economiser de
I'energie
Pour economiser de I'energie, de
rargent et du temps, Bosch vous
recommande ceci :
- Essorez suffisamment le linge.
Avant lesechage, faites bien
essorer le linge dans le lave-linge.
Servez-vous de la plus haute
vitesse d'essorage possible
adaptee au type de linge. Une
vitesse d'essorage assez elevee
reduit la duree du sechage et la
consommation d'energie.
- Mettez la charge maximale de
linge.
Mettez une charge de linge
correspondant au maximum
recommande. Ne chargez
toutefois pas de quantites
excessives de linge.
- Nettoyez le filtre.
Nettoyez le filtre avant et apres
chaque seance de sechage
(voir page 50).
- Aerez la piece.
Pendant la seance de sechage,
veillez ace qu'il arrive
suffisamment d'air frais dans
la piece.
- Ne sechez pas de materiaux
inadaptes!
Ne faites pas secher de pieces de
linge enrobees de caoutchouc ou
hermetiques.
- Nettoyez et inspectez
regulierement le systeme
d'evacuation !
Les blocages peuvent prolonger la
duree de sechage ou emp_cher le
seche-linge de fonctionner
correctement.
Linge
Determination de la nature
du tissu
Veuillez respecter les symboles de
traitement figurant sur les etiquettes
des pieces de linge. ENescontiennent
des informations precieuses ainsi que
des restrictions quant au processus de
sechage.
Avec cet appareil, ne sechez pas les
textiles suivants :
- Textiles etanches (par ex. enrobes
de caoutchouc)
Les textiles delicats (sole, voilages
synthetiques)
%
Sechez les textiles en laine
ou a forte proportion de laine
uniquement dans le tiroir de
sechage.
%
Servez-vous du programme
duree limitee ,<Airfluff/No heat,
(Defoulage a I'air/aucune chaleur)
pour secher les articles contenant
du caoutchouc mousse ou des
articles a texture similaire a celle
du caoutchouc.
Conseils pour le sechage
En principe, les instructions suivantes
s'appliquent a tous les programmes de
sechage :
- Pour assurer un resultat de
sechage uniforme, triez le linge
conformement aux types de tissu
et au programme voulu.
- Refermez les fermetures
glissieres, les crochets et les
ceillets. Fixez les ceintures
detachees, les lanieres des
tabliers, etc.
45

S61ection du programme
Pourdesr6sultatsdes6chageoptimum,votres_che lingeposs_deplusieursgroupesdeprogrammeset optionssuppl6mentaires.
Lesprogrammes automatiquescomprennentRegular/Cotton(Normal/Coton)etPermanentpress
(Perma-press).Las61ectiondesprogrammesest,entreautre,fonctiondutypedetissub.laver.Ces
programmessontcontr016spardescapteursd'humidit6. Ladur6edesprogrammesestd6termin6eparla
teneuren humidit6mesur6edansla lessiveetpar leniveaudes6chages61ectionn6(parexemple,Dampdry
(Sec/humide),RegularDry(Sec/normal),ExtraDry(Tr_ssec).
Lesprogrammes _.minuterie s'ex6cutentpourunedur6edetempssp6cifi6epar I'utilisateur.Lecycle
programm6Air fluff/Noheat(Duvetage/Sanschaleur)utiliseFairambiant(b.latemp6raturede lapiece)sans
alimentationdechaleuret s'ex6cutependant20 minutes.
Lesprogrammes sp_ciauxsentindividualis6senfonctiondestypessp6cifiquesdetissus,parexemplelalain_
ou lesjeans. Lalaineou lesproduitslaineuxdoivent_tres6ch6suniquementavecla grilledus_che linge.
Les cycles MISTCARE®est particuli_rementindiqu6pour61iminerlesfauxplis et r6duirelesodeurs. Cesprogrammesdoivent_treutilis6savecdes
lessivescontenanttrois ouquatrearticlesencotoninfroissable,compos6sd'un m61angedecotonet polyester,despull oversencotonoudes
synth6tiques.Aucoursde cecycle,unefaiblequantit6d'eauestvaporis6edansletambourpendantleculbutageavecchaleur. Ceprocessusest
r6p6t6,puisestsuivid'un culbutagesuppl6mentaireetd'unep6riodederefroidissementdecourtedur6e. Le niveaudechaleuret la dur6esent
pr6r6gl6spourcesprogrammes.Remarque: Lesr6sultatsvarientenfonctiondutypedetissu. IIestpossiblequelesv_tements100 % cotonavecfini
infroissabledonnentdemeilleursr6sultats.
Sile gicleurs'arr_tedevaporiserpendantFundescyclesMISTCARE® (lessympt0mesb.observersentI'absencedevaporisationd'eaudansle
tambour,desv_tementsplusfroiss6squ'habituellementIorsquevousutilisezcettefonction),assurezvousquele gicleurn'estpasbouch6. La
charpiepeuts'accumulersurle gicleuret bloquersonfonctionnementou I'eaudurepeutentratneruneaccumulationde d6p0tssurle gicleur(voir
page54).
Option Boutons
Eco
P_ase iow_emp e .....
@
Delicates low temp. (Delicats
basse temperature)
Appuyez sur le bouton <<Delicateslow
temp.<<(Delicats basse temperatura)
pour secher les textiles craignant la
chaleur. Respectez les conseils ou
symboles d'entretien figurant sur ces
textiles. La temperature du processus
de sechage diminue, la duree de
sechage augmente.
ECO e
Votre seqhe-linge est dote d'une
option ,<Economie d'energie _ ECO.
Cette option est utilisee uniquement
avec les programmes automatiques
Coton et Perma-press. Moins de
chaleur est appliquee et la duree de
sechage est prolongee. Appuyez sur le
bouton d'option avant de demarrer un
programme automatique.
D Les economies d'energie
realisees gr_.ceau programme
ECO e sont affectees par la taifle
de lacharge de lavage, le type de
textile et les conditions
climatiques.
DEn combinaison avec le bouton
Delicates low temp.
(Delicats/Basse temperature), ce
programme peut faire realiser des
economies d'energie
supplementaires.
Signal (Signal sonore)
Serie 500
Votre seche-linge emet di%rents
signaux si vous avez appuye sur le
bouton <<Signal_>.Vous pouvez rendre
capable ou pouvez rendre infirme le
signal par deprimant simultanement les
boutons montres. Les tons audibles
alors suivants seront produits indiquant
le status de I'appareil.
Signal Type
D6part Signalbref
Fin S_quencedetons
courts
Dysfonctionne- S6quencedetons
ment longs
Alarmede S6quencedetons
d6rangement longs
D Le signal _alarme de
derangement >>fonctionne dans
tousles cas.
Indicateur de deroulement
du programme
Le seche-linge utilise un systeme de
scannerisation electronique dans tous
les programmes excepte les
programmes a duree reglable. Un
capteur d'humidite verifie
constamment I'humidite presente dans
le linge. Le sechage prend fin
automatiquement des que le degre de
sechage selectionne a ete atteint.
Le tambour continue, pendant une
heure, de toumer selon une
intermittence specifique afin
d'emp6cher le linge de se froisser.
Les voyants renseignent sur le degre
de sechage actuel et le niveau atteint
pendant le deroulement du programme
; ces voyants correspondent
plusieurs degres de sechage: drying
(sechage en cours), damp dry
(humide), regular dry (normalement
sec), Wrinkle block (anti-froissage).
Lint filter
Wrinkle block
0 Regular dry
Drying
D Si le voyant ,,Wrinkle block_ (bloc
anti-froissage) s'allume une fois
que leprogrammateur se trouve
sur la position Off, ramenez le
disjoncteur en position eteinte et
prevenez leservice apres-vente.
46

Regular/Cottons(ECOSENSORLingenormal/Coton)
Pourlecotonset le lingedecouleurencotonouen linAppuyezsur lebouton@elicateslowtemp.,_pours6cherlestextilescraignantla chaleur.
Lingeriedelit etdetable
Dampdry (Humide) Lingeriede lit etdetable,serviettes,T-shirts,maillotsdesport,tabliers qu'il faut repasser
T-shirts,maillotsdesport,tenues,pantalons,tabliers,lingeriedecorps
Regulardry (Normalementsec) lingeriedecorps,chaussettesencoton
Serviettesentissu@onge,serviettesdecuisineetb.mains,lingeriede lit, qu'il nefaut pasrepasser
Verydry (Tr_ssec) Serviettesentissu@onge,serviettesdecuisineetb.mains,lingeriede lit, qu'il nefaut pasrepasser,b.plusieurs
lingeriedecorps,chaussettesencoton couches@aisses
particuli_rement@aisou comportant
Extradry (Extrasec) Peignoirsdebainentissu@onge,lingedelit entissu @onge plusieurscouches
Permanent press ECOSENSOR(Infroissable)
Lingefacileb.entretenir(encoregouttant),b.basedetissussynth6tiquesetmixtes,decoton,enpolyesterparex.
Appuyezsurlebouton@elicateslowtemp.,_pours6cherlestextilestr_ssensiblesb.lachaleur
Dampdry (Humide) Pantalons,tenues,jupes,chemises,chemisiers,leggings,tenuesdesport qu'il nefaut pasrepasseroualors
Regulardry (Normalementsec) Chemises,chemisiers,tenuesdesport qu'il nefaut pasrepasser
Verydry (Tr_ssec) Lingeriede lit etdetable,surv_tements,anoraks,draps qu'il nefaut pasrepasser,b.plusieurs
MISTCARE ® Refresh m61angedecoton,jupes,t shirtsetpull overs.Lestissusinfroissablesdonnentlesmeilleursr6sultats.
(Rafraichissement) Permetd'61iminerlesfauxpliset der6duirelesodeurs.Utilisezavecunepetitelessive,parexemple3 ou 4 chemises.
MISTCARE ®Wrinkle relax Permetd'61iminerlesfauxplis. Utilisezavecunepetitelessive,parexemple3 ou 4 chemises. Ladur6edu
(D_froisser) programmeestdeI'ordrede12 minutes.
MISTCARE ®Touch up Ce programmeest utilis6pourrafraTchirunelessivecontenantdestextilesencotonquia 6t6 s6ch6eetlaiss6edans
(Retoucher) 61iminantlesfauxplisquise sontform6sdufait de lapressionexerc6esurle lingeparle poidsde la lessive.
et fibresb.fortpourcentagesynth6tique,lingerie seulement16g_rement.
couches@aisses
Coton,m61angescoton polyester,tissusa maillecourantsetchemisessynth6tiques,pantalonsconstitu6sd'un
La dur6eduprogrammeestde I'ordrede 16 minutes.
letambourb.lafin decyclejusqu'aulendemainmatin. Ceprogrammede20 minutesrafra?chitla lessiveen
Lesv_tementscontenantdela mousse,ducaoutchoucou du plastiquedoivent_tre rafraTchissurunecordeb.linge
ou moyennantle cycleAir fluff/Noheat(%foulageb.I'air/Aucunechaleur),carcesarticlesrisquentdes'enflammer
du fairdela chaleur6miseparle programmeMISTCARE®,
:
Wool
Jeans TissudejeanIourd
Quick (Rapide)(Serie800) de travail[coton,synth6tiques])
30 min., 60 min. (500Series)
Medium + requireddryingtime
(800Series)
(Serie 800) Si vous choisissez un
programme avec duree variable (par
exemple les programmes _.
minuterie, Wool Care [soin de la
laine]) I'affichage commence _.
clignoter. Vous devez programmer
la duree.
Air fluff / Noheat (5ooSeries)
Air fluff / Noheat+ required
time(8ooSeries)
Textilesdelainelavables(parexemplelestricots,les pull oversde laine,lesjupes)
Faites secher les textiles de laine ou en melange de laine seulement avec la grille !
Petiteslessives,lessivesqui n'ontpasbesoindes6cherIongtemps(parexempleleschemisesdesport,lesv_tements
Lestextilespr6-s6ch6sa basseteneuren humidit6,les articlesindividuelsde petitetaille,commeparexempleles
serviettesdebain,lesmaillotsdebain,lestorchons.
Pourlestr_spetiteslessivespesantde0,22b.0,44Ib (100 b.200 g)(unepetiteservietteparexemple),s@ctionnez
unprogrammedes6chagecourt.
Appuyezsurle bouton,<Delicateslowtemp.,_si cestextilessontsensiblesb.lachaleur.
Textilessensiblesb.lachaleur.
Rafra?chissementoua6rationdela lingeriepeuport6eets6chagedetextilescraignantbeaucoupla chaleur.
Pourtouslestypesdetextiles,ycomprislecaoutchoucmousse(parex.lesoreillers,lesjouetsrembourr6s),
leplastique(parex.lesrideauxdedouche,les serviettesdetable),le caoutchouc(parex.lesnattesb.dos
encaoutchouc,le nylonseul,le polypropyl_ne.
47

Options additionnelles
800 Series
D Avant de regler des options
additionnelles, choisissez
un programme par le
programmateur,
Selectionnez I'option que vous voulez
modifier a I'aide du bouton _Menu_>,
Appuyez sur le bouton pour passer
I'option suivante sur I'ecran. Le
symbole active commence a clignoter,
Les reglages de I'option actuellement
active s'affichent sur la droite,
Maintenant, vous pouvez changer ces
reglages a I'aide du bouton _Selecb>.
Appuyez sur le bouton pour passer au
reglage suivant possible.
D Le fait d'appuyer a nouveau sur le
bouton _Menu_ vous permet de
sauvegarder les reglages
effectues. Si vous n'appuyez sur
aucun bouton pendant 10
secondes, I'appareil memorise
les nouveaux reglages
automatiquement,
Symbole Reglagepossible Explication
Q (parpasde0,5 h)
ro
@
Fonction
FixeI'heurede@part
diff6r6du @che-linge
(@partdans,,, heures)
Extracare(Traitement
encoreplusdouxquela
fonction,<Delicates/Iow
temp,>_)
Protectionenfants(active
seulementpen-dantla
marcheduprogramme)
ExtraDryingTime(Dur@
des6chage
suppl6mentaire)
Degr6de s6chage
s61ectionnerpar
I'utilisateur
Volumedusignalsonore
enfin des6chageetdu
signalpr@enantque le
lingea atteintle degr6de
s6chageDampdry
(humide)
Ladur@des6chage
optimis@parlavitesse
derotationcoordonnele
tempsrestantaffich6
pourle@che tingeet la
vitessederotation
laquellelalessivea 6t6
pr6alablementessor@
dansle lave linge,
0-12h
On/Off
On/Off
0,1,2,3
(0-defaut,1-plus
sec,3-1eplussec)
Off
continuel
maximal
4OO
60O
8OO
1000
1200
SivousavezchoisiI'optionadditionnelle"suppl6mentaireinqui6tezvous" la
"temp6raturedeDelicates/Iow,"levoyantdesignalisationillumine,Pressionde
la "temp6raturede Delicates/Iow,"le bouton@commandeI'optionadditionnelle
"soin suppl6mentaire",
Cetteoptionadditionnellevouspermetdefermervosarrangementspour
emp_cherI'utilisationfortuitedu dessiccateur,Pourmettreenmarchele
dessiccateurquandla gardede@ret6estenactivit6: Appuyezsur et tenezle
bouton"@but/ arr_t"pendant4 secondes,Pourouvrircetteoption
additionnellequandle dessiccateurfonctionne:Appuyezsuret tenezle bouton
"@but/ arr_t"pendant4 secondes,
Sivousavezchoisiles6tapes1 a 3 deI'optionadditionnelle"degr6dela
s6cheresse"le symboleestmontr6,0est la normeplaqant0symbolesn'estpas
montr6,
Votredessiccateurproduitdiff6rentssignauxpourcertains@@ements,Vous
pouvezpermettreou neutraliserlesignalen enfonqantsimultan6mentles
boutonsmontr6s,
Pour optimiser la duree restante affichee, la vitesse de rotation
laquelle la lessive aete prealablement essoree dans le lave-linge
peut _tre saisie par I'utilisateur,
Event
Permettezlesignal
Neutralisezle signal
CommencezLeCycle
CycleD'Extr6mit6
D6fautdefonctionnement
Avertirdu@faut defonctionnement
Signal
Tonalit6courte
Deuxtonalit6scourtes
Tonalit6courte
Ordredestonalit6scourtes
Ordrede Ionguestonalit6s
Ordrede Ionguestonalit6s(maximum
volume)
48

Utilisation
Utilisation du seche-linge
1. Ouvrez la porte.
2. Le filtre doit _tre nettoye avant et
apres rutilisation du seche-linge.
Le nettoyage du filtre reduit la
duree de sechage et permet de
faire des economies d'energie.
(voir page 50 pour des instructions
sur le nettoyage du filtre a charpie).
D La javel peut decolorer laface
externe en couleur de seche-linge.
Pour cette raison, ilest important
de ne pas faire entrer en contact la
face externe en couleur de votre
seche-linge avec de la javel. Si
vous faites tomber de la javel sur
sa face externe, nettoyez cette
derniere immediatement et avec
soin a I'aide d'un essui-tout
humide.
3. Amenez le programmateur sur le
programme voulu. A I'aide
du tableau de selection, choisissez
un programme adapte au linge
present dans le tambour (voir page
46). L'eclairage du seche-linge
s'allume dans le tambour.
D Le voyant <<start/stop>> se met
clignoter.
4. Si necessaire, selectionnez
_,Optiom CDelicates low temp" or
"ECO e") en appuyant sur le
bouton. L'explication des options
figure a la page 46.
D Le temps restant prevu sera
affiche.
.
Introduisez le linge dans le
tambour vide. Placez
individueliement chaque piece de
linge dans la machine.
Pour obtenir les meilleurs resultats,
triez d'abord le linge en fonction
du type de linge et du degre de
sechage requis. La page 45
contient des informations plus
detaillees.
%
Respectez les symboles de
sechage utilises par le fabricant du
linge. Si vous voulez secher des
v_tements en laine ou des
chaussures, reportez-vous aux
informations figurant aux page 50.
Assurez-vous qu'il n'y aque du linge
dans le tambour. Verifiez que toutes les
pieces de linge se trouvent entierement
dans letambour.
6. Refermez la porte.
Le voyant _<Start/Stop_,se met
clignoter.
D Si vous n'avez pas ferme la porte
correctement, le seche-linge ne
demarrera pas.
7. Appuyez sur le bouton
_,Start/Stop>,. Le voyant
_,Start/Stop_,s'allume.
D Le programme demarre avec
emission d'un signal sonore
(sivous I'avez regle).
Si vous avez selectionne un
programme standard, les voyants
indiquent le stade deroulement du
programme.
0 Lint filter
O V'¢ink/e block
0 Regular dry
0 Damp dry
O Drying
%
A lafin du programme, I'appareil
emet un signal sonore (sivous
I'avez regle et levoyant lumineux
,,Wrinkle block,, (protection
antifroissage) s'allume.
%
Une fois le processus de sechage
termine (leprogramme ou le
programme a duree reglable a pris
fin), le tambour continue de
toumer par intermittence pendant
1 heure.
Ceci emp_che le linge de se
froisser. Le linge repose non tasse
et bien defoule dans le tambour
jusqu'a ce que vous I'enleviez.
IIfaudrait retirer le linge au plus
tard une fois cette periode
ecoulee.
.
Ouvrez laporte.
9.
Sortez le linge du seche-linge.
49

10. Amenez le programmateur
sur _<Off_>.
L'eclairage du seche-linge
s'eteint.
11. Nettoyez lefiltre.II faudrait nettoyer
le filtre apres chaque seance de
sechage. Le nettoyage du filtre
reduit la duree de sechage et
permet d'economiser de I'energie.
12. Refermez le hublot.
Nettoyage du filtre
& peluches
Un filtre sale accro_t la duree de
sechage ainsi que la consommation
d'energie.
IIfaudrait nettoyer le filtre avant et apres
chaque seance de sechage.
Si un signal d'alarme et un message
E01 avertissement sont emis pendant
un programme de sechage, nettoyez le
filtre immediatement et verifiez le
conduit d'echappement.
D Le programme s'interrompt
automatiquement.
1. Eteignez le seche-linge. Ramenez
le programmateur sur ,,Off_,.
L'interieur de la porte s'echauffe
pendant le sechage.
2. Ouvrez la porte.
4. Retirez les peluches en passant la
main sur le filtre.
Le filtre devrait _tre legerement frotte
deux fois par an avec de I'eau
savonneaux chaud. Lefiltre est
nettoye quand il ne tient plus I'eau.
Sechez bien le filtre avant de le
remettre en place.
5. Remettez lefiltre en place.
6. Refermez la porte.
Utilisation du tiroir de
sechage
(Accessoire, voir page 42)
% L'etendoir livre avec la secheuse
dolt _tre utilise pour faire secher le
linge conjointement avec le
programme laine. SiI'etendoir
n'est pas utilise, le capteur mettra
la secheuse a I'arr_t au bout
d'environ 7 minutes.
Servez-vous du tiroir de sechage pour
secher les textiles lavables en laine (les
chandails par ex.) et les chaussures. Le
tiroir de sechage reste immobile tandis
que letambour tourne. Fvitez de
deplacer la laine humide vu qu'elle
a tendance a feutrer. Le sechage
de chaussures sans utiliser le tiroir
pourrait endommager letambour.
Ne faites secher qu'un v_tement ou
une paire de chaussure a la fois
(charge maximale de linge sec
2,2 Ibs (1 kg). IIfaut que le linge ait
ete essore. Ne sechez que des
chaussures prealablement lavees.
Le lingene dolt pas toucher le
tambour car il pourrait se coincer et
_tre endommage par le tambour.
Apres avoir utilise le tiroir de
sechage, retirez-le immediatement
du seche-linge.
Insertion du tiroir de sechage
1. Ouvrez la porte du seche-linge.
2. Verifiez que letambour est vide.
3. Retirez lefiltre a peluches.
4. Soulevez le tiroir de sechage
horizontalement pour I'introduire
dans le tambour.
/
3. Retirez le filtre a peluches.
5O
5. Placez le tiroir de sechage de telle
sorte que les tiges penetrent dans
les trous de positionnement situes
I'avant.

6. Apres le sechage, etalez le linge
I'air pendant approximativement
15 min. (les chaussures pendant
env. 30 min.).
7. Retirez lefiltre a peluches.
6. Inserez le filtre a peluches.
Introduisez lefiltre en veillant ace
qu'il soit bien aligne sur lebord du
tambour!
Secher des pieces de linge sur le
tiroir
1. Pliez lelinge pour qu'il rentre dans
le tiroir.
2. Placez le linge non tasse dans le
panier. N'appuyez pas sur le linge.
Ce dernier ne doit pas toucher le
tambour. Veillez ace qu'aucune
piece de linge ne pende du tiroir.
3. Refermez le hublot.
4. Amenez le programmateur sur
,<Timedry/...min, (Sechage
duree reglable/...min).
- Selectionnez la duree de sechage
partir du tableau suivant, en
respectant le type de linge.
Sechage de chaussures sur le
tiroir :
1. Preparez les chaussures.
I;;;3Nettoyez les chaussures pour
emp_cher letambour de se salir.
E3 Sivous preparez des
chaussures de sport, etirez leur
languette.
I;;;3Desserrez ou retirez les lacets.
I;;;3Retirez les semelles interieures
et les talonnettes.
2. Placez les chaussures sur le
panier.
I;;;3Directement sur letiroir de
sechage
OU
E3
Enroulez une serviette et placez
les talons dessus.
Ceci permettra d'obtenir un
resultat de sechage plus
uniforme.
3. Refermez la porte.
4. Appuyez sur le bouton
,<Start/Stop,. Le voyant
,<Start/Stop- s'allume.
5. Si la piece de linge concernee
contient encore une humidite
residuelle une fois ecoulee la
duree de sechage indiquee :
I;;;3Pliez cette piece de linge de
sorte que les parties humides se
retrouvent exposees.
E3
Relancez le programme et
reduisez la duree du sechage en
fonction du degre d'humidite
residuel requis.
8. Sortez le tiroir de sechage du
tambour.
9. Inserez a nouveau le filtre
peluches.
51

Nettoyage et
entretien
Nettoyage du seche-linge
POUE EVITER
RISQUE D'EXPLOSION !
Pour netteyer, n'utilisez jamais de
solvants ou de liquides
inflammables.
Un nettoyage incorrect peut
endommager le seche-linge. Ne le
nettoyez pas avec un jet d'eau.
N'utilisez pas de produits recurants
ou de detergents multi-usage.
N'utilisez pas non plus de
nettoyeurs a vapeur.
Essuyez le corps de I'appareil et le
bandeau uniquement avec un chiffon
doux additionne d'un peu d'eau
savonneuse.
Essuyez le tambour, lejoint de la porte
et I'interieur de la porte uniquement
avec un chiffon humide.
Nettoyage du conduit
d'echappement
Inspectez et nettoyez le conduit
d'echappement au moins une fois par
an pour emp_cher qu'il ne se bouche.
Un conduit d'echappement
partiellement obstrue allonge la duree
de sechage.
E3 Ramener le disjoncteur en position
eteinte
E3 Debranchez la fiche m_le de
la prise de courant
E3 Debranchez le conduit du
seche-linge.
E3 Passez le conduit a I'aspirateur
puis rebranchez-le.
Nettoyage des capteurs
d'humidite
IIfaut nettoyer les capteurs d'humidite
de temps en temps vu qu'une couche
fine de matiere transparente se depose
dessus.
Ce dep6t s'enleve facilement en
essuyant les capteurs (ils'agit des deux
barres situees a c6te du filtre
peluches) au moyen d'un chiffon et
d'un peu de vinaigre blanc.
N'utilisez que du vinaigre blanc.
Nettoyez le capteur d'humidite une fois
par mois.
Nettoyage de la flasque
A la Iongue, les pluches creees par le
processus de sechage se rassemblent
dans la fiasque.
Ces pluches s'enlevent facilement avec
raspirateur ; nettoyez au moins une fois
par mois.
Nettoyage du bec de
MISTCARE TM
Inspectez une fois par an la sortie de
bec. Sivous suspectez le colmatage,
essuyez I'exterieur du bec avec un
tissu humidi% du vinaigre. Si le gicleur
est completement bloque, consultez le
guide de depannage (voir page 54)
pour obtenir des instructions de
demontage et de nettoyage. Si vous ne
parvenez pas a deboucher le gicleur,
appelez le service clientele (voir page
55).
Changer I'ampoule de
I'eclairage
Lorsque vous ouvrez la porte,
reclairage du tambour s'allume
I'interieur du tambour.
Pour changer I'ampoule :
E3 Placez le selecteur de programme
"off.".
E3 Ramener le disjoncteur en position
eteinte.
E3 Debranchez la fiche m_le de la
prise de courant.
E3 Ouvrez la porte et Iocalisez
I'ampoule sur le cOte superieur
gauche du joint.
E3
Desserrez la vis du couvercle puis
ouvrez ce dernier.
E3
Toumez I'ampoule en sens inverse
des aiguilles d'une montre.
Remplacez-la par une ampoule
neuve adaptee a I'appareil (foumie
par leservice apres-vente).
%
Toutes les pieces sont disponibles
aupres de notre site
www.boschappliances.com ou en
appelant le 1-800-944-2904.
E3 Remettez lecouvercle en place
puis fixez-le en position a raide de
la vis.
E3 Rebranchez la fiche m_le du
seche-linge dans une prise de
courant.
52

D6rangement et rem des
Avant d'appeler leservice apres-vente,
verifiez si vous ne pouvez pas
supprimer la panne vous-m_me en
POUR EVITER LES RISQUES DE
CHOC ELECTRIQUE !
La reparation ou le remplacement
de pieces doivent _tre effectues
seulement par un technicien qualifie
ou un electricien certifie.
vous servant du tableau ci-dessous.
Si vous ne parvenez pas a la supprimer
ou si une reparation s'impose :
1. Reglez le selecteur de programme
sur _<Off>_.
2. Retirez lefusible.
3. Debranchez la fiche male de la
prise de courant.
4. Appelez le service apres-vente
(voir page 55).
Probleme
Les_che-lingened6marrepas.
Levoyant,<StardStop_,nes'allumepas.
L'appareil6metun signal
avertissementet la mention,<E:0!,/
s'affichesur 1'6cran.
Degr6de s6chagepasatteintou dur6e
des6chagetrop Iongue,
Lamention,<E:03>>peuts'affichersur
1'6cran
L'6clairagedu tambournefonctionne
pas.
Causepossible
Fichem_lepasbranch6edutout oualors
incorrectementdanslaprisedecourant,
Unfusible/ disjoncteurprot6geantlesecteurde la
maisonagrill6/ disjonct6,
Vousn'avezpasappuy6sur lebouton,_Start/Stop,_
Vousn'avezpass61ectionn6de programme,
Portepasferm6e,
Temp6ratureambianteinf6rieurea 41 °F/ 5°C
Lefiltre a peluchesestsale,Leprogrammea6t6interrompu.
Leconduitd'6chappementd'air obstru6outrop long.
D6fautdansle d6roulementduprogrammeou
dysfonctionnement,
Lapiece/ le r6duitn'estpascorrectementa6r6,
Capteurd'humidit6sale,
Conduitd'6chappementd'air obstru6ou trop long,
Lefiltre a peluchesestsale.
Lingetrop humide.
S61ectiond'unprogrammeinadapt6.
D@assementdela dur6emaximaledes6chage
D@assementdelatemp6raturelimitedu moteur.
Ledegr6des6cheressen'a pas6t6r6g16
correctement.
Vousn'avezpass61ectionn6de programme,
Lamped6fectueuse,ampoulegrill6e,
L'6clairagene recoitpasd'61ectricit6,
L'ampouleest I_ch6,
Remede
Branchezlafichem_lecorrectementdanslaprisede
courant,
Remplacezlefusible/ R_armezle disjoncteur,
Appuyezsurle bouton,_Start/Stop,_
S_lectionnezun programme.
Refermezlaporte.
Accroissezlatemperaturede la piece
Nettoyezlefiltre commed_critala page50.
EteignezI'appareilpuisrallumez-leensuite.
Nettoyezleconduitd'_chappement.Ramenezla
Iongueurdu conduitd'_chappementa la Iongueur
maximale,commed_crita lapage42.
EteignezI'appareilpuisrallumez-leensuite.
Eteignezles_che-linge,laissez-lerefroidirpendant
30 minutespuisrallumez-le.
Relancezensuiteleprogramme.
Pr@oyezun apportsuffisantd'airfrais.
EteignezI'appareilpuisrallumez-leensuite.
Nettoyezle capteurd'humidit_commedScritala
page52.EteignezI'appareilpuisrallumez-leensuite.
NettoyezI'orificedesortiedu conduit
d'echappement.Ramenezla Iongueurduconduit
d'_chappementa la Iongueurmaximale,comme
d_crita la page42. EteignezI'appareilpuis
rallumez-leensuite.
Nettoyezlefiltre commed_crita la page50. Eteignez
I'appareilpuisrallumez-leensuite.
Dansle lave-linge,essorezle lingea unevitesseplus
_lev_e.EteignezI'appareilpuisrallumez-leensuite.
Selectionnezleprogrammeenvousservantdu
tableaudes_lectiondes programmes(voirpage46).
EteignezI'appareilpuisrallumez-leensuite.
Nettoyezlefiltre (voirpage50).
V_rifiezI'orificedesortiedu conduitd'_chappement.
Dansle lave-linge,essorezle lingea unevitesseplus
_lev_e.
Eteignezles_che-linge,laissez-lerefroidirpendant
30 minutes.Rallumez-leensuite.Faitesd_marrerun
programme.
800 Series,lescadresdechangementpourle degr_
des_cheresse,voirla page48
S_lectionnezun programme.
ChangezI'ampoule,voirpage52.
Veillezace queI'_lectricit_arrive.
SerrezI'ampoule. Enlevezetr_installezlacouverture
commedirig_a lapage50.
53

Probleme Causepossible Remede
Levoyant,<Start/Stopnes'allumepas. D6fautdansle d6roulementduprogrammeou Eteignezles_che-linge,laissez-lerefroidirpendant
Levoyant,,Wrinkleblock,,est allume, dysfonctionnement. 30 minutespuisrallumez-le.
Lamention,_OOO>_s'affichesur1'6cran. Relancezensuiteleprogramme.
Lefiltre LEDdefibreclignoteapr_sque Leclignotementdufiltre LEDdefibren'estpasune Aucuneactionrequise.LaLEDcesserale
lefiltredefibreair6t6nettoy6, indcationd'un probl_me.II estemploy6seulement clignotement.
commerappelpournettoyerlefiltre defire.
Bruitin habituel Cognement Lesgaletsde suspensiondutambouront besoinde
tempspourse r6chauffer.
Bruitinhabituel Les_che lingen'estpasdeniveau.
Bruitinhabituel Lessiveen boulecausantlebondissementdela
Unusualnoise:Rhythmic vibration
L'eaun'estpasvaporis6edansI'unit6
pendantlescyclesMISTCARETM
Vibrationconstante
Vibrationrythmique
charge.
Laundryballedupcausingloadto bounce.
Robinet(s)d'eaunonouvert.
Lafonction de s_curit_ du tuyau AQUASTOP®est
activ6e.
Gicleurbloqu6
Aucuneactionrequise.Lorsqueles galetsdu
syst_medesuspensionse r6chaufferont,le
cognementdiminueraet devraitcesserapr_s2 ou3
minutesdefonctionnementdus_che linge.
Mettezles_che lingedeniveau(consultezlasection
du manuelintitul6e,_Instructionsd'installation,/).
Arr_tezles_che linge,s@arezlespi_cesdelingeet
faitesred6marrerles_che linge.
Stopdryer,separateloaditems,restartdryer.
Ouvrezlerobinetd'eau.
ConfirmezI'activationdu tuyau AQUASTOP® en
effectuantuneinspectionvisuelledeI'indicateur
rougesetrouvantdansletuyau(voirpage37).Si
I'indicateurrougeestvisible(tuyauactiv6),remplacez
le tuyau.
Retirezlegicleurb.I'aided'unecl6b.douillesde7/16
po. Placezle gicleurdansun r6cipientremplide
vinaigrede mani_reb.recouvrirle gicleur. Laisserle
vinaigreagirsur le gicleurpendantcinqminutes,
puisessuyezd61icatementI'emboutdugicleur
I'aided'unebrossea dentspourenleverlesr6sidus.
Rincezle gicleuret remettez-leen placedansle
s_che-lingeet serreza la main,puisserrezde1
tourdeplusavecla cl6.
54

SERVICE ET RC:PARATIONS
AVERTISSEM ENT -
Repertoriez tousles ills avant
tout debranchement de
I'appareil lots de I'entretien des
commandes. Les erreurs de
c_btage peuvent entraTner un
mauvais fonctionnement de
I'appareil pouvant causer de
serieux d6g_ts a I'appareil ou
des btessures corporetles.
Verifiez que I'appareil fonctionne
bien apres tout depannage.
Ce sechedinge ne demande aucun
entretien particulier autre que les
operations de nettoyage et entretien
precedemment mentionnees.
D Si vous avez un probleme avec
votre seche-linge, consultez le
tableau de derangement et
remedes a la page 53, avant
d'appeler le service apres-vente.
Si des operations de SAV s'averent
necessaires, veuillez contacter votre
installateur ou un point de SAV agree.
Ne tentez pas de reparer I'appareil par
vos propres moyens. Toute reparation
accomplie par des personnes non
autorisees risque de vous faire perdre
le benefice de la garantie.
Si le seche-linge vous cause un
probleme quelconque, et si les
prestations regues ne vous ont pas
satisfait,
- Commencez s.v.p, par contacter
votre installateur ou I'entreprise de
SAV Bosch agreee situee dans
votre region, et expliquez-lui les
raisons de votre meconten-
tement. Ceci suffira normalement
resoudre le probleme.
- Si le probleme persiste apres avoir
collabore avec votre installateur ou
avec letechnicien du SAV,
faites-nous le savoir soit en nous
ecrivant a I'adresse suivante,
BSH Home Appliances Corporation
5551 McFadden Ave.
Huntington Beach, CA 92649,
USA
soit en nous appelant au numero
suivant "
1-800-944-2904.
Si vous nous ecrivez, n'oubliez pas de
joindre / Si vous nous appelez,
n'oubliez pas de preparer,
les informations suivantes :
Le numero du modele
Le numero de serie
La date d'achat d'origine
La date d'apparition du probleme
Une description du probleme
De m_me, si vous nous ecrivez, veuillez
joindre une copie de la facture et nous
indiquer un numero de telephone ou
nous pouvons vous joindre darts la
journee.
Vous trouverez lenumero du modele et
le numero de serie sur la plaque
signaletique situee sur la face interieure
du panneau avant.
L'image ci-dessous illustre
I'emplacement approximatif de la
plaque signaletique. Le numero de
modele est entoure d'un rectangle. Le
numero de serie est situe sous le
numero de modele.
Un exemple est montre ci-dessous.
q
_ _ _4_ _.,_®_ _ _ ,r _
Le fabricant se reserve le droit
d'effectuer des modifications au
produit ou au manuel sans avis
prealable.
555657


585960


61

62

I=NONCI= DE GARANTIE DE PRODUIT LIMITI=E
Lave-linge Bosch Nexxt ®
Couverture de la garantie et application : La garantie limitee fournie par BSH Home Appliances Corporation (Bosch) dans cet
enonce de garantie de produit limitee s'applique seulement au lave-linge Bosch Nexxt ®(le ,< Produit >7)vendu au premier
acheteur utilisateur, mais a la stricte condition que le Produit ait ete achete : (1) pour un usage domestique normal (non
commercial) et qu'il ait effectivement, en tout temps, ete utilise uniquement a des fins domestiques normales (tout usage
commercial ou dans un environnement commercial de ce Produit annule automatiquement la qarantie) ;(2) neuf au detail (non
comme modele expose, ,<tel quel ,_ou prealablement retourne), achete directement par le consommateur final, et non pour la
revente ou I'utilisation commerciale ; et (3) aux Ftats-Unis ou au Canada, et qu'il soit en tout temps demeure dans le pays de
I'achat d'origine. Les garanties enoncees aux presentes s'appliquent seulement au premier acheteur du Produit et ne sont pas
cessibles. La garantie est automatiquement annulee si le Produit etait un modele expose, s'il a ete vendu ,<tel quel >7,trafique,
s'il est abTmeou s'il a ete ,<vendu legerement endommage >7,ou si c'est un modele qui a ete prealablement retourne, octroye
gratuitement, un don de bienfaisance ou un prix de concours.
• S'assurer de retourner la carte d'enregistrement : Quoique non necessaire pour que la couverture de la garantie prenne effet,
elle constitue le meiNeurmoyen pour Bosch de vous prevenir dans I'eventualite improbable d'un avis de securite ou d'un retrait
de produit.
Duree de la garantie Bosch garantit que leProduit est exempt de defaut de matiere ou de fabrication pendant une periode de
trois-cent soixante-cinq jours (365) jours a compter de la date d'achat. Cette periode commence a courir a partir de la date
Reparation ou remplacement du produit comme recours exclusif : Pendant cette periode de garantie, Bosch ou I'un de ses
prestataires de services agrees reparera le Produit sans frais de votre part (sous reserve de certaines limitations enoncees aux
presentes) s'il s'avere que lafabrication du Produit presente un defaut de matiere ou de fabrication. Si des tentatives
raisonnables de reparation du Produit ont ete faites sans succes, alors Bosch remplacera le Produit (des modeles mis a niveau
peuvent _tre mis a votre disposition), a la seule discretion de Bosch, moyennant des frais supplementaires). Tout composant ou
piece enleves deviennent lapropriete de Bosch, a sa seule option. Toute piece remplacee et/ou reparee dolt assumer I'identite de
la piece d'origine aux fins de la presente garantie, et cette derniere ne sera pas prolongee au regard de ces pieces. La seule
obligation et responsabiNte de Bosch en vertu des presentes est de reparer seulement le Produit presentant un defaut de
fabrication, par I'entremise d'un prestataire de services agree Bosch aux heures normales de travail. Pour des questions de
securite et de dommages a la propriete, Bosch recommande vivement de ne pas tenter de reparer soi-m_me le Produit, ni
d'utiliser un service de reparation non autorise. Bosch decline toute responsabilite ou obligation pour les reparations ou le travail
effectues par un service de reparation non autorise. Si vous choisissez de faire reparer le Produit par une personne autre qu'un
prestataire de services agree, CETTE GARANTIE DEVIENDRA AUTOMATIQUEMENT NULLE ET NON AVENUE. Les prestataires
de services agrees sont des personnes ou des compagnies qui ont ete specialement formees pour les produits Bosch et qui
possedent, de I'avis de Bosch, une excellente reputation pour le service a la clientele et des aptitudes techniques (ilest a noter
qu'il s'agit d'entites independantes et non des agents, partenaires, affilies ou representants de Bosch). Nonobstant les
dispositions precedentes, Bosch n'assumera aucune responsabilite ou obligation a I'egard du Produit s'il est situe dans une
region eloignee (plus de 100 miles (160 km) d'un prestataire de services agree) ou s'il est raisonnablement inaccessible ou a un
endroit, dans une zone ou dans un environnement dangereux, menagants ou hasardeux ; dans un tel cas, si vous en faites la
demande, Bosch pourrait payer les frais de main-d'ceuvre et de piece et expedier les pieces au prestataire de service agree le
plus proche, mais vous seriez quand m_me entierement responsable pour tout deplacement ou autres frais speciaux requis par
le service de reparation, a supposer qu'il accepte d'effectuer une visite de reparation.
Garantie limitee prolongee :
DURI_EDELAGARANTIE
Garantielimiteede2 ans
A c0mpterdeladated'achat
Garantielimiteede2 anssur les c0mp0santselectr0niques
A c0mpterdeladated'achat
Garantielimiteede2 anssur le m0teur
/_c0mpterde ladated'achat
PORTEEDELAGARANTIE
Boschf0urniragratuitementlespiecesde rechangedetout element
c0nstituants'averantdefectueuxdansdesconditionsn0rmales
d'utilisati0nd0mestiquependantlesdeuxpremieresanneesc0urantes
c0mpterdela dated'achat, fraisd'expediti0nn0rmaux(nonacceleres)
inclus,fraisde main d'oeuvreexclus.
Boschreparera0u remplaceragratuitementtoutmicr0pr0cesseur0u
cartea circuitsimprimess'averantdefectueuxdansdesconditions
n0rmalesd'utilisati0nd0mestiquependantlesdeuxpremieresannees
c0urantesa c0mpterde ladated'achat, fraisde main d'oeuvreexclus.
Boschreparera0u remplaceragratuitementtout m0teur0uc0mp0sant
du m0teurs'averantdefectueuxdansdesconditionsn0rmales
d'utilisati0nd0mestiquependantlesdeuxpremieresanneesc0urantes
c0mpterdela dated'achat,fraisde main d'oeuvreexclus.
63

Produit hors garantie Bosch n'est nullement tenu, en droit ou autrement, de vous offrir toute concession, y compris
reparations, tarifs proportionnels ou remplacement de Produit, une fois la garantie expiree.
Exclusions de la garantie : La couverture de garantie decrite aux presentes exclut tout defaut ou dommage ne decoulant pas
d'une faute directe de Bosch, y compris sans limitation, un ou plusieurs des cas suivants : (1) utilisation du Produit d'une fagon
autre que normale, habituelle et prevue (y compris, sans limitation, toute forme d'utilisation commerciale, utilisation ou rangement
d'un produit pour I'interieur a I'exterieur, utilisation du Produit avec des vaisseaux aeriens ou fiottants ) ; (2) mauvaise conduite
volontaire de toute partie, conduite negligente, mauvaise utilisation, abus, accidents, negligence, exploitation irreguliere,
manquement a I'entretien, installation inadequate ou negligee, alteration, manquement a observer les instructions de
fonctionnement, manipulation sans precaution, service non autorise (y compris le _<bricolage >_fait soi-m_me ou I'exploration du
fonctionnement interne de I'appareil) ; (3) reglage, alteration ou modification de toute sorte ;(4) manquement a se conformer
tousles codes electriques, de plomberie et/ou de construction de I'etat, Iocaux, municipaux ou du comte, reglements ou lois en
vigueur, y compris le manquement a installer le Produit strictement en conformite avec les codes et reglements d'incendie et de
construction Iocaux ; (5) usure et deterioration normales, deversements d'aliments, de liquides, accumulation de graisse, ou
autres substances accumulees sur, dans ou autour du Produit ; et (6) toute force et facteur externes, elementaires et/ou
environnementaux, y compris sans limitation, pluie, vent, sable, inondations, incendies, glissements de terrain, gel, humidite
excessive ou exposition prolongee a I'humidite, foudre, surtensions, defauts de structure environnante de I'appareil, et
catastrophes naturelles. En aucun cas Bosch n'assumera la moindre obligation ou responsabilite pour des dommages survenus
la propriete environnante, y compris armoires, planchers, plafonds et autres structures ou objets autour du Produit. Egalement
exclus de la garantie sont les egratignures, eraflures, encoches mineures et dommages esthetiques sur les surfaces externes et
les pieces exposees ; Les produits dont les numeros de serie ont ete modi%s, effaces ou enleves ; les visites de service pour
montrer au client comment utiliser le Produit ou les visites alors que le Produit ne presente aucun probleme ; la correction de
problemes d'installation (vous _tes uniquement responsable de toute structure et reglage du Produit, y compris electricite,
plomberie ou autres services utilitaires, pour un plancher/fondation appropries et pour toute modification y compris, sans
limitation, des armoires, murs, planchers, etageres, etc.) ; et pour la remise en fonction des coupe-circuits ou fusibles. DANS LA
MESURE OU LA LOI LE PERMET, LA PRESENTE GARANTIE ENONCE VOS RECOURS EXCLUSIFS _, L'EGARD DU PRODUIT,
QUE LA RECLAMATION SOIT DE NATURE CONTRACTUELLE OU DELICTUELLE (Y COMPRIS LA RESPONSABILITE
ABSOLUE OU LA NEGLIGENCE) OU AUTRE. LA PRESENTE GARANTIE REMPLACE TOUTES LES AUTRES GARANTIES,
EXPRESSES OU IMPLICITES. TOUTE GARANTIE IMPLICITE EN VERTU DE LA LOI, QUE CE SOIT A DES FINS DE QUALITE
MARCHANDE OU D'ADAPTATION _, UN BUT PARTICULIER, OU AUTREMENT, EST EN VIGUEUR UNIQUEMENT PENDANT LA
PERIODE AU COURS DE LAQUELLE LA PRESENTE GARANTIE LIMITEE EXPRESSE EST EN VIGUEUR. LE FABRICANT NE
SERA EN AUCUN CAS RESPONSABLE DES DOMMAGES, PERTES OU FRAIS CONSECUTIFS, PARTICULIERS,
ACCESSOIRES, INDIRECTS, ET/OU PUNITIFS, DES _<PERTES COMMERCIALES >_,Y COMPRIS, NOTAMMENT, LE TEMPS
D'ABSENCE AU TRAVAIL, L'HEBERGEMENT ET/OU LES REPAS AU RESTAURANT, LES FRAIS DE REMANIEMENT EN
EXCEDENT DES DOMMAGES DIRECTS QUI SONT MANIFESTEMENT CAUSES EXCLUSIVEMENT PAR BOSCH OU
AUTREMENT. CERTAINS ETATS NE PERMETTENT PAS L'EXCLUSION OU LA LIMITATION DES DOMMAGES ACCESSOIRES
OU INDIRECTS ET CERTAINS ETATS NE PERMETTENT PAS LA LIMITATION SUR LA DUREE D'UNE GARANTIE IMPLICITE, DE
SORTE QUE LES LIMITATIONS CI-DESSUS PEUVENT NE PAS S'APPLIQUER A VOTRE CAS. LA PRESENTE GARANTIE
VOUS DONNE DES DROITS JURIDIQUES SPECIFIQUES ET VOUS POUVEZ AVOIR EGALEMENT D'AUTRES DROITS QUI
VARIENT D'UN ETAT A L'AUTRE. Aucune tentative d'alterer, de modifier ou d'amender la presente garantie ne peut _tre
effective a moins d'une autorisation ecrite par un representant de BSH.
Obtention du service sous garantie : Pour obtenir leservice sous garantie pour votre Produit, contactez le centre de service
autorise de Bosch le plus proche.
BSH Home Appliances Corporation - 5551 McFadden Avenue, Huntington Beach, CA 92649 / 800-944-2904
05/2008
9000321298
64
 Loading...