

Page 1
Bosch Nexxt®500 Plus Series
Electric Dryer
Models / Modèle / Modelo:
WTMC5321US/CN, WTMC532SUS/CN,
WTMC532RUS/CN
BOSCH
Invented for life
en Dryer: Operating. Care and Installation Instructions
fr Seche-linge: Notice d’utilsation, de maintenance et d’installation
es Secador-. Operación, cuidado y instrucciones para la instalación
Page 2

Table of Contents
Definitions ............................................................................................................................................................................ 3
IMPORTANT SAFETY INSTRUCTIONS............................................................................................................................. 3
GROUNDING INSTRUGTIONS...................................................................................................................................... 4
INSTALLATION INSTRUCTIONS........................................................................................................................................ 4
Introduction ..................................................................................................................................................................... 4
Information concerning waste disposai .......................................................................................................................... 4
Before instaiiing the dryer................................................................................................................................................ 5
Eiectricai connection ....................................................................................................................................................... 6
Exhaust air connection.................................................................................................................................................... 6
Accessories...................................................................................................................................................................... 8
Instaiiation - step by step................................................................................................................................................. 9
Gheck iist before using the dryer..................................................................................................................................... 9
Preparing to transport the dryer - step by step .............................................................................................................. 9
OPERATING INSTRUCTIONS.......................................................................................................................................... 10
Your new dryer ............................................................................................................................................................. 10
Panei ............................................................................................................................................................................ 11
Summary of instructions .................................................................................................................................................... 12
Safety information .............................................................................................................................................................. 13
Before switching on the dryer ....................................................................................................................................... 13
Using the dryer ............................................................................................................................................................. 13
Protecting the dryer ...................................................................................................................................................... 13
Protection of the environment............................................................................................................................................ 13
Before using the dryer for the first time ............................................................................................................................. 13
Temporary disconnection of the dryer................................................................................................................................ 13
Laundry .............................................................................................................................................................................. 13
Identification of fabrics .................................................................................................................................................. 13
Drying tips ..................................................................................................................................................................... 13
Program selection .............................................................................................................................................................. 14
Automatic programs....................................................................................................................................................... 14
Time programs .............................................................................................................................................................. 14
Options ......................................................................................................................................................................... 14
Indicator of program sequence...................................................................................................................................... 14
Program selection table...................................................................................................................................................... 15
Operation............................................................................................................................................................................ 15
Using the dryer ............................................................................................................................................................. 15
Using the dryer rack (Option)........................................................................................................................................ 16
Cleaning and care .............................................................................................................................................................. 18
Gieaning the dryer......................................................................................................................................................... 18
Gieaning the iint fiiter..................................................................................................................................................... 18
Gieaning the exhaust duct............................................................................................................................................. 18
Gieaning the moisture sensor ...................................................................................................................................... 18
Gieaning the bearing shieid .......................................................................................................................................... 19
Ghange the iight buib.................................................................................................................................................... 19
Troubleshooting ................................................................................................................................................................. 20
SERVIGE and REPAIR ................................................................................................................................................ 21
STATEMENT OF WARRANTIES BOSCH CLOTHES DRYERS....................................................................................... 22
Exciusions .................................................................................................................................................................... 22
Page 3
Congratulations on having selected a
Bosch clothes dryer, the choice of
those that demand exceptional drying
performance and care from their
clothes dryer.
This dryer complies with
UL2158/CAN/CSA-C22.2 No.
112-97 Clothes Dryers
A distinctive feature of your dryer is low
energy consumption.
An easy operation philosophy, a variety
of customized drying programs and a
solid touch and feel make this
appliance a user-friendly assistant in
your household.
The Bosch dryer offers the following
standard features:
- High efficiency precision drying
system
- Large 6.4 cu.ft. (181 l) stainless
steel drum with a capacity up to
17.6 lbs (8 kg)
- Large port hole (18”/457 mm),
door lock with automatic drum
stop function
- Exceptionally quiet operation
- Sensor controlled auto cycles
- Timed cycles
20, 40 and 60 minutes
Each dryer which leaves our factory
has undergone a thorough
performance test and is in full working
condition. If you have any questions
especially concerning installation of the
dryer - our customer service team will
be happy to assist you.
Further information and a selection of
our products can be found on our web
site:
www.boschappliances.com
Information
Please read and follow these operating
and installation instructions and all
other information enclosed with the
dryer.
Definitions
A WARNING A
WARNING - This indicates that
death or serious injuries may
occur as a result of
non-observance of this warning.
A CAUTION
CAUTION- This indicates that
injuries may occur as a result of
non-observance of this warning.
ATTENTION
ATTENTION - This indicates
that damage may occur as a
result of non-observance of this
warning.
I i I This symbol is used to draw the
user’s attention to important
matters.
A IMPORTANT SAFETY INSTRUCTIONS
safe practices by qualified
A WARNING A
To reduce the risk of fire, electric
shock, serious injury or death to
persons and /or damage when
using your dryer, follow basic
precautions, including the
following.
1. Read all instructions before using
the dryer. Bosch dryers are
provided with Operating, Care and
Installation Instructions.
2. Do not dry articles that have been
previously cleaned, washed,
soaked, or spotted with gasoline,
dry cleaning solvents, other
flammable, or explosive
substances as they give off vapors
that could ignite or explode.
3. Do not allow children to play on or
with the appliance. Close
supervision of children is
necessary when the appliance is
used near children.
4. When children become old
enough to operate the appliance, it
is the legal responsibility of the
parents or legal guardians to
ensure that they are instructed in
persons.
5. Before the appliance is removed
from service or discarded, remove
the door to the drying
compartment.
6. Do not reach into the appliance if
the drum is rotating.
7. Do not install or store this
appliance where it will be exposed
to the weather.
8. Do not tamper with the controls.
9. Do not repair or replace any part of
the appliance or attempt any
service unless specifically
recommended in the
user-maintenance instructions or
in published user repair
instructions that you understand
and have the skills to carry out.
10. Do not use fabric softeners or
products to eliminate static unless
recommended by the fabric
manufacturer.
11. Do not use heat to dry articles
containing foam rubber (may be
labeled latex foam) or similarly
textured rubber-like materials.
Foam rubber materials can ignite
by spontaneous combustion.
12. Clean lint screen before or after
each load.
13. Keep area around the exhaust
opening and adjacent surrounding
areas free from the accumulation
of lint, dust and dirt. An obstructed
port might reduce the airflow.
14. The interior of the machine and
exhaust duct should be cleaned
periodically by qualified service
personnel.
15. Always be sure to unplug the dryer
from the electrical supply before
attempting any service.
Disconnect the power cord by
grasping the plug, not the cord.
16. Store all laundry chemicals and
aids in a cool dry place according
to the manufac
turer’s instructions in an area
where children cannot reach them.
17. To reduce the risk of fire, clothes,
cleaning rags, mop heads and the
like which have traces of any
flammable substance, such as
vegetable oil, cooking oil,
petroleum based oils or distillates,
waxes, fats, etc., must not be
placed in the dryer. These items
may contain some flammable
substance(s) even after washing,
which may smoke or catch fire by
itself.
Page 4

18. Do not place items exposed to
cooking oils in your dryer. Items
contaminated with cooking oils
may contribute to a chemical
reaction that could cause a load to
catch tire.
19. Do not sit on top ot the dryer.
20. To reduce the risk ot tire or
electrical shock, DO NOT use an
extension cord or an adapter to
connect the dryer to the electrical
power supply.
21. The dryer must only be used tor its
intended purpose.
22. Always check pockets and remove
any objects. Oigarette lighters are
particularly hazardous.
23. Replace worn out power cords
and/or loose plugs.
24. Do not operate the dryer it any
guards and/or panels have been
removed.
25. Do not operate the dryer it any
parts are missing or broken.
26. Do not bypass any satety devices.
27. Do not use a plastic or non-metal
tlexible duct with this dryer. Plastic
or non-metal tlexible duct are a
potential tire hazard.
28. Do not operate this dryer until you
are sure that the dryer has been
installed according to the
INSTALLATION INSTRUOTIONS
and that installation and grounding
are in compliance with all local
regulations and/or other applicable
regulations and requirements.
29. Failure to install, maintain and/or
operate the dryer according to
the manutacturer’s instructions may result in
injury and/or damage.
30. To avoid tloor damage and mold
growth, do not let spills or
splashout cause standing water
around or under the appliance.
Notes:
A The IMPORTANT
SAFEGUARDS and
WARNINGS presented in this
manual do not cover all
possible conditions that may
occur.
Oommon sense, caution and
care must be exercised when
installing, maintaining or
operating the dryer.
B Always contact your dealer,
distributor, service agent or
the manutacturer about any
problems or conditions that
you do not understand.
O Follow also the Satety
Intormation in the
INSTALLATION
INSTRUOTIONS and the
OPERATING
INSTRUOTIONS.
GROUNDING
INSTRUCTIONS
This appliance must be grounded. In
the event ot maltunction or breakdown,
grounding will reduce the risk ot electric
shock by providing a path ot least
resistance tor the electric current.
For U.S.A.
Your dryer comes without a power
supply cord. The power cord must
meet the tollowing requirements:
- UL listed in the uSa
- 208 - 240 volt rated (minimum)
- 30 amps
- Type SRDT or DRT(UL 2158)
- Five teet long (minimum)
For CANADA
This appliance is equipped with a cord
having an equipment-grounding
conductor and a grounding plug.
The plug must be plugged into an
appropriate outlet that is properly
installed and grounded in accordance
with all local codes and ordinances.
A WARNING A
Improper connection ot the
equipment grounding conductor
can result in a risk ot electric
shock.
Oheck with a qualitied electrician
or service person it you are in
doubt as to whether the dryer is
provided with the appliance.
It it will not tit the outlet, have
a proper outlet installed by
a qualitied electrician.
SAVE THESE
INSTRUCTIONS
INSTALLATION
INSTRUCTIONS
Introduction
Read these installation instructions
completely and caretully. They will save
you time and ettort and help to ensure
optimum dryer pertormance. Be sure to
observe all listed warnings and
cautions.
These installation instructions are
intended tor use by qualitied installers.
In addition to these instructions the
dryer must be installed in accordance
with all local codes or, in the absence
ot a local code:
- In the U.S.A., in accordance with
the National Electric Oode,
ANSI/NFPA70 - latest
edition/State and Municipal codes
and/or local codes.
- In Canada, in accordance with the
Oanadian Electric Oode O22.1 latest edition/Provincial and
Municipal codes and/or local
codes.
Information concerning
waste disposal
Disposal of the packaging
A WARNING A
Keep children away trom
shipping carton and packaging
components. Danger ot
suttocation trom plastic toil and
tolding cartons.
All packaging materials are
environmentally triendly and can be
reused. Please dispose ot packaging in
an environmentally triendly manner.
Please ask your dealer or inquire at
your local authority about the current
means ot disposal.
Disposal of the old appliance
KEEP THESE
INSTRUCTIONS FOR
FUTURE REFERENCE.
In case ot change ot ownership,
manual should be conveyed with the
dryer.
A WARNING A
It appliance is no longer usable,
pull out main plug, cut ott power
cord and discard with main plug.
To prevent children trom locking
themselves in the appliance, remove
the door.
Page 5
Old appliances are not worthless
rubbish! Valuable raw materials can be
reclaimed from environmentally friendly
recycling.
Please ask your dealer or inquire at
your local authority about the current
means of disposal.
Before installing the dryer
Unpacking the appliance
A CAUTION
The dryer is very heavy. Do not
lift it by yourself. Do not lift the
appliance by projecting
components (e.g. door) - due to
risk of breakage.
ATTENTION
Remove the appliance
packaging carefully to prevent
damage to the surfaces.
Check the dryer for transportation
damage. Do not connect a dryer which
is visibly damaged. If in doubt, contact
your dealer.
Supplied components
For U.S.A.
A CAUTION
The dryer is supplied without
a power cord. The power cord
must be connected by qualified
persons only.
Installation location
A WARNING A
Do not install the dryer:
- outdoors
- in an environment with dripping
water,
- near flammable materials,
- in rooms which are at risk of frost,
- in rooms which may contain gas
or other fuels,
- in cupboards with lockable doors
or in alcoves.
The installation room must be well
ventilated, otherwise the dryer will
operate below optimum performance.
Do not operate the dryer at
temperatures above 104°F (40°C) and
below 41 °F (5°C). Low temperatures
affect the automatic program sequence
and may prolong the drying times.
The installation surface for the dryer
must be clean, level and firm. Do not
install the appliance on carpets!
Compensate for uneven floors with the
height-adjustable feet.
Install the dryer and level side to side
and front to back. Use a bubble level.
Never remove the height-adjustable
feet!
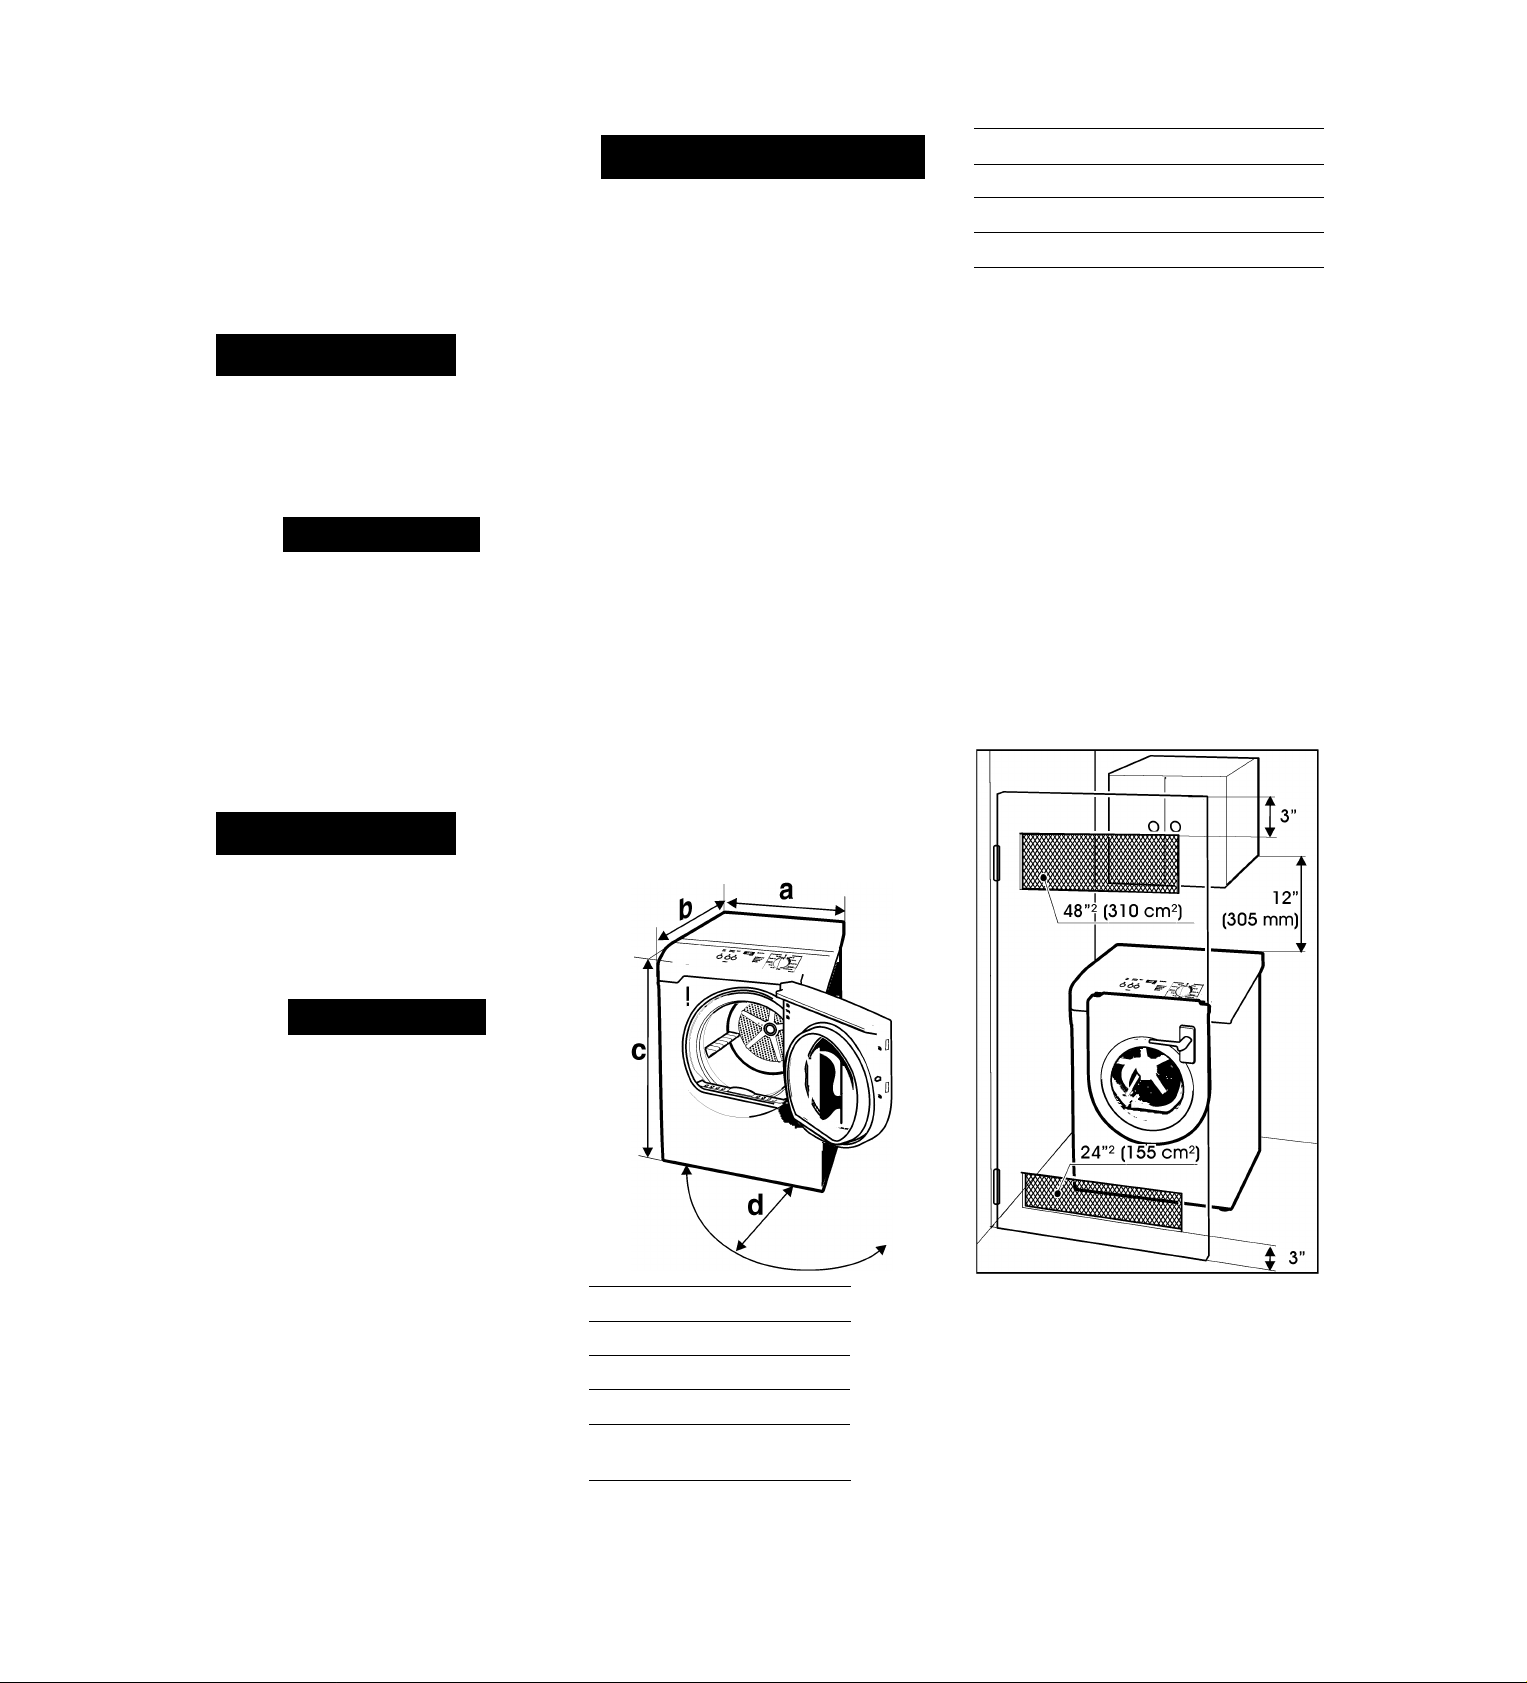
The size of the installation area
depends on the dimensions of the
dryer. Ensure that there is adequate
room for the swivel range of the door!
Minimum Installation Clearances
Closet
Sides 0” (0 mm)
Top 12” (305 mm)
Rear* 0” (0 mm)
* as close to wall as venting will allow.
Important information concerning
minimum distances:
- Depending on the location of the
exhaust air connection, an
additional minimum distance of
5^ inch (14 cm) must be provided
on this side for pipes/brackets (see
page 7).
- Distances above the indicated
minimum dimensions reduce the
risk of mold formation behind the
appliance.
- Additional distances reduce noise
transmission.
- Additional distances facilitate
installation and service.
- If the dryer is installed in a small
room, the doors of the room must
be fitted with vents of a specified
minimum size.
ATTENTION
After removing the packaging,
immediately remove any objects
from the drum.
The dryer is delivered as a complete
unit. The operating instructions and
supplied accessories can be found in
the drum.
Dimension
a 27.0” (686 mm)
b 31.8” (808 mm)
C 37.2” (945 mm)
d
angle 170- 180”
If installing the dryer in a closet, observe
the minimum distances according to
the following table:
19.7” (500 mm)/
Weight
125 lbs
(56 kg)
with
packaging
143 lbs
(64 kg)
The dryer door is delivered with hinges
on the right. If required, the door hinges
can be switched to the left side.
If the door hinges are to be changed
over, please contact your dealer or our
customer service-team (seepage21)
Page 6
Electrical connection
A WARNING A
3. Fix the strain relief clamp to the
angle bracket. Tighten the nut.
A WARNING A
Power cord must be connected
by a qualified person only.
Connect to individual Branch
Circuit.
Do not use an adapter.
Do not use an extension cord.
Do not remove ground prong.
For CANADA
Your dryer comes with a power supply
cord, CSA listed in Canada.
The Bosch dryer requires a 4-wire
receptacle.
When installing the receptacle for the
dryer cord, ensure that the power
supply cord is accessible when the
dryer is in the installed position.
The power cord should only be
replaced by a qualified person. Use a
4-wire power supply cord (see
electrical connection U.S.A. below).
For U.S.A.
Your dryer comes without a power
supply cord. The power cord must
meet the following requirements:
- UL listed in the uSa
- 208 - 240 volt rated (minimum)
- 30 amps
- Type SRDT or DRT(UL 2158)
- Five feet long (minimum)
Power cord must be connected
by a licensed electrician only.
Use only a U.L. approved
30 amp power cord with strain
relief clamp note manufacturer’s instructions.
Do not plug end of power cord
into a live receptacle before
connecting power cord to
appliance terminals and closing
iunction/splitter box as described
below.
Do not reuse old power cord.
Cord must have closed loop or
upturned end wire terminating
connectors.
Do not make a sharp bend or crimp
wiring/conductor at connections.
Only a 4-conductor cord shall
be used when the appliance is
installed in a mobile home, in a
recreational vehicle, in a new branch
circuit installation or an area where
the local codes do not permit
grounding through the neutral.
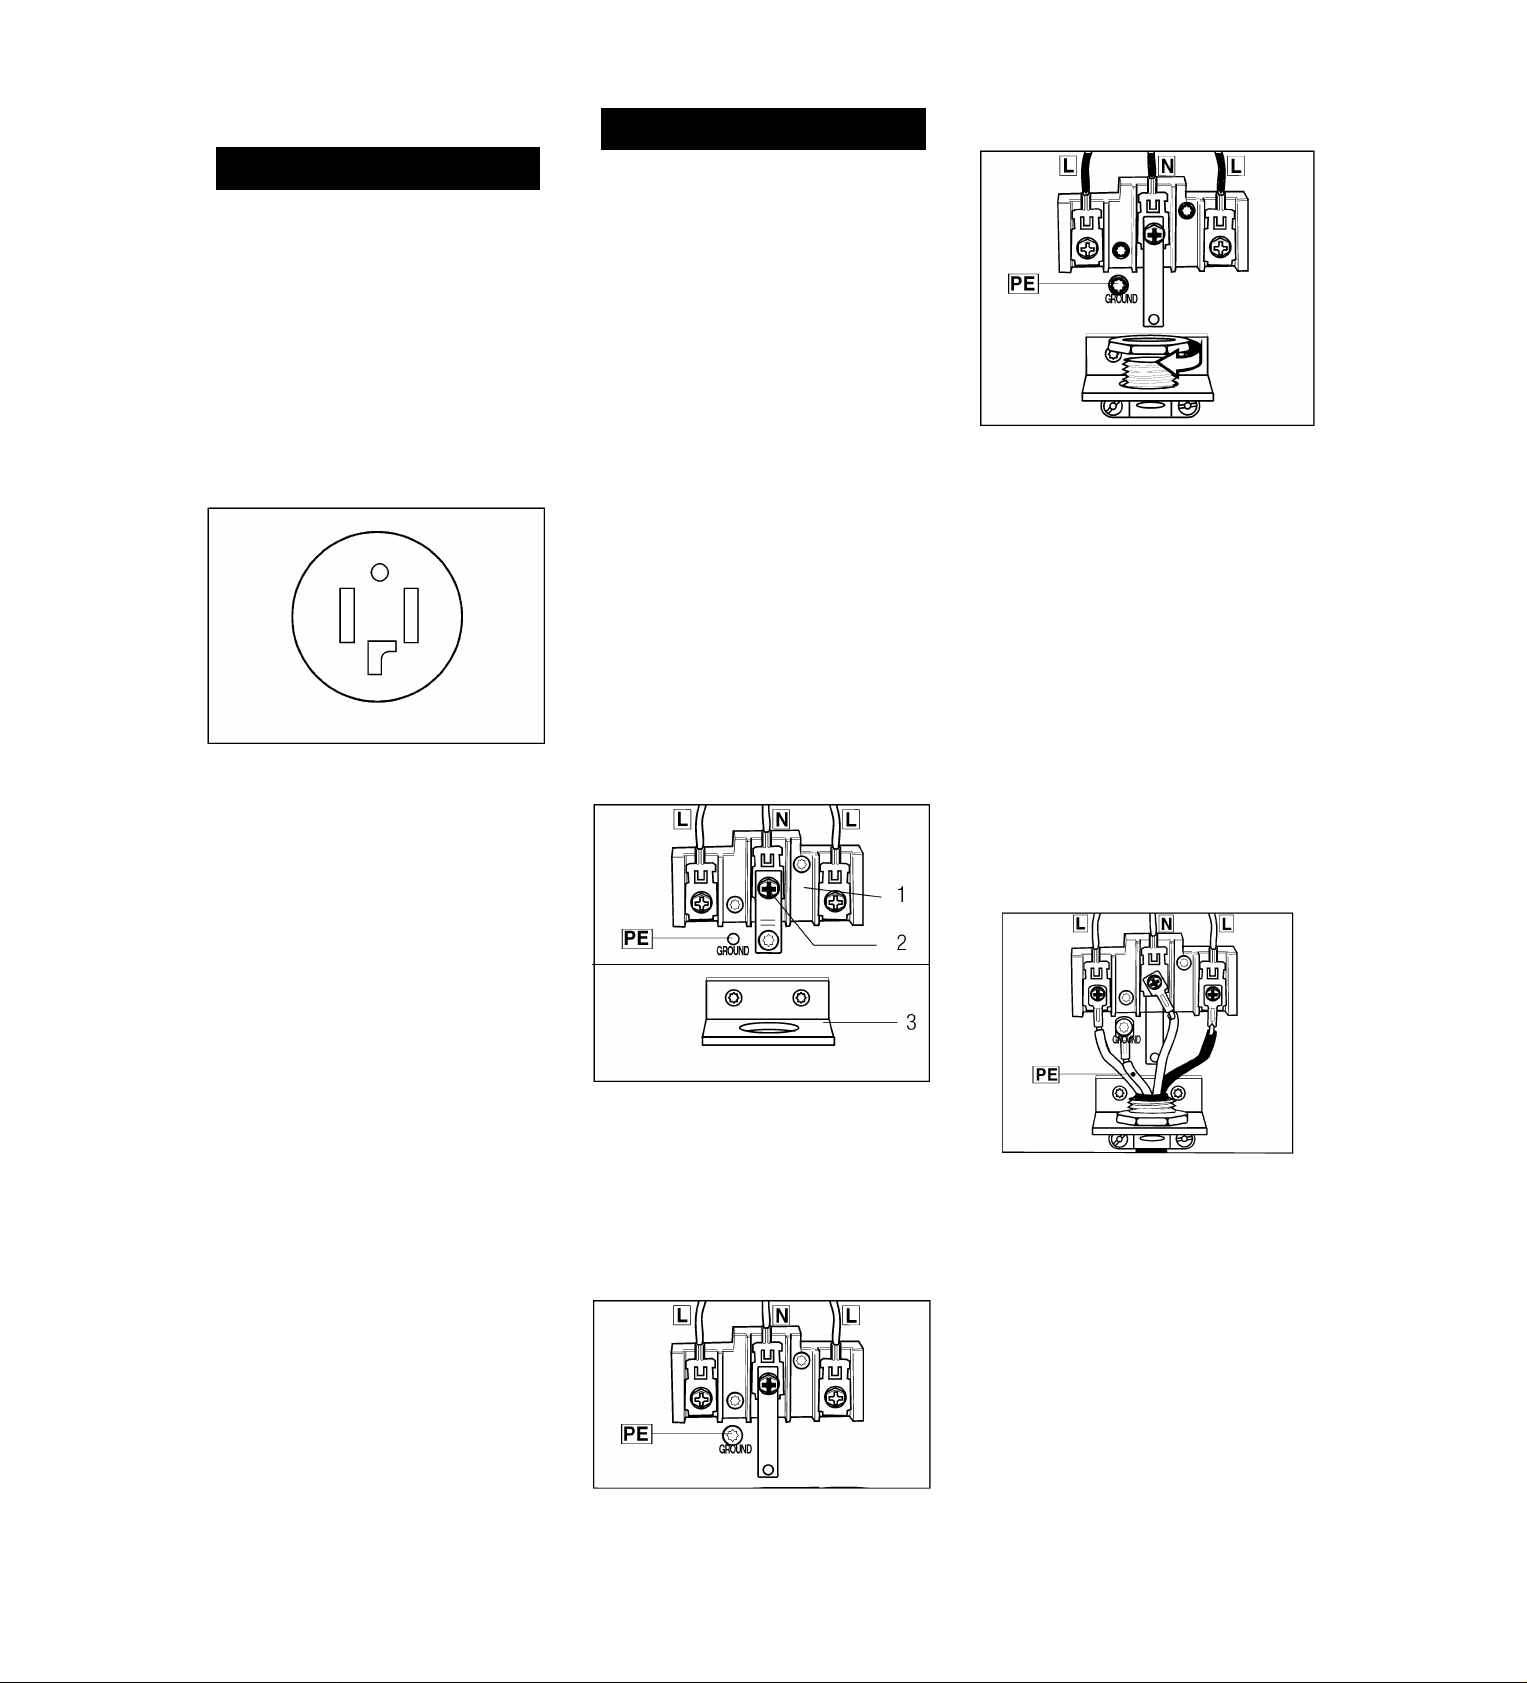
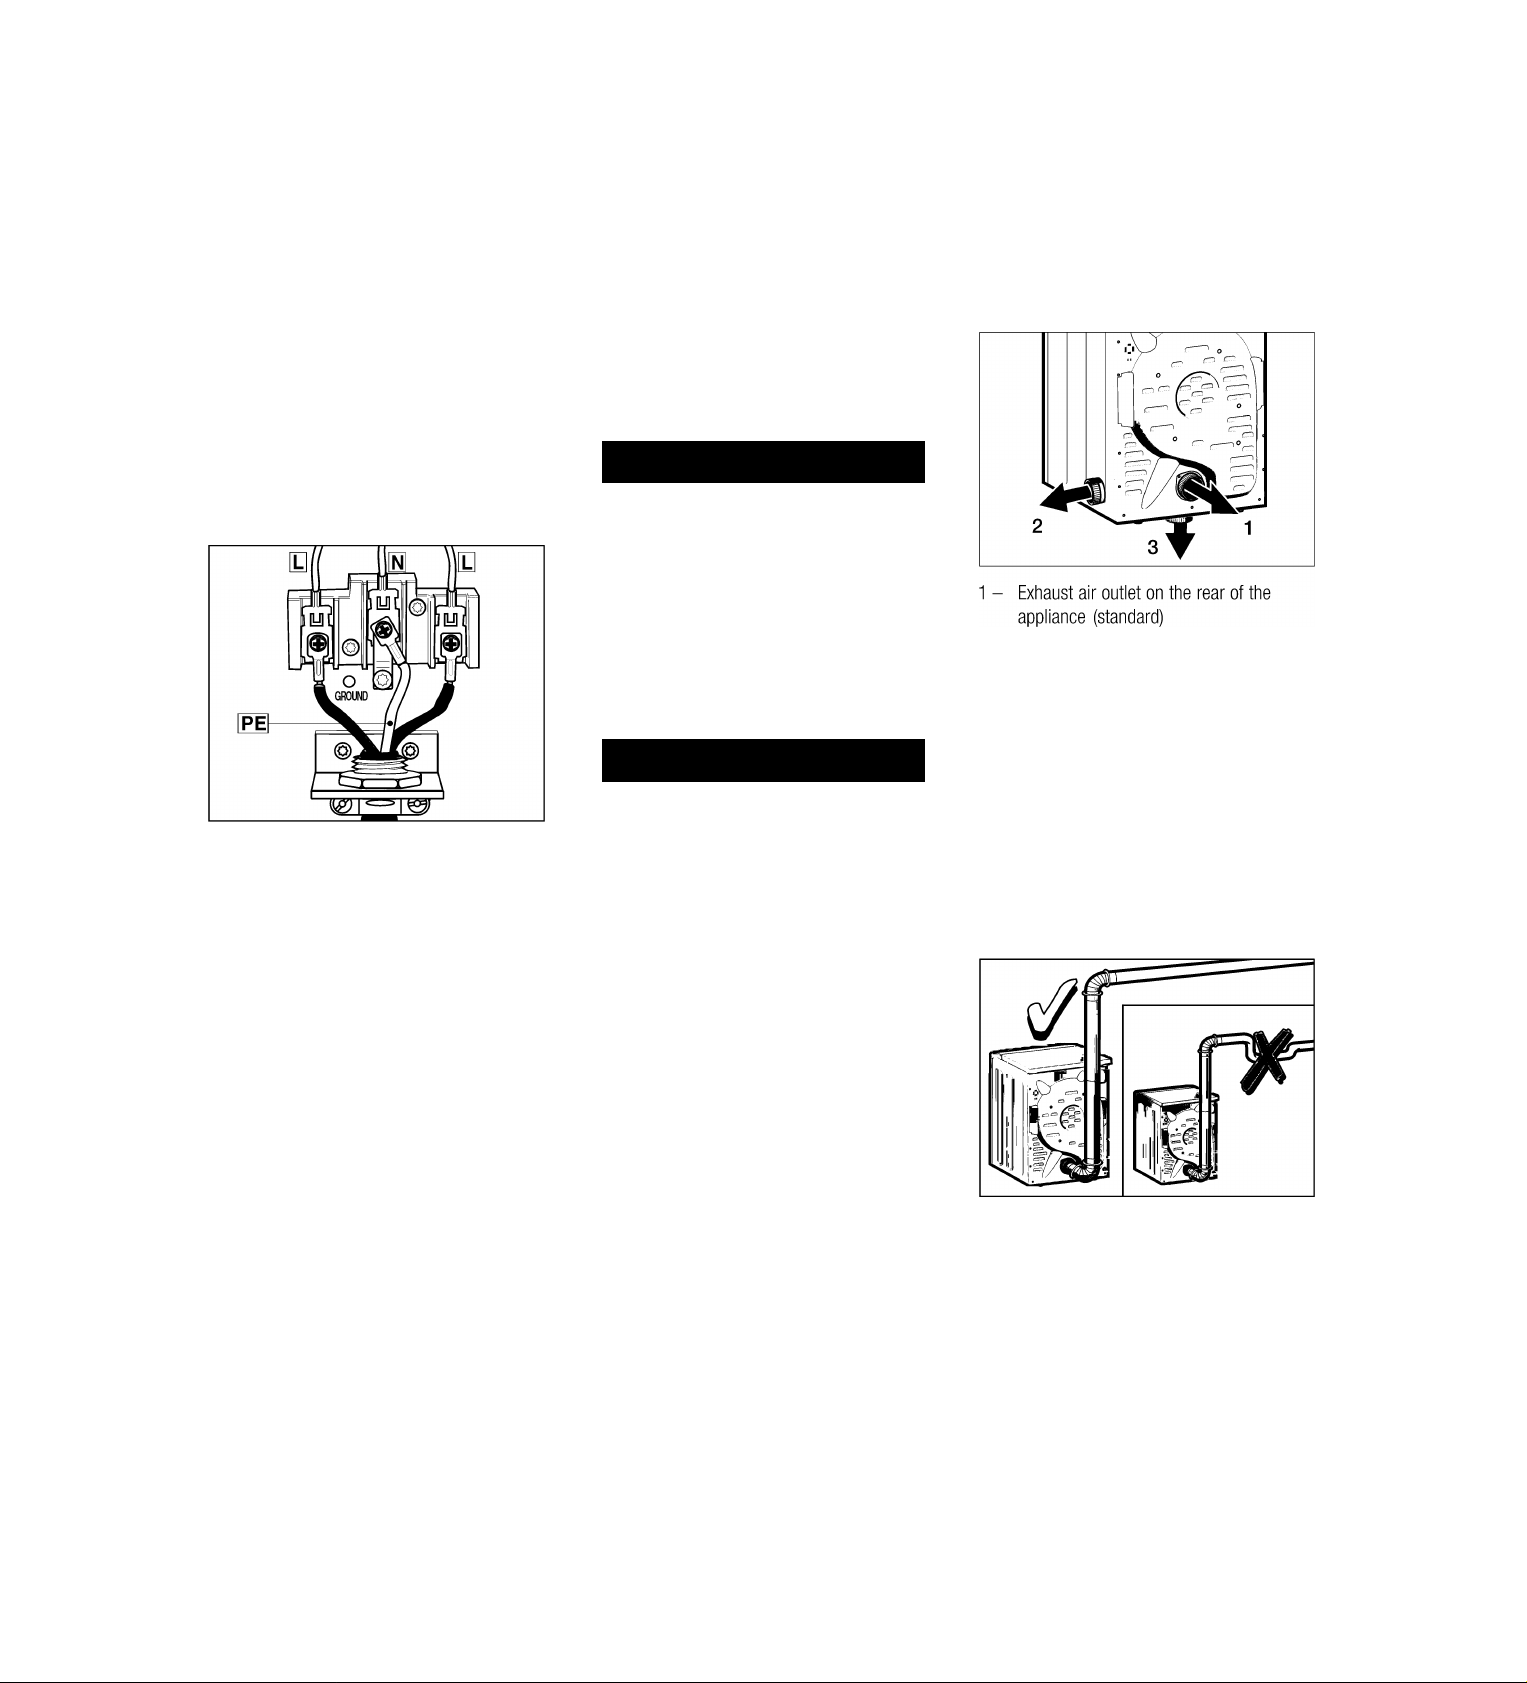
Connecting 4-wire power supply
cord
1. Remove the screws from the cover
of the terminal block located at the
top rear of the appliance.
1 - terminal block
2 - grounding strap
3 - Angle bracket for strain relief clamp
2. Loosen the bottom screw of the
grounding strap. Place the screw
to the GROUND location.
Straighten the grounding strap and
hang loosely.
4. Loosen the 2 screws labeled L and
the screw labeled N in the terminal
block. and the screw of the
GROUND terminal.
5. Thread the 4 wire cable through the
U.L. strain relief clamp.
6. Tighten the screws (2.5 Nm) of the
U.L. strain relief clamp so that the
power cord cannot be moved.
7. Attach the power cord ground
conductor (green) to the GROUND
terminal. Tighten the screw (2.5
Nm) so that the ground conductor
is held securely in place.
8. Attach the 2 power cord outer
conductors (red and black) to the 2
terminals labeled L and the
remaining power cord conductor
(white) to the terminal labeled N.
9. Tighten all 3 screws (3 Nm) so that
the power conductors are held
securely in place .
10. Check the U.L. strain relief clamp
to make sure that it is tight and
cannot be turned.
11. Replace the cover on the terminal
block and fasten in place.
m Make sure that the U.L. strain relief
clamp is outside the cover!
The appliance is now ready to be
plugged into the 4-wire receptacle of
the power rating.
Connecting 3-wire power supply
cord
1. Remove the screws from the cover
of the terminal block located at the
top rear of the appliance.
Page 7
2. Make sure that there is
a grounding strap.
3. Fix the strain relief clamp to the
angle bracket. Tighten the nut.
4. Loosen the 2 screws labeled L and
the screw labeled N in the terminal
block.
5. Thread the 3-wire cable through
the U.L. strain relief clamp.
6. Tighten the screws (2.5 Nm) on the
U.L. strain relief clamp so that the
power cord cannot be moved.
7. Attach the 2 power cord outer
conductors (red and black) to the 2
terminals labeled L and the
remaining power cord conductor
(white) to the terminal labeled N.
8. Tighten all 3 screws (3 Nm) so that
the power conductors are held in
place securely.
9. Check the U.L. strain relief clamp
to make sure that it is tight and
cannot be turned.
10. Replace the cover on the terminal
block and fasten in place.
0 Make sure that the U.L. strain relief
clamp is outside the coverl
Additional grounding procedure
- Some local regulations may
require a separate ground. In such
cases, the required accessory
ground wire, clamp and screw
must be purchased separately.
- Never ground the dryer to plastic
plumbing lines, gas lines or water
pipes.
Grounding instruction
This appliance must be grounded. In
the event of a malfunction or
breakdown, grounding will reduce the
risk of electric shock by providing a
path of least resistance for the electric
current.
For Canada the dryer comes with a
cord which has an equipment
grounding conductor and a grounding
plug. The plug must be plugged into an
appropriate outlet which has been
properly installed and grounded in
accordance with all local regulations
and ordinances.
A WARNING A
Improper connection of the
equipment grounding conductor
may result in electric shock.
Have the appliance checked by
a qualified electrician or service
technician if you are in doubt as
to whether the dryer has been
properly grounded.
Exhaust air connection
A WARNING A
1. To reduce the risk of fire, this dryer
MUST BE EXHAUSTED
OUTDOORS.
2. To reduce the risk of fire, do not
use the ductwork longer than
recommended.
3. DO NOT use a plastic or
non-metal duct with this dryer.
4. DO NOT use a duct smaller than 4
inches in diameter.
5. DO NOT use exhaust hoods with
magnetic latches.
6. DO NOT exhaust the dryer into a
chimney, furnace cold air duct,
attic, crawl space, or any other
ductwork used for venting.
7. DO NOT install a flexible duct in an
enclosed wall, ceiling or floor.
8. DO NOT crush or kink the duct.
9. Do clean and inspect the exhaust
system on a regular basis; at least
once a year.
10. The exhaust duct must terminate
in a manner to prevent back drafts
or entry of birds or other wildlife.
The Bosch dryers are intended to be
vented outdoors. To prevent build-up
of moisture and accumulation of lint
indoors, as well as to maintain
maximum drying efficiency, it is
recommended that the dryer is vented
outdoors.
Exhaust air outlet on the dryer
The dryer is delivered with an exhaust
air outlet on the rear of the appliance.
To take account of the spatial
requirements and an existing exhaust
air system, the following connection
options are possible for the exhaust air
outlet:
- on right side of the appliance,
- on the underside of the appliance.
2 - Exhaust air outlet on the side (optional)
3 - Exhaust air outlet on the underside of the
appliance (optional)
Special exhaust air connections must
be obtained from your dealer or part
supplier for either connection type (see
page 8).
- Side exhaust kit
- Bottom exhaust kit
A qualified technician should change
the exhaust air outlet to the optional
connection location.
Ductwork
To ensure optimum performance, the
ducting system of the dryer should be
as short as possible with a minimum
number of elbows. Your dryer will work
best when the venting system has as
few air flow restrictions as possible.
Exhaust ducting which is longer than
recommended may extend drying time,
cause lint to accumulate and affect
dryer performance and dryer life-time.
Four-inch (approx. 100 mm) diameter
ducting should be used. Use either
rigid metal or flexible metal ducting
material.
DO NOT use plastic or non-metal duct
with this dryer.
Page 8

DO NOT assemble the ductwork with
screws or fasteners that extend into the
duct. They will serve as an
accumulation point for lint.
Joints should be secured with
aluminum tape.
All joints should be tight to avoid leaks.
The male end of each duct section
must point away from the dryer.
Whether connecting to an existing
venting system or a new venting
system, make sure that all ducting is
clean and free of lint.
The maximum permitted length for both
rigid and flexible metal duct is shown in
the table below.
Number of
90° Turns
or Elbows
0 66 ft.
1
2 48 ft.
3
4 30 ft.
Note:
Side and bottom exhaust installations
have a 90° turn inside the dryer. To
determine maximum exhaust length,
add one 90° turn to the chart.
More than two 90° turns are not
recommended. For best performance,
separate all turns by at least 4 ft. of
straight duct, including distance
between last turn and exhaust hood.
Rigid Duct Flexible Duct
45 ft.
(2011 cm)
56 ft.
(1707 cm)
(1463 cm)
39 ft.
(1189 cm)
(914 cm)
(1372 cm)
36 ft.
(1097 cm)
29 ft.
(884 cm)
22 ft.
(671 cm)
16 ft.
(488 cm)
Exhaust vent hood
The exhaust duct must end with an
approved exhaust vent hood with
swing out damper(s). DO NOT use an
exhaust vent hood with magnetic
latches.
To avoid exhaust restriction, the outlet
must be a minimum of 12 inches (30
cm) above ground level or any other
obstructing surface.
Required parts
The parts required for the exhaust air
system (elbows, lines, exhaust air
outlets) are not included in standard
delivery of the dryer.
Accessories
The parts required for the exhaust air
system can be obtained from customer
service or your local dealer. Please
follow the installation instructions
supplied by the appropriate
manufacturer!
Side exhaust kit
part no. WTZ 1265
Note:
The maximum permitted number of 90°
elbows (including this side exhaust kit)
is four!
Bottom exhaust kit
part no. WTZ 1270
Note:
The maximum permitted number of 90°
elbows (including this side exhaust kit)
is four!
Dryer rack
part no. WTZ1290
Use the dryer rack to dry washable
woolen textiles (e.g. sweaters) and
shoes.
Left hinge kit
part no. WTZ 1260 for all dryers except
silver and duo tone silver
part no. WTZ 126S for silver and duo
tone silver dryers
The door catch can be reversed if
necessary. The door is hinged on the
right at the factory.
Pedestal Mounting Kit
part no. WTZ 1295 (White Dryers)
part no. WTZ 1295S (Silver Dryers)
part. no. WTZ 1295P (Duo tone Silver)
part. no. WTZ 1295R (Duo tone Red)
if mounting the dryer on the pedestal
follow the instructions supplied with the
pedestal.
rn Special tool for cutting the hole in
prepared side panel is required.
Contact local dealer!
8
Page 9
Installation -
step by step
1. Unpack the dryer.
2. Remove all objects from the drum.
3. Check the dryer for visible
damage.
4. Position the dryer near the
installation location.
5. If required, change the door hinges
to the left (see page 5).
6. If required, have customer service
install the exhaust air outlet on the
dryer (see page 7).
7. Have the power supply cord fitted
by an authorized technician (see
page 6).
8. Install exhaust duct if necessary.
Follow the installation instructions
supplied by the appropriate
manufacturer!
m If space is very restricted, it is
recommended to fit the initial parts
of the exhaust duct to the dryer
before the dryer is moved to its
final installation location.
9. Move the dryer to its final location
and align.
ATTENTION
Do not slide dryer across the
floor if height-adjustable feet
have been extended. Feet and/or
dryer base may be damaged if
dryer is slid across floor with
height-adjustable feet extended.
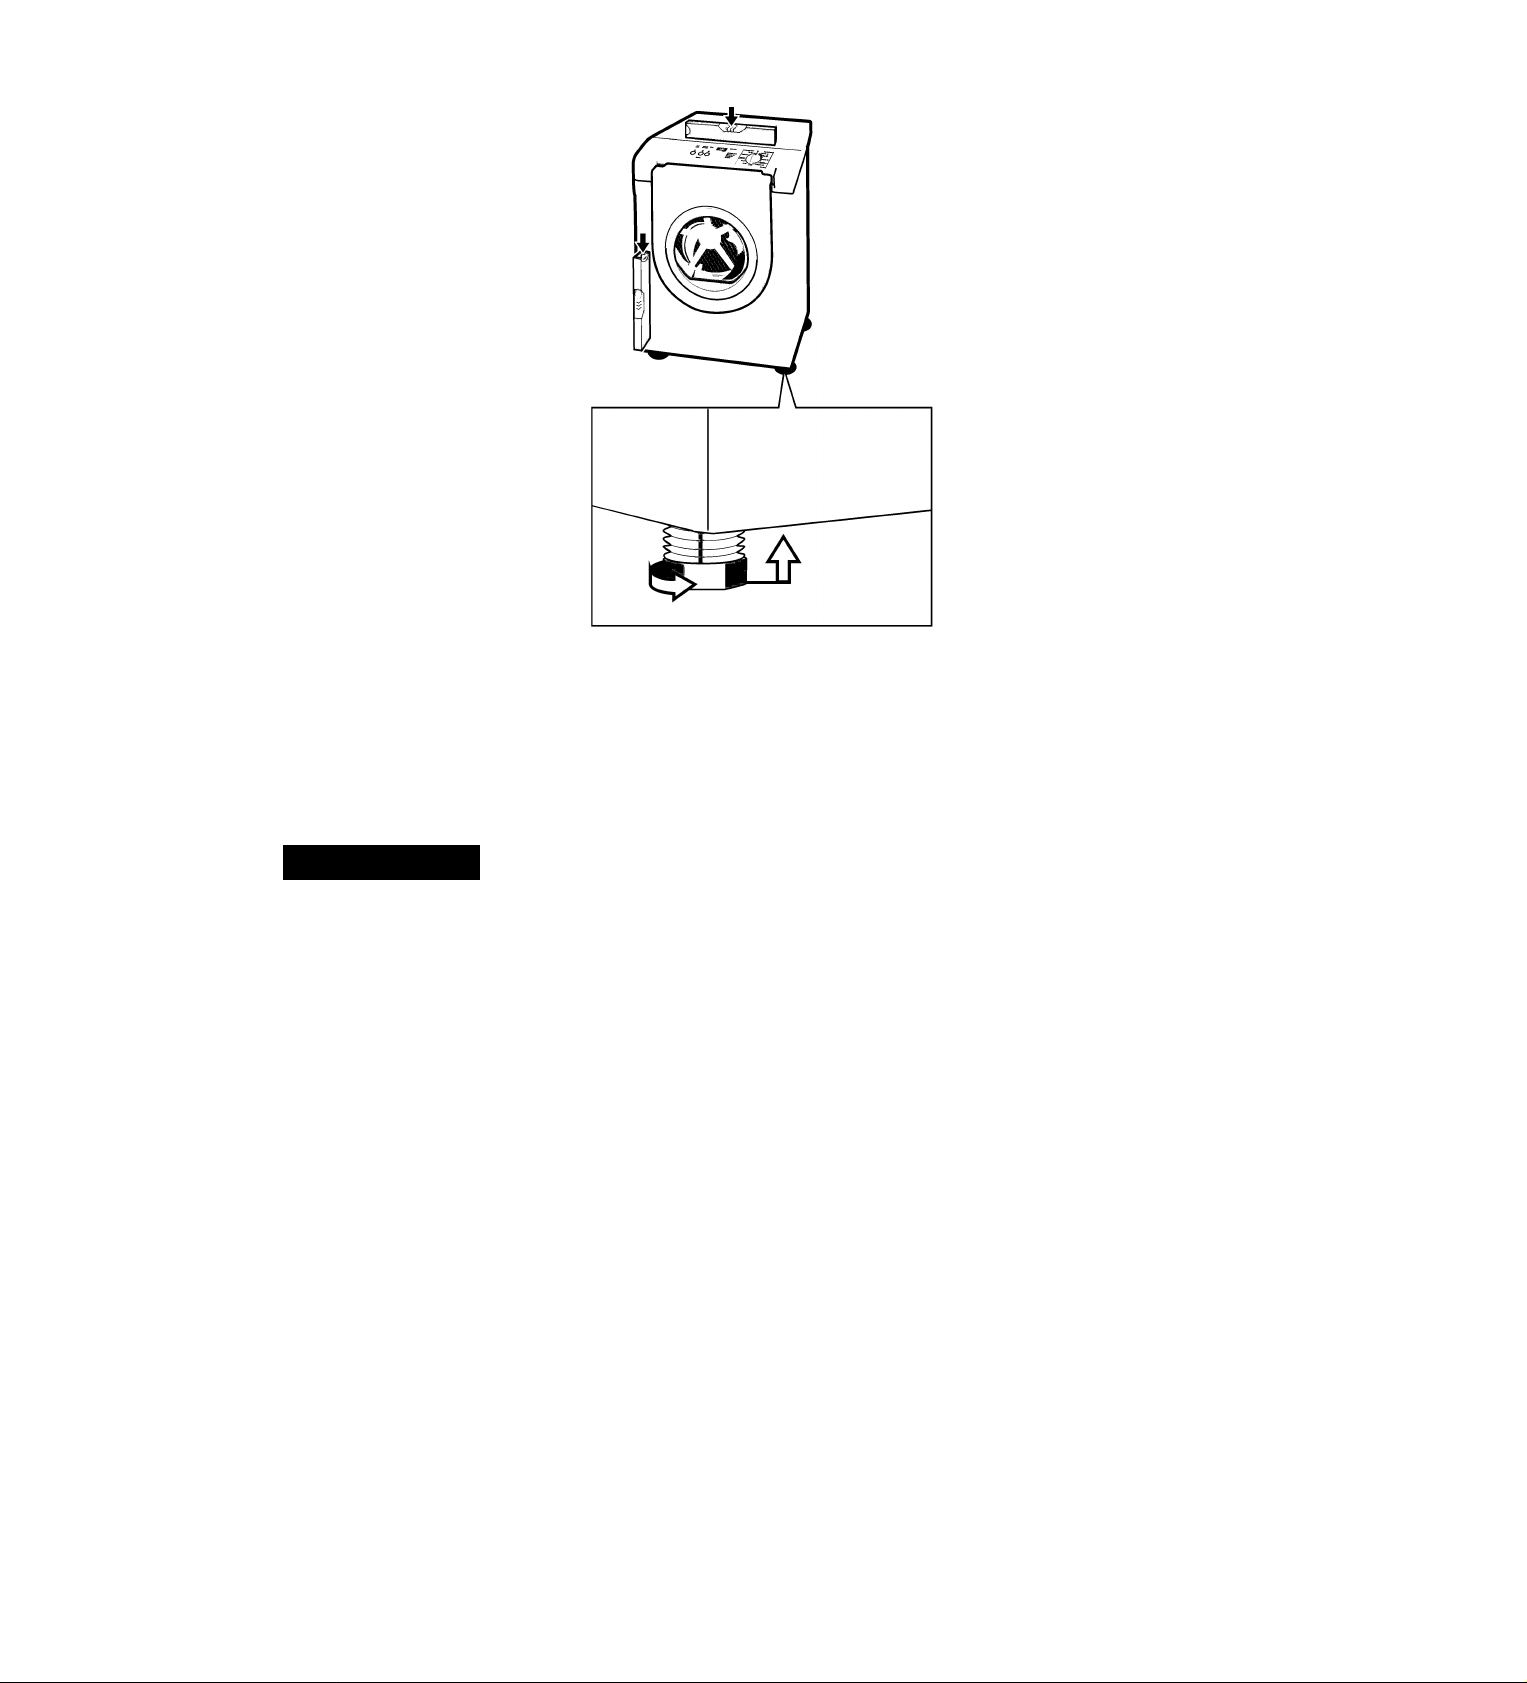
10. Position and then level the dryer.
The dryer should be level with all
four feet firmly on the ground. The
dryer must not wobble. If the dryer
is not level or if it does wobble, the
feet must be adjusted. Adjust the
height-adjustable feet until the
dryer does not rock and is level,
both front-to-back and
side-to-side.
11. Connect the exhaust duct to the
exhaust air outlet on the dryer.
12. Insert plug into the wall receptacle.
Check list before using
the dryer
1. Check that steps 1-12 have been
implemented properly.
2. Ensure that the dryer is connected
to the power supply.
3. Read the operating instructions to
understand how your dryer
operates.
4. Conduct an appliance test:
□ Check that the drum is empty.
□ Close the dryer door.
□ Switch the dryer to "Extra Dry”
and then press the Start
button.
□ After 3-5 minutes press the
Stop button and open the door.
5. If the interior of the dryer feels
warm, the dryer has been
connected properly.
Switch the dryer to "OFF”.
6. If the dryer does not work, switch
the dryer to "OFF”.
Look in the troubleshooting
section (page 20) of the
OPERATING INSTRUCTIONS and
find the fault.
Preparing to transport the
dryer - step by step
1. Rotate the program selector
to "OFF”.
2. Pull out the power supply plug.
3. Disconnect the exhaust duct from
the exhaust air outlet on the dryer.
4. Place any accessories in the drum.
5. Close the door and secure with
adhesive tape.
6. Screw the height-adjustable feet of
the dryer into the housing to
prevent them from being damaged
during transportation.
Page 10
OPERATING INSTRUCTIONS
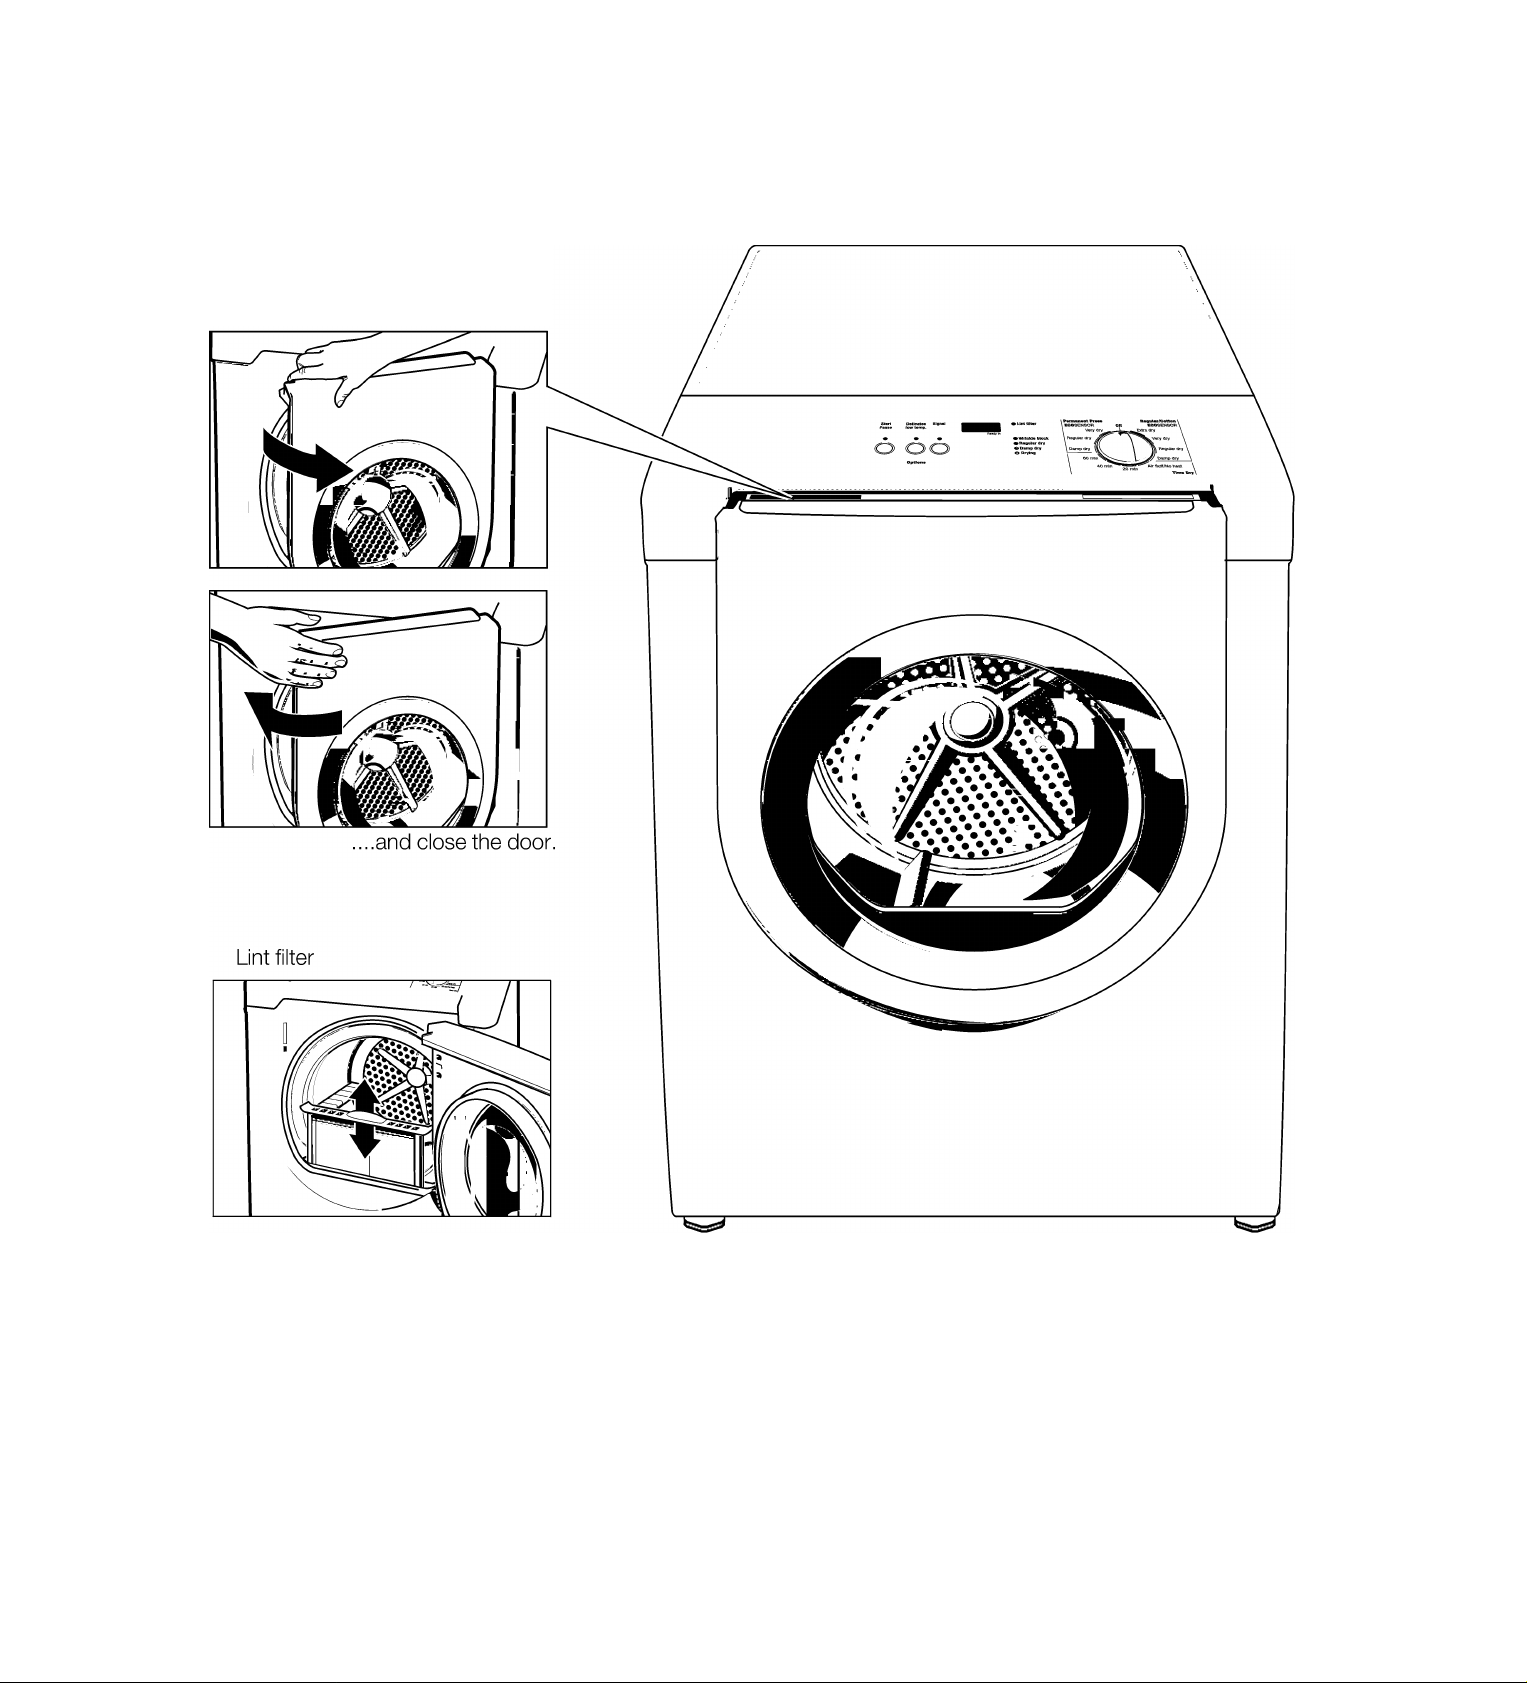
Your new dryer
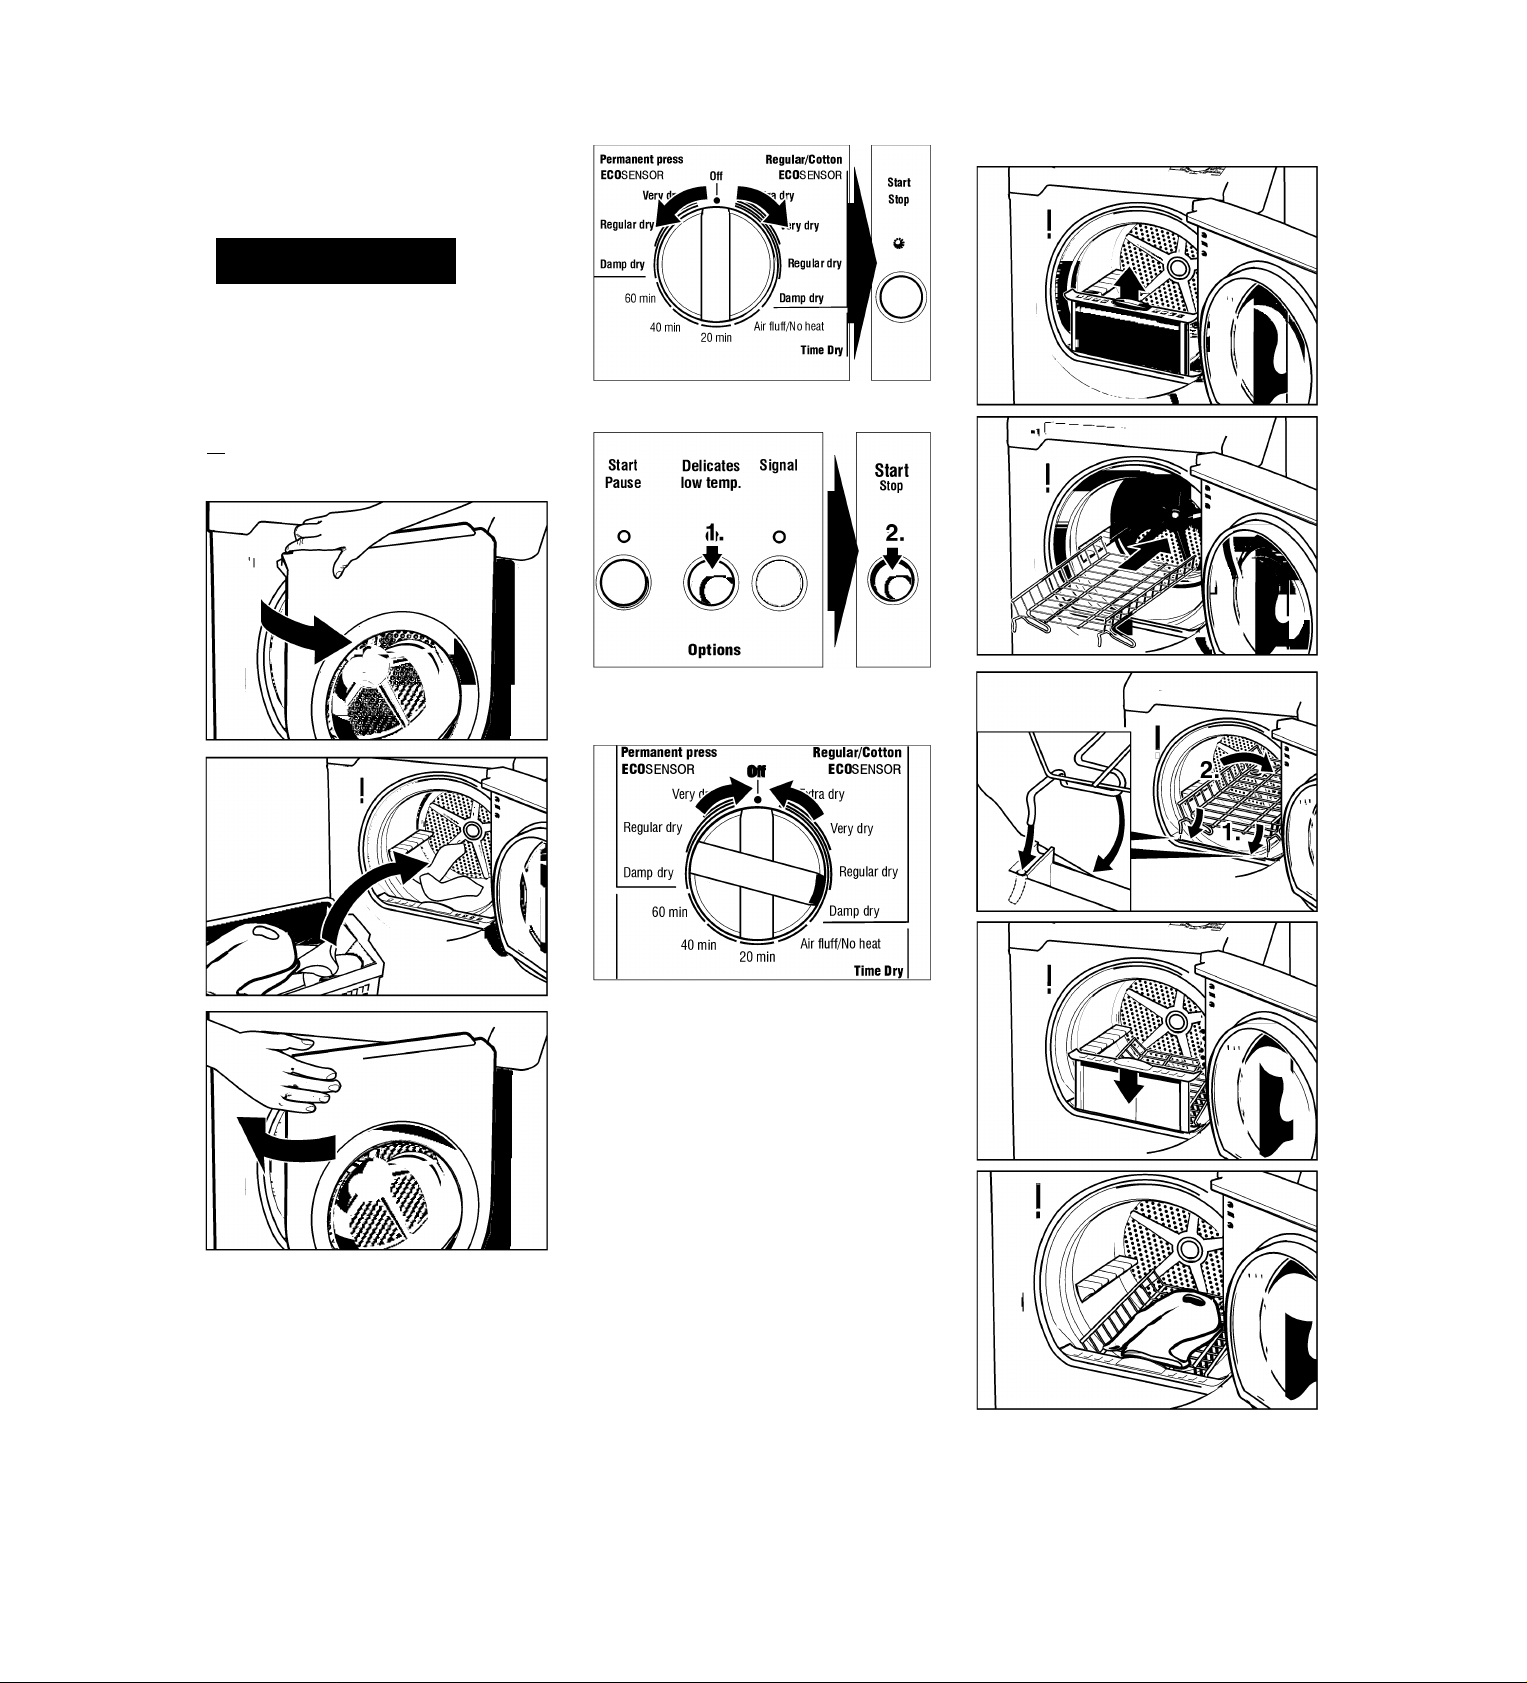
Open the door.... (colored marking)
10
Page 11
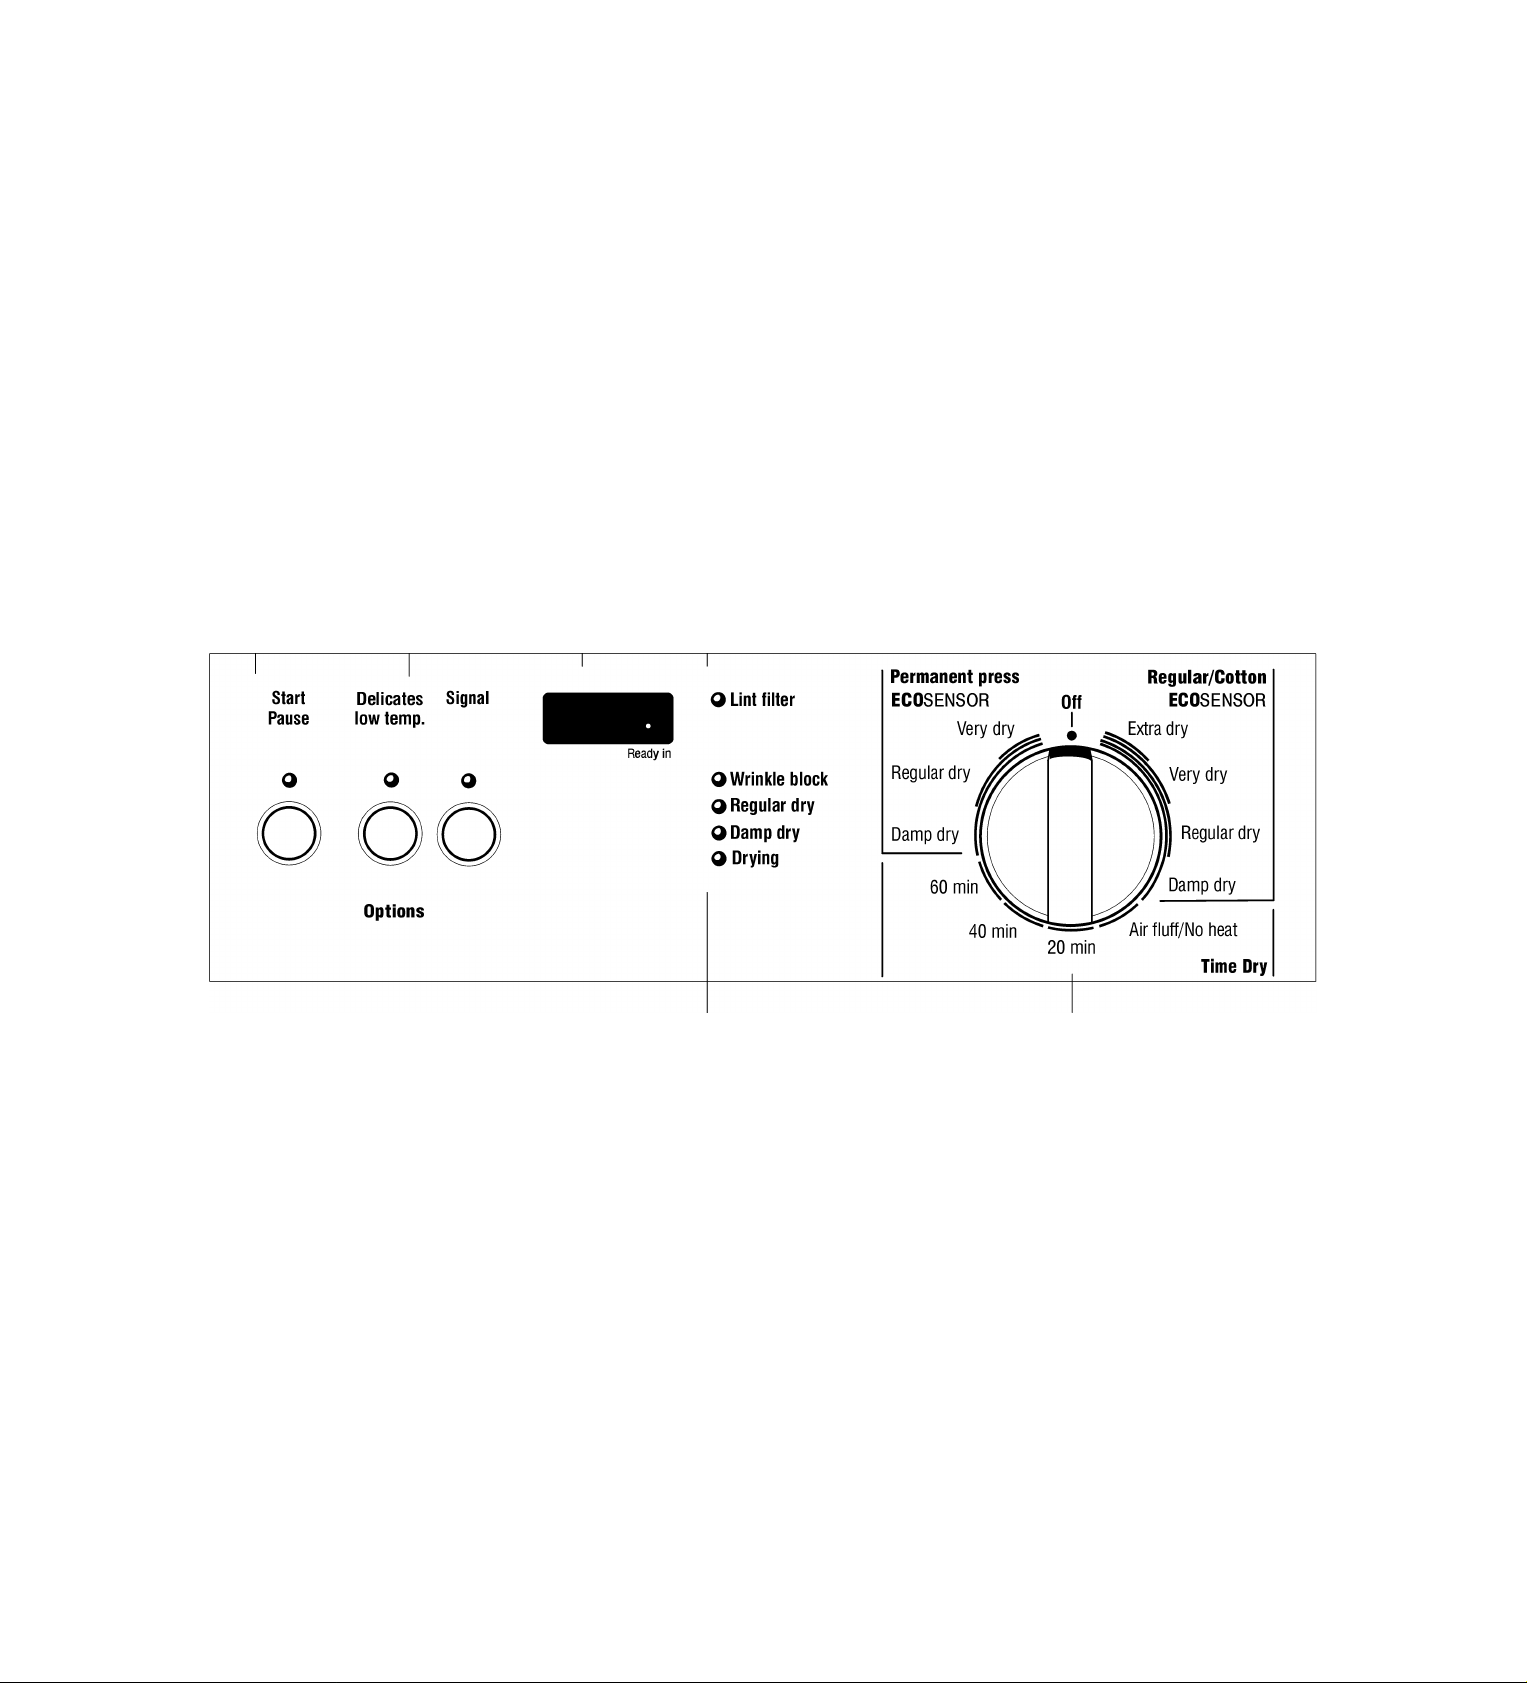
Panel
Start/Stop button
Starts, interrupts and ends the drying process,
Display
Indicates the estimated remaining time of programs.
Buttons for Options (in addition to the program if
required). See page 14.
Delicates low temp.
Press for temperature-sensitive textiles
(e.g. acrylic fibers). The temperature of the drying
process is reduced, the drying time is extended
correspondingly.
Signal
An acoustic signal indicates the end of the
program.
Indicator light (LED)
Serves as a reminder to clean the lint filter
Program selector
Selects a program. See page 14.
Can be rotated in both directions.
To switch off the dryer, rotate the
program selector to ”Off”.
Indicator lights (LED)
Indicate the current state of
the drying process.
11
Page 12
Summary of
instructions
A CAUTION
Before using your dryer read and
follow all installation and
operating instructions.
Selecting a program
Using the dryer rack
(Option, see page 8)
Preparing the dryer
rn Check the lint filter. The filter
should be cleaned before and after
every drying process.
Choose an option.
...and start the dryer.
Switch off the dryer
12
Page 13

Safety information
WARNING
Always follow the IMPORTANT
SAFETY INSTRUCTIONS
(see page 24).
Do not store or use solvent detergent
boosters or stain remover in the vicinity
of the dryer.
The dryer could be damaged.
Do not lift the dryer by projecting
components.
Risk of breakage!
Protection of the
7. If the dryer does not work, switch
the dryer to "Off”.
Look in the troubleshooting
section (page 20) of the operating
instructions and find the fault.
Temporary
disconnection of
WARNING
TO AVOID
EXPLOSION HAZARD!
Keep flammable materials and
vapors, such as gasoline, away from
the dryer.
Do not dry anything that has ever
had anything flammable on it (even
after washing).
Do not dry anything that has ever
had any type of oil on it (including
cooking oils).
Items containing foam, rubber or
plastic must be dried on
a clothes-line or by using an
airfluff-cycle.
Do not allow items containing
flammable materials, such as
lighters, to remain in clothes while
drying.
Failure to follow these instructions
may result in explosion or fire.
To avoid risk of death or injury!
Use the dryer only in the house or the
garage for drying normal amounts of
laundry for the household.
Use only for drying textiles which were
washed with water.
Before switching on the
dryer
Install the dryer in accordance with the
installation instructions (from page 4).
Do not use a dryer which is visibly
damaged. If in doubt, contact your
dealer.
Using the dryer
Do not leave children unsupervised
near the dryer.
Keep pets away from the dryer. Before
closing the door, check the contents of
the drum.
Remove all objects from pockets.
Lighters are particularly hazardous.
Risk of expiosion!
Switch off the dryer at the end of the
program.
Protecting the dryer
Do not climb on the dryer.
Do not lean or sit on the door.
Risk of dryer tipping over!
environment
Tips on saving energy
To save energy, money and time,
Bosch recommends the following:
- Drain the iaundry thoroughly!
Before drying, spin the laundry
thoroughly in the washing
machine. Use the highest possible
spin speed for the type of laundry!
Higher spin speeds reduce the
drying time and the energy
consumption.
- Use optimum ioad!
Use maximum recommended
loads. However, do not exceed
loads.
- Clean filter!
Clean the filter before and after
each drying process
(see page 18).
- Ventilate the room!
During the drying process provide
an adequate supply of fresh air.
- Do not dry unsuitable materials!
Do not dry rubberized or air-tight
items.
- Do clean and inspect the
exhaust system on a regular
basis!
Blockages may extend drying
time.
Before using the
dryer for the first
time
Before you use the dryer for the first
time:
1. Read these operating instructions
carefully.
2. Check that the supply voltage
corresponds with the voltage
specifications on the rating plate of
the dryer, see picture page 21
3. Remove all objects from the drum.
4. Check the dryer for visible
damage. If damages found
contact your dealer.
5. Wipe the inside of the drum with a
damp cloth.
6. Conduct an appliance test, see
page 9.
the dryer
Operate your dryer only when you are
at home. If you intend going on
vacation or are not using your dryer for
an extended period of time, you
should:
1. Turn off the circuit breaker.
2. Pull out the power supply plug if
possible.
3. Clean the lint filter.
Laundry
Identificationof fabrics
Observe the treatment symbols on the
textile labels. They provide valuable
information as well as limitations about
the drying process.
Do not dry the following textiles in the
dryer:
- Air-tight textiles (e.g. rubberized)
- Delicate fabrics (silk, synthetic
curtains)
I i I Dry woolen or wool-rich textiles
__
with dryer rack only!
I i I Use the time program “Airfluff/No
heat" to dry articles containing
foam rubber or similarly textured
rubber-like materials.
Drying tips
In principle, the following applies to all
drying programs:
- To ensure a uniform drying result,
sort the laundry according to fabric
type and drying program.
- Fasten zippers, hooks and eyes.
Fasten loose belts, apron strings,
etc..
- Do not overdry easy-care laundry risk of wrinkling! Leave laundry to
dry in the air.
- Do not iron laundry immediately
after drying. Place the laundry in a
pile for a short while. Residual
moisture will then be distributed
uniformly.
- Knitted textiles (e.g. T-shirts,
cotton jersey laundry) often shrink
when dried for the first time. Do
not use the "Very dry/Extra dry"
program.
13
Page 14

Program selection Time programs
For optimum drying resuits your dryer
offers severai program groups and
additionai options.
Seiect the required drying program
from the program tabie according to
the exampies (see page 15).
Automatic programs
There are automatic programs for
different types of textiies.
(Reguiar/Cotton ECOSENSOR or
Permanent Press ECOSENSOR).
Reguiar/Cotton
ECOSENSOR
Time programs run for a specific time
(20, 40, 60 minutes).
in the ”Air fiuff/No heat” stage the dryer
runs on ambient air without a heat
suppiy for 20 minutes.
I i I Dry wooien or wooi-rich textiies
with dryer rack oniy!
Options
Indicator of program
sequence
The dryer uses an eiectronic scanning
system for aii programs except the time
programs . A moisture sensor
continuousiy checks the moisture in the
iaundry. Drying ends automaticaiiy as
soon as the seiected degree of dryness
has been reached.
The drum continues to rotate at
specific intervais for one hour to
prevent creasing.
The current degree of drying and the
ievei reached during the program
sequence is indicated via indicator
iights (Drying, Damp dry, Reguiar dry,
Wrinkie biock).
Permanent Press
ECOSENSOR
The program sequence of automatic
programs is controiied via sensors. The
duration of the program depends on
the measured degree of moisture in the
iaundry and on the seiected degree of
dryness (e.g. Damp dry or Extra dry).
Delicates low temp.
Press the ”Deiicates iow temp.” button
for temperature sensitive textiies.
Observe the care information or
symbois on the textiies. The
temperature of the drying process is
reduced, the drying time is extended.
Signal
Your dryer outputs different signais, if
the ”Signai” button is pressed.
Signal Type
Start Short tone
End Sequence of short
tones
Mal-operation
Warning of Sequence of iong tones
malfunction
Sequence of iong tones
if the indicator iight “Wrinkie biock”
m
iiiuminates when the program
seiector is in Off-Position - turn off
the circuit breaker and caii for
customer service!
14
rn The signai
“Warning of maifunction” is active
in any case.
Page 15
Program selection table
Automatic programs
For Cottons and coloreds made of cotton or linen.
Press “Delicates low temp.” button for temperature-sensitive textiles.
For laundrv.
Bed linen, table linen, towels
Bed linen and table linen, towels, T-shirts, sports shirts, overalls
T-shirts, sports shirts, dresses, trousers, overalls, underwear
Terry towels, kitchen towels, hand towels, bed linen, underwear, cotton
socks
Terry towels, kitchen towels, hand towels, bed linen, underwear, cotton
socks
Terry bathrobes and terry bed linen, which is particularly thick or
Easy-care (drip-dry) laundry made of synthetic and blended fabric, cotton e.g. polyester
Press the "Delicates low temp.” button for very temperature-sensitive textiles.
Trousers, dresses, skirts, shirts, blouses, leggings, sports clothing with
synthetic-rich fibers, lingerie
Shirts, blouses, sports clothing
Bed linen and table linen, track suits, comforters, blankets which is not to be ironed, thick
Time programs
Pre-dried textiles with low moisture content, individual small items, e.g. bath towels, bathing suits, dish cloths.
For the smallest loading condition from 0.22 lb - 0.44 lb (i. e. one small towel), for this a time dry program should
be selected
Press the ”Delicates low temp.” button for temperature-sensitive textiles option.
- Cottons and coloreds made of cotton or linen.
- Temperature-sensitive textiles.
Freshening or airing little worn items of clothing and drying of extreme sensitive textiles.
For all textile types inclusive foam rubber (e.g. pillows, stuffed toys), plastic (e.g. shower curtains, table clothes),
rubber (e.g. backed rugs), sheer nylon, polypropylene.
which is to be ironed
which is not to be ironed Regular dry
which is not to be ironed, thick
multi-ply
multi-ply
For laundrv.
which is not to be ironed or only
lightly ironed
which is not to be ironed
multi-ply
“Regular/Cottons”
ECOSENSOR Automatic program
Damp dry
Very dry
Extra dry
“Permanent Press”
ECOSENSOR Automatic program
Damp dry
Regular dry
Very dry
“Time Drv”
20, 40, 60 min
20, 40, 60 min
Air fluff
Operation
Using the dryer
nj
1. Open the door.
I i I Bleach may cause discoloration of
the dryer’s colored surface.
Therefore, it is important to keep
the bleach away from the colored
surface of your dryer. If any bleach
spills on the surface, use a moist
paper towel to thoroughly clean it
immediately.
2. Check lint filter.
The filter should be cleaned after
and before every drying process.
Cleaning the filter reduces the
drying time and saves energy.
15
Page 16
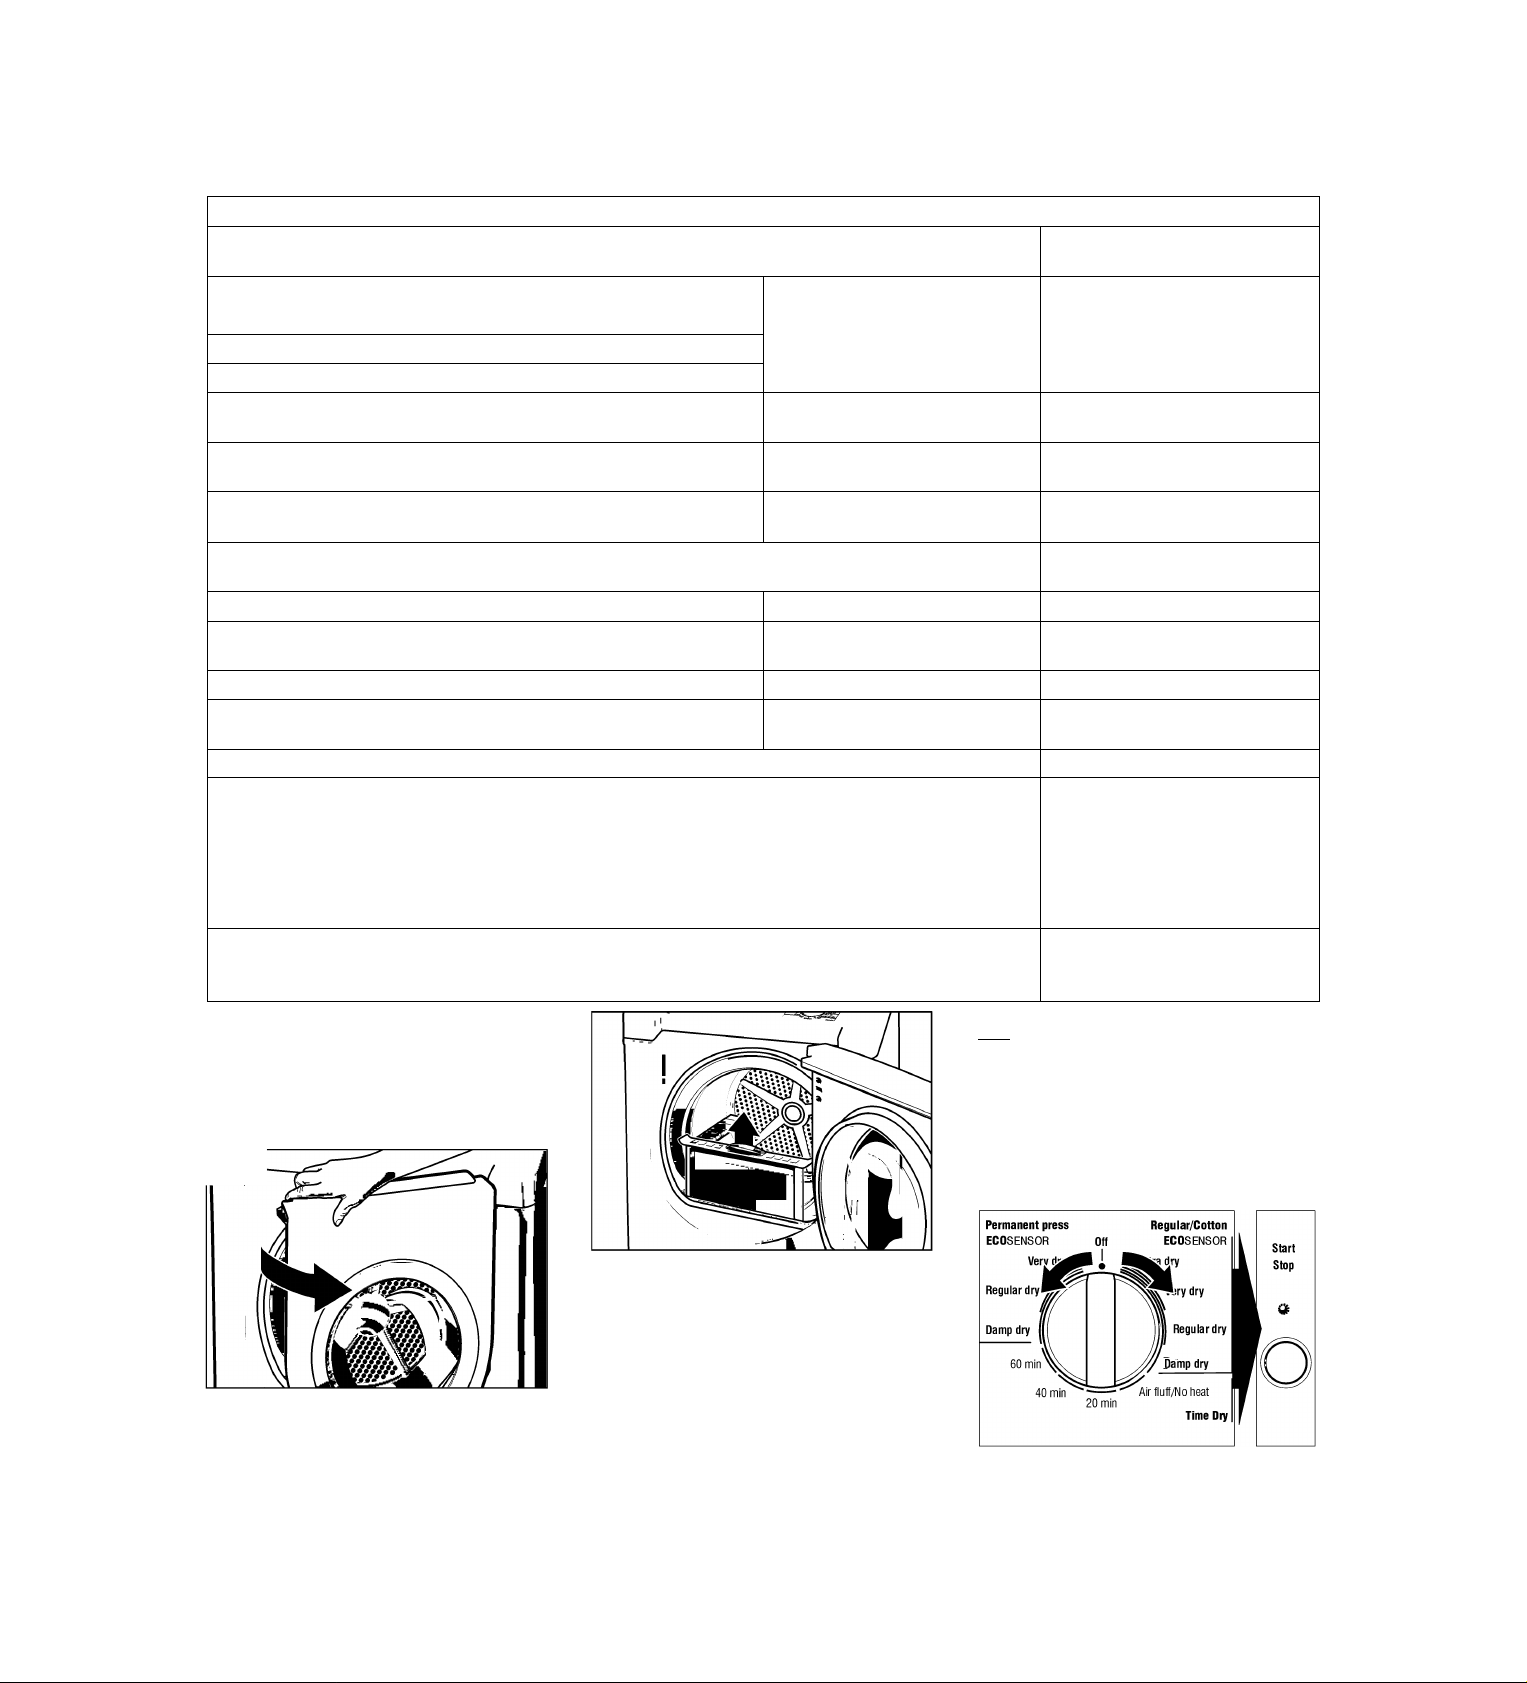
3. Rotate program seleotor to the
desired program.
Seleot the program whioh
oorresponds to the laundry in the
dryer from the program seleotion
table (see page 15).
The dryer light turns on inside the
drum.
I i I The “Start/Stop” indioator light
starts flashing.
4. If required, seleot “Option” by
pressing the button.
The ”Options” are explained on
page 14.
rn The estimated remaining time will
be updated.
5. Plaoe laundry in the empty drum.
Put eaoh pieoe of laundry into the
maohine separately.
For best results the laundry to be
dried must be sorted aooording to
type of laundry and desired degree
of drying. For further information
see page 13.
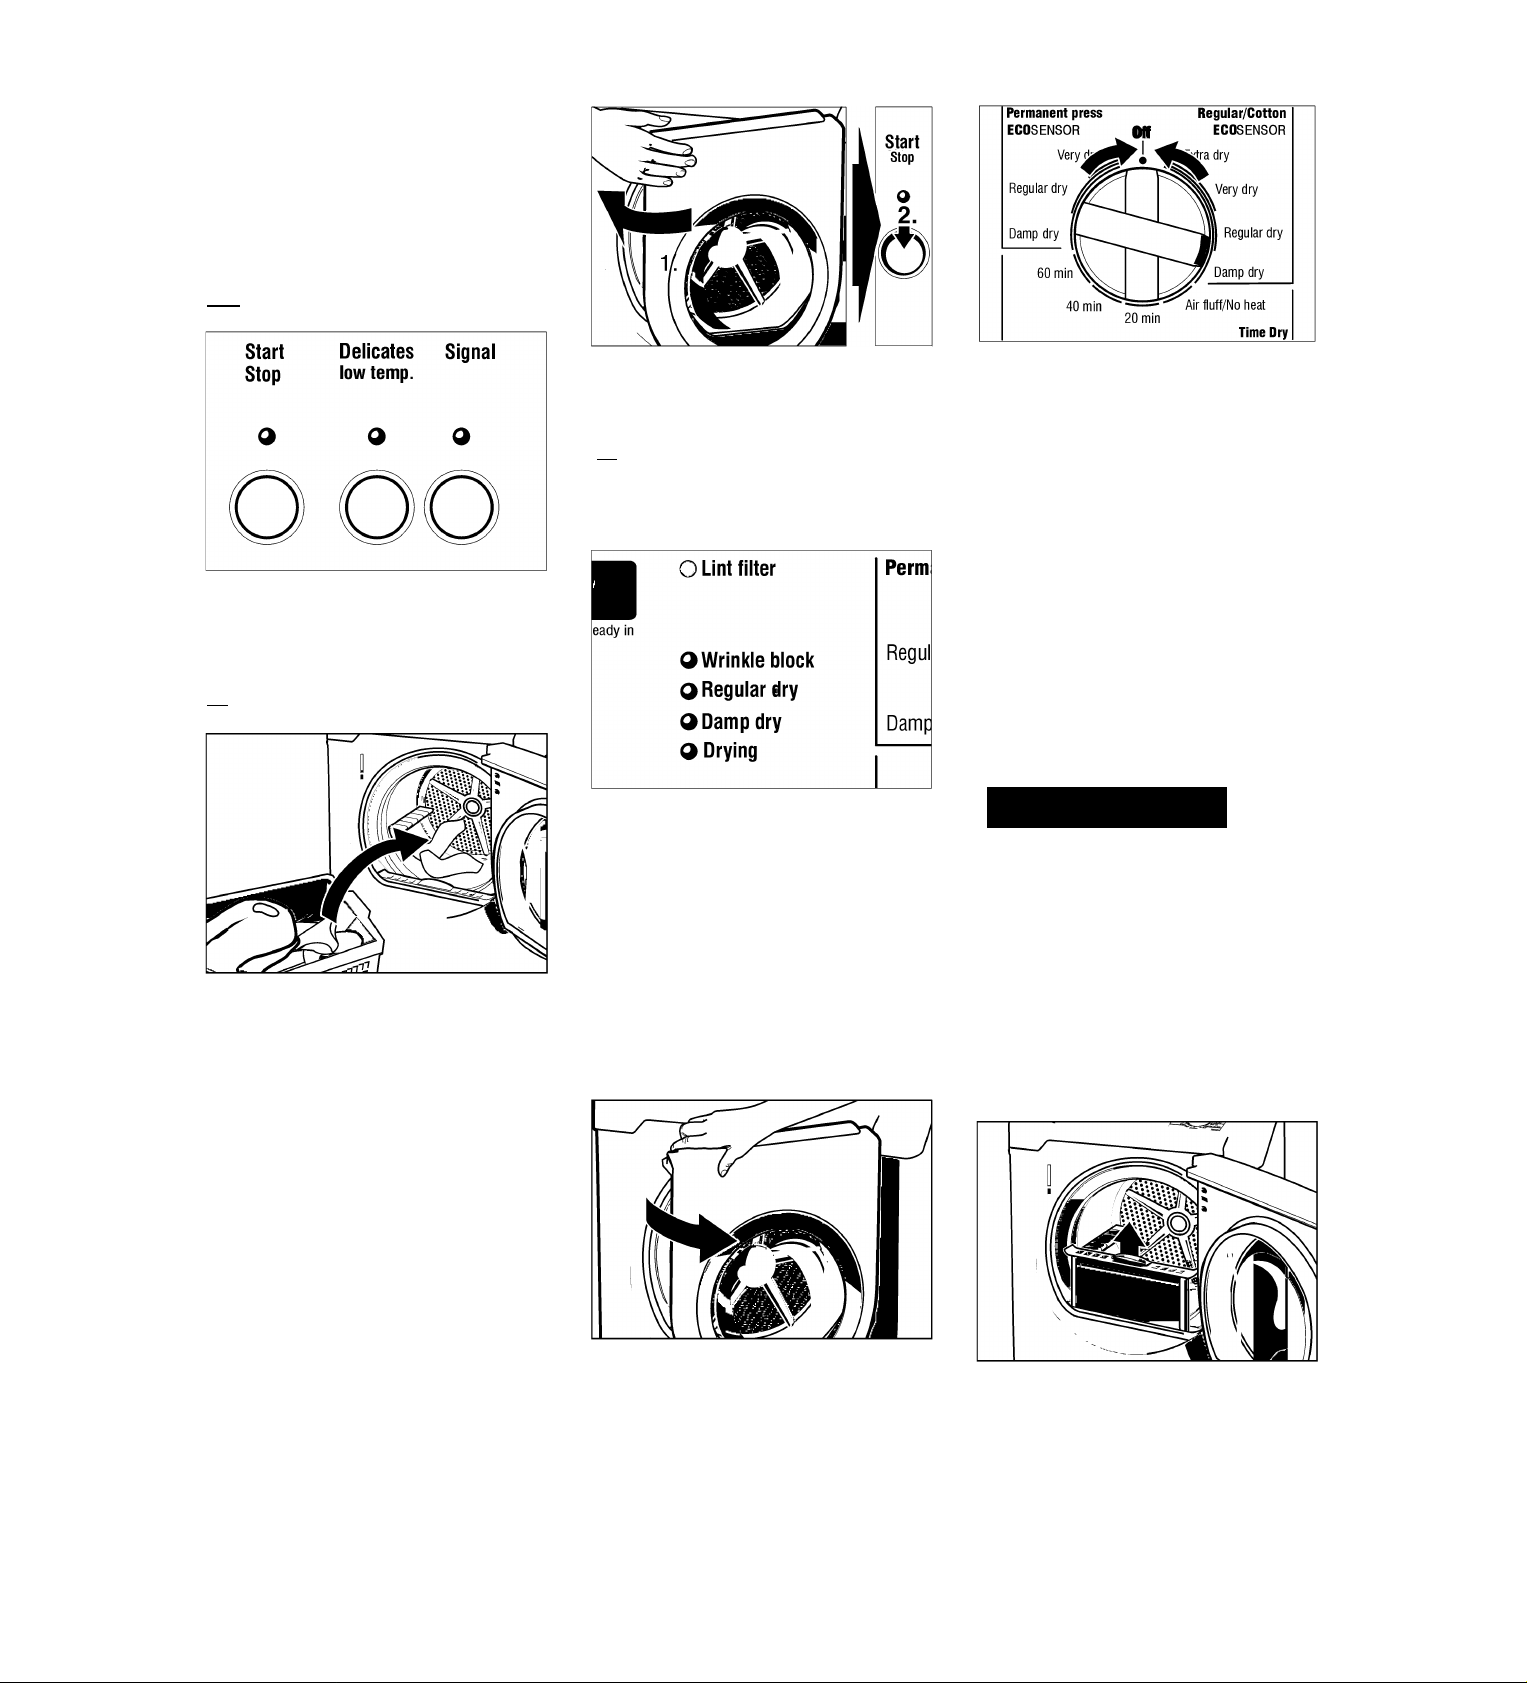
7. Press the “Start/Stop” button. The
“Start/Stop” indioator light
illuminates.
i I The program starts with an
aooustio signal (if set).
If a standard program has been
seleoted, the indioator lights indioate
the progress of the program sequenoe.
At program end an aooustio signal
□
is emitted (if set) and the LED
“Wrinkle blook” illuminates.
When the drying prooess is
0
oomplete (program or seleoted
time program ended), the drum
rotates at speoifio intervals for
1 hour.
This prevent the laundry from
oreasing. The laundry remains
loose and fluffy until it is removed.
The laundry should be removed
before this time has elapsed.
10. Rotate the program seleotor
to “Off”.
The dryer light goes out.
11. Clean the filter.
The filter should be oleaned after
eaoh drying prooess. Cleaning the
filter reduoes the drying time and
saves energy.
12. Close the door.
Using the dryer rack
(Option, see page 8)
Use the dryer raok to dry washable
woolen textiles (e.g. sweaters) and
shoes. The dryer raok remains
stationary while the drum rotates.
Damp wool should not be moved, as it
has a tendenoy to matt. Drying shoes
without a raok oould damage the drum.
A CAUTION
Dry only one item of olothing or
one pair of shoes - maximal dry
load 2,2 lbs (1 kg)! The laundry
must have been spun! Only dry
prewashed shoes! The laundry
must not touoh the drum! It
oould jam and be damaged.
After using the dryer raok, take it
out of the dryer immediately.
Inserting the dryer rack
1. Open the dryer door.
2. Cheok that the drum is empty.
Observe drying symbols of the
m
laundry manufaoturer. If drying
woolen olothing and shoes, see
the information on page 16.
Ensure that there is only laundry in the
drum. Cheok that all items are
oompletely in the drum.
6. Close the door.
The “Start/Stop” indioator light
oontinues flashing.
m If the door has not been olosed
properly, the dryer will not start.
16
8. Open the door.
9. Take the laundry out of the dryer.
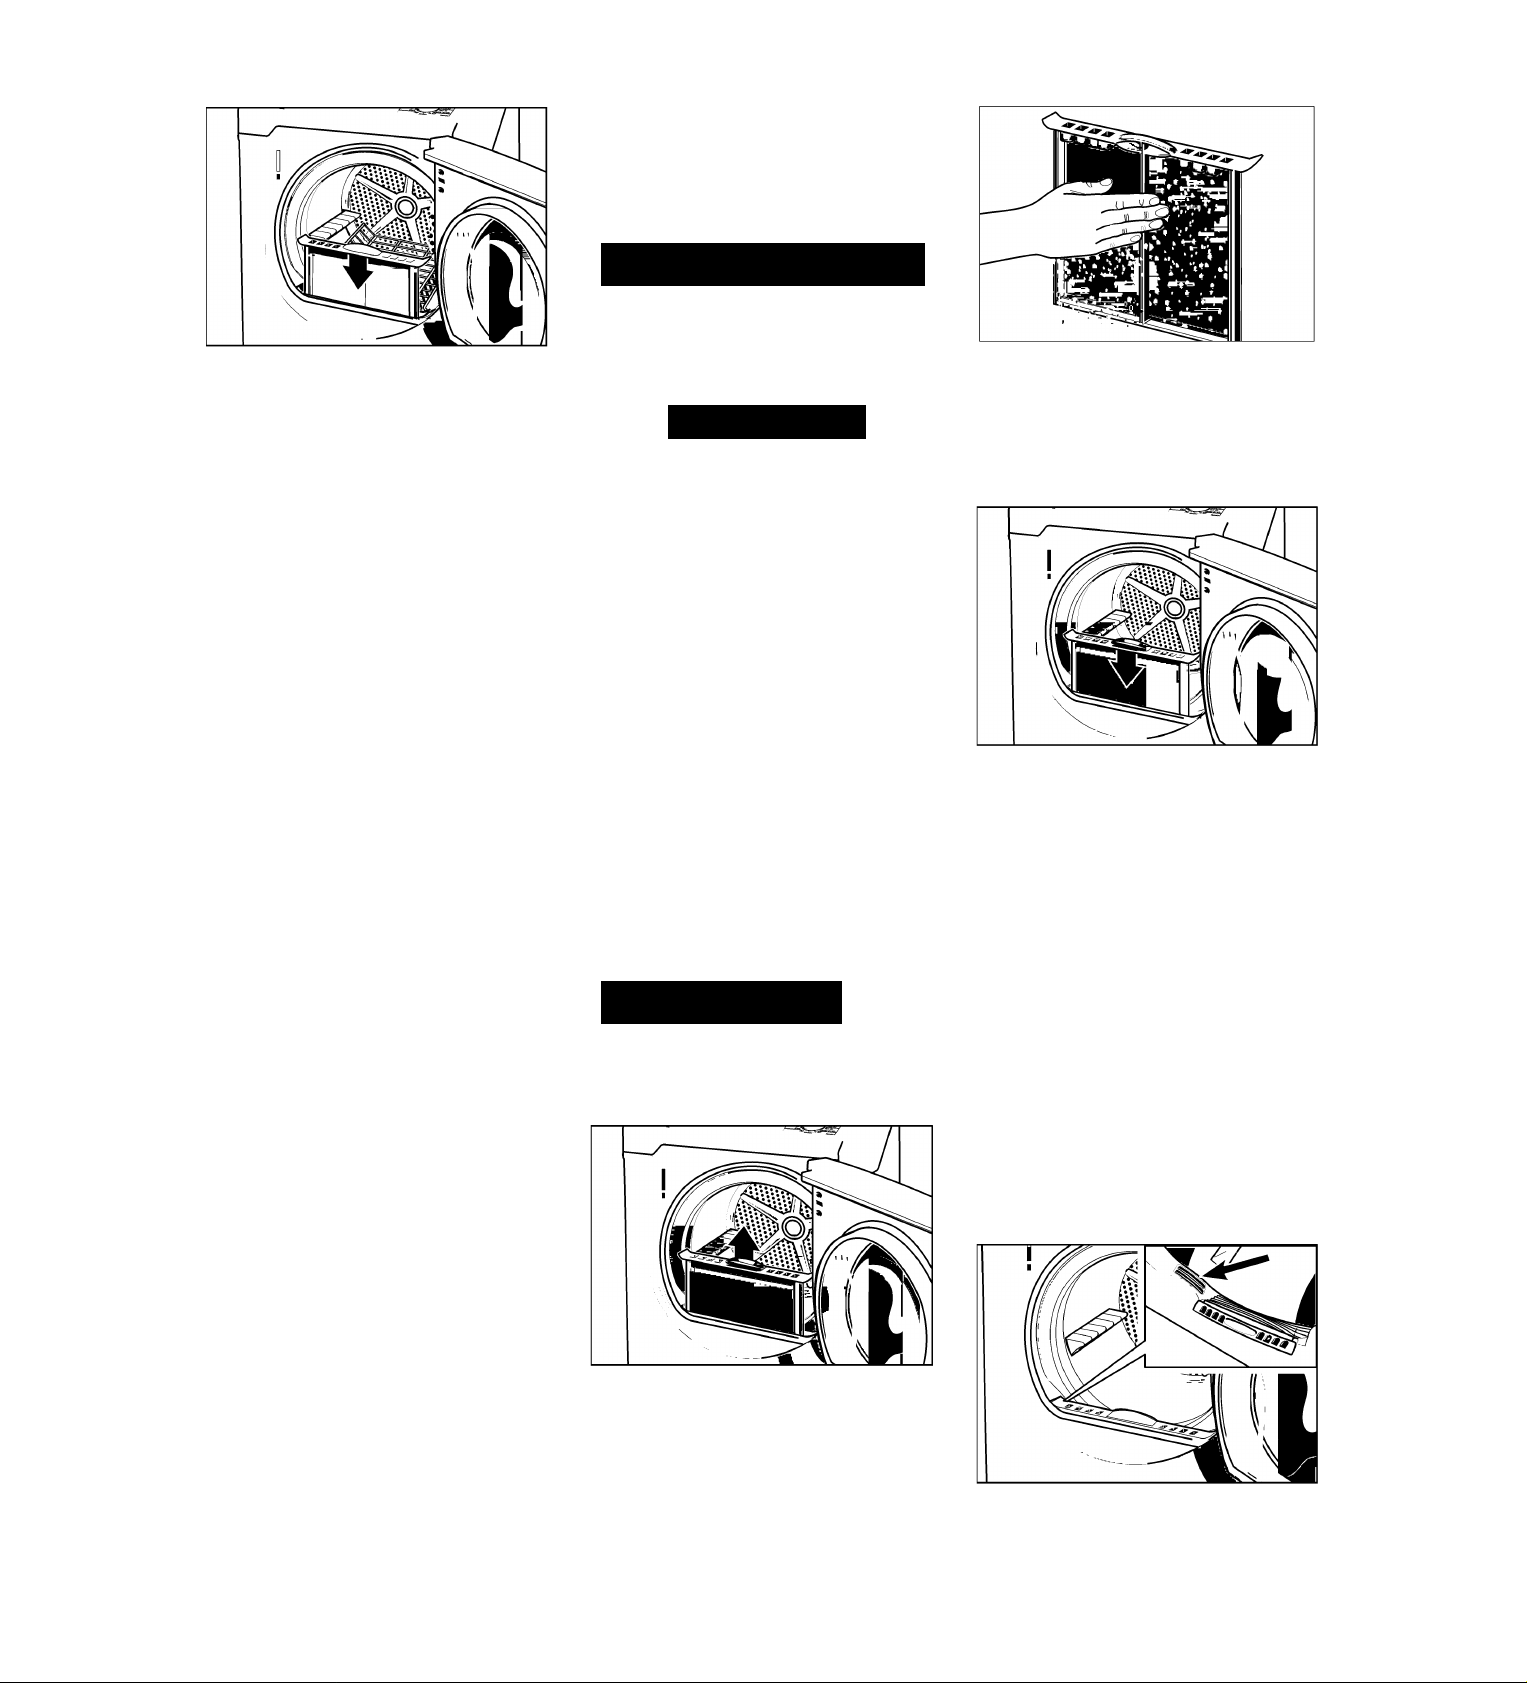
3. Remove the lint filter.
Page 17
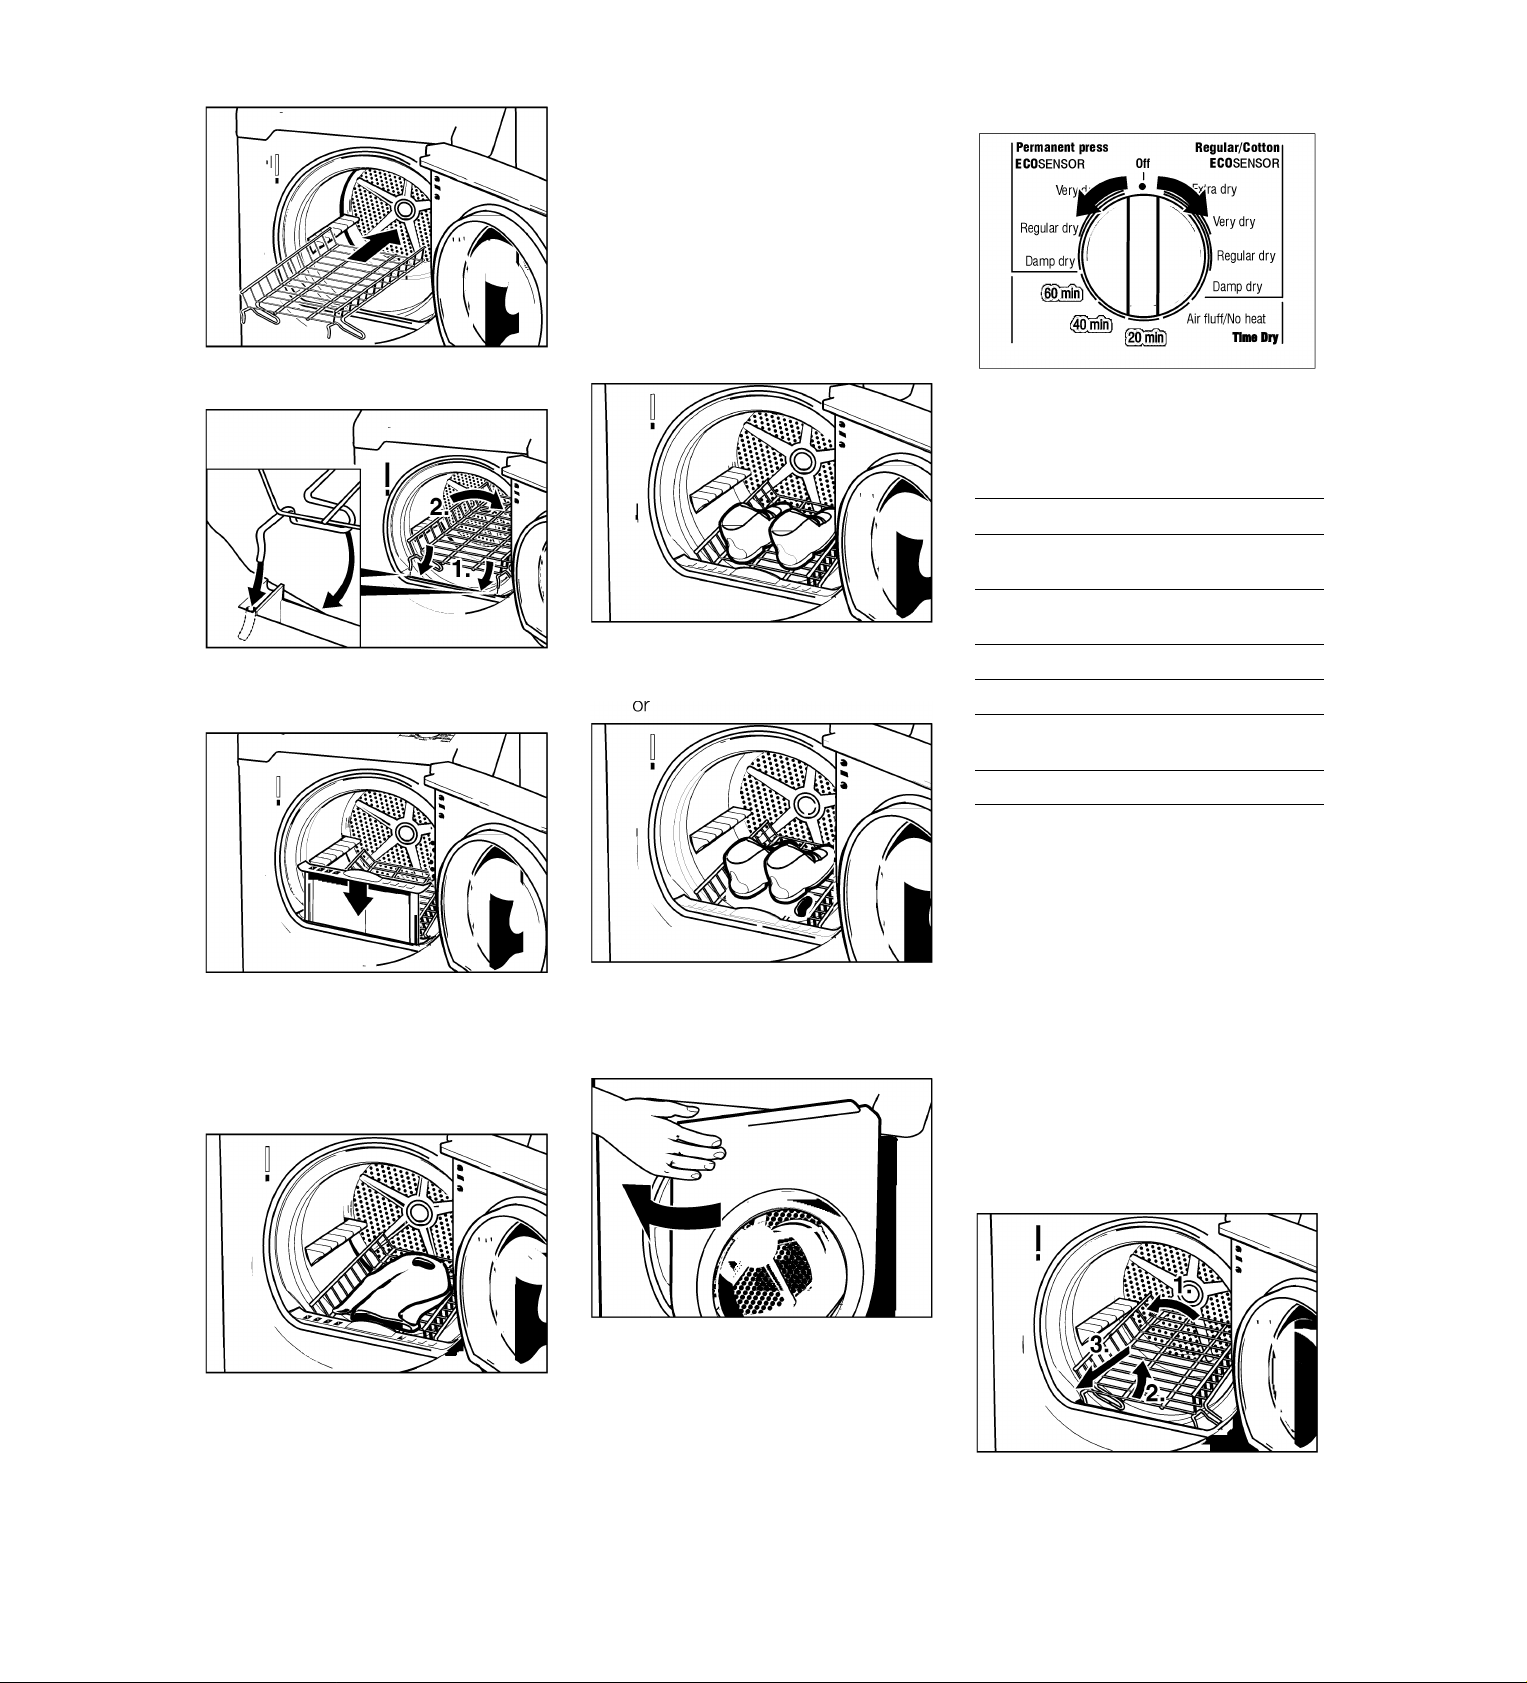
4. Lift the dryer rack horizontally into
the drum.
4. Follow directions for time program
on next page.
Drying shoes on the dryer rack:
1. Prepare shoes.
□ Clean shoes to prevent the drum
from becoming soiled.
□ If preparing sports shoes, extend
the tongue.
□ Loosen or remove shoe-laces.
□ Remove insoles and heel pads.
Choose a time program
1. Rotate program selector to “Time
dry/.... min.”.
- Select the drying time from the
following table according to the
laundry type.
Laundry type Required drying time
5. Place the dryer rack so that the
catches are inserted at the front in
the locating holes.
6. Insert the lint filter.
The lint filter must be inserted flush
with the drum edge!
Drying laundry items on the dryer
rack
1. Fold laundry to fit the dryer rack.
2. Place shoes on the rack.
□ Directly on the dryer rack
□ Roll up a towel and place the
heels of the shoes on the towel.
This will ensure a more uniform
drying result.
Thin woolen pullover
(approx. 0,8lbs/350 g)(e.g. 60 + 20 min)
Thick woolen pullover90-120 min.
(approx. 1,9lbs/850 g)(e.g. 60 + 40 min)
Skirt 60-90 min.
Trousers 60-90 min.
Small items
(e.g. gloves)
Shoes 30 min.
2. Press the “Start/Stop” button. The
“Start/Stop” indicator light
illuminates.
3. If the item of clothing still contains
residual moisture after the
indicated drying time:
□ Fold the item of clothing so that
the damp parts are on the
outside.
□ Restart the program and reduce
the drying duration depending
on the degree of residual
moisture.
4. After drying, spread out the
laundry at air for approx. 15 min.
(shoes for approx. 30 min.).
5. Remove the lint filter.
80 min.
30 min.
2. Place laundry loosely on the
basket. Do not crush! Laundry
must not touch the drum! Do not
allow items to hang over the dryer
rack!
3. Close the door.
3. Close the door.
6. Take the dryer rack out of the
drum.
17
Page 18
7. Re-insert the lint filter.
Cleaning and care
Cleaning the dryer
A WARNING A
TO AVOID
RISK OF EXPLOSION!
Never use solvents or highly
flammable liquids for cleaning.
ATTENTION
Incorrect cleaning may damage the
dryer. Do not spray with a water jet.
Do not use scouring agents or
all-purpose cleaners. Do not use
steam cleaners.
Wipe the housing and fascia with a soft
cloth and soapy water only.
Wipe the drum, door seal and inside of
the door with a damp cloth only.
Cleaning the lint filter
A dirty filter extends the drying time and
increases energy consumption.
The filter should be cleaned before and
after each drying process.
If a warning signal and an E01 warning
message are emitted during a drying
program, clean the filter immediately
and check the exhaust duct.
The program interrupts
E
automatically.
1. Switch off the dryer. Program
selector to “Off”.
A CAUTION
The inside of the door heats up
during the drying process.
2. Open the door.
4. Remove lint by stroking your hand
over the filter.
The filter should be lightly scrubbed
twice a year with warm soapy water.
The filter is cleaned when it no longer
holds water. The filter must be dried
thoroughly before being replaced.
5. Insert the filter.
6. Close the door.
Cleaning the exhaust duct
Inspect and clean the exhaust ducting
at least once a year to prevent
clogging. A partially clogged exhaust
can lengthen the drying time.
□ Turn off the circuit breaker
□ Pull out power supply plug
□ Disconnect the duct from the
dryer.
□ Vacuum and reconnect the duct.
Cleaning the moisture
sensor
18
The moisture sensor has to be cleaned
because a fine layer of transparent
buildup is deposited on the sensors.
3. Remove the lint filter.
Page 19
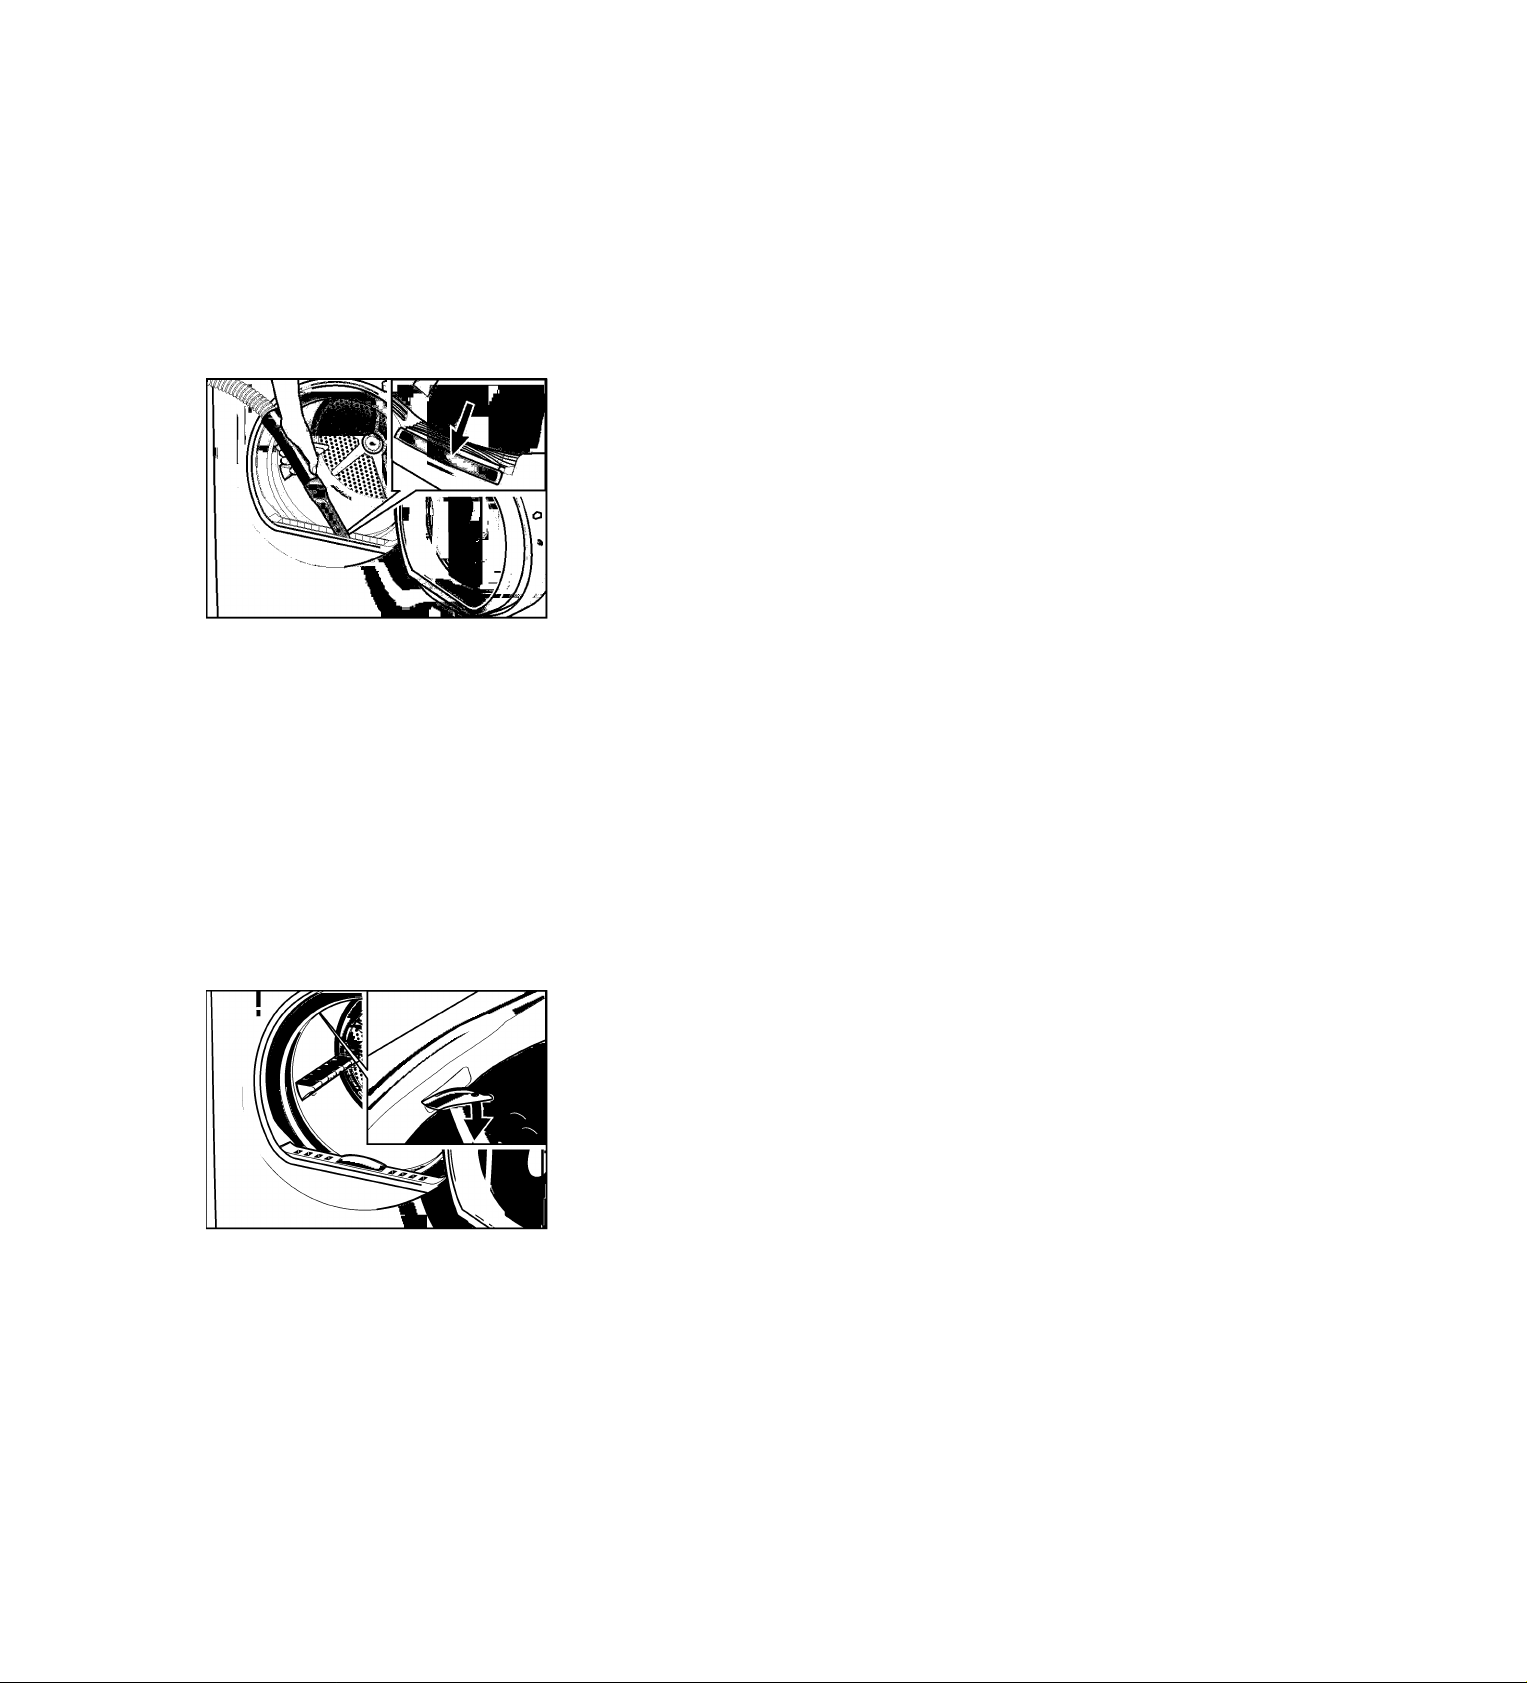
This deposit can easiiy be removed by
wiping the sensors (the two bars next
to the iint fiiter) with a cioth and a iittie
white vinegar.
Use white vinegar oniy!
Ciean the moisture sensor once a
month.
Cleaning the bearing
shield
Over time, fiuff from the drying process
coiiects in the bearing shieid.
This fiuff can be easiiy removed using
your vacuum cieaner, at ieast once a
month.
Change the light bulb
The dryer iight turns on inside the drum
when you open the door.
To change the iight buib:
□ Set program seiector to “Off”.
□ Turn off the circuit breaker.
□ Puii out power suppiy piug.
□ Open the door and iocate the iight
buib on the upper ieft side of the
seai.
□ Loosen the screw of the cover and
open the cover.
□ Turn buib counterciockwise.
Repiace the buib with a new
appiiance buib oniy (obtainabie
through parts department).
□ Repiace the cover and secure with
the screw.
□ Piug in dryer or reconnect power
suppiy.
19
Page 20

Troubleshooting
A WARNING A
TO AVOID RISK OF
ELEOTRIOAL SHOOKI
Repairs or replacement of parts
may be carried out by authorized
technicians only.
Problem
Dryer does not start.
“Start/Stop” Indloator light does not
Illuminate.
Program has been interrupted.
Awarning signal is emitted and the
display shows “E:01”.
Degree of drying has not been reaohed
or the drying time is too long.
Display may indioate “E:03”.
Drum light does not funotion.
“Start/Stop” indioator light does not
illuminate. “Wrinkle blook” indioator
lights.
The display shows “000”.
Lint filter LED is blinking after lint filter
has been oleaned
Possible cause Remedial action
Main plug not inserted at all or not inserted oorreotly.Insert main plug correctly.
A fuse of power supply has tripped.
“Start/Stop” button not pressed. Press “Start/Stop” button.
No program seleoted.
Door not olosed.
Ambient temperature below 41 °F/5 °C. Increase room temperature.
Lint filter dirty.
Exhaust air duot is blooked or too long. Clean exhaust air duct. Reduce exhaust air duct to
Fault in program sequenoe or malfunotion. Switch off dryer, leave to cool down for 30 min,
The room/oabinet is not adequately ventilated.Provide an adequate supply of fresh air.
Moisture sensor dirty.
Exhaust air duot is blooked or too long. Clean exhaust air extraction. Reduce exhaust air duct
Lint filter dirty.
Laundry was too wet. Spin laundry at higher speed in the washing
Unsuitable program seleoted.
Maximum drying time was exoeeded.
Motor limit temperature was exoeeded.
No program seleoted.
Light bulb defeotive, light bulb burned out. Change light bulb, see page 19.
No power supply. Guarantee power supply.
Light bulb is loose. Tighten light bulb. Remove and reinstall the cover as
Fault in program sequenoe or malfunotion. Switch off dryer, leave to cool down for 30 min,
Blinking of lint filter LED is not an indioation of a
problem. It is used only as a reminder.
Before calling the customer service,
check whether you can rectify the fault
yourself by means of the following
table.
If a fault cannot be rectified or a repair
is required:
Replace/switch on fuse.
Select program.
Close door.
Clean filter as described on page 18.
Switch off/switch on again.
maximum length as described on page 8.
Switch off/switch on again.
switch on again.
Restart program.
Switch off/switch on again.
Clean moisture sensor as described on page 18.
Switch off/switch on again.
to maximum length as described on page 8.
Switch off/switch on again.
Clean filter as described on page 18.
Switch off/switch on again.
machine. Switch off/switch on again.
Select program with aid of the program selection
table (see page 15). Switch off/switch on again.
Clean lint filter (see page 18).
Check exhaust air extraction.
Spin laundry at a higher speed in your washer.
Switch off dryer, leave to cool down for 30 min.
Switch on again. Start program.
Select program.
directed on page 24.
switch on again.
Restart program.
No action required. Light will stop blinking.
1. Set program selector to “Off”
2. Turn off the circuit breaker.
3. Pull the main plug out of the
socket.
4. Oall customer service
(see page 21).
20
Page 21
SERVICE and REPAIR
CAUTION
CAUTION - Label all wires prior
to disconneotion when servicing
controls. Wiring errors can cause
improper and dangerous
operation. verify proper
operation after servicing.
The Bosch dryers require no special
care other than the care and cleaning
noted above.
I i I If you are having a problem with
your dryer, before calling for
service please refer to Table on
page 20, following.
If service becomes necessary, contact
your dealer or installer or an authorized
service center. Do not attempt to repair
the appliance yourself. Any work
performed by unauthorized personnel
may void the warranty.
If you are having a problem with your
Bosch dryer and are not pleased with
the service you have received:
- First, please contact your installer
or the Bosch Authorized Service
Contractor in your area and
explain to them why you are not
satisfied. This will usually correct
the problem.
- If after working with your installer
or service person the problem still
has not been resolved to your
satisfaction, please let us know by
either writing to us at,
BSH Home Appliances
5551 McFadden Avenue
Huntington Beach, CA 92649
or, calling us at
1-800-944-2904.
Please be sure to include, if writing, or
have available, if calling, the following
information:
- Model Number
- Serial Number
- Date of Original Purchase
- Date Problem Originated
- Explanation of Problem
Also, if writing, please be sure to
include a daytime telephone number
and a copy of the sales invoice.
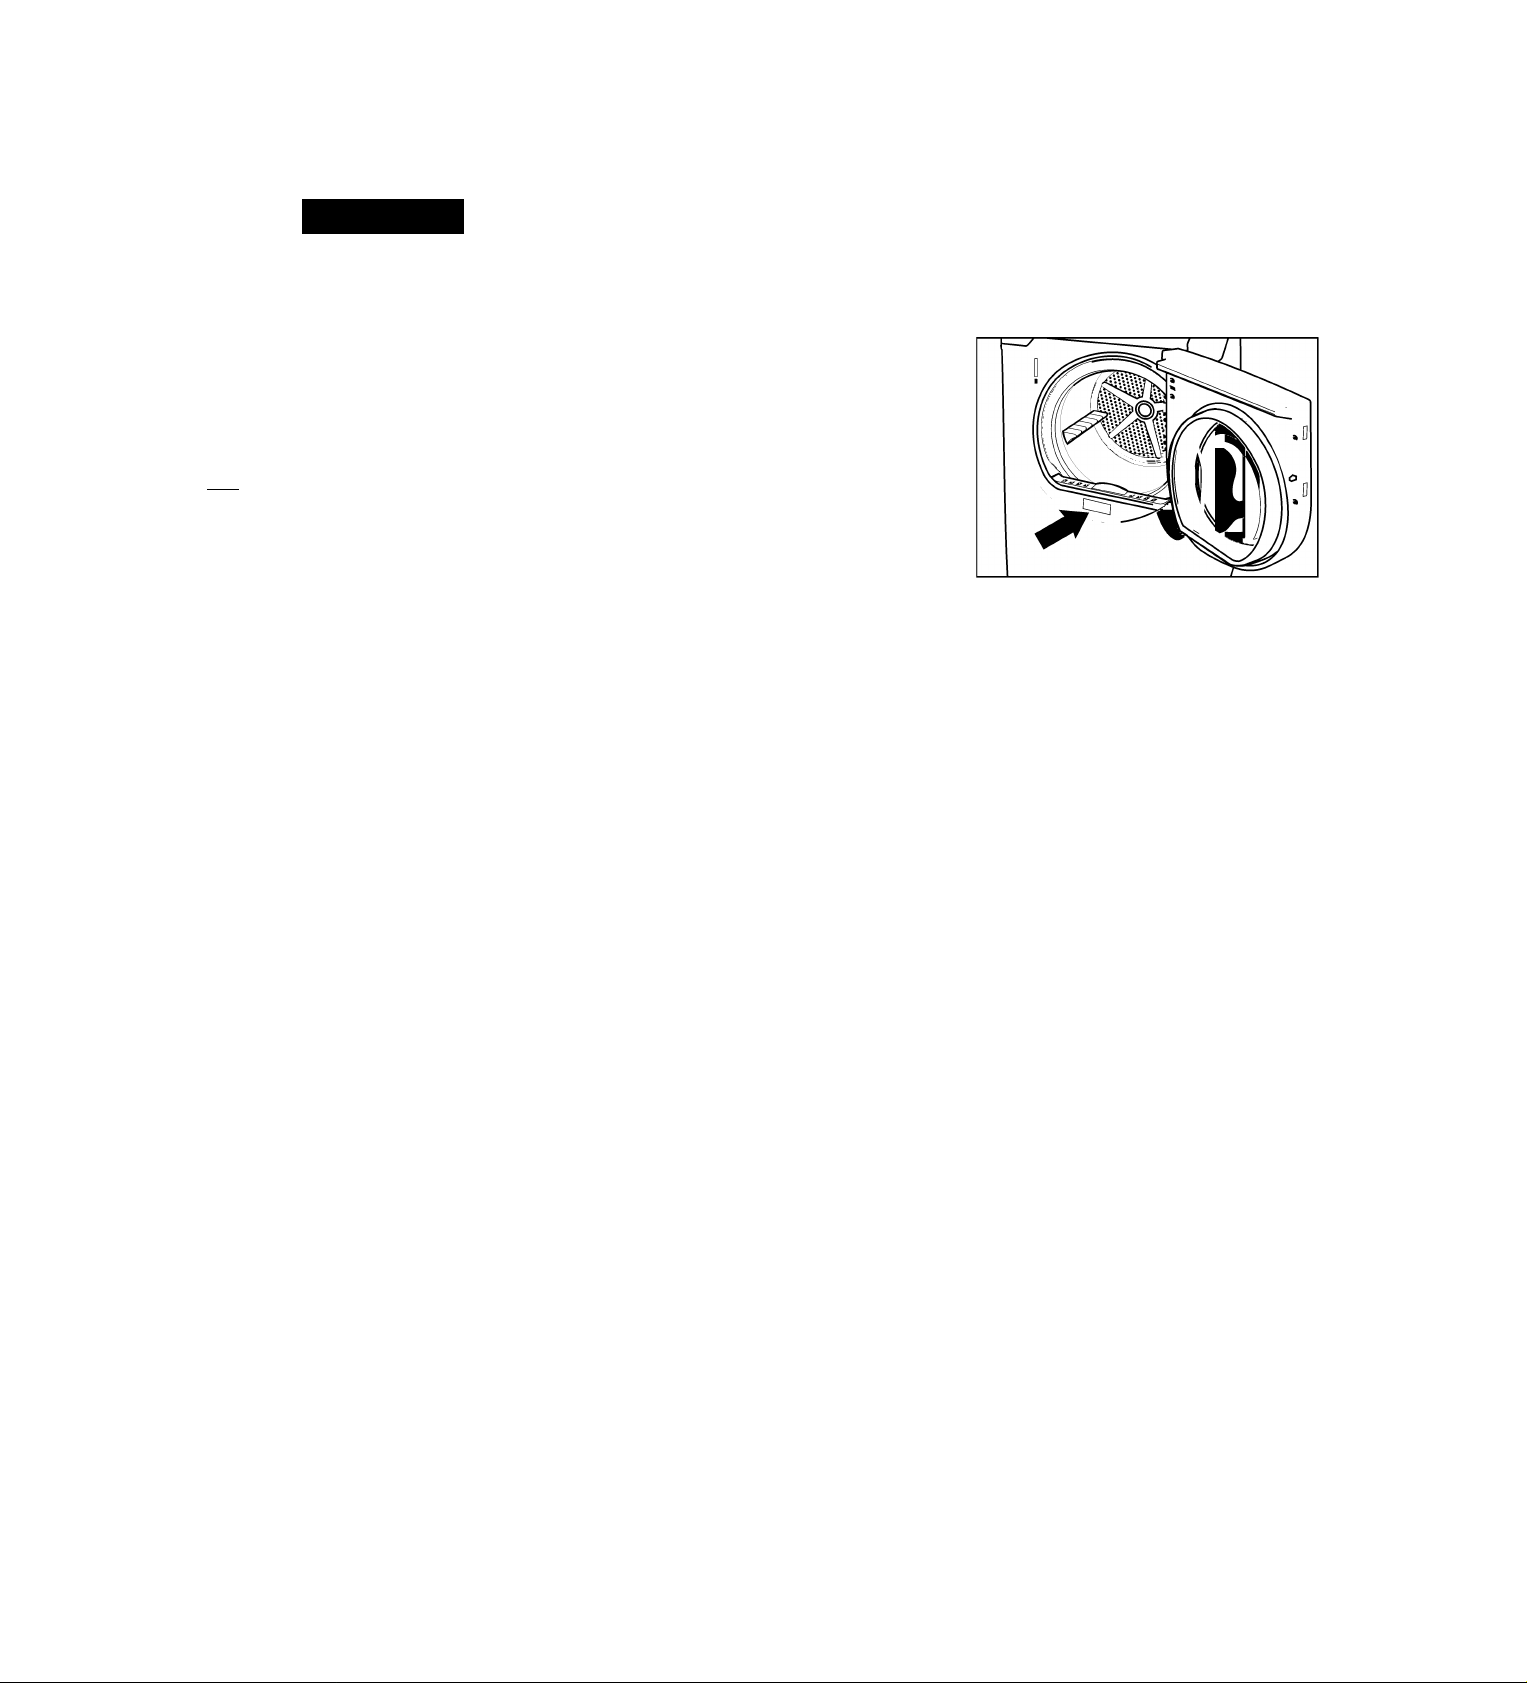
You will find the model number and
serial number information on the rating
plate located on the inside of the front
panel.
21
Page 22

STATEMENT OF WARRANTIES BOSCH CLOTHES DRYERS
The warranties provided by BSH Home
Appiiances (“Bosch”) in this Statement
of Warranties appiy oniy to Bosch
LENGTH OF WARRANTY SCOPE OF WARRANTY
1 Year Fuii Limited Warranty
From Date of instaiiation*
2 Year Limited Warranty
From Date of instaiiation*
2 Year Limited Warranty on Eieotronios
From Date of instaiiation*
2 Year Limited Warranty on Motor
From Date of instaiiation*
* Date of instaiiation shaii refer to the eariier of the date the oiothes dryer is instaiied or ten business days after the deiivery date.
Exclusions
This warranty does not cover service
caiis or repairs to correct the instaiiation
of the ciothes dryer, to provide
instructions on the use of your ciothes
dryer, to repiace house fuses or correct
piumbing or the eiectric wiring in your
home or to repair any ciothes dryer
that’s use was in a manner other than
what is normai and customary for home
use. In addition, the warranties
provided in this Statement exciude any
defects or damage arising from
accident, aiteration, misuse, abuse,
improper instaiiation, unauthorized
service work, externai forces beyond
Bosch’s controi, such as fire, fiood,
and other acts of God, or instaiiation
not in accordance with iocai eiectricai
and piumbing codes.
Ciothes dryers soid to the first using
purchaser by Bosch or its authorized
deaiers, retaiiers or service centers in
Bosoh wiii repair or repiaoe, free of oharge, any oomponent part that is
proven defeotive under oonditions of normai home use, iabor and
shipping oosts inoiuded. Warranty repair servioe must be performed by
an authorized Bosoh Servioe Center.
Bosoh wiii provide repiaoement parts, free of oharge, for any oomponent
part that is proven defeotive under oonditions of normai home use,
shipping oosts inoiuded, iabor oharges exoiuded.
Bosoh wiii repair or repiaoe, free of oharge, any mioroprooessor or printed
oirouit board that is proven defeotive under oonditions of normai home
use from the date of originai instaiiation, iabor oharges exoiuded.
Bosoh wiii repair or repiaoe, free of oharge, any motor or oomponent part
of the motor that is proven defeotive under oonditions of normai home
use from the date of originai instaiiation, iabor oharges exoiuded.
Labor charges incurred in the repair or
repiacement of any ciothes dryer after a
period of one year from date of
instaiiation shaii not be covered by this
warranty. Any and aii repiaced and/or
repaired parts shaii assume the identity
of the originai for purposes of the
appiicabie warranty period. TO THE
EXTENT PERMITTED BY LAW, THIS
WARRANTY IS IN LIEU OE ALL OTHER
EXPRESS AND IMPLIED
WARRANTIES, INCLUDING THE
IMPLIED WARRANTIES OE
MERCHANTABILITY AND EITNESS
EOR A PARTICULAR PURPOSE.
BOSCH DOES NOT ASSUME ANY
RESPONSIBILITY EOR INCIDENTAL
OR CONSEQUENTIAL DAMAGES.
the United States or Canada. The
Warranties provided herein are not
transferabie.
TO OBTAIN WARRANTY SERVICE,
CONTACT THE NEAREST BOSCH
AUTHORIZED SERVICE CENTER OR
CALL 1-800-944-2904, OR WRITE TO:
BSH HOME APPLIANCES CORP.,
5551 MCEADDEN AVENUE
HUNTINGTON BEACH
CA 92649.
BE SURE TO PROVIDE YOUR
CLOTHES DRYER’S MODEL, SERIAL
NUMBER, PURCHASE DATE AND
THE SELLER’S NAME,
ADDRESS.AND A COPY OE THE
SALES INVOICE.
22
Page 23

Table des matières
Définitions .......................................................................................................................................................................... 24
INSTRUCTIONS DE SÉCURITÉ IMPORTANTES............................................................................................................ 24
Instructions de mise à ia terre ...................................................................................................................................... 25
Instructions d’installation.................................................................................................................................................... 26
Introduction ................................................................................................................................................................... 26
Informations sur ia mise au rebut ................................................................................................................................. 26
Avant d’instaiier ie sèche-iinge ..................................................................................................................................... 26
Branchement éiectrique................................................................................................................................................ 27
Raccordement du conduit d’échappement.................................................................................................................... 29
Accessoires.................................................................................................................................................................... 30
Instaiiation pas à pas ................................................................................................................................................... 31
Check-iist préaiabie à i’empioi du sèche-iinge ............................................................................................................ 31
Préparation pas à pas au transport du sèche-iinge..................................................................................................... 31
INSTRUCTIONS D’UTILISATION ..................................................................................................................................... 32
Présentation de votre nouveau sèche-iinge.................................................................................................................. 32
Le bandeau de commande............................................................................................................................................ 33
Résumé des instructions.................................................................................................................................................... 34
Informations de sécurité..................................................................................................................................................... 35
Avant d’aiiumer ie sèche-iinge....................................................................................................................................... 35
Utiiisation du sèche-iinge.............................................................................................................................................. 38
Protection du sèche-iinge ............................................................................................................................................. 35
Protection de l’environnement ........................................................................................................................................... 35
Avant d’utiliser le sèche-linge pour la première fois .......................................................................................................... 35
Débranchement temporaire du sèche-linge....................................................................................................................... 35
Linge................................................................................................................................................................................... 36
Détermination de ia nature du tissu.............................................................................................................................. 36
Conseiis pour ie séchage.............................................................................................................................................. 36
Sélection du programme .................................................................................................................................................... 36
Programmes automatiques........................................................................................................................................... 36
Programmes assortis d’une durée ............................................................................................................................... 36
Options ......................................................................................................................................................................... 36
Indicateur de dérouiement du programme.................................................................................................................... 37
Tableau de sélection des programmes.............................................................................................................................. 37
Utilisation............................................................................................................................................................................ 38
Utiiisation du sèche-iinge.............................................................................................................................................. 38
Utiiisation du tiroir de séchage (options)....................................................................................................................... 39
Nettoyage et entretien........................................................................................................................................................ 40
Nettoyage du sèche-iinge ............................................................................................................................................. 40
Nettoyage du fiitre à peiuches....................................................................................................................................... 40
Nettoyage du conduit d’échappement.......................................................................................................................... 41
Nettoyage des capteurs d’humidité ............................................................................................................................. 41
Nettoyage de ia fiasque ............................................................................................................................................... 41
Changer i’ampouie de i’éciairage................................................................................................................................. 41
Dérangement et remèdes................................................................................................................................................... 42
SERVICE ET RÉPARATIONS...................................................................................................................................... 43
DECLARATION DES GARANTIES SECHE-LINGE BOSCH............................................................................................ 44
Exciusions de garantie.................................................................................................................................................. 44
23
Page 24

Vous venez d’acheter un sèche-linge
Bosch et nous vous en félicitons. Vous
venez de faire le même choix que font
tous les consommateurs attendant de
leur sèche-linge des performances
exceptionnelles.
Ce sèche-linge se conforme à la norme
UL 2158/CAN/CSA-22.2 No. 112-97.
Appareils de séchage des vêtements.
Ce sèche linge offre une
caractéristique particulièrement
intéressante: il consomme peu
d’énergie.
Une philosophie de fonctionnement
simple, tout un éventail de programmes
de séchage personnalisés et un
agréable retour haptique attestant de la
robustesse de l’appareil font de ce
dernier un assistant pratique au service
de votre foyer.
Ce sèche-linge Bosch offre les
caractéristiques standard suivantes:
- Système de séchage hautement
efficace et précis.
- Grand tambour d’une contenance
de 6,4 pieds cubes (181 litres),
capable de recevoir jusqu’à 17.6
lbs (8 kg) de linge.
- Grand orifice d’accès
(18”/ 457 mm), verrouillage de
la porte avec fonction d’arrêt au de
la porte.
- Fonctionnement extrêmement
silencieux.
- Cycles automatiques contrôlés par
des capteurs.
- Cycles chronométrés
20, 40 et 60 minutes
Chaque sèche-linge quittant notre
usine a subi des tests complets de
performances et se trouve en parfait
état de marche. Si vous souhaitez
formuler quelque question que ce soit
notamment sur l’installation de votre
sèche-linge, notre équipe du service
après-vente se fera un plaisir d’y
répondre.
Vous trouverez d’autres informations et
tout un choix de nos produits sur le site
Web suivant:
www.boschappliances.com
Information
Veuillez s.v.p. lire et respecter
l’intégralité de cette notice d’installation
et d’utilisation, ainsi que toutes les
informations qui ont été fournies avec
ce sèche-linge.
Définitions
A AVERTISSE- A
^ MENT
Avertissement - Ce symbole
vous prévient d’un danger de
mort ou d’un risque de blessures
graves si vous ne respeotez pas
l’avertissement qui
l’aooompagne.
A
A PRUDENCE
Prudence - Ce symbole vous
prévient d’un risque de blessures
si vous ne respeotez pas
l’avertissement qui
l’aooompagne.
PRUDENCE
PRUDENCE - Ce symbole vous
prévient d’un risque de dégâts
matériels si vous ne respeotez
pas l’avertissement qui
l’aooompagne.
AINSTRUCTIONS DE SÉCURITÉ IMPORTANTES
AVERTISSE- A
A
A
MENT
A
Pour réduire le risque d’inoendie,
de ohoo éleotrique, de blessure
grave ou éoarter tout danger de
mort et / ou risque de dégâts
matériels pendant l’utilisation de
votre sèohe-linge, veuillez s.v.p.
prendre des préoautions
fondamentales oomprenant
oelles énonoées oi-après.
1. Veuillez lire toutes les instructions
figurant dans cette notice avant
d’utiliser le sèche-linge. A la
livraison, les sèche-linge Bosch
sont accompagnées d’une notice
d’utilisation, de maintenance et
d’installation.
2. Ne faites pas sécher de pièces de
linge qui ont été préalablement
nettoyées, lavées et tachées avec
ou trempées dans de l’essence,
des solvants de dégraissage à sec
ou d’autres substances
explosives, car toutes ces
substances dégagent des vapeurs
susceptibles de s’enflammer ou
d’exploser.
3. Lorsque les enfants arrivent à l’âge
de faire maroher l’appareil, leurs
parents ou tuteurs légaux ont la
responsabilité de veiller à oe que
des personnes qualifiées leur
enseignent des méthodes
d’utilisation sûres.
4. Ne permettez jamais aux enfants
de jouer sur ou aveo l’appareil.
Surveillez les enfants de près
lorsque vous servez de l’appareil à
proximité des enfants.
5. Avant de mettre l’appareil hors
servioe ou au rebut, retirez la porte
du oompartiment de séohage.
6. N’introduisez pas les mains dans
l’appareil tandis que le tambour
tourne.
7. N’installez ni ne stookez pas
l’appareil dans un endroit exposé
aux intempéries.
8. Ne oherohez pas à modifier les
oommandes de l’appareil.
9. Ne tentez pas de réparer ni
remplaoer quelque pièoe que oe
soit de l’appareil, ne le soumettez
pas à des opérations de
maintenanoe autres que oelles
spéoifiquement indiquées dans les
1 Ce symbole est destiné à attirer
votre attention sur quelque chose
de particulier.
instruotions de maintenanoe ou de
réparation et permises à
l’utilisateur, oeoi à oondition que
vous en oompreniez le oontenu et
ayez l’habilité requise pour réaliser
oes opérations.
10. Pour supprimer l’éleotrioité
statique, n’utilisez pas
d’adouoissant ou produit pour
tissu, sauf si le fabrioant le
reoommande.
11. Ne vous servez pas de la ohaleur
pour séoher des artioles oontenant
du oaoutohouo mousse (une
étiquette peut indiquer la présenoe
de mousse de latex) ou des
matériaux en oaoutohouo texturés
de façon similaire. Les matériaux
oontenant du oaoutohouo mousse
peuvent, dans oertaines
oiroonstanoes, s’enflammer et
brûler spontanément lorsque
éohauffés.
12. Avant et après le passage,
nettoyez les peluohes déposées
sur le filtre.
13. Veillez à oe que la zone située
autour de l’orifioe de sortie et les
zones voisines soient exemptes de
bourres, peluohes, poussières
24
Page 25

accumulées. Un orifice obstrué
risque de réduire le flux d’air.
14. Il faudrait que le personnel de
service après-vente qualifié nettoie
régulièrement l’intérieur de la
machine et le conduit
d’échappement d’air.
15. Avant de soumettre l’appareil
à toute maintenance, débranchez
toujours sa fiche mâle de la prise
de courant. Pour débrancher,
saisissez la fiche mâle et non pas
le cordon de celle-ci.
16. Rangez tous les produits
chimiques et accessoires de
traitement du linge dans un endroit
sec et frais, en respectant les
instructions publiées par leurs
fabricants. Cet endroit doit se
trouver hors de portée des
enfants.
17. Pour réduire le risque d’incendie,
ne mettez jamais dans le
sèche-linge des vêtements,
chiffons de nettoyage, accessoires
de nettoyages à franges
comportant des traces de toute
substance inflammable comme
l’huile végétale, l’huile de cuisine,
les huiles ou produits distillés à
base de pétrole, les cires,
graisses, etc. Une ou plusieurs
substances inflammables peuvent
être restées sur ces pièces de
linge même après le lavage. Elles
risquent de se mettre à fumer ou
de prendre feu spontanément.
18. Ne mettez pas à sécher dans
l’appareil des pièces de linge
exposées aux huiles de cuisson.
Ces pièces de linge contaminées
par les huiles de cuisson peuvent
contribuer à une réaction chimique
qui ferait prendre feu à la charge
de linge.
19. Ne vous asseyez pas sur le
sèche-linge.
20. Pour réduire le risque d’incendie
ou de choc électrique, N’UTILISEZ
PAS de prolongateur ni
d’adaptateur pour raccorder le
sèche-linge à une prise du secteur
électrique.
21. N’utilisez ce sèche-linge que
conformément à sa destination.
22. Vérifiez toujours le contenu des
poches et retirez tous les objets
trouvés. Les briquets à cigarettes
sont particulièrement dangereux.
23. Remplacez les cordons
d’alimentaton électriques usés
et/ou les fiches mâles comportant
des faux contacts.
24. Ne faites pas marcher le
sèche-linge tant que tout
couvercle ef/ou panneau enlevé
n’a pas éfé remis en place.
25. Ne faifes pas marcher le
sèche-linge s’il lui manque des
pièces ou si elles sonf cassées.
26. Ne fenfez pas de confourner un
disposifif de sécurifé quelconque.
27. Avec ce sèche-linge, n’ufilisez pas
de conduif flexible en plasfique ou
dans un mafériau non méfallique.
Les conduifes flexibles en
plasfique ou dans fouf mafériau
non méfallique engendrenf un
risque pofenfiel d’incendie.
28. Ne faifes pas marcher le
sèche-linge fanf que vous n’êfes
pas sûr si le sèche-linge a éfé
insfallé conformémenf aux
insfrucfions D’insfallafion, ef que
l’insfallafion ainsi que le
raccordemenf à la ferre se
conforme à fous les arrêfés
municipaux ef/ou les aufres
règlemenfs ef exigences
applicables.
29. Touf manquemenf à insfaller,
enfrefenir ef/ou faire marcher le
sèche-linge en conformifé avec les
insfrucfions du fabricanf peuf
provoquer des dommages
corporels ef/ou des dégâfs
mafériels.
30. Pour évifer d’endommager le sol
ou la proliférafion de moisissures,
ne laissez pas l’eau répandue ou
les éclaboussures en permanence
aufour de l’appareil ou sous
celui-ci.
Remarques :
A Les MISES EN GARDE ef
AVERTISSEMENTS
IMPORTANTS figuranf dans le
présenf manuel ne sauraienf
envisager foufes les sifuafions
possibles ef imaginables.
Eaifes preuve de bon sens, de
prudence ef de soin pendanf
l’insfallafion, l’enfrefien ef
l’ufilisafion de ce sèche-linge.
B Confacfezfoujours vofre
revendeur, disfribufeur, agenf
du service après-venfe (SAV)
ou le fabricanf en présence de
problèmes ou sifuafions vous
paraissanf
incompréhensibles.
Respecfez égalemenf les
informafions de sécurifé
incluses dans les
INSTRUCTIONS
D’INSTALLATION ef les
INSTRUCTIONS
D’UTILISATION.
Instructions de mise à la
terre
Il faut impérativement raccorder ce
sèche-linge à la terre. En cas de
dysfonctionnement ou de panne,
sa liaison avec la terre réduira le risque
de choc électrique en fournissant au
courant électrique un chemin de
passage à résistance électrique très
réduite.
Pour le CANADA
Cet appareil est équipé d’un cordon
d’alimentation avec fil intégré de
raccordement de l’appareil à la terre, et
d’une fiche de raccordement à la terre.
Il faudra brancher la fiche dans une
prise femelle appropriée, reliée à la
terre conformément à la réglementation
et aux décrets locaux.
Pour les Etats-Unis
Votre sèche-linge a été livré sans
cordon d’alimentation. Ce cordon doit
se conformer aux exigences suivantes :
- Il doit figurer dans la liste UL
américaine.
- Il doit supporter au minium une
tension comprise entre 208 et 240
volts.
- Il doit supporter jusqu’à
30 ampères.
- Il doit être du type SRDT ou DRT
(UL2158).
- Il doit mesurer au minimum 5 pieds
de long.
AVERTISSE
MENT
Le branchement inexpert du fil
chargé de raccorder l’appareil à la
terre peut engendrer un risque de
choc électrique. Avec l’aide d’un
électricien agréé ou d’un technicien
du service après-vente (SAV),
vérifiez en cas de doute que le
sèche-linge est bien raccordé à la
terje.NE MODIEIEZ PAS LA EICHE
MÂLE accompagnant l’appareil. Si
elle ne rentre pas dans la prise,
demandez à un électricien agréé de
vous installer une prise femelle
appropriée à ce sèche-linge.
Conservez cette notice
afin de pouvoir la
consulter a nouveau
ultérieurement.
Si l’appareil doit un jour changer de
propriétaire, remettez-lui le manuel en
même temps que le sèche-linge.
CONSERVEZ
CETTE NOTICE
25
Page 26

Instructions.d’installation
Introduction
Veuillez lire ces instructions
d’installation entièrement et
soigneusement. Elles vous feront
économiser du temps et des efforts et
vous aideront à obtenir des
performances optimales de votre
sèche-linge. Veillez à bien respecter
tous les avertissements et mises en
garde énoncés.
Les présentes instructions d’utilisation
sont destinées à des installateurs
qualifiés. Outre le respect de ces
instructions, vous devez installer le
séchoir conformément à toutes les
réglementations locales ou bien, en
l’absence de telles recommandations:
- Aux Etats-Unis : conformez-vous
au National Electric Code,
ANSI/NFPA70 - en son édition la
plus récente / en conformité avec
la réglementation édictée par l’Etat
de résidence, la réglementation
municipale et/ou locale.
- Au Canada : conformez-vous au
Code Electrique Canadien C22.1 en son édition la plus récente / en
conformité avec la réglementation
édictée par la province de
résidence, la réglementation
municipale et/ou locale.
Informations sur la mise
au rebut
Mise au rebut de l’emballage
A AVERTISSE- A
^ MENT ^
Eloignez les enfants de tout carton
d’emballage et composants
d’emballage. Lesfeuilles en
plastique et les cartons pliants
comportent un risque
d’étouffement.
Tous les matériaux composant
l’emballage sont écologiques et
recyclables. Pour contribuer vous aussi
à la protection de la nature, mettez les
matériaux d’emballage au rebut de
façon respectueuse
de l’environnement.
Pour connaître les circuits de mise au
rebut, veuillez consulter votre
revendeur ou les services compétents
de votre mairie.
Mise au rebut de l’ancien
appareil
A AVERTISSE- A
^ MENT ^
Si l’appareil ne doit plus jamais
servir, débranchez sa fiche mâle de
la prise de courant, coupez son
cordon d’alimentation etjetez-le
avec la fiche mâle.
Pour empêcher que des entants ne
s’enferment dans l’ancien appareil et
risquent leur vie, détruisez lesystème
de fermeture du hublot ou retirez ce
dernier.
Les appareils anciens ne sont pas des
déchets sans valeur! Un recyclage
respectueux de l’environnement
permet de récupérer de précieuses
matières premières.
Pour connaître les circuits de mise au
rebut, veuillez consulter votre
revendeur ou les services compétents
de votre mairie.
Avant d’installer
le sèche-linge
Déballage de l’appareil
A PRUDENCE
Ce sèche-linge est très lourd.
Ne tentez pas de le soulever.
Ne tentez pas de soulever l’appareil
par certaines parties saillantes (sa
porte par ex.). Vous risqueriez de les
casser.
PRUDENCE
Retirez soigneusement tout
l’emballage de l’appareil, ceci pour
empêcher d’endommager des
surfaces.
Vérifiez si le sèche-linge a subi
des dégâts en cours de transport.
Ne branchez pas un sèche-linge
visiblement endommagé. En cas de
doute, contactez votre revendeur.
Accessoires fournis
Pour les Etats-Unis
A PRUDENCE
L’appareil est fourni sans cordon
d’alimentation. Le branchement du
cordon d’alimentation est réservé
uniquement à des personnes
qualifiées.
PRUDENCE
Après avoir retiré l’emballage, sortez
tous les objets éventuellement
présents dans le tambour.
Ce sèche-linge a été livré en tant
qu’appareil complet. Vous trouverez la
notice d’utilisation et les accessoires
d’origine dans letambour.
Lieu d’installation
AVERTISSE- A
A
A
MENT
N’installez pas ce sèche-linge :
- hors de locaux fermés par une
porte,
- dans un environnement où de
l’eau goutte,
- près de matériaux inflammables,
- dans des locaux comportant un
risque de gel,
- dans des locaux pouvant contenir
du gaz, de l’essence ou d’autres
combustibles,
- dans des placards à portes
fermant à clé et dans des alcôves.
Le local d’installation doit être bien
aéré, sinon le sèche-linge fonctionnera
en dessous de ses performances
optimales.
Ne faites pas marcher le sèche-linge à
des températures supérieures à 10^4 °F
(40 °C) et inférieures à 41 °F (5 °C). Les
basses températures affectent le
séquencement automatique des
programmes et peuvent allonger
la durée de séchage.
La surface sur laquelle se trouve
lesèche-linge doit être propre,
horizontale et dure. N’installez jamais
l’appareil sur des tapis et moquettes.
Compensez les irrégularités du sol par
ses pieds réglables en hauteur.
Installez le séchoir, puis assurez sa
planéité latéralement et d’avant en
arrière. Utilisez un niveau à bulle.
N’enlevez jamais les pieds réglables en
hauteur!
Les dimensions de la surface
d’installation dépendent de celles du
sèche-linge. Vérifiez qu’il reste
suffisamment de place pour que sa
porte puisse tourner!
A
26
Page 27

Dimensions Poids
a 27,0” (686 mm)
b 31,8” (808 mm)
C 37,2” (945 mm)
d
angle
Si vous installez le sèche-linge dans un
placard d’encastrement, respectez les
distances minimums conformément au
tableau ci-dessous :
Distance minimum à respecter lors de
l’installation
19,7" (500 mm)
170 - 180°
125 Ibs
(56 kg)
avec
l'emballage
143 Ibs
(64 kg)
Placard
Côtés 0” (0 mm)
Dessus 12” (305 mm)
Arrière *
0” (0 mm)
* le plus près possible du mur, en tenant
compte du système d’aération.
Informations importantes sur les
distances minimums
- Suivant le côté de l’appareil sur
lequel a été raccordé le conduit
d’échappement, il faudra prévoir
un espace libre d’au minimum 5 ^
pouces (14 cm) pour faire passer
le conduit/les fixations (voir page
29).
- Des distances supérieures aux
distances minimums indiquées
réduisent le risque d’apparition de
moisissures à l’arrière de
l’appareil.
- Des distances supérieures
réduisent la propagation du bruit.
- Des distances supérieures
facilitent l’installation et les
opérations de maintenance.
- Si le sèche-linge a été installé dans
un local exigu, il faudra prévoir sur
la porte des orifices d’aération
ayant la taille minimum spécifiée.
La porte du sèche-linge a été fournie
avec des charnières sur la droite. Si
nécessaire, ces charnières se laissent
transférer sur le côté gauche.
Avant de modifier le sens d’ouverture
de la porte, veuillez s.v.p. contacter
votre revendeur ou l’équipe du SAV
(voirpage 43).
Branchement électrique
A AVERTISSE-
^ MENT
Le raccordement du cordon
d’alimentation électrique est réservé
uniquement à une personne
qualifiée.
Raccordez l’appareil à un circuit de
dérivation individuel.
N’utilisez pas d’adaptateur.
N’utilisez pas de prolongateur.
Ne retirez pas la broche de
connexion à la terre.
Pour le CANADA
Votre sèche-linge a été livré équipé
d’un cordon d’alimentation figurant
dans la liste CSA canadienne.
Ce sèche-linge requiert une prise
femelle à 4 fils.
Lorsque vous installez la prise femelle
recevant le cordon d’alimentation,
veillez bien à ce qu’il reste accessible
une fois le sèche-linge en position.
Le remplacent du cordon
d’alimentation est réservé uniquement
à une personne qualifiée. Utilisez un
cordon d’alimentation à 4 fils (voir la
procédure de branchement électrique
décrite ci-dessous pour les Etats-Unis).
Pour les Etats-Unis
Votre sèche-linge a été livré sans
cordon d’alimentation. Ce cordon doit
se conformer aux exigences suivantes :
- Il doit figurer dans la liste UL
américaine.
- Il doit supporter au minium une
tension comprise entre 208 et 240
volts.
- Il doit supporter jusqu’à
30 ampères.
- Il doit être du type SRDT ou DRT
(UL2158).
- Il doit mesurer au minimum 5 pieds
de long.
AVERTISSE
A
MENT
Le raccordement du cordon est
exclusivement réservé à un
électricien agréé.
N’utilisez qu’un cordon
d’alimentation homologué UL,
supportant un ampérage de 30 A et
comportant un frein destiné
à absorber la tension mécanique.
Respectez les instructions publiées
par son fabricant.
Ne branchez pas l’extrémité du
cordon d’alimentation dans une
prise femelle sous tension avant
d’avoir raccordé les fils du cordon
aux bornes de l’appareil et d’avoir
refermé le boîtier de jonction / de
distribution comme décrit
ci-dessous.
Seul un cordon à 4 fils est autorisé si
vous installez l’appareil dans un
mobile home, dans un
camping-car, dans une nouvelle
installation de circuit de branche ou
dans une zone où les
réglementations locales interdisent
une mise à la terre par le neutre.
27
Page 28

Branchement d’un cordon
d’alimentation électrique à 4 fils
1. Défaites les vis retenant le
couvercle du boîtier à bornes situé
en haut à l’arrière de l’appareil.
1 - Boîtier à bornes
2 - Bande de raccordement à la terre
3 - Fixation destinée au frein à câble
2. Desserrez la vis inférieure de la
bande de raccordement à la terre.
Placez la vis sur l’emplacement
GROUND (Terre). Aplanissez cette
bande de terre et laissez-la pendre
librement.
3. Montez le frein à cordon contre le
support angulaire. Serrez la vis.
4. Dans le boîtier à bornes, desserrez
les 2 vis comportant la mention L
et la vis comportant la mention N.
Desserrez également la vis de la
borne GROUND (Terre).
5. Faites passer le cordon à 4 fils par
le frein à cordon homologué UL.
6. Serrez les vis du frein à un couple
de 2,5 Nm, de sorte que le cordon
d’alimentation ne puisse plus se
déplacer.
7. Fixez le fil de terre (vert) contre la
borne GROUND. Serrez la vis à un
couple de 2,5 Nm de sorte que le
fil de terre soit fixé de manière
sûre.
8. Fixez les 2 fils extérieurs (rouge et
noir) du cordon aux deux bornes
comportant la lettre L. Raccordez
le fil restant (blanc) à la borne
comportant la lettre N.
9. Serrez les 3 vis à un couple
3,0 Nm pour que les fils
d’alimentation soient fermement
retenus en place.
10. Vérifiez le frein à cordon
homologué UL et assurez-vous
que ce frein est bien serré et qu’il
ne peut pas tourner.
11. Replacez le couvercle sur le boîtier
à bornes puis fixez-le en place.
I i I Assurez-vous que le frein à câble
U.L. se trouve hors du couvercle.
L’appareil est maintenant prêt à ce que
vous branchiez sa fiche mâle dans une
prise de courant à quatre fil débitant la
tension adéquate.
Branchement d’un cordon
d’alimentation électrique à 3 fils
1. Défaites les vis retenant le
couvercle du boîtier à bornes situé
en haut à l’arrière de l’appareil.
2. Assurez-vous de la présence
d’une bande de raccordement à la
terre.
3. Montez le frein à cordon contre le
support angulaire. Serrez la vis.
4. Dans le boîtier à bornes, desserrez
les 2 vis comportant la mention L
et la vis comportant la mention N.
5. Enfilez le cordon trifilaire par le frein
à cordon U.L.
6. Sur le frein U.L. à cordon, vissez
les vis à un couple de 2,5 Nm de
sorte que le cordon d’alimentation
ne puisse plus bouger.
7. Fixez les 2 fils extérieurs (rouge et
noir) aux deux bornes comportant
la mention L, et le fil restant (blanc)
à la borne comportant la mention
N.
8. Vissez les 3 vis à un couple de 3,0
Nm pour qu’elles retiennent les fils
bien en place.
9. Vérifiez le frein à cordon
homologué UL et assurez-vous
que ce frein est bien serré et qu’il
ne peut pas tourner.
10. Replacez le couvercle sur le boîtier
à bornes puis fixez-le en place.
|~n Assurez-vous que le frein à câble
U.L. se trouve hors du couvercle.
Procédure additionnelle de
raccordement à la terre
- Certains règlements locaux
peuvent exiger un raccordement
séparé à la terre. En pareils cas,
vous devrez acheter séparément,
comme accessoires, le fil de terre,
la bride et la vis.
- Ne raccordez jamais le fil de terre à
des conduites de plomberie en
plastique, à des conduites de gaz
ou à des conduites d’eau.
Instructions de raccordement
à la terre
Il faut impérativement raccorder ce
sèche-linge à la terre. Si un
dérangement ou une panne se produit,
le raccordement à la terre réduira le
risque de choc électrique vu que le
courant pourra s’échapper par un fil
offrant une faible résistance électrique.
Pour le Canada cet appareil est équipé
d’un cordon d’alimentation intégrant un
fil de terre et une fiche de terre. Il faut
raccorder la fiche à une prise femelle
réglementairement installée et dotée de
contacts eux-mêmes raccordés à la
terre, ceci en conformité avec la
réglementation et les ordonnances
locales.
28
Page 29

AVERTISSE
MENT
Un raccordement incorrect de
l’appareil à la terre engendre un
risque de choc électrique.
Si vous avez des doutes quant
à son raccordement à la terre,
confiez la vérification à un
électricien agréé ou à un
technicien du SAV.
Raccordement du conduit
d’échappement
AVERTISSE
MENT
1. Pour réduire le risque d’incendie, il
faut que le conduit
d’échappement de ce sèche-linge
aboutisse en plein air.
2. Pour réduire le risque d’incendie,
n’utilisez pas de conduits
d’échappement d’une longueur
supérieure à celle recommandée.
3. Avec ce sèche-linge, N’UTILISEZ
PAS de conduit en plastique ou
non métallique.
4. Le diamètre du conduit
d’échappement NE DOIT PAS
ÊTRE INFÉRIEUR à 4 pouces.
5. N’UTILISEZ PAS de hottes
aspirantes équipées de
fermetures magnétiques.
6. NE FAITES PAS ABOUTIR le
conduit d’échappement dans une
cheminée, dans le conduit d’air
froid d’une chaudière, par une
lucarne, un espace accessible
uniquement en rampant ou tout
autre conduit utilisé pour aéré.
7. N’INSTALLEZ PAS un conduit
flexible dans un mur, plafond ou
plancher situé dans une enceinte.
8. N’ÉCRASEZ ET NE vrillez pas le
conduit.
9. Nettoyez et vérifiez le circuit
d’échappement de façon
régulière, au minimum une fois par
an.
10. Le conduit d’échappement doit se
terminer de manière à empêcher
tout refoulement d’air ou la
pénétration d’oiseaux ou
d’animaux non domestiqués.
Les sèche-linge Bosch ont été conçus
pour rejeter la chaleur et la vapeur en
plein air. Pour empêcher l’apparition de
moisissure ou l’accumulation de
peluches dans le local d’installation,
mais aussi pour maintenir une efficacité
de séchage maximale, nous
recommandons que le conduit
d’échappement débouche en plein air.
Orifice de sortie d’air sur le
sèche-linge
Ce sèche-linge a été livré avec un
orifice de sortie d’air à l’arrière.
Pour tenir compte des impératifs
architecturaux et de la présence d’un
système préexistant d’échappement
de l’air, il est possible de placer l’orifice
de sortie à d’autres endroits :
- Sur le côté droit de l’appareil,
- Sur la face inférieure de l’appareil.
2 - Orifice de sortie d’air sur le côté (option)
3 - Orifice de sortie d’air sur la face
inférieure (option)
A votre revendeur ou fournisseur de
pièces, il faudra demander des
raccords de sortie d’air spéciaux pour
raccorder le conduit d’échappement à
l’un ou l’autre orifice en option (voir
page 30).
- Kit de sortie par le côté
- Kit de sortie par le bas.
Il faudrait confier le changement
d’orifice de sortie d’air (passage de
l’orifice standard à un orifice en option)
à un technicien qualifié.
Conduit d’échappement
Pour que l’appareil offre des
performances optimales, il faudrait que
le conduit d’échappement soit le plus
court possible et comporter aussi peu
de coudes que possible. Votre
sèche-linge fonctionnera de manière
optimale si le flux d’air rencontre le
moins d’obstacles possible. Un conduit
d’échappement d’une longueur
supérieure à celle recommandée risque
d’allonger la durée de séchage,
provoquer une accumulation de
peluches, pénaliser les performances
du sèche-linge et sa durée de vie.
Il faudrait utiliser un conduit faisant
quatre pouces de diamètre (env. 100
mm). Utilisez soit un conduit en métal
rigide, soit un flexible souple en métal.
Avec ce sèche-linge, N’UTILISEZ PAS
de conduit en plastique ou dans un
matériau non métallique.
N’ASSEMBLEZ PAS le conduit
d’échappement avec des vis ou des
fixations susceptibles de faire saillie à
l’intérieur du conduit. Ces obstacles
seraient autant de point
d’accumulation des peluches.
Immobilisez les jonctions avec du
aluminium adhésif pour conduit.
Il faudrait que toutes les jonctions soit
étanches pour éviter les fuites. La
partie mâle de chaque segment de
conduit doit regarder en direction
opposée à celle du sèche-linge.
Oue vous raccordiez le conduit à un
système d’aération préexistant ou à un
nouveau système, assurez-vous que
l’intérieur du conduit est intégralement
propre et exempt de peluches.
La longueur maximale permise des
conduits rigides et flexibles en métal
figure dans le tableau ci-dessous.
29
Page 30

Nombre de
virages ou
coudes à 90°
Conduit
rigide
Conduit
fiexibie
Kit de sortie par le bas.
0 66 ft.
(2011 cm)
1 56 ft.
(1707 cm)
2 48 ft.
(1463 cm)
3
4 30 ft.
Remarque:
Les conduits d’échappement
raccordés à l’orifice de sortie latéral ou
par le fond de l’appareil forment un
coude à 90° dans celui-ci. Pour
déterminer la longueur maximale du
conduit d’échappement, ajoutez un
coude à 90° dans le tableau.
Plus de deux coudes à 90° sont
déconseillés. Pour obtenir les
meilleures performances, veillez à ce
que tous les virages soient distants
d’au moins 4 pieds les uns des autres,
y compris la distance entre le dernier
virage et la hotte d’échappement.
39 ft.
(1189 cm)
(914 cm)
45 ft.
(1372 cm)
36 ft.
(1097 cm)
29 ft.
(884 cm)
22 ft.
(671 cm)
16 ft.
(488 cm)
Hotte d’échappement
Le conduit doit se terminer par une
hotte d’échappement homologuée
présentant un ou plusieurs volets
pivotant. N’UTILISEZ PAS de hotte
d’échappement à fermetures
magnétiques.
Pour éviter tout freinage de l’air sortant,
il faudrait que la bouche de sortie se
trouve au minimum 12 pouces (30 cm)
au-dessus du niveau du sol ou de toute
surface faisant obstruction.
Pièces requises
Les pièces affectées au système
d’échappement de l’air (coudes, lignes,
bouches de sortie d’air) ne sont pas
livrées d’origine avec le sèche-linge.
Accessoires
Vous pouvez vous procurer les pièces
requises par le système
d’échappement d’air auprès du service
après-vente ou de votre revendeur
local. Veuillez s.v.p. respecter les
instructions de pose fournies par le
fabricant concerné.
Kit de sortie par le côté
N° de réf. WTZ 1265
Remarque :
Le nombre maximal permis de coudes
à 90° (y compris celui formé par ce kit
de sortie latérale) est de quatre.
rn Le découpage du trou dans le
panneau latéral préparé à cet effet
requiert un outil spécial. Contactez
votre revendeur local.
N° de réf. WTZ 1270
Remarque :
Le nombre maximal permis de coudes
à 90° (y compris celui formé par ce kit
de sortie latérale) est de quatre.
Tiroir de séchage
N° de réf. WTZ 1290
Servez-vous du tiroir de séchage pour
sécher les textiles lavables en laine (les
chandails par ex.) et les chaussures.
Charnières gauches en kit
N° de réf. WTZ 1260 (pour tous les
sèche-linge excepté l’argent et l’argent
de tonalité de duo)
N° de réf. WTZ 126S (pour des
sèche-linge l’argent et d’argent de
tonalité de duo)
Si nécessaire, vous pouvez changer le
sens d’ouverture de porte.
A la fabrication, la porte a été montée
sur charnière du côté droit.
Montage sur estrade
N° de réf. WTZ 1295 (Sèche-Linge
Blancs)
N° de réf. WTZ 1295S (Sèche-Linge
de Argentés)
N° de réf. WTZ 1295P (Sèche-Linge
de tonalité de duo de Argentés)
N° de réf. WTZ 1295R (Sèche-Linge
de tonalité de duo de Rouge)
Pour monter le sèche-linge sur
l’estrade veuillez suivre la notice
d’instructions accompagnant cet
accessoire.
30
Page 31

Installation pas à pas
1. Déballez le sèche-linge.
2. Retirez tous les objets présents
dans le tambour.
3. Vérifiez l’absence de dégâts
apparents sur le sèche-linge.
4. Placez le sèche-linge à proximité
de son emplacement définitif.
5. Si nécessaire, inversez le sens
d’ouverture de la porte
(voir page 27).
6. Si nécessaire, demandez au
service après-vente d’installer
l’orifice de sortie de l’air
d’échappement sur le sèche-linge
(voir page 29).
7. Demandez à un technicien agréé
de monter le cordon
d’alimentation électrique
(voir page 27).
8. Installation le conduit
d’échappement si nécessaire.
Respectez les instructions
d’installation publiées par le
fabricant du matériel
correspondant!
rn En présence d’un espace très
exigu, nous recommandons de
fixer l’orifice de départ du conduit
d’échappement sur le sèche-linge
avant d’amener le sèche-linge sur
son emplacement définitif.
9. Amenez le sèche-linge sur son
emplacement définitif puis ajustez
son horizontalité.
PRUDENCE
Ne faites pas glisser le
sèche-linge sur le sol si ses pieds
réglables en hauteur se trouvent
en position sortie. Vous risquez
d’endommager les pieds et/ou
la base du sèche-linge si vous
le faites glisser sur le sol avec
les pieds en position sortie.
10. Positionnez le sèche-linge puis
ajustez son horizontalité.
Il faudrait que le sèche-linge se
retrouve bien à l’horizontale, avec
ses quatre pieds fermement en
appui sur le sol. Le sèche-linge ne
doit pas osciller. S’il n’est pas
parfaitement à l’horizontale ou s’il
oscille, il faudra corriger le réglage
des pieds. Vissez ou dévissez les
pieds réglables en hauteur jusqu’à
ce que le sèche-linge cesse de
s’agiter et se trouve parfaitement
à l’horizontale, tant de l’avant vers
l’arrière que d’un côté à l’autre.
11. Raccordez le conduit
d’échappement à l’orifice prévu à
cet effet sur le sèche-linge.
12. Branchez la fiche mâle dans
la prise de courant murale.
Check-list préalable
à l’emploi du sèche-linge
1. Vérifiez que les étapes 1 à 12 ont
été correctement réalisées.
2. Assurez-vous que le sèche-linge
est raccordé à l’alimentation
électrique.
3. Veuillez lire les instructions
d’utilisation pour comprendre
comme votre sèche-linge
fonctionne.
4. Soumettez l’appareil à un test:
□ Vérifiez que le tambour
est vide.
□ Fermez la porte du sèche-linge.
□ Commutez le sèche-linge sur
«Extra Dry» (Très sec) puis
appuyez sur le bouton Start.
□ 3 à 5 minutes plus tard,
appuyez sur le bouton Stop
puis ouvrez la porte.
5. Si l’intérieur du tambour paraît
chaud, ceci signifie que vous avez
connecté le sèche-linge
correctement. Commutez
l’interrupteur sur «OFF».
6. Si le sèche-linge ne fonctionne
pas, commutez le sèche-linge sur
«OFF».Consultez la section de ces
INSTRUCTIONS D’UTILISATION
consacrée au dépannage (page
42) et essayez de localiser
le dérangement.
Préparation pas à pas au
transport du sèche-linge
1. Amenez le programmateur
sur «OFF».
2. Débranchez la fiche mâle
de la prise de courant.
3. Débranchez le conduit de l’orifice
d’échappement d’airsitué contre
l’appareil.
4. Placez les accessoires,
si présents, dans le tambour.
5. Fermez la porte et maintenez-la
fermée avec du ruban adhésif.
6. Revissez les pieds réglables
en hauteur dans le corps de
l’appareil pour empêcher qu’ils
soient endommagés pendant
le transport.
31
Page 32

INSTRUCTIONS D’UTILISATION
Présentation de votre
nouveau sèche-linge.
Ouvrez la porte
....
(repère en couleur)
Ô ÔÔ ISF
—^
------------------
r
32
Page 33

Le bandeau de
commande
Bouton Start/Pause
Ce bouton sert à faire démarrer, à
interrompre et à mettre fin au
processus de séchage.
Boutons des options (ces options viennent
compléter un programme si vous le souhaitez).
Voir page 36.
Delicates low temp. (Délicats basse
température)
Appuyez sur ce bouton si vous voulez sécher des
textiles délicats, sensibles à la chaleur (par ex. les
fibres acryliques). La température du processus
de séchage diminue, la durée de séchage
augmente en conséquence.
Signal (Signal)
Un signal sonore vous indique la fin du
programme.
Ecran
Il indique la durée approximative restante des programmes.
Voyant indicateur (LED)
Servir de rappel pour nettoyer le filtre de fibre.
Voyant indicateur (LED)
Ils indiquent le stade actuel
d’avancement du séchage.
Programmateur
Sélectionnez un programme. Voir
page 36.
Vous pouvez le faire tourner dans
les deux directions.
Pour éteindre le séche-linge,
ramenez le programmateur sur la
position «off».
33
Page 34

Résumé des
instructions
A PRUDENCE
Avant d’utiliser votre sèche-linge,
veuillez lire et respecter toutes
les instructions d’installation et
d’utilisation.
Sélection d’un programme
Préparation du
sèche-linge
I i I Vérifiez le filtre à peluches. Il faut
nettoyer le filtre après et avant
chaque séchage.
Choisir une option...
...et faire démarrer le
sèche-linge.
Eteindre le sèche-linge.
34
Utilisation du tiroir de
séchage
(Accessoire, voir page 30)
Page 35

Informations de
sécurité
AVERTISSE
MENT
Respectez toujours les,
INSTRUCTIONS DE SECURITE
IMPORTANTES (voir page 24).
AVERTISSE
MENT
POUE EVITER
RISQUE D’EXPLOSION !
Du sèche-linge, éloignez les
matériaux infiammaoles comme
l’essence, et les vapeurs qu’ils
dégagent.
Eloignez toutes les matières et
vapeurs inflammables du
sèche-linge (comme l’essence
ar exemple).
R
'e séchez jamais dans l’appareil
des objets qui à un moment ou
à un autre ont été en contact
avec une matière inflammable,
huile de cuisine comprise (et
même après les avoir lavés).
Il faudra faire sécher les pièces
de linge contenant de la mousse,
du caoutchouc ou du plastique
sur un fil à linge ou en vous
servant d’un cycle de défoulage
du linge.
Ne laissez pas dans les
vêtements qui sèchent des
objets contenant des matériaux
inflammables, tels que des
briquets.
Le non-respect de ces
instructions peut engendrer un
risque d’explosion ou d’incendie.
Poue éviter Danger de mort ou
de blessures !
N’utilisez ce sèche-linge que dans la
maison/le garage et pour sécher des
quantités normales de linge dans votre
ménage. Ne vous en servez que pour
sécher du linge qui a été lavé à l’eau.
Avant d’allumer le
sèche-linge
Installez le sèche-linge conformément
aux instructions d’installation (à partir
de la page 26).
N’utilisez pas le sèche-linge s’il est
visiblement endommagé. En cas de
doute, contactez votre revendeur.
Utilisation du sèche-linge
Ne laissez pas les enfants jouer sans
surveillance près de l’appareil.
Eloignez les animaux de compagnie de
l’appareil. Avant de refermer la porte,
vérifiez le contenu du tambour.
Enlevez tous les objets présents dans
les poches.
Les briquets restés dedans sont
particulièrement dangereux.
Risque d’explosion !
Eteignez le sèche-linge à la fin du
programme.
Protection du sèche-linge
Ne montez pas sur le sèche-linge.
Ne vous appuyez pas sur la porte et ne
vous asseyez pas dessus.
Le sèche-linge risque de se
renverser!
Ne rangez pas à proximité de l’appareil
des auxiliaires de nettoyage contenant
des solvants, ou des produits
détachants.
Vous risqueriez d’endommager le
sèche-linge.
Ne tentez pas de le soulever par ses
parties saillantes.
Risque de rupture !
Protection de
l’environne
ment
Conseils pour économiser de
l’énergie
Pour économiser de l’énergie, de
l’argent et du temps, Bosch vous
recommande ceci :
- Essorez suffisamment le linge.
Avant le séchage, faites bien
essorer le linge dans le lave-linge.
Servez-vous de la plus haute
vitesse d’essorage possible
adaptée au type de linge. Une
vitesse d’essorage assez élevée
réduit la durée du séchage et la
consommation d’énergie.
- Mettez la charge maximale de
linge.
Mettez une charge de linge
correspondant au maximum
recommandé. Ne chargez
toutefois pas de quantités
excessives de linge.
- Nettoyez le filtre.
Nettoyez le filtre avant et après
chaque séance de séchage
(voir page 40).
- Aérez la pièce.
Pendant la séance de séchage,
veillez à ce qu’il arrive
suffisamment d’air frais dans
la pièce.
Ne séchez pas de matériaux
inadaptés!
Ne faites pas sécher de pièces de
linge enrobées de caoutchouc ou
hermétiques.
Nettoyez et vérifiez le conduit
d’échappement d’air de façon
régulière!
Les obstructions pourraient
en effet allonger la durée
de séchage.
Avant d’utiliser le
sèche-linge pour
la première fois
Avant de vous servir du sèche-linge
pour la première fois :
1. Veuillez lire attentivement les
présentes instructions d’utilisation.
2. Vérifiez que la tension du secteur
de votre domicile correspond avec
la tension spécifiée sur la plaque
signalétique du sèche-linge (voir
l’illustration page 43).
3. Retirez tous les objets présents
dans le tambour.
4. Vérifiez l’absence de dégâts
apparents sur le sèche-linge.
Si vous en trouvez, prévenez votre
revendeur.
5. Essuyez l’intérieur du tambour à
l’aide d’un chiffon humide.
6. Soumettez l’appareil à un test. Voir
page 31.
7. Si le sèche-linge ne fonctionne
pas, ramenez le program
mateur sur «Off». Consultez la
section de ces INSTRUCTIONS
D’UTILISATION consacrée au
dépannage (page 42) et essayez
de localiser le dérangement.
Débranche
ment temporaire
du sèche-linge
Ne faites marcher votre sèche-linge
que pendant que vous vous trouvez à
votre domicile. En prévision d’un départ
en vacances ou si vous devez ne pas
utiliser le sèche-linge pendant une
période prolongée, vous devrez :
1. Ramener le disjoncteur en position
éteinte.
2. Débrancher la fiche mâle de
la prise de courant (si possible).
3. Nettoyer le filtre à peluches.
35
Page 36

Linge
Programmes assortis
d’une durée
Sélection du
Détermination de la nature
du tissu
Veuillez respecter les symboles de
traitement figurant sur les étiquettes
des pièces de linge. Elles contiennent
des informations précieuses ainsi que
des restrictions quant au processus de
séchage.
Avec cet appareil, ne séchez pas les
textiles suivants :
- Textiles étanches (par ex. enrobés
de caoutchouc)
- Les textiles délicats (soie, voilages
synthétiques)
I i I Séchez les textiles en laine
ou à forte proportion de laine
uniquement dans le tiroir de
séchage.
I i I Servez-vous du programme
à durée limitée «Air fluff/No heat»
(Défoulage à l’air/aucune chaleur)
pour sécher les articles contenant
du caoutchouc mousse ou des
articles à texture similaire à celle
du caoutchouc.
programme
Pour obtenir des résultats de séchage
optimaux, votre sèche-linge offre
différents groupes de programmes et
options additionnelles.
Sélectionnez le programme de
séchage requis dans le tableau des
programmes, en fonction des
exemples (voir page 37).
Programmes
automatiques
Il existe des programmes automatiques
adaptés aux différents types de textiles:
Regular/Cotton ECOSeNsOR et
Permanent Press ECOSENSOR (Linge
normal/Coton ou infroissable).
Regular/Cotton ECOSENSOR
(Linge normal/Coton)
Les programmes à durée réglable
marchent pendant la durée spécifiée
(20, 40, 60 minutes).
Sur la position «Air Fluff/No heat»
(Défoulage à l’air/Aucune chaleur), le
sèche-linge fait pénétrer l’air ambiant
dans le tambour sans ajout de chaleur
pendant 20 minutes.
I i I Séchez les textiles en laine ou à
forte proportion de laine
uniquement dans le tiroir de
séchage.
Options
Conseils pour le séchage
En principe, les instructions suivantes
s’appliquent à tous les programmes de
séchage :
- Pour assurer un résultat de
séchage uniforme, triez le linge
conformément aux types de tissu
et au programme voulu.
- Refermez les fermetures
à glissières, les crochets et les
œillets. Fixez les ceintures
détachées, les lanières des
tabliers, etc.
- Ne séchez pas à l’excès le linge
synthétique - risque de le froisser !
Laissez ce linge finir de sécher à
l’air.
- Ne repassez pas le linge
immédiatement après le séchage.
Laissez le linge reposer en pile
pendant un petit moment. Ceci
permettra à l’humidité résiduelle
de se répartir uniformément.
- Les textiles à mailles (par ex. les
t-shirts, le linge en coton tricoté en
jersey) rétrécit souvent lors du
premier séchage au sèche-linge.
N’utilisez pas le programme «Very
dry/Extra dry» (Très sec/Extra sec).
Permanent Press ECOSENSOR
(Linge infroissable)
Le déroulement des programmes
automatiques est surveillé par des
capteurs. La durée du programme
dépend du degré d’humidité mesuré
dans le linge et du degré de séchage
sélectionné (par ex. Damp dry ou Extra
dry (Humide ou Extra sec)).
Delicates low temp. (Délicats
basse température)
Appuyez sur le bouton «Delicates low
temp.« (Délicats basse températura)
pour sécher les textiles craignant la
chaleur. Respectez les conseils ou
symboles d’entretien figurant sur ces
textiles. La température du processus
de séchage diminue, la durée de
séchage augmente.
Signal (Signal sonore)
Votre sèche-linge émet différents
signaux si vous avez appuyé sur le
bouton «Signal».
Signal Type
Départ Signal bref
Fin Séquence de tons
courts
Dysfonctionne Séquence de tons
ment
Alarme de Séquence de tons
dérangement longs
longs
36
Page 37

1 I Le signal «alarme de
m
dérangement» fonctionne dans
tous les cas.
Indicateur de déroulement
du programme
Le sèche-linge utilise un système de
scannérisation électronique dans tous
les programmes excepté les
programmes à durée réglable. Un
intermittence spécifique afin
d’empêcher le linge de se froisser.
Les voyants renseignent sur le degré
de séchage actuel et le niveau atteint
pendant le déroulement du programme
; ces voyants correspondent à
plusieurs degrés de séchage: drying
(séchage en cours), damp dry
(humide), regular dry (normalement
sec), Wrinkle block (anti-froissage).
capteur d’humidité vérifie
constamment l’humidité présente dans
le linge. Le séchage prend fin
automatiquement dès que le degré de
séchage sélectionné a été atteint.
Le tambour continue, pendant une
heure, de tourner selon une
Si le voyant «Wrinkle block» (bloc
anti-froissage) s’allume une fois
que le programmateur se trouve
sur la position Off, ramenez le
disjoncteur en position éteinte et
prévenez le service après-vente.
Tableau de sélection des programmes
Programmes automatiques
Pour le cotons et le linge de couleur en coton ou en linAppuyez sur le bouton «Délicates low temp.» pour sécher
les textiles craignant la chaleur.
Pour le llnae.
Lingerie de lit et de table
Lingerie de lit et de table, serviettes. T-shirts, maillots de sport, tabliers
T-shirts, maillots de sport, tenues, pantalons, tabliers, lingerie de corps
Serviettes en tissu éponge, serviettes de cuisine et à mains, lingerie de lit,
lingerie de corps, chaussettes en coton
Serviettes en tissu éponge, serviettes de cuisine et à mains, lingerie de lit,
lingerie de corps, chaussettes en coton
Peignoirs de bain en tissu éponge, linge de lit en tissu éponge
Linge facile à entretenir (encore gouttant), à base de tissus synthétiques et mixtes, de coton, en polyester par ex.
Appuyez sur le bouton «Delicates low temp.» pour sécher les textiles très sensibles à la chaleur
Pantalons, tenues, jupes, chemises, chemisiers, leggings, tenues de sport
et fibres à fort pourcentage synthétique, lingerie
Chemises, chemisiers, tenues de sport qu’il ne faut pas repasser Regular dry (Normalement sec)
Lingerie de lit et de table, survêtements, anoraks, draps qu’il ne faut pas repasser,
Programmes assortis d’une durée
Textiles pré-séchés, à faible teneur en humidité, petits articles personnels comme par ex. les serviettes de bain,
les tenues de bain, les serviettes de table.
Si vous utilisez la plus petite charge allant de 0,22 à 0,44 livre (par exemple une petite serviette de toilette),
sélectionnez un programme de séchage de durée.
Appuyez sur le bouton «Delicates low temp.» si ces textiles sont sensibles à la chaleur.
- Le cotons et le linge de couleur en coton ou en lin.
- Textiles sensibles à la chaleur.
Rafraîchissement ou aération de la lingerie peu portée et séchage de textiles craignant beaucoup la chaleur.
Pour tous les types de textiles, y compris le caoutchouc mousse (par ex. les oreillers, les jouets rembourrés),
le plastique (par ex. les rideaux de douche, les serviettes de table), le caoutchouc (par ex. les nattes à dos
en caoutchouc, le nylon seul, le polypropylène.
qu’il faut repasser Damp dry (Humide)
qu’il ne faut pas repasser Regular dry (Normalement sec)
qu’il ne faut pas repasser,
à plusieurs couches épaisses
particuliérement épais ou
comportant plusieurs couches
Pour le llnae.
qu’il ne faut pas repasser ou alors
seulement légèrement.
à plusieurs couches épaisses
Regular/Cottons
(ECOSENSOR Linge normal/Coton)
Very dry (Très sec)
Extra dry (Extra sec)
Permanent Press
ECOSENSOR (Infroissable)
Damp dry (Humide)
Very dry (Très sec)
Time dry
(Séchage à durée réglable)
20 min, 40 min, 60 min
20 min, 40 min, 60 min
Air fluff/No heat (Défouler à
l’air/Aucune chaleur)
37
Page 38

utilisation
Utilisation du sèche-linge
1. Ouvrez la porte.
2. Vérifiez le filtre à peluches. Il faut
nettoyer le filtre après et avant
chaque séchage. Le nettoyage du
filtre réduit la durée de séchage et
permet d’économiser de l’énergie.
^ Le voyant «start/stop» se met à
□
clignoter.
4. Si nécessaire, sélectionnez
«Option» en appuyant sur le
bouton. L’explication des options
figure à la page 36.
1 I L’appareil actualise l’estimation de
0
la durée restante.
7. Appuyez sur le bouton
«start/stop». Le voyant
«start/stop» s’allume.
m Le programme démarre avec
émission d’un signal sonore
(si vous l’avez réglé).
si vous avez sélectionné un
programme standard, les voyants
indiquent le stade déroulement du
programme.
m A la fin du programme Damp dry
(humide), un signal sonore retentit
(à condition que vous ayez
progammé son activation).
rn La javel peut décolorer la face
externe en couleur de sèche-linge.
Pour cette raison, il est important
de ne pas faire entrer en contact la
face externe en couleur de votre
sèche-linge avec de la javel. Si
vous faites tomber de la javel sur
sa face externe, nettoyez cette
derniére immédiatement et avec
soin à l’aide d’un essui-tout
humide.
3. Amenez le programmateur sur le
programme voulu. A l’aide
dutableau de sélection, choisissez
un programme adapté au linge
présent dans le tambour (voir page
37). L’éclairage du sèche-linge
s’allume dans le tambour.
5. Introduisez le linge dans le
tambour vide. Placez
individuellement chaque pièce de
linge dans la machine.
Pour obtenir les meilleurs résultats,
triez d’abord le linge en fonction
du type de linge et du degré de
séchage requis. La page 36
contient des informations plus
détaillées.
rn Respectez les symboles de
séchage utilisés par le fabricant du
linge. Si vous voulez sécher des
vêtements en laine ou des
chaussures, reportez-vous aux
informations figurant aux page 39.
Assurez-vous qu’il n’y a que du linge
dans le tambour. Vérifiez que toutes les
pièces de linge se trouvent entièrement
dans le tambour.
6. Refermez la porte.
Le voyant «Start/Stop» se met
à clignoter.
m Si vous n’avez pas fermé la porte
correctement, le sèche-linge ne
démarrera pas.
m A la fin du programme, l’appareil
émet un signal sonore (si vous
l’avez réglé et le voyant lumineux
«Wrinkle block» (protection
antifroissage) s’allume.
m Une fois le processus de séchage
terminé (le programme ou le
programme à durée réglable a pris
fin), le tambour continue de
tourner par intermittence pendant
I heure.
Ceci empêche le linge de se
froisser. Le linge repose non tassé
et bien défoulé dans le tambour
jusqu’à ce que vous l’enleviez.
II faudrait retirer le linge au plus
tard une fois cette période
écoulée.
38
Page 39

8. Ouvrez la porte.
9. Sortez le linge du sèche-linge.
Insertion du tiroir de séchage
1. Ouvrez la porte du sèche-linge.
2. Vérifiez que le tambour est vide.
Sécher des pièces de linge sur le
tiroir
1. Pliez le linge pour qu’il rentre dans
le tiroir.
10. Amenez le programmateur
sur «Off».
L’éclairage du sèche-linge
s’éteint.
11. Nettoyez le filtre.ll faudrait nettoyer
le filtre après chaque séance de
séchage. Le nettoyage du filtre
réduit la durée de séchage et
permet d’économiser de l’énergie.
12. Refermez le hublot.
Utilisation du tiroir de
séchage
Servez-vous du tiroir de séchage pour
sécher les textiles lavables en laine (les
chandails par ex.) et les chaussures. Le
tiroir de séchage reste immobile tandis
que le tambour tourne. Evitez de
déplacer la laine humide vu qu’elle
a tendance à feutrer. Le séchage
de chaussures sans utiliser le tiroir
pourrait endommager le tambour.
3. Retirez le filtre à peluches.
4. Soulevez le tiroir de séchage
horizontalement pour l’introduire
dans le tambour.
5. Placez le tiroir de séchage de telle
sorte que les tiges pénètrent dans
les trous de positionnement situés
à l’avant.
2. Placez le linge non tassé dans le
panier. N’appuyez pas sur le linge.
Ce dernier ne doit pas toucher le
tambour. Veillez àcequ’aucune
pièce de linge ne pende du tiroir.
3. Refermez le hublot.
4. Pour utiliser un programme de
durée, suivez les instructions de la
page suivante.
Séchage de chaussures sur le
tiroir :
1. Préparez les chaussures.
□ Nettoyez les chaussures pour
empêcher le tambour de se salir.
□ Si vous préparez des
chaussures de sport, étirez leur
languette.
□ Desserrez ou retirez les lacets.
□ Retirez les semelles intérieures
et les talonnettes.
A PRUDENCE
Ne faites sécher qu’un vêtement ou
une paire de chaussure à la fois
(charge maximale de linge sec
2,2 lbs (1 kg). Il faut que le linge ait
été essoré. Ne séchez que des
chaussures préalablement lavées.
Le linge ne doit pas toucher le
tambour car il pourrait se coincer et
être endommagé par le tambour.
Après avoir utilisé le tiroir de
séchage, retirez-le immédiatement
du sèche-linge.
2. Placez les chaussures sur le
panier.
□ Directement sur le tiroir de
séchage
6. Insérez le filtre à peluches.
Introduisez le filtre en veillant à ce
qu’il soit bien aligné sur le bord du
tambour!
39
Page 40

Enroulez une serviette et placez
les talons dessus.
Ceci permettra d’obtenir un
résultat de séchage plus
uniforme.
2. Appuyez sur le bouton
«Start/Stop». Le voyant
«Start/Stop» s’allume.
3. Si la pièce de linge concernée
contient encore une humidité
résiduelle une fois écoulée la
durée de séchage indiquée :
□ Pliez cette pièce de linge de
sorte que les parties humides se
retrouvent exposées.
□ Relancez le programme et
réduisez la durée du séchage en
fonction du degré d’humidité
résiduel requis.
4. Après le séchage, étalez le linge à
l’air pendant approximativement
15 min. (les chaussures pendant
env. 30 min.).
5. Retirez le filtre à peluches.
Nettoyage et
entretien
Nettoyage du sèche-linge
A AVERTISSE- A
^ MENT
POUE EVITER
RISQUE D’EXPLOSION !
Pour nettoyer, n’utilisez jamais de
solvants ou de liquides
inflammables.
A
PRUDENCE
Un nettoyage incorrect peut
endommager le sèche-linge. Ne le
nettoyez pas avec un jet d’eau.
N’utilisez pas de produits récurants
ou de détergents multi-usage.
N’utilisez pas non plus de
nettoyeurs à vapeur.
3. Refermez la porte.
Choisissez un programme
à durée définissable
1. Amenez le programmateur sur
«Time dry/...min» (Séchage
àdurée réglable/...min).
Sélectionnez la durée de séchage
à partir du tableau suivant, en
respectant le type de linge.
Type de linge
Pullover en laine mince 80 min.
(approx. 0,8 lbs/350 g) (par ex. 60 + 20 mn)
Pullover en laine épais90-120 min.
(approx. 1,9 lbs/850 g) (par ex. 60 +40 mn)
Jupe
Durée de séchage
60-90 min.
6. Sortez le tiroir de séchage du
tambour.
7. Insérez à nouveau le filtre
à peluches.
Essuyez le corps de l’appareil et le
bandeau uniquement avec un chiffon
doux additionné d’un peu d’eau
savonneuse.
Essuyez le tambour, le joint de la porte
et l’intérieur de la porte uniquement
avec un chiffon humide.
Nettoyage du filtre
à peluches
Un filtre sale accroît la durée de
séchage ainsi que la consommation
d’énergie.
Il faudrait nettoyer le filtre avant et après
chaque séance de séchage.
Si un signal d’alarme et un message
E01 avertissement sont èmis pendant
un programme de séchage, nettoyez le
filtre immédiatement et vérifiez le
conduit d’echappement.
I i I Le programme s’interrompt
automatiquement.
1. Eteignez le sèche-linge. Ramenez
le programmateur sur «Off».
A PRUDENCE
L’intérieur de la porte s’échauffe
pendant le séchage.
2. Ouvrez la porte.
Pantalons 60-90 min.
Petits articles
(gants par ex.)
Chaussures
40
30 min.
30 min.
Page 41

Nettoyage des capteurs
d’humidité
Il faut nettoyer les capteurs d’humidité
de temps en temps vu qu’une couche
fine de matière transparente se dépose
dessus.
3. Retirez le filtre à peluches.
4. Retirez les peluches en passant la
main sur le filtre.
Le filtre devrait être légèrement frotté
deux fois par an avec de l’eau
savonneaux chaud. Le filtre est
nettoyé quand il ne tient plus l’eau.
Séchez bien le filtre avant de le
remettre en place.
Ce dépôt s’enlève facilement en
essuyant les capteurs (il s’agit des deux
barres situées à côté du filtre
à peluches) au moyen d’un chiffon et
d’un peu de vinaigre blanc.
N’utilisez que du vinaigre blanc.
Nettoyez le capteur d’humidité une fois
par mois.
Nettoyage de la flasque
A la longue, les pluches créées par le
processus de séchage se rassemblent
dans la flasque.
□ Desserrez la vis du couvercle puis
ouvrez ce dernier.
□ Tournez l’ampoule en sens inverse
des aiguilles d’une montre.
Remplacez-la par une ampoule
neuve adaptée à l’appareil (fournie
par le service après-vente).
□ Remettez le couvercle en place
puis fixez-le en position à l’aide de
la vis.
□ Rebranchez la fiche mâle du
sèche-linge dans une prise de
courant.
5. Remettez le filtre en place.
6. Refermez la porte.
Nettoyage du conduit
d’échappement
Inspectez et nettoyez le conduit
d’échappement au moins une fois par
an pour empêcher qu’il ne se bouche.
Un conduit d’échappement
partiellement obstrué allonge la durée
de séchage.
□ Ramener le disjoncteur en position
éteinte
□ Débranchez la fiche mâle de
la prise de courant
□ Débranchez le conduit du
sèche-linge.
□ Passez le conduit à l’aspirateur
puis rebranchez-le.
Ces pluches s’enlèvent facilement avec
l’aspirateur ; nettoyez au moins une fois
par mois.
Changer l’ampoule de
l’éclairage
Lorsque vous ouvrez la porte,
l’éclairage du tambour s’allume
à l’intérieur du tambour.
Pour changer l’ampoule :
□ Placez le sélecteur de programme
à “off.”.
□ Ramener le disjoncteur en position
éteinte.
□ Débranchez la fiche mâle de la
prise de courant.
□ Ouvrez la porte et localisez
l’ampoule sur le côté supérieur
gauche du joint.
41
Page 42

Dérangement et remèdes
AVERTISSE
MENT
POUE EVITER RISQUE DE CHOC
ELECTRIQUE !
Les réparations et le remplacent de
pièces sont des opérations
réservées uniquement à des
techniciens agréés.
Problème Cause possible Remède
Le sèche-linge ne démarre pas.
Le voyant «Start/Stop» ne s’allume pas.
Le programme a été interrompu.
L’appareil émet un signal
avertissement et la mention «E:01»
s’affiche sur l’écran.
Degré de séchage pas atteint ou durée
de séchage trop longue.
La mention «E:03» peut s’afficher sur
l’écran
L’éclairage du tambour ne fonctionne
pas.
Fiche mâle pas branchée du tout ou alors
incorrectement dans la prise de courant.
Un fusible / disjoncteur protégeant le secteur de la
maison a grillé / disjoncté.
Vous n’avez pas appuyé sur le bouton «Start/Stop»
Vous n’avez pas sélectionné de programme.
Porte pas fermée. Refermez la porte.
Température ambiante inférieure à 41 °F / 5 °CAccroissez la température de la pièce
Le filtre à peluches est sale. Nettoyez le filtre comme décrit à la page 40.
Le conduit d’échappement d’air obstrué ou trop long.Nettoyez le conduit d’échappement. Ramenez la
Défaut dans le déroulement du programme ou
dysfonctionnement.
La pièce / le réduit n’est pas correctement aéré.Prévoyez un apport suffisant d’air frais.
Capteur d’humidité sale. Nettoyez le capteur d’humidité comme décrit à la
Conduit d’échappement d’air obstrué ou trop long.
Le filtre à peluches est sale. Nettoyez le filtre comme décrit à la page 40. Eteignez
Linge trop humide. Dans le lave-linge, essorez le linge à une vitesse plus
Sélection d’un programme inadapté.
Dépassement de la durée maximale de séchageNettoyez le filtre (voir page 40).
Dépassement de la température limite du moteur.Eteignez le sèche-linge, laissez-le refroidir pendant
Vous n’avez pas sélectionné de programme.
Lampe défectueuse, ampoule grillée. Changez l’ampoule, voir page 41.
L’éclairage ne reçoit pas d’électricité. Veillez à ce que l’électricité arrive.
L’ampoule est lâché. I Serrez l’ampoule. Enlevez et réinstallez la couverture
Avant d’appeler le service après-vente,
vérifiez si vous ne pouvez pas
supprimer la panne vous-même en
vous servant du tableau ci-dessous.
Si vous ne parvenez pas à la supprimer
ou si une réparation s’impose :
Branchez la fiche mâle correctement dans la prise de
courant.
Remplacez le fusible / Réarmez le disjoncteur.
Appuyez sur le bouton «Start/Stop»
Sélectionnez un programme.
Eteignez l’appareil puis rallumez-le ensuite.
longueur du conduit d’échappement à la longueur
maximale, comme décrit à la page 29.
Eteignez l’appareil puis rallumez-le ensuite.
Eteignez le sèche-linge, laissez-le refroidir pendant
30 minutes puis rallumez-le.
Relancez ensuite le programme.
Eteignez l’appareil puis rallumez-le ensuite.
page 41. Eteignez l’appareil puis rallumez-le ensuite.
Nettoyez l’orifice de sortie du conduit
d’échappement. Ramenez la longueur du conduit
d’échappement à la longueur maximale, comme
décrit à la page 29. Eteignez l’appareil puis
rallumez-le ensuite.
l’appareil puis rallumez-le ensuite.
élevée. Eteignez l’appareil puis rallumez-le ensuite.
Sélectionnez le programme en vous servant du
tableau de sélection des programmes (voir page 37).
Eteignez l’appareil puis rallumez-le ensuite.
Vérifiez l’orifice de sortie du conduit d’échappement.
Dans le lave-linge, essorez le linge à une vitesse plus
élevée.
30 minutes. Rallumez-le ensuite. Faites démarrer un
programme.
Sélectionnez un programme.
I comme dirigé à la page 50.
1. Réglez le sélecteur de programme
sur «Off».
2. Retirez le fusible.
3. Débranchez la fiche mâle de la
prise de courant.
4. Appelez le service après-vente
(voir page 43).
42
Page 43

Problème Cause possible Remède
Le voyant «Start/Stop ne s’allume pas.
Le voyant «Wrinkle block» est allumé.
La mention «000» s’affiche sur l’écran.
Le filtre LED de fibre clignote après que
le filtre de fibre ait été nettoyé.
Défaut dans le déroulement du programme ou
dysfonctionnement.
Le clignotement du filtre LED de fibre n’est pas une
indcation d’un problème. Il est employé seulement
comme rappel pour nettoyer le filtre de fire.
Eteignez le sèche-linge, laissez-le refroidir pendant
30 minutes puis rallumez-le.
Relancez ensuite le programme.
Aucune action requise. La LED cessera le
clignotement.
SERVICE ET REPARATIONS
Si le sèche-linge vous cause un
A PRUDENCE
PRUDENCE - Etiquetez tous
les fils avant de les débrancher
lorsque vous effectuez des
contrôles de service. Des erreurs
de câblage peuvent engendrer
un fonctionnement inadéquat et
des situations dangereuses.
Après avoir soumis l’appareil
à une opération de service,
vérifiez qu’il fonctionne
correctement.
Ce sèche-linge ne demande aucun
entretien particulier autre que les
opérations de nettoyage et entretien
précédemment mentionnées.
I i I Si votre sèche-linge vous cause
des problèmes, reportez-vous au
tableau de la page 42 avant
d’appeler le service après-vente
(SAV).
Si des opérations de SAV s’avèrent
nécessaires, veuillez contacter votre
installateur ou un point de SAV agréé.
Ne tentez pas de réparer l’appareil par
vos propres moyens. Toute réparation
accomplie par des personnes non
autorisées risque de vous faire perdre
le bénéfice de la garantie.
problème quelconque, et si les
prestations reçues ne vous ont pas
satisfait,
- Commencez s.v.p. par contacter
votre installateur ou l’entreprise de
SAV Bosch agréée située dans
votre région, et expliquez-lui les
raisons de votre méconten
tement. Ceci suffira normalement
à résoudre le problème.
- Si le problème persiste après avoir
collaboré avec votre installateur ou
avec le technicien du SAV,
faites-nous le savoir soit en nous
écrivant à l’adresse suivante,
BSH Home Appliances
5551 McFadden Ave.
Huntington Beach, CA 92649,
USA
soit en nous appelant au numéro
suivant :
1-800-944-2904.
Si vous nous écrivez, n’oubliez pas de
joindre / Si vous nous appelez,
n’oubliez pas de préparer,
les informations suivantes :
- Le numéro du modèle
- Le numéro de série
- La date d’achat d’origine
- La date d’apparition du problème
- Une description du problème
De même, si vous nous écrivez, veuillez
joindre une copie de la facture et nous
indiquer un numéro de téléphone où
nous pouvons vous joindre dans la
journée.
Vous trouverez le numéro du modèle et
le numéro de série sur la plaque
signalétique située sur la face intérieure
du panneau avant.
43
Page 44

DECLARATION DES GARANTIES SECHE-LINGE BOSCH
Les garanties fournies par BSH Home
Appiiances (ci-après dénommé
«Bosch») dans ia présente déciaration
s’appiiquent exciusivement aux
sèche-iinge Bosch vendus par Bosch
DUREE DE LA GARANTIE ETENDUE DE LA GARANTIE
au premier acheteur par Bosch ou par
ses revendeurs agréés, ses détaiiiants
ou centres de service après-vente, aux
Etats-Unis ou au Canada. Les
garanties figurant dans cette
déciaration ne sont pas transférabies.
Les garanties figurant dans cette
déciaration ne sont pas transférabies.
1 an de garantie iimitée compiète
à compter de ia date d’instaiiation*
2 ans de garantie iimitée
à compter de ia date d’instaiiation*
2 ans de garantie iimitée sur i’éiectronique
à compter de ia date d’instaiiation*
2 ans de garantie iimitée sur ie moteur
à compter de ia date d’instaiiation*
*La date d’instaiiation sera réputée ia pius précoce des deux dates suivantes : soit ia date à iaqueiie ie sèche-iinge a été instaiié, soit dix jours
ouvrabies après ia date de iivraison.
Exclusions de garantie
La présente garantie ne couvre pas ies
appeis du SAV et ies réparations
nécessaires pour rectifier i’instaiiation
du sèche-iinge, pour fournir des
instructions sur i’utiiisation de cet
appareii, pour rempiacer ies fusibies
/disjoncteurs ou vos iignes éiectriques
domestiques, ou pour réparer un
sèche-iinge qui a été utiiisé d’une façon
non conforme au mode d’utiiisation
domestique normai ou habituei.
En outre, ies garanties fournies dans ia
présente déciaration exciuent tout
défaut ou dommage engendré par un
accident, une modification, une
utiiisation inexperte ou abusive, une
instaiiation incorrecte, des travaux
d’entretien par des personnes non
autorisées, et des facteurs externes
échappant à toute infiuence de Bosch
teis qu’un incendie, une inondation et
ia force majeure, ou une instaiiation
non conforme avec ia régiementation
iocaie appiicabie aux iignes éiectriques
et aux fusibies de protection. Les frais
de main-d’œuvre engendrés par ies
réparations ou ie rempiacement de tout
sèche-iinge après une période d’un an
courant depuis ia date d’instaiiation ne
seront pius couverts par ia présente
garantie.
Toutes pièces rempiacées et/ou
réparées acquerront ie statut des
pièces d’origine aux fins de ia période
de garantie appiicabie : eiies
n’engendreront aucune proiongation
de ia période de garantie. SAUF
EXCEPTION LEGALE, LA PRESENTE
GARANTIE REMPLACE TOUTES
AUTRES GARANTIES EXPLICITES OU
IMPLICITES, Y COMPRIS LES
GARANTIES IMPLICITES DE
Bosch réparera ou rempiacera gratuitement toute pièce s’avérant
défaiiiante dans ies conditions normaies d’utiiisation domestique, frais de
main d’œuvre et d’expédition incius. Les réparations sous garantie
devront être effectuées par un Centre Bosch du Service Après-Vente
(SAV).
Bosch fournira gratuitement ies pièces de rechange de toute pièce
s’avérant défaiiiante dans ies conditions normaies d’utiiisation
domestique, frais d’expéditions incius.
Bosch réparera ou rempiacera gratuitement tout microprocesseur ou
carte à circuits imprimés s’avérant défaiiiant(e) dans ies conditions
normaies d’utiiisation domestique depuis ia date d’instaiiation d’origine,
frais de main d’oeuvre excius.
Bosch réparera ou rempiacera gratuitement tout moteur ou composant
du moteur s’avérant défaiiiant dans ies conditions normaies d’utiiisation
domestique depuis ia date d’instaiiation d’origine, frais de main d’oeuvre
excius.
COMMERCIALISABILITE ET
D’ADEQUATION A UN BUT PRECIS.
BOSCH DECLINE TOUTE
RESPONSABILITE DES DOMMAGES
ACCESSOIRES ET CONSECUTIFS.
POUR BÉNÉFICIER DES
PRESTATIONS EN GARANTIE,
VEUILLEZ CONTACTER LE CENTRE
DE SERVICE APRÈS-VENTE LE PLUS
PROCHE OU APPELEZ LE
1-800-944-2904, OU ÉCRIVEZ À
L’ADRESSE SUIVANTE : BSH HOME
APPLICANCES CORP.
5551 MCFADDEN AVENUE,
HUNTINGTON BEACH
CA 92649.VEILLEZ À BIEN INDIQUER
LE NUMÉRO DU MODÈLE DE
SÈCHE-LINGE, SON NUMÉRO DE
SÉRIE, LA DATE D’ACHAT, LE NOM
ET L’ADRESSE DU REVENDEUR,
AINSI QU’UNE COPIE DE LA
FACTURE.
44
Page 45

Indice
Definiciones........................................................................................................................................................................ 46
INSTRUCCIONES IMPORTANTES DE SEGURIDAD ..................................................................................................... 46
INSTRUCCIONES PARA LA PUESTA A TIERRA.................................................................................................. 47
INSTRUCCIONES PARA LA INSTALACIÓN.................................................................................................................... 48
Introducción .......................................................................................................................................................................... 48
Información sobre eiiminación de residuos ........................................................................................................................ 48
Antes de instaiar ei secador................................................................................................................................................... 48
Conexión eiéctrica ................................................................................................................................................................. 49
Conexión dei tubo de aire de saiida .................................................................................................................................... 51
Accesorios................................................................................................................................................................................ 52
La instaiación paso a paso..................................................................................................................................................... 53
Lista a controiar antes de usar ei secador .......................................................................................................................... 53
Preparar ei secador para ei transporte, paso a paso ................................................................................................... 53
INSTRUCCIONES DE FUNCIONAMIENTO...................................................................................................................... 54
Su nuevo secador.................................................................................................................................................................... 54
Panei de manejo..................................................................................................................................................................... 55
Resumen de instrucciones ................................................................................................................................................ 56
Informaciones para su seguridad....................................................................................................................................... 57
Antes de encender su secador............................................................................................................................................... 57
Uso dei secador ...................................................................................................................................................................... 57
Protección dei secador .......................................................................................................................................................... 57
Protección del medio ambiente ......................................................................................................................................... 57
Antes de usar el secador por primera vez.......................................................................................................................... 57
Desconexión temporal del secador.................................................................................................................................... 57
Ropa................................................................................................................................................................................... 57
Identificación de prendas...................................................................................................................................................... 57
Consejos para ei secado ........................................................................................................................................................ 58
Selección del programa...................................................................................................................................................... 58
Programas automáticos......................................................................................................................................................... 58
Programas temporizados....................................................................................................................................................... 36
Opciones.................................................................................................................................................................................. 58
Indicador de estado dei programa ...................................................................................................................................... 58
Tabla de selección de programas ..................................................................................................................................... 59
Funcionamiento ................................................................................................................................................................. 59
Uso dei secador ...................................................................................................................................................................... 59
Uso de ia canastiiia (opciones) ............................................................................................................................................. 60
Limpieza y cuidado............................................................................................................................................................. 62
Limpieza dei secador............................................................................................................................................................. 62
Limpiar ei fiitro para peiusas .............................................................................................................................................. 62
Limpiar ei tubo de aire de saiida ......................................................................................................................................... 62
Limpiar ei sensor de humedad ............................................................................................................................................ 63
Limpieza de ia protección dei rodamiento.......................................................................................................................... 63
Cambiar ia iampariiia .......................................................................................................................................................... 63
Localización de fallos ........................................................................................................................................................ 64
SERVICIO y REPARACIONES.......................................................................................................................................... 66
DECLARACIÓN DE GARANTIA PARA SECADORES PARA ROPA BOSCH ................................................................ 68
Exciusiones ............................................................................................................................................................................. 68
45
Page 46

Lo felicitamos por haber seleccionado
un secador de ropa Bosch, que eligen
todos aquellos que requieren un
rendimiento excepcional en sus
secador de ropa.
El secador cumple con la norma
UL2158/CAN/CSA-C22.2 No.
112-97 Secadores de ropa.
Uno de las características
fundamentales de su secador es el
bajo consumo de energía.
Una filosofía fácil en el manejo,
una gran variedad de programas de
lavado y una sensación de solidez,
hacen de este secador un asistente
sumamente útil en su hogar.
El secador Bosch presenta las
siguientes características estándar:
- un sistema de secado de alto
rendimiento
- un tambor de acero inoxidable
grande de 6,4 pies cúbicos (181 l)
con una capacidad hasta 17.6 lbs
(8kg)
- gran abertura de carga (18”/457
mm), con un sistema de traba para
la puerta con paro automático de
tambor
- funcionamiento excepcionalmente
sereno
- ciclos automáticos controlados
por sensor
- Ciclos temporizados de
20, 40 y 60 minutos
Todo secador que deja nuestra planta,
ha aprobado un control de rendimiento
realístico y está en perfectas
condiciones de funcionamiento.
Si tiene cualquier pregunta respecto de
la instalación de nuestros secadores,
nuestro grupo de servicio a clientes,
gustosamente le responderá.
En nuestra página de web, encontrará
más información referida a nuestros
productos y su selección:
www.boschappliances.com
Información
Rogamos leer y seguir estas
instrucciones de funcionamiento
e instalación conjuntamente con todas
aquellas informaciones entregadas con
nuestra máquina de lavar.
Definiciones
A ADVERTEN- a
^ CIA ^
ADVERTENCIA - Esto significa que
puede resultar la muerte o lesiones
graves debido a la inobservancia de
esta advertencia.
A CUIDADO
CUIDADO - Esto significa que
pueden resultar lesiones debido a la
inobservancia de esta advertencia.
CUIDADO
CUIDADO - Esto significa que
pueden resultar daños debido a la
inobservancia de esta advertencia.
I i I Este símbolo se utiliza para llamar
la atención del usuario respecto de
algo en particular.
A INSTRUCCIONES IMPORTANTES DE SEGURIDAD
A ADVERTEN- a
A
CIA
Para reducir el peligro de incendio,
descargas eléctricas, lastimaduras
de gravedad o muerte al emplear su
secador, tome las siguientes
precauciones:
1. Lea todas las instrucciones antes
2. No seque prendas que
A
de utilizar el secador.
Los secadores Bosch se entregan
con instrucciones de manejo,
cuidado e instalación.
anteriormente hayan sido
limpiadas, lavadas, remojadas, o
se le hayan quitado las manchas
con gasolina, limpiadores en seco,
solventes, otros productos
inflamables o explosivas de las
cuales puedan desprenderse
vapores que puedan encenderse
o explotar.
3. Cuando los niños llegan a una
edad adecuada para operar
equipos electrodomésticos, es
responsabilidad legal de los
padres o reponsables legales,
hacerlos instruir por personal
adecuadamente califacado
respecto de las medidas de
seguridad correspondientes
4. No permita que los niños jueguen
en o con el secador. Debe
ejercerse una supervisión estricta
cuando éstos se encuentran cerca
del secador.
5. Antes de sacar el
electrodoméstico de servicio, quite
la puerta de acceso al
compartimiento de secado.
6. No introduzca las manos en el
electrodoméstico mientras el
tambor está girando.
7. No instale o almacene este
electrodoméstico a la intemperie.
8. No juegue con los controles.
9. No reparar o reemplazar ninguna
parte del secador ni intentar
cualquier tipo de servicio a menos
que haya sido recomendado en
las instruc- ciones de
mantenimiento o en instrucciones
de reparación para usuarios, que
se hayan comprendido
plenamente y para las que se
disponga de habilidad.
10. No utilice suavizadores para
prendas u otros productos para
eliminar las cargas estáticas, salvo
que estén recomendados por el
fabricante de las prendas.
11. No seque con calor, artículos que
contengan espuma de goma
(puede denominarse espuma de
latex) u otros materiales que se
parezcan a los mencionados.
Las espumas de goma pueden
encenderse por autoignición
cuando se los calienta bajo ciertas
circunstancias.
12. Limpie el filtro para pelusas antes
o después de cada carga.
13. Mantenga el área alrededor de la
salida de aire despejada y las
zonas adyacentes libres de
46
Page 47

pelusas, suciedad y polvo. Una
salida obstruida puede impedir la
circulación de aire.
14. El interior de la máquina y de la
salida de aire debe limpiarse
periódicamente por personal
calificado.
15. Asegúrese siempre que el secador
ha sido desconectado de la
alimentación eléctrica, antes de
intentar cualquier trabajo de
mantenimiento. Desconecte el
cable de alimentación, tomándolo
del tomacorriente y no del cable.
16. Almacene todos los productos
químicos y aditivos en un lugar
fresco y seco de acuerdo con las
recomendaciones del fabricante y
de modo que no estén al alcance
de los niños.
17. A fin de reducir el peligro de
incendios, no ponga ropa, paños
para la limpieza, estropajos o
cosas similares en el secador, si
contienen sustancias inflamables
como aceites vegetales, aceite de
cocina, aceites minerales
o destilados de éstos, ceras,
grasas, etc. en el secador. Estas
prendas pueden contener
sustancias inflamables aún, que
pueden producir humo o
incendiarse espontáneamente aún
después de haberlas lavado.
18. No ubique prendas sucias con
aceite de cocina en su secador.
Prendas con este tipo de suciedad
pueden contribuir a reacciones
químicas que pueden causar un
incendio.
19. No se siente sobre el secador.
20. A fin de evitar incendios,
NO UTILICE cables de
prolongación para conectar el
secador a la alimentación de
energía eléctrica.
21. El secador debe usarse
únicamente para lo que fue
diseñado.
22. Controle siempre los bolsillos
y quite todos los objetos
contenidos en éstos.
Especialmente peligrosos son los
cigarrillos y encendedores.
23. Reemplace cables y enchufes
defectuosos.
24. No utilice el secador si se quitaron
paneles o protecciones.
25. No utilice el secador si faltan
piezas o están rotas.
26. No elimine la función de los
dispositivos de seguridad.
27. No utilice conductos de material
plástico o materiales flexibles no
metálicos. Estos materiales
pueden presentar peligros de
incendios.
28. No haga funcionar el secador
antes de asegurarse que fue
instalado de acuerdo con las
INSTRUCCIONES DE
FUNCIONAIENTOy que la
instalación y puesta a tierra
cumplen con todos los
reglamentos locales y/u otras
reglas y requerimientos de
aplicación.
29. Fallos en la instalación, el
mantenimiento y/o operación del
secador respecto de la
instrucciones del fabricante,
pueden ser causa de lesiones
o daños.
30. Para evitar daños en el piso y
también en el crecimiento de
moho, no permita que
salpicaduras o derramamientos de
agua se acumulen alrededor o
debajo del secador.
Notas:
A. Las INSTRUCCIONES
IMPORTANTES DE
SEGURIDAD y los
LLAMADOS DE ATENCIÓN
que se presentan en este
manual no cubren todas las
situaciones posibles que
pueden tener lugar. Deben
aplicarse el sentido común,
precaución y cuidado al
instalar, mantener o hacer
funcionar el secador.
B. Consultar siempre con el
comerciante, distribuidor,
agente de servicio
o fabricante cualquier
problema o bien condiciones
que no se han comprendido
completamente.
C. Tenga en cuenta también las
informaciones de seguridad
en las INSTRUCCIONES DE
INSTALACIÓN y las
INSTRUCCIONES DE
FUNCIONAMIENTO.
INSTRUCCIONES PARA
LA PUESTA ATIERRA
Este electrodoméstico debe
conectárselo a tierra. En caso de fallos
en el funcionamiento o roturas, la
conexión a tierra reduce el riesgo de
descargas eléctricas, presentando una
vía de baja resistencia por la que puede
fluir la corriente.
Para CANADA
Este electrodoméstico está provisto de
un cable de conexión con un
conductor de tierra y el tomacorriente
con la toma de tierra correspondiente.
El tomacorriente debe conectarse en
un enchufe adecuado que esté de
acuerdo con todos los reglamentos
y ordenanzas locales.
En Estados Unidos
Su secador se provee sin el cable de
alimentación. El cable a conec- tar
debe presentar las siguientes
características:
- Aprobación UL en USA
- 208 a 240 volts de valor eficaz
(mínimo)
- 30 amperes
- TipoSRDToDRT(UL2158)
- Cinco pie de longitud (mínimo)
ADVERTEN
CIA
La conexión inadecuada de la
puesta a tierra de este equipo
puede conducir a un riesgo elevado
de descargas eléctricas.
Haga controlar la instalación por un
electricista calificado si tiene dudas,
a fin de determinar que el secador
esté correctamente conectada a
tierra.
NO modifique el enchufe
suministrado con el secador.
Si no es adecuado al tomacorriente,
haga instalar un tomacorriente
adecuado por un electricista
calificado o cambie el cable por uno
que sea adecuado al secador.
CONSERVE ESTAS
INSTRUCCIONES PARA
CONSULTAS
POSTERIORES.
En caso de un cambio de propietario,
este manual debe entregarse
conjuntamente con el secador.
CONSERVE ESTAS INSTRUCCIONES
47
Page 48

INSTRUCCIONES PARA LA INSTALACION
Introducción
Lea estas instrucciones compietamente y con cuidado. Esto va a evitar
que pierda tiempo y esfuerzo,
permitiendo iograr un funcionamiento
óptimo dei secador. Asegúrese de
tener en cuenta todas ias advertencias
y precauciones.
Estas instrucciones para ia instaiación están destinadas para ser usadas
por personai caiificado. Adicionaimente
a estas instruc
ciones, ei secador debe instaiarse de
acuerdo con todas ias regias iocaies o
bien, en su ausencia, con:
- en ios Estados Unidos,
ei Nationai Eiectric Code,
ANSI/NFPA70 en su úitima edición
y ias regias municipaies y/o iocaies
vigentes.
- En Canadá, ei Canadian Eiec-
tricai Code C22.1 en su úitima
edición y ias regias municipaies
y/o iocaies vigentes.
Información sobre
eliminación de residuos
Eliminación del embalaje
A ADVERTEN- a
^ CIA ^
El secador es sumameMantenga
aiejados a los niños tanto del cartón
como de ios demás componentes
del embalaje. Existe peligro de
asfixia con la lámina plástica y con
los cartones plegados.nte pesado.
Ninguno de ios materiaies dei embaiaje
es dañino para ei medio ambiente y
pueden reciciarse. Rogamos
eiiminarios según ias normas de
protección dei mismo.
Rogamos ponerse en contacto con su
vendedor o ia autoridad competente
respecto de ias disposiciones vigentes.
Desecho de electrodomésticos
viejos
Para evitar que los niños al jugar se
pongan en peligro al quedar atrapados,
asegurarse de que el mecanismo de
cierre de la puerta esté desactivado o
desmonte la puerta.
¡Los electrodomésticos viejos no son
basura! Pueden utilizarse materias
primas valiosas en un reciclado
adecuado al medio ambiente.
Rogamos ponerse en contacto con su
vendedor o la autoridad competente
respecto de las disposiciones vigentes.
Antes de instalar el
secador
Desembalaje del
electrodoméstico
A CUIDADO
No ievante ei eiectro- doméstico
personaimente. Tampoco debe
ievantárseio de partes
protuberantes debido ai riesgo de
quebraduras.
CUIDADO
Quite el embalaje
cuidadosamente, para evitar
daños en las superficies.
Controle si el secador se ha dañado
durante el transporte. No conecte un
secador visiblemente dañado. En
casos de duda, consulte con su
vendedor.
Volumen de entrega
En Estados Unidos
CUIDADO
El secador se provee sin el cable de
alimentación. Éste debe conectarlo
personal calificado.
Emplazamiento
A ADVERTEN- a
A
CIA
No instale el secador:
- en ei exterior,
- en ambientes donde gotea ei
agua,
- ceca de materiaies infiamabies,
- en ambientes con riesgo de
congeiamiento,
- en ambientes donde puede haber
gas u otros combustibies,
- en armarios con puertas que se
puedan trabar o en nichos.
Ei ambiente de empiazamiento debe
poseer una buena ventiiación, de otro
modo ei secador trabajará con
rendimiento reducido.
No opere ei secador a temperaturas
superiores a ios 104 °F (40 °C)
o debajo de 41 °F (5 °C). Las tem
peraturas bajas pueden afectar ia
secuencia ei programa automático y
pueden proiongar ios tiempos dei
secado.
La superficie donde se vaya a instaiar ei
secador deben estar iimpias, parejas y
firmes. ¡No instaie ei secador sobre
aifombras! Compense ias
irreguiaridades en ei piso mediante ios
pies ajustabies en aitura.
Instaie ei secador y nivéieio un iado
respecto dei otro y ia parte anterior
respecto de ia parte posterior.
Utiiice un nivei de aicohoi.
¡Nunca desenrosque totaimente ios
pies ajustabies!
Ei tamaño dei área de instaiación
depende de ias medidas dei secador.
¡Asegúrese que exista espacio
suficiente para ei área de giro de ia
puerta!
A
A ADVERTEN- a
^ CIA ^
En los artefactos que se van
a poner fuera de servicio,
desconecte el enchufe principal,
corte el cable de red y elimine el
cable junto con el enchufe.
48
CUIDADO
Una vez eliminado el embalaje, quite
inmediatamente todos los objetos
contenidos en el tambor.
Ei secador se entrega como unidad
compieta. Las instrucciones de
funcionamiento y ios accesorios que
forman parte dei voiumen de entrega
se encuentran en ei tambor.
Page 49

Medidas Peso
a 27.0” (686 mm)
b 31.8” (808 mm)
c 37.2” (954 mm)
d
ángulo
19.7” (500 mm)/
170- 180°
125 lbs
(56 kg)
con
embalaje
143 lbs
(64 kg)
Información importante respecto de las
distancias mínimas:
- Dependiendo de la ubicación de la
salida de aire, debe sumarse una
distancia adicional mínima de 5^”
(14 cm) sobre este lado, para el
tubo y las abrazaderas (ver página
51).
- Distancias superiores a las
indicadas, reducen la probabilidad
que se produzca moho detrás del
secador.
- Distancias adicionales reducen la
transmisión del ruido.
- Distancias adicionales facilitan la
instalación y el mantenimiento.
- Si se instala el secador en
ambientes reducidos, las puertas
del ambiente deberán estar
equipadas con ventilaciones de
dimensiones mínimas
establecidas.
Conexión eléctrica
ADVERTEN
CIA
El cable de alimentación debe
instalarlo únicamente personal
calificado.
Conecte el secador a un ramal
individual del circuito.
No utilice adaptadores.
No utilice cables prolongadores.
No quite la clavija de puesta
a tierra.
Para CANADA
Su secador se provee con un cable de
alimentación aprobado en Canadá.
El secador Bosch necesita un
tomacorrientes de 4 conductores.
Si instala el secador en un retrete,
observe el cumplimiento de las
distancias mínimas de acuerdo con la
siguiente tabla:
Distancias de instalación mínimas
Retrete
A los lados 0”
Arriba
Detrás* 0”
* tan cerca de la pared como lo permita la
ventilación
' (0 mm)
12”
' (0 mm)
(305 mm)
La puerta del secador se provee con
bisagras sobre el lado derecho. Si así
se lo requiere, las bisagras pueden
cambiarse al lado derecho.
Si necesita cambiar las bisagras de
lado, póngase en contacto con su
vendedor o el servicio técnico
a clientes (ver página 66).
Cuando instale el enchufe para el cable
de alimentación, asegúrese que el
cable de alimentación sea accesible
cuando el secador está instalado.
El cable de alimentación debe
reemplazarlo personal calificado. Utilice
un cable de alimentación de 4
conductores (consulte abajo por la
conexión en los Estados Unidos).
En Estados Unidos
Su secador se provee sin el cable de
alimentación. El cable a conec- tar
debe presentar las siguientes
características:
- Aprobación UL en USA
- 208 a 240 volts de valor eficaz
(mínimo)
- 30 amperes
- TipoSRDToDRT(UL2158)
- Cinco pie de longitud (mínimo)
49
Page 50

ADVERTEN
CIA
El cable de alimentación debe
conectarlo un electricista
registrado únicamente.
Utilice únicamente cables UL
de 30 Amps con descarga de
tracción. Tenga en cuenta las
instrucciones del fabricante.
No conecte el cable de
alimentación a un enchufe bajo
tensión, antes de conectarlo
a los terminales del
electrodoméstico y que esté
cerrada la caja de conexión
o derivación según se describe
abajo.
No utilice cables de alimentación
usados. El cable deberá estar
provisto de terminales cerrados
o bien doblados hacia arriba.
No tuerza los cable en un ángulo
cerrado en las conexiones.
Debe utilizarse únicamente un
cable de 4 conductores si el
equipo se instala en una casa
rodante, en un vehículo
recreacional, en una nueva rama
del circuito de instalación u otro
lugar donde las reglas locales no
permiten una puesta a tierra a
través del conductor neutro.
Conexión a través de un cable
de 4 conductores
1. Quite los tornillos de la cubierta de
la bornera ubicada en la parte
superior trasero del
electrodoméstico.
3. Sujete la abrazadera de descarga
de tracción a la abrazadera en
ángulo.
Ajuste la tuerca.
4. Afloje los 2 tornillos marcados con
L y también aquél marcado con N
en la bornera y el tornillo en el
borne GROUND.
5. Pase el cable de 4 conductores a
través de la abrazadera de
descarga de tracción UL.
6. Ajuste los dos tornillos (2,5 Nm) de
la abrazadera de descarga de
tracción de modo que el cable no
se mueva.
7. Sujete el conductor de toma de
tierra del cable (verde) al terminal
marcado con GROUND. Sujete el
tornillo (2,5 Nm), de modo que el
cable esté firmemente sujetado.
8. Gonecte los dos conductores
exteriores(rojo y negro) a los
bornes marcados con L y luego el
que queda (blanco) al borne
marcado con N.
9. Ajuste los 3 tornillos (3,0 Nm) de
modo que los conductores
queden firmemente sujetados.
10. Gontrole que la abrazadera de
descarga de tracción UL esté
firmemente ajustada y no se
mueva.
11. Reemplace la cobertura de la
bornera y sujétela en su lugar.
|~n ¡Asegúrese que la abrazadera de
descarga de tracción se encuentra
fuera de la cubierta!
El electrodoméstico está ahora lista
para conectarlo al enchufe de 4 polos
de la alimentación.
Conexión mediante un cable de
alimentación de tres
conductores
1. Quite los tornillos de la cubierta de
la bornera ubicada en la parte
superior trasero
del electrodoméstico.
2. Asegúrese que haya un rabillo de
conexión a tierra.
3. Sujete la abrazadera de descarga
de tracción a la abrazadera en
ángulo.
Ajuste la tuerca.
4. Afloje los dos tornillos marca- dos
con las letras L y N en la bornera.
5. No utilice sombreretes con
sujeciones magnéticas.
6. Sujete los tornillos (2,5 Nm) de la
abrazadera de descarga de
tracción UL de modo que el cable
de alimentación no se mueva.
7. Gonecte los 2 conductores
exteriores (rojo y negro) a los 2
bornes marcados con la letra L y
luego el conductor sobrante
(blanco) en el borne marcado con
la letra N. Ajuste los 3 tor- nillos
(2,5 Nm) de modo que los
conductores queden firme
mente sujetados.
8. Ajuste los 3 tornillos (3,0 Nm) de
modo que los conductores
queden firmemente sujetados.
1 - Bornera
2 - Rabillo de conexión a tierra
3 - Brida en ángulo con descarga de tracción
2. Afloje el tornillo inferior del rabillo
de toma de tierra. Ubique el tornillo
en el sitio marcado con GROUND.
Aplane el cable de tierra
y conéctelo suelto.
50
9. Controle que la abrazadera de
descarga de tracción UL esté
firmemente ajustada y no se
mueva.
Page 51

10. Reemplace la cobertura de la
bornera y sujétela en su lugar.
1 I ¡Asegúrese que la abrazadera de
m
descarga de tracción se encuentra
fuera de la cubierta!
Procedimientos de puesta
a tierra adicionales
- Algunas reglamentaciones locales
pueden exigir una conexión a
tierra adicional. En este caso
deben adquirirse por separado, los
accesorios requeridos, como el
cable de conexión, abrazaderas
y tornillos.
- Nunca conecte el
electrodoméstico a tuberías de
agua de material plástico, tuberías
de gas o de agua.
Instrucciones para la conexión
a tierra
Este electrodoméstico debe
conectárselo a tierra. En caso de fallos
en el funcionamiento o roturas, la
conexión a tierra reduce el riesgo de
descargas eléctricas, presentando una
vía de baja resistencia por la que puede
fluir la corriente. Para CANADA este
electro- doméstico está provisto de un
cable de conexión con un conductor
de tierra y el tomacor- riente con la
toma de tierra corres- pondiente.
El tomacorriente debe conectarse en
un enchufe adecuado que esté de
acuerdo con todos los reglamentos
y ordenanzas locales.
A ADVERTEN- a
^ CIA ^
Una conexión inadecuada del
conductor de puesta a tierra del
equipo puede causar descargas
eléctricas. Haga controlar el
electrodoméstico por un
electricista calificado o del
servicio técnico si tiene dudas
respecto de la correcta conexión
a tierra de su secador.
Conexión del tubo de aire
de salida
A ADVERTEN- a
^ CIA ^
1. A fin de reducir el peligro de
incendio, el aire de salida de este
electrodoméstico DEBE
CONDUCIRSE AL EXTERIOR.
2. A fin de reducir el peligro de
incendio, no utilice las tuberías
más largas que lo recomendado.
3. NO utilice tubos de material
plástico o no metálicos con este
secador.
4. NO utilice un tubo de un diámetro
inferior a 4 pulgadas.
5. NO utilice sombreretes con
sequros magnéticos.
6. NO conduzca el aire de salida al
interior de una chimenea,
conducto de ventilación, altillo u
otra tubería utilizada para fines de
ventilación.
7. No instale un tubo flexible
empotrado en la pared, un
cielorraso o piso.
8. NO retuerza ni doble el tubo.
9. Controle y limpie la tubería
regularmente. Como mínimo una
vez al año.
10. El tubo de salida de aire debe
terminar de modo de evitar la
circulación inversa, la entrada de
pájaros u otros animales.
Los secadores Bosch se han
construido para que el aire de secado
sea conducido al exterior. Para evitar la
formación de moho y la acumulación
de pelusas y también para garantizar
un rendimiento máximo, el aire de
secado debe conducirse al exterior.
Salida de aire del secador
El secador se provee con una salida de
aire ubicada en la parte posterior del
mismo.
Para tener en cuenta los requeri
mientos de espacio y un sistema de
ventilación eventualmente existente,
se posibilitan las siguientes opciones
de conexión:
- en el lado derecho del
electrodoméstico,
- en la parte inferior del
electrodoméstico.
1 - Salida de aire en la parte posterior del
electrodoméstico (estándar)
2 - Salida de aire en el costado del
electrodoméstico (opción)
3 - Salida de aire en la parte inferior del
electrodoméstico (opción)
Las conexiones especiales para el aire
de salida, se las provee su vendedor al
igual que parte requeridas para cada
opción (ver la página 8).
- Juego para salida lateral
- Juego de salida inferior
El cambio de la salida de aire y una
conexión opcional, debe efectuarla un
técnico calificado.
Tubería
Para asegurar un rendimiento máximo,
la tubería del secador debe ser tan
corta como posible y con la menor
cantidad de codos. Su secador
trabajará en las mejores condiciones, si
la tubería presenta la menor cantidad
de estorbos para la circulación posible.
Tuberías más largas que las
recomendadas, prolongan el tiempo de
secado, causan la acumulación de
pelusas y acortan la vida útil del
secador.
Debe utilizarse un tubo de cuatro
pulgadas (aprox. 100 mm).
Utilice tubos de metal rígidos o bien
flexibles.
NO utilice tubos de material plástico o
materiales no metálicos con este
secador.
51
Page 52

NO utilice tornillos o sujetadores en el
ensamble de la tubería, que se
prolonguen hacia el interior de la
misma. Funcionarán como puntos de
concentración de pelusas.
Las junturas de los tubos deberán
asegurarse con una cinta adhesiva de
aluminio.
Todas las junturas de los tubos deben
sellarse para que no presenten
pérdidas. El extremo del tubo de menor
diámetro, deberá señalar en el sentido
de circulación del aire.
Independientemente de conectar
la tubería a un sistema existente
o nuevo, asegure que esté libre
de pelusas.
En la tabla siguiente se indican las
longitudes máximas permitidas tanto
para tuberías rígidas como para
aquellas flexibles.
Número de
codos de
90°
0
1 56 ft.
2
3 39 ft.
4
Nota:
La salida lateral e inferior ya tienen un
codo de 90° en el interior del secador.
Para determinar la longitud máxima,
deberá agregar por lo tanto, un codo
en la tabla anterior.
No se recomienda el uso de más de 2
codos de 90°. Para un resultado
óptimo, separe los codos por lo menos
con 4 pies de tubería recta, incluyendo
en ello la distancia entre el último codo
y el sombrerete.
Tubo
rígido
66 ft.
(2011 cm)
(1707 cm)
48 ft.
(1463 cm)
(1189 cm)
30 ft.
(914 cm)
Tubo
flexible
45 ft.
(1372 cm)
36 ft.
(1097 cm)
29 ft.
(884 cm)
22 ft.
(671 cm)
16 ft.
(488 cm)
Sombrerete de ventilación
El tubo de ventilación debe terminar en
un sombrerete de ventilación aprobado
con laminillas de cierre amortiguado.
NO utilice un sombrerete con seguros
magnéticos.
Para evitar restricciones en la venti
lación, la salida debe presentar un
distancia mínima de 12 pulgadas (30
cm) sobre el suelo u otra superficie de
obstrucción.
Partes necesarias
Las partes que se necesitan para el
sistema de ventilación, (codos, tubos,
salidas para la tubería) no forman parte
del volumen de entrega del secador.
Accesorios
Las partes necesarias para el sistema
de ventilación pueden adquirirse en el
servicio a clientes o bien en su
vendedor local. ¡Rogamos tener en
cuenta las instrucciones de instalación
que provee el fabricantel
Juego para salida lateral
Nota:
¡El número máximo de codos de 90°
permitido es 4 (se incluye aquí, el del
juego de adaptación)!
rn Se requiere de una herramienta
especial, para abrir el orificio en el
panel lateral.
¡Póngase en contacto con
el vendedor de su zona!
Juego de salida inferior
N° de parte: WTZ1270
Nota:
¡El número máximo de codos de 90°
permitido es 4 (se incluye aquí, el del
juego de adaptación)!
Canastilla para secar
N° de parte: WTZ1290
Utilice la canastilla para secar prendas
de lana lavables (p. ej. suéteres) y
calzados.
Juego de salida por la izquierda
N° de parte: WTZ1260 (para todos los
secodores excepto la plata y la plata de
tono del dúo)
N° de parte: WTZ126S (para los
secodores de la Plata y la plata del tono
del dúo)
El haza de la puerta puede cambiarse
al lado opuesto. De fábrica, la puerta
presenta las bisagras a la derecha.
Montje sobre pedestal
N° de parte: WTZ 1295 (Secodores de
Blancos)
N° de parte: WTZ 1295S (Secodores
de Plata)
N° de parte: WTZ 1295P (Secodores
del tono de duo de Plata)
N° de parte: WTZ 1295R (Secodores
del tono de duo de Rojo)
Si monta el secador Sobre un pedestal
de Bosch siga las instrucciones
suministradas con el pedestal.
52
Page 53

La instalación paso
a paso
1. Quite el secador de su embalaje.
2. Quite todos los objetos del
tambor.
3. Controle si el secador presenta
daños visibles.
4. Ubique el secador cerca del sitio
de emplazamiento.
5. Si hace falta, cambia las bisagras
de la puerta a la izquierdo (ver
página 49).
6. Si hace falta, haga instalar la salida
de aire del secador al exterior, por
el servicio a clientes (ver página
51).
7. Haga colocar el cable de
alimentación de energía por un
técnico autorizado
(ver página 49).
8. Instale la tubería de ventilación si
hace falta.
ISiga las instrucciones de
instalación del fabricante
apropiadol
Si las condiciones de espacio son
m
muy reducidas, se recomienda
montar las primeras partes de la
tubería antes de ubicar el secador
en su sitio de emplazamiento
definitivo.
9. Ubique el secador en su sitio de
emplazamiento definitivo.
CUIDADO
No arrastre el secador por el
suelo, si los pies ajustables
fueron extendidos. En este caso
se dañarían tanto los pies
ajustables, como la parte inferior
del secador.
10. Posicione y nivele luego el
secador.
El secador debe nivelarse con
todos los pies ajustables
firmemente asentados en el piso.
No debe tambalearse. Si el
secador no está nivelado o si se
tambalea, deben regularse los pies
ajustables. Los pies deben
ajustarse hasta que el secador no
se bambolea y está nivelado tanto
de un lado respecto del otro,
como de atrás respecto de
adelante.
11 Conecte el tubo de ventilación a la
salida de aire del secador.
12. Conecte el tomacorriente en el
enchufe correspondiente.
Lista a controlar antes de
usar el secador
1. Controle que los pasos 1 a 12
hayan sido efectuados
correctamente.
2. Asegure que el secador está
conectado a la alimentación.
3. Lea ls instrucciones de
funcionamiento, para enterarse
como funciona su secador.
4. Efectúe un control del
electrodoméstico:
□ Controle que el tambor esté
vacío.
□ Cierre la puerta del secador.
□ Conmute el secador a «Extra
dry» (Extra seco) y enciéndalo.
□ Párelo después de
aproximadamente 3 a 5
minutos y abra la puerta.
5. Si el interior del secador está tibio,
significa que está correctamente
conectado.
Apague el secador.
6. Si el secador no funciona,
conmútelo a «Off».
Consulte en la localización de
fallos (ver página 64) de las
INSTRUCCIONES DE
FUNCIONAMIENTO y determine el
fallo.
Preparar el secador para
el transporte, paso a paso
1. Gire el selector de programas a la
posición «Off».
2. Desconecte el enchufe de
alimentación.
3. Desconecte el tubo de ventilación
de la salida correspondiente en el
secador.
4. Coloque todos los accesorios en
el tambor.
5. Cierre la puerta y asegúrela con
cinta adhesiva.
6. Atornille los pies ajustables en
altura hasta que queden dentro de
la carcasa para evitar que se
dañen durante el transporte.
53
Page 54

INSTRUCCIONES DE FUNCIONAMIENTO
Su nuevo secador
Abra la puerta .... (con la marca en colore)
54
Page 55

Panel de manejo
Botón Start/Stop (Arranque y parada)
Arranca, interrumpe y para el proceso de
secado.
Display
Indica el tiempo remanente estimado para la finalización de los
programas.
Botones para seleccionar las opciones
(adicionales a los programas, si así se lo requiere).
Ver página 58.
Delicates low temp. (Ropa fina baja temperatura)
Accione este botón cuando se trata de ropa sensible
a la temperatura (p.ej. fibra acrílicas). Latemperatura
del proceso de secado se reduce y el tiempo se
prolonga correspondientemente.
Signal (Señal)
Una señal acústica indica el final del programa.
Luz indicadora (LED)
Sirve como un recordatorio para limpiar el filtro de
la pelusa.
Selector de programa
Selecciona el programa. Ver página 58.
Puede girárselo en ambas direcciones.
Para apagar el secador, conmutar el
selector de programa a «Off».
Luces indicadoras
Indica el estado vigente del
proceso de secado.
55
Page 56

Selección de un programa
Resumen de
instrucciones
A CUIDADO
Antes de usar su secador lea
y tenga en cuenta todas las
instrucciones de instalación
y funcionamiento.
Preparación del secador Seleccionar una opción...
|~n Controle el filtro de pelusas. Debe
limpiárselo antes y después de
cada proceso de secado.
...a poner en
funcionamiento el
secador.
Apagar el secador
Uso de la canastilla
(Accesorio, ver página 8)
56
Page 57

Informaciones
para su seguridad
ADVERTEN
CIA
Tenga siempre en cuenta las
INSTRUCCIONES DE SEGURIDAD
IMPORTANTES (Ver página 46).
ADVERTEN
CIA
PARA EVITAR
¡PELIGRO DE EXPLOSIONES!
Mantenga alejadas del secador
materiales inflamables y vapores
como la gasolina.
Nunca seque prendas que
estuvieron en contacto alguna vez
con materiales inflamables (aún
después de lavarlas).
Nunca seque objetos que hayan
estado en contacto con aceites de
ningún tipo (incluyendo aceite para
cocinar).
Prendas que contengan espumas,
goma o plástico, deben secarse
sobre la soga o bien con un ciclo de
suavizado con aire.
No está permitido dejar prendas
que contengan materiales
inflamables (como encendedores)
durante el secado.
El incumplimiento de estas
instrucciones puede ser causa de
explosiones o incendios.
Para evitar ¡Peligro de muerto o
lesiones!
Utilice el secador únicamente a nivel
doméstico y con cantidades de ropa
domiciliarias.
Debe usarse este secador únicamente
con textiles lavados con agua.
Antes de encender su
secador
Instale el secador de acuerdo con las
instrucciones de instalación (ver página
48).
No utilice un secador, si éste presenta
daños visibles. En casos de duda,
consulte con su vendedor.
Utilización del secador
No deje que niños jueguen sin
vigilancia en las cercanías del secador.
Mantenga alejados del secador a los
animales caseros. Antes de cerrar la
puerta, controle el contenido del
tambor.
Quite todos los objetos de los bolsillos.
Los encendedores para cigarrillos son
especialmente peligrosos.
¡Peligro de explosión!
Apague el secador cuando termina el
programa.
Protección del secador
No se suba al secador.
No se apoye ni siente sobre la puerta.
¡Existe peligro de vuelco para el
secador!
No use ni almacene solventes,
potenciadores para detergentes
o quitamanchas en las cercanías del
secador.
Puede dañarse el secador.
No levante el secador, sujetándolo de
partes sobresalientes del mismo.
¡Peligro de quebraduras!
Protección
del medio
ambiente
Consejos para la racionalización de
energía
Bosch recomiendo lo siguiente, para
racionalizar energía, dinero ytiempo:
- ¡Escurra la ropa prolijamente!
Antes del secado, centrifugue la
ropa prolijamente en la máquina
de lavar. ¡Utilice la velocidad de
centrifugado máxima admisible
para el tipo de ropa en cuestión!
Velocidades de centrifugado
elevadas reducen el tiempo de
secado y el consumo de energía.
- ¡Utilice la carga óptima!
Use la carga máxima
recomendada. Sin embargo no
debe excedérsela.
- ¡Limpie el filtro!
Limpie el filtro antes y después de
cada proceso de secado (ver
página 62).
- ¡Ventile el ambiente de
emplazamiento!
Provea una suministro adecuado
de aire fresco durante el proceso
de secado.
- ¡No seque materiales
inadecuados!
No seque prendas engomadas o
impermeables.
- ¡Limpie e inspeccione el
sistema de salida de aire
regularmente!
Obstrucciones en este sistema
prolongan el tiempo de secado.
Antes de usar el
secador por
primera vez
Antes de usar su secador por primera
vez:
1. Lea este manual de instrucciones
cuidadosamente.
2. Controle que el voltaje de
alimentación esté de acuerdo con
aquél indicado en la chapa de
características. Ver la figura en
página 66.
3. Quite todos los objetos del
tambor.
4. Controle si el secador presenta
daños visibles. Si encontrara
alguno, póngase en contacto con
su vendedor.
5. Eriegue el interior del tambor con
un paño húmedo.
6. Efectúe un control del
electrodoméstico.
Ver página 53.
7. Si el secador no funciona,
conmútelo a «Off». Consulte la
sección de localización de fallos
menores (página 64) en el manual
de instrucciones y determine la
causa.
Desconexión
temporal del
secador
Haga funcionar su secador únicamente
cuando está en su casa. Si tiene
intención de irse de vacaciones o no va
a usar el secador por un tiempo
prolongado:
1. Corte el conmutador de
alimentación.
2. Si es posible, desconecte el
enchufe de alimentación.
3. Limpie el filtro de pelusas.
Ropa
Identificación de prendas
Observe el símbolo que determina el
tratamiento en las etiquetas de las
prendas. Éstas proveen información
importante respecto de eventuales
limitaciones concernientes al proceso
de secado.
No seque textiles de los siguientes
tipos:
- Impermeables
(p. ej engomadas)
- Ropa fina (seda, cortinas
sintéticas)
57
Page 58

¡Seque prendas de lana o con alto
contenido de lana, únicamente
sobre la cesta!
Utilice le programa «Air fluff/no
heat^ (Suavizado a aire/ningún
calor) para secar materiales de
espuma de goma o similares.
Consejos para el secado
En principio, lo siguiente encuentra
aplicación en todos los programas:
- Para lograr un secado uniforme,
seleccione la ropa de acuerdo al
tipo de prenda y al programa a
utilizar.
- Cierre cierres, ganchos y botones.
Sujete cintas sueltas, delantales,
cordeles, etc.
- No seque demasiado prendas de
fácil cuidado. ¡Existe el peligro que
se arruguen! Deje que estas
prendas se sequen al aire libre.
- No planche la ropa inmediatamente
después de secarla. Deje la ropa
apilada por un momento. De esta
manera se distribuye de modo
parejo la humedad.
- Trabajos de punto (p. ej. camisas,
prendas de jersey) muchas veces
encogen cuando se las seca por
primera vez. No utilice el programa
«Very dry/Extra dry^ (Muy
seco/Extra seco).
Selección del
programa
Para un secado óptimo, su secador
ofrece diversos grupos de programas y
opciones adicionales.
Seleccione el programa de secado
necesario de la tabla de acuerdo con
los ejemplos (ver página 59).
Permanent Press ECOSENSOR
(Estampados)
El avance de los programas
automáticos se controla a través de
sensores. La duración de los
programas depende del grao de
humedad medido en la ropa y del
grado de humedad seleccionado (p. ej.
«Damp dry» (Húmedo seco) o «Extra
dry» (Extra seco))
ProgramastemPor¡zados
Los programas de tiempo tienen una
duración específica
(20, 40 o 60 minutos).
En la etapa de «Air fluff/No heat»
(Suavizado a aire/Ningún calor), el
secador funciona por 20 minutos con
aire del medio ambiente y sin
suministro de calor.
1 I ¡Seque prendas de lana o con alto
E
contenido de lana, únicamente
sobre la cesta!
indicadorde estado del
símbolos sobre las prendas. Se reduce
la temperatura y se prolonga el tiempo
que dura el proceso de secado.
Signal (Señal)
Su secador emite diversos sonidos si
se presiona el botón «señal».
Señal Tipo
Arranque Sonido corto
Fin de programa
Secuencia de
sonidos cortos
Fallo en el Secuencia de
funcionamiento sonidos prolongados
Advertencia de malSecuencia de
funcionamiento
1 I La señal «Advertencia de mal
E
funcionamiento» está siempre
activa.
programa
El secador utiliza un sistema de
seguimiento para todos los programas,
excepto los programas de tiempo. Un
sensor de humedad controla
permanentemente el grado de
humedad de la ropa. El secado
concluye inmediatamente, en cuanto
se logra el grado de humedad
ajustado.
El tambor sigue girando por una hora a
intervalos específicos, a fin de evitar
que la ropa se arrugue.
El grado de humedad vigente y el nivel
logrado durante la secuencia del
programa se indica a través de luces
indicadoras: drying (secado), damp dry
(no muy seco), regular dry (secado
normal) y Wrinkle block (protección
contra arrugado).
sonidos prolongados
Programas automáticos
Hay diversos programas automáticos
para los diferentes tipos de textiles:
Regular/Cotton ECOSENSOR
(Normal/Algodón) o Permanent Press
ECOSENSOR (Estampados).
Regular/Cotton ECOSENSOR
(Normal/Algodón)
58
Opciones
Delicates low temp. (Ropa fina
baja temperatura)
Presione el botón «Delicates low
temp.» (Ropa fina baja temperatura)
para tratar prendas sensibles a la
temperatura. Tenga en cuenta las
informaciones de cuidado o los
rP Si se enciende el indicador
luminoso «Wrinkle block» mientras
el selector de programas está en la
posición Off, corte el suministro de
energía eléctrica apagando el
conmutador correspondiente y
llame al servicio a clientes.
Page 59

Tabla de selección de programas
Programas automáticos
Para algodón y ropa de color hecha de algodón o lino.
Presione «Delicates low temp.» (Ropa fina baja temperatura) para ropa sensible a altas temperaturas.
Para ropa aue.
Sábanas, manteles y toallas
Sábanas, manteles y toallas, camisas, camisas deportivas, ropa de trabajo
debe plancharse
Camisas, camisas deportivas, trajes, pantalones, ropa de trabajo e interior
Toallas de rizo, repasadores, y toallas de mano, sábanas, ropa interior,
que no debe plancharse
soquetes de algodón
Toallas de rizo, repasadores, y toallas de mano, sábanas, ropa interior,
soquetes de algodón
que no debe plancharse gruesos
multicapa
Salidas de baño de rizo y sábanas de rizo, particularmente gruesas
o multicapa
Ropa de fácil cuidado (sin centrifugar) de fibra sintética o mezcla, algodón con poliéster.
Presione el botón «Delicates low temp.» para prendas extremadamente sensibles a altas temperaturas.
Para ropa aue.
Pantalones, trajes, faldas, camisas, blusas, jeans, ropa deportiva con
abundante fibra sintética, lencería
que no debe plancharse o solo
ligeramente
Camisas, blusas, ropa deportiva que no debe plancharse Regular dry (Medlanemente seco)
Sábanas y manteles, equipos de gimnasia, anoraks, frazadasque no debe plancharse gruesos
multicapa
Programas temporizados Time dry (Tiempo de secado)
Prendas centrifugadas con bajo contenido de humedad, prendas pequeñas como toallas de baño, ropa de baño,
repasadores. En el caso de cargas mínimas de 0,22 a 0,44 Ib (esto es en un tambor pequeño), deberá
seleccionarse un programa de secado controlado por tiempo.
Presione el botón «Delicates low temp.» para ropas muy sensible a temperaturas.
- Para algodón y ropa de color hecha de algodón o lino.
- Textiles sensibles a altas temperaturas.
Refrescado o ventilación de prendas con poco uso y secado de textiles muy delicados.
Para todos los tipos de prendas incluyendo goma espuma (p. ej. almohadas, animales de peluche), plástico
(p. ej. cortinas de baño, manteles), goma (p. ej. alfombrillas), nylon puro, polipropileno.
Regular/Cotton
ECOSENSOR (Normal/Algodón)
Damp dry (Húmedo seco)
Regular dry (Medlanemente seco)
Very dry (Muy seco)
Extra dry (Extra seco)
Permanent Press
ECOSENSOR (Estampados)
Damp dry (Húmedo seco)
Very dry (Muy seco)
20 min, 40 min, 60 min
20 min, 40 min, 60 min
Air fluff/No heat (Suavizado a
alre/NIngún calor)
Funciona
miento
Uso del secador
1. Abra la puerta.
2. Controle el filtro.
El filtro debe limpiarse antes
y después de cada proceso de
secado. Un filtro limpio reduce el
tiempo de secado y ahorra
energía.
rn SI las superficies coloreadas de la
secador entran en contacto con el
blanqueador, puede ocurrir que
éstas se decoloren. Por ello es
importante que el blanqueador no
entre en contacto con las
superficies mencionadas. Si se
desparramara blanqueador sobre
las superficies coloreadas, limpie
inmediatamente con un paño de
papel húmedo on la mayor
prolijidad.
59
Page 60

3. Gire el selector de programas
al programa deseado. Selecciones
el programa que corresponda a la
ropa colocada en el secador de la
tabla correspondiente (ver
página 59). Se enciende la luz en
el interior del secador.
|~n La luz indicadora «start/stoop»
comienza a centellear.
4. Si hace falta, seleccione «Option»,
presionando el botón.
Las «Opciones» se explican el la
página 58.
I i I Se actualiza el tiempo remanente
indicado.
7. Presione el botón «Start/Stop». Le
luz indicadora «Start/Stop»
quedará encendida
permanentemente.
rn El programa comienza con una
señal acústica (si así fue ajustado).
Si fue seleccionado un programa
estándar, las luces indicadoras señalan
el avance de la secuencia del
programa.
8. Abra la puerta.
9. Saque la ropa del secador.
10. Gire el selector de programas a la
posición «Off».
La luz del secador se apaga.
11. Limpie el filtro.
El filtro debe limpiarse después de
cada proceso de secado. Un filtro
limpio reduce el tiempo de secado
y ahorra energía.
12. Cierre la puerta.
Uso de la canastilla
Utilice la canastilla para secar prendas
de lana lavables (p. ej. suéteres) y
calzados. La canastilla para secar
permanece quieta mientras el tambor
gira. La lana húmeda no debe moverse
ya que tiende a afeltrarse. Secar
calzados sin la canastilla, puede dañar
el tambor.
5. Coloque la ropa en el tambor
vacío. Coloque cada prenda por
separado en el interior de la
máquina.
- Para un resultado óptimo, debe
separarse la ropa en función de su
tipo y el grado de humedad
residual deseado. Para más
información, consulte la
página 57.
I i I Tenga en cuenta los símbolos para
el secado de la ropa, colocados
por el fabricante. Si está por secar
prendas de lana y calzados,
consulte la página 60.
Asegúrese que haya solamente ropa
en el tambor. Controle que todas las
prendas estén completamente dentro
del tambor.
6. Cierre la puerta.
La luz indicadora «Start/Stop» continúa
a centellear.
|~n Si la puerta no fue cerrada
correctamente, el secador no
arrancará.
1 I Al finalizar el programa se emite
0
una señal acústica (si así fue
ajustado) y se enciende el LED
«Wrinkle block» (protección contra
arrugado).
rn Una vez que el proceso de secado
ha finalizado (el programa o el
programa de tiempo han
concluido), el tambor gira en
intervalos específicos durante 1
hora.
Esto evita que la ropa se arrugue.
La ropa permanece suelta y suave
hasta que se la quita.
Deberá quitarse la ropa como
máximo, una vez concluido este
tiempo.
A CUIDADO
¡Seque solamente una prenda o un
par de zapatos por vez! ¡La carga
máxima para secar es de 2,2 Ibs (1
kg)! ¡La ropa debe haberse
centrifugado! ¡El calzado a secar
debe presentar solamente la
humedad residual después de un
lavado! ¡La ropa no debe tocar el
tambor! Puede engancharse en éste
y dañarse. Una vez utilizada la
canastilla para secar, sáquela
inmediatamente del secador.
Colocar la canastilla para secar
1. Abra la puerta del secador.
2. Controle que el tambor esté vacío.
60
Page 61

3. Quite el filtro.
4. Inserte la canastilla para secar
horizontalmente en el tambor.
5. Coloque la canastilla para secar
de modo que los soportes
penetren en los alojamientos
frontales previstos a tal fin.
2. Coloque la ropa suelte sobre la
canastilla. ¡No la aplaste! ¡La ropa
no debe tocar el tambor! ¡No
permita que la ropa cuelgue fuera
de la cansastilla!
3. Cierre la puerta.
4. Siga las instrucciones para un
programa controlado por tiempo
según se describe en «Seleccione
un programa de tiempo».
Secar calzado sobre la canstilla:
1. Prepare el calzado.
□ Limpie el calzado para evitar que
el tambor se ensucie.
□ Al preparar el calzado, extienda
la lengua de los mismos.
□ Afloje o quite los cordones.
□ Extraiga partes adicionales
como plantillas.
3. Cierre la puerta.
Seleccione un programa
de tiempo
1. Gire el selector de programas a
«Time dry/...min».
Seleccione el tiempo de secado
según la tabla siguiente y de
acuerdo con el tipo de ropa.
Tipo de ropa
Tiempo de secado
requerido
Suéter de lana fina80 min.
(aprox. 0,8 lbs/350 gr)(p. ej. 60 + 20 min)
Suéter de lana gruesa90 a 120 min.
(aprox. 1,9 lbs/850 gr)(p. ej. 60 +40 min)
Faldas 60 a 90 min.
Pantalones 60 a 90 min.
6. Coloque el filtro para la pelusa.
!Éste debe insertarse de modo
que quede alineado con el borde
del tambor!
Secar prendas de ropa sobre
la canastilla
1. Pliegue la ropa de modo que
quepa en la canastilla.
2. Coloque el calzado sobre la
canastilla.
□ Directamente sobre la canastilla
o bien
Coloque una toalla y, sobre ésta,
los tacos del calzado.
Esto conducirá a un resultado
más uniforme del secado.
Prendas pequeñas
30 min.
(p. ej. guantes).
Calzado 30 min.
2. Presione el botón «Start/Stop». Le
luz indicadora «Start/Stop»
quedará encendida
permanentemente.
3. Si la prenda aún presenta una
humedad residual después del
secado:
□ pliegue la prenda de modo que
las partes húmedas están hacia
fuera,
□ vuelva a hacer arrancar
el proceso de secado
y selecciones un tiempo de
secado menor, según el grado
de humedad residual.
4. Después del secado, extienda la
ropa al aire libre por
aproximadamente 15 minutos.
(calzado por aprox. 30 min.).
5. Quite el filtro.
61
Page 62

6. Extraiga la canastilla del tambor.
7. Vuelva a colocar el filtro para las
pelusas.
Limpieza y
cuidado
Limpieza del secador
A ADVERTEN- a
^ CIA ^
PARA EVITAR
¡PELIGRO DE EXPLOSIONES!
Nunca utilice solventes o líquidos
altamente inflamables para la
limpieza.
CUIDADO
Una limpieza incorrecta, puede
dañar el secador. No limpie con
chorro de agua a presión. No utilice
agentes agresivos o limpiadores
multiuso. No utilice limpiadores a
vapor.
Friegue la carcasa y el frente con un
paño suave y agua con jabón.
Friegue el tambor, la junta de la puerta
y el interior del mismo solamente con
un paño húmedo.
Limpiar el filtro para
pelusas
Un filtro sucio incrementa el tiempo de
secado y aumenta el consumo de
energía.
El filtro debe limpiarse antes y después
de cada proceso de secado o a más
tardar.
Si tanto la señal como el mensaje de
alerta E:01 son omitidos durante algún
ciclo de secado, limpie el filtro
inmediatamente y chequee el ducto de
escape.
El programa se interrumpe
m
automáticamente.
1. Apague el secador. Coloque el
selector de programas en «Off».
A CUIDADO
La parte interior de la puerta se
calienta durante el proceso.
2. Abra la puerta.
3. Quite el filtro.
4. Quite las pelusas pasando la
mano sobre el filtro.
El filtro debe ser restregado
suavemente dos veces al año con agua
tibia enjabonada. El filtro debe ser
limpiado cuando no es capaz de
mantener el agua. El filtro debe ester
bien seco antes de que sea
reemplazado.
5. Coloque el filtro.
6. Cierre la puerta.
Limpiar el tubo de aire de
salida
Inspeccione y limpie la tubería de aire
de salida como mínimo una vez al año,
para evitar obturaciones. Un tubo de
aire de salida parcialmente obturado,
puede prolongar los tiempos de
secado.
□ Corte el conmutador de
alimentación
□ Desconecte el enchufe de
alimentación
□ Desconecte el tubo del secador.
□ Vacíe el tubo y vuélvalo
a conectar.
62
Page 63

Limpiar el sensor de
humedad
Ocasionalmente debe limpiarse el
sensor de humedad, ya que se genera
una capa fina de depósitos sobre la
superficie del mismo.
El depósito puede eliminarse
fácilmente, fregando el sensor (las dos
barras próximas al filtro para pelusas)
mediante un paño y un poco de
vinagre blanco.
¡Utilice solamente vinagre blanco!
Limpie el sensor de humedad una vez
al mes.
□ Afloje el tornillo de la cobertura y
ábrala.
□ Gire la lamparilla en el sentido
opuesto a las agujas del reloj.
Reemplace la lamparilla
únicamente por una del tipo para
electrodomésticos (se adquiere en
el servicio a clientes).
□ Vuelva a colocar la cubierta
y sujétela mediante el tornillo.
□ Vuelva a enchufar el secador o a
conectar la alimentación.
Limpieza de la protección
del rodamiento
A través del tiempo, se junta pelusa
resultante de los sucesivos procesos
de secado en la protección del
rodamiento.
Esta pelusa puede eliminarse
fácilmente utilizando la aspiradora, por
lo menos una vez al mes.
Cambiar la lamparilla
La luz del secador se enciende,
cuando abre la puerta del mismo.
Para cambiar la lamparilla:
□ Fije el selector del programa a
“Off.”
□ Oorte el conmutador de
alimentación.
□ Desconecte el enchufe
de alimentación.
□ Abra la puerta y localice la
lamparilla en la parte superior
izquierda del la junta.
63
Page 64

Localización de fallos
ADVERTEN
CIA
Para evitar ¡Existe riesgo de
descargas eiéctricas! Eventuaies
reparaciones debe etectuarias
exciusivamente un técnico
autorizado.
Problema Causa posible Remedio
Ei secador no arranoa.
«Start/Stop» ia iuz de indicadorano
iiumina.
Fue interrumpido ei programa.
Se emite una señai de advertencia y ei
dispiay indica «E:01».
No se ha iogrado ei grado de humedad
deseado o ei tiempo de secado es
demasiado iargo.
Ei dispiay indica «E:03».
No se ha iogrado ei grado de humedad
deseado o ei tiempo de secado es
demasiado iargo.
Ei dispiay indica «E:03».
Ei enohufe no está ooneotado o inoorreotamente
ooneotado.
Se ha quemado un fusibie de ia aiimentaoión.Cambie o reponga ei fusibie.
No fue guisado ei botón «Start/Stop». Presione ei botón «Start/Stop».
No fue seieooionado programa aiguno. Seieooione un programa.
La puerta no está oerrada. Cierre ia puerta.
La temperatura ambiente está debajo
de ios 41 °F/5 °C.
Ei fiitro para peiusas está suoio. Limpie ei fiitro para peiusas según se desoribe en
Ei tubo de aire de saiida está obstruido o es
demasiado iargo.
Hay on faiio en ei desarroiio dei programa o faiio en
ia máquina.
Ei ambiente o gabinete no posee ia ventiiaoión
sufioiente.
Está suoio ei sensor de humedad. Limpie ei sensor de humedad según se desoribe en
Ei tubo de aire de saiida está obstruido o es
demasiado iargo.
Ei fiitro para peiusas está suoio. Limpie ei fiitro para peiusas según se desoribe en
La ropa está demasiado mojada. Centrifugue ia ropa a mayor veiooidad en ia máquina
Se ha seieooionado un programa no admisibie.Seieooione ei programa oon ayuda de ia tabia
Se exoede ei tiempo de seoado máximo. Limpie ei fiitro para peiusas (ver página 62).
Ei motor ha exoedido ia temperatura máxima.Apague ei seoador, déjeio enfriar por 30 minutos
Antes de iiamar ei servicio a ciientes,
controie si no puede reparar ei taiio
usted mismo, consuitando ia esta
tabia.
Si es necesario etectuar reparaciones y
usted no puede eiiminar ei taiio
mediante ia tabia siguiente:
Coneote ei enohufe oorreotamente.
Aumente ia temperatura dei ambiente.
página 62.
Apague y vueiva a enoender equipo.
Limpie ei tubo de aire de saiida. Reduzoa ia iongitud
dei tubo de aire de saiida a su iongitud máxima
según se desoribe en página 52.
Apague y vueiva a enoender equipo.
Apague ei seoador, déjeio enfriar por 30 minutos
yvueiva a enoenderio.
Haga arranoar nuevamente ei programa.
Provea un aooeso de aire fresoo sufioiente.
Apague y vueiva a enoender equipo.
ia página 63. Apague y vueiva a enoender ei equipo.
Limpie ei tubo de aire de saiida. Reduzoa ia iongitud
dei tubo de aire de saiida a su iongitud máxima
según se desoribe en página 52.
Apague y vueiva a enoender equipo.
página 62.
Apague y vueiva a enoender equipo.
de iavar. Apague y vueiva a enoender ei equipo.
oorrespondiente (ver página 59). Apague y vueiva
a enoender ei equipo.
Controie ia saiida de aire.
Centrifugue ia ropa a mayor veiooidad en su
iavadora.
yvueiva a enoenderio. Haga arranoar ei programa.
1. Gire ei seiector de programas
a «Off».
2. Quite ei fusibie.
3. Desconecte ei enchufe dei
tomacorriente.
4. Liame ai servicio para ciientes
(consuite ia página 66).
64
Page 65

Problema Causa posible Remedio
No funciona la luz en el tambor.
No fue seleccionado programa alguno. Seleccione un programa.
La lamparilla está defectuosa o guemada.Cambie la lamparilla según se indica en
la página 63.
No hay alimentación de energía. Controle gue la alimentación de energía funcione
correctamente.
La bombilla es floja.
Apriete la bombilla. Quite y reinstale la cubierta
según lo dirigido en la página 76.
No se enciende la luz indicadora
«Start/Stop». La luz indicadora “Wrinkle
block” (Protección contra arrugado).
Error en el desarrollo del programa o fallo en la
máguina.
Apague el secador, déjelo enfriar por 30 minutos
yvuelva a encenderlo.
Haga arrancar nuevamente el programa.
EL display indica «000».
El filtro de la pelusa LED esta
intermitente despué de gue el filtro ha
sido cambiado.
La intermitencia del filtro de la pelusa LED no es
indicación de gue hay un problema. Solo es usado
No reguiere de ninguna acción. LED dejara de estar
intermitente.
como un recordatorio para limpiar el filtro de la
pelusa.
65
Page 66

SERVICIO y REPARACIONES
CUIDADO
CUIDADO - Identifique todos
los oables antes de
desooneotarlos ouando se
efeotúan trabajos de servioio.
Errores en el oableado pueden
oausar un funoionamiento
inoorreoto y peligroso. Controle
el oorreoto funoionamiento
después de haberse realizado
trabajos de servioio.
El seoador no requiere de otros
cuidados especiales, aparte de
aquellos espeoifioados más arriba.
I i I Si tiene un problema oon su
seoador, antes de llamar el
servioio a olientes, oonsulte la
tabla en página 64.
Si se haoe neoesario un servioio,
póngase en oontaoto oon su vendedor,
instalador u otro oentro de se^ioios
autorizado. No intente repara el
eleotrodoméstioo usted mismo.
Cualquier trabajo realizado por
personal no autorizado, hará oaduoar
la garantía.
Si tiene problemas y no está conforma
con el servicio recibido:
- Primero rogamos ponerse en
contacto con su instalador o bien
el servicio autorizado y contratado
Bosch de su zona, explicando
porque no está conforme,
explicando a que se debe su
disconformidad.
- Si después del trabajo realizado
por su instalador o técnico de
servicio el problema no ha sido
solucionado a su satisfacción,
háganoslo saber, o bien
escribiendo a:
BSH Home Appliances
5551 McFadden Ave.
Huntington Beach, CA 92649
O bien llámenos a
1-800-944-2904.
Tanto en caso de escribir o de llamar,
asegúrese de incluir o tener a mano la
siguiente información:
- Número de modelo
- Número de serie
- Fecha de compra original
- Fecha en la cual ha ocurrido el
problema
- Explicación del problema
En caso que nos escriba, rogamos
incluir también un número telefónico
diurno y una copia de la factura de
compra.
Encontrará la información respecto del
número de modelo y de serie sobre la
chapa de características ubicada en el
interior del panel frontal.
66
Page 67

67
Page 68

DECLARACION DE GARANTIA PARA SECADORES PARA ROPA BOSCH
Las garantías brindadas por BSH
Home Appliances («Bosch») en esta
declaración son aplicables únicamente
a secadores Bosch vendidos al
DURACIÓN DE LA GARANTÍA
consumidor final por Bosch o sus
comerciantes autorizados,
revendedores o centros de servicio en
Alcances de la garantía
los Estados Unidos o Canadá. Las
garantías aquí descriptas no son
transferidles.
Amplia garantía limitada a un año
a partir de la fecha de instalación *
Bosch se hará cargo libre de costos de la reparación o reemplazo de
cualquier componente que presente defectos en condiciones de uso
domiciliario normal, incluyendo los costos de mano de obra y transporte.
La reparación cubierta por la garantía deberá efectuarse en un Centro de
Servicio Autorizado Bosch.
Garantía limitada a 2 años
a partir de la fecha de instalación *
Bosch proveerá piezas de recambio libre de costos para cualquier
componente que presente defectos en condiciones de uso domiciliario
normal, excluyendo los costos mano de obra.
Garantía limitada a componentes electrónicos por 2 años
a partir de la fecha de instalación *
Bosch se hará cargo, libre de costos, de la reparación o reemplazo de
placas de microprocesadores o impresas que presenten defectos en
condiciones de uso domiciliario normal a partir de la fecha de su primera
instalación, excluyendo costos de mano de obra.
Garantía limitada al motor por 2 años
a partir de la fecha de instalación *
Bosch se hará cargo, libre de costos, de la reparación o reemplazo de
todo motor o componente del mismo que presente defectos en
condiciones de uso domiciliario normal, por un período de dos años,
excluyendo costos de mano de obra.
* La fecha de instalación se refiere o bien a la fecha de instalación del secador propiamente dicha o a diez días hábiles a partir de la fecha de
entrega.
Exclusiones
Esta garantía no cubre llamadas
de servicio o reparaciones para corregir
la instalación del secador, suministrar
instrucciones referentes al uso del
mismo, reemplazar fusibles
domiciliarios o repara- ciones de
plomería o cableado en el domicilio del
usuario o para reparar cualquier
secador que fue usada en forma
diferente a la normal o usual a la
domiciliaria.
Adicionalmente, las garantías provistas
en esta declaración excluyen todo
defecto o daño proveniente de
accidente, alteración, uso inadecuado,
abuso, instalación inadecuada,
trabajos de servicio no autorizado,
influencias externas más allá de los
alcances de Bosch, como fuego,
inundaciones, fuerza mayor,
o instalación en desacuerdo con reglas
locales de plomería yelectricidad.
Costos de mano de obra producidos
por la reparación o reemplazo de los
secadores después de un período de
un año a partir de la fecha de
instalación pueden no estar cubiertas
por esta garantía. Todas y cada una de
la piezas reparadas y/o cambiadas
deberán ser originales o^autorizadas a
los fines de aplicación del período de
garantía.
DENTRO DEL MARCO DE LA LEY,
ESTA GARANTÍA VALE EN LUGAR DE
TODA OTRA GARANTÍA IMPLÍCITA O
EXPLÍCITA, INCLUYENDO LAS
GARANTÍAS IMPLÍCITAS DE
COMERCIA
LIZACIÓN Y APTITUD PARA USOS
PARTICULARES. BOSCH NO ASUME
RESPONSABILIDAD ALGUNA POR
DAÑOS INCIDENTALES
O DERIVADOS.PARA SOLICITAR
SERVICIOS DE GARANTÍA, DIRIGIRSE
AL CENTRO DE SERVICIO BOSCH
MAS CERCANO O LLAMAR AL
1-800-944-2904, O ESCRIBIR A:
BSH HOME APPLIANCES, CORP.,
5551 MCEADDEN AVENUE
HUNGTINGTON BEACH
CA 92649.
ASEGÚRESE DE INDICAR EL
MODELO DE SU SECADOR,
EL NUMERO DE SERIE, EECHA
DE ADQUISICIÓN, NOMBRE
YDIRECCIÓN DEL VENDEDOR.
68
04/2007
9000230712
 Loading...