

Bosch WFVC844PUC/25, WFVC844PUC/24, WFVC844PUC/23, WFVC844PUC/22, WFVC844PUC/20 Owner’s Manual
...
Bosch Vision _ 800
Clothes Washers
B
Series
Features and Benefits of Your New Washer
ActiveClean TMTechnology
Bosch ActiveClean ® technology optimizes the wash pro-
cess at every stage of the cycle by sensing load size, water
level and temperature needs for superior results. Digital
sensors care for all fabrics including wool, mohair and silk.
This machine virtually operates at the touch of a button.
EcoSmart TM Technology
EcoSmart TMTechnology utilizes a network of sensors in the
Bosch Vision washer for cycles that conserve the most
energy possible while maintaining superior washing
performance. By adjusting to the size of the load and
regulating temperature to never overheat, it is no wonder
that Bosch is the most efficient brand on the market.
EcoAction ®
This option gives you the ability to reduce energy usage by
up to 20%. By selecting this option the temperature is
reduced to save resources while the wash time is slightly
extended to ensure proper washing.
ActiveWaterTM Wash System
Only Bosch Vision washers featuring the ActiveWater TM
wash system can consume as little as 13 gallons of water
but wash with the power of 400 gallons! By adding water
faster and constantly raining water back down on the
clothes, Bosch Vision gets the most out of every drop of
water.
Stain Removal
This unique option begins each cycle with a cold water fill
and heats to all the most important water temperatures to
remove stains. Since each type of stain is removed at a
different specific temperature, only Bosch Vision with the
Stain Removal option can address the widest variety of
stains and remove them all in just one load.
Exclusive Hinge and Gasket System
A reinforced hinge and our unique gasket design help seal
in the heat, allowing your laundry to reach the optimum
temperature, which eliminates even the toughest stains.
3-Part Detergent Jet Dispenser
A 3-part dispenser automatically distributes detergent,
bleach and softener at exactly the right times.
XxtraSamtary ® Cycle
With this innovative cycle, a thermostat controlled
intelligent system heats up the water to 170° F. The clothes
are thoroughly cleaned and sanitized while killing 99.99% of
most common household bacteria.
Baby CareTM Cycle
The littlest people in the house usually account for the
toughest stains. This cycle heats the wash water up to
155° Fto remove even the most stubborn stains with ease.
Bosch Exclusive Paddles
As your wash gently tumbles, the paddles cascade water
from high above, rinsing away suds and giving your laundry
a complete, even clean. Our stainless steel drum optimizes
performance to ensure not a single shirt goes unturned.
Stainless Steel Drum
The Vision TMwasher drum has hundreds of smooth double
punched holes, which allow your garments to gently tumble
completely snag free.
Internal Water Heater
An internal heating element heats the water to up to 180° F
while a digital temperature sensor continually monitors the
water temperature. Bosch Vision TMwashers deliver the
most efficient and accurate water heating method for each
selected fabric type.
Quiet Performance
Bosch washers use suspended brushless motors, isolated
pump systems and special sound-deadening material to
keep them exceptionally quiet while in operation. This
means they can be installed virtually anywhere in the home
without causing a disturbance. Bosch's special unbalance
control software eliminates noisy unbalance conditions.
AVS TM Anti-Vibration System
The AVS TMAnti-Vibration System reduces vibration even
during high spins for near silent, smooth operation. So even
ifthe Vision washer is installed on a second story you may
never know its there.
AquaStop TtM
AquaStop TI_4 is an internal containment safety system
designed to protect against flood-type leakage to decrease
the chance of water damage when the washer isturned on
and operating.
AquaStop TM Hose
The AquaStop TMHose stops water flow in the event the
AquaStop TMHose experiences flood-type leakage.

Table of Contents
Definitions .......................................................................................... 4
IMPORTANT SAFETY INSTRUCTIONS ................................................................. 4
Grounding Instructions .............................................................................. 6
INSTALLATION INSTRUCTION ........................................................................ 7
Introduction ....................................................................................... 7
Information concerning waste disposal ................................................................ 7
Intended use ...................................................................................... 7
Environmental Protection / Conservation Issues ......................................................... 7
Factory-supplied equipment ......................................................................... 7
Dimensions ....................................................................................... 8
Installation area .................................................................................... 8
Removing the transport bolts ......................................................................... 11
Water connection .................................................................................. 12
Electrical connection ............................................................................... 14
Leveling procedure ................................................................................. 15
Transporting the Washer ............................................................................ 16
OPERATING INSTRUCTION .......................................................................... 17
Panel ............................................................................................ 17
Before Using For the First Time ....................................................................... 18
Using For the First Time .............................................................................. 18
Setting the time .................................................................................... 18
Selecting the Language ............................................................................. 18
First washing cycle (without laundry) ................................................................... 18
Preparing the laundry ............................................................................... 19
Sorting the laundry ................................................................................. 19
Degrees of soiling .................................................................................. 19
Loading the laundry ................................................................................ 20
Laundry Detergents and Additives ..................................................................... 20
Adding the correct amount of detergent ................................................................ 20
Filling laundry detergent and/or additives ............................................................... 20
Decolorizing ....................................................................................... 21
Cycles and Options .................................................................................. 22
Option buttons (Stain Removal, Allergy Rinse, ECO Action) ................................................ 22
Cycle Selection Table ............................................................................... 23
LCD Menu Options and Special Features .............................................................. 24
Quick Overview (Spin Speed, Finish at Time, Washing Mode, Reduced Ironing, Pre Soak, Signal, Set Clock) ..... 24
Signal Volume ..................................................................................... 24
Special features (Auto Load adjust, AVSTMAnti-Vibration System) .......................................... 25
Child lock ......................................................................................... 25
During Washing ..................................................................................... 26
Re-selecting a program ............................................................................. 26
Add a garment / Interrupting the program .............................................................. 26
Canceling the active program ........................................................................ 26
After Washing ....................................................................................... 26
User Maintenance Instructions ........................................................................ 27
Cleaning and Care ................................................................................. 27
Cleaning the appliance housing and control panel ....................................................... 27
Cleaning the drum ................................................................................. 27
Cleaning the detergent dispenser ..................................................................... 27
Cleaning water inlet strainers ......................................................................... 27
Descaling the washing machine ...................................................................... 28
Troubleshooting of Minor Faults ...................................................................... 29
Customer Service .................................................................................... 32
STATEMENT OF LIMITED PRODUCT WARRANTY ...................................................... 33
Cycle Selection Table ................................................................................ 108
3
Congratulations!
Your washing machine is a modern,
high quality domestic appliance.
This modern washing machine cleans
your laundry using the most
sophisticated washing processes
to obtain superior cleaning results.
Excellent engineering and reliability
reduce operating costs significantly.
An easy operation philosophy, a variety
of customized washing cycles and a
solid touch and feel make this
appliance a user-friendly assistant in
your household.
Your washer offers the following
standard features:
Low noise level for washing
and spinning.
Large door with magnetic door
lock.
Door opening 16 inches (41 cm),
quality sturdy hinge, opening angle
is 160°.
Drum capacity 22 Ibs (10 kg) for
regular cotton loads.
Each washing machine which leaves
our factory has undergone a thorough
performance test and is in full working
condition. The appliance may contain
residual water due to the testing
procedures. If you have any questions
concerning installation of the washing
machine, our customer service will be
happy to advise you.
Further information and a selection of
our products can be found on our web
site: www.boschappliances.com
Please read and follow these operating
and installation instructions along with
all other information enclosed with the
washing machine.
These operating and installation
instructions describe various models.
Differences are indicated in the
appropriate places.
The illustrations may show different
details than your washer.
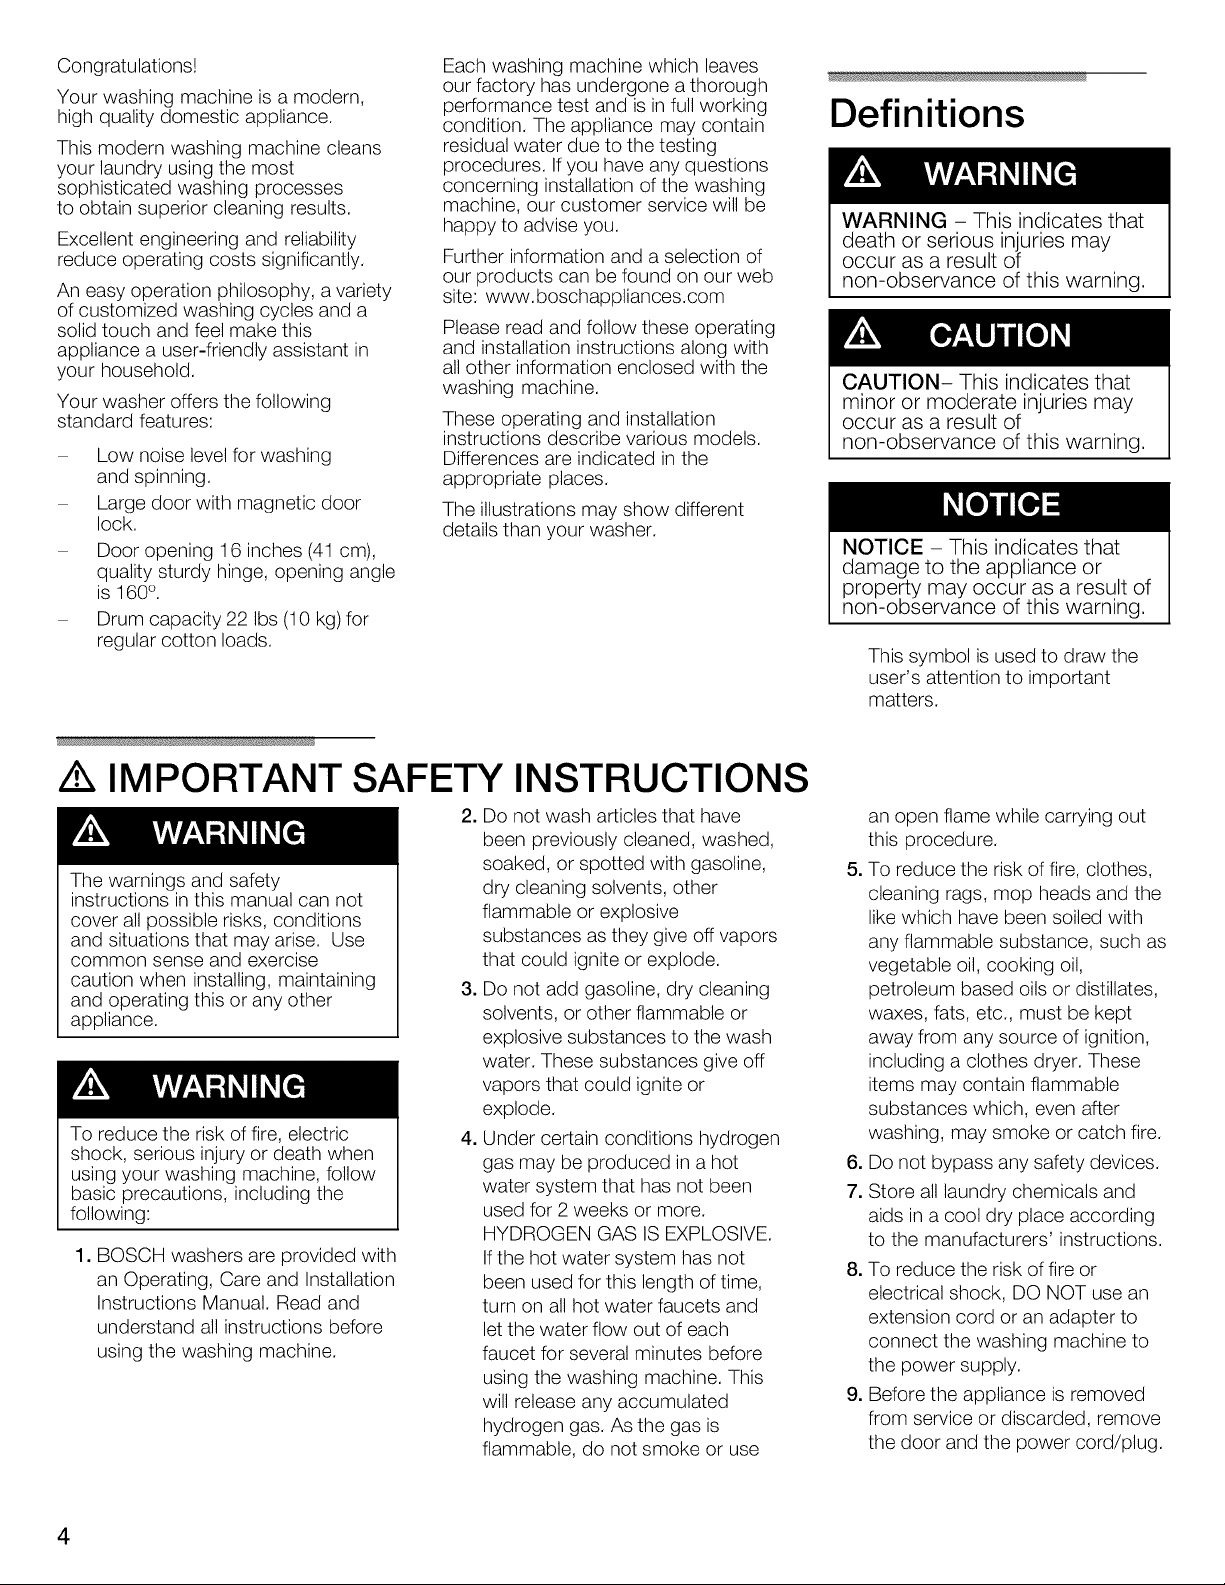
Definitions
WARNING - This indicates that
death or serious injuries may
occur as a result of
non-observance of this warning.
CAUTION- This indicates that
minor or moderate injuries may
occur as a result of
non-observance of this warning.
NOTICE - This indicates that
damage to the appliance or
property may occur as a result of
non-observance of this warning.
This symbol is used to draw the
user's attention to important
matters.
/k IMPORTANT SAFETY INSTRUCTIONS
2. Do not wash articles that have
been previously cleaned, washed,
The warnings and safety
instructions in this manual can not
cover all possible risks, conditions
and situations that may arise. Use
common sense and exercise
caution when installing, maintaining
and operating this or any other
appliance.
To reduce the risk of fire, electric
shock, serious injury or death when
using your washing machine, follow
basic precautions, including the
following:
1. BOSCH washers are provided with
an Operating, Care and Installation
Instructions Manual. Read and
understand all instructions before
using the washing machine.
soaked, or spotted with gasoline,
dry cleaning solvents, other
flammable or explosive
substances as they give off vapors
that could ignite or explode.
3. Do not add gasoline, dry cleaning
solvents, or other flammable or
explosive substances to the wash
water. These substances give off
vapors that could ignite or
explode.
4. Under certain conditions hydrogen
gas may be produced in a hot
water system that has not been
used for 2 weeks or more.
HYDROGEN GAS IS EXPLOSIVE.
If the hot water system has not
been used for this length of time,
turn on all hot water faucets and
let the water flow out of each
faucet for several minutes before
using the washing machine. This
will release any accumulated
hydrogen gas. As the gas is
flammable, do not smoke or use
an open flame while carrying out
this procedure.
5. To reduce the risk of fire, clothes,
cleaning rags, mop heads and the
like which have been soiled with
any flammable substance, such as
vegetable oil, cooking oil,
petroleum based oils or distillates,
waxes, fats, etc., must be kept
away from any source of ignition,
including a clothes dryer. These
items may contain flammable
substances which, even after
washing, may smoke or catch fire.
6. Do not bypass any safety devices.
7. Store all laundry chemicals and
aids in a cool dry place according
to the manufacturers' instructions.
8. To reduce the risk of fire or
electrical shock, DO NOT use an
extension cord or an adapter to
connect the washing machine to
the power supply.
9. Before the appliance is removed
from service or discarded, remove
the door and the power cord/plug.
4
10. When children become old
enough to operate the appliance,
it is the responsibility of the parents
or legal guardians to ensure that
they are instructed in safe
practices by qualified persons.
11. Do not allow children to play on or
in the appliance at any time;
severe injury or death could result.
Children should be kept a safe
distance away from appliances at
all times. Children should only be
permitted within an appliance's
vicinity if under close, constant
adult supervision.
12. Do not allow children's toys or
other items that might encourage
children to climb on the washer, to
be stored on or in the washer or on
shelves or in cabinets or other
storage areas above the washer.
13. Do not sit or stand on the top of
the washing machine.
14. Do not allow anyone to climb, lean
or hang on any part of the washer
including any protruding
components such as the
appliance door or a pullout shelf.
15. To reduce the risk of poisoning or
chemical burns, keep all cleaning
products out of the reach of
children.
16. Keep pets away from the washing
machine.
17. Do not reach into the appliance if
the wash drum is moving.
18. Do not install or store this
appliance where it will be exposed
to the weather.
19. Do not tamper with the controls.
20. Do not repair or replace any part of
the appliance or attempt any
service unless specifically
recommended in the user
maintenance instructions or in
published user repair instructions
that you understand and have the
skills to carry out.
21. Do not touch the washer door if
washing at high temperatures.
22. Use caution when draining hot
water.
23. Removing any panel can expose
sharp edges and points, electrical
connections or hot surfaces.
24. Always unplug the washing
machine from the power supply
before attempting any service.
Disconnect the power cord by
grasping the plug, not the cord.
25. Do not machine wash fiberglass
materials (such as curtains and
window coverings that use
fiberglass materials). Small
particles may remain in the
washing machine and stick to
fabrics in subsequent wash loads
causing skin irritation.
26. Do not insert/pull out the power
plug with wet hands.
27. Do not use the washing machine if
it has a worn power cord or loose
plug. If this is the case, contact an
authorized service agent.
28. Do not operate the washing
machine if any guards, panels
and/or fasteners except transport
fixing bolts have been removed.
29. The washing machine must only
be used for its intended purpose.
30. Always follow the fabric care
instructions recommended by the
clothing manufacturer.
31. Make sure that all water
connections to the washing
machine have shut-off valve(s) that
are readily accessible. Close the
washing machine water shut-off
valve(s) at the end of each wash
day.
32. Check the fill hose connections on
a regular basis to ensure that they
are tight and not leaking, and
before applying power to the
machine.
33. Always read and follow the
instructions of the manufacturer of
the detergent(s), cleaning aid(s),
fabric softener(s) and static
eliminator(s) which you are using.
Heed all warnings and
precautions.
34. Do not operate the washing
machine if parts are missing
or broken.
35.
Do not operate this washing
machine until you are sure that:
a. the washing machine has
been installed according to
the INSTALLATION
INSTRUCTIONS.
b. all water, drain, power and
grounding connections are in
compliance with all local
regulations and/or other
applicable regulations and
requirements.
36. Failure to install, maintain and/or
operate the washing machine
according to the manufacturer's
instructions may result in injury
and/or damage.
37. To avoid damage to the door, do
not push against the door when
moving the unit. Precautions
should be taken to avoid damage
to the floor as well.
38. To avoid floor damage and mold
growth, do not let spills or
splashes cause standing water
around or under the appliance.
39. The water connections should be
made and tested before electrical
power is applied to the machine.
SAVE THESE
INSTRUCTIONS
Notes:
A.
The IMPORTANT
SAFEGUARDS and
WARNINGS indicated in this
manual do not cover all
possible conditions which
may occur. Common sense,
caution and care must be
exercised when installing,
maintaining or operating the
washing machine.
B.
Always contact your dealer,
distributor, service agent or
the manufacturer about any
problems or conditions that
you do not understand.
GROUNDING
INSTRUCTIONS
This appliance must be grounded. In
the event of damage or failure,
grounding will reduce the risk of electric
shock by providing a path of least
resistance for the electric current. This
appliance is equipped with a cord that
has an equipment-grounding
conductor and a grounding plug. The
plug must be plugged into an
appropriate outlet that is properly
installed and grounded in accordance
with all local codes and ordinances.
Improper connection of the
equipment grounding conductor
can result in electric shock.
Connect to an individual branch
circuit.
Check with a qualified electrician or
serviceman ifyou are in doubt as to
whether the washer is properly
grounded.
DO NOT modify the plug provided
with the appliance - if it will not fit
the outlet have a proper outlet
installed by a qualified electrician.
KEEP THESE
INSTRUCTIONS FOR
FUTURE REFERENCE.
In case of change of ownership,
manual should be conveyed with the
washer.
INSTALLATION INSTRUCTIONS
Introduction
TO AVOID RISK OF INJURY
The washing machine is heavy. Lift
with caution.
Be sure to observe all listed warnings
and cautions.
Frozen hoses can tear/burst. Do not
install the washing machine outdoors
or in an area exposed to freezing
conditions. Ifthe washing machine is
located in a room which will be
exposed to temperatures below
freezing, or if it is located in a cabin
that is being shut down for the
winter, any residual water in the
pump or water inlet hose(s) must be
drained.
These installation instructions are
intended for use by qualified installers.
Inaddition to these instructions, if
installing the washing machine:
In the United States comply with
the National Electric Code,
ANSI/NFPA70 -latest
edition/State and municipal and/or
local regulations.
In Canada comply with the
Canadian Electric Code C22.1 -
latest edition/Provincial and
Municipal and/or local regulations.
Take care not to damage the washing
machine. Do not hold onto protruding
parts (e.g. door) when lifting.
Inaddition to the safety information
listed here, the local water and
electricity supplier may have special
requirements.
If in doubt, have the appliance
connected by an authorized technician.
Information concerning
waste disposal
Disposing of the packaging
The shipping package has protected
your new appliance on its way to your
home. All packaging materials are
non-polluting and recyclable. Please
contribute to a better environment by
disposing of packaging materials in an
environmentally friendly manner.
Please ask your dealer or local
authority about the best means of
disposal.
Keep children away from shipping
carton and packaging components
to avoid risk of suffocation from
plastic wrap and folding cartons.
Disposing of your old appliance
Old appliances are not worthless
rubbish! Valuable raw materials can be
reclaimed from environmentally friendly
recycling.
If appliance is no longer usable, pull
out the main plug, cut offthe power
cord and discard.
Also remove the washer door to
prevent children from locking
themselves in the appliance.
Intended Use
Your washing machine is intended:
For domestic use only.
For cleaning machine washable
fabrics in tap water.
For operation using cold and hot
(140 °F / 60 °C)tap water and
conventional additives that are
suitable for use in residential
washing machines.
Environmental
Protection/Conservation
Issues
Your washing machine uses water,
energy and detergent efficiently,
thereby protecting the environment and
reducing your household costs.
To use your washing machine in an
efficient and non polluting manner:
Avoid using too much
detergent,
Use detergents bearing the HE
symbol for high efficiency and front
loading washers.
Add detergent according to the
degree of soiling, amount of
laundry and water hardness, and
follow the detergent
manufacturer's instructions.
Factory-supplied
Equipment
There is a packet of accessory parts
supplied with your washer. Check that
all the accessory parts supplied for your
model are there. If any parts are
missing, contact your dealer
immediately.
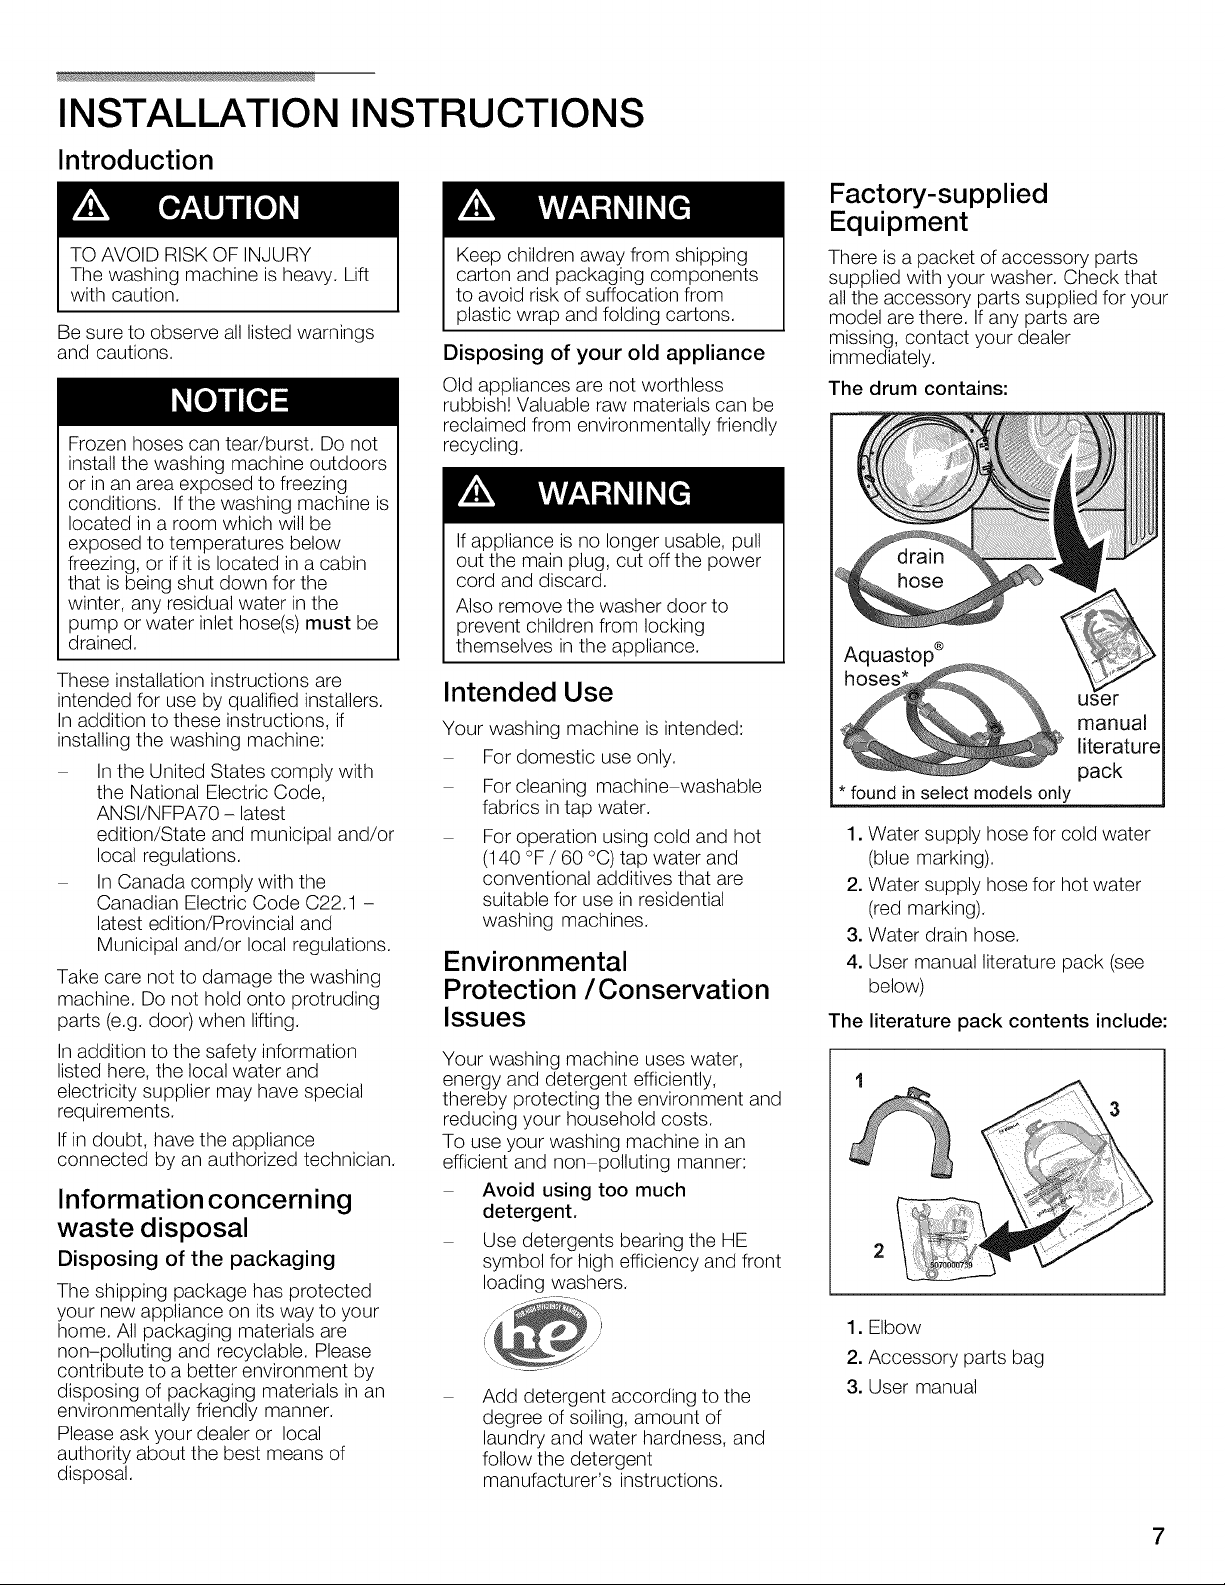
The drum contains:
Aquastop ®
user
manual
literature
pack
* found in select models only
1. Water supply hose for cold water
(blue marking).
2. Water supply hose for hot water
(red marking).
3. Water drain hose.
4. User manual literature pack (see
below)
The literature pack contents include:
1. Elbow
2. Accessory parts bag
3. User manual
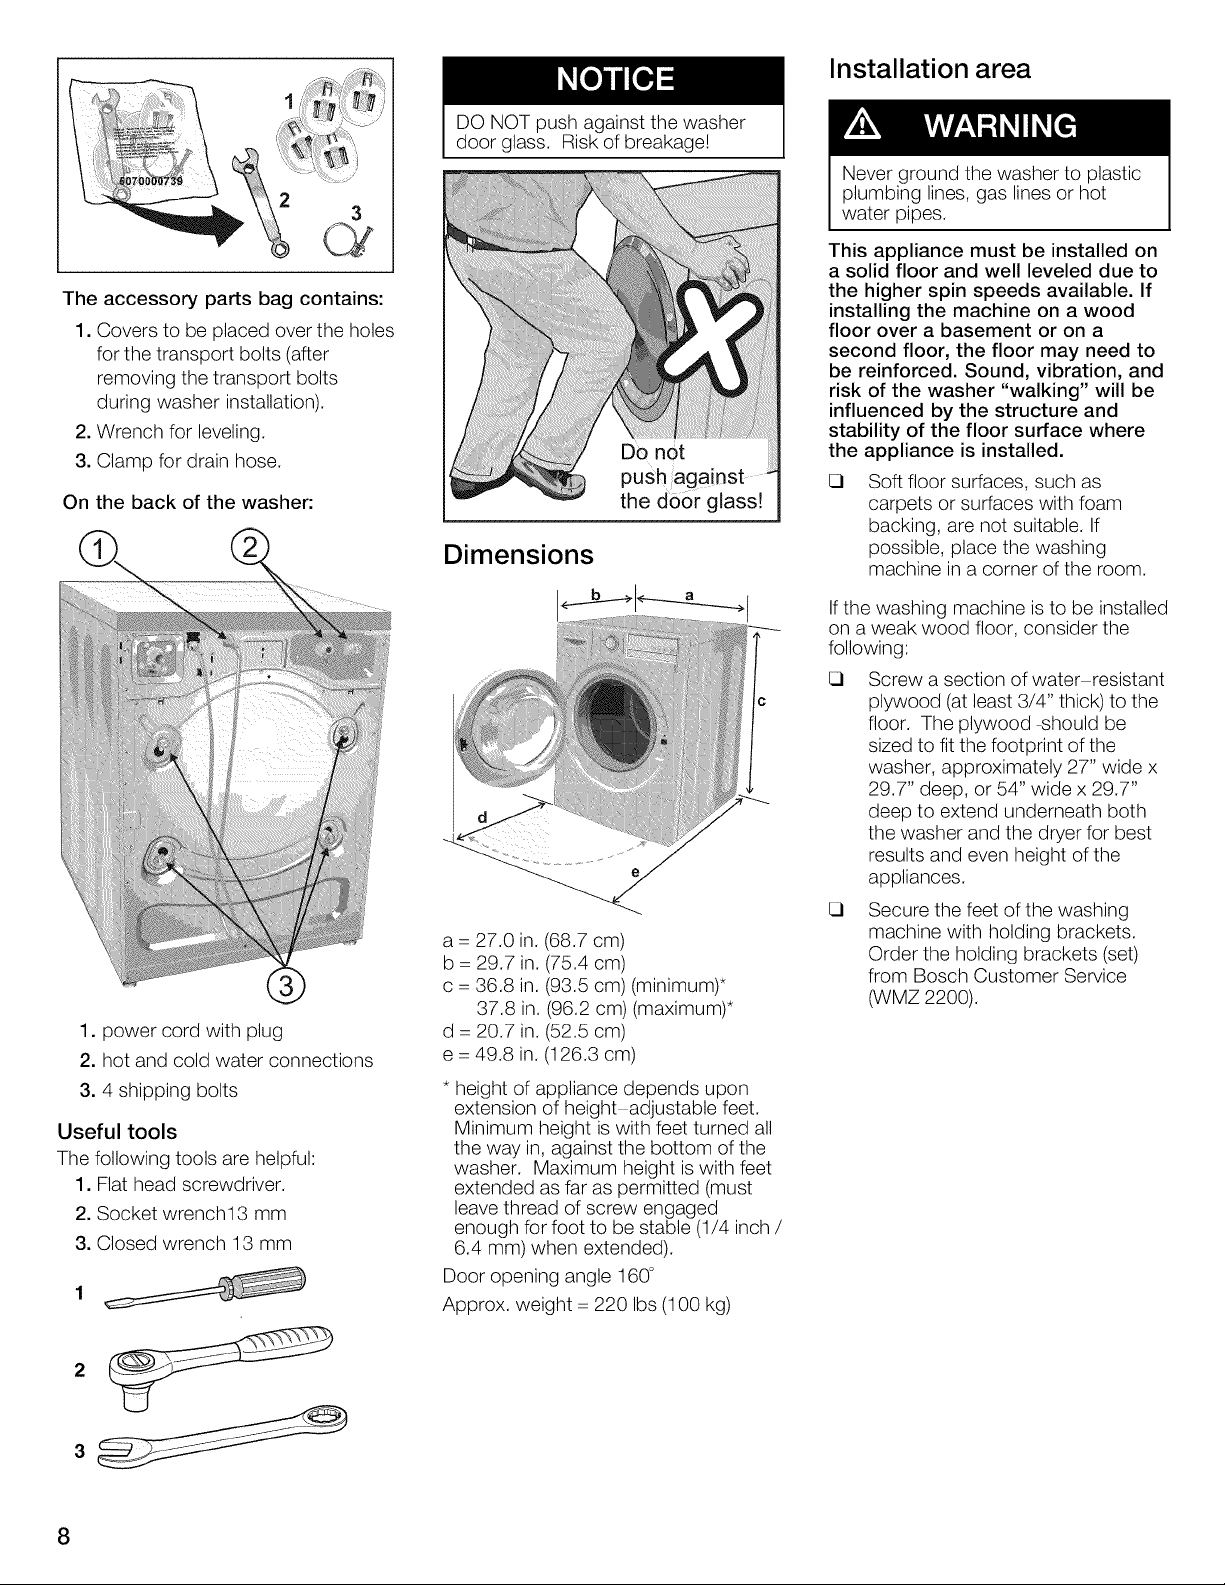
Theaccessorypartsbagcontains:
1.Coverstobeplacedovertheholes
forthetransportbolts(after
removingthetransportbolts
duringwasherinstallation).
2.Wrenchforleveling.
3.Clampfordrainhose.
Onthebackofthewasher:
1.powercordwithplug
2.hotandcoldwaterconnections
3.4shippingbolts
Usefultools
Thefollowingtoolsarehelpful:
1.Flatheadscrewdriver.
2.Socketwrench13mm
3.Closedwrench13mm
DONOTpushagainstthewasher
doorglass.Riskofbreakage!
Do not
push against
the door glass!
Dimensions
a = 27.0 in. (68.7 cm)
b = 29.7 in. (75.4 cm)
c = 36.8 in. (93.5 cm) (minimum)*
37.8 in. (96.2 cm) (maximum)*
d = 20.7 in. (52.5 cm)
e = 49.8 in. (126.3 cm)
* height of appliance depends upon
extension of height adjustable feet.
Minimum height is with feet turned all
the way in, against the bottom of the
washer. Maximum height is with feet
extended as far as permitted (must
leave thread of screw engaged
enough for foot to be stable (1/4 inch /
6.4 mm) when extended).
Door opening angle 160°
Approx. weight = 220 Ibs (100 kg)
Installation area
Never ground the washer to plastic
plumbing lines, gas lines or hot
water pipes.
This appliance must be installed on
a solid floor and well leveled due to
the higher spin speeds available. If
installing the machine on a wood
floor over a basement or on a
second floor, the floor may need to
be reinforced. Sound, vibration, and
risk of the washer "walking" will be
influenced by the structure and
stability of the floor surface where
the appliance is installed.
Soft floor surfaces, such as
carpets or surfaces with foam
backing, are not suitable. If
possible, place the washing
machine in a corner of the room.
If the washing machine is to be installed
on a weak wood floor, consider the
following:
Screw a section of water resistant
plywood (at least 3/4" thick) to the
floor. The plywood _hould be
sized to fit the footprint of the
washer, approximately 27" wide x
29.7" deep, or 54" wide x 29.7"
deep to extend underneath both
the washer and the dryer for best
results and even height of the
appliances.
Secure the feet of the washing
machine with holding brackets.
Order the holding brackets (set)
from Bosch Customer Service
(WMZ 2200).
Accessories
Pedestal Mounting Kit
A storage pedestal with a pull-out
drawer is available as an accessory for
your washer. The pedestal adds 15
inches to the height of the washer.
Appliance must not be mounted
on a pedestal in stacked
installations.
part no. WTZ 1610 isfor a solid white
color pedestal.
Other color pedestals may be
available.
Reference part no. WTZ 1610"X" in
which the X designates an available
color (eg: A for Anthracite, S for silver).
Please inquire at your dealer for color
choices available.
You may also consult a current product
catalog or visit our website at:
www.boschappliances.com
If mounting the washer on the pedestal,
follow the instructions supplied with the
pedestal.
D If mounting the washer on a
pedestal, install the washer on the
pedestal prior to removing the
transport bolt assemblies from the
rear of the washer (see page 11 for
details).
Stacking Kits
There are two stacking kits available.
Basic Stacking Kit
This kit anchors the dryer on top of the
washer and adds approximately 0.63
inches (16 mm) to the stacked height.
part no. WTZ 1601 is for the basic
mechanical stacking kit.
part no. WTZ 1600 is for the solid
white pull-out shelf stacking kit.
Other color pull-out shelf stacking
kits may be available.
Reference part no. WTZ 1600"X" in
which the X designates an available
color (eg: A for Anthracite, S for silver).
Please inquire at your dealer for color
choices available.
Minimum Distances
Important information concerning
minimum distances:
If the washer is to be installed with
a dryer so that the fronts of the
appliances are to be flush with one
another it is necessary to allow
additional rear clearance for the
dryer venting system. Depending
on the location of the exhaust air
connection, a minimum distance
of 5 1Ainch (13.4 cm) must be
provided for ducts/brackets (see
dryer installation instructions).
Benefits of maintaining greater
distance (clearances) than the
minimum shown include:
• reduction of the risk of mold
formation behind the appliances.
• reduced noise transmission
• facilitation of installation and
service.
• more air cools the dryer, keeps
the dryer from overheating, and
improves drying performance.
If the washer and dryer are to be
installed in a small room, the doors
of the room must be fitted with
vents of a specified minimum size.
Refer to the following illustrations
of enclosed installations for
additional information.
Allow additional clearance for
door, wall and window molding
where necessary.
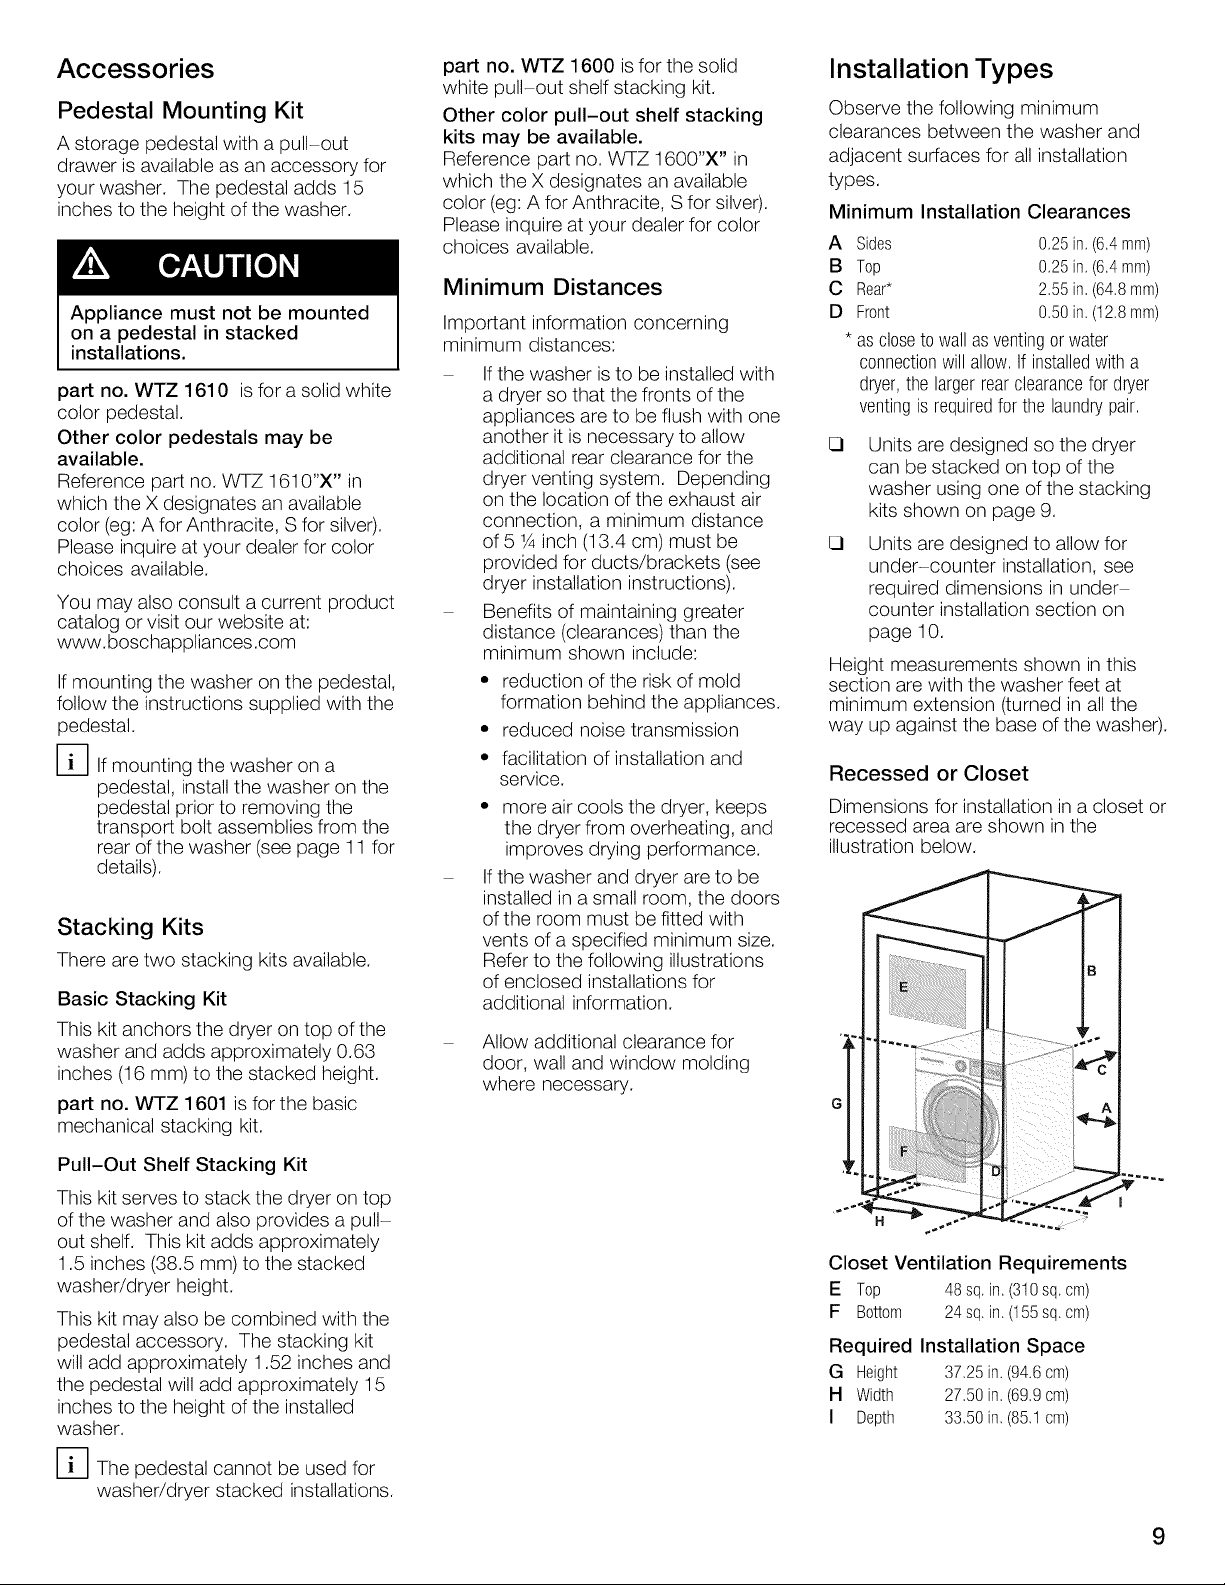
Installation Types
Observe the following minimum
clearances between the washer and
adjacent surfaces for all installation
types.
Minimum Installation Clearances
A Sides 0,25in,(6.4mm)
B Top 0,25in,(6.4mm)
C Rear* 2,55in.(64.8mm)
D Front 0,50in,(12,8mm)
* asclosetowallasventingor water
connectionwill allow If installedwitha
dryer,the largerrearclearancefor dryer
ventingis requiredfor the laundrypair
Units are designed so the dryer
can be stacked on top of the
washer using one of the stacking
kits shown on page 9.
Units are designed to allow for
under-counter installation, see
required dimensions in under
counter installation section on
page 10.
Height measurements shown in this
section are with the washer feet at
minimum extension (turned in all the
way up against the base of the washer).
Recessed or Closet
Dimensions for installation in a closet or
recessed area are shown in the
illustration below.
Pull-Out Shelf Stacking Kit
This kit serves to stack the dryer on top
of the washer and also provides a pull-
out shelf. This kit adds approximately
1.5 inches (38.5 mm) to the stacked
washer/dryer height.
This kit may also be combined with the
pedestal accessory. The stacking kit
will add approximately 1.52 inches and
the pedestal will add approximately 15
inches to the height of the installed
washer.
D The pedestal cannot be used for
washer/dryer stacked installations.
Closet Ventilation Requirements
E Top 48sq,in.(310sq,cm)
F Bottom 24sq,in,(155sq,cm)
Required Installation Space
G Height 37.25in. (94.6cm)
H Width 27.50in,(69.9cm)
I Depth 33.50in.(85.1cm)
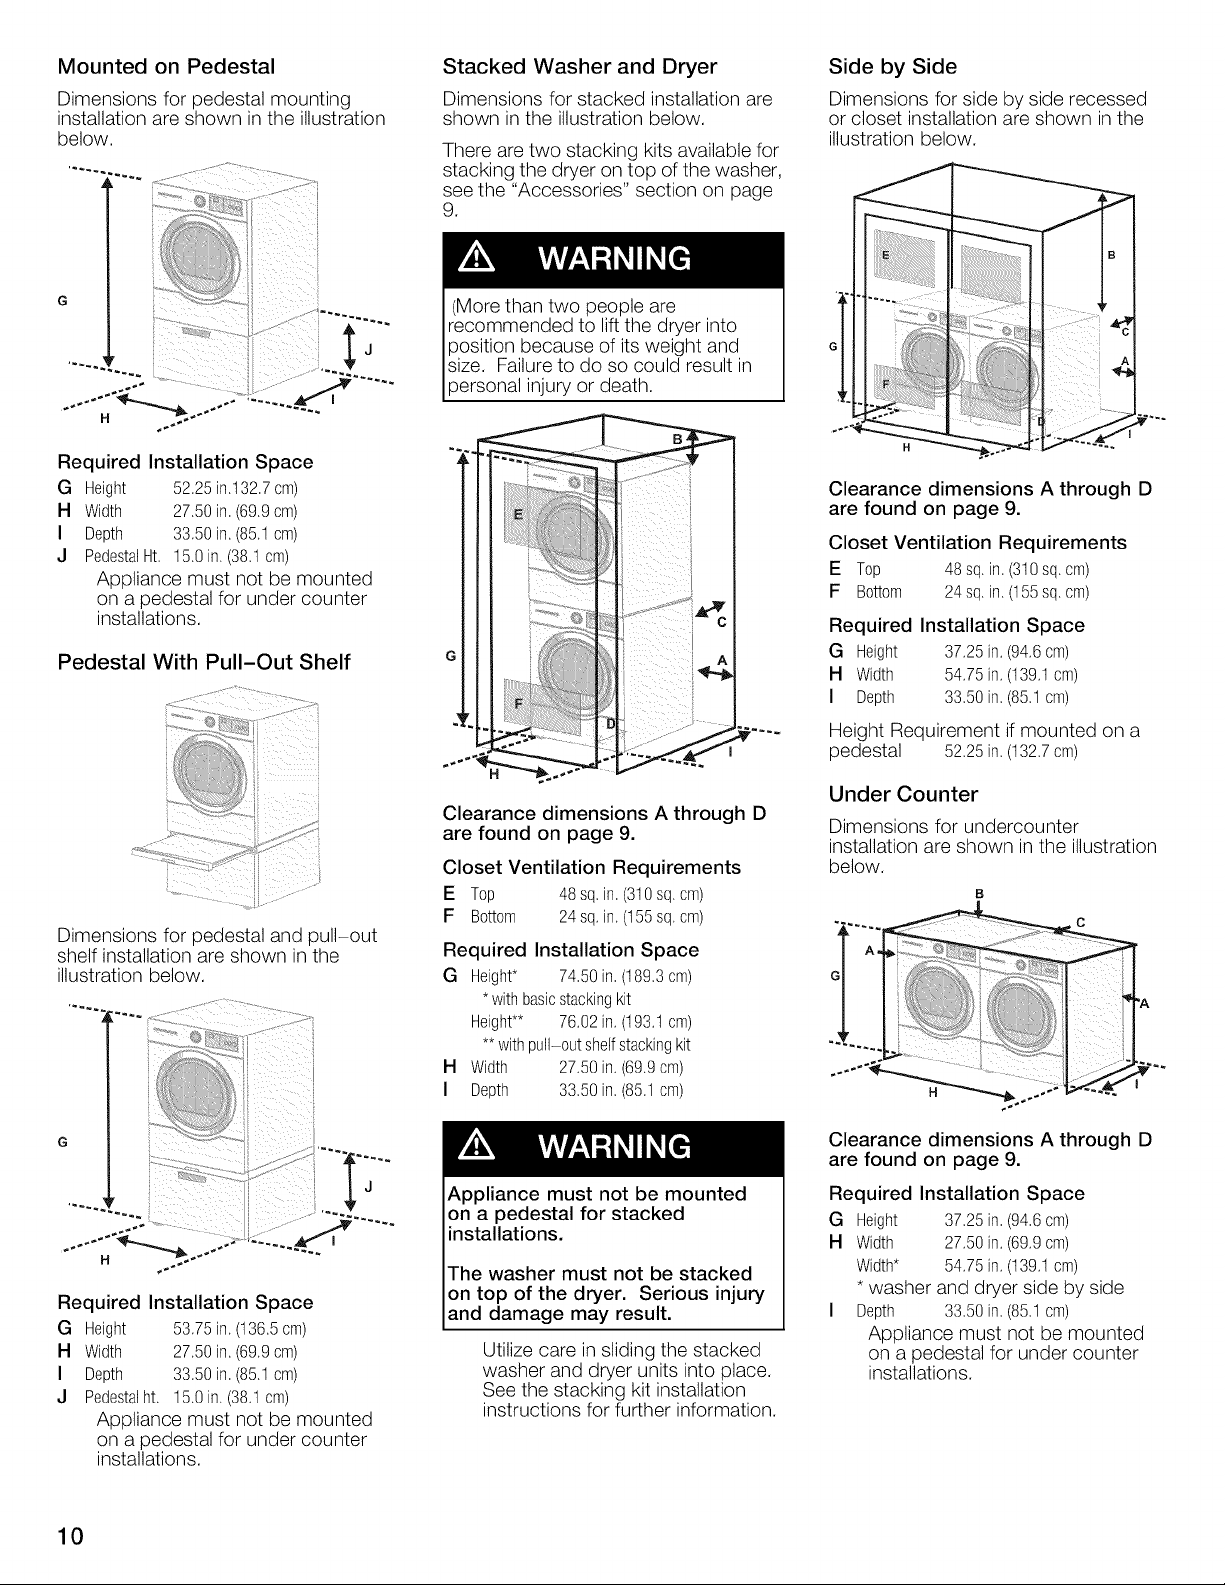
Mounted on Pedestal
Dimensions for pedestal mounting
installation are shown in the illustration
below.
Stacked Washer and Dryer
Dimensions for stacked installation are
shown in the illustration below.
There are two stacking kits available for
stacking the dryer on top of the washer,
see the "Accessories" section on page
9.
Side by Side
Dimensions for side by side recessed
or closet installation are shown in the
illustration below.
G i i _/ i_i..~
Required Installation Space
G Height 52.25in.132.7cm)
H Width 27.50in.(69.9cm)
I Depth 33.50in.(85.1cm)
J PedestalHt. 15.0in.(38.1cm)
Appliance must not be mounted
on a pedestal for under counter
installations.
Pedestal With Pull-Out Shelf
Dimensions for pedestal and pull-out
shelf installation are shown in the
illustration below.
(More than two people are
recommended to lift the dryer into
position because of its weight and
size. Failure to do so could result in
persona njury or death.
Clearance dimensions A through D
are found on page 9.
Closet Ventilation Requirements
E Top 48sq.in.(310sq.cm)
F Bottom 24sq,in,(155sq,cm)
Required Installation Space
G Height* 74.50in.(189,3cm)
*withbasicstackingkit
Height** 76.02in,(t93.1 cm)
**withpull-out shelfstackingkit
H Width 27.50in,(69.9cm)
I Depth 33.50in.(85.1cm)
Clearance dimensions A through D
are found on page 9.
Closet Ventilation Requirements
E Top 48sq.in.(310sq.cm)
F Bottom 24sq,in,(155sq,cm)
Required Installation Space
G Height 37.25in. (94.6cm)
H Width 54,75in,(139,t cm)
I Depth 33.50in.(85.1cm)
Height Requirement if mounted on a
pedestal 52.25in.(132.7cm)
Under Counter
Dimensions for undercounter
installation are shown in the illustration
below.
B
c
G A,
Required Installation Space
G Height 53.75in.(136.5cm)
H Width 27.50in.(69.9cm)
I Depth 33.50in.(85.1cm)
J Pedestalht 15.0in.(38.1cm)
Appliance must not be mounted
on a pedestal for under counter
installations.
10
Appliance must not be mounted
on a pedestal for stacked
installations.
The washer must not be stacked
on top of the dryer. Serious injury
and damage may result.
Utilize care in sliding the stacked
washer and dryer units into place.
See the stacking kit installation
instructions for further information.
Clearance dimensions A through D
are found on page 9.
Required Installation Space
G Height 37.25in.(94.6cm)
H Width 27.50in.(69.9cm)
Width* 54.75in.(139.tcm)
* washer and dryer side by side
I Depth 33.50in.(85.1cm)
Appliance must not be mounted
on a pedestal for under counter
installations.
Checklist for Page
Installation
completely remove4 transport bolt 11
assembliesand movethe washer
into place
connectthewatersupplylinesand 12
drainpipe
connecttheelectricalpower 14
slidethe washerintoitsfinal location 15
levelthewasheraslowaspossible 15
beforefirst use,runa cleaningcycle 18
Removing the transport
bolt assemblies
To avoid possible injury and damage
to the appliance and adjacent
surfaces, all four transport bolt
assemblies must be removed before
using the appliance. Retain the bolt
assemblies for use inany future
transport (e.g. when moving). Ifyou
have purchased a pedestal
mounting kit, follow the installation
instructions provided with it before
removing the transport bolt
assemblies.
.
The bolt assemblies may be easier
to remove using 13 mm socket
wrench.
.
Pull the washer drum slightly
forward towards the open washer
door to reduce pressure on the
transport bolt assemblies.
Slide each loosened transport bolt
assembly out of its retaining slot,
then pull it out through the round
hole in the housing.Completely
remove all 4 transport bolt
assemblies (each assembly
consists of a bolt, a metal flat
washer and a white plastic
bushing).
.
If the bushings do not come out
when removing the bolt
assemblies, place the bolts back
into the bushings and carefully try
again. It is important to do this
with the bolts, otherwise the
bushings will not come out
properly.
.
To store the bolt assemblies for
future use, do not remove the bolts
from the plastic bushings.
Storing the transport bolt
assemblies
Always keep the transport bolt
assemblies for future transportation of
the appliance (such as when moving ).
Store the transport bolt assemblies
with the washer and bushing
attached.
Do not remove the bolt and
washer from the bushing.
D If mounting the washer on a
pedestal, install washer on the
pedestal prior to removing the
transport bolt assemblies.
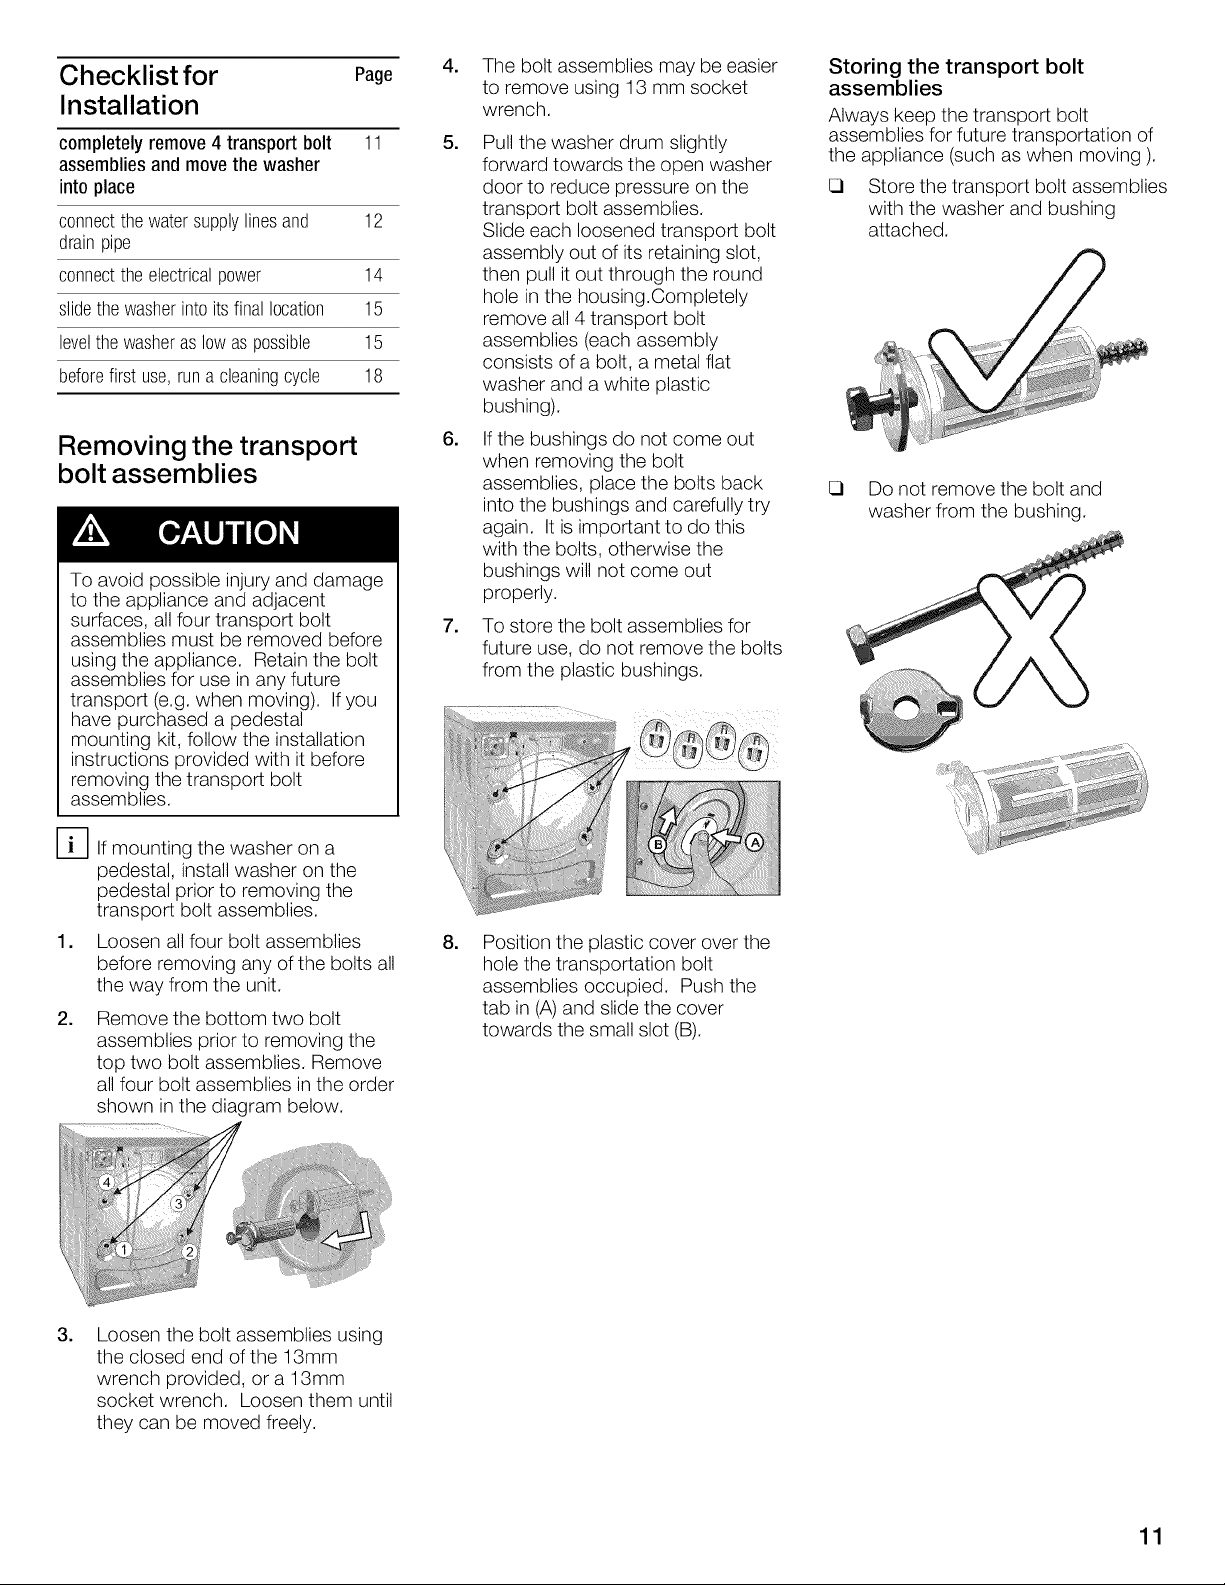
.
Loosen all four bolt assemblies
before removing any of the bolts all
the way from the unit.
.
Remove the bottom two bolt
assemblies prior to removing the
top two bolt assemblies. Remove
all four bolt assemblies in the order
shown in the diagram below.
_ ,, _ ......
---7T7---- ......
) ....... .......
"\,
.
Loosen the bolt assemblies using
the closed end of the 13mm
wrench provided, or a 13mm
socket wrench. Loosen them until
they can be moved freely.
.
Position the plastic cover over the
hole the transportation bolt
assemblies occupied. Push the
tab in (A) and slide the cover
towards the small slot (B).
11
Water connection
Water supply
The washing machine must only be
operated with hot (max. 140 °F/ 60
°C)and cold tap water. Do not
connect the appliance to the mixer
tap of an unpressurized hot-water
boiler.
If in doubt, have the water connection
installed by an authorized technician.
The water supply hoses must not be:
Kinked, bent or flattened in such a
way as to potentially diminish
water flow.
Modified or cut (integrity can
no longer be guaranteed).
Periodic inspection and
replacement of damaged or
kinked hoses is recommended.
Replacement of the water supply
hoses after five years of use may
help reduce the risk of hose failure.
If installing the washing machine in a
new building or a building in which
the plumbing system was recently
installed or upgraded, flush the lines
before installing the washing
machine to remove any sand, dirt or
residue.
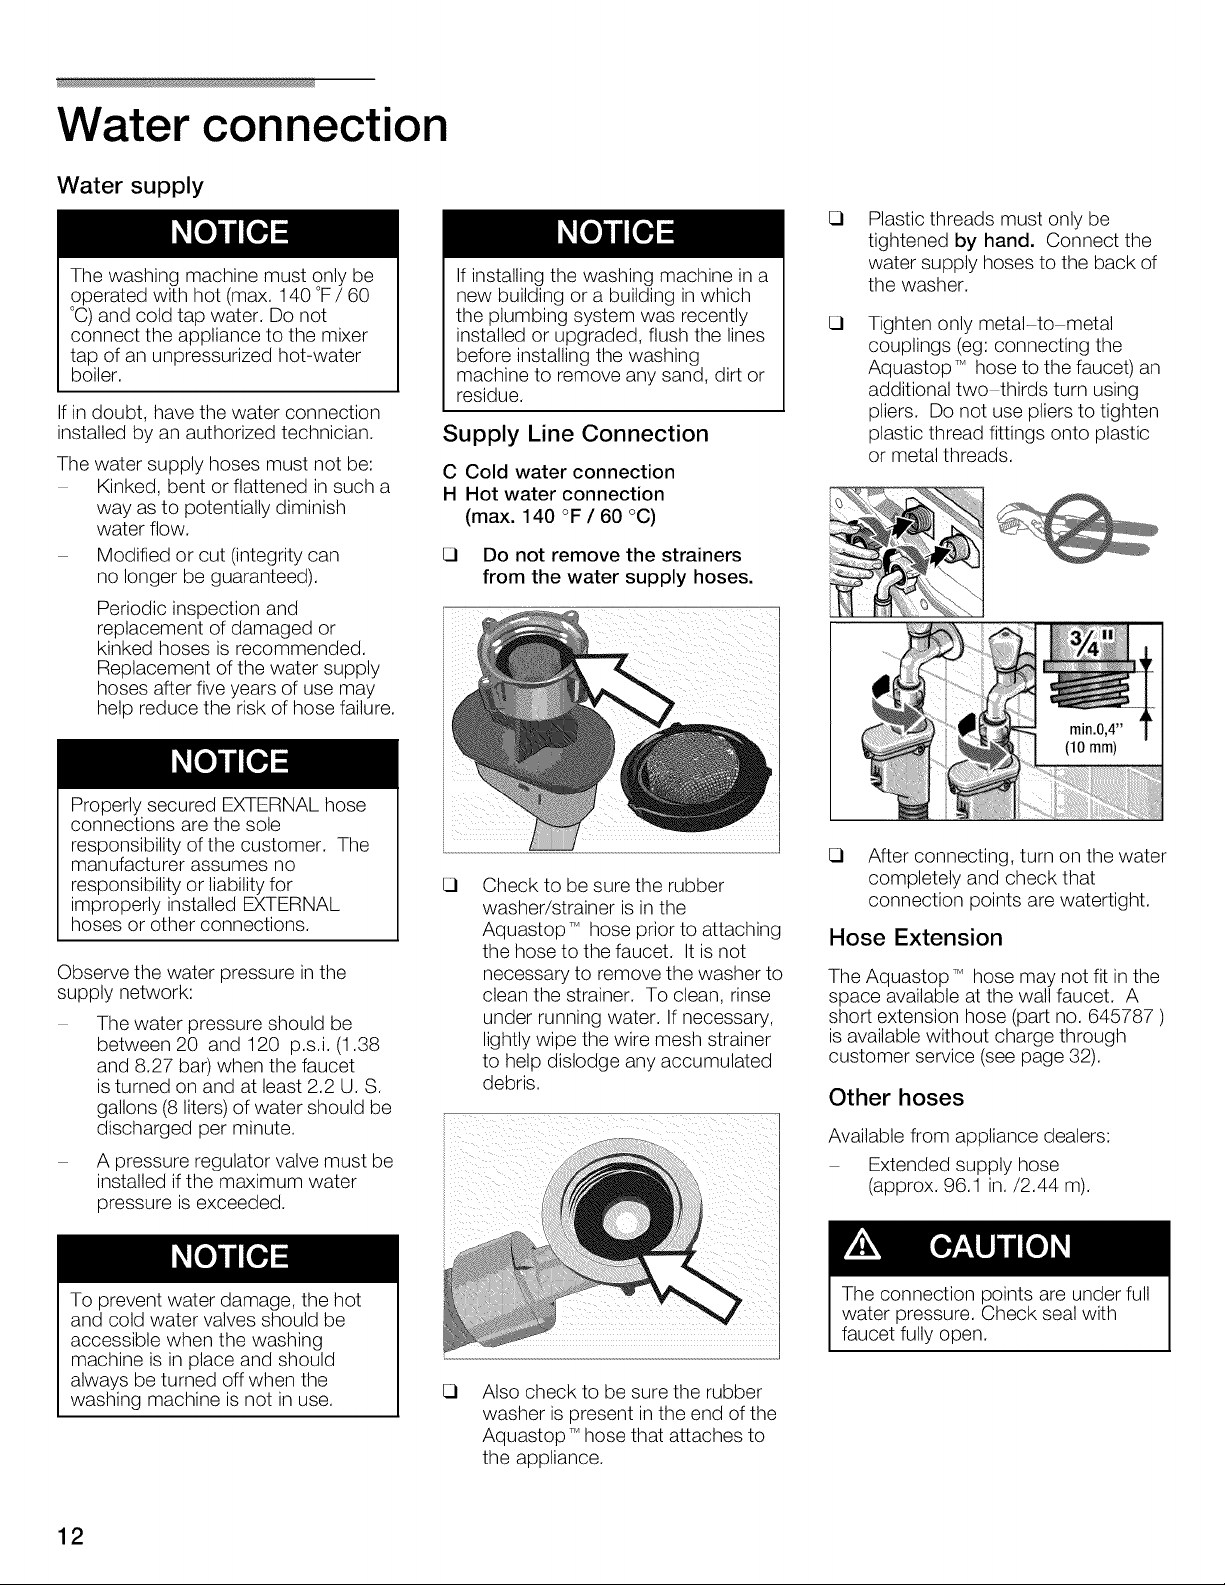
Supply Line Connection
C Cold water connection
H Hot water connection
(max. 140 °F / 60 °C)
Do not remove the strainers
from the water supply hoses.
Plastic threads must only be
tightened by hand. Connect the
water supply hoses to the back of
the washer.
Tighten only metal-to metal
couplings (eg: connecting the
Aquastop _ hose to the faucet) an
additional two thirds turn using
pliers. Do not use pliers to tighten
plastic thread fittings onto plastic
or metal threads.
Properly secured EXTERNAL hose
connections are the sole
responsibility of the customer. The
manufacturer assumes no
responsibility or liability for
improperly installed EXTERNAL
hoses or other connections.
Observe the water pressure in the
supply network:
The water pressure should be
between 20 and 120 p.s.i. (1.38
and 8.27 bar) when the faucet
is turned on and at least 2.2 U. S.
gallons (8 liters) of water should be
discharged per minute.
A pressure regulator valve must be
installed ifthe maximum water
pressure is exceeded.
To prevent water damage, the hot
and cold water valves should be
accessible when the washing
machine is in place and should
always be turned off when the
washing machine is not in use.
i
Check to be sure the rubber
washer/strainer is in the
Aquastop TMhose prior to attaching
the hose to the faucet. It is not
necessary to remove the washer to
clean the strainer. To clean, rinse
under running water. If necessary,
lightly wipe the wire mesh strainer
to help dislodge any accumulated
debris.
i iiii
Also check to be sure the rubber
washer is present in the end of the
Aquastop TMhose that attaches to
the appliance.
After connecting, turn on the water
completely and check that
connection points are watertight.
Hose Extension
The Aquastop _ hose may not fit in the
space available at the wall faucet. A
short extension hose (part no. 645787 )
is available without charge through
customer service (see page 32).
Other hoses
Available from appliance dealers:
Extended supply hose
(approx. 96.1 in./2.44 m).
The connection points are under full
water pressure. Check seal with
faucet fully open.
12
AquaStopTM
The AquaStop TM system is available in
select models only. AquaStop TM
protects against flood-type water
leakage through the clothes washer.
This is accomplished using a
stop valve in the AquaStop TM hose and
a floating switch in the washer base.
If a leak is detected, the system is
designed to shut off the water flow,
minimizing leakage.
AquaStop TM isan internal containment
technology, and does not protect
against outside forces, such as home
plumbing problems, or damage caused
to the machine's hose (such as
installation damage). The clothes
washer must be level and turned "on"
for proper functionality.
The AquaStop TM feature is not
active and will not operate if the
cycle selector is in the "Off"
position.
The washer must_e level for
correct Aquastop _Joperation.
AquaStop TMHose
The AquaStop TM hose is an external
containment technology that prevents
potential flooding ifthe hose leaks.
Ifthe AquaStop TMhose leaks, a red
mark is displayed and the water inlet is
blocked.
Water drai nag e
Do not bend or pull the water
drainage hose.
The drain pipe height should be no
lower than 12 inches (30.5 cm) below
the top of the washer and no higher
than 5 feet (152.4 cm) from the top of
the washer.
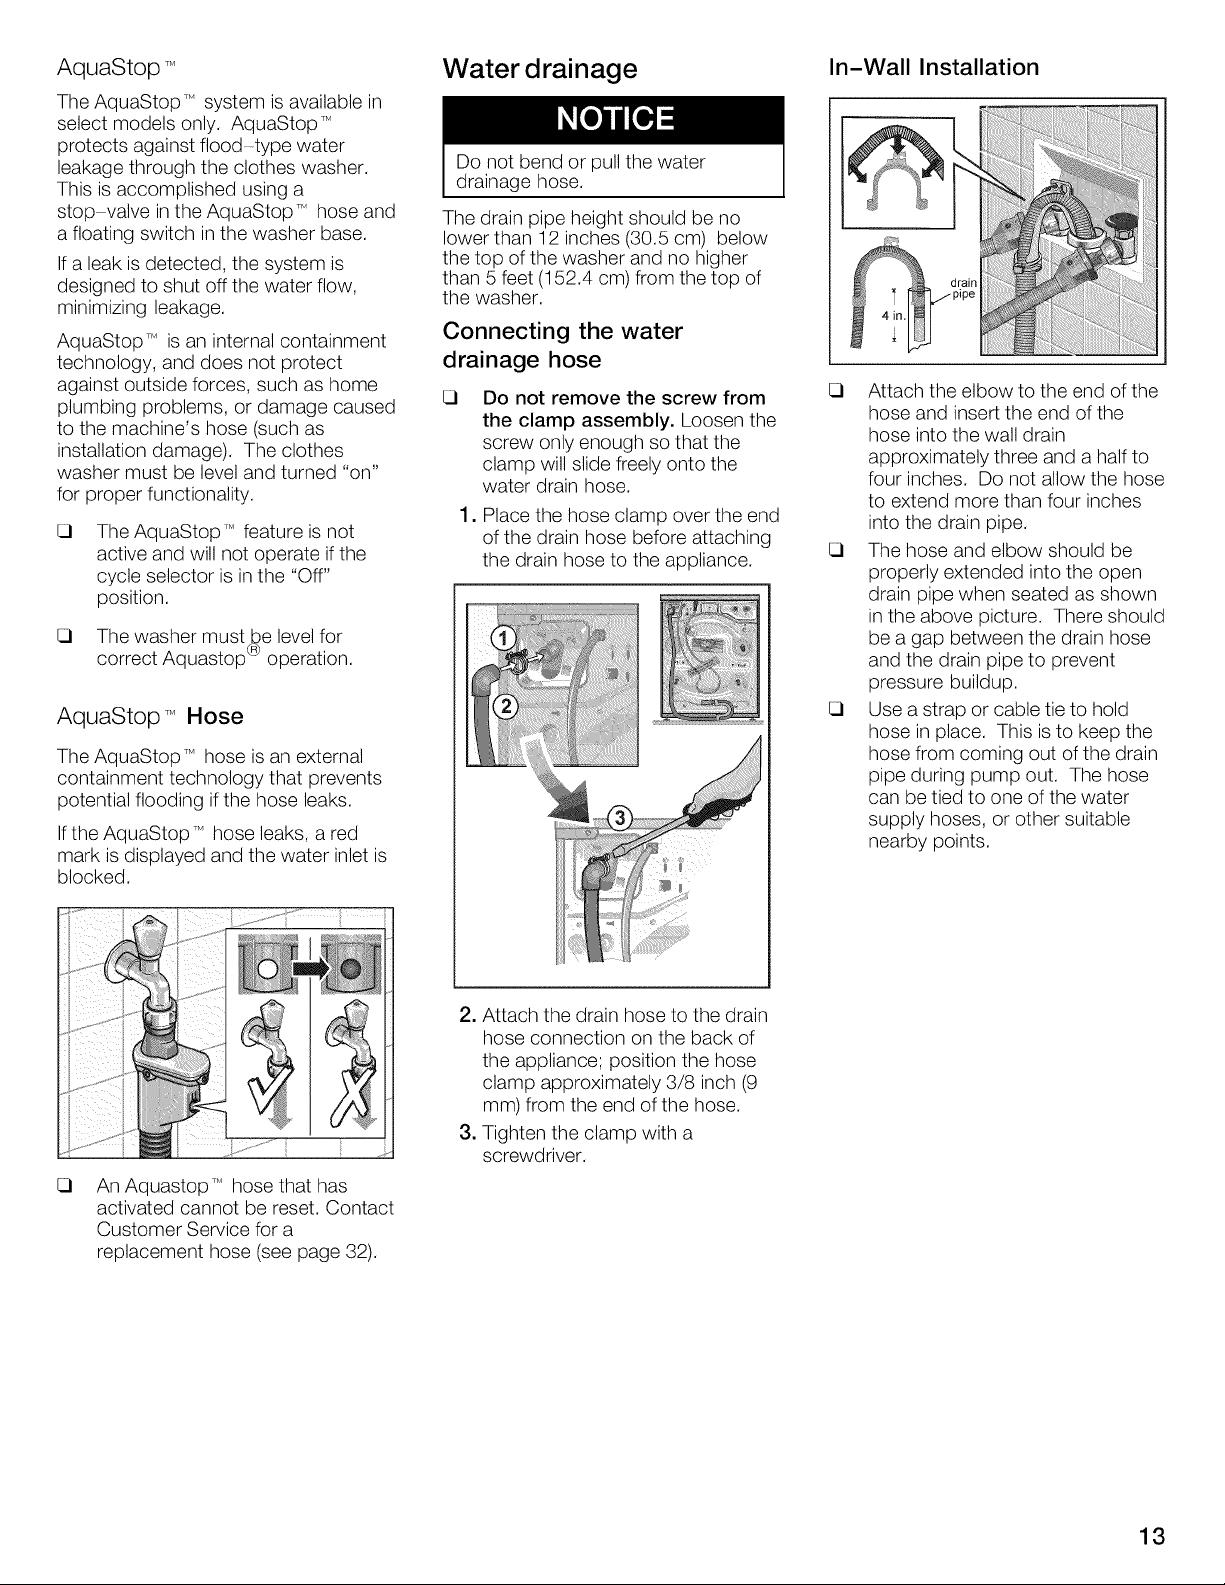
Connecting the water
drainage hose
Do not remove the screw from
the clamp assembly. Loosen the
screw only enough so that the
clamp will slide freely onto the
water drain hose.
,
Place the hose clamp over the end
of the drain hose before attaching
the drain hose to the appliance.
In-Wall Installation
Attach the elbow to the end of the
hose and insert the end of the
hose into the wall drain
approximately three and a half to
four inches. Do not allow the hose
to extend more than four inches
into the drain pipe.
The hose and elbow should be
properly extended into the open
drain pipe when seated as shown
in the above picture. There should
be a gap between the drain hose
and the drain pipe to prevent
pressure buildup.
Use a strap or cable tie to hold
hose in place. This is to keep the
hose from coming out of the drain
pipe during pump out. The hose
can be tied to one of the water
supply hoses, or other suitable
nearby points.
An AquastopT_ hose that has
activated cannot be reset. Contact
Customer Service for a
replacement hose (see page 32).
2. Attach the drain hose to the drain
hose connection on the back of
the appliance; position the hose
clamp approximately 3/8 inch (9
mm) from the end of the hose.
3. Tighten the clamp with a
screwdriver.
13
Electrical connection
GROUNDING INSTRUCTIONS
This appliance must be grounded. In
the event of damage or failure,
grounding will reduce the risk of
electrical shock by providing a path of
least resistance for the electric current.
This appliance features a cord with an
equipment-grounding conductor and a
grounding plug. The plug must be
plugged into an appropriate outlet
which has been properly installed and
grounded in accordance with all local
regulations and ordinances.
Improper connection of the
equipment grounding conductor
may result in electric shock. Have
the appliance checked by
a qualified electrician or service
technician if you are in doubt as to
whether the washer has been
properly grounded.
Do not modify the plug provided with
the appliance - if it will not fit in the
outlet, have a proper outlet installed by
a qualified electrician.
To reduce the risk of fire or electrical
shock, DO NOT use an extension
cord or an adapter to connect the
washing machine to the power
supply.
Use of a Ground Fault Circuit
Interrupter (GFCI) is recommended.
Do not insert/remove the power plug
with wet or damp hands.
Touch the plug only when removing the
plug from the socket.
The washing machine must only be
connected to an individual branch
circuit via a socket which has been
properly installed and grounded.
The household electrical voltage must
correspond to the voltage specification
on the washing machine (rating plate,
see page 32).
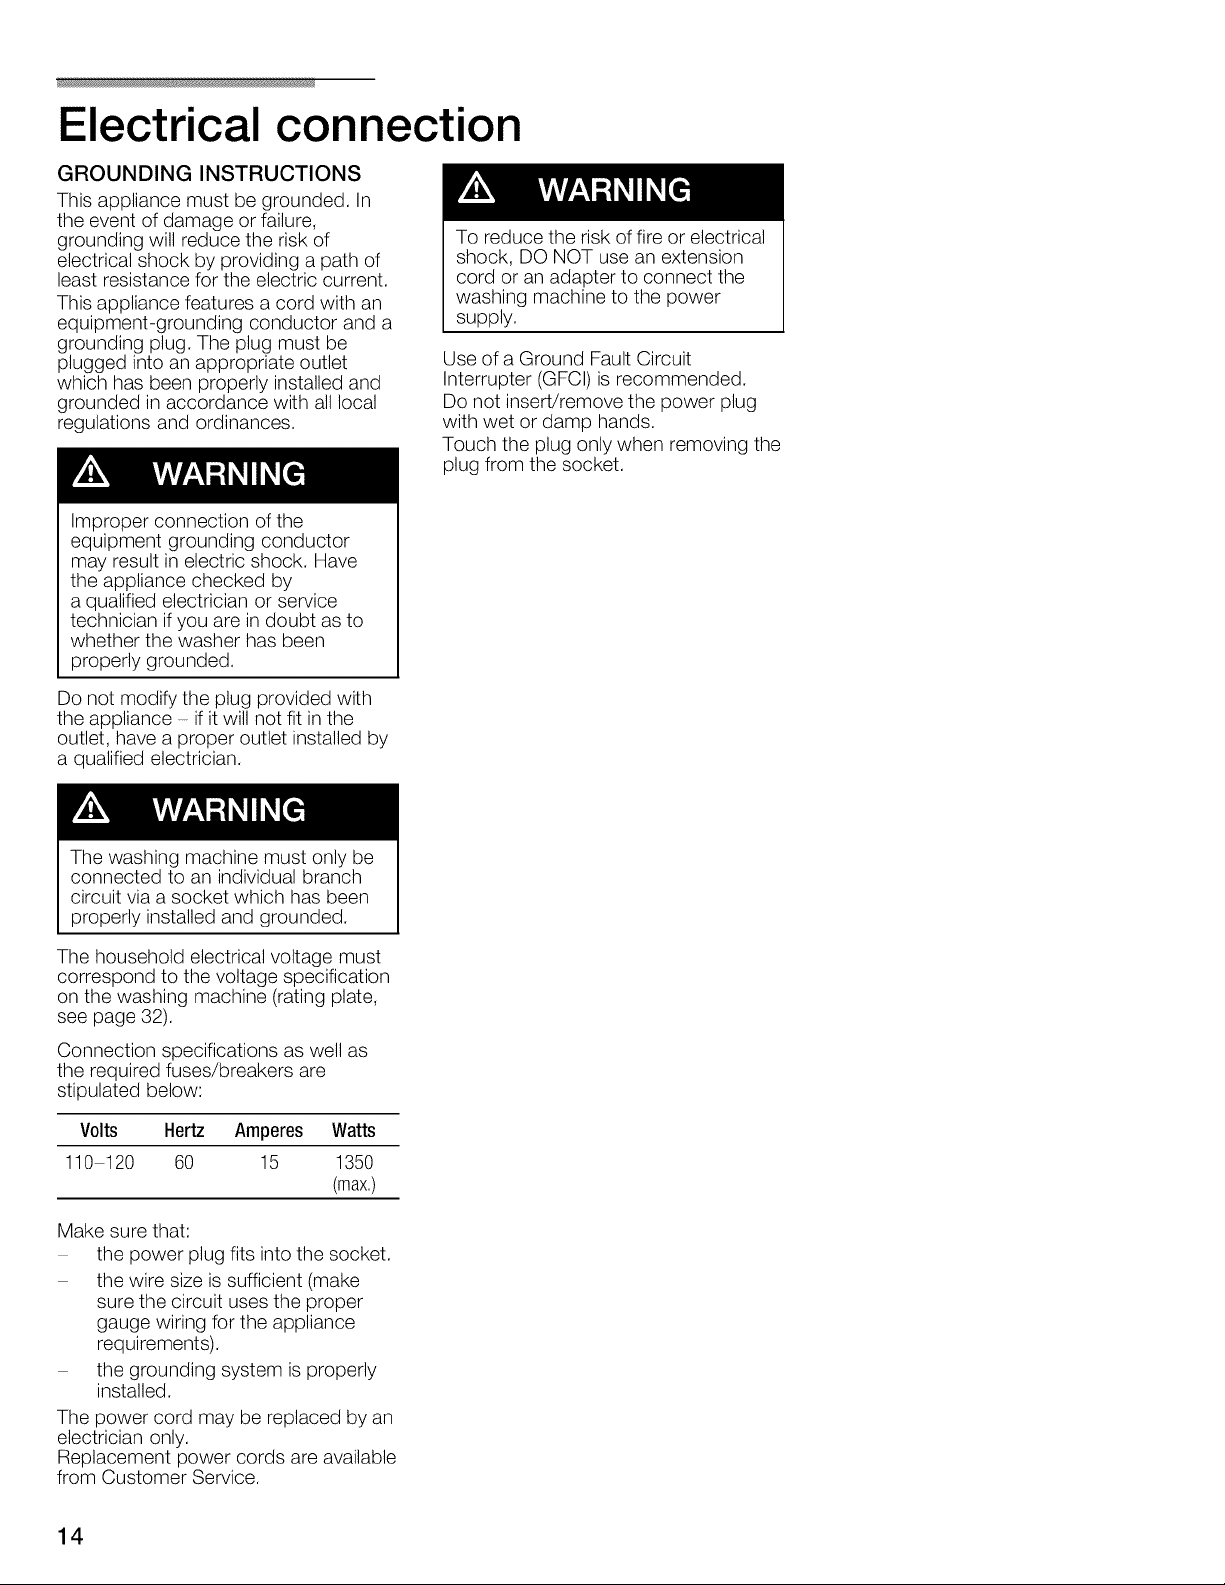
Connection specifications as well as
the required fuses/breakers are
stipulated below:
Volts Hertz Amperes Watts
110 120 60 15 1350
(max.)
Make sure that:
the power plug fits into the socket.
the wire size is sufficient (make
sure the circuit uses the proper
gauge wiring for the appliance
requirements).
the grounding system is properly
installed.
The power cord may be replaced by an
electrician only.
Replacement power cords are available
from Customer Service.
14
Leveling Procedure
Importance of Leveling
the Washer
The high spin speeds realized by your
high performance washer make
leveling the washer during installation a
critical issue to reduce noise and
vibration.
The washer feet are height adjustable
and must be adjusted so the washer is
leveland each foot is seated firmly
against the floor.
If these procedures are not
followed, the washer may
experience severe vibration
resulting in significant washer
movement and excessive noise
levels.
D Level the washer prior to stacking
the dryer on it in a stacked
washer/dryer installation.
Important Actions During
Leveling
.
Prior to beginning the leveling
procedure, move the washer into
the final location where you will
use it.
.
Do not push the washer across the
floor with the washer leveling feet
extended. This can damage the
floor or the washer leveling feet.
.
Start with all four washer leveling
feet turned all the way in so they
are snug up against the bottom of
the washer.
.
When leveling, keep the base of
the washer as low to the floor as
possible to reduce sound and
vibration during use. Extend the
washer leveling feet only as much
as is necessary to level the
washer.
.
Hold the washer foot (bottom
rubber portion) with a 36mm (1 1/2
in.) wrench or a pair of slip-joint
pliers while tightening the Iocknut
up against the bottom of the
washer. Do not allow the foot to
turn. If the washer leveling foot is
allowed to turn when tightening
the Iocknut, the height of the
washer on that corner will change.
Leveling Procedure
1. With the washer in its final position,
check to see if it is level. To do
this, use a bubble level if one is
available. An alternate method is
to place a large bowl nearly full of
water on the center of the top of
the washer. The water should be
about 1/2" (12.7 mm) from the top
of the bowl. If the water is the
same distance from the top of the
bowl all the way around, the
washer is fairly level.
.
Press down on each corner of the
washer. The washer should feel
firm when pressed down upon,
there should be no "give" or
movement.
.
If a corner of the washer moves
downward when pushed down
upon, it is necessary to extend the
washer leveling foot under that
corner. The foot should touch the
floor firmly.
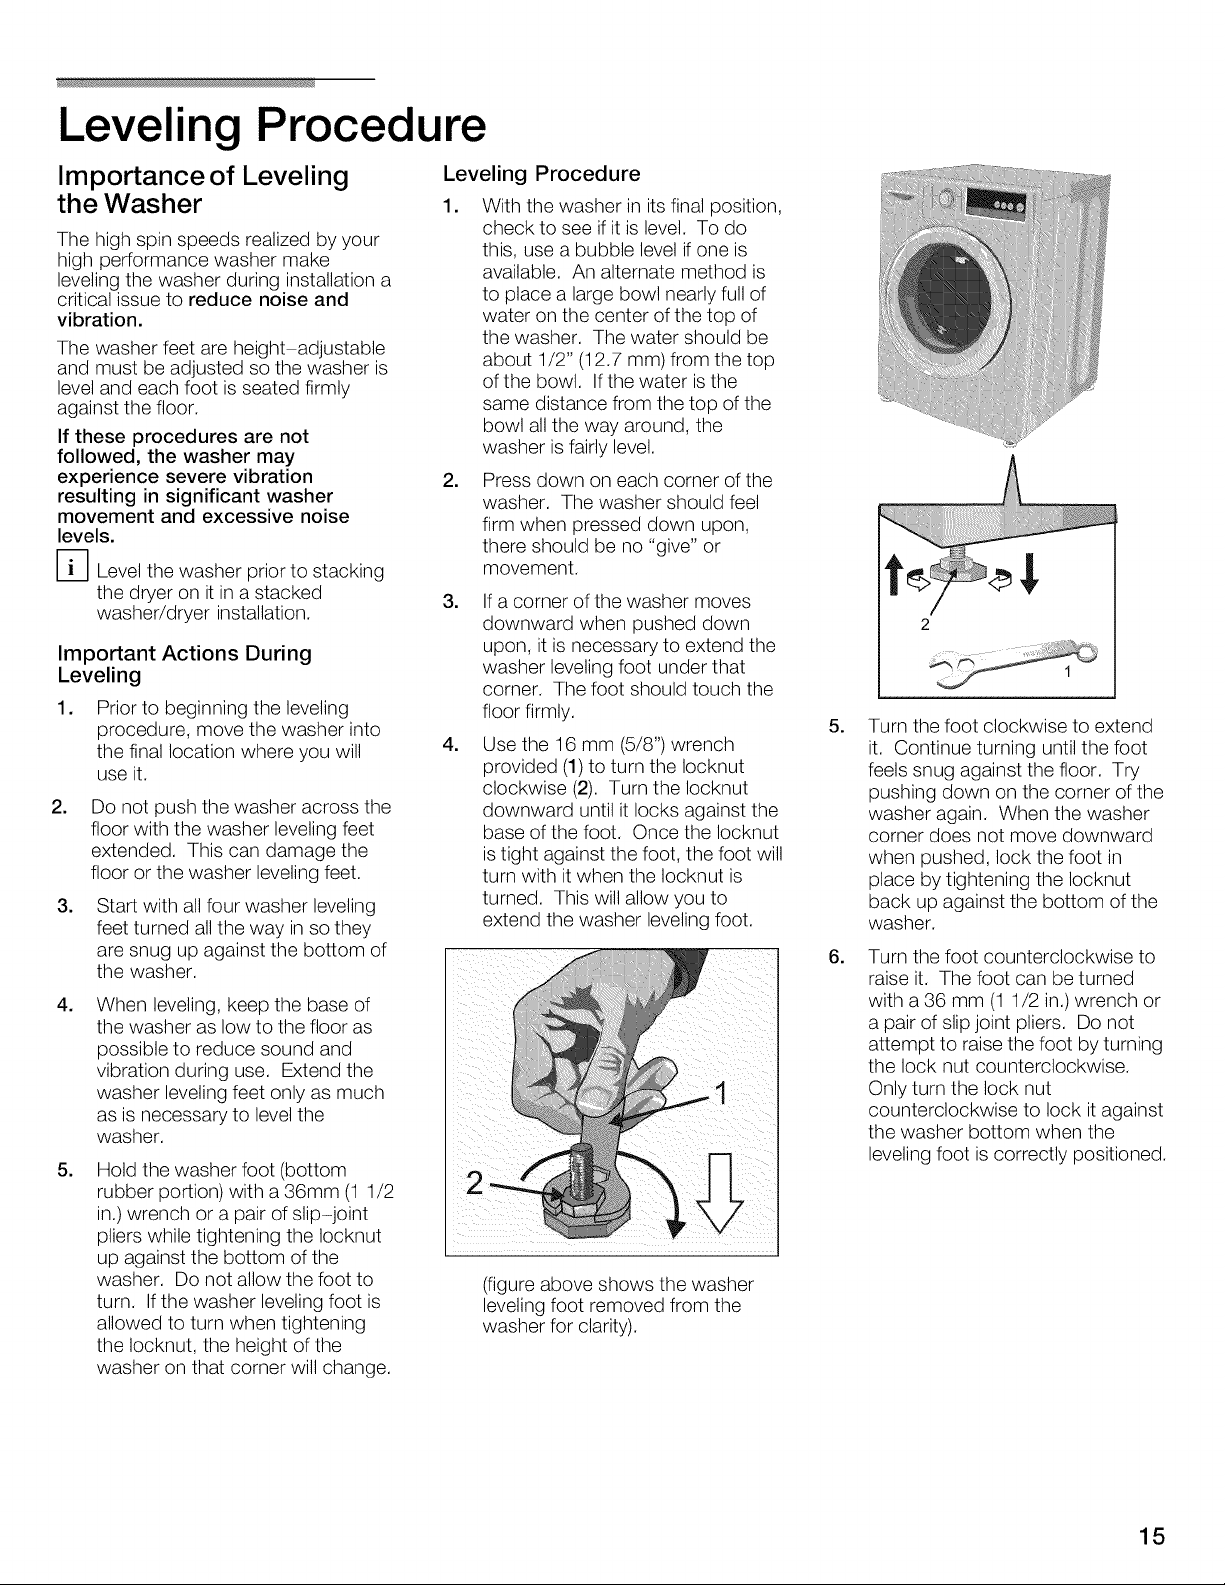
.
Use the 16 mm (5/8") wrench
provided (1) to turn the Iocknut
clockwise (2). Turn the Iocknut
downward until it locks against the
base of the foot. Once the Iocknut
is tight against the foot, the foot will
turn with it when the Iocknut is
turned. This will allow you to
extend the washer leveling foot.
(figure above shows the washer
leveling foot removed from the
washer for clarity).
2
.
Turn the foot clockwise to extend
it. Continue turning until the foot
feels snug against the floor. Try
pushing down on the corner of the
washer again. When the washer
corner does not move downward
when pushed, lock the foot in
place by tightening the Iocknut
back up against the bottom of the
washer.
.
Turn the foot counterclockwise to
raise it. The foot can be turned
with a 36 mm (1 1/2 in.)wrench or
a pair of slipjoint pliers. Do not
attempt to raise the foot by turning
the lock nut counterclockwise.
Only turn the lock nut
counterclockwise to lock it against
the washer bottom when the
leveling foot is correctly positioned.
15
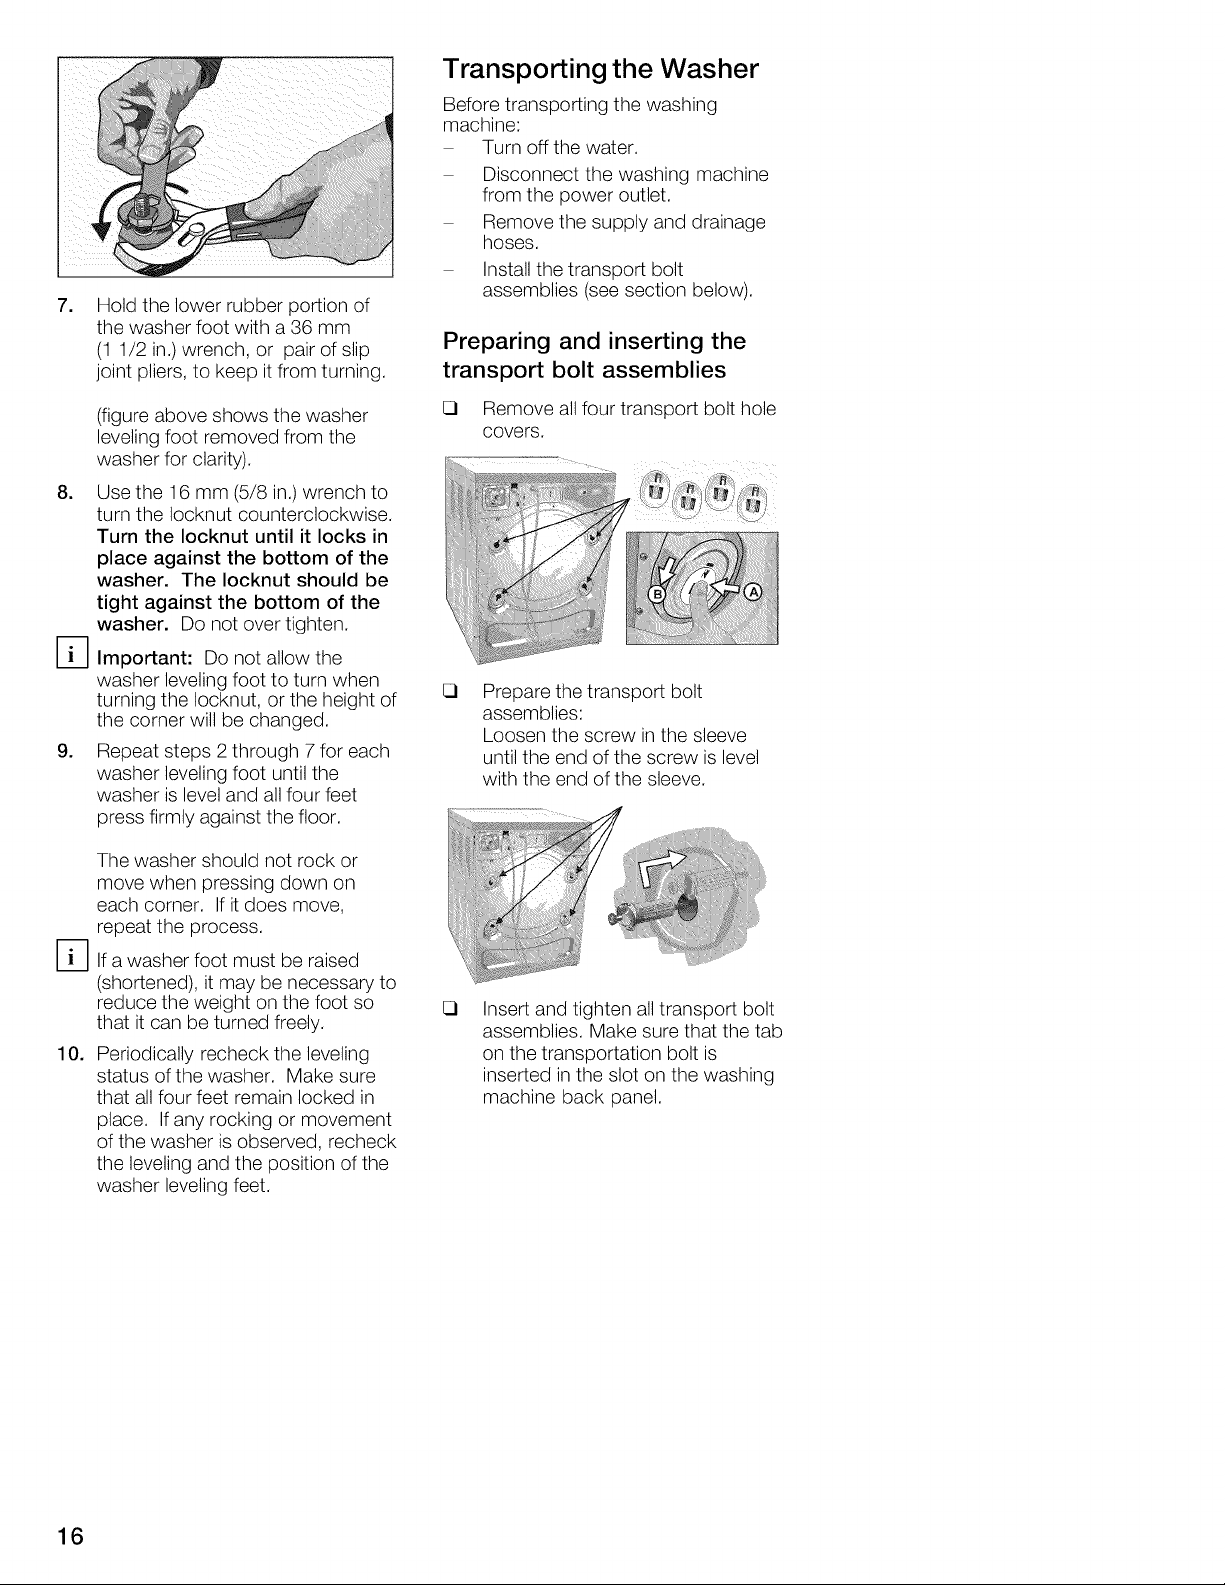
.
Hold the lower rubber portion of
the washer foot with a 36 mm
(1 1/2 in.)wrench, or pair of slip
joint pliers, to keep it from turning.
Transporting the Washer
Before transporting the washing
machine:
Turn off the water.
Disconnect the washing machine
from the power outlet.
Remove the supply and drainage
hoses.
Install the transport bolt
assemblies (see section below).
Preparing and inserting the
transport bolt assemblies
(figure above shows the washer
leveling foot removed from the
washer for clarity).
8. Use the 16 mm (5/8 in.) wrench to
turn the Iocknut counterclockwise.
Turn the Iocknut until it locks in
place against the bottom of the
washer. The Iocknut should be
tight against the bottom of the
washer. Do not over tighten.
D Important: Do not allow the
washer leveling foot to turn when
turning the Iocknut, or the height of
the corner will be changed.
9. Repeat steps 2 through 7 for each
washer leveling foot until the
washer is level and all four feet
press firmly against the floor.
The washer should not rock or
move when pressing down on
each corner. Ifit does move,
repeat the process.
D If a washer foot must be raised
(shortened), it may be necessary to
reduce the weight on the foot so
that it can be turned freely.
10. Periodically recheck the leveling
status of the washer. Make sure
that all four feet remain locked in
place. Ifany rocking or movement
of the washer is observed, recheck
the leveling and the position of the
washer leveling feet.
Remove all four transport bolt hole
covers.
Prepare the transport bolt
assemblies:
Loosen the screw in the sleeve
until the end of the screw is level
with the end of the sleeve.
i ,,,_,___Ji_ii_!i!i_iiiiiiiiiiillilih_.....
i;
\, _ N .............
Insert and tighten all transport bolt
assemblies. Make sure that the tab
on the transportation bolt is
inserted in the slot on the washing
machine back panel.
16
OPERATING INSTRUCTIONS
Before using
To reduce the risk of fire, electric
shock, or injury to persons, read the
IMPORTANT SAFETY
INSTRUCTIONS before operating
this appliance.
Panel
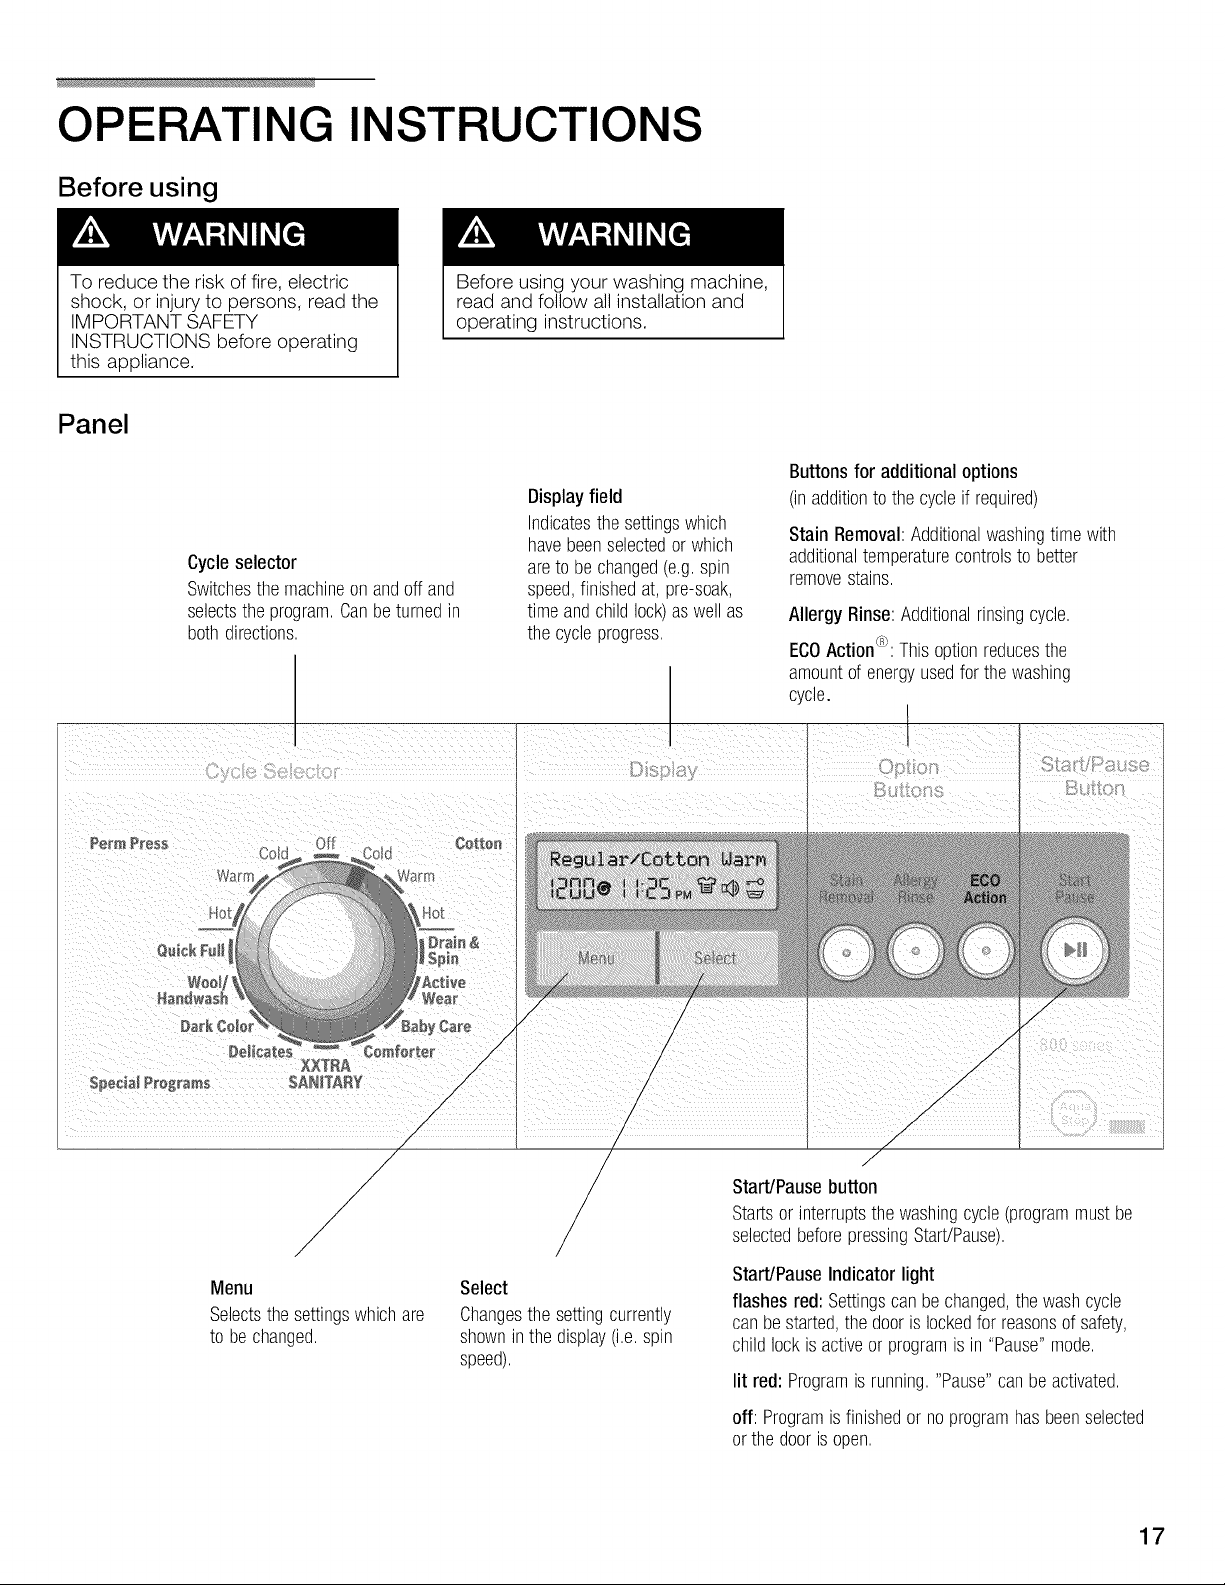
Cycleselector
Switchesthe machineon andoffand
selectsthe program.Canbeturnedin
bothdirections.
Before using your washing machine,
read and follow all installation and
operating instructions.
Displayfield
Indicatesthe settingswhich
havebeenselectedor which
areto bechanged(e.g.spin
speed,finishedat, pre-soak,
timeandchildlock)aswell as
thecycleprogress.
Buttonsfor additionaloptions
(inadditiontothecycleif required)
Stain Removal:Additionalwashingtimewith
additionaltemperaturecontrolsto better
removestains.
Allergy Rinse:Additionalrinsingcycle.
ECOAction®: Thisoptionreducesthe
amountof energyusedforthewashing
cycle.
Menu
Selectsthesettingswhichare
to be changed.
/
/
/
Select
Changesthesettingcurrently
shownin thedisplay(i.e.spin
speed).
Start/Pausebutton
Startsorinterruptsthewashingcycle(programmustbe
selectedbeforepressingStart/Pause).
Start/PauseIndicatorlight
flashesred: Settingscanbechanged,thewashcycle
canbestarted,the doorislockedfor reasonsof safety,
childlockisactiveor programis in "Pause"mode.
lit red: Programis running."Pause"can beactivated.
off: Programisfinishedor noprogramhasbeenselected
orthedoorisopen.
17
Before Using For
the First Time
To reduce the risk of fire, electric
shock, or injury to persons, read the
IMPORTANT SAFETY
INSTRUCTIONS before operating
this appliance.
The washing machine must be installed
and connected properly (refer to Page
7).
Turn the Cycle Selector to any cycle to
turn the washer on and illuminate the
display. Turn the Cycle Selector to
"Off" to turn the washer off.
Before using your washing machine,
read and follow all installation and
operating instructions.
Using For the First
Time
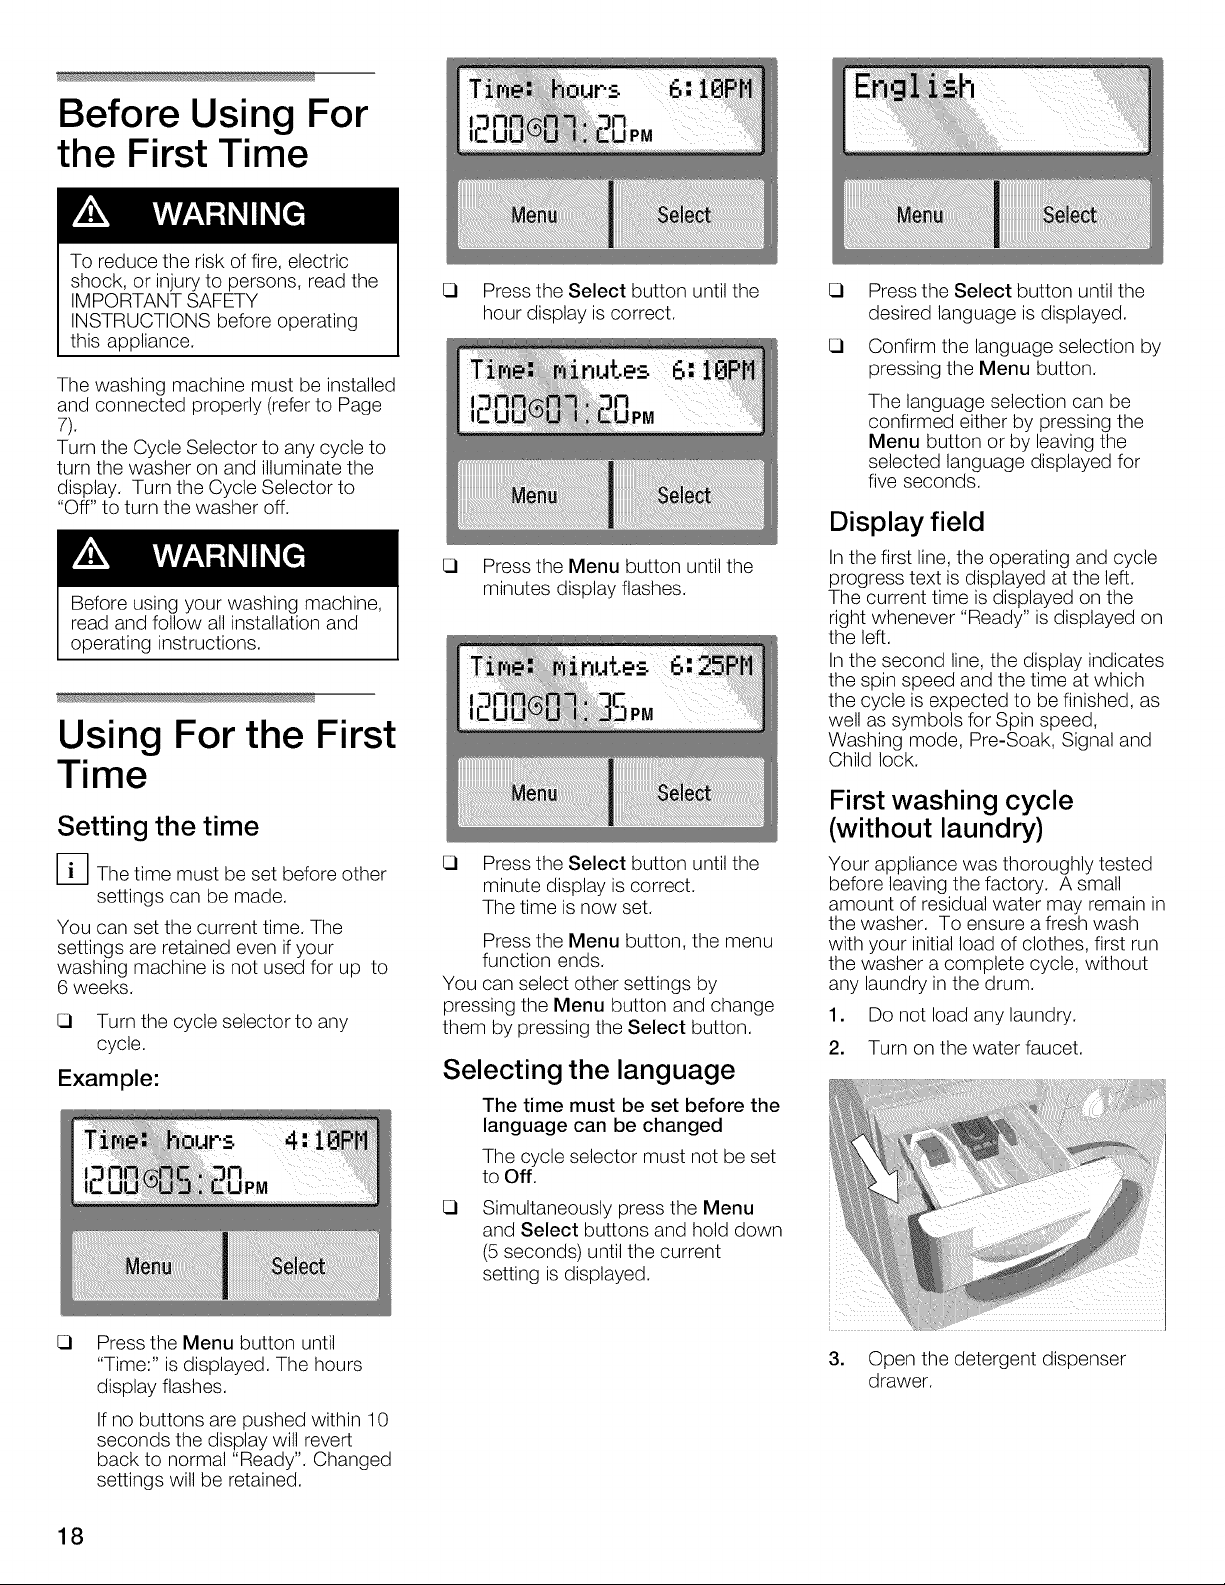
Setting the time
D The time must be set before other
settings can be made.
You can set the current time. The
settings are retained even if your
washing machine is not used for up to
6 weeks.
Turn the cycle selector to any
cycle.
Example:
Press the Select button until the
hour display is correct.
Press the Menu button until the
minutes display flashes.
Press the Select button until the
minute display is correct.
The time is now set.
Press the Menu button, the menu
function ends.
You can select other settings by
pressing the Menu button and change
them by pressing the Select button.
Selecting the language
The time must be set before the
language can be changed
The cycle selector must not be set
to Off.
Simultaneously press the Menu
and Select buttons and hold down
(5 seconds) until the current
setting is displayed.
Press the Select button until the
desired language is displayed.
Confirm the language selection by
pressing the Menu button.
The language selection can be
confirmed either by pressing the
Menu button or by leaving the
selected language displayed for
five seconds.
Display field
In the first line, the operating and cycle
progress text is displayed at the left.
The current time is displayed on the
right whenever "Ready" is displayed on
the left.
In the second line, the display indicates
the spin speed and the time at which
the cycle is expected to be finished, as
well as symbols for Spin speed,
Washing mode, Pre-Soak, Signal and
Child lock.
First washing cycle
(without laundry)
Your appliance was thoroughly tested
before leaving the factory. A small
amount of residual water may remain in
the washer. To ensure a fresh wash
with your initial load of clothes, first run
the washer a complete cycle, without
any laundry in the drum.
1. Do not load any laundry.
2. Turn on the water faucet.
Press the Menu button until
"Time:" is displayed. The hours
display flashes.
If no buttons are pushed within 10
seconds the display will revert
back to normal "Ready". Changed
settings will be retained.
18
3. Open the detergent dispenser
drawer.
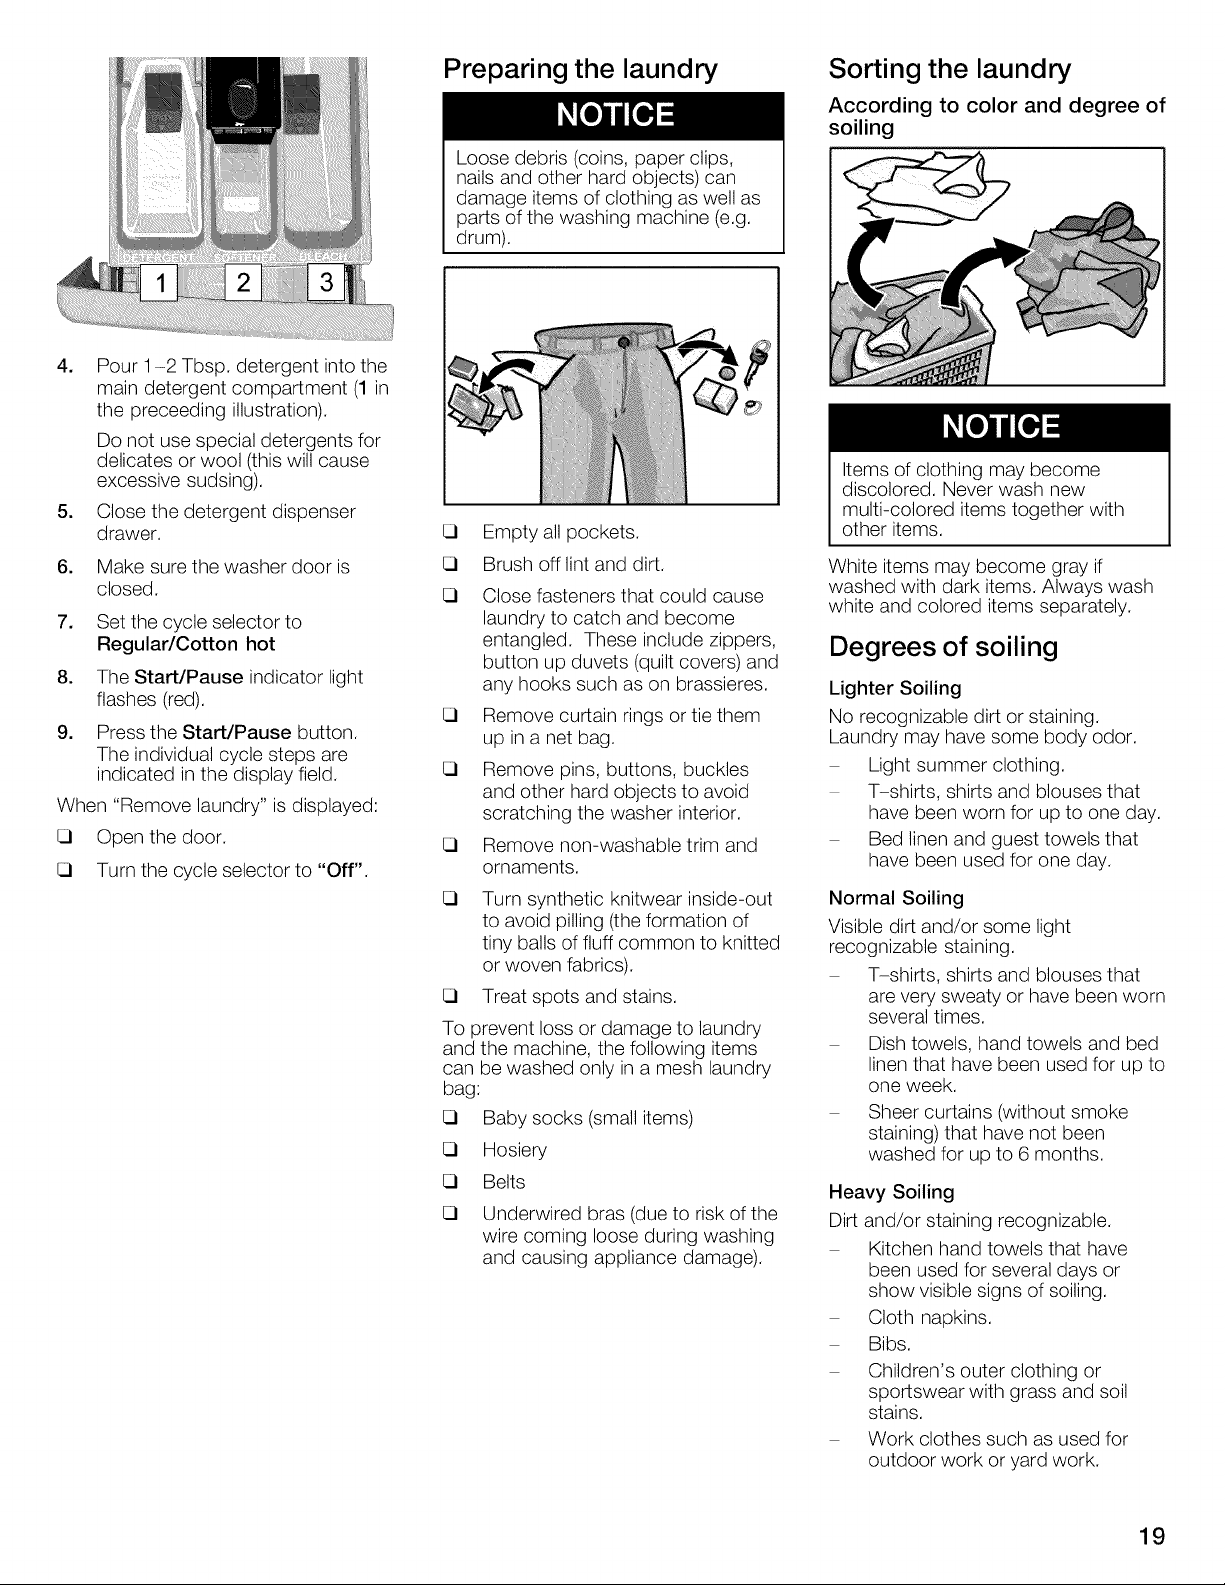
4. Pour 1-2 Tbsp. detergent into the
main detergent compartment (1 in
the preceeding illustration).
Do not use special detergents for
delicates or wool (this will cause
excessive sudsing).
5. Close the detergent dispenser
drawer.
6. Make sure the washer door is
closed.
7. Set the cycle selector to
Regular/Cotton hot
8. The Start/Pause indicator light
flashes (red).
9. Press the Start/Pause button.
The individual cycle steps are
indicated in the display field.
When "Remove laundry" is displayed:
Open the door.
Turn the cycle selector to "Off".
Preparing the laundry
Loose debris (coins, paper clips,
nails and other hard objects) can
damage items of clothing as well as
parts of the washing machine (e.g.
drum).
Empty all pockets.
Brush off lint and dirt.
Close fasteners that could cause
laundry to catch and become
entangled. These include zippers,
button up duvets (quilt covers) and
any hooks such as on brassieres.
Remove curtain rings or tie them
up in a net bag.
Remove pins, buttons, buckles
and other hard objects to avoid
scratching the washer interior.
Remove non-washable trim and
ornaments.
Turn synthetic knitwear inside-out
to avoid pilling (the formation of
tiny balls of fluff common to knitted
or woven fabrics).
Treat spots and stains.
To prevent loss or damage to laundry
and the machine, the following items
can be washed only ina mesh laundry
bag:
Baby socks (small items)
Hosiery
Belts
Underwired bras (due to risk of the
wire coming loose during washing
and causing appliance damage).
Sorting the laundry
According to color and degree of
soiling
Items of clothing may become
discolored. Never wash new
multi-colored items together with
other items.
White items may become gray if
washed with dark items. Always wash
white and colored items separately.
Degrees of soiling
Lighter Soiling
No recognizable dirt or staining.
Laundry may have some body odor.
Light summer clothing.
T-shirts, shirts and blouses that
have been worn for up to one day.
Bed linen and guest towels that
have been used for one day.
Normal Soiling
Visible dirt and/or some light
recognizable staining.
T-shirts, shirts and blouses that
are very sweaty or have been worn
several times.
Dish towels, hand towels and bed
linen that have been used for up to
one week.
Sheer curtains (without smoke
staining) that have not been
washed for up to 6 months.
Heavy Soiling
Dirt and/or staining recognizable.
Kitchen hand towels that have
been used for several days or
show visible signs of soiling.
Cloth napkins.
Bibs.
Children's outer clothing or
sportswear with grass and soil
stains.
Work clothes such as used for
outdoor work or yard work.
19
Typical stains
Sauces, tea, coffee, red wine, fruit,
vegetables.
Blood, egg, milk, starch
(containing protein/carbohydrate).
Soot, soil, sand (pigments), red
clay.
Removing stains
If possible, pretreat stains while they
are still fresh.
First, dab soapy water onto the stain.
Do not rub.
Subsequently, wash the items of
clothing using the appropriate cycle.
Occasionally, several wash cycles may
be required in order to remove
persistent, dried-on stains.
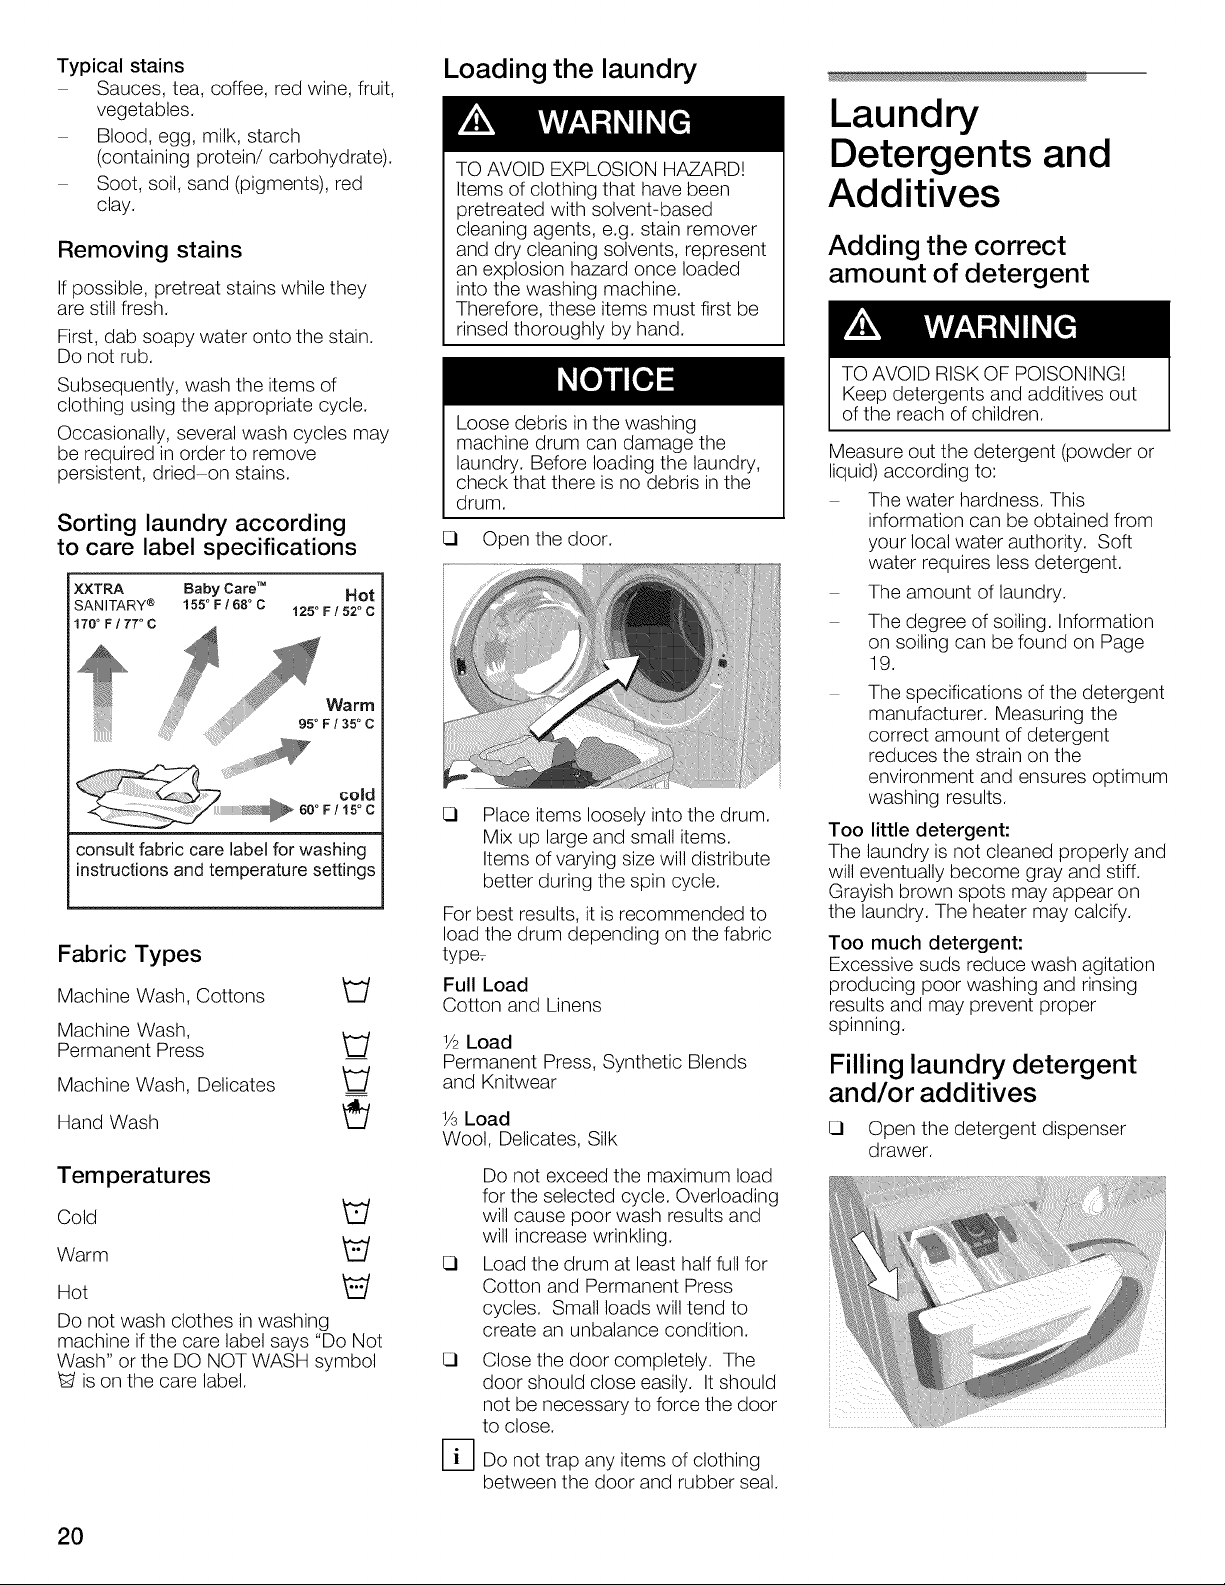
Sorting laundry according
to care label specifications
XXTRA Baby Care TM Hot
SANITARY ® 155° F168° C 125o F! 52oc
1700 Ft 77° C
Warm
95oF/35°C
cold
F!15°C
consult fabric care label for washing
instructions and temperature settings
Fabric Types
Machine Wash, Cottons _/
Machine Wash,
Permanent Press
Machine Wash, Delicates
Hand Wash _/
Temperatures
Cold _/
Warm _/
Hot "_
Do not wash clothes in washing
machine if the care label says "Do Not
Wash" or the DO NOT WASH symbol
_d is on the care label.
Loading the laundry
TO AVOID EXPLOSION HAZARD!
Items of clothing that have been
pretreated with solvent-based
cleaning agents, e.g. stain remover
and dry cleaning solvents, represent
an explosion hazard once loaded
into the washing machine.
Therefore, these items must first be
rinsed thoroughly by hand.
Loose debris in the washing
machine drum can damage the
laundry. Before loading the laundry,
check that there is no debris in the
drum.
Open the door.
Place items loosely into the drum.
Mix up large and small items.
Items of varying size will distribute
better during the spin cycle.
For best results, it is recommended to
load the drum depending on the fabric
type_
Full Load
Cotton and Linens
1/2Load
Permanent Press, Synthetic Blends
and Knitwear
V_Load
Wool, Delicates, Silk
Do not exceed the maximum load
for the selected cycle. Overloading
will cause poor wash results and
will increase wrinkling.
Load the drum at least half full for
Cotton and Permanent Press
cycles. Small loads will tend to
create an unbalance condition.
Close the door completely. The
door should close easily. It should
not be necessary to force the door
to close.
r]]
Do not trap any items of clothing
between the door and rubber seal.
Laundry
Detergents and
Additives
Adding the correct
amount of detergent
TO AVOID RISK OF POISONING!
Keep detergents and additives out
of the reach of children.
Measure out the detergent (powder or
liquid) according to:
The water hardness. This
information can be obtained from
your local water authority. Soft
water requires less detergent.
The amount of laundry.
The degree of soiling. Information
on soiling can be found on Page
19.
The specifications of the detergent
manufacturer. Measuring the
correct amount of detergent
reduces the strain on the
environment and ensures optimum
washing results.
Too little detergent:
The laundry is not cleaned properly and
will eventually become gray and stiff.
Grayish brown spots may appear on
the laundry. The heater may calcify.
Too much detergent:
Excessive suds reduce wash agitation
producing poor washing and rinsing
results and may prevent proper
spinning.
Filling laundry detergent
and/or additives
Open the detergent dispenser
drawer.
2O
Add the liquid detergent and/or
additive. First check to be sure the
liquid insert is present in the
detergent compartment (1). If
using a powder detergent, see the
note below on removing the liquid
detergent insert.
Do not overfill the compartment to
avoid early dispensing.
D DO NOT operate the washer
without the detergent drawer in
place and fully closed!
If using a powder detergent, first
remove the liquid detergent insert
from compartment 1.
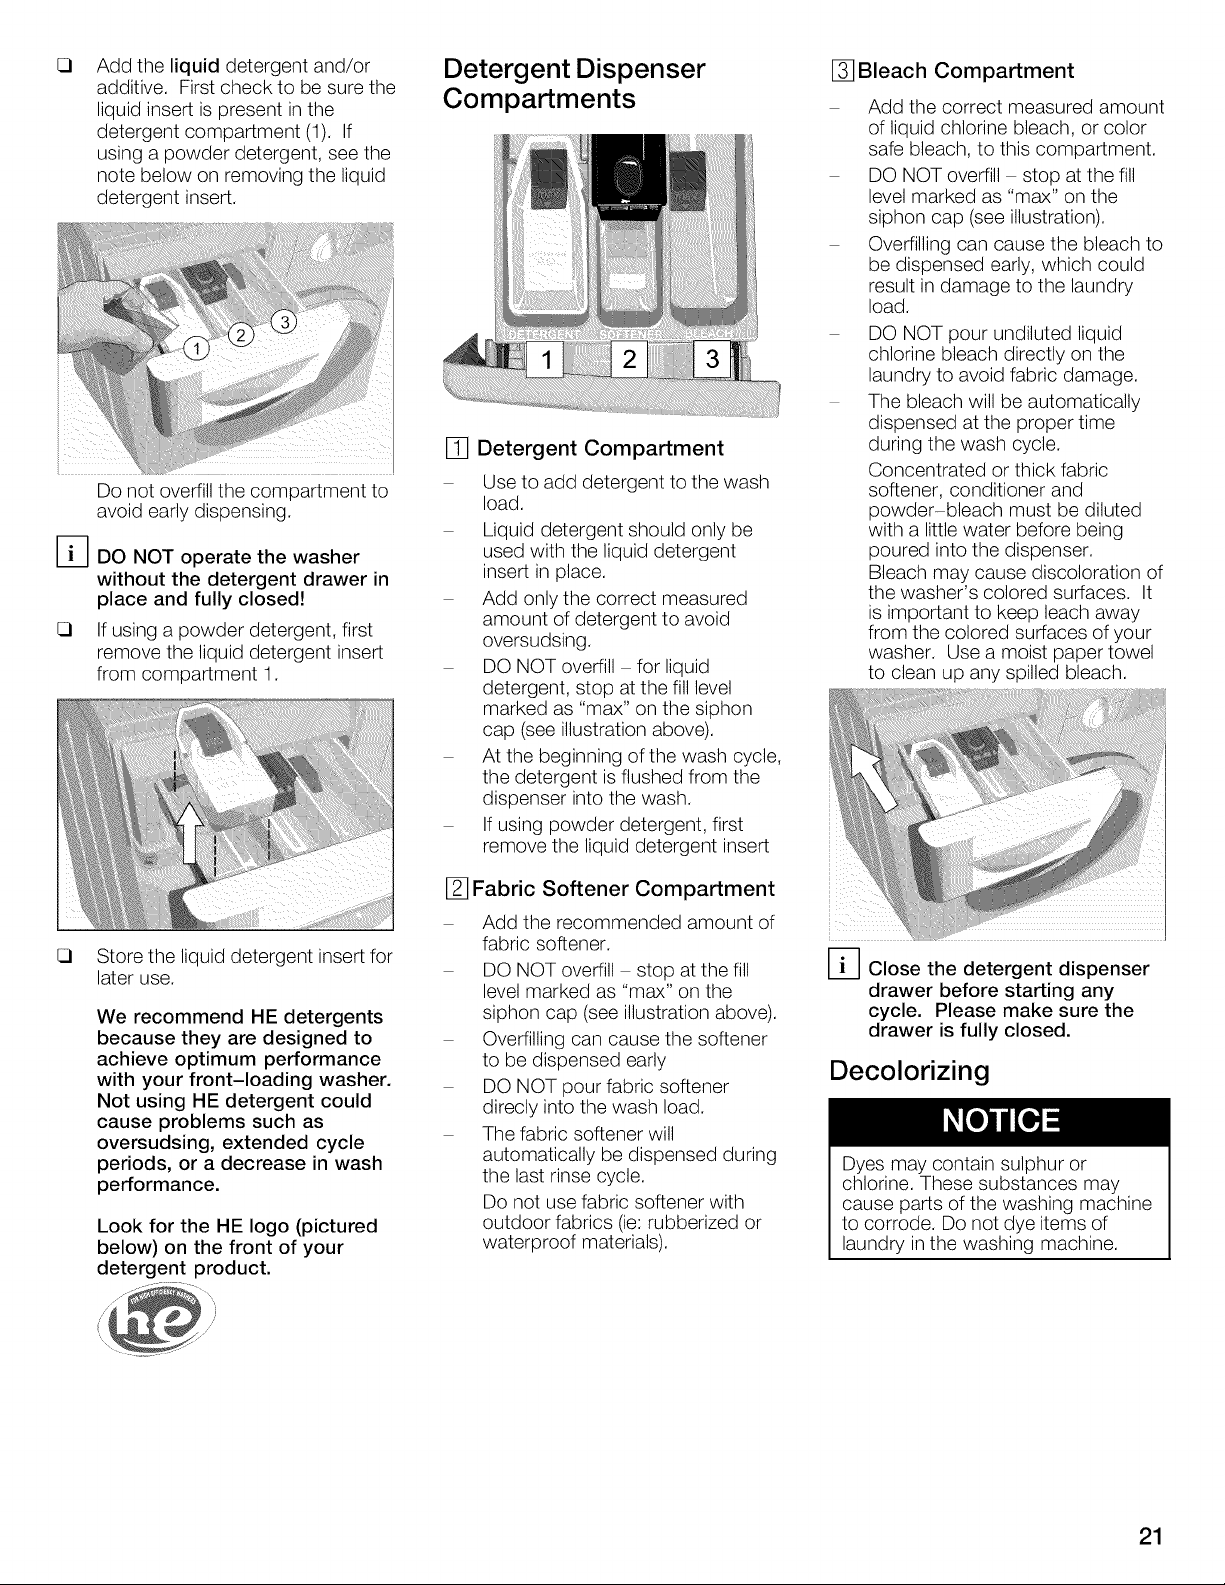
Detergent Dispenser
Compartments
[]
Detergent Compartment
Use to add detergent to the wash
load.
Liquid detergent should only be
used with the liquid detergent
insert in place.
Add only the correct measured
amount of detergent to avoid
oversudsing.
DO NOT overfill for liquid
detergent, stop at the fill level
marked as "max" on the siphon
cap (see illustration above).
At the beginning of the wash cycle,
the detergent is flushed from the
dispenser into the wash.
If using powder detergent, first
remove the liquid detergent insert
[] Bleach Compartment
Add the correct measured amount
of liquid chlorine bleach, or color
safe bleach, to this compartment.
DO NOT overfill stop at the fill
level marked as "max" on the
siphon cap (see illustration).
Overfilling can cause the bleach to
be dispensed early, which could
result in damage to the laundry
load.
DO NOT pour undiluted liquid
chlorine bleach directly on the
laundry to avoid fabric damage.
The bleach will be automatically
dispensed at the proper time
during the wash cycle.
Concentrated or thick fabric
softener, conditioner and
powder-bleach must be diluted
with a little water before being
poured into the dispenser.
Bleach may cause discoloration of
the washer's colored surfaces. It
is important to keep leach away
from the colored surfaces of your
washer. Use a moist paper towel
to clean up any spilled bleach.
Store the liquid detergent insert for
later use.
We recommend HE detergents
because they are designed to
achieve optimum performance
with your front-loading washer.
Not using HE detergent could
cause problems such as
oversudsing, extended cycle
periods, or a decrease in wash
performance.
Look for the HE logo (pictured
below) on the front of your
detergent product.
[] Fabric Softener Compartment
Add the recommended amount of
fabric softener.
DO NOT overfill stop at the fiii
level marked as "max" on the
siphon cap (see illustration above).
Overfilling can cause the softener
to be dispensed early
DO NOT pour fabric softener
direcly into the wash load.
The fabric softener will
automatically be dispensed during
the last rinse cycle.
Do not use fabric softener with
outdoor fabrics (ie:rubberized or
waterproof materials).
D Close the detergent dispenser
drawer before starting any
cycle. Please make sure the
drawer is fully closed.
Decolorizing
Dyes may contain sulphur or
chlorine. These substances may
cause parts of the washing machine
to corrode. Do not dye items of
laundry in the washing machine.
21
Cycles and Options
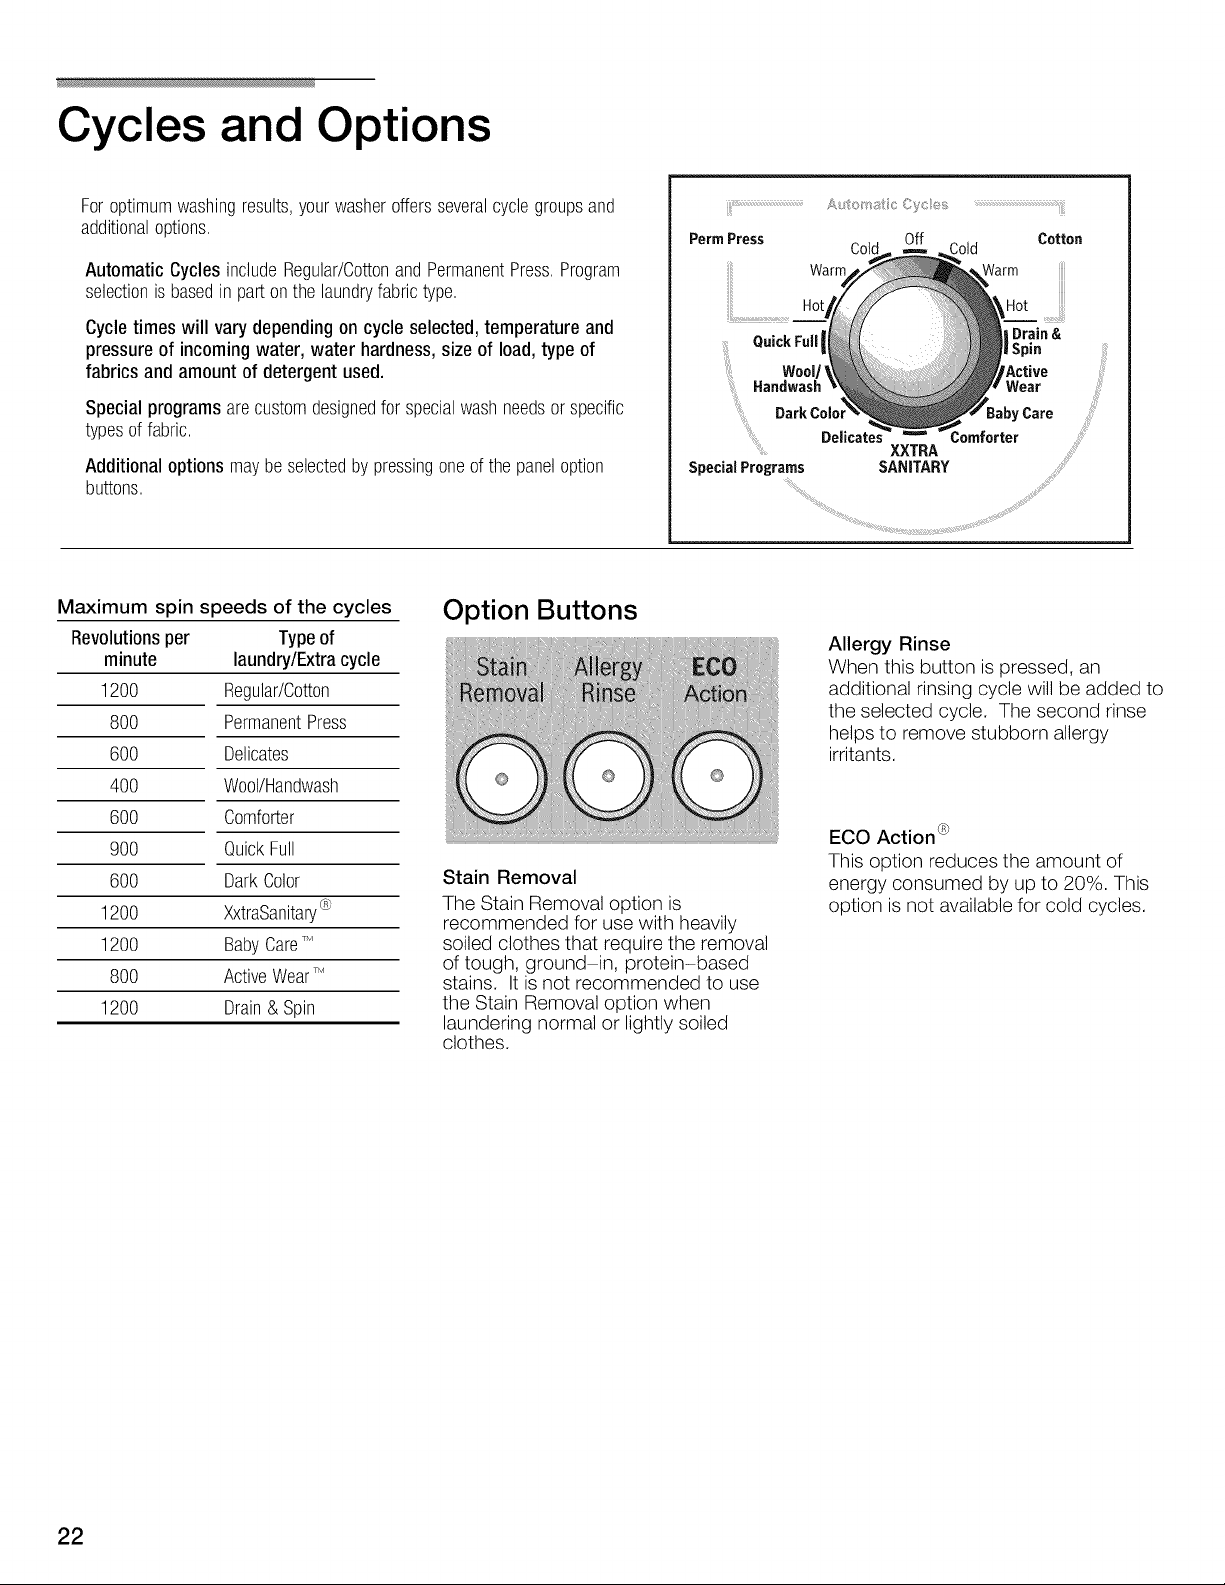
Foroptimumwashingresults,yourwasheroffersseveralcyclegroupsand
additionaloptions.
Automatic CyclesincludeRegular/CottonandPermanentPress,Program
selectionisbasedin partonthelaundryfabrictype,
Cycletimes will vary dependingoncycle selected,temperature and
pressureof incomingwater, water hardness,sizeof load,type of
fabrics and amount of detergentused.
Specialprogramsarecustomdesignedfor specialwashneedsorspecific
typesof fabric,
Additional optionsmaybeselectedby pressingoneof the paneloption
buttons,
Maximum spin speeds of the cycles
Option Buttons
Revolutionsper Typeof
minute laundry/Extracycle
1200 Regular/Cotton
800 PermanentPress
600 Delicates
400 Wool/Handwash
600 Comforter
900 QuickFull
600 DarkColor
1200 XxtraSanitary®
1200 BabyCareT,v,
800 ActiveWearT,v,
1200 Drain& Spin
Stain Removal
The Stain Removal option is
recommended for use with heavily
soiled clothes that require the removal
of tough, ground-in, protein-based
stains. It is not recommended to use
the Stain Removal option when
laundering normal or lightly soiled
clothes.
ii!i'¸_
PermPress Cotton
QuickFull
Wooly
Handwash
Special Programs
Cold Cold
Warm Warm
Hot
Delicate
XXTRA
SANITARY
3omforter
Hot
| Drain &
| Spin
Wear
Care
Allergy Rinse
When this button is pressed, an
additional rinsing cycle will be added to
the selected cycle. The second rinse
helps to remove stubborn allergy
irritants.
ECO Action ®
This option reduces the amount of
energy consumed by up to 20%. This
option is not available for cold cycles.
22
Cycle Selection Table
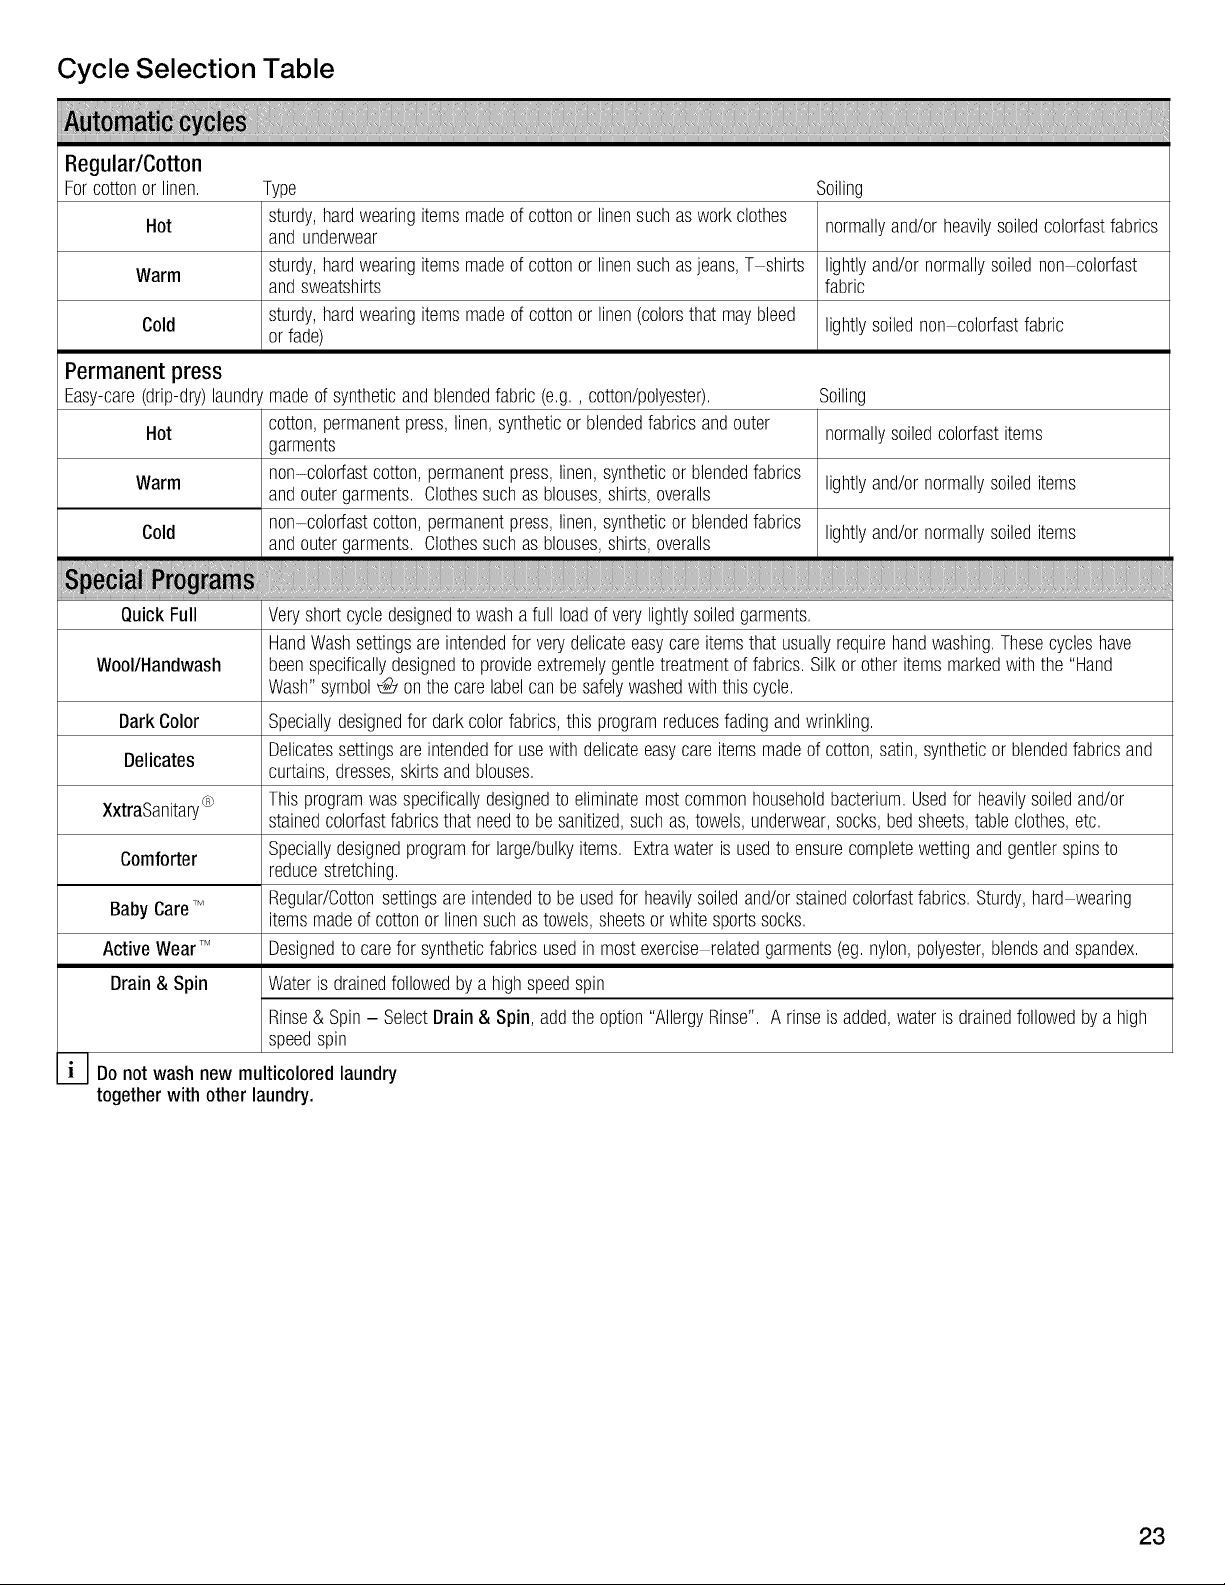
Regular/Cotton
Forcottonorlinen, Type Soiling
Hot sturdy,hardwearingitemsmadeof cottonor linensuchas workclothes normallyand/orheavilysoiledcolorfastfabrics
Warm sturdy,hardwearingitemsmadeof cottonor linensuchas jeans,T shirts lightlyand/ornormallysoilednon colorfast
Cold or fade) lightlysoilednon colorfastfabric
and underwear
andsweatshirts fabric
sturdy,hardwearingitemsmadeofcottonor linen(colorsthat maybleed
Permanent press
Easy-care(drip-dry)laundry
Hot
Warm
Cold
QuickFull Veryshortcycledesignedtowashafull loadof verylightlysoiledgarments,
Wool/Handwash beenspecificallydesignedto provideextremelygentletreatmentof fabrics,Silkorotheritemsmarkedwiththe "Hand
DarkColor Speciallydesignedfor darkcolorfabrics,this programreducesfadingandwrinkling,
Delicates
, _', Thisprogramwasspecificallydesignedto eliminatemostcommonhouseholdbacterium,Usedfor heavilysoiledand/or
XxtraSanltary® stainedcolorfastfabricsthat needto besanitized,suchas,towels,underwear,socks,bedsheets,tableclothes,etc,
madeof syntheticandblendedfabric(e,g,, cotton/polyester),
cotton,permanentpress,linen,syntheticorblendedfabricsandouter
garments
non-colorfastcotton,permanentpress,linen,syntheticor blendedfabrics
andoutergarments,Clothessuchasblouses,shirts,overalls
non-colorfastcotton,permanentpress,linen,syntheticor blendedfabrics
andoutergarments,Clothessuchasblouses,shirts,overalls
HandWashsettingsareintendedfor verydelicateeasycareitemsthatusuallyrequirehandwashing,Thesecycleshave
Wash"symbol@ onthe carelabelcanbe safelywashedwiththis cycle,
Delicatessettingsareintendedfor usewithdelicateeasycareitemsmadeofcotton,satin,syntheticor blendedfabricsand
curtains,dresses,skirtsandblouses,
Soiling
normallysoiledcolorfastitems
lightlyand/ornormallysoileditems
lightlyand/ornormallysoileditems
Comforter Speciallydesignedprogramfor large/bulkyitems, Extrawater isusedto ensurecompletewettingandgentlerspinsto
BabyCareTM itemsmadeofcottonorlinensuchastowels,sheetsor whitesportssocks,
ActiveWearTM Designedto careforsyntheticfabricsusedinmostexerciserelatedgarments(eg,nylon,polyester,blendsandspandex,
Drain& Spin Wateris drainedfollowedbya highspeedspin
i_Do not wash new multicolored laundry
together with other laundry.
reducestretching,
Regular/Cottonsettingsareintendedto be usedfor heavilysoiledand/orstainedcolorfastfabrics,Sturdy,hard wearing
Rinse& Spin- SelectDrain & Spin,addthe option"AllergyRinse".A rinseis added,waterisdrainedfollowedbyahigh
speedspin
23
LCD Menu Options and Special Features
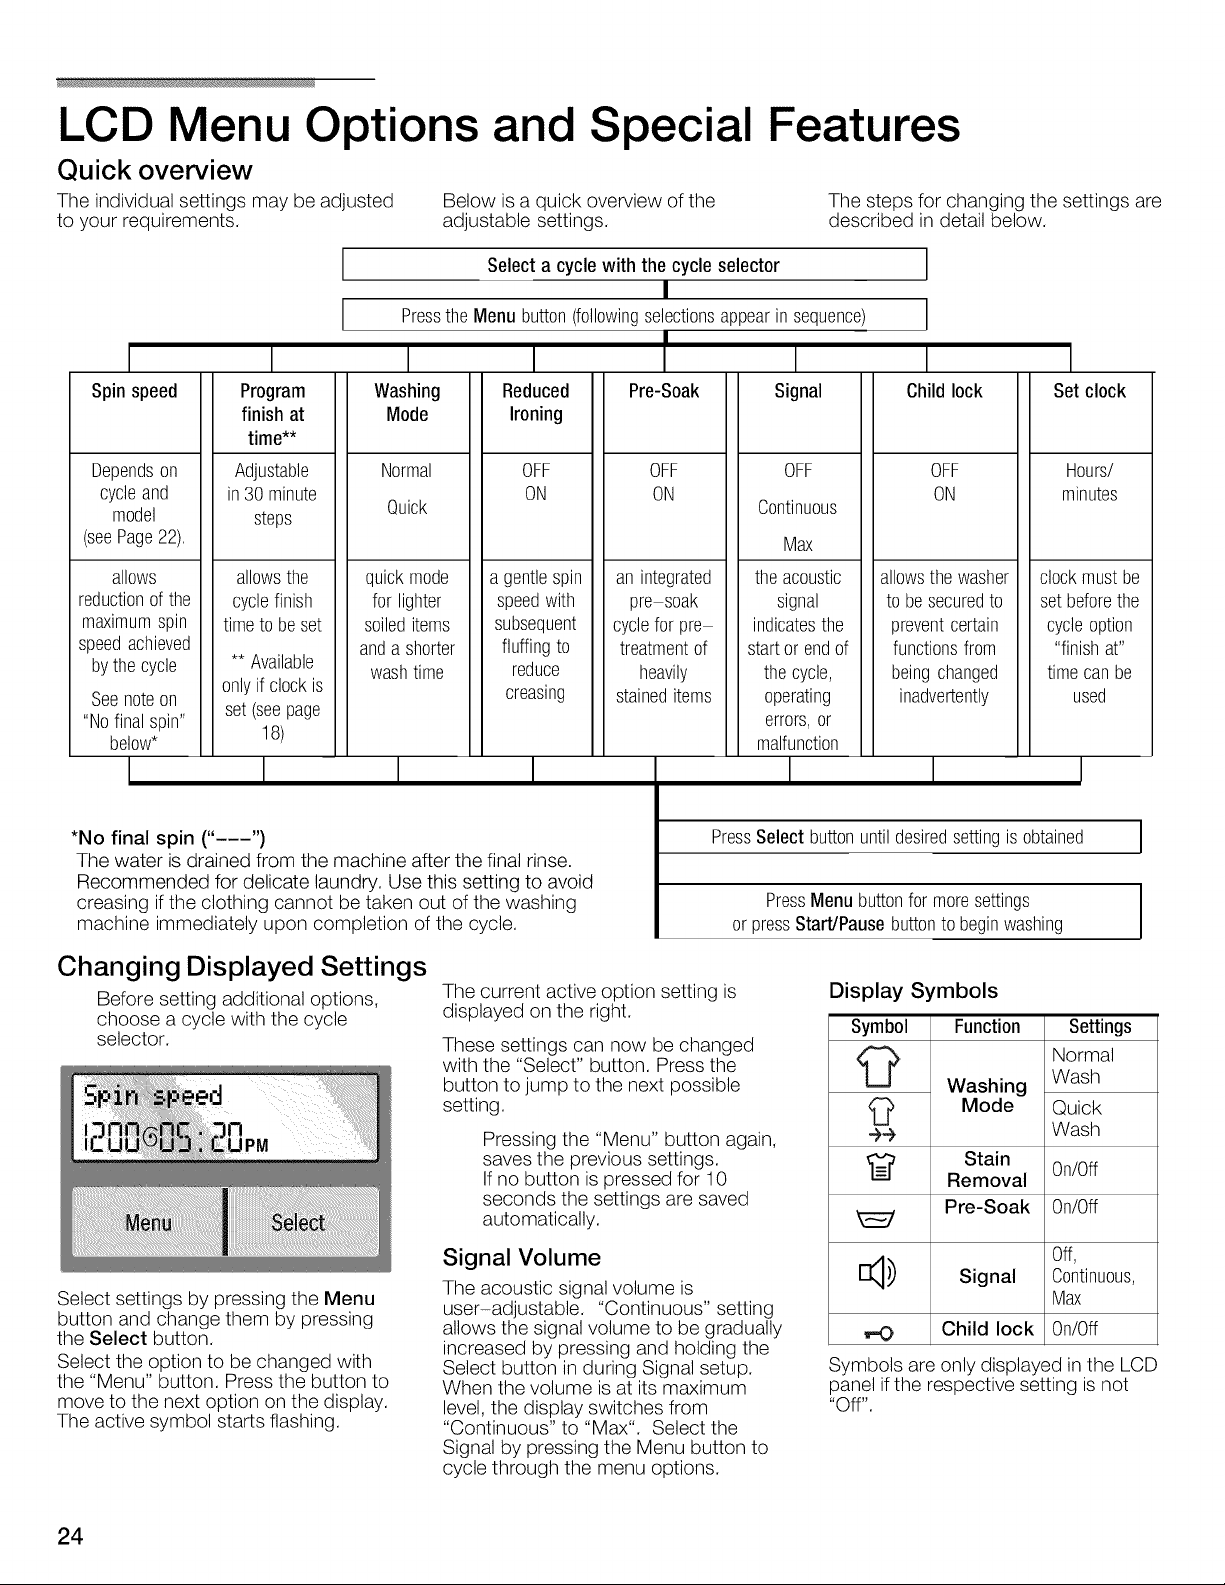
Quick overview
The individual settings may be adjusted Below is a quick overview of the The steps for changing the settings are
to your requirements, adjustable settings, described in detail below.
Select a cyclewith the cycle selector
I
Pressthe Menubutton(followingselectionsappearin sequence)
I I
Spinspeed Washing
Dependson
cycleand
model
(seePage22),
allows
reductionof the
maximumspin
speedachieved
bythe cycle
Seenoteon
"Nofinalspin"
below*
[
*No final spin ("---")
The water is drained from the machine after the final rinse.
Recommended for delicate laundry, Use this setting to avoid
creasing if the clothing cannot be taken out of the washing
machine immediately upon completion of the cycle.
I
Program
finish at
time**
Adjustable
in30minute
steps
allowsthe
cyclefinish
timeto beset
** Available
onlyif clockis
set (seepage
18)
1
Mode
Normal
Quick
quickmode
for lighter
soileditems
andashorter
washtime
I
Reduced
Ironing
OFF
ON
a gentlespin
speedwith
subsequent
fluffingto
reduce
creasing
1
r i
Pre-Soak Signal
OFF OFF
ON Continuous
an integrated
pre soak
cyclefor pre
treatmentof
heavily
staineditems
theacoustic
signal
indicatesthe
startor endof
thecycle,
operating
errors,or
malfunction
PressSelectbuttonuntildesiredsettingisobtained
PressMenu buttonfor moresettings
orpressStart/Pausebuttontobeginwashing
Max
I
I
Childlock
OFF
ON
allowsthewasher
to besecuredto
preventcertain
functionsfrom
beingchanged
inadvertently
J
I
Set clock
Hours/
minutes
clockmust be
set beforethe
cycleoption
"finishat"
timecanbe
used
I
J
1
Changing Displayed Settings
Before setting additional options,
choose a cycle with the cycle
selector.
Select settings by pressing the Menu
button and change them by pressing
the Select button.
Select the option to be changed with
the "Menu" button. Press the button to
move to the next option on the display.
The active symbol starts flashing.
24
The current active option setting is
displayed on the right.
These settings can now be changed
with the "Select" button. Press the
button to jump to the next possible
setting.
Pressing the "Menu" button again,
saves the previous settings.
If no button is pressed for 10
seconds the settings are saved
automatically.
Signal Volume
The acoustic signal volume is
user-adjustable. "Continuous" setting
allows the signal volume to be gradually
increased by pressing and holding the
Select button in during Signal setup.
When the volume is at its maximum
level, the display switches from
"Continuous" to "Max". Select the
Signal by pressing the Menu button to
cycle through the menu options.
Display Symbols
Symbol
f2
÷÷
%
I_) Signal Continuous,
Symbols are only displayed inthe LCD
panel ifthe respective setting is not
"Off".
Function
Washing
Mode
Stain
Removal
Pre-Soak 0n/0ff
Child lock 0n/0ff
Settings
Normal
Wash
Quick
Wash
0n/0ff
Off,
Max
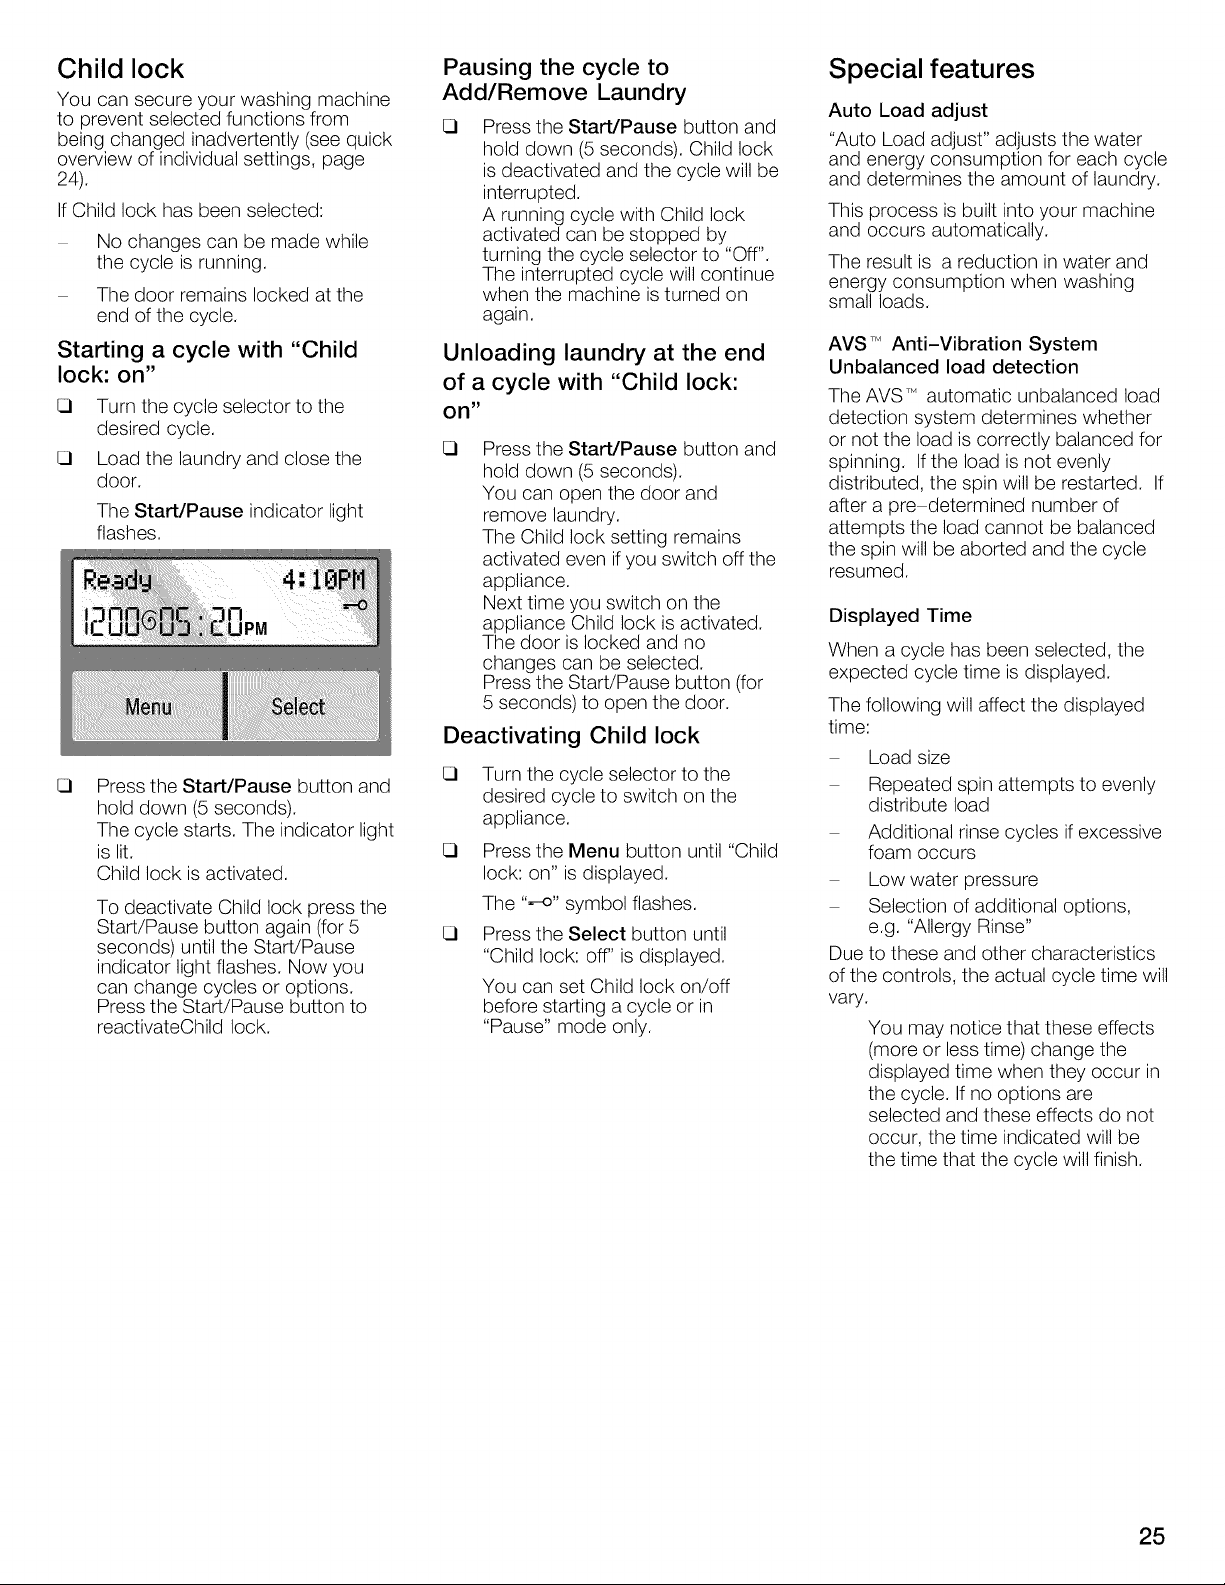
Child lock
You can secure your washing machine
to prevent selected functions from
being changed inadvertently (see quick
overview of individual settings, page
24).
If Child lock has been selected:
No changes can be made while
the cycle is running.
The door remains locked at the
end of the cycle.
Starting a cycle with "Child
lock: on"
Turn the cycle selector to the
desired cycle.
Load the laundry and close the
door.
The Start/Pause indicator light
flashes.
Press the Start/Pause button and
hold down (5 seconds).
The cycle starts. The indicator light
is lit.
Child lock is activated.
To deactivate Child lock press the
Start/Pause button again (for 5
seconds) until the Start/Pause
indicator light flashes. Now you
can change cycles or options.
Press the Start/Pause button to
reactivateChild lock.
Pausing the cycle to
Add/Remove Laundry
Press the Start/Pause button and
hold down (5 seconds). Child lock
is deactivated and the cycle will be
interrupted.
A running cycle with Child lock
activated can be stopped by
turning the cycle selector to "Off".
The interrupted cycle will continue
when the machine isturned on
again.
Unloading laundry at the end
of a cycle with "Child lock:
on"
Press the Start/Pause button and
hold down (5 seconds).
You can open the door and
remove laundry.
The Child lock setting remains
activated even if you switch off the
appliance.
Next time you switch on the
appliance Child lock is activated.
The door is locked and no
changes can be selected.
Press the Start/Pause button (for
5 seconds) to open the door.
Deactivating Child lock
Turn the cycle selector to the
desired cycle to switch on the
appliance.
Press the Menu button until "Child
lock: on" is displayed.
The ".-o" symbol flashes.
Press the Select button until
"Child lock: off" is displayed.
You can set Child lock on/off
before starting a cycle or in
"Pause" mode only.
Special features
Auto Load adjust
"Auto Load adjust" adjusts the water
and energy consumption for each cycle
and determines the amount of laundry.
This process is built into your machine
and occurs automatically.
The result is a reduction in water and
energy consumption when washing
small loads.
AVSTMAnti-Vibration System
Unbalanced load detection
The AVS TMautomatic unbalanced load
detection system determines whether
or not the load is correctly balanced for
spinning. If the load is not evenly
distributed, the spin will be restarted. If
after a pre determined number of
attempts the load cannot be balanced
the spin will be aborted and the cycle
resumed.
Displayed Time
When a cycle has been selected, the
expected cycle time is displayed.
The following will affect the displayed
time:
Load size
Repeated spin attempts to evenly
distribute load
Additional rinse cycles if excessive
foam occurs
Low water pressure
Selection of additional options,
e.g. "Allergy Rinse"
Due to these and other characteristics
of the controls, the actual cycle time will
vary.
You may notice that these effects
(more or less time) change the
displayed time when they occur in
the cycle. If no options are
selected and these effects do not
occur, the time indicated will be
the time that the cycle will finish.
25
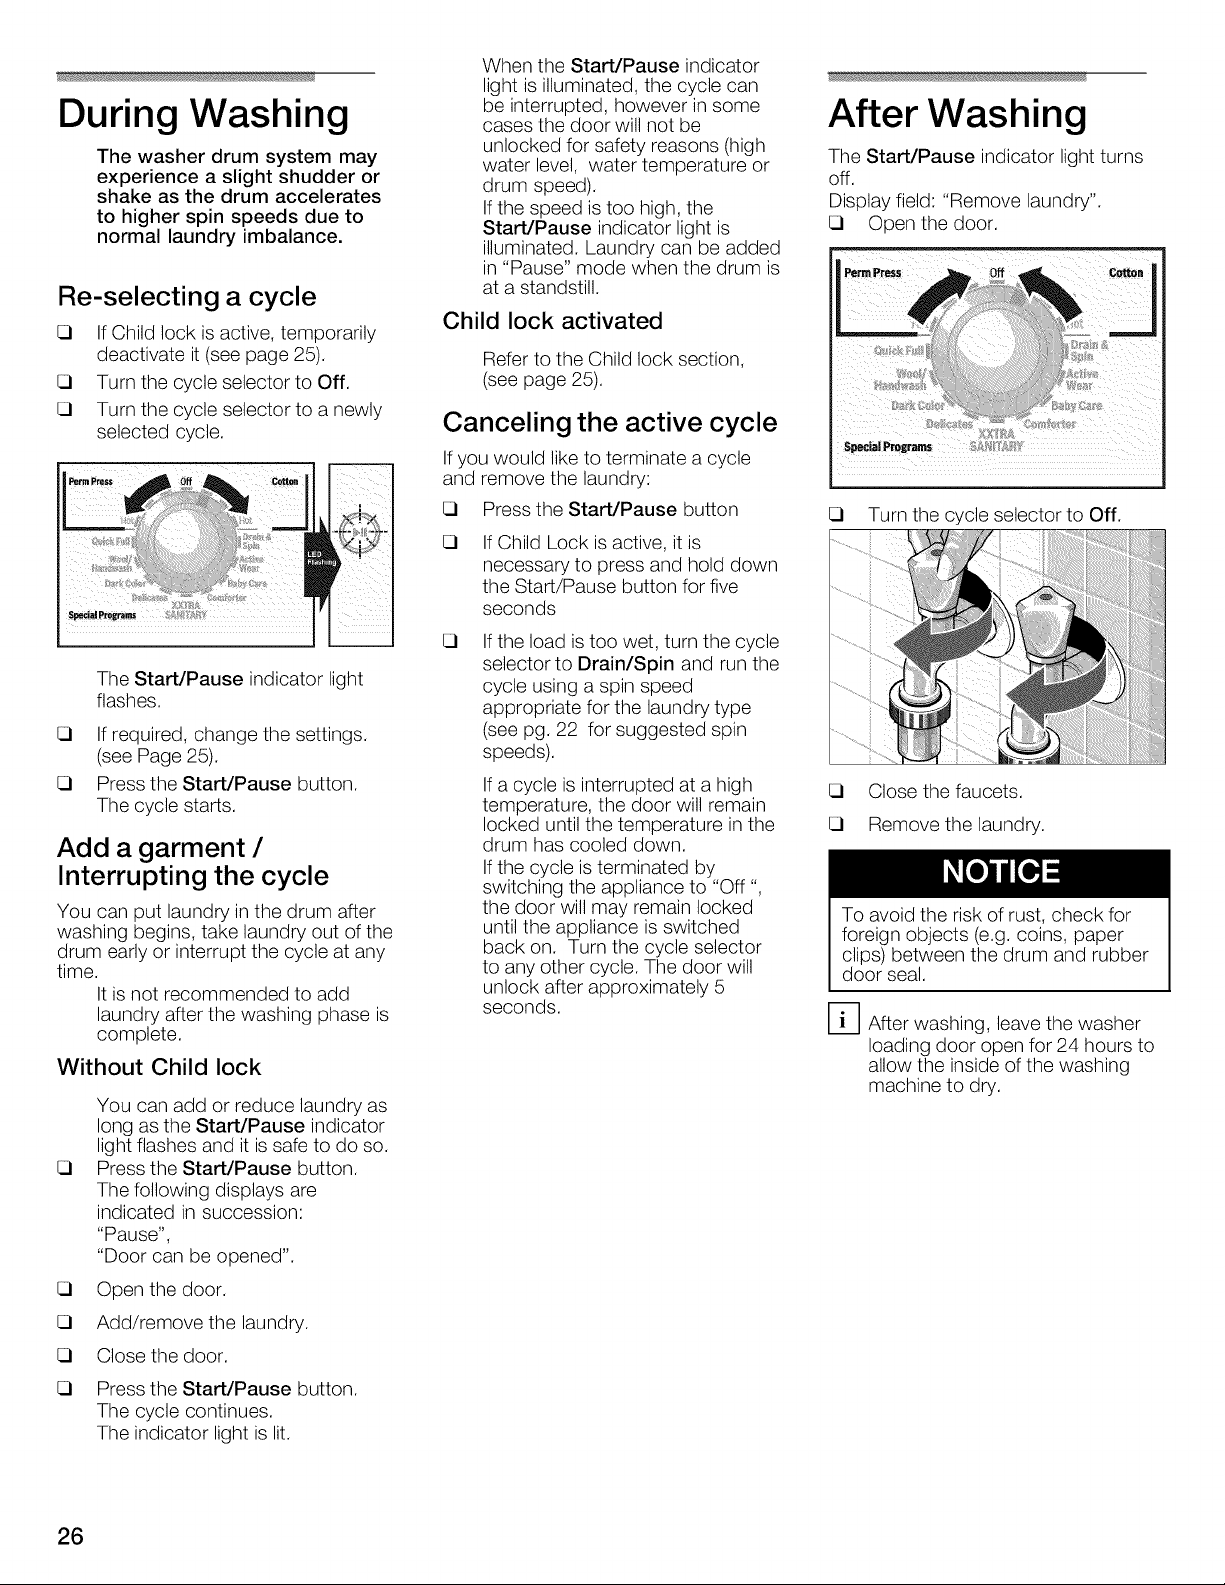
During Washing
The washer drum system may
experience a slight shudder or
shake as the drum accelerates
to higher spin speeds due to
normal laundry imbalance.
Re-selecting a cycle
If Child lock is active, temporarily
deactivate it (see page 25).
Turn the cycle selector to Off.
Turn the cycle selector to a newly
selected cycle.
:::
B
s_ P_ogr_
The Start/Pause indicator light
flashes.
If required, change the settings.
(see Page 25).
Press the Start/Pause button.
The cycle starts.
Add a garment /
Interrupting the cycle
You can put laundry in the drum after
washing begins, take laundry out of the
drum early or interrupt the cycle at any
time.
It is not recommended to add
laundry after the washing phase is
complete.
Without Child lock
You can add or reduce laundry as
long as the Start/Pause indicator
light flashes and it is safe to do so.
Press the Start/Pause button.
The following displays are
indicated in succession:
"Pause",
"Door can be opened".
Open the door.
Add/remove the laundry.
Close the door.
Press the Start/Pause button.
The cycle continues.
The indicator light is lit.
When the Start/Pause indicator
light is illuminated, the cycle can
be interrupted, however in some
cases the door will not be
unlocked for safety reasons (high
water level, water temperature or
drum speed).
If the speed is too high, the
Start/Pause indicator light is
illuminated. Laundry can be added
in "Pause" mode when the drum is
at a standstill.
Child lock activated
Refer to the Child lock section,
(see page 25).
Canceling the active cycle
If you would like to terminate a cycle
and remove the laundry:
Press the Start/Pause button
If Child Lock is active, it is
necessary to press and hold down
the Start/Pause button for five
seconds
If the load is too wet, turn the cycle
selector to Drain/Spin and run the
cycle using a spin speed
appropriate for the laundry type
(see pg. 22 for suggested spin
speeds).
If a cycle is interrupted at a high
temperature, the door will remain
locked until the temperature in the
drum has cooled down.
If the cycle is terminated by
switching the appliance to "Off ",
the door will may remain locked
until the appliance is switched
back on. Turn the cycle selector
to any other cycle. The door will
unlock after approximately 5
seconds.
After Washing
The Start/Pause indicator light turns
off.
Display field: "Remove laundry".
Open the door.
Turn the cycle selector to Off.
Close the faucets.
Remove the laundry.
To avoid the risk of rust, check for
foreign objects (e.g. coins, paper
clips) between the drum and rubber
door seal.
DAfter washing, leave the washer
loading door open for 24 hours to
allow the inside of the washing
machine to dry.
26
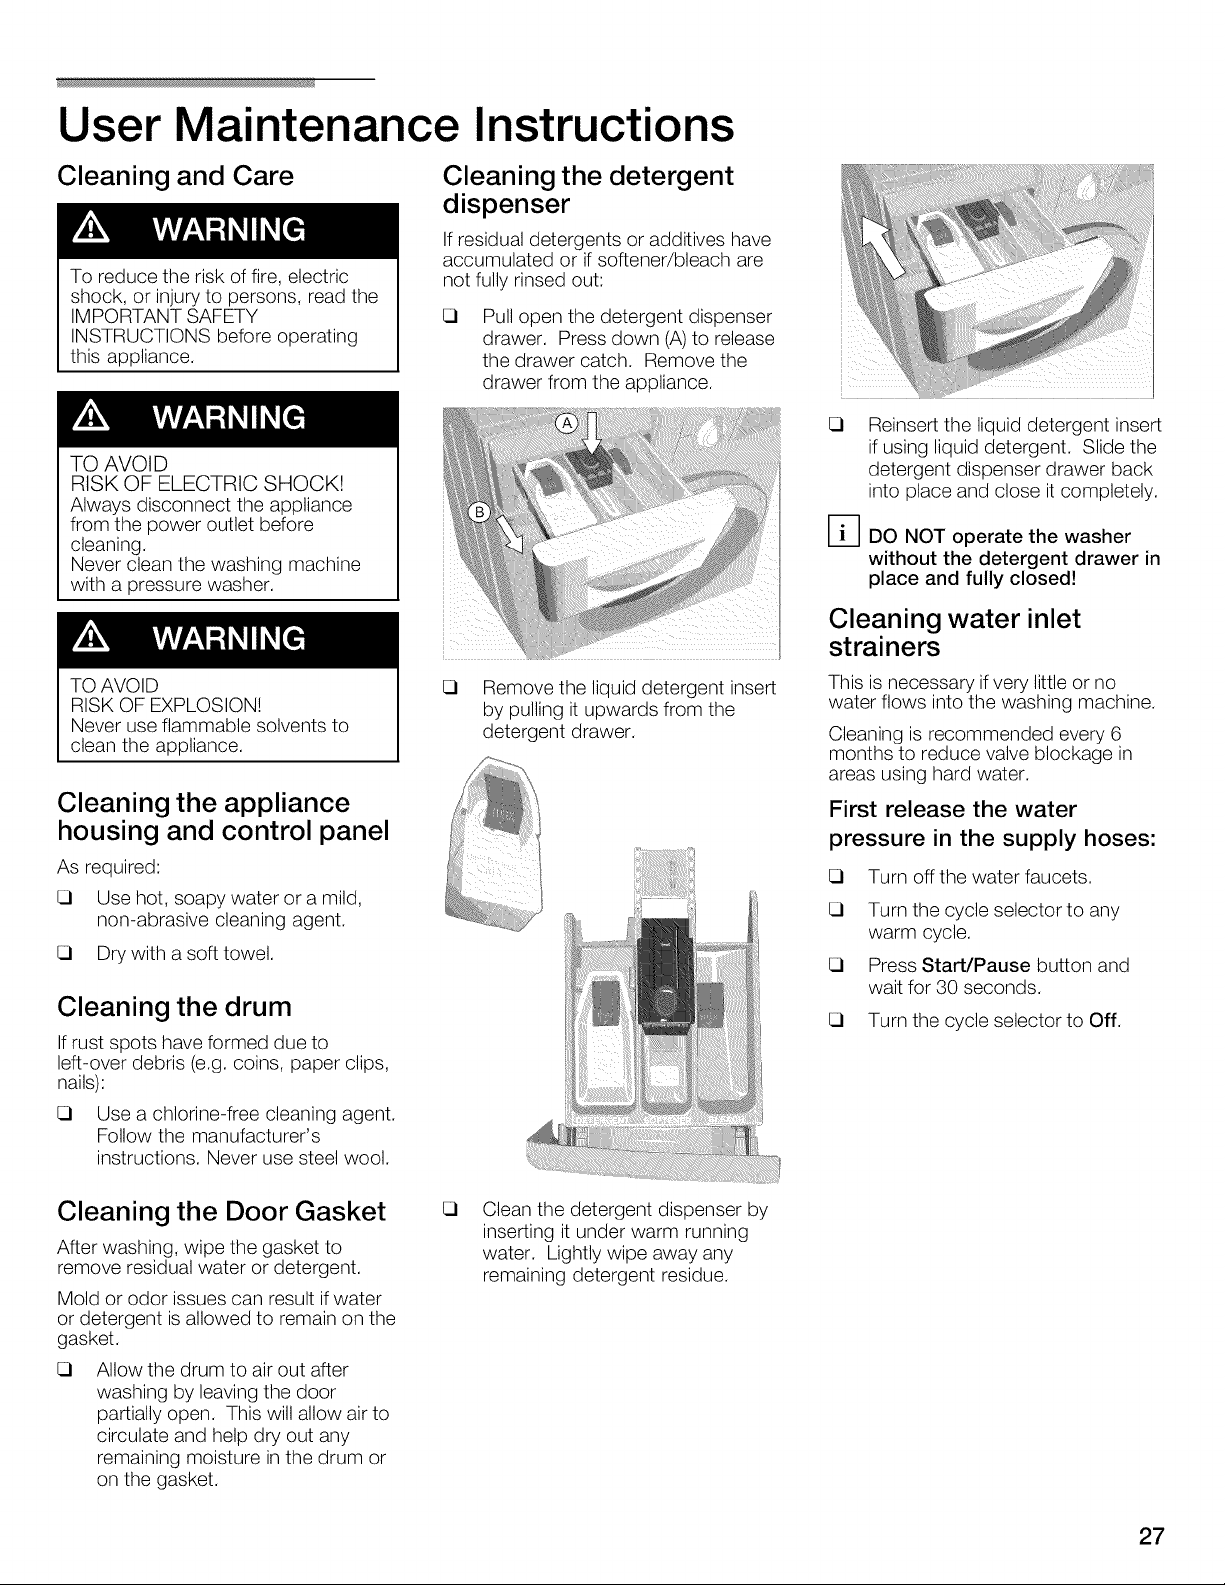
User Maintenance Instructions
Cleaning and Care
To reduce the risk of fire, electric
shock, or injury to persons, read the
IMPORTANT SAFETY
INSTRUCTIONS before operating
this appliance.
TO AVOID
RISK OF ELECTRIC SHOCK!
Always disconnect the appliance
from the power outlet before
cleaning.
Never clean the washing machine
with a pressure washer.
TO AVOID
RISK OF EXPLOSION!
Never use flammable solvents to
clean the appliance.
Cleaning the appliance
housing and control panel
As required:
Use hot, soapy water or a mild,
non-abrasive cleaning agent.
Dry with a soft towel.
Cleaning the drum
If rust spots have formed due to
left-over debris (e.g. coins, paper clips,
nails):
Use a chlorine-free cleaning agent.
Follow the manufacturer's
instructions. Never use steel wool.
Cleaning the detergent
dispenser
If residual detergents or additives have
accumulated or if softener/bleach are
not fully rinsed out:
Pull open the detergent dispenser
drawer. Press down (A)to release
the drawer catch. Remove the
drawer from the appliance.
Remove the liquid detergent insert
by pulling it upwards from the
detergent drawer.
Reinsert the liquid detergent insert
if using liquid detergent. Slide the
detergent dispenser drawer back
into place and close it completely.
D DO NOT operate the washer
without the detergent drawer in
place and fully closed!
Cleaning water inlet
strainers
This is necessary if very little or no
water flows into the washing machine.
Cleaning is recommended every 6
months to reduce valve blockage in
areas using hard water.
First release the water
pressure in the supply hoses:
Turn off the water faucets.
Turn the cycle selector to any
warm cycle.
Press Start/Pause button and
wait for 30 seconds.
Turn the cycle selector to Off.
Cleaning the Door Gasket
After washing, wipe the gasket to
remove residual water or detergent.
Mold or odor issues can result ifwater
or detergent isallowed to remain on the
gasket.
Allow the drum to air out after
washing by leaving the door
partially open. This will allow air to
circulate and help dry out any
remaining moisture in the drum or
on the gasket.
Clean the detergent dispenser by
inserting it under warm running
water. Lightly wipe away any
remaining detergent residue.
27
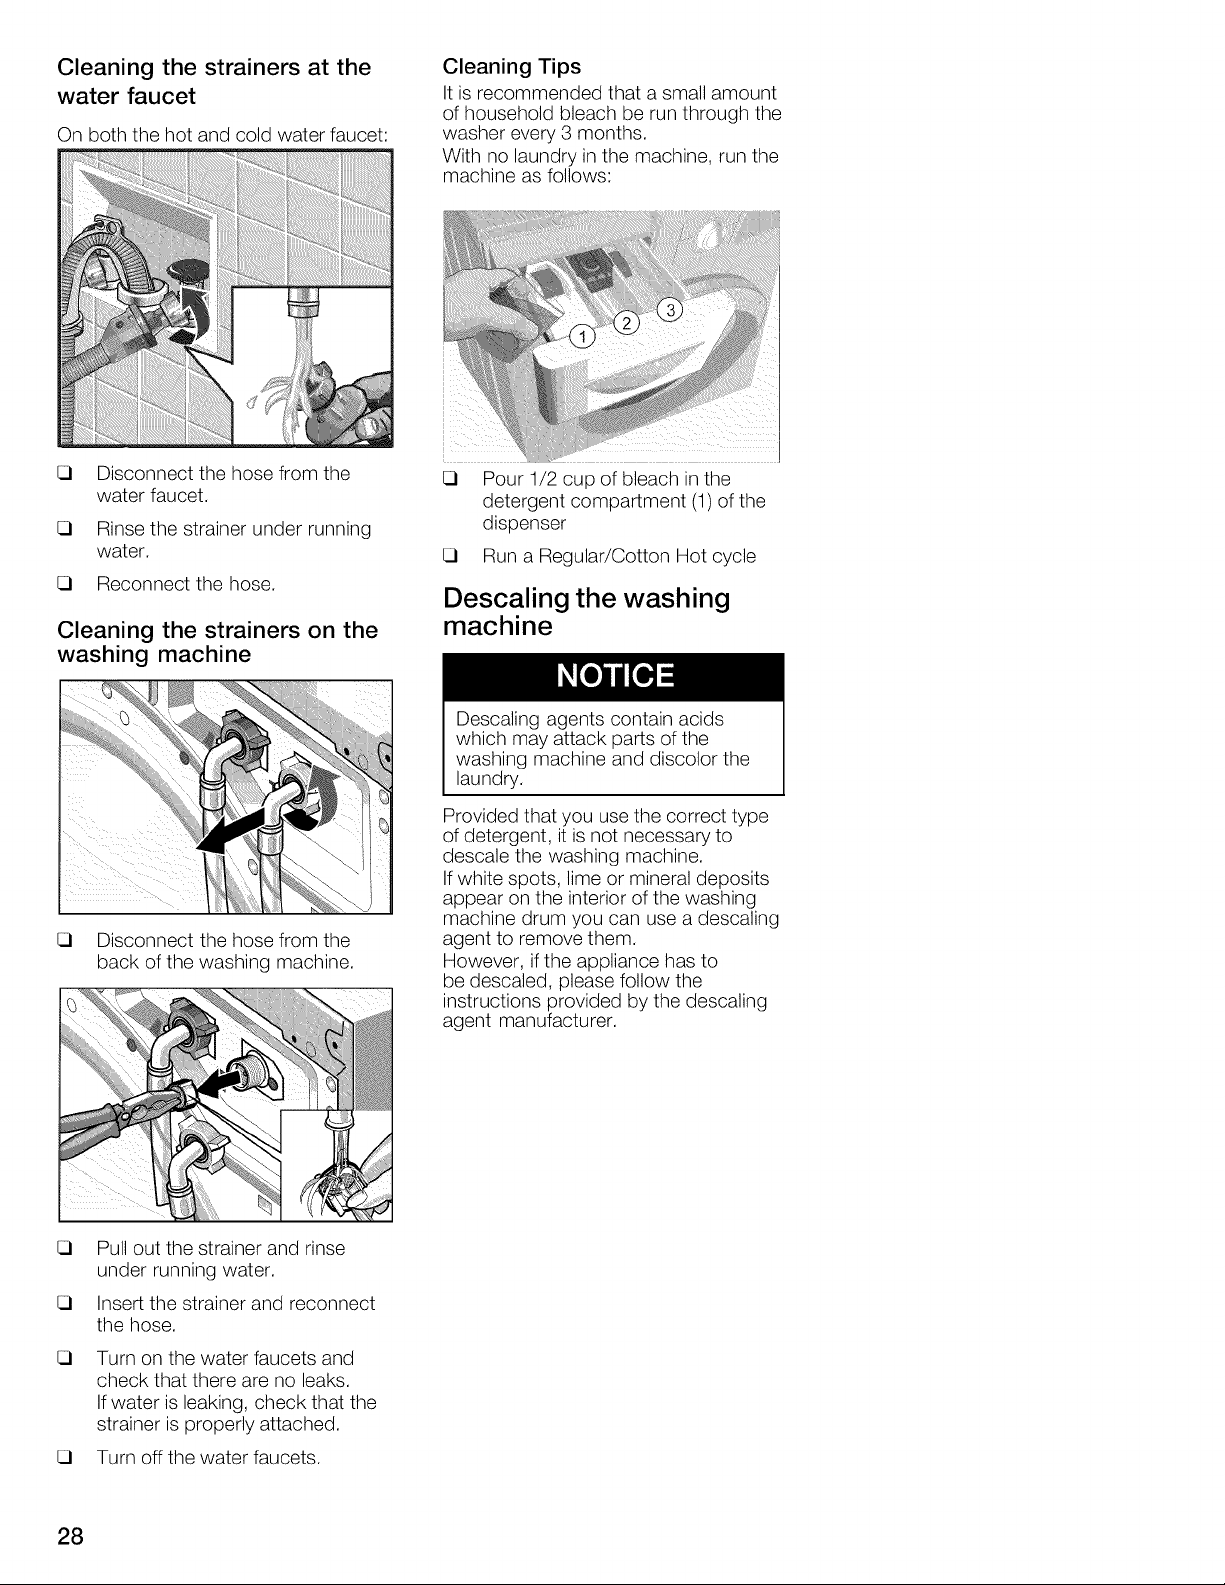
Cleaning the strainers at the
water faucet
On both the hot and cold water faucet:
Cleaning Tips
It is recommended that a small amount
of household bleach be run through the
washer every 3 months.
With no laundry in the machine, run the
machine as follows:
Disconnect the hose from the
water faucet.
Rinse the strainer under running
water.
Reconnect the hose.
Cleaning the strainers on the
washing machine
Disconnect the hose from the
back of the washing machine.
Pour 1/2 cup of bleach inthe
detergent compartment (1) of the
dispenser
Run a Regular/Cotton Hot cycle
Descaling the washing
machine
Descaling agents contain acids
which may attack parts of the
washing machine and discolor the
laundry.
Provided that you use the correct type
of detergent, it is not necessary to
descale the washing machine.
If white spots, lime or mineral deposits
appear on the interior of the washing
machine drum you can use a descaling
agent to remove them.
However, ifthe appliance has to
be descaled, please follow the
instructions provided by the descaling
agent manufacturer.
Pull out the strainer and rinse
under running water.
Insert the strainer and reconnect
the hose.
Turn on the water faucets and
check that there are no leaks.
If water is leaking, check that the
strainer is properly attached.
Turn off the water faucets.
28
Troubleshootin
of Minor Faults
TO AVOID
RISK OF ELECTRIC SHOCK!
Repairs should only be carried out
by an authorized technician.
If repairs are necessary, and you
cannot eliminate the fault yourself with
the aid of the table below, follow these
steps:
1. Turn the cycle selector to Off.
2. Disconnect the washing machine
from the power outlet.
3. Turn off the water faucets.
4. Call Customer Service
(referto Page 32).
Troubleshooting items listed below may
not be covered by warranty service!
Please carefully rule out any of these
issues before calling for service.
Fault Possible cause Action
Cycledurationextended. Thisisnotafault. Addamoreappropriateamountof detergent.
Thesudsdetectionfeaturehasactivatedanadditional
rinsingcycleto reducetheamountofsuds.
Thedoorcannotbe
opened.
Doorcannotbeopened,
eventhoughtheappliance
hasbeenswitchedoff and
on again.
Cyclecontinuesrunning,
eventhoughtheappliance
hasbeenswitchedoff and
on again.
Appliancecannotbe
operated."Childlock
activated"as indicatedin
thedisplayfield.
Controllightsdo notlight
up,
Cycledoesnot start.
Start/Pauseindicatorlight
flashes,
Cycledoesnot start,
"CheckDoor!" indicatedin
thedisplayfield,
Thisisnotafault.
Theunbalancecompensationsystemis attemptingto
balancethe loadthroughrepeatedspins.
Thisis notafault.
Thelaundryloadmaybelarge,requiringmoretime.
Childlockactivated.
Powerfailure.
Cycleisrunningand/orthedoorislockedfor safety
reasons.
Plugis looseor notinserted.
Cycleselectorturnedto Off beforeendof cycle.
Childlockactivated.
Forsafetyreasonsthedoorhasbeenlockedbecausethe
waterlevel,temperatureor highdrumspeed.
Childlockactivated.
Childlockactivated.
A fusehasblown.
Powerfailure.
Start/Pausebuttonnotpressed.
Doornotclosedproperly. Checkwhetherlaundryistrappedin door.
Alwaysloadthe drumwith largeand smallitems
together.
Allowadditionalwashingtimefor largerloads.
Deactivatechildlock;(seePage25)
An interruptedcyclewill beresumedwhenpoweris
restored.If the laundryisto be removedduringapower
failure,call CustomerService(referto Page32).
Waituntilthecycleends (seePage26).
Eliminatethe cause.
Selecta cycle.
Deactivatechildlock(seePage25).
See"Addingtothe laundry/Interruptingthecycle",Page
26.
Deactivatechildlock(seePage25).
Deactivatechildlock(seePage25).
Resetcircuitbreaker.
CallCustomerServiceif thisfaultrecurs.
An interruptedcyclewill beresumedwhenpoweris
restored.If the laundryisto beremovedduringa power
failure,call CustomerService (seepage32).
Pressthe Start/Pausebutton.
Closethe door(aclick shouldbe heard).
cyclecontinues.
29
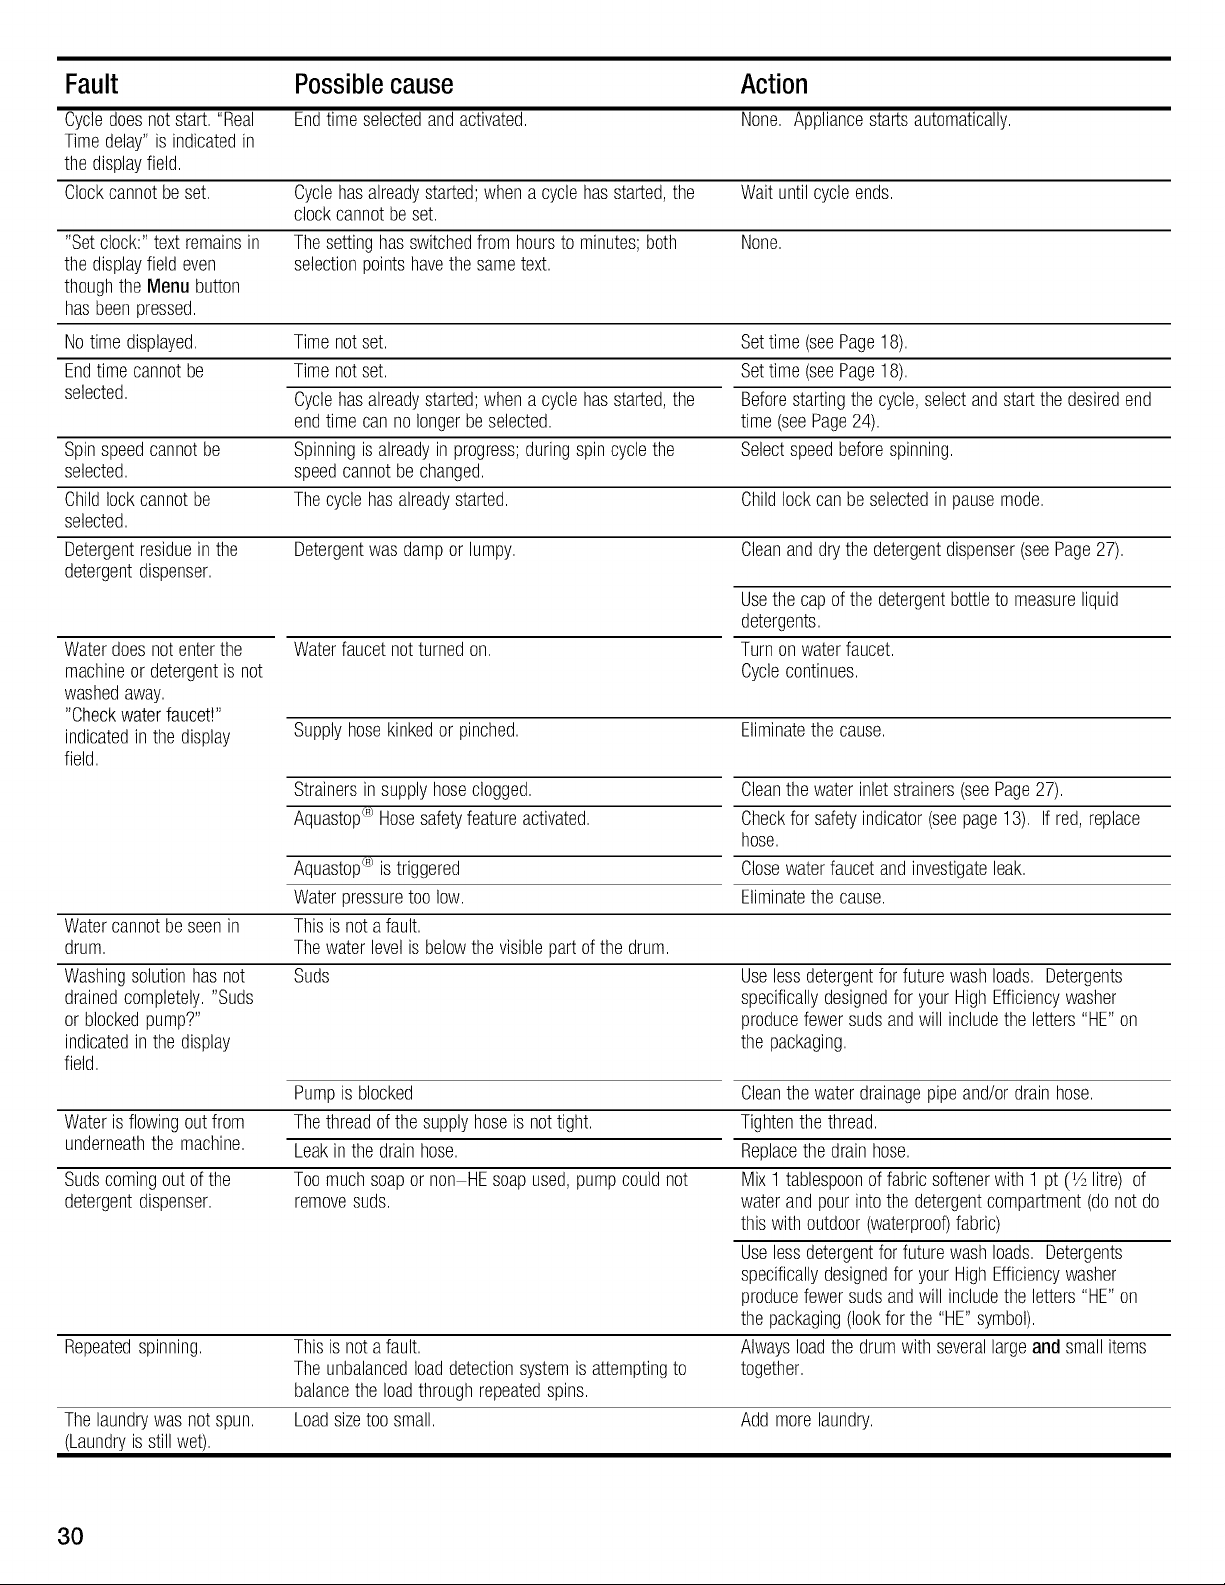
Fault Possible cause Action
Cycledoesnotstart,"Real Endtimeselectedandactivated, None, Appliancestartsautomatically,
Timedelay"isindicatedin
thedisplayfield,
Clockcannotbeset, Cyclehasalreadystarted;whenacyclehasstarted,the Waituntilcycleends,
clockcannotbeset,
"Setclock:"textremainsin Thesettinghasswitchedfrom hourstominutes;both None,
thedisplayfieldeven selectionpointshavethesametext,
thoughtheMenubutton
hasbeenpressed,
Notime displayed, Timenotset, Settime(seePage18),
Endtimecannotbe Timenotset, Settime(seePage18),
selected, Cyclehasalreadystarted;whenacyclehasstarted,the Beforestartingthecycle,selectandstartthedesiredend
endtime cannolongerbeselected, time(seePage24),
Spinspeedcannotbe
selected,
Childlockcannotbe
selected,
Detergentresidueinthe
detergentdispenser,
Waterdoesnotenterthe
machineor detergentisnot
washedaway,
"Checkwaterfaucet!"
indicatedin thedisplay
field,
Watercannotbeseenin
drum,
Washingsolutionhasnot
drainedcompletely,"Suds
or blockedpump?"
indicatedin thedisplay
field,
Waterisflowingoutfrom
underneaththe machine,
Sudscomingoutofthe
detergentdispenser,
Repeatedspinning, Thisisnotafault,
Thelaundrywasnotspun, Loadsizetoosmall, Addmorelaundry,
(Laundryisstillwet),
Spinningis alreadyinprogress;duringspincyclethe Selectspeedbeforespinning,
speedcannotbechanged,
Thecycle hasalreadystarted,
Detergentwasdampor lumpy, Cleananddrythedetergentdispenser(seePage27),
Waterfaucetnotturnedon,
Supplyhosekinkedor pinched,
Strainersin supplyhoseclogged,
Aquastop<_Hosesafetyfeatureactivated,
Aquastop<_istriggered
Waterpressuretoo low,
Thisisnotafault,
Thewaterlevelisbelowthevisiblepartofthe drum,
Suds
Pumpis blocked
Thethreadofthesupplyhoseis nottight,
Leakinthedrainhose,
Toomuchsoapor non HEsoapused,pumpcouldnot
removesuds,
Theunbalancedloaddetectionsystemisattemptingto
balancethe loadthroughrepeatedspins,
Childlockcan beselectedinpausemode,
Usethe capofthedetergentbottletomeasureliquid
detergents,
Turnonwaterfaucet,
Cyclecontinues,
Eliminatethe cause,
Cleanthewaterinletstrainers(seePage27),
Checkfor safetyindicator(seepage13), Ifred,replace
hose,
Closewaterfaucetandinvestigateleak,
Eliminatethe cause,
Uselessdetergentfor futurewashloads, Detergents
specificallydesignedfor yourHighEfficiencywasher
producefewersudsandwill includethe letters"HE"on
thepackaging,
Cleanthe waterdrainagepipeand/or drainhose,
Tightenthe thread,
Replacethe drainhose,
Mix1tablespoonof fabricsoftenerwith1 pt(]A litre)of
waterandpourintothe detergentcompartment(donotdo
thiswithoutdoor(waterproof)fabric)
Uselessdetergentfor futurewashloads, Detergents
specificallydesignedfor yourHighEfficiencywasher
producefewersudsandwill includetheletters"HE"on
thepackaging(lookforthe "HE"symbol),
Alwaysloadthedrumwith severallargeandsmallitems
together,
3O
 Loading...