


Bosch SMU88TW06S, SMU88TS06S Instructions for Use

Dishwasher
SM... SB...
[en] User manual
Register your
new device on
MyBosch now and
get free benefits:
bosch-home.com/
welcome

en
Table of contents
Safety...............................................4
General information..........................4
Intended use.....................................4
Restriction on user group.................4
Safe installation ................................5
Safe use ...........................................6
Damaged appliance .........................8
Risk to children ................................9
Safety systems ...............................10
Preventing material damage ........11
Safe installation ..............................11
Safe use .........................................11
Childproof lock1............................12
Door lock........................................12
Environmental protection and
saving energy................................13
Disposing of packaging .................13
Saving energy.................................13
Zeolith drying ............................13
AquaSensor1...................................13
Sensors ..........................................14
Installation and connection..........14
Scope of supply .............................14
Installing and connecting the ap-
pliance ............................................14
Drainage connection ......................15
Drinking water connection .............15
Electrical connection ......................15
Familiarising yourself with
your appliance...............................17
Appliance .......................................17
Controls ..........................................18
Programmes ..................................21
Information for test institutes ..........23
Additional functions .....................23
Features.........................................24
Top basket .....................................25
Bottom basket ................................26
Cutlery basket ................................27
Cutlery drawer ................................27
Etagere ...........................................28
Folding prongs ...............................28
Small items holder .........................29
Knife shelf.......................................29
Baking sheet spray head ...............29
Basket heights................................30
Before using for the first time ......31
Performing initial start-up ...............31
Water softening system................31
Overview of water hardness set-
tings................................................31
Setting water softening system ......32
Special salt .....................................32
Switching off water softening
system ............................................33
Regeneration of the water
softening system ............................33
Rinse aid system...........................34
Rinse aid ........................................34
Setting the amount of rinse aid......35
Switching rinse aid system off .......35
Detergent .......................................35
Suitable detergents ........................35
Unsuitable detergents ....................36
Information on detergents ..............36
Adding detergent ...........................37
Tableware ......................................38
Damage to glass and tableware ....38
Arrange tableware ..........................39
Removing tableware.......................40
1
Depending on the appliance specifications
2

en
Basic operation .............................40
Opening appliance door ................40
Switching on the appliance ............40
Setting a programme .....................40
Setting additional functions ............40
Setting timer programming ............41
Starting the programme .................41
Interrupting programme .................41
Terminate programme....................41
Display programme information.....41
Switching off appliance ..................41
Basic settings................................43
Overview of basic settings .............43
Changing basic settings.................45
Setting the time ..............................46
HomeConnect ..............................46
Installing app ..................................46
Automatically connecting appliance to WLAN home network
(Wi-Fi) .............................................47
Connecting appliance to WLAN
home network (Wi-Fi) manually......47
HomeConnect settings..................48
Remote start ...............................48
Remote Diagnostics ......................48
Energy manager ........................49
Data protection...............................49
Declaration of Conformity...............50
Error code / Fault display / Sig-
nal...................................................54
Washing results..............................56
Home Connect problem.................63
Information on display panel..........63
Malfunctions ...................................64
Mechanical damage.......................65
Noise ..............................................65
Clean wastewater pump.................66
Transportation, storage and
disposal .........................................66
Removing the appliance ................66
Protect appliance from frost...........67
Transporting the appliance ............67
Disposing of old appliance ............67
Customer Service..........................67
Product number (E-Nr.) and pro-
duction number (FD) ......................68
AQUA-STOP guarantee1.................68
Technical specifications...............68
Cleaning and servicing.................50
Cleaning the tub .............................50
Self-cleaning interior1......................51
Cleaning products ..........................51
Tips on appliance care...................51
Machine Care 1...........................51
Filter system ...................................52
Cleaning spray arms ......................53
Troubleshooting............................54
Appliance safety.............................54
1
Depending on the appliance specifications
3

en Safety
Safety
Please read the safety information to ensure that you use the appliance safely.
General information
¡ Read this instruction manual carefully. Only this will ensure you
use the appliance safely and efficiently.
¡ Keep the instruction manual and the product information safe
for future reference or for the next owner.
¡ Check the appliance after unpacking it. Do not connect the ap-
pliance if it has been damaged in transit.
Intended use
Read the information on intended use to ensure that you use the
appliance correctly and safely.
Only use this appliance:
¡ For cleaning household tableware.
¡ In private households and in enclosed spaces in a domestic en-
vironment.
¡ Up to an altitude of max. 2500m above sea level.
Restriction on user group
Avoid risks to children and vulnerable persons.
This appliance may be used by children aged 8 or over and by
people who have reduced physical, sensory or mental abilities or
inadequate experience and/or knowledge, provided that they are
supervised or have been instructed on how to use the appliance
safely and have understood the resulting dangers.
Children must not play with the appliance.
Cleaning and user maintenance must not be performed by children unless they are being supervised.
Keep children under the age of 8 years away from the appliance
and power cable.
4

Safety en
Safe installation
Follow these safety instructions when installing the appliance.
WARNING‒Risk of injury!
Improper installation may cause injury.
▶
When installing and connecting the appliance, follow the instructions in the manual and installation instructions.
WARNING‒Risk of electric shock!
¡ Improper installation is dangerous.
▶
Connect and operate the appliance only in accordance with
the specifications on the rating plate.
▶
Connect the appliance to a power supply with alternating
current only via a properly installed socket with earthing.
▶
The protective conductor system of the domestic electrical
installation must be properly installed.
▶
Never equip the appliance with an external switching
device, e.g. a timer or remote control.
▶
When the appliance is installed, the mains plug of the
power cord must be freely accessible. If free access is not
possible, an all-pole isolating switch must be installed in the
permanent electrical installation according to the installation
regulations.
▶
When installing the appliance, check that the power cable is
not trapped or damaged.
¡ Cutting through the supply hose or immersing the Aqua-Stop
valve in water is dangerous.
▶
Never immerse the plastic housing in water. The plastic
housing on the supply hose contains an electric valve.
▶
Never cut through the supply hose. The supply hose contains electric power cables.
WARNING‒Risk of fire!
It is dangerous to use an extended power cord and non-approved adapters.
▶
Do not use extension cables or multiple socket strips.
▶
If the power cord is too short, contact Customer Service.
5

en Safety
▶
Only use adapters approved by the manufacturer.
WARNING‒Risk of injury!
Hinges move when opening and closing the appliance door
and can cause injury.
▶
If built-under or integrable appliances are not in a cavity so
that one side is accessible, the hinge area must be covered
at the side. Covers are available from Customer Service or
specialist outlets.
WARNING‒Risk of tipping!
Improper installation may cause the appliance to tip up.
▶
Only install built-under or integrable appliances under a
continuous worktop that is securely connected to adjacent
cabinets.
WARNING‒Risk of burns!
If the appliance is not installed properly, this may result in
burns.
▶
With free-standing appliances, ensure that they are installed
with the back panel against a wall.
Safe use
WARNING‒Risk of serious harm to health!
Failure to comply with safety instructions and directions for
use on packagings of detergent and rinse aid products may
cause serious harm to health.
▶
Follow the safety instructions and directions for use on the
packagings of detergent and rinse aid products.
WARNING‒Risk of explosion!
¡ Adding solvents to the interior of the appliance may cause ex-
plosions.
▶
Never add solvents to the interior of the appliance.
6

Safety en
¡ Highly caustic alkaline or highly acidic cleaning agents in con-
junction with aluminium parts in the interior of the appliance
may cause explosions.
▶
Never use highly caustic alkaline or highly acidic cleaning
agents, in particular commercial or industrial products, in
conjunction with aluminium parts (e.g. grease filters of extractor hoods or aluminium pans), e.g. for the Machine Care
programme.
WARNING‒Risk of injury!
¡ Leaving the appliance door open may result in injury.
▶
Only open the appliance door to load or unload tableware
in order to prevent accidents, e.g. through tripping.
▶
Do not sit or stand on the appliance door when open.
¡ Knives and utensils with sharp points can cause injuries.
▶
Arrange knives and utensils with sharp points in the cutlery
basket with the points downwards, on the knife shelf or in
the cutlery drawer.
WARNING‒Risk of scalding!
If you open the appliance door while the programme is running, hot water may splash out of the appliance.
▶
Open the appliance door carefully if the programme is still
running.
WARNING‒Risk of tipping!
Overfilling the Baskets may cause the appliance to tip up.
▶
Never overfill the Baskets with free-standing appliances.
WARNING‒Risk of electric shock!
¡ An ingress of moisture can cause an electric shock.
▶
Only use the appliance in enclosed spaces.
▶
Never expose the appliance to intense heat or humidity.
▶
Do not use steam- or high-pressure cleaners to clean the
appliance.
7

en Safety
¡ If the insulation of the power cord is damaged, this is danger-
ous.
▶
Never let the power cord come into contact with hot appliance parts or heat sources.
▶
Never let the power cord come into contact with sharp
points or edges.
▶
Never kink, crush or modify the power cord.
WARNING‒Risk of burns!
The blow opening of the Zeolith container becomes hot and
can cause burns.
▶
Never touch the blow opening of the Zeolith container.
Damaged appliance
Follow the safety instructions if the appliance is damaged.
WARNING‒Risk of electric shock!
¡ If the appliance or the power cord is damaged, this is danger-
ous.
▶
Never operate a damaged appliance.
▶
Never operate an appliance with a cracked or fractured surface.
▶
Never pull on the power cord to unplug the appliance. Always unplug the appliance at the mains.
▶
If the appliance or the power cord is damaged, immediately
unplug the power cord or switch off the fuse in the fuse box
and turn off the water tap.
▶
"Call Customer Service." →Page67
▶
Repairs to the appliance should only be carried out by
trained specialist staff.
¡ Incorrect repairs are dangerous.
▶
Repairs to the appliance should only be carried out by
trained specialist staff.
▶
Only use genuine spare parts when repairing the appliance.
▶
If the power cord of this appliance is damaged, it must be
replaced with a special connection cable, which is available
from the manufacturer or his Customer Service.
8

Safety en
Risk to children
Follow the safety instructions if there are children in your home.
WARNING‒Risk of suffocation!
¡ Children may put packaging material over their heads or wrap
themselves up in it and suffocate.
▶
Keep packaging material away from children.
▶
Do not let children play with packaging material.
¡ Children may breathe in or swallow small parts, causing them
to suffocate.
▶
Keep small parts away from children.
▶
Do not let children play with small parts.
WARNING‒Risk of harm to health!
Children can lock themselves in the appliance, thereby putting
their lives at risk.
▶
With redundant appliances, unplug the power cord. Then
cut through the cord and damage the lock on the appliance
door beyond repair so that the appliance door will no longer
close.
WARNING‒Risk of crushing!
With higher-level appliances, children can become crushed
between the appliance door and cabinet doors underneath.
▶
Keep an eye on children when opening and closing the appliance door.
WARNING‒Risk of chemical burns!
Rinse aid and detergent may cause chemical burns to the
mouth, throat and eyes.
▶
Keep children away from detergent and rinse aid products.
▶
Keep children away from the appliance when open. The water in the interior of the dishwasher is not drinking water. It
may contain residues of detergents and rinse aid.
9

en Safety
WARNING‒Risk of injury!
Children may get their fingers caught in the slots of the tablet
collecting tray and injure themselves.
▶
Keep children away from the appliance when open.
WARNING‒Risk of suffocation!
Children may become trapped in the appliance and suffocate.
▶
Use the childproof lock if fitted.
▶
Never let children play with or operate the appliance.
Safety systems
Protect children from possible hazards resulting from the appliance.
Depending on the features of the model, the appliance comes
with a
→"Childproof lock", Page12.
10

Preventing material damage en
Preventing material damage
Preventing material damage
Preventing material damage
Safe installation
Follow the instructions when installing
the appliance.
ATTENTION!
¡ Improper installation of the appli-
ance may cause damage.
▶
If the dishwasher is installed
above or below other domestic
appliances, follow the information on installation in combination with a dishwasher in the installation instructions for the individual appliances.
▶
If there is no information or if the
installation instructions do not include the relevant information,
contact the manufacturer of
these appliances to check that
the dishwasher can be installed
above or below these appliances.
▶
If no information is available
from the manufacturer, the dishwasher should not be installed
above or below such appliances.
▶
To ensure the safe operation of
all domestic appliances, continue following the installation instructions for the dishwasher.
▶
Do not install the dishwasher under a hob.
▶
Do not install the dishwasher
near heat sources, e.g. radiators, heat storage tanks, ovens
or other appliances that generate heat.
¡ Modified or damaged water hoses
may result in material damage and
damage to the appliance.
▶
Never kink, crush, modify or cut
through water hoses.
▶
Only use the water hoses supplied with the appliance or genuine spare hoses.
▶
Never re-use water hoses that
have been used before.
¡ If the water pressure is too high or
too low, this may impair functioning of the appliance.
▶
Make sure that the water pressure in the water supply system
is min. 50kPa (0,5bar) and
max. 1000kPa (10bar).
▶
If the water pressure exceeds
the maximum value specified, a
pressure-reducing valve must be
installed between the drinking
water connection and the hose
set of the appliance.
Safe use
Follow the instructions when using
the appliance.
ATTENTION!
¡ Escaping water vapour can dam-
age fitted units.
▶
When the programme ends,
leave the appliance to cool
down for a while before opening
the door.
¡ Special salt can damage the tub
due to corrosion.
▶
To make sure that any special
salt that escapes is washed out
of the tub, add the special salt
to the dispenser for special salt
immediately before the programme starts.
¡ Detergent may damage the water
softening system.
▶
Only fill the dispenser of the water softening system with special
dishwasher salt.
¡ Unsuitable cleaning agents may
damage the appliance.
▶
Do not use a steam cleaner.
11
en Childproof lock
1
2
1
2
▶
So as not to scratch the finish
on the appliance, do not use
sponges with a rough surface or
abrasive cleaning agents.
▶
To prevent corrosion, do not use
sponge cloths on dishwashers
with a stainless steel front or
rinse such cloths thoroughly
several times before using them
for the first time.
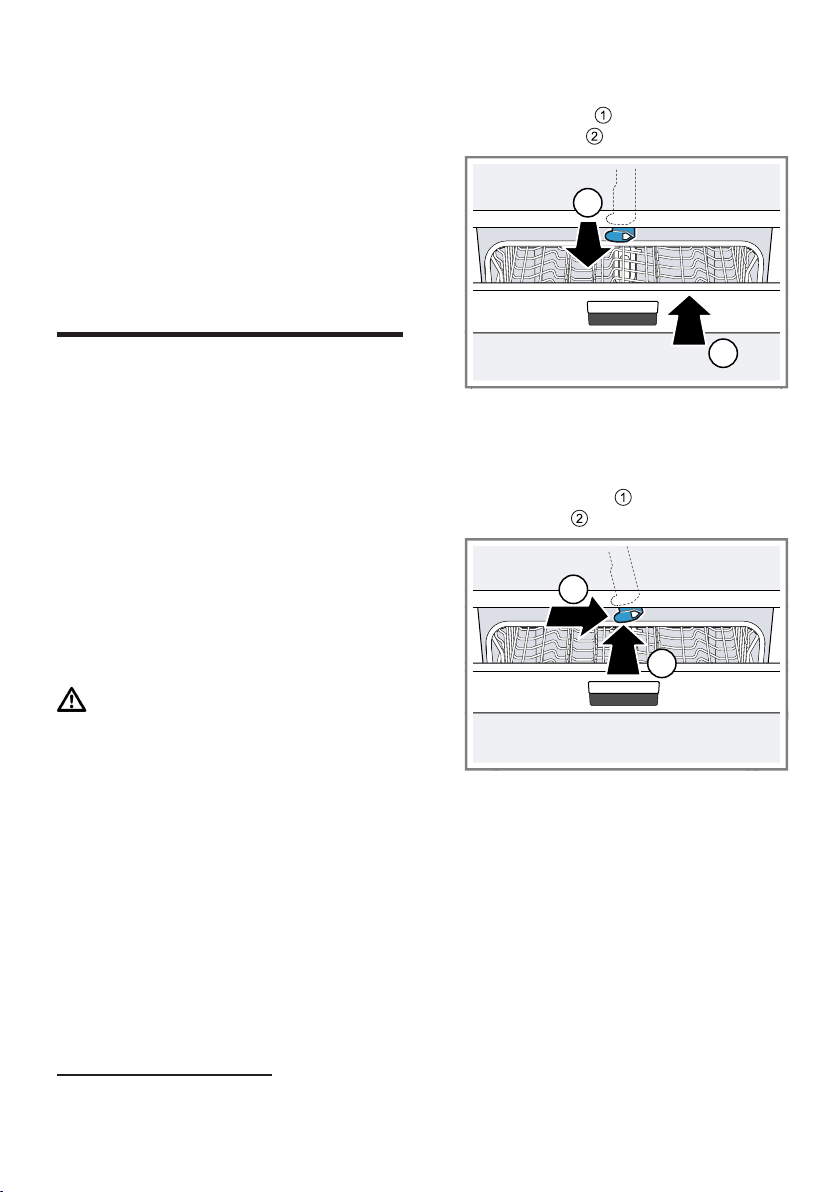
2. Pull the catch of the childproof
lock forwards and close the appliance door .
Childproof lock
Childproof lock
Childproof lock
The childproof lock lets you protect
1
children from possible hazards resulting from the appliance.
Depending on the features of the
model, the appliance comes with a
door lock.
Door lock
The door lock is a mechanical safety
system and makes it more difficult to
open the appliance door.
You can activate or deactivate the
door lock.
WARNING
Risk of suffocation!
Children may become trapped in the
appliance and thus suffocate.
▶
Activate the door lock and close
the appliance door.
→"Opening appliance door",
Page40
Activating the door lock
Note:The door lock remains activ-
ated until it is deactivated manually.
1. Open the appliance door.
Deactivating the door lock
1. Open the appliance door.
2. Push the catch of the childproof
lock to the right and slide it
backwards .
3. Close the appliance door.
1
Depending on the appliance specifications
12

Environmental protection and saving energy en
Environmental protection and saving energy
Environmental protection
and saving energy
Environmental protection and saving energy
Help protect the environment by using your appliance in a way that conserves resources and by disposing of
reusable materials properly.
Disposing of packaging
The packaging materials are environmentally compatible and can be recycled.
▶
Sort the individual components by
type and dispose of them separately.
Information about current disposal
methods are available from your
specialist dealer or local authority.
Saving energy
If you follow these instructions, your
appliance will use less electricity and
less water.
Use the Eco 50° programme.
The Eco 50° programme is energy efficient and environmentally
friendly.
→"Programmes", Page21
If you do not have much tableware to
wash, use the additional Half Load
function.
Change the sensor setting to the default.
1
The programme will adjust to a
lower load and consumption will
be reduced.
→"Additional functions", Page23
Consumption is reduced.
→"Sensors", Page14
Zeolith drying automatically helps to
save energy.
→"Zeolith drying ", Page13
Zeolith drying
The appliance features a Zeolith container. Zeolith drying lets you save
energy.
Zeolite is a mineral that can store
moisture and heat energy and then
release them again.
During dishwashing heat energy is
used to heat up the washing water
and dry the mineral.
During the drying phase moisture
from the interior of the dishwasher is
stored in the mineral and heat energy
is released. The heat energy is blown
out into the interior of the dishwasher
with dry air. This speeds up and improves drying.
Zeolith drying therefore saves a great
deal of energy.
Tip:To avoid impairing Zeolith drying
performance, do not position tableware parts directly in front of the intake opening or the blow opening of
the Zeolith container.
Do not position heat-sensitive tableware parts directly in front of the blow
opening of the Zeolith container.
→"Appliance", Page17
AquaSensor
The AquaSensor is an optical measuring device (light barrier) which
measures the turbidity of the washing
water. You can save water with the
AquaSensor.
Use of the AquaSensor depends on
the programme. If the soiling level is
low, the washing water is used in the
next wash cycle, so reducing water
1
1
Depending on the appliance specifications
13

en Installation and connection
consumption by 3-6 litres. If the soiling level is is greater, the washing
water is drained off and replaced with
fresh water. In the automatic programmes the temperature and running time are additionally adjusted to
the level of soiling.
Sensors
The sensors adjust the programme
sequence and strength in the automatic programmes depending on the
level and type of soiling.
The sensor has different sensitivity
settings that can be changed in the
basic settings.
→"Changing basic settings",
Page45
Sensor setting Description
Standard Optimum setting for a
mixed load and heavily
soiled tableware. Saves
both energy and water.
Sensitive Adjusts the programme
strength for effective removal of food remnants
even with low soiling
levels. Energy and water
consumption are adjusted
accordingly.
Very sensitive Adjusts the programme
strength for difficult conditions of use, e.g. stubborn
dried-on food remnants.
Recommended setting
when using organic or ecological detergents containing low levels of active
agents. Energy and water
consumption are adjusted
accordingly.
Installation and connection
Installation and connection
Installation and connection
Scope of supply
After unpacking all parts, check for
any damage in transit and completeness of the delivery.
If you have any complaints, contact
the dealer who sold you the appliance or our Customer Service.
Note:The appliance was tested at
the factory to check it is in working
order. It is possible that water has left
marks on the appliance. These
marks will disappear after the first
wash cycle.
The delivery consists of the following:
¡ Dishwasher
¡ Instruction manual
¡ Installation instructions
¡ Warranty
¡ Installation material
¡ Steam guard plate
¡ Rubber apron
¡ Mains cable
¡ Quick reference guide
Installing and connecting the appliance
You can position your built-under or
integrable appliance in a fitted kitchen between wooden and plastic
walls. If you subsequently install your
dishwasher as a free-standing appliance, you must stop it from tipping
over, e.g. by screwing it to the wall or
installing it under a continuous worktop that is securely connected to adjacent cabinets.
1. "Follow the safety instructions."
→Page4
1
1
1
1
1
Depending on the appliance specifications
14

Installation and connection en
2. "Follow the instructions for elec-
trical connection." →Page15
3. Check the "Scope of supply"
→Page14 and the condition of
the appliance.
4. Consult the installation instructions
for the installation dimensions required.
5. Make the appliance level using the
height-adjustable feet.
Make sure that the appliance is
standing on the floor securely.
6. "Install the drainage connection."
→Page15
7. "Install the drinking water connec-
tion." →Page15
8. Connect the appliance to the
power supply.
Drainage connection
Connect your appliance to drainage
connection so dirty water is discharged via the wash cycle.
Installing the drainage connection
1. Consult the installation instructions
supplied for the steps required
here.
2. Connect the wastewater hose to
the outlet connection of the siphon
using the enclosed parts.
3. When doing so, check that the
wastewater hose is not kinked,
crushed or twisted.
4. Also check that there is no cover
in the drainage system preventing
the wastewater from being discharged.
Drinking water connection
Connect your appliance to a drinking
water connection.
Installing the drinking water connection
Note
¡ If you are replacing the appliance,
you must use a new water supply
hose.
1. Consult the installation instructions
supplied for the steps required
here.
2. Connect the appliance to the drink-
ing water connection using the enclosed parts.
Observe the "Technical data"
→Page68.
3. When doing so, check that the
drinking water connection is not
kinked, crushed or twisted.
Electrical connection
Connect your appliance to the power
supply.
Connecting the appliance to the electricity supply
Notes
¡ Follow the "Safety instructions"
→Page5.
¡ Connect the appliance to alternat-
ing current only, in the range of
220 - 240V and 50Hz or 60Hz.
¡ Please note that the water safety
system is only functional if there is
a power supply.
1. Insert the non-heating appliance
plug of the power cable into the
appliance.
2. Insert the mains plug of the appli-
ance into a nearby socket.
15

en Installation and connection
The connection data for the appliance can be found on the rating
plate.
3. Check that the mains plug is inser-
ted properly.
16
Familiarising yourself with your appliance en
1
2
3
4
5
6
7
8
9
10
11
12
13
14
15
16
1
Familiarising yourself with your appliance
Familiarising yourself with your appliance
Familiarising yourself with your appliance
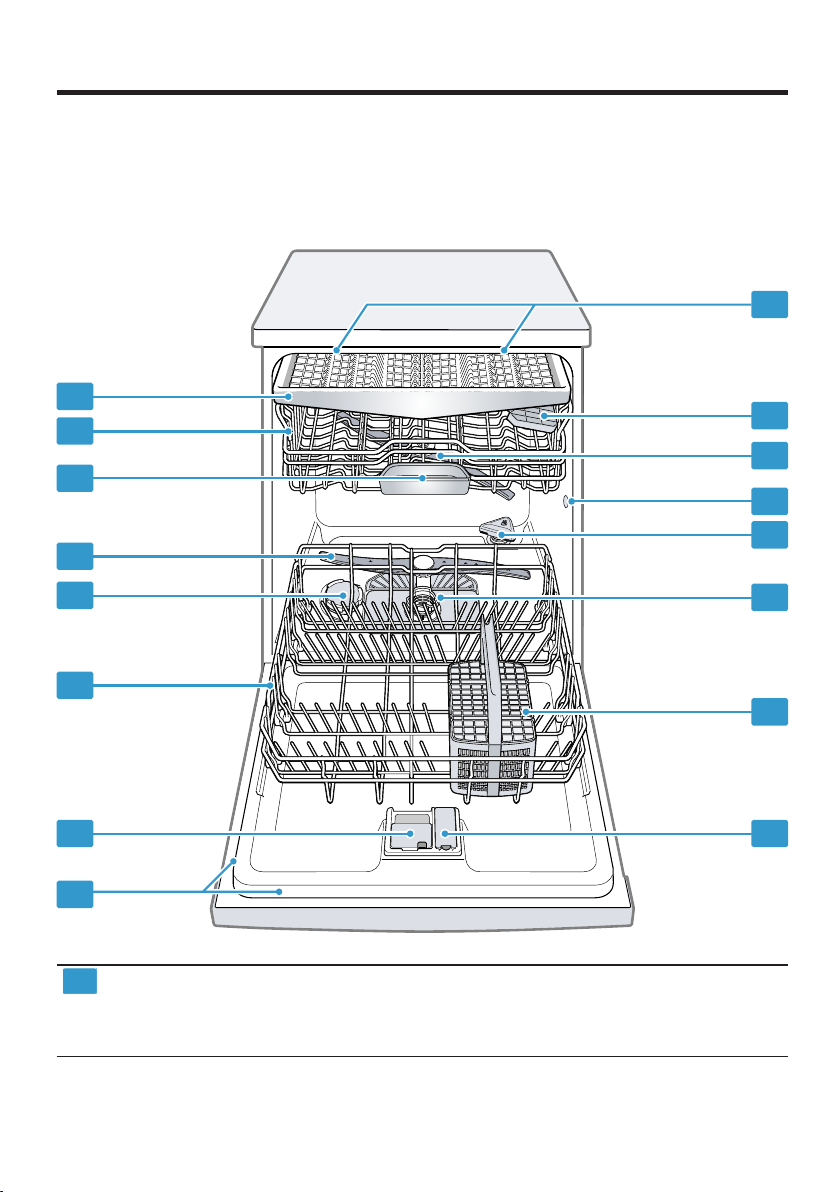
Appliance
You can find an overview of the parts of your appliance here.
Rating plate Rating plate with "E number and FD number"
1
Depending on the appliance specifications
→Page68.
The data you need for "Customer Service"
→Page67.
17
en Familiarising yourself with your appliance
2
3
4
5
6
7
8
9
10
11
12
13
14
15
16
Detergent dispenser "Detergent" →Page35 is added to the detergent
dispenser.
Bottom basket "Bottom basket" →Page26
Dispenser for special salt Add special salt for the "Water softening system"
→Page31 to the dispenser for special salt.
Lower spray arm The lower spray arm washes the tableware in the bot-
tom basket.
If the tableware has not been washed properly, clean
the spray arms.
→"Cleaning spray arms", Page53
Tablet collecting tray During the wash cycle tablets automatically fall out of
the detergent dispenser into the tablet collecting tray
where they can fully dissolve.
Top basket "Top basket" →Page25
Cutlery drawer
EmotionLight
Etagere "Etagere" →Page28
Upper spray arm The upper spray arm washes the tableware in the top
Intake opening of the Zeolith container
Blow opening of the Zeolith container
Filter system "Filter system" →Page52
Cutlery basket
1
1
1
"Cutlery drawer" →Page27
Interior lighting of the appliance.
→"Overview of basic settings", Page43
basket.
If the tableware has not been washed properly, clean
the spray arms.
→"Cleaning spray arms", Page53
The intake opening is required for "Zeolith drying"
→Page13.
The blow opening is required for "Zeolith drying "
→Page13.
"Cutlery basket" →Page27
Dispenser for rinse aid Add rinse aid for the "Rinse aid system" →Page34
1
Depending on the appliance specifications
to the dispenser for rinse aid.
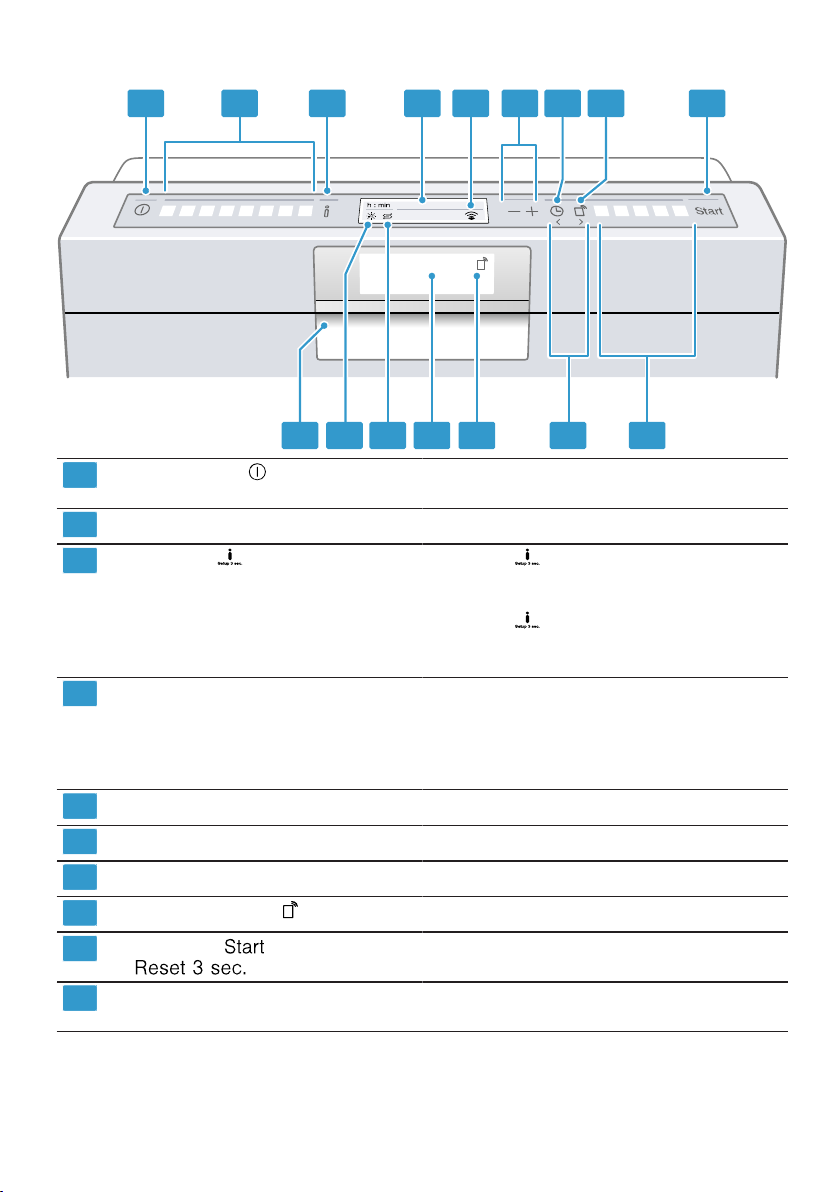
Controls
The controls are used to configure all functions of your appliance and to obtain
information about the operating status.
With some buttons you can perform different functions.
18
Familiarising yourself with your appliance en
1 2 3 4 5 6 7 8 9
1011121415 1316
1
2
3
4
5
6
7
8
9
10
ON/OFF button "Switching on the appliance" →Page40
"Switching off the appliance" →Page41
Programme buttons "Programmes" →Page21
Info button If you press , the display shows information
about selected programmes, basic settings and
additional functions.
If you press for approx. 3 seconds, you can
open the menu.
→"Changing basic settings", Page45
Display The display shows information about pro-
grammes, basic settings or additional functions.
You can change the basic settings via the display
and the setting buttons.
→"Changing basic settings", Page45
WLAN display "Home Connect" →Page46
Setting buttons "Changing basic settings" →Page45
Timer programming "Setting timer programming" →Page41
Remote start button "Remote start" →Page48
Start button and reset button "Starting the programme" →Page41
"Terminating the programme" →Page41
Programme buttons and additional
1
functions
Depending on the appliance specifications
"Programmes" →Page21
"Additional functions" →Page23
19
en Familiarising yourself with your appliance
11
12
13
14
15
16
buttons You can use these buttons to scroll between the
Remote start display
1
Display
Special salt refill indicator "Water softening system" →Page31
Rinse aid refill indicator "Rinse aid system" →Page34
Door opener
1
Depending on the appliance specifications
1
1
basic settings.
→"Changing basic settings", Page45
If you have activated the remote start button and
are controlling the appliance via the HomeConnect app, the remote start display lights up.
The display shows information about programmes, basic settings or additional functions.
You can change the basic settings via the display
and the setting buttons.
→"Changing basic settings", Page45
"Opening the appliance door" →Page40
20
Programmes
Programmes
Programmes
You can find an overview of the programmes that can be selected here.
Different programmes, which can be
found on the control panel of your
appliance, are available depending
on the appliance configuration.
The running time may vary depending on the programme selected. The
running time depends on the water
temperature, the quantity of dishes,
the level of soiling and the "Additional
function" →Page23 selected. The
Programmes en
running time will change if the rinse
aid system is switched off or rinse
aid needs to be added.
The consumption values can be
found in the quick reference guide.
The consumption values relate to
normal conditions and a water hardness of 16-20°E. Different influencing factors such as water temperature or pipe pressure may result in
deviations.
Programme Use Programme se-
quence
Intensive 70°
Tableware:
¡ Washing pots and
pans, non-fragile
tableware and cutlery.
Level of soiling:
Intensive:
¡ PreRinse
¡ Cleaning 70°C
¡ Intermediate rinse
¡ Rinsing 50°C
¡ Drying
¡ Removing stubborn
burned or dried-on
food remnants containing starch and
protein.
When using powder detergent, you can also
apply a little to the inside of the appliance
door.
Auto 45-65°
Tableware:
¡ Cleaning mixed
tableware and cutlery.
Level of soiling:
Sensor-controlled:
¡ Optimised by
sensors depending
on the soiling of the
washing water.
¡ Removing common
household food remnants lightly driedon.
Additional functions
All
→"Additional functions", Page23
All
→"Additional functions", Page23
21
en Programmes
Programme Use Programme se-
quence
Eco 50°
Tableware:
¡ Cleaning mixed
tableware and cut-
lery.
Level of soiling:
¡ Removing common
household food rem-
Most economical programme:
¡ Pre-Rinse
¡ Cleaning 50°C
¡ Intermediate rinse
¡ Rinsing 35°C
¡ Drying
nants lightly dried-
on.
Silence 50
Tableware:
¡ Cleaning mixed
tableware and cut-
lery.
Level of soiling:
¡ Removing common
Reduced noise:
¡ PreRinse
¡ Cleaning 50°C
¡ Intermediate rinse
¡ Rinsing 35°C
¡ Drying
household food rem-
nants lightly dried-
on.
Glass 40°
Tableware:
¡ Cleaning delicate
tableware, cutlery,
temperature-sensit-
ive plastics, glasses
and stemware in the
Particularly gentle:
¡ PreRinse
¡ Cleaning 40°C
¡ Intermediate rinse
¡ Rinsing 50°C
¡ Drying
stemware basket.
Level of soiling:
¡ Removing lightly ad-
hering fresh food
remnants.
Quick 65°
Tableware:
¡ Cleaning mixed
tableware and cut-
lery.
Level of soiling:
Time-optimised:
¡ Cleaning 65°C
¡ Intermediate rinse
¡ Rinsing - °C
¡ Drying
¡ Removing common
household food rem-
nants lightly dried-
on.
Additional functions
All
→"Additional functions", Page23
IntensiveZone
Half Load
HygienePlus
ExtraDry
Shine & Dry
→"Additional functions", Page23
IntensiveZone
VarioSpeedPlus
Half Load
ExtraDry
Shine & Dry
→"Additional functions", Page23
ExtraDry
Shine & Dry
→"Additional functions", Page23
22