

Bosch SKS60E18EU, SKS60E12EU, SKS60E02EU, SKS60E02CH, SKS60E02GB User Manual
...
en
Summary of instructions Dishwasher
Switching on the appliance
5
(8908) 550 EG
Start programme
Switch off the appliance
9
9000 451 595
Brief and handy:
everything your dishwasher
needs …
Before using for the first time,
read the Installation instructions
and Operating instructions!
Filling the salt dispenser
2
Adding rinse aid
3
Adding detergent
4
Select programme
6
Here we go...
Everything o.k....
Start
8
1
7
Adjusting the water softening system*
Ask your water
supply company
what the water
hardness
is and enter...
* only before the first
wash or if the water
hardness has been
changed
Dissolves limescale (not necessary for set value 0!) ...
Water
hardness
value
°Clarke
Unscrew
cover.
0-8
9-10
11-12
13-15
16-20
21-26
27-38
39-44
Hardness
range
soft
soft
medium
medium
medium
hard
hard
hard
mmol/l
0 -1.1
1.2-1.4
1.5-1.8
1.9-2.1
2.2-2.9
3.0-3.7
3.8-5.4
5.5-6.2
Factory
setting
:
• ‹‹
:
• ‹‚
:
• ‹ƒ
:
• ‹„
:
• ‹…
:
• ‹†
:
• ‹‡
:
• ‹ˆ
$
Spick and span ...
Press
2
1
mark 1,
lift up
cover 2.
%
A lot of dirt, a lot of detergent ...
If required,
open the cover
(press button).
Quick, economical or intensive ...
Overview of programmes
The max. possible number of programmes
is illustrated in this overview.
The corresponding programmes for your appliance
can be found on the fascia.
The programme data has been measured
in the laboratory according to European
standard EN 50242.
Deviations are possible in practice.
Additional options**
Express Wash
... is obtained by increased
Ÿ
energy consumption
at a constant cleaning
performance.
Attention:
Combination
products
are not suitable
for all programmes,
follow
manufacturer’s
instructions.
7
Hygiene
·
... the temperature
is increased during
the final rinse process.
This increases
the hygiene status.
** depending on model
Duration: hs : mins
Energy consumption in kWh
Water consumption in litres
With Aquasensor
BA
Start
Fill the salt
dispenser with
water before
the first wash only.
Flexibility…
Extra drying
¿
... improves the drying
result by increased
temperature
in the final rinse.
(Please take care
with delicate dishes.)
Quickly sorted ...
How to adjust
– Switch on ON/OFF switch.
– Press and hold down the START button A.
– Rotate programme selector B until H:0. is indicated on the digital display.
– Release button.
The factory set value H:04 is lit on the digital display.
– Rotate programme selector B until the required value is indicated
on the digital display.
– Press START button A.
The set value is saved.
Quick
45°
ñ
Screw on
the cover.
Wash
immediately.
Screw on
the cover.
CLICK!
Slide cover
shut, press.
PLOP!
Prerinse
ù
ð
Add special salt
(never add
detergent!).
Fill in
rinse aid.
50 ml
25 ml
15 ml
Intensive
70°
±
2:00 1:30-2:30 2:40 1:15 0:29 0:15
0,90 0,55 - 0,85 0,63 0,45 0,45 0,05
9 - 7763
7,5 6 - 9 - 6 - -
Pour detergent
into the dry
detergent
dispenser only.
Auto
45°–65°
Á
á
Eco
50°
à
Gentle
é
40°
ê
ø²
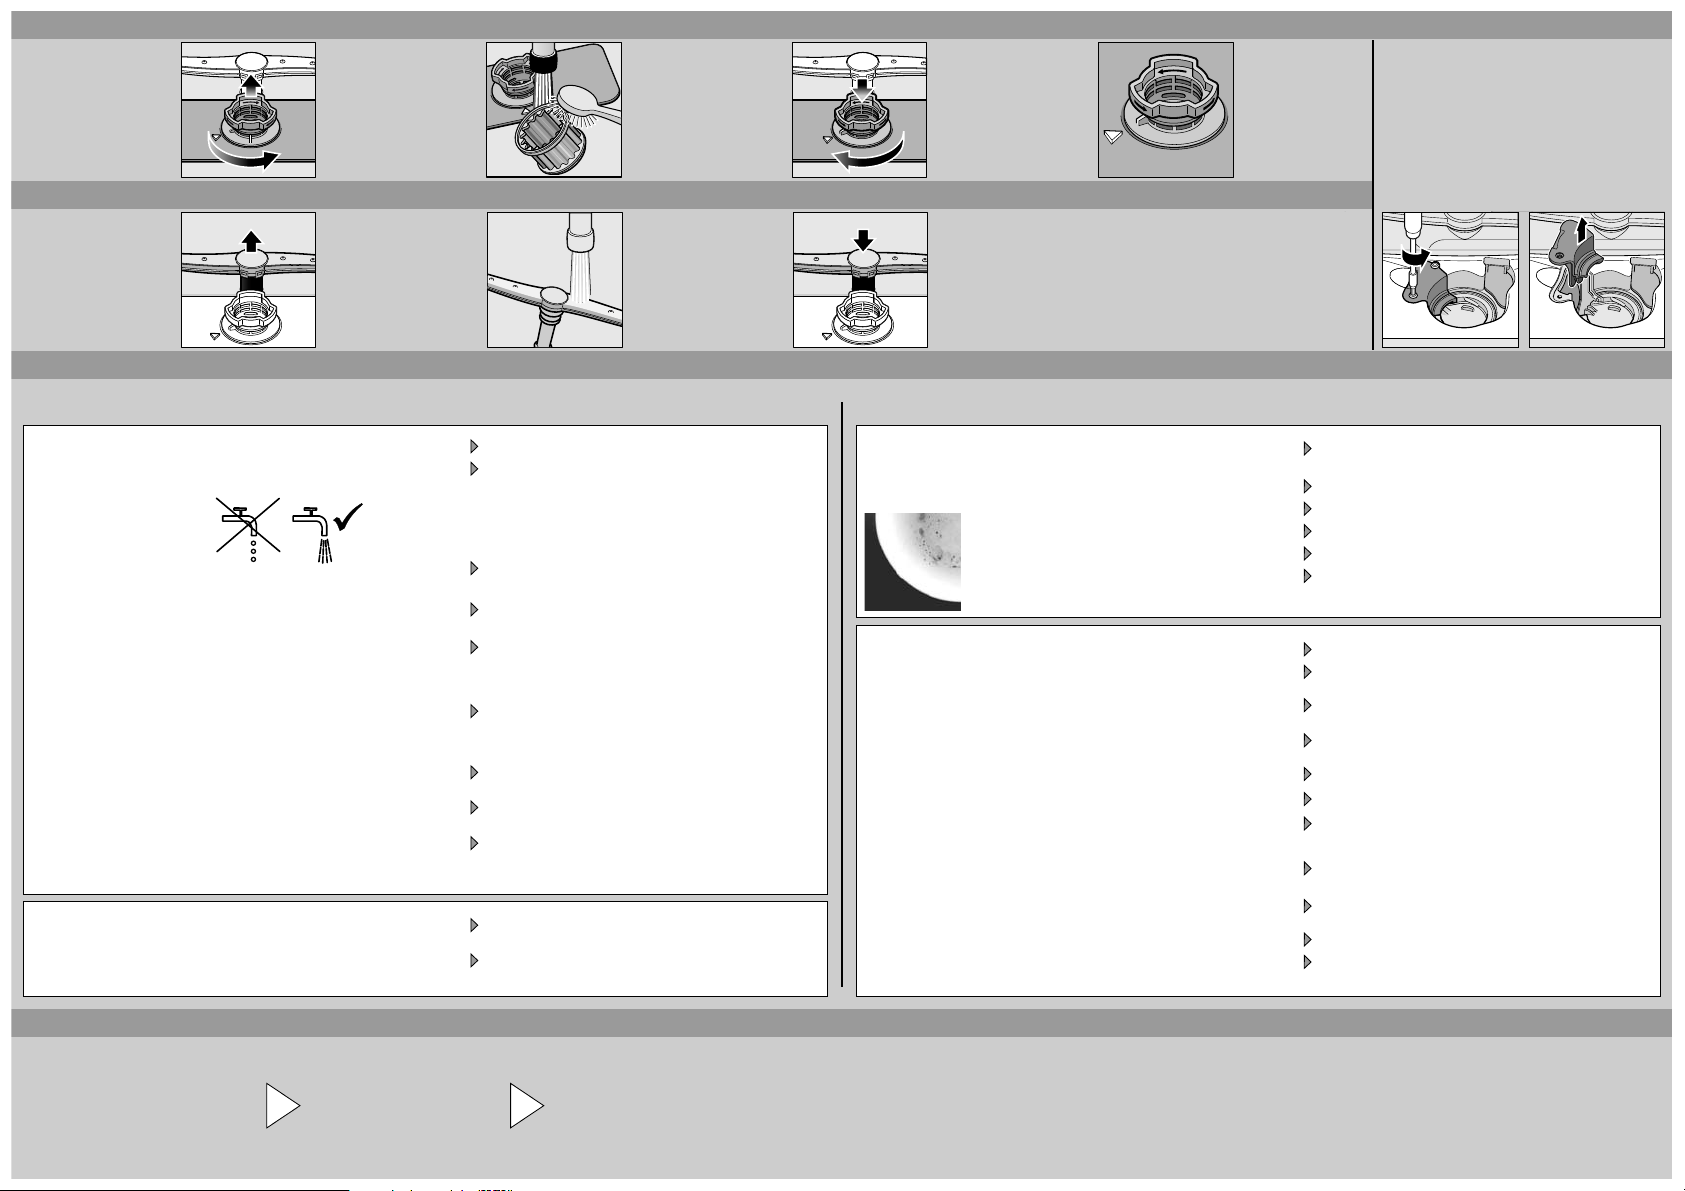
Maintenance and care
Filters
... check,
if required,
clean.
Rotate
filter cylinder,
remove filter
system...
For perfect rinsing results ...
rinse
under
running
water ...
insert ...
Screw on
filter system
NOTE
MARK!
Cleaning waste water pump
– Pull out the mains plug.
– Remove filters and scoop out water.
– Loosen screws on the pump cover
(TorxT20).
– Pull off cover.
– Check area around the fan impeller
for foreign objects.
– Insert cover and screw tight.
– Insert filters.
Spray arm
...remove
blockages/
deposits.
Rectifying minor faults yourself ...
Fault Possible causes
Display “6” is lit
Display “E:24”
and “6” are lit
Display “E:25”
and “6” are lit
Other fault display
“E:XX” is lit
Residual water
in the appliance
Rust on the cutlery
Supply fitting jammed or calcified
Waste water hose is blocked
or kinked
Cover not attached to waste
water pump
Waste water pump blocked
Appliance has technical defect
The programme has not yet ended
Cutlery not rust-resistant
Hard knife blades are more susceptible
Extraneous rust
pull lower
arm upwards ...
clean spray nozzles
under running water
(if required
use toothpicks) ...
... as it is worth doing it yourself!
Remedial action
Open supply fitting.
1. Unscrew water connection.
2. Clean filter in the water connection.
3. Flow rate must be min. 10l/min.,
when water supply is open.
If the flow rate is less, replace the supply fitting.
Install supply hose without kinks.
Install waste water hose without kinks.
Attach cover (see above).
Clean waste-water pump (see above).
Call factory customer service (state fault display).
Unplug appliance.
Close the appliance and switch it on or terminate
the programme (see Terminating the programme).
Use dishwasher-proof cutlery.
Never wash rusting parts in the appliance.
insert
spray arm ...
Fault Possible causes
Utensils are not clean
Sand or gritty residue
on the utensils
Stains and streaks
Utensils not dry
Milky deposits
on the utensils
(can be removed)
Milky deposits, glasses
cloudy/tarnished
(cannot be removed)
Plastic/utensils
discoloured
Utensils are situated close together
or one above the other
Too little detergent
Unsuitable programme selected
Spray arm nozzles blocked
Filters dirty, not seated firmly
Spray arms blocked
Rinse aid dosage too high/too low
Rinse aid Increase dosage.
The combined detergent used
has a poor drying performance
Appliance setting
Water softening system incorrectly set
No salt
Glasses not dishwasher-proof
Too little detergent
Discoloration caused by food colourings
(tomato sauce)
More information can be found in the operating instructions
Remedial action
Separate the utensils, prevent contact points.
Follow manufacturer’s instructions (detergent).
Select a more intensive programme.
Clean the spray arms (see above).
Clean the filters (see above).
Arrange the utensils so that the spray
arms can rotate freely.
Streaks: reduce dosage.
Water or limescale stains: increase dosage.
Change the product.
Use rinse aid.
Activate intensive drying (depending on model).
Correctly set water softening system.
Refill with special salt.
Use dishwasher- proof glasses.
Use a detergent suitable for glasses.
Follow manufacturer’s instructions (detergent).
Discoloration is harmless;
subsequent rinse cycles will cause it to fade.
Terminating the programme ... Loading the dishwasher correctly ...
While the programme is running,
press the START button
for approx. 3 sec. (Reset).
The numerical display
indicates “0:01”;
approx. 1 minute after
the programme ends,
“0:00” is indicated.
Switch off the appliance.
Dishwasher-proof utensils (not soiled with ash, wax, lubricating grease, ink
or adhesive labels; remove large remnants of jam, milk products and food
according to the operating instructions and check that the spray arms can rotate freely.
 Loading...