

Page 1
DISHWASHER USE AND CARE MANUAL
For MODELS • SHV99A13UC and SHX99A15UC
YOUR LIFE. OUR INSPIRATION,
P/N 9000039259 (8408)
Page 2
Congratulations and Thank You from Bosch!
Thank you for selecting a Bosch dishwasher, You have joined the many consumers who
demand quiet and superior performance from their dishwashers,
This manual was written with your safety and convenience in mind, and the information
contained herein is very important, We highly recommend that you read this manual
before you use your dishwasher for the first time,
To learn even more about your dishwasher and available accessories, as well as many
other top-quality Bosch appliances, visit our website at www, boschappliances,com,
Please contact us if you have any questions or comments, You can call us at
1-800-944-2904, or you can write us at:
BSH Home Appliances, Corp,
5551 McFadden Avenue
Huntington Beach, CA 92649
Enjoy!
Table of Contents
IMPORTANT SAFETY INSTRUCTIONS .................................................... 2
Dishwasher Components ........................................................................... 3
Dishwasher Features ................................................................................. 3
Dishware Materials .................................................................................... 4
Preparing and Loading the Dishware ......................................................... 5
Loading the Silverware Basket ................................................................... 8
Operating the Dishwasher .......................................................................... 9
Selecting a Wash Cycle .......................................................................................................... 9
Selecting Dishwasher Options ................................................................................................ 10
Adding Detergent and Rinse Agent ........................................................... 13
Care and Maintenance ............................................................................. 15
Self Help .................................................................................................. 19
Cycle Duration/Water Usage Information .................................................. 20
Customer Service ..................................................................................... 21
Statement of Warranties ........................................................................... 22
Page 3
Important Safety Instructions
INJURY/DEATH HAZARD - Serious injury or
death could result if the dishwasher
covered in this manual is operated
incorrectly or in a way other than its
intended purpose. Do not use the
dishwasher covered in this manual any
other way or for any other purpose than is
e×piained in this manual.
Use this dishwasher only for its intended
function, which is the washing of household
dishware and kitchenware.
This dishwasher is provided with a manual set
which includes Installation instructions and
Use and Care instructions. Read and
understand all instructions before using the
dishwasher.
Under certain conditions, hydrogen gas may
be produced in a hot water system that has
not been used for two weeks or more.
Hydrogen gas is explosive. Before using a
dishwasher that is connected to a hot water
system that has been unused for two weeks
or longer, turn on all hot water faucets and let
the water flow from each for several minutes.
This will release any accumulated hydrogen
gas. As the gas is explosive, do not smoke or
use an open flame during this time.
Remove the door to the washing
compartment when removing an old
dishwasher from service or discarding.
To avoid floor damage and possible mold
growth, do not allow wet areas to remain
around or under the dishwasher.
,, Use only detergents or wetting agents
recommended for use in a dishwasher, and
keep them out of the reach of childen.
When loading items to be washed:
Locate sharp items so that they are
not likely to damage the door seal.
Load knives and other sharp utensils
with their HANDLES UP to reduce the
risk of cut-type injuries.
,, Do not wash plastic items unless they are
marked "dishwasher safe" or the equivalent.
For plastic items not so marked, check the
manufacturer's recommendations.
,, Do not operate your dishwasher unless all
enclosure panels are in place.
Do not tamper with or override controls and
interlocks.
Do not abuse, sit on, or stand on the door or
dish racks of the dishwasher.
ELECTRIC SHOCK HAZARD o Electrical
shock could result if the electrical supply
for the dishwasher covered in this manual
is incorrectly installed or if the dishwasher
has been improperly grounded. Do not
use the dishwasher covered in this manual
if you are not certain the electrical supply
has been correctly installed or the
dishwasher has been properly grounded.
GROUNDING INSTRUCTIONS
This appliance must be grounded to a metal,
permanent wiring system, or an equipment
grounding conductor must be run with the circuit
conductors and connected to the equipment
grounding terminal or lead on the dishwasher.
See the Installation Instructions included with
this dishwasher for more information on electrical
requirements.
To reduce the risk of injury, do not allow
children to play in or on the dishwasher.
SAVE THESE INSTRUCTIONS!
Page 4
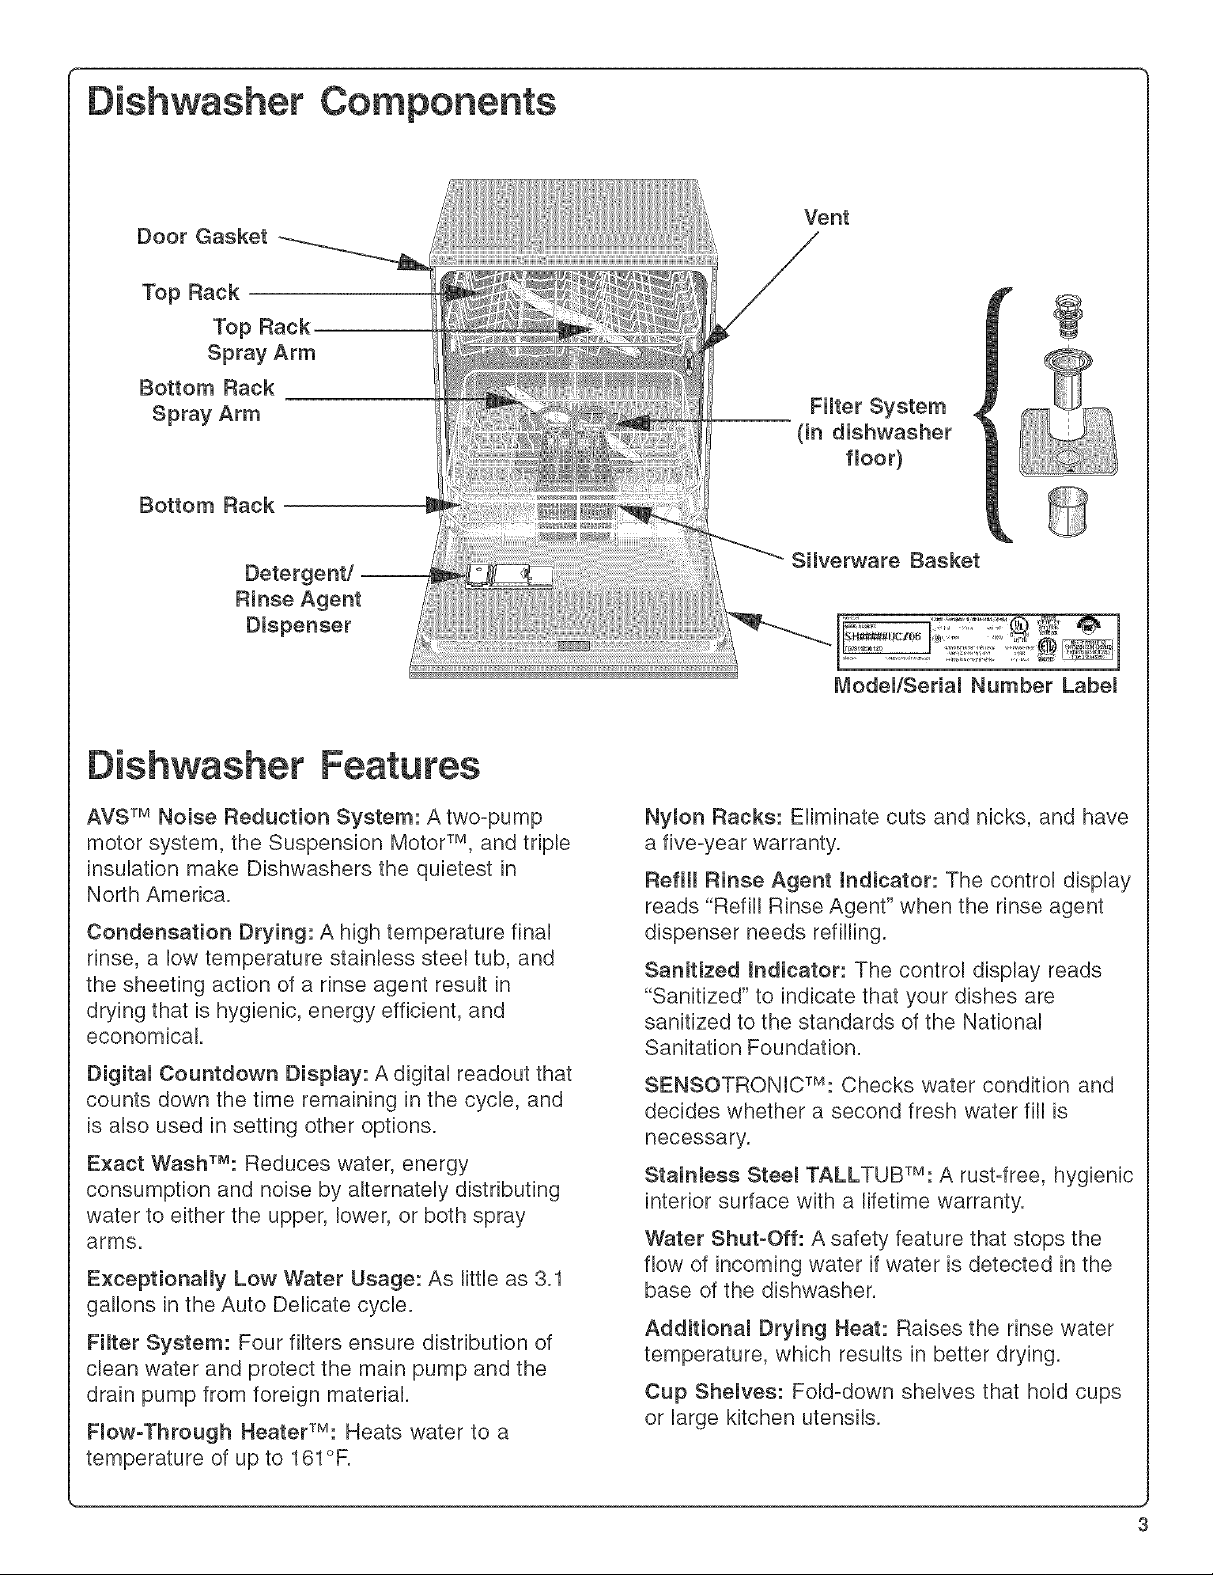
Dishwasher Components
Door Gasket
Top Rack
Top Rack
Spray Arm
Bottom Rack
Spray Arm
Bottom Rack
Vent
Filter System
(in dishwasher
floor)
Detergent/--
Rinse Agent
Dispenser
Dishwasher Features
AVS TM Noise Reduction System: A two-pump
motor system, the Suspension Motor TM, and triple
insulation make Dishwashers the quietest in
North America.
Condensation Drying: A high temperature final
rinse, a low temperature stainless steel tub, and
the sheeting action of a rinse agent result in
drying that is hygienic, energy efficient, and
economical.
Digitam Countdown Dispmay: A digital readout that
counts down the time remaining in the cycle, and
is also used in setting other options.
Exact WashTM: Reduces water, energy
consumption and noise by alternately distributing
water to either the upper, lower, or both spray
arms.
Exceptionally Low Water Usage: As little as 3.1
gallons in the Auto Delicate cycle.
Fimter System: Four filters ensure distribution of
clean water and protect the main pump and the
drain pump from foreign material.
Flow-Through Heater_M: Heats water to a
temperature of up to 161°R
Silverware Basket
Model/Serial Number Label
Nylon Racks: Eliminate cuts and nicks, and have
a five-year warranty.
Refill Rinse Agent Indicator: The control display
reads "Refill Rinse Agent" when the rinse agent
dispenser needs refilling.
Sanitized Indicator: The control display reads
"Sanitized" to indicate that your dishes are
sanitized to the standards of the National
Sanitation Foundation.
SENSOTRONICTM: Checks water condition and
decides whether a second fresh water fill is
necessary.
Stainmess Steel TALLTUBTM: A rust-free, hygienic
interior surface with a lifetime warranty.
Water Shut-Off: A safety feature that stops the
flow of incoming water if water is detected in the
base of the dishwasher.
Additionam Drying Heat: Raises the rinse water
temperature, which results in better drying.
Cup Shelves: Fold-down shelves that hold cups
or large kitchen utensils.
Page 5
Dishwasher Features
(continued)
Dishware Materials
Cycle Completion Signah A tone that sounds
when your dishwasher finishes washing and
drying your dishes.
Demay Start: Allows you to delay the start of the
wash cycle for up to 24 hours.
Knife Rack: Designed to securely hold fine
cutlery and silverware.
RACKMATIC TM Height-Adjustable Top Rack:
Lower the top rack to accommodate large items
in the top rack, or raise the top rack to make
room for larger items in the bottom rack.
Top Rack and Bottom Rack Flip Tines: Tines
that fold down allow loading versatility.
POWERBOOSTTM: Reduces the time to
complete the wash cycle by preheating.
INFOMGHTTM: Red LED illuminates floor to
indicate unit is running.
OPTIDRYTM: Senses when the unit is low on
rinse agent and automatically adjusts the drying
performance.
CLEARTOUCH TM Controls: Provide easy
cleaning while preventing accidental activation.
Rack Attachment: Adds additional fold down
shelves on the lower rack.
NOTE: Before using your dishwasher for the first
time, check the information in this section. Some
items are not dishwasher safe and should be
hand=washed; others require special loading.
Contact the item's manufacturer if you are unsure
about the item's dishwasher suitability.
Recommended
Aluminum: Colored anodized aluminum may fade
over time. Minerals in your water may cause the
aluminum to darken or spot. This can usually be
removed by using a soap=filled steel wool pad.
China, Crystal_ Stoneware: Some
hand=painted pieces may discolor, fade, or spot.
Hand=wash these pieces. Position fragile
glassware so that it will not topple over or
contact other pieces during the wash cycle.
Gmass: Milk glass may yellow.
Non-Stick Coatings: Apply a light coating of
vegetable oil to non=stick surfaces after drying.
Pmastics: Make sure the piece is dishwasher safe.
Stainmess Steem, Sterling Silver, and Silver
Plate: Place these pieces so that they do not
contact dissimilar metals.
Not Recommended
Acrylic: Crazing (small cracks throughout the
acrylic) may occur.
Adhesive-Joined Pieces: Adhesives that join
materials such as plastic, wood, bone, steel
copper, tin, etc. may loosen.
Bone-Handmed Utensils: Handles may separate.
iron: Iron will rust. Hand-wash and dry
immediately.
NonoDishware Items: Your dishwasher is
intended for use in cleaning ONLY standard
household dishware and kitchenware.
Pewter, Brass, Bronze: Pewter will tarnish.
Hand=wash and dry immediately.
Tin: Tin will rust. Hand=wash and dry
immediately.
Wood: Wooden bowls, wooden utensils, and
wood=handled utensils can crack, warp, and lose
their finish.
4
Page 6
Preparing and Loading the Dishware
Preparing the Dishware
Do not pre=wash items having loosely=attached
soiling.
Remove large food particles, bones, seeds,
toothpicks, and excessive grease.
items having burned=on or hard, stuck=on soiling
may require soaking and hand=scouring.
Loading the Dishwasher
DISHWASHER DAMAGE: Loading the
dishwasher with objects such as paper
products, plastic bags, packing materials,
or anything other than normal dishware
and kitchenware could damage the
dishwasher. Do not moad the dishwasher
with anything other than dishwasher-safe
dishware and kitchenware.
Check the Dishware Materials section of this
manual if you are unsure about an item's
dishwasher suitability.
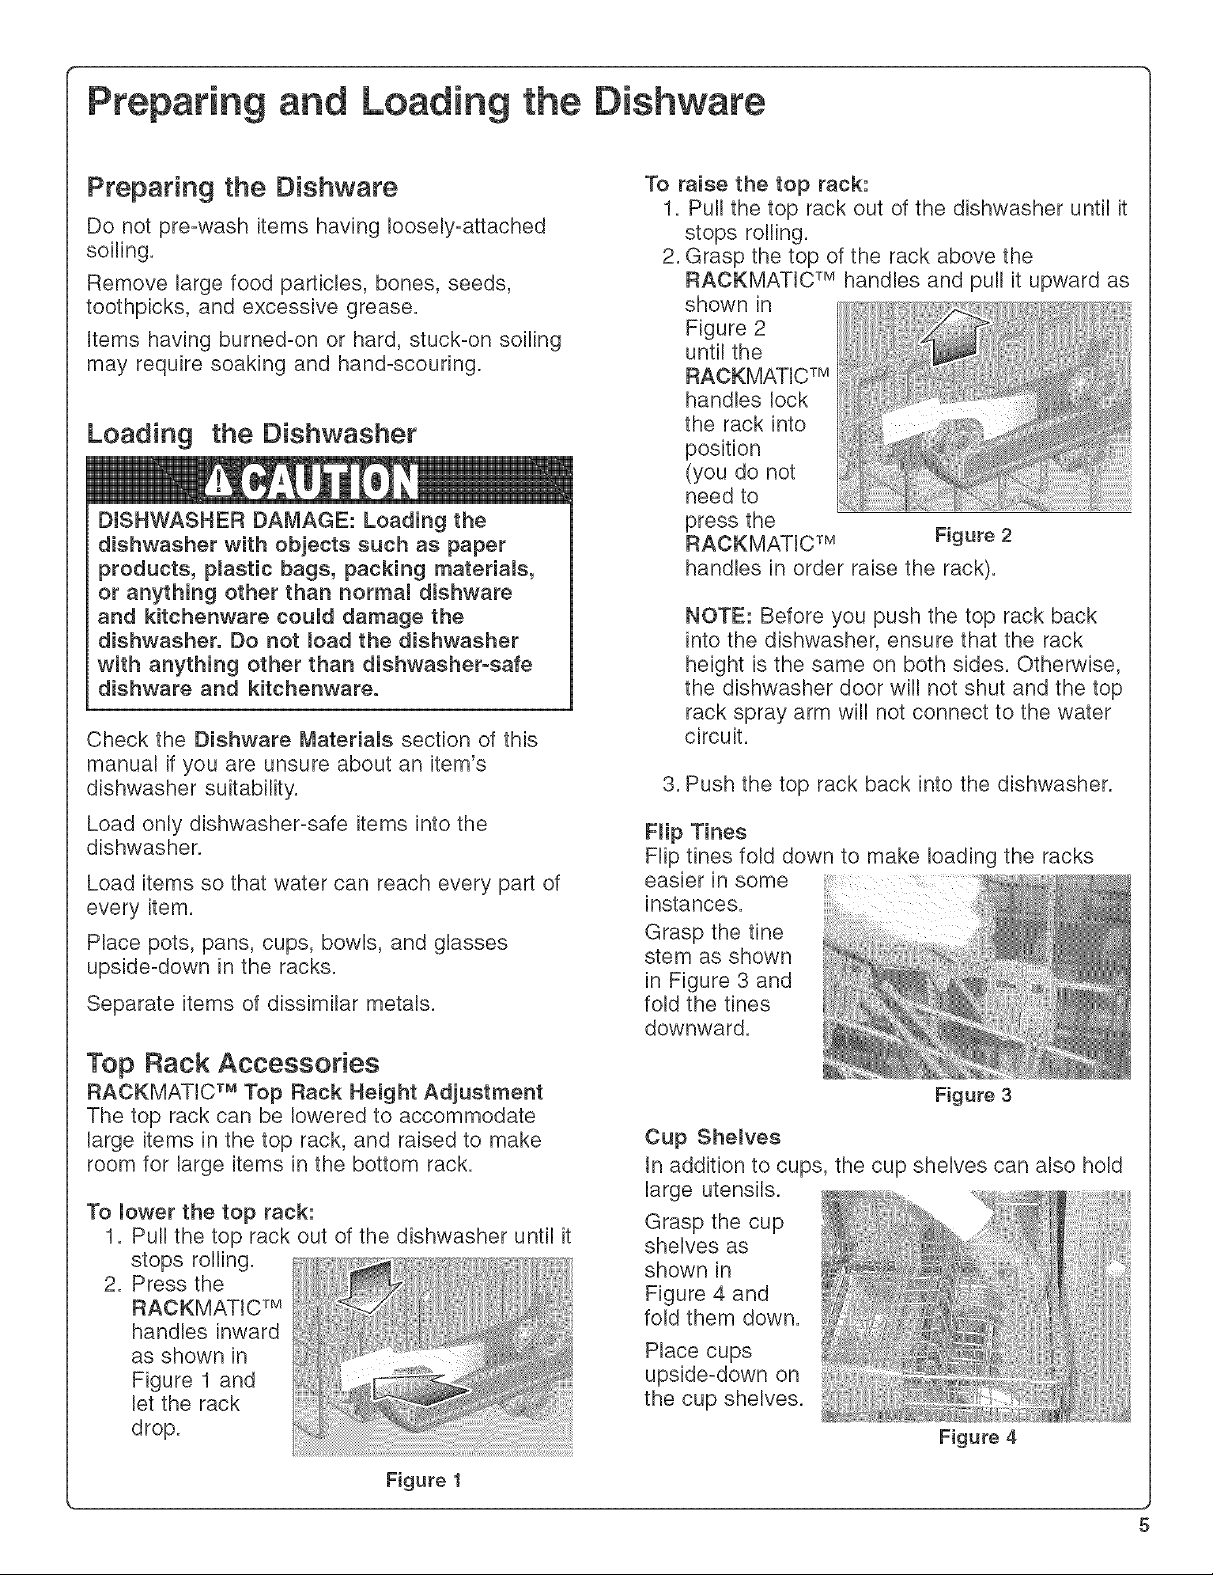
To raise the top rack:
1. Pull the top rack out of the dishwasher until it
stops rolling.
2. Grasp the top of the rack above the
RAOKMATIC TM handles and pull it upward as
shown in
Figure 2
until the
RAOKMATIC TM
handles lock
the rack into
position
(you do not
need to
press the
RACKMATIC TM
handles in order raise the rack).
NOTE: Before you push the top rack back
into the dishwasher, ensure that the rack
height is the same on both sides. Otherwise,
the dishwasher door will not shut and the top
rack spray arm will not connect to the water
circuit.
3. Push the top rack back into the dishwasher.
Figure 2
Load only dishwasher=safe items into the
dishwasher.
Load items so that water can reach every part of
every item.
Place pots, pans, cups, bowls, and gbsses
upside=down in the racks.
Separate items of dissimilar metals.
Top Rack Accessories
RAOKMATIC TM Top Rack Height Adjustment
The top rack can be lowered to accommodate
large items in the top rack, and raised to make
room for large items in the bottom rack.
To mower the top rack:
1. Pull the top rack out of the dishwasher until it
stops rolling.
2. Press the
RAOKMATIC TM
handles inward
as shown in
Figure 1 and
let the rack
drop.
Flip Tines
Flip tines fold down to make loading the racks
easier in some
instances.
Grasp the tine
stem as shown
in Figure 3 and
fold the tines
downward.
Figure 3
Cup Shelves
in addition to cups, the cup shelves can also hold
large utensils.
Grasp the cup
shelves as
shown in
Figure 4 and
fold them down.
Place cups
upside=down on
the cup shelves.
Figure 4
Figure 1
Page 7
Preparing and Loading the Dishware (ooot o.o¢
Top Rack Accessories
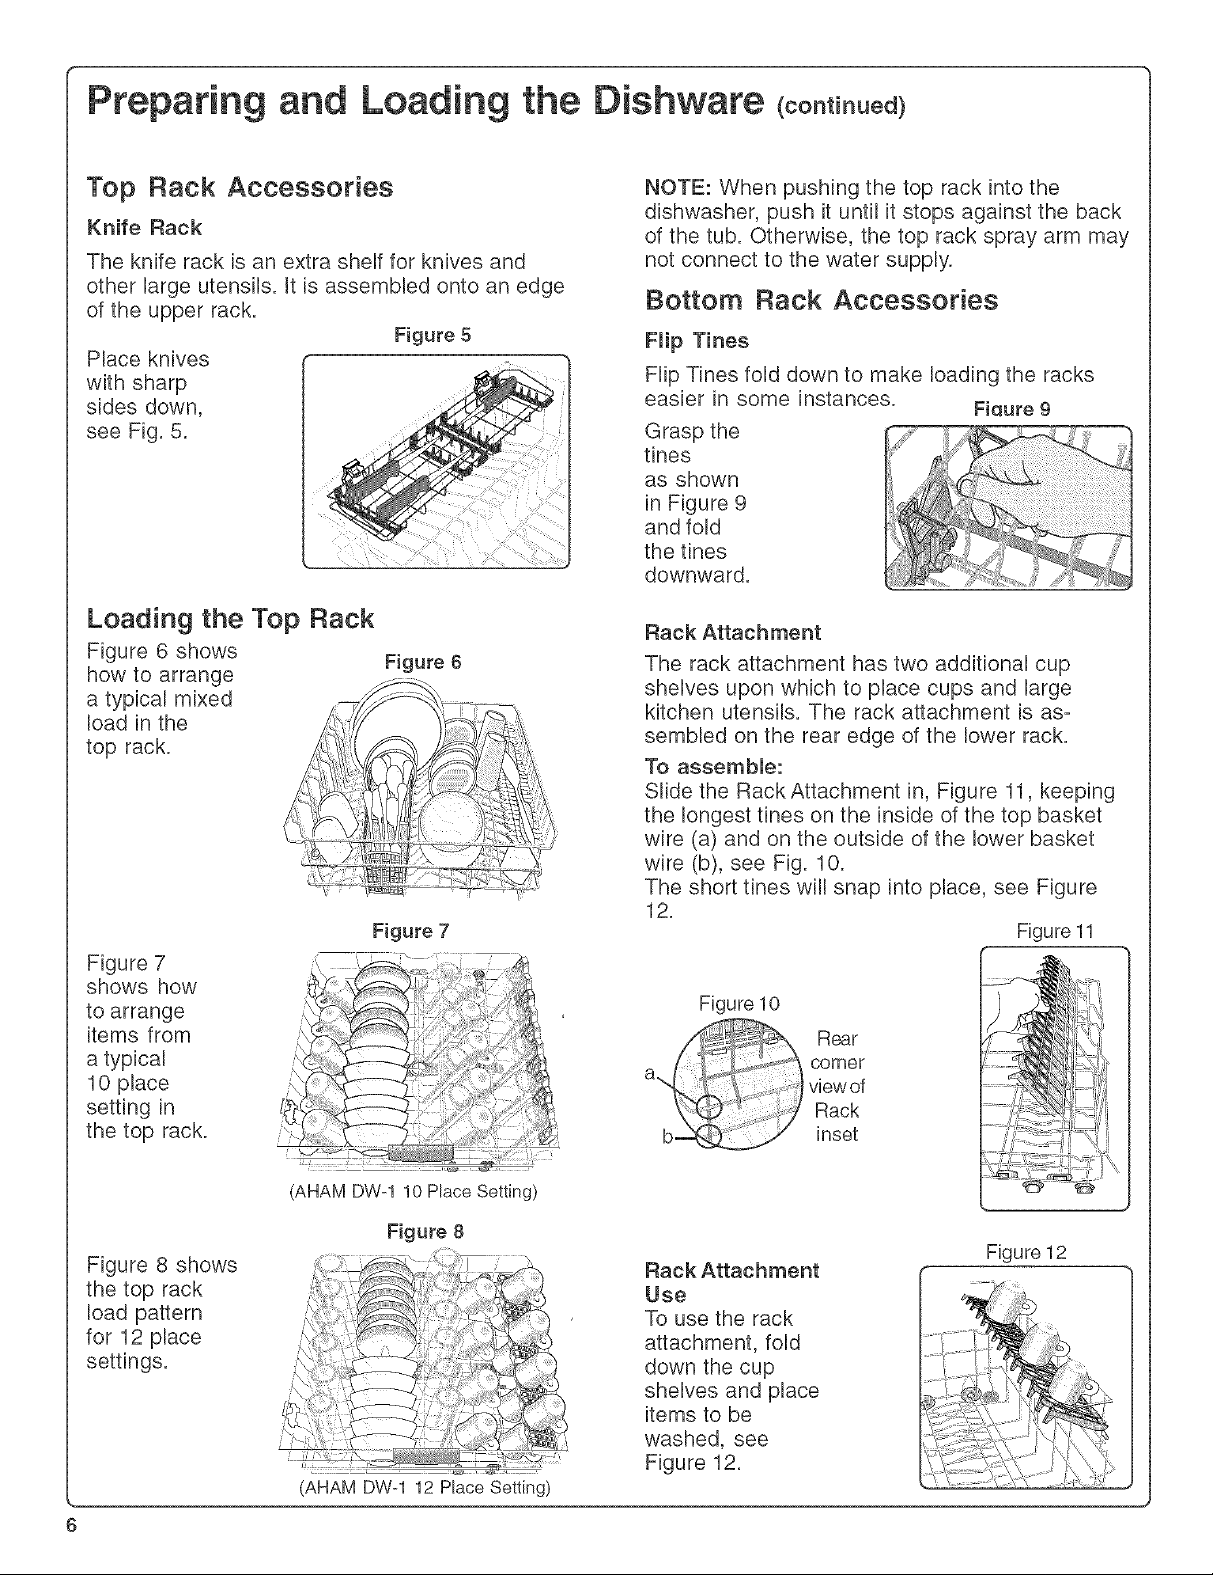
Knife Rack
The knife rack is an extra shelf for knives and
other large utensils, tt is assembled onto an edge
of the upper rack.
Figure 5
Place knives
with sharp
sides down,
see Rg. 5.
Loading the Top Rack
Rgure 6 shows
how to arrange
a typbal mixed
load in the
top rack.
Figure 7
shows how
to arrange
items from
a typbal
10 place
setting in
the top rack.
Figure 6
Figure 7
NOTE: When pushing the top rack into the
dbhwasher, push it until it stops against the back
of the tub. Otherwbe, the top rack spray arm may
not connect to the water supply.
Bottom Rack Accessories
Flip Tines
Flip Tines fold down to make loading the racks
easbr in some instances. Fiaure 9
Grasp the
tines
as shown
in Figure 9
and fold
the tines
downward.
Rack Attach merit
The rack attachment has two additional cup
shelves upon whbh to place cups and large
kitchen utensils. The rack attachment is as=
sembled on the rear edge of the lower rack.
To assemble:
Slide the Rack Attachment in, Figure 11, keeping
the longest tines on the inside of the top basket
wire (a) and on the outside of the lower basket
wire (b), see Fig. 10.
The short tines will snap into place, see Figure
12.
Figure 11
Figure 10
Figure 8 shows
the top rack
load pattern
for 12 place
settings.
(AHAM DW-1 10Place Setting)
Figure 8
Figure 12
Rack Attachment
Use
To use the rack
attachment, fold
down the cup
shelves and place
items to be
washed, see
Figure 12.
(AHAM DW-1 12 Place Setting)
Page 8
Preparing and Loading the Dishware (ooot o.o¢
Loading the Bottom Rack
NOTE: Keep the vent on the tub's right side clear
by placing tall items such as plastic cutting
boards and tall baking sheets on the bottom
rack's left side, center, or back.
Place large
items in the
bottom rack.
Load pots
and pans
upside-down.
Figure 13
shows a
typical mixed
load in the
bottom rack.
Figure 14
shows the
bottom rack
load pattern
for 10 place
settings.
Figure 13
Figure 14
top rack spray
outlet and turn the
sprinkler
clockwise to lock
it into position as
shown in Figure
16.
NOTE: Keep the vent on the tub's right side clear
by placing tall items such as plastic cutting
boards and tall baking sheets on the bottom
rack's left side, center, or back.
5. Place your extra
tall item(s)in the
bottom rack as
shown in Figure
17.
Figure 16
Figure !7
AHAM DW-1 10 Place Setting)
Figure !5
Figure 15
shows the
bottom rack
load pattern
for 12 place
settings.
(AHAM DW-1 12 Place Setting)
When the bottom rack is loaded, push it into the
dishwasher.
To Load Extra Tall Items:
1. Remove the empty top rack by pulling it out
of the dishwasher until it stops rolling.
2. Pull the front of the rack upward and
outward until the rollers are completely free
of the roller guides. Set the top rack aside.
3. Push the roller guides back into the
dishwasher.
4. insert the Extra Tall item Sprinkler into the
DISHWASHER DAMAGE: Reinstalling the
top rack without removing the extra tall
item sprinkler can damage the dishwasher.
Do not reinstall the top rack with the
sprinkler installed.
To remove the sprinkler and return the
dishwasher to its normal condition:
1. Turn the sprinkler counterclockwise and
remove it from the top rack spray outlet.
2. Retrieve the top rack.
3. Tilt the top rack upwards and position the
top rack rollers onto the roller guides.
4. Continue pushing the top rack until the
rollers are on the guides.
5. Push the top rack into the dishwasher.
Page 9
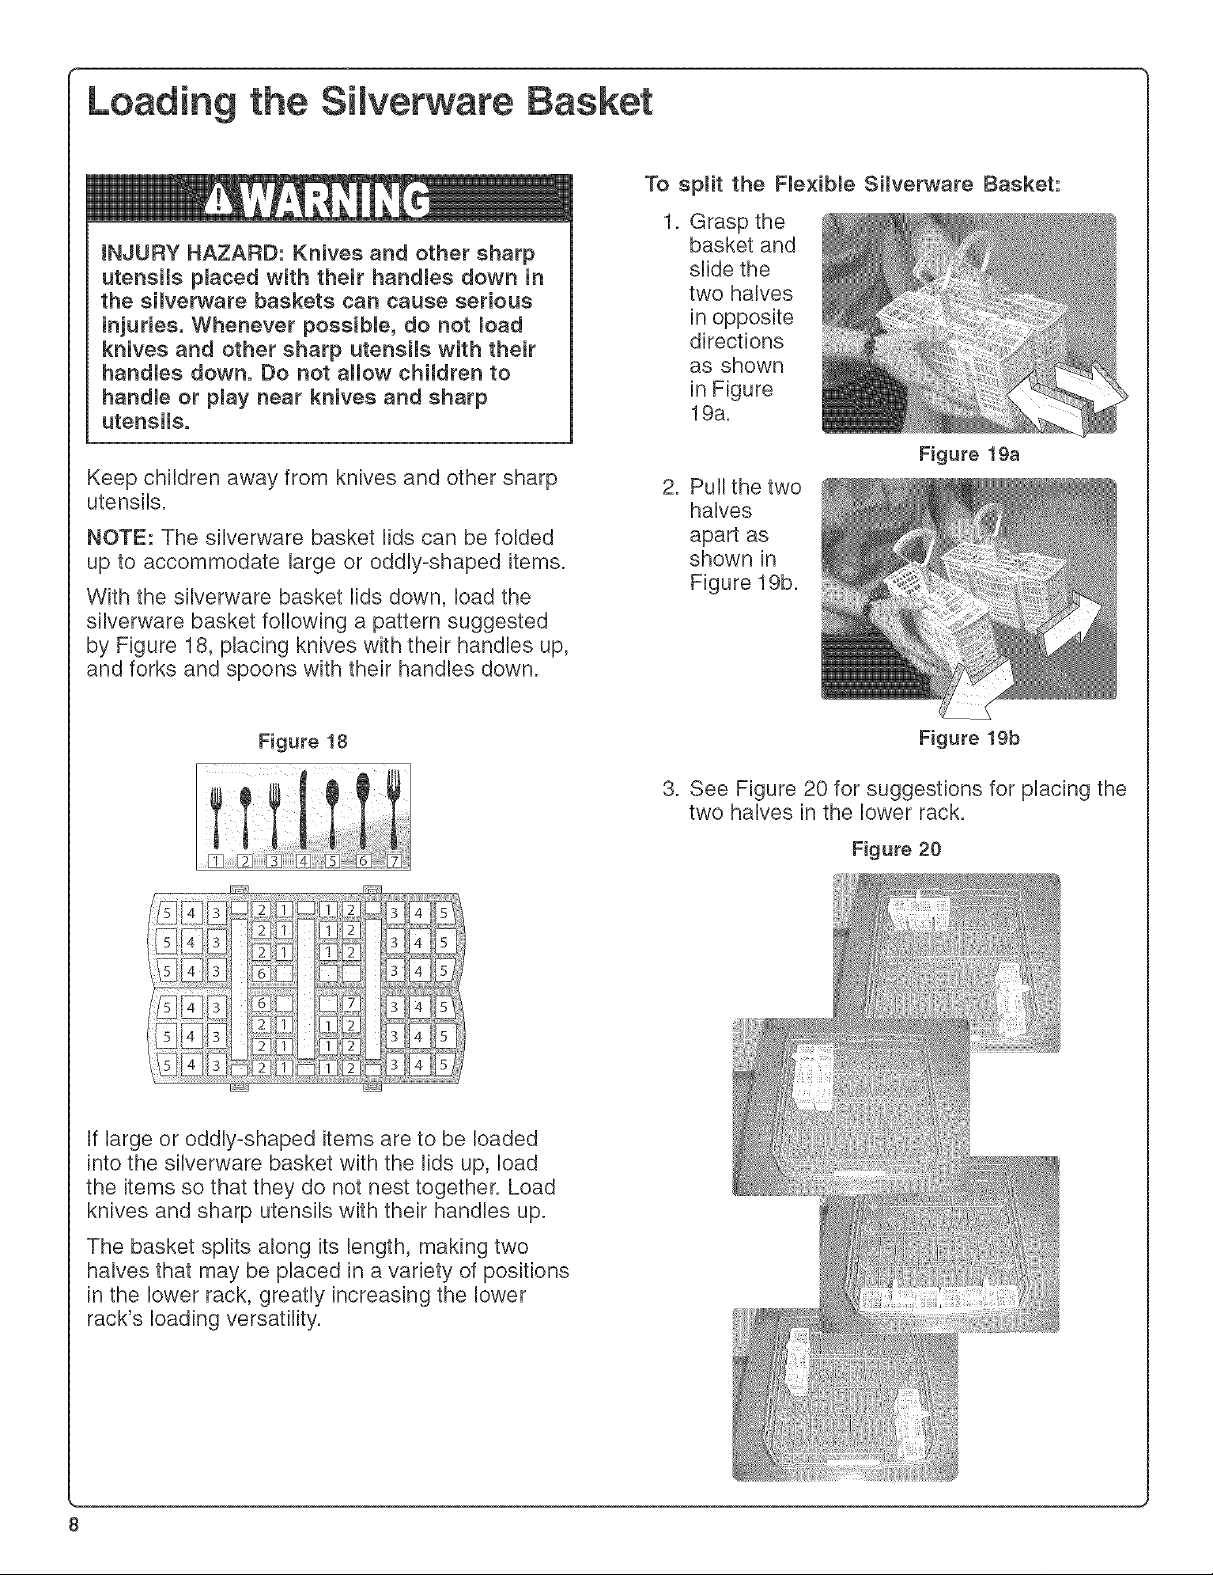
Loading the Silverware Basket
iNJURY HAZARD: Knives and other sharp
utensils pmaced with their handles down in
the silverware baskets can cause serious
injuries. Whenever possible, do not load
knives and other sharp utensims with their
handles down. Do not allow children to
handme or play near knives and sharp
utensils.
Keep children away from knives and other sharp
utensib.
NOTE: The silverware basket lids can be folded
up to accommodate large or oddly-shaped items.
With the silverware basket lids down, load the
silverware basket following a pattern suggested
by Figure 18, placing knives with their handles up,
and forks and spoons with their handles down.
To split the Fle×ibie Silverware Basket:
1. Grasp the
basket and
slide the
two halves
in opposite
directions
as shown
in Figure
19a.
Figure 19a
2. Pull the two
halves
apart as
shown in
Figure 19b.
Figure 18
tf large or oddly-shaped items are to be loaded
into the silverware basket with the lids up, load
the items so that they do not nest together. Load
knives and sharp utensils with their handles up.
The basket splits along its length, making two
halves that may be placed in a variety of positions
in the lower rack, greatly increasing the lower
rack's loading versatility.
Figure 19b
3. See Figure 20 for suggestions for placing the
two halves in the lower rack.
Figure 20
Page 10
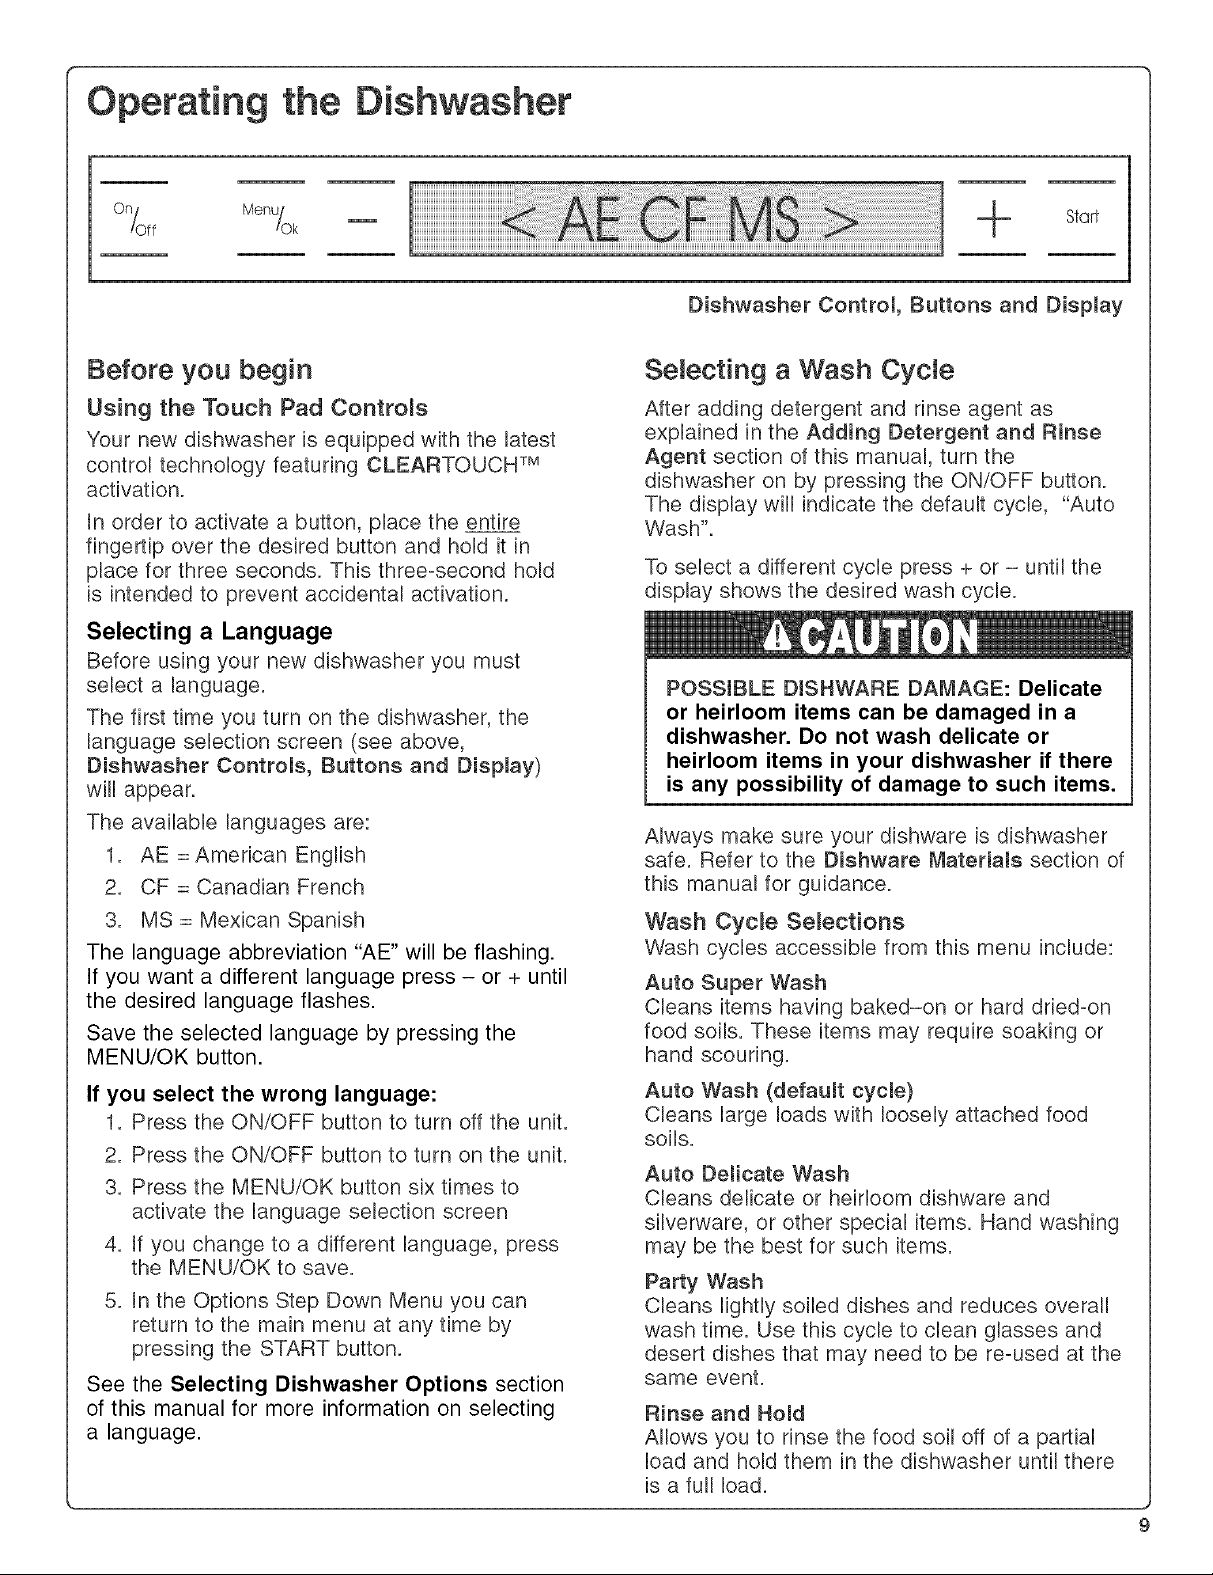
Operating the Dishwasher
°n/off Start
Dishwasher Control0 Buttons and Display
Before you begin
Using the Touch Pad Controls
Your new dishwasher is equipped with the latest
control technology featuring CLEARTOUCH TM
activation.
tn order to activate a button, place the entire
fingertip over the desired button and hold it in
place for three seconds. This three=second hold
is intended to prevent accidental activation.
Selecting a Language
Before using your new dishwasher you must
select a language.
The first time you turn on the dishwasher, the
language selection screen (see above,
Dishwasher Controls, Buttons and Display)
will appear.
The available languages are:
1. AE = American English
2. CF = Canadian French
3. MS = Mexican Spanish
The language abbreviation "AE" will be flashing.
If you want a different language press - or + until
the desired language flashes.
Save the selected language by pressing the
MENU/OK button.
If you select the wrong language:
1. Press the ON/OFF button to turn off the unit.
2. Press the ON/OFF button to turn on the unit.
3. Press the MENU/OK button six times to
activate the language selection screen
4. tf you change to a different language, press
the MENU/OK to save.
5. tn the Options Step Down Menu you can
return to the main menu at any time by
pressing the START button.
See the Selecting Dishwasher Options section
of this manual for more information on selecting
a language.
Selecting a Wash Cycle
After adding detergent and rinse agent as
explained in the Adding Detergent and Rinse
Agent section of this manual, turn the
dishwasher on by pressing the ON/OFF button.
The display will indicate the default cycle, "Auto
Wash".
To select a different cycle press + or - until the
display shows the desired wash cycle.
POSSIBLE DISHWARE DAMAGE: Delicate
or heirloom items can be damaged in a
dishwasher. Do not wash delicate or
heirloom items in your dishwasher if there
is any possibility of damage to such items.
Always make sure your dishware is dishwasher
safe. Refer to the Dishware Materials section of
this manual for guidance.
Wash CycLe Selections
Wash cycles accessible from this menu include:
Auto Super Wash
Cleans items having baked-on or hard dried-on
food soils. These items may require soaking or
hand scouring.
Auto Wash (defaumt cycle)
Cleans large loads with loosely attached food
soils.
Auto Delicate Wash
Cleans delicate or heirloom dishware and
silverware, or other special items. Rand washing
may be the best for such items.
Party Wash
Cleans lightly soiled dishes and reduces overall
wash time. Use this cycle to clean glasses and
desert dishes that may need to be re=used at the
same event.
Rinse and Hold
Allows you to rinse the food soil off of a partial
load and hold them in the dishwasher until there
is a full load.
Page 11
Operating the Dishwasher (ooo...e¢
,
Selecting Dishwasher Options
The factory default settings for all options should
provide good results.
Options Semections
You can access the available options in the
Options Step Down Menu as follows:
Demay Start
This option allows you to delay the start of the
selected cycle for up to 24 hours in 30 minute
increments.
NOTE: In the Options Step Down Menu you can
return to the main menu at any time by pressing
the START button.
,
Open the dishwasher door far enough to
expose the control panel.
Press the ON/OFF button.
2.
3.
Press the MENU/OK button once to display
the Delay Start option.
4.
Press the ÷ or - button until the display
shows the desired amount of delay time.
5.
After selecting the desired amount of delay
time, you must press the MENU/OK button
to save the setting. The display will indicate
"Value Stored" and return to the main menu.
tf you did not select a delay time, press the
START button to return to the main menu.
,
Select the desired wash cycle by pressing
the - or ÷ buttons.
7.
Close the door. When the time delay has
elapsed, the dishwasher will start
automatically and continue operating
through the end of the selected cycle.
,
You can change the time delay and/or the
wash cycle at any time during the delay.
POWERBOOST TM
Reduces the time to complete the wash cycle by
preheating.
NOTE: In the Options Step Down Menu, you can
return to the main menu at any time by pressing
the START button.
This option can be turned on or off by
pressing the ÷ button.
5.
After selecting the + button to turn on
POWERBOOST TM, you must press the
MENU/OK button to save the setting. The
display will show "Value Stored" and return
to the main menu. If you did not select the ÷
button to change the current setting,
press the START button to return to the
main menu.
6. You can now select the desired wash cycle
by pressing the - or ÷ buttons.
7. Press START and close the dishwasher
door to begin the cycle.
Extra Drying
This option allows you to adjust the final rinse
temperature to improve drying or to save energy.
NOTE: In the Options Step Down Menu you can
return to the main menu at any time by pressing
the START button
,
Open the dishwasher door far enough to
expose the control panel.
2.
Press the ON/OFF button.
3.
Press the MENU/OK button three times to
obtain the current drying program
4.
Press the ÷ or - buttons to step through the
following options:
Economy Drying - saves energy.
Normal Drying - factory default setting.
Extra Drying - improves the drying
performance.
,
After selecting the desired drying option, you
must press the MENU/OK button to save the
setting. The display will show "Value Stored"
and return to the main menu. If you did not
select a different drying option, press the
START button to return to the main menu.
,
Select the desired wash cycle by pressing
the - or ÷ buttons.
7.
Press START and close the dishwasher door
to begin the cycle.
10
,
Open the dishwasher door far enough to
expose the control panel.
2.
Press the ON/OFF button.
3.
Press the MENU/OK button twice to display
the POWERBOOST TM option.
Page 12
Operating the Dishwasher (ooot o o¢
End Signam
The dishwasher emits a tone (five times) to let
you know that your dishes are clean and dry. You
can change the tone volume or you can disable
it.
NOTE: In the Options Step Down Menu you can
return to the main menu at any time by pressing
the START button.
1. Open the dishwasher door far enough to
expose the control panel.
2. Press the ON/OFF button.
3. Press the MENU/OK button four times to
display the current End Signal setting
4. Press the ÷ or - buttons to obtain the
desired volume.
End Signal 6 -loudest setting (factory
default setting)
End Signal 0- End Signal disabled
5. After selecting the desired volume, you must
press the MENU/OK button to save the
setting. The display will show "Value Stored"
and return to the main menu. tf you did not
change the volume, press the START button
to return to the main menu.
6. Select the desired wash cycle by pressing
the - or ÷ buttons.
7. Press START and close the dishwasher door
to begin the cycle.
Rinse Agent Adjustment
This option allows you to adjust the amount of
rinse agent the dishwasher will dispense to
control spotting or streaking.
NOTE: In the Options Step Down Menu you can
return to the main menu at any time by pressing
the START button.
1. Open the dishwasher door far enough to
expose the control panel.
2. Press the ON/OFF button.
3. Press the MENU/OK button five times to
display the current rinse agent setting.
4. Press the + or - buttons to display the
desired amount of rinse agent.
5. tf your glassware is spotted, press + to
increase the amount of rinse agent
dispensed. If your glassware is streaked,
press - to decrease the amount of rinse
agent dispensed.
Rinse Agent 6 - maximum amount of
rinse agent available
Rinse Agent 4 - factory default setting
Rinse Agent 0 - rinse agent dispenser
disabled
.
After selecting the desired amount of rinse
agent to be dispensed, you must press the
MENU/OK button to save the setting. The
display will show "Value Stored" and return to
the main menu. If you did not change the
rinse agent amount, press the START button
to return to the main menu.
7. Select the desired wash cycle by pressing
the - or ÷ buttons.
8. Press the START button and close the
dishwasher door to begin the cycle.
Display Language Selection
This option allows you to select the display
language. The first time that you use your
dishwasher this screen will automatically appear.
NOTE: In the Options Step Down Menu you can
return to the main menu at any time by pressing
the START button.
.
Open the dishwasher door far enough to
expose the control panel.
2.
Press the ON/OFF button.
3.
Press the MENU/OK button six times to
display the current language setting
4.
The available language choices are:
AE = American English
CF = Canadian French
MS = Mexican Spanish
Press the ÷ or - buttons until the desired
.
language flashes.
6.
After changing the language selection, you
must press the MENU/OK button to save the
setting. The display will show "Value Stored"
and return to the main menu. If you did not
change the language, press the START
button to return to the main menu.
.
Select the desired wash cycle by pressing
the - or ÷ buttons.
Press START and close the dishwasher door
8.
to begin the cycle.
11
Page 13
Operating the Dishwasher (ooot ouo¢
Standard Programs
The wash cycles available in tNs Ndden menu
are special wash cycles that may be used to
solve special needs in the field.
NOTE: In the Options Step Down Menu you can
return to the main menu at any time by pressing
the START button.
1. Open the dishwasher door far enough to
expose the control panel.
2. Press the ON/OFF button.
3. Press the MENU/OK button seven times to
display the screen "STANDARD
PROGRAMS".
4. After the "STANDARD PROGRAMS" screen
is displayed, press the 4- button one time to
display available wash cycles. Those cycles
are:
Regular - normal wash cycle.
EnvJro Care - reduces water and energy
consumption.
Glass Care - reduces temperatures to
reduce glass damage.
Extreme Wash - for extremely hard to
remove food soils.
5. Press the + or - buttons until the desired
wash cycle is displayed.
6. When the desired setting is displayed, press
the START button and close the door to
begin the cycle.
Starting the Dishwasher
When the correct cycle and options are shown in
the display window and you have added
detergent and rinse agent as explained in the
Adding Detergent and Rinse Agent section of
this manual, press the START button and close
the door.
" "Return" (allows you to choose another
cycle).
Close the dishwasher door. The dishwasher will
begin and run until the cycle is complete. When
the dishwasher door is closed, the JNFOLIGHT TM
will illuminate and cast a red circle on the floor to
indicate the dishwasher is running.
When the cycle ends, the dishwasher will emit an
end of cycle tone (five times). The display will
briefly show "Clean". After 5 seconds the
dishwasher and the JNFOLIGHT TM will
automatically turn off.
NOTE: To accelerate and enhance drying, open
the dishwasher door, pull the top rack a few
inches out of the dishwasher, and prop the
dishwasher door against the top rack.
interrupting a cycle
SCALD HAZARD: You could be seriously
scalded if you open the dishwasher door
quickly during a wash or rinse cycle. Do
not fully open the dishwasher door for at
least 10 seconds or until water noises
stop.
Open the dishwasher door far enough to expose
the control panel. The display will show:
• "Cancel Program".
,, "Close the door".
,, the remaining cycle time.
• the selected cycle.
• the cycle phase.
To continue the cycle, shut the dishwasher door.
The dishwasher will start automatically and
continue the selected cycle.
After pressing the START button, the display will
show the following information:
" "Close the door".
Estimated completion time (this estimated
time automatically adjusts throughout the
cycle based on incoming water temperature
and selected options).
• Current cycle name.
12
Page 14
Operating the Dishwasher
(continued)
Canceling a Cycle
Open the dishwasher door far enough to expose
the control panel. The display will show:
. "Cancel Program".
. "Close the door".
. the remaining cycle time.
. the selected cycle.
Adding Detergent and
Rinse Agent
ent
DISHWASHER DAMAGE: Using hand
dishwashing products in your dishwasher
coumd damage your dishwasher. Do not use
hand dishwashing products in your
dishwasher.
. the cycle phase.
Press the - button. The display will show "To
drain ° close the door".
Close the dishwasher door.
When the dishwasher has drained, the
dishwasher will emit an end of cycle tone (five
times).
Open the dishwasher door. The display will briefly
show "Clean". After 5 seconds the dishwasher
will automatically turn off.
Unloading the Dishwasher
It is recommended to unload the bottom rack first.
Remove and unload the silverware basket(s).
They are easily removed for unloading.
Unload the top rack.
Use only detergent specifically designed for
dishwashers.
DISHWARE DAMAGE: Too much detergent
insoft water may cause etching in
gmassware. Do not use too much detergent
if your water supply is soft.
The detergent dispenser cup has lines that
measure detergent to 15 milliliters (ml) and 25ml.
45ml of detergent will completely fill the
detergent dispenser cup.
NOTE: tf you do not know the hardness of your
water supply, use 15ml of detergent. Increase the
amount of detergent, if necessary, to the least
amount required to get your dishware and
kitchenware clean.
Use the measuring lines in the detergent
dispenser cup as a guide to measure the amount
of detergent recommended in Table 1.
Table 1 - Recommended Detergent Amount
Water Type
Wash Unit of Hard Medium Soft
Cycle Measure
Auto ml 45 45 25-45
Super
Wash Tbsp 3,5 3,5 1,75 to 3,5
Auto
Wash Tbsp 1,75 to 3,5 1,75 1 to 1,75
Auto
De_icate Tbsp 1,75 1 to 1,75 1
Party mm 15-25 15 15
Wash Tbsp 1 to 1_75 1 1
Rinse
and None None None
Hold
mJ 25-45 25 15-25
ml 25 15-25 15
13
Page 15
Adding Detergent and Rinse Agent (oont n.e¢
Rinse Agent
Always use a liquid rinse agent, even if your
detergent contains a rinse agent or drying
additive, to acNeve proper drying and proper
maintenance of your dishware and dishwasher.
The control display will indicate "Refill Rinse
Agent" when the cup needs filling. After rinse
agent is added, "Refill Rinse Agent" will
disappear.
Filling the Detergent and Rinse
Agent Dispenser
The detergent and rinse agent dispenser can be
filled from two positions: the lowered position,
with the dishwasher door fully open or the raised
position, from a more comfortable posture with
the dishwasher door half-open.
FHHng the Detergent Dispenser
(Lowered Position)
1. Fill the detergent cup as recommended in
Table 1.
2. Slide the cover as shown in Figure 21, arrow
1 and press down firmly as shown in Figure
21, arrow 2 so that the cover snaps shut.
Figure 21
Filling the Rinse Agent Dispenser
(Lowered Position)
1. Press the blue release button as shown in
Figure 23 and lift the cover.
Figure 23
2. Add liquid rinse agent to the dispenser as
shown in Figure 24a until the rinse agent
reservoir is full.
Figure 24
u
Opening the Detergent Dispenser Cover
(Lowered Position)
NOTE: Pressing down on the blue release tab
will not open the cover.
1. Press the blue release tab into the dispenser
as shown in Figure 22.
2. The cover
will slide
open to
the left.
Figure 22
.
Return the rinse agent dispenser cover to its
shut position and press it firmly so that it
snaps shut.
NOTE: Figure 24b represents a completely
empty nnse agent reservoir.
.
Refill the rinse agent dispenser when the
rinse agent reservoir level indicator as
shown in Figure 24b begins to show a silver
background with black lines or when the
"Refill Rinse Agent" indicator appears on the
dishwasher control panel.
NOTE: After the rinse agent reservoir is filled
and the dishwasher door is shut, within a few
minutes the "Refill Rinse Agent" indicator will
turn off.
14
Page 16
Adding Detergent and
Rinse Agent (ooot oue¢
FHling the Detergent Dispenser
(Raised Position)
1. Open the dishwasher door approximately
halfway to a 45 ° angle.
NOTE: The detergent dispenser cover must
be open for the detergent dispenser to be
placed in the raised position.
2. Press the Figure 25
blue
button
on the
right
side of the
dispenser
as shown
in Figure
25. The
dispenser
cover and cup will swing upward to the
raised position.
3. Fill the detergent cup as recommended in
Table 1.
4. Slide the cover as shown in Rgure 26, arrow
1, and
press
down
firmly as
shown in
Figure 26,
arrow 2
so that
the cover
snaps
shut.
Care and Maintenance
Maintenance Tasks
Certain areas of your dishwasher require
occasional maintenance. The maintenance tasks
are easy to perform and wifl ensure continued
superior performance from your dishwasher.
Wiping Up Spills and Splash-out
NOTE: Standing water around or under the
dishwasher can cause mold growth. Do not allow
water from spills and splashout to remain around
or under your dishwasher.
Water may occasionally splash out of your
dishwasher, especially if you interrupt a cycle or
open the dishwasher door during a cycle.
immediately wipe up any water that spills or
splashes out.
Your Dishwasher
POSSIBLE DISHWASHER DAMAGE:
Freezing temperatures can damage your
dishwasher. Do not allow water to remain in
your dishwasher water suppJy or drain
systems through extended periods of
freezing temperatures.
Jfyour dishwasher will not be used for an
extended period of time in a location that
experiences freezing temperatures (e.g., in a
holiday home or through a vacation period), you
must drain all the water from the dishwasher
interior.
Filling the Rinse Agent Dispenser
(Raised Position)
1. Open the dishwasher door approximately
halfway to a 45 ° angle.
2. Open the rinse agent dispenser cover.
3. Pull the filling trough upward so that it
snaps into Figure 27
the raised
position
as indicated
by the arrow
in Figure
27.
15
Page 17
Care and Maintenance
(continued)
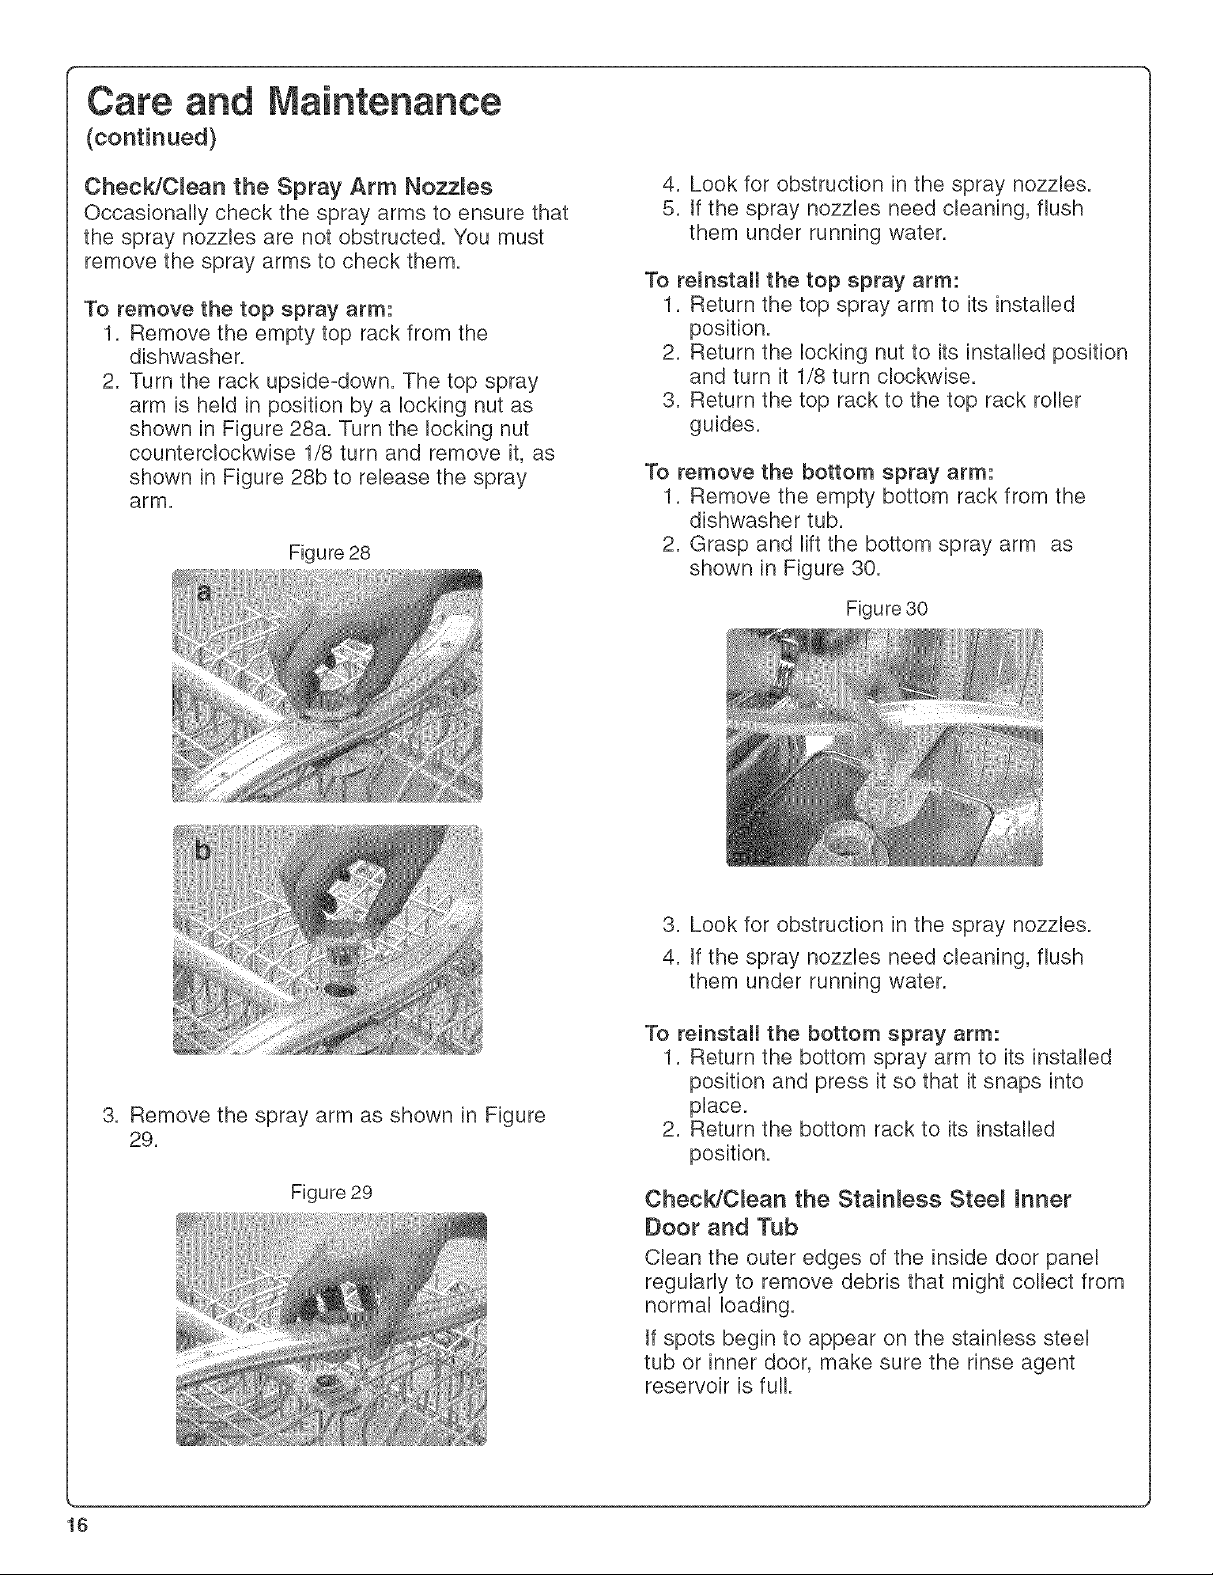
Check/C_ean the Spray Arm Nozzles
©ccasionally check the spray arms to ensure that
the spray nozzles are not obstructed. You must
remove the spray arms to check them.
To remove the top spray arm:
1. Remove the empty top rack from the
dishwasher.
2. Turn the rack upside-down. The top spray
arm is held in position by a locking nut as
shown in Figure 28a. Turn the locking nut
counterclockwise 1/8 turn and remove it, as
shown in Figure 28b to release the spray
arm.
Figure 28
4. Look for obstruction in the spray nozzles.
5. tf the spray nozzles need cleaning, flush
them under running water.
To reinstall the top spray arm:
1. Return the top spray arm to its installed
position.
2. Return the locking nut to its installed position
and turn it 1/8 turn clockwise.
3. Return the top rack to the top rack roller
guides.
To remove the bottom spray arm:
1. Remove the empty bottom rack from the
dishwasher tub.
2. Grasp and lift the bottom spray arm as
shown in Figure 30.
Figure 30
3. Remove the spray arm as shown in Figure
29.
Figure 29
3. Look for obstruction in the spray nozzles.
4. tf the spray nozzles need cleaning, flush
them under running water.
To reinstall the bottom spray arm:
1. Return the bottom spray arm to its installed
position and press it so that it snaps into
place.
2. Return the bottom rack to its installed
position.
Check/C_ean the Stainless Stee_ Inner
Door and Tub
Clean the outer edges of the inside door panel
regularly to remove debris that might collect from
normal loading.
tf spots begin to appear on the stainless steel
tub or inner door, make sure the rinse agent
reservoir is full.
16
Page 18
Care and Maintenance
(continued)
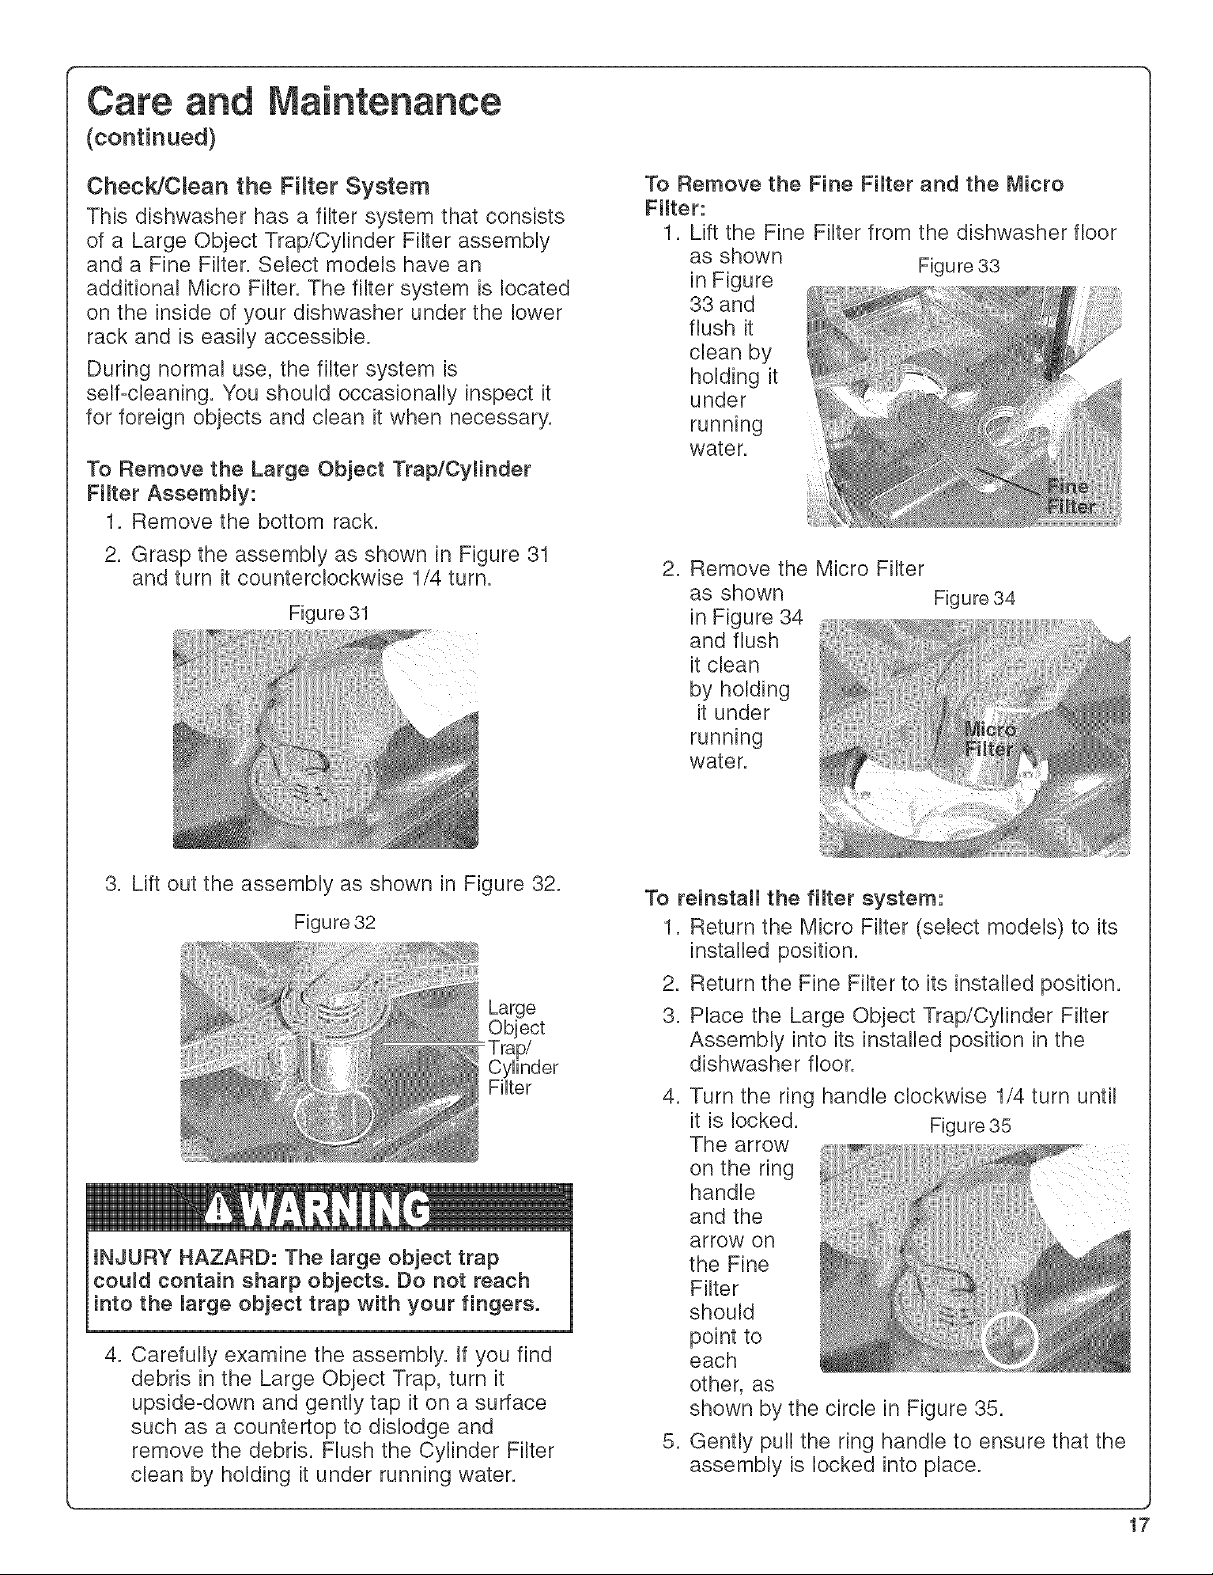
ChecldClean the Filter System
This dishwasher has a filter system that consists
of a Large Object Trap/Cylinder Filter assembly
and a Fine Filter. Select models have an
additional Micro Filter. The filter system is located
on the inside of your dishwasher under the lower
rack and is easily accessible.
During normal use, the filter system is
self-cleaning. You should occasionally inspect it
for foreign objects and clean it when necessary.
To Remove the Large Object Trap/Cylinder
Filter Assembly:
1. Remove the bottom rack.
2. Grasp the assembly as shown in Figure 31
and turn it counterclockwise 1/4 turn.
Figure 31
To Remove the Fine Filter and the Micro
Filter:
1. Lift the Fine Filter from the dishwasher floor
as shown Figure 33
in Figure
33 and
flush it
clean by
holding it
under
running
water.
2. Remove the Micro Filter
as shown
in Figure 34
and flush
it clean
by holding
it under
running
water.
Figure 34
3. Lift out the assembly as shown in Figure 32.
Figure 32
Large
Object
-Trap/
Cylinder
Filter
could contain sharp objects. Do not reach
into the large object trap with your fingers,
4. Carefully examine the assembly. If you find
debris in the Large Object Trap, turn it
upside=down and gently tap it on a surface
such as a countertop to dislodge and
remove the debris. Flush the Cylinder Filter
clean by holding it under running water.
To reinstaml the filter system:
1. Return the Micro Filter (select models) to its
installed position.
2. Return the Fine Filter to its installed position.
3. Place the Large Object Trap/Cylinder Filter
Assembly into its installed position in the
dishwasher floor.
4. Turn the ring handle clockwise 1/4 turn until
it is locked. Figure 35
The arrow
on the ring
handle
and the
arrow on
the Fine
Filter
should
point to
each
other, as
shown by the circle in Figure 35.
5. Gently pull the ring handle to ensure that the
assembly is locked into place.
17
Page 19
Care and Maintenance (ooot o.e¢
POSSIBLE DmSHWASHER DAMAGE: Harsh
chemicams, abrasive cmeaners, scouring
pads (metal or plastic), or abrasive cloths/
paper towems can damage the dishwasher
exterior door. Do not use harsh chemicams,
abrasive cleaners, scouring pads (metal or
pmastic), or abrasive cmothsfpaper towems to
cmean the dishwasher's exterior door panel
Colored Doors
Use only a soft cloth that is lightly dampened with
soapy water.
Stainmess Steem Doors
Use a soft cloth with a nonabrasive cleaner
(preferably a liquid spray) made for cleaning
stainless steel. For best results, apply the
stainless steel cleaner to a cloth and wipe the
surface.
C_ean the Door Gasket
Regularly clean the door gasket with a damp
cloth to remove food particles and other debris.
18
Page 20
Serf He p
Dishwashers may occasionally exhibit problems
that are unreUated to a maUfunction of the
dishwasher itseUf. The following information may
heUp you with a dishwasher problem without your
having to call a repair person.
Dishes do not dry
The rinse agent dispenser may be empty. Check
the rinse agent dispenser and refill it if necessary.
Dishware drying can be accelerated and
enhanced by opening the dishwasher door
slightUy and propping it open with the top rack.
Indicator Hght(s) do not come on
Check the fuse or circuit breaker at your fuse
box/breaker box and replace the fuse or reset the
breaker if necessary.
Dishwasher does not start
Make certain the dishwasher door is shut and
Ratched.
Suds in dishwasher
You may have used the wrong type of
dishwasher detergent. Use only automatic
dishwasher detergents.
White spots or streaks melt on dishes and
gmassware
Go to the Rinse Agent Adjustment section of
this manual for instructions on increasing the
amount of rinse agent.
Rattling noises
Utensils may not be properly arranged.
Machine cycle does not advance to rinse
NOTE: The mnstaHation instructions that came
with your dishwasher will help you with the
following instructions.
The water supply line may be shut off. Check the
water supply valve and open it if it's shut.
Detergent dispenser cover will not shut
You may not be correctly shutting the detergent
dispenser cover, or a cycle was not finished and
should be canceled. Go to the Adding Detergent
and Rinse Agent section of this manual for
instructions on shutting the detergent dispenser
cover. Go to the Operating the Dishwasher
section of this manual for instructions on
canceling a cycle.
Unsatisfactory washing resumts
,, Incorrect amount of detergent.
• Utensils incorrectly arranged or rack
overloaded.
• Spray arm rotation blocked by utensils.
• Spray arm nozzles need cleaning.
• Filters not properly fitted into position.
,, Unsuitable cycle selected.
Water not pumped from dishwasher
Make certain the drain hose isn't kinked, clogged,
or improperly installed. Make certain a portion of
the drain hose is at least 20 inches above the
dishwasher's enclosure floor (see the Installation
Manual). Filters may be clogged. Make certain
the filter system isn't clogged (see the Care and
Maintenance section of this manual). The kitchen
sink drain may be clogged; you may need a
plumber rather than a serviceman for the
dishwasher. If an air gap is installed at sink, it
may be clogged.
Dishwasher runs a mong time
May be due to cold incoming water. Before
starting the dishwasher, open the hot water
faucet at the sink nearest the dishwasher. Run
the water until it runs hot, then turn off the water
and start the dishwasher.
19
Page 21
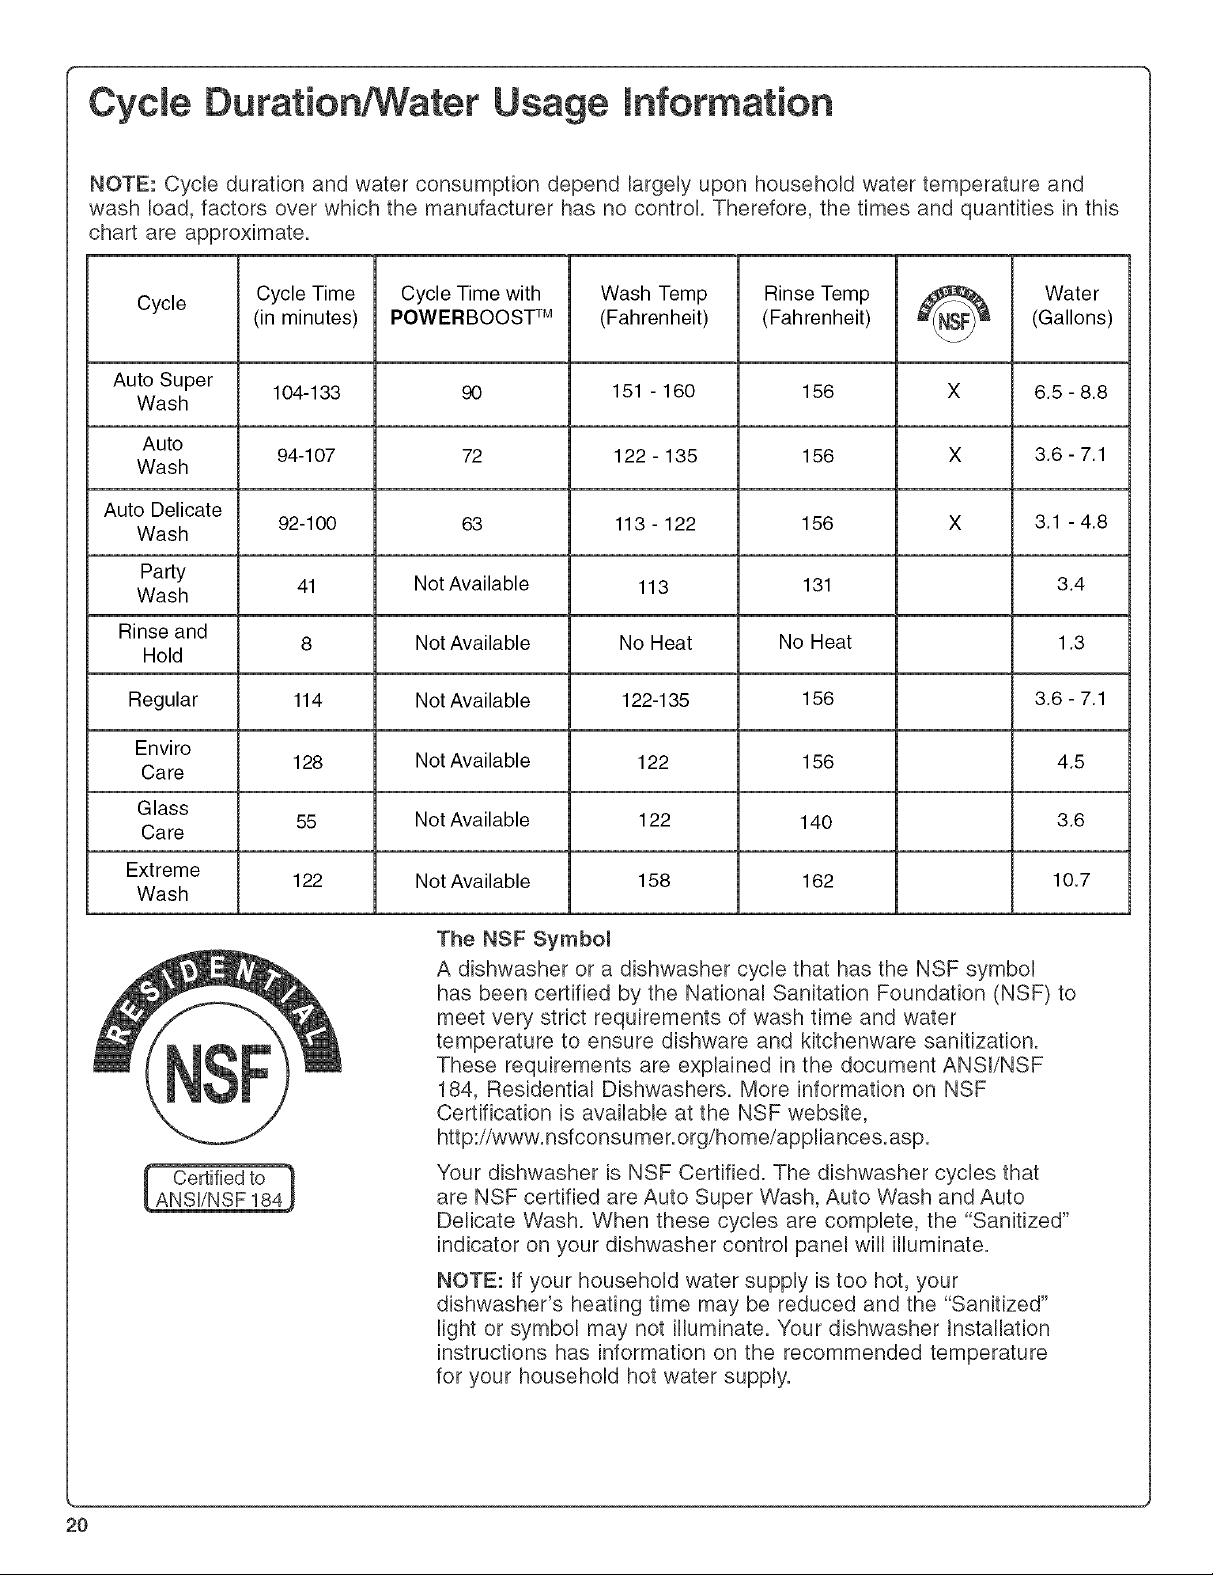
Cycle Duration/Water Usage hformation
NOTE: Cycle duration and water consumption depend largely upon household water temperature and
wash load, factors over which the manufacturer has no control. Therefore, the times and quantities in this
chart are approximate.
Cycle (in minutes) POWERBOOST TM (Fahrenheit) (Fahrenheit) (Gallons)
Auto Super 104-133 90 151 - 160 156 X 6.5 - 8.8
Wash
Auto
Wash
Auto Delicate
Wash
Party
Wash 41 Not Available 113 131 3.4
Rinse and
Hold
Regular 114 Not Available 122-135 156 3.6 - 7.1
Enviro
Care 128 Not Available 122 156 4.5
Glass
Care
Extreme
Wash
Cycle Time Cycle Time with Wash Temp Rinse Temp _ Water
94-107 72 122 - 135 156 X 3.6 - 7.1
92-100 63 113 - 122 156 X 3.1 - 4.8
8 Not Available No Heat No Heat 1.3
55 Not Available 122 140 3.6
122 Not Available 158 162 10.7
The NSF Symbol
A dishwasher or a dishwasher cycle that has the NSF symbol
has been certified by the National Sanitation Foundation (NSF) to
meet very strict requirements of wash time and water
temperature to ensure dishware and kitchenware sanitization.
These requirements are explained in the document ANSI/NSF
184, Residential Dishwashers. More information on NSF
Certification is available at the NSF website,
http://www.nsfconsu mer.org/home/appliances.asp.
Your dishwasher is NSF Certified. The dishwasher cycles that
are NSF certified are Auto Super Wash, Auto Wash and Auto
Delicate Wash. When these cycles are complete, the "Sanitized"
indicator on your dishwasher control panel will illuminate.
NOTE: If your household water supply is too hot, your
dishwasher's heating time may be reduced and the "Sanitized"
light or symbol may not illuminate. Your dishwasher Installation
instructions has information on the recommended temperature
for your household hot water supply.
20
Page 22

Customer Service
Your Bosch dishwasher requires no special care
other than that described in the Care and
Maintenance section, if you are having a problem
with your dishwasher, before calling for service
please refer to the Self Help section. If service is
necessary, contact your dealer or installer or an
authorized service center. Do not attempt to
repair the appliance yourself. Any work performed
by unauthorized personnel may void the warranty.
If you are having a problem with your Bosch
dishwasher and are not pleased with the service
you have received, please take the following
steps (in the order listed below) until the problem
is corrected to your satisfaction:
1. Contact your installer or the Bosch
Authorized Service Contractor in your area.
2. E-mail us from the customer service section
of our website, www.boschappliances.com.
3. Write us at the address below:
BSH Home Appliances, Corp.
6551 McFadden Avenue
Please be sure to include (if you are writing), or
have available (if you are calling), the following
information:
Model number
Serial number
Date of original purchase
,, Date the problem originated
Explanation of the problem
You will find the model and serial number
information on the label located on the right edge
of the dishwasher door as shown in Figure 36.
Also, if you are writing, please include a daytime
phone number where you can be reached.
Please make a copy of your invoice and keep it
with this manual.
Huntington Beach, CA 92649
4. Call us at 1o800-944o2904.
Figure 36
21
Page 23

Statement of Warranties ° Bosch Dishwashers
The warranties provided by BSH Home Appliances ("Bosch") in this Statement of Warranties apply only to
Bosch Dishwashers sold to the first using purchaser by Bosch or its authorized dealers, retailers, or
service centers in the United States or Canada. The Warranties provided herein are not transferrable. TO
OBTAIN WARRANTY SERVICE, CONTACT THE NEAREST BOSCH AUTHORIZED SERVICE CENTER
OR CALL 1o800-944o2904 OR WRITE BSH HOME APPLIANCES CORR DIRECTLY AT 5551 McFADDEN
AVENUE, HUNTINGTON BEACH, CA 92649. BE SURE TO PROVIDE YOUR DISHWASHER'S MODEL,
SERIAL NUMBER, PURCHASE DATE, AND THE SELLER'S NAME AND ADDRESS.
*Date of installation shall refer to the earlier of the date the dishwasher is installed or ten business days
after the delivery date.
1 Year Full Limited Warranty from Date of Installation*: Bosch will repair or replace any component
part that proves defective under conditions of normal home use free of charge, labor and shipping costs
included. Repair service must be performed by an Authorized Bosch Service Center (All cosmetic defects
must be reported within 30 days of installation).
2 Year Limited Warranty from Date of Installation*: Bosch will provide replacement parts free of charge
for any component part that proves defective under conditions of normal home use, labor charges
excluded.
5 Year Limited Warranty on Electronics from Date of Installation*: Bosch will repair or replace any
microprocessor or printed circuit boards that prove defective under conditions of normal home use during
the second through the fifth year from the date of installation, labor charges excluded.
5 Year Limited Warranty from Date of Installation*: Bosch will replace the upper or lower dish rack
(excluding rack components) free of charge, if the rack proves defective in materials or workmanship
under conditions of normal home use during the second through the fifth year, labor charges excluded.
Lifetime Warranty against Stainless Steel Rust Through from Date of Installation: Bosch will replace
your dishwasher with the same model or a current model that is equivalent or better in functionality if the
inner liner should rust through under conditions of normal home use, labor charges excluded. Bosch will
replace the stainless steel door of any dishwasher if the door should rust through under conditions of
normal home use, labor charges excluded.
EXCLUSIONS: This warranty does not cover service calls or repairs to correct the installation of the
dishwasher, to provide instructions on the use of your dishwasher, to replace fuses or to correct plumbing
or the electric wiring in your home or to repair any dishwasher the use of which was in a manner other
than what is normal and customary for home use. In addition, the warranties provided in this Statement
exclude any defects or damage arising from accident, alteration, misuse, abuse, improper installation,
unauthorized service work, external forces beyond Bosch's control, such as fire, flood, and other acts of
God, or installation not in accordance with local electrical or plumbing codes. Labor charges incurred in
the repair or replacement of any dishwasher more than one year from date of installation shall not be
covered by this warranty. Any and all replaced and/or repaired parts shall assume the identity of the
original for purposes of the applicable warranty period.
TO THE EXTENT PERMITTED BY LAW, THIS WARRANTY IS IN LIEU OF ALL OTHER EXPRESS AND
IMPLIED WARRANTIES, INCLUDING THE IMPLIED WARRANTIES OF MERCHANTBIMTY AND
FITNESS FOR A PARTICULAR PURPOSE. BOSCH DOES NOT ASSUME ANY RESPONSIBILITY FOR
INCIDENTAL OR CONSEQUENTIAL DAMAGES.
22
Page 24

Felbitations et merci de Bosch !
Merci d'avoir choisi un lave-vaisseHe Bosch. Vous rejoignez un bon hombre de
consommateurs qui requierent un rendement sHencbux et de qualite superbur de bur Uave-
vaisseHe.
Ce guide a ate ecrit pour uasecurite et le cote pratique° L1nformation contenue ici est tres
importante. Nous recommandons fortement de Hrece guide avant d'utHber UeUave-vabseHe Ua
premiere lois.
Pour en conna'itre plus sur le lave-vaisselle et les accessoires disponibles, ainsi que sur les
autres appareils de haute qualite Bosch, visiter notre site web www.boschappliances.com.
IIest possible de communiquer avec nous pour toutes questions ou tout commentaire au
1°800°944°2904, ou nous ecrire a.°
BSH Home Appliances, Corp.
5551 McFadden Avenue
Huntington Beach, CA 92649
Merci!
Table des mati res
RNSTRUCTRONS DE SECURRT!5 RMPORTANTES ..................................... 2
Composants du lave-vaisselle ..................................................................... 3
Caracteristiques ........................................................................................ 3
Materiaux .................................................................................................. 4
Preparation et chargement du lave-vaisselle ............................................... 5
Chargement du panier a.ustensiles ............................................................ 8
Fonctionnement ......................................................................................... 9
Se.lection d'un cycle de lavage ................................................................................................. 9
Selection d'une option ............................................................................................................. 10
Ajout de detergent et d'agent de ringage ................................................... 13
Entretien .................................................................................................. 15
Aide ......................................................................................................... 19
Information sur la duree du cycle et rutilisation d'eau ............................... 20
Service a la clientele ................................................................................. 21
E_noncede garantie .................................................................................. 22
Page 25

Instructions de s6curit
RISQUE DE BLESSURE/MORT - H peut en
r_sulter des blessures serieuses ou la
mort si ie lave-vaisseile indique darts ce
guide n'est pas actionne correctement ou
d'autres fins. Ne pas utHiser ce lave-
vaisselle d'autres fa_ons que ceiies
indiqu_es darts ce guide.
Dans certains cas, de rhydrogene peut se
produire dans un systeme d'eau chaude non
utJlise pendant plus de deux semaines, tl s'agit
d'un gaz explosJf. Avant d'utJliser rappareJl
branche sur un tel systeme d'eau chaude,
ouvrir tous les robinets d'eau chaude et
laisser couler quelques minutes. Ceci degage
rhydrogene accumul& Comme ce gaz est
explosif, ne pas fumer ni utiliser une fiamme
nue a ce moment.
UtJlJser ce lave=vaJsselle seulement pour
rusage auquel Jlest destine, soJt laver la
vaJsselle et les ustensJles.
Le lave=vaisselle est dote d'un guide qui
comprend les instructions d'installation et les
instructions d'utilisation et d'entretien. Lire
et comprendre toutes les instructions avant
d'utiliser le lave=vaisselle.
UtJliser seulement les detergents ou les
agents de ringage destines aux lave=vaisselle
et les tenir hors de la portee des enfants.
Au moment de charger les articles :
Reperer les articles affQtes afin qu'ils
n'endommagent pas le joint de porte.
Charger les couteaux et articles affQtes
avec les manches vers le HAUT pour ne
passe blesser.
Ne pas laver des articles en plastique & moins
qu'ils ne portent la mention <<vontau lave=
vaisselle>>. Pour ceux qui ne sont pas
marques, verifier les recommandatJons du
fabricant.
Ne pas actionner rappareil sJ les panneaux
lateraux ne sont pas en place.
Ne pas jouer ni outrepasser les contr61es et
les verrouillages.
Ne pas abuser, s'asseoir ni se tenir debout
sur la porte ni les paniers.
RetJrer la porte au moment de jeter un vieux
lave=vaJsselle.
Pour evJter tout dommage possible et la
moisissure sur le plancher, ne pas laisser
reau s'accumuler sous ou autour du lave=
vaJsselle.
RISQUE DE CHOC ELECTRIQUE - ii peut
resuiter un risque de choc electrique si
l'aHmentatJon electrique au lave-vaJsseHe
indique darts ce guide n'est pas raise a la
terre adequatement. Ne pas utHiser
FappareH en cas d'incertitude
relativement a la rnise a la terre ou a une
installation inadequate,
iNSTRUCTiONS DE MISE _, LA TERRE
Cet appareJl dolt _tre mJs & la terre sur un
systeme de c&blage permanent en metal ou un
conducteur de raise a la terre d'equipement doit
6tre achemine avec les conducteurs de circuit et
branche sur la borne de mise & la terre
d'equipement ou au fil du lave=vaisselle. Voir les
Instructions d'installation comprises avec le
lave-vaisselle pour plus de d6tails sur les
exigences electriques.
Pour r_duire le risque de blessures, ne pas
laisser les enfants jouer avec ou dans le lave=
vaJsselle.
CONSERVER CES INSTRUCTIONS !
Page 26

Composants du lave°vaisselle
Joint de porte
Panier supereiur
Bras gicleur du panier
superieur
Bras gicJeur du
panier inferieur
Partier inferieur
Systeme de
filtration (darts
-- ie plancher du k
lave-vaisselle)
[
Oistributeur de_
detergent et d'agent de
rin_age
Caract ristiques
Systeme de r@duction de bruit AVS Mc :
systeme & deux pompes, moteur & suspension et
triple isolation rendent le lave=vaJsselle le plus
silencieux en Am6rique du Nord.
Sechage par condensation : ringage final &
temperature elevee, cuve en acier inoxydable
faJble temp@rature et I'actJon de I'agent de ringage
donnent un sechage hygienique, efficace
energiquement et economique.
Affichage nurnerqiue a rebouts : affichage
num@rique comptant a rebours le temps residuel
d'un cycle et aussi utilis@ pour regler les options.
Lavage exact : reduction d'eau, de la
consommation d'energie et du bruit en distribuant
de fagon alternative reau par les bras superieur,
inferieur ou les deux.
Faibie utilisation d'eau : aussJ peu que 3,1
gallons au cycle delJcat automatJque.
Systeme de filtration : 4 filtres assure la
distribution d'eau propre et protegent la pompe
principale et de drainage des objets etrangers.
Chauffe-eau Flow-ThroughMC: chauffe reau
jusqu'a 161 °R
ustensiies
Plaque signal_tique
Paniers en nylon : elimine les coupures et sont
dot@s d'une garantie de 5 ans.
Voyant d'agent de ringage : raffichage indJque
d'ajouter de ragent de ringage, au besoin.
Voyant hygienique : indiquant que la vaJsselle est
desJnfectee selon les normes de la FondatJon
sanitaJre natJonale.
SENSOTRONJC Mc: verifie la condition de I'eau et
decide si un second remplissage d'eau fraTche est
necessaire.
Grande cuve en acier inoxydabie : surface
interieure sans rouille, hygienique avec garantie &
vie.
Arr@t d'eau : disposJtif de securite qui arr6te le
debit d'eau, sJ de reau est detectee a la base du
lave=vaJsselle.
Chaleur de sechage additionnelle : augmente
la temperature de reau de ringage, pour un
meilieur sechage.
IVlanchons pour tasses : repliables pouvant
accommoder tasses et grands ustensJles.
Page 27

Caract ,ristiques
(suite)
Mat6riaux
Signal de fin de cycle : retentJt Iorsque le laveo
vaisselle a termin@ ReRavage et Resechage de Ra
vaisselle.
Differe : pour differer la mise en marche d'un
cycle de lavage jusqu'& 24 heures.
Partier a couteaux : congu pour bien maintenir
les ustensJles et Fargenterie
Partier sup_rieur RAOKMATIC Mca hauteur
reglabme : abaisser le panier sup@rieur pour
accommoder les grands articles ou le soulever
pour plus d'espace dans le panier inf6rieur.
Dents a rabat des paniers : pour encore plus de
commodit&
POWERBOOSTMC: Uon peut reduJre la duree
pour completer un cycle de lavage en
prechauffant.
INFOLIGHTMC: voyant DEL rouge eclaJrant le
plancher pour indiquer que Fappareil fonctionne.
OPTIDRyMc: detecte sJ I'appareJl a peu d'agent
de ringage et regle automatJquement le s@chage.
Contr61es CLEARTOUCH Mc : se nettoJent
facJlement et emp@chent FactJvatJon accJdentelle.
REMARQUE : avant d'utiliser le lave-vaisselle la
premiere fois, lire cette section. Certains articles
ne conviennent pas au lave-vaisselle et doivent
6tre laves & la main, d'autres requierent un
emplacement special. Communiquer avec le
fabricant.
Recommandes
Aiurninium : anodise colore peut a. la Iongue
s'estomper. Les mineraux dans Feau peuvent
causer des taches pouvant habituellement 6tre
enlevees & I'aide d'un tampon en laine d'acier
aveo savon.
Porcelaine, cristal, fafence : certaines pieces
peintes & la main peuvent se decolorer ou tacher.
Laver & la main. Positionner les verres fragiles
afin qu'ils ne se touchent pas ni ne touchent aux
autres pieces pendant le lavage.
Enduit non adhesif : appliquer un peu d'huile
vegetale sur les surfaces apres le s_chage.
Piastique : s'assurer que les articles vont au
laveovaisselle.
Acier inoxydable, argenterie : ne doivent pas
entrer en contact avec d'autres pieces.
Fixation de partier : permet d'ajouter des
manchons repliables pour le panier inferieur.
Non recommand#s
Acryiique : des craquelures peuvent se produire.
Pieces collees : Fadhesif collant les joints de
pieces en plastique, bois, os, cuivre, etain, etc.
peut se decoller.
Manche en os : peut se s_parer.
Fer : rouille, laver a la main et ass_cher
immediatement.
Articles n'aHant pas au lave-vaisseHe : le laveo
vaisselle est destine au lavage d'articles de
cuisine SEULEMENT.
Etain, laiton, bronze: ternis. Laver a la main et
assecher immediatement
Fer blanc : rouille. Laver a la main et assecher
imm_diatement.
Bois : les bols, ustensiles, manches en bois
peuvent craqueler, voiler et perdre leur fini.
4
Page 28

et chargement
Preparation du lave=vaisselte
Ne pas prelaver les articles peu sales.
Enlever les grosses particules d'aliments, os,
graines, cure-dents et graisse.
Les articles avec taches incrustees necessJtent
un trempage et un recurage a la main.
Chargement du lave=vaisselle
DOMI_AGE AU LAVEoVAtSSELLE : charger
FappareH avec des objets comme du
papJer, sac de plastJque, materiau×
d'embaHage, etc. peuvent endommager le
lave-vaisseHeo Ne pas mettre des articles
autres que de la vaJsseHe et des
ustensHes pouvant aHer au lave-vaisseHe.
Verifier la rubrique IVlateriau× dans ce guide
concernant les articles allant au lave-vaisselle.
Pour soulever ie partier sup@rieur :
1. Tirer le panier hors du lave-vaJsselle jusqu'a
la butee.
2. SaJsJr le haut du partier au=dessus des
poJgnees RAOKMATIC Mcet tJrer vers le haut
comme b_la
figure 2
jusqu'a ce que
les poignees
RAOKMATIC Mc
se verrouJllent
en position
(il n'est pas
necessaire de
presser sur les
poJgnees RAOKMATIC Mc Figure 2
pour soulever le panier).
REIViARQUE : avant de pousser le panier
dans rappareJl, s'assurer que la hauteur est
la m6me des deux c6tes. Autrement, la porte
ne se fermera pas et le bras gicleur peut ne
passe brancher sur ralimentatJon en eau.
3. Pousser le panier dans le lave=vaJsselle.
Charger seulement des articles allant au lave-
vaisselle.
Charger les articles afin que reau les atteigne
tous.
Placer les casseroles, tasses, bols et verres &
renvers dans les paniers.
Separer les articles fabriques de metaux
diff6rents.
Accessoires partier superieur
Partier superieur RACKMATIC Mca hauteur
reglable
Peut 6tre baisse pour accommoder les grands
articles dans le panier sup_rieur ou soulever pour
plus d'espace dans le panier inferieur.
Pour abaisser le partier superieur :
1. Tirer le panier hors du lave-vaisselle jusqu'a
la but6e.
2. Presser les
poignees
RAOKMATIC Mc
vers rinterieur
comme a la
figure 1 et
laisser le
panier tomber.
Figure 1
Dents a rabat
Rabattre les dents pour facJlJter le chargement
des paniers.
SaisJr la tJge
comme a la
figure 3 et
replier vers le
bas.
Figure 3
lVlanchons a tasses
En plus des tasses, les manchons peuvent tenJr
de grands articles
Saisir le
comme a la fi,
4 et les replier.
Placer les tasses
renvers dans
les manchons.
Figure 4
Page 29

Preparation et chargement (s. te
Accessoires partier superieur
Partier a ustensiies
Le panbr & couteau est une tabbtte additJonnelle
pour placer bs couteaux et autres grands
ustensJbs, tl est fixe sur le bord du panbr
superbur.
Placer les
couteaux avec la
lame vers le bas,
figure 5.
Figure 5
Chargement du partier superieur
Figure 6
Figure 6 indiquant
comment placer une
charge typique dans
le panier superieur.
Figure 7
Figure 7
indiquant
comment
placer une
charge
typique de
10 couverts
dans le
panier
sup_rieur.
Figure 8
indiquant
comment placer
une charge de
12 couverts
(AHAM DW-1 10 couverts)
Figure 8
REMARQUE : en poussant le panbr supedeur
dans le lave-vabselb, le pousser au fond de la
cuve pour que le bras gbbur se branche sur
I'alimentatJon en eau.
Accessoires partier inferieur
Dents & rabat
Rabattre bs dents pour facJliter le chargement
des panbrs.
Figure 9
Saisir la tige
comme a. la
figure 9 et
replier vers le
bas.
Fixation du partier
Le panJer est dote de deux manchons 8. tasses
additionnels pour placer bs tasses et les grands
ustensJbs de cubine, tl est installe sur le bord
arriere du panier inferieur.
Assemblage du partier
Faire glisser la fixation de panier vers Hnterieur,
en gardant bs Iongues dents & I'int_rieur du
panier metallique superieur (a) eta I'exterieur du
panier metallique inf6rieur (b), voir figure 10.
Les petites dents s'encbnchent en place, figure
12.
Figure 11
Figure 10
Vue du
coin
arri_.re
du
panier
J
Figure 12
UtiHsation du partier
Pour utiliser le panier,
replier le manchon a.
tasses et y placer les
articles a laver, figure
12.
(AHAM DW-1 12 couverts)
6
Page 30

Preparation et chargement
Chargement du partier inf rieur
REMARQUE : ne pas obstruer revent du cSte
droit de la cuve. Placer les grands articles
comme planche a decouper, t61e a biscuits du
c6t_ gauche, au centre ou a rardere du panier.
Placer les Figure 13
grands articles
dans le panier
infedeur. Mettre
les casseroles &
renvers. Figure
13 indiquant une
charge typique
dans le panier
infedeur.
Figure 14
indiquant une
charge de 10
couverts dans
le panier
inferieur.
Figure 14
4. tnserer le bras
pour grands
articles dans la
sortie gicleur du
panier superieur,
le tourner dans le
sens horaire pour
qu'il se verrouille
en place, figure
16.
REMARQUE : ne pas obstruer I'event du c6te
droit de la cuve. Placer les grands articles
comme planche a. decouper, t61e a biscuits du
c6te gauche, au centre ou a. rarriere du panier.
5. Placer les
grands articles
dans le panier
inferieur, figure
17.
Figure 16
Figure !7
(AHAM DW-1 10 couverts)
Figure 15
indiquant une
charge de 12
couverts
dans le panier
inferieur.
Lorsque le panier inferieur est charge, le
pousser dans le lave-vaisselle.
Pour charger de grands articles :
1. Enlever le partier superieur vide et le tirant
hors du lave=vaisselle jusqu'a, la butee.
2. Tirer le panier vers le haut et le sortir
jusqu'a ce que les roulettes se degagent
completement des guides. Mettre le panier
de c6te.
3. Repousser les guides dans rappareil.
Figure 15
(AHAM DW-1 12 couverts)
DOIVllVlAGE ALl LAVEoVAISSELLE :
reinstaller le partier superieur sans
enlever ie bras pour grands articles peut
endornmager FappareiL
Pour enlever le bras gicleur et remettre
l'appareii a son etat initial :
1. Tourner le bras gicleur dans le sens contre
horaire et renlever de la sortie.
2. Reprendre le panier superieur.
3. incliner le panier superieur vers le haut et
positionner les roulettes sur les guides.
4. Continuer de pousser le panier superieur
jusqu'a ce que les roulettes soient sur les
guides.
5. Pousser dans le lave=vaisselle.
Page 31

Chargement du partier ustensiles
Pour separer ie partier a ustensiles :
1. SaJsJr le
RISQUE DE BLESSURES : couteaux et
autres objets affQtes places avec les
manches vers mebas darts mepartier peut
causer des blessures. Lorsque possible,
ne pas charger ces articles ainsi. Ne pas
iaisser les enfants manipuier ni jouer avec
des ustensiies affQt_s.
Garder Rescouteaux et autres objets affOtes hors
de la portee des enfants.
REIViARQUE : le couverde du panier &
ustensiles peut 6tre pli6 pour accommoder de
grands objets.
Avec le couvercle abaiss_, charger Bepanier
ustensiles selon les suggestions & la figure 18 en
plagant les couteaux avec les manches vers Re
haut et les cuHleres et fourchettes avec les
manches vers Rebas
Figure 18
panier et
faire glisser
dans des
directions
opposees,
figure 19a.
2. S@arer les
deux demies,
figure 19b.
Figure 19a
Figure 19b
Si de grands articles ou de forme variee sont
charges dans le panier & ustensiles avec
couvercle releve, les charger afin qu'ils ne soient
pas coller les uns aux autres. Mettre les manches
de couteaux et objets affOtes vers le haut.
Le panier se separe pour faire deux demies
pouvant _tre plac_es de differentes positions
dans le panier inferieur pour maximiser la charge.
3. Voir figure 20 pour les suggestions
d'emplacement des deux demies.
Figure 20
Page 32

Fonctionnement
Menu/ok Start
ContrSles, touches et affichage du lave-vaisselle
Avant de commencer
Contr61es a effleurement
Ce nouveau lave-vaisselle est dote de la toute
derniere technologb CLEARTOUCH Me.
Afln d'activer la touche, placer tout le doigt sur la
touche desir6e et maintenir 3 secondes. La tenue
3 secondes est destinee a. empScher ractivation
accidentelb.
S_lection de la langue
Avant d'utJliser le lave-vaJsselb, selectJonner la
langue.
,S,la premiere mbe en drcuit de rappareJl, recran
de s61ection de langue (voir ci-dessus,
Contr6bs, touches et affichage du lave-
vaisseHe) figure.
Langues disponibles :
1. AE = anglais americain
2. CF = fran£ais canadien
3. MS = espagnol mexicain
L'abbreviation ,,AE,, clignote. Pour une langue
differente, presser - ou + jusqu'& ce que la langue
desiree clignote.
Sauvegarder en pressant la touche MENU/OK.
Si I'on selectionne la mauvaise langue :
1. Presser ON/OFF pour mettre Fappareil hors
circuit.
2. Presser ON/OFF pour mettre en circuit.
3. Presser MENU/OK six fob pour activer
recran sebction de langue.
4. Si ton change la langue, presser MENU/OK
pour sauvegarder.
5. Au menu options, I'on peut revenir au menu
principal en tout temps en pressant START.
Voir Selection des options du lave-vaisselle
dans ce guide pour plus de details.
S_lection d'un cycle de lavage
Apres avoir ajoute detergent et agent de rin£age
tel qu'indique & A]out de detergent et d'agent
de rin_age, mettre le lave-vaisselle en circuit en
pressant ON/OFR Uaffichage indique le cycle par
defaut davage automatique_.
Pour cholslr un cycle different, presser - ou +
jusqu'& ce que Faffichage indlque le cycle desir&
DOMMAGE POSSIBLE A LA VAtSSELLE :
les articles delicats peuvent atre
endommages. Ne pas les laver darts le
laveovaisseHe s'H y a un risque que ces
articles soient endornmages.
Toujours s'assurer que la vabselle va au lave-
vaisselle. Voir Materiaux pour plus de details.
S_lection du cycle de lavage
Les cycles accessibles de ce menu sont :
Lavage super automatique
Nettoie les artbles avec taches tenaces qui
requierent un trempage ou un recurage a la main.
Lavage automatique (par defaut)
Nettoie bs articles avec taches moins tenaces.
Lavage delicat automatique
Nettoie les artbles delicats et I'argenterie. Un
lavage a la main peut 6tre pref6rable pour ces
articles.
Lavage fate
Nettoie la vaisselle peu sale et reduit le temps de
lavage. Utiliser ce cycle pour nettoyer les verres
et la vaisselle pouvant 6tre necessaires pendant
un 6v6nement.
Ringage et attente
Permet de rincer les aliments d'une charge
partielb et attendre jusqu'a ce que le laveo
vaisselle soit pbin.
Page 33

Fonctionnement (,,,its)
Selection des options
Les reglages par defaut en usine pour toutes les
options devraient donner de bons resultats.
S_lection d'options
Acceder aux options disponibles depuis Remenu
options, comme suit :
Differe
Permet de retarder Ra raise en marche du cycle
choisJ jusqu'& 24 h, en tranches de 30 minutes.
REMARQUE :du menu options, Fon peut
retourner au menu principal en tout temps en
pressant START.
.
Ouvrir suffisamment la porte pour exposer le
panneau de contr61es.
Presser ON/OFR
2.
3.
Presser MENU/OK une fois pour afficher
Foption differ6e.
4.
Presser + ou - jusqu'a ce que Faffichage
indique la duree desir6e pour le differ&
5.
Apres avoir choisi la duree, presser MENU/
OK pour sauvegarder le reglage. Uaffichage
indique <<Value Stored>> (valeur en memoire)
et retourne au menu principal. Si I'on n'a pas
choisi une duree, presser START pour
revenir au menu principal.
.
Choisir le cycle de lavage desir6 en pressant
-or+.
7.
Fermer la porte. Lorsque la duree s'est
ecoulee, le lave=vaisselle commence
automatiquement jusqu'a la fin du cycle.
.
Uon peut changer le dJff6r6 et/ou le cycle en
tout temps pendant le differ&
POWERBOOST Mc
Uon peut reduire la dur6e pour completer un cycle
de lavage en prechauffant.
REMARQUE : du menu options, Fon peut
retourner au menu principal en tout temps en
pressant START.
1. Ouvrir suffisamment la porte pour exposer le
panneau de contr61es.
2. Presser ON/OFR
3. Presser MENU/OK deux foJs pour afficher
I'option POWERBOOST.
4. Cette option peut _tre mise en ou hors
circuit en pressant ÷.
5. Apres avoir presser + pour mettre
POWERBOOST en circuit, presser MENU/
OK pour sauvegarder le reglage. L'affichage
indique <<ValueStored>> (valeur en memoire)
et retourne au menu principal. Si Fon n'a
pas presse + pour changer le reglage en
cours, presser START pour revenir au
menu principal.
6. Uon peut choisir le cycle de lavage desir6
en pressant - or +.
7. Presser START et fermer la porte pour
activer le cycle.
Sechage extra
Permet de regler la temperature du rin_age final
pour am61iorer le sechage ou economiser
Fenergie.
REMARQUE :du menu options, Fon peut
retourner au menu principal en tout temps en
pressant START.
1. Ouvrir suffisamment la porte pour exposer le
panneau de contr61es.
2. Presser ON/OFR
3. Presser MENU/OK trois fois pour obtenir le
programme de s_chage en cours.
4. Presser + ou - pour passer en sequence les
options suivantes :
, Sechage economique - economise
Fenergie.
, Sechage normal - reglage par defaut en
usine.
, Sechage extra = am61iore le rendement de
sechage.
5. Apres avoir choisi I'option de sechage
desir6e, presser MENU/OK pour
sauvegarder le reglage. Uaffichage indique
<<Value Stored>> (valeur en memoire) et
retourne au menu principal. Si I'on n'a pas
choisi une option differente, presser START
pour revenir au menu principal.
6. Choisir le cycle de lavage desir6 en pressant
-or+.
7. Presser START et fermer la porte pour
activer le cycle.
10
Page 34

Fonctionnement (,,,ire
Signal de fin
Le lave=vaisselle emet une tonalite (5 fois) pour
indiquer que la vaisselle est propre et seche. L'on
peut changer le volume ou rannuler.
REIVlARQUE :du menu options, ron peut
retourner au menu principal en tout temps en
pressant START.
1. Ouvrir suffisamment la porte pour exposer le
panneau de contr61es.
2. Presser ON/OFR
3. Presser MENU/OK quatre foJs pour afficher
le reglage du signal en cours.
4. Presser + ou - pour la valeur desJr6e.
Signal 6 - le plus fort (par defaut).
Signal 0 - signal annule
5. Apres avoir choisi le volume d6sir6, presser
MENU/OK pour sauvegarder le reglage.
Uaffichage indique <<ValueStored>> (valeur en
memoire) et retourne au menu principal. Si
ron n'a pas changer le volume, presser
START pour revenir au menu principal.
6. Uon peut choisir le cycle de lavage d6sir6
en pressant - or +.
7. Presser START et fermer la porte pour
activer le cycle.
Reglage de i'agent de tin,age
Permet de regler la quantite d'agent de nn_age
que distribue le lave-vaisselle pour contr61er les
taches et les rayures.
RE[VIARQUE :du menu options, ton peut
retourner au menu principal en tout temps en
pressant START.
1. Ouvrir suffisamment la porte pour exposer le
panneau de contr61es.
2. Presser ON/OFR
3. Press the MENU/OK button five times to
display the current rinse agent setting.
4. Presser + ou - pour afficher la quantite
d'agent de ringage desir6e.
5. Si les verres sont taches, presser ÷ pour
augmenter la quantite. S'ils sont rayes,
presser - pour diminuer la quantite.
Agent de ringage 6 - quantite maximale
disponible
Agent de ringaget 4 =par defaut
Agent de ringage 0 - agent de ringage
annule
6. Apres avoir choisi la quantite desiree,
presser MENU/OK pour sauvegarder le
reglage. L'affichage indique <<ValueStored>>
(valeur en memoire) et retourne au menu
principal. Si ron n'a pas changer la quantite,
presser START pour revenir au menu
principal.
7. Uon peut choisir le cycle de lavage desir6 en
pressant - or +.
8. Presser START et fermer la porte pour
activer le cycle.
S_,lection de iangue pour Faffichage
Permet de choJsJr la langue de raffichage. A la
premiere utJlisatJon, cet ecran figure
automatiquement.
REIVIARQUE :du menu options, ton peut
retourner au menu principal en tout temps en
pressant START.
1. Ouvrir suffisamment la porte pour exposer le
panneau de contr61es.
2. Presser ON/OFR
3. Presser MENU/OK sJxfoJs pour afficher le
reglage du signal en cours.
4. Les langues dJsponibles sont :
AE = anglais americaJn
CF = frangais canadien
MS = espagnol mexicain
5. Presser + ou - jusqu'a ce que la langue
desJr6e figure.
6. Apres avoir choisJ la langue desiree, presser
MENU/OK pour sauvegarder le reglage.
Udfichage indique <<ValueStored>> (valeur en
memoire) et retourne au menu principal. Si
ton n'a pas changer la langue, presser
START pour revenir au menu principal.
7. Uon peut choisJr le cycle de lavage desJr6 en
pressant - or +.
8. Presser START et fermer la porte pour
activer le cycle.
11
Page 35

Fonctionnement (,,,its)
Programmes standard
Les cycles de lavage disponibles qui sont dans
ce menu dissimule sont des cycles sp_ciaux
pouvant 6tre utilis_s & des fins speciales.
REMARQUE :du menu options, I'on peut
retourner au menu principal en tout temps en
pressant START.
1. Ouvrir suffisamment la porte pour exposer le
panneau de contr61es.
2. Presser ON/OFR
.
Presser MENU/OK sept fois pour afficher
<<STANDARD PROGRAMS>> (programmes
standard).
.
Une fois <<STANDARD PROGRAMS>> affiche,
presser + une fois pour afficher les cycles
disponibles qui sent :
R_gulier - cycle de lavage normal
Environnement - reduit la consommation
d'eau et d'energie
Verre - reduit la temperature pour
minimiser les dommages aux verres.
Lavage extr6me - pour taches d'aliments
tenaces difficiles & enlever
5. Uon peut choisir le cycle de lavage desir6 en
pressant - or +.
6. Lorsque le reglage d6sir_ s'affiche, presser
START et fermer la porte pour activer le
cycle.
Mise en marche du lave=vaisselle
Lorsque le cycle approprie et les options figurent
I'affichage, I'on peut ajouter le detergent et
I'agent de ringage comme indique a Ajout de
detergent et d'agent de rin£age, presser
START et fermer la porte
Apres avoir presse START, I'affichage indique :
<<Close the door>> (fermer la porte).
° Temps estime qui s'ajuste pendant le cycle
en fonction de la temperature de I'eau qui
entre et des options choisies.
° Nora du cycle en cours
<<Return>>(retour) (permet de choisir un
autre cycle).
Fermer la porte. Le lave=vaisselle commence et
fonctionne jusqu'& la fin du cycle. Lorsque la
porte est fermee, le voyant INFOLIGHT Mc
s'allume et projete un cercle rouge sur le
plancher pour indiquer que I'appareil fonctionne.
A la fin du cycle, le lave-vaisselle emet une
tonalite (5 fois). Uaffichage indique brievement
<<Clean>>(propre) et le voyant INFOLIGHT s'eteint
automatiquement.
REMARQUE : pour accelerer et maximiser le
sechage, ouvrir la porte, tirer le panier superieur
de quelques pouces pour maintenir la porte
ouverte legerement. Appuyer la porte centre le
panier.
interruption de cycle
RISQUE DE BROLURE : risque de
brQlures serieuses si ron ouvre
promptement la porte pendant un cycle de
iavage ou rin£age° Ne pas ouvrir
completement la porte pendant au moins
10 secondes ou jusqu'a ce que les bruits
d'eau cessent.
Ouvrir suffisamment le porte pour exposer le
panneau de contr61e. Uaffichage indique :
<<Cancel Program>> (programme annule).
<<Close the door>> (fermer la porte).
Le temps residuel du cycle
Le cycle selectionn&
La phase du cycle.
Pour continuer le cycle, fermer la porte. Le lave=
vaisselle reprend automatiquement et poursuit le
cycle choisi.
12
Page 36

Fonctionnement
Ajout de d tergent et
d'agent de rin£age
Annulation d'un cycle
Ouvrir suffisamment Reporte pour exposer le
panneau de contr6Ue. L'affichage indique •
• <<Cancel Program>> (programme annuUe).
• <<Close the door>> (fermer Baporte).
• Le temps r_siduel du cycUe
• Le cycUe selectionn&
• La phase du cycUe.
Presser - , Faffichage indique : <<Todrain - dose
the door>> (pour drainer, fermer Raporte).
Fermer Raporte du Rave-vaissefle.
Lorsque BeRave-vaisseHe a draine, iRemet une
tonafite (5 fois).
Ouvrir Baporte. L'affichage indique brievement
<<Clean>>(propre) et se met automatiquement
hors circuit apres 5 secondes.
D charger ie lave=vaisseHe
tl est recommander de decharger le panier
inferieur d'abord.
Enlever et decharger le(s) panier(s) a. ustensiles,
faciles & retirer.
Decharger le panier superieur.
D tergent
DOMMAGE AU LAVE-VAtSSELLE :
VutHisation de detergent ama main peut
endommager VappareiL Ne pas utHiser de
detergent pour mayer mavaisseHe ama main
darts memave-vaisseHe.
Utiliser seulement du d_tergent specifiquement
con£u pour lave-vaisselle.
DOMAMGE _, LA VAtSSELLE : trop de
detergent darts une eau douce peut causer
des rayures. Ne pas trop utiHser de
detergent si Veau est douce.
Le distributeur de detergent est dote de lignes
pour mesurer la quantite de 15 ml et 25 ml. Avec
45 ml, le distributeur est completement rempli.
REMARQUE : en cas de doute sur la qualite de
Feau, utiliser 15 ml de detergent. Augmenter la
quantite au besoin au minimum necessaire pour
avoir une vaissefle et des verres propres.
Utifiser les lignes du distributeur de detergent
comme guide pour mesurer les quantites de
detergent recommandees au tableau 1.
Tabteau 1 - Quantit_ recommand_e
Type d'eau
Cycle Unite de Camcaire Moyenne Douce
mavage mesure
Lavage mm 45 45 25-45
super
auto C. a ta, 3,5 3,5 1,75 to 3,5
Lavage
auto C. ata, 1,75to3,5 1,75 1 to 1,75
D_,licat
auto C. a ta. 1.75 1 to 1.75 1
Lavage mm 15-25 15 15
f_te C. a ta, 1 to 1.75 1 1
Rin£age
et Auoune Aucune Auoune
attente
mJ 25-45 25 15-25
ml 25 15-25 15
13
Page 37

A]out de d tergent et d'agent de tin,age
Agent de rin£age
Toujours utifiser un agent de ringage fiquide,
m_me si le detergent contient un agent de
rin_age ou un additif de sechage afin d'obtenir un
bon sechage et un bon entretien de la vaisselle et
du lave=vaisselle.
Uaffichage indique <<Refill Rinse Agenb> (rempfir
d'agent de rin_age) Iorsque le godet dolt _tre
rempli. Lorsque ajoute, <<Refill Rinse Agent>>
disparaft.
Filting the Detergent and Rinse
Agent Dispenser
The detergent and rinse agent dispenser can be
filled from two positions: the lowered position,
with the dishwasher door fully open or the raised
position, from a more comfortable posture with
the dishwasher door half-open.
Remplissage du distributeur de detergent
(position abaissee)
1. Remplir tel qu'il est indique au tableau 1.
2. Faire gfisser le couvercle, figure 21, fieche 1
et presser fermement, figure 21, fleche 2
pour qu'il s'enclenche.
Remplissage du distributeur d'agent de
ringage (position abaissee)
1. Presser le bouton de degagement bleu,
figure 23 et soulever le couvercle.
Figure 23
2. Ajouter de Fagent de rin_age liquide, figure
24a jusqu'& ce que le reservoir soit plein.
Figure 24
u
Figure 21
Ouvrir le couverc_e du distributeur de
d_tergent (position inferieure)
REMARQUE : presser sur la languette de
degagement bleue n'ouvre pas le couverde.
=
Remettre le couvercle & sa position ferm_e
et presser fermement pour qu'il s'enclenche.
RE[WARQUE : a figure 24b repr6sente un
r6servolr d'agent de ringage entierement
vide.
=
Remplir le distributeur Iorsque le voyant du
reservoir d'agent de ringage, figure 24b,
commence a montrer un fond argente avec
des Iignes noires ou Iorsque le voyant <<Refill
Rinse Agent>> (remplir agent de rin_age)
figure sur le panneau de contr61e.
REMARQUE : une fois le reservoir rempli et
que la porte est fermee, le voyant s'eteint
apres quelques minutes.
14
Page 38

Ajout de d tergent et
d'agent de tin,age
Remplissage du distributeur de detergent
(position eievee)
1. Ouvrir la porte a.un angle d'environ 45 °, a.mP
chemin.
REMARQUE : le couvercle du distributeur
doit 6tre ouvert pour que le distributeur soit
plac_ en position 6levee.
2. Presser le Figure 25
bouton bleu
sur Rec6te
droit, figure
25. Le
couvercle
et le godet
se placent
vers le haut
en position
6levee.
T_ches d'entretien
Certaines zones du lave-vaisselle requierent un
entretien occasionnel. Les t&ches sont faciles
effectuer et assurent un rendement sup_rieur
constant du lave-vaisselle.
Essuyer les d_versements et eclaboussure_
REMARQUE : Feau stagnante autour et sous le
lave-vaisselle peut causer de la moisissure. Ne
pas laisser Feau demeurer autour et sous
Fappareil.
Ueau peut occasionnellement eclabousser,
surtout si I'on a interrompu un cycle ou ouvert la
porte du lave-vaisselle pendant un cycle. Essuyer
immediatement Feau.
Hiveriser le lave-vaisseHe
,
Remplir selon le tableau 1.
4.
Faire glisser le couvercle, figure 26, fieche 1
et presser fermement, figure 26, fleche 2
afin que
le Figure 26
couvercle
s'endenche
en place.
RempHssage du distributeur d'agent de
rin£age (position elevee)
1. Ouvrir la porte & un angle d'environ 45°, a.
mi-chemin.
2. Ouvrir le couverde du distributeur d'agent de
ringage.
3. Tirer le goder
vers le haut Figure 27
pourqu'il
s'enclenche
en position
elevee,
comme
indique par la
fleche de la
figure 27.
DOMIVIAGE POSSIBLE AU LAVE-VAISSELLE :
les temperatures froides peuvent
endommager le lave-vaisseHe. Ne pas laisser
l'eau demeurer darts FaHmentation en eau du
lave-vaisseHe ou drainer les systemes
3endant de Iongues periodes a des
temperatures ires froides.
Si le lave-vaisselle n'est pas utilise pendant une
Iongue periode darts un endroit oQ il peut y avoir
des temperatures tres froides (ex. : chalet ou
pendant les vacances), il faut drainer Feau de
Finterieur du lave-vaisselle.
15
Page 39

Entretien (s.ite
V_rifier et nettoyer les gicleurs
Verifier occasionnellement les bras gicleurs pour
s'assurer qu'il n'y a pas d'obstruction dans les
gicleurs. Hfaut retirer le bras pour verifier.
Pour eniever ie bras gicleur superieur :
1. RetJrer le panier supereiur vide du lave=
vaJsselle.
2. Mettre le panier & Fenvers. Le bras superieur
est maJntenu en position avec un ecrou de
verrouillage, figure 28a. Le tourner dans le
sens contre horaire 1/8 de tour et Fenlever,
figure 28b pour degager le bras gicleur.
Figure 31
4. Rechercher toute obstruction dans le gicleur.
5. S'il doit _tre nettoye, le passer a Feau
cou rante.
Pour reJnstaHer ie bras gicleur superieur :
1. Remettre Bebras gJcleur & sa position initiale.
2. Remettre Fecrou de verrouillage en position
et le tourner 1/8 de tour dans le sens horaire.
3. Remettre le panier superieur dans les guides
de roulettes.
Pour eniever le bras gicleur inf_rieur :
1. RetJrer le panJer Jnferieur vide de la cuve.
2. Saisir le bras gideur inferieur, figure 30.
Figure 30
3. Retirer le bras gicleur, figure 29.
Figure 29
3. Rechercher toute obstruction dans le
gicleur.
4. S'il doit _tre nettoye, le passer a Feau
cou rante.
Pour reinstaHer ie bras gicleur inferieur :
1. Remettre le bras gicleur en position initiale
et le presser pour qu'il s'enclenche en place.
2. Remettre le panier inferieur en position
initiale.
V_rifier/nettoyer Finterieur de la porte en
acier inoxydable et la cuve
Nettoyer les bords exterieurs du panneau de
porte interieure regulierement pour enlever tout
debris accumules.
Si des taches commencent a. paraftre sur la cuve
ou I'interieur de porte en acier inoxydable,
s'assurer que le reservoir d'agent de ringage est
plein.
16
Page 40

Enttetien (suite)
V_rifier / nettoyer le syst_me de filtration
Ce lave=vaisselle est dote d'un systeme de
filtration soit un assemblage filtre cylindrique/
crepine pour objets larges et d'un filtre fin.
Certains modeles ont un micro filtre additionnel.
Le systeme est situe & rinterieur du lave=vaisselle
sous le panier inferieur et est facile d'acces.
Pendant un usage normal, le systeme de filtration
est autonettoyant. 11faut occasionnellement le
verifier et le nettoyer des objets etrangers au
besoin.
Pour eniever i'assembiage fiitre cyiindrique/
cr_pine large :
1. Enlever le panier inf6rieur.
2. Saisir rassemblage, figure 31 et le tourner
1/4 de tour dans le sens contre horaire.
Figure 31
Pour eniever le fiitre fin et memacro fiitre :
1. Soulever le filtre fin du plancher du laveo
vaisselle comme e. la figure 33 et
le Figure 33
passer
a.reau
courante
pour le
nettoyer.
2. Retirer le micro filtre comme illustre a la
figure 34 Figure 34
et le passer
a.reau
courante
pour le
nettoyer.
3. Soulever rassemblage, figure 32.
Figure 32
Filtre
cylindriqud
crepine
pour
ohjets
larges
RISQUE DE BLESSURE : ia crepine large
peut contenir des objets tranchants. Ne pas
utiiiser les doigts.
4. Verifier rassemblage. S'il y a des debris
dans la crepJne large, la tourner _.renvers et
taper legerement sur une surface pour
deloger les debris. Passer a. reau courant
pour enlever tout objet.
Pour reinstalier le systeme de filtration :
1. Remettre le filtre micro (certaJns modeles
sa position initiale.
2. Remettre le filtre fin a sa position initJale.
3. Remettre rassemblage filtre cylindrique/
crepine large a sa position initiale.
4. Tourner la poignee anneau dans le sens
horaire 1/4 de tour jusqu'a, ce qu'elle se
verrouJlle. Figure 35
La fieche sur
la poJgnee et
celle sur le
filtre fin
doivent
pointer une
vers rautre,
comme
illustr6 par le
cercle g. la
figure 35.
5. Tirer delJcatement sur la poJgnee pour
s'assurer que rassemblage est bien verrouille
en place.
17
Page 41

Entretien (suite)
Nettoyage du panneau de porte exterieur
)OIVIMAGE POSSIBLE AU LAVE-VAISSELLE :
es produits chimiques, nettoyants abrasifs0
ampons a recurer (metal ou plastique),
-hiffonsiessuie-tout abrasifs peuvent
.mdomrnager l'exterieur du lave-vaisseHe. Ne
_as utiliser ces articles pour nettoyer ie
)anneau exterieur du lave-vaisseHeo
Porte de couleur
Utiliser seulement un chiffon doux legerement
humide avec de Feau savonneuse.
Porte en acier inoxydable
Utiliser un chiffon doux avec un nettoyant non
abrasif (preferablement en vaporisateur) con(2u
pour I'acier inoxydable. Pour de meilleurs
resultats, appliquer un nettoyant pour acier
inoxydable avec un chiffon et essuyer la surface.
Nettoyage du joint de porte
Nettoyer regulierement le joint de porte avec un
chiffon humide pour enlever les particules
d'aliments et les debris.
18
Page 42

Aide
Le lave=vaJsselle peut parfoJs presenter des
problemes non relies au mauvais
fonctionnement. L'information suivante peut aider
resoudre un probleme sans avoir
communiquer avec un technicien.
Vaisselie non seche
Le distributeur d'agent de ringage peut 6tre vide.
Le verifier et le remplir au besoin. Le sechage
peut _tre acceler6 en ouvrant 16gerement la porte
et en I'appuyant sur le panier superieur.
Voyant ne s'allurnant pas
Verifier le fusible ou le coupe-circuit & la bofte de
jonction et remplacer le fusible ou reenclencher le
coupe-circuit, au besoin.
Lave-vaisselle ne se rnettant pas en marche
S'assurer que la porte est bien fermee et qu'elle
est verrouillee.
Mousse darts ie iave-vaisselie
MauvaJs type de detergent utJlise. UtJliser
seulement du detergent destine au lave-vaJsselle.
Tache blanche ou rayures sur la vaisselie et
les verres
VoJr la rubrique Reglage de ragent de rin9age
dans ce guide pour plus de details.
Bruits
UstensJles mal places.
Cycle ne passant pas au ringage
REMARQUE : les instructions d'installation
peuvent fournir une aide.
UalJmentatJon en eau peut &tre coupee. Verifier la
soupape d'alimentation en eau et I'ouvrir au
besoin.
Couvercie du distributeur de detergent ne se
ferme pas
tl est possible que Fen ne ferme pas
adequatement le couvercle ou un cycle n'etait
pas termine et doJt 6tre annule. VoJr la section
Ajout de detergent et d'agent de tin,age pour
plus de details. VoJr la section Fonctionnernent
concernant Fannulation d'un cycle.
Resultats de lavage insatisfaisants
,, QuantJt6 incorrecte de detergent.
Ustensiles mal places ou panier surcharge.
Rotation du bras gicleur obstruee par les
ustensiles.
Gicleur du bras devant 6tre nettoye.
Filtres mal places.
Cycle inadequat s_lectionne.
Eau non drainee du iave-vaisselle
S'assurer que le tuyau de drainage n'est pas plie,
obstru_ ou mal installe. S'assurer qu'une portion
du tuyau de drainage est a.au moJns 20 po au=
dessus du plancher de I'espace du lave=vaisselle
(voir le guide d'installation). Les filtres peuvent
6tre obstru_s. S'assurer que le systeme de
filtration n'est pas obstru_ (voir la rubrique sur
I'entretien). Le drain de I'evier de la cuisine peut
6tre obstrue; il faudra peut=6tre les services d'un
plombier plut6t qu'un technicien. Si un invervalle
d'air est installe b. Fevier, il peut 6tre obstrue.
Lave-vaisselie fonctionnant longtemps
Peut 6tre cause par I'eau froide entrante. Avant
d'actionner le lave=vaisselle, ouvrir le robinet
d'eau chaude a I'evier. Laisser couler jusqu'#, ce
qu'elle soJt chaude, fermer, puJs actJonner le lave=
vaJsselle.
19
Page 43

sur la dur e d'un cycle et utilisation d'eau
REMARQUE : la duree du cycle et la consommation d'eau dependent essentiellement de la temperature
de I'eau de la r6sidence et de la charge, des facteurs sur lesquels le fabricant n'a aucun contr61e. Par
consequent, les durees et les quantites de ce tableau sont approximatives.
Cycle Duree Dureeavec Temperature de Temperature de _ Eau
(en minutes) POWERBOOST lavage (Fahrenheil ringage m_NS_,I (gallons)
Lavagesuper 104-133 90 151 - 160 156 X 6.5 - 8.8
auto
Lavage auto 94-107 72 122 - 135 156 X 3.6 - 7.1
Lavagedelicat 92-100 63 113 - 122 156 X 3.1 - 4.8
auto
Lavage 41 Non disponible 113 131 3.4
f_te
Ringage et 8 Non disponible Sans chaleur Sans chaleur 1.3
attente
(Fahrenheit)
Regulier 114 Non disponible 122-135 156 3.6 - 7.1
Environnement
Verres
Lavage extr6me 122 Non disponible 158 162 10.7
128 Non disponible 122 156 4.5
55 Non disponible 122 140 3.6
Symbole NSF
Un lave-vaisselle ou un cycle portant le symbole NSF est certifie
par la Fondation sanitaire nationale (NSF) pour repondre aux
normes strictes de la duree de lavage et de la temperature de
I'eau afin de s'assurer que la vaisselle et les ustensiles sont
hygieniques. Ces exigences sont expliquees dans la
documentation ANSI/NSF 184, pour lave-vaisselle residentiel.
Pour plus d'information, consulter le site web au
http://www.nsfconsumer.org/home/appliances.asp.
Ce lave-vaisselle est certifie NSF et les cycles certifies sont :
lavage super auto, lavage auto et lavage delicat auto. Lorsque
ces cycles sont termines, le voyant <<Sanitized>> (hygienique)
s'allume sur le panneau de contr61e du laveovaisselle.
REMARQUE : si I'alimentation en eau de la residence est trop
chaude, la dur6e de chauffage du laveovaisselle peut 6tre reduite
et le voyant <<Sanitized>> peut ne pas s'allumer. Les instructions
d'installation du lave-vaisselle comportent de I'information
concernant la temperature recommandee pour I'alimentation en
eau de la residence.
20
Page 44

Service la clientele
Ce laveovaisselle Bosch ne requiert aucun
entretien special autre que ce qui est decrit dans
la section Entretien. En cas de probleme avec le
lave-vaisselle, avant d'effectuer un appel de
service, voir la section Aide. Si un service est
necessaire, communiquer avec le marchand ou
Hnstallateur ou un centre de service autoris_. Ne
pas tenter d'effectuer soiom_me la reparation.
Toute reparation effectuee par un personnel non
autoris_ peut annuler la garantie.
Si I'on a un probleme avec le lave-vaisselle Bosch
et que I'on n'est pas satisfait du service re£u,
prendre les mesures suivantes (dans I'ordre
indiqu6 ciodessous) jusqu'a ce que le probleme
soit corrige :
1. Communiquer avec I'installateur ou le centre
de service Bosch dans la region.
2. Envoyer un courriel par la section service a la
clientele de notre site web :
www.boschappliances.com.
3. ¢crire a :
Huntington Beach, CA 92649
4. Tel6phoner au 1.800.944.2904.
S'assurer d'inclure (par ecrit) ou avoir sous la
main (par telephone) I'information suivante :
Num_ro de modele
Num_ro de serie
,, Date d'achat d'origine
,, Date du debut du probleme
Explication du probleme
Les numeros de modele et de serie sont sJtues
sur la plaque sJgnaletJque, bord droJt de la porte
du laveovaJsselle, figure 36.
De plus, si par ecrit, inclure un numero de
telephone pendant la journee.
FaJre une copie de la facture et la conserver dans
ce guide.
BSH Home Appliances, Corp.
5551 McFadden Avenue
Figure 36
Plaque signaletique
Numero de serie Numero de module
T
i
21
Page 45

r f
Enonce de garantie- lave-vaisselle Bosch
Les garanties fournies par BSH Home Appliances (<<Bosch>>)dans cet enonce de garantie s'appliquent
seulement aux lave-vaisselle vendus au premier utilisateur acheteur par Bosch ou un marchand, detaillant
ou centre de service autorise aux Etats-Unis ou au Canada. Les garanties suivantes ne sont pas
transferables. POUR OBTENIR UN SERVICE, COMMUNIQUER AVEC LE CENTRE DE SERVICE BOSCH
AUTORtS[_ LE PLUS PRF:S OU T[_LCPHONER AU 1.800.944.2904 OU €:CRIRE ik : BSH HOME
APPLIANCES CORR, 5551 McFADDEN AVENUE, HUNTINGTON BEACH, CA92649. S'ASSURER D'tNCLURE
LE NUM[_RO DE MODF:LE DU LAVE-VAtSSELLE, LE NUMC:RO DE S¢:RtE, LA DATE D'ACHAT ET LES
NOM ETADRESSE DU MARCHAND.
*La date d'installation r_ferera a [a date [a plus t6t oQ le lave-vaisselle a ete installe ou 10 jours ouvrables
apres la date de livraison.
Garantie limitee complete de 1 an depuis la date d'installation* : Bosch reparera ou remplacera toute
piece de composant pr6sentant un defaut dans des conditions d'utiIisation domestique normales sans frais,
les frais de main-d'oeuvre et d'exp_dition sont compris. La reparation doit _tre effectu_e par un centre de
service Bosch autorise des defauts esthetiques doivent 6tre rapportes dans un delai de 30 jours suNant
rinstallation).
Garantie lJmitee de 2 arts depuis la date d'instaliation* : Bosch fournira les pieces de rechange sans
frais pour toute piece de composant presentant un defaut dans des conditions d'utiIisation domestique
normales, frais de main-d'oeuvre non compris.
Garantie iimitee de 5 arts sur ies pieces electroniques depuJs ia date d'installation* : Bosch reparera
ou remplacement tout microprocesseur ou panneaux de circuits imprim_s presentant un defaut dans des
conditions d'uti[isation domestique normales de la deuxieme a.la cinquieme annee, frais de main-d'oeuvre
non compris.
Garantie iimitee de 5 arts depuis [a date d'insta[iation* : Bosch remplacera le panier superieur ou
inferieur (excluant [es composants du panier) sans frais, s[ le panier presente un defaut de fabrication ou
materiaux darts des conditions d'uti[isation domestique normales de la deuxieme a la cinquieme annee,
frais de main-d'oeuvre non compris.
Garantie a vie centre ia rouille de i'acier inoxydabie depuis ia date d'instailation : Bosch remplacera
[e lavewaisse[[e avec un m6me mode[e ou un modele semblable si la doublure int_rieure devrait rouiiler
darts des conditions d'utilisation domestique norma[es, frais de main-d'oeuvre non compris. Bosch
remplacera la porte en acier inoxydab[e de tout lave-vaisselle si la porte presente de la roui[[e dans des
conditions d'uti[isation domestique normales, frais de main-d'oeuvre non compris.
EXCLUSIONS : cette garantie ne couvre pas les appels de service ou de reparation pour corriger
['installation du lavewaisselle, pour donner des instructions quanta ['utilisation du lave-vaisselle, [e
remplacement de fusible ou la correction de la plomberie ou du c&blage electrique dans la r_sidence ou la
reparation du lave-vaisse[[e uti[ise de fa£on autre que rusage auquel i[ est destine, soit un usage normal
des fins domestiques. De plus, les garanties stipulees dans renonce excluent tout defaut ou dommage
survenant a cause d'accident, modification, mauvaise utilisation, abus, installation inadequate, reparation
non autorisee, forces externes hors du contr61e de Bosch tels actes de Dieu, ou installation non conforme
aux codes electriques ou de plomberie [ocaux. Les frais de main-d'oeuvre encourus pour la reparation ou le
remplacement de tout lave-vaisselle de plus d'un an depuis la date d'insta[lation ne seront pas couverts par
cette garantie. Toute piece reparee et/ou remplacee par des pieces sembIabIes a des fins de la periode de
garantie applicable.
SELON CE QUI EST PERMIS PAR LA LOI, CETTE GARANTiE EST EN LiEU DE TOUTE AUTRE
GARANTIE EXPRESSE OU tMPLICITE, INCLUANT LES GARANTIES [MPLICITES OU DE
COMMERCIALiSATION ET DESTINE_ES A DES FiNS PARTICULIC::RES. BOSCH N'ASSUME AUCUNE
RESPONSABILIT¢: POUR LES DOMMAGES INTC:Ri:t::TS OU ACCESSOtRES.
22
Page 46

iFelicidades y gracias por parte de Bosch!
Gracias por haber escogido una UavavajHUasBosch° Usted se ha unido a muchos cHentes
quienes exigen un rendimiento sHencioso y excepcionaU de su UavavajHUas,
Este manuaU ha sido escrito tomando en cuenta su seguridad y comodidad, y Ua
informaciOn incUuida es muy importante, Le aconsejamos que Ueaeste manuaU antes de
utHizar su UavavajHUaspor primera vez,
Para aprender mas acerca de su UavavajHlas y Uosaccesorios disponibUes, asi como
muchos otros aparatos Bosch de exceUente calidad, visite nuestra pagina Web en:
www, boschappliances,com,
Si usted tiene alguna pregunta o comentario, p6ngase en contacto por favor con
nosotros, Nos puede Ilamar al 1o800o944o2904, o nos puede escribir a:
BSH Home Appliances, Corp,
5551 McFadden Avenue
Huntington Beach, CA 92649
!Disfrutela!
Contenido
RNSTRUCCRONES RMPORTANTES DE SEGURRDAD 2
Componentes de la Lavavajillas .................................................................. 3
Caracteristicas de la Lavavajillas ................................................................ 3
Materiales de la Lavavajillas ....................................................................... 4
Preparar y cargar la Lavavajillas ................................................................ 5
Cargar la Canasta para Cubiertos ............................................................. 8
Operar la Lavavajillas ................................................................................. 9
Seleccionar un ciclo de lavado ................................................................................................. 9
Seleccionar opciones de la lavavajillas ................................................................................... 10
A_adir Detergente y Agente de Enjuague ................................................. 13
Cuidado y Mantenimiento ......................................................................... 15
Autoayuda ................................................................................................ 19
Informaci6n sobre la Duraci6n del CicloiUso de Agua 20
Servicio al Cliente ..................................................................................... 21
DedaraciOn de Garantias ......................................................................... 22
Page 47

hstrucciones lmportantes de Seguridad
o Bajo ciertas condiciones, el gas hidr6geno podria
acumularse en un sistema de agua caliente que no
PEUGRO DE LESIONESiiVIUERTE °
Lesiones graves o hasta la muerte podrian
resultar si la lavavajiHas descrita en este
manual se opera lncorrectamente o de un
modo contrario ai prop6sito Jntencionado.
No use la lavavajJilas descrita en este
manual de ningun otro modo o para ningun
otro fin dei que se detaiia en este manual.
se ha usado durante por Io menos dos semanas.
El gas hidr6geno es explosivo. Antes de usar una
lavavajillas conectada a un sistema de agua
caliente que no ha sido operada por dos o mas
semanas, abra todas las Ilaves de agua caliente y
permita que corra el agua por algunos minutes. De
este modo se dispersa el gas hidr6geno que se
acumul6. Ya que elgas podria explotar, no fume ni
prenda una llama durante este preceso,
o Utilice las lavavajillas _nicamente para realizar la
funci6n intencionada que es la de lavar la vajilla y
los utensilios de cocina en su hogar,
o Las lavavajillas se distribuyen con dos manuales,
el Manual de Instrucciones para la Instalaci6n y
las Instrucciones para su Uso y Cuidado, Lea y
comprenda todas las instrucciones antes de utilizar
la lavavajillas.
o Utilice Onicamente detergentes o agentes de
enjuague recomendados para uso en lavavajillas y
mant6ngalos fuera del alcance de ni_os,
o A medida que cargue los articulos a lavar:
Acomode los articulos filosos de modo
que no da_en el sello de la puerta.
Cargue los cuchillos y otros utensilios filosos
con el MANGO HACIAARRIBA para reducir el
riesgo de cortarse,
o No lave articulos de pl4stico a menos de que
indiquen "a prueba de lavavajillas" [dishwasher
safe], En cuanto a los productos de plastico que
no Ileven tai aviso, consulte al fabricante para
averiguar sus recomendaciones,
o No opere su lavavajillas a menos de que todos los
paneles del gabinete est6n instalados
correctamente.
o No intente alterar, modificar o anular los controles o
los interruptores el6ctricos de seguridad,
o No abuse nise siente o se pare en la puerta o en
las rejillas de la lavavajillas,
o Quite lapuerta del compartimiento de lavado antes
de poner una lavavajillas vieja fuera de servicio o
cuando la deseche,
Con tai de evitar da_os al piso y la posible
formaci6n de moho, no permita que el agua
derramada o Areas hOmedas permanezcan
alrededor o debajo de la lavavajillas,
PELIGRO DE DESCARGA ELECTRICA- Una
descarga ÷lectrica podria resuitar si se instaia
de modo incorrecto la fuente de alimentaci6n
para la lavavajillas descrita en este manual o si
la lavavajillas no est_ puesta a tierra correcta-
mente. No use la lavavajillas descrita en este
manual si no eeta seguro de que la alimentaci6n
electrica se inetalo correctamente o que la
lavavajillas este debidamente puesta a tierra.
INSTRUCCIONES PARA LA PUESTAATIERRA
Este aparato debe estar puesto a tierra por medio de
un sistema permanente de cableado metalico o de un
dispositivo conductor de puesta a tierra instalado con
los conductores de circuito y conectado a la borna de
la puesta a tierra del equipo o de la lavavajillas.
Consulte las Instrucciones de Instalaci6n que se
incluyen con esta lavavajillas para mas informaci6n
acerca de los requirimientos el6ctricos.
, Con el fin de reducir el riesgo de heridas, no
permita que ni_os jueguen adentro o encima de la
lavavajillas.
iGUARDE ESTAS INSTRUCCIONES!
Page 48

Componentes de la Lavavajillas
Sello de la puerta
Rejilla superior
Brazo rociador de la
rejilla superior
Brazo rocJador de
la rejilla inferior
Rejilla inferior
SurtJdor de detergente y --
del agente de enjuague
Caractedsticas de la Lavavajillas
Abertura de
ventilaci6n
Sistema de
filtraci6n (en el
piso interior de la
lavavillas)
Canasta para los
cubiertos
Placa/etiqueta con el nOmero
de serie y modelo
Sistema de Reducci6n de Ruido AVSTM: Un
sistema motorizado con dos bombas, el Motor de
Suspensbn [Suspension MotorTrVl y el triple
aislamiento establecen las lavavajillas como las
mas silenciosas en toda Am6rica del Norte,
Secado por Condensaci6n: Un enjuague final
realizado a una temperatura alta, una tina de
acero inoxidable a una temperatura m4s baja junto
y la acci6n del agua que se escurre en forma de
14minas gracias al agente del enjuague, resulta en
un secado higi6nico, econ6mico y eficiente en el
uso de la energia el6ctrica,
Visualizador Numerico Digital: Un visualizador
num6rico de cuenta regresiva que indica el tiempo
que queda para terminar el ciclo de lavado y que
tambi6n se usa para configurar otras opciones,
Lavado Exacto [Exact WashTUb: Reduce el
consumo de agua y de energia el6ctrica ademas
de Ilevar al minimo el ruido a trav_s de distribuir el
agua ya sea s61o al brazo rociador superior o al
brazo inferior o a ambos brazos rociadores.
Consumo de Agua Excepcionalmente Bajo:
Tan bajo como 3,1 galones (11.7 litros) en el Ciclo
Delicado Automatico [Auto Delicate cycle],
principal y la bomba de drenaje contra materiales
ajenos.
Calentador de Circulaci6n [Flow-Through
HeaterTM]: Calienta el agua hasta 1610 F [72 _ C].
Rejillas de Nil6n: Eliminan cortaduras y mellas y
los garantizamos por cinco aSos,
Indicador "Llenar con Agente de Enjuague"
[Refill Rinse Agent]: En la pantalla de control
aparece "Rellenar con Agente de Enjuague" [Refill
Rinse Agen_ cuando se debe rellenar el surtidor del
agente de enjuague,
Indicador "Desinfectado" [Sanitized]: En la
pantalla de control aperece "Desinfectado"
[Sanitized] para indicar que su vajilla esta
desinfectada conforme alas normas de la
Organizaci6n Nacional de Salubridad [National
Sanitation Foundation].
SENSOTRONtCTM: Revisa la condici6n del agua y
determina la necesidad de Ilenar con agua fresca
por segunda vez.
Tina Alta de Acero Inoxidable [Stainless Steel
Taft TubT_l: Proporciona una superficie interior
inoxidable e higi6nica con garantia de por vida.
Sistema de Filtraci6n: Cuatro filtros aseguran la
distribuci6n de agua limpia y protegen la bomba
Cierre de Agua [Water Shut-Oft]: Un dispositivo
de seguridad que interrumpe la circulaci6n del
Page 49

Caractedsticas de Ja
MateriaJes de Ja
LavavajiJJas< oot o o 6o)
agua de entrada cuando detecta agua en la base
de la lavavajillas.
Calor Extra Seeante: Aumenta Ja temperatura del
agua de enjuague, asi que resuRa un meier
secado.
Accesorios para ias Tazas: RejiJlas plegabJes
para acomodar tazas o utensilios grandes de
cocina.
Set_ai de Terminaci6n dei Cicio: Un tono que
suena cuando su lavavajiJlas ha terminado el
lavado y el secado de su vajilla.
Retardar ia Puesta en Marcha [Delay Start]: Le
permke retardar eJ comienzo del ciclo de lavado
pot hasta 24 horas.
Rejiiia para los Cuchiiios: Dise_iado para
acomodar y proteger su cuchilleria y sus cubiertos
finos.
Ajuste de Elevaci6n de la Rejilla Superior
"RACKMATICTM': Le permite bajar la rejilla
superior para acomodar articuJos grandes en esta
rejiJla, o le permite elevar la rejiJJa superior para
hacer espacio para articulos grandes en la rejilla
inferior.
PQas Plegables en las Rejillas Superior e
Inferior: Las pOas plegables facilitan la carga.
Aumento de Potencia [POWERBOOSTT_]: AI
precaJentar, reduce el tiempo para terminar el ciclo
de lavado.
Luz Rndicadora INFOLIGHTTM: Se ilumina el LED
rojo para indicar que la unidad est4 en marcha.
Secado Optimo [OPTIDRyT_]: Registra cuando le
falta agente de enjuague a la unidad y ajusta el
rendimiento del secado autom4ticamente.
Controles CLEARTOUCHTM: Proporcionan una
limpieza f4cil mientras que previenen la activaci6n
accidental de la unidad.
Aditamento para rejilla: ASade accesorios
pJegabJes adicionaJes en Ja rejiJJa inferior.
LavavajiJJas
NOTA: Antes de usar su lavavajillas per primera vez,
revise la informaci6n en esta secci6n. Algunos articulos
que usted desea limpiar no estan a prueba de la
lavavajillas y deben set lavados a mane; otros requieren
de un acomodo especial. P6ngase en contacto con el
fabricante del articulo si usted tiene dudas acerca de
que el uso de la lavavajillas sea apropiado.
Recomendados
Aluminio: El aJuminioanodizado de color puede
oscurecerse con el tiempo. Los minerales en su agua
pueden causar que el aluminio se oscurezca oque se
manche. Generalmente se pueden quitar estas manchas
usando esponjiJJasdefibra met41icarellenas dejab6n.
Porceiana, Crietai, Ceramica: Algunas piezas
pintadas a mane pueden perder el color, oscurecerse
o mancharse. Lave estas piezas a mano. Posicione
piezas fragiles de vidrio de tal modo que no se puedan
voltear y que no tengan contacto con otras piezas
durante eJciclo de lavado.
Vidrio: El vidrio opalino puede ponerse amarillo.
Capae antiadherentee: Aplique una ligera capa de
aceite vegetal alas superficies antiadherentes
despu6s del secado.
Plasticos: AsegOrese que la pieza esta apta para set
usada en una lavavajillas.
Acero Jno×idabie, Plata de Ley, y Piateado: CoJoque
estas piezas de tal mode que no tengan contacto una
con la otra pieza.
No Recomendados
Acrilico: Puede ocurrir eJcraquelado (grietas
pequeBas en el acrilico).
Piezas unidas pot adhesivoe: Se pueden afiojar los
adhesivos que unen materiales come plastico, madera,
hueso, acero, cobre, estaBo, etc.
Utensiiioe con mango de hueeo: Se pueden separar
los mangos.
Hierro: El hierro se oxidar4. Lave las piezas de hierro
a mano y s6quelas de inmediato.
Piezas no diserBadas para ia iavavajiiias: Su
lavavajillas esta disePiada para limpiar SOLO trastes y
articulos de cocina caseros.
Pewter, Lat6n, Bronce: El pewter se manchara. Lave
las piezas de pewter a mane y s_quelas de inmediato.
EetarBo: EI estaBo se oxidara. Lave las piezas de
estaBo a mano y s6quelas de inmediato.
Madera: Los tazones de madera, utensilios de madera
y piezas con mango de madera pueden agrietarse,
doblarse y perder su acabado.
4
Page 50

Preparar y Cargar la Lavavajillas
Preparar la vajilia
No haga ning_n lavado preliminar de los articulos con
suciedad pegada ligeramente.
Elimine las particulas grandes de alimentos, los
huesos, semillas, palillos para los dientes y la grasa
excesiva.
Tal vez deba remojar y frotar a mane los articulos con
desechos pegados, quemados o endurecidos.
Cargar la lavavajillas
DANO A LA LAVAVAJILLAS: Usted corre ei
rieego de daSar ia iavavajiiias si introduce
objetos o materiaies tai corno productos de
papei, boisae de plastico, material de ernbaiaje o
cualquier otra cosa que no sea vajilla o utensilio
de cocina norrnales. No cargue ningun articulo
en su iavavajiiias que no sea vajiiia o utensiiio
de cocina a prueba de iavavajiiias
Revise la secci6n Materiales de este manual para
asegurarse de que alg0n articulo en particular se
preste a limpiarse en lavavajillas.
Cargue 0nicamente articulos a prueba de lavavajillas
[dishwasher-safe] en su lavavajillas.
Cargue los articulos de mode que el agua pueda
alcanzar todas las partes de cada articulo.
Coloque las elias, sartenes, tazas, tazones y vasos de
mode invertido en las rejillas.
Separe los articulos hechos de metales diferentes.
Accesorios para la rejilla superior
Ajuste de Altura de la Rejilla Superior
RAOKMATIC TM
Se puede bajar la rejilla superior para acomodar
art[culos grandes en esta rejilla, o se puede elevar la
rejilla superior para hacer espacio para articulos
grandes en la rejilla inferior.
Para bajar la rejiiia superior:
1. Jale la rejilla superior hacia afuera de la
lavavajillas hasta
que se detenga.
2. Presione las
palancas
RACKMATIC TM
hacia adentro
come se
muestra en la
Figura 1 ydeje
caer la rejilla. Figura 1
Para ievantar ia rejiiia superior:
1. Jale la rejilla superior hacia afuera de la
lavavajillas hasta que se detenga.
2. Agarre la parte superior de la rejilla arriba de las
palancas RACKMATIC TM y jalela hacia arriba
come se
muestra en la
Figura 2 hasta
que las
palancas
RACKMATIC TM
se traben en su
posici6n (no es
necesario
presionar las
palancas RAOKMATIC TM
para elevar la rejilla).
NOTA: Antes de volver a meter la rejilla superior en
la lavavajillas, asegOrese que laaltura de la rejilla
sea la misma en ambos lades. De otto mode no
cerrarA la puerta de la lavavajillas y no se
conectara el brazo rociador de la rejilla superior al
circuito de agua.
3. Empuje la rejilla superior de vuelta hacia adentro de
lalavavajillas.
PQas Piegables
Las pOas plegables se doblan hacia abajo para facilitar
la carga en ciertas
ocasiones.
Agarre la varilla de
la p0a come se
muestra en la
Figura 3 y doble
p0as hacia abajo.
Accesorios para Tazas
Ademas de tazas, los accesorios pueden acomodar
tambi6n utensilios
grandes.
Agarre los
accesorios para
las tazas come se
muestra en la
Figura 4, yd6blelos
hacia abajo.
Acomode las tazas
de mode invertido
en los accesorios Figura 4
para las tazas.
Figura 2
Figura 3
Page 51

Preparar y Cargar Lavavaji as (ooot o..o 6o)
Accesorios para la rejilla superior
RejiHa para Cuchillos
La rejilla para cuchillos es un aditamento extra
para colocar cuchillos y otros utensilios grandes
y se fija sobre uno de los bordes de la rejilla
superior.
Figura 5
Coloque los
cuchillos con el
lado filoso hacia
abajo, vea la Figura
5.
Cargar la rejiiia superior
La Figura 6 muestra Figura 6
c6mo acomodar una
vajilla tfpica variada
en la rejilla
superior.
Figura 7
La Figura 7
muestra c6mo
acomodar un
juego tfpico de
vajilla para 10
personas en la
rejilla superior.
NOTA: Cuando reintroduzca la rejilla superior
hacia adentro de la lavavajillas, empOjela hasta
que se detenga contra la pared trasera de la tina.
De otro modo, el brazo rociador de la rejilla
superior podria fallar en conectarse al sistema de
alimentaci6n de agua.
Accesorios para la rejilla inferior
Pr3as Pmegables
Las pOas plegables se doblan hacia abajo para
facilitar la carga en ciertas ocasiones.
Agarre la varilla Figura 9
de la p0a como
se muestra en
la Rgura 9 y
doble las p0as
hacia abajo.
Aditamento para Reiiima
Ensambme del aditamento para rejiiia
El aditamento para rejilla incluye dos accesorios
adicionales para acomodar tazas y utensilios
grandes de cocina. El aditamento de rejilla es
ensamblado sobre el borde trasero de la rejilla
inferior.
Para ensamblar:
Deslice el aditamento para rejilla hacia adentro,
vea la Fig. 11, manteniendo los dientes m_.s largo. _
en el interior del alambre de la canasta superior (a)
yen el exterior del alambre de la canasta inferior
(b), vea la Figura 10. Los dientes cortos entran a
presi6n, vea la Figura 12. Figura 11
FiguraI0
La Figura 8
(AHAM DW-1 Juego de Vajilla para 10
Personas)
Figura 8
Page 52

Preparar y Cargar la Lavavajillas (ooot o..o 6o)
Cargar la rejiiia inferior
NOTA: Mantenga Iibre la abertura de ventilaci6n
en la pared derecha de la tina acomodando
piezas altas (tal como las tablas de plastico para
cortar alimentos o las bandejas para hornear
galletas) en el lado izquierdo o en la parte trasera
de la rejilla inferior. Figura 13
Acomode los
artfculos grandes
en la rejilla
inferior. Cargue
las ollas y
cazuelas de
modo invertido.
La Rgura 13
muestra una
carga tfpicamente
variada acomodada Figura 14
en la rejilla inferior.
La Figura 14
muestra c6mo
aoomodar un
juego tipico de
vajilla para 10
personas.
4. tnserte el Rociador Figura 16
para Articulos Extra
Altos [Extra Tall
Item Sprinkler] en
la salida de agua
para la rejilla
superior y dele
vuelta al rociador
en sentido del reloj
hasta asentarlo en
su posici6n como
se muestra en la
Figura 16.
NOTA: Mantenga libre la abertura de ventilaci6n
en la pared derecha de la tina acomodando
piezas altas (tal como las tablas de plastico para
cortar alimentos o las bandejas para hornear
galletas) en el lado izquierdo o en la parte trasera
de la rejilla inferior. Figura 17
}}_i i,i
z t
5. Acomode los
art[culos extra
altos en la rejilla
inferior como se
muestra en la
Figura 17.
(AHAM DW-1 Juego de Vajilla para 10
Personas)
La Figura 15
Figura !5
muestra c6mo
aoomodar un
juego tipico de
vajilla para 12
personas en la
rejilla inferior.
(AHAM DW-1 Juego de Vaiilla para 12
Personas)
Cuando la rejilla inferior este cargada, empOjela
hacia adentro de la lavavajillas.
Para cargar articumos extra altos:
1. Saque la rejilla superior vacia jalandola hacia
afuera de la lavavajillas hasta que se detenga.
2. Jale hacia arriba y hacia afuera la orilla
delantera de la rejilla hasta que los rodillos
queden completamente libres de los deles
guias. Guarde la rejilla al lado.
3. Empuje los rieles guias de nuevo hacia
adentro de la lavavajillas.
DANO A LA LAVAVAJILLAS: Usted puede
da_ar ia iavavajiiias si intenta reinstalar ia
rejilla superior antes de quitar el rociador
para articulos extra altos. No trate de
reinstaiar la rejilla superior mientras el
rociador este todavia instalado.
Para extraer el rociador y restabmecer la
iavavajiiias a su condici6n normal:
1. Dele vuelta al rociador en el sentido contrario
del reloj y quitelo de la salida que alimenta
agua a la rejilla superior.
2. Busque la rejilla superior.
3. Incline la orilla delantera de la rejilla hacia
arriba y acomode los rodillos en los deles
guias.
4. Siga empujando la rejilla hacia adentro hasta
que todos los rodillos se acomoden en los
deles.
5. Empuje la rejilla superior hacia adentro de la
lavavajillas.
Page 53

Cargar Canasta para Cubiertos
Partir la canasta flexible para moscubiertos:
PEUGRO DE LESIONES: Los cucHHos y
otros utensHios fHosos pueden causar
iesiones graves si se acomodan con el
mango hacia abajo en macanasta. IVlientras
sea posible, no acomode los cuchiHos y
otros utensiHos filosos con emmango hacia
abajo. No permita que mosniSos toquen o
jueguen con los cuchillos y otros
utensilios filosos.
Mantenga bs cuchiHos y otros utensilios filosos
fuera deUabance de bs niRos.
NOT.&: Se pueden doMar hacfa ardba las
tapaderas de Rascanastas para los cubbrtos para
poder acomodar artfcubs grandes o bs de forma
irreguUar.
Con Rastapaderas dobladas hacia abajo, cargue
la canasta para los cubiertos segOn el modelo
indicado en la Figura 18, acomodando los
cuchillos con el mango hacia arriba pero los
tenedores y cucharas con el mango hacia abajo.
1. Agarre la
canasta y
deslice las
dos
mitades en
direcciones
opuestas
como se
muestra en
la Figura
19a. Figura t 9a
2. Separe las
dos
mitades
como se
muestra en
la Figura
19b.
Figura 19b
Figura 18
En caso de que tenga que cargar articulos
grandes o algunos de forma irregular en la
canasta para los cubiertos (con la tapadera hacia
arriba), acom6delos de modo que no se aniden y
asi impidan el efecto de los chorritos de agua.
Acomode los cuchillos y otros utensilios filosos
con el mango hacia arriba.
La canasta se parte por Io largo, Io que resulta en
dos mitades que se pueden colocar en una
variedad de posiciones en la rejilla inferior y asi
aumentar la versatilidad de carga de la rejilla
inferior.
3. La Figura 20 muestra algunas sugerencias
d6nde puede colocar las dos mitades en la
rejilla inferior.
Figura 20
Page 54

Operar la Lavavajillas
°n/off Start
Control de la lavavajillae, botones y pantalla
Antes de comenzar
Usar los botones de control
Su nueva lavavajillas viene equipada con la Oltima
tecnologfa de control, la activaci6n per medio de
los botones CLEARTOUCW M.
Para activar un bot6n, ponga toda la punta del
dedo encima del bot6n deseado y mantengala alli
por tres segundos. Este tiempo de tres segundos
previene la activaci6n accidental.
Seleccionar un idioma
Antes de usar su nueva lavavajillas, usted debe
seleccionar un idioma.
La primera vez que prenda la lavavajillas,
aparecera la pantalla de selecci6n del idioma (vea
arriba), Controles de la lavavajlllas0 botones y
pantalla).
Los idiomas disponibles son:
1. AE =tnglesAmericano
2. CF = Frances Canadiense
3. MS = Espa_ol Mexicano
La abreviatura de idioma "AE" parpadeara. Si
usted desea otro idioma, presione - o + hasta que
parpadee el idioma deseado.
Guarde el idioma seleccionado pulsando el bot6n
MENU/OK.
Cuando selecciona el idioma equivocado:
1. Pulse el bot6n ON/OFF para apagar la
unidad.
2. Pulse el bot6n ON/OFF para prender la
unidad.
3. Pulse el bot6n MENU/OK sels veces para
activar la pantalla de selecci6n del idioma.
4. Si cambia a otro idioma, pulse el bot6n
MENU/OK para guardarlo.
5. En el menO desplegable de opciones usted
puede regresar al menO principal en cualquier
memento pulsando el bot6n START (/nicio)
Yea la selecci6n Seleccionar opciones de la
lavavajillas en este manual para mas informaci6n
acerca de c6mo seleccionar un idioma.
Seleccionar un ciclo de lavado
Despu_s de a_adir detergente y agente de enjuague
como se explica en la secci6n At_adir detergente y
agente de enjuague de este manual, prenda la
lavavajillas pulsando el bot6n ON/OFR La pantalla
indicara el ciclo por default, "Auto Lavado" [Auto
Wash],
Para seleccionar un ciclo diferente, pulse + o - hasta
que la pantalla indique el ciclo de lavado deseado.
POSlBLE DANO A LA VAJILLA: Se pueden
da_ar articulos delicados o reliquias de
familla en una lavavajlllas° No lave estos
artlculos en su lavavajillas si existe
eualquier posibilidad de daFlarlos.
AsegOrese siempre que sus trastes estan a prueba de
lavavajillas. Consulte la secci6n Materiales de Vajilla
en este manual como guia,
Selecciones del ciclo de lavado
Los ciclos de lavado accesible desde este men0
incluyen:
Super Auto Lavado [Auto Super Wash]
Limpia articulos que tienen restos alimenticios duros
horneados o secos, Tal vez sea necesario remojar o
fregar estos articulos a mano.
Auto Lavado [Auto Wash] (eiclo por default)
Limpia cargas grandes con restos alimenticios no muy
pegado&
Auto Lavado Delicado [Auto Delicate Wash]
LimpJa trastes y cubiertos delicados o reliquias de
familia u otros articulos especiales, El lavado a mano
tal vez sea la mejor opci6n para estos articulos.
Lavado de Fiesta [Party Wash]
Limpia trastes ligeramente sucios y reduce el tiempo
de lavado general, use este ciclo para limpiar vasos y
trastes para postres que tal vez se deben volver a usar
durante el mismo evento.
Enjuagar y Guardar [Rinse andHold]
Le permite enjuagar los restos alimenticios de una
carga parcial y guardarla en la lavavajillas hasta que la
Ilene completamente.
Page 55

Operar JaLavava]iJJas(ooo....o 6o)
Seieccionar opciones de ia iavavajiiias
Las configuraciones de f4brica deber[an ofrecer
buenos resultados para todas las opciones.
Selecciones de las opciones
Usted puede acceder alas opciones disponibles en el
menO desplegable de opciones:
Retardar ia puesta en rnarcha [Delay Start]
Esta opci6n le permite retardar la puesta en marcha
de] cicJoseJeccionado hasta por 24 horas en
incrementos de 30 minutos.
NOTA: En eJmenO desplegable de opciones, usted
puede regresar al menO principal en cualquier
momento pulsando el bot6n START,
1. Abra la puerta de la lavavajilias suficientemente
para exponer el panel de control
2, Pulse el bot6n ON/OFR
3. Pulse elbot6n MENU/OK una vez para desplegar
la opci6n de retardar la puesta en marcha [Delay
Start],
4. Pulse el bot6n +o - hasta que la pantalla indique
el tJempo de retardo deseado,
5. Despu6s de seleccionar el tiempo de retardo
deseado, usted debe pulsar el bot6n MENU/OK
para guardarlo= La pantalla indicar4 "Valor
Guardado" [Value Stored] y regresa al menO
principal. Si usted no seleccion6 un tiempo de
retardo, pulse el bot6n START para regresar al
menO principal
6. Seleccbne el cJclode lavado deseado pulsando
los botones - o +.
7. CJerre la puerta. AI transcurrir el tiempo de
retardo, la JavavajJllascomenzara automatica-
mente y contJnOaoperando hasta Ilegar al final
del cJcloseleccJonado.
8. Usted puede cambJar el tiempo de retardo y/o el
cJcJode lavado en cualquier momento durante el
retardo.
Aumento de Potencia [POWERBOOSTr_
AI precaJentar, reduce el tiempo para terminar el
ciclo de lavado.
NOTA: En el men0 desplegabJe de opciones, usted
puede regresar al men0 principal en cualquier
momento pulsando el bot6n START,
1. Abra Japuerta de la Javavajillas suficientemente
para exporter el panel de control.
2. Presioneelbot6nON!OFR
3. Presione el bot6n MENU/OK dos veces para
mostrar la opci6n POWERBOOST TM,
4. Se puede prender o apagar esta opci6n
pulsando el bot6n +.
5. Despu6s de seJeccionar el bot6n + para prender
el Aumento de Potencia [POWERBOOSTrrVl,
usted debe pulsar el bot6n MENU/OK para
guardar esta configuraci6n. La pantalla indicara
"Valor Guardado" [ Value Stored] y regresa al
menO principal. Si usted no seleccion6 el bot6n
+ para cambiar la configuraci6n actual, pulse el
bot6n START para regresar al menO principal.
6. Ahora puede seJeccionar el ciclo de lavado
deseado pulsando los botones - o +.
7. Pulse START y cierre la puerta de la lavavajillas
para iniciar el ciclo,
Secado Extra [Extra Drying]
Esta opcbn lepermite ajustar la temperatura del
enjuague final y asi mejorar el secado o para ahorrar
energia,
NOTA: En el menO desplegable de opciones usted
puede regresar al menO principal en cualquier
momento pulsando el bot6n START.
1. Abra la puerta de la lavavajiJJas suficiente-mente
para exporter el panel de control.
2, Pulse el bot6n ON/OFR
3. Pulse el bot6n MENU/OK tres veces para obtener
el programa de secado actual.
4. Pulse los botones + o- para pasar a trav6s de las
siguientes opciones:
Secado econ6mico-ahorra energia.
Secado normal- configuraci6n de f4brica,
Secado extra- mejora el rendimiento del
secado.
5. Despu@s de seleccionar la opci6n de secado
deseada, usted debe pulsar el bot6n MENU/OK
para guardar laconfiguraci6n, La pantaJla
indicara "Valor Guardado" [Value Stored] y
regresa al men0 principal. Si usted no seleccion6
una opci6n de secado diferente, pulse el bot6n
START para regresar al menO principal,
6. Seleccione el cido de lavado deseado pulsando
los botones - o +.
7. Pulse START y cierre la puerta de la lavavajiJlas
para iniciar el ciclo.
SeSaJ de Terminaci6n
La Javavajillas emite un tono (cinco veces) para
informarle que sus trastes est4n limpios y secos. Usted
10
Page 56

Operar la Lavavajillas
puede cambiar el volumen del tono o Io puede
deshabilitar.
NOTA: En el menO desplegable de opciones usted
puede regresar al menO principal en cualquier
momento pulsando el bot6n START.
1. Abrala puerta de la lavavajillas suficientemente
para exporter el panel de control
2, Pulse el bot6n ON/OFR
3. Pulse elbot6n MENU/OK cuatro veces para
indicar la configuraci6n actual de la sepal de
terminaci6n,
4. Pulse los botones +o- hasta obtener el volumen
deseado.
SePal de Terminaci6n 6- tono mas fuerte
(configuraci6n de f4bdca)
Sdial de Terminaci6n 0 - SePal de
Terminaci6n deshabilitada
5. Despu6s de seleccionar el volumen deseado,
usted debe pulsar el bot6n MENU/OK para
guardar la configuraci6n. La pantalla indicara
"Valor Guardado" [Value Stored] y regresa al
menO principal Si usted no cambi6 el volumen,
pulse el bot6n START para regresar al menO
principal,
6. Seleccione el ciclo de lavado deseado pulsando
los botones - o +.
7. Pulse STARTy cierre la puerta de la lavavajillas
para iniciar el ciclo.
Agente de enjuague 6- maxima cantidad del
agente de enjuague disponible
Agente de enjuague 4 - ajuste de f4brica
Agente de enjuague 0- agente de enjuague
deshabilitado
6_
Despu6s de seleccionar lacantidad deseada del
agente de enjuague aaplicarse, Ud, debe pulsar
el bot6n MENU/OK para guardar la configuraci6n.
La pantalla indicar4 "Valor Guardado" [Value
Stored] y regresa al men0 principal. Si usted no
cambi6 la cantidad del agente de enjuague, pulse
el bot6n START para regresar al men0 principal.
7_
Seleccione el cido de lavado deseado pulsando
los botones - o +.
8.
Pulse el bot6n START y cierre la puerta de la
lavavajillas para iniciar el ciclo.
Seleccion del idioma que aparece en la pantalla
Esta opci6n le permite seleccionar el idioma que
aparece en la pantalla, La primera vez que usa su
lavavajillas, esta pantalla aparecera autom4ticamente.
NOTA: En el menO desplegable de opciones usted
puede regresar al menO principal en cualquier
momento pulsando el bot6n START,
1. Abra la puerta de la lavavajillas suficientemente
para exporter el panel de control.
2, Pulse el bot6n ON/OFR
3. Pulse el bot6n MENU/OK seis veces para indicar
el idioma actual seleccionado,
Ajuste del agente de enjuague
Esta opci6n le permite ajustar la cantidad del agente
de enjuague que la lavavajillas dosificara para controlar
las manchas y rayas.
NOTA: En el menO desplegable de opciones usted
puede regresar al menO principal en cualquier
momento pulsando el bot6n START,
1. Abra la puerta de la lavavajillas suficientemente
para exporter el panel de control
2. Pulse el bot6n ON/OFR
3. Pulse el bot6n MENUiOKcinco veces para
indicar el ajuste actual del agente de enjuague.
4. Pulse los botones + o- para indicar la cantidad
deseada del agente de enjuague
5. Si sus vasos salen con manchas, pulse + para
aumentar la cantidad del agente de enjague, Si
salen rayados, pulse- para disminuir la cantidad
de agente de enjuague que se aplica,
4. Las opciones disponibles son:
AE = Ingles Americano
CF = Franc6s Canadiense
MS = Espa_iol Mexicano
5. Pulse los botones + o- hasta que parpadea el
idioma seleccionado.
6. Despu6s de cambiar el idioma, usted debe pulsar
el bot6n MENU/OK para guardar la configuraci6n.
La pantalla indicara "Valor Guardado" [Value
Stored] y regresa al menO principal. Si usted no
cambi6 el idioma, pulse el bot6n START para
regresar al menO principal.
7. Seleccione el cido de lavado deseado pulsando
los botones - o +.
8. Pulse START y cierre la puerta de la lavavajillas
para iniciar el ciclo.
11
Page 57

Operar la Lavavajillas (ooot ouao 6o)
"Regresa¢' [Return] (le permite escoger otro
Los ciclos de lavado disponibles en este men[3 oculto
son ciclos de lavado especiales que se pueden usar
para satisfacer necesidades especiales en el campo.
NOTA: En el men[3 desplegable de opciones usted
puede regresar al men[3 principal en cualquier
momento pulsando el bot6n START.
1. Abra la puerta de la lavavajillas suficientemente
para exporter el panel de control
2. Pulse el bot6n ON/OFR
3. Pulse el bot6n MENU/OK siete veces para indicar
la pantalla Programas Estandar [STANDARD
PROGRAMS].
4. Despu6s de que aparezca la pantalla "Pregramas
Estandar" [STANDARD PROGRAMS], pulse el
bot6n + una vez para indicar los cidos de lavado
disponibles. Estos cidos son:
Regular- cido de lavado normal
Cuidado Ambiental [Enviro Care] - reduce el
consumo de agua y energia.
Cuidado de Vidrio [Glass Care] - reduce las
temperaturas para reducir el da_o al vidrio.
Lavado Extremo [Extreme VVash]- para restos
alimenticios que son muy dificiles de quitar.
5. Pulse los botones + o- hasta que aparezca el
cido de lavado deseado.
6. Cuando aparece la configuraci6n deseada, pulse
el bot6n START y cierre la puerta para iniciar el
ciclo.
ciclo),
Cierre la puerta de la lavavajillas. La lavavajillas
comenzara a trabajar hasta que termina el ciclo.
Cuando se cierra la puerta de la lavavajillas, se ilumina
la luz indicadora JNFOLIGHT TM arrojando un circulo
rojo en el piso para indicar que la lavavajillas esta en
marcha.
Cuando termina el ciclo, la lavavajillas emitira un tono
para indicar el fin del ciclo (cinco veces). La pantalla
indicara brevemente "Limpio" [Clean]. Despu6s de 5
segundos la lavavajillas y la luz indicadora
RNFOLIGHTTM se apagaran automaticamente.
NOTA: Para acelerar y mejorar el secado, abra la
puerta de la lavavajillas, jale la rejilla superior unos
pocos centimetros hacia afuera de la lavavajillas, y
apoye la puerta de la lavavajillas contra la rejilla supe-
rior.
Jnterrumpir un ciclo
PEMGRO DE QUEMARSE CON VAPOR:
Si usted abre mapuerta de mamavavaiiHas
rapidamente durante un cicmo de mavado o
enjuague, podria sufrir quemaduras graves
por el vapor caHente. No abra la puerta de
malavavaiiHas durante amrnenos 10
segundos o hasta que se detenga el ruido
demagua.
Poner en marcha ia iavavajiitas
Cuando aparezcan el ciclo y las opciones correctas
en la ventana de la pantalla y usted aSadi6 el
detergente y el agente de enjuague tal como se
explica en la secci6n A5adir Detergente y Agente de
Enjuague de este manual, pulse el bot6n START y
cierre la puerta.
Despu6s de pulsar el bot6n START, la pantalla
mostrar& la siguiente informaci6n:
"Oierre la puerta" [Close the door].
El tiempo estimado para terminar (este tiempo
estimado se ajusta automSticamente atrav6s del
cido, basado en la temperatura del agua entrante
y las opciones seleccionadas).
El hombre del ciclo actual.
12
Abra la puerta de la lavavajillas suficientemente para
exporter el panel de control. La pantalla indicara:
o "Cancelar Programa" [CanceIProgram].
o "Cierre la puerta" [Close the door].
, eltiempo del cido remanente.
, elcicloseleccionado.
, lafase delcido.
Para continuar con el ciclo, cierre la puerta de la
lavavajillas, la lavavajillas arrancarS, automaticamente y
continuara con el ciclo seleccionado.
Page 58

Operar la Lavavajillas
(continuaci6n)
Canceiar un ciclo
Abra la puerta de la Uavavajillas suficientemente
para exponer eUpaneU de control La pantaHa
indicara:
, "CanceUar Programa" [Cancel Program].
, "Cierre Rapuerta" [Close the door].
, eUtiempo deUcicUo remanente.
, eUcicUoseleccionado.
, Rafase deUcicUo.
PuUse eUbot6n -. La pantaUUaindicara "Para
drenar - cierre Rapuerta" [To drain - close the
doe4.
Cierre Rapuerta de Ralavavajillas.
Cuando se haya drenado la lavavajiHas eUaparato
emitira un tono para indicar el fin deUcicUo (cinco
veces).
Abra Rapuerta de BaUavavajiHas. La pantaUla
indicar_, brevemente "Limpio" [Clean]. Despues de
5 segundos, la lavavajillas se apagara automatica-
mente.
Descargar la lavavajillas
Se recomienda descargar la rejilla inferior primero.
Saque y descargue la(s) canasta(s) para
cubiertos. Son faciles de sacar.
Descargue la rejilla superior.
Ahadir Detergente y Agente
de Enjuague
Detergente
DANO A LA LAVAVAJILLAS: El uso de
productos para iavar ia vajHla a mano
podria dahar su lavavajiHas. No utimice
estos productos en su mavavajiHas.
Use Onicamente detergentes diseSados
especificamente para lavavajillas.
DANO A LA VAJmLLA: Demasiado
detergente en agua muy blanda puede
rayar la cristaleria tai como si fuera agua
fuerte° Evite usar demasiado detergente si
el agua es bmanda.
La copa para detergente en el surtidor tiene rayas
que miden la cantidad de detergente cada 15 y 25
mililitros. 45 ml de detergente Ilena la copa
totalmente.
NOTA: Si usted no sabe si el agua es blanda o
dura, empiece con 15 ml de detergente. Aumente
la cantidad de detergente, si es necesario, hasta
la cantidad minima que se necesita para realizar
la limpieza de su vajilla y los utensilios de cocina.
Use las rayas de medici6n en la copa para deter°
gente en el surtidor para medir la cantidad adecua-
da de detergente recomendada en la labia 1.
TabJa 1 - Cantidad recomendada det detergente
Tipo de Agua
Ciclo de Unidad Dura Mediana Suave
Lavado Medici6n
Super ml 45 45 25-45
Auto
Lavado Cuchara 3.5 3.5 1.75 a 3.5
Auto
Lavado Cuchara 1.75 a3.5 1.75 1 a 1.75
Auto ml 25 15-25 15
Lavado
DeHcado Cuchara 1.75 1a 1.75 1
Lavado mm 15-25 15 15
Fiesta Cuchara 1 a 1_75 1 1
Enjuague
y Ninguno Ninguno Ninguno
Guardar
ml 25-45 25 15-25
13
Page 59

ASadir detergente y agente de enjuague
Agente de enjuague
Siempre use un agente de enjuague liquido, ann si su
detergente contiene un agente de enjuague o aditivo
para secar, para Iograr un buen secado y un
mantenimiento adecuado de su vajilla y lavavajillas.
La pantalla de control indicar4 "Rellenar con agente de
enjuague" [RefillRinseAgen_ cuando es necesario
llenar la cop& Despu6s de a_adir el agente,
desapa rece r4 el mensaje "Refill Rinse Agent'.
LJenar el surtidor de detergente y
agente de enjuague
Se puede Ilenar el surtidor del detergente y del
agente de enjuague desde dos posiciones: la
posici6n inferior, con la puerta de la lavavajillas
totalmente abierta o la posici6n superior o
elevada, desde una postura m4s c6moda con la
puerta de la lavavajillas medio abierta.
Uenar el surtidor de detergente
(Posici6n inferior)
1. Llene la copa del detergente como se recomienda
en la Tabla 1.
2. Deslice la tapa como se muestra en la Figura
21, fiecha 1 y presione firmemente hacia
abajo como se muestra en la Figura 21,
fiecha 2 de modo que la tapa enganche bien..
Figura 21
Uenar el surtidor del agente de enjuague
1. Pulse el bot6n azul como se muestra en la
Figura 23 y levante la tapa.
Figura 23
2. ASada el agente de enjuague I[quido al
surtidor del modo que se indica en la Figura
24a hasta que se Ilene el dep6sito del agente
de enjuague. Figura 24
u
Abrir la tapa del surtidor de detergente
(Posici6n inferior)
NOTA: No se abrira la tapa si presiona hacia abajo
sobre la pestaSa azul.
1. Pulse hacia abajo sobre la pestaSa azul en el
surtidor como se muestra en la Figura 22.
2. La tapa se Figura 22
abre y se
desliza hac[a
la izquierda.
3_
Regrese la Iapa del surtidor del agente de
enjuague a su posiclOn cerrada y presione
firmemente hacia abajo hasta que engancha
bien.
NOTA: La F gura 24b muestra un dep6sito del
agente de enjuague totalmente vacio.
4_
Rellene el surtidor del agente de enjuague
cuando el indicador del nivel en el dep6sito
del agente de enjuague que se muestra en la
Figura 24b comienza a mostrar un fondo
plateado con lineas negras o cuando aparece
el indicador "Rellenar con agente de
enjuague" [Refill Rinse Agent] en el panel de
control de la lavavajillas.
NOTA: Despu6s de Ilenar el dep6sito del
agente de enjuague y cerrar la puerta de la
lavavajillas, dentro de unos pocos minutos se
apagara el indicador "Rellenar con agente de
enjuague" [Refill Rinse Agent].
14
Page 60

ASadir Detergente y
Agente de Enjuague
L_enar eHsurtidor de detergente
(Posici6n eievada)
1. Abra la puerta de la lavavajillas casi a mitad
en un angulo de 45°.
NOTA: Se debe abrir la tapa del surtidor de
detergente para poder colocar el surtidor en la
posici6n elevada.
2. Pulse elbot6n azul Figura 25
en el lado
derecho del
surtidor tal
como Se
muestra en
la Figura 2_
La tapa del
surtidor y la
copa se
abren hacia
arriba a la posici6n elevada.
3. Llene la copa de detergente tal como se
recomienda en la Tabla 1.
4. Deslice la tapa como se muestra en la Figura
26, fiecha 1, y presione firmemente hacia
abajo como se
muestra en Figura 26
la Figura 26,
fiecha 2,
hasta que
la tapa i
enganche
bien.
L_enar emsurtidor del agente de enjuague
(Posici6n emevada)
1. Abra lapuerta de la lavavajillas casi a mitad en un
angulo de 45°.
2. Abra la tapa del surtidor del agente de
enjuague.
3. Jale el bebedero de llenado hacia arriba de
modo que enganche Figura 27
en la posici6n _-
elevada tal
como Se
muestra pot
la fecha en
la Figura
Cuidado y Mantenimiento
Tareas de Mantenimiento
Ciertas &teas de su lavavajillas requieren de un
mantenimiento ocasional. Las tareas de mantenimiento
son faciles de realizar y aseguraran un desempeSo
superior de su lavavajillas pot mucho tiempo.
Limpiar derrames y salpicaduras
NOTA: El agua estancada alrededor o debajo de la
lavavajillas puede causar laformaci6n de moho. No
permita que se quede elagua de derrames o
salpicaduras alrededor o debajo de su lavavajillas.
Ocasionalmente, agua puede derramar o salpicar de
su lavavajillas,particularmente cuando usted
interrumpe un ciclo o abre lapuerta de la lavavajillas
durante un ciclo. Limpie de inmediato cualquier agua
derramada o salpicada.
Preparar su _avavajH_as para el invierno
POSIBLES DAf_OS A LA LAVAVAJtLLAS: Las
temperaturas giaciaies pueden daSar su
mavavajiHas. No permita que permanezca
agua en mos sistemas de surninistro o
drenaje de agua de su mavavajiHas pot
pedodos prolongados de temperaturas
congemantes°
En caso de que su lavavajillas quedara sin usarse
durante un periodo prolongado de tiempo en un lugar
expuesto a temperaturas congelantes (pot ejemplo en
su casa de campo o en su hogar durante un viaje),
usted deberia drenar toda el agua en el interior de la
lavavajillas
15
Page 61

Cuidado y Mantenimiento
(continuaci6n)
Revisat/Limpiar las BoquH_as de _os
Brazos Rociadores
De vez en cuando revise los brazos rociadores
para venficar que las boquillas rociadorae no
esten tapadas. Usted debe sacar los brazoe
rociadoree para poder revieadoe.
Para quitar el brazo rociador superior:
1. Saque la rejilla superior vacfa de la
lavavajillas.
2. Voltee la rejilla. El brazo rociador superior
est,. sujetado con una contratuerca como se
muestra en la Figura 28a. Gire la tuerca 1/8
de vuelta en sentido contrario del reloj y
quitela, como se muestra en la Figura 28b,
para soltar el brazo rociador.
Figura 28
4. Revise que las boquillas no esten tapadas.
5. Si se necesita destapar las boquillas,
limpielos bajo un chorro de agua.
Para reinstalar el brazo rociador superior:
1. Reacomode el brazo rociador superior a su
posici6n instalada.
2. Reacomode la contratuerca a su posici6n
instalada y girela 1/8 de vuelta en sentido del
reloj.
3. Reacomode los rodillos de la rejilla superior a
los riebs guias.
Para quitar el brazo rociador inferior:
1. Saque la rejilla inferior vacia de la tina de la
lavavajillas.
2. Agarre y jab hacia arriba el brazo rociador
inferior como se muestra en la Figura 30.
Figura 30
3. Saque el brazo rociador como se muestra
en la Figura 29.
Figura 29
3. Revise que las boquillas no esten tapadas.
4. Si se necesita destapar las boquillas,
limpielos bajo un chorro de agua.
Para reinstamar el brazo rociador inferior:
1. Reacomode el brazo rociador inferior a su
posici6n instalada y presi6nelo hasta que
enganche en su lugar.
2. Reacomode la rejilla inferior a su posici6n
instalada.
Revisar/Limpiar {a Cara Interior de [a
Puerta y la Tina de Acero inoxidabIe
Limpie las orillas del panel interior de la puerta
habitualmente para eliminar desechos que se
acumulan durante el proceso de cargar la vajilla.
Cuando se forman manchas en la tina o en el
panel interior de la puerta de acero inoxidabb,
Ibne el dep6sito del agente de enjuague.
16
Page 62

Cuidado y Mantenimiento
(continuaci6n)
RevisadLimpiar el Sistema de Filtraci6n
Su lavavajillas cuenta con un sistema de filtracidn que
se compone de una trampa para objetos grandes/
conjunto de filtro cilinddco y de un filtro fino, El
sistema de filtracidn se instal6 en el piso de la
lavavajillas debajo de la rejilla inferior para facilitar el
acceso.
Normalmente el sistema de filtracidn se limpia a si
mismo, sin embargo, de vez en cuando usted deberia
revisarlo para eliminar objetos ajenos y limpiarlo
cuando sea necesario.
Para quitar la trampa para objetos grandes/
con junto de fimtrocimindrico:
1, Saque la rejilla inferior,
2, Agarre el conjunto como se muestra en la
Figura 31 y girelo 1/4 de vuelta en sentido
contrario del reloj,
Figura 31
Para quitar el filtro fino y el microfiltro:
1. Levante el filtro fino para quitarlo del piso de
la lavavajillas como se muestra en la Figura
33y limpielo Figura 33
bajo un
chorro de
agua.
=
Saque el microfiltro
como se
Figura 34
muestra en
la Figura 34
y limpielo
bajo un
chorro de
agua.
3. Jale el conjunto hacia arriba como se muestra en
la Figura 32,
Figura 32
La trampa
para
grandes/
filtro
cilindrico
filosos. No meta los dedos en la trampa.
4. Examine cuidadosamente el conjunto. Si
nota desechos en la trampa para objetos
grandes, volteela y dele un golpe ligero en
alguna superficie tal como una mesa para
desalojar y eliminar los desechos. Limpie el
filtro cilindrico bajo un chorro de agua.
etos
Para reinstalar el sistema de filtraci6n:
1. Reacomode el microfiltro (modelos
seleccionados) en su posici6n instalada.
2. Reacomode el filtro fino en su posici6n
instalada.
=
Acomode la trampa para objetos grandes/
conjunto de filtro cilindrico en su posici6n
instalada en el piso de la lavavajillas.
4.
Dele un 1/4 de la vuelta en el sentido del reloj
a la agarradera de anillo hasta que
enganche. Fi ura 35
La fiecha en
la agarraders
de anillo y la
fiecha en el
filtro fino
deben apun-
tarse una a
la otra, comc
se muestra el circulo en la Figura 35.
=
Delicadamente jale la agarradera para
verificar que el cojunto esta instalado
correctamente.
17
Page 63

Cuidado y Mantenimiento (ooot nuao 6o)
POSIBJLES DANES A LA LAVAVAJJLLAS:
Productos quimicos caueticos, Jimpiadores
abrasives, estropajos (sean de metal o de
pJaetJco), toaHas abrasJvas de teJa o de
papeJ pueden daSar la cara exterior de la
puerta de la lavavajiHae. No use quimicos
caueticos, Hmpiadores abrasives, estropajes
(sean de metal o de pJaetico), toaHae
abrasivae de teia o de papei para limpiar el
paneJ exterior de la puerta
Puertas pintadas
Use Onicamente un pare suave Jigeramente
humedecido con agua jabonosa.
Puertas de acero inoxidable
Use un pare suave con un limpiador no abrasive
(preferiblemente en forma Ifquida suministrado a
traves de un atomizador) fabricado especialmente
para limpiar el acero inoxidable. Para Iograr
mejores resultados, primero moje el pare con el
limpiador de acero inoxidable para despues
pasarlo per la superficie.
Limpiar el empaque de la puetta
Limpie habituaJmente el empaque de la puerta con
un pare mo.jado para eJiminar las particulas de
aJimentos y los otros desechos que se le hayan
pegado.
18
Page 64

Ocasionalmente,Inslavavajillaspuedenexhibir
problemasnorelacionadosaunmalfuncionamientode
lalavavajillasmisma.Lasiguienteinformaci6npuede
ayudarlearesolverunproblemaconsulavavajillassin
tenerquesolicitarelserviciodeunt6cnico.
Elsurtidordeagentedeenjuaguepodrfaestarvacio.
Reviseloy116nelodenuevosiesnecesario.Elsecado
delavajillapuedeacelerarseymejorarseabriendola
puertadelalavavajillasunpoquitoydejandolaabierta
usandolarejillasuperior.
NoseprendeIn(s)luz(ces)indicadora(s)
Reviselosfusiblesoloscortacircuitosenlacajade
fusibles/cortacircuitosycambieelfusibleo
restablezcaelinterruptorsiesnecesario.
La lavavajillas no se pone on marcha
Revise que la puerta de la lavavajillas est6 bien cerrada
y atrancada.
Hay mucha espuma en la lavavajillas
Usted pudo haber utilizado un tipo de detergente
incorrecto. Use Onicamente los detergentes
fabricados especialmente para use en lavavajillas
automaticas.
Manchas bmancas o rayas en mavajimmay moovasos
Consulte la secci6n Ajuste del Agente de Eniuague
de este manual para Ins instrucciones de c6mo
aumentar la cantidad de agente de enjuague que surte
la lavavajillas.
La bomba no drena el agua de la lavavajillas
Revise que la manguera de desagQe no est6
torcida, obstruida o instalada incorrectamente.
AsegOrese de que una parte de la manguera de
desag(_e est6 por Io menos a una distancia de 20"
(50 cm.) arriba del piso del gabinete de la
lavavajillas (v6ase el Manual de Instalaci6n), Los
fikros podr[an estar obstruidos. Aseg0rese de que
el sistema de filtraci6n no est6 tapado (v_ase la
secci6n Cuidado y Mantenimiento de este
manual). El desagOe del fregadero en la cocina
podria estar tapado. Usted podria tener que
acudir aun plomero m4s bien que aun t6cnico de
reparaciones de lavavajillas, Si se instal6 un
dispositivo con espacio de aire [air gap] en el
fregadero, 6ste podria estar tapado.
La lavavajillas esta funcionando mucho tiempo
Esto se puede deber a la entrada de agua fr[a. Antes
de prender la lavavajillas, abra la Ilave de agua caliente
en el fregadero m4s cercano a la lavavajillas. Deje que
corra el agua hasta que est_ caliente, luego cierre la
Ilave de agua y prenda la lavavajillas.
Ruidos de matraqueo
Talvez los utensilios no estan acomodados
correctamente.
Emcicmodo mavadono avanza al de eniuague
NOTA: Las instrucciones de instalaci6n que se
incluyen con su lavavajillas le ayudaran con las
instrucciones siguientes:
El conducto de alimentaci6n de agua podr[a estar
cerrado. Revise la valvula de la fuente de agua y
abrala si esta cerrada.
No se cierra matapa demsurtidor do detergente
Tal vez no cierra bien la tapa del surtidor de
detergente, o no se termin6 un ciclo y se deberia
cancelar 6ste. Consulte la secci6n de C6mo ASadir
Detergente y el Agente de Enjuague en este manual
para las instrucciones de c6mo cerrar la tapa del
surtidor, Consulte la secci6n de C6mo Operar la
Lavavajillas de este manual para instrucciones de
c6mo cancelar un ciclo.
El lavado resumta insatisfactorio
, Cantidad incorrectadedetergente=
, Los utensilios estan arreglados de mode
incorrecto o la rejilla esta sobrecargada.
, AIg0n utensilio impide la rotaci6n del brazo
rociador,
, Las boquillas de los brazes rociadores necesitan
limpiarse,
, Los filtros estan instalados incorrectamente.
, Se seleccion6 un ciclo inadecuado.
19
Page 65

hfotmaci6n acerca de la duraci6n del ciclo/uso de agua
NOTA: La duraci6n de los ciclos y el consumo de agua dependen en gran parte de la temperatura del agua
suministrada por su casa y del tipo de carga para lavarse, factores sobre Roscuales el fabricante no tiene
ningOn control Por consiguiente, las duraciones cantidades notadas en esta tabla son aproximadas.
Ciclo Tiempodel Tiempo del Ciclo con Temperaturade Temperaturade _ Agua
Ciclo POWERBOOST TM Lavado Enjuague _NS_._ (Galones)
(en minutos) (Fahrenheit) (Fahrenheit)
Super Auto 104-133 90 151 - 160 156 X 6.5 - 8.8
Lavado
Auto
Lavado
Auto Lavado
Delicado
Lavado de
Fiesta
Enjuagar y 8 No Disponible Sin Calor Sin Calor 1.3
Guardar
Regular 114 No Disponible 122-135 156 3.6 - 7.1
Cuidado
Ambiental
Cuidado de
Vidrio
Lavado 122 No Disponible 158 162 10.7
Extremo
94-107 72 122 - 135 156 X 3.6 - 7.1
92-100 6,3 113 - 122 156 X 3.1 - 4.8
41 No Disponible 113 131 3.4
128 No Disponible 122 156 4.5
55 No Disponible 122 140 3.6
El simbolo NSF
Una lavavajillas o un ciclo de la lavavajillas que exNbe el sfmbolo NSF
ha sido certificadado por la Fundaci6n Nacional de Salubridad (NSF)
por haber cumplido con los requisitos muy rigurosos de tiempo y
temperatura para desinfectar la vajilla y los utensifios de cocina. Estos
requisitos se explican en el documento referente a lavavajillas para uso
residendial ANSI/NSF 184, "Lavavajillas Domesticas" [Residential
Dishwashers]. Averig0e mg.s informaci6n acerca de la Certificaci6n
NSF en el sitio web, http://www.nsfconsumer.org/home/appliances.asp.
2O
Su lavavajillas est4 certificada por la NSR Los ciclos de la lavavajiflas
que est_.n certificados por NSF son Super Auto Lavado [Auto Super
Wash], Auto Lavado [Auto Wash] y Auto Lavado Delicado [Auto
Delicate Wash]. AI terminar estos ciclos, se iluminara el indicador
"Desinfectado" en el panel de control de su lavavajiflas.
NOTA: Cuando el suministro de agua en su casa esta muy cafiente,
se puede reducir el tiempo de calentamiento de su lavavajillas yes
posible que no se ilumine el indicador o simbolo de "Desinfectado'. El
manual de instalaci6n de su lavavajillas contiene informaci6n sobre la
temperatura recomendada para el suministro domestico de agua
caliente.
Page 66

Servicio al cliente
Su lavavajillas Bosch no requiere de ningOn otro
cuidado especial del que se describe en la secci6n
de Cuidado y Mantenimiento. Si usted tiene alg0n
problema con su lavavajillas, antes de solicitar
servicio tecnico, por favor consulte la secci6n de
Autoayuda. Si se necesita servicio, p6ngase en
contacto con su distribuidor o instalador o con un
centro de servicio autorizado. No trate de reparar
el aparato usted mismo. Todo trabajo realizado por
personas no autorizadas puede invalidar la
garantfa.
Si usted tiene alg0n problema con su lavavajillas
Bosch y no est,. contento con el servicio que haya
recibido, tome los siguientes pasos por favor (en el
orden listado abajo) hasta corregir el problema a
su entera satisfacci6n:
1. Contacte a su instalador o al contratista de
servicio autorizado por Bosch en su _.rea.
2. Mandenos un correo electr6nico desde la
secci6n de servicio al cliente en nuestra
pagina Web, www.boschappliances.com.
3. Escribanos a la siguiente direcci6n:
BSH Home Appliances, Corp.
5551McFaddenAvenue
Huntington Beach, CA 92649
4. Ll_.menos al 1o800-944o2904.
Aseg0rese por favor de incluir (si esta
escribiendo) o tener a la mano (si esta hablando)
la siguiente informaci6n:
NOmero de modelo
NOmero de serie
Fecha de la compra original
Fecha cuando se origin6 el problema
Explicaci6n del problema
Usted podra encontrar la informaci6n sobre el
nOmero de modelo y el nOmero de serie en la
placa (etiqueta) que se encuentra en la orilla
derecha de la puerta de la lavavajillas tal como se
muestra en la Figura 36.
Ademas, si nos escribe, favor de incluir un n0mero
telef6nico donde Io podamos Iocalizar durante el
dia.
Por favor saque una copia de su factura y
guardela junto con este manual.
Figura 36
PlacaiEtiqueta con el NOmero de
Modelo y el NOmero de Serie
NOmero de Serie NOmero de Modelo
T
i
21
Page 67

Dec araci6n de Garantias ° Lavavaji as Bosch
las garantfas ofrecidas por BSH Home Appliances ("Bosch") en esta Declaraci6n de Garantfas apfican s61o
a las Lavavajillas Bosch vendidas al primer comprador usuario por Bosch o sus distrbuidores autorizados,
revendedores o centros de servicio en los Estados Unidos o CanadA. Las Garantfas incluidas aqd no son
transferbles. PARAOBTENER BERVlQO DE GARANTiA, CONTACTE AL CENTRO DE SERVIQO
AUTORIZADO POR BOSCH MAS CERCANO O LLAME AL 1o800-944o2904 O ESCRJBAA BSH HOME
APPLIANCES CORR DIRECTAMENTE EN 5551 McFADDEN AVENUE, HUNTINGTON BEACH, CA 92649.
ASEGORESE DE INCLUIR EL NUMERO DE MODELO DE SU LAVAVAJILLAS, EL NOMERO DE SERE, LA
FECHA DE COMPRAY ELNOMBRE Y DJRECCtON DONDE COMPRO ELAPARATO.
*La fecha de instaiacbn se refiere ya sea a la fecha cuando se instal6 la lavavajillas o diez dias laborales
posteriores a la fecha de entrega.
1 Afro de Garanfia Limitada Compmeta a partir de maFecha de lnstalaci6n*: Bosch se compromete a
reparar o reemplazar cualquier componente que resulte defectuoso bajo condiciones de uso casero normal
sin costo alguno e incluyendo los gastos de la mano de obra y transporte. El servicio de reparaci6n debe ser
realizado por un Centro de Servicio Autorizado por Bosch (Todos los daSos cosmeticos deben ser
reportados dentro de 30 dias a partir de la instalaci6n).
2 Afros de Garanfia Limitada a partir de la Fecha de mnstahci6n*: Bosch se compromete a proporcionar
refacciones sin costo alguno para cualquier componente que resulte defectuoso bajo condiciones de uso
casero normal, excluyendo los gastos por la mano de obra.
5 Afros de Garanfia Limitada sobre los Componentes Bectr6nicos a partir de h Fecha de
lnstalaci6n*: Bosch se compromete a reparar o reemplazar cualquier microprocesador o tarjetas de
circuitos impresos que resulten defectuosos bajo condiciones de uso casero normal durante el segundo
hasta el quinto aSo a partir de la fecha de instalaci6n, exchyendo los gastos por la mano de obra.
5 Afros de Garanfia Limitada a partir de ia Fecha de [nstalaci6n*: Bosch se compromete a reemplazar la
rejil[a superior o inferior para trastes (exchyendo los componentes de la rejil[a) sin costo alguno, si la rejifla
resu[ta defectuosa en materia[es o mano de obra bajo condiciones de uso casero normal durante el segundo
hasta el quinto afro, exchyendo los gastos por la mano de obra.
Garatia de pot Vida contra maOxidaci6n del Acero hoxidable a partir de la Fecha de lnstalaci6n:
Bosch se compromete a reemplazar su lavavajillas con el mismo modelo o con un modelo actual que tiene la
misma o mejor funcionalidad, si la camisa interior se oxida bajo condiciones de uso casero normal,
exchyendo los gastos de la mano de obra. Bosch reemplazara la puerta de acero inoxidable de cualquier
lavavajillas en caso que se oxide la puerta bajo condiciones de uso casero normal, excluyendo los gastos de
la mano de obra.
EXCLUSIONES: Esta garantia no cubre visitas de servicio o reparaciones para corregir ia instalaci6n de la
lavavajillas, para dar instrucciones sobre el uso de su lavavajillas, para reemplazar fusibles o para corregir la
tuberia de agua o el cableado electrico en su casa o para reparar cualquier lavavajillas que ha sido utifizada
de un modo contrario a Io que se considera un uso casero normal. Adem_.s, las garantias incluidas en esta
Declaraci6n exchyen cualquier defecto y da5o que surge debido a un accidente, alteraci6n, mal uso, abuso,
instalaci6n incorrect& trabajo de servicio no autorizado, fuerzas externas mas aria del control de Bosch, tal
como fuego, inundaci6n y otros actos de la naturaleza, o una instalaci6n que no cumple con los c6digos
locales electrico y de fontaneria. Esta garantia tampoco cubre los gastos por la mano de obra causados
para la reparaci6n o el reemplazo de cualquier lavavajiilas posterior a un a_o a partir de la fecha de
instalacbn. Todas y cualquier parte reemplazada y/o reparada asumira la identidad de la parte original para
los prop6sitos del periodo apficable de la garantia.
AL GRADO PERMFIDO POR LA LEY, ESTA GARANTiA REEMPLAZA CUALQUIER OTRA GARANTiA
EXPRESAO IMPLiCITA, INCLUYENDO LAS GARANTiAS IMPLiQTAS DE COMERQABILIDAD YAPTFUD
PARAALGUN PROPOSITO PARTICULAR. BOSCH NO ASUME NINGUNA RESPONSABILtDAD DE DANOS
tNCIDENTALES O CONSECUENCIALES.
22
Page 68

BSH reserves the right to change specifications or design without notice, Some models are certified for use in Canada, BSH is not responsible for
products which are transported from the United States for use in Canada, Check with your local Canadian distributor or dealer, BSH Home Appliances,
Corporation, 5681 McFadden Avenue, Huntington Beach, CA 92649,
For the most up to date critical installation dimensions by fax, use your fax handset and call 702/833-3800, Use code #8030,
8881 McFadden Avenue, Huntington Beach, CA 92649 ,, 800/944-2904
Part Number: P/N 9000039259 (8408) ,,© BSH Home Appliances Corporation 2004 ,, Lithe U,S,A, 08/04
 Loading...