

Bosch SHE4AM16UC/01, SHE4AM15UC/01, SHE4AM12UC/01 Owner’s Manual

BOSCH
YOUR LIFE.
DISHWASHER USE AND CARE MANUAL
MODEL: SHE4AM, SHESAM, SHX3AM
GUIDE D'ENTRETIEN ET D'UTILISATION DU LAVE-VAISSELLE
MODEL: SHE4AM, SHE5AM, SHX3AM
MANUAL DE USO Y CUIDADO PARA LAVADORA DE PLATOS
MODEL: SHE4AM, SHE5AM, SHX3AM
9000266262 RevE01/08

Congratulations, and ThankYou from Bosch!
Thank you for selecting aBosch dishwasher. You have joined the many consumers who demand quiet and superior performance from their
dishwashers.
This manual was written with your safety and convenience in mind, and the information contained herein is very important. We highly
recommend that you read this manual before you useyour dishwasher for the first time.
Tolearn even more about your dishwasher and available accessories,as well as many othertop-quality Boschappliances, visit our website at
www.boschapplia nces.com.
Pleasecontact us if you have any questions or comments. Call 1-800-944-2904, or write to:
BSH Home Appliances, Corp.
5551 McFadden Avenue
Huntington Reach, CA 92649
Enjoy]
IMPORTANT SAFETY INSTRUCTIONS ..................................................................................................................................................... 3
Dishwasher Components ........................................................................................................................................................................ 4
Dishwasher Features and Options ........................................................................................................................................................ 4-5
Dishware Materials ................................................................................................................................................................................. 6
Preparing and Loading the Dishware ................................................................................................................................................... 6-8
Dishware Preparation ..................................................................................................................................................................... 6
Loading the Dishwasher ............................................................................................................................................................... 7-8
Adding Detergent and Rinse Agent .................................................................................................................................................... 9-I0
Operating the Dishwasher ............................................................................................................................................................... 10-14
Operating the SHX3AM ................................................................................................................................................................. I0
Operating the SHE5AM ................................................................................................................................................................. 12
Operating the SHE4AMOll ............................................................................................................................................................. 13
Care and Maintenance .................................................................................................................................................................... 14-16
Wash Cycle InformationlSanitized ......................................................................................................................................................... 16
Self Help ......................................................................................................................................................................................... 17-19
Customer Service ................................................................................................................................................................................. 20
Statement of Warranties ....................................................................................................................................................................... 21

Important Safety Instructions - Save This Information
NOTICE
Never use steam cleaning products to clean your dishwasher. The manufacturer will not be liable for possible damages or conse-
quences.
Never use harsh chemicals to clean your dishwasher. Some chloride-containing cleaning products can damage your dishwasher
and may present health hazards!
It is highly recommended for the end use consumer to become familiar with the procedure to shut off the incoming water supply
and the procedure to shut off the incoming power supply. See the Installation Instructions or speak with your installer for more
information.
WARN I NG
Misuse of the dishwasher can result in serious injury or death. Do not use the dishwasher in any way not covered in this manual or
for any purpose other than those explalned on the following pages.
Severe product damage and/or injury could result from the use of unqualified service technlcians or non-original replacement parts.
Aft repairs must be performed by a qualified service technician using only original equipment factory replacement parts.
Electrical shock or fire could result if the electrical supply for the dishwasher covered in this man ual is incorrectly installed or if the
dishwasher has been improperly grounded. Do not use the dishwasher covered in this manual if you are not certain the electrical
supply has been correctly installed or the dishwasher has been properly grounded.
WARNING: To reduce the risk of fire, electrical shock, or serious injury, observe
the following:
This appliance must be grounded to a metal, permanent wiF
ing system, or an equipment grounding conductor must be
run with the circuit conductors and connected to the equip-
ment grounding terminal or lead on the dishwasher. See the
Installation Instructions included with this dishwasher for
more information on electrical requirements.
Use this dishwasher only for its intended function, which is
the washing of household dishware and kitchenware.
This dishwasher is provided with Installation Instructions
and this Use and Care Manual. Read and understand all
instructions before using the dishwasher.
Use only detergents or rinsing agents recommended for use in
a dishwasher, and keep them out of the reach of children.
When loading items to be washed:
Locate sharp items so that they are not likely to damage
the door seal.
Load knives and other sharp utensilswiththeirHANDLES
UP to reduce the risk of cut-type injuries.
Do not wash plastic items unless they are marked "dishwasher
safe" or the equivalent. For plastic items not so marked, check
the manufacturer's recommendations.
Do not operate your dishwasher unless all enclosure panels
are in place.
Do not tamper with or override controls and interlocks.
Do not abuse, sit on, or stand on the door or dish racks of the
dishwasher.
To reduce the risk of injury, do not allow children to play in
or on the dishwasher.
When children become old enough to operate the appliance,
it isthe legal responsibility of the parents or legal guardians to
ensure that they are instructed in safe practices by qualified
persons.
Under certain conditions, hydrogen gas may be produced in
a hot water system that has not been used for two weeks or
more. Hydrogen gas is explosive. Before using a dishwasher
that is connected to a hot water system that has been unused
for two weeks or longer, turn on all hot water faucets and let
the water flow from each for several minutes. This will release
any accumulated hydrogen gas. As the gas is explosive, do
not smoke or use an open flame during this time.
Remove the door to the washing compartment when remov-
ing an old dishwasher from service or discarding.
To avoid floor damage and possible mold growth, do not allow
wet areas to remain around or under the dishwasher.
Protect your dishwasher from the elements. Protect against
freezing to avoid possible damage to the fill vane. Damage
caused by freezing is not covered by the warranty.
When you dispose your old appliance make sure you remove
the door or disable the latch.
3

Dishwasher Components
Door Gasket
Top Rack,
Top Rack
Spray Arm
Bottom Rack
Spray Arm
Bottom Rack
Vent
Filter System
in dishwasher
floor)
Silverware Basket
Model/Serial Number Label
Detergent
Dispenser
Rinse Agent
Dispenser
Dishwasher Features and Options
Noise Reduction System: A two-pump motor system, the Suspension Motor TM, and insulation make this dishwasher one of
the quietest in North America.
Nylon Coated Racks: Eliminate cuts and nicks, and have a five-year warranty.
Flow-Through HeaterTM: Heats water to a temperature of up to 160°F.
Condensation Drying: A high temperature final rinse, a low temperature stainless steel tub, and the sheeting action of a
rinse agent result in drying that is hygienic, energy efficient, and economical.
Filter System: Three filters ensure distribution of clean water and protect the main pump and the drain pump from foreign
material.
4

Dishwasher Features and Options
<
Model Number
_q
x
I,U
I
_N
LU
3=
Ul
uJ
3=
Control Panel
Design
Hidden Top
Control
Exposed
Front
Control
Exposed
Front
Control
Exposed
Front
Control
Audible Cycle
Completion Signal yes no no no
Clean Light yes no yes yes
Refill Rinse Agent yes yes
Indicator Light yes yes
Sanitize Light yes yes yes yes
Upper Rack
Flip Tines yes yes yes yes
Lower Rack
Flip Tines no yes no no
Child Lock Button
Suspension no yes yes yes
Silverware standard flexible standard standard
Basket
Height Adjustable no yes no yes
Upper Rack
Time Remaining
Indicator
no
yes
no
no

Dishware Materials
NOTE: Before using your dishwasher for the first time, check the information in this section.
Some items are not dishwasher safe and should be hand-washed; others require special loading.
Contact the item's manufacturer if you are unsure about the item's dishwasher suitability.
Recommended
Aluminum: Colored anodized aluminum may fade over time. Minerals in your water may
cause the aluminum to darken or spot. This ca n usually be removed by using a soap-filled steel
wool pad.
China, Crystal, Stoneware: Some hand-painted pieces may discolor, fade, or spot. Hand-
wash these pieces, Position fragile glassware so that it will not topple over or contact other
pieces during the wash cycle.
Glass: Milk glass may yellow.
Non-Stlck Coatings: Apply a light coating of vegetable oil to non stick surfaces after
drying.
Plastics: Make sure the piece is dishwasher safe.
Stainless Steel, Sterling Silver, and Silver Plate: Place these pieces so that they do not
contact dissimilar metals.
Not Recommended
Acrylic: Crazing (small cracks throughout the acrylic) may occur.
Adhesive-Joined Pieces: Adhesives that join materials such as plastic, wood, bone, steel
copper, tin, etc. may loosen.
Bone-Handled Utensils: Handles may separate.
Iron: Iron will rust. Hand-wash and dry immediately.
Non-Dishware Items: Your dishwasher is intended for use in cleaning ONLY standard
household dishware and kitchenware.
Pewter, Brass, Bronze: Pewter will tarnish. Hand-wash and dry immediately.
Tin: Tin will rust. Hand-wash and dry immediately.
Wood: Wooden bowls, wooden utensils, and wood-handled utensils can crack, warp, and
lose their finish.
Preparing and Loading the Dishware
Dishware Preparation
Do not pre-wash items having loosely-attached soiling. Remove large food particles, bones,
seeds, toothpicks, and excessive grease. Items having burned-on, baked-on or starchy soils
may require pre-treatment.
Loading the Dishwasher
Check the Materials section of this manual if you are unsure about an item's dishwasher
suitability.
Load only dishwasher-safe items into the dishwasher. Load dishes in the dishwasher racks so
that the insides of bowls, pots, and pans are face downwards. Avoid nesting and contact points
between dishes. Separate items of dissimilar metals.
Loading the Top Rack
Figures 1 and 2 show typical 10 and 12 place load patterns for the top rack.
NOTE: Make sure items do not protrude through the bottom of the racks and block the spray
arms.
Figure 1
10 place setting top rack
Figure 2
12 place setting top rack
NOTICE
To avoid dishwasher damage, do not load the dishwasher with objects such as paper
products, plastic bags, packing materials, or anything other than normal dlshware and
kitchenware.
6
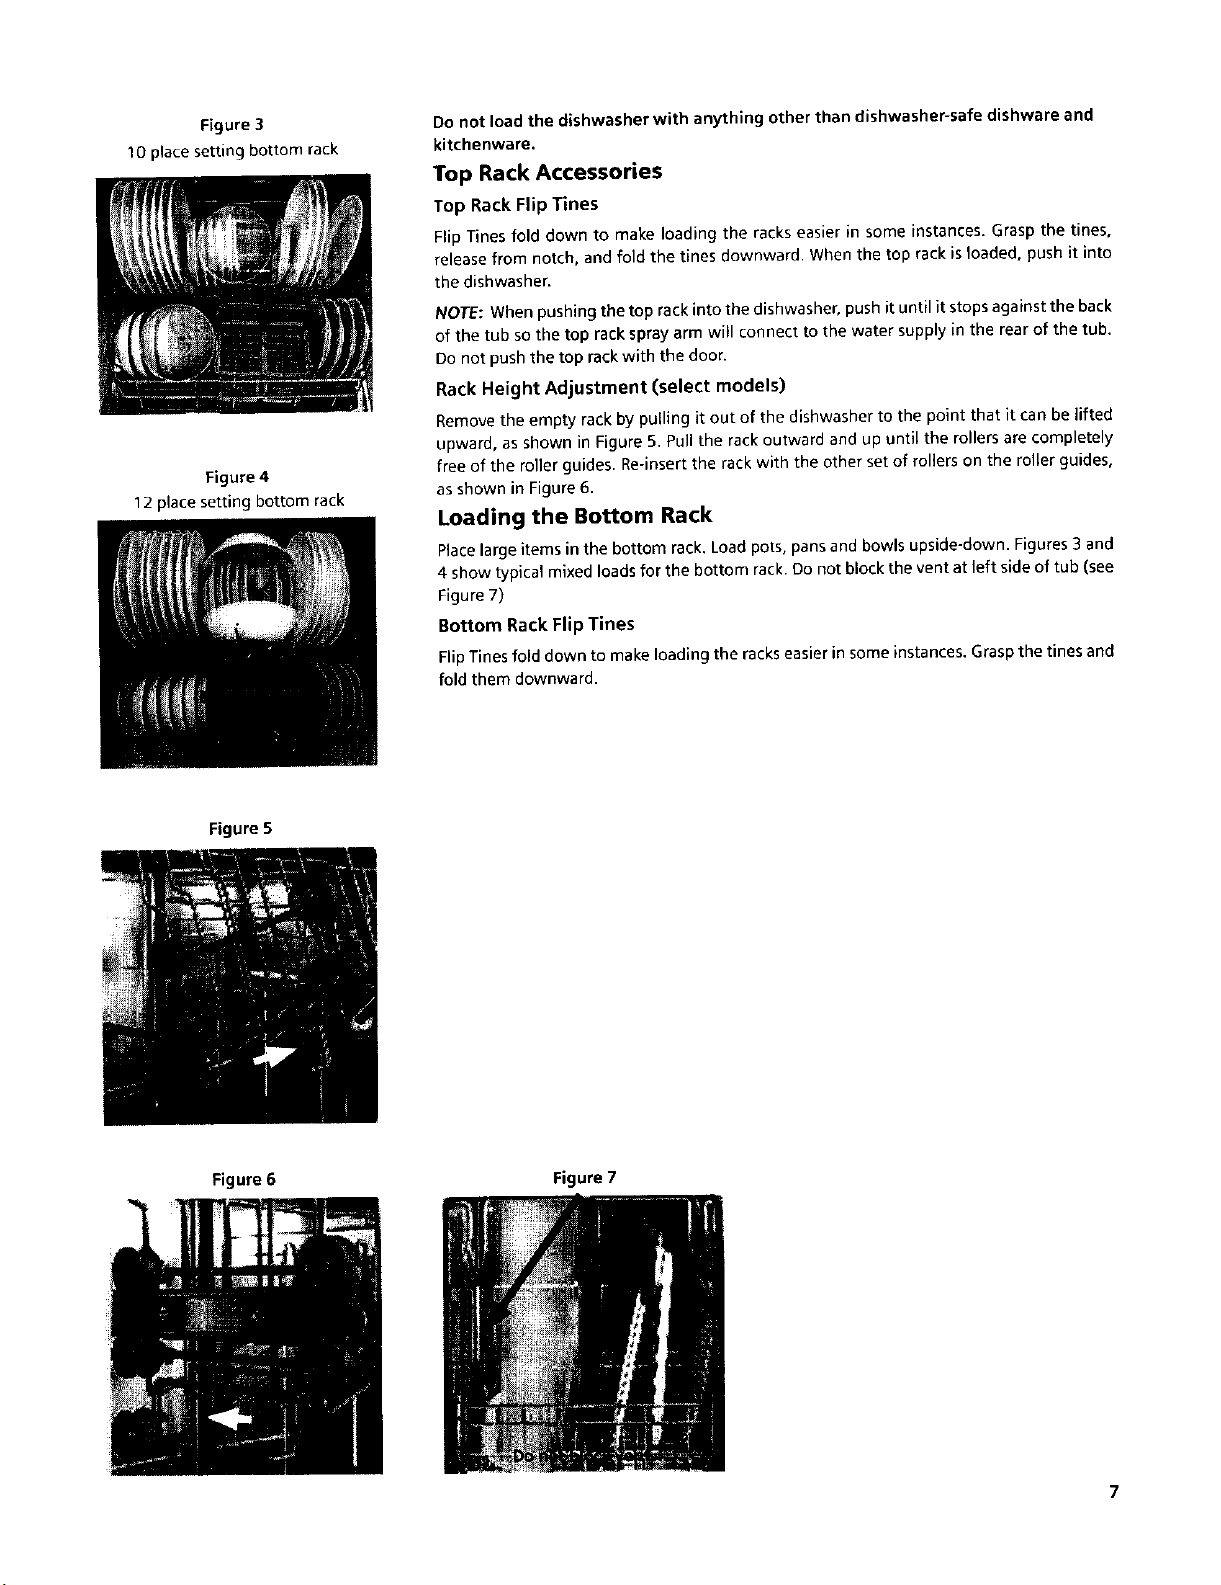
Figure 3
10 place setting bottom rack
Figure 4
12 place setting bottom rack
Do not load the dishwasher with anything other than dishwasher-safe dishware and
kitchenware.
Top Rack Accessories
Top Rack Flip Tines
Flip Tines fold down to make loading the racks easier in some instances. Grasp the tines,
release from notch, and fold the tines downward. When the top rack is loaded, push it into
the dishwasher.
NOTE: When pushing the top rack into the dishwasher, push it until it stops against the back
of the tub so the top rack spray arm will connect to the water supply in the rear of the tub.
Do not push the top rack with the door.
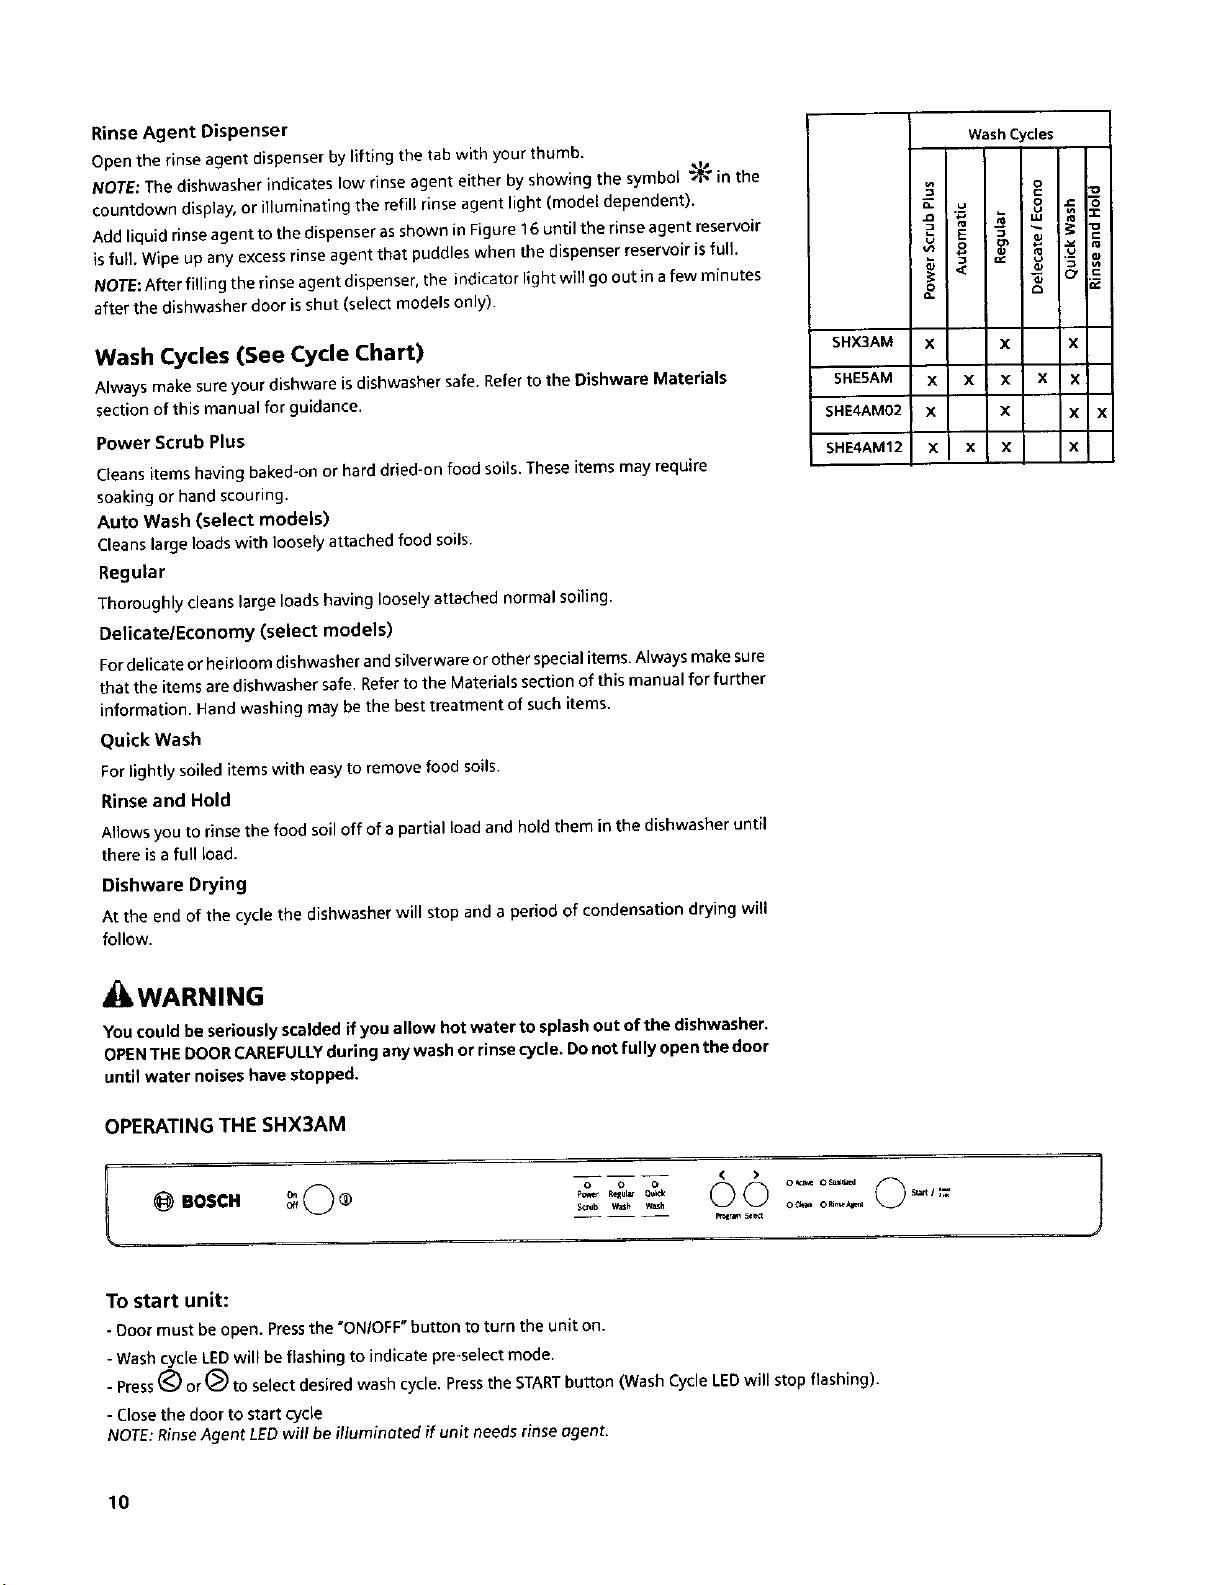
Rack Height Adjustment (select models)
Remove the empty rack by pulling it out of the dishwasher to the point that it can be lifted
upward, as shown in Figure 5. Pull the rack outward and up until the rollers are completely
free of the roller guides. Re-insert the rack with the other set of rollers on the roller guides,
as shown in Figure 6.
Loading the Bottom Rack
Place large items in the bottom rack. Load pots, pans and bowls upside-down. Figures 3 and
4 show typical mixed loads for the bottom rack. Do not block the vent at left side of tub (see
Figure 7)
Bottom Rack Flip Tines
Flip Tines fold down to make loading the racks easier in some instances. Grasp the tines and
fold them downward.
Figure 5
Figure 6
Figure 7

Loading the Silverware Basket
NOTE:The silverware basket topscan be forded up to accommodate large or oddly-shapeditems.
With the silverwarebaskettops down, load the silverware basketfollowing the patterns suggestedin Figures8 (for standardbasket) and
9 (for flexib(e basket).Place knives with their handles up. and forks and spoonswith their handlesdown.
If largeor oddly-shapeditems areto beloadedinto the silverwarebasketwith the topsup, loadthe itemsso that they do not nesttogether.
Load knivesand sharp utensilswith their handlesup,
CAUTION
The sharp points andedges of knives and other sharp utensils can cause serious injuries. Load knivesand other sharp utensils with
sharp points and edges down. Do not allow children to handle or play near knives and sharp utensils.
The Standard Silverware Basket
Thisbasketfits inthe front-middle of the lowerrack.
The Flexible Silverware Basket
Thisbasketisdesignedfor maximum versatility The basket splitsalong its length, resultingin two halvesthat may be placed ina variety
of positionsinthe tower rack, greatly increasingthe tower rack'sloadingversatility.
To split the Flexible Silverware Basket:
1. Graspthebasketasshown in Figure 10A, and slidethe two halvesin oppositedirections,asshown in Figure 10A,
2. Pullthe two halves apart, asshown in Figure 10B.
Somesuggestionsfor placingthe two halvesinthe lower rackareshown in Figure11.
i[ 08D
12 place setting
(Select Models)
Figure 10
Figure 8 Figure 9
12 place setting
(Select Models)
Figure 11
8

Figure12 Adding Detergent and Rinse Agent
Add Detergent
_/_N g_ntfo_best_e_olt_ Detergent
_-_:_BS_ "Use fresh powdered deter
;i iJ'_ ;_ =r tablespoon wil! clean
,_[_ mostloads Use only detergent specifically designed for dishwashers. For best results, use fresh powdered
[ ,3 tablespoonsMax,donot dishwashing detergent.
' _'!1 o,.,._ill
NOTICE"When using dete gent
il tabs,ay,bornPo,,oovoid
i "J contactwiththecover TO avoid dishwasher damage, do not use hand dishwashing products in your dish-
washer.
This dishwasher useslesswater soyouneed to uselessdetergent. With soft water, 1tablespoon
Figure 13
To close
(15rnl) of detergent will clean most loads.The detergent dispenser cup has lines that measure
detergent to 1 tablespoon (15ml) and 1.75 tablespoons (25ml). 3 tablespoons (45ml) of
detergent will completely fill the detergent dispenser cup.
NOTICE
_ ' _ • Pace nge as
shownabove,slide
forward,then press
•_ _ , down FIRMLYuntil
....... yOU hear _CLICK_
To avoid dishware damage, do not use toe much detergent if your water supply is soft,
Using too much detergent in soft water may cause etching in glassware.
NOTE: If you do not know the hardness of your water supply, use _5rot of detergent. Increase
the amount of detergent, if necessary, to the least amount required to get your dishware and
kitchenware clean,
Usethemeasuring lines inthe detergent dispenser cup as aguide to measure the amount of
detergent recommended in Table 1,
Figure 14
To open the cover
-Pushbu_on
Figure 15
To add Rinse Agent
Always use RinseAgent ° AddRinseAgent
evenifyourdetergentcon= whenthelight
rainsRinseAgent onthe control
Figure 16
panelilluminates
Lifttabto open
TO add Rinse
Agentpourin
theoval
Table I - Recommended Detergent Amount
Water Typ.e
Wash
Cycle
Power
Scrub
Plus
Auto
Wash
Regular
Wash
Quick
Unit Hard Medium Soft
m| 45 45 25 45
Tbsp 3 3 1.75 to 3
ml 25-45 25 15-25
Tbsp 1.75to 3 1.75 ltol.75
ml 25-45 25 15-25
Tbsp 1.75_3 1.75 lto1.75
ml 25 t5-25 15
Wash/
Delicate
Economy
Rinse
Hold None None None
Tbsp 1.75 1_1.75 1
Filling the Detergent Dispenser
Fig the dispenser cup as recommend in Table 1. (See Figure 12 for additional
information.)
Toclose,placefinger asshownin Figure13, slideforward, then pressdown until you hear
a *click*.
Toopen the detergent dispensercover,pressthe gray releasetab asshown in Figure 14.
Adding Rinse Agents
Toachieve properdrying, alwaysusealiquidrinseagent, even if your detergentcontains
a rinseagent or drying additive.
9
Rinse Agent Dispenser
Open the rinse agent dispenser by lifting the tab with your thumb.
NOTE: The dishwasher indicates low rinse agent either by showing the symbol "_ in the
countdown display, or illuminating the refill rinse agent light (model dependent).
Add liquid rinse agent to the dispenser as shown in Figure 16 until the rinse agent reservoir
is full. Wipe up any excess rinse agent that puddles when the dispenser reservoir is full.
NOTE: After filling the rinse agent dispenser, the indicator light will go out in a few minutes
after the dishwasher door is shut (select models only).
Wash Cycles
.__ 8
o o
a.
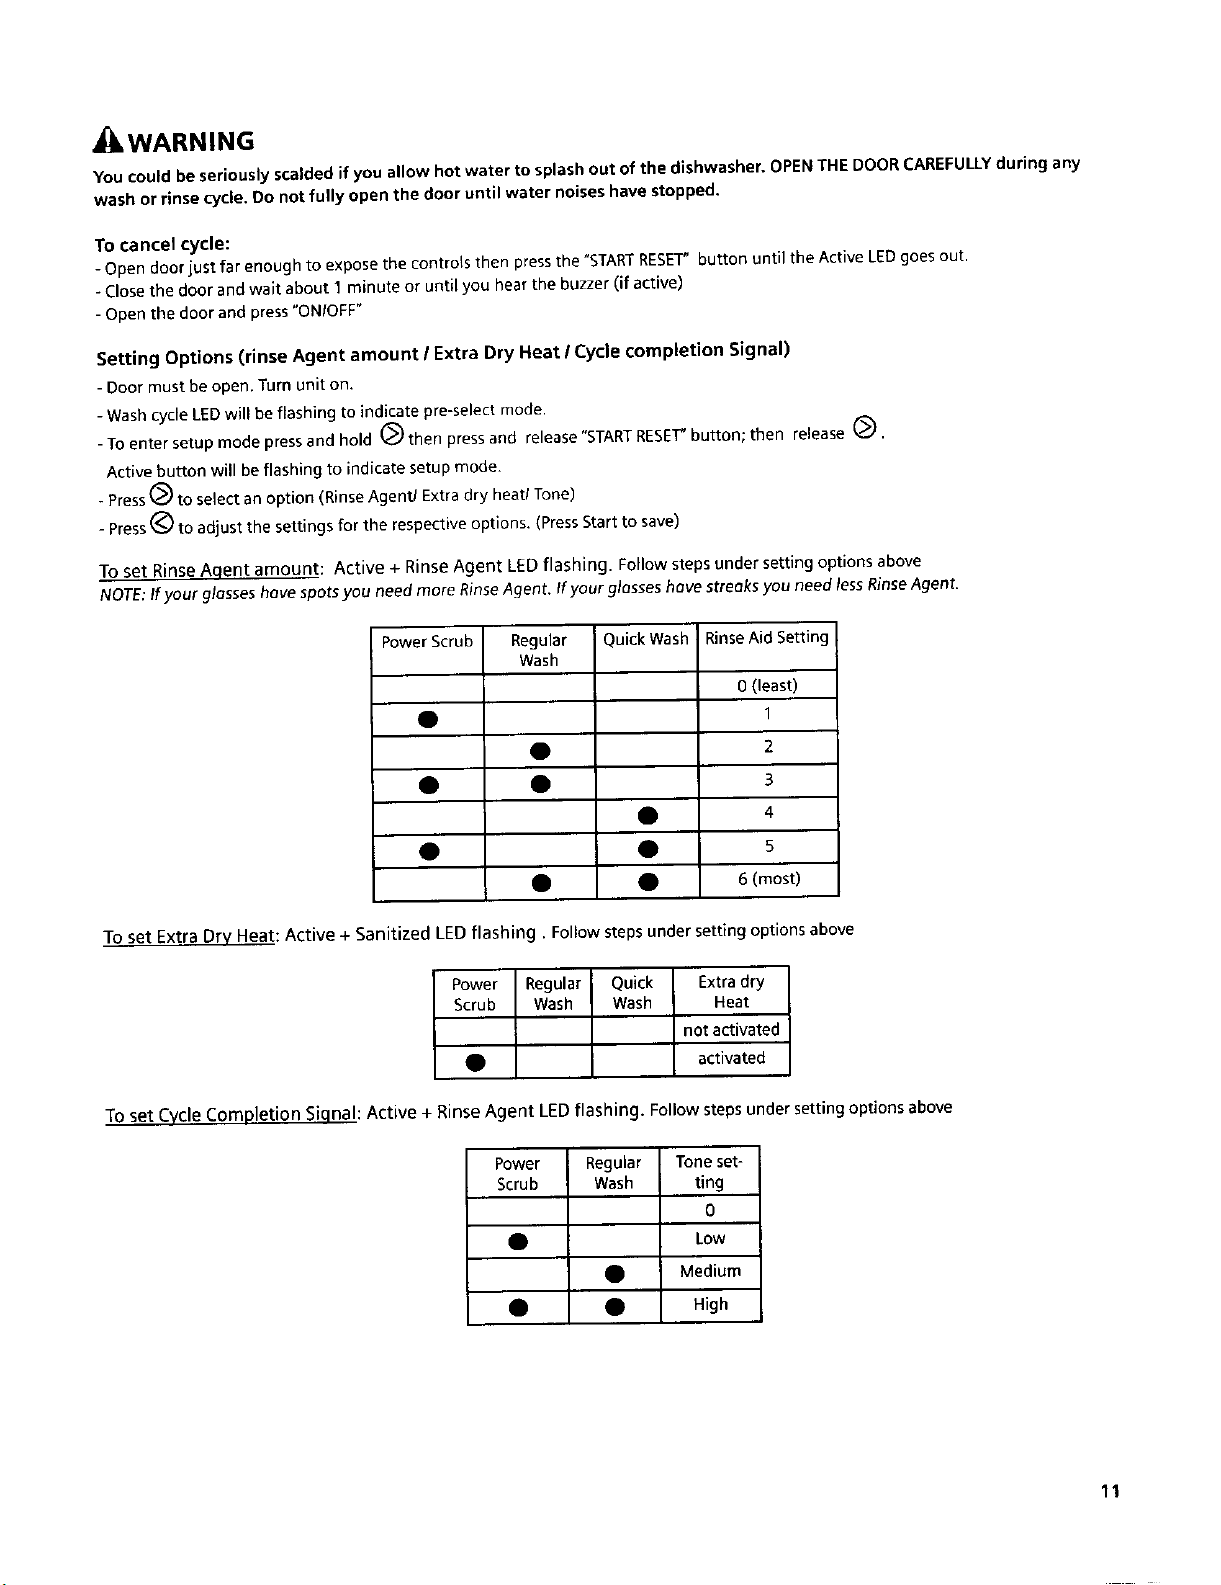
Wash Cycles (See Cycle Chart)
Always make sure your dishware isdishwasher safe.Refer to the Dishware Materials
sectionof this manual for guidance.
Power Scrub Plus
Cleansitems havingbaked-on or hard dried-on food soils. These items may require
soaking or hand scouring.
Auto Wash (select models)
Cleanslarge loads with loosely attached food soils,
Regular
Thoroughlycleanslarge loadshavinglooselyattached normal soling.
Delicate/Economy (select models)
Fordelicateor heirloomdishwasherand silverware orotherspecialitems.Alwaysmakesure
thatthe itemsare dishwashersafe. Referto the Materialssectionof this manualfor further
information. Handwashingmay bethe besttreatment of suchitems.
Quick Wash
For lightly soiled items with easy to remove food soils,
Rinse and Hold
Allows you to rinse the food soil off of a partial load and hold them in the dishwasher until
there isa full load.
Dishware Drying
At the end of the cyclethe dishwasher will stop and a period of condensation drying will
follow.
SHX3AM X
SHE5AM X
SHE4AM02 x
SHE4AM12 x
X
X X ×
X
X X
X
X
X
x
WARNING
Youcould be seriously scalded if you alow hot water to splash out of the dishwasher.
OPENTHE DOORCAREFULLYduringany wash or rinse cycle. Donot fully open the door
until water noises havestopped.
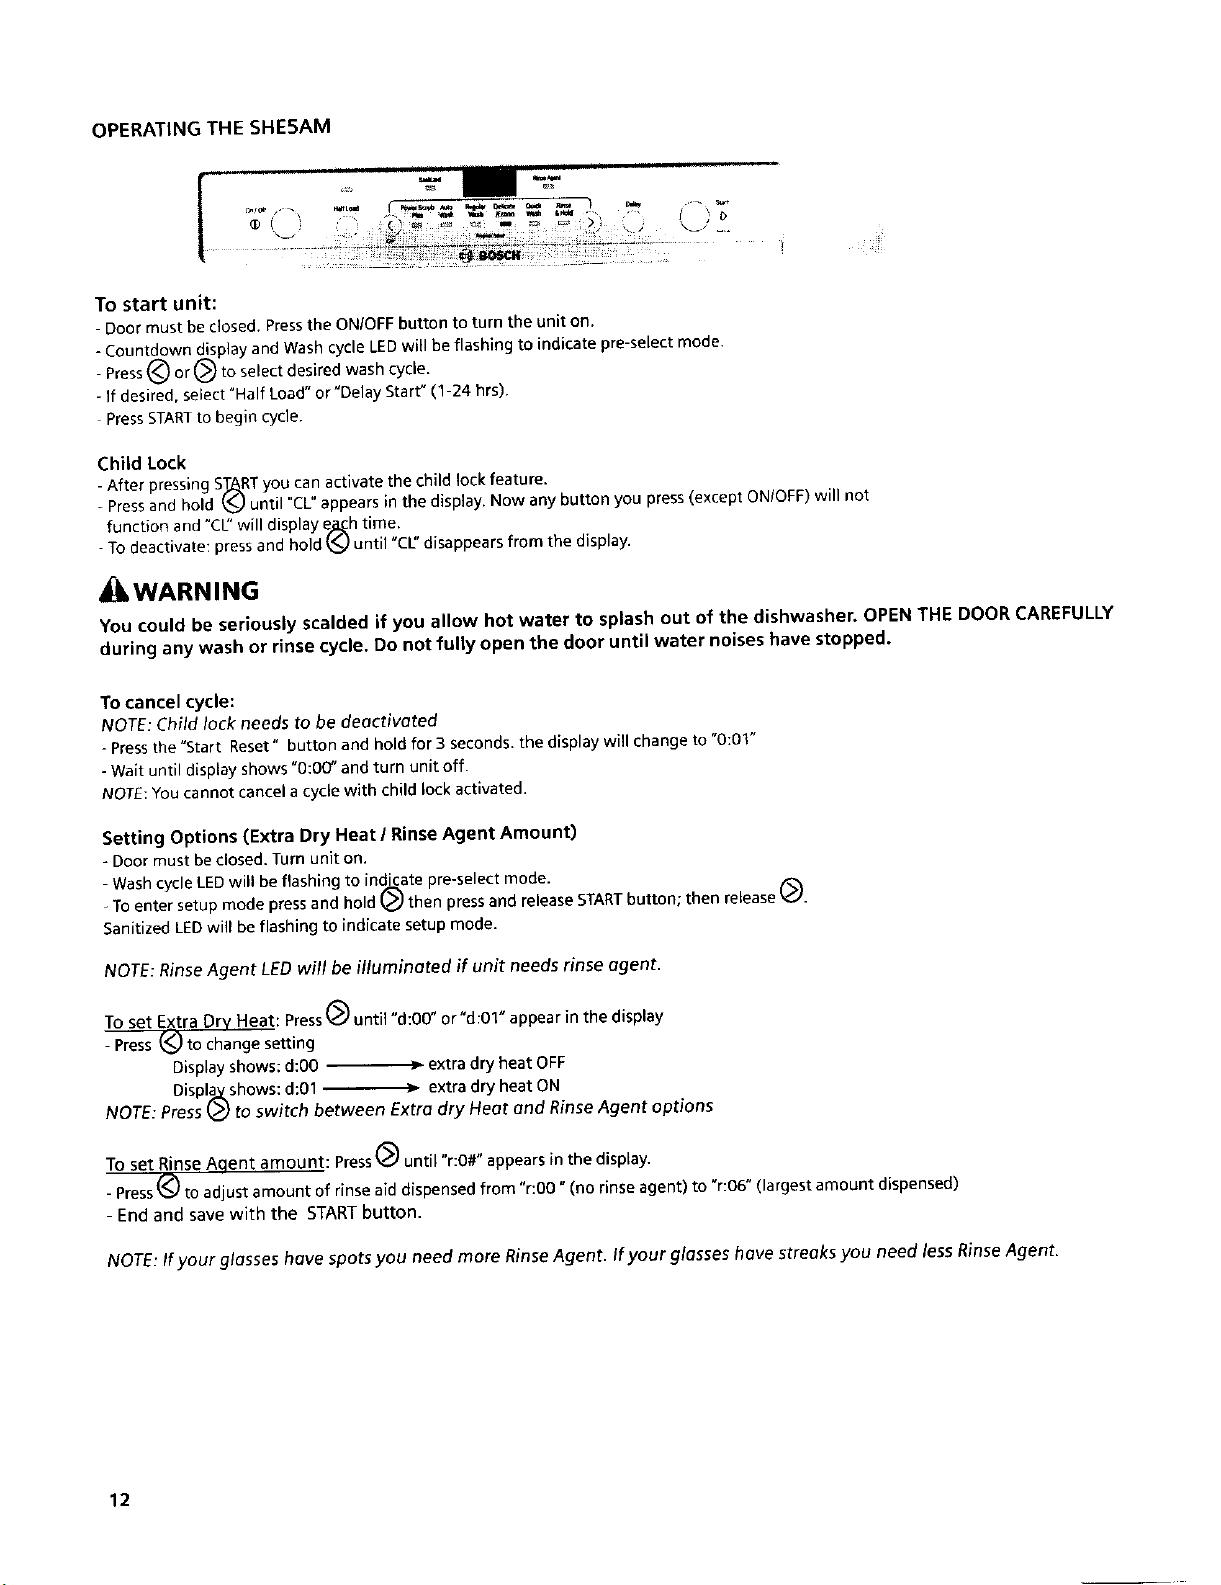
OPERATING THE SHX3AM
< >
@ BOSCH _ _ _"_ °"°_ _ i
To start unit:
- Door must be open. Pressthe "ONIOFF"button to turn the unit on.
- Wash cycle LEDwill be flashing to indicate pre-select mode.
- Press_) or (_) to select desired wash cycle, Pressthe STARTbutton (Wash Cycle LEDwill stop flashing).
- Close the door to start cycle
NOTE:RinseAgent LEDwill beilluminated if unit needs rinse agent.
10
o o on ...... 0
WARNING
You could be seriously scalded if you allow hot water to splash out of the dishwasher. OPEN THE DOOR CAREFULLY during any
wash or rinse cycle. Do not fully open the door until water noises have stopped.
To cancel cycle:
- Open door just far enough to expose the controls _hen press the "STARTRESET"button until the Active LEDgoes out.
-Closethe door and wait about 1 minute or until you hear the buzzer (if active)
- Open the door and press "ONIOFF"
Setting Options (rinse Agent amount I Extra Dry Heat I Cycle completion Signal)
- Door must be open. Turnunit on,
- Wash cycle LED will be flashing to indicate pre-select mode.
- To enter setup mode press and hold (_ then press and release "START RESET" button; then release (_.
Active button will be flashing to indicate setup mode.
- Press @ to select an option (Rinse Agent/Extra dry heat/Tone)
- Press @ to adjust the settings for the respective options. (Press Start to save)
To set Rinse Agent amount: Active + Rinse Agent LED flashing. Follow stepsunder setting options above
NOTE:If your glosses heve spots you need more RinseAgent. If your glosses hove streaks you need less RinseAgent_
Power Scrub Regular QuickWash RinseAid Setting
Wash
0 (least)
• 1
• 2
• • 3
• 4
• • s
• • 6 (most)
To set Extra Dry Heat: Active + Sanitized LEO flashing. Follow steps under setting options above
Power Regular Quick Extra dry
Scrub Wash Wash Heat
not activated
• activated
To set Cycle Completion Siqnah Active + Rinse Agent LED flashing. Follow steps under setting options above
Power ReguLar Tone set-
Scrub Wash ting
0
• Low
• Medium
• • High
11
OPERATING THE SHESAM
I
To start unit:
- Door must be closed. Pressthe ON/OFFbutton to turn the unit on.
- Countdown display and Wash cycle LEDwill be flashing to indicate pre-select mode.
Press(_ or A(_to select desired wash cycle.
- If desired, select "Half Load"or"Delay Start" (1-24 hrs).
PressSTARTto begin cycle.
Child Lock
- After pressing STARTyou can activate the child lock feature.
- Press and hold _ until "CL appears in the display. Now any button you press (except ON/OFF) will not
function and "CL" will display e21_htime,. ,
- To deactivate: press and hold _ until CIJ disappears from the display.
_IbWARNING
You could be seriously scalded if you allow hot water to splash out of the dishwasher. OPEN THE DOOR CAREFULLY
during any wash or rinse cycle. Do not fully open the door until water noises have stopped.
To cancel cycle:
NOTE: Child lock needs to be deactivated
- Press the "Start Reset" button and hold for 3 seconds, the display will change to "0:01"
- Wait until display shows "0:00" and turn unit off.
NOTE: You cannot cancel a cycle with child lock activated.
Setting Options (Extra Dry Heat / Rinse Agent Amount)
- Door must be closed. Turn unit on.
Wash cycle LED will be flashing to indi_xcatepre-select mode.
- To enter setup mode press and hold _ then press and release START button; then release _.
Sanitized LED will be flashing to indicate setup mode.
NOTE: Rinse Agent LED will be illuminated if unit needs rinse agent.
To set E.xtra Dry Heat: Press_) until "d:O0" or"d:01" appear in the display
- Press _ to change setting
Display shows: d:O0 _ extra dry heat OFF
Displa_shows: d:01 -_ extra dry heat ON
NOTE: Press _.) to switch between Extra dry Heat and Rinse Agent options
To set Rinse Aqent amount: Press(_ untJ_"r:O#"appears in the display.
- Press(_ to adjust amount of rinse aid dispensed from "r:O0" (no rinse agent) to "r:06" (largest amount dispensed)
- End and save with the STARTbutton.
NOTE: If your glasses have spots you need more Rinse Agent. If your glasses have streaks you need less Rinse Agent.
12
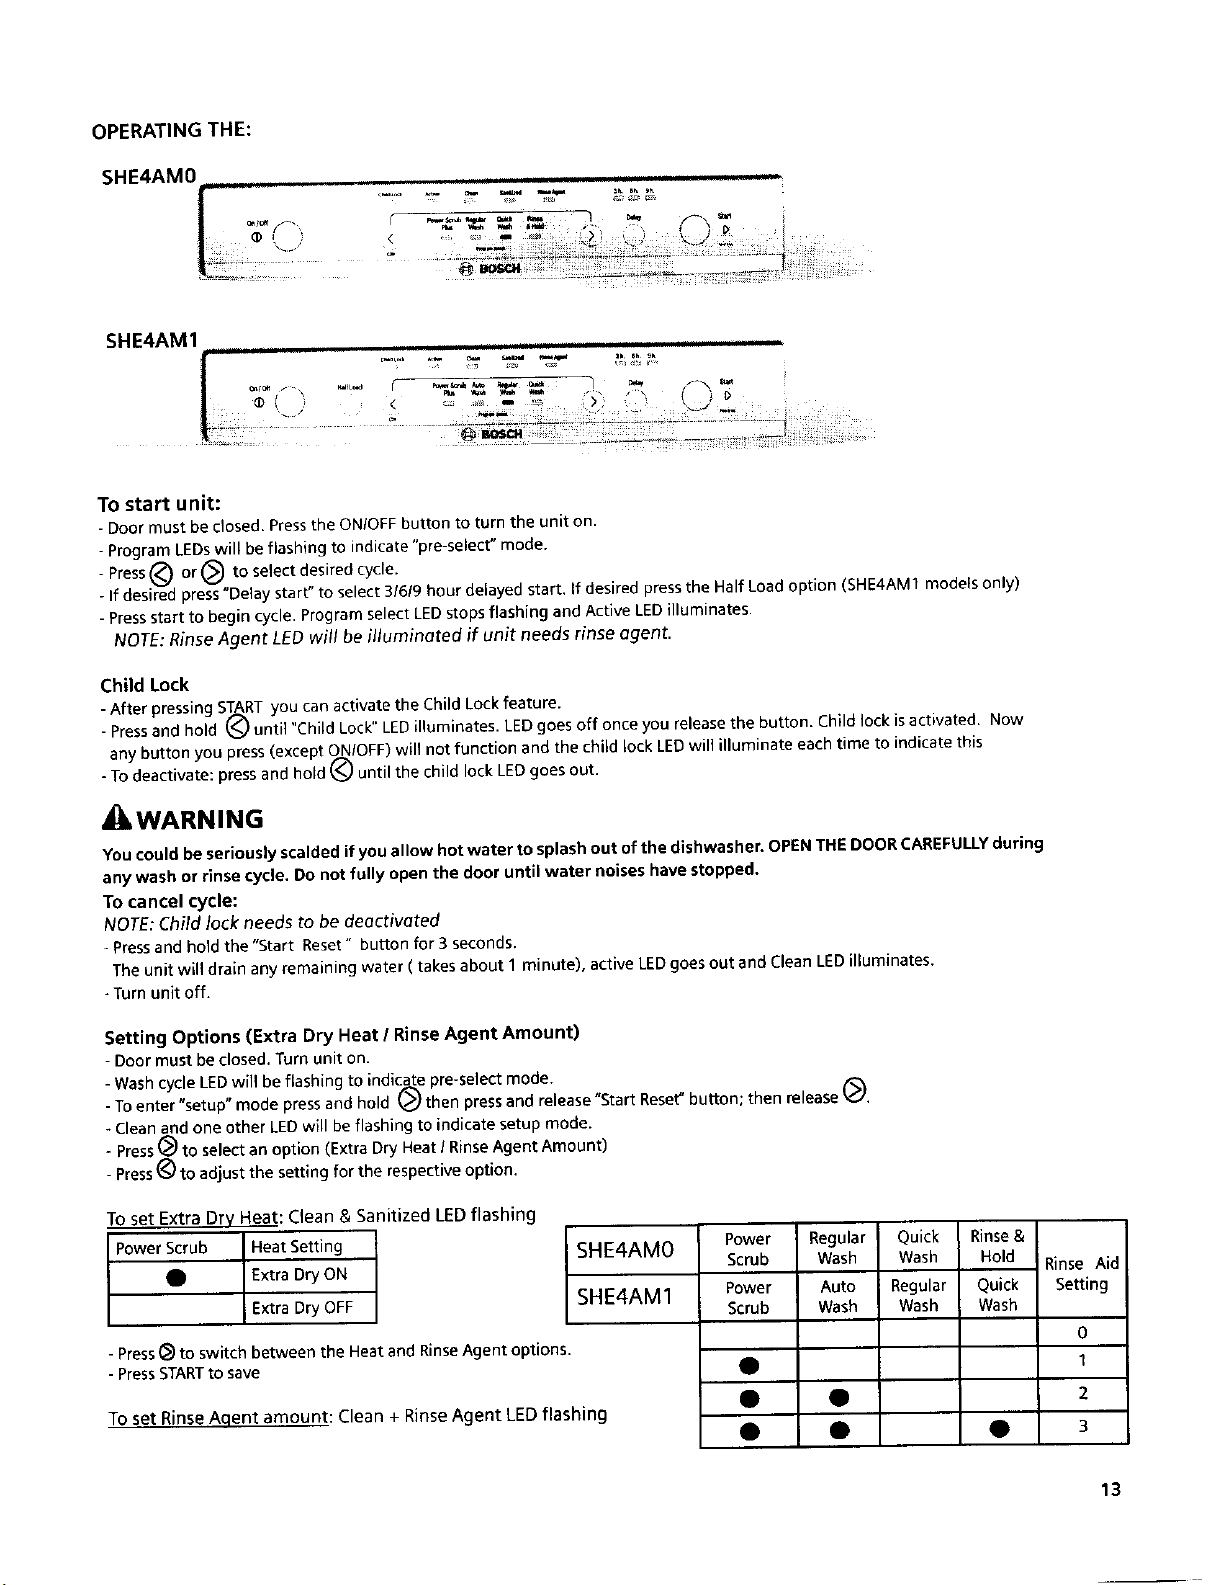
OPERATING THE:
SHE4AM0
SHE4AM1
To start unit:
- Door must be closed. Press the ONIOFF button to turn the unit on.
- Program LEDs will be flashing to indicate "pre-select" mode.
Press('_ or _ to select desired cycle.
V
- If desired press "Delay start" to select 31619hour delayed start. If desired press the Half Load option (SHE4AM1 models only)
- Press start to begin cycle. Program select LED stops flashing and Active LED illuminates.
NOTE: Rinse Agent LED will be illuminated if unit needs rinse agent.
Child Lock
- After pressing ST(._ARTyou can activate the Child Lock feature.
- Press and hold _ until "Child Lock" LED illuminates. LED goes off once you release the button. Child lock isactivated. Now
any button you press (except O(._N/OFF)will not function and the child lock LED will illuminate each time to indicate this
- To deactivate: press and hold _ until the child lock LED goes out.
_WARNING
You could be seriously scalded if you allow hotwater to splash out of the dishwasher. OPEN THEDOORCAREFULLYduring
any wash or rinse cycle. Do not fully open the door until water noises have stopped.
TOcancel cycle:
NOTE: Child lock needs to be deactivated
Pressand hold the "Start Reset" button for 3 seconds.
The unit will drain any remaining water ( takes about 1minute), activeLEDgoes out and CleanLEDilluminates.
- Turn unit off.
Setting Options (Extra Dry Heat / Rinse Agent Amount)
- Door must be closed. Turn unit on.
- Wash cycle LEDwill be flashing tO indic_e pre-select mode. ,,
- To enter setup mode press and hold _,l then press and release Start Reset" button; then release _,'.
- Clean and one other LED will be flashing to indicate setup mode.
- Press (_ to select an option (Extra Dry Heat / Rinse Agent Amount)
- Press _) to adjust the setting for the respective option,
To set Extra Dry Heat: Clean & Sanitized LED flashing
PowerScrub Heat Setting
SHE4AMO
• ExtraDry ON
ExtraDry OFF
SHE4AM1
- Press_ to switchbetween the Heat and RinseAgent options,
- PressSTARTto save
To set Rinse Aqent amount: Clean + Rinse Agent LED flashing
Power Regular Quick Rinse&
Scrub Wash Wash Hold
Power Auto Regular Quick
Scrub Wash Wash Wash
Rinse Aid
Setting
0
t
2
3
13

Figure 17
Sanitized Light
When the Sanitized light appears, it means that the dishware and kitchenware that was
just washed has been sanitized according to the requirements of the National Sanitation
Foundation (NSF). For more information on NSF certification, refer to the Wash Cycle
Information section of this manual.
Unloading the Dishwasher
Unload the bottom rack first.
Unload the silverware basket(s). They are easily removed for unloading.
Unload the top rack.
Care and Maintenance
Maintenance Tasks
Certain areas of your dishwasher require occasional maintenance. The maintenance tasks
are easy to do and will ensure continued superior performance from your dishwasher.
These tasks are:
Winterizing Your Dishwasher
Wiping up Spills and Splash-out
Clean the Stainless Steel Inner Door and Tub
CheckfClean the Spray Arm Nozzles
Check/Clean the Filter System
Clean the Exterior Door Panel
Clean the Door Gasket
Figure 18
Figure 19
Winterizing Your Dishwasher
Ifyour dishwasher will be unused for an extended period of time in a location that experiences
freezing temperatures (e.g., in a holiday home or through a vacation period), have your
dishwasher winterized by an authorized service center.
NOTICE
To avoid dishwasher damage, do not allow water to remain in your dishwasher sys-
tems through extended periods of freezing temperatures. Freezing temperatures can
damage your dishwasher,
Wiping Up Spills and Splash-out
Water may occasionally splash out of your dishwasher, especially if you interrupt a cycle or
open the dishwasher door during a cycle. To avoid floor damage and possible mold growth,
do not allow wet areas to remain around or under the dishwasher.
Check/Clean the Stainless Steel Inner Door and Tub
Cleanthe outer edgesof the inside door panel regularly to remove debris that might collect
there from normal loading.
Ifspots begin to appear on the stainlesssteel tub or inner door, make sure the rinse agent
reservoir isfull.
Check/Clean the Spray Arm Nozzles
Occasionally check the spray arms to ensure that the spray arm nozzles (holes) are
unobstructed. Youmust removethe spray arms to check them for obstruction.
14

To remove the top spray arm:
1. Remove the empty top rack from the dishwasher.
2. Turn the rack upside-down. The top spray arm is held in position by a locking nut as shown
in Figure 17A. Turn the locking nut counter-clockwise 118 turn and remove it, as shown in
Figure 17B to release the spray arm.
3. Remove the spray arm as shown in Figure 18.
4. Look for obstruction in the spray nozzles.
5. If the spray nozzles need cleaning, flush them under running water.
Figure 20
To reinstall the top spray arm:
1. Return the top spray arm to its installed position,
2. Return the locking nut to its installed position and turn it 1/8 turn clockwise.
3. Return the top rack to the top rack roller guides.
To remove the bottom spray arm:
1. Remove the empty bottom rack from the dishwasher tub.
2. Grasp and lift the bottom spray arm as shown in Figure 19.
3. Look for obstruction in the spray nozzles.
4. If the spray nozzles need cleaning, flush them under running water.
To reinstall the bottom spray arm:
7. Return the bottom spray arm to its instalted position and press it so that it snaps into
place.
2. Return the bottom rack to its installed position.
Chec_JClean the Filter System
This dishwasher has a filter system that consists of a Large Object Trap/Cylinder Filter assembly
and a Fine Filter, Select models have an additional Micro Filter. The filter system is located on the
inside of your dishwasher under the lower rack and is easily accessible.
During normal use, the filter system is self-cleaning. You should occasionally inspect it for foreign
objects and dean it when necessary.
TOopen - turn counterclockwise.
Figure 21
LargeObject Trap
Figure 22
/k CAUTION
To avoid injury, do not reach into the large object trap with your fingers. The large object
trap could contain sharp objects.
To Remove the Large Object TraplCylinder Filter Assembly:
1. Remove the bottom rack.
2. Graspthe assembly as shown in Figure 20 and turn it counter clockwise 1/4 turn.
3. Lift out the assembly as shown in Figure 21 and 22.
4. Carefui_yexamfne the assemb_y__fy_u finddebdsinthe Large_bject Trap_turn itupside*d_wn
and gently tap it on asurface such asa countertop to dislodge and remove the debris. Flush
the Cylinder Filter clean by holding it under running water. Placeparts back in unit and lock
asshown in Figure 23.
Figure 23
Toclose -turn clockwise.
15

Clean the Exterior Door Panel
Colored Doors
Use only a soft cloth that is lightly dampened with soapy water.
Stainless Steel Doors
Use a soft cloth with a non-abrasive cleaner (preferably a liquid
spray) made for cleaning stainless steel. For the best results, apply
the stainless steel cleaner to the cloth, then wipe the surface.
Clean the Door Gasket and Door Seal
Regularly clean the door gasket with a damp cloth to remove food
particles and other debris. Also clean the door seal, located inside
the dishwasher at the bottom of the door.
Wash Cycle Information
NOTE: To save energy, this dishwasher has a "Smart Control" that
automatically adjust the cycle based on soil loads and incoming
water temperature. The "Smart Control" makes decisions that can
cause the cycle time and water usage to adjust intermittently. The
cycle times listed in the Use and Care manual are based on normal
soil loads and 120°F incoming water and will vary based on your
actual conditions.
See the Cycles Chart to determine the cycles available for your specific
model.
NOTE: On select modeJs, the Half Load feature wilJ reduce the water
consumption by approximately 30 percent in the Power Scrub Plus,
Regular, and Auto Wash cycles• The ECOoption may be selected for the
Power Scrub Plus, Auto, Regular and Delicate cycles on select models•
This reduces energy consumption approximately 10% due to lower
main wash and final rinse temperatures, but extends cycle length 5-I 0
minutes to maintain drying performance and the water usage will be
unmodified in comparison to the normal program cycles
THE NSFSYMBOL I__;"i_;ii
A dishwasher or adishwasher cyclethat hasthe NSFsymbol hasbeen
certified by the NSFInternational to meet very strict requirements
of wash time and water temperature to ensure dishware and
kitchenware sanitization. These requirements are explained in the
document NSF]ANS1184,ResidentialDishwashers, More information
on NSF Certification is available at the NSFwebsite, http:llwww.
nsfconsumer.orglhomela ppliances.asp.
Your dishwasher is NSF certified• The dishwasher cycles that are
NSF certified are shown in the chart above. When these cycles are
complete, the"Sanitized" indicator on your dishwasher control panel
will illuminate•
NOTE: If your household water supply is too hot, your dishwasher's
heating time may be reduced and the "Sanitized" light or symbol may
not illuminate. Your Dishwasher Installation Manual has information on
the recommended temperature for your household hot water supply•
Cycle Data
*Select Models - refer to Cycle Chart
Half Load Function
Cycle Time
(in minutes)
Water
Consumption
in gallons
Water
Consumption
in liters
Cycle Time 110
(in minutes)
Consumption g)
Consumption(gal)
Minimum
Maximum
Minimum
Maximum
RinseTemp "F
Water
Water
0
Power Scrub
Plus
130
6.8
6.8
25.6
25•6
160_
156=
17.9
4.7
Auto
Wash
105-125
3.8
6.5
14•6
24•6
130'
156"
99-110
11.5-15.9
3.4- 4.2
Regular
Wash
95
2.3
5.4
8.7
20•5
122"
149"
90-110
8.7-15.9
2.3- 4.2
O
Delicate/
Economy*
80
3.0
3.0
11•3
11•3
122"
156'
75
10.9
2.9
Quick Rinse &
Wash*
30
3.0
3.0
11•3
11.3
113_
122"
Hold
9
1.0
1.0
4.0
4.0
Incominq
Incoming
Not Available
16

Self Help
Dishwashers may occasionally exhibit problems that are unrelated to a malfunction of the dishwasher itself. The following information
may help you with a dishwasher problem without involving a repair professional.
Problem
Dishwasher does not start
Dishwasher beeping (end of cycle
si9nal)
Display does not illuminate or
console lights are not on
Cause
1. Door may not be properly latched.
2. Unit may not be turned on.
3. Unit not reset or previous cycle not
completed.
4. Delay start engaged.
5. Interruption of electrical power supply
to dishwasher or blown fuse.
6. Child lock activated (select models).
7. The door may have been dosed with-
out first selecting a cycle.
8. Water supply may not be turned on,
Default factory settings alert the customer
that the cycle has completed by beeping.
This feature can be deactivated if so de-
sired.
1. A fuse may have been blown or circuit
breaker tripped.
2, Door not closed or _atched.
Note: For models with controls on the top
portion of the door, the display only illumi-
nates when the door isopened ond controls
ore visible.
Action
1. Shut the door completely.
2. Pressthe main power switch to turn unit on.
3. To reset, refer to "Canceling or changing the
cycle" section in this manual.
4. To reset, refer to "Delay Star_ section in this
manual.
5. Check circuit breaker.
6, Deactivate the child lock. Referto "Child Lock"
section in this manual if applicab]e.
7. Select acycle and closethe door.
8. Checkand turn on water supply,
To adjust the volume or deactivate, refer to "Cycle
Completion Signar section in this manual
1. Check the fuse or circuit breaker box and re-
place the fuse or reset the breaker if neces-
sary.
2. Ensure that door is properly latched and com-
pletely closed.
Dishwasher seems to run a
long time
Dishesaren't getting clean
enough
t. Incoming water is not warm enough.
2. Cycle time can vary due to soil and wa-
ter conditions.
3. Rinse agent dispenser is empty.
4. Dishwasher connected to cold water
supply.
Note: Refer to "Cycle Chart Data"section in
this manual for typical cyclelength.
I. Sprayarm movement isobstructed.
2. Sprayarm nozzlesclogged.
3. Improper use of detergents.
4. Filters could be clogged,
5. Dishes are nested or loaded too close
together.
6, Selected wash cycle is not suitable for
food soil condtions.
1. Refore starting acycle, run hot water faucet at
the sink nearest to the dishwasher.
2. Sensors in the dishwasher automatically in-
crease the cycle time to ensure a good wash
when heavy soil isdetected.
3. Add rinse agent.
4. Verify dishwasher is connected to hot water
supply plumbing.
1. Ensure that spray arm movement is not
blocked by hand rotating spray arms.
2. Removethe sprayarms and clean according to
"Check/Clean the Spray Arm Nozzles" in Care
and Maintenance section of this manual.
3. Increaseor decrease detergent depending on
the water hardness. Referto Table under "Add-
ing Detergent and RinseAgent'.
4. Clean the filter. Referto"Check/Clean the Fil-
ter System" under Care and Maintenance sec-
tion of this manual.
5. Rearrange loadsuch that water spraycan reach
all items in the dishwasher. See also "Prepar-
ing and Loading" section of this manual.
6. Refer to "WashCycle"section inOperating the
Dishwasher section of this manual.
17

Problem
Cause Action
Dishesare not getting dry enough
Odor
1. Rinse agent dispenser is empty. (Rinse
agent indicator is activated),
2. Improperloading of dishes,
3, Selected cycle does not include drying.
Note: Plastic or Teflon do not typically dry
os completely as other items due to their
inherent properties.
I. Food debris is present at the bottom of
the dishwasher.
2. Food particles are present near the
door seal,
3. Dishes left too long in unit before run-
ning a cycle.
4. Residual water is present at the bottom
of the dishwasher.
5. Drain hose is obstructed.
1. Add rinse agent. The use of rinse agent im-
proves drying.
2. Rearrange load to ensure items are not nest-
ed. Refer also to the "Preparing and Loading"
section of this manual.
3. Rinse and Ho_d setting does not include dry-
ing cycle,
Note: Selectmodels offer an extra hooting options
to improve drying performonce. Refer to "Wash Cy-
cle options* under the Operating the Dishwasher
section of this monuaL
1. Remove the filters and clean according to the
"Check/Clean the Filter System" section of this
manual.
2. Refer to "Clean the Door Gasket and Door Seal"
in the Care and Maintenance section of this
manual.
3. Run a Rinse/Hold cycle if you do not intend to
immediately wash the dishes.
4. Ensure the unit has completely drained from
the last cycle. Refer to the "Canceling or chang-
ing the cycle" section of this manual.
5. Remove any obstructions from the drain hose
by calling qualified personnel.
Note: If odor still persists, run the NormallRegulor
cycle until it flushes ond interrupt the cycle and
place on 8 oz. cup of distilled white vinegor solu-
tion on the top rock end then finish the cycle.
Dishwasher not filling with water
Water Leaks
Tub stains
18
I. Restriction in the water supply system,
2. Previous wash cycle was not complet-
ed.
3. Delay-start is active.
1. Suds
2. Door seal could be pulled away from
track.
3. Condensation vent is blocked.
4. Improper installation.
1. Stains on the dishwasher interior are
due to hardness of water.
2. Silverware incontact with tub.
1. Ensure that the water supply valve (typically
located under kitchen sink) isopen and check
that the water supply line has no kinks and
dogs.
2, Refer to the "Canceling or changing the cycle"
section of this manual.
3. Cancelthe delay-start or wait until delay-start
time completes (times out). Refer to the "De-
lay Start" section of this manual.
1. Wrong type of detergent results in suds and
leaks. Useonly dishwasher detergents. Ifsuds
still persist, then add one tablespoon of veg-
etable oil atthe bottom of the dishwasher and
run the desired cycle.
2. Ensure that door seal is in the track.
3. Ensure that condensation vent is not blocked,
4-. Have proper installation verified by qualified
personnel (water supply, drain system, level-
ing, plumbing).
I. Concentrated Lemon juice can reduce the
build up of hard water stains. Run a normal cy-
cle until it flushes and interrupt the cycle and
then place an 8 oz. cup of the concentrated
lemon solution on the top rack and finish the
cycle. This can be clone periodically to avoid
build up.
2. Ensure that the silverware does not make con-
tact with the tub while running a cycle.

Cause ActionProblem
Streaks on glassware or residue on the
dishes
Fascia panel discolored or marked
Noise during wash cycle
Detergent dispenser cover will not shut
Unable to select desired cycle
Incorrect rinse agent setting.
Abrasive cleaner used.
The dishes may not be arranged properly.
1. Improper operation of detergent
cover.
2. Previous cycle has not been fin-
ished, reset, or cycle was inter-
rupted.
Previous cycle has not finished.
Depending on the hardness of water, adjust
the rinse agent dispenser. Refer to "Adding
Detergent and Rinse Agent" section in this
manual for adjustment.
Use mild detergents with soft damp cloth.
Water circulation sound is normal, but if you
suspect items are banging into each other or
into the spray arms, refer to the "Preparing
and Loading" section of this manual for opti-
mal arrangement.
I. Referto "Adding Detergent and RinseAid"
section of this manual for instructions on
opening and closing the dispenser.
2. Refer to the "Canceling or changing the
cycle" section of this manual.
Refer to the "Canceling or changing the cycle"
section of this manual.
19
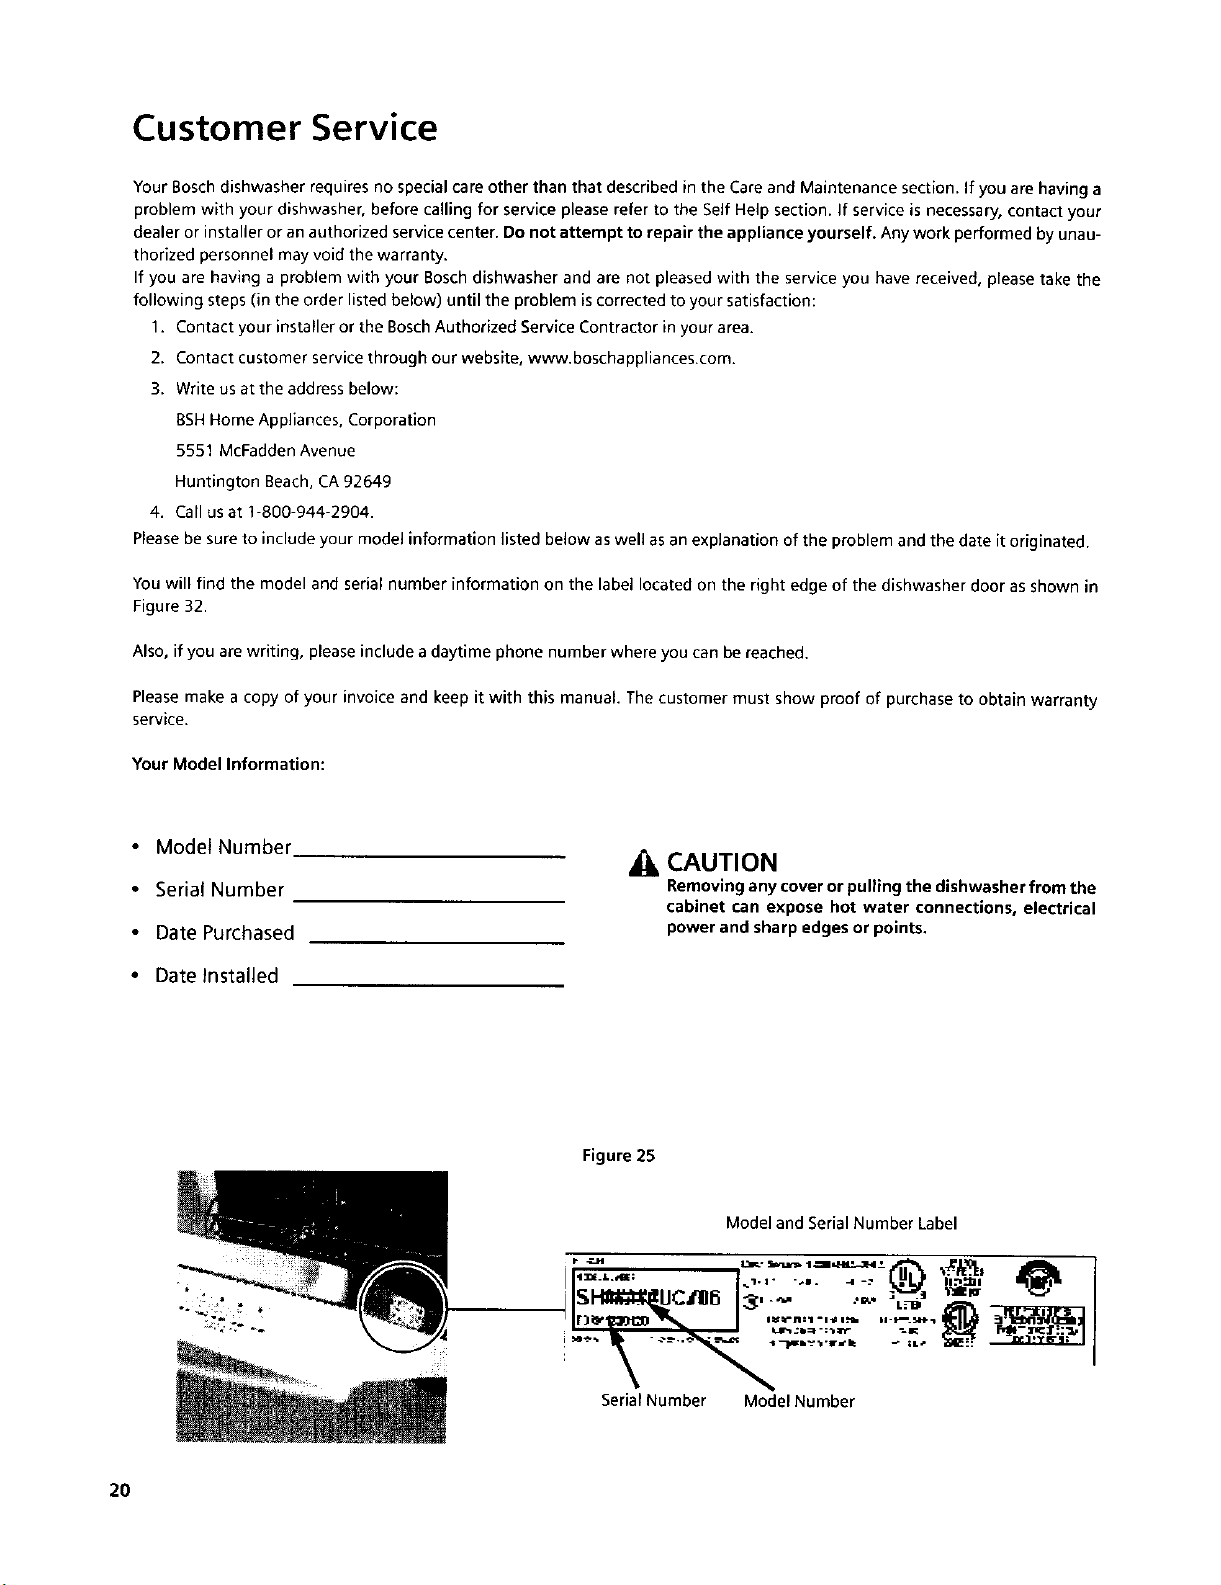
Customer Service
Your Bosch dishwasher requires no special care other than that described in the Care and Maintenance section. If you are having a
problem with your dishwasher, before calling for service please refer to the Self Help section. If service is necessary, contact your
dealer or installer or an authorized service center. Do not attempt to repair the appliance yourself. Any work performed by unau-
thorized personnel may void the warranty.
If you are having a problem with your Bosch dishwasher and are not pleased with the service you have received, please take the
following steps (in the order listed below) until the problem is corrected to your satisfaction:
1. Contact your installer or tee Bosch Authorized Service Contractor in your area.
2. Contact customer service through our website, www.boschappliances.com.
3. Write us at the address below:
BSH Home Appliances, Corporation
5551 McFadden Avenue
Huntington Beach, CA 92649
4. Call us at 1-800-944-2904.
Please be sure to include your model information listed below as well as an explanation of the problem and the date it originated.
You will find the model and serial number information on the label located on the right edge of the dishwasher door asshown in
Figure 32.
Also, if you are writing, please include a daytime phone number where you can be reached.
Pleasemake a copy of your invoice and keep it with this manual. The customer must show proof of purchase to obtain warranty
service.
Your Model Information:
Model Number
• Serial Number
Date Purchased
• Date Installed
CAUTION
Removing any cover or pulling the dishwasher from the
cabinet can expose hot water connections, electrical
power and sharp edges or points,
Figure 25
Model and Serial Number Label
I - " " 1- I " -÷I. 4 -_ II. _1_1
•q_l =
20
Serial Number Model Number
Statement of Limited Product Warranty
Bosch Dishwashers
What this Warranty Covers & Who it Applies to: The limited warranty
provided BSH Home Appliances ("Bosch') in this Statement of Limited Product
Warranty applies only to Bosch dishwashers ("Product") sold to you, the
first using purchaser, provided that the Product was purchased: ( I ) for you_
normal, household (non-commercial) use, and has in fact at all times only
been used for normal household purposes; (2) new at retail (not a display,
_as is", or previously returned model), and not for resale, or commercial use;
and (3) within the United States or Canada, and has at all times remained
within the country of original purchase. The warranties stated herein
apply only to the first purchaser of the Product and are not transferable.
Please make sure to return your registration card; while not necessary
to effectuate warranty coverage, it is the best way for Bosch to
notify you in the unlikely event of a safety notice or product recall.
How Long the Warranty Lasts: Bosch warrants that the Product is
free from defects in materials and workmanship for a period of three
hundred sixty five (365) days (i.e., 1 year) from the date of purchase.
The foregoing tirneline begins to run upon the date of purchase, and
shall not be stalled, tolled, extended, or suspended, for any reason
whatsoever. Labor and shipping costs are included in this basic coverage.
Extended Limited Warranty: Boschalso provides these additional limited
warranties:
2 Year Limited Warranty: Bosch will repair or replace any
component that proves to be defective in materials or workmanship
(excludes labor charges).
5 Year Limited Warranty on Electronics: Bosch will repair or
replace any Bosch microprocessor or printed circuit board if it
proves to be defective in materials or workmanship (excludes labor
charges).
5 Year Limited Warranty on Dish Racks: Bosch will replace the
upper or lower dish rack (excluding rack components), if the rack
proves defective in materials or workmanship (excludes labor
charges).
Lifetime Warranty against Stainless Steel Rust Through: Bosch
will replace your dishwasher with the same model or a current
model that is substantially equivalent or better in functionality, if
the inner liner should rust through (excludes labor charges). Bosch
will replace the stainless steel door if the door should rust through
(excludes labor charges).
The foregoing timeline beginsto run upon the date of purchase, and shall
not be stalled, tolled, extended, or suspended, for any reason whatsoever.
Repair/Replace as Your Exclusive Remedy: During this warranty period,
Bosch or one of its authorized service providerswill repair your Product
without charge toyou (subject to certain limitations stated herein) ifyour
Product proves to have been manufactured with a defect in materials or
workmanship. If reasonable attempts to repair the Product have been
made without success, then Boschwill replace your Product (upgraded
models may beavailableto you, in Bosch'ssolediscretion,for an additional
charge). All removed parts and components shall becomethe property
of Boschat itssole option. All replacedand/or repairedparts shall assume
the identity of the original part for purposesof this warranty and this
warranty shall not be extended with respect to such parts. Bosch's sole
liability and responsibility hereunder is to repairmanufacturer-defective
Product only, using a Bosch-authorized service provider during norma_
business hours. Forsafety and property damage concerns, Bosch highly
recommends that you do not attempt to repair the Product yourself, or
use an un-authorized servicer; Bosch will have no responsibility or liability
for repairsor work performed byanon-authorized servicer. Ifyou choose
to have someone other than an authorized service provider work on your
Product, THISWARRANTYWILLAUTOMATICALLYBECOMENULLAND VOID.
Authorized serviceproviders are those personsor companies that havebeen
specially trained on Boschproducts, and who possess,in Bosch'sopinion,
a superior reputation for customer service and technical ability (note that
they are independent entities and are not agents, partners, affiliates or
representatives of Bosch).Notwithstanding the foregoing, Boschwill not
incur any liability, or have responsibility, for the Product if it is located ina
remote area (more than 100 miles from an authorized service
provider) or is reasonably inaccessible, hazardous, threatening, or
treacherous locale, surroundings, or environment; in any such event, if
you request, Bosch would still pay for labor and parts and ship the parts to
the nearest authorized service provider, but you would still befully liable
and responsible for any travel time or other special charges by the service
company, assuming they agree to make the service call.
Out of Warranty Product: Bosch is under no obligation, at law or
otherwise, to provide you with any concessions, including repairs,
pro-rates, or Product replacement, once this warranty has expired.
Warranty Exclusions: The warranty coverage described herein excludes
all defects or damage that are not the direct fault of Bosch, including
without limitation, one or more of the following: (1) use of the Product
in anything other than its normal, customary and intended manner
(including without limitation, any form of commercial use, use or storage
of an indoor product outdoors, use of the Product in conjunction with air
or water-going vessels); (2) any party's willful misconduct, negligence,
misuse, abuse, accidents, neglect, improper operation, failure to maintain,
improper or negligent installation, tampering, failure to follow operating
instructions, mishandling, unauthorized service (including self-performed
"fixing" or exploration of the appliance's internal workings); (3) adjustment,
alteration or modification of any kind; (4) a failure to comply with any
applicable state, local, city, or county electrical, plumbing and/or building
codes, regulations, or laws, including failure to install the product in
strict conformity with local fire and building codes and regulations; (5)
ordinary wear and tear, spills of food, liquid, grease accumulations, or
other substances that accumulate on, in, or around the Product; and (6)
any external, elemental andlor environmental forces and factors, including
without limitation, rain, wind, sand, floods, fires, mud slides, freezing
temperatures, excessive moisture or extended exposure to humidity,
lightning, power surges, structural failures surrounding the appliance,
and acts of God. In no event shall Bosch have any liability or responsibility
whatsoever for damage to surrounding property, including cabinetry,
floors, ceilings, and other structures or objects around the Product.
Also excluded from this warranty are scratches, nicks, minor dents, and
cosmetic damages on external surfaces and exposed parts; Products
on which the serial numbers have been altered, defaced, or removed;
service visits to teach you how to use the Product, or visits where there
is nothing wrong with the Product; correction of instaBation problems
(you are solely responsible for any structure and setting for the Product,
including all electrical, plumbing or other connecting facilities, for proper
foundation/flooring, and for any alterations including without limitation
cabinetry, walls, floors, shelving, etc.); and resetting of breakers or fuses.
TO THE EXTENT ALLOWED BY LAW, THIS WARRANTY SETS OUT YOUR
EXCLUSIVE REMEDIES WITH RESPECT TO PRODUCT, WHETHER THE
CLAIM ARISES IN CONTRACT OR TORT (INCLUDING STRICT UABILITY,
OR NEGLIGENCE) OR OTHERWISE. THIS WARRANTY IS IN LIEU OF ALL
OTHER WARRANTIES, WHETHER EXPRESS OR IMPLIED. ANY WARRANTY
IMPLIED BY LAW, WHETHER FOR MERCHANTABILITY OR FITNESS
FOR A PARTICULAR PURPOSE, OR OTHERWISE, SHALL BE EFFECTIVE
ONLY FOR THE PERIOD THAT THIS EXPRESS LIMITED WARRANTY IS
EFFECTIVE. IN NO EVENT WILL THE MANUFACTURER BE LIABLE FOR
CONSEQUENTIAL, SPECIAL, INCIDENTAL, INDIRECT, "BUSINESS LOSS",
AND/OR PUNITIVE DAMAGES, LOSSES, OR EXPENSES, INCLUDING
WITHOUT LIMITATION TIME AWAY FROM WORK, HOTELS AND/OR
RESTAURANT MEALS, REMODELLING EXPENSES IN EXCESS OF DIRECT
DAMAGES WHICH ARE DEFINITIVELY CAUSED EXCLUSIVELY BY BOSCH,
OR OTHERWISE. SOME STATES DO NOT ALLOW THE EXCLUSION OR
LIMITATION OF INCIDENTAL OR CONSEQUENTIAL DAMAGES, AND
SOM E STATES DO NOT ALLOW LIMITATIONS ON HOW LONG AN IMPLIED
WARRANTY LASTS, SO THE ABOVE UMITATIONS MAY NOT APPLY TO
YOU. THIS WARRANTY GIVES YOU SPECIFIC LEGAL RIGHTS, AND YOU
MAY ALSO HAVE OTHER RIGHTS WHICH VARY FROM STATE TO STATE.
No attempt to alter, modify or amend this warranty shall
be effective unless authorized in writing by an officer of BSH.
How to Obtain Warranty Service: TOOBTAINWARRANTYSERVICEFOR
YOURPRODUCT,YOUSHOULDCONTACTTHENEARESTBOSCHAUTHORIZED
SERVICECENTER,ORCALL 800-944-2904, or write Boschat: BSHHome
Appliances - 5551 McFadden Avenue, Huntington Beach,CA92649 /
21

22
F_licitations et merci de Bosch !
Merci d'avoir choisi un lave-vaisselle Bosch. Vous avez rejoint les nombreux consommateurs qui exigent un rendement sup_rieur et silencieux
de leur lave-vaissene.
Ce guide a _t_ _crit avec securit_ et c6te pratique en t_te et I'information contenue ici est importante. Nous recommandons fortement de
lire ce guide avant d'utiliser ce ]ave-vaisselle la premiere fois.
Pour en conna_tre plus sur ce lave vaisselle et les accessoires disponibles ainsi que les autres appareils Bosch de haute qualitY, visitez notre
site : www.boschappliances.com.
Vous pouvez communiquer avec nous pour tout commentaire et toute question en t_l_phonant au 1.800.944.2904 ou en _crivant _ :
BSH Home Appliances, Corp.
5551 McFadden Avenue
Huntington Beach, CA 92649
Merci !
INSTRUCTIONS IMPORTANTES DE SI_CURITI_....................................................................................................................................... 24
Composants du lave-vaisselle ............................................................................................................................................................... 25
Caract_ristiques et options du lave-vaisselle ......................................................................................................................................... 26
Mat_riaux ............................................................................................................................................................................................ 27
Preparation et chargement de la vaisselle ....................................................................................................................................... 28-29
Preparation ................................................................................................................................................................................... 28
Chargement .................................................................................................................................................................................. 29
Ajout de d_tergent et d'agent de rin_age ............................................................................................................................................. 30
Fonctionnement du lave-vaisselle .................................................................................................................................................... 31-34
S_chage de la vaisselle ............................................................................................................................................................. 32-33
D_chargement .............................................................................................................................................................................. 34
Entretien ......................................................................................................................................................................................... 35-37
information sur le cycle de lavage/hygi_nique .................................................................................................................................. 37-38
Aide ................................................................................................................................................................................................ 39-41
Service _ la clientele ............................................................................................................................................................................. 42
Enonc_ de garantie .............................................................................................................................................................................. 43
23

Instructions de s curit importantes-Conserver ces Instructions
NOTICE
Ne jamais utiliser des produits nettoyants _ vapeur dans le lave-vaisselle. Le fabricant n'est pas responsable des dommages
ou consequences possible.
Ne jamais utiliser des produits chlmiques pour nettoyer le lave-vaisselle. Certains produits contenant du ehlore peuvent
endommager le lave-valsselle et poser un risque pour la sant_.
II est recommand6 que I'utilisateur se familiarise avec la marche _ suivre d'arr_t de I'alimentation en eau entrante alnsi que de
I'alimentation _lectrique. Voir les instructions d'installation ou communiquer avec Yinstallateur pour plus de d_tails.
AVERTISSEMENT
Une mauvaise utilisation du lave-vaisselle peut causer des blessures ou la mort. Ne pas utiliser d'une fa_on autre que celle
couverte dans ce guide ou &d'autres fi ns que celles expliqu6es dans les pages suivantes.
Des dommages aux produits et/ou des blessurespeuvent r_sulter & cause d'un technicien non qualifi_ ou par des pi_ces de
rechange non d'origine. Toute r_paration dolt _tre effectu_e par un technicien qualifi_ utilisant seulement des pi_ces de
rechange d'origine.
II peut en r_sulter un ehoc _lectrique ou un incendie si I'alimentation _lectrique du lave-vaisselle indiqu_e dans ee guide est
inad_quatement install_e ou si le lave-vaisselle n'est pasad_quatement mis a la term. Ne pas utiliser le lave-vaisselle siYon
n'est pas certain que I'alimentation _lectrique a _t_ effectu_e correetement ou que la raise b la terre est adequate.
AVERTISSEMENT: Pour r_duire le risque d'incendie, de choc _lectrique ou de blessures
s_rieuses, observer ce qui suit :
Cet appareil dolt _tre mis _ la terre sur un syst_me de c_blage
permanent ou un connecteur de mise _ la terre d'_quipement
dolt _tre achernin_ avec des connecteurs de circuit et branch_
sur un fi I ou une borne mis _ la term du lave vaisselle. Voir les
instructions d'inst_llation comprises avec le lave-vaisselle pour
plus de d_tails concernant les exigences electriques.
Utifiser le lave-vaisselle seulement pour I'usage auquel il est
destin_, qui est de laver la vaisselle et articles de cuisine.
Les lave-vaisselle sont dot_s d'un guide contenant les instruc-
tions d'installation et d'utilisation et d'entretien. Lire et com-
prendre toutes les instructions avant d'utiliser le lave-vaisselle.
Utiliser seulement du d_tergent et de I'agent de rin;age recom-
mand_s pour Futilisation avec lave-vaisselle et les conserver hors
de la port_e des enfants.
Au moment de charger des articles _ laver :
- Placer les articles aff6t_s de fa;on a ne pas endommager le
joint.
- Charger les couteaux et autres articles aff_t_s, LESMANCHES
VERSLE HAUT, pour r_duire le risque de blessures.
Ne pas laver d'articles en plastique 6 moins qu'ils ne portent
la marque <_vaau lave-vaisselle_ ou I'_quivalent. Pour ceux qui
ne portent pas de marque, v_rifier les recommandations du
fabdcant.
Ne pas actionner le lave-vaisselle tant que tousles panneaux
ne sont pas en place.
Ne pas jouer avec ni outrepaaser les contr61es et les verrouil-
lages.
Ne pas abuser, s'asseoir, ni se tenir debout sur la porte ou les
paniers du lave-vaissefle.
Pour r_duire le risque de blessure, ne pas laisser les enfants
jouer dans ou avec le ]ave-vaisselJe.
Lorsque les enfants sont suffisamment _g_s pour acUonner
I'appareil, il incombe aux parents ou tuteur I_gal de s'assurer
de montrer les instructions _ des fins d'utilisation s_cu-
ritaire.
Dans certains cas, de I'hydrog_ne peut se produire dans un
syst_me d'eau chaude qui n'a pas _t_ utilis_ pendant plus de
2 semaines. L'hydrog_ne est un gaz explosif. Avant d'utiliser
un lave-vaisselle branch_ sur un syst_me d'eau chaude non
utilis_ pendant plus de 2 semaines, ouvrir tousles robinets
d'eau chaude et laisser couler I'eau quelques minutes. Ceci
relSche tout hydrog_ne accumul_. Puisqu'il s'agit d'un gaz
explosif, ne pas fumer ni utiliser de flamme nue pendant ce
temps.
Enlever la porte de I'appareil si I'on enl_ve un ancien lave-
vaisselle pour le jeter.
Pour _viter des dommages au ptancher et de la moisissure,
ne pas laisser des zones mouill_es autour et sous le lave
vaissefle.
Prot_ger le lave-vaisselle des _l_ments. Prot_ger contre le
gel afin d'_viter tout dommage _ la soupape de remplissage
Les dommages causes par le gel ne sont pas couverts par la
garantie.
Au moment de jeter un vieil appamil, s'assurer de retirer la
porte ou d_sactiver le loquet.
24
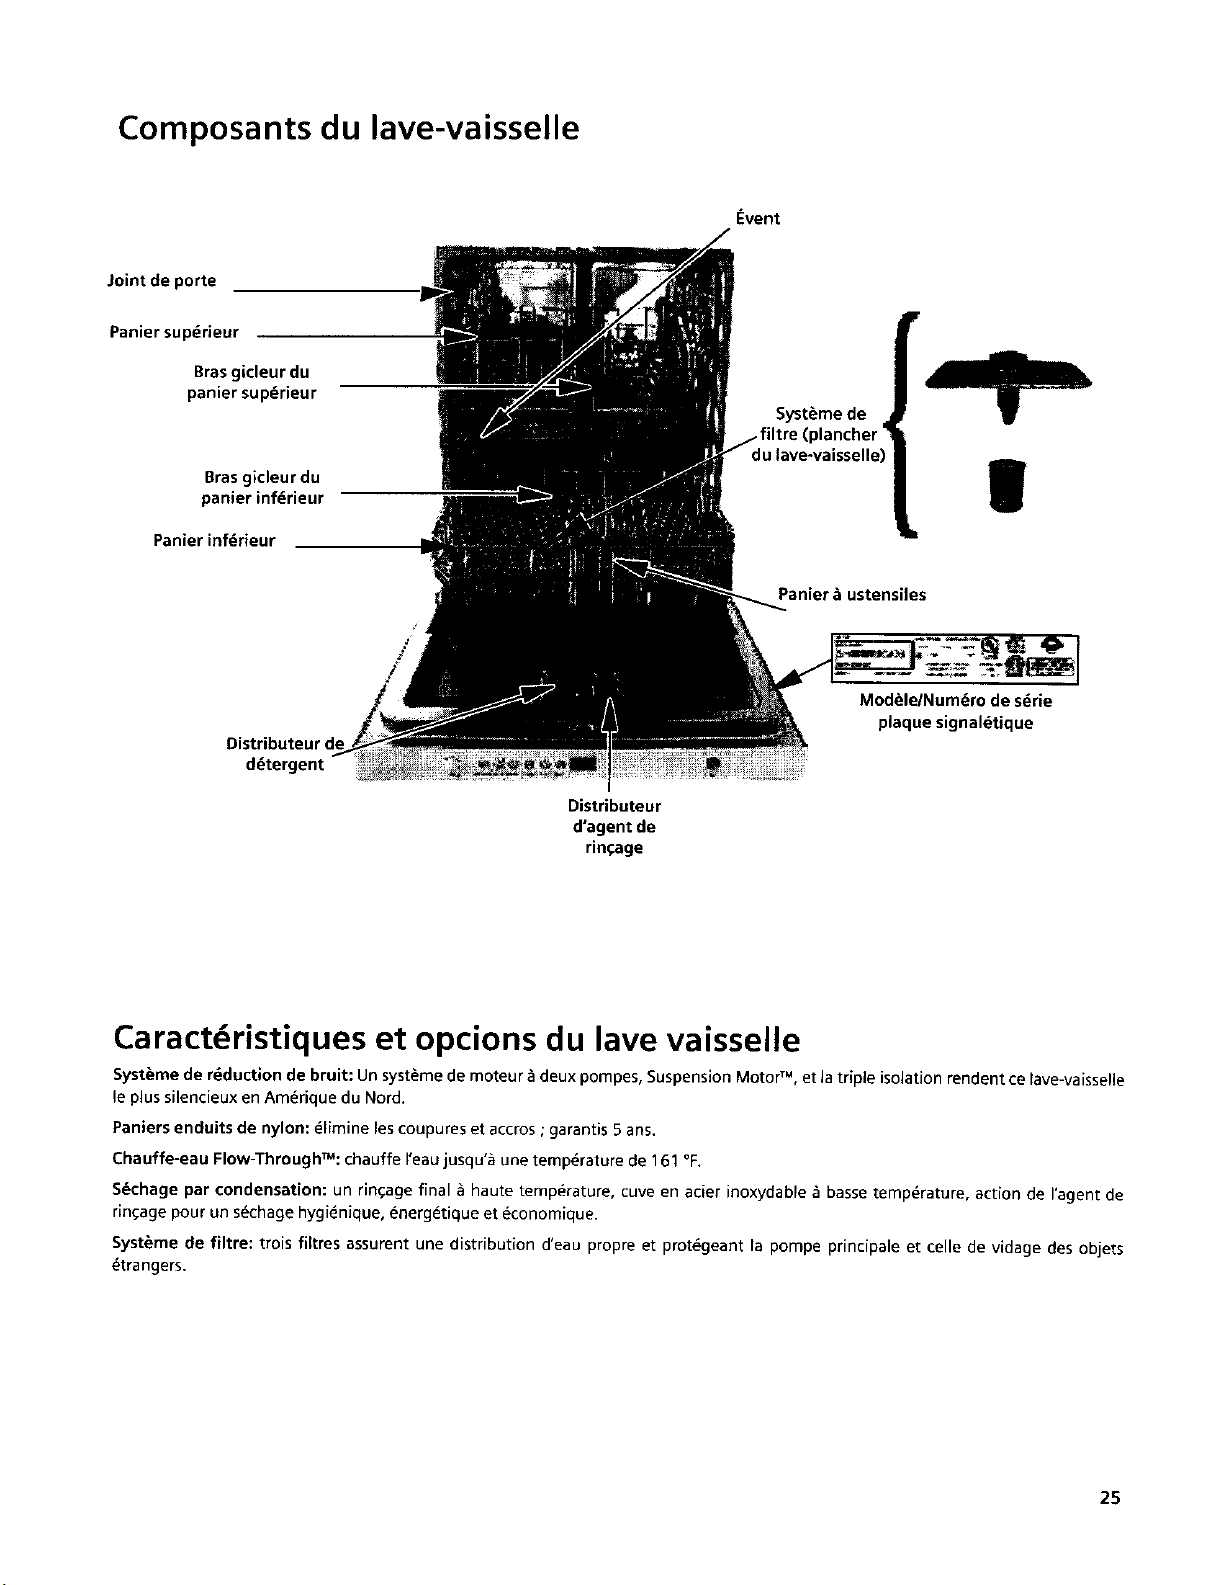
Composants du lave-vaisselle
Joint de porte
Panier sup_rieur
Bras 9icleur du
panier sup_rieur
Event
Syst_me de
Bras gicleur du m
panier inf_rieur
Panier infdrieur
Panier t, ustensiles
Mod_lelNumdro de s_rie
plaque signaldtique
Distributeur de
d6tergent
Distributeur
d'agent de
ringage
I
Caract ristiques et opcions du lave vaisselle
Syst_me de r_duction de bruit: Un syst_me de moteur _ deux pompes, Suspension Motor TM, et ia triple isolation rendent ce lave-vaisselle
le plus silencieux en Am_rique du Nord.
Paniers enduits de nylon: _limine les coupures et accros ; garantis 5 ans.
Chauffe-eau Flow-Through_: chauffe I'eau jusqu'a une temperature de 161 °F.
S_chage par condensation: un ringage final _ haute temp@rature, cure en acier inoxydable _ basse temperature, action de I'agent de
rin_age pour un s_chage hygi_nique, _nerg_tique et _conomique.
Syst_me de filtre: trois filtres assurent une distribution d'eau propre et prot_geant la pompe principale et celle de vidage des objets
_trangers.
25

Caract ristiques et opcions du lave vaisselle
¢N
<
_t
2=
L/I
Contr61es
avants
exposes
ModUle
Design de panneau
de contr61e
Signal de fin de cycle
audible
<
t_
x
U3
Contr61es
sup_rieurs dis-
simul_s
<
u_
LU
2=
Contr61es
avants
expos@s
o
<
_r
uJ
Contr61es
avants
exposes
oui non non non
Voyant de propretd oui non oui oui
Voyant de
remplissage oui oui oui oui
Voyant hygi_nique oui oui oui eui
Dents rabattables
du panier sup_rieur oui oui oui oui
R_glage de la hauteur
du panier sup_rieur non oui non oui
Verrouillage enfant non oui oui oui
s_curitaire
Panier _ utensiles standard flexible standard standard
Abaisser les dents
non oui non non
du panier
26
Mat riaux
REMARQUE: avant d'utiliser le lave-vaisselle la premiere fois, v_rifier I'information ci-dessous.
Certains articles ne conviennent pas au lave-vaisselle et devraient _tre laves _ la main.
Communlquer avec le fabricant de I'article en cas d'incertitude quant _ savoir si un article va au
lave-vaisselle ou non.
Recommand_s
Aluminium: I'a]uminium anodis_ co]or_ peut s'estomper avec le temps. Les min_raux dans Feau
peuvent causer des taches ou noircir Faluminium. Ceci peut habituellement _tre enlev_ a I'aide
d'un tampon en laine d'acier savonneux.
Porcelaine, cristal, fat'ence: certains articles peints _ la main peuvent se d_colorer, p_lir ou
tacher. Laver _ la main. Positionner la verrerie de fa_on _ ce qu'elle ne s'entrechoque pas avec
les autres pi_ces pendant le lavage.
Verre: les verres de lair peovent jaunir.
I:nduits non adh_sifs: appliquer one I_g_re couche d'huile v_g_tale I_g_re sur les surfaces
antiadh_sives apr_s le s_chage.
Plastique: s'assurer que les articles peuvent aller au lave-vaisselle.
Acier inoxydable, argent fin, argent plaque: pour _viter la corrosion, placer les articles fabriques
de cliff,rents m_taux de fa¢on _ ce qu'ils n'entrent pas en contact _esuns avec les autres.
Non recommand_
Acrylique: des craquelures peuvent survenir.
Pi_ces collies: les adh_sifs qui reEent les joints comme du plastique, bois, os, cuivre, _tain,
etc. peuvent se d_faire.
Ustensiles avec manches enos: les manches peuvent se d_tacher.
Fer: rouillera. Laver _ la main et ass_cher imm_diatement.
Articles n'allant pas au lave-vaisselle: le lave-vaisselle est destin_ _ des fins de nettoyage de
vaisselle et accessoires de cuisine standard SEULEMENT.
Etain, laiton, bronze: I'_tain ternit. Laver E la main et ass_cher imm_diatement.
Fer blanc: rouillera. Laver _ la main et ass_cher imm_diatement.
Bois: les bols. ustensiles et manches en bois peuvent craqueler, se voiler et perdre leur fini.
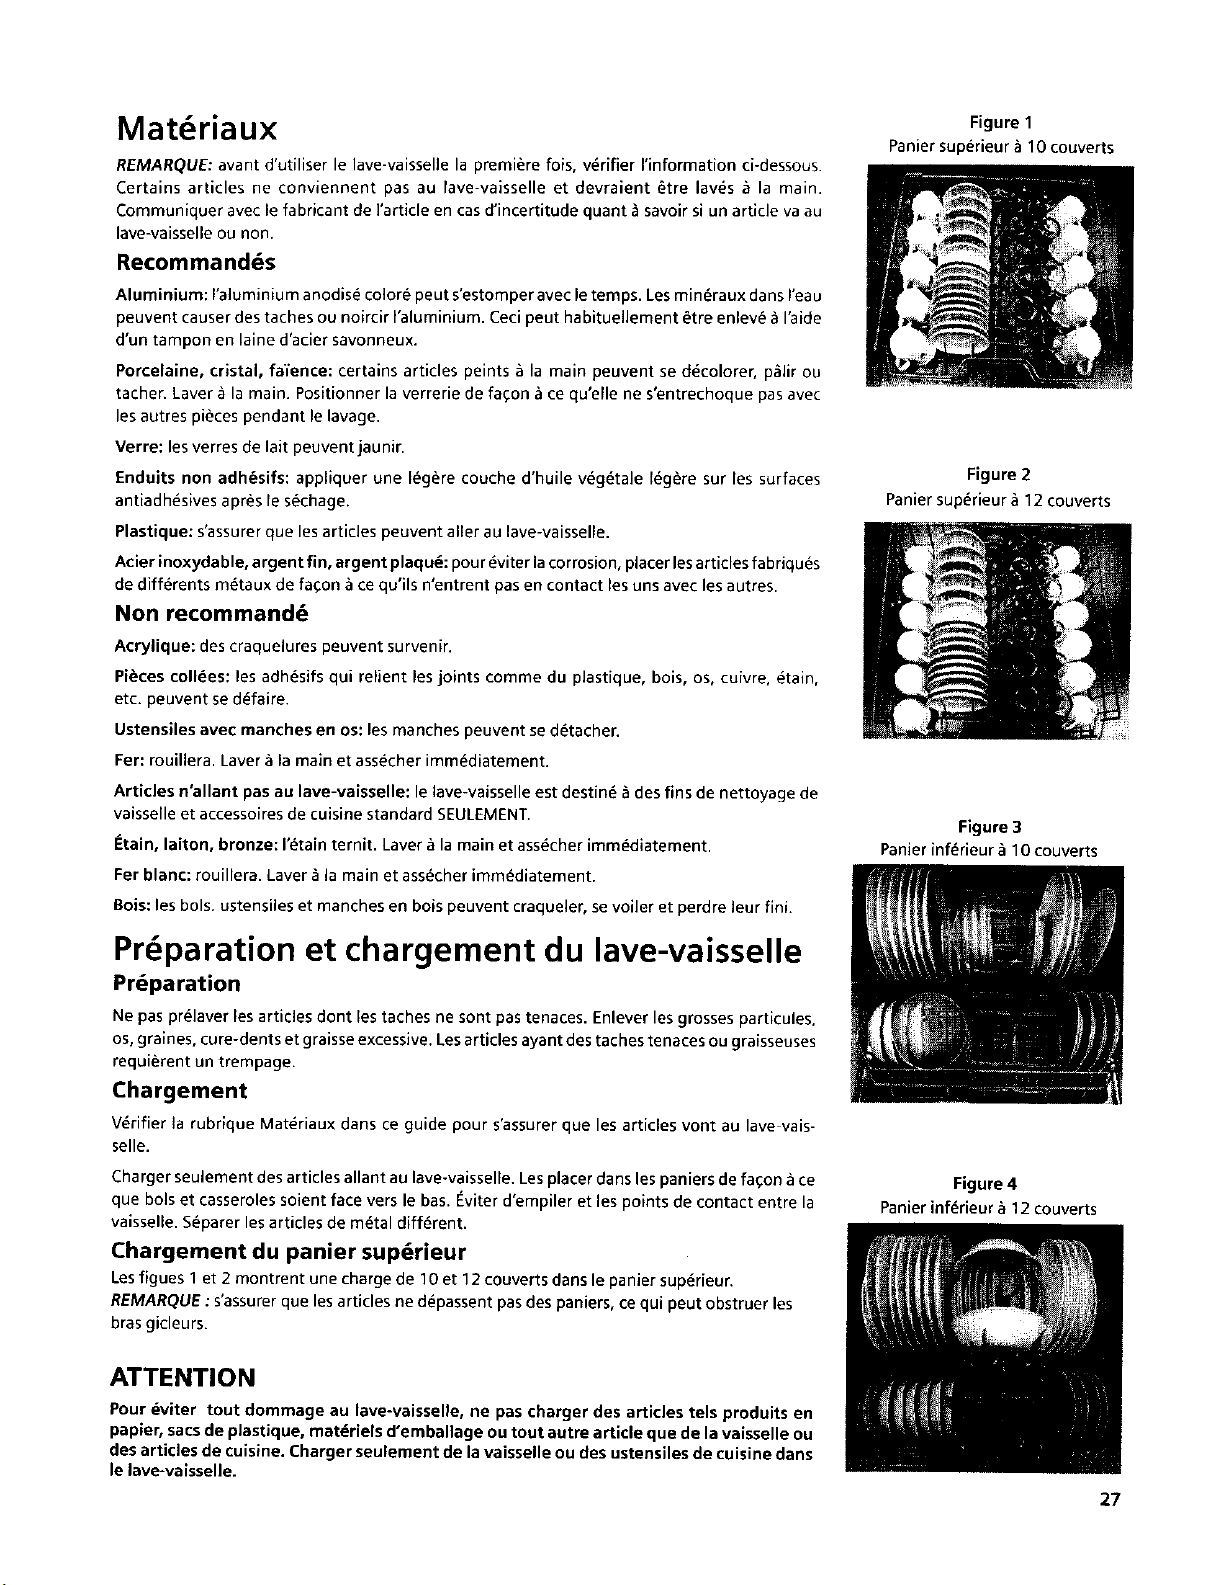
Figure 1
Panier superieur _ 10 couverts
Figure 2
Panier sup_rieur _ 12 couverts
Figure 3
Panier infdrieur_ 10 couverts
Preparation et chargement du lave-vaisselle
Pr6paration
Ne pas pr_laver _esarticles dont les taches ne sont pas tenaces. Enlever les grosses particules,
os, graines, cure-dents et graisse excessive. Les articles ayant des taches tenaces ou graisseuses
requi_rent un trempage.
Chargement
V_rifier la rubrique Mat_riaux dans ce guide pour s'assurer que les articles vont au lave vais-
selle.
Charger seulement des articles allant au lave-vaisselle. Les placer clans les paniers de fa_on ace
que bols et casseroles soient face vers le bas. Eviter d'empiler et les points de contact entre la
vaisselie. S_parer les articles de m_tal different.
Chargement du panier sup_rieur
Les figues 1 et 2 montrent une charge de 10 et 12 couverts dans le panier sup_rieur,
REMARQUE : s'assurer que les articles ne depassent pas des paniers, ce qui peut obstruer les
bras gicleurs.
ATTENTION
Pour dviter tout dommage au lave-vaisselle, ne pascharger des articles tels produits en
papier, sacs de plastique, matdriels d'embanage ou tout autre article que de lavaisselle ou
des articles de cuisine. Charger seulement de la vaisselle ou des ustensiles de cuisinedans
le lave-vaisselle.
Figure4
Panier infdrieur_ 12 couverts
27

Figure 5
Figure 6
Accessoires du panier sup rieur
Dents rabattables
Rabattre les dents pour faciliter le chargernent dans certains cas. Saisir les dents, d_gager
des eneoches et replier vers le bas. Lorsque le panier superieur est charge, ]e pousser au
fond du lave-vaisselle.
REMARQUE: au moment de pousser le panier sup_rieur dans le lave-vaisselle, ]e pousser
jusqu'au fond de la cure afin que le bras gicleur superieur se branche sur I'alimentation en
eau _ I'arri_re de la cure. Ne pas pousser le panier sup_rieur avec la porte.
Hauteur r_glable (certains modules)
Enlever le panier vide en le tirant hors du lave-vaissel]ejusqu'_ ce qu'il puisse _tre soulev_,
figure 5. Tirer [e panier vers I'ext_rieur et le haut pour lib_rer les roulettes des guides. R_ins_rer
le panier avec rautre jeu de roulettes sur ]es guides, figure 6.
Chargement du panier inf_rieur
Placer les grands articles dans le panier inf_rieur. Charger les casseroles et res bols
I'envers. Les figures 3 et 4 montrent une charge mixte dans le panier inf_rieur. Ne pas
obstruer I'_vent du c6t_ gauche de la cuve, figure 7.
Dents rabattables du panier inf_rieur
Rabattre les dents pour faciliter le chargernent dans certains cas. Saisir les dents et les
abaisser.
Chargement du panier _ ustensiles
REMARQUE: le dessus du panier _ ustensiles peut _tre abaiss_ pour accornrnoder de grands
objets ou de forrne vari_e.
Le dessus du panier _ ustensiles abaiss_, charger ce panier suivant le rnod_le sugg_r_ aux
figures 8 (panier standard) et 9 (panier flexible). Placer les couteaux avec le rnanche vers le
haut ; fourchettes et cuill_res avec le rnanche vers le bas.
Si de gros objets ou de forme vari_e doivent _tre places dans le panier _ ustensiles avec le
dessus relev_, charger les articles de fa_:on _ ce qu'ils ne soient pas les uns sur les autres.
Charges les couteaux et ustensiles affOtes avec le rnanche vers le haut.
Ne pasobstruer I'_vent
28
Figure 7
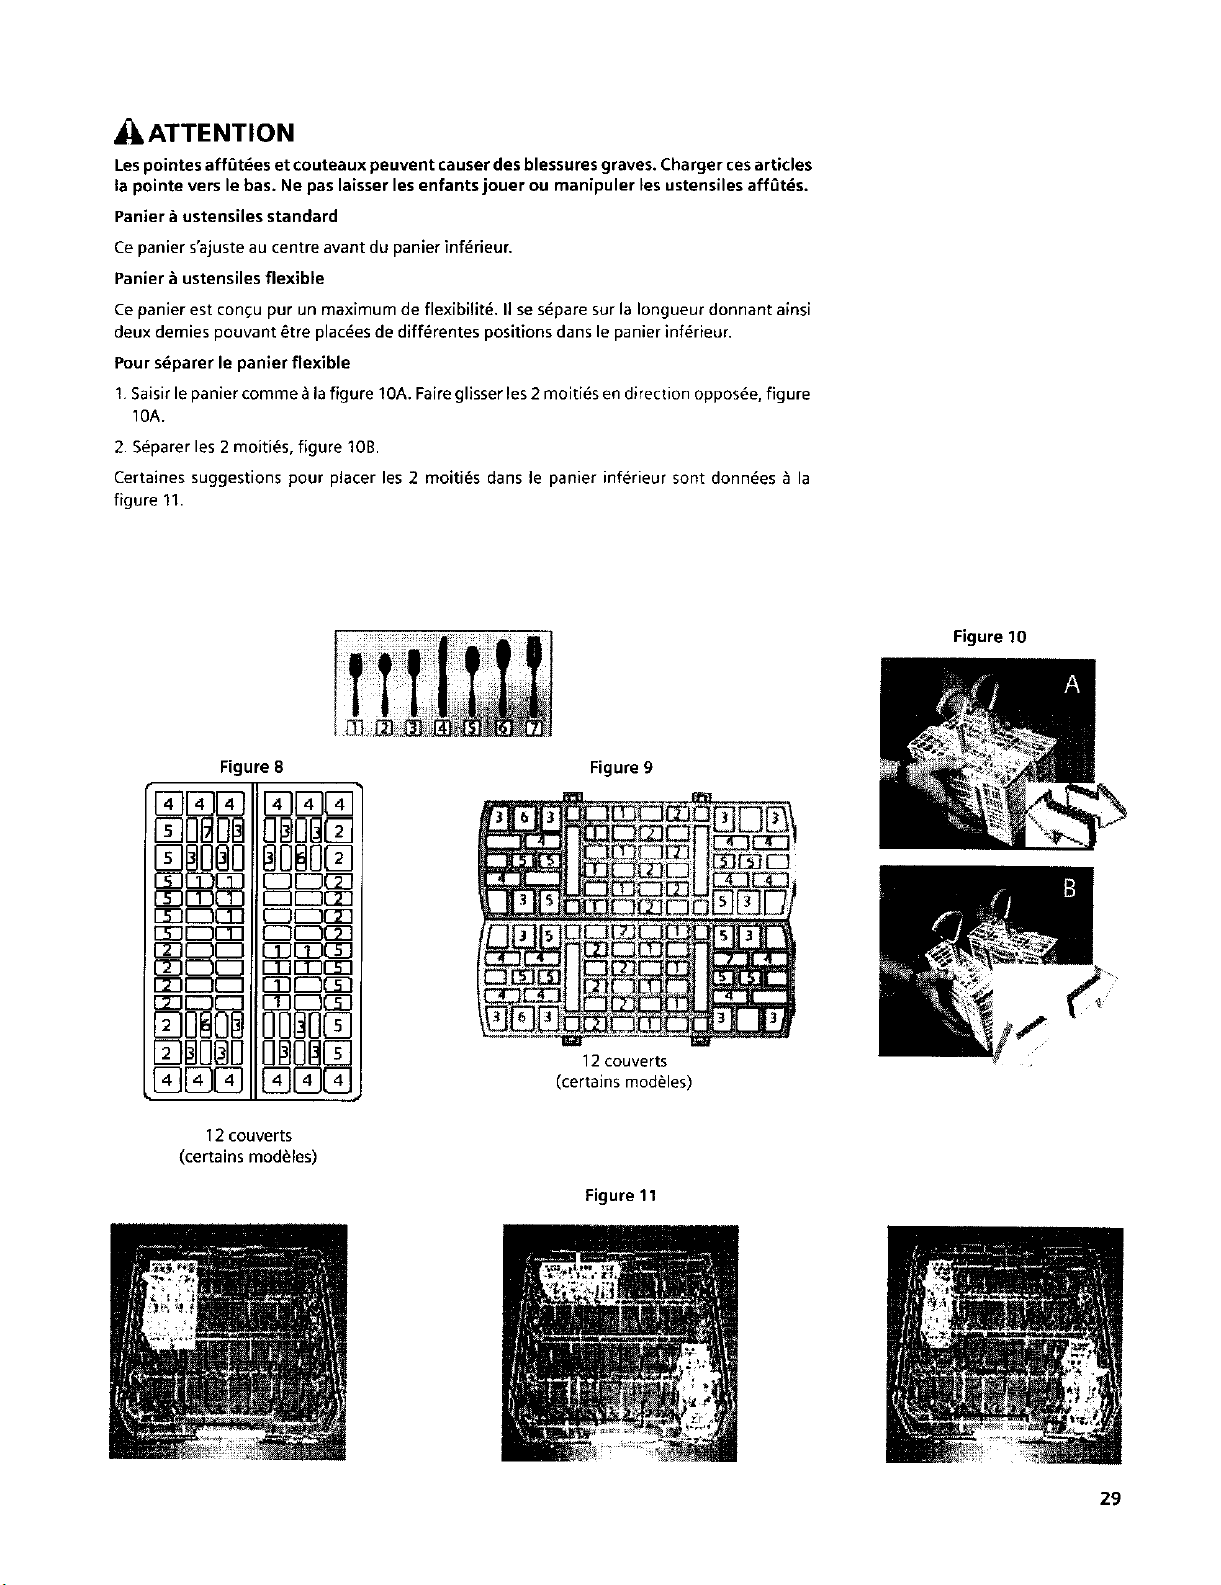
_ATTENTION
Les pointes aff_tdes et couteaux peuvent causer des blessures graves. Charger ces articles
la pointe vers le bas. Ne pas laisser les enfants jouer ou manipuler les ustensiles aff,_tds.
Panler ii ustensiles standard
Ce panier s'ajuste au centre avant du panier inf6rieur.
Panier _ ustensiles flexible
Ce panier est con_u put un maximum de flexibilitY. II se s6pare sur la Iongueur dormant ainsi
deux demies pouvant _tre plac_es de diff6rentes positions dans le panier inf_rieur.
Pour s_parer le panler flexible
! Saisir le panier comme _ la figure IOA. Faire glisser les 2 moiti_s en direction oppos6e, figure
10A.
2. S6parer les 2 moiti6s, figure lOB.
Certaines suggestions pour placer les 2 moiti6s dans le panier inferieur sont donn_es _ la
figure 11.
Figure 10
Figure 8
[]Dr 133D@
EBBOBOBOBO0
0_30000 0000
OD_CO 00_
F_OEI300r_q
[_30mn EZ30(_3
mmm
r_r--T-1 [2Dr-ncgl
E_r--nr---1
OOBO@OOBOBF
%EO@ 0080@
12 couverts
(certains modules)
Figure 9
12 couverts
(certains modules)
Figure 11
29

Utiliser du d_tergent
enpoudrefrais
pourdemeilleurs
r_sultats
Figure 12
• 1 c. a table nettoie la
plupart des charges
• 3 c. &table maximum, ne
pas trop remplir
• Avec du d_tergent en
tablette, le poser _ plat
pour _viter tout contact
avecle couverde
Figure 13
Ajout de d tergent et d'agent de rinsage
Distributeur
Utiliser seulement du d_tergent congupour lave-vaisselle. Pour de meilleurs r_sultats, utiliser
du detergent en poudre.
NOTICE
Pour dviter tout dommage au lave-vaisselle, ne pas utiliser de ddtergent & vaisselle _ la
main.
Lelave-vaisselleutilise moins d'eau, alors il faut moins de d_tergent. Avec de Feau douce, 1
cuillere &table (15 ml) de d_tergent nettoie laplupart descharges. Ledistributeur de d_tergent
est dot_ de lignes pour mesurer le d_tergent de 1 c. a table (15 ml) et 1,75 c. _ table (25 ml).
3 c. _ table (45 ml) de d_tergent remplissent compl_tement le distributeun
ATTENTION
Pour fermer
• Pour fermer, placer
le doigt comme _ la
figure 13, faire glisser
vers I'avant, puis presser
jusqu'_ ce qu'il y ait un
CLIC
Figure 14
, _ "Pousserle bouton
POU_ouvrir le couvercle
Figure 15
ToujoursutUiserde • AjouterdeI'agentde
I'agent de rin_age m_me rinsageIorsquele
siled_tergentencontient voyants'allumeau
• Soulever la languette
_ • _ panneaudecontrgles
pourouvrir
Figure 16
Pour dviter tout dommage au lave-vaisselle, ne pas ne pas trop utiliser de ddtergent
si I'allmentation en eau est douce. Trop de ddtergent avec de I'eau douce cause des
dgratlgnures sur les verres.
REMARQUE:siI'onneconna_t pasladuret_ de I'alimentation eneau, utiliser 15 ml ded_tergent.
Augmenter la quantit_ au besoin jusqu'6 la quantit_ minimale pour nettoyer la vaisselle et
les ustensiles. Utiliser les lignes gradu_es dans le distributeur _ d_tergent comme guide pour
mesurer laquantit_ de d_tergent recommand_e, tableau 1.
Tableau 1
Type d'eau
Cycle
lava_le Unit Dure Moyenne Douce
R_- ml 45 45 25-45
curage
plus Tbsp 3 3 1.75 to 3
Lavage ml 25-45 25 15-25
auto-
matique Tbsp 1.75 to 3 1.75 1 to 1.75
Lavage ml 25-45 25 15-25
rdgulier Tbsp 1.75 to 3 1.75 1 to 1.75
Lavage i ml 25 15-25 15
rapide Tbsp 1.75 1 to 1.75 1
Rin_age Aucun Aucun Aucun
at attenb
Remplir le distributeur de d_tergent
Remplirselon les recommandationsdonn_es au tableau 1, (Voir la figure 12 pour plus de
details.)
Pourfermer, placer ledoigt comme & la figure 13, faire glisservers I'avant, puis presserjusqu'&
ce qu'il y ait un clic.
Pour ouvrir, presser la languette de d_gagement grise, figure 14
Agent de rim;age
Pour un s_chage appropri_, toujours utiliser de I'agent de rincage, m_me si le d_tergent en
contient.
3O
I "Pour ajouter de
I I'agent de rin_age,
I verserdansrovale
Ajout d'agent de rim;age
Pouruns_chageappropri_, toujours utiliser deI'agentderin¢age, m_me siled_tergent contient
un agent de rin¢age ou un additif de rim;age.
Distributeur d'agent de rin_:age
Ouvrir le distributeur en soulevant la languette avec le pouce,
 Loading...