

Page 1

PAVIRO Amplifier
PVA-2P500
en Operation manual
Page 2

Page 3

PAVIRO Amplifier Table of contents | en 3
Table of contents
1
2
3
3.1 Front panel 9
3.2 Rear panel 12
4
5
6
6.1 Audio inputs 16
6.2 Audio output 18
6.3 Supply voltage 19
6.4 CAN BUS 20
7
7.1 Setting the CAN address 23
7.2 Displaying the CAN baud rate 24
7.3 Configuring the CAN baud rate 24
8
8.1 Stand-alone mode 25
9
9.1 Firmware update 27
9.2 Resetting to factory default settings 27
10
10.1 Standards 30
10.2 Power consumption 30
10.3 Dimensions 31
10.4 Circuit diagram 32
Safety 4
Short information 8
System overview 9
Parts included 13
Installation 14
Connection 16
Configuration 23
Operation 25
Maintenance 27
Technical data 28
Operation manual 18-Jun-2015 | 04 | F01U306898
Page 4
!
!
4 en | Safety PAVIRO Amplifier
1
Safety
Danger!
High risk: This symbol indicates an imminently hazardous situation such as "Dangerous
Voltage" inside the product.
If not avoided, this will result in an electrical shock, serious bodily injury, or death.
Warning!
Medium risk: Indicates a potentially hazardous situation.
If not avoided, this could result in minor or moderate bodily injury.
Caution!
Low risk: Indicates a potentially hazardous situation.
If not avoided, this could result in property damage or risk of damage to the unit.
1. Read these instructions. – All the safety and operating instructions should be read
before the apparatus or system is operated.
2. Keep these instructions. – The important safety instructions and operating instructions
should be retained for future reference.
3. Heed all warnings. – All warnings on the apparatus and in the operating instructions
should be adhered to.
4. Follow all instructions. – All instructions for installation or use/operating should be
followed.
5. Do no use this apparatus near water. – Do not use this apparatus near water or a moist
environment - for example, near a bath tub, wash bowl, kitchen sink, or laundry tub, in a
wet basement, near a swimming pool, in an unprotected outdoor installation, or any area
which is classified as a wet location.
6. Clean only with dry cloth. – Unplug the apparatus from the outlet before cleaning. Do
not use liquid cleaners or aerosol cleaners.
7. Do not block any ventilation openings. Install in accordance with the manufacturer’s
instructions. – Openings in the enclosure, if any, are provided for ventilation and to
ensure reliable operation of the apparatus and to protect it from overheating. These
openings must not be blocked or covered. This apparatus should not be placed in a builtin installation unless proper ventilation is provided or the manufacturer’s instructions
have been adhered to.
8. Do not install near any heat sources such as radiators, heat registers, stoves, or other
apparatus (including amplifiers) that produce heat or in direct sunlight.
9. No naked flame sources, such as lighted candles, should be placed on the apparatus.
10. Do not defeat the safety purpose of the polarized or ground-type plug. – A polarized
plug has two blades with one wider than the other. A grounding type plug has two blades
and a third grounding prong. The wider blade or the third prong are provided for your
safety. If the provided plug does not fit into your outlet, consult an electrician for
replacement of the obsolete outlet.
11. Protect the power cord from being walked on or pinched particularly at plug,
convenience receptacles, and the point where they exit from the apparatus.
12. Only use attachments/accessories specified by the manufacturer. – Any mounting of the
apparatus should follow the manufacturer’s instructions, and should use a mounting
accessory recommended by the manufacturer.
18-Jun-2015 | 04 | F01U306898 Operation manual
Page 5
!
PAVIRO Amplifier Safety | en 5
13. Use only with the cart, stand, tripod, bracket or table specified by the manufacturer, or
sold with the apparatus. – When a cart is used, use caution when moving the cart/
apparatus combination to avoid injury from tip-over. Quick stops, excessive force, and
uneven surfaces may cause the appliance and cart combination to overturn.
14. Unplug this apparatus during lighting storms or when unused for long periods of time.
– Not applicable when special functions are to be maintained, such as evacuation
systems.
15. Refer all servicing to qualified service personnel. – Servicing is required when the
apparatus has been damaged in any way, such as power-supply cord or plug is damaged,
liquid has been spilled or objects have fallen into the apparatus, the apparatus has been
exposed to rain or moisture, does not operate normally, or has been dropped.
16. The apparatus shall not be exposed to dripping or splashing and that no objects filled
with liquid, such as vases, shall be placed on the apparatus.
17. Batteries (battery pack or batteries installed) shall not be exposed to excessive heat
such as sunshine, fire or the like.
Caution!
Danger of explosion if battery is incorrectly replaced. Replace only with the same or
equivalent type. Dispose of used batteries according to the environmental law and
procedures.
18. Professional installation only – Do not use this equipment in residential applications.
19. Condensation – In order to avoid condensation; wait a few hours before turning on the
equipment when it is transported from a cold to a warm space.
20. Hearing damage – For apparatus with audio output, to prevent possible hearing damage,
do not listen at high volume levels for long periods.
21. Replacement parts – When replacement parts are required, be sure the service
technician has used replacement parts specified by the manufacturer or having the same
characteristics as the original part. Unauthorized substitutions may result in fire, electric
shock or other hazards.
22. Safety check – Upon completion of any service or repairs to this apparatus, ask the
service technician to perform safety checks to determine that the apparatus is in proper
operating condition.
Danger!
Overloading – Do not overload outlets and extension cords as this can result in a risk of fire or
electric shock.
23. Power sources – This apparatus should be operated only from the type of power source
indicated on the marking label. If you are not sure of the type of power supply you plan to
use, consult your appliance dealer or local power company. For apparatuses intended to
operate from battery power, or other sources, refer to the operating instructions.
24. Power lines – An outdoor system should not be located in the vicinity of overhead power
lines or other electric light or power circuits, or where it can fall into such power lines or
circuits. When installing an outdoor system, extreme care should be taken to keep from
touching such power lines or circuits, as contact with them might be fatal. U.S.A. models
only – refer to the National Electrical Code Article 820 regarding installation of CATV
systems.
Operation manual 18-Jun-2015 | 04 | F01U306898
Page 6
!
!
!
!
6 en | Safety PAVIRO Amplifier
Danger!
Object and Liquid entry – Never push objects of any kind into this apparatus through
openings as they may touch dangerous voltage points or short-out parts that could result in a
fire or electric shock. Never spill liquid of any kind on the apparatus.
25. Coax grounding – If an outside cable system is connected to the apparatus, be sure the
cable system is grounded. U.S.A. models only: Section 810 of the National Electrical
Code, ANSI/NFPA No.70-1981, provides information with respect to proper grounding of
the mount and supporting structure, grounding of the coax to a discharge apparatus, size
of grounding conductors, location of discharge unit, connection to grounding electrodes,
and requirements for the grounding electrode.
26. Protective grounding – An apparatus with class I construction shall be connected to a
power outlet socket with a protective grounding connection.
Protective earthing – An apparatus with class I construction shall be connected to a
mains socket outlet with a protective earthing connection.
Note for power connections
– For permanently connected equipment, a readily operable mains plug or all-pole mains
switch shall be external to the equipment and in accordance with all applicable
installation rules.
– For pluggable equipment, the socket-outlet shall be installed near the equipment and
shall be easily accessible.
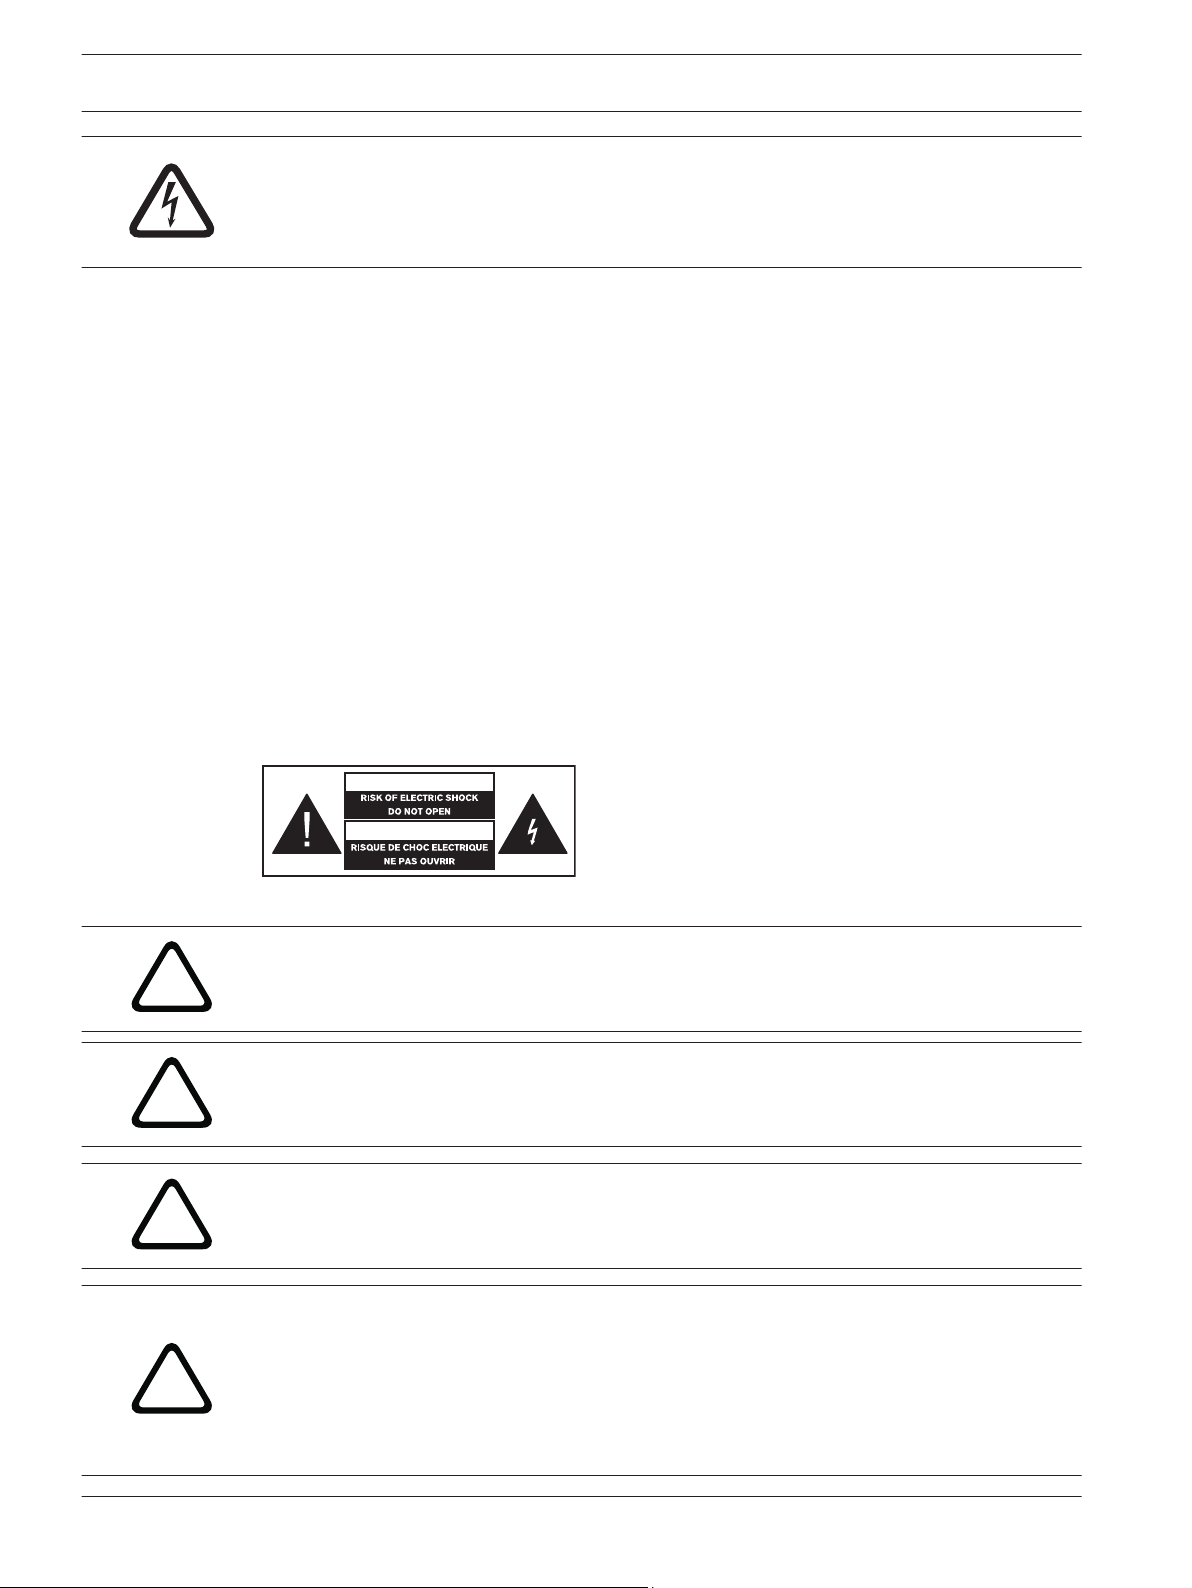
This label may appear on the bottom of the apparatus due to space limitations.
Caution!
To reduce the risk of electrical shock, DO NOT open covers. Refer servicing to qualified
service personnel only.
Warning!
To prevent fire or shock hazard, do not expose units to rain or moisture.
Warning!
Installation should be performed by qualified service personnel only in accordance with the
National Electrical Code or applicable local codes.
Warning!
Power disconnect: If the apparatus is mains powered and a power supply cord set is
provided, the disconnect device is the mains plug of the power cord set.
If an AC‑DC adapter is provided and the mains plug that is part of the direct plug‑in device,
the AC‑DC adapter is the disconnect device.
The socket outlet shall be near the apparatus and shall be easily accessible.
18-Jun-2015 | 04 | F01U306898 Operation manual
Page 7

!
PAVIRO Amplifier Safety | en 7
Warning!
To avoid electric shock, do not connect safety extra-low voltage (SELV) circuits to telephone-
network voltage (TNV) circuits. LAN ports contain SELV circuits, and WAN ports contain TNV
circuits. Some LAN and WAN ports both use RJ‑45 connectors. Use caution when connecting
cables.
Old electrical and electronic appliances
Electrical or electronic devices that are no longer serviceable must be collected separately and
sent for environmentally compatible recycling (in accordance with the European Waste
Electrical and Electronic Equipment Directive).
To dispose of old electrical or electronic devices, you should use the return and collection
systems put in place in the country concerned.
Only used at
altitude not
exceeding 2000m.
Only used in non-
tropical climate
regions.
Operation manual 18-Jun-2015 | 04 | F01U306898
Page 8

8 en | Short information PAVIRO Amplifier
2
Short information
The PVA-2P500 class-D amplifier is a 2 ✕ 500 W professional audio amplifier for evacuation
purposes. It can be operated from both the mains and a DC supply. The output voltage is
galvanically insulated and is constantly monitored for ground fault. An energy-saving mode and
temperature-controlled fans reduce energy consumption and noise levels. The control and
monitoring functions are performed via CAN bus. This amplifier is designed for operation in an
emergency evacuation system. It can be used as system amplifier or in stand-alone mode. The
amplifiers are usually controlled via a controller and configured using IRIS-Net.
The power amplifier has the following features:
– Floating 100 V or 70 V power outputs
– High efficient amplifier blocks in class-D technology
– Outputs idling and short circuit-protected
– Mains operation 120–240 V (50/60 Hz) and/or 24 V DC emergency backup
– Electronically balanced inputs
– Temperature monitoring function
– Pilot tone and ground fault monitoring function via PVA-4CR12 controller or PVA-4R24
router
– Processor control of all functions
– Monitoring of the processor system via watchdog circuit
– Non-volatile FLASH memory for configuration data
– Internal monitoring function
– Integrated audio relays
– Line monitoring function
The power amplifier is processor-controlled and equipped with extensive monitoring
functions. Line monitoring for the CAN bus and for audio transmission allows line
interruptions and short-circuits to be detected and indicated to the user.
18-Jun-2015 | 04 | F01U306898 Operation manual
Page 9
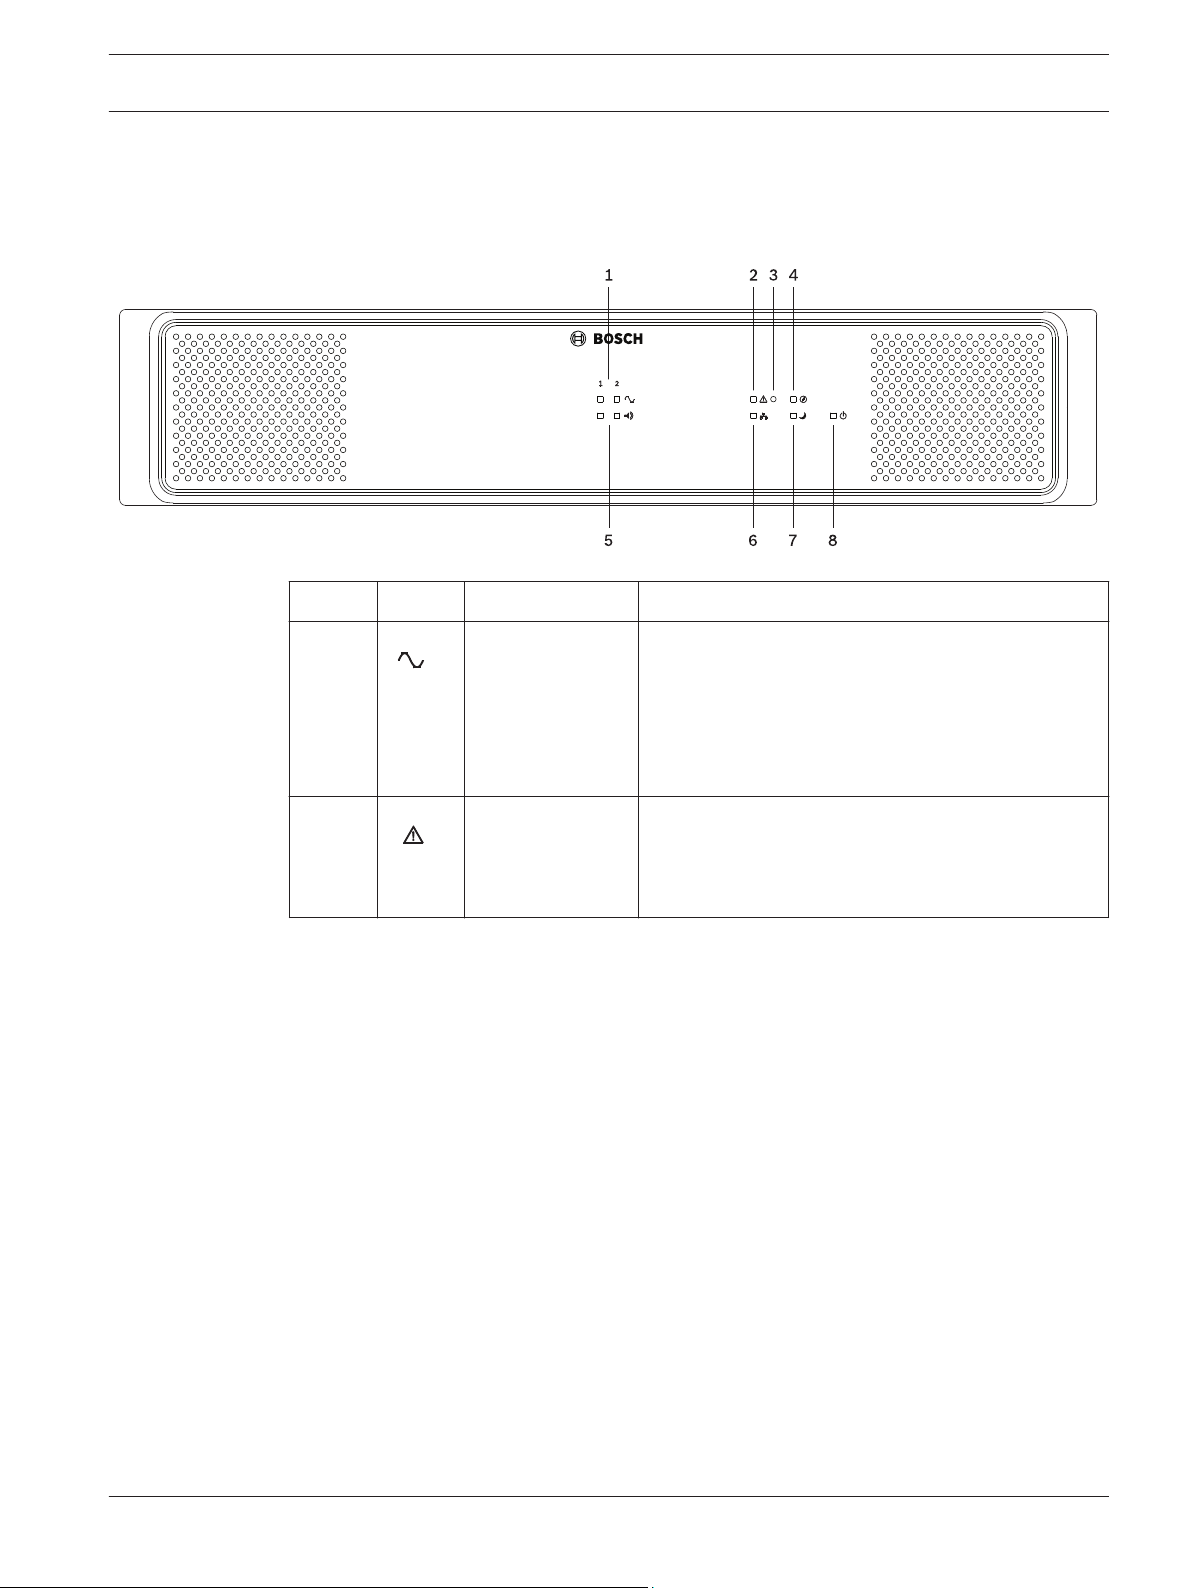
PAVIRO Amplifier System overview | en 9
3
3.1
System overview
Front panel
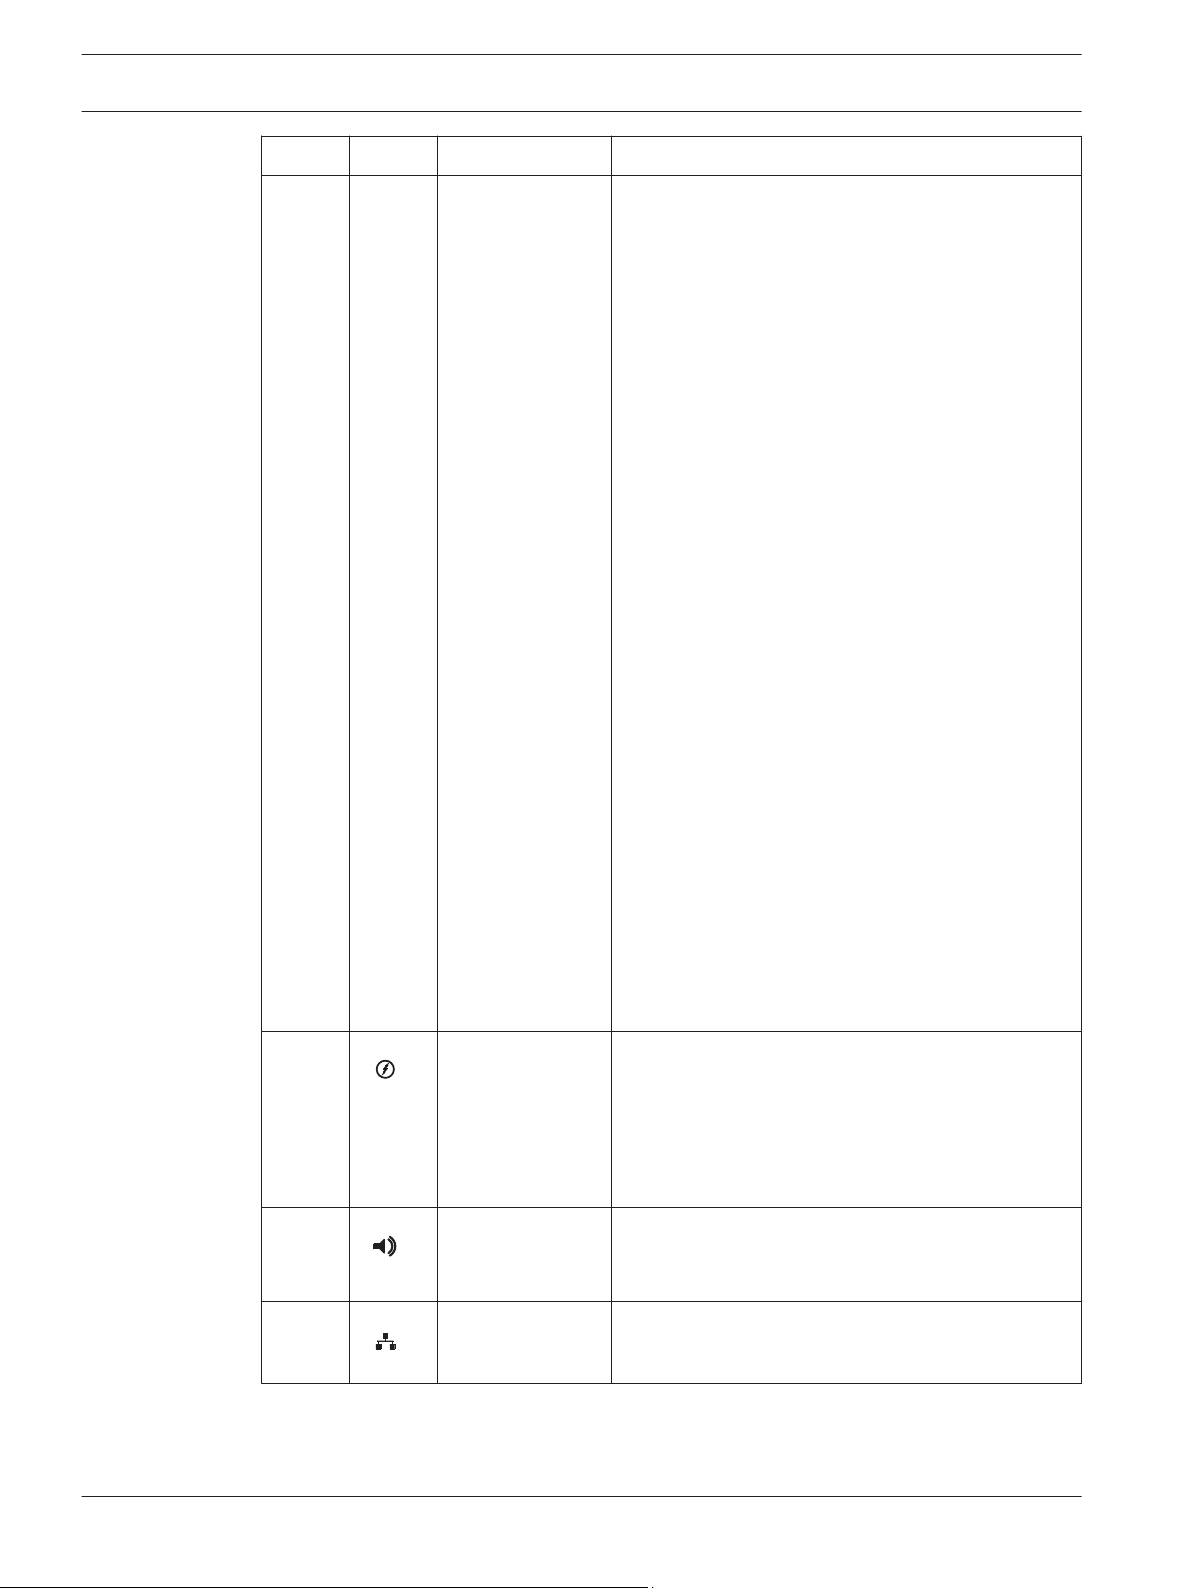
Number Symbol Element Description
1 Signal clip
indicator light
Indicates the signal level of the amplifier channel:
– Green = The output signal is 18 dB below clip
level
– Yellow = The output signal is clipping or the
integrated limiter of the amplifier is limiting the
output signal.
2 General fault
warning indicator
light
This indicator lights up yellow when a fault has
occurred in the device. The types of faults to be
displayed via this indicator are configured in IRISNet. Please refer to section Operation, page 25.
Operation manual 18-Jun-2015 | 04 | F01U306898
Page 10
10 en | System overview PAVIRO Amplifier
Number Symbol Element Description
3 Recessed button The button is protected to prevent it from being
pressed accidentally. Use a pointed object (such as
a ballpoint pen) to press the button.
This button has the following functions if the CAN
address of the device is not set to 00:
– Find function: If the find function of the device
is activated, press this button to deactivate the
indicators.
– Displaying the CAN baud rate: Press this button
for at least one second. Please refer to section
Displaying the CAN baud rate, page 24.
– LED test: Press this button for at least three
seconds to activate the LED test. All indicators
at the front panel light up as long as the button
is pressed.
This button has the following functions if the CAN
address of the device is set to 00 (stand-alone
mode):
– Resetting a ground fault or watchdog fault:
Press the button briefly to confirm a watchdog
fault or ground fault (stand-alone mode only,
please refer to section Stand-alone mode, page
25)
– Setting/displaying the CAN baud rate: Press this
button for at least one second. Please refer to
section Configuring the CAN baud rate, page
24.
– Resetting to delivery condition: To reset all
settings to their original configuration on
delivery, press this button for at least three
seconds to reset all device settings.
4
Ground fault
indicator light
This indicator lights up yellow when a ground fault
has occurred at least one output. The indicator
remains illuminated even when the ground fault has
been resolved. To deactivate the indicator, press the
Recessed button (3) or use IRIS-Net. Please refer to
section Stand-alone mode, page 25.
5 Audio signal
indicator light
This indicator lights up green if an audio signal
(signal level > -36 dB) is present at the power
amplifier input.
6 Network indicator
light
18-Jun-2015 | 04 | F01U306898 Operation manual
This indicator lights up green in the event of
successful data communication with the controller.
Page 11

PAVIRO Amplifier System overview | en 11
Number Symbol Element Description
7 Standby indicator
light
8 Power indicator
light
This indicator lights up green when the device is in
standby mode.
This indicator lights up green when the power
supply is OK.
Operation manual 18-Jun-2015 | 04 | F01U306898
Page 12

12 en | System overview PAVIRO Amplifier
3.2
Rear panel
Number Element Description
1 AC power input and power
switch
2 Grounding screw Ground connection for DC only systems.
3 DC power input
4 CAN BUS port Connection with CAN bus, e.g. controller.
5 CAN ADDRESS selector switch HIGH-byte and LOW-byte for configuring the CAN
address of the device.
6 LINE 1-4 IN / THRU audio
input sockets (RJ-45)
7 LINE IN L1 or L2 audio input
sockets (Euroblock)
8 Amplifier power output
sockets (70 V or 100 V)
Audio input (and through socket) for all
channels. Please refer to section Audio inputs,
page 16.
Balanced audio input for channels 1 or 2. Please
refer to section Audio inputs, page 16.
Power output for speaker zones. Please refer to
section Audio output, page 18.
18-Jun-2015 | 04 | F01U306898 Operation manual
Page 13

PAVIRO Amplifier Parts included | en 13
4
Parts included
Quantity Component
1 PVA-2P500
1 Power cord 230 V AC
1 Power cord 120 V AC
1 Euroblock connector 2-pole (Phoenix, PC 5/2-STF-7,62, 1975697, F.01U.
108.398) for 24 V DC
2 Euroblock connector 3-pole (Phoenix, MC 1,5/3-STF-3,81, Nr. 1827716, F.
01U.104.680) for audio input
2 Euroblock connector 6-pole (Phoenix, MC 1,5/6-ST-3,81, 1827745, F.01U.
104.179) for audio outputs
4 Foot stand (self-adhesive)
1 Operation manual
1 Important safety instructions
Operation manual 18-Jun-2015 | 04 | F01U306898
Page 14

!
14 en | Installation PAVIRO Amplifier
5
Installation
This device has been designed to be installed horizontally in a conventional 19” rack cabinet.
In general, an installation location must be selected in which the device is protected from the
following conditions:
– Dripping water or spray
– Direct sunlight
– High ambient temperatures or direct effect of sources of heat
– High level of humidity
– Heavy dust accumulation
– Strong vibrations
Front attachment of the device
Refer to the following illustration to attach the front of the device, using four screws and
washers. Because of painted surfaces the connection of the grounding screw at the rear panel
of the device is recommended.
Figure 5.1: Installation of the device into a 19" rack
Caution!
The use of rack mount rails is recommended when installing the device in a rack shelf or rack
cabinet to prevent the front panel from twisting or warping. If devices should be stacked in
the rack (e.g. using the self-adhesive foot stands supplied) the maximum permissible load of
the mount rails must be considered. Please refer to the technical specifications provided by
the rack rail manufacturer.
18-Jun-2015 | 04 | F01U306898 Operation manual
Page 15

PAVIRO Amplifier Installation | en 15
Figure 5.2: Stacking of devices using the supplied foot stands (example with 3 devices, rack mount rails are
used for the bottom device only)
Heat development
The table in chapter Specification can be used to determine the requirements for power
supply and supply lines. The power drawn from the mains is converted into output power to
feed the loudspeaker systems and heat. The difference between power consumption and
power output is called power dissipation (P
). The heat that is generated by losses might
loss
stay in the rack shelf and has to be dissipated by appropriate measures. The table can be used
to calculate the thermal ratio inside of a rack shelf/cabinet or for dimensioning the perhaps
required ventilation measures. The P
column lists the power dissipation for various
loss
operating conditions.
Operation manual 18-Jun-2015 | 04 | F01U306898
Page 16

16 en | Connection PAVIRO Amplifier
6
6.1
Connection
Audio inputs
The power amplifier has four audio input channels. With the help of integrated pilot tone
monitoring, a missing or faulty input signal can be detected reliably. Please refer to section
Circuit diagram, page 32 for details about the internal audio routing of the device.
RJ-45
The pin assignment of the LINE 1-4 IN / THRU audio input sockets allows connecting the
power amplifier to the RJ-45 audio output socket of a controller using standard RJ-45 patch
cables. The two RJ-45 sockets are switched in parallel which allows looping through the audio
signal.
Figure 6.1: Pin assignment of LINE IN 1-4 socket
Notice!
Do not use Ethernet crossover cables to connect audio inputs. Only use high quality straight
through Ethernet cables with shielding.
Notice!
Do not plug a CAN terminating resistor into the LINE IN 1-4 socket.
18-Jun-2015 | 04 | F01U306898 Operation manual
Page 17

PAVIRO Amplifier Connection | en 17
Euroblock
The L1 or L2 audio inputs allow to connect local audio sources, e.g. in stand-alone mode. The
audio signal L1 is mixed with input signal LINE IN 4 (provided via RJ-45) and amplified by
amplifier output channel 1. Audio signal L2 is mixed with input signal LINE IN 4 and amplified
by amplifier output channel 2.
Notice!
If local audio sources should be used while full system supervision is required, a pilot tone
must be available at LINE IN 4. Please refer to section Circuit diagram, page 32 and the
documentation of IRIS-Net.
The audio inputs are electronically balanced. You must always use a balanced audio signal at
the input of the device where this is possible. The scope of delivery for the device includes a
3-pin connector. Conductor cross-sections of 0.14 mm² (AWG26) to 1.5 mm² (AWG16) can be
used.
Recommended connecting cable: balanced cable with shielded flexible 2 x 0.14 mm².
Balanced cabling
The following illustration shows the balanced cabling of an audio input (or output) on the
device.
Figure 6.2: Balanced cabling
Unbalanced cabling
If the connecting cable(s) is/are very short and no interference signals are to be expected in
the environment of the device, then an unbalanced signal can also be connected. In this case,
it is imperative that a bridge in the connector between the shield and the inverting pin is
switched (see diagram below), otherwise the level can drop by 6 dB. However, for reasons of
immunity to external interference sources such as dimmers, mains supplies, HF control lines
etc., balanced cabling is always preferable.
Operation manual 18-Jun-2015 | 04 | F01U306898
Page 18

18 en | Connection PAVIRO Amplifier
Figure 6.3: Unbalanced cabling
6.2
Audio output
The audio outputs on the device are galvanically insulated and are constantly monitored for
ground fault. For each output channel there are 6 pins, two pins for 0V, two pins for 70V and
two pins for 100V speaker lines. The delivery for the device includes 6-pole connectors.
Conductor cross-sections of 0.14 mm² (AWG26) to 1.5 mm² (AWG16) can be used.
Recommended connecting cable: flexible CU strand, LiY, 0.75 mm².
For ease of installation, the connector can be removed. With regard to the maximum number
of speakers that can be connected, speakers can be connected until the point at which the
total power consumption of the speaker network corresponds to the nominal power value of
the output stage, where the rated load resistance of the output stage outputs is not to be
exceeded. The nominal power values and the rated load resistances of the outputs can be
found in the section entitled Technical data.
Notice!
Conductor cross-section
The maximum voltage drop must be less than 10% to avoid alarm signal attenuation and
ensure a sufficient signal level of the pilot tone for (optional) EOL modules.
Notice!
Do not use 70V and 100V outputs simultaneously.
Danger!
It is possible that during operation shock hazard voltages (> 140 V peak value) may be present
at the outputs. Therefore, the connected loudspeaker zones have to be installed in accordance
with applicable safety regulations. When installing and operating 100 V loudspeaker networks,
compliance with the VDE regulation DIN VDE 0800 is mandatory. Especially, when 100 V
loudspeaker networks in alarm system applications are concerned, all safety precautions have
to be in accordance with the safety class 3 standard.
18-Jun-2015 | 04 | F01U306898 Operation manual
Page 19

PAVIRO Amplifier Connection | en 19
6.3
Supply voltage
The device is normally operated via the AC mains input (120–240 V). In addition, a battery
input is available for emergency power operation (24 V DC).
Notice!
If the AC and DC power inputs are used, it is recommended to connect AC power first, then
switch on the device, then connect the DC power source.
Notice!
A power-on delay can be programmed for the PVA-2P500 via IRIS-Net. Upon switching on the
power supply the device does not start until the set delay time has elapsed. If several devices
are operated on the same automatic circuit breaker (or battery), cascaded switch-on can be
accomplish by programming individually different power-on delays for the devices. This also
prevents the magnetic trip of an automatic circuit breaker from acting and thus disconnecting
the devices from the mains supply, when various devices are switched on at the same time.
AC input and power switch
The power supply to the device is provided via the mains input using the supplied IEC cable
only. During installation, always disconnect the device from all supply voltages. Connect the
device only to a suitable power supply that meets the requirements specified on the type
plate. The associated fuse is located on the inside of the amplifier and is not accessible from
outside of the device.
The power switch at the rear separates the device from the power supply when the switch is
in the off position (0). The device starts booting up when the switch is in the on position (|). A
soft-start circuit limits in-rush current peaks occurring during this process. The speakers are
switched on via the output relays after a time delay. This effectively suppresses any audible inrush noises.
DC input
Operation manual 18-Jun-2015 | 04 | F01U306898
Page 20

20 en | Connection PAVIRO Amplifier
The device automatically switches to DC input in the event of failure of the mains supply
voltage. For this input, connect a 24-volt DC source to the DC INPUT input. The scope of
delivery for the device includes a 2-pin connector. Conductor cross-sections of 2 mm² to
6 mm² can be used.
Recommended connecting cable: flexible CU strand, LiY, 4 mm².
The DC input is protected against incorrect polarity and overload. The associated fuse is
located on the inside of the device and is not accessible from outside of the device. The
threshold of the internal audio peak limiters are lowered by 3 dB if DC is connected only.
Notice!
The DC input cannot be switched off. The power switch can only be used to switch off the
mains power supply.
6.4
CAN BUS
This section contains information about the connection of the device to the CAN BUS and the
correct setting of the CAN address.
Connection
The device has two RJ-45 jacks for the CAN BUS. The jacks are connected in parallel, and act
as an input and for daisy chaining the network. The CAN bus allows different data rates to be
used, where the data rate is indirectly proportional to the bus length. If the network is small,
data rates of up to 500 kbit/s are possible. In larger networks, the data rate must be
decreased (down to the minimum data rate of 10 kbit/s), please refer to section Configuring
the CAN baud rate.
Notice!
The data rate is preset to 10 kbit/s in the factory.
The following table explains the relationship between data rates and bus lengths/network
size. Bus lengths of over 1,000 m must be implemented only with CAN repeaters.
Data rate (in kbit/s) Bus length (in meters)
500 100
250 250
125 500
62.5 1000
Table 6.1: Data rate and bus length of the CAN BUS
The following diagrams show the assignment of the CAN port/CAN connector.
18-Jun-2015 | 04 | F01U306898 Operation manual
Page 21

PAVIRO Amplifier
Connection | en 21
Figure 6.4: Assignment of the CAN port
Figure 6.5: Assignment of the CAN connector
Pin
Designation Cable color
T568A T568B
2 CAN_GND Green Orange
4 CAN_H (+) Blue
5 CAN_L (-) Blue stripes
Table 6.2: Assignment of the CAN BUS interface
Cable specification
In accordance with the ISO 11898-2 standard, shielded twisted-pair cables with an impedance
of 120 ohms must be used as the data transfer cable for the CAN bus. A terminating resistance
of 120 ohms must be provided at both ends as the cable terminator. The maximum bus length
depends on the data transmission rate, the type of data transmission cable, and the number
of bus participants.
Bus length (in
m)
0 to 40 < 70 0.25 to 0.34 mm²
Data transmission cable Termination (inΩ)Maximum data
Resistance per unit
(in mΩ/m)
Cable crosssection
transmission
rate
124 1000 kbit/s at
AWG23, AWG22
40 m
40 to 300 < 60 0.34 to 0.6 mm²
AWG22, AWG20
300 to 600 < 40 0.5 to 0.6 mm²
AWG20
600 to 1000 < 26 0.75 to 0.8 mm²
AWG18
Table 6.3: Relationships for CAN networks with up to 64 participants
127 500 kbit/s at
100 m
150 to 300 100 kbit/s at
500 m
150 to 300 62.5 kbit/s at
1000 m
If there are long cables and several devices on the CAN bus, terminating resistors with ohm
ratings higher than the specified 120 ohms are recommended in order to reduce the resistive
load for the interface drivers, which in turn reduces the voltage loss from one cable end to
another.
Operation manual 18-Jun-2015 | 04 | F01U306898
Page 22

en | Connection PAVIRO Amplifier
22
The following table allows initial estimates for the required cable cross-section for different
bus lengths and various numbers of bus participants.
Bus length (in m) Number of devices on the CAN Bus
32 64 100
100 0.25 mm² or AWG24 0.34 mm² or AWG22 0.34 mm² or AWG22
250 0.34 mm² or AWG22 0.5 mm² or AWG20 0.5 mm² or AWG20
500 0.75 mm² or AWG18 0.75 mm² or AWG18 1.0 mm² or AWG17
Table 6.4: CAN BUS cable cross-section
If a participant cannot be directly connected to the CAN bus, a stub line (branch line) must be
used. Since there must always be precisely two terminating resistors on a CAN bus, a stub line
cannot be terminated. This creates reflections, which impair the rest of the bus system. To
minimize these reflections, these stub lines must not exceed a maximum individual length of
2 m at data transmission rates of up to 125 kbit/s, or a maximum length of 0.3 m at higher bit
rates. The overall length of all branch lines must not exceed 30 m.
The following applies:
– In terms of rack wiring, standard RJ-45 patch cables with 100-ohm impedance (AWG 24/
AWG 26) can be used for short distances (up to 10 m).
– The guidelines specified above for the network cabling must be used when wiring the
racks with each other and for the building installation.
See also
– Configuring the CAN baud rate, page 24
18-Jun-2015 | 04 | F01U306898 Operation manual
Page 23

PAVIRO Amplifier Configuration | en 23
7
7.1
Configuration
Setting the CAN address
The CAN address of the device is set using the two address selector switches HIGH and LOW.
Addresses 1 to 250 (01 hex to FA hex) can be used in a CAN network. The address is set using
the hexadecimal numbering system. The LOW selector switch is for the low-order digit and the
HIGH selector switch is for the high-order digit.
Notice!
Each address may only occur once in the system, otherwise network conflicts will occur.
The address 0 (00 hex, set on delivery) ensures that the device is disconnected from the
remote communication. This means that the device does not appear in the system, even if it is
connected to the CAN bus.
HIGH LOW Address
0 0 Stand-alone
0 1 to F 1 to 15
1 0 to F 16 to 31
2 0 to F 32 to 47
3 0 to F 48 to 63
4 0 to F 64 to 79
5 0 to F 80 to 95
6 0 to F 96 to 111
7 0 to F 112 to 127
8 0 to F 128 to 143
9 0 to F 144 to 159
A 0 to F 160 to 175
B 0 to F 176 to 191
C 0 to F 192 to 207
D 0 to F 208 to 223
E 0 to F 224 to 239
Operation manual 18-Jun-2015 | 04 | F01U306898
Page 24

24 en | Configuration PAVIRO Amplifier
HIGH LOW Address
F 0 to A 240 to 250
F B to F Reserved
Table 7.1: CAN addresses
7.2
7.3
Displaying the CAN baud rate
To display the CAN baud rate, press the Recessed button and keep the button pressed down
for at least one second. Three front panel indicator lights then display the set baud rate for
two seconds. Please refer to the following table for details.
Baud rate (in kbit/s) Audio signal
indicator light of
channel 1
10 Off Off On
20 Off On Off
62.5 Off On On
125 On Off Off
250 On Off On
500 On On Off
Table 7.2: Displaying the CAN baud rate via indicator lights on the front panel
Audio signal
indicator light of
channel 2
Network indicator
light
Configuring the CAN baud rate
The CAN baud rate can be configured using a UCC1 USB-CAN CONVERTER or directly on the
front of the device.
Changing the CAN baud rate
Notice!
The CAN baud rate can only be changed if the CAN address is set to 00.
18-Jun-2015 | 04 | F01U306898 Operation manual
To change the CAN baud rate, perform the following steps:
1. Press the Recessed button and keep the button pressed down for at least one second.
The CAN baud rate is indicated for two seconds, please refer to the section entitled
“Displaying the CAN baud rate” for more information.
2. As soon as the CAN baud rate is displayed, release the Recessed button. Please note that
if the button is pressed for more than 3 seconds, the device will be reset to factory
settings.
3. Briefly press the Recessed button to switch to the next-higher CAN baud rate. The LEDs
indicate the new setting.
4. Repeat step 3 until the desired baud rate has been set. (Example: To change the baud
rate from 62.5 kbit/s to 20 kbit/s, press the Recessed button exactly five times, i.e. 62.5 >
125 > 250 > 500 > 10 > 20).
5. The new CAN baud rate is applied two seconds after the last time that the Recessed
button is pressed.
Page 25

PAVIRO Amplifier Operation | en 25
8
Operation
Fault monitoring
The following functions of the power amplifier can be monitored:
– Mains under-voltage
– Battery under-voltage
– Excessive temperature
– Overload
– Output voltage
– Output current
– Ground fault (in stand-alone mode only)
– Pilot tone monitoring when used in combination with PVA-4CR12 and PVA-4R24
– Monitoring of the microprocessor
– CAN BUS connection
Whenever a fault occurs in the power amplifier, this is always indicated by means of the
General fault warning indicator light lighting up. IRIS-Net can be used to configure which
power amplifier fault types are to be displayed. The monitoring of functions that are not being
used (e.g. DC input) must be deactivated, otherwise a permanent fault is displayed.
Standby mode
In standby mode the power consumption of the PVA-2P500 is below 2 W (AC or DC power
supply). Following functions are available in standby mode:
– Remote control via CAN bus
– Supervision of the AC power input
– Supervision of the DC power input
The standby mode is activated or deactivated via CAN bus. The standby mode will be
deactivated automatically if the CAN bus is disconnected or the CAN address is set to 0
(stand-alone mode).
8.1
Stand-alone mode
Audio signals
In stand-alone mode (without CAN connection to a controller, e.g. CAN address set to 0) the
audio input signal L1 (or L2) is mixed with audio input 4, amplified with 36 dB and provided
by audio output 1 (or 2).
Ground fault monitoring
The VDE specification DIN VDE 0800 must be observed when setting up and operating 100-volt
speaker systems. Particularly with 100-volt speaker systems that are used for alarm purposes,
all protective measures must be designed for measuring class 3. The integrated ground fault
monitoring function in the power amplifier allows the insulation of the ungrounded speaker
line network to be monitored in stand-alone mode. Any ground fault (e.g. R ≤ 50kΩ) that
occurs is an indication of either cable damage, which means that a line interruption may occur
in the near future, or a wiring fault, which can result in malfunctions. A ground fault that has
been present for at least five seconds is indicated on the front panel by the Ground fault
indicator light lighting up yellow. The Ground fault indicator light lights up until the power
supply to the output stage is disconnected or the error is reset by pressing the Recessed
button.
To test the ground fault monitoring function, use a 22 kOhm resistor (the power amplifier
must not be in STANDBY mode during the testing process). If the resistance is switched from
a terminal of the power output socket to protective ground for approx. five seconds, the
Ground fault indicator light must light. If the resistance is greater than 100 kOhms and the
Operation manual 18-Jun-2015 | 04 | F01U306898
Page 26

26 en | Operation PAVIRO Amplifier
capacity is less than 5 μF, the Ground fault indicator light must not light up. After the resistor
has been removed, the display and the malfunction message must continue to be shown. To
reset the ground fault monitoring function, press the Recessed button.
18-Jun-2015 | 04 | F01U306898 Operation manual
Page 27

!
PAVIRO Amplifier Maintenance | en 27
9
9.1
9.2
Maintenance
Firmware update
IRIS-Net can be used to update the firmware on the device. Depending on the CAN data rate
used, the update will take one or more minutes to complete. Since development work is
always being performed in relation to all system software, it may be necessary to update the
firmware on the controller. Any software incompatibilities are displayed in IRIS-Net. For more
information on firmware updates, please refer to the IRIS-Net documentation.
Resetting to factory default settings
The device is programmed in the factory with the following functions and properties:
Parameter Setting/description
CAN baud rate 10 kbit/s
Input routing Line input L1 to CH 1
Line input L2 to CH 2
Line input 4 to CH 1 and CH 2 (in stand-alone mode)
Output relays All closed
Table 9.1: Device factory default settings
The device settings can be reset to the default values manually or using IRIS-Net. To perform a
manual reset, perform the following steps with the device switched on:
1. Disconnect the device from the CAN BUS.
2. Set the address to “00” using the CAN ADDRESS selector switch on the rear panel.
3. Press the Recessed button on the front panel and keep the button pressed down for
three seconds.
The device has now been reset to the factory default settings.
Caution!
Before reconnecting the device to the CAN BUS, note the CAN baud rate, which may change
under certain circumstances.
Operation manual 18-Jun-2015 | 04 | F01U306898
Page 28

28 en | Technical data PAVIRO Amplifier
10
Technical data
Specification
Rated load impedance (output power)
– 100 V 20 Ω (500 W)
– 70 V 10 Ω (500 W)
Rated output power, 1 kHz, THD ≤ 1% 2 ✕ 500 W
Rated input voltage +6 dBu
Max. RMS voltage swing, 1 kHz, THD ≤ 1%, without load
– 100 V 110 V
– 70 V 78 V
Voltage gain, ref. 1 kHz, fixed
– 70 V 33.2 dB
– 100 V 36.2 dB
Maximum load capacitance 2 µF
Input level, max. +18 dBu (9.75 V
1
rms
)
Frequency response, ref. 1 kHz, rated load,
50 Hz to 25 kHz
-3 dB
Input impedance, active balanced 20 kΩ
Signal-to-noise ratio (A-weighted) > 104 dB
Output noise (A-weighted) < -62 dBu
Crosstalk , ref. 1 kHz < -85 dB
Output stage topology Class-D, transformer, floating
Power requirements
– AC 115–240 V (-10/+10%)
2
– DC 21‑32 V
Power consumption, AC and DC See section “Power consumption” in
operation manual
Inrush current 2 A
Inrush current, after five-second power cycle 1.3 A
Mains fuse T6.3A (internally)
DC fuse 30A (internally)
Ground fault R < 50 kΩ
CAN BUS port 2 ✕ RJ-45, 10 to 500 kbit/s
18-Jun-2015 | 04 | F01U306898 Operation manual
Page 29

PAVIRO Amplifier Technical data | en 29
Protection Audio input level limiter, RMS output power
limiter, high temperature, DC, short circuit,
mains undervoltage protection, DC supply
undervoltage protection, inrush current
limiter, ground fault
Cooling Front-to-rear, temperature-controlled fans
Operating temperature -5 °C to +45 °C
Safety class Class I
Electromagnetic environment E1, E2, E3
Product dimensions (Width ✕ Height ✕ Depth) 19”, 2 HU, 483 ✕ 88.2 ✕ 391 mm
Net weight 16.5 kg
Shipping weight 19 kg
1
In DC mode and in continuous alarm-signal operation, output signal limited by 3 dB max.
2
Reduced output power at mains voltages below 115 V
Operation manual 18-Jun-2015 | 04 | F01U306898
Page 30

30 en | Technical data PAVIRO Amplifier
10.1
10.2
Standards
– EN 50130-4
– EN 50581
– EN 55103-1/2
– EN 61000-3-2/3
– EN 61000-6-3
– IEC 60065
– EN 60945
Power consumption
230 V/50 Hz operation
I
supply
Standby 0.14 A 33.0 VA 1.9 W 0.0 W 6.5
Idle (no audio) 0.20 A 47.0 VA 19.5 W 0.0 W 66.5
Announcement (-10 dB) 0.88 A 202 VA 175 W 100 W 255.8
Alert (-3 dB) 3.35 A 772 VA 745 W 500 W 835.5
120 V/60 Hz operation
S
supply
P
supply
P
out
BTU/h
I
supply
S
supply
P
supply
P
out
BTU/h
Standby 0.09 A 9.0 VA 1.3 W 0.0 W 4.4
Idle (no audio) 0.27 A 29.0 VA 17.3 W 0.0 W 59.0
Announcement (-10 dB) 1.6 A 189 VA 175 W 100 W 255.8
Alert (-3 dB) 6.9 A 824 VA 800 W 500 W 1023
24 V DC operation
I
supply
S
supply
P
supply
P
out
BTU/h
Standby 0.06 A - 1.4 W 0.0 W 4.8
Idle (no audio) 0.65 A - 15.6 W 0.0 W 53
Announcement (-10 dB) 7.0 A - 168 W 100 W 232
Alert (-3 dB) 32.5 A - 780 W 500 W 938
Description of table columns:
– I
– S
– P
– P
– P
= RMS current drawn from mains (or DC supply)
supply
= apparent power drawn from the mains line
supply
= reactive power drawn from mains (or DC supply)
supply
= NF output power provided to the speaker lines
out
or BTU/h = thermal loss
loss
18-Jun-2015 | 04 | F01U306898 Operation manual
Page 31

PAVIRO Amplifier Technical data | en 31
Dimensions10.3
Operation manual 18-Jun-2015 | 04 | F01U306898
Page 32

IN1+
IN1-
IN2+
IN2-
IN3+
IN4+
OUT1+
IN3-
IN4-
GNDA
OUT2+
OUT3+
OUT4+
OUT1-
OUT2-
OUT3-
OUT4-
All NF-Inputs:
+6dBu input sensitivity
+12dBu input acceptance
2.RJ45
analog audio
input
4 IN 1
Router
250W
250W
250W / 500W
Output
Transformer
Control & Supervision GND-FAULT
+15V
CAN
LED Display
1
2
1
2
1 2
250W / 500W
Output
Transformer
Output Relay
ADCADC
ADCADC
Clipper / Limiter
FAN_PWM
Power
Standby
Remote
General Fault
GND Fault
Signal CH1
Clip CH1
Signal CH2
Clip CH2
Test-Button
Watchdog
4 CH Signal
detection
(>= -50dB)
Display BUS
Phoenix Input
GNDA
GNDA
IN1+
IN1-
IN2+
IN2-
4 IN 1
Router
+
+
Phoenix Input
CH1
CH2
CH3
CH4
Local 1
Local 2
100V
70V
0V
100V
70V
0V
DC Power supply unit
AC Power supply unit
FAN
Powerstage
DC Input
AC Input
Clipper / Limiter
32 en | Technical data PAVIRO Amplifier
10.4
Circuit diagram
18-Jun-2015 | 04 | F01U306898 Operation manual
Page 33

Page 34

Bosch Security Systems B.V.
Torenallee 49
5617 BA Eindhoven
The Netherlands
www.boschsecurity.com
© Bosch Security Systems B.V., 2015
 Loading...