

Page 1
[en] Instruction manual .....................................3 [nl] Gebruiksaanwijzing .................................. 28
Free standing cooker HGV745221N
Fornuis HGV745221N
Page 2

Page 3

3
Ú Table of contents
[en]Instruction manual
Important safety information..................................................... 3
Causes of damage......................................................................6
Damage to the oven...........................................................................6
Damage to the plinth drawer............................................................6
Set-up, gas and electricity connection..................................... 7
Gas connection ................................................................................... 7
Faults in the gas installation/smell of gas .....................................7
Moving the appliance by the gas line or door handle ................. 7
Electrical connection ..........................................................................7
Levelling the cooker ........................................................................... 7
Wall fixing ............................................................................................. 7
Setting up the appliance ...................................................................7
Measures to be noted during transport .......................................... 8
Your new cooker......................................................................... 8
General information ............................................................................8
Cooking area ....................................................................................... 8
The oven............................................................................................... 9
The cooking compartment ............................................................. 10
Oven door - Additional safety precautions ................................. 10
Your accessories......................................................................10
Inserting accessories ...................................................................... 10
Optional accessories ...................................................................... 10
After-sales service products .......................................................... 11
Before using the oven for the first time ................................. 12
Setting the clock .............................................................................. 12
Heating up the oven ........................................................................ 12
Cleaning the accessories............................................................... 12
Advance cleaning of burner cup and cap .................................. 12
Making settings on the hob ..................................................... 12
Igniting the gas burners.................................................................. 12
Table - Cooking................................................................................ 13
Setting the oven........................................................................ 13
Types of heating and temperature ............................................... 13
If the oven is to switch off automatically ..................................... 13
If the oven is to switch on and off automatically ....................... 14
Rapid heating ................................................................................... 14
Setting the clock....................................................................... 14
Setting the timer ....................................................................... 14
Childproof lock ......................................................................... 15
Oven ................................................................................................... 15
Care and cleaning .................................................................... 15
Upper glass cover ........................................................................... 15
Cleaning agents ............................................................................... 15
Detaching and refitting the rails.................................................... 16
Detaching and attaching the oven door...................................... 16
Removing and refitting the door panels...................................... 17
Troubleshooting ....................................................................... 18
Malfunction table.............................................................................. 18
Replacing the bulb in the oven ceiling light ............................... 18
Glass cover ....................................................................................... 18
After-sales service ................................................................... 18
E number and FD number ............................................................. 18
Energy and environment tips.................................................. 19
Saving energy with your oven ....................................................... 19
Saving energy with the gas hob ................................................... 19
Environmentally-friendly disposal.................................................. 19
Tested for you in our cooking studio ..................................... 19
Cakes and pastries ......................................................................... 19
Baking tips ........................................................................................ 21
Meat, poultry, fish ............................................................................ 22
Tips for roasting and grilling.......................................................... 23
Bakes, gratins, toast with toppings .............................................. 24
Preprepared products..................................................................... 24
Special dishes.................................................................................. 25
Defrosting .......................................................................................... 25
Drying ................................................................................................. 25
Preserving ......................................................................................... 25
Acrylamide in foodstuffs ......................................................... 26
Test dishes................................................................................ 27
Baking ................................................................................................ 27
Grilling................................................................................................ 27
Produktinfo
Additional information on products, accessories, replacement
parts and services can be found at www.bosch-home.com and
in the online shop www.bosch-eshop.com
: Important safety information
Read these instructions carefully. Only then will you be able to operate your appliance safely and correctly. Retain the instruction manual and installation instructions for future use or for subsequent owners.
These instructions are only valid if the
appropriate country symbol appears on the
appliance. If the symbol does not appear on
the appliance, it is necessary to refer to the
technical instructions which will provide the
necessary instructions concerning
modification of the appliance to the
conditions of use of the particular country.
Appliance category: Category 1
Check the appliance for damage after
unpacking it. Do not connect the appliance
if it has been damaged in transport.
Only allow a licensed professional to
connect the appliance and to convert the
appliance to a different type of gas. The
appliance must be installed (electric and
gas connections) in accordance with the
Page 4

4
instruction and installation manual. An
incorrect connection or incorrect settings
may lead to serious accidents and damage
to the appliance. The appliance
manufacturer accepts no liability for
damage of this kind. The appliance's
warranty becomes void.
Caution:This appliance is for cooking purposes only. It must not be used for other purposes, for example room heating.
Caution:The use of a gas cooking
appliance results in the production of heat,
moisture and products of combustion in the
room in which it is installed. Ensure that the
kitchen is well ventilated especially when
the appliance is in use: keep natural
ventilation holes open or install a
mechanical ventilation device (mechanical
extractor hood).
Prolonged intensive use of the appliance may call for additional ventilation, for example opening of a window, or more effective ventilation, for example increasing the level of mechanical ventilation where present.
This appliance is not designed for operation with an external timer or by remote control.
This appliance may be used by children
over the age of 8 years old and by persons
with reduced physical, sensory or mental
capacity or by persons with a lack of
experience or knowledge if they are
supervised or are instructed by a person
responsible for their safety how to use the
appliance safely and have understood the
associated hazards.
Children must not play with the appliance. Children must not clean the appliance or carry out general maintenance unless they are at least 8 years old and are being supervised.
Keep children below the age of 8 years old at a safe distance from the appliance and power cable.
Always slide accessories into the cooking compartment correctly. See "Description of accessories in the instruction manual.
Risk of fire!
■
A draught is created when the appliance
door is opened. Greaseproof paper may
come into contact with the heating
element and catch fire. Do not place
greaseproof paper loosely over
accessories during preheating. Always
weight down the greaseproof paper with a
dish or a baking tin. Only cover the
surface required with greaseproof paper.
Greaseproof paper must not protrude over
the accessories.
Risk of fire!
■
Combustible objects that are left in the
cooking compartment may ignite. Never
store combustible items in the cooking
compartment. Never open the appliance
door if there is smoke inside. Switch off
the appliance and unplug the mains plug
or switch off the fuse in the fuse box. Shut
off the gas supply.
Risk of fire!
■
Hot oil and fat can ignite very quickly.
Never leave hot fat or oil unattended.
Never use water to put out burning oil or
fat. Switch off the hotplate. Extinguish
flames carefully using a lid, fire blanket or
something similar.
Risk of fire!
■
The hotplates become very hot. Never
place combustible items on the hob.
Never place objects on the hob.
Risk of fire!
■
The appliance becomes very hot, and
flammable materials can easily catch fire.
Do not store or use any flammable
objects (e.g. aerosol cans, cleaning
agents) under or in the vicinity of the oven.
Do not store any flammable objects inside
or on top of the oven.
Risk of fire!
■
When gas hotplates are in operation
without any cookware placed on them,
they can build up a lot of heat. The
appliance and the extractor hood above it
may become damaged or be set on fire.
Grease residue in the filter of the extractor
hood may ignite. Only operate the gas
burners with cookware on them.
Risk of fire!
■
The rear of the appliance becomes very
hot. This may cause damage to the power
cables. Electricity and gas lines must not
come into contact with the rear of the
appliance.
Risk of fire!
■
Never place flammable objects on the
burners or store them in the cooking
compartment. Never open the appliance
door if there is smoke inside. Switch off
the appliance. Pull out the mains plug or
switch off the appliance at the circuit
breaker in the fuse box. Shut off the gas
supply.
Risk of fire!
■
The surfaces of the plinth drawer may
become very hot. Only store oven
accessories in the drawer. Flammable and
combustible objects must not be stored in
the plinth drawer.
Page 5
5
Risk of burns!
■
The appliance becomes very hot. Never
touch the interior surfaces of the cooking
compartment or the heating elements.
Always allow the appliance to cool down.
Keep children at a safe distance.
Risk of burns!
■
Accessories and ovenware become very
hot. Always use oven gloves to remove
accessories or ovenware from the cooking
compartment.
Risk of burns!
■
Alcoholic vapours may catch fire in the hot
cooking compartment. Never prepare food
containing large quantities of drinks with a
high alcohol content. Only use small
quantities of drinks with a high alcohol
content. Open the appliance door with
care.
Risk of burning !
■
The hotplates and the area around them
get very hot. Never touch the hot surfaces.
Keep children away.
Risk of burns!
■
During operation, the surfaces of the
appliance become hot. Do not touch the
surfaces when they are hot. Keep children
away from the appliance.
Risk of burns!
■
Empty cookware becomes extremely hot
when set on a gas hotplate that is in
operation. Never heat up empty cookware.
Risk of burns!
■
The appliance becomes hot during
operation. Allow the appliance to cool
down before cleaning.
Risk of burns!
■
Caution: Accessible parts may be hot
when the grill is in use. Young children
should be kept away from the appliance.
Risk of scalding!
■
The accessible parts become hot during
operation. Never touch the hot parts. Keep
children at a safe distance.
Risk of scalding!
■
When you open the appliance door, hot
steam may escape. Open the appliance
door with care. Keep children at a safe
distance.
Risk of scalding!
■
Water in a hot cooking compartment may
create hot steam. Never pour water into
the hot cooking compartment.
Risk of injury!
■
Scratched glass in the appliance door
may develop into a crack. Do not use a
glass scraper, or sharp or abrasive
cleaning aids or detergents.
Risk of injury!
■
Incorrect repairs are dangerous. Repairs
may only be carried out, and damaged
power and gas lines replaced, by an aftersales engineer trained by us. If the
appliance is faulty, unplug the mains plug
or switch off the fuse in the fuse box. Shut
off the gas supply. Contact the after-sales
service.
Risk of injury!
■
Faults or damage to the appliance are
dangerous. Never switch on a faulty
appliance. Unplug the appliance from the
mains or switch off the circuit breaker in
the fuse box. Shut off the gas supply.
Contact the after-sales service.
Risk of injury!
■
Unsuitable pan sizes, damaged or
incorrectly positioned pans can cause
serious injury. Observe the instructions
which accompany the cookware.
Risk of injury!
■
Caution: The glass cover may crack due
to heat. Before closing the cover, turn off
all burners. Wait until the oven has cooled
down before closing the glass cover.
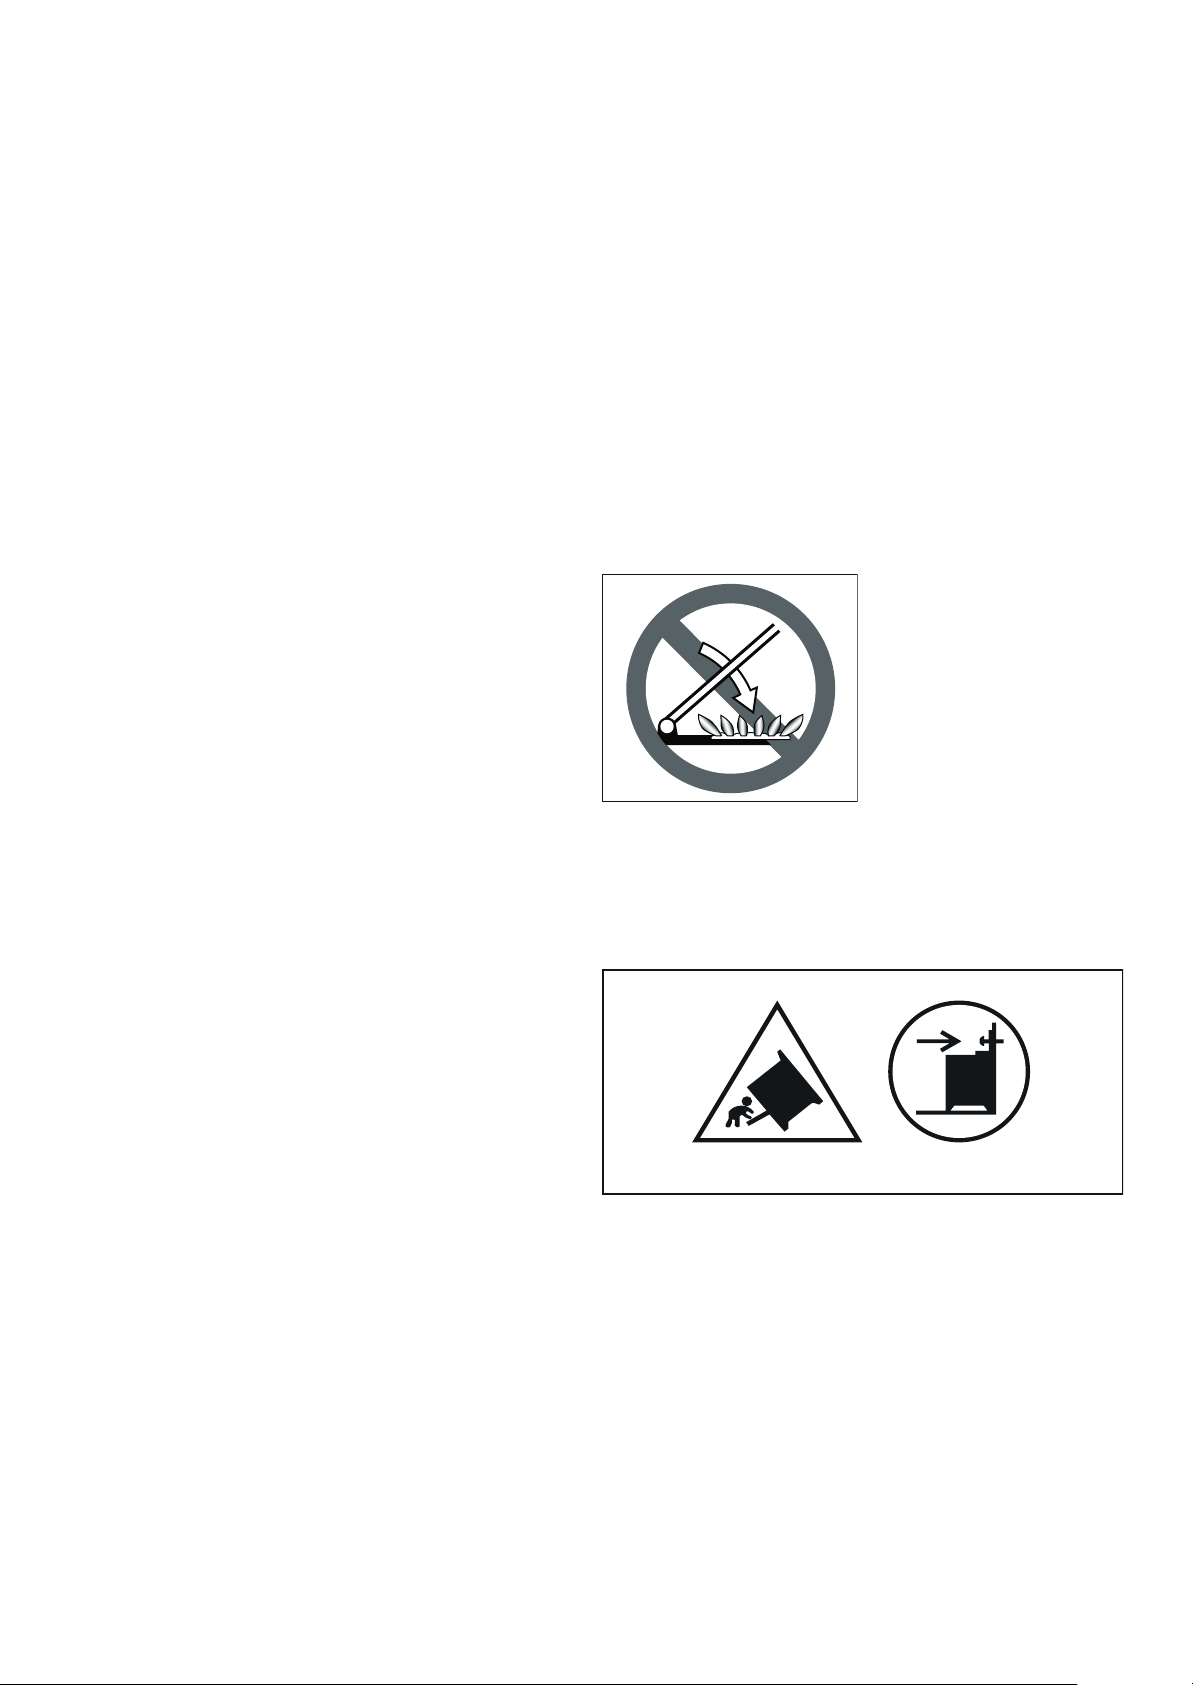
Risk of injury!
■
If the appliance is placed on a base and is
not secured, it may slide off the base. The
appliance must be fixed to the base.
Risk of tipping!
Warning: In order to prevent tipping of the
appliance, this stabilizing means must be
installed. Refer to the instructions for
installation.
Risk of electric shock!
■
Incorrect repairs are dangerous. Repairs
may only be carried out by one of our
trained after-sales engineers. If the
appliance is faulty, unplug the mains plug
or switch off the fuse in the fuse box.
Contact the after-sales service.
Risk of electric shock!
■
The cable insulation on electrical
appliances may melt when touching hot
parts of the appliance. Never bring
Page 6

6
electrical appliance cables into contact
with hot parts of the appliance.
Risk of electric s hock!
■
Penetrating moisture may cause an
electric shock. Do not use any highpressure cleaners or steam cleaners.
Risk of electric s hock!
■
When replacing the cooking compartment
bulb, the bulb socket contacts are live.
Before replacing the bulb, unplug the
appliance from the mains or switch off the
circuit breaker in the fuse box.
Risk of electric shock!
■
A defective appliance may cause electric
shock. Never switch on a defective
appliance. Unplug the appliance from the
mains or switch off the circuit breaker in
the fuse box. Contact the after-sales
service.
Causes of damage
Hob
Caution!
■ Only use the burners when cookware has been placed on
top. Do not heat up empty pots or pans. The saucepan base
will be damaged.
■ Only use pots and pans with an even base.
■ Place the pot or pan centrally over the burner. This will
optimise transfer of the heat from the burner flame to the pot
or ban base. The handle does not become damaged, and
greater energy savings are guaranteed.
■ Ensure that the gas burners are clean and dry. The burner
cup and ¶burner cap must be positioned exactly.
■ Ensure that the top cover is not closed when the oven is
started up.
Damage to the oven
Caution!
■ Accessories, foil, greaseproof paper or ovenware on the
cooking compartment floor: do not place accessories on the
cooking compartment floor. Do not cover the cooking
compartment floor with any sort of foil or greaseproof paper.
Do not place ovenware on the cooking compartment floor if a
temperature of over 50 ºC has been set. This will cause heat
to accumulate. The baking and roasting times will no longer
be correct and the enamel will be damaged.
■ Water in a hot cooking compartment: do not pour water into
the cooking compartment when it is hot. This will cause
steam. The temperature change can cause damage to the
enamel.
■ Moist food: do not store moist food in the cooking
compartment when it is closed for prolonged periods This will
damage the enamel.
■ Fruit juice: when baking particularly juicy fruit pies, do not
pack the baking tray too generously. Fruit juice dripping from
the baking tray leaves stains that cannot be removed. If
possible, use the deeper universal pan.
■ Cooling with the appliance door open: only allow the cooking
compartment to cool when it is closed. Even if the appliance
door is only open a little, front panels of adjacent units could
be damaged over time.
■ Very dirty door seal: If the door seal is very dirty, the
appliance door will no longer close properly when the
appliance is in use. The fronts of adjacent units could be
damaged.Always keep the door seal clean.
■ Appliance door as a seat, shelf or worktop: Do not sit on the
appliance door, or place or hang anything on it. Do not place
any cookware or accessories on the appliance door.
■ Inserting accessories: depending on the appliance model,
accessories can scratch the door panel when closing the
appliance door. Always insert the accessories into the
cooking compartment as far as they will go.
■ Carrying the appliance: do not carry or hold the appliance by
the door handle. The door handle cannot support the weight
of the appliance and could break.
Damage to the plinth drawer
Caution!
Do not place hot objects in the plinth drawer. It could be
damaged.
Page 7
7
Set-up, gas and electricity connection
Gas connection
Installation must only be performed by an approved expert or a
licensed after-sales service engineer in accordance with the
instructions specified under "Gas connection and conversion to
a different gas type".
For the licensed expert or after-sales service
Caution!
■ The setting conditions for this appliance are specified on the
rating plate on the back of the appliance. The gas type set in
the factory is marked with an asterisk (*).
■ Before setting up the appliance, check the grid access
conditions (gas type and gas pressure) and ensure that the
gas setting of the appliance meets these conditions. If the
appliance settings have to be changed, follow the instructions
in the section "Gas connection and conversion to a different
gas type".
■ This appliance is not connected to a waste gas main. It must
be connected and commissioned in accordance with the
installation conditions. Do not connect the appliance to a
waste gas main. All ventilation regulations must be observed.
■ The gas connection must be made via a fixed, i.e. not mobile
connection (gas line) or via a safety hose.
■ If using the safety hose, ensure that the hose is not trapped
or crushed. The hose must not come into contact with hot
surfaces.
■ The gas line (gas pipe or safety hose) can be connected to
the right or left-hand side of the appliance. The connection
must have an easily accessible locking device.
Faults in the gas installation/smell of gas
If you notice a smell of gas or faults in the gas installation, you
must
■ immediately shut off the gas supply and/or close the gas
cylinder valve
■ immediately extinguish all naked flames and cigarettes
■ switch off electrical appliances and lights
■ open windows and ventilate the room
■ call the aftersales service or the gas supplier
Moving the appliance by the gas line or door handle
Do not move the appliance while holding the gas line; the gas
pipe could be damaged. There is a risk of a gas leak! Do not
move the appliance while holding it by the door handle. The
door hinges and door handle could be damaged.
Electrical connection
Caution!
■ Have the appliance set up by your after-sales service. A 16 A
fuse is required for connection. The appliance is designed for
operation at 220-240 V.
■ If the electricity supply drops below 180 V, the electrical
ignition system does not work.
■ Any damage arising from the appliance being connected
incorrectly will invalidate the guarantee.
■ If the supply cord is damaged, it must be replaced by the
manufacturer, its service agent or similarly qualified persons
in order to avoid a hazard.
For the after-sales service
Caution!
■ The appliance must be connected in accordance with the
data on the rating plate.
■ Only connect the appliance to an electrical connection that
meets the applicable provisions. The socket must be easily
accessible so that you can disconnect the appliance from the
electricity supply if necessary.
■ Please ensure the availability of a multi-pin disconnecting
system.
■ Never use extension cables or multiple plugs.
■ For safety reasons, this appliance must only be connected to
an earthed connection. If the safety earth terminal does not
comply with regulations, safety against electrical hazards is
not guaranteed.
■ You must use a H 05 W-F type cable or equivalent for the
appliance connection.
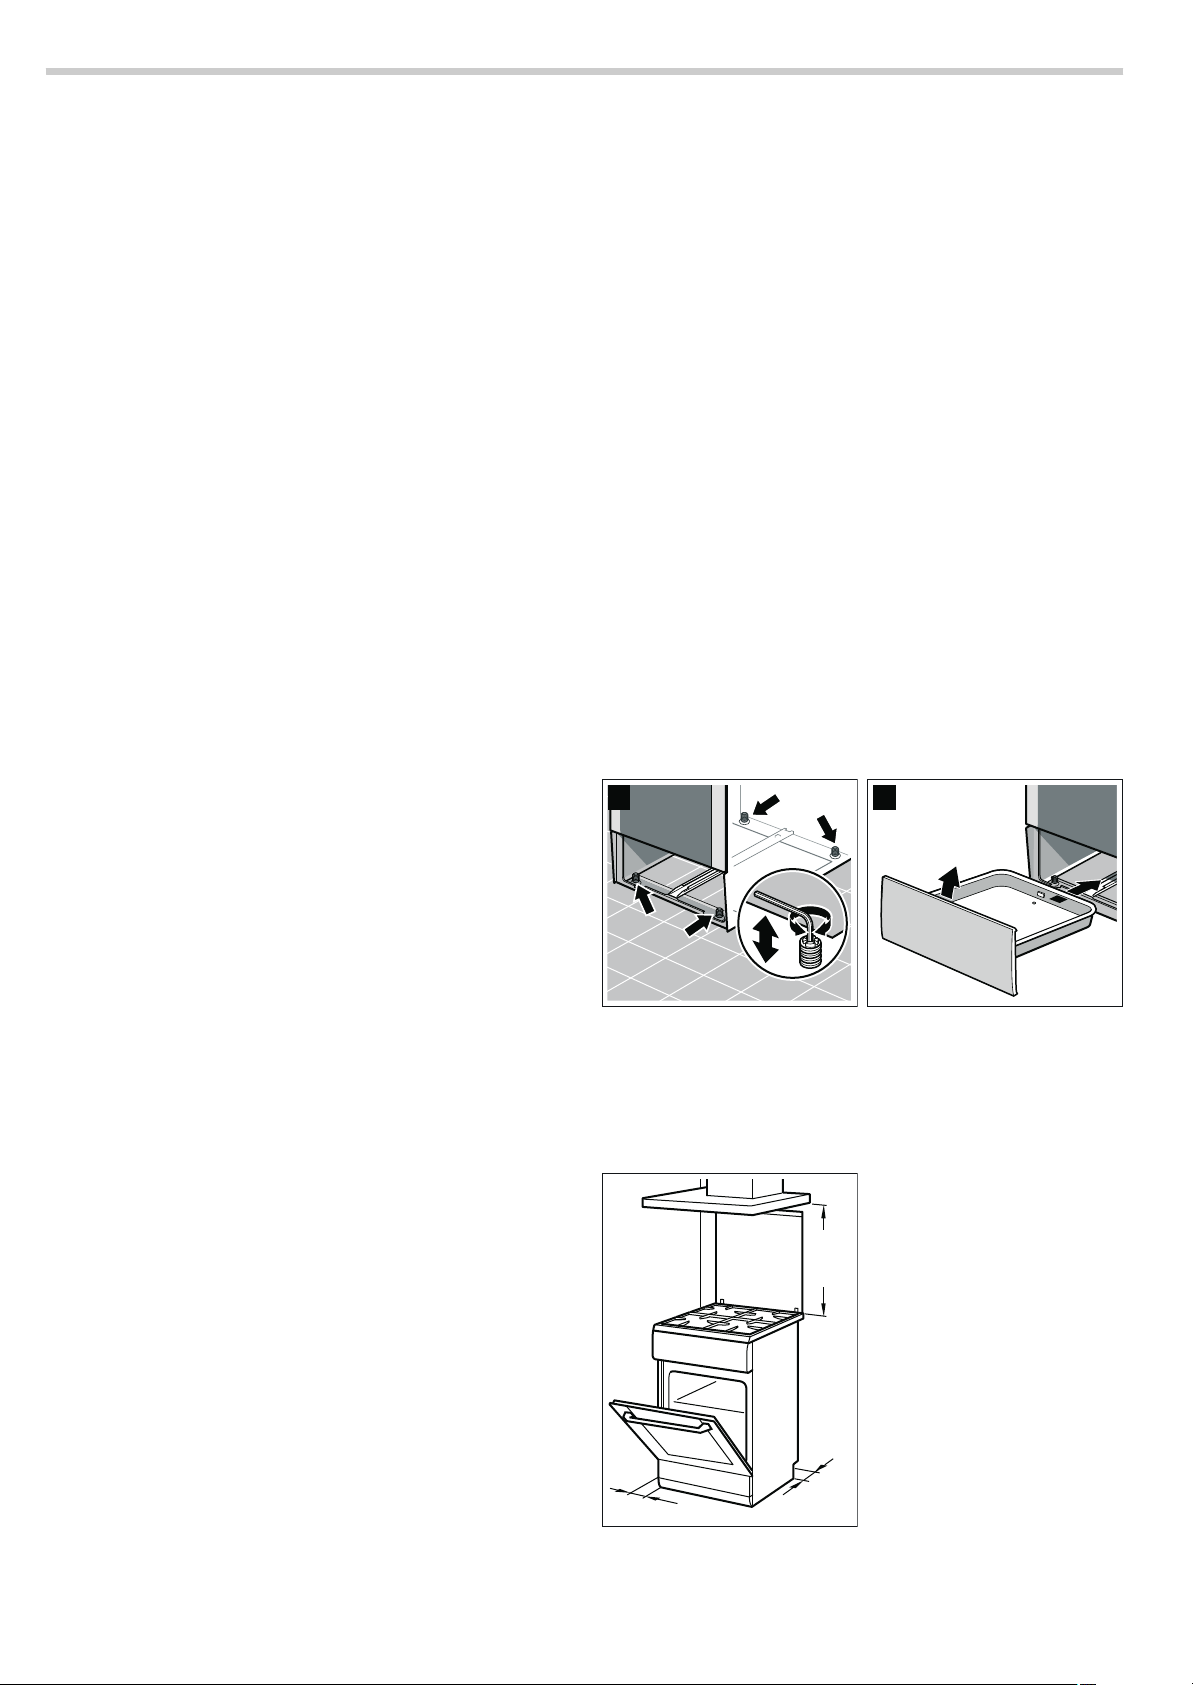
Levelling the cooker
Always place the cooker directly on the floor.
1. Pull out the plinth drawer and lift it up and out.
There are adjustable feet at the front and rear on the inside of
the plinth.
2. Use an Allen key to raise or lower the adjustable feet as
necessary until the cooker is level (picture A).
3. Push the plinth drawer back in (picture B).
Wall fixing
To prevent the cooker from tipping over, you must fix it to the
wall using the enclosed bracket. Please observe the installation
instructions for fixing the oven to the wall.
Setting up the appliance
■ The appliance must be set up directly on the kitchen floor
and in line with the specified dimensions. The appliance must
not be set up on any other object.
%$
0LQ
Page 8
8
■ The distance between the top edge of the oven and the
bottom edge of the extractor hood must meet the
requirements of the extractor hood manufacturer.
■ Ensure that the appliance is not moved again after set up.
The distance from the high output burner or wok burner to
the fronts of the adjacent units or the wall must be at least 50
mm.
Measures to be noted during transport
Secure all mobile parts in and on the appliance using an
adhesive tape that can be removed without leaving any traces.
Push all accessories (e.g. baking tray) into the corresponding
slots with cardboard at the edges, in order to avoid damaging
the appliance. Place cardboard or similar between the front and
rear side to prevent knocks against the inside of the glass door.
Secure the door and, if available, the top cover to the appliance
sides using adhesive tape.
Keep the original appliance packaging. Only transport the
appliance in the original packaging. Observe the transport
arrows on the packaging.
If the original packaging is no longer available
pack the appliance in protective packaging to guarantee
sufficient protection against any transport damage.
Transport the appliance in an upright position. Do not hold the
appliance by the door handle or the connections on the rear, as
these could be damaged. Do not place any heavy objects on
the appliance.
Your new cooker
Here you will learn about your new cooker. We will explain the
control panel, the hob and the individual operating controls.
You will find information on the cooking compartment and the
accessories.
General information
The design depends on the respective appliance model.
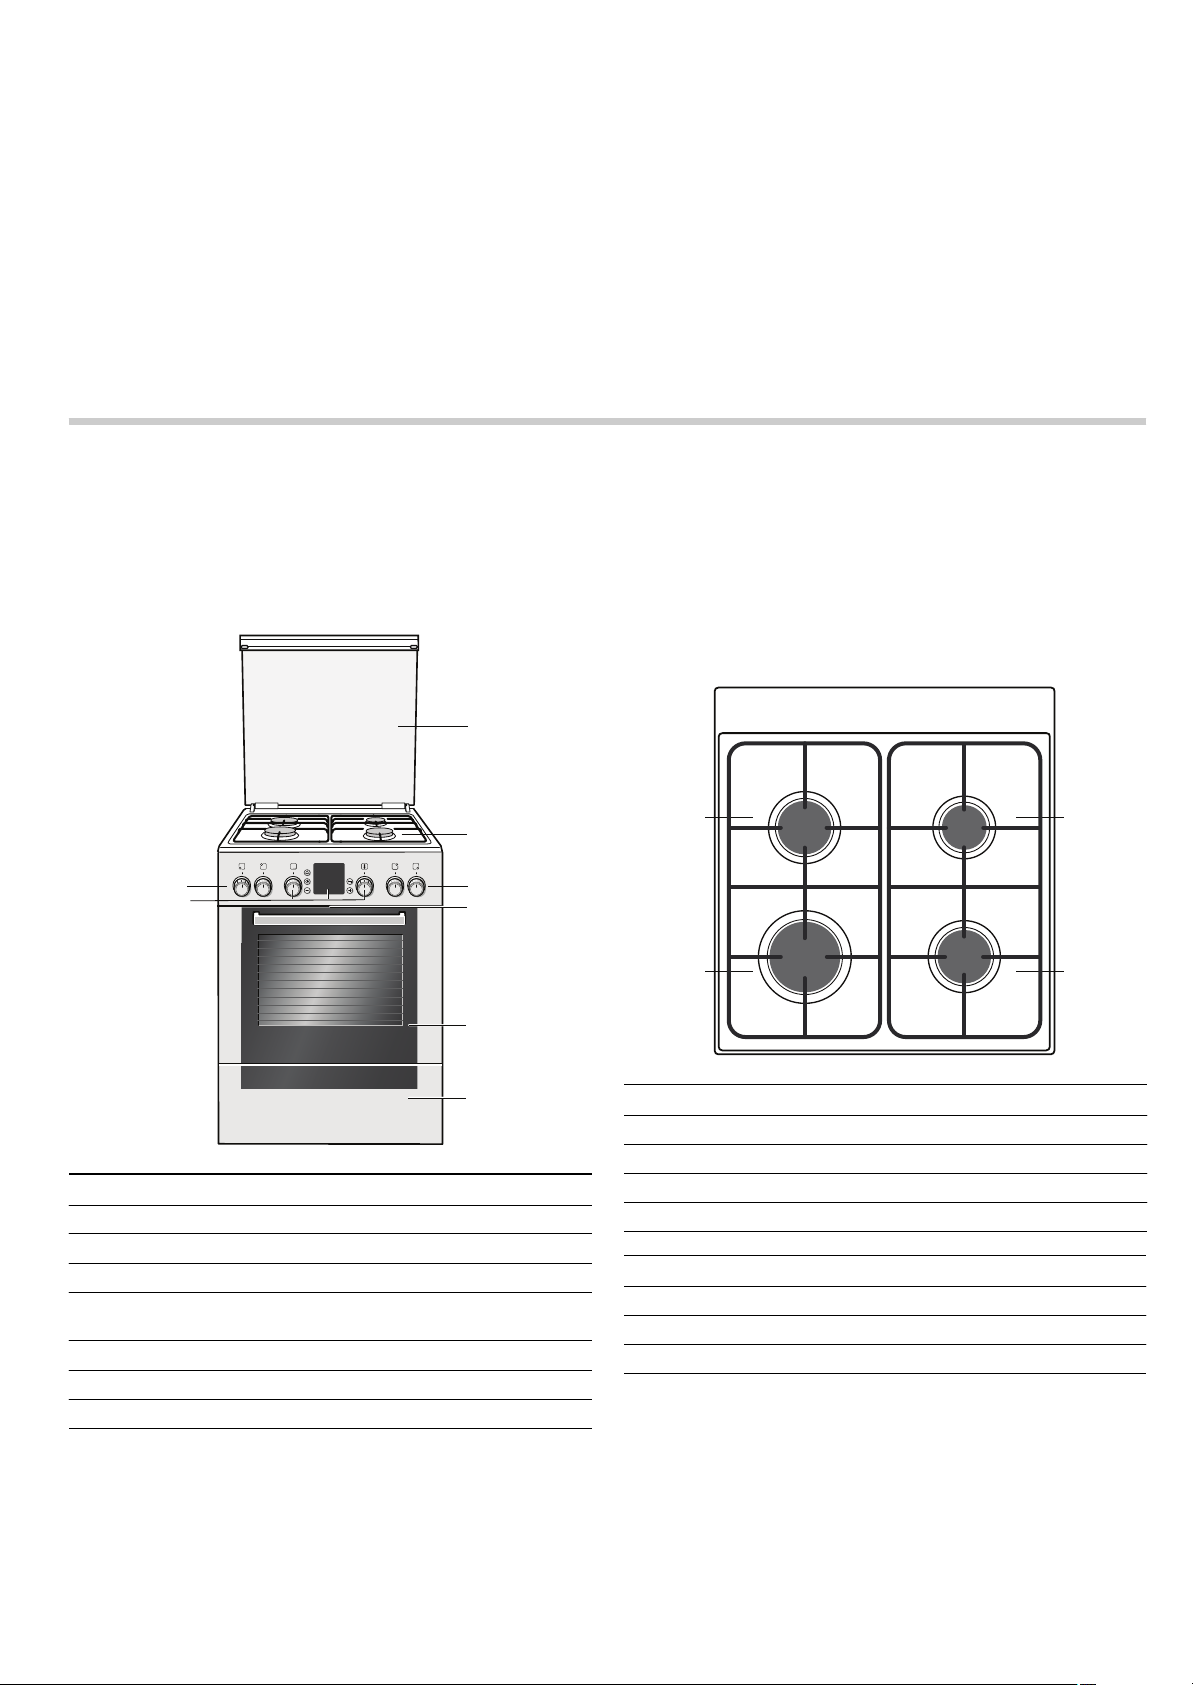
Cooking area
Here is an overview of the control panel. The design depends
on the respective appliance model.
Explanations
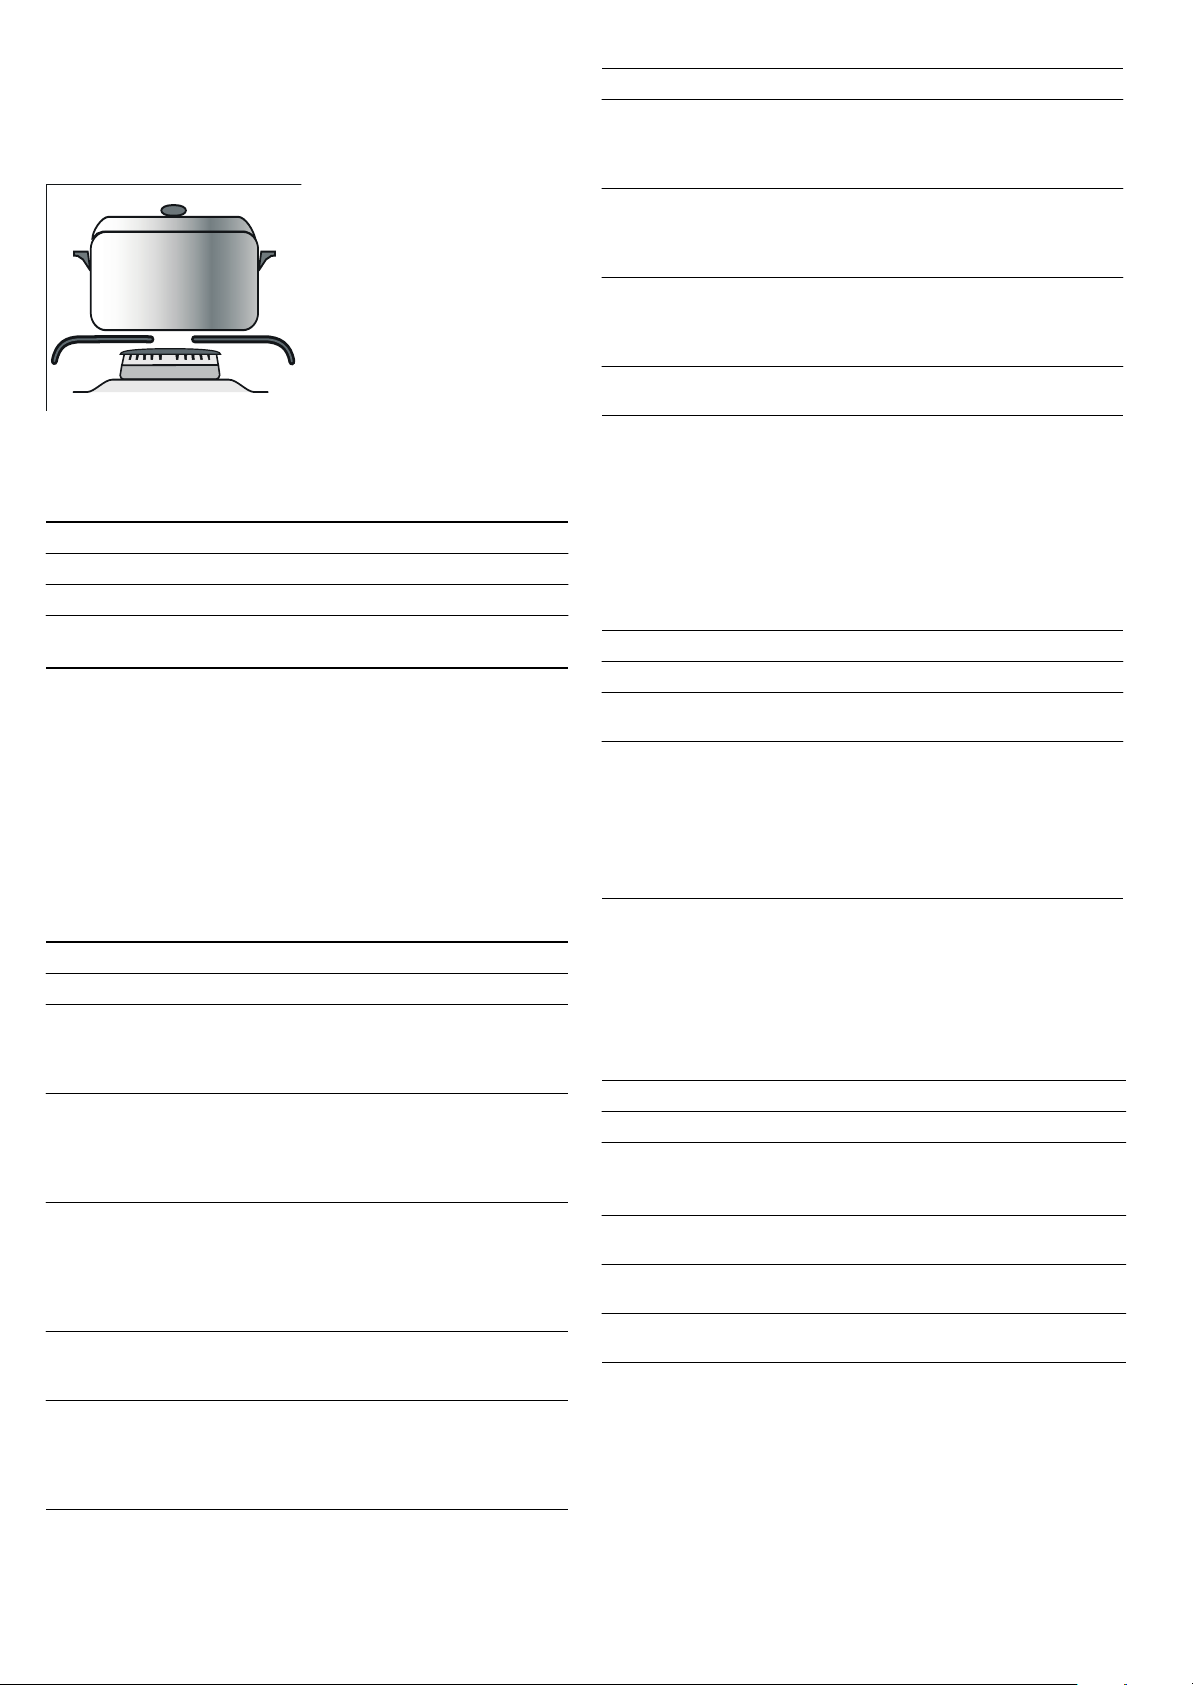
1Hob cover
2Hob
3 Hotplate knob
4 Function selector, Operating switches and display
panel, Temperature selector
5 Appliance cooling
6 Oven door
7Plinth drawer
Explanations
1Standard burner
2Economy burner
3High output burner
4Standard burner
Burner Pot or pan diameter
Economy burner 1 kW 12-18 cm
Standard burner 1.7 kW 18-24 cm
High output burner 3 kW 24-28 cm
Page 9
9
Only use pots or pans with an even base.
Place the pot or pan centrally over the burner. This will optimise
transfer of the heat from the burner flame to the pot or ban
base. The handle does not become damaged, and greater
energy savings are guaranteed.
Burner knob
You can adjust the heat setting of the hotplates using the four
burner knobs.
There is a limit stop at the end of the settings area. Do not turn
the timer beyond this.
The oven
Use the function selector and the temperature selector to set
the oven.
Function selector
Use the function selector to select the type of heating for the
oven.
You can turn the function selector clockwise and anti-clockwise.
The light comes on in the cooking compartment when you
make settings.
Temperature selector
Use the temperature selector to set the temperature and the
grill setting.
While the oven is heating up, the
p temperature symbol lights
up in the display. If heating is interrupted, the symbol goes out.
For some settings, it does not light up.
Buttons and display
You can use the buttons to set various additional functions. You
can read the values that you have set in the display.
Positions Function/gas oven
þ
Zero position The oven is switched off.
8
Ignition position Ignition position
—
˜
Settings area Large flame = highest setting
Economy flame = lowest setting
Setting Use
þ
Off position The oven switches off.
%
Top/bottom heating For cakes, bakes and lean joints of
meat (e.g. beef or game) on one
level. Heat is emitted evenly from
the top and bottom.
<
3D hot air* For cakes and pastries on one to
three levels. The fan distributes the
heat from the heating ring in the
back panel evenly around the
cooking compartment.
6
Pizza setting For the quick preparation of frozen
products without preheating, e.g.
pizza, chips or strudel. The bottom
heating element and the ring heating element in the back panel heat
up.
$
Bottom heating For preserving, browning and the
final baking stage. The heat is
emitted from below.
7
Hot air grilling For roasting meat, poultry and
whole fish. The grill element and
the fan switch on and off alternately. The fan causes the hot air
to circulate around the dish.
* Type of heating used to determine the energy efficiency class
in accordance with EN50304.
*
Grill, small area For grilling small amounts of
steaks, sausages, bread and
pieces of fish. The centre part of
the grill element becomes hot.
(
Grill, large area For grilling steaks, sausages, toast
and pieces of fish. The whole area
below the grill heating element
becomes hot.
B
Defrost For defrosting, e.g. meat, poultry,
bread and cakes. The fan causes
the warm air to circulate around
the dish.
I
Rapid heating For rapid preheating of the oven
without accessories.
Positions Function
ÿ
Zero position Oven not hot.
50-270 Temperature
range
Temperature in °C.
1, 2, 3 Grill settings
Grill settings for the
* Grill,
small area and
( Grill, large
area.
Setting 1 = low
Setting 2 = medium
Setting 3 = high
Button Use
V
Timer button This is used to set the timer.
0
Clock button
This is used to set the Clock,
x
Oven cooking time and
y End
time.
A
Minus button Use this button to decrease the
setting values.
E
Key button This is used to switch the child-
proof lock on and off.
@
Plus button Use this button to increase the set-
ting values.
Setting Use
* Type of heating used to determine the energy efficiency class
in accordance with EN50304.
Page 10
10
The cooking compartment
The oven light is located in the cooking compartment. A cooling
fan protects the oven from overheating.
Oven light
During operation, the oven light in the cooking compartment is
on.
Cooling fan
The cooling fan switches on and off as required. The hot air
escapes above the door.
So that the cooking compartment cools down more quickly
after operation, the cooling fan continues to run for a certain
period afterwards.
Caution!
do not cover the ventilation slots. Otherwise the oven will
overheat.
Oven door - Additional safety precautions
During long cooking times, the oven door may become very
hot.
If you have small children, extra supervision is required during
oven operation.
In addition, there is a protective device (protective grid) which
prevents direct contact with the oven door. You can purchase
this optional accessory (469088) from the after-sales service.
Your accessories
The accessories supplied with your appliance are suitable for
making many meals. Ensure that you always insert the
accessories into the cooking compartment the right way round.
There is also a selection of optional accessories, with which
you can improve on some of your favourite dishes, or simply to
make working with your oven more convenient.
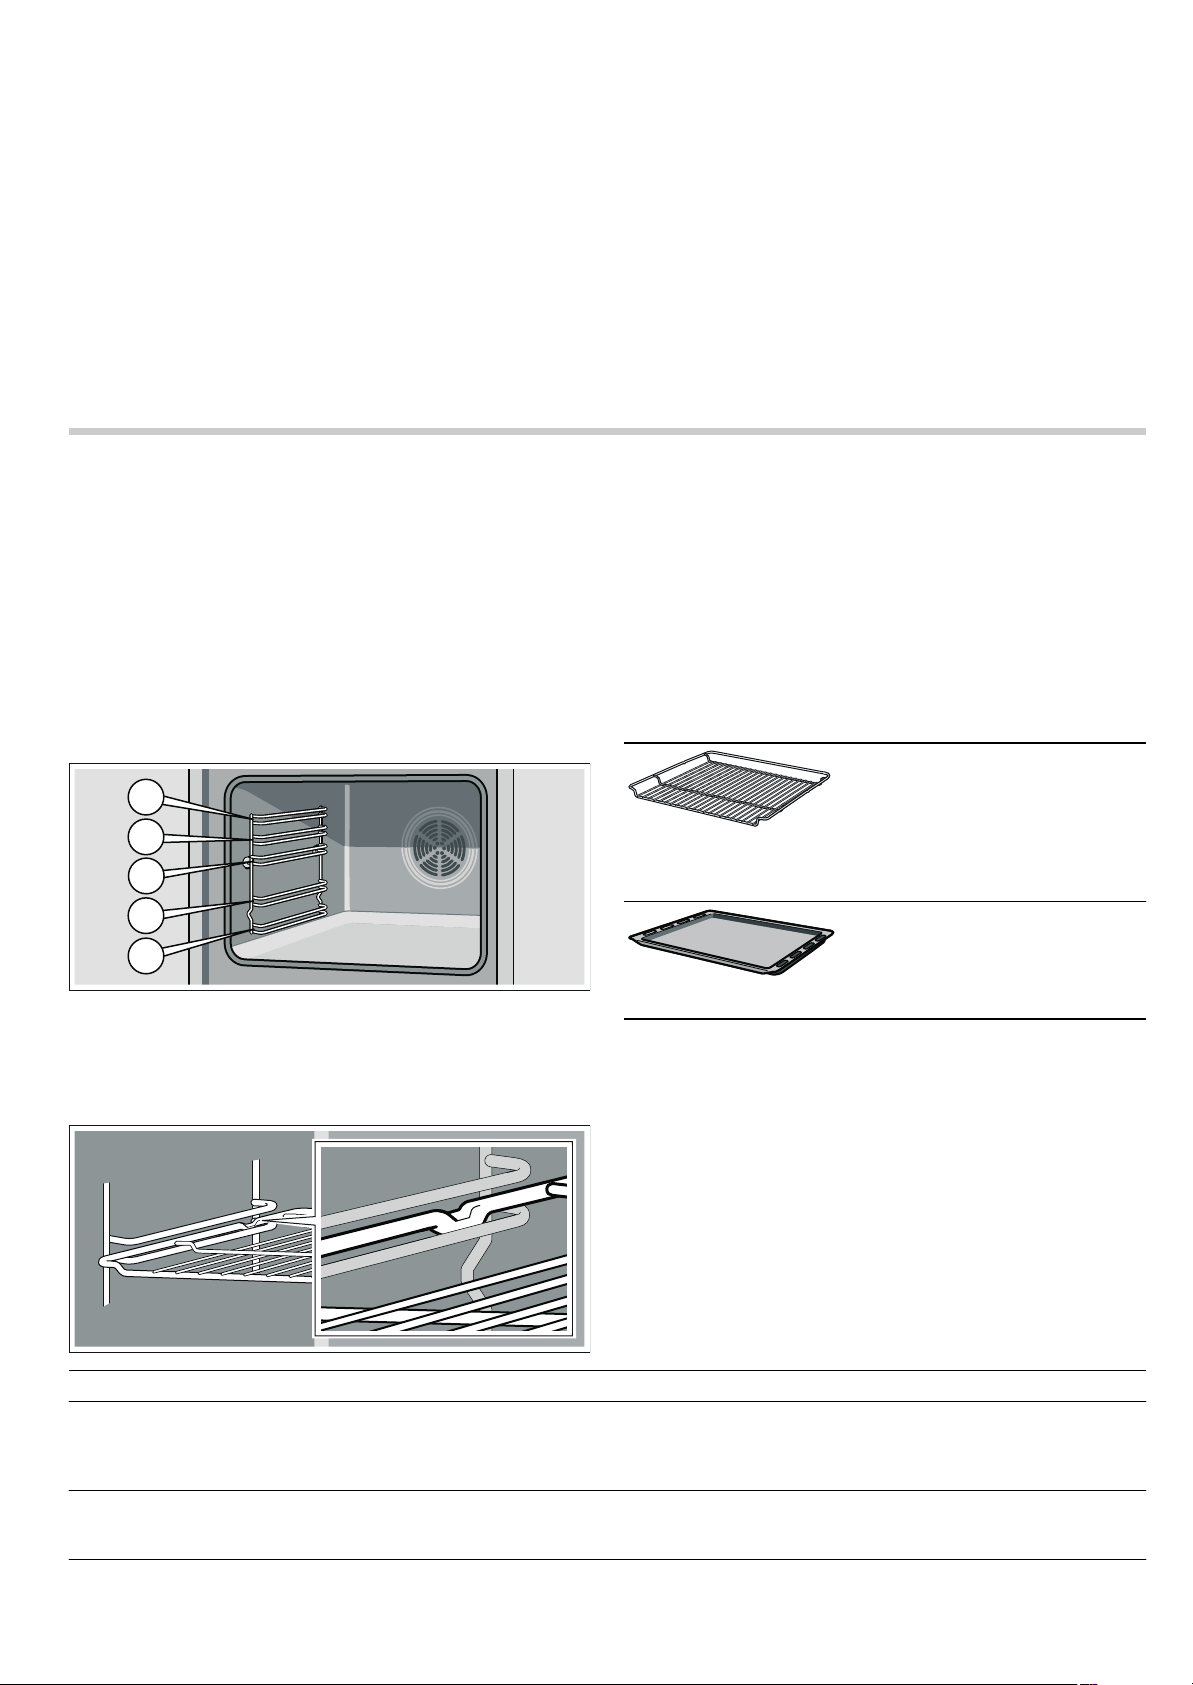
Inserting accessories
You can insert the accessories into the cooking compartment
at 5 different levels. Always insert them as far as they will go so
that the accessories do not touch the door panel.
The accessories can be pulled out approximately halfway until
they lock in place. This allows dishes to be removed easily.
When sliding the accessories into the cooking compartment,
ensure that the indentation is at the back. They can only lock in
place from this position.
Note: The accessories may deform when they become hot.
Once they cool down again, they regain their original shape.
This does not affect their operation.
Hold the baking tray s ecurely on the sides with both hands and
push it parallel into the frame. Avoid movements to the right or
left when pushing the baking tray in. Otherwise, it will be difficult
to push the tray in and the enamelled surfaces could be
damaged.
You can buy accessories from the after-sales service, from
specialist retailers or online. Please specify the HEZ number.
Optional accessories
You can buy optional accessories from your after-sales service
or from specialist retailers. You will find a variety of suitable
products for your oven in our brochures and on the Internet.
The availability of optional accessories and the options for
ordering them on the internet vary depending on the country.
Information on purchasing accessories can be found in the
sales documents.
Not every optional accessory is suitable for every appliance.
When purchasing, always quote the complete identification
number (E no.) of your appliance.
Wire rack
For ovenware, cake tins, roasts,
grilling and frozen meals.
Slide the wire rack into the oven
with the open side facing the oven
door and the curvature pointing
downwards
¾.
Enamel baking tray
For cakes and biscuits.
Push the baking tray into the oven
with the sloping edge facing
towards the oven door.
Optional accessories HEZ number Function
Pizza tray HEZ317000 Particularly good for pizza, frozen meals and round tarts. You
can use the pizza tray instead of the universal pan. Slide the
tray in above the wire rack and proceed according to the
instructions in the tables.
Insert wire rack HEZ324000 For roasting. Always place the grill wire rack on the universal
pan. This ensures that dripping fat and meat juices are collected.
Page 11

11
After-sales service products
You can obtain suitable care and cleaning agents and other
accessories for your domestic appliances from the after-sales
service, specialist retailers or (in some countries) online via the
eShop. Please specify the relevant product number.
Grill tray HEZ325000 Used for grilling instead of the grill wire rack or used as a
splatter guard to protect the oven from becoming heavily
soiled. Only use the grill tray with the universal pan.
Grilling on the grill tray: only shelf positions 1, 2 and 3 can be
used.
The grill tray as a splash guard: the universal pan is inserted
together with the grill tray under the wire rack.
Baking stone HEZ327000 The baking stone is perfect for preparing home-made bread,
bread rolls and pizzas which require a crispy base. The baking
stone must always be preheated to the recommended temperature.
Enamel baking tray HEZ331003 For cakes and biscuits.
Place the baking tray in the oven with the sloping edge
towards the oven door.
Enamel baking tray with non-stick coating HEZ331011 The baking tray is ideal for laying out cakes and biscuits. Place
the baking tray in the oven with the sloping edge towards the
oven door.
Universal pan HEZ332003 For moist cakes, pastries, frozen meals and large roasts. Can
also be used under the wire rack to catch fat or meat juices.
Place the universal pan in the oven with the sloping edge
towards the oven door.
Universal pan with non-stick coating HEZ332011 This universal pan is ideal for moist cakes, pastries, frozen
meals and large roasts. Place the universal pan in the oven
with the sloping edge towards the oven door.
Lid for the Profi extra-deep pan HEZ333001 The lid converts the Profi extra-deep pan into the Profi roasting
dish.
Profi extra-deep pan with insert wire rack HEZ333003 Particularly suitable for preparing large quantities of food.
Pull-out rail
3-level shelf rail HEZ338352 With the pull-out rails at levels 1, 2 and 3, you can pull the
accessories out without them tilting.
3-level shelf rail – not suitable for appliances fitted with a rotary
spit.
3-level shelf rail with stop function HEZ338357 With the pull-out rails on level 1, 2 and 3, the accessories can
be fully pulled out without tilting. The pull-out rails click into
place so that baking trays can be easily inserted.
The 3-level telescopic shelf with stop function is not suitable for
appliances fitted with a rotary spit.
Wire rack HEZ334000 For ovenware, cake tins, roasts, grilling and frozen meals.
Glass roasting dish HEZ915001 The glass roasting dish is suitable for pot roasts and bakes.
Ideal for programmes and automatic roasting.
Optional accessories HEZ number Function
Cleaning cloths for stainless-steel surfaces Product no. 311134 Reduces the build-up of dirt. Impregnated with a special oil for
perfect maintenance of your appliance's stainless-steel surfaces.
Oven and grill cleaning gel Product no. 463582 For cleaning the cooking compartment. The gel is odourless.
Microfibre cloth with honeycomb structure Product no. 460770 Especially suitable for cleaning delicate surfaces, such
as glass, glass ceramic, stainless steel or aluminium. The
microfibre cloth removes liquid and grease deposits in one go.
Door lock Product no. 612594 To prevent children from opening the oven door. The locks on
different types of appliance door are screwed in differently.
See the information sheet supplied with the door lock.
Page 12
12
Before using the oven for the first time
In this section, you can find out what you must do before using
your oven or gas hob to prepare food for the first time. First
read the section on Safety information.
Setting the clock
After the oven has been connected, the 0 symbol and three
zeros light up in the display. Set the clock.
1. Press the
0 button.
The time 12:00 appears in the display and the
0 symbol
flashes.
2. Use the + or - button to change the clock.
After a few seconds, the time that has been set is adopted.
Heating up the oven
To remove the new cooker smell, heat up the oven when it is
empty and closed. An hour of
% Top/bottom heating at
240 °C is ideal for this purpose. Make sure that there are no
remnants of packing in the cooking compartment.
1. Use the function selector to set
% Top/bottom heating.
2. Set the temperature selector to 240 °C.
After an hour, switch off the oven. Turn the function selector
and temperature selector to the off position.
Cleaning the accessories
Before you use the accessories for the first time, clean them
thoroughly with hot soapy water and a soft dish cloth.
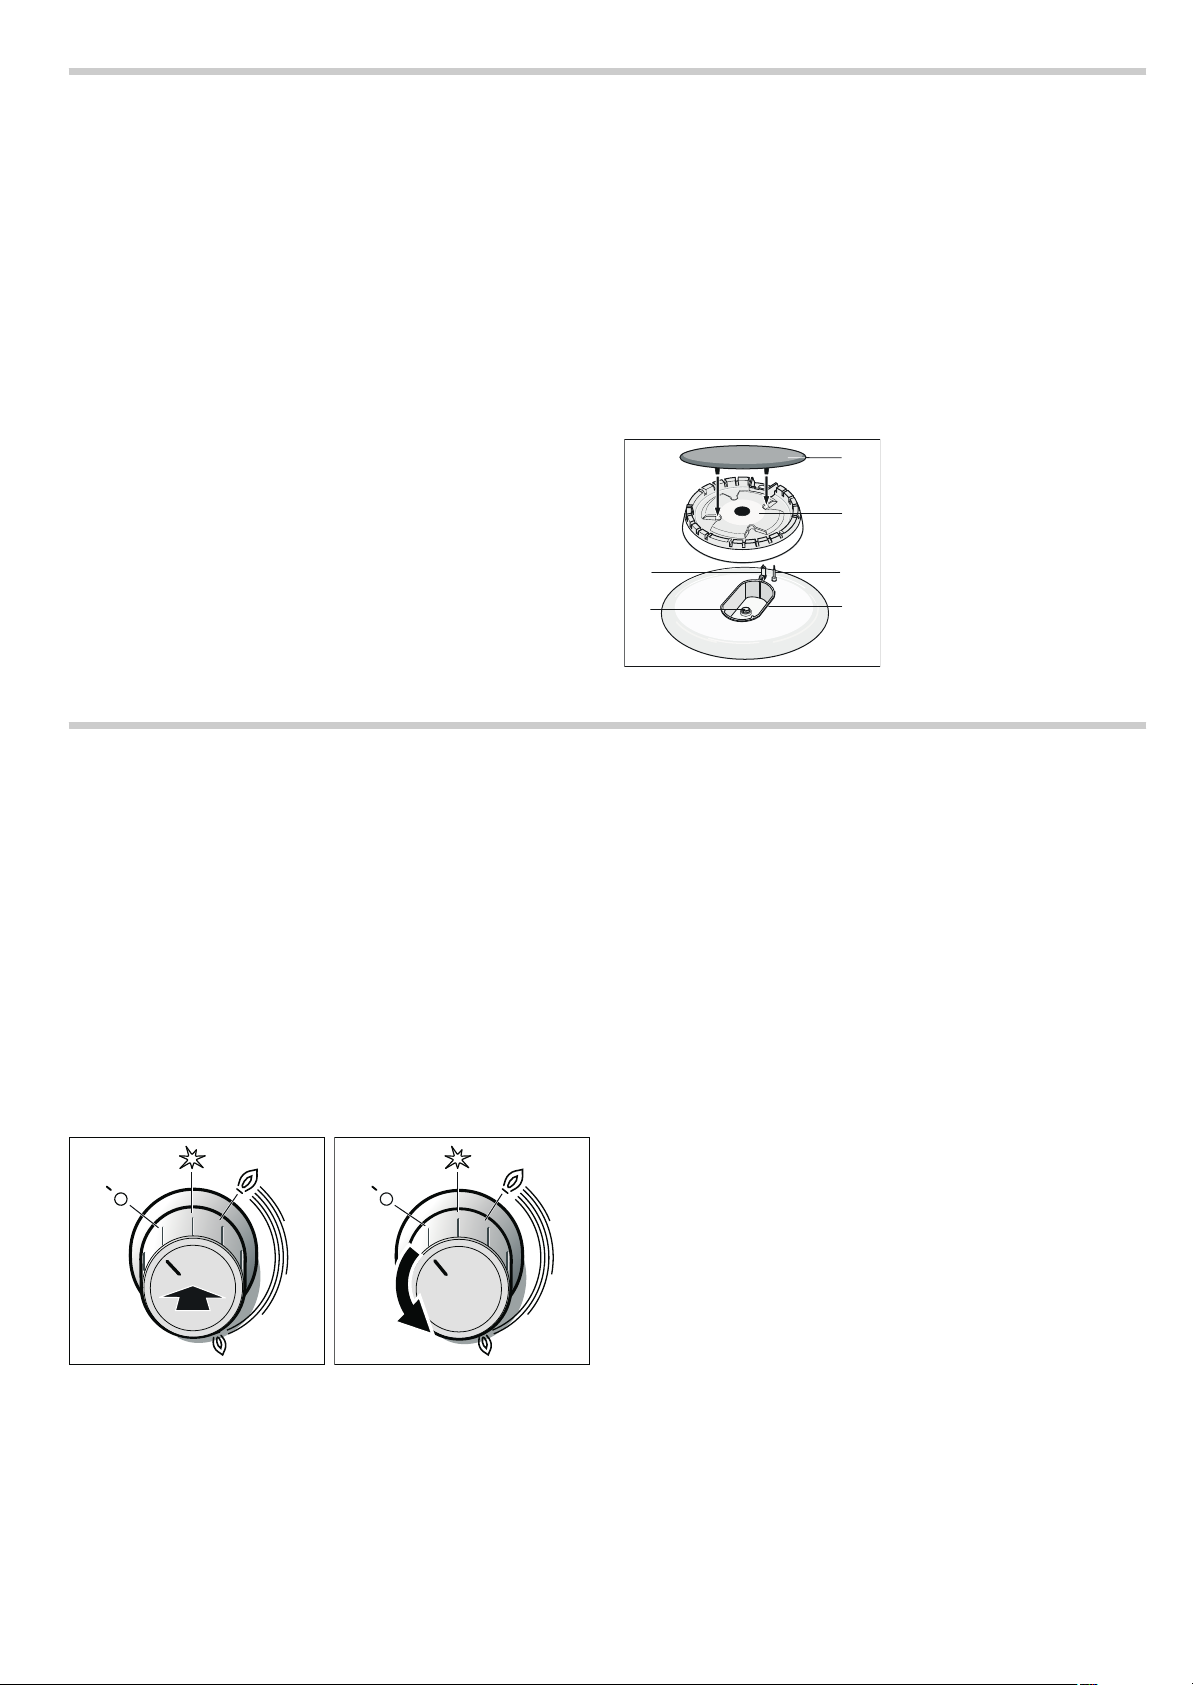
Advance cleaning of burner cup and cap
Clean the burner cap (1) and cup (2) with water and washingup liquid. Dry the individual parts carefully.
Place the burner cup and cap back on the burner shell (5).
Ensure that the igniter (3) and flame safety pin (4) are not
damaged.
The nozzle (6) must be dry and clean. Always position the
burner cap exactly over the burner cup.
Making settings on the hob
Your hob is equipped with four gas burners. The following
information explains how to light the gas burners and set the
size of flame.
Igniting the gas burners
Always position the burner cap exactly over the burner cup.
Openings on the burner cup are always unobstructed. All parts
must be dry.
1. Open the top cover. The top cover must remain open for as
long as the oven is in operation.
2. Turn the knob for the desired burner anti-clockwise to the
ignition position
8. Ignition begins.
3. Press and hold the burner knob for 1-3 seconds. The gas
burner ignites.
The safety pilot is activated. If the gas flame goes out, the gas
supply is automatically interrupted by the safety pilot.
4. Set the desired flame size. Between setting
þ Off and setting
—, the flame is not stable. Therefore, always choose a setting
between
— large and ˜ small flame.
5. If the flame goes out again, repeat the process from step 2.
6. To end the cooking process: Turn the burner knob
þ
clockwise to the Off position.
The ignition device should not be actuated for more than 15
seconds. If the burner does not light within 15 seconds, wait for
at least one minute. Then repeat the ignition process.
: Caution!
If after switching the oven off you turn the burner knob while the
oven is still hot, gas will escape. +If you do not turn the knob to
the ignition position
8, the gas supply will be interrupted after
60 seconds.
The gas burner does not ignite
If there is a power cut or if the ignition plugs are damp, you can
light the gas burners with a gas lighter or a match.
Page 13

13
Tabl e - Cooking
Select the right saucepan size for each burner. The diameter of
the pot or pan base should be the same as that of the burner.
Cooking times depend on the type, weight and quality of the
food. Deviations are therefore possible. You yourself can best
judge the optimal cooking time.
Minerals and vitamins are very quickly destroyed during
cooking. Therefore, only use a little water. This will help you
retain vitamins and minerals. Select short cooking times so that
the vegetables remain firm and full of nutrients.
Setting the oven
There are various ways in which you can set your oven. Here
we will explain how you can select the desired type of heating
and temperature or grill setting. You can select the cooking
time and end time for your dish on the oven.
Types of heating and temperature
Example in the picture: 190 °C, Top/bottom heating %.
1. Use the function selector to select the required type of
heating.
2. Use the temperature selector to set the temperature or the
grill setting.
The oven heats up.
Switching off the oven
Turn the function selector to the off position.
Changing the settings
The type of heating and temperature or grill setting can be
changed at any time using their respective selectors.
If the oven is to switch off automatically
Set the cooking time for your meal.
Example in the picture: Setting for
% Top/bottom heating,
190 °C, cooking time of 45 minutes.
1. The function selector is used to set the type of heating.
2. The temperature selector is used to set the temperature or
grill setting.
3. Press the
0 Clock button.
The
x Cooking time symbol flashes.
4. Use the
@ or A button to set the cooking time.
Default value for the
@ button = 30 minutes
Default value for the
A button = 10 minutes
Example Dish Burner Heat setting
Melting Chocolate, butter, margarine Economy burner small flame
Heating Stock, tinned vegetables Standard burner small flame
Heating and keeping
warm
Soups Economy burner small flame
Braising* Fish Standard burner between large and small flame
Braising* Potatoes and miscellaneous
vegetables, meat
Standard burner between large and small flame
Cooking* Rice, vegetables, meat dishes
(with sauces)
Standard burner Large flame
Roasting Pancakes, potatoes, schnitzel,
fish fingers
High output burner between large and small flame
* If you are using a saucepan with a cover, turn the flame down as soon as it reaches boiling point.
PLQ VHF
K
PLQ
PLQ VHF
K
PLQ
Page 14
14
The cooking time has elapsed
A signal sounds. The oven switches off. Press the
0 button
twice and switch off the function selector.
Changing the setting
Press the
0 Clock button. Use the + or - button to change the
cooking time.
Cancelling the setting
Press the
0 Clock button. Press the - button until zero is
shown on the display. Switch off the function selector.
Setting the cooking time if the clock is hidden
Press the
0 Clock button twice and make your settings as
described in point 4.
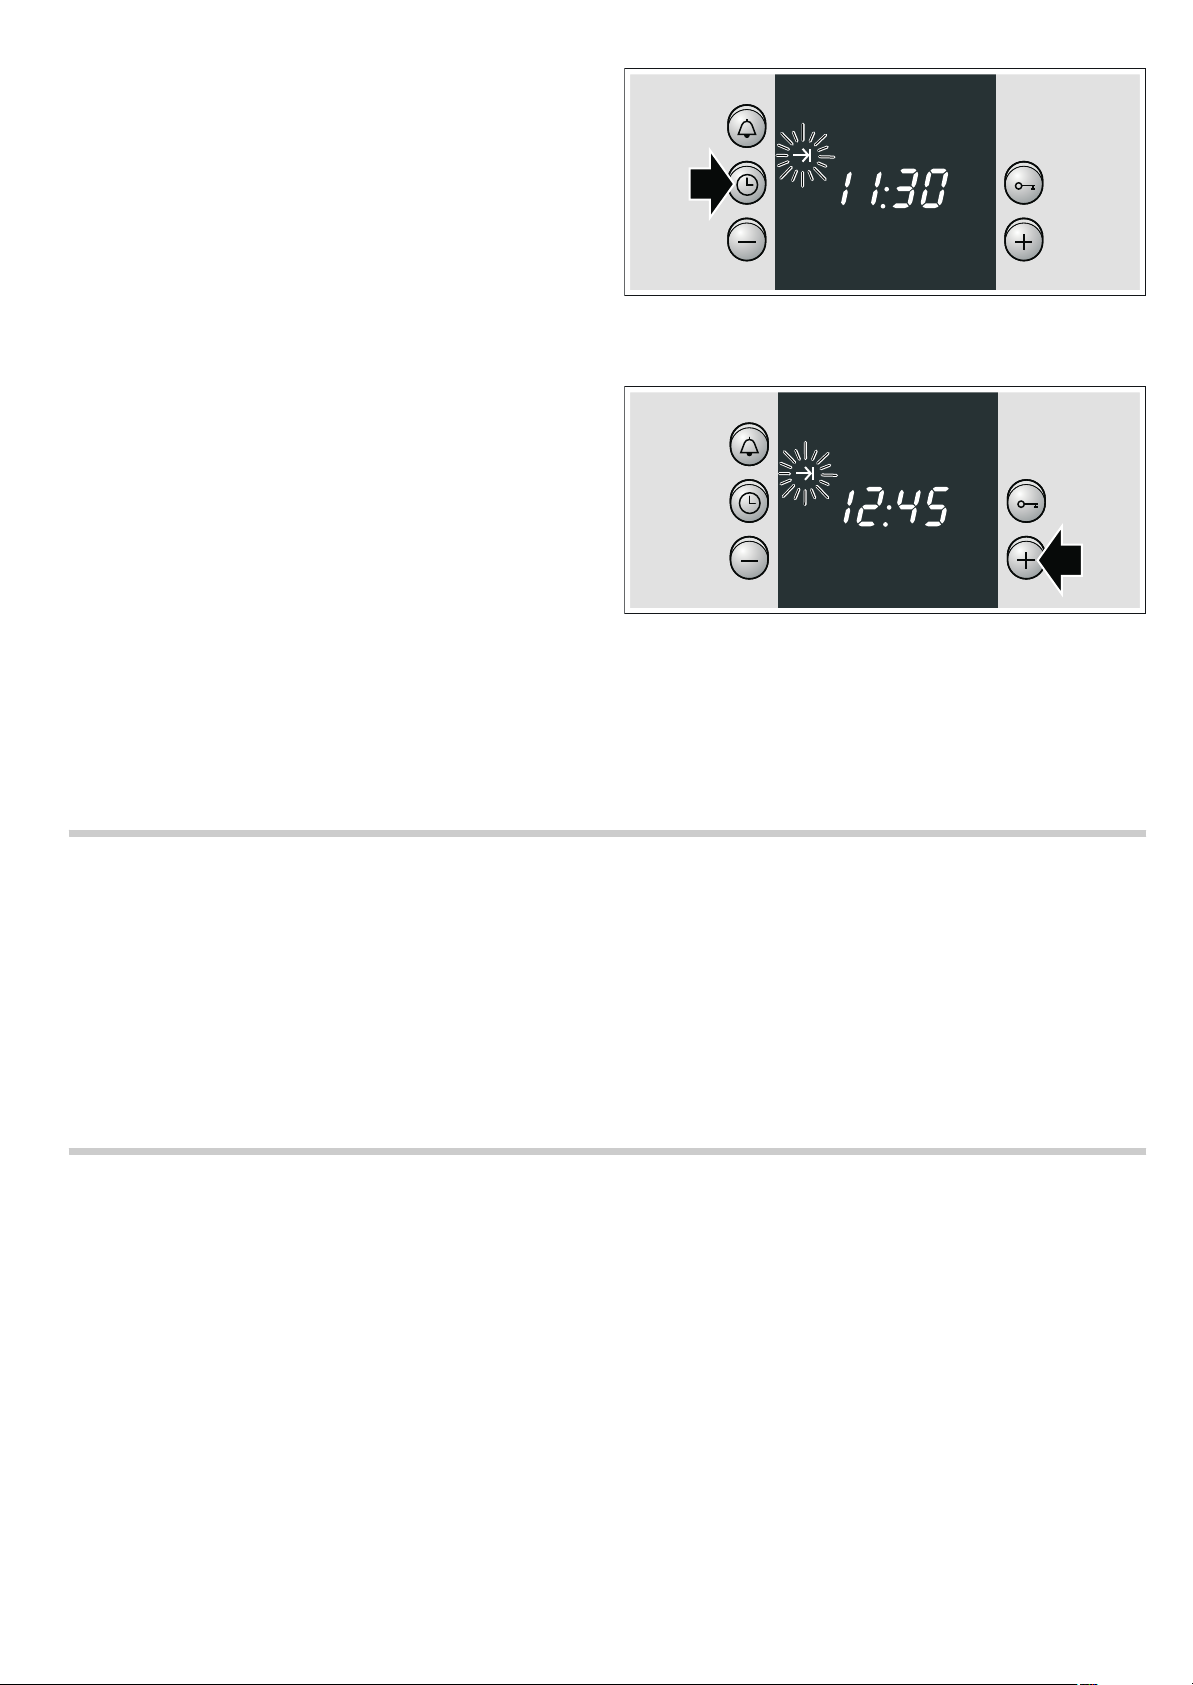
If the oven is to switch on and off automatically
Please remember that easily spoiled foods must not be allowed
to remain in the cooking compartment for too long.
Example in the picture: Setting for
% Top/bottom heating at
190 °C. It is 10:45 . The meal takes 45 minutes to cook and
should be ready at 12:45 .
1. The function selector is used to set the type of heating.
2. The temperature selector is used to set the temperature or
grill setting.
3. Press the
0 Clock button.
4. Use the
@ or A button to set the cooking time.
5. Press the
0 Clock button repeatedly until the y End symbol
flashes.
You can see in the display when the meal will be ready.
6. Use the
@ button to set a later end time.
The setting is adopted after a few seconds.
The end time is shown in the display until the oven starts.
The cooking time has elapsed
A signal sounds. The oven switches off. Press the
0 button
twice and switch off the function selector.
Note: You can make changes as long as the symbol is
flashing. When the symbol lights up, the setting has been
adopted.
Setting the clock
When the appliance is connected for the first time or after a
power cut, the
0 symbol and three zeros flash in the display.
Set the clock. The function selector must be switched off.
Setting procedure
1. Press the
0 Clock button.
12.00 appears in the display and the
0 symbol flashes.
2. Use the + or - button to change the clock.
After a few seconds, the time is saved. The
0 symbol goes
out.
Changing from summer to winter time, for example
Press the
0 Clock button twice and change the time using the
+ or - button.
Setting the timer
You can use the timer as a kitchen timer. It runs independently
of the oven. The timer has a special signal. This means that you
can tell whether the timer duration or the cooking time has
elapsed. You can also set the timer if the childproof lock is
active.
Setting procedure
1. Press the
S Timer button.
The
S symbol flashes.
2. Use the - or + button to change the timer duration.
Default value for + button = 10 minutes
Default value for - button = 5 minutes
The timer starts after a few seconds. The
S symbol lights up in
the display. You will see the time counting down.
When the time has elapsed
A signal sounds. Press the
S Timer button. The timer goes out.
Changing the timer duration
Press the
S Timer button. Use the + or - button to change the
time.
Cancelling the setting
Press the
S Timer button. Press the - button until zero is shown
on the display.
The timer and cooking time count down at the same time
Both symbols light up. You can see the timer duration counting
down in the display.
To call up the
x remaining cooking time, y end time or 0
clock:
Press the
0 Clock button repeatedly until the relevant symbol
appears.
The value you are checking appears for several seconds on the
display.
PLQ VHF
K
PLQ
PLQ VHF
K
PLQ
Page 15

15
Childproof lock
Oven
The oven has a childproof lock to prevent children switching it
on accidentally.
Switching the childproof lock on and off
The function selector must be switched off.
To switch on: press and hold the
C key button until the C
symbol appears in the display. This takes about 4 seconds.
To switch off: press and hold the
C key button until the C
symbol goes out.
Notes
■ You can set the timer and clock at any time.
■ If the childproof lock is active, it will be cancelled following a
power cut.
Care and cleaning
With attentive care and cleaning, your hob and oven will retain
its looks and remain in good working order for a long time. We
will explain here how you should care for and clean them
correctly.
Notes
■ Slight differences in the colours on the front of the oven are
caused by the use of different materials, such as glass,
plastic and metal.
■ Shadows on the door panel which look like streaks, are
caused by reflections made by the oven light.
■ Enamel is baked on at very high temperatures. This can
cause some slight colour variations. This is normal and does
not affect operation. The edges of thin trays cannot be
completely enamelled. As a result, these edges can be
rough. This will not impair the anti-corrosion protection.
Upper glass cover
Before opening the top cover, remove any spills with a cloth.
Use glass cleaner if possible.
For cleaning, remove the top cover. To do this, hold the cover
securely on both sides with both hands and pull it upwards.
If the cover hinges become loose, note the letters marked on
them. The hinge with the letter R must be fitted on the right, and
the hinge with the letter L must be fitted on the left.
After cleaning, re-assemble the top cover following the same
procedure in reverse order.
Only close the top cover once the burners have cooled down.
Cleaning agents
Damage to the various different surfaces caused by using the
wrong cleaning agent can be avoided by observing the
following instructions.
When cleaning the hob do not use
■ undiluted washing-up liquid or dishwasher detergent,
■ scouring pads,
■ abrasive cleaning agents such as oven cleaner or stain
remover,
■ high-pressure cleaners or steam jets.
■ Do not clean individual parts in the dishwasher.
When cleaning the oven do not use
■ sharp or abrasive cleaning agents,
■ cleaning agent with a high alcohol content,
■ scouring pads,
■ high-pressure cleaners or steam jets.
■ Do not clean individual parts in the dishwasher.
Wash new sponges thoroughly before first use.
Stainless steel
fronts
Wipe with some washing-up liquid and a damp cloth. Always wipe parallel to the natural grain. Otherwise,
you may scratch the surface. Dry with a soft cloth. Remove flecks of limescale, grease, starch and albumin
(e.g. egg white) immediately. Do not use any abrasive materials, scouring sponges or rough cleaning
cloths. The stainless steel fronts can be polished using a special care product. Follow the manufacturer's
instructions. You can purchase special stainless steel cleaner from our after-sales service or from specialist
retailers.
Enamel surfaces and
lacquered surfaces
Clean with some washing-up liquid and a damp cloth. Dry with a soft cloth.
Burners and steel
grid of the gas burners
Do not clean in the dishwasher. Remove the wire rack and clean with a sponge, washing-up liquid and
some hot water. Remove the burner cup and cap. Clean with a sponge and some hot water and washing-up
liquid. Ensure that the gas outlets on the burner cups are clean and unobstructed. Brush the igniters with a
small, soft brush. The gas burners only work properly when the igniters are clean. Remove food residue
from the burner shells with some washing-up liquid and a damp cloth. Only use a little water. Water must
not be allowed to enter the appliance. Ensure that the nozzle opening does not become blocked or damaged during cleaning. Dry all parts after cleaning and place the burner cover accurately on the burner cup.
If the parts are not positioned accurately, it will be harder to ignite the burner. The burner covers are coated
with black enamel. Due to the high temperatures, discolouration may occur. This will not impair the function
of the burner. Replace the wire rack in the oven.
Page 16
16
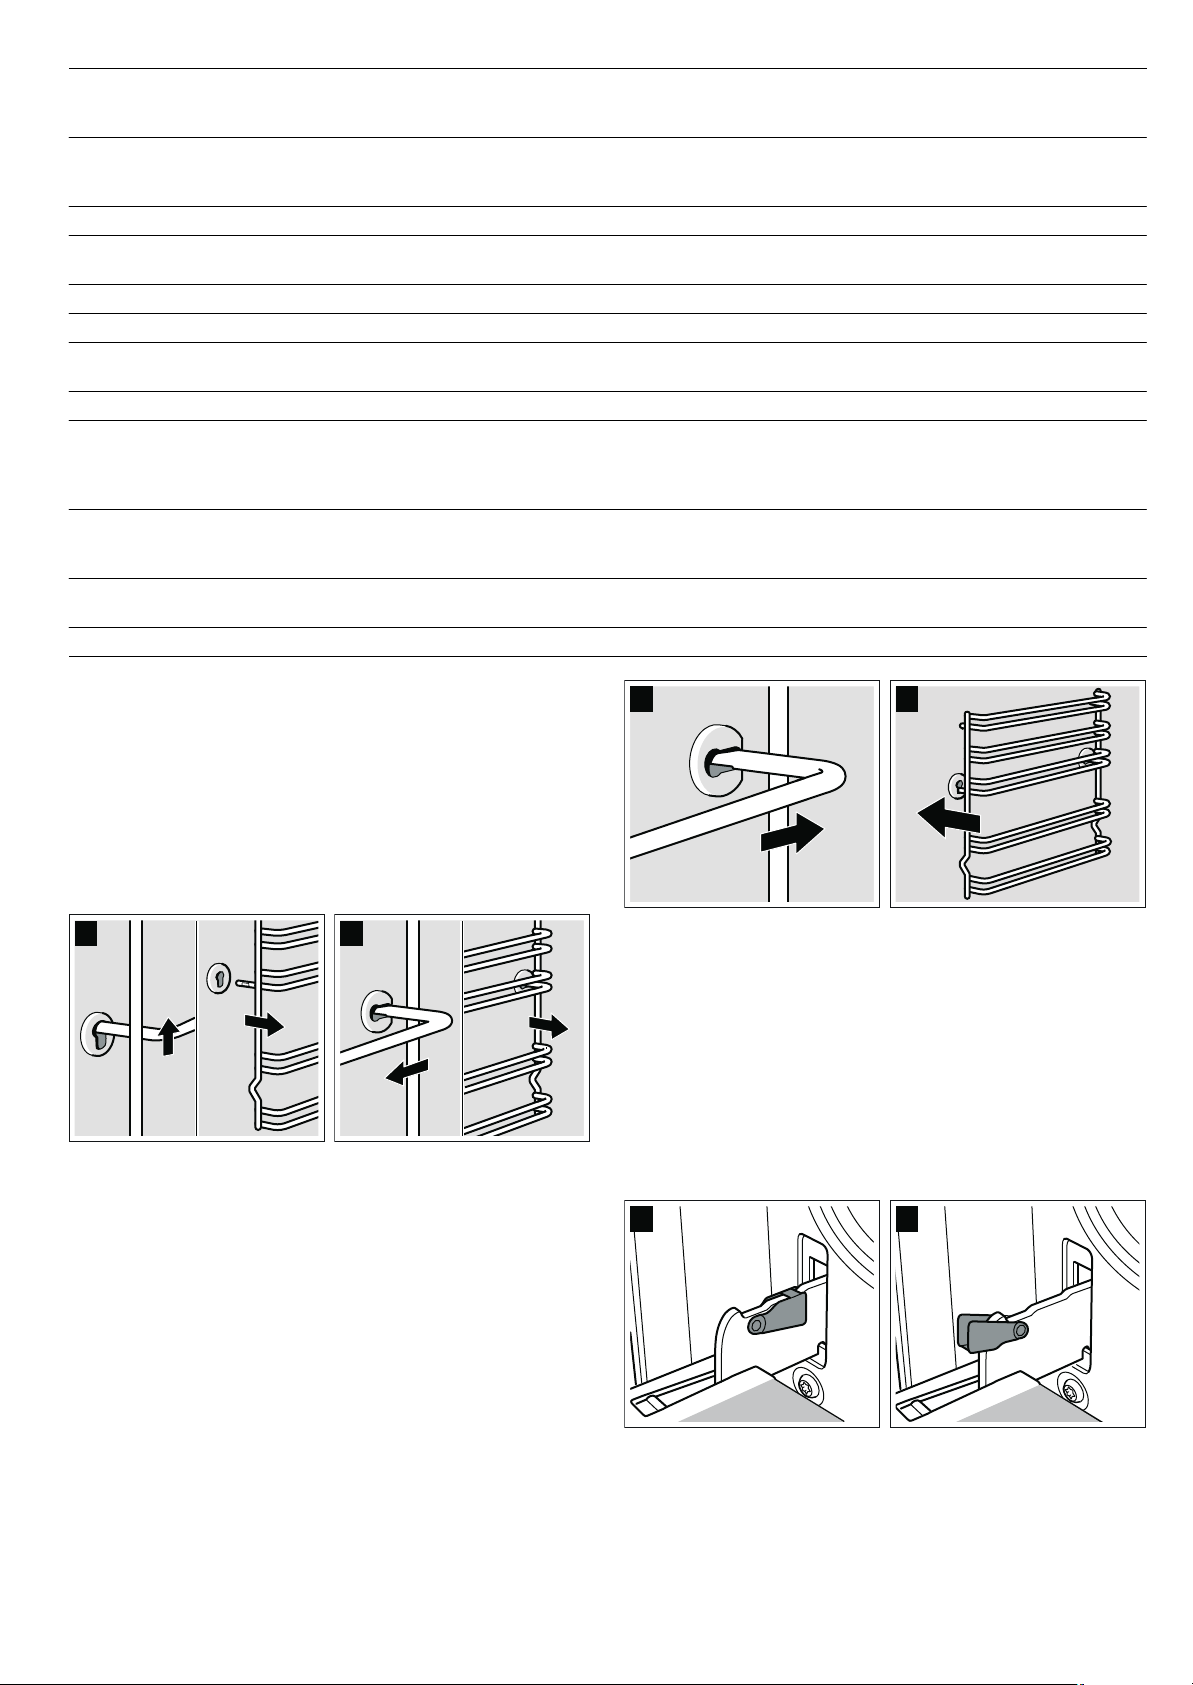
Detaching and refitting the rails
The rails can be removed for cleaning. The oven must have
cooled down.
Detaching the rails
1. Lift up the front of the rail
2. and unhook it (figure A).
3. Then pull the whole rail forward
4. and remove it (Fig. B).
Clean the rails with cleaning agent and a sponge. For stubborn
deposits of dirt, use a brush.
Refitting the rails
1. First insert the rail into the rear socket, press it to the back
slightly (figure A),
2. and then hook it into the front socket (figure B).
The rails fit both the left and right sides. Ensure that, as shown
in figure B, levels 1 and 2 are below and levels 3, 4 and 5 are
above.
Detaching and attaching the oven door
For cleaning purposes and to remove the door panels, you can
detach the oven door.
The oven door hinges each have a locking lever. When the
locking levers are closed (figure A), the oven door is secured in
place. It cannot be detached. When the locking levers are open
in order to detach the oven door (figure B), the hinges are
locked. They cannot snap shut.
: Risk of injury!
Whenever the hinges are not locked, they snap shut with great
force. Ensure that the locking levers are always fully closed or,
when detaching the oven door, fully open.
Electric hob (option) Clean with the hard side of a scouring sponge and some liquid scouring agent. After cleaning, switch the
hob on briefly to dry i t. Wet hobs rust over time. T hen apply a care p roduct. Always remov e sp ilt liquids and
food residue immediately.
Metal ring of the
electric hob (option)
The metal ring may discolour with time. However, it is possible restore the original colour. Clean the ring
with the hard side of a scouring sponge and some liquid scouring agent. When doing so, make sure that
you do not scour the adjacent surfaces, as this could damage them.
Knobs Clean with some washing-up liquid and a damp cloth. Dry with a soft cloth.
Door glass Can be cleaned with glass cleaner. Do not use any abrasive cleaning agents or sharp metal objects. These
could scratch and damage the surface of the glass panel.
Seal Wipe with a damp cloth. Dry with a soft cloth.
Oven interior Clean with hot water or vinegar solution. For heavy soiling: Only use oven cleaner on cold surfaces.
Glass cover on the
oven light
Clean with some washing-up liquid and a damp cloth. Dry with a soft cloth.
Accessories Soak in hot soapy water. Clean with a brush or a sponge.
Aluminium baking
tray (option)
Do not clean in the dishwasher. Never use oven cleaner. To avoid scratches, never touch the metal surfaces with a knife or similar sharp object. Wipe the surfaces horizontally and without applying pressure with
soapy water and a soft window cloth or a lint-free microfibre cloth. Dry with a soft cloth. Do not use any
abrasive materials, scouring sponges or rough cleaning cloths. They could scratch the baking tray
Childproof lock
(option)
If a childproof lock has been fitted on the oven door, it must be removed before cleaning. Soak all plastic
parts in hot soapy water and wash with a sponge. Dry with a soft cloth. If very dirty, the childproof lock will
not work properly.
Plinth drawer
(option)
Clean with some washing-up liquid and a damp cloth. Dry with a soft cloth.
Accessories Soak in hot soapy water. Clean with a brush or sponge.
%
$
%
$
%
$
Page 17
17
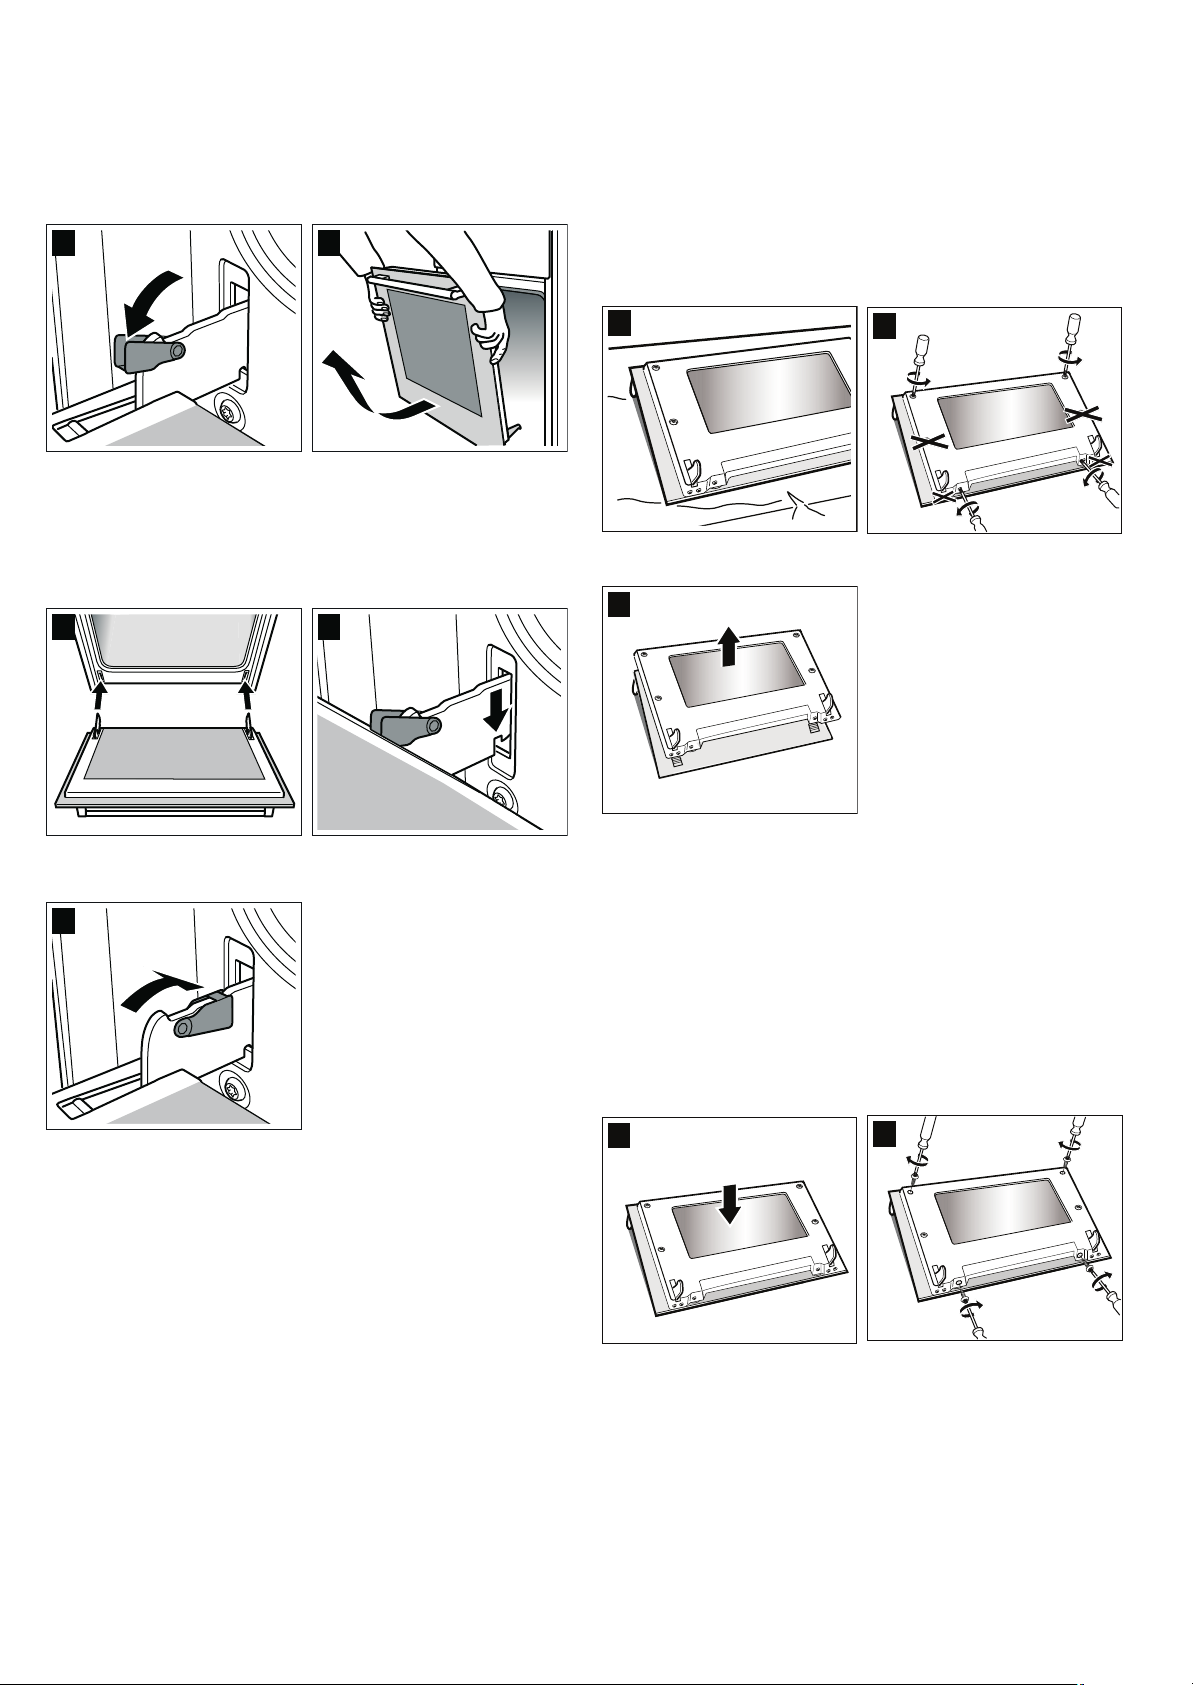
Detaching the door
1. Open the oven door fully.
2. Fold up the two locking levers on the left and right (figure A).
3. Close the oven door as far as the limit stop. With both hands,
grip the door on the left and right-hand sides. Close the door
a little further and pull it out (figure B).
Attaching the door
Reattach the oven door in the reverse sequence to removal.
1. When attaching the oven door, ensure that both hinges are
inserted straight into the opening (figure A).
2. The notch on the hinge must engage on both sides (figure B).
3. Fold back both locking levers (figure C). Close the oven
door.
: Risk of injury!
Risk of injury. If the oven door falls out accidentally or a hinge
snaps shut, do not reach into the hinge. Call the aftersales
service.
Removing and refitting the door panels
The glass panels can be removed from the oven door to allow
more thorough cleaning.
Removal
1. Removing the oven door See the section Removing the oven
door. Lay the oven door on a cloth with the handle facing
downwards (Fig. A).
2. First turn the two screws at the bottom anticlockwise, then the
two screws at the top, also anticlockwise (Fig. B).
3. Remove the cover (Fig. C).
The parts that have been removed must not be washed. Clean
the panels with a glass cleaner and a soft cloth.
: Risk of injury!
Scratched glass in the appliance door may develop into a
crack. Do not use a glass scraper, or sharp or abrasive
cleaning aids or detergents.
Refitting
1. Place the cover back in position (Fig. A).
2. First retighten the two screws at the bottom, then the two
screws at the top (Fig. B).
3. Fitting the oven door See the section Fitting the oven door.
Do not use the oven again until the panels have been
correctly fitted.
%
$
%
$
&
%
$
&
%
$
Page 18

18
Troubleshooting
Malfunctions often have simple explanations. Refer to the table
before calling the after-sales service as you may be able to
remedy the fault yourself.
Malfunction table
If a dish doesn't turn out as well as you had hoped, refer to the
section Tested for you in our cooking studio, where you will
find plenty of cooking tips and tricks.
: Risk of electric shock!
Incorrect repairs are dangerous. Repairs may only be carried
out by one of our trained after-sales engineers.
Replacing the bulb in the oven ceiling light
If the bulb in the oven light fails, it must be replaced. Heatresistant, 40 watt spare bulbs can be obtained from our aftersales service or a specialist retailer. Only use these bulbs.
: Risk of electric shock!
Switch off the circuit breaker in the fuse box.
1. Place a tea towel in the oven when it is cold to prevent
damage.
2. Unscrew the glass cover by turning it anti-clockwise.
3. Replace the bulb with one of the same type.
4. Screw the glass cover back in.
5. Remove the tea towel and switch on the circuit breaker.
Glass cover
You must replace a damaged glass cover. Suitable glass
covers may be obtained from the after-sales service. Please
specify the E number and FD number of your appliance.
After-sales service
Our after-sales service is there for you if your appliance needs
to be repaired. We will always find the right solution in order to
avoid unnecessary visits from a service technician.
E number and FD number
When calling us, please give the product number (E no.) and
the production number (FD no.) so that we can provide you with
the correct advice. The rating plate containing these numbers is
found on the side of the oven door. To save time, you can make
a note of the number of your appliance and the telephone
number of the after-sales service in the space below, should it
be required.
Please note that there will be a fee for a visit by a service
technician in the event of a malfunction, even during the
warranty period.
Please find the contact data of all countries in the enclosed
customer service list.
To book an engineer visit and product advice
Trust the expertise of the manufacturer, and rest assured that
the repair will be carried out by trained service technicians
using original spare parts for your domestic appliance.
Problem Possible cause Remedy/information
The oven does
not work.
The circuit
breaker is
defective.
Look in the fuse box and
check that the circuit
breaker is in working order.
Power cut Check whether the kitchen
light or other kitchen appliances are working.
The clock display flashes.
Power cut Reset the clock.
The oven does
not heat up.
There is dust on
the contacts.
Turn the control knobs back
and forth several times.
The gas burner
does not ignite.
Power failure or
damp ignition
plugs.
Light the gas burner with a
gas lighter or a match.
E no.
FD no.
After-sales service
O
GB 0844 8928979
Calls from a BT landline will be charged at up to 3
pence per minute. A call set-up fee of up to 6 pence may
apply.
IE 01450 2655
Page 19

19
Energy and environment tips
Here you can find tips on how to save energy when baking and
roasting in the oven and when cooking on the hob, and how to
dispose of your appliance properly.
Saving energy with your oven
■ Only preheat the oven if this is specified in the recipe or in
the operating instruction tables.
■ Use dark, black lacquered or enamelled baking tins. They
absorb the heat particularly well.
■ Open the oven door as infrequently as possible while
cooking, baking or roasting.
■ It is best to bake more than one cake, one after the other.
The oven is still warm. This reduces the baking time for the
second cake. You can also place two loaf tins next to each
other.
■ For longer cooking times, you can switch the oven off
10 minutes before the end of the cooking time and use the
residual heat to finish cooking.
Saving energy with the gas hob
■ Always use a saucepan which is the correct size for your
food. A larger, less full saucepan requires a lot of energy.
■ Always place a suitable lid on the saucepan.
■ The gas flame must always be in contact with the base of the
saucepan.
Environmentally-friendly disposal
Dispose of packaging in an environmentally-friendly manner.
Tested for you in our cooking studio
Here you will find a selection of dishes and the ideal settings for
them. We will show you which type of heating and which
temperature are best suited for your dish. You can find
information about suitable accessories and the height at which
they should be inserted. There are also tips about cookware
and preparation methods.
Notes
■ The values in the table always apply to dishes placed into the
cooking compartment when it is cold and empty.
Only preheat the appliance if the table specifies that you
should do so. Do not line the accessories with greaseproof
paper until after they have been preheated.
■ The times specified in the tables are guidelines only. They will
depend on the quality and composition of the food.
■ Use the accessories supplied. Additional accessories may be
obtained as special accessories from specialist retailers or
from the after-sales service.
Before using the oven, remove any unnecessary accessories
and ovenware from the cooking compartment.
■ Always use oven gloves when taking hot accessories or
ovenware out of the cooking compartment.
Cakes and pastries
Baking on one level
When baking cakes, the best results can be achieved using
%
Top/bottom heating.
When baking with
: 3D hot air, use the following shelf heights
for the accessory:
■ Cakes in tins: level 2
■ Cakes on trays: level 3
Baking on two or more levels
Use
: 3D hot air.
Shelf heights for baking on 2 levels:
■ Universal pan: level 3
■ Baking tray: level 1
Shelf heights for baking on 3 levels:
■ Baking tray: level 5
■ Universal pan: level 3
■ Baking tray: level 1
Baking trays that are placed in the oven at the same time will
not necessarily be ready at the same time.
The tables show numerous suggestions for your dishes.
If you are baking with 3 cake/loaf tins at the same time, place
these on the wire racks as indicated in the picture.
Baking tins
It is best to use dark-coloured metal baking tins.
Baking times are increased when light-coloured baking tins
made of thin metal or glass dishes are used, and cakes do not
brown so evenly.
If you wish to use silicone baking tins, use the information and
recipes provided by the manufacturer as a guide. Silicone
baking tins are often smaller than normal tins. The amount of
mixture and recipe instructions may differ.
This appliance complies with European Directive
2002/96/EC on Waste Electrical and Electronic
Equipment (WEEE). The directive gives a framework for
the collection and recycling of old appliances, which is
valid across the EU.
Page 20

20
Tables
The tables show the ideal type of heating for the various cakes
and pastries. The temperature and baking time depend on the
amount and composition of the mixture. This is why
temperature ranges are given in the tables. You should try the
lower temperature first, since a lower temperature results in
more even browning. You can increase the temperature next
time if necessary.
If you preheat the oven, the baking time is shortened by 5 to 10
minutes.
Additional information can be found in the Baking tips section
following the tables.
Cakes in tins Tin Level Type of
heating
Temperature
in °C
Cooking time
in minutes
Sponge cake, simple Ring tin/loaf tin 2
:
160-180 40-50
3 loaf tins 3+1
:
140-160 60-80
Sponge cake, delicate Ring tin/loaf tin 2
%
150-170 60-70
Flan base, sponge Flan-base cake tin 2
%
150-170 20-30
Delicate fruit flan, sponge Springform/ring tin 2
%
160-180 50-60
Sponge flan Springform cake tin 2
%
160-180 30-40
Shortcrust pastry base with crust Springform cake tin 1
%
170-190 25-35
Fruit tart or cheesecake, pastry base* Springform cake tin 1
%
170-190 70-90
Swiss flan Pizza tray 1
%
220-240 35-45
Savoury cakes (e.g. quiche/onion tart)* Springform cake tin 1
%
180-200 50-60
Pizza, thin base with light topping (preheat)
Pizza tray 1
%
250-270 10-15
* Turn off the oven and allow cakes to cool for an additional 20 minutes with the oven door closed.
Cakes on trays Accessories Level Type of
heating
Temperature
in °C
Cooking time
in minutes
Sponge mixture or yeast dough with dry
topping
Baking tray 2
%
170-190 20-30
Universal pan + baking
tray
3+1
:
150-170 35-45
Sponge mixture or yeast dough with
moist topping, fruit
Universal pan 3
%
160-180 40-50
Universal pan + baking
tray
3+1
:
150-170 50-60
Swiss flan Universal pan 2
%
210-230 40-50
Swiss roll (preheat) Baking tray 2
%
190-210 15-20
Plaited loaf with 500 g flour Baking tray 2
%
160-180 30-40
Stollen with 500 g flour Baking tray 3
%
160-180 60-70
Stollen with 1 kg flour Baking tray 3
%
150-170 90-100
Strudel, sweet Universal pan 2
%
180-200 55-65
Burek Universal pan 2
%
180-200 40-50
Pizza Baking tray 2
%
220-240 15-25
Universal pan + baking
tray
3+1
:
180-200 35-45
Small baked products Accessories Level Type of
heating
Temperature
in °C
Cooking time
in minutes
Biscuits Baking tray 3
:
140-160 15-25
Universal pan + baking tray 3+1
:
130-150 25-35
2 baking trays + universal pan 5+3+1
:
130-150 30-40
Viennese whirls (preheat) Baking tray 3
%
140-150 30-40
Baking tray 3
:
140-150 30-40
Universal pan + baking tray 3+1
:
140-150 30-45
2 baking trays + universal pan 5+3+1
:
130-140 35-50
Macaroons Baking tray 2
%
110-130 30-40
Universal pan + baking tray 3+1
:
100-120 35-45
2 baking trays + universal pan 5+3+1
:
100-120 40-50
Meringue Baking tray 3
:
80-100 130-150
Page 21

21
Bread and rolls
When baking bread, preheat the oven, unless instructions state
otherwise.
Never pour water into the hot oven.
When baking on 2 levels, always insert the universal pan above
the baking tray.
Baking tips
Choux pastry Baking tray 2
%
200-220 30-40
Puff pastry Baking tray 3
:
180-200 20-30
Universal pan + baking tray 3+1
:
180-200 25-35
2 baking trays + universal pan 5+3+1
:
160-180 35-45
Leavened cake Baking tray 3
%
180-200 20-30
Universal pan + baking tray 3+1
:
170-190 25-35
Small baked products Accessories Level Type of
heating
Temperature
in °C
Cooking time
in minutes
Bread and rolls Accessories Level Type of
heating
Temperature
in °C
Cooking time
in minutes
Yeast bread with 1.2 kg flour Universal pan 2
%
270
200
8
35-45
Sourdough bread with 1.2 kg
flour
Universal pan 2
%
270
200
8
40-50
Bread rolls (do not preheat) Baking tray 3
%
210-230 20-30
Rolls made with sweet yeast
dough
Baking tray 3
%
170-190 15-20
Universal pan + baking tray 3+1
:
160-180 20-30
You wish to bake according to your own
recipe.
Use similar items in the baking tables as a guide.
How to establish whether sponge cake
is baked through.
Approximately 10 minutes before the end of the baking time specified in the recipe, stick
a cocktail stick into the cake at the highest point. If the cocktail stick comes out clean,
the cake is ready.
The cake collapses. Use less fluid next time or set the oven temperature 10 degrees lower. Observe the
specified mixing times in the recipe.
The cake has risen in the middle but is
lower around the edge.
Do not grease the sides of the springform cake tin. After baking, loosen the cake carefully with a knife.
The cake goes too dark on top. Place it lower in the oven, select a lower temperature and bake the cake for a little
longer.
The cake is too dry. When it is done, make small holes in the cake using a cocktail stick. Then drizzle fruit
juice or an alcoholic beverage over it. Next time, select a temperature 10 degrees higher
and reduce the baking time.
The bread or cake (e.g. cheesecake)
looks good, but is soggy on the inside
(sticky, streaked with water).
Use slightly less fluid next time and bake for slightly longer at a lower temperature. For
cakes with a moist topping, bake the base first. Sprinkle it with almonds or bread crumbs
and then place the topping on top. Please follow the recipe and baking times.
The cake is unevenly browned. Select a slightly lower temperature to ensure that the cake is baked more evenly. Bake
delicate pastries on one level using
% Top/bottom heating. Protruding greaseproof
paper can affect the air circulation. For this reason, always cut greaseproof paper to fit
the baking tray.
The bottom of a fruit cake is too light. Place the cake one level lower the next time.
The fruit juice overflows. Next time, use the deeper universal pan, if you have one.
Small baked items made out of yeast
dough stick to one another when baking.
There should be a gap of approx. 2 cm around each item. This gives enough space for
the baked items to expand well and turn brown on all sides.
You were baking on several levels. The
items on the top baking tray are darker
than that on the bottom baking tray.
Always use
: 3D hot air to bake on more than one level. Baking trays that are placed in
the oven at the same time will not necessarily be ready at the same time.
Condensation forms when you bake
moist cakes.
Baking may result in the formation of water vapour, which escapes above the door. The
steam may settle and form water droplets on the control panel or on the fronts of adjacent units. This is a natural process.
Page 22

22
Meat, poultry, fish
Ovenware
You may use any heatresistant ovenware. The universal pan is
suitable for large roasts.
Glass ovenware is the most suitable. Ensure that the lid of the
roasting dish fits well and closes properly.
Add a little more liquid when using enamelled roasting dishes.
With roasting dishes made of stainless steel, browning is not so
intense and the meat may be somewhat less well cooked.
Increase the cooking times.
Information in the tables:
Ovenware without a lid = open
Ovenware with a lid = closed
Always place the ovenware in the centre of the wire rack.
Place hot glass ovenware on a dry mat after cooking. The glass
could crack if placed on a cold or wet surface.
Roasting
Add in a little liquid if the meat is lean. Cover the base of the
ovenware with approx. ½ cm of liquid.
Add liquid generously for pot roasts. Cover the base of the
ovenware with approx. 1 - 2 cm of liquid.
The amount of liquid depends on the type of meat and the
material the ovenware is made of. If preparing meat in an
enamelled roasting dish, it will need a little more liquid than if
cooked in glass ovenware.
Roasting dishes made from stainless steel are not ideal. The
meat cooks more slowly and browns less fully. Use a higher
temperature and/or a longer cooking time.
Grilling
When grilling, preheat the oven for approx. 3 minutes, before
placing the food into the cooking compartment.
Always grill with the oven door closed.
As far as possible, the pieces of food you are grilling should be
of equal thickness. This will allow them to brown evenly and
remain succulent and juicy.
Turn the food you are grilling after
Z of the time.
Do not add salt to steaks until they have been grilled.
Place the food to be grilled directly on the wire rack. If you are
grilling a single piece, the best results are achieved by placing
it in the centre of the wire rack.
The universal pan should also be inserted at level 1. The meat
juices are collected in the pan and the oven is kept cleaner.
When grilling, do not insert the baking tray or universal pan at
level 4 or 5. The high heat distorts it and the cooking
compartment can be damaged when removing it.
The grill element switches on and off continually. This is normal.
The grill setting determines how frequently this will happen.
Meat
Turn pieces of meat halfway through the cooking time.
When the roast is ready, turn off the oven and allow it to rest for
an additional 10 minutes. This allows better distribution of the
meat juices.
After cooking, wrap sirloin in aluminium foil and leave it to rest
for 10 minutes in the oven.
For roast pork with a rind, score the rind in a crossways pattern,
then lay the roast in the dish with the rind at the bottom.
Meat Weight Accessories and
ovenware
Level Type of
heating
Temperature
in °C, grill setting
Cooking time
in minutes
Beef
Pot-roasted beef 1.0 kg Covered 2
%
200-220 120
1.5 kg 2
%
190-210 140
2.0 kg 2
%
180-200 160
Fillet of beef, medium 1.0 kg Uncovered 2
%
210-230 70
1.5 kg 2
%
200-220 80
Sirloin, medium 1.0 kg Uncovered 1
4
210-230 50
Steaks, medium, 3 cm thick Wire rack 5
(
315
Veal
Joint of veal 1.0 kg Uncovered 2
%
190-210 100
2.0 kg 2
%
170-190 120
Pork
Joint without rind (e.g. neck) 1.0 kg Uncovered 1
4
200-220 100
1.5 kg 1
4
190-210 140
2.0 kg 1
4
180-200 160
Joint with rind (e.g. shoulder) 1.0 kg Uncovered 1
4
200-220 120
1.5 kg 1
4
190-210 150
2.0 kg 1
4
180-200 180
Smoked pork on the bone 1.0 kg Covered 2
%
210-230 70
Lamb
Leg of lamb, boned, medium 1.5 kg Uncovered 1
4
150-170 120
Page 23

23
Poultry
The weights indicated in the table refer to oven-ready poultry
(without stuffing).
Place whole poultry on the lower wire rack breast-side down.
Turn after
Z of the specified time.
Turn roasts, such as rolled turkey joint or turkey breast, halfway
through the cooking time. Turn poultry portions after
Z of the
time.
For duck or goose, pierce the skin on the underside of the
wings. This allows the fat to run out.
Poultry will turn out particularly crispy and brown if you baste it
towards the end of the roasting time with butter, salted water or
orange juice.
Fish
Turn the pieces of fish after
Z of the time.
Whole fish does not have to be turned. Place the whole fish in
the oven in its swimming position with its dorsal fin facing
upwards. Placing half a potato or a small ovenproof container
in the belly of the fish will make it more stable.
If you are grilling directly on the wire rack, the universal pan
should also be inserted at level 1. The liquid is then collected,
thereby keeping the oven cleaner.
Tips for roasting and grilling
Minced meat
Meat loaf Made from
500 g meat
Uncovered 1
4
170-190 70
Sausages
Sausages Wire rack 4
(
315
Meat Weight Accessories and
ovenware
Level Type of
heating
Temperature
in °C, grill setting
Cooking time
in minutes
Poultry Weight Accessories and
ovenware
Level Type of
heating
Temperature
in °C
Cooking time
in minutes
Chicken, whole 1.2 kg Wire rack 2
4
200-220 60-70
Poulard, whole 1.6 kg Wire rack 2
4
190-210 80-90
Chicken, halved 500 g each Wire rack 2
4
200-220 40-50
Chicken portions 300 g each Wire rack 3
4
200-220 30-40
Duck, whole 2.0 kg Wire rack 2
4
170-190 90-100
Goose, whole 3.5-4.0 kg Wire rack 2
4
160-170 110-130
Small turkey, whole 3.0 kg Wire rack 2
4
170-190 80-100
Turkey thigh 1.0 kg Wire rack 2
4
180-200 90-100
Fish Weight Accessories and
ovenware
Level Type of
heating
Temperature
in °C, grill setting
Cooking time
in minutes
Fish, whole 300 g each
(approx.)
Wire rack 2
(
3 20-25
1.0 kg Wire rack 2
4
180-200 45-50
1.5 kg Wire rack 2
4
170-190 50-60
Fish steak, 3 cm thick Wire rack 3
(
2 20-25
The table does not contain information
for the weight of the joint.
Select the next lowest weight from the instructions and extend the time.
How to tell when the roast is ready. Use a meat thermometer (available from specialist shops) or carry out a “spoon test”.
Press down on the roast with a spoon. If it feels firm, it is ready. If the spoon can be
pressed in, it needs to be cooked for a little longer.
The roast is too dark and the crackling
is partly burnt.
Check the shelf height and temperature.
The roast looks good but the juices are
burnt.
Next time, use a smaller roasting dish or add more liquid.
The roast looks good but the juices are
too clear and watery.
Next time, use a larger roasting dish and use less liquid.
Steam rises from the roast when basted. This is normal and due to the laws of physics. The majority of the steam escapes through
the steam outlet. It may settle and form condensation on the cooler switch panel or on
the fronts of adjacent units.
Page 24

24
Bakes, gratins, toast with toppings
If you are grilling directly on the wire rack, the universal pan
should also be inserted at level 1. This keeps the oven cleaner.
Always place the ovenware on the wire rack.
How well cooked the bake is will depend on the size of the dish
and the height of the bake. The figures in the table are only
average values.
Preprepared products
Observe the instructions on the packaging.
If you line the accessories with greaseproof paper, make sure
that the paper is suitable for these temperatures. Make sure the
paper is a suitable size for the dish to be cooked.
The cooking result greatly depends on the quality of the food.
Pre-browning and irregularities can sometimes even be found
on the raw product.
Dish Accessories and oven-
ware
Level Type of
heating
Temperature
in °C
Cooking time
in minutes
Bakes
Bake, sweet Ovenproof dish 2
%
180-200 40-50
Pasta bake Ovenproof dish 2
%
210-230 30-40
Gratin
Potato gratin, raw ingredients,
max. 4 cm deep
1 ovenproof dish 2
4
160-180 60-80
2 ovenproof dishes 1+3
:
150-170 65-85
Toast
Toast with topping, 4 slices Wire rack 4
4
160-170 10-15
Toast with topping, 12 slices Wire rack 4
4
160-170 15-20
Dish Accessories Level Type of
heating
Temperature
in °C, grill setting
Cooking time
in minutes
Pizza, frozen
Pizza with thin base Universal pan 2
6
190-210 15-20
Universal pan +
wire rack
3+1
:
180-200 20-30
Pizza with deep-pan base Universal pan 2
6
170-190 20-30
Universal pan +
wire rack
3+1
:
170-190 25-35
Pizza baguette Universal pan 3
6
170-190 20-30
Mini pizza Universal pan 3
6
180-200 10-20
Pizza, chilled, preheat Universal pan 1
6
180-200 10-15
Potato products, frozen
Chips Universal pan 3
6
190-210 20-30
Universal pan +
baking tray
3+1
:
180-200 30-40
Croquettes Universal pan 3
6
190-210 20-25
Rösti, stuffed potato pockets Universal pan 3
6
190-210 15-25
Baked items, frozen
Bread rolls, baguette Universal pan 3
6
190-210 10-20
Pretzels (dough) Universal pan 3
6
200-220 10-20
Baked items, prebaked
Part-cooked rolls or part-cooked baguette Universal pan 3
%
190-210 10-20
Universal pan +
wire rack
3+1
:
160-180 20-25
Processed portions, frozen
Fish fingers Universal pan 2
6
200-220 10-15
Chicken goujons, nuggets Universal pan 3
6
190-210 10-20
Strudel, frozen
Strudel Universal pan 3
6
190-210 30-40
Page 25

25
Special dishes
At low temperatures, : 3D hot air is equally useful for
producing creamy yoghurt as it is for proving light yeast dough.
First, remove accessories, hook-in racks or telescopic shelves
from the cooking compartment.
Preparing yoghurt
1. Bring 1 litre of milk (3.5 % fat) to the boil and cool down to
40 °C.
2. Stir in 150 g of yoghurt (at refrigerator temperature).
3. Pour into cups or small screw-top jars and cover with cling
film.
4. Preheat the cooking compartment as indicated.
5. Place the cups or jars on the cooking compartment floor and
incubate as indicated.
Proving dough
1. Prepare the dough as usual, place it in a heat-resistant
ceramic dish and cover.
2. Preheat the cooking compartment as indicated.
3. Switch off the oven and place the dough in the cooking
compartment and leave it to prove.
Defrosting
Take food out of its packaging and place in suitable ovenware
on the wire rack.
Observe the instructions on the packaging.
The defrosting time depends on the amount and type of food.
Place poultry with the breast side to the plate.
Drying
With : 3D hot air, you can dry foods brilliantly.
Use unblemished fruit and vegetables only and wash them
thoroughly.
Drain off the excess water, then dry them.
Line the universal pan and the wire rack with greaseproof or
parchment paper.
Turn very juicy fruit or vegetables several times.
Remove fruit and vegetables from the paper as soon as they
have dried.
Preserving
For preserving, the jars and rubber seals must be clean and
intact. If possible, use jars of the same size. The information in
the table is for round, one-litre jars.
Caution!
Do not use jars that are larger or taller than this. The lids could
crack.
Only use fruit and vegetables in good condition. Wash them
thoroughly.
The times given in the tables are a guide only. The time will
depend on the room temperature, number of jars, and the
quantity and temperature of the contents. Before you switch off
the appliance or change the cooking mode, check whether the
contents of the jars are bubbling as they should.
Preparation
1. Fill the jars, but not to the top.
2. Wipe the rims of the jars, as they must be clean.
3. Place a damp rubber seal and a lid on each jar.
4. Seal the jars with the clips.
Place no more than six jars in the cooking compartment.
Making settings
1. Insert the universal pan at level 2. Arrange the jars on it so
that they do not touch each other.
2. Pour ½ litre of hot water (approx. 80 °C) into the universal
pan.
3. Close the oven door.
4. Set
$ Bottom heating.
5. Set the temperature to between 170 and 180 °C.
Dish Ovenware Type of
heating
Temperature Cooking time
Yoghurt Cups or screw-top
jars
on the cooking
compartment floor
:
50 °C Preheat
50 °C
5mins
8hrs
Proving dough Heat-resistant dish on the cooking
compartment floor
:
50 °C Preheat
Switch off the appliance and
place the yeast dough in the
cooking compartment
5-10 mins
20-30 mins
Frozen food Accesso-
ries
Level Type of
heating
Temperature in °C
e.g. cream cakes, buttercream cakes, gateaux with chocolate or
sugar icing, fruit, chicken, sausage and meat, bread and bread
rolls, cakes and other baked items
Wire rack 2
B
The temperature selector
remains switched off
Fruit and herbs Accessories Level Type of
heating
Temperature Cooking time
600 g apple rings Universal pan + rack 3+1
:
80 °C 5 hrs (approx.)
800 g pear slices Universal pan + rack 3+1
:
80 °C 8 hrs (approx.)
1.5 kg damsons or plums Universal pan + rack 3+1
:
80 °C 8-10 hrs
(approx.)
200 g herbs, washed Universal pan + rack 3+1
:
80 °C 1½ hrs (approx.)
Page 26

26
Preserving
Fruit
After approx. 40 to 50 minutes, small bubbles begin to form at
short intervals. Switch off the oven.
After 25 to 35 minutes of residual heat, remove the preserving
jars from the cooking compartment. If they are allowed to cool
for longer in the cooking compartment, germs could multiply,
promoting acidification of the preserved fruit.
Vegetables
As soon as bubbles begin to form in the jars, set the
temperature back to between 120 and 140 °C. Depending on
the type of vegetable, heat for approx. 35 to 70 minutes. Switch
off the oven after this time and use the residual heat.
Taking out the jars
After preserving, remove the jars from the cooking
compartment.
Caution!
Do not place the hot jars on a cold or wet surface. They could
suddenly burst.
Acrylamide in foodstuffs
Acrylamide is mainly produced in grain and potato products
prepared at high temperatures, such as potato crisps, chips,
toast, bread rolls, bread or fine baked goods (biscuits,
gingerbread, cookies).
Fruit in one-litre jars When it starts to bubble Residual heat
Apples, redcurrants, strawberries Switch off approx. 25 minutes
Cherries, apricots, peaches, gooseberries Switch off approx. 30 minutes
Apple purée, pears, plums Switch off approx. 35 minutes
Vegetables with cold cooking water in one-litre jars When it starts to bubble Residual heat
Gherkins - approx. 35 minutes
Beetroot approx. 35 minutes approx. 30 minutes
Brussels sprouts approx. 45 minutes approx. 30 minutes
Beans, kohlrabi, red cabbage approx. 60 minutes approx. 30 minutes
Peas approx. 70 minutes approx. 30 minutes
Tips for keeping acrylamide to a minimum when preparing food
General
■ Keep cooking times to a minimum.
■ Cook meals until they are golden brown, but not too dark.
■ Large, thick pieces of food contain less acrylamide.
Baking With top/bottom heating max. 200 °C.
With 3D hot air or hot air max.180 °C.
Biscuits With top/bottom heating max. 190 °C.
With 3D hot air or hot air max. 170 °C.
Egg or egg yolk reduces the production of acrylamide.
Oven chips Spread evenly over the baking tray, in a single layer. Bake at least 400 g per baking tray
so that the chips do not dry out
Page 27

27
Test dishes
These tables have been produced for test institutes to facilitate
the inspection and testing of the various appliances.
In accordance with EN 50304/EN 60350 (2009) and IEC
60350.
Baking
Baking on 2 levels:
Always insert the universal pan above the baking tray.
Baking on 3 levels:
Insert the universal pan in the middle.
Piped biscuits:
Baking trays that are placed in the oven at the same time will
not necessarily be ready at the same time.
Double crust apple pie on 1 level:
place dark springform cake tins next to each other diagonally
on the same level.
Double crust apple pie on 2 levels:
Place dark springform cake tins next to each other (see
illustration).
Cakes in tinplate springform cake tins:
Bake on 1 level with
% Top/bottom heating. Place the
springform cake tin on the universal pan instead of on the wire
rack.
Note: For baking, use the lower of the temperatures indicated
first.
Grilling
If you are grilling food directly on the wire rack, the universal
pan should also be inserted at level 1. The liquid is then
collected, keeping the oven cleaner.
Dish Accessories and oven-
ware
Level Type of
heating
Temperature
in °C
Cooking time
in minutes
Whirls , preheat* Baking tray 3
%
140-150 30-40
Baking tray 3
:
140-150 30-40
Baking tray + universal
pan
1+3
:
140-150 30-45
2 baking trays + universal
pan
1+3+5
:
130-140 40-55
Small cakes, preheat* Baking tray 3
%
150-170 20-35
Baking tray 3
:
150-170 20-35
Baking tray + universal
pan
1+3
:
140-160 30-45
2 baking trays + universal
pan
1+3+5
:
130-150 35-55
Hot water sponge cake, preheat* Springform cake tin on the
wire rack
2
%
160-170 30-40
Springform cake tin on the
wire rack
2
:
160-170 25-40
Apple pie Wire rack + 2 springform
cake tins, dia. 20 cm
1
%
170-190 80-100
2 wire racks + 2 springform cake tins, dia. 20 cm
1+3
:
170-190 70-100
* Do not use rapid heating to preheat the appliance.
Dish Accessories and oven-
ware
Level Type of
heating
Grill setting Cooking time
in minutes
Toast
Preheat for 10 minutes
Wire rack 5
(
3½-2
Beefburgers, x 12*
do not preheat
Wire rack + universal pan 4+1
(
3 25-30
* turn over after
Z of the cooking time.
Page 28

28
é Inhoudsopgave
[nl]Gebruiksaanwijzing
Belangrijke veiligheidsvoorschriften ..................................... 28
Oorzaken van schade .............................................................. 31
Schade aan de oven ....................................................................... 31
Schade aan de schuiflade ............................................................. 31
Opstelling, gas- en elektrische aansluiting........................... 32
Gasaansluiting.................................................................................. 32
Storingen aan de gasinstallatie/ gaslucht................................... 32
Apparaat aan de gasleiding of aan de deurgreep verschuiven
............................................................................................................. 32
Elektrische aansluiting .................................................................... 32
Fornuis met de waterpas horizontaal plaatsen.......................... 32
Bevestiging aan de wand............................................................... 32
Plaatsen van het apparaat ............................................................. 33
Maatregelen tijdens het transport................................................. 33
Uw nieuwe fornuis ................................................................... 33
Algemeen .......................................................................................... 33
Kookplaat .......................................................................................... 34
De oven ............................................................................................. 34
De binnenruimte............................................................................... 35
Ovendeur - aanvullende veiligheidsinstructies ........................... 35
De toebehoren.......................................................................... 35
Toebehoren plaatsen ...................................................................... 35
Extra toebehoren.............................................................................. 36
Klantenserviceartikelen.................................................................. 37
Voor het eerste gebruik ........................................................... 37
Tijd instellen ...................................................................................... 37
De oven opwarmen ......................................................................... 37
Toebehoren reinigen....................................................................... 37
Reinigen van de branderkelk en het branderdeksel ................ 37
Kookplaat instellen .................................................................. 38
Gasbrander ontsteken .................................................................... 38
Tabel - koken .................................................................................... 38
Oven instellen .......................................................................... 39
Wijzen van verwarmen en temperatuur ....................................... 39
De oven moet automatisch uitschakelen .................................... 39
De oven schakelt automatisch in en uit ...................................... 39
Snelvoorverwarming ........................................................................ 40
Tijd instellen ............................................................................. 40
Kookwekker instellen .............................................................. 40
Kinderslot ..................................................................................41
Oven ................................................................................................... 41
Onderhoud en reiniging...........................................................41
Bovenste glasafdekking ................................................................. 41
Schoonmaakmiddelen.................................................................... 41
Inschuifrails verwijderen en bevestigen....................................... 42
Ovendeur verwijderen en inbrengen............................................ 43
Glazen deurplaten uit- en inbouwen ............................................ 43
Wat te doen bij storingen?....................................................... 44
Storingstabel ..................................................................................... 44
Ovenlamp aan het plafond vervangen ........................................ 44
Glazen afscherming ........................................................................ 44
Servicedienst ............................................................................45
Enummer en FDnummer.............................................................. 45
Energie en milieutips ..............................................................45
Energie besparen met de oven .................................................... 45
Energie besparen met de gas-kookplaat .................................... 45
Milieuvriendelijk afvoeren ............................................................... 45
Voor u in onze kookstudio uitgetest. ......................................45
Gebak ................................................................................................ 45
Tips voor het bakken ...................................................................... 47
Vlees, gevogelte, vis ....................................................................... 48
Tips voor het braden en grillen..................................................... 50
Ovenschotels, gegratineerde gerechten, toast .......................... 50
Kant-en-klaar producten ................................................................. 51
Bijzondere gerechten...................................................................... 51
Ontdooien.......................................................................................... 52
Drogen............................................................................................... 52
Inmaak ............................................................................................... 52
Acrylamide in levensmiddelen ................................................53
Testgerechten ...........................................................................54
Bakken............................................................................................... 54
Grillen................................................................................................. 54
Produktinfo
Meer informatie over producten, accessoires, onderdelen en
diensten vindt u op het internet: www.bosch-home.com en in
de online-shop: www.bosch-eshop.com
: Belangrijke veiligheidsvoorschriften
Lees deze gebruiksaanwijzing zorgvuldig door. Alleen dan kunt u uw apparaat goed en veilig bedienen. Bewaar de gebruiksaanwijzing voor later gebruik of om door te geven aan een volgende eigenaar.
Dit voorschrift geldt alleen als het symbool
van het betreffende land op het apparaat is
aangegeven. Als het symbool noet op het
apparaat staat, moet u de
installatiehandleiding raadplegen, waarin de
vereiste voorschriften voor het ombouwen
van het apparaat op de aansluitingseisen
van het land staan.
Apparaatcategorie: Categorie 1
Controleer het apparaat na het uitpakken.
Niet aansluiten in geval van
transportschade.
Alleen een daartoe bevoegd vakman mag
het apparaat aansluiten en het
omschakelen naar een ander type gas. De
installatie van het toestel (elektrische en
gasaansluiting) dient volgens de
Page 29

29
gebruiksaanwijzing en de
montagehandleiding te worden uitgevoerd.
Een verkeerde aansluiting en onjuiste
instellingen kunnen leiden tot ernstige
ongelukken en schade aan het toestel. De
fabrikant van het apparaat is niet
aansprakelijk voor dergelijke schade. De
garantie van het apparaat komt te vervallen.
Opgelet:Dit apparaat is alleen bestemd voor kookdoeleinden. Het mag niet anderszins, bijvoorbeeld voor de verwarming van de ruimte, worden gebruikt.
Opgelet:Het gebruik van een gasfornuis
zorgt voor warmte en vochtvorming in de
opstellingsruimte. Let vooral als het
apparaat in werking is, op een goede
ventilatie van de ruimte waarin het staat: de
natuurlijke ventilatie-openingen open
houden of een mechanische ventilatieinrichting (bijv. een afzuigkap) installeren.
Bij een intensief en langdurig gebruik van het apparaat kan extra ventilatie nodig worden, bijv. door het openen van een raam of extra ventilatie bijv. door de afzuigkap op een hoger vermogen te zetten.
Dit apparaat is niet geschikt voor het gebruik met een externe wekker of afstandsbediening.
Dit toestel kan worden gebruikt door
kinderen vanaf 8 jaar en door personen met
beperkte fysieke, sensorische of geestelijke
vermogens of personen die gebrek aan
kennis of ervaring hebben, wanneer zij
onder toezicht staan van een persoon die
verantwoordelijk is voor hun veiligheid of
geleerd hebben het op een veilige manier
te gebruiken en zich bewust zijn van de
risico's die het gebruik van het toestel met
zich meebrengt.
Kinderen mogen niet met het apparaat spelen. Reiniging en onderhoud van het toestel mogen niet worden uitgevoerd door kinderen, tenzij zij 8 jaar of ouder zijn en onder toezicht staan.
Zorg ervoor dat kinderen die jonger zijn dan 8 jaar uit de buurt blijven van het toestel of de aansluitkabel.
Toebehoren altijd op de juiste manier in de binnenruimte plaatsen. Zie beschrijving toebehoren in de gebruiksaanwijzing.
Risico van brand!
■
Wanneer de apparaatdeur geopend wordt,
ontstaat er een luchtstroom. Het
bakpapier kan dan de
verwarmingselementen raken en vlam
vatten. Tijdens het voorverwarmen mag er
nooit bakpapier los op de toebehoren
liggen. Verzwaar het bakpapier altijd met
een vorm. Bakpapier alleen op het
benodigde oppervlak leggen. Het
bakpapier mag niet uitsteken over de
toebehoren.
Risico van brand!
■
Brandbare voorwerpen die in de
binnenruimte worden bewaard kunnen
vlam vatten. Geen brandbare voorwerpen
in de binnenruimte bewaren. Nooit de
deur openen wanneer er sprake is van
rookontwikkeling in het toestel. Schakel
het toestel uit en haal de stekker uit het
stopcontact of schakel de zekering in de
meterkast uit. Gastoevoer afsluiten.
Risico van brand!
■
Hete olie en heet vet vatten snel vlam.
Hete olie en heet vet nooit gebruiken
zonder toezicht. Vuur nooit blussen met
water. Schakel de kookzone uit. Vlammen
voorzichtig met een deksel, smoordeksel
of iets dergelijks verstikken.
Risico van brand!
■
De kookzones worden erg heet. Nooit
brandbare voorwerpen op de kookplaat
leggen. Geen voorwerpen op de
kookplaat leggen.
Brandgevaar!
■
Het apparaat wordt erg heet, brandbare
materialen kunnen snel vlam vatten.
Bewaar of gebruik geen brandbare
voorwerpen ( bijv. spuitbussen,
reinigingsmiddelen) onder of in de
nabijheid van de oven. Bewaar geen
brandbare voorwerpen in of op de oven.
Risico van brand!
■
Wanneer er gas-kookzones ingeschakeld
zijn waar geen kookgerei op staat, wordt
er tijdens het gebruik zeer veel warmte
ontwikkeld. Het toestel en een daarboven
aangebrachte afzuigkap kunnen
beschadigd raken of vlam vatten.
Vetresten in de filter van de stofafzuigkap
kunnen vlam vatten. Gebruik de gaskookzones alleen wanneer er kookgerei
op staat.
Risico van brand!
■
De achterkant van het toestel wordt zeer
heet. Dit kan leiden tot beschadiging van
de aansluitleidingen. Elektriciteits- en
gasleidingen mogen niet met de
achterkant van het toestel in aanraking
komen.
Risico van brand!
■
Nooit brandbare voorwerpen op de
kookzones leggen of in de binnenruimte
bewaren. Nooit de deur openen wanneer
er sprake is van rookontwikkeling in het
apparaat. Zet het apparaat uit. Haal de
netstekker uit het stopcontact of schakel
Page 30

30
de zekering in de meterkast uit. Sluit de
gastoevoer af.
Risico van bra nd!
■
Het oppervlak van de schuiflade kan erg
heet worden. Bewaar alleen
oventoebehoren in de schuiflade.
Ontvlambare en brandbare voorwerpen
mogen niet in de ovenlade worden
opgeborgen.
Risico van verbranding!
■
Het toestel wordt zeer heet. Nooit de hete
vlakken in de binnenruimte of
verwarmingselementen aanraken. Het
apparaat altijd laten afkoelen. Zorg ervoor
dat er geen kinderen in de buurt zijn.
Risico van ver branding!
■
Toebehoren of vormen worden zeer heet.
Neem hete toebehoren en vormen altijd
met behulp van een pannenlap uit de
binnenruimte.
Risico van ver branding!
■
Alcoholdampen kunnen in de
binnenruimte vlam vatten. Nooit gerechten
klaarmaken die een hoog percentage
alcohol bevatten. Alleen kleine
hoeveelheden drank met een hoog
alcoholpercentage gebruiken. De deur
van het toestel voorzichtig openen.
Risico van ver branding!
■
De kookzones en de omgeving ervan
worden zeer heet. Raak de hete
oppervlakken nooit aan. Zorg ervoor dat
er geen kinderen in de buurt zijn.
Verbrandingsgevaar!
■
Tijdens het gebruikt worden de
oppervlakken van het apparaat heet. De
hete oppervlakken niet aanraken. Houd
kinderen uit de buurt van het toestel.
Risico van ver branding!
■
Wanneer er leeg kookgerei op
ingeschakelde gas-kookzones staat, wordt
dit zeer heet. Nooit leeg kookgerei
verwarmen.
Verbrandingsgevaar!
■
Het apparaat wordt heet tijdens de
bereiding. Laat het voor de reiniging
afkoelen.
Risico van ver branding!
■
Opgelet: Aanraakbare delen kunnen
tijdens het grillen heet worden. Houd
kleine kinderen op een afstand.
Kans op verbranding!
■
Tijdens het gebruik worden de
toegankelijke onderdelen heet. De hete
onderdelen nooit aanraken. Zorg ervoor
dat er geen kinderen in de buurt zijn.
Risico van ver branding!
■
Bij het openen van de apparaatdeur kan
hete stoom vrijkomen. De deur van het
toestel voorzichtig openen. Zorg ervoor
dat er geen kinderen in de buurt zijn.
Kans op verbrandi ngen!
■
Door water in de hete binnnruimte kan
hete waterdamp ontstaan. Nooit water in
de hete binnenruimte gieten.
Risico van letsel!
■
Wanneer er krassen op het glas van de
apparaatdeur zitten, kan dit springen.
Geen schraper, scherpe of schurende
schoonmaakmiddelen gebruiken.
Risico van letsel!
■
Ondeskundige reparaties zijn gevaarlijk.
Reparaties en vervangingen van
beschadigde elektriciteits- en gasleidingen
mogen uitsluitend worden uitgevoerd door
technici die zijn geïnstrueerd door de
klantenservice. Is het toestel defect, haal
dan de stekker uit het stopcontact of
schakel de zekering in de meterkast uit,
de gastoevoer sluiten. Contact opnemen
met de klantenservice.
Risico van letsel!
■
Storingen of beschadigingen aan het
apparaat zijn gevaarlijk. Een defect toestel
nooit inschakelen. De netstekker uit het
stopcontact halen of de zekering in de
meterkast uitschakelen. Gastoevoer
afsluiten. Contact opnemen met de
klantenservice.
Risico van letsel!
■
Wanneer de pannen onjuiste afmetingen
hebben, beschadigd of verkeerd geplaatst
zijn, kunnen ze ernstig letsel veroorzaken.
Neem de aanwijzingen voor het kookgerei
in acht
Risico van letsel!
■
Opgelet: De glasafdekking kan door de
hitte barsten. Voor het sluiten van de
afdekking moeten alle branders
uitgeschakeld zijn. Wacht tot de oven
afgekoeld is voordat u de afdekking sluit.
Risico van letsel!
■
Wordt het toestel onbevestigd op een
sokkel geplaatst, dan kan het hiervan
afglijden. Het toestel moet goed aan de
sokkel worden bevestigd.
Page 31

31
Kantelgevaar!
Waarschuwing: Om te voorkomen dat het
apparaat kantelt, moet een
kantelbeveiliging worden gemonteerd. Lees
de montage-instructies door.
Kans op een elektrische schok!
■
Ondeskundige reparaties zijn
gevaarlijk.Reparaties mogen uitsluitend
worden uitgevoerd door technici die zijn
geïnstrueerd door de klantenservice.Is het
apparaat defect, haal dan de stekker uit
het stopcontact of schakel de zekering in
de meterkast uit. Contact opnemen met
de klantenservice.
Kans op een elektris che schok!
■
De kabelisolatie van hete
toestelonderdelen kan smelten. Zorg
ervoor dat er nooit aansluitkabels van
elektrische toestellen in contact komen
met hete onderdelen van het apparaat.
Kans op een elektris che schok!!
■
Binnendringend vocht kan een schok
veroorzaken. Geen hogedrukreiniger of
stoomreiniger gebruiken.
Kans op een elektris che schok!
■
Bij vervanging van de lamp in de
binnenruimte staan de contacten van de
lampfitting onder stroom. Trek voordat u
tot vervanging overgaat de netstekker uit
het stopcontact trekken of schakel de
zekering in de meterkast uit.
Kans op een elektris che schok!
■
Een defect toestel kan een schok
veroorzaken. Een defect toestel nooit
inschakelen. De netstekker uit het
stopcontact halen of de zekering in de
meterkast uitschakelen. Contact opnemen
met de klantenservice.
Oorzaken van schade
Kookplaat
Attentie!
■ Gebruik de kookzones alleen als er een pan op staat. Verhit
geen lege pannen. De panbodem raakt hierdoor beschadigd.
■ Gebruik alleen pannen met een vlakke bodem.
■ Zet de pan midden boven de brander. Daardoor wordt de
warmte van de brandervlam optimaal aan de panbodem
doorgegeven. Handvatten of stelen worden niet beschadigd,
en er wordt een hogere energiebesparing gerealiseerd.
■ Let erop dat de gasbranders schoon en droog zijn. Het
branderdeksel moet altijd exact op de branderkelk liggen.
■ Let erop dat de bovenste afdekking niet gesloten is als het
fornuis in bedrijf genomen wordt.
Schade aan de oven
Attentie!
■ Toebehoren, folie, bakpapier of vormen op de bodem van de
binnenruimte: Geen toebehoren op de bodem van de
binnenruimte leggen. Geen bakpapier of folie, van welk type
dan ook, op de bodem van de binnenruimte leggen. Geen
vorm op de bodem van de binnenruimte plaatsen wanneer
een temperatuur van meer dan 50 °C ingesteld is. Er
ontstaat dan een opeenhoping van warmte. De bak- en
braadtijden kloppen niet meer en het email wordt
beschadigd.
■ Water in de hete binnenruimte: Nooit water in de hete
binnenruimte gieten. Er ontstaat dan waterdamp. Door de
verandering van temperatuur kan schade aan het email
ontstaan.
■ Vochtige levensmiddelen: Geen vochtige levensmiddelen
langere tijd in de afgesloten binnenruimte bewaren. Het email
raakt dan beschadigd.
■ Vruchtensap: De bakplaat bij zeer vochtig vruchtengebak niet
te overvloedig bedekken. Vruchtensap dat van de bakplaat
druppelt, laat vlekken achter die niet meer kunnen worden
verwijderd. Gebruik zo mogelijk de diepere braadslede.
■ Afkoelen met open apparaatdeur: De binnenruimte alleen
laten afkoelen wanneer deze afgesloten is. Ook wanneer de
deur slechts op een kier openstaat, kan de voorzijde van
aangrenzende meubels op den duur worden beschadigd.
■ Sterk vervuilde deurdichting: is de deurdichting sterk vervuild,
dan sluit de apparaatdeur tijdens het gebruik niet meer goed.
De voorzijde van aangrenzende meubels kan worden
beschadigd.Zorg ervoor dat de deurdichting altijd schoon is.
■ Apparaatdeur als vlak om op iets op te leggen of te plaatsen:
niets op de apparaatdeur leggen of plaatsen en er niets aan
hangen. Geen vormen of toebehoren op de apparaatdeur
plaatsen.
■ Toebehoren inschuiven: afhankelijk van het type toestel
kunnen de toebehoren krassen geven op de deur.
Toebehoren altijd tot de aanslag in de binnenruimte schuiven.
■ Apparaat transporteren: Het apparaat niet aan de deurgreep
vasthouden of dragen. De deurgreep houdt op den duur het
gewicht van het apparaat niet en kan afbreken.
Schade aan de schuiflade
Attentie!
Leg geen hete voorwerpen in de schuiflade. Deze kan
beschadigd raken.
Page 32

32
Opstelling, gas- en elektrische aansluiting
Gasaansluiting
De installatie mag uitsluitend door een erkende installateur of
een door de importeur erkende servicemonteur worden
uitgevoerd volgens de "Instructie voor het aansluiten van het
gas en het wijzigen van de gassoort".
Voor de door de importeur erkende installateur of servicedienst
Attentie!
■ De instellingsvoorwaarden voor dit apparaat staan op het
typeplaatje op de achterzijde van het apparaat aangegeven.
De door de fabriek ingestelde gassoort is met een ster (*)
gemarkeerd.
■ Controleer voor de opstelling van het apparaat de
distributievoorwaarden (gassoort en gasdruk) en verzeker u
ervan dat de gasinstelling van het apparaat hierop is
ingesteld. Indien de instellingen van het apparaat gewijzigd
moeten worden, raadpleeg dan de instructies in het
hoofdstuk "Instructie voor het aansluiten van het gas en het
wijzigen van de gassoort".
■ Dit apparaat is niet op een verbrandingsgasafvoer
aangesloten. Het apparaat moet in overeenstemming met de
installatievoorschriften aangesloten en in gebruik genomen
worden. Sluit het apparaat niet op een verbrandingsgasafvoer
aan. Alle ventilatievoorschriften moeten in acht genomen
worden.
■ De gasaansluiting moet via een vaste, niet-flexibele
aansluiting (gasleiding) of via een veiligheidsslang worden
gerealiseerd.
■ Indien een veiligheidsslang wordt gebruikt, moet er beslist op
gelet worden dat de slang niet vastgeklemd of geknikt wordt.
De slang mag niet met hete oppervlakken in aanraking
komen.
■ De gasleiding (gasleiding of veiligheidsslang) kan zowel aan
de linker- als aan de rechterzijde van het apparaat worden
aangesloten. De aansluiting moet over een gemakkelijk
toegankelijke afsluitingsvoorziening beschikken.
Storingen aan de gasinstallatie/ gaslucht
Wanneer u merkt dat het naar gas ruikt of storingen aan de
gasinstallatie vaststelt, dient u het volgende te doen.
■ direct de gastoevoer of het ventiel van de gasfles sluiten
■ direct open vuur en sigaretten doven
■ elektrische apparaten uitschakelen ook lampen
■ ramen openen en de ruimte goed luchten
■ telefonisch contact opnemen met de klantenservice of de
elektriciteitsmaatschappij.
Apparaat aan de gasleiding of aan de deurgreep verschuiven
Verschuif het apparaat niet door aan de gasleiding te trekken;
de gasleiding kan beschadigd raken. Gevaar voor een gaslek!
Verschuif het apparaat niet door aan de deurgreep te trekken.
Deurscharnieren en deurgreep kunnen beschadigd raken.
Elektrische aansluiting
Attentie!
■ Laat het apparaat door een servicedienst plaatsen. Voor de
aansluiting is een zekering van 16 A nodig. Het apparaat is
geschikt voor een netspanning van 220-240 V.
■ Wanneer de netspanning afneemt tot minder dan 180 V,
functioneert het elektrische ontstekingssysteem niet meer.
■ Wordt het apparaat verkeerd aangesloten, vervalt bij schade
de garantieclaim.
■ Als de aansluitkabel beschadigd raakt, moet deze door de
fabrikant, door de servicedienst of door een erkende monteur
worden vervangen.
Voor de servicedienst
Attentie!
■ Het apparaat moet overeenkomstig de specificaties op het
typeplaatje worden aangesloten.
■ Sluit het toestel alleen op een elektrische aansluiting aan die
voldoet aan de geldende bepalingen. De contactdoos moet
goed toegankelijk zijn om het apparaat indien nodig van het
lichtnet te kunnen scheiden.
■ Er moet een meerpolige scheidingsinrichting aangebracht
zijn.
■ Gebruik nooit een verlengkabel of meervoudige stekker.
■ Om veiligheidsredenen mag dit apparaat alleen op een
geaarde aansluiting worden aangesloten, Wanneer de
randaarde-aansluiting niet aan de voorwaarden voldoet, is de
bescherming tegen elektrische gevaren niet gegarandeerd.
■ Voor de aansluiting van het apparaat moet een kabel van het
type H 05 W-F of gelijkwaardig worden gebruikt.
Fornuis met de waterpas horizontaal plaatsen
Zet het fornuis direct op de vloer.
1. Ovenlade eruit trekken en er naar boven uittillen.
Aan de onderkant bevinden zich binnenin voor en achter
stelvoeten.
2. De stelvoeten zo nodig met een zeskantsleutel omhoog of
omlaag draaien, tot het fornuis waterpas staat (Afbeelding A).
3. Ovenlade weer inschuiven (Afbeelding B).
Bevestiging aan de wand
Om te voorkomen dat het fornuis kantelt, dient u het met de
meegeleverde haak aan de wand te bevestigen. Neem het
montagevoorschrift voor bevestiging aan de wand in acht.
%$
Page 33

33
Plaatsen van het apparaat
■ Het apparaat moet volgens de opgegeven maten worden
geplaatst en direct op het vloeroppervlak van uw keuken. Het
apparaat mag niet boven op wat voor object dan ook worden
geplaatst.
■ Voor de afstand tussen de bovenkant van het fornuis en de
onderzijde van de afzuigkap moet u zich houden aan de
instructies van de fabrikant van de afzuigkap.
■ Let erop dat het apparaat na de plaatsing niet meer wordt
verschoven. De afstand tussen de extra krachtige brander of
wokbrander met aangrenzende keukenmeubels resp. de
muur moet minstens 50 mm bedragen.
Maatregelen tijdens het transport
Bevestig alle beweegbare onderdelen in en op het apparaat
met plakband, dat zonder sporen verwijderd kan worden.
Schuif alle toebehoren (bijv. de bakplaat) met een dunne strook
karton aan beide zijden in de vakken om beschadiging van het
apparaat te voorkomen. Leg karton of iets dergelijks tussen de
voorzijde van de bakplaat en de achterzijde van de deur om te
voorkomen dat de bakplaat tegen de binnenzijde van de glazen
deur stoot. Bevestig de deur en, indien aanwezig, de bovenste
afdekking met plakband aan de zijden van het apparaat.
Bewaar de originele verpakking van het apparaat. Transporteer
het apparaat alleen in de originele verpakking. Let op de
transportpijlen op de verpakking.
Als de originele verpakking niet meer beschikbaar is
Verpak het apparaat in een beschermende verpakking om
voldoende bescherming tegen eventuele transportschade te
garanderen.
Transporteer het apparaat rechtop. Houd het apparaat niet aan
de deurgreep of aan aansluitingen op de achterzijde vast,
omdat deze dan beschadigd kunnen raken. Leg geen zware
voorwerpen op het apparaat.
Uw nieuwe fornuis
Hier maakt u kennis met uw nieuwe fornuis. Wij leggen u de
werking van het bedieningspaneel, de kookplaat en de
afzonderlijke bedieningselementen uit. U krijgt informatie over
de binnenruimte en de toebehoren.
Algemeen
De uitvoering hangt van het type apparaat af.
0LQ
Toe lich ting
1 Afdekplaat
2 Kookplaat
3 Kookzoneschakelaars
4 Functiekeuzeknoppen, bedieningstoetsen en weer-
gaveveld, temperatuurkeuzeknop
5 Koeling van het apparaat
6Ovendeur
7Schuiflade
Toelichting
Page 34

34
Kookplaat
Hier krijgt u een overzicht van het bedieningspaneel. De
uitvoering hangt van het type apparaat af.
Gebruik alleen pannen met een vlakke bodem.
Zet de pan midden boven de brander. Daardoor wordt de
warmte van de brandervlam optimaal aan de panbodem
doorgegeven. Handvatten of stelen worden niet beschadigd, en
er wordt een hogere energiebesparing gerealiseerd.
Branderschakelaar
Met de vier branderschakelaar kunt u het
verwarmingsvermogen van de branders instellen.
Aan het einde van het instelbereik voelt u een aanslag. Niet
verder draaien.
De oven
U stelt de oven in met de functie- en de temperatuurkeuzeknop.
Functiekeuzeknop
Met de functiekeuzeknop stelt u de verwarmingsmethode voor
de oven in.
U kunt de functiekeuzeknoppen naar rechts of naar links
draaien.
Wanneer u instelt, brandt de lamp in de binnenruimte.
Toelic htin g
1 Normale brander
2 Spaarbrander
3 Extra krachtige brander
4 Normale brander
Brander Diameter van de pan
Spaarbrander 1kW 12-18 cm
Normale brander 1,7 kW 18-24 cm
Sterke brander 3 kW 2428 cm
Standen Functie/gasfornuis
þ
Nulstand Fornuis is uitgeschakeld.
8
Onstekingsstand Onstekingsstand
—
˜
Instelbereik grote vlam = sterkste instelling
spaarvlam = kleinste instelling
Stand Gebruik
þ
Nulstand De oven is uitgeschakeld.
%
Boven- en onderwarmte
Voor taart en gebak, ovenschotels
en magere braadstukken,
bijv. rund of wild, op één niveau.
De hitte komt gelijkmatig van
boven en van beneden.
<
3D-hetelucht* Voor taart en gebak op één tot
drie niveaus. De ventilator verdeelt de warmte van het ronde verwarmingselement aan de
achterkant gelijkmatig in de oven.
6
Pizzastand Voor de snelle bereiding van diep-
vriesproducten zonder voorverwarmen, bijv. pizza's, patates frites of
strudel. Het onderste verwarmingselement en het ronde verwarmingselement aan de achterwand
zijn ingeschakeld.
$
Onderwarmte Voor het inkoken en nabakken of
naroosteren. De warmte komt van
onderen.
7
Circulatiegrillen Voor het braden van vlees, gevo-
gelte en hele vis. Het grillelement
en de ventilator worden afwisselend in- en uitgeschakeld. De ventilator wervelt de hete lucht rond het
gerecht.
*
Grill, klein Voor het grillen van kleine hoeveel-
heden steaks, worstjes, toast en
stukjes vis. Het middelste deel van
het grillelement wordt heet.
(
Grill, groot Voor het grillen van steaks, snee-
tjes brood en stukjes vis. Het
gehele vlak onder het grillelement
wordt heet.
B
Ontdooien Voor het ontdooien van vlees,
gevogelte, brood en gebak. De
ventilator wervelt de warme lucht
rond het gerecht.
I
Snelvoorverwarming Snel voorverwarmen van de oven
zonder toebehoren.
* Verwarmingsmethode waarbij de energie-efficiëntieklasse
overeenkomt met EN50304.
Page 35

35
Temperatuurkeuzeknop
Met de temperatuurkeuzeknop kunt u de temperatuur en de
grillstand instellen.
Terwijl de oven opwarmt, brandt het temperatuursymbool
p in
het display. Als het opwarmen wordt onderbroken, gaat het
symbool uit. Bij sommige instellingen brandt het niet.
Toetsen en indicatie
Met de toetsen stelt u de verschillende extra functies in. Op het
display kunt u de ingestelde waarden aflezen.
De binnenruimte
In de binnenruimte bevindt zich de ovenlamp. Een
koelventilator beschermt de oven tegen oververhitting.
Ovenlamp
Tijdens het gebruik brandt de ovenlamp in de binnenruimte.
Koelventilator
De koelventilator wordt zo nodig in- en uitgeschakeld. De
warme lucht ontsnapt via de deur.
De koelventilator loopt een bepaalde tijd na, zodat de
binnenruimte na gebruik sneller afkoelt.
Attentie!
De ventilatiesleuven niet afdekken. Anders raakt de oven
oververhit.
Ovendeur - aanvullende veiligheidsinstructies
Bij langere baktijden kan de ovendeur erg heet worden.
Indien u kinderen hebt, is bij het gebruik van de oven extra
voorzichtigheid geboden.
Verder is er een beveiligingsvoorziening (beveiligingsrooster)
beschikbaar waarmee directe aanraking van de ovendeur
wordt verhinderd. Dit beveiligingsrooster is onder nr. 469088
bij de klantenservice verkrijgbaar.
De toebehoren
De meegeleverde toebehoren zijn geschikt voor vele
gerechten. Let erop dat u de toebehoren altijd op de juiste
manier in de binnenruimte plaatst.
Het grote assortiment speciale toebehoren zorgt ervoor dat
vele van uw gerechten nog beter lukken en u de oven nog
comfortabler kunt gebruiken.
Toebehoren plaatsen
U kunt de toebehoren op 5 verschillende hoogtes in de
binnenruimte plaatsen. Altijd tot de aanslag inschuiven, zodat
de toebehoren de deurruit niet raken.
De toebehoren kunnen tot ongeveer halverwege naar buiten
worden getrokken, tot ze inklikken. Zo kunnen de gerechten
gemakkelijk uit de oven worden genomen.
Zorg ervoor dat de toebehoren met de welving naar achteren in
de binnenruimte worden geplaatst. Alleen zo klikken ze in.
Standen Functie
ÿ
Nulstand Oven niet heet.
50-270 Temperatuurbe-
reik
Temperatuurinstellingen in °C.
1, 2, 3 Grillstanden
Grillstanden voor de grill, klein
*
en groot
( oppervlak.
Stand 1 = zwak
Stand 2 = gemiddeld
Stand 3 = sterk
Toets Gebruik
V
Toets Kookwekker Hiermee stelt u de wekker in.
0
Toets Klok Hiermee stelt u de tijd, de tijds-
duur van de oven
x en de
eindtijd
y in.
A
Toets Min Hiermee stelt u een lagere instel-
waarde in.
E
Toets Sleutel Hiermee schakelt u het kinderslot
in en uit.
@
Toets Plus Hiermee stelt u een hogere instel-
waarde in.
Page 36

36
Aanwijzing: Wanneer de toebehoren heet worden, kunnen ze
vervormen. De vervorming verdwijnt weer nadat ze zijn
afgekoeld. Dit heeft geen invloed op de werking ervan.
Houd de bakplaat aan weerszijden met beide handen vast en
schuif de bakplaat recht in het frame. Vermijd bij het inschuiven
bewegingen naar links of rechts. Anders kan de bakplaat niet
gemakkelijk ingeschoven worden. Het geëmailleerde oppervlak
kan beschadigd raken.
Toebehoren kunt u nabestellen bij de klantenservice, in de
vakhandel of via Internet. Geef hiervoor alstublieft het
HEZnummer op.
Extra toebehoren
Extra toebehoren kunt u bij de servicedienst of in de
speciaalzaak kopen. In onze brochures of op internet vindt u
diverse producten die voor uw oven geschikt zijn. De
beschikbaarheid van extra toebehoren en de mogelijkheid om
deze via internet te kopen is per land verschillend. Informatie
hierover vindt u in de verkoopbrochures.
Niet elk extra toebehoren is voor elk apparaat geschikt. Geef bij
aankoop steeds de volledige naam (E-nr.) van uw apparaat op.
Rooster
Voor servies, taart- en cakevormen,
braadstukken, grillstukken en diepvriesgerechten.
Het rooster met de open kant naar
de ovendeur en de welving naar
beneden
¾ inschuiven.
Emaillen bakplaat
Voor gebak en koekjes.
Plaats de bakplaat met de schuine
kant naar de ovendeur.
Extra toebehoren HEZ-nummer Functie
Pizzaplaat HEZ317000 Is zeer geschikt voor pizza, diepvriesgerechten en ronde taar-
ten. U kunt de pizzaplaat in plaats van de braadslede gebruiken. Schuif de plaat boven het rooster erin en houd u aan de
gegevens in de tabellen.
Inzetrooster HEZ324000 Om te braden. Plaats het grillrooster altijd op de braadslede.
Afdruipend vet en vleesvocht worden opgevangen.
Grillplaat HEZ325000 Deze wordt bij het grillen in plaats van het grillrooster of als
spatbeveiliging gebruikt om de oven tegen sterke vervuiling te
beschermen. Gebruik de grillplaat alleen in combinatie met de
braadslede.
Grillstukken op de grillplaat: Alleen de inschuifhoogtes 1, 2 en
3 worden gebruikt.
Grillplaat als spatbeveiliging: De braadslede wordt tezamen
met de grillplaat onder het rooster ingeschoven.
Baksteen HEZ327000 De baksteen is uitstekend geschikt voor het bereiden van zelf-
gemaakt brood, broodjes en pizza die een knapperige bodem
moeten krijgen. De baksteen moet altijd op de aanbevolen
temperatuur worden voorverwarmd.
Geëmailleerde bakplaat HEZ331003 Voor gebak en koekjes.
Schuif de bakplaat met de schuine kant naar de ovendeur in
de oven.
Geëmailleerde bakplaat met anti-aanbaklaag HEZ331011 Gebak en koekjes kunnen goed op de bakplaat worden ver-
deeld. Schuif de bakplaat met de schuine kant naar de ovendeur in de oven.
Braadslede HEZ332003 Voor vochtig gebak, koekjes, diepvriesgerechten en grote
braadstukken. Kan ook voor het opvangen van vet of vleesvocht onder het rooster worden gebruikt.
Schuif de braadslede met de schuine kant naar de ovendeur in
de oven.
Braadslede met anti-aanbaklaag HEZ332011 Vochtig gebak, koekjes, diepvriesgerechten en grote braad-
stukken kunnen goed op de braadslede worden verdeeld.
Schuif de braadslede met de schuine kant naar de ovendeur in
de oven.
Deksel voor profipan HEZ333001 Met een deksel wordt de profipan een profibraadpan.
Profipan met inzetrooster HEZ333003 Is zeer geschikt voor het bereiden van grote hoeveelheden.
Uitschuifrail
3-voudige telescopische uitschuifhulp HEZ338352 Met de uitschuifrails op de hoogtes 1, 2 en 3 kunt u het toebe-
horen verder uittrekken zonder dat het kantelt.
3-voudige telescopische uitschuifhulp, niet geschikt voor apparaten met draaispit.
Page 37

37
Klantenserviceartikelen
Voor uw huishoudelijke apparaten kunt u bij de klantenservice,
in de vakhandel of via het Internet voor afzonderlijke landen in
de e-shop de juiste onderhouds en reinigingsmiddelen of
andere toebehoren kopen. Geef hiervoor het betreffende
artikelnummer op.
Voor het eerste gebruik
Hier vindt u alles wat u moet doen voordat u voor het eerst
gerechten klaarmaakt met de oven of de gas-kookplaat. Lees
eerst het hoofdstuk Veiligheidsvoorschriften.
Tijd instellen
Na de aansluiting zijn op het display het symbool 0 en drie
nullen verlicht. Stel de tijd in.
1. De toets
0 indrukken.
Op het display verschijnt de tijd 12:00 uur en het symbool
0
knippert.
2. Met de toets + of de toets - de tijd instellen.
Na enige seconden wordt de ingestelde tijd overgenomen.
De oven opwarmen
Om de geur van het nieuwe te verwijderen, warmt u de lege,
gesloten oven op. Ideaal hiervoor is een uur met boven- en
onderwarmte
% bij 240 °C. Let erop dat zich geen
verpakkingsresten in de binnenruimte bevinden.
1. Met de functiekeuzeknop Boven- en onderwarmte
%
instellen.
2. Met de temperatuurkeuzeknop 240 °C instellen.
Na een uur de oven uitschakelen. Functie- en
temperatuurkeuzeknop op de nulstand draaien.
Toebehoren reinigen
Reinig de toebehoren voor het eerste gebruik grondig met
warm zeepsop en een zacht schoonmaakdoekje.
Reinigen van de branderkelk en het branderdeksel
Reinig het branderdeksel (1) en het branderdeksel (2) met
water en afwasmiddel. Droog deze onderdelen goed af.
Plaats de branderkelk en het deksel weer op de branderkom
(5). Let erop dat de ontsteking (3) en de vlambeveiligingspin
(4) niet worden beschadigd.
De sproeier (6) moet droog en schoon zijn. Plaats het
branderdeksel altijd exact op de branderkelk.
3-voudige uitschuifhulp met stopfunctie HEZ338357 Met de uitschuifrails op de hoogten 1, 2 en 3 kan het toebeho-
ren geheel worden uitgetrokken zonder dat het kantelt. De uitschuifrails klikken vast, zodat de bakplaten gemakkelijk
kunnen worden geplaatst.
De 3-voudige telescopische uitschuifhulp met stopfunctie is
niet geschikt voor apparaten met draaispitvoorzieningen.
Rooster HEZ334000 Voor ovenschalen, bakvormen, braadstukken, gegrilde stuk-
ken en diepvriesgerechten.
Glazen pan HEZ915001 De glazen pan is geschikt voor smoorgerechten en ovenscho-
tels. Is zeer geschikt voor programma's en braadautomaat.
Extra toebehoren HEZ-nummer Functie
Schoonmaakdoekjes voor roestvrijstalen
oppervlakken
Artikelnr. 311134 Het afzetten van vuil wordt tegengegaan. Door de impregnatie
met een speciale olie worden de oppervlakken van roestvrijstalen apparaten optimaal schoongemaakt.
Ovengrillreinigergel Artikel-nr. 463582 Voor het reinigen van de binnenruimte. De gel is reukloos.
Microvezeldoek met honingraatstructuur Artikelnr. 460770 Bijzonder geschikt voor het schoonmaken van gevoelige
oppervlakken, zoals bijv. glas, glaskeramiek, roestvrij staal of
aluminium. Het microvezeldoekje verwijdert in één keer vochtig en vethoudend vuil.
Deurbeveiliging Artikel-nr. 612594 Om te voorkomen dat kinderen de ovendeur openen. De
beveiliging wordt vastgeschroefd op een manier die afhangt
van de apparaatdeur. Neem de aanwijzingen in het bijlageblad
bij de deurbeveiliging in acht.
Page 38

38
Kookplaat instellen
Uw kookplaat is voorzien van vier gasbranders. Hier kunt u
nalezen hoe u de gasbranders aansteekt en de kookplaat
instelt.
Gasbrander ontsteken
Plaats het branderdeksel altijd exact op de branderkelk. De
openingen op de branderkelk moeten altijd vrij zijn. Alle
branderdelen moeten droog zijn.
1. Open de bovenste afdekking. Deze moet tijdens het gebruik
van het fornuis altijd geopend zijn.
2. Draai de schakelaar van de gewenste brander naar links in
de ontstekingsstand
8. Het ontsteken begint.
3. Druk de schakelaar helemaal in en houd deze 1-3 seconden
ingedrukt. De gasbrander wordt ontstoken.
De ontstekingsbeveiliging wordt geactiveerd. Als de gasvlam
uitgaat, wordt de gastoevoer automatisch door de
ontstekingsbeveiliging onderbroken.
4. Stel de gewenste vlamhoogte in. Tussen de instelling
þ Uit en
de instelling
— is de vlam niet stabiel. U moet daarom altijd
een instelling tussen de hoogste
— en de laagste vlam ˜
kiezen.
5. Als de vlam weer uitgaat, herhaalt u de procedure vanaf stap
2.
6. Bereiding beëindigen: Draai de gasbranderschakelaar
þ naar
rechts in de stand Uit.
De ontsteking mag niet langer dan 15 seconden worden
bediend. Wanneer de brander na 15 seconden nog niet
ontstoken is, moet u minstens 1 minuut wachten. Herhaal dan
de ontstekingsprocedure.
: Let op!
Wanneer u kort na het uitschakelen van een nog warme
gasbrander de schakelaar bedient, stroomt er gas uit. Wanneer
u de schakelaar niet in de ontstekingsstand
8 zet, wordt de
gastoevoer na 60 seconden onderbroken.
De gasbrander ontsteekt niet.
Bij stroomuitval of bij vochtige bougies kunt u de gasbrander
met een gasaansteker of lucifer ontsteken.
Tabel - koken
Kies voor elke kookzone de juiste pangrootte. De diameter van
de panbodem moet met de grootte van de kookzone
overeenstemmen.
De kooktijden zijn afhankelijk van de soort, het gewicht en de
kwaliteit van de gerechten. Daarom zijn afwijkingen mogelijk.
De optimale kooktijd kunt u op basis van uw eigen ervaring
bepalen.
Mineralen en vitaminen kunnen bij het koken zeer snel hun
voedingswaarde verliezen. Gebruik daarom maar weinig water.
Zo blijven vitaminen en mineralen behouden. Kies korte
kooktijden zodat groentes steviger blijven en meer
voedingswaarde hebben.
Voorbeeld Gerecht Kookzone Kookstand
Smelten Chocolade, boter, margarine Spaarbrander Kleine vlam
Ver warmen Bouillon, groenteconserven Normale brander Kleine vlam
Verwarmen en warm
houden
Soepen Spaarbrander Kleine vlam
Stomen* Vis Normale brander Tussen grote en kleine vlam
Stomen* Aardappels en overige groen-
ten, vlees
Normale brander Tussen grote en kleine vlam
Koken* Rijst, groente, vleesgerechten
(met saus)
Normale brander grote vlamhoogte
Braden Pannenkoeken, aardappels,
schnitzels, vissticks
Extra krachtige brander Tussen grote en kleine vlam
* Wanneer u een pan met deksel gebruikt, schakel dan naar een kleinere vlam terug zodra het eten begint te koken.
Page 39

39
Oven instellen
U heeft verschillende mogelijkheden om de oven in te stellen.
Hier geven wij u uitleg over de manier waarop u de gewenste
verwarmingsmethode en temperatuur of grillstand instelt. U
kunt voor uw gerecht de tijdsduur en eindtijd instellen.
Wijzen van verwarmen en temperatuur
Voorbeeld op de afbeelding: 190 °C, boven-/onderwarmte %.
1. Met de functiekiezer de gewenste wijze van verwarmen
instellen.
2. Met de temperatuurkeuzeknop kunt u de temperatuur of de
grillstand instellen.
De oven wordt opgewarmd.
Oven uitschakelen.
Functiekeuzeknop op de nulstand draaien.
Instellingen veranderen
U kunt de verwarmingsmethode en temperatuur of grillstand op
elk moment met de daarvoor bestemde keuzeknop veranderen.
De oven moet automatisch uitschakelen
Voer nu nog een bereidingstijd (tijdsduur) voor uw gerecht in.
Voorbeeld in de afbeelding: instelling voor boven- en
onderwarmte
%, 190 °C, tijdsduur 45 minuten.
1. Met de functiekeuzeknop de verwarmingsmethode instellen.
2. Met de temperatuurkeuzeknop de temperatuur of de
grillstand instellen.
3. De toets Klok
0 indrukken.
Het symbool Tijdsduur
x knippert.
4. Met de toets
@ of de toets A de tijdsduur instellen.
De toets
@ voorgestelde waarde = 30 minuten
De toets
A voorgestelde waarde = 10 minuten
De bereidingstijd is afgelopen
Er klinkt een signaal. De oven schakelt zichzelf uit. De toets
0
tweemaal indrukken en de functiekeuzeknop uitzetten.
Instelling wijzigen
De toets Klok
0 indrukken. Met de toets + of de toets - de
tijdsduur veranderen.
Het instellen afbreken
De toets Klok
0 indrukken. De toets - indrukken tot de indicatie
op nul staat. De functiekeuzeknop uitzetten.
Tijdsduur instellen wanneer de tijd niet meer weergegeven wordt
De toets Klok
0 twee keer indrukken en instellen, zoals
beschreven bij punt 4.
De oven schakelt automatisch in en uit
Let er op dat levensmiddelen die snel bederven niet te lang in
de oven mogen staan.
Het voorbeeld in de afbeelding: instelling voor boven- en
onderwarmte
%, 190 °C. Het is 10:45 uur. De bereidingstijd
van het gerecht bedraagt 45 minuten en het moet om
12:45 uur klaar zijn.
1. Met de functiekeuzeknop de verwarmingsmethode instellen.
2. Met de temperatuurkeuzeknop de temperatuur of de
grillstand instellen.
3. De toets Klok
0 indrukken.
4. Met de toets
@ of de toets A de tijdsduur instellen.
PLQ VHF
K
PLQ
PLQ VHF
K
PLQ
Page 40

40
5. De toets Klok 0 zo vaak indrukken tot het symbool Einde y
knippert.
Op het display ziet u wanneer het gerecht klaar is.
6. Met de toets
@ de eindtijd op een later tijdstip zetten.
Na enkele seconden wordt de instelling overgenomen.
Op het display staat de eindtijd, totdat de oven start.
De bereidingstijd is afgelopen
Er klinkt een signaal. De oven schakelt zichzelf uit. De toets
0
tweemaal indrukken en de functiekeuzeknop uitzetten.
Aanwijzing: Zolang er een symbool knippert kunt u wijzigen.
Wanneer het symbool verlicht is, is de instelling overgenomen.
Snelvoorverwarming
Met de snelvoorverwarming bereikt de oven de ingestelde
temperatuur bijzonder snel.
Gebruik de snelvoorverwarming bij een ingestelde temperatuur
boven 100 °C.
Om een gelijkmatig resultaat te krijgen, doet u het gerecht pas
in de binnenruimte wanneer het snel voorverwarmen beëindigd
is.
1. De functiekeuzeknop op
I zetten.
2. Met de temperatuurkeuzeknop de gewenste temperatuur
instellen.
Op het display is het symbool
p verlicht. De oven begint op te
warmen.
Het snel voorverwarmen is beëindigd
Het symbool
p verdwijnt van het display. Plaats uw gerecht in
de oven en stel de gewenste verwarmingsmethode in.
Tijd instellen
Na de eerste aansluiting of na een stroomonderbreking
knipperen op het display het symbool
0 en drie nullen. Stel de
tijd in. De functiekeuzeknop dient uitgeschakeld te zijn.
Zo stelt u in
1. De toets Klok
0 indrukken.
Op het display verschijnt 12.00 uur en het symbool
0
knippert.
2. Met de toets + of de toets - de tijd instellen.
Na enkele seconden wordt de tijd overgenomen. Het
symbool
0 verdwijnt.
Wijzigen van bijv. zomer- in wintertijd
De toets Klok 0 twee keer indrukken en wijzigen met de toets
+ of de toets -.
Kookwekker instellen
U kunt de wekker gebruiken als een kookwekker. Hij loopt
onafhankelijk van de oven. De wekker heeft een speciaal
signaal. Zo hoort u of de wekker of een tijdsduur van de oven
afgelopen is. U kunt de wekker ook instellen wanneer het
kinderslot actief is.
Zo stelt u in
1. De toets Kookwekker
S indrukken.
Het symbool
S knippert.
2. Met de toets + of de toets - de wekkertijd instellen.
Toets + voorgestelde waarde = 10 minuten.
Toets + voorgestelde waarde = 5 minuten.
Na enige seconden start de wekker. Op het display is het
symbool
S verlicht. De tijd loopt zichtbaar af.
Aan het einde van de ingestelde tijd
Er klinkt een signaal. De toets Kookwekker S indrukken. De
indicatie van de wekker gaat uit.
Wekkertijd veranderen
De toets Kookwekker
S indrukken. Met de toets + of de toets -
de tijd veranderen.
Instelling wissen
De toets Kookwekker
S indrukken. De toets - indrukken tot de
indicatie op nul staat.
De wekker en tijdsduur lopen gelijktijdig af
De symbolen zijn verlicht. De wekkertijd loopt zichtbaar op het
display af.
Resterende tijd
x, Eindtijd y of Tijd 0 opvragen:
de toets Tijd
0 zo vaak indrukken tot het betreffende symbool
verschijnt.
De opgevraagde waarde verschijnt enkele seconden op het
display.
PLQ VHF
K
PLQ
PLQ VHF
K
PLQ
Page 41

41
Kinderslot
Oven
Om te voorkomen dat kinderen per ongeluk de oven
inschakelen, is deze voorzien van een kinderslot.
Kinderslot in- en uitschakelen
De functiekeuzeknop dient uitgeschakeld te zijn.
Inschakelen: de toets Sleutel
C indrukken tot op het display
het symbool
C verschijnt. Dit duurt ca. 4 seconden.
Uitschakelen: de toets Sleutel
C indrukken tot het
symbool
C verdwijnt.
Aanwijzingen
■ De wekker en de tijd kunt u altijd instellen.
■ Na een stroomonderbreking is het ingestelde kinderslot
opgeheven.
Onderhoud en reiniging
Wanneer u de kookplaat en de oven goed verzorgt en
schoonmaakt, blijven ze lang mooi en intact. Hieronder leggen
wij u uit hoe u beide op de juiste manier verzorgt en
schoonmaakt.
Aanwijzingen
■ Geringe kleurverschillen op de voorzijde van de oven zijn het
gevolg van het gebruik van verschillende materialen, zoals
glas, kunststof en metaal.
■ Schaduwen op de ruit van de deur, die eruit zien als strepen,
zijn lichtreflexen van de ovenlamp.
■ Het email wordt ingebrand op zeer hoge temperaturen.
Hierdoor kunnen er kleine kleurverschillen ontstaan. Dit is
normaal en heeft geen nadelige invloed op de werking. De
smalle randen van de bakplaten kunnen niet volledig worden
geëmailleerd. Ze kunnen daarom ruw zijn. De bescherming
tegen corrosie blijft hierbij intact.
Bovenste glasafdekking
Voordat u de bovenste afdekking opent, moet u eerst eventueel
gemorst vuil met een doek verwijderen.
Voor de reiniging kan het beste een glasreiniger worden
gebruikt
Verwijder de bovenste afdekking voor de reiniging. Houd de
afdekking aan weerszijden vast en trek deze naar boven.
Indien de scharnieren van de afdekking losraken, moet u op de
letters op de scharnieren letten. Het scharnier met de letter R
moet rechts, het scharnier met de letter L moet links worden
gemonteerd.
Monteer na het reinigen de bovenste afdekking weer in
omgekeerde volgorde.
Sluit de bovenste afdekking pas als de kookplaat is afgekoeld.
Schoonmaakmiddelen
Om te voorkomen dat de verschillende oppervlakken door
verkeerde reinigingsmiddelen beschadigd raken, moet u zich
aan het volgende houden.
Gebruik bij de reiniging van de kookplaat
■ geen onverdund afwasmiddel of reinigingsmiddelen voor de
vaatwasmachine,
■ geen schuursponsjes,
■ geen agressieve reinigingsmiddelen zoals ovensprays of
middelen om vlekken te verwijderen,
■ geen hogedrukreiniger of stoomstraler.
■ Reinig losse onderdelen niet in de vaatwasmachine.
Gebruik bij de reiniging van de oven
■ geen scherpe of schurende reinigingsmiddelen,
■ geen reinigingsmiddelen met een hoog alcoholpercentage,
■ geen schuursponsjes,
■ geen hogedrukreiniger of stoomstraler.
■ Reinig losse onderdelen niet in de vaatwasmachine.
Was nieuwe sponsen voor het eerste gebruik goed uit.
Roestvrijstalen fronten
Reinig deze met een vochtige doek en wat afwasmiddel. Veeg bij roestvrijstalen fronten altijd in de slijprichting. Anders kunnen er krassen ontstaan. Droog met een zachte doek af. Kalk, vet, zetmeel en eiwitvlekken moeten altijd onmiddellijk worden verwijderd. Gebruik geen schuurmiddelen, schuursponsjes of grove
reinigingsdoeken. De roestvrijstalen oppervlakken kunnen met speciale onderhoudsmiddelen gepoetst worden. Neem de instructies van de fabrikant in acht. Speciale reinigingsmiddelen voor roestvrij staal zijn bij de
servicedienst of in de speciaalzaak verkrijgbaar.
Geëmailleerde en
geglazuurde oppervlakken
Reinig deze met een vochtige doek en wat afwasmiddel. Droog met een zachte doek af.
Page 42

42
Inschuifrails verwijderen en bevestigen
U kunt de rails voor het reinigen verwijderen. De oven dient
afgekoeld te zijn.
Inschuifrails verwijderen
1. Rail voor optillen
2. en uit de geleiders nemen (Afbeelding A).
3. Hierna de hele rail naar voren trekken
4. en verwijderen (Afbeelding B).
Maak de rails schoon met zeepsop en een
schoonmaaksponsje. Gebruik bij hardnekkig vuil een borstel.
Inhangroosters bevestigen
1. Inhangrooster eerst in de achterste bus plaatsen, iets naar
achteren drukken (Afbeelding A)
2. en vervolgens in de voorste bus plaatsen (Afbeelding B).
De inschuifrails passen links en rechts. Let erop dat evenals in
afbeelding B hoogte 1 en 2 beneden is en hoogte 3, 4 en 5
boven.
Gasbranders en
roosters van de
kookzones
Niet in de vaatwasmachine reinigen. Neem het rooster van zijn plaats en reinig het met een spons, afwasmiddel en warm water. Verwijder de branderkelk en het branderdeksel. Maak deze schoon met een spons
met wat warm water en afwasmiddel. Let erop dat de openingen van de branderkelken waar het gas uitstroomt schoon en niet verstopt zijn. Maak de ontstekers schoon met een klein, zacht borsteltje. De gasbranders functioneren alleen als de ontstekers schoon zijn. Verwijder etensresten met een vochtige doek en
wat afwasmiddel uit de branderkommen. Gebruik hierbij weinig water. Er mag geen water in het apparaat
komen. Let erop dat de opening van de sproeier tijdens het schoonmaken niet verstopt of beschadigd
raakt. Droog alle onderdelen na het schoonmaken af en plaats de branderdeksels exact op de branderkelken. Als de onderdelen niet op de juiste wijze worden geplaatst, zal dat het ontsteken van de branders
bemoeilijken. De branderdeksels zijn met een laag zwart email bedekt. Door de grote hitte kan deze kleur
met de tijd veranderen. Dit zal de werking van de branders echter niet beïnvloeden. Leg het rooster weer
op zijn plaats.
Elektrische kookplaat (optie)
Reinig deze met de harde kant van een schuursponsje en met wat vloeibaar schuurmiddel. Schakel na het
reinigen de kookplaat kort in om deze te laten drogen. Vochtige kookplaten gaan op den duur roesten.
Smeer er vervolgens een onderhoudsmiddel op. Overgekookt voedsel en etensresten moeten altijd direct
worden verwijderd.
Metalen ring van de
elektrische kookplaat (optie)
De metalen ring kan op den duur verkleuren. Het is mogelijk om de oorspronkelijke kleur te herstellen.
Maak de ring schoon met de harde kant van een schuurspons en met wat vloeibaar schuurmiddel. Let hierbij op dat de aangrenzende oppervlakken niet afgeschuurd worden. De oppervlakken kunnen anders
beschadigd raken.
Knoppen Reinig deze met een vochtige doek en wat afwasmiddel. Droog met een zachte doek af.
Deurglas Dit kan met een glasreiniger worden gereinigd. Gebruik geen agressieve reinigingsmiddelen of schrapers.
Deze kunnen het glasoppervlak bekrassen en beschadigen.
Dichting Reinig deze met een vochtige doek. Droog met een zachte doek af.
Binnenruimte van de
oven
Reinig deze met warm water of met azijn verdund water. Wanneer de oven erg vuil is: Gebruik een ovenreiniger. Deze mag alleen op afgekoelde oppervlakken worden gebruikt.
Glazen kapje op de
ovenlamp
Reinig deze met een vochtige doek en wat afwasmiddel. Droog met een zachte doek af.
Toebehoren Laat deze in warm zeepsop inweken. Reinig deze met een borstel of spons.
Aluminium bakblik
(optie)
Niet in de vaatwasmachine reinigen. Gebruik in geen geval ovenreiniger. Om krassen te vermijden mogen
de metalen oppervlakken nooit met een mes of soortgelijk scherp voorwerp in aanraking komen. Veeg een
zachte doek voor glas met zeepsop of een pluisvrije microvezeldoek horizontaal en zonder druk over de
oppervlakken. Droog met een zachte doek af. Gebruik geen schuurmiddelen, schuursponsjes of grove reinigingsdoeken. Deze maken krassen op het bakblik.
Kinderbeveiliging
(optie)
Indien een kinderbeveiliging op de ovendeur is aangebracht, moet deze voor het reinigen worden verwijderd. Laat alle kunststofonderdelen in warm zeepsop weken en was deze met een spons af. Droog met een
zachte doek af. Bij sterke vervuiling functioneert de kinderbeveiliging niet meer goed.
Ovenlade (optie) Reinig deze met een vochtige doek en wat afwasmiddel. Droog met een zachte doek af.
Toebehoren Laat deze in warm zeepsop inweken. Reinig deze met een borstel of spons.
%
$
%
$
Page 43

43
Ovendeur verwijderen en inbrengen
Om de deurruiten schoon te maken en te demonteren, kunt u
de ovendeur verwijderen.
De scharnieren van de ovendeur zijn alle voorzien van een
blokkeerhendel. Wanneer de blokkeerhendel is dichtgeklapt
(Afbeelding A), is de ovendeur beveiligd. Hij kan niet worden
verwijderd. Wanneer de blokkeerhendels voor het verwijderen
van de ovendeur opengeklapt zijn (Afbeelding B), zijn de
scharnieren beveiligd. Ze kunnen niet dichtklappen.
: Risico van letsel!
Wanneer de scharnieren niet beveiligd zijn, klappen ze met
grote kracht dicht. Let erop dat de blokkeerhendels altijd
helemaal dichtgeklapt zijn, en bij het verwijderen van de
ovendeur helemaal opengeklapt.
Deur verwijderen
1. Ovendeur helemaal openen.
2. Beide blokkeerhendels links en rechts openklappen
(Afbeelding A).
3. Ovendeur tot de aanslag sluiten. Met beide handen links en
rechts vastpakken. Nog wat verder sluiten en uitnemen
(Afbeelding B).
Deur inbrengen
De ovendeur in de omgekeerde volgorde weer inbrengen.
1. Let er bij het inbrengen van de ovendeur op dat beide
scharnieren recht in de opening worden geleid
(Afbeelding A).
2. De keep op het scharnier dient aan beide kanten in te klikken
(Afbeelding B).
3. Beide blokkeerhendels weer dichtklappen (Afbeelding C).
Ovendeur sluiten.
: Risico van letsel!
Risico van letsel! Wanneer de ovendeur er per ongeluk uitvalt
of een scharnier dichtklapt, het scharnier niet met uw hand
aanraken. Neem contact op met de klantenservice.
Glazen deurplaten uit- en inbouwen
Om de glazen platen in de ovendeur beter te kunnen reinigen,
kunnen deze worden uitgebouwd.
Uitbouw
1. Hang de ovendeur uit. Zie de instructies in het hoofdstuk
Ovendeur uithangen. Leg de ovendeur met de greep naar
onderen op een doek (afbeelding A).
2. Draai eerst de onderste twee schroeven en vervolgens de
bovenste twee schroeven linksom (afbeelding B).
3. Verwijder de afdekking (afbeelding C).
De gedemonteerde onderdelen mogen niet worden gewassen.
Reinig de glazen platen met een glasreiniger en een zachte
doek.
: Risico van letsel!
Wanneer er krassen op het glas van de apparaatdeur zitten,
kan dit springen. Geen schraper, scherpe of schurende
schoonmaakmiddelen gebruiken.
%
$
%
$
%
$
&
%
$
&
Page 44

44
Inbouw
1. Plaats de afdekking weer (afbeelding A).
2. Draai eerst de onderste twee schroeven en vervolgens de
bovenste twee schroeven weer vast (afbeelding B).
3. Ovendeur inhangen. Zie de instructies in het hoofdstuk
Ovendeur inhangen.
Gebruik de oven pas weer als de glazen platen correct zijn
ingebouwd.
Wat te doen bij storingen?
Storingen worden vaak veroorzaakt door een kleinigheid.
Raadpleeg de volgende tabel voordat u contact opneemt met
de servicedienst. Wellicht kunt u zelf de storing verhelpen.
Storingstabel
Wanneer een gerecht niet goed gelukt is, lees hier dan het
hoofdstuk Voor u in onze kookstudio getest op na. Hier vindt u
vele tips en aanwijzingen voor het koken.
: Kans op een elektrische schok!
Ondeskundige reparaties zijn gevaarlijk. Reparaties mogen
uitsluitend worden uitgevoerd door technici die zijn
geïnstrueerd door de klantenservice.
Ovenlamp aan het plafond vervangen
Als de ovenlamp is uitgevallen, moet deze worden vervangen.
Temperatuurbestendige reservelampen, 40 watt, kunt u krijgen
bij de klantenservice of uw speciaalzaak. Gebruik uitsluitend
originele lampen.
: Kans op een elektrische schok!
Zekering in de meterkast uitschakelen.
1. Theedoek in de onverwarmde oven leggen, om schade te
voorkomen.
2. Glazen afscherming eruit halen door de schroeven naar links
te draaien.
3. Lamp vervangen door een van hetzelfde type.
4. Glazen afscherming er weer inschroeven.
5. Theedoek eruit nemen en de zekering inschakelen.
Glazen afscherming
Als de glazen afscherming beschadigd is, dient hij te worden
vervangen. Passende glazen afschermingen zijn verkrijgbaar bij
de klantenservice. Vermeld a.u.b. het productnummer (Enr.) en
het fabricagenummer (FD-nr.) van uw apparaat.
%
$
Storing Mogelijke oor-
zaak
Oplossing/aanwijzing
De oven functioneert niet.
De zekering is
defect.
Kijk in de meterkast na of
de zekering in orde is.
De stroom is uitgevallen.
Controleer of het keukenlicht of andere keukenapparaten functioneren.
De tijdsindicatie knippert.
De stroom is uitgevallen.
Stel de tijd opnieuw in.
De oven warmt
niet op.
Er zit stof op de
contacten.
Draai de schakelaars meerdere keren heen en weer.
De gasbrander
ontsteekt niet.
Stroomonderbreking of vochtige
ontstekingskaarsen.
Steek de gasbranders aan
met een gasaansteker of
een lucifer.
Page 45

45
Servicedienst
Wanneer uw apparaat gerepareerd moet worden, staat onze
servicedienst voor u klaar. Wij vinden altijd een passende
oplossing, ook om onnodig bezoek van een technicus te
voorkomen.
Enummer en FDnummer
Geef aan de klantenservice altijd het productnummer (E-nr.) en
het fabricagenummer (FD-nr.) van uw apparaat op, zodat wij u
goed van dienst kunnen zijn. Het typeplaatje met de nummers
vindt u aan de zijkant van de ovendeur. Om niet te lang te
hoeven zoeken wanneer u de klantenservice nodig heeft, kunt u
hier direct de gegevens van uw apparaat en het
telefoonnummer van de servicedienst invullen.
Let erop dat het bezoek van een technicus van de servicedienst
in het geval van een verkeerde bediening ook tijdens de
garantietijd kosten met zich meebrengt.
De contactgegevens in alle landen vindt u in de bijgesloten lijst
met Servicedienstadressen.
Verzoek om reparatie en advies bij storingen
Vertrouw op de competentie van de producent. Zo bent u er
zeker van dat de reparatie wordt uitgevoerd door geschoolde
onderhoudstechnici, die beschikken over de originele
onderdelen voor uw huishoudelijke apparaten.
Energie en milieutips
Hier krijgt u tips over de manier waarop u bij het bakken en
braden in de oven en bij het koken op de kookplaat energie
bespaart en het apparaat op de juiste manier afvoert.
Energie besparen met de oven
■ De oven alleen voorverwarmen als dit in het recept of in de
tabellen van de gebruiksaanwijzing is opgegeven.
■ Gebruik donkere, zwart gelakte of geëmailleerde bakvormen.
Deze nemen de hitte bijzonder goed op.
■ Open de ovendeur tijdens het garen, bakken of braden zo
weinig mogelijk.
■ Meerdere taarten of cakes kunt u het beste na elkaar bakken.
De oven is dan nog warm. Daardoor is de baktijd voor het
tweede gerecht korter. U kunt ook 2 rechthoekige bakvormen
naast elkaar in de oven plaatsen.
■ Bij langere bereidingstijden kunt u de oven 10 minuten voor
het einde van de bereidingstijd uitzetten en de restwarmte
gebruiken voor het afbakken.
Energie besparen met de gas-kookplaat
■ Kies altijd een pan die de juiste grootte heeft voor uw
gerechten. Een grote, slechts weinig gevulde pan heeft veel
energie nodig.
■ Sluit de pan altijd af met een passend deksel.
■ De gasvlam moet altijd contact met de bodem van de pan
hebben.
Milieuvriendelijk afvoeren
Voer de verpakking op een milieuvriendelijke manier af.
Voor u in onze kookstudio uitgetest.
Hier vindt u een keur aan gerechten en de daarbij behorende
optimale instellingen. Wij laten u zien welke
verwarmingsmethode en temperatuur het meest geschikt is
voor uw gerecht. U krijgt informatie over de juiste toebehoren
en de hoogte waarop ze ingeschoven dienen te worden. U
krijgt tips over de te gebruiken vormen en de bereiding.
Aanwijzingen
■ De tabel geldt altijd voor producten die in de onverwarmde
en lege binnenruimte worden geplaatst.
Alleen voorverwarmen wanneer dit in de tabel wordt
aangegeven. Leg pas na het voorverwarmen bakpapier op
de toebehoren.
■ De aangegeven tijden in de tabellen zijn richtwaarden. Ze zijn
afhankelijk van de kwaliteit en de aard van de
levensmiddelen.
■ Maak gebruik van de meegeleverde toebehoren. Bij de
klantenservice of in de vakhandel kunt u toebehoren of extra
toebehoren kopen.
Verwijder voor het gebruik alle toebehoren en vormen die u
niet nodig heeft uit de binnenruimte.
■ Gebruik altijd een pannenlap wanneer u hete toebehoren of
vormen uit de oven neemt.
Gebak
Bakken op één niveau
Met boven en onderwarmte
% lukt het gebak het beste.
Wanneer u met 3D-hetelucht
: bakt, dient u de volgende
inschuifhoogtes voor de toebehoren te gebruiken:
■ Gebak in vormen: hoogte
■ Gebak op de plaat: hoogte
Enr.
FDnr.
Servicedienst O
NL 088 424 4010
B 070 222 141
Dit apparaat beantwoordt aan de Europese richtlijn
2002/96/EG inzake gebruikte elektro en elektronicaapparatuur (WEEE - waste electrical and electronic
equipment). De richtlijn biedt het kader voor de
terugname en verwerking van gebruikte apparaten
geldend voor de hele EU.
Page 46

46
Bakken op meerdere niveaus
Gebruik 3Dhetelucht
:.
Inschuifhoogtes bij het bakken op 2 niveaus
■ Braadslede: hoogte
■ Bakplaat: hoogte
Inschuifhoogtes bij het bakken op 3 niveaus
■ Bakplaat: hoogte 5
■ Braadslede: hoogte
■ Bakplaat: hoogte
Bakplaten die gelijktijdig in de oven worden gedaan, hoeven
niet op hetzelfde moment klaar te zijn.
In de tabellen vindt u talrijke voorstellen voor uw gerechten.
Wanneer u met 3 rechthoekige bakvormen tegelijk bakt, zet
deze dan zoals op de afbeelding aangegeven op het rooster.
Bakvormen
Het meest geschikt zijn donkere metalen bakvormen.
Bij lichte bakvormen van dunwandig metaal of glazen vormen is
de baktijd langer en wordt het gebak niet zo gelijkmatig bruin.
Wanneer u siliconen vormen wilt gebruiken, raadpleeg dan de
informatie en de recepten van de fabrikant. Vormen van
silicone zijn vaak kleiner dan normale vormen. De deegvormen
en receptgegevens kunnen afwijken.
Tabellen
In de tabellen vindt u voor de verschillende soorten gebak de
optimale verwarmingsmethode. Temperatuur en tijdsduur zijn
afhankelijk van de hoeveelheid en de kwaliteit van het deeg. In
de tabellen zijn bereiken aangegeven. Probeer het eerst met de
laagste waarde. Een lage temperatuur zorgt ervoor dat het
gerecht gelijkmatiger bruin wordt. Stel de oven indien nodig de
volgende keer hoger in.
De baktijden worden 5 tot 10 minuten korter wanneer u
voorverwarmt.
Bijkomende informatie vindt u onder Tips voor het bakken na
de tabellen.
Gebak in vormen Vorm Hoogte Verwar-
mingsmethode
Temper at uur
in °C
Tijdsduur
in minuten
Cake, eenvoudig Krans/rechthoekige vorm 2
:
160-180 40-50
3 cakevormen 3+1
:
140-160 60-80
Cake, fijn Krans/rechthoekige vorm 2
%
150-170 60-70
Taartbodem, roerdeeg Vorm vruchtentaartbodem 2
%
150-170 20-30
Vruchtentaart fijn, roerdeeg Springvorm/tulbandvorm 2
%
160-180 50-60
Biscuittaart Springvorm 2
%
160-180 30-40
Bodem zandtaartdeeg met rand Springvorm 1
%
170-190 25-35
Vruchten- of kwarktaart, bodem van
zandtaartdeeg*
Springvorm 1
%
170-190 70-90
Zwitserse vruchtentaart Pizzaplaat 1
%
220-240 35-45
Hartig gebak (bijv. quiche/uientaart)* Springvorm 1
%
180-200 50-60
Pizza, dunne bodem met weinig bedekking (voorverwarmen)
Pizzaplaat 1
%
250-270 10-15
* Gebak ca. 20 minuten in de uitgeschakelde, gesloten oven laten afkoelen.
Gebak op de plaat Toebehoren Hoogte Verwar-
mingsmethode
Temper at uur
in °C
Tijdsduur
in minuten
Roer of gistdeeg met droge bedekking Bakplaat 2
%
170-190 20-30
Braadslede + bakplaat 3+1
:
150-170 35-45
Roer- of gistdeeg met vochtige bedekking, vruchten
Braadslede 3
%
160-180 40-50
Braadslede + bakplaat 3+1
:
150-170 50-60
Zwitserse vruchtentaart Braadslede 2
%
210-230 40-50
Biscuitrol (voorverwarmen) Bakplaat 2
%
190-210 15-20
Broodvlecht van 500 g bloem Bakplaat 2
%
160-180 30-40
Kerststol van 500 g bloem Bakplaat 3
%
160-180 60-70
Kerststol van 1 kg bloem Bakplaat 3
%
150-170 90-100
Strudel, zoet Braadslede 2
%
180-200 55-65
Page 47

47
Brood en broodjes
Bij het bakken van brood de oven voorverwarmen als er niets
anders is aangegeven.
Giet nooit water in de hete oven.
Bij het bakken op 2 niveaus de braadslede altijd boven de
bakplaat inschuiven.
Tips voor het bakken
Börek Braadslede 2
%
180-200 40-50
Pizza Bakplaat 2
%
220-240 15-25
Braadslede + bakplaat 3+1
:
180-200 35-45
Klein gebak Toebehoren Hoogte Verwar-
mingsmethode
Temperatuur
in °C
Tijdsduur
in minuten
Koekjes Bakplaat 3
:
140-160 15-25
Braadslede + bakplaat 3+1
:
130-150 25-35
2 bakplaten + braadslede 5+3+1
:
130-150 30-40
Sprits (voorverwarmen) Bakplaat 3
%
140-150 30-40
Bakplaat 3
:
140-150 30-40
Braadslede + bakplaat 3+1
:
140-150 30-45
2 bakplaten + braadslede 5+3+1
:
130-140 35-50
Bitterkoekjes Bakplaat 2
%
110-130 30-40
Braadslede + bakplaat 3+1
:
100-120 35-45
2 bakplaten + braadslede 5+3+1
:
100-120 40-50
Schuimgebak Bakplaat 3
:
80-100 130-150
Deeg van bijv. soesjes Bakplaat 2
%
200-220 30-40
Bladerdeeggebak Bakplaat 3
:
180-200 20-30
Braadslede + bakplaat 3+1
:
180-200 25-35
2 bakplaten + braadslede 5+3+1
:
160-180 35-45
Gistdeeggebak Bakplaat 3
%
180-200 20-30
Braadslede + bakplaat 3+1
:
170-190 25-35
Gebak op de plaat Toebehoren Hoogte Verwar-
mingsmethode
Temperatuur
in °C
Tijdsduur
in minuten
Brood en broodjes Toebehoren Hoogte Verwar-
mingsmethode
Temperatuur
in °C
Tijdsduur
in minuten
Gistbrood van 1,2 kg bloem Braadslede 2
%
270
200
8
35-45
Zuurdeegbrood van 1,2 kg
bloem
Braadslede 2
%
270
200
8
40-50
Broodjes (niet voorverwarmen) Bakplaat 3
%
210-230 20-30
Broodjes van gistdeeg, zoet Bakplaat 3
%
170-190 15-20
Braadslede + bakplaat 3+1
:
160-180 20-30
U wilt bakken volgens uw eigen recept. Raadpleeg de baktabellen voor gelijksoortig gebak.
Zo stelt u vast of de cake goed doorbakken is.
Prik ca. 10 voor het einde van de in het recept vermelde baktijd met een stokje in het
hoogste punt van het gebak. Wanneer er geen deeg meer aan de prikker zit, is het
gebak klaar.
Het gebak zakt in. Voeg de volgende keer minder vloeistof toe of stel de oventemperatuur 10 graden lager
in.Houd rekening met de omroertijden in het recept.
Het gebak is in het midden hoog gerezen en lager bij de randen.
De rand van de springvorm niet invetten. Na het bakken maakt u het gebak voorzichtig
los met een mes.
Het gebak wordt te donker aan de
bovenkant.
Plaats het verder naar binnen, kies een lagere temperatuur en bak het iets langer.
Page 48

48
Vlees, gevogelte, vis
Vormen
U kunt alle vormen gebruiken die hittebestendig zijn. Voor grote
stukken vlees is ook de braadslede geschikt.
Het meest geschikt zijn vormen van glas. Let erop dat het
deksel voor de pan past en goed sluit
Gebruikt u geëmailleerde braadpannen, voeg dan wat meer
vloeistof toe.
Bij braadgerei van roestvrij staal wordt het gerecht niet zo erg
bruin en kan het vlees wat minder gaar zijn. Houd langere
bereidingstijden aan.
Opgaven in de tabellen:
Vorm zonder deksel = open
Vorm met deksel = gesloten
Zet de vorm altijd midden op het rooster.
Zet hete vormen van glas op een droge onderzetter. Is de
ondergrond nat of koud, dan kan het glas knappen.
Braden
Voeg aan mager vlees een beetje vloeistof toe. De bodem van
de vorm dient ca. ½ cm bedekt te zijn.
Voeg aan stoofvlees royaal vloeistof toe. De bodem van de
vorm dient ca 1 - 2 cm bedekt te zijn.
De hoeveelheid vloeistof is afhankelijk van het soort vlees en
het materiaal van de vormen. Wanneer u vlees in geëmailleerde
braadvormen klaarmaakt, is er wat meer vloeistof nodig dan in
glazen vormen.
Braadsledes van roestvrij staal zijn slechts beperkt geschikt.
Het vlees gaart langzamer en wordt minder bruin. Houd een
hogere temperatuur en/of een langere bereidingstijd aan.
Grillen
Verwarm bij het grillen ca. 3 minuten voor alvorens het gerecht
in de binnenruimte te plaatsen.
Gril altijd in een gesloten oven.
Gebruik zoveel mogelijk gelijke stukken om te grillen. Zo
worden ze gelijkmatig bruin en blijven ze lekker mals.
Keer de grillstukken na
Z van de bereidingstijd.
Zout de steaks pas na het grillen.
Leg de te grillen stukken vlees rechtstreeks op het rooster. Als
u één stuk vlees wilt grillen, lukt dit het best wanneer u het
midden op het rooster legt.
Plaats ook de braadslede op hoogte 1.Het vleessap wordt
opgevangen en de oven blijft schoner.
De bakplaat of braadslede bij het grillen niet op hoogte 4 of 5
plaatsen. Door de sterke hitte vervormen ze en bij verwijdering
kunnen ze de binnenruimte beschadigen.
Het grillelement wordt steeds weer in- en uitgeschakeld. Dit is
normaal. Hoe vaak dit gebeurt, is afhankelijk van de ingestelde
grillstand.
Vlees
Draai stukken vlees na de helft van de tijd om.
Als het vlees klaar is, moet het nog 10 minuten in de
uitgeschakelde, gesloten oven blijven. Het vocht kan zich dan
beter verdelen.
Wikkel rosbief na de bereiding in aluminiumfolie en laat het
10 minuten in de oven nagaren.
Snijd bij varkensvlees met zwoerd, het zwoerd kruisgewijs in en
leg het vlees eerst met het zwoerd naar beneden in de vorm.
Het gebak is te droog. Als het gebak klaar is, prikt u er met een prikker kleine gaatjes in. Vervolgens bedruppelt
u het met vruchtensap of alcohol. Stel de temperatuur de volgende keer 10 graden
hoger in en houd een kortere baktijd aan.
Het brood of het gebak (bijv. kwarktaart)
ziet er goed uit, maar is van binnen klef
(zacht, doortrokken met waterstrepen).
Gebruik de volgende keer wat minder vloeistof en bak iets langer bij een wat lagere temperatuur. Bij gebak met een vochtige bovenkant bakt u eerst de bodem voor. Bestrooi
het met amandelen of paneermeel en doe dan de bovenlaag erop. Houd u aan de recepten en baktijden.
Het gebak is ongelijkmatig bruin geworden.
Kies een wat lagere temperatuur, dan wordt het gebak gelijkmatiger bruin. Gebruik bij
kwetsbaar gebak boven- en onderwarmte
% op één niveau. Ook bakpapier dat uitsteekt
kan de luchtcirculatie beïnvloeden. Knip het bakpapier altijd zodanig af dat het goed op
de plaat past.
Het vruchtengebak is te licht aan de
onderkant.
Plaats het gebak de volgende keer één niveau lager.
Het sap van de vruchten stroomt over. Gebruik, indien beschikbaar, de volgende keer de diepere braadslede.
Klein gebak van gistdeeg plakt bij het
bakken aan elkaar.
Tussen de gebakstukken dient een afstand van ca. 2 cm te zijn. Zo is er voldoende
plaats en kan het gebak goed rijzen en helemaal bruin worden.
U hebt op meerdere niveaus gebakken.
Op de bovenste plaat is het gebak donkerder dan op de onderste.
Gebruik voor het bakken op meerdere niveaus altijd 3Dhetelucht
:. Bakplaten die
gelijktijdig in de oven worden gedaan, hoeven niet op hetzelfde moment klaar te zijn.
Bij het bakken van vochtig gebak ontstaat er condenswater.
Bij het bakken kan waterdamp ontstaan. Deze komt vrij via de deur. De waterdamp kan
neerslaan op het bedieningspaneel of op het meubilair en als condens neerdruppelen.
Dit is normaal.
Vlees Gewicht Toebehoren en
vormen
Hoogte Verwar-
mingsmethode
Temperatuur
in °C, grillstand
Tijdsduur
in minuten
Rundvlees
Gestoofd rundvlees 1,0 kg gesloten 2
%
200-220 120
1,5 kg 2
%
190-210 140
2,0 kg 2
%
180-200 160
Runderfilet, medium 1,0 kg open 2
%
210-230 70
1,5 kg 2
%
200-220 80
Page 49

49
Gevogelte
De gewichtsgegevens in de tabel hebben betrekking op
ongevuld, panklaar gevogelte.
Leg het hele gevogelte eerst met de borstzijde naar beneden
op het rooster. Na
Z van de opgegeven tijd keren.
Braadstukken, zoals kalkoenrollade of kalkoenfilet, halverwege
de opgegeven tijd keren. Stukken gevogelte na
Z van de tijd
keren.
Prik bij eend of gans het vel onder de vleugels in.Zo kan het vet
weglopen.
Gevogelte wordt bijzonder knapperig bruin als u het tegen het
einde van de bereidingstijd bestrijkt met boter, zout water of
sinaasappelsap.
Rosbief, medium 1,0 kg open 1
4
210-230 50
Steaks, medium, 3 cm dik Rooster 5
(
315
Kalfsvlees
Gebraden kalfsvlees 1,0 kg open 2
%
190-210 100
2,0 kg 2
%
170-190 120
Varkensvlees
Braadstuk zonder zwoerd (bijv.
halsstuk)
1,0 kg open 1
4
200-220 100
1,5 kg 1
4
190-210 140
2,0 kg 1
4
180-200 160
Braadstuk, zonder zwoerd
(bijv. schouder)
1,0 kg open 1
4
200-220 120
1,5 kg 1
4
190-210 150
2,0 kg 1
4
180-200 180
Casselerrib met been 1,0 kg gesloten 2
%
210-230 70
Lamsvlees
Lamsbout zonder been, medium 1,5 kg open 1
4
150-170 120
Gehakt
Gehakt van 500 g
vlees
open 1
4
170-190 70
Worstjes
Worstjes Rooster 4
(
315
Vlees Gewicht Toebehoren en
vormen
Hoogte Verwar-
mingsmethode
Temperatuur
in °C, grillstand
Tijdsduur
in minuten
Gevogelte Gewicht Toebehoren en
vormen
Hoogte Verwar-
mingsmethode
Temperatuur
in °C
Tijdsduur
in minuten
Kip, heel 1,2 kg Rooster 2
4
200-220 60-70
Poularde, heel 1,6 kg Rooster 2
4
190-210 80-90
Kip, gehalveerd elk 500 g Rooster 2
4
200-220 40-50
Stukken kip elk 300 g Rooster 3
4
200-220 30-40
Eend, heel 2,0 kg Rooster 2
4
170-190 90-100
Gans, heel 3,5-4,0 kg Rooster 2
4
160-170 110-130
Kalkoen, heel 3,0 kg Rooster 2
4
170-190 80-100
Kalkoenbout 1,0 kg Rooster 2
4
180-200 90-100
Page 50

50
Vis
Keer visstukken na
Z van de tijd.
Hele vis hoeft niet gekeerd te worden. Plaats de hele vis in de
zwemstand, met de rugvin naar boven, in de oven. Een
ingesneden aardappel of een kleine ovenvaste vorm in de buik
van de vis maakt hem stabieler.
Grilt u direct op het rooster, plaats dan ook de braadslede op
hoogte 1. De vloeistof wordt opgevangen en de oven blijft
schoner.
Tips voor het braden en grillen
Ovenschotels, gegratineerde gerechten, toast
Grilt u direct op het rooster, plaats dan ook de braadslede op
hoogte 1. De oven blijft schoner.
Plaats de vormen altijd op het rooster.
De bereidingstoestand van een ovenschotel is afhankelijk van
de grootte van de vorm en de hoogte van het gerecht. De
opgaven in de tabellen zijn slechts richtwaarden.
Vis Gewicht Toebehoren en
vormen
Hoogte Verwar-
mingsmethode
Temper at uur
in °C, grillstand
Tijdsduur
in minuten
Vis, heel elk ca. 300 g Rooster 2
(
3 20-25
1,0 kg Rooster 2
4
180-200 45-50
1,5 kg Rooster 2
4
170-190 50-60
Viskotelet, 3 cm dik Rooster 3
(
2 20-25
Voor het gewicht van het vlees staan
geen gegevens in de tabel.
Maak uw keuze in overeenstemming met het eerstvolgende, lagere gewicht en houd een
langere tijd aan.
Hoe kunt u vaststellen of het vlees klaar
is?
Gebruik de vleesthermometer (verkrijgbaar in de speciaalzaak) of doe de “lepeltest".
Druk met een lepel op het vlees. Voelt het stevig aan, dan is het klaar. Geeft het mee,
dan heeft het nog wat tijd nodig.
Het vlees is te donker en de korst is op
enkele plaatsen verbrand.
Controleer de inschuifhoogte en de temperatuur.
Het vlees ziet er goed uit, maar de jus is
aangebrand.
Neem de volgende keer kleiner braadgerei of voeg wat meer vloeistof toe.
Het vlees ziet er goed uit, maar de jus is
te licht en te waterig.
Gebruik de volgende keer groter braadgerei en voeg minder vloeistof toe.
Bij het overgieten van het vlees ontstaat
waterdamp.
Dit is normaal. Een groot deel van de waterdamp ontsnapt uit de oven. Het kan neerslaan op het koudere schakelpaneel of op meubilair en als condens neerdruppelen.
Gerecht Toebehoren en vormen Hoogte Verwar-
mingsmethode
Temper at uur
in °C
Tijdsduur
in minuten
Ovenschotels
Ovenschotel, zoet Ovenschaal 2
%
180-200 40-50
Pastaschotel Ovenschaal 2
%
210-230 30-40
Gratin
Gegratineerde aardappels, rauwe ingrediënten,
max. 4 cm hoog
1 ovenschaal 2
4
160-180 60-80
2 ovenschalen 1+3
:
150-170 65-85
Toast
Toast grillen, 4 stuks Rooster 4
4
160-170 10-15
Toast grillen, 12 stuks Rooster 4
4
160-170 15-20
Page 51

51
Kant-en-klaar producten
Houd u aan de opgaven van de fabrikant op de verpakking.
Wanneer u de toebehoren bekleedt met bakpapier, let er dan
op dat het bakpapier geschikt is voor deze temperaturen. Pas
de grootte van het papier aan het gerecht aan.
Het bereidingsresultaat is zeer sterk afhankelijk van het soort
levensmiddelen. Op het rauwe product kunnen al bruine
plekken en ongelijkmatigheden te zien zijn.
Bijzondere gerechten
Bij lage temperaturen lukt romige yoghurt u met
3D-hetelucht
: even goed als luchtig gistdeeg.
Verwijder eerst de toebehoren, inhangroosters of telescooprails
uit de binnenruimte.
Yoghurt maken
1. 1 liter melk (3,5 % vet) aan de kook brengen en tot 40 °C
aafkoelen.
2. Hier 150 g yoghurt (koelkasttemperatuur) door roeren.
3. Hiermee koppen of kleine twist-off potjes vullen en afdekken
met vershoudfolie.
4. Den binnenruimte zoals aangegeven voorverwarmen
5. De koppen of potjes vervolgens op de bodem van de
binnenruimte zetten en bereiden zoals aangegeven.
Gerecht Toebehoren Hoogte Verwar-
mingsmethode
Temperatuur
in °C, grillstand
Tijdsduur
in minuten
Pizza, diepvries
Pizza met dunne bodem Braadslede 2
6
190-210 15-20
Braadslede + rooster
3+1
:
180-200 20-30
Pizza met dikke bodem Braadslede 2
6
170-190 20-30
Braadslede + rooster
3+1
:
170-190 25-35
Pizza baguette Braadslede 3
6
170-190 20-30
Minipizza Braadslede 3
6
180-200 10-20
Pizza, gekoeld, voorverwarmen Braadslede 1
6
180-200 10-15
Aardappelproducten, diepvries
Frites Braadslede 3
6
190-210 20-30
Braadslede + bakplaat
3+1
:
180-200 30-40
Kroketten Braadslede 3
6
190-210 20-25
Rösti, gevulde aardappelflappen Braadslede 3
6
190-210 15-25
Brood en banket, diepvries
Broodjes, baguette Braadslede 3
6
190-210 10-20
Zoute krakelingen Braadslede 3
6
200-220 10-20
Brood en banket, voorgebakken
Afbakbroodjes of -stokbrood Braadslede 3
%
190-210 10-20
Braadslede + rooster
3+1
:
160-180 20-25
Groenteballetjes, diepvries
Vissticks Braadslede 2
6
200-220 10-15
Kipsticks, nuggets Braadslede 3
6
190-210 10-20
Strudel, diepvries
Strudel Braadslede 3
6
190-210 30-40
Page 52

52
Gistdeeg laten rijzen
1. Het gistdeeg maken zoals gebruikelijk, in een hittebestendige
vorm van keramiek leggen en afdekken
2. Den binnenruimte zoals aangegeven voorverwarmen
3. De oven uitschakelen en het deeg in de uitgeschakelde
binnenruimte plaatsen om het te laten rijzen.
Ontdooien
Levensmiddelen uit de verpakking halen en in een geschikte
schaal op het rooster zetten.
Let op de aanwijzingen van de fabrikant op de verpakking.
De ontdooitijden zijn afhankelijk van de aard en de hoeveelheid
van de levensmiddelen.
Gevogelte met de borstzijde op het bord leggen.
Drogen
Met 3D-hetelucht : kunt u uitstekend drogen.
Gebruik uitsluitend fruit en groente zonder gebreken en was
deze grondig.
Laat ze goed afdruipen en droog ze af.
Bedek de braadslede en het rooster met bak- of
perkamentpapier.
Fruit of groente met veel vocht enkele malen keren.
Het gedroogde gerecht direct na het drogen losmaken van het
papier.
Inmaak
Voor het inmaken moeten de potten en rubberen ringen
schoon en in orde zijn. Gebruik zo mogelijk potten van gelijke
grootte. De gegevens in de tabel hebben betrekking op ronde
glazen potten van 1 liter.
Attentie!
Gebruik geen grotere of hogere potten. De deksels zouden
kunnen springen.
Gebruik uitsluitend fruit en groente zonder gebreken. Was het
grondig.
De aangegeven tijden in de tabellen zijn richtwaarden. Deze
kunnen worden beïnvloed door de omgevingstemperatuur, het
aantal potten, de hoeveelheid en de temperatuur van de
inhoud. Controleer voor u om- of uitschakelt of de potten
werkelijk borrelen.
Voorbereiden
1. De potten vullen, niet te
2. De glazen randen schoonmaken.
3. Leg op elke pot een natte rubberen ring en een deksel.
4. Sluit de potten af met klemmen.
Plaats niet meer dan zes potten in de ovenruimte.
Instellen
1. * Braadslede op hoogte 2 plaatsen. Plaats de glazen potten
zó dat ze elkaar niet raken.
2. ½ Liter heet water (ca. 80 ºC) in de braadslede gieten.
3. Ovendeur sluiten.
4. Onderwarmte
$ instellen.
5. Temperatuur op170 tot 180 °C instellen
Gerecht Vormen Verwar-
mingsmethode
Temperatuur Tijdsduur
Yoghurt Koppen of Twist-Off
potten
op de bodem van
de binnenruimte
plaatsen
:
50 °C
50 °C
5m
8 uur
Gistdeeg laten rijzen Hittebestendige
vorm
op de bodem van
de binnenruimte
plaatsen
:
50 °C
Apparaat uitschakelen en
gistdeeg in de binneruimte
plaatsen
510 min..
2030 min..
Diepvries Toebehoren Hoogte Wijze
van verwarmen
Temperatuurinstelling in °C
Bijv. slagroomtaarten, bakkersroomtaarten, taarten met chocoladeof suikerglazuur, vruchten, kip, worst en vlees, brood, broodjes,
cake en ander gebak
Rooster 2
B
De temperatuurkeuzeknop
blijft uitgeschakeld
Vruchten en kruiden Toebehoren Hoogte Verwar-
mingsmethode
Temperatuur Tijdsduur
600 g appelringen Braadslede + rooster 3+1
:
80 °C ca. 5 uur
800 g stukjes peer Braadslede + rooster 3+1
:
80 °C ca. 8 uur
1,5 kg kwetsen of pruimten Braadslede + rooster 3+1
:
80 °C ca. 8-10 uur
200 g panklare keukenkruiden Braadslede + rooster 3+1
:
80 °C ca. 1½ uur
Page 53

53
Inmaak
Fruit
Na ca. 40 tot 50 minuten stijgen er met korte tussenpozen
belletjes op. Schakel de oven uit.
Na 25 tot 35 minuten nawarmen haalt u de weckflessen uit de
ovenruimte. Als u ze langer in de ovenruimte laat afkoelen,
kunnen zich kiemen vormen waardoor het ingemaakte fruit
sneller zuur wordt.
Groente
Zodra er in de potten belletjes opstijgen de temperatuur naar
120 tot 140 °C terugbrengen. Afhankelijk van de soort groente
ca. 35 tot 70 m. Schakel vervolgens de oven uit en gebruik de
restwarmte.
Glazen potten verwijderen
Neem de potten na het inkoken uit de binnenruimte.
Attentie!
Zet de hete potten niet op een koude of natte ondergrond. Ze
kunnen knappen.
Acrylamide in levensmiddelen
Acrylamide ontstaat vooral bij graan- en aardappelproducten
die met grote hitte worden bereid, zoals aardappelchips, frites,
toast, broodjes, brood of fijne bakwaren (koekjes, taaitaai,
speculaas).
Fruit in glazen potten van één liter Wanneer het borrelen begint Nawarmen
Appels, rode bessen, aardbeien Uitschakelen Ca. 25 minuten
Kersen, abrikozen, perziken, kruisbessen Uitschakelen Ca. 30 minuten
Appelmoes, peren, pruimen Uitschakelen Ca. 35 minuten
Groente met koud vocht in glazen potten van één liter Wanneer het borrelen begint Nawarmen
Augurken - Ca. 35 minuten
Rode biet Ca. 35 minuten Ca. 30 minuten
Spruitjes ca. 45 minuten Ca. 30 minuten
Bonen, koolrabi, rodekool Ca. 60 minuten Ca. 30 minuten
Erwten Ca. 70 minuten Ca. 30 minuten
Tips voor het klaarmaken van gerechten met weinig acrylamide
Algemeen
■ Bereidingstijden zo kort mogelijk houden.
■ De gerechten goudgeel en niet te donker bakken.
■ Grote, dikke ingrediënten bevatten minder acrylamide.
Bakken Met boven- en onderwarmte max. 200 °C.
Met 3D-hetelucht of hete lucht max.180 °C.
Koekjes Met boven- en onderwarmte max. 190 °C.
Met 3D-hetelucht of hete lucht max. 170 °C.
Ei of eierdooier gaat de vorming van acrylamide tegen.
Frites uit de oven Gelijkmatig en in één laag verdelen over de plaat. Minstens 400 g per plaat bakken,
zodat de frites niet uitdrogen
Page 54

54
Testgerechten
Deze tabellen zijn gemaakt voor onderzoeksinstituten om het
controleren en testen van verschillende apparaten te
vergemakkelijken.
Volgens EN 50304/EN 60350 (2009) resp. IEC 60350.
Bakken
Bakken op twee niveaus:
Braadslede altijd boven de bakplaat plaatsen.
Bakken op 3 niveaus:
Braadslede in het midden plaatsen.
Sprits:
Bakplaten die gelijktijdig worden geplaatst, hoeven niet op
hetzelfde moment klaar te zijn.
Bedekte appeltaart op 1 niveau:
Donkere springvormen verspringend naast elkaar plaatsen.
Bedekte appeltaart op 2 niveaus:
Donkere springvormen diagonaal boven elkaar plaatsen, zie
afbeelding.
Gebak in springvormen van blik:
Met boven- en onderwarmte
% op 1 niveau bakken. Gebruik
de braadslede in plaats van het rooster en plaats hier de
springvorm in.
Aanwijzing: Gebruik voor het bakken eerst de laagste
opgegeven temperatuur.
Grillen
Wanneer u eten direct op het rooster plaatst, schuif dan ook de
braadslede in op hoogte 1.De vloeistof wordt opgevangen en
de oven blijft schoner.
Gerecht Toebehoren en vormen Hoogte Verwar-
mingsmethode
Temper at uur
in °C
Tijdsduur
in minuten
Sprits, voorverwarmen* Bakplaat 3
%
140-150 30-40
Bakplaat 3
:
140-150 30-40
Bakplaat + braadslede 1+3
:
140-150 30-45
2 bakplaten + braadslede 1+3+5
:
130-140 40-55
Small cakes, voorverwarmen* Bakplaat 3
%
150-170 20-35
Bakplaat 3
:
150-170 20-35
Bakplaat + braadslede 1+3
:
140-160 30-45
2 bakplaten + braadslede 1+3+5
:
130-150 35-55
Waterbiscuit, voorverwarmen* Springvorm op het rooster 2
%
160-170 30-40
Springvorm op het rooster 2
:
160-170 25-40
Donkere appeltaart Rooster + 2 springvor-
men Ø 20 cm
1
%
170-190 80-100
2 roosters + 2 springvormen Ø 20 cm
1+3
:
170-190 70-100
* Om voor te verwarmen niet de functie Snelvoorverwarming gebruiken.
Gerecht Toebehoren en vormen Hoogte Verwar-
mingsmethode
Grillstand Tijdsduur
in minuten
Brood roosteren
10 minuten voorverwarmen
Rooster 5
(
3½-2
Beefburger, 12 stuks*
niet voorverwarmen
Rooster + braadslede 4+1
(
3 25-30
* Na
Z van de tijd keren
Page 55

55
Page 56

01
280392
*9000743223*
9000743223
Robert Bosch Hausgeräte GmbH
Carl-Wery-Straße 34
81739 München
Germany
www.bosch-home.com
 Loading...